

Walkthrough Menu
- General Tips
- Chapter 1: Grandma's House
- Chapter 2: The Castle
- Chapter 3: The Lake
- Chapter 4: The Dungeon
- Chapter 5: Defeating Alan
- Chapter 6 Defeating Rothbart
General Tips
- This is the official guide for Dark Romance: The Swan Sonata.
- This guide will not mention each time you have to zoom into a location; the screenshots will show each zoom scene.
- Hidden-object puzzles are referred to as HOPs. This guide will not show HOP solutions. It will identify the location of the HOP and the inventory item acquired.
- This guide will show solutions for non-random puzzles. Please read the in-game instructions for each puzzle.
- In this game, you will sometimes have to select the new scene to trigger dialog, cut-scenes, or tasks prior to interacting with the scene.
Chapter 1: Grandma's House
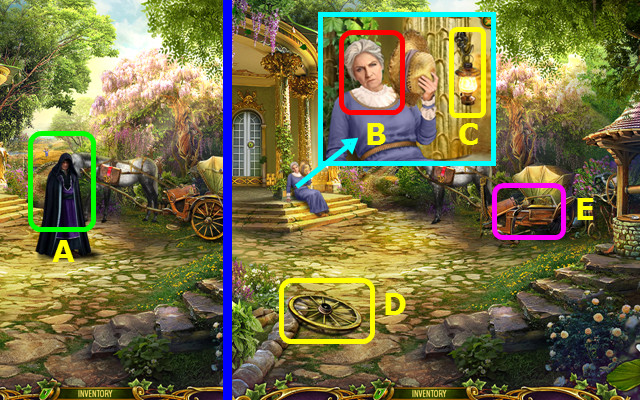
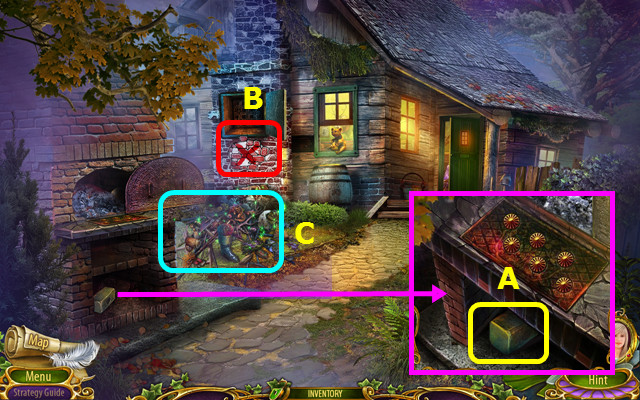
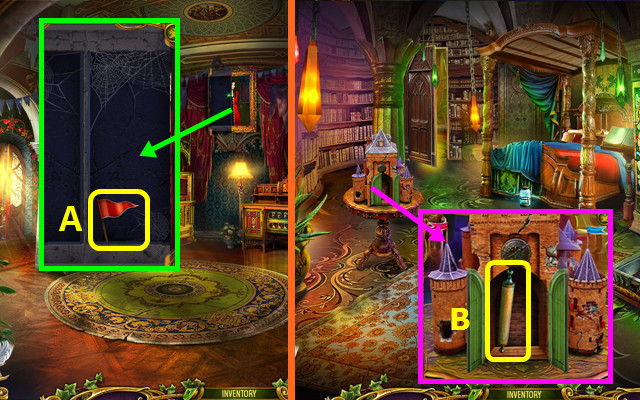
- Talk to Rothbart (A).
- Talk to Grandmother; earn the 1/2 LOCKPICK (B).
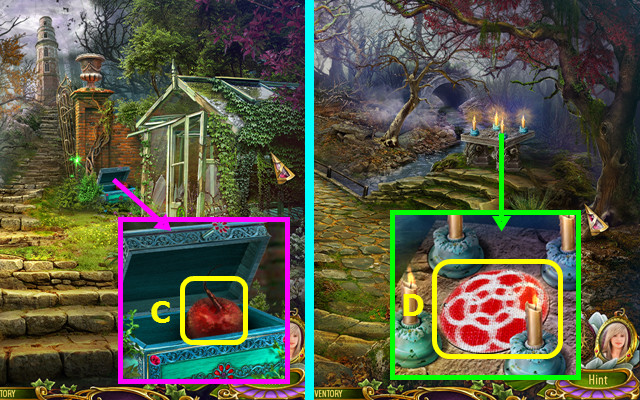
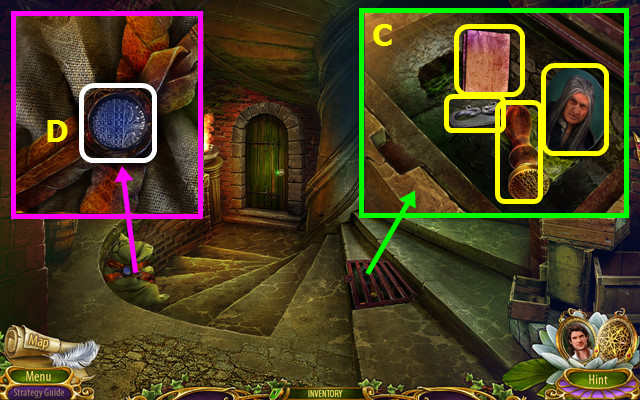
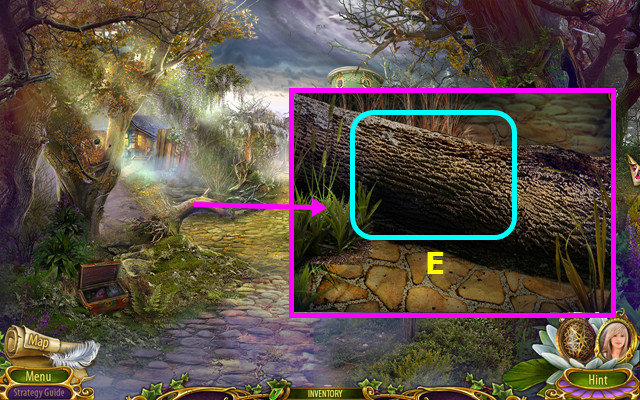
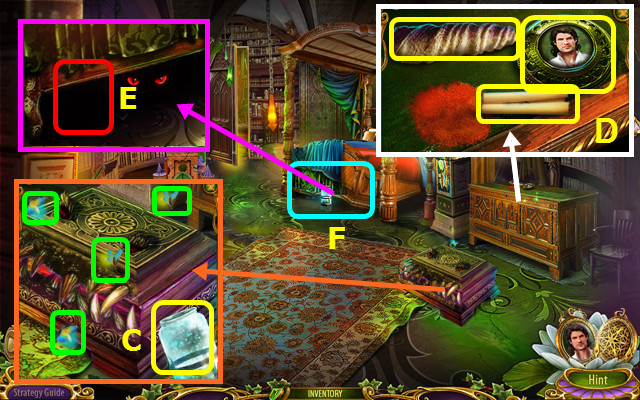
- Take the LAMP (C).
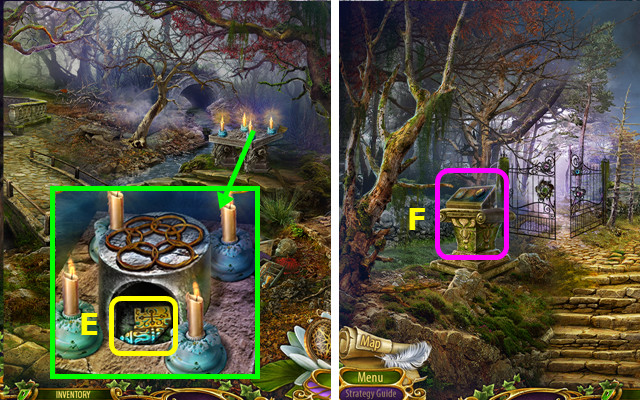
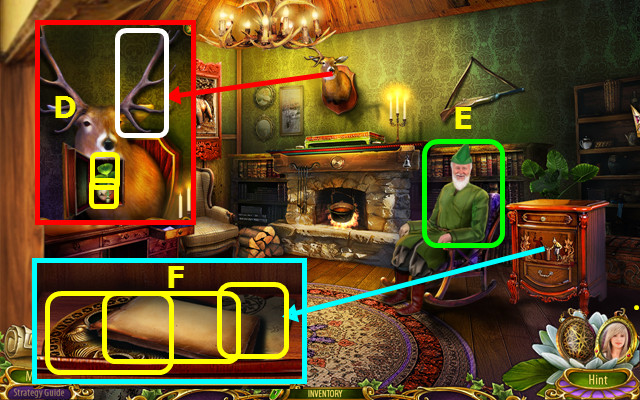
- Take the WHEEL (D); place the WHEEL (E).
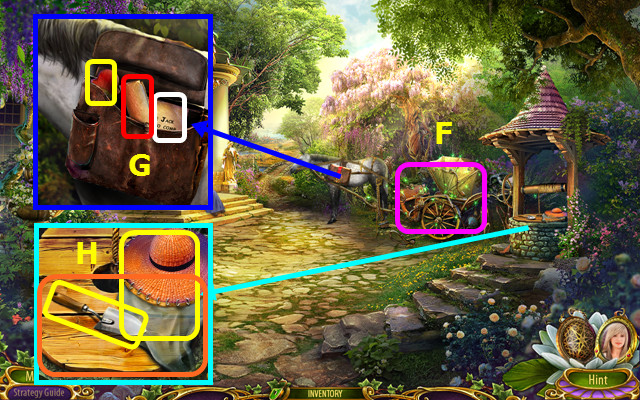
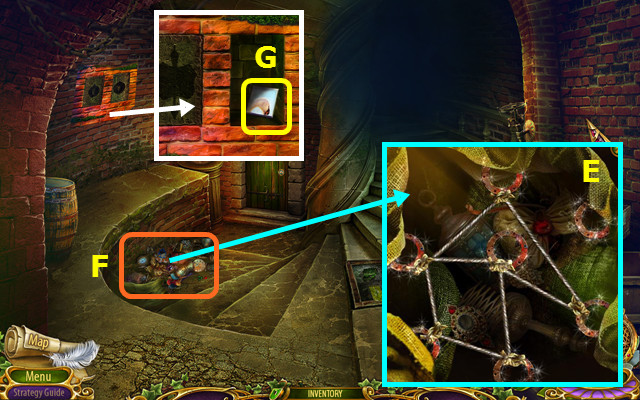
- Play the HOP; earn the HORSE AMULET (F).
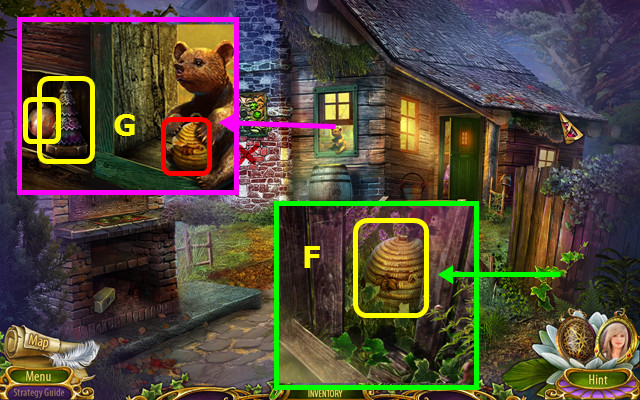
- Place the HORSE AMULET; take the MAP, NOTE, and NUTCRACKER'S HEAD (G).
- Take the SCOOP and 1/2 NET; remove the cover (H).
- Go forward.
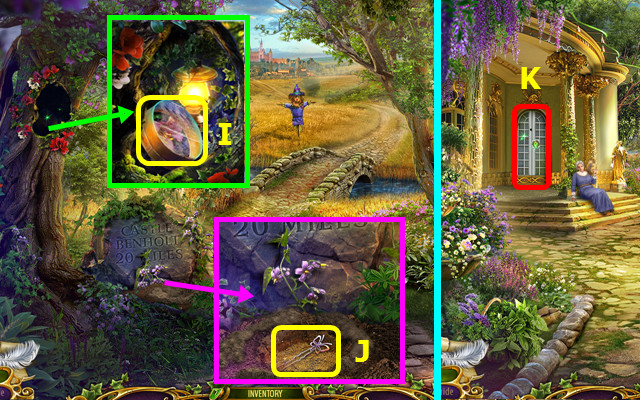
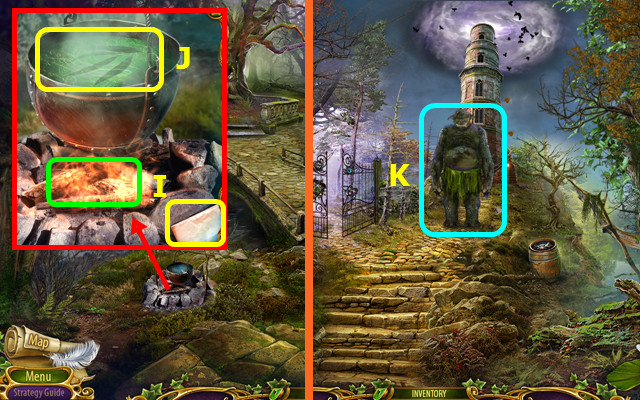
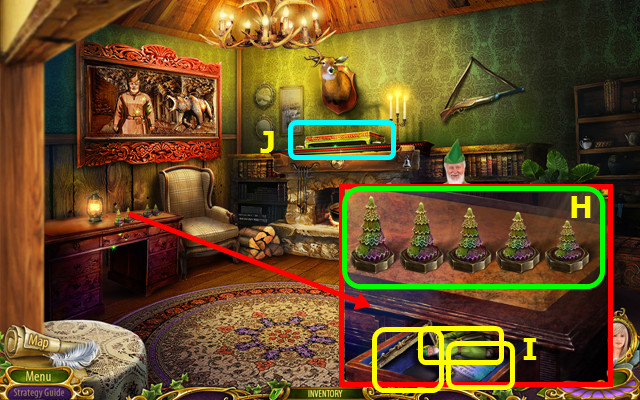
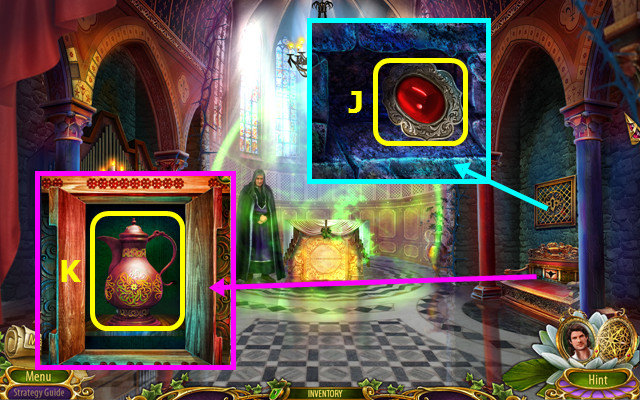
- Place the LAMP; take the SCREEN (I).
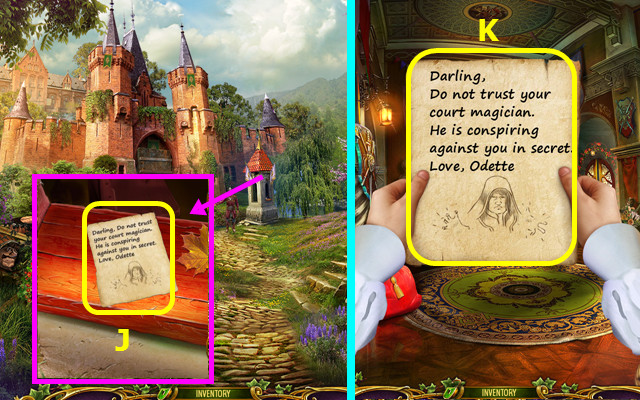
- Use the SCOOP; take the 2/2 LOCKPICK (J).
- Walk down.
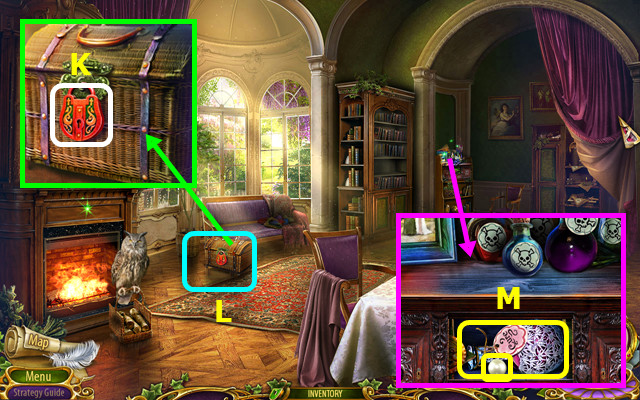
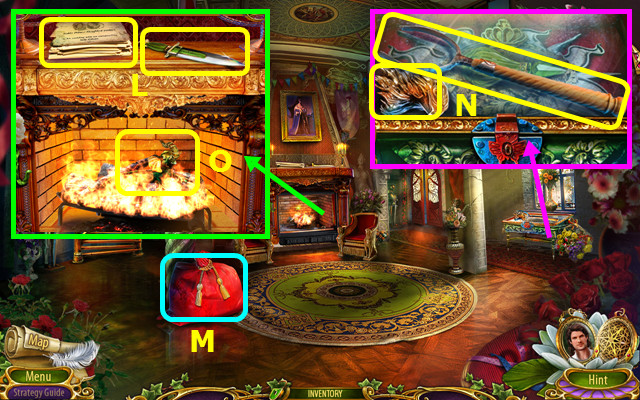
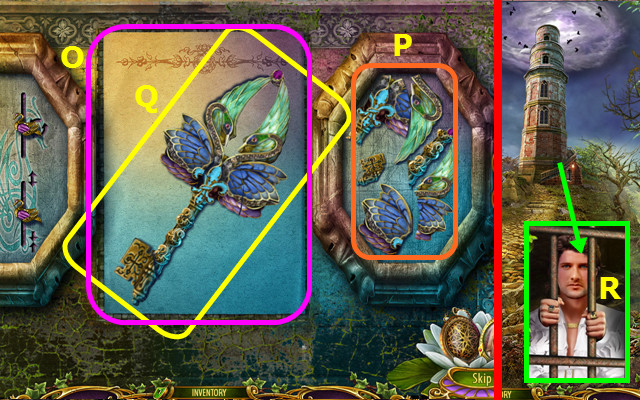
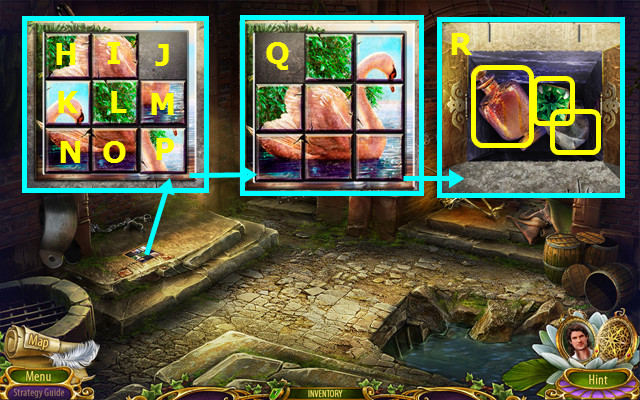
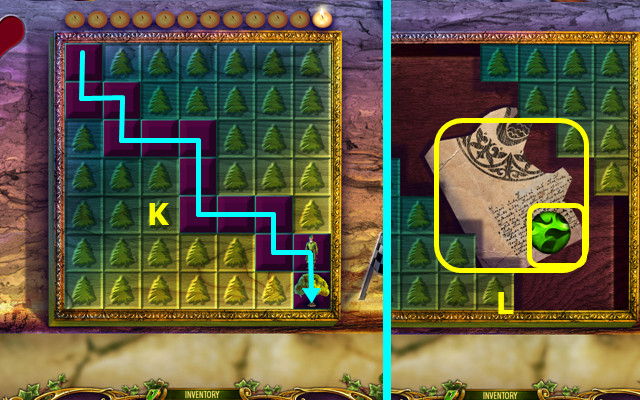
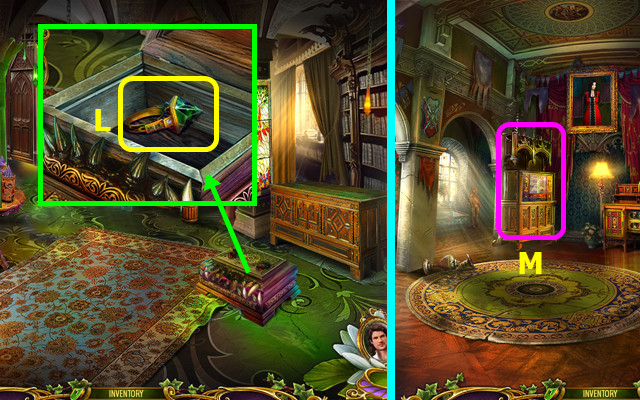
- Select (K).
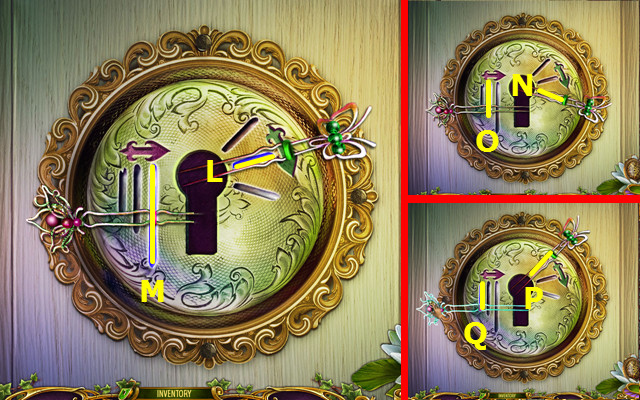
- Use the 2 LOCKPICKS in the center.
- Solution; L-M-N-O-P-Q.
- Walk left.
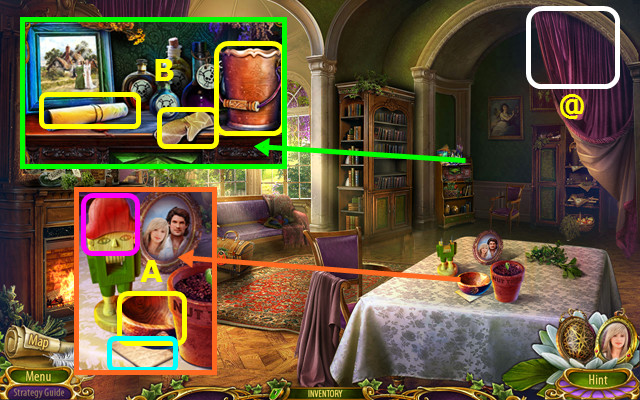
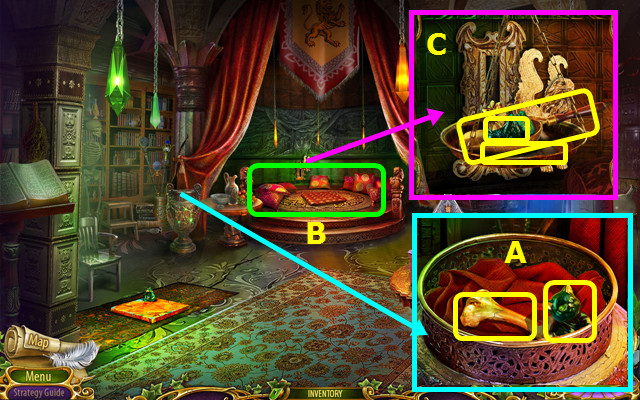
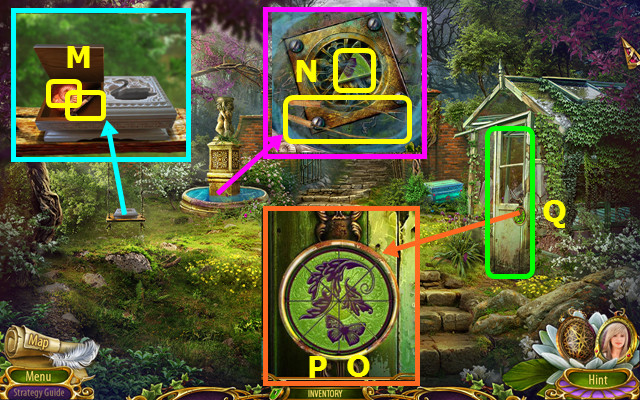
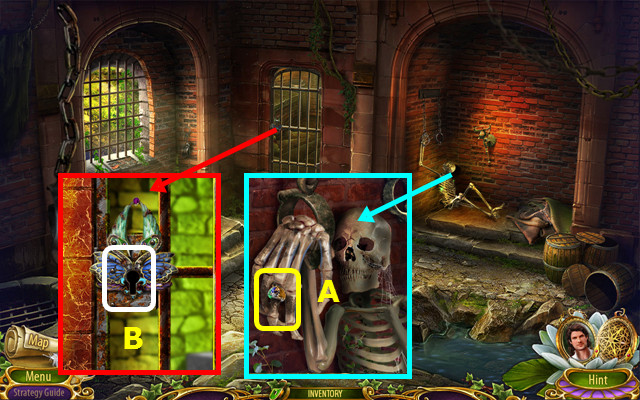
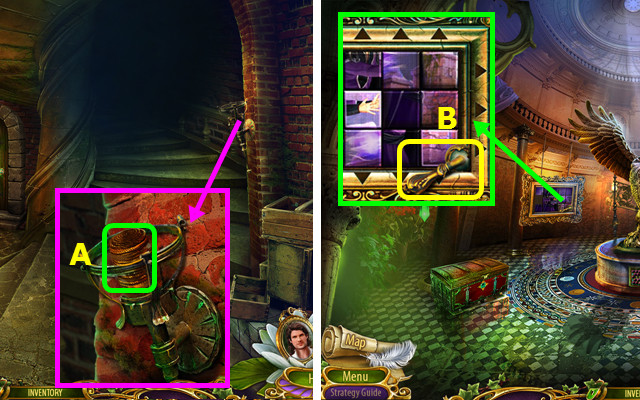
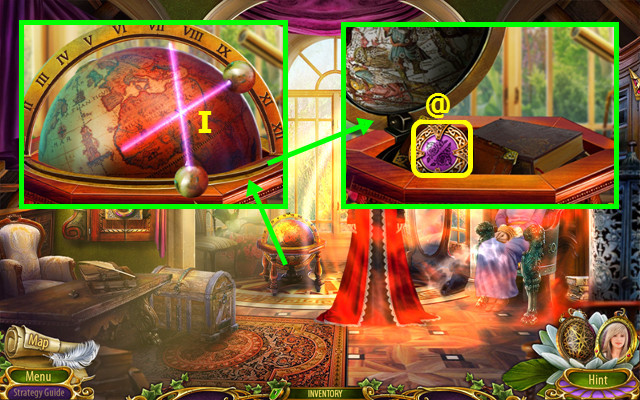
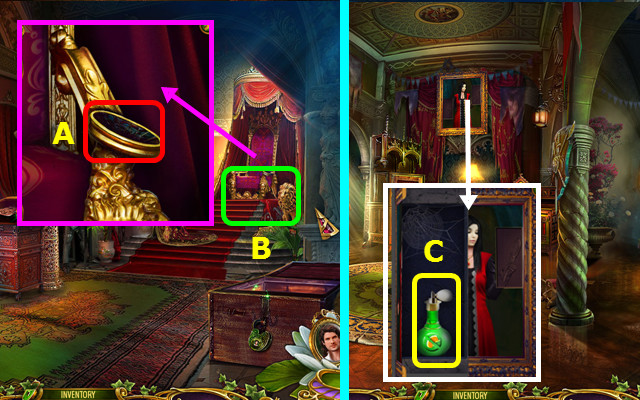
- Place the NUTCRACKER'S HEAD; take the CUP and read the note (A).
- Open the curtain (@).
- Take the BUCKET, 2/2 NET, and read the instructions (B).
- Walk down.
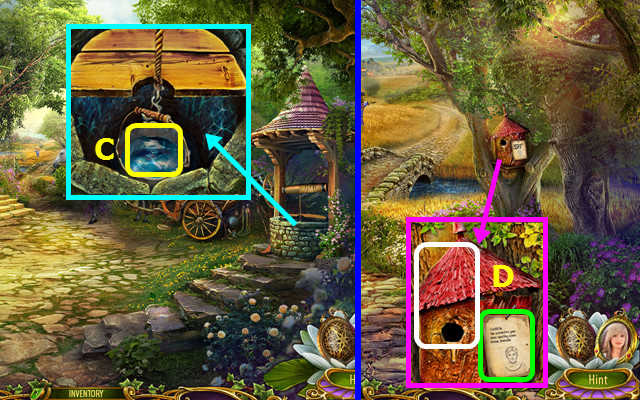
- Place the BUCKET; use the CUP to take the CUP OF WATER (C).
- Go forward.
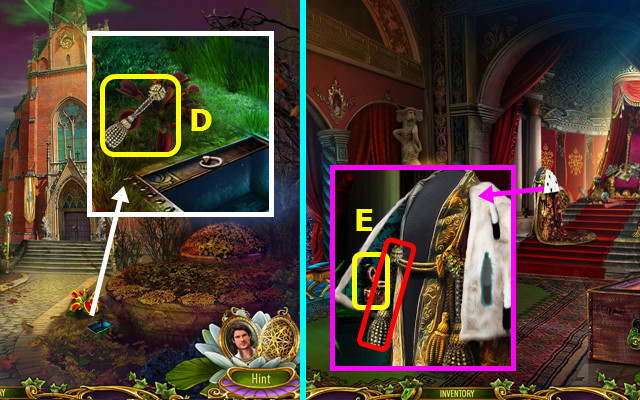
- Read the note and use the NET (D).
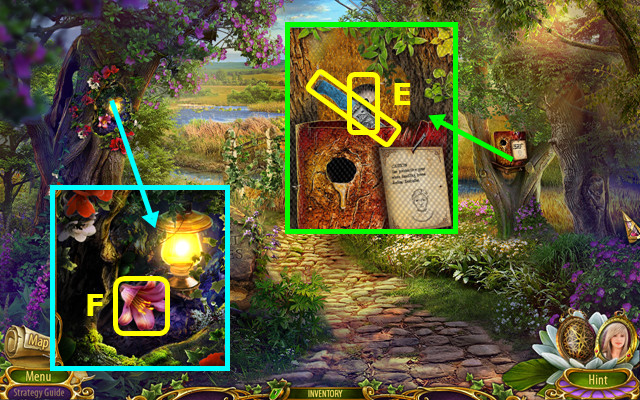
- Take the KNIFE and BRUSH (E).
- Use the BRUSH to make the BRUSH WITH POLLEN (F).
- Combine the CUP OF WATER and BRUSH WITH POLLEN to make the CUP OF GROWTH POTION (inventory).
- Walk down and left.
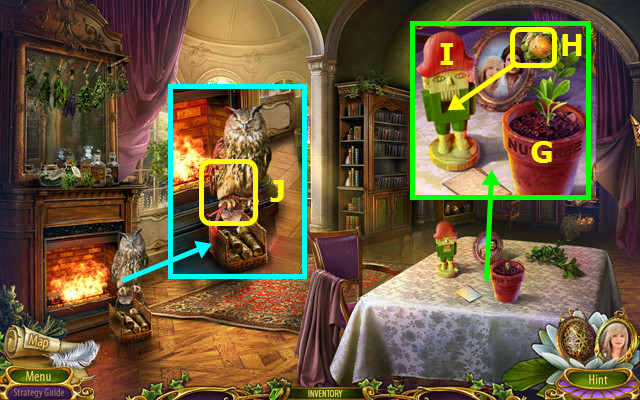
- Use the CUP OF GROWTH POTION (G); take the nut (H) and use it on the nutcracker (I) to earn the NUT.
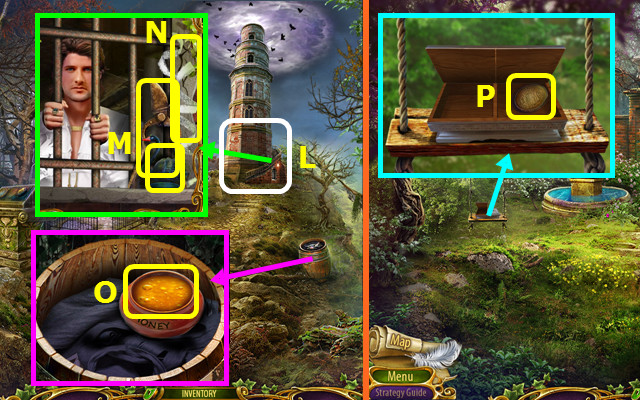
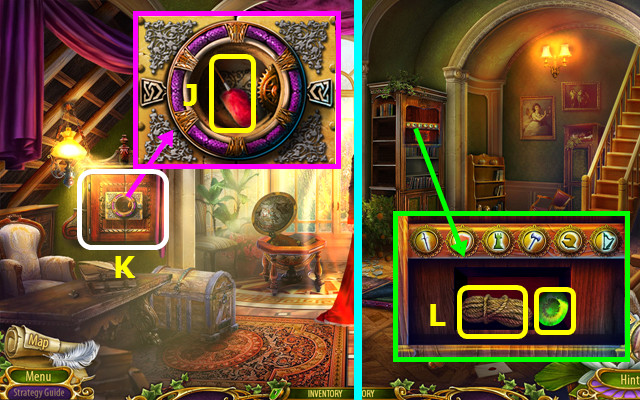
- Talk to Fenris; give the NUT (J) and earn the CHEST KEY.
- Use the CHEST KEY (K).
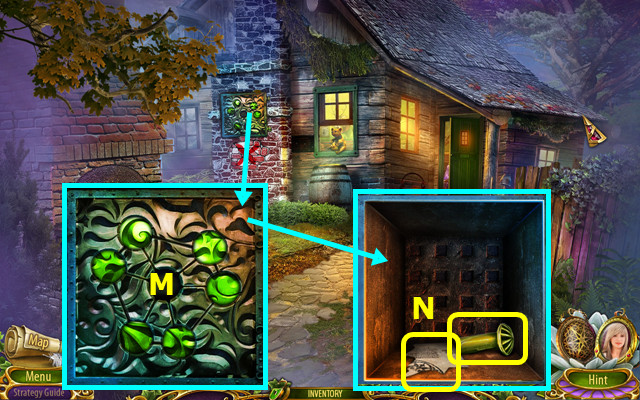
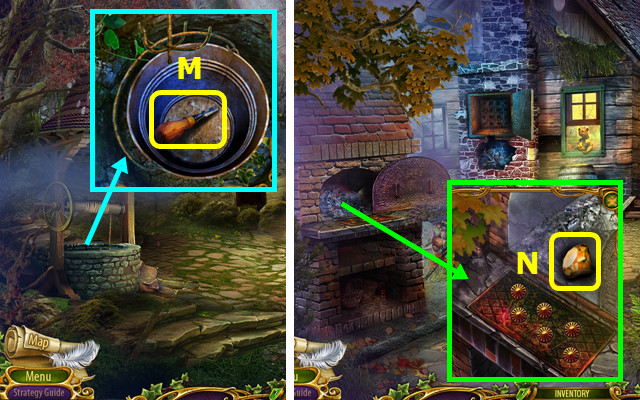
- Play the HOP; earn the SMILE KEY (L).
- Place the SMILE KEY; take the 1/2 PEARL and POTION (M).
- Walk down.
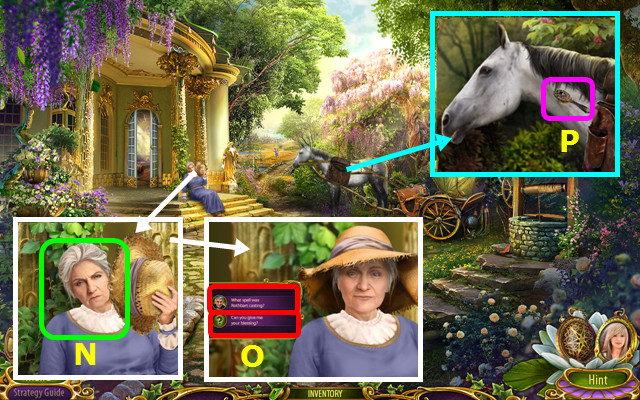
- Give the POTION (N).
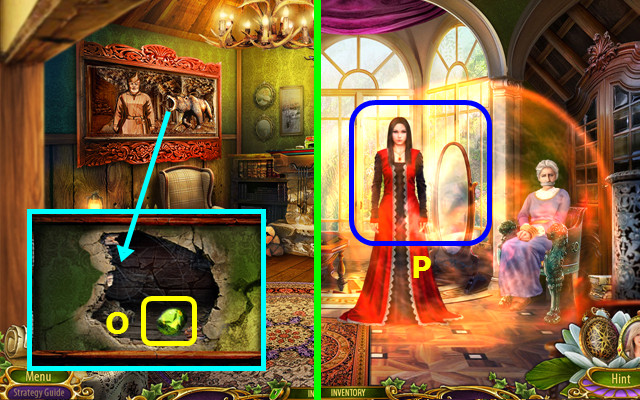
- Talk to Grandma; earn the HORSE BRUSH (O).
- Use the HORSE BRUSH (P).
- Go forward.
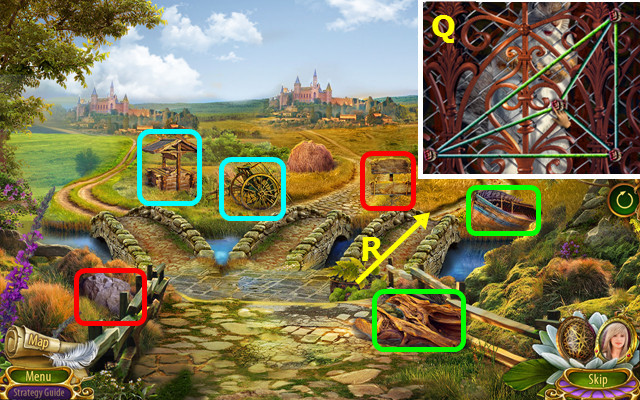
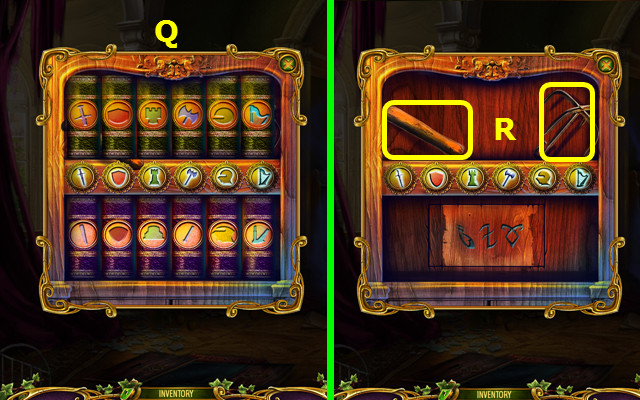
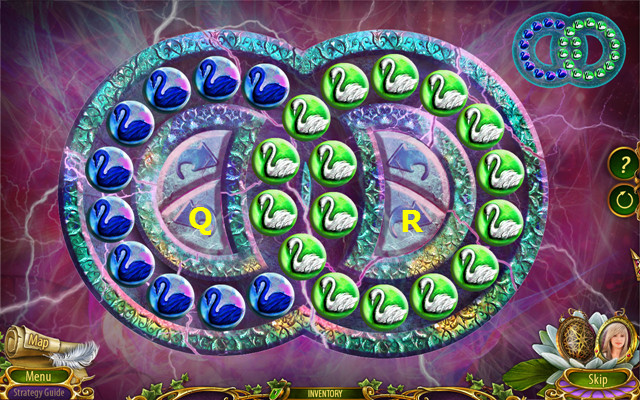
- Select pairs (color-coded).
- Untangle the ropes (Q).
- Select the right path (R).
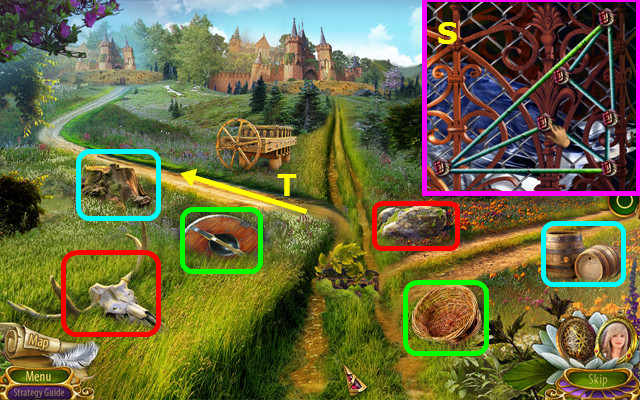
- Select pairs (color-coded).
- Untangle the ropes (S).
- Select the left path (T).
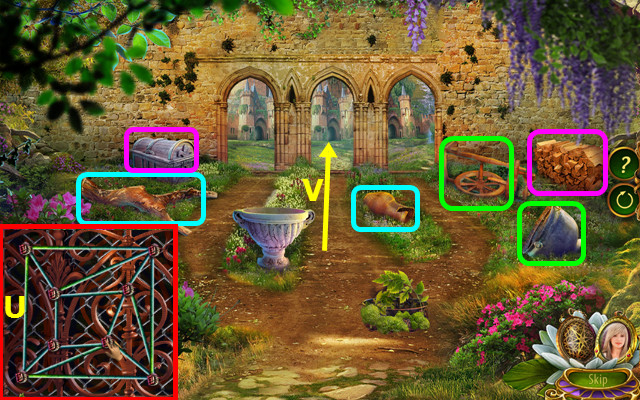
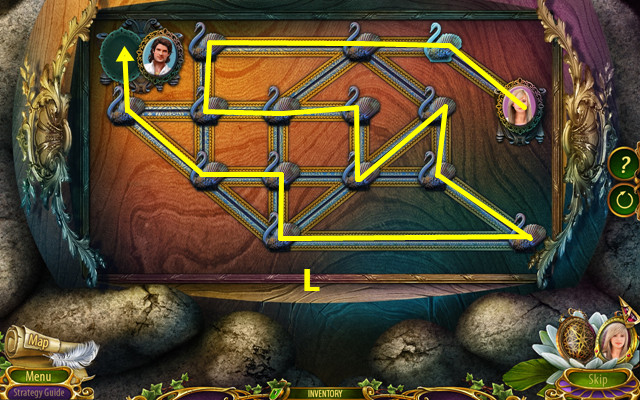
- Select pairs (color-coded).
- Untangle the ropes (U).
- Select the center path (V).
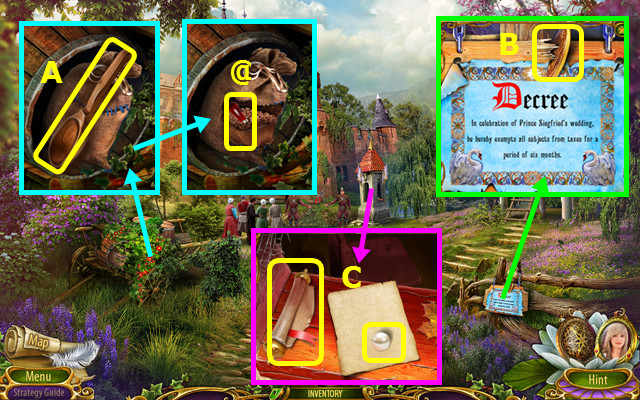
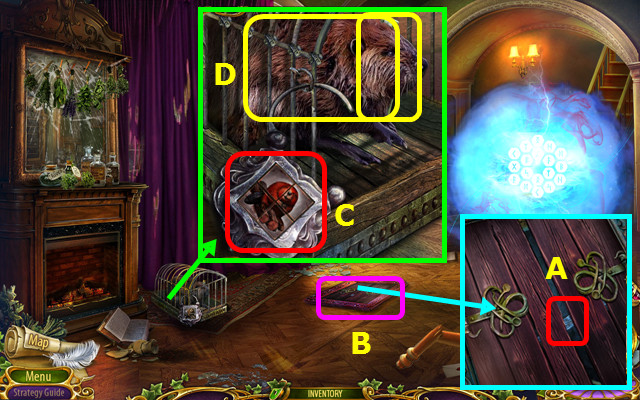
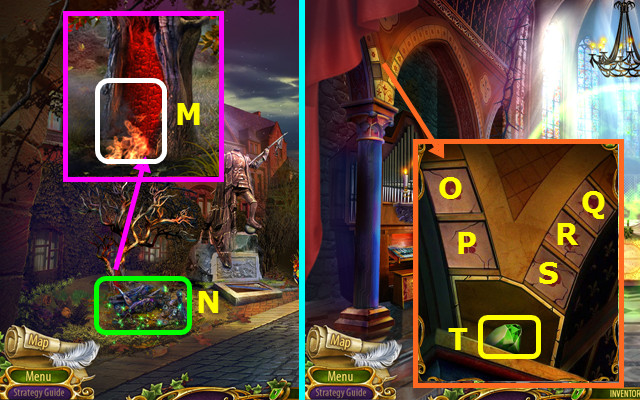
- Remove the vines 2x and take the LADLE (A).
- Use the KNIFE and take the AWL (@).
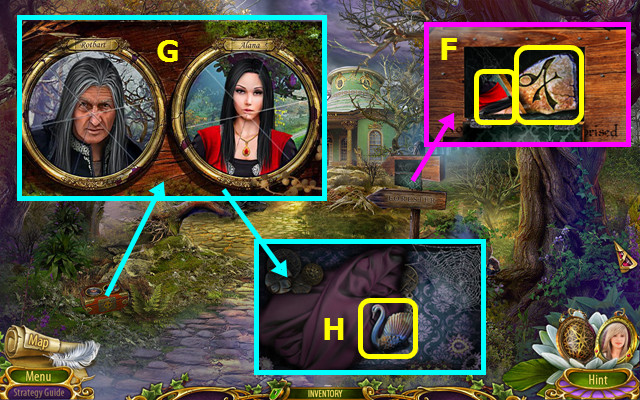
- Use the AWL to take the FEATHER COIN (B).
- Take the NOTE and 2/2 PEARL (C).
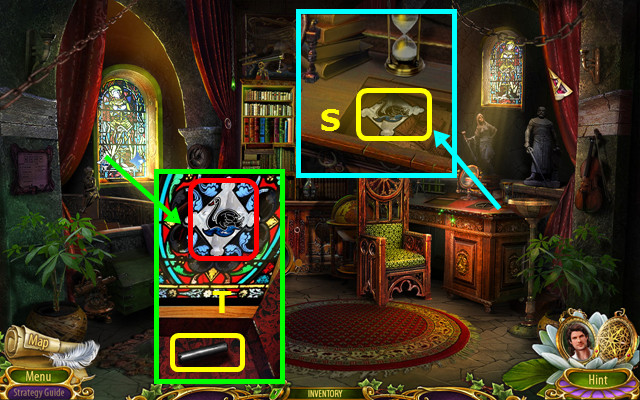
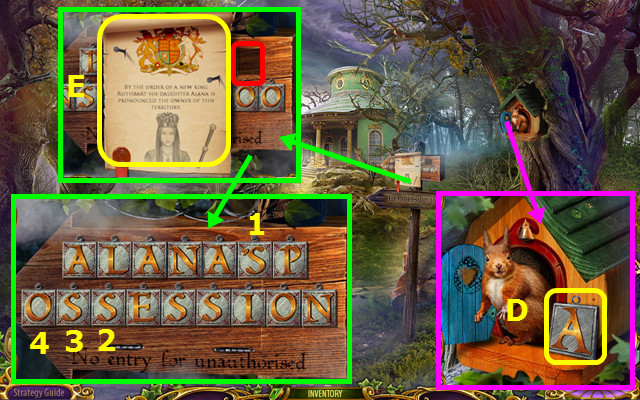
- Walk right.
- Place the FEATHER COIN; take the PENCIL (D).
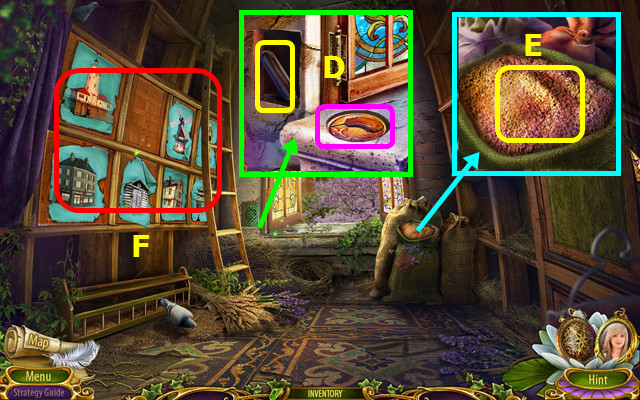
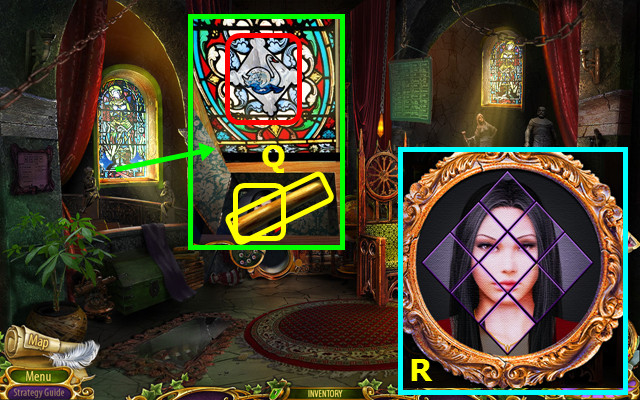
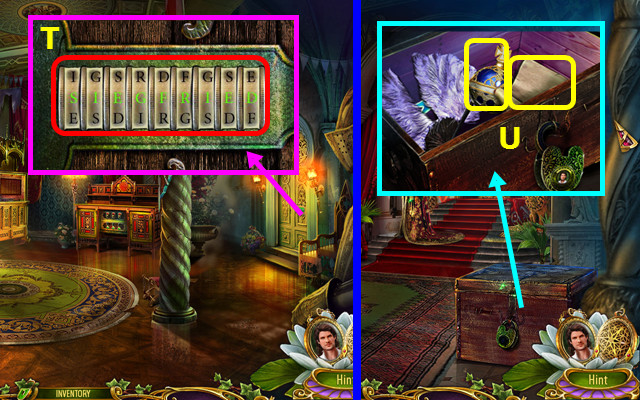
- Use the SCREEN to find the MESSAGE (E).
- Select (F).
- Place the MESSAGE (G).
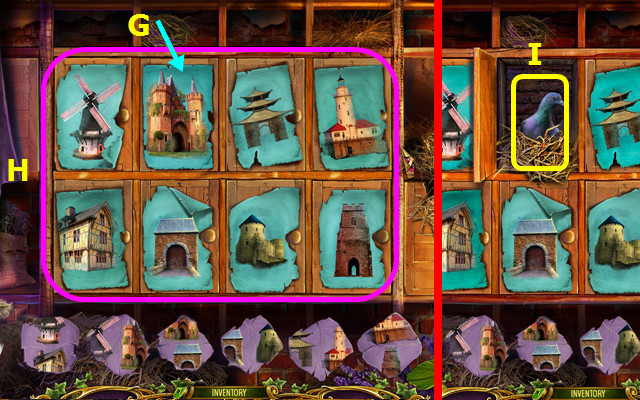
- Solution (H).
- Take the CARRIER PIGEON (I).
- Walk down.
- Use the PENCIL; take the LETTER TO SIEGFRIED (J).
- Combine the CARRIER PIGEON and LETTER TO SIEGFRIED (inventory).
- You are now playing as Siegfried.
- Select the NOTE (K).
Chapter 2: The Castle
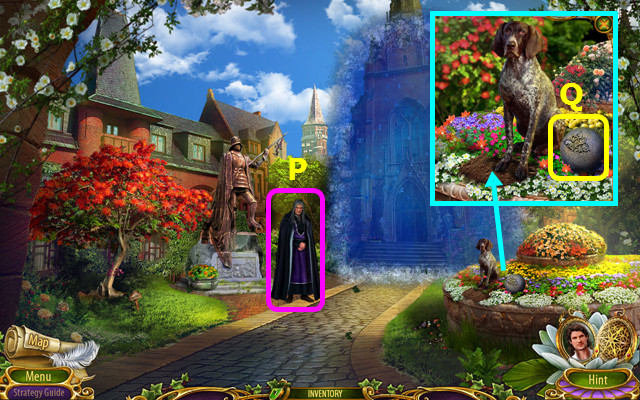
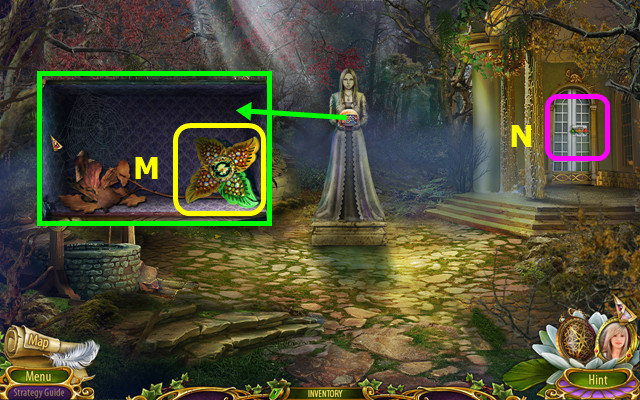
- Take the NOTE and DAGGER (L).
- Use the DAGGER; play the HOP to earn the WAX EGG (M).
- Take the TONGS and HEAD (N).
- Place the WAX EGG; use the TONGS to take the 1/3 FIGURINE (O).
- Walk forward.
- Talk to ROTHBART; earn the DOOR CHIP (P).
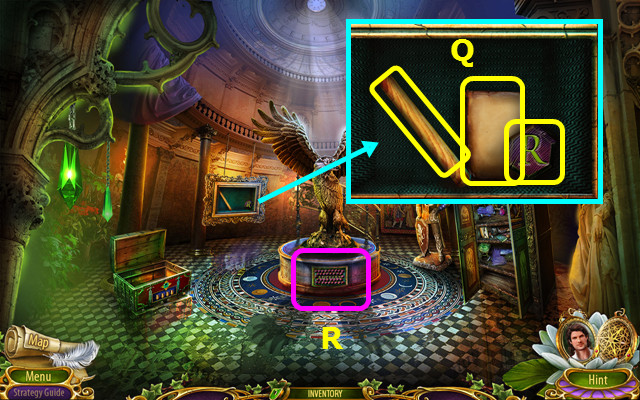
- Take the STONE BALL (Q).
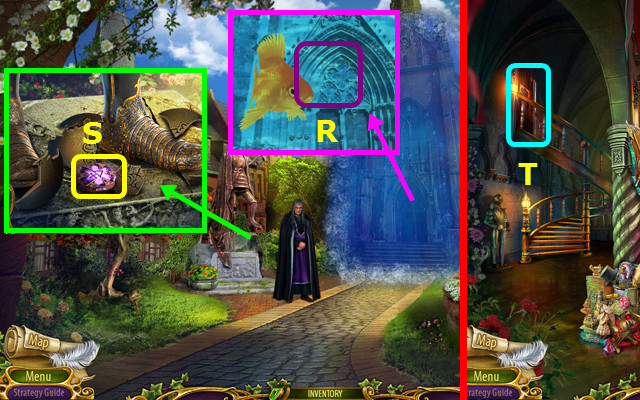
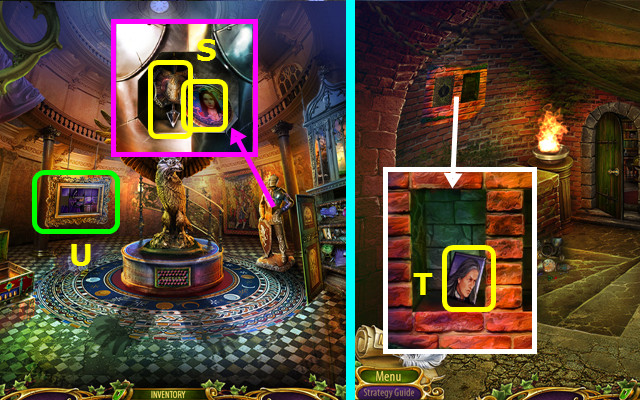
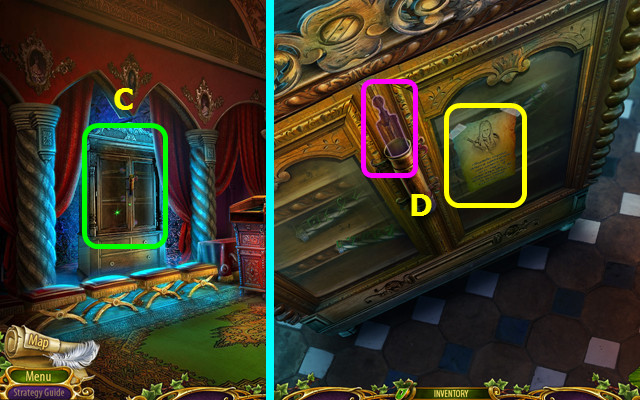
- Select (R).
- Place the STONE BALL; take the JAR TALISMAN (S).
- Walk down.
- Select (T).
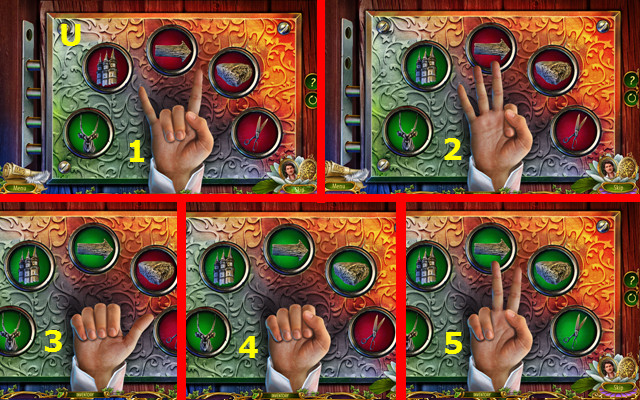
- Place the DOOR CHIP (U).
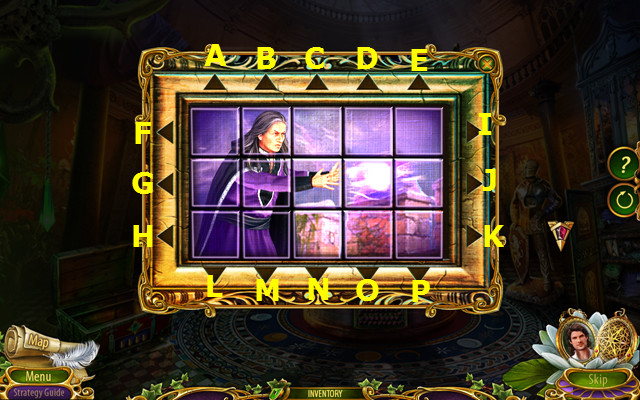
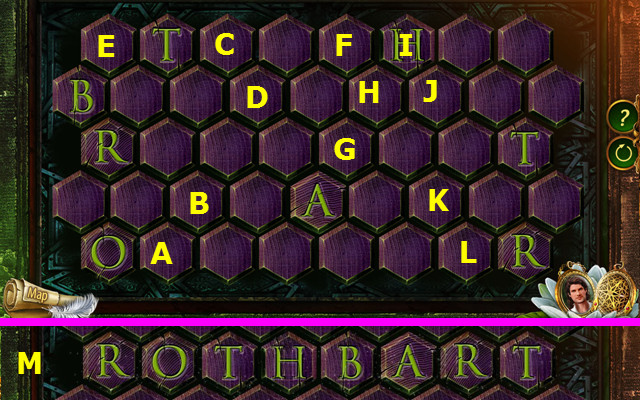
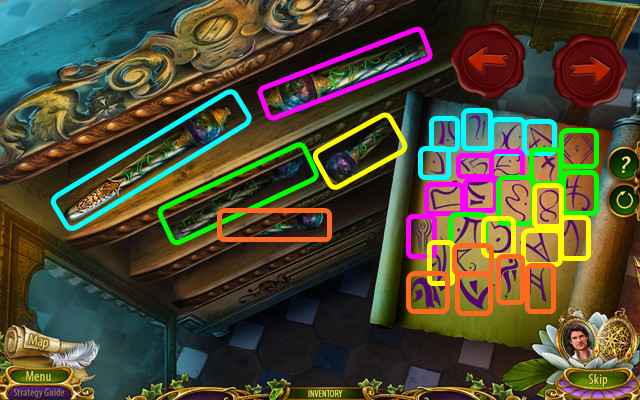
- Arrange the hand (1-5).
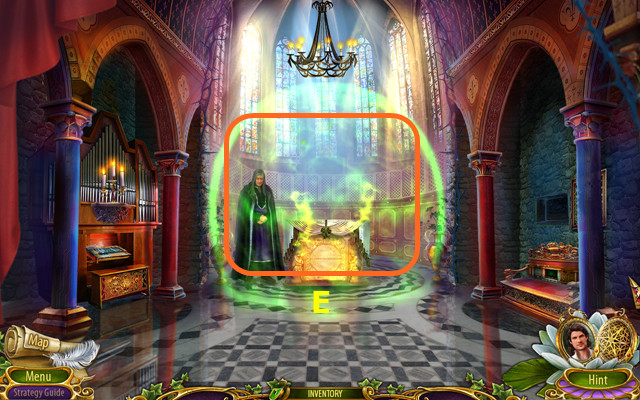
- Walk left.
- Place the JAR TALISMAN; take the 2/3 FIGURINE and the BONE (A).
- Select (B); talk to Alana.
- Place the HEAD; take the 3/3 FIGURINES, SCOOP, and NOTE (C).
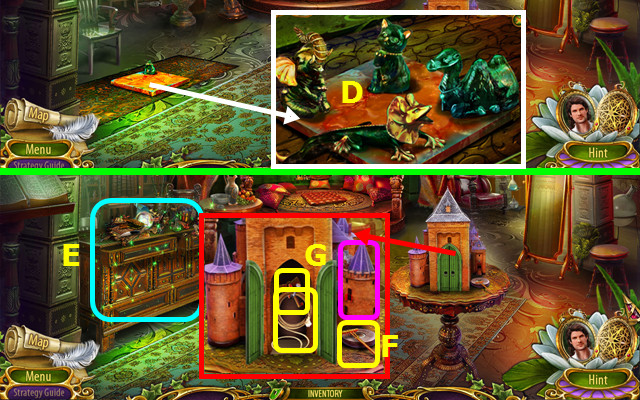
- Place the 3 FIGURINES; swap the heads as shown (D).
- Play the HOP; earn the CASTLE TOWER (E).
- Take the RAKE (F).
- Place the CASTLE TOWER; take the ROPE and CHEST KEY (G).
- Walk down.

- Use the CHEST KEY; take the 1/2 PUZZLE PIECE (H).
- Walk forward.
- Give the BONE; take the POT (I).
- Walk down.
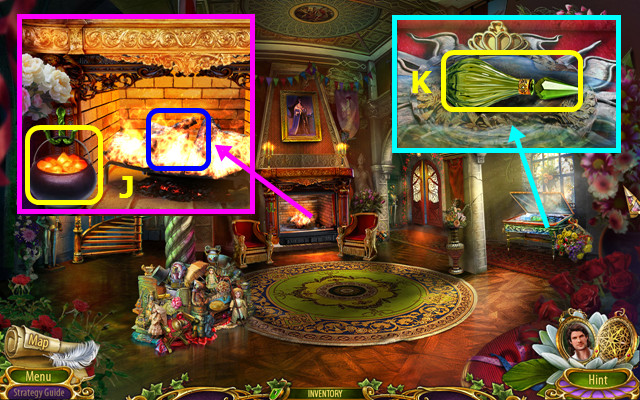
- Place the POT, use the SCOOP, and take the COALS (J).
- Use the COALS; take the FLASK WITH MAGIC POTION (K).
- Walk forward.
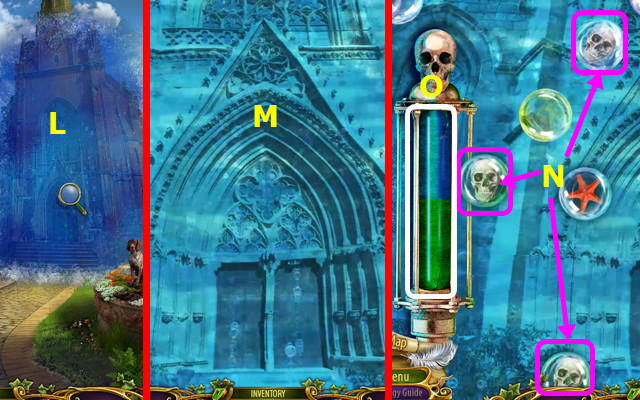
- Select (L).
- Use the FLASK WITH MAGIC POTION (M).
- Select skull bubbles (N) to fill the vial (O).
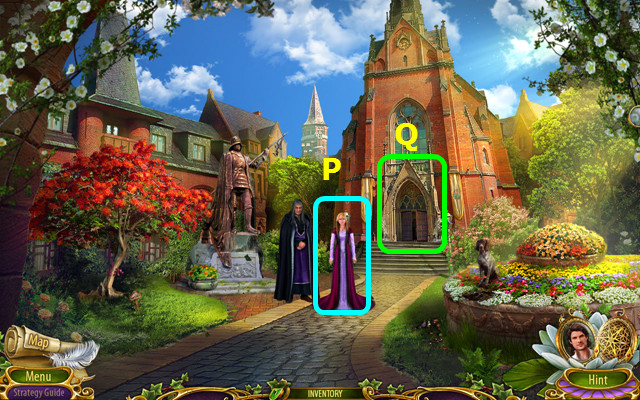
- Talk to Odette (P).
- Go forward (Q).
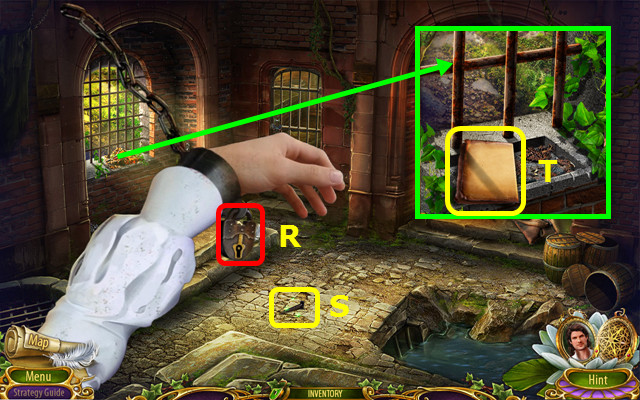
- Touch the lock (R).
- Use the ROPE to take the NAIL (S); use the NAIL on the lock (R).
- Use the RAKE; take the NOTE (T).
Chapter 3: The Lake
- You are playing as Odette.
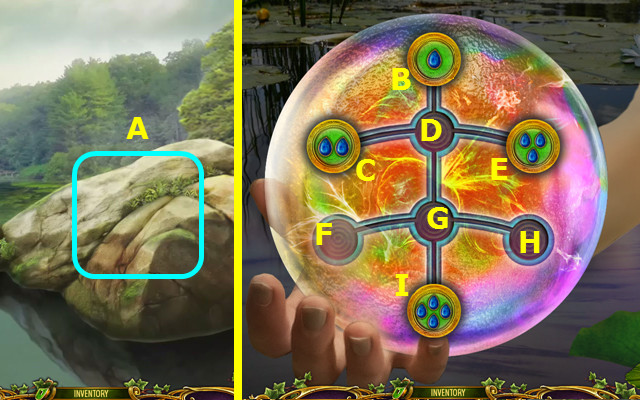
- Select (A) and talk to the Mermaid.
- Solution: DC-BE-CB-GD-DC.

- Take the ROPE (J).
- Use the LADLE and ROPE to make the BROOM (K).
- Use the BROOM; take the RING (L).
- Walk left.
- Place the 2 PEARLS; take the BRANCH and MAGIC WATER AMULET (M).
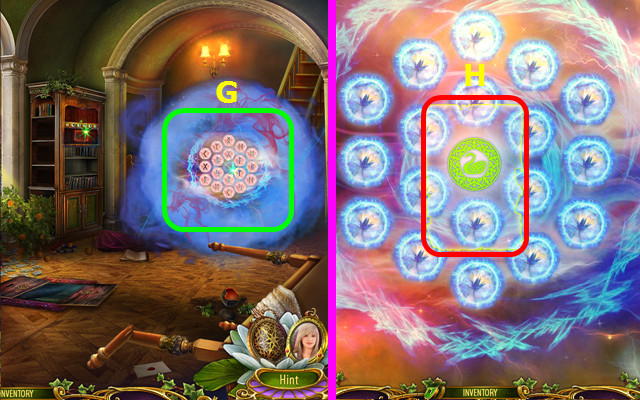
- Use the MAGIC WATER AMULET; take the CIRCLE'S SECTOR and TONGS (N).
- Place the CIRCLE'S SECTOR; select Ox6-Px6.
- Play the HOP; earn the JAR (Q).
- Walk down.
- Use the JAR to make the JAR OF WILLOW (R).
- Go forward 2x.
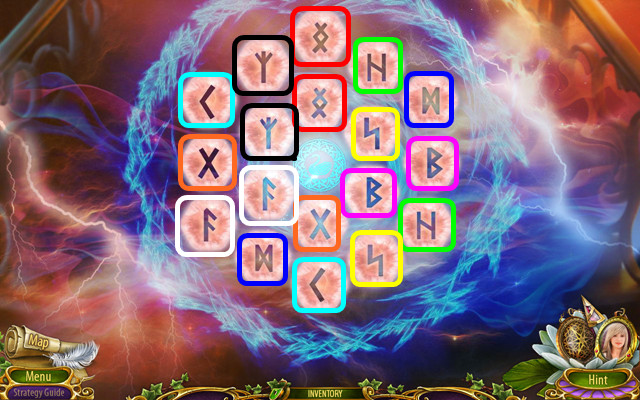
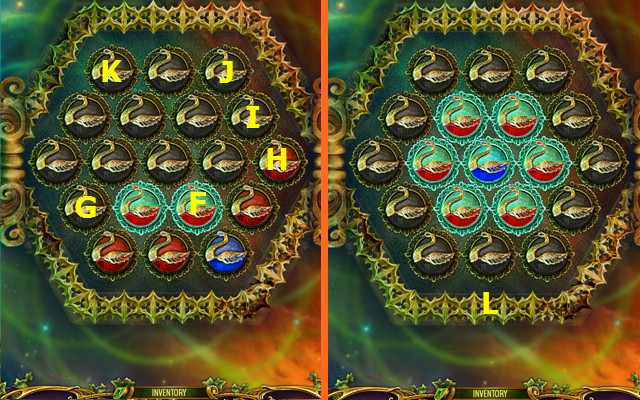
- Place the RING; starting with the inner ring and working out, restore the pattern (S).
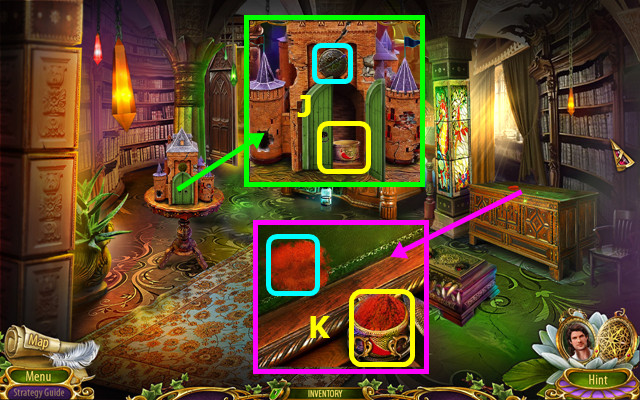
- Take the FLINT, STAR, and NOTE; remove the honey lid (T).
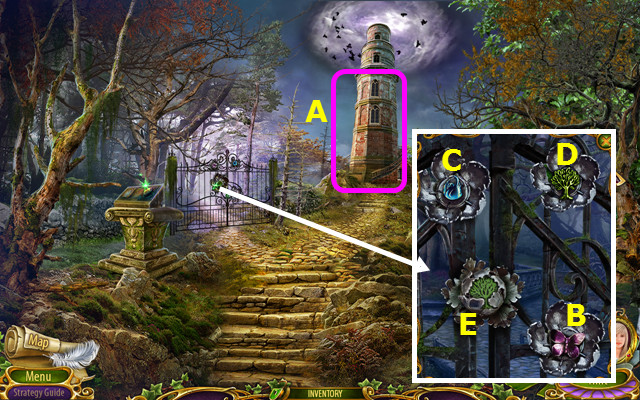
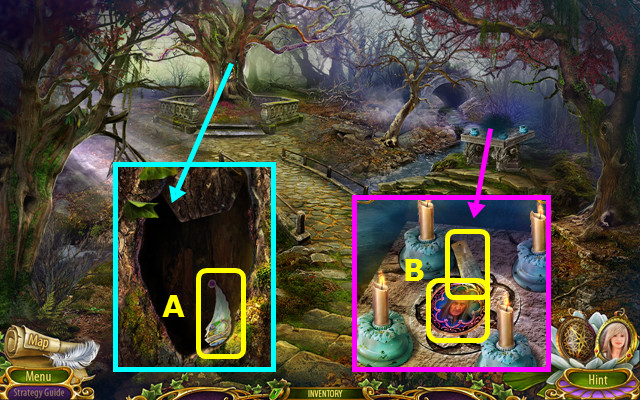
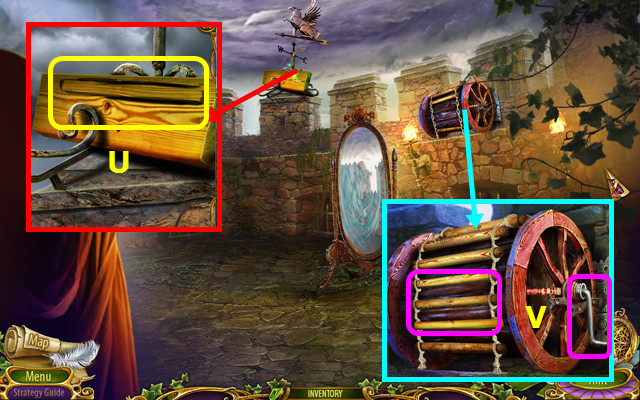
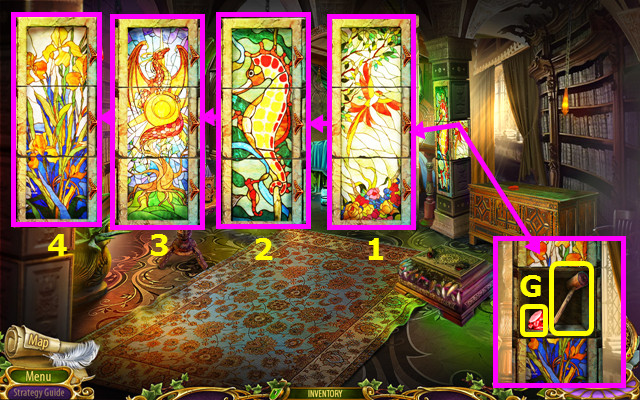
- Select (A).
- Place the STAR; take the butterfly (B).
- Place the butterfly; take the swan (C).
- Place the swan; take the tree (D).
- Place the tree (E).
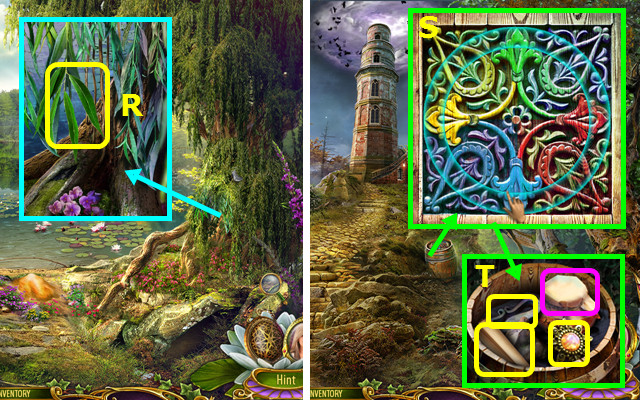
- Walk left.
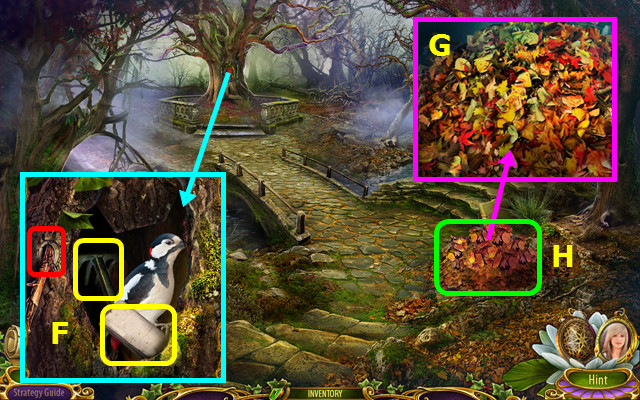
- Use the BRANCH; take the NOTE and RAKE (F).
- Use the RAKE (G).
- Play the HOP; earn the CUP (H).
- Use the FLINT and take the NOTE (I).
- Use the JAR OF WILLOW and CUP to make the POTION CUP (J).
- Walk down.
- Use the POTION CUP (K).
- Select (L); earn the KEY PATTERN.
- Take the BLACK SWAN, and PRUNER (M).
- Use the TONGS to take the TAPE (N).
- Use the TAPE to make the STICKY TAPE (O).
- Walk down.
- Place the BLACK SWAN; take the COIN (P).
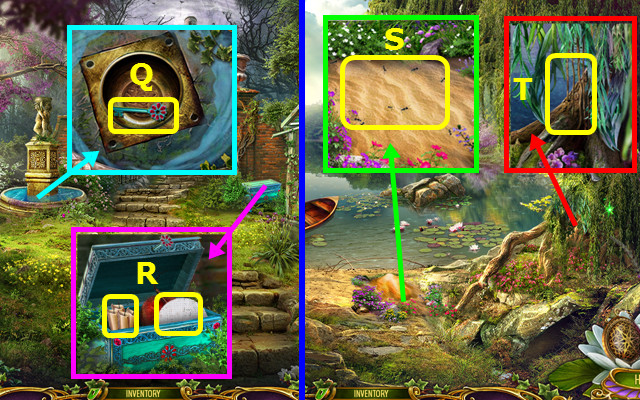
- Use the COIN; take the CHEST KEY (Q).
- Use the CHEST KEY; take the CANDLES and CLOTH (R).
- Walk down.
- Use the STICKY TAPE to take the ANTS (S).
- Use the PRUNERS to take the VINE (T).
- Walk left, forward, and left.
- Use the ANTS; take the 1/2 KEY PART (A).
- Place the CANDLES; take the ROTHBART AMULET and SHARP END (B).
- Walk down 2x.
- Use the SHARP END to take the CUT BEETROOT (C).
- Go forward and left.
- Place the CLOTH and CUT BEETROOT; take the FABRIC (D).
- Combine the VINE and FABRIC to make the VINE FLOWER (inventory).
- Place the VINE FLOWER; take the 2/2 KEY PART (E).
- Walk down.
- Select (F).
- Place the KEY PATTERN (O) and 2 KEY PARTS (P).
- Restore and take the DUNGEON KEY (Q).
- Give the DUNGEON KEY (R).
Chapter 4: The Dungeon
- You are playing as Siegfried; you earn the DUNGEON KEY.
- Take the RING (A).
- Use the DUNGEON KEY (B).
- Walk forward.
- Use the RING; take the NOTE, FIRE STEEL, STAMP, and ROTHBART PORTRAIT (C).
- Use the STAMP (D).
- Untangle the ropes (E).
- Play the HOP; earn the SWORD KEY (F).
- Use the SWORD KEY; take the 2/2 PUZZLE PIECE (G).
- Walk down.
- Place the 2 PUZZLE PIECES.
- Select I-H-K-N-O-L-M-P-O-L-I-J-M-P-O-N-K-L-I-H-K-L-M-J-I-L-K-H.
- Final solution (Q).
- Take the BOTTLE with OIL, JEWEL, and FLINTSTONE (R).
- Combine the FIRE STEEL and FLINTSTONE to make the FLINT (inventory).
- Go forward.
- Use the BOTTLE WITH OIL and the FLINT (A).
- Go forward.
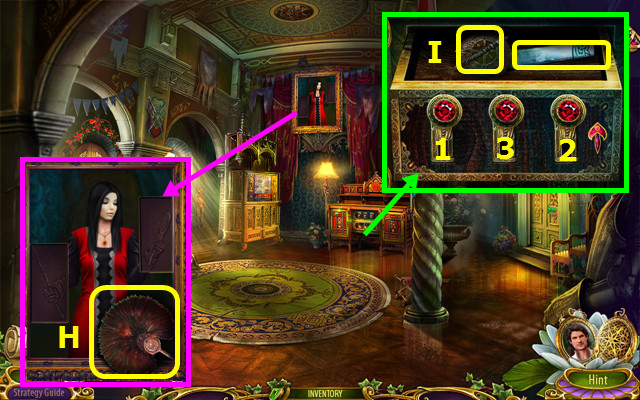
- Take the DOOR HANDLE (B).
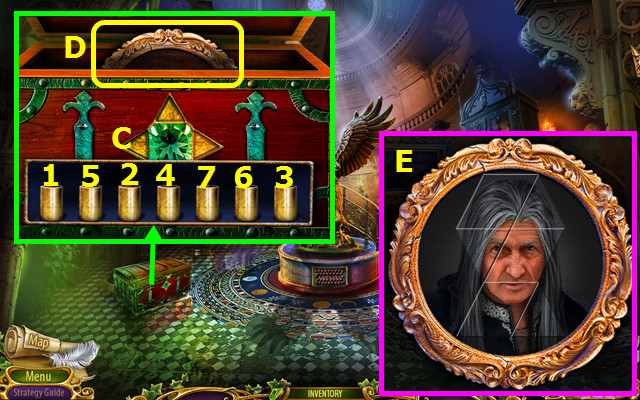
- Place the JEWEL (C); select 1-7.
- Take ROTHBART'S IMAGE (D).
- Combine ROTHBART'S IMAGE and ROTHBART'S PORTRAIT (inventory).
- Restore and take ROTHBART'S PORTRAIT (E).
- Walk down.
- Use the DOOR HANDLE (F).
- Go left.
- Place ROTHBART'S PORTRAIT; take the NOTE, BOOK, and 1/2 PATTERN PARTS (G).
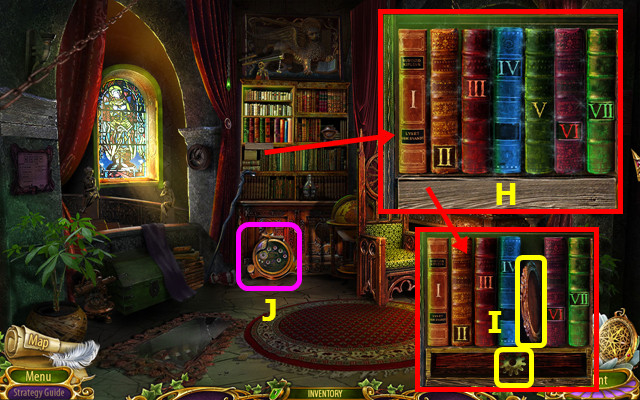
- Place the BOOK; arrange the books as shown (H).
- Take the GEAR and ALANA'S PORTRAIT FRAME (I).
- Select (J).
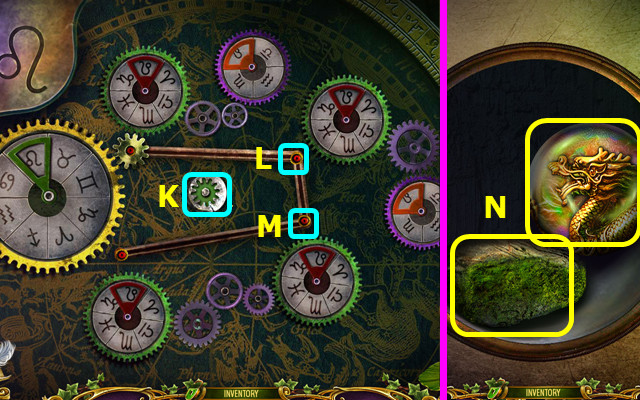
- Place the GEAR.
- Select 6x (+).
- Select (K); select 1x (+).
- Select (L); select 6x (+).
- Select (M); select 2x (+).
- Take the MOSS STONE and SPHERE PART (N).
- Walk down.
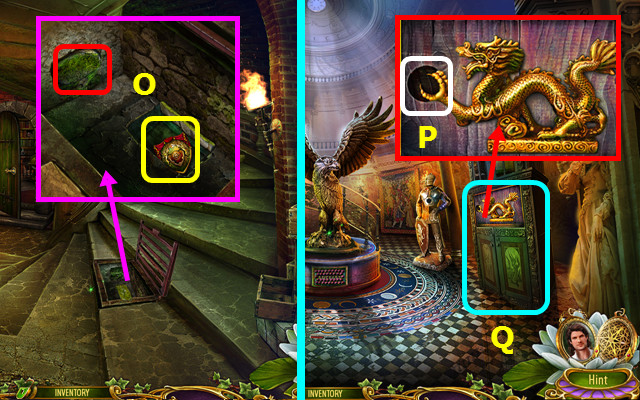
- Place the MOSS STONE; take the CREST (O).
- Go forward.
- Place the SPHERE PART (P).
- Play the HOP; earn the CROWN (Q).
- Combine the CREST and CROWN to make the CREST (inventory).
- Place the CREST; take the ARROW KEY and ALANA AMULET (S).
- Walk down.
- Use the ARROW KEY; take the PUZZLE PIECE (T).
- Go forward.
- Select (U).
- Place the PUZZLE PIECE.
- Solution J-B-N-G-I-O-F-Kx4-Ix2-Ex2-Fx2-H-I-P-F-Kx2-E-Hx2-P-Hx2-E-K-P-K.
- Take the 1/3 RUNG, MOSAIC PART, and NOTE (Q).
- Select (R).
- Place the MOSAIC PART.
- Solution A-B-C-Dx3-E-C-F-Gx4-Hx3-I-Jx3-K-Lx3-Kx5.
- Final solution (M).
- Go up the stairs.

- Take the JAR (N).
- Take the STAINED-GLASS PIECE and SAW (O).
- Take the LADDER HANDLE (P).
- Walk down 2x; go left.
- Place the STAINED-GLASS PIECE; take the 2/3 RUNG and ALANA'S PORTRAIT (Q).
- Combine ALANA'S PORTRAIT FRAME and ALANA'S PORTRAIT; restore the picture to make ALANA'S PORTRAIT (R).
- Place ALANA'S PORTRAIT; take the STAINED-GLASS PIECE (S).
- Place the STAINED-GLASS PIECE; take the COAL (T).
- Walk down; go forward, and up.
- Use the COAL and SAW to make the 3/3 RUNG (U).
- Place the LADDER HANDLE and 3 RUNGS (V).
Chapter 5: Defeating Alana
- You are playing as Odette.
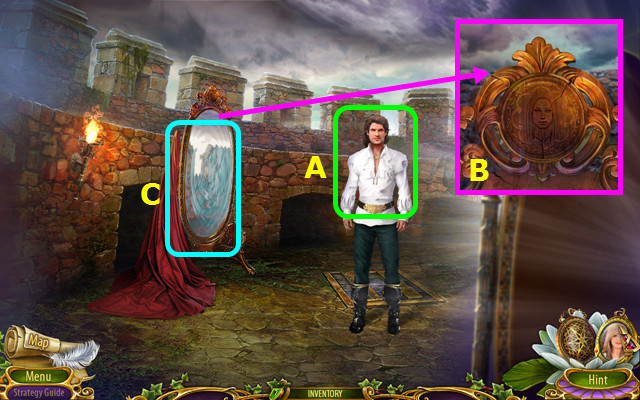
- Walk forward.
- Give the ROTHBART AMULET; earn the ALANA AMULET (A).
- Use the ALANA AMULET (B).
- Enter the mirror (C).
- Take the LETTER A (D).
- Take the NOTE and place the LETTER A (E).
- Select 1-4.
- Take the CHEST PART and STONE (F).
- Place the CHEST PART; restore the two photos (G).
- Take the 1/2 SWAN (H).
- Walk forward.
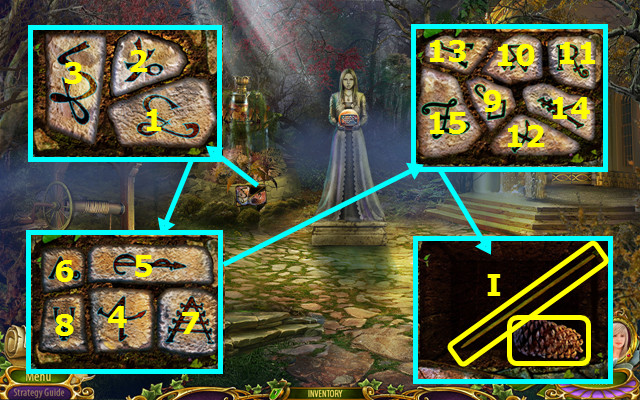
- Place the STONE; select 1-3.
- Select 4-8.
- Select 9-15.
- Take the NEEDLE and PINECONE (I).
- Walk down.
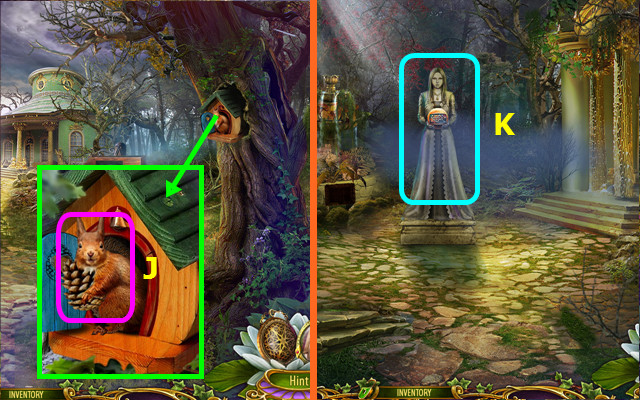
- Give the PINECONE; earn the 2/2 SWAN (J).
- Go forward.
- Select (K).
- Place the 2 SWANS.
- Solution (L).
- Take the FLOWER LOCK (M).
- Select (N).
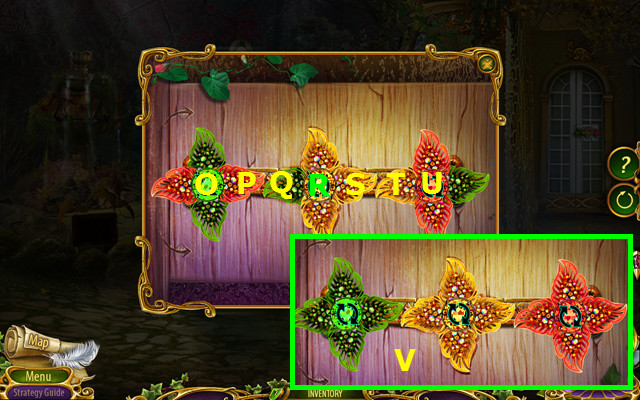
- Place the FLOWER LOCK.
- Select P-Q-Ox2-Rx2-Ux2-S-T-Rx2-P-Q-Rx2-Ux2-S-T.
- Final solution (V).
- Walk right.
- Use the NEEDLE (A).
- Play the HOP; earn the BEAVER LOCK PART (B).
- Place the BEAVER LOCK PART; restore the picture (C).
- Take the BEAVER and GROWTH POTION (D).
- Walk down 2x.
- Use the BEAVER (E).
- Walk left.
- Use the GROWTH POTION; take the BARREL OF HONEY (F).
- Place the BARREL OF HONEY; take the TREE FIGURE and 1/2 GLOBE PART (G).
- Go forward.
- Place the TREE FIGURE; arrange by height (H).
- Take the FORESTER FIGURINE, GRIMOIRE, and NOTE (I).
- Select (J).
- Place the FORESTER FIGURINE.
- Select the path (K).
- Take the GRATING DISK and 1/4 GRIMOIRE PAGE PART (L).
- Walk down.
- Place the GRATING DISC; arrange as shown (M).
- Take the RIVET and 2/4 GRIMOIRE PAGE PART (N).

- Place the RIVET; select 6-1-4-2-5-3.
- Take the BOOK and 3/4 GRIMOIRE PAGE PART (O).
- Walk down, forward, and right.
- Select (P).
- Place the BOOK; arrange as shown (Q).
- Take the HAMMER HANDLE and HOOK (R).
- Walk down 2x; go left.
- Use the HAMMER HANDLE to take the SLEDGEHAMMER (A).
- Use the SLEDGEHAMMER (B).
- Play the HOP; earn the DEER HORN (C).
- Go forward.
- Place the DEER HORN; take the CLOVER and 2/2 GLOBE PART (D).
- Talk to the Forester and give the CLOVER; earn the WOODCUTTER FIGURINE (E).
- Place the WOODCUTTER FIGURINE; take the NOTE, AMULET, and 4/4 GRIMOIRE PAGE PART (F).
- Combine the GRIMOIRE and 4 GRIMOIRE PAGE PARTS to make the PAGE (inventory).
- Walk down 2x; go forward and right.
- Select (G).
- Place the PAGE (H).
- Select the pairs (color-coded).
- Note the inner circle moves after every 2 opened.
- Go up the stairs.
- Place the 2 GLOBE PARTS; move the beams over the X (I).
- Take the BAS-RELIEF KEY (@).
- Take the BRUSH; place the BAS-RELIEF KEY (J).
- Play the HOP; earn the MYSTERIOUS SCROLL (K).
- Walk down.
- Place the MYSTERIOUS SCROLL; take the ROPE and 1/3 MAGIC CRYSTALS (L).
- Combine the ROPE and HOOK to make the HOOK WITH ROPE (inventory).
- Walk down.
- Use the HOOK WITH ROPE; take the CHISEL (M).
- Walk down and left.
- Use the BRUSH; take the 2/3 MAGIC CRYSTALS (N).
- Go forward.
- Use the CHISEL; take the 3/3 MAGIC CRYSTALS (O).
- Combine the AMULET and 3 MAGIC CRYSTALS to make the MAGIC AMULET (inventory).
- Walk down 2x; go forward, right, and forward.
- Use the MAGIC AMULET (P).
- Select Q-Rx2-Qx4-R-Qx2-Rx5-Q-Rx3-Qx2.
- You will switch to Siegfried.
Chapter 6: Defeating Rothbart
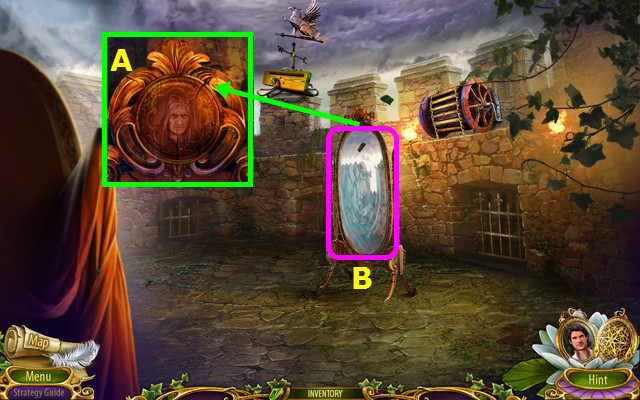
- You earn the ROTHBART AMULET.
- Use the ROTHBART AMULET (A).
- Enter the mirror (B).
- Place the JAR and select the 4 fireflies (green); take the FIREFLIES (C).
- Take the AMULET, UNICORN HORN, and NOTE (D).
- Place the FIREFLIES (E).
- Play the HOP; earn the 2/2 PATTERN PARTS (F).
- Place the 2 PATTERN PARTS; restore the 4 images (1-4).
- Take the RUBY and 1/2 MALLET AND WEDGE (G).
- Walk forward.
- Take the FAN (H).
- Place the RUBY; slide the handles up (1-3); take the PIANO KEY and CHEST WITH ROD (I).
- Walk down.
- Place the CHEST WITH ROD; take the BOX (J).
- Place the BOX, use the FAN, and take the PEPPER (K).
- Use the PEPPER; take the LION RING (L).
- Go forward.
- Select (M).
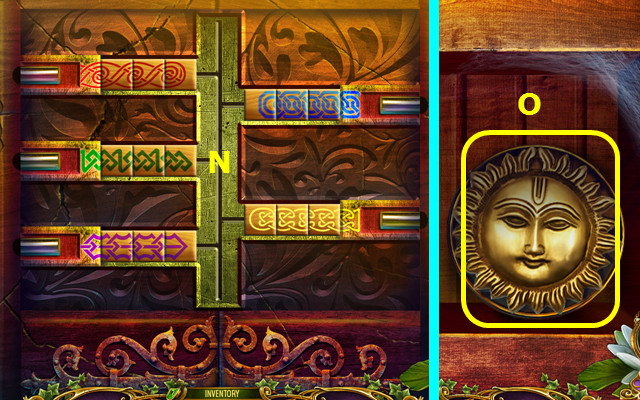
- Use the LION RING on the glass.
- Arrange the tiles as shown (N).
- Take the SUN KEY (O).
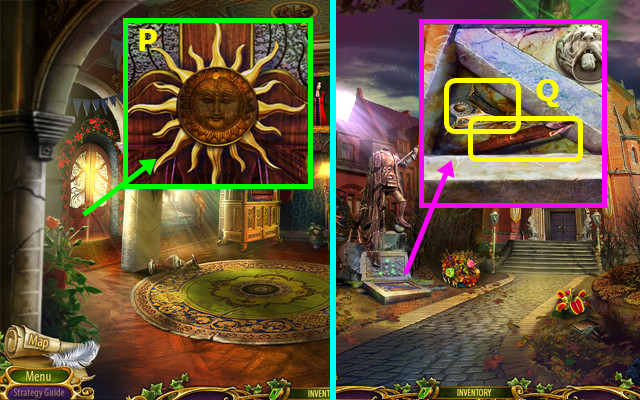
- Place the SUN KEY (P).
- Walk left.
- Place the UNICORN HORN; take the AMULET and 2/2 MALLET AND WEDGE (Q).
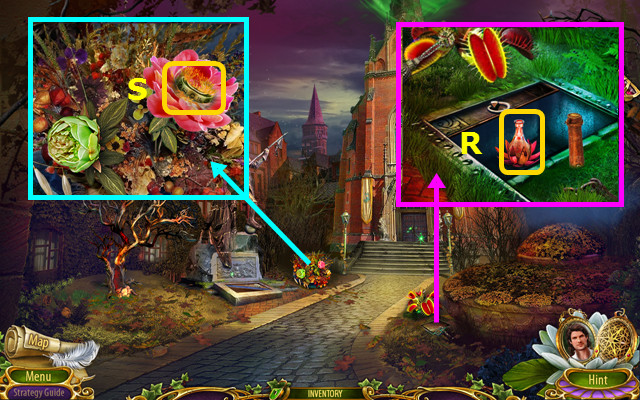
- Use the MALLET AND WEDGE; take the GROWTH POTION (R).
- Use the GROWTH POTION; take the LOCK PIECE (S).
- Walk down.
- Place the LOCK PIECE; enter SIEGFRIED (T).
- Walk right.
- Use the AMULET; take the MAGIC ORB and NOTE (U).
- Place the MAGIC ORB (A).
- Play the HOP; earn the PICTURE FRAGMENT (B).
- Walk down.
- Place the PICTURE FRAGMENT; take the PLANT POISON (C).
- Walk left.
- Use the PLANT POISON; take the TASSEL (D).
- Walk down and right.
- Place the TASSEL; take the INKPOT (E).
- Place the INKPOT; take the CATHEDRAL KEY (F).
- Walk down and left.
- Use the CATHEDRAL KEY (G).
- Walk forward.
- Select (@).

- Place the PIANO KEY; arrange the keys as shown (H).
- Take the KEY (I).
- Use the KEY; take the STONE AMULET (J).
- Combine the AMULET and STONE AMULET to make the AMULET (inventory).
- Place the AMULET; take the PITCHER WITH WATER (K).
- Walk down.
- Use the PITCHER WITH WATER (M).
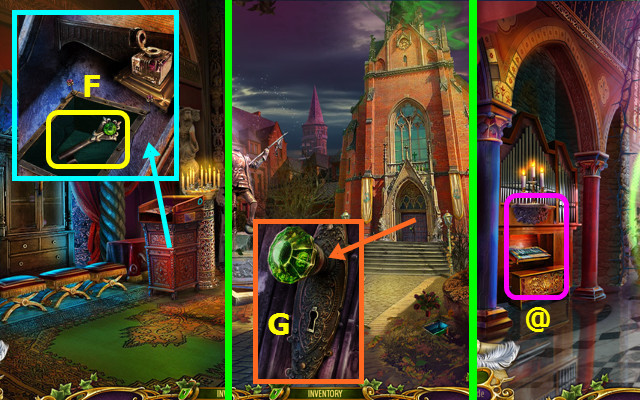
- Play the HOP; earn the COLUMN PART (N).
- Go forward.
- Place the COLUMN PART; select Q-O-R-P-S-R-Q-O-P-S.
- Take the EMERALD (T).
- Walk down 2x.

- Place the EMERALD; move the levers down (1-3).
- Take the GROWTH POTION (U).
- Go left.
- Use the GROWTH POTION; take the RING (V).
- Place the RING; take the FAN FEATHER (W).
- Walk down and right.
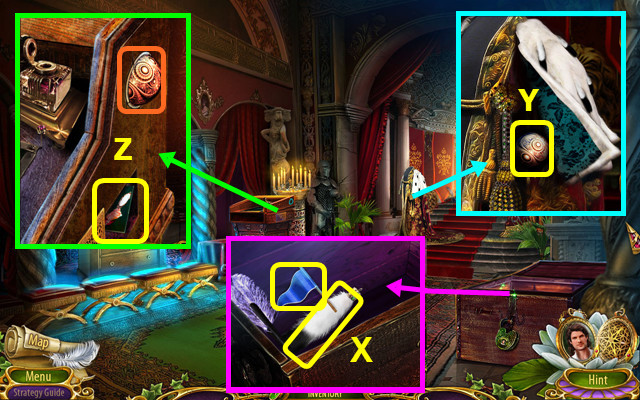
- Place the FAN FEATHER; take the 1/2 FLAGS and ERMINE TAIL (X).
- Place the ERMINE TAIL; take the SPHERE (Y).
- Place the SPHERE; take the PICTURE FRAGMENT (Z).
- Walk down.
- Place the PICTURE FRAGMENT; take the 2/2 FLAGS (A).
- Walk down.
- Place the 2 FLAGS; take the SCROLL WITH SYMBOLS (B).
- Walk forward and right.
- Select (C).
- Read the NOTE and place the SCROLL (D).
- Select a wand and the matching symbols (color-coded).
- You earn the MAGIC STAFF.
- Walk down, left, and forward.
- Use the MAGIC STAFF (E).
- Select Fx3-Gx3-Hx2-Ix3-Jx2-Kx2.
- Final solution (L).
- Congratulations! You have completed Dark Romance: The Swan Sonata!
Created at: 2015-11-15