

Walkthrough Menu
- General Tips
- Chapter 1: Saving William
- Chapter 2: Castle
- Chapter 3: Underground City
- Chapter 4: Saving Grace
- Chapter 5: Dwarven Forge
General Tips
- This is the official guide for Dark Romance: Winter Lily.
- This guide won't tell you when to zoom into a location; the screenshots show each zoom scene.
- Hidden-object puzzles are referred to as HOPs. Only the locations of the HOPs will be shown.
- Use the Map to fast travel to a location.
Chapter 1: Saving William
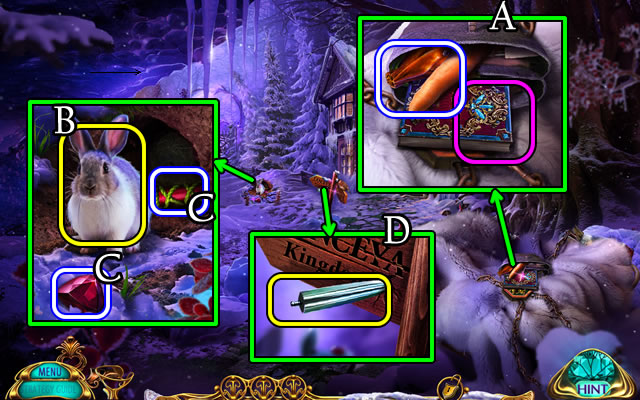
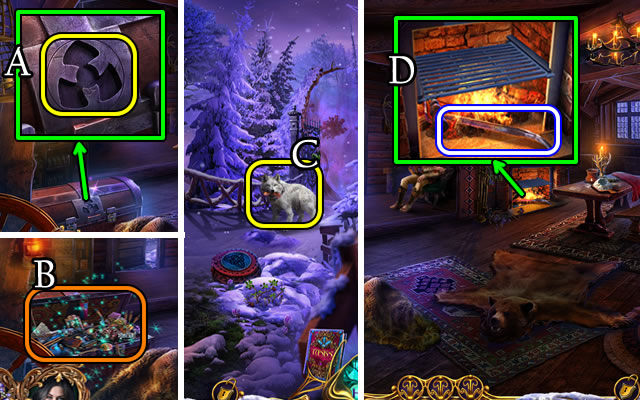
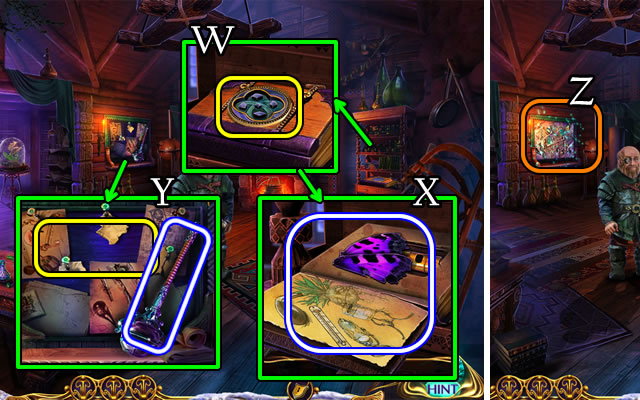
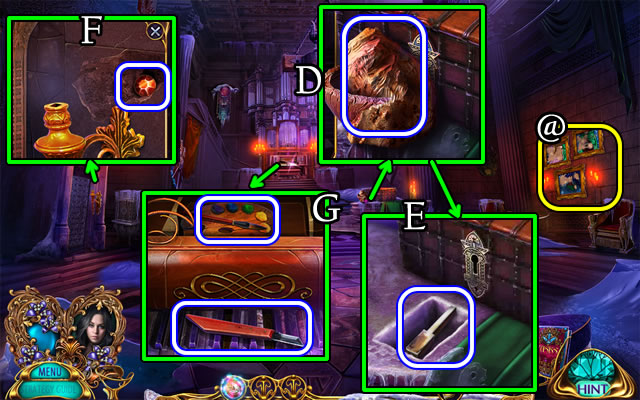
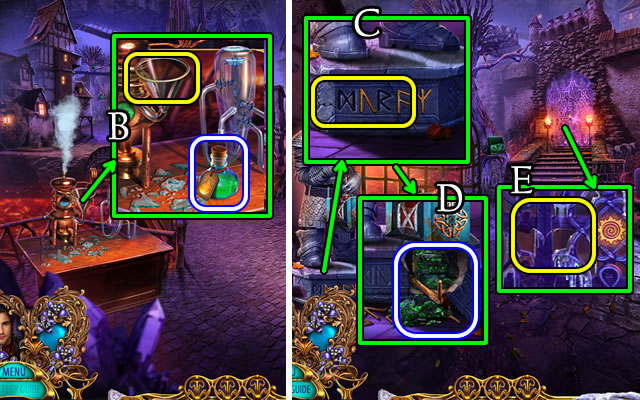
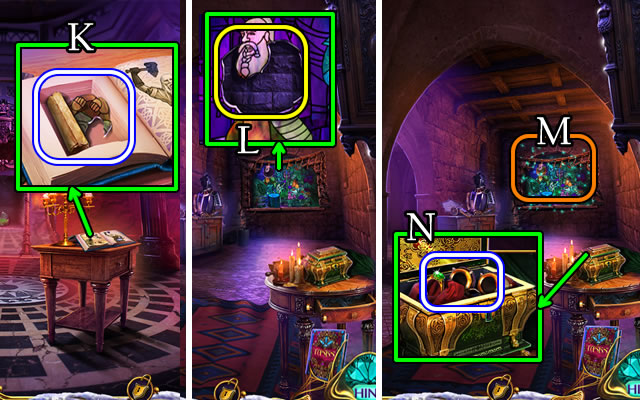
- Take Tasks, CARROT and POUCH (A).
- Give CARROT (B); take 1/2 DOOR PIECE and HILT (C).
- Use HILT for DAGGER (D).
- POUCH for ROYAL MEDALLION and PUZZLE PIECE.
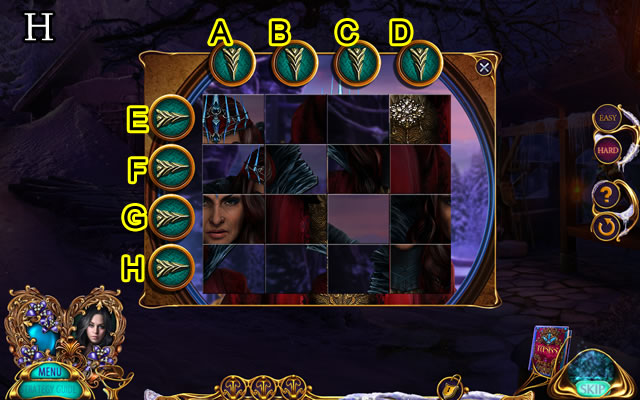
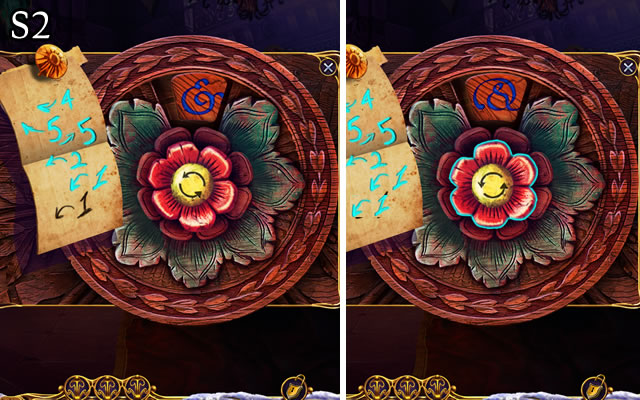
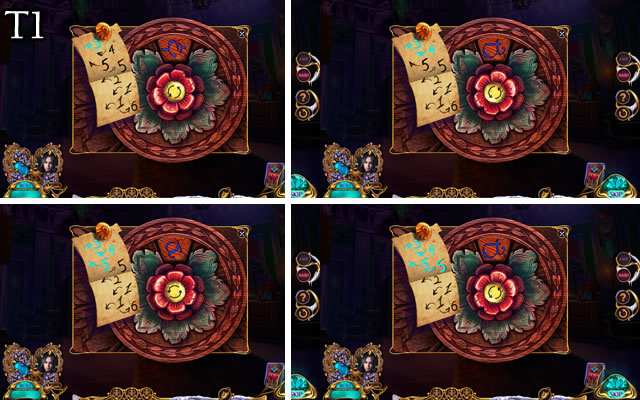
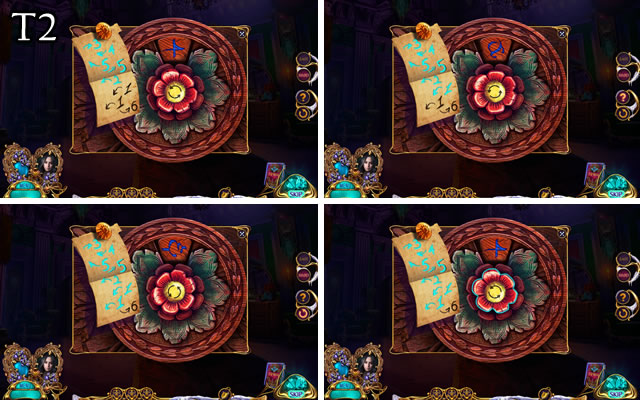
- Use PUZZLE PIECE (E).
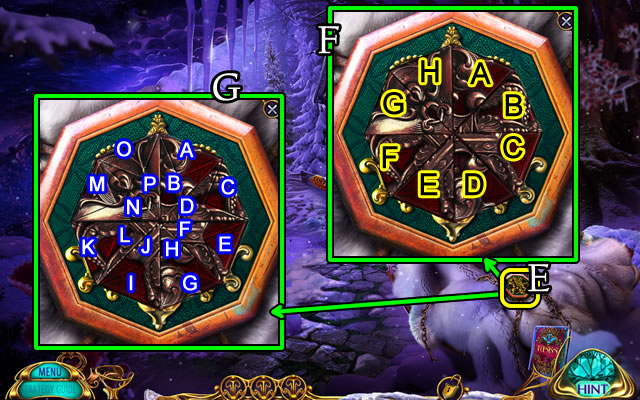
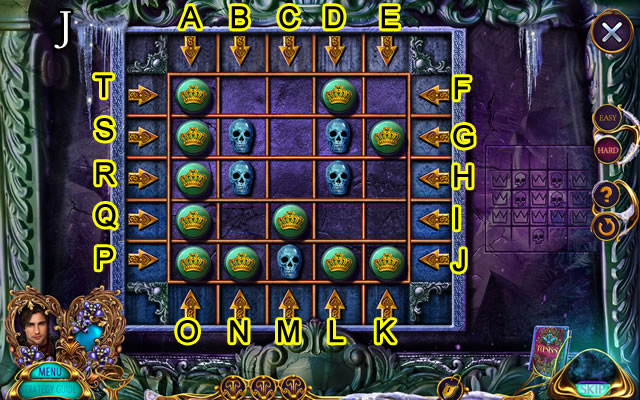
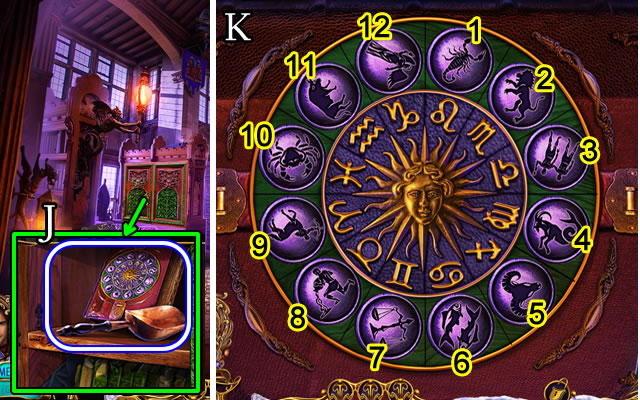
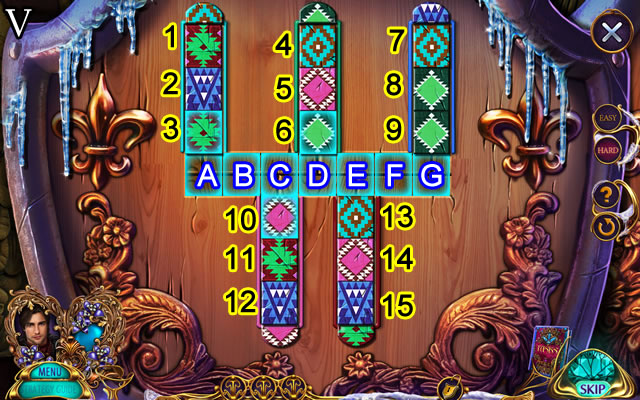
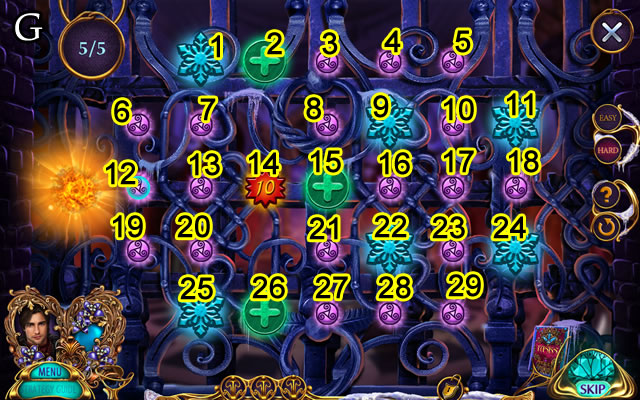
- Easy solution (F). (G-C)-(A-F)-(H-B)-(B-E)-(D-E)-(C-E).
- Hard solution (G). (M-E)-(A-K)-(O-C)-(C-I)-(G-I)-(E-I)-(N-F)-(B-L)-(P-D)-(D-J)-(H-J)-(F-J).
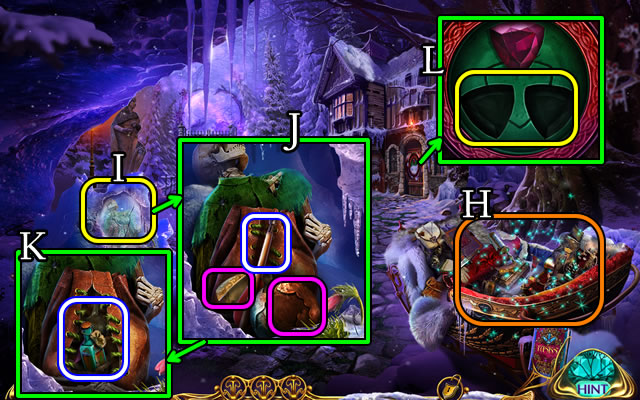
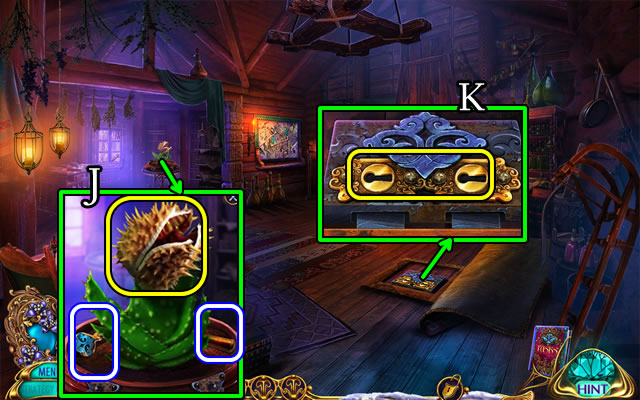
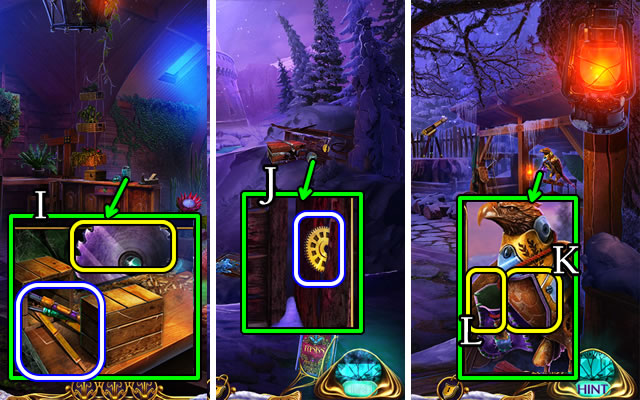
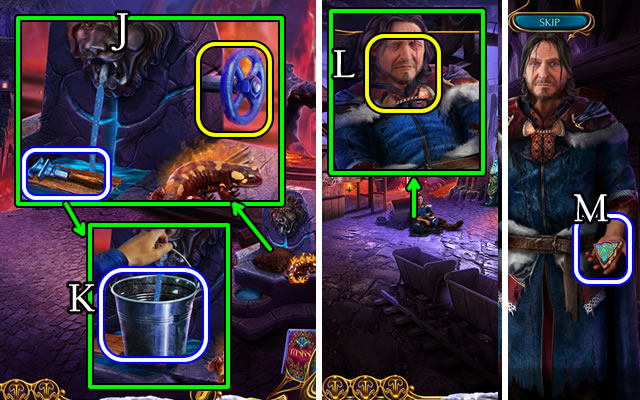
- Play HOP for PICKAXE (H).
- Use PICKAXE (I); take 1/3 ARROWS, Map and note (J).
- Use DAGGER; take 2/2 DOOR PIECE and OIL (K).
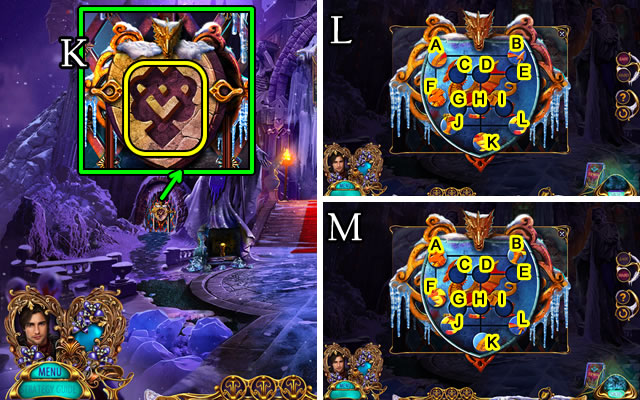
- Place 2/2 DOOR PIECES (L).
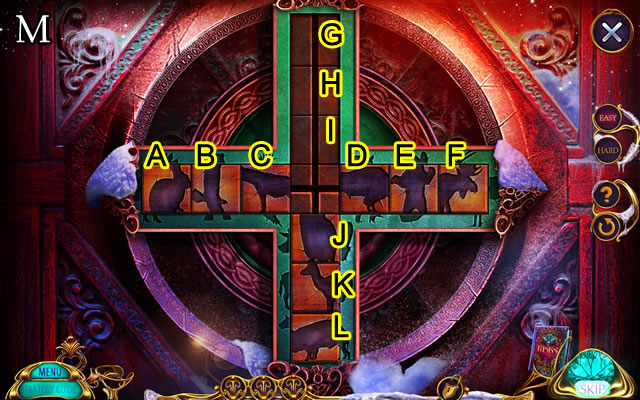
- Easy solution (M). (J-G)-(D-H)-(E-J)-(F-I)-(C-F)-(B-E)-(A-D)-(I-A)-(J-B)-(D-J)-(E-C).
- (F-I)-(J-F)-(K-E)-(L-D)-(I-L)-(H-K)-(D-H)-(E-J)-(F-I)-(J-F)-(I-E)-(H-J)-(G-D).

- Hard solution (N). (J-G)-(D-H)-(E-I)-(F-J)-(C-F)-(B-E)-(A-D)-(J-A)-(I-J)-(H-B)-(D-H)-(E-C).
- (H-E)-(J-D)-(G-J)-(D-G)-(E-H)-(F-I)-(J-F)-(I-E)-(H-D)-(K-H)-(L-I)-(D-L)-(I-K)-(H-J)-(G-D)-(J-G)-(K-H)-(D-K)-(H-J)-(G-D).
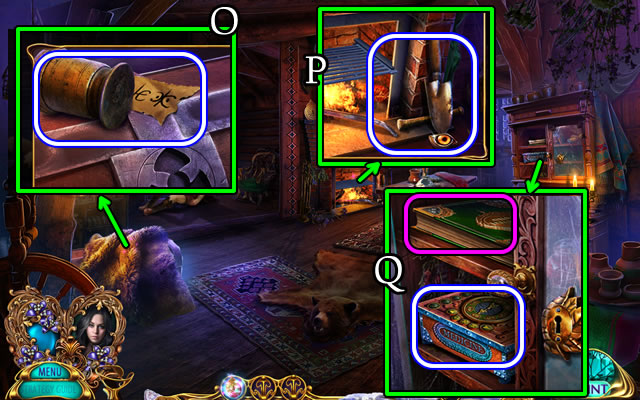
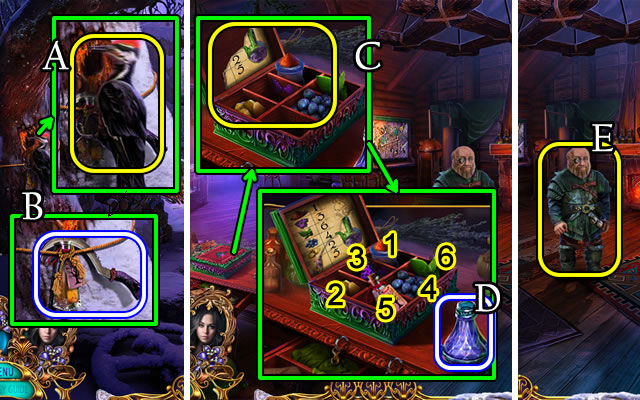
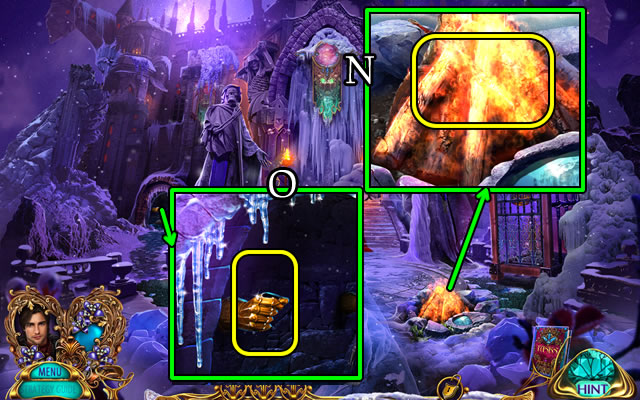
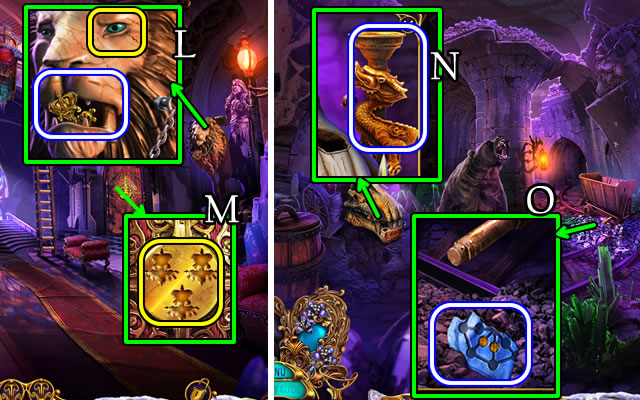
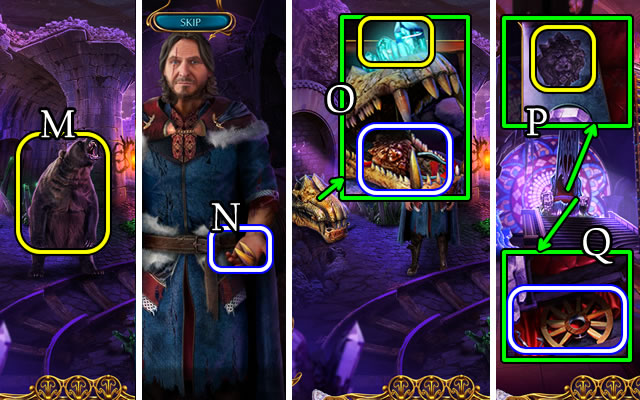
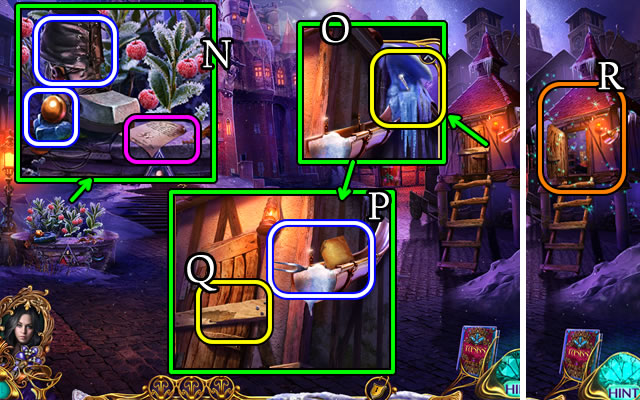
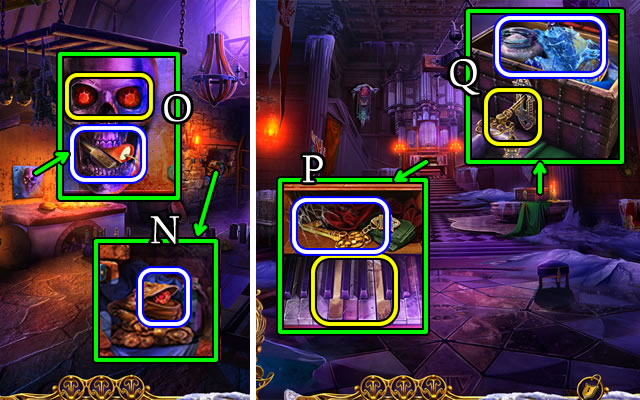
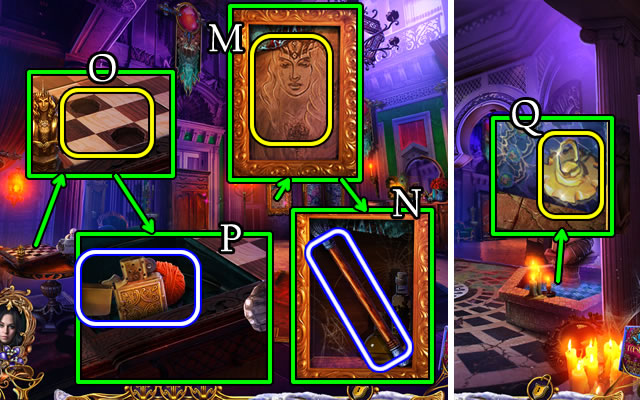
- Uncover; take 1/2 MORTAR AND PESTLE and CODE (O).
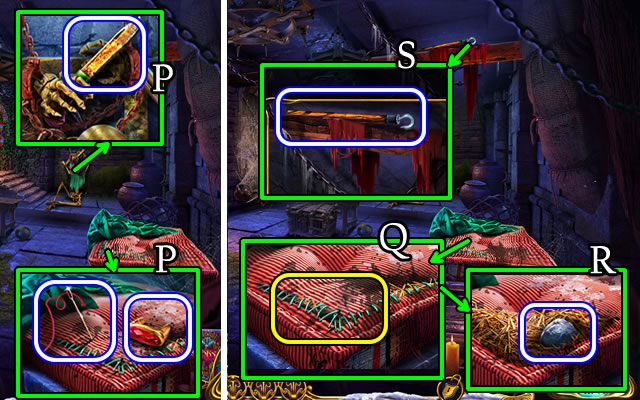
- Take TROWEL, 1/2 WOLF EYES, 2/2 MORTAR AND PESTLE (P).
- Take ANTIDOTE RECIPE from book and MEDICINE KIT (Q).
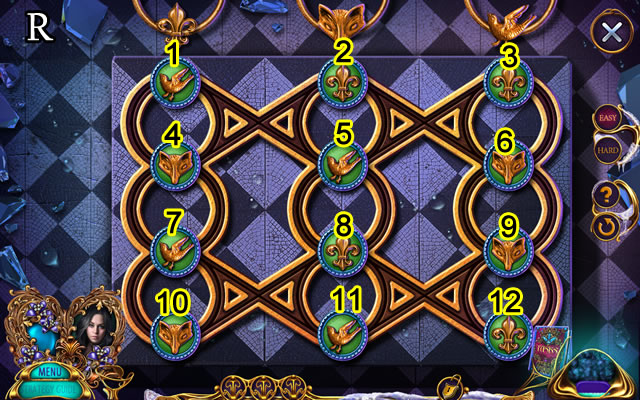
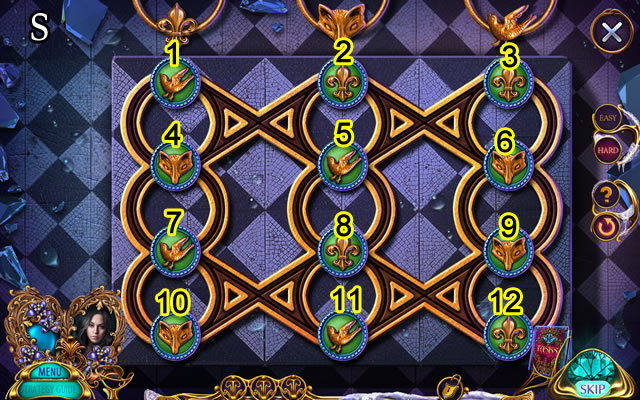
- CODE on MEDICINE KIT.
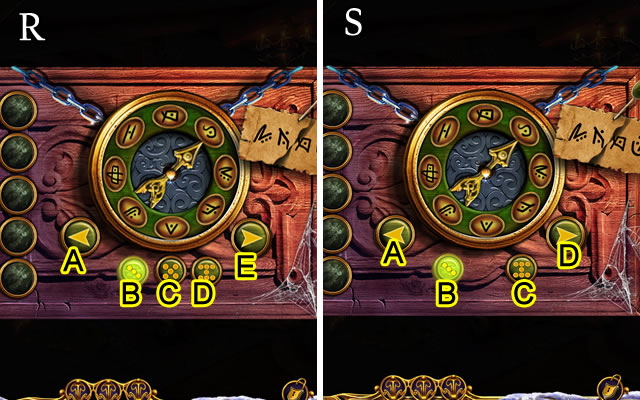
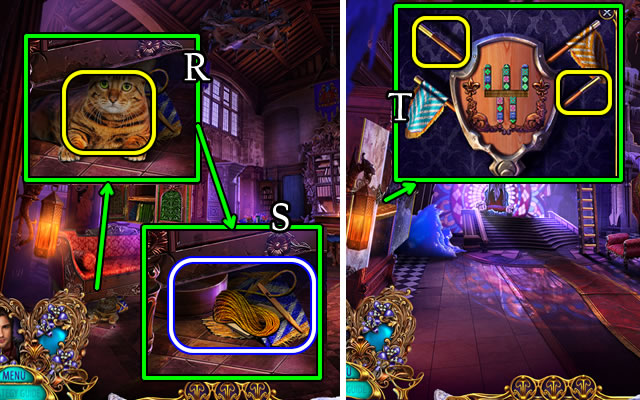
- Easy solution (R). DAx2-CE-BA-DE.
- Hard solution (S). CAx2-BAx2-CA.
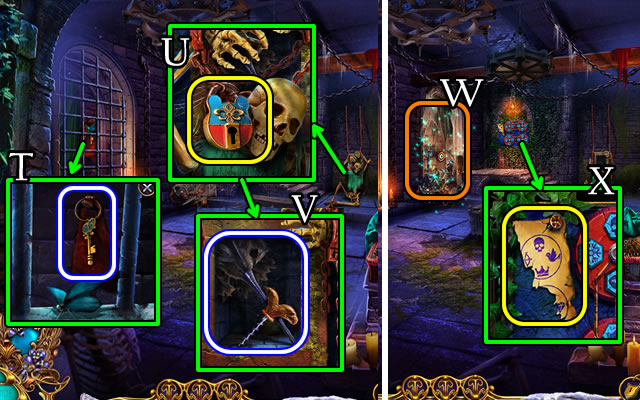
- Take note, TWEEZERS and ANTIDOTE BASE.
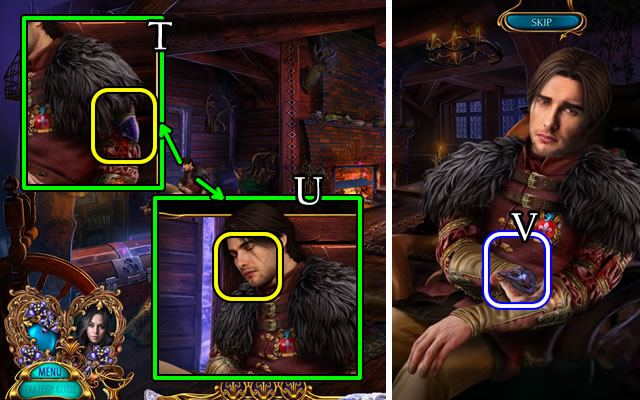
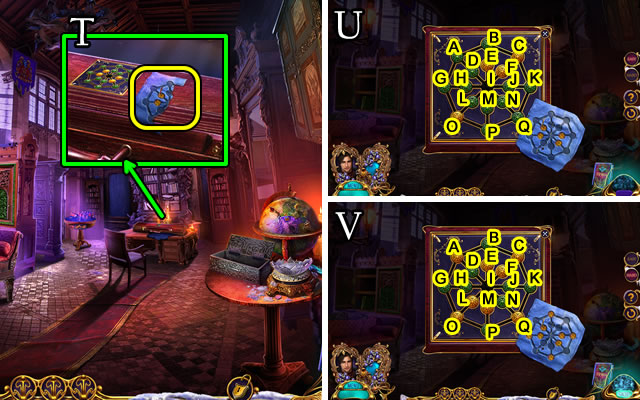
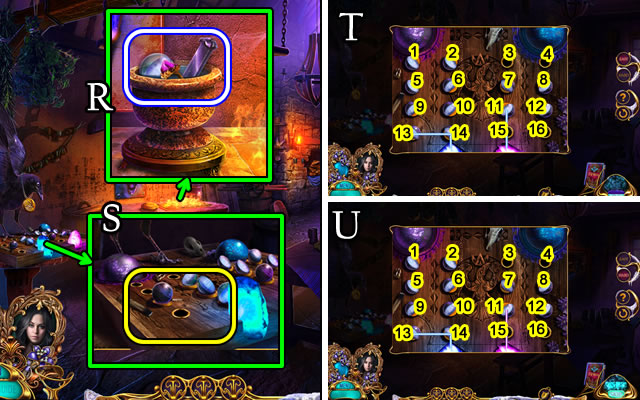
- Use TWEEZERS for OBSIDIAN SHARD (T).
- 2/2 MORTAR AND PESTLE, OBSIDIAN SHARD and ANTIDOTE BASE on ANTIDOTE RECIPE for ANTIDOTE.
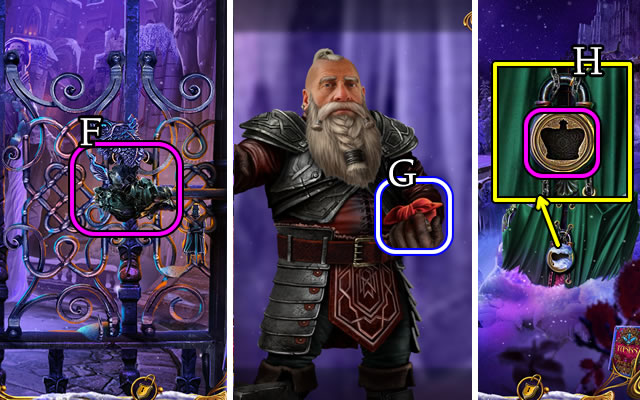
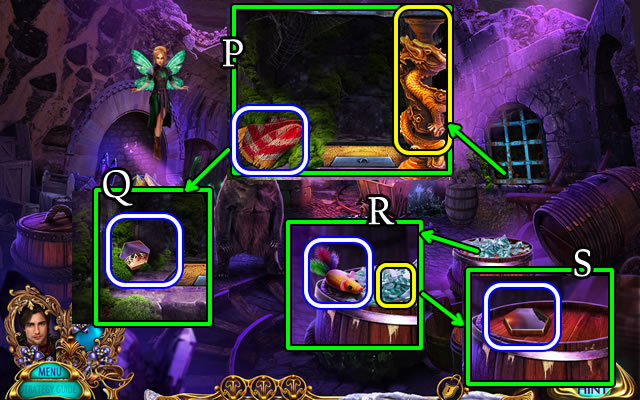
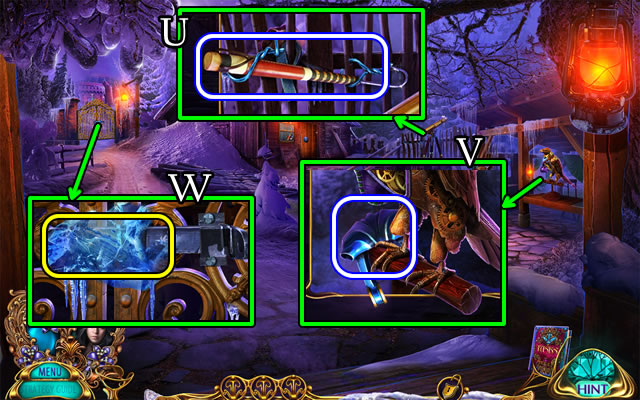
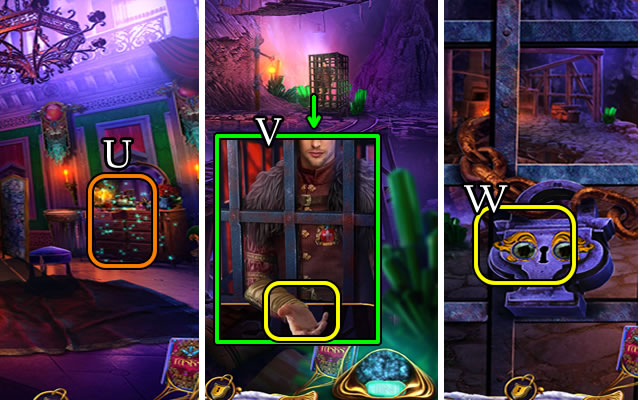
- Give ANTIDOTE (U).
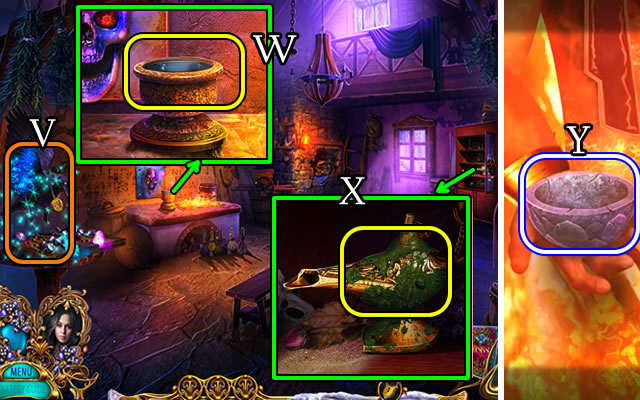
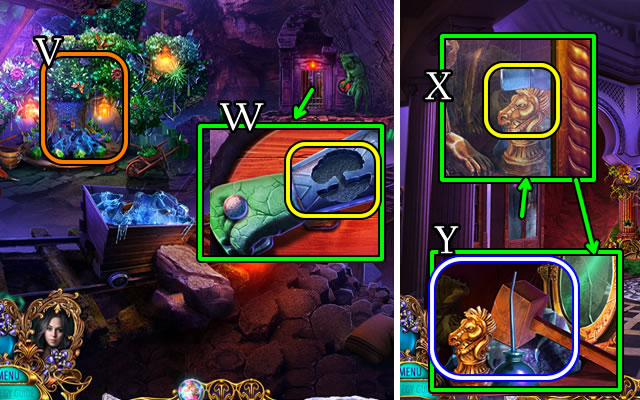
- Take HEART INLAY (V).
- Go forward.
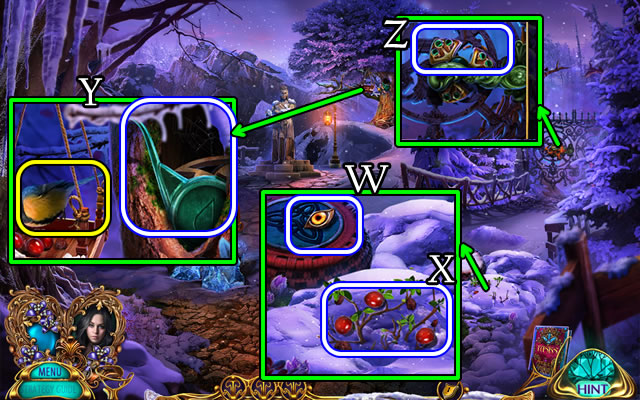
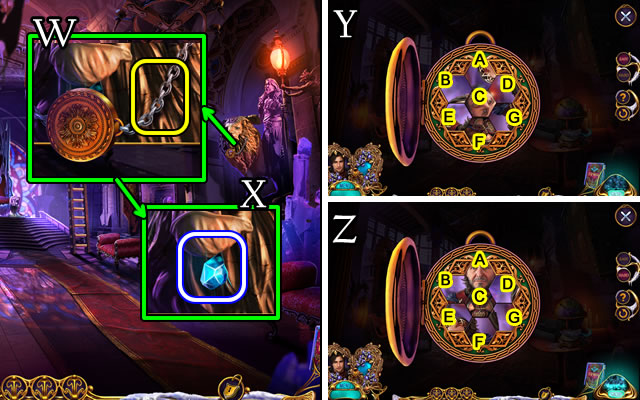
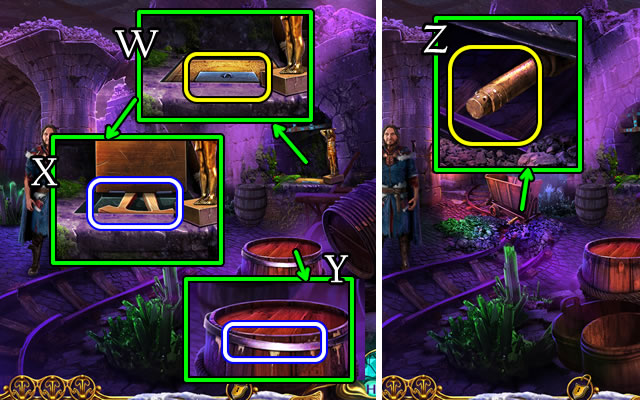
- Uncover; take 2/2 WOLF EYES (W).
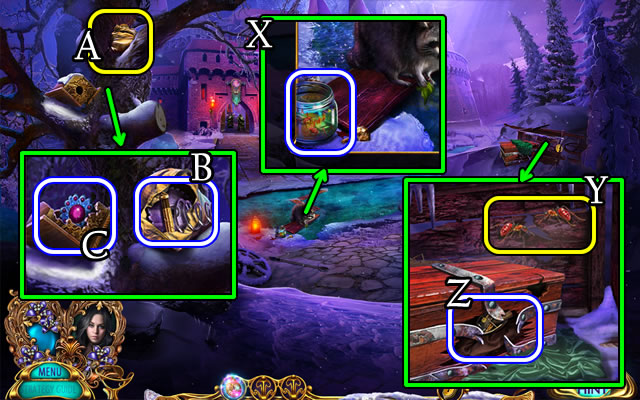
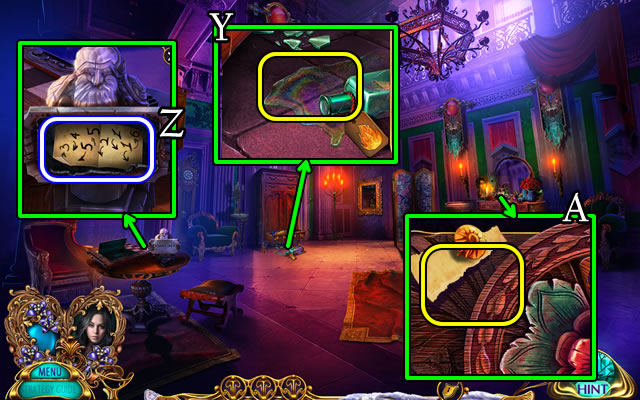
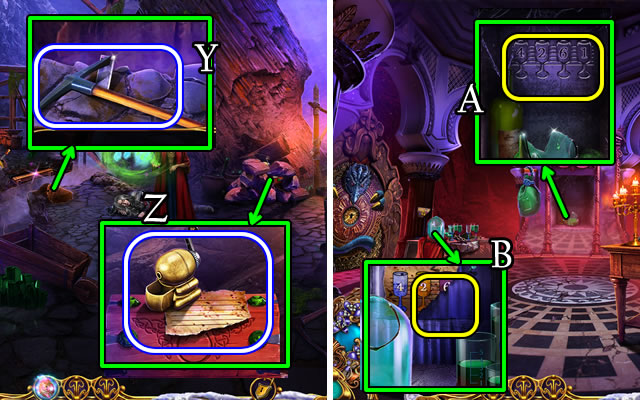
- Use TROWEL; take 3/3 WINTER CHERRIES (X).
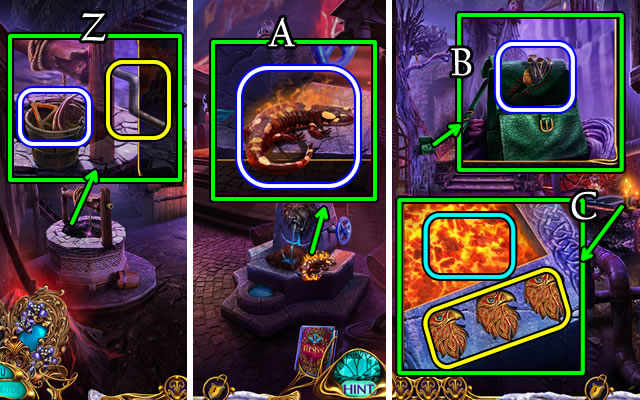
- Give 3/3 WINTER CHERRIES; take OIL CAN and 1/2 STONE CROWN (Y).
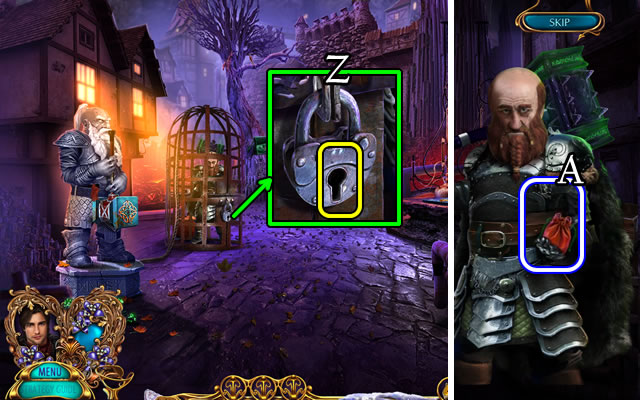
- Use OIL CAN; take CHEST INLAY. Pull lever (Z).
- Go down.
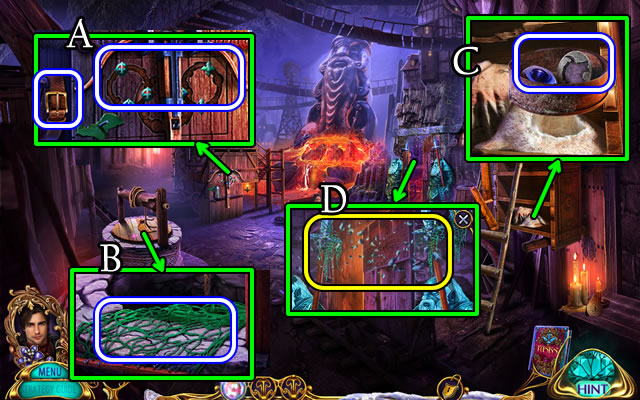
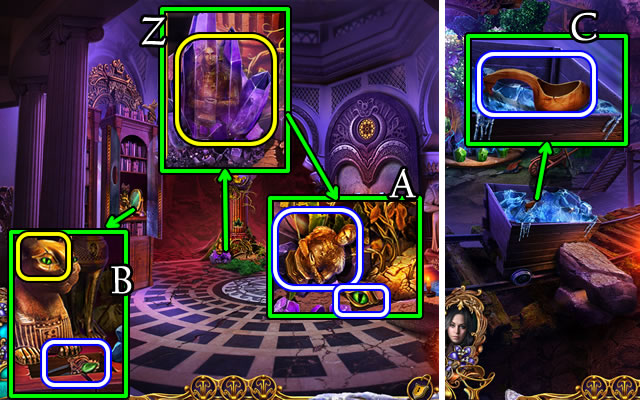
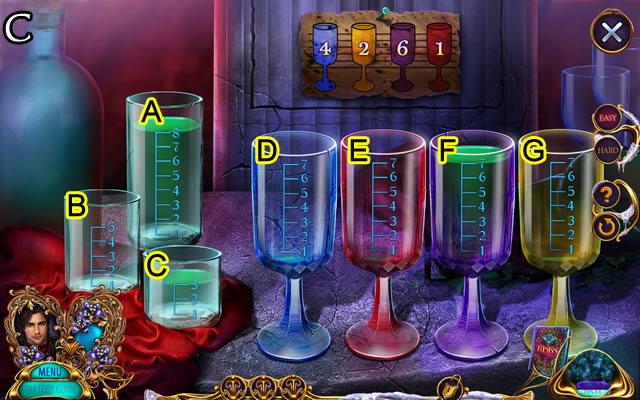
- Use CHEST INLAY (A).
- Play HOP (B) for BROKEN AMULET.
- Go forward.
- 2/2 WOLF EYES on BROKEN AMULET for WOLF SUBMISSION AMULET.
- Use WOLF SUBMISSION AMULET (C); receive GLOVE.
- Go down.
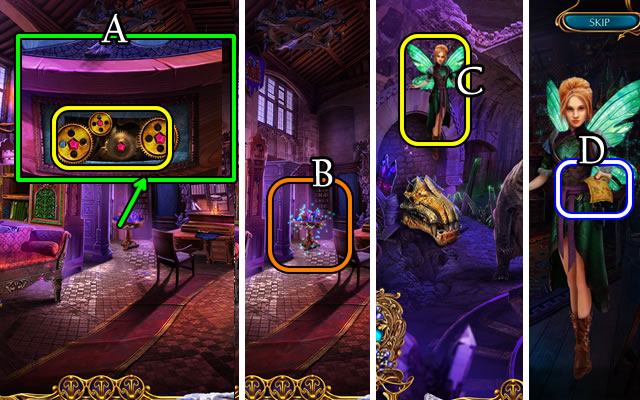
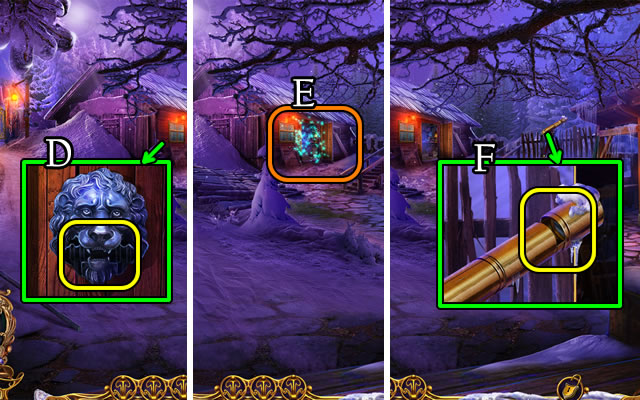
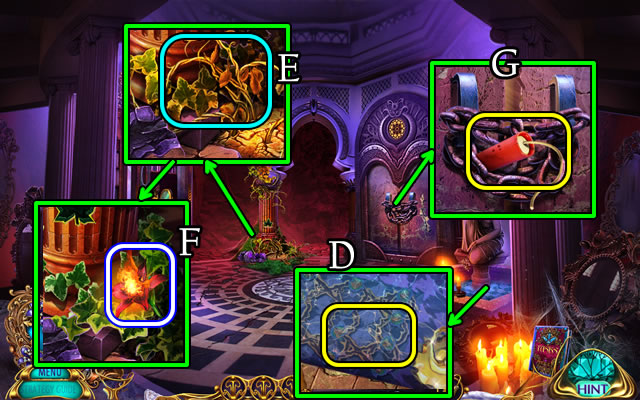
- Use GLOVE for HOT CROWBAR (D).
- Go forward.
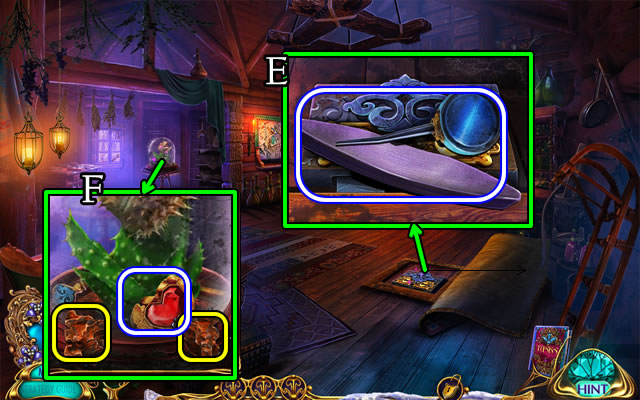
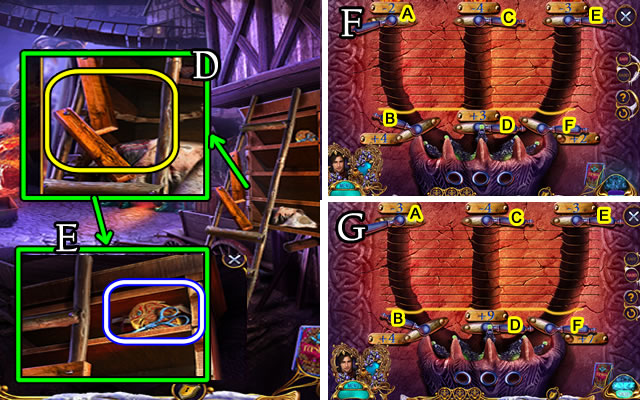
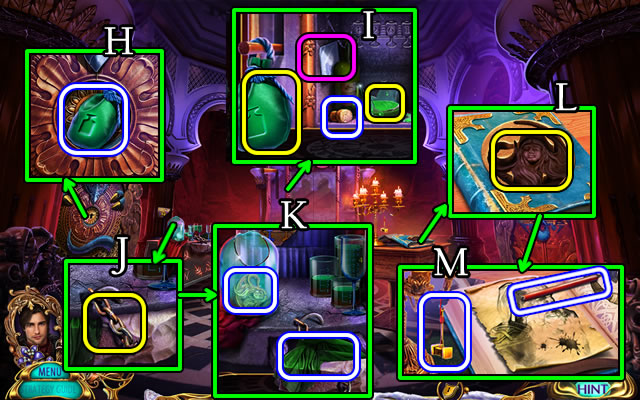
- Use HOT CROWBAR (E); take FAN and Journal page (F).
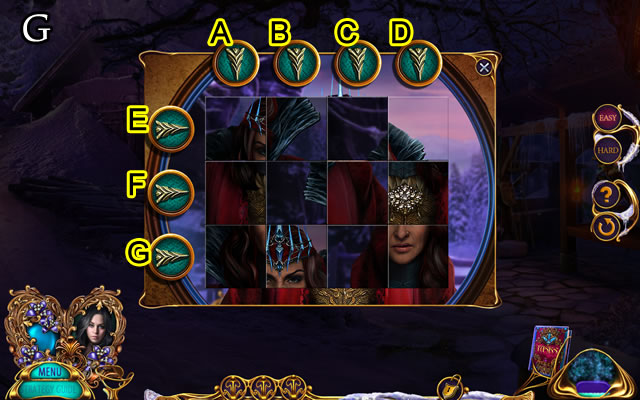
- Use HEART INLAY; take MAGNET and BANDAGE (G).
- Go down.
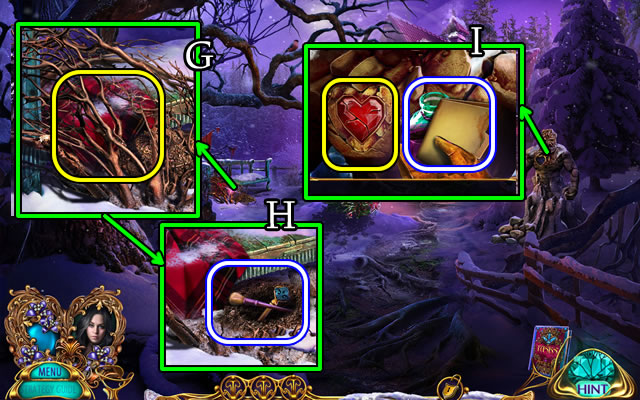
- Use BANDAGE (H).
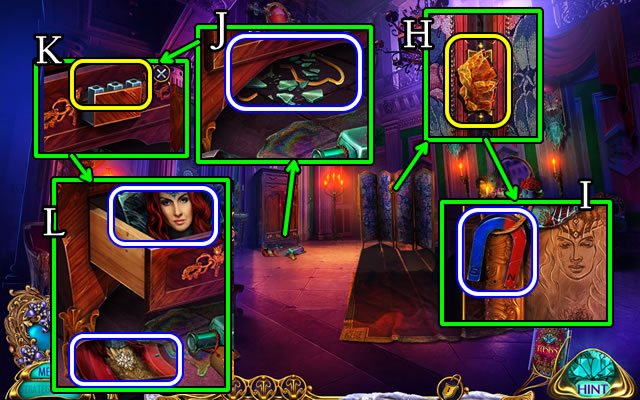
- Select William Amulet (I).

- Take LONG HOOK (J).
- Use LONG HOOK (K); take 2/3 ARROWS and SMALL HAMMER (L).
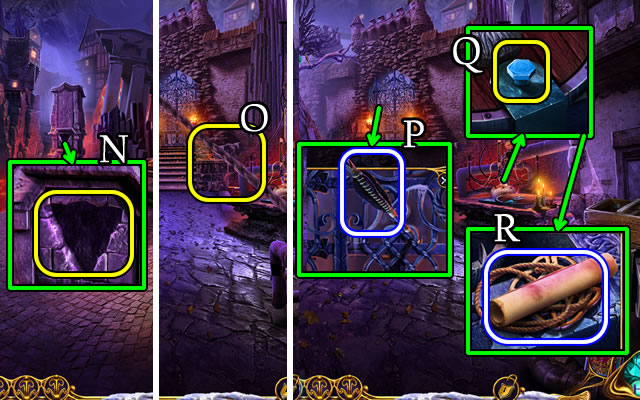
- Take 3/3 ARROWS; use DAGGER to take ROPE (M).
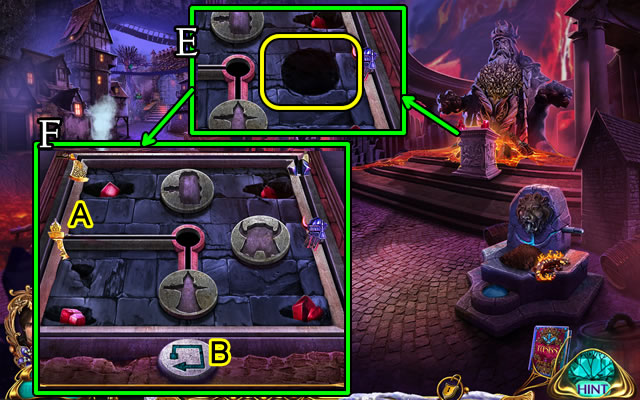
- Take FROZEN ITEM and LEVER (N).
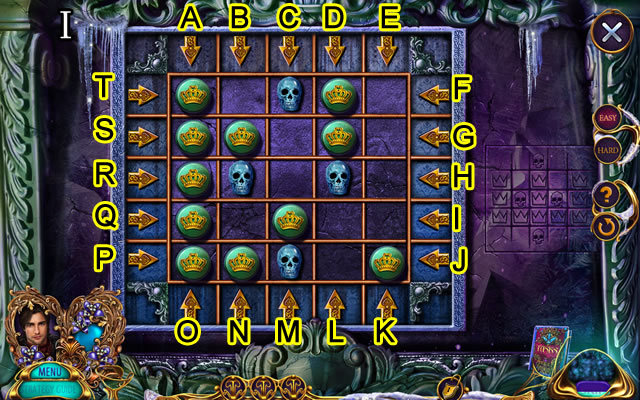
- Replace, ROPE and LEVER; place 3/3 ARROWS (O).
- Easy solution (P).
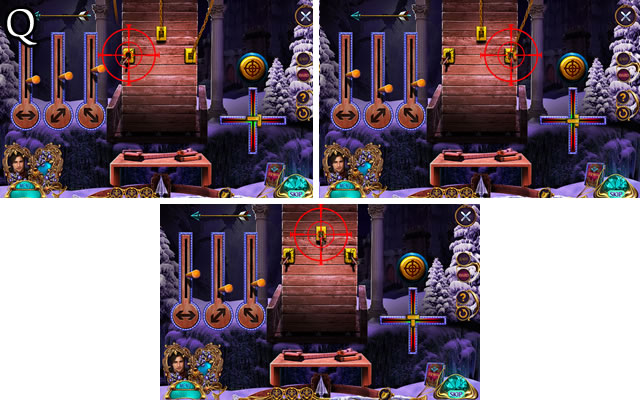
- Hard solution (Q).
- Go forward.
- Interact with character.
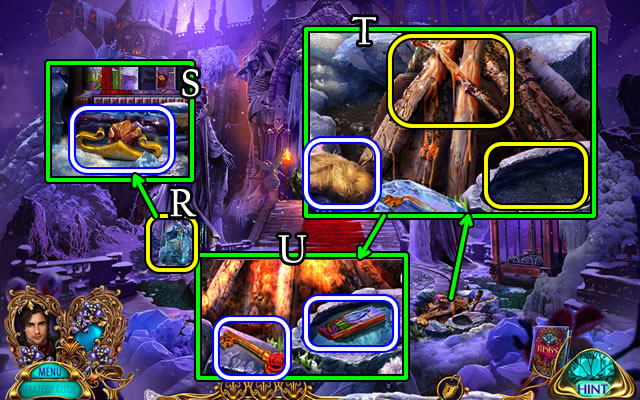
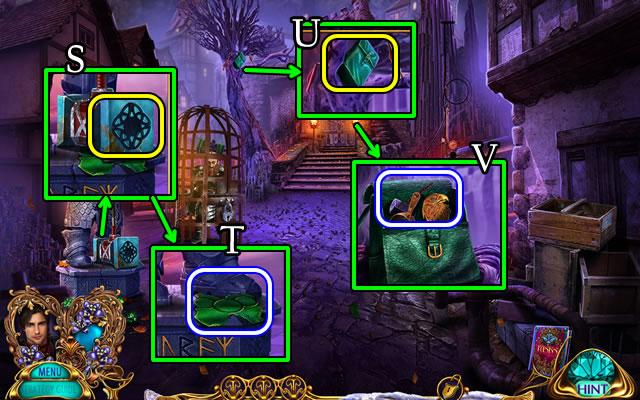
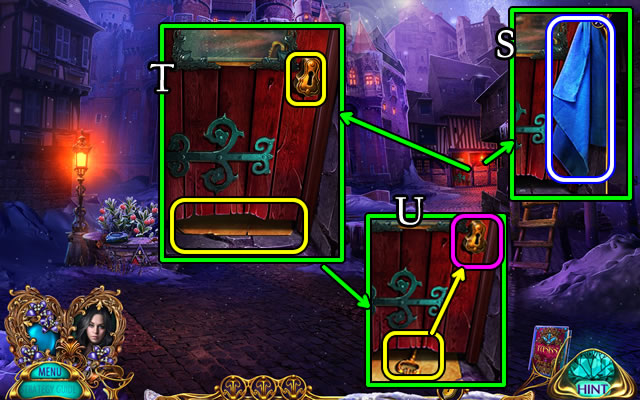
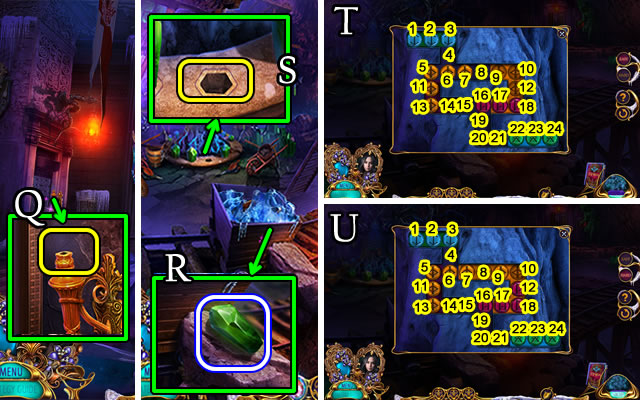
- Use SMALL HAMMER (R); take FLINT AND STEEL (S).
- Use OIL; place FROZEN ITEM; take FIBER (T).
- Use FLINT AND STEEL; take BOX KEY and 1/2 PAINTED TILES (U).
- Go down.
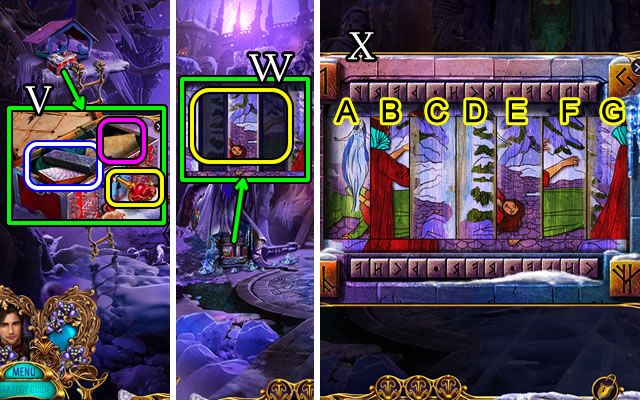
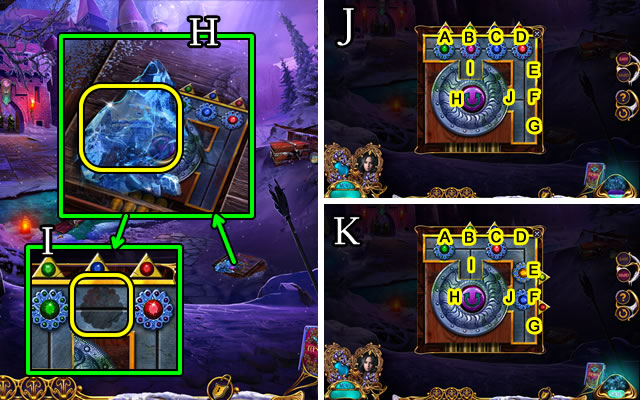
- Use BOX KEY; take note, 2/2 PAINTED TILES and WHETSTONE (V).
- Go forward.
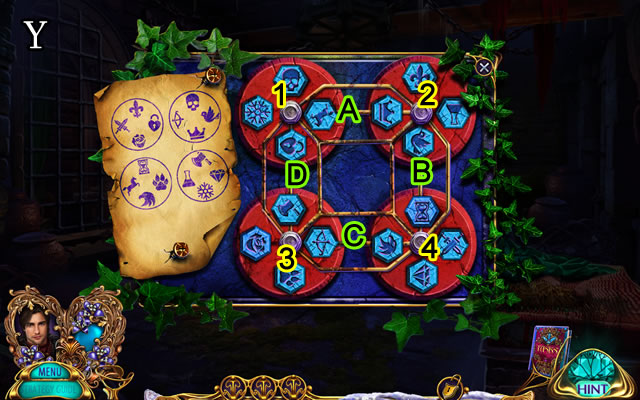
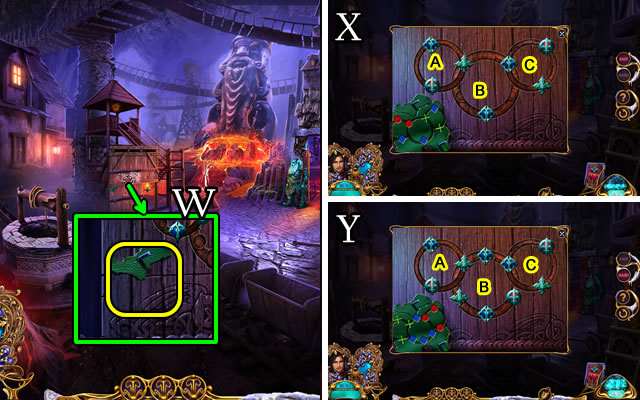
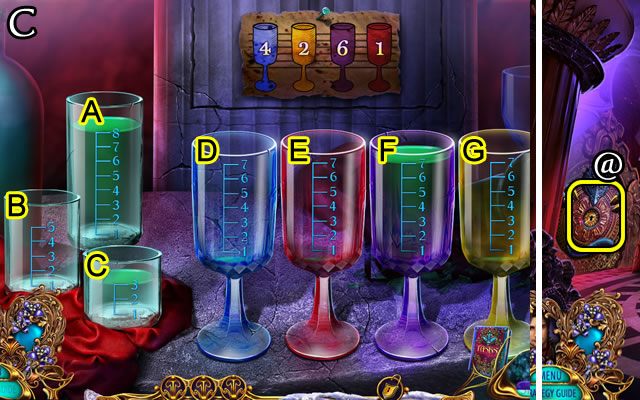
- Use 2/2 PAINTED TILES (W).
- Easy solution (X). B-E-A-C-A.
- Hard solution (X). A-G-C-A-E-C-F-G-E-F-G-F-D-E-F.
- Take SLINGSHOT; pull lever.
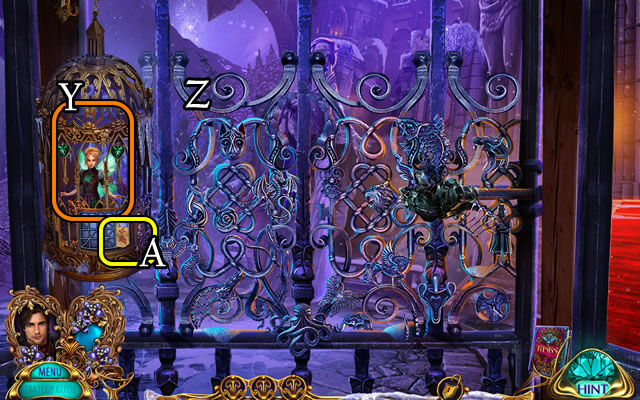
- Speak (Y) to trigger HOP (Z); receive HINT PART.
- Place HINT PART (A).
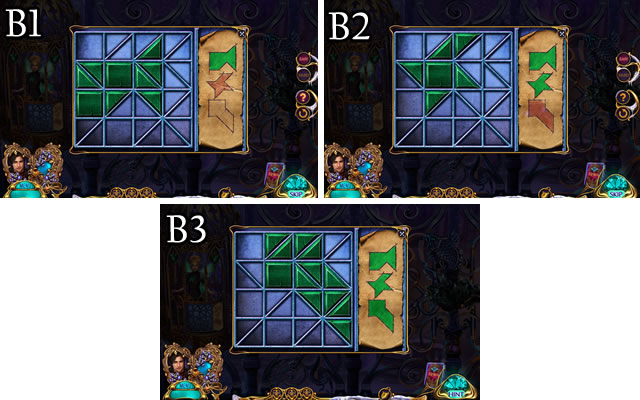
- Easy solution (B1-B3).
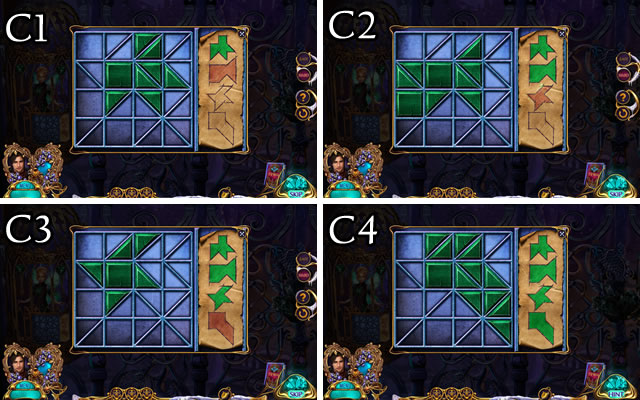
- Hard solution (C1-C4).
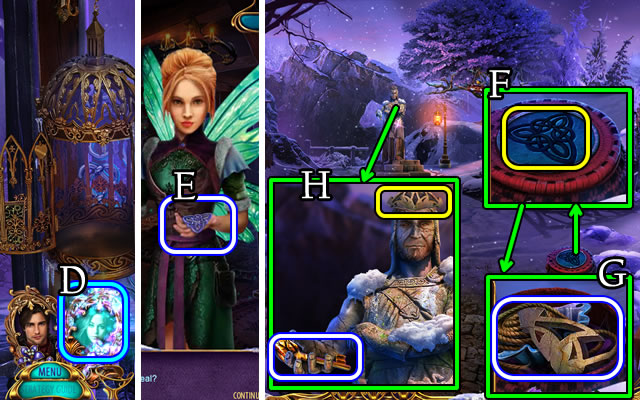
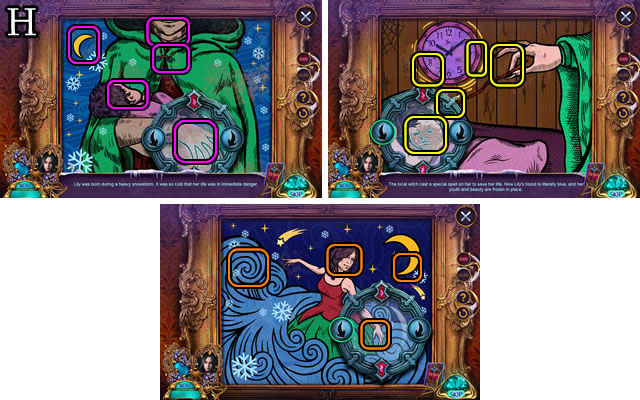
- Select Lily Amulet (D).
- Take MAGIC AMULET (E).
- Go forward.
- Place MAGIC AMULET (F); take 2/2 STONE CROWN, ROPE and BAKING DISH (G).
- Place 2/2 STONE CROWN; take CUPBOARD KEY (H).
- Go down.
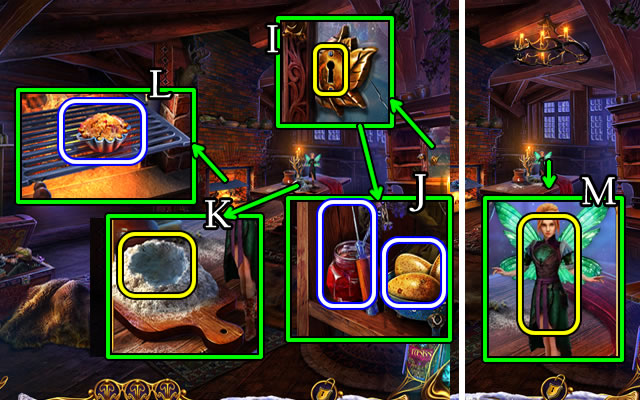
- Use CUPBOARD KEY (I); take AWL, JAM and 3/3 EGGS (J).
- Use 3/3 EGGS (K); take DOUGH.
- DOUGH and JAM on BAKING DISH for PREPARED PIE.
- Place PREPARED PIE; use FAN; take PIE (L).
- Give PIE (M).
- Go forward.
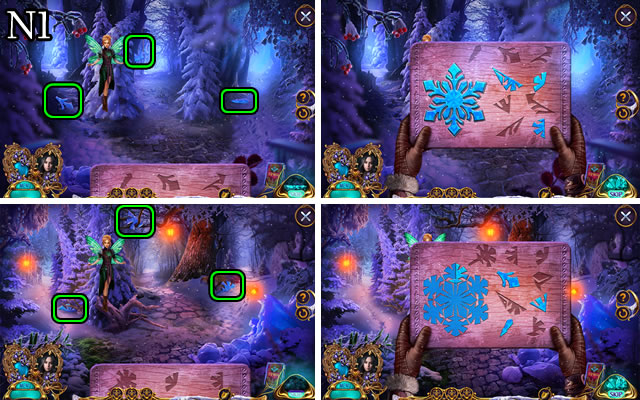
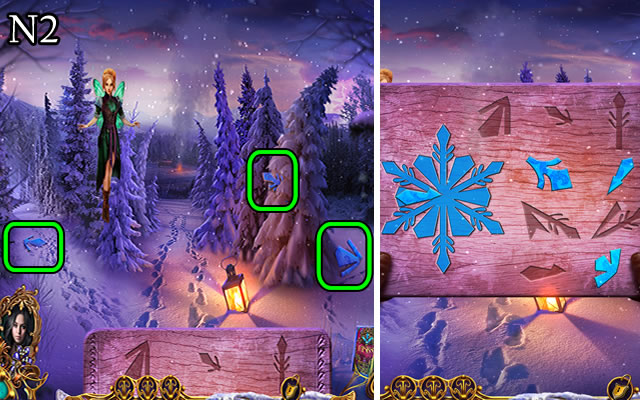
- Solution (N1-N2).
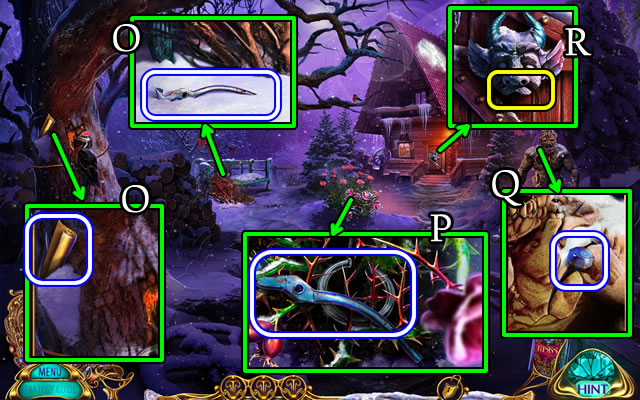
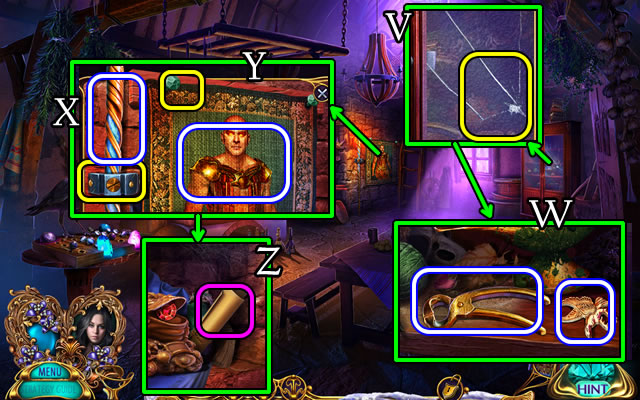
- Take 1/3 PAGES; PINCERS PART (O).
- ROPE on MAGNET for MAGNET ON A ROPE.
- Take BROKEN PINCERS; use MAGNET ON A ROPE for METAL RING (P).
- Use AWL for BOLT (Q).
- Use METAL RING (R).
- Go forward.
- Interact with character
- PINCERS PART, BOLT on BROKEN PINCERS for PINCERS.
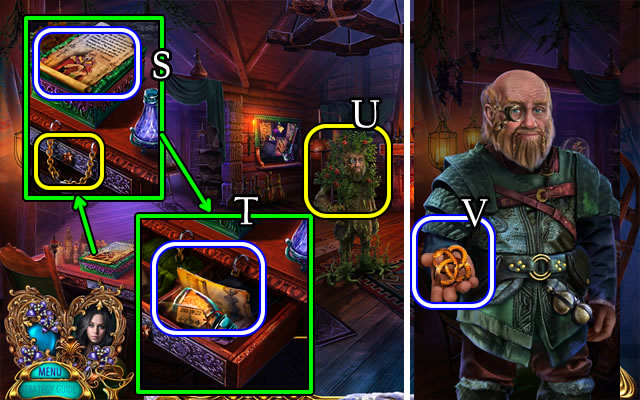
- Take note; Use PINCERS (S); take REVERSING POTION, 2/3 PAGES and SCOOP (T).
- Give REVERSING POTION (U).
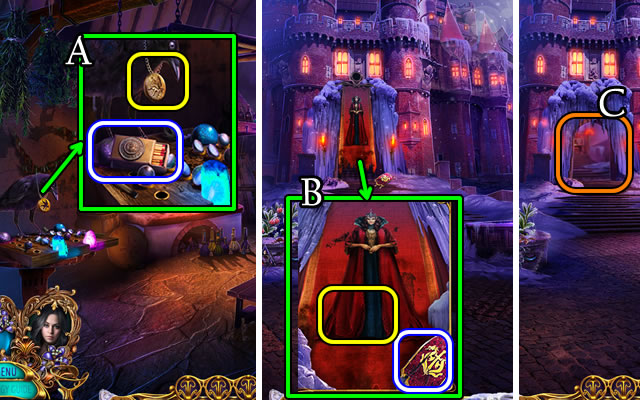
- Take BOOK INLAY (V).
- Use BOOK INLAY (W); take 3/3 PAGES, BUTTERFLY WINGS and WHISTLE (X).
- Take EMPTY SCEPTER. Place 3/3 PAGES (Y).
- Play HOP (Z) for TORN POTION RECIPE.
- Go down.
- Use WHISTLE (A); take DULL SICKLE and ARBOREAL SAP (B).
- Go forward.
- Open, place BUTTERFLY WINGS, TORN POTION RECIPE and ARBOREAL SAP (C).
- Solution (1-6).
- Take ANTI-OBSIDIAN CONCOCTION (D).
- ANTI-OBSIDIAN CONCOCTION in EMPTY SCEPTER for ANTI-OBSIDIAN SCEPTER.
- Give ANTI-OBSIDIAN SCEPTER (E).
- Select William Amulet; receive ANTI-OBSIDIAN SCEPTER.
- Use ANTI-OBSIDIAN SCEPTER(F).
- Take BUNDLE (G).
- Go down.
- BUNDLE for ROYAL CROWN, ELASTIC and note.
- Use ROYAL CROWN (H).
- Easy solution (I). T-S-Ex2-Qx2-C-S-F-N-Ox2-A-K.
- Hard solution (J). Tx2-C-O-Tx2-C-N-L-Kx2-E.
- Take LANCEYA AMULET.
- Go forward.
Chapter 2: Castle
- Use LANCEYA AMULET (K).
- Easy solution (L). (A-E)-(F-C)-(E-A)-(B-E)-(A-D)-(L-I)-(J-G)-(K-H).
- Hard solution (M). (A-C)-(L-E)-(J-I)-(F-J)-(B-G)-(K-D)-(J-H).
- Take TORCH.
- FIBER on TORCH.
- Place TORCH for BURNING TORCH (N).
- Use BURNING TORCH (O).
- Take 1/2 GEMSTONE RINGS and NEEDLE AND THREAD; RUSTED KNIFE (P).
- WHETSTONE on RUSTED KNIFE for KNIFE.
- Use KNIFE (Q); take ROCK (R).
- ELASTIC and ROCK on SLINGSHOT.
- Use SLINGSHOT for LONG HOOK (S).
- Use LONG HOOK for SHACKLES KEY (T).
- Use SHACKLES KEY (U); take CORKSCREW and DUSTER (V).
- Use DUSTER for HOP (W); receive COMBINATION.
- Place COMBINATION (X).
- Easy solution (Y). 1-2-C-4-B-2x2-A-1x2-3-D-4-3-C-3x3-1x2-D-1-4-C-1x2.
- A-1-2x3-A-2-A-1x3-2x3-A-1x3-2-3x3-4x2-C-4-C-4x3-C-4x3-C-3x3-C-3-C.
- Hard solution (Y). 1-2-D-2x2-A-1x3-2x3-A-1-3x3-D-4x3-C-1x2-3x3-D-3-C-4x3-3x2-C-2.
- A-2x3-A-2-A-1-3-D-3x2-D-3x2-D-3-D-3-D-3x3-D-3x2-A-1x3-A-1-A-C-4-3-C-4x3-3x3-C-4-3.
- Take BROKEN LADDER; 1/3 RODS (Z).
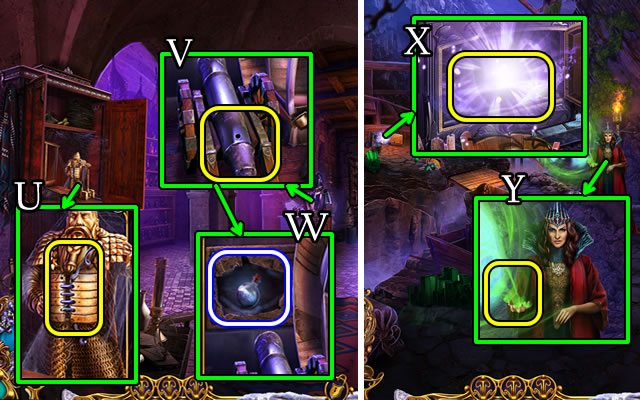
- Use CORKSCREW (A); take 2/3 RODS, 2/2 GEMSTONE RINGS and LION'S CROWN (B).
- Take ROYAL ORB; place 2/2 GEMSTONE RINGS; take 3/3 RODS (C).
- 3/3 RODS on BROKEN LADDER for LADDER.
- Place LADDER (D).
- Go forward.
- Take 1/3 DOOR AMULETS and SCRAPER; TORN GLOVE (E).
- Place LION'S CROWN (F); take HANDLE and note (G). Use ROYAL ORB (H); take 2/3 DOOR AMULETS (I).
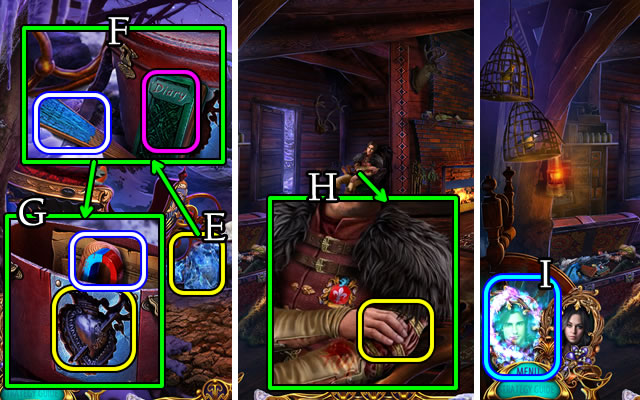
- Use HANDLE; take SCOOP and NIVELLA'S DIARY (J).
- NIVELLA'S DIARY.
- Easy solution (K). (12-4)-(1-2)-(3-7)-(6-10)-(5-9)-(8-11).
- Hard solution (K). (1-2)-(12-11)-(11-10)-(10-9)-(9-8)-(8-7)-(7-6)-(6-5)-(5-4)-(5-6)-(6-7)-(7-8)-(8-9)-(9-10).
- (10-11)-(11-12)-(8-9)-(9-10)-(10-11)-(7-6)-(6-5)-(5-4)-(4-3)-(5-4)-(8-7)-( 7-6)-(6-5)-(9-8)-(8-7)-(7-6)-(9-10)-(8-9).
- Take LION'S EYE.
- Go down.
- Place LION'S EYE; take 3/3 DOOR AMULETS (L).
- Place 3/3 DOOR AMULETS (M).
- Enter Underground Passage.
- Take TELAMON FIGURINE (N).
- Use SCOOP; take COMBINATION PART (O).
- Use TELAMON FIGURINE; take 1/2 FLAGS (P).
- Use SCRAPER; take 1/2 MEDALLION TILES (Q).
- NEEDLE AND THREAD on TORN GLOVE for GLOVE.
- Take TOY MOUSE; use GLOVE (R); tale 2/2 MEDALLION TILES (S).
- Return to Library.
- Place COMBINATION PART (T).
- Easy solution (U). M-P-Q-K-C-F-I-N-Q-K-C-F-I-N-Q-P-M-I-J-K-C-F-I-E-B-A-D-I-H-G-O-L-I-H-G.
- Hard solution (V). D-A-B-E-I-N-Q-K-C-F-I-J-K-C-F-I-H-G-O-L-I-H-G-O-P-M.
- Take ACID.
- Go down.
- Use ACID (W); receive CLOSED MEDALLION; take 1/2 CRYSTALS (X).
- Return to Library.
- MEDALLION TILES on opened CLOSED MEDALLION.
- Easy solution (Y). Ax2-Dx3-Gx3-Fx2-Ex5-Bx5-Cx4.
- Hard solution (Z). (C-F)-(C-G)-(C-D)-(C-B)-(C-E)-(C-A).
- Take GEAR.
- Use GEAR (A) for HOP (B); receive VIAL AND INGREDIENTS LIST.
- Return to Underground Passage.
- Give VIAL AND INGREDIENTS LIST (C).
- Select Lily Amulet; take VIAL AND INGREDIENTS LIST (D).
- Take GRINDSTONE and OILER (E).
- Use OILER; take GOLEM'S HEART (F).
- Go down.
- GRIND STONE on DULL SICKLE for SICKLE.
- Use SICKLE; take MAKESHIFT BROOM (G).
- Use SCOOP; take BRUSH and 1/2 BASEMENT KEYS (H).
- Place GOLEM'S HEART; take note and EMBELLISHING POTION (I).
- Go forward.
- Use EMBELLISHING POTION; take 2/2 BASEMENT KEYS and CARVING FORK (J).
- Use 2/2 BASEMENT KEYS (K).
- Go forward.
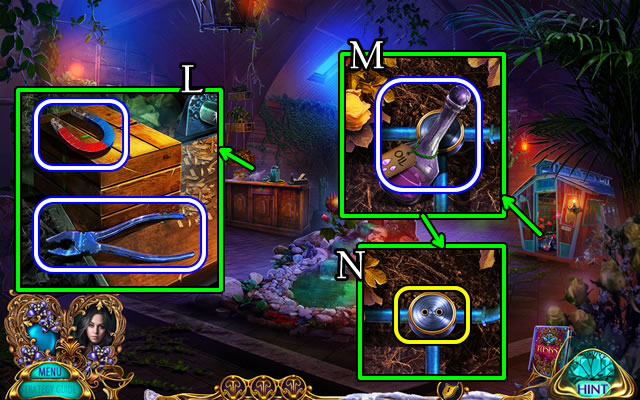
- Use MAKESHIFT BROOM; take MAGNET and PLIERS (L).
- Take ROSE OIL (M).
- Use CARVING FORK (N).
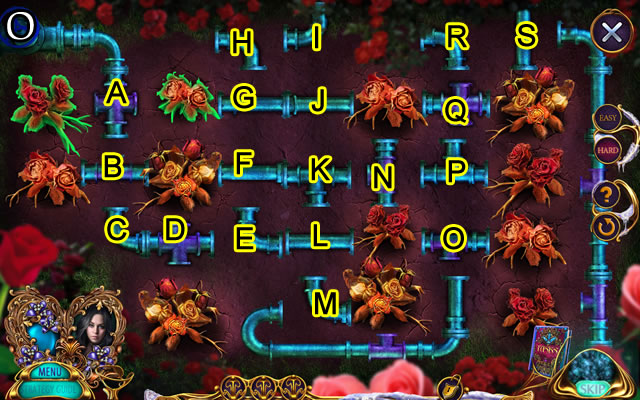
- Easy solution (O). P-Q-Rx3-P-O-N-Mx3-L-Ex3-Hx3-B-J-Kx3-Ix2-Mx3-F-A-Ex3-I-G-NX2.
- Hard solution (O). N-Kx2-Q-Px2-S-Rx3-Cx3-R-B-Ex3-D-F-Hx3-J-Q-Px3-R-S-Mx2-L-Mx3-F-S-Ix2-G-Cx2-Rx2-O-Nx2-Kx2.
- Take WINDMILL BLADES.
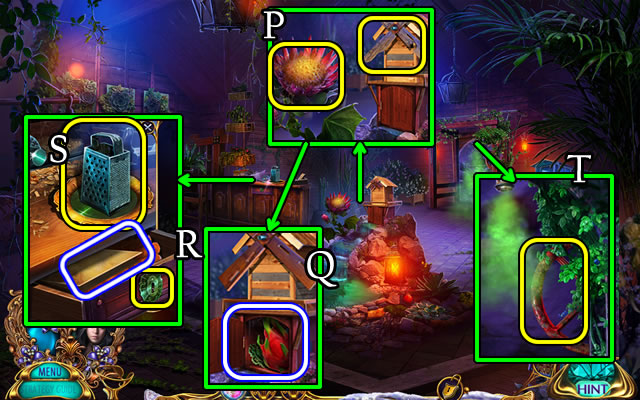
- Use BRUSH for GATHERED POLLEN; replace WINDMILL BLADES (P).
- Take DRAGON FRUIT and LOCKPICK (Q).
- Use LOCKPICK; take note, CANDLE and RUBBER GLOVE (R).
- Use DRAGON FRUIT (S); take GRATED DRAGON FRUIT.
- Use RUBBER GLOVE (T).
- Go forward.
- Use PLIERS; take PIKE POLE and FLINT AND STEEL (U).
- Take 1/2 BARN HANDLE (V).
- FLINT AND STEEL on CANDLE for LIT CANDLE.
- Use LIT CANDLE (W).
- Go forward.
- Take HONEY JAR (X).
- Use HONEY JAR for JAR OF TERMITES (Y).
- Uncover; use MAGNET for BROKEN PIGEON POST MECHANISM (Z).
- Use PIKE POLE (A); take SPRING, 2/2 BARN HANDLE and SAW BLADE (B).
- Use JAR OF TERMITES for PUZZLE PART (C).
- Go down.
- Place 2/2 BARN HANDLE (D) for HOP (E); receive LENS.
- Place LENS (F).
- Easy solution (G). Ax3-B-D-G-D-Fx2-G-E-F-Gx2-B-G-Bx2-D-Gx2-A-G-Ax2-Gx3-F-Ax2-Fx3.
- Hard solution (H). Dx3-Fx3-Bx3-Hx3-Gx3-Dx3-Bx2-Fx3-Ex2.
- Take GYROSCOPE.
- Go down.
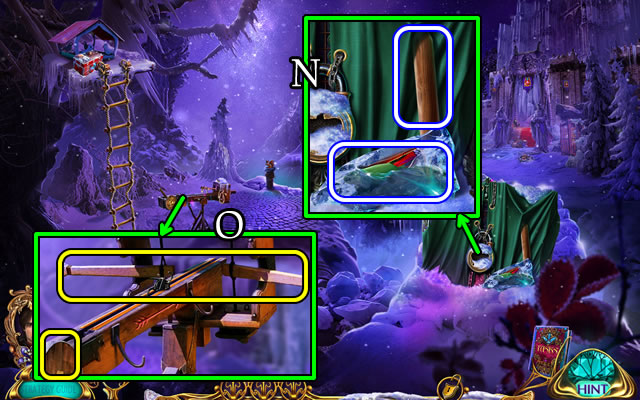
- Place SAW BLADE; take AXE HANDLE, SMALL HOOK and BROKEN RULER (I).
- Return to Outside Winterhelm Castle.
- Use SMALL HOOK; take GEAR (J).
- Go down.
- ROSE OIL, GRATED DRAGON FRUIT and GATHERED POLLEN on VIAL AND INGREDIENTS LIST for REVERSING POTION.
- SPRING, GYROSCOPE and GEAR on BROKEN PIGEON POST MECHANISM for PIGEON POST MECHANISM.
- Place POST PIGEON MECHANISM (K) and REVERSING POTION (L).
- Select William Amulet; receive REVERSING POTION.
- Use REVERSING POTION (M).
- Take 2/2 CRYSTALS (N).
- Use 2/2 CRYSTALS; take THRONE AMULET, PLIERS and STICK WITH ROPE (O).
- Go down.
- Place THRONE AMULET (P); take HOOK and BROKEN WHEEL (Q).
- Go to Library.
- STICK WITH ROPE on TOY MOUSE for CAT TOY.
- Use CAT TOY (R); take ROPE WITH NEEDLE, SIEVE, 2/2 FLAGS and note (S).
- Go down.
- Place 2/2 FLAGS (T).

- Easy solution (U). (3-A)-(2-I)-(1-H)-(13-1)-(10-2)-(11-B)-(12-C)-(14-12)-(15-E)-(H-15)-(E-14)-(6-11).
- (5-10)-(4-D)-(9-4)-(8-5)-(7-6)-(14-7)-(I-8)-(D-I)-(C-9)-(B-14)-(A-13)-(2-A)-(I-2)-(6-3)-(10-B)-(11-6)-(B-11)-(A-10).
- Hard solution (V). (6-H)-(5-G)-(4-F)-(3-4)-(2-5)-(1-6)-(F-1)-(G-2)-(H-3)-(9-B)-(8-C)-(10-H)-(11-G)-(12-F)-(C-12).
- (B-11)-(6-B)-(F-6)-(G-B)-(H-10)-(7-D)-(6-7)-(13-6)-(14-E)-(15-8)-(E-9)-(D-H)-(C-15)-(6-14)-(5-13)-(B-G)-(4-F)-(3-4).
- (10-3)-(11-5)-(12-6)-(3-12)-(2-11)-(F-10)-(13-2)-(G-3)-(10-B)-(H-13)-(9-10)-B-9)-(3-H)-2-G)-(13-2)-(14-3)-(G-3)-(H-14)-(9-13)-(E-9).
- Take CROWBAR.
- Return to Underground Passage.
- Use HOOK (W); take SPOKES (X).
- Use CROWBAR; receive METAL HOOP (Y).
- SPOKES and METAL HOOP on BROKEN WHEEL for MINECART WHEEL.
- Use MINECART WHEEL (Z).
Chapter 3: Underground City
- Take LEATHER BELT; use PLIERS receive BROKEN CROSSBOW (A).
- Uncover; take TORN NET (B).
- Use SIEVE; take NUT and STONE PIECE (C).
- ROPE WITH NEEDLE on TORN NET for NET.
- Use NET (D).
- Go forward.
- Place STONE PIECE (E).
- Easy solution (F). A-Bx5-A-Bx3-A-B-A-B-A-Bx3-A.
- Hard solution (F). A-Bx2-A-Bx2-A-B-A-Bx4-A-Bx4-A.

- Play HOP (G); receive VALVE HANDLE.
- Take BUCKET and note (H).
- Use LEATHER BELT for SPEARHEAD (I).
- Use VALVE HANDLE and NUT; take ADJUSTABLE WRENCH (J).
- Use BUCKET for BUCKET OF WATER (K).
- Go down.
- Use BUCKET OF WATER (L); take DWARVEN AMULET (M).
- Go forward.
- Place DWARVEN AMULET (N).
- Go forward.
- Use SPEARHEAD (O); receive LUTHER'S CROWN.
- Take ARROW (P).
- Use ADJUSTABLE WRENCH (Q); take note, ROPE and HAMMER AMULET (R).
- Use HAMMER AMULET (S); take COMBINATION (T).
- ROPE and ARROW on BROKEN CROSSBOW for LOADED CROSSBOW.
- Use LOADED CROSSBOW (U); open, take 1/3 LAVA FOUNTAIN AMULET, SCOOP and HAMMER (V).
- Go down 2x.
- Place COMBINATION (W).
- Easy solution (X). Cx2-Bx2-A-C-Bx2-A.
- Hard solution (Y). A-B-A-Bx4-C-Bx4.
- Take FIRE BERRIES and WELL HANDLE.
- Place, select WELL HANDLE; take 1/2 RUNES and DRAGON CLAW (Z).
- Go forward.
- Use FIRE BERRIES; take SALAMANDER (A).
- Go forward.
- Use DRAGON CLAW; take 2/3 LAVA FOUNTAIN AMULET and NAILS(B).
- Go down 2x.
- Use NAILS and HAMMER (C); take NAIL SCISSORS and 3/3 LAVA FOUNTAIN AMULET (D).
- Go forward 2x.
- Use 3/3 LAVA FOUNTAIN AMULETS; place LUTHER'S CROWN (E).
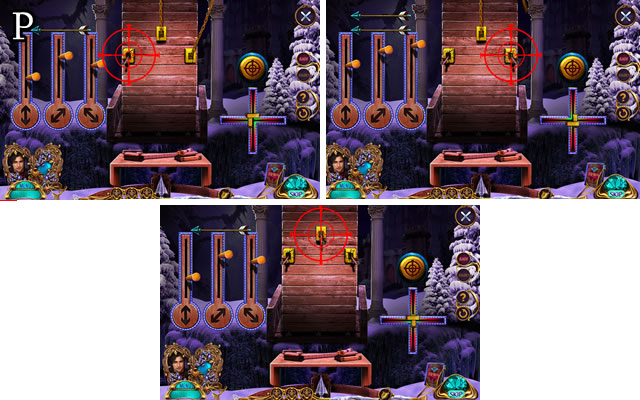
- Easy solution (F). Bx2-A-B-Dx3-Cx2-Dx3-Fx5.
- Hard solution (G). Bx2-Ax2-Bx2-D-Cx2-D-F-Ex2-F-Ex2-F-Ex2-F.
- Select Lily Amulet; receive INVISIBILITY CLOAK.
Chapter 4: Saving Grace
- INVISIBILITY CLOAK; take LIGHTER and note.
- Go forward.
- Use LIGHTER (H); place PUZZLE PART (I).
- Easy solution (J). D-C-B-H-Ax2-H-I-H-B-C-D-H-Ex5.
- Hard solution (K). H-F-H-I-H-Ex2-Cx4-J-H-F-G-H-B-A.
- Take BROKEN AXE, MUSHROOMS and COIN.
- Give MUSHROOMS (L).
- Use INVISIBILITY CLOAK (M).
- Take HEAVY BOOT, BOLT and note (N).
- BOLT on BROKEN RULER for LONG RULER.
- Use LONG RULER (O).
- Take FORK and QUADRIL (P).
- AXE HANDLE on BROKEN AXE for AXE.
- Use AXE (Q) for HOP (R); receive QUILL.
- Take FABRIC (S).
- Use QUADRIL and QUILL (T); take, use key (U).
- Go forward.
- Use HEAVY BOOT (V); take NIPPERS and RAVEN EMBLEM (W).
- Use COIN; receive STAFF (X).
- Use FORK, receive TAPESTRY (Y); take note (Z).
- Place RAVEN EMBLEM; take MATCHES (A).
- Go down.
- Take TORN FLAG; use MATCHES (B).
- Go (C).
- Take UNFINISHED BOWL (D); use STAFF; take 1/2 PIPE ORGAN KEY (E).
- Take 1/2 SKULL GEM (F).
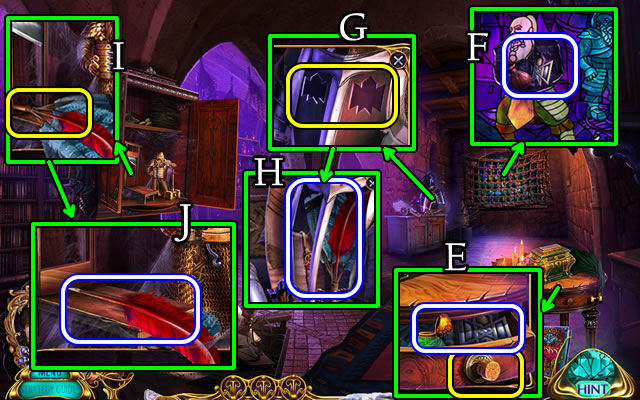
- Take CARVING KNIFE; use NIPPERS, take PALETTE, BRUSH AND LENS (G).
- Use PALETTE, BRUSH AND LENS (@).
- Easy and hard solutions (H).
- Take MEMORY ELIXIR.
- Go down.
- TAPESTRY and TORN FLAG on FABRIC for CLOTH ROPE.
- Use CLOTH ROPE (I); receive COLORFUL TRIANGLE.
- Place COLORFUL TRIANGLE (J).
- Easy solution (K). (1-3)-(3-5x2)-(4-5).
- Hard solution (K). (1-3)-(3-5)-(3-4)-(2-3)-(4-5)-(4-2)-(2-3)-(3-4)-(4-5)(4-3)-(3-5)-(4-1)-(1-2)-(3-4).
- (2-4)-(1-4)(1-3)-(3-4)-(3-2)-(1-3)-(1-4)-(1-2)-(1-3)-(3-4)-(2-4)-(3-5)-(2-5)-(2-5).
- Take MORTAR AND PESTLE WITH RECIPE and TWEEZERS.
- CARVING KNIFE on UNFINISHED BOWL for BOWL.
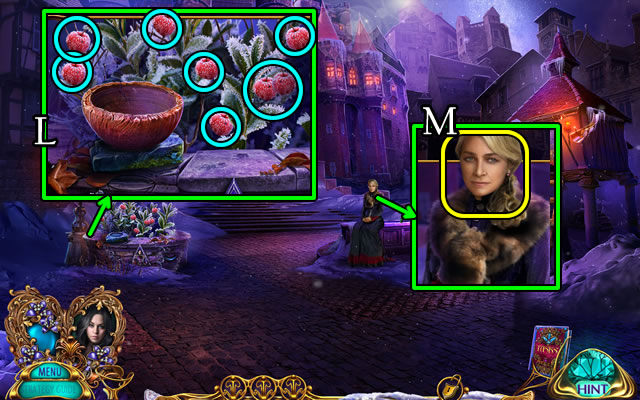
- Place BOWL; take 8/8 berries for WINTER CHERRIES (L).
- WINTER CHERRIES and MEMORY ELIXIR on MORTAR AND PESTLE WITH RECIPE for MEMORY POTION.
- Give MEMORY POTION (M); receive GRACE'S MEDALLION.
- Return to Witch's Hut.
- Use TWEEZERS for 2/2 SKULL GEM (N).
- Place 2/2 SKULL GEMS; take 2/2 PIPE ORGAN KEY and DYNAMITE (O).
- Return to Winterhelm Castle.
- Place 2/2 PIPE ORGAN KEYS; take CHEST KEY (P).
- Use CHEST KEY; take FROZEN GOBLET and BAG OF SALT (Q).
- Return to Witch's Hut.
- Place FROZEN GOBLET; take CHISEL, GLASS PUZZLE PART and CRYSTAL RING (R).
- Place GLASS PUZZLE PART (S).
- Easy solution (T). (10-15)-(11-16)-(14-12)-(5-11)-(9-3)-(8-4)-(7-5)-(13-14)-(2-13)-(5-6)-(2-6).
- Hard solution (U). (6-15)-(12-16)-(7-12)-(11-4)-(5-10)-(13-2)-(8-7)-(9-3).
- Play HOP (V); receive DRY SPONGE.
- Place DRY SPONGE for WET SPONGE (W).
- Use WET SPONGE (X).
- Select William Amulet; take GREEN FLAME RECIPE (Y).
Chapter 5: Dwarven Forge
- GREEN FLAME RECIPE for LOCKPICK.
- Use LOCKPICK (Z); take FARDEL (A).
- FARDEL for GREEN LIQUID and GLASS SYRINGE.
- Go down.
- Use GREEN LIQUID; take GREEN FUEL and 2/2 RUNES (B).
- Go forward.
- Use 2/2 RUNES (C); take CROOKED BRANCH; use SCOOP for GREEN ASHES (D).
- GREEN ASHES, SALAMANDER and GREEN FUEL on GREEN FLAME RECIPE for GREEN FLAME.
- Use GREEN FLAME (E).

- Easy solution (F). 12-19-20-25-26-27-21-15-14-13-7-1-2-3-4-5-10-17-23-29.
- Hard solution (G). 12-19-20-25-26-27-28-22-21-15-14-13-7-1-2-3-4-9-10-11-18-24.
- Go forward.
- Take WEIGHT (H).
- Use WEIGHT; take note and CORK; use GLASS SYRINGE for ACID (I).
- Use ACID (J); take SCARF; use CROOKED BRANCH for BOOK COVER INLAY (K).
- Place BOOK COVER INLAY (L); take BROKEN PENCIL; use NAIL SCISSORS for TOY HAMMER (M).

- Place TOY HAMMER (N).
- Go (O).
- Select Lily Amulet; take DECORATIVE FLAME (P).
- Place DECORATIVE FLAME (Q).
- Go forward.
- Take SHINING CRYSTAL (R).
- Use SHINING CRYSTAL (S).
- Easy solution (T). (18-8)-(22-14)-(10-17)-(7-10)-(14-5)-(17-24)-(10-14)-(3-12)-(5-1)-(14-8)-(22-13)-(12-24)-(8-17)-(13-11).
- Hard solution (U). (16-21)-(9-17)-(3-15)-(7-1)-(16-9)-(15-21)-(18-5)-(8-15)-(5-1)-(9-11)-(19-13).
- (22-12)-(15-24)-(17-21)-(10-17)-(4-15)-(7-1)-(15-9)-(19-5)-(18-21)-(8-17)-(5-1)-(16-5).
- Play HOP (V); receive TREE ORNAMENT.
- Place TREE ORNAMENT (W).
- Go forward.
- Use CRYSTAL RING (X); take CHESS KNIGHT, OILER and MALLET (Y).
- Use CHISEL and MALLET (Z); take CHESS KING and CAT'S EYE (A).
- Place CAT'S EYE; take COMB (B).
- Go down.
- Use BAG OF SALT; take LADLE (C).
- Go forward.
- Use LADLE for WATER (D).
- Use WATER (E); take FIERY FLOWER (F).
- Use DYNAMITE and FIERY FLOWER (G).
- Go forward.
- Use OILER (H); take MAGNET (I).
- Use MAGNET; receive METAL HANGER (J).
- Use COMB (K); take 1/2 PORTRAIT FRAGMENT; take 2/2 PORTRAIT FRAGMENT (L).
- Place 2/2 PORTRAIT FRAGMENTS (M); take CANE (N).
- Place CHESS KNIGHT and CHESS KING (O); take EMPTY LIGHTER and YARN (P).
- Go down.
- YARN on METAL HANGER for HOOK ON A ROPE.
- Use HOOK ON A ROPE (Q).
- Easy solution (R). (1-2)-(2-3)-(2-4)-(7-8)-(8-12)-(8-10)-(9-11)-(6-5).
- Hard solution (S). (8-10)-(8-12)-(5-3)-(4-2)-(1-5)-(8-11)-(11-7)-(5-3)-(11-9)-(8-12)-(3-6)-(3-5).
- Take NIVELLA'S BUST.

- Place NIVELLA'S BUST; take COTTON and note (T).
- Go down.
- Use CANE (U); take IVY EMBLEM (V).
- Go forward.
- Place IVY EMBLEM (W); take WICK (X).
- Go forward.
- Use COTTON for FUEL-SOAKED COTTON (Y).
- WICK and FUEL-SOAKED COTTON on EMPTY LIGHTER for LIGHTER.
- Use LIGHTER; take COMBINATION (Z).
- Place COMBINATION (A).

- Easy solution (S1-S2). Clockwise 4-5; counter-clockwise 5-2-1-1.
- Hard solution (T1-T2). Clockwise 3-4-5; counter-clockwise 5-2-1-1-6.
- Play HOP (U); receive CAGE KEY.
- Go down 2x.
- Give CAGE KEY (V).
- Select William Amulet; receive CAGE KEY.
- Use CAGE KEY (W).
- Take PICKAXE; use SCARF for SHARP SHARD (Y).
- Use PICKAXE; take PENCIL SHARPENER and 1/2 PAPER AND PENCIL (Z).
- Go down.
- BROKEN PENCIL on PENCIL SHARPENER for 2/2 PAPER AND PENCIL.
- Place 2/2 PAPER AND PENCIL for GLASSES COMBINATION (A).
- Place GLASSES COMBINATION (B).
- Easy solution (C). (F-B)-(F-E)-(C-D)-(A-D)-(D-G)-(A-D)-(B-C)-(C-E)-(G-C)-(G-F)-(B-F)-(E-B)-(C-E)-(B-E)-(B-G)-(E-B).
- Hard solution (D). (E-B)-(A-D)-(G-E)-(A-G)-(F-A)-(D-A)-(D-F)-(A-B)-(A-D)-(B-A)-(D-B)-(C-D).
- Take, then use WORKSHOP KEY (@).
- Enter Luther's Workshop.
- Use CORK; take INKWELL and 1/2 ARMOR EMBLEM (E).
- Use SHARP SHARD; take THROWING STONE and 2/2 ARMOR EMBLEM (F).
- Place 2/2 ARMOR EMBLEMS (G); take FEATHER BUNDLE and INCOMPLETE WEAPON (H).
- Place FEATHER BUNDLE (I); take QUILL (J).
- Go down.
- QUILL on INKWELL for INKWELL AND QUILL.
- Use INKWELL AND QUILL; take TWIN MIRROR INSTRUCTIONS and STAINED GLASS PIECE (K).
- Enter Luther's Workshop.
- Place STAINED GLASS PIECE (L).
- Play HOP (M) for SMALL CHEST KEY.
- Use SMALL CHEST KEY; take RING AMULET and PROTECTIVE GOGGLES (N).
- Return to Dwarven Forge.

- Place RING AMULET (O); take REVERSING SCEPTER, PLIERS and THROWING STONE (P).
- 2 THROWING STONES on INCOMPLETE WEAPON for THROWING WEAPON.
- Use THROWING WEAPON (Q); take MECHANICAL TONGS (R).
- Place PROTECTIVE GOGGLES (S); take MIRROR FRAME; use MECHANICAL TONGS for HOT COAL (T).
- Return to Luther's Workshop.
- Use PLIERS; take WICK (U).
- Use WICK and HOT COAL (V); take SILVER PAINT (W).
- Return to Dwarven Forge.
- MIRROR FRAME, SILVER PAINT and REVERSING SCEPTER on TWIN MIRROR INSTRUCTIONS for PLAIN MIRROR.
- Place PLAIN MIRROR; receive TWIN MIRROR (X).
- Give TWIN MIRROR (Y).
- Easy and hard solutions are random.
- Congratulations, you've completed Dark Romance: Winter Lily .
Created at: 2018-02-16