

Walkthrough Menu
- General Tips
- Chapter 1: Marie's Worries
- Chapter 2: Madame Roget's Will
- Chapter 3: Leblanc's Lies
- Chapter 4: The Lighthouse Keeper's Observations
- Chapter 5: The Sailor's Letter
- Chapter 6: Lola's Secret
General Tips
- This is the official guide for Dark Tales: Edgar Allan Poe's the Mystery of Marie Roget.
- This guide will not mention each time you have to zoom into a location; the screenshots will show each zoom scene.
- Hidden-object puzzles are referred to as HOPs. This guide will not show screenshots of the HOPs, but it will mention when a HOP is available and the inventory item you'll collect from it.
- This guide will give step-by-step solutions for all puzzles that are not random. Please read the instructions in the game for each puzzle.
Chapter 1: Marie's Worries
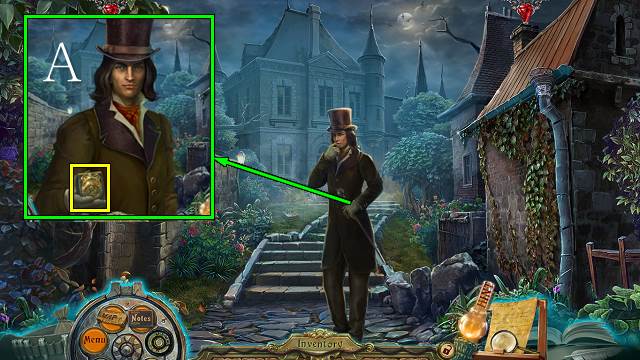
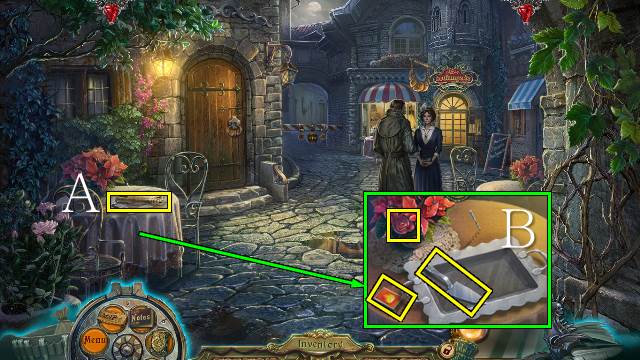
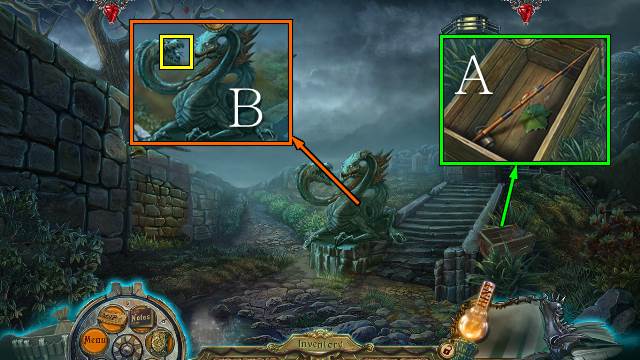
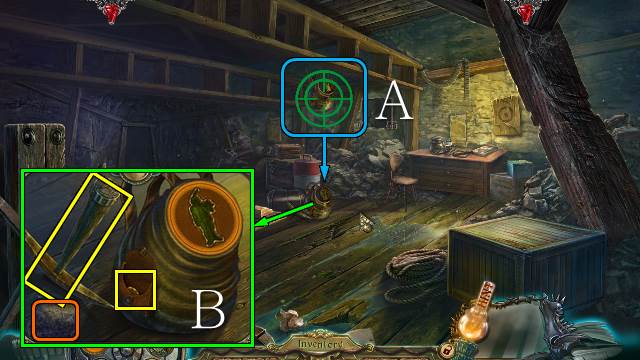
- Talk to Auguste; take your badge (A).
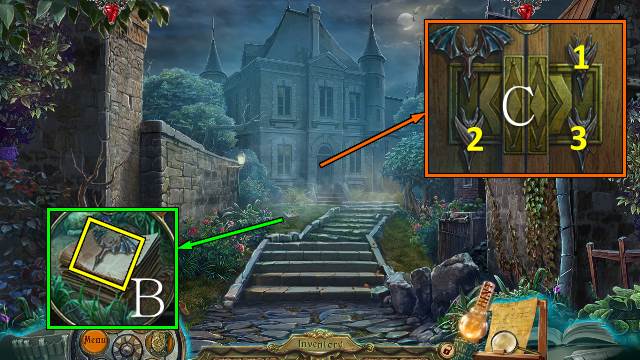
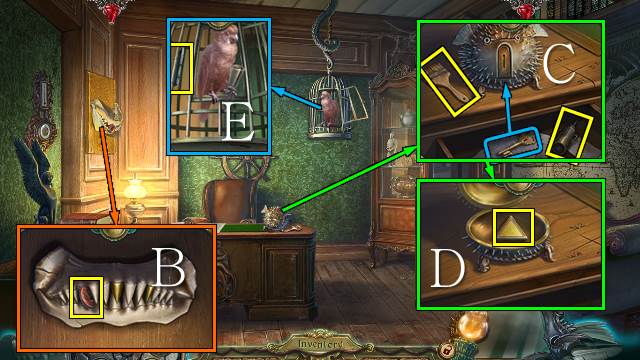
- Take the METAL BAT (B).
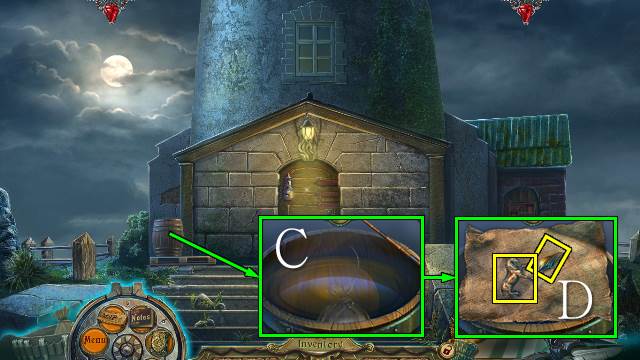
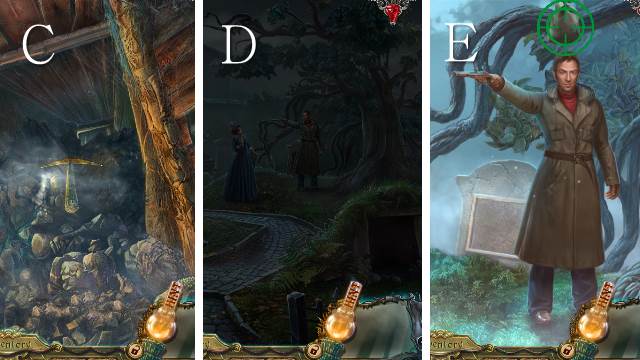
- Place the METAL BAT and select the bats in the order shown (C).
- Go forward.
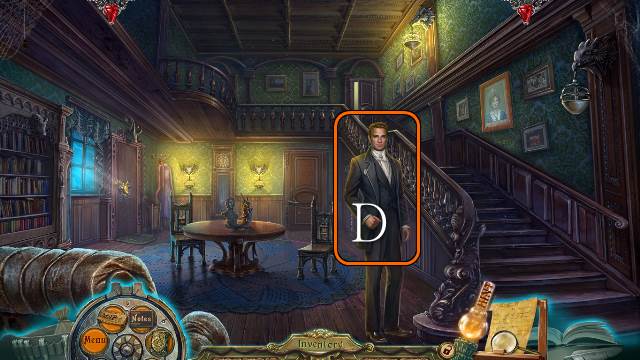
- Talk to Jacque (D).
- Go upstairs.
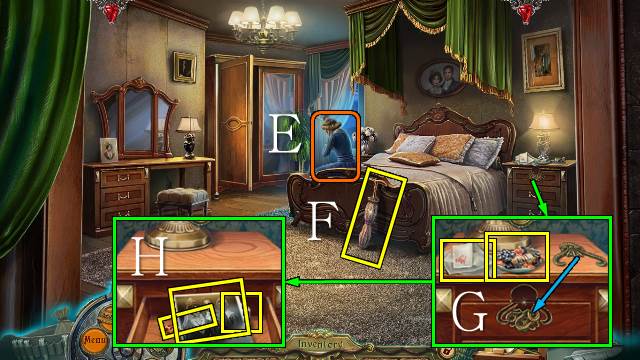
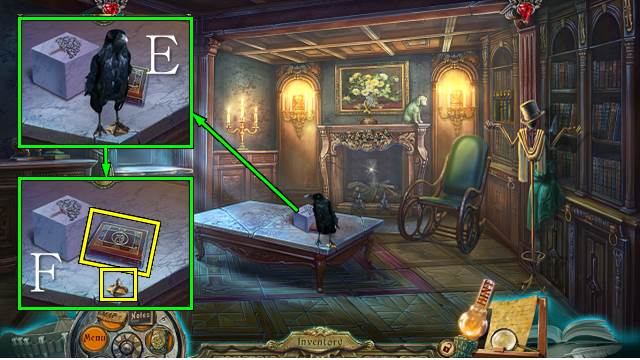
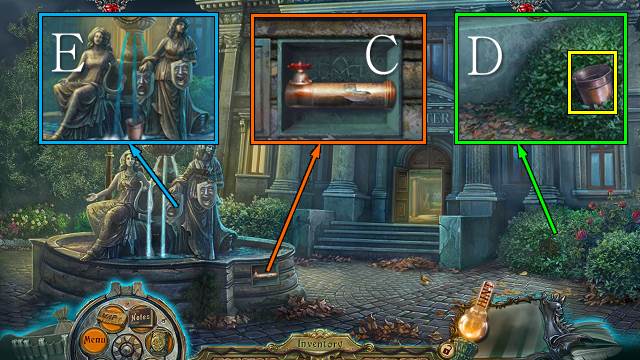
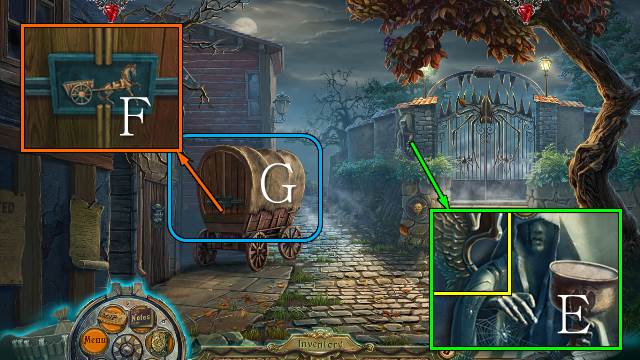
- Interact with Marie (E).
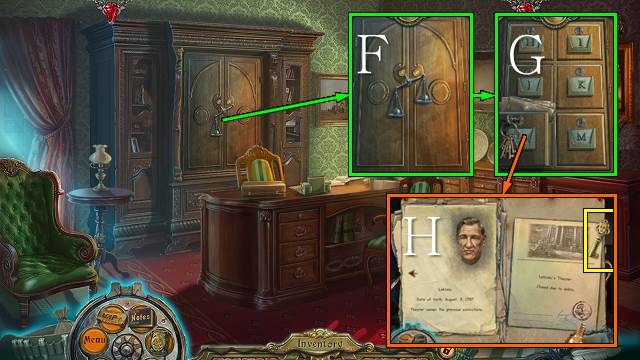
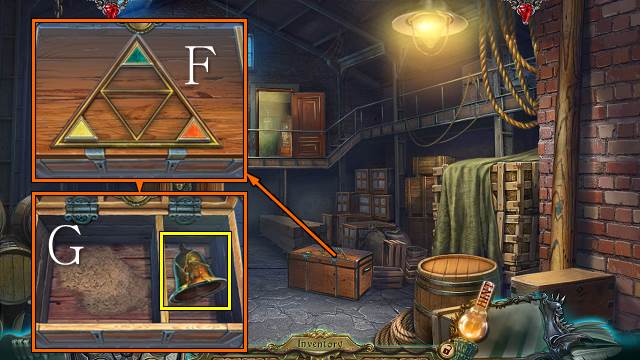
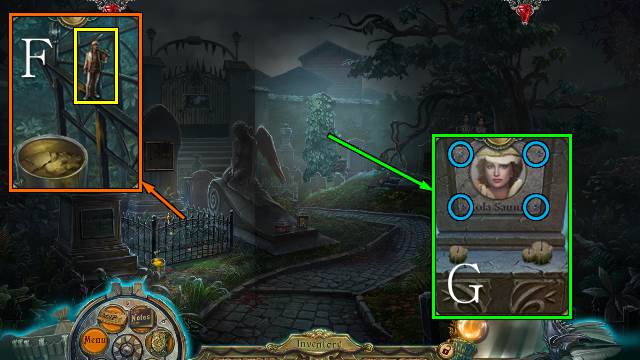
- Take the UMBRELLA (F).
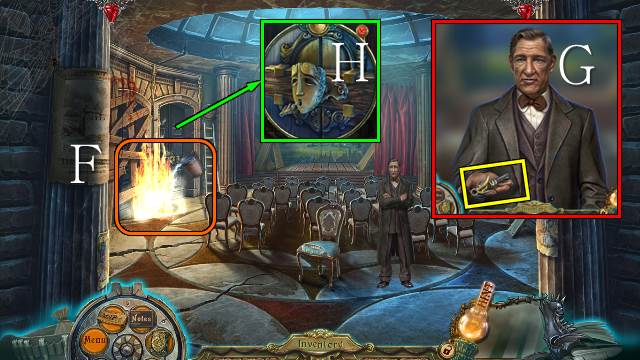
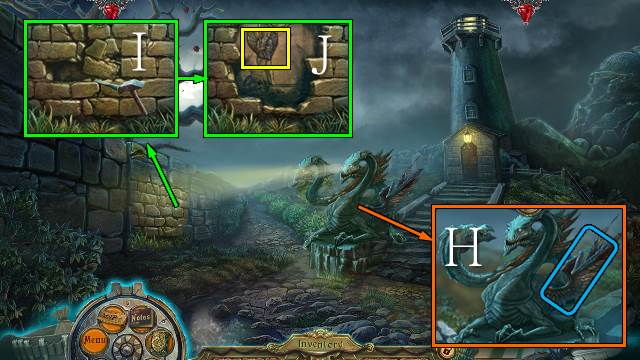
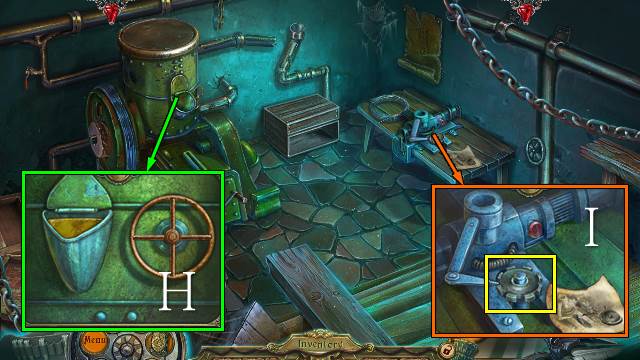
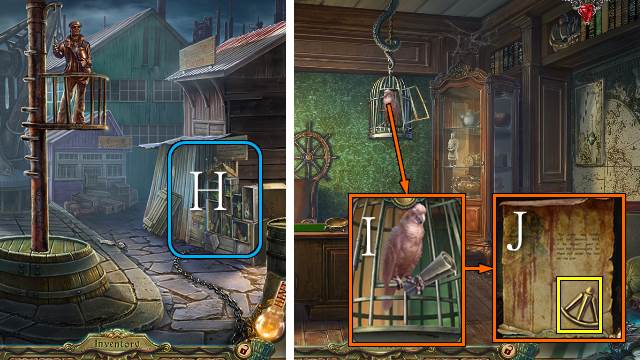
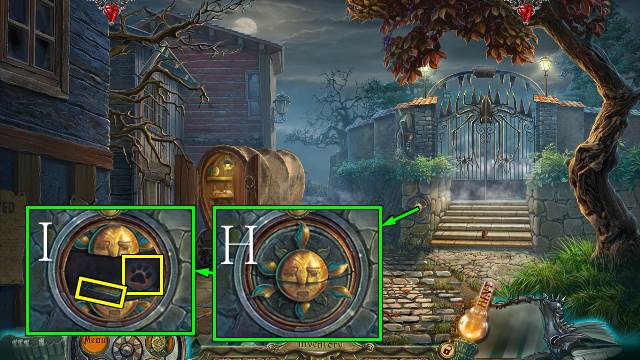
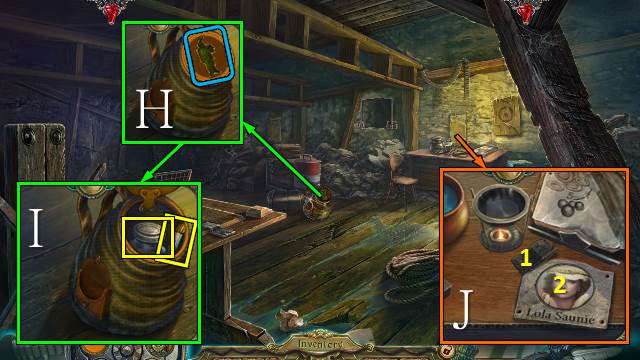
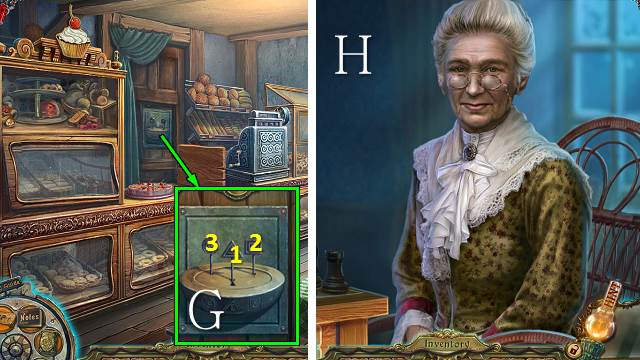
- Take the BURNT NOTE and KERCHIEF and place the handle on the drawer (G); take the photo, CREAM and CANDLE (H).
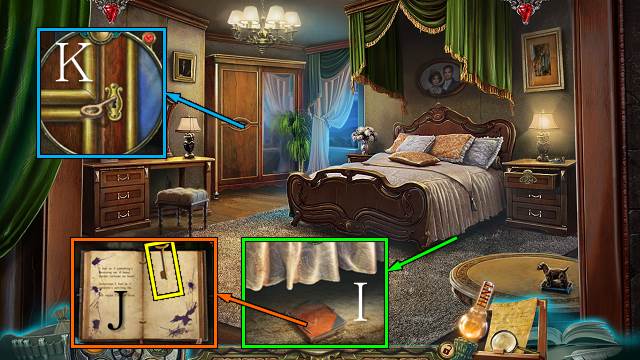
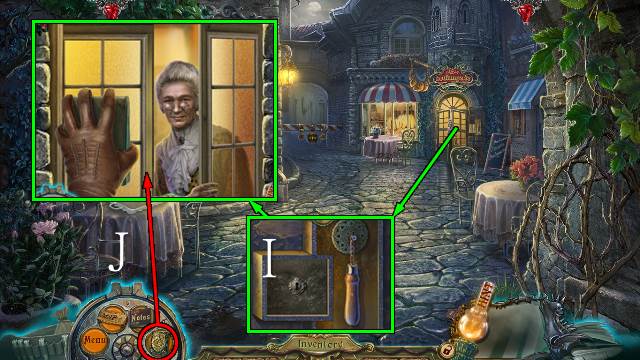
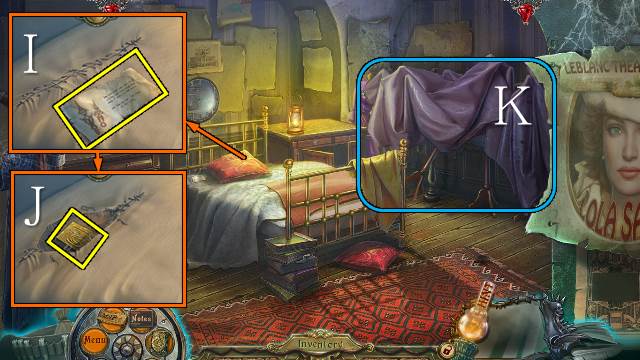
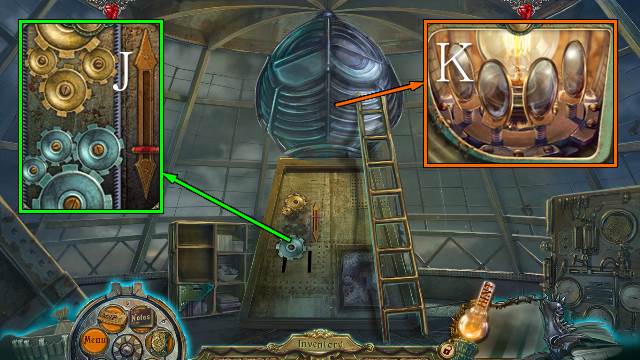
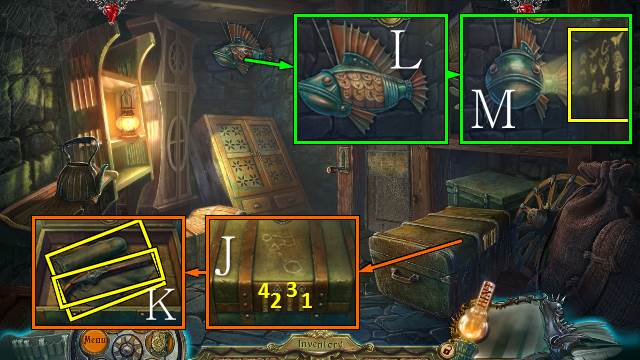
- Use the UMBRELLA (I); open the diary and take the KEY and diary (J).
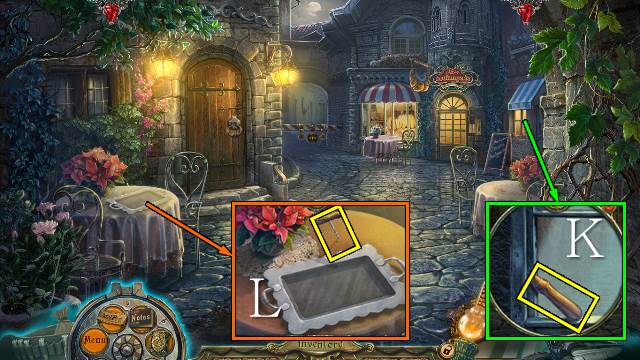
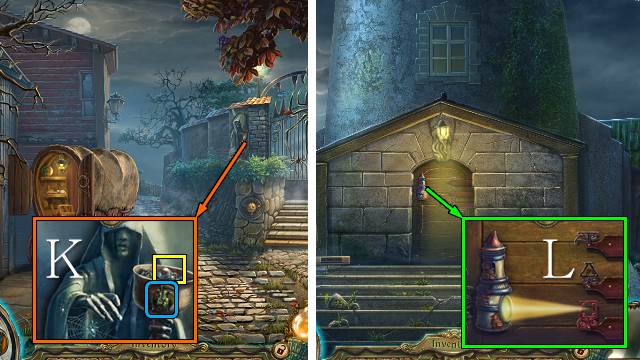
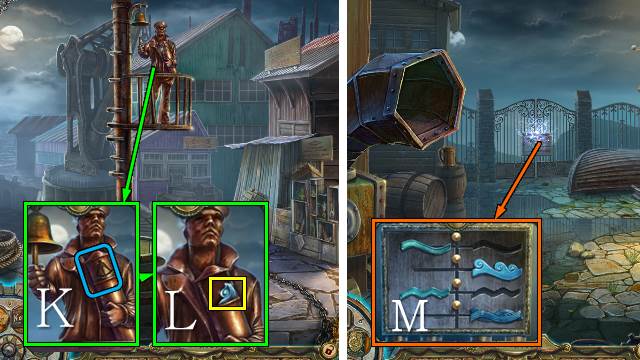
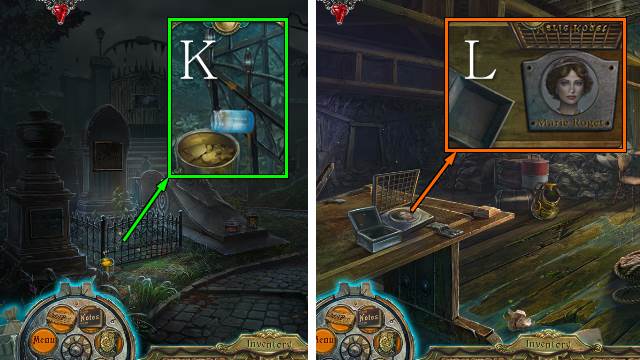
- Place and turn the KEY (K).
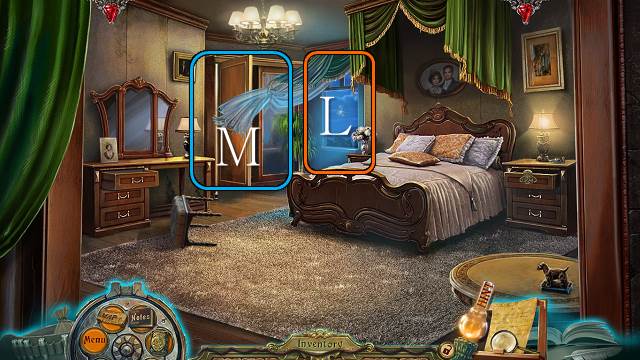
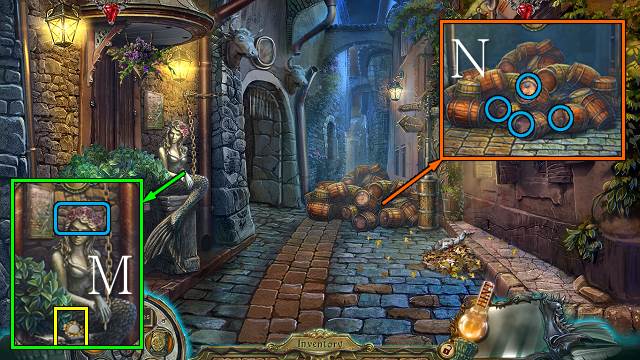
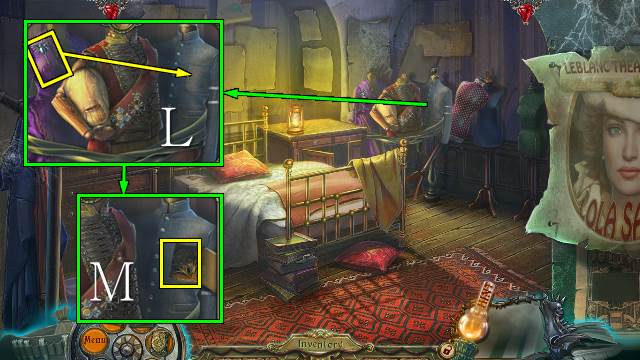
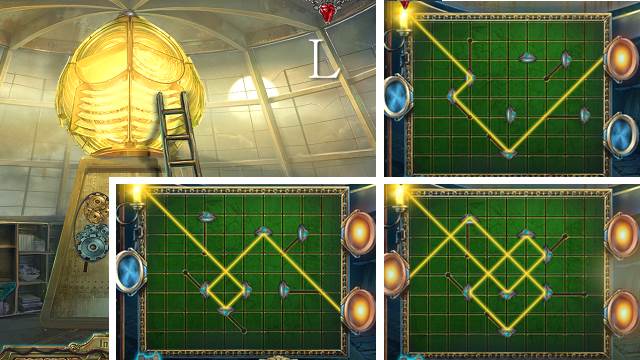
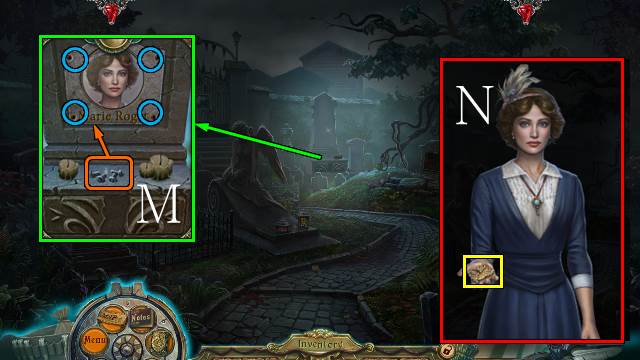
- Look out the window twice (L).
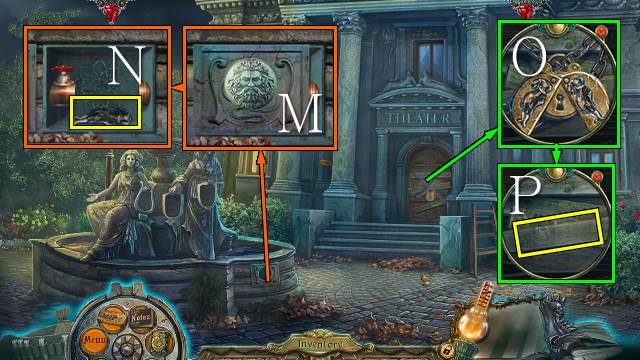
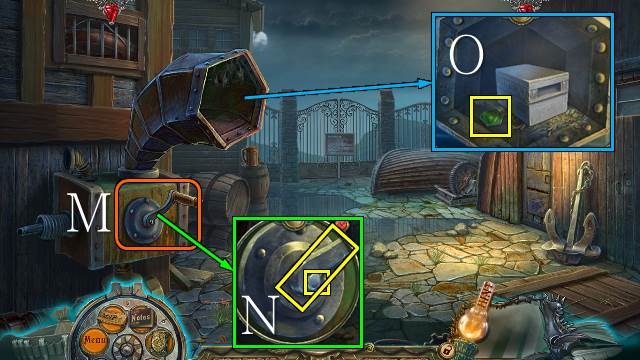
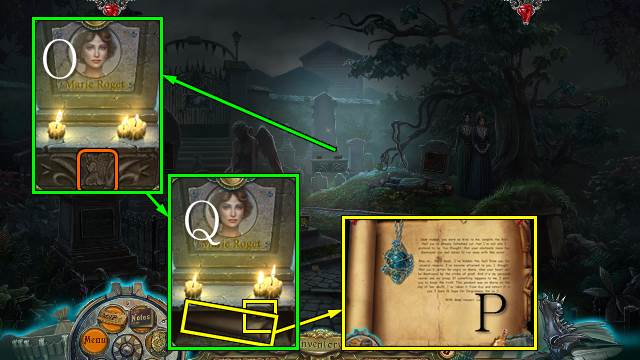
- Play the HOP (M).
- You receive the RAVEN.
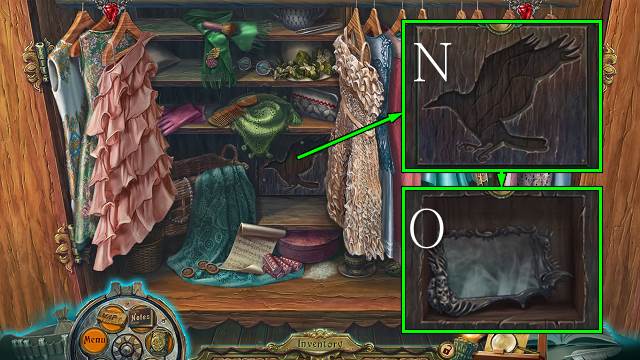
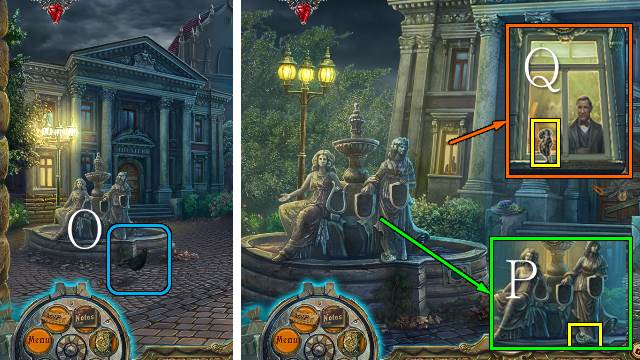
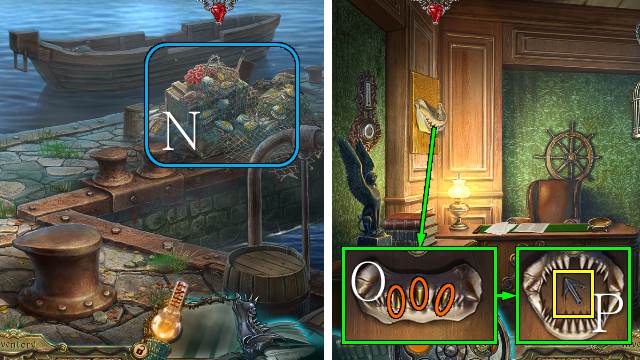
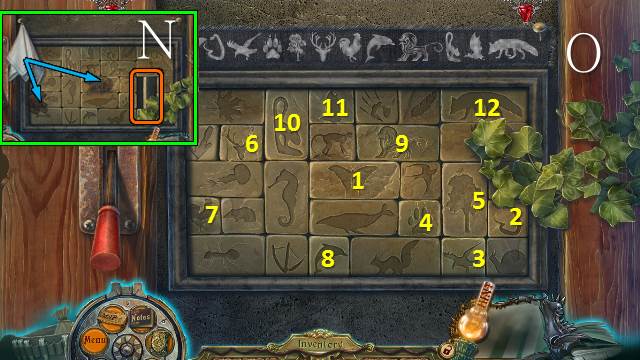
- Place the RAVEN (N); take the MAGIC MIRROR (O).
- Walk down.
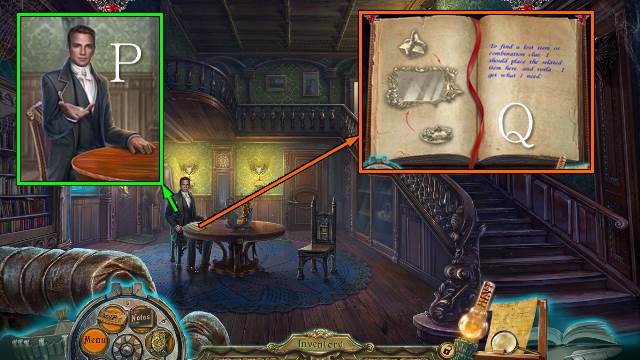
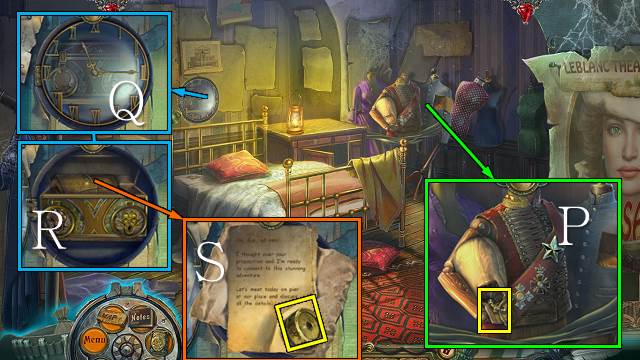
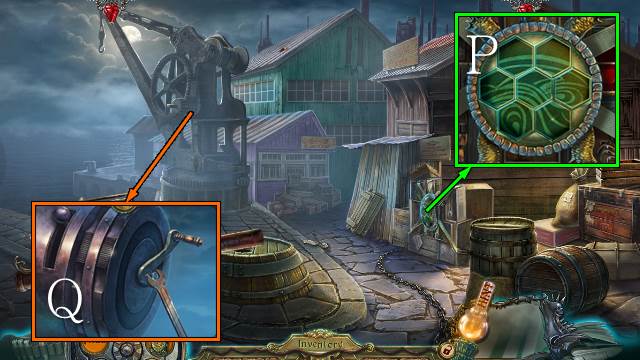
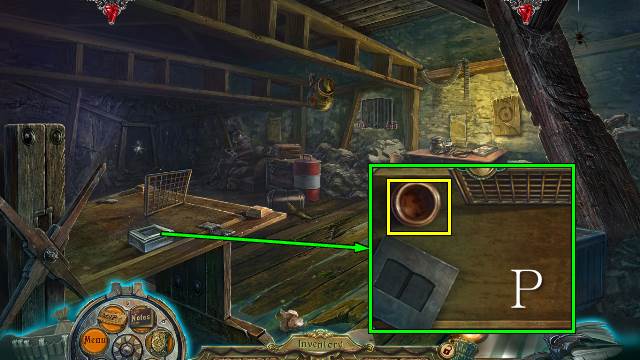
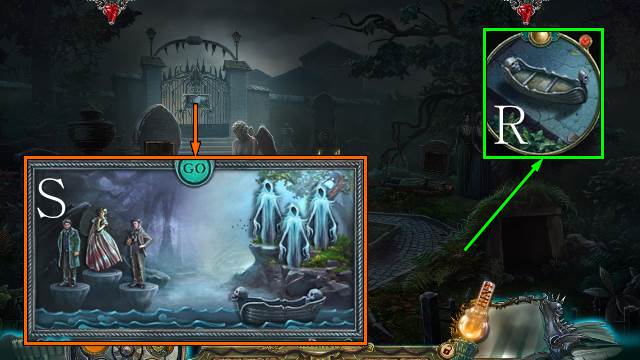
- Talk to Jacque; show him the MAGIC MIRROR and take it back (P).
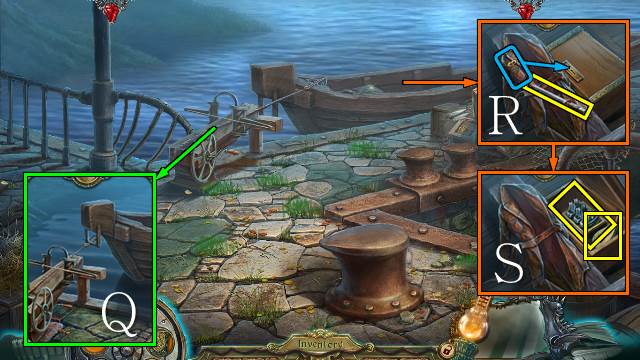
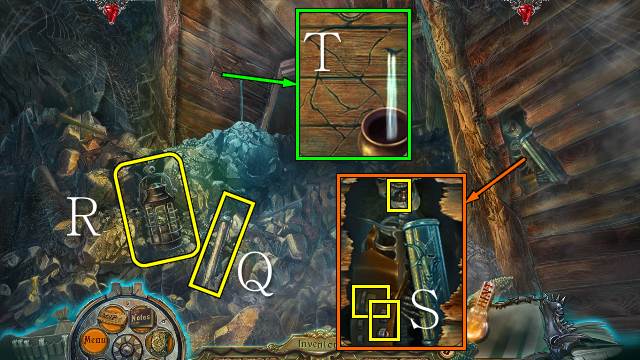
- Inspect the diary (Q).
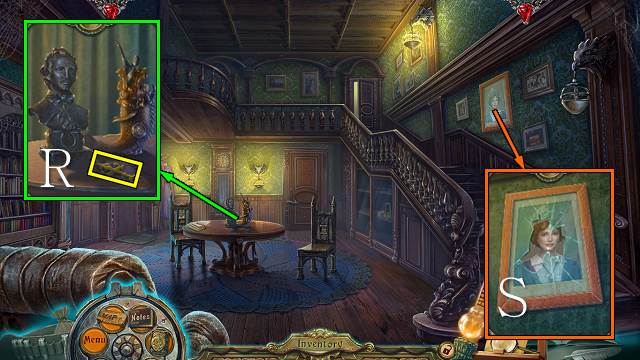
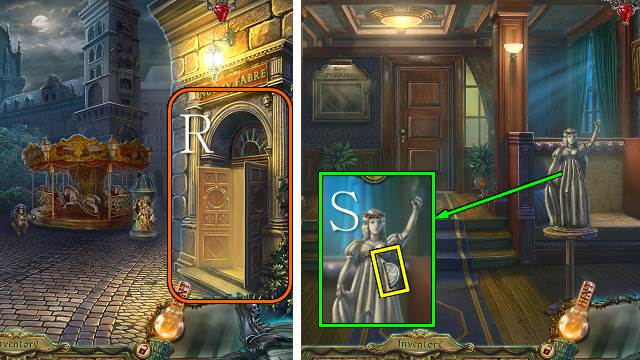
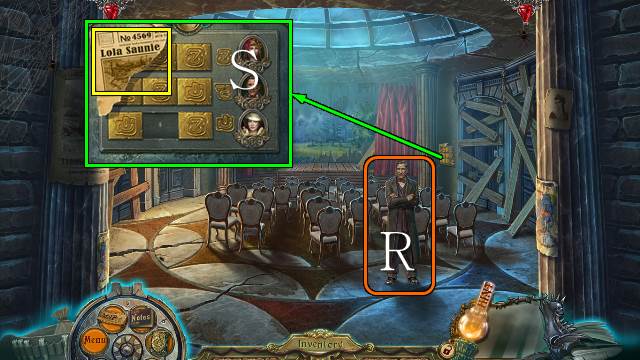
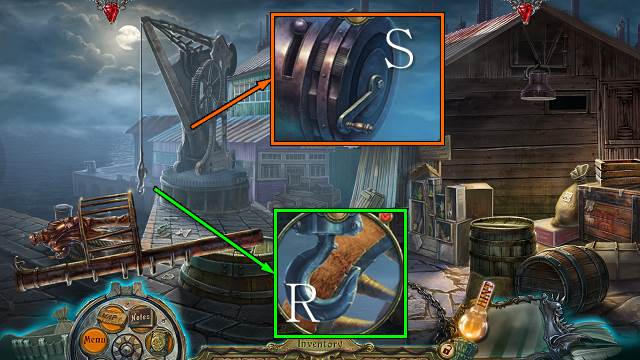
- Take the ARROW (R).
- Remove the glass with the KERCHIEF; you receive a GLASS SHARD and PHOTO (S).
- Go upstairs.
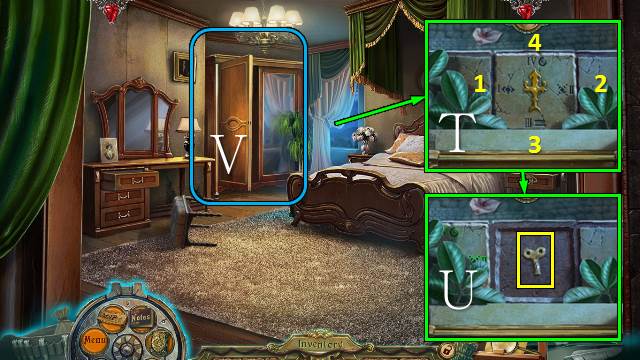
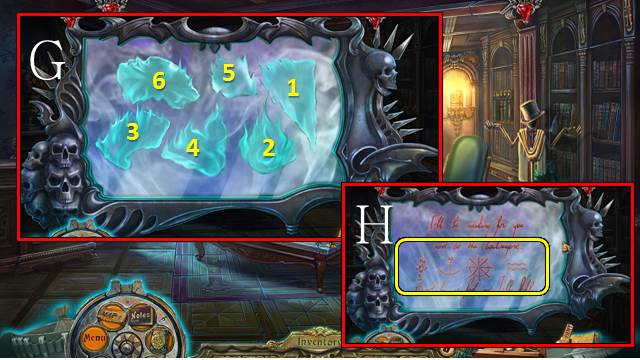
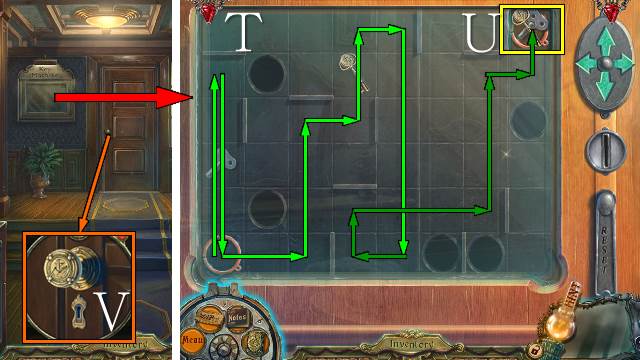
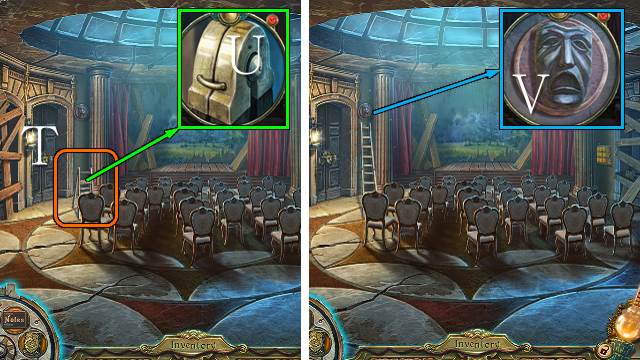
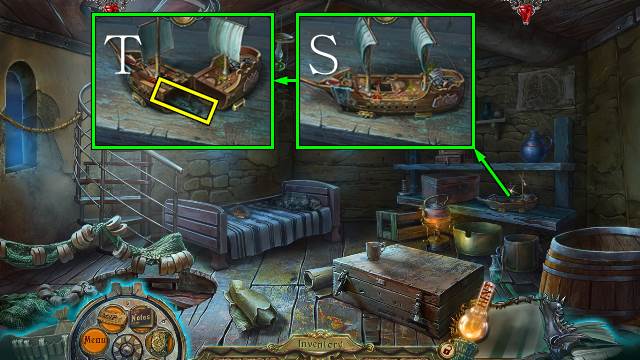
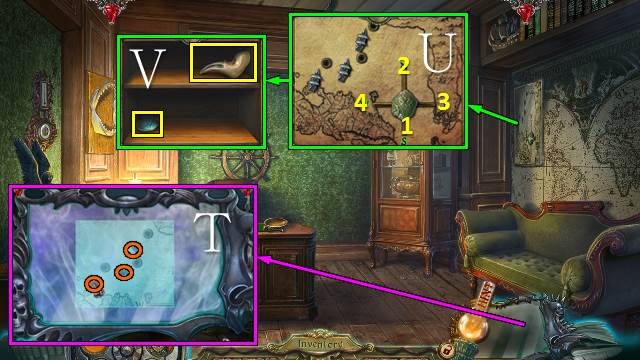
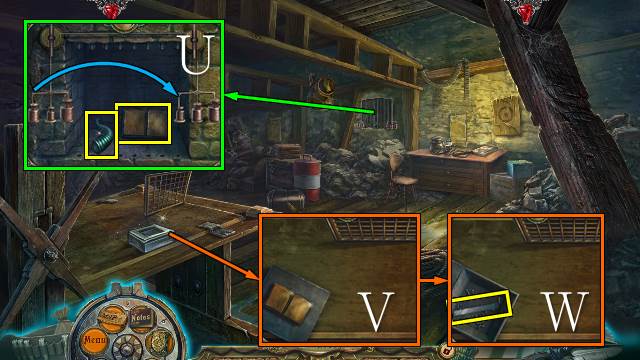
- Place the ARROW and select the symbols in numerical order (T); take the CLOCKWORK KEY (U).
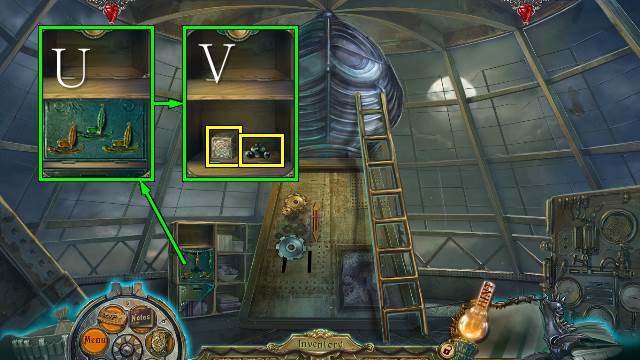
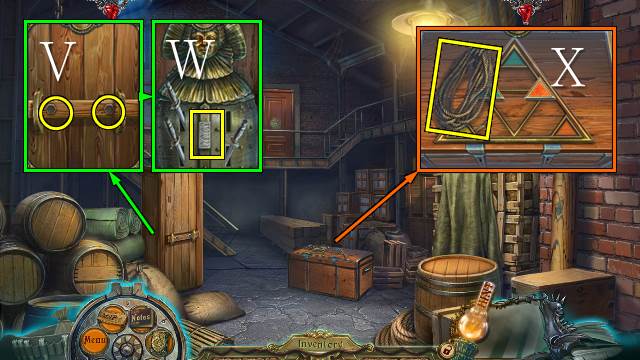
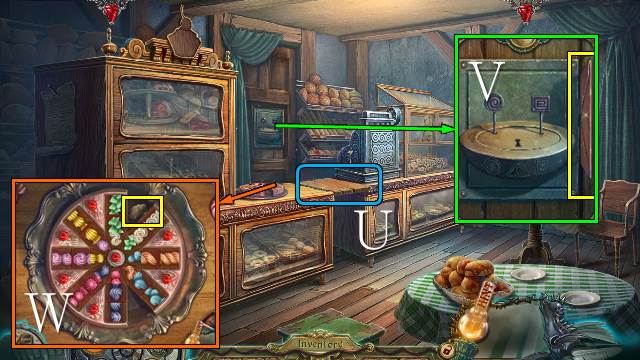
- Play the HOP (V).
- You receive a NAIL FILE.
- Walk down.

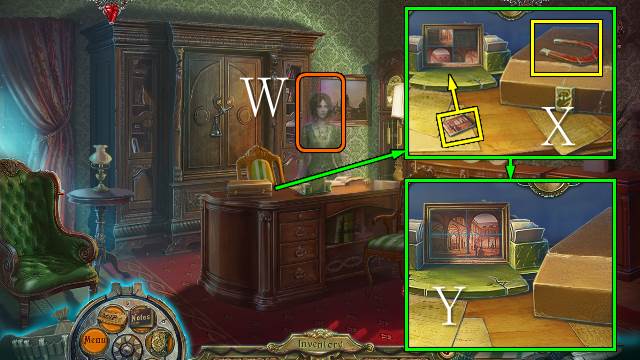
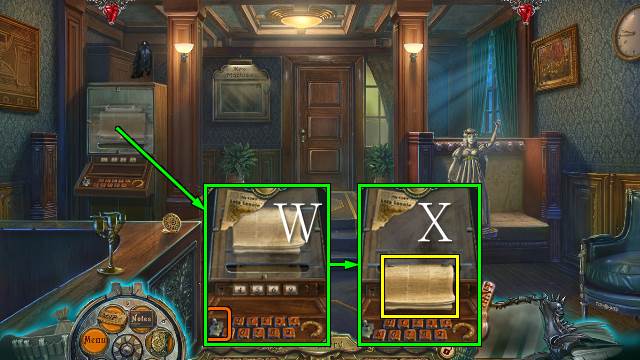
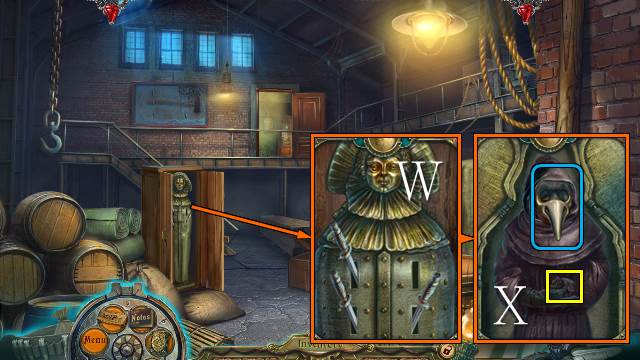
- Place and turn the CLOCKWORK KEY; take the WOMAN FIGURINE (W).
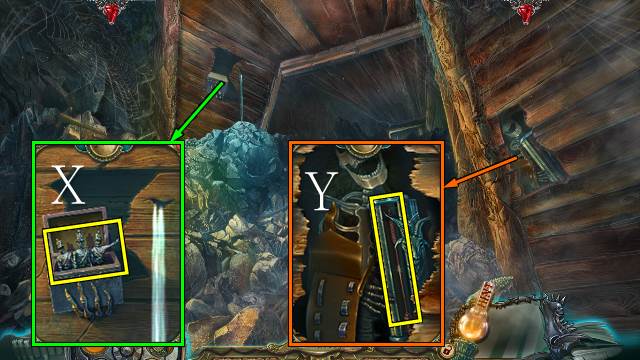
- Place the WOMAN FIGURINE and move her (X).
- Walk forward.
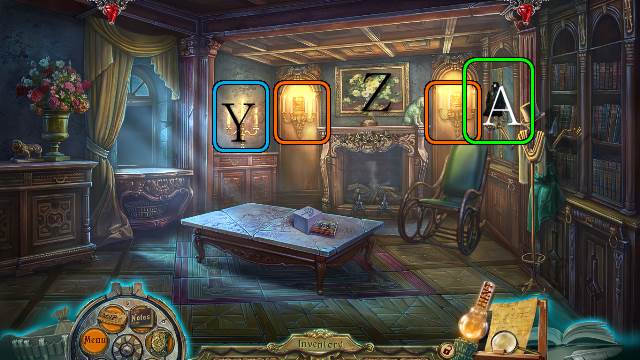
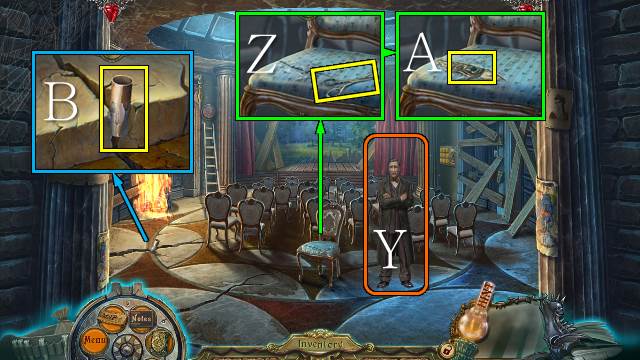
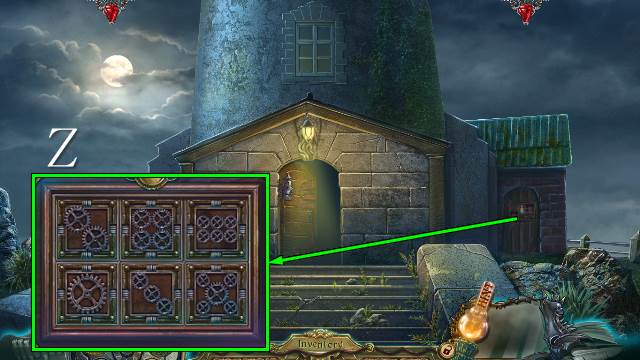
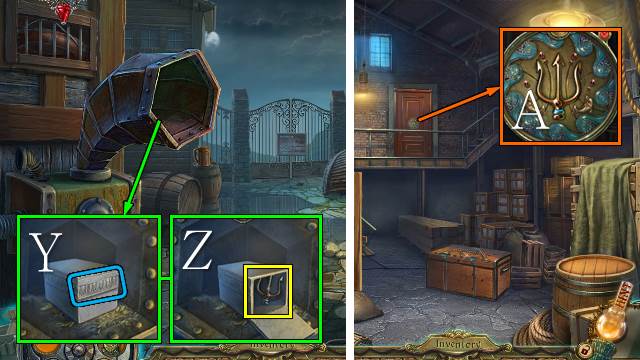
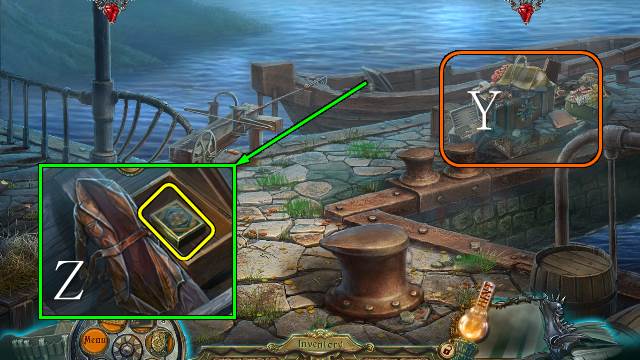
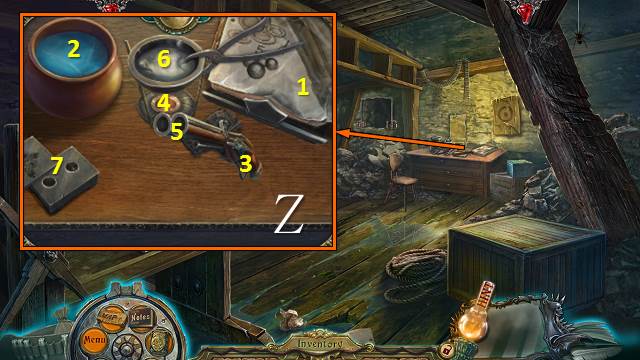
- Light the CANDLE (Y) and use it on the candles in the room (Z).
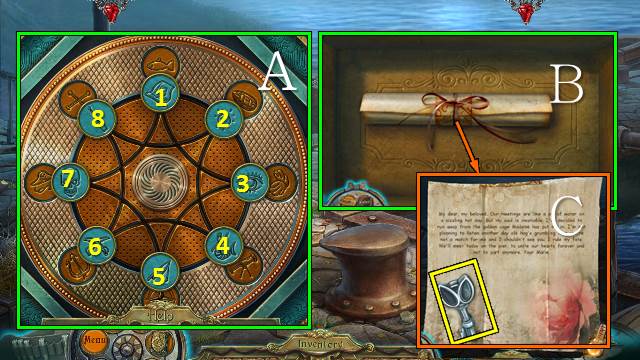
- Interact with the raven (A).
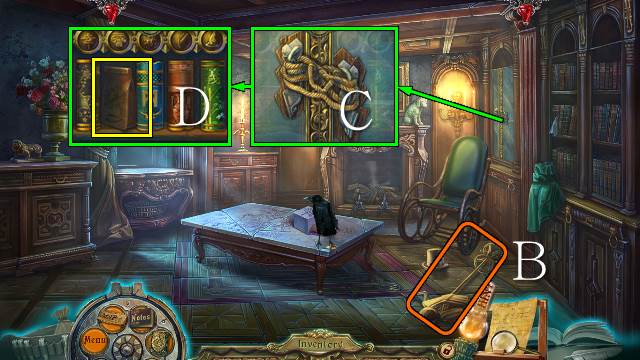
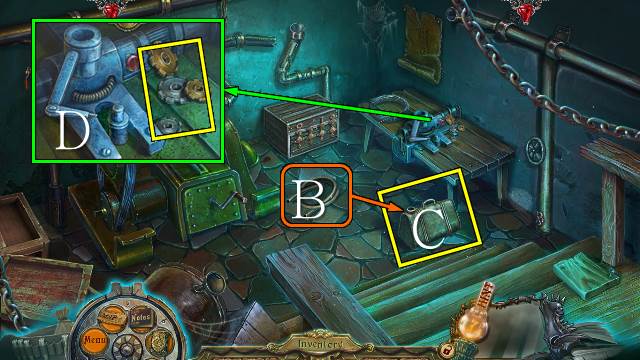
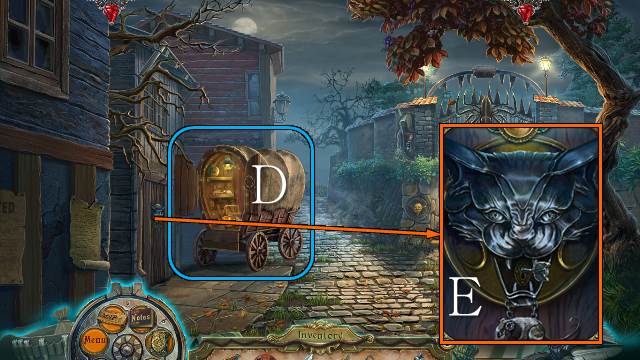
- Move the hat stand (B).
- Use the GLASS SHARD (C); take the SEEDS (D).
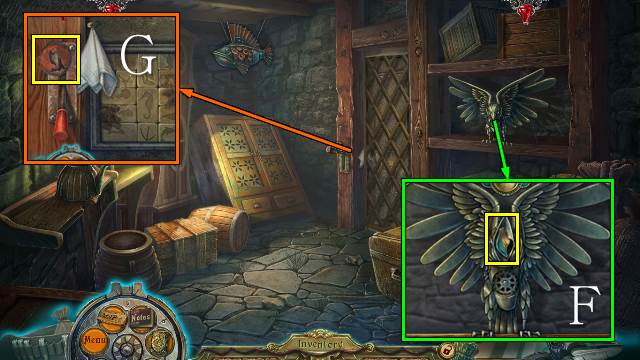
- Use the SEEDS (E); take the BOOK and TOP (F).
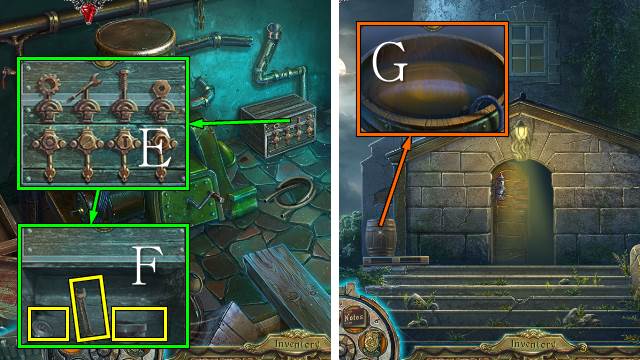
- Use the TOP, place the BURNT NOTE and select the shapes that light up when you move over them (G); note the code (H).
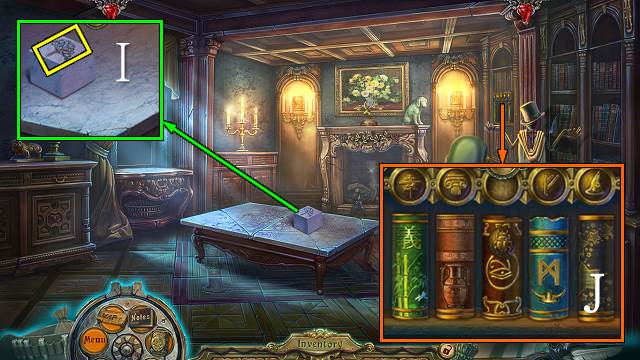
- Take the BRONZE TREE with the NAIL FILE (I).
- Place the BOOK and swap the books to match the symbols above; you receive a SYMBOL (J).
- Walk down.
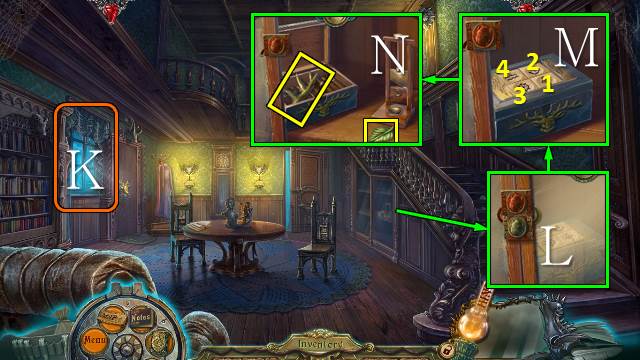
- Look out the window (K).
- Place the SYMBOL (L); select the buttons in the order according to the code from the mirror (M) and take the BRONZE HORN and BAS-RELIEF LEAF (N).
- Go forward.
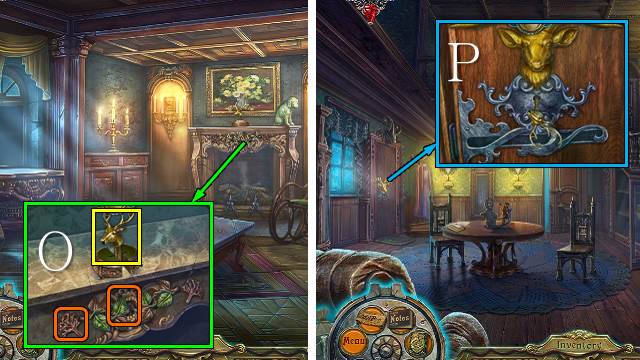
- Place the BRONZE TREE and BAS-RELIEF LEAF; take the DEER KEY (O).
- Walk down.
- Place the BRONZE HORN and DEER KEY; turn the key (P).
- Go left.
Chapter 2: Madame Roget's Will
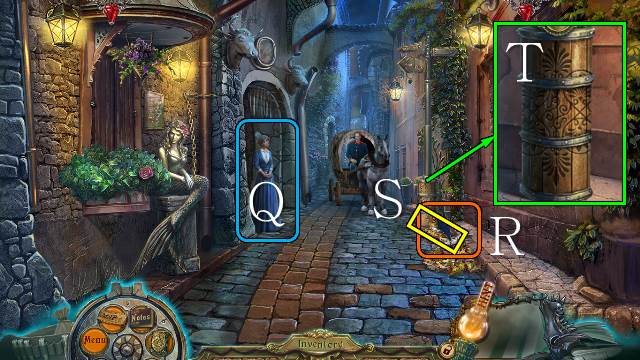
- Interact with Marie (Q).
- Move the raven (R).
- Take PLANK 1/2 (S).
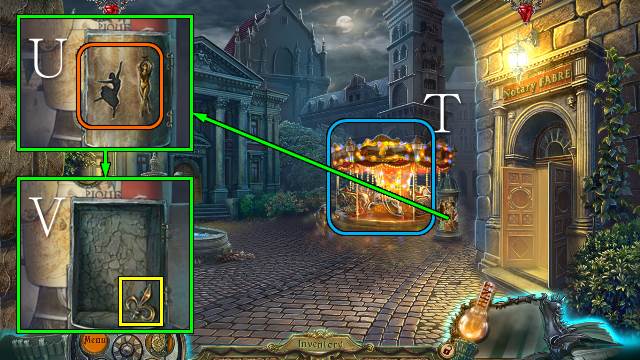
- Align the three sections (T).
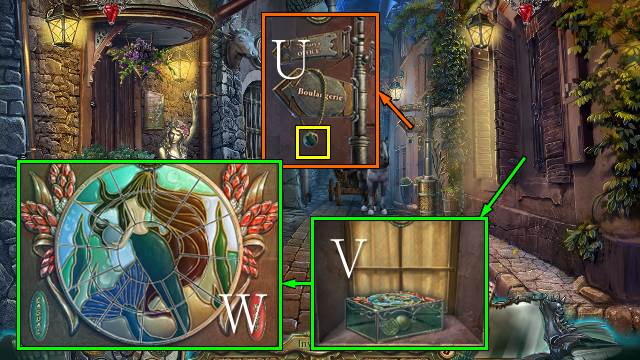
- Take the CHEST PART (U).
- Open the shutters and place the CHEST PART (V); zoom in for a mini-game (W).
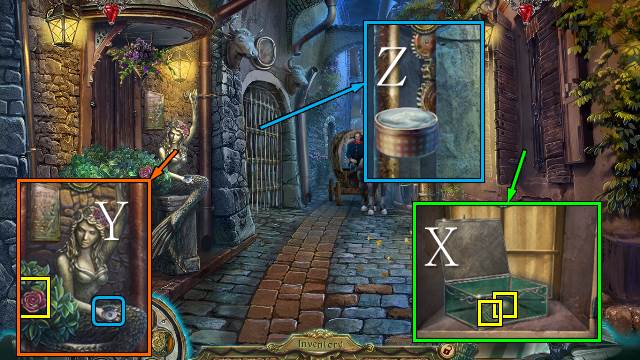
- Take the METAL GEAR and PEARL (X).
- Take ROSE 1/2 with the GLASS SHARD and place the PEARL (Y).
- Use the CREAM (Z).
- Go left.
- Take the newspaper (A).
- Take the KNIFE, MATCHES and ROSE 2/2 (B).

- Move the chair (C).
- Open the lantern, place the CANDLE and use the MATCHES; take the BAS-RELIEF PART with the KNIFE (D).
- Place the BAS-RELIEF PART and move the tiles (E); place the METAL GEAR for a mini-game.
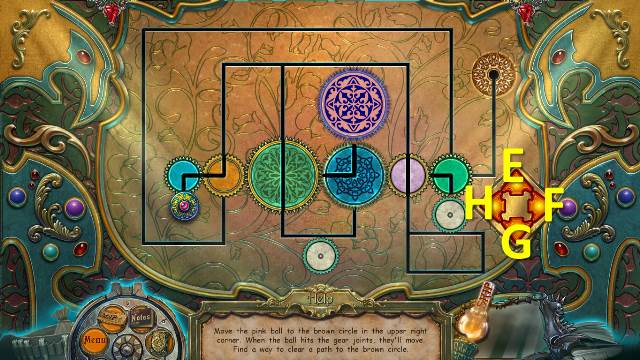
- Solution: E-F-E-F-F-G-(F-G-H-E)x4; E-H-G-F-E-H-G-H-E-F-G-F-E.
- Ring the bell (I).
- Talk to the Madame Roget; show your badge (J).
- Take the CORKSCREW HANDLE (K).
- Place the CORKSCREW HANDLE and take the CORKSCREW (L).
- Walk down.
- Place the ROSES and take the BELT (M).
- Use the CORKSCREW four times (N); zoom in for a mini-game.
- Go forward.
- Move the raven (O).
- Go left.
- Take MEDALLION PART 1/2 (P).
- Take MIME FIGURINE 1/2 (Q).
- Walk down.
- Open the doors (R).
- Go right.
- Place the BELT; take the TOKEN (S).
- Use the TOKEN for a mini-game (T).
- Take the KEY and WINDING KEY (U).
- Use the KEY (V).
- Go forward.
- Interact with the ghost (W).
- Take the MAGNET and place the tile in the frame (X); and move the tiles (Y).
- Walk down.
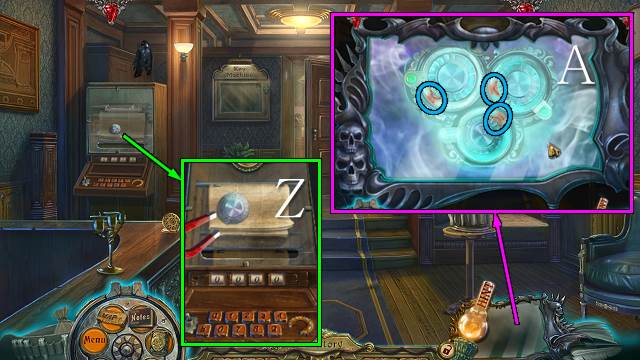
- Use the MAGNET; take the SAFE DIAL (Z).
- Place the SAFE DIAL on the Magic Mirror; select the sections that light up (A).
- Walk forward.
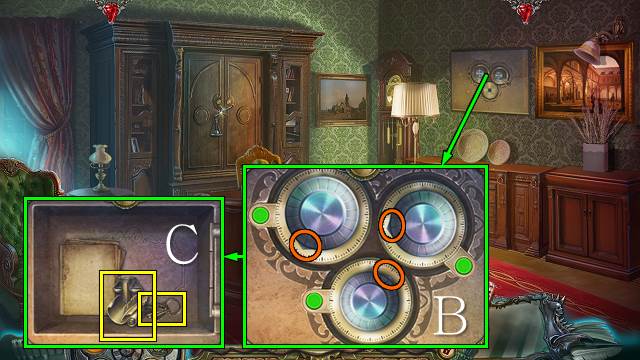
- Place the SAFE DIAL and turn the dials until the lights turn green (B); take the TYPEWRITER KEY and KEYS (C).
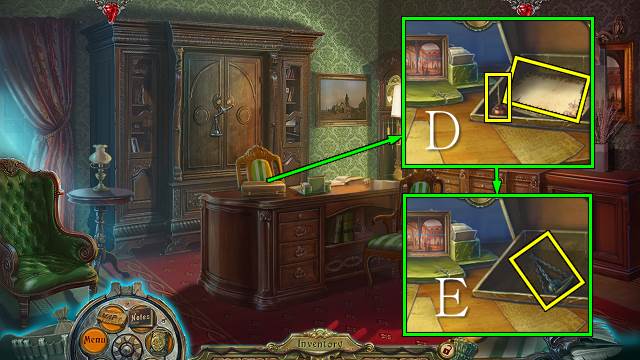
- Place the TYPEWRITER KEY; take the OIL CAN and will (D).
- Take the SCALE (E).
- Place the SCALE (F); place the KEYS and open the drawer (G), go through the folder and take the THEATER KEY (H).
- Walk down twice.
- Place the WINDING KEY and OIL CAN; turn the key (I).
- Play the HOP (J).
- You receive the COMEDY MASK.
- Play the mini-game (K).
- You receive a POSTER.
- Take MEDALLION PART 2/2 with the KNIFE (L).
- Go left.
- Place the MEDALLION PARTS (M); take MIME FIGURINE 2/2 (N).
- Place the MIME FIGURINES and THEATER KEY (O); take PLANK 2/2 (P).

- Place the PLANKS and take the LADDER (Q).
- Go forward.
Chapter 3: Leblanc's Lies
- Talk to Leblanc and show him the POSTER (R).
- Take the NEWSPAPER (S).
- Place the LADDER (T).
- Use the OIL CAN and move the latch (U).
- Take the TRAGEDY MASK with the KNIFE (V).
- Walk down twice and go right.
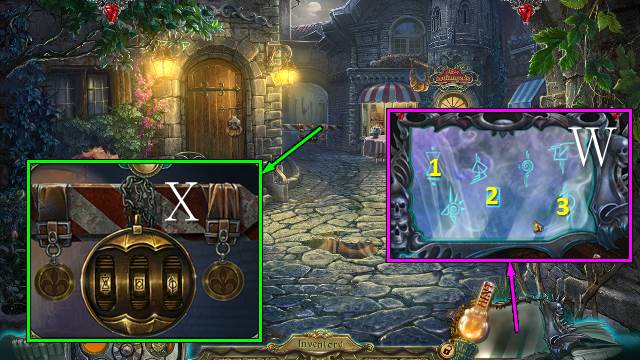
- Place the NEWSPAPER, enter 4569 and pull the switch (W); take the NEWSPAPER (X).
- Go to the Theater.
- Show Leblanc the NEWSPAPER (Y).
- Take the SCISSORS and use them (Z); take the MASK (A).
- Move the PIPE until you can take it (B).
- Walk down.
- Place the PIPE; turn the valve (C).
- Use the SCISSORS; take the EMPTY BUCKET (D).
- Place the COMEDY MASK, TRAGEDY MASK and EMPTY BUCKET; you receive a WATER BUCKET (E).
- Walk forward.
- Use the WATER BUCKET (F).
- Take the KEY (G).
- Use the KEY (H).
- Go left.
- Move the cushion and take the NOTE (I); use the SCISSORS and take the CHIP (J).
- Move the drape (K).
- Use the spider brooch on the compartment, you'll receive the SPIDER BROOCH 1/2 (L); take the MASK (M).
- Walk down.

- Place the CHIP and move the chips to match the symbols on the right (N); take the STAR and CLOCK HANDS (O).
- Go left.
- Place the STAR; take the DANCER (P).
- Place the CLOCK HANDS and NOTE, and set the time to 11:15 (Q); place the masks, open the case (R), use the SCISSORS and take the TUMBLER and note (S).
- Walk down three times.
- Play the HOP (T).
- You receive FLEUR DE LIS 1/2.
- Move the poster and place the DANCER (U); take FLEUR DE LIS 2/2 (V).
- Walk down and left.
- Place the TUMBLER on the Magic Mirror; select the symbols that light up (W).
- Place the TUMBLER and FLEUR DE LIS; enter the code from the mirror (X).
- Go forward twice and right.
Chapter 4: The Lighthouse Keeper's Observations
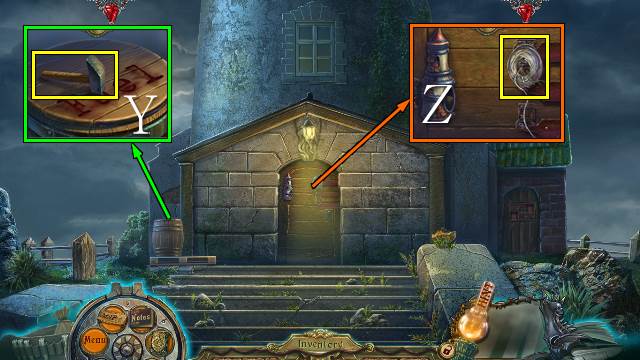
- Take the HAMMER (Y).
- Take the FISHING LINE (Z).
- Walk down.
- Assemble the rod, place the FISHING LINE, floater and hook and take the FISHING ROD (A).
- Take SPIDER BROOCH 2/2 (B).
- Go right.
- Open the barrel and use the FISHING ROD (C); open the bag and take the HORSE and RAY 1/3 (D).
- Walk down twice.
- Place the SPIDER BROOCHES and take the ANGEL WING (E).
- Place the HORSE (F).
- Play the HOP (G).
- You receive a CHISEL.
- Walk forward.
- Place the ANGEL WING and move it (H).
- Place the CHISEL and use the HAMMER three times (I); take CHRONOS (J).
- Walk down.
- Place CHRONOS; take the SMALL LENS (K).
- Go forward and right.
- Use the MATCHES and place the SMALL LENS; move the lighthouse to the three symbols until they turn red and fall down (L).
- Go forward.

- Take the three RUNGS (M).
- Take the NAILS (N).
- Place the RUNGS and NAILS; use the HAMMER (O).
- Go upstairs.
- Open the hatch and take SAFE RING 1/2 and the MAST (P).
- Move the LADDER (Q).
- Take the two RODS and open the glass cover (R).
- Walk down.
- Place the MAST and play the HOP (S).
- Take the note and GREEN HAT (T).
- Go upstairs.
- Place the GREEN HAT and move the feathers to their hats (U); take DIE 1/2 and the BAG KEY (V).
- Walk down.

- Place the BAG KEY and turn it (W); take DIE 2/2 and the INSTRUCTIONS (X).
- Place the DICE on the Magic Mirror and select the objects that light up (Y).
- Walk down.
- Place the DICE and change them according to the code on the mirror (Z); zoom in for a mini-game.
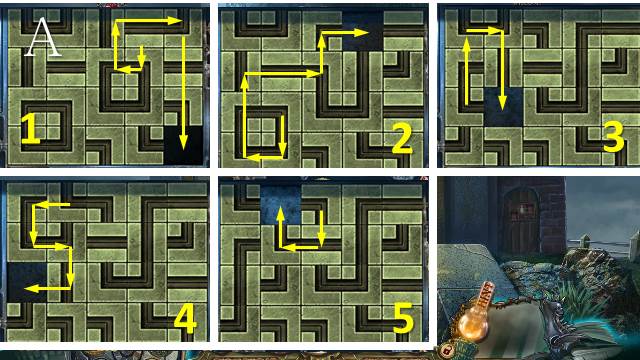
- Solution (A).
- Go right.
- Move the hose (B) and take the EMPTY FUEL CAN (C).
- Take GEARS 4/5 (D).
- Move the lock pieces (E); take the WRENCH, STRAP and METAL (F).
- Walk down.
- Place the EMPTY FUEL CAN; you receive the FUEL CAN (G).
- Go right.
- Place the RODS and use the HAMMER twice; open the lid, use the FUEL CAN and turn the valve (H).
- Place the INSTRUCTIONS and METAL and push the button; take GEAR 5/5 (I).
- Go down, forward and up.
- Place the GEARS and STRAP and pull the lever (J).
- Use the WRENCH on all four lenses (K); zoom in for a mini-game.
- Solution (L).
- Walk down three times and go forward twice.
Chapter 5: The Sailor's Letter
- Move the handle (M).
- Take the BOLT with the WRENCH; take the HANDLE (N).
- Move the leaves; take the TURTLE ARMOR (O).
- Walk down.
- Place the TURTLE ARMOR for a mini-game (P).
- Play the reverse HOP, then play the HOP.
- You receive an ANCHOR CHIP.
- Place the HANDLE and BOLT and use the WRENCH; turn the handle, then pull the lever (Q).
- Move the hook (R).
- Pull the lever again (S).
- Walk forward.

- Play the mini-game (T).
- Place the SAFE RING for another mini-game (U).
- Strategy: Move an object to the empty space, find the object that fits in the newly-opened space and move it there, etc.
- Go right.
- Use the WRENCH twice (V), move the board and take the BAS-RELIEF (W).
- Take the ROPE (X).
- Walk down.
- Place the BAS-RELIEF (Y); take the TRIDENT (Z).
- Go right.
- Place the TRIDENT (A).
- Go forward.
- Take SCALE 1/3 (B).
- Open the drawer, move the papers and take the GLUE and BRUSH (C); place and turn the key and take the STONE (D).
- Take the CHALK (E).
- Walk down.
- Place the STONE and move the triangles to the corners (F); use the BRUSH, reassemble the bell, place the BELL PIECE, use the GLUE and take the BELL (G).
- Walk down twice.
- Play the HOP (H).
- You receive a CRACKER.
- Go forward, right and forward.
- Interact with the bird and give him a CRACKER (I); read the note and take the SEXTANT (J).
- Walk down three times.
- Place the BELL and SEXTANT (K); take the WAVE (L).
- Walk forward.
- Place the WAVE (M).
- Swap the latches so they can slide into place.
- Go forward.
- Play the HOP (N).
- You receive a TOOTH.
- Go down, right and forward.
- Place the TOOTH and select the gold teeth (O); take the HARPOON (P).
- Go down twice and forward.
- Place the ROPE and HARPOON and turn the handle twice (Q).
- Take the DAGGER and use and turn the key (R); take the POWDER and SHIPS (S).
- Go down, right and forward.
- Place the SHIPS on the Magic Mirror; select the holes that light up (T).
- Move the compass to south, north, east and west, and place the SHIPS and move them to the configuration seen on the mirror (U); take the PLAGUE MASK and COIN (V).
- Walk down.
- Place the DAGGER and pull all four daggers (W); place the PLAGUE MASK and take the METAL RAT (X).
- Walk down and forward.
- Play the HOP (Y).
- You receive RAY 2/3.
- Place the COIN for a mini-game (Z).
- Casual solution: 1-5-3-7; hard solution: 3-3-5-4-4-6-7-8 (A).
- Open the scroll (B) and take the KEY (C).
- Walk down four times.
- Play the HOP (D).
- You receive a FEATHER.
- Take the note; place the METAL RAT and KEY and turn the key (E).
- Go left.
Chapter 6: Lola's Secret
- Place the FEATHER; swap the feathers on the left side to match the right and take RAY 3/3 (F).
- Pull the lever and take SCALE 2/3 (G).
- Walk down.
- Place the RAYS and push them (H); take the SUITCASE BUTTON and SCALE 3/3 (I).
- Go left.
- Place the SUITCASE BUTTON and push the buttons in numerical order (J); open the cloth and take the MUSKET and BLACK CLOTH (K).
- Place the SCALES (L); place the BLACK CLOTH, use the CHALK and take the CLOTH WITH SYMBOLS (M).
- Use the handkerchief on the dirt, turn the tile and move the vines (N); hang the CLOTH WITH SYMBOLS for a mini-game (O).
- Go forward.
- Take the JUG (P).
- Go left.
- Take the PICK HANDLE (Q).
- Use the MATCHES and take the LANTERN (R).
- Open the bag and take the ARMY MANUAL, WAD and WEIGHT (S).
- Use the JUG to get a WATER JUG (T).
- Walk down.
- Place the WEIGHT and swap the two indicated weights; take the HORN and BOOK (U).
- Place the BOOK (V) and take the RULER (W).
- Go left.
- Remove the wood and use the RULER; take the TIN SOLDIER (X).
- Place the HORN and take the RAMROD (Y).
- Walk down.
- Place the ARMY MANUAL (1), WATER JUG (2) and MUSKET (3), use the MATCHES (4) and the POWDER (5) and place the TIN SOLDIER (6), open and fill the mold (7) and dip it in the water (2), use the RAMROD (5), WAD (5), and RAMROD again (5), open the mold (7) and put the bullets in the musket (5); you receive a LOADED MUSKET (Z).
- Shoot the LOADED MUSKET (A).
- Place the PICK HANDLE and hit it with the rock; open the bag and take the COIN and PICK (B).
- Go left.
- Use the PICK twice (C).
- Go forward.
- Use the LANTERN (D).
- Use the MUSKET (E).
- Take the MINER (F).
- Move the vines and use the COIN on the screws; take LOLA'S MARKER (G).
- Walk down twice.
- Place the MINER (H); take the BRUSH and SOLVENT (I).
- Place LOLA'S MARKER, use the sandpaper (1), open the cover (2), remove the photo, place the PHOTO, close the cover and take the GRAVE MARKER (J).
- Go left and forward.
- Use the SOLVENT and BRUSH; take the GOLD PAINT (K).
- Walk down twice.
- Place the GRAVE MARKER, place the letters on the grid, use the GOLD PAINT, flip the grid and take MARIE'S MARKER (L).
- Go left and forward.
- Place MARIE'S MARKER and screws and use the COIN on all four screws (M).
- Take the ANGEL (N).
- Place the ANGEL (O); take the PENDANT WITH LETTER (P) and KEY (Q).
- Move the leaves, fix the boat and take the CHARON'S BOAT (R).
- Place the CHARON'S BOAT for a mini-game (S).
- Place the following in the boat and select 'go' in between steps: 1 dead, 2 living, 1 living and 1 dead, 2 living, 1 dead.
- Go forward and down.

- Place and turn the KEY (T).
- Go into the Boulangerie.
- Lift the hatch (U).
- Take the note (V).
- Take the HAT (W).
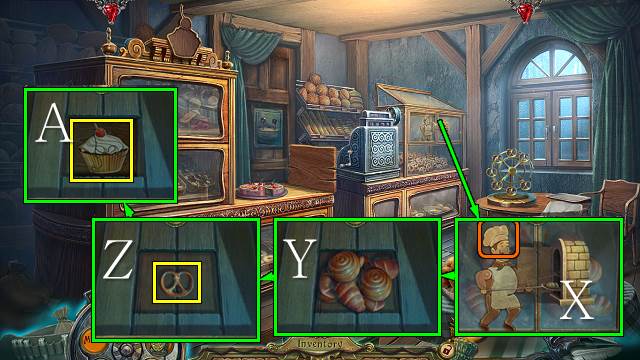
- Place the HAT (X), remove the pastries in pairs (Y) and take the PRETZEL (Z); move the puzzle pieces and take the CUPCAKE DECORATION (A).
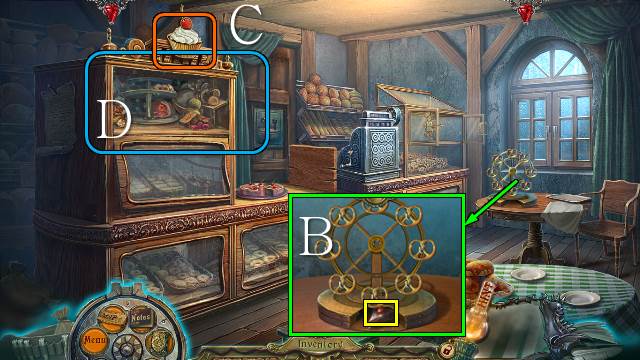
- Place the PRETZEL and take CAKE PIECE 1/2 (B).
- Place the CUPCAKE DECORATION (C).
- Play the HOP (D).
- You receive CAKE PIECE 2/2.
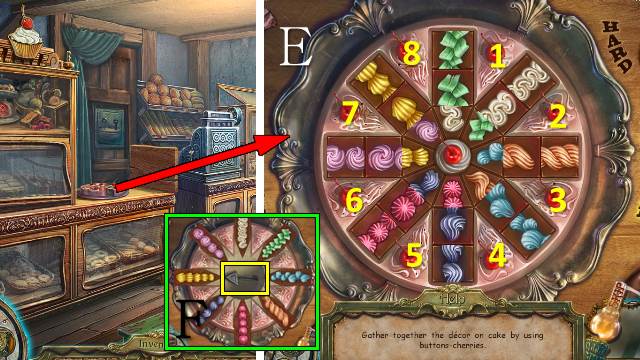
- Place the CAKE PIECES for a mini-game (E).
- Casual solution: 1-1-3-3-5-5-7-7.
- Hard solution: 7-6-7-7-7-5-6-5-6-6-6-4-4-5-5-5-4-5-4-2-3-4-4-4-2-2-3-2-3-2.
- Take the KEY (F).
- Place the KEY and turn the keys in the indicated order (G).
- Go forward.
- Give Madame Rochet the PENDANT WITH LETTER (H).
- Congratulations, you have completed Dark Tales: Edgar Alan Poe's the Mystery of Marie Roget.
Created at: 2015-03-20