

Walkthrough Menu
- General Tips
- Chapter 1: The Nucleus Seal
- Chapter 2: The Forbidden Zone
- Chapter 3: The Library
- Chapter 4: The Vine Room
- Chapter 5: The Elven Palace
- Chapter 6: The Perilous Peak
General Tips
- This is the official guide for Dawn of Hope: Skyline Adventure.
- This guide will not mention when you have to zoom into a location; screenshots will show each zoom scene.
- The screenshots will show where to play a Hidden-Object Puzzle (HOP) and what inventory item will be received.
- Some inventory items require further actions.
- This guide will give step-by-step solutions for all puzzles which are not random. Read the instructions in the game for each puzzle.
Chapter 1: The Nucleus Seal

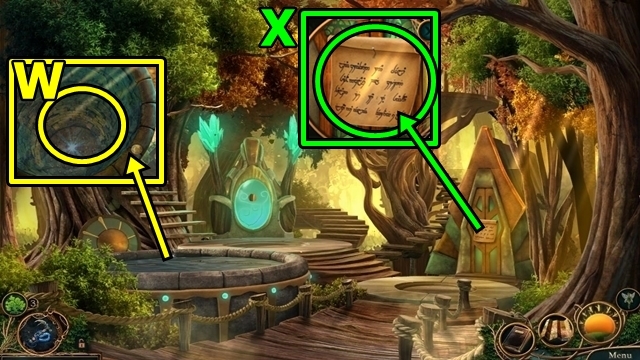
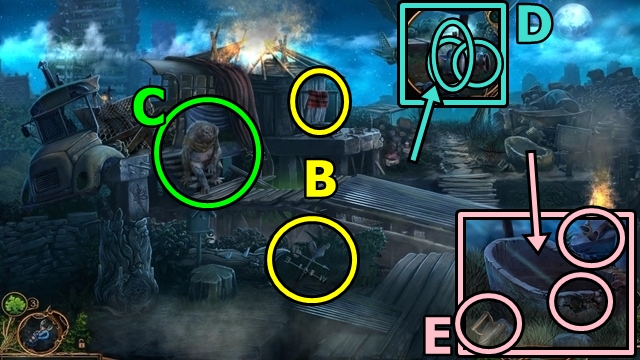
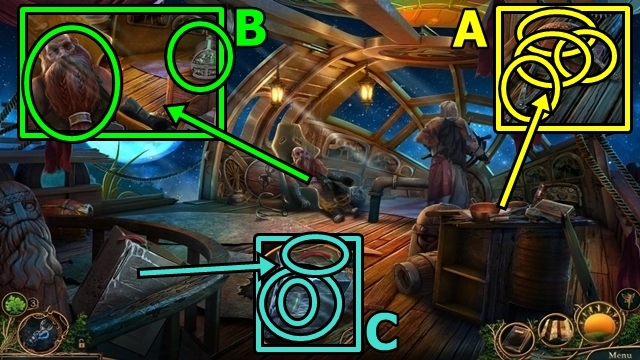
- Climb over the wall (A).
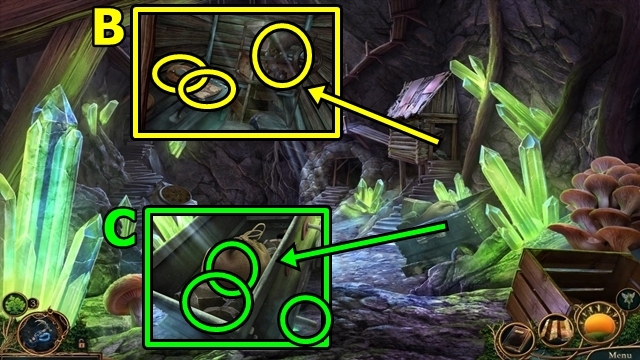
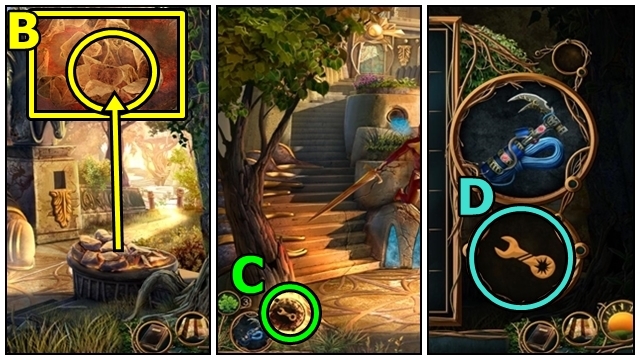
- Talk to Queen Alysandra (B). Move forward. Take the NUCLEUS SEAL and HEALING POTION.
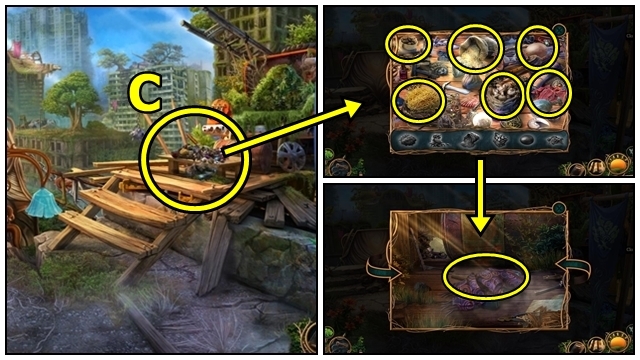
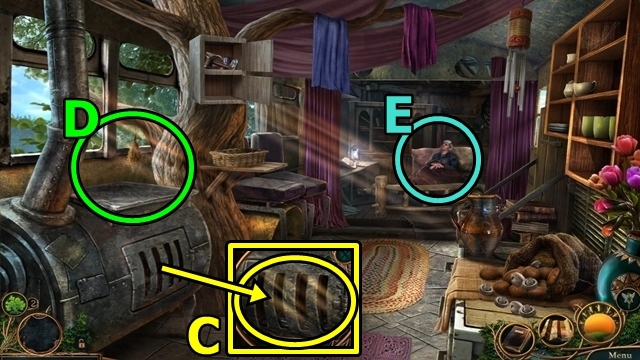
- Find the items (C); receive the UNPREPARED FOOD. Flip the table; take the SCARF and CRYSTAL HAMMER.
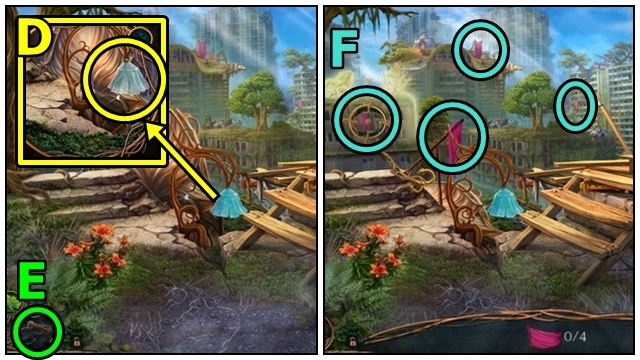
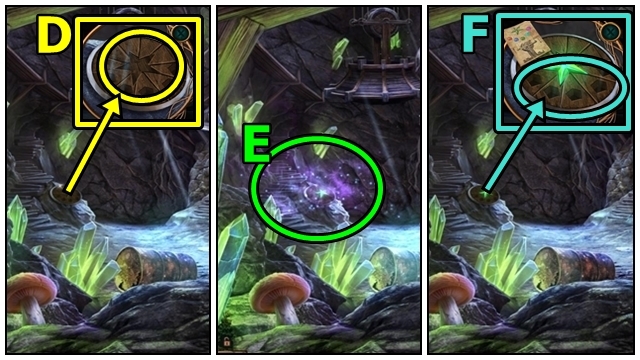
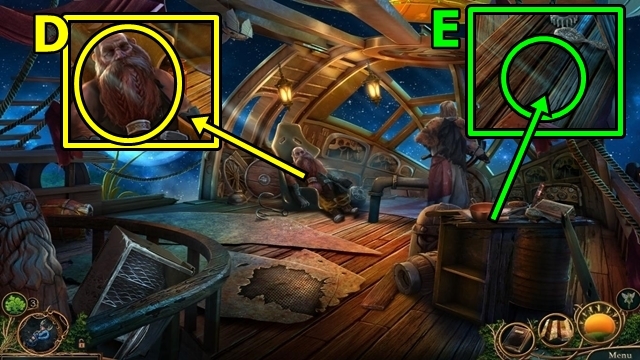
- Use the CRYSTAL HAMMER (D).
- Activate the CLIMBING HOOK (E).
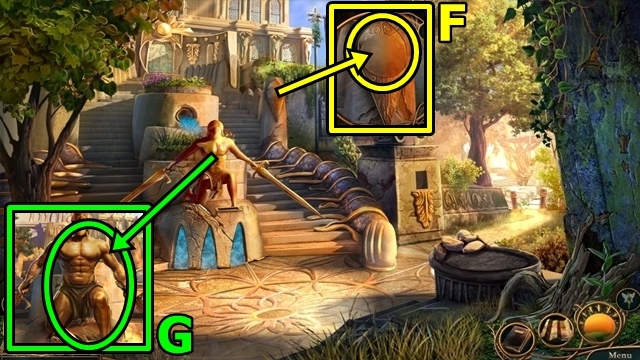
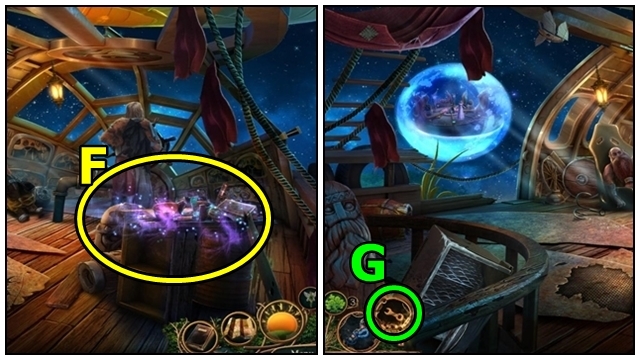
- Use the Climbing Hook (F).
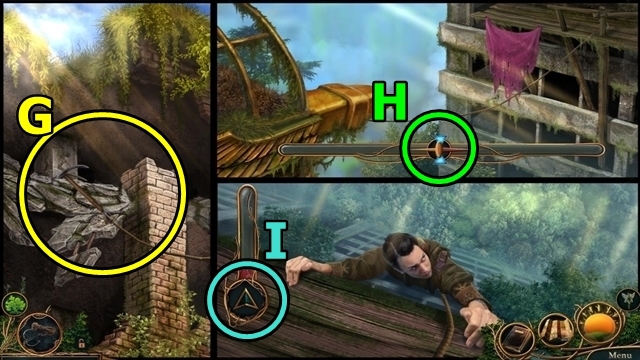
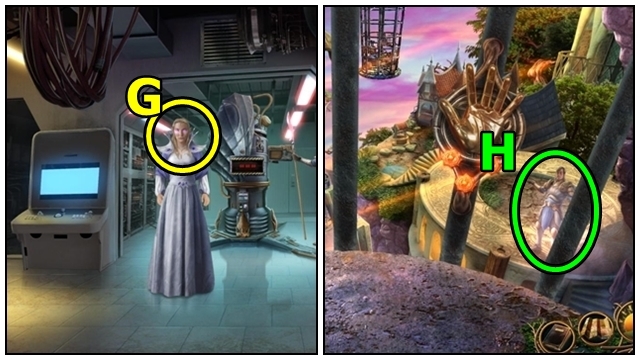
- Move up (G).
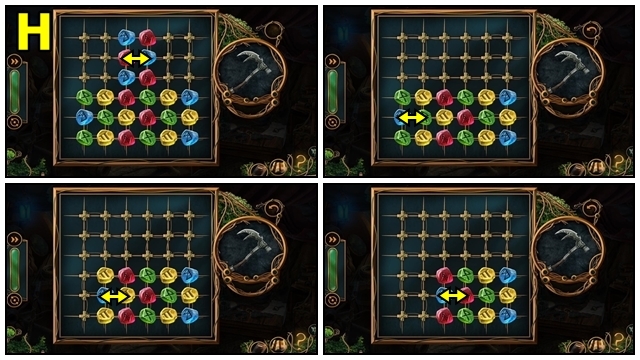
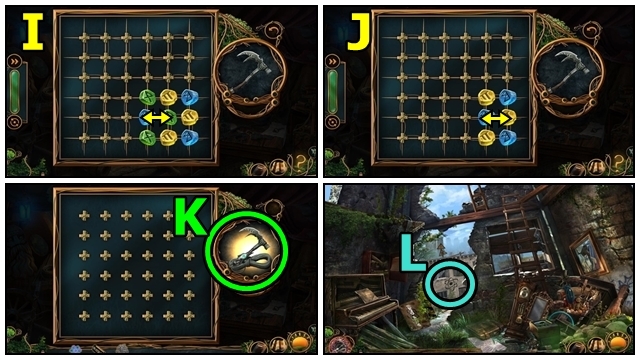
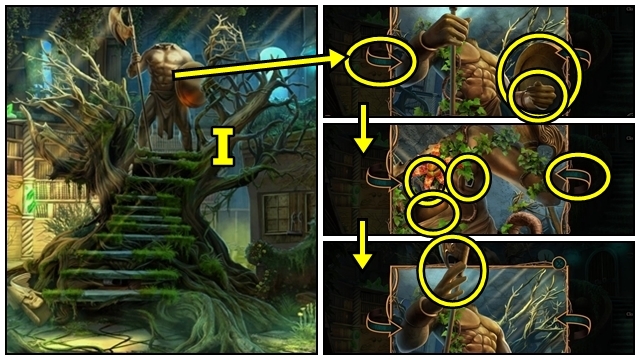
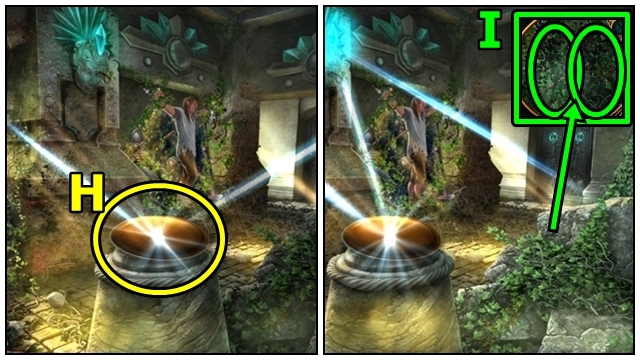
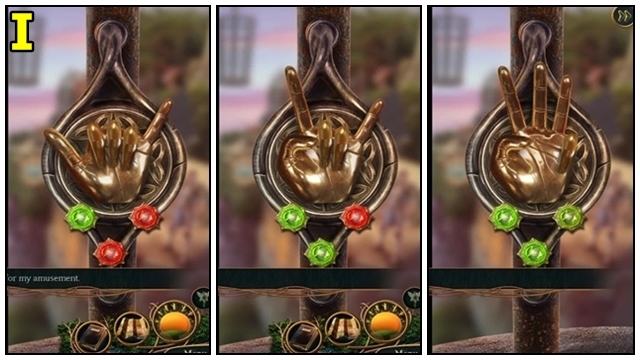
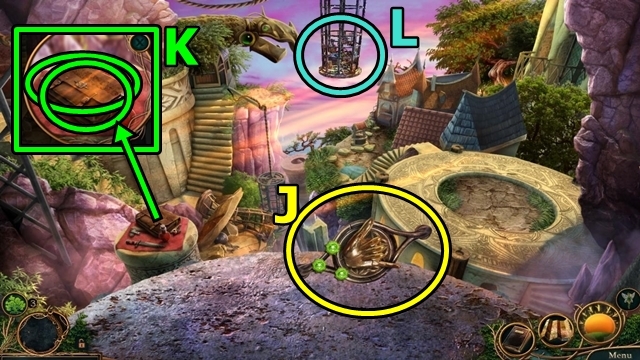
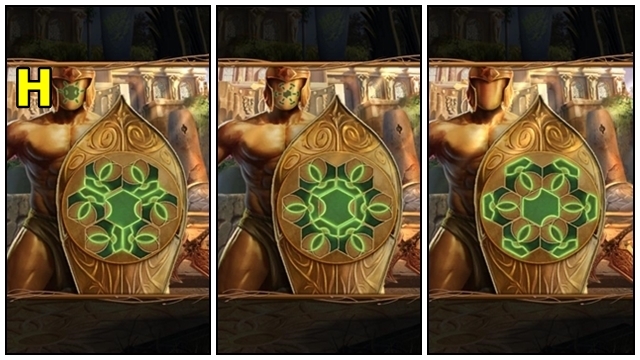
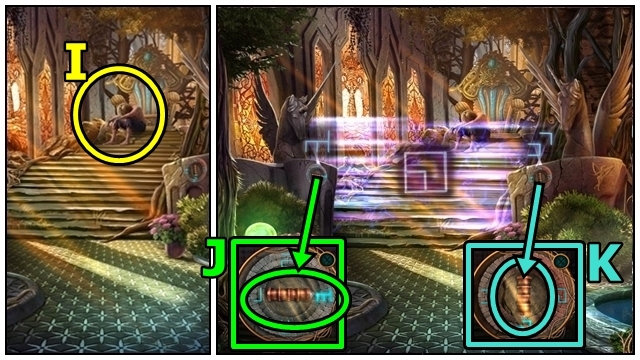
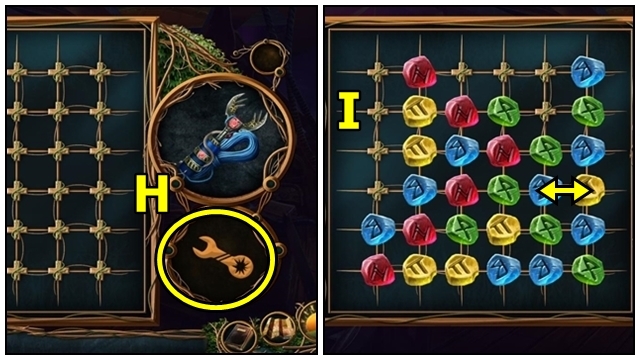
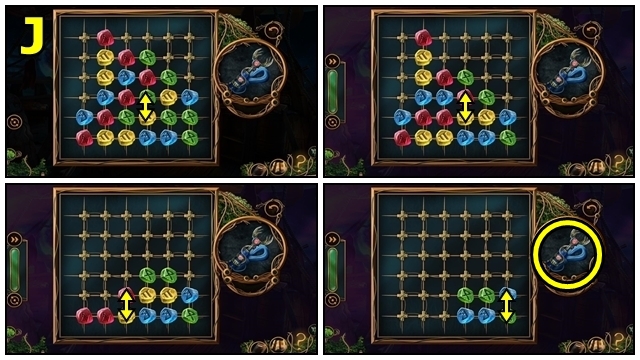
- Play the mini-games (H-I).
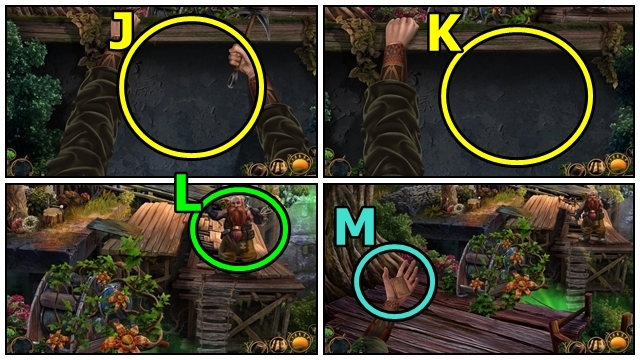
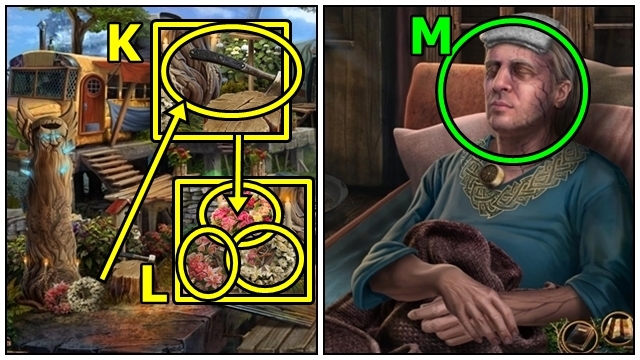
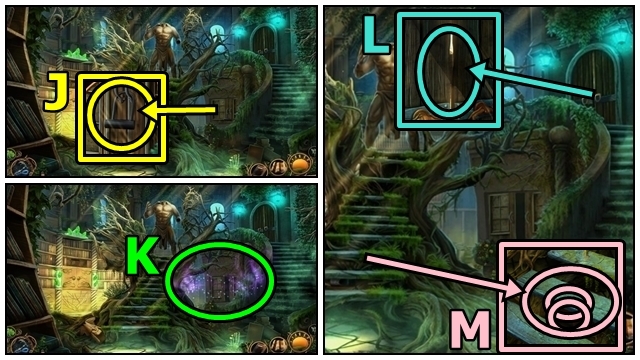
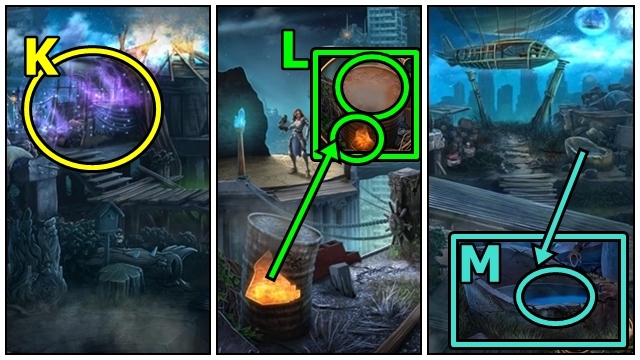
- Climb the wall (J-K).
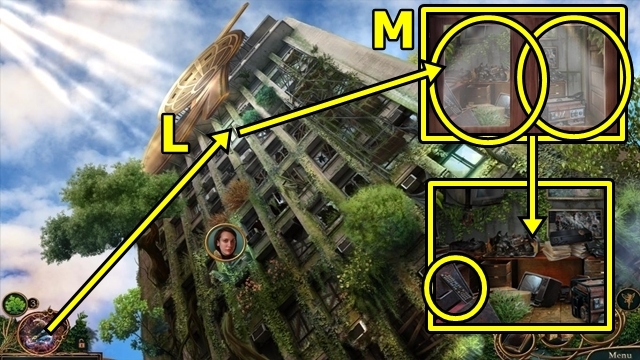
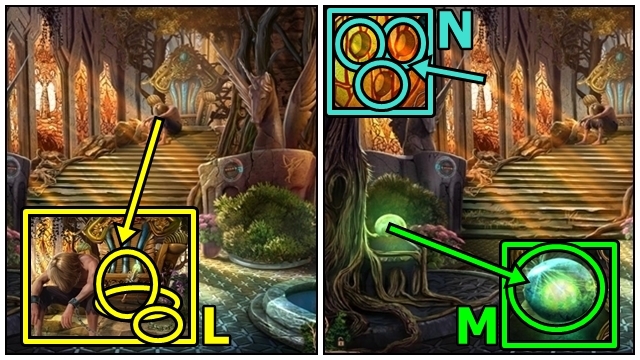
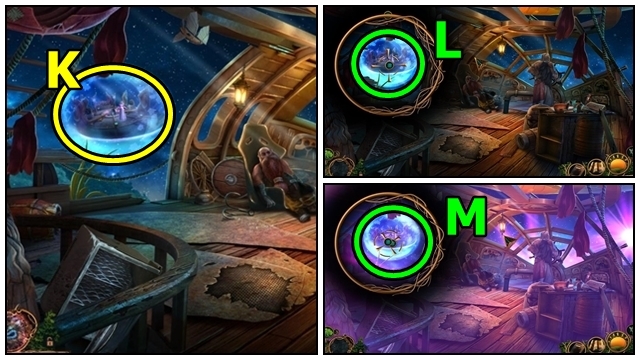
- Talk to Coop (L).
- Take the ORNATE LIGHTER (M).
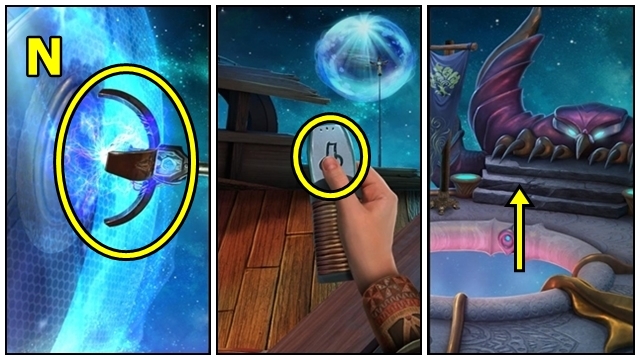
- Put the SCARF on the WOODEN POLE (inventory); use the ORNATE LIGHTER; receive the IMPROVISED TORCH.
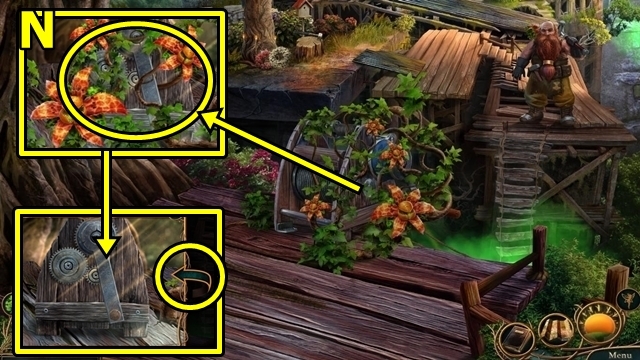
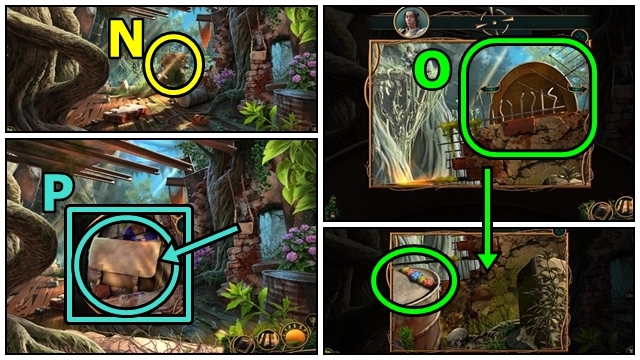
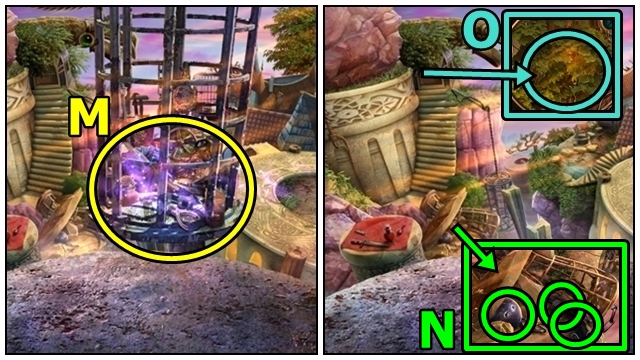
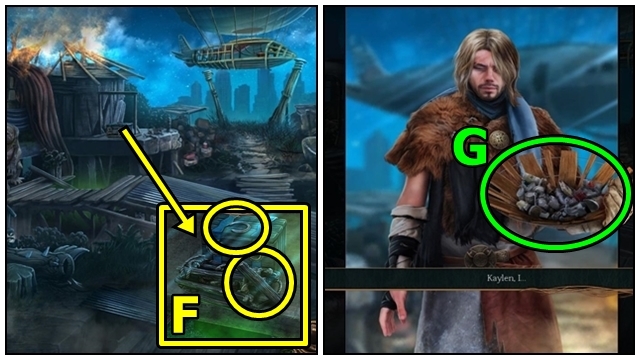
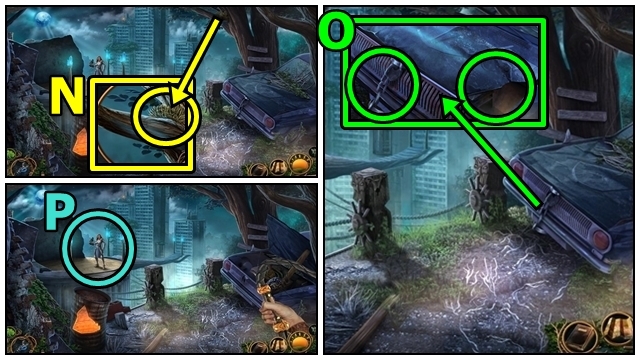
- Use the IMPROVISED TORCH (N). Flip the mechanism.
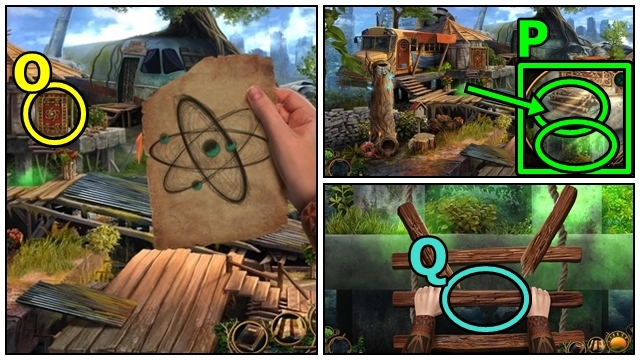
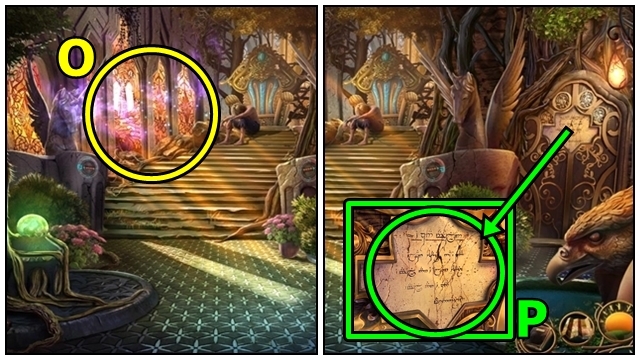
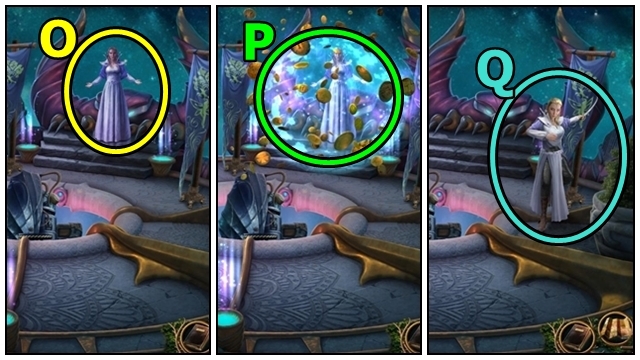
- Move the rope (O). Play the mini-game.
- Solution: (P). Flip the mechanism.
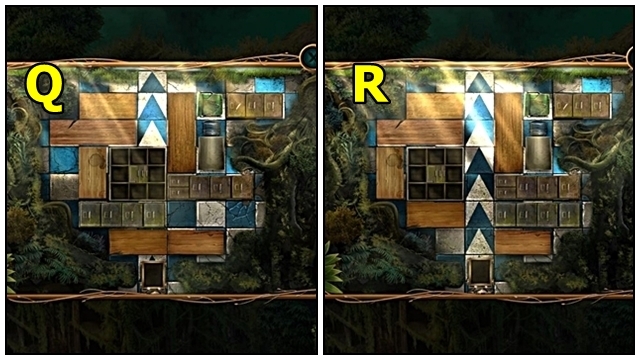
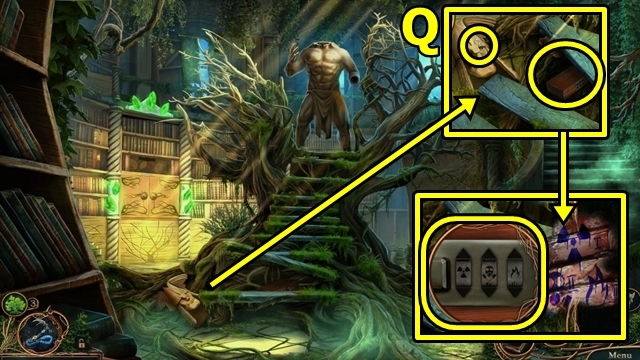
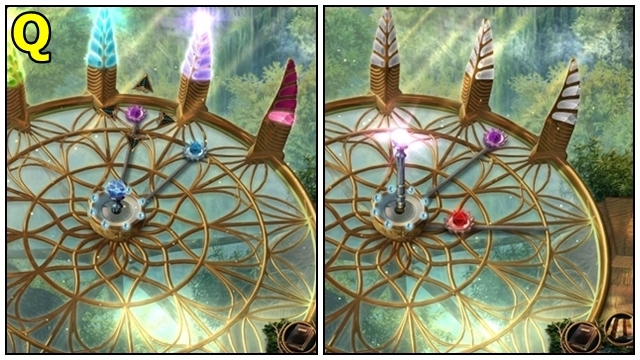
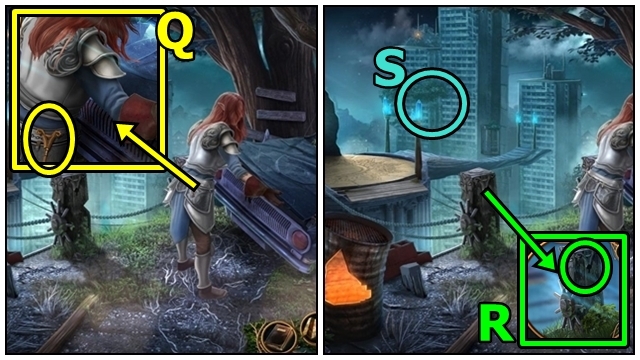
- Activate the lever (Q).
- Move forward.
- Enter the Home.
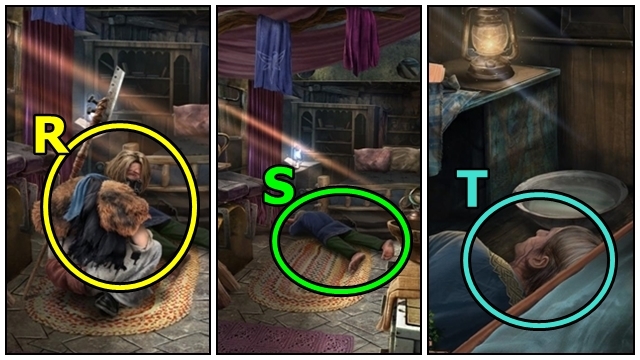
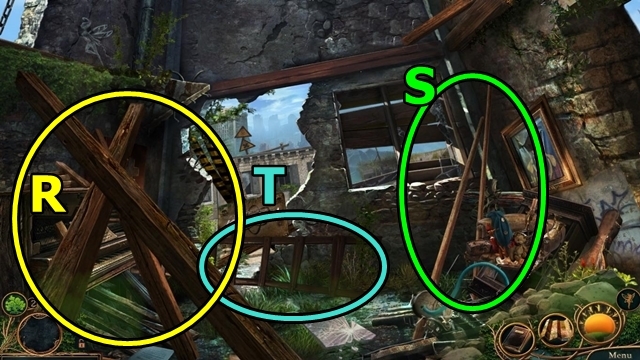
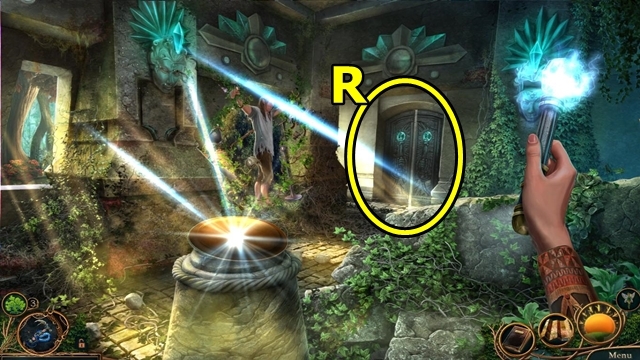
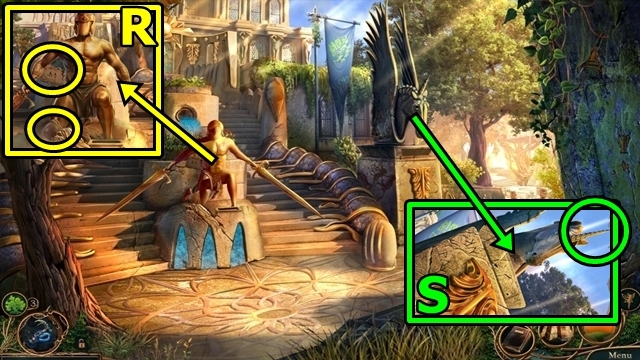
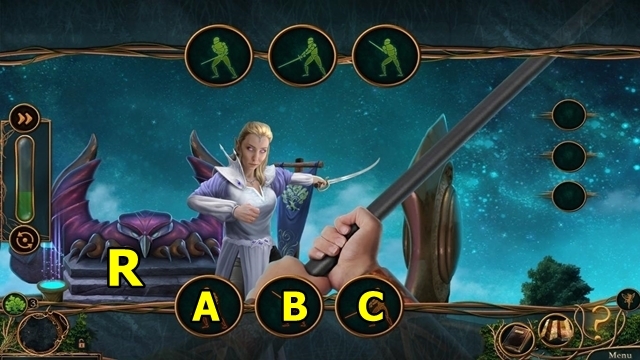
- Talk to the man (R).
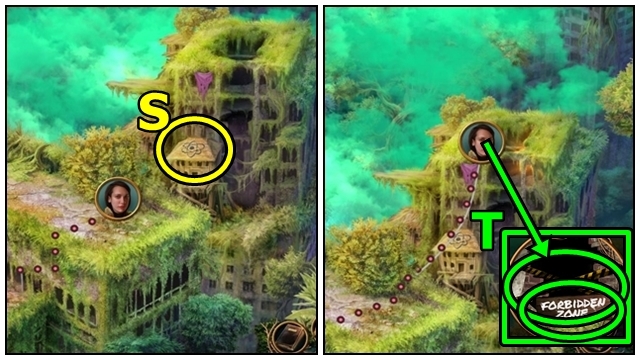
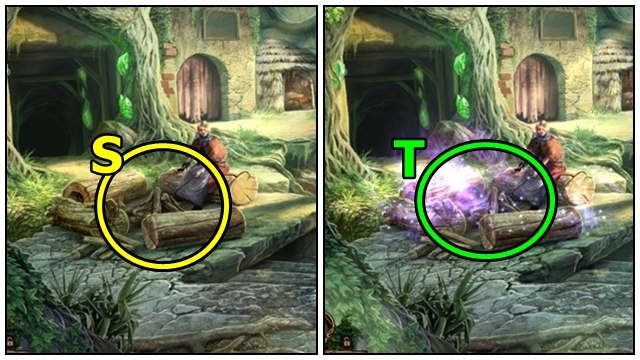
- Examine your father (S).
- Talk to your father (T).
- Move down.
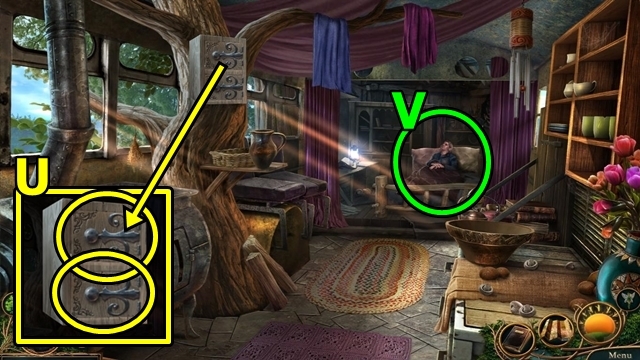
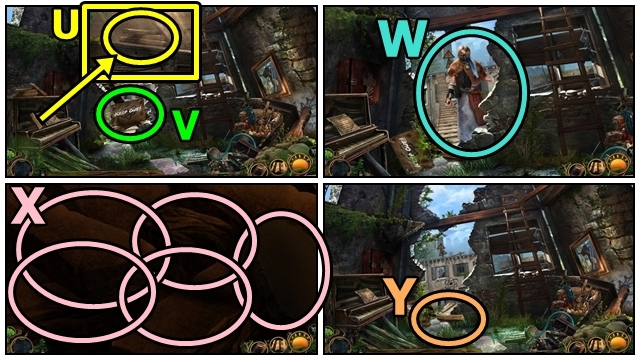
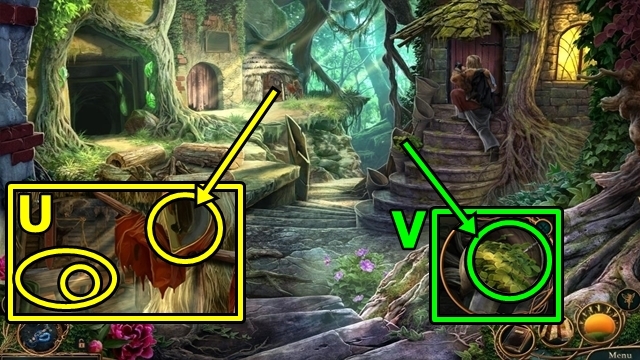
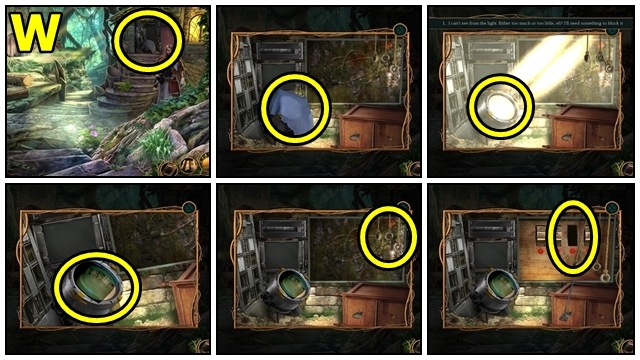
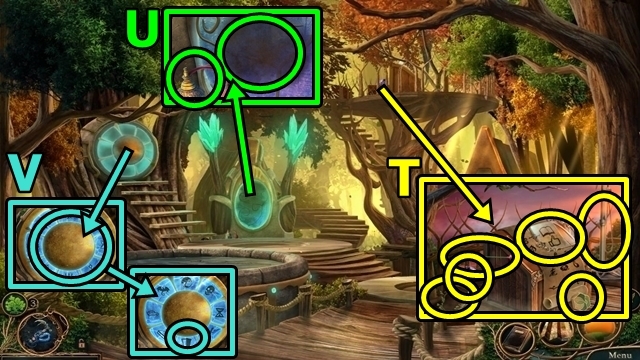
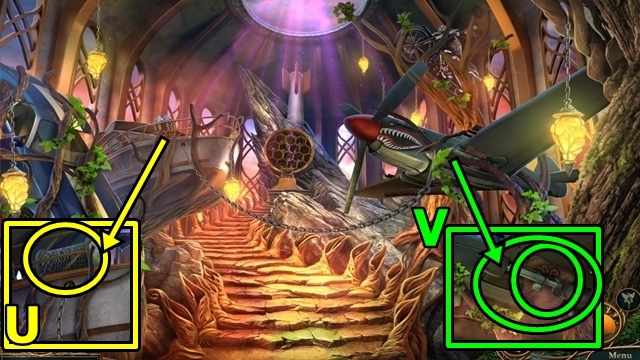
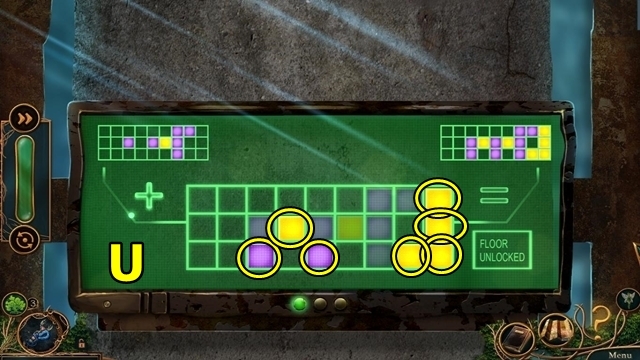
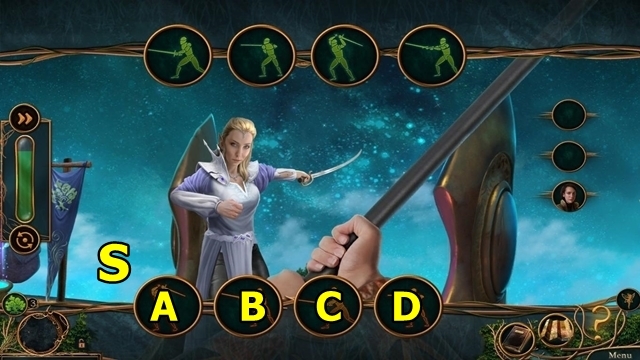
- Open both cupboards (U); take the FRESH TOWEL.
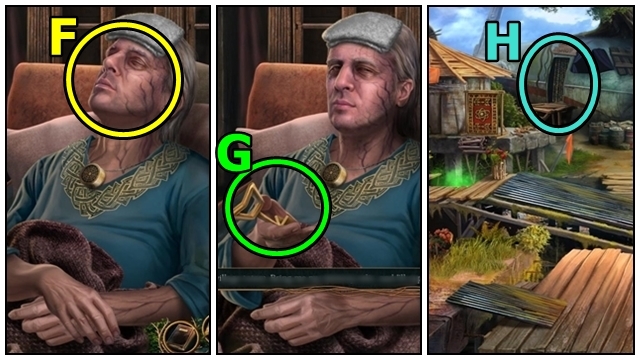
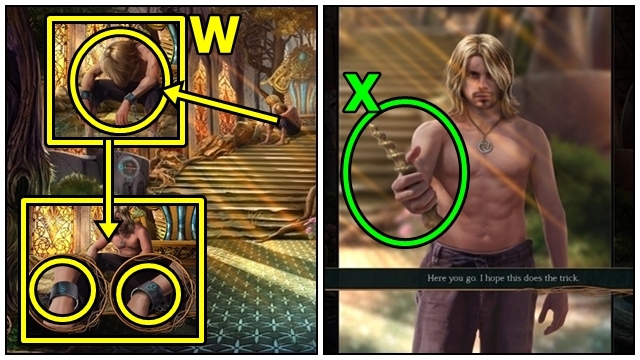
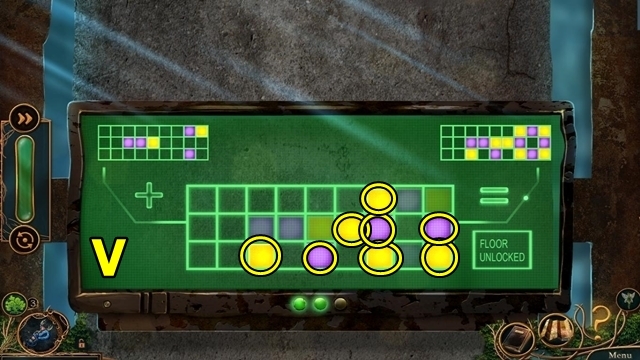
- Examine your father (V).
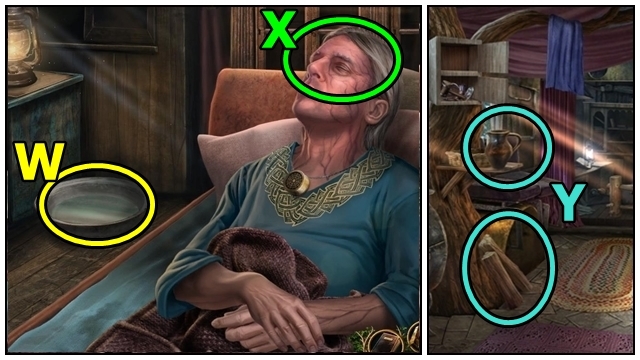
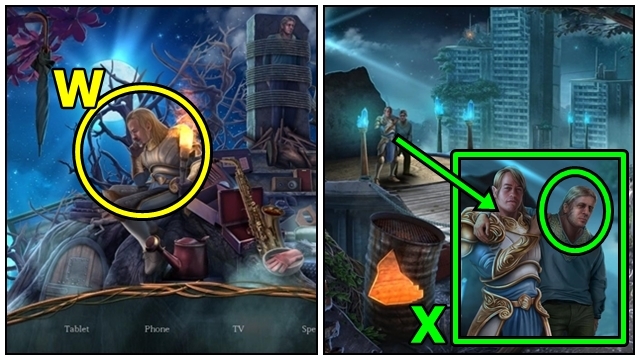
- Add the FRESH TOWEL (W); receive the WET TOWEL.
- Use the WET TOWEL (X).
- Move down.
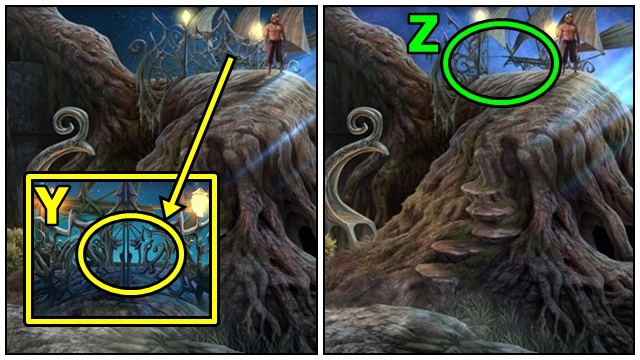
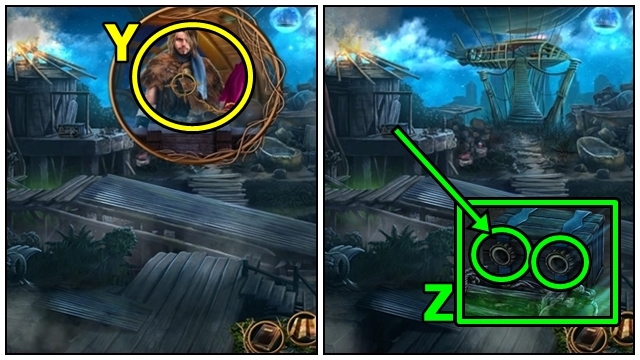
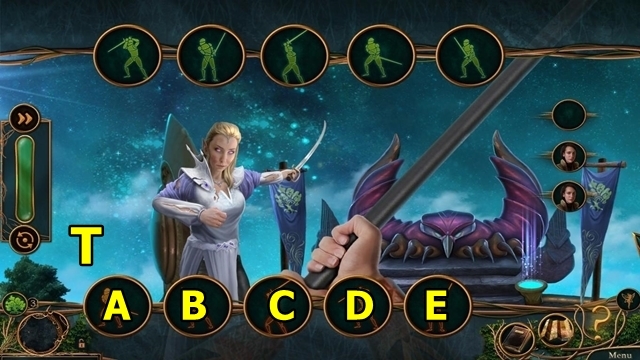
- Take the EMTPY PITCHER (Y) and FIREWOOD.
- Move down.

- Use the pencil (Z); add the EMPTY PITCHER; receive the PITCHER WITH WATER.
- Enter the Home.
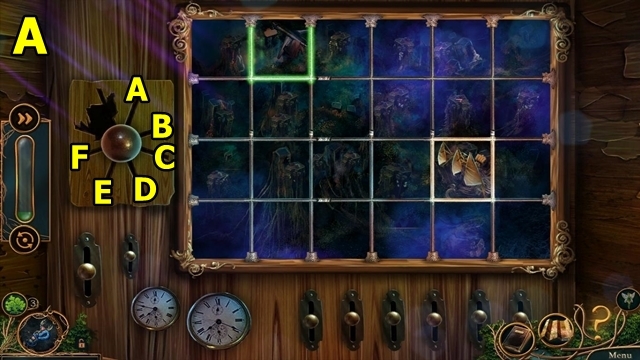
- Add the UNPREPARED FOOD (A) and PITCHER WITH WATER.
- Play the HOP (B); receive the COLD MEAL.
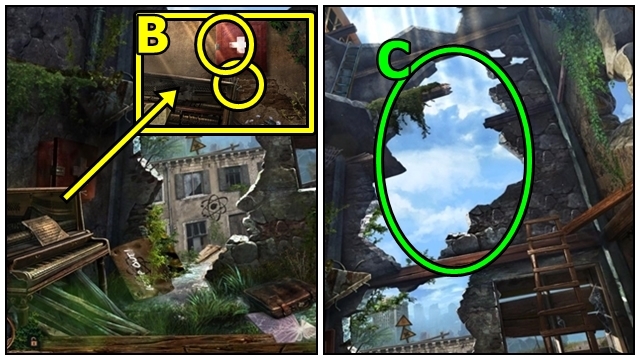
- Open the panel (C); add the FIREWOOD.
- Place the COLD MEAL (D); add the HEALING POTION. Take the REJUVENATING STEW.
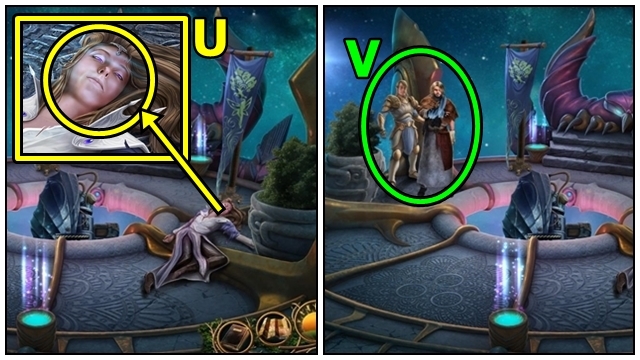
- Examine your father (E).
- Offer the REJUVENATING STEW (F).
- Take the TOTEM KEY (G).
- Return to the Village Center.
- Enter Coop's Air Shop (H).
- Talk to Coop (I).
- Move the items (J); take the WHETSTONE.
- Move down.
- Take the OLD AXE (K).
- Use the WHETSTONE on the OLD AXE (inventory); receive the AXE.
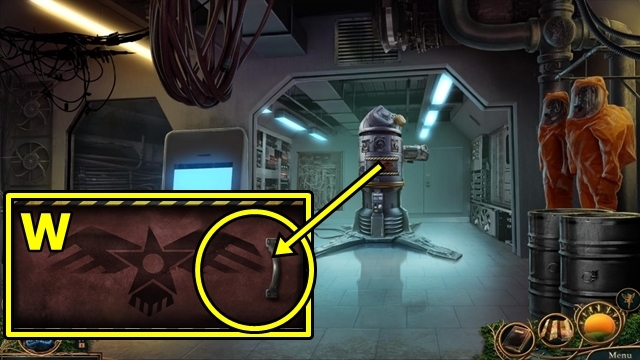
- Move the wreaths (L); use the AXE twice; insert and turn the TOTEM KEY. Move the old grappling hook; read your father's journal. Take the BROKEN MEMORY RELIC and MASK WITHOUT FILTER.
- Return Home.
- Open the BROKEN MEMORY RELIC (inventory); take the MEMORY RELIC.
- Offer the MEMORY RELIC (M); take the FILTER.
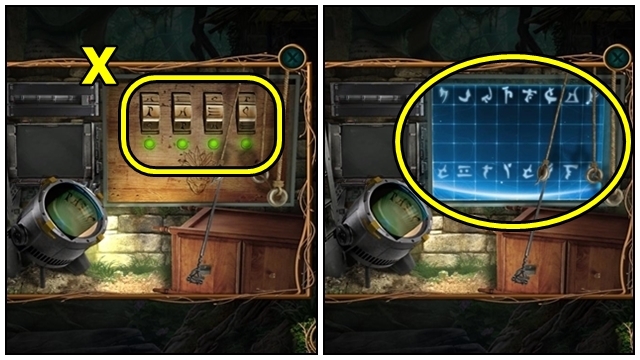
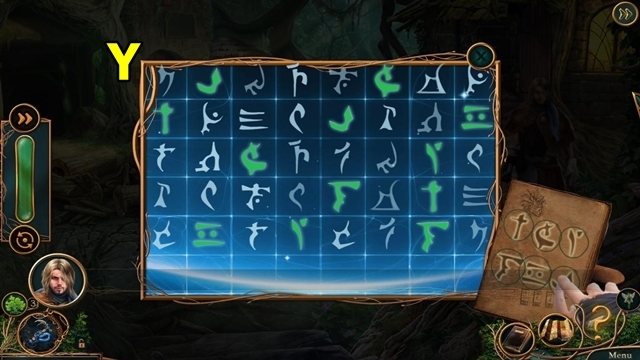
- Play the mini-game.
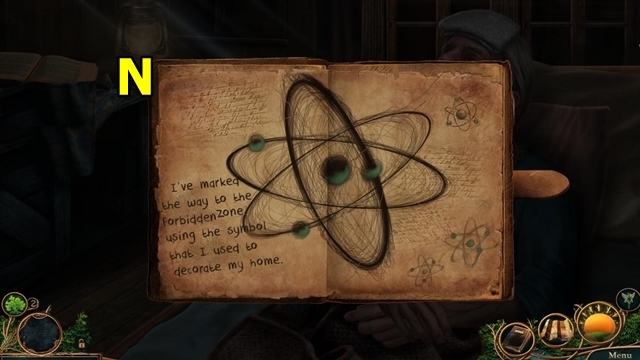
- Solution: (N). Close the Journal.
- Return to the Village Center.
- Select the Nucleus (O).
- Add the FILTER to the MASK WITHOUT FILTER (inventory); receive the MASK WITH FILTER.
- Use the MASK MASK WITH FILTER (P); lower the ladder. Move down.
- Climb down (Q).
- Move the beams (R).
- Take the WOODEN POLES (S).
- Straighten the ladder (T).
- Take the PLANKS (1/5)-(3/5) (U).
- Move the sign (V).
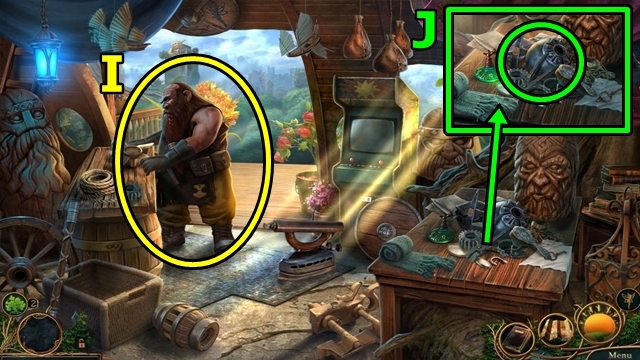
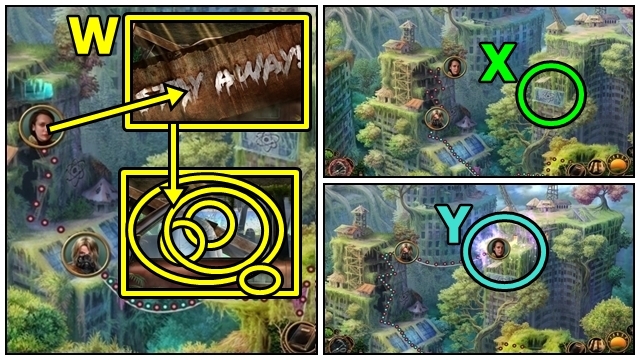
- Talk to the man (W).
- Move the stones (X).
- Take the PLANKS (4/5) (Y).
- Move up.

- Try to take the Climbing Pick (Z).
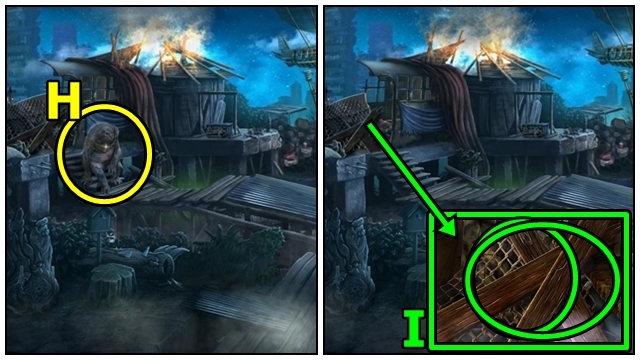
- Play the HOP (A); receive the CLIMBING PICK.
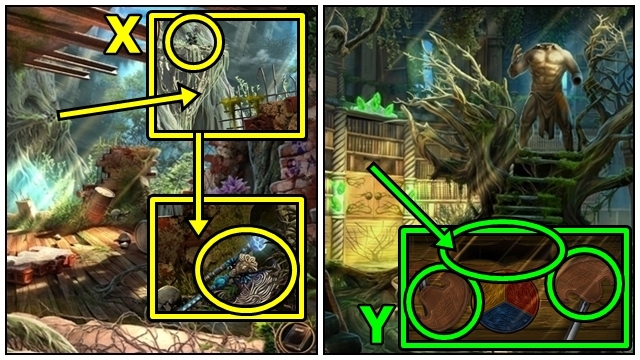
- Use the CLIMBING PICK (B); take the ELVEN PIN and PLANKS (5/5). Use the CLIMBING PICK; receive the NAILS.
- Add the PLANKS, then NAILS to the WOODEN POLES (inventory); use the CLIMBING PICK; receive the MAKESHIFT LADDER.
- Move up.
- Place the MAKESHIFT LADDER (C). Move up.
- Enter Coop's Air Shop.
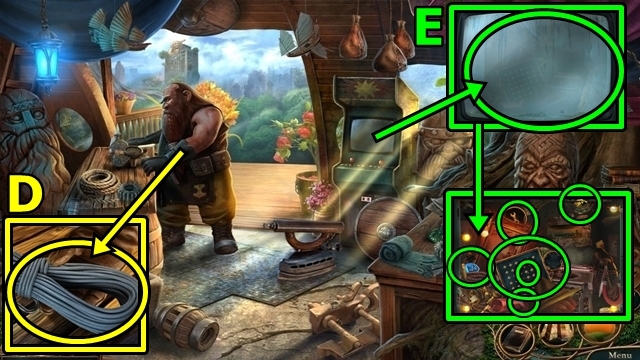
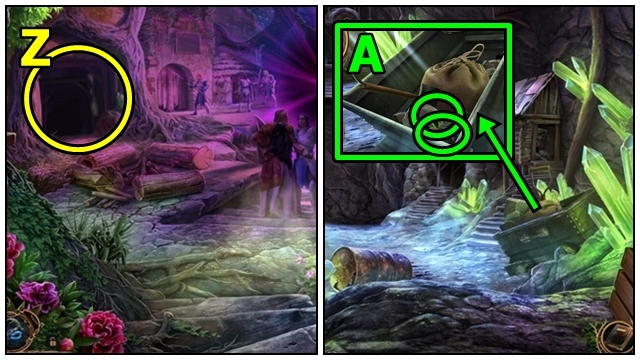
- Talk to Coop (D). Take the LONG ROPE COIL.
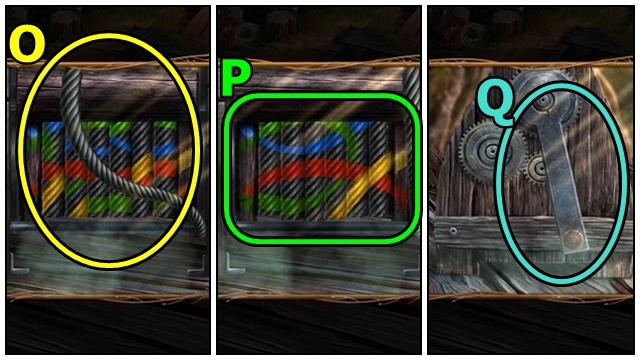
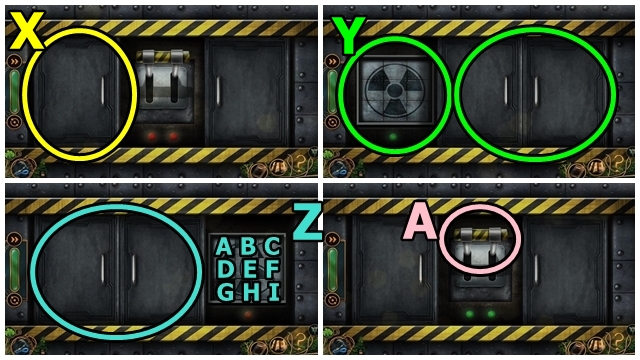
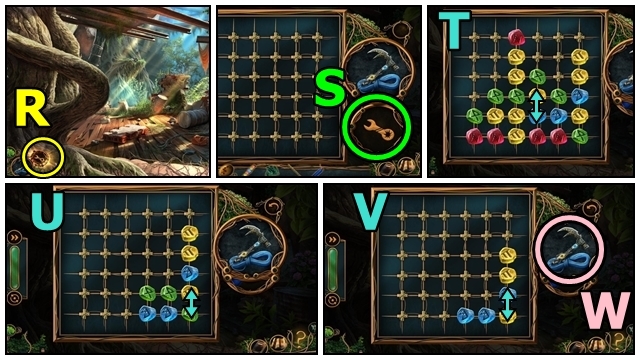
- Remove the cover (E); take the rune stone tablet; take the green, then yellow rune stones, take the wrench; take the blue, then red rune stones. Take the rune stone tablet.
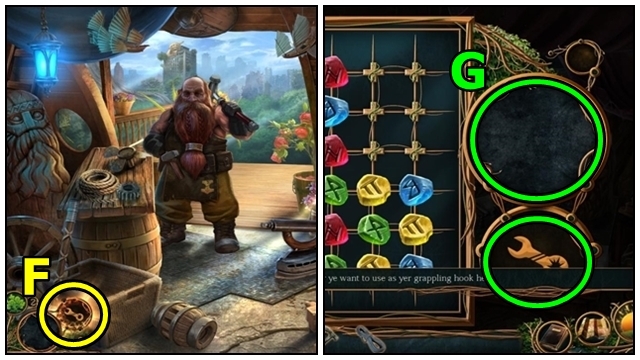
- Select the wrench (F).
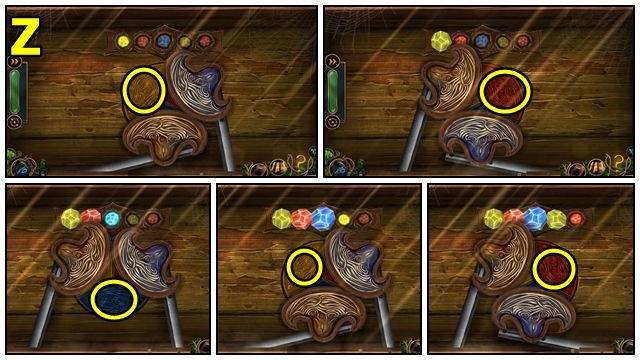
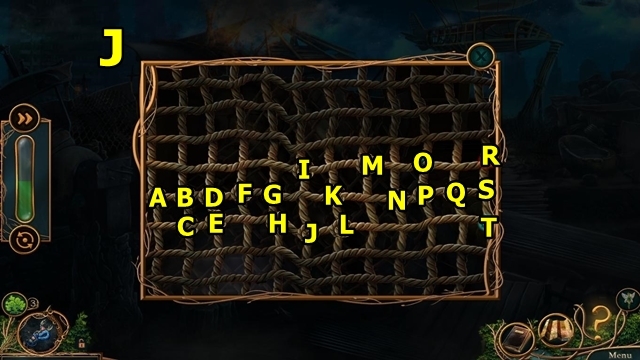
- Add the CLIMBING PICK (G), then LONG ROPE COIL. Play the mini-game.
- Solution: (H).
- Solution: (I-J).
- Receive the Climbing Hook (K).
- Return to the Lower Apartment.
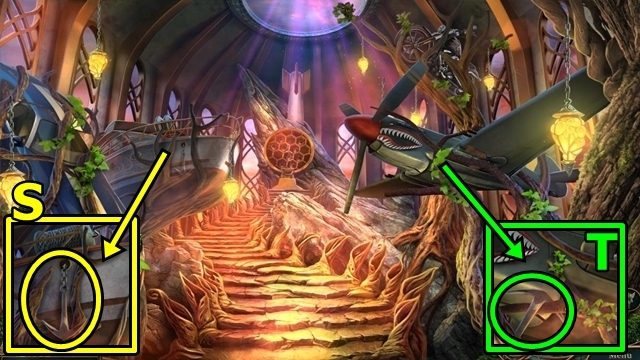
- Use the Climbing Hook (L).
- Move forward.
Chapter 2: The Forbidden Zone
- Use the Climbing Hook (M).
- Attach the line (N).
- Slide down the line (O).
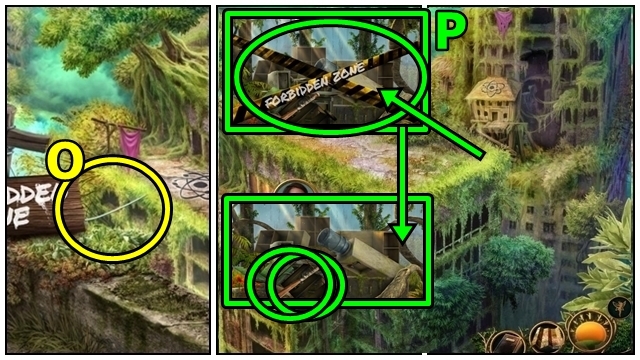
- Move the barrier (P); take the BASEBALL BAT. Straighten the trolley; play the mini-game.
- Solution: (Q-R).
- Use the Climbing Hook (S).
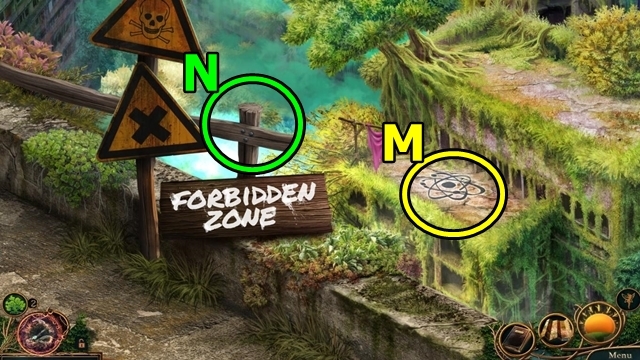
- Move the sign (T) and barrier.

- Use the Climbing Hook (U).
- Talk to the Wanderer (V).
- Move the sign (W). Use the BASEBALL BAT; open the door. Use the ELVEN PIN; take the SMALL LEATHER FOLDER. Move the beam; move forward twice.
- Use the Climbing Hook (X).
- Examine the area (Y).
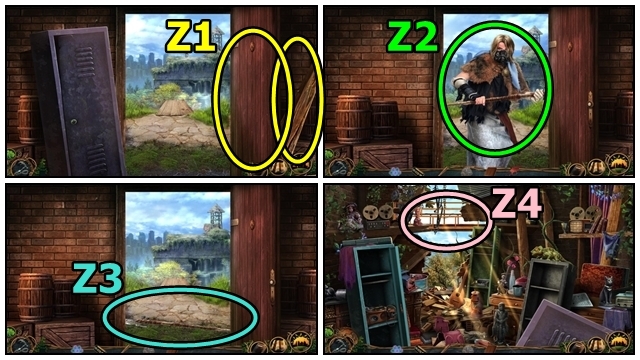
- Close the door (Z1); move the beam. Play the HOP; receive the FLARE GUN.
- Use the FLARE GUN (Z2).
- Take the WANDERER'S SPEAR (Z3).
- Use the WANDERER'S SPEAR (Z4).
- Open the SMALL LEATHER FOLDER (inventory); take the METAL BADGE; remove the dollar; take the COIN.
- Use the METAL BADGE (A); open the door. Move forward. Take the THICK RAG, FLARE and RUNE CRYSTAL (1/3). Move the board; use the BASEBALL BAT. Turn the valve handle.
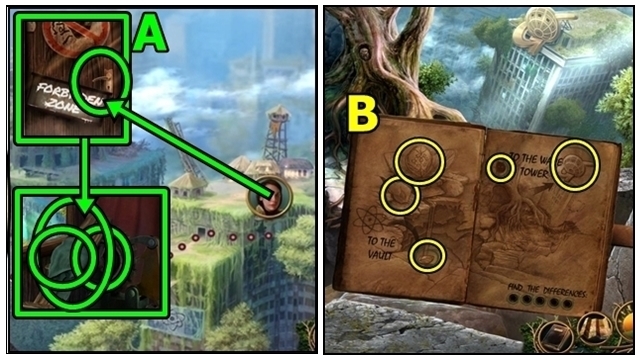
- Move left.
- Find the differences (B); close the book.
- Take the ELVEN ROPE (C) and LANTERN.
- Move towards the Tower of Waves.
- Activate the wrench (D).
- Place the ELVEN ROPE (E); play the mini-game.
- Solution: (F-H). Close the Climbing Hook.
- Activate the Climbing Hook (I).
- Use the Climbing Hook (J).
- Move the boards (K). Take the BROKEN GLASS. Open the panel. Move right. Take the FUEL CANISTER and RUNE CRYSTAL (2/3).
- Use the Climbing Hook (L).
- Open the panels (M). Take the RUNED SCEPTER.
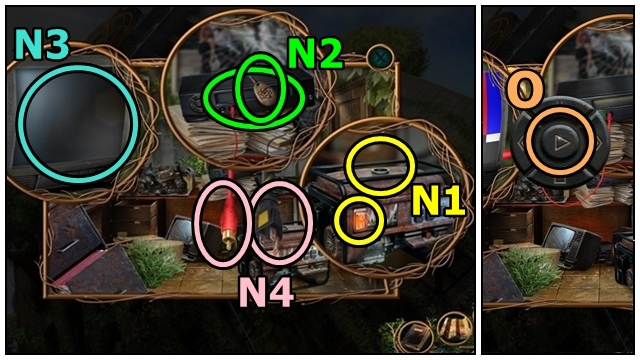
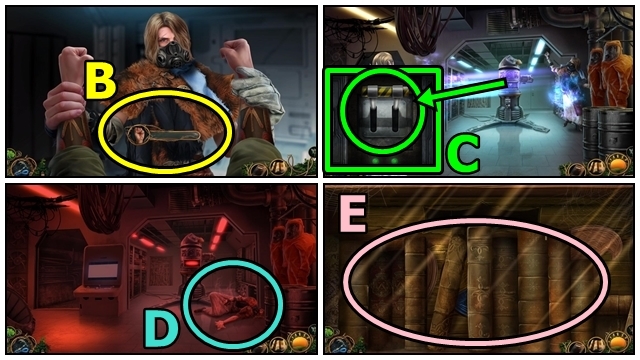
- Add the FUEL CANISTER (N1), press the power button. Take FATHER'S NECKLACE (N2); add the MEMORY RELIC. Use the RUNED SCEPTER (N3). Insert the Plug and Cable (N4).
- Press Play (O). Receive the Clue.
- Move down.
- Attach the THICK RAG to the BROKEN GLASS (inventory); receive the GLASS KNIFE.
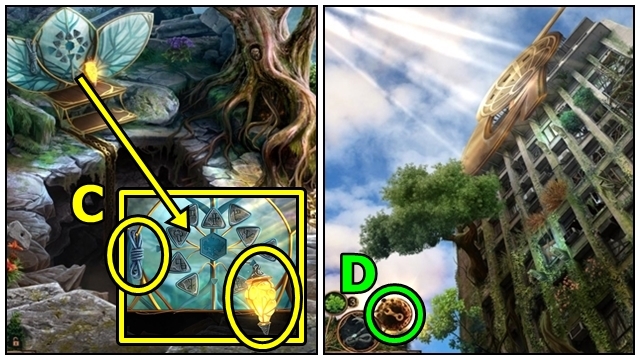
- Use the GLASS KNIFE (P); add the LANTERN.
- Play the HOP (Q); receive the RUNE CRYSTAL (3/3).
- Press the runes (R). Add the ELVEN PIN and RUNE CRYSTALS. Press the elven pin.
- Press the runes (S).
- Open the EMPTY FLARE GUN (inventory); add the FLARE; receive the LOADED FLARE GUN.
Chapter 3: The Library
- Use the LOADED FLARE GUN (T).
- Move down to the Vault.
- Add the NUCLEUS SEAL (U).
- Place your hand (V).
- Move forward.
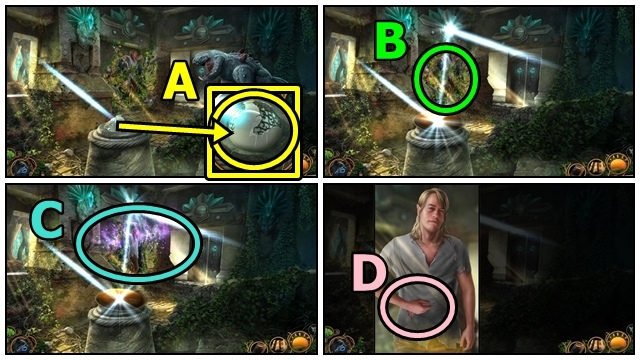
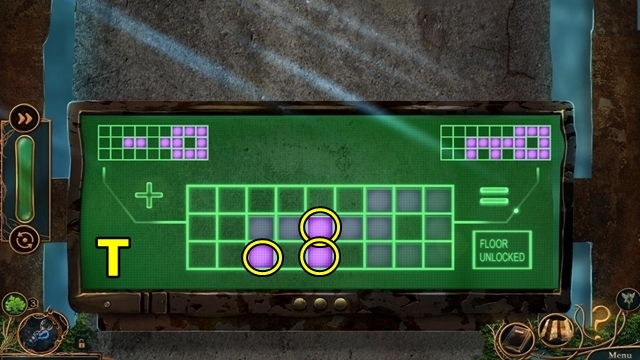
- Open the panel (W); play the mini-game.
- Solution: Slide the panel (X). Rearrange the image (Y); slide the panel. D-E-B-C-F-E (Z); slide the panel. Try to pull the lever (A).
- Fight the Wanderer (B).
- Pull the lever (C). Activate the Nucleus.
- Talk to the Wanderer (D).
- Enter the Forgotten Library.
- Move all the books (E).
- Move down.

- Take the BOX OF MATCHES (F).
- Use the COIN (G); take the ELVEN DAGGER.
- Take the BOOK (H).
- Open the BOOK (inventory); take the STENCIL, take the New Clue and OLD BOOK PAGE.
- Take the STATUE HAND (I). Use the ELVEN DAGGER; take the STATUE SHIELD. Look behind the statue. Add the OLD BOOK PAGE, then BOX OF MATCHES. Take the ARCHAIC KEY; pull the lever. Look at the front of the statue. Take the STATUE HALBERD.
- Use the ARCHAIC KEY (J); remove the lock.
- Play the HOP (K); receive the VALVE.
- Use the STATUE HALBERD (L); take the STATUE HALBERD TOP.
- Use the STATUE HAND (M); take the BLACK SPRAY PAINT and SANDPAPER.
- Go out to the Broken Room.
- Move right.
- Use the STATUE SHIELD (N); play the mini-game.
- Solution: (O). Take the CHARRED SHIELD. Look down. Take the CRYSTAL LOCK.
- Take the TRAVEL PURSE (P). Add the STENCIL, then the BLACK SPRAY PAINT; receive the Combination Clue Text.
- Move down.
- Open the TRAVEL PURSE (inventory); take the NUCLEUS CLOTH and MARBLE EYE.
- Add the MARBLE EYE (Q); take the RUBBER HOSE and BAMBOO STRAW. Open the box under the stairs using the combination; take the AIR TANK.
- Return to the Broken Room.
- Add the RUBBER HOSE and VALVE to the AIR TANK (inventory); receive the COMPRESSED AIR TANK.
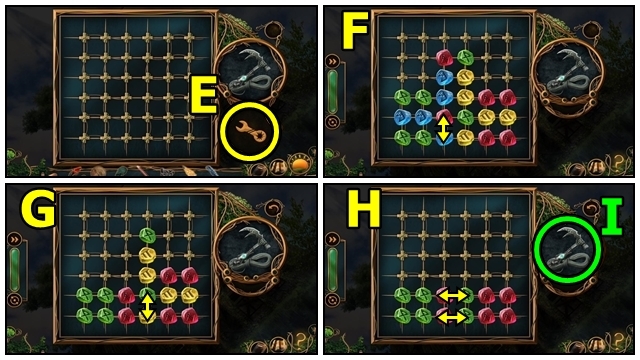
- Activate the wrench (R).
- Add the COMPRESSED AIR TANK (S). Play the mini-game.
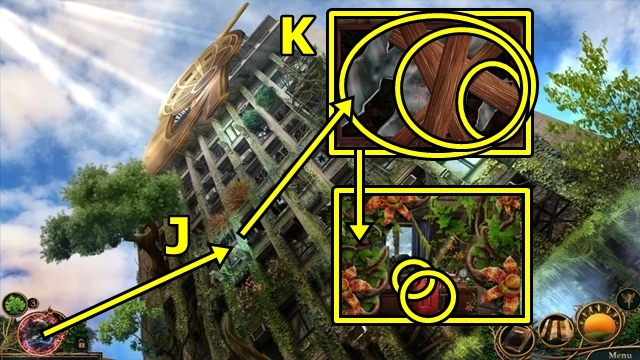
- Solution: (T-V). Take the Climbing Hook (W).
- Use the Climbing Hook (X). Take the ELVEN HALBERD.
- Move down.
- Take the HALBERD TOP and CRYSTAL ROD from the ELVEN HALBERD (inventory).
- Add the CRYSTAL LOCK (Y), STATUE HALBERD TOP and HALBERD TOP. Play the mini-game.
- Solution: (Z).
- Enter the Vine Room.
Chapter 4: The Vine Room
- Use the SANDPAPER on the CHARRED SHIELD (inventory); take the SHINY SHIELD.
- Remove the broken mirror (A); place the SHINY SHIELD. Move the shield twice.
- Use the ELVEN DAGGER (B).
- Play the HOP (C); receive the ELVEN KINDLING.
- Offer the FATHER'S NECKLACE (D).
- Move the shield (E).
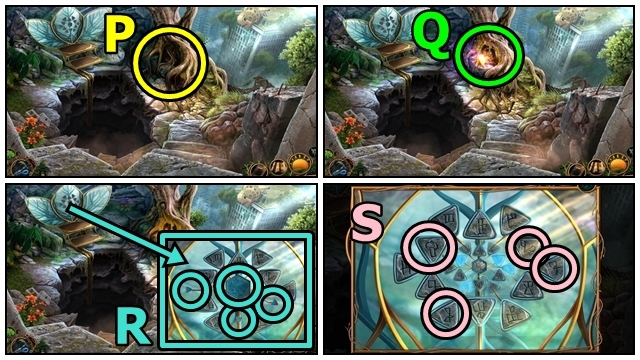
- Try to take the crystal (F); play the mini-game.
- Solution: C-B (G). Take the PAINTED CIRCLE.
- Move the shield (H).
- Move the vines (I); take the CRUDE PICK.
- Move toward the Treeroot Balcony.
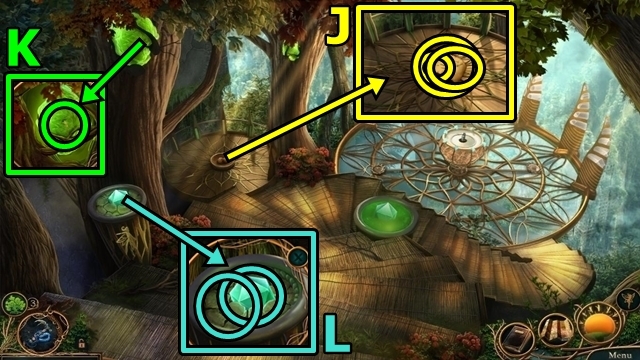
- Take the New Clue (J), WALNUTS and WOODEN BOWL.
- Place the BAMBOO STRAW (K) and WOODEN BOWL. Take the GLOWING LIQUID.
- Use the CRUDE PICK (L); take the PRISM (1/2).
- Try to take the crystal (M); quickly add the NUCLEUS CLOTH. Take the PRISM (2/2).
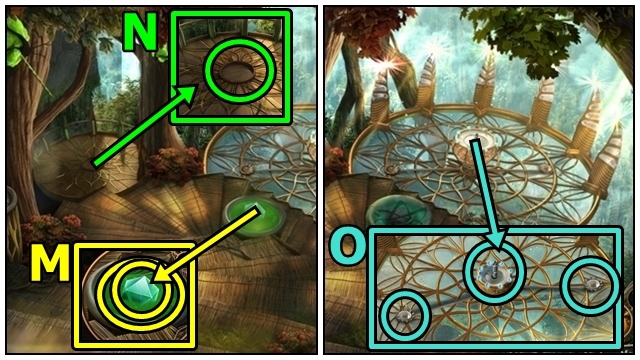
- Pour the GLOWING LIQUID (N).
- Remove the broken rod (O). Place the CRYSTAL ROD; add the PRISMS. Play the mini-game.
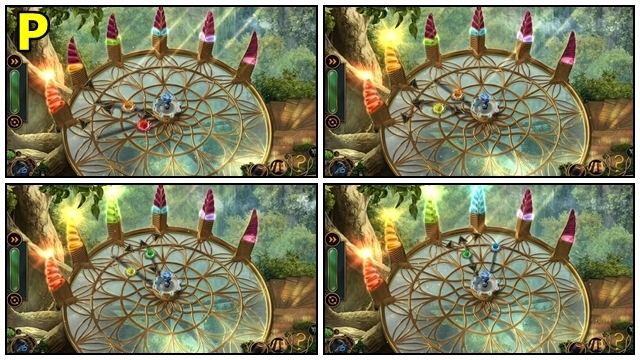
- Solution: (P).
- Solution: (Q). Take the Crystal Rod.
- Return to the Vine Room.
- Destroy the door (R).
- Go to the Cottages.
- Add the ELVEN KINDLING (S).
- Play the HOP (T); receive the CURE.
- Take the TANNER TOOL (U). Use the TANNER TOOL; receive the TINTED GLASS. Place the WALNUTS; use the TANNER TOOL. Take the NUTS.
- Move the leaves (V); take the FIRE IRON. Move the leaves; offer the NUTS. Pull the handle.
- Remove the cloth (W). Place the TINTED GLASS. Press the spotlight. Use the FIRE IRON. Add the PAINTED CIRCLE.
- Turn the dials (X). Press the board. Play the mini-game.
- Solution: (Y). Take the NUCLEUS CONTROL RELIC.
- Receive the BUG TORCH.
- Use the BUG TORCH (Z).
- Enter the Crystal Mines.
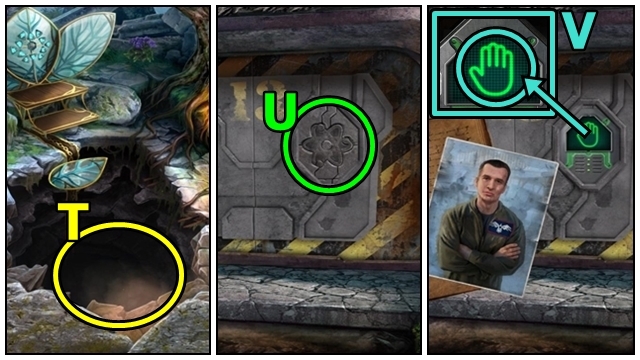
- Move the items (A); take the CRYSTAL ORE.
- Take the ELEVATOR NOTES (B). Use the TANNER TOOL; receive the WOODEN WHEEL. Add the CRYSTAL ORE; take the SHARP CRYSTAL.
- Move the rocks (C); use the SHARP CRYSTAL; remove the items from the bag. Add the WOODEN WHEEL; move the trolley. Take the STAR CRYSTAL.
- Add the STAR CRYSTAL (D) and ELEVATOR NOTES.
- Play the HOP (E); receive the COLORED CRYSTALS.
- Add the COLORED CRYSTALS (F).
- Move up to the Vault, then move forward.
- Use the Climbing Hook (G).
- Talk to the man (H).
- Play the mini-game.
- Solution: (I).
- Take the STRANGE LOCK (J).
- Take LANA'S THINGS (K) and LEG BONE.
- Open LANA'S THINGS (inventory); take the Climbing Hook, FATHER'S NECKLACE, NUCLEUS CONTROL RELIC and CURE.
- Use the Climbing Hook (L).
- Play the HOP (M); receive the MACHINE KEY.
- Use the LEG BONE (N), then STRANGE LOCK. Push the ball.
- Move the leaves (O); move the board and open the door. Enter the area.

- Take the TOY VEHICLE (P). Look at the Machine Instructions. Insert the MACHINE KEY. Play the mini-game.
- Solution: (A-C)-(A-B)-(C-B)-(A-C)-(B-A)-(B-C)-(A-C) (Q).
- Move to the Elven Palace.
Chapter 5: The Elven Palace
- Take the BRASS PLATE (R) and EMPTY WINESKIN
- Take the UNICORN HORN (1/2) (S). Add the BRASS PLATE. Take the SHIELD PLATE (1/6).
- Go to the Elven Town.
- Take the FINE DIAMOND (T), BRANCH CROWN, TOY ARROW, TRANSLATION LENS and SHIELD PLATE (2/6). Lower the flag; take the ELVEN BANNER.
- Use the atomizer (U). Use the ELVEN BANNER, then the FINE DIAMOND. Use the TOY ARROW; take the SHIELD PLATE (3/6).
- Use the TRANSLATION LENS (V); press the door icon; take the SHIELD PLATE (4/6) and RED GARNET.
- Press the water (W). Offer the FATHERS NECKLACE. Press the water. Use the EMPTY WINESKIN.
- Try to take the note (X). Use the TRANSLATION LENS. Take the New Clue; open the door.

- Play the HOP (Y); receive the SHIELD PLATE (5/6).
- Move forward to the Tree Root Gate.
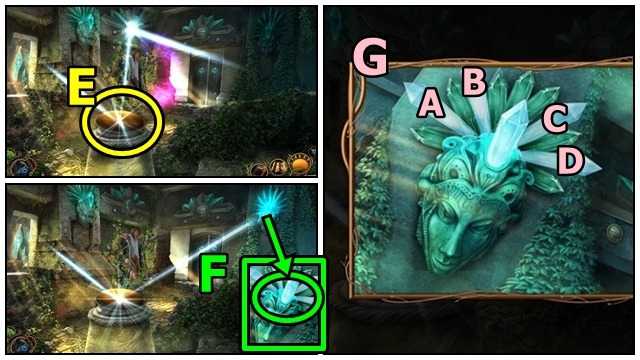
- Use the TRANSLATION LENS (Z). Press the rune; take the EMBER LIGHT.
- Use the EMBER LIGHT (A). Take the TOPAZ; move the items, take the DRIED HERBS. Use the TRANSLATION LENS. Press the rune.
- Return to the Elven Palace.
- Pour the FULL WATERSKIN (B). Move the rocks; take the EMBER, SHIELD PLATE (6/6) and ELVEN TONGS.
- Use the ELVEN TONGS on the TOY VEHICLE (inventory); receive the GRABBER.
- Activate the wrench (C).
- Add the GRABBER (D); play the mini-game.

- Solution: (E).
- Use the Climbing Hook (F). Receive the STATUE SHIELD.
- Place the STATUE SHIELD (G), then the SHIELD PLATES. Play the mini-game.
- Solution: (H).
- Enter the Throne Room.
- Move forward.
- Try to talk to the Wanderer (I).
- Turn the dial two times (J).
- Turn the dial three times (K).
- Talk to the Wanderer (L). Take the LEATHER WHIP, LEAF CROWN and ELVEN SCEPTER.
- Press the sphere (M); examine the scene. Use the ELVEN SCEPTER; take the PERIDOT GEM.
- Add the RED GARNET (N), TOPAZ and PERIDOT GEM.
- Play the HOP (O); receive the GLASS CROWN.
- Use the TRANSLATION LENS (P); remove the plate. Add the BRANCH CROWN, LEAF CROWN and GLASS CROWN.
- Enter the Museum of the Anathema.

- Add the DRIED HERBS (Q), then the EMBER.
- Play the HOP (R); receive the LOCK CODES LEFT.
- Pull the anchor (S).
- Move the anchor (T).
- Use the Climbing Hook (U).
- Move the wheel (V); take the LOCK CODES RIGHT.
- Move down.
- Talk to the Wanderer (W). Use the LOCK CODES LEFT and LOCK CODES RIGHT.
- Take the UNICORN HORN (2/2) (X).
- Return to the Tree Root Gate.
- Place the UNICORN HORNS (Y). Open the gate.
- Play the mini-game (Z).
- Solution: A-F-D-A-F-A-Fx2-A (A).
Chapter 6: The Perilous Peak
- Take the IRON WEATHERVANE (B) and FLANNEL.
- Talk to the troll (C).
- Move the bottle (D); take the BROKEN BOTTLE and EMPTY KEG.
- Take the OLD IRON (E). Use the BROKEN BOTTLE. Add the EMPTY KEG; receive the KEG OF WATER. Add the FLANNEL; receive the SOAKED FLANNEL.
- Use the SOAKED FLANNEL (F). Take the RUSTY HORSESHOE and LADDER STICK.
- Receive the ROCK STEW (G).
- Add the OLD IRON, IRON WEATHERVANE and RUSTY HORSESHOE to the ROCK STEW (inventory); receive the IRON TROLL STEW.
- Offer the IRON TROLL STEW (H).
- Move the beams (I); try to remove the net. Play the mini-game.
- Solution: T-S-Q-N-P-O-M-I-J-H-L-K-G-F-D-E-C-B-A (J). Take the FIREPLACE TONGS and CORRODED SIGNET RING. Move the sign.
- Play the HOP (K); receive the BAG OF IRON.
- Use the KEG OF WATER (L), then FIREPLACE TONGS; receive the BURNING COAL. Remove the cover; take the SAUSAGE ON A STICK.
- Move down.
- Use the EMPTY KEG (M); receive the KEG OF WATER.
- Return to the Perilous Peak.
- Use the Climbing Hook (N). Receive the ABANDONED NEST.
- Use the BURNING COAL (O), then pour the KEG OF WATER. Use the LADDER STICK. Add the ABANDONED NEST, then SAUSAGE ON A STICK. Use the LEATHER WHIP.
- Try to talk to the Sentry (P).
- Take the BRIDGE KEY (Q).
- Insert the BRIDGE KEY (R).
- Play the mini-game (S).
- Solution: Level 1 (T).
- Solution: Level 2 (U).
- Solution: Level E (V).
- Talk to the soldier (W). Play the HOP; receive the ELVEN MAGIC CATALYST.
- Talk to your father (X). Offer the CURE. Take FATHER'S SIGNET RING.
- Move down.
- Select the airship; use the Climbing Hook (Y).
- Insert the CORRODED SIGNET RING (Z) and FATHER'S SIGNET RING. Take the THUNDER CORE.
- Go to Coop's Flying Wonder.
- Move the items (A); take the COFFEE BEANS.
- Talk to Coop (B). Take the EMPTY TONIC BOTTLE.
- Take the CHILI PEPPER (C). Open the fridge; take the GREEN HORSE DRINK.
- Put the CHILI PEPPER, COFFEE BEANS and GREEN HORSE DRINK in the EMPTY TONIC BOTTLE PLUS (inventory); receive COOP'S TONIC.
- Offer COOP'S TONIC (D). Take the OLD DWARVEN RUNE.
- Place the THUNDER CORE (E), then the ELVEN MAGIC CATALYST and OLD DWARVEN RUNE.
- Play the HOP (F); receive the THUNDER BOMB.
- Activate the wrench (G).
- Add the THUNDER BOMB (H). Play the mini-game.
- Solution: (I).
- Solution: (J). Take the Climbing Hook.
- Use the Climbing Hook (K).
- Play the mini-game.
- Solution: (L-M).
- Press the thunder bomb (N), then the button. Move to the Royal Platform.
- Throw the BAG OF IRON (O).
- Play the HOP (P); receive the IRON BAR.
- Use the IRON BAR (Q); play the mini-game.
- Solution: B-C (R).
- Solution: (B-C)-(C-D)-(A-B)-(C-B) (S).
- Solution: (B-C)-(C-D)-(D-E)-(A-B)-(B-C)-(C-D)-(A-B)-(B-C) (T).
- Use the IRON BAR (U). Take the ELVEN CROWN.
- Talk to the men (V).
- Use the NUCLEUS CONTROL RELIC (W).
- Offer the ELVEN CROWN (X).
- Congratulations! You've completed Dawn of Hope: Skyline Adventure.
Created at: 2016-12-04