

Walkthrough Menu
- General Tips
- Chapter 1: The Manor
- Chapter 2: Courtyard
- Chapter 3: Hedge Maze
- Chapter 4: Atrium
- Chapter 5: The Aquarium
General Tips
- This is the official guide for Dead Reckoning: Brassfield Manor!
- This guide will not mention each time you have to zoom into a location; the screenshots will show each zoom scene.
- Hidden-object puzzles are referred to as HOPs. This guide will not show screenshots of the HOPs, however, it will mention when an HOP is available and the inventory item you'll collect from it.
- This guide will give step-by-step solutions for all puzzles which are not random. Please read the instructions in the game for each puzzle.
Chapter 1: The Manor
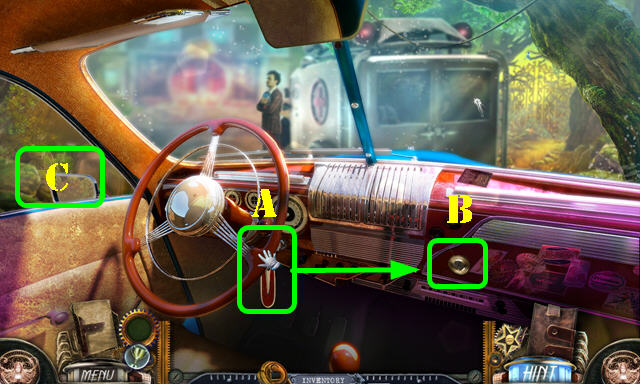
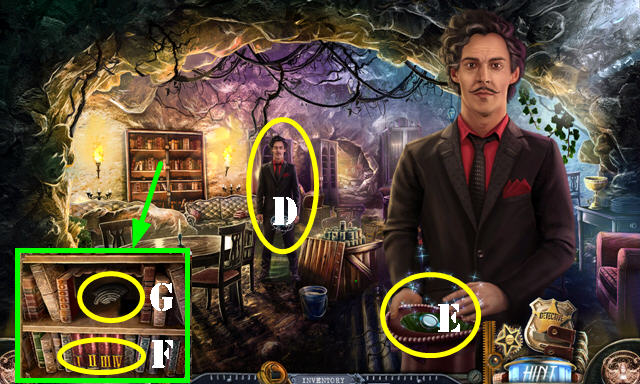
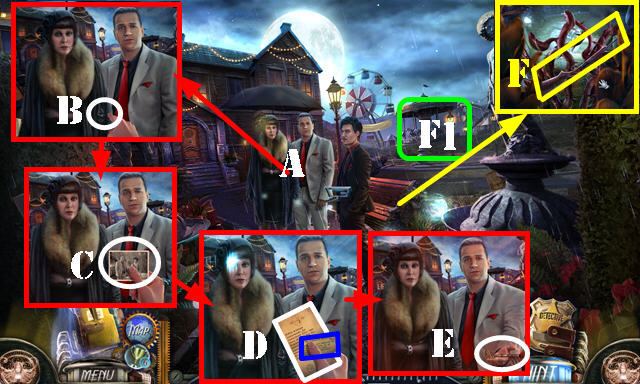
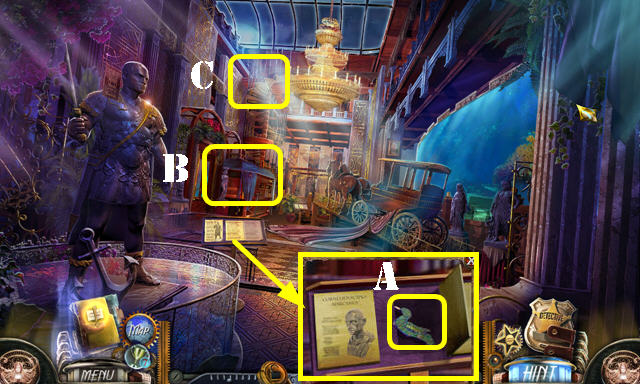
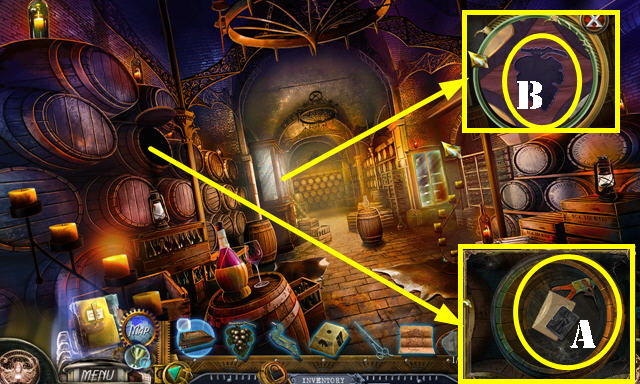
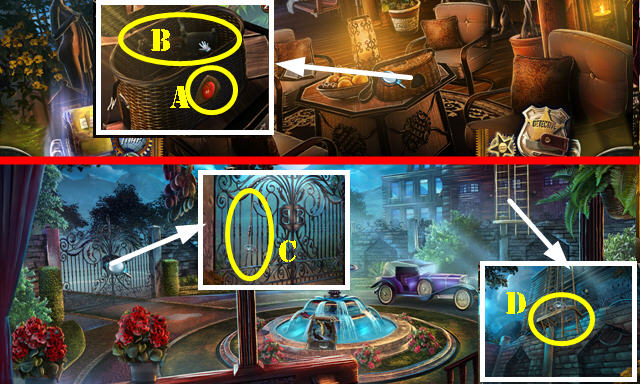
- Take the CAR KEY (A).
- Use the CAR KEY (B) for a HOP; play it to get the WALLET.
- Open the WALLET; take the BADGE and the NICKELS 1/2 (inventory).
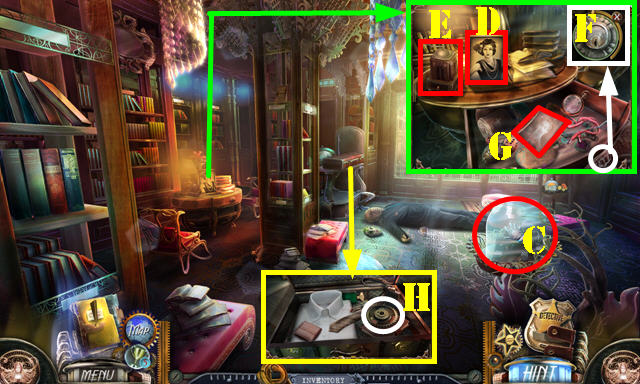
- Exit the car (C).
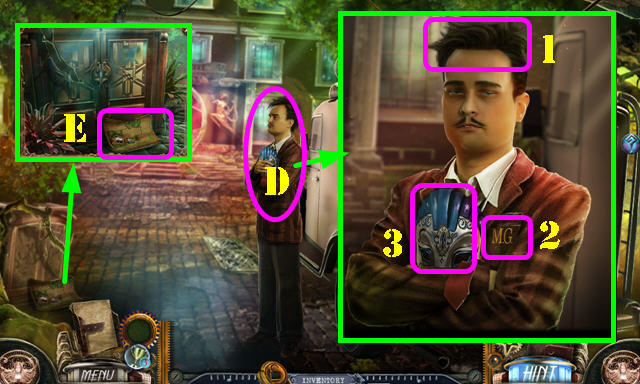
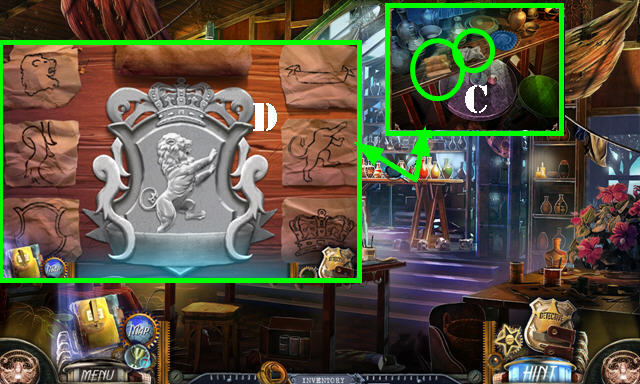
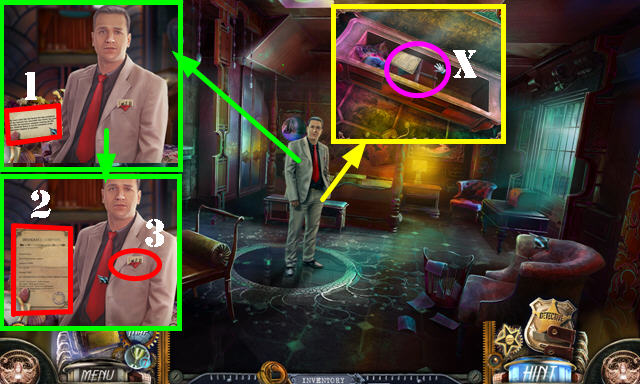
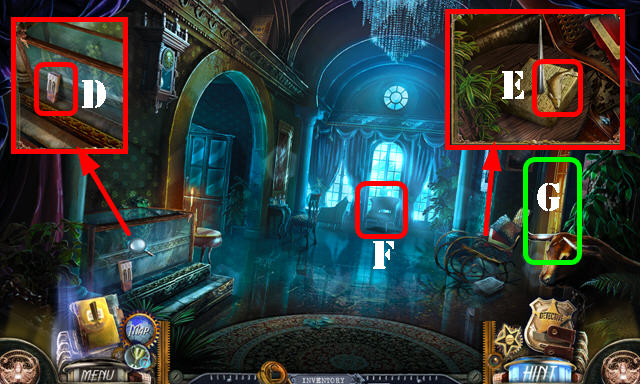
- Talk to Mortimer and give him the BADGE (D).
- Select these items (1-2-3).
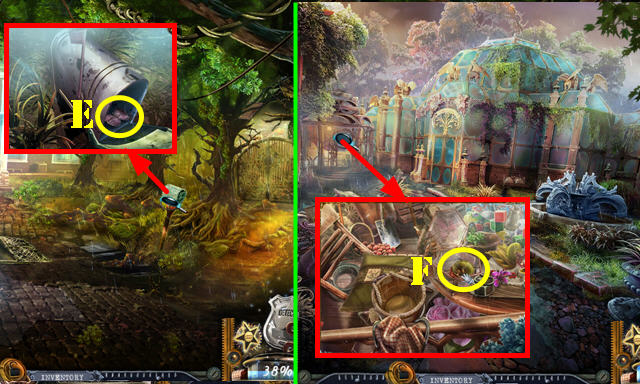
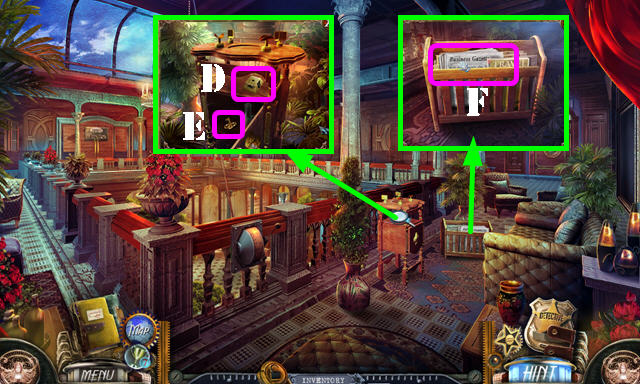
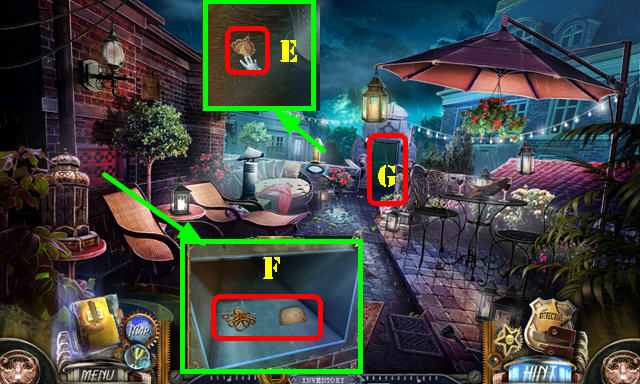
- Take the Map and PUZZLE TOKEN (E).
- Go forward.
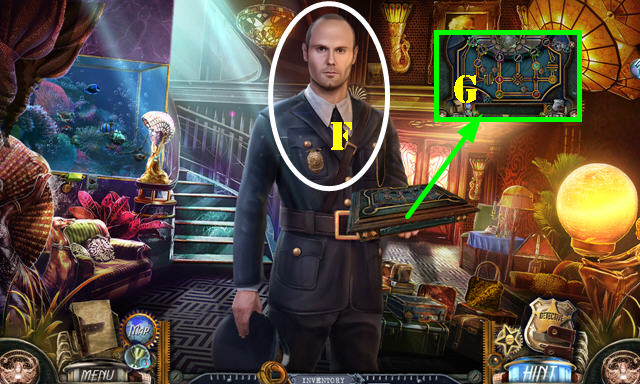
- Talk to the officer (F).
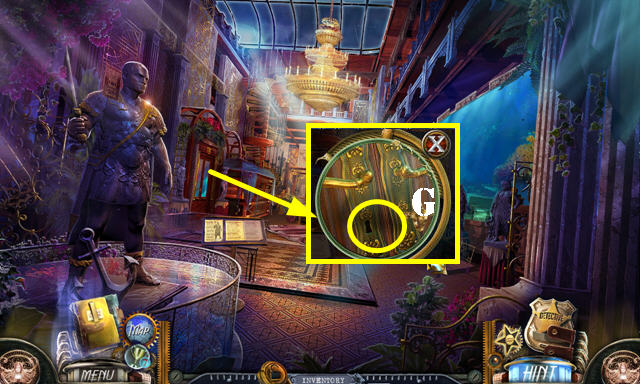
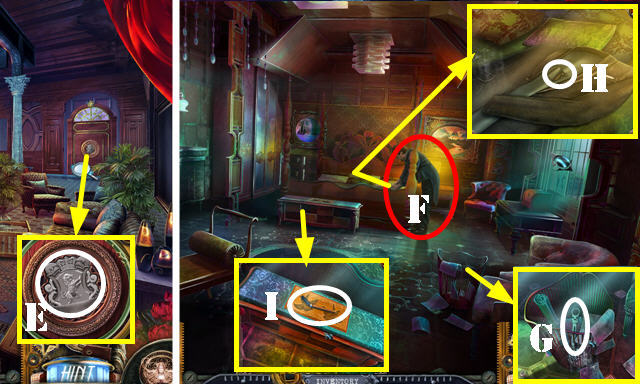
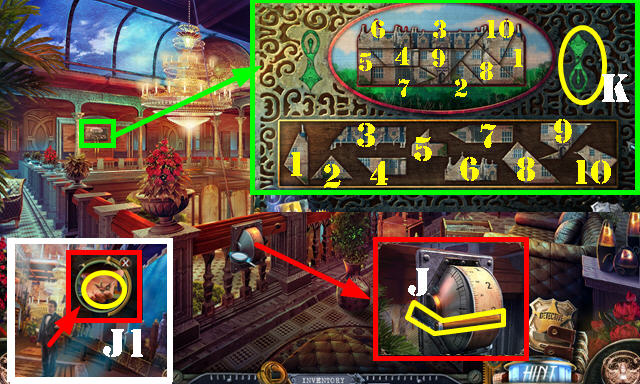
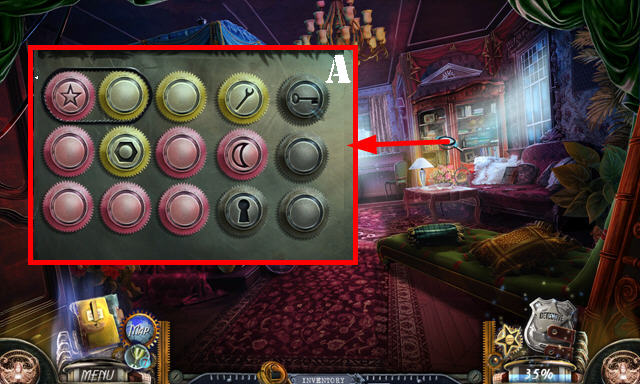
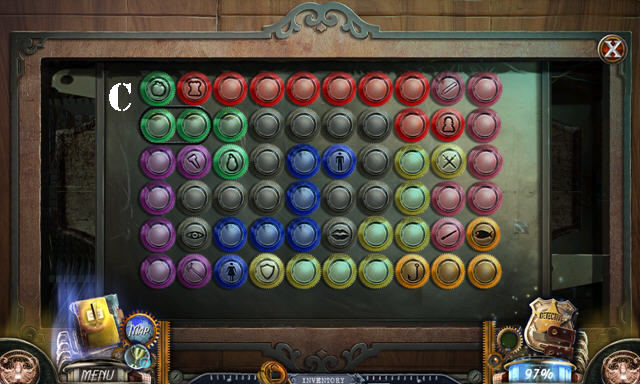
- Place the PUZZLE TOKEN for a puzzle (G).
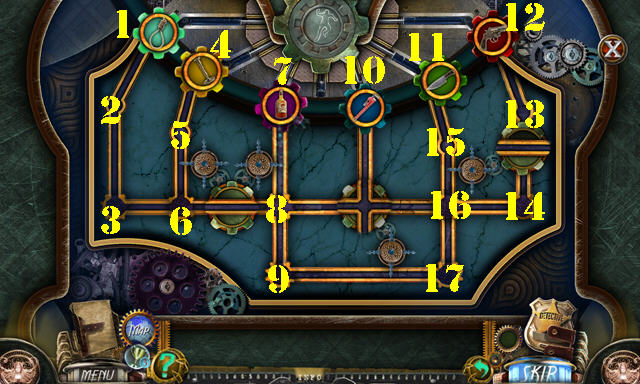
- Solution: (8-7)-(9-2)-(17-9)-(14-6)-(15-8)-(9-12)-(8-14)-(6-9)-(2-11)-(14-1)-(5-3)-(7-16)-(3-10)-(9-4)-(16-7).
- Take the Suspect photos. You'll receive the MYSTERY BOX.
- Talk to the officer again.
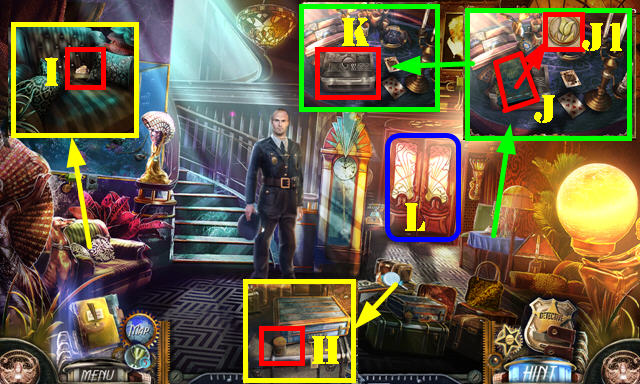
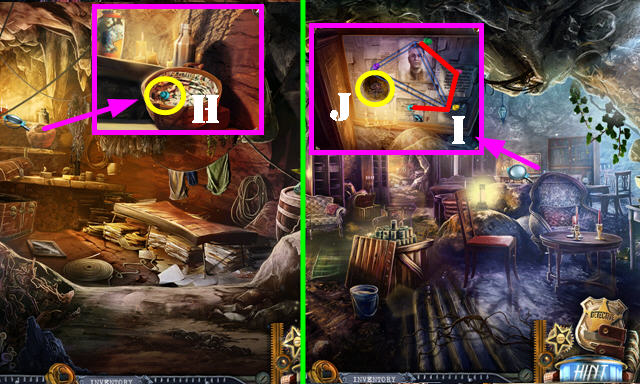
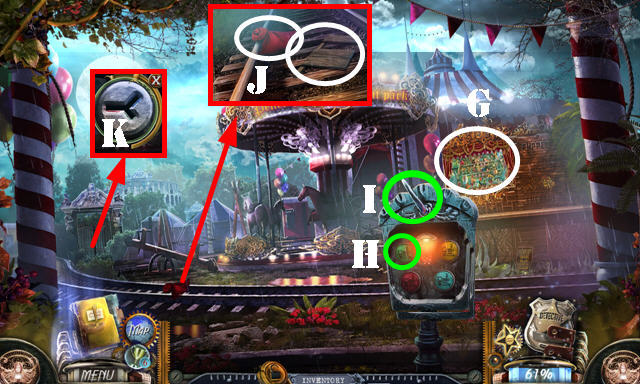
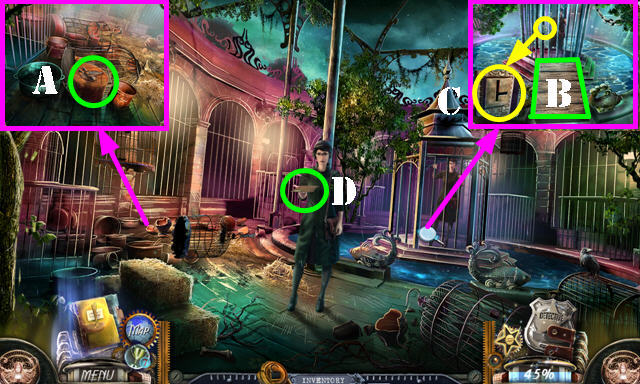
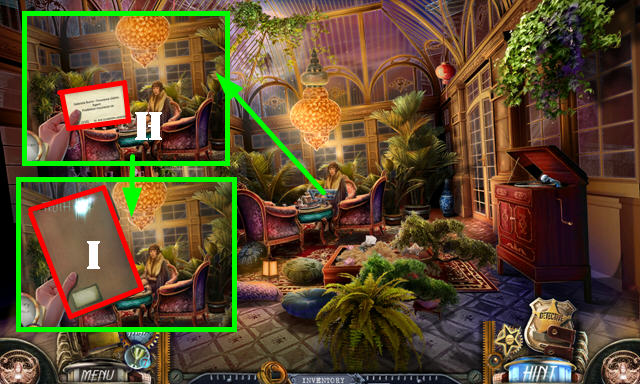
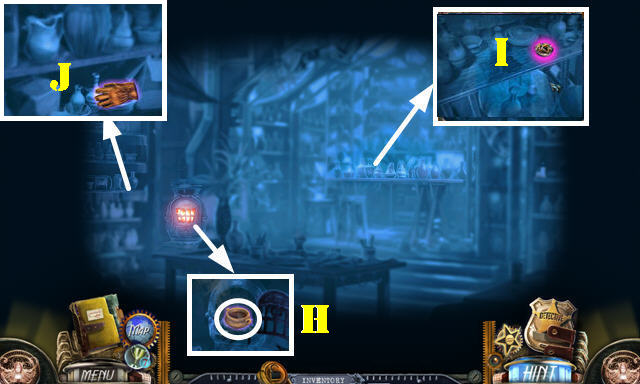
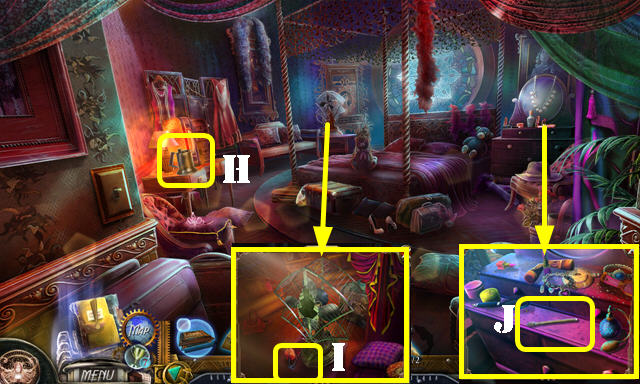
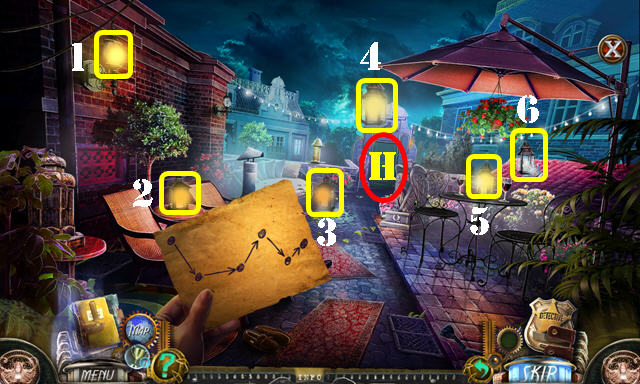
- Take the COFFEE TIN (H).
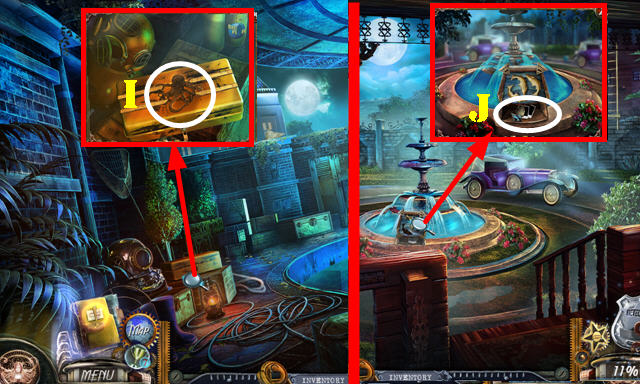
- Move the pillows; read the note and take the EMPTY GATE ORNAMENT (I).
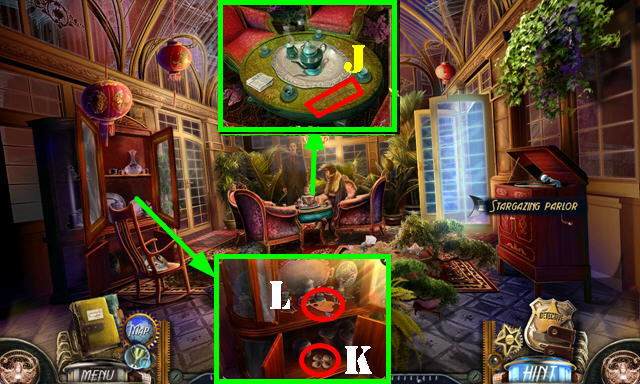
- Open the book (J) and turn the page; take the BOX TOKEN 1 (J1).
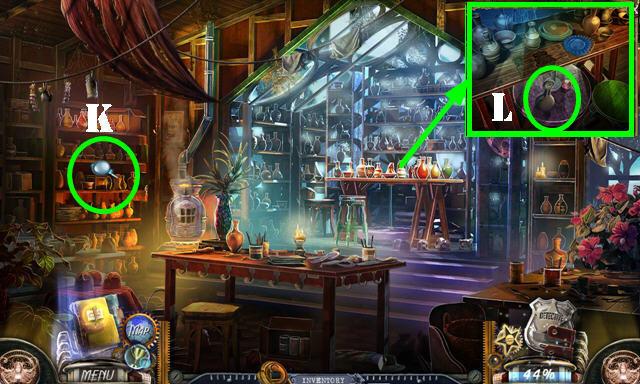
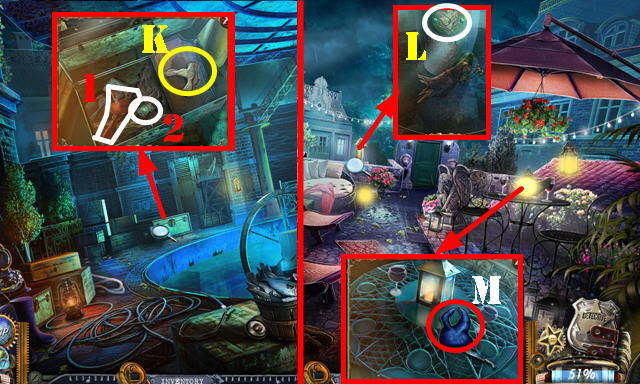
- Take the DETECTIVE KIT (K).
- Place the BOX TOKEN 1 on the MYSTERY BOX; take the evidence and GEM 1/4 (inventory).
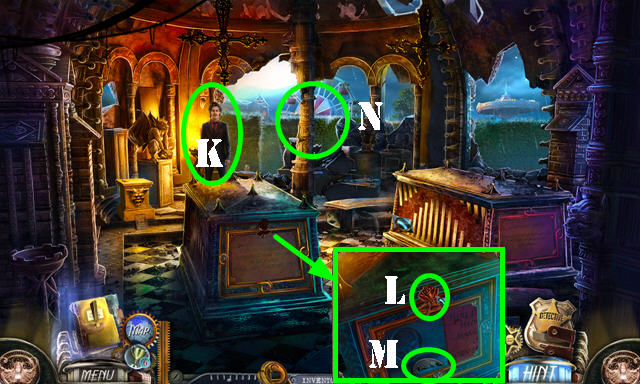
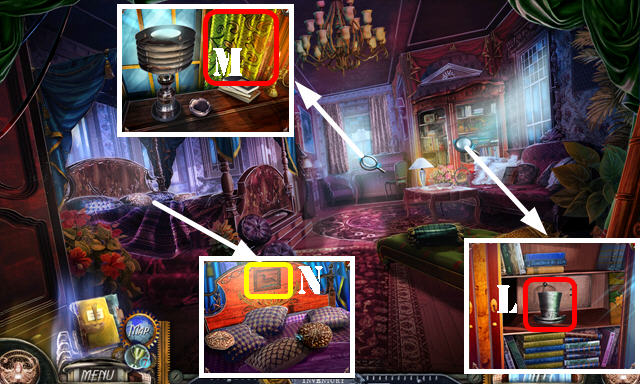
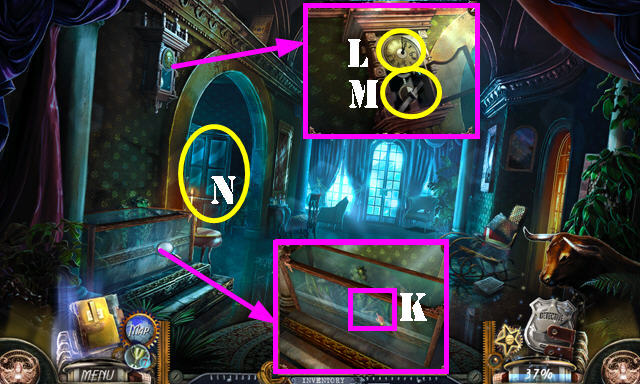
- Go to Greer's study (L).

- Examine the body and put down the DETECTIVE KIT.
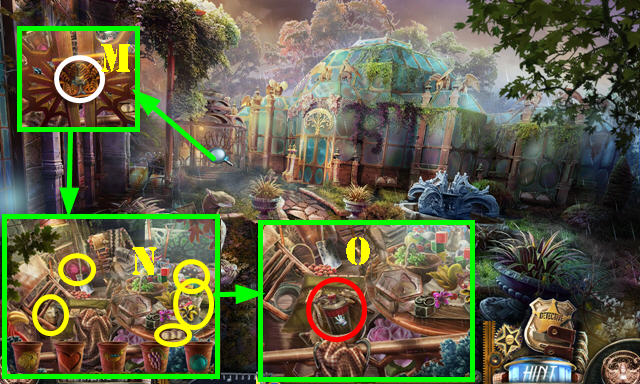
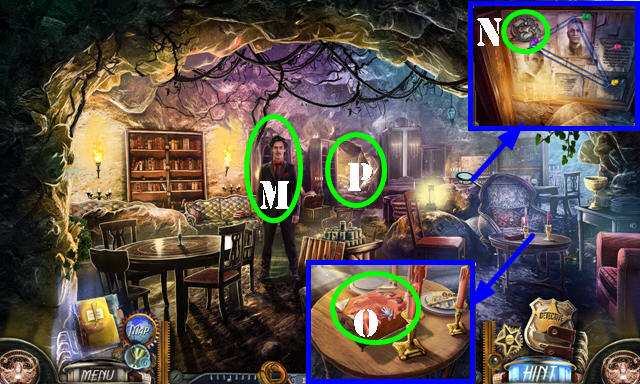
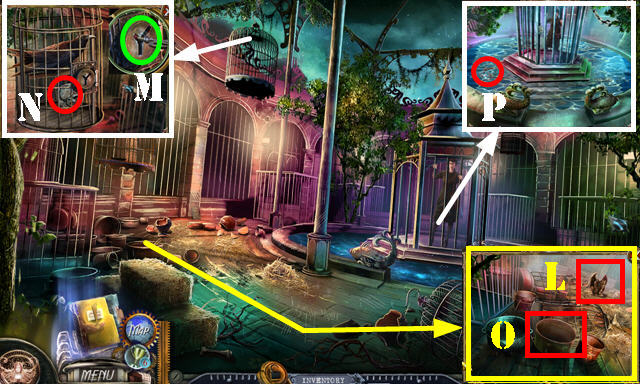
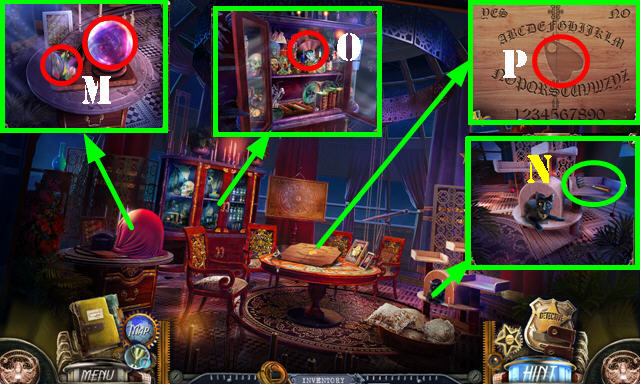
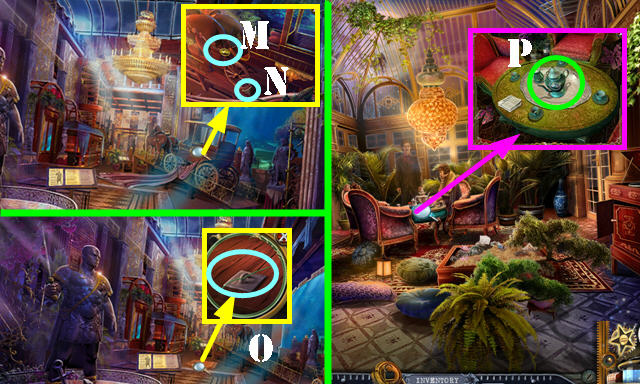
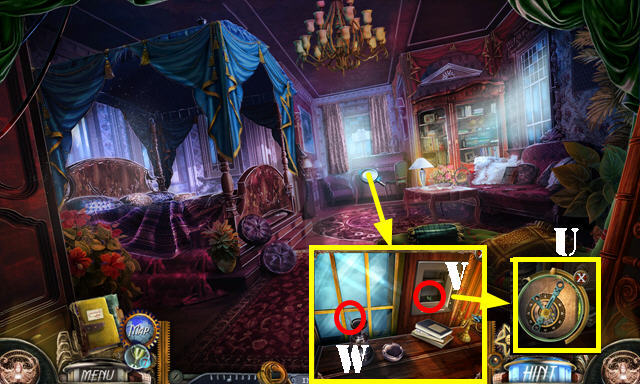
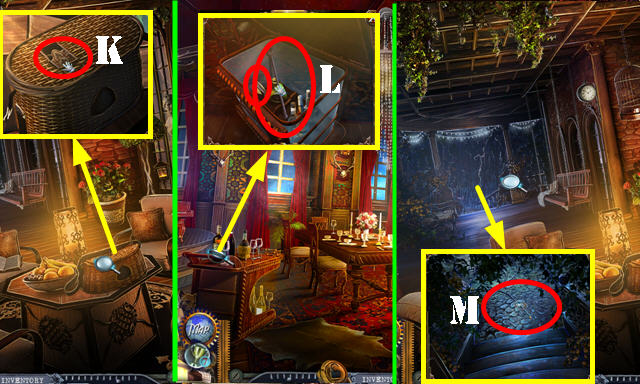
- Take the evidence (M) and touch the glass for a puzzle.
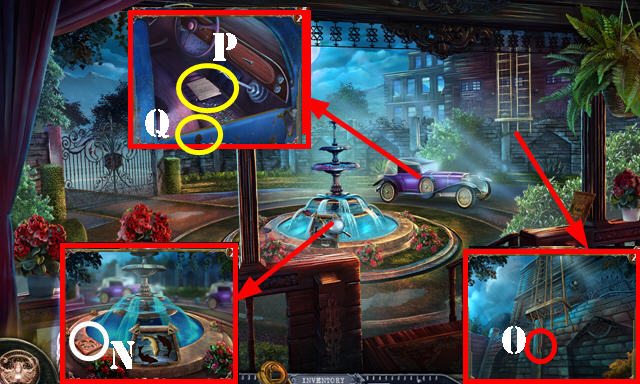
- Assemble the glass as shown (N).
- Touch the glass for the kit to appear; take the litmus paper (O). You receive more evidence.
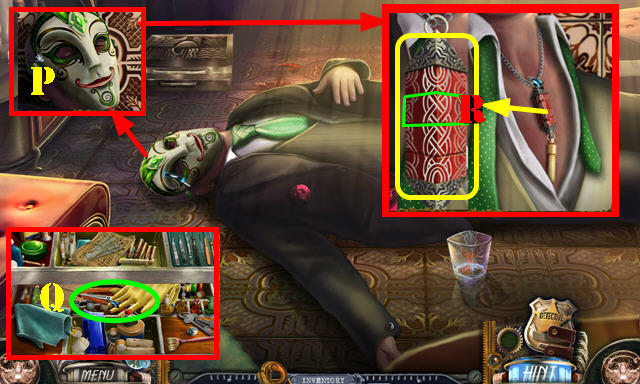
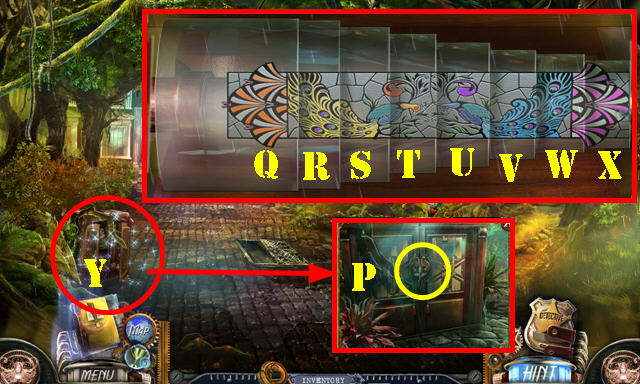
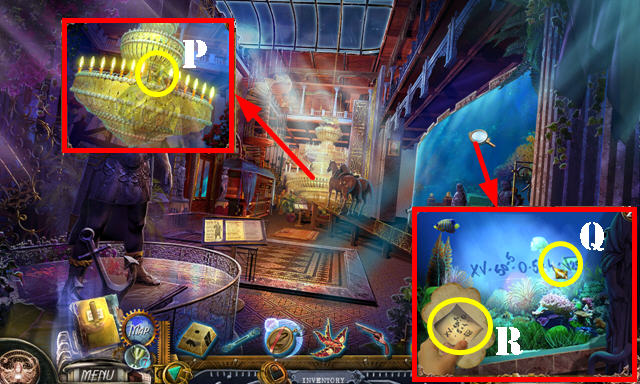
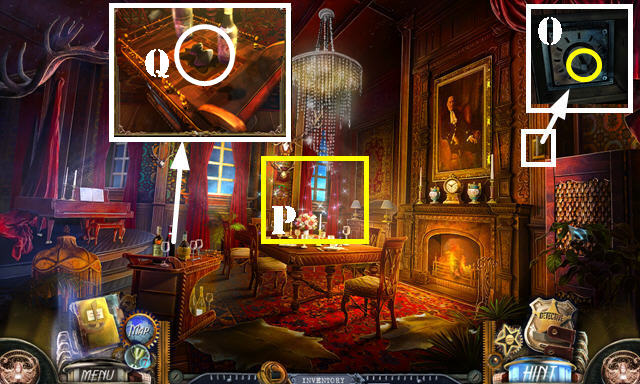
- Touch the mask (P) for the kit to appear.
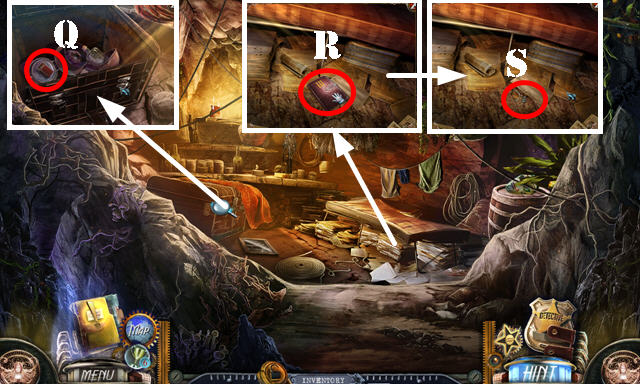
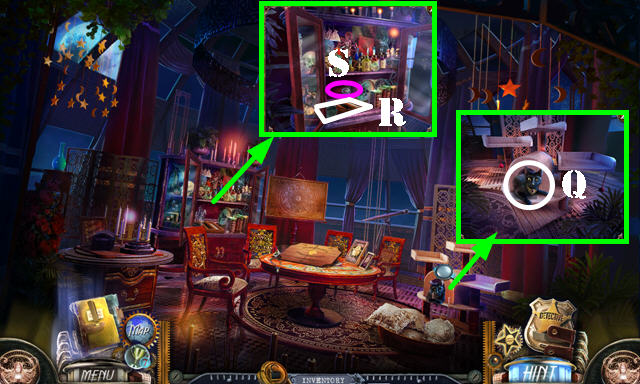
- Take the scissors (Q).
- Loosen up the tie 2X. Solve the puzzle by selecting Rx3. You receive the CAPSULE.
- Open the CAPSULE to get the DRAWER KEY (inventory).
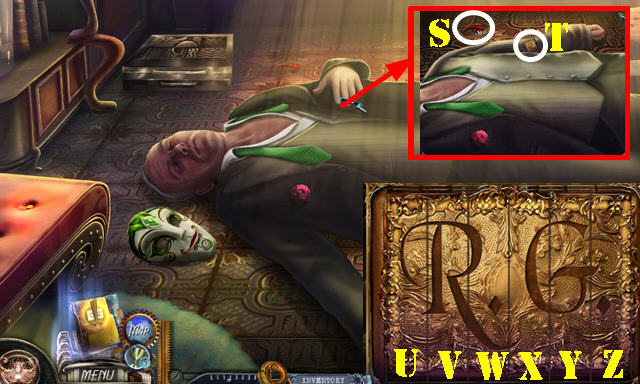
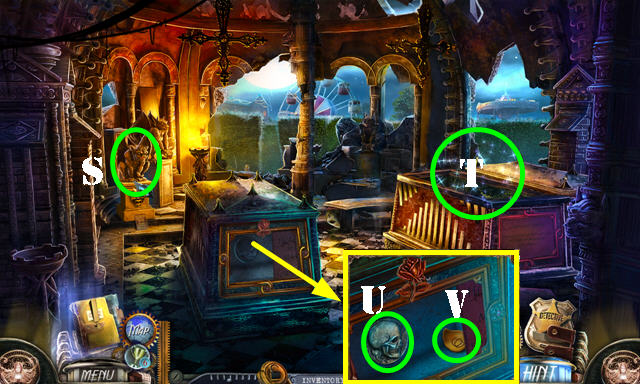
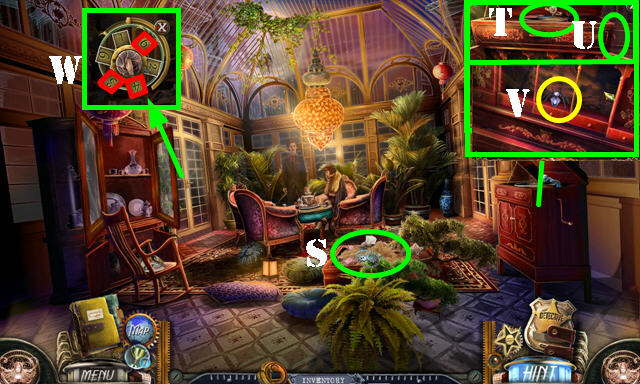
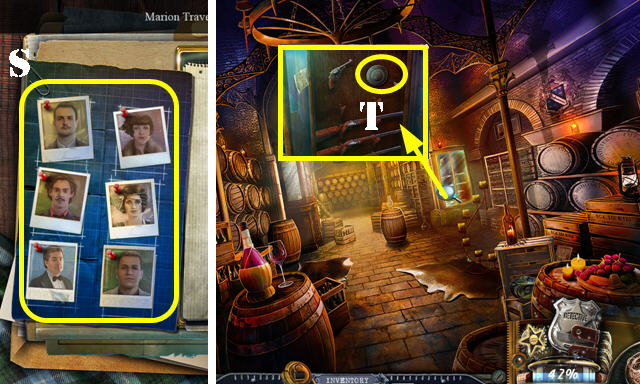
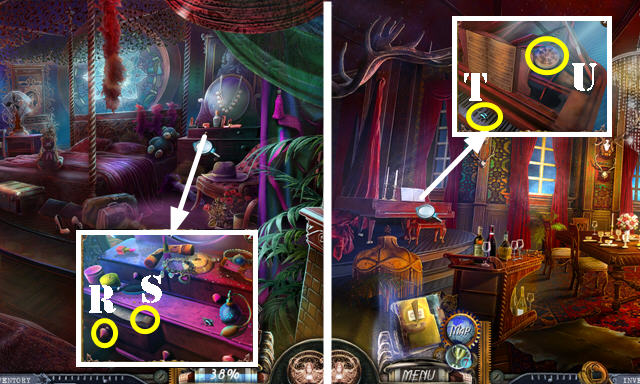
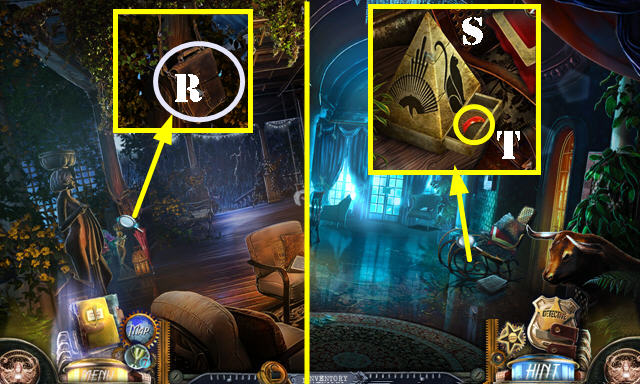
- Take the evidence (S).
- Touch the arm 3x for a puzzle (T).
- Solution: (U-Z)-(V-Y)-(W-X).
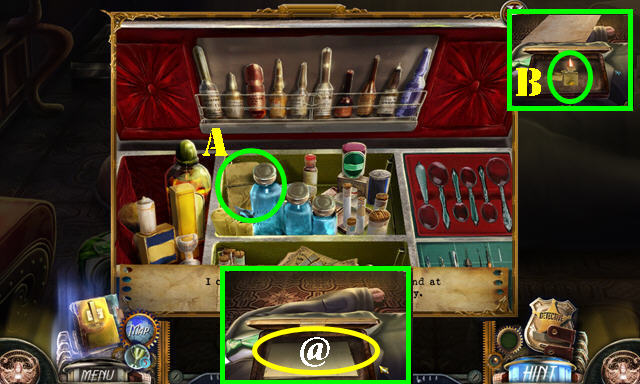
- Open the case and look at the note (@).
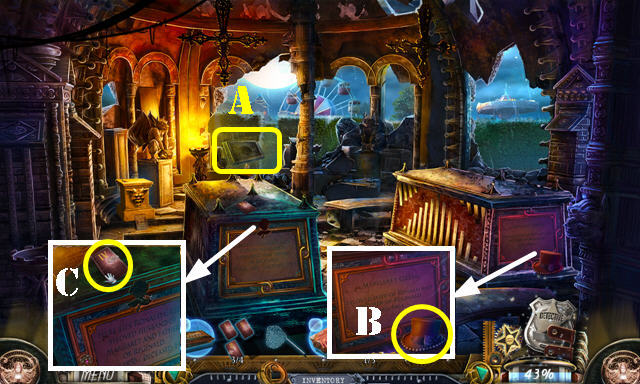
- Take the lighter (A); open it and flick it (B); take the evidence.
- Remove the dome (C).
- Look at and flip the photo (D).
- Take the COFFEE GRINDER (E).
- Use the DRAWER KEY (F). Look at the photo and take the DECK OF CARDS 1/3 (G).
- Open the case; take the ROULETTE GEAR 1/3 (H).
- Use the COFFEE TIN in the COFFEE GRINDER to get the GROUND COFFEE (inventory).
- Walk down.

- Talk to the officer (I).
- Take the steps up to the Salon.
- Take the TICKER TAPE (J).
- Place the GROUND COFFEE (K); take the CUP OF COFFEE (K1).
- Give the CUP OF COFFEE to Gabriella and then talk to her (L).
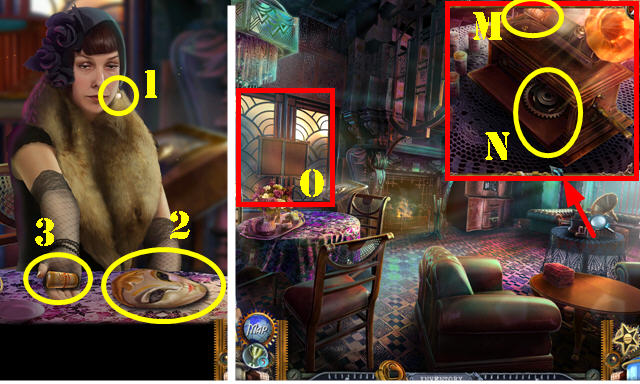
- Select 1-2. Take the RECORDED INSTRUCTIONS (3).
- Place the RECORDED INSTRUCTIONS (M). Take the ROULETTE GEAR 2/3 (N).
- Go to the Game room (O).
- Talk to Darvis.
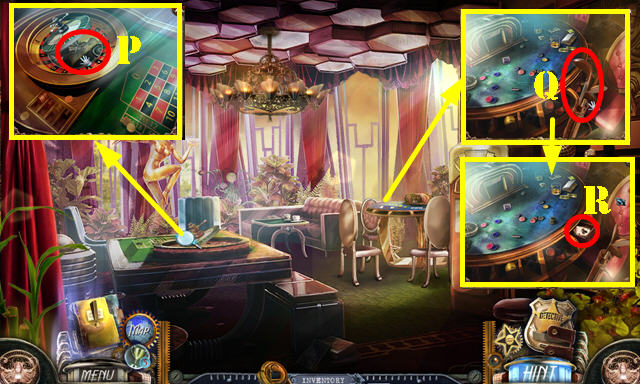
- Take the SUITCASE COMBINATION (P) and GOLF CLUB (Q).
- Move the clubs and open the drawer; take the DECK OF CARDS 2/3 (R).
- Return to Manor hall.
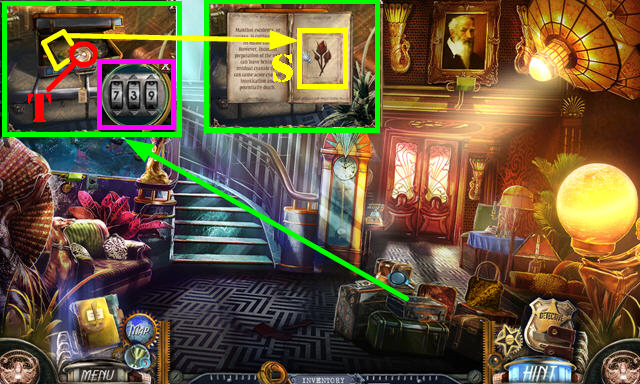
- Place the SUITCASE COMBINATION and enter the code (739).
- Open the book; take the PLANT NAME CARDS (S); you receive the evidence. Take the THERMOMETER (T).
- Go to Greer's study.
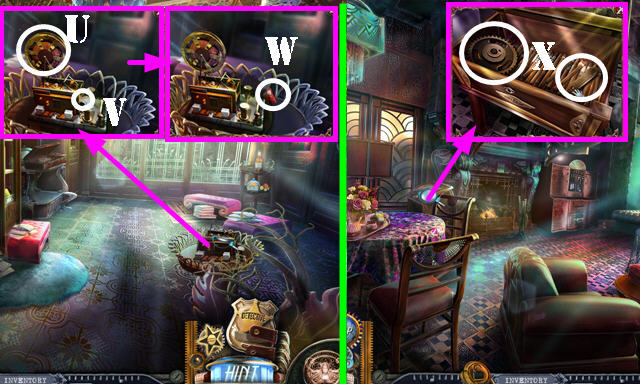
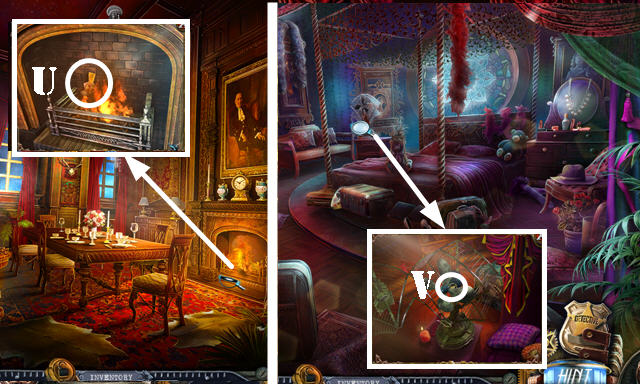
- Place the TICKER TAPE (U); take the evidence (V). Move the machine and take the GEM 2/4 (W).
- Go to the Salon.
- Place the THERMOMETER; take the CIGAR KNIFE and ROULETTE GEARS 3/3 (X).
- Go into the Game room.
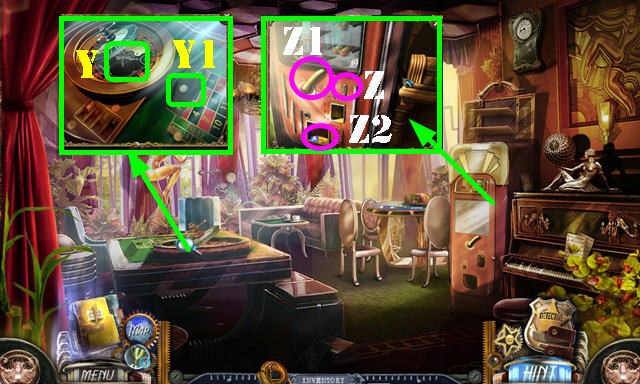
- Place the 3 ROULETTE GEARS (Y); take the NICKELS 2/2 (Y1).
- Place the 2 NICKELS (Z); pull the handle (Z1) and take the GEM 3/4 (Z2).
- Walk down 3x.
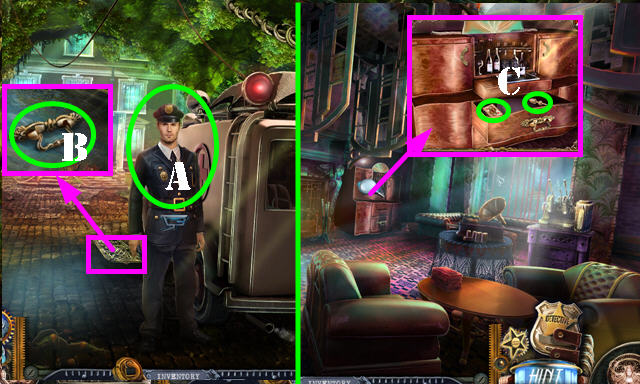
- Talk to the officer (A).
- Use the GOLF CLUB; take the MINI-BAR HANDLE (B).
- Return to the Salon.
- Place the MINI-BAR HANDLE; take the DECK OF CARDS 3/3 and ICE PICK (C).
- Go into the Game room.

- Place the 3 DECK OF CARDS (D) and touch all 3 for a puzzle.
- Solution (E).
- Take the FISH KEY (F).
- Go to Greer's study.
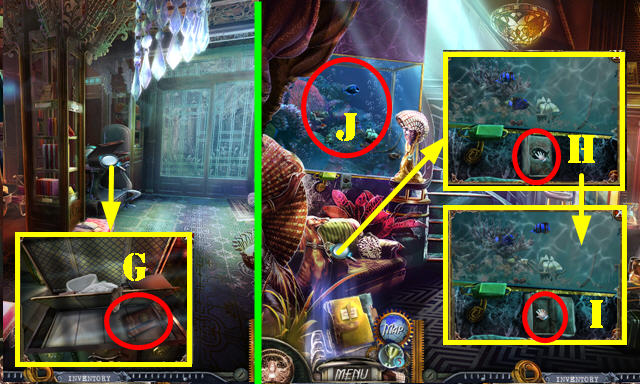
- Use the ICE PICK; take the evidence and BUTTON (G).
- Walk down.
- Use the FISH KEY (H); open the box, place the BUTTON (I) and push it to activate a HOP; play it to get the GEM 4/4 (J).
- Walk down.
- Place the 4 GEMS in the EMPTY GATE ORNAMENT to get the GATE ORNAMENT (inventory).
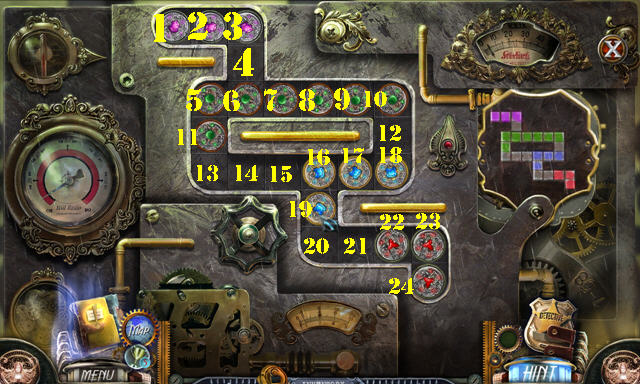
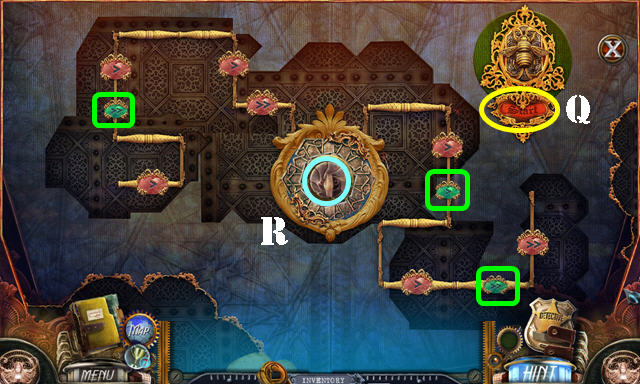
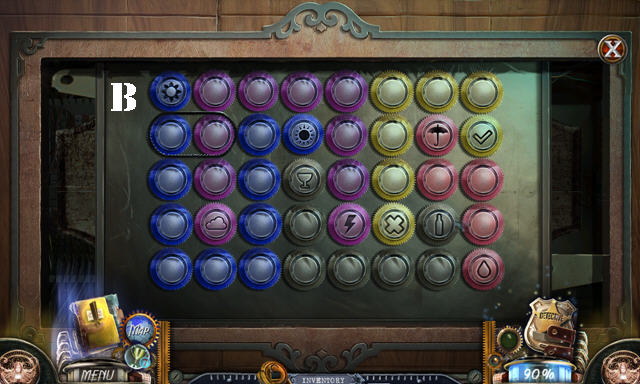
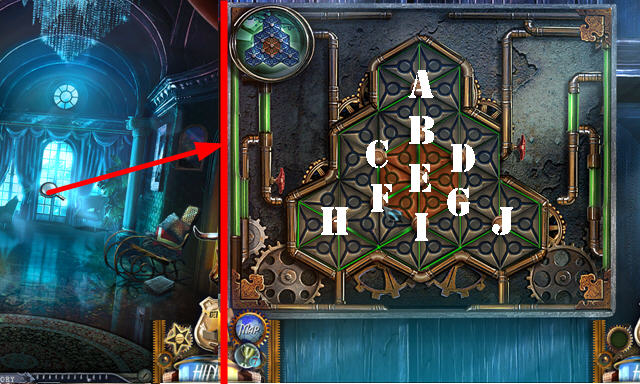
- Place the GATE ORNAMENT for a puzzle.
- Solution: (3-6)-(10-7)-(14-21)-(6-14)-(7-1)-(11-5)-(16-9)-(13-21)-(18-5)-(19-9)-(12-21)-(8-16)-(14-15)-(11-1)-(8-11).
- (19-13)-(22-12)-(15-24)-(11-21)-(13-10)-(17-13)-(10-21)-(4-10)-(13-1)-(7-15)-(12-5)-(15-18)-(5-11)-(18-12)-(16-19).
- Go through the gates.
Chapter 2: Courtyard
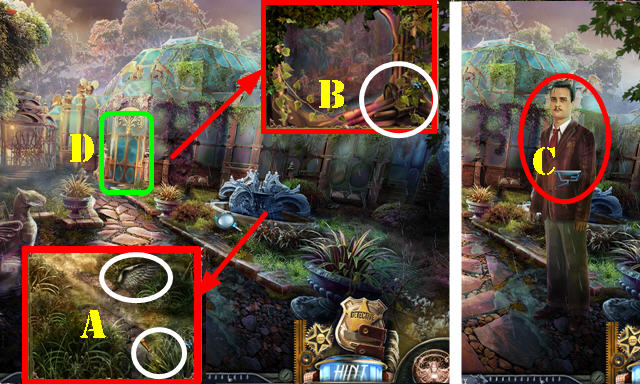
- Take the TROWEL and STONE WING 1/2 (A).
- Use the CIGAR KNIFE; take the CLIMBING HOOK (B).
- Talk to Mortimer (C).
- Go to the Greenhouse (D).
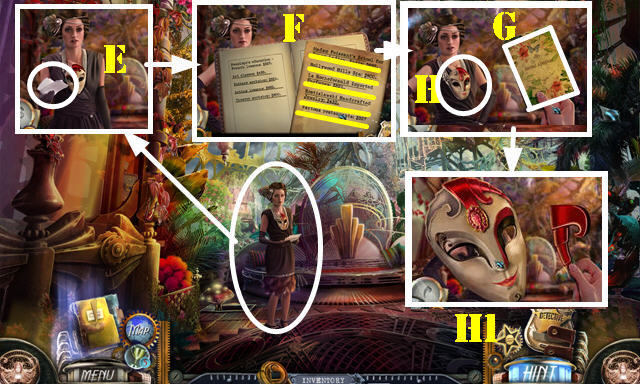
- Talk to Penelope and select the letter (E).
- Touch each sentence (F).
- Open the diary and touch it (G).
- Touch the mask (H) and the evidence (H1).
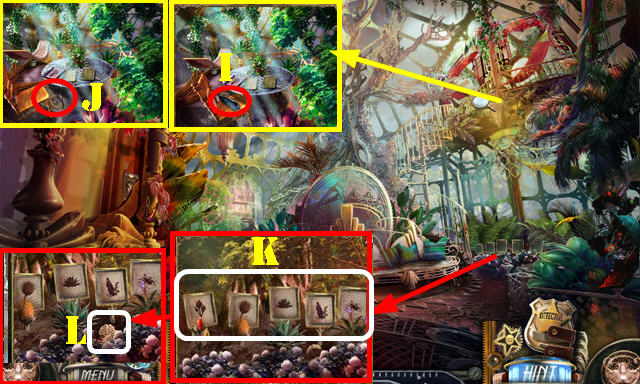
- Take the STONE WING 2/2 (I). Move the chair; take the CLIMBING ROPE (J).
- Place the PLANT NAME CARDS for a puzzle. Solution (K).
- Use the TROWEL; take the GAZEBO KEY (L).
- Walk down.
- Use the GAZEBO KEY (M).
- Find the items (N).
- Take the BUG-REPELLENT LIQUID and STAR KEY (O).
- Walk down.
- Use the STAR KEY (P) for a puzzle.
- Solution: Qx4-Sx3-T-Ux5-Vx2-Wx4-Wx5.
- Play the HOP (Y) to get the PERFUME BOTTLE.
- Return to the Greenhouse.
- Use the BUG-REPELLENT LIQUID in the PERFUME BOTTLE to get the BUG SPRAY (inventory).
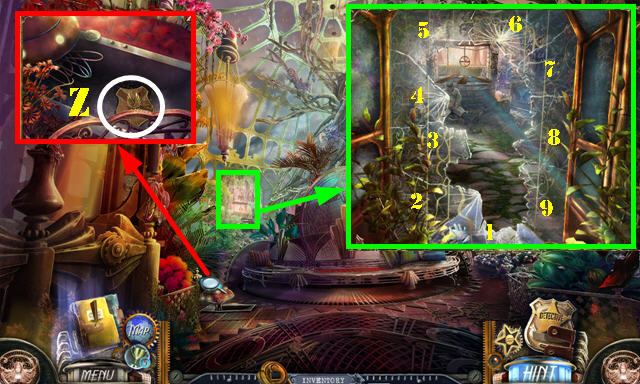
- Use the BUG SPRAY; take the CREST and GARDENING GLOVES (Z).
- Use the GARDENING GLOVES to remove the glass pieces (1-9).
- Go forward.
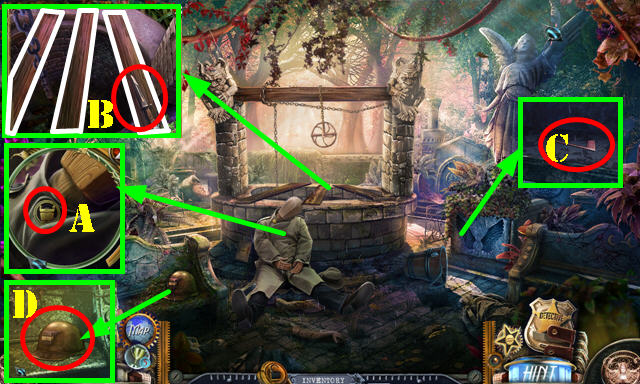
- Touch the body; take the BOX TOKEN 2 (A).
- Take the BAYONET; remove the 3 boards (B).
- Place the 2 STONE WINGS; take the MAILBOX FLAG (C).
- Take the HELMET (D).
- Place the BOX TOKEN 2 on the MYSTERY BOX (inventory); take the evidence and CARBIDE CHUNK.
- Return to Manor road.
- Place the MAILBOX FLAG and pull it; take the OLD BOOK 1/4, read and take the evidence, then take the GLASS-BOX SLOT (E).
- Go to the Courtyard.
- Place the GLASS-BOX SLOT; take the LAMP (F).
- Return to the Secret garden.
- Combine the CLIMBING ROPE with the CLIMBING HOOK to get the GRAPPLING HOOK (inventory).
- Place the LAMP and the CARBIDE CHUNK on the HELMET to get the MINING HELMET (inventory).
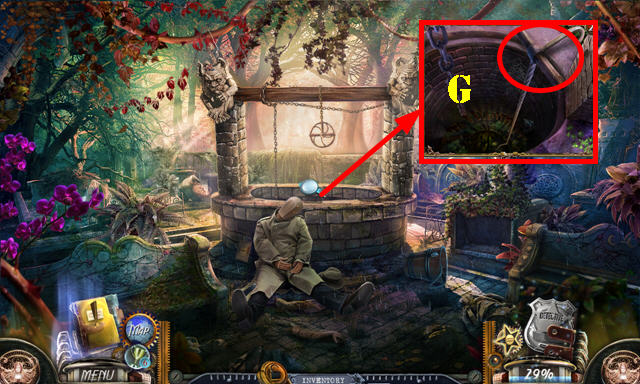
- Use the GRAPPLING HOOK and MINING HELMET (G).
- Go down the well.
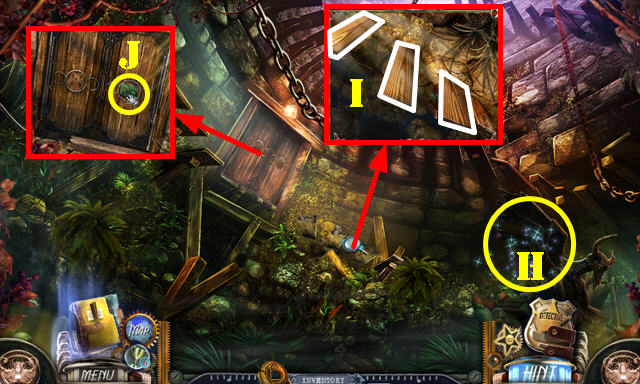
- Play the HOP (H) to get the PLANKS.
- Remove the broken planks and place the PLANKS (I).
- Take the ENGRAVED BRICK; place the CREST (J); enter the Drainage tunnel.
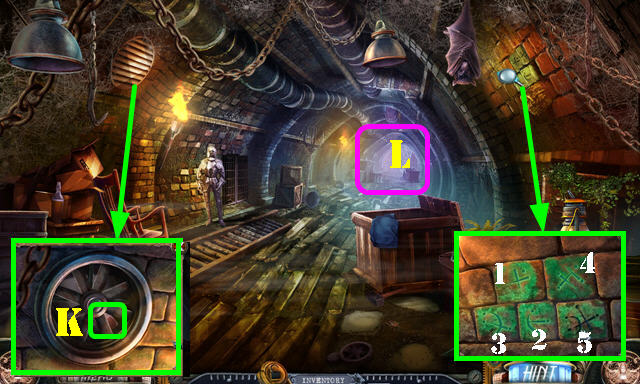
- Place the ENGRAVED BRICK; touch the bricks in order (1-5) and take the SCOOP NET.
- Remove the vent; use the BAYONET to get the OLD BOOK 2/4 (K).
- Go forward (L).
- Talk to LaFarge (M).
- Take the SHIP (N) and SMALL CHEST (O).
- Go to the Cave (P).
- Remove the cloth. Place the SHIP; take the MATCHES (Q).
- Remove the papers 3x; take the OLD BOOK 3/4 (R).
- Use the BAYONET to get the BRASS OWL (S).
- Use the MATCHES on the OLD CHEST; take the MAZE PART 1/3 (inventory).
- Walk down twice.
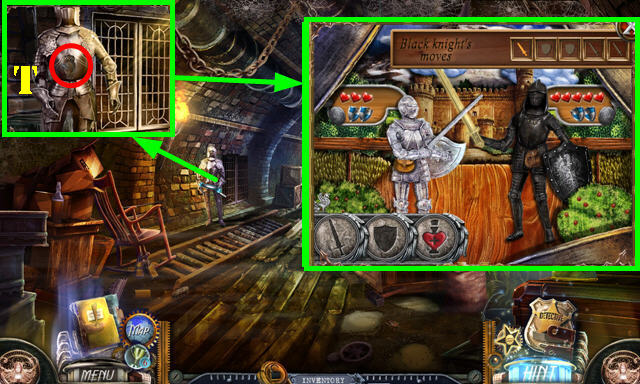
- Place the BRASS OWL and zoom in for a puzzle (T).
- The solution to the puzzle is random. Make your move (attack, defend, or heal) according to the lit symbol in the upper right.
- Enter the Mausoleum.
- Take the INCOMPLETE MAZE BOARD (A), LAFARGE'S HAT (B), and OLD BOOK 4/4 (C).
- Return to the Underground lounge.
- Give LAFARGE'S HAT (D); talk to him for a HOP; play it (E) to get the ENVELOPE.
- Talk to LaFarge.
- Take the 2 pieces of evidence and MOON from the ENVELOPE (inventory).
- Place the 4 OLD BOOKS (F); take the MAZE PART 2/3 (G).
- Go to the Cave.
- Place the MOON; open the container and take the PIN (H).
- Walk down.
- Use the PIN for a puzzle.
- Solution (I); take the STONE ROSE (J).
- Return to the Mausoleum.
- Talk to LaFarge (K).
- Place the STONE ROSE (L); take the MAZE PART 3/3 (M).
- Place the 3 MAZE PARTS on the INCOMPLETE MAZE BOARD to get the MAZE BOARD (inventory).
- Place the MAZE BOARD for a puzzle (N).
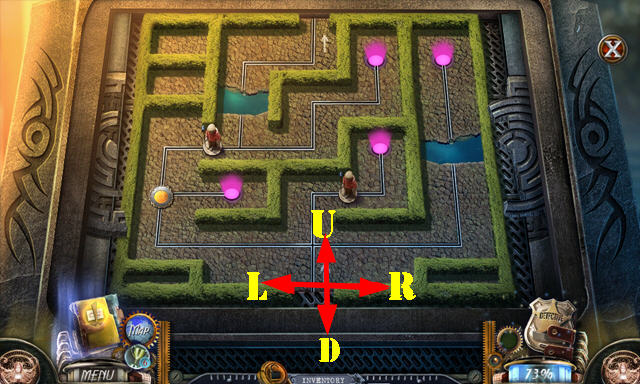
- Solution: U-Lx2-U-R-L-D-Rx2-U-R-U-D-L-D-Lx2-Ux2-Rx2-U-R-U-D-L-D-Lx2-Dx2-Rx4-Ux4-Dx4-Lx4-Ux2-R-Ux2-R-U.
- Go forward to the Hedge maze.
Chapter 3: Hedge Maze
- Talk to (A).
- Select (B-C-D-E). You receive the ADJUSTABLE KEY.
- Take the BB GUN (F).
- Go to the Amusement park (F1).
- Pull the curtain; use the BB GUN for an HOP (G); play it to get the TRAIN ACTIVATOR BUTTON.
- Place the TRAIN ACTIVATOR BUTTON (H) and pull the handle (I).
- Take the SCARF and OLD BOARDS 1/2 (J).
- Select the lock (K). Select the ADJUSTABLE KEY to get the MENAGERIE KEY (inventory). Use the MENAGERIE KEY (K).
- Enter the Menagerie.
- Select the cage (M). Select the ADJUSTABLE KEY to get the BIRD-CAGE KEY (inventory).
- Use the BIRD-CAGE KEY (M). Take the SKULL ORNAMENT (N).
- Take the GARGOYLE (L). Flip the pot (O).
- Use the SCOOP NET to get the HAMMER (P).
- Return to the Hedge maze.
- Use the SCARF; take the HORSEMAN FIGURINE 1/3 and OLD BOARDS 2/2 (Q).
- Take the HAIRPIN (R).
- Walk down.
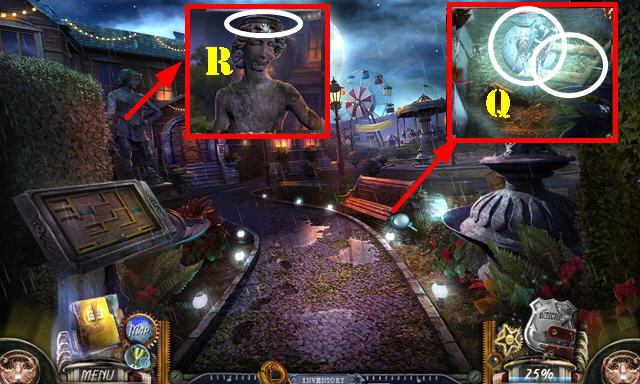
- Place the GARGOYLE (S) to activate a HOP; play it (T) to get the SAPPHIRE.
- Place the SKULL ORNAMENT (U); take the DAMAGED GOLDEN PETAL (V).
- Go forward.

- Place the SAPPHIRE on the SMALL CHEST; take the HALO (inventory).
- Place the HALO (W); take the BOX TOKEN 3 (X).
- Place the BOX TOKEN 3 on the MYSTERY BOX; take the evidence and CAROUSEL PUNCH CARD (inventory).
- Go to the Amusement park.
- Insert the CAROUSEL PUNCH CARD (Y); take the STEEL WOOL (Z).
- Go to the Menagerie.
- Use the STEEL WOOL; take the NAILS (A).
- Place the 2 OLD BOARDS and NAILS (B). Use the HAMMER.
- Select the ADJUSTABLE KEY to get the CAGE KEY (inventory). Use the CAGE KEY (C).
- Talk to Marion; take the FACTORY-ARSON EVIDENCE (D).
- Take the GOLDEN PETAL and the evidence from the FACTORY-ARSON EVIDENCE (inventory).
- Return to the Hedge maze.
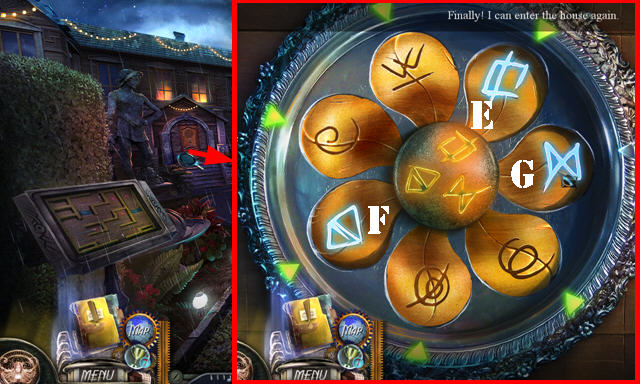
- Place the DAMAGED GOLDEN PETAL and GOLDEN PETAL for a puzzle.
- Solution (E-F-G).
- Enter the Tea room.
- Talk to Gabriella. Select (H-I).
- Talk to LaFarge.
- Take the CAT TOY (J).
- Open the cabinet; take the FLOWER (K).
- Use the HAIRPIN; take the PLANCHETTE (L).
- Go to the Stargazing parlor.
- Remove the cloth; take the FEATHERS and CRYSTAL BALL (M).
- Take the SMALL RAKE (N).
- Open the door; take the VINYL RECORD (O).
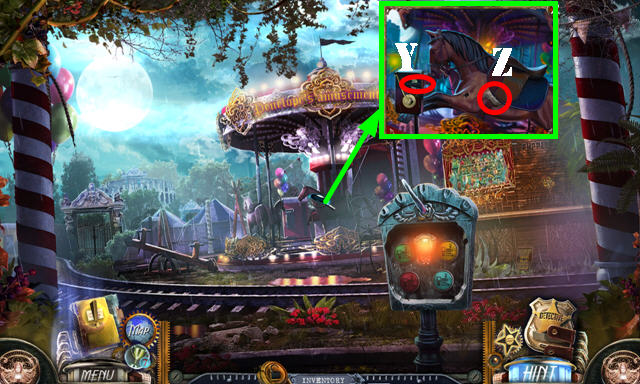
- Place the PLANCHETTE for a puzzle (P).
- Solution: select the buttons marked in green and push start (Q).
- Take the ATRIUM DOORKNOB (R).
- Walk down.
- Use the SMALL RAKE (S) for a HOP; play it to get the MINIATURE SWORD.
- Place the VINYL RECORD (T) and pull the handle (U). Take the CRYSTAL LOCK (V).
- Place the CRYSTAL LOCK on the CRYSTAL BALL; take the HORSEMAN FIGURINE 2/3 (inventory).
- Place the ATRIUM DOORKNOB (W); select 364 and go through the door.
Chapter 4: The Atrium
- Place the MINIATURE SWORD; take the BED MOSAIC PIECE (A).
- Open the curtains for a HOP (B); play it to get the GRAPES.
- Go to the Gallery (C).
- Take the PYRAMID PIECE (D).
- Place the FLOWER SIGN; take the POTTERY-ROOM KEY and VINEGAR (E).
- Move the magazines; take the NEWSPAPER (F).
- Take the SCISSORS and CREST SKETCH from the NEWSPAPER (inventory).
- Walk down.
- Use the POTTERY-ROOM KEY (G).
- Go through the door.
- Talk to Penelope.
- Open the stove; take the evidence (H).
- Take the evidence (I-J).
- Play the HOP (K) to get the HORSEMAN FIGURINE 3/3.
- Take the HAND WEIGHT (L).
- Walk down.
- Use the SCISSORS (M) and the HAND WEIGHT (N).
- Take the METAL WIRE (O).
- Walk down.
- Use the VINEGAR (P); take the CLAY PIECE 1/2.
- Go to the Stargazing parlor.
- Place the FEATHERS and then the METAL WIRE on the CAT TOY (inventory).
- Use the CAT TOY (Q); take the evidence and WINE-BARREL CLUE.
- Place the 3 HORSEMEN FIGURINES (R); take the METAL RING (S).
- Return to the Atrium.

- Place the METAL RING (T).
- Go down to the Wine Cellar.
- Place the WINE-BARREL CLUE for a puzzle (U).
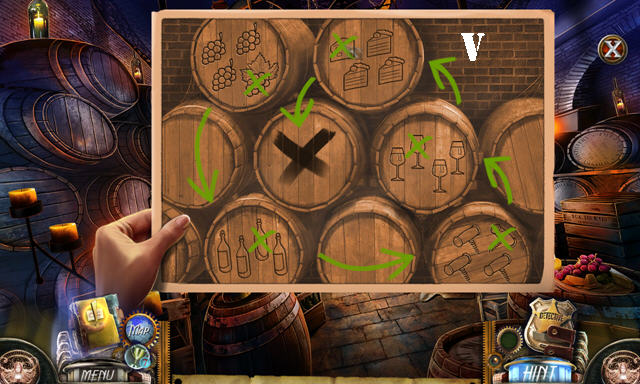
- Solution (V).
- Take the evidence, WHITE ENVELOPE, and WOODEN HUNTER (A).
- Place the GRAPES for a HOP (B); play it to get the CLAY PIECE 2/2.
- Take the BOX TOKEN 4 from the WHITE ENVELOPE (inventory).
- Place the BOX TOKEN 4 on the MYSTERY BOX; take the evidence and PUZZLE CONTROL (inventory).
- Return to the Pottery studio.
- Place the 2 CLAY PIECES and CREST SKETCH for a puzzle (C).
- Solution (D). Take the ROOM CREST.
- Return to the Gallery.
- Place the ROOM CREST (E).
- Enter Darvis' Room.
- Talk to Rickman (F).
- Move the trash pieces; take the WRENCH (G).
- Use the SCISSORS; take the POCKET WATCH (H).
- Take the CRANK (I).
- Walk down.
- Place the CRANK (J) and pull it. You get transported back to the Atrium.
- Talk to Rickman and take the RED DOVE (J1).
- Return to the Gallery.
- Place the PUZZLE CONTROL for a puzzle (K).
- Select a puzzle piece and then an arrow to rotate the puzzle piece as needed.
- Solution (1-10).
- Enter Reginald's room.
- Place the WOODEN HUNTER; take the TOP HAT (L). Touch the compartment behind it.
- Take the CLOTH (M).
- Move the pillows; place the BED MOSAIC PIECE (N); take the METAL-GUN EMBLEM.
- Go to Darvis' room.

- Place the TOP HAT; take the OLIVE OIL (O).
- Return to the Atrium.
- Use the CLOTH to get the HOT LIGHT BULB (P).
- Use the HOT LIGHT BULB (Q); take the SAFE CODE (R).
- Go to the Wine cellar.
- Open the Evidence Board in the lower-left corner and place all the suspects in the right spots. Solution (S).
- Place the METAL-GUN EMBLEM; take the METAL PIECE (T).
- Return to Reginald's room.
- Place the SAFE CODE and use the WRENCH (U). Flip the handle 5x; take the BLUE DOVE (V).
- Use the OLIVE OIL; remove the shade; take the THIN NEEDLE (W).
- Use the THIN NEEDLE on the POCKET WATCH to get the GEAR BAND 1/2 (inventory).
- Return to Darvis' room.
- Place the RED DOVE and BLUE DOVE; take the evidence WOODEN BOX (X).
- Talk to Darvis.
- Select (1-2-3).
- Place the METAL PIECE on the WOODEN BOX; take the GEAR BAND 2/2 (inventory).
- Return to Reginald's room.
Chapter 5: The Aquarium
- Place the 2 GEAR BANDS for a puzzle.
- Level 1 solution (A).
- Level 2 solution (B).
- Level 3 solution (C).
- Go forward to the Guest wing.
- Take the PIANO-KEY PART (D) and FISH STATUETTE 1/2 (E).
- Move the chair (F).
- Go to Penelope's room (G).
- Take the BLOWTORCH (H), CLOCK HANDS (I) and GLASS CUTTER (J).
- Walk down.
- Use the GLASS CUTTER; take the POCKET-WATCH INSERT (K).
- Put the POCKET-WATCH INSERT on the POCKET WATCH to get the OPENED POCKET WATCH (inventory).
- Place the CLOCK HANDS and the OPEN POCKET WATCH (L); open the door and take the SWITCH PEG (M).
- Enter the Dining room (N).
- Remove the cover; place the SWITCH PEG (O) and then use the WRENCH on it.
- Play the HOP (P) to get the PYRAMID PIECE.
- Take the CONE KNOB (Q).
- Walk down.
- Talk to Rickman.
- Go into Penelope's room.
- Place the CONE KNOB (R); take the PIANO KEY (S).
- Place the PIANO-KEY PART on the PIANO KEY to get the PIANO KEYS (inventory).
- Return to the Dining room.
- Place the PIANO KEYS (T); take the PUZZLE BOX (U).
- Touch all the wedges on the PUZZLE BOX and take the VERANDA MECHANISM (inventory).
- Walk down.
- Place the VERANDA MECHANISM for a puzzle.
- Solution: F-H-Fx2-C-Hx5-Fx3.
- Go forward to the Veranda.
- Remove the handle; take the WOODEN MOSAIC PIECE (K).
- Return to the Dining room.
- Place the WOODEN MOSAIC PIECE; take the BACK SCRATCHER and WINE-FOIL CUTTER (L).
- Return to the Veranda.
- Use the BACK SCRATCHER (M); go forward.
- Take the FLOWER ORNAMENT (N) and TONGS (O).
- Take the evidence and DOOR KNOB (P).
- Place the DOOR KNOB (Q) for an HOP; play it to get the PYRAMID PIECE.
- Walk down.
- Use the WINE-FOIL CUTTER (R) for a HOP; play it to get the LIGHTER.
- Walk down.
- Place the 3 PYRAMID PIECES (S). Rotate the Middle 2x and the top 3x.
- Take the BASKET-INSERT PIECE (T).
- Go to the Dining room.
- Use the TONGS; take the FAN INSERT (U).
- Return to Penelope's room.
- Place the FAN SLOT; take BOX TOKEN 5 (V).
- Place the BOX TOKEN 5 on the MYSTERY BOX; take the evidence and BASKET-INSERT PIECE (inventory).
- Return to the Veranda.
- Place the 2 BASKET-INSERT PIECES (A); take the BLOWTORCH PART (B).
- Go forward.
- Place the BLOWTORCH PART on the BLOWTORCH and use the LIGHTER on it to get the LIT BLOWTORCH (inventory).
- Use the LIT BLOWTORCH; take the IRON BAR (C).
- Use the IRON BAR (D); go up to the Rooftop terrace.
- Take the BIRD-FEEDER PART 1/2 (E).
- Place the FLOWER ORNAMENT; use the LIGHTER; take the OCTOPUS and LIGHTS-PUZZLE SOLUTION (F).
- Place the LIGHTS-PUZZLE SOLUTION (G) for a puzzle.
- Select the lights (1-6).
- Go to the Aquarium top (H).
- Place the OCTOPUS for a HOP (I); play it to get the FISH STATUETTE 2/2.
- Return to the Driveway.
- Place the 2 FISH STATUETTES; take the BIRD-FEEDER PART 2/2 (J).
- Return to the Aquarium top.
- Place the 2 BIRD-FEEDER PARTS (K). Select 1-2. Take the BIRD FEEDER ORNAMENT (K).
- Walk down.
- Place the BIRD FEEDER ORNAMENT (L).
- Take the STRANGE KEY (M).
- Go forward.
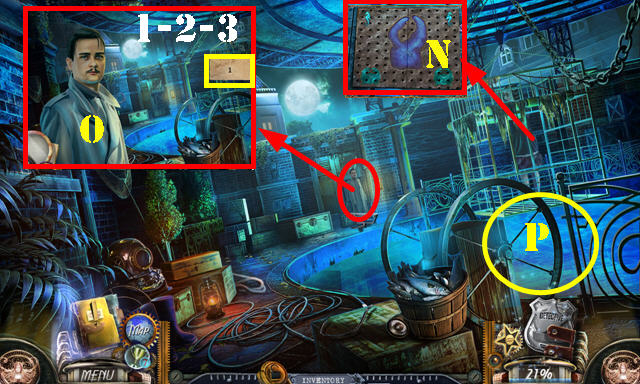
- Use the STRANGE KEY (N).
- Talk to Mortimer (O). Select the items (1-2-3).
- Go to the Aquarium Bottom (P).
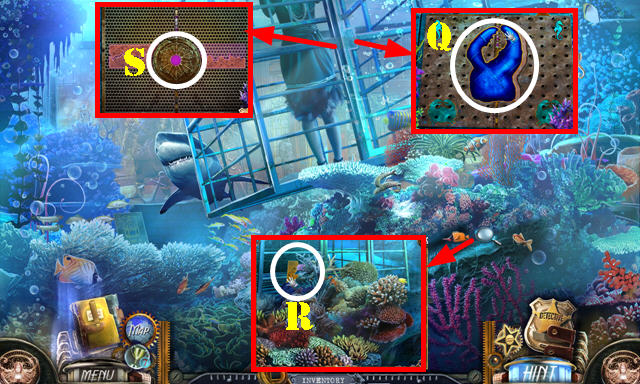
- Open the door (Q); move the corals and take the STRANGE KEY (R).
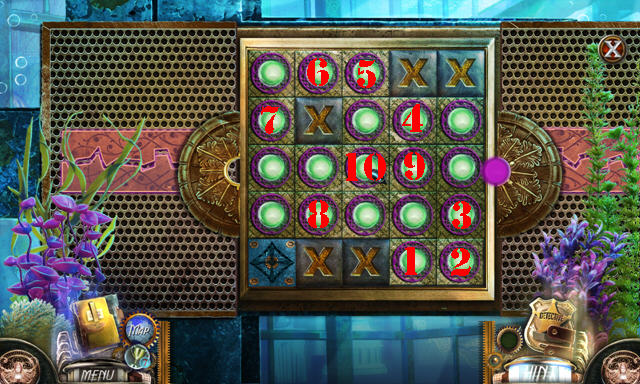
- Place the STRANGE KEY for a puzzle (S).
- Solution (1-10).
- Congratulations, you've completed Dead Reckoning: Brassfield Manor!
Created at: 2015-04-10