

Walkthrough Menu
- General Tips
- Chapter 1: La Colomba
- Chapter 2: The Beach
- Chapter 3: Pensington Square
- Chapter 4: The Resort
- Chapter 5: Swamp
General Tips
- This is the official guide for Dead Reckoning: Broadbeach Cove.
- This guide will not tell you when you have to zoom into a location; the screenshots will show each zoom scene.
- Hidden-object puzzles are referred to as HOPs. This guide will not show screenshots of the HOPs, however, it will mention when an HOP is available and the inventory item you'll collect from it.
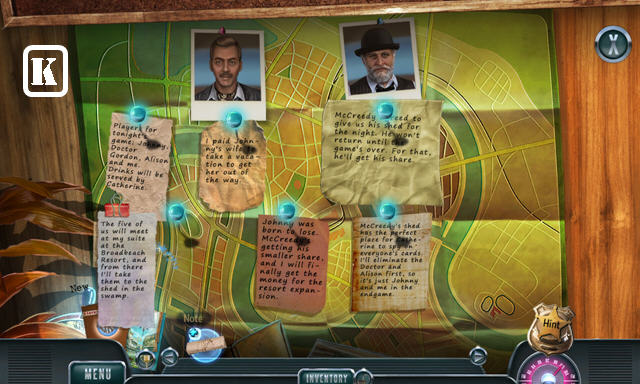
- Use the Map to fast travel to a location.
Chapter 1: La Colomba
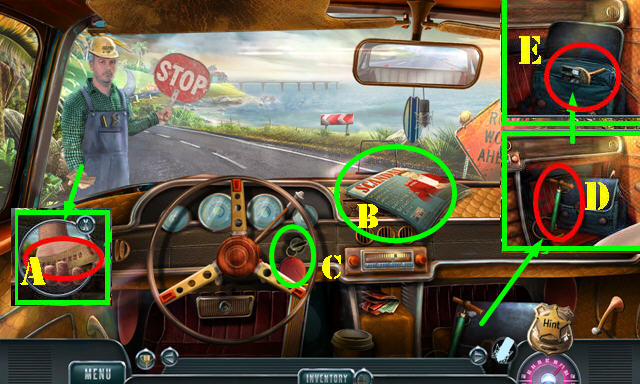
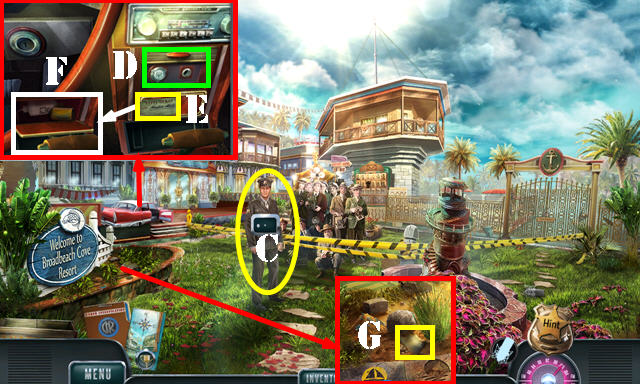
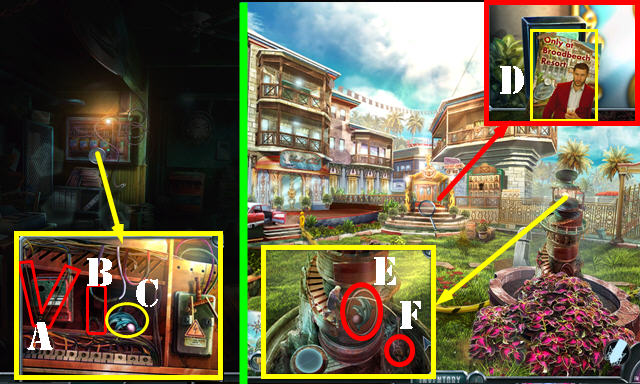
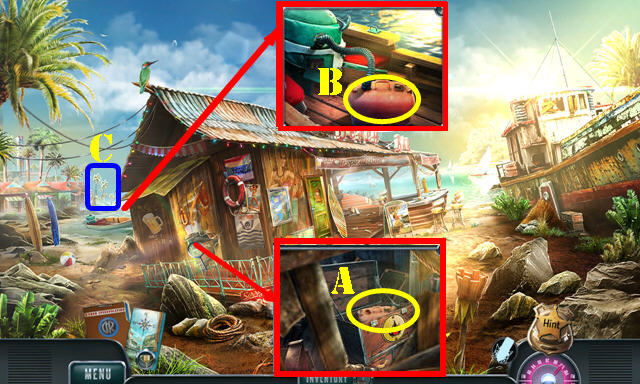
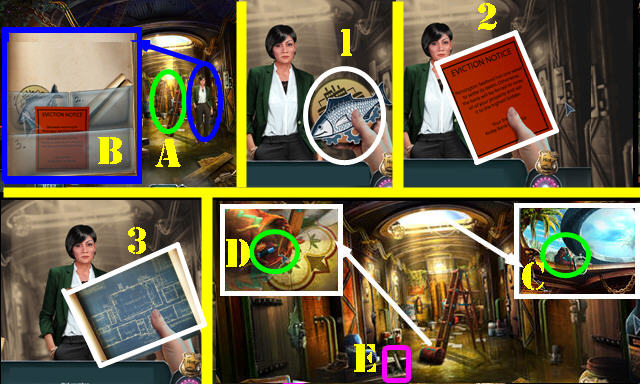
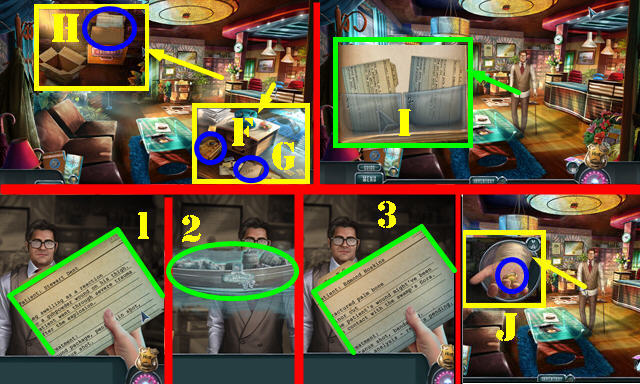
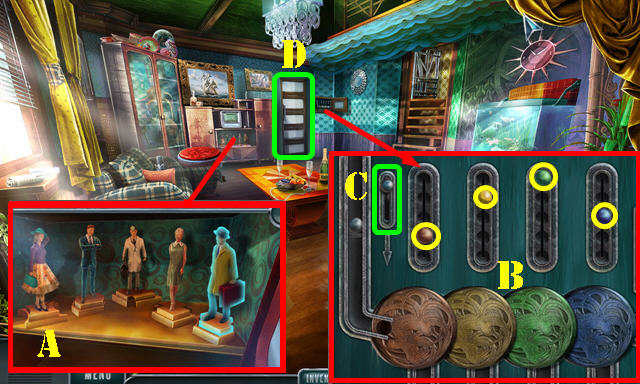
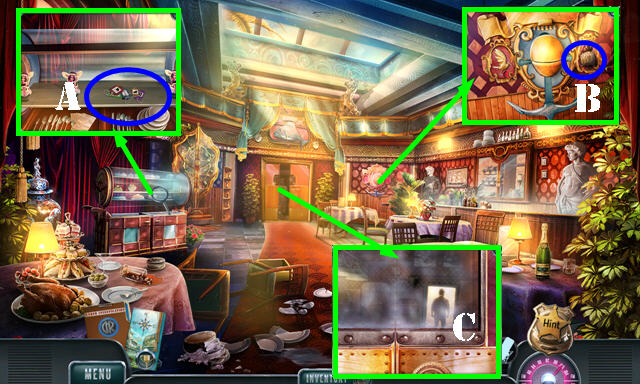
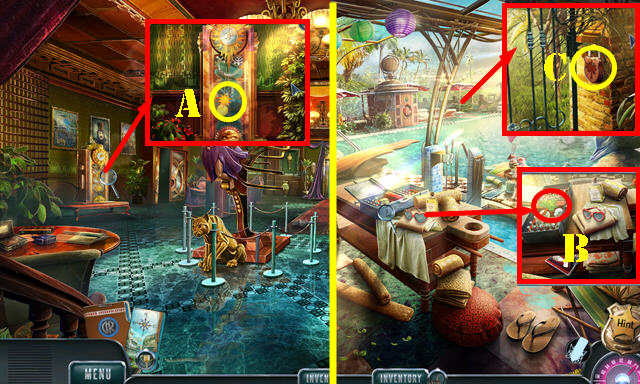
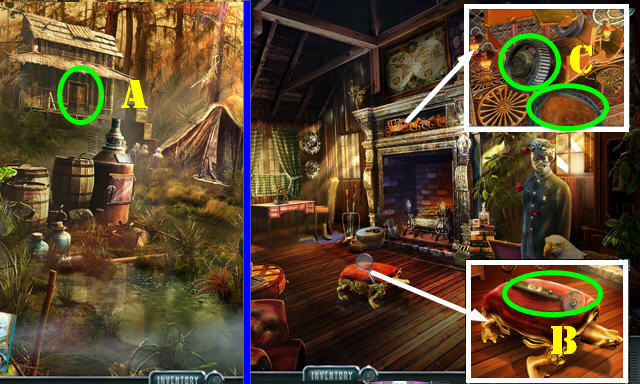
- Talk to the man; take the TRAFFIC REPORT (A).
- Look at the magazine (B).
- Take the KEYCHAIN (C).
- Take the CAR KEY and BUCKLE PIECE from the KEYCHAIN (inventory).
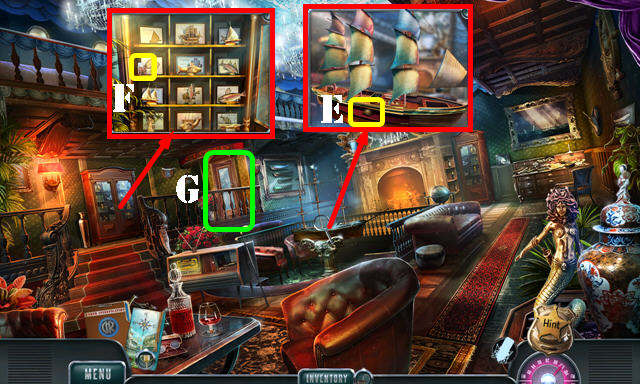
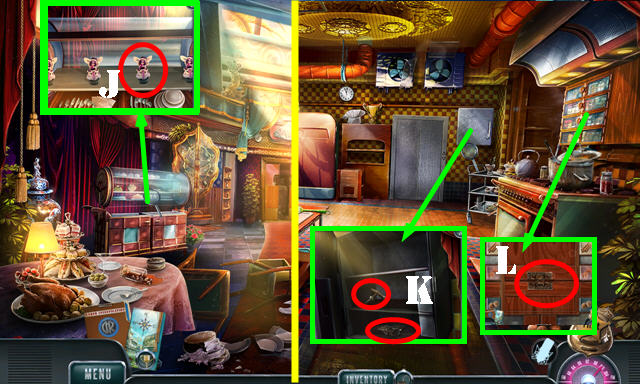
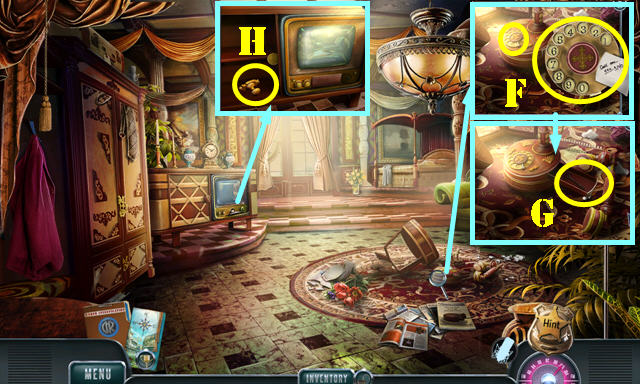
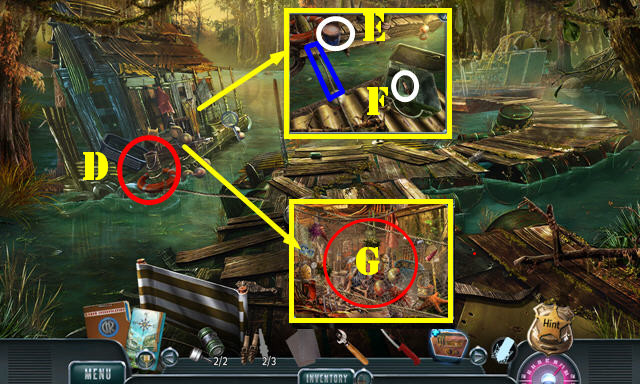
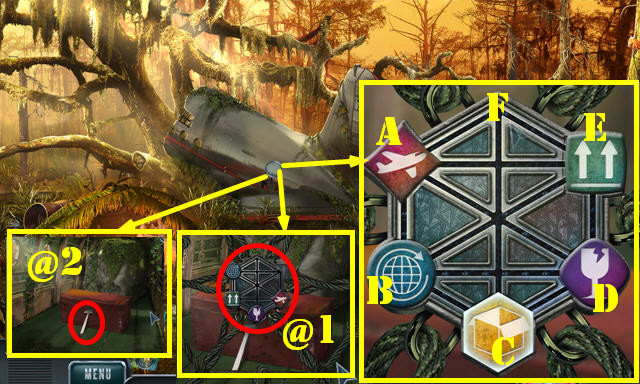
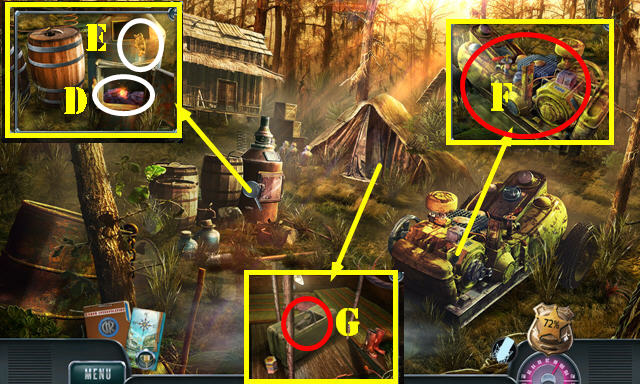
- Take the TIRE PUMP (D). Place the BUCKLE PIECE and twist it; take the CAMERA and DASHBOARD CLOCK (E).
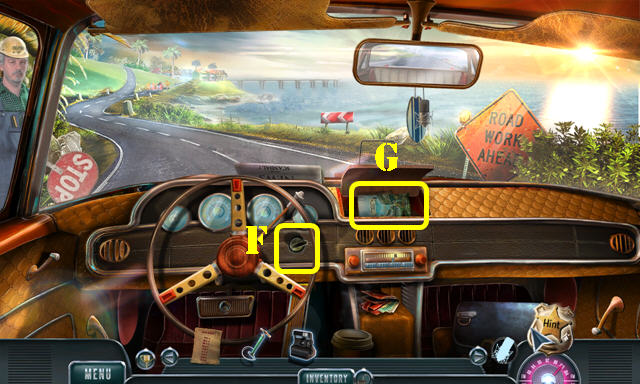
- Use the CAR KEY (F).
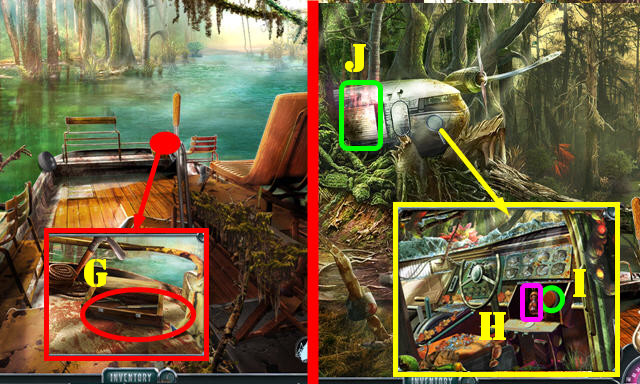
- Place the DASHBOARD CLOCK; take the FOLDED MAP (G).
- Open the FOLDED MAP; place the TRAFFIC REPORT on it for a puzzle (inventory).
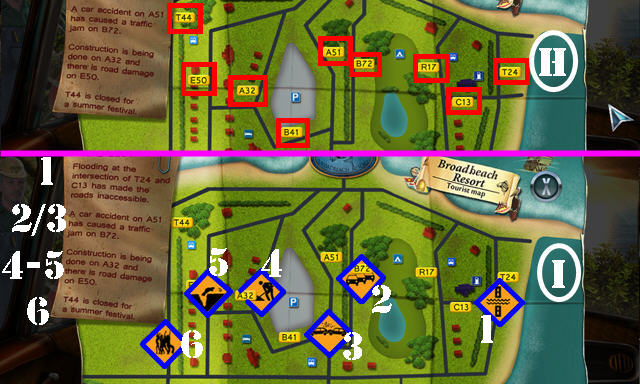
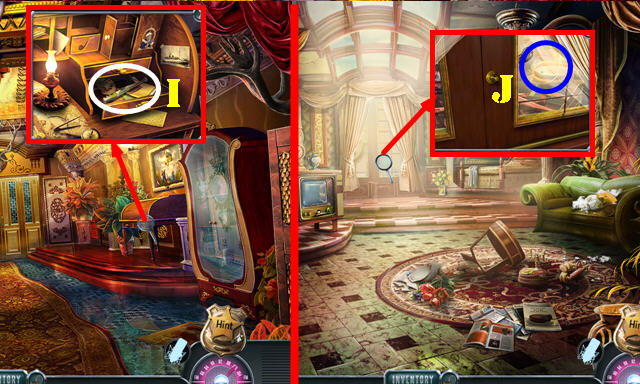
- Select the road codes (H).
- Place the signs (I).
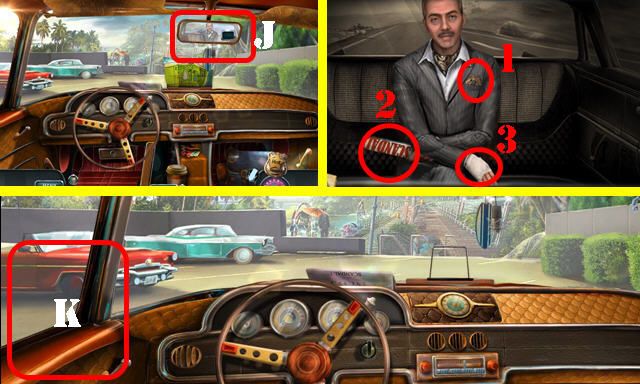
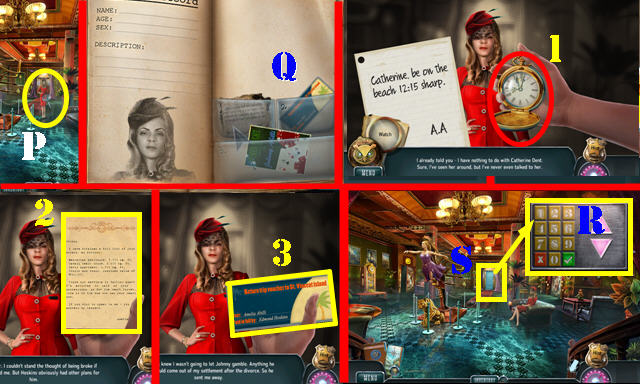
- Talk to Hoskins (J).
- Select (1-2-3).
- You automatically receive the Map.
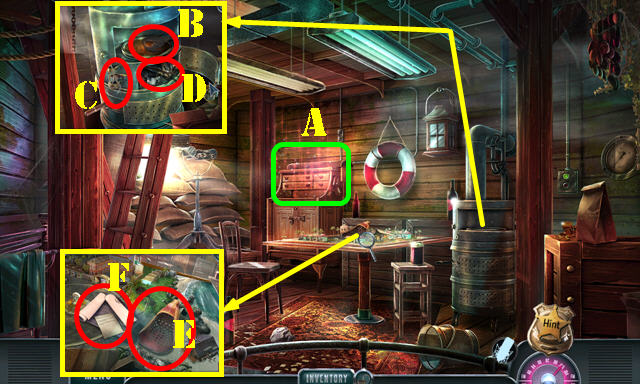
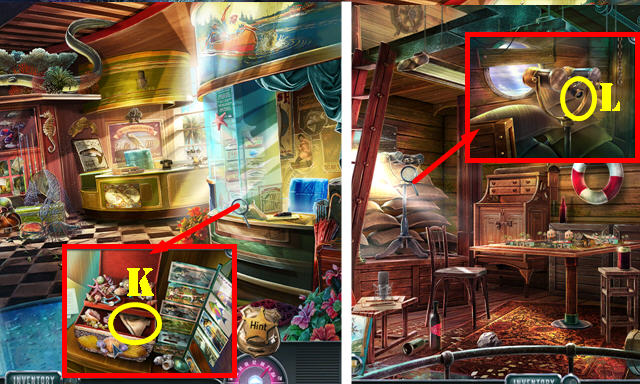
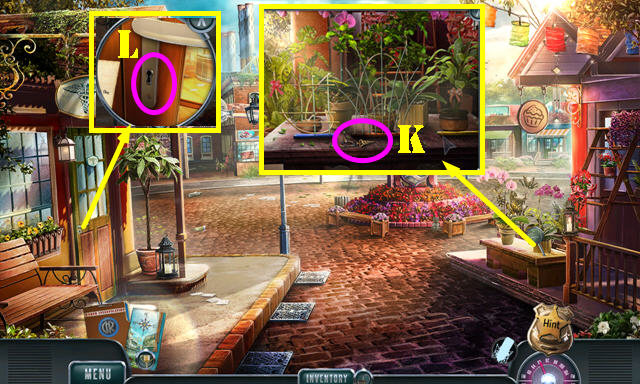
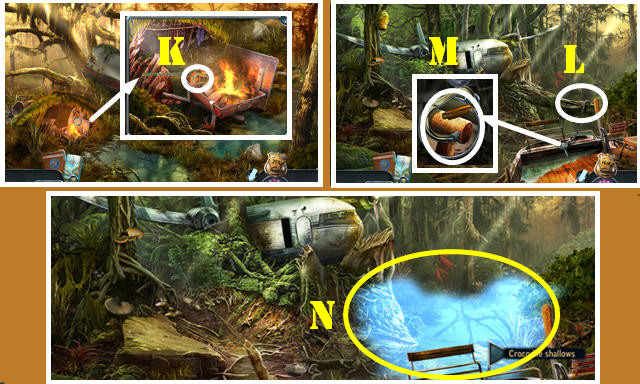
- Exit the vehicle (K).
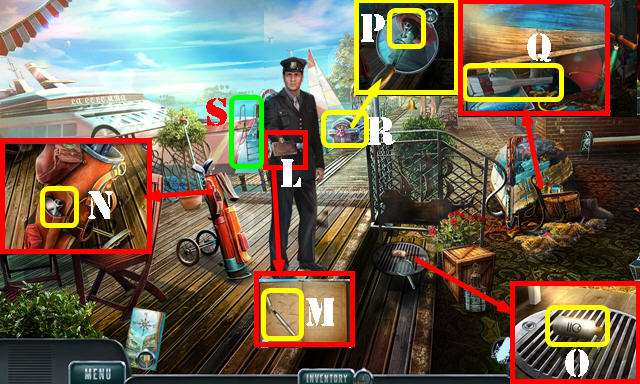
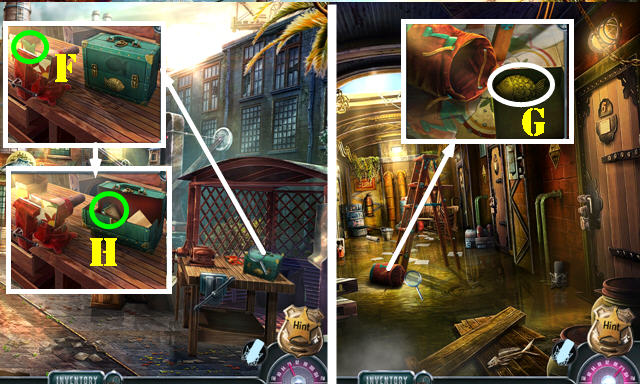
- Take the ledger (L); select the pen (M).
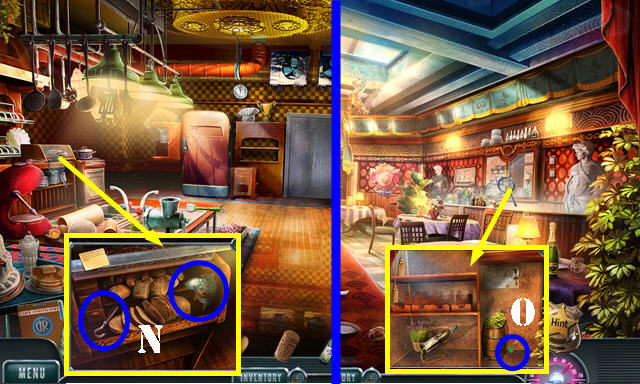
- Open the flap; take the GOLF TEE (N).
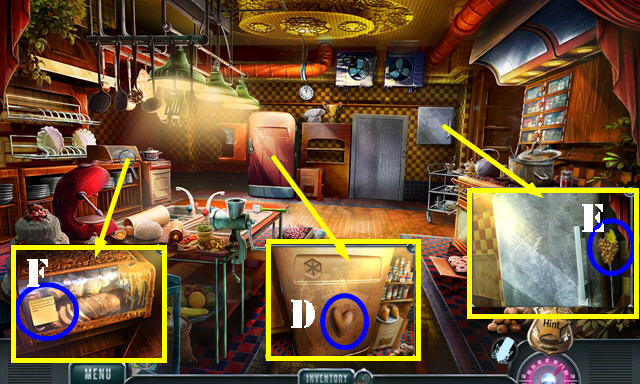
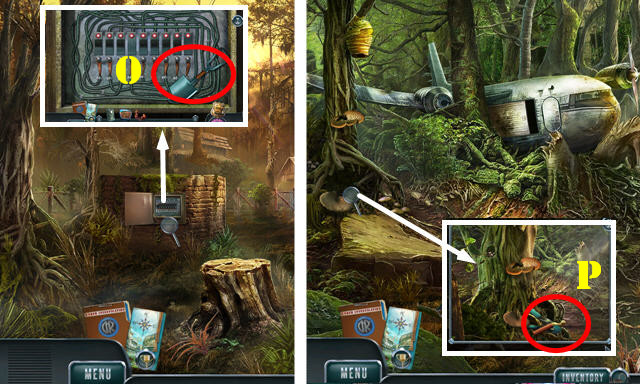
- Move the pot, lantern and box; take the DEVELOPING CHEMICALS 1/3 (O).
- Push the handle; place the GOLF TEE and select it (P) for an HOP: play it to get the INFLATING BUOY.
- Place the INFLATING BUOY; use the TIRE PUMP; take the BOAT OAR (Q).
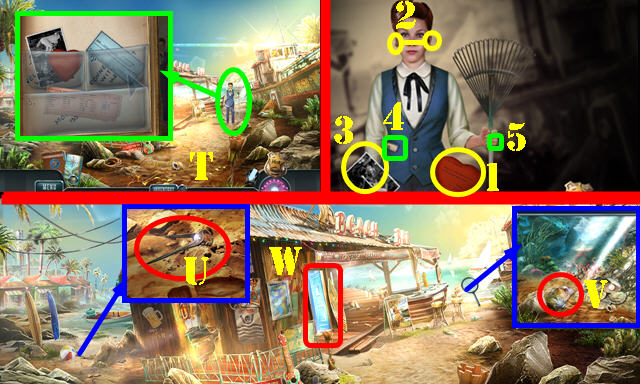
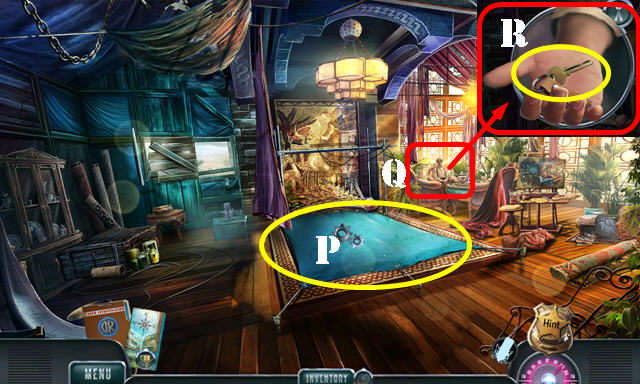
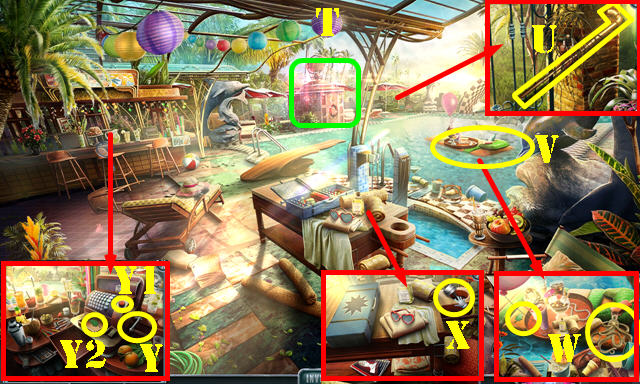
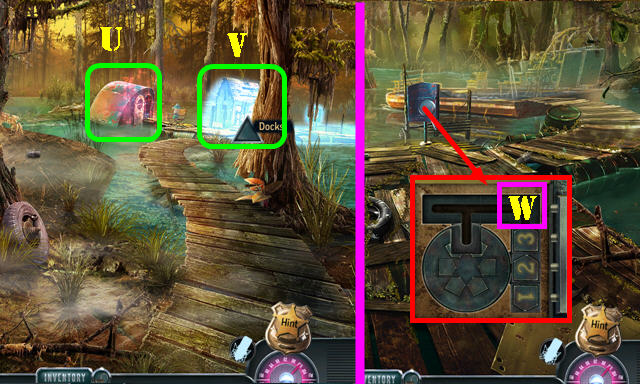
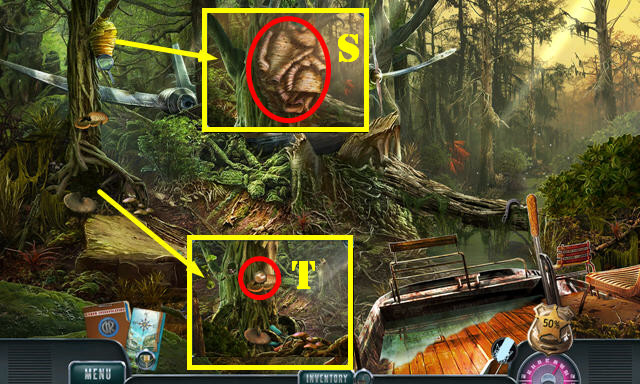
- Select the handle (R); go to La Colomba (S).
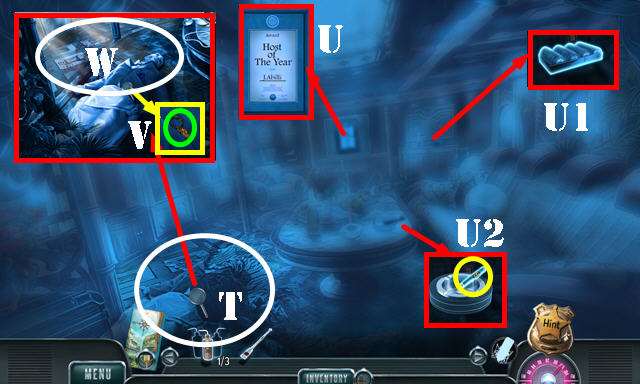
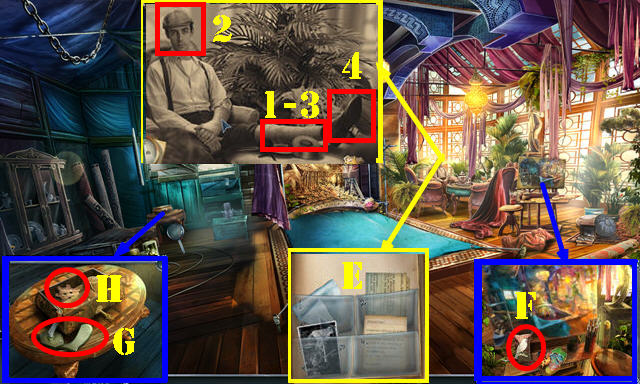
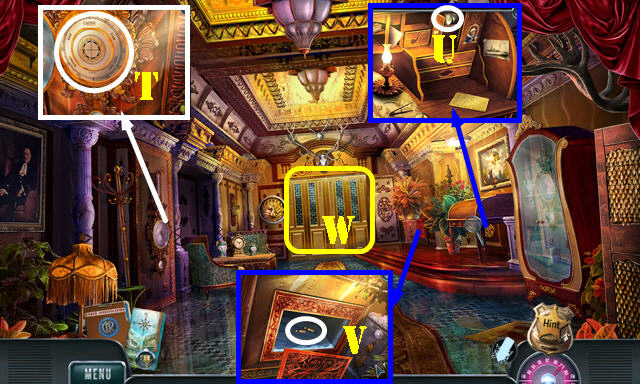
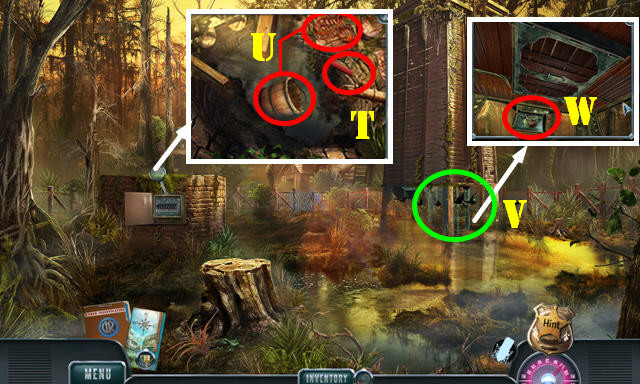
- Select the man and then use the CAMERA (T).
- Select (U-U1-U2). Open the locket (V). Then select the area 3x (W) to receive the Evidence.
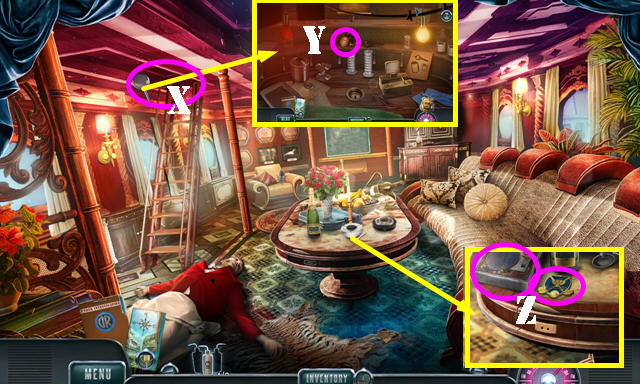
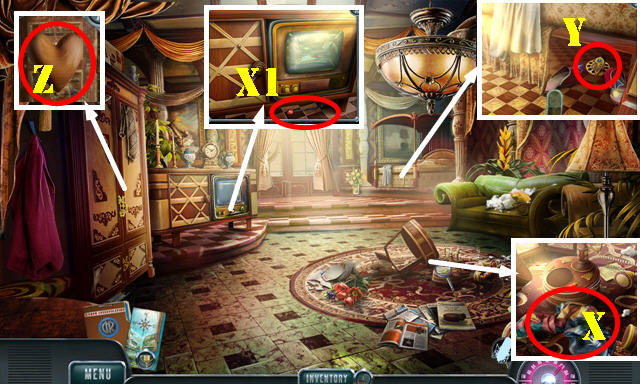
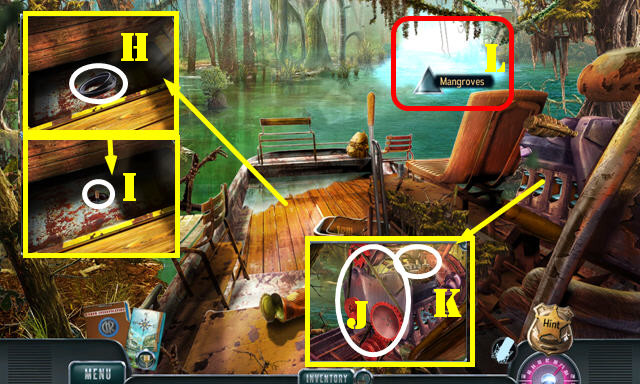
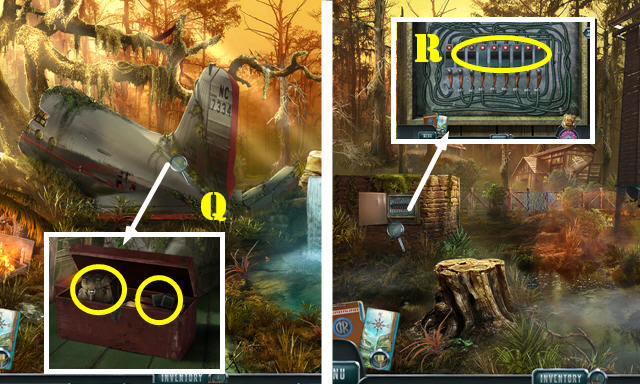
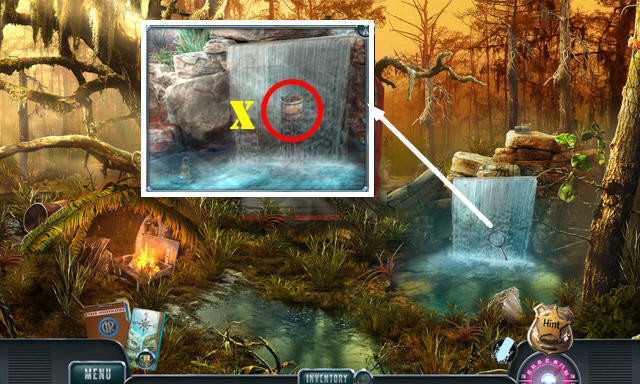
- Use the BOAT OAR (X). Take the LIGHT BULB (Y).
- Take the PUZZLE BOX and BUCKLE PIECE (Z).
- Walk down.
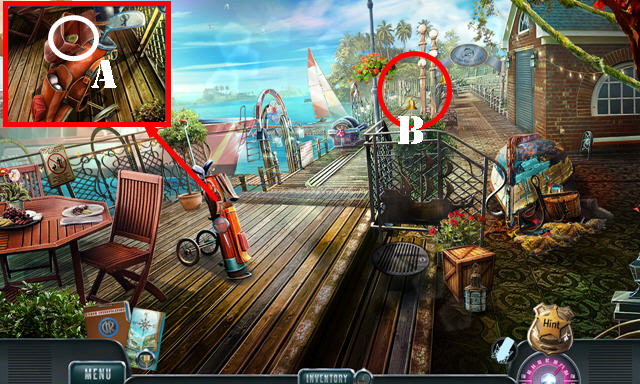
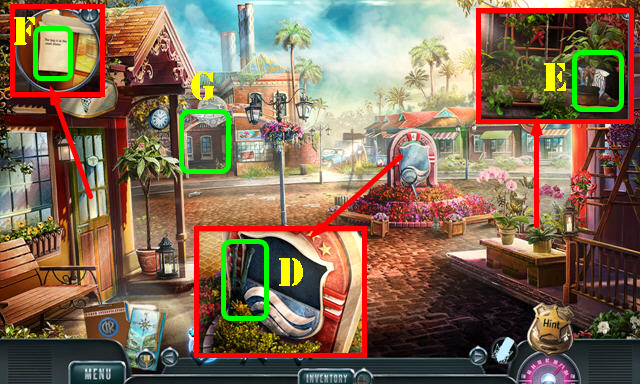
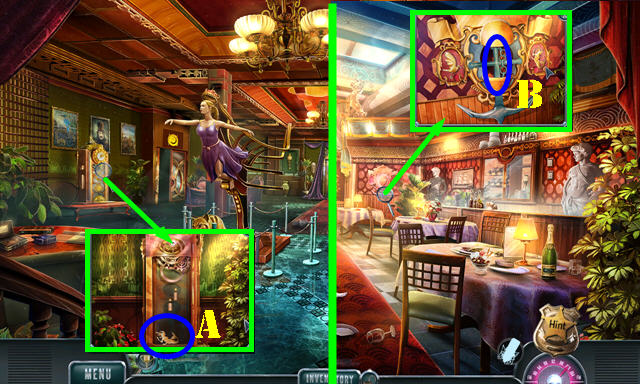
- Place the BUCKLE PIECE; open the bag; take the DIVOT TOOL (A).
- Go to the Courtyard (B).
- Talk to the officer (C).
- Open the compartment (D). Take the Evidence (E). Open the compartment; take the FILM CANISTER and DEVELOPING CHEMICALS 2/3 (F).
- Take the SHIP SAILS 1/2 (G).
- Return to La Colomba.
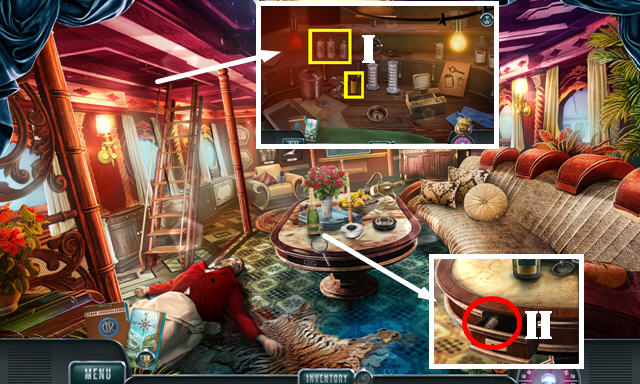
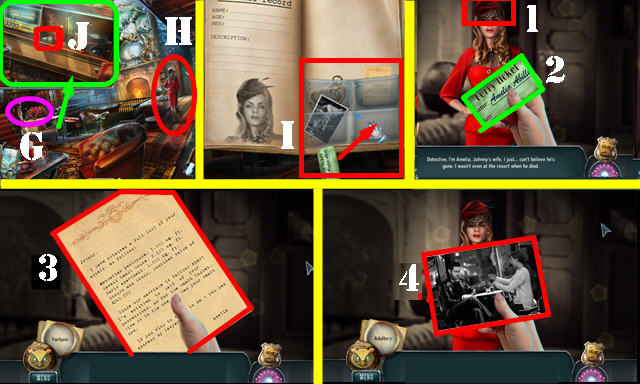
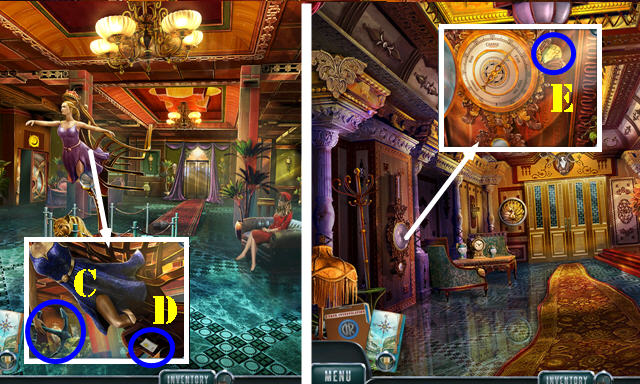
- Use the DIVOT TOOL; read the note; take the Evidence and DEVELOPING CHEMICALS 3/3 (H).
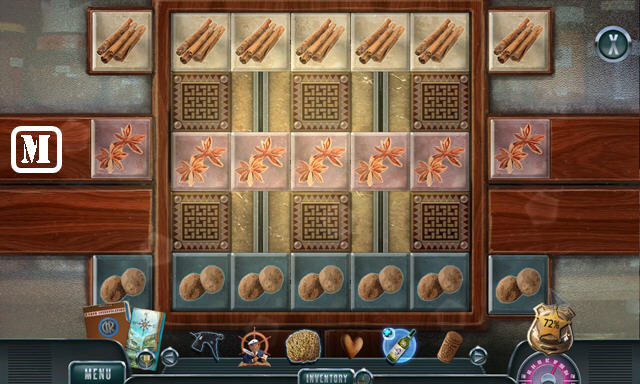
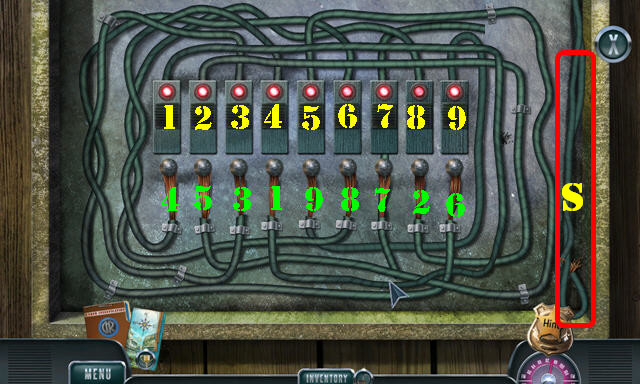
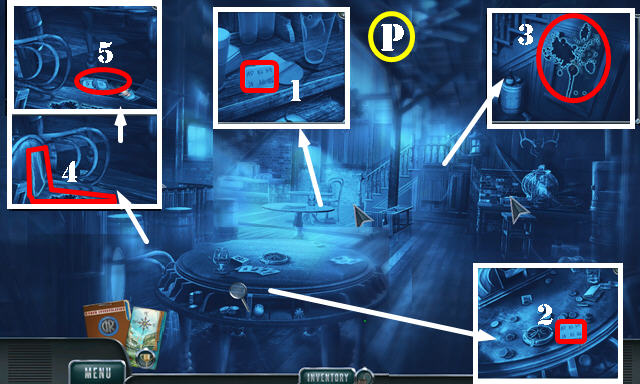
- Place the DEVELOPING CHEMICALS 3/3 and FILM CANISTER. Select the knob (I) for a puzzle.
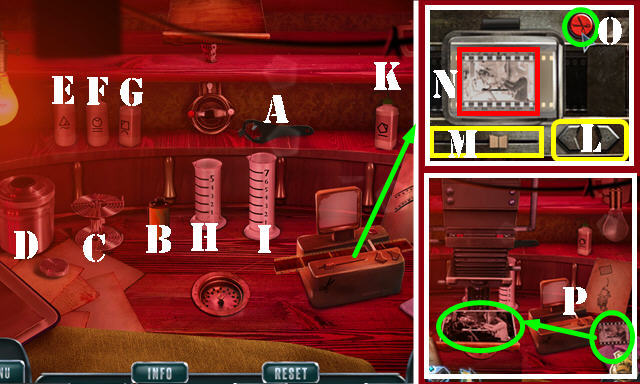
- Solution: (A-B)-(B-C)-(E-H)-(H-D)-(F-I)-(I-H)-(I-D)-(G-H)-(H-I)-(G-H)-(H-I)-(H-D)-(K-D).
- Move the arrows (L) and the slider (M) until the image (N) is aligned, then press the button (O).
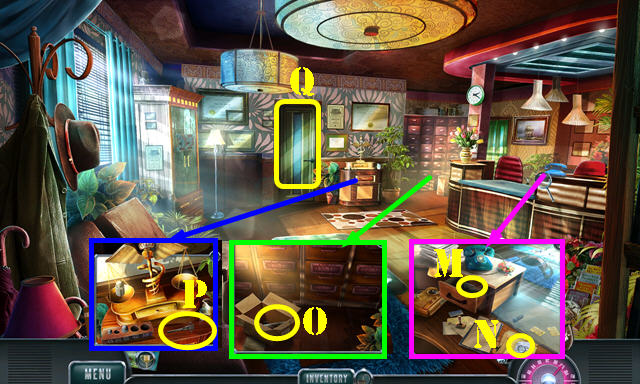
- Place the picture (P); select it to get the Evidence. Take the JOURNALIST'S REPORT.
- Return to the Courtyard.

- Give the JOURNALIST'S REPORT (Q).
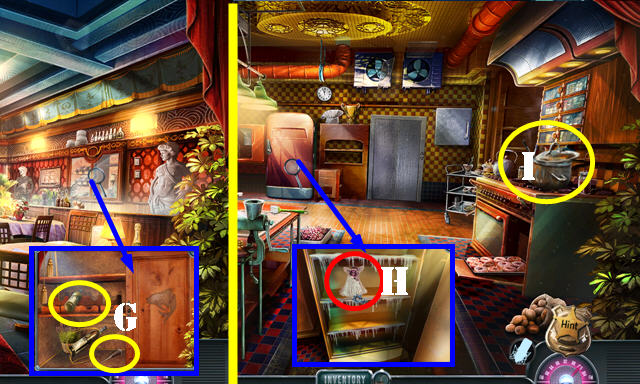
- Open the cover; insert the LIGHT BULB (R); take the ELECTRICAL TAPE (S).
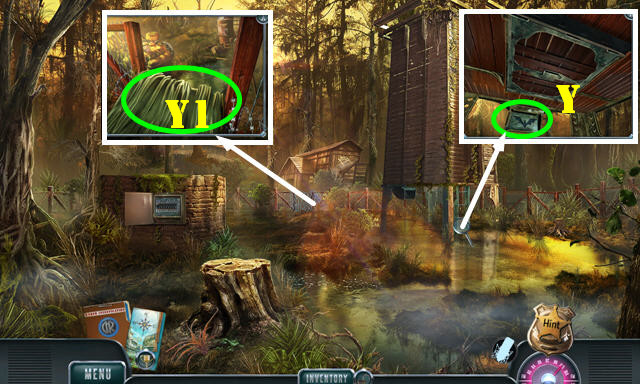
- Go to the Yacht club (T).
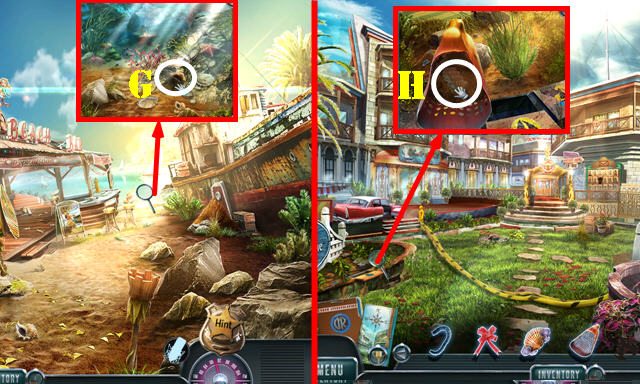
- Play the HOP (U) to get the ARCHIVE KEY.
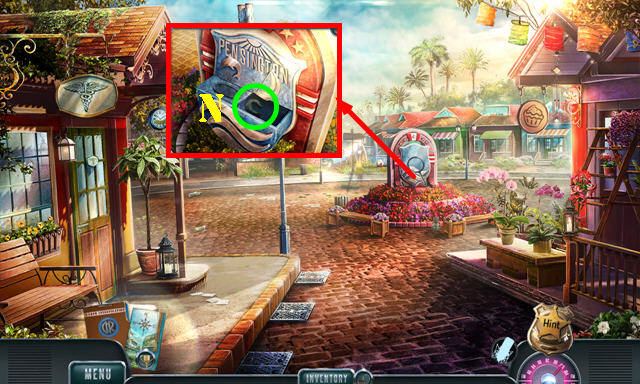
- Take the INITIALS (V).
- Look at the sign (W).
- Return to the Pier.
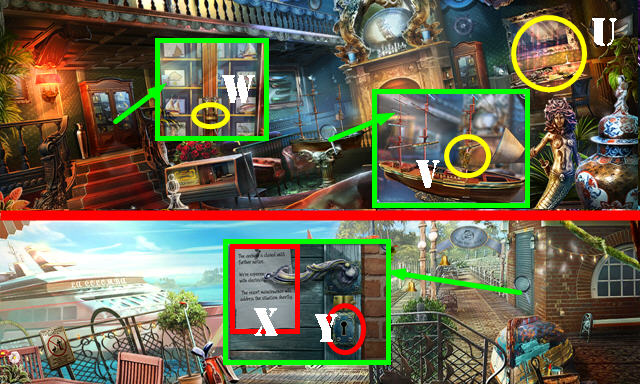
- Look at the note (X). Use the ARCHIVE KEY; turn it and enter the Archives (Y).
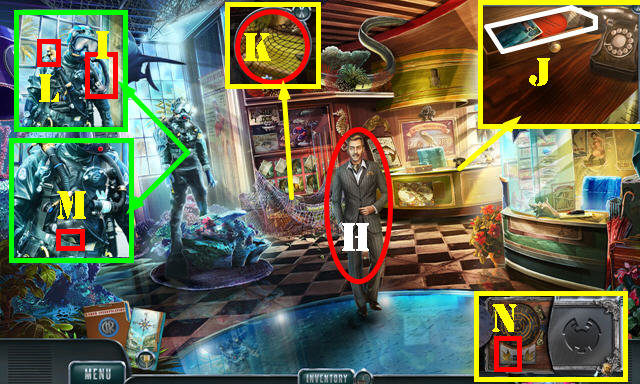
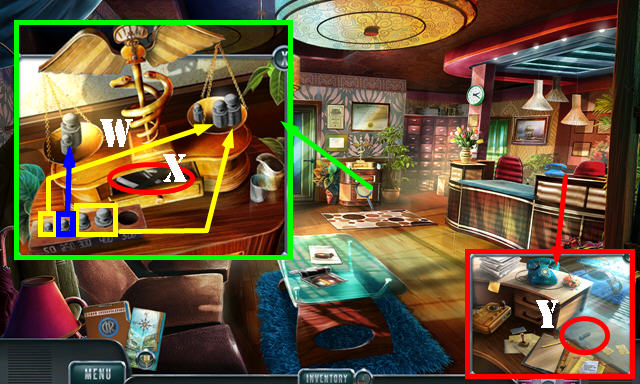
- Select the wires. Take the RADIO ANTENNA (A). Use the ELECTRICAL TAPE (B); take the DOLPHIN EMBLEM (C).
- Return to the Courtyard.
- Take the Evidence (D).
- Place the DOLPHIN EMBLEM (E); take the BUTTON (F).
- Go to the Yacht club.
- Place the RADIO ANTENNA (G).
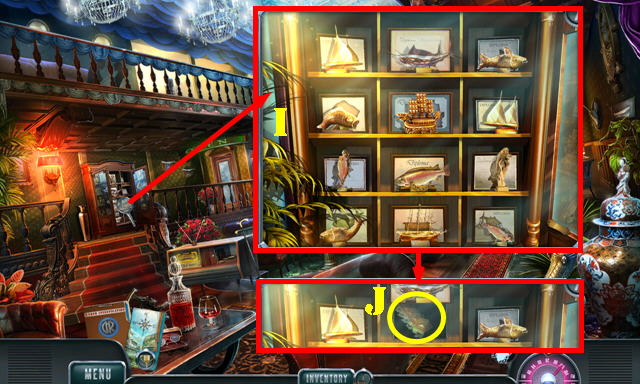
- Talk to Amelia (H). Place the items as shown (I). Select 1-4.
- Take the BOLT (J).
- Return to the Archives.
- Place the BOLT and flip the lever (K).
- Place the BUTTON (L); flip it. Take the SHIP SAILS 2/2 (M).
- Take the Evidence and TYPEWRITER RIBBON (N).
- Place the INITIALS for a puzzle (O).
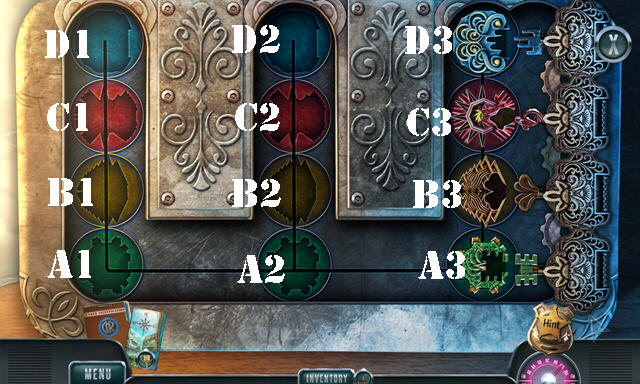
- Solution: (A1-A3))-(B1-B2)-(A3-A1)-(B2-B3)-(A1-A3)-(C1-C2)-(A3-A1)-(B3-B2)-(A1-A3)-(B2-B1).
- (A3-A1)-(C2-C3)-(A1-A3)-(B1-B2)-(A3-A1)-(B2-B3)-(A1-A3)-(D1-D2)-(A3-A1)-(B3-B2)-(A1-A3).
- (B2-B1)-(A3-A1)-(C3-C2)-(A1-A3)-(B1-B2)-(A3-A1)-(B2-B3)-(A1-A3)-(C2-C1)-(A3-A1)-( B3-B2).
- (A1-A3)-(B2-B1)-(A3-A1)-(D2-D3)-(A1-A3)-(B1-B2)-(A3-A1)-(B2-B3)-(A1-A3)-(C1-C2)-(A3-A1).
- (B3-B2)-(A1-A3)-(B2-B1)-(A3-A1)-(C2-C3)-(A1-A3)-(B1-B2)-(A3-A1)-(B2-B3)-(A1-A3).
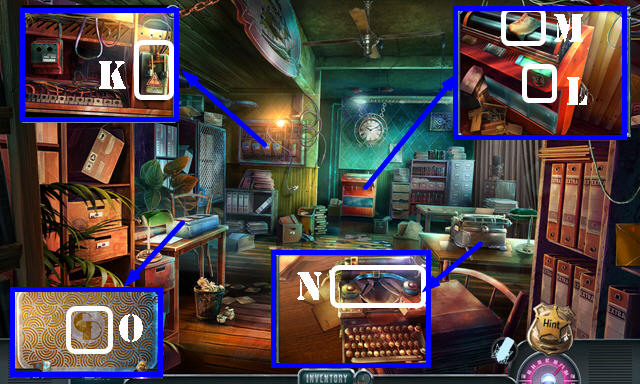
- Look at the note; take the two pieces of Evidence and CABINET KEY.
- Return to the Yacht club.
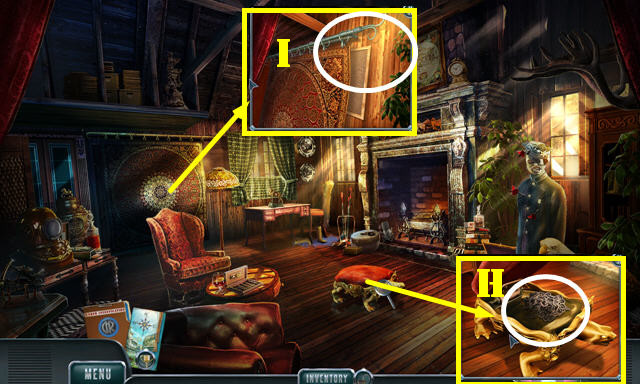
- Place the SHIP SAILS 2/2; take the DRAWER KNOB (E).
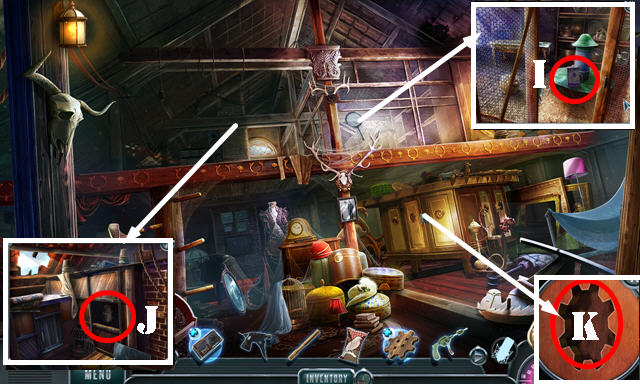
- Use the CABINET KEY; slide the latch. Open the cabinet; take the EMPTY LIGHTER (F).
- Go to the Tour room (G).
- Talk to Hoskins (H).
- Take the DIVER HOSE (I).
- Place the DRAWER KNOB; look at the ID; take the Evidence and LIGHTER FLUID (J).
- Take the RIBBON from the EMPTY LIGHTER. Open the EMPTY LIGHTER; use the LIGHTER FLUID on it; select the spark wheel to get the LIGHTER (inventory).
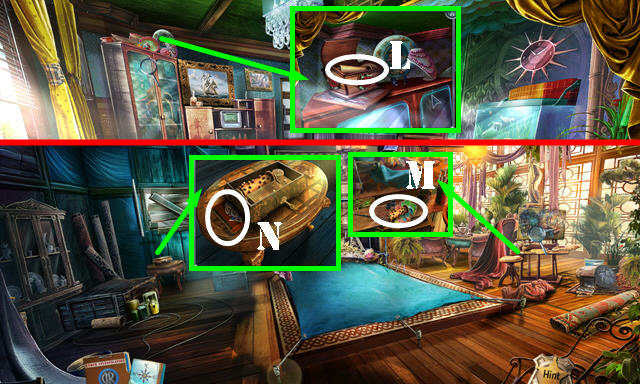
- Use the LIGHTER (K); select the net for an HOP; play it to get the VALVE.
- Place the VALVE (L); take the DOVE EMBLEM (M).
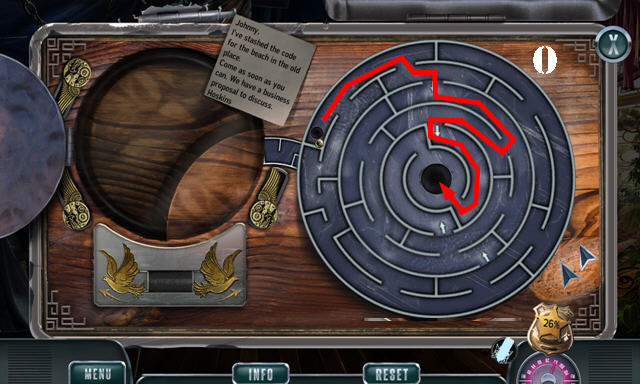
- Place the DOVE EMBLEM (N) on the PUZZLE BOX for a puzzle (inventory).
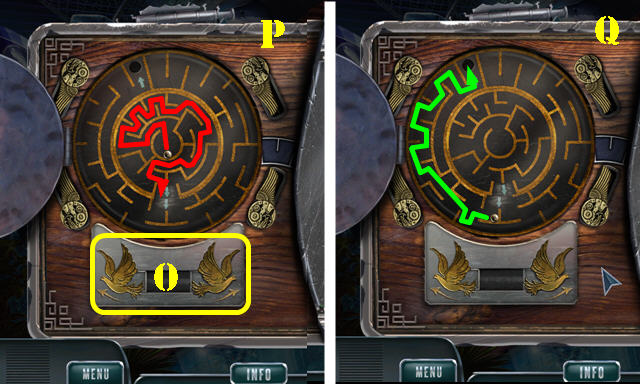
- Use the doves (O) to rotate the maze. Follow the marked path to solve the puzzle (P-Q).
- Look at the note; take the DECORATIVE TILE.
- Return to the Courtyard.
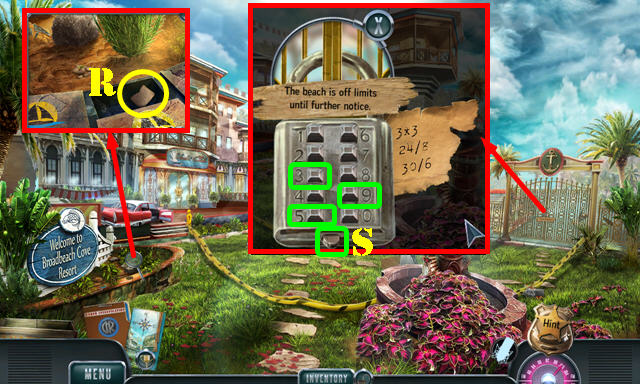
- Place the DECORATIVE TILE; take the BLANK PAPER (R).
- Use the TYPEWRITER RIBBON on the BLANK PAPER take the PADLOCK CODE (inventory).
- Place the PADLOCK CODE; select 9-S-3-S-5-S; enter the Beach.
Chapter 2: The Beach
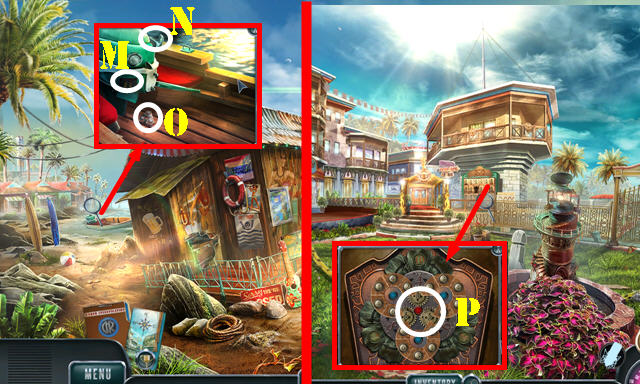
- Select the lady. Place the items as shown (T). Select 1-5.
- Select the dirt twice; take the WIRE CUTTER (U).
- Take the SHELL EMBLEM (V).
- Enter the Beach shed (W).
- Play the HOP (A) to get the TROPHY 1/2.
- Take the Evidence and FIRE EMBLEMS 1/2 (B).
- Use the WIRE CUTTER (C). Open the compartment; take the Evidence and FIRE POKER (D).
- Take the SAND SCOOP (E); read the note and take the Evidence (F).
- Walk down.
- Use the FIRE POKER; take the TROPHY 2/2 (G).
- Walk down.
- Use the SAND SCOOP; select it 4x; take the TOWN MODEL PIECE 1/3 (H).
- Return to the Yacht club.
- Place the TROPHY 2/2 for a puzzle. Solution (I). Take the TOWN MODEL PIECE 2/3 (J).
- Go to the Tour room.
- Place the SHELL EMBLEM and select it. Take the HANDKERCHIEF (K).
- Return to the Beach shed.
- Use the HANDKERCHIEF; take the LENS (L).
- Walk down.
- Open the compartment; use the LENS and select it (M). Pull the cord (N); take the MAILBOX LOCK (O).
- Walk down.
- Place the MAILBOX LOCK for a puzzle (P).
- Solution: Rx4-Tx2-Sx2-Rx2-Tx2-Sx4.
- Take the TOWN MODEL PIECE 3/3.
- Return to the Beach shed.
- Place the TOWN MODEL PIECE 3/3 (U); read the note; take the GOLF CLUB EMBLEM (V).
- Return to the Pier.
- Select the Evidence on the screen.
- Place the GOLF CLUB EMBLEM; take the TRIANGLE WRENCH (W).
- Use the TRIANGLE WRENCH twice (X). Open the grid; take the SAFETY SHACKLE and FIRE EMBLEMS 2/2 (Y).
- Return to the Beach.
- Place the FIRE EMBLEMS 2/2; open the chest; take the GAS CANISTER (A).
- Put down the GAS CANISTER; use the DIVER HOSE on it (B).
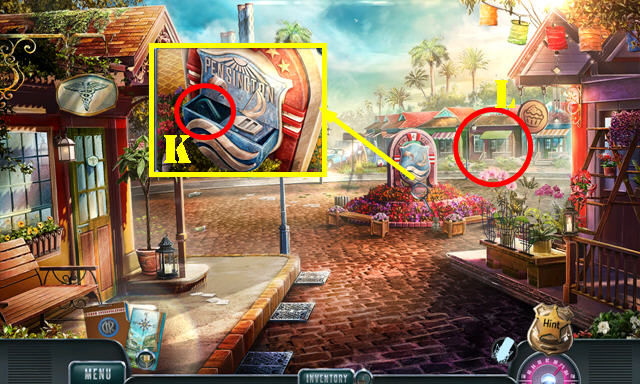
- Go to Pensington square (C).
Chapter 3: Pensington Square
- Take the BOLT CUTTER (D).
- Use the RIBBON and select it; take the TOWN CREST 1/2 (E).
- Read the note (F).
- Go to the Factory courtyard (G).

- Talk to McCreedy (I).
- Take the REACHING ROD (J).
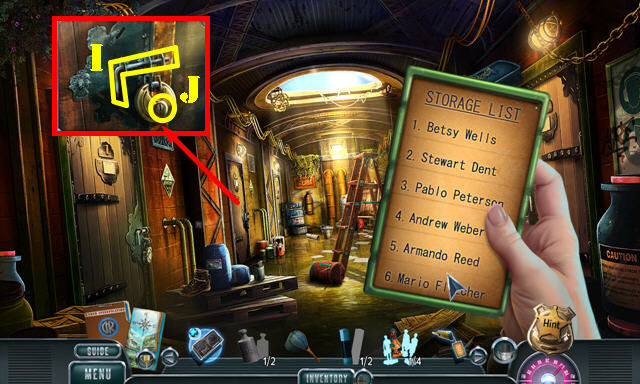
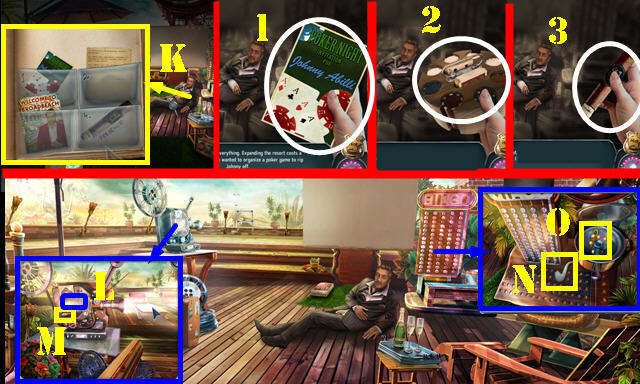
- Look at the note; take the WEIGHTS 1/2 (K). Use the BOLT CUTTER 2x for an HOP (L); play it to receive the FISHING NET.
- Take the CRANE CONTROLLER (M).
- Walk down.
- Select the FISHING NET twice; take the TOWN CREST 2/2 (inventory).
- Place the TOWN CREST 2/2; take the CRANE HOOK (N).
- Return to the Factory courtyard.
- Place the SAFETY SHACKLE on the CRANE HOOK (inventory).
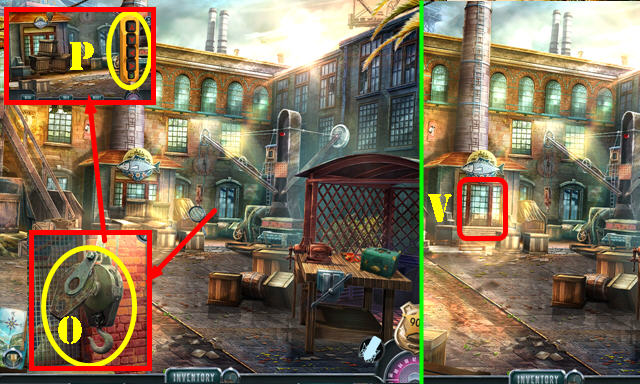
- Open the mechanism; place the CRANE HOOK and close it (O).
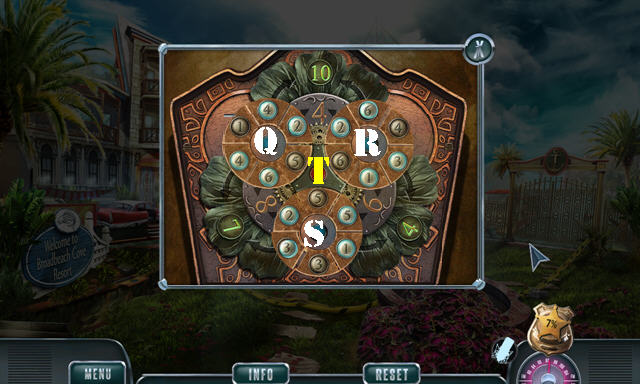
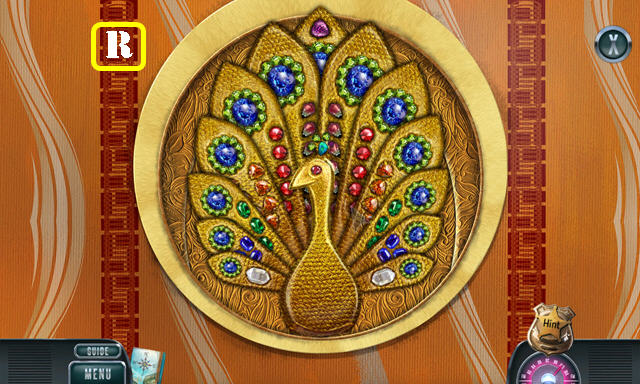
- Place the CRANE CONTROLLER on the scene for a puzzle (P).
- Solution: R-U-Tx4-R-U-Sx3-U-T-U-Sx3-U-Tx4-Q-U.
- Enter the Storage (V).
- Move the ladder (A).
- Select Alison; place the items as shown (B). Select 1-3.
- Select the chain; use the REACHING ROD (C). Open the bag; take the CERAMIC FIGURINES 1/4 and BATTERIES 1/2 (D).
- Take the GREASE GUN (E).
- Walk down.
- Use the GREASE GUN; open the mechanism; take the TILE DECORATION (F).
- Return to the Storage.
- Place the TILE DECORATION; take the GOLDFISH EMBLEM (G).
- Walk down.
- Place the GOLDFISH EMBLEM and open the box. Look at the note; take the MASTER KEY (H).
- Return to the Storage.
- Select the MASTER KEY (inventory).
- Use the MASTER KEY anywhere on the scene.
- Select door two; slide the latch (I) and use the MASTER KEY for an HOP (J); play it to get DENT'S BACKPACK.
- Return to Pensington Square.
- Take the BRASS BARS from DENT'S BACKPACK (inventory).
- Use the BRASS BARS; take the DOCTOR'S OFFICE KEY (K).
- Insert the DOCTOR'S OFFICE KEY (L); select it and enter the Reception.
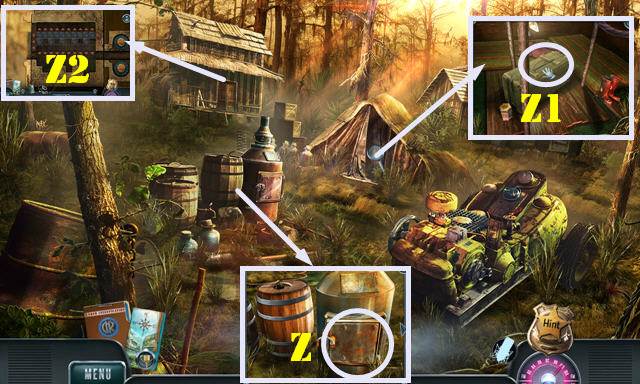
- Open the drawer; take the SPRING (M). Read the note (N).
- Open the box; take the X-RAY BULB (O).
- Take the EXTRACTION TOOL (P).
- Go to the Examination room (Q).

- Remove the board (R); take the SUCTION CUP (R1).
- Use the EXTRACTION TOOL 3x; take the TEST TUBE DOMINO (S). Place the SPRING (T) and select the area twice. Take the MAGNET (U).
- Take the WEIGHTS 2/2 (V).
- Walk down.
- Put down the WEIGHTS 2/2. Place the weights as shown (W). Take the SHREDDED X-RAY IMAGE (X).
- Use the MAGNET; take the BATTERIES 2/2 (Y).
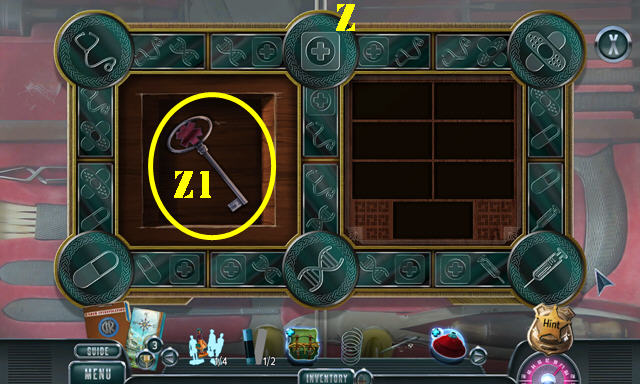
- Place the TEST TUBE DOMINO for a puzzle. Solution (Z).
- Take the MEDICAL CABINET KEY (Z1).
- Go to the Examination room.

- Use the MEDICAL CABINET KEY; take the CERAMIC FIGURINES 2/4 and FUSE (A).
- Remove the broken glass twice; place the X-RAY BULB (B). Open the panel; place the FUSE (C). Press the button and place the SHREDDED X-RAY IMAGE. Select the image 3x to get the X-RAY IMAGE (D).
- Open the curtain for an HOP (E); play it to get the CASSETTE.
- Walk down.
- Insert the BATTERIES 2/2 and CASSETTE (F); select it. Take the FILE NUMBER (G).
- Place the FILE NUMBER; look at the folder (H). Use the X-RAY IMAGE and select the next folder. Take the DRILL BIT.
- Place the items as shown (I).
- Select 1-3. Take the SIGNET RING (J).
- Walk down.
- Open the backpack and select the journal; use the SIGNET RING. Take the BOAT EMBLEM and HOUSE PHOTO (inventory).
- Place the BOAT EMBLEM; take the SUCTION-CUP HANDLE (K).
- Place the HOUSE PHOTO; go to Dent's house (L).
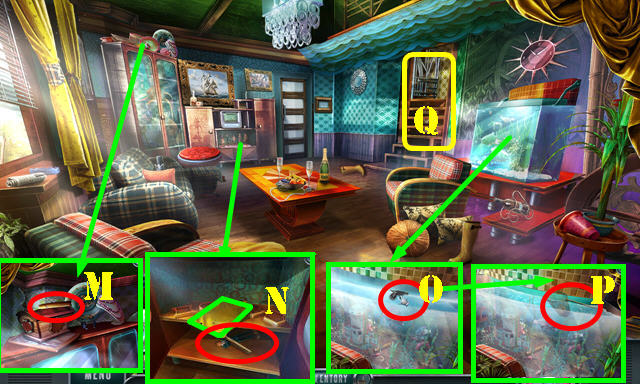
- Take the WOODEN POLES 1/4 (M).
- Open the cabinet; take the Evidence and WOODEN HANDLE; select the figurine (N).
- Take the Evidence and SPRAYER (O).
- Place the SUCTION-CUP HANDLE on the SUCTION CUP (inventory).
- Use the SUCTION CUP and then the FISHING NET; take the HAT TOKEN (P). Use the FISHING NET again and take the WOODEN POLES 2/4.
- Go to Dent's attic (Q).
- Take the WOODEN POLES 3/4 (R).
- Open the box; take the WOODEN POLES 4/4 (S). Remove two boxes; use the HAT TOKEN; open the box and take the CERAMIC FIGURINES 3/4 (T).
- Place the WOODEN POLES 4/4 (U). Select the area 3x (V). Take the MUSIC BOX KEY (W).
- Take the CERAMIC FIGURINES 4/4 (X).
- Walk down.
- Place the CERAMIC FIGURINES 4/4; arrange as shown (A).
- Play the puzzle. Place the sliders as shown (B); slide the handle down (C).
- Enter the Relaxation area (D).
- Place the items as shown (E). Select 1-2-3-4.
- Take the BIRDSEED (F) and DRILL (G).
- Use the MUSIC BOX KEY and turn it. Open the box; take the WOODEN GEAR (H).
- Return to the Dent's attic.
- Place the DRILL BIT on the DRILL to get the SCREW DRILL (inventory).
- Use the BIRDSEED; take the PAINT THINNER (I).
- Use the SCREW DRILL; take the GEAR SHAFT (J).
- Place the GEAR SHAFT and WOODEN HANDLE on the WOODEN GEAR to get the CABINET CRANK (inventory).
- Use the CABINET CRANK (K) for an HOP; play it to get the ROSE EMBLEM.
- Walk down.
- Place the ROSE EMBLEM; open the box; take the MUSIC BOX CYLINDER 1/2 (L).
- Go to the Relaxation area.
- Use the PAINT THINNER; take the MUSIC BOX CYLINDER 2/2 (M).
- Insert the MUSIC BOX CYLINDER 2/2; take the CAPTAIN FIGURINE and LABYRINTH PIECE (N).
- Place the LABYRINTH PIECE on the PUZZLE BOX for a puzzle (inventory). Solution (O).
- Take the Evidence and RAZOR.
- Use the RAZOR 3x; remove the cover for an HOP (P); play it to get MCCREEDY'S AGENDA.
- Open MCCREEDY'S AGENDA and select it (inventory).
- Give MCREEDYS AGENDA (Q).
- Take the MAILBOX KEY (R).
- Go to Pensington square.
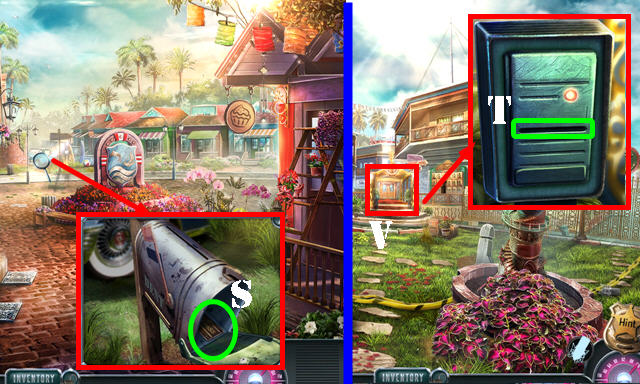
- Use the MAILBOX KEY; take the VIP PASS CARD (S).
- Go to the Courtyard.
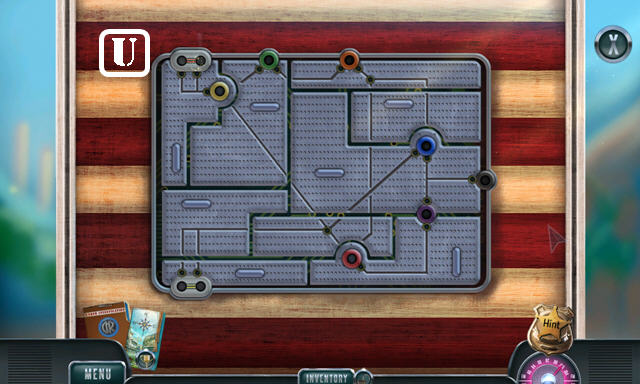
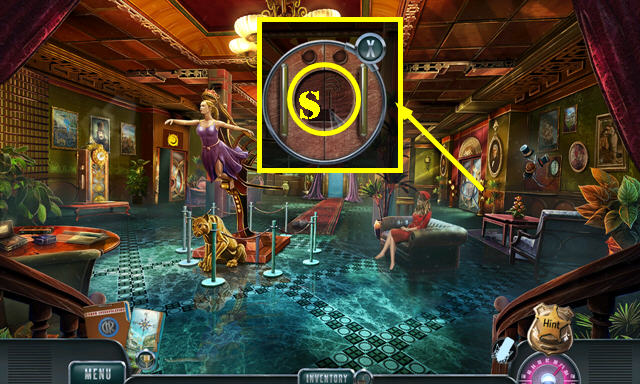
- Use the VIP PASS CARD; open the box for a puzzle (T).
- Solution (U). Insert the VIP PASS CARD again (T).
- Go to the Resort foyer (V).
Chapter 4: The Resort

- Talk to Mrs. Alibi (W).
- Open the door (X).
- Go to the Dining room (Y).
- Open the cabinet; take the KEY TAGS (A).
- Take the WIRE SCRUBBER (B).
- Open the door; enter the Resort kitchen (C).
- Take the WOODEN HEART (D); open the door.
- Take the GRAPE EMBLEM (E).
- Look at the note (F).
- Walk down.
- Use the GRAPE EMBLEM; open the door; take the WINE BOTTLE and ICE PICK (G).
- Return to the Resort kitchen.
- Use the ICE PICK; take the FROZEN FIGURINE (H).
- Place the FROZEN FIGURINE to get the CUPCAKE FIGURINE (I).
- Walk down.
- Place the CUPCAKE FIGURINE for an HOP (J); play it to get the WIRE CUTTER.
- Go to the Resort kitchen.
- Use the WIRE CUTTER; take the CORKSCREW and KEYS (K).
- Place the KEY TAGS on the KEYS; take the SPICE RACK KEY (inventory).
- Use the SPICE RACK KEY for a puzzle (L).
- Solution (M).
- Take the BAKING SODA.
- Use the CORKSCREW on the WINE BOTTLE; take the CORK (inventory).
- Pour the BAKING SODA; place the SPRAYER in the WINE BOTTLE to get the CLEANING MIXTURE (inventory).
- Use the CLEANING MIXTURE and WIRE SCRUBBER; open the case; take the RESORT LOGO and BUTTER CURLER (N).
- Walk down.
- Place the RESORT LOGO; take the Evidence and METAL LEAVES 1/3 (O).
- Walk down.
- Select Mrs. Alibi (P). Place the items as shown (Q). Select 1-3.
- Enter 011 (R).
- Enter the Hallway (S).
- Open the case (T).
- Open the cabinet; place the CAPTAIN FIGURINE; take the FLASHLIGHT (U).
- Use the BUTTER CURLER; take the CLOCK WEIGHTS (V).
- Go to the Deluxe apartment (W).
- Take the SILK SCARF (X) and BINGO LEVER (X1).
- Lift the skirt; use the FLASHLIGHT; move three items; take the GOLDEN FEATHERS 1/3 and PHONE DIAL (Y).
- Place the WOODEN HEART for an HOP (Z); play it to get the WALLET.
- Return to the Resort foyer.
- Place the CLOCK WEIGHTS; take the MERMAID FIGURINE (A).
- Go to the Dining room.
- Place the MERMAID FIGURINE; take the ANCHOR (B).
- Walk down.
- Place the ANCHOR (C); take the WEATHER REPORT and BAROMETER NEEDLE (D).
- Go to the Hallway.
- Place the BAROMETER NEEDLE; select it once and take the DIAL PART (E).
- Go to the Deluxe apartment.
- Place the DIAL PART on the PHONE DIAL (inventory).
- Open the WALLET; look at the note and ID; take the PHONE NUMBER (inventory).
- Place the PHONE DIAL and PHONE NUMBER (F). Dial 555-3140. Take the CUPBOARD KEY (G).
- Use the CUPBOARD KEY; take the DRAWER KNOB (H).
- Walk down.
- Place the DRAWER KNOB; take the GLASS CUTTER (I).
- Go to the Deluxe apartment.
- Use the GLASS CUTTER (J); pull the handle and go out to the Rooftop.
- Place the items as shown (K). Select 1-3.
- Take the GOLDEN FEATHERS 2/3 (M). Use the SILK SCARF to get the BULB (L).
- Take the PIPE EMBLEM (N). Place the BINGO LEVER; take the GOLDEN FEATHERS 3/3 (O).
- Place the BULB in the FLASHLIGHT (inventory).
- Go to the Hallway.

- Place the PIPE EMBLEM; take the CASH REGISTER BUTTON (P).
- Place the GOLDEN FEATHERS 3/3 for a puzzle (Q).
- Solution (R).
- Take the THORN STRIPPER and TRANSMITTER.
- Walk down.
- Place the TRANSMITTER; enter the Poolside (S).
- Play the HOP (T) to get the CLOCK PENDULUM.
- Use the THORN STRIPPER; move the vines; take the METAL ROD (U).
- Use the METAL ROD (V); take the BRASS SQUID and METAL LEAVES 2/3 (W).
- Take the PUMP PARTS 1/2 (X).
- Pull the lever (Y). Place the CASH REGISTER BUTTON (Y1) and push it; take the METAL LEAVES 3/3 (Y2).
- Walk down.
- Place the CLOCK PENDULUM; take the SUN SEAL (A).
- Go to the Poolside.
- Place the SUN SEAL and open the box; take the TREE MEDAL (B).
- Place the METAL LEAVES 3/3 on the TREE MEDAL (inventory).
- Place the TREE MEDAL and go to the Swamp (C).
Chapter 5: Swamp
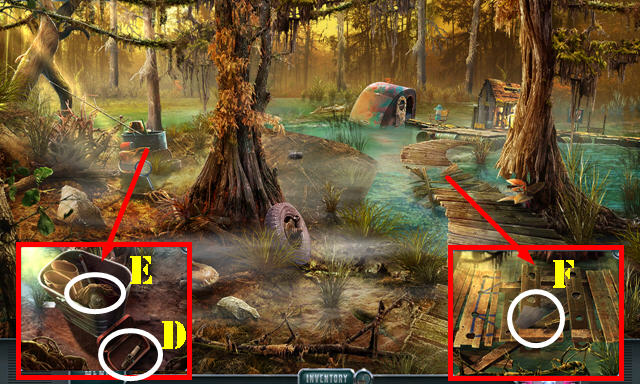
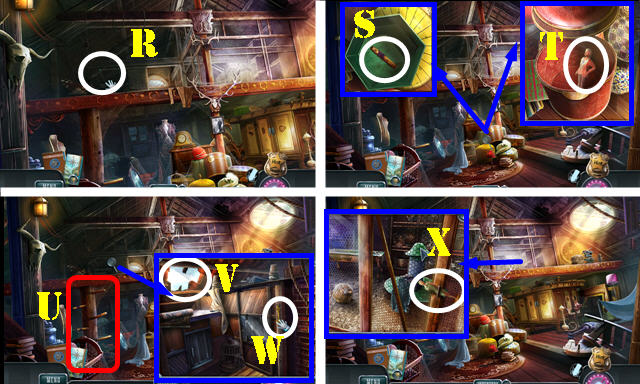
- Open the case; take the SPARK PLUGS 1/3 (D).
- Place the BRASS SQUID; take the ROPE (E).
- Take the SANDPAPER (F); select the boards 4x; place the ROPE for a puzzle.
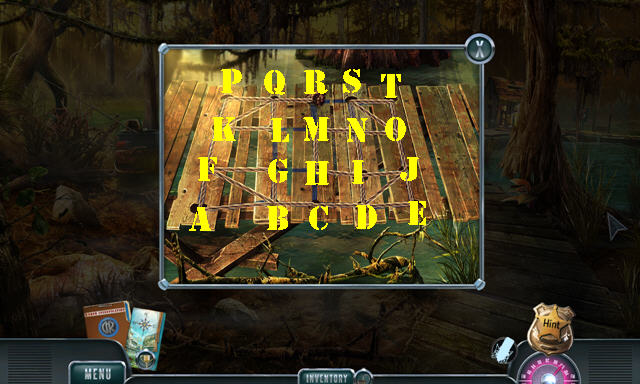
- Solution: C-B-F-A-B-G-F-K-Q-P-K-L-Q-R-S-O-T-S-N-O-J-D-E-J-I.
- D-C-H-I-N-M-L-G-H-M-R.
- Play the HOP to get the NUMBER TILE (U).
- Go to the Docks (V).
- Place the NUMBER TILE for a puzzle (W).
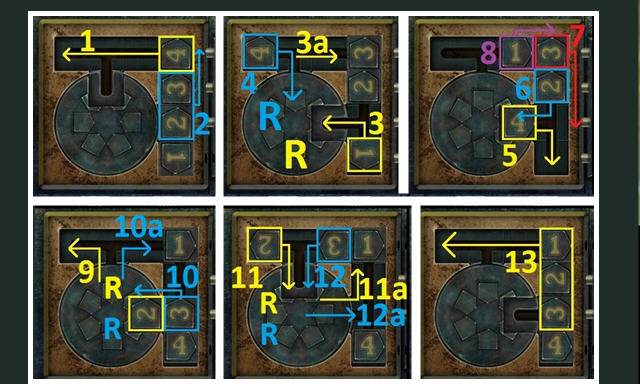
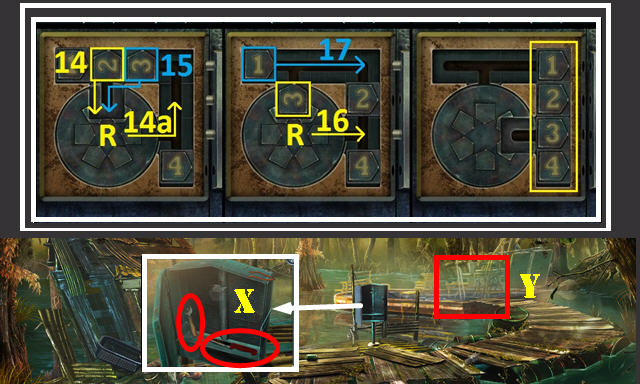
- Solution: 1-2-3-R-3a-4-R-5-6-7-8-R-9-10-R-10a-11-R-11a-12-R.
- 12a-13-14-R-14a-15-R-16-17.
- Take the CAN OPENER and KNIFE (X).
- Go to the Swampboat (Y).
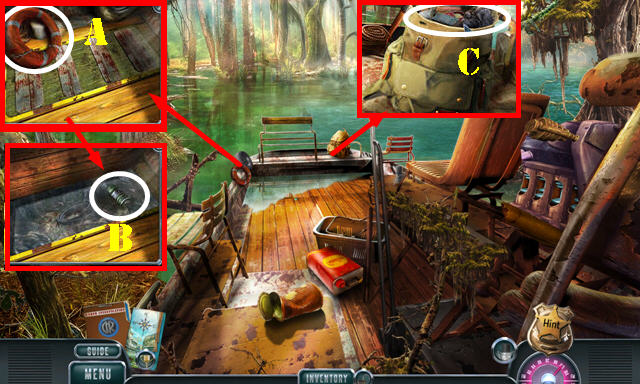
- Take the LIFE PRESERVER (A). Open the cover; take the PUMP PARTS 2/2 (B).
- Open the backpack; take the BROKEN ULTRASONIC DEVICE and SPARK PLUGS 2/3 (C). Remove the backpack.
- Walk down.
- Throw the LIFE PRESERVER (D); pull the rope 3x (blue). Take the CAN OF TAR (E). Open the box; take the SPARK PLUGS 3/3 (F).
- Use the KNIFE for an HOP (G); play it to get the WATER PUMP.
- Go to the Swampboat.
- Place the PUMP PARTS 2/2 on the WATER PUMP (inventory).
- Use the WATER PUMP; take the BANDED BELT (H).
- Use the CAN OPENER on the CAN OF TAR (inventory).
- Use the CAN OF TAR and CORK (I).
- Place the BANDED BELT (J). Place the SPARK PLUGS 3/3 and use the SANDPAPER (K).
- Go to the Mangroves (L).
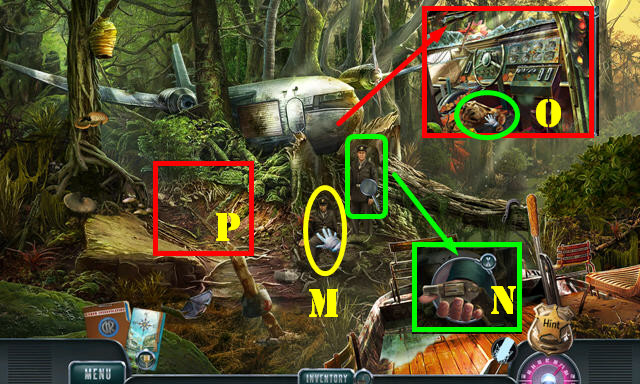
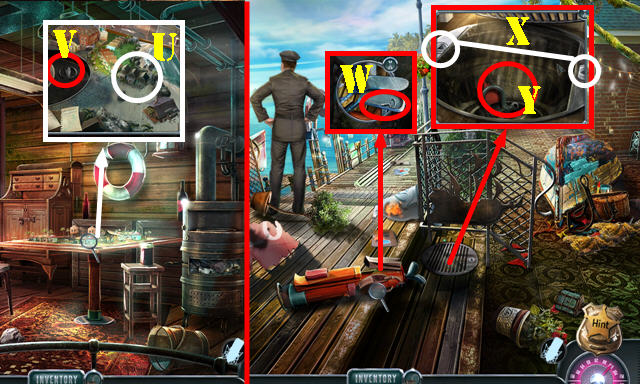
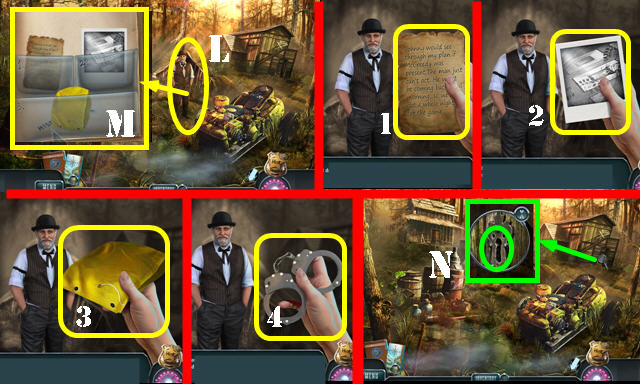
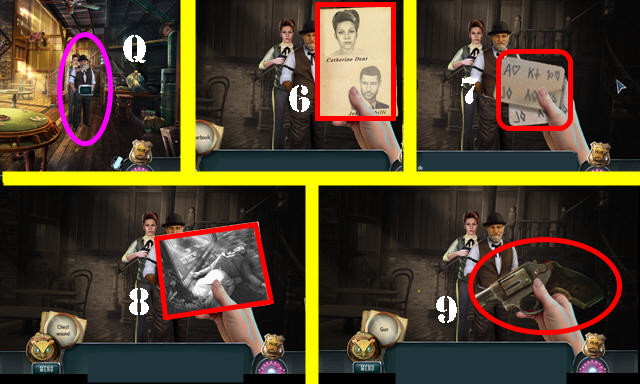
- Select the officer (M) and talk to him; take the Gun (N).
- Take the OILED CLOTH (O).
- Go to the Dry patch (P).
- Take the STICK (Q).
- Place the OILED CLOTH on the STICK; take the UNLIT TORCH (inventory).
- Place the UNLIT TORCH; take the LIT TORCH (R).
- Walk down.
- Use the LIT TORCH (S).
- Take the CARGO BUTTON (T).
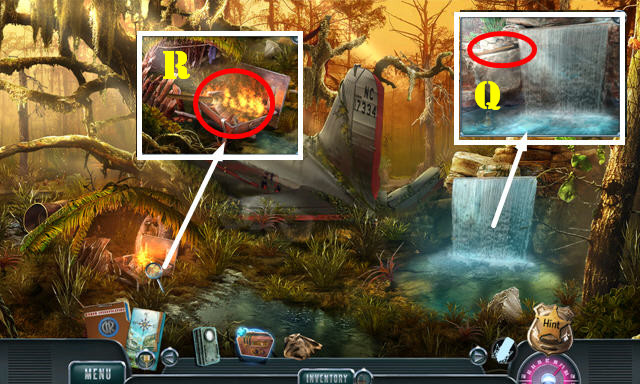
- Go to the Dry patch.
- Place the CARGO BUTTON for a puzzle (@1).
- Solution: E-B-A-D-C-F.
- Take the HAMMER EMBLEM (@2).
- Return to the Swampboat.
- Place the HAMMER EMBLEM; take the TONGS and SCREWDRIVER (G).
- Go to the Mangroves.
- Use the SCREWDRIVER; take the ULTRASONIC DEVICE PART (H); push the button (I).
- Play the HOP (J) to get the TOW CHAIN.
- Go to the Dry patch.
- Use the TONGS; take the CARABINER (K).
- Walk down.
- Place the TOW CHAIN (L) and CARABINER (M).
- Go to the Crocodile shallows (N).
- Take the SMALL SHOVEL (O).
- Walk down.
- Use the SMALL SHOVEL; take the FAUCET HANDLE and CLAMP (P).
- Go to the Dry patch.
- Use the CLAMP; take the PARACHUTE BACKPACK and SWITCHES (Q).
- Go to the Crocodile shallows.
- Place the SWITCHES for a puzzle (R).
- Solution (1-9).
- Take the WIRES (S).
- Place the FAUCET HANDLE (T) and turn it.
- Take the GENERATOR PARTS 1/3 and EMPTY BUCKET (U).
- Look at the note on the BROKEN ULTRASONIC DEVICE; remove the cover and place the ULTRASONIC DEVICE PART and WIRES on it. Close the cover to get the BAT REPELLER 5000 (inventory).
- Use the BAT REPELLER 5000 (V); take the GENERATOR PARTS 2/3 (W).
- Return to the Dry patch.
- Use the EMPTY BUCKET; take the BAT EMBLEM (X).
- Return to the Crocodile shallows.
- Place the BAT EMBLEM (Y) for an HOP; play it to get the PARACHUTE STRAP.
- Place the PARACHUTE STRAP on the PARACHUTE BACKPACK; select it twice to get the PARACHUTE CANVAS (inventory).
- Use the PARACHUTE CANVAS (Y1) and go to Moonshiner's camp.
- Open the door (Z).
- Remove the cover; take the LOCK CONTROLLER (Z1).
- Use the LOCK CONTROLLER for a puzzle (Z2).
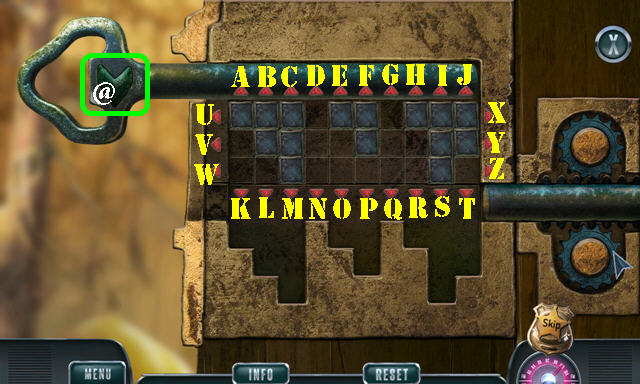
- Solution: A-Zx2-D-W-L-E-Q-Z-D-Q-P-Zx2-T-Z-N-W-@.
- Enter McCreedy's cottage (A).
- Use the FLASHLIGHT on the scene.
- Take the ELECTRIC SAW (B).
- Open the door; take the GENERATOR PARTS 3/3 and BELLOWS (C).
- Walk down.
- Use the BELLOWS (D); take the GOLDEN ORNAMENT (E).
- Place the GENERATOR PARTS 3/3 (F).
- Use the ELECTRIC SAW; take the HOOK (G).
- Return to McCreedy's cottage.
- Place the GOLDEN ORNAMENT; take the CHAIN (H).
- Place the CHAIN on the HOOK; take the GRAPPLING HOOK (inventory).
- Use the GRAPPLING HOOK (I). Select the pieces shown and zoom into the map for a puzzle.
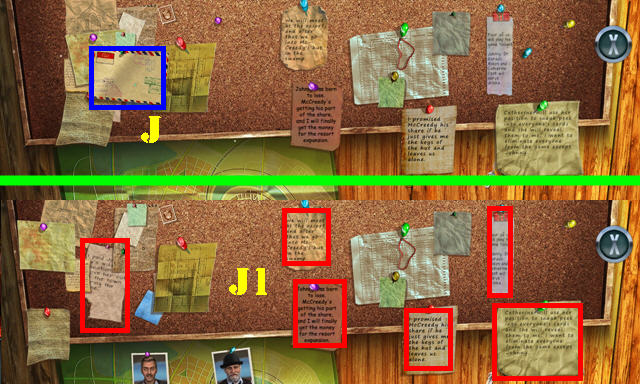
- Select the letter and the area behind it (J). Select the marked items and touch the map for a puzzle (J1).
- Solution (K).
- You receive the NOTE.
- Walk down.
- Open the NOTE; read it and take the SHED KEY (inventory).
- Select McCreedy (L); place the items as shown (M).
- Use the SHED KEY (N) and enter the Smuggler's shed.
- Select 1-4, move the chair and the board; select 5 (P).
- Talk to McCreedy (Q). Select 6-9.
- Congratulations, you've completed Dead Reckoning: Broadbeach Cove.
Created at: 2016-03-20