

Walkthrough Menu
- General Tips
- Chapter 1: Parlor
- Chapter 2: Dead Reckoning Room
- Chapter 3: Hidden Expedition Room
- Chapter 4: Library Anteroom
- Chapter 5: Harridan's Office
- Chapter 6: Garden Overlook
General Tips
- This is the official guide for Dead Reckoning: Death Between the Lines.
- This guide will not tell you when you have to zoom into a location; the screenshots will show each zoom scene.
- Hidden-object puzzles are referred to as HOPs. This guide will not show screenshots of the HOPs, however, it will mention when an HOP is available and the inventory item you'll collect from it.
- Use the Map to fast travel to a location.
Chapter 1: Parlor
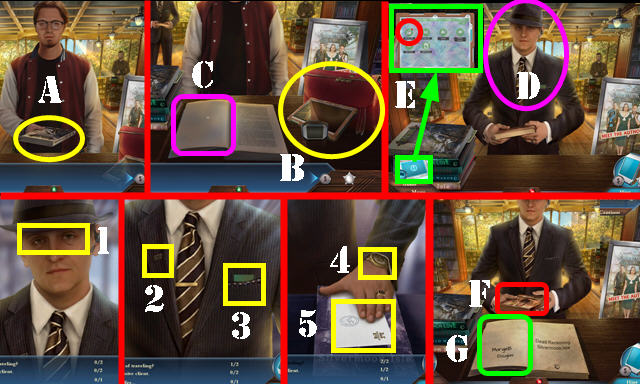
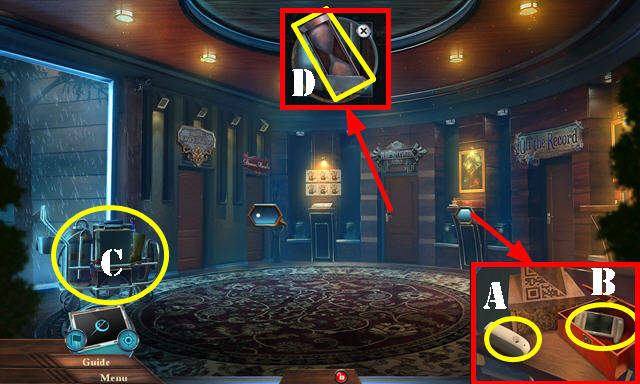
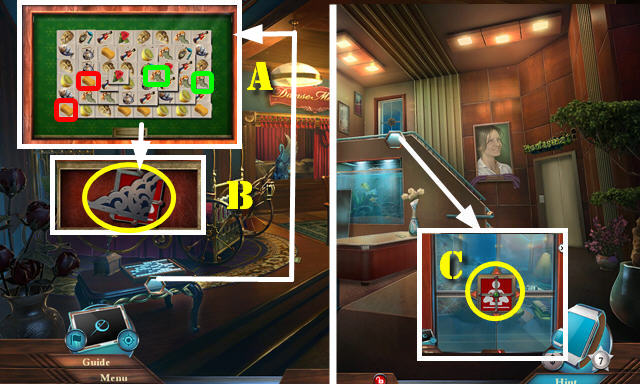
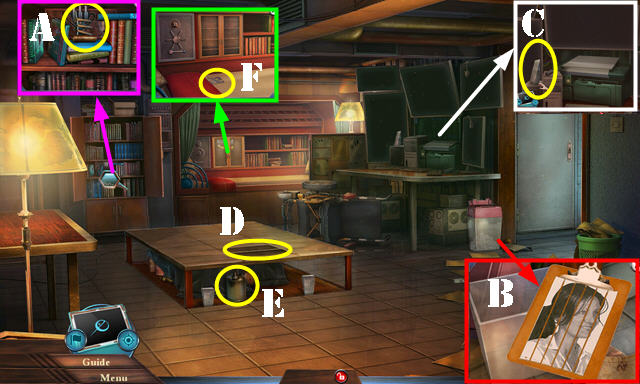
- Take the book and open it (A).
- Take the watch, tablet, and PURSE (B).
- Select the PURSE twice; move things around; take the FOLDABLE UMBRELLA and FOUNTAIN PEN.
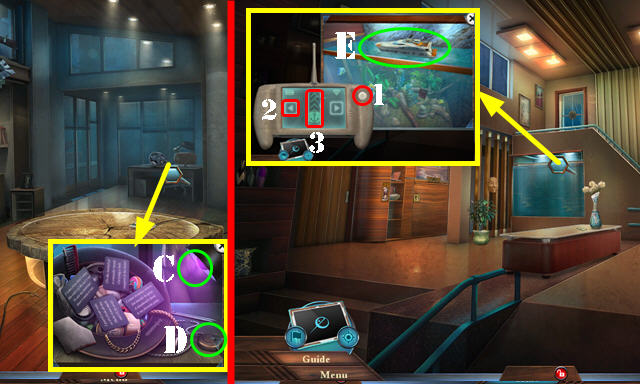
- Use the FOUNTAIN PEN (C).
- Talk to the man (D).
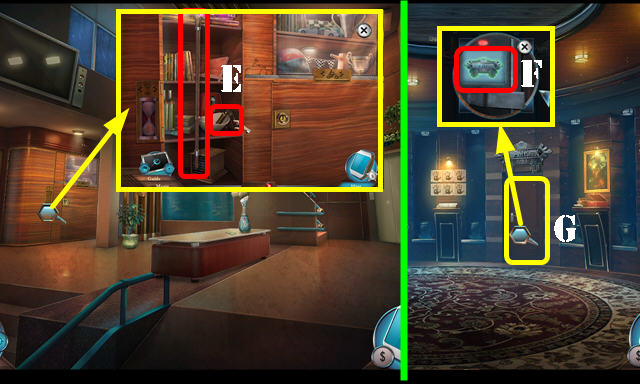
- Select 'Bank Account' on the tablet (E).
- Talk to the man (D).
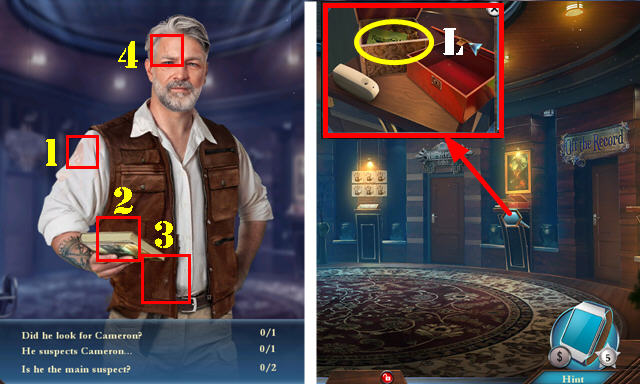
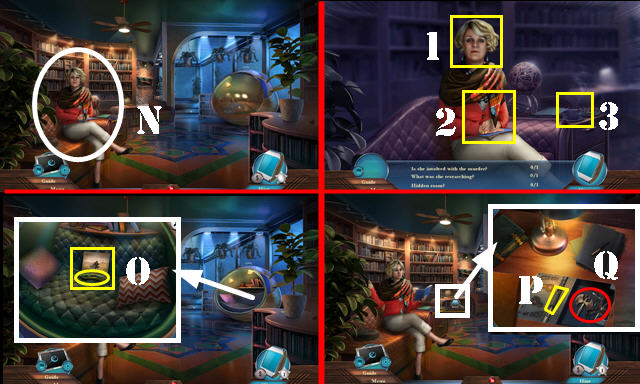
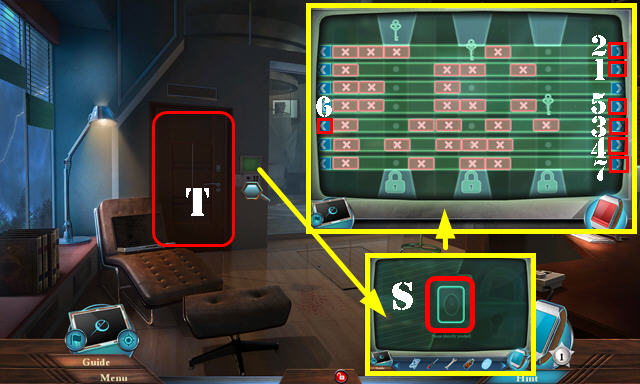
- Select the scene. Select (1); scroll down. Select (2-3); scroll down. Select (4-5).
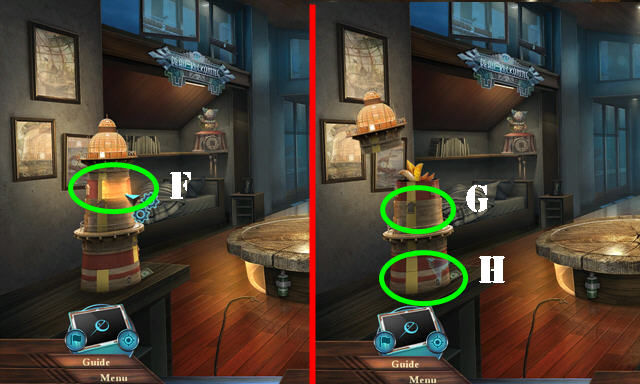
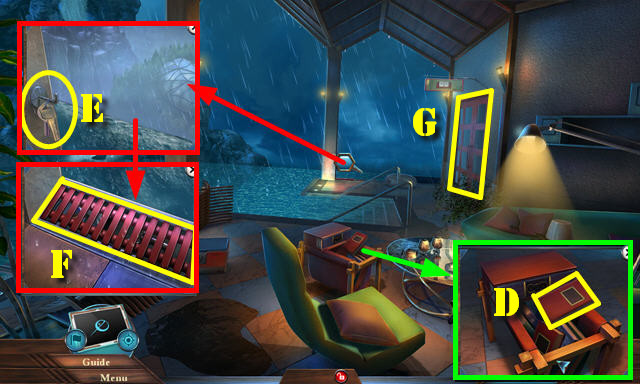
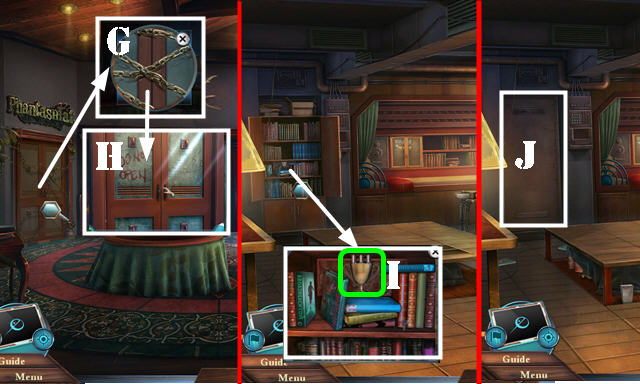
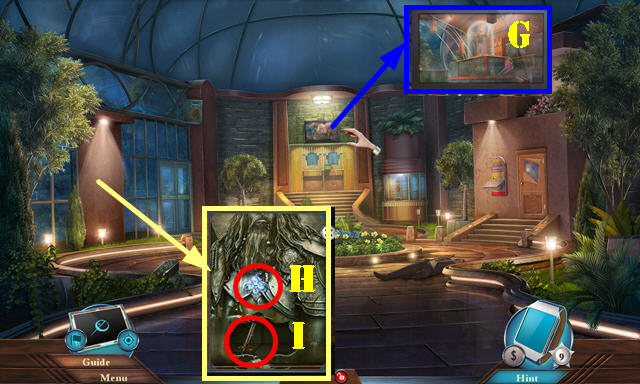
- Take the book (F) and open it. Use the FOUNTAIN PEN (G).
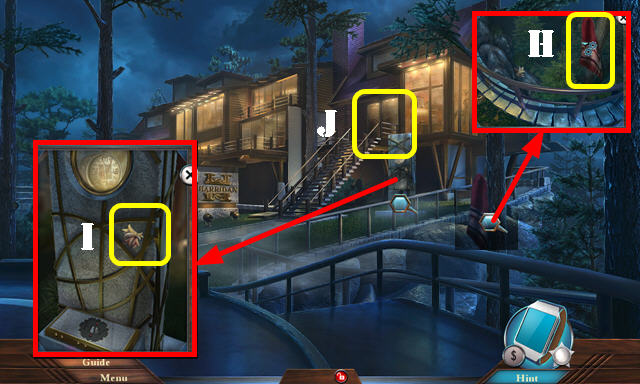
- Try to move forward.
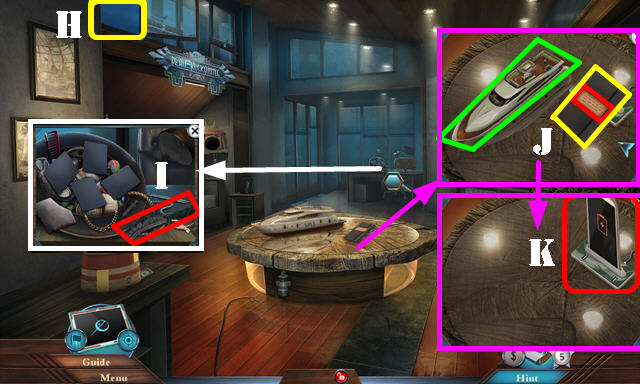
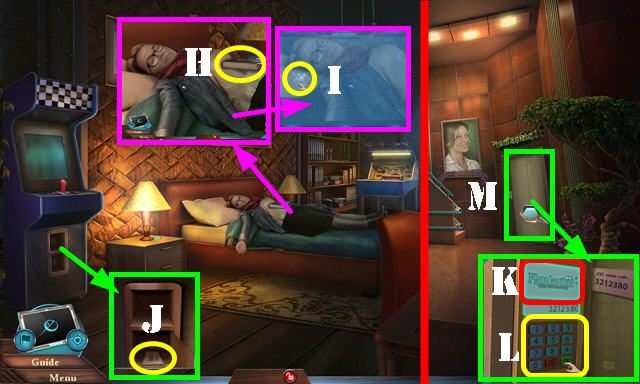
- Use the FOLDABLE UMBRELLA (H); receive the SCARF.
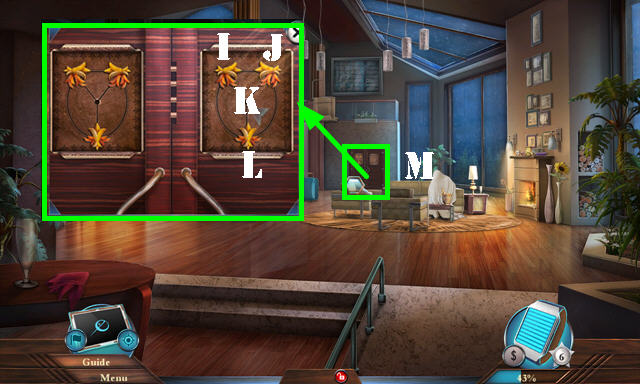
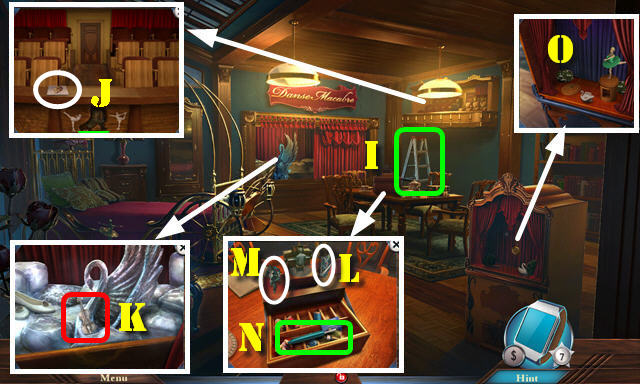
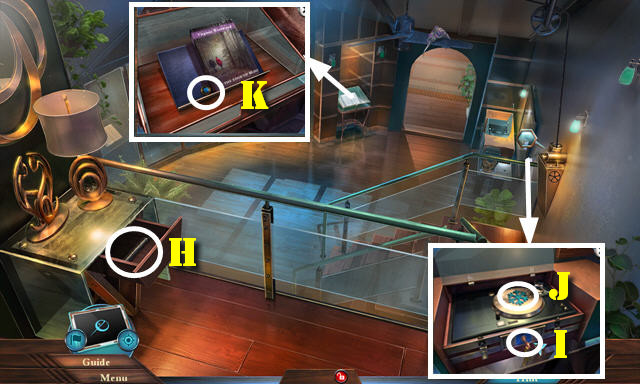
- Take the METAL ORNAMENTS 1/3 (I).
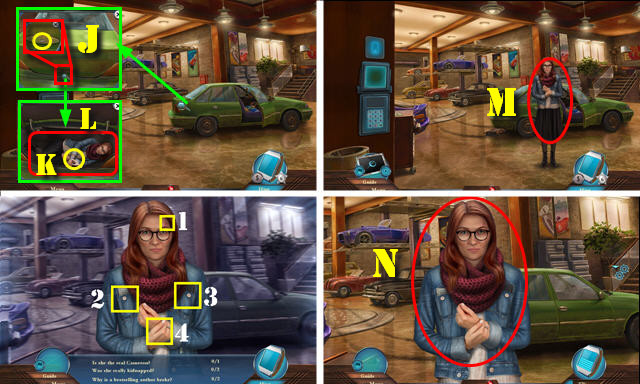
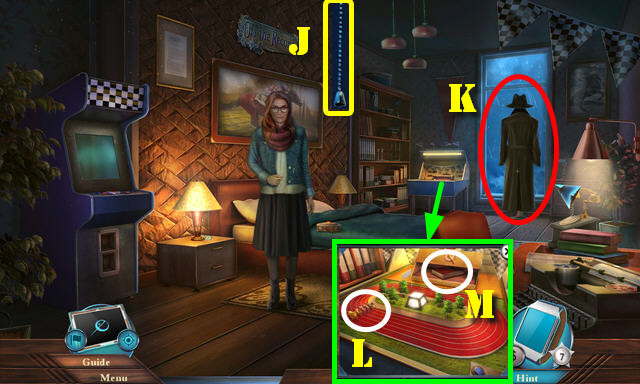
- Enter the Parlor (J).
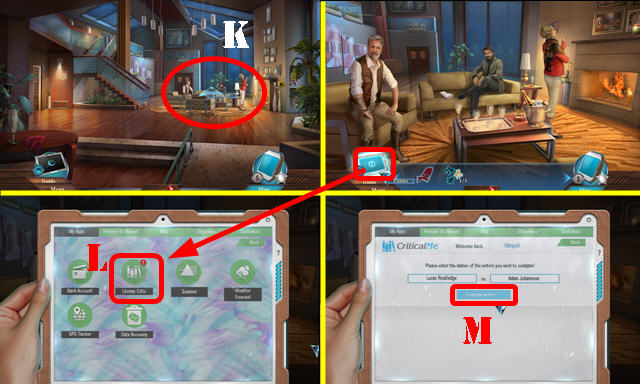
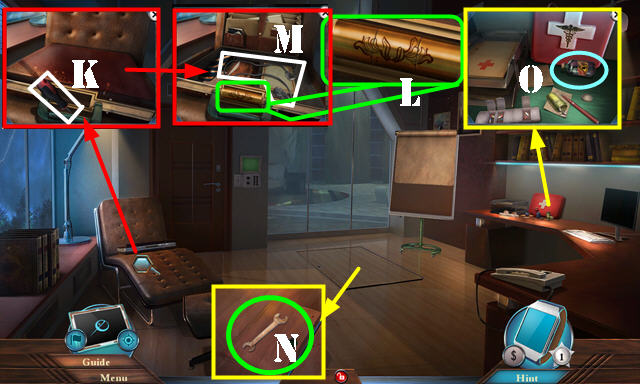
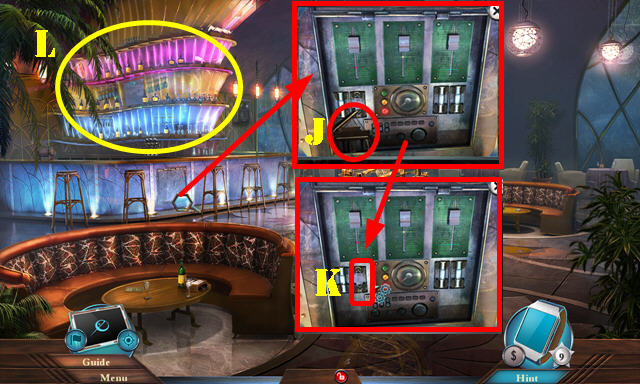
- Go to the Lounge (K).
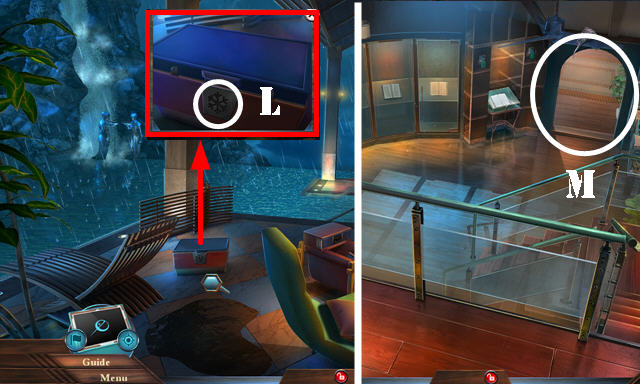
- Select 'Literary Critic' on the tablet (L).
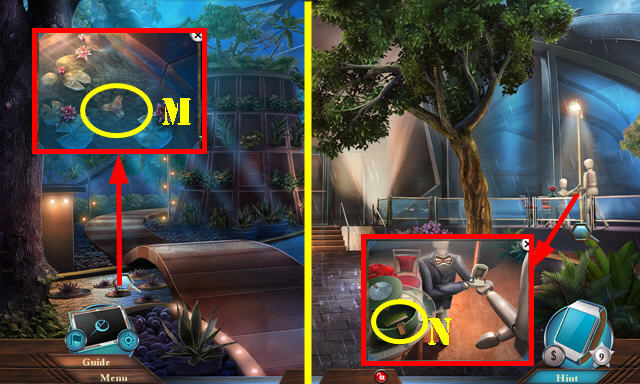
- Select compare writers for a puzzle (M).
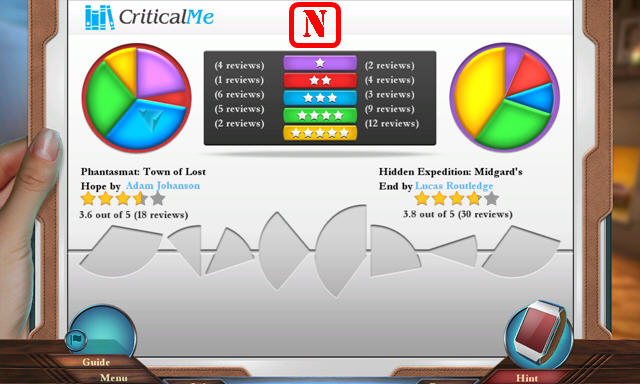
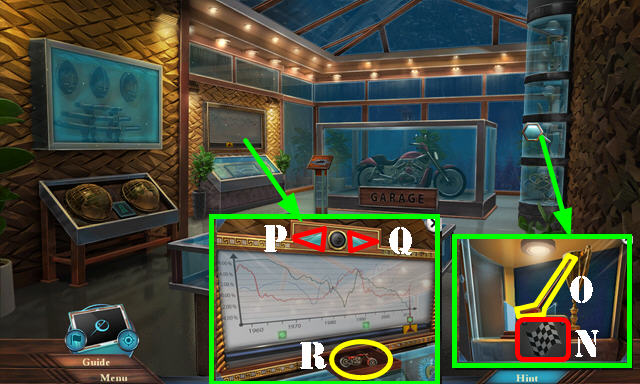
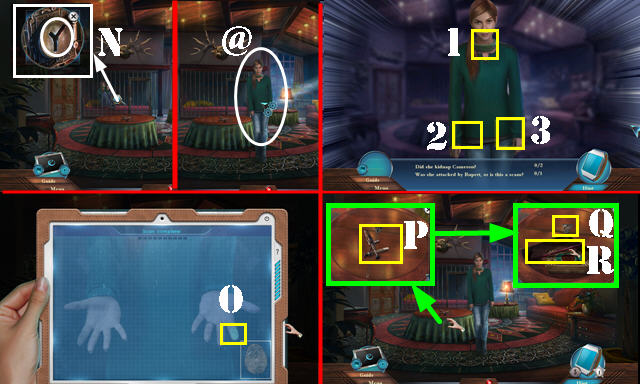
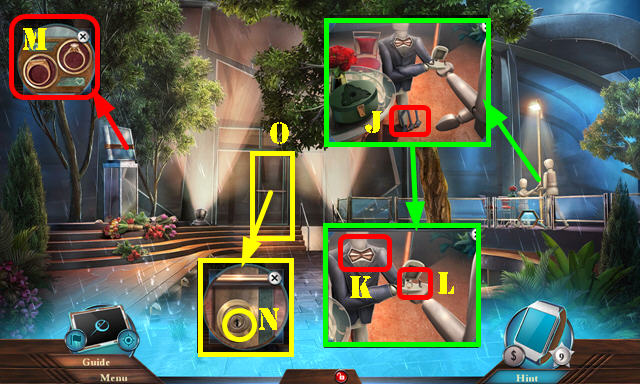
- Solution (N).
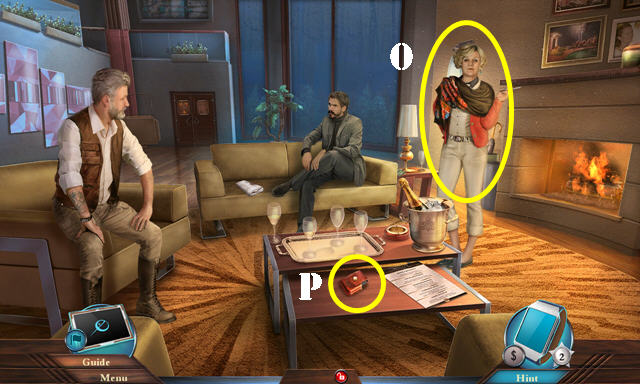
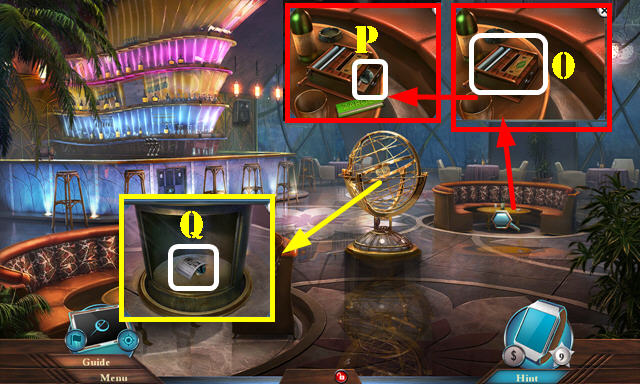
- Talk to the lady (O).
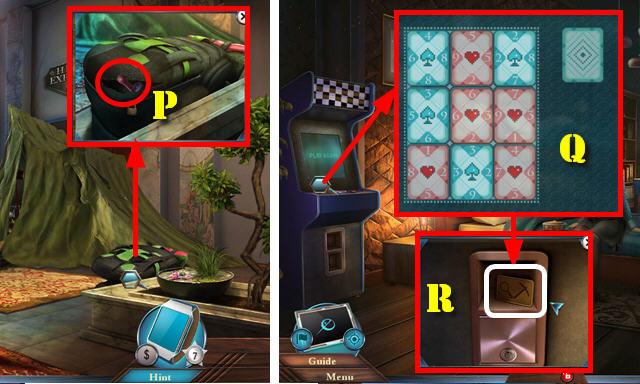
- Open the drawer; look at the note and take the LIGHTER CASE (P).
- Select the LIGHTER CASE 3x; receive the MOTORCYCLE RIDER 1/2 and LIGHTER.
- Use the LIGHTER (O).
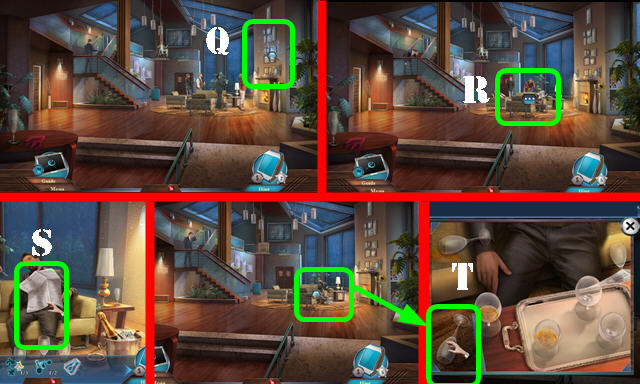
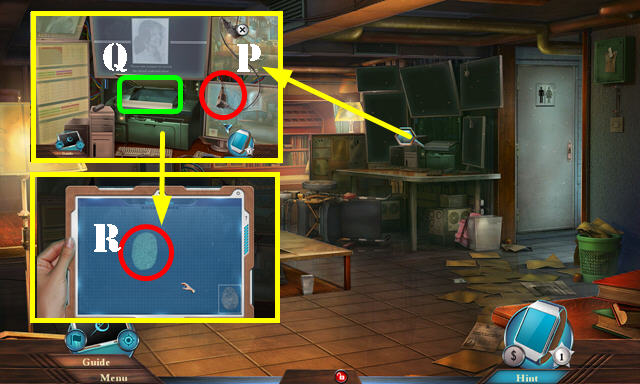
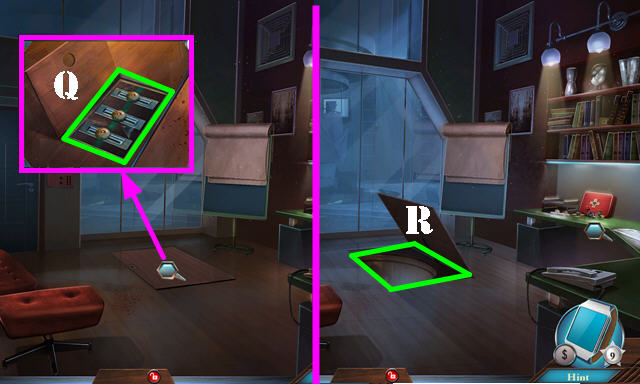
- Play the HOP (Q) to receive the NOOSE TOKEN.
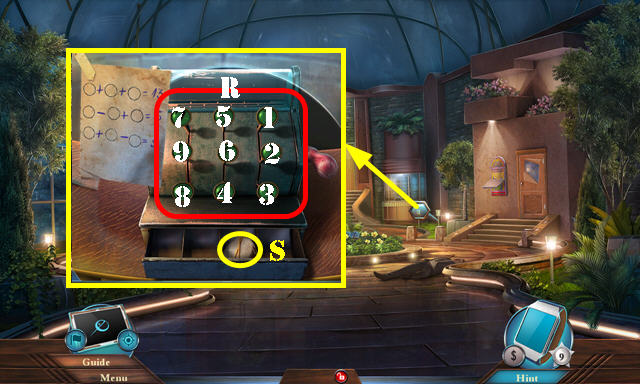
- Talk to the man (R).
- Go forward.
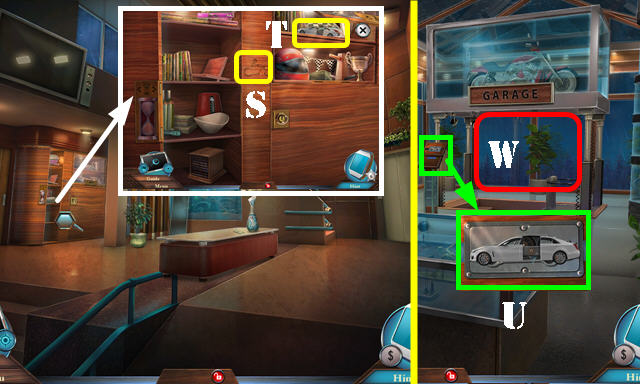
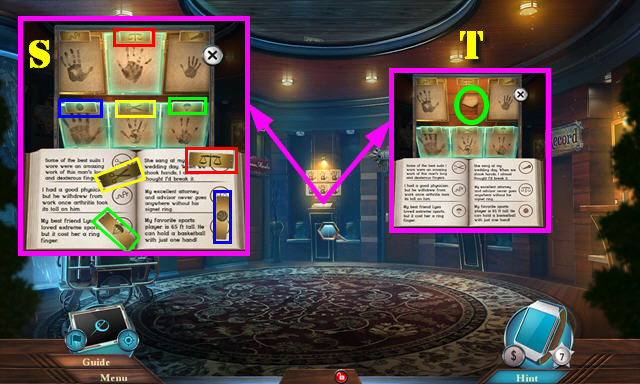
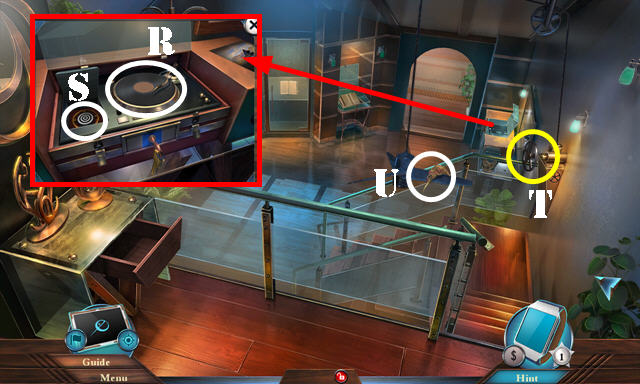
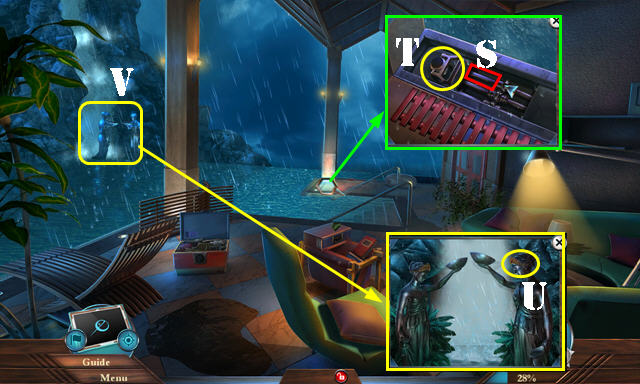
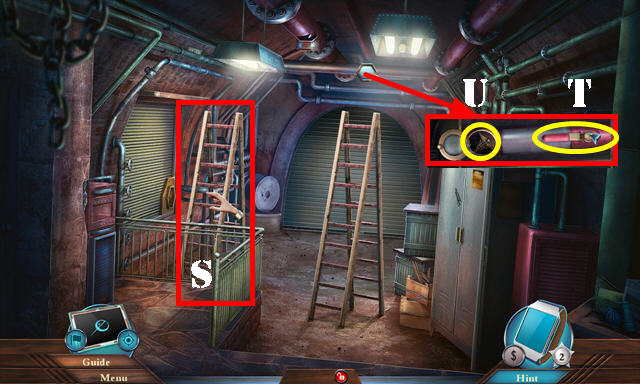
- Remove the newspaper (S).
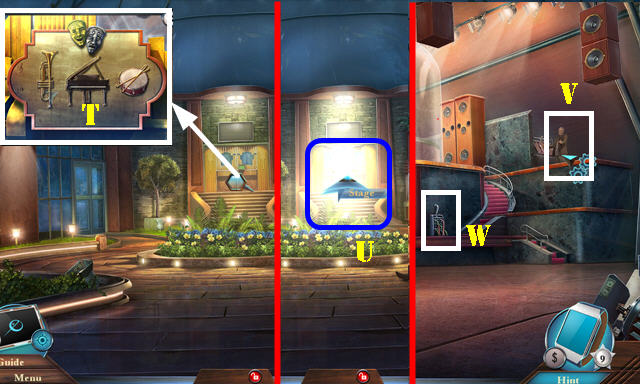
- Select the glass (T).
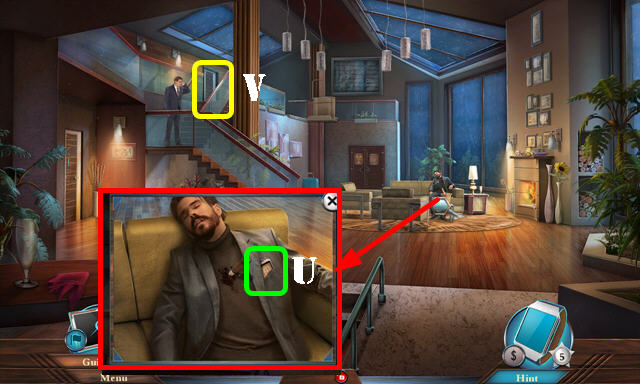
- Look at the note; take the UNCHARGED SMARTPHONE (U).
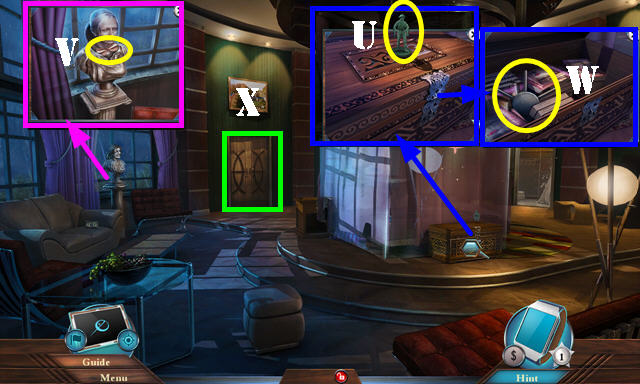
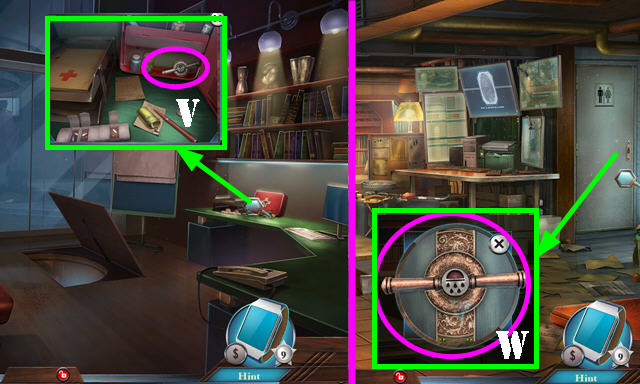
- Go to the Second Floor Landing (V).
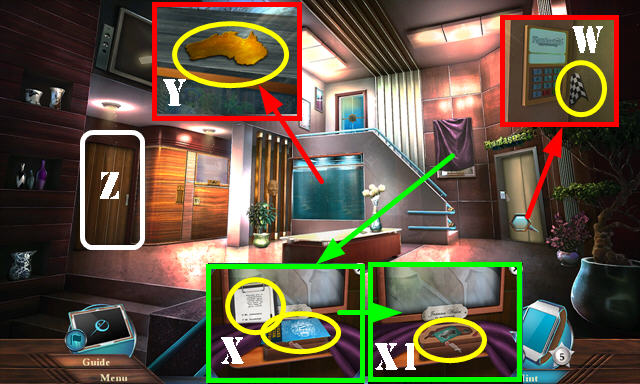
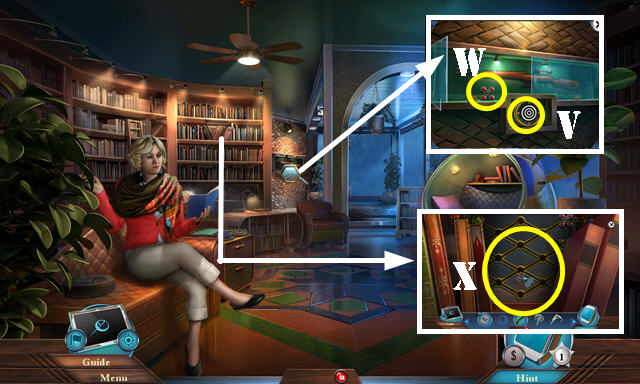
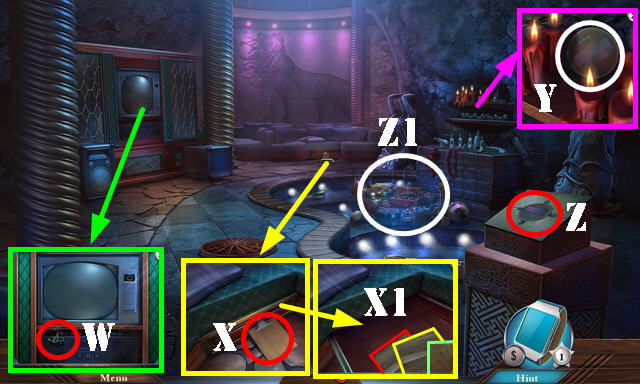
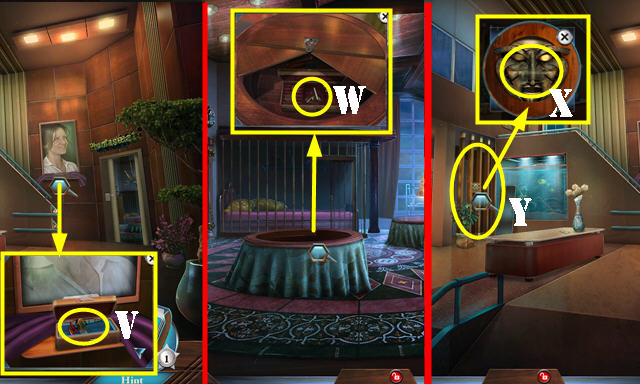
- Look at the note; take the CHECKERED FLAG (W).
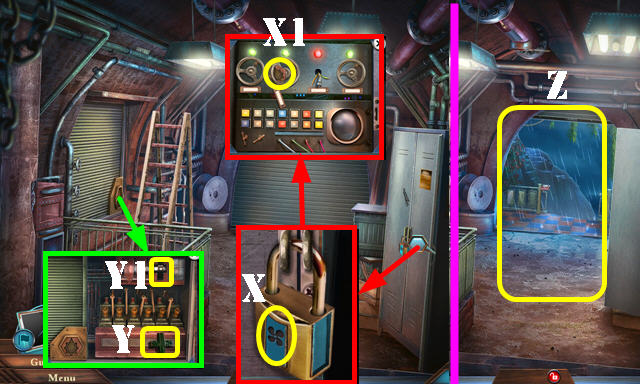
- Remove the sheet and select the painting; select the clipboard and the map (X); take the DR ROOM KEY (X1).
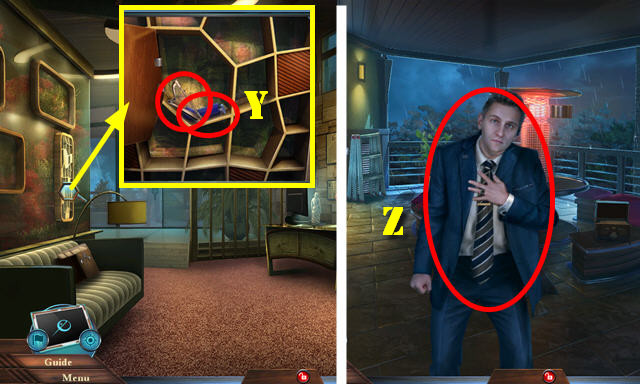
- Take the CONTINENTS 1/2 (Y).
- Go to the Guest Rooms (Z).
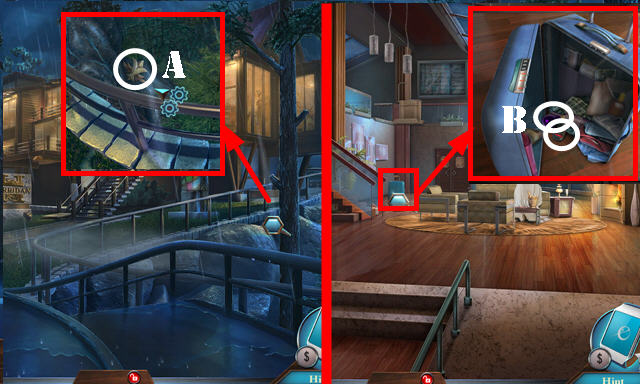
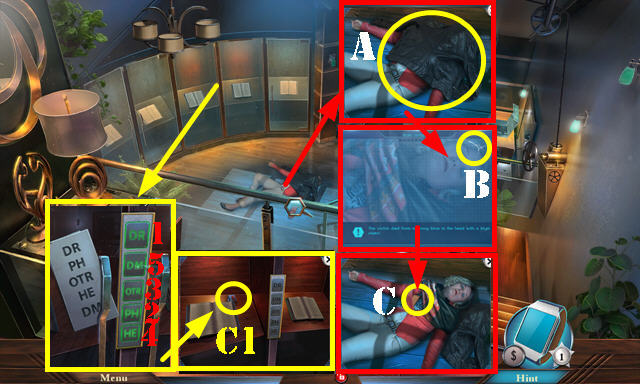
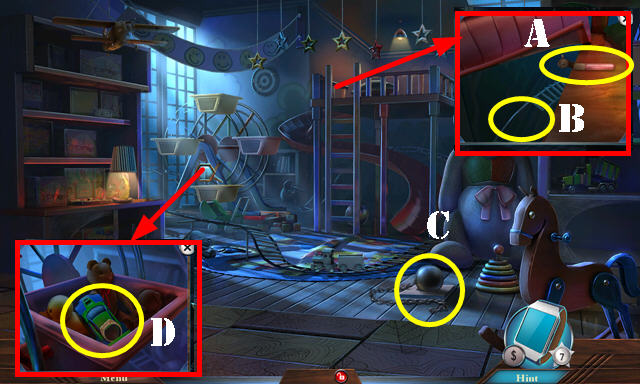
- Take the BATTERIES (A).
- Look at the note and place the NOOSE TOKEN; take the BROKEN CONTROLLER (B).
- Play the HOP (C) to receive the RUST REMOVER.
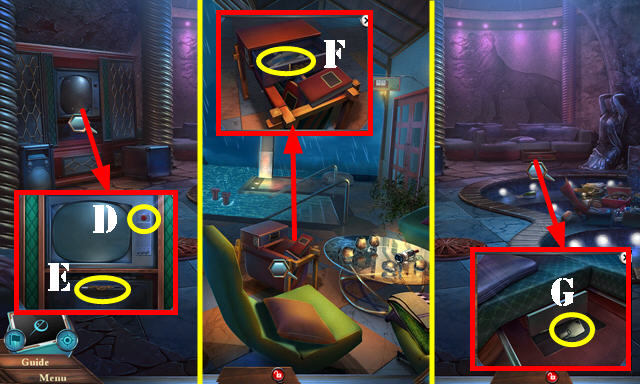
- Take the HOURGLASS (D).
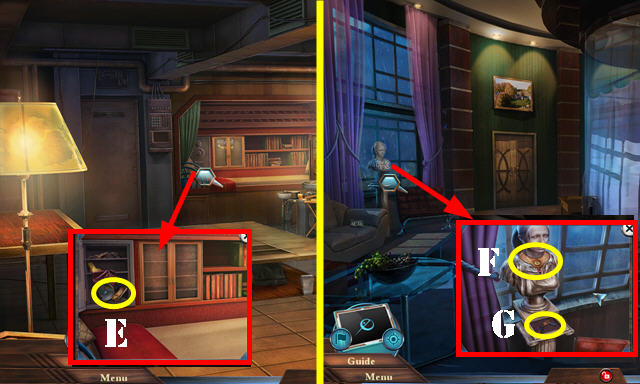
- Walk down.
- Place the HOURGLASS; take the CLOCK WEIGHT and WALKING CANE (E).
- Go to the Guest Rooms.
- Use the DR ROOM KEY (F); enter the Dead Reckoning Room (G).
- Use the WALKING CANE (H).
- Take the WIRE BRUSH (I).
- Look at the note; take the NOTEBOOK and RC YACHT (J).
- Place the UNCHARGED SMARTPHONE; select the phone 4x; receive ADAM'S CODE (K).
- Walk down.
- Select the scene and then 1-4.
- Use ADAM'S CODE; take the PH ROOM KEY and INITIALS EMBLEM (L).
- Return to the Front Yard.
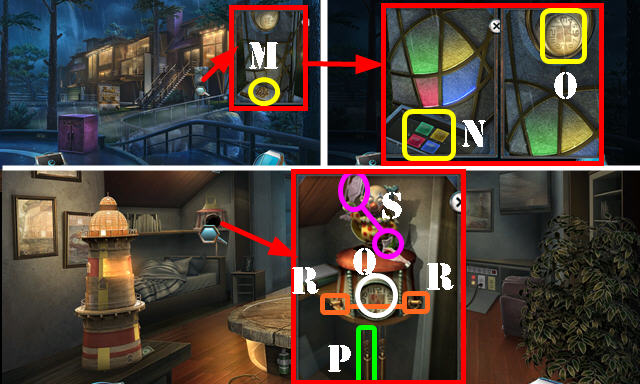
- Place the INITIALS EMBLEM (M); press blue-green-red-yellow (N). Take the RUSTY MECHANISM (O).
- Return to the Dead Reckoning Room.
- Use the RUST REMOVER and WIRE BRUSH on the RUSTY MECHANISM; take the CLOCK FACE.
- Place the CLOCK WEIGHT (P) and CLOCK FACE (Q); flip the two switches (R). Take the HELICOPTER EMBLEM and BRIEFCASE SHAPES 1/2 (S).
- Return to the Front Yard.
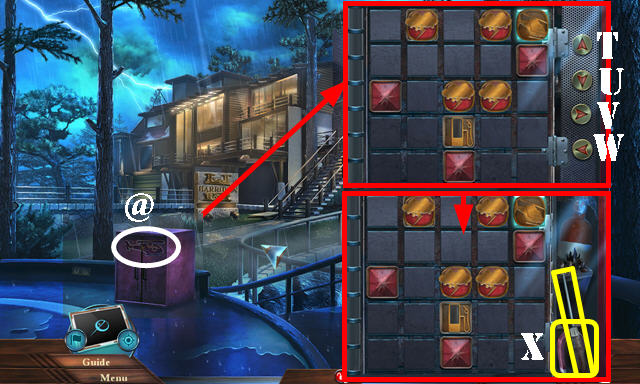
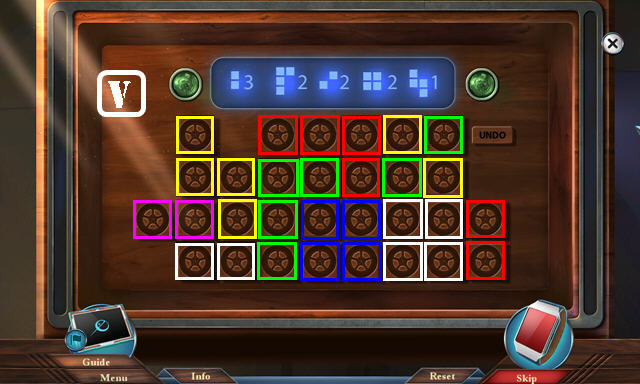
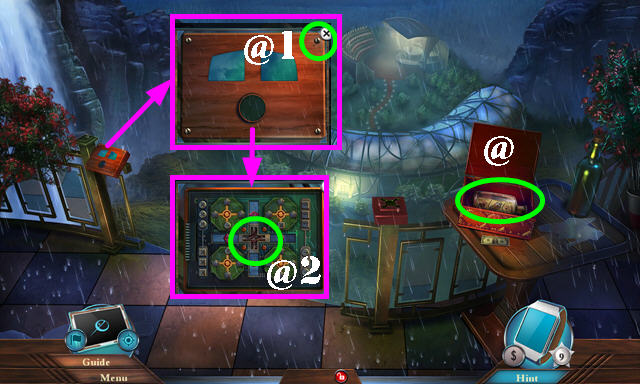
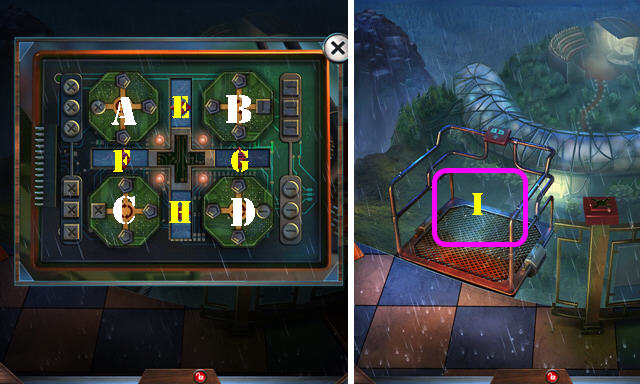
- Place the HELICOPTER EMBLEM and play the puzzle (@).
- Solution: V-T-Vx2-Tx2-W-T-W-Vx3.
- Take the FILE and MAGNET (X).
- Use the SCARF on the MAGNET; receive the DANGLING MAGNET.
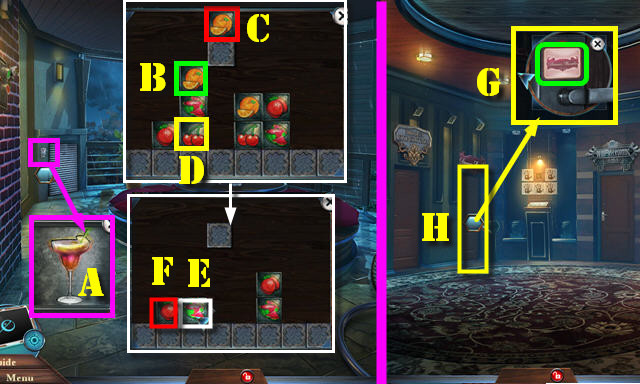
- Use the DANGLING MAGNET (A); receive the METAL ORNAMENTS 2/3.
- Go to the Parlor.
- Use the FILE and look at the book; take the CAR REMOTE and UV LIGHT BULB (B).
- Return to the Dead Reckoning Room.
Chapter 2: Dead Reckoning Room
- Use the UV LIGHT BULB (C) and press the button (D); play the HOP to receive the ANTENNA.
- Return to the Second Floor Landing.
- Place the BATTERIES and ANTENNA on the BROKEN CONTROLLER; take the CONTROLLER.
- Open the top; place the RC YACHT and use the CONTROLLER (E).
- Select 1-3; receive the LIGHTHOUSE RING.
- Go to the Dead Reckoning Room.
- Place the LIGHTHOUSE RING (F). Select Gx2-Hx2; receive the METAL ORNAMENTS 3/3.
- Return to the Parlor.
- Place the METAL ORNAMENTS 3/3 for a puzzle. Solution: K-I-L-J-I-L-K.
- Enter the Showroom (M).
- Place the CHECKERED FLAG (N); take the THIN POINTER (O).
- Place the THIN POINTER for a puzzle. Solution: Qx2-Px2-Qx2-P-Qx2-P-Q-P-Q.
- Take the MOTORCYCLE RIDER 2/2 (R).
- Return to the Second Floor Landing.
- Place the MOTORCYCLE RIDER 2/2 (S); take the GARAGE KEY (T).
- Return to the Showroom.
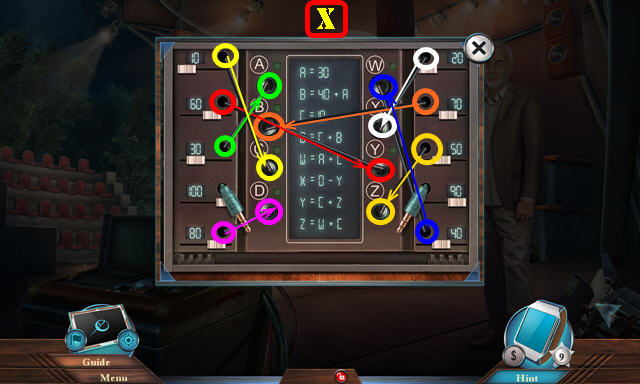
- Use the GARAGE KEY (U) for a puzzle.
- Solution (V).
- Go to the Garage (W).
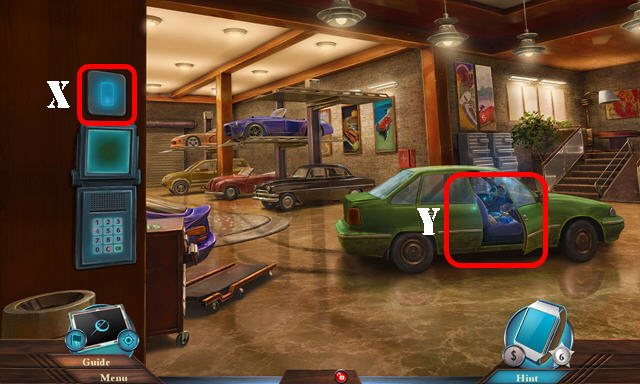
- Flip the switch (X).
- Use the CAR REMOTE (Y); play the HOP to get GLASS CUTTER.
- Walk down.
- Use the GLASS CUTTER; take the SMALL WHEEL (A).
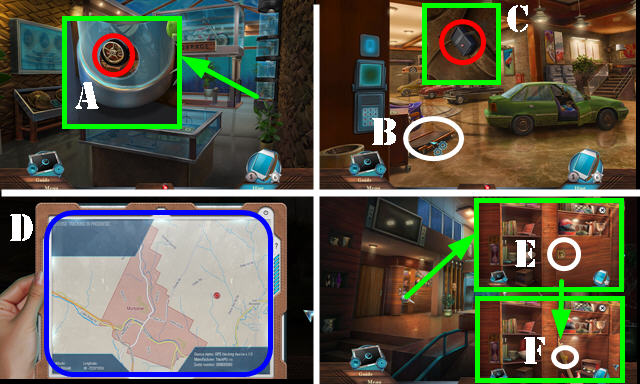
- Go to the Garage.
- Place the SMALL WHEEL (B); select the device (C) and map (D). Take the SHARP WIRE and TRACKING DEVICE (C).
- Go to the Second Floor Landing.
- Use the SHARP WIRE (E); take the CONTINENTS 2/2 (F).
- Return to the Showroom.
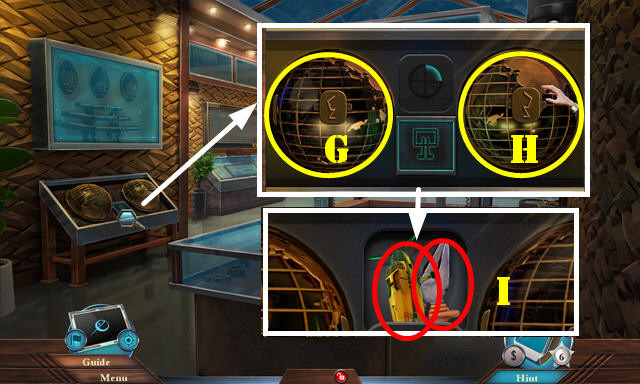
- Place the CONTINENTS 2/2. Select (Gx3-Hx3)-(Gx3-Hx3)-(Gx2-Hx3)-(G-Hx3).
- Take the BROKEN BIPLANE and PLIERS (I).
- Go to the Garage.
- Use the PLIERS (J).
- Take the DUCT TAPE (K).
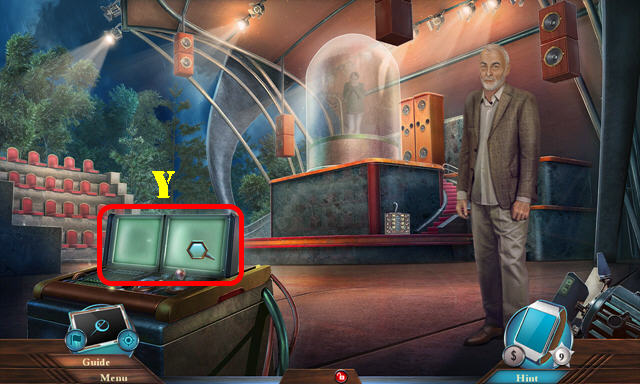
- Talk to the lady twice (L-M).
- Select the scene and then 1-4.
- Give the DR ROOM KEY (N); Select the scene; receive the OFFICE CODE.
- Return to the Parlor.
- Use the DUCT TAPE (O).
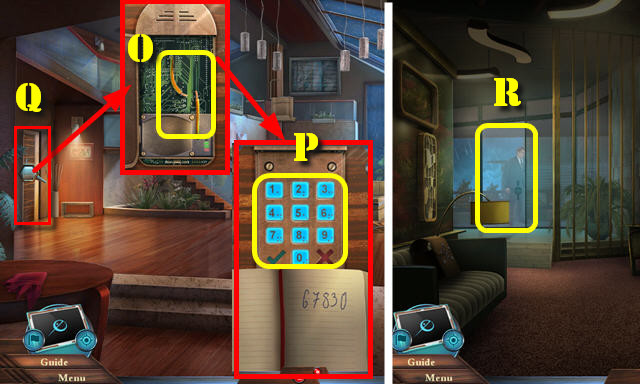
- Use the OFFICE CODE and press 67830 (P).
- Enter the Office (Q).
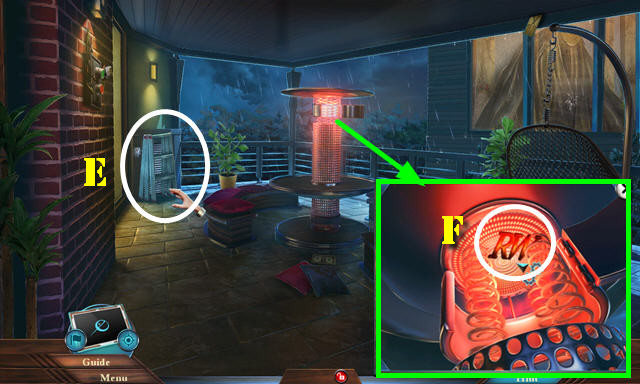
- Go to the Balcony (R).
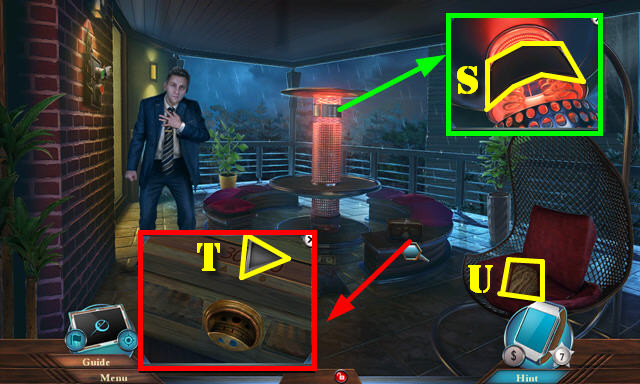
- Open the cover (S).
- Take the BRIEFCASE SHAPES 2/2 (T).
- Take the LAW BOOKS 1/2 (U).
- Walk down.
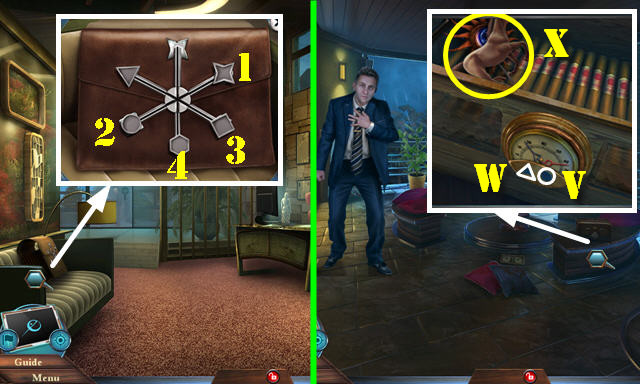
- Place the BRIEFCASE SHAPES 2/2; select 1-4. Take the HYGROMETER.
- Go to the Balcony.
- Place the HYGROMETER; select V-Wx2.
- Take the HORSE FIGURINE and WOODEN SUN (X).
- Walk down.
- Place the WOODEN SUN and look at the note; take the MINI HARP and INHALER (Y).
- Go to the Balcony.
- Use the INHALER (Z).
Chapter 3: Hidden Expedition Room
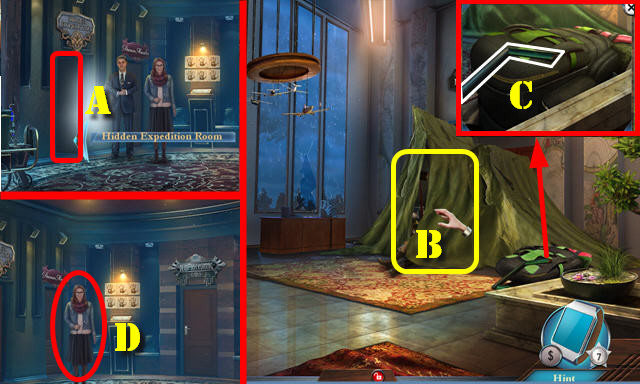
- Go to the Hidden Expedition Room (A).
- Select the tent (B); play the HOP to get the OTR ROOM KEY.
- Take the LADDER PEGS (C).
- Walk down. Select the fingerprints and talk to the lady (D).
- Return to the Balcony.
- Take the CLOSED FOLDABLE LADDER (E).
- Take the WET RAG from the CLOSED FOLDABLE LADDER.
- Use the LADDER PEGS on the CLOSED FOLDABLE LADDER; receive the LADDER.
- Use the WET RAG (F); receive the INITIALS RW.
- Walk down.
- Place the INITIALS RW; take the MATCHES (G).
- Return to the Guest Rooms.
- Use the OTR ROOM KEY (H).
- Enter the Off The Record Room (I).
- Pull the pull switch (J).
- Remove the coat (K).
- Place the HORSE FIGURINE (L). Take the LAW BOOKS 2/2 (M).
- Return to the Office.

- Place the LAW BOOKS 2/2; swap as shown (N).
- Take the MAHJONG TILES 1/3 and WIRE CONNECTOR (O).
- Go to the Balcony.
- Place the WIRE CONNECTOR (P); select the green button (Q).
- Take the HANDPRINT PLAQUE (R).
- Return to the Guest Rooms.
- Place the HANDPRINT PLAQUE and select the book. Place the plaques in the slots as shown (S).
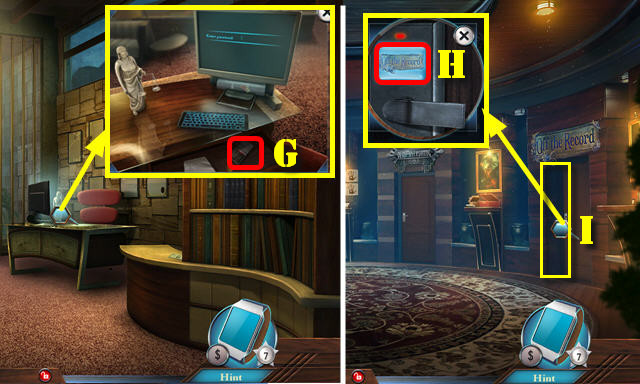
- Take the PASSWORD (T).
- Return to the Office.
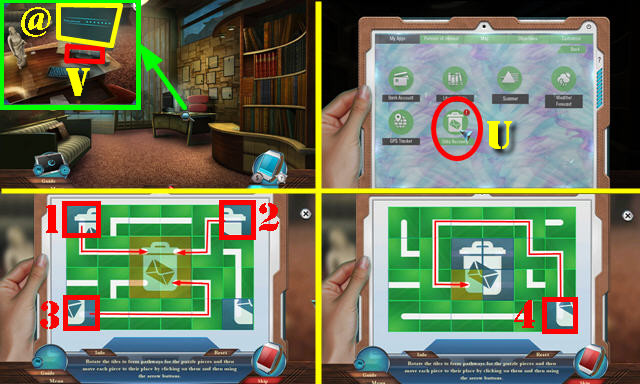
- Place the PASSWORD and select the monitor (@). Select 'Data Recovery' and 'Connect' on the tablet for a puzzle (U).
- Arrange the tiles as shown and move the selected blocks through the path in order (1-4).
- Select the monitor 4x (@). Take the COCKTAIL SYMBOL and HAILEY'S DNA (V).
- Go to the Balcony.
- Place the COCKTAIL SYMBOL (A); play the HOP to get the DM ROM KEY. HOP puzzle solution: (B right)-(C left and right)-(D right)-(E right x2)-(F right x3).
- Return to the Guest Rooms.
- Use the DM ROOM KEY (G); enter the Danse Macabre Room (H).
- Place the LADDER (I); take the MAHJONG TILES 2/3 (J).
- Use the MATCHES twice; take the MINI FIDDLE (K).
- Look at the note; place the MINI HARP (L) and MINI FIDDLE (M). Take the SEAM RIPPER (N).
- Look at the stage (O).
- Return to the Hidden Expedition Room.
- Use the SEAM RIPPER; take the JOYSTICK (P).
- Go to the Off The Record Room.
- Place the JOYSTICK for a puzzle; the solution is random (Q).
- Take the HELP LOGO (R).
- Return to the Hidden Expedition Room.

- Use the HELP LOGO; move the statue and take the LIBERTY STONE REPLICA (S).
- Go to the Off The Record Room.
- Place the LIBERTY STONE REPLICA; take the ICE SKATE (T).
- Return to the Danse Macabre Room.
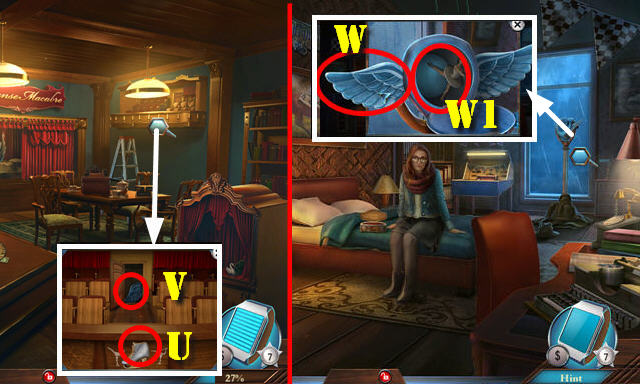
- Place the ICE SKATE (U); take the OWL WING (V).
- Go to the Off The Record Room.
- Place the OWL WING (W); take the BALLERINA FIGURINE (W1).
- Return to the Danse Macabre Room.
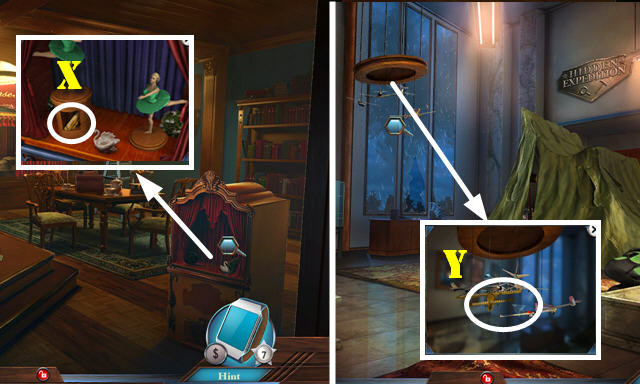
- Place the BALLERINA FIGURINE; take the BIPLANE WING (X).
- Return to the Hidden Expedition Room.
- Place the BIPLANE WING on the BROKEN BIPLANE; take the BIPLANE.
- Place the BIPLANE (Y); receive the MAHJONG TILES 3/3.
- Return to the Danse Macabre Room.
- Place the MAHJONG TILES 3/3 for a puzzle. The solution is random. Select matching unobstructed tiles to solve (A).
- Take the BOOK STAND ORNAMENT and ROOF KEY (B).
- Return to the Second Floor Landing.
- Place the ROOF KEY (C).
- Select the book (D).
- Take the KEY SET (E). Remove the grate (F).
- Go to the Library Anteroom (G).
Chapter 4: Library Anteroom
- Open the drawer; take the SPRING (H).
- Place the KEY SET and select it (I); take the SNOWFLAKE TOKEN (J).
- Place the BOOKSTAND ORNAMENT. Close the book and take the SAFE KEYS 1/2 (K).
- Walk down.
- Place the SNOWFLAKE TOKEN (L); play the HOP to get the SPIRAL HANDLE.
- Go to the Library Anteroom and then enter the Library (M).
- Select the scene and then the tablet. Talk to the lady (N). Select 1-3.
- Place the SPIRAL HANDLE and select it. Look at the note; take the EMPTY UTILITY KNIFE and VINYL RECORD (O).
- Move the book and remove broken spring. Place the SPRING (P); take the AXE PENDANT and FAN HANDLE (Q).
- Walk down.
- Place the VINYL RECORD (R); take the TARGET (S).
- Place the FAN HANDLE and select 3x (T); take the BRONZE TIARA (U).
- Go to the Library.
- Place the TARGET (V); take the SAFE KEYS 2/2 (W).
- Place the SAFE KEYS 2/2 for a puzzle (X).
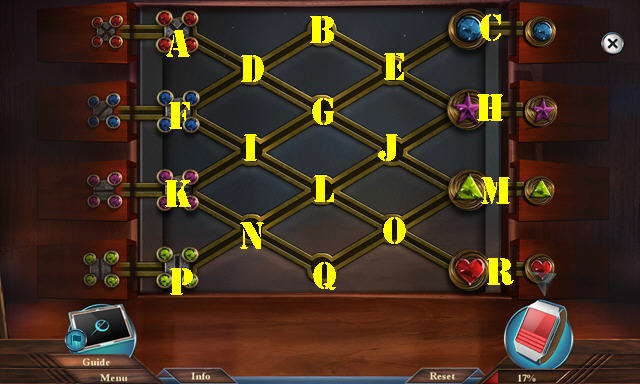
- Solution: (F-D)-(K-I)-(I-F)-(P-N)-(N-K)-(K-I)-(D-B)-(F-D)-(I-F)-(H-J)-(J-L)-(L-N)-(N-P)-(F-I).
- (I-K)-(D-F)-(B-D)-(C-E)-(F-I)-(D-F)-(E-H)-(I-G)-(G-D)-(D-B)-(F-D)-(K-I)-(I-F)-(H-J).
- (J-L)-(L-N)-(N-K)-(D-G)-(G-E)-(E-C)-(F-D)-(D-G)-(G-E)-(E-H)-(B-E)-(M-O)-(O-L)-(A-D).
- (D-B)-(L-I)-(I-F)-(E-G)-(B-E)-(G-J)-(R-O)-(O-Q)-(J-M)-(Q-N)-(E-G).
- (M-O)-(O-R)-(G-J)-(J-M)-(N-L)-(L-I)-(I-G)-(G-D)-(D-A).
- Look at the note; take the AXLE.
- Go to the Rooftop Pool.
- Place the AXLE (S) and flip the handle (T).
- Place the BRONZE TIARA (U).
- Go to the Waterfall Cave (V).
- Take the STRANGE KEY (W).
- Take the CLIPBOARD (X). Open the drawer and select the three papers (X1).
- Select the candles 4x; take the HOT TUB SWITCH (Y).
- Place the HOT TUB SWITCH (Z); play the HOP (Z1) to get the ANTIQUES CHEST.
- Open the ANTIQUES CHEST; look at the note and take the FAVORITES SEQUENCE.
- Go to the Library Anteroom.
- Remove the jacket (A). Select the scar (B).
- Look at the note in pocket (C).
- Place the FAVORITES SEQUENCE; select 1-5. Take the POWER SWITCH (C1).
- Return to the Waterfall Cave.
- Place the POWER SWITCH (D); take the THREE COGS (E).
- Walk down.
- Place the THREE COGS; take the KNIFE BLADE (F).
- Go to the Waterfall Cave.
- Place the KNIFE BLADE in the EMPTY UTILITY KNIFE; take the UTILITY KNIFE.
- Use the UTILITY KNIFE and select the floor; take the ARCADE KEY (G).
- Return to the Off The Record Room.
- Open the book (H) and look at the note. Select the Ricin traces (I).
- Use the ARCADE KEY; take the PHANTASMAT CODE (J).
- Return to the Second Floor Landing.
- Use the PH ROOM KEY (K) and PHANTASMAT CODE. Enter 3212380 and OK (L).
- Enter the Phantasmat Room (M).
- Use the STRANGE KEY (N).
- Give the TRACKING DEVICE (@).
- Select 1-3.
- Select the girl (@) and fingerprint (O).
- Take the BLOWTORCH NOZZLE (P). Place the AXE PENDANT (Q); take the MANHOLE OPENER (R).
- Return to the Waterfall Cave.
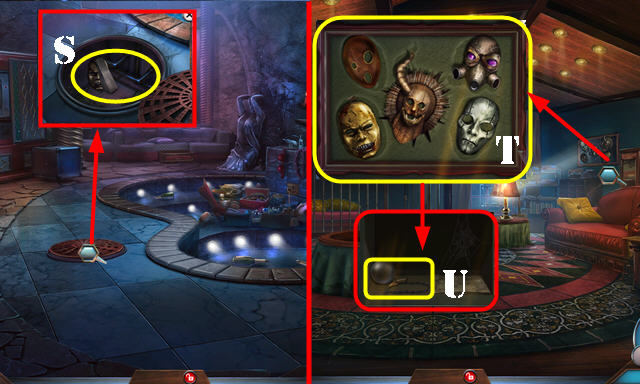
- Use the MANHOLE OPENER; take the WEDGE 1/2 and SCARY MASK (S).
- Return to the Phantasmat Room.
- Place the SCARY MASK; swap as shown (T). Take the GOLDEN QUILL and BALL AND CHAIN (U).
- Walk down.
- Place the GOLDEN QUILL; take the ANTLERS SIGIL (V).
- Go to the Phantasmat Room.
- Place the ANTLERS SIGIL; take the PANIC ROOM KEY (W).
- Walk down.
- Use the PANIC ROOM KEY (X); enter the Panic Room (Y).
- Open the door and look at the note; take the RAIL PIECE and BRIEFCASE LOCK (A).
- Open the lid; place the CLIPBOARD and arrange the image as shown. Take JOANNA'S IMAGE (B).
- Take the WEDGE 2/2 (C).
- Place the WEDGE 2/2 (D); take the BLOWTORCH FUEL (E).
- Look at the note; take the CHEST ADORNMENT (F).
- Return to the Phantasmat Room.
- Use the BLOWTORCH FUEL on the BLOWTORCH NOZZLE; take the BLOWTORCH.
- Use the BLOWTORCH (G). Open the doors (H); play the HOP to receive ADAM'S FOLDER.
- Open ADAM'S FOLDER; look at the note and take the TROPHY.
- Return to the Panic Room.
- Place the TROPHY (I); enter Harridan's Office (J).
Chapter 5: Harridan's Office
- Take the SCREWDRIVER (K).
- Place the BRIEFCASE LOCK and arrange as shown (L). Take the CONNECTION CABLE (M).
- Take the WRENCH and open the lid (N).
- Look at the note; take the PESTICIDE COMPONENT (O).
- Walk down.
- Use the CONNECTION CABLE (P).
- Open the lid; place JOANNA'S IMAGE (Q). Select the fingerprint (R); receive the FINGERPRINT PASS.
- Go to Harridan's Office.
- Place the FINGERPRINT PASS for a puzzle (S).
- Solution: 1-7.
- Go to Joanna's Memorial (T).
- Take the TOY SOLDIERS 1/3 (U) and BOW TIE (V).
- Place the CHEST ADORNMENT and look at the note; take the SAFE WHEEL (W).
- Go to the Children's Room (X).
- Move the pillow; take the VALVE (A).
- Place the RAIL PIECE (B).
- Place the BALL AND CHAIN (C).
- Take the WEDDING RINGS 1/2 and select the toy 4x (D); receive the TOY SOLDIERS 2/3.
- Return to the Panic Room.
- Place the SAFE WHEEL; take the SNOW GLOBE and NECKLACE (E).
- Go to Joanna's Memorial.
- Place the NECKLACE (F); take the WINDER (G).
- Go to the Children's Room.
- Place the WINDER (H); take the LASER ACTIVATOR (I).
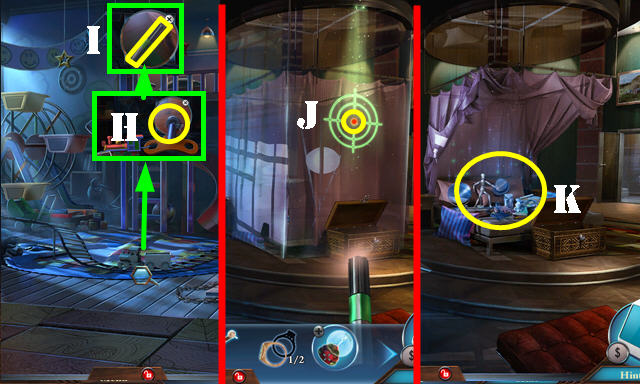
- Walk down.
- Use the LASER ACTIVATOR and place the red dot in the center (J); play the HOP (K) to get the BEEHIVE.
- Go to the Children's Room.
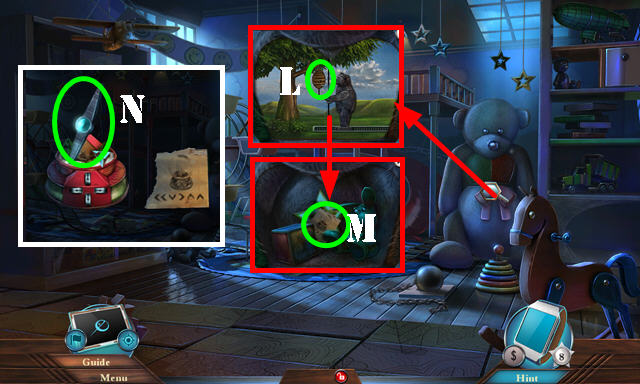
- Select the bear and look at the note; place the BEEHIVE (L); take the SHAKING INSTRUCTIONS (M).
- Place the SHAKING INSTRUCTIONS on the SNOW GLOBE. Select left x2, down, right, up x2. Take the CLOSET LATCH (N).
- Walk down.
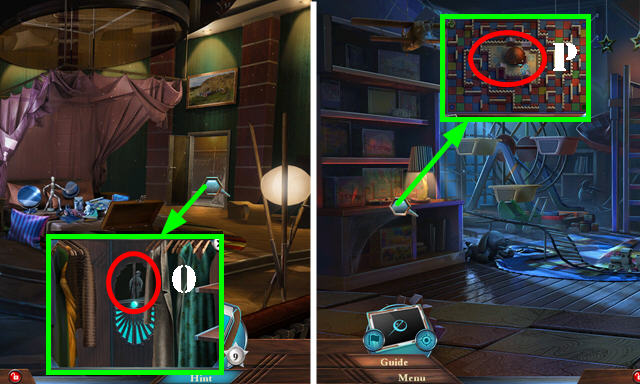
- Select the clothes 4x; use the CLOSET LATCH; take the TOY SOLDIERS 3/3 (O).
- Go to the Children's Room.
- Place the TOY SOLDIERS 3/3 for a puzzle (P).
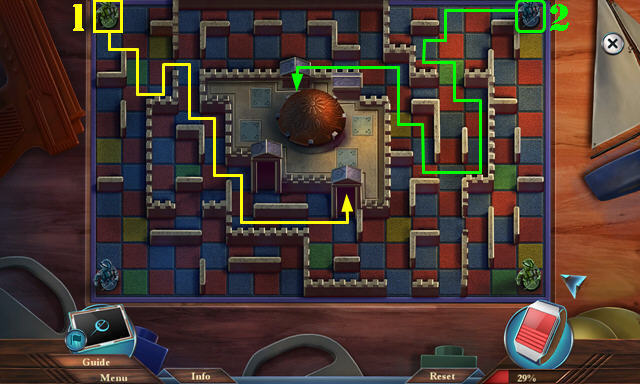
- Solution (1-2).
- Take the LOCK SLIDER.
- Return to Harridan's Office.
- Place the LOCK SLIDER; select it 3x (Q).
- Enter the Secret Passage (R).
- Move the ladder (S).
- Place the VALVE and select it twice (T). Take the CADUCEUS (U).
- Walk down.
- Place the CADUCEUS; take the BATHROOM KEY (V).
- Walk down.
- Use the BATHROOM KEY and turn it (W); play the HOP to get the PADLOCK MAGNET.
- Go to the Secret Passage.
- Use the PADLOCK MAGNET (X); take the AIRLOCK KEY (X1).
- Place the AIRLOCK KEY; take the ELEVATOR CENTERBOARD (Y).
- Use the WRENCH (Y1).
- Go to the Garden Overlook (Z).
Chapter 6: Garden Overlook
- Open the box; take the PESTICIDE BASE (@).
- Use the SCREWDRIVER (@1); place the ELEVATOR CENTERBOARD for a puzzle (@2).
- Solution: D-G-F-C-Dx3-H-A-Bx3-Dx2-Cx2.
- Go to the Courtyard Entrance (I).
- Take the TERRARIUM CONTROLLER (J).
- Place the BOW TIE (K); take the WEDDING RINGS 2/2 (L).
- Place the WEDDING RINGS 2/2 (M); play the HOP to receive the COURTYARD KEY.
- Use the COURTYARD KEY (N); enter the Courtyard (O).
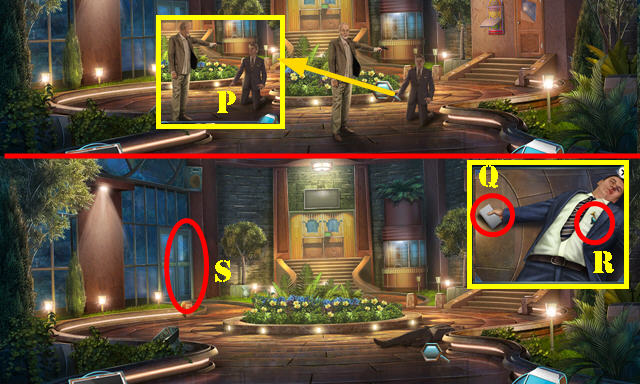
- Zoom into the men (P). Select the scene.
- Look at the note (Q); take the GLOBE ORNAMENT 1/2 and TRUMPET TOKEN (R).
- Go to the Indoor Garden (S).
- Select the vines 3x and open the compartment; take the TOBACCO (T).
- Place the TERRARIUM CONTROLLER and pull the lever (U).
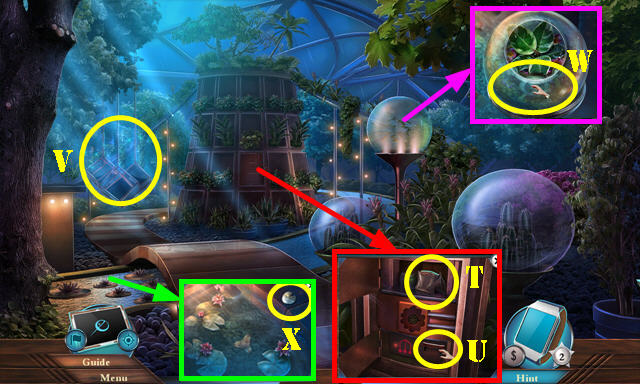
- Play the HOP (V) to receive the PESTICIDE BOTTLE.
- Use the PESTICIDE COMPONENT on the PESTICIDE BASE; take the PESTICIDE SOLUTION. Use the PESTICIDE SOLUTION on the PESTICIDE BOTTLE; take the PESTICIDE.
- Use the PESTICIDE; take the PILLAR BUTTON (W).
- Take the SILVER LILY (X).
- Go to the Courtyard Entrance.
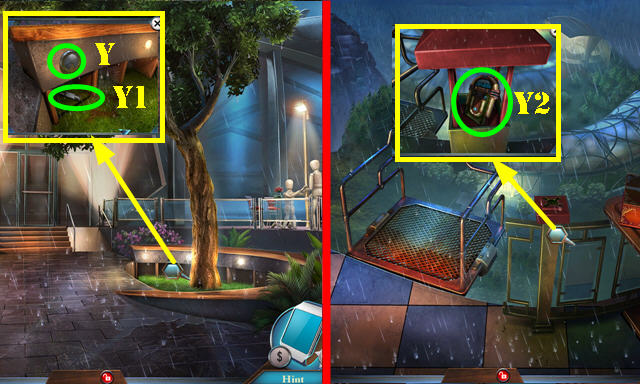
- Place the SILVER LILY (Y); take the FUSE (Y1).
- Walk down.
- Place the PILLAR BUTTON; take the JUKEBOX (Y2).
- Go to the Courtyard.
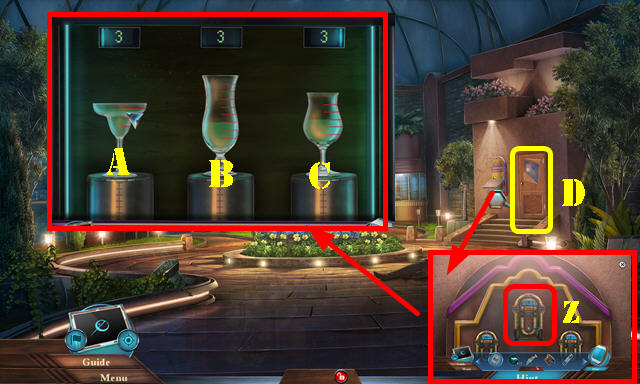
- Place the JUKEBOX for a puzzle (Z). Solution: (C-A)-(B-C)-(A-B)-(C-A)-(B-C)-(C-B)-(A-C)-(B-A).
- Enter the Bar (D).
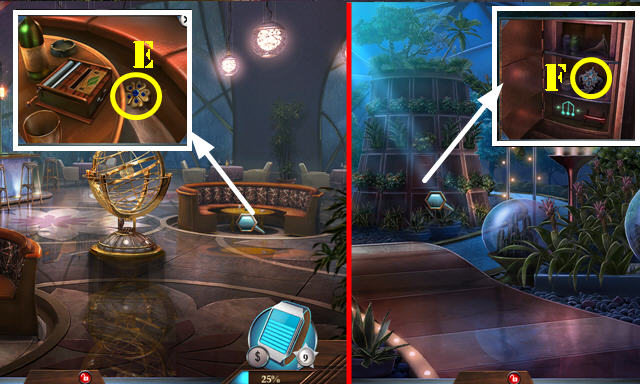
- Take the SAPPHIRE FLOWER (E).
- Return to the Indoor Garden.
- Place the SAPPHIRE FLOWER; take the CAPTAIN'S PENDANT (F).
- Walk down.
- Look at the image (G).
- Place the CAPTAIN'S PENDANT (H); take the PIRATE SABRE (I).
- Go to the Bar.
- Use the PIRATE SABRE; take the PIANO TOKEN (J).
- Place the FUSE (K). Play the HOP (L) to receive the BOTTLE HOLDER.
- Go to the Indoor Garden.
- Use the BOTTLE HOLDER (M); receive the GOLDEN ROSE.
- Go to the Courtyard Entrance.
- Place the GOLDEN ROSE; take the ROLLING PAPER (N).
- Go to the Bar.
- Place the ROLLING PAPER and TOBACCO (O); select the paper and take the GLOBE ORNAMENT 2/2 (P).
- Place the GLOBE ORNAMENT 2/2 and look at the note; take HARRIDAN'S DNA TEST and REGISTER DIAL (Q).
- Walk down.
- Place the REGISTER DIAL for a puzzle. Solution (R).
- Take the DRUM TOKEN (S).
- Place the TRUMPET TOKEN, PIANO TOKEN, and DRUM TOKEN (T).
- Go to the Stage (U).
- Place HARRIDAN'S DNA TEST on HAILEY'S DNA; select them and take the PROOF OF PATERNITY.
- Use the PROOF OF PATERNITY (V).
- Play the puzzle (W).
- Solution (X).
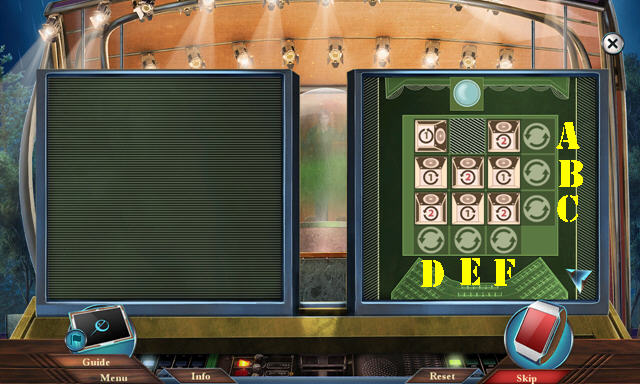
- Select the monitors (Y) and play the puzzle.
- Select: Ax3-Bx2-Cx3-F-Ex2-Dx3-A.
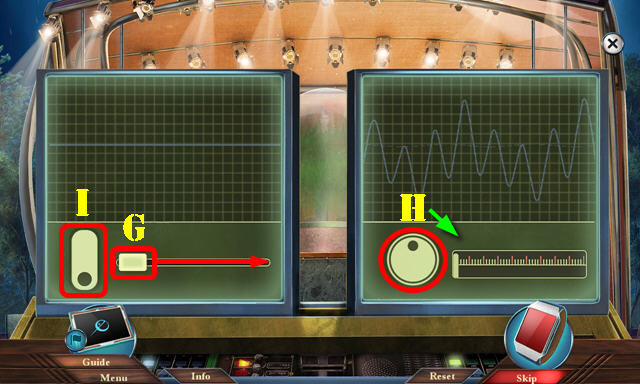
- Move (G) to the end.
- Turn (H) clockwise to the end.
- Select (I).
- Turn (H) clockwise to the end.
- Congratulations, you've completed Dead Reckoning: Death Between the Lines!
Created at: 2016-11-27