

Walkthrough Menu
- General Tips
- Chapter 1: Dawson's Office
- Chapter 2: Fraternity House
- Chapter 3: Sorority House
- Chapter 4: University
- Chapter 5: Plan Room
- Chapter 6: Disciple's Hall
General Tips
- This is the official guide for Dead Reckoning: Lethal Knowledge.
- This guide won't tell you when to zoom into a location; the screenshots show each zoom scene.
- Hidden-object puzzles are referred to as HOPs. Only the locations of the HOPs will be shown.
- Use the Map to fast travel to a location.
Chapter 1: Dawson's Office
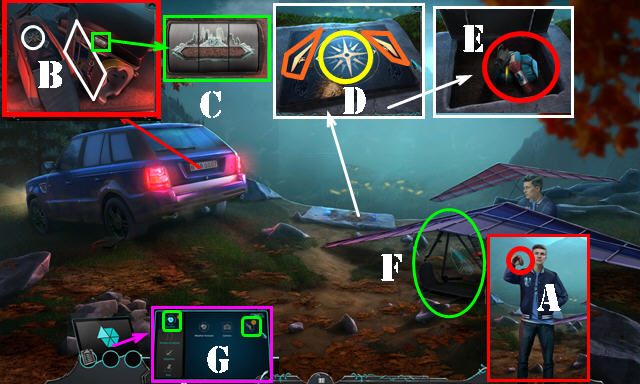
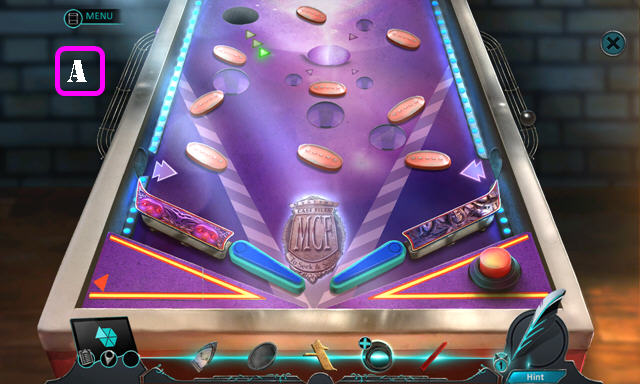
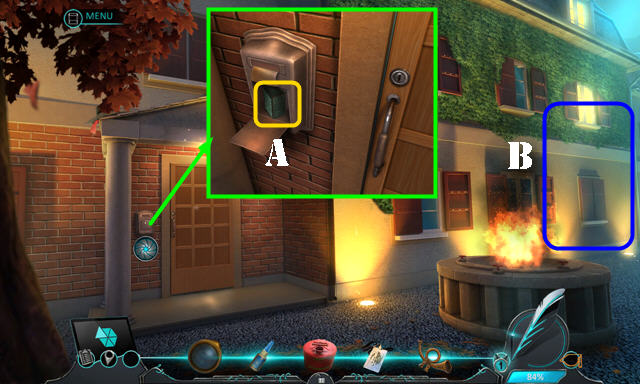
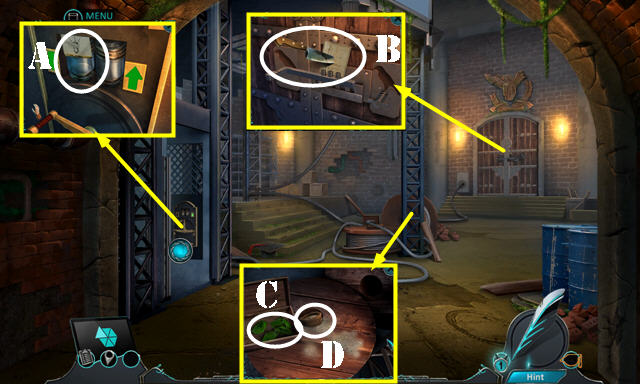
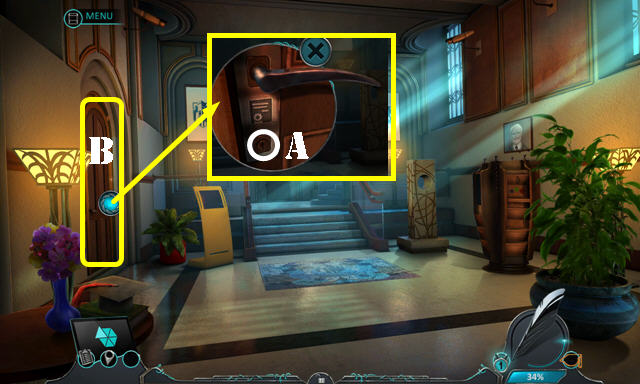
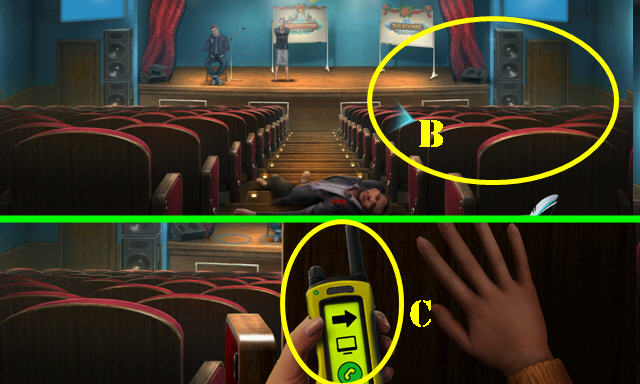
- Take CAR KEY (A).
- Use CAR KEY; take HARNESS and STONE COMPASS (B).
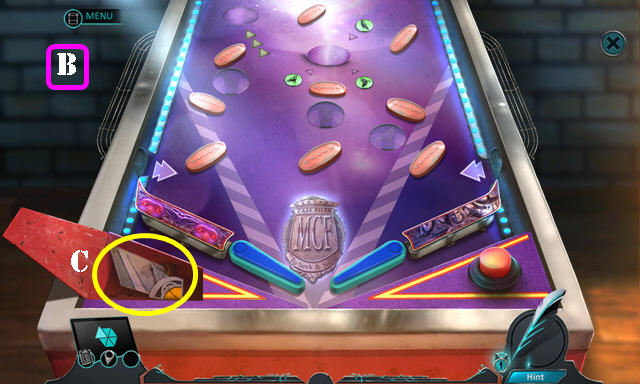
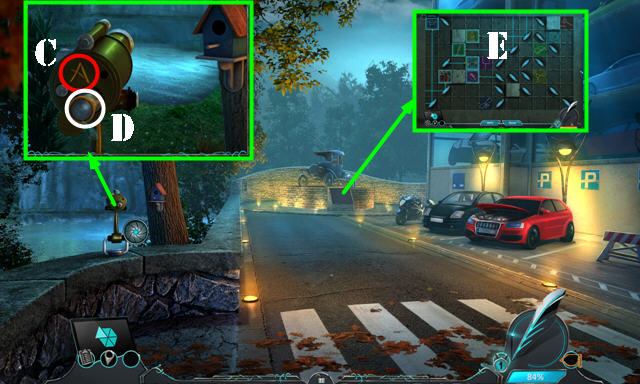
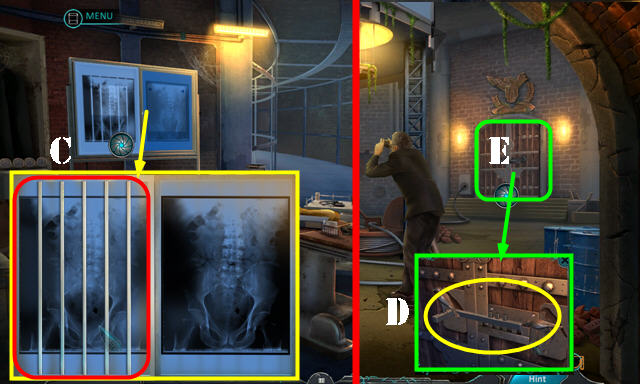
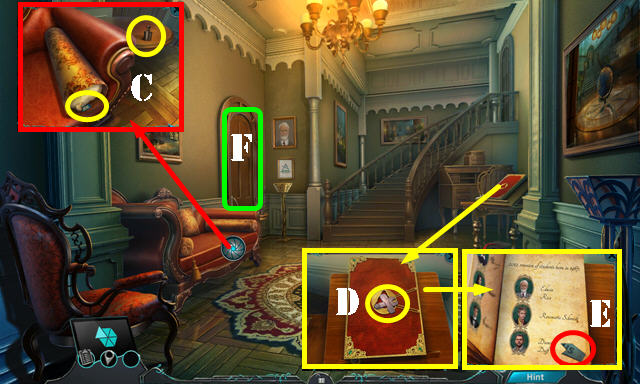
- Arrange lock (C); take INVITATION, Tablet, and BRUSH.
- Drag BRUSH and place STONE COMPASS (D). Select both latches (orange).
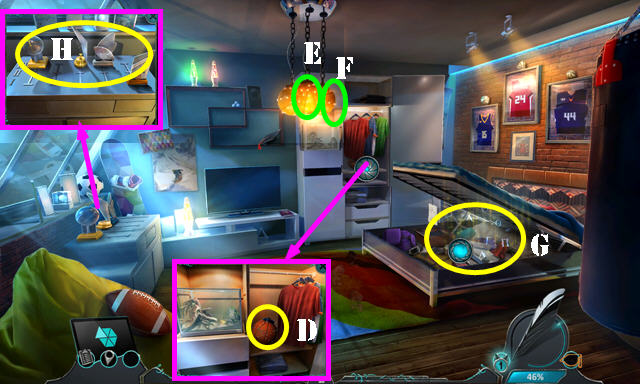
- Move items; take AIR PUMP. Look at note and open backpack; take HARNESS STRAP (E).
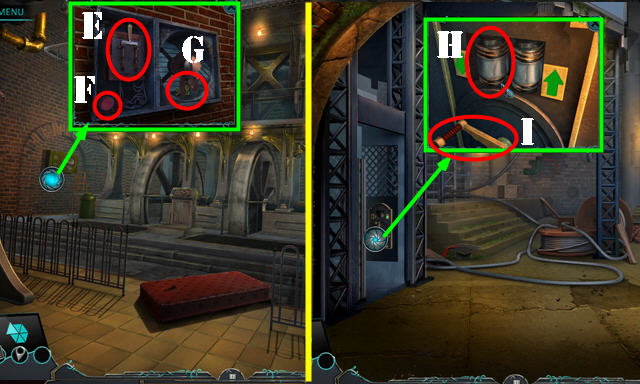
- Select HARNESS twice; place HARNESS STRAP; receive REPAIRED HARNESS.
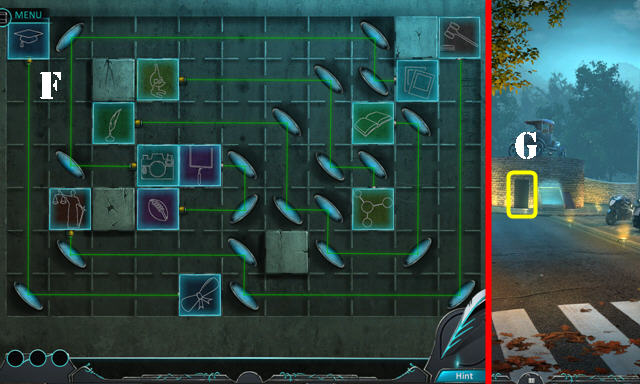
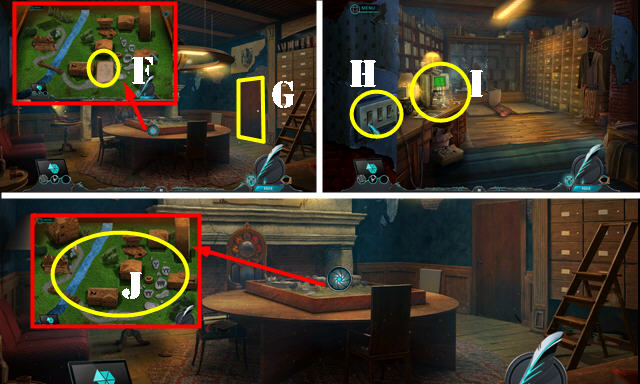
- Place REPAIRED HARNESS (F).
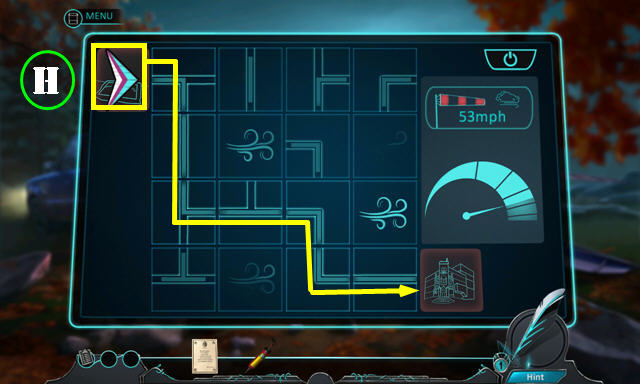
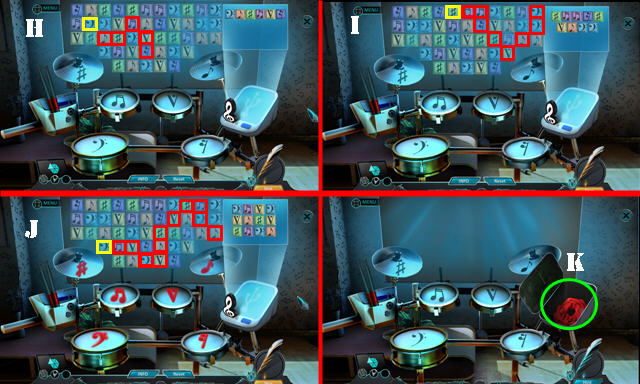
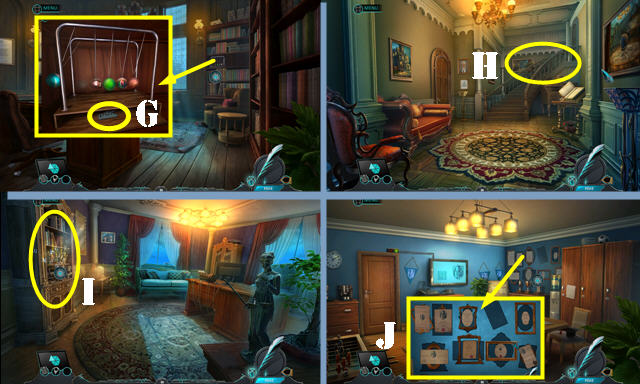
- Select Tablet, my apps, and hang-time (G).
- Solution (H).
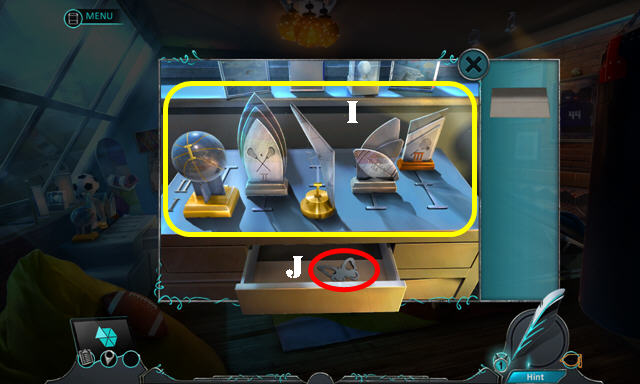
- Give INVITATION (I).
- Take EUROPEAN FLAG and OIL (J).
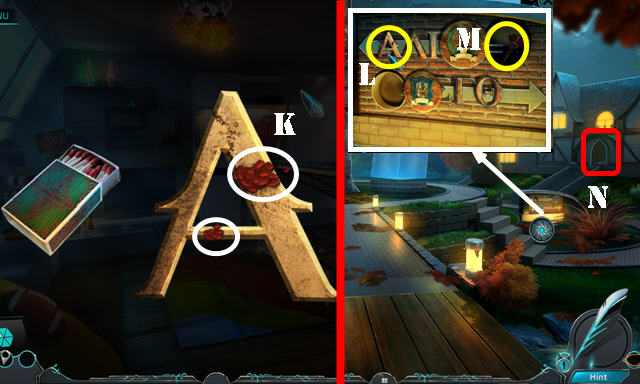
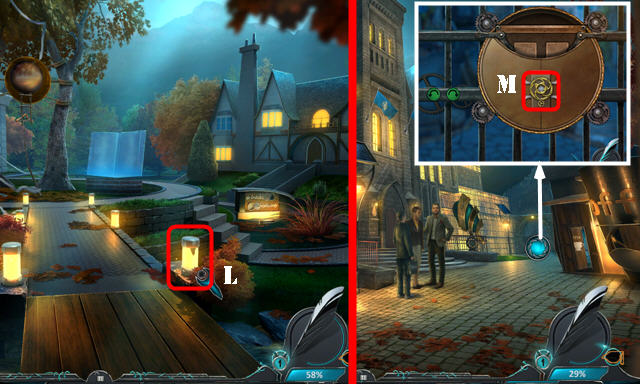
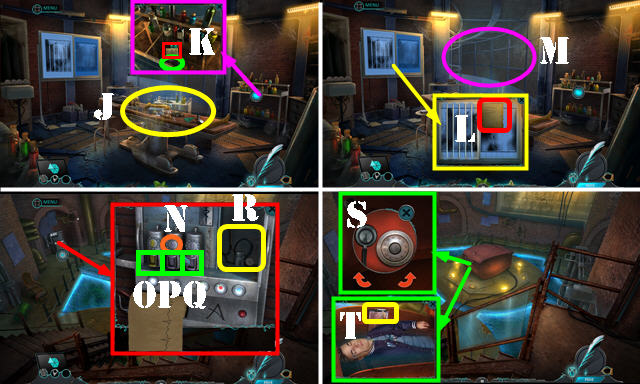
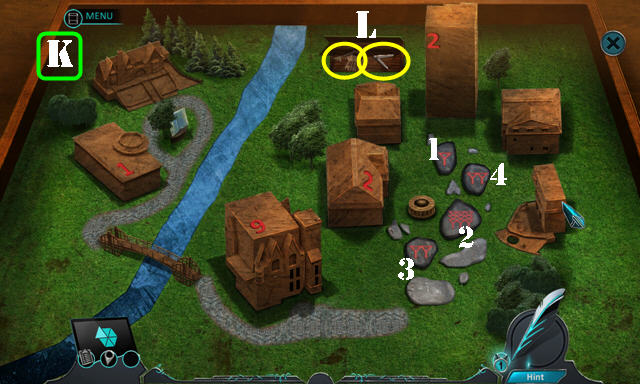
- Select coin (K); take COINS 1/3 (L).
- Go (M).
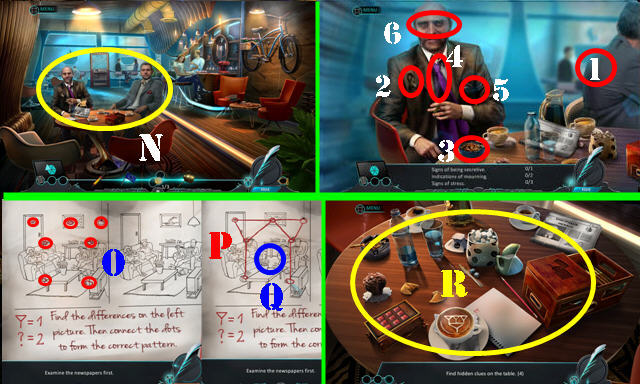
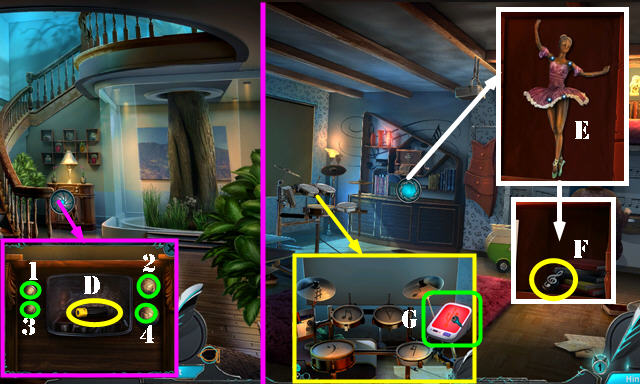
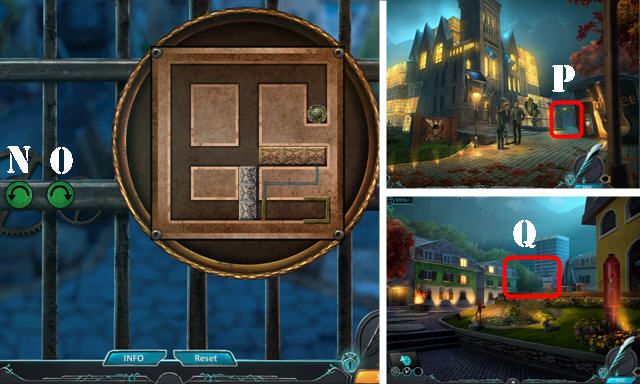
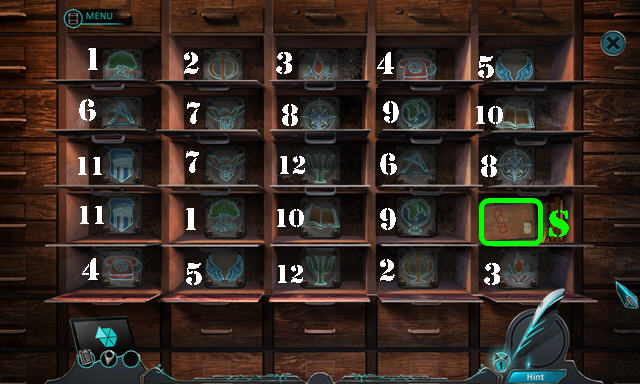
- Approach table (N).
- Select 1-6.
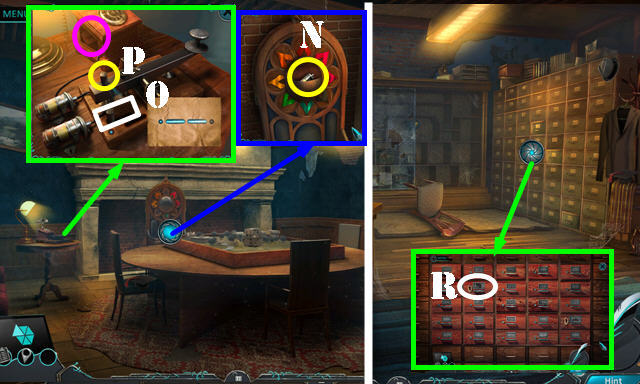
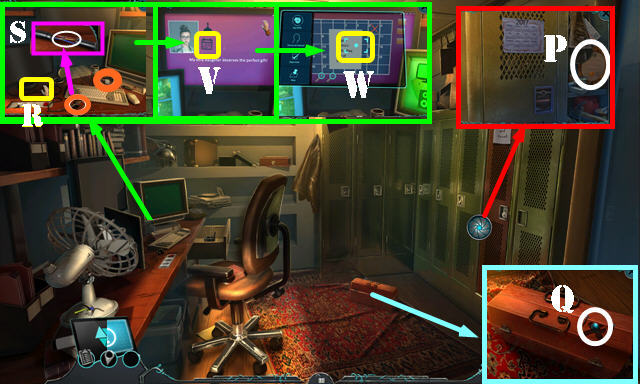
- Select scene and open newspaper. Find differences (O).
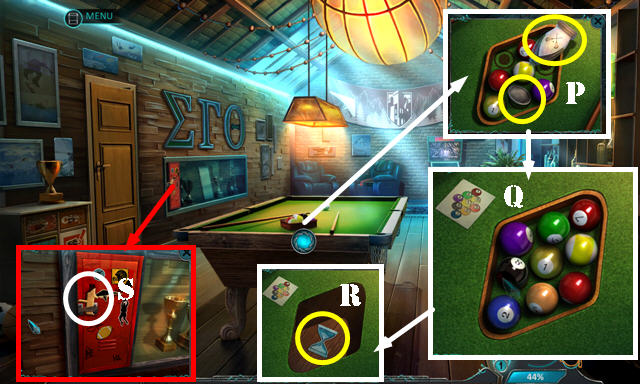
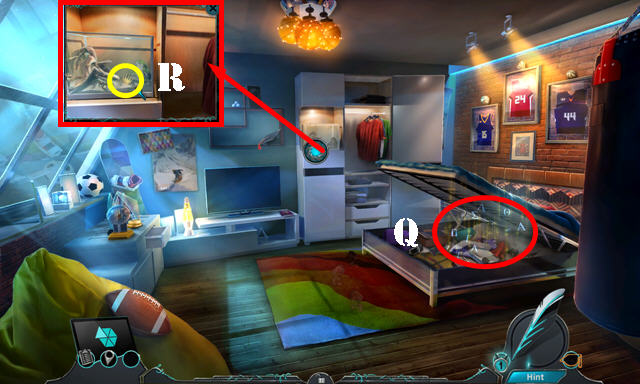
- Connect circles (P). Select table (Q).
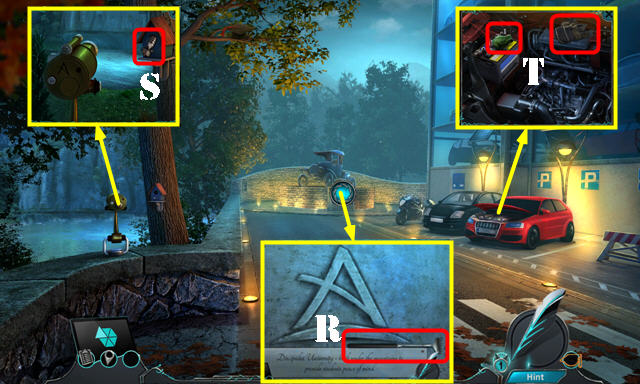
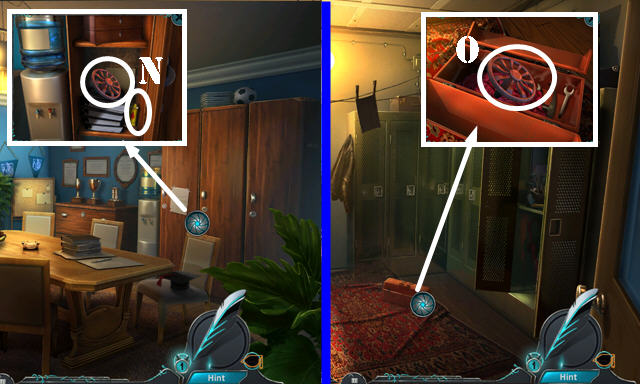
- Play HOP (R); receive STRANGE CODE.
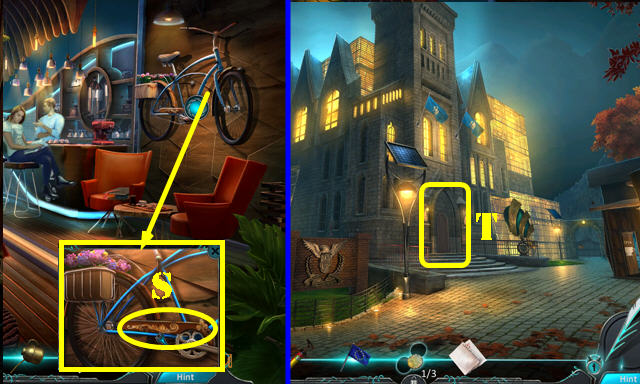
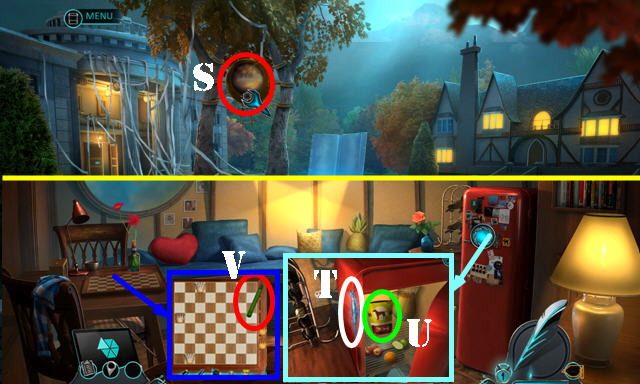
- Use OIL (S).
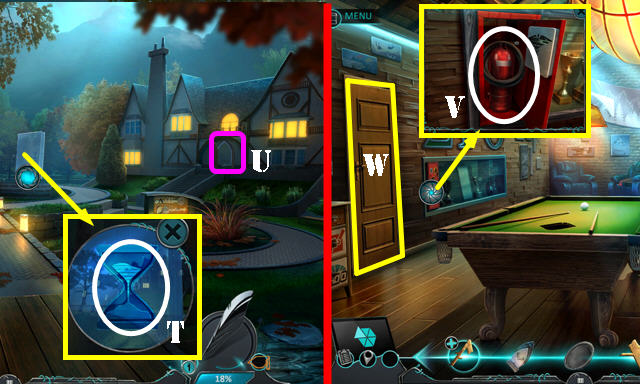
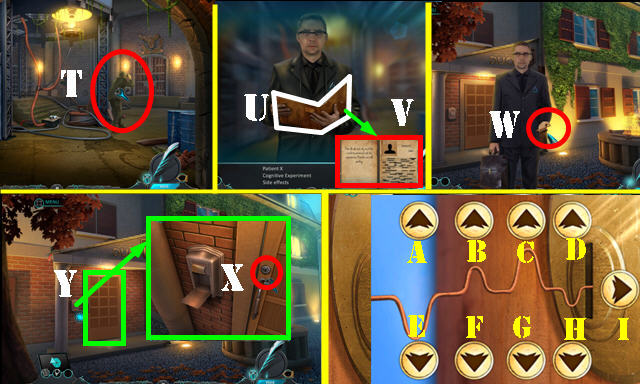
- Walk down and go (T).
- Take COINS 2/3 (U).
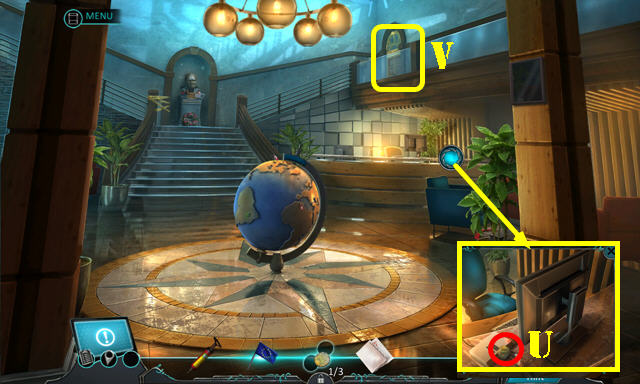
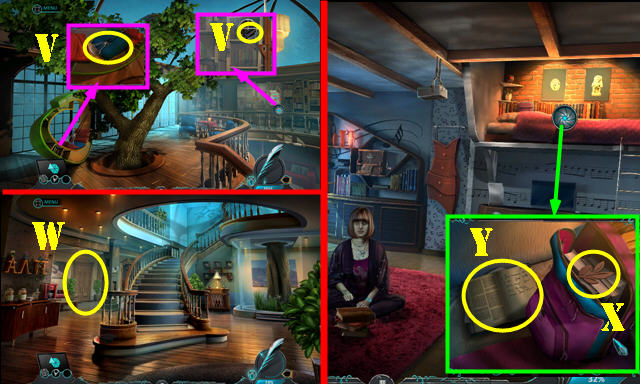
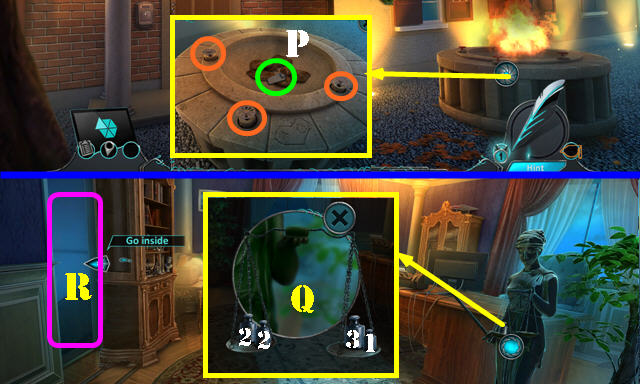
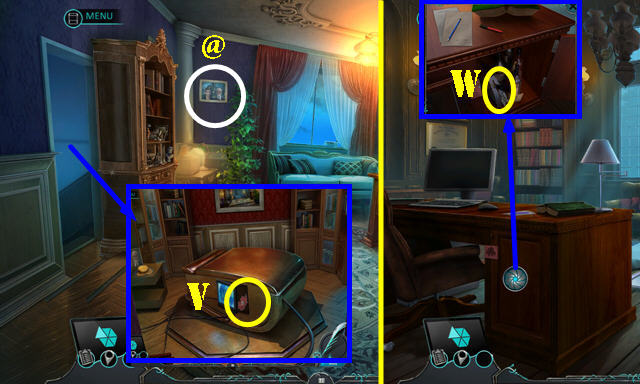
- Go (V).
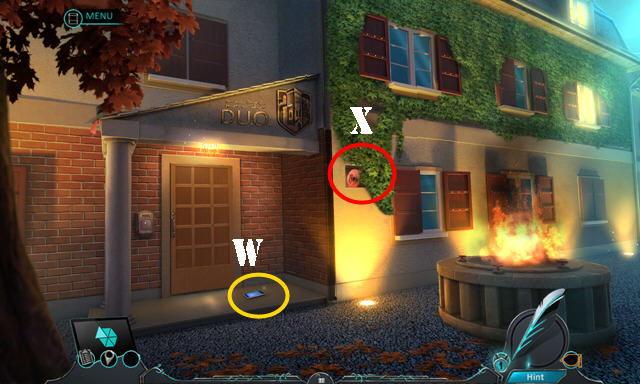
- Take POOL PICTURE (W).
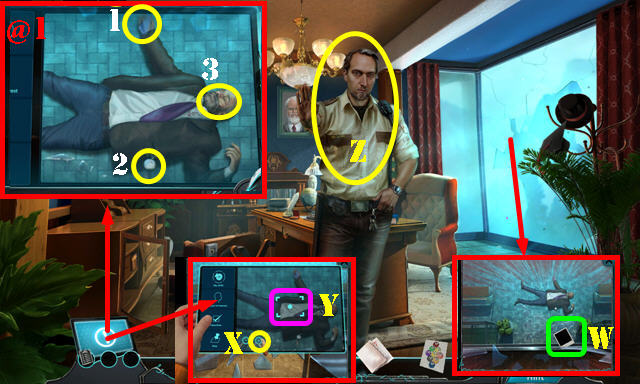
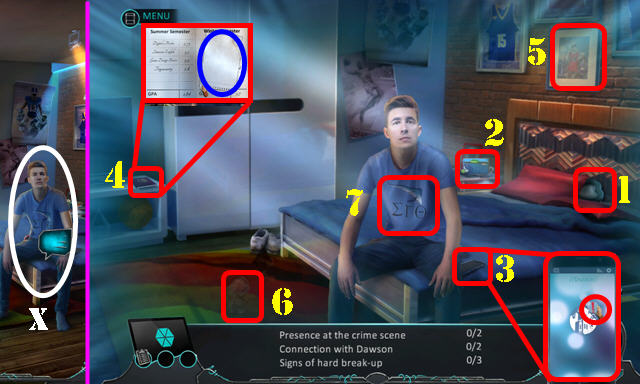
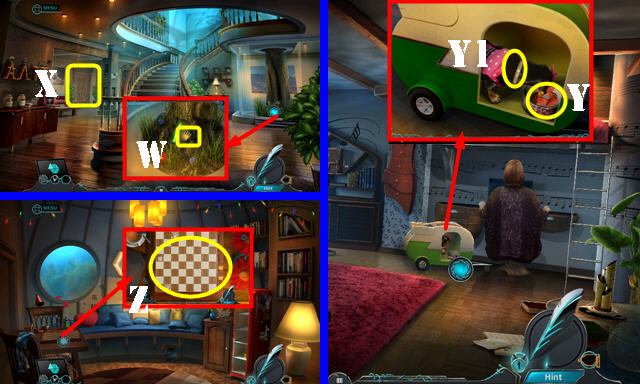
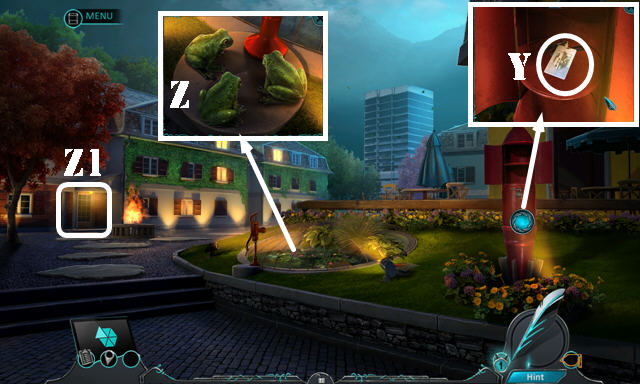
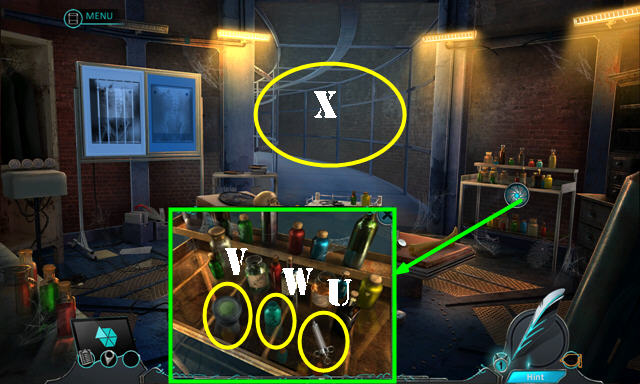
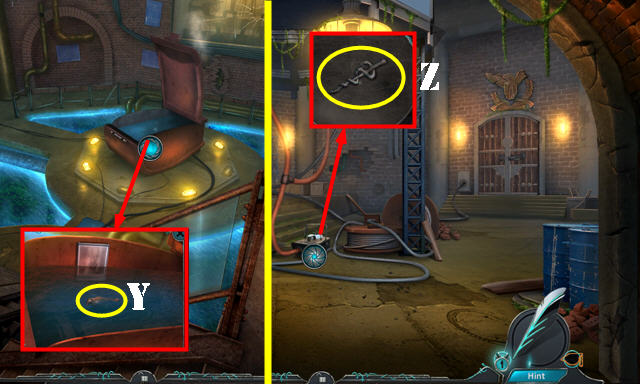
- Select Tablet, My Apps, and Camera. Select plus sign twice (X) and camera once (Y).
- Talk (Z).
- Select Tablet and 1-3 (@1).
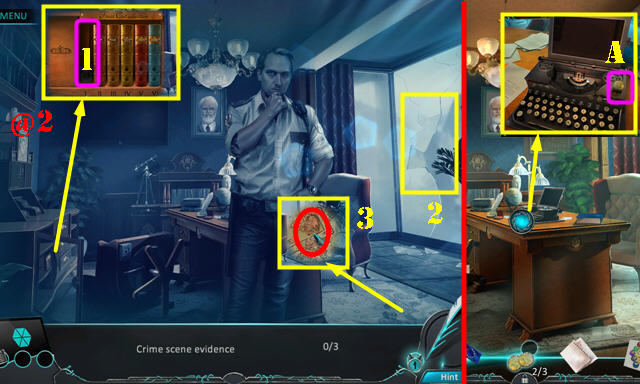
- Select 1-3 (@2).
- Open folder; take COINS 3/3 (A).
- Return to Café.
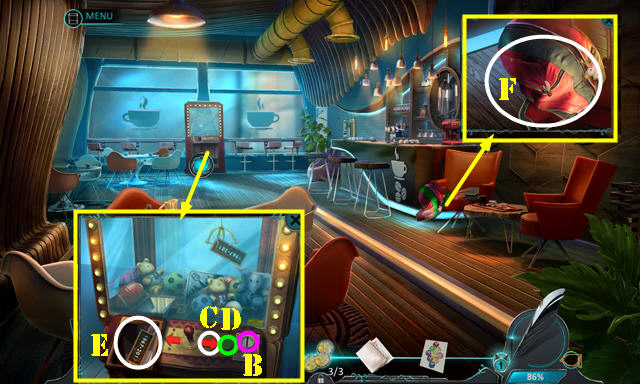
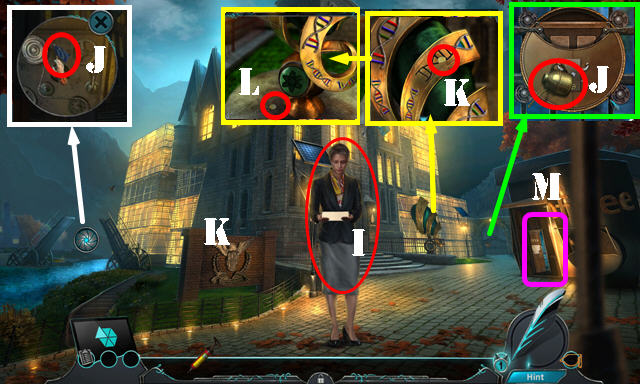
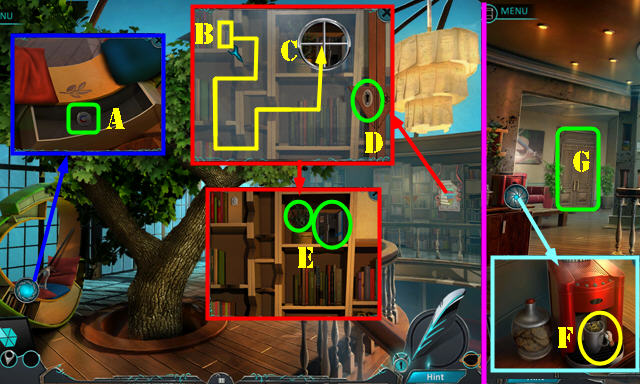
- Insert COINS 3/3 (B). select C-D; take GOLDSTEIN NAME PLATE (E).
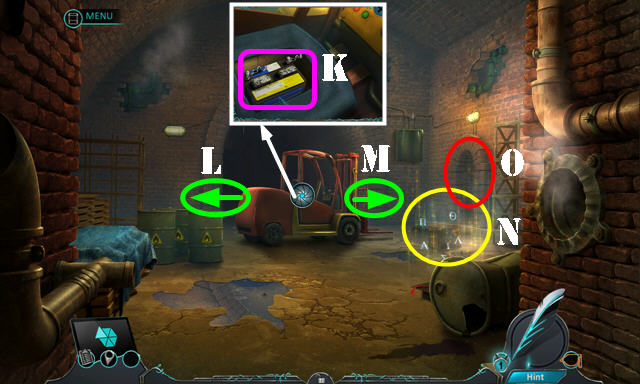
- Open backpack (F). Play HOP; receive USB CABLE.
- Go to Main Hall.
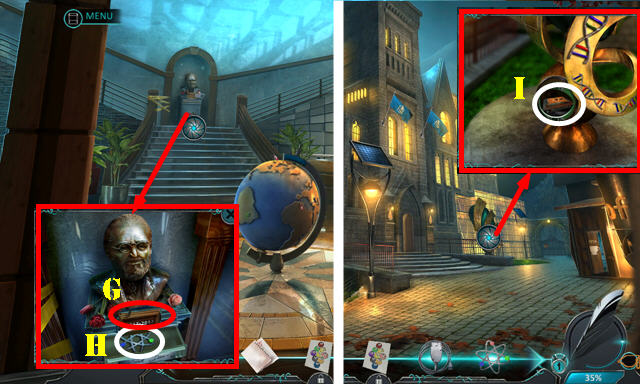
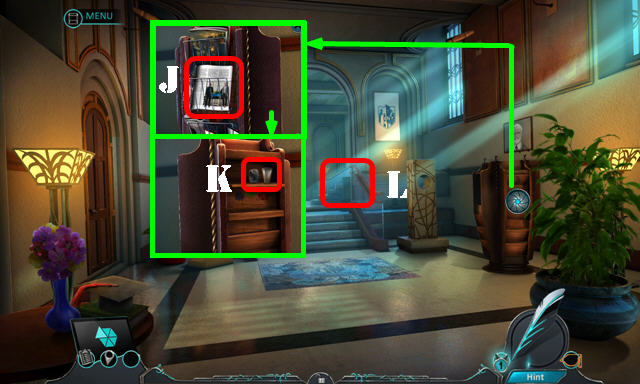
- Look at note. Place GOLDSTEIN NAME PLATE (G); take ATOM SYMBOL (H).
- Walk down.
- Place ATOM SYMBOL; take INTRICATE BOX (I).
- Go to Dawson's Office.
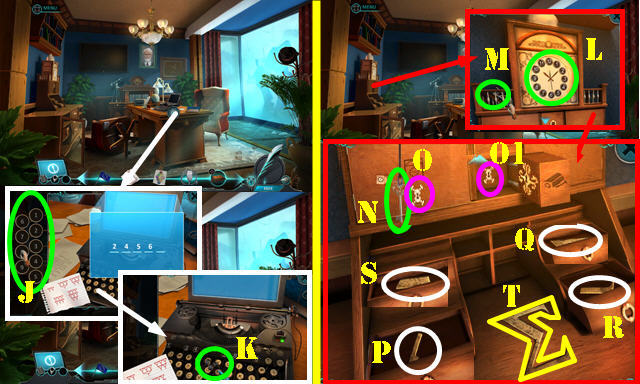
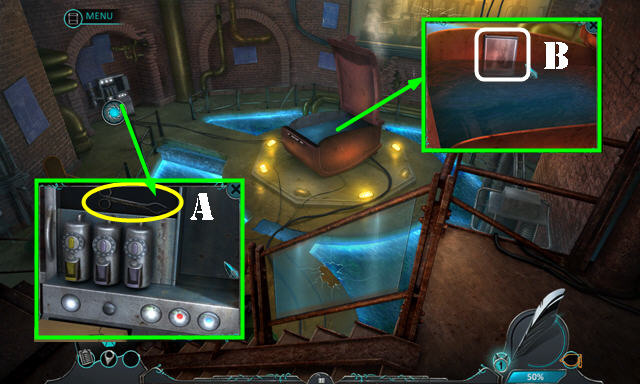
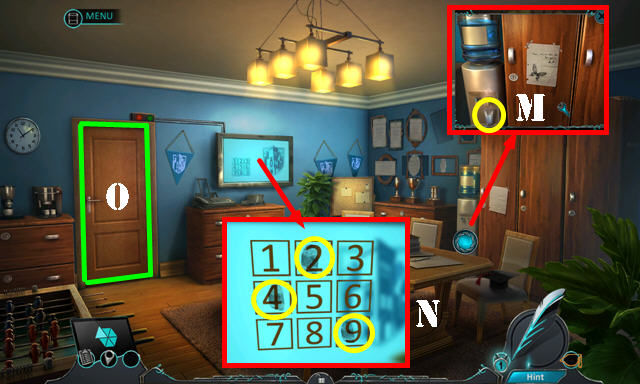
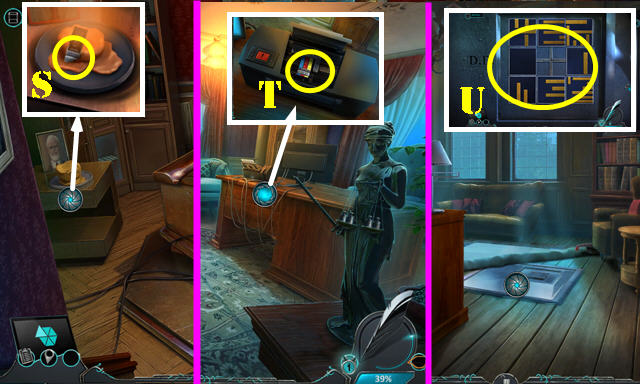
- Place USB CABLE and STRANGE CODE; enter 2-4-5-8-6 (J). Select email icon and eject. Take TYPEWRITER KEYS (K).
- Place TYPEWRITER KEYS (L); take DNA SEQUENCE and select key (M).
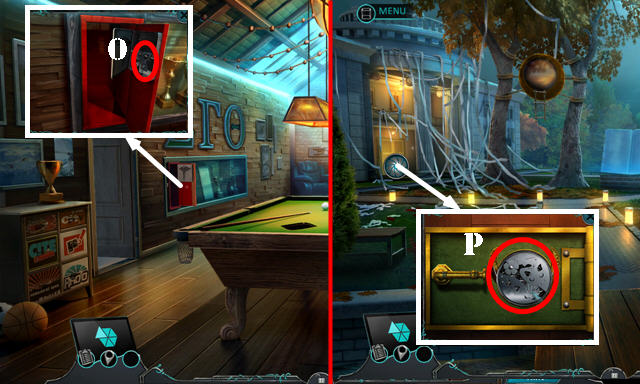
- Pan down; take key (N) and insert (O-O1).
- Select fragment; close drawer (P-Q-R-S).
- Take SIGMA LETTER (T).
- Go to University Entrance.
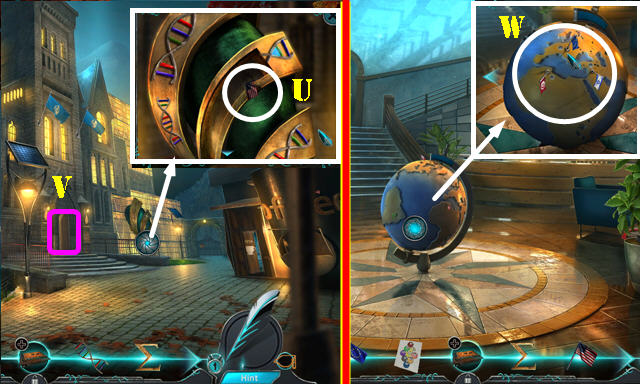
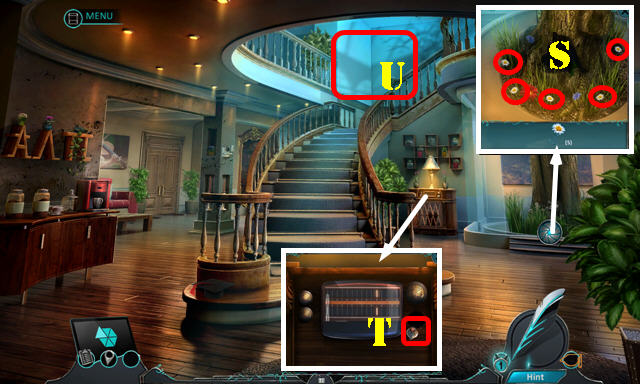
- Pan up and place DNA SEQUENCE; take USA FLAG (U).
- Go (V).
- Place EUROPEAN FLAG (W); rotate right twice. Place USA FLAG.
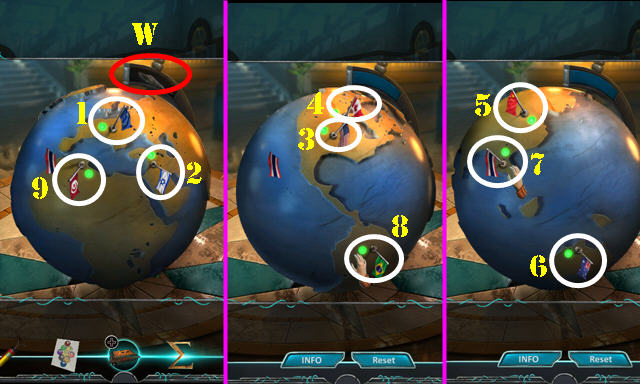
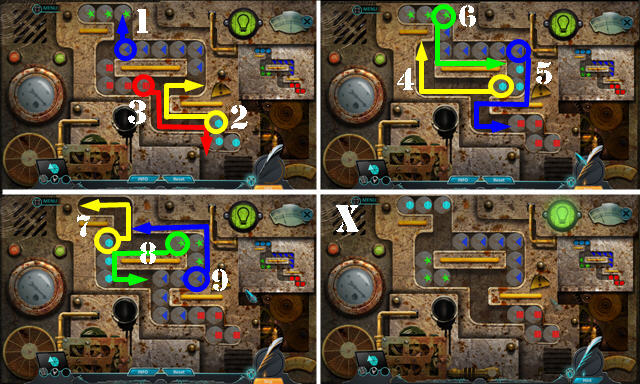
- Select My apps and Student History on Tablet.
- Solution (1-9). Rotate left and right to access all flags.
- Take QUILL SYMBOL (W).
- Go to Dawson's Office.
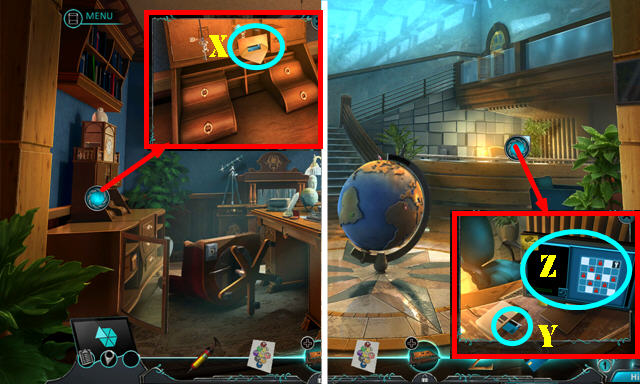
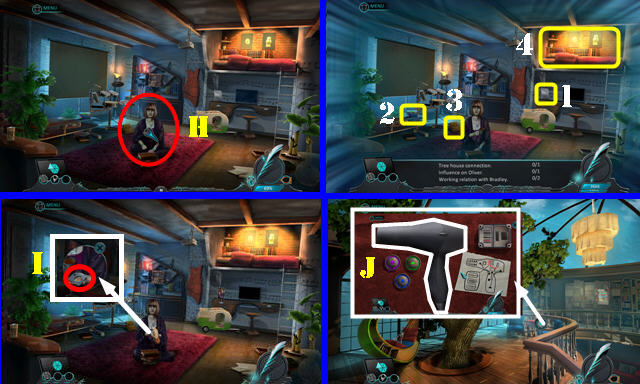
- QUILL SYMBOL on INTRICATE BOX; look at note and take SECURITY KEY.
- Use SECURITY KEY; look at note and take SECURITY CARD (X).
- Walk down.
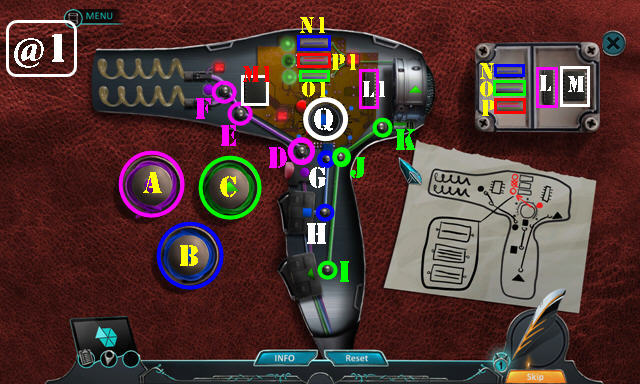
- Select monitor and use SECURITY CARD (Y); select monitor again (Z).

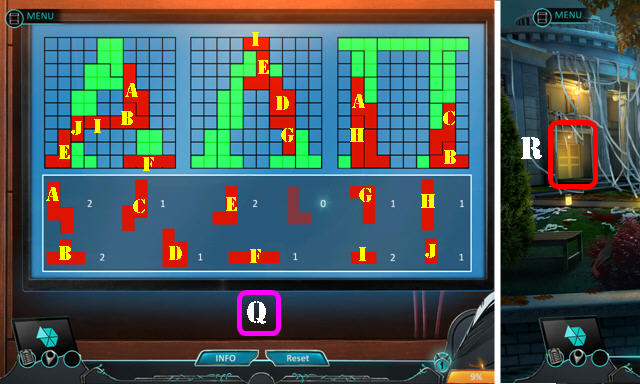
- Solutions one and two (A-B).
- Drag arrow (C) and select screen (D).
- Take TALON (E).
- Walk down.
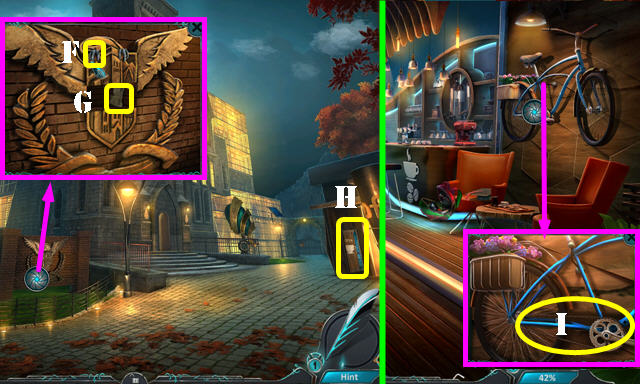
- Place TALON (F); take BOOK SYMBOL (G).
- BOOK SYMBOL on INTRICATE BOX; take ALLEN WRENCH.
- Go (H).
- Use ALLEN WRENCH twice; remove cover and take CHAIN (I).
- Walk down.
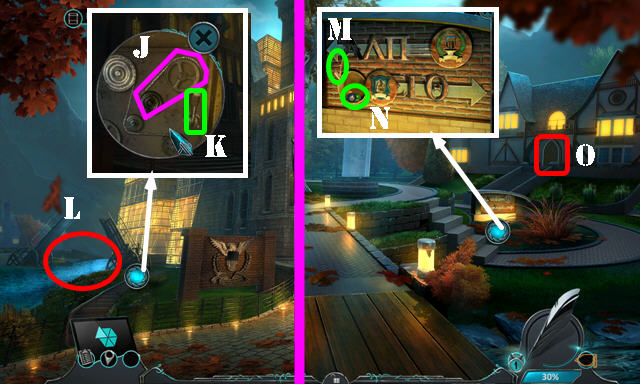
- Place CHAIN (J); pull (K).
- Go (L).
- Place SIGMA LETTER (M); take POOL BALLS and ALPHA PLATE (N).
- Go (O).
Chapter 2: Fraternity House
- Take LACROSSE TROPHY and TEA INFUSER (P).
- Place POOL BALLS and POOL PICTURE; arrange (Q).
- Take HOURGLASS (R).
- Take LETTER HALF (S).
- Walk down.
- Place HOURGLASS (T). Play HOP; receive HEART SYMBOL.
- Go (U).
- HEART SYMBOL on INTRICATE BOX; take WIRE CUTTERS.
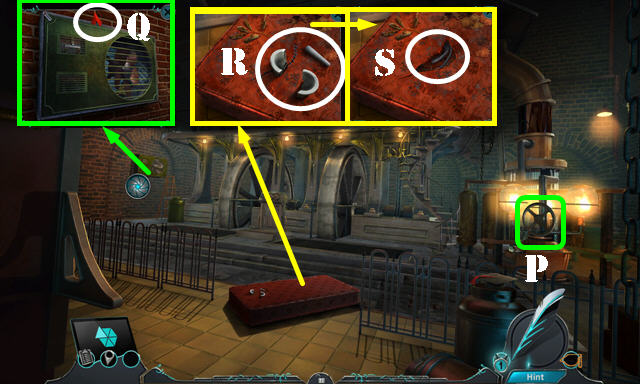
- Use WIRE CUTTERS; take HOSE and BROKEN EXTINGUISHER (V).
- Use BROKEN EXTINGUISHER and go (W).
- Talk (X).
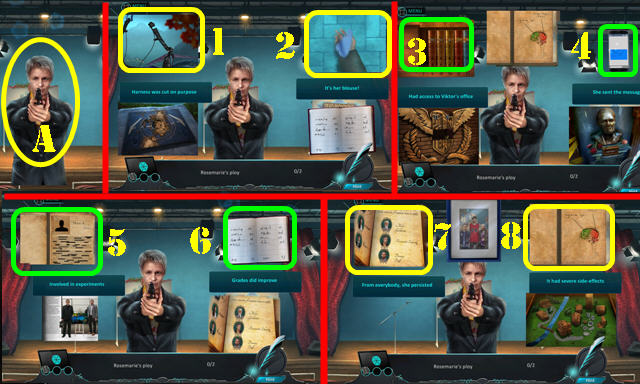
- Select evidence (1-7).
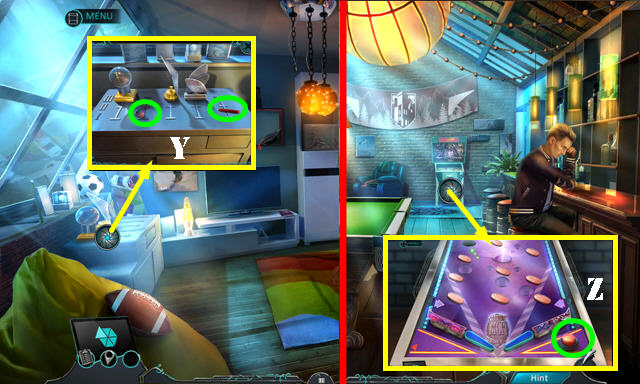
- Take PINBALL BUTTON and WAX STICK (Y).
- Walk down.
- Place PINBALL BUTTON (Z).
- Solutions (A-B).
- Take LOCK PART and TENNIS TROPHY (C).
- Go to Oliver's Room.
- Place LOCK PART and move shirts; take BATTERIES 1/2. Use AIR PUMP; take BASKETBALL (D).
- Place BASKETBALL; select Ex2-F.
- Play HOP (G); receive INTRICATE LOCK.
- Place LACROSSE TROPHY and TENNIS TROPHY (H).
- Solution (I).
- Look at note; take BUTTERFLY TOKEN (J).
- Flip INTRICATE LOCK; take MATCHES.
- LETTER HALF, WAX STICK, and MATCHES on ALPHA PLATE. Drip wax over both cracks (K); receive ALPHA LETTER.
- Go to Park.
- Place ALPHA LETTER (L); take CADUCEUS (M).
- Go (N).
- Place CADUCEUS; take HAIR BOW TOKEN (O).
- BUTTERFLY TOKEN and HAIR BOW TOKEN on INTRICATE LOCK; receive WORKING LOCK.
- Walk down.
- Place WORKING LOCK (P).
- Solution (Q).
- Enter (R).
Chapter 3: Sorority House
- Select scene.
- Select 5 flowers (S); receive CHAMOMILE.
- Take EARRING (T).
- Go to Book Club (U).
- Take POLAROID CARTRIDGE and BROKEN STICK (V).
- Walk down and go (W).
- Look at book (Y). Use EARRING; take TREE ORNAMENT (X).
- Go to Book Club.
- Move pillow; place TREE ORNAMENT; take MAGNET (A).
- Use MAGNET to drag key (B) to exit (C). Insert key in lock (D).
- Take POLAROID CAMERA and ROSEMARY (E).
- Walk down.
- Look at note; place TEA INFUSER, CHAMOMILE, and ROSEMARY. Select machine; take HERBAL TEA (F).
- Go (G).
- Give HERBAL TEA (H).
- Find Evidence (1-4).
- Take CAMERA LOCK (I).
- Go to Book Club.
- Place CAMERA LOCK; open case; remove cover (J).
- Solution (@1). Select wires and connect with pins: (A-D-E-F)-(B-H-G)-(C-I-J-K).
- Place: (N-N1)-(O-O1)-(P-P1)- (L-L1)-(M-M1)-(Qx3).
- Take HAIR DRYER and THREAD.
- Go to Oliver's Room.
- Play HOP (Q); receive COAT HANGER.
- THREAD on BROKEN STICK; select twice; receive LACROSSE STICK.
- Use LACROSSE STICK (R); receive QUEEN FIGURES 1/3.
- Go to Park.
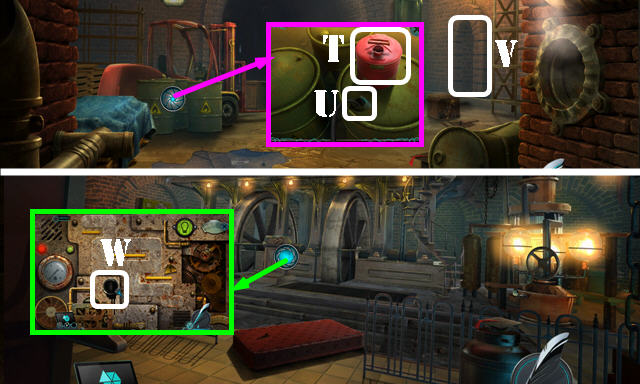
- Select HOSE; place COAT HANGER; take GRAPPLING HOOK.
- Use GRAPPLING HOOK (S) and go.
- Look at note; use HAIR DRYER (T).
- Open fridge; take DOG FOOD (U).
- Take GLOW STICK (V).
- Go to Sorority House.
- Use GLOW STICK; take QUEEN FIGURES 2/3 (W).
- Go (X).
- Place DOG FOOD (Y); select collar (Y1) receive QUEEN FIGURES 3/3 and pet dog.
- Go to Rest House.
- Place QUEEN FIGURES 3/3 (Z).

- Solution (A).
- Look at note; take LENS and COFFEE STIRRER (B).
- Use COFFEE STIRRER; take GLUE and RADIO KNOB (C).
- Go to Sorority House.
- Place RADIO KNOB; select 4-3-3; take BATTERIES 2/2 (D).
- Go to Alison's Room.
- POLAROID CARTRIDGE and BATTERIES 2/2 on POLAROID CAMERA; select button; take PHOTO.
- Place PHOTO; position doll (E). Take FLASH DRIVE (F).
- Use FLASH DRIVE (G).
- Solution (H-I-J).
- Take SCARF (K).
- Go to Park.
- Use SCARF (L); take ROUND MECHANISM.
- Walk down.
- Place ROUND MECHANISM (M).
- Solution: Nx3-Ox4-Nx4-Ox4-Nx2-Ox4-Nx2.
- Go (P-Q).
Chapter 4: University
- Take BACK SCRATCHER (R).
- Use BACK SCRATCHER (S); receive BOMB.
- Take FROG STATUE 1/3 and GLOVES (T).
- Walk down.

- Use BOMB; take FROG STATUE 2/3 (U).
- Go (V).
- Take SMART PHONE (W).
- Use GLOVES; receive FROG STATUE 3/3; take CONTAINER (X).
- Walk down.
- Pan down and use SMART PHONE; take DISCIPULUS PASS (Y).
- Place FROG STATUE 3/3 (Z). Play HOP; receive MAILBOX SIGN.
- Go (Z1).
- Place MAILBOX SIGN; take PACKAGE (A).
- Go (B).
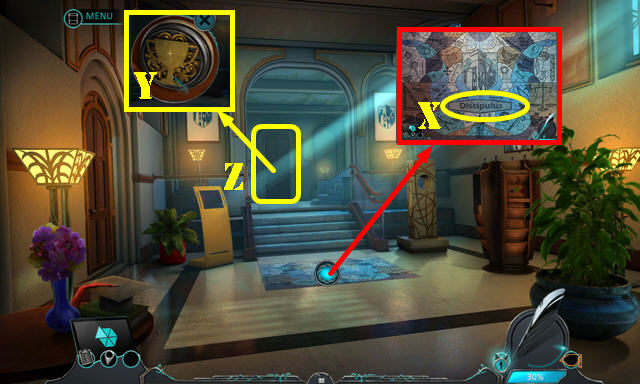
- DISCIPULUS PASS on PACKAGE; take ASTOR LOGO.
- Place ASTOR LOGO (C) and LENS (D); play HOP.
- Play puzzle (E).
- Solution (F).
- Go (G).

- Look at note; take RATCHET (H).
- Walk down.
- Use RATCHET twice; take CAR BATTERY (I).
- Go (J).
- Open cover; place CAR BATTERY (K).
- Select (M-L).
- Play HOP (N); receive SCISSORS.
- Go (O).
- Select valve 2x (P).
- Take GLASS PIECE 1/2 (Q).
- Use GLUE and select; receive MORTAR AND PESTLE (R).
- Use SCISSORS (S); take RUBBER TUBE.
- Walk down.
- Place CONTAINER (T); remove cap (U) and insert RUBBER TUBE; take GASOLINE.
- Go (V).
- Remove cap; use GASOLINE (W).
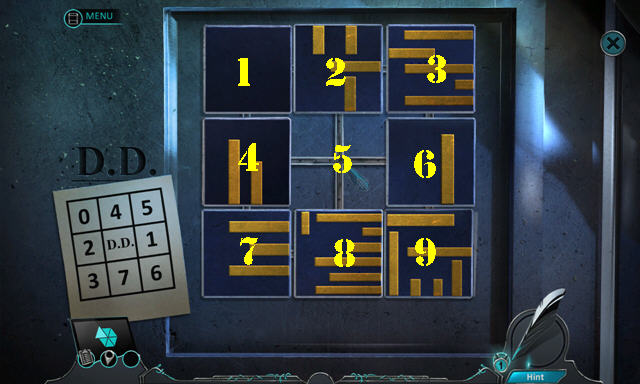
- Solution (1-9). Solved image (X).
- Walk down and go forward.
- Look at note; receive EMPTY FUSE (A).
- Take KNIFE and INSTRUCTIONS (B).
- Select 2x; use KNIFE and open box; take PEPPERMINT (C). Move box; take SAND (D).
- Go to Generator Room.
- Place INSTRUCTIONS; select E-F-E; take TRIANGULAR DECORATION and WIRE (G).
- Go to Bunker Hall.
- Remove lid from EMPTY FUSE; add SAND and WIRE; receive FUSE.
- Place FUSE (H); pull handle (I).
- Remove cover; play HOP (J); receive DIAL.
- Take BIRD FIGURE 1/2; look at note (K).
- Look at note (L).
- Go (M).
- Place DIAL (N); select (O-P-Q).
- Take STETHOSCOPE and EMPTY LIGHTER (R).
- Place STETHOSCOPE; Left to 50 and right to 15 (S).
- Take SYRINGE (T).
- Walk down.
- Put down PEPPERMINT and MORTAR AND PESTLE. Put down SYRINGE; select 2x (U).
- Select mortar and pestle (V); Take SMELLING SALTS (W).
- SMELLING SALTS on scene.
- Go (X).
- Take BIRD FIGURE 2/2 (Y).
- Go to Bunker Hall.
- Take MACHINE SLOT (Z).
- Go to Experiment Chamber.
- Place MACHINE SLOT; take MEDICAL TONGS (A).
- Use MEDICAL TONGS (B); receive X-RAY.
- Walk down.
- Place X-RAY; arrange as shown (C); take SWITCH.
- Walk down.
- Place BIRD FIGURE 2/2 (D).
- Go (E).
Chapter 5: Plan Room
- Look at note (F).
- Go (G).
- Place SWITCH and select it (H).
- Play HOP (I); receive MODEL BUILDING.
- Walk down.
- Place MODEL BUILDING (J).
- Solution (K).
- Select 1-4.
- Take NAIL CLIPPER and KEY CHAIN (L).
- Go to File Room.
- Use NAIL CLIPPER; take GLASS PIECE 2/2 and MORSE CODE (M).
- Walk down.
- Place GLASS PIECE 2/2; take COIL (N).
- Place COIL and MORSE CODE; select: O-P-O-Px2-O-P. Take KEY RING (purple).
- Take PENDANT from KEY CHAIN.
- KEY RING on KEY CHAIN; select middle key; receive CABINET KEY.
- Go to File Room.
- Use CABINET KEY (R).
- Solution (1-12).
- Take EVIDENCE (S).
- Go to Bunker Hall.
- Show EVIDENCE (T).
- Select (U); select book (V) and notes inside 5x.
- Take IMPROVISED LOCKPICK (W).
- Use IMPROVISED LOCKPICK (X).
- Solution: (Ex2-B-Cx2-H-I).
- Enter (Y).
Chapter: 6 Disciple's Hall
- Look at magazine (J).
- Select rack and place PENDANT; take DUCT TAPE and GLASS CUP (K).
- Go (L).
- Use GLASS CUP and select; take HOT WATER (M).
- Use HOT WATER; select 429 (N).
- Go (O).
- Open locker; take DIPLOMA (P).
- Take MARBLE (Q).
- Select cord (R). Use DUCT TAPE (S). Plug in both cords (orange).
- Select calendar 2x (V).
- Select camera icon under my apps on tablet; select (W).
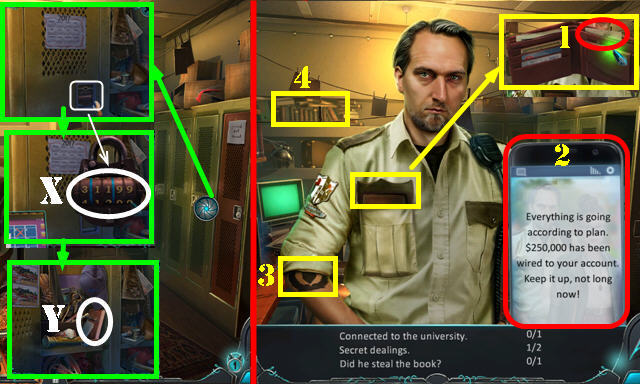
- Select lock; enter 31199 (X).
- Select book (Y) Play HOP: receive COLLEGIUM KEY.
- Select evidence (1-4).
- Go to Disciple's Hall.
- Use COLLEGIUM KEY (A).
- Go (B).
- Open; take BUTTERFLY KEY and WEIGHTS 1/3 (C).
- Take TOOLBOX KEY (D).
- Place TRIANGULAR DECORATION and select. Open book; take MOSAIC PIECE 1/4 (E).
- Go (F).
- Place MARBLE and select; take MOSAIC PIECE 2/4 (G).
- Walk down and go (H).
- Play HOP (I); receive WEIGHTS 2/3.
- Go to Staff Room.
- Place DIPLOMA (J).

- Solution (K-L).
- Take WEIGHTS 3/3 (M).
- Use BUTTERFLY KEY; take VALVES 1/2 and LIGHTER FLUID (N).
- LIGHTER FLUID on EMPTY LIGHTER; receive FILLED LIGHTER.
- Go to Security Room.
- Place TOOLBOX KEY; take VALVES 2/2 (O).
- Go to Front of Office.
- Place VALVES 2/2; select each one (orange); take MOSAIC PIECE 3/4 (P).
- Go to Rosemarie's Office.
- Place WEIGHTS 3/3; swap weights (Q).
- Go (R).
- Use FILLED LIGHTER; take PRINTER TONER (S).
- Walk down.
- Open cover; place PRINTER TONER (T). Take PAPER CODE.
- Go to Duff's Office.
- Lift rug; place PAPER CODE (U).
- Solution (6-3-2-1-4-7-8-9-6-5).
- Take SENSORY REMOTE.
- Go to Rosemarie's Office.
- Look at photo (@).
- Use SENSORY REMOTE; take SWISS FLAG (V).
- Go to Duff's Office.
- Place SWISS FLAG; look at note; take MOSAIC PIECE 4/4 (W).
- Receive WALKIE-TALKIE.
- Go to Disciple's Hall.
- Place MOSAIC PIECE 4/4 (X). Play HOP; receive TROPHY TRINKET.
- Place TROPHY TRINKET (Y).
- Go (Z).
- Talk (A).
- Select Evidence (1-8).
- Take cover (B).
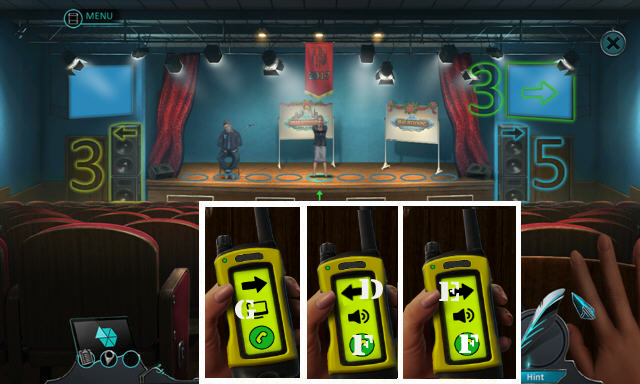
- Use WALKIE TALKIE on scene (C).
- Solution Solution (G-D-F-E-F-D-F-E-F-D-F).
- Congratulations, you've completed Dead Reckoning: Lethal Knowledge!
Created at: 2017-12-03