

Walkthrough Menu
- General Tips
- Chapter 1: Death of a Movie Star
- Chapter 2: Inspecting the Scene
- Chapter 3: The Locked Library
- Chapter 4: Sylvia Crawford
- Chapter 5: Investigating the Second Floor
- Chapter 6: Evelyn's Secret
- Chapter 7: The Net Closes In
General Tips
- This is the official guide for Dead Reckoning: Silvermoon Isle.
- This guide will not mention each time you have to zoom into a location; the screenshots will show each zoom scene.
- Hidden-object puzzles are referred to as HOPs. This guide will not show screenshots of the HOPs, but it will mention when a HOP is available and the inventory item you'll collect from it.
- Instead of HOPs you can play a bubble shooter game; a HOP item will be removed from the list each time you remove an 'e' bubble.
- This guide will give step-by-step solutions for all puzzles that are not random. Please read the instructions in the game for each puzzle.
Chapter 1: Death of a Movie Star

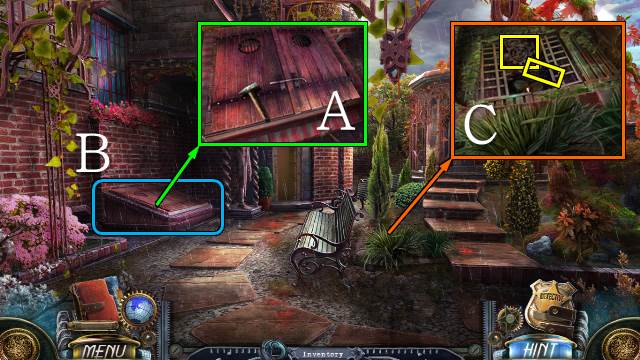
- Talk to Daniels.
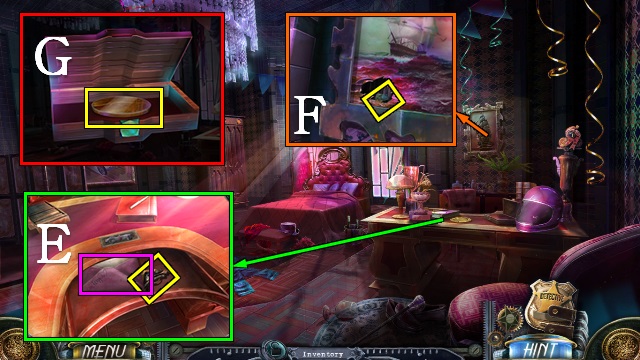
- Take the SMALL KEY (A).
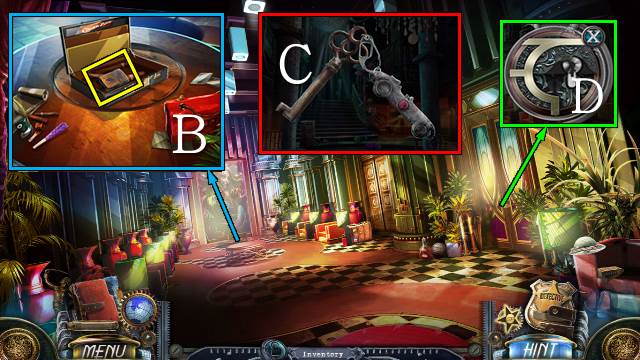
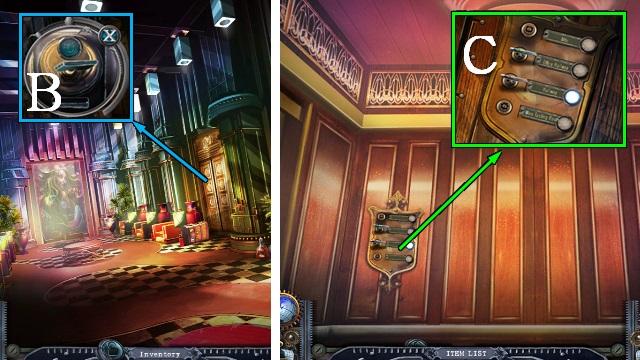
- Open the suitcase with the SMALL KEY; open the box and take the COMPASS (B).
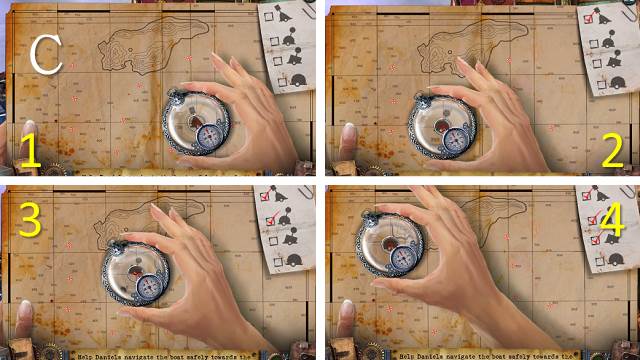
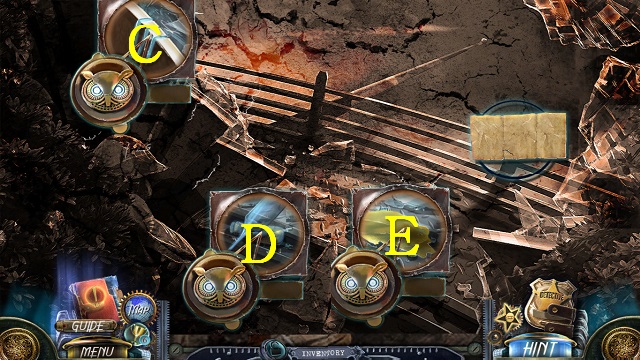
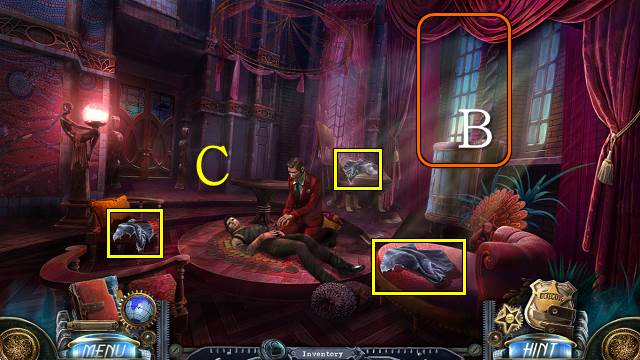
- Place the COMPASS on the map for a mini-game (C).
- Use the compass to find the icons shown on the right.
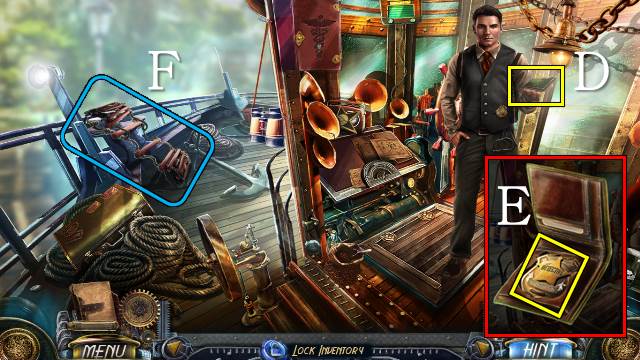
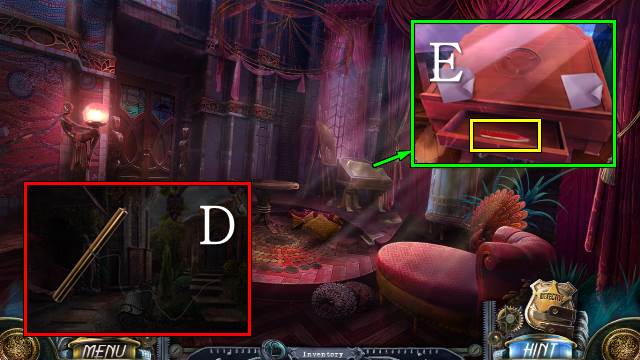
- Take the BADGE (D).
- Access the BADGE, open it and take your badge (E).
- Throw out the rope ladder (F).
- Walk forward.
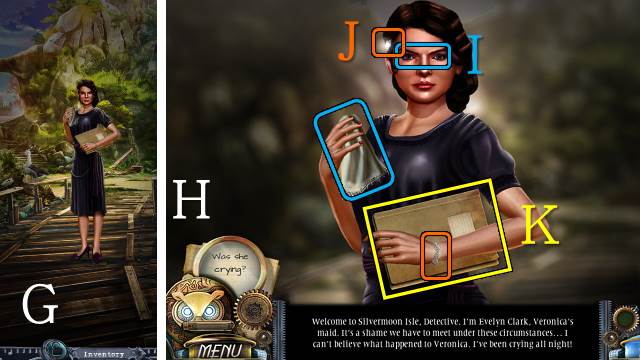
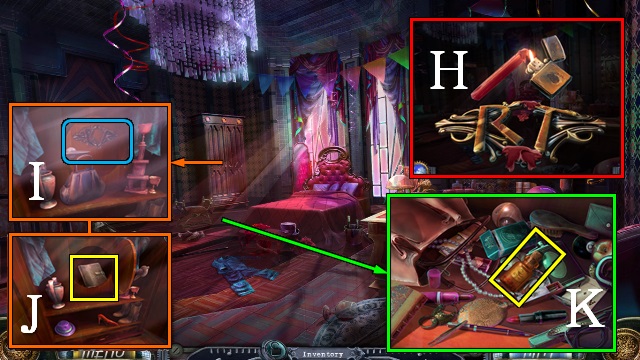
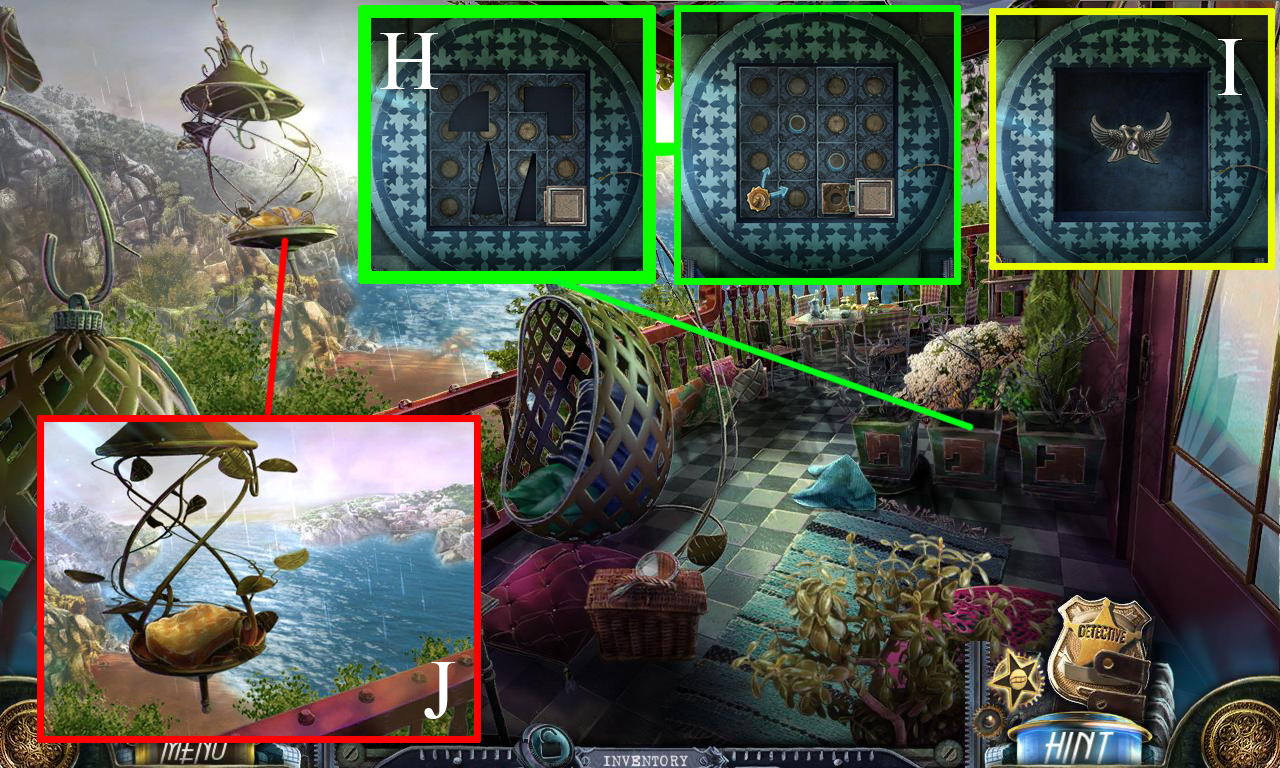
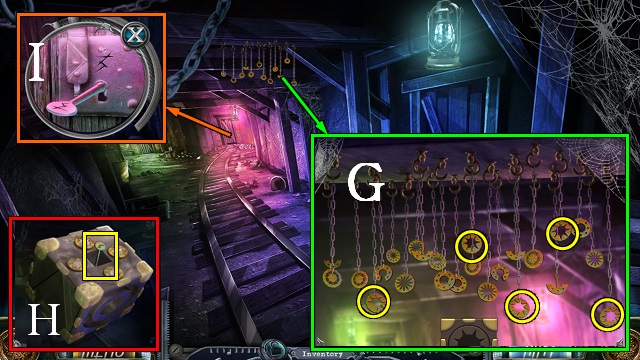
- Talk to Evelyn (G).
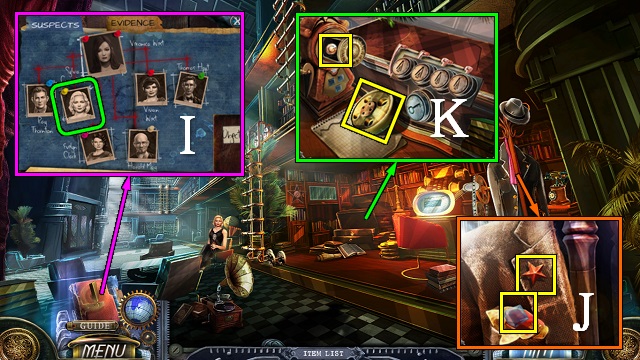
- Check if Evelyn is lying by using the questions in the magnifier (H).
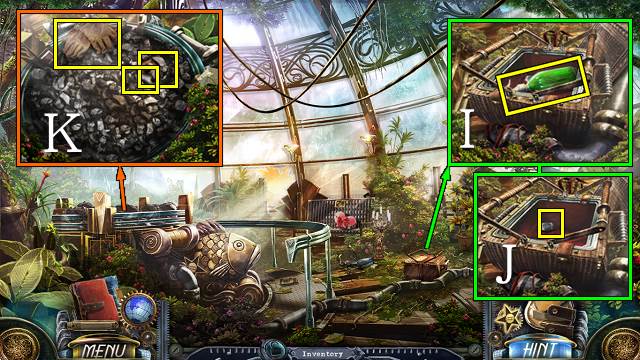
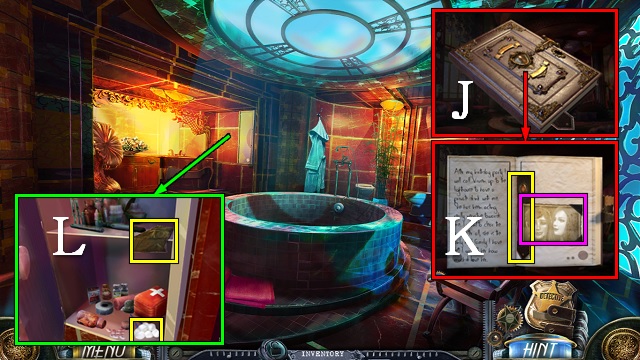
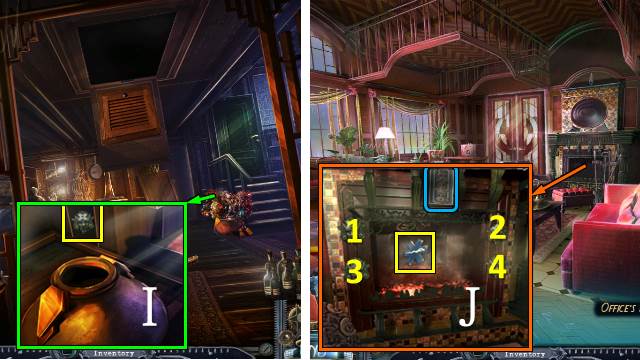
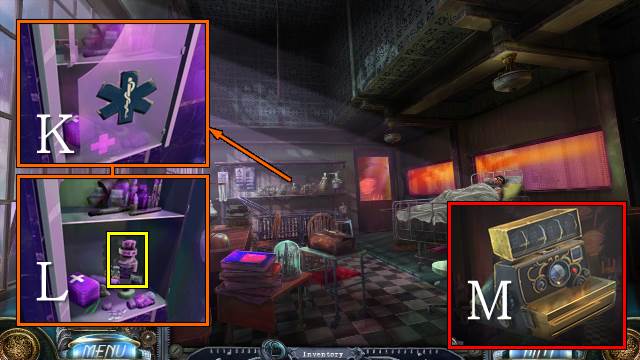
- Inspect her eyes and handkerchief (I).
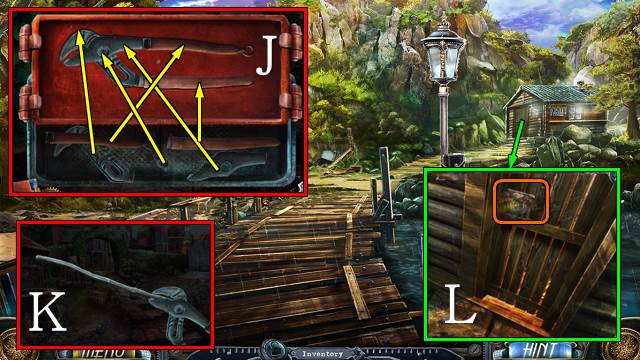
- Inspect her bracelet and hairpin (J).
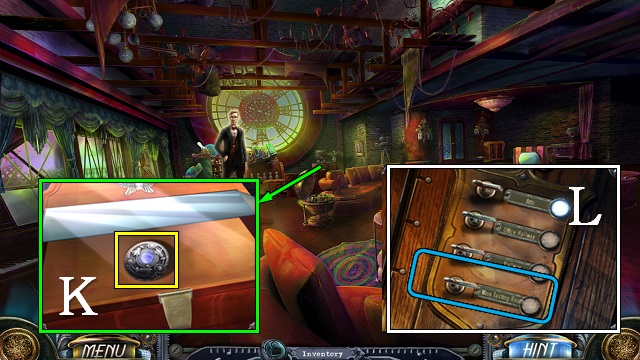
- Ask for the case file, then take it (K).
- Take the Suspect List.
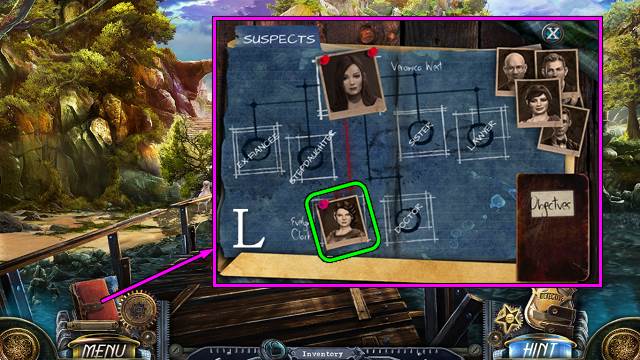
- Inspect the Evidence Board.
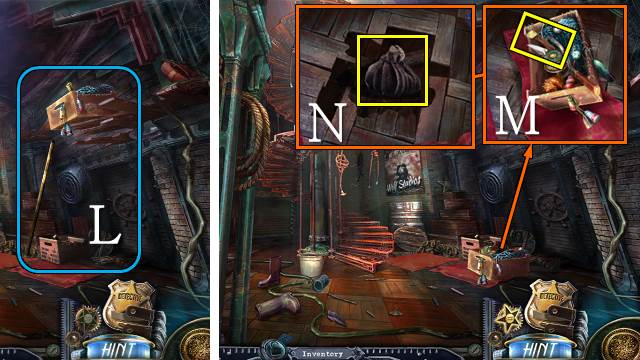
- Drag Evelyn's picture to the 'Maid' area (L).
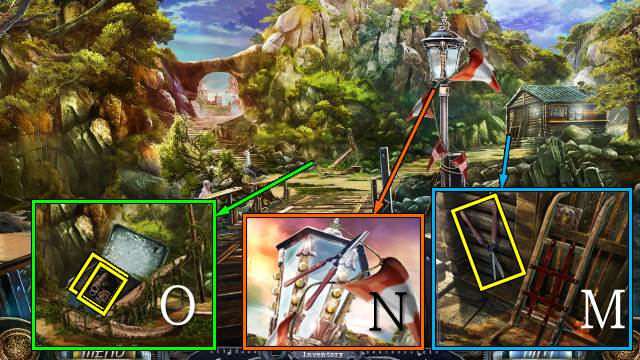
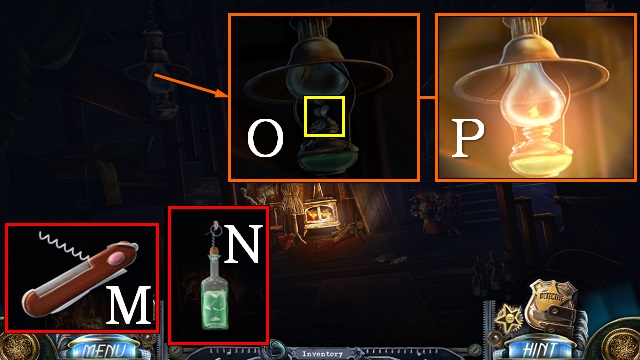
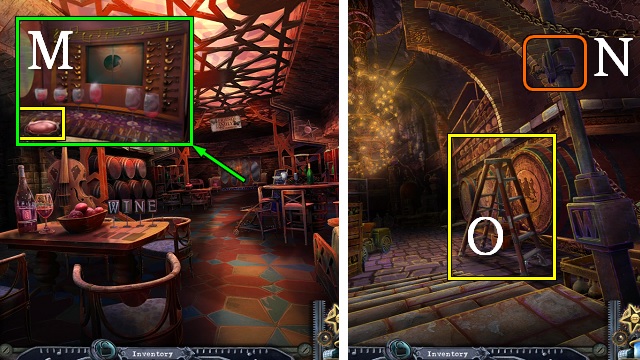
- Take the GARDEN SHEARS (M).
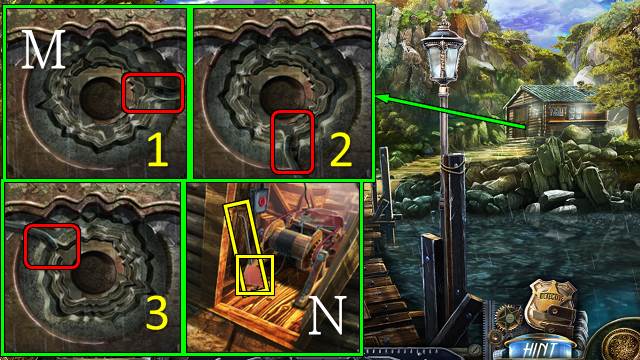
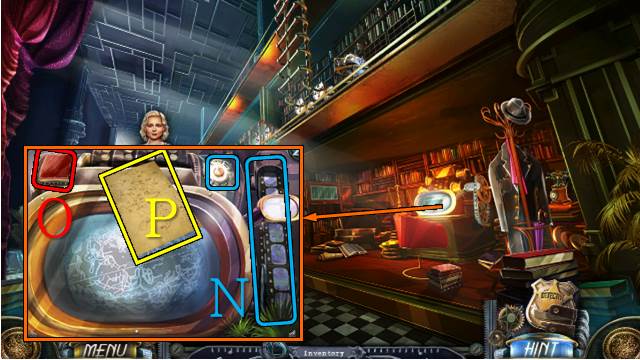
- Take the PENNANT STRING with the GARDEN SHEARS (N).
- Cut the algae twice with the GARDEN SHEARS; open the suitcase and take the EMPTY FLARE GUN and HAND TRUCK WHEEL 1/2 (O).
- Walk forward.
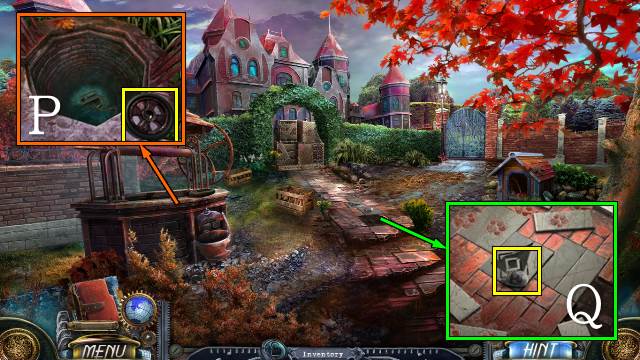
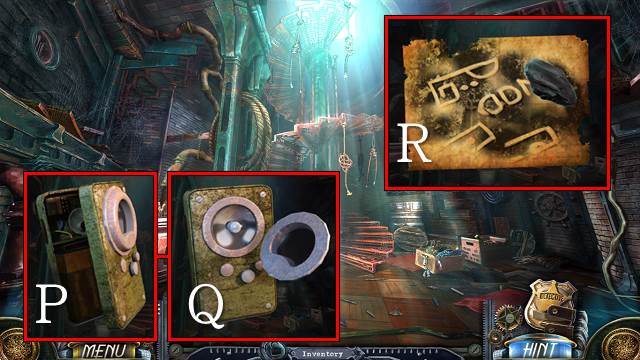
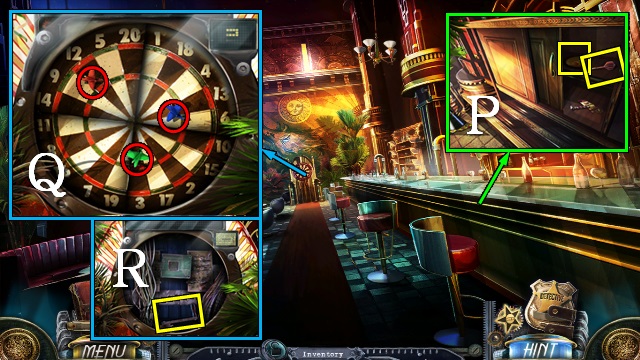
- Take HAND TRUCK WHEEL 2/2 (P).
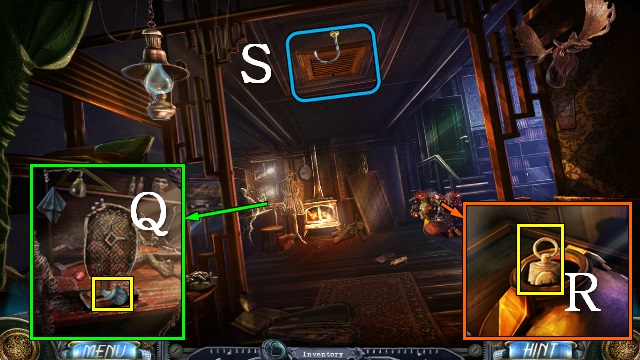
- Take FUSE 1/3 (Q).
- Walk down.
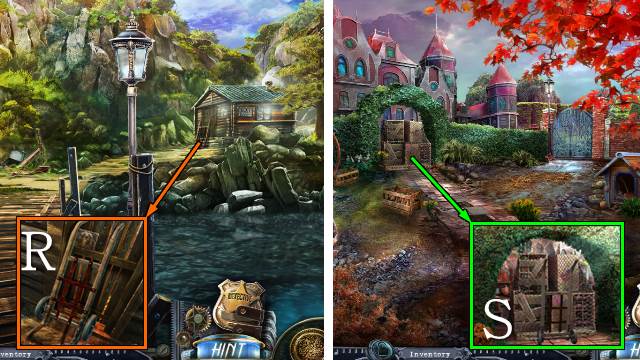
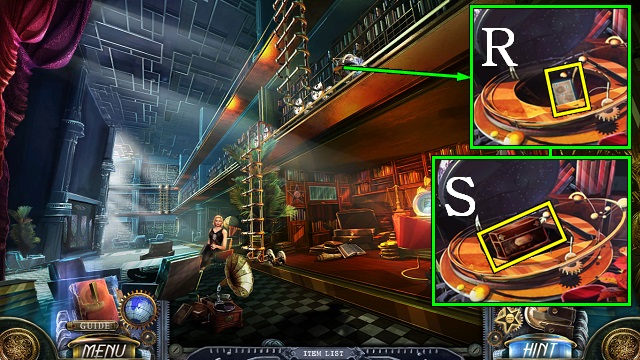
- Put the HAND TRUCK WHEELS on the HAND TRUCK and take it (R).
- Walk forward.
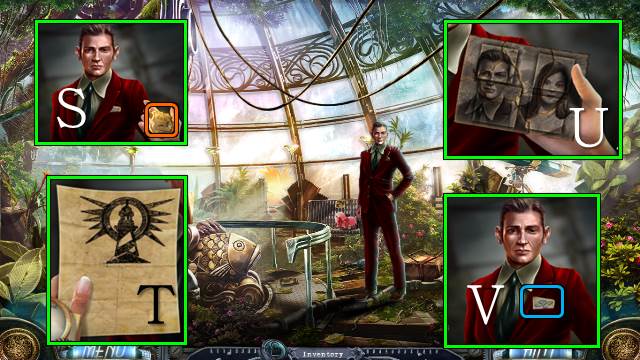
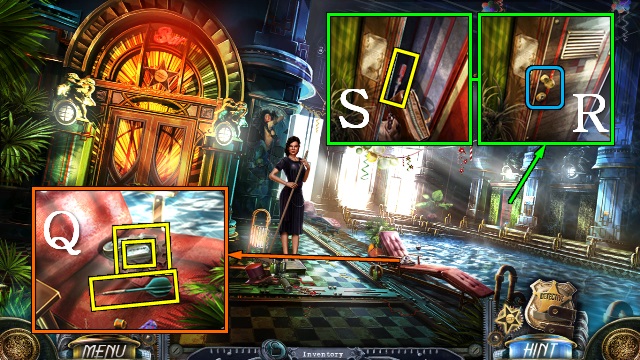
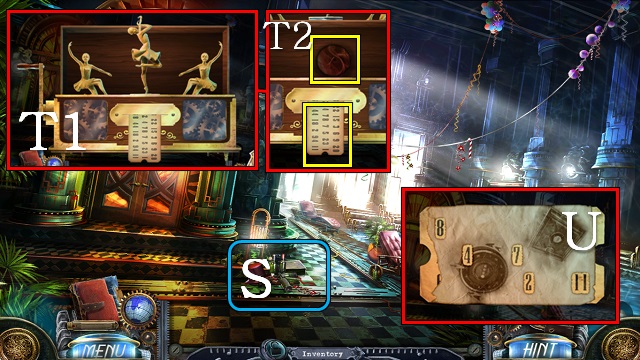
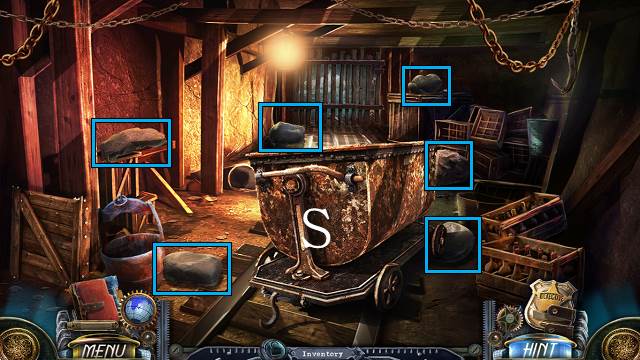
- Remove the crates with the HAND TRUCK (S).
- Walk forward.

- Talk to Vivian.
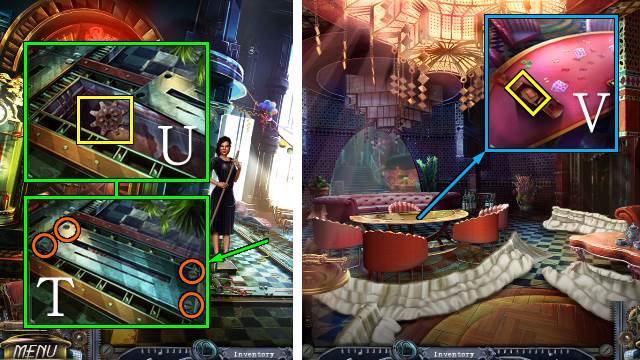
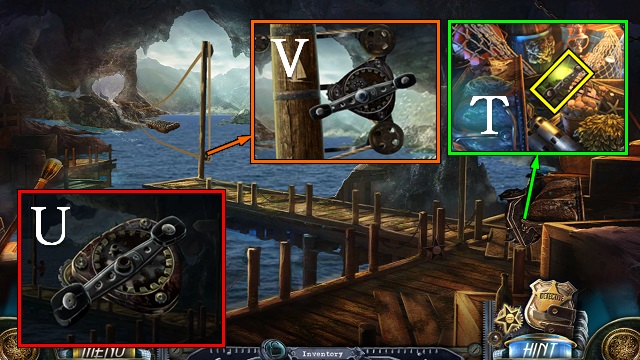
- Inspect her eyes (T).
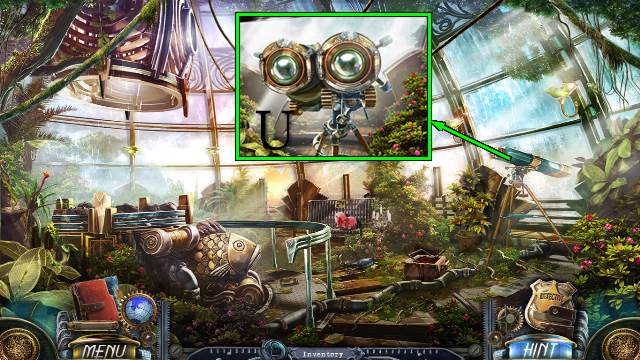
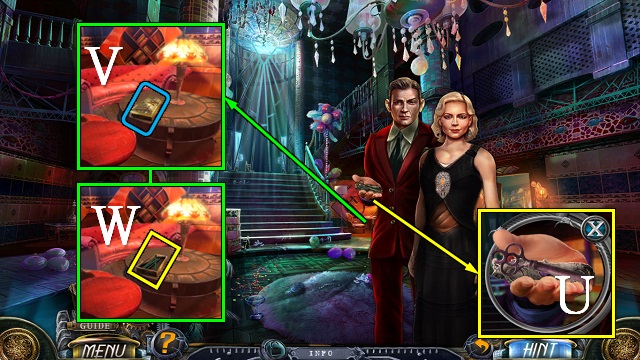
- Inspect the glass (U).
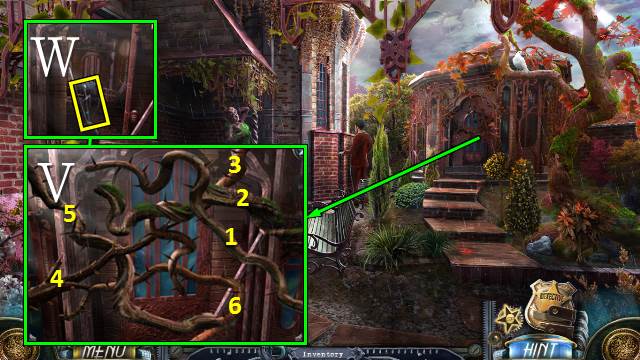
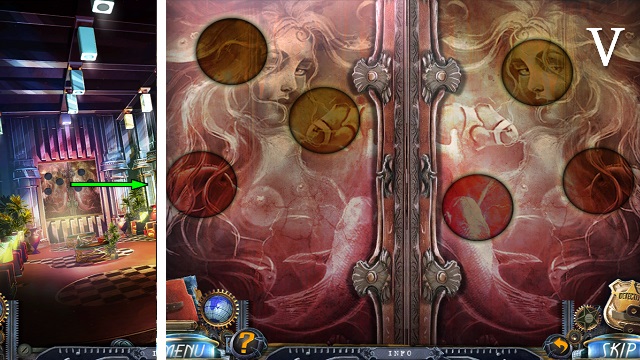
- Open and inspect the locket (V).
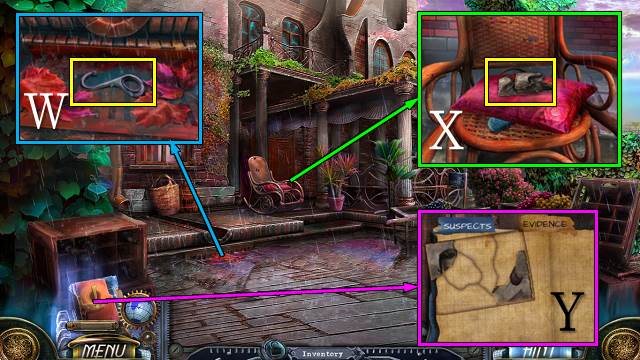
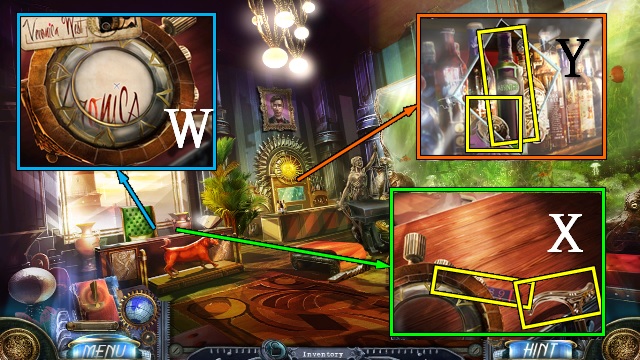
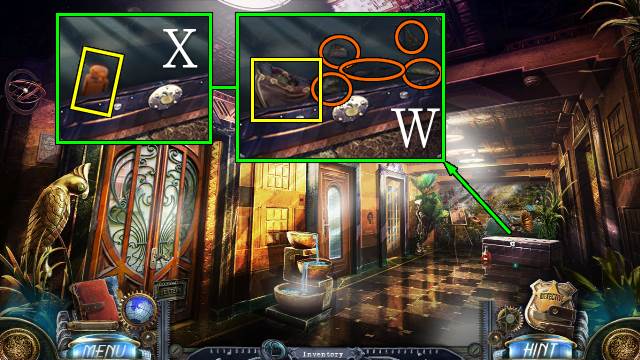
- Move the leaves and take the FISHHOOK (W).
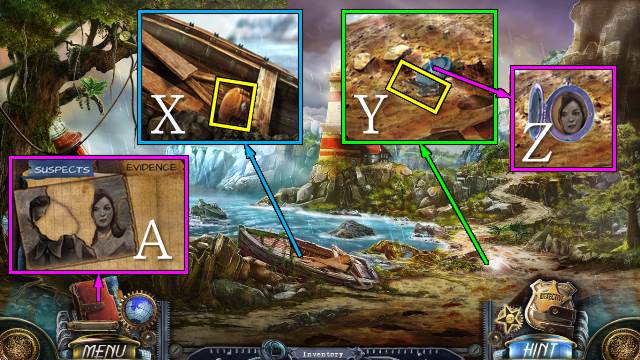
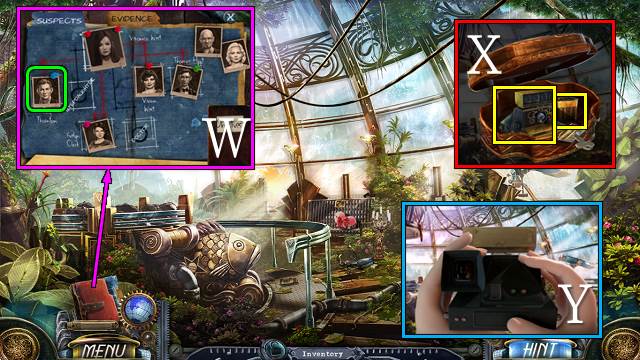
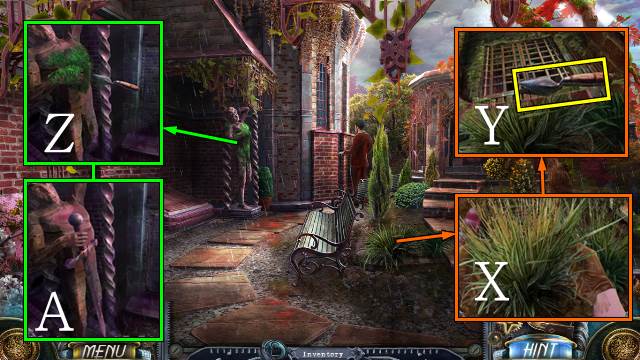
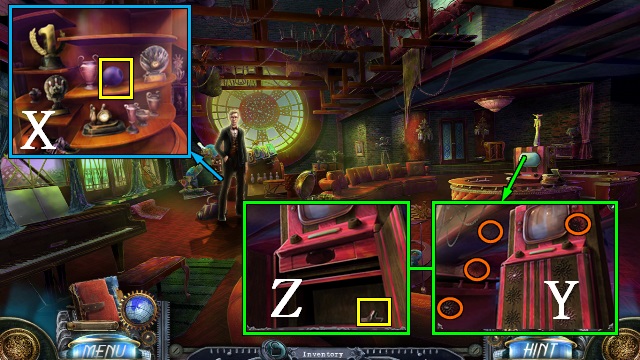
- Take the Evidence (X).
- Open the Evidence Board and access the 'Evidence' tab.
- Drag the photo pieces into the frame (Y).
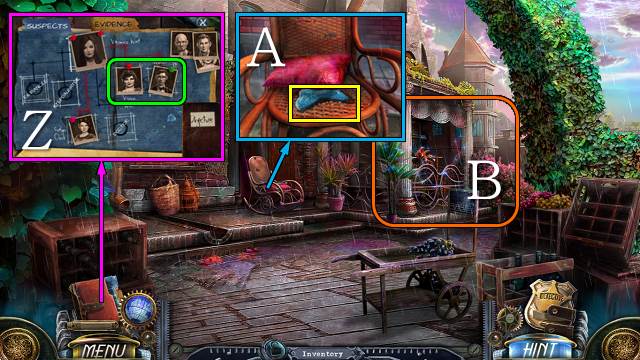
- On the 'Suspects' tab, drag Vivian's picture to 'Sister' and Thomas's picture to 'Lawyer' (Z).
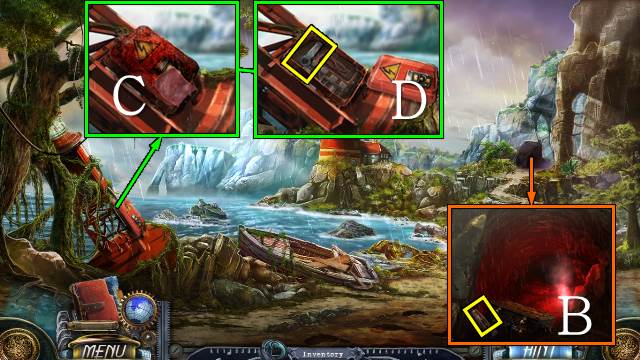
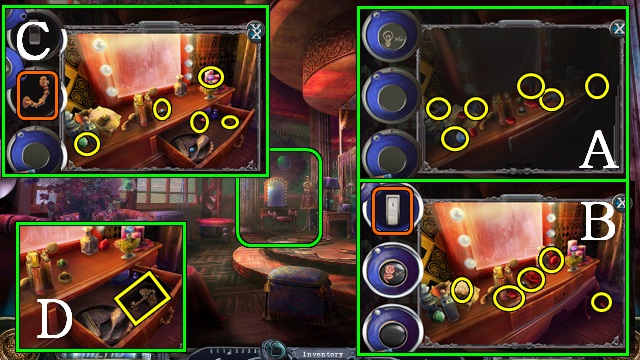
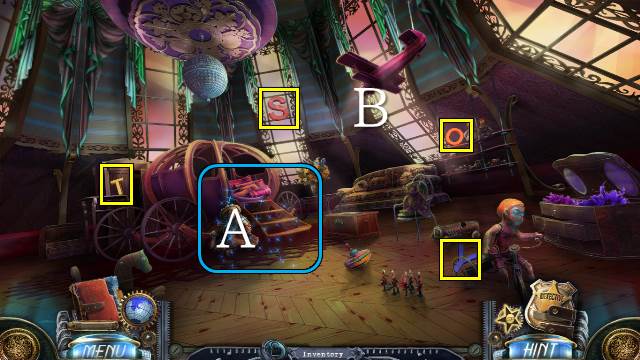
- Move the cushion and take the BONE (A).
- Move the trolley and play the HOP (B) to receive the PLIERS PARTS.
- Walk down.
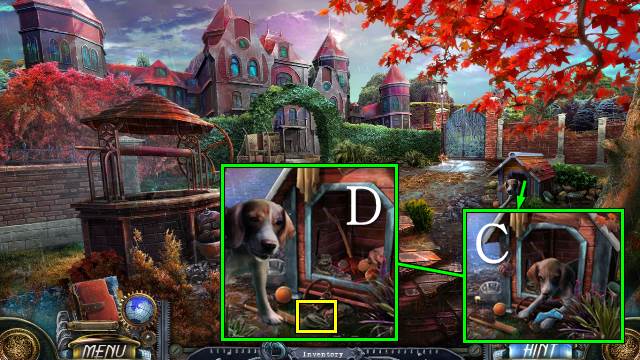
- Give the BONE to the dog (C); play the mini-HOP and take the SWITCH (D).
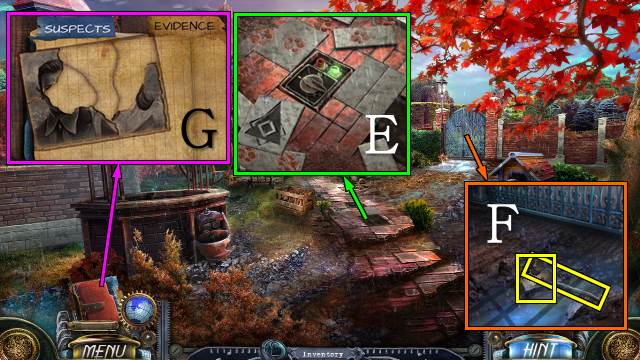
- Remove the panel, place the SWITCH and turn it (E).
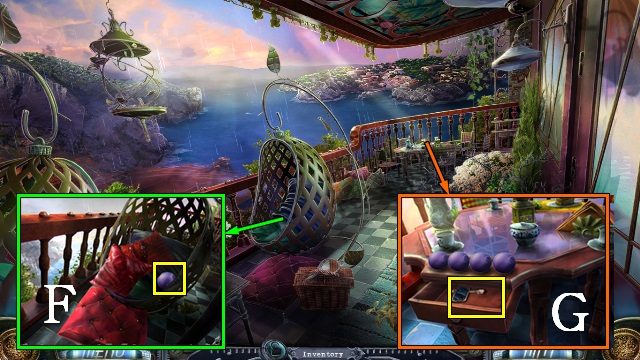
- Try to open the gate; take the Evidence and STEEL WIRE (F).
- On the 'Evidence' tab, drag the photo piece into the frame (G).
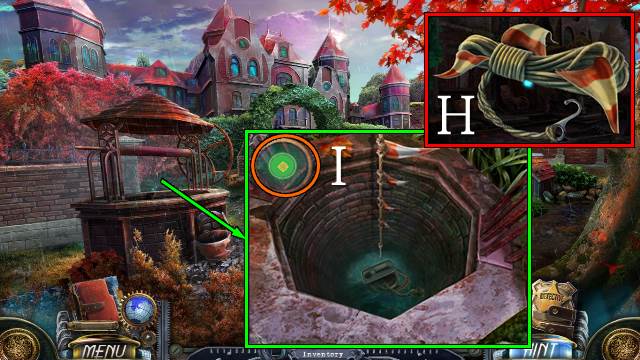
- Access the FISHHOOK and attach the PENNANT STRING to it; you receive an IMPROVISED FISHING LINE (H).
- Put the IMPROVISED FISHING LINE down the well for a mini-game.
- Select the well when the ball is in the green circle (I); you receive a GASOLINE CAN WITH ROPE.
- Walk down.
- Access the PLIERS PARTS and drag the pieces into place; take the PLIERS (J).
- Access the STEEL WIRE and bend it with the PLIERS; you receive a LOCKPICK (K).
- Open the lock (L).
- Put the LOCKPICK in the hole for a mini-game (M).
- Rotate each layer of the lock to a place where the lockpick can move to the next layer.
- Take the SAND PAPER and CROWBAR (N).
- Walk down.
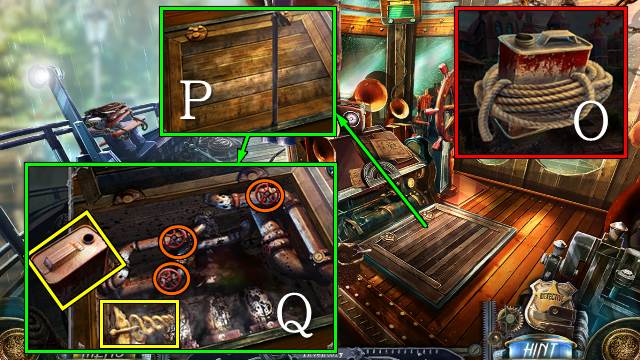
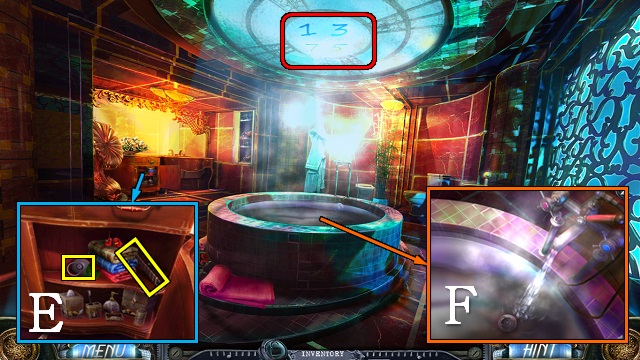
- Access the GASOLINE CAN WITH ROPE and take the ROPE and EMPTY GASOLINE CAN (O).
- Open the hatch with the CROWBAR (P); turn the three valves, fill the EMPTY GASOLINE CAN and take the GASOLINE CAN and CADUCEUS (Q).
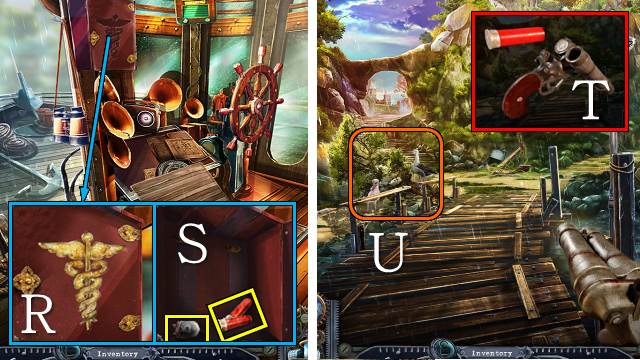
- Put the CADUCEUS on the door and open the cabinet (R); take the FLARES and FUSE 2/3 (S).
- Walk forward.
- Access the EMPTY FLARE GUN and put the FLARES in it; you receive a FLARE GUN (T).
- Shoot the FLARE GUN at the gulls (U).

- Tie the ROPE around the tree (V).
- Use the GASOLINE CAN on the engine, attach the rope to the hook and push the button (W).
- Go left.
Chapter 2: Inspecting the Scene
- Move the boards and take the WOODEN BOX (X).
- Move the sand and take the BOX KEY (Y); open the locket and take the Evidence (Z).
- Open the 'Evidence' tab and drag the picture fragment into the frame (A).
- Shoot the FLARE GUN into the cave; take the WEIGHT (B).
- Rub the SAND PAPER over the box (C); remove the cover and take the STOVE HANDLE (D).
- Walk forward.

- Take the POLE (E); move the rocks and take the Evidence and COIN 1/3 (F).
- Play the mini-HOP; take the BROKEN FLASHLIGHT (G).
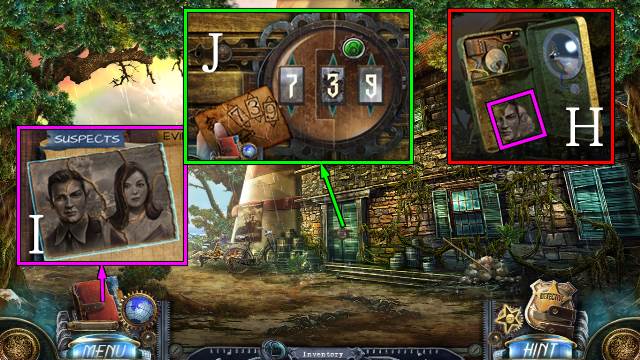
- Access the BROKEN FLASHLIGHT, open it and take the Evidence (H).
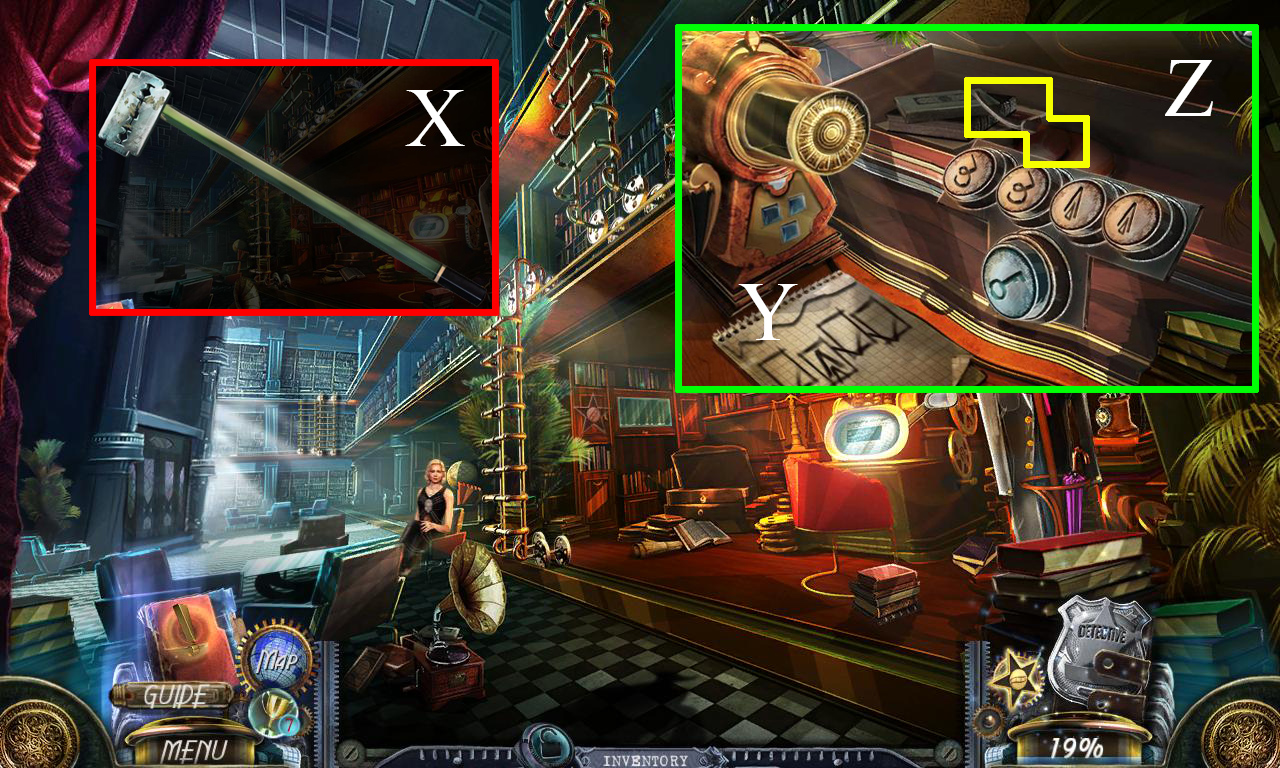
- Access the 'Evidence' tab and drag the pieces into the frame; you receive the LIGHTHOUSE CODE (I).
- Put the LIGHTHOUSE CODE on the door; enter 739 and push the button (J).
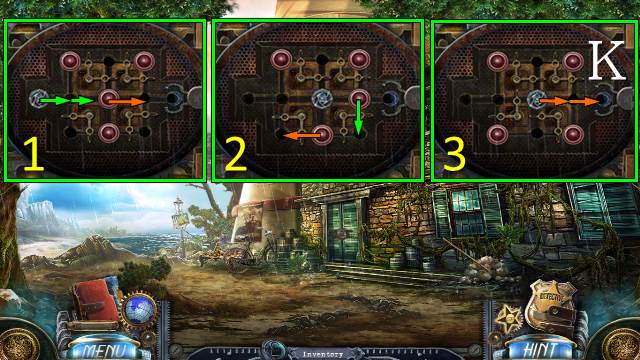
- Play the mini-game (K).
- Select a blue or red button and move it to an empty spot; barriers will only turn if there are no obstacles.
- Move the blue button from left to right.
- Walk forward.
- Get the box with the POLE (L).
- Take the POCKET KNIFE (M); move the box and carpet, break the floorboards with the WEIGHT and take the BAG WITH COINS (N).
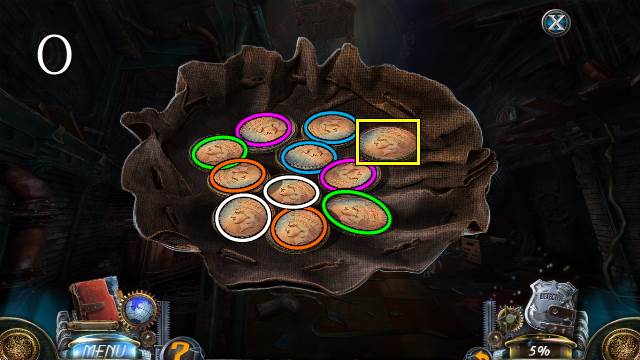
- Access the BAG WITH COINS and open it for a match-two mini-game (O).
- Take the last coin to get COIN 2/3.

- Open the stove with the STOVE HANDLE (P); take the WEDGE (Q).
- Put the WEDGE in the trapdoor and hit it with the WEIGHT (R).
- Go up.
- Talk to Ray.
- Select your badge (S).
- Move the shapes into the outline and select it (T).
- Turn the sections of the picture and take the picture (U).
- Inspect his pocket square (V).
- Go to the Evidence Board and move Ray's picture to 'Fiancé' (W).
- Access the WOODEN BOX and open it with the BOX KEY; take the PHOTO CAMERA and BATTERY (X).
- Use the PHOTO CAMERA (Y).

- Use the magnifying glass to find the evidence, which glows blue.
- Inspect the fire pit (Z), picnic basket (A) and candelabra (B).
- Select the scratched boards (C), pill bottle (D) and fabric (E).
- Cut the straps with the POCKET KNIFE, open the basket and take the SODA BOTTLE (I); take FUSE 3/3 (J).
- Extinguish the embers with your SODA BOTTLE; take the COAL, gloves and COIN 3/3 (K).
- Go to the Beach.
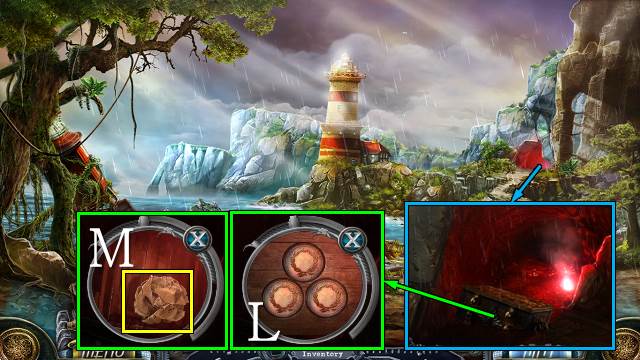
- Open the chest with the COINS (L); take the NOTE (M).
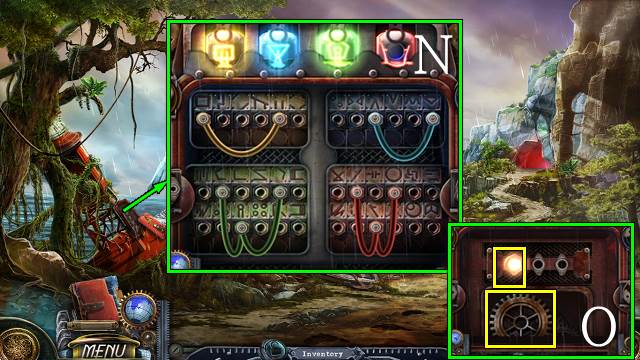
- Put the FUSES on the panel for a mini-game (N).
- Drag the connectors on the cables to the holes under the symbols that together make up the image on the fuse.
- Take GEAR 1/5 and the LIGHT BULB (O).
- Go to the Lighthouse.
- Access the BROKEN FLASHLIGHT and put the BATTERY (P) and LIGHT BULB in it (Q); you receive a FLASHLIGHT.
- Access the NOTE, open it, rub it with the COAL and take the CODE (R).

- Shine the FLASHLIGHT at the wall and put the CODE on the wall; select the bricks matching the symbols on the code (S).
- Play the HOP to receive a LENS (T).
- Go up.
- Remove the broken lens and put your LENS on the telescope (U).
Chapter 3: The Locked Library
- Use the GLOVES on the branches for a mini-game (V).
- Remove the branches one by one; you can only move the branch on top.
- Open the door and take the SWORD (W).
- Remove the grass with the GLOVES (X); take the TROWEL (Y).
- Remove the moss with the TROWEL (Z); give the SWORD to the statue (A).
- Walk forward.
- Open the curtains (B).
- Talk to Ray.
- Collect the three pieces of BANDAGE (C).
- Give the BANDAGE to Ray.

- Play the mini-HOP, take the Scissors (D) and give them to the Doctor.
- Play the mini-HOP, take the Sedative (E) and give it to the Doctor.
- Find the bandages (F), take the Alcohol (G) and give it to the Doctor.
- Play the mini-HOP, take the Forceps (H) and give them to the Doctor.
- Play the mini-HOP, take the Medicinal Thread (I) and give them to the Doctor.
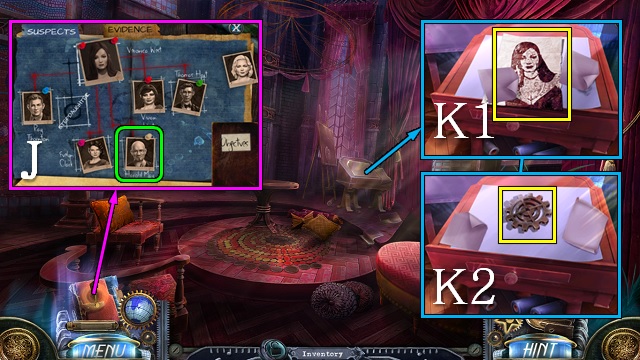
- Go to the Evidence Board and drag the doctor's picture to 'Doctor' (J).
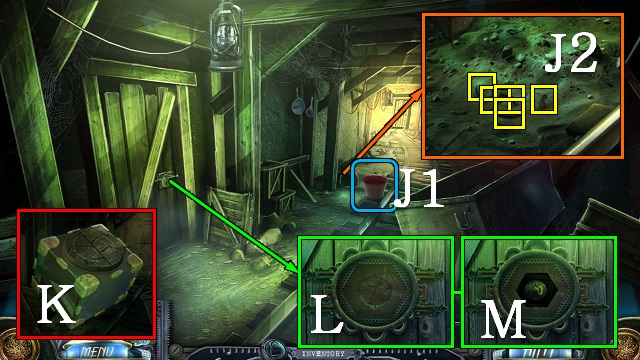
- Move the papers and take the Evidence (K1) and GEAR 2/5 (K2).
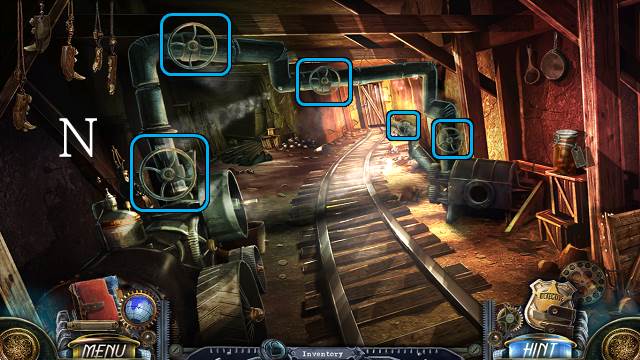
- Walk forward.
- Remove all dust sheets.
- Take GLASS CUBE 1/3 (L).
- Open the projector and take the FILM TAPE (M).
- Open the clock and take the SMALL ROD (N).
- Walk forward.
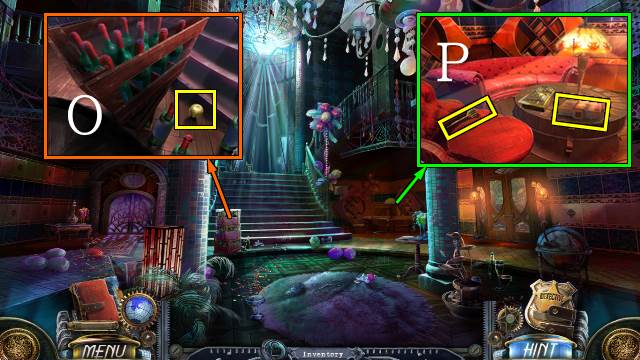
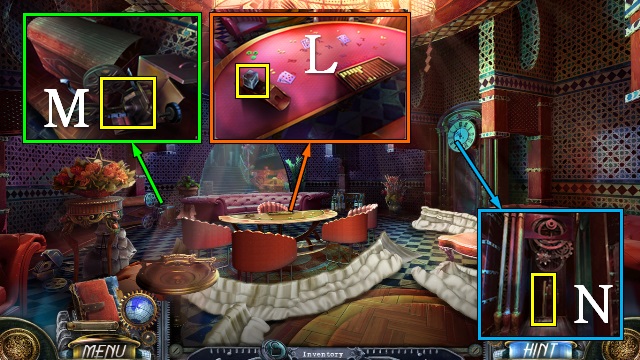
- Move the bottles and take the LOCKER HANDLE (O).
- Switch on the lamp, move the cushion and take the ORNAMENT BOX and DART 1/3 (P).
- Go left to the Pool Room.
- Open the box and take the RAZOR, gear 3/5, and DART 2/3 (Q).
- Open the locker with the LOCKER HANDLE (R); take the SCREWDRIVER (S).
- Remove all screws with the SCREWDRIVER and move the cover plate (T); take GEAR 4/5 (U).
- Walk down twice.
- Open the box with the SCREWDRIVER; take the BACCARAT CARD (V).
- Walk down.
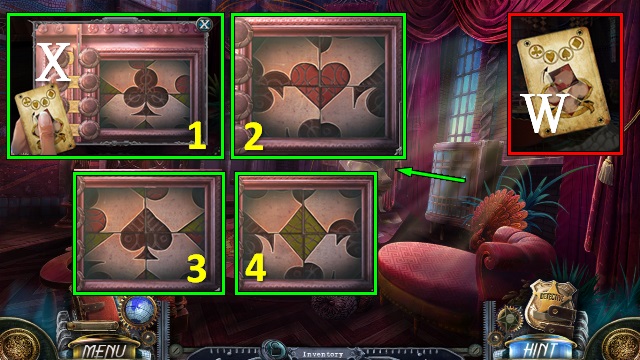
- Access the BACCARAT CARD and turn it over; take the JOKER CARD (W).
- Put the JOKER CARD next to the lock (X).
- Turn the squares to first make a club, then a heart, spade and diamond.
- Open the cabinet.
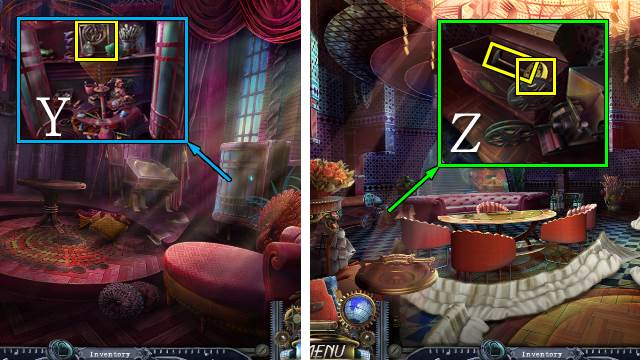
- Play the mini-HOP and take the CHEST TOKEN (Y).
- Walk forward.
- Put the CHEST TOKEN on the chest; take WHEEL 1/2 and the HAMMER (Z).
- Walk down twice.
- Open the hatch by hitting the lock with the HAMMER twice (A).
- Play the HOP to receive a DESK CLAMP (B).
- Open the grate with the DESK CLAMP; take GEAR 5/5 and the STRING (C).
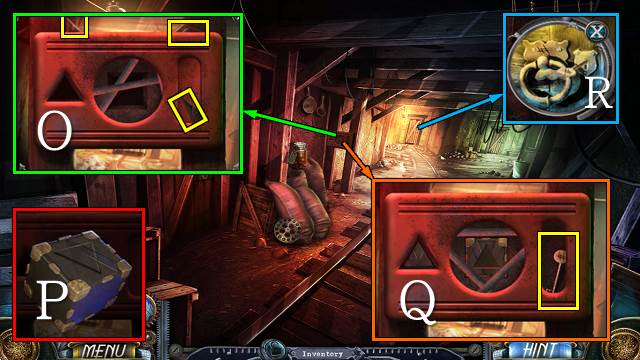
- Walk forward.
- Access the SMALL ROD and attach the STRING to it; take the ROD ON STRING (D).
- Try to open the drawer; open the drawer with the ROD ON STRING and take the SEALING WAX (E).
- Walk forward.
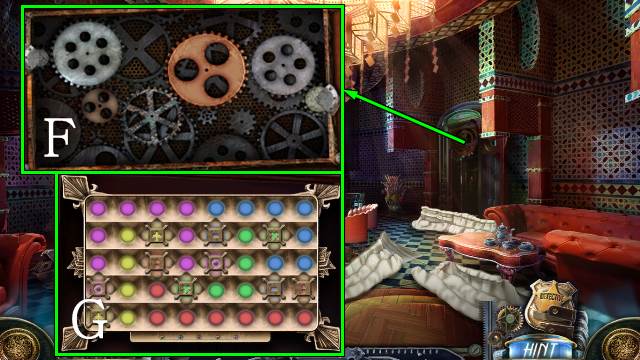
- Put the GEARS on the clock for a series of mini-games.
- Swap the gears until they're all turning (F).
- Connect matching symbols with strings of lights without the lines intersecting (G).
- Go right.
Chapter 4: Sylvia Crawford
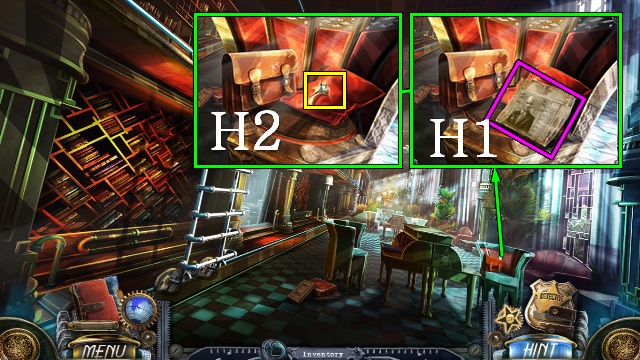
- Take the Evidence (H1); cut the cushion with the RAZOR and take GLASS CUBE 2/3 (H2).
- Go left.
- Access the Evidence Board and drag Sylvia's picture to 'Stepdaughter' (I).
- Move the kerchief and take GLASS CUBE 3/3 and the STAR (J).
- Take WHEEL 2/2; put the GLASS CUBES in the clock and take the MACHINE BUTTON (K).
- Walk down.

- Put the WHEELS on the ladder (L).
- Move the ladder.
- Open the box and take the BROKEN INITIALS and MOSAIC PART 1/6 (M).
- Go left.
- Put the MACHINE BUTTON and FILM TAPE on the projector (N), push the button and adjust the visor; push the square button (O) and take the CONSTELLATIONS LIST (P).
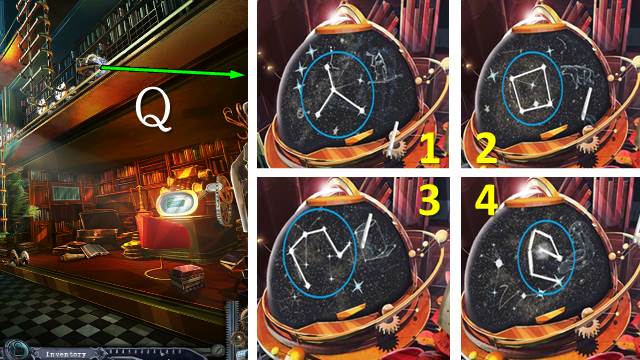
- Put the CONSTELLATIONS LIST on the globe for a mini-game (Q).
- Connect the stars of the constellations with the chalk.
- Take the PAPER WITH HOLES (R) and MUSIC BOX (S).
- Give the MUSIC BOX to Sylvia.
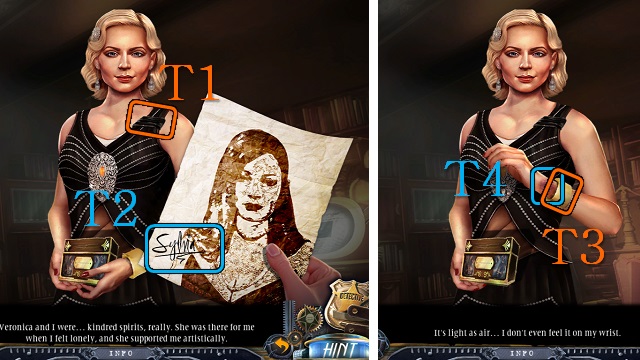
- Inspect the ribbon (T1), Sylvia's signature (T2), the bracelet (T3) and the bruise (T4).
- Go left.
- Take RAY'S ROOM KEY (U).
- Open the box with the STAR (V); take the DULL PENCIL (W).
- Go right.
- Access the DULL PENCIL and sharpen it with the RAZOR; take the PENCIL (X).
- Put the PENCIL on the pad for a mini-game (Y).
- Deduce the correct combination.
- A tick mark means you have a symbol in the correct place, arrows mean you have a correct symbol in the wrong place, an X indicates a wrong symbol.
- Take the PIPE SLOT and MOSAIC PART 2/6 (Z).
- Go left and forward.

- Talk to Thomas.
- Select the key (A1), cufflink and pocket watch (A2).
- Select the picture (A3).
- Select the folder, open and close it (A4).
- You receive some Evidence.
- Open the box with the PIPE SLOT and take the LIGHTER (B).
- Access RAY'S ROOM KEY and dismantle it; you receive RAY'S ROOM KEY and RAY'S KEY RING (C).
- Open the keyhole and open the door with RAY'S ROOM KEY (D).
- Go into Ray's Room.
- Put RAY'S KEY RING in the slot and open the drawer; take the Evidence and INITIALS PIECE (E).
- Cut the painting with the RAZOR; take the ORNAMENT BOX KEY (F).
- Access the ORNAMENT BOX and open it with the ORNAMENT BOX KEY; take MOSAIC PART 3/6 (G).
- Access the BROKEN INITIALS and put the INITIALS PIECE, SEALING WAX and LIGHTER on it; move the wax over the pieces and take the INITIALS (H).
- Open the cabinet and open the secret compartment with the INITIALS (I); take the NOTEBOOK (J).
- Play the mini-HOP and take SYLVIA'S PILLS (K).
- Go to the Pool Room.

- Access and open the NOTEBOOK; take the PAPERCLIP (L).
- Open the bag with the PAPERCLIP (M); take MOSAIC PART 4/6 (N).
- Walk forward.
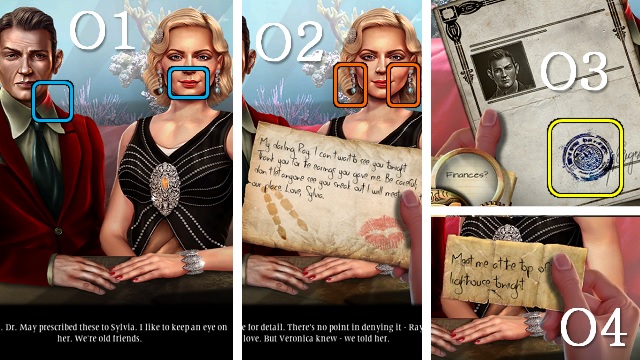
- Give SYLVIA'S PILLS to Sylvia.
- Select Ray's collar and Sylvia's mouth (O1).
- Select Sylvia's earrings (O2).
- Select the stamp (O3).
- Select the note (O4).
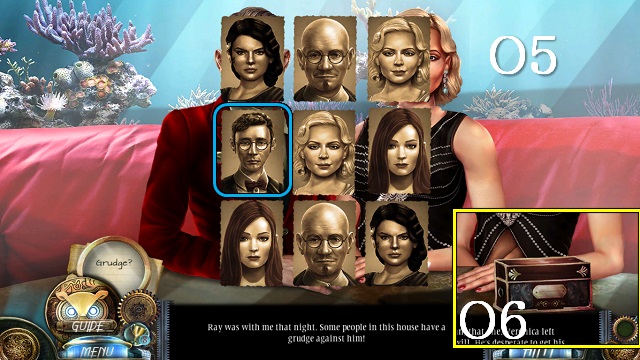
- Play the match two game and select Thomas's picture (O5).
- Take the MUSIC BOX (O6.
- Open the bar and take DART 3/3 and MOSAIC PART 5/6 (P).
- Put the DARTS on the board for a mini-game (Q).
- Throw your dart at the next number in the sequence at the top.
- Solution: hit 12, 13 and 3.
- Take the MUSIC BOX HANDLE (R).
- Walk down.
- Play the HOP to receive a MUSIC BOX FIGURINE (S).
- Access the MUSIC BOX, put the MUSIC BOX HANDLE on it, turn the handle and place the MUSIC BOX FIGURINE (T1); take the STRANGE CODE and MOSAIC PART 6/6 (T2).
- Access and open the STRANGE CODE and put the PAPER WITH HOLES on it; take the SAFE COMBINATION (U).
- Go to the Hallway.
- Put the MOSAIC PARTS on the wall for a mini-game (V).
- Restore the image; drag tiles to swap them and select tiles to turn them.
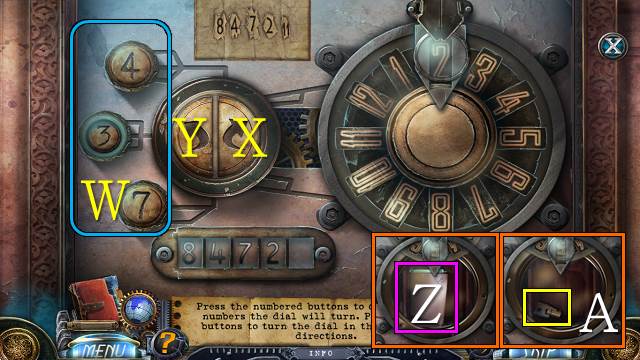
- Place the SAFE COMBINATION.
- Select the number of moves (W) and direction for the dial to turn to enter the code.
- Solution: 7 right (X), 4 left (Y), 3 right, 7 right, 3 left.
- Take the Evidence (Z) and ELEVATOR KEY (A).
- Put the ELEVATOR KEY in the hole and turn it (B).
- Go right.
- Turn the key next to 'Office Hallway' (C).
- Go left.
Chapter 5: Investigating the Second Floor
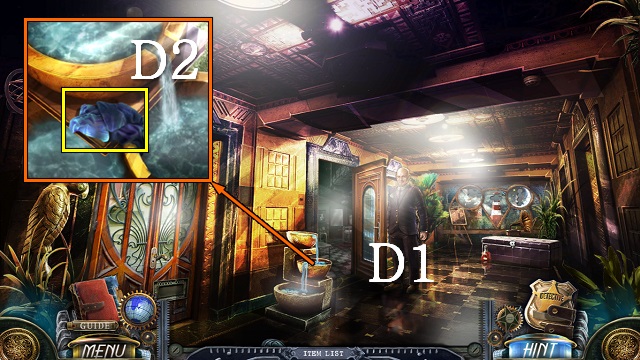
- Talk to the Doctor (D1).
- Take the WRAPPED WET TOWEL (D2).
- Go into the Doctor's Office.
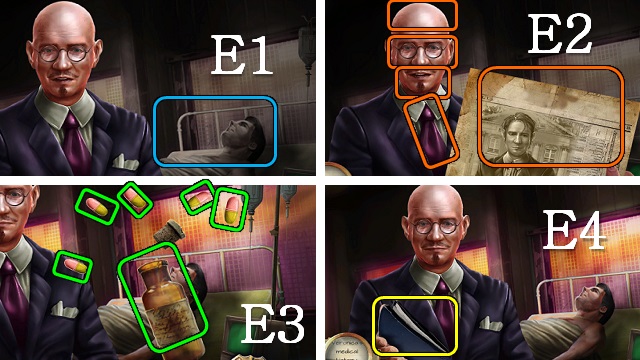
- Talk to the Doctor.
- Select Daniels (E1).
- Select the doctor's scalp, eyes, mouth and tie; select the paper (E2).
- Select the pills and the bottle (E3).
- Take the notebook, open it, and select the picture (E4).
- Take the FREQUENCY CODE (F).
- Walk down and go into the Common Room.
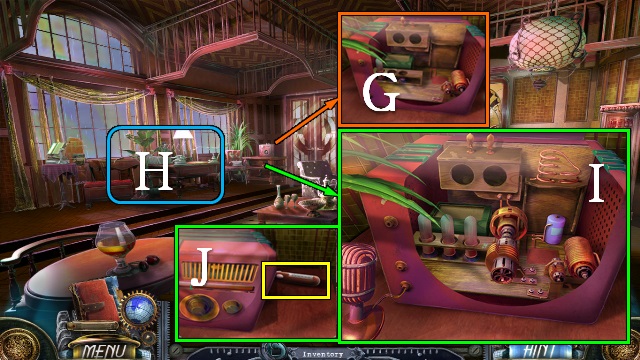
- Open the radio (G).
- Play the HOP to receive the RADIO PARTS (H).
- Put the RADIO PARTS and FREQUENCY CODE on the radio and play it (I).
- Take the MULTI-TOOL (J).
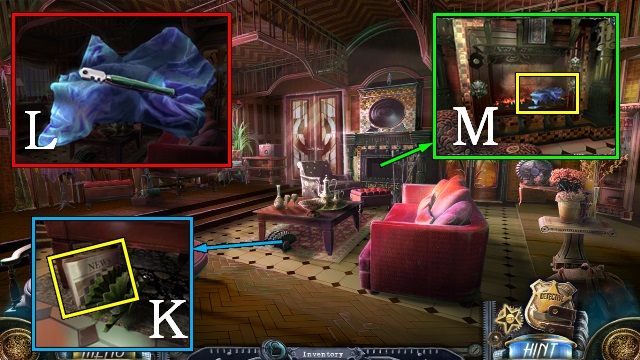
- Take the NEWSPAPER (K).
- Access the WRAPPED WET TOWEL, open it, remove the glass and take the GLASS CUTTER and WET TOWEL (L).
- Use the WET TOWEL and take the HOT STONE HEXAGONS (M).
- Walk down.

- Put the HOT STONE HEXAGONS in the water; take the STONE HEXAGONS (N).
- Put the STONE HEXAGONS on the mosaic for a mini-game (O).
- Rotate the tiles to restore the mosaic.
- Take SMALL WEIGHT 1/4 (P).
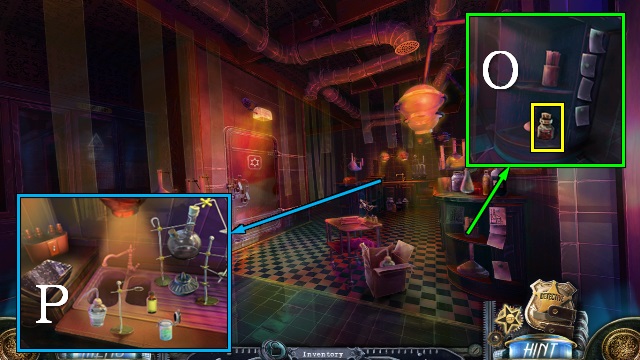
- Access the MULTI-TOOL and open the MINI SCISSORS (Q).
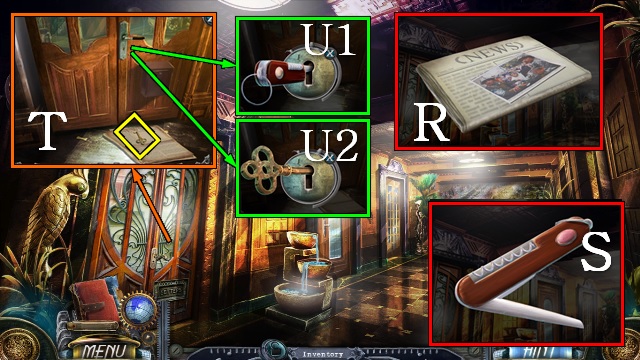
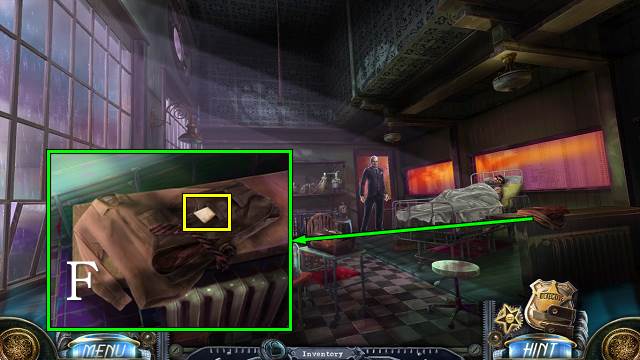
- Use the MINI SCISSORS on the NEWSPAPER; take the Evidence and NEWSPAPER (R).
- Access the MINI SCISSORS and open the pick to get a MINI KNIFE (S).
- Put the NEWSPAPER under the door (T) and the MINI KNIFE in the lock (U1); move the newspaper, take HART'S OFFICE KEY (T) and open the door with HART'S OFFICE KEY (U2).
- Go into Hart's Office.
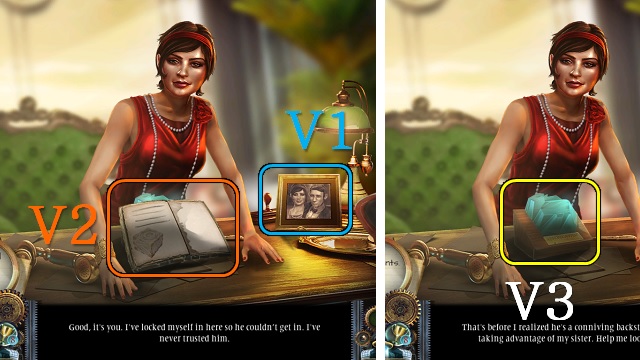
- Talk to Vivian.
- Select the picture (V1).
- Select the book (V2).
- Take VERONICA'S AWARD (V3).
- Pick up the paper for a mini-game (W). Select all parts of the signature to compare them with the other one.
- Take the WALKING CANE and NUMBERED BARS 1/3 (X).
- Cut the glass with the GLASS CUTTER; take VERONICA'S ROOM KEY and the ABSINTHE (Y).
- Go to the Common Room.

- Open the door with VERONICA'S ROOM KEY (Z).
- Go into Veronica's Room.
Chapter 6: Evelyn's Secret
- Find the 6 bulbs (A).
- Switch on the light; find the 5 roses (B).
- Select the handle; find the 5 gems (C).
- Take the gem and take the DIARY KEY (D).
- Go right.
- Open the cabinet and take the BATHTUB PLUG and NUMBERED BARS 2/3 (E).
- Put the BATHTUB PLUG in the bath and run the tap (F).
- Walk down.
- Open the drawer; take NUMBERED BARS 3/3 and the AWARD PIECE (H).
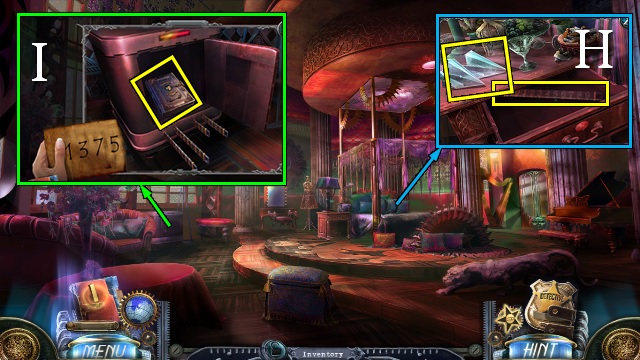
- Put the NUMBERED BARS in the safe for a mini-game.
- Enter 1375; open the safe and take VERONICA'S DIARY (I).
- Go right.
- Access VERONICA'S DIARY and open it with the DIARY KEY (J); take the BOOKMARK (K).
- Open the cabinet with the BOOKMARK; take SMELLING SALT INGREDIENTS 1/4 and the WICK (L).
- Go to the Servant's Quarters.
- Access the MULTI-TOOL and open the MINI CORKSCREW (M).
- Access the ABSINTHE, open it with the MINI CORKSCREW and take the STRONG ALCOHOL (N).
- Open the lamp and remove FLOWER EMBLEM 1/3 (O); put the STRONG ALCOHOL and LAMP FUSE in the lamp and light it with the LIGHTER (P).
- Take FLOWER EMBLEM 2/3 (Q).
- Move the flowers and take SMALL WEIGHT 2/4 (R).
- Open the trapdoor with the WALKING CANE; play the HOP to receive a FISHING POLE (S).
- Go forward.

- Take FLOWER EMBLEM 3/3 and the APPLE KEY (T).
- Open the box with the FLOWER EMBLEM; take SMELLING SALT INGREDIENTS 2/4 (U).
- Move the chair; note the missing token (V).
- Go to the Office Hallway.
- Open the chest with the APPLE KEY, move all fragments to the pouch and take the STRANGE STONE PARTS (W) and SMALL WEIGHT 3/4 (X).
- Go into Hart's Office.
- Put the FISHING POLE in the fish tank; move the plants and rock and take the SIGNET RING (Y).
- Open the box with the SIGNET RING; take the Evidence, SMALL WEIGHT 4/4 and CAMERA FLASH (Z).
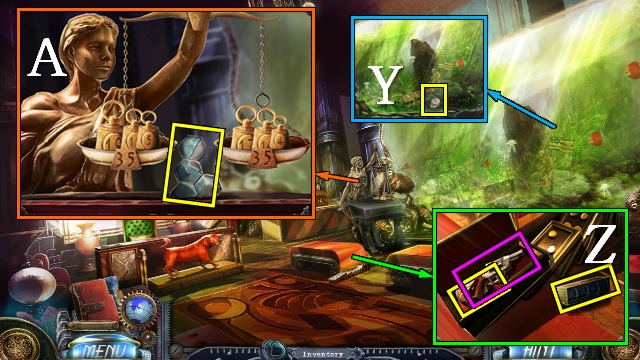
- Put the SMALL WEIGHTS by the scales for a mini-game (A).
- Put a total weight of 35 in each scale; 19, 11 and 5, and 17, 14 and 4.
- Take the STONE HEXAGONS.
- Walk down.
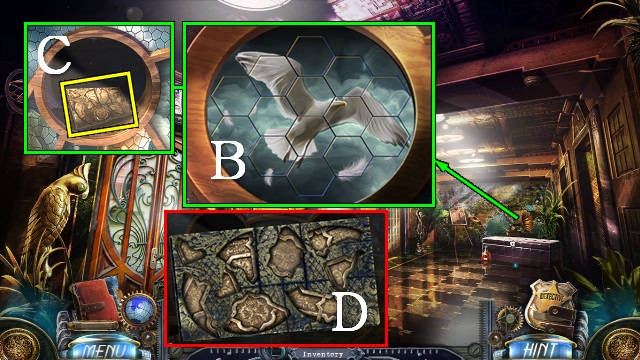
- Put the STONE HEXAGONS on the mosaic for a mini-game (B).
- Swap tiles to restore the mosaic.
- Take the METALLIC ORNAMENT (C).
- Access the METALLIC ORNAMENT and take all ORNAMENT PIECES (D).
- Go to the Servant's Quarters.
- Put the ORNAMENT PIECES on the frame for a mini-game (E).
- Drag-and-drop the pieces into place.
- Take the ORNAMENT LOCK.
- Go forward.
- Put the ORNAMENT LOCK on the wall panel (F). Play the mini-HOP; take the Evidence and GOLDEN LEAF (G).
- Walk down.
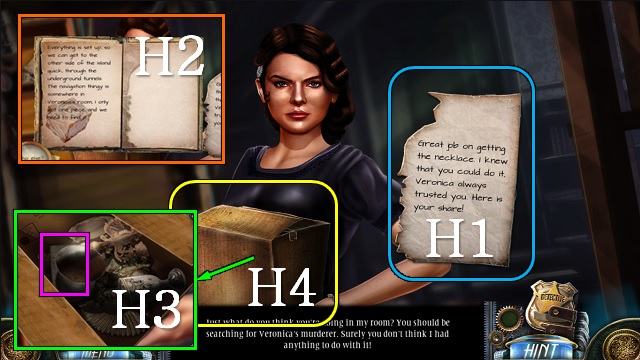
- Talk to Evelyn.
- Select the paper (H1) and book (H2).
- Play the mini-HOP; remove the items and take the Evidence (H3).
- Take the box (H4).
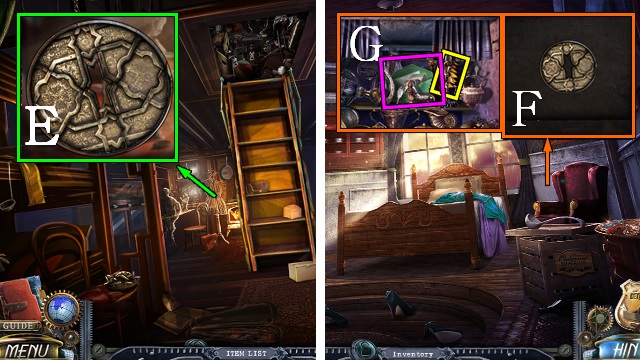
- Put the GOLDEN LEAF on the wall; take the LION HEAD (I).
- Walk down.
- Put the LION HEAD by the fireplace, push the heads in order of the symbols shown above and take the STAR OF LIFE (J).
- Go to the Doctor's Office.
- Open the cabinet with the STAR OF LIFE (K); take SMELLING SALT INGREDIENTS 3/4 (L).
- Access the PHOTO CAMERA, remove the flash and put the CAMERA FLASH on it (M).
- Walk forward.
- Open the fridge.
- Use the PHOTO CAMERA.
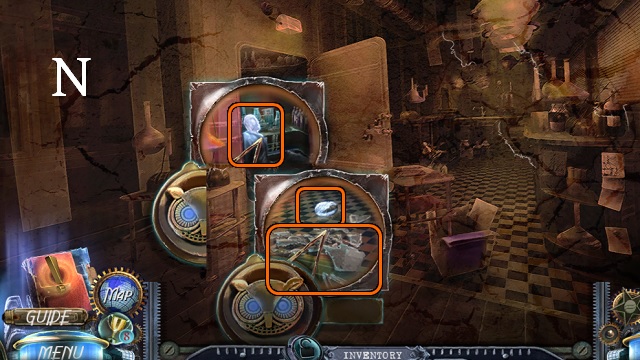
- Select the doctor, locket and glass (N).
- Open the cabinet and take SMELLING SALT INGREDIENTS 4/4 (O).
- Put the SMELLING SALT INGREDIENTS on the bench (P).
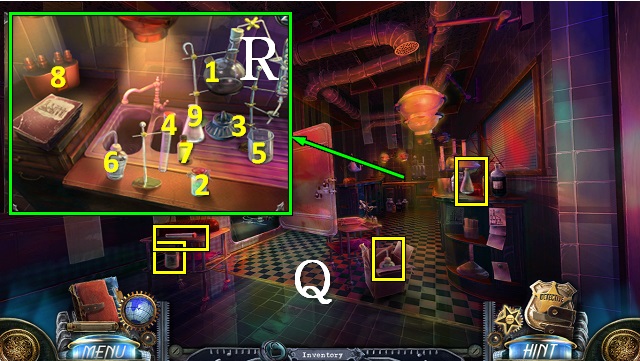
- Take the 4 FLASKS (Q).
- Put the FLASKS on the bench for a mini-game (R).
- Uncork the flask (1), open the vial (2) and use it on the flask, light the burner and turn it off (3), open the tube (4), pour the distillate (5) into the tube, top up with water (6), add reagent (7), put the tube in the Vortex and flick the switch (8), pour the solution into the flask and take the SMELLING SALTS (9).
- Walk down.
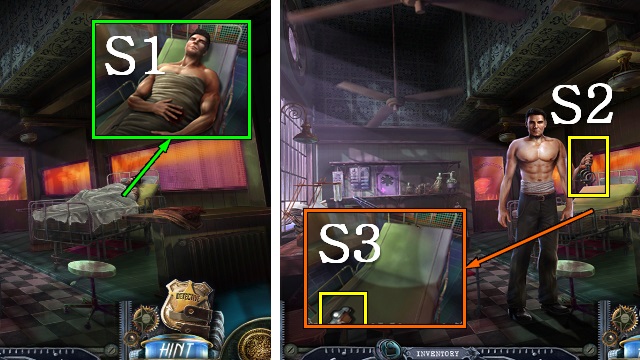
- Revive Daniels with the SMELLING SALTS (S1).
- Take the HANDCUFFS (S2).
- Take the STONE HEXAGONS (S3).
- Walk down.
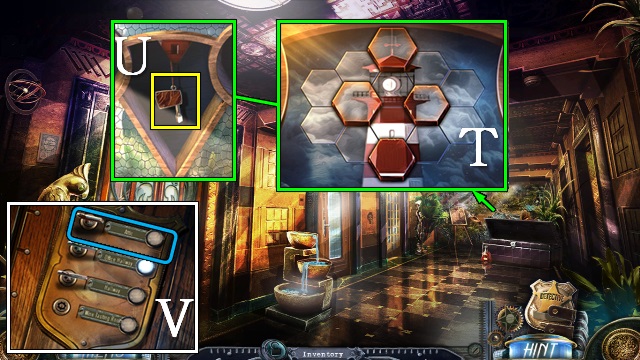
- Put the STONE HEXAGONS on the mosaic and push all the tiles down (T).
- Take the ELEVATOR KEY (U).
- Walk down.
- Put the ELEVATOR KEY in the keyhole next to 'Attic' and turn it (V).
- Go left.
Chapter 7: The Net Closes In
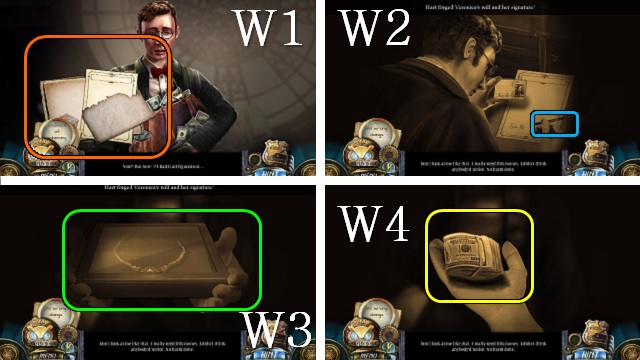

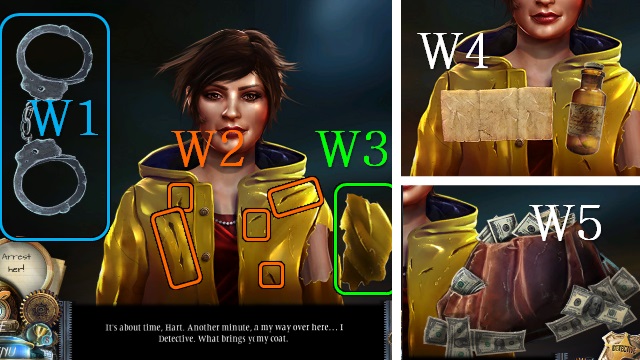
- Talk to Thomas.
- Select the folders (W1), pen (W2), necklace (W3) and money (W4).
- Select the silhouette (W5) wall panel (W6), money (W7) and empty bullet chamber (W8).
- Close the locket and select the name (W9).
- You receive some Evidence.
- Use the HANDCUFFS on Thomas.
- Open the cabinet, move the trophies and take PURPLE GLOBE 1/3 (X).
- Find the 4 suns (Y); open the cabinet and take the WINDER KEY (Z).
- Go forward.
- Play the HOP to receive a DRUMMER TOY (A).
- Take the T.O.Y.S letters (B).
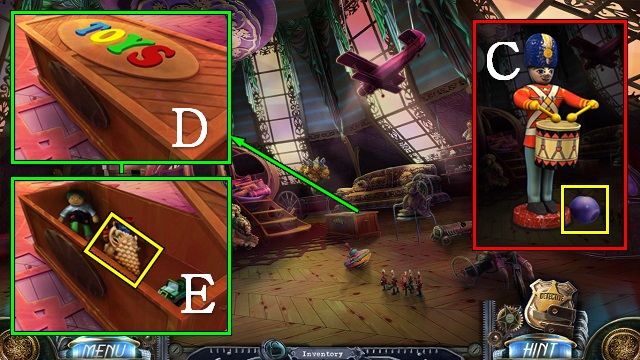
- Access the DRUMMER TOY, wind it with the WINDER KEY and take PURPLE GLOBE 2/3 (C).
- Put the T.O.Y.S letters on the chest (D); take GRAPES 1/2 (E).
- Go down and left.
- Move the cushions and take PURPLE GLOBE 3/3 (F).
- Put the PURPLE GLOBES on the table and take the ELEVATOR KEY (G).
- Move the planter.
- Put the STRANGE STONE PARTS on the board for a mini-game (H).
- Move the lion next to the other lion using knight move; use every tile once.
- Take the DOVES (I).
- Take the WET SPONGE (J).
- Walk down.
- Open the cabinet with the DOVES; take GEM 1/3 (K).
- Walk down.
- Put the ELEVATOR KEY in the keyhole next to 'Wine Tasting Room' and turn it (L).
- Go left.
- Take the WOODEN SWITCH (M).
- Go left.
- Switch on the light (N).
- Take the LADDER (O).
- Take the elevator to the Attic.

- Put the WOODEN SWITCH on the cabinet and push it (P1); take GRAPES 2/2 (P2).
- Walk forward.
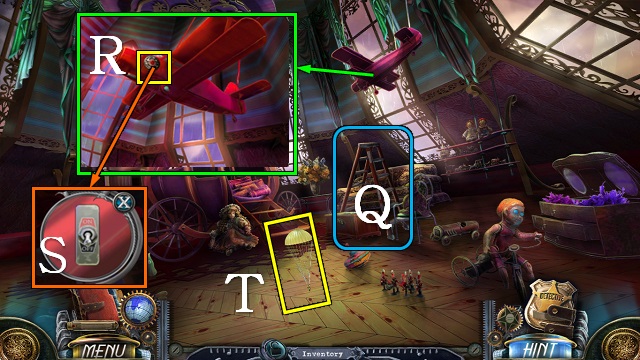
- Put the LADDER under the plane (Q).
- Take GEM 2/3 (R); flick the switch (S).
- Take the PARATROOPER TOY (T).
- Take the elevator to the Wine Tasting Room.
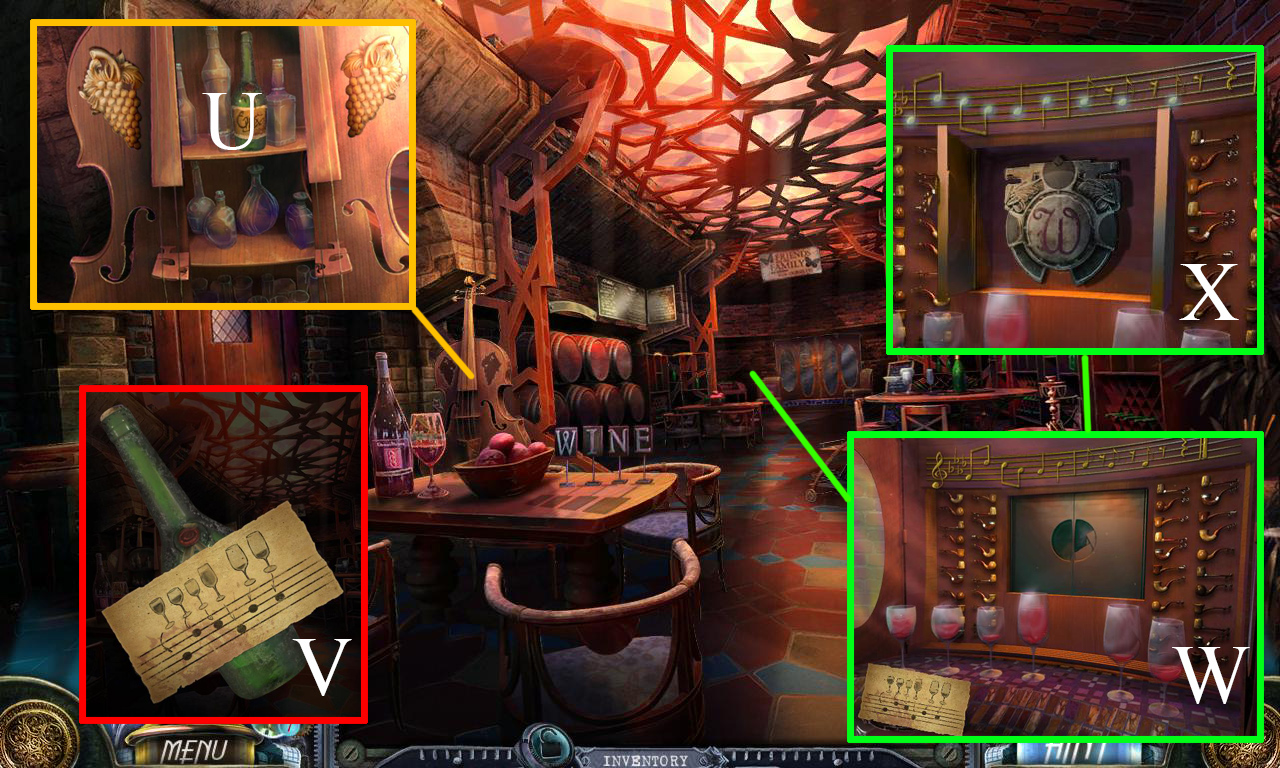
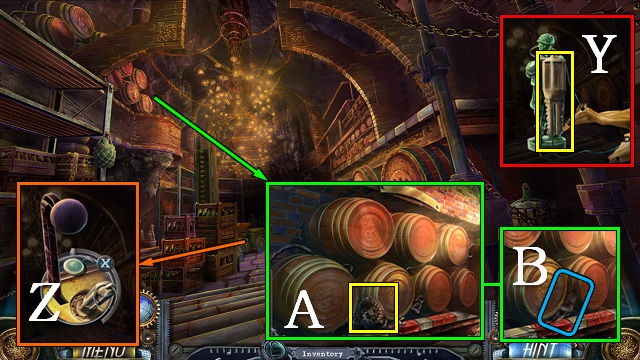
- Put the GRAPES on the double bass; take the OLD WINE BOTTLE (U).
- Access the OLD WINE BOTTLE and clean it with the WET SPONGE; take the OLD MELODY NOTES (V).
- Put the OLD MELODY NOTES by the glasses for a mini-game (W).
- Play the glasses according to the note.
- Solution: 4-2-3-6-1-5-6-1-4.
- Take the FAMILY CREST (X).
- Go left.
- Access the PARATROOPER TOY and take the FORKLIFT KEY (Y).
- Put the FORKLIFT KEY in the keyhole, turn it and pull the lever (Z).
- Take the STRANGE MECHANISM (A); plug in the cable (B).
- Play the HOP to receive GEM 3/3 (C).
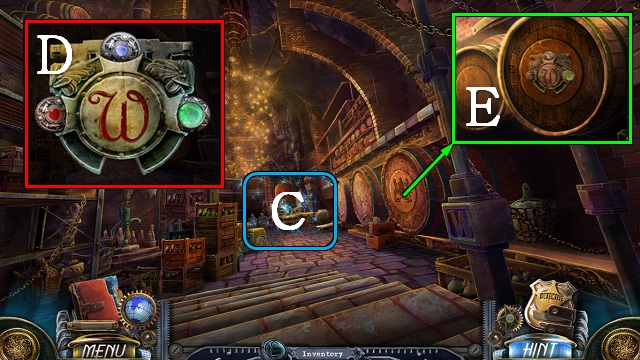
- Access the FAMILY CREST and put the GEMS on the shield (D).
- Put the FAMILY CREST on the barrel and push it (E).
- Go right.
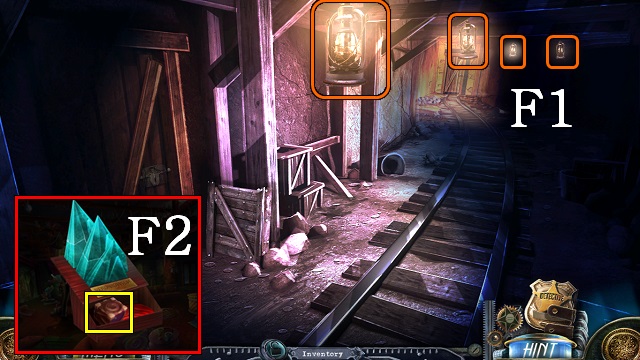
- Switch on the 4 lamps (F1).
- Access VERONICA'S TROPHY and put the TROPHY PART on it; take the STRANGE CUBE (F2).
- Walk forward.
- Take the 5 identical STRANGE CUBE PARTS (G).
- Put the STRANGE CUBE PARTS on the STRANGE CUBE; take the MAZE KEY (H).
- Open the middle door with the MAZE KEY (I).
- Walk forward.
- Move the bucket (J1).
- Dig up the STRANGE CUBE PARTS (J2).
- Put the STRANGE CUBE PARTS on the STRANGE CUBE; take the MAZE DISC (K).
- Open the lock with the MAZE DISC (L); turn the key (M).
- Go left.
- Turn the 5 valves (N).
- Walk forward.
- Take the 3 STRANGE CUBE PARTS (O).
- Put the STRANGE CUBE PARTS on the STRANGE CUBE; take the MAZE TRIANGLE (P).
- Put the MAZE TRIANGLE and MAZE CUBE in the mechanism; take the MAZE KEY (Q).
- Open the middle door with the MAZE KEY (R).
- Walk forward.
- Move the stones into the cart (S).
- Push the cart.
- Walk forward.
- Play the mini-HOP and take the CRANK PART (T).
- Access the STRANGE MECHANISM and put the CRANK PART on it; take the CRANK (U).
- Put the CRANK on the pulley and turn it (V).
- Go forward.
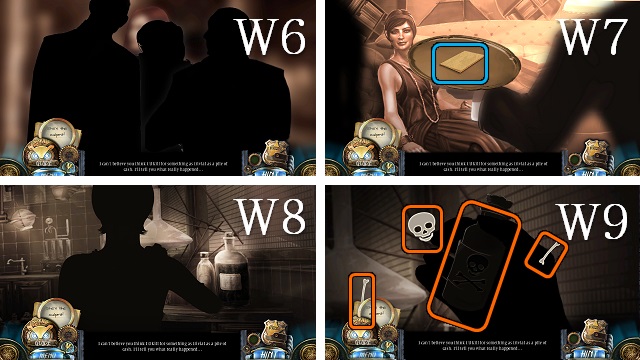
- Talk to Vivian.
- Close the handcuffs and select them (W1).
- Select the tears in the coat (W2).
- Move the patch and select it (W3).
- Select the pills and note (W4).
- Select the money (W5).
- Move the silhouettes (W6).
- Select the note (W7).
- Move the silhouette (W8).
- Select the skull, bones and bottle (W9).
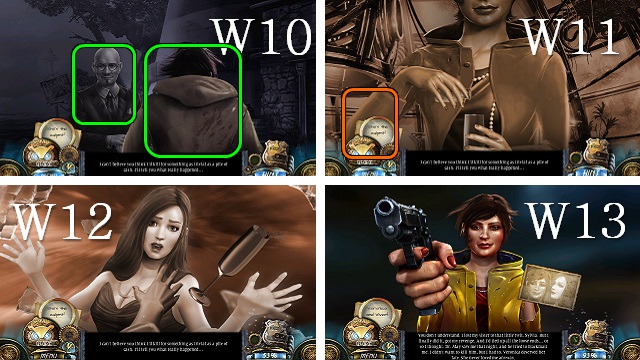
- Select the silhouette twice and then Evelyn (W10).
- Select Evelyn's elbow (W11).
- Push Sylvia (W12).
- Select the picture and gun (W13).
- Congratulations, you've completed Dead Reckoning: Silvermoon Isle.
Created at: 2014-08-10