

Walkthrough Menu
- General Tips
- Chapter 1: Stevens Tower
- Chapter 2: The Pool
- Chapter 3: The Casino
- Chapter 4: The Waiting Room
- Chapter 5: The Penthouse
General Tips
- This is the official guide for Dead Reckoning: Sleight of Murder.
- This guide won't tell you when to zoom into a location; the screenshots show each zoom scene.
- Hidden-object puzzles are referred to as HOPs. Only the locations of the HOPs will be shown.
- Use the Map to fast travel to a location.
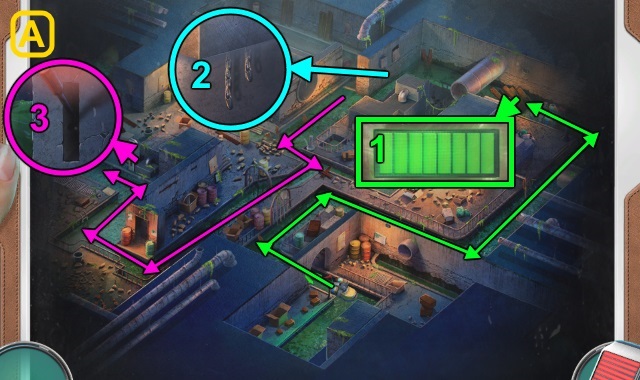
Chapter 1: Stevens Tower
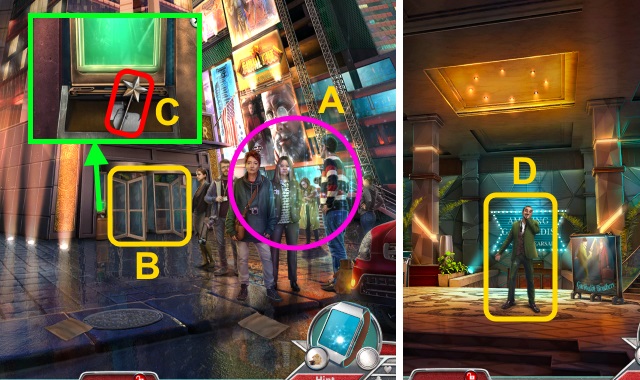
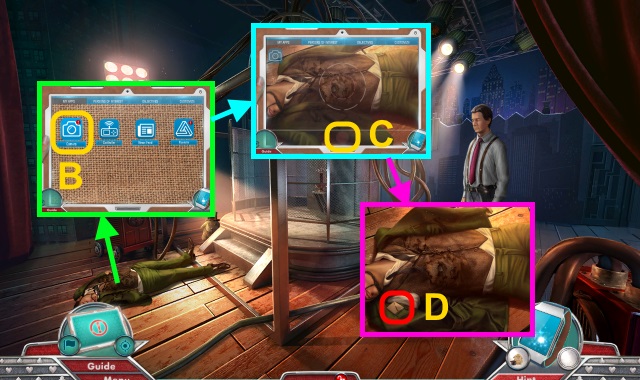
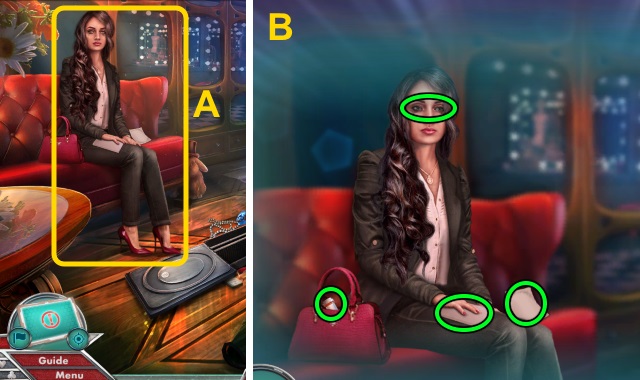
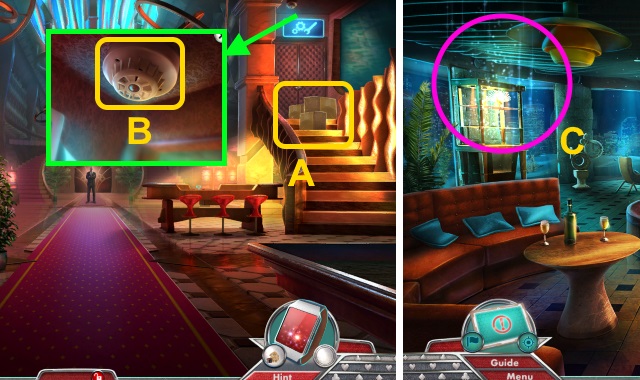
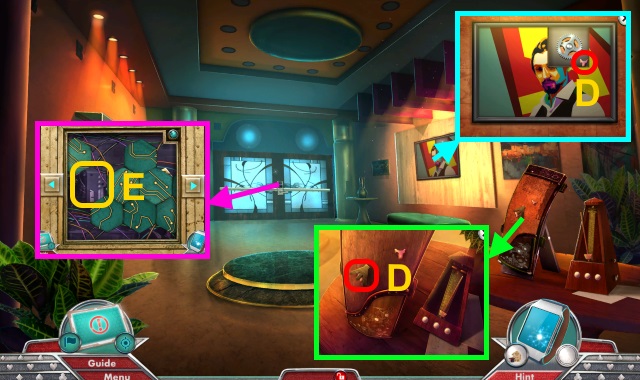
- Play HOP; receive HOTEL ID CARD (A).
- Examine door (B).
- Take MAGIC WAND (C); use HOTEL ID CARD.
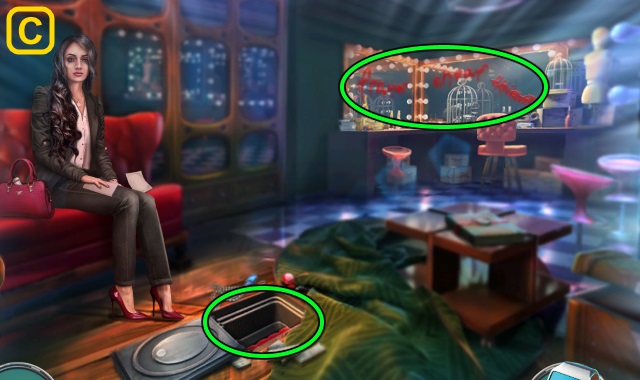
- Walk forward.
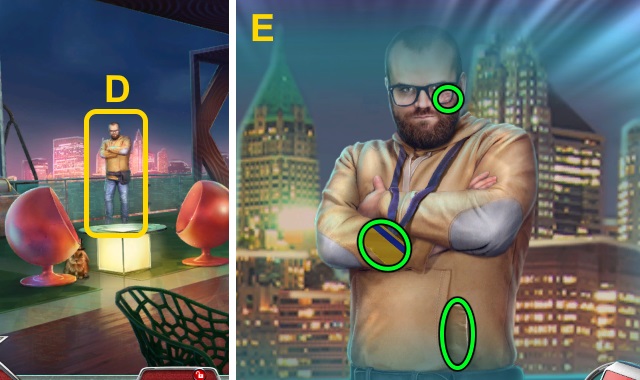
- Talk (D).
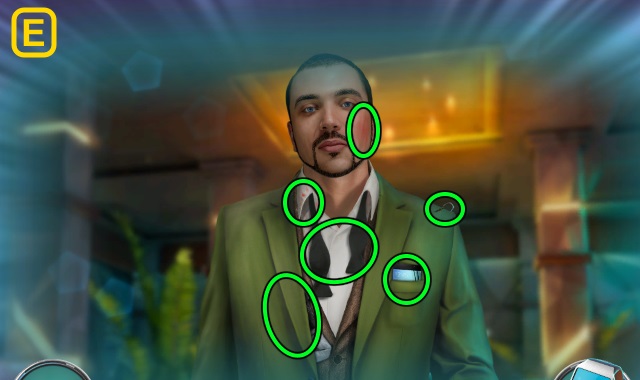
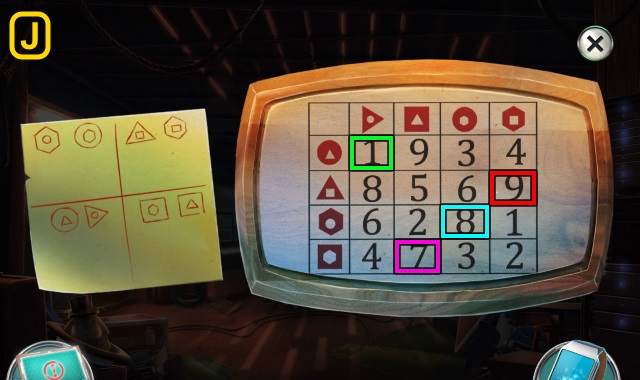
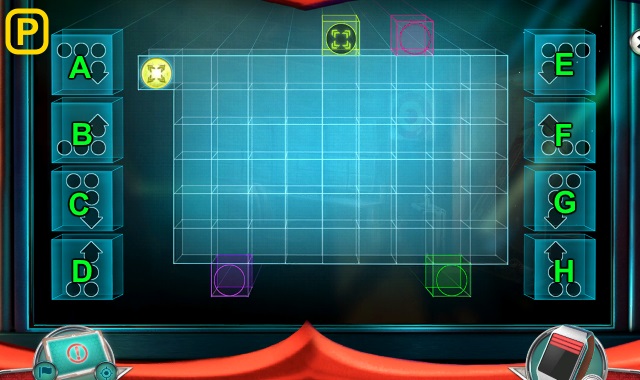
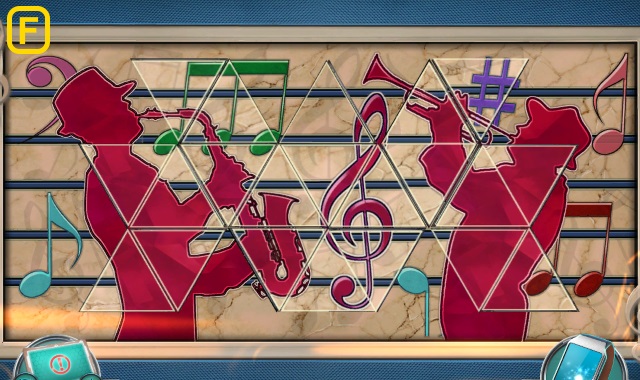
- Solution (E).
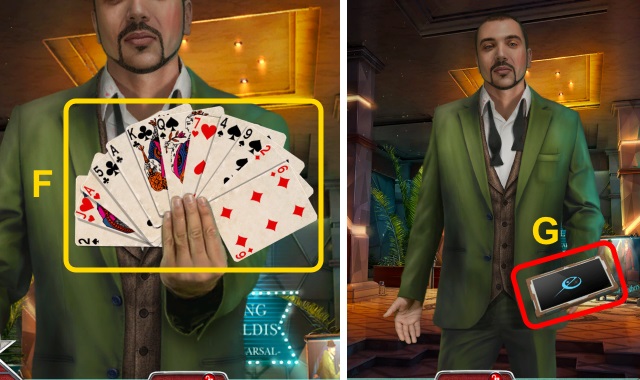
- Select any card (F).
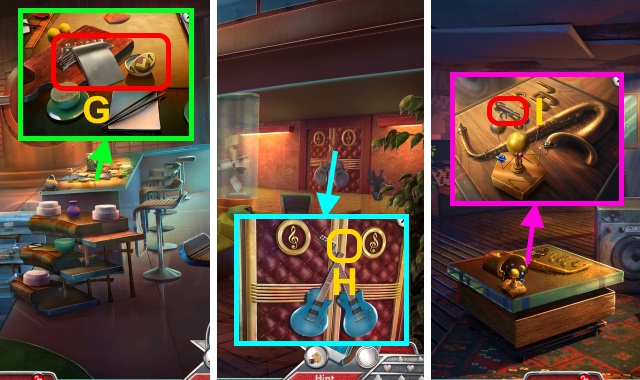
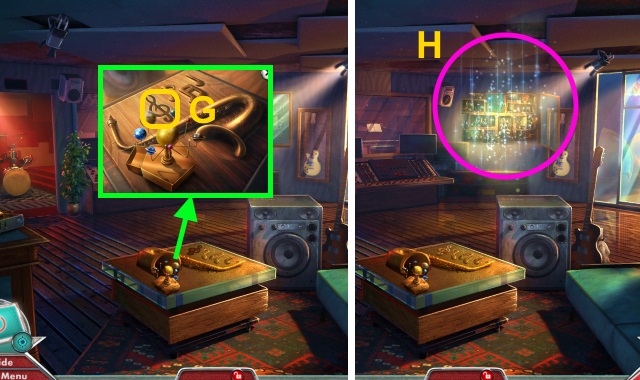
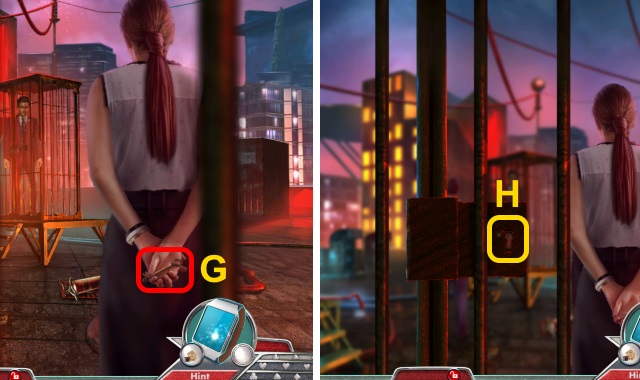
- Take Tablet (G).
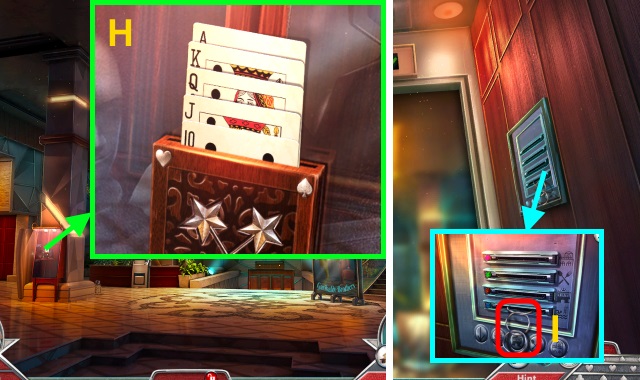
- Place MAGIC WAND; solution (H).
- Take BUTTERFLY WINGS (1/2).
- Walk left.
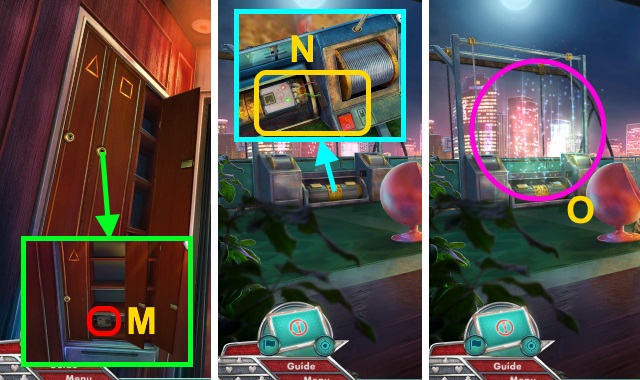
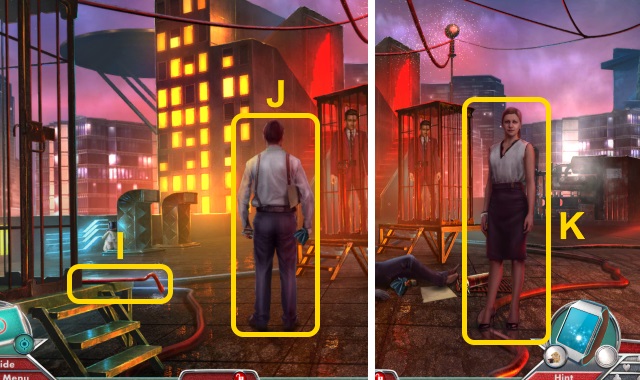
- Take METAL RINGS (I).
- Walk forward twice.
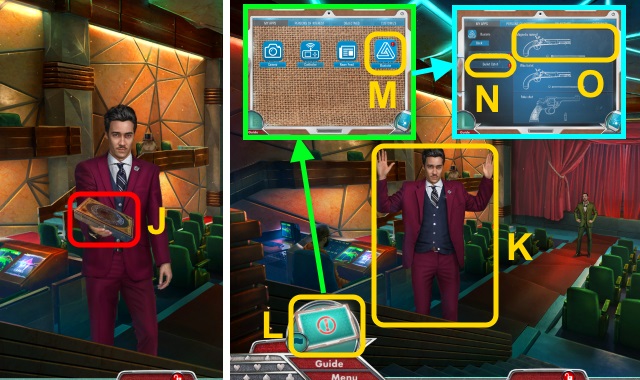
- Take GUN CASE (J).
- Examine GUN CASE; load gun. Receive GUN.
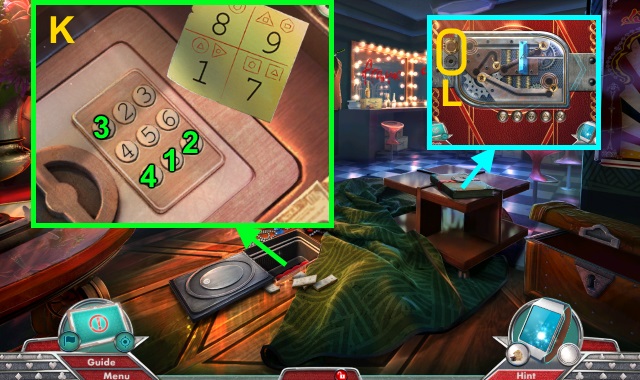
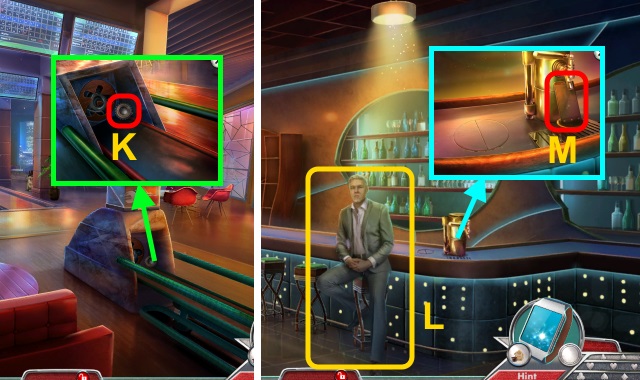
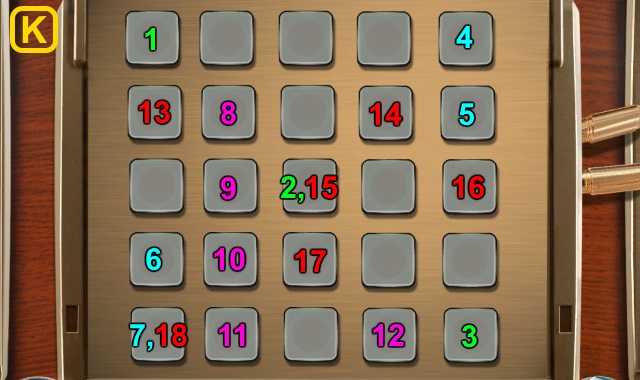
- Use GUN (K).
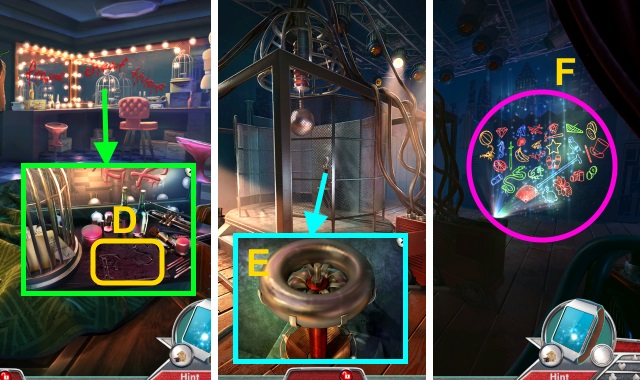
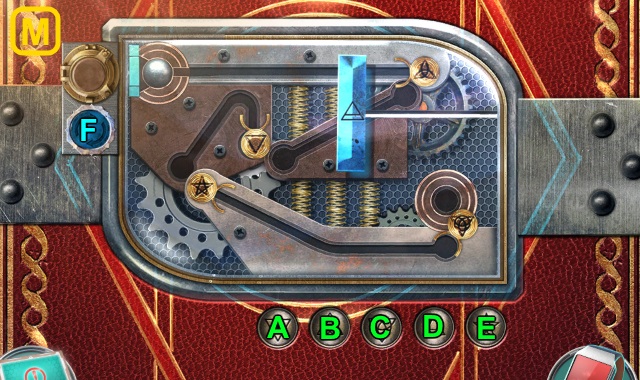
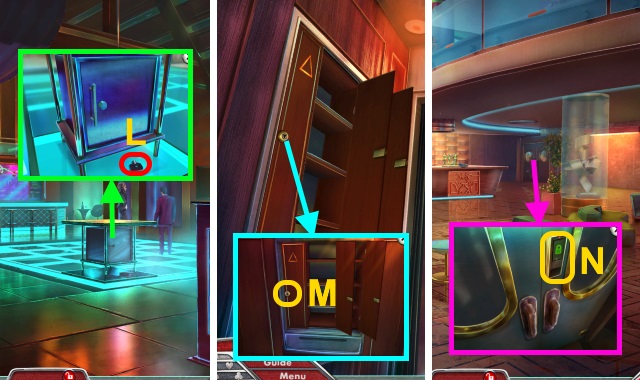
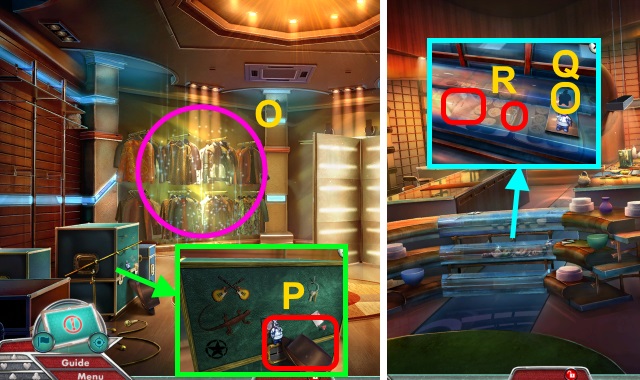
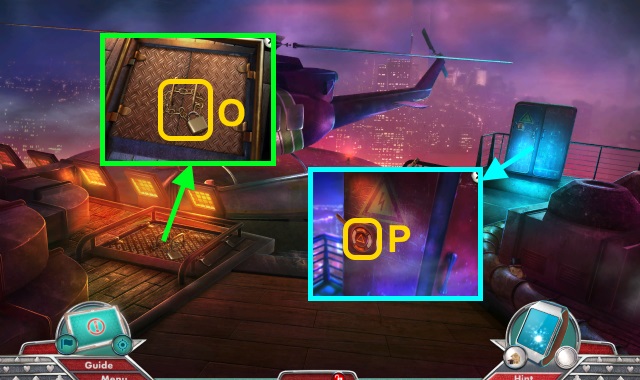
- Use Tablet (L); select Illusions (M). Select Bullet Catch (N), then choose Magnetic Ramrod (O).
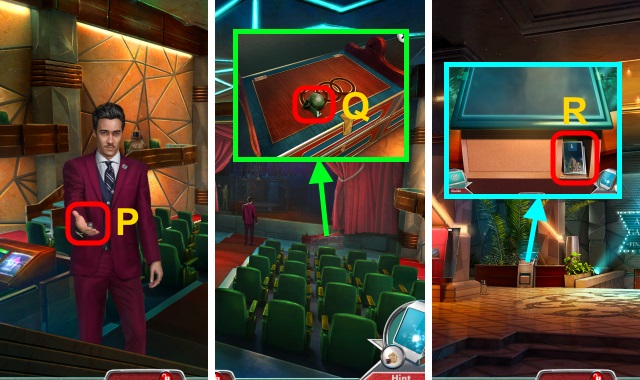
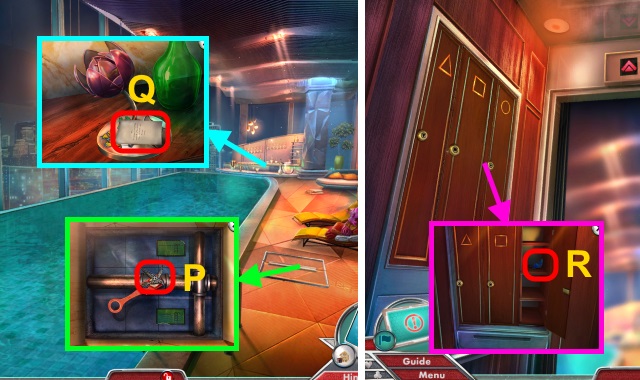
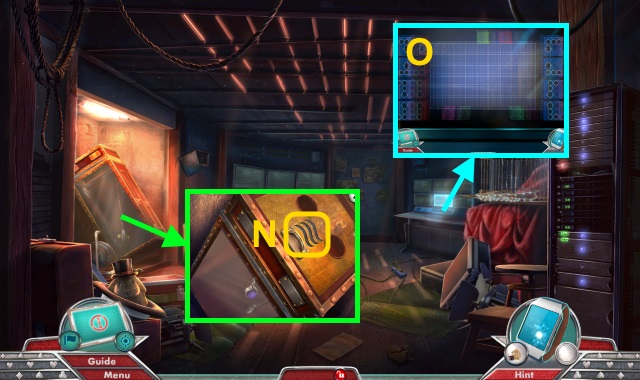
- Take IRON BALL (P).
- Take JADE SKULL (Q); place METAL RINGS. Play HOP; receive CLOVER KEY.
- Walk down.
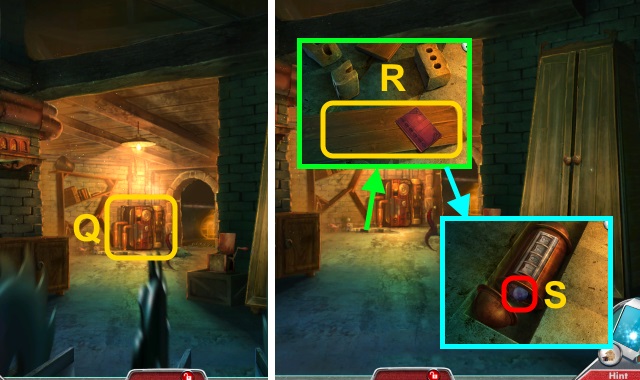
- Take Pamphlet (R); examine. Take RED LENS; use CLOVER KEY.

- Solution (S).
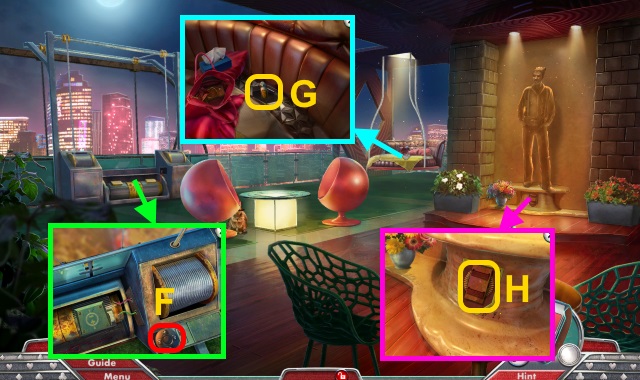
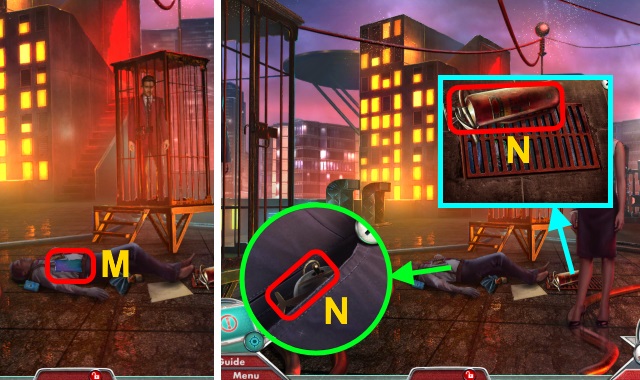
- Take FUSES (1/2) and REMOTE.
- Walk down.
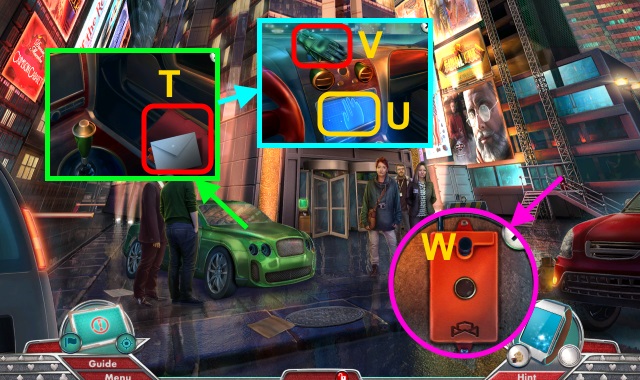
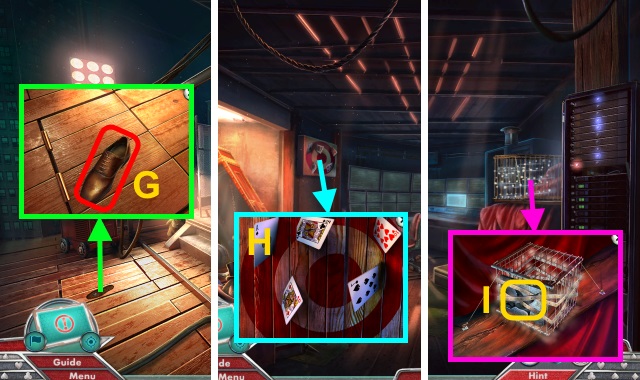
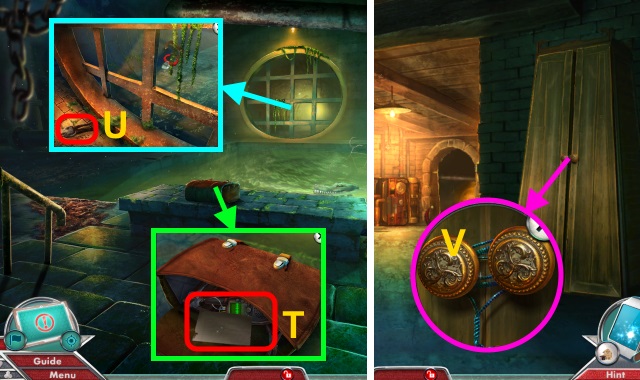
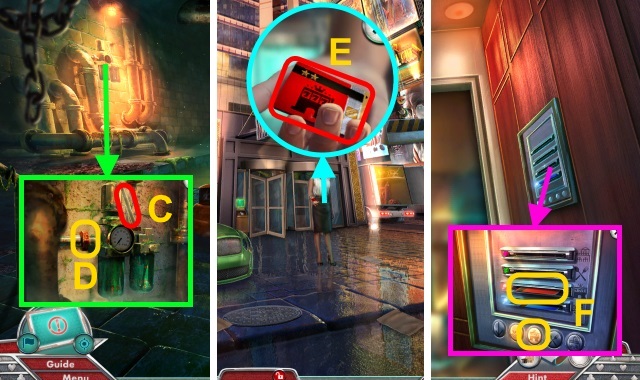
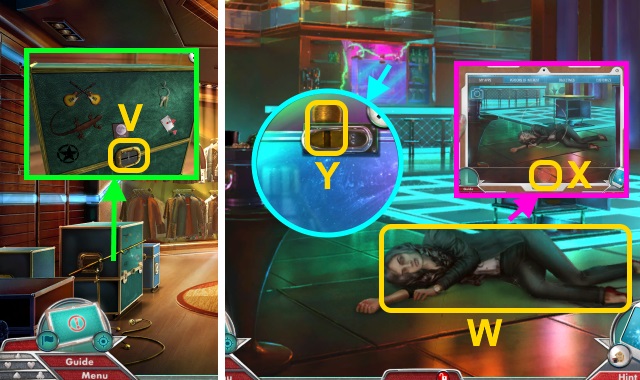
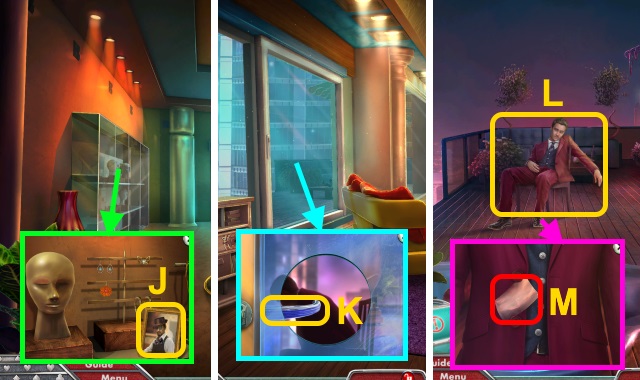
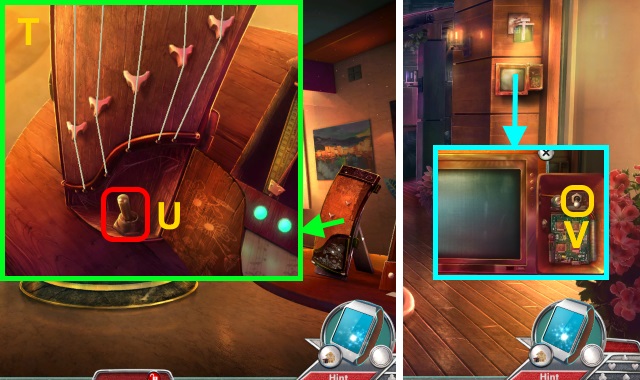
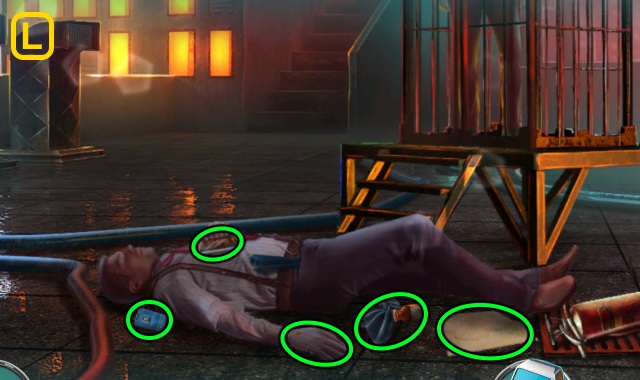
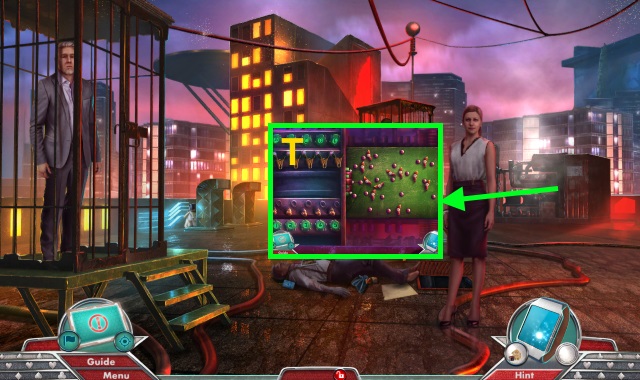
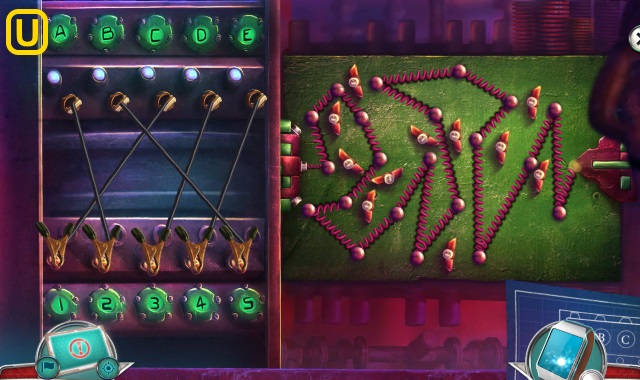
- Take letter and WOODEN TOY PIECE; read files (T). Examine screen 2x (U); take LEATHER GLOVE (V).
- Use REMOTE (W).
- Go right.
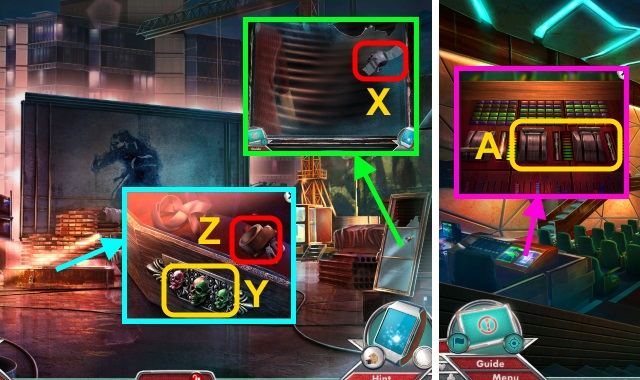
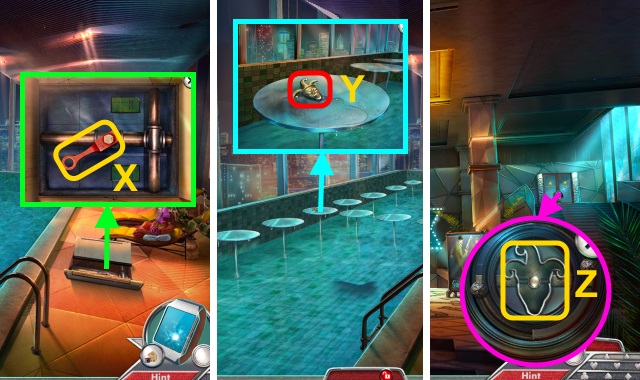
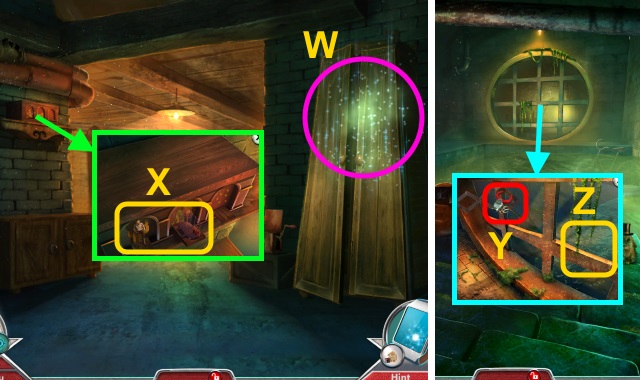
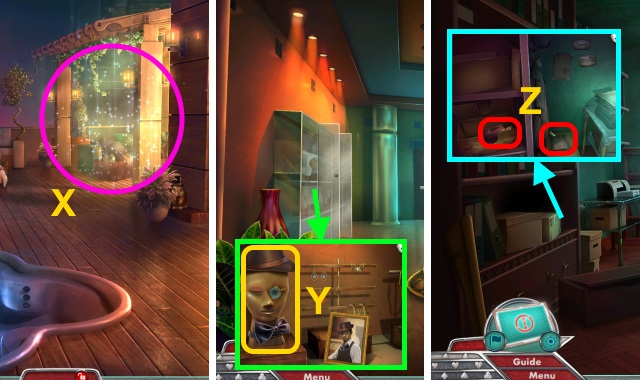
- Take RUBY SKULL (X).
- Read note; place JADE SKULL and RUBY SKULL (Y). Take DUCT TAPE and FUSES (2/2) (Z).
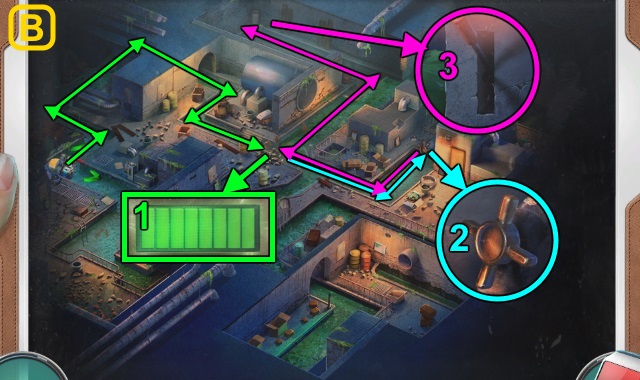
- Go to Theater.
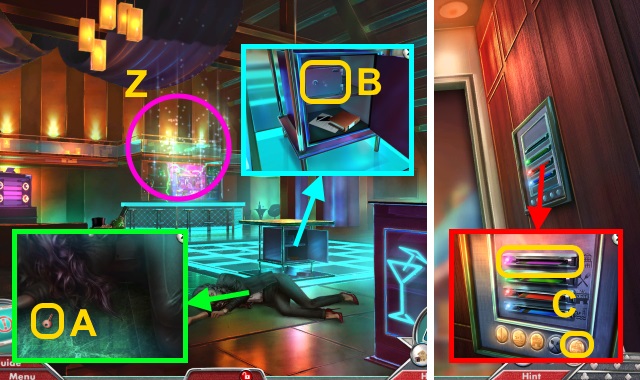
- Place FUSES (2/2); flip switches (A).
- Walk forward.
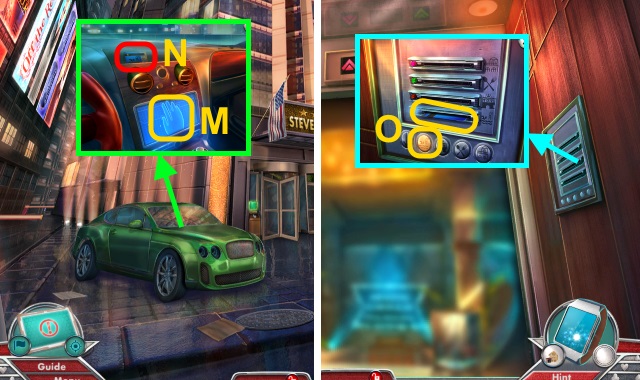
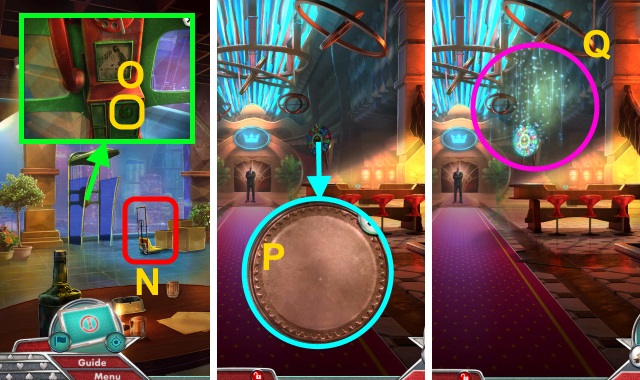
- Use Tablet; use Camera (B). Press (C).
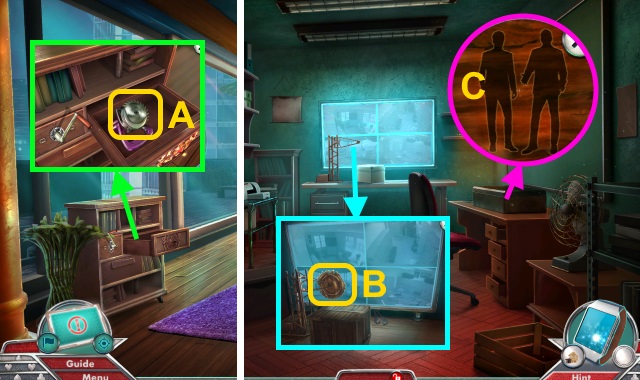
- Open coat; take letter and LETTER F (D).
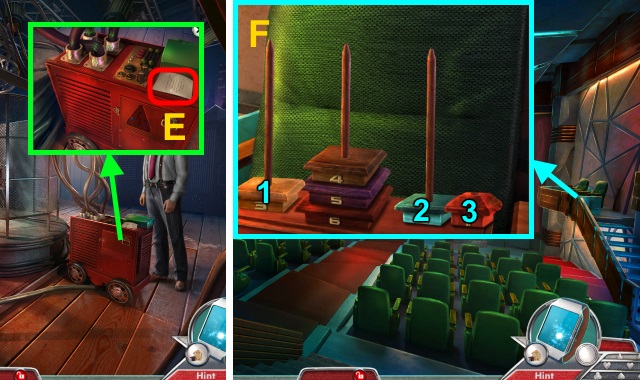
- Read note; take USB STICK (E).
- Walk down.
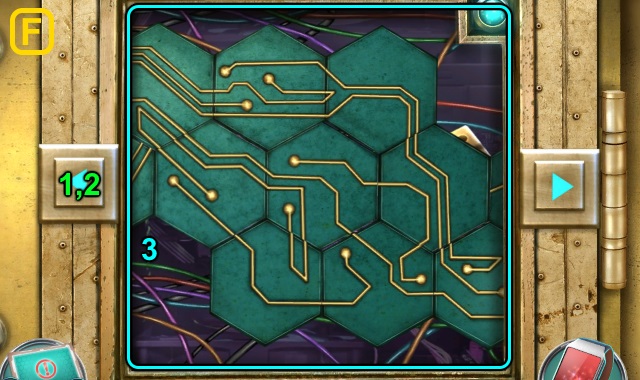
- Place WOODEN TOY PIECE; solution (F).
- Take BROKEN BUTTERFLY.
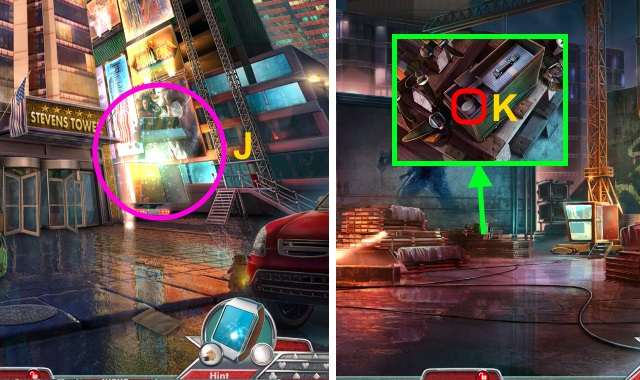
- Go to Skyscraper.
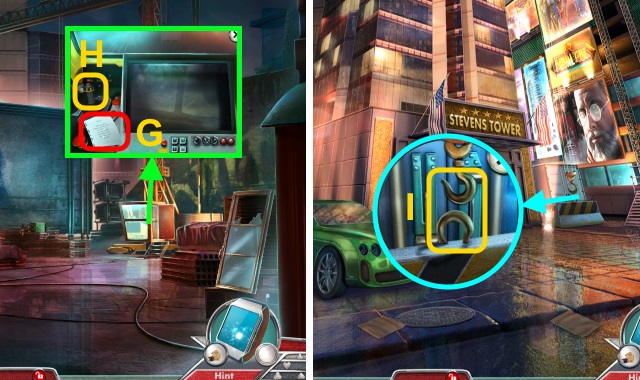
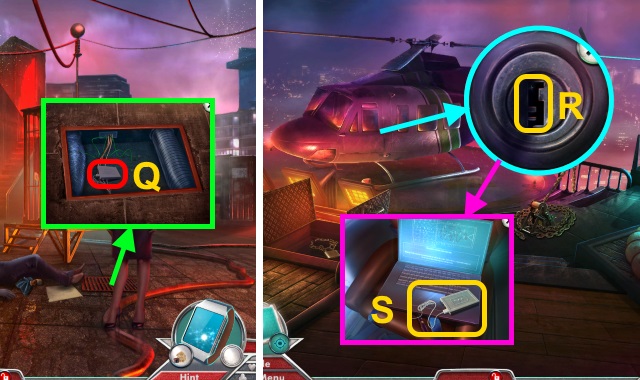
- Take note and WIRE (G); place USB STICK. Pull lever (H).
- Walk down.
- Place hook (I); examine handles.
- Play HOP; receive SLIDER HANDLE (J).
- Go right.
- Place SLIDER HANDLE; take SILICONE RUBBER (K).
- Examine scene.
- Solution (L).
- SILICONE RUBBER on LEATHER GLOVE; take SILICONE HAND.
- Walk down.
- Use SILICONE HAND (M); take POOL CARD (N).
- Walk forward, then left.
- Place POOL CARD; press button (O).
- Walk forward.
Chapter 2: The Pool
- Open; take BIRD EMBLEM (P).
- Take note and CIRCLE KEY (Q).
- Walk down.
- Use CIRCLE KEY; take BUTTERFLY WINGS (2/2) (R).
- BUTTERFLY WINGS (2/2) on BROKEN BUTTERFLY; receive BUTTERFLY ORNAMENT.
- Walk forward.

- Place BUTTERFLY ORNAMENT (S); take WARNING LABEL (T).
- Go to Teleportation Machine.
- Place WARNING LABEL (U); take FRANCISCO'S HAT, ID card, and LETTER S.
- Walk down twice.
- Examine; place FRANCISCO'S HAT (V). Examine 2x (W); use WIRE. Receive HANDCUFFS; take BROKEN GLASSES.
- Go to Pool.
- Use HANDCUFFS (X).
- Take JESTER EMBLEM (Y).
- Go to Lobby.
- Place JESTER EMBLEM (Z).
- Walk right.
- Talk (A).
- Solution (B-C).
- Move items; place LETTER F and LETTER S (D). Take MAGNETIC COIL.
- Go to Teleportation Machine.
- Place MAGNETIC COIL (E).
- Play HOP; receive PROP SHOE (F).
- Place PROP SHOE (G).
- Go left.
- Take SHARP METAL CARDS (H); remove target. Use SHARP METAL CARDS; take CRYPTIC CODE.
- Examine; place BIRD EMBLEM (I). Take CIPHER.
- CIPHER on CRYPTIC CODE.
- Solution (J).
- Receive SECRET CODE.
- Go to Dressing Room.
- Move items; place SECRET CODE. Solution (K).
- Take paper, NEWSPAPER ARTICLE, and UNIQUE SCREW.
- Place UNIQUE SCREW and IRON BALL (L).
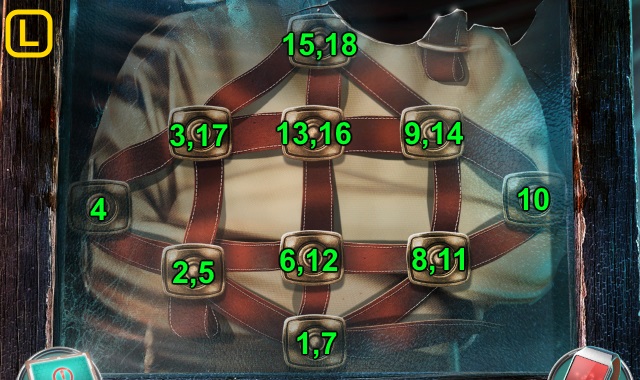
- Solution (M): D-F-B-A-F-A-E-F-E-D-F-C.
- Take WATER TRAP KEY.
- Go to Control Room.
- Place WATER TRAP KEY (N); examine chain. Take BLUE LENS.
- Examine BROKEN GLASSES; place RED LENS and BLUE LENS. Receive 3D GLASSES.
- Use 3D GLASSES (O).
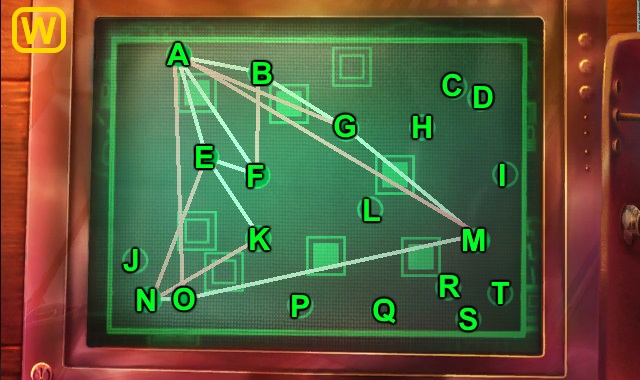
- Solution (P): (Ax2-B-H)-(Cx2-A-E)-(C-A-G-B-Ax2)-(A-B-A-D).
- Walk forward.
- Use SHARP METAL CARDS (Q).
- Go forward.
- Read book (R); move items. Remove cover; use NEWSPAPER ARTICLE. Examine safe; take CRYSTAL BALL and MODEL TELEPORTATION MACHINE (S).
- Walk forward.
- Open bag; take note and WALKIE-TALKIE (T).
- Examine WALKIE-TALKIE; take WIRE CUTTER and ANTENNA.
- Take MAGICIAN FIGURINE (U).
- Walk down.
- Use WIRE CUTTER (V).
- Play HOP; receive HOVERCRAFT (W).
- Place MODEL TELEPORTATION MACHINE and MAGICIAN FIGURINE (X); take VANISHING BOX and EXTENDIBLE CLAW.
- Walk forward.
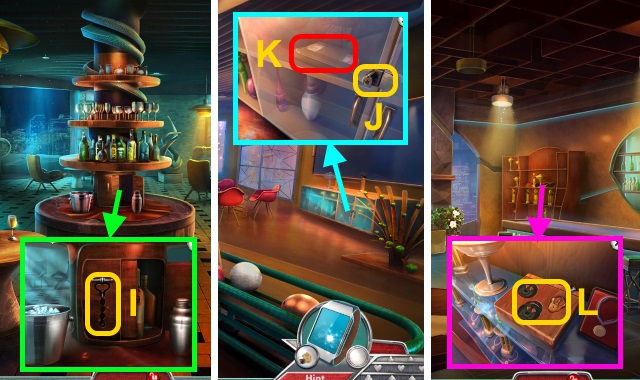
- Use EXTENDIBLE CLAW; take C-CLAMP and ROBOT CLAW (Y).
- ANTENNA, ROBOT CLAW, and DUCT TAPE on HOVERCRAFT; take UTILITY HOVERCRAFT.
- Use UTILITY HOVERCRAFT (Z).
- Solution (A-B).
- Take NEON LIGHT (C); use C-CLAMP (D).
- Walk forward.
- Take CASINO PASS (E).
- Walk forward, then left.
- Use CASINO PASS; press button (F).
- Walk forward.
Chapter 3: The Casino
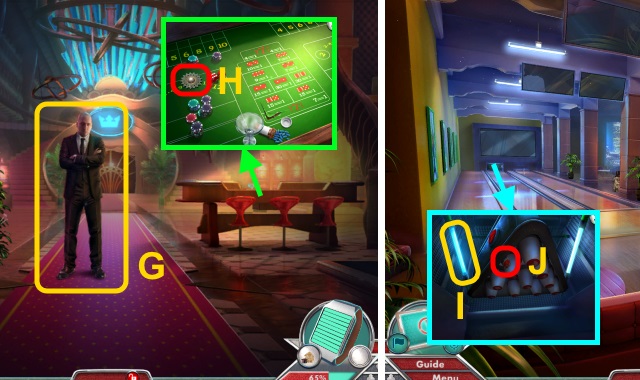
- Talk (G).
- Take COGS (1/3) (H).
- Walk left.
- Use NEON LIGHT (I); take RED KEY (J).
- Take COGS (2/3) (K).
- Walk forward.
- Talk (L).
- Take phone (M); examine 3x.
- Take HAND TRUCK (N).
- Use RED KEY, take SWITCH and COGS (3/3) (O).
- Walk down twice.
- Examine; place COGS (3/3) (P).
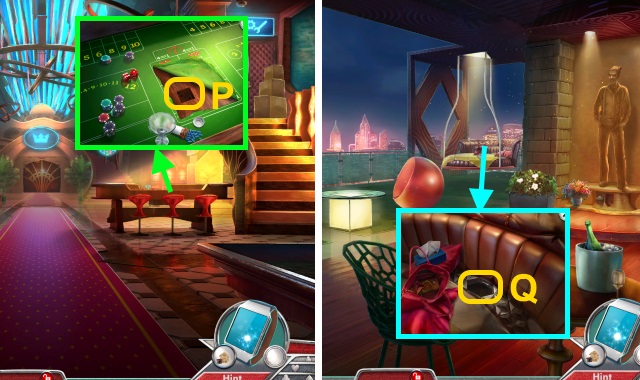
- Play HOP; receive BEER MUG (Q).
- Walk left, then forward.
- Place BEER MUG (R); take BOWLING PIN EMBLEM (S).
- Walk down.
- Place BOWLING PIN EMBLEM (T); take BOWLING BALL.
- Use BOWLING BALL (U).
- Solution (V): stop red dot on front pin.
- Take TAPE WINDER and BLACKJACK CREDITS (W).
- Walk down.
- Use BLACKJACK CREDITS (X).

- Solution (Y).
- Take CIGARETTE CASE (Z).
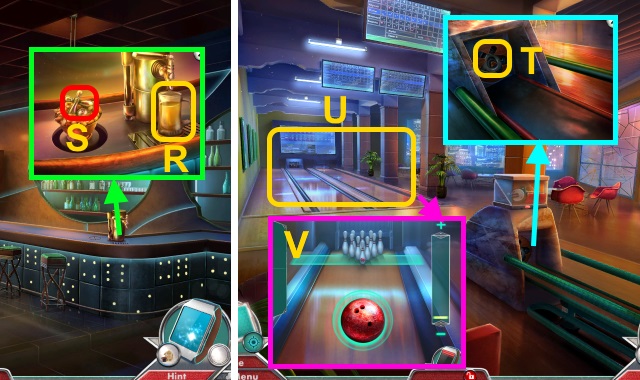
- Examine CIGARETTE CASE; take LIGHTER.
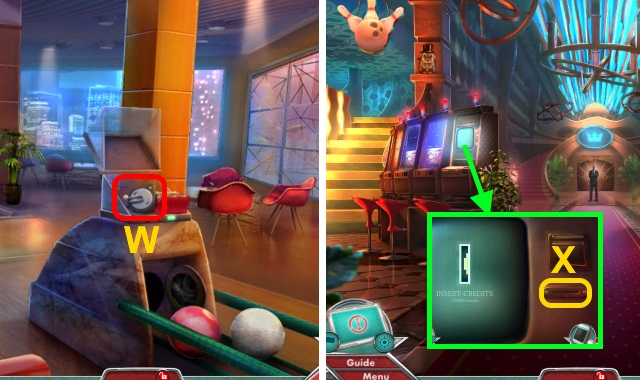
- Use HAND TRUCK (A).
- Use LIGHTER (B).
- Walk forward.
- Play HOP; receive STODARE INLAY (C).
- Walk right.
- Talk (D).
- Solution (E).
- Take CONTROL PANEL (F).
- Move pillows; take SPICES (1/3) (G).
- Place STODARE INLAY (H); take MOSAIC TILES (1/3) and GLOBE EMBLEM.
- GLOBE EMBLEM on CIGARETTE CASE; take BOTTLE OPENER.
- Walk down.
- Use BOTTLE OPENER (I); take TRICK COIN and MAGNET.
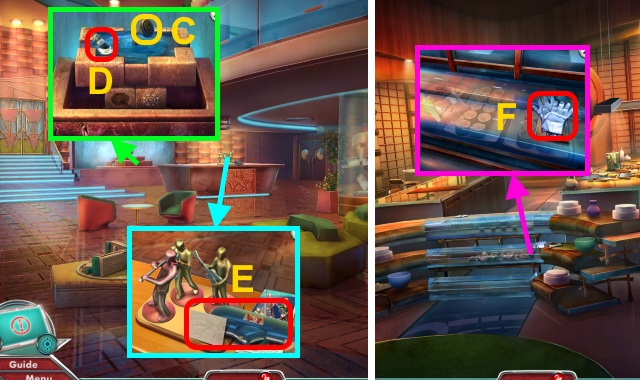
- Open VANISHING BOX; use CRYSTAL BALL and TRICK COIN. Take SILVER MEDAL.
- Walk down, then left.
- Use MAGNET (J); take BROKEN VHS TAPE and GOLD MEDAL (K).
- Walk forward.
- Place GOLD MEDAL and SILVER MEDAL (L); take SQUARE KEY.
- Walk down 3x.
- Use SQUARE KEY; take POWER UNIT (M).
- Go to Balcony.
- Place SWITCH, POWER UNIT, and DUCT TAPE (N); press switch.
- Play HOP; receive LUCKY DIE (O).
- Walk down twice.
- Examine; place LUCKY DIE (P). Take STRANGE TILE.
- Walk forward, then right.
- Place STRANGE TILE (Q); take GLUE and VHS REEL.
- Open BROKEN VHS TAPE; use VHS REEL, GLUE, and TAPE WINDER. Take VHS TAPE.
- Walk down.
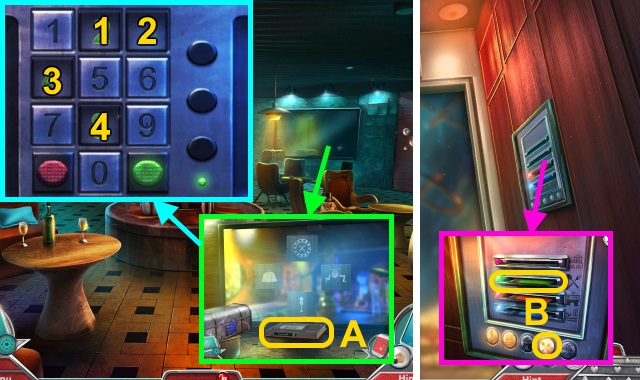
- Open; place VHS TAPE (A). Solution is random.
- Enter code (1-4).
- Take WAITING ROOM CARD.
- Walk down twice.
- Place WAITING ROOM CARD; press button (B).
- Walk forward.
Chapter 4: The Waiting Room
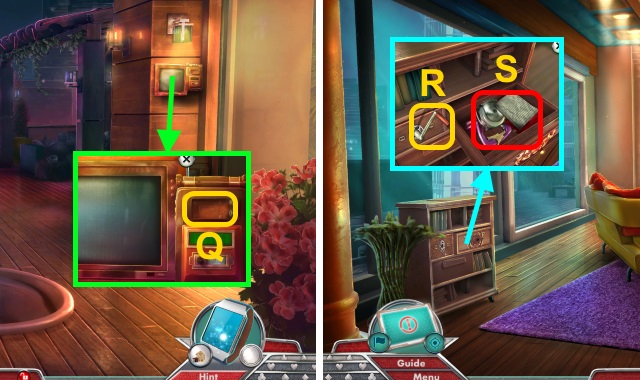
- Place CONTROL PANEL (C); take SPICES (2/3) (D).
- Take note and INSTRUMENT CASE (E).
- Walk left.
- Take LATEX GLOVES (F).
- Take note, PLAQUES (1/3), and GUITAR HEAD (G).
- Walk down.
- Place GUITAR HEAD (H).
- Walk right.
- Take BASS (I).
- Take MOSAIC TILES (2/3) (J).
- Walk forward.
- Open (K).
- Take PLAQUES (2/3), MUSICIAN'S TORSO, LETTER H, and PLANET EARTH (L).
- Walk down.
- Place PLANET EARTH (M); take CONSTELLATION RING (N).
- Walk down.
- Place LETTER H; take SPICES (3/3) (O).
- Walk left.
- Place SPICES (3/3) (P).
- Play HOP; receive METAL FLOWER (Q).
- Walk down.
- Place METAL FLOWER (R); take CONSTELLATION CIRCLE.
- CONSTELLATION CIRCLE on CONSTELLATION RING; take CONSTELLATION LENS.
- Walk right twice.
- Place CONSTELLATION LENS (S).
- Examine (T).
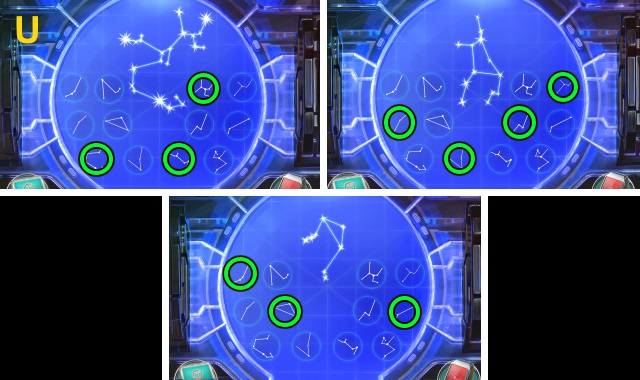
- Solution (U).
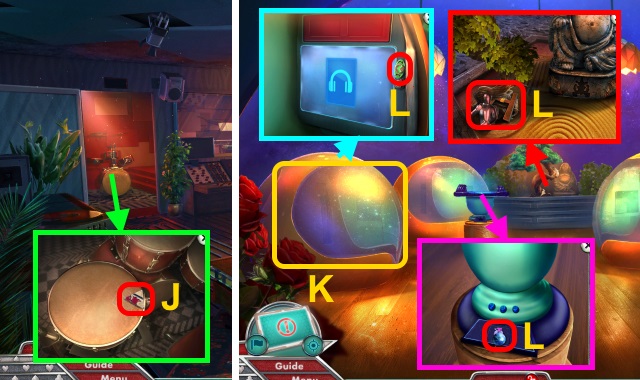
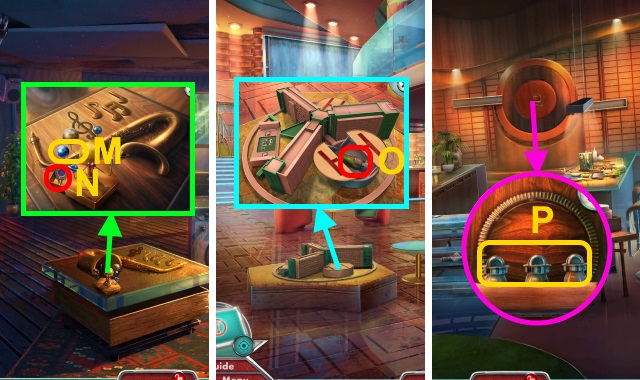
- Take NEON SIGN and DRUM KEY.
- Walk down.
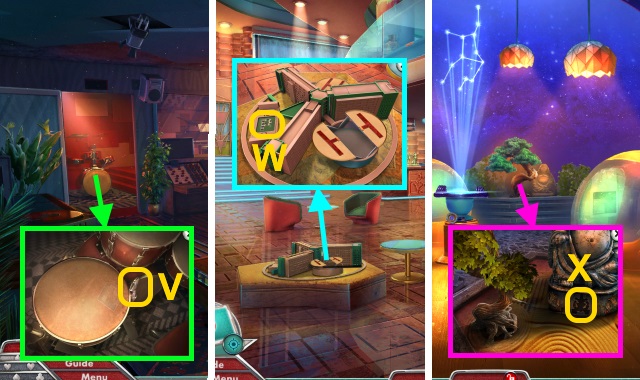
- Use DRUM KEY (V); open. Take PARKING SIGN.
- Walk down.
- Place PARKING SIGN (W); take WIRES and PEACEFUL STATUE DECORATION.
- Walk right twice.
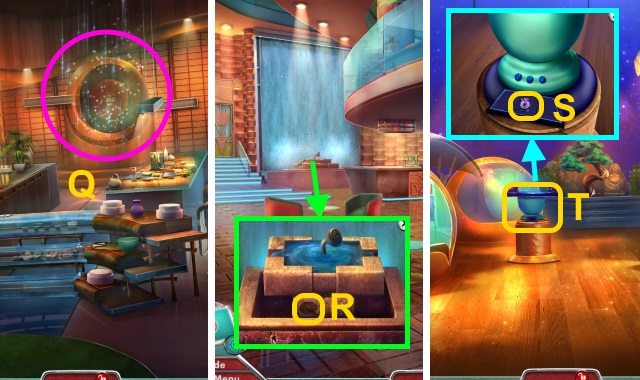
- Place PEACEFUL STATUE DECORATION (X); take SILVER SPOON.
- Go to Restaurant.
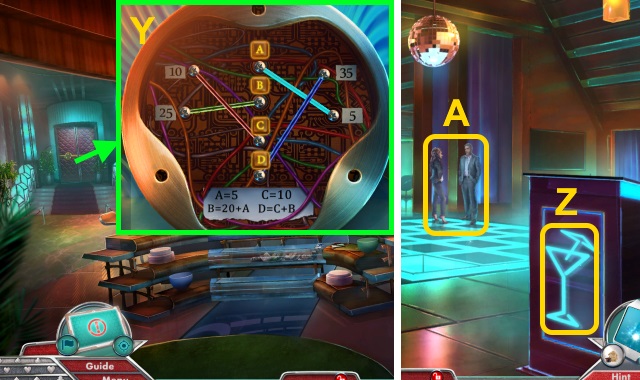
- Use SILVER SPOON 3x; place WIRES. Solution (Y).
- Walk left.
- Place NEON SIGN (Z).
- Talk (A).

- Solution (B).
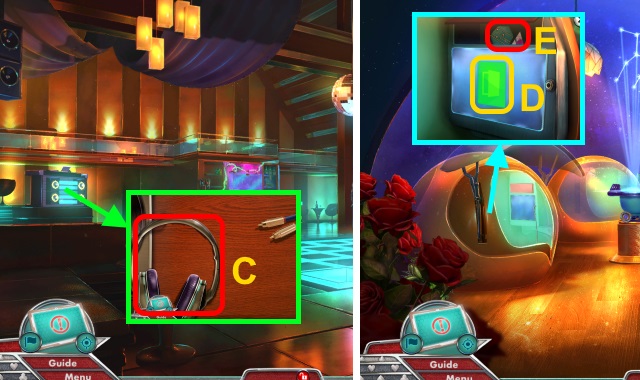
- Take HEADPHONES (C).
- Go to Chill-Out Zone.
- Use HEADPHONES. Examine screen (D); take CIRCUIT BOARD and MOSAIC TILES (3/3) (E).
- MOSAIC TILES (3/3) on INSTRUMENT CASE.
- Solution (F).
- Take TREBLE CLEF.
- Walk down.
- Place TREBLE CLEF (G).
- Play HOP; receive MUSICIAN'S LEGS (H).
- MUSICIAN'S TORSO and BASS on MUSICIAN'S LEGS; take MUSICIAN FIGURINE.
- Walk down.

- Place MUSICIAN FIGURINE; solution (I).
- Take CORKSCREW KEY (1/3) and DJ CONTROL BOARD.
- Go left twice.
- Place DJ CONTROL BOARD (J).
- Solution (K).
- Take TRIANGLE KEY (L).
- Walk down 3x.
- Use TRIANGLE KEY (M); take COAT ROOM KEYCARD.
- Walk forward.
- Use COAT ROOM KEYCARD (N).
- Walk forward.
- Move screen. Play HOP; receive WALLET (O).
- Take GOOD-LOOKING HAT and CHEF EMBLEM (P).
- Walk down, then left.
- Place CHEF EMBLEM (Q); take CORKSCREW KEY (2/3) and HANDKERCHIEF CODE (R).

- HANDKERCHIEF CODE on WALLET; solution (S).
- Take PLAQUES (3/3).
- Go to Coat Room.
- Place PLAQUES (3/3) (T).
- Solution (U).
- Take SMALL HOOK and INCOMPLETE KEY.
- Use SMALL HOOK (V); take CORKSCREW KEY (3/3).
- Go to Night Club.
- Examine (W).
- Select Camera; press button (X).
- Use CORKSCREW KEY (3/3) (Y).
- Play HOP; receive INCOMPLETE KEY (Z).
- Use LATEX GLOVES (A); place 2 INCOMPLETE KEYS. Take INTRICATE KEY.
- Use INTRICATE KEY (B); take CAMERA LENS INLAY and PENTHOUSE CARD.
- Walk down 3x.
- Place PENTHOUSE CARD; press (C).
- Walk forward.
Chapter 5: The Penthouse
- Take TRIPOD INLAY and INSTRUMENT BRIDGES (1/3) (D).
- Place CIRCUIT BOARD (E).
- Solution (F).
- Take GREASE and ACE OF SPADES.
- Walk forward.

- Examine (G).
- Take ELECTRICAL COMPONENT (H); use GREASE. Play HOP; receive DISPLAY CASE KEY.
- Take CANVAS SEGMENTS (1/2) and INSTRUMENT BRIDGES (2/3) (I).
- Walk down.
- Use DISPLAY CASE KEY. Examine photo (J); take GLASS CUTTER.
- Walk forward.
- Use GLASS CUTTER; open door (K).
- Walk left.
- Examine (L).
- Take note (M); open coat. Take MONOCLE and CAMERA CASE.

- Take GLASS TUBE (N).
- GLASS TUBE on ELECTRONICAL COMPONENT; take SLENDER LIGHTBULB.
- Walk down.
- Place SLENDER LIGHTBULB; take CANVAS SEGMENTS (2/2) (O).
- Walk down.
- Place CANVAS SEGMENTS (2/2) (P); take BATTERY.
- Walk forward, then left.
- Place BATTERY; take CRANK (Q).
- Walk down.
- Place CRANK (R); take note, MEMORY CARD READER, and INSTRUMENT BRIDGES (3/3) (S).
- Walk down.
- Place INSTRUMENT BRIDGES (3/3); solution (T). Take ELECTRICAL SWITCH (U).
- Walk forward, then left.
- Use SWITCH (V).
- Solution (W): (G-C)-(A-G)-(F-A)-(O-R)-(K-J)-(N-K)-(J-O).
- Play HOP; receive BOW TIE (X).
- Walk down twice.
- Place GOOD-LOOKING HAT, MONOCLE, and BOW TIE (Y); press button.
- Walk left.
- Place ACE OF SPADES; take GARIBALDI FIGURINES (1/2), note, and SCREWDRIVER (Z).
- Walk down, then forward.
- Use SCREWDRIVER; take SAW BLADE (A).
- Walk down, then left.
- Replace SAW BLADE (B); take GARIBALDI FIGURINES (2/2).
- Place GARIBALDI FIGURINES (2/2) (C).

- Play HOP; receive FILM REEL INLAY (D).
- TRIPOD INLAY, CAMERA LENS INLAY, and FILM REEL INLAY on CAMERA CASE; open. Take MEMORY CARD.
- Place MEMORY CARD READER (E); examine.
- Open; place MEMORY CARD (F).
- Take CAGE KEY (G).
- Use CAGE KEY (H).
- Use bar (I) on Robert (J).
- Talk (K).
- Solution (L).
- Take INCOMPLETE BLUEPRINTS (M).
- Take HELICOPTER KEY and HEAVY EXTINGUISHER (N).
- Walk forward.
- Use HEAVY EXTINGUISHER 2x (O). Play HOP; receive SPOTLIGHT KEY.
- Place SPOTLIGHT KEY (P); open. Take RUBBER MAT.
- Walk down.
- Remove grate; use RUBBER MAT. Take LAPTOP BATTERY (Q).
- Walk forward.
- Use HELICOPTER KEY (R).
- Open laptop; use LAPTOP BATTERY (S). Place INCOMPLETE BLUEPRINTS; open. Take BLUEPRINTS.
- Walk down.
- Place BLUEPRINTS (T).
- Solution (U).
Created at: 2017-07-09