

Walkthrough Menu
- General Tips
- Chapter 1: Main Street
- Chapter 2: The Lodge
- Chapter 3: The Cemetery
- Chapter 4: The Cabin
- Chapter 5: The Mining Shed
- Chapter 6: Crystal Cave
General Tips
- This is the official guide for Dead Reckoning: Snowbird's Creek.
- This guide will not tell you when you have to zoom into a location; the screenshots will show each zoom scene.
- Hidden-object puzzles are referred to as HOPs. This guide will not show screenshots of the HOPs, however, it will mention when an HOP is available and the inventory item you'll collect from it.
- Use the Map to fast travel to a location.
Chapter 1: Main Street
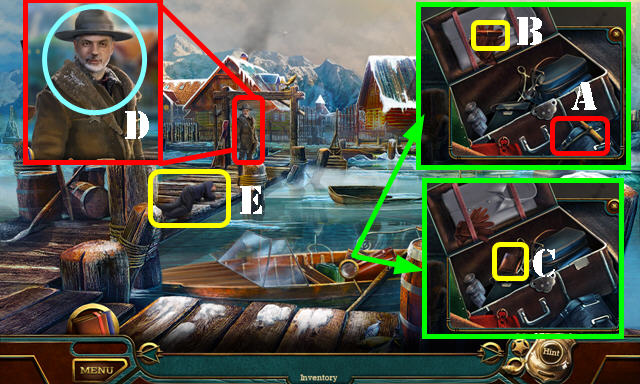
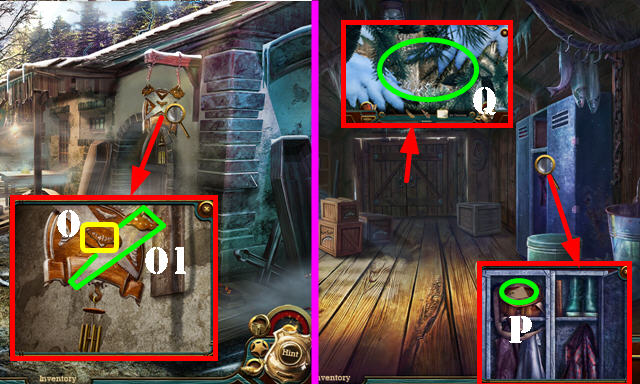
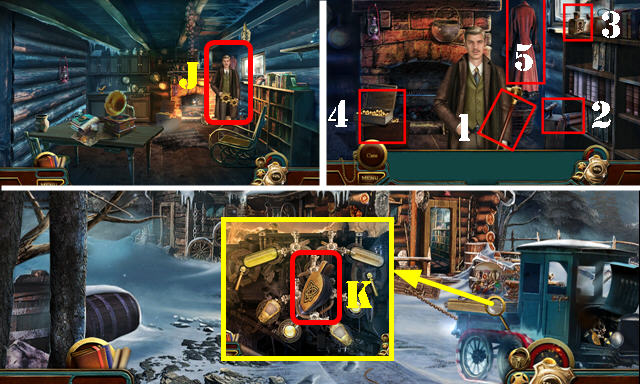
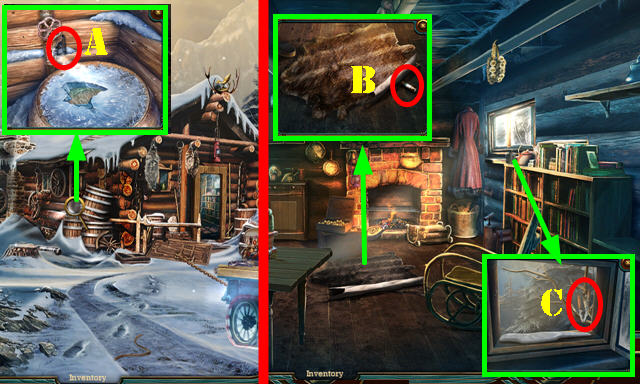
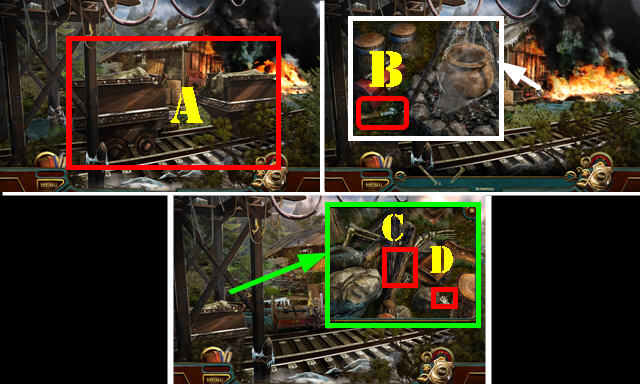
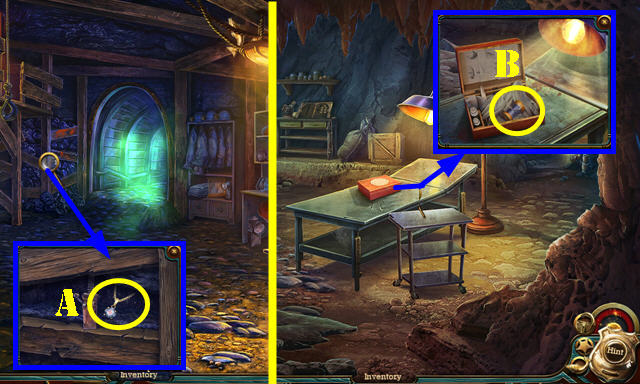
- Take the ICEPICK (A).
- Use the ICEPICK on the lock; take the METAL TOOTHPICKS (B) and select the glove. Take the DETECTIVE BADGE (C).
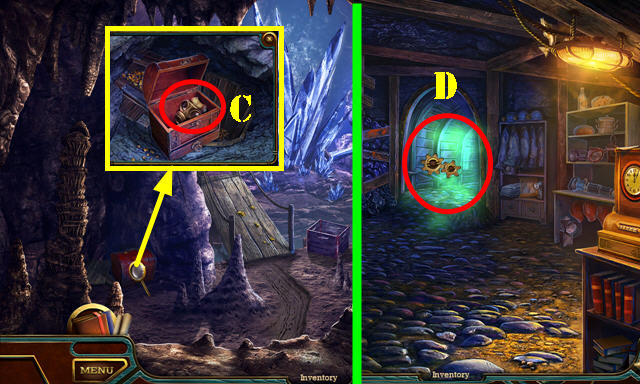
- Talk to the Sheriff: show the DETECTIVE BADGE (D).
- Turn the victim over and look at him (E).
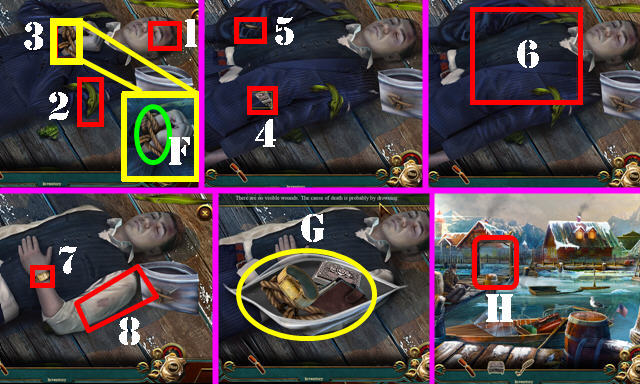
- Select 1-3. Take the rope (F).
- Select 4; take the box.
- Select 5 twice; take the wallet. Select 6-7; take the watch. Select 8.
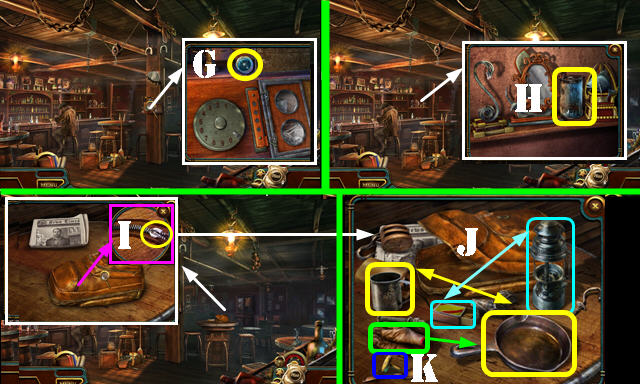
- Take the EVIDENCE BOX and ROPE EVIDENCE (G).
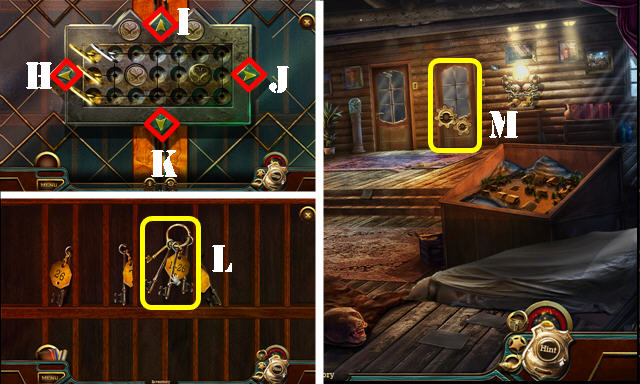
- Go to Main Street (H).
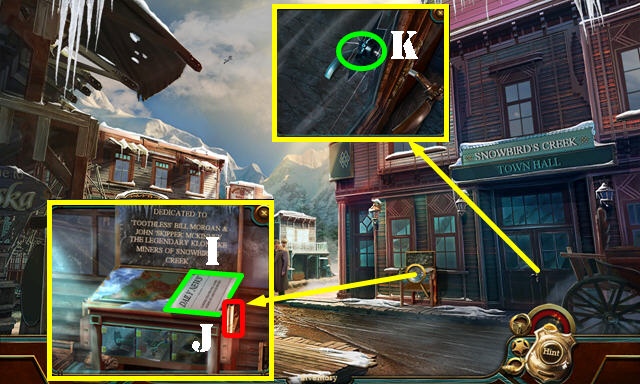
- Look at the newspaper (I); take the ROLLED MAP (J).
- Open the ROLLED MAP and take the Map. Select the wire 3x; receive the WIRE.
- Use the WIRE and enter the Mayor's Office (K).
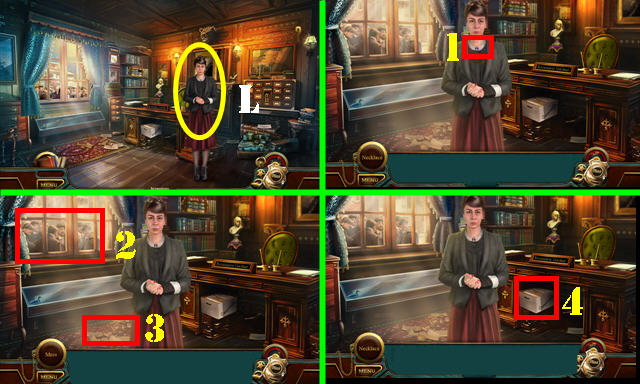
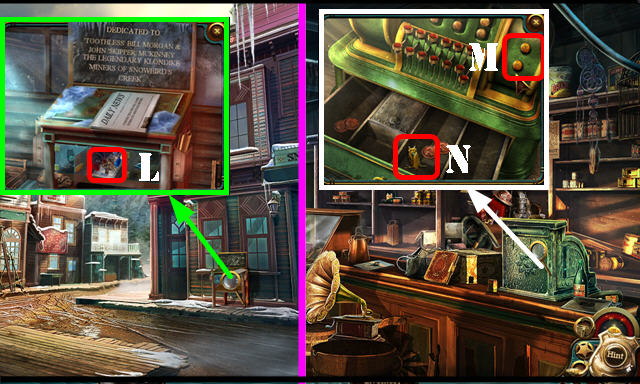
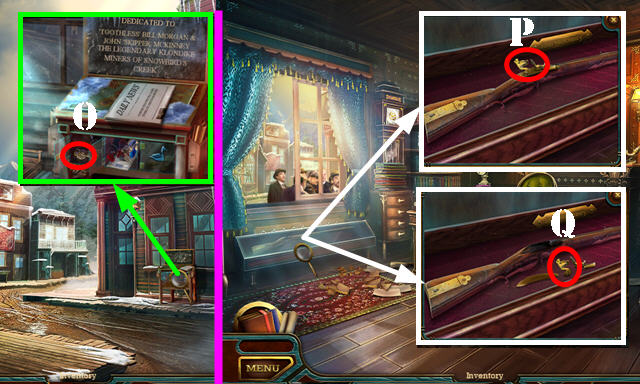
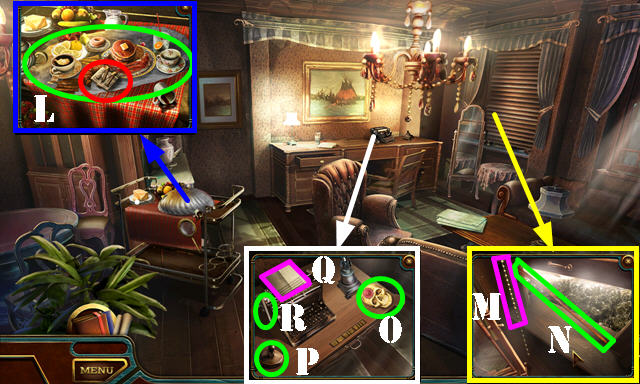
- Give the EVIDENCE BOX (L).
- Select 1-4.
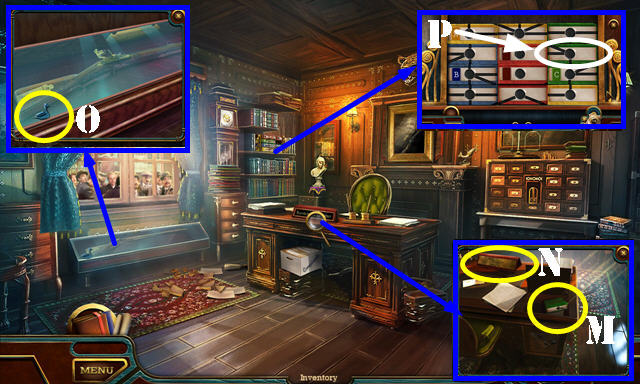
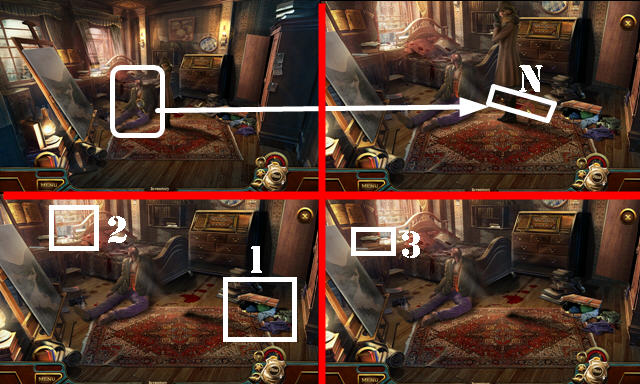
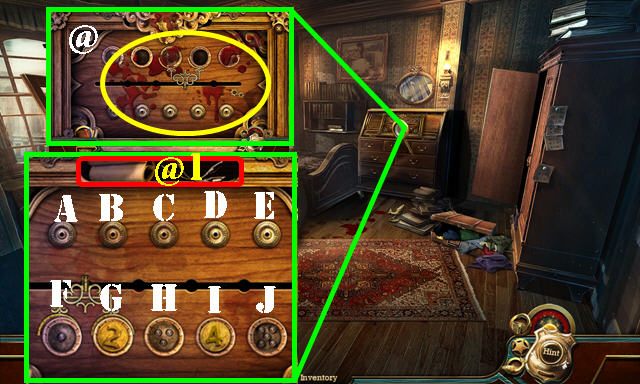
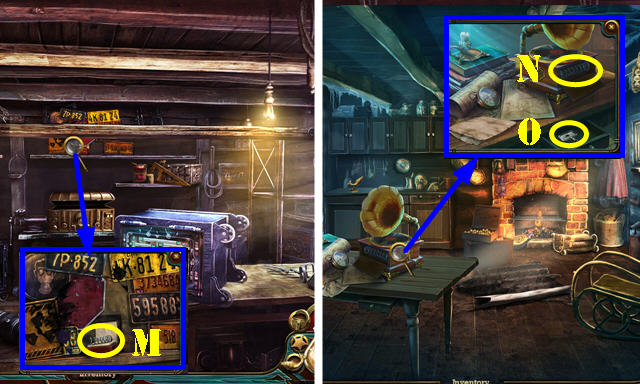
- Move the papers; use the METAL TOOTHPICKS and take the FINANCIAL RECORDS (M). Take the NAME PLATE (N).
- Take the BLUE DUCK (O).
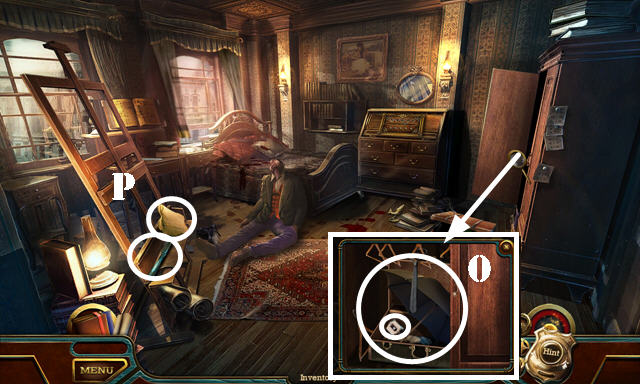
- Place the FINANCIAL RECORDS for a puzzle (P).
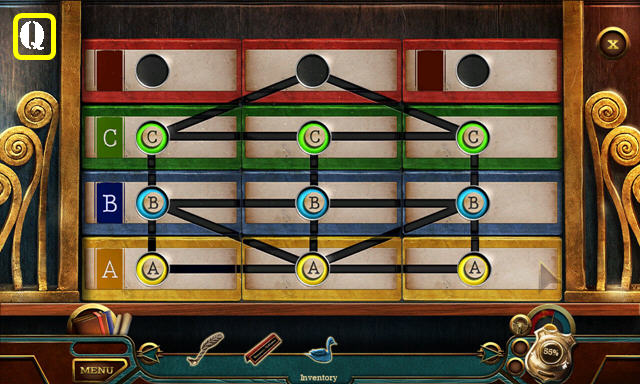
- Solution (Q). Select the folder 4x; receive the PAPER BINDER.
- Walk down.
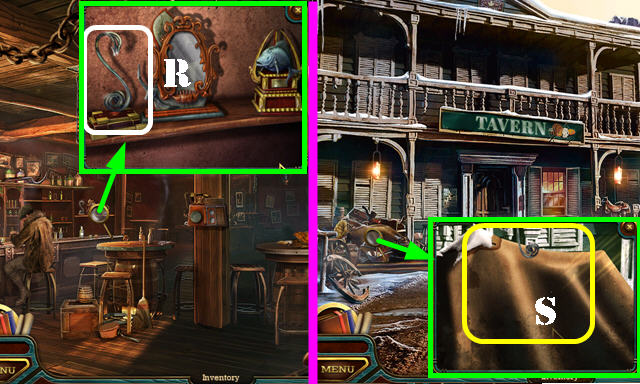
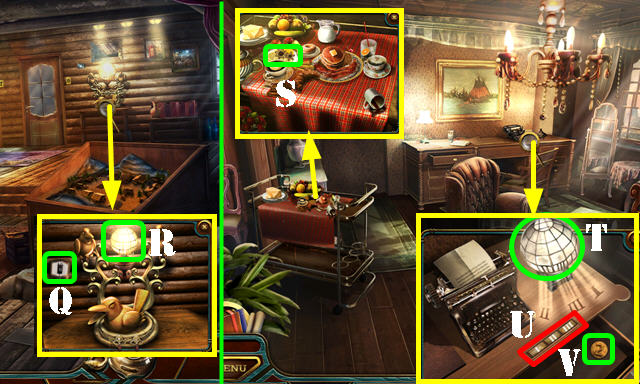
- Place the BLUE DUCK; take the REFRIGERATOR MAGNET (R).
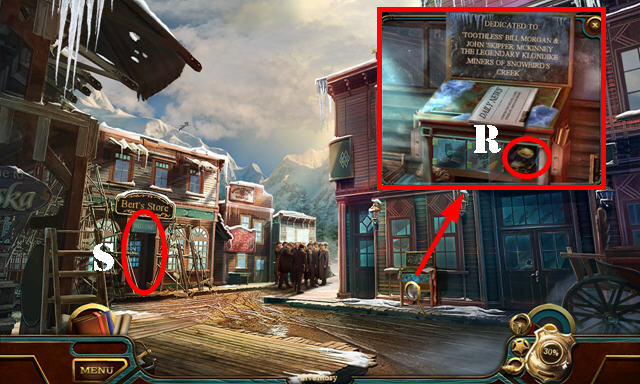
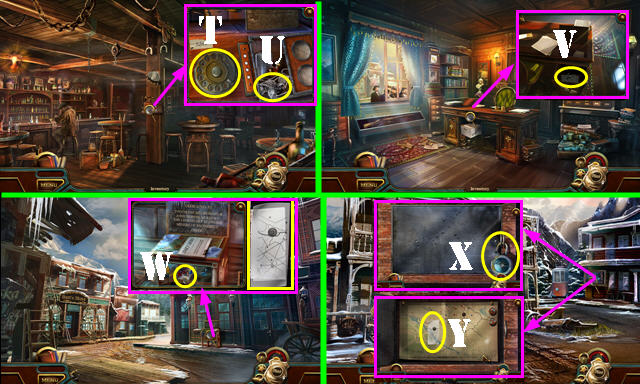
- Enter the General Store (S).
- Select the tag on the scene.
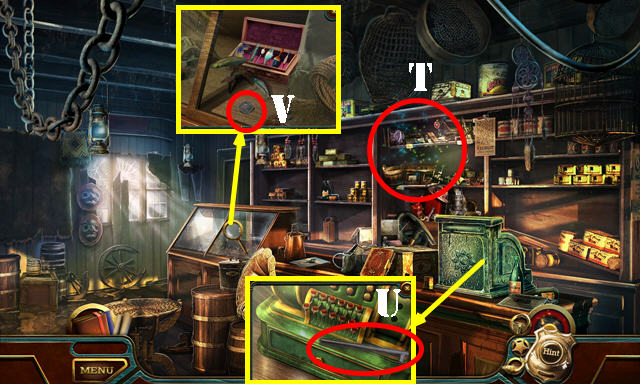
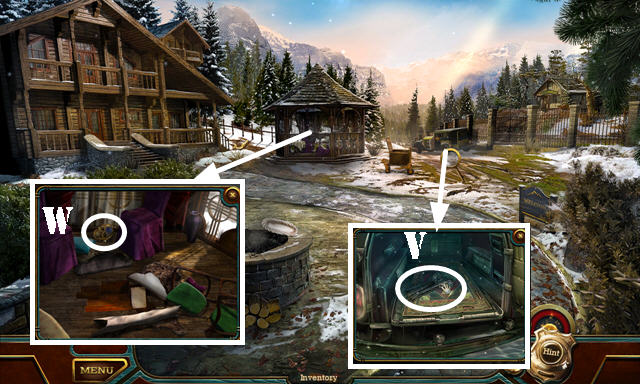
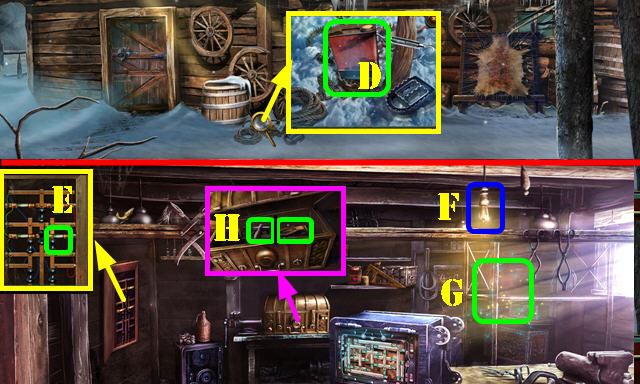
- Play the HOP (T) to receive the PURCHASED ROPE.
- Take the TENT STAKE (U).
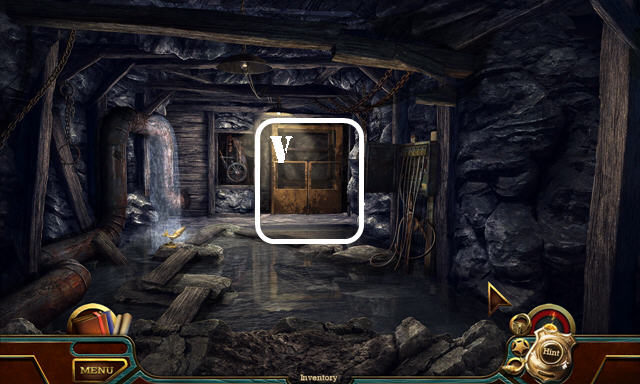
- Use the NAME PLATE; look at the note and take the POSTAL BADGE (V).
- Place the ROPE EVIDENCE on the PURCHASED ROPE for a puzzle.
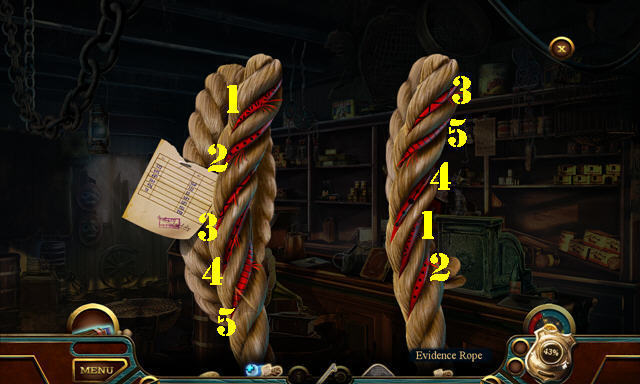
- Solution (1-5).
- Receive the EVIDENCE ROPE.
- Walk down.
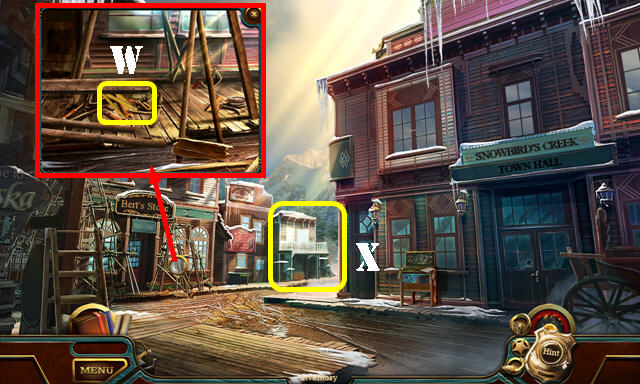
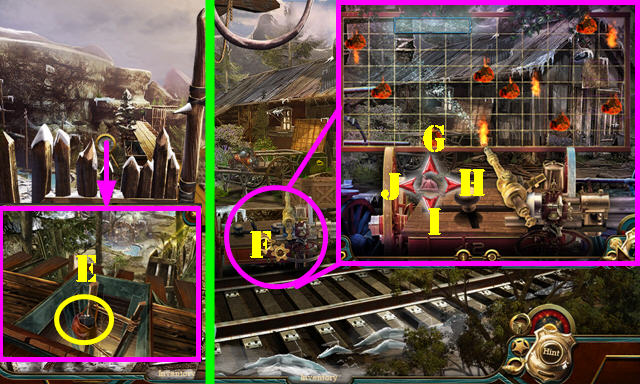
- Use the TENT STAKE; take the FOLDING RULER (W).
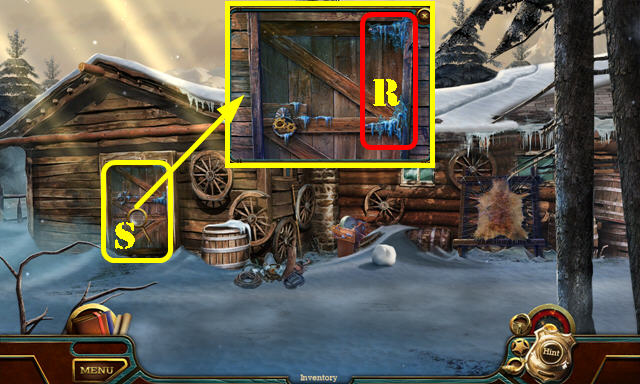
- Go to the Side Street (X).
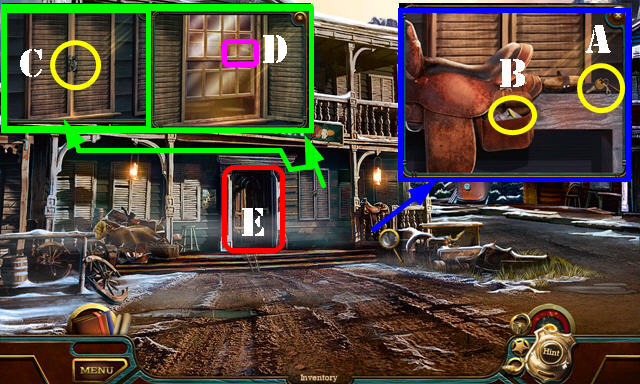
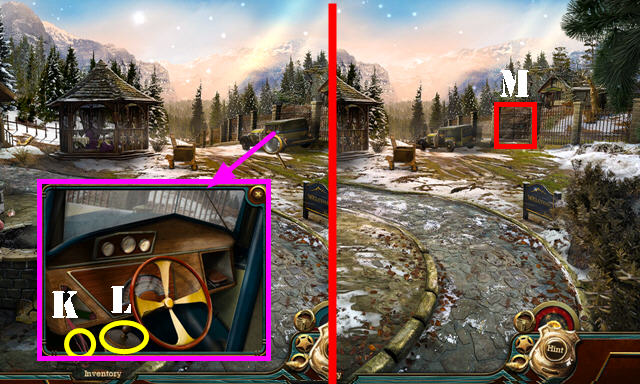
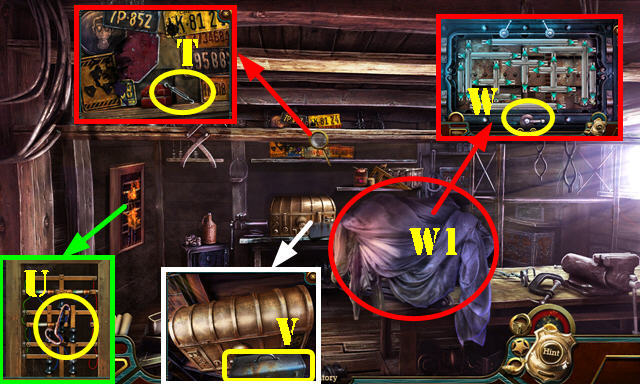
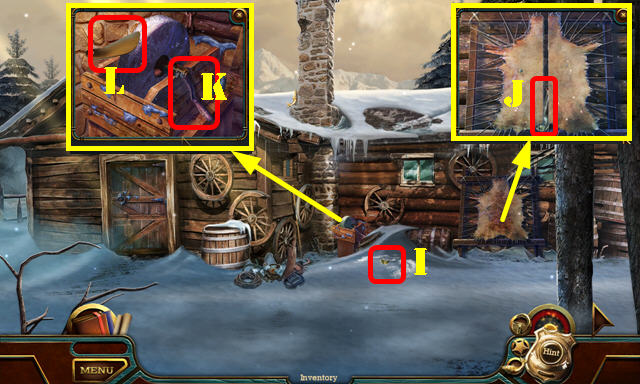
- Take the CAR KEYS (A). Place the POSTAL BADGE; take the REGISTER BUTTONS 1/2 (B).
- Take the COWBOY SPUR and select the latch (C). Use the FOLDING RULER (D); take the PHONE NUMBER.
- Enter the Tavern (E).
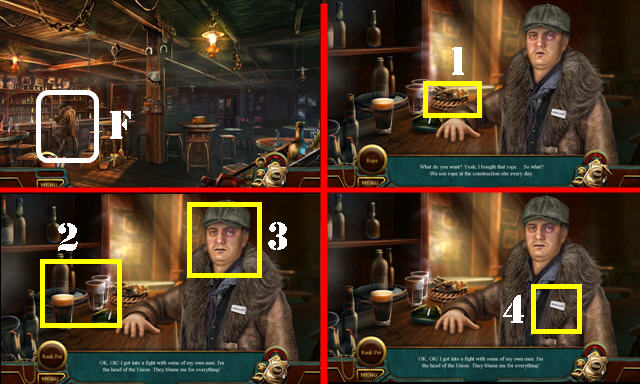
- Give the EVIDENCE ROPE (F).
- Select 1-4.
- Take the DEMAGNETIZED COMPASS (G).
- Use the REFRIGERATOR MAGNET on the DEMAGNETIZED COMPASS; receive the COMPASS.
- Take the MONEY CAN (H).
- Look at the newspaper; and use the PAPER BINDER (I). Select matching pairs (J). The other glove is below the skillet. Take the REGISTER BUTTONS 2/2 (K).
- Use the COWBOY SPUR on the MONEY CAN; take the RED MAGPIE.
- Walk down twice.
- Place the RED MAGPIE; take the WINDING KEYS 1/2 (L).
- Go into the General Store.
- Place the REGISTER BUTTONS 2/2 (M); take the YELLOW OWL (N).
- Walk down.
- Place the YELLOW OWL; take the BOTTLE OPENER (O).
- Enter the Mayor's Office.
- Open the case and use the BOTTLE OPENER (P); take the RIFLE HAMMER (Q).
- Return to the Tavern.
- Use the RIFLE HAMMER; take the HOOK (R).
- Walk down.
- Use the HOOK (S); play the HOP to receive the ROTARY DIAL.
- Return to the Tavern.
- Place the ROTARY DIAL and PHONE NUMBER; dial 5264 (T); take the SNOWBIRD CREST (U).
- Return to the Mayor's Office.
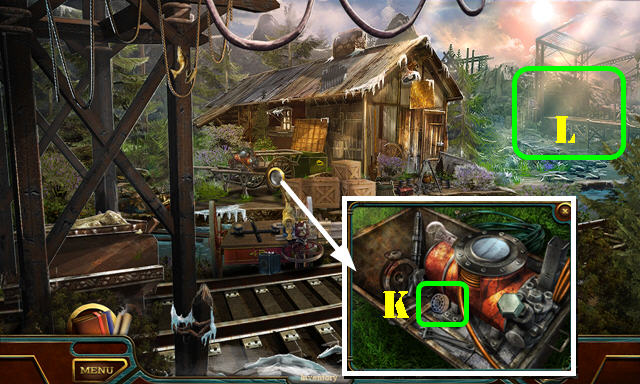
- Place the SNOWBIRD CREST; take the NAIL CLIPPER and TRACING PAPER (V).
- Walk down.
- Open the brochure and place the TRACING PAPER on it; take the TRACED MAP (W).
- Go to Side Street.
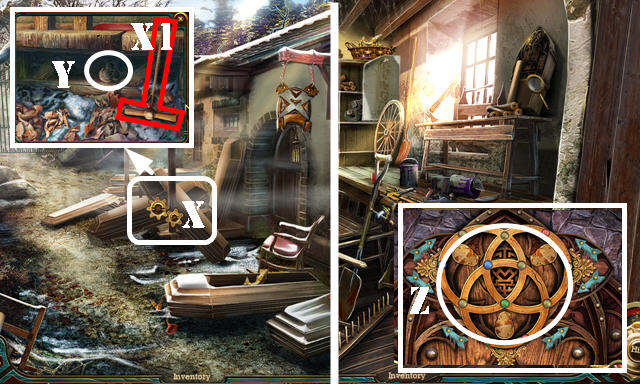
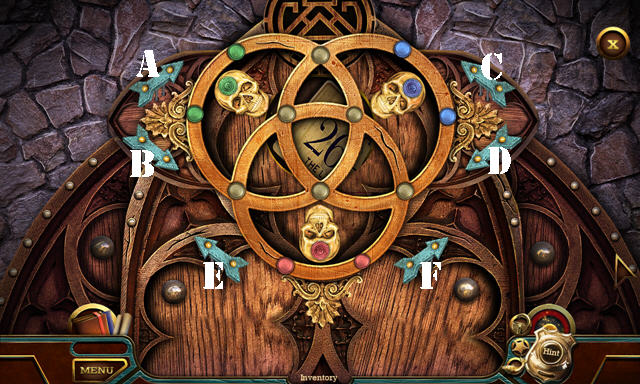
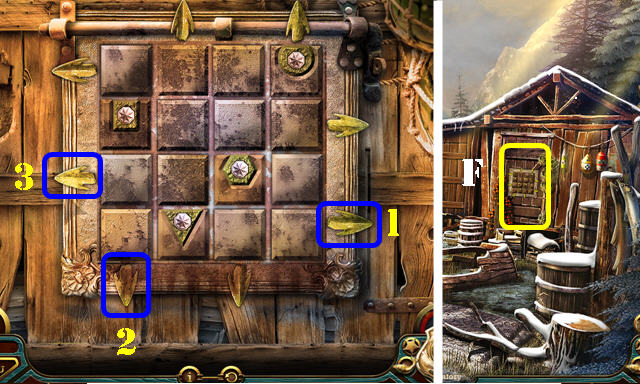
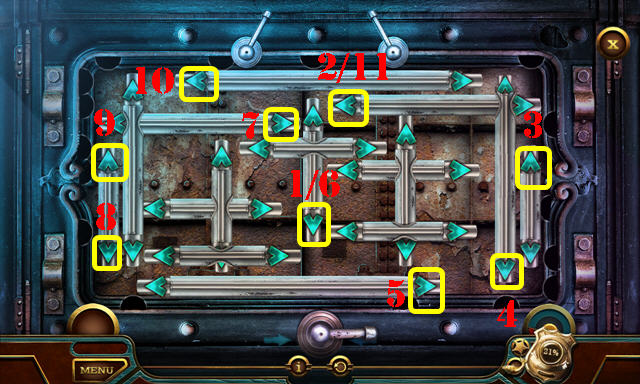
- Place the COMPASS and remove the lock (X). Place the TRACED MAP for a puzzle (Y).
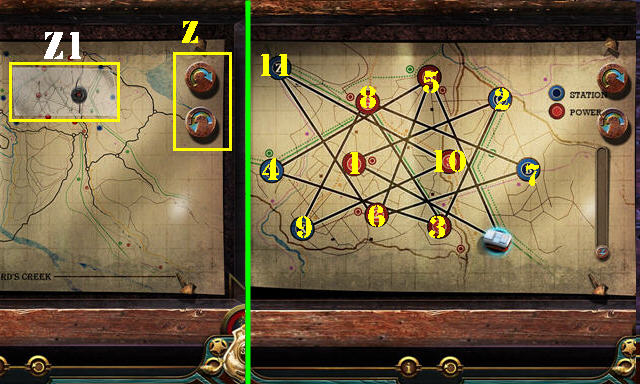
- Solution one; use the buttons (Z) to rotate the map. Solution (Z1).
- Solution two (1-11).
Chapter 2: The Lodge
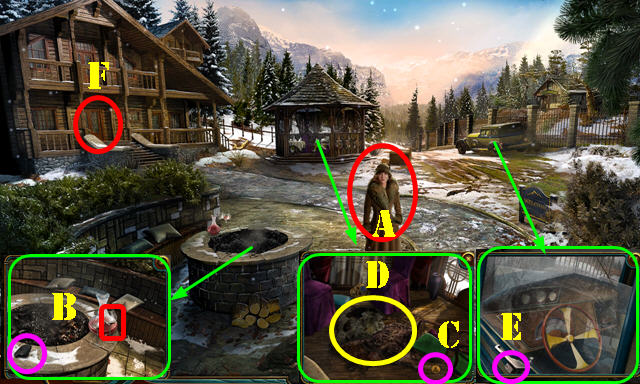
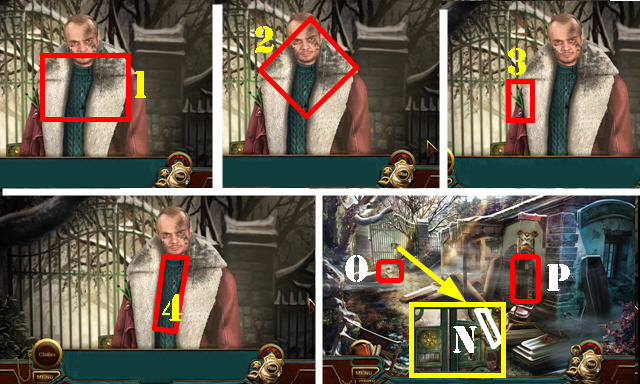
- Talk to Iris (A).
- Take the GLASS and CHARCOAL (B).
- Take the NUMBERED COINS 1/2 (C); select the coats 3x (D).
- Use the CAR KEYS; receive the CHAIN PIECE (E).
- Enter the Lodge Lobby (F).
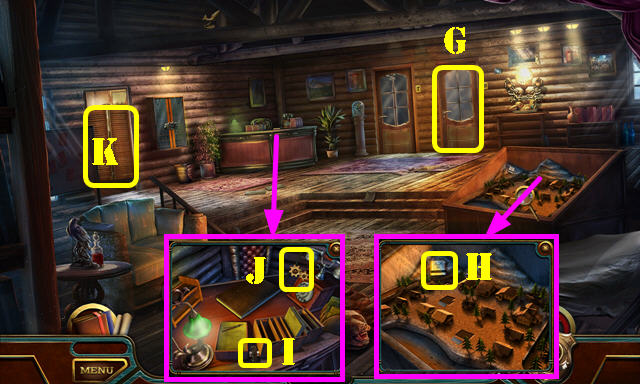
- Try to open the door (G).
- Remove the cover and open the case; take the MATCHBOOK (H).
- Take the RELEASE KNOB (I). Use the NAIL CLIPPER; receive the PHONE CORD (J).
- Go to the Living Room (K).
- Lift the cover; take MONEY CLIP and SERVING PLATTER (L).
- Place the CHAIN PIECE (M); take the STURDY STICK (N).
- Take the SKULLS 1/3 (O) and PAPERWEIGHT (P). Place the RELEASE KNOB on the typewriter; look at the note (Q) and take the CARRIAGE RETURN (R).
- Walk down twice.
- Use the STURDY STICK (S); play the HOP to receive the LODGE MODEL.
- Use the CARRIAGE RETURN; look at the note and take the CITY PLANS (T).
- Use the PHONE CORD; take the WINDING KEYS 2/2 (U). Remove the cover (V).
- Return to the Lodge Lobby.
- Place the WINDING KEYS 2/2 and select A-B-A; take SAVAGE'S RING (C).
- Place the CITY PLANS and LODGE MODEL (D); take the CLAY (E).
- Select the CLAY 3x; use the SAVAGE'S RING and GLASS on it; receive the SCULPTED SHAPES.
- Walk down.
- Place the SCULPTED SHAPES and SERVING PLATTER; take the MONOGRAM COINS (F).
- Go to the Lodge Lobby.
- Place the MONOGRAM COINS for a puzzle (G).
- Solution: K-J-I-H-K-H-I-H-I-H.
- Take the MAID'S KEYS (L).
- Use the MAID'S KEYS to automatically enter Marlon's Room (M).
- Take JOSEPH'S CANE (N).
- Select 1-3.
- Select the notes on the screen.
- Use the MONEY CLIP; take the BROKEN UMBRELLA and LIGHT SWITCH (O).
- Remove the canvas; take the HANDKERCHIEF and BRUSH (P).
- Walk down.
- Place the LIGHT SWITCH (Q); take the LAMPSHADE (R).
- Go to the Living Room.
- Use the HANDKERCHIEF; take the WET HANDKERCHIEF (S).
- Use the MATCHBOOK and place the LAMPSHADE (T). Select (I-II-III)- (II-I-III)-(II-III-1) (U). Take the NUMBERED COINS 2/2 (V).
- Return to Marlon's Room.
- Use the WET HANDKERCHIEF and place the NUMBERED COINS 2/2 for a puzzle (@).
- Solution: (DE-HI)-(IJ-FG)-(GH-IJ)-(FG-HI)-(GH-HI)-(CD-GH)-(BC-CD)-(AB-DE)-(CD-FG).
- Look at the note; take the ALLIGATOR CLIPS; you'll automatically receive the METAL DETECTOR (@1).
- Return to the Lodge Driveway.
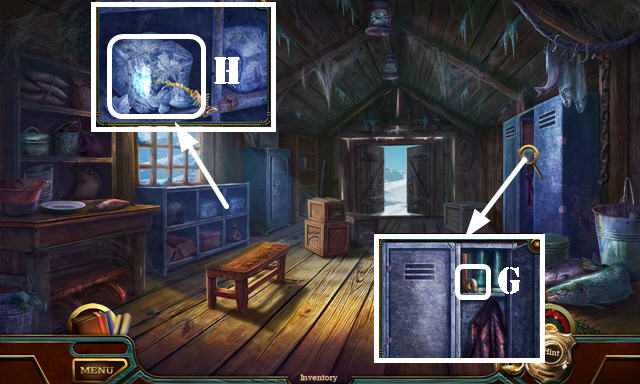
- Use the ALLIGATOR CLIPS (K) and PAPERWEIGHT (L).
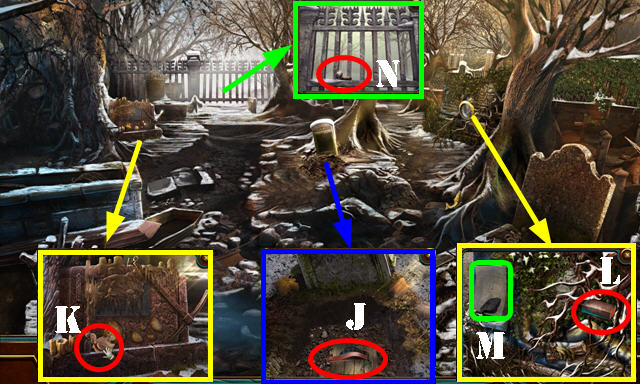
- Go to the Cemetery Gate (M).
- Select 1-4.
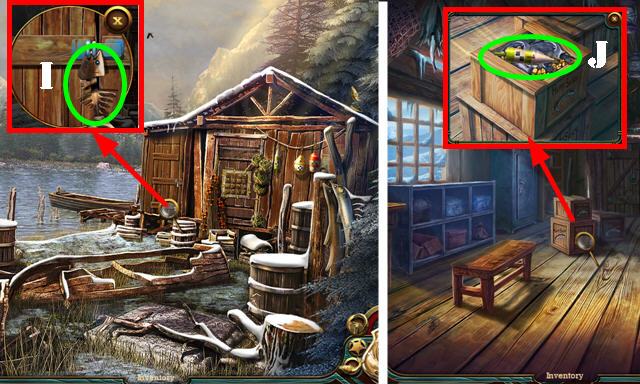
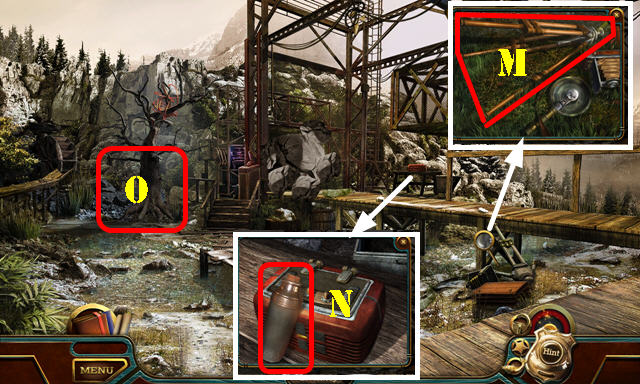
- Take the VISE HANDLE (N) and PAPER (O).
- Enter the Coffin Maker's Shed (P).
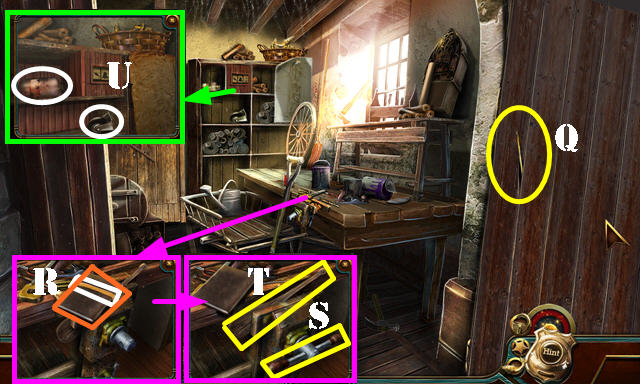
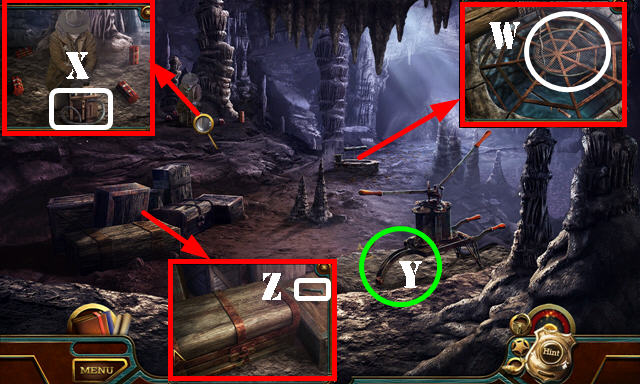
- Remove the sign; use the BRUSH; receive the CROCHET HOOK (Q).
- Take the RUBBER BAND (R); open the book (orange) and select the pages.
- Place the VISE HANDLE (S); take the SMALL PADDLE (T).
- Take the TROLLEY WHEEL and PAINT THINNER (U).
- Use the RUBBER BAND on the BROKEN UMBRELLA; receive the UMBRELLA.
- Return to Lodge Driveway.
- Place the TROLLEY WHEEL; take the COFFIN TROLLEY (V).
- Use the PAINT THINNER; take the SKULLS 2/3 (W).
- Go to the Cemetery Gate.
- Use the COFFIN TROLLEY (X); take the PUMP HANDLE (X1). Use the UMBRELLA; take the SKULLS 3/3 (Y).
- Go to the Coffin Maker's Shed.
- Place the SKULLS 3/3 for a puzzle (Z).
- Solution: Ax2-Dx2-E-A.
- Take the LICENSE PLATE.
- Walk down.
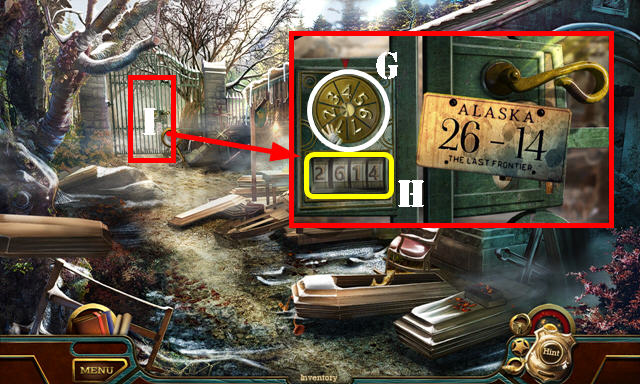
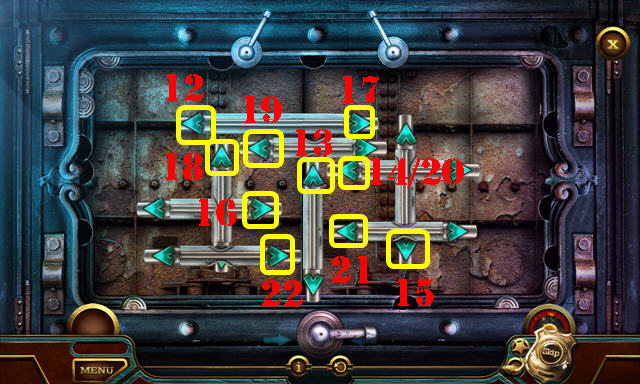
- Place the LICENSE PLATE for a puzzle. Drag the wheel (G) until the first number on the tumbler (H) lands on 2 and stop. Follow the same steps for 6, 1 and 4.
- Enter the Cemetery (I).
Chapter 3: The Cemetery
- Use the METAL DETECTOR on the scene.
- Use the SMALL PADDLE; take the RIBBON (J).
- Take the WAX CHUNK (K) and SANDING SPONGE (L).
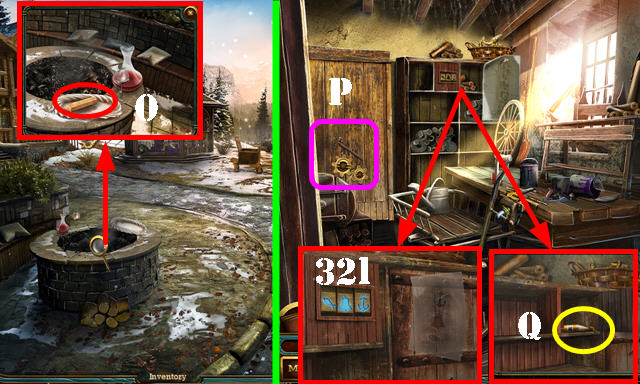
- Place the PAPER and use the CHARCOAL; receive the TRACED PATTERN (M).
- Take the CRANK (N).
- Return to the Lodge Driveway.
- Place the WAX CHUNK; take the WAX STICK (O).
- Return to the Coffin Maker's Shed.
- Use the WAX STICK (P): play the HOP to receive the STAPLE REMOVER.
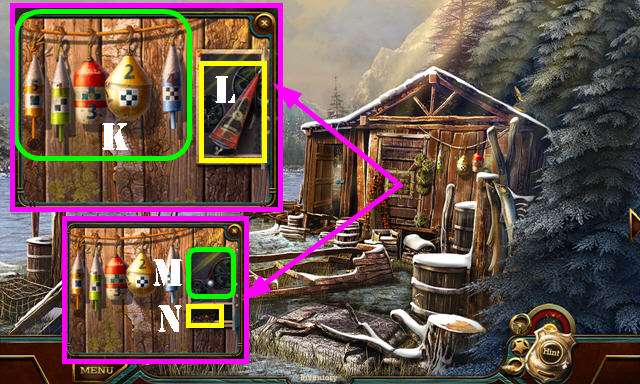
- Place the TRACED PATTERN and select 1-2-3; take the BUOYS 1/2 (Q).
- Travel to Lodge Driveway.

- Use the STAPLE REMOVER; take the CARPET (R).
- Return to the Cemetery.
- Place the CARPET (S); go to the River Shack (T).
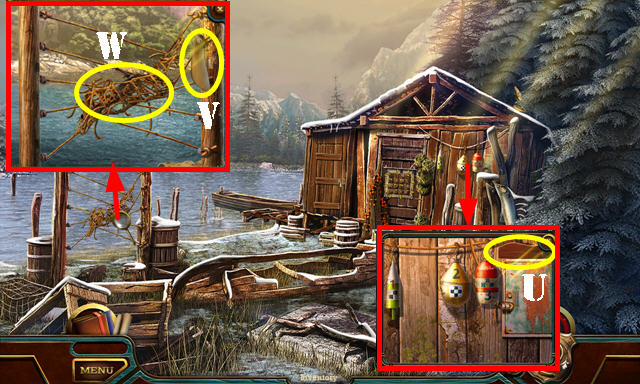
- Take the WOOD PLANE (U).
- Take the SHOEHORN (V). Use the CROCHET HOOK (W); take the HOLE BORER.
- Walk down.
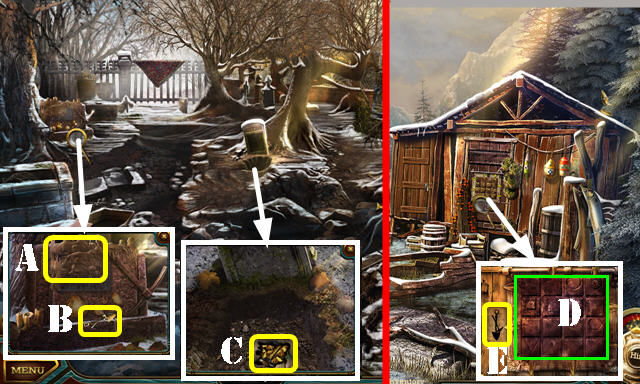
- Use the WOOD PLANE (A); take the MINER'S EMBLEM (B).
- Use the HOLE BORER; take MCKINNEY'S PICKAXE (C).
- Go forward.
- Use the SANDING SPONGE (D) and MINER'S EMBLEM (E) for a puzzle.
- Solution: 1-2-3-3.
- Go into the Shack Interior (F).
- Take the DUCT TAPE (G).
- Use MCKINNEY'S PICKAXE (H); receive the FISHBONE KEY.
- Walk down.
- Use the FISHBONE KEY (I); play the HOP to get the BROKEN PUMP.
- Place the PUMP HANDLE and use the DUCT TAPE on the BROKEN PUMP; receive the PUMP.
- Go to the Shack Interior.
- Use the PUMP; select the salmon and take the BUOYS 2/2 (J).
- Walk down.
- Place the BUOYS 2/2 for a puzzle. Arrange as shown (K).
- Take the FIRE EXTINGUISHER (L). Use the RIBBON and CRANK (M); take the WOODEN ORNAMENT (N).
- Look at the note on the FIRE EXTINGUISHER.
- Go to the Cemetery Gate.
- Place the WOODEN ORNAMENT (O); take the RUSTY SAW (O1).
- Return to the Shack Interior.
- Use the RUSTY SAW and open the bag; take IRIS' DIRECTIONS (P).
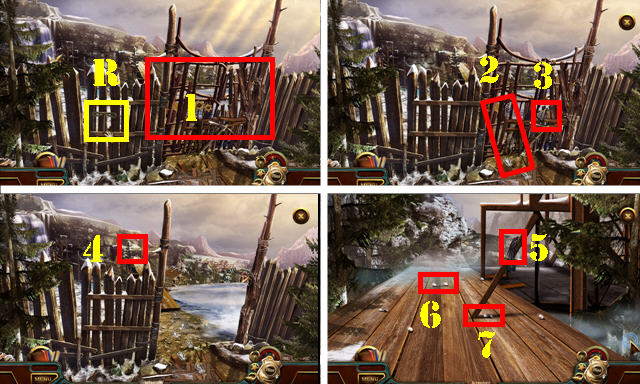
- Place IRIS' DIRECTIONS for a puzzle (Q).
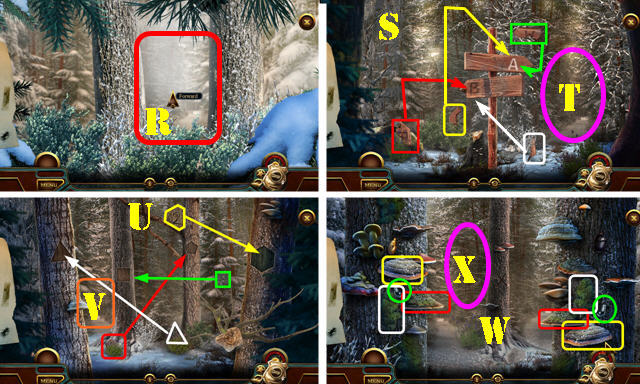
- Select the leaves twice; go forward (R).
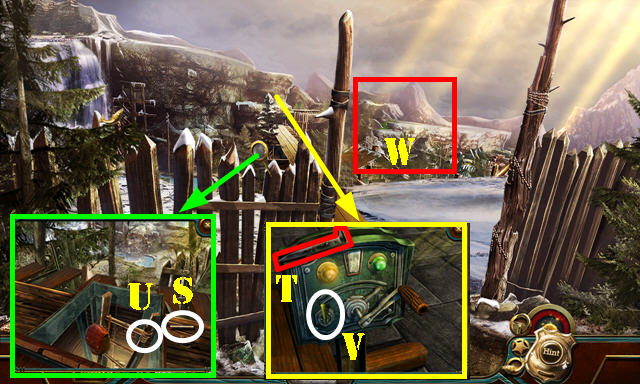
- Assemble the road sign as shown (S); go right (T).
- Place the shapes (U). Go forward (V).
- Find matching pairs (W). Go forward (X).
Chapter 4: The Cabin
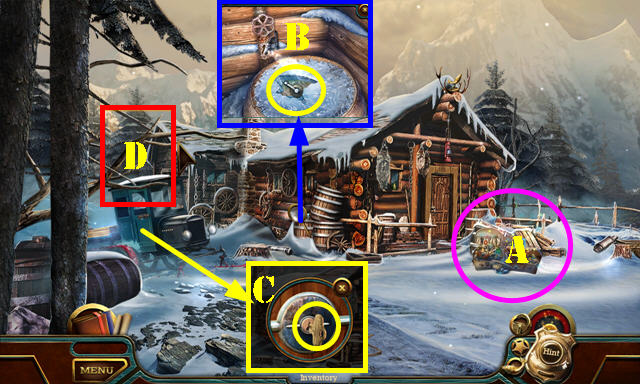
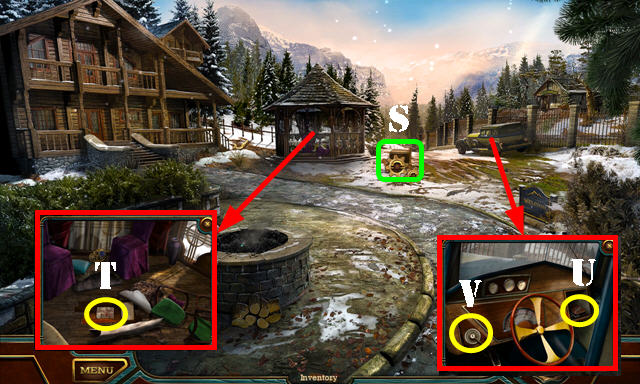
- Play the HOP (A) to get the SNOWMOBILE KEYS.
- Take the SAFE HANDLE (B).
- Use the SNOWMOBILE KEYS (C).
- Go to the Cabin Yard (D).
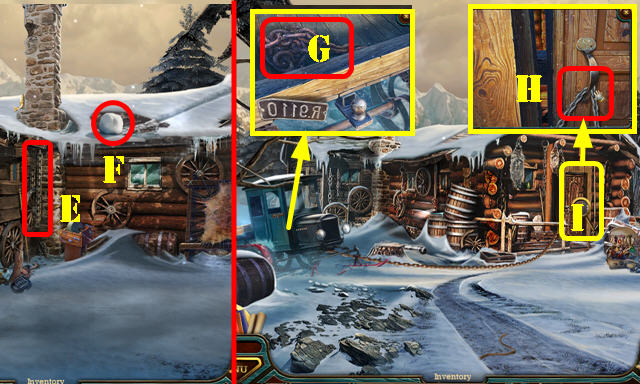
- Take the CHAIN (E).
- Use the CHAIN (F).
- Walk down.
- Use the CHAIN (G).
- Select the chain (H).
- Go into the Cabin Parlor (I).
- Give JOSEPH'S CANE (J). Select 1-5.
- Walk down.
- Take the BELLOWS (K).
- Go to the Cabin Parlor.

- Look at the note; take the ACETONE (L) and open the drawer (M).
- Take the SHOE WAX (N).
- Use the BELLOWS (O); take the STEAMING KETTLE (P).
- Use the STEAMING KETTLE; open the window; take the PHOTO OF IRIS and BRANDING IRON (Q).
- Place the BRANDING IRON (O); take the HEATED BRANDING IRON.
- Go to the Cabin Yard.
- Use the HEATED BRANDING IRON (R).
- Enter the Cabin Workshop (S).
- Use the ACETONE and select 3x; take the TENSIONER 1/3 (T).
- Use the FIRE EXTINGUISHER; take the MEAT HOOK (U).
- Take the REPAIR KIT (V).
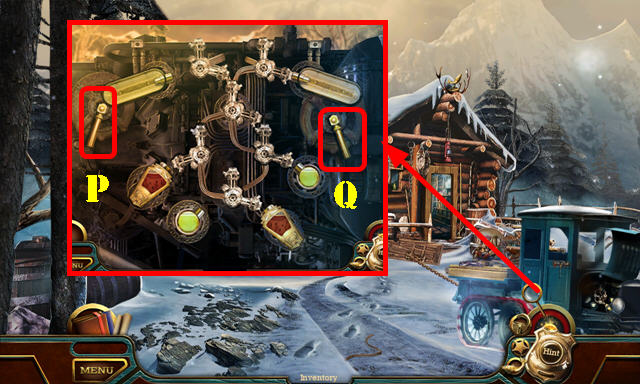
- Remove the sheet (W1); place the SAFE HANDLE for a puzzle (W).
- Solution (1-11) and (12-22).
- Take the WRENCH.
- Walk down twice.
- Use the WRENCH; take the POTATO PEELER (A).
- Go into the Cabin Parlor.
- Use the POTATO PEELER; lift the rug and take the FUSE (B).
- Use the MEAT HOOK (C); take the NUTCRACKER and TENSIONER 2/2.
- Return to the Cabin Yard.
- Use the TENSIONER 2/2; take the MOTOR OIL (D).
- Go into the Cabin Workshop.
- Place the FUSE (E); select the bulb (F); play the HOP (G) to receive the SNOW SHOVEL.
- Use the NUTCRACKER; take the IRON HANDLE and STRAP CUTTER (H).
- Walk down.
- Use the SNOW SHOVEL; take the BROOCH (I).
- Use the SHOE WAX and STRAP CUTTER; receive the STRENGTHENED LEATHER. Take the ALCOHOL (J).
- Place the IRON HANDLE (K) and SHOEHORN (L); receive the THIN SHOEHORN.
- Go to the Cabin Workshop.
- Place the BROOCH; take the SPRING (M).
- Return to the Cabin Parlor.
- Use the THIN SHOEHORN and place the SPRING (N). Take the EXHAUST KEY (O).
- Walk down.
- Open the REPAIR KIT; place the MOTOR OIL, ALCOHOL and EXHAUST KEY.
- Place the REPAIR KIT for a puzzle. Solution: P-Qx3-Px3-Qx3-Px3-Qx3-P.
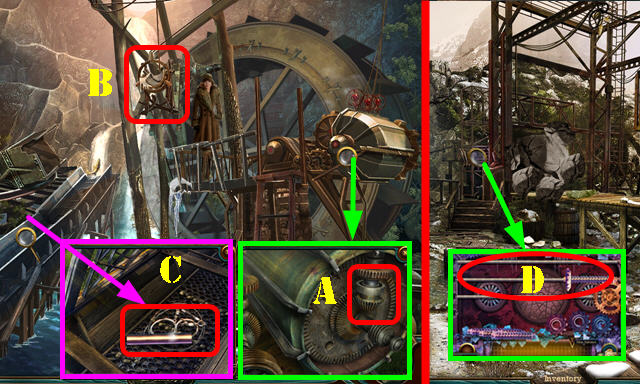
- Go right to the Overlook.
- Take the SOCKET WRENCH (R).
- Use the PHOTO OF IRIS (1); select 1-7; receive the ELEVATOR SWITCH.
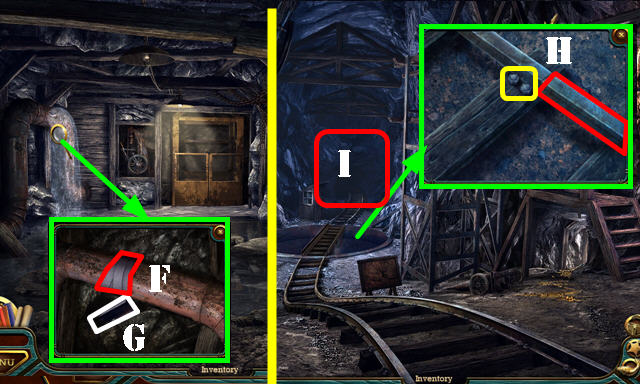
- Take the STEEL ROD 1/4 (S) and RAILROAD SPIKE (T).
- Use the STRENGTHENED LEATHER (U).
- Place the ELEVATOR SWITCH (V).
- Go to the Mining Shed (W).
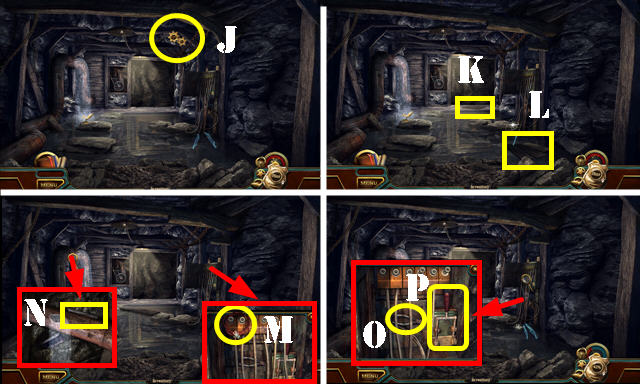
Chapter 5: The Mining Shed
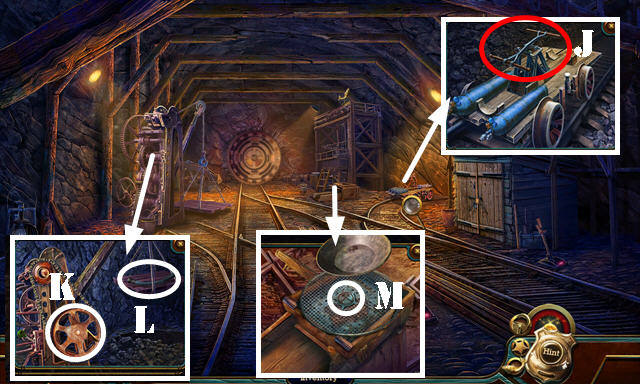
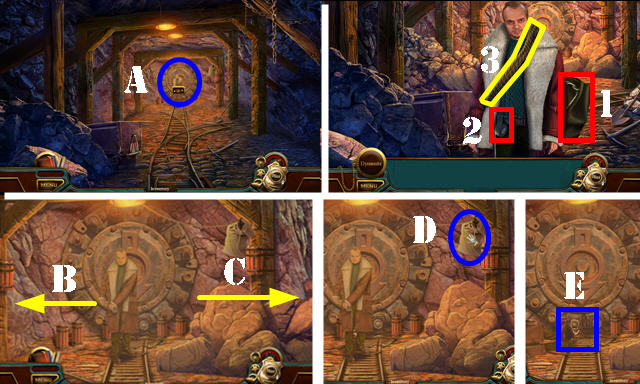
- Use the SOCKET WRENCH (A).
- Take the CAN OPENER (B).
- Use the RAILROAD SPIKE (C); take the STEEL ROD 2/4 (D).
- Walk down.
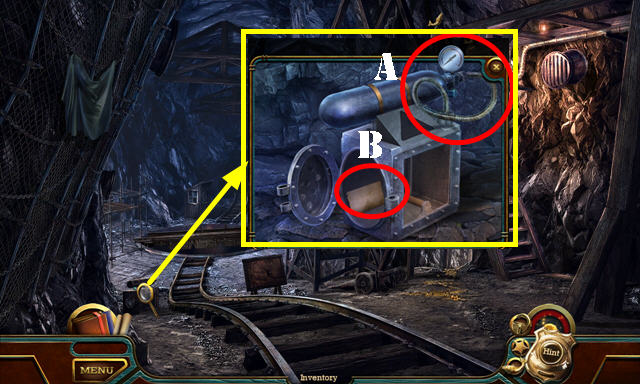
- Use the CAN OPENER; take the BATTERY (E).
- Go to the Mining Shed.
- Place the BATTERY for a puzzle (F).
- Solution: H-I-H-G-I-J-G-J-I-J-G-I-J-G-I-H-I-H-I.
- Take the BALL BEARING (K).
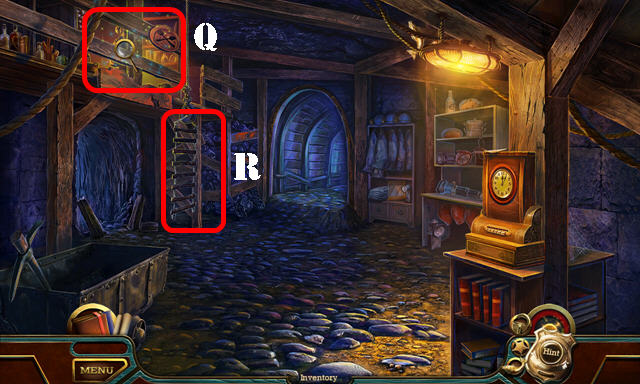
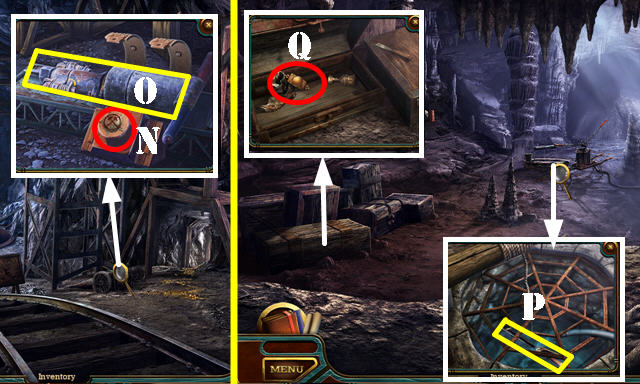
- Go to the Mine Entrance (L).
- Take the TRIPOD (M) and FULL BOTTLE (N).
- Go to the Water Wheel (O).
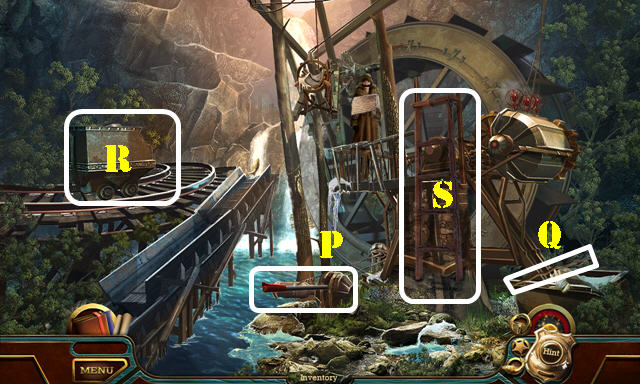
- Pull the lever (P); take the WALKING STICK (Q).
- Push the cart (R).
- Select the ladder (S) and use the TRIPOD on it.
- Walk down.
- Use the WALKING STICK to receive the STEEL ROD 3/4 (T).
- Walk down.
- Use the FULL BOTTLE; take the SPATULA and KNIFE HANDLE (U).
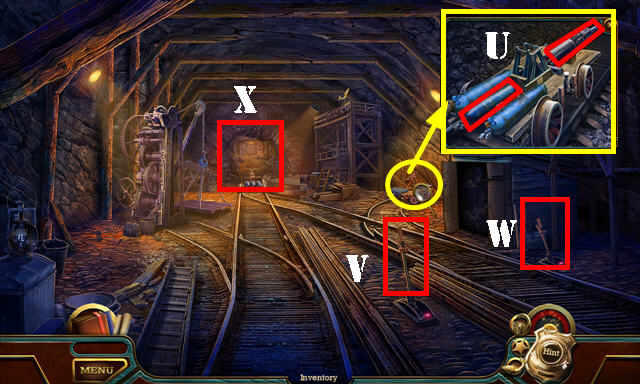
- Return to the Water Wheel.
- Use the KNIFE HANDLE to get the CUFFLINK (V).
- Walk down.
- Use the CUFFLINK (W); take the FLASHBULB (W).
- Walk down.
- Select the FLASHBULB twice; receive the BULB and ALUMINUM FOIL.
- Place the BULB (X).
- Select 1-4.
- Select the roof (Y); play the HOP to get the ENGINEER'S NOTEPAD.
- Go to the Mine Entrance.
- Place the ENGINEER'S NOTEPAD and look at the note; take the BACK SCRATCHER and PLUMB BOB (Z).
- Go to the Water Wheel.
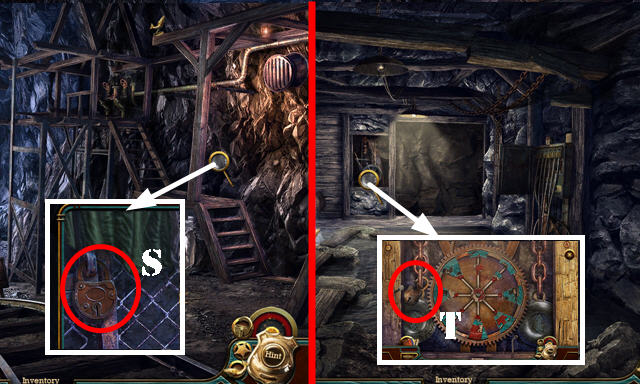
- Place the BALL BEARING and PLUMB BOB (A).
- Select the contraption (B).
- Use the ALUMINUM FOIL; take the STEEL ROD 4/4 and WIRE SAW (C).
- Walk down.
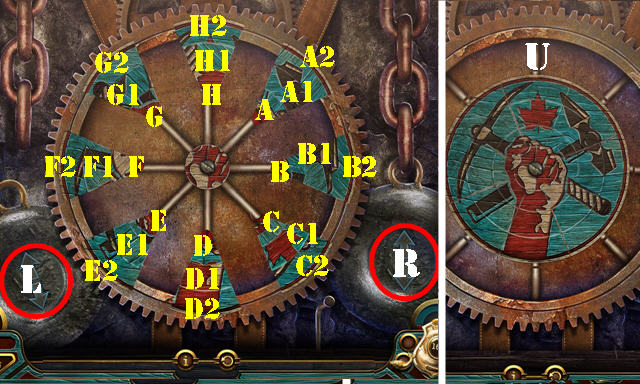
- Place the STEEL ROD 4/4 for a puzzle (D).
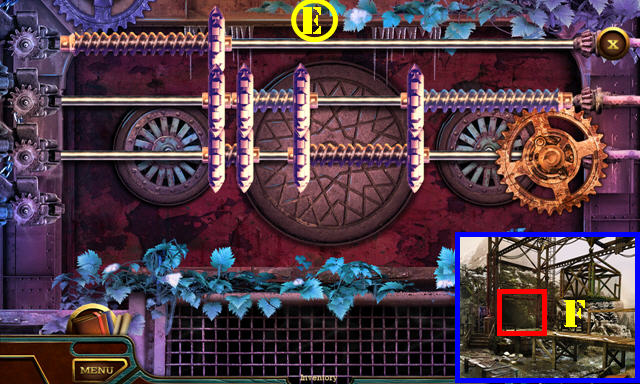
- Solution (E).
- Enter the Abandoned Mine (F).
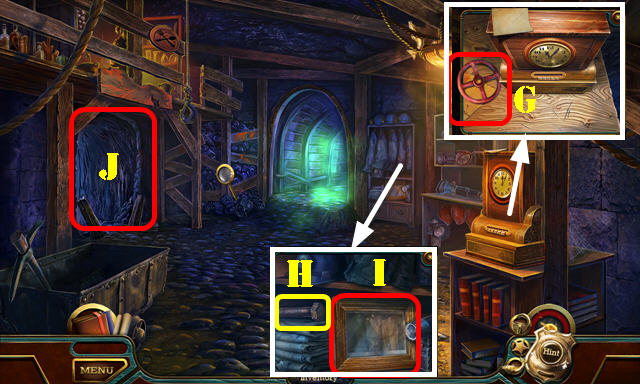
- Look at the envelope; take the VALVE HANDLES 1/2 (G).
- Take the RAIL BOLTS 1/2 (H).
- Use the SPATULA; take the MINER'S PHOTOGRAPH (I).
- Go to the Miner's Infirmary (J).
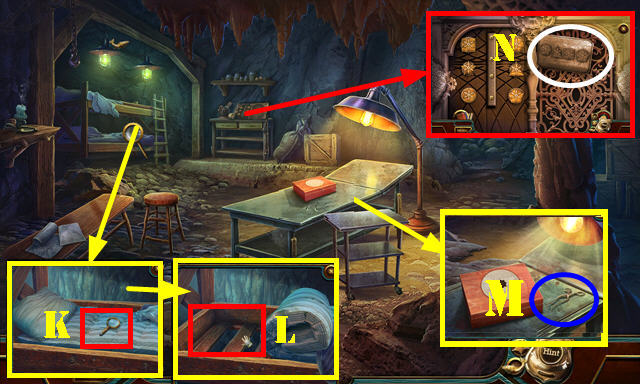
- Move the cover; take the MAGNIFYING GLASS (K).
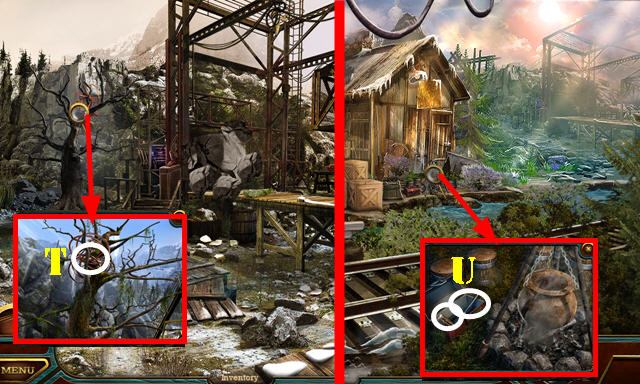
- Use the BACK SCRATCHER; take the BED SLATS (L).
- Take the MEDICAL RETRACTOR (M).
- Use the MAGNIFYING GLASS on the MINER'S PHOTOGRAPH; take the DOCTOR'S NUMBER.
- Place the DOCTOR'S NUMBER for a puzzle (N).
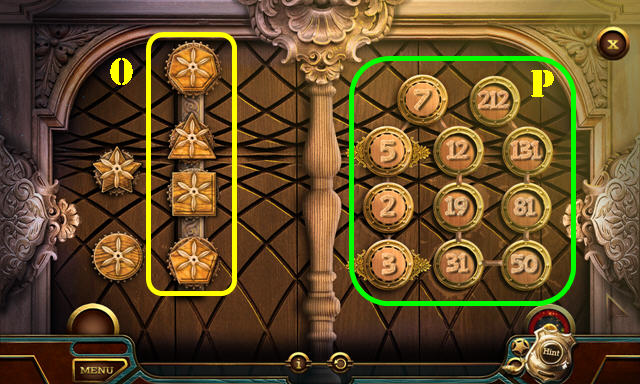
- Place the tokens as shown (O).
- Select the numbers as shown (P).
- Take the TIMECARD.
- Walk down.
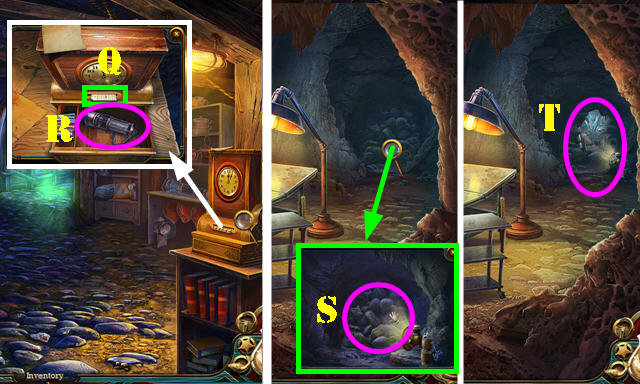
- Insert the TIMECARD (Q); take the CARBIDE LAMP (R).
- Go to the Miner's Infirmary.
- Place the CARBIDE LAMP; select the rocks (S).
- Go to Crystal Cave (T).
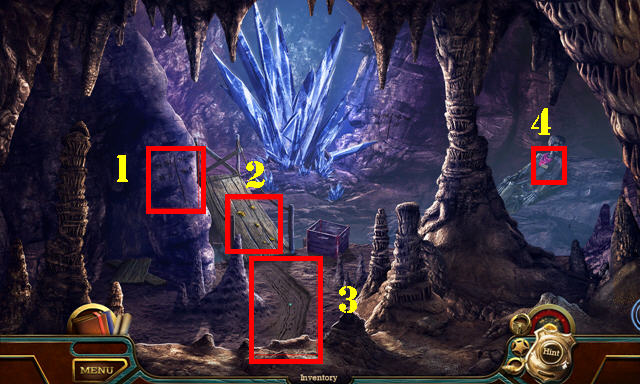
- Select 1-4.
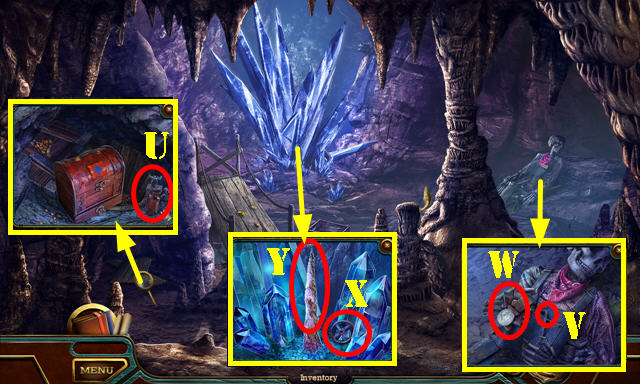
- Select the JACK and then take it (U).
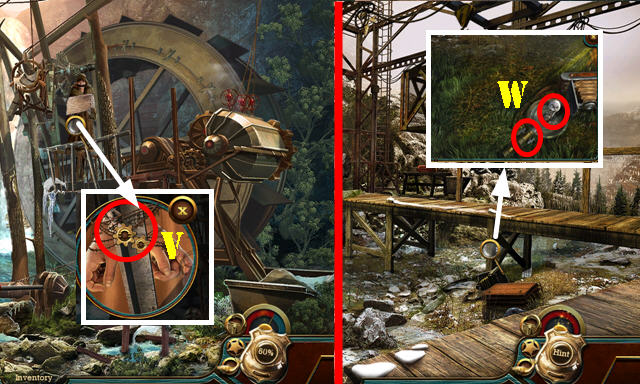
- Look at the note; take the HEX WRENCH (V). Use the MEDICAL RETRACTOR; take the LEATHER BELT (W).
- Take the VALVE HANDLES 2/2 (X). Use the WIRE SAW; take the STALAGMITE (Y).
- Return to the Abandoned Mine.
- Select the stones; use the JACK; take the NURSE'S PENDANT (A).
- Go to the Miner's Infirmary.
- Use the NURSE'S PENDANT; take the SURGICAL SUTURE (B).
- Go to the Crystal Cave.
Chapter 6: Crystal Cave
- Use the SURGICAL SUTURE; take the GAS MASK (C).
- Return to the Abandoned Mine.
- Use the GAS MASK (D); go forward to the Tunnel.
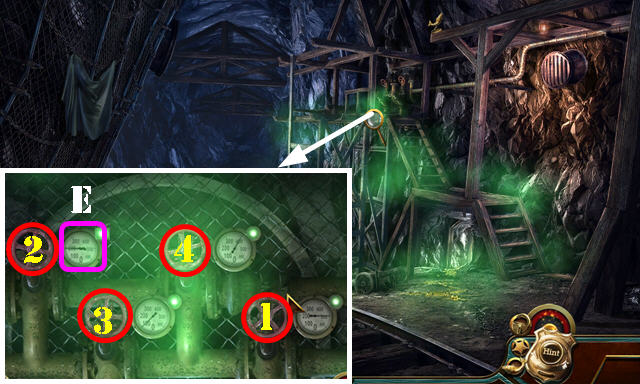
- Place the VALVE HANDLES 2/2 for a puzzle.
- Drag each valve in the order shown (1-4) until each light to the right of it turns green.
- Take the GAUGE (E).
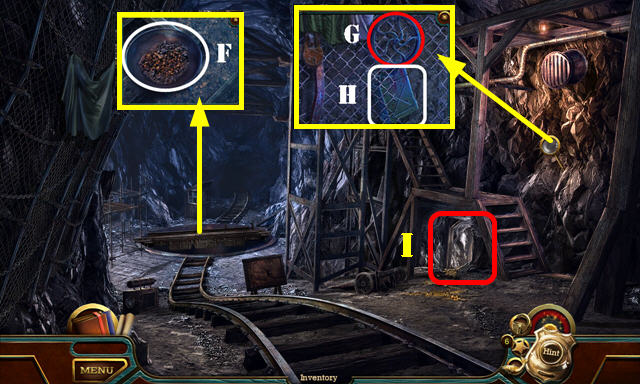
- Take the GOLD PAN (F) and METAL WHEEL (G).
- Use the STALAGMITE; take the GASOLINE TANK (H).
- Go to the Flooded Shaft (I).
- Use the LEATHER BELT (J).
- Select the boards (K-L).
- Take the ELECTRIC CABLE (M) and STONE CHISEL (N).
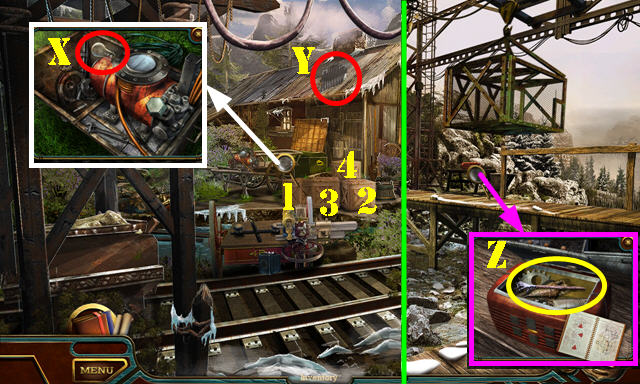
- Use the HEX WRENCH twice; take the WIRECUTTERS (O) and flip the switch (P).
- Walk down twice.
- Use the ELECTRIC CABLE on the BED SLATS; receive the IMPROVISED LADDER.
- Place the IMPROVISED LADDER (Q); play the HOP (R) to receive the GASOLINE WELDER.
- Go forward.
- Use the GASOLINE TANK on the GASOLINE WELDER; take the WELDER.
- Use the WELDER; take the CUT PADLOCK (S).
- Go to the Flooded Shaft.
- Place the CUT PADLOCK for a puzzle (T).
- Solution: B-Lx4-C-R-E-Lx2-D-Lx2-G-Rx2-H-L-F-Lx3-D1-D2-L-A-Lx2-G1-H1-Lx2.
- C1-B1-Lx2-F1-L-A1-L-E1-A2-R-E2-F2-H2-R-B2-Rx3-G2-C2-Rx4. Solved puzzle (U).
- Go to the Underground Lake (V).
- Take the SIEVE (W) and RUBBER TUBE (X).
- Place the METAL WHEEL (Y).
- Take the RAIL BOLTS 2/2 (Z).
- Walk down twice.
- Place the RUBBER TUBE and GAUGE (A); take the BOMB DISPOSAL INSTRUCTIONS (B).
- Return to the Underground Lake.
- Place the BOMB DISPOSAL INSTRUCTIONS (C). Use the WIRECUTTERS (D). Remove the two bolts (E) to get the DUCT TAPE.
- Select 1-3.
- Walk down.
- Use the DUCT TAPE (F); take the RAIL PIECE (G).
- Walk down.
- Place the RAIL PIECE and RAIL BOLTS 2/2 (H).
- Go to the Railroad Siding (I).
- Take the HANDCAR HANDLE (J).
- Use the STONE CHISEL (K); take the WATER HOSE (L).
- Use the SIEVE and GOLD PAN; take the UNION EMBLEM (M).
- Walk down.
- Place the UNION EMBLEM (N); take the PNEUMATIC DRILL (O).
- Return to the Underground Lake.
- Use the WATER HOSE; take the RAILWAY SWITCH (P).
- Use the HANDCAR HANDLE; take the DOORKNOB (Q).
- Return to the Railroad Siding.

- Place the DOORKNOB (R); play the HOP to receive the SAFETY LABEL.
- Walk down.
- Place the SAFETY LABEL (S); take the OXYGEN TANK (T).
- Go forward.
- Place the PNEUMATIC DRILL and OXYGEN TANK (U).
- Place the RAILWAY SWITCH (V).
- Select W-Vx2.
- Go to the Mining Core (X).
- Talk to the man (A).
- Select 1-3.
- Duck left (B), duck right (C), duck left (B), duck right (C).
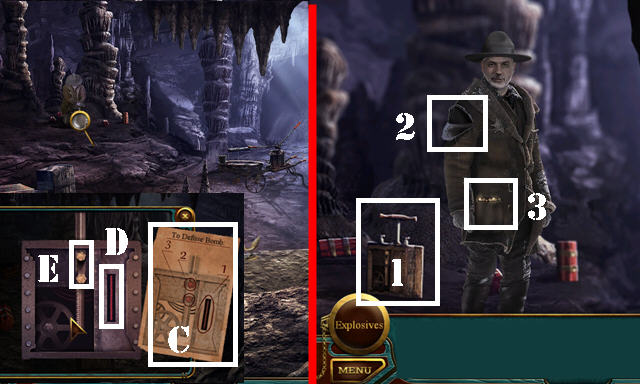
- Select the sack (D) and dynamite (E).
- Congratulations, you've completed Dead Reckoning: Snowbird's Creek!
Created at: 2016-09-25