
Walkthrough Menu
- General Tips
- Chapter 1: The Graveyard
- Chapter 2: The Catacombs
- Chapter 3: The Docks
- Chapter 4: The Hallway
- Chapter 5: The Armory
General Tips
- This is the official guide for Demon Hunter 3: Revelation.
- This guide will not mention each time you have to zoom into a location; the screenshots will show each zoom scene.
- Hidden-object puzzles are referred to as HOPs. This guide will not show HOP solutions. It will identify the location of the HOP and the inventory item acquired.
- This guide will show solutions for non-random puzzles. Please read the in-game instructions for each puzzle.
- In this game, you will sometimes have to select the new scene to trigger dialog, cut-scenes, or tasks prior to interacting with the scene.
Chapter 1: The Graveyard
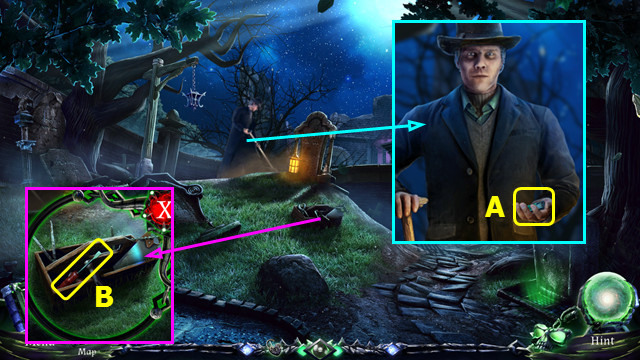
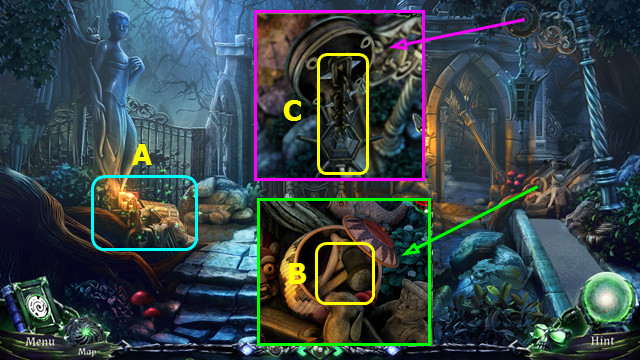
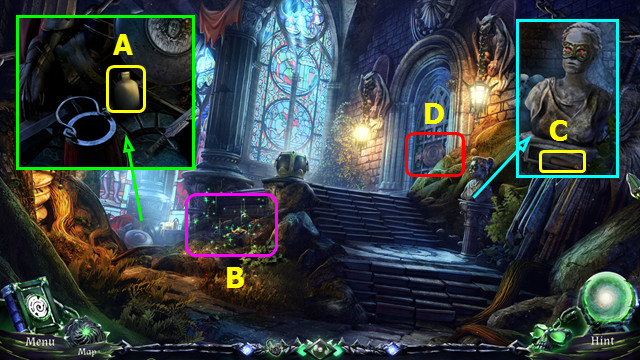
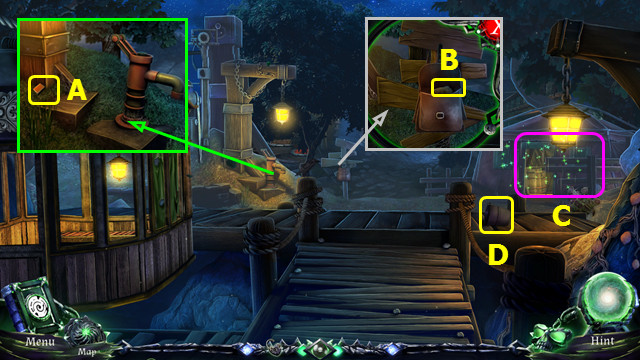
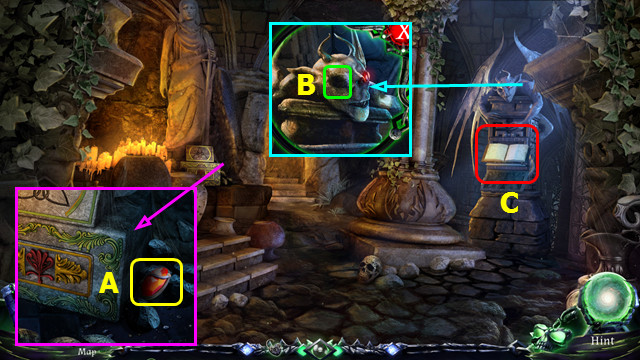
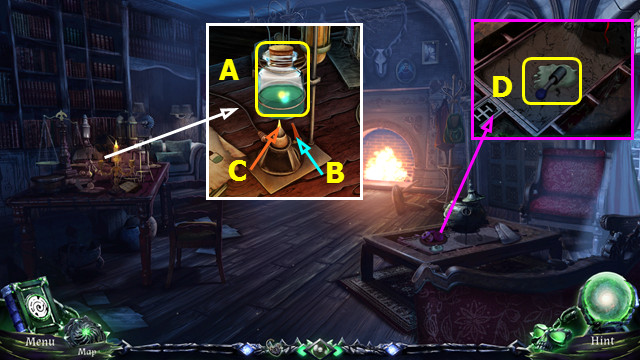
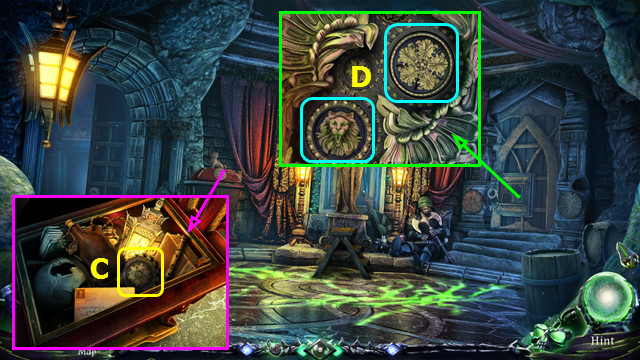
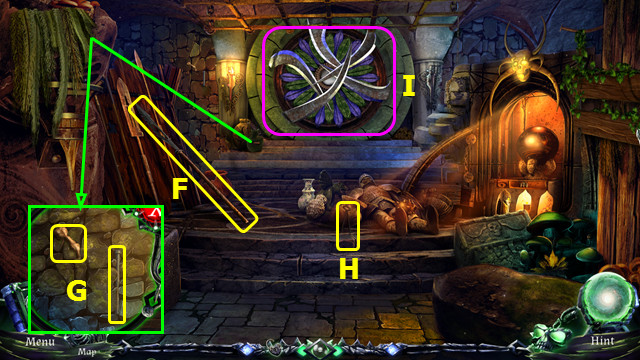
- Talk to the Gravedigger; take the MATCHES (A).
- Take the SCREWDRIVER (B).
- Use the SCREWDRIVER; open the lantern and take the CANDLE (C).
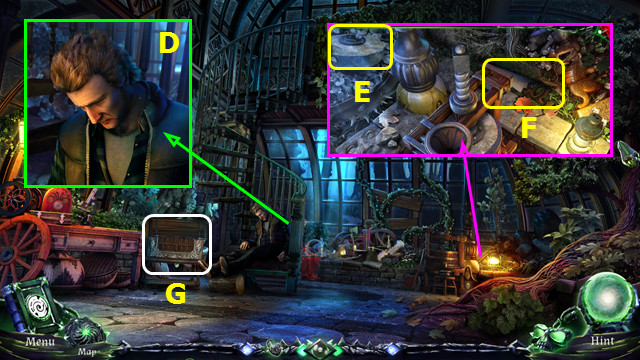
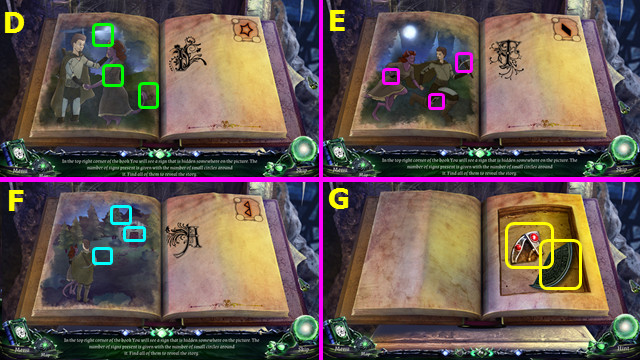
- Use the CANDLE and MATCHES (D).
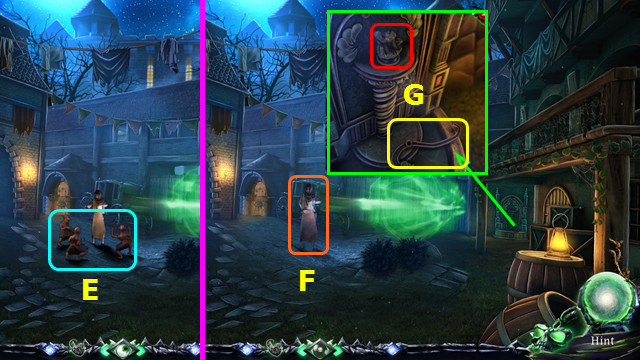
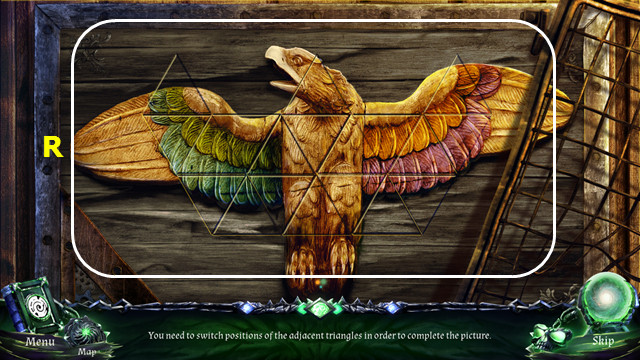
- Select (E).
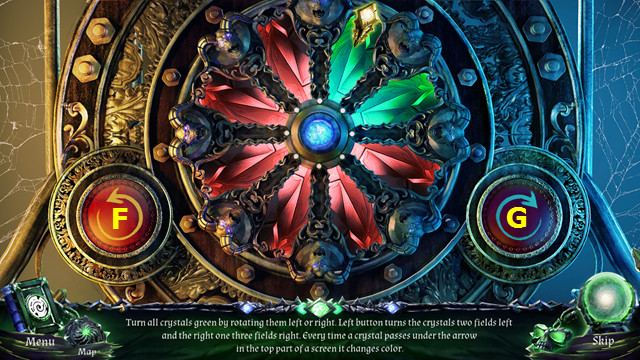
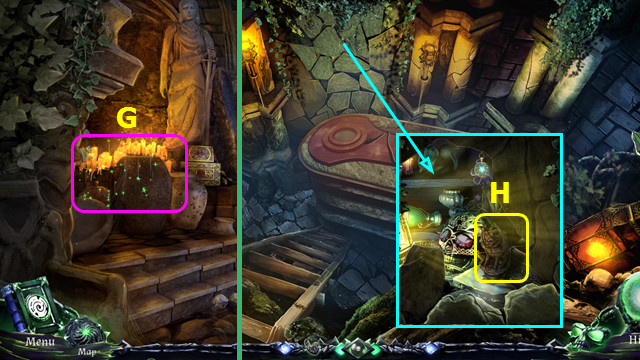
- Select Fx3-G-Fx2.
- Walk forward.
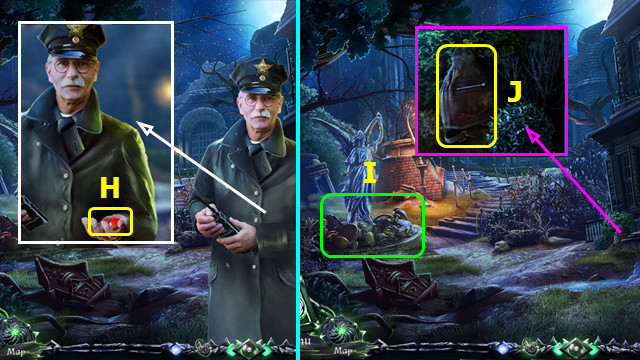
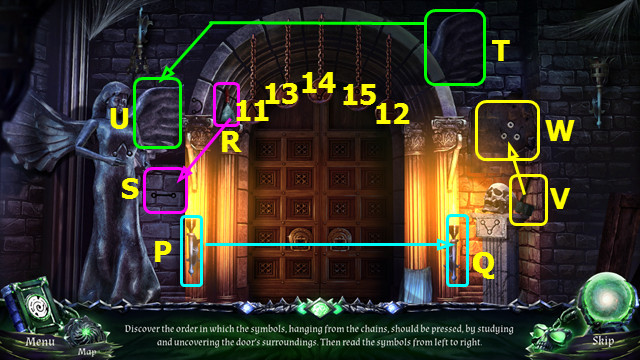
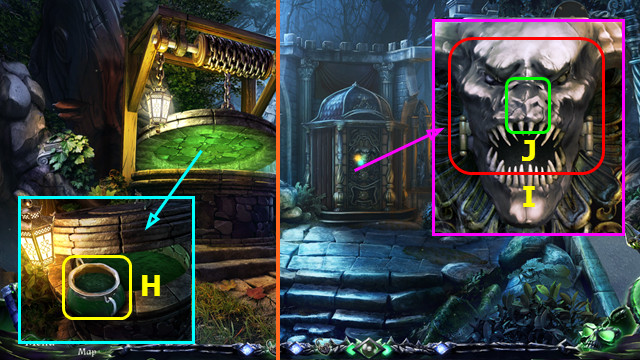
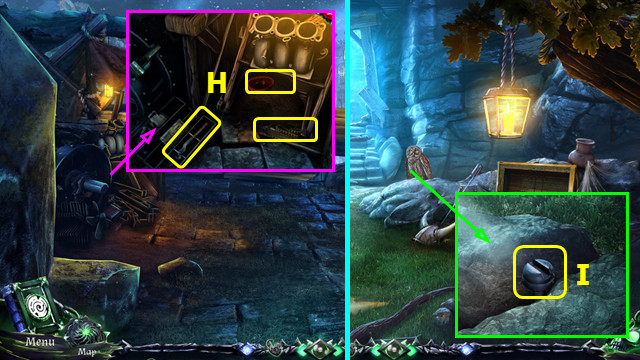
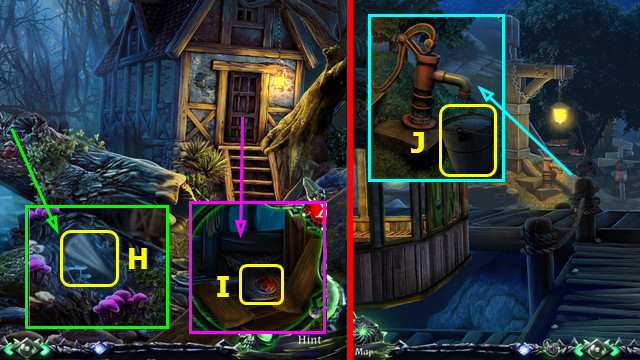
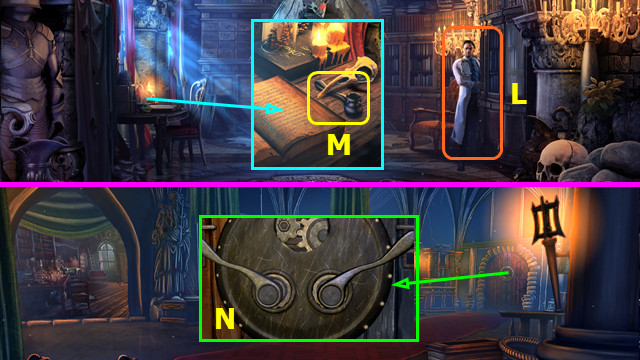
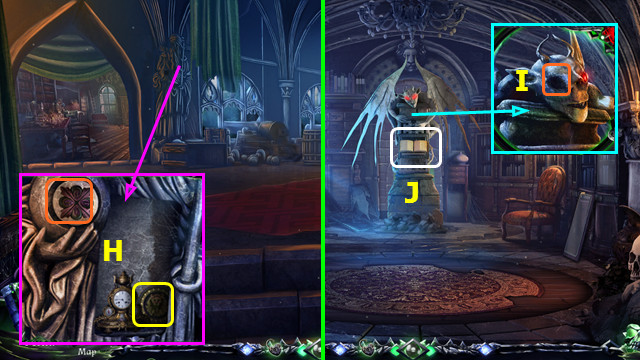
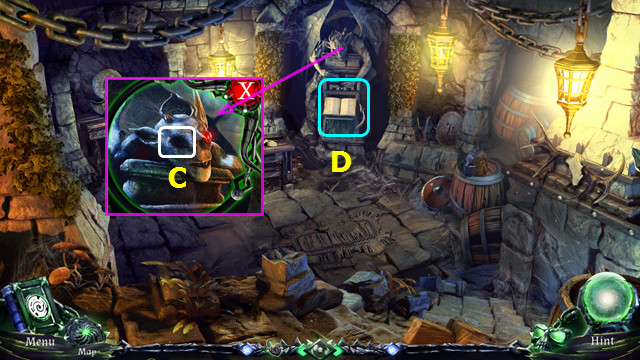
- Talk to the Policeman; take the GARGOYLE EYE (H).
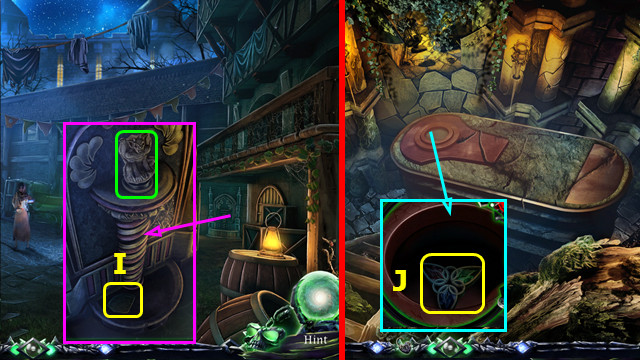
- Play the HOP; earn the DOOR KNOCKER (I).
- Take the BAG (J).
- Go forward.
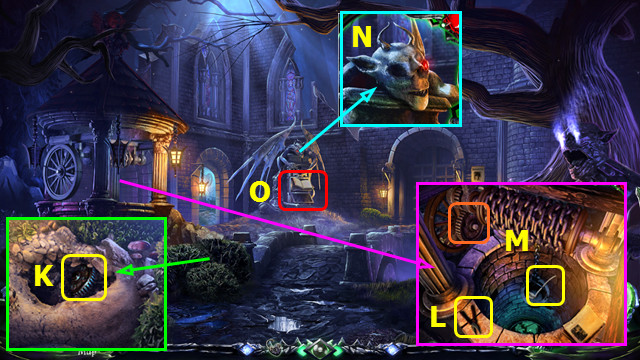
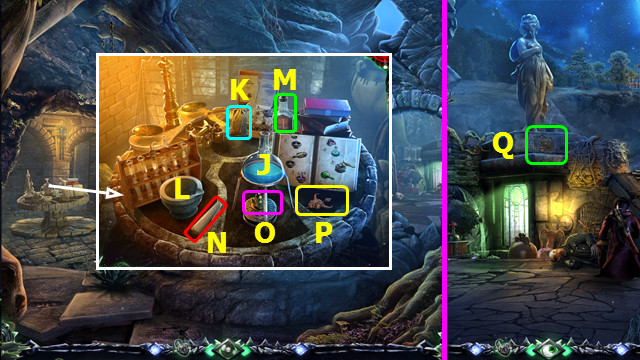
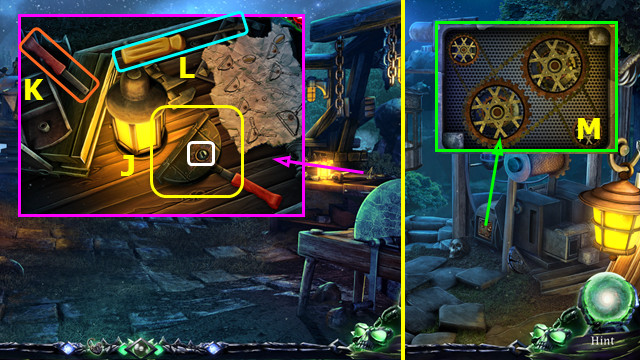
- Take the GEAR (K).
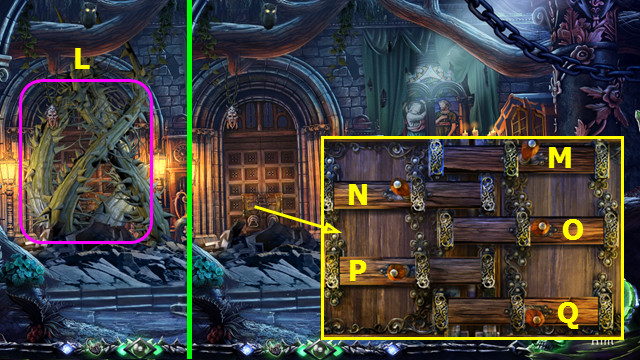
- Read the newspaper; take the PLIERS (L).
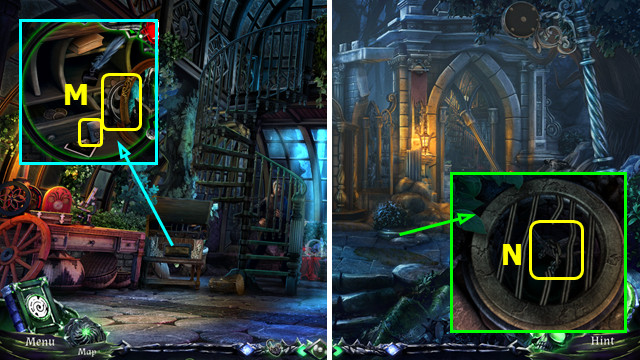
- Place and select the GEAR; take the GLASS LADLE (M).
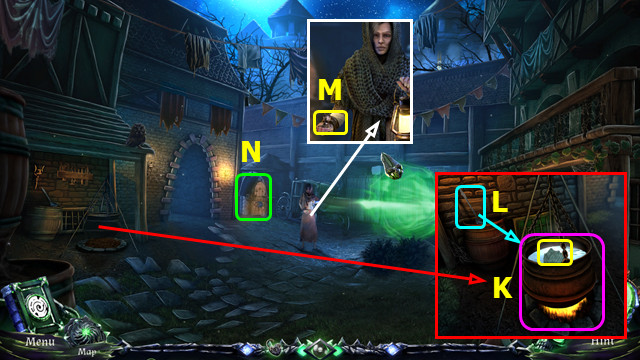
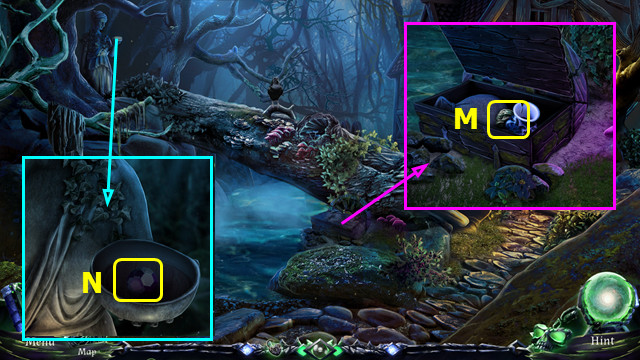
- Place the GARGOYLE EYE (N).
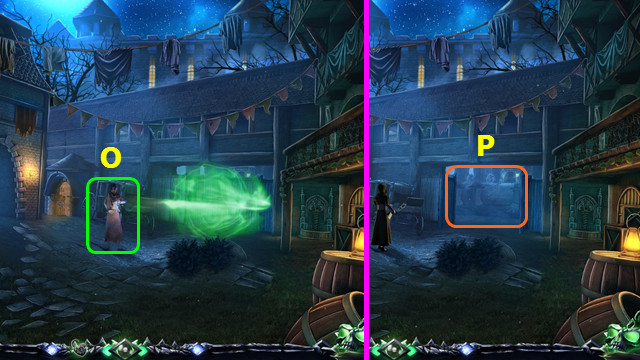
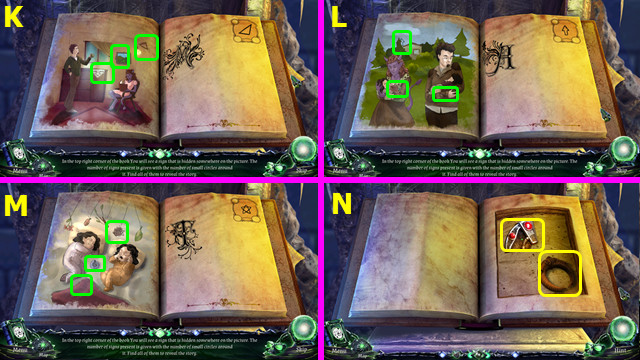
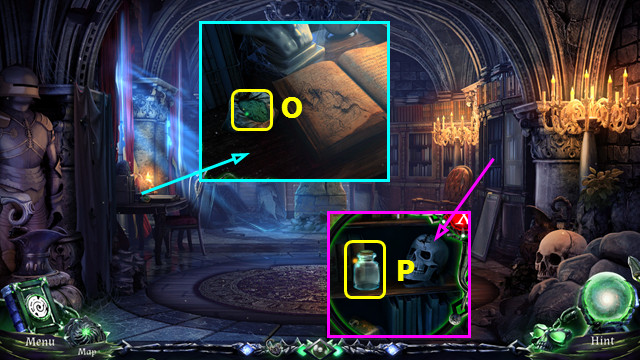
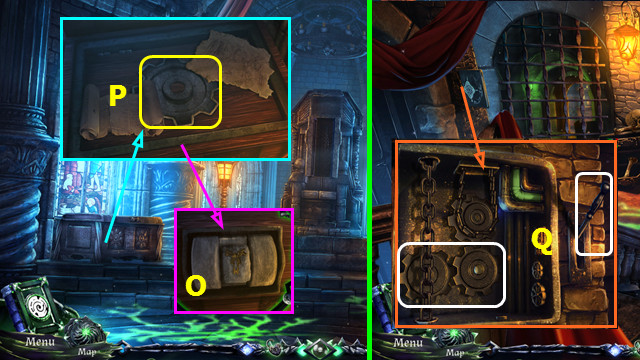
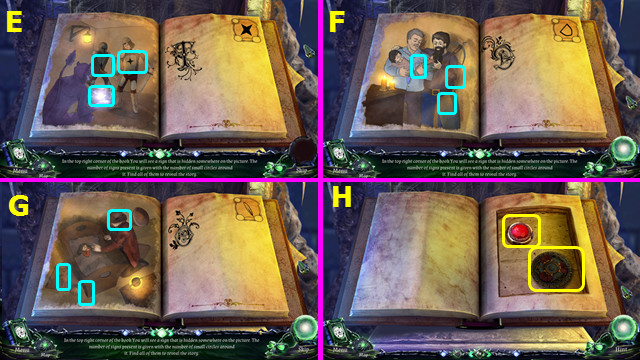
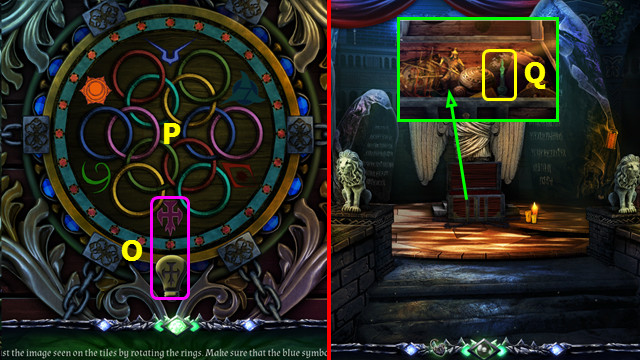
- Select (O).
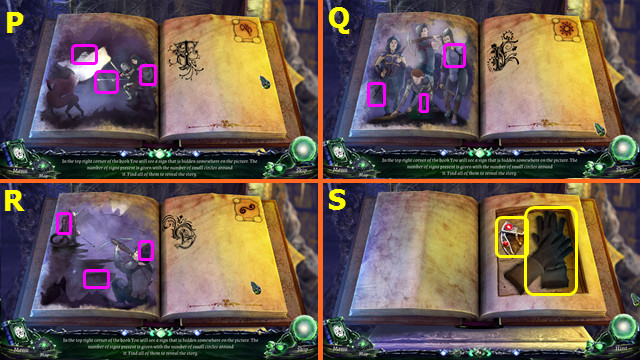
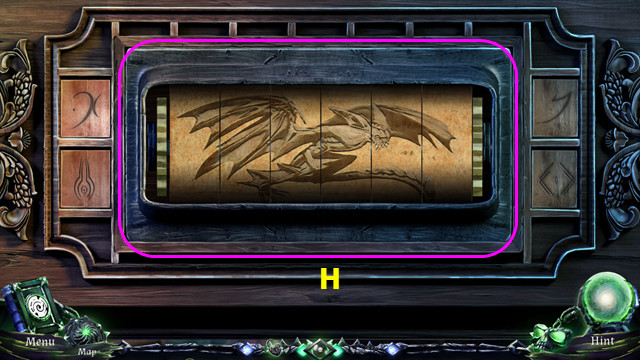
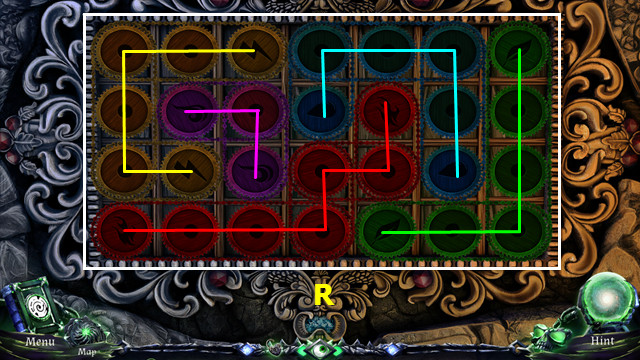
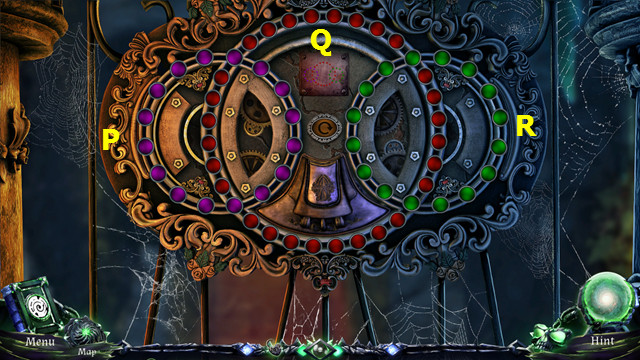
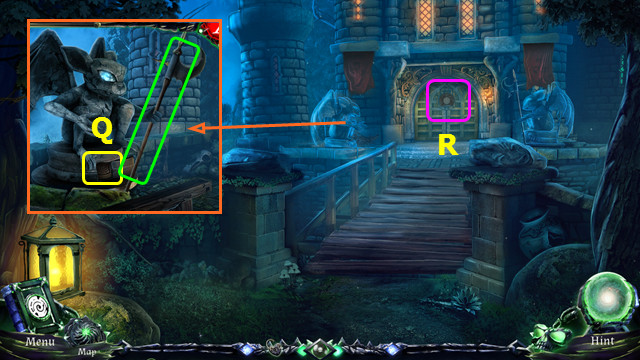
- Select the 3 symbols (P); turn the page.
- Select the 3 symbols (Q); turn the page.
- Select the 3 symbols (R); turn the page.
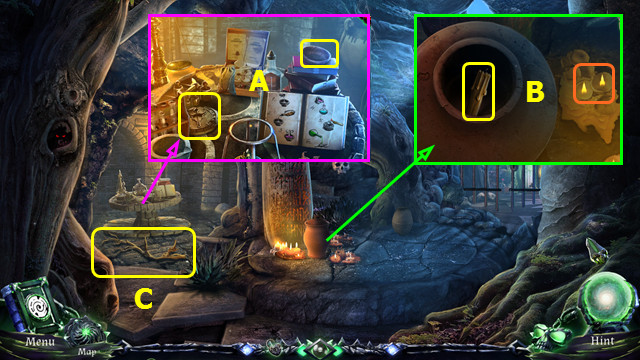
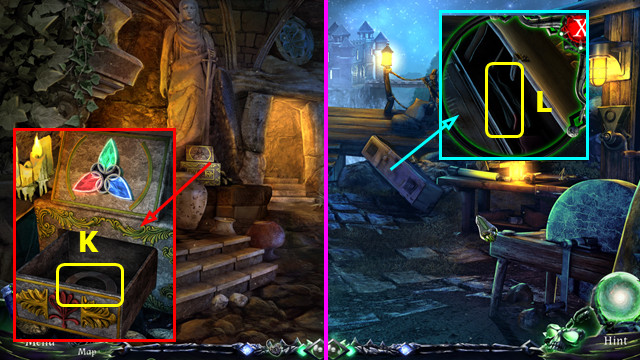
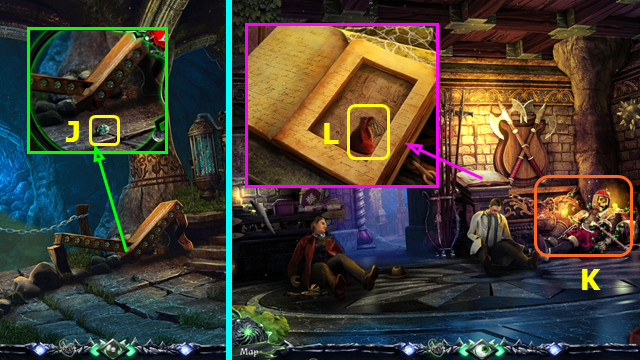
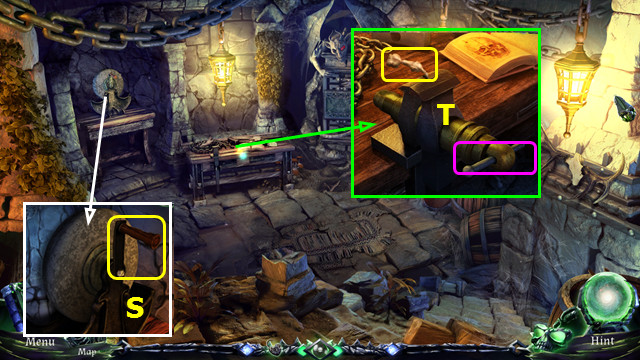
- Take the GARDENING GLOVES and AMULET PIECE (S).
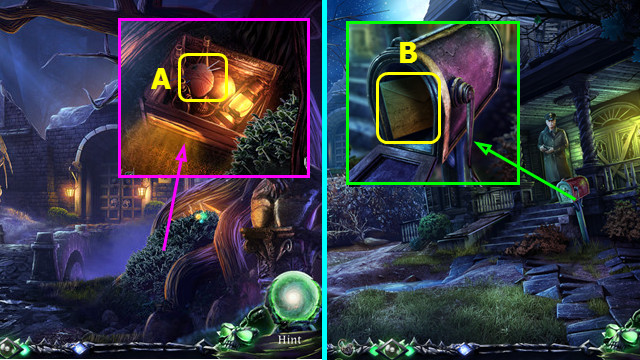
- Use the GARDENING GLOVES 3x; take the BALL OF YARN (A).
- Remove the PIN from the BALL OF YARN (inventory).
- Combine the BAG and PIN; take the SCISSORS (inventory).
- Walk down.
- Use the PLIERS; take the CLOSED ENVELOPE (B).
- Open the CLOSED ENVELOPE; take the COIN (inventory).
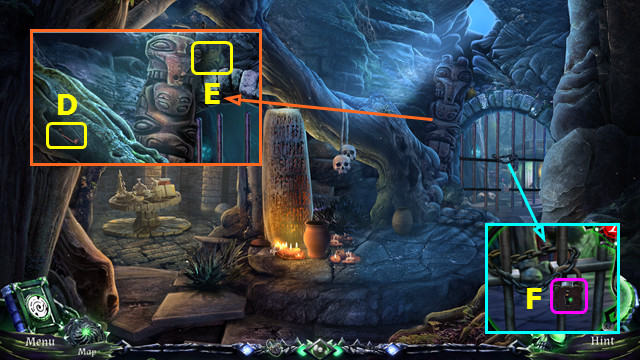
- Walk forward and left.
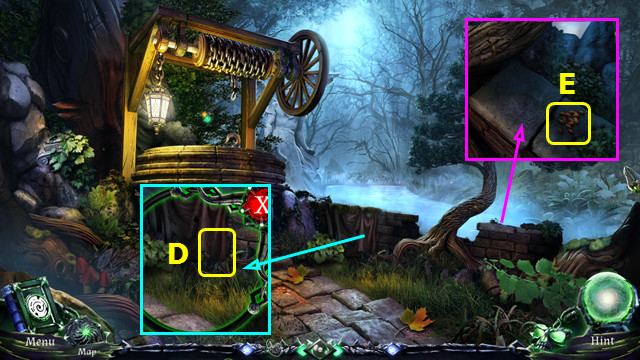
- Use the SCISSORS; take the OLD RAG (D).
- Move the leaves; take the ALMONDS (E).
- Walk down.
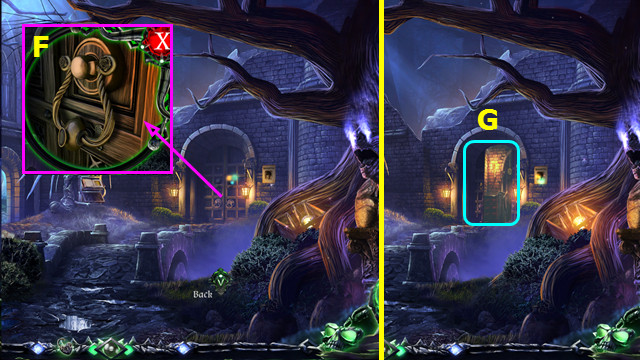
- Use the OLD RAG; place and select the DOOR KNOCKER (F).
- Select (G).
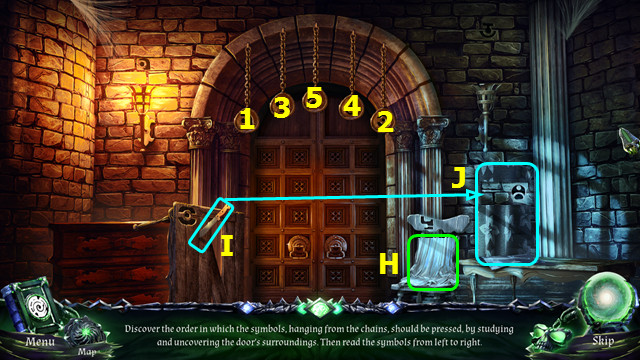
- Move the shirt (H).
- Use (I) on (J).
- Select 1-5.
- Use (K) on (L).
- Use (M) on (N).
- Select (O).
- Select 6-10.
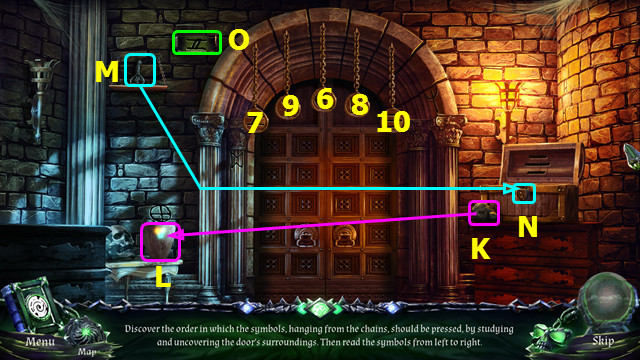
- Use (P) on (Q).
- Use (R) on (S).
- Use (T) on (U).
- Use (V) on (W).
- Select 11-15.
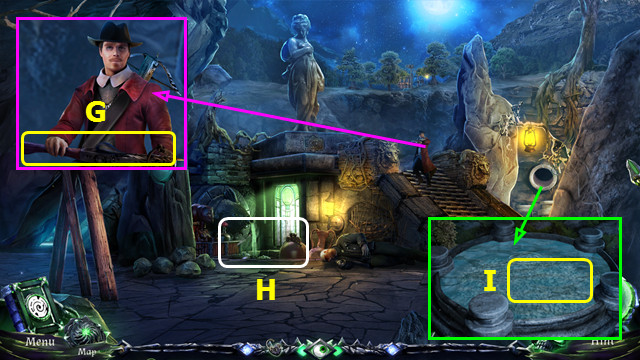
- Play the HOP; earn the ICE PICK (A).
- Open the basket; take the HAMMER (B).
- Use the COIN and remove the cover; take the EMPTY LANTERN (C).
- Walk right.
- Rouse the Man (D).
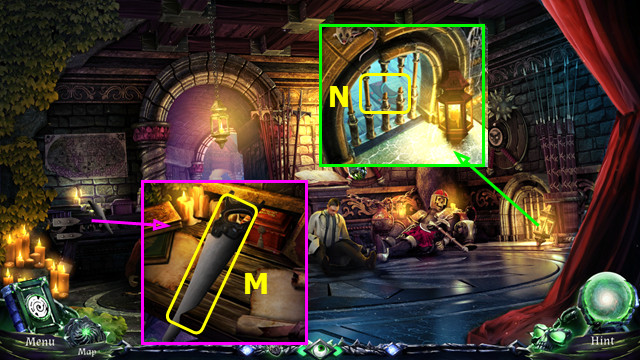
- Move the leaves 2x; take the GRINDING STONE (E).
- Take the SAW (F).
- Select (G).
- Move the reels to complete the picture (H).
- Each reel may move others.
- This mini-game is randomly generated.
- Take the BRONZE GEAR and LIGHTER (M).
- Walk down.
- Move the leaves and use the SAW; take the STEEL CHAIN (N).
- Walk down and left.
- Use the ICE PICK and EMPTY LANTERN to make the LANTERN WITH RESIN (O).
- Combine the LANTERN WITH RESIN and LIGHTER to make the BURNING LANTERN (inventory).
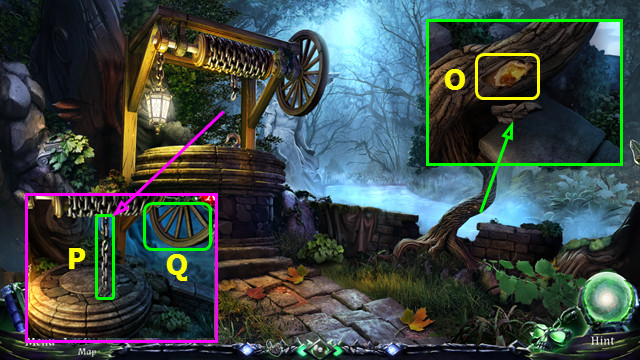
- Place the STEEL CHAIN (P) and select the wheel (Q).
- Walk down, forward, right, and go up the stairs.
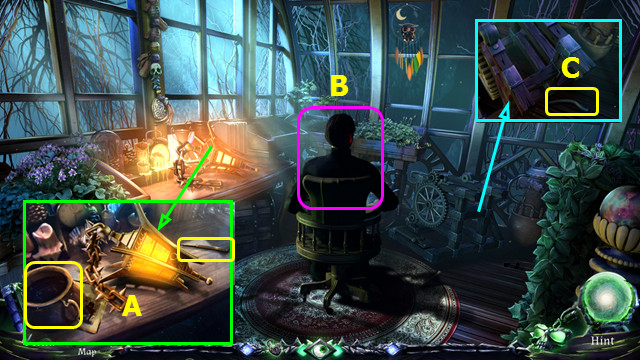
- Place the BURNING LANTERN. Take the GLASS BOWL and LOCKPICK; read the newspaper (A).
- Select (B).
- Take the CROOKED PIPE (C).
- Walk down.
- Play the HOP; earn the CRANK (D).
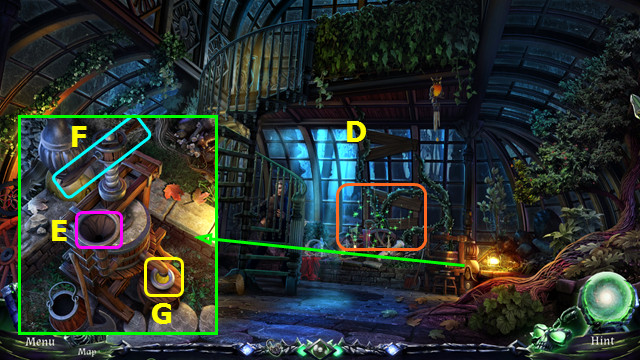
- Place the ALMONDS (E). Place and select the CRANK (F). Take the OIL (G).
- Walk down 3x. Walk forward and left.
- Use the GLASS BOWL and GLASS LADLE; take the BOWL OF ACID (H).
- Walk down and forward.
- Use the BOWL OF ACID and OIL (I).
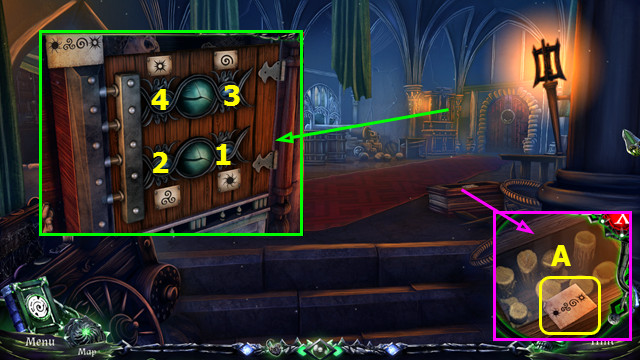
- Select (J).
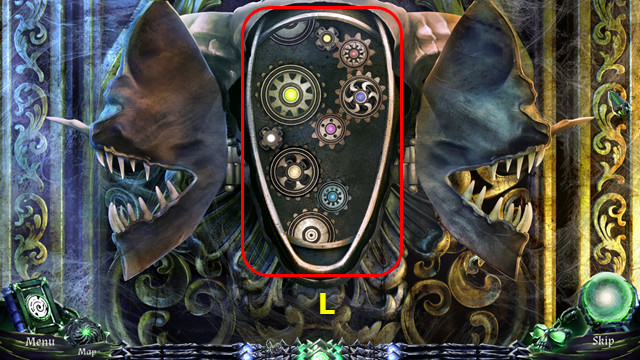
- Place the BRONZE GEAR.
- Arrange the gears as shown (L).
- Go forward.
Chapter 2: The Catacombs
- Play the HOP; earn the MASK (M).
- Use the LOCKPICK; take the KEY and GENERATOR CABLE (N).
- Take the DULL KNIFE and read the note (O).
- Use the KEY; take the SPARKPLUG (P).
- Use the CROOKED PIPE and HAMMER to make the GENERATOR PIPE (Q).
- Place the GENERATOR PIPE, SPARKPLUG, and GENERATOR CABLE; turn the crank (R).
- Go forward.
- Move the items; take the EMPTY BOTTLE (A).
- Play the HOP; earn the CENTRAL PIECE (B).
- Place the MASK; take the 1/2 LEVER (C).
- Select (D).
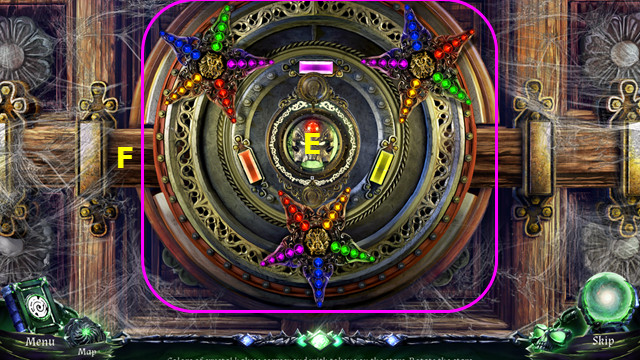
- Place the CENTRAL PIECE (E).
- Position the 3 stars as shown (F).
- Walk right.
- Play the HOP; earn the 2/2 LEVER (G).
- Use the OLD RAG 2x on the glass; take the SMALL SPADE and SPRAYER (H).
- Walk down 2x; go left, right, and up the stairs.
- Place and select the GRINDING STONE; use the DULL KNIFE to make the SHARP KNIFE (I).
- Walk down 2x and go forward.
- Use the SHARP KNIFE and SMALL SPADE to take the SPADE WITH HERBICIDE (J).
- Go forward.
- Use the SPADE WITH HERBICIDE and EMPTY BOTTLE to take the BOTTLE WITH HERBICIDE (K).
- Combine the BOTTLE WITH HERBICIDE and SPRAYER to make the FULL BOTTLE (inventory).
- Walk right.
- Use the FULL BOTTLE (L).
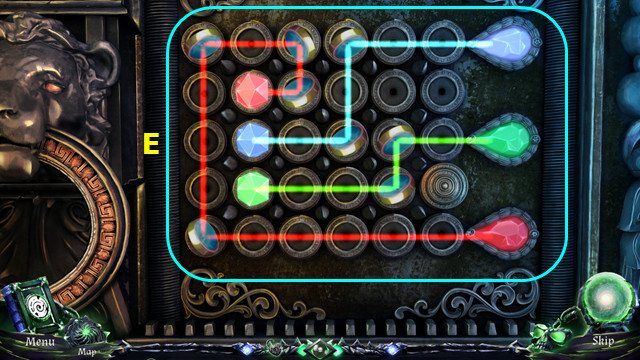
- Place the 2 LEVERS and select P-O-M-Q-N; next select Q-M-P-O-N.
- Go forward.
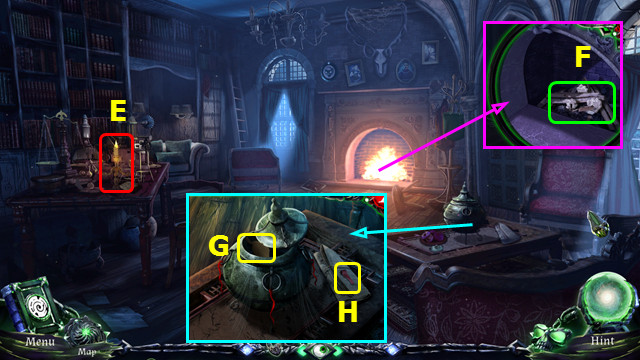
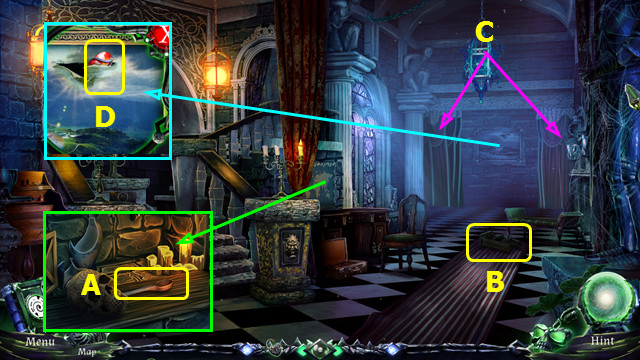
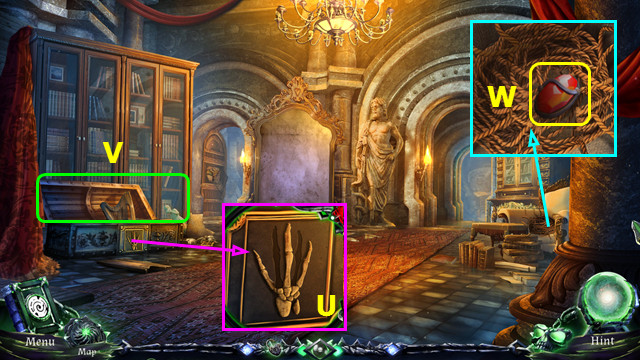
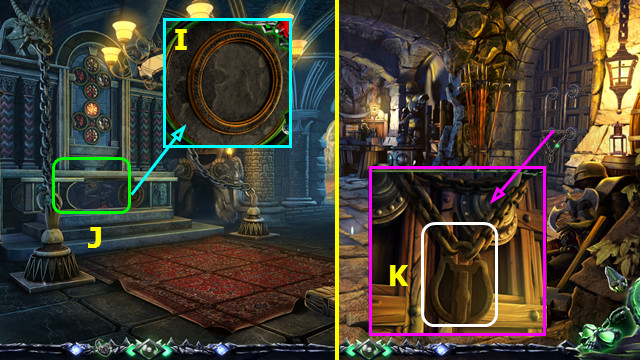
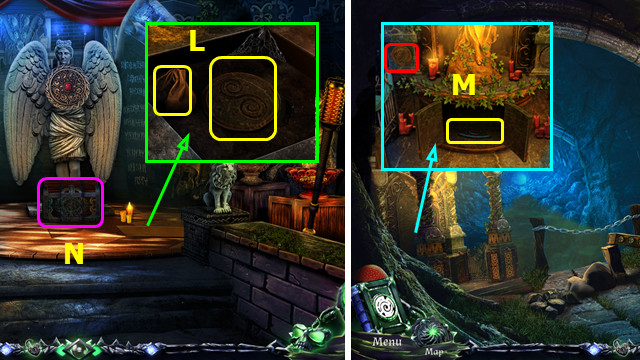
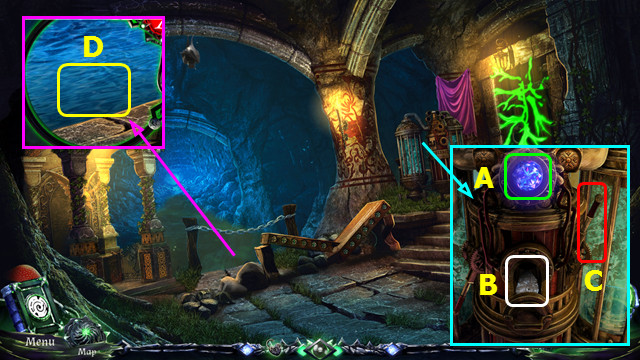
- Take the STATUE EMBLEM and BOWL (A).
- Remove the lid and take the CANDLE; use the CANDLE on the flame (B).
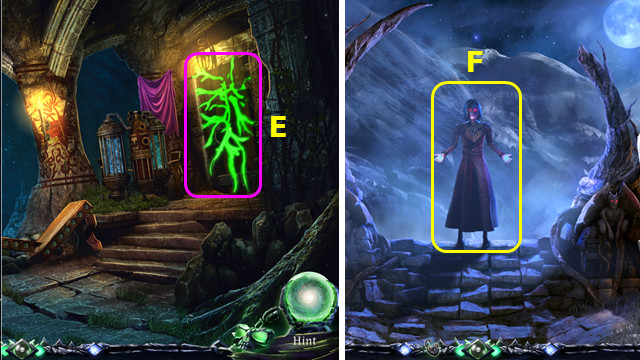
- Take the BRANCH (C).
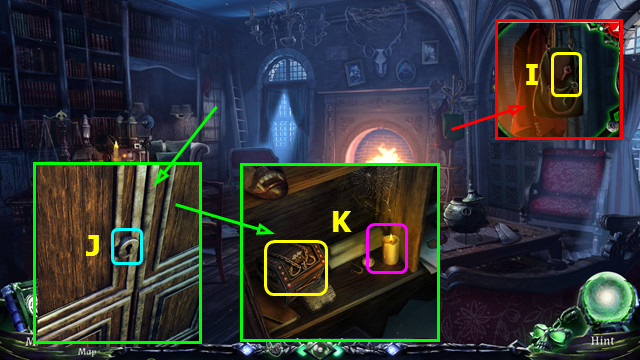
- Use the BRANCH; take the KEY (D).
- Take the 1/2 GOLDEN HANDLE (E).
- Use the KEY (F).
- Walk right.
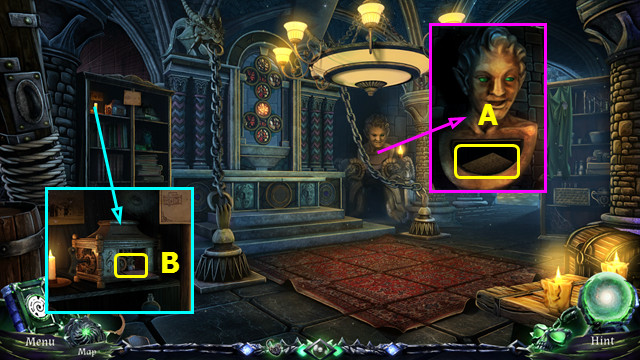
- Talk to the Demon Hunter; take the CROSSBOW (G).
- Play the HOP; earn the EMPTY FLASK (H).
- Use the EMPTY FLASK to take the FLASK OF WATER (I).
- Walk down.
- Place the FLASK OF WATER (J).
- Use (K) on (L).
- Use (M) on (L).
- Use (N) on (L).
- Use (L) on (J).
- Use the CANDLE (O).
- Use (J) on (P); take the SKELETON HEAD.
- Combine the STATUE EMBLEM and SKELETON HEAD to make the FINISHED STATUE EMBLEM (inventory).
- Walk right.
- Select (Q).
- Place the FINISHED STATUE EMBLEM.
- Connect the wheels as shown (R).
- Go forward.
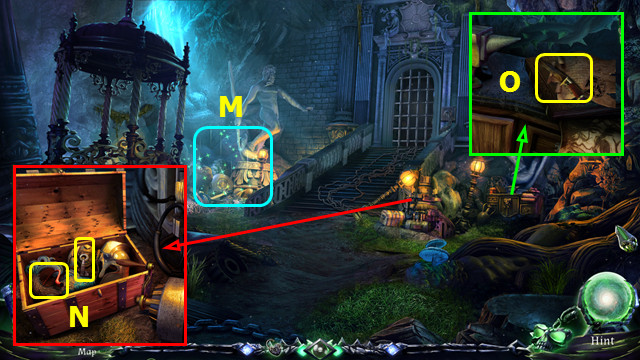
- Play the HOP; earn the GEAR (A).
- Move the grain 2x; take the 2/2 GOLDEN HANDLES (B).
- Remove the old lever casing (C).
- Walk left.
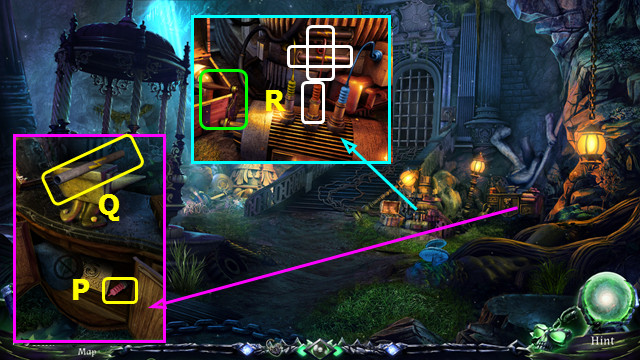
- Place and select the 2 GOLDEN HANDLES (D).
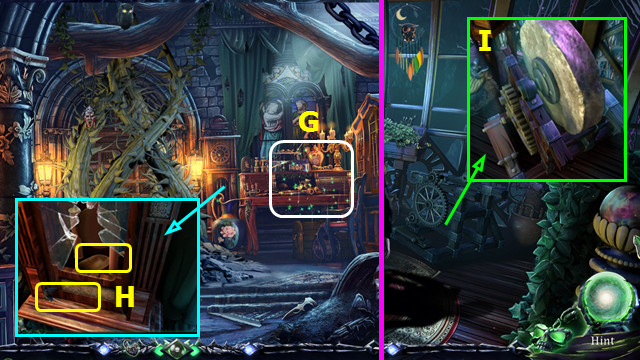
- Play the HOP; earn the HATCHET (E).
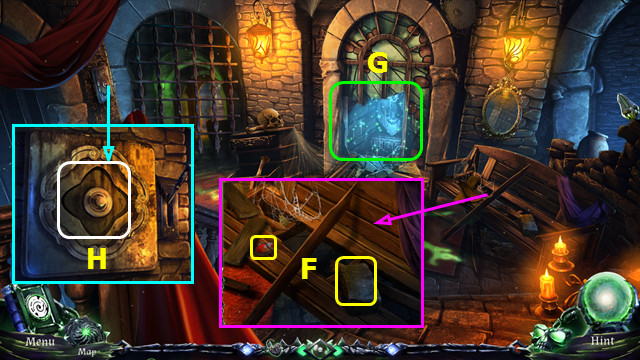
- Take the HAMMER and use the HATCHET; take the BAG (F).
- Open the BAG; take the 1/3 SARCOPHAGUS PLATE and 1st PINCERS HALF (inventory).
- Use the HATCHET (G).
- Walk forward.
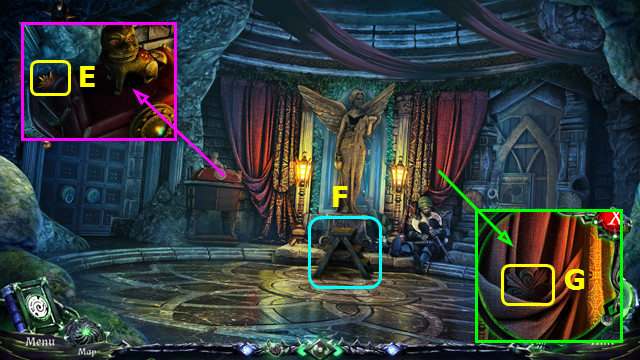
- Take the 2nd PINCERS HALF and BELT; use the BOWL to take the BOWL OF OIL (H).
- Combine the 2 PINCER HALVES to make the PINCERS (inventory).
- Walk down.
- Use the PINCER to take the BOLT (I).
- Walk forward.
- Use the BOWL OF OIL on (J).
- Place (K) on (J).
- Place the BOLT on (J).
- Use (L) on (J); take the LEVER.
- Walk down 2x.
- Place the GEAR and BELT (M).
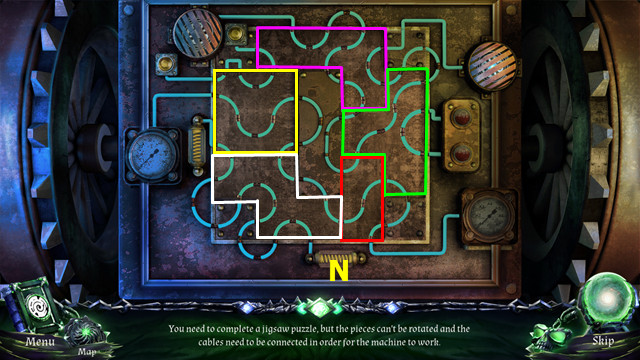
- Place the pieces in the grid as shown (N).
- The pieces are outlined.
- Place and select the LEVER (O).
- Go forward (P).
Chapter 3: The Docks
- Take the MATCHES (A).
- Open the pouch; take the DIRTY BANDAGES (B).
- Play the HOP; earn the EMPTY SCEPTER (C).
- Take the EMPTY BUCKET (D).
- Go forward.
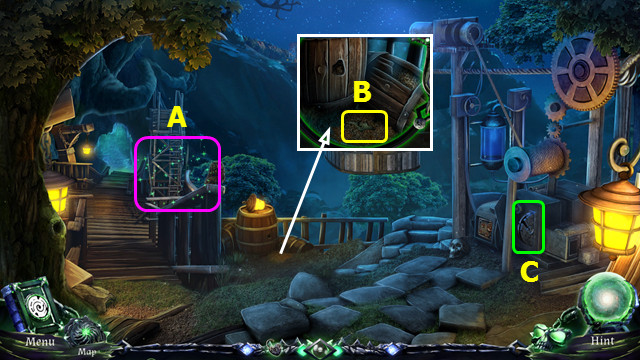
- Use the CROSSBOW (E).
- Talk to the Woman (F).
- Take the TAP HANDLE and move the piece (G).
- Walk left.
- Take the WEDGE (H).
- Open the door, move the 2 boards, and take the DOOR TOKEN (I).
- Walk down 2x.
- Place the EMPTY BUCKET. Place and select the TAP HANDLE 5x. Take the BUCKET OF WATER (J).
- Go forward.
- Use the BUCKET OF WATER, MATCHES, and DIRTY BANDAGES (K).
- Use the ladle to take the CLEAN BANDAGES (L).
- Use the CLEAN BANDAGES; take the INCOMPLETE CRYPT KEY (M).
- Combine the INCOMPLETE CRYPT KEY and DOOR TOKEN to make the CRYPT KEY (inventory).
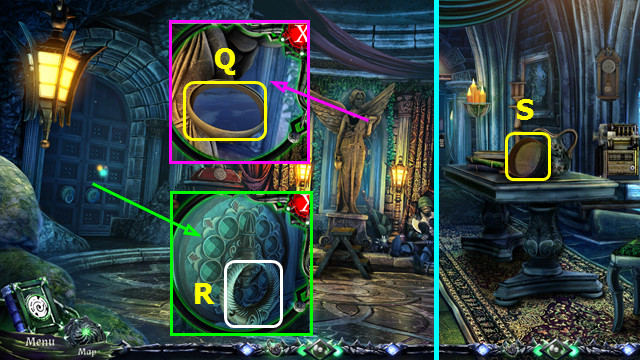
- Select (N).
- Place the CRYPT KEY.
- Rotate P right 7x, rotate R right 3x, rotate Q right 16x, rotate P right 4x, rotate R right 5x, rotate Q right 16x.
- Go forward.
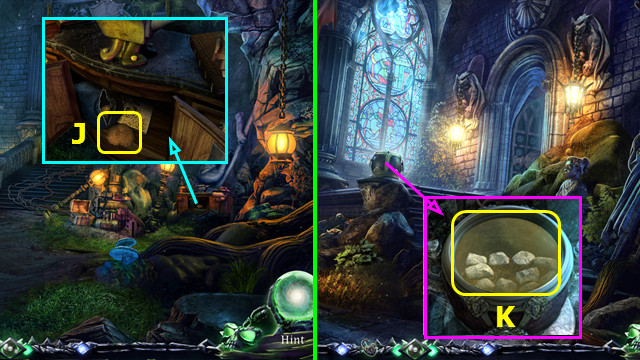
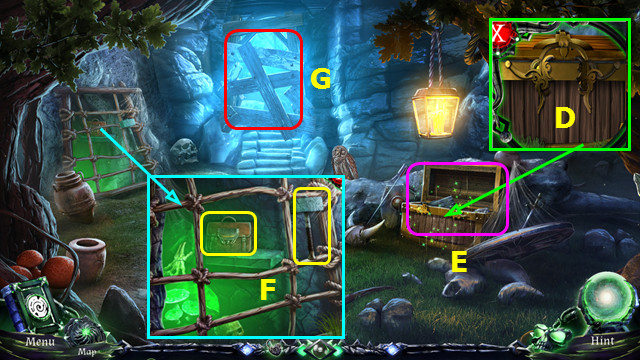
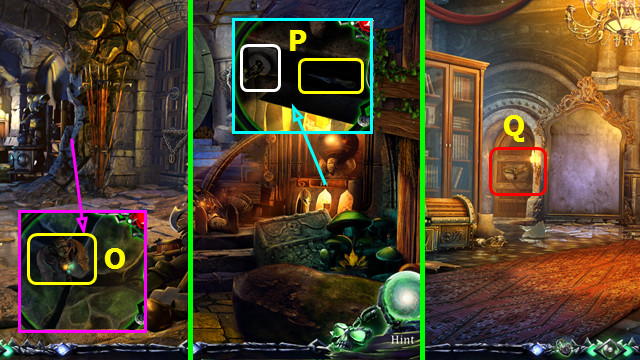
- Move the rocks 3x; take the GARGOYLE EYE (A).
- Place the GARGOYLE EYE (B).
- Select (C).
- Select the 3 symbols (D); turn the page.
- Select the 3 symbols (E); turn the page.
- Select the 3 symbols (F); turn the page.
- Take the 2/3 SARCOPHAGUS PLATE and 2nd AMULET PIECE (G).
- Play the HOP; earn the POLEAXE (G).
- Go forward.
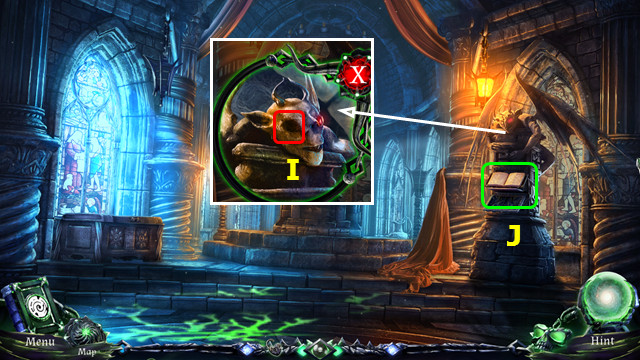
- Use the HAMMER; take the SHRINE IDOL (H).
- Walk down 2x.
- Place the SHRINE IDOL; take the 3/3 SARCOPHAGUS PLATE (I).
- Go forward 2x.
- Place the 3 SARCOPHAGUS PLATES; take the TRICOLOR TOKEN (J).
- Walk down.
- Place the TRICOLOR TOKEN; take the 1/2 CASTLE GATE PIECE (K).
- Walk down 2x and go left. Go left and forward.
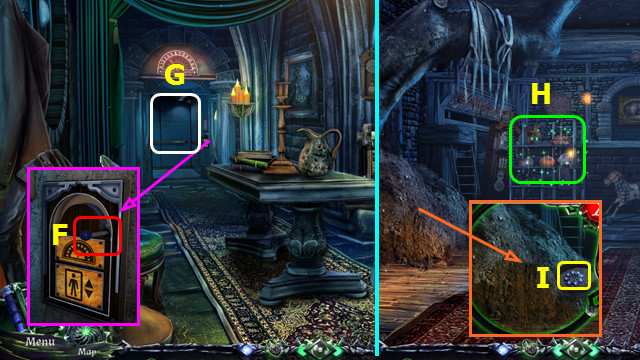
- Use the WEDGE and HAMMER; remove the lock, open the door, and take the CROWBAR (L).
- Walk down 2x, go forward 2x, and go left.
- Use the CROWBAR; take the STONE EYE (M).
- Place the STONE EYE, remove the lid, and take the POWER CRYSTAL (N).
- Combine the EMPTY SCEPTER and POWER CRYSTAL to make the SCEPTER (inventory).
- Walk down.
- Give the SCEPTER (O).
- Walk right (P).
- Place the POLEAXE; take the 2/2 CASTLE GATE PIECE (Q).
- Select (R).

- Place the 2 CASTLE GATE PIECES.
- Rotate S until the 2 legs with 3 claws are at the bottom and horizontal.
- Rotate U until the lion's head is in the upper left and it lines up with the outer ring.
- Rotate V to align the lion's tongue.
- Walk forward.
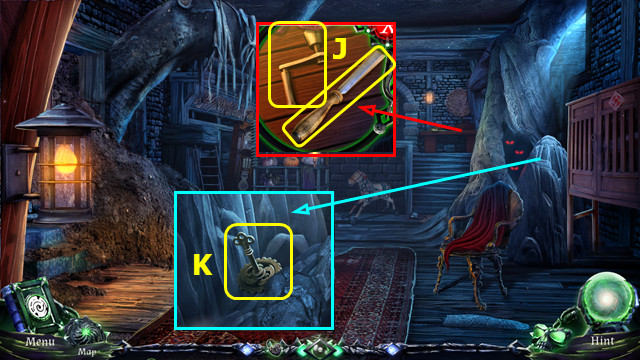
- Take the CODE (A).
- Place the CODE; select 1-4.

- Take the 1/2 DOOR HANDLE, MATCHES, and GLASS CUTTER (C).
- Use the GLASS CUTTER; take the UNLIT CANDLE (D).
- Combine the UNLIT CANDLE and MATCHES to make the CANDLE (inventory).
- Walk left.
- Place the CANDLE (E).
- Use the MATCHES (F).
- Remove the lid; take SOUTH AMERICA (G).
- Take the BURNER SWITCH (H).
- Open the bag; take the KEY (I).
- Use the KEY (J).
- Use the MATCHES; take the SMALL CHEST (K).
- Walk right.
- Talk to the Doctor (L).
- Take the 2/2 DOOR HANDLES (M).
- Walk down 2x.
- Place and select the 2 DOOR HANDLES (N).
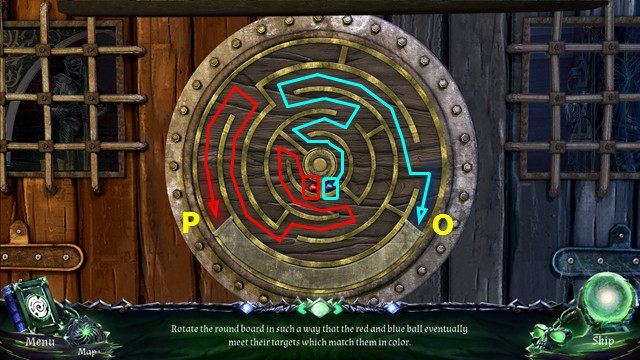
- Rotate the maze to move the blue ball along the path (O).
- Next, rotate the maze to move the red ball along the path (P).
- Walk right.
Chapter 4: The Hallway
- Place SOUTH AMERICA; move the skull and take the VINTAGE SPOON (A).
- Take the LADDER (B).
- Open the 2 curtains (C).
- Take the GARGOYLE EYE (D).
- Go forward.
- Take the ROYAL MEDALLION (E).
- Place the LADDER (F).
- Take the STATUE EMBLEM (G).
- Walk down 2x.
- Place the STATUE EMBLEM; move the clock and take the 1/2 ARENA PIECE (H).
- Walk left and right.
- Place the GARGOYLE EYE (I).
- Select (J).
- Select the 3 symbols (K); turn the page.
- Select the 3 symbols (L); turn the page.
- Select the 3 symbols (M); turn the page.
- Take the 3rd AMULET PIECE and DOOR HANDLE (N).
- Use the VINTAGE SPOON to take the SPOONFUL OF CLEANING POWDER (O).
- Take the EMPTY BOTTLE (P).
- Walk down 2x; go right and forward.
- Use the EMPTY BOTTLE to take the BOTTLE OF WATER (Q).
- Place the DOOR HANDLE (R).
- Walk left.
- Take the SIEVE (S).
- Walk down 3x; go left.
- Place the BOTTLE OF WATER and remove the cork (A).
- Use the SPOONFUL OF CLEANING POWDER on (A).
- Place and select the BURNER SWITCH (B).
- Use the MATCHES (C).
- Take the CLEANING SOLUTION (A).
- Use the CLEANING SOLUTION; take the ELEVATOR LEVER (D).
- Walk down, right, forward, and left.
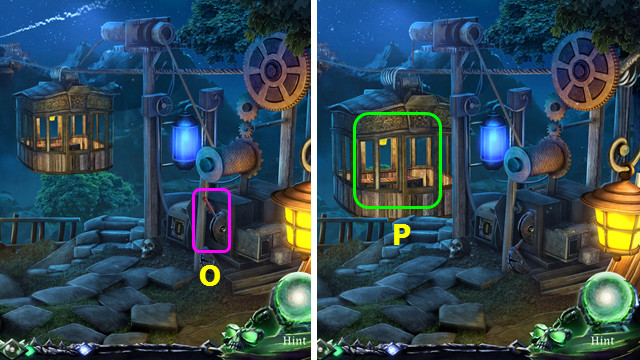
- Place and select the ELEVATOR LEVER (F).
- Enter the elevator (G).
- Play the HOP; earn the PICKAXE (H).
- Use the SIEVE; take the 1st MECHANISM KEY (I).
- Move the items; take the MACHINE HANDLE and CHISEL (J).
- Use the PICKAXE; take the OFFERINGS SHRINE KEY (K).
- Combine the SMALL CHEST and CHISEL; take the LIGHT CRYSTAL (inventory).
- Walk down.

- Place and turn the MACHINE HANDLE; take the 2nd MECHANISM KEY (L).
- Use the LIGHT CRYSTAL (M).
- Walk right.
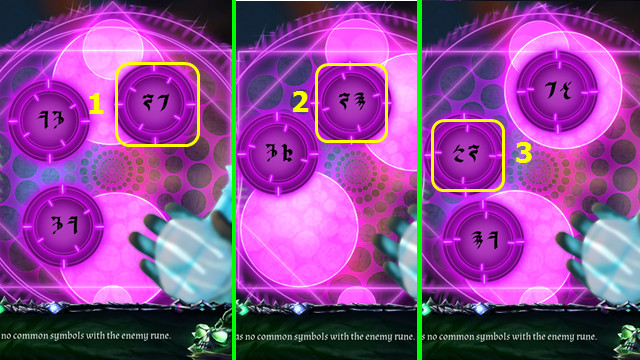
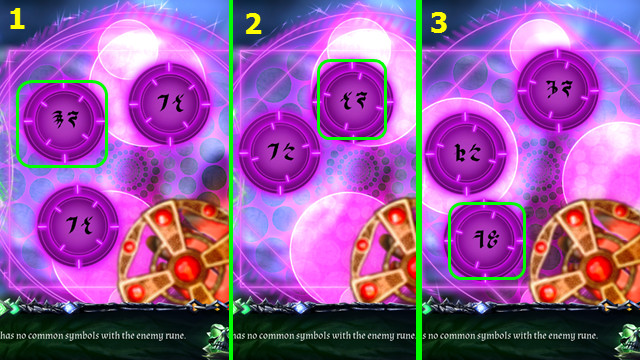
- Select the correct rune 1-3.
- These runes are randomly generated; this is a sample solution.
- The runes will change if you choose incorrectly.

- Place the ROYAL MEDALLION (A).
- Take the MECHANISM KEY FRAME (B).
- Combine the MECHANISM KEY FRAME and 2 MECHANISM KEYS to make the MECHANISM KEY (inventory).
- Walk down 2x.
- Use the OFFERINGS SHRINE KEY; move the items and take the 2/2 ARENA PIECE (C).
- Place the 2 ARENA PIECES (D).
- Arrange the mirrors as shown (E).
- Walk right.
- Move the 2 boards and take the GARGOYLE EYE; take the BRICK (F).
- Use the BRICK; play the hop to earn the 1/2 GEAR (G).
- Place the MECHANISM KEY (H).
- Walk down, left and right.
- Place the GARGOYLE EYE (I).
- Select (J).

- Select the 3 symbols (K); turn the page.
- Select the 3 symbols (L); turn the page.
- Select the 3 symbols (M); turn the page.
- Take the 4th AMULET PIECE and ROYAL RING (N).
- Use the ROYAL RING (O).
- Move the papers; take the 2/2 GEAR (P).
- Walk down 2x; go right.
- Place the 2 GEARS and pull the lever (Q).
- Walk left.
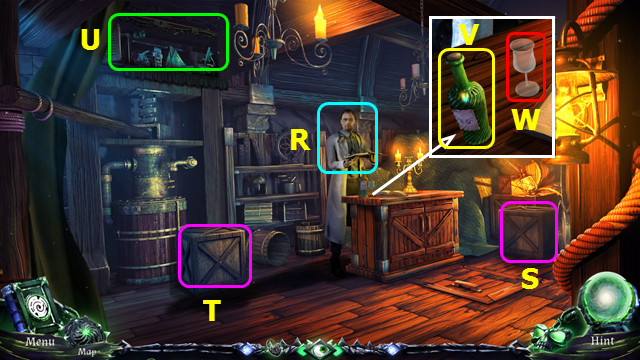
- Talk to the Doctor (R).
- Move the crate (S) to (T).
- Open the cupboard and play the HOP; earn the CORKSCREW (U).
- Take the CLOSED BOTTLE OF WINE (V).
- Combine the CLOSE BOTTLE OF WINE and CORKSCREW to make the OPENED BOTTLE OF WINE (inventory).
- Use the OPENED BOTTLE OF WINE (W).
- Move the items; take the DUSTER (A).
- Walk right.
- Select the mirror (B).
- Walk right.
Chapter 5: The Armory
- Take the MUSIC BOX KEY (C).
- Use the DUSTER; take the 1/2 PUZZLE PIECE (D).
- Play the HOP; earn the 2/2 PUZZLE PIECE (E).
- Walk forward.
- Take the SPEAR (F).
- Take the VICE HANDLE and 1/2 BONE (G).
- Take the PLIERS (H).
- Select (I).

- Remove the blades 1-6.
- Walk forward.
- Take the POWER CRYSTAL (J).
- Walk down.
- Play the HOP; earn the SAW HANDLE (K).
- Turn the pages 2x; take the POWDER OF LIFE (L).
- Use the SAW HANDLE; take the SAW (M).
- Use the SAW; take the 1st RING PIECE (N).
- Walk down 2x.
- Use the PLIERS; take the DEMONIC KEY (O).
- Go forward.
- Use the DEMONIC KEY; take the DULL DAGGER (P).
- Walk down 2x.
- Select (Q).
- Place the 2 PUZZLE PIECES.
- Restore the picture (R).
- This mini-game is randomly generated.
- Walk left.
- Turn the handle; use the DULL DAGGER to make the SHARP DAGGER (S).
- Place and select the VISE HANDLE; take the 2/2 BONES (T).
- Walk down.
- Place the 2 BONES (U).
- Play the HOP; earn the GREEN CRYSTAL (V).
- Use the SHARP DAGGER; take the GARGOYLE EYE (W).
- Walk down.
- Place the GREEN CRYSTAL; take the SHEET OF MUSIC (A).
- Place the MUSIC BOX KEY and SHEET OF MUSIC; turn the key and take the WEDGE (B).
- Walk right and left.
- Place the GARGOYLE EYE (C).
- Select (D).
- Select the 3 symbols (E); turn the page.
- Select the 3 symbols (F); turn the page.
- Select the 3 symbols (G); turn the page.
- Take the ALTAR DECORATION and 5th AMULET PIECE (H).
- Combine the 5 AMULET PIECES to make the AMULET (inventory).
- Walk down 2x.
- Place the ALTAR DECORATION (I).
- Play the HOP; earn the HAMMER (J).
- Walk right 2x.
- Use the WEDGE and HAMMER (K).
- Walk right.
- Use the SPEAR; take the PURIFICATION POWDER and the SHRINE (L).
- Walk down; go forward 3x.
- Place the SHRINE; take the 2nd RING PIECE (M).
- Walk down 3x; go right.
- Select (N).
- Place the 2 RING PIECES.
- Rotate the outer ring so the purple cross is over the yellow cross (O).
- Rotate the center circle to align the colored rings (P).
- Move the items; take the PURIFYING LIQUID (Q).
- Walk down; go forward 3x.
- Place the POWER CRYSTAL (A).
- Place the PURIFYING LIQUID, PURIFICATION POWDER, and POWDER OF LIFE (B).
- The CRYSTAL VIAL returns to your inventory.
- Pull the lever (C).
- Use the CRYSTAL VIAL to take the PURE WATER (D).
- Use the PURE WATER (E).
- Walk right.
- Select (F).
- Select 1-3.
- These runes are randomly generated; this is a sample solution.
- The symbols change if an incorrect choice is made.
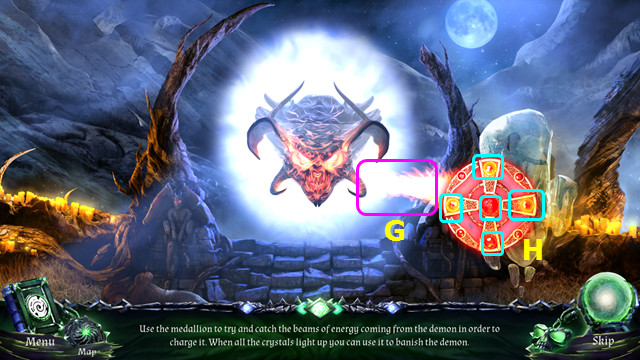
- Use the AMULET.
- Drag the amulet to catch the beams (G).
- The 5 jewels will light as you catch the beams (H).
- A miss will empty the amulet. You need to fill the amulet twice.
- Congratulations! You have completed Demon Hunter 3: Revelation!
Created at: 2016-05-15