

WALKTHROUGH MENU
- INTRODUCTION
- CASE 1 – MOORVILLE, TN /FANG OF THE PACKLEADER
- CASE 2 – EVERGREEN RESERVATION, ND /DREAMCATCHER
- CASE 3 – GRAYHILL, MS/ SLEEPSAND
- CASE 4 – IRONWOOD, MI/ STOPWATCH
- CASE 5 – TOLEDO, OH/RABBIT’S PAW
- CASE 6 – HOPTON, WY/ SPHERE OF LIFE
- CASE 7 – FLAMING ROSE
- CASE 8 - MOSQUERO, NM/ MIRROR OF DREAMS
- CASE 9 – GRIMSTONE MANSION, KANSAS CITY/ EYE OF EVIL
INTRODUCTION
GENERAL TIPS
- There are nine cases to solve in Department 42: The Mystery of the Nine and 20 mini-games to solve.
- There is no timer in the game, so you can take your time and play this game at your leisure.
- The items in the hidden object scenes are random, with the exception of the inventory items; they will always be the same for everyone.
- If you click randomly on the scene too many times, the cursor will float around the screen for a few seconds. As soon as the cursor stops floating around, you will be able to resume your game.
- Some items can be very hard to pick up. Make sure that you place the tip of the finger on the item you are trying to grab.
- There are unlimited hints in the game, but you do have to wait for the hint button to recharge before you can use it again.
MINI-GAMES
- You can skip one of the mini-games if you get stuck or don’t feel like playing it. The skip button is the yellow button in the upper right corner of the scene.
- In order to skip a mini-game, you have to wait until that yellow button is charged.
- If you don’t know what to do in a mini-game, just click on the question mark that is on the top left side of the scene.
- If you want to follow one of the solutions in the walkthrough, make sure that you click on the blue reset button in the upper right side of the scene.
- You can replay any mini-game that you’ve unlocked from the main menu as many times as you like. Just go to the Main Menu and click on the Puzzles tab.
CASE 1 – MOORVILLE, TN /FANG OF THE PACKLEADER
CRIME SCENE
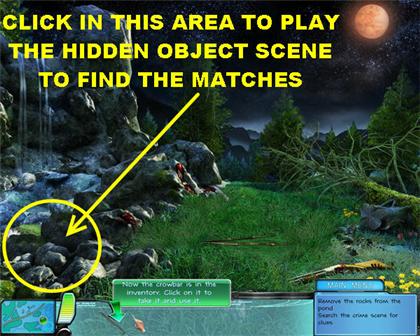
- When you start the game you will be asked to pick up a crowbar. The crowbar will go in the inventory section at the bottom of the screen.
- Grab the crowbar and place it in all the sections that the green arrow is pointing to.
- Once that section has been cleared, you will notice some sparkles floating around the area that you just uncovered.
- Click on the sparkly area to look for hidden objects in the scene.
CRIME SCENE - MATCHES
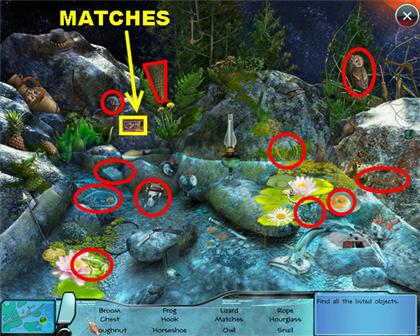
- In order to find the matches, you have to find a list of objects in the hidden spot that you just discovered.
- The screenshot shows you the locations of all the items on the list.
- The Matches are in the top left side of the scene. Click on them and they will go into inventory.
MOONLIGHT BAR – OPEN THE FRIDGE
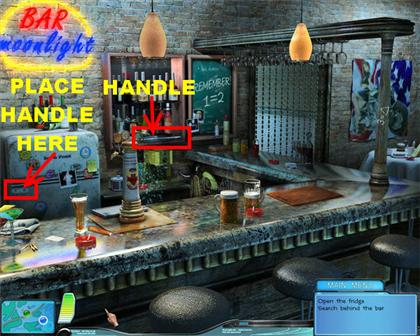
- Grab the Handle that is on the wall in the back of the bar. It is on the bottom shelf where the bottles are located.
- Grab the Handle and place it on the left side of the fridge.
- Click on the Handle of the fridge and the door will open.
MOONLIGHT BAR – SHATTER ICE/ GET KNIFE
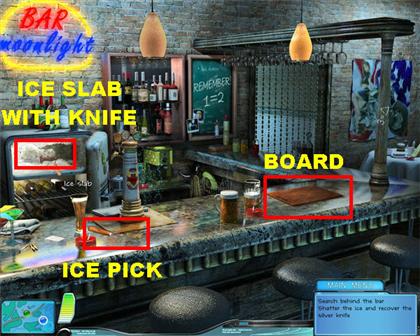
- Grab the Ice Pick that is on the left side of the bar.
- Once the fridge is open, grab the Ice Slab that contains the knife located in the freezer.
- The Ice Slab will go into inventory. Grab the Ice Slab and place it on the Chopping Board that is on the right side of the bar.
- Break the ice by using the Ice Pick on the slab. Click on the ice three times until the Knife is visible.
- Once the ice has been broken, grab the Knife and it will go into inventory.
SEARCH BEHIND BAR – SCROLL
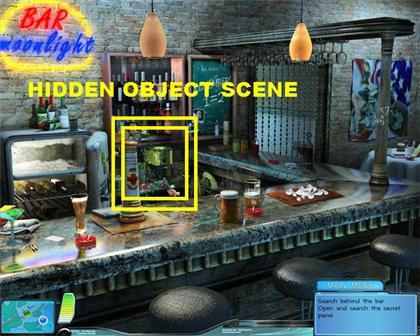
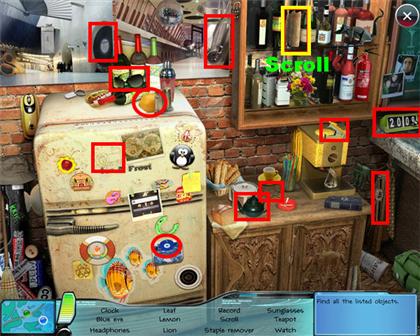
- Click on the sparkly area that is behind the bar and you will enter a hidden object scene.
- All the items on the list are highlighted in the screenshot.
- The Scroll with Runes is in the top center of the scene.
OPEN & SEARCH SECRET PANEL
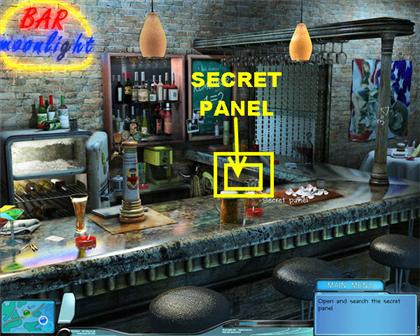
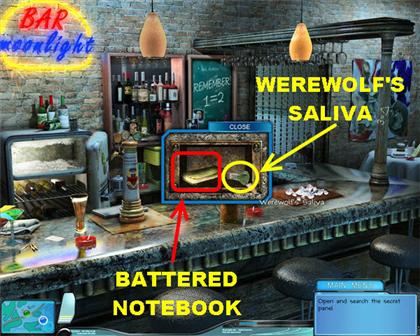
- Click on the secret panel that is on the right side of the bar.
- Once you click on it, you will get a closer view of the secret panel.
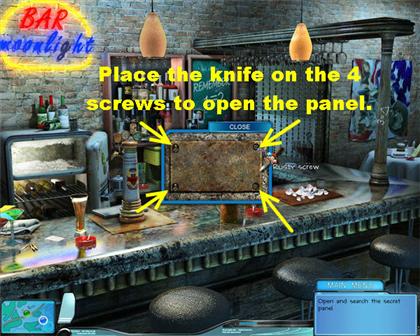
- Place the Knife from inventory on the four screws located on the panel. Click on the screws and they will loosen up.
- Once all the screws have been taken off, grab the Werewolf’s Saliva and the Battered Notebook from inside.
- Read the message that pops up once you click on the notebook.
- Go to the Werewolf’s Lair by clicking on the flashing blue button in the lower left side of the scene.
WEREWOLF’S LAIR – LIGHT THE LAMP
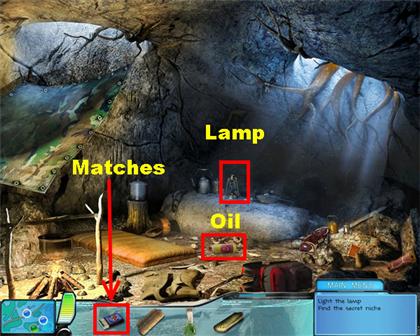
- Grab the Oil Bottle that is in the center of the scene.
- Place the Oil on the Oil Lamp that is on top of the rock in the back of the scene.
- Put the Matches from inventory on the Oil Lamp to light it.
- As soon as the lamp lights up, you will see some symbols on the wall.
FIND THE SECRET NICHE
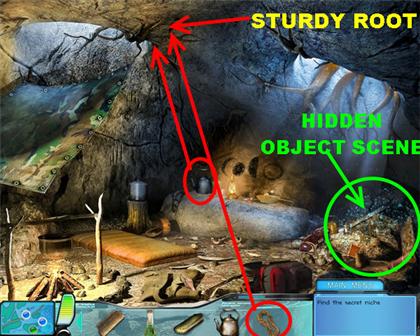
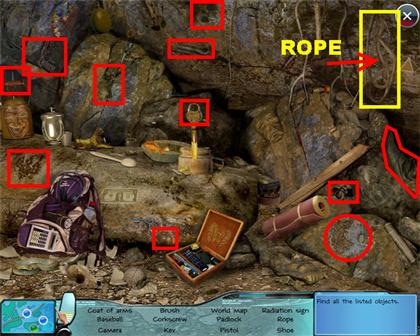
- Click on the sparkly area that is in the lower right side of the scene and you will enter a new scene.
- All the objects on the list have been highlighted in the screenshot.
- Pick up the Rope that is on the top right side of the scene. You will need that Rope to uncover the Secret Niche.
- Once you finish finding all the hidden objects, you will be taken back to the Werewolf’s Lair.
- Grab the Kettle that is on top of the rock in the back of the scene.
- Place the Rope on the Sturdy Root that is located in the top left side of the scene.
- Place the Kettle at the end of the rope and you will see the camouflage cover lift up; some symbols will be revealed.
OPEN THE SECRET NICHE
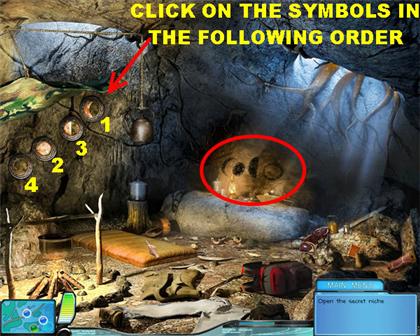
- The symbols on the left side of the wall match the symbols on the back of the wall.
- Your goal is to click on the symbols on the left side of the wall in the same order as the ones in the back of the wall.
- Click on the symbols in the order shown in the screenshot. The solution is as follows:Crescent Moon Light Circle Half Light, Half Dark Dark Circle
- Once the symbols have been entered correctly, the niche will open below the symbols.
DECIPHER THE BOOK OF RUNES
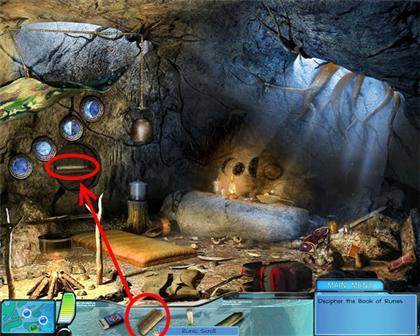
- Grab the Runic Scroll from inventory and place it on the Book of Runes that is in the left side of the wall.
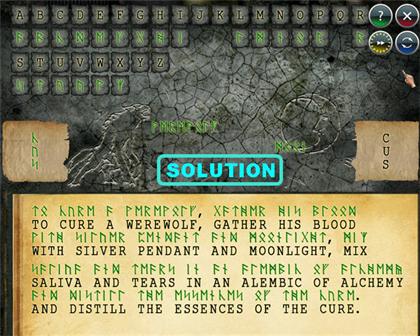
- To decipher the Book of Runes, you have to click on one of the letters that are on top of the page. Once you click on a letter, the book will open revealing certain symbols.
- If you look at the bottom of the page, you will see the symbols are the same as the ones inside of the book.
- Your goal is to figure out which symbols belong to the letters in the alphabet.
- Click on the symbol which you think represents the letter you chose.
- Each time you pick a symbol to go with a letter, the game will automatically fill in all the areas in which those symbols are located.
- Each letter that has been chosen will light up on top of the board. This helps you keep track of letters you’ve already used.
- Three of the letters are already given to you as an example. You do not have to worry about deciphering the symbols that correspond to the letters “C-U-S.”
- The solution is as follows:“TO CURE A WEREWOLF, GATHER HIS BLOOD WITH SILVER PENDANT AND MOONLIGHT, MIX SALIVA AND TEARS IN AN ALEMBIC OF ALCHEMY AND DISTILL THE ESSENCES OF THE CURE.”
WEREWOLF
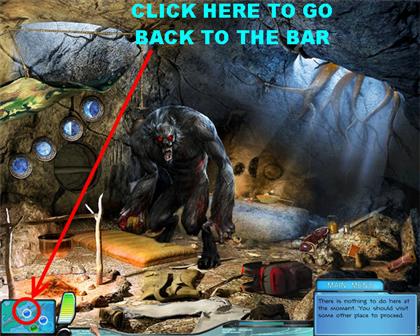
- Once you’re done deciphering the book, the werewolf will come out and ask you to go back to the bar.
- He wants you to go to the lab and make a cure for him.
- Click on the blue button in the lower left side of the scene.
SEARCH BEHIND THE BAR – BEAKER
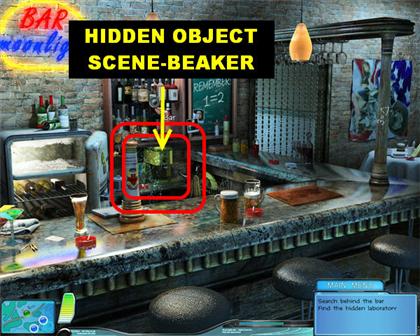
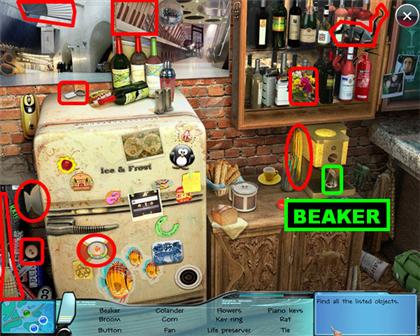
- Click on the sparkly area in the back of the scene and you will enter a hidden object scene.
- The screenshot shows you the location of all the items on the list.
- The Beaker is on the yellow coffee machine that is on the counter. You will use the beaker in the lab.
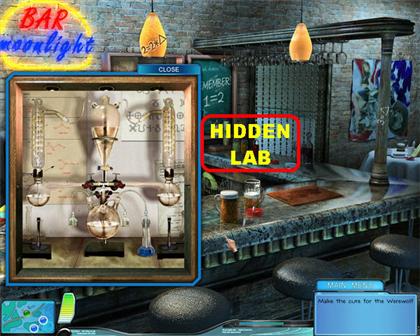
FIND THE HIDDEN LABORATORY
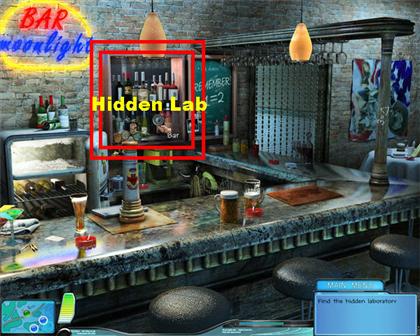
- At this point the game will ask you to find the hidden laboratory. Click on the cabinet with the bottles that is in the back of the bar.
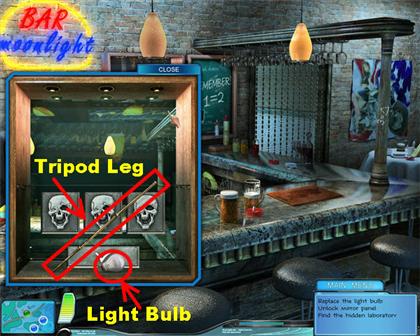
- You will see a close-up view of the bar.
- Grab the Tripod Leg that appears over the skulls.
- Pick up the Light Bulb that is at the bottom of the cabinet.
- Click on the close tab in the upper right side of the pop-up window and you will be back at the bar.
REPLACE THE LIGHT BULB
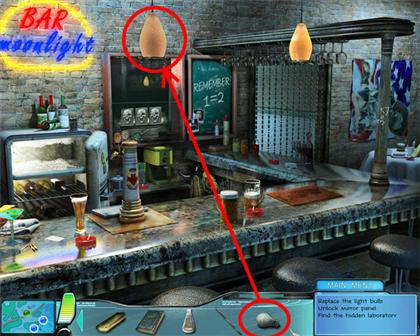
- Grab the Light Bulb from inventory and place it on the lamp that is hanging on the left side of the ceiling.
- Once the lamp is lit, you will see some numbers appear on the outside of the lamp.
UNLOCK MIRROR PANEL/ FIND HIDDEN LAB

- Click on the mirror that is on the back wall and you will get a closer view.
- There are three skulls at the bottom of the panel. If you click on the skulls you will see some numbers.
- Your goal is to figure out the code to unlock the mirror panel. Hints for the solution are written around the bar area.
- The blackboard has “REMEMBER 1= 2” which means that the first code in the first slot is 2.
- The lamp in the top left side of the scene says “2 =2* triangle”. This pertains to the second number in the code. The solution for that is 2 multiplied by 3 (triangle) is 6.
- The pole that is on the right side of the bar has “3 = triangle” scribbled on it. The number on the third spot is 3.
- The solution is: 2 – 6 – 3.
- Click on the check mark at the bottom of the page, once you have the right combination, and the hidden lab will be revealed.
MAKE THE CURE FOR THE WEREWOLF
- At this point you will be asked to make the cure for the werewolf. You cannot make the cure until you have the Werewolf’s Blood.
- Click on the blue dot in the lower left side of the scene and go back to the crime scene.
REPAIR TRIPOD/ FIND SILVER PENDANT
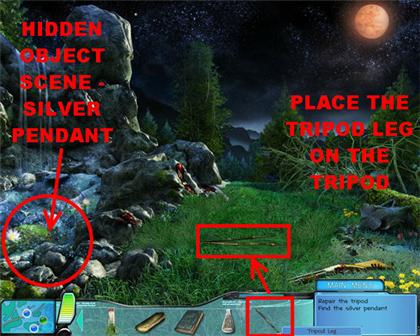
- Grab the Tripod from inventory and place it on the Broken Tripod that is on the grass.
- As soon as the leg is on the Tripod, it will stand up on the grass.
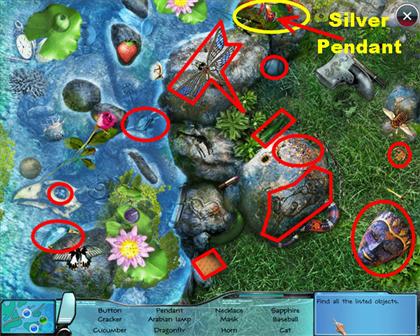
- You will be asked to find the Silver Pendant at this point. Click on the glittery spot that is in the lower left side of the crime scene.
- All the items on the list are highlighted in the screenshot. The Silver Pendant is on the top right side of the scene.
USE PENDANT TO FIND WEREWOLF’S BLOOD
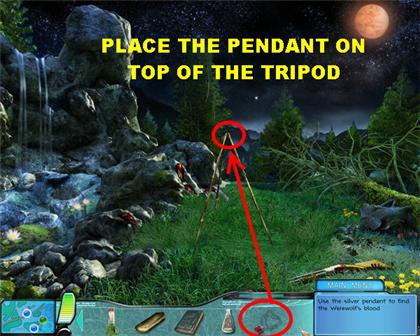
- Place the Silver Pendant from inventory on top of the Tripod.
- The Pendant will use the moonlight to shine on a spot on the rock which shows the location of the blood.
GATHER THE WEREWOLF’S BLOOD
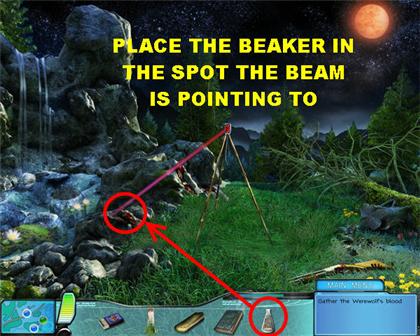
- Grab the Beaker from inventory and place it on the spot to which the beam is pointing.
- The blood sample will gather in the Beaker.
- Click on the Beaker to end this task.
- Go back to the Moonlight Bar.
- MAKE Solution for 2ND Cure.
THE CURE FOR THE WEREWOLF
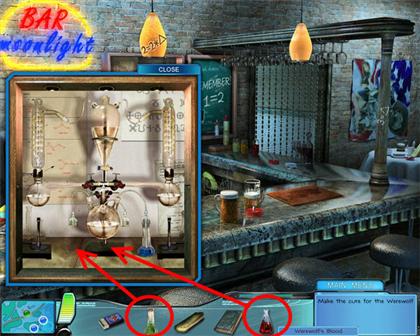
- Click on the lab that is on the back wall and you will get a closer view.
- Place the Beaker with the Werewolf’s Blood in the pop-up window.
- Grab the Beaker with the Werewolf’s Saliva and place it in the pop-up window.
- Once the two Beakers have been placed, you can begin making the cure for the werewolf.
1ST WEREWOLF CURE
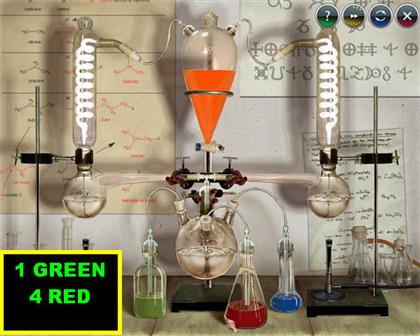
- In this section of the game you have to combine the right combination of blood, tears, and saliva.
- Your goal is to make the right combination of ingredients so the color looks like the one on top of the scene.
- Solution for 1ST Cure:1 GREEN 4 RED
2ND WEREWOLF CURE

- Solution for 2ND Cure:3 GREEN 4 RED 1 BLUE
3RD WEREWOLF CURE
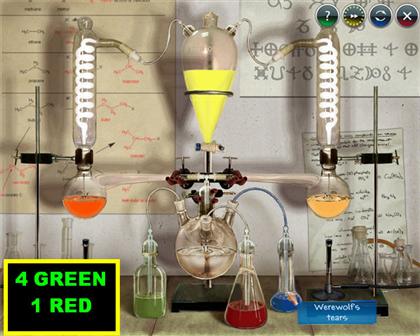
- Solution for 3RD Cure:4 GREEN 4 RED 1 BLUE
KINDLE A FIRE/ BOIL THE CURE
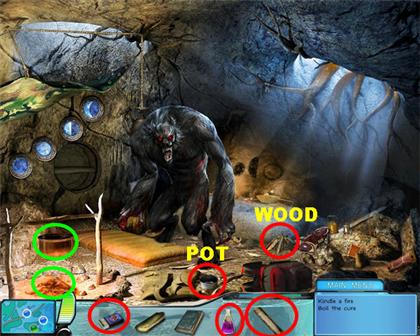
- Click on the sparkly area that is in the lower right side of the scene in the werewolf’s lair.
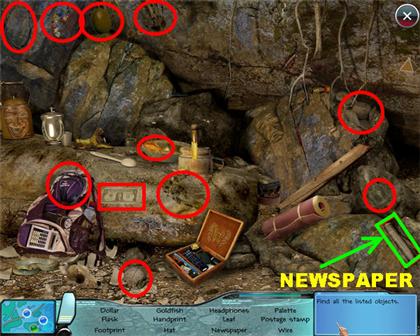
- All the items on the list are highlighted in the screenshot. The Newspaper is in the lower right corner.
- After all the objects have been found, you will be back at the Werewolf’s Lair.
- Grab the Fresh Wood that is in the lower right side of the scene.
- Pick up the Camp Pot that is in the lower center of the scene.
- Place the Fresh Wood on the Fireplace, followed by the Newspaper and the Matches.
- Once the fire starts, place the Cure in the Camp Pot that is on the Fireplace.
CURE WEREWOLF/ TAKE FANG OF PACK LEADER
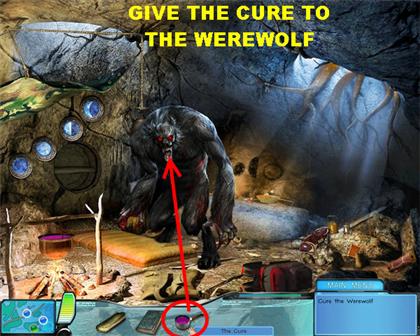
- Grab the Camp Pot and place it on the cure that is in the pot in the fireplace.
- The Pot will automatically go back into inventory full of liquid.
- Grab the Cure and give it to the Werewolf. Place it on his mouth so he can swallow it.
- After the Werewolf takes the Cure, he will disappear and a man will appear on the ground.
- Grab the Fang of the Pack Leader that is in the man’s hand.
CASE 2 – EVERGREEN RESERVATION, ND /DREAMCATCHER
FIND EAGLE’S FEATHER/ OPEN TRAILER DOOR
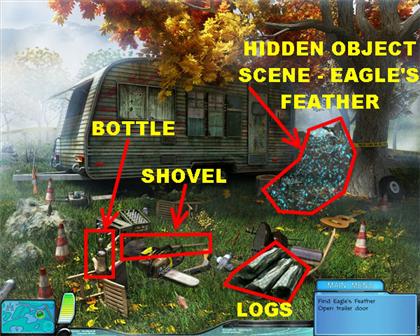
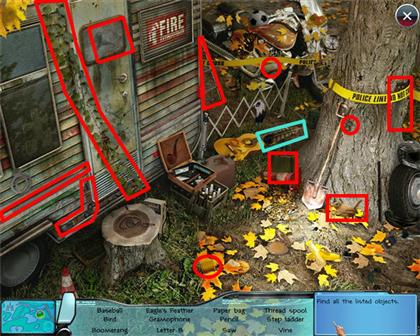
- Once you enter the crime scene, click on the sparkly area that is on the right side of the trailer.
- Find all the objects on the list. The Eagle’s Feather is on the far right side of the scene. It is close to the trunk of the tree.
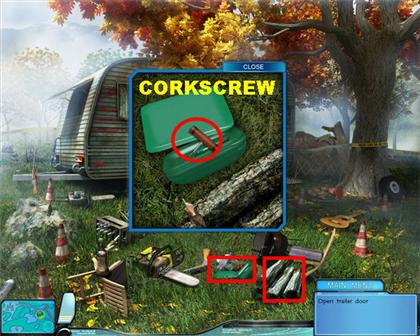
- Pick up the Shovel that is on the left side of the grass.
- Place the Shovel on the Wooden Logs that are on the right side of the grass. A secret Cache will appear underneath the logs.
- Click on the Cache to get a closer view. Click on it again to open it up. Pick up the Corkscrew that appears inside the cache.
- Place the Corkscrew on the Bottle that is in the lower left side of the scene. The Corkscrew will open the Bottle.
- Click on the Bottle again and it will fall to the ground. Grab the Key that appears on the grass.
- Place the Key on the door of the trailer to open it.
READ THE NOTE
- Once you get the trailer door open, pick up the hasty note that is inside the door. Once you’re done reading the note, click on it.
- Click on the dot in the lower left side of the scene to access the Reservation location.
GIVE PIPE TO SHAMAN/ RESTORE WAMPUM
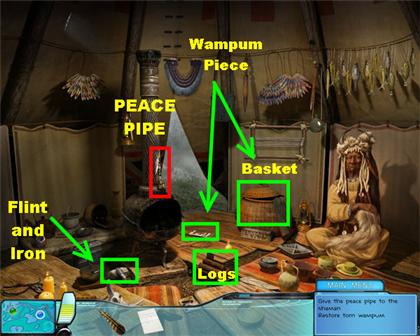
- Pick up the Peace Pipe that is on the stove.
- Pick up the Wampum piece that is on the floor in front of the Stove.
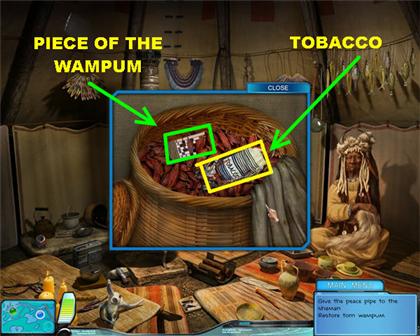
- Click on the Basket that is next to the Indian and you will get a closer view. Pick up the Tobacco and the piece of the Wampum that is inside the Basket.
- Pick up the Flint and Iron that is on the left side of the Stove.
- Pick up the Wood pieces that are in the lower center of the scene.
- In the Stove, place the Wood pieces, followed by the Flint and the Stone.
- Click on the Logs that are in the Stove and you will get some Glowing Embers.
- Click on the Glowing Embers that are in the Stove, and they will go into inventory.
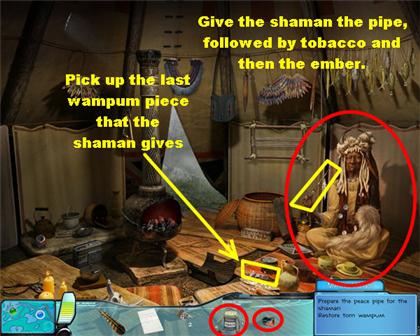
- Give the Shaman the Pipe, followed by the Tobacco, and then the Ember.
- The Shaman will reward you by giving you the last piece of the Wampum.
- Pick up the wampum piece that appears on the floor in front of the vase.
RESTORE TORN WAMPUM – PART 2
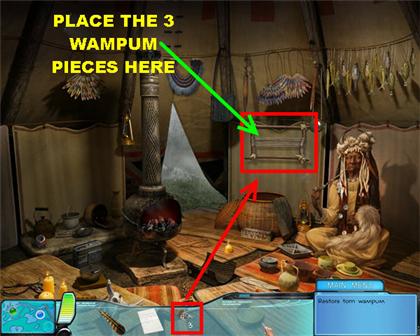
- At this point you should have collected all three pieces of the Wampum as described in the previous section.
- Grab the three Wampum pieces from your inventory and place them on the Torn Wampum, to the left of the Shaman.
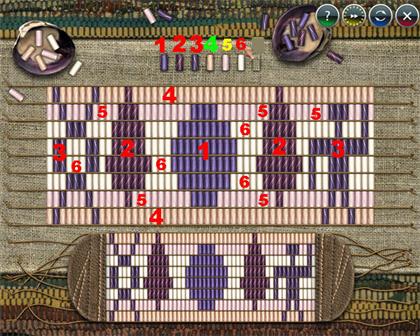
- You will be taken to a closer view of the Wampum. The goal in this puzzle is to fill in the missing gaps in the Wampum using the beads that are on top of the scene.
- Make sure to pay attention to the slight variation in colors in each individual bead, since this is an important factor in completing the Wampum correctly.
- Click on a bead that is on top of the page. Then, click on the space in which you need to place that bead. You only have to click on a bead once, and you can use it as many times as you need.
- If you placed a bead in the wrong place, you can simply click the correct bead over the mistake and it will swap the pieces.
- Please look at the screenshot for the solution. The screenshot shows you which beads go in which sections.
REMOVE LITTER/ PLACE FEATHER ON TOTEM
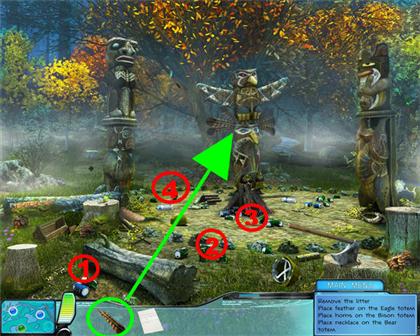
- Click on the cans that are scattered on the ground. Please look at the screenshot for the locations in which you need to click on the cans.
- Take the feather from inventory and place it on the totem that is in the middle of the scene.
PLACE HORNS ON BISON & NECKLACE ON BEAR
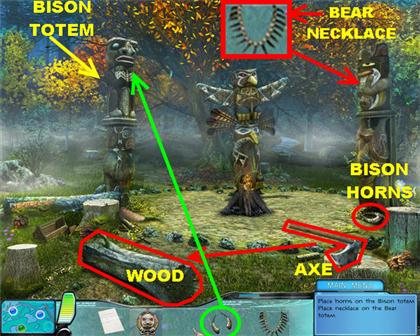
- Grab the axe that is on the right side of the ground.
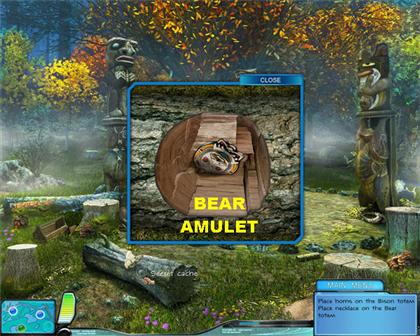
- Place the Axe on the recently cut tree that is on the left side of the ground and you will find a secret Cache. Click on the Cache and you will find the Bear Amulet.
- Grab the Bear Amulet that is inside the Cache, and it will go into your inventory.
- Grab the Bison Horns that are on the right side of the ground, close to the totem on the right.
- Grab the Bison Horns and place them on the Bison Totem that is on the left side of the scene.
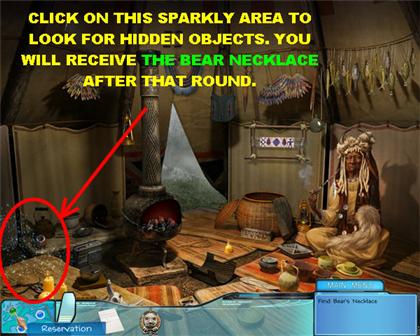
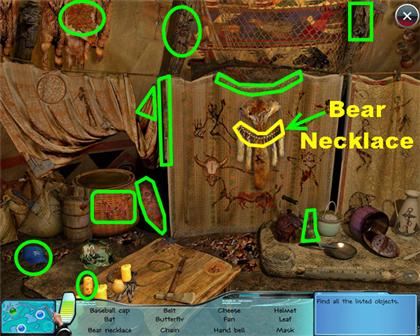
- To locate the Bear Necklace, go to the Reservation by clicking on the blue dot in the lower left side of the scene.
- Look for all the hidden objects; you will be given the bear necklace after you find all the objects.
- Go back to the Sacred Ground and give the Bear Necklace to the Totem on the right.
- Once you give the bear necklace to the Totem, a Ghost will appear in the middle of the scene.
RETURN EAGLE, BEAR & BISON AMULETS
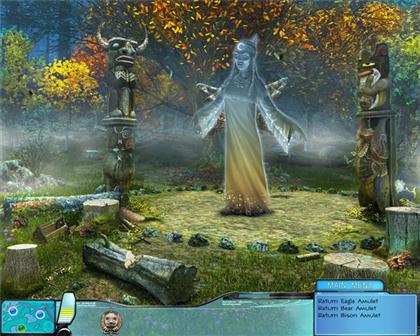
- The Bear Amulet should be in your inventory at this point. Give the Bear Amulet to the Moon Lady.
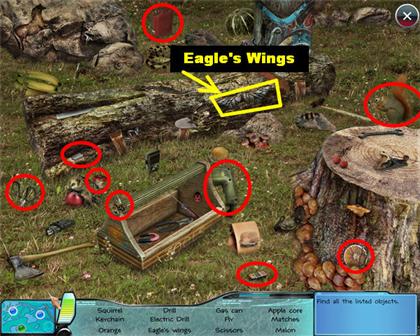
- Click on the sparkly area that is in the lower left side of the scene. Look for all the hidden objects. At the end of this level you will receive the Eagle’s Wings.
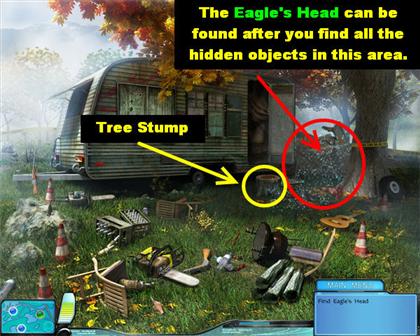
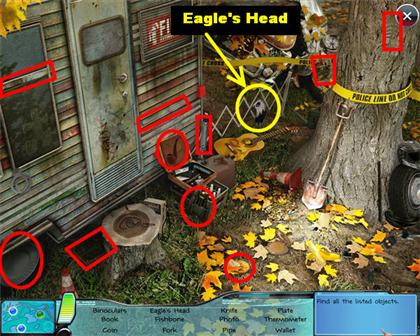
- Go to the Crime Scene and click on the sparkly area on the right side of the scene.
- Look for the hidden objects and you will receive the Eagle’s Head at the end of this round.
REPAIR THE EAGLE AMULET
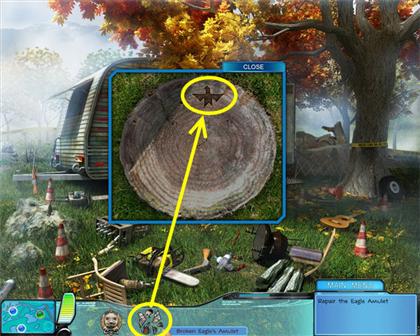
- Click on the Tree Stump that is by the trailer’s entrance and you will get a closer view.
- Place the Broken Eagle’s Amulet on the close-up view of the Tree Stump and you will be taken to a new puzzle.
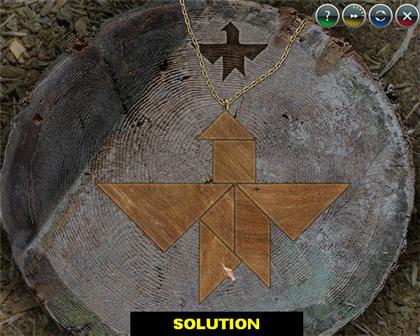
- The objective of this puzzle is to reconstruct the image of the eagle correctly.
- Grab the puzzle pieces that are scattered around the stump, and the pieces will automatically enlarge themselves.
- You can right-click to rotate a puzzle piece. You can left-click on a puzzle piece to place it on the stump.
- If the piece is in the right spot, it will lock itself in. If the piece is in the wrong place, you can move it to a different spot.
- Please look at the screenshot for the solution.
- You are done with this scene; go back to the Reservation.
FIND BISON AMULET
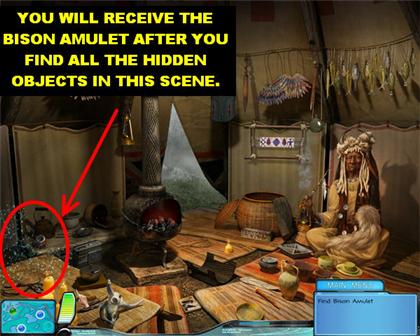
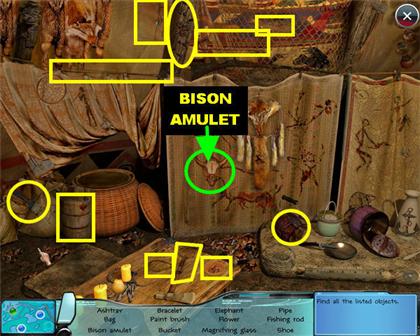
- Go back to the Reservation and click on the sparkly area that is on the lower left side of the scene.
- Find all the hidden objects and you will be given the Bison Amulet at the end of the scene.
- Go back to the Crime Scene.
RETURN, EAGLE, BEAR & BISON AMULETS - PART 2
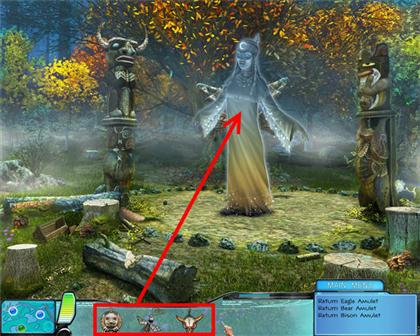
- You should have all three of the amulets at this point, if you followed all the steps above.
- Give the Bear Amulet to the Moon Lady, if you didn’t give it to her earlier. Then, hand her the Eagle and the Bison Amulet as well.
- The Moon Lady hands you the Tambourine of the Spirits and asks you to hand it to the Shaman.
- Go back to the Reservation.
GIVE TAMBOURINE TO SHAMAN/ TAKE DREAMCATCHER
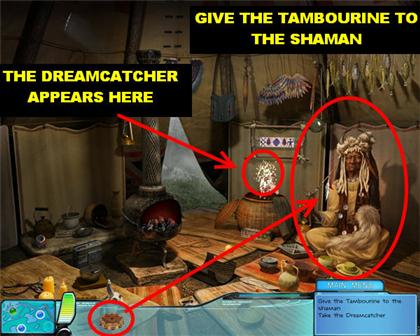
- Give the Shaman the Tambourine that the Moon Lady gave you.
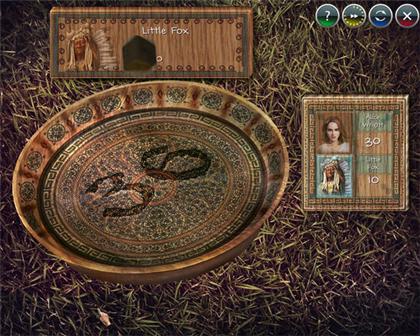
- He will ask you to play a game of “36” with him. If you win, he will give you the Dreamcatcher.
- The goal in “36” is to roll the die and be the first one to accumulate 36 points or more.
- Each time you roll the die, you will see the sum of all your rolls on top of the page. If you roll and get a die with a skull on it, it wipes away all your points that are not stored.
- You can keep rolling the die until you hit 36 points, or you can store some points as you go along.
- You can roll the die and click on the store button; the game will save your points and the Shaman will roll the die next.
- If the Shaman wins the game, you will have a chance to replay the game until you win.
- The solution for this is random so it’s really the luck of the draw.
- Once you win the game, the Shaman will give you the Dreamcatcher which will appear over the basket.
- Grab the Dreamcatcher from the basket to end this chapter.
CASE 3 – GRAYHILL, MS/ SLEEPSAND
RESTORE THE ROADSTONE ALTAR – PART 1
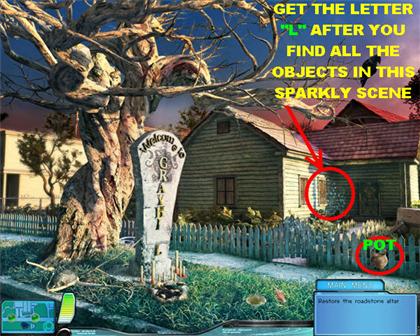
- Pick up the Old Pot that is on the right side of the street, and it will go into inventory.
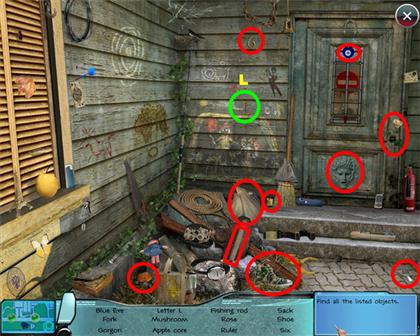
- Click on the sparkly area that is on the right side of the house.
- The letter “L” is in the center of the back wall.
- After you find all the objects on the list, you will receive the letter “L” in your inventory.
COLLECT THREE PIECES OF THE MAGIC SYMBOL
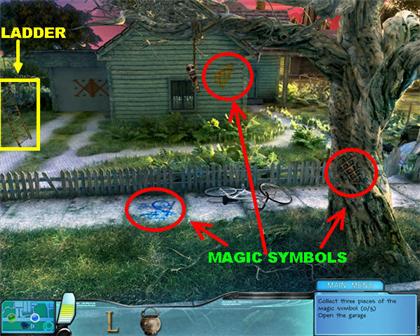
- Go to the Grayhill Street location by placing your cursor on the left side of the scene. As soon as you see some footsteps appear on the scene, click on them and you will be taken to Grayhill Street.
- There is one magic symbol on the trunk of the tree.
- There is another magic symbol on the side of the house.
- The last magic symbol is on the sidewalk.
- Pick up the ladder that is on the left side of the scene.
RESTORE THE ROADSTONE ALTAR – PART 2
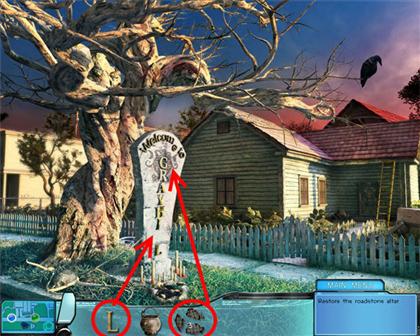
- Place the letter “L” at the bottom of the altar.
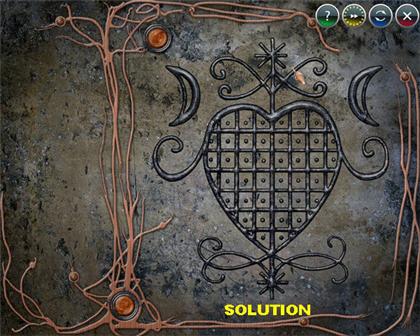
- Place the Magic Symbols on top of the Altar. You will be taken to a puzzle in which you need to restore Erzula’s special sign.
- Grab the puzzle pieces that are scattered around the puzzle, and the pieces will automatically enlarge themselves.
- You can right-click to rotate a puzzle piece. You can left-click on a puzzle piece, once you figure out where you want it to go.
- If the piece is in the right spot, it will lock itself in. If the piece is in the wrong place, you can move it to a different spot.
- Please look at the screenshot for the solution.
- Once the puzzle has been solved, click on the niche that appears at the bottom of the Altar. Click on the book that appears so you can read its contents.
- The book tells you that you need to find three Roots and three Mushrooms.
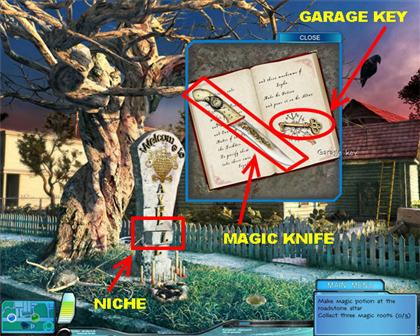
- Exit out of that window and you will find a knife and a key inside the book.
- Pick up the Magic Knife and the Garage Key and both pieces will go into your inventory.
COLLECT THREE MAGIC ROOTS
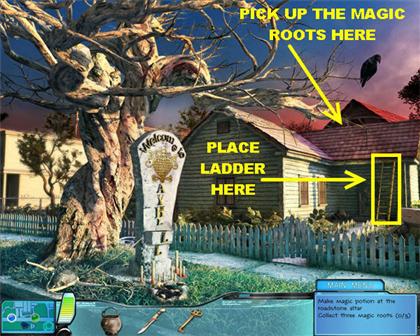
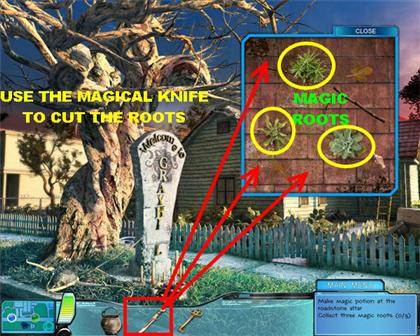
- Place the Ladder on the side of the house. This will give you access to the roof.
- Click on the Roof and you will get a closer view of it.
- Grab the Magical Knife from inventory and click on the three magical roots that are within the pop-up view of the roof.
OPEN THE GARAGE/ COLLECT THREE MUSHROOMS
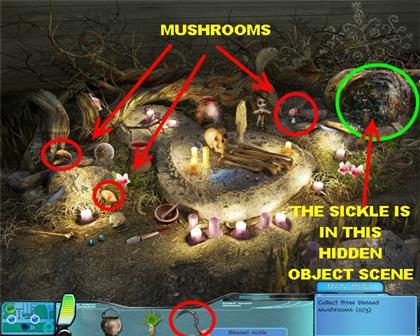
- Put the Garage Key on the garage door and enter the garage once the door opens.
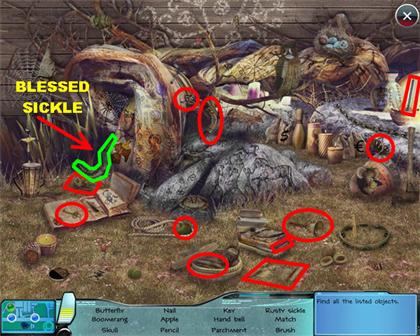
- As soon as you enter the garage, you will be taken to the Secret Shrine in which you can collect three Mushrooms. You have to obtain the Sickle before you can collect the mushrooms.
- Click on the sparkly area on the right side of the scene and you will be able to obtain the sickle after all the objects have been found.
- As soon as you get back to the Secret Shrine, use the Sickle to collect all three Mushrooms.
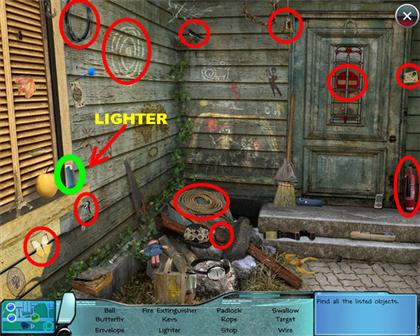
LIGHT CANDLES/ MAKE MAGIC POTION
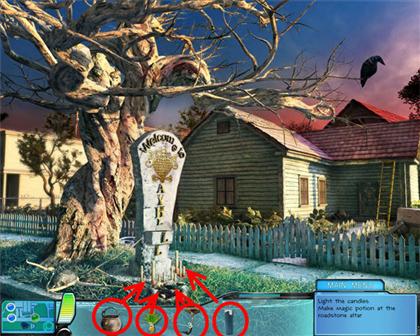
- Go back to the Grayhill Roadstone location.
- Click on the sparkly area that is on the side of the house. You will receive the lighter, once you find all the objects in that section.
- Go back to the Altar and place the Old Pot on the Fireplace at the bottom of the Shrine.
- Place the Blessed Mushrooms and the Magic Roots in the Old Pot.
- Place the Lighter on the candles, and then click on the pot to take the potion.
POUR MAGIC POTION ON THE ALTAR
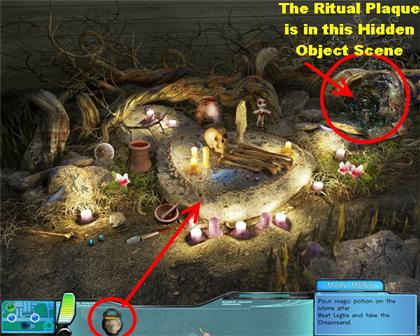
- Take the Magic Potion from inventory and place it on the Stone Altar.
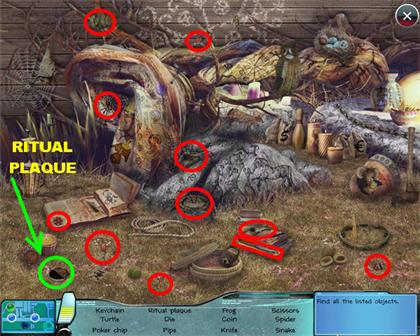
- Click on the sparkly area on the right side of the scene and look for all the objects on the list.
- You will receive the Ritual Plaque, after you find all the objects on the list.
BEAT LEGBA AND TAKE THE DREAMSAND
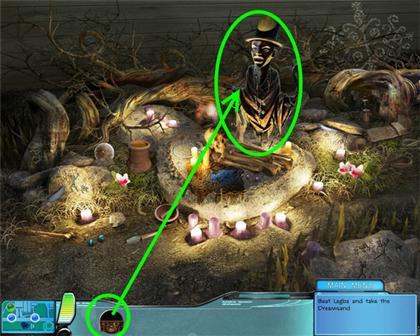
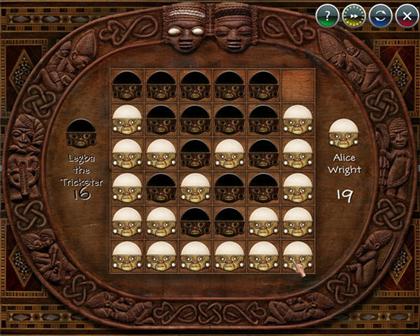
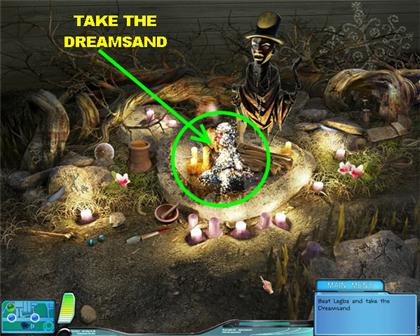
- Give Legba the Ritual Plaque, and he will ask you to play a game with him. If you can beat him at the game, he will give you the Dreamsand.
- The objective of this game is to have more of the light colored pieces on the board than dark ones.
- Click on an empty spot on the board that will make one of your pieces end up being vertical, diagonal, or horizontal from one of your current pieces on the board.
- Since the solution for this game is random, we cannot give you step by step instructions on how to solve it. The outcome depends on Legba’s moves.
- You can always skip the puzzle by clicking on the blue button in the upper right side of the scene.
- Once you complete the game, the Trickster will give you the Dreamsand. Click on it when it appears to end the level.
CASE 4 – IRONWOOD, MI/ STOPWATCH
DOUSE THE FIRE
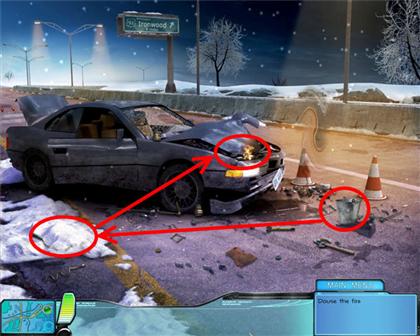
- Grab the Empty Bucket that is on the right side of the road.
- Place the Bucket on the Mound of Snow that is on the left side of the road. The Bucket will fill with snow and go back into inventory as a Bucket of Snow.
- Take the Bucket of Snow and place it over the flames on the hood of the car. The bucket will become a Bucket of Water.
- Grab the Bucket of Water and it will go back into inventory. Place the Bucket of Water on the fire.
- As soon as the fire is out, a sparkly area will appear in front of the car; click on it and look for the items on the list.
OPEN & SEARCH GLOVEBOX/ USE MAGNET
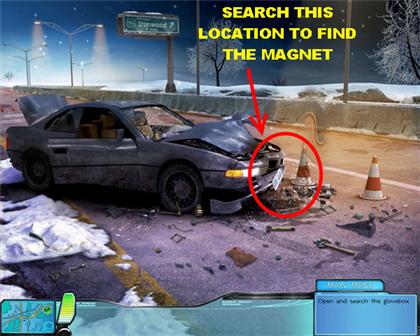
- Click on the sparkly area that is in front of the car.
- The Magnet is on the hood of the car. Search for the rest of the items on the list and you will receive the Magnet in your inventory as soon as you’re done.
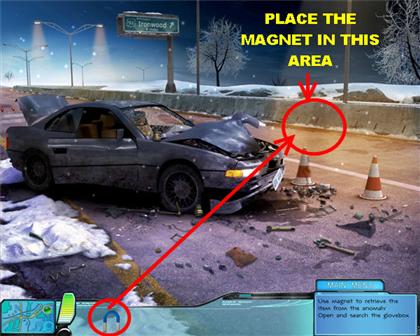
- Place the Magnet on the Anomaly that is on the right side of the road, and a puzzle will appear. The Anomaly is the distorted view of the road on the right side of the scene.
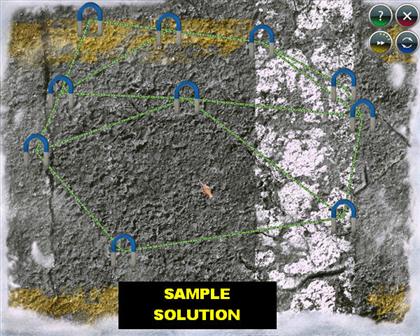
- Your goal in this puzzle is to pull apart the ties between the Magnets until none of the ties cross each other.
- Grab a Magnet and pull it to the side.
- The green ties are the ones that are not crossed with others.
- When you see a red tie, it means that they are still crossing other ties.
- The yellow ties are the ones that you are currently holding on to.
- Once you beat this puzzle, you will receive the Keys to the Glove Compartment.
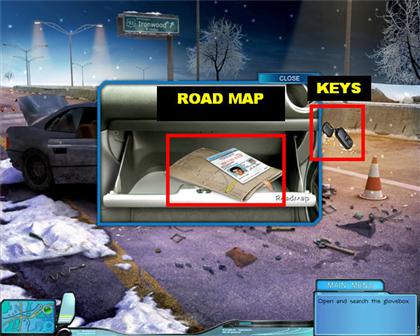
- Click on the window of the car and you will see a closer view of the Glove Compartment.
- Place the Key in the lock of the Glove Compartment.
- Pick up the Roadmap that is inside of the Glove Compartment. When you pick it up, you will notice that the map is pointing to the Car Dump.
- Two new locations will open up in the lower left side of the scene. Click on Pollock’s Car Dump first.
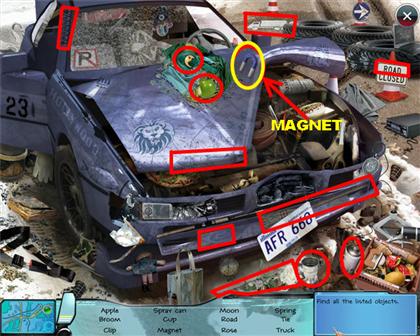
POLLOCK’S CAR DUMP – FIND WRENCH/ OPEN RUSTY CAR
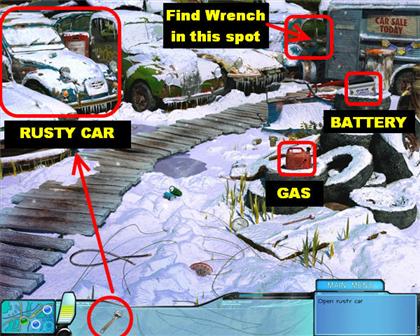
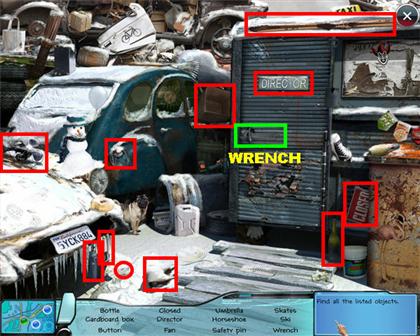
- Click on the sparkly area in the back of the scene.
- You will find the Wrench on the metal door in the center of the scene.
- Back at Pollock’s Car Dump, pick up the red Gas can that is on top of the stack of tires.
- Pick up the Discharged Battery that is on top of the stacked tires.
- Place the Wrench on the Rusty Car that is on the left side of the scene.
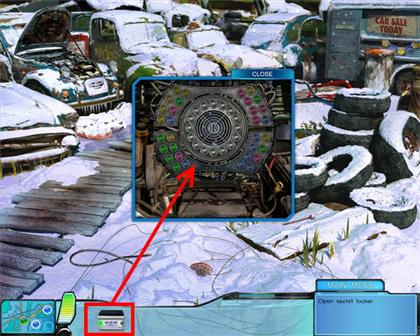
- A Secret Locker will appear after you open the car; click on it. You will be asked to open it.
OPEN SECRET LOCKER – PART 1
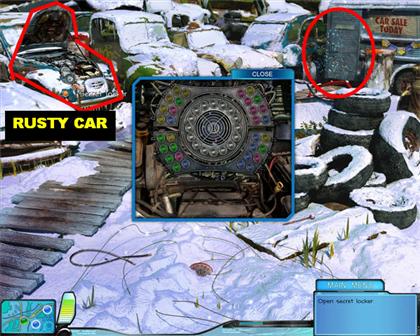
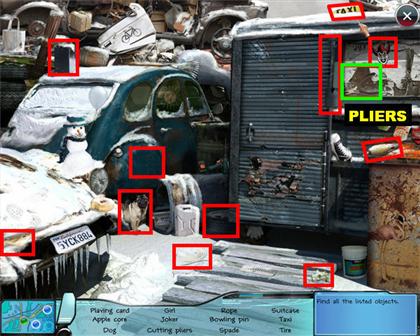
- Click on the sparkly area in the back of the scene and look for the hidden objects.
- The Cutting Pliers will be in the top right side of the scene.
- Go to the Tool Shed.
TOOL SHED – START GENERATOR/ RECHARGE BATTERY
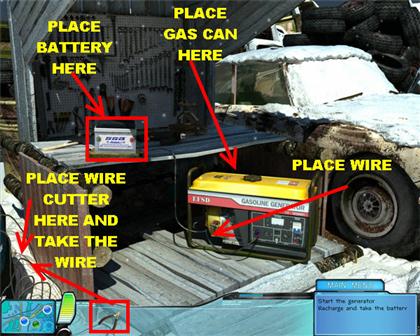
- Place the Discharged Battery on the Charger Slot.
- Place the Gas can on the Gasoline Generator.
- Place the Cutting Pliers on the wires that are in the lower left side of the scene.
- Place the Wire from inventory on the Gasoline Generator, and the Battery will start recharging.
- Grab the Battery from the slot, once you see the green light on the Battery.
- Go back to Pollock’s Car Dump.
OPEN SECRET LOCKER
- Click on the Secret Locker that is in the Rusty Car and you will get a closer view.
- Place the Recharged Battery from inventory on the close-up view of the Secret Compartment. Click on the Secret Compartment again to activate the puzzle.
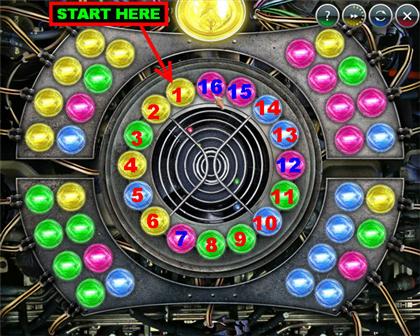
- The goal in this puzzle is to activate all the lights in the outer ring of the puzzle by clicking on the right buttons in the inner ring.
- Each time you click on a button in the inner ring, it causes some of the lights in the outer rings to light up.
- You want to light them up in pairs, before you move on to the next set of lights.
- Please look at the screenshot for the solution. Light up the lights in the order and color shown to be able to beat the puzzle.
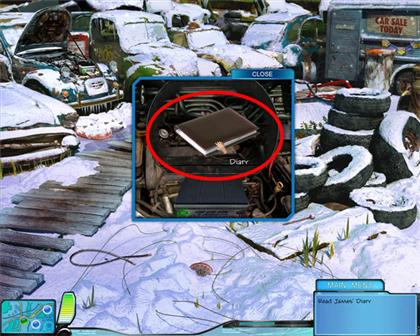
- Once you solve the puzzle, you will be able to grab the Diary that appears inside. Click on the Diary to read it.
- The Diary states that James had a lucky stopwatch and that he hid it in the car.
CRASH SITE – FIND THE STOPWATCH
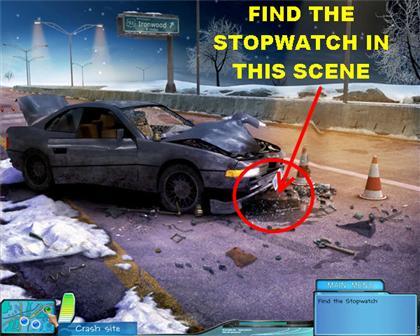
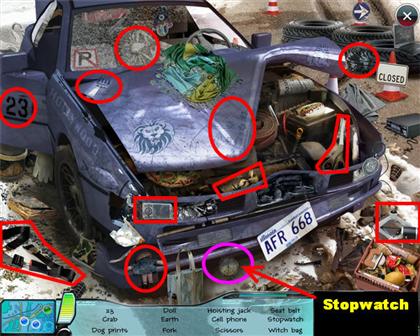
- Click on the sparkly area that is in front of the car and search for all the items on the list.
- The Stopwatch is in the lower center of the scene, below the left side of the fender.
USE STOPWATCH TO SAVE JAMES POLLOCK
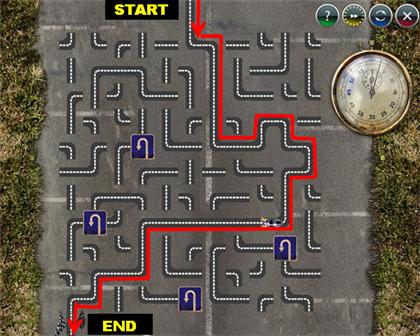
- In this puzzle you must take James from the starting point all the way down to the flags in the lower left side of the scene.
- Time is limited in this puzzle, so you have to work fast. Your goal is to connect the pieces of the road that lead to a straight line to the finish line.
- If your car reaches a dead-end, it will crash and the puzzle will be reset.
- If the car reaches a U Turn, it will turn around and go back to where it came from.
- Click on the stopwatch that appears on top of the car once you’ve completed the puzzle.
CASE 5 – TOLEDO, OH/ RABBIT’S PAW
HOTEL ROOM – FIND ACE/ OPEN SAFE

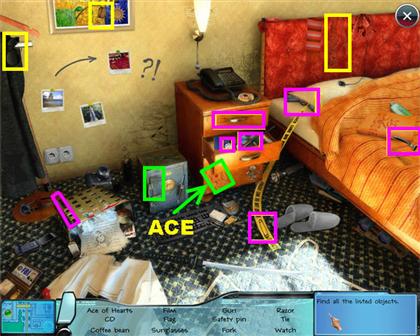
- Click on the sparkly area that is on the back wall and look for the Ace of Hearts in the hidden object location.
- Once you find all the items on the list, you will be taken back to the Hotel Room.
- Pick up the Microcassette that is on the bed.
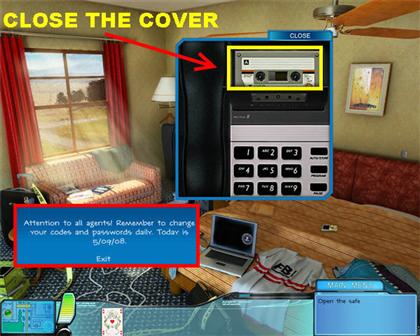
- Click on the Telephone and place the Microcassette in the slot above the phone
- Click on the cover and it will close; click on it again to read the following message:“Attention to all agents! Remember to change your codes and passwords daily. Today is 05/09/08.”
- This lets you know that the code for the safe is “5 9 8.”
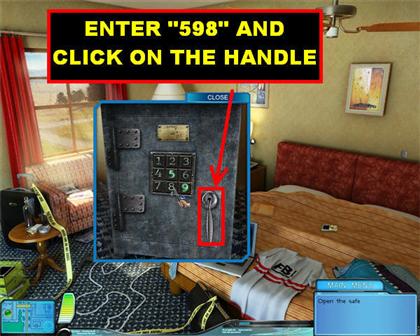
- Click on the Safe to get a closer view. Enter the numbers “5-9-8” and click on the safe handle to open the door.
READ DEREK’S DIARY
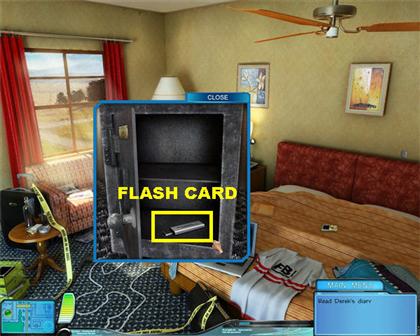
- Once the Safe is open, click on the Flash Card that is inside of the Safe and it will go into inventory.
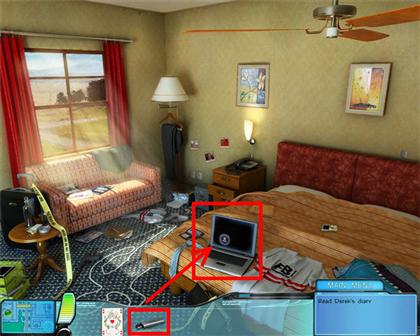
- Place the Flash Card on the Laptop that is on the bed.
- The message states that Derek lost all his money gambling at the casino.
- Two new areas will open up at this point, the Casino Roulette and the Casino Slot Machines.
- Go to the Casino Roulette section for now.
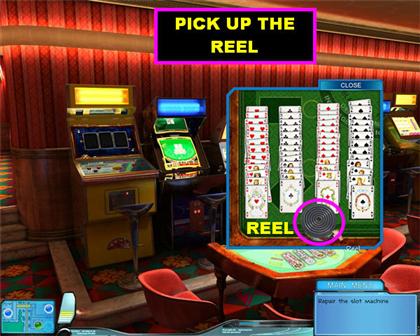
CASINO ROULETTE – FIND REEL, ACE OF DIAMONDS, AND ACE OF SPADES.
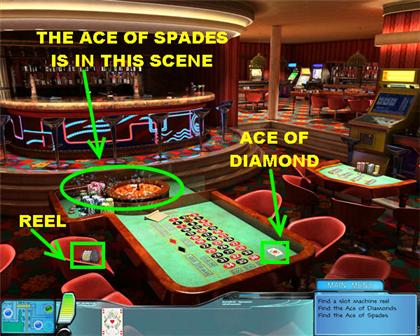

- The Ace of Diamonds is in the lower right side of the Roulette Table.
- The Reel is on the red chair that is in the lower left side of the scene.
- Click on the sparkly roulette wheel and you will find the Ace of Spades in the hidden object scene.
- You’re done with this scene for now. Go to the Casino Slot Machine location.
CASINO SLOT MACHINE – FINISH PATIENCE SOLITAIRE
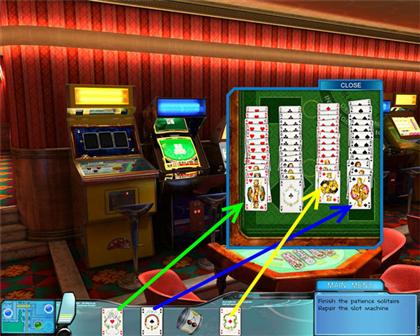
- Click on the solitaire game that is on the table and you will get a closer view.
- Place the Ace of Hearts over the King of Hearts.
- Place the Ace of Spades over the King of Spades.
- Place the Ace of Diamonds over the King of Diamonds.
- Once all the cards have been placed correctly, you will receive a Reel. Pick it up, and it will go into your inventory.
- This will give you a total of two Reels; you need one more Reel, and a Lever, to fix the Slot Machine. Go back to the Hotel Room.
HOTEL ROOM - OPEN THE SUITCASE
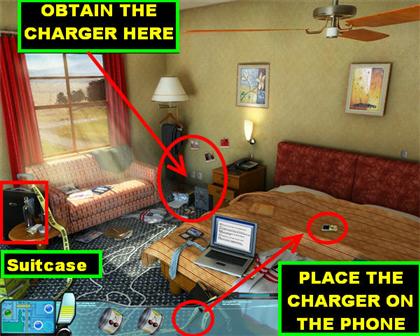

- Click on the sparkly area in the back of the scene and look for the Cell Phone Charger that is on the pillow that is on the bed.
- Once you’re back in the Hotel Room, place the Charger on the Cell Phone that is on the bed.
- Click on the Phone once it’s charged and you will be told to remember the number “221b.”
- Click on the Suitcase that is on the left side of the room, next to the couch, and you will get a closer view.
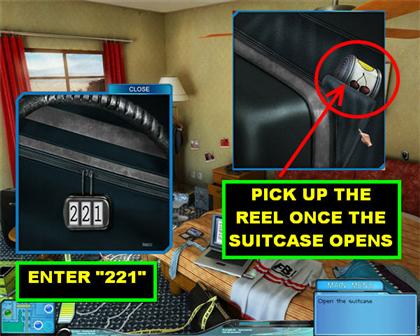
- Click on the numbers that are in front of the Suitcase to change them.
- Enter the number “221,” and the Suitcase will open.
- Grab the Reel that appears inside of the suitcase.
- Go back to the Casino Roulette location.
CASINO ROULETTE – FIND LEVER
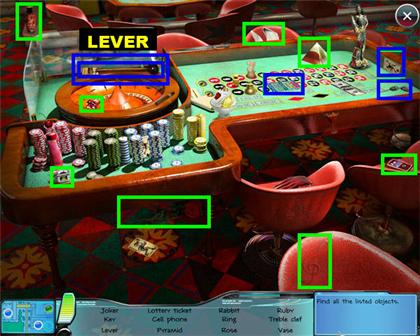
- Once you’re in the Casino Roulette location, click on the roulette wheel and you can find the lever on top of the roulette wheel.
- Find the rest of the items on the list and go back to the Casino Slot Machine location once you are finished.
REPAIR THE SLOT MACHINE

- If you followed all the steps in the previous section, you should have three Reels and one Lever in your inventory at this time.
- Place the three Reels and the Lever on the yellow machine that is on the left side of the room.
- Click on the lever to start the game.
WIN AT THE SLOT MACHINE
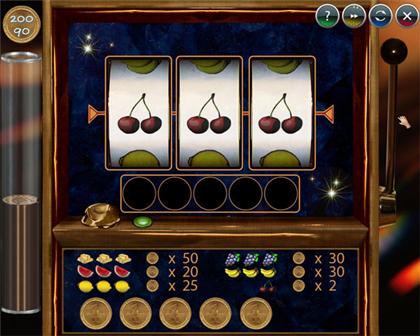
- The objective of this game is to win at the slot machine by accumulating 200 coins.
- Click on the coins that are at the bottom of the page and click on the lever. You can bet up to five coins.
- Whatever money you win will be added to your total in the top left side of the scene.
- If you lose all your money, you will have to start over again. If this happens, click on the reset button on top of the page.
- Once you win this game, you will have some chips added to your inventory.
- Go back to the Casino Roulette location.
WIN AT ROULETTE
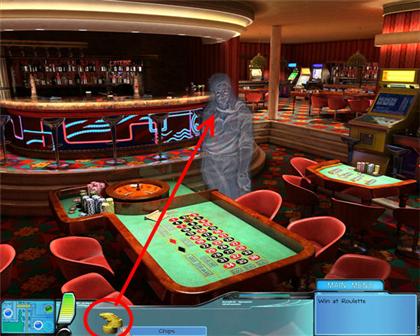

- As you go back to the roulette table, you will see a Ghost standing by it that asks you to free him by winning a hand in roulette.
- Take the Chips from inventory and hand them to the Ghost.
- Click on any of the numbers on the table; then, click on the roulette wheel to enter your guess.
- The Ghost will give you hints as to what number will come up next by giving you a series of numbers to decipher.
- If you can correctly guess the next sequence of numbers you will win some chips. Win three sets of chips to set the Ghost free.
- Here are some solutions for the number sequences:0, 4, 2, 6, 4 = 8 2, 3,5,7,11,13 = 17 77, 49, 36, 18 = 8 7, 5, 12, 10 = 17 2, 3, 5, 7 = 11 1, 10, 2, 20, 3 = 30 128, 64, 32, 16 = 8 1, 2, 4, 5, 25 = 26
CASE 6 – HOPTON, WY/ SPHERE OF LIFE
KABBALIST’S STUDY – OPEN THE SAFE
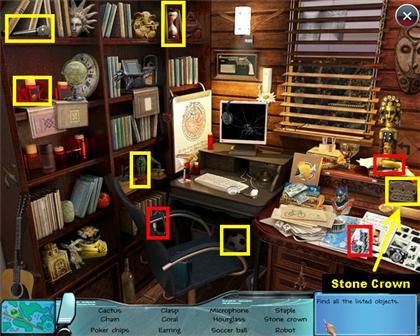
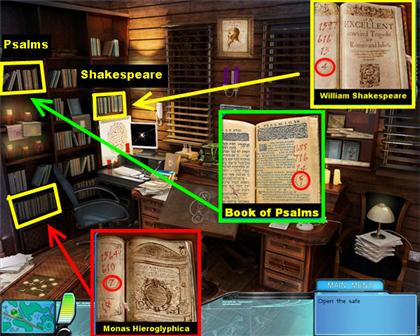
- Click on the sparkly area that is on the back wall and look for the Stone Crown that is on the top right side of the scene.
- Click on the Book of Psalms that is on the top left side of the bookcase and you will see several numbers appear. You only need the number 5 that is circled.
- Click on the Monas Hieroglyphica book located on the bottom shelf on the left side of the bookcase. You only need to worry about the number 7 that is circled on the page.
- Click on the William Shakespeare book on the right side of the bookcase and you will see several sets of numbers. You only need to worry about the number 4 that is circled on the page.
- When you arrange the numbers correctly, you will have the number “574” as the combination for the safe.
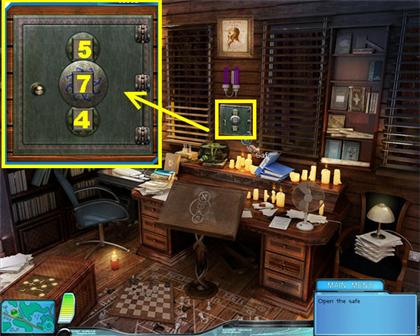
- Click on the Safe that is on the back wall and you will get a closer view.
- Enter the numbers “5-7-4,” and the Safe will open.
READ KABALIST’S DIARY
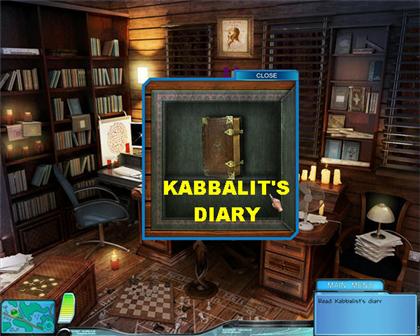
- Click on the Diary that appears inside the Safe and you will be able to read it.
- The Diary states that the Sphere was placed inside the Golem.
- Go to the Cemetery.
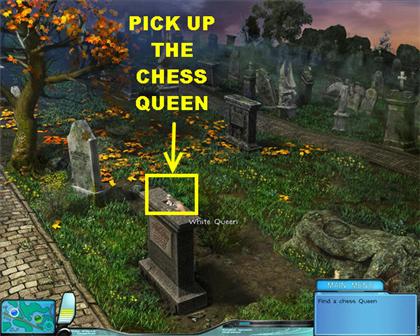
OLD CEMETERY – FIND THE DIARY PAGE & THE CHESS QUEEN
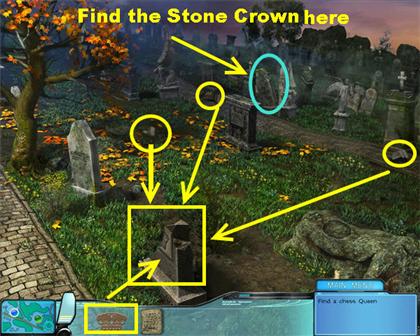
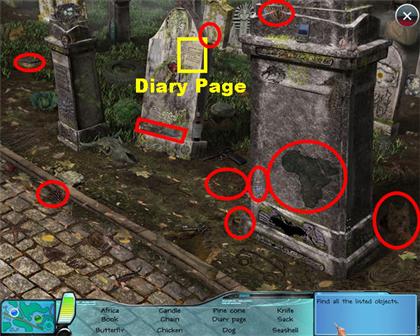
- Click on the sparkly area in the back of the cemetery and grab the Diary Page that is on the Gravestone in the middle of the scene.
- Once you get back to the cemetery, pick up the three Gravestone pieces that are scattered on the grass.
- Place the three Gravestone pieces on the Broken Gravestone that is in the lower center of the scene.
- Place the Stone Crown in the center of the Gravestone.
- The Chess Queen piece appears on top of the Gravestone; pick it up.
- Go back to the Kabbalist’s Study.
KABBALIST’S STUDY OPEN THE CHEST
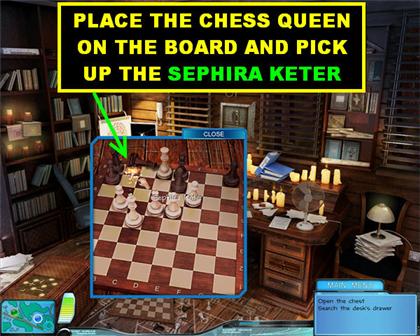
- In the Kabbalist’s Study, click on the chessboard and you will get a closer view. Place the Chess Queen from inventory on the chessboard, and it will knock a piece over.
- Pick up the Sephira Keter that is on the top left side of the chessboard.
- Place the Sephira Keter on the chest that is in the lower left side of the scene, and a mini-game will appear.
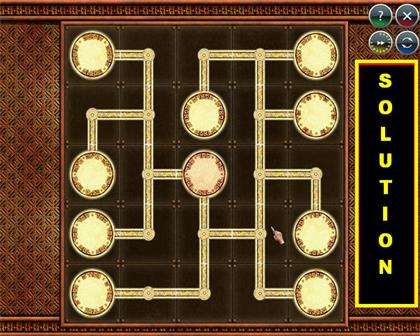
- Your goal is to connect all the coins until all of them are lit.
- Click on the pieces and they will rotate. All the pieces have to be connected in order to win the game.
- Please look at the screenshot for the solution.
KABBALIST’S STUDY – SEARCH THE CHEST
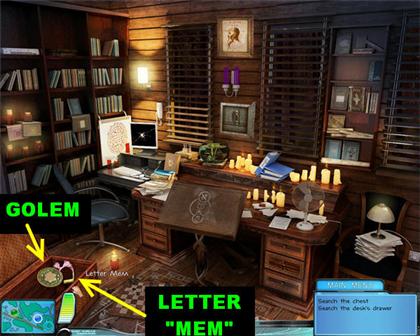
- Pick up the Golem and the Letter Mem that appears inside of the chest.
- Go back to the Cemetery so you can find the key for the drawer.
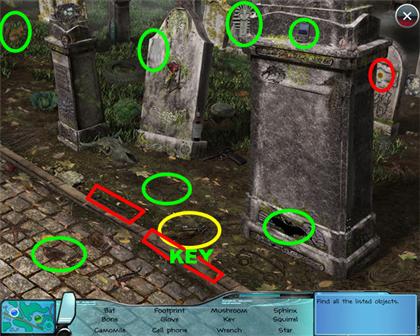
CEMETERY – KEY
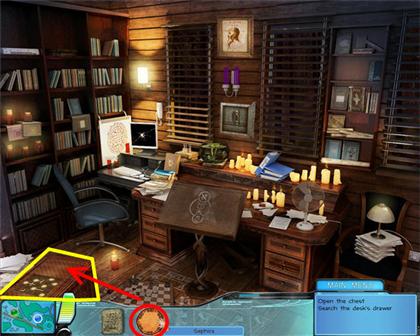
KABBALIST’S STUDY – SEARCH THE DRAWER & THE OFFICE
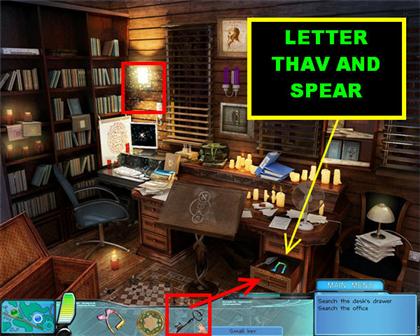
- Use the Small Key from inventory and place it on the Locked Drawer in the lower right side.
- Pick up the Letter Thav and the Spear that is inside of the drawer.
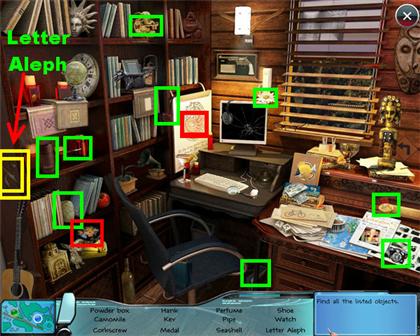
- Click on the sparkly spot on the left side of the scene and pick up the Letter Aleph that is on the lower left side of the scene.
- Go back to the Cemetery.
SUMMON AND DESTROY THE GOLEM
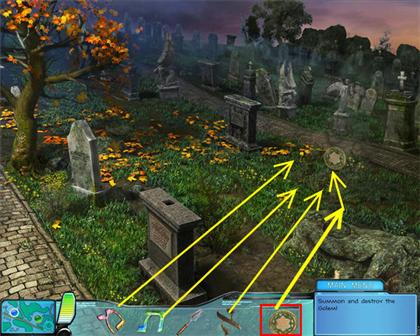
- Place the Golem on the Ritual Stone in the lower right side of the scene.
- The Golem will move closer to the pavement in the back of the scene.
- Place the Letter Aleph, The Letter Thav, and the Letter Mem on the statue, and the Golem will appear.
- Once the Golem appears, a mini-puzzle will show up on the page.
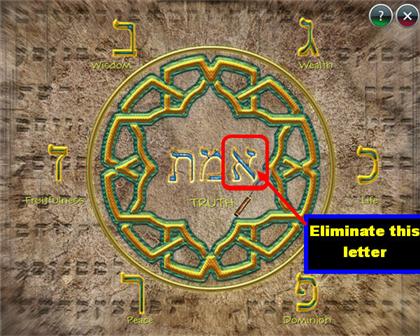
- The goal of this mini-game is to find the true name of the Golem by eliminating all the unnecessary letters from the board.
- Drag the letters from the center of the circle and drop them on their matching symbols.
- Once you only have three letters on the board, you have to eliminate one of them by using the spade in the lower left side of the scene.
- The letter you need to eliminate is the last one.
- Once that last letter is eliminated, you will receive the Sphere of Life.
CASE 7 – FLAMING ROSE
EXTINGUISH THE FIRE
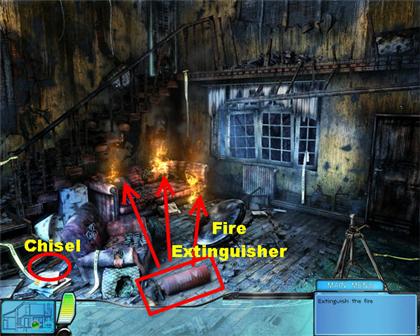
- Pick up the Fire Extinguisher that is on the left side of the floor.
- Grab the Chisel that is in the lower left corner of the scene.
- Extinguish the fire on the couch by clicking on the three flames that are on the couch. You only need to pick up the Fire Extinguisher one time and click it on the three different spots.
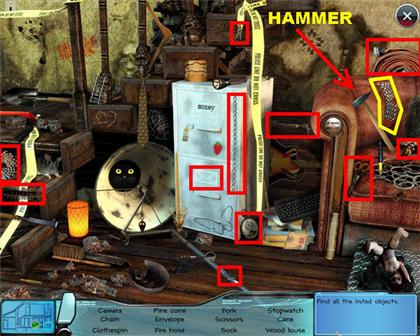
- Once the fire has been extinguished, a sparkly spot will appear over the couch; click on it to look for the items on the list.
- You will receive a Hammer in your inventory at the end of this section.
OPEN THE STRONGBOX
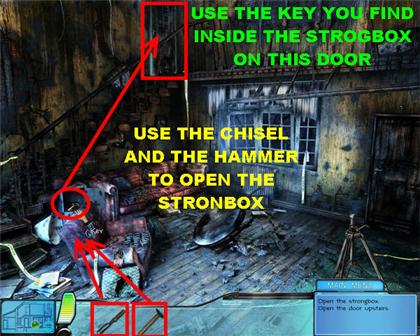
- Place the Chisel on the Strongbox that is next to the couch.
- Put the Hammer on the Strongbox, and the door will open.
- Grab the Key that is inside the Strongbox.
- Place the Key on the door that is up the steps. Go through the door, once it is open.
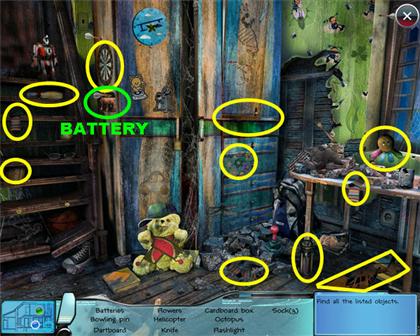
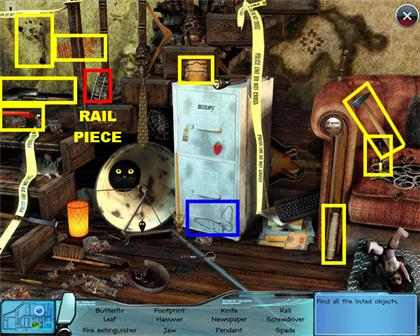
FIND CAMERA, BATTERIES & CROWBAR
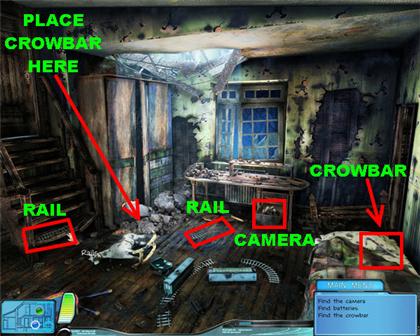
- Click on the bottom drawer of the dresser that is in the back of the room, and the drawer will open. Pick up the Camera that is inside the drawer.
- Click on the blanket that is on the bed, and the covers will be pulled back. Pick up the Crowbar that appears under the blanket.
- Pick up the two Rail pieces that are on the floor.
- Place the Crowbar on the rubble that is in front of the armoire several times, until you see a sparkly location appear.
- Click on the sparkly spot to look for objects.
GROUND FLOOR – TAKE SHOT OF THE ROOM

- Take the Crowbar and place it on the Loose Floorboard that is on the right side of the floor.
- Click on the Floorboard one more time; a Photo Paper will come out of the floor.
- Place the Camera on the Tripod.
- Put the Batteries in the Camera.
- Place the Photo Paper on the Camera. Click on the Camera, to take the photograph.
FIND THE DIFFERENCES
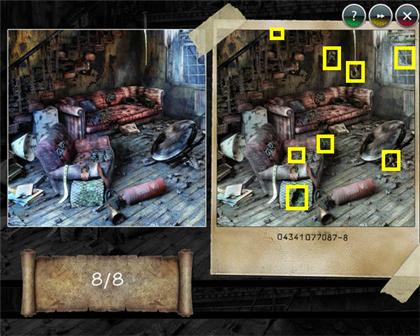
- In this scene you have to find the eight differences in the picture.
- As soon as you click on a difference, the item that was missing will appear in the right place.
- You cannot use a hint in this puzzle; if you get stuck, you can wait until the hint restores itself.
- The solution will be the same for everyone; please look at the screenshot for the solution.
TALK TO THE GHOST – RAIL PIECE
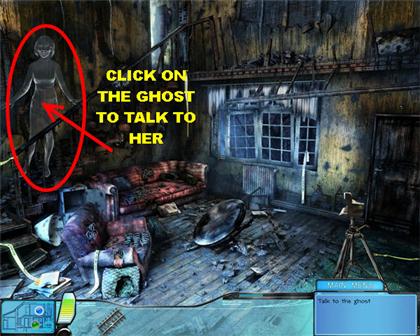
- Click on the Ghost and she will tell you that she cannot leave without the Rose.
- As soon as you’re done talking to her, a sparkly area will appear on the couch. Look in that location to find the Rail piece that is in the upper left side of the scene, on the steps.
REPAIR THE RAILROAD/ JOYSTICK
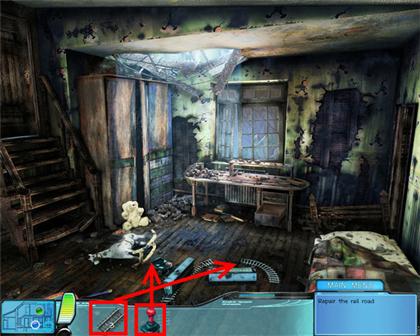
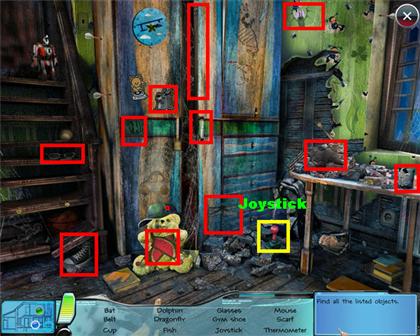
- Go to the First Floor and click on the sparkly area in the back of the room. Pick up the Joystick that is in the lower right side of the scene.
- Place the three rail pieces on the Toy Railway that is on the floor. Click all 3 pieces onto the train.
- Put the Joystick on the Electric Train Controller that is on the floor.
- Click on the Joystick, and the train will come around with a key on top of it.
OPEN DOOR TO ATTIC/ TAKE FLAMING ROSE
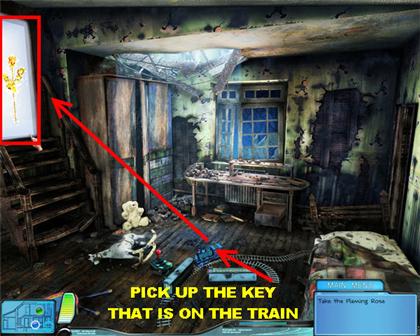
- Take the Key that is on top of the train and place the Key on the door that is above the steps.
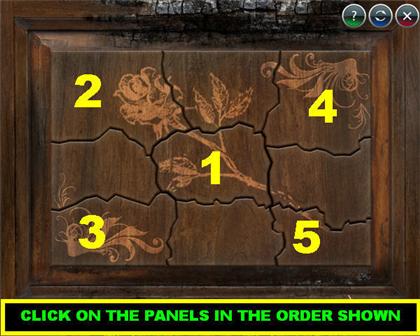
- When you place the Key on the door a puzzle appears. Your goal is to click on the pieces in the correct order so all the pieces stay down.
- If you number the pieces 1 through 9, top to bottom, left to right, click on the pieces in the following order:5-1-7-3-9
- Once you’ve completed the puzzle, the flaming rose will appear over the door.
GIVE THE ROSE TO THE GHOST
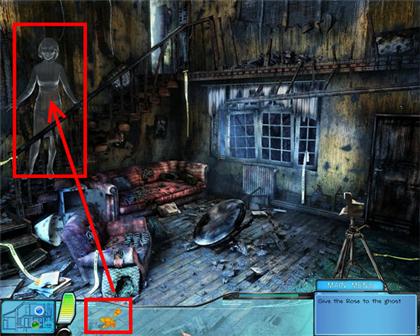
- Give the ghost the rose that is in inventory.
CASE 8 - MOSQUERO, NM/ MIRROR OF DREAMS
READ INVISIBLE MESSAGE/ COLLECT TWO TAROT CARDS

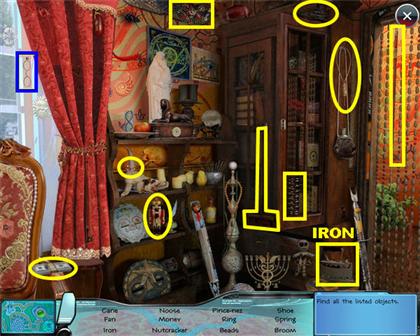
- Click on the sparkly area in the back of the room. Pick up the Iron that is on the lower right side of the scene.
- Pick up the “Wheel of Fortune” tarot card that is on the board, located on the left side of the scene.
- Pick up the “Chariot” tarot card that is on the left side of the table.
- Pick up the Trowel that is on the arm of the chair on the right side of the room.
- Place the Trowel on the Hot Embers on the left side of the scene. The Glowing Embers will go into inventory.
- Place the Iron on the Invisible Message that is on the table.
- Place the Glowing Embers on the Iron. Click on the Iron a second time, so you can read the Invisible Message.
- Two locations open up at this point; go to the Mirror Room.
MIRROR ROOM - COLLECT TAROT CARD/ MIRROR SHARD
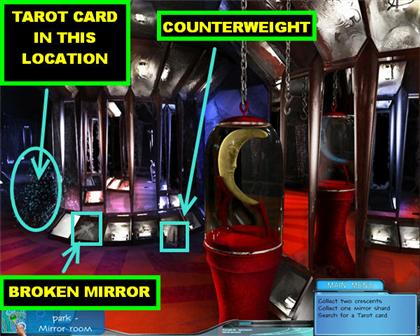
- Click on the sparkly area that is on the left side of the scene.
- Pick up the tarot card that is on the lower center of the scene.
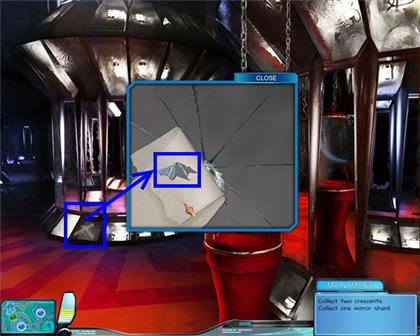
- Once you’re back in the Mirror Room, click on the Broken Mirror that is on the base of the large mirror and you will get a closer view.
- Click on the tape and, once it peels back, click on the Mirror Shard that is on the back of the tape.
MIRROR ROOM - COLLECT TWO CRESCENTS
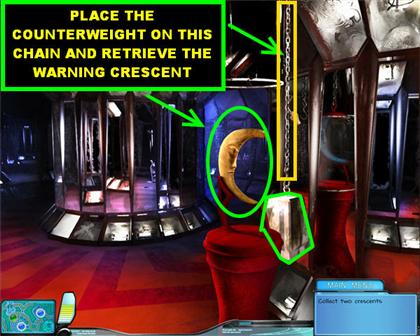
- Pick up the Counterweight that is on the right side of the large mirror.
- Place the Counterweight on the chain that is hanging on the right side of the scene.
- The Counterweight will lift up the cover that is over the Crescent. Click on the Warning Crescent, and it will go into inventory.
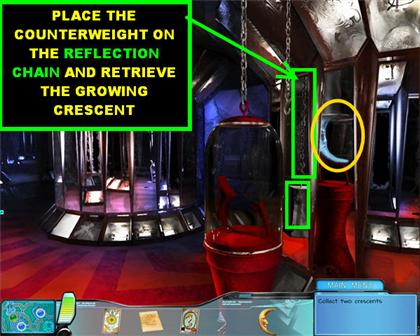
- Take the Counterweight off the chain. This time, place it on the other chain that reads “Chain Reflection.” When you place it on that one, it lifts the cover off of the Growing Crescent.
- Click on the Growing Crescent, and it will go into inventory.
GREAT MIRROR – COLLECT MIRROR SHARD/ TAROT CARD
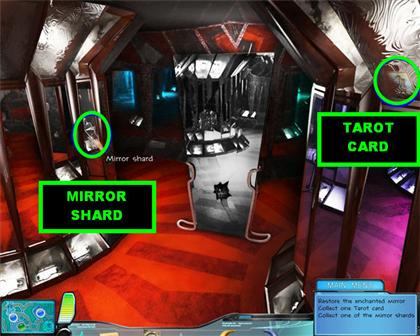
- Pick up the Mirror Shard that is on the left side of the scene.
- Pick up the tarot card that is on the upper right side of the scene.
- Go back to the Fortuneteller’s for now.
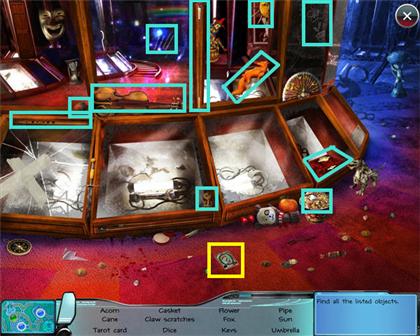
FORTUNETELLER’S - OPEN CHEST

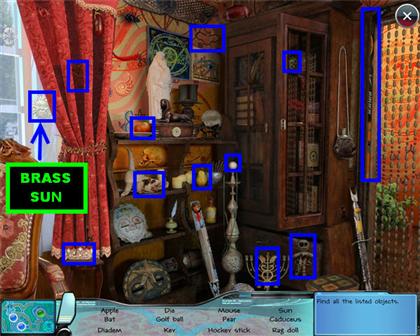
- Click on the sparkly area in the back of the scene and look for the objects on the list.
- The Brass Sun is in the upper left side of the scene, on the window.
- Click on the Chest that is in the lower right side of the scene and you will get a closer view.
- Place the Brass Sun on the slot for the sun in the pop-up window.
- Place the Warning Crescent on the left side of the cover.
- Place the Growing Crescent on the right side of the cover.
REPLACE THE CRYSTAL BALL
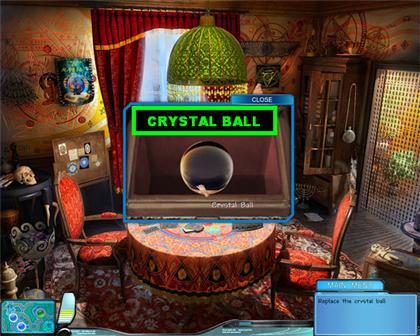
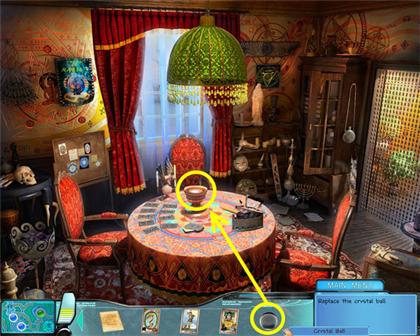
- Pick up the Crystal Ball that appears inside the Chest.
- Place the Crystal Ball on the Base for the Crystal Ball that is on the table.
FIND THE TAROT CARD

- Click on the Crystal Ball and a mini-game will appear.
- The objective of this game is to click on the same cards as the ones shown in the crystal ball.
- The trick is that the cards only appear for a few seconds, you have to remember where they are and click on them.
- If you flip a Death Card, you will lose a life, you only have three lives. If you lose all three lives you will have to start again.
- The solution for this game is random.
- You will receive the Magician tarot card, once you beat this mini-game.
MIRROR ROOM - COLLECT LAST MIRROR SHARD
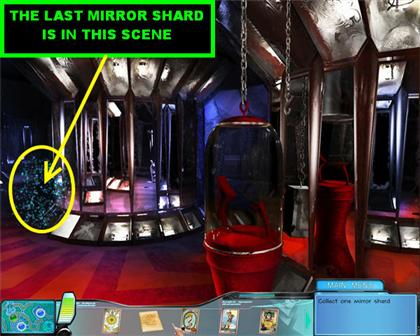
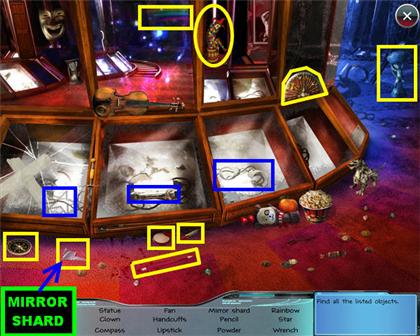
- Click on the sparkly area that is on the left side of the scene and look for the objects on the list.
- The last Mirror Shard is on the lower left side of the scene.
- Go back to the Great Mirror scene.
GREAT MIRROR – RESTORE ENCHANTED MIRROR
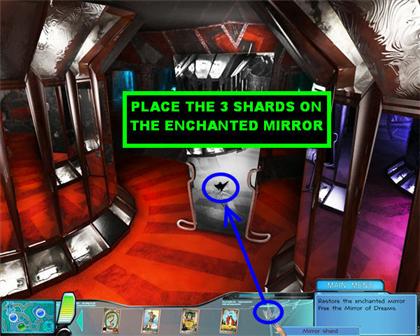
- Place the three Shard pieces on the Broken Mirror. You will be asked to free the Mirror of Dreams.
GREAT MIRROR – FREE THE MIRROR OF DREAMS
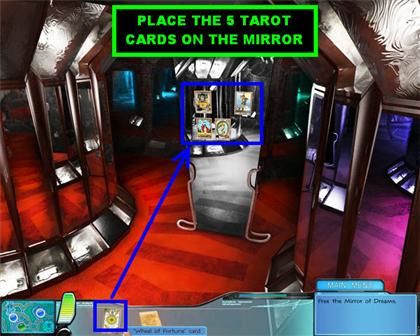
- Place the five tarot cards from inventory on the Enchanted Mirror.
TAKE THE MIRROR OF DREAMS
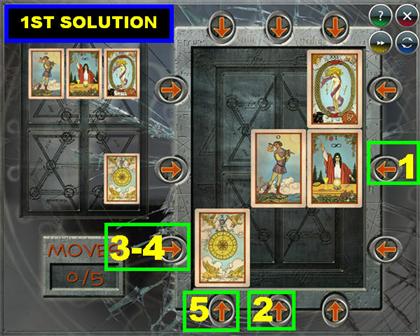
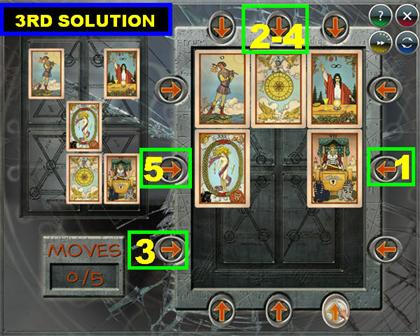
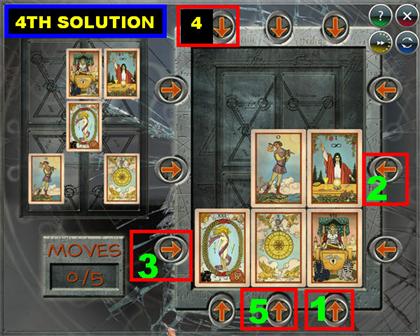
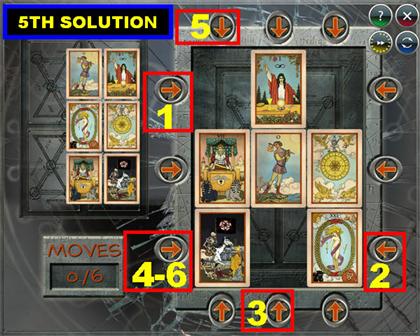
- Before you can take the Mirror of Dreams, you have to open the portals by playing a tarot card mini-game.
- Your goal is to move the cards on the right side of the field to look like the cards on the top left side of the field.
- Click on the arrows and they will move the cards one space in the direction of the arrow.
- You can only move the cards a certain amount of times in order to beat each round.
- The amount of times you can move the cards is indicated in the lower left side of the playing field.
- If you do not complete the moves in a certain amount of time, you will have to redo that puzzle.
- You have to complete five sets of puzzles to win the game.
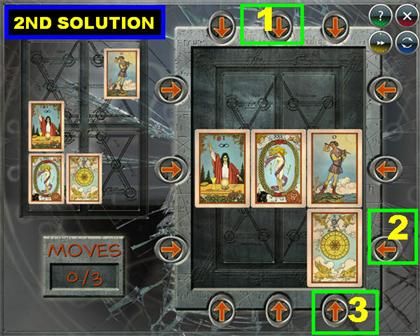
- Please click on the arrows in the order shown in the screenshots.
SOLUTION 1
SOLUTION 2
SOLUTION 3
SOLUTION 4
SOLUTION 5
- Once the puzzle has been completed, click on the Mirror of Dreams that appears in the back of the scene.
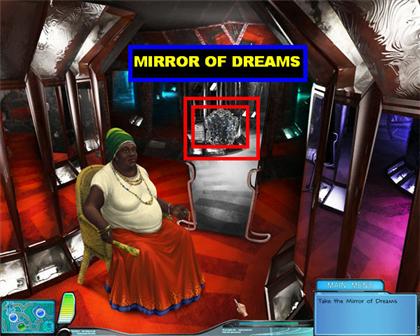
- Listen to what the Fortuneteller has to say; then, click on the mirror again to end the level.
CASE 9 –GRIMSTONE MANSION, KANSAS CITY/ EYE OF EVIL
ASHES OF GRIMSTONE MANSION – FIND THREE PAPERS
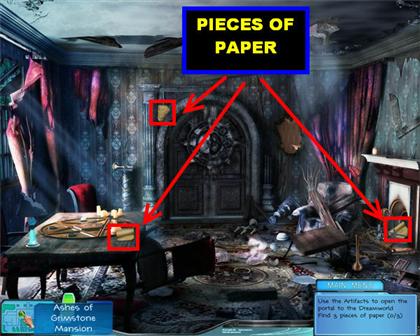
- Please look at the screenshot for the location of all the papers.
ASHES OF GRIMSTONE MANSION – USE ARTIFACTS TO OPEN PORTAL
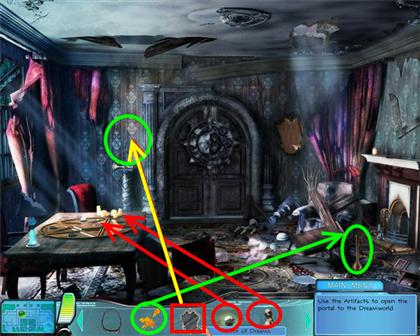
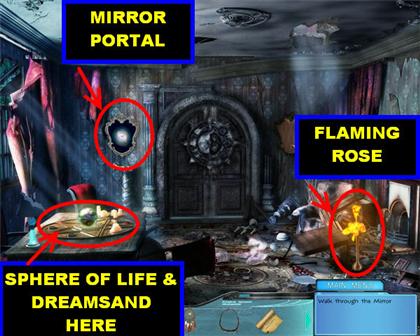
- Place the Mirror of Dreams on the back wall. It goes on the left side of the door.
- The Flaming Rose goes on the Sooty Vase that is in the lower right side of the scene.
- The Sphere of Life goes on the Pentagram that is on the table.
- Place the Dreamsand on the Pentagram, and the Mirror on the left side of the door will be activated.
- Click on the Mirror Portal to go through it.
DREAMSWORLD MANSION – OPEN ELEMENTAL LOCK
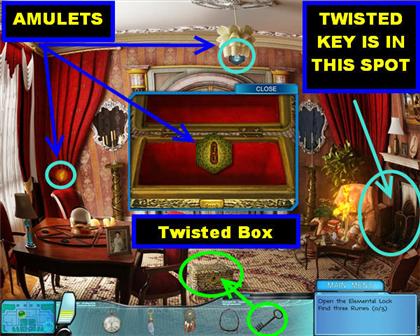
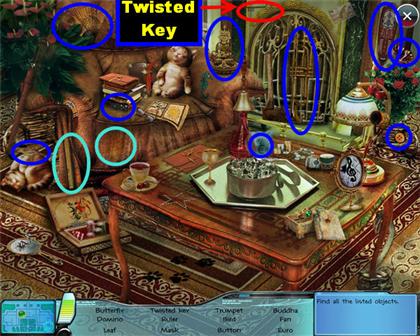
- There are two Amulets in the room; the third one is in the Twisted Box that is on the floor.
- The first Amulet is in the upper center of the scene; it is hanging from the light fixture.
- The second Amulet is on the curtains in the lower left side of the scene.
- Go to the sparkly area and retrieve the Twisted Key that is in the top right side of the scene, above the fireplace.
- Once you get back to the Mansion, place the Twisted Key on the Twisted Box that is in the lower center of the scene.
- Once the box is opened, grab the last Amulet.
OPEN ELEMENTAL LOCK – PART 2
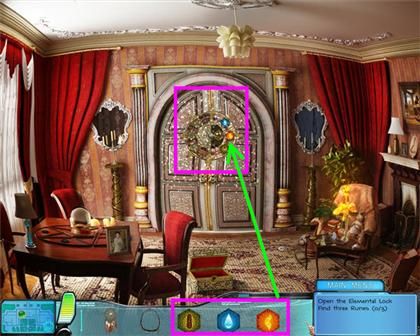
- Grab the three Amulets and place them on the Elemental Lock that is on the door. Click on the sparkles that appear on the door to get a closer view.
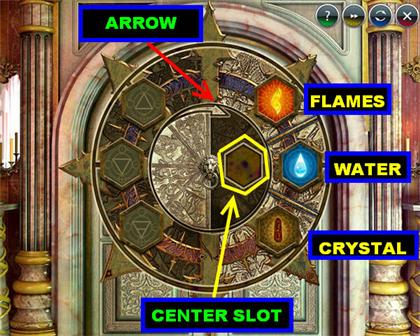
- Your goal in this puzzle is to transfer the amulets to the left side of the lock without making any of them explode.
- To move the Amulets around, click on them and they will enter the slot in the middle.
- Click on the arrow that is in the center of the lock, and it will move the Amulet to the opposite side.
- Once you get to the opposite side, click on the Amulet that is in the center and it will go into the next available slot.
- Repeat the same process to move the amulets around.
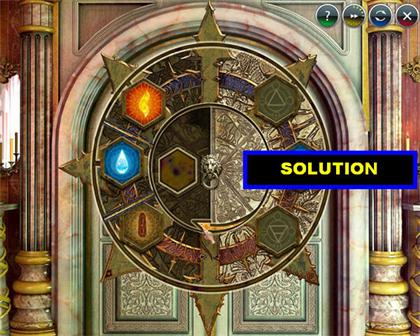
- The solution is as follows:Pick up the Water and place it on the left side. Go to back to the right side and pick up the Flames. Place the Flames on the left side. Grab the Water from the left side and place it back on the right side. Grab the Crystal from the right side and place it on the left. Pick up the Water from the right side and place it back on the left.
- Once the lock has been solved, you will be able to enter through the door.
FIND THREE RUNES - RUNE OF THE GODS
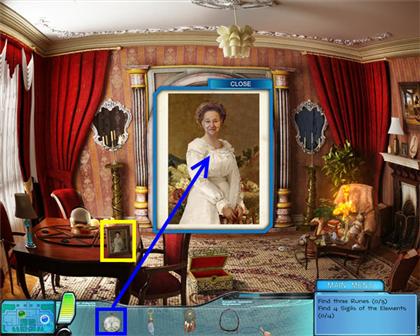
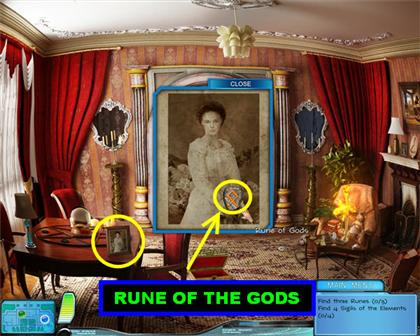
- Click on the photograph that is on the table in the Mansion and you will get a closer view.
- Place the Stopwatch on the Photograph and a younger picture of the woman will appear.
- Pick up the Rune of the Gods that appears at the bottom of her portrait.
- Go through the door to enter the next scene.
FIND THREE RUNES – RUNE OF SPIRITS
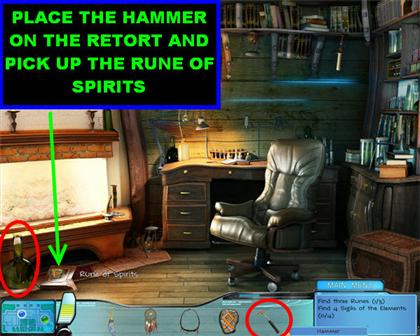
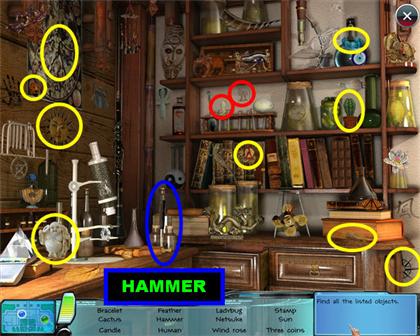
- Click on the sparkly area that is located in the lower right side of the Dreamsworld Study and find the Hammer.
- The Hammer is on the lower left side of the scene, next to the funnel.
- In the Study, place the Hammer on the Big Retort that is in the lower left side of the scene.
- Once the Retort is broken, click on the Rune of Spirits that appears on the floor.
FIND THREE RUNES – RUNE OF GIANTS
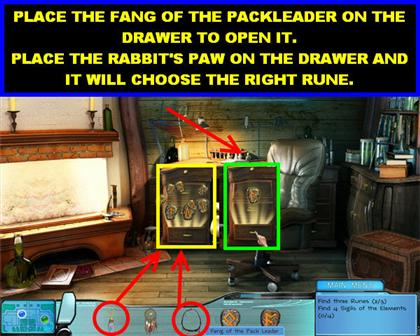
- In the Study, place the Fang of the Pack Leader on the Locked Drawer.
- Once the drawer opens, you have to click on the correct Rune in order for it to go into inventory.
- Grab the Rabbit’s Paw from inventory and place it on the drawer. The right Rune will isolate itself from the rest and appear on top of the drawer.
OPEN THE RUNIC CHEST PUZZLE
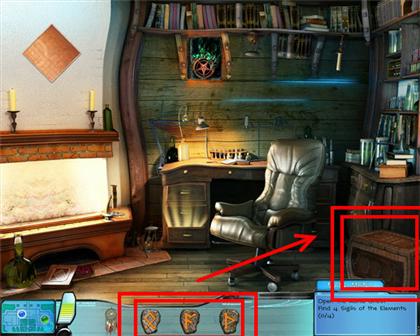
- Place the four Runes on the Chest that is in the lower right corner of the Study, and a puzzle will appear.
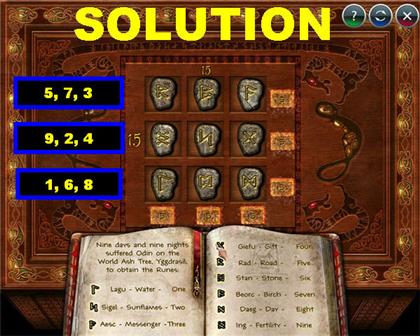
- Your goal in this puzzle is to arrange all the runes so that each column, and row, adds up to 15.
- Each rune has a specific value assigned to it; to look at the value, you can look at the book that is at the bottom of the puzzle.
- There are many combinations you can use, here is one of them. Using the names in the book, the solution is as follows:1st Row – RAD (5), BEORC (7), AESC (3) 2nd Row – ING (9), SIGEL (2), GIEFU (4) 3rd Row – LAGU (1), STAN (6), DAEG (8)
FIND FOUR SIGILS OF THE ELEMENTS – SIGIL OF AIR
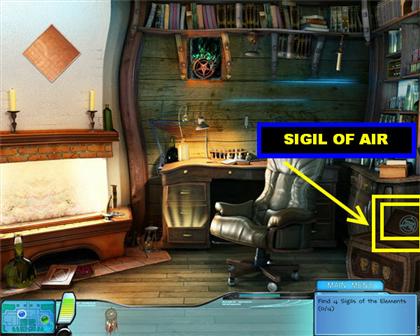
- Once the Runic Chest has been opened, pick up the Sigil of Water symbol that appears on the inside lid of the chest.
FIND FOUR SIGILS OF THE ELEMENTS – SIGIL OF FIRE
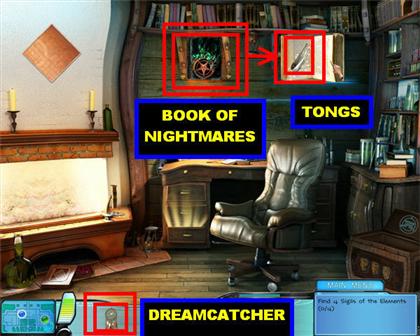
- Place the Dreamcatcher on the Book of Nightmares that is on the back wall of the Study, and a book will appear.
- Click on the book again and pick up the Tongs that appear inside the book.
- Go back to the Mansion and place the Tongs on the Flaming Rose. The Tongs will go back into inventory with a Flaming Petal.
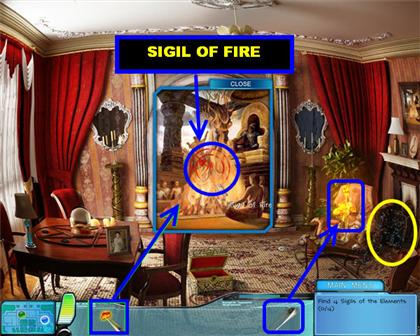
- Click on the Picture of “Temple of Flames” and you will get a closer view.
- Place the Flaming Petal in the lower left side of the pop-up window, and the Sigil of Fire will appear in the flames.
- Pick up the Sigil of Fire. Click on the sparkly area that is in the lower right side of the Mansion.
FIND FOUR SIGILS OF THE ELEMENTS – SIGIL OF EARTH
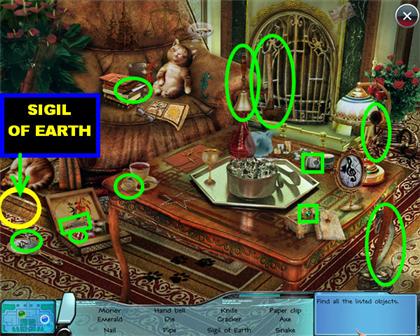
- Click on the sparkly area that is by the fireplace in the Mansion and look for all the objects on the list.
- Click on the Sigil of Earth that blends into the lower left side of the carpet.
- Go back to the Study.
FIND FOUR SIGILS OF THE ELEMENTS – SIGIL OF WATER
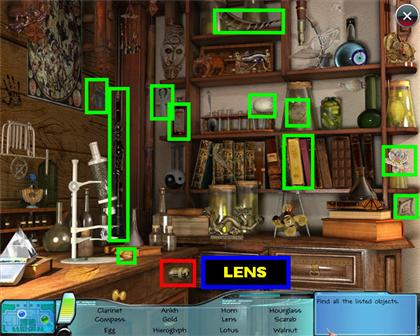
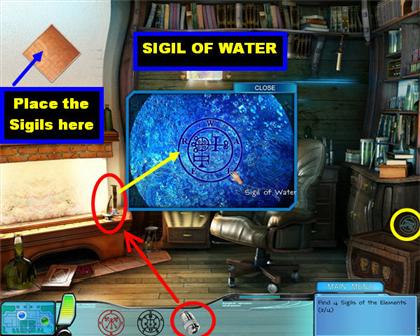
- Go back to the Study and click on the sparkly area that is on the right side of the scene.
- Pick up the Microscope Lens that is in the lower center of the scene.
- Go back to the Study and place the Microscope Lens on the Microscope. Click on the Lens and you will see the Sigil of Water; click on it to pick it up.
RETRIEVE THE EYE OF EVIL
- Place the four Sigils of the Elements on the Shield of Sigils that is in the upper left corner of the Study, and a mini-game will appear.
- Your goal in this mini-game is to eliminate all the Sigils on the board by making them collide with matching Sigils.
- To move the Sigils around, click on them until you see them light up. Then drag them in the direction that you want them to go to.
- Let go of the mouse when you see the arrow appear. At that point the Sigils will go in the direction you chose until they hit an obstacle.
- If two Sigils with the same symbols, but different colors, collide with each other, they will switch colors.
- If two Sigils with the same symbols and color collide with each other, they will be eliminated from the board.
- Please look at the screenshots for the solutions to this puzzle. Make sure that you move the pieces in the order and the direction shown in the screenshots.
SOLUTION 1
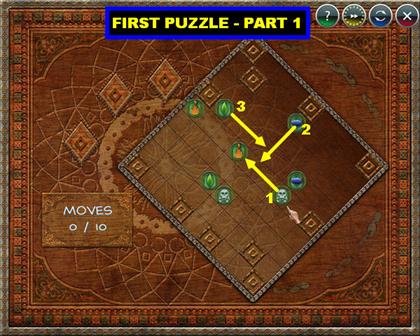
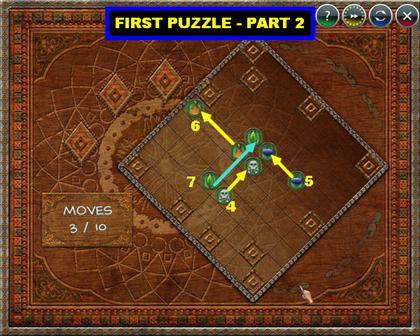
- This puzzle has to be done in 10 moves or less.
- Please follow the arrows in the order shown in the two screenshots for this puzzle.
SOLUTION 2
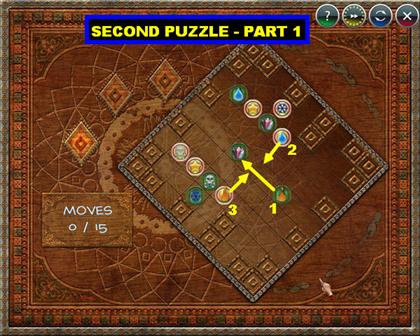
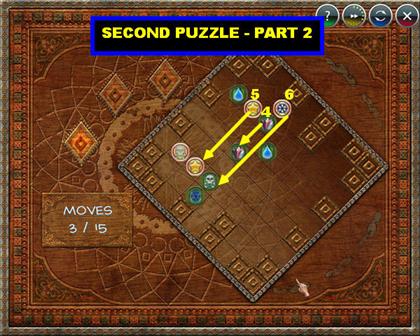
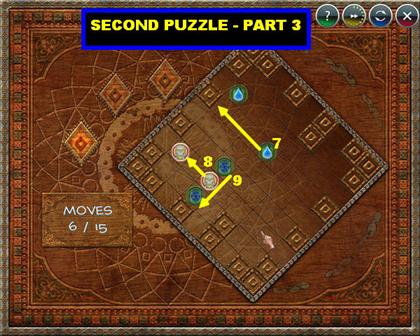
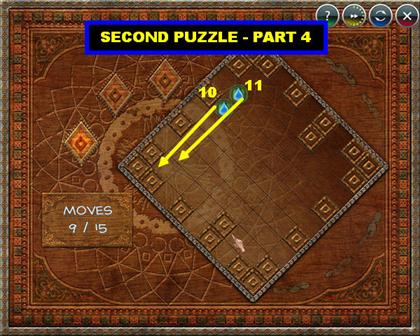
- This puzzle has to be done in 15 moves or less.
- Please follow the arrows in the order shown in the four screenshots for this puzzle.
SOLUTION 3
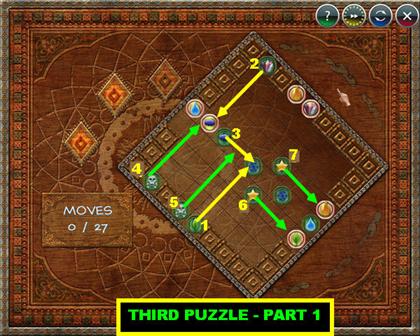
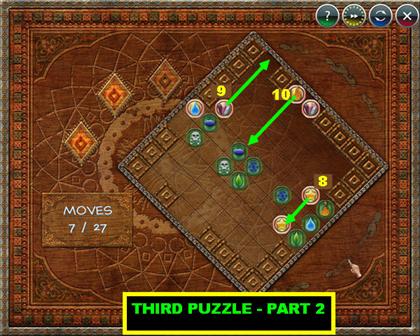
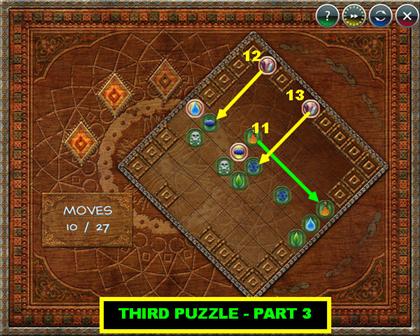

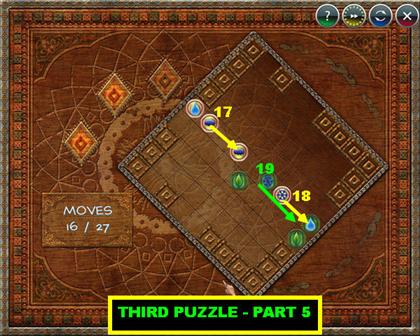
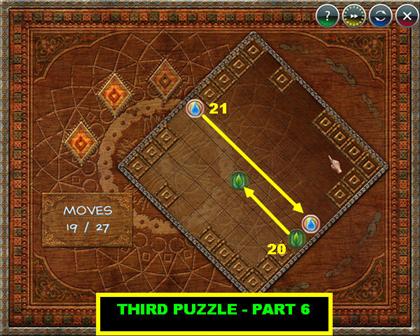
- This puzzle has to be done in 27 moves or less.
- Please follow the arrows in the order shown in the six screenshots for this puzzle.
CONGRATULATIONS! YOU’VE COMPLETED DEPARTMENT 42: THE MYSTERY OF THE NINE.
Created at: 2009-07-14