

WALKTHROUGH MENU
- General Tips
- Chapter One: Jim’s Cabin
- Chapter Two: Flowery Coast
- Chapter Three: Tyrolean Trolley
- Chapter Four: Skull Rock
- Chapter Five: The Resin Tree
- Chapter Six: The First Ram’s Horn
- Chapter Seven: The Idol
- Chapter Eight: The Pirate Statues
- Chapter Nine: Gallows Grove
- Chapter Ten: Snare Valley
- Chapter Eleven: The Sword Puzzle
- Chapter Twelve: The Disc Puzzle
- Chapter Thirteen: Sail to Cuba
- Chapter Fourteen: The Swamp
- Chapter Fifteen: The Glass Eye
- Chapter Sixteen: Rescue Pepita
- Chapter Seventeen: The Fever
- Chapter Eighteen: The Treasure Chest
- Chapter Nineteen: Repair the Lock
- Chapter Twenty: The Skull Puzzle
- Chapter Twenty-one: The Tiller
- Chapter Twenty-two: The Fort
- Chapter Twenty-three: The Cannon
- Chapter Twenty-four: The Pistol
- Chapter Twenty-five: The Cannonball
- Chapter Twenty-Six: The Diving Apparatus
- Chapter Twenty-Seven: Fire When Ready!
- Chapter Twenty-Eight: The Wreck
- Chapter Twenty-Nine: The Dinghy
- Chapter Thirty: The Waterfall
- Chapter Thirty-one: Twin Daggers
- Chapter Thirty-two: Long John Silver’s House
- Chapter Thirty-three: Get the Key
- Chapter Thirty-four: the Mayan Enigma
GENERAL TIPS
- This is a Point and Click Adventure game. It is based on the classic novel Treasure Island, but starts 4 years after the end of that story.
- There is no timer.
- Like some full-scale adventure games, Destination: Treasure Island WILL allow you to leave a location without picking up all critical items. What’s unusual is that it will then punish you for not having them by making you do extra tasks or take a longer route. For example, if you don’t have the Sextant, you won’t be able to navigate precisely and will land at the wrong place.
- If you miss a critical item you will get an opportunity to get a replacement for it later in the game, but not before you’ve done some of the penalty work. Some players may enjoy this feature of the game as an extra challenge.
- Items are often stacked on top of each other, so after you pick up the first object, try the cursor in that position again to see if there is something else you can pick up.
- In most cases when you pick up an item, it will go into the Transit Area so you can put it into inventory. In a few cases, though, it will just stick to your cursor. That means you’re supposed to use it immediately in the current scene.
- You will be reminded before you exit and given a chance to save then.
- Saves are stored under a timestamp with a thumbnail of the scene.
- The Gallery tab on the Main Menu lets you review any of the cut scenes from the game at any time.
- There are several places in the game when your character can fail or die. The game does do an autosave here, and you will be given a failure message, then immediately returned to the moment just before you made the wrong decision so you can try again.
- You can use the options menu to adjust the volume for the music and the special effects as you like.
GENERAL TIPS: NAVIGATION
- As you move the cursor, the entire scene will shift, as though your character is moving his head rather than walking around the scene.
- Make sure you examine the floor and ceiling in scenes as well as the walls.
- The cursor will change to gears when you can interact with the scene. This may be anything from overhearing a conversation to opening a drawer.
- The cursor will change to a hand when you can pick something up. Small text describing the object will appear at the very top of the screen.
- The cursor will change to a face when you can click to speak to a character.
- The cursor will change to an eye when there is a detail you are supposed to notice. Usually this will be a verse displayed at the bottom of the screen.
- A right-click will take you out of the scene altogether and show you the Inventory Screen. On this screen you can examine objects in your inventory, combine them, and even do some mini-game puzzles. You can also exit the game from this screen.
GENERAL TIPS: INVENTORY SCREEN
- The Inventory Screen is unusual in this adventure, and it’s important that you understand all its features or you will miss a lot in the game.
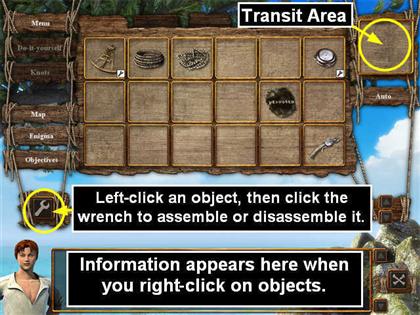
- The left column has six tabs.
- MENU will take you back to the Main Menu so you can save or exit.
- DO-IT-YOURSELF is used when you want to assemble/disassemble objects yourself.
- KNOTS is an inventory of all the knot puzzles you have solved so far.
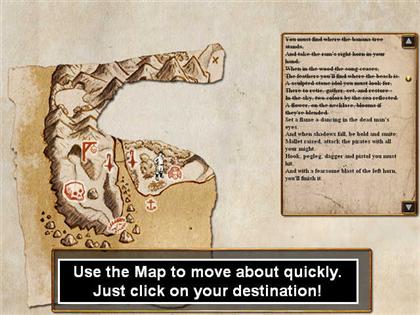
- MAP is a map of Jim’s journey. The further you go in the game, the more useful the Map becomes. It allows you to jump directly to any location you’ve previously visited. Just click on MAP, then choose the location you want to jump to. As you move your cursor over a symbol, the name of that location will appear in the information bar at the bottom of the screen.
- ENIGMA is the set of verses from Long John Silver’s Will. As you complete each task, that part of the verse will be crossed out. You will need to review this to decide what to do next.
- OBJECTIVES is a hint about your current task. When you click on OBJECTIVES, the hint will appear in the information area at the bottom of the center column.
- The center column has three areas.
- THE STORAGE AREA allow you to take items out of the Transit Area and spread them out so you can get more information about them, disassemble them, or combine them with other inventory objects.
- There are five pages of Storage Area. Use the tabs at the top of this area to page through them.
- You must position the item completely inside a Storage Slot in order to place it there.
- Once an object is in a Storage Slot, you can right-click it to get more information about it, or Left-click it to pick it up.
- If an object can be assembled or disassembled, it will have a tiny wrench icon next to it.
- THE ASSEMBLY AREA is used to assemble or disassemble objects that are in the Storage Area. First Left-click on an object that has a wrench icon, then click on the wrench itself.
- When you disassemble an object, its component parts will end up stacked on top of each other in the Transit Area. You should take them out of this area one at a time so you can see what they are. We do not recommend using AUTO at this point, or you might miss the significance of one of the parts.
- The Assembly Area is also used when you are combining objects from the Storage Area and you have to complete a Knots mini-game. For example, when you combine two pieces of rope, you will see a picture of the ropes on the Assembly Area. Click on that picture, and the mini-game will start.
- THE INFORMATION BAR is where detailed information about tasks or objects will show up.
- On the right side of the Inventory Screen there are two areas.
- The top area is the Transit Area. When you pick up an item in room view, it will go into the Transit Area.
- If you pick up multiple items, they will all pile on top of each other in the Transit Area.
- To take items out of the Transit Area, either Left-click on them one at a time and then move them to Storage Area, or click on the AUTO button to empty the Transit Area and just put each item there in a Storage Slot.
- Then all the way at the bottom on the right is a small X button. If you click on this X, the Inventory Screen will close and you will be back in Room View. You can also return to Room View by right-clicking.
GENERAL TIPS FOR THE KNOTS MINI-GAMES
- Whenever you have to tie a knot, Jim will first tell you what kind of knot you need.
- The rope you are working on will appear on the left.
- On the right, you will have a choice of one or more actions to take with the ropes. You must take the correct action to make the kind of knot that Jim says you need. Just click on the upper or lower arrow to make your choice.
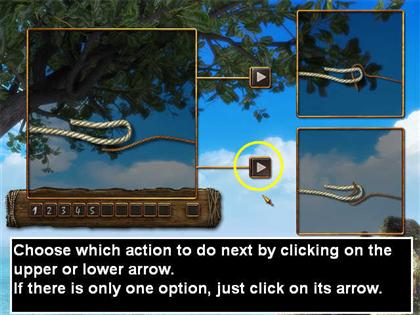
- Most knots will require 4 or more steps.
- Sometimes there is only one step available on the right. That’s fine, just click on its arrow to proceed.
- Usually you will have to choose between two possible steps. If you pick the wrong one, the knot will unravel and you will have to start back at the beginning, so you may want to make notes for which ones you try as you go.
- The numbers underneath your work on the left side just tell you what step you are on.
Chapter One: Jim’s Cabin
- Find the door. The Cursor will change to gears. Click there, and you will have a conversation with the former mutineers, who have come to kill you!
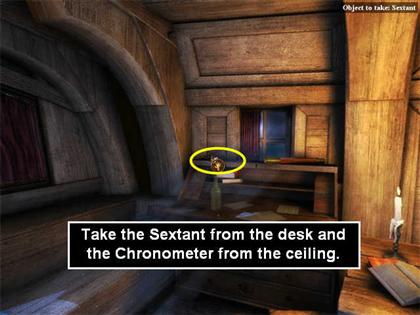
- Look around the room. On the post on the left of the door you will find a rope and the Black Spot. On the floor on the right of the bed you will find another rope and a Lighter. Up on the ceiling, you will find a chronograph. And on the desk to the right of the window you will find a sextant. Make sure you collect all of these items before you leave the room.
- Click on the red curtain over the window, and you will see Long John Silver’s parrot.
- Click on the parrot, and it will tell you you have a message.
- Click on the message it is holding to read it. The message is quite long, but it will go into your inventory under the ENIGMA tab so you can review it whenever you like.
- Now you have to find a way out of the room. Use a right-click to go to the Inventory Screen.
- The objects will be stacked together in the Transit Area in the upper right of the Inventory Screen. Sort them out into the storage squares in the middle. You can do this one at a time or use the AUTO key.
- Combine the short rope and the long rope in inventory.
- A mini-game will open up. You must use a Sheet Bend knot to combine the two ropes.
- Solution: Lower Arrow, Upper Arrow, Lower Arrow, Single Arrow.
- Then use the X at the bottom right to return to the room view.
- To the left of the window where the parrot is you will find a spot where you can attach the rope.
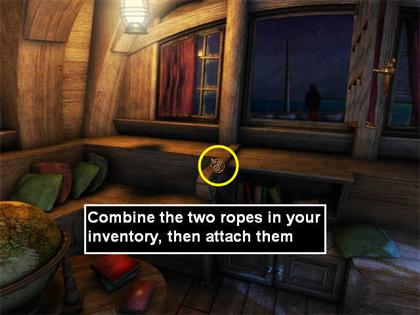
- This will trigger a Knot Mini-game for a Mooring with Two Half Hitches.
- Solution: Single Arrow, Lower Arrow, Lower Arrow, Single Arrow, Single Arrow.
- Use the rope to go through the window. As long as you collected both the sextant and the chronometer, you will be able to follow the Enigma directions exactly, and you will go right to the next scene.
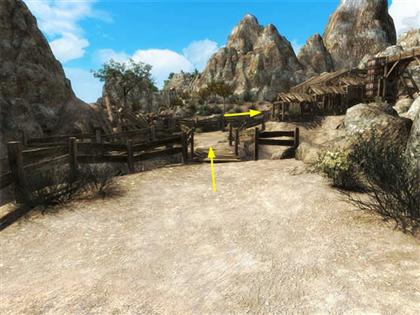
Chapter Two: Flowery Coast
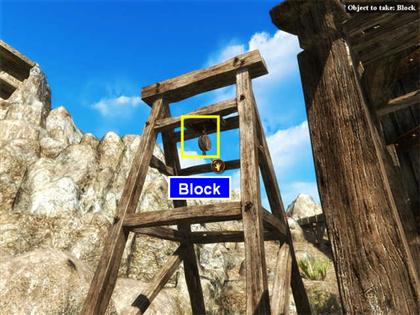
- Pan to the right of the boat. You will see a block hanging from the pole. Collect it.
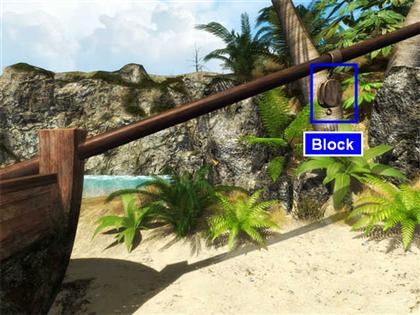
- The Block has a wrench icon, so it can be disassembled. Right-click to go to the Inventory Screen.
- Left-click on the Block, then Left-click on the Wrench button to disassemble it.
- The Block has 3 component parts: the Cheek Plate, the Wheel, and the Axle.
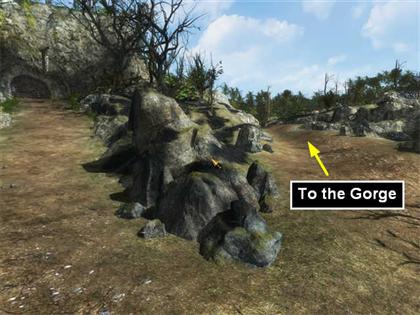
- Look around a little. You will see two paths heading into the jungle.
- Take the left path to the Gorge.
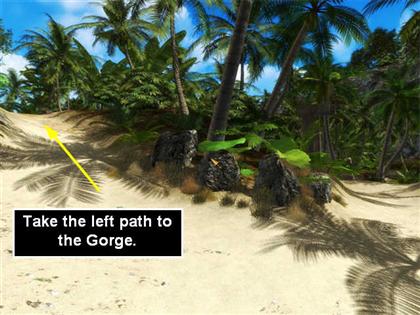
- Pan to the left until you see some ropes. This is the Tyrolean Trolley.
Chapter Three: Tyrolean Trolley
- You have to repair the Trolley before you can use it.
- Find the place on the ropes where the cursor turns to gears and click. The handle will come towards you.
- Collect the handle.
- Right-click to go to the Inventory Screen.
- Left-click on the Trolley Handle in the Transit Area.
- Jim will give you a hint that you need a Wheel to make the Trolley Handle functional. Left-click on the Wheel to combine the two.
- An equation will open in the Assembly Zone. You need one more item.
- Left-click on the Axle in the Storage Zone, then left-click on the equation to add it to the assembly.
- The assembled Trolley Handle will move to the Transit Area.
- Left-click on the Trolley Handle to select it.
- Right-click to return to the scene. You can also use the X at the bottom of the right column to return to the scene.
- Make sure the Trolley Handle is in the Transit Area. Then position the cursor on the ropes so you see gears. Click to replace the handle.
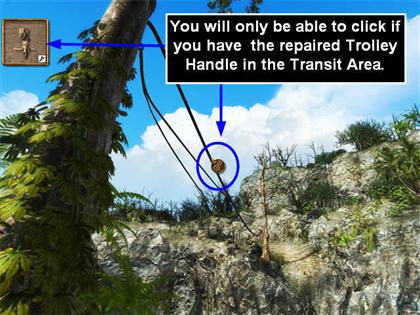
- Click one more time, and Jim will use the Trolley to cross the Gorge.
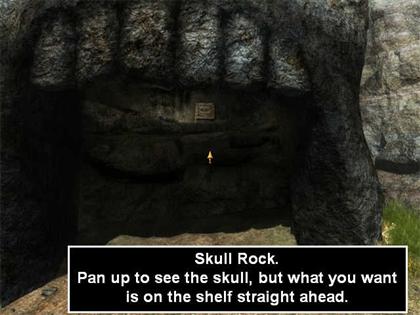
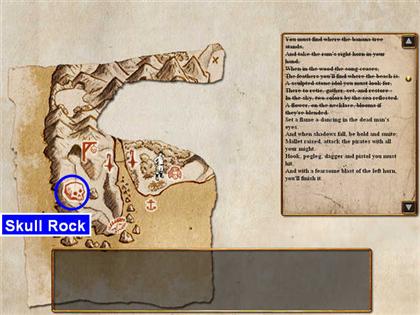
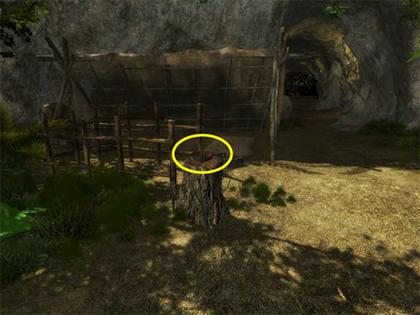
Chapter Four: Skull Rock
- Go along the path straight ahead.
- You will come to a tree on your right, but you can’t do anything with it yet, so keep going.
- There will be a large skull cave on your right. Go closer.
- Start at the far left.
- Take the "Fuel." This is a pile of wood. Notice that it attaches to your cursor instead of going into the Transit Area, so you’re supposed to use it in this scene.
- Pan right. You will see a burnt-out spot. Put the Fuel there.
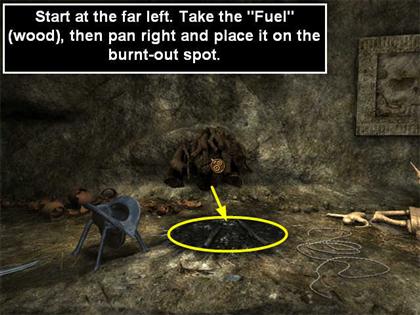
- Collect the other objects: Knife Blade, Empty Helmet, String, Broken Statuette, Figurine.
- Go back to the path.
- Keep going down to the ocean.
- You will see a flat black rock on the sand with a Rusty Knife on it. Collect the Rusty Knife.
- Jim will mention that the rock seems magnetic, but you can’t do anything about that yet.
- Right-click to go to the Inventory Screen.
- You have all the components; put everything into the Storage Area.
- Jim will talk about the rusty knife. It’s falling apart and has Long John Silver’s initials on it.
- Left-click on the Rusty Knife then Left-click on the Wrench icon. It will come apart, and the Recovered Hilt will go to the Transit Area.
- Left-click on the Knife Hilt in the Transit Area and the Knife Blade in the Storage Area. They will form an equation in the Assembly Area.
- Left-click on the string, then on the equation, to try repairing the Knife.
- A Knot Mini-game will open. You need a Constrictor Knot.
- Solution: Single Arrow, Upper Arrow, Lower Arrow, Single Arrow, Single Arrow.
- The new Knife will be in the Transit Area. Left-click on it.
- Right-click to return to the scene.
Chapter Five: The Resin Tree
- At this point the Knife is in the Transit Area, and you can’t do anything else until you find out what to do with it.
- Go up the path away from the beach. Pass Skull Rock on your left, and ahead you will see a tree with a white band around it. Go to it.
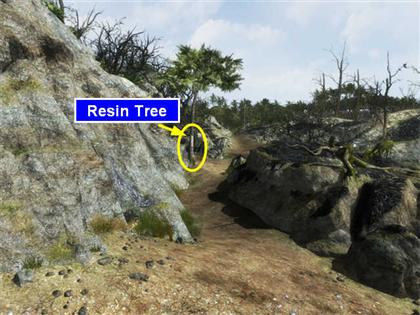
- You will probably end up a little past the tree. Pan back to the left to see the tree for a closer look.
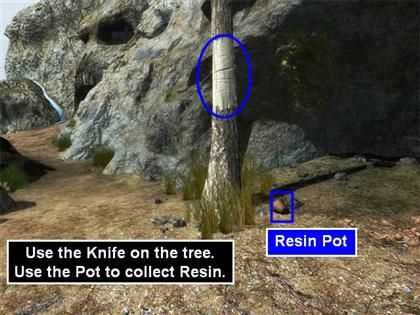
- Use the Knife on the white part of the tree to start the Resin flowing.
- Pick up the Resin Pot from the ground and use it to collect the Cold Resin.
- Someone pushed a boulder down!
- Pan right, and you will see a path to a cave with a gate across it. Go there.
- You can do a lot of looking around here. The main things to notice are that there is a wooden panel on the left of the cave that needs a Hook to open, and there is a skeleton with a Hook hanging from the gallows up above the cave.
- However, you can’t get to the skeleton for now. Head back to the Resin tree.
- At this point there are two ways to play the game. One is to try to do as much as possible with whatever you have currently in inventory. That would, for example, suggest that it might be time to try to fix that broken figurine.
- The other way is to assume that Jim’s primary objective isn’t exploration, but rather to solve Long John Silver’s Enigma had get his inheritance. Given the presence in the story of hostile mutineers and whoever it was who pushed the boulder down, it’s probably best to assume that Jim just wants to solve the riddle and get going.
- Right-click to go to the Inventory Screen and review the riddle.
Chapter Six: The First Ram’s Horn
- Click on the ENIGMA button to view the riddle. The next part is:You must find where the banana tree stands, And take the Ram's right horn in your hand; When in the wood the song ceases, The feathers you'll find where the beach is.
- There’s a beach on this side of the Gorge, but no banana trees, so let’s go back across the Tyrolean Trolley to the jungle.
- Walk back to the Gorge.
- Take the trolley back across to the jungle.
- The first path has no choices; just go straight.
- You will come to a fork where you can see a blue parrot.
- If you pan to the left, you will see a flower that you need.
- If you walk to the right, you’ll go to the Beach where you first landed.
- If you go straight ahead, you will go to a tree with bananas.
- Note: there are many yellow flowers in these three locations that look like they might be bananas, but they’re not.
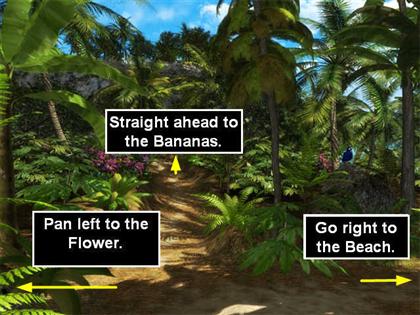
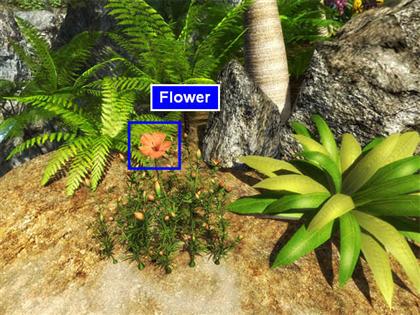
- Start by panning left. Take the flower.
- Pan around in either direction until you are back to the original position. Go straight ahead to the banana tree.
- Pan slightly to your right and you will also see the Ram’s Horn.
- Collect both.
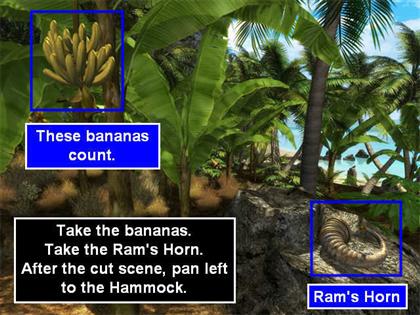
- When you collect the Ram’s Horn, Jim will automatically blow it, and the next part of the Enigma riddle will be crossed off. That’s good, but you’re not done here yet.
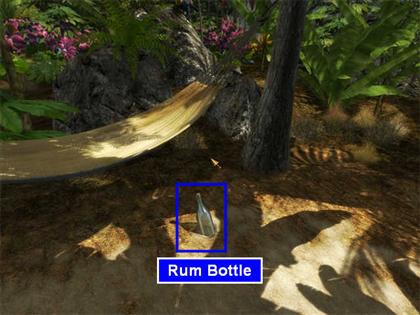
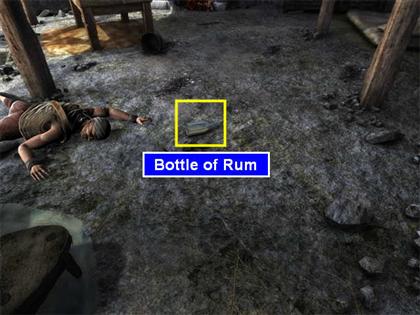
- Pan to the left until you see the Hammock, then collect the Rum Bottle on the ground.
- Pan back to where the Ram’s Horn was. You can see the ocean below to your right. Take that path.
- You will see Jim’s boat ahead. Before you get it, pan around to the right and you will see a giant stone snake. Stop and look at it.
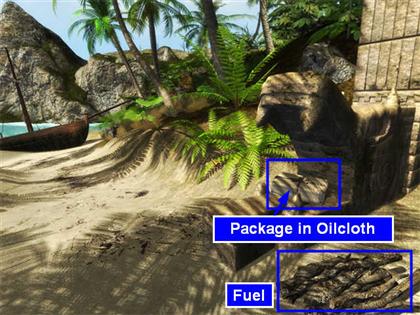
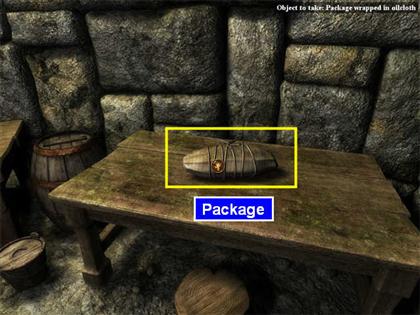
- There is a package wrapped in oilcloth in the snake’s mouth. Collect it.
- Right-click to go to the Inventory Screen.
- Disassemble the package. You will get Oakum, a Caulking Iron, and a Mallet.
- Put everything from the Transit Area into storage spaces.
- There is also more Fuel just to the right of the snake. Collect that, then pan right and put it on the burnt out spot.
- Pan back to the boat, and go down to the beach.
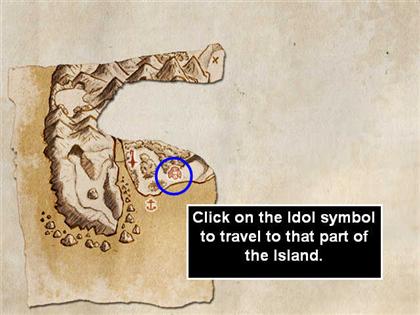
Chapter Seven: The Idol
- When you get to Jim’s boat, turn around and you will see a path leading to an idol in the jungle. Go up it.
- You will come to a fork. You can see Long John Silver’s red parrot to the right. Go to it.

- Talk to the parrot. It will tell you what it wants: nanasinrum.
- You will have to Suspend the Dialogue to continue.
- Right-click to go to the Inventory Screen.
- Combine the Knife with the Bananas to get Sliced Bananas.
- Disassemble the Rum Bottle to get an Open Bottle of Rum and a Cork.
- Combine the Empty Helmet, the Open Bottle of Rum, and the Sliced Bananas to get Bananas in Rum.
- Put this in the Transit Area.
- Right-click to return to the scene.
- Give the helmet to the Parrot.
- The Parrot will give you a Red Feather. It will fall down by the Idol’s feet.
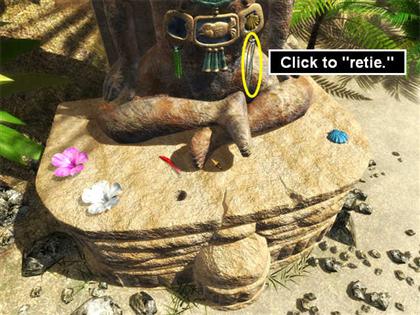
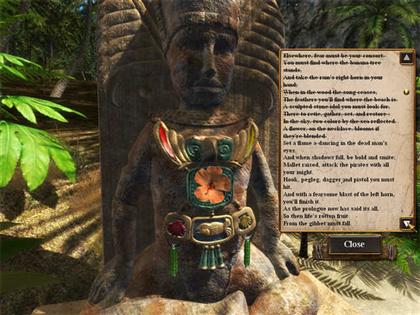
- Time to review the Enigma. A sculpted stone idol you must look for There to retie, gather, set and restore: In the sky, two colors by the sea reflected. A flower on the necklace blooms if they're blended.
- Click on the strings hanging down on the right side to "retie."
- This will open a Knot Mini-game.
- Solution: Single Arrow, Upper Arrow, Single Arrow, Upper Arrow, Single Arrow, Single Arrow, Single Arrow.
- Now for "Gather." Pan a little to the right. You will see some feathers further up on the beach. Go there.
- Collect the Blue Feather, Yellow Feather, and Red Shell.
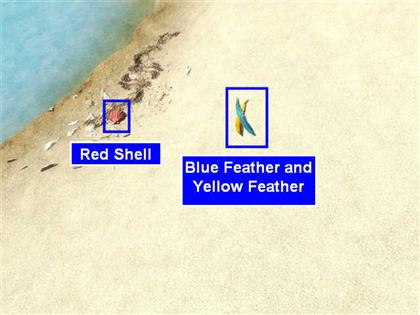
- Go back to the Idol.
- Collect the Red Feather from the base.
- Now you want to place red items on the left and yellow items on the right.
- Red + Yellow "blended" = Orange, so put the orange flower in the middle.
Chapter Eight: The Pirate Statues
- Now we get to use the map.
- Right-click to return to the Inventory Screen.
- Choose MAP.
- Click on Skull Rock to return there.
- Review the Enigma riddle:And when shadows fall, be bold and smite; Mallet raised, attack the pirates with all your might. Hook, pegleg, dagger and pistol you must hit, And with a fearsome blast of the left horn, you'll finish it.
- The two statuettes you have are pirates. Let’s repair the broken one.
- We’ll use the Resin.
- Use the Lighter on the Fuel to start a fire.
- (If you used the Lighter earlier on another fire, you may have run out of Oakum. If it won’t light, just combine it with Oakum on the Inventory Screen and try again.)
- Use the Cold Resin on the fire to get Hot Resin.
- Combine the Hot Resin and the Broken Statuette to get a Figurine.
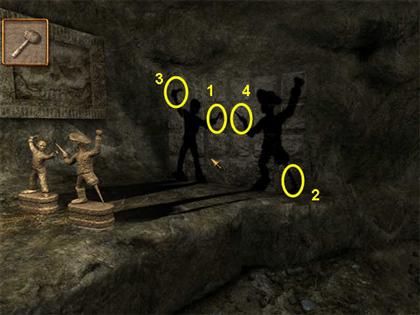
- Now you have two pirate Figurines. Place them on the white spaces on the right of the fire.
- See the shadows? That’s what you have to "attack" as described in the Enigma.
- Use the Mallet on the Hook, pegleg, dagger, and pistol shadows in that order.
- A secret compartment opens. Take the second Ram’s Horn.
- Jim will automatically blow it. This will cause the skeleton to fall off the gallows that you saw earlier.
- Pick up the Figurines again.
Chapter Nine: Gallows Grove
- You can either use the Map or just go up the path to the place where the gate is blocking the cave.
- Pan to the right of the gate. The skeleton has fallen.
- Collect the Glass Eye, the Scrap of Cloth, and the Hook.
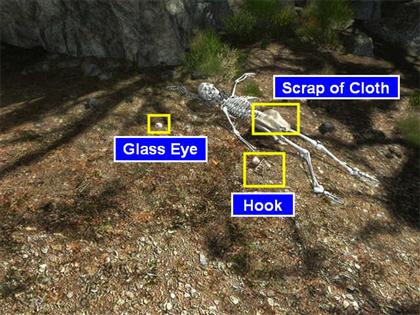
- Note: If you didn’t get the Chronometer from Jim’s Cabin in the first chapter, you will also see a "Junk Watch" above the Glass Eye by the end of the chain. Collect it. If you already have the Chronometer, you won’t see this because you already have a watch.
- Pan up to the gallows. The parrot is sitting there. Talk to it and it will start to sing.
- You have to continue the song:"Drink and the Devil had done for the rest"
- Continue:"The mate was fixed by the bosun’s spike"
- Continue:"And Cookey’s throat was marked belike"
- Continue:"And there they lay, all good dead men"
- Jim and the parrot will sing the song through a second time.
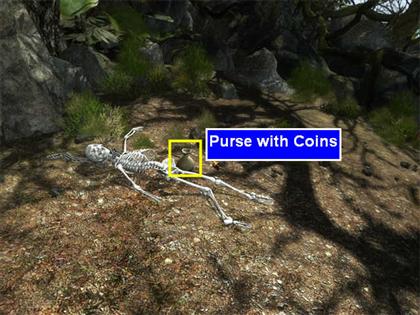
- The parrot will drop a Purse. Talk to the Parrot, and it will say "Help yourself, and Heaven will help ye."
- Pan down and collect the Purse.
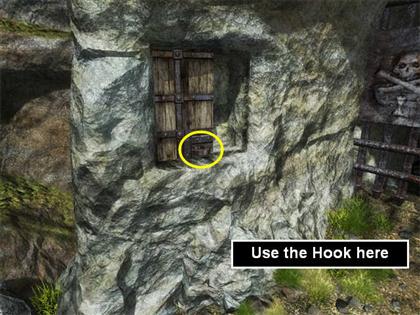
- Use the Hook to open the wooden panel.
- You will see a new verse.
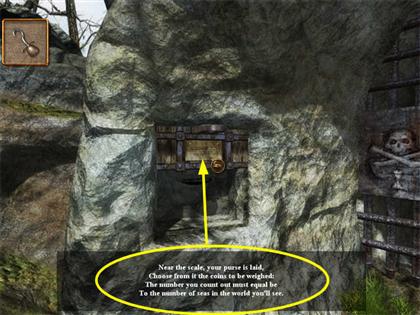
- So now you know you need 109 shillings (from the Enigma verse) and you can only use 7 coins (from the wooden panel verse).
- Use the Purse on the scale. You will now see the individual coins in the top left.
- Select 2 Louis d'or coins, 2 Guineas, 2 Pistareen, and 1 Piaster and put them one at a time on the scale.
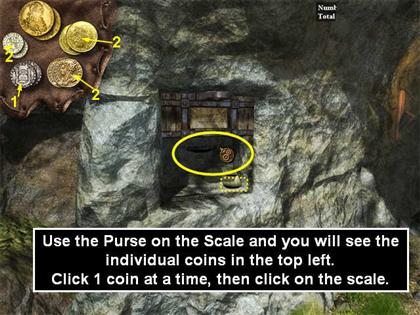
- The gate will rise.
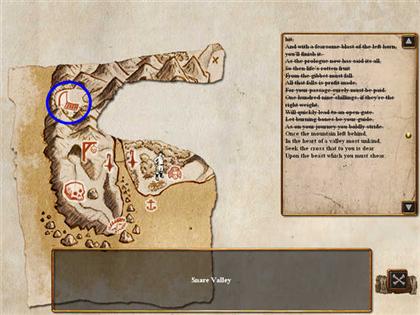
- Refer to the Enigma again:Let burning bones be your guide, As on your journey you boldly stride.
- Take the Blackened Bone from the left wall of the cave.
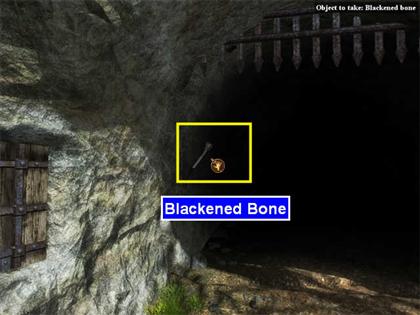
- Combine it with the Cold Resin to make a Macabre Torch, then put it back.
- Use your Lighter to light the Macabre Torch.
- All the torches in the tunnel light. Walk through.
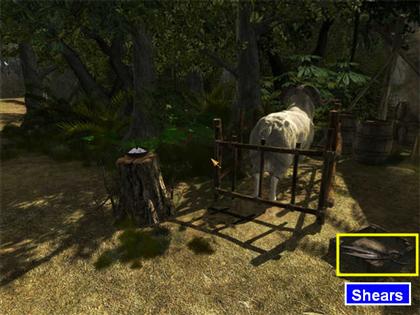
Chapter Ten: Snare Valley
- You will come out in a valley on the other side.
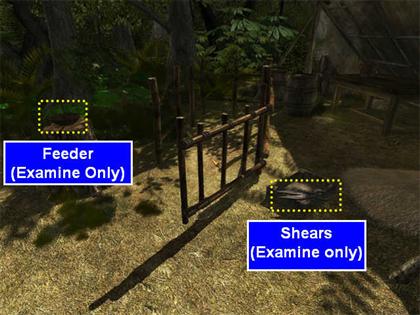
- Pan right.
- You will see a salt Feeder and some Shears.
- You can examine both of these, but you can’t pick them up.
- Pan back to the left so you see the path through the valley.
- Walk forward. Jim will notice a trap and avoid it.
- Keep going forward until you come to a gate.
- Pan left and you will see a Ram. Click on it, but it isn’t going to follow you.
- You need to get more salt for the Feeder bowl.
- At this point you can do a lot of searching all over the island, but it turns out that the only place where the game will allow you to collect salt water is by the Idol where you put the orange flower. It’s in the pool near where you collected the blue and yellow feathers. Use the Map to go there.
- When you arrive, you are facing the idol.
- Pan right, and you can see the pool. Walk to it.
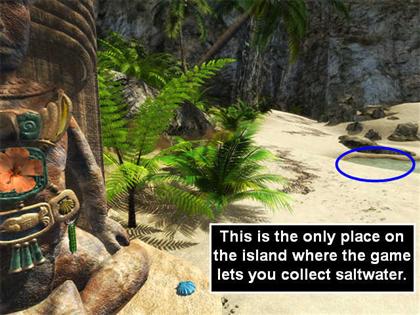
- Use the Helmet to collect water from the pool. Now you need to boil away the water.
- Turn back around so you have the Idol on your right. Past it is the stone snake. Remember there was a firepit with fuel next to it? Go there.
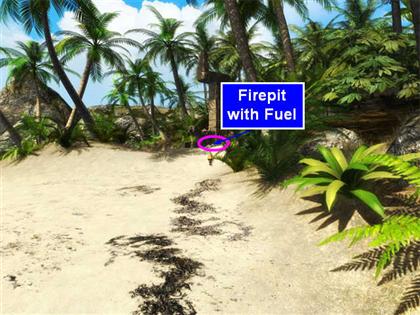
- Use the Lighter on the Fuel.
- Put the Helmet on the Fire. You will get a Helmet full of Salt.
- Use the Map to return to Snare Valley.
- Turn until you see the Feeder.
- Put the Helmet full of Salt on the Feeder.
- Walk back to the Ram and talk to it.
- The Ram will head for the Feeder and get caught in the trap.
- Use the Shears on the Ram.
- You will see the second part of Long John Silver’s Enigma.
Chapter Eleven: The Sword Puzzle
- Go forward to the gate. On the left you will see some swords.
- Right-click to go to the Inventory Screen.
- Examine the Black Spot. On the back you will find some Bible verses. One of them matches part of the Enigma. It is numbered 22:15.
- Right-click to return to the scene.
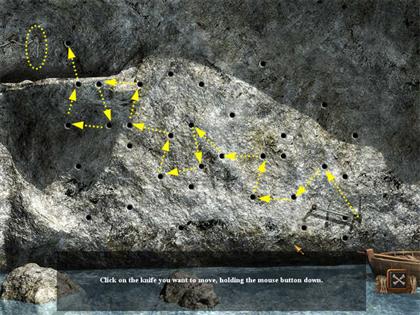
- Zoom in on the swords.
- There are 4 swords. You can move each one independently by holding down the mouse and dragging it.
- Each sword has numbered notches cut into the blade. Arrange the swords so that they are at 2 2 1 5 to match the verse.
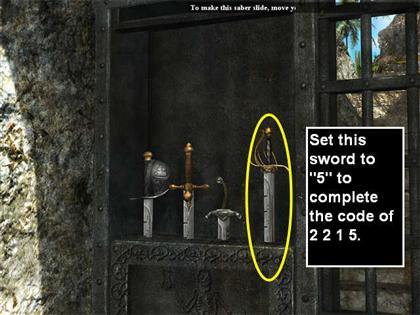
- The gate will open. Go up the steps.
- Jim will stop at a bench. Take the path to the right, to the tower.
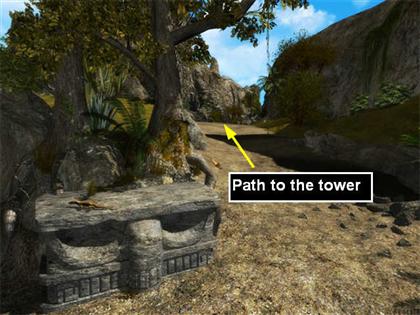
- Jim will hear a loud growl, become frightened, and run all the way back into the valley.
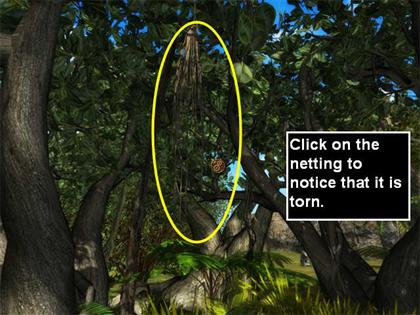
- Look at the netting to notice that it is torn.
Chapter Twelve: The Disc Puzzle
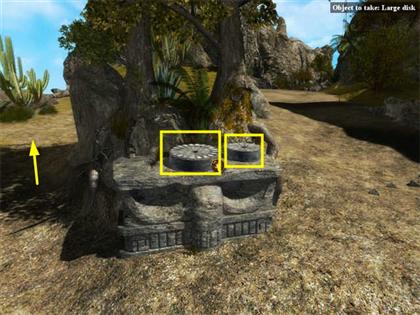
- Go back up the steps to the bench.
- Now there are two disks on the bench. Collect both.
- This time, take the left path.
- You will immediately see a place to put the disks. Do so.
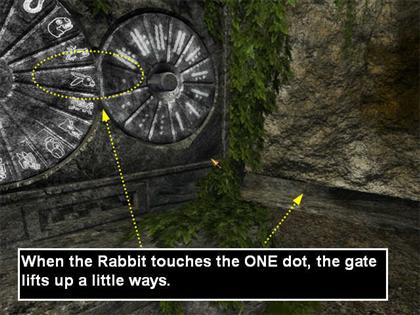
- Check the Enigma:One rabbit, five monkeys and thirteen snakes, A head will open, yet cause no aches.
- Turn the disks so that the rabbit is touching the segment with just one dot. The gate will lift up a little ways.
- The solid line represents a five, so match the monkey to it.
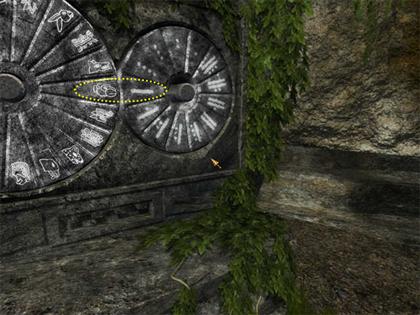
- And finally the snake and 13.
- The gate will open.
- Walk into the Hollow Head and go up the stairs.
Chapter Thirteen: Sail to Cuba
- You will be greeted by the Parrot.
- Talk to the parrot, and it will repeat the Enigma again: 'Tis the pirates' turn to wage their attack. America's towns suffer when they ransack: Set a hook /Between two lakes, A slashing saber/ Near desert waste A pegleg that paces /O'er the isthmus' fine spaces. To open all eyes, On your three master set sail, And make haste for Cuba, In the teeth of the gale.
- Pan down and around. You will see a table with a map on it, but keep looking until you see a table with a Package wrapped in oilcloth.
- Collect the Package.
- Note: if you did not take the Sextant from Jim’s Cabin in Chapter One, you will also get a Sextant now.
- Disassemble the Package in your inventory. You will get the Hull of a Miniature Boat, a Sailmaker’s Kit, and 3 miniature Masts. So it looks like your "three master" will be miniature.
- Combine the Sailmaker’s Kit and the Scrap of Cloth from the skeleton, and you will get miniature Sails.
- Combine the Sails, the Hull, and the Masts and you will get a Model.
- Right-click to return to Room View.
- Pan until you see the map table again, then click to zoom in.
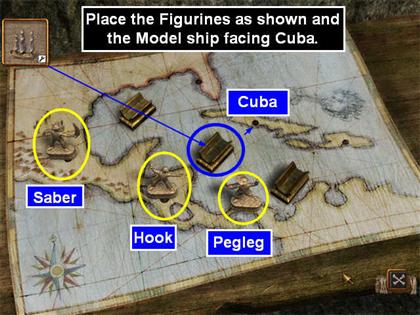
- There are 3 brown spots on the map of Mexico.
- You have two pirate Figurines in your inventory and one on the table. Look at the 3 Figurines carefully. One has a hook, one has a pegleg, and one has a saber. That fits the Enigma!
- Set the Figurines on the brown spots from left to right: Saber, Hook, Pegleg.
- Set the Model ship so it faces Cuba.
- Once you have placed the Model, you will be able to adjust its sails by clicking on them. The Parrot will tell you which direction to turn. Port is left, Starboard is right. When you have the sails set correctly, the Parrot will yell, "Full Speed Ahead!"
- The Parrot will open the "eyes"; the windows in the tower.Twixt a camel's humps stands a fine proud tree Where the heart sticks to spades. The bone gleams forth, the wood's in the shade.
- Take the Ram’s Skull you can see in the first window.
- This reveals the "camel’s humps"; the two hills you can see with the tree in between them.
- Pick up the Model ship from the table.
- Leave the tower by going down the stairs next to the table.
- Once you are outside the tower, pan around until you see the disks in the wall again. Collect them.
- Now you need to go back to the bench. Go forward until you see the steps down into the valley, then pan and you should see the bench again.
- Take the path to the right of the bench. It leads towards the Swamp.
Chapter Fourteen: The Swamp
- Continue, bearing right, for 3 clicks until you see the water’s edge.
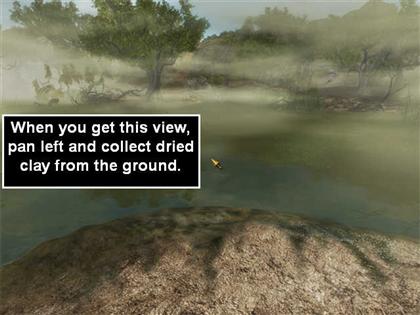
- Pan left and collect some dried clay from the ground.
- Return to the water’s edge view. Jim wants to get to the Lone Tree.
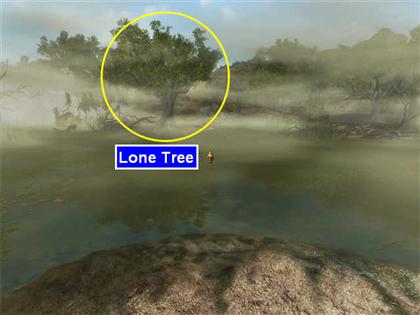
- Walk two paces forward. Jim will get stuck in quicksand.
- Pepita will appear and have a conversation, then throw Jim a Hangman’s Noose. Collect it.
- Right-click to go to the Inventory Screen.
- First disassemble the Hangman’s Noose. Now it’s just a Long Rope.
- Left-click on the Long Rope, then left-click on the Pirate’s Hook.
- This will trigger a Knots Mini-game. You need to make a Capuchin Knot.
- Solution: Lower Arrow, Upper Arrow, Single Arrow, Single Arrow, Upper Arrow, Single Arrow.
- Now you have a Grapnel. Left-click on the Grapnel.
- Right-click to return to the scene.
- Use the Grapnel on the Lone Tree trunk to pull yourself out.
Chapter Fifteen: The Glass Eye
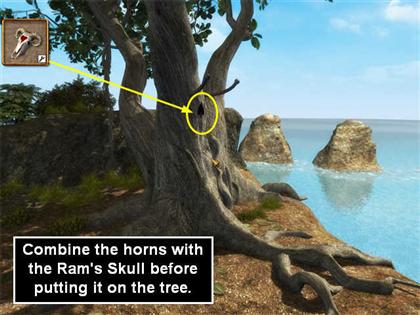
- Continue forward to the tree with the Spade marker on it.
- Combine the Ram’s Skull with the Left Horn and Right Horn.
- Put the Ram’s Skull on the tree. You will not be able to put it on the tree unless you’ve assembled it with the horns first.
- Cast an eye at the skull And where it comes to rest, Be sure it will lead you to the buried chest.
- Get the Glass Eye from the Inventory Screen and put it on the Ram’s Skull.
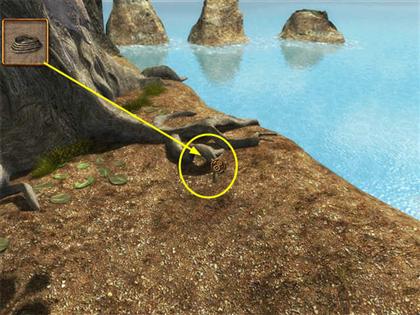
- The Glass Eye rolls over the edge. You’ll have to climb down.
- You can try the Grapnel, but it won’t work.
- Disassemble the Grapnel, then use just the Long Rope on the tree root as shown.
- This will trigger a Knots Mini-game. You need to tie a Figure Eight Knot.
- Solution: Single Arrow, Upper Arrow, Single Arrow, Upper Arrow, Single Arrow, Lower Arrow, Single Arrow, Upper Arrow, Single Arrow.
- Now click on the water to go over the edge. Your guide's look turns fierce If the sun's rays begin to pierce. Close for the taking The metal's awaiting Reach out and take it, no hesitating.
- Pick up the Glass Eye again and Jim will mark the spot with an X.
Chapter Sixteen: Rescue Pepita
- Pan right and you will see the entrance to the mine.
- Walk towards the mine, then turn right to get closer to it.
- Keep walking towards the barrels at the end of the path.
- Pepita will jump out from behind the barrels, then fall down a well.
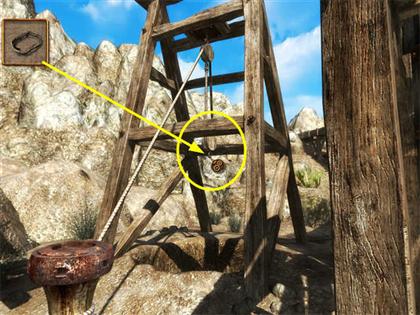
- Pan up above the well and you will see a Block. Collect it.
- Pan to the right. There’s a machine there, but it needs a part.
- Pan down. There’s an open box with several items and a pick leaning against the post. Collect the Pick, Axle, Wheel, and Short Rope.

- Keep panning right. You will see a dusty case on the ground.
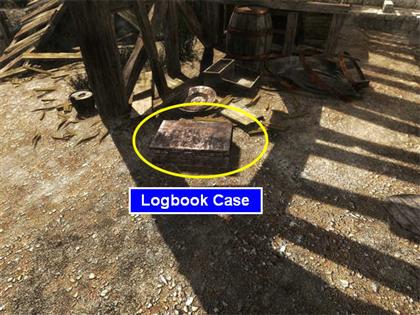
- Click to open the Case.
- Read the Logbook inside.
- Continue to pan right. Jim will comment about a mask, Megaphone, and claws, and he will realize that Pepita was the one who tried to push the boulder on him at Skull Rock.
- Collect the Megaphone.
- Click on the Crate the Megaphone was standing on to open it. Collect the Long Rope.
- Time to rescue Pepita!
- Right-click to go to the Inventory Screen.
- Spread everything out in your inventory. Remember you can use the tabs at the top of the Storage Area to get to additional pages.
- Combine the Block Cheek Plate, Axle, and Wheel to make a new Block. Now you have two.
- Combine the two Blocks and the Long Rope to make a Tackle. The Tackle will be in the Transit Zone.
- Left-click on the Tackle to pick it up.
- Right-click to return to the scene.
- Put the Tackle on the hook above the well. This is the same place where you took the original Block from.
- This will trigger a Knots Mini-game. You need to tie a Clove Hitch.
- Solution: Single Arrow, Lower Arrow, Single Arrow.
- Now attach the Short Rope to the end of the Tackle where it is hanging over the well.
- This will trigger another Knots Mini-game. You need a Bowline.
- Solution: Single Arrow, Upper Arrow, Lower Arrow, Lower Arrow, Single Arrow, Single Arrow.
- Now you need something to turn the red wheel. Right-click to return to the Inventory Screen.
- Disassemble the Pick.
- Left-click on the handle, now called a Handspike.
- Put the Handspike in the slot on the side of the red wheel.
- Click to turn it.
- Pepita is rescued, but Jim faints from the fever.
Chapter Seventeen: The Fever
- Pan down to stand up.
- Collect the Short Rope, the Tackle, and the Handspike.
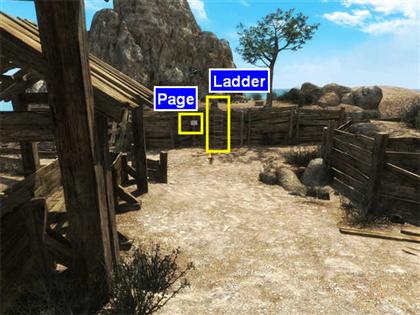
- Look around for Pepita. She’s gone, but you can see something on the fence by the entrance.
- Walk over and read the Page. Make sure you scan over the text at the bottom of the page to read it.
- Climb up the Ladder.
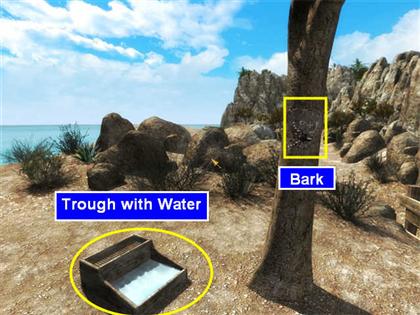
- Pan slightly right. There is a water trough on the ground and a tree with a heart carved on it. The heart’s initials say P + J.
- Use your Knife on the heart to get a piece of Bark. You will have to use it once to loosen it and once to remove it.
- Use the Helmet on the Trough to get some Water.
- Turn around, and you can see the Ladder and the Mine entrance.
- Walk all the way back to where the barrels were, and go left into the Forge.
- Pan around until you see the Kiln.
- There is Fuel (wood) on the right. Put it in the fireplace part of the Kiln.
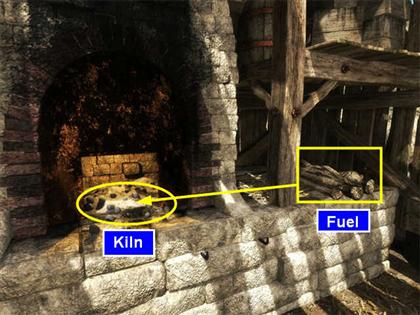
- Use your Lighter to start a fire.
- Put the Helmet with Water on the fire.
- Right-click to go to the Inventory Screen.
- Combine the Helmet with Hot Water and the Bark to make Herbal Tea.
- Jim will drink it and feel better.
Chapter Eighteen: The Treasure Chest
- Go back to where the Page is stuck on the fence.
- Pan left, then go back along the beach until you come to the X.
- Reassemble the Pick. (If you forgot the pick handle, it’s what you used to turn the red wheel next to the well back at the mine entrance.)
- Use the Pick on the X.
- A Treasure Chest! Click on it to open it.
Chapter Nineteen: Repair the Lock
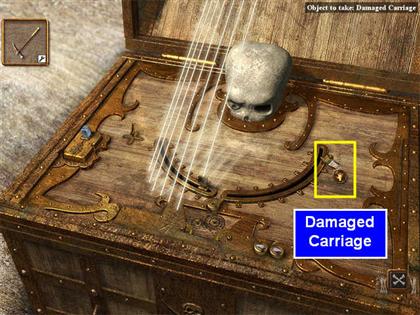
- The first thing you will discover is that one of the moving parts of the lock is damaged. Collect it.
- Now you have to repair it. Right-click to go to the Inventory Screen.
- Start by disassembling the Sextant. You got this either from Jim’s Cabin in Chapter One or from the table in Hollow Head. If you don’t have it, use the map to go to Hollow Head and get it.
- Once you disassemble the Sextant you will have a Vernier, a Small Mirror, and a Lens.
- Now disassemble the clock-like item you have. You should either have the Marine Chronometer from Jim’s Cabin or the Junk Watch from ground by the chain from the Skeleton at Gallows Grove. If you don’t have it, use the Map to go to Gallows Grove and get it.
- Once you disassemble this item you will have a Case and Gears.
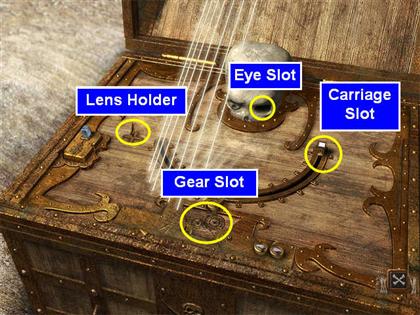
- Combine the Small Mirror and the Damaged Carriage.
- Replace the Repaired Carriage in the right slot of the Skull lock.
- Place the Lens in the Lens Holder on the left.
- Place the Gears in the Gear Slot at the bottom of the lock.
- Put the Glass Eye into the Skull.
Chapter Twenty: The Skull Puzzle
- There is a small crystal Stone on the left side of the chest. The goal of the puzzle is to position the Left Carriage so that light will hit the Lens, heating the Stone.
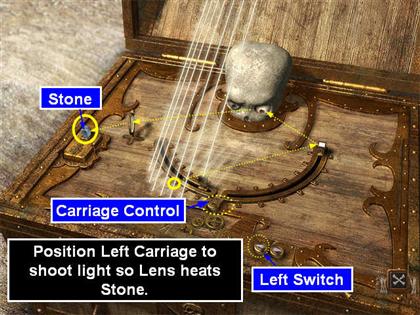
- Start by clicking the Carriage Control so it points to the left track. Now the Left Carriage can move.
- Click the Left Switch twice to move the Left Carriage over two slots.
- Click the mirror on the Left Carriage until the light hits the Right Carriage. Now the Stone will heat up and the Treasure Chest will open.
- Collect the Bar (it’s attached to a wheel) and the Treasure.
- You will see the third part of Long John Silver’s Enigma.
Chapter Twenty-one: The Tiller
- Look to the left of the Treasure Chest. There is some Sand there. Collect it.
- Remember that machine back by the well that was missing a part? Well, now you have a part ("the Bar") that might fit there. Let’s go try it!
- Turn around until you can see the Mine entrance again. Walk back there.
- When you get to the barrels where Pepita was hiding, pan right until you see the machine with the missing part. Place the Bar there.

- Check the Enigma: Turn the tiller so the water in a rush Fills the sluice to its brim flush. Your three-master to the current you'll commend. And where e'er she founders or runs aground, Your final chart is sure to be found.
- Click on the tiller to start the water flowing.
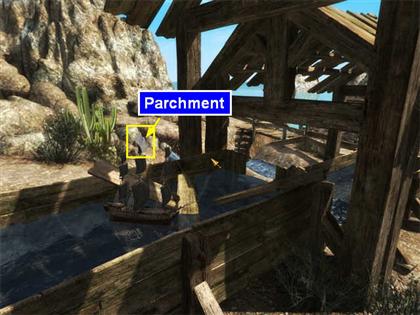
- Put the Model ship in the water. You will see it move down the trough.
- Go get the Model ship at the end of the trough. You will see a Parchment stuck to its mast. Collect it.
- Pepita will appear. Talk to her.
- Ask her if she pushed the boulder on her.
- Ask her to tell you the whole story.
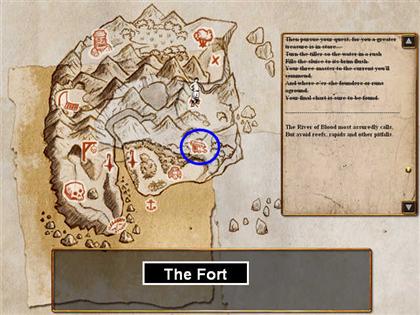
Chapter Twenty-two: The Fort
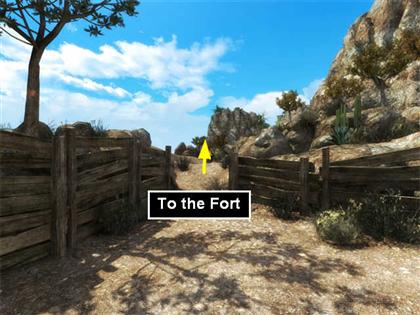
- Walk to where the Page is stuck on the fence.
- Pan right, and you will see the path you should take.
- If you were paying close attention to the last cut scene, you saw the Parrot drop a ladder down. Keep walking straight ahead and you’ll find it. Climb the ladder.
- You’ll see the Jolly Roger flag. Go closer.
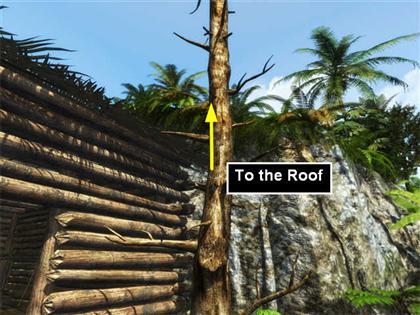
- Pirates! Pan right, and you’ll see a convenient tree. Climb it to get to the roof so you can see how many pirates there are.
- Climb down again.
- Go into the Fort.
- There are a number of objects associated with the Cannon, but you won’t use them yet.
- Pan right until you see the shelves. These are the items described in the Spanish Logbook.
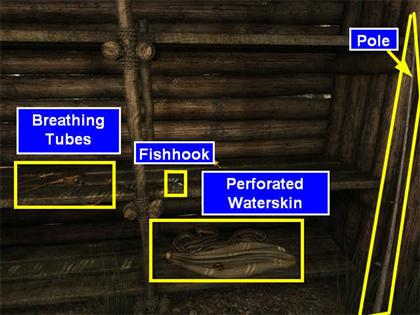
- Collect the Breathing Tubes, Perforated Waterskin, Fish-hook, and Pole.
- Right-click to go to the Inventory Screen.
- Disassemble the Sailmaker’s Kit to get a Needle and Thread.
- Combine the Thread, the Pole, and the Fish-hook to get a Fishing Pole.
- This will trigger a Knots Mini-game. You need a Uni Knot.
- Solution: Single arrow, Lower Arrow, Single Arrow, Upper Arrow, Single Arrow, Lower Arrow, Single Arrow, Single Arrow, Single Arrow.
- Left-click on the Fishing Pole.
- Right-click to return to the scene.
- Climb back up on the roof and look down at the Pirates.
- You can try clicking on the Pirate on the right, but Jim doesn’t want to deal with him yet.
- Use the Fishing Pole to get the Tobacco Pouch.
- Right-click to get to the Inventory Screen.
- Disassemble the Tackle so you’ll have some Rope later. If you didn’t bring the Tackle, don’t worry; there will be some rope on the ground later when you need it.
- Disassemble the Snagged Tobacco Pouch so your Fishing Pole is free again.
- Left-click on the Fishing Pole.
- Right-click to return to the scene.
- Use the Fishing Pole to get the Powder Horn.
- Disassemble the Snagged Powder Horn.
- Combine the Tobacco Pouch and the Powder Horn. This will put gunpowder in the Tobacco Pouch!
- Combine the Booby-trapped Tobacco Pouch and the Fishing Pole.
- Right-click to return to the scene.
- Put the Booby-trapped Tobacco Pouch back on the table.
- Watch the cut scene.
- Use the Short Rope to tie up the Pirates. If you don’t already have Short Rope in your inventory, look around on the ground and you should find some.
- This will trigger a Knots Mini-game. You need to make a Double Loop Bridle Knot.
- Solution: Single Arrow, Lower Arrow, Single Arrow, Lower Arrow.
- Take the Bullets from the table next to the pirates.
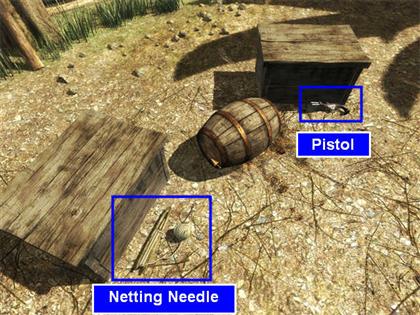
- Keep looking down at the ground and pan to the right.
- Collect the Netting Needle and the Pistol.
- Pan back to the pirates sitting tied up on the ground. Now pan left, and you will see a rope ladder at the cliff’s edge. Climb down.
Chapter Twenty-three: The Cannon
- You are back by the pool of salt water where you collected the blue and yellow feathers. There is a ship off to the left.
- Start walking right towards the Idol. The ship will fire on you!
- Click the cursor on the ship, and you will see that it is Jim’s own ship from Chapter One that the mutineers captured!
- Turn around until you see the ladder on the cliff again, and climb back up.
- Go into the Fort. You’ll have to fire the cannon, even though you’ll be damaging your own ship.
- First you will have to clean the cannon so it doesn’t misfire.
- There are three tools hanging together on the wall: the Gunpowder shovel, the Rammer, and the Swab (brush).
- Collect the Swab from the wall and use it to clean the Cannon.
- Put the Swab back on the wall.
- Click on the Gunpowder Barrel to open it.
- Now take the Gunpowder Shovel and use it to get gunpowder from the Gunpowder Barrel.
- Put the gunpowder in the Cannon.
- Put the Gunpowder Shovel back on the wall.
- Use the Rammer from the wall on the Cannon.
- Put the Rammer back on the wall.
- Right-click to go to the Inventory Screen.
- Combine the two Blocks and the Long Rope to make a Tackle.
- Disassemble the Pick to get a Handspike and a pike head.
- Left-click on the Tackle.
- Right-click to return to the scene.
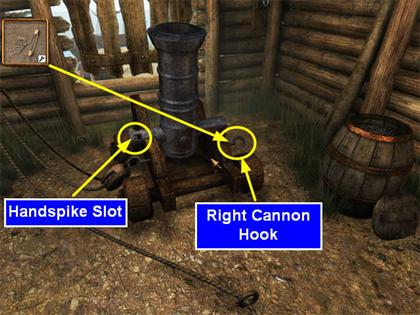
- Put the Tackle on the Right Cannon Hook.
- Put the Handspike in the slot on the left side of the Cannon.
Chapter Twenty-four: The Pistol
- We might as well put this gunpowder to good use. Take the Empty Powderhorn and use it on the Gunpowder Barrel to get a full Powderhorn.
- Right-click to go to the Inventory Screen.
- Combine the Full Powderhorn, Bullets, and Empty Pistol to get a Loaded Pistol.
Chapter Twenty-five: The Cannonball
- That takes care of the bullets, but we still have no cannonballs. Time to go to the Forge and make some.
- You can either go out of the Fort, down the Parrot’s ladder, and walk back to the Mine, or you can just use the Map.
- If you take the Map, you will arrive inside the Forge.
- Go the trough where you sailed your model boat.
- Use the Empty Helmet to collect Water.
- Right-click to go to the Inventory Screen.
- Combine the Helmet with Water + Dried Clay (from the Swamp) + Sand (from the Treasure Chest). This results in an Empty Helmet and a Mixture.
- Left-click on the Mixture.
- Right-click to return to the scene.
- Walk back into the Forge.
- Pan until the table is in front of you.
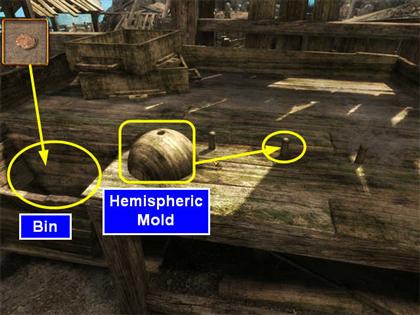
- Put the Mixture in the Bin on the far left.
- Move the Hemisphere Mold to the center post.
- Put the Conical Mold on top of the Hemispheric Mold.
- Put an Empty Molding Box on top of the Conical Mold.
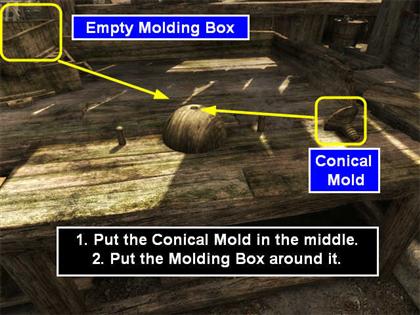
- Take some Mixture from the Bin and put it in the Box.
- Take the Conical Mold out and put it back on the table to the right of the Box.
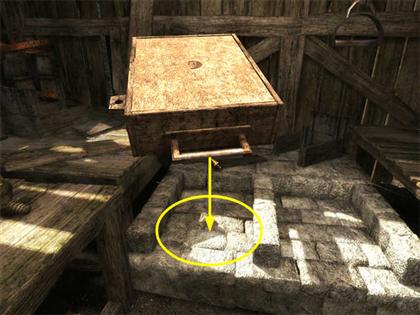
- Pick up the filled Molding Box.
- Pan right and put the Box down in one of the white holding areas.
- That’s the half mold with a hole. Now we need to make one just like it, but without a hole, so we won’t use the Conical Mold this time. Everything else is the same.
- Pan back to the left.
- The Hemisphere Mold is still on the center post. Put an Empty Molding Box on top of it.
- Take some Mixture from the Bin and put it in the Box.
- Pick up the filled Molding Box.
- Pan right and put the Box down in the other white holding area.
- Take the Mold with the Hole and put it on top of the Mold without a hole. That way you can pour in lead from the top.
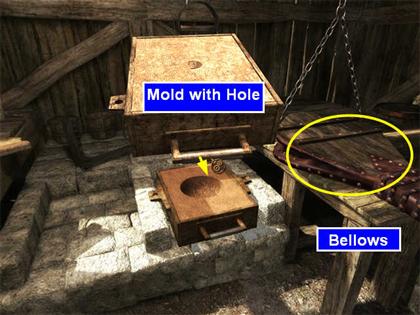
- Try the Bellows by pulling the chain. It has a hole in it.
- Right-click to go to the Inventory Screen.
- Disassemble the Fishing Pole so you have Pole, Thread, and Fish-hook.
- Combine the Thread and the Needle to create the Sailmaker’s Kit.
- Left-click on the Sailmaker’s Kit.
- Right-click to return to the scene.
- Use the Sailmaker’s Kit to fix the Bellows.

- Now the Bellows works, but it doesn’t point at the fire. Pan right and look down. There is an Extension Tube for the Bellows on the wall below the Kiln. Collect it and attach it to the end of the Bellows.
- Now we just need metal to make a cannon ball. But there isn’t any available. Well, if friendship is more valuable than treasure, there’s only one thing to do; melt the coins from the Treasure Chest! Put them in the Crucible.
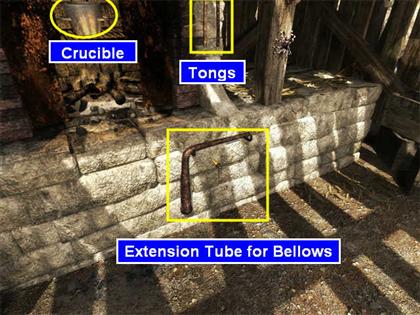
- Pull the handle of the Bellows and the fire will get hot, melting the coins.
- Now use the Tongs from the wall to the right of the Kiln to pick up the Crucible.
- Pan left and pour it in the hole in the mold.
- Put the Crucible back in the Kiln. The Tongs will go back automatically.
- Take the top Molding Box and empty it into the Bin to the left of the table.
- Set the empty Box over the top of the Hemispheric Mold.
- Pan right and collect the Cannonball.
Chapter Twenty-six: The Diving Apparatus
- Might as well get all the use we can out of that Logbook.
- Take the Extension Tube off the end of the Bellows and put it back on the wall by the Kiln.
- Right-click to go to the Inventory Screen.
- Combine the perforated bag and the Tubes to make a Strange Device.
- Left-click on the Strange Device.
- Right-click to return to the scene.
- Put the Strange Device on the end of the Bellows.
- Pull the Bellows Handle to pump it up.
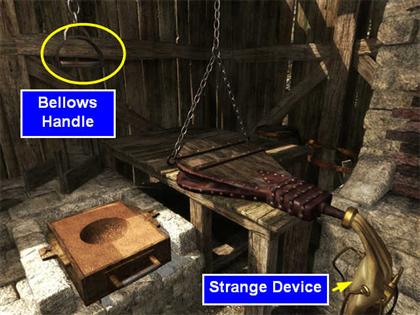
- Collect the Diving Apparatus (the Strange Device with air in it).
- Use the Map to go back to the Fort.
Chapter Twenty-seven: Fire When Ready!
- Note: If you haven’t done everything to get the Cannon ready to fire yet, review Chapter Twenty-three: the Cannon.
- Put the Cannonball in the Cannon.
- Pull the Handspike. Jim will automatically take the Handspike back.
- Pull the knotted rope on the floor behind the Cannon and it will roll forward.
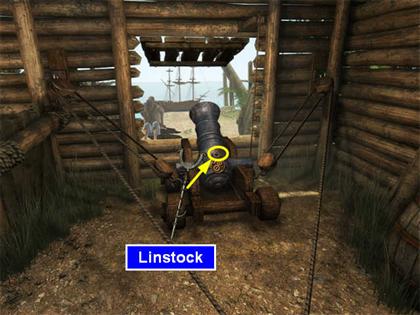
- Pan left. Use the Oakum from your inventory on the Linstock with no Wick that is leaning against the wall. Now it is an Unlit Linstock.
- Use the Lighter to light the Linstock.
- Take the lit Linstock and use it to light the Cannon.
Chapter Twenty-eight: The Wreck
- With the coast clear, walk back around to where the two captured pirates are seated. Pan left, and you’ll see the rope ladder down to the beach. Go down it.
- Pan until you see the Pirate Flag from the wreck.
- Click on the Pirate Flag and you will dive down to the wreck.
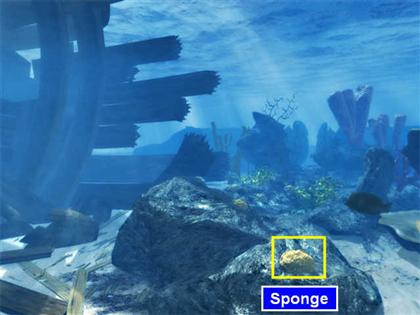
- Use the Knife on the Sponge on the rock to cut it loose, then collect it.
- Pan right so you can see the Surgeon’s Chest.

- The Clam won’t let you take the Surgeon’s Chest. Use the Handspike to hold the Clam open (put it on the Clam, not the Chest). Get the Surgeon’s Chest, then take back the Handspike.
- Pan around until you see the gold Cannonball. Collect it.
- Pan up the mast to swim back to the beach. If you can’t find the exact spot to go to the surface, just use the Map to go to the Idol.
Chapter Twenty-nine: The Dinghy
- Walk all the way up the beach until you come to Jim’s dinghy. The pirates have put a hole in it!
- Click on the hole for a close-up, and Jim will tell you he needs to fix the hole, caulk, and varnish.
- Pan left and you will see some boards nailed together lying on the beach. Let’s see if the Surgeon had any useful tools.
- Right-click to go to the Inventory Screen.
- Disassemble the Surgeon’s Chest. You will get a Forceps and a Saw.
- Use the Forceps to pull the boards apart.
- Use the Saw to cut them to size.
- Jim will automatically repair the hole.
- For the caulking step, use the Oakum from inventory.
- Now for varnish. Walk back to the stone Snake’s Head.
- Use the Cold Resin on the Fire. (If necessary, light the Firepit with the Lighter first.)
- Take the Hot Resin back and use it on the Dinghy.
- Click on the boat one more time. Watch Jim row upriver.
Chapter Thirty: The Waterfall
- Pan right and you will see an Iron Ring in the rock.
- Pick up the rope from the deck and click it on the Iron Ring.
- This will open a Knots Mini-game. You need an Anchor Hitch.
- Solution: Lower Arrow, Lower Arrow, Upper Arrow, Single Arrow, Single Arrow.
- Continue to pan right and get out of the back of the boat.
- There’s a Bell, but don’t ring it yet.
- Did you notice the piranha jumping out of the water as Jim was rowing in the cut scene? Just in case you didn’t, keep panning right and then click on the skeleton, and Jim will tell you about the danger.
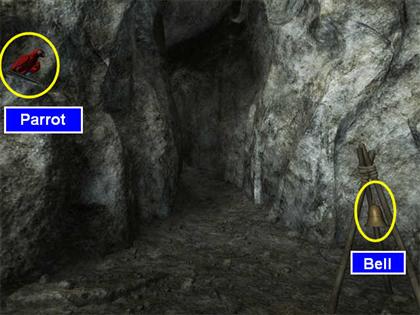
- Turn around again and look at the entrance. Long John Silver’s parrot is on the left and the Bell is on the right.
- Talk to the Parrot. He tells you it’s a trap.
- Ring the bell.
- The pirates will start negotiating.
- Give them the gold Cannonball. That doesn’t work.
- Right-click to go to the Inventory Screen.
- Combine the Open Bottle of Rum and the Cork.
- Left-click on the Bottle of Rum.
- Put it in the basket.
- The pirates will fight over it.
Chapter Thirty-one: Twin Daggers
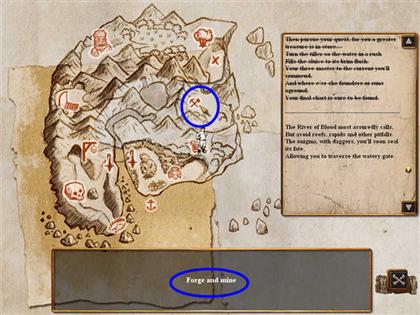
- Talk to the Parrot again. It repeats the Enigma. The enigma with dagger, you'll soon seal its fate, Allowing you to traverse the watery gate.
- The parrot will drop two daggers. Collect them.
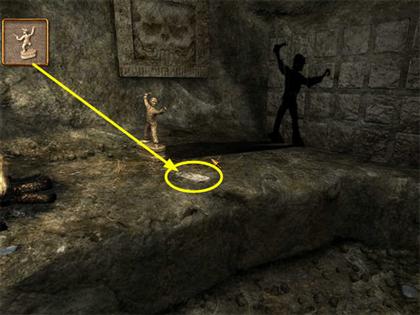
- Go back to your boat and look at the wall.
- You will be able to climb the wall using the daggers as shown in the screenshot.
Chapter Thirty-two: Long John Silver’s House
- Talk to Long John Silver.
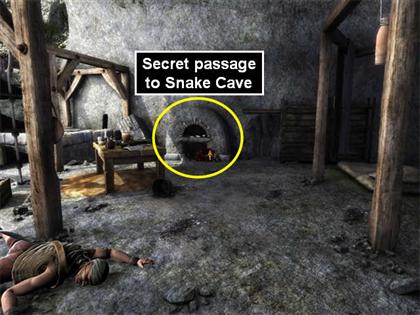
- Walk up the secret passageway.
- Use the loaded pistol on the pirate.
- Pan around until you see the table with the mirror on it.
- Collect the Mirror and the Slate (small chalkboard).
- Collect the Bottle of Rum from the floor by the dead pirate.
Chapter Thirty-three: Get the Key
- Use the Map to go to Snare Valley.
- Go through the Sword Puzzle Gate and take the right path towards Hollow Head and you will encounter a pirate.
- Run back to the valley. Go to where the Trap was.
- Use the Netting Needle to repair the torn net. Jim will automatically reset the trap.
- Return to Hollow Head, but this time take the left path by the bench and go up the stairs.
- Go inside Hollow Head.
- Use the Megaphone.
- The pirate will be scared and run back and get caught in the trap.
- Retrieve the Key.
- Use the Map to return to the Waterfall.
- Use the key to free Pepita.
- Talk to Morgan.
- Talk to Long John Silver.
Chapter Thirty-four: the Mayan Enigma
- You will automatically all go to the Snake Cave. Long John Silver will explain the Mayan Enigma: Let them answer all three beneath the serpent's gaze: From south to white north, how many days? From south to west, how many to count? And from west to north, add what amount?
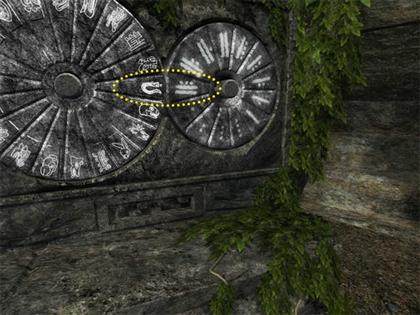
- Pan around the room until you see the two large circular indentations where the disks from Hollow Head go.
- Put the disks in place.
- Pepita will explain about the Mayan Calendar and the Mayan Compass.
- Use the Damp Sponge to clean off the area below the Disks. (The central hole is a Basin.)
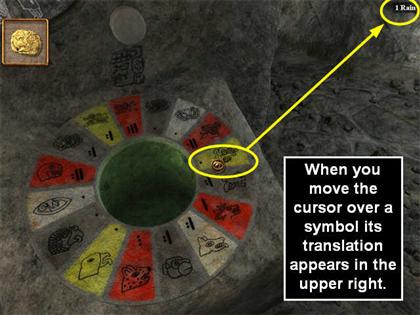
- From now on when you move the cursor over a symbol here, its translation will appear in the upper right of the screen.
- Now you need to make a compass. Use the Map to go to Cape Fear.
- Disassemble the Sailmaker’s Kit.
- Put the Needle on the black rock to magnetize it, then collect it again as a Magnetized Needle.
- Use the Map to go to the Mine.
- Fill the Empty Helmet with Water from the Trough where you sailed your Model.
- Use the Map to return to the Waterfall.
- Walk up the entrance by the Bell to Long John Silver’s House.
- Use the secret passage to go down into Snake Cave.
- Pour the water from the Helmet into the Basin below the calendar Disks.
- Right-click to go to the Inventory Screen.
- Disassemble the Rum Bottle.
- Combine the Cork and the Magnetized Needle to make a Compass.
- Left-click on the Compass.
- Right-click to return to the scene.
- Put the Compass in the water.
- Note the Cardinal Points around the basin. North = White, 1 Flint, East = Red, 13 Water South = Yellow, 1 Rain West = Gray, 7 Monkey
- Check the Enigma: From south to white north, how many days?
- Set the calendar Disks to 1 Rain.
- Push the button until you get to 1 Flint.

- The answer for the first part is 39.
- Repeat for the other 2 parts of the Enigma. From south to west, how many to count? And from west to north, add what amount?
- So the three answers are 39, 32, and 7.
- Pan around until you are facing everyone around the table.
- There are three sets of buttons, which goes with this part of the Enigma: Let them answer all three beneath the serpent's gaze
- Each of the 3 people must press one button for each answer. The three buttons added together have to equal the number you came up with from the Calendar Disks.
- Remember that on the buttons a dot is a one and a dash is a five.
- There are many different solutions. They’ll all be accepted as long as you meet the criteria: each person presses one button, and the totals are 39, then 32, then 7.
- There is one more twist; you have to make sure the Stone Snake is asking the same question that you’re trying to answer!
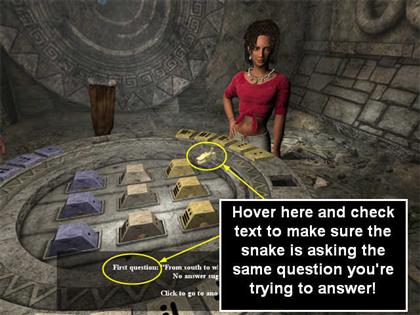
- We highly recommend saving the session both before and after this puzzle.
- Here are the buttons available for each character. Note that some numbers are duplicated.
- Long John Silver: 1, 3, 9, 12, and 19.
- Pepita: 2, 3, 11, 14, and 17.
- Jim: 2, 8, 9, 11, and 17.
- Solution: 39 = Long John Silver (19), Pepita (11), Jim (9)
- 32 = Long John Silver (12), Pepita (11), Jim (9)
- 7 = Long John Silver (3), Pepita (2), Jim (2)
- The central column will descend and produce a new puzzle based on the moon picture on the wall.
- Check the Enigma: When 'twixt their arms the moon takes shape, The dazzle of riches will leave all agape.
- You must make both the central balls and the outer rings match the picture on the wall.
- Solution: Jim left 2, Pepita left 2, Jim right 2, Long John Silver left 3, Pepita left 2.
- Make sure you are pressing the character’s left, not your left.
- You can see the treasure, but a snake is threatening Long John Silver.
- Take the Mirror that you got from the table in Long John Silver’s house and place it on the floor in the beam of sunlight.
- Watch the ending.
Created at: 2009-10-04