
Walkthrough Menu
General Tips
- This is the official guide for Detectives United: Origins.
- This guide won't tell you when to zoom into a location; the screenshots show each zoom scene.
- Hidden-object puzzles are referred to as HOPs. Only the locations of the HOPs will be shown.
- Use the Map to fast travel to a location.
Chapter 1: Three Detectives
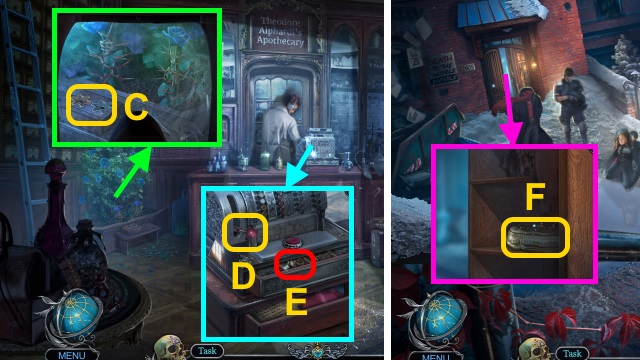
- Examine scene.
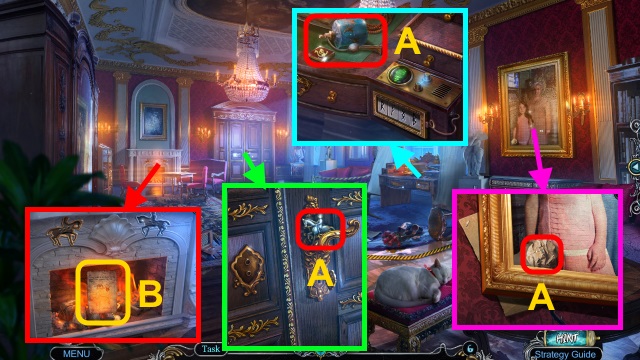
- Take HORSEMAN FIGURINE (1/2), CREST PART (1/3), PERFUME, and CRUMPLED PAPER (A).
- Open CRUMPLED PAPER; use PERFUME. Take CODE PAPER.
- Use CODE PAPER (B); receive DESK CODE.
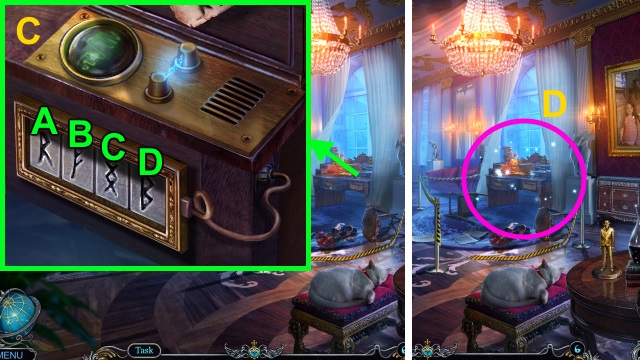
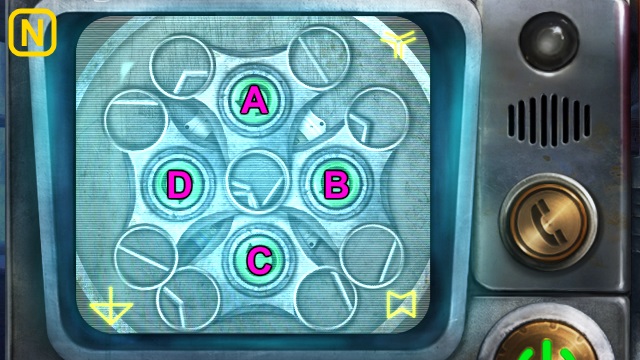
- Use DESK CODE; solution: (C): (A-Cx2)-(B-A-B)-(D-C-D)-(A-B-A).
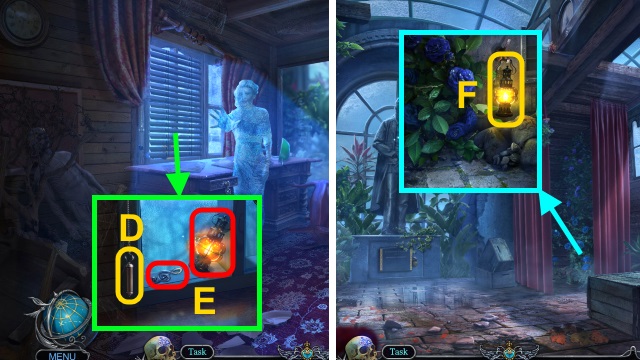
- Play HOP; receive ROYAL EMBLEM (D).
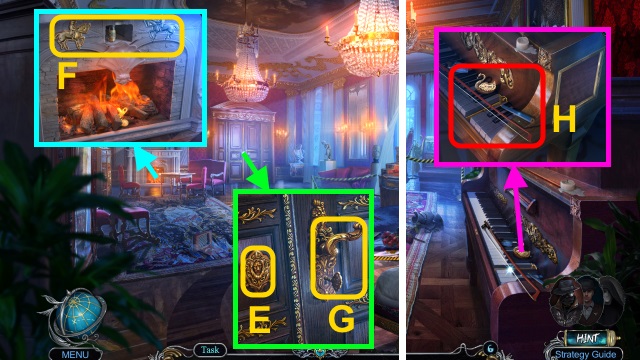
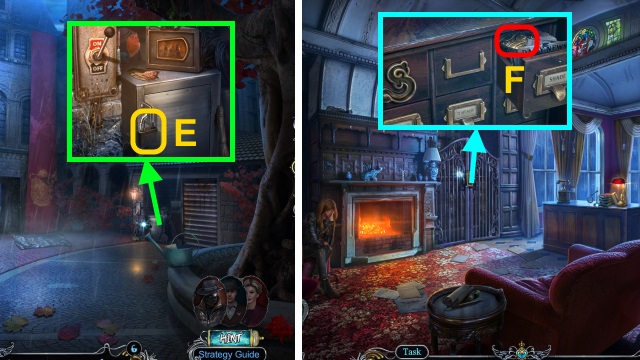
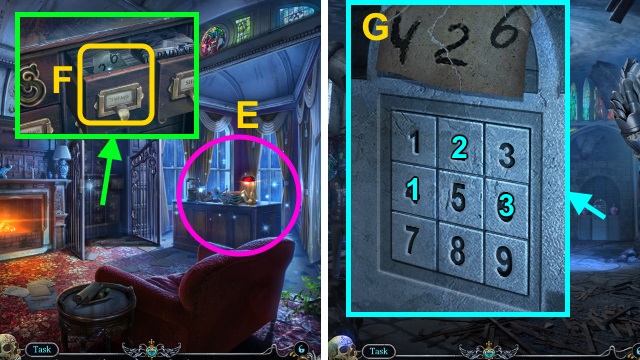
- Place ROYAL EMBLEM (E); take HORSEMAN FIGURINE (2/2).
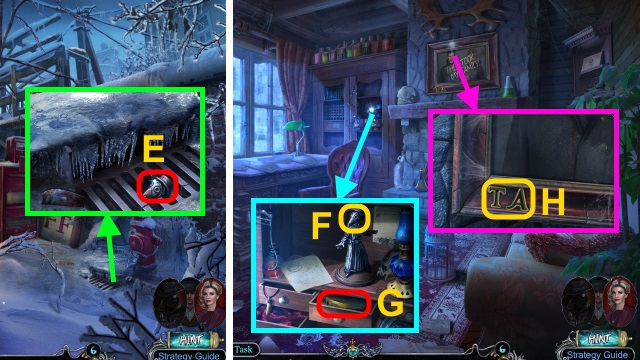
- Place HORSEMAN FIGURINE (2/2) (F); take OIL.
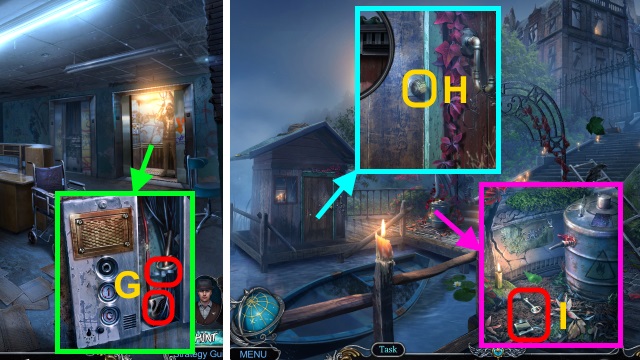
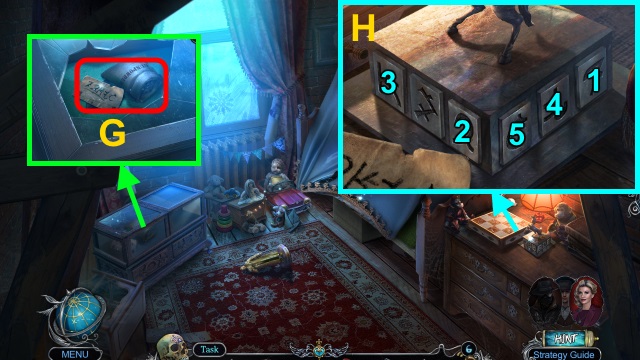
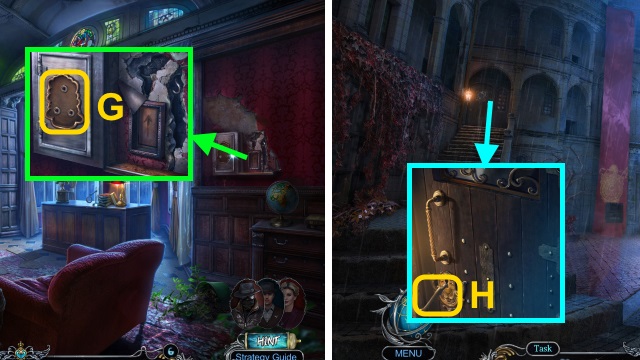
- Use OIL (G).
- Walk forward.
- Examine scene. Talk; receive JAMES' FILE.
- Examine JAMES' FILE. Play HOP; receive CREST PART (2/3).
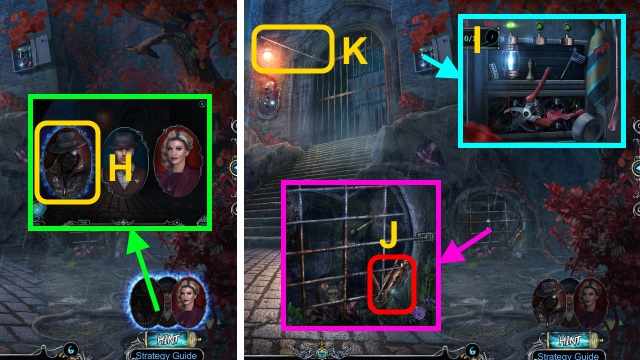
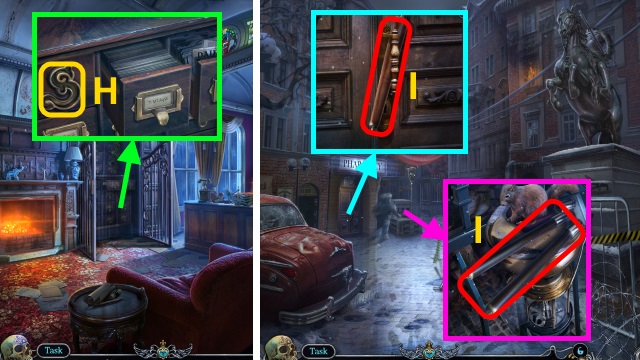
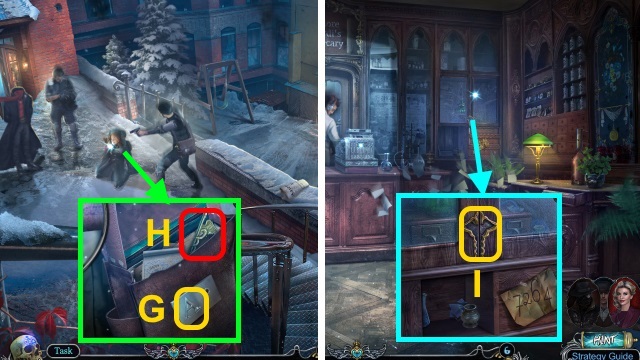
- Take METAL SWAN (1/2), VIOLIN BOW, and PENCIL (H).
- Walk down.
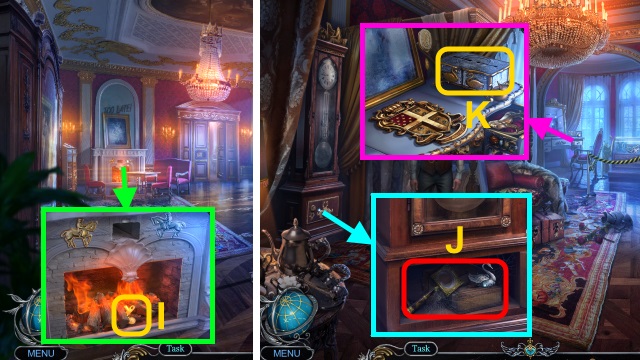
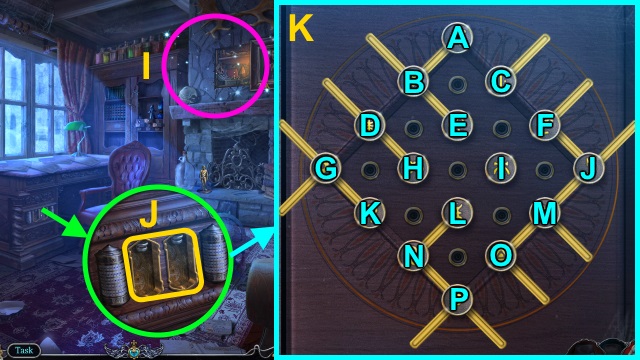
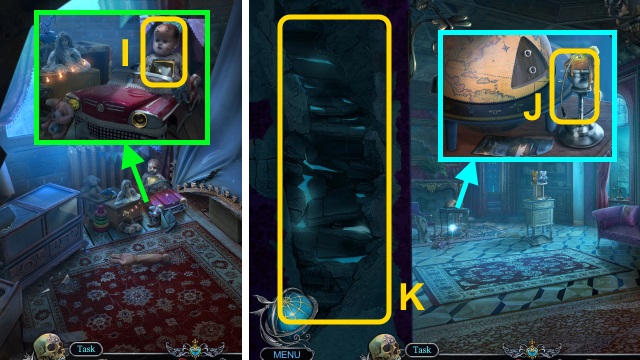
- Use VIOLIN BOW (I); take WINDING KEY.
- Walk forward.
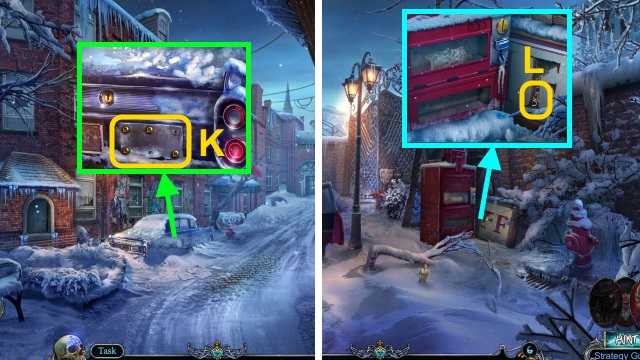
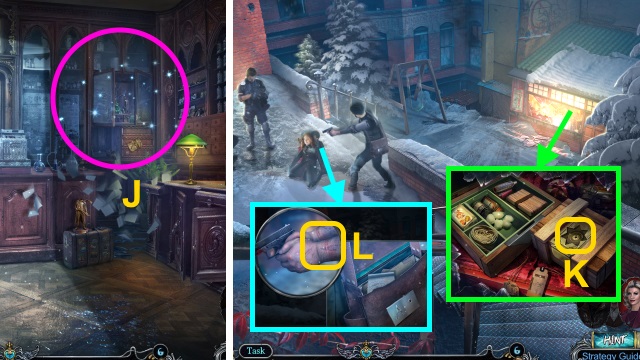
- Place WINDING KEY; take METAL SWAN (2/2) and MAGNIFIER (J).
- Place METAL SWAN (2/2) (K); take BATTERY (1/2) and PAPER KNIFE.
- Walk down.
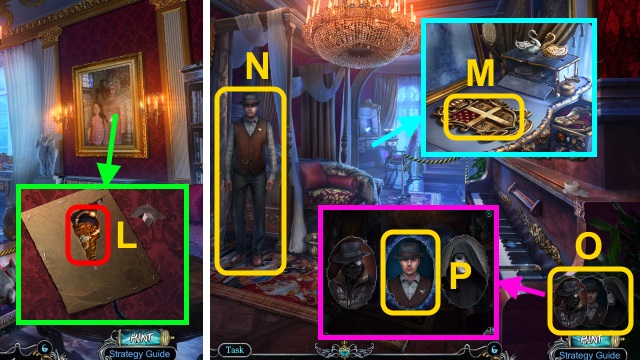
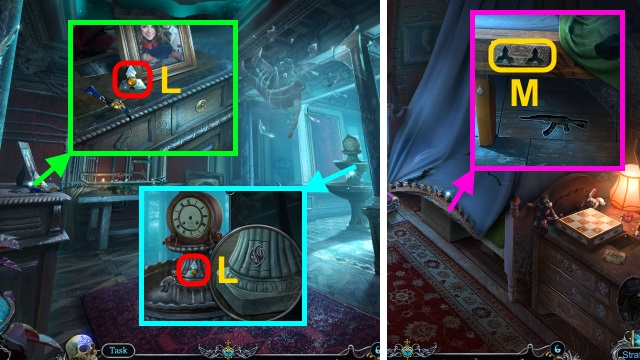
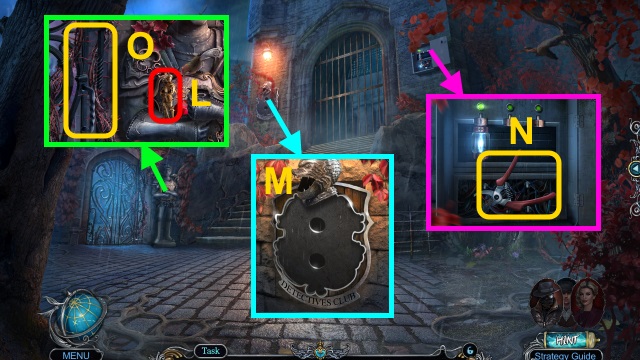
- Move portrait and spider; use PAPER KNIFE. Take LION EMBLEM (1/2) and CREST PART (3/3) (L).
- Walk forward.
- Place CREST PART (3/3) (M). Play HOP; receive BATTERY (2/2).
- Examine DEVICE; replace BATTERY (2/2). Take WORKING DEVICE.
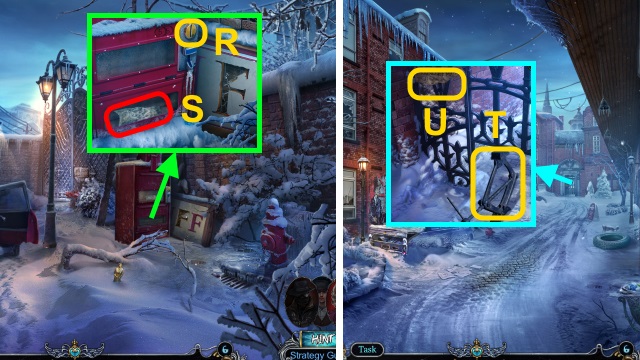
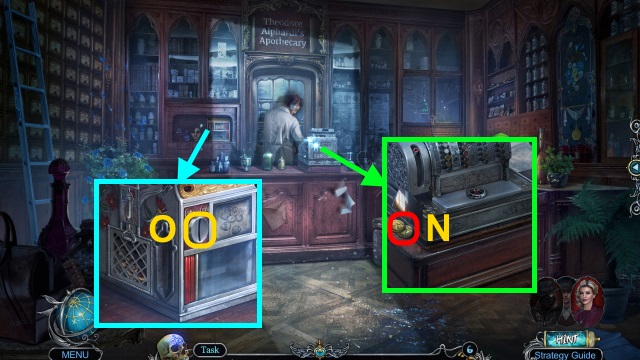
- Give WORKING DEVICE (N).
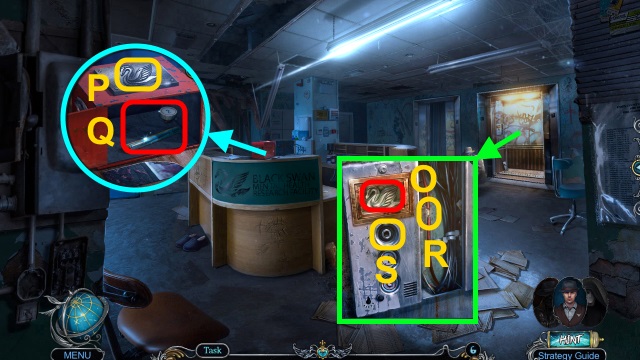
- Examine (O); switch to James Blackthorne (P).
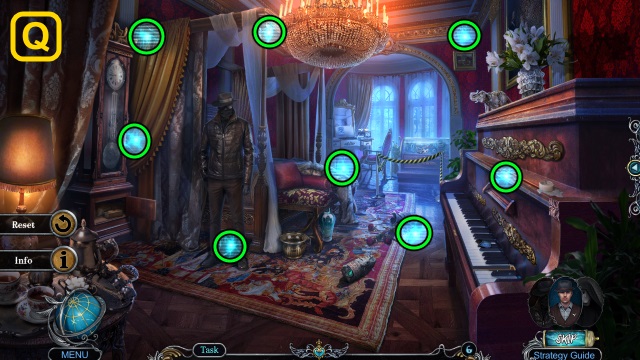
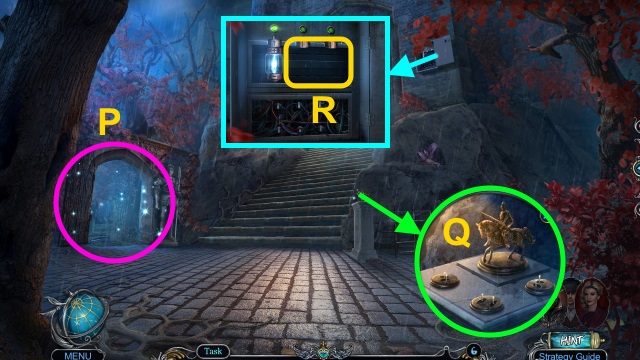
- Solution (Q).
- Receive DEVICE.
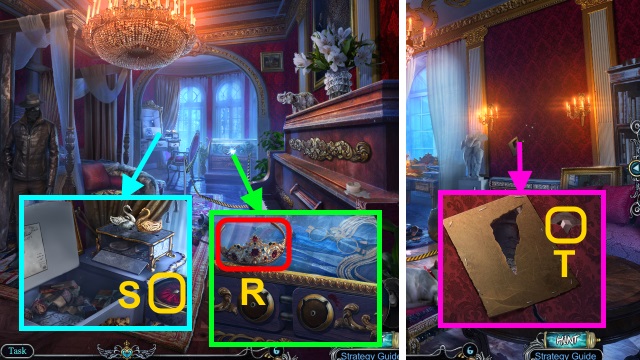
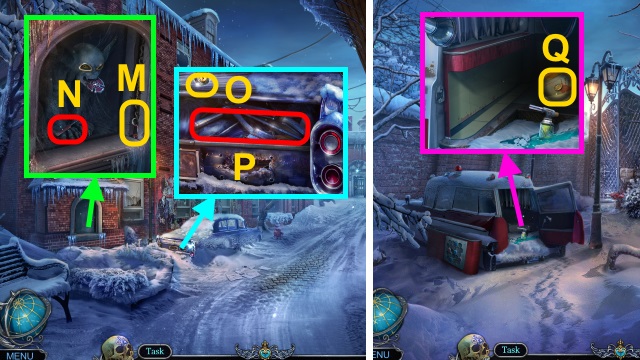
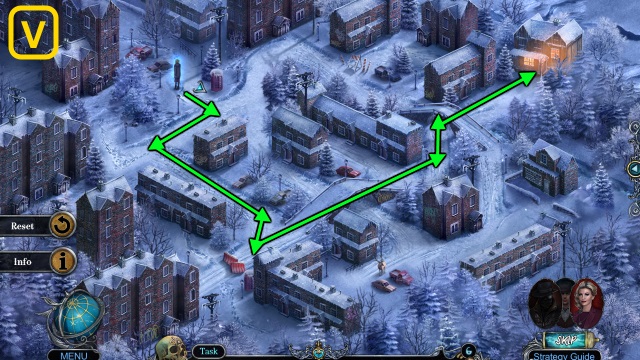
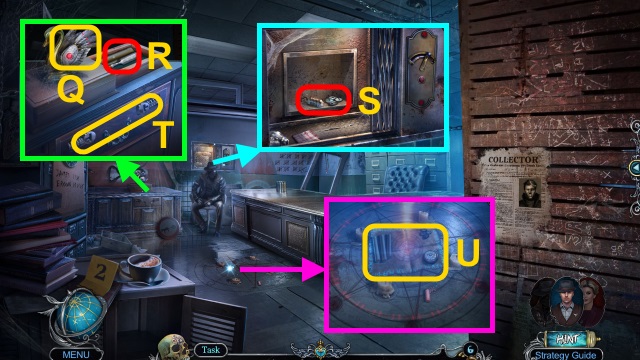
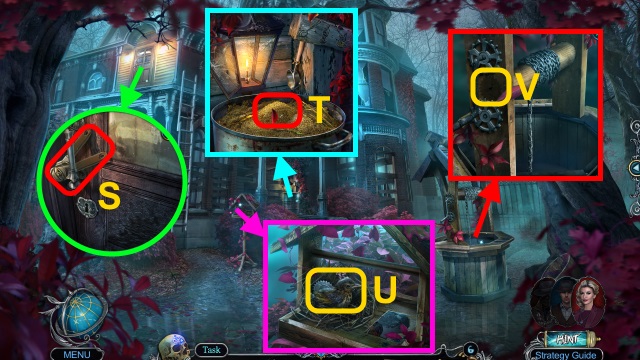
- Take TIARA (R).
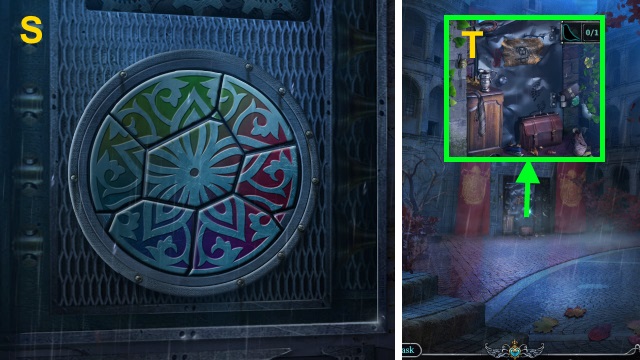
- Examine 2x (S); place TIARA. Take HAIRPIN.
- Walk down.
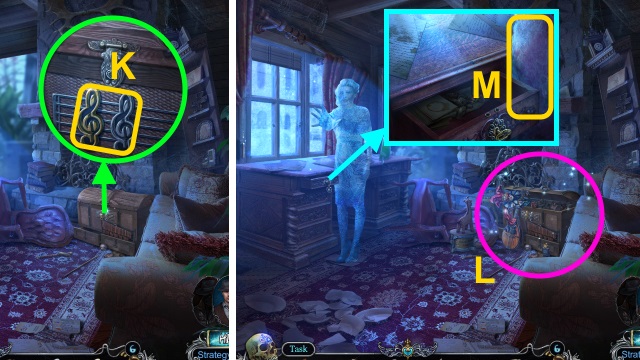
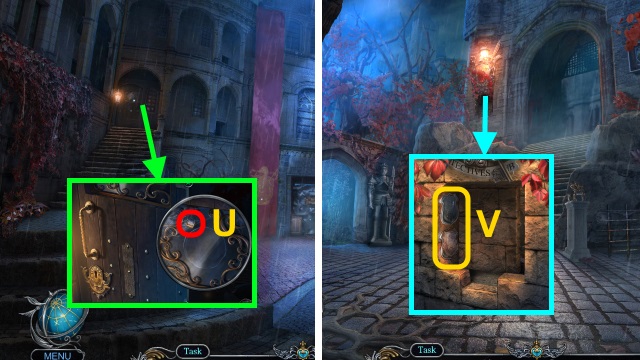
- Use HAIRPIN (T); receive PIANO KEY.
- Walk forward.
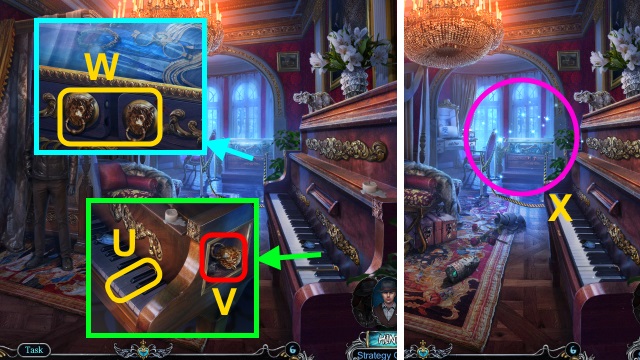
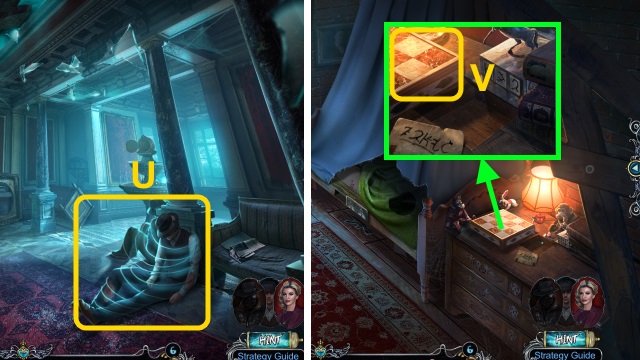
- Place PIANO KEY (U); take LION EMBLEM (2/2) (V).
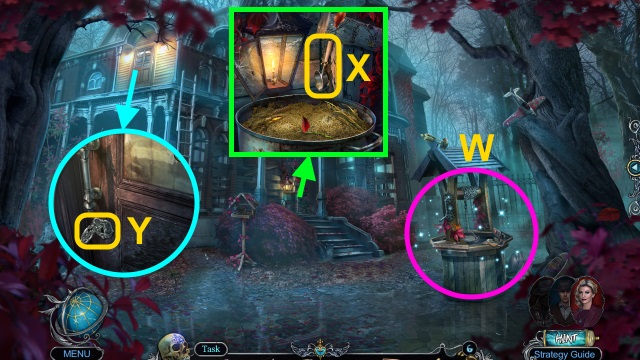
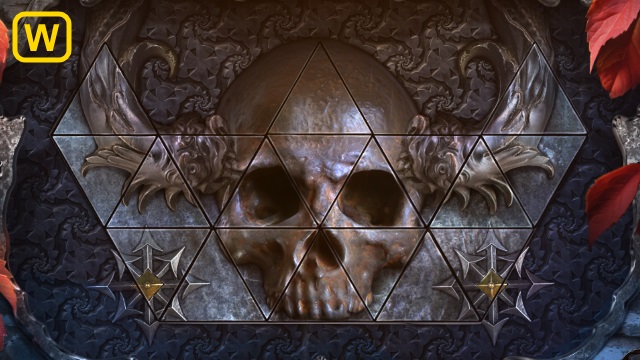
- Place LION EMBLEM (2/2) (W); open.
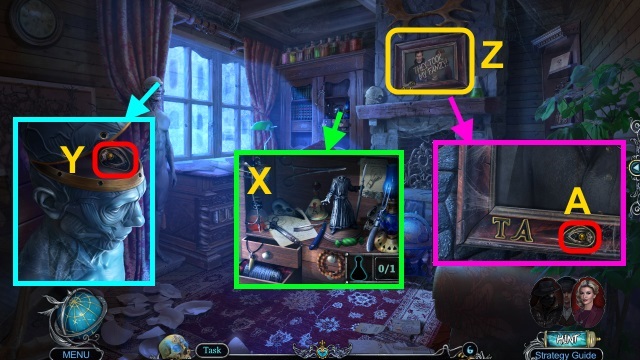
- Play HOP; receive TORN PHOTO (X).
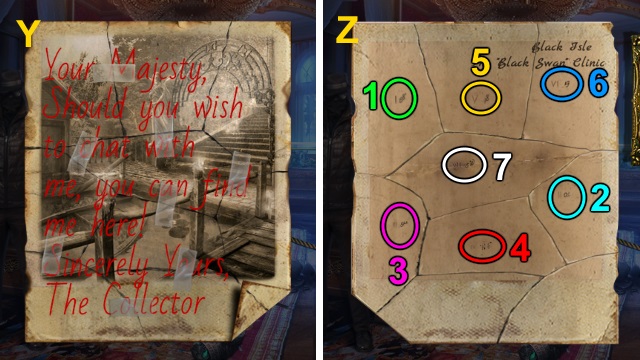
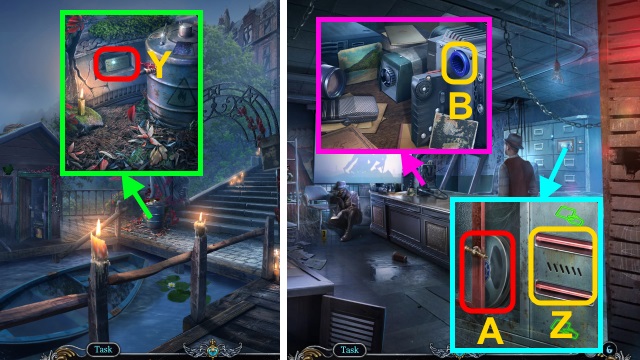
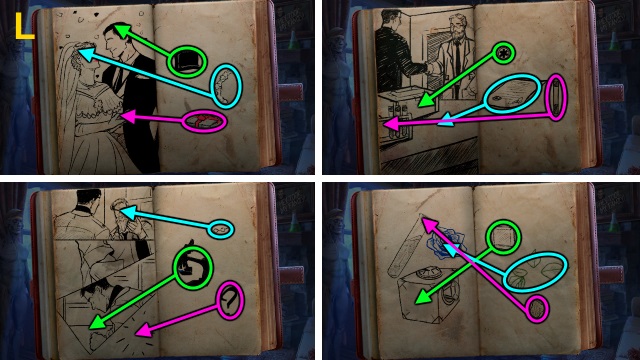
- Examine TORN PHOTO; solution (Y).
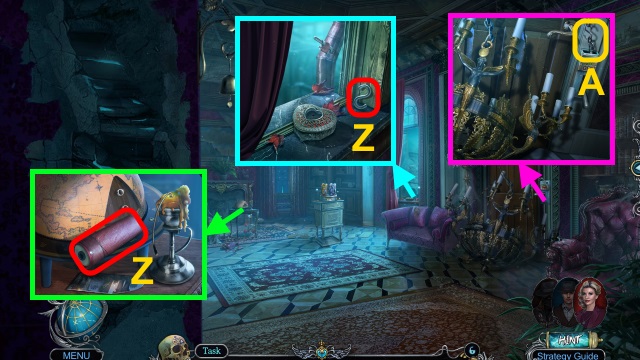
- Use PENCIL and MAGNIFIER; solution (Z).
- Take COORDINATES.
- Examine DEVICE; press phone button. Use COORDINATES.
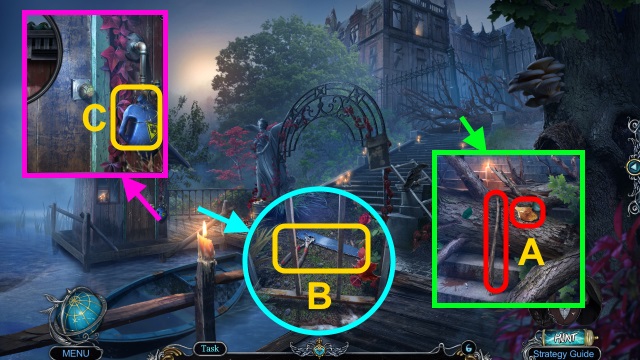
- Examine scene. Talk; receive CHAIN SAW BASE.
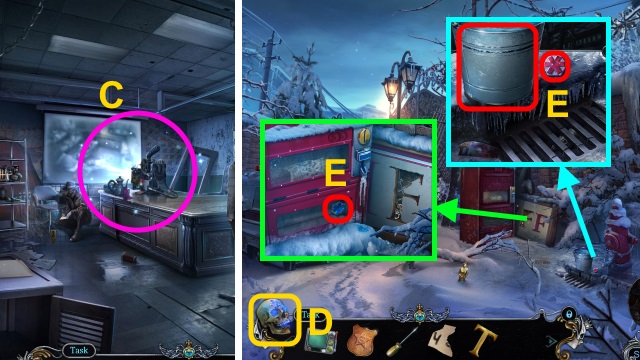
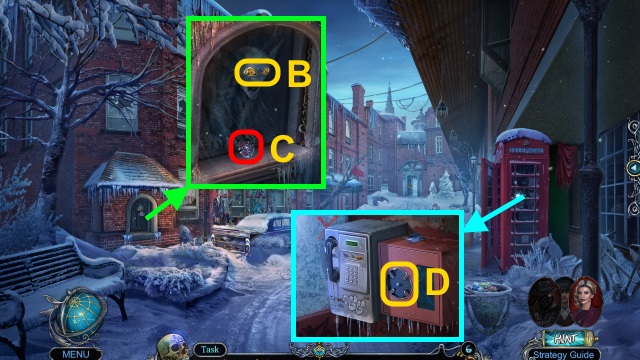
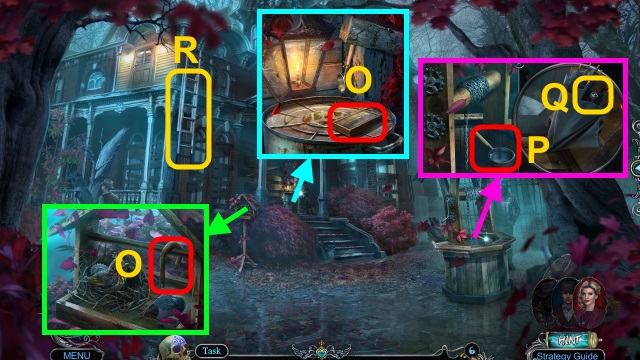
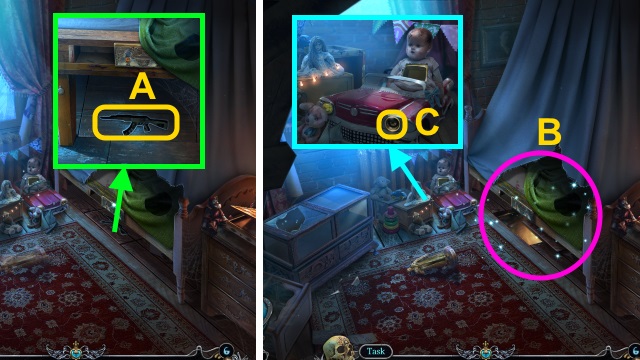
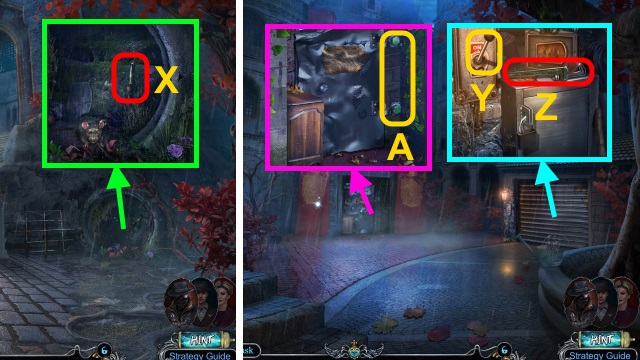
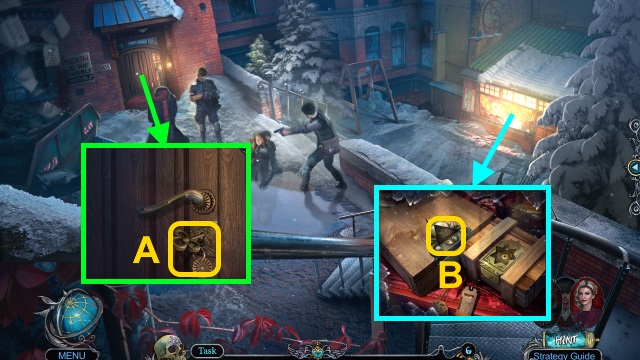
- Take RUSTY BADGE and BRANCH (A).
- Use BRANCH (B); take WIRE CUTTERS and SAW BLADE.
- Use WIRE CUTTERS (C); take EMPTY FUEL CAN.
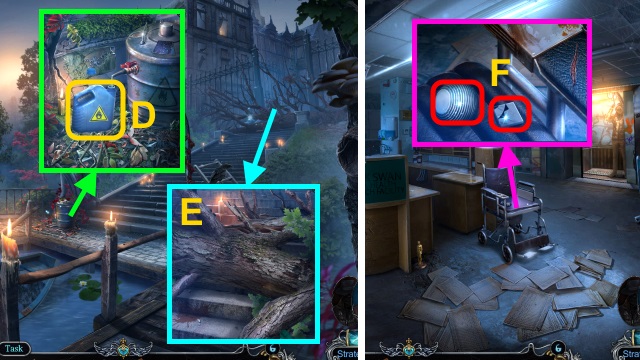
- Use EMPTY FUEL CAN (D); receive FUEL.
- Examine CHAIN SAW BASE; place SAW BLADE and FUEL. Take CHAIN SAW.
- Use CHAIN SAW (E).
- Walk right.
- Take DOORKNOB and TILE (1/3) (F).
- Examine; take METAL KEY (1/2) and TILE (2/3) (G).
- Walk down.
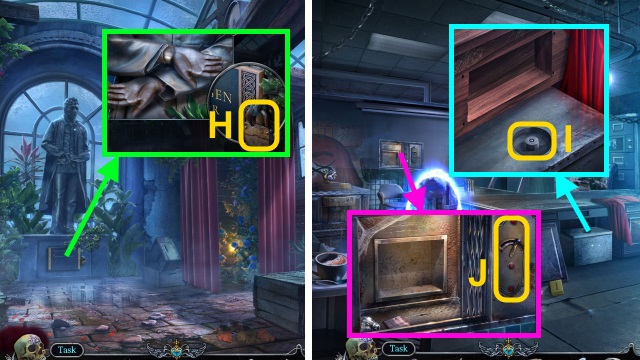
- Examine (H); place DOORKNOB. Take RAKE.
- Use RAKE; take TILE (3/3) and METAL KEY (2/2) (I).
- Walk right.
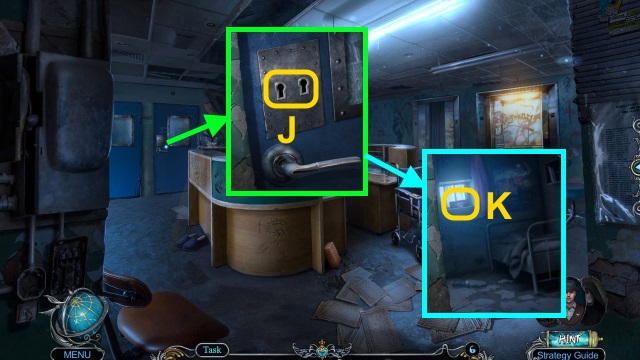
- Use METAL KEY (2/2) (J).
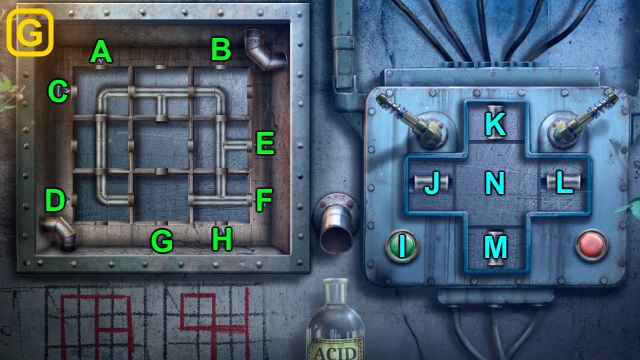
- Examine (K); take PRISONER'S BOX.
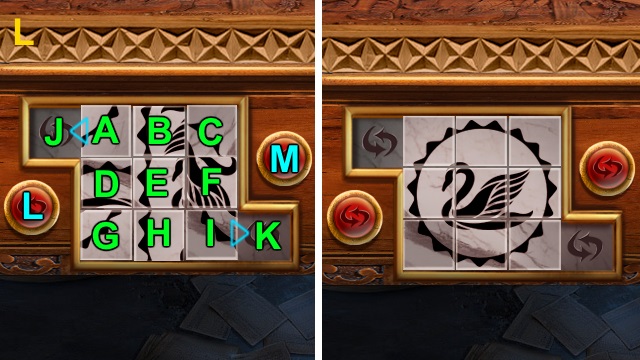
- TILE (3/3) on PRISONER'S BOX.
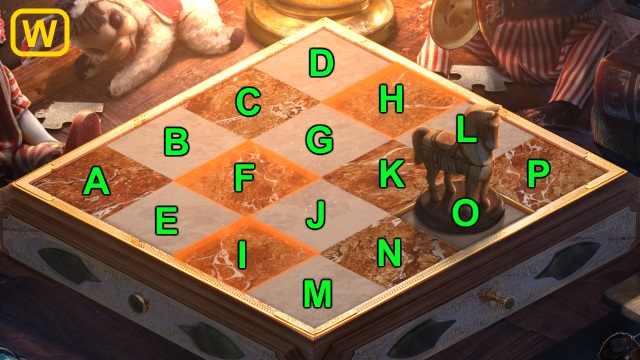
- Solution (L): (A left)-(L)-(I right)-(F down)-(E right)-(D right)-(J right)-(A down)-(B left)-(A left)-(Lx2)-(E up)-(D right)-(J right)-(A down)-(B left)-(A left)-(Lx2)-(J right)-(A right)-(D up)-(G up)-(H left)-(E down)-(B down)-(A right)-(D up)-(A left)-(Lx2)-(J right)-(A down)-(B left)-(C left)-(F up)-(E right)-(D right)-(A down)-(B left)-(A left)-(Lx3)-(C left)-(B left)-(F up)-(E up)-(I up)-(H up)-(K left)-(I left)-(F down)-(I right)-(M)-(C down)-(F down)-(B right)-(C down)-(A right)-(B right)-(J right)-(A right)-(D up)-(E left)-(F left)-(C down)-(B right)-(A right)-(D up)-(E left)-(F left)-(C down)-(B right)-(A right)-(D up)-(G up)-(H left)-(I left)-(F down)-(C down)-(B right)-(A right)-(D up)-(A left)-(Lx3)-(J right)-(A down)-(B left)-(A left)-(D up)-(E up)-(F left)-(G up)-(I up)-(H left)-(K left)-(I left)-(F down)-(I right)-(E right)-(H up)-(G right)-(H right)-(D down)-(E down)-(B down)-(E left)-(A right)-(J right)-(H up)-(I left)-(K left).
- Take ELECTRICAL TAPE and WHISTLE.
- Walk down.
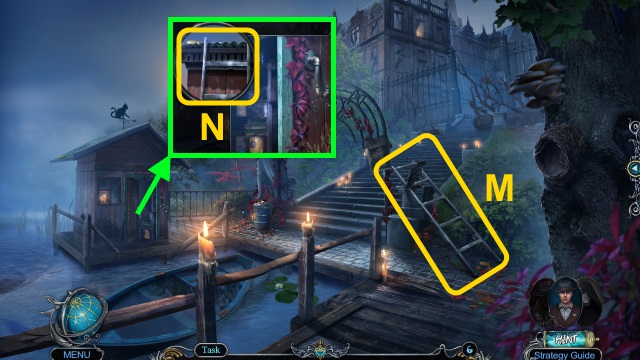
- Use WHISTLE (M); take LADDER.
- Use LADDER; take SCREWDRIVER (N).
- Walk right.
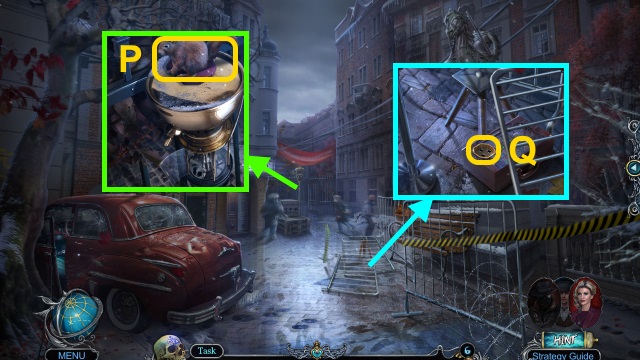
- Use SCREWDRIVER; take SWAN EMBLEM (O).
- Place SWAN EMBLEM (P); take BUTTON and TEST TUBE (1/3) (Q).
- Use ELECTRICAL TAPE (R). Place BUTTON (S); press.
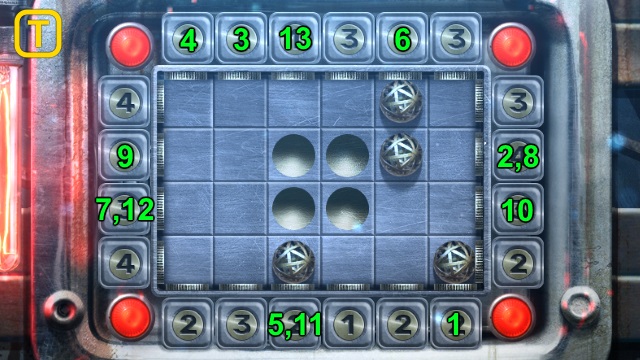
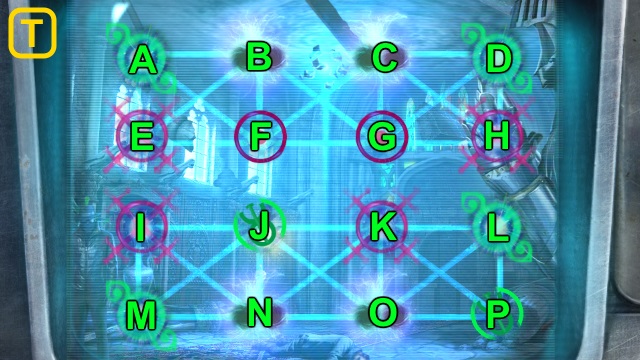
- Solution (T).
- Examine scene.
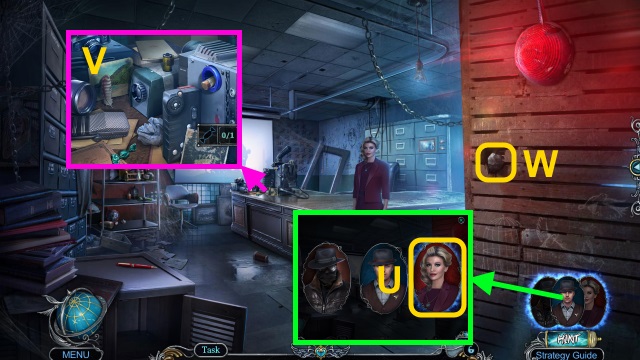
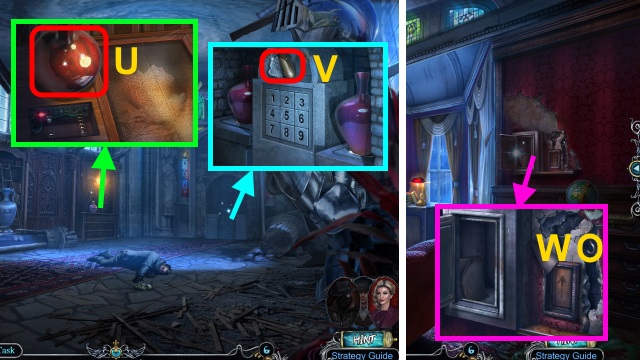
- Switch to Anna Gray (U).
- Talk; receive BROWN'S INFO.
- Read BROWN'S INFO; take PUNCH CARD (1/2) and TORN PAPER.
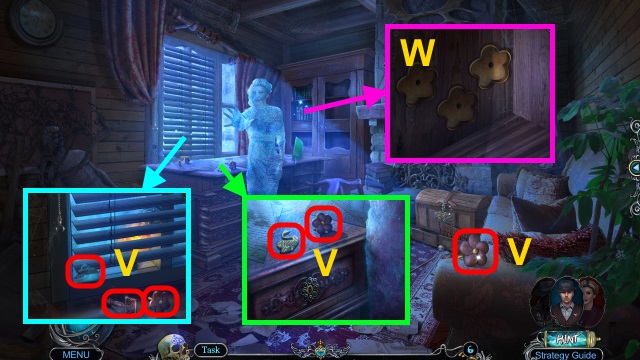
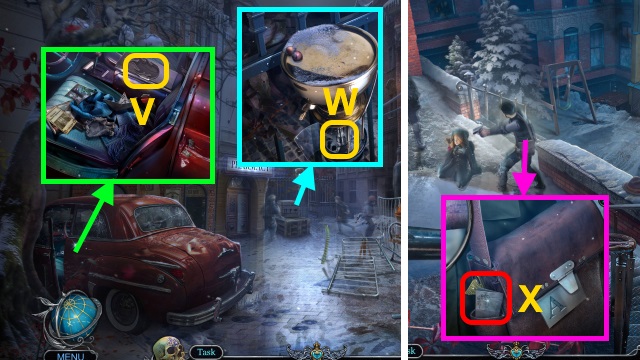
- Play HOP; receive TEST TUBE (2/3) (V).
- Use HAIRPIN (W); receive ROCK.
- Walk down.
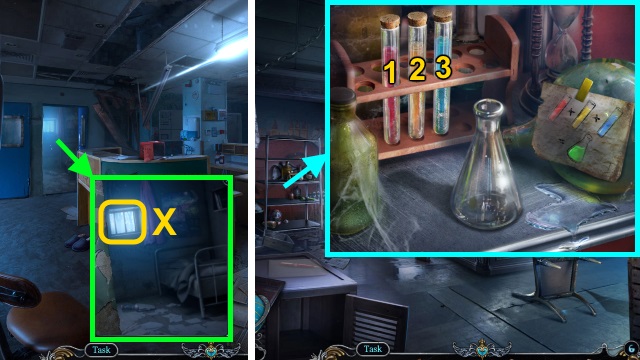
- Examine (X); use ROCK. Take TEST TUBE (3/3).
- Walk right.
- Place TEST TUBE (3/3); select in order (1-3). Take SCUM REMOVER.
- Walk down twice.
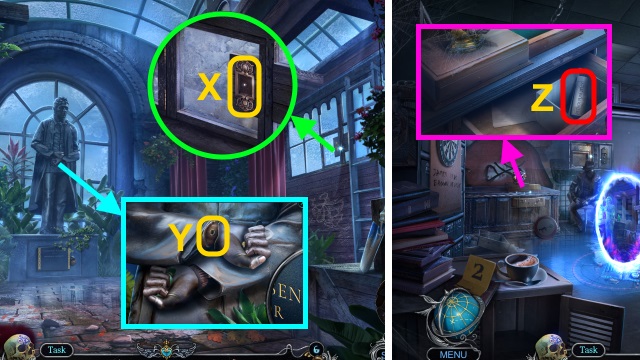
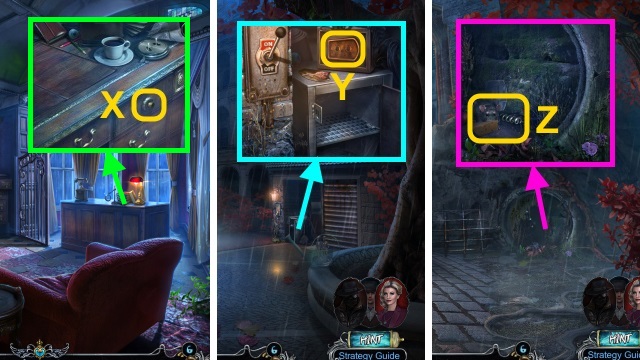
- Use SCUM REMOVER; take PUNCH CARD (2/2) (Y).
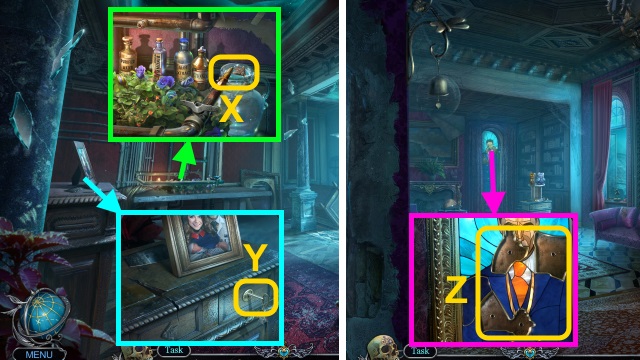
- Go to the Study.
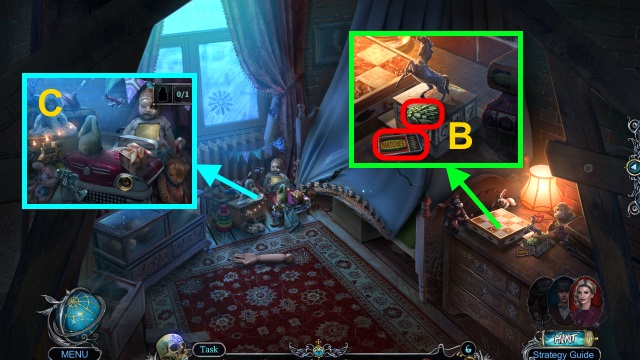
- Use PUNCH CARD (2/2) (Z); take FILM REEL (A).
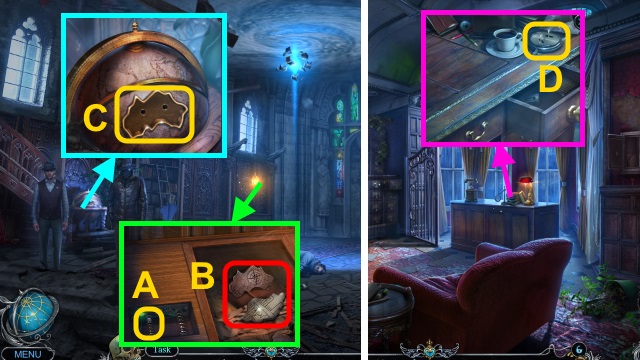
- Place FILM REEL (B).
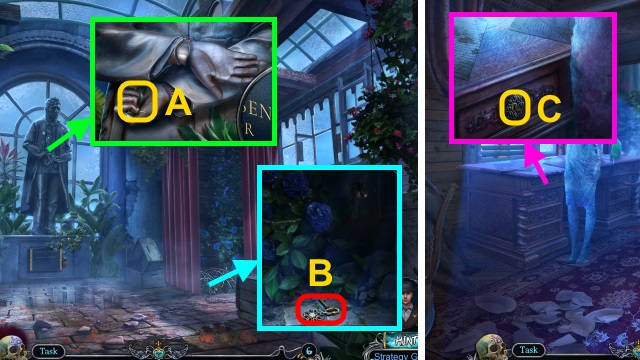
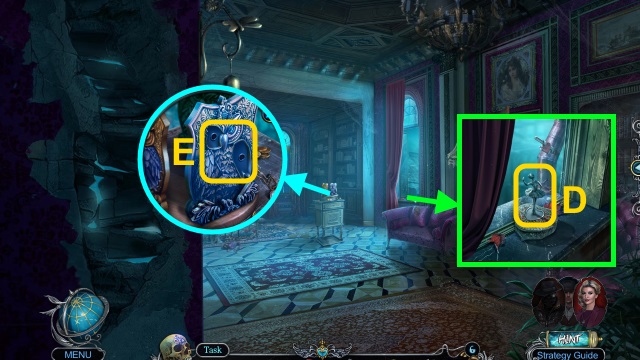
- Play HOP; receive ENVELOPE (C).
- Open ENVELOPE; take GOLDEN T.
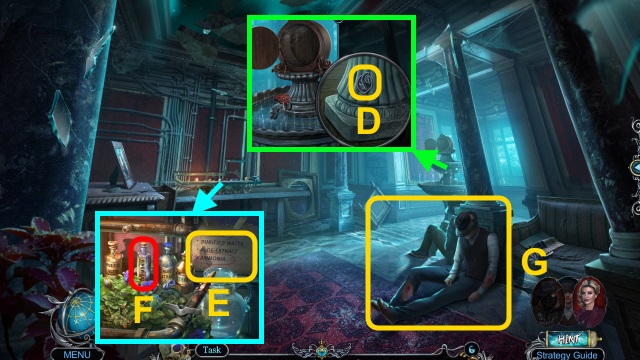
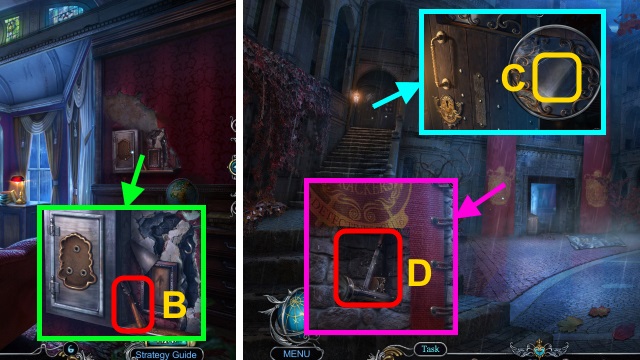
- Examine scene. Use Skull (D); receive MEDICAL TILE (1/3).
- Take MEDICAL TILE (2/3)-(3/3) and BUCKET WITH WATER (E).
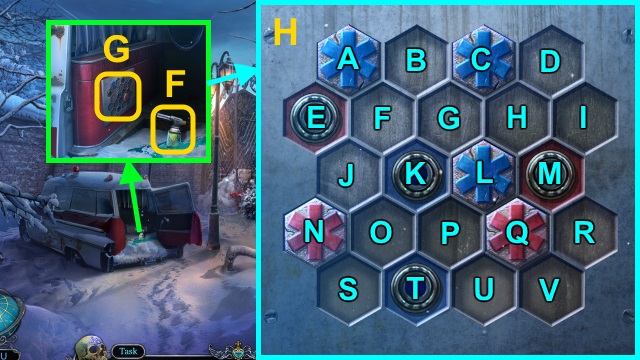
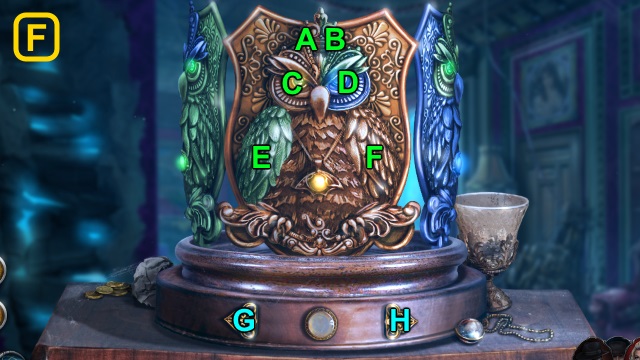
- Use BUCKET WITH WATER (F); receive HOT WATER. Examine (G); place MEDICAL TILE (3/3).
- Solution (H): Ex2-O-R-P-F-K-Ox5-Ux2.
- Take SHOVEL.
- Use SHOVEL (I); pour HOT WATER.
- Walk forward.
- Take BANDAGE, CARABINER, and COIN (1/2) (J).
- Use SCREWDRIVER (K); take MAGNET.
- Walk down.
- Use MAGNET (L); take CHAIN.
- Walk forward.
- Use CHAIN and CARABINER (M); take LOCKPICK (N).
- Use LOCKPICK (O); take FLASHLIGHT and JACK (P).
- Walk down.
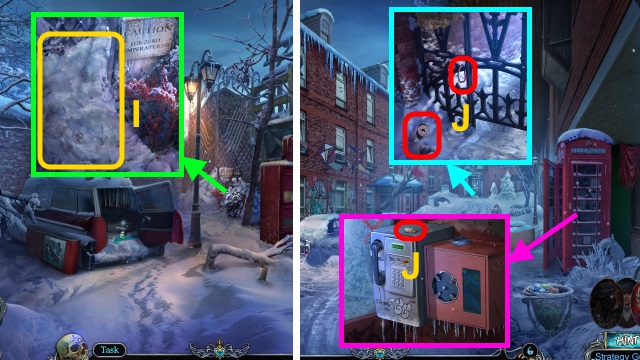
- Use FLASHLIGHT; examine note (Q). Take COIN (2/2).
- Use COIN (2/2) (R); take MAP PIECE (S).
- Walk forward.
- Use JACK (T); place MAP PIECE (U).
- Solution (V).
- Use Skull; receive SUSPECT'S DIARY.
- Play HOP; receive COMBO LOCK (1/2) (X).
- Use SCREWDRIVER; take METAL EYE (1/2) (Y).
- Examine 2x (Z).
- Take METAL EYE (2/2) (A).
- Walk down.
- Place METAL EYE (2/2) (B); take FIRE BADGE (C).
- Place FIRE BADGE (D); take BOLT CUTTER.
- Walk down.
- Use BOLT CUTTER; take FIGURINE HEAD (E).
- Walk forward twice.
- Place FIGURINE HEAD (F); take GOLDEN A (G).
- Place GOLDEN T and GOLDEN A (H).
- Play HOP; receive COMBO LOCK (2/2) (I).
- Place COMBO LOCK (2/2) (J).
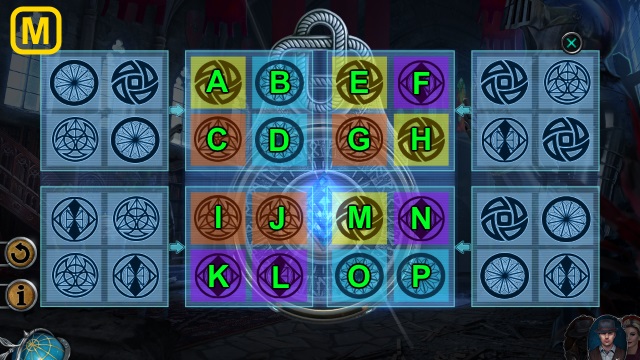
- Solution (K): C-Ax2-K-Mx3-Jx3-F-L-N-Kx2-E-Bx2.
- Ex2-H-Dx3-L-Ex3-Ix2-H-Ex3-H-I-M.
- N-Lx3-Ox2-Mx2-Ax2-Gx2-Jx2-Px2.
- Take SNAKE EMBLEM.
- SNAKE EMBLEM on SUSPECT'S DIARY.
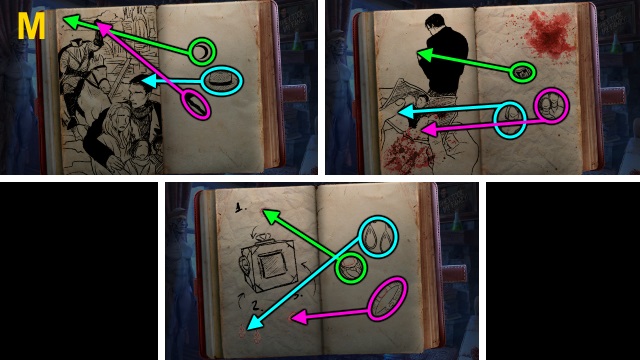
- Solution (L-M).
- Take VESSEL.
Chapter 2: Portal to the Past
- Talk; receive LIST.
- Use DEVICE on scene.
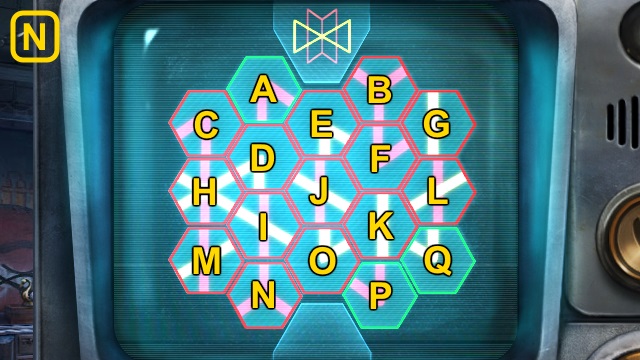
- Solution (N): (C-B)-(F-N)-(H-J)-(C-E)-(F-O)-(D-G).
- (F-M)-(H-K)-(D-K)-(K-L)-(K-I)-(I-F).
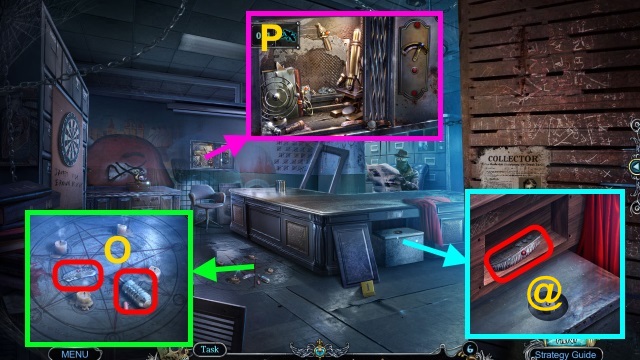
- Take LEVER (1/2) and FEATHER (1/3) (O).
- Use SCREWDRIVER; take FEATHER (2/3) (@).
- Play HOP; receive FEATHER (3/3) (P).
- Place FEATHER (3/3) (Q); take CANDLES and CHISEL (R).
- Use CHISEL; take LEVER (2/2) and RUNE STONES (S).
- Place LEVER (2/2) (T); take POCKET WATCH.
- CANDLES, RUNE STONES, and POCKET WATCH on LIST; take RITUAL MATERIALS.
- Place RITUAL MATERIALS (U).
- Go forward.
- Take SWAN EMBLEM, WOODEN FLOWER (1/3)-(3/3), LATCH, and PAPER PIECE (1/3) (V).
- Move books; place WOODEN FLOWER (3/3) (W).
- Walk forward.
- Place LATCH (X); take BRACELET.
- Place BRACELET (Y); take SWAN EMBLEM.
- Walk down twice.
- Place 2 SWAN EMBLEMS; take PETROLEUM JELLY (Z).
- Go forward twice.
- Use PETROLEUM JELLY (A); take HERBICIDE.
- Use HERBICIDE; take DRAWER KEY (B).
- Walk down.
- Use DRAWER KEY (C); take CORD PART.
- Place CORD PART (D); take MUSIC EMBLEM and LAMP (E).
- Walk forward.
- Place LAMP (F).
- Solution (G): (K-J-M-I)-(N-E)-(J-K-I)-(N-F).
- (K-M-I)-(N-C)-(J-M-I)-(N-C)-(L-M-I)-(N-C).
- (K-L-I)-(N-E)-(K-L-M-J-I)-(N-E)-(K-J-M-I)-(N-E).
- (J-L-I)-(N-F)-(J-L-K-I)-(N-F)-(K-J-I)-(N-F).
- Take ACID.
- Pour ACID (H); take METAL KNOB.
- Walk down twice.
- Place METAL KNOB (I); take WRENCH.
- Use WRENCH (J); take MUSIC EMBLEM.
- Walk forward.
- Place 2 MUSIC EMBLEMS (K).
- Play HOP; receive TUNING FORK (L).
- Use TUNING FORK (M); receive BUSINESS CARD.
- BUSINESS CARD on DEVICE; Solution (N): (B-Cx2)-(Ax2-C-D-B)-(Ax2-B-D-C).
- Examine scene; switch to Anna Gray.
- Take UMBRELLA HANDLE and MOLD (O).
- Take COLD WATER (P). Place UMBRELLA HANDLE (Q); take UMBRELLA.
- Use UMBRELLA (R).
- Take CAN OPENER (S).
- Use CAN OPENER; take GRAINS (T).
- Give GRAINS (U); take GEAR.
- Place GEAR (V).
- Play HOP; receive TIN SOLDIER (W).
- Examine (X); place TIN SOLDIER. Receive MELTED TIN.
- Open MOLD; pour MELTED TIN. Use COLD WATER; take MOLDED KEY.
- Use MOLDED KEY (Y).
- Walk left.
- Take DYNAMITE STICK and S-HOOK (Z).
- Place S-HOOK (A).
- Walk right.
- Take OWL PART and MATCHES (B).
- Play HOP; receive BALLERINA FIGURINE (C).
- Walk down.
- Place BALLERINA FIGURINE (D); take OWL PART.
- Place 2 OWL PARTS (E).
- Solution (F): (D-G-D)-(B-H-B)-(E-H-E)-(C-H-C)-(A-G-A)-(B-H-B).
- Take HAMMER.
- Walk right.
- Use HAMMER; take PEDESTAL CODE and GUNPOWDER (G).
- Use PEDESTAL CODE; solution (H).
- Take DOLL HEAD.
- Replace DOLL HEAD; take GLASS SHARD (I).
- Walk down.
- Use GLASS SHARD (J); take WICK.
- Open DYNAMITE STICK; use GUNPOWDER and WICK. Take DYNAMITE.
- Use DYNAMITE and MATCHES (K).
- Walk left.
- Play HOP; receive ROPE.
- Take TRIANGLE EMBLEM (1/2)-(2/2) (L).
- Walk down, then right.
- Use GLASS SHARD; place TRIANGLE EMBLEM (2/2) (M). Take TWEEZERS.
- Walk down, then left.

- Use TWEEZERS (N); take CLOCK HANDS and STAINED GLASS PIECE.
- Place CLOCK HANDS (O); take GLOBE PART.
- Walk down.
- Place GLOBE PART (P); move items. Take WRENCH HANDLE.

- Place WRENCH HANDLE; take WRENCH (Q).
- Walk left.
- Use WRENCH (R); take VALVE.
- Place VALVE; take HOOK (S).
- Examine ROPE; replace HOOK. Take ROPE WITH HOOK.
- Use ROPE WITH HOOK (T).
- Use GLASS SHARD (U).
- Use Skull; receive CHESS PIECE.
- Walk down, then right.
- Place CHESS PIECE (V).
- Solution (W): H-B-K-M-F-D-K-E-N-G-A-J-P-G-I-B-H-J-C-L.
- Take PAPER PIECE (2/3), FAUCET, and STAINED GLASS PIECE.
- Walk down, then left.
- Place FAUCET; take GOLD KEY (X).
- Use GOLD KEY (Y); take STAINED GLASS PIECE.
- Walk down.
- Place 3 STAINED GLASS PIECES (Z); take GUN EMBLEM.
- Walk right.
- Place GUN EMBLEM (A).
- Play HOP; receive HEADLIGHT (B).
- Place HEADLIGHT (C); take FLAME EMBLEM.
- Walk down, then left.
- Place FLAME EMBLEM (D); take PAPER PIECE (3/3).
- Place PAPER PIECE (3/3) (E); take AMMONIA (F).
- Use BANDAGE and AMMONIA (G).
Chapter 3: The Collector
- Switch to Agent Brown (H); receive AZAZEL's BRACELET.
- Talk; receive PROTECTIVE AMULET.
- Play HOP; receive CROWBAR (I).
- Take KNIGHT FIGURINE (1/3) (J). Use CROWBAR; take SLINGSHOT.
- Use SLINGSHOT (K); take SPEAR.
- Take KNIGHT FIGURINE (2/3) (L). Use SPEAR; take SHIELD.
- Place SHIELD (M); take FUSE (1/2) and RUBBER GLOVE.
- Use RUBBER GLOVE (N); receive PRUNING SHEARS.
- Use PRUNING SHEARS (O).
- Play HOP; receive KNIGHT FIGURINE (3/3) (P).
- Place KNIGHT FIGURINE (3/3) (Q); take FUSE (2/2).
- Place FUSE (2/2) (R).
- Solution (S).
- Walk forward.
- Play HOP; receive WALLET (T).
- Take LATCH PART (U).
- LATCH PART on WALLET; take SHINY BADGE.
- Walk down.
- Place RUSTY BADGE and SHINY BADGE (V).
- Solution (W).
- Take WEDGE.
- Use WEDGE; take LEVER (X).
- Walk forward.
- Place LEVER (Y); take WRENCH (Z).
- Use WRENCH (A).
- Walk forward.
- Talk; receive BADGE PART and MAZE MAP.
- Take GLASS CUTTER (B).
- Walk down.
- Use GLASS CUTTER (C); take GLASS SHARD.
- Use GLASS SHARD; take BADGE PART (2/3), FLASHLIGHT, and FILE (D).
- Use FILE (E); take GAUNTLET, VASE (1/2), and PASS KEY.
- Walk forward.
- Use PASS KEY. Open; take BADGE PART (3/3) (F).
- Place BADGE PART (3/3) (G). Examine paper; take LOCKPICK.
- Walk down.
- Use LOCKPICK (H).
- Use FLASHLIGHT and MAZE MAP on scene.
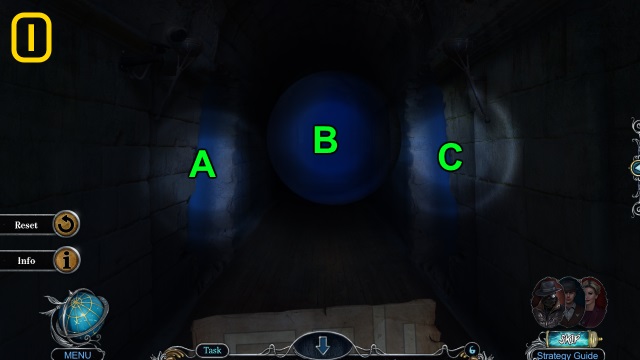
- Solution (I): A-C-B-C-A.
- Examine scene.
- Switch to James Blackthorne.
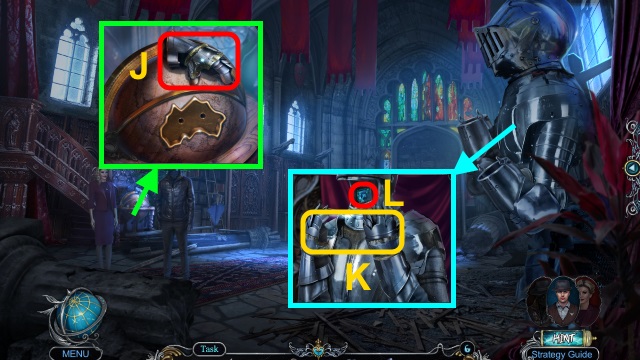
- Take GAUNTLET (J).
- Place 2 GAUNTLETS (K); take MYSTIC GEM (L).
- AZAZEL'S BRACELET on PROTECTIVE AMULET; place MYSTIC GEM.
- Solution (M): (B-A)-(G-H)-(H-F)-(G-H).
- (I-K)-(H-F)-(M-N)-(N-P)-(C-D).
- Take CHARGED AMULET.
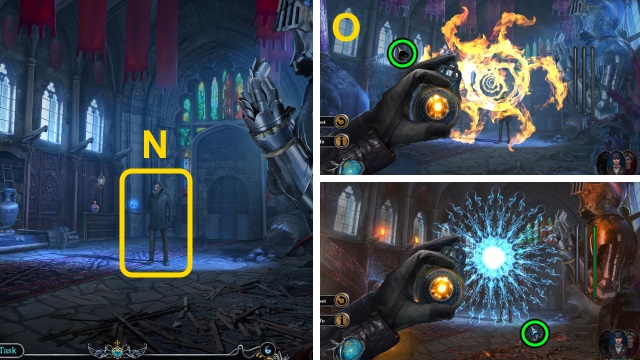
- Use CHARGED AMULET (N).
- Solution (O).
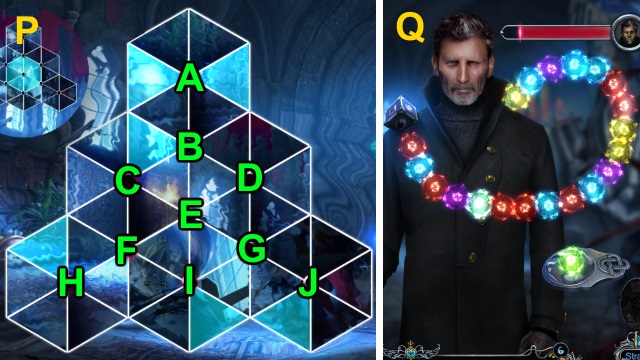
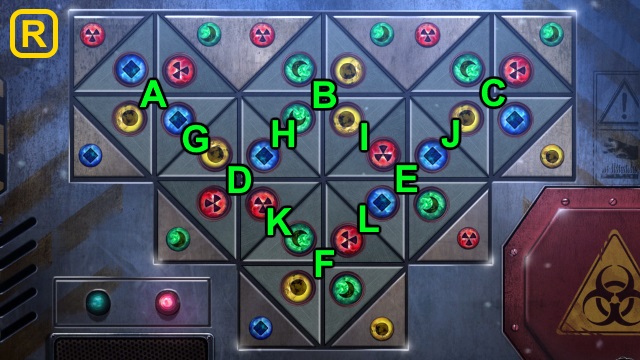
- Solution (P): A-B-Ax3-B-D-B-Jx4-Gx2-Ix2-Fx3-Hx5-Fx3.
- Solution (Q): Match colored orbs.
- Switch to Anna Gray.
- Use DEVICE on scene.

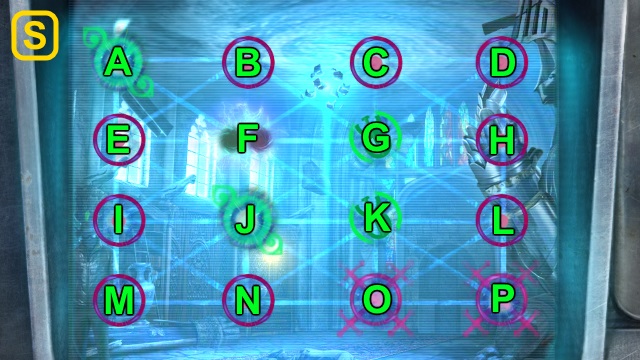
- Solution (R): (A-E-B-C-E-F-I-E-D-G-E-H).
- Solution (S): (P-L-H-D-C-B-F-E-I-M-N-O)-(A-F-G-K-J).
- Solution (T): (I-N-O-K)-(M-N-J-O-P-L)-(A-B-C-D)-(E-F-B-G-C-H).
- Use Skull; receive RITUAL GOBLET.
- Take VASE (2/2) (U).
- Place VASE (2/2); take WEIGHT and GOBLET PIECE (1/3) (V).
- Walk down, then forward.
- Place WEIGHT (W); take GOLDEN KNOB.
- Place GOLDEN KNOB (X); take CHEESE EMBLEM.
- Walk down.
- Place CHEESE EMBLEM (Y); take CHEESE.
- Walk down.
- Give CHEESE; take SPRING (Z).
- Walk forward, then left.
- Place SPRING (A); take GOBLET PIECE (2/3) and CONTINENT PART (B).
- Place CONTINENT PART (C); take DETECTIVE FIGURINE.
- Walk down, then forward.
- Place DETECTIVE FIGURINE (D).
- Play HOP; receive FILE HANDLE (E).
- Place FILE HANDLE; take TORN PAPER (F).
- Walk down, then left.
- Place 2 TORN PAPERS; enter code (G).
- Take SHADE'S MONOGRAM.
- Walk down, then forward.
- Place SHADE'S MONOGRAM (H); take GOBLET PIECE (3/3).
- GOBLET PIECE (3/3) on RITUAL GOBLET.
- Use Skull; receive FLAME EMBLEM (1/2).
- Take TRIPOD LEG and BROKEN TRIPOD (I).
- TRIPOD LEG on BROKEN TRIPOD; take TRIPOD.

- Place TRIPOD (J); take HACKSAW.
- Use HACKSAW (K); receive METAL ROD.
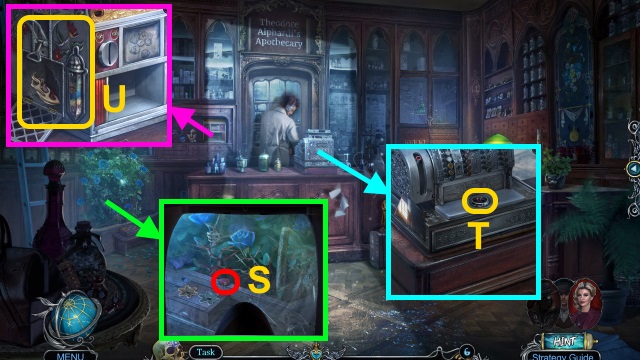
- Use METAL ROD; take PHARMACY KEY (L).
- Use PHARMACY KEY (M).
- Walk left.
- Take COINS (N).
- Use COINS (O); take PAPER BAG.
- Examine PAPER BAG; take NUTS.
- Walk down.
- Give NUTS (P); take NUCLEAR EMBLEM.
- Place NUCLEAR EMBLEM (Q).
- Solution (R): H-D-G-A-J-Cx2-J-Cx2-J-Cx3-I.
- K-D-H-Bx2-Dx3-Fx2-K-Dx2-F-K.
- D-Ex3-L-Ex2-L-Ex3-L-Fx3-L-Fx3.
- Take GAS MASK.
- Walk left.
- Use GAS MASK; take RED BUTTON (S).
- Place RED BUTTON (T); take LATCH.
- Place VESSEL and LATCH; take FLAME EMBLEM (2/2) (U).
- Walk down.
- Place FLAME EMBLEM (V); take FLINT AND STEEL.
- Use FLINT AND STEEL (W).
- Walk forward.
- Take CRUMPLED PAPER and CADUCEUS (1/2) (X).
- Open CRUMPLED PAPER; take CABINET CODE.
- Walk down, then left.

- Place CABINET CODE; enter code (Y).
- Take WIRE and GEAR EMBLEM.
- Use WIRE; take GOLD KEY (Z).
- Walk down, then forward.
- Use GOLD KEY (A); take TRIANGLE EMBLEM.
- Place TRIANGLE EMBLEM (B); take GEAR EMBLEM.
- Walk down, then left.
- Place 2 GEAR EMBLEMS (C); take LEVER.
- Place LEVER (D); take GOLDEN ROSE (E).
- Walk down, then forward.
- Examine (F); place GOLDEN ROSE. Take METAL A.
- Place METAL A (G); take CADUCEUS (2/2) (H).
- Walk down, then left.
- Place CADUCEUS (2/2) (I).
- Play HOP; receive POLICE BADGE (J).
- Walk down, then forward.
- Place POLICE BADGE (K); take HANDCUFFS.
- Use HANDCUFFS (L).
- Congratulations: You have completed Detectives United: Origins.
Created at: 2018-09-07