

Walkthrough Menu
- General Tips
- Chapter 1: Anna Gray (Present Day)
- Chapter 2: Agent Brown (Future)
- Chapter 3: James Blackthorne (Past)
- Chapter 4: Anna Gray (Past)
- Chapter 5: Agent Brown (Future)
- Chapter 6: James Blackthorne (Past)
- Chapter 7: Anna Gray (Present Day)
General Tips
- This is the official guide for Detectives United: Timeless Voyage.
- This guide will not tell you when you have to zoom into a location; the screenshots will show each zoom scene.
- Hidden-object puzzles are referred to as HOPs. This guide will not show screenshots of the HOPs, however, it will mention when an HOP is available and the inventory item you'll collect from it.
- Use the Map to fast travel to a location.
Chapter 1: Anna Gray (Present Day)
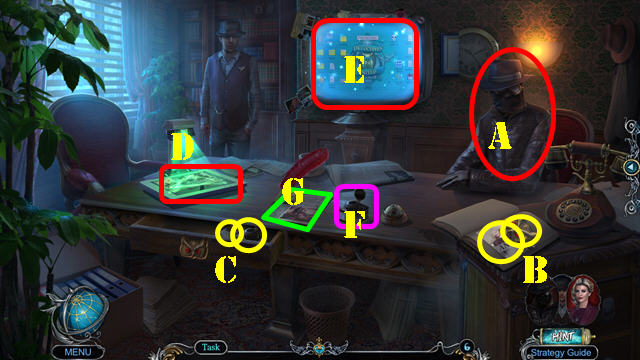
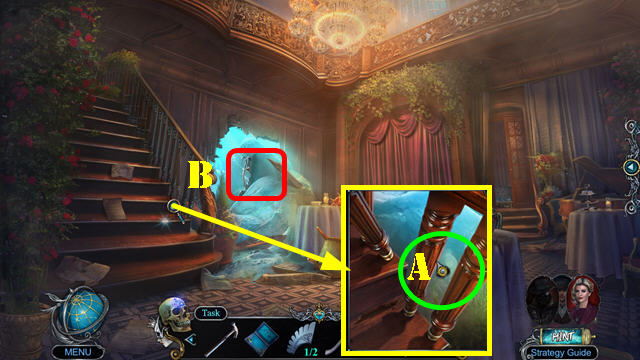
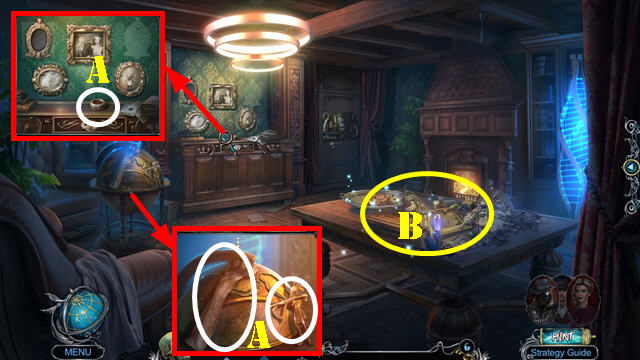
- Talk (A); receive BROWN'S ID CARD.
- Select notebook; take DU AMULET and ANNA'S ID CARD (B).
- Place DU AMULET; take INKPOT and JAMES'S ID CARD (C).
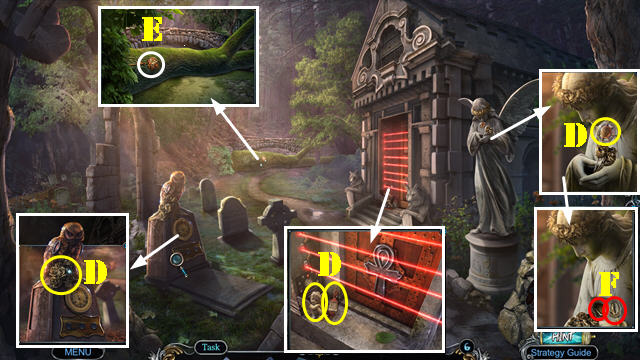
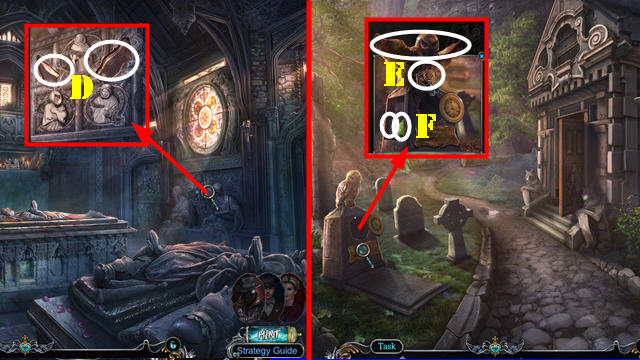
- Place BROWN'S ID CARD, ANNA'S ID CARD, and JAMES'S ID CARD (D).
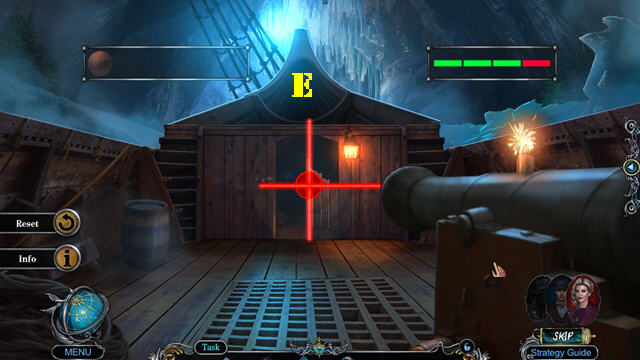
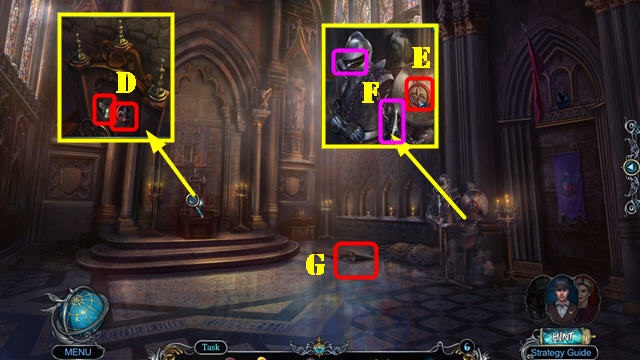
- Play HOP (E); receive SHRINE REPORT.
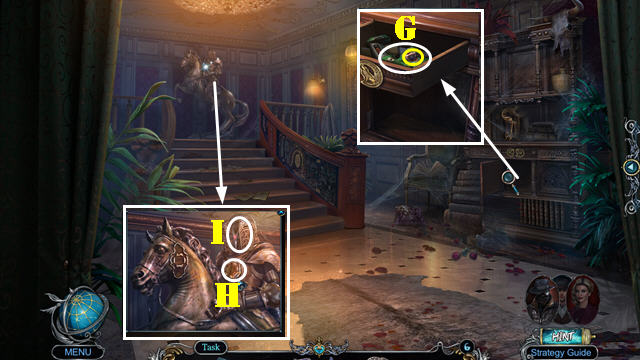
- Place INKPOT (F) and SHRINE REPORT (G).
- Select Richard Gray's Skull (H); receive ANNA'S PURSE.
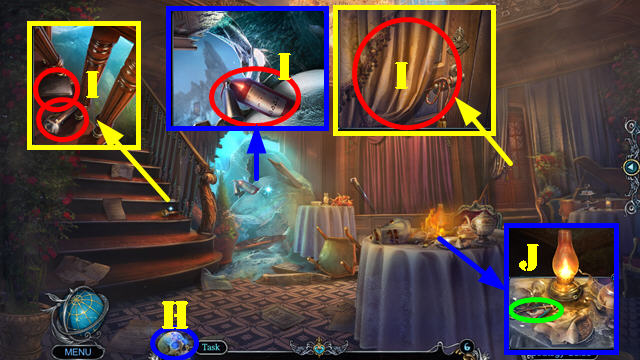
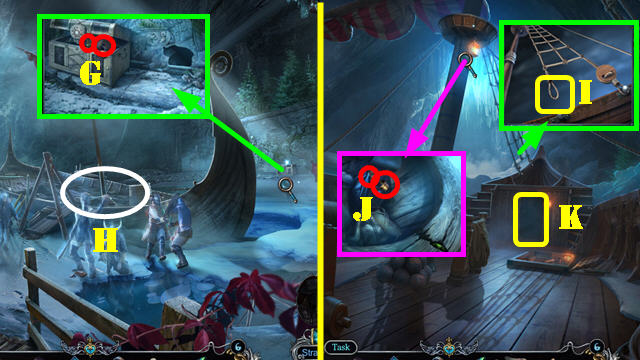
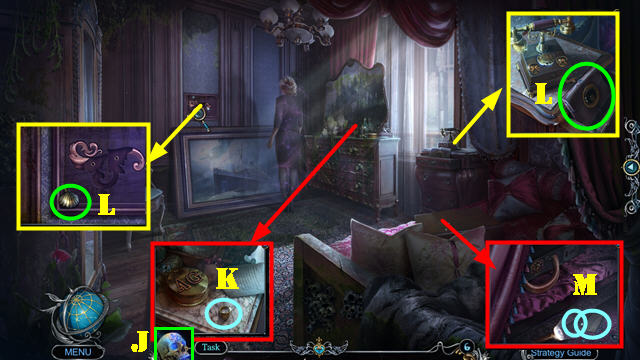
- Take JAMES'S CONNECTOR, BROWN'S FLASHLIGHT, FIRE EXTINGUISHER, and DRAPE TIE (I).
- Select ANNA'S PURSE 5x; take SCISSORS and ANNA'S TICKET.
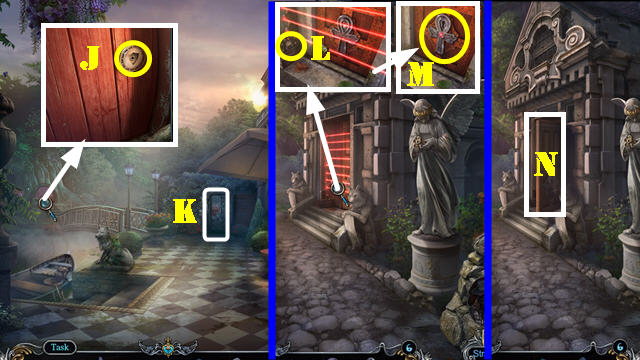
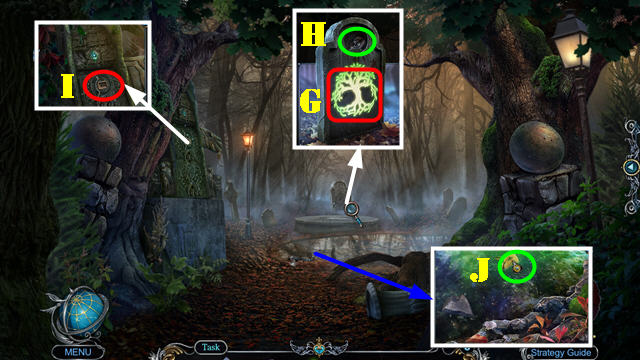
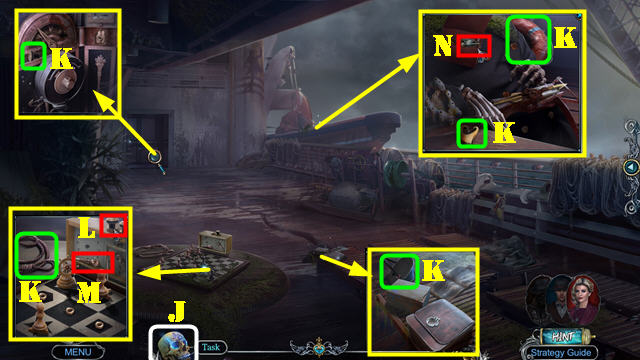
- Use FIRE EXTINGUISHER; take CHAIN WITH ANCHOR (J).
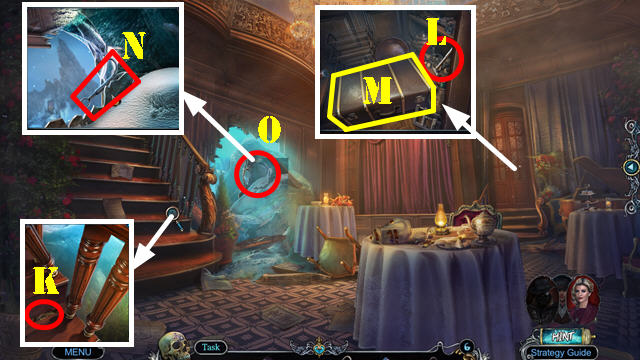
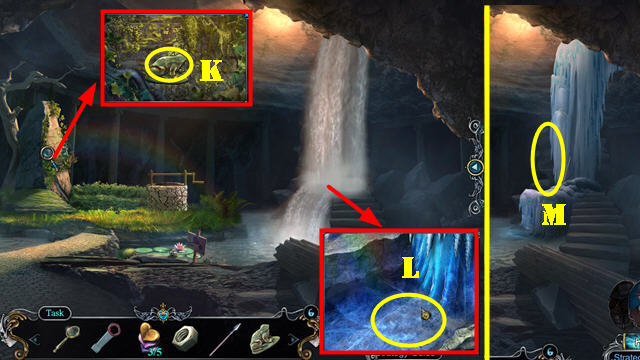
- Use CHAIN WITH ANCHOR (K); take SERVICE ROOM KEY.
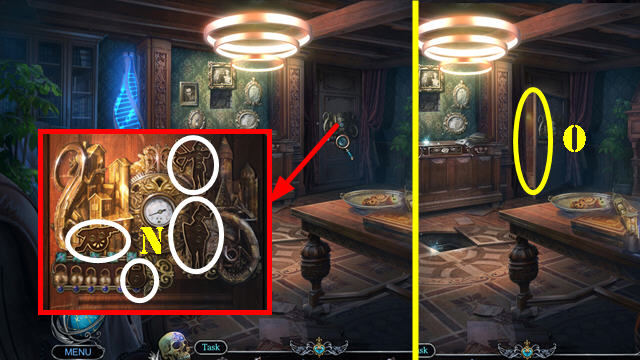
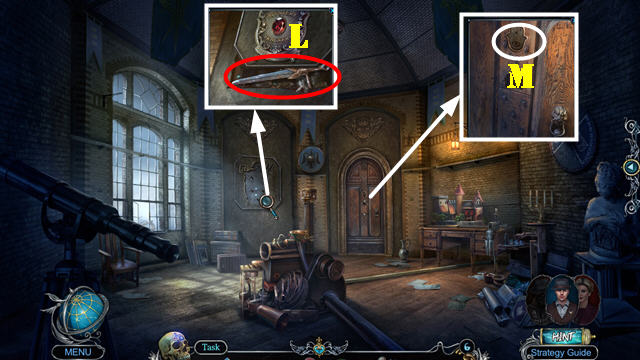
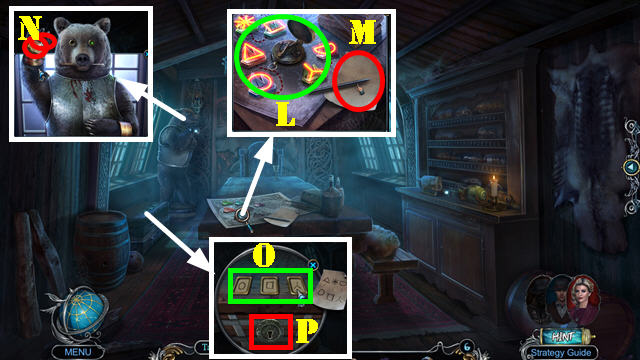
- Use SERVICE ROOM KEY; take HAMMER (L). Open suitcase and play HOP (M); receive WARM CLOTHES.
- SCISSORS on WARM CLOTHES; take CLIMBING HOOK.
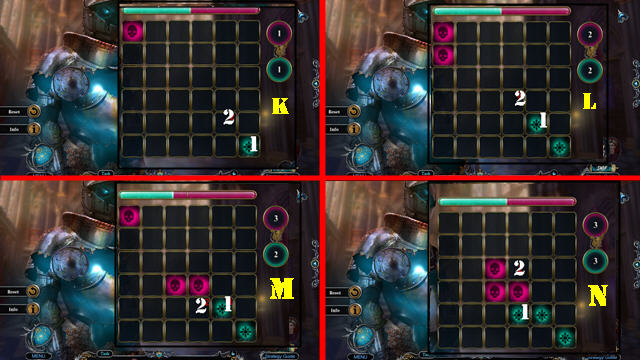
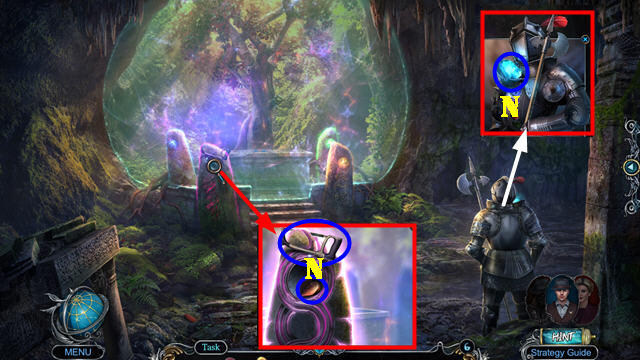
- Place CLIMBING HOOK and DRAPE TIE (N).
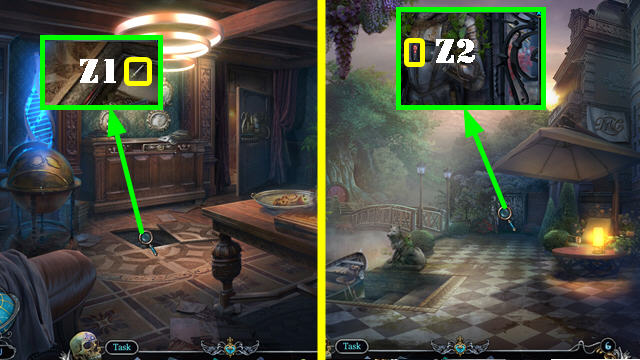
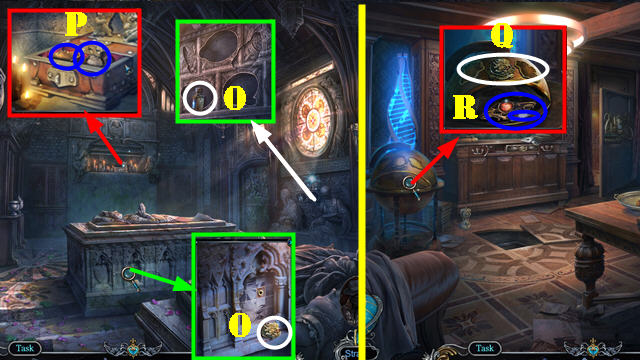
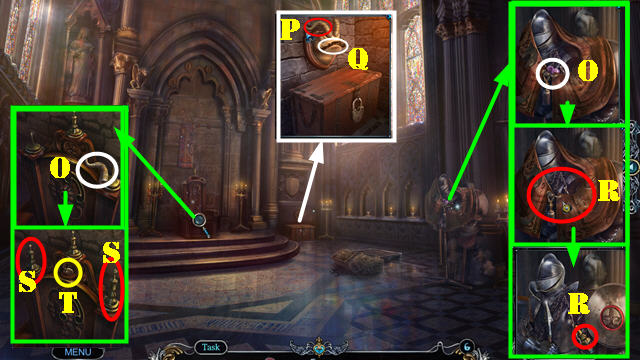
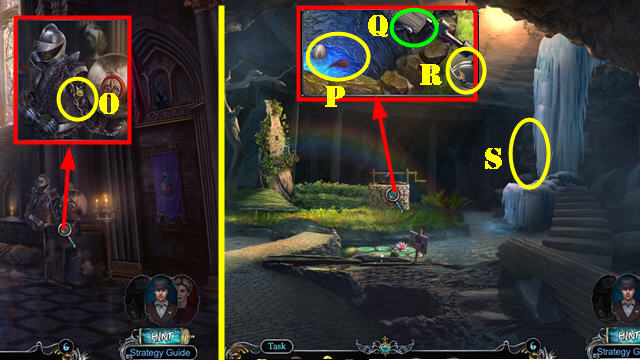
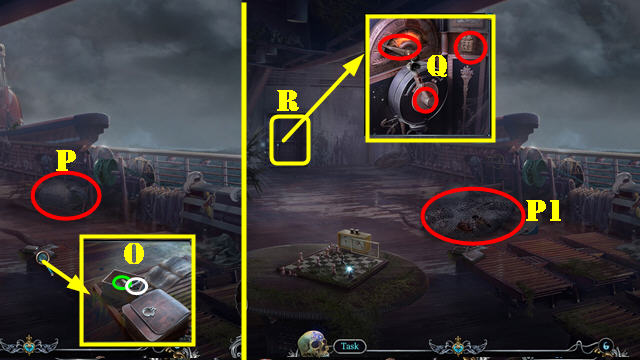
- Go (O).

- Select scene.
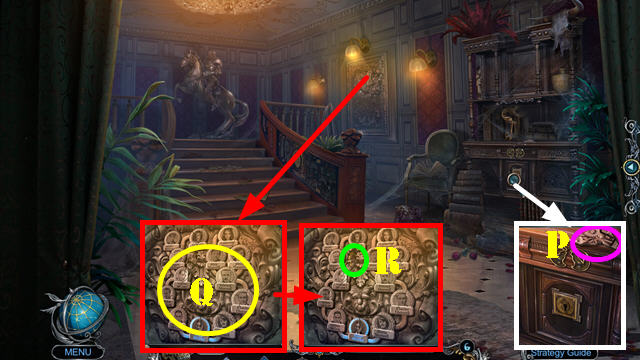
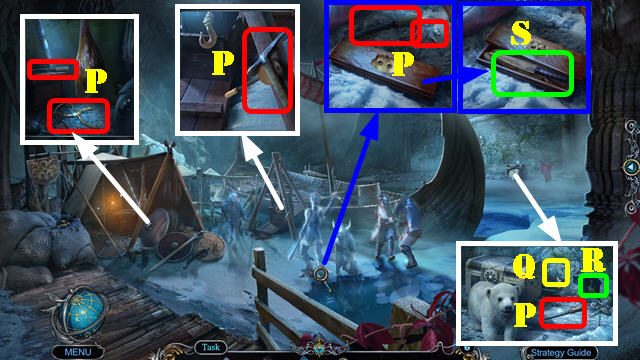
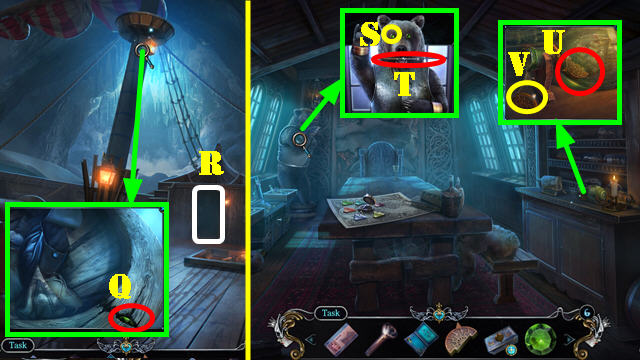
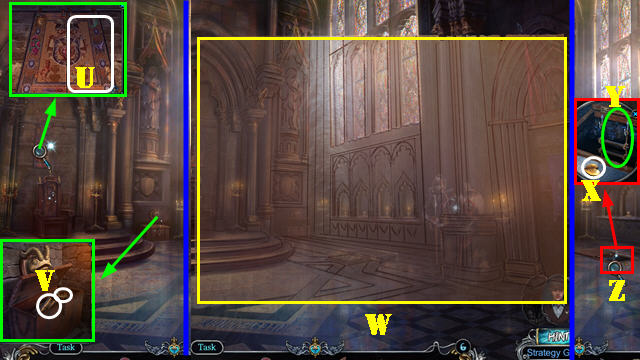
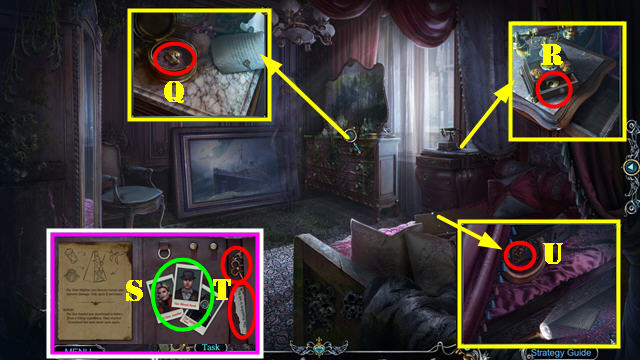
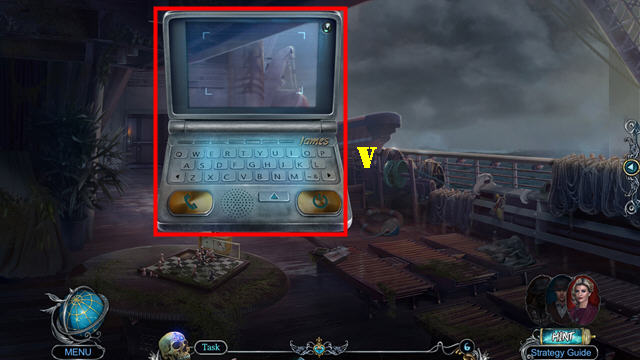
- Open JAMES'S CONNECTOR and select power button (Q). Scroll down twice (R) and select phone icon (S).
- Solution. Select 1-3.
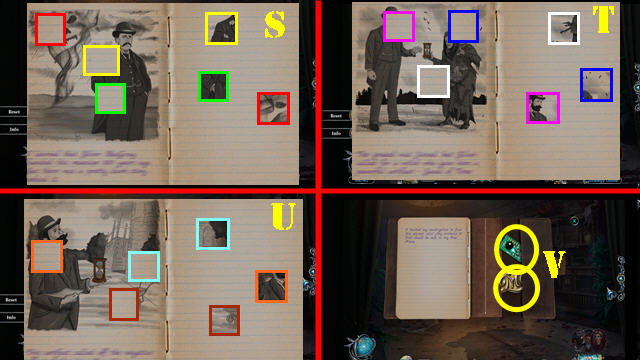
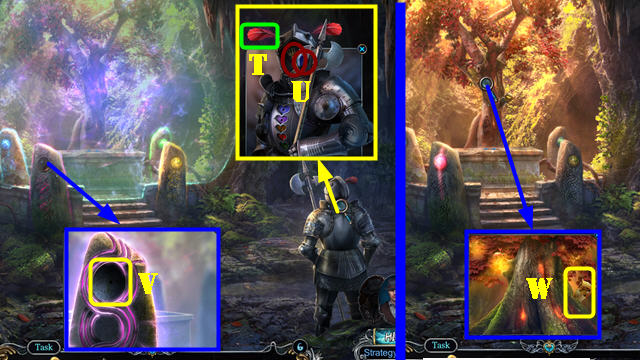
- Select Next (T).
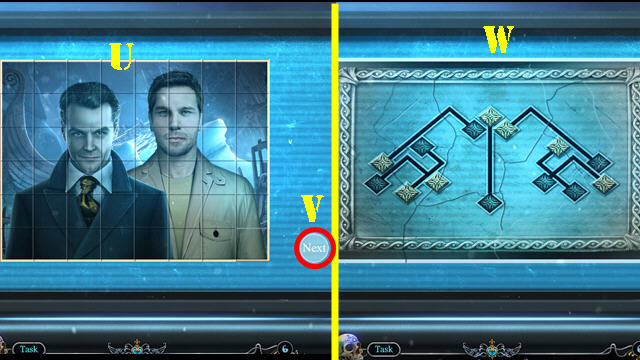
- Puzzle solution (U).
- Select Next (V).
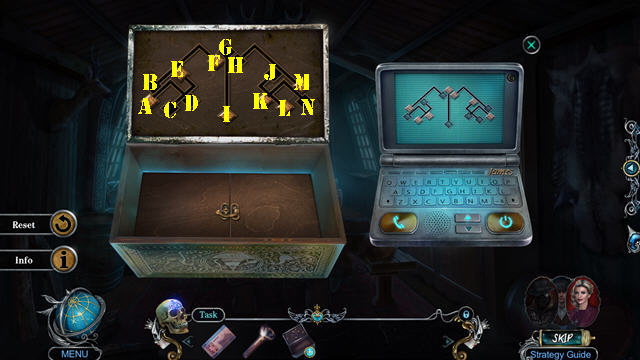
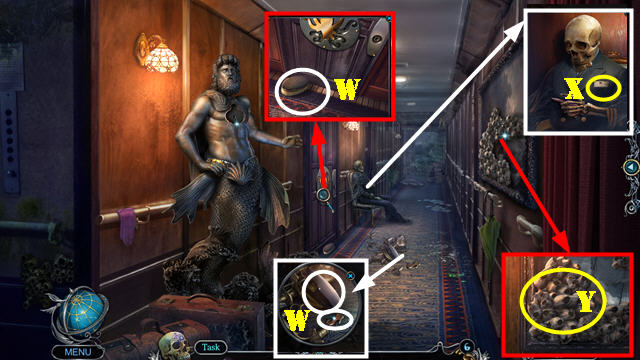
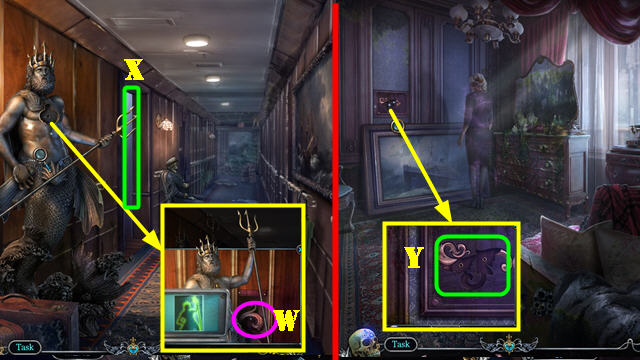
- Jigsaw puzzle solution (W).
- Take THE ONE AMULET PHOTO.
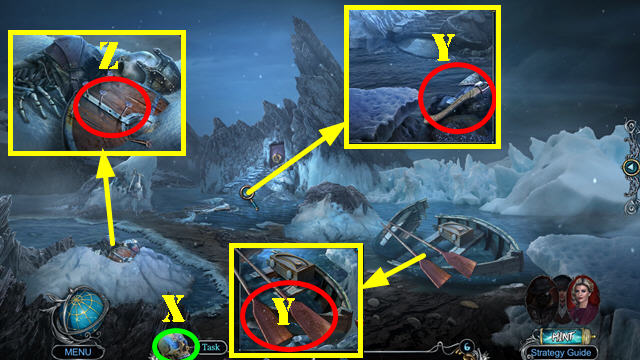
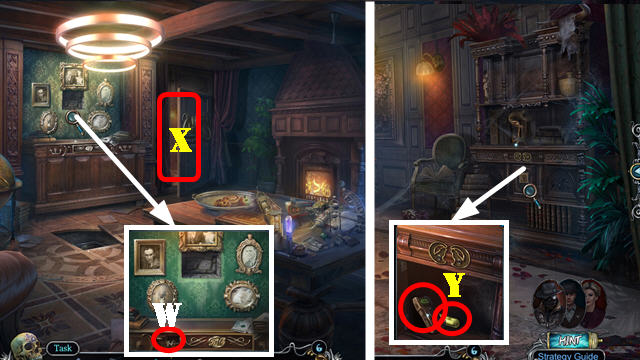
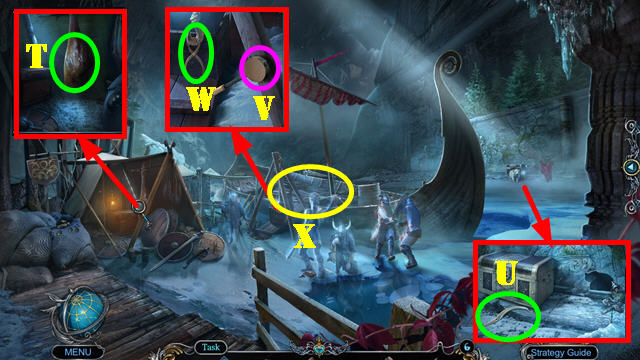
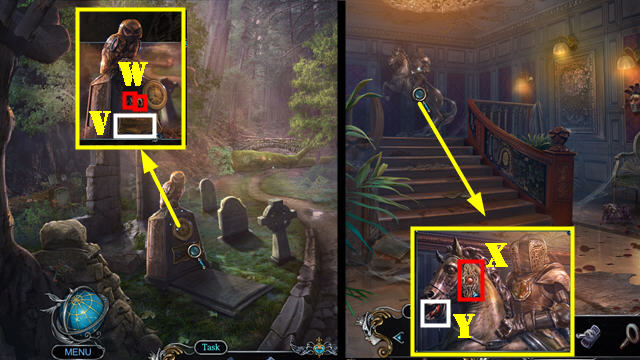
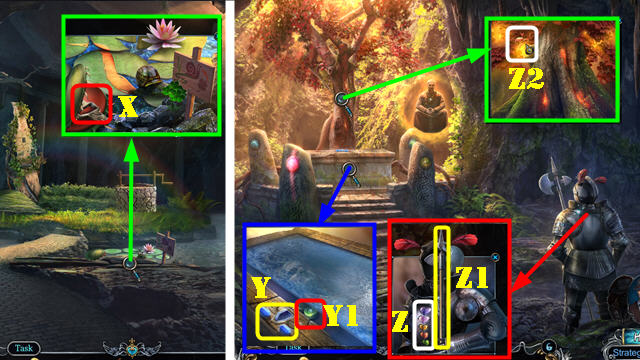
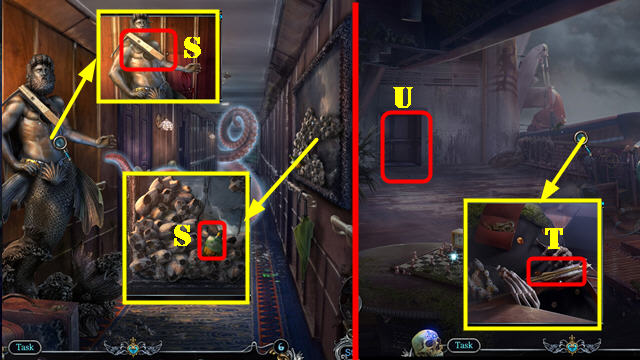
- Select Richard Gray's Skull (X); receive VIKING SYMBOL PIECES 1/2.
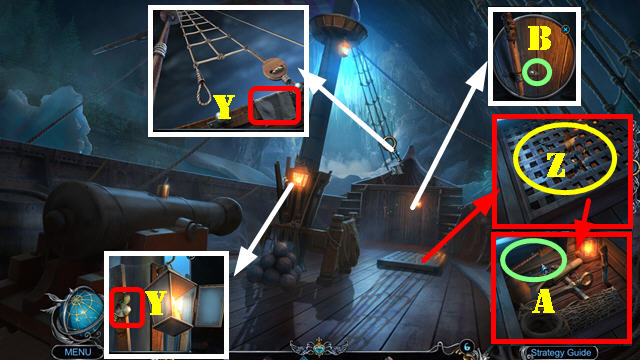
- Take VIKING AXE and PADDLES (Y).
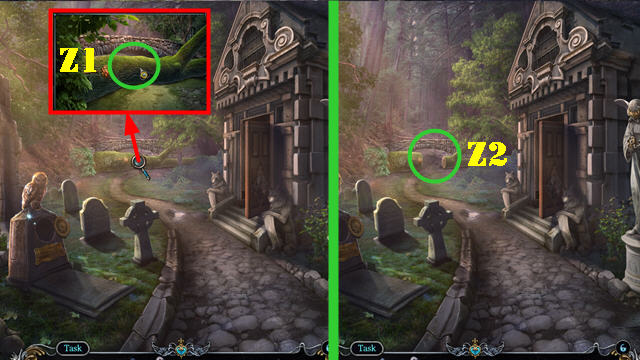
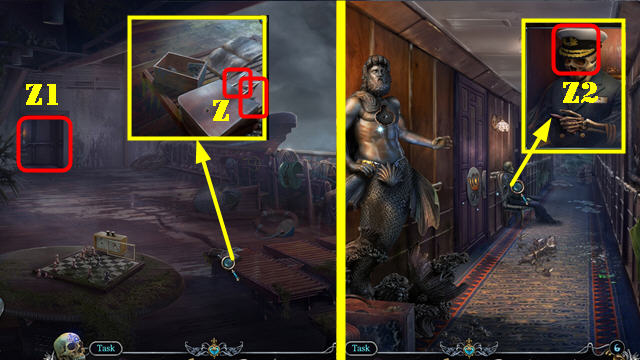
- Select snow; take NAILS (Z).
- Walk down.
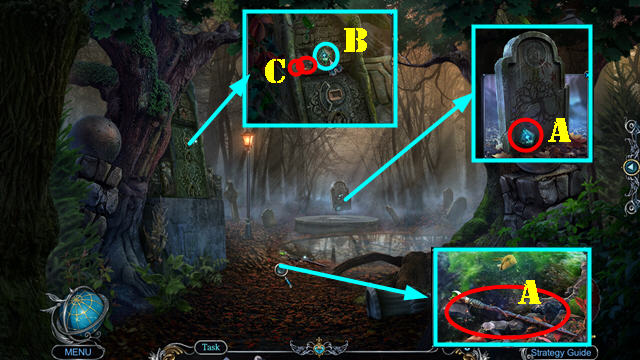
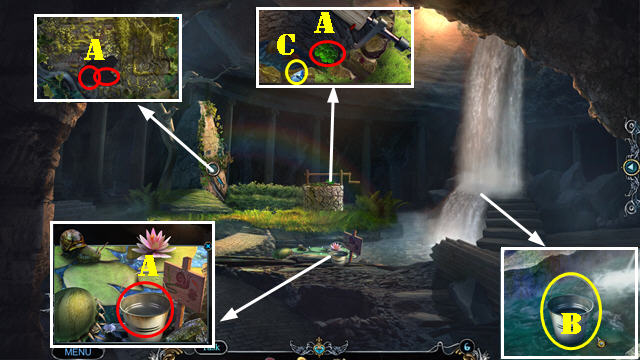
- Use VIKING AXE (A); take PLANKS.
- Go (B).
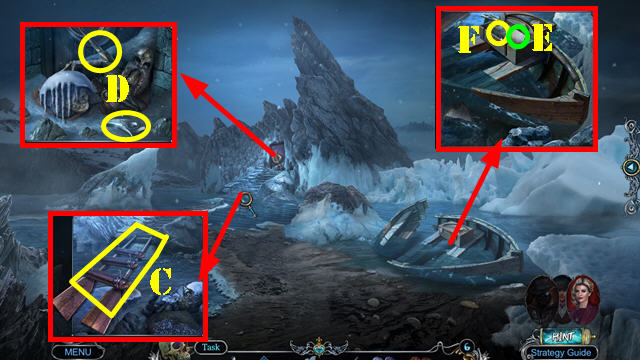
- Place PADDLES, PLANKS, NAILS, and use HAMMER (C).
- Take ARROWHEAD and CLAW EMBLEM (D).
- Place CLAW EMBLEM and look at note (E); take VIKING SYMBOL PIECES 2/2 (F).
- Walk down.
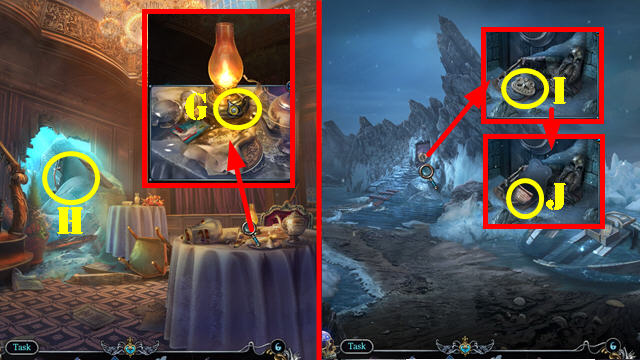
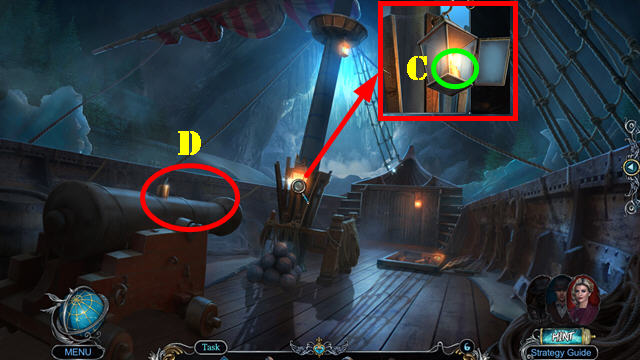
- Use ARROWHEAD (G); take LIT LAMP.
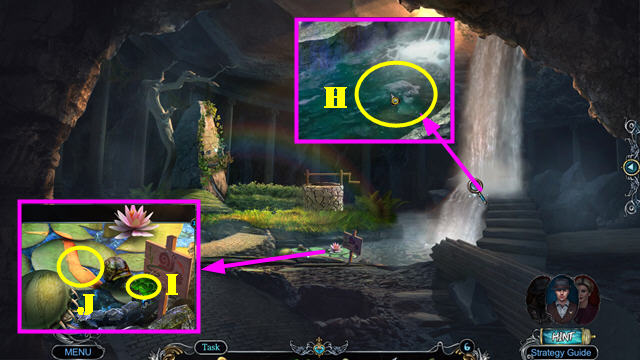
- Go (H).
- Use LIT LAMP; take VIKING'S PENDANT (I).
- Place VIKING SYMBOL PIECES 2/2; take VIKING'S LETTER (J).
- Look at VIKING'S LETTER.
Chapter 2: Agent Brown (Future)
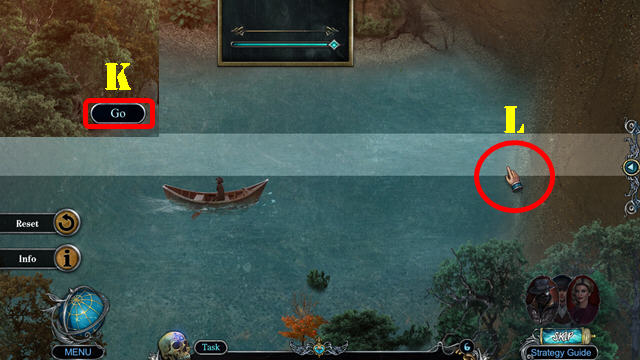
- Select Go (K).
- Solution is random (L).
- Select scene.
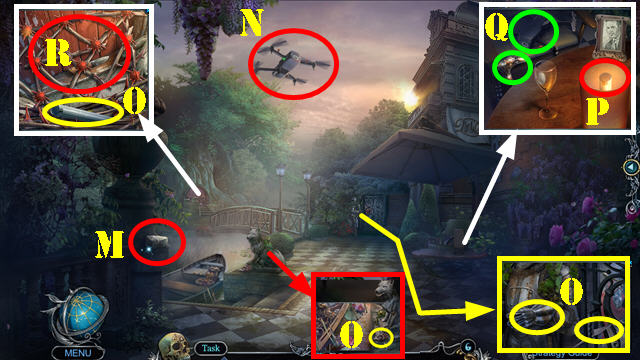
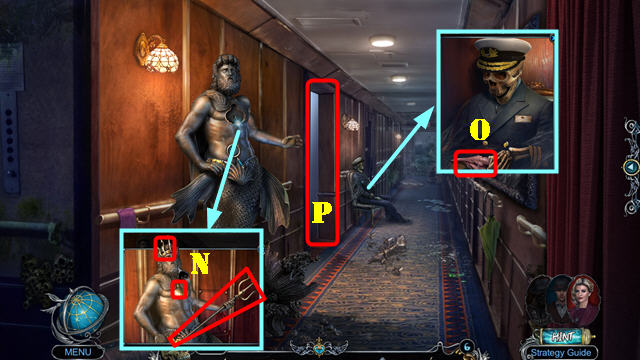
- Take STONE (M).
- Throw STONE at drone (N).
- Select power button on BROWN'S CONNECTOR. Scroll down twice and select phone icon. Select BROWN'S CONNECTOR twice; take BROWN'S TICKET and CONNECTOR.
- Take MOLDING PIECES 1/4, NEON LIGHT, ROBOT-KNIGHT GLOVE, and DRONE BLADES 1/2 (O).
- Use NEON LIGHT (P); take BROKEN DRONE and MCGRAY'S CANE (Q).
- Use ROBOT-KNIGHT GLOVE (R).
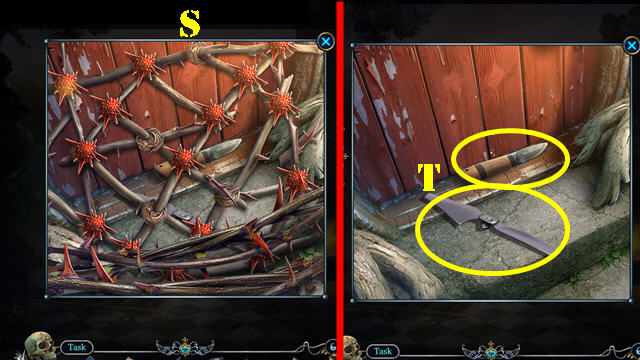
- Solution is random (S).
- Take DRONE BLADES 2/2 and ANCIENT MCGRAY'S KNIFE (T).
- Use MCGRAY'S CANE; take MIRROR and DRONE REMOTE (U).
- Use ANCIENT MCGRAY'S KNIFE; take ROPE LADDER (V).
- DRONE REMOTE, DRONE BLADES 2/2, and ROPE LADDER on BROKEN DRONE; take DRONE.
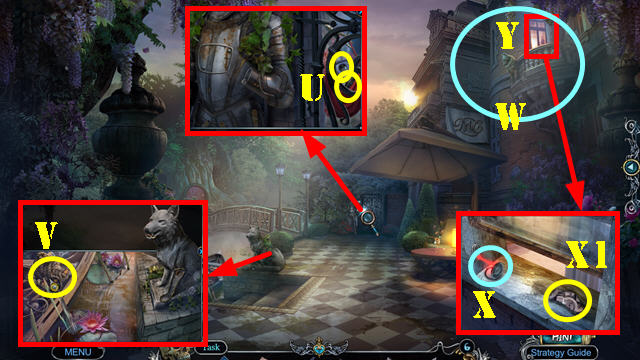
- Use DRONE (W).
- Select window. Place MIRROR (X); take MOLDING PIECES 2/4 (X1).
- Go (Y).
- Take DUCT TAPE, WOLF PAW, and ARCHER FIGURINE (A).
- Play HOP (B); receive PICTURE.
- Walk down.
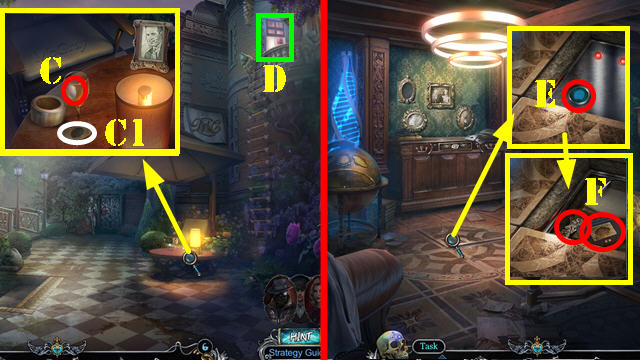
- Use DUCT TAPE (C); take FINGERPRINT (C1).
- Go (D).
- Select tile and use FINGERPRINT (E); take HEIR DIARY and FRAME PART (F).
- Walk down.
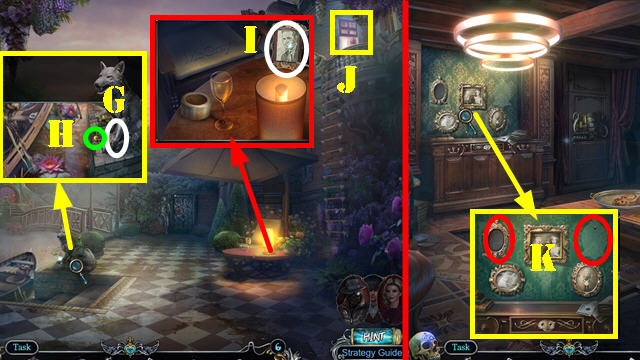
- Place WOLF PAW (G); take WEIGHT FIGURINE (H).
- Place FRAME PART; take PHOTO (I) and the KNIGHT FIGURINE behind it.
- Go (J).
- Place PHOTO and PICTURE (K).
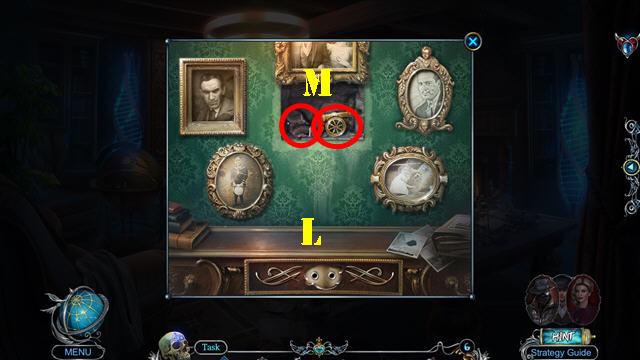
- Solution (L).
- Take MOLDING PIECES 3/4 and CANNON FIGURINE (M).
- Place CANNON FIGURINE, KNIGHT FIGURINE, WEIGHT FIGURINE, and ARCHER FIGURINE (N).
- Go (O).
- Take MOLDING PIECES 4/4 (P).
- Place MOLDING PIECES 4/4 and CONNECTOR (Q); receive SILVER MCGRAY PHOTO. Take HEIR CAMEO (R).
- HEIR CAMEO on HEIR DIARY. Solution one (S). Flip page.
- Solution two (T). Flip page.
- Solution three (U). Flip page.
- Take GATE CIRCUIT BOARD and MCGRAY MONOGRAM (V).
- Walk down.
- Place MCGRAY MONOGRAM; take CABINET KEY (W).
- Go (X).
- Use CABINET KEY; take STUNNING DEVICE and SCREWDRIVER HANDLE (Y).
- Walk down.
- Place SCREWDRIVER HANDLE (Z1); receive SCREWDRIVER.
- Walk down.
- Use SCREWDRIVER and place GATE CIRCUIT BOARD (Z2).
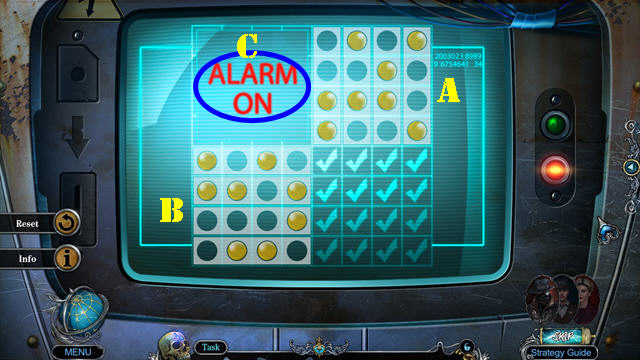
- Solution (A-B).
- Select alarm on (C).
Chapter 3: James Blackthorne (Past)
- Select scene. Receive JAMES'S TICKET.
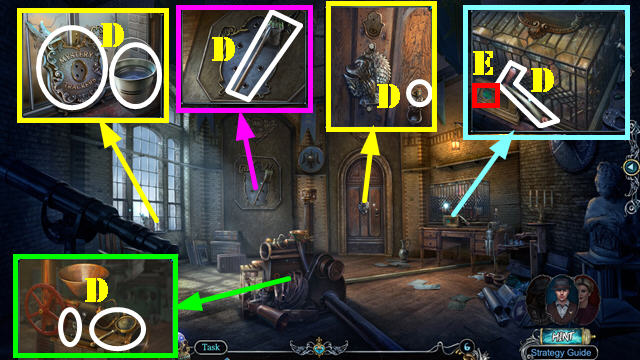
- Take WHEEL HANDLE, ORDER SIGNET, FRUIT COLLECTOR, MAGNIFYING GLASS, WIRE, EMPTY SHIELD, and BUCKET OF WATER (D).
- Use ORDER SIGNET (E). Play HOP; receive CRYSTALS 1/3.
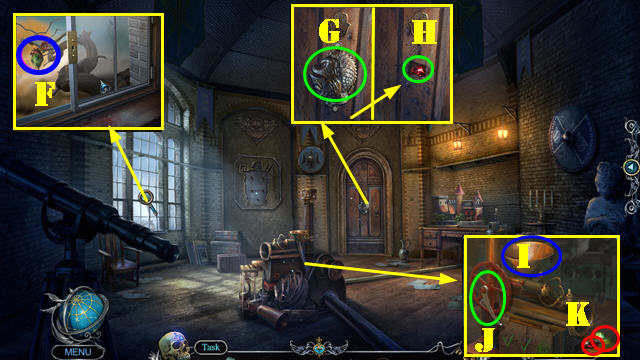
- Use WIRE and FRUIT COLLECTOR (F); receive MUTAGENIC FRUIT and RING WRENCH.
- Use RING WRENCH (G); receive HELMET. Take CRYSTALS 2/3 (H).
- Place MUTAGENIC FRUIT and BUCKET OF WATER (I). Place WHEEL HANDLE and select (J); take CRYSTALS 3/3 and POWER SPHERE (K).
- CRYSTALS 3/3 and HELMET on EMPTY SHIELD; take MT SHIELD.
- Place MT SHIELD; take SWORD (L). Play HOP; receive PALM ORNAMENT.
- POWER SPHERE on SWORD; take EYE and ENHANCED SWORD.
- Place PALM ORNAMENT and EYE (M).
Chapter 4: Anna Gray (Past)
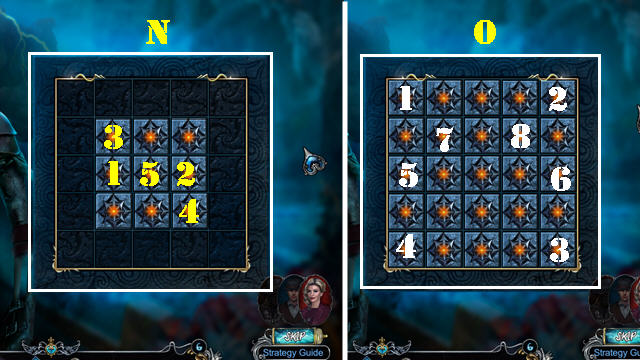
- Solution one (N).
- Solution two (O).
- Take LEVER PIECES 1/3-3/3, BROKEN HOIST TONGS, FRESCO FIGURINE, and PICKAX (P).
- Place FRESCO FIGURINE (Q); take OIL (R).
- Place VIKING'S PENDANT; take BONE DAGGER (S).
- Use BONE DAGGER (T); receive JERKED MEAT.
- Give JERKED MEAT to bear; take TONGS HALF (U).
- Select BROKEN HOIST TONGS and place TONGS HALF; take HOIST TONGS.
- Place LEVER PIECES 3/3 (V) and HOIST TONGS (W).
- Go (X).
- Take RAG and CANNON SYMBOL (Y).
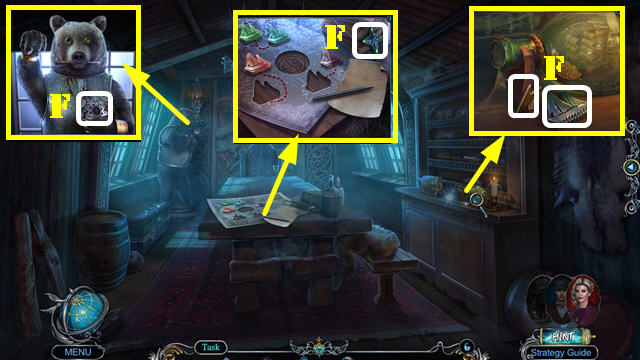
- Use PICKAX (Z). Play HOP: receive ANCIENT COMPASS.
- Place CANNON SYMBOL; take CLEANING BRUSH (A).
- Open ANCIENT COMPASS; take VIKING COIN.
- Use VIKING COIN (B); take OLD TORCH.
- Select OLD TORCH; place RAG and use OIL; take TORCH.
- Use TORCH (C); receive BURNING TORCH.
- Use CLEANING BRUSH and BURNING TORCH (D).
- Solution (E) is random. Solve three times to beat the game.
- Take NAVIGATION AMULET, FLOWER ORNAMENT, COMPASS ARROW, and SHIP INSIGNIA 1/2 (F).
- Walk down twice.
- Place FLOWER ORNAMENT; take CHAIN PLATE and SHIP INSIGNIA 2/2 (G).
- Go (H).
- Place CHAIN PLATE (I).
- Use NAVIGATION AMULET; take VIKING BRACELET and LOCATION SCALE (J).
- Go (K).
- LOCATION SCALE and COMPASS ARROW on ANCIENT COMPASS; take COMPASS.
- Place SHIP INSIGNIA 2/2 and COMPASS (L). Select paper (M); receive CIPHER.
- Place VIKING BRACELET; take AMULET HALF and BONE KEY (N).
- Place CIPHER; solution (O). Use BONEY KEY (P). Play HOP; receive MYSTERIOUS BOX.
- Walk down.
- Take FANG from MYSTERIOUS BOX.
- Use FANG (Q); receive CRYSTAL EYE.
- Go (R).
- Place CRYSTAL EYE (S); take HOOK NEEDLE (T).
- Use HOOK NEEDLE (U); take AMULET HALF (V).
- Place AMULET HALF, AMULET HALF, and THE ONE AMULET PHOTO on MYSTERIOUS BOX.
- Solution (E-A-F-I-M-K-L).
Chapter 5: Agent Brown (Future)
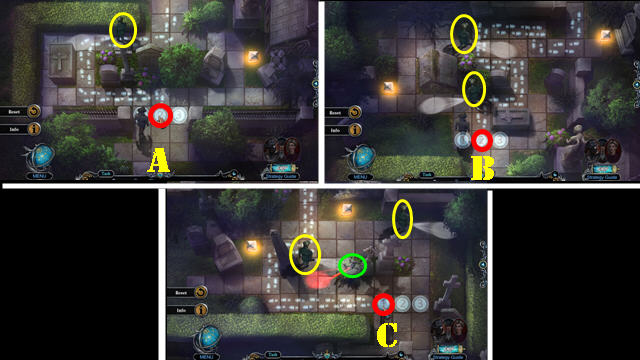
- Solution (A-B-C). Select the number marked in red when the guards (yellow) and the drone (green) are in the positions shown.
- Take PALETTE KNIFE, ANGEL FIGURINE, KNIGHT'S PENDANT, and ARTIFICIAL FLOWERS (D).
- Use PALETTE KNIFE (E); receive CABINET AMULETS 1/2.
- Place ARTIFICIAL FLOWERS; take CABINET AMULETS 2/2 and GREENLAND EMBLEM (F).
- Go to McGray Secret Room.
- Place CABINET AMULETS 2/2; take HEIR SIGNET and LASER SAW BASE (G).
- Place KNIGHT'S PENDANT (H); take SYMBOL OF ETERNAL LIFE (I).
- Walk down twice.
- Place HEIR SIGNET (J). Play HOP: receive TOMB-CHEST KEY.
- Go (K).
- Use STUNNING DEVICE (L); receive BROKEN STUNNING DEVICE.
- Place SYMBOL OF ETERNAL LIFE and use TOMB-CHEST KEY (M).
- Enter (N).
- Take DEVELOPER and MCGRAY CREST (O).
- Place ANGEL FIGURINE; take IRELAND EMBLEM and PANEL PIECES 1/3 (P).
- Go to McGray Study.
- Place IRELAND EMBLEM, GREENLAND EMBLEM, and MCGRAY CREST (Q); take HARNESS ORNAMENT and TOMB TILE (R).
- Go to McGray Mausoleum.

- Place TOMB TILE and SILVER MCGRAY PHOTO (S).
- Solution (T).
- Take MCGRAY CONTAINER and MEMORIAL TABLET (U).
- Walk down.
- Place MEMORIAL TABLET (V); take SWITCH and ANCIENT LATCH (W).
- Go to McGray Secret Room.
- Place HARNESS ORNAMENT (X); take LASER CRYSTAL and PANEL PIECES 2/3 (Y).
- Go to McGray Cemetery.
- ANCIENT LATCH on MCGRAY CONTAINER. Use DEVELOPER on parchment; take FOREST MAP.
- BROKEN STUNNING DEVICE, SCREWDRIVER, LASER CRYSTAL, and SWITCH on LASER SAW BASE. Select switch and take LASER SAW.
- Use LASER SAW and place FOREST MAP (Z1). Play HOP; receive PANEL PIECES 3/3.
- Go (Z2).
- Take WITCH'S STAFF and TOTEM PIECE (A).
- Place TOTEM PIECE (B); take SILVER'S WIND-UP KEY and look at paper (C).
- Go to McGray Mausoleum.
- Place PANEL PIECES 3/3; take OWL WINGS (D).
- Walk down.
- Place OWL WINGS and SILVER'S WIND-UP KEY (E); take REPARATIVE STONE and SYMBOL OF TIME (F).
- Go to Ancient Cemetery.
- Select the stone on the WITCH'S STAFF; place the REPARATIVE STONE on it; take REPARATIVE STAFF.
- Use REPARATIVE STAFF (G); take SYMBOL OF LIFE (H).
- Place SYMBOL OF LIFE and SYMBOL OF TIME (I). Play HOP; receive WITCH'S WATER.
- Use WITCH'S WATER; select hourglass (J).
Chapter 6: James Blackthorne (Past)
- Solution (K-N).
- Receive BROKEN SWORD and IRON HEARTS 1/5.
- Take MONSTER'S HORN and IRON HEARTS 2/5 (O).
- Place MONSTER'S HORN (P); take THRONE FIGURINE (Q).
- Use BROKEN SWORD; take TAPESTRY CANVAS and THRONE FIGURINE (R).
- Place two THRONE FIGURINES (S); take MT SIGNET (T).
- Place TAPESTRY CANVAS (U). Play HOP; receive CHEST KEY.
- Use CHEST KEY; take SCROLL and ROPE LADDER (V).
- MT SIGNET on SCROLL; take STAVESACRE. Select parchment 3x; take THRONE ROOM DRAWING.
- Place THRONE ROOM DRAWING as shown (W); take IRON HEARTS 3/5 (X).
- Place ROPE LADDER (Y).
- Go (Z).
- Take CROWN DECORATION, NUT, SNAIL GRASS, and BUCKET (A).
- Use BUCKET and STAVESACRE (B); receive BUCKET OF STAVESACRE WATER.
- Use BUCKET OF STAVESACRE WATER; take CROWN JEWEL (C).
- Walk down.
- Place CROWN DECORATION and CROWN JEWEL; take BROKEN TOAD STATUE and SHIELD EMBLEM (D).
- Place SHIELD EMBLEM (E); take SPEAR and DIRTY SPOON (F).
- Go (G).
- Place DIRTY SPOON (H); receive SPOON.
- Place SNAIL GRASS (I). Use SPOON (J); receive SNAIL GLUE.
- SNAIL GLUE on BROKEN TOAD STATUE; take TOAD STATUE.
- Place TOAD STATUE and use MAGNIFYING GLASS (K). Play HOP; receive FREEZING SPHERE.
- Use FREEZING SPHERE and SPEAR (L).
- Go (M).
- Take IRON HEARTS 4/5, GLOWING GEM, and HACKSAW (N).
- Walk down twice.
- Use HACKSAW (O); receive CHAIN WITH HOOK.
- Go to Underground Lake.
- Use GLOWING GEM (P). Place CHAIN WITH HOOK and NUT; use RING WRENCH (Q). Select bucket (R); receive CLOSED SPHERE and FEATHER.
- Go (S).
- Place FEATHER (T); take TOMB-CHEST SHARD and SPHERE KEY (U).
- SPHERE KEY on CLOSED SPHERE. Play HOP; receive FORCE FIELD SPHERE.
- Place FORCE FIELD SPHERE (V).
- Take BLUNT SAW (W).
- Walk down.
- Use BLUNT SAW; take TOMB-CHEST ORNAMENT (X).
- Go to MT Sanctuary.
- Place TOMB-CHEST ORNAMENT and TOMB-CHEST SHARD (Y); take IRON HEARTS 5/5 (Y1).
- Place IRON HEARTS 5/5 (Z); take BATTLE-AX (Z1).
- Use BATTLE-AX (Z2).
Chapter 7: Anna Gray (Present Day)
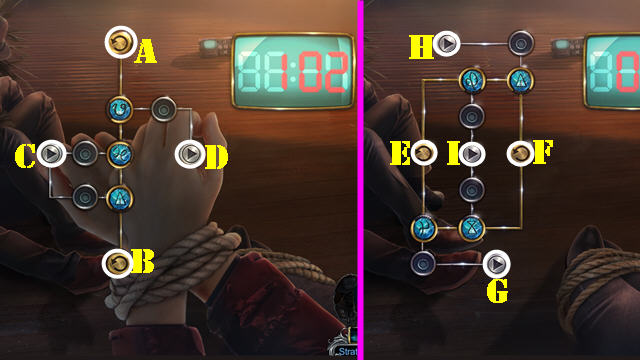
- Solution one: (Ax2-Bx2-C-D).
- Solution two: (I-Fx3-G-Ex3-H).
- Select Richard Gray's Skull (J); receive HELM SYMBOL.
- Take FOOT PUMP, DEFLATED RING BUOY, KRAKEN'S TENTACLES 1/4, CLOCK BUTTON, and ROPE (K).
- Place CLOCK BUTTON (L); take ELEVATOR ARROW (M).
- Place HELM SYMBOL; take AWL (N).
- Use AWL; take KRAKEN'S TENTACLES 2/4 and ELEVATOR LEVER (O).
- Use DEFLATED RING BUOY and FOOT PUMP (P); take FISHING NET (P1).
- Select FISHING NET. Play HOP; receive ELEVATOR SYMBOL and NET.
- Place ELEVATOR SYMBOL, ELEVATOR LEVER, and ELEVATOR ARROW (Q).
- Enter (R).
- Take UNLOADED HARPOON and ACID (S).
- Walk down.
- Use ACID; take HARPOON ARROW (T).
- Go (U).

- HARPOON ARROW and ROPE on UNLOADED HARPOON; take HARPOON GUN.
- Use NET and HARPOON GUN (V).
- Take KRAKEN'S TENTACLES 3/4, CAPTAIN'S CAP, and SCRUBBING BRUSH (W).
- Look at photo (X).
- Use SCRUBBING BRUSH (Y). Play HOP; receive ARTIST'S AMULET.
- Walk down.
- Place ARTIST'S AMULET; take CHESS SEAHORSE and MARINE CROWN (Z).
- Go (Z1).
- Place CAPTAIN'S CAP (Z2); receive KRAKEN'S TENTACLES 4/4 and CHESS FIGURINE.
- Walk down.
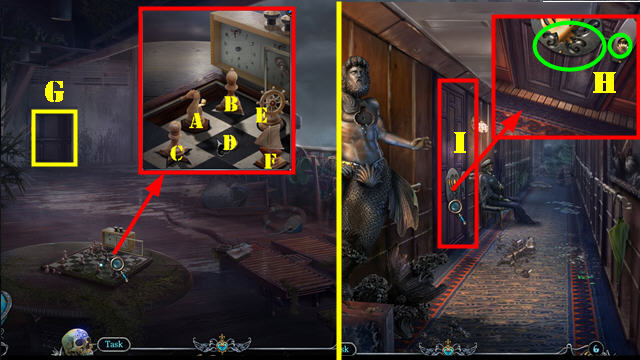
- Place CHESS FIGURINE and CHESS SEAHORSE. Solution (C-E-D-B-E-D).
- Take GOLD KNOB.
- Go (G).
- Place KRAKEN'S TENTACLES 4/4 and GOLD KNOB (H).
- Enter (I).
- Select scene.
- Select Richard Gray's Skull (J); receive A MONOGRAM.
- Look at note; take CAPTAIN'S SIGNET (K).
- Take DARK ANNA'S FOLDER and MARINE AMULET (L).
- Use FLASHLIGHT; take TRIDENT and look at note (M).
- Walk down.
- Place MARINE AMULET, TRIDENT, and MARINE CROWN (N); receive PHONE PENDANTS 1/2 and G MONOGRAM.
- Place CAPTAIN'S SIGNET; take WOOD PANEL PIECE (O).
- Go (P).
- Place A MONOGRAM and G MONOGRAM; take PHONE PENDANTS 2/2 (Q).
- Place PHONE PENDANTS 2/2; take DARK ANNA'S BROOCH (R).
- DARK ANNA'S BROOCH on DARK ANNA'S FOLDER; select photos (S); take SUITCASE KEY and NEWSPAPER CLIPPING (T).
- Use SUITCASE KEY (U). Play HOP; receive WOOD PANEL PIECE.
- Walk down twice.
- NEWSPAPER CLIPPING on JAMES'S CONNECTOR. Select down button 2x; take CONNECTOR WITH HINT.
- Place CONNECTOR WITH HINT as shown and select (V); receive SHIP SYMBOL.
- Go to Cruise Ship Hall.
- Use SHIP SYMBOL and select trident 2x; take WOOD PANEL PIECE (W).
- Go (X).
- Place three WOOD PANEL PIECES (Y).
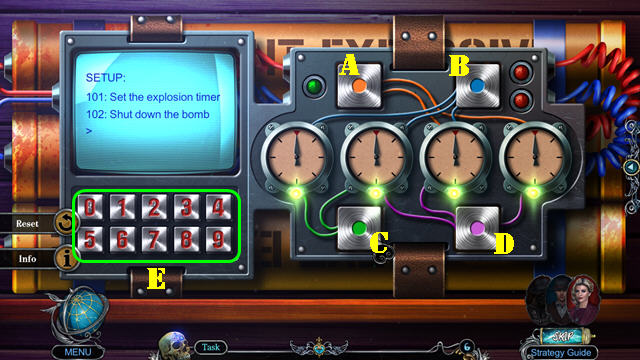
- Solution (Dx6-Ax3-Bx6-Ax2-Cx2).
- Enter 1-0-1 and 1-9-5-7 (E).
- Congratulations, you've completed Detectives United: Timeless Voyage!
Created at: 2020-02-28