

Walkthrough Menu
- General Tips
- Chapter 1: Villa
- Chapter 2: Study
- Chapter 3: Underground
- Chapter 4: Workshop
- Chapter 5: Pub
General Tips
- This is the official guide for Donna Brave: And the Deathly Tree.
- This guide won't tell you when to zoom into a location; the screenshots show each zoom scene.
- Hidden-object puzzles are referred to as HOPs. Only the locations of the HOPs will be shown.
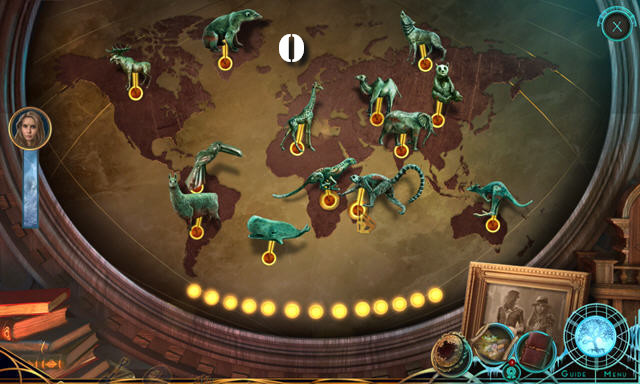
- Use the Map to fast travel to a location.
Chapter 1: Villa

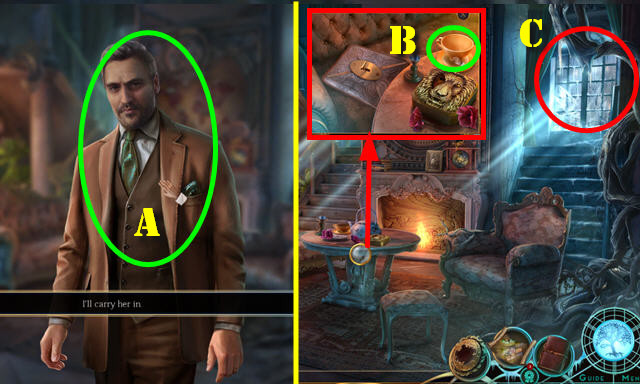
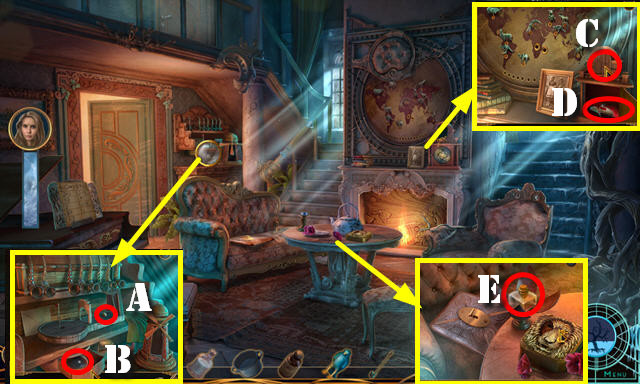
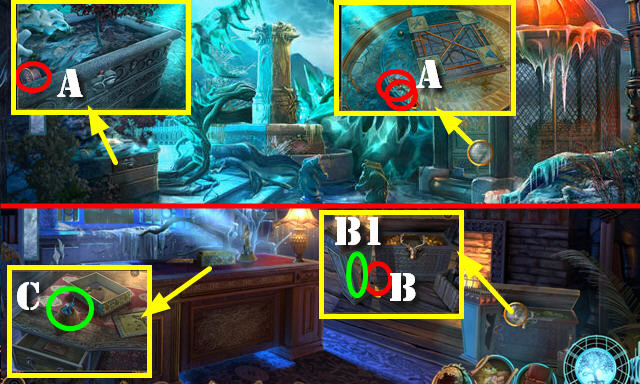
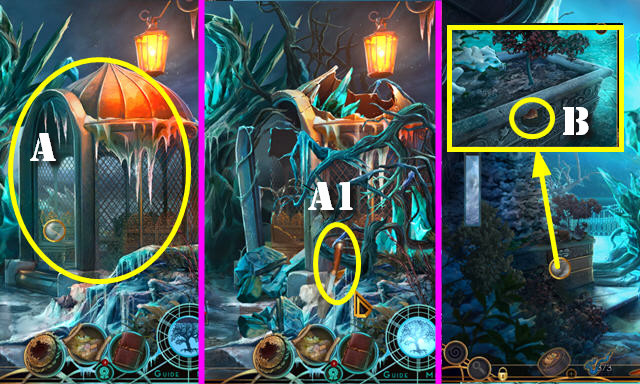
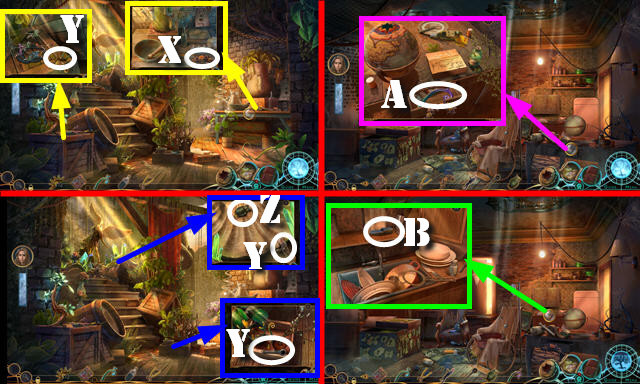
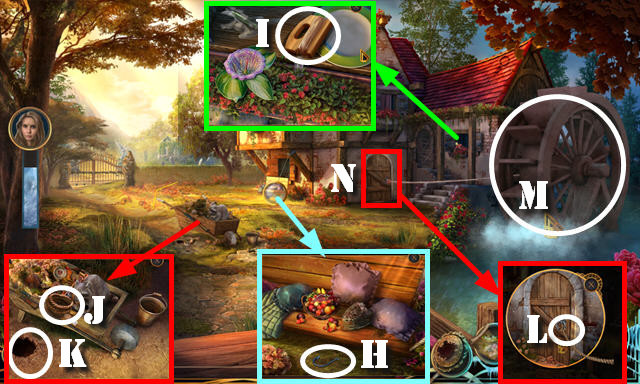
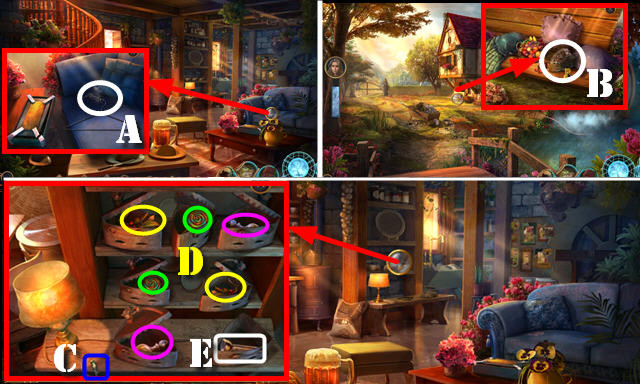
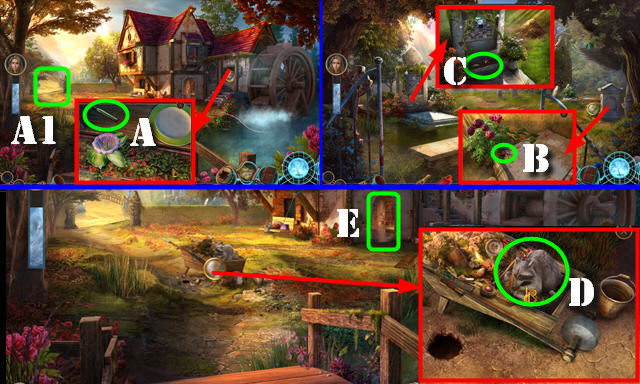
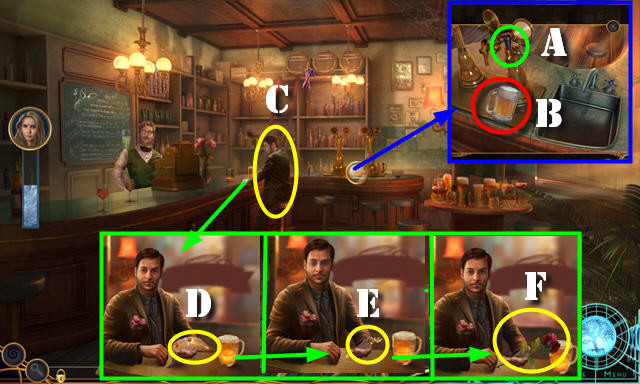
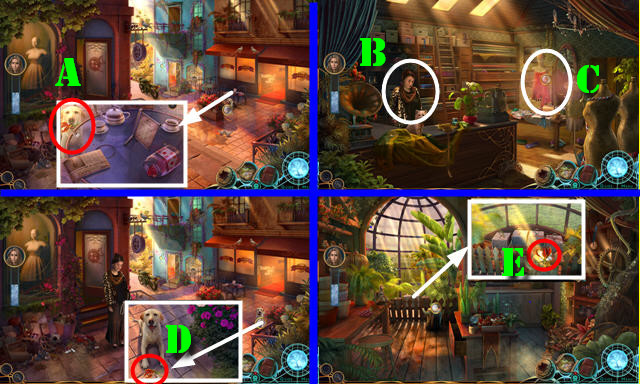
- Take SPECIAL FLOWER (A); select.
- Take Map and look at note (B).
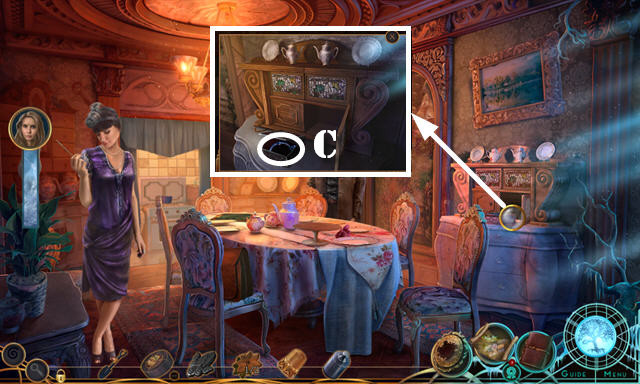
- Talk (C).
- Go forward.
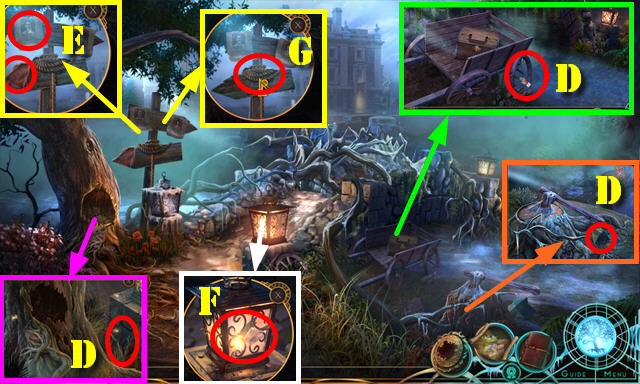
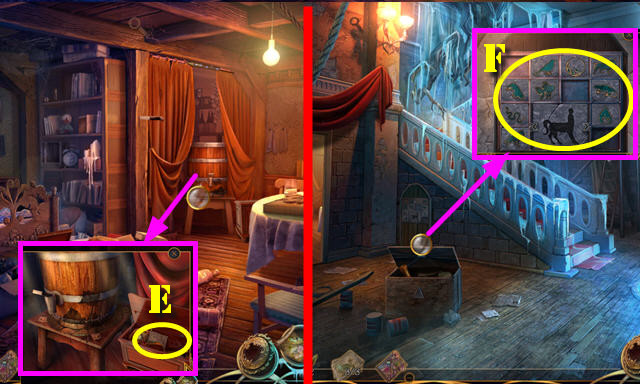
- Take TWIG, WOODEN WHEEL, and ROCK (D).
- Look at note; take OLD RAG (E).
- Use ROCK and OLD RAG (F); receive SHARP GLASS.
- Use SHARP GLASS; take LONG ROPE and IRON HANDLE (G).
- Place IRON HANDLE; take SCREWDRIVER (H).
- Use SCREWDRIVER; take LANTERN (I).
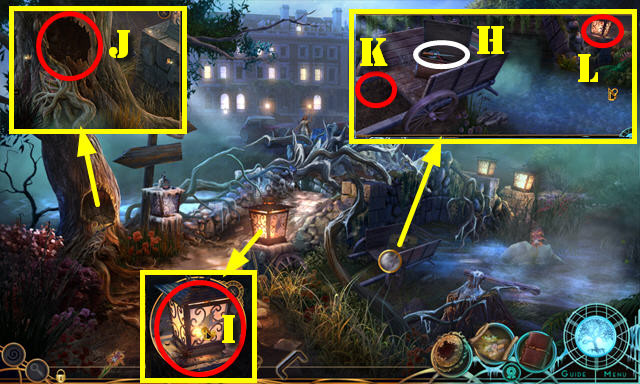
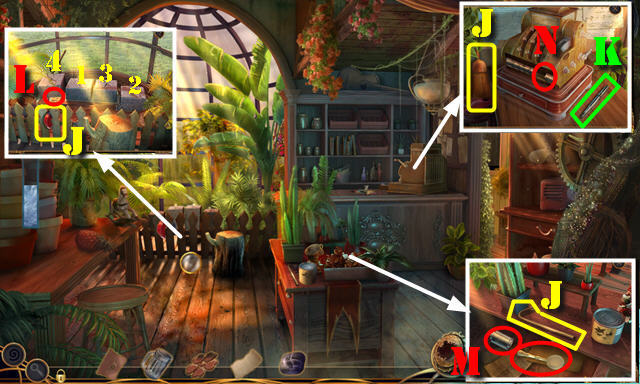
- Use LANTERN (J). Play HOP; receive SHOVEL.
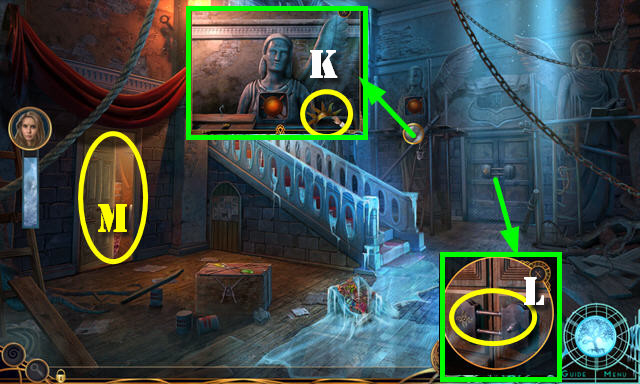
- Use SHOVEL (K).
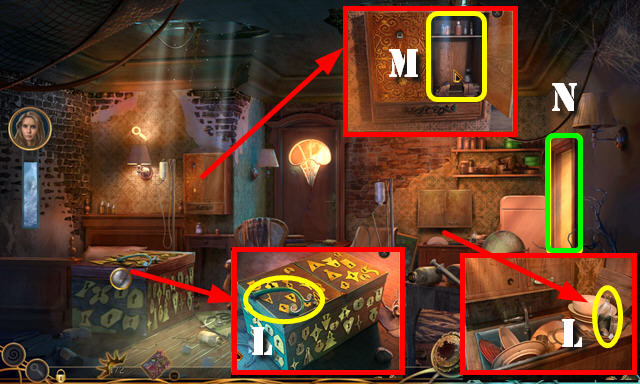
- LONG ROPE on WOODEN WHEEL; take IMPROVISED HOOK.
- Use IMPROVISED HOOK (L).
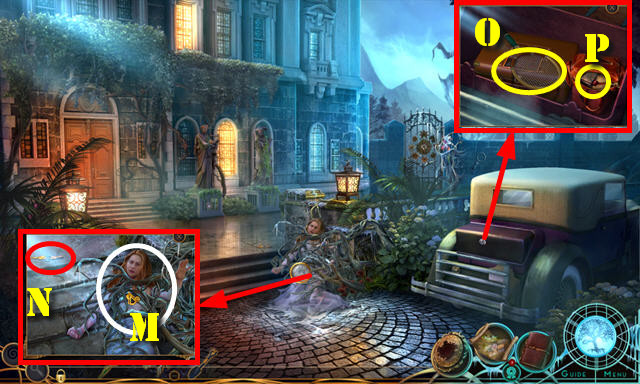
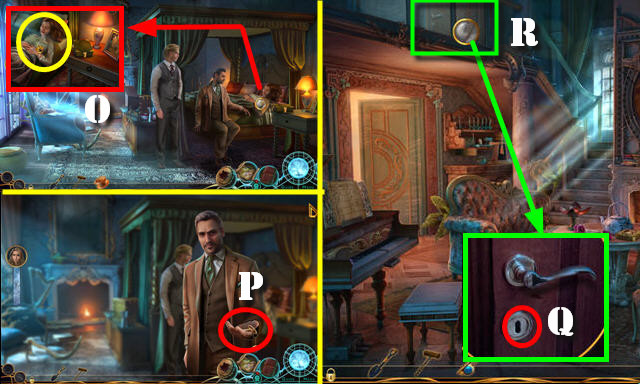
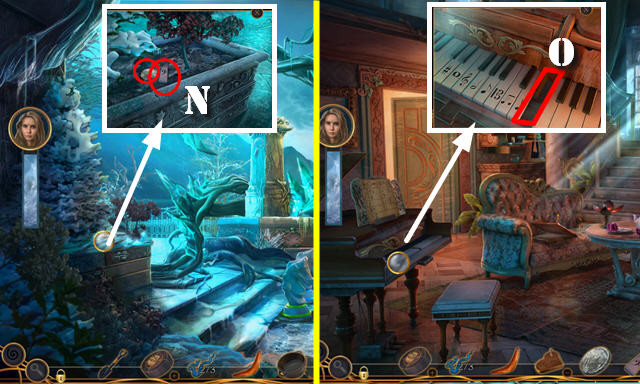
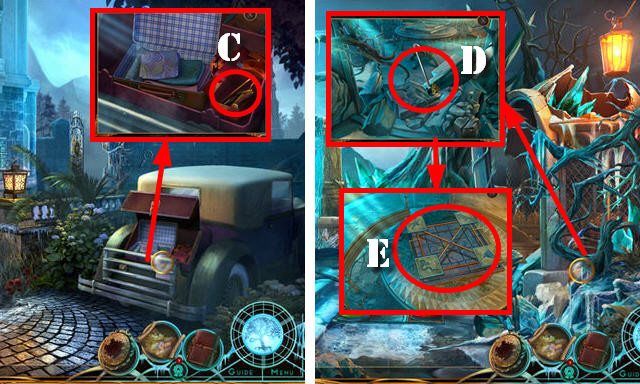
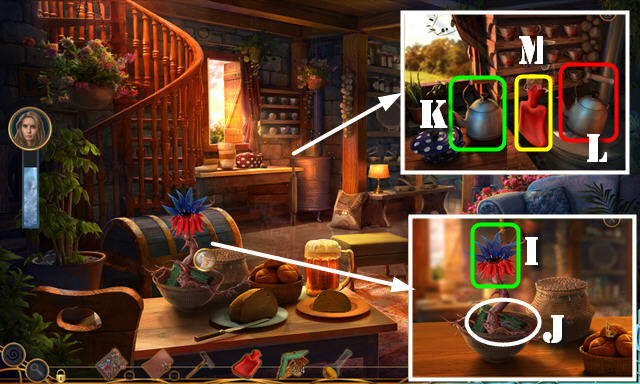
- Use SPECIAL FLOWER (M); take CAR KEYS (N).
- Use CAR KEYS; remove racket (O).
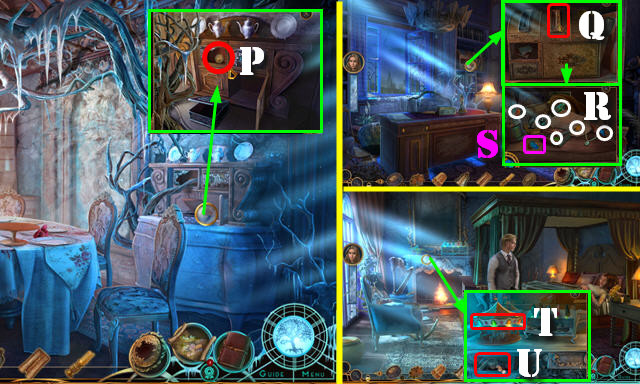
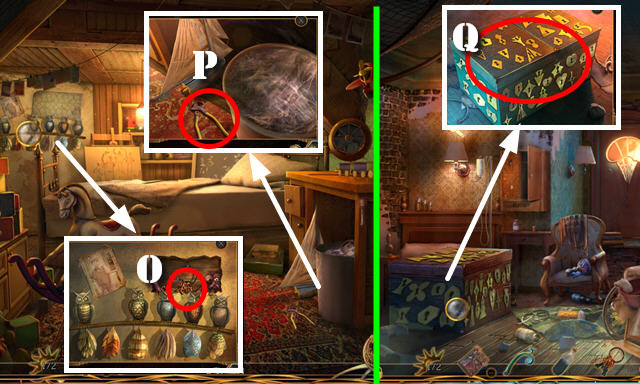
- Open bag; take MATCHES (P).
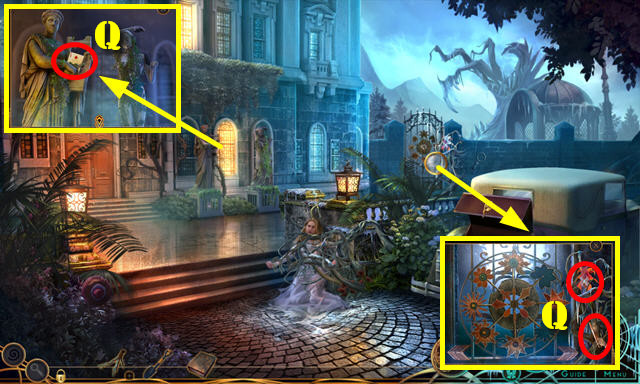
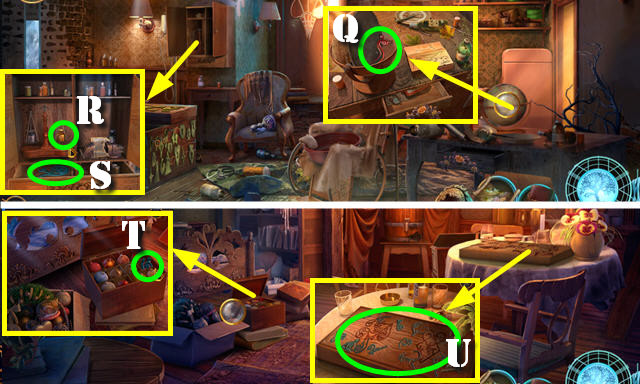
- Take PLAYING CARD 1/4, SPECIAL FLOWERS 1/3, and TWEEZERS (Q).
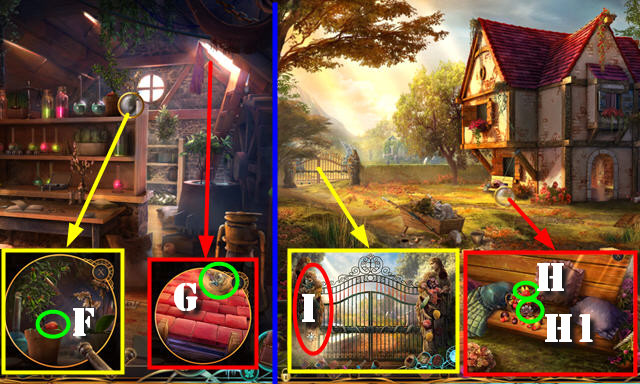
- Walk down.
- MATCHES on TWIG; take TORCH.
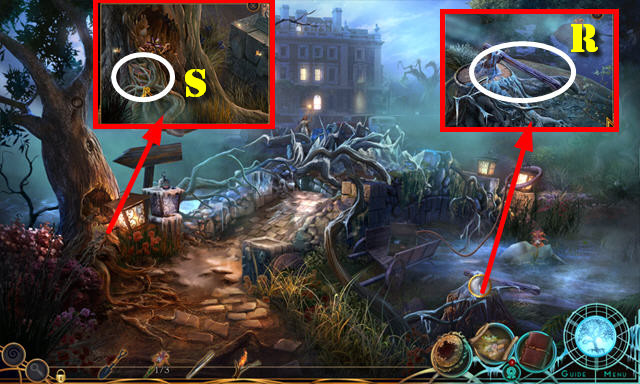
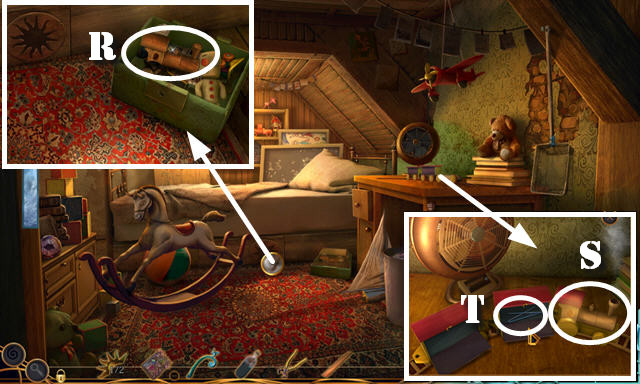
- Use TORCH; take AXE (R).
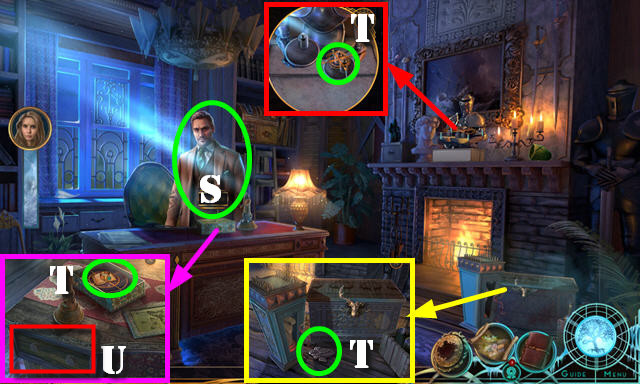
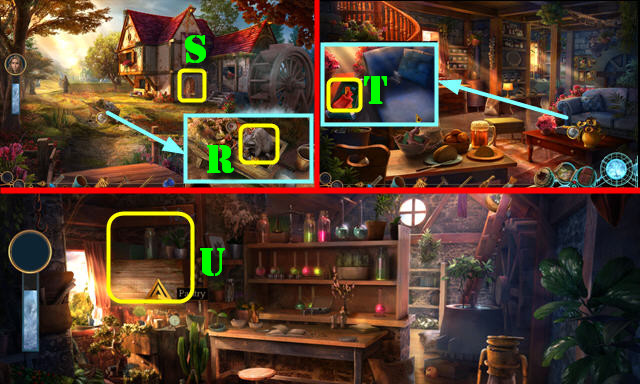
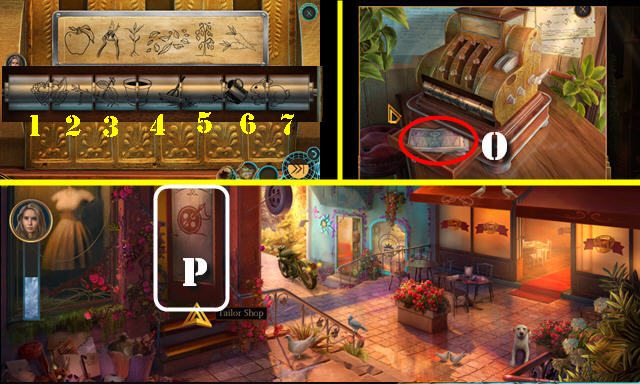
- Use TWEEZERS (S); receive PATTERNED TILE and look at note.
- Go forward.
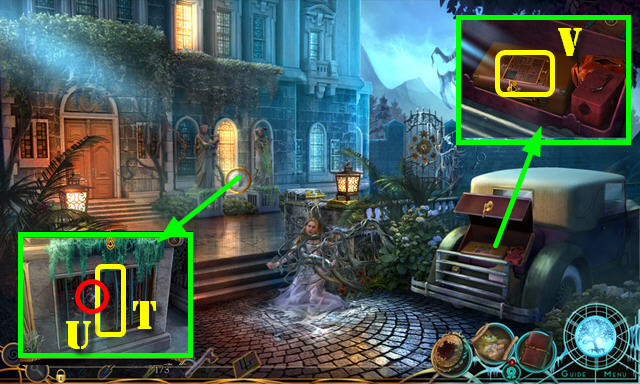
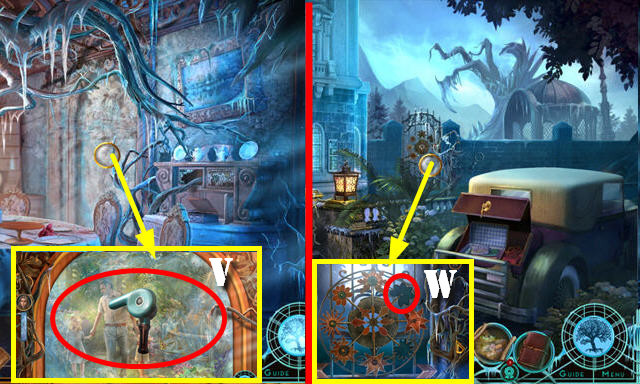
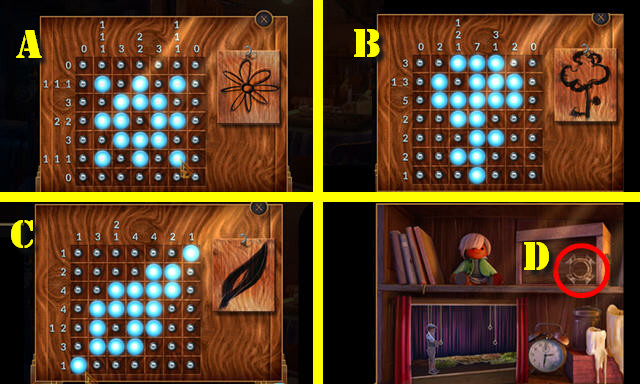
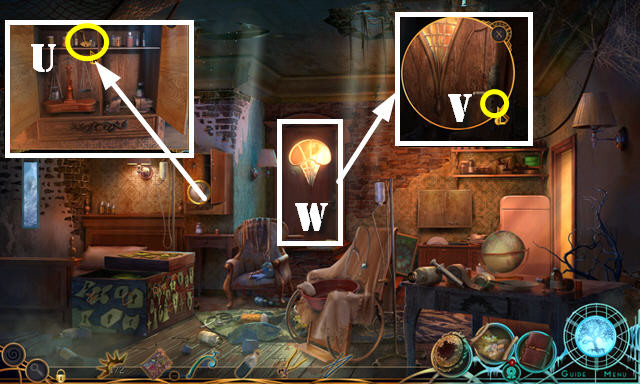
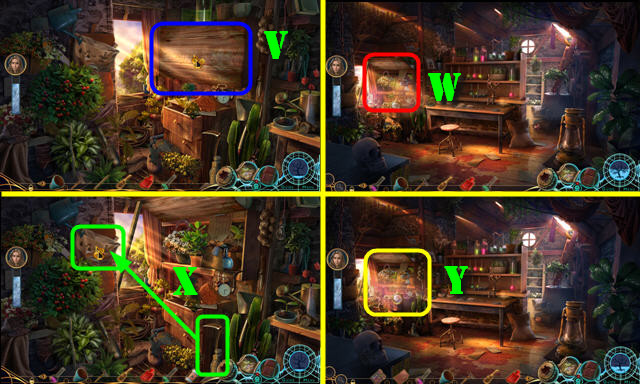
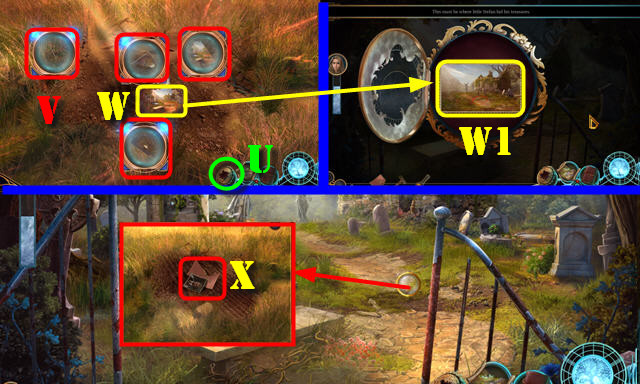
- Pan down and use AXE (T); take METAL TUBES and SPECIAL FLOWERS 2/3 (U).
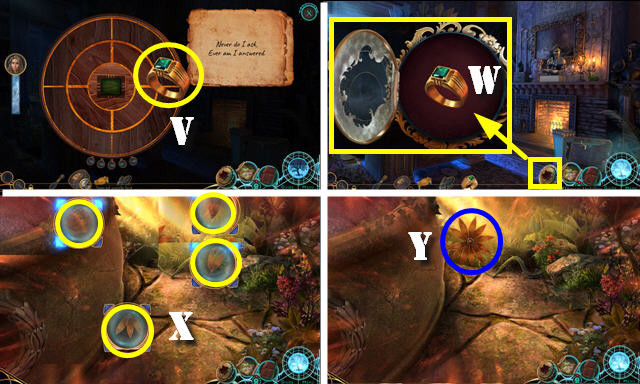
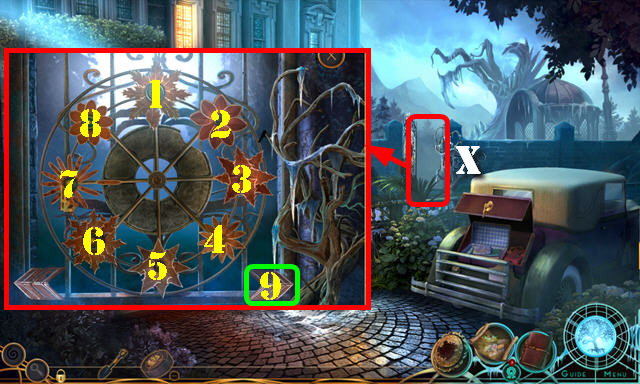
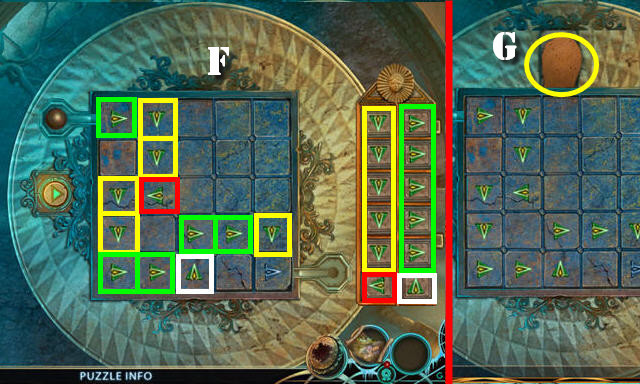
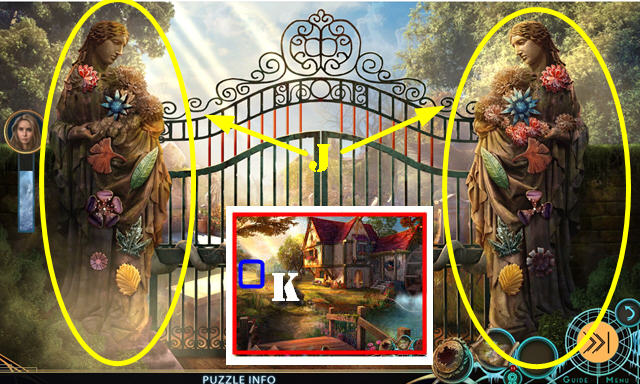
- Place PATTERNED TILE (V).
- Solution (1-1-2-2-3-4-5-7-7-8-8-8).
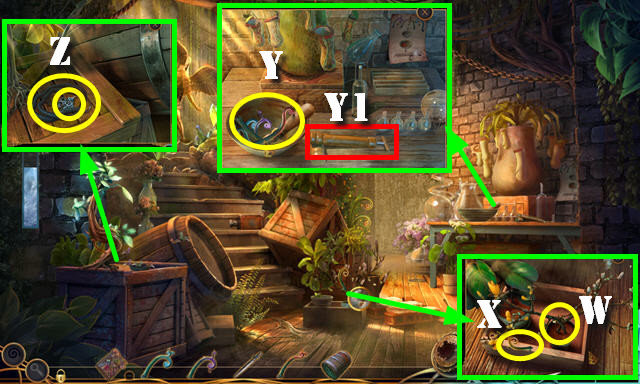
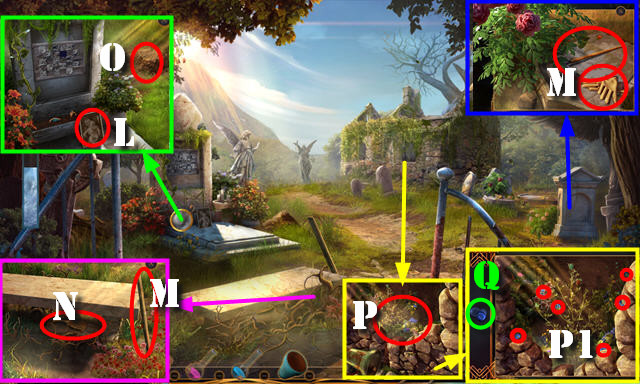
- Take GARDEN SHEARS (W).
- Walk down.
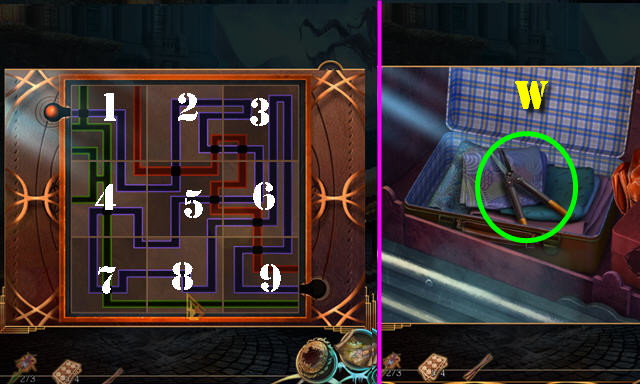
- METAL TUBES on GARDEN SHEARS; take LENGTHENED SHEARS.
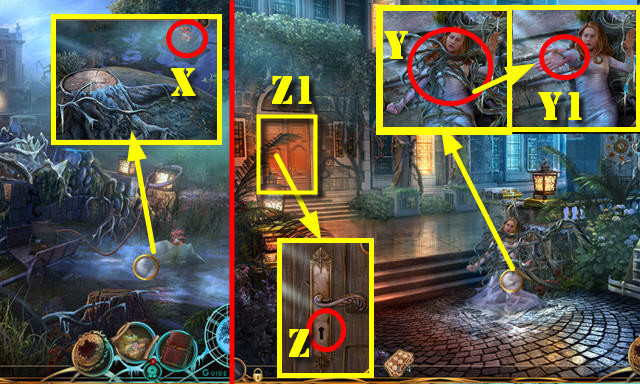
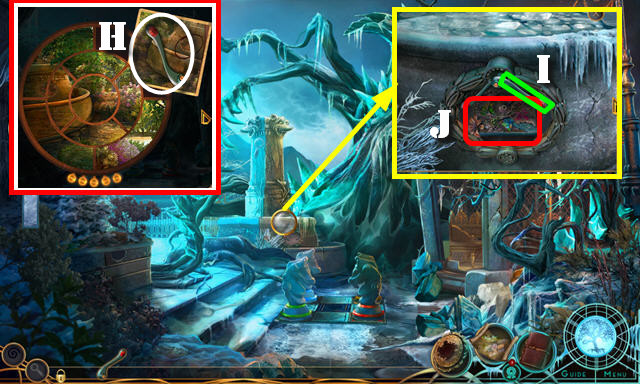
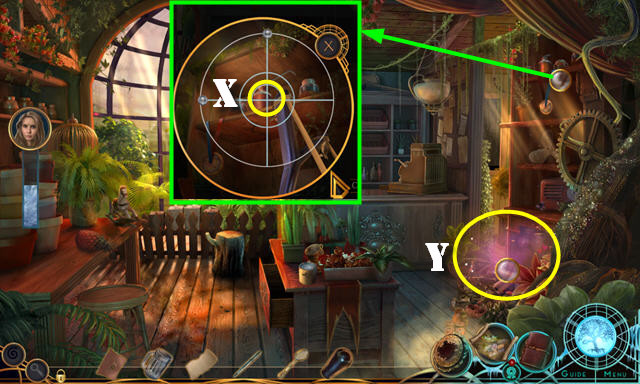
- Use LENGTHENED SHEARS and SHOVEL (X); receive SPECIAL FLOWERS 3/3.
- Go forward.
- Use SPECIAL FLOWERS 3/3 (Y); take VILLA KEY (Y1).
- Use VILLA KEY (Z).
- Go (Z1).
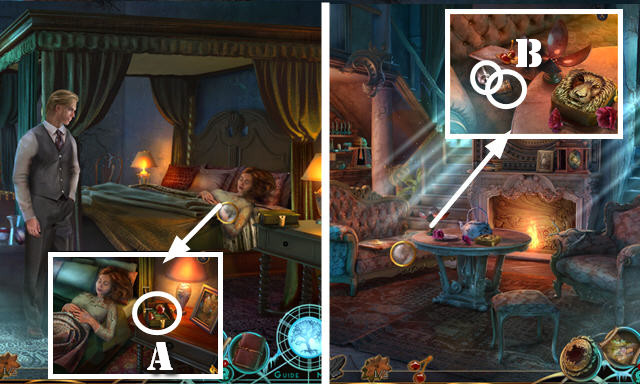
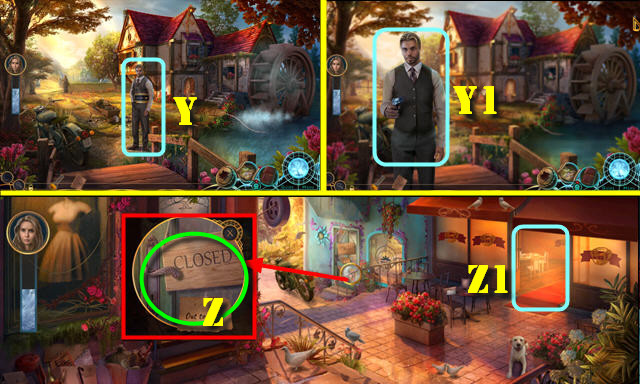
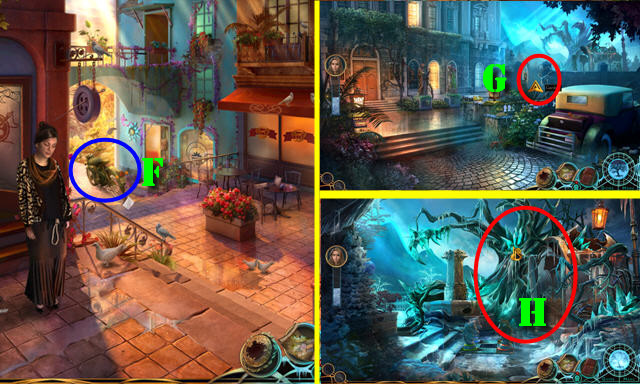
- Select man (A).
- Take TEACUP (B).
- Go (C).
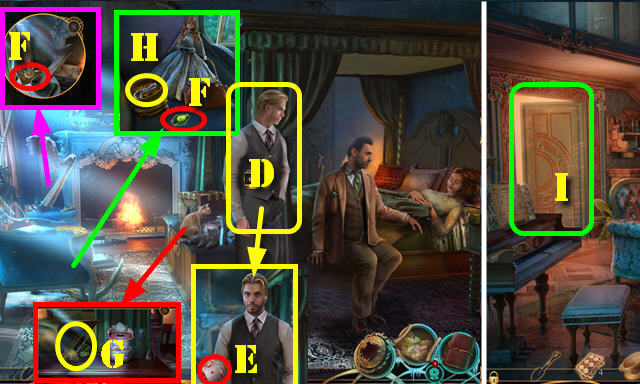
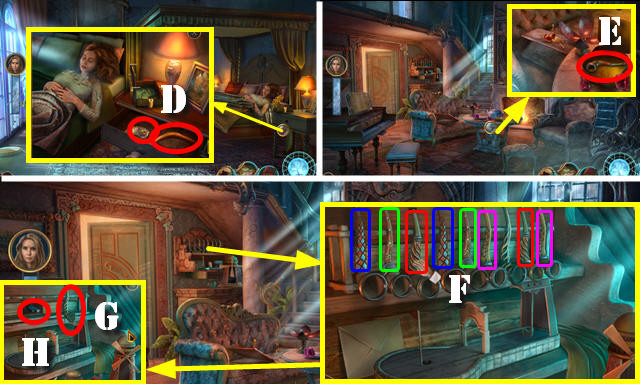
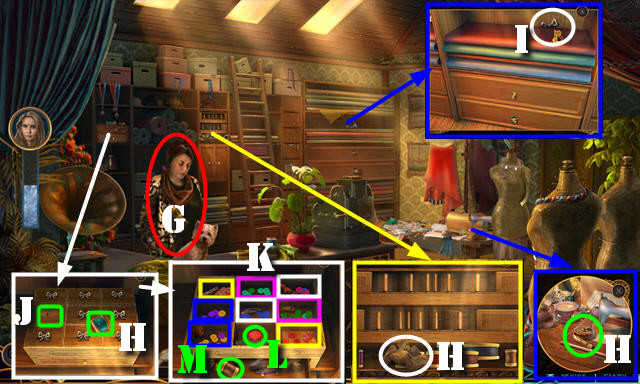
- Talk (D); take PLAYING CARD 2/4 (E).
- Take WOODEN LEAF and GREEN CRYSTAL (F).
- Pet the cats; place GREEN CRYSTAL; take HAIR COMB (G).
- Use HAIR COMB; take BLUE NECKLACE (H).
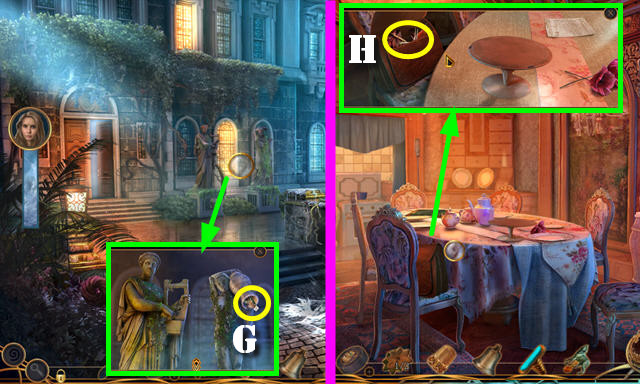
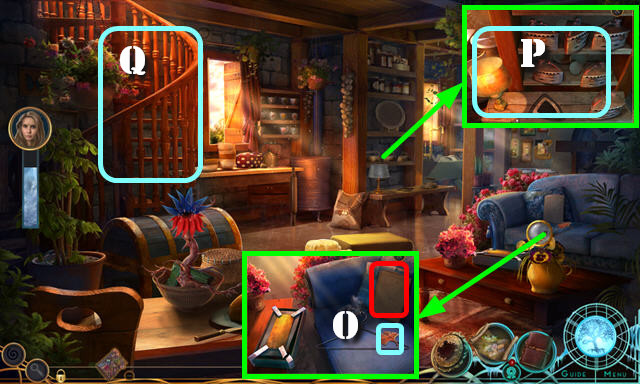
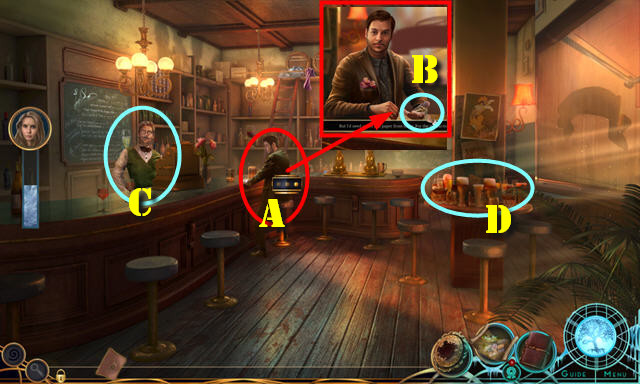
- Walk down; go to Dining Hall (I).

- Talk to man (J); take PIANO ORNAMENT (K).
- Talk to lady (L); take BALLERINA (M).
- Give BLUE NECKLACE (L); take HARP PART (N).
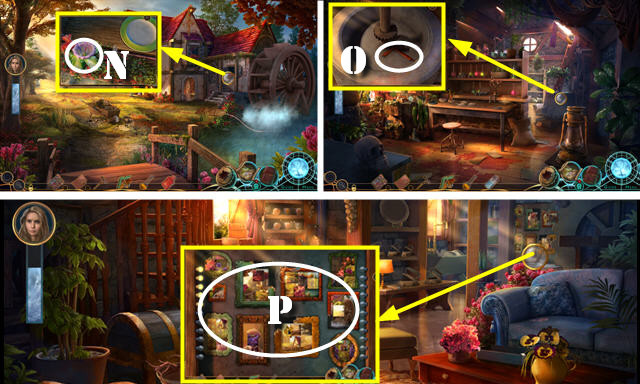
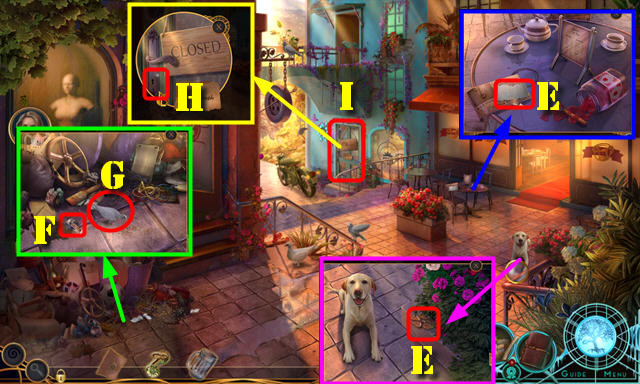
- Take CORKSCREW and WINDMILL BLADES (O).
- Place WOODEN LEAF; take TAPE and LOCKING MECHANISM (P).

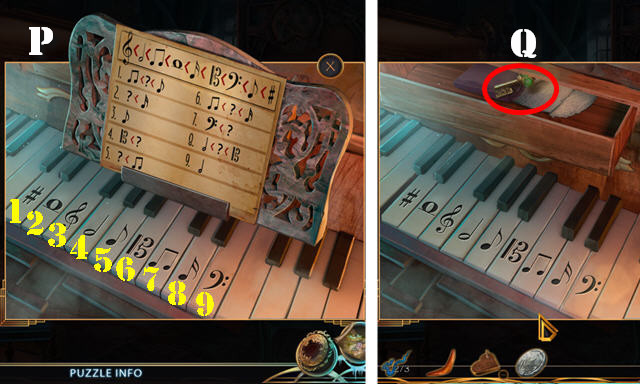
- Select 6 scraps (Q).
- Use TAPE; take PHOTO OF KATHI (R).
- Take WATER CARAFE (S).
- Place LOCKING MECHANISM and PHOTO OF KATHI. Select buttons and take OLD POT (T).
- Walk down.
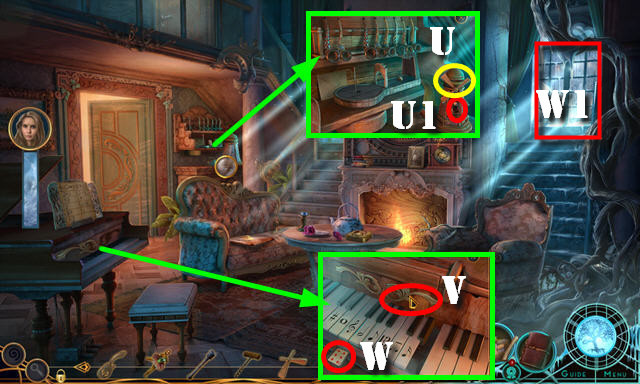
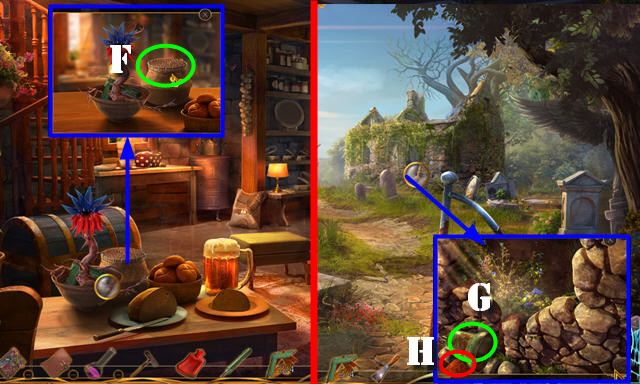
- Place WINDMILL BLADES (U); take TINCTURE (U1).
- Place PIANO ORNAMENT (V); take PLAYING CARD 3/4 (W).
- Go (W1).
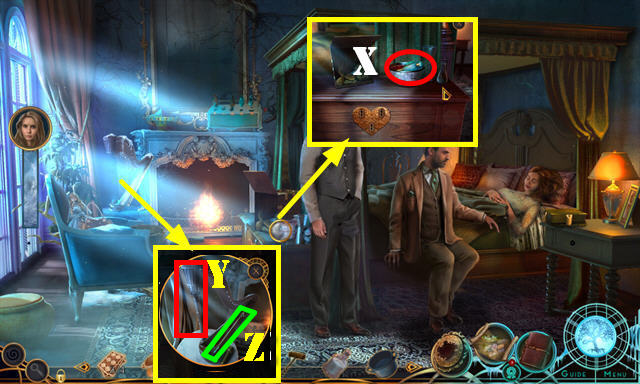
- Place BALLERINA; take BLUE CUCKOO (X).
- Place HARP PART (Y); take GOLF CLUB (Z).
- Walk down.
- Use GOLF CLUB (A); take CERAMIC EGG (B).
- Place BLUE CUCKOO (C); take RED SHOE (D).
- Place CERAMIC EGG; take HERBAL LIQUID (E).
- Go to Kathi's Room.
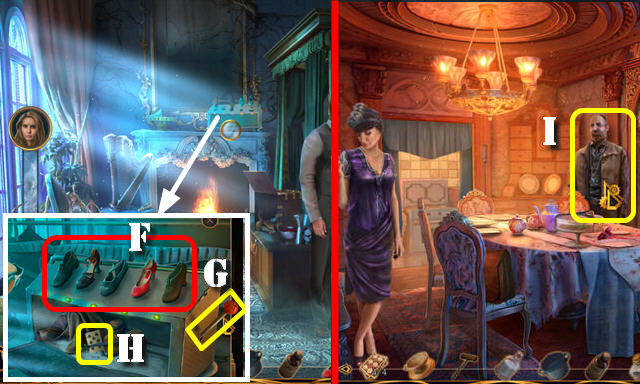
- Place RED SHOE. Solution (F). Select lever (G).
- Take PLAYING CARD 4/4 (H).
- Go to Dining Hall.
- Give PLAYING CARD 4/4 (I).
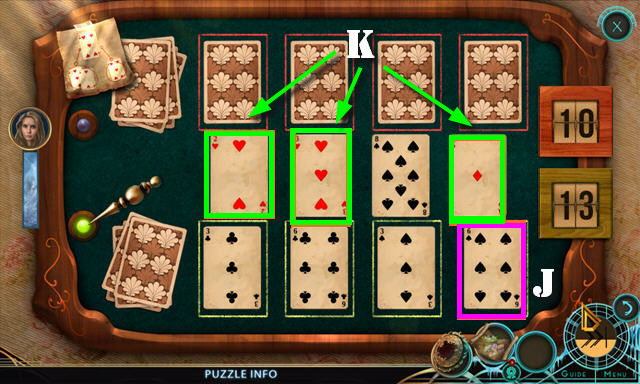
- Solution is random. Select a card (J); take as many cards from the pile (K) that add up to that card.
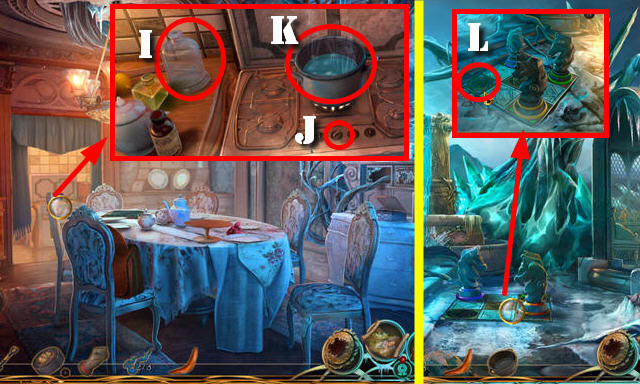
- Take GLASS LID KEY (L).
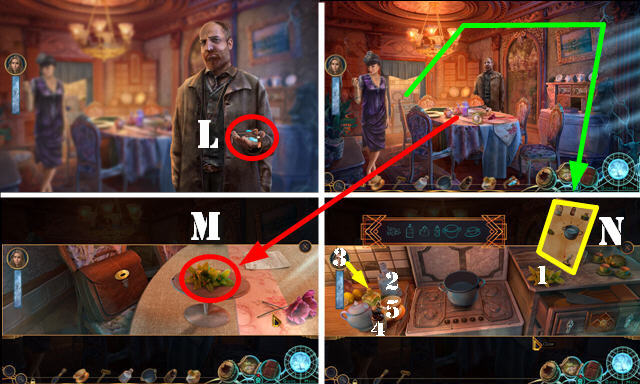
- Use GLASS LID KEY; take MINT LEAVES (M).
- Look at recipe (N).
- Place TEACUP, OLD POT, WATER CARAFE, TINCTURE, HERBAL LIQUID, and MINT LEAVES. Select 1-6; receive CUP OF TEA.
- Go to Kathi's Room.
- Give CUP OF TEA (O).
- Take STUDY KEY (P).
- Walk down.
- Use STUDY KEY (Q).
- Enter (R).
Chapter 2: Study
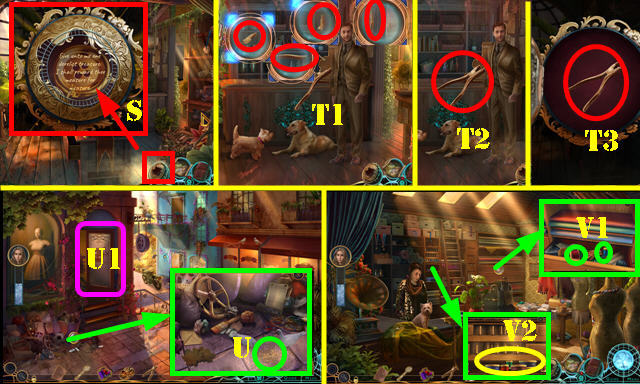
- Talk (S).
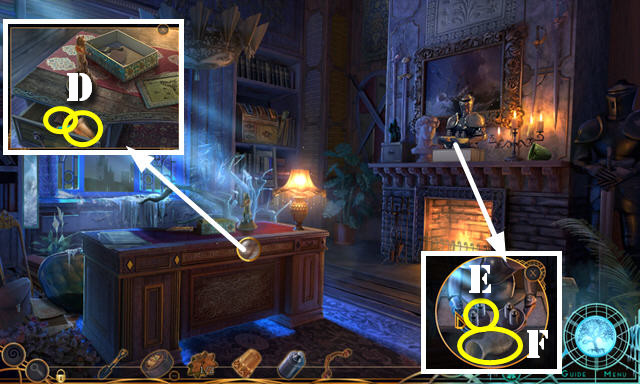
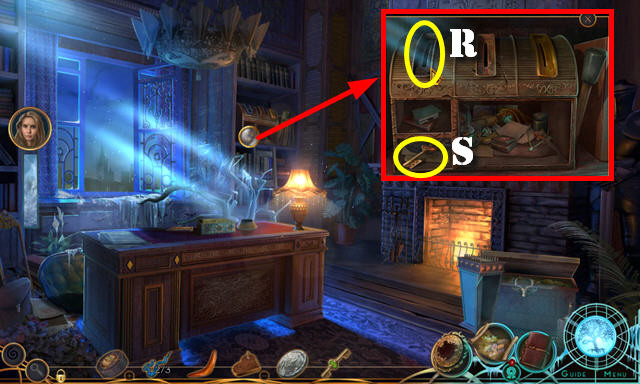
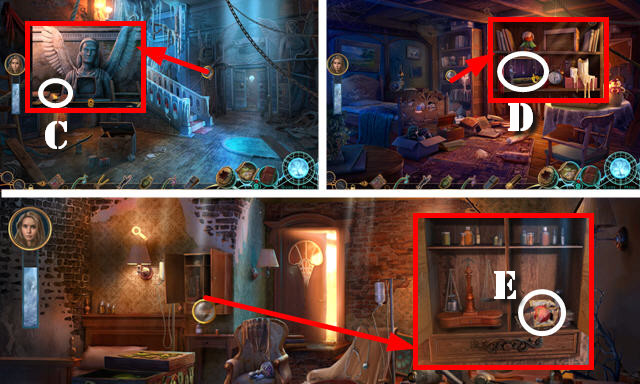
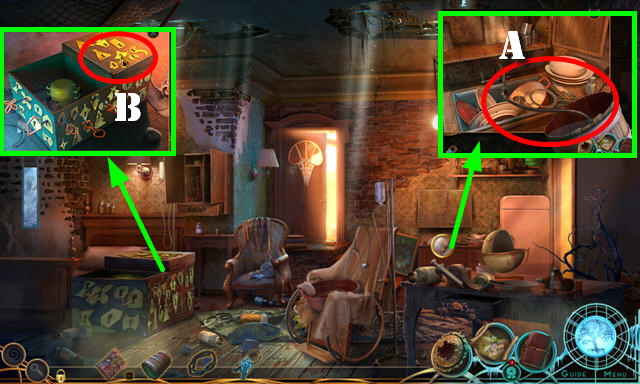
- Take LEON'S PUZZLE BOX, ROSE EMBLEM, BOOK ORNAMENT (T).
- Use CORKSCREW on drawer (U).
- Select LEON'S PUZZLE BOX and ring (V); receive LEON'S RING.
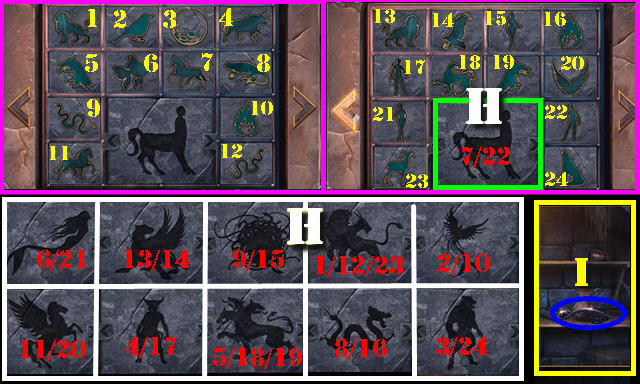
- LEON'S RING on Memory Medallion (W).
- Select fragments (X).
- Take GARDEN GATE PART 1/2 (Y).
- Go to Kathi's Room.
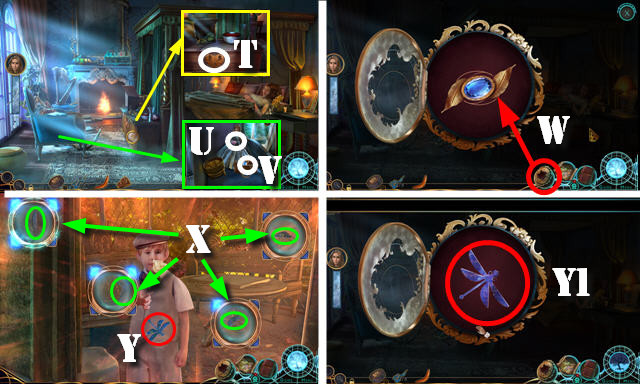
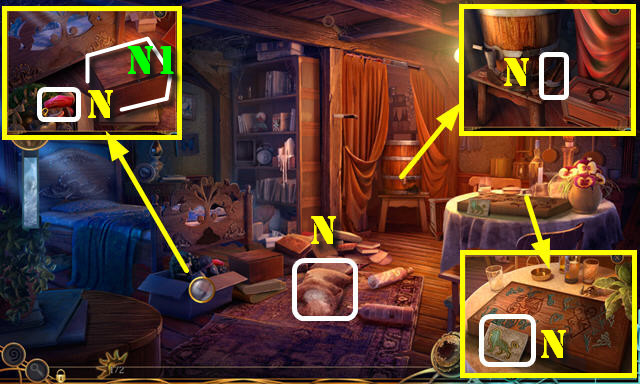
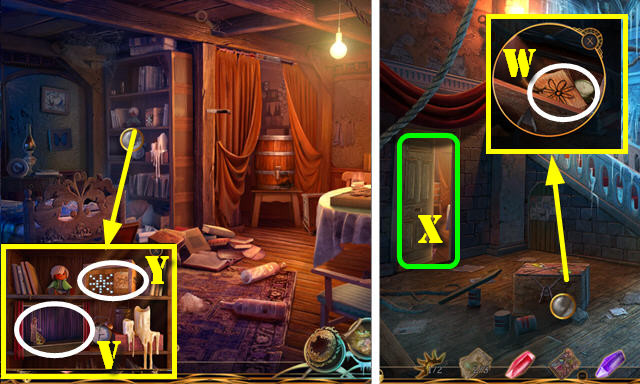
- Use BOOK ORNAMENT; take PLASTIC CHERRY (A).
- Walk down.
- Place PLASTIC CHERRY and look at photo; take THIMBLE and SMALL WEIGHT (B).
- Go to Dining Hall.
- Place ROSE EMBLEM; take BRONZE HANDLE (C).
- Go to Study.
- Place BRONZE HANDLE; take DOORBELL and BAG CLASP (D).
- Place SMALL WEIGHT (E); take AMPHORA (F).
- Walk down twice.
- Pan up. Place AMPHORA; take WOLF FIGURINE (G).
- Go to Dining Hall.
- Use BAG CLASP; take SILVER ANTLER (H).
- Go to Study.
- Place SILVER ANTLER (I).
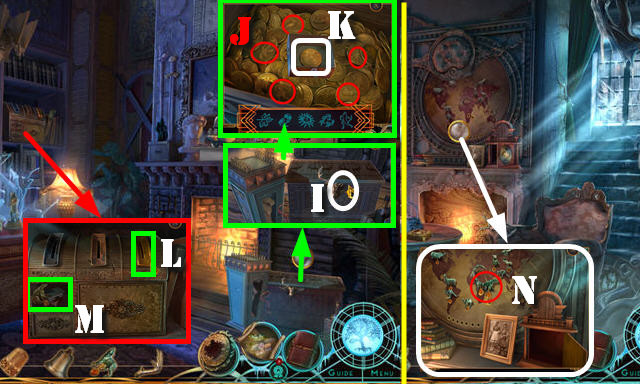
- Find coins (J) and select five keys; take GOLD COIN (K).
- Place GOLD COIN (L); take BEAR FIGURINE (M).
- Walk down.
- Place WOLF FIGURINE and BEAR FIGURINE (N).
- Solution (O).
- Take LIST OF ITEMS and CANDLE.
- Go to Dining Hall.
- Take BRONZE COIN (P).
- Go to Study.
- Place BRONZE COIN (Q). Select beads (R); take COLORFUL BEADS (S).
- Go to Kathi's Room.
- Place COLORFUL BEADS (T); take HAIR DRYER (U).
- Go to Dining Hall.
- Use BLOW DRYER and LIST OF ITEMS (V). Play HOP; receive FOLDED PAPER.
- Select FOLDED PAPER twice; take GATE PIECE 2/2.
- Walk down twice.
- Place GARDEN GATE PART 2/2 (W).
- Solution (9-9-1-2-6-9-9-3-9-5-4-9-8-7).
- Go to Garden (X).
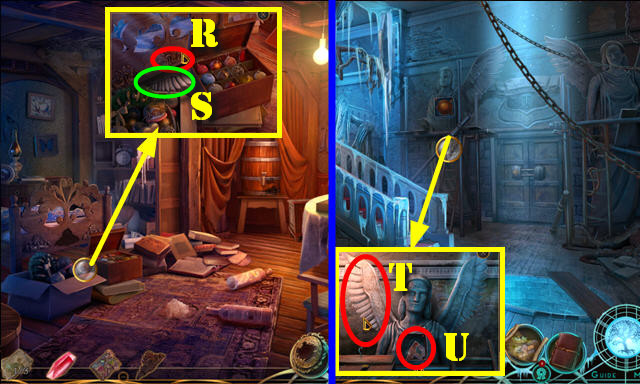
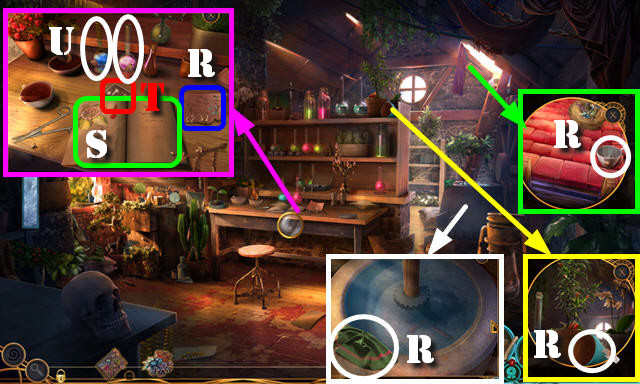
- Take DRAWER KNOB, FIDDLE, and WIRE CUTTER (A).
- Go to Study.
- Use WIRE CUTTER (B); take RED KNIGHT (B1).
- Place FIDDLE; take BLUE PUZZLE PART 1/3 (C).
- Go to Kathi's Room.
- Place DRAWER KNOB; take LION'S EYE and BOOMERANG (D).
- Walk down.
- Place LION'S EYE; take ORNAMENTAL PIPE (E).
- Place ORNAMENTAL PIPE; select matching pairs (F).
- Select last pipe (G); take BLUE PUZZLE PART 2/3 (H).
- Go to Dining Hall.
- Select bottle (I) and knob (J); take HOT WATER (K).
- Go to Garden.
- Place RED KNIGHT (L).
- Solution: (9-2)-(1-8)-(7-6)-(2-7)-(6-1)-(7-6)-(3-4)-(8-3)-(4-9)-(1-8)-(6-1)-(3-4)-(8-3)-(9-2)-(2-7)-(4-9).
- Take BROKEN HEART (M).
- Use HOT WATER and SHOVEL; take PIANO KEY and SILVER COIN (N).
- Go to Main Hall.
- Place PIANO KEY (O).
- Solution (P): (6-7-5-9-3-2-1-8-4).
- Take GREEN HEART KEY (Q).
- Go to Study.
- Place SILVER COIN (R); take RED HEART KEY (S).
- Go to Kathi's Room.
- RED HEART KEY and GREEN HEART KEY on BROKEN HEART; take MASTER KEY HEART.
- Place MASTER KEY HEART (T). Play HOP; receive SMALL BELT BUCKLE.
- Place SMALL BELT BUCKLE (U); look at book and take KATHI'S BROOCH (V).
- KATHI'S BROOCH on Memory Medallion (W).
- Select pieces (X); select part (Y); take BLUE PUZZLE PART 3/3 (Y1).
- Go to Garden.
- Select gazebo (A); take SHARP KNIFE (A1).
- Use SHARP KNIFE; take METAL INLAY (B).
- Walk down.
- Place METAL INLAY; take CROWBAR (C).
- Go to Garden.
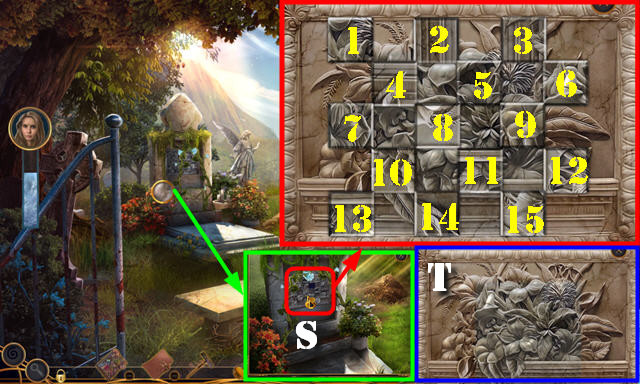
- Use CROWBAR (D); place BLUE PUZZLE PART 3/3 (E).
- Solution (F).
- Take SPONGE (G).
- DOORBELL, THIMBLE, CANDLE, BOOMERANG, SPONGE on LEON'S PUZZLE BOX. Take JEWELED HANDLE (H).
- Place JEWELED HANDLE (I); take Diary (J).
Chapter 3: Underground
- Take SUN PIECE 1/2 (K).
- Look at door (L).
- Go (M).
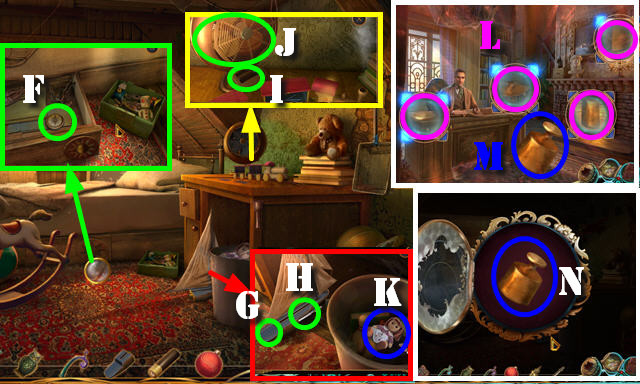
- Take SALT, RED CRYSTAL, SMALL HAMMER, and MYTHOLOGY TILE (N).
- Open box (N1).
- Walk down.

- Use SALT; take DIARY (O).
- Use SMALL HAMMER 3x; take DECORATIVE WOODEN EMBLEM (P).
- Go (Q).
- Place DECORATIVE WOODEN EMBLEM (R); take STONE WING (S).
- Walk down.
- Place STONE WING (T); take PUPPET GIRL and MYTHOLOGY TILE 2/3 (U).
- Go to Butler's Room.
- Place PUPPET GIRL (V). Play HOP; receive PURPLE CRYSTAL.
- Walk down.
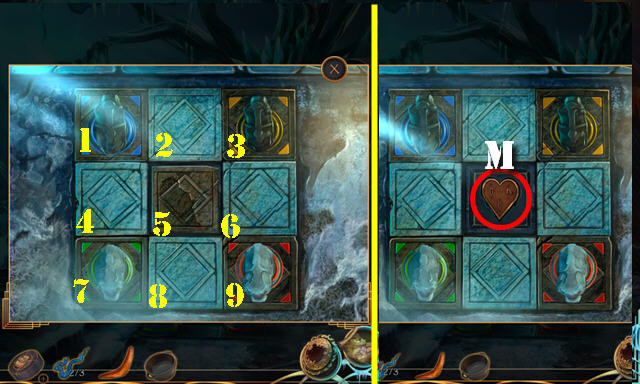
- Place RED CRYSTAL and PURPLE CRYSTAL; take PATTERN COMBINATION (W).
- Go (X).
- Place PATTERN COMBINATION (Y).
- Solution (A-B-C).
- Take STRANGE EMBLEM (D).
- Use STRANGE EMBLEM; take MYTHOLOGY TILE 3/3 (E).
- Walk down.
- Place MYTHOLOGY TILE 3/3 (F).
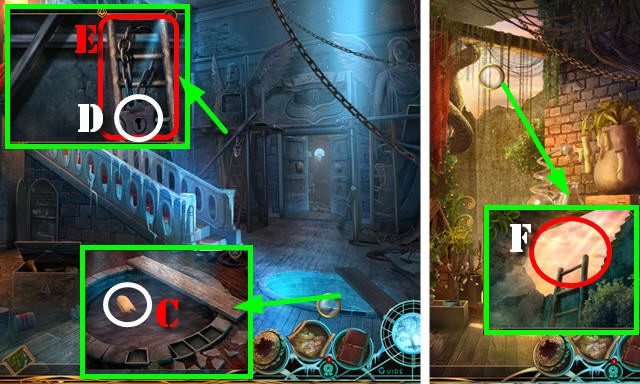
- Solution (H).
- Take DOOR HANDLE (I).
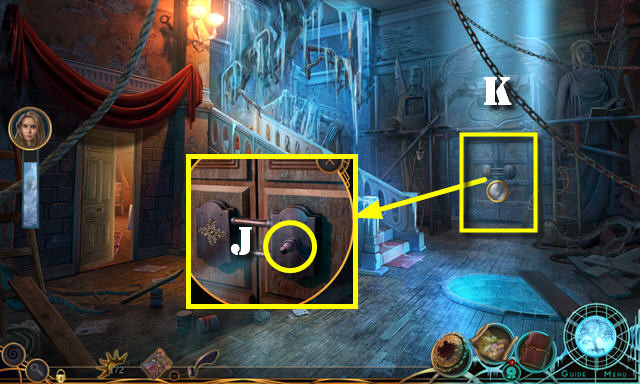
- Use DOOR HANDLE (J).
- Enter (K).
- Take BLUE SPRIG and BOTTLE OF LIQUID (L).
- Look at note on BOTTLE OF LIQUID; take TEARDROPS.
- Open door (M).
- Go (N).
- Tear wallpaper; look at photo; take ASSORTMENT OF KEYS (O).
- Take PLIERS (P).
- Walk down.
- Use ASSORTMENT OF KEYS (Q). Play HOP; receive WOODEN RULER.
- Go to Child's Bedroom.
- Use WOODEN RULER; take TOY TRAIN ENGINE (R).
- Place TOY TRAIN ENGINE (S); take BENT PAPER CLIP (T).
- Walk down.
- Use BENT PAPER CLIP; take GARDEN DOOR KEY (U).
- Use GARDEN DOOR KEY (V).
- Go (W).
- Look at recipe; take FLORAL HANDLE (X).
- Take SOCKET WRENCH, GENTLEMAN PUPPET, and SUN PIECE 2/2 (Y).
- Use TEARDROPS; take OWL FIGURINE (Z).
- Walk down.
- Place FLORAL HANDLE; take PURPLE SPRIG (A).
- Use SOCKET WRENCH; take BOW OF A BOAT (B).
- Walk down.
- Use PLIERS; take BATTERY (C).
- Go to Butler's Room.
- Place GENTLEMAN PUPPET (D). Play HOP: receive GLASS BOX.
- Go to Gardener's Quarters.
- Place GLASS BOX; take CHRISTMAS ORNAMENT (E).
- Go to Child's Bedroom.
- Place SUN PIECE 2/2; take COMPASS (F).
- Place BOW OF A BOAT (G); take LETTER OPENER (H).
- Place BATTERY (I); take FAN (J).
- Use FAN; take TRUDI'S DOLL (K).
- TRUDI'S DOLL on Memory Medallion. Find items (L).
- Select weight (M); take GOLD WEIGHT (N).
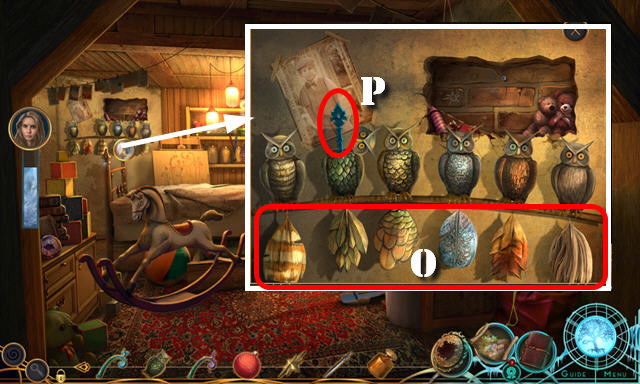
- Place OWL FIGURINE. Solution (O).
- Take ORNATE INSET 1/3 (P).
- Walk down.
- Use COMPASS; take RED SPRIG (Q).
- Place GOLD WEIGHT (R); take ORNATE INSET 2/3 (S).
- Go to Butler's Room.
- Place CHRISTMAS ORNAMENT; take ORNATE INSET 3/3 (T).
- Place ORNATE INSET 3/3 (U).
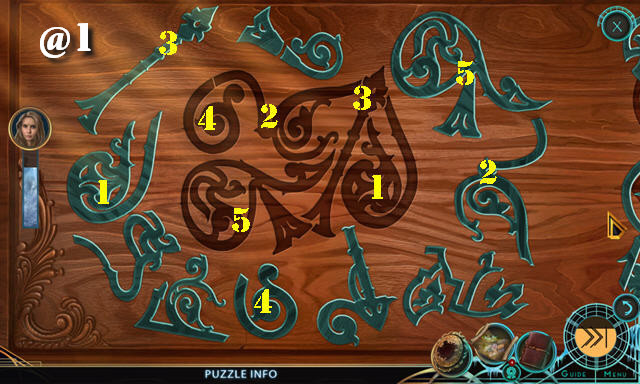
- Solution one: (@1): (1-5).
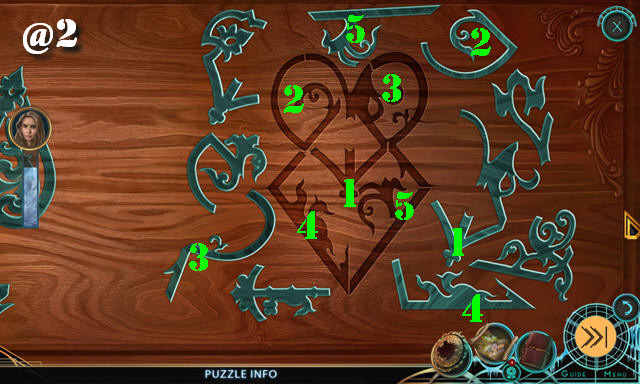
- Solution two: (@2): (1-5).
- Take GREASE CLEANER.
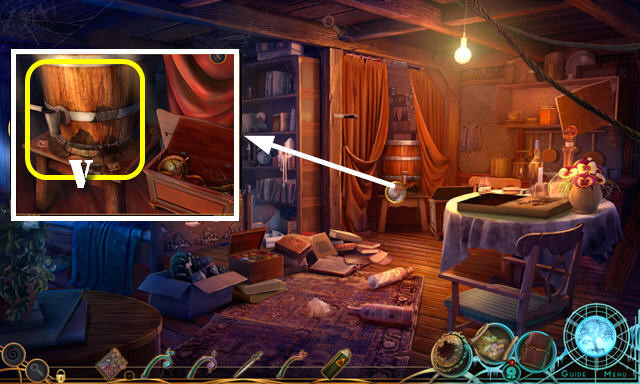
- Use GREASE CLEANER; take BARREL (V).
- Go to Underground Garden.
- Use LETTER OPENER (W); take YELLOW SPRIG (X).
- Place BLUE SPRIG, PURPLE SPRIG, RED SPRIG, and YELLOW SPRIG (Y). Take BUG SPRAY (Y1).
- Use BUG SPRAY; take RUBBER HOSE and BUNCH OF KEYS (Z).
- Walk down.
- Use BARREL and RUBBER HOSE; take BARREL OF WATER (A).
- Use BUNCH OF KEYS (B). Play HOP; receive BUTTERFLY.
- BUTTERFLY on DIARY; select page 2x; take MAP. Select page again.
- Walk down.
- Use BARREL OF WATER; take SCUFFED-UP KEY (C).
- Pan down; use SCUFFED-UP KEY (D); take LADDER (E).
- Go to Underground Garden.
- Use LADDER and MAP (F).
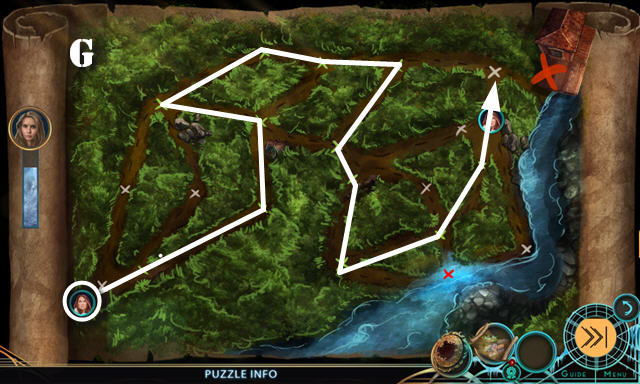
- Solution (G).
Chapter 4: Workshop
- Select 3x; take FISHHOOK (H).
- Take FISHING LINE (I).
- FISHHOOK on FISHING LINE; take HAND REEL.
- Select rope (J); use HAND REEL (K); receive ROPE.
- Place ROPE (L) and attach it (M).
- Enter (N).
- Look at folder; take FLOWER DECORATION 1/3 (O).
- Examine (P).
- Go (Q).
- Take CLEANING RAG, PORCELAIN CUP, POT, and INCOMPLETE RECIPE (R).
- Flip through all pages (S); look at stamp (T).
- Take PINK POTION and BLUE POTION (U).
- Look at notes on the BLUE POTION and PINK POTION.
- Walk down.
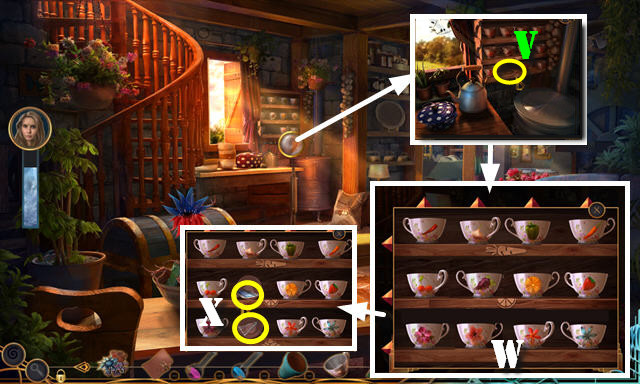
- Place PORCELAIN CUP (V). Solution is random. Final image (W).
- Take CHEWING GUM and BROKEN GLASS (X).
- Use BROKEN GLASS; take WIRE HANGER (A).
- Walk down.
- Use CLEANING RAG; take DECORATIVE IRON (B).
- Go to Living Room.
- Use CHEWING GUM (C).
- Place DECORATIVE IRON. Select matching irons (D).
- Open last iron; take FLASHLIGHT (E).
- Go to Workshop.
- Use FLASHLIGHT; take STRAWBERRY (F).
- Select WIRE HANGER 4x; receive HOOK.
- Use HOOK; take FLOWER DECORATION 2/3 (G).
- Walk down twice.
- Place STRAWBERRY (H); take FLOWER DECORATION 3/3 (H1).
- Place FLOWER DECORATION 3/3 (I).
- Solution (J).
- Go to Graveyard (K).
- Look at photo (L).
- Take WOODEN PLANK, RAKE, and GLOVES (M).
- Use GLOVES; take FERTILIZER AND SCOOP (N).
- Use FERTILIZER AND SCOOP (O); receive FERTILIZED DIRT.
- Use RAKE (P) and select six berries (P1); take BLUEBERRIES (Q).
- Walk down.
- Give BLUEBERRIES (R). Play HOP; receive BACKSAW.
- Go (S).
- Use BACKSAW; take EMPTY RUBBER POUCH and THERMOMETER (T).
- Go to Workshop and then Potting Bench (U).
- Use WOODEN PLANK (V).
- Play HOP (W); receive ADHESIVE REMOVER.
- Go to Potting Bench; use scythe (X).
- Play HOP (Y); receive SEEDS.
- Walk down twice.
- Use ADHESIVE REMOVER; take SEAM RIPPER (A).
- Go (A1).
- THERMOMETER and GLOVES on BLUE POTION; take RESIZING POTION.
- Use RESIZING POTION; take GOJI BERRIES (B).
- FERTILIZED DIRT and SEEDS in POT; take FRIENDLY PLANT.
- Place FRIENDLY PLANT; take FRAME PART 1/4 (C).
- Walk down.
- Give GOJI BERRIES (D). Play HOP; receive FRAME PART 2/4.
- Go (E).
- Use SEAM RIPPER and select (F); receive SCRAPER.
- Go to Graveyard.
- Use SCRAPER (G); take METAL DUST (H).
- Go to Living Room.
- METAL DUST on PINK POTION; take SLEEPING POTION.
- Use SLEEPING POTION (I); take FRAME PART 3/4 (J).
- Select kettle (K); use EMPTY RUBBER POUCH (L); take HOT WATER BOTTLE (M).
- Walk down.
- Use HOT WATER BOTTLE; receive PLANT TEARS (N).
- Go to Workshop.
- Use PLANT TEARS; take FRAME PART 4/4 (O).
- Walk down.
- Place FRAME PART 4/4 (P).
- Solution (Q).
- Take STONE TILE (R).
- Go to Graveyard.
- Use STONE TILE (S).
- Solution (11-12)-(12x2)-(2-15)-(15x3)-(14-6)-(6x3)-(10-7)-(7x3)-(9-10)-(8-1).
- (1x2)-(4-13)-(13x2)-(2x3)-(5-9)-(11-3)-(3x3)-(4-11)-(11x2)-(4-14)-(14x1)-(8-5)-(8x1).
- Solved image (T).
- Take DIARY KEY.
- DIARY KEY on DIARY; take GARDENER'S MEDALLION.
- GARDENER'S MEDALLION on Memory Medallion (U).
- Pick up pieces (V). Select photo (W) and take GRAVEYARD PHOTO (W1).
- Use GRAVEYARD PHOTO on scene.
- Use RAKE; look at photo; take RECIPE PIECE (X).
- Walk down.
- RECIPE PIECE on INCOMPLETE RECIPE; take RECIPE FOR DESTRUCTION.
- Talk (Y); use SLEEPING POTION (Y1).
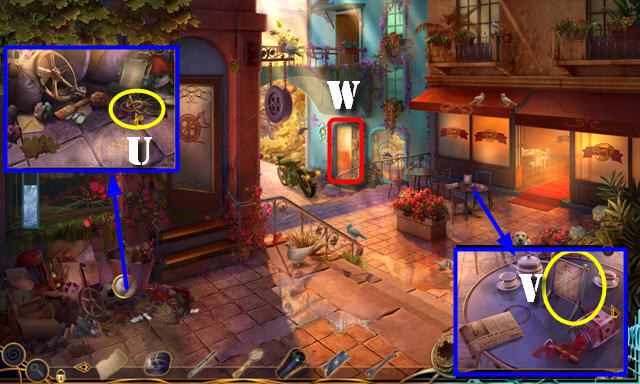
- Look at sign (Z).
- Enter Pub (Z1).
Chapter 5: Pub
- Talk (A). Take FLOWER SHOP KEY (B).
- Talk (C).
- Play HOP (D); receive CLEAN MUG.
- Walk down.
- Take CERAMIC FLOWER and BLANK PAPER (E).
- Select 3x; take SMALL STONE (F).
- Select bird (G).
- Use FLOWER SHOP KEY (H).
- Enter (I).
- Take CROWBAR, BROOM, and POWERFUL MAGNET (J).
- Select 3x; take PEN (K).
- Use CROWBAR (1-2-3-4); take note (L).
- Place CERAMIC FLOWER; take SILVER CYLINDER and MAGNIFYING GLASS (M).
- Place SILVER CYLINDER (N).
- Solution (1-1-2-5-6-7-7-).
- Take CASH (O).
- Walk down; enter Tailor Shop (P).
- Go to Pub.

- Give CASH (Q).
- Take TAP HANDLE (R).
- Use POWERFUL MAGNET (S); receive RAZOR BLADE.
- Use BROOM; select hammer; take WRENCH (T).
- Walk down.
- Use RAZOR BLADE (U); receive RUBBER BAND.
- Use WRENCH (V); receive METAL STICK.
- Go (W).
- RUBBER BAND and SMALL STONE on METAL STICK; take SLINGSHOT.
- Use SLINGSHOT and select once each ball is in middle (X).
- Play HOP (Y); receive OILCAN.
- Go to Pub.
- Use OILCAN and place TAP HANDLE (A).
- Place CLEAN MUG (B). Select handle; receive BEER.
- Give BEER, PEN, and BLANK PAPER (C).
- Look at note (D); take DECORATIVE CAN OPENER (E) and RED ROSE (F).
- Go to Tailor Shop.
- Give RED ROSE (G).
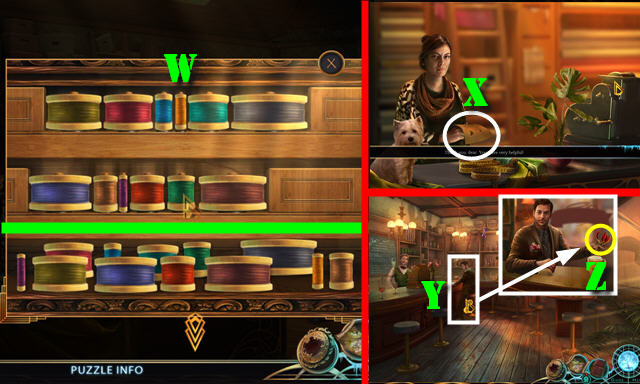
- Take DRY RAG, THREAD 1/5, and MEASURING TAPE (H).
- Use MEASURING TAPE (I); take SILVER RIBBON.
- Place SILVER RIBBON (J).
- Select matching sets (K).
- Select items and push button (L); take THREAD 2/5-3/5 (M).
- Go to Pub.

- Place = (N); select valve(O); take WET RAG.
- Go to Flower Shop.
- Use DECORATIVE CAN OPENER; take BIRDSEED (P).
- Walk down.
- Use WET RAG; take BOTTLE OPENER (Q).
- Go to Tailor Shop.
- Pan down. Use BOTTLE OPENER; select 3x; take GOLDEN BUTTON (R).
- GOLDEN BUTTON on Memory Medallion (S).
- Look for items (T1); select (T2) and then take PLIERS (T3).
- Walk down.
- Place BIRDSEED (U). Play HOP; receive WHITE FEATHERS.
- Go (U1).
- Use PLIERS; take THREAD 4/5-5/5 (V1).
- Pan up; place THREAD 5/5 (V2).
- Solution (W).
- Take TAILOR'S MESSAGE (X).
- Go to Pub.
- Give TAILOR'S MESSAGE (Y); take flower (Z).
- Walk down.
- Select dog (A).
- Go to Tailor Shop. Talk (B).
- Play HOP (C); receive DRESS.
- Give DRESS (B).
- Walk down.
- Take RARE FLOWER (D).
- Go to Flower Shop.
- Place WHITE FEATHERS and RARE FLOWER; use MAGNIFYING GLASS; take FLAME FLOWER (E).
- Walk down.
- Select motorcycle (F).
- Go (G).
- Use FLAME FLOWER (H).
- Select both buttons (I) until both meters fill.
- Select: (1-15) (J).
- Select: (1-9) (K).
- Select: (1-9) (L).
- Select all four buttons (M).
- Use FLAME FLOWER (N).
- Congratulations, you've completed Donna Brave: And the Deathly Tree!
Created at: 2018-02-25