
Walkthrough Menu
General Tips
- This is the official guide for Donna Brave: And the Strangler of Paris.
- This guide won't tell you when to zoom into a location; the screenshots show each zoom scene.
- Hidden-object puzzles are referred to as HOPs. Only the locations of the HOPs will be shown.
- Use the Map to fast travel to a location.
Chapter 1: Uncle Andre
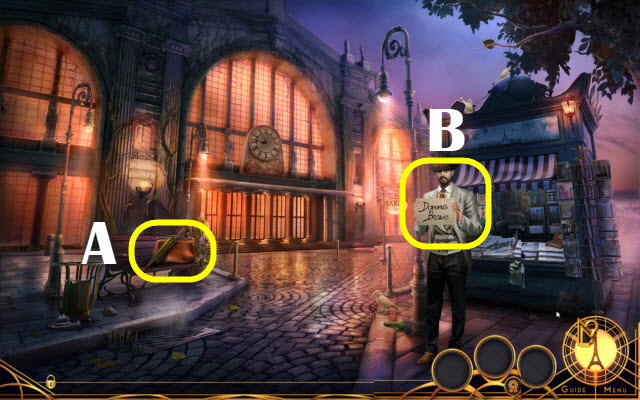
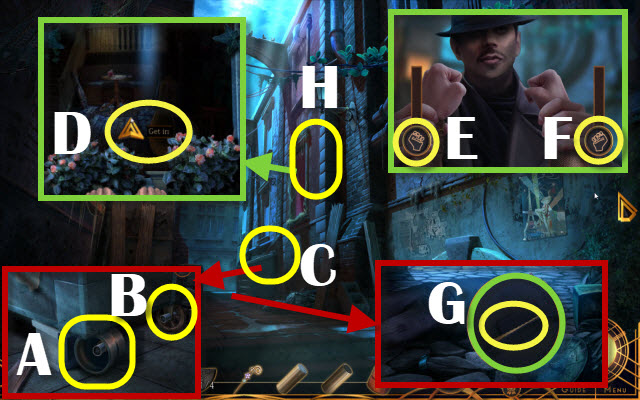
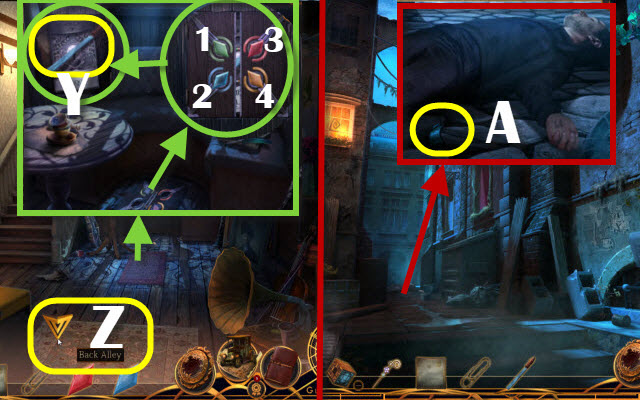
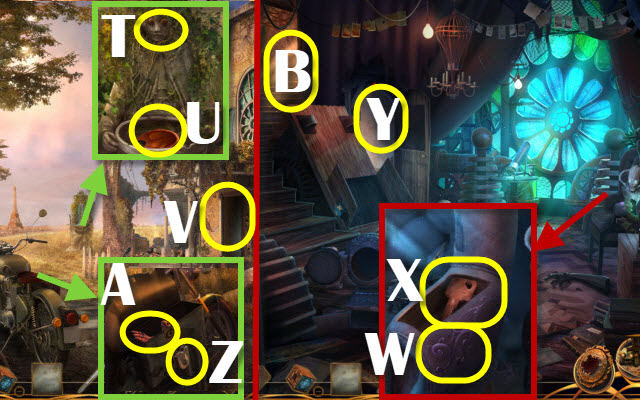
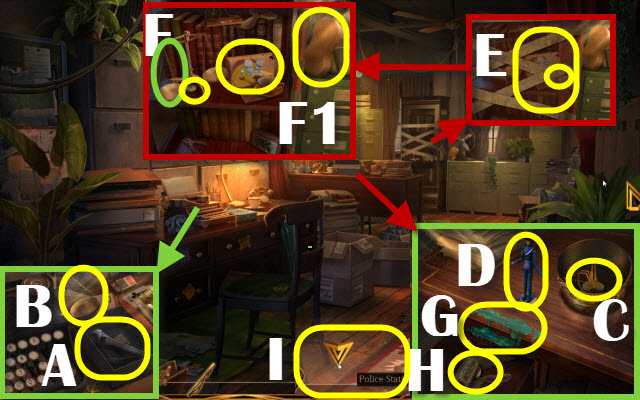
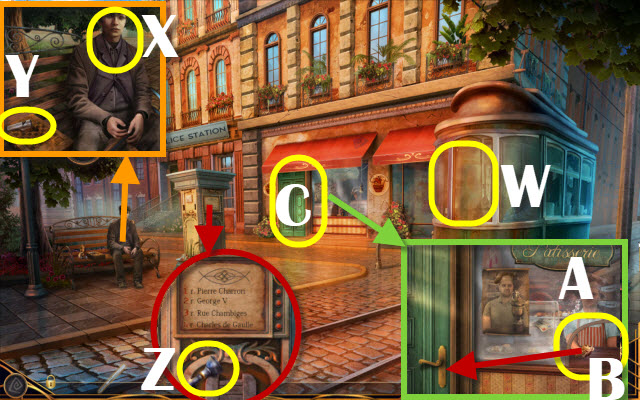
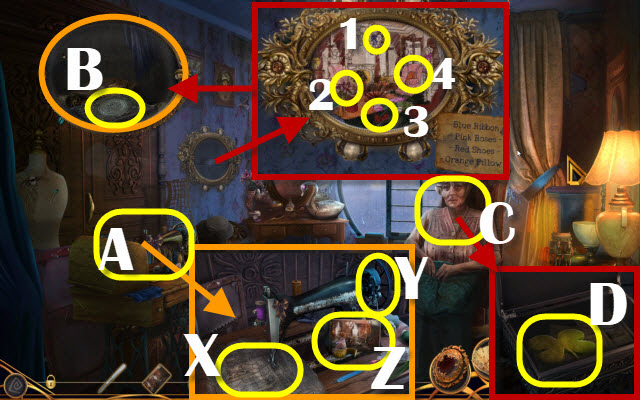
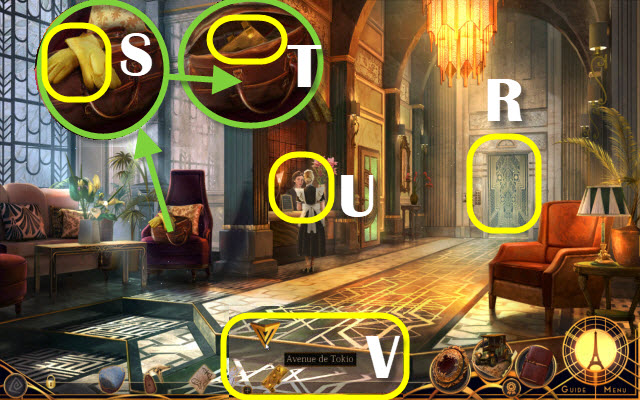
- Take UMBRELLA and TRAVELING BAG (A).
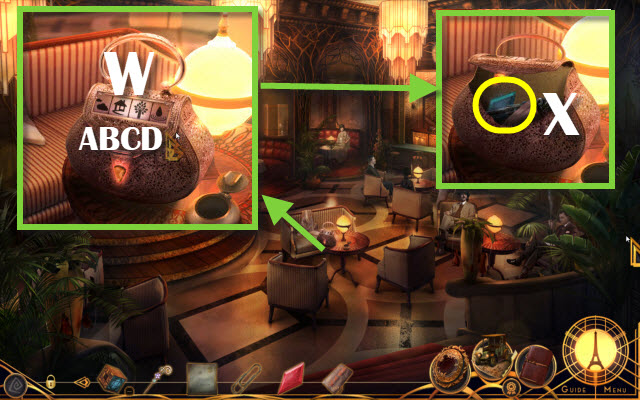
- Open TRAVELING BAG; take UNCLE'S LETTER, MONEY and JOURNAL.
- Talk; give TRAVELING BAG (B).
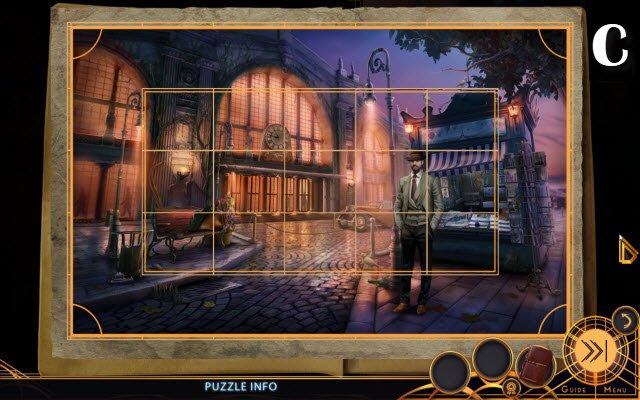
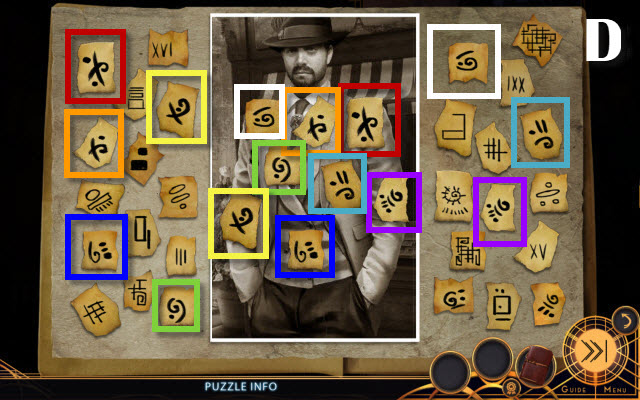
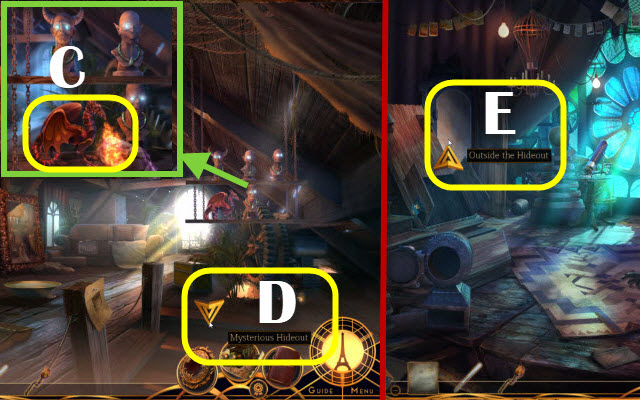
- Solutions (C-D).
- Receive INSPECTOR'S CONTACT CARD.

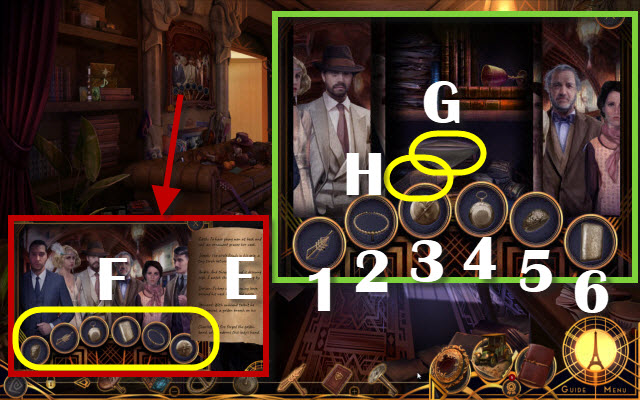
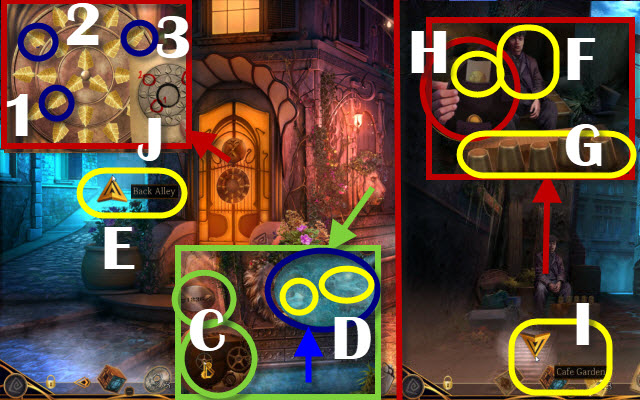
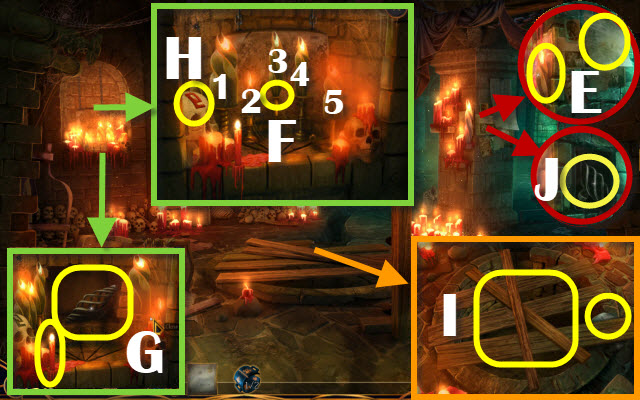
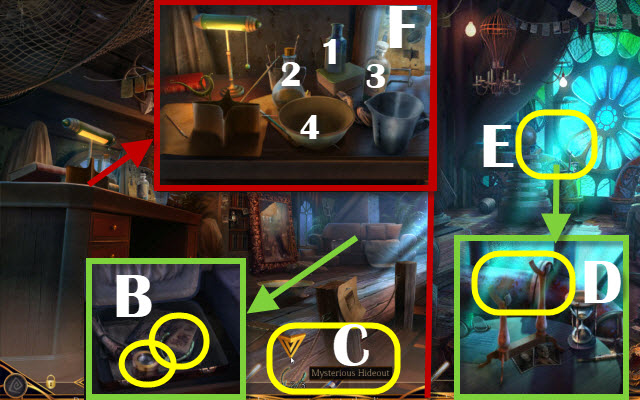
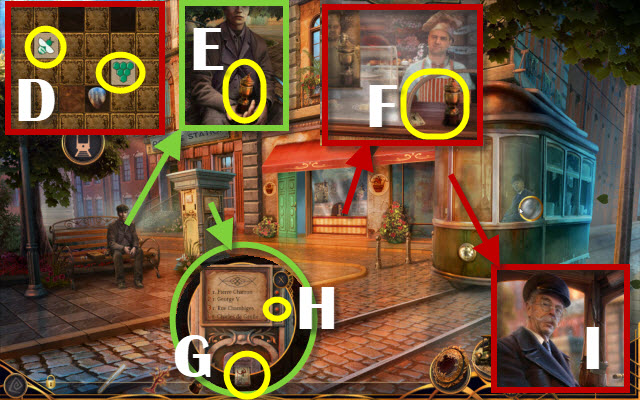
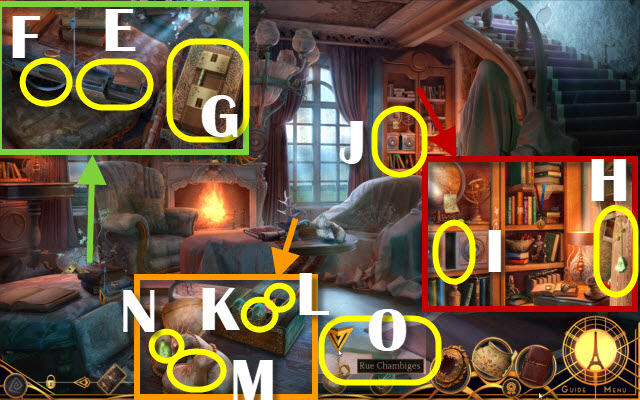
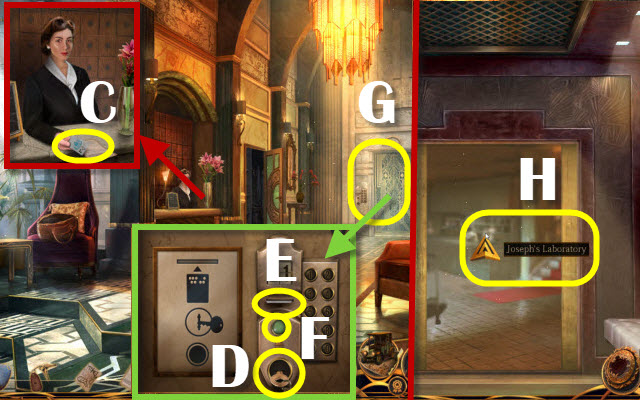
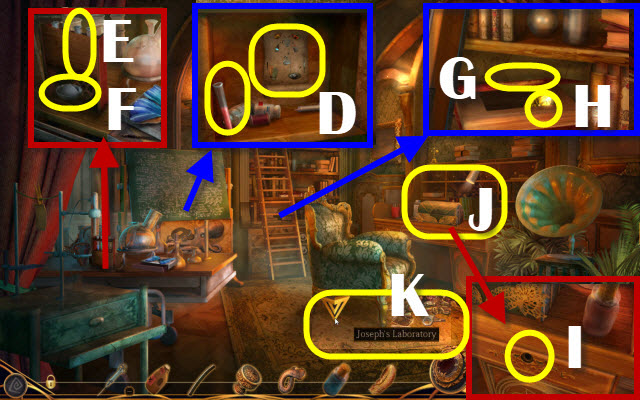
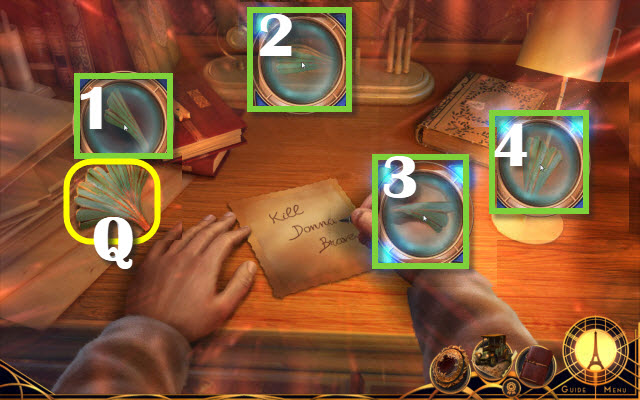
- Take POSTCARDS (E).
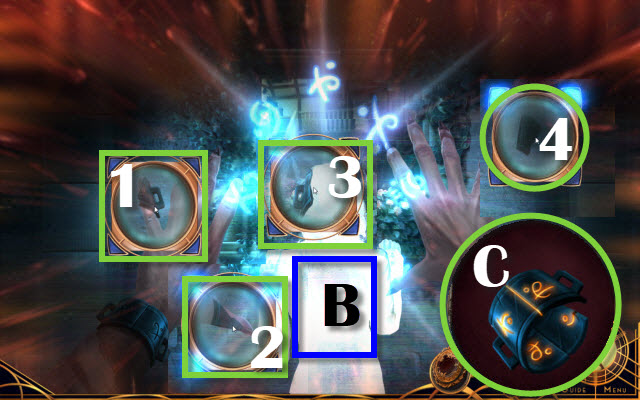
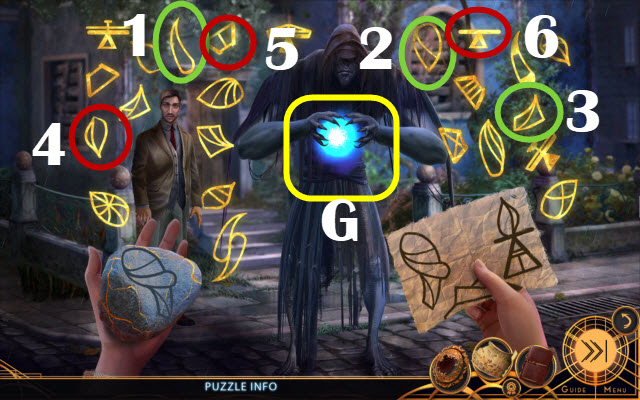
- Select (1-2-3). Place POSTCARDS (4).
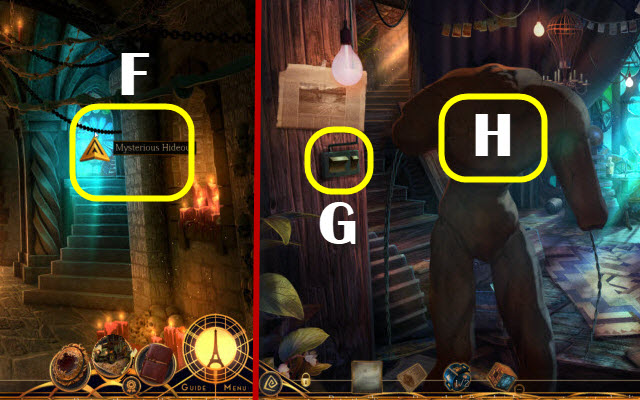
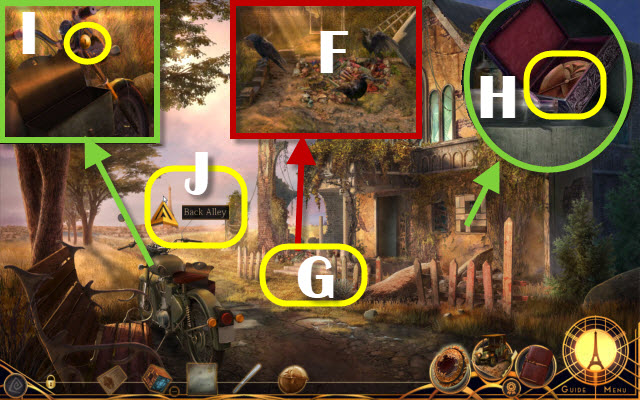
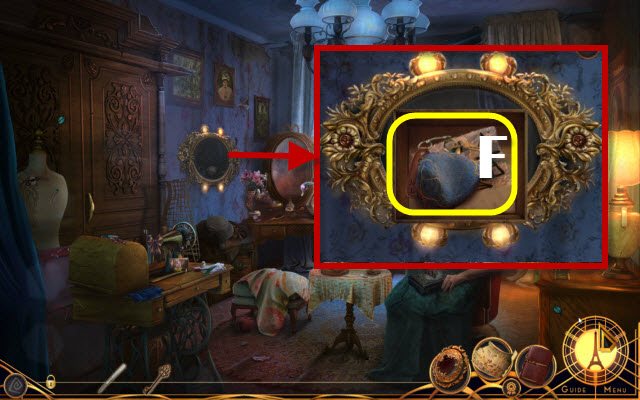
- Play HOP (F); receive MORNING PAPER. Examine it.
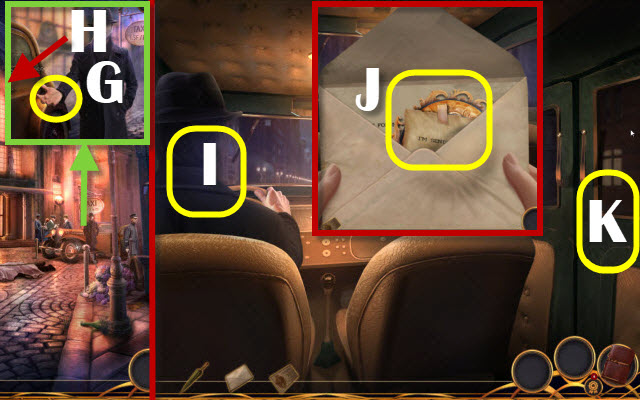
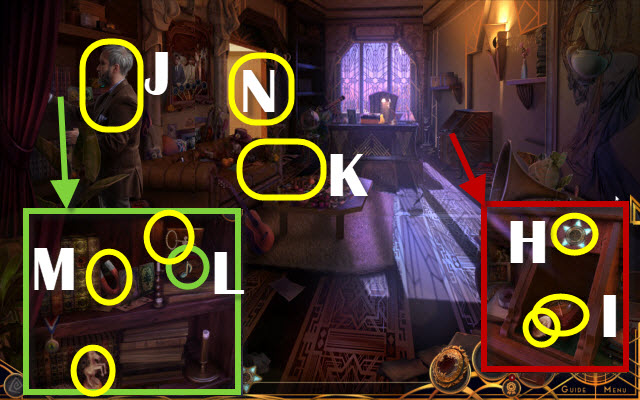
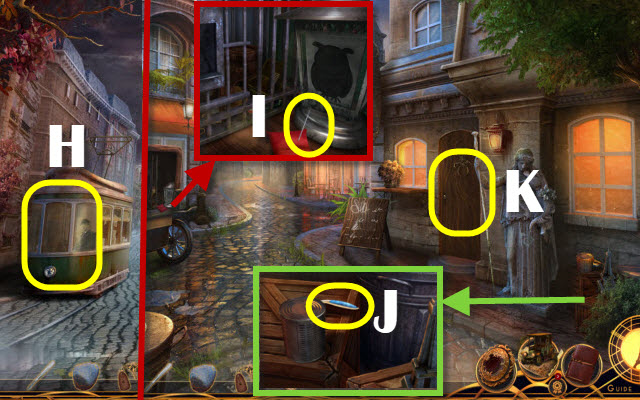
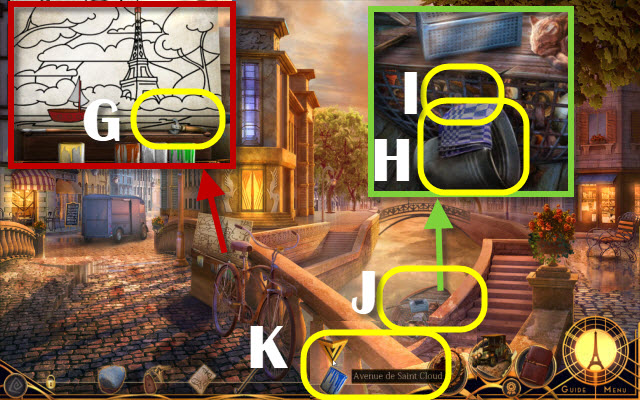
- Give MONEY (G); enter (H).
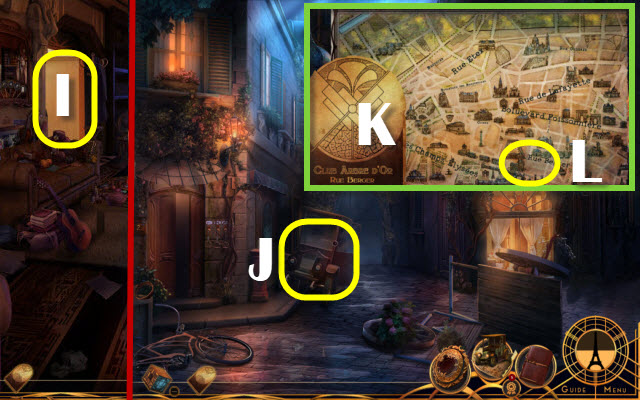
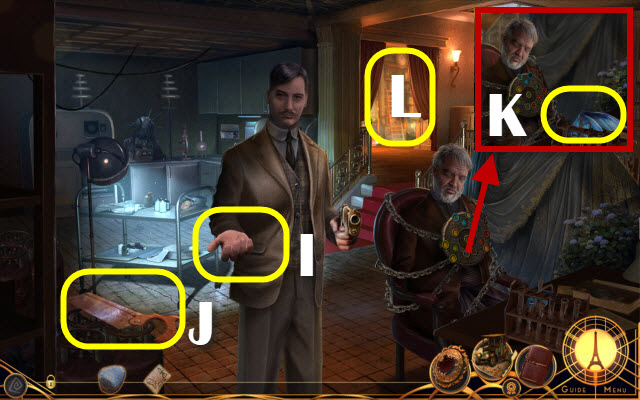
- USE UNCLE'S LETTER (I); take FATHER'S MEDALLION (J).
- Use UMBRELLA (I).
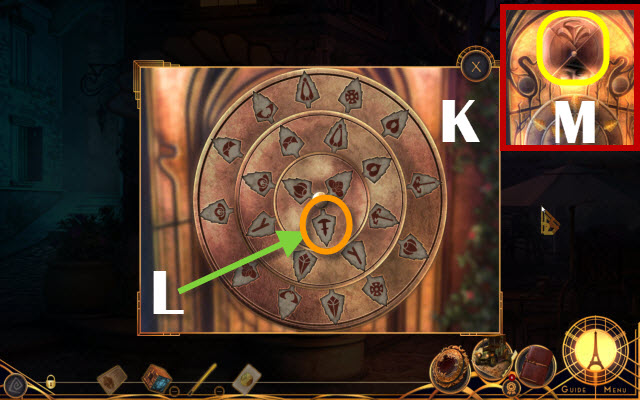
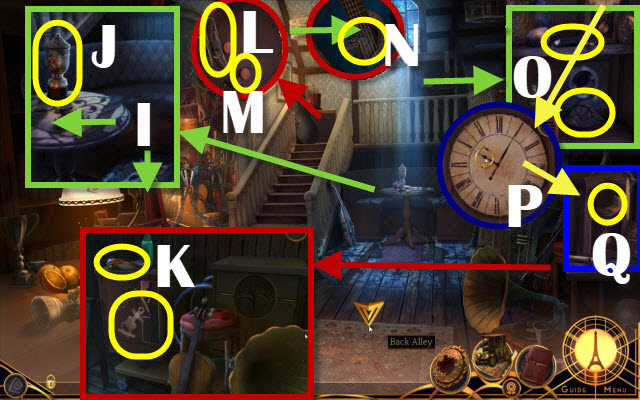
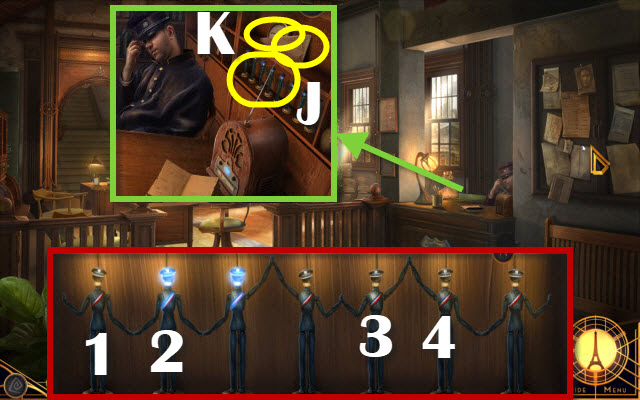
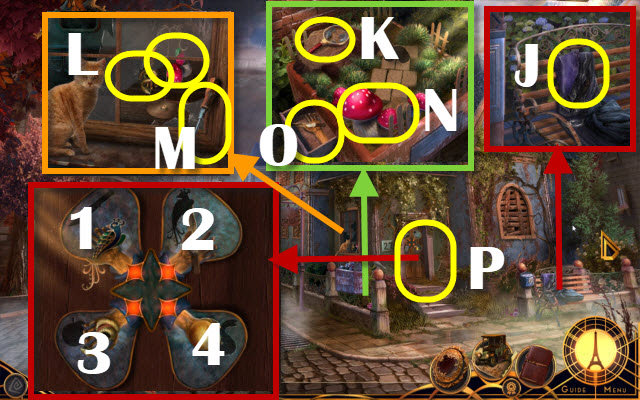
- Exit (K).
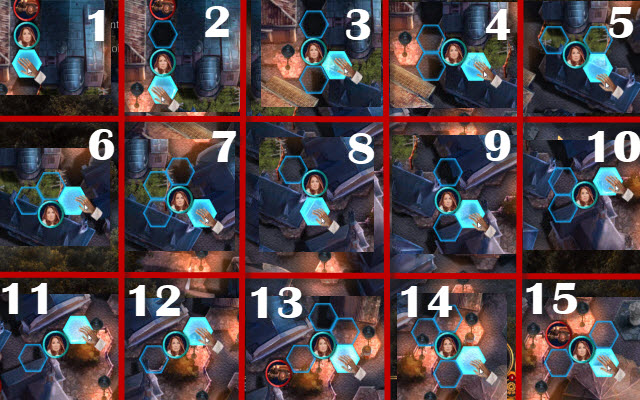
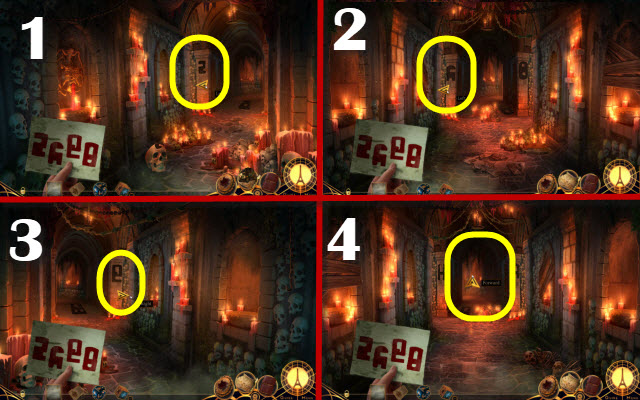
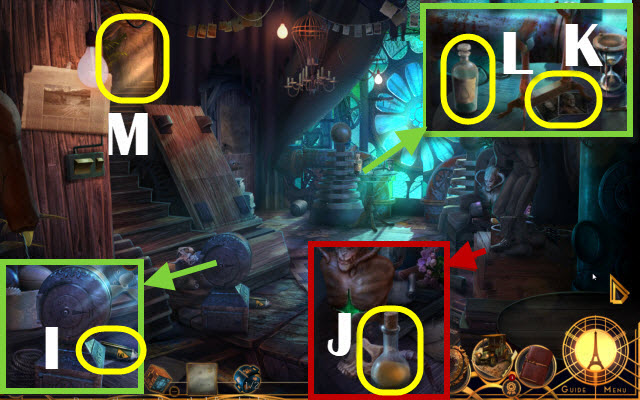
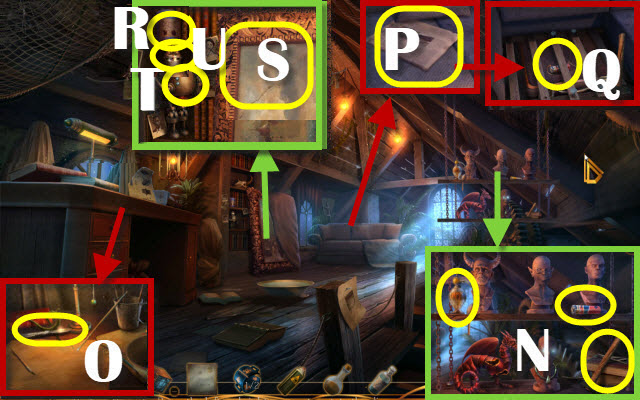
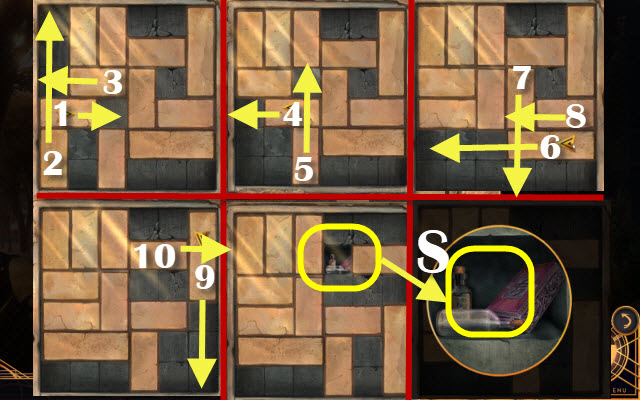
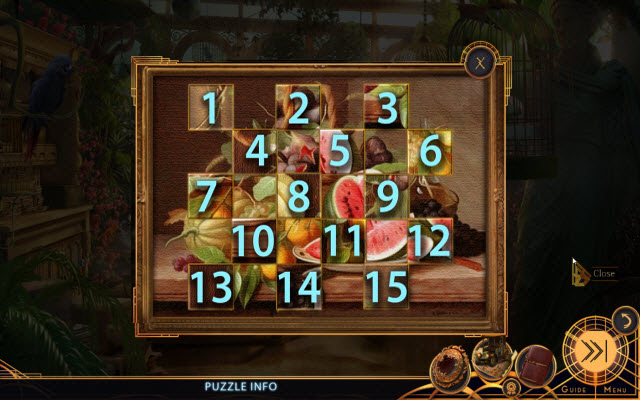
- Solution (1-15).
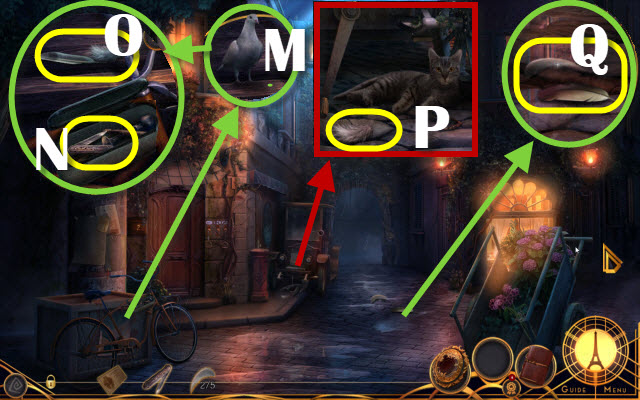
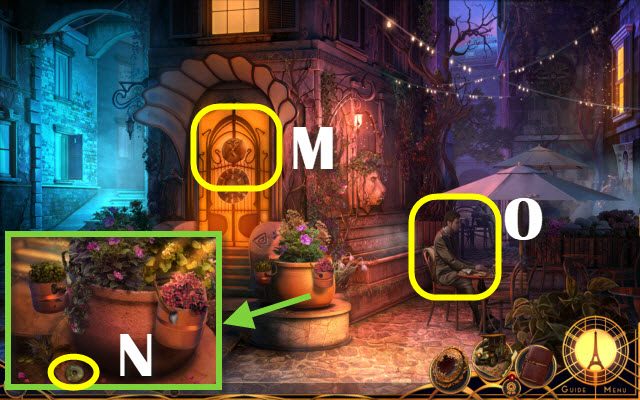
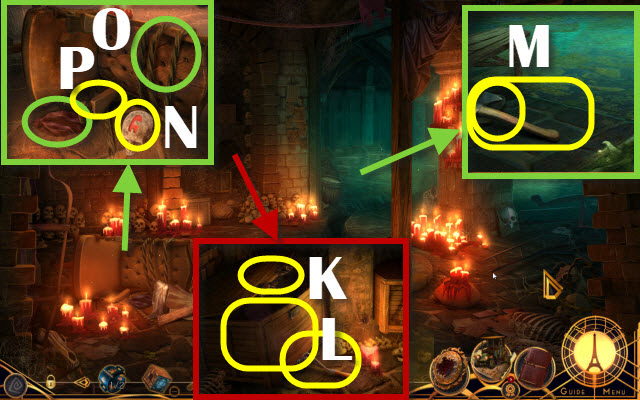
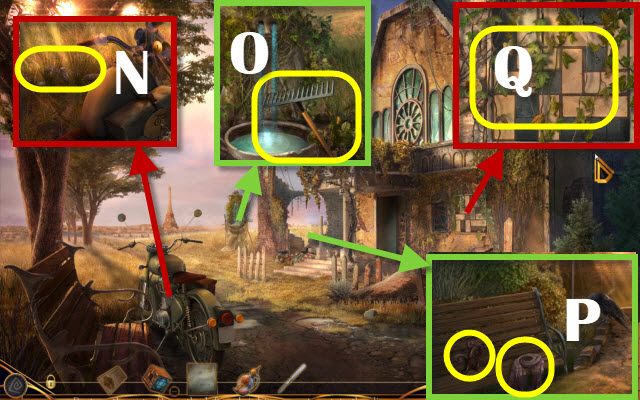
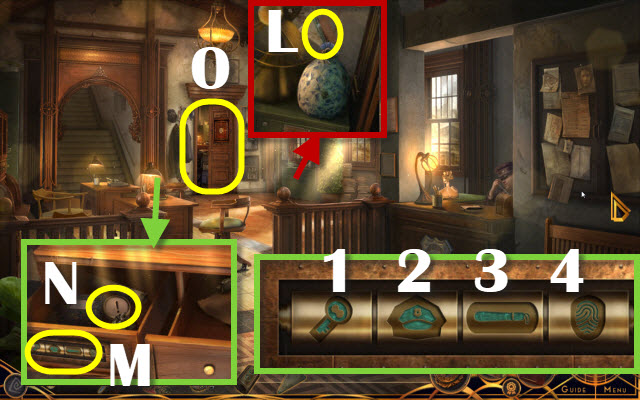
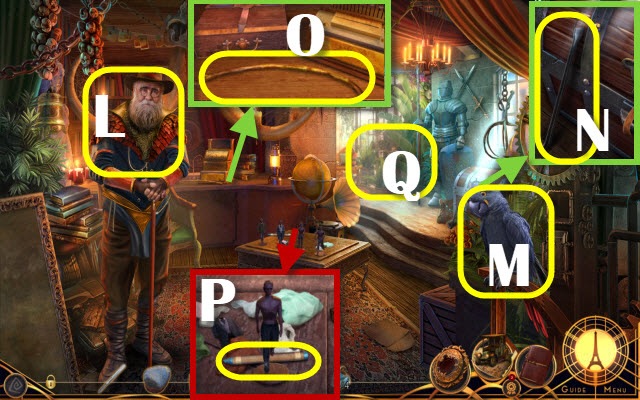
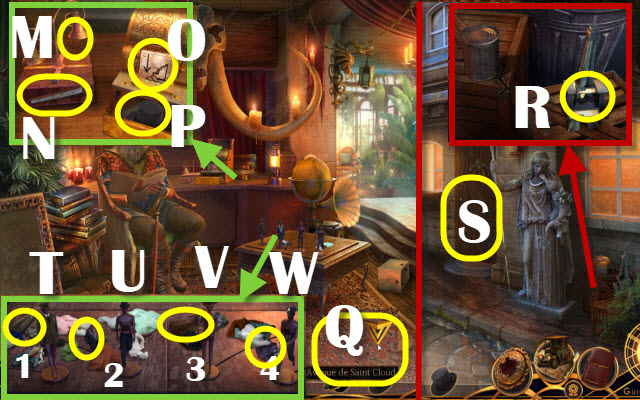
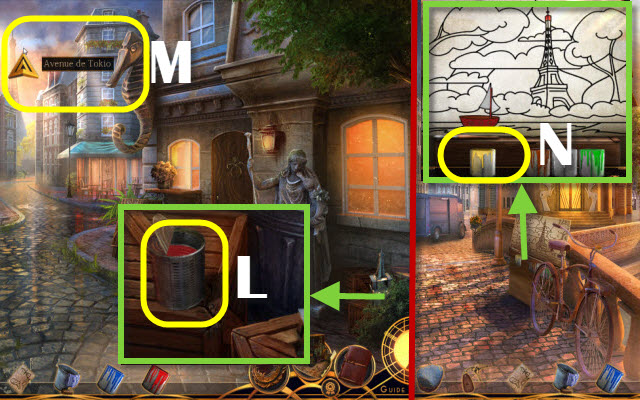
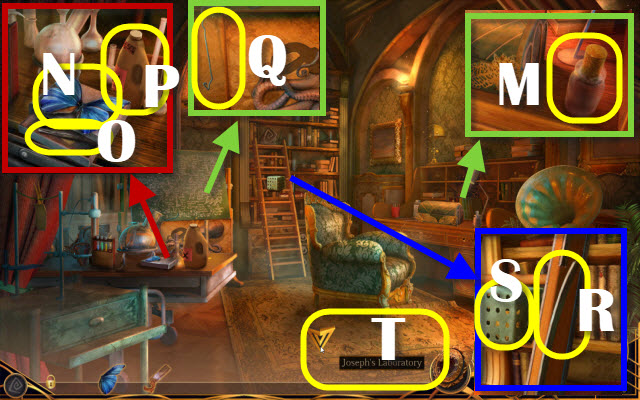
- Select twice (M); take ANTIQUE KNIFE (N).
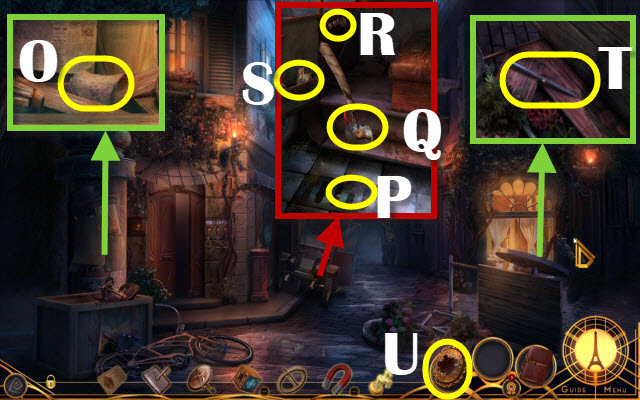
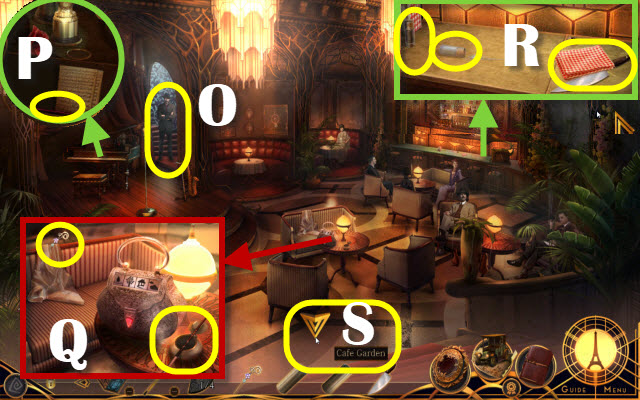
- Take FEATHER 5/5 (O-P-Q).
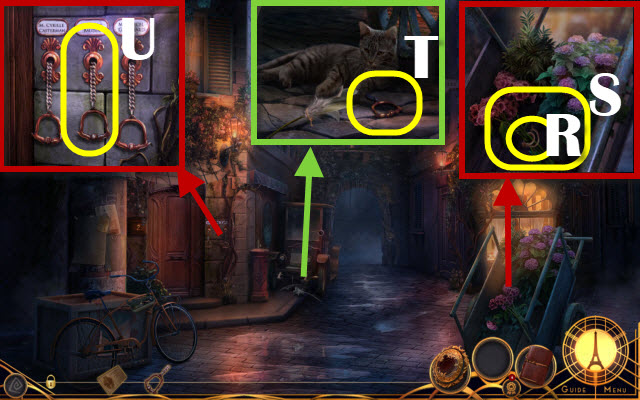
- Take STRING (R).
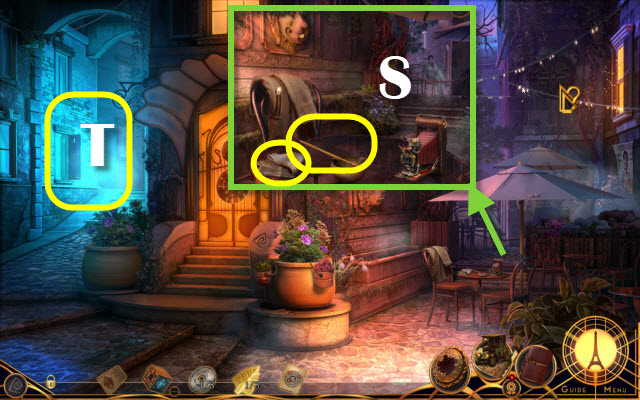
- Use ANTIQUE KNIFE; take FLOWER STEM (S).
- FEATHER 5/5 and STRING on FLOWER STEM; create CAT TOY.
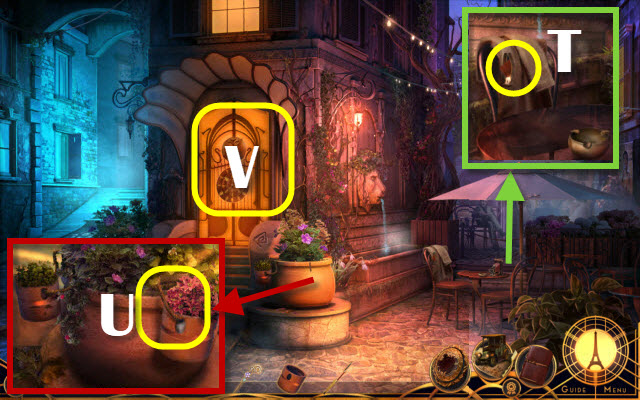
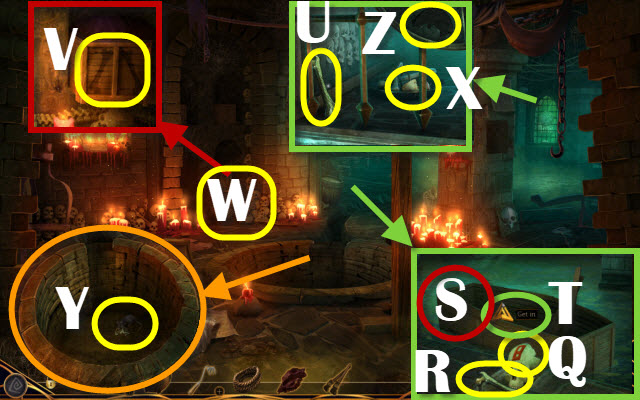
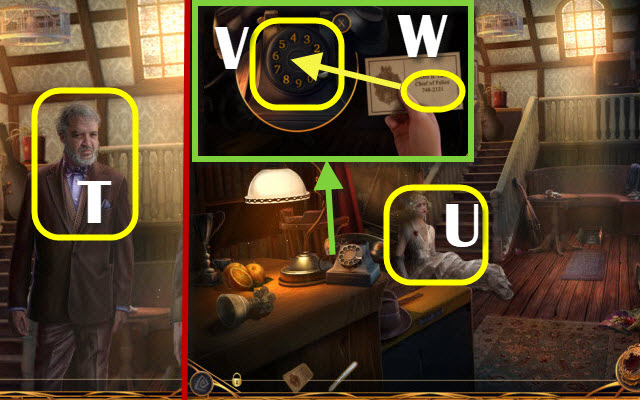
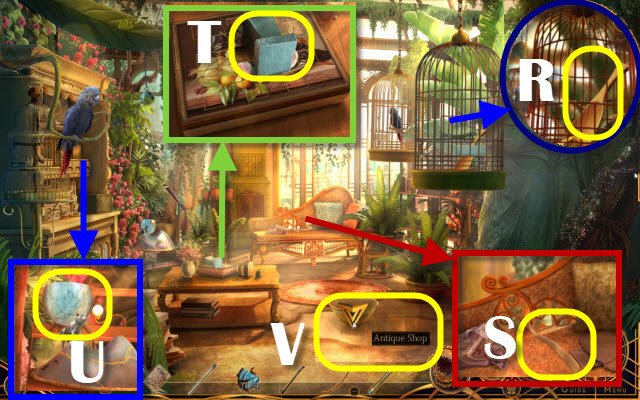
- Use CAT TOY; take DOORBELL CHAIN (T).
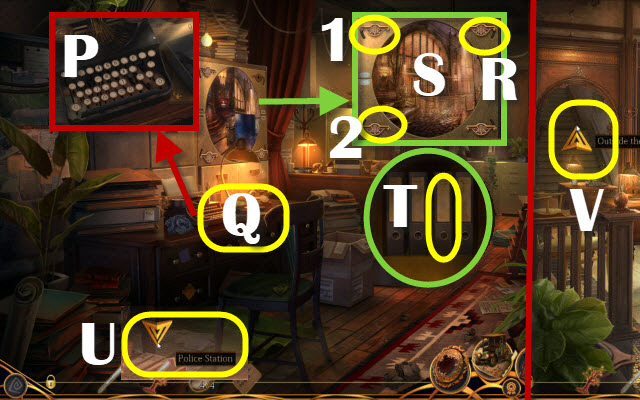
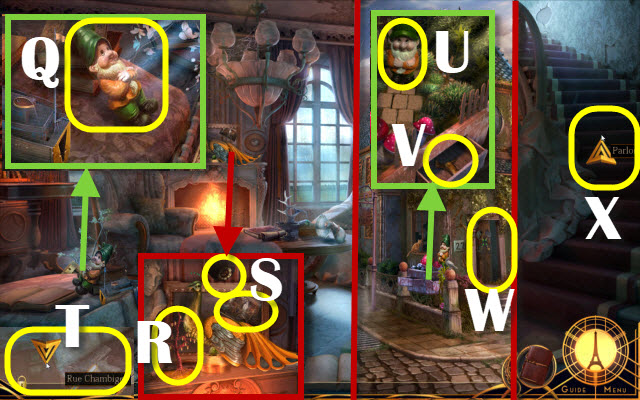
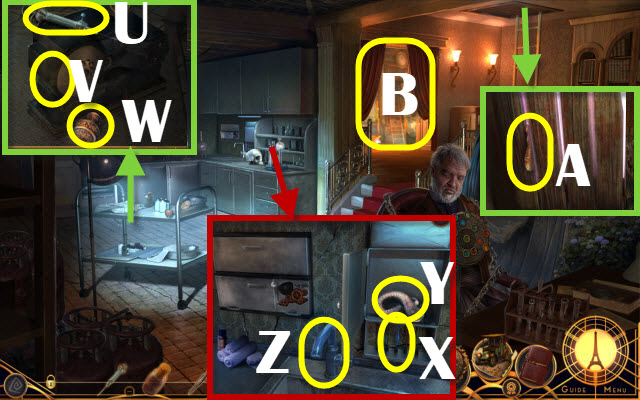
- Hang DOORBELL CHAIN; pull (U).
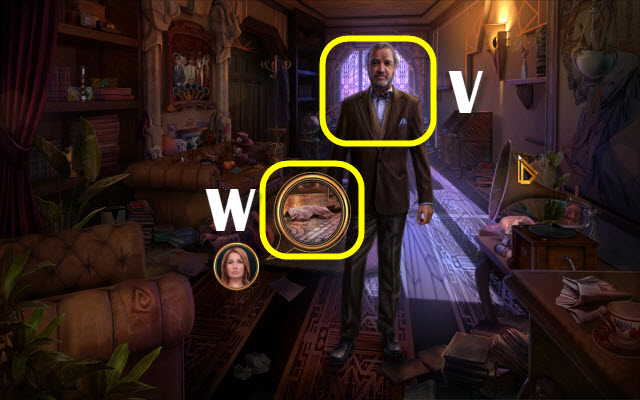
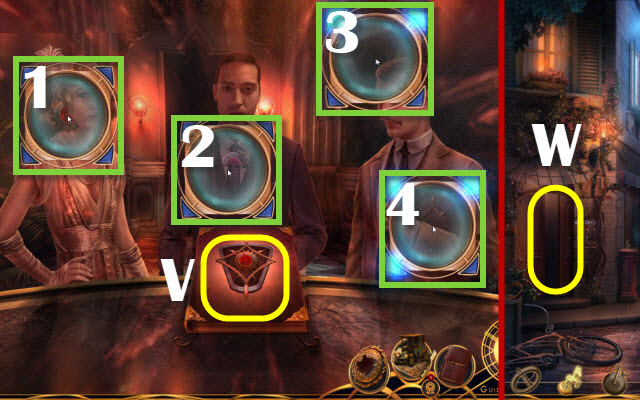
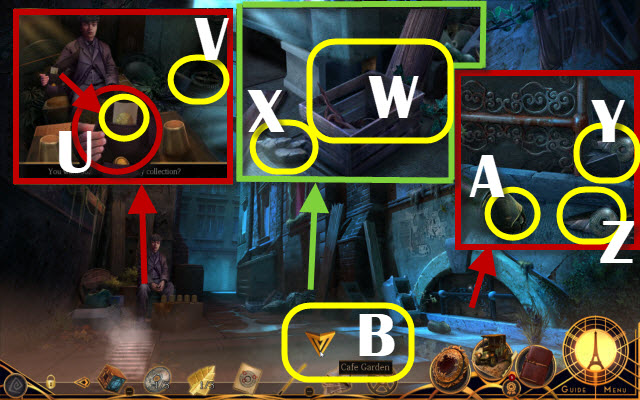
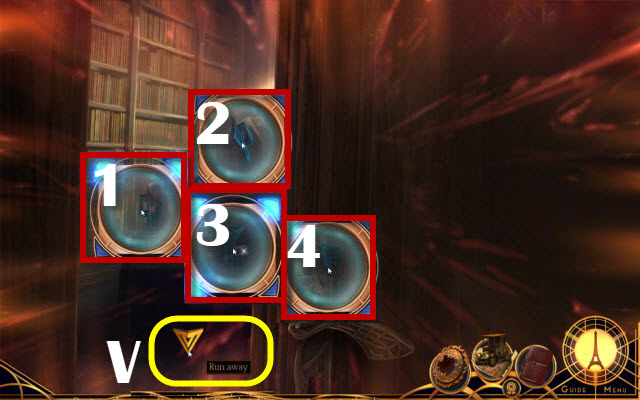
- Talk (V).
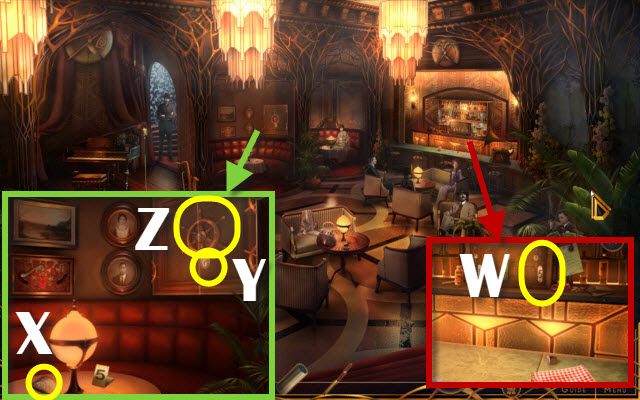
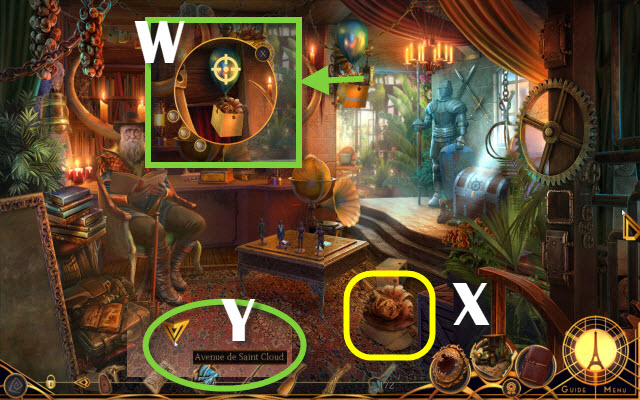
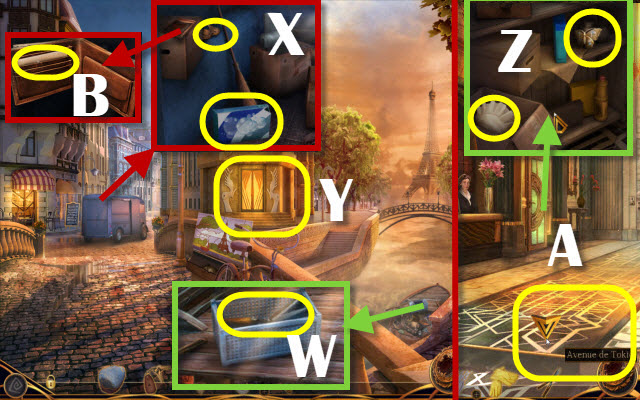
- Select (Wx3).
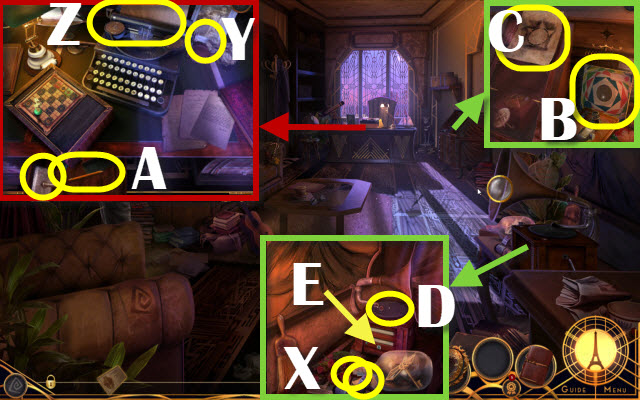
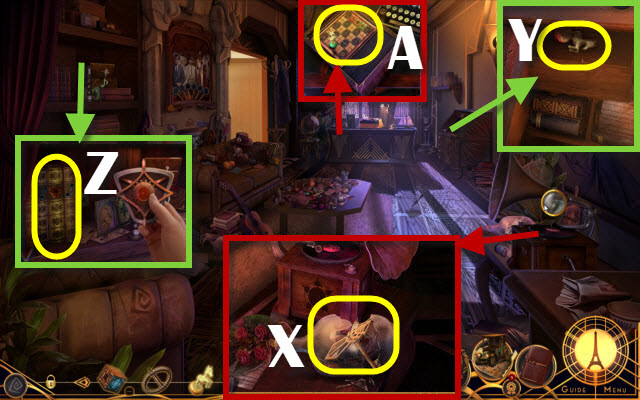
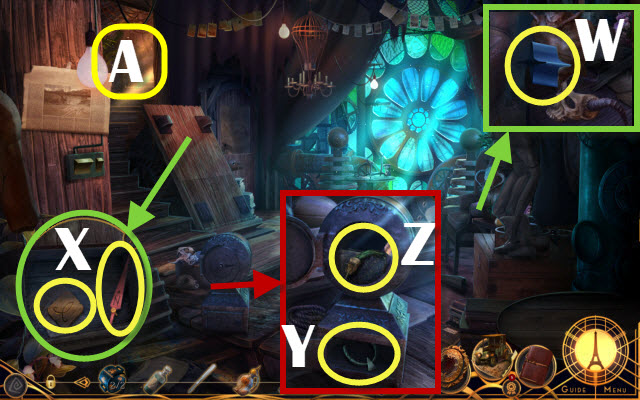
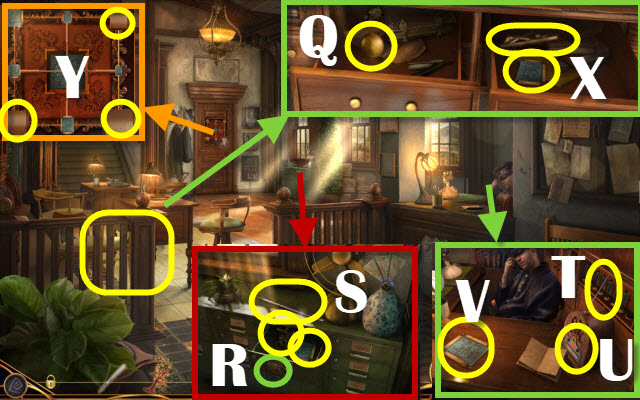
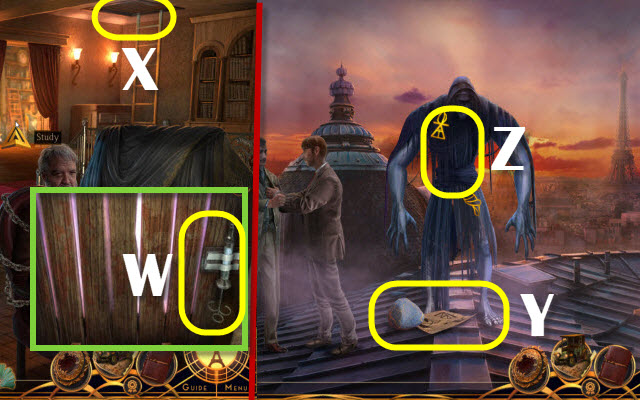
- Take TYPEWRITER KNOB and MUSIC NOTE (X).
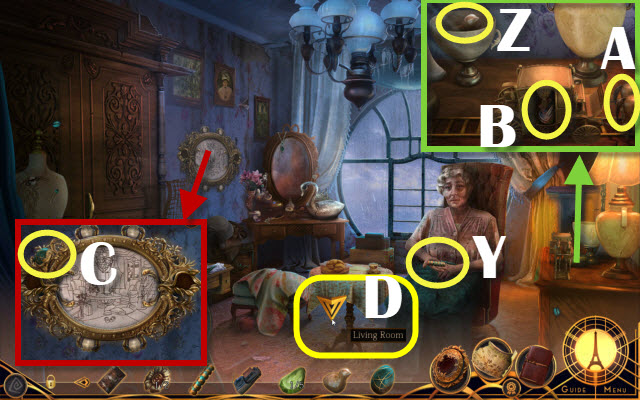
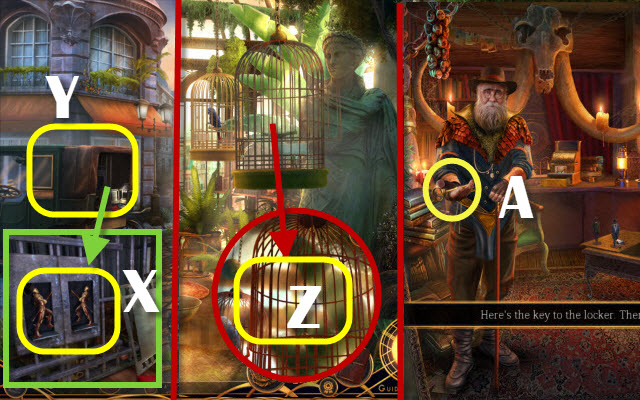
- Place TYPEWRITER KNOB (Y); take BLANK PAPER (Z).
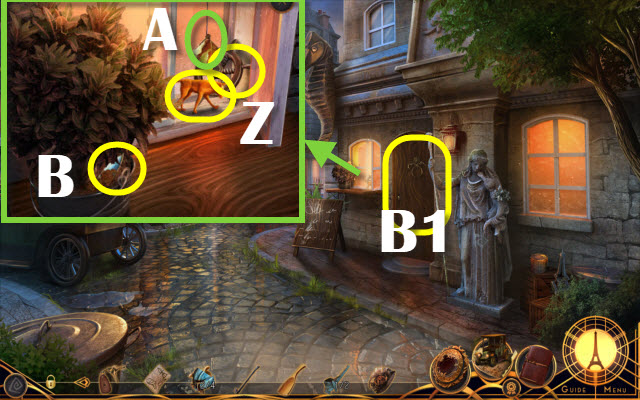
- Take PENCIL and CIGARETTE CASE KEY (A).
- Take PHONOGRAPH RECORD (B).
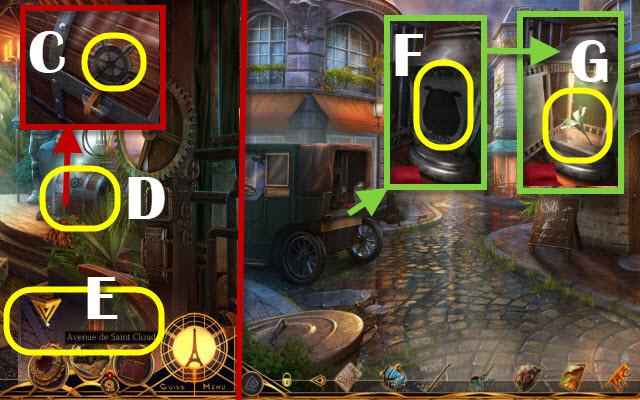
- Use BLANK PAPER and PENCIL; take KEY TRACING (C).
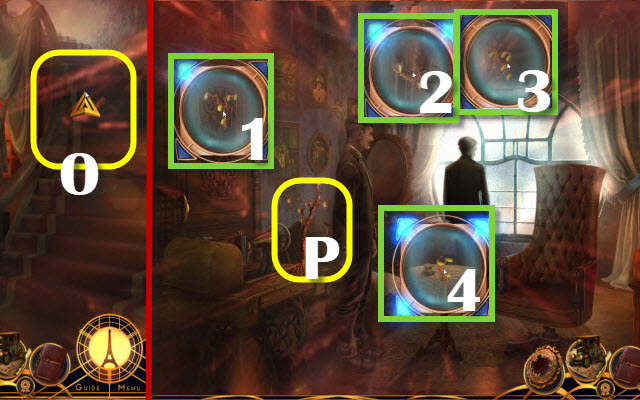
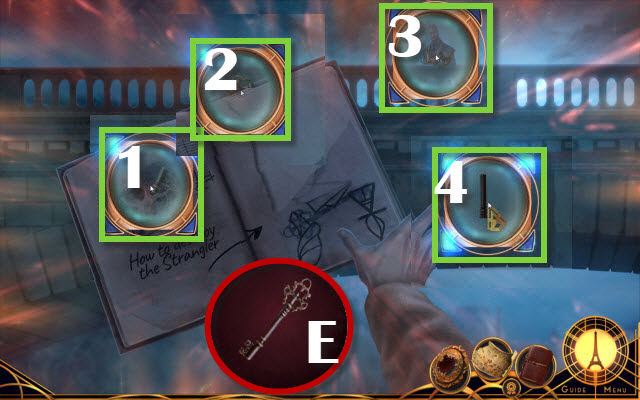
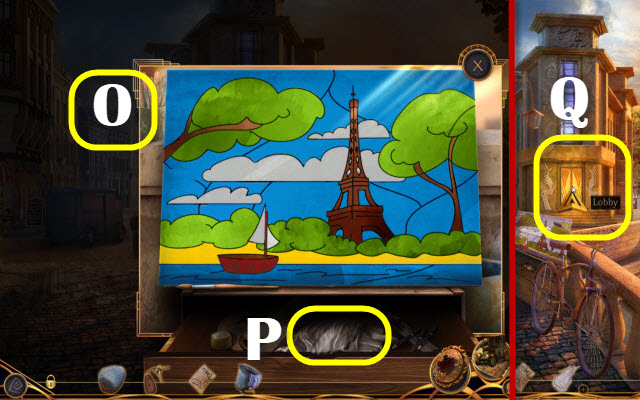
- Place PHONOGRAPH RECORD (D); examine (E).
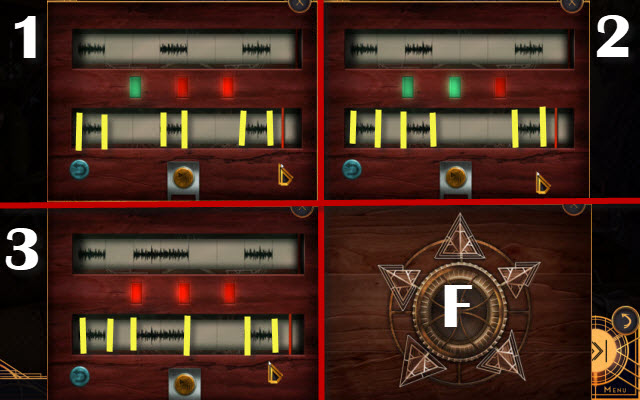
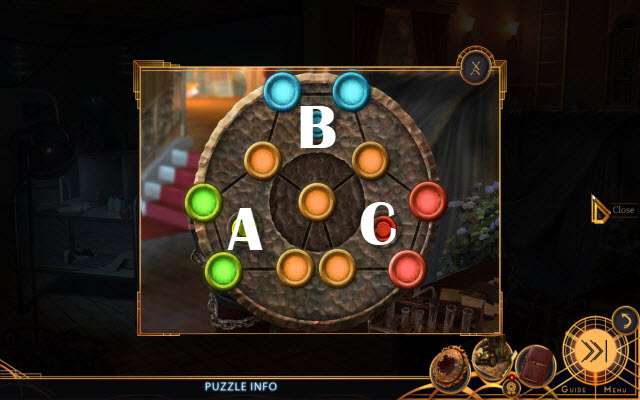
- Solution (1-3); order is random.
- Take COMPLEX KEY (F).
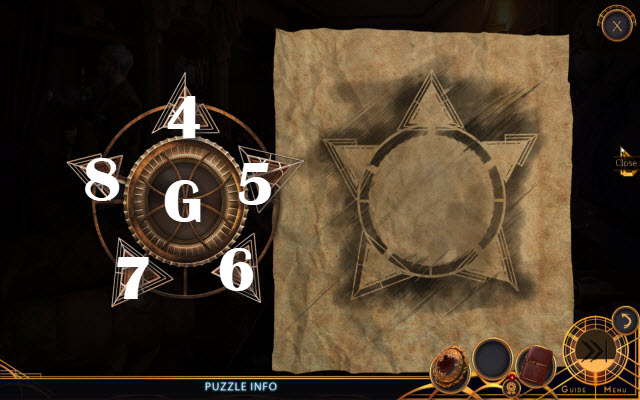
- KEY TRACING on COMPLEX KEY.
- Solution: 4-7x2-6-8-5-8 and 7.
- Take GLOWING KEY (G).
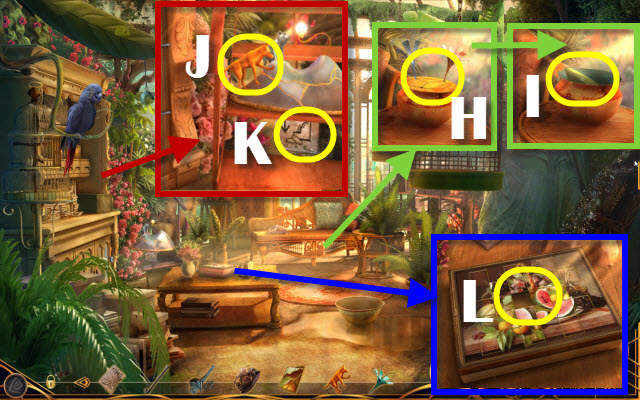
- Place GLOWING KEY (H); take BROOCH KEY and ANDRE'S BOX (I).
- Give ANDRE'S BOX (J).
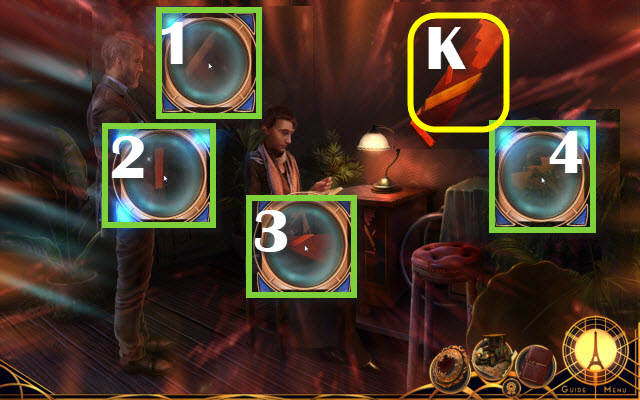
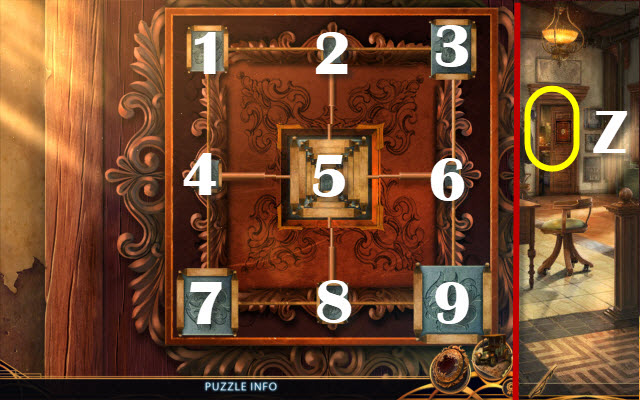
- Play HOP (K); receive PUZZLE BOX.
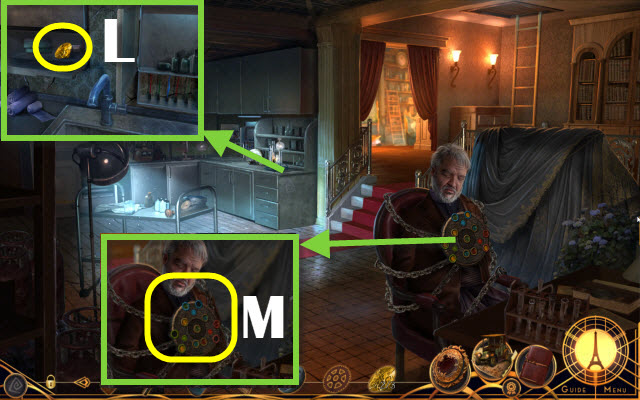
- Place MUSIC NOTE (L); take NECKLACE KEY, YELLOW CHESS PIECE and MAGNET (M).
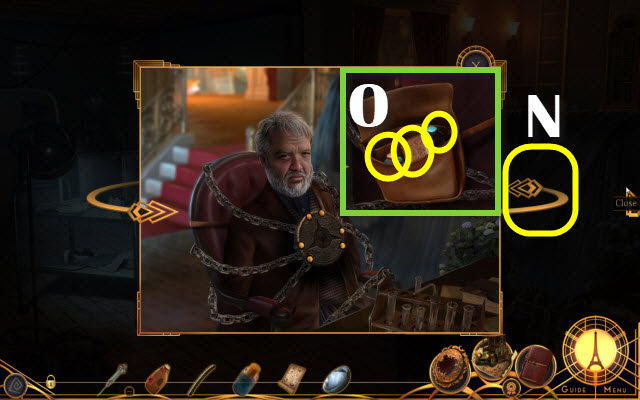
- Go (N).
- Take MAP and NECKTIE (O).
- NECKTIE on MAGNET; create MAGNET TOOL.
- Use MAGNET TOOL (P); take CRUMPLED PAPER and CAR KEY (Q). Place CAR KEY (R).
- Take POCKET WATCH KEY and DRAWER HANDLE (S).
- Take METAL BAR (T).
- Examine CRUMPLED PAPER; receive ANDRE'S POCKET WATCH.
- ANDRE'S POCKET WATCH on FATHER'S MEDALLION (U).
- Select 1-4; take GOLDEN CIRCLE SYMBOL (V).
- Enter (W).
- Use METAL BAR; take TIEPIN KEY (X).
- Place DRAWER HANDLE; take RED CHESS PIECE (Y).
- Use GOLDEN CIRCLE SYMBOL; take GOLDEN CIRCLE BOOK (Z).
- Examine GOLDEN CIRCLE BOOK; take PICTURE CODE.
- Place YELLOW CHESS PIECE and RED CHESS PIECE (A).
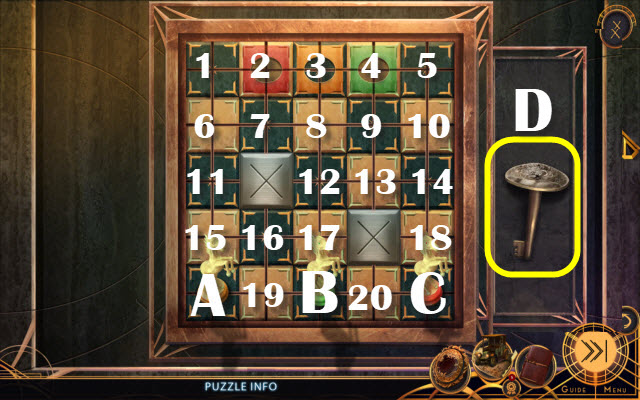
- Solution: (A-17-14-4-7-13-3)-(B-18-12-4)-(C-17-11-2).
- Take RING KEY (D).
- Place PICTURE CODE (E).
- Place from left: RING KEY, TIEPIN KEY, POCKET WATCH KEY, CIGARETTE CASE KEY, NECKLACE KEY and BROOCH KEY (F).
- Solution: (1-5)-(1-2)-(3-6) and (4-6).
- Read (G); take GOLDEN CIRCLE ADDRESS (H).
- Go (I).
- Enter (J); place GOLDEN CIRCLE ADDRESS (K).
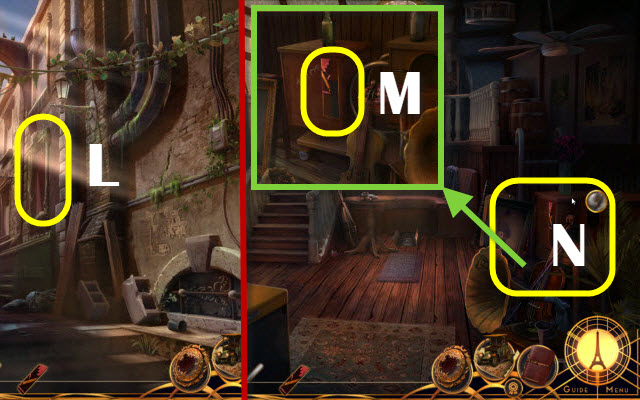
- Go (L).
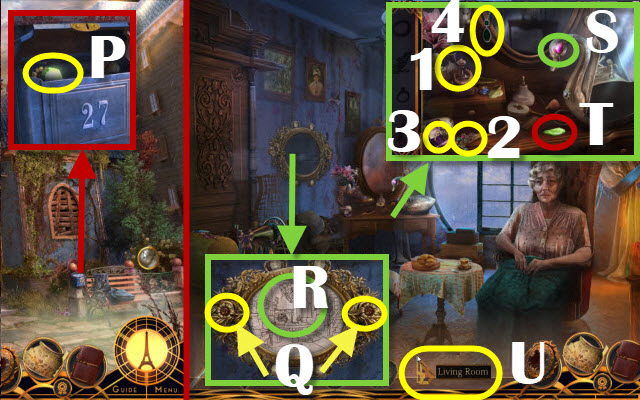
- Examine (M).
- Take 10 CENTIMES 1/3 (N).
- Speak (O).
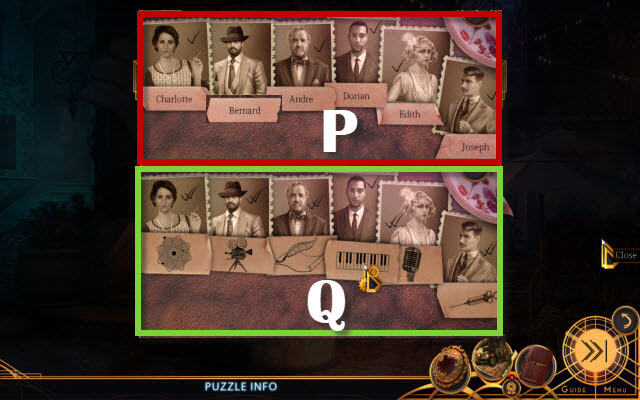
- Solution (P-Q).
- Receive GOLDEN LEAF 1/3 and DOOR CODE.
- Take HANDKERCHIEF and PLAIN CIGARETTE HOLDER (S).
- Go (T).
- Select (U); take GEAR (V).
- Move (W); take SHARP ROCK (X).
- Use SHARP ROCK and HANDKERCHIEF (Y); take 20 CENTIMES 2/3 and GOLDEN LEAF 2/3 (Z).
- Take CAN LID (A).
- Go (B).
- Use CAN LID and GEAR (C).
- Take 30 CENTIMES 3/3 and GOLDEN LEAF 3/3 (D).
- Go (E).
- Give 30 CENTIMES 3/3 (F).
- Play (G); random.
- Take GUEST CARD (H).
- Go (I).
- Use GOLDEN LEAF 3/3; zoom and DOOR CODE (J). Select (1-3).
- Solution (K); match pairs of symbols; select (L).
- Give GUEST CARD (M); enter.
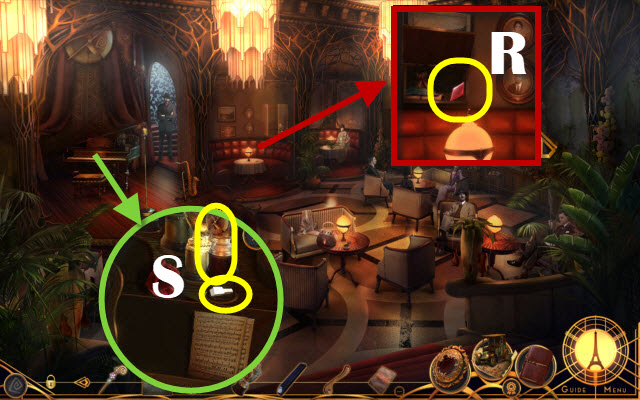
- Speak (O).
- Take FANCY CIGARETTE HOLDER 1/2 (P).
- Take HATPIN and FANCY CIGARETTE HOLDER 2/2 (Q).
- Take SALT SHAKER, PEPPER SHAKER and SHARP KNIFE (R).
- Go (S).
- Use HATPIN; examine; take ADHESIVE TAPE (T).
- Use SHARP KNIFE (U); receive ROUND FLOWER POT.
- FANCY CIGARETTE HOLDER 2/2 and ADHESIVE TAPE on PLAIN CIGARETTE HOLDER; create LONG STICK.
- Go (V).
- Use LONG STICK; receive SHOWCASE KEY (W).
- Take TREE INSET PIECE 1/4 (X).
- Use SHOWCASE KEY (Y).
- Take DECORATIVE SHIP'S WHEEL (Z); remove handles; create IMPROVISED WHEEL.
- Go to Back Alley.
- Use ROUND FLOWER POT and SALT SHAKER (A), IMPROVISED WHEEL and PEPPER SHAKER (B); select (A).
- Push (C).
- Enter (D).
- Alternate (E-F).
- Select 3x; take NAPKIN WITH MESSAGE (G).
- Go (H).
- Move (I); take HEAVY GOBLET (J).
- Take BOTTLE OPENER and BRASS HANDLE (K).
- Take PAPER CLIP (L); use BOTTLE OPENER (M). Take TREE INSET PIECE 2/4 (N).
- Take BLACK PIANO KEY and TREE INSET PIECE 3/4 (O).
- Set 10:05 (P); take INCOMPLETE ANIMAL CODE (Q).
- Go to Club Arbre d'Or.
- Place BRASS HANDLE; take RED DIAMOND (R).
- Place HEAVY GOBLET; take WHITE PIANO KEY (S).
- Go to Back Room.
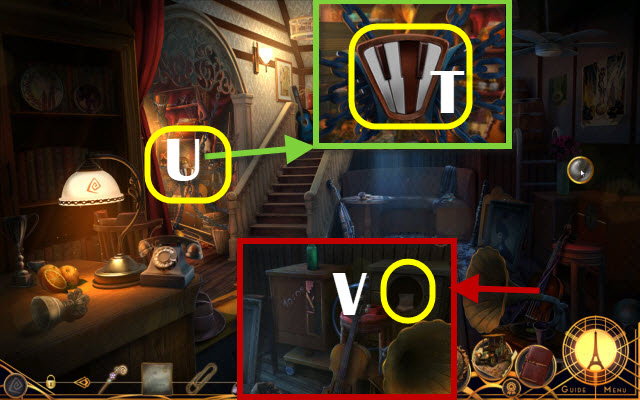
- Place WHITE PIANO KEY and BLACK PIANO KEY (T).
- Play HOP (U); receive TREE INSET PIECE 4/4.
- Place TREE INSET PIECES 4/4; take ANIMAL CODE PART (V).
- ANIMAL CODE PART on INCOMPLETE ANIMAL CODE; create COMPLETE ANIMAL CODE.
- Go to Club Arbre d'Or.
- Place COMPLETE ANIMAL CODE (W).
- Solution: A-B-Cx3-Dx3.
- Take BLUE DIAMOND (X).
- Go to Back Room.
- Place RED DIAMOND and BLUE DIAMOND (Y); select (1-4).
- Take FILE (Y).
- Go (Z).
- Use FILE; take STRANGLERS SHACKLE (A).
- STRANGLERS SHACKLE on MEMORY MEDALLION.
- Solution: (1-4).
- Select (B); take CHARGED SHACKLE 1/2 (C).
Chapter 2: Catacombs
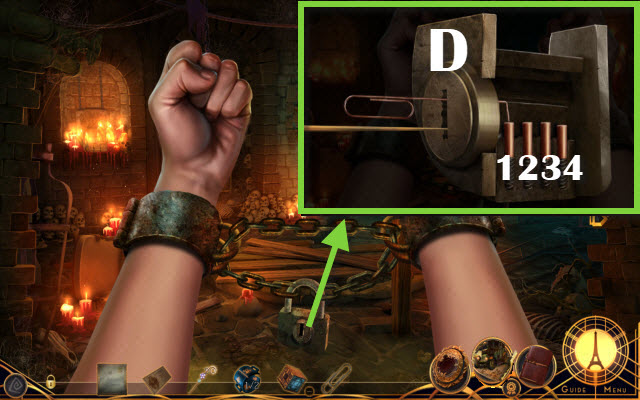
- Use PAPER CLIP and HATPIN (D).
- Solution: 3-2-4-1.
- Take SHEET OF PAPER and BIZARRE CANDLE (E).
- Place BIZARRE CANDLE (F).
- Solution: (1-4)-(2-5)-(1-2).
- Take COFFIN HANDLE 1/2 and BURNING CANDLE (G).
- Use BURNING CANDLE; take WAX STAMP 1/4 (H).
- Take WOODEN PLANKS and SKULL INSET (I).
- Place SKULL INSET; take COFFIN HANDLE 2/2 (J).
- Place COFFIN HANDLE 2/2 (K); take COFFIN and MENACING RAKE (L).
- Take HATCHET and FLAT STONE (M).
- Use BURNING CANDLE; take WAX STAMP 2/4 (N).
- Take LONG ROPE and DIRTY RAG (O).
- Use HATCHET; take ARMRESTS (P).
- ARMRESTS and LONG ROPE on WOODEN PLANKS; create IMPROVISED PADDLES.
- DIRTY RAG on MENACING RAKE; create CLEANING TOOL.
- Use CLEANING TOOL and BURNING CANDLE; take WAX STAMP 3/4 (Q) and BONE 1/2 (R).
- Place COFFIN and IMPROVISED PADDLES (S); go (T).
- Take BONE 2/2 (U).
- Place BONE 2/2 (V); select.
- Play HOP (W); receive ORNAMENTAL HAIRPIN.
- Use ORNAMENTAL HAIRPIN; take CHEESE (X).
- LONG ROPE and CHEESE on FLAT STONE; create BAIT.
- Use BAIT (Y); receive GATE TILE.
- Place GATE TILE (Z).
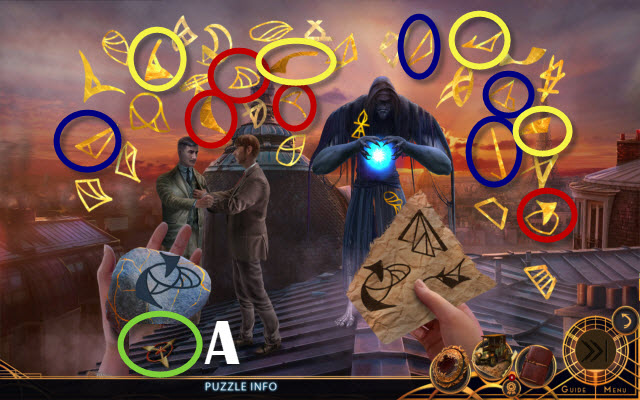
- Solution (A).
- Go (B).

- Use BURNING CANDLE; take WAX STAMP 4/4 (C).
- Dunk WAX STAMP 4/4; take INKED STAMPS (D).
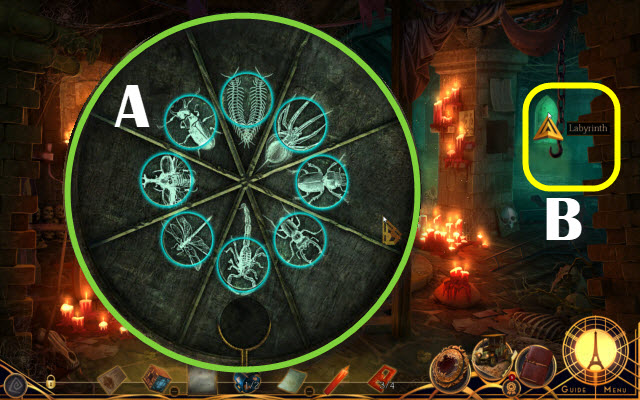
- INKED STAMPS on SHEET OF PAPER; create LABYRINTH GUIDE and use (E).
- Solution: 1-4.
- Go (F).
- Select (G-H).
- Take PAINT THINNER (I).
- Take STRANGE LIQUID (J).
- Look (K); take DISTILLED WATER (L).
- Go (M).
- Take PERFUME, BATTERY 1/2 and HAMMER (N).
- Take SCALPEL (O).
- Read (P); move pillows and cushion, use HAMMER; take BATTERY 2/2 (Q).
- Take THIN METAL SHEET (R). Use PAINT THINNER and SCALPEL; take RECIPE PART (S).
- Insert BATTERY 2/2 (T); take IRON KEY and DORIAN'S TIEPIN (U).
- DORIAN'S TIEPIN on MEMORY MEDALLION.
- Solution: 1-4.
- Go (V).
- Receive CHARGED SHACKLE 2/2.
- Walk down.
- Use THIN METAL SHEET; take MOLD (W).
- Place CHARGED SHACKLE 2/2; take ENGRAVED LATCH and COMPASS NEEDLE (X).
- Use IRON KEY; take NECKLACE 1/3 (Y).
- Place COMPASS NEEDLE; read and take BROKEN KALEIDOSCOPE (Z).
- Go (A).
- Place ENGRAVED LATCH; take NECKLACE 2/3 and KALEIDOSCOPE LENS (B).
- KALEIDOSCOPE LENS on BROKEN KALEIDOSCOPE; create KALEIDOSCOPE.
- Go (C).
- Place KALEIDOSCOPE (D).
- Play HOP (E); receive a WEIRD CHEMICAL.
- Go to Attic.
- Add RECIPE PART(F).
- Place MOLD, WEIRD CHEMICAL, DISTILLED WATER and STRANGE LIQUID; select (1-4). Receive DEMONIC EMBLEM.
- Go (C).

- Place DEMONIC EMBLEM; take NECKLACE 3/3 (G).
- Go (H).
- Place NECKLACE 3/3 (I); take DOOR HANDLE (J).
- Go (K).
- Place DOOR HANDLE (L).
- Go (M).
- Take BRANCH (N).
- Take GARDEN RAKE (O).
- Take OLD SCARF and ARMCHAIR INSET (P).
- OLD SCARF and PERFUME on BRANCH; create IMPROVISED TORCH.
- Use GARDEN RAKE (Q).
- Solution: 1-10.
- Take CORKS (S).
- Use CORKS (T); take DRAGON WING (U).
- Go (V).
- Place ARMCHAIR INSET (W); take SMALL KEY (X).
- Go (Y).
- Use SMALL KEY (Z); take DRAGON PAW (A).
- Go (V-B).
- Place DRAGON WING, DRAGON PAW and IMPROVISED TORCH (C); receive BURNING TORCH.
- Go (D-E).
- Use BURNING TORCH (F).
- Play HOP (G); receive PURPLE INLAY.
- Place PURPLE INLAY; take BERNARD'S BROOCH and MOTORCYCLE KEY (H).
- Insert MOTORCYCLE KEY (I).
- Go (J).
- BERNARD'S BROOCH on MEMORY MEDALLION.
- Solution: (1-4).
- Take PATTERNED TILE (K).
- Go (L).
- Place PATTERNED TILE (M).
- Play HOP (N); receive PUZZLE BOX PART.
- PUZZLE BOX PART on PUZZLE BOX.
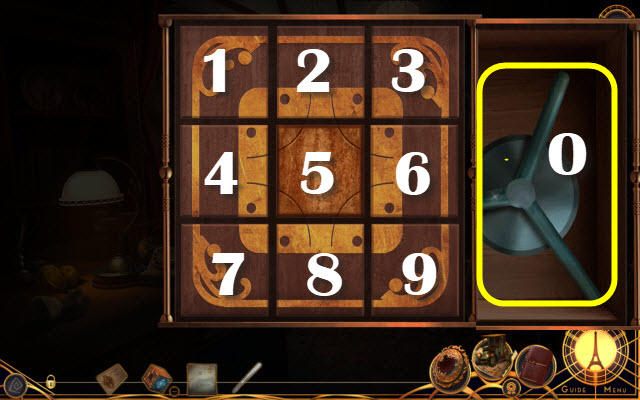
- Solution: 6-9-8-5-2-1-4-7-8-5-2-3-6-9-8-5-2-3-6-9-8-5-4-1-2 and 5.
- Take SAFE HANDLE (O).
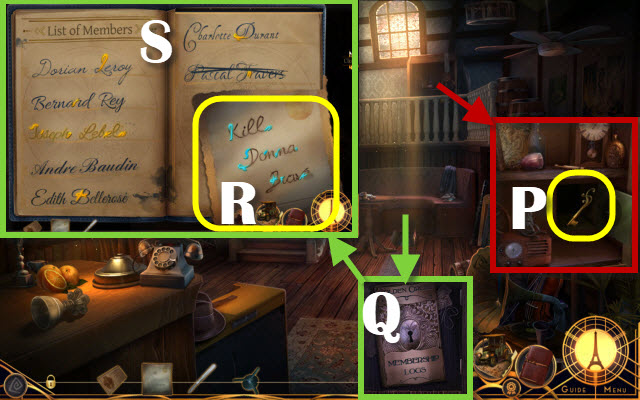
- Place SAFE HANDLE; take MEMBERSHIP LOG KEY (P).
- Use MEMBERSHIP LOG KEY (Q); use NAPKIN WITH MESSAGE (R).
- Solution (S).
- Use NAPKIN WITH MESSAGE (T).
- Speak (U).
- Use INSPECTOR'S CONTACT CARD (V); dial (W).
- Speak (X); take EDITH'S NECKLACE (Y).
- Go (Z).
Chapter 3: Police
- EDITH'S NECKLACE on MEMORY MEDALLION.
- Go (O).
- Solution (1-4); take GOLDEN TREE (P).
- Take GOLDEN BALL (Q).
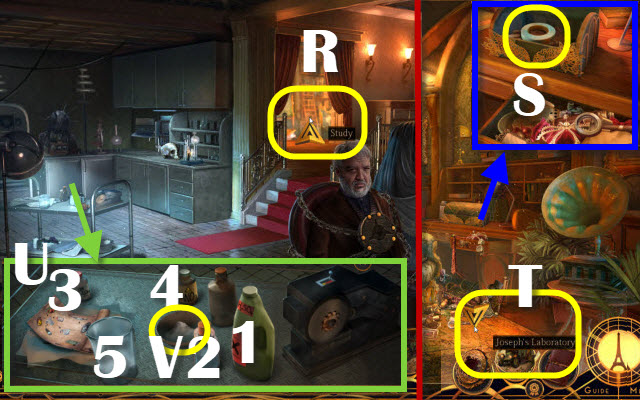
- Place GOLDEN BALL (R); take DOOR PART 1/3, DRAWER INSET and RADIO ANTENNA (S).
- Place RADIO ANTENNA (T); select (U).
- Take DOOR PART 2/3 (V).
- Place DRAWER INSET; take DOOR PART 3/3 and SUNDIAL PART (X).
- Place DOOR PART 3/3 (Y).
- Solution: (6-5-2)-(4-5)-(2-5-6)-(8-5)-(6-5-4-1-2-3)-(7-4-1-2)-(3-6-5-2)-(9-8-5) and (2-5).
- Go (Z).
- Use SUNDIAL PART; take WRENCH (A) and SCALE PART (B).
- Use WRENCH; take SHELF KEY (C) and TOY POLICE OFFICER (D).
- Use SCALPEL and SHELF KEY (E).
- Hang SCALE PART (F); take TYPEWRITER KEY 1/4, OLD SPONGE and CLEANING POWDER (F1).
- Use CLEANING POWDER and OLD SPONGE (G); take BRONZE CYLINDER and TYPEWRITER KEY 2/4 (H).
- Go (I).
- Place TOY POLICE OFFICER (J); solution (1-2)-(3-4).
- Take CERAMIC PLATE and TYPEWRITER KEY 3/4 (K).
- Place CERAMIC PLATE; take TYPEWRITER CODE (L).
- Place BRONZE CYLINDER (M).
- Solution: (1x2)-(2x7)-(3x5) and (4x7).
- Take TYPEWRITER KEY 4/4 (N).
- Go (O).
- Place TYPEWRITER KEYS 4/4 and TYPEWRITER CODE (P).
- Play HOP (Q); receive LOCKER HANDLE.
- Place LOCKER HANDLE (R).
- Solution: 1-2x2-1.
- Select (S); read (T).
- Go (U-V).
- Speak (W-X); take BROKEN WHISTLE (Y).
- Take WHISTLE PART (Z).
- WHISTLE PART on BROKEN WHISTLE; create WHISTLE.
- Use WHISTLE (A); drag (B).
- Play HOP (C); receive a CUPCAKE.
- Give CUPCAKE (X).
- Solution: Random (D).
- Take LUCKY CHARM (E).
- Place LUCKY CHARM; take TRAM TICKET (F).
- Insert TRAM TICKET (G); select (H). Take VERIFIED TRAM TICKET (G).
- Give VERIFIED TRAM TICKET (I).
- Take TORN DRESS PIECE (J).
- Take BROKEN MAGNIFYING GLASS (K).
- Remove glass; TORN DRESS PIECE on BROKEN MAGNIFYING GLASS. Create IMPROVISED NET.
- Use IMPROVISED NET; retrieve SNAKE HAND and WOODEN MUSHROOM (L).
- Take SCREWDRIVER (M).
- Place WOODEN MUSHROOM (N); take KNIFE HAND (O).
- Place KNIFE HAND and SNAKE HAND; solution (1-2)-(3-4).
- Enter (P).
- Take GARDEN GNOME (Q).
- Place GOLDEN TREE (R); take GILDED FLOWER 1/2 and FAMILY PHOTOGRAPH (S).
- Go (T).
- Place GARDEN GNOME (U); take TOY HORSE (V).
- Go (W-X).
- Select; speak; take BOOK LOCK PART (Y).
- Use SCREWDRIVER; take PIGEON FIGURINE (Z).
- Place TOY HORSE (A); take PEACOCK GEM 1/5 and BOAT STERN (B).
- Take JADE EGG (C).
- Go (D).
- Place BOAT STERN (E); take SEWING MACHINE WHEEL (F).
- Place BOOK LOCK PART; take OLD BOOK (G).
- Use SCALPEL; receive PEACOCK GEM 2/5 (H).
- Place OLD BOOK (I).
- Play HOP (J); receive MAILBOX KEY.
- Place JADE EGG (K); take SWAN EYE (L).
- Place PIGEON FIGURINE (M); take PEACOCK GEM 3/5 (N).
- Go (O).
- Use MAILBOX KEY; take GILDED FLOWER 2/2 and PEACOCK GEM 4/5 (P).
- Go to Parlor.
- Place GILDED FLOWER 2/2 (Q); take PAINTED LINEN (R).
- Place SWAN EYE (S); select (1-4). Take PEACOCK GEM 5/5 (T).
- Go (U).
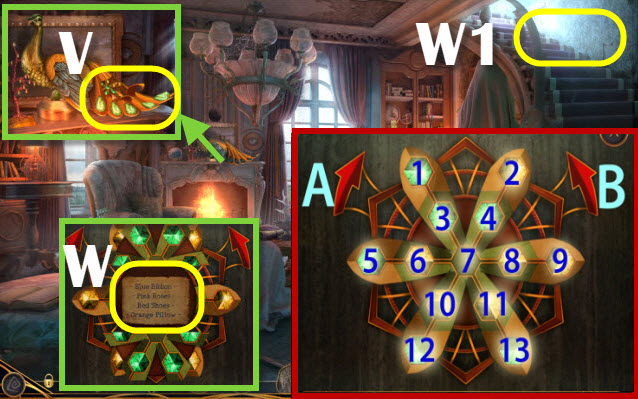
- Place PEACOCK GEMS 5/5 (V); examine.
- Solution: 6-5-A-6-B-12-A-10-B-13-A-11-7-8-B-B-1-B-3-7.
- Take COLOR CODE (W).
- Go (W1).
- Place PAINTED LINEN (X), SEWING MACHINE WHEEL (Y) and FAMILY PHOTOGRAPH (Z).
- Play HOP (A); receive EMBROIDERED LINEN.
- Place EMBROIDERED LINEN and COLOR CODE; select (1-4). Take PASCAL'S BOX (B).
- Give PASCAL'S BOX (C); take FOUR-LEAF CLOVER and read (D).
- FOUR-LEAF CLOVER on MEMORY MEDALLION.
- Solution: 1-4.
- Take DISTINCTIVE KEY (E).
- Use DISTINCTIVE KEY; take ALCHEMICAL STONE, JOSEPH'S KEY and PAPER WITH SYMBOLS (F).
- Walk down twice.
- Use ALCHEMICAL STONE and PAPER WITH SYMBOLS (G).
- Solution: 1-6.
Chapter 4: Pascal
- Go (H).
- Take NEEDLE (I).
- Take OWL PIECE 1/4 (J).
- Go (K).
- Speak (L).
- Select (M).
- Take CROWBAR (N).
- Take FLEXIBLE STICK (O).
- Take CRAYON (P).
- Go (Q).
- Take SCOOP (R).
- Use SCALPEL; take RUBBER BAND (S).
- CRAYON, RUBBER BAND, NEEDLE on FLEXIBLE STICK; create IMPROVISED BOW AND ARROW.
- Take TOWER PART 1/2 (T).
- Take OWL PIECE 2/4 (U).
- Go (V).
- Use IMPROVISED BOW AND ARROW 3x (W).
- Take FLORAL HAT (X).
- Go (Y).
- Use CROWBAR; take WOLF FIGURINE and SHIP WHEEL EMBLEM (Z).
- Use SCALPEL; receive MOSAIC TILE (A).
- Use SCOOP; take OWL PIECE 3/4 (B).
- Go (B1).
- Place SHIP WHEEL EMBLEM (C).
- Play HOP (D); receive SEALED BAG.
- Open SEALED BAG; take OWL PIECE 4/4.
- Go (E).
- Place OWL PIECE 4/4 (F); take METAL FLOWER (G).
- Go to Conservatory.
- Place METAL FLOWER (H); take MILITARY HAT (I).
- Place WOLF FIGURINE (J); take CASH REGISTER CARD (K).
- Place MOSAIC TILE (L).
- Solution: 11-12x3-2-15x4-14-6x4-10-7x4-9-10-8-1x3-4-13x3-2x4-5-9-11-3x4-4-11x3-4-14x2-8-5 and 8x2.
- Receive a BELL.
- Walk down.
- Hang BELL (M); take TOWER PART 2/2 (N).
- Insert CASH REGISTER CARD (O); take TOP HAT (P).
- Go (Q).
- Place TOWER PART 2/2; take POLICE HAT (R).
- Go (S).
- Place MILITARY HAT (T), TOP HAT (U), FLORAL HAT (V) and POLICE HAT (W); select (1-4). Take SOLDIER FIGURINE.
- Go (Q).
- Place SOLDIER FIGURINE (X); select.
- Play HOP (Y); receive PARROT'S PINWHEEL.
- Go to Conservatory.
- Place PARROT'S PINWHEEL (Z).
- Walk down.
- Speak; take ANTIQUE KEY (A).
- Walk up.

- Insert ANTIQUE KEY (A1); take LABORATORY ADDRESS (B).
- Go (C).
- Give LABORATORY ADDRESS (D).
- Go (E-F).
- Take CAN OPENER (G).
- Take CLEANING BUCKET (H).
- Use CROWBAR (I).
- Play HOP (J); receive BLUE PAINT.
- Go (K).
- Use CAN OPENER; take RED PAINT (L).
- Go (M).
- Place RED PAINT and BLUE PAINT (N).
- Solution (O).
- Take APRON (P).
- Go (Q).
- Look (R).
- Take RUBBER GLOVES (S) and BRASS BOX INSET (T).
- Speak (U).
- Go (V).
- Place BRASS BOX INSET; take GARDEN SHEARS (W).
- Use GARDEN SHEARS; take SOAP and CLOSET KEY (X).
- Go (Y).
- Use CLOSET KEY; take CLEANING CAP and BUTTERFLY EMBLEM (Z).
- Go (A).
- Use BUTTERFLY EMBLEM; take EMPLOYEE CARD (B).
- CLEANING BUCKET, RUBBER GLOVES, SOAP and CLEANING CAP on APRON.
- Go (Y).
- Give EMPLOYEE CARD; take ELEVATOR PASS CARD (C).
- Insert JOSEPH'S KEY (D) and ELEVATOR PASS CARD (E); select (F).
- Go (G-H).
- Give ALCHEMICAL STONE and PAPER WITH SYMBOL (I).
- Take SMALL SAW (J).
- Take BUTTERFLY WING (K).
- Go (L).
- Take SMALL BOTTLE (M).
- Place BUTTERFLY WING (N); take TWEEZERS (O).
- Take SULFURIC ACID (P).
- Take BLUE WIRE (Q).
- Use SMALL SAW (R); receive METAL BAR. Take METAL BOX (S).
- Go (T).
- Take SYRINGE (U).
- Use METAL BOX (V); take DRAWER KNOB (W).
- Place BLUE WIRE (X); take LARGE TENTACLE (Y).
- Use SMALL BOTTLE (Z); receive BOTTLE OF WATER.
- Use TWEEZERS (A); receive FEATHER INSET.
- Go (B).
- Place LARGE TENTACLE; take VIAL OF RED LIQUID and NITROGLYCERIN RECIPE (D).
- Place VIAL OF RED LIQUID (E); take BAKING SODA and METAL GEAR (F).
- Place FEATHER INSET (G); take YELLOW GEM 1/3 (H).
- Place DRAWER KNOB (I).
- Play HOP (J); receive YELLOW GEM 2/3.
- Go (K).
- Place METAL GEAR; take YELLOW GEM 3/3 (L).
- Place YELLOW GEM 3/3 (M).
- Solution: Ax2-B-A-C-B-C-Bx4-Cx3-B and C.
- Select (N).
- Take JOSEPH'S CIGARETTE CASE, GLYCERIN, and NITRIC ACID (O); select (N).
- JOSEPH'S CIGARETTE CASE on MEMORY MEDALLION.
- Solution: 1-4.
- Take LEAF EMBLEM (Q).
- Go (R).
- Place LEAF EMBLEM; take SURGICAL TAPE and LEATHER GLOVES (S).
- Go (T).
- Place SULFURIC ACID, BOTTLE OF WATER, NITROGLYCERIN RECIPE, BAKING SODA, GLYCERIN, NITRIC ACID and LEATHER GLOVES (U).
- Select: 1-5. Take NITROGLYCERIN (V).
- NITROGLYCERIN on SYRINGE; create NITROGLYCERIN SYRINGE.
- Use NITROGLYCERIN SYRINGE, SURGICAL TAPE and METAL BAR (W).
- Go (X).
- Take ALCHEMICAL STONE and PAPER WITH SYMBOLS (Y).
- Use ALCHEMICAL STONE and PAPER WITH SYMBOLS (Z).
- Solution: Red-blue-yellow.
- Take (A).
- Congratulations, you've completed Donna Brave: And the Strangler of Paris!
Created at: 2017-09-24