

Walkthrough Menu
- General Tips
- Chapter 1: Martha Spencer
- Chapter 2: Mark Spencer
- Chapter 3: Martha Spencer II
- Chapter 4: Mark Spencer II
General Tips
- This is the official guide for Dreadful Tales: The Space between.
- This guide won't tell you when to zoom into a location; the screenshots show each zoom scene.
- Hidden-object puzzles are referred to as HOPs. Only the locations of the HOPs will be shown.
- Use the Map to fast travel to a location.
Chapter 1: Martha Spencer
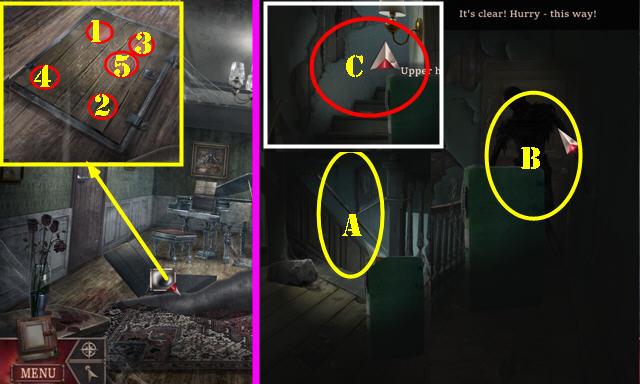
- Open door and go forward.
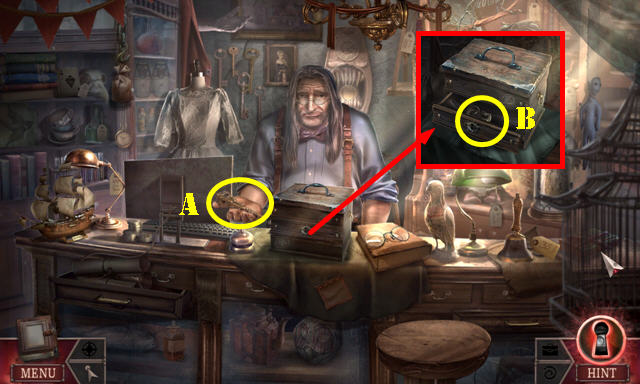
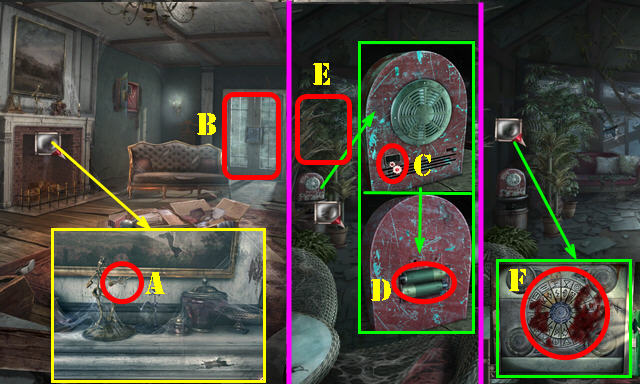
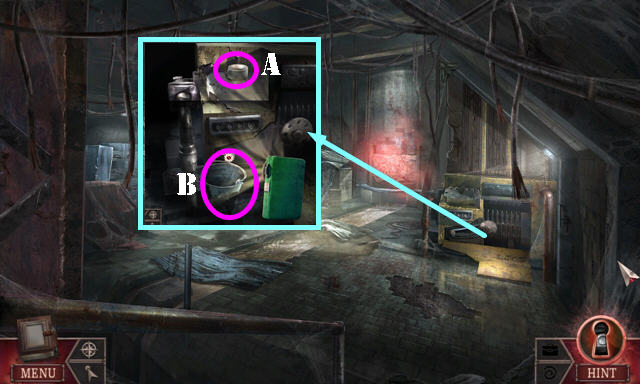
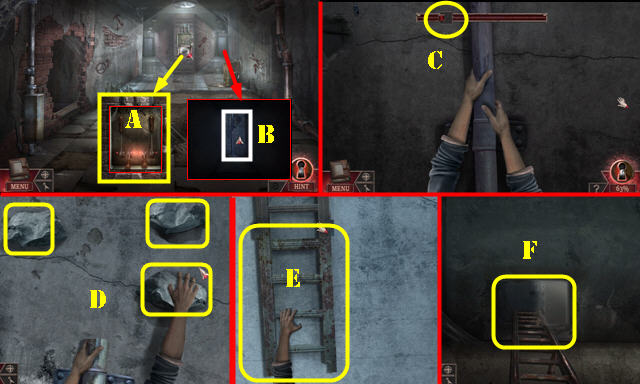
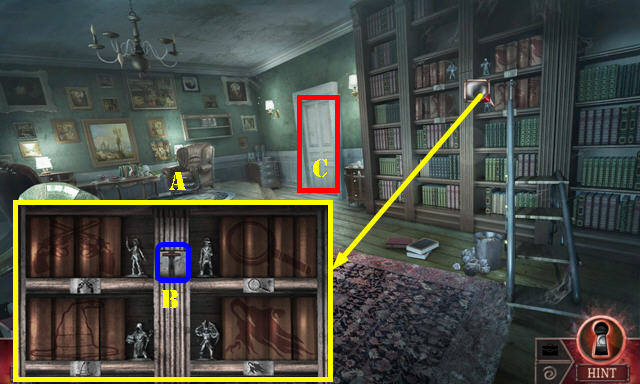
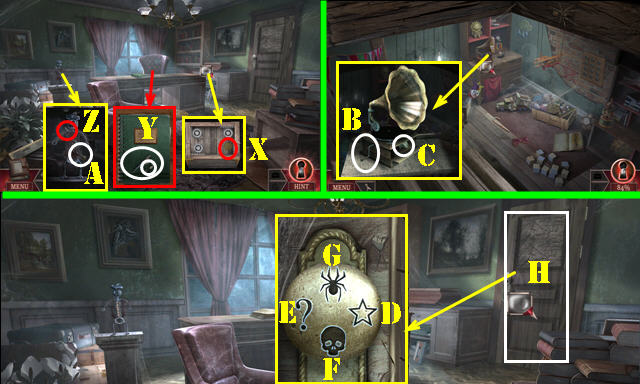
- Take ODD KEY (A).
- Use ODD KEY; take doorknob (B).
- Turn on light (C).
- Move forward.
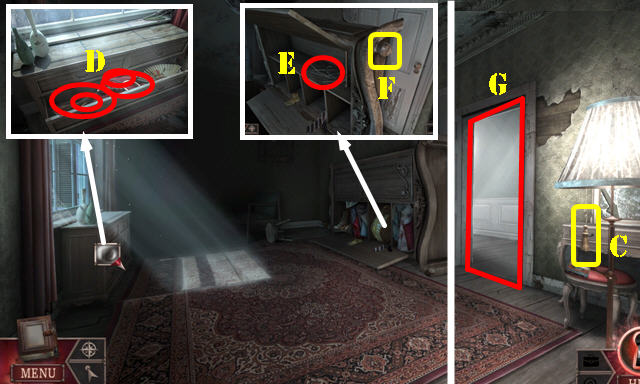
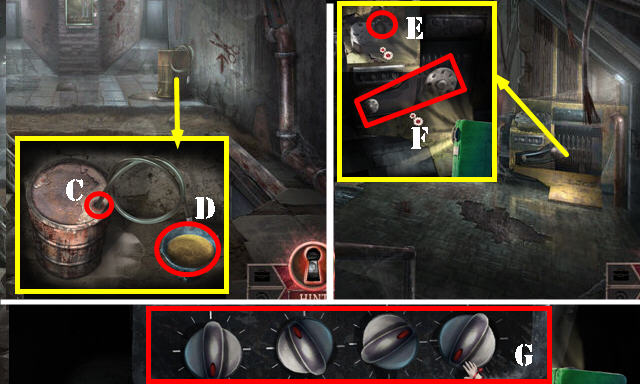
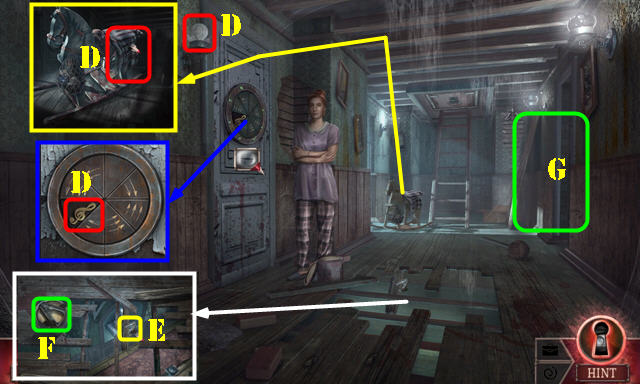
- Open drawer and move items; take NYLON SOCK, BOBBY PIN, MAGNIFIER FRAME, and BELT (D).
- Open door and move all items out of the way. Take hanger and select 3x (E); receive BENT COAT HANGER.
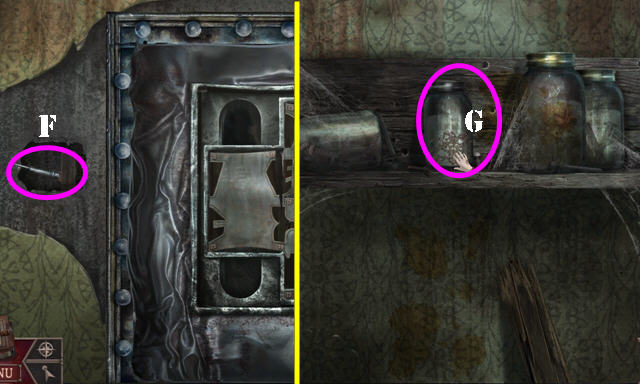
- Use BELT and pull (F).
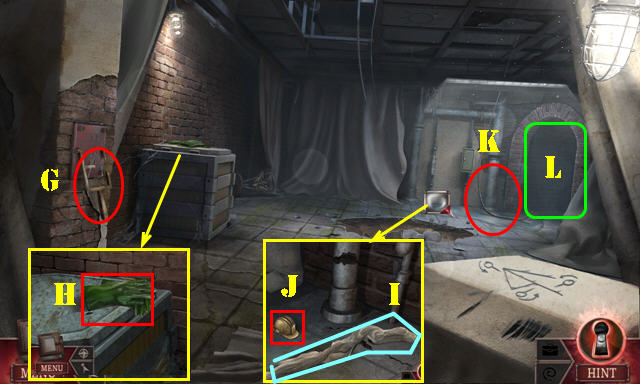
- Go (G).

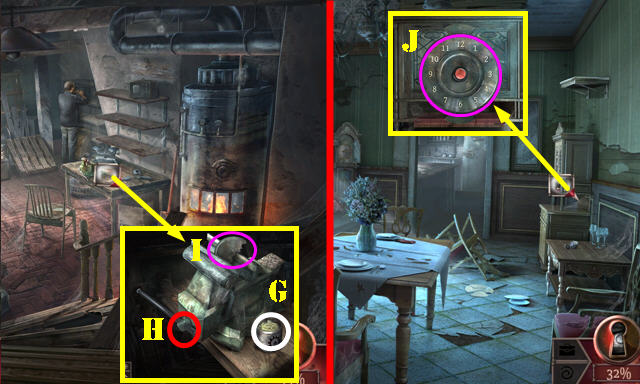
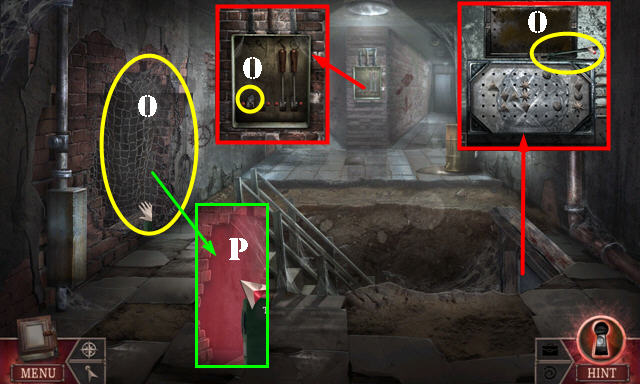
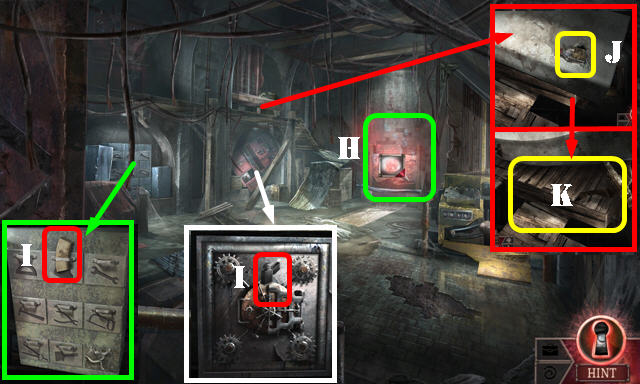
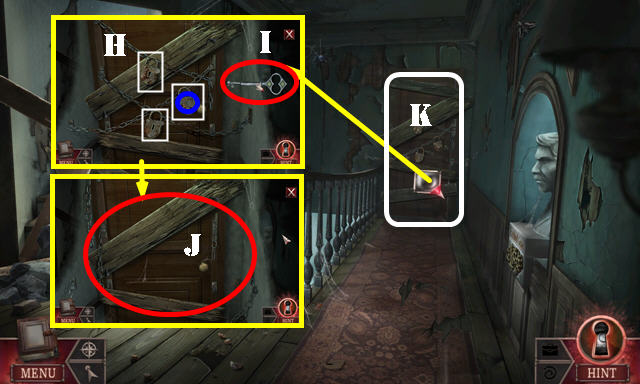
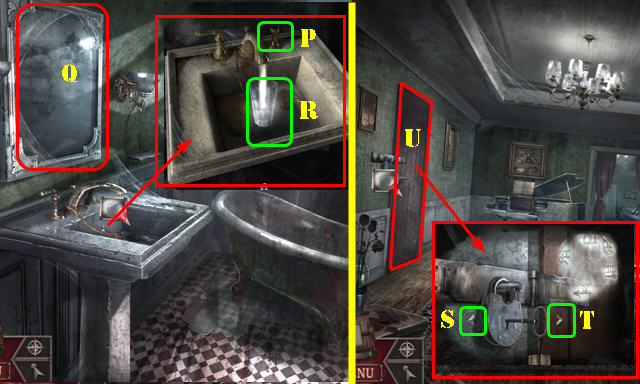
- Take EMPTY SPRAY BOTTLE (H).
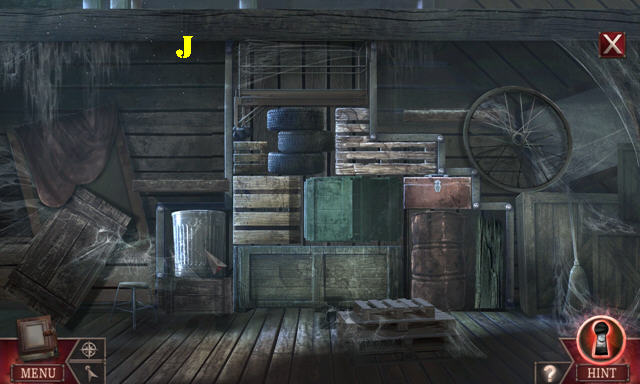
- Remove cover (I).
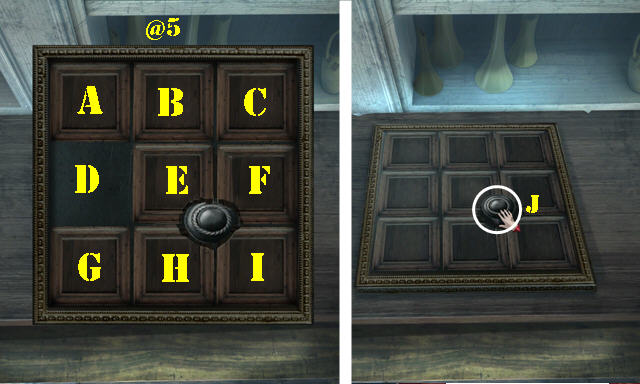
- Examine (J).
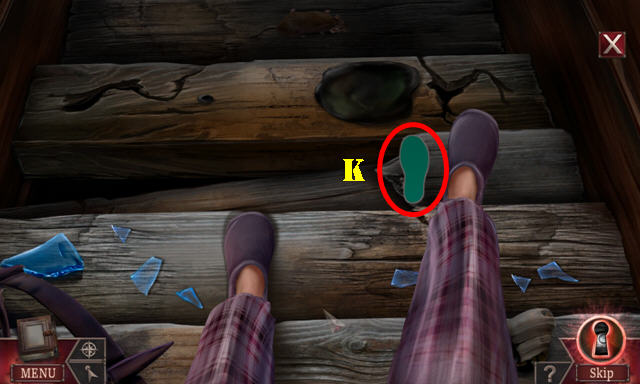
- Select foot when footprint is below foot (K).
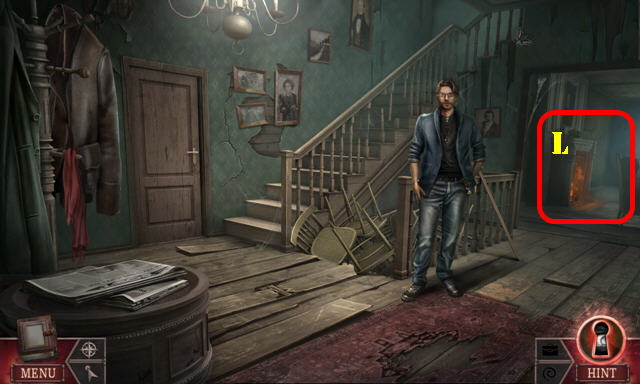
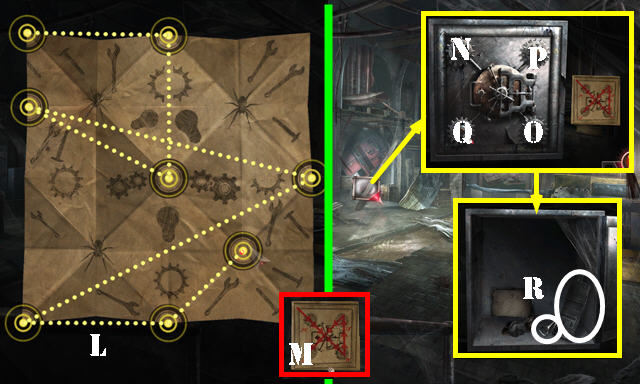
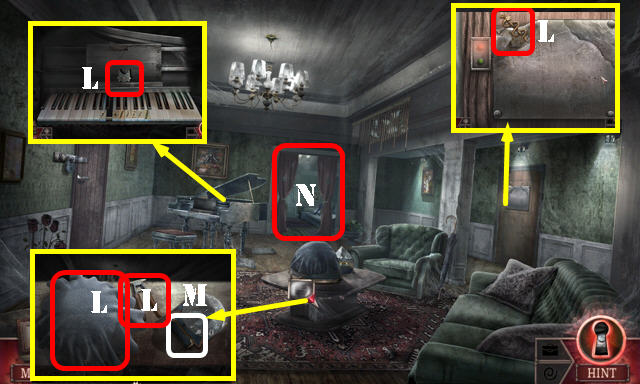
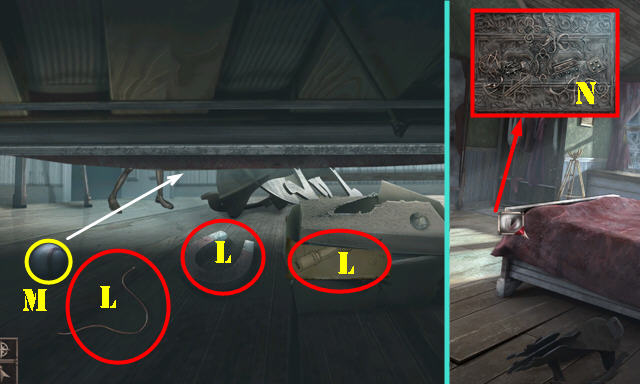
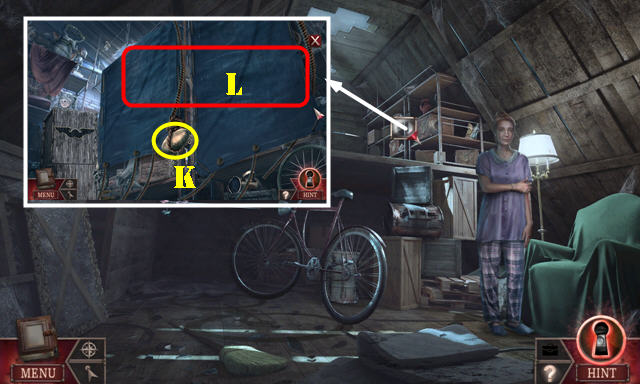
- Go (L).
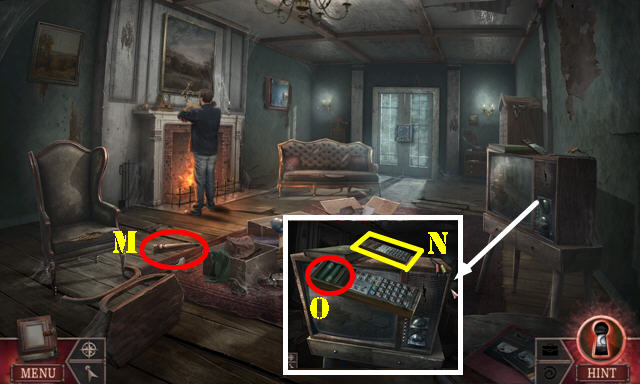
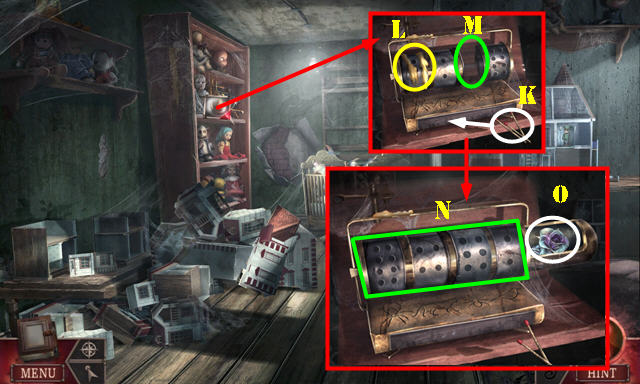
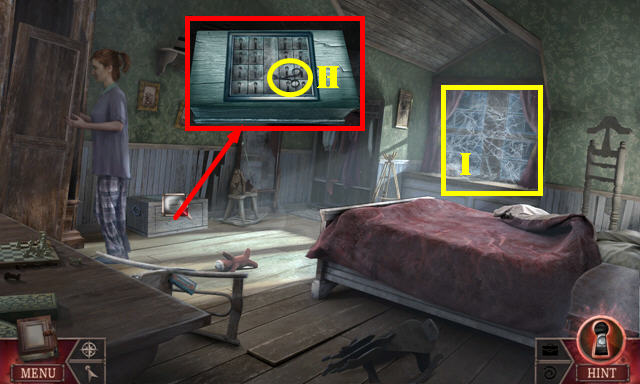
- Take CHAIR LEG (M).
- Select remote twice (N); receive RUBBER BAND.
- Open cover on remote; take BATTERIES (O).
- Walk down.

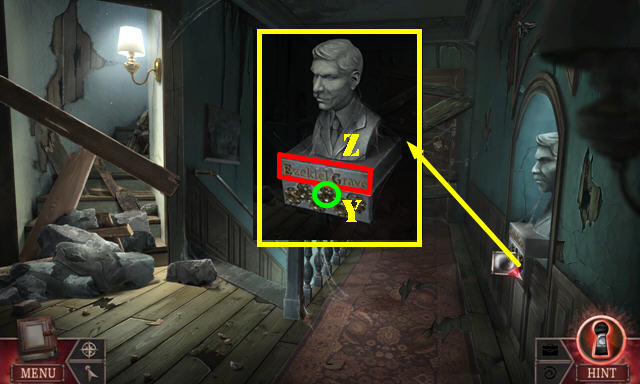
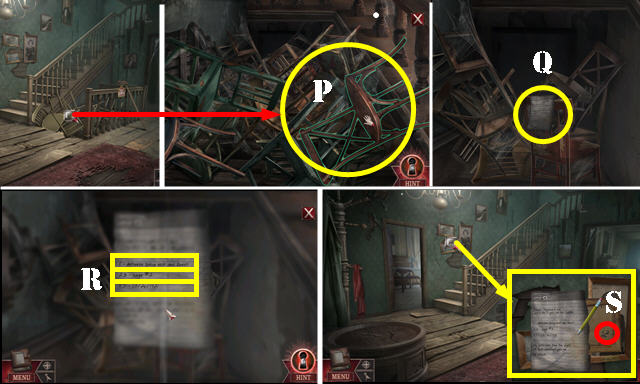
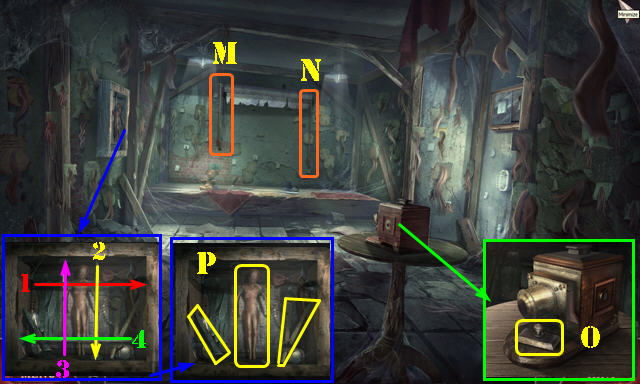
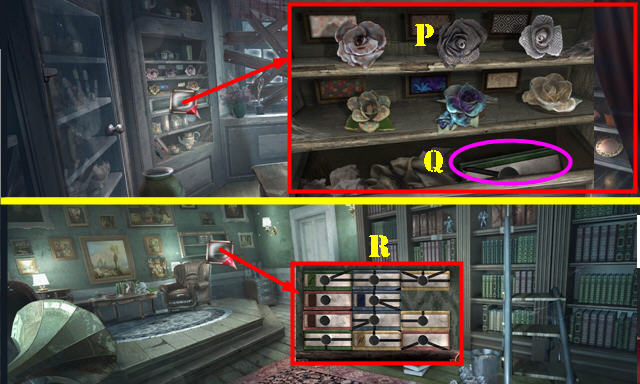
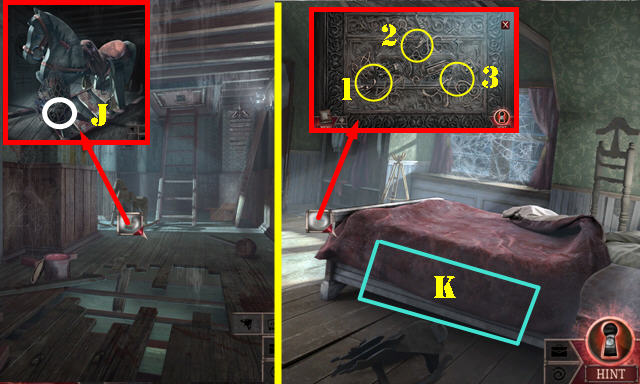
- Select newspapers 3x; receive GRAVE FAMILY EMBLEM (P).
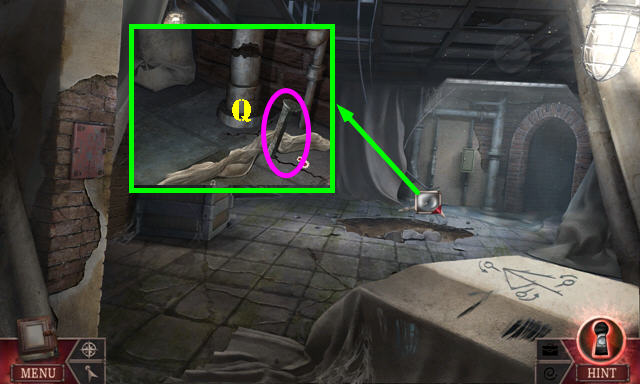
- Open jacket; take PACKING CHECKLIST (Q).
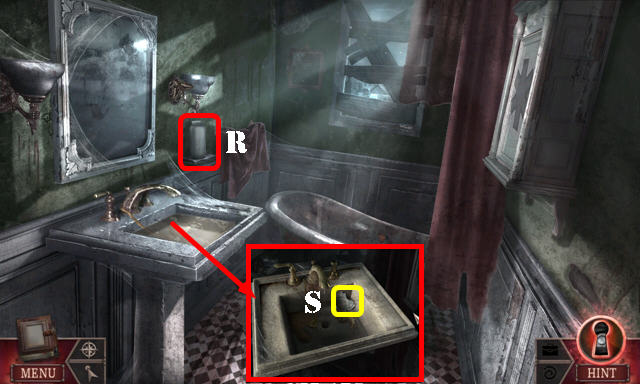
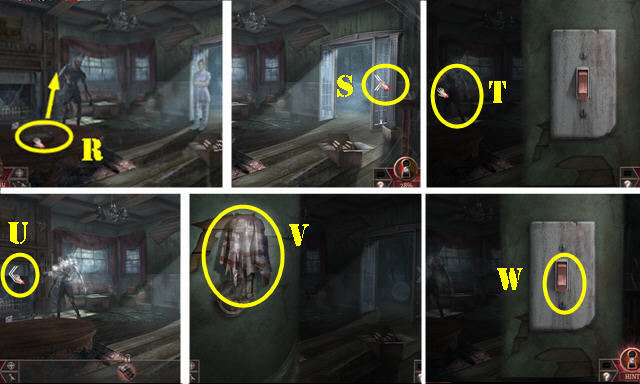
- Select each picture (R).
- Go (S).
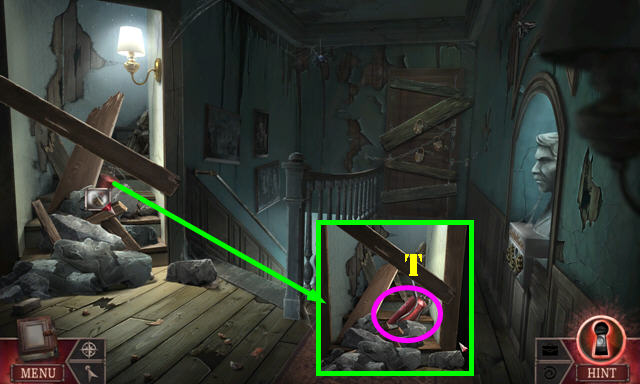
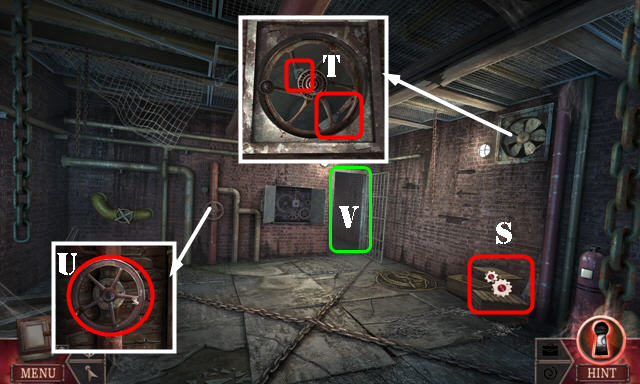
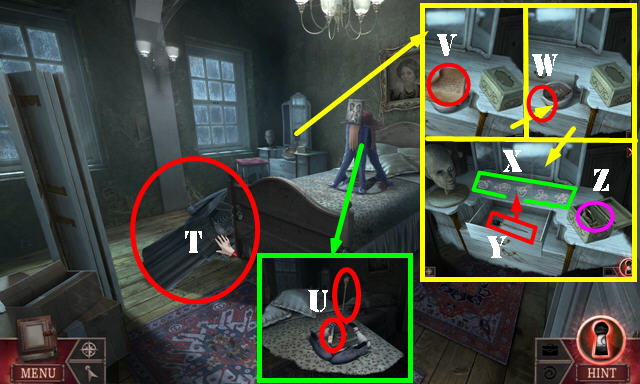
- Use CHAIR LEG; take FIRE EXTINGUISHER (T).
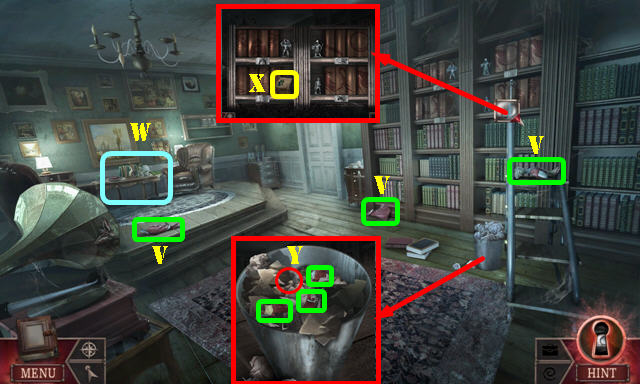
- Go to Living room.

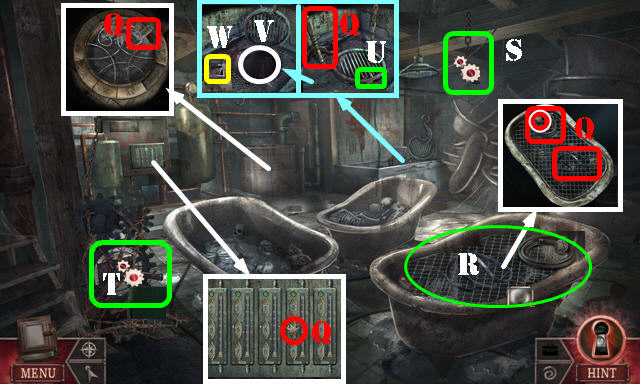
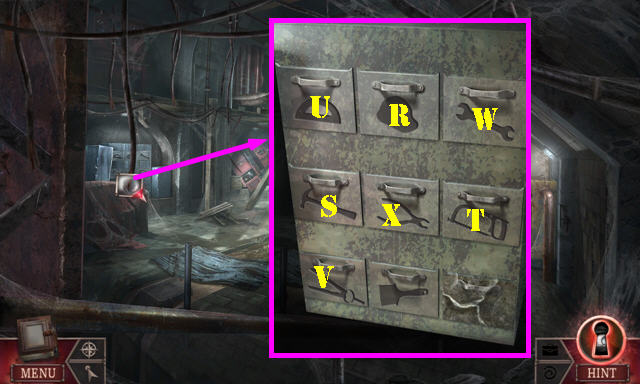
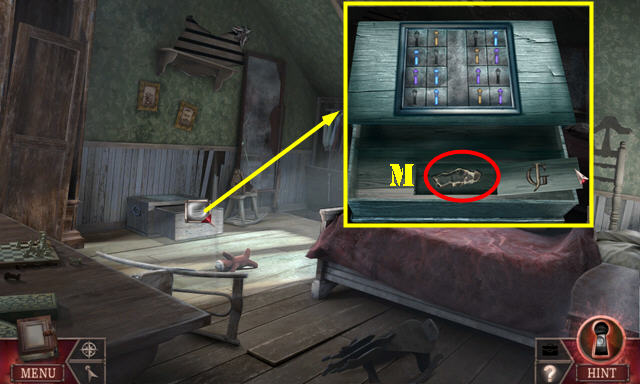
- Open box; place PACKING CHECKLIST (U). Play HOP; receive FLASHLIGHTS.
- Give FLASHLIGHTS (V); receive FLASHLIGHT.
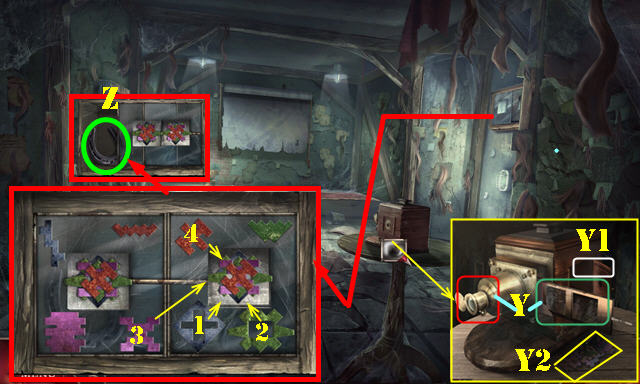
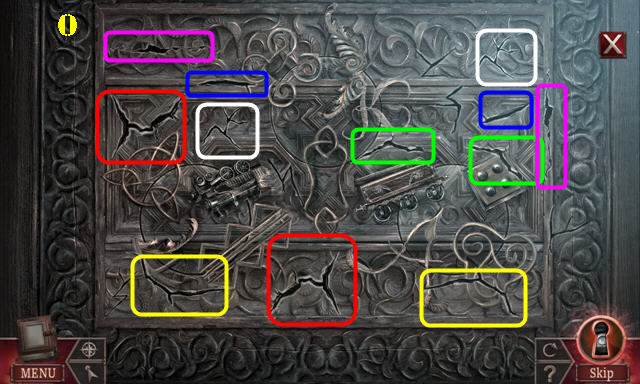
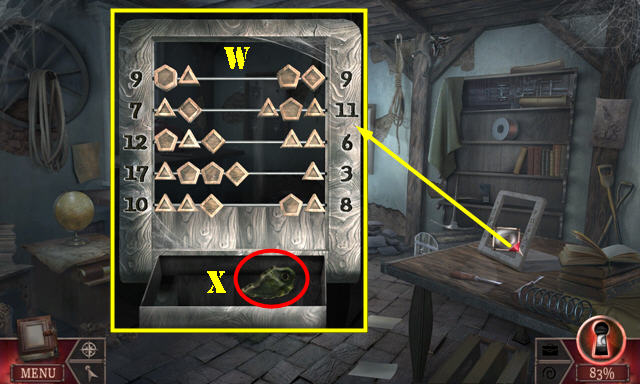
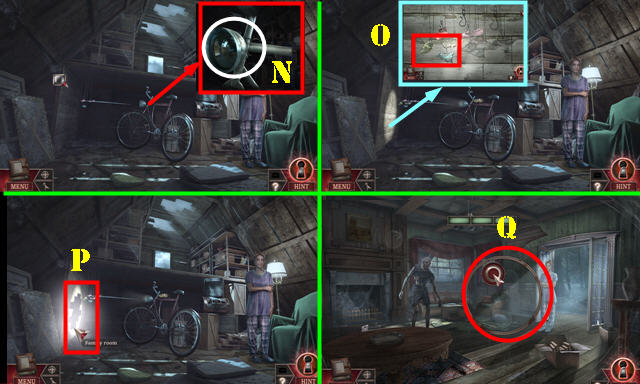
- Select card and then spiderweb 3x; take COG (W).
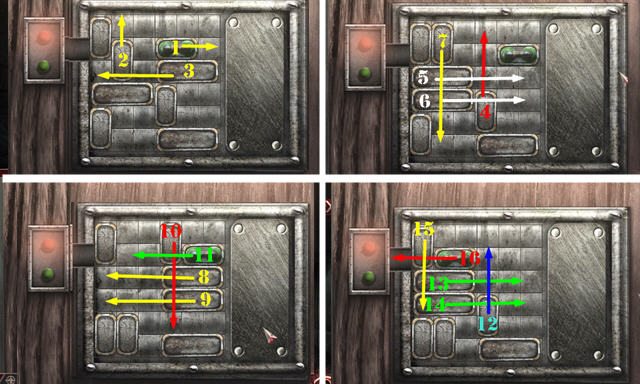
- Pan down. Use FIRE EXTINGUISHER and BENT COAT HANGER (X); receive TRIANGLE BUTTONS 1/2.
- Go to Hallway.
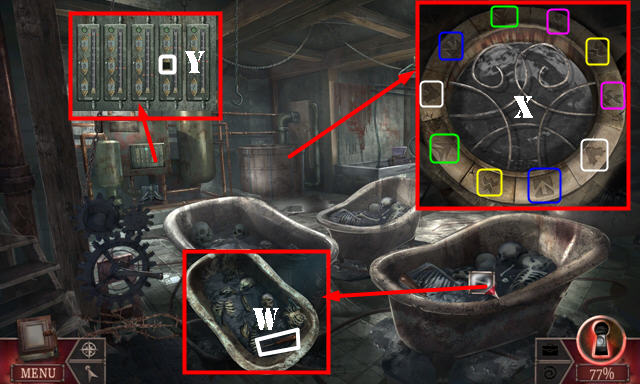
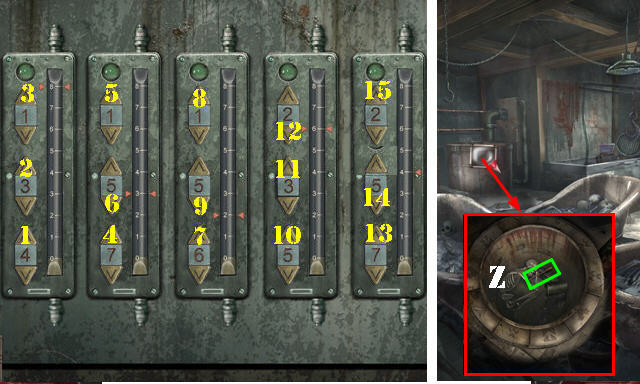
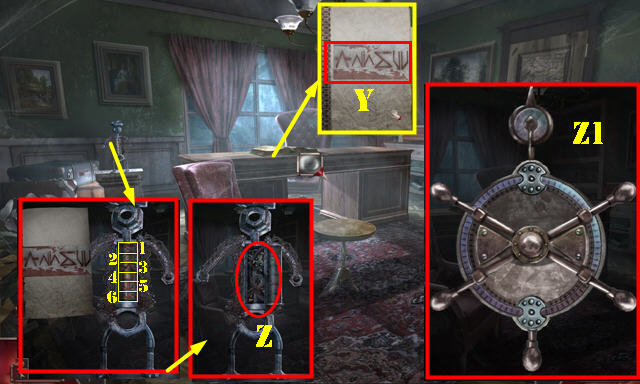
- Place COG and select (Y); take METAL INITIALS (Z).
- Go to Living room.
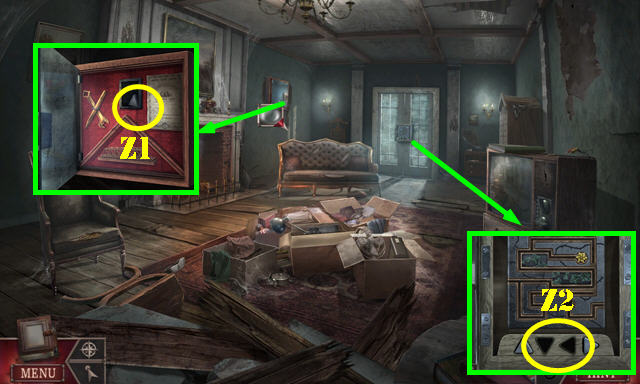
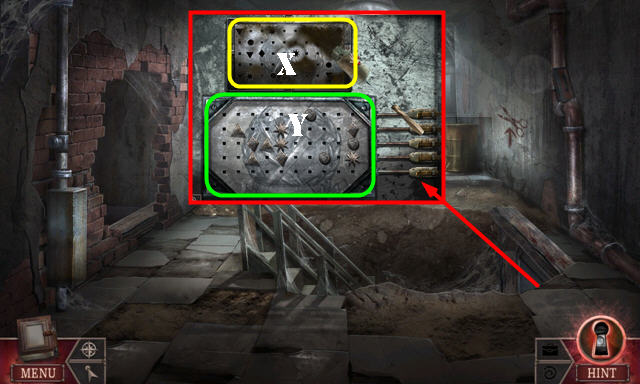
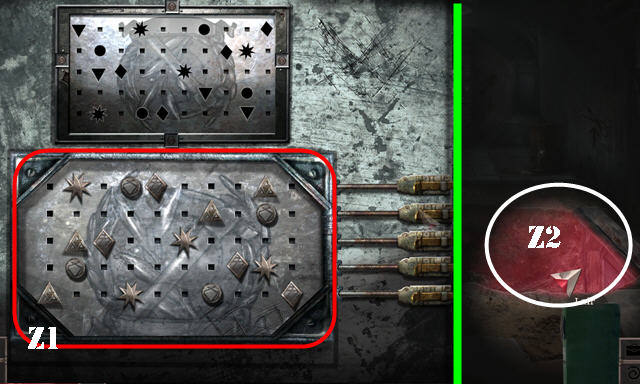
- Use GRAVE FAMILY EMBLEM and select; remove picture. Place METAL INITIALS; take TRIANGLE BUTTONS 2/2 (Z1).
- Place TRIANGLE BUTTONS 2/2 (Z2).
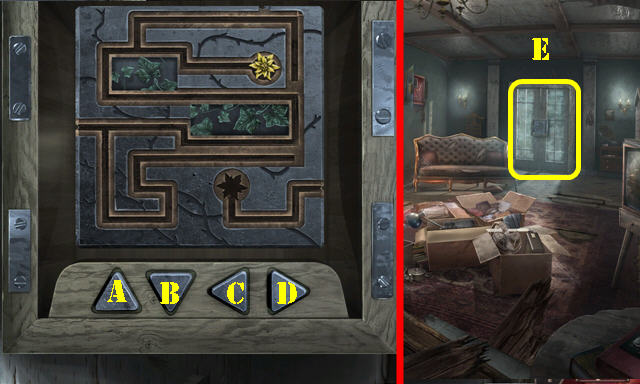
- Solution: C-A-Cx2-B-D-B-C-A-Cx4-B-Cx2-A-C-Ax3-Cx3-Bx2-D-B-C-A-Cx2-A-C-B-D-B-C-A-C-A-C-Bx2-C-A-Cx2-B-C-A.
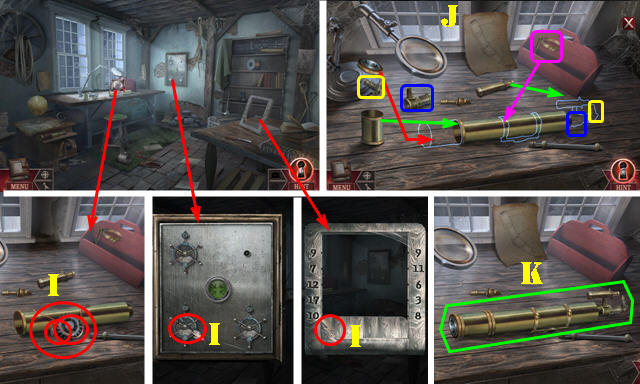
- Go (E).
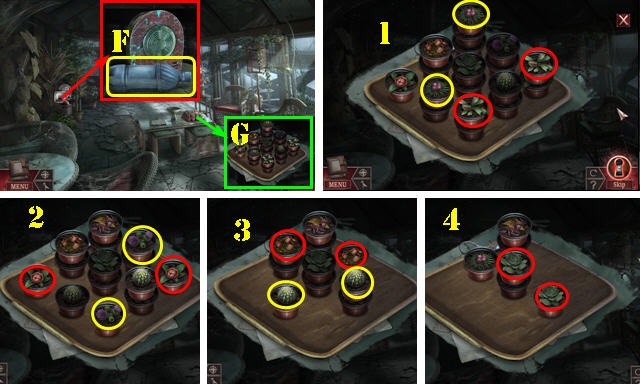
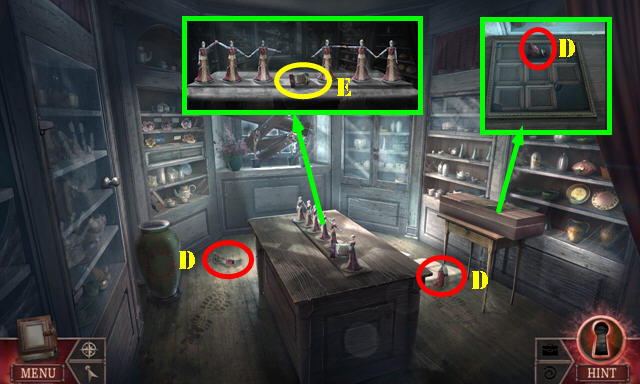
- Take WATER BOTTLE (F).
- Examine (G).
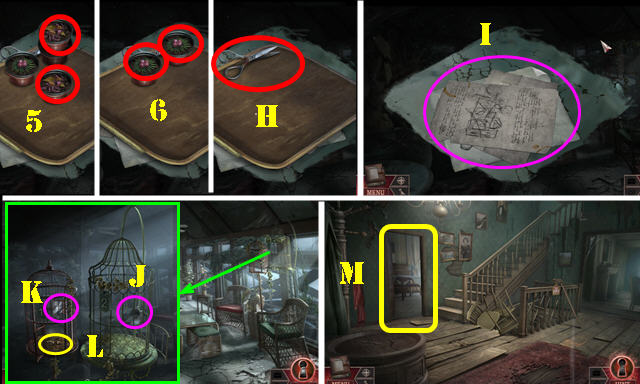
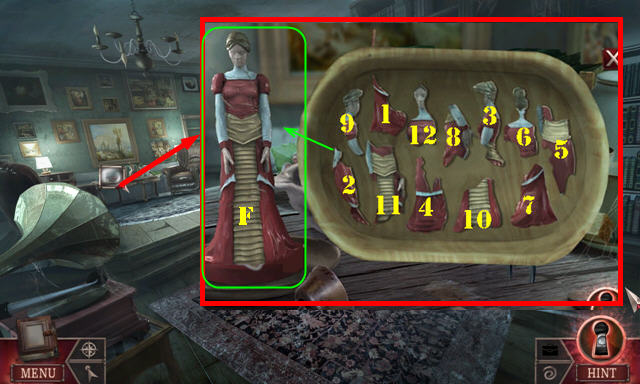
- Select flower pot sets (1-6).
- Take SCISSORS (H). Select papers 4x; receive WEED KILLER RECIPE (I).
- Open cage; take BOWL (J).
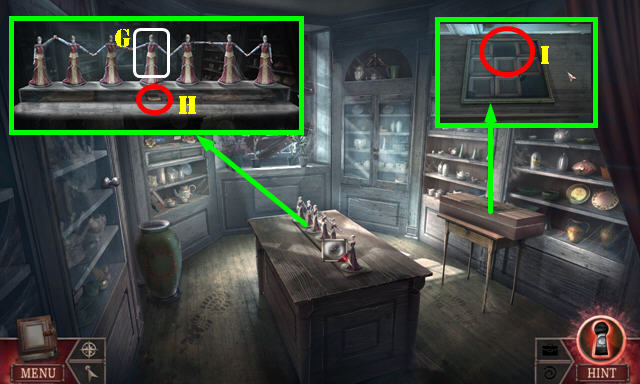
- Open cage; take MIRROR (K). Select bottom of cage; take CLOCK HANDS 1/3 (L).
- Go to Foyer and then to Dining room (M).

- Look at window; take PAINT THINNER (N).
- Take SUPERGLUE and WHITE VINEGAR (O).
- Play HOP (P); receive PENCIL.
- Go to Kitchen (Q).
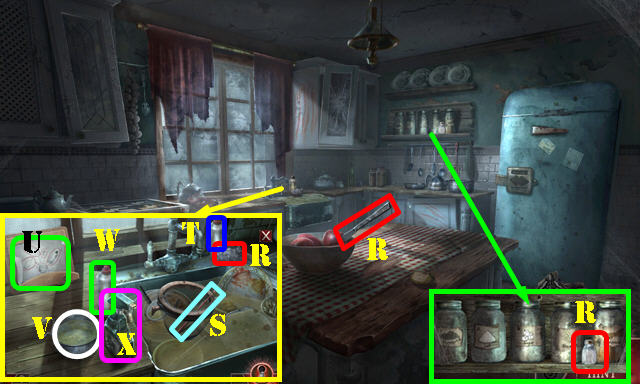
- Take BUTTER KNIFE, STEEL WOOL, and SALT SHAKER (R).
- NYLON SOCK on MAGNIFIER FRAME; take IMPROVISED NET.
- Use IMPROVISED NET; take CLOCK HANDS 2/3 (S).
- Move bottle (T). Place WEED KILLER RECIPE (U) and BOWL (V). Select bottle (W). Add WHITE VINEGAR, SALT SHAKER, and WATER BOTTLE to bowl (V). Receive EMPTY WATER BOTTLE.
- BUTTER KNIFE and SCISSORS on EMPTY WATER BOTTLE; receive FUNNEL.
- Put down the EMPTY SPRAY BOTTLE and remove cap (X); place FUNNEL on spray bottle and select bowl (V). Remove funnel and take WEED KILLER (x).
- Go to Living room.
- Use PAINT THINNER; take CLOCK HANDS 3/3 (A).
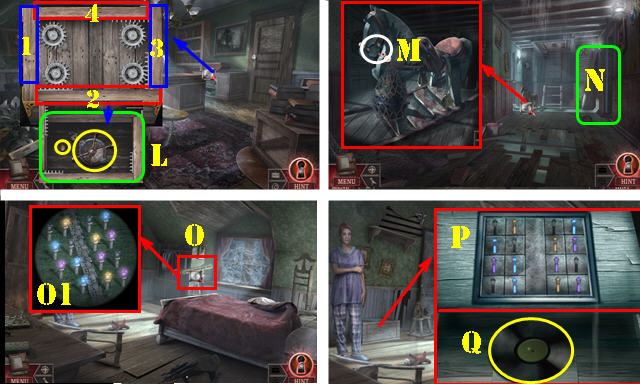
- Go (B).
- Use BOBBY PIN (C). Use BUTTER KNIFE; remove cover and old batteries; place BATTERIES (D). Select bobby pin (C).
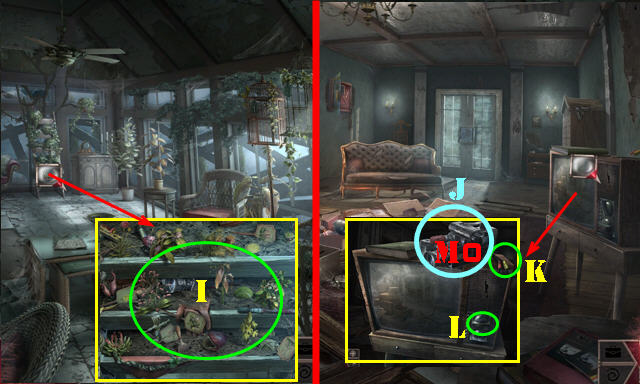
- Select plants twice (E).
- Use FLASHLIGHT and select; drag STEEL WOOL over rust (F).
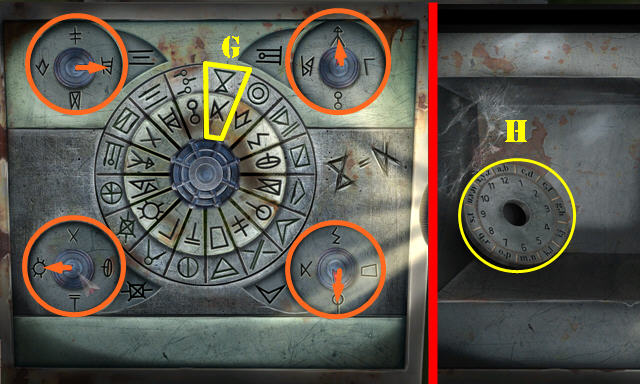
- Rotate wheel to position shown (G).
- Position dials as shown (orange).
- Select papers 3x; take CLOCKFACE (H).
- Use WEED KILLER and select leaves twice (I). Play HOP; receive CAMERA.
- Walk down.
- Place CAMERA (J) and attach cables (K). Turn TV on (L) and press play (M).
- Go to Dining room.
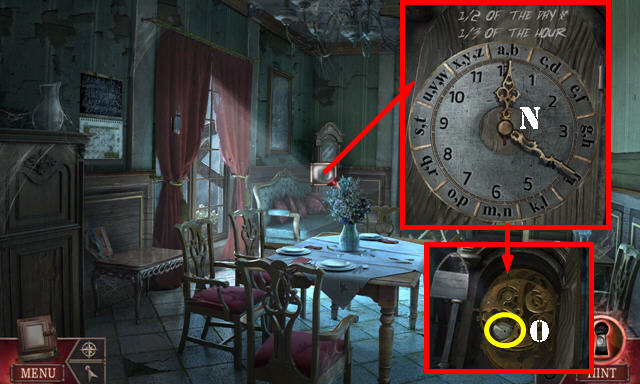
- Open door; place CLOCKFACE and CLOCK HANDS 3/3. Set clock to 12:20 (N).
- Look at note and take LOCK DIAL (O).
- Walk down.
- Select chairs 9x (P); take paper (Q) and select all three lines (R); take CLUE AND PENCIL.
- Select chairs one more time.
- Select picture twice; use CLUE AND PENCIL; select 12 (S).
- Go to Sun porch.

- Use CLUE AND PENCIL; select XVI (T).
- Go to Kitchen.
- Use CLUE AND PENCIL; select 2 (U). Receive SOLVED CLUE NOTE.
- Go to Foyer.
- Place LOCK DIAL and SOLVED CLUE NOTE; enter 21612 (V).
- Go to Basement (W).
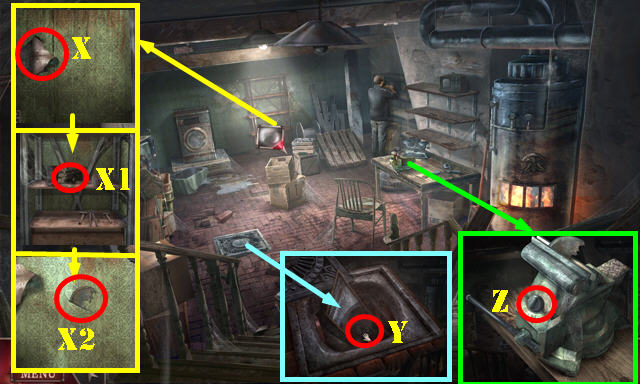
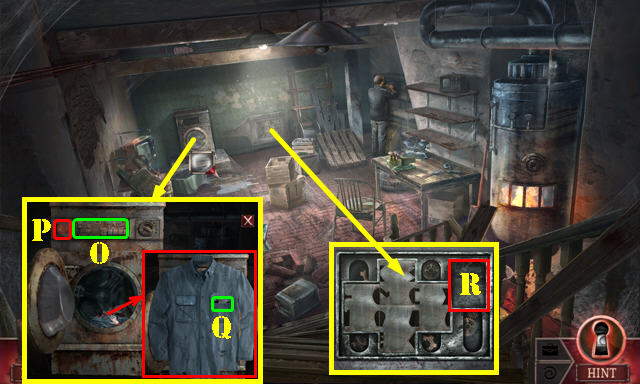
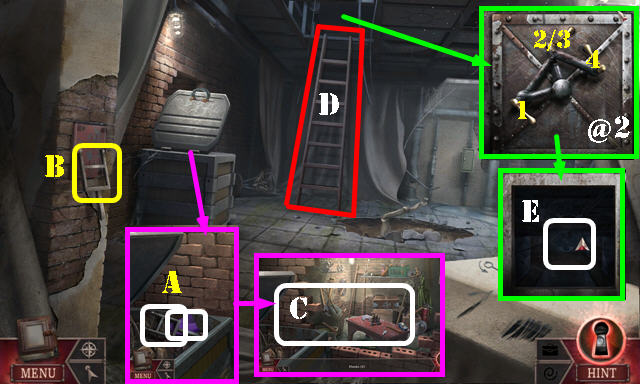
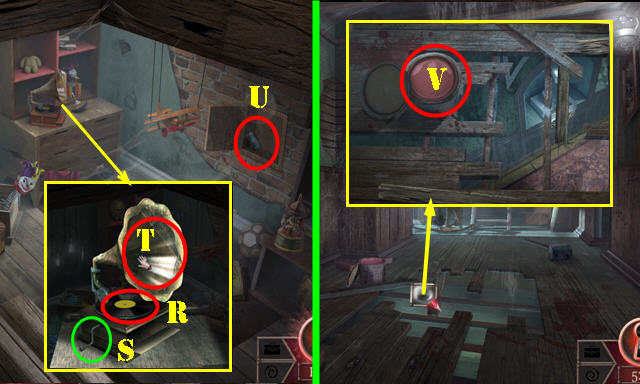
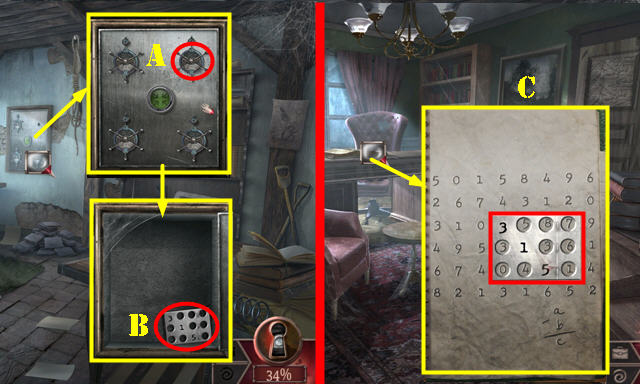
- Tear wallpaper (X). Look at picture (X1) and move cabinet. Take BROKEN COVER (X2).
- Lift cover. Use MIRROR and select twice; take FRIDGE LOCK PART (Y).
- Take OVEN KNOB (Z).
- Go to Kitchen.
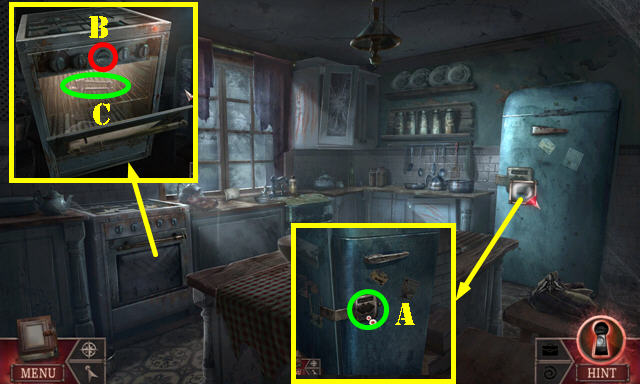
- Use FRIDGE LOCK PART (A). Play HOP; receive FROZEN BUNDLE.
- Place OVEN KNOB (B).
- Open oven door and place FROZEN BUNDLE (C); select knob (B) and open door; take SPREADER TOOL (C).
- Go to Foyer.
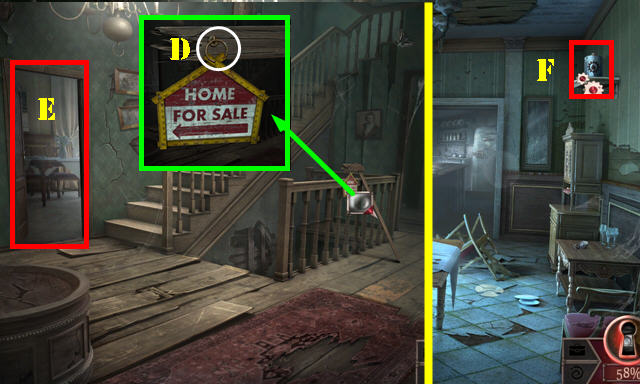
- Use SPREADER TOOL and select (D); receive FOLDABLE RULER.
- Go (E).
- Use FOLDABLE RULER (F); receive GREASE CAN.
- Go to Basement.
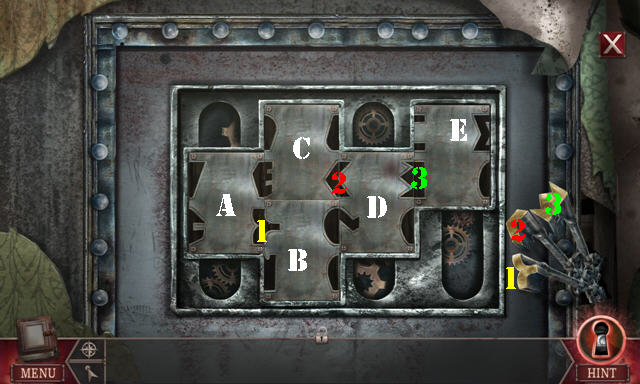
- Place GREASE CAN and open can (G). Place grease on vice (H) and select. Take COVER PART (I).
- Go to Dining room.
- COVER PART on BROKEN COVER and use SUPERGLUE; receive LOCK COVER.
- Place LOCK COVER (J).

- Solution: 1-7-7-8 (K); press button (L) after each number.
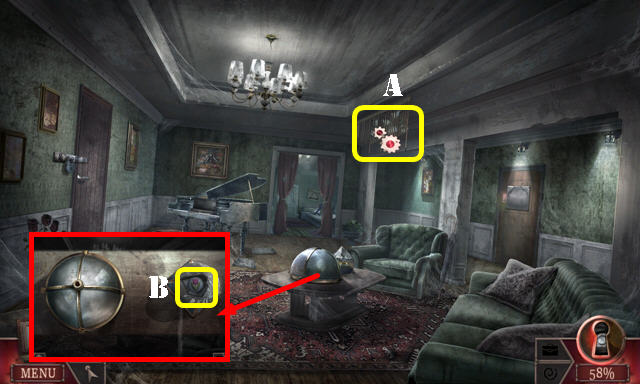
- Take CONTROL CIRCUIT (M).
- Select jar twice and use RUBBER BAND; select twice and receive STRANGE KEYS (N).
- Go to Basement.
- Place CONTROL CIRCUIT (O); push button (P).
- Open door and select shirt. Open pocket; take SMALL METAL PLATE (Q).
- Place SMALL METAL PLATE and STRANGE KEYS (R).
- Solution: (A-B)-(A-E)-(C-D)-(C-E).
- Place keys as shown (1-3).
Chapter 2: Mark Spencer
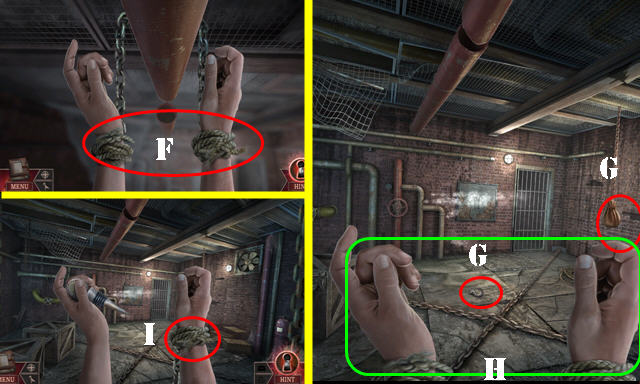
- Select hands 3x (F).
- Take BAG AND HOOK (G).
- Take CARABINER from BAG. Open bag; take FLASHLIGHT and WINE STOPPER.
- Use WINE STOPPER on hands (H) and then on wrist (I); receive CHAIN.

- Select grid (J); take METAL BAR (K).
- Place METAL BAR; select 3x (L).
- Open door (M). Play HOP.
- Go (N).
- Use FLASHLIGHT on scene.
- Take NET, METAL PINS 1/4, and BOLT CUTTER (O).
- Go (P).
- Take METAL PINS 2/4-3/4, BOTTLEBRUSH, CONVEYOR BELT, RUBBER HOSE, and BROKEN COATRACK (Q).
- Remove grid on tub (R).
- Use CARABINER, CHAIN, and HOOK (S).
- Use BOLT CUTTER (T).
- Attach hook (U) and select crank (T). Use NET and select 3x (V); take METAL PINS 4/4 (W).
- Walk down.
- Use BOTTLEBRUSH (X) and drag across board.
- Place METAL PINS 4/4 (Y).
- Solution (Z1).
- Go (Z2).
- Take DUCT TAPE (A). Open door; take BUCKET (B).
- Walk down.
- Remove cap and insert RUBBER HOSE (C); put down BUCKET; take FUEL BUCKET (D).
- Go to Lair.
- Remove cap and use FUEL BUCKET (E).
- Place CONVEYOR BELT (F).
- Position dials (G). Receive FLASHLIGHT.
- Play HOP (H); receive PAPER.
- Take MARKED TILE and LIGHTER (I).
- Select 4x: take HYDROCHLORIC ACID (J).
- Use BROKEN COATRACK; take WOODEN CRATE (K).
- Select PAPER; solution (L).
- Take STRONGBOX CLUE (M).
- Place STRONGBOX CLUE; solution (Nx2-Ox3-P-Q).
- Select walkie-talkie and take BOTTLE OPENER (R).
- Go to The cell.
- Place WOODEN CRATE (S).
- Use BOTTLE OPENER and select 3x; take BUTTON and SCRAPER (T).
- Select wheel valve 2x (U).
- Go (V) and then to Tub chamber.
- Use HYDROCHLORIC ACID and SCRAPER; take LEVER 1/2 (W).
- Place MARKED TILE; select matching tiles (X).
- Place BUTTON (Y).
- Solution (1-15).
- Take LEVER 2/2 (Z).
- Walk down.
- Place LEVER 2/2; select 2nd and 3rd levers (A).
- Go right 2x (B).
- Solution is random; press when marked elements are aligned (C).
- Climb stones (D).
- Climb ladder (E).
- Go (F).
- Remove switch handle (G).
- Pull curtain aside; take RUBBER GLOVES (H).
- Pull curtain aside; select sheets 3x (I); take HARD HAT RELIEF (J). Select sheets again (I).
- Use RUBBER GLOVESS (K).
- Go (L).
- Pull two ropes (M-N).
- Take PAPERWEIGHT (O).
- Move bars 2-1-3-4. Take STAKE, WAX DOLL, and DIVIDER RELIEF (P).
- Walk down.
- Place STAKE and use PAPERWEIGHT; select (Q).
- Go to Lair.
- Place HARD HAT RELIEF (R); take hammer.
- Place hammer (S); take saw.
- Place saw (T); take ruler.
- Place ruler (U); take PROJECTOR LENS and BLUE CANDY WRAPPER.
- Place DIVIDER RELIEF (V); take wrench.
- Place wrench (W); take pliers.
- Place pliers (X); take SLIDE.
- Go to Museum.
- Place SLIDE and PROJECTOR LENS (Y). Select projector 4x.
- Open cover (Y1).
- Take SHAPES (Y2).
- Place SHAPES (1-4). Take HORSESHOE (Z).
- Walk down.
- LIGHTER and HORSESHOE on WAX DOLL; receive MAKESHIFT HANDLE.
- Place MAKESHIFT HANDLE and select; take SWITCH HANDLE and PURPLE CELLOPHANE (A).
- Place SWITCH HANDLE and select (B).
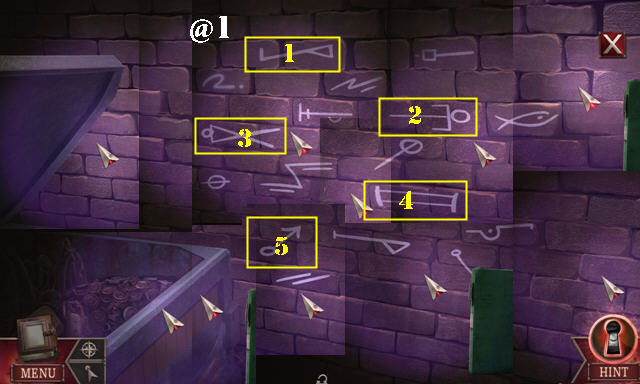
- BLUE CANDY WRAPPER, PURPLE CELLOPHANE, and DUCT TAPE on FLASHLIGHT; take BLACKLIGHT.
- Use BLACKLIGHT (A); select 1-5 (@1).
- Select switch handle (B).
- Examine (C); receive BLACKLIGHT. Play HOP; receive LADDER.
- Place LADDER (D). Select handles 1-4 (@2).
- Go (E).
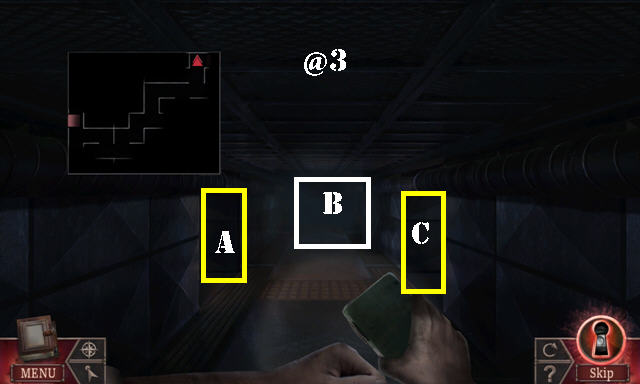
- Use BLACKLIGHT and select; receive FLASH LIGHT. Use FLASH LIGHT.
- Solution: C-A-B-C-Ax2-C-A-C-A-B-C-Bx2-A-B-C (@3).
- Go forward.
Chapter 3: Martha Spencer II
- Select wall; take SWITCHABLE KEY (F).
- Take JAR OF TERMITES (G).
- Go to Hallway.
- Open three covers on locks (H); take ORNAMENT 1/3.
- Place SWITCHABLE KEY and select (I).
- Place JAR OF TERMITES and select (J).
- Go (K).
- Take ORNAMENT 2/3, CHAMPAGNE OPENER, NAPKIN, and ROD OF ASCLEPIUS (L).
- Look at plaque (M).
- Go (N).

- Move screen (O).
- Go (P).
- Hit door continuously to fill bar (Q).
- Move shower curtain.
- Take TALC POWDER (R).
- Pull sink plug; take ORNAMENT 3/3 (S).
- Walk down.
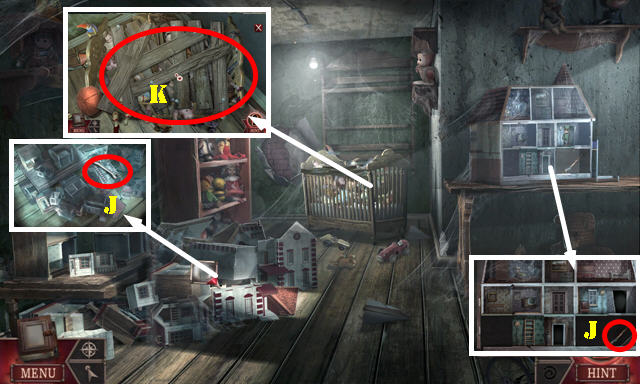
- Select mannequin (T). Play HOP; receive STAR OF LIFE BASE.
- Select 4x; take BACK SCRATCHER and PIANO KEY (U).
- Select notes 3x (V); take MORTAR (W). Use TALC POWDER (X).
- Open drawer; take brush (Y) and use on powder.
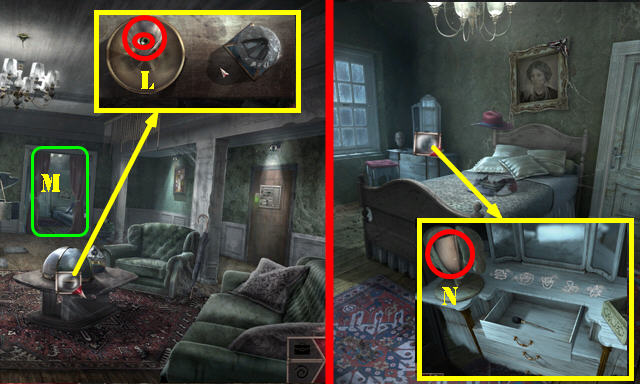
- Place ORNAMENT 3/3 and open box; take DIAMOND RING (Z).
- Walk down.
- Use BACK SCRATCHER; receive STAR OF LIFE FRAGMENTS (A).
- Use DIAMOND RING and select; take INTRICATE BUTTON (B).
- Go to Bathroom.
- STAR OF LIFE FRAGMENTS and ROD OF ASCLEPIUS on STAR OF LIFE BASE; receive STAR OF LIFE.
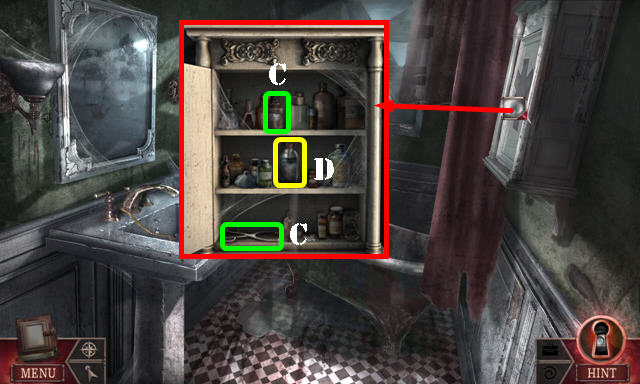
- Place STAR OF LIFE and open cabinet; take GLYCERIN and MEDICAL TONGS (C). Move bottles; take ALCOHOL (D).
- Walk down.
- Place INTRICATE BUTTON (E). Use slider (W) to move up, down and left (F). Solution: A-E, D-A, B-D, C-B, D-C, F-D (@4).
- Take LOCK FRAGMENT (G).
- Walk down.
- Use MEDICAL TONGS and place LOCK FRAGMENT (H).
- Solution (1-16).
- Enter (I).
- Take DIRTY BRUSH and WRENCH (J).
- Use CHAMPAGNE OPENER and select wooden planks (K). Play HOP; receive DISH KNOB.
- Walk down.
- Place DISH KNOB and select twice (L); take PLASTIC EYE and EMPTY GLASS.
- Go (M).
- Place PLASTIC EYE and select; take MUSIC SHEET (N).
- Walk down.
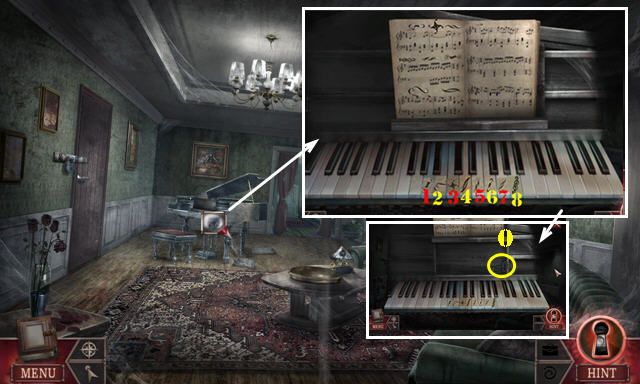
- Place PIANO KEY and MUSIC SHEET; solution (8-5-1-2-4).
- Take LIBRARY KEY (O).
- Go to Bathroom.
- Use WRENCH (P). Play HOP (Q) for a clue.
- Place EMPTY GLASS; take GLASS OF HOT WATER (R).
- Walk down twice.
- Use LIBRARY KEY; select (S-T-T-S).
- Enter (U).
- Take PORCELAIN PIECES 1/9-3/9 (V).
- Play HOP (W); receive MATCHES.
- Look at three notes (X).
- Select papers several times; take PORCELAIN PIECES 4/9-6/9 and DOLLHOUSE SKETCH (Y).
- Go to Doll room.
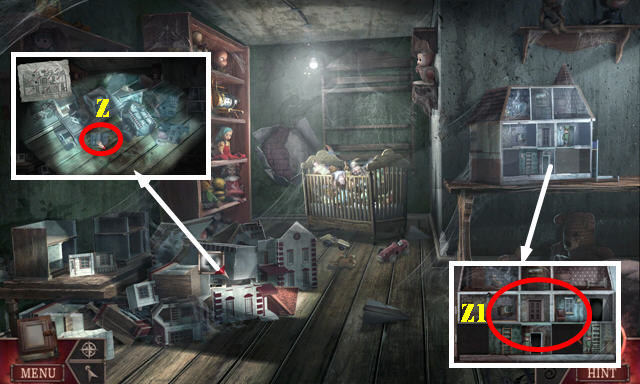
- Place DOLLHOUSE SKETCH and select twice; take DOLLHOUSE PART (Z).
- Place DOLLHOUSE PART (Z1).

- Solution (1-35).
- Take MINIATURE COWBOY.
- Go to Library.
- Place MINIATURE COWBOY; arrange as shown (A).
- Pull lever (B).
- Go (C).
- Take PORCELAIN PIECES 7/9-9/9 (D).
- Take POWDERED GUM ARABIC (E).
- Walk down.
- ALCOHOL and DIRTY BRUSH on NAPKIN; receive CLEAN BRUSH.
- Look at paper in MORTAR; place GLYCERIN, GLASS OF HOT WATER, and POWDERED GUM ARABIC; select the ingredients to receive GLUE.
- Place PORCELAIN PIECES 9/9 and GLUE. Use CLEAN BRUSH. Assemble figurine (1-12).
- Use glue (F) on figurine; receive PORCELAIN FIGURINE.
- Go to Porcelain room.
- Place PORCELAIN FIGURINE (G).
- Take WOODEN TILE (H).
- Place WOODEN TILE and select (I).
- Solution: H-E-D-A-B-E-D-A-B-C-F-I-H-E-F-I-H-G-D-E-H-G-D-A-B-C-F-E-D-A-B-E-D (@5).
- Push button (J) and play HOP; receive CYLINDER SEGMENT.
- Go to Doll room.
- Place MATCHES and strike (K). Use lit match (L).
- Place CYLINDER SEGMENT (M).
- Solution 8-4-6-2 (N).
- Take PORCELAIN ROSE (O).
- Go to Porcelain room.
- Place PORCELAIN ROSE; swap to match solution (P).
- Take FOLDER (Q).
- Walk down.
- Place FOLDER (R).
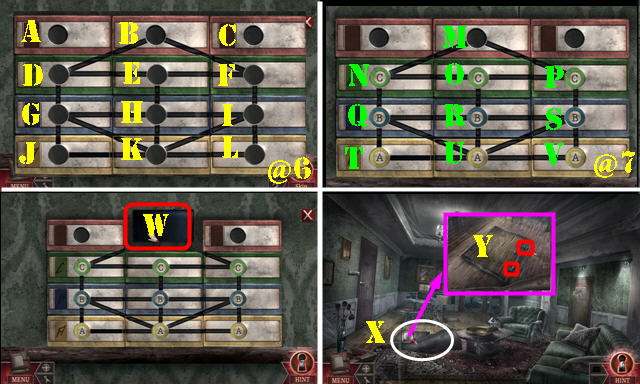
- Solution one (@6): (A-D)-(C-K)-(B-L)-(E-G)-(H-I)-(H-L)-(J-E)-(J-C).
- Solution two (@7): (P-S-V-U-R-Q-N-M-P-S-V-U-)-(T-Q-N-M-P-S-V-U-R-O-N-Q-T)-(U-R-O-P-S-V-U-R-Q-N-M).
- Select blueprints (W).
- Walk down.
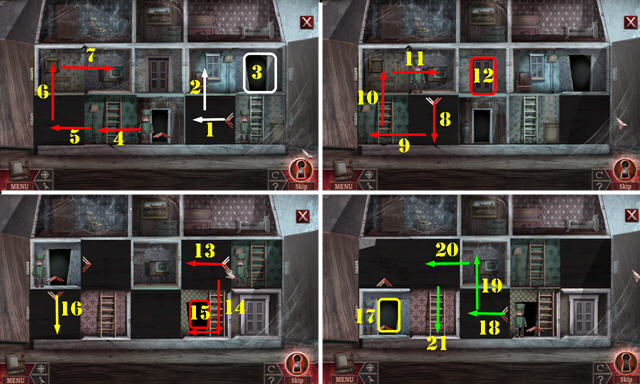
- Select rug (X); open both latches and trapdoor (Y).
Chapter 4: Mark Spencer II
- Close trapdoor; select 1-5.
- Walk down.
- Use FLASHLIGHT twice (A-B).
- Go (C).
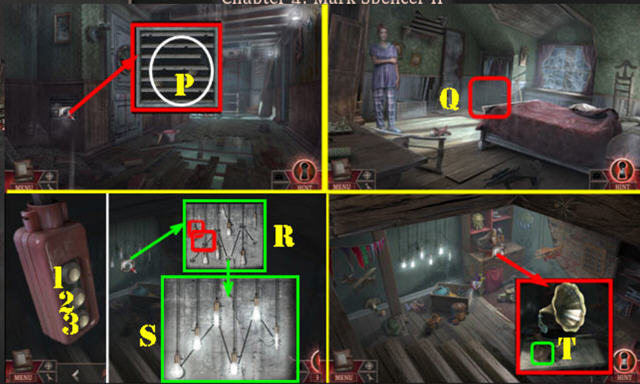
- Take TREBLE CLEF SYMBOL, CLOTH, and LIGHT BULB (D).
- Try to take stapler remover (E).
- Take STAPLE REMOVER and remove paint can cover (F).
- Go (G).
- Take NAIL SCISSORS (H).
- Play HOP (I); receive CHILD'S BOX.
- Walk down.
- Use NAIL SCISSORS; take CIRCULAR FRAGMENT (J).
- Go to Child's room.
- Place CIRCULAR FRAGMENT; swap 1-2 and 2-3.
- Go (K).
- Take COPPER WIRES 1/3, MAGNET, and TELESCOPE INSTRUCTIONS (L).
- Take baseball (M) and throw it.
- Get out.
- Play puzzle (N).
- Solution (O).
- Walk down.
- Place MAGNET and select (P); receive COIN 1/2 and SWITCH BUTTON.
- Go to Child's room and then go (Q).
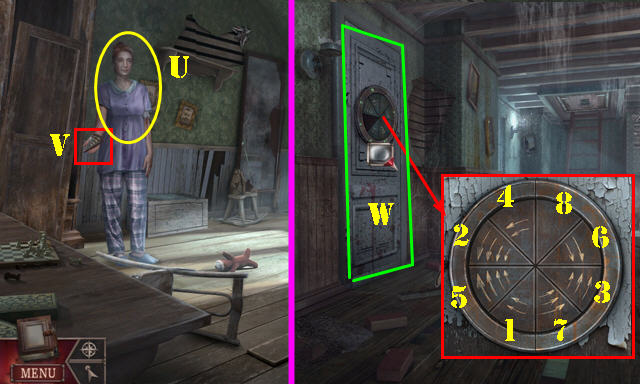
- Place SWITCH BUTTON; press (3-1-2).
- Take WOODEN STICK (R).
- Place LIGHT BULB; solution (S).
- Look at photo (T).
- Walk down.
- Give CLOTH and WOODEN STICK (U); receive CLOTH PIECE. Take LOCK PART (V).
- Walk down.
- Place LOCK PART. Solution (1-8).
- Enter (W).
- Take SUN SYMBOL (X).
- Look at note; take PHONOGRAPH ORNAMENT and LETTER OPENER (Y).
- Use STAPLE REMOVER; take GALVANIZED NAIL 1/2 (Z). Select statue; take PHONOGRAPH CRANK (A).
- Go to Secret room.
- Place PHONOGRAPH CRANK (B).
- Place PHONOGRAPH ORNAMENT; take DOORKNOB (C).
- Go to Study.
- Place DOORKNOB. Play HOP. Select: D-E-F-G.
- Enter (H).
- Take COPPER WIRES 2/3, GALVANIZED NAIL 2/2, COGWHEEL, PIN PULLER, and LIGHTNING SYMBOL (I).
- Place TELESCOPE INSTRUCTIONS. Assemble telescope (J).
- Take TELESCOPE (K).
- Walk down.
- Place COGWHEEL; select 1-4.
- Take TURN HANDLE BASE and COIN 2/2 (L).
- Walk down. Use PIN PULLER; take METAL RING (M).
- Go (N).
- Place TELESCOPE (O) and look (O1).
- Play puzzle; solution (P).
- Select drawer 3x; take VINYL RECORD (Q).
- Go to Secret room.
- Place VINYL RECORD (R) and turn crank (S). Select horn (T); receive SKULL SYMBOL.
- Play automatic HOP.
- Take CYLINDER SEAL (U).
- Go to Upper hallway.
- Place CYLINDER SEAL (V); receive PAINTED CYLINDER SEAL.
- Go to Workshop.
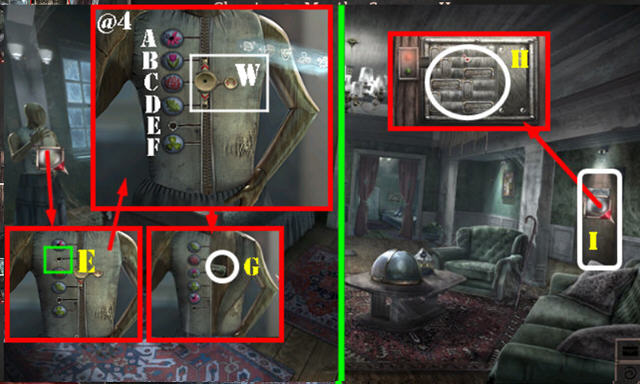
- TREBLE CLEF SYMBOL and LIGHTNING SYMBOL on CHILD'S BOX. Select arrow; place SUN SYMBOL and SKULL SYMBOL; take GEOMETRIC SHAPES.
- Remove five strings from TURN HANDLE BASE; receive ABACUS STRINGS.
- Place ABACUS STRINGS and GEOMETRIC SHAPES. Solution (W).
- Take HANGING SHAPES 1/2 (X).
- Walk down.
- Select book; place PAINTED CYLINDER SEAL; take CLUE WITH SYMBOLS (Y).
- Place CLUE WITH SYMBOLS; select 3-6-1-5.
- Take TURN HANDLE PARTS (Z).
- TURN HANDLE PARTS on TURN HANDLE BASE; assemble as shown (Z1). Receive TURN HANDLE.
- Go to Workshop.
- Place TURN HANDLE (A) and select board; take METAL FRAME (B).
- Walk down.
- Place METAL FRAME; Solution (C).
- Receive NUMBER CODE.
- Walk down.
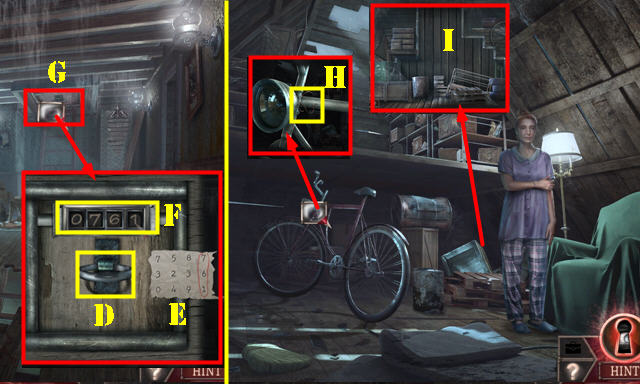
- Place METAL RING (D) and NUMBER CODE (E); enter 761 (F) and open safe.
- Go (G).
- Take COPPER WIRES 3/3 (H).
- Play puzzle (I).
- Solution (J).
- Take POTATO (K).
- Use LETTER OPENER on tarps (L). Play HOP; receive JOSEPH'S INITIALS.
- Go to Child's room.
- Place JOSEPH'S INITIALS; take HANGING SHAPES 2/2 (M).
- Go to Attic.
- LETTER OPENER, COIN 2/2, COPPER WIRES 3/3 and GALVANIZED NAIL 2/2 on POTATO; take POTATO BATTERY.
- Place POTATO BATTERY (N).
- Place HANGING SHAPES and select wall (O).
- Go (P).
- Solution is random; keep button inside circle (Q).
- Throw bowl (R).
- Pan right (S). Select (T).
- Pan left (U).
- Place CLOTH PIECE and select (V).
- Pan right. Flip switch (W).
- Congratulations, you've completed Dreadful Tales: The Space Between!
Created at: 2019-02-03