

Walkthrough Menu
- General Tips
- Chapter 1: Wish
- Chapter 2: The Crater of Time
- Chapter 3: Tree House Village
- Chapter 4: Wind Music
- Chapter 5: Water Collector
- Bonus Chapter: Barge City
General Tips
- This is an Adventure game. There are 5 main chapters and 1 bonus chapter.
- There are 2 Modes in the game, Casual and Challenge. In Casual Mode you can skip a puzzle after the “Skip Puzzle” button appears in the upper left corner.
- In Challenge Mode, you will not be able to skip any puzzles and some of the puzzles will be harder than in Casual Mode. This walkthrough provides you with solutions for both Modes.
- You can click randomly in the scene without any penalties.
- The Locate Power in the lower left can help you find inventory items. This power must be charged before it can be used.
- You can look at your score at the end of the game, along with the number of Dream Pieces you collected along the way.
- Your final score and ranking will be affected by the amount of time it took to complete the game, how many puzzles you skipped, the amount of Dream Pieces you collected and the amount of times the Locate Power was used.
- Make sure you pick up Tangle’s Notes that are scattered through the game to obtain insight into the game.
- Left-click on an inventory item to pick it up; right-click on an inventory item to return it back to the tray.
- An inventory item with a number next to it can be used several times.
- The inventory items and the Dream pieces should be in the same location the first time you play the game. If you choose to replay under the same name some of the items may be in alternate locations.
- The Dream Journal will be located in the lower right corner of the scene. In it you can find parts of the story, clues for puzzles and you can read all of Tangle’s notes that you picked up throughout the game.
Built-in Strategy Guide
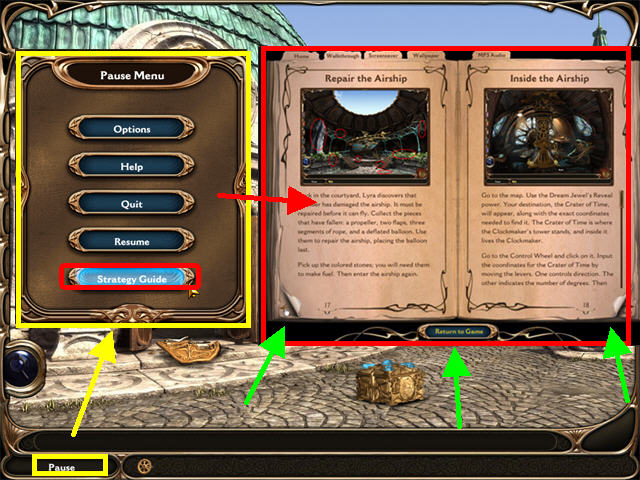
- You can access the built-in Strategy Guide without leaving the game.
- Click on the Pause Button in the lower left to bring up the Menu. Choose “Strategy Guide” to access the guide and the bonus content.
- Click on the lower left and right edges of each page to flip through all the chapters.
- Click on “Return to Game” in the lower right to go back to the game.
- You can also access the Screensavers, Wallpaper and MP3 Audio tabs in this section.
Fuel Generator
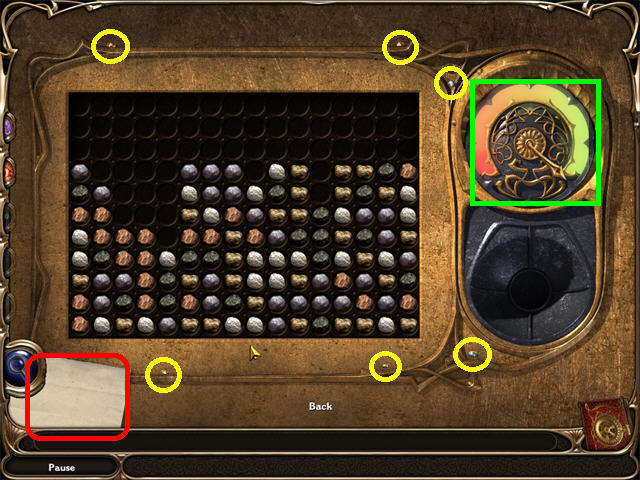
- Use the Fuel Generator to power-up the Airship with the Colored Stones found in each chapter.
- Place the Colored Stones in the slot in the lower right corner.
- You can click on one stone or several matching stones at a time to eliminate them. However, it is in your best interest to make bigger matches because the bigger the match the faster the fuel tank will fill up.
- If you run out of stones before you fill up the tank, return to the area in which you found the Colored Stones and pick up another batch.
- Once the tank is full you will hear a bell and you will not be able to click on any stones.
- In Casual Mode you get more rocks for the Fuel Generator than you get while playing in Challenge Mode.
Dream Pieces/ Dream Jewels
- Pick up the Dream Pieces (which look like small sparkling gems) in each scene to fill the Dream Jewels on the left side of the screen.
- Dream Pieces can be found anywhere, on a page, a puzzle board or on the ground. There are 184 Dream Pieces to collect in the game.
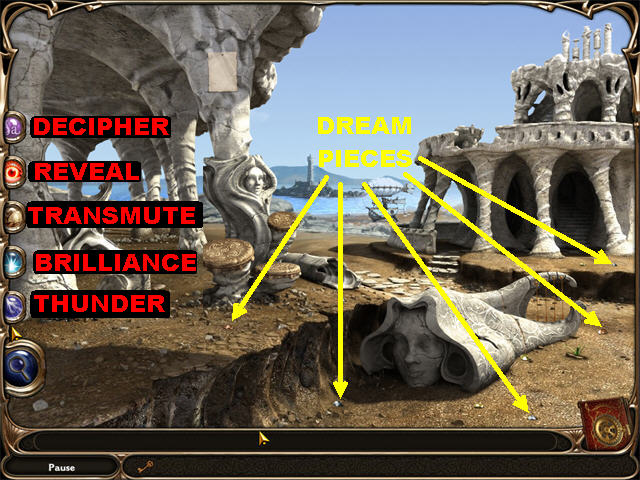
- Each Dream Jewel has a new power. Here are the description of all the Dream Jewels in order of appearance:
- Decipher Dream Jewel – Use this jewel to translate fairy text wherever you find it. You have unlimited usage with this power.
- Reveal Dream Jewel – Use it to find secrets on pages and maps.
- Transmute Dream Jewel – It can transform gold items into wood.
- Brilliance Dream Jewel – You can light up any dark room using this power.
- Thunder Dream Jewel – Use it to make thunder, lightning and rain appear.
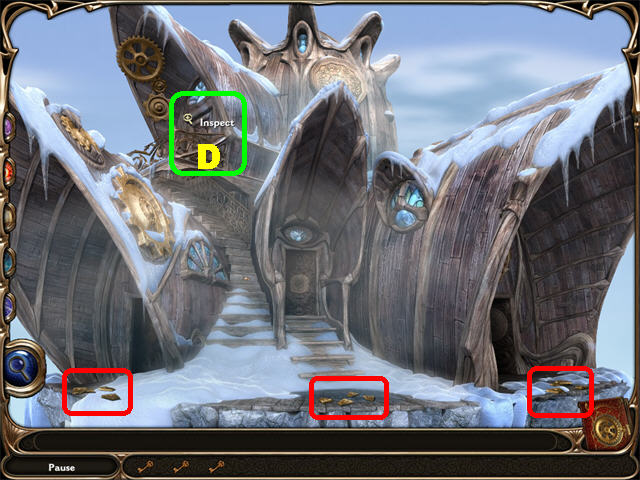
Chapter 1: Wish
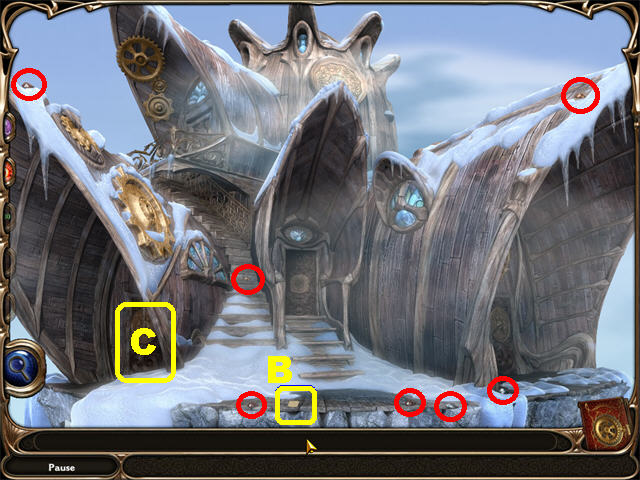
- Wait for the box to drop from the sky.
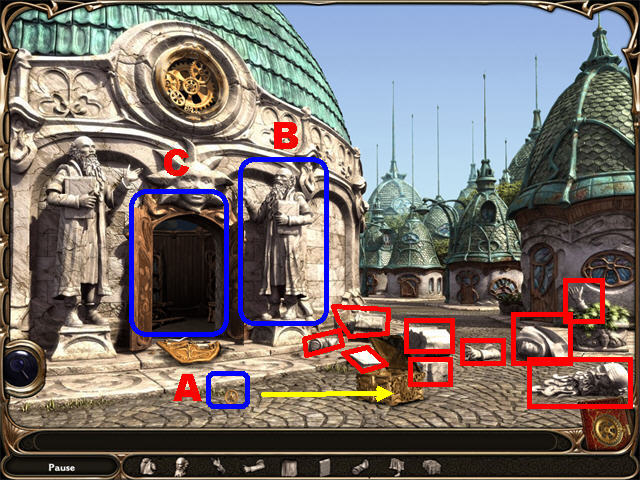
- Pick up the CLOCK GEAR (A) on the left and place it on the side of the CURIOUS BOX on the ground.
- Look inside the box; pick up the Dream Journal and read Tangle’s Note inside the box.
- The statue has been destroyed; pick up the pieces marked in red.
- Reassemble the statue by starting from the bottom and working your way up. Please look at the screenshot for the solution (B).
- Enter the classroom (C) after the puzzle has been completed.
Classroom
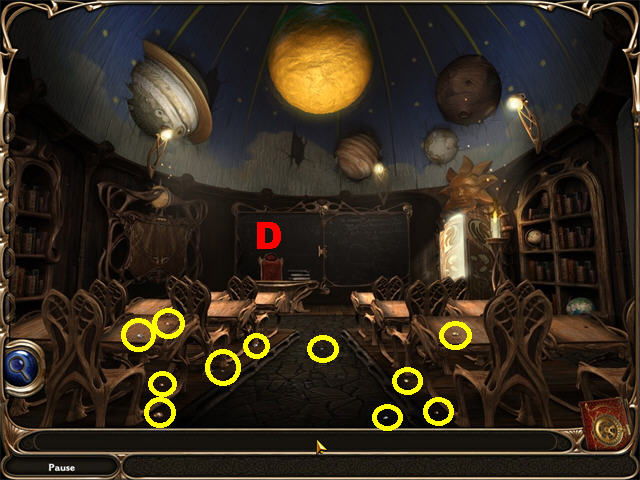
- Pick up the 11 DREAM PIECES circled in yellow.
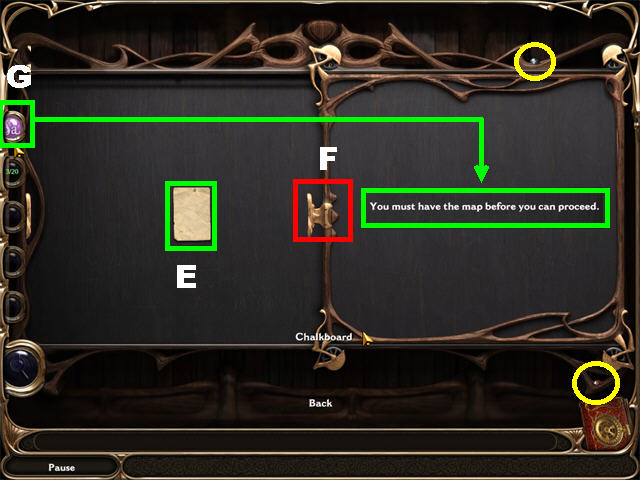
- Zoom into the chalkboard (D) in the back of the scene.
- Pick up the 2 DREAM PIECES circled in yellow.
- Click on the note (E) on the left side of the board.
- Click on the chalkboard’s handle (F) to slide it open and reveal some symbols.
- Click on the Decipher Dream Jewel (G) on left to decipher the words on the board, it states: “You must have the map before you can proceed.”
- Exit the chalkboard.
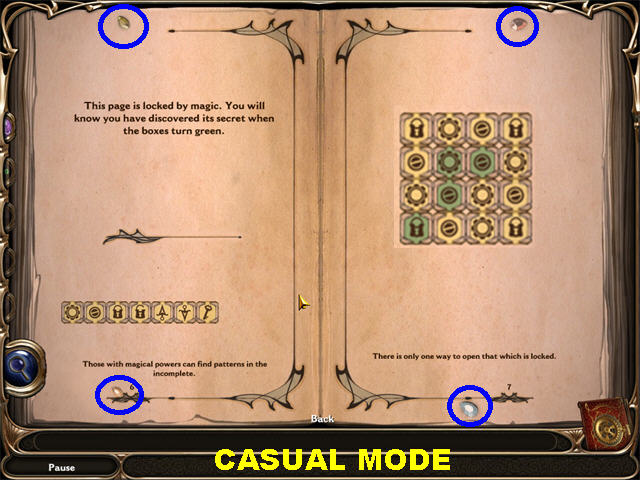
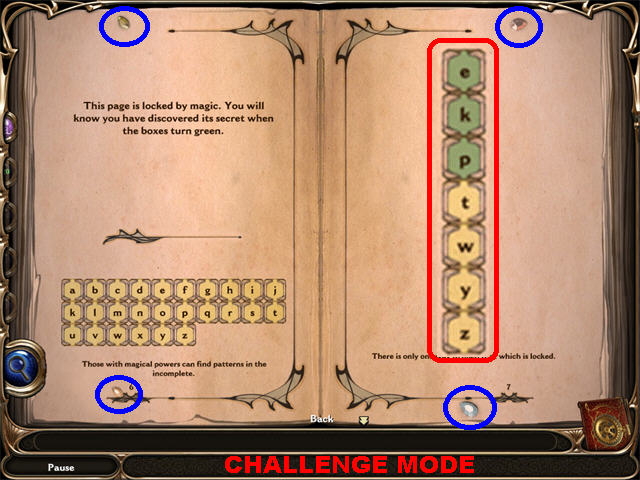
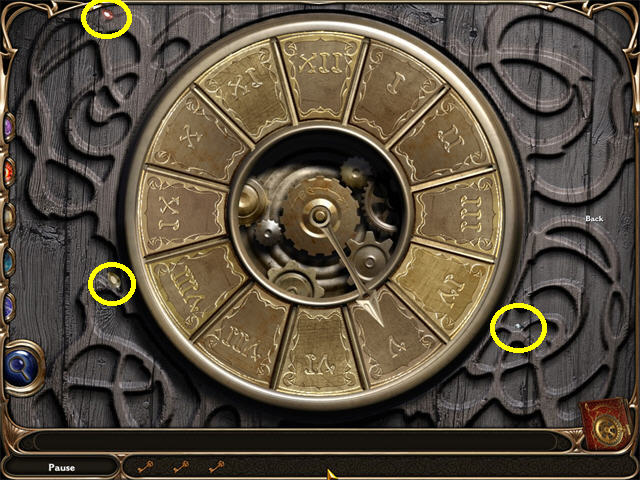
Magical Books Puzzle
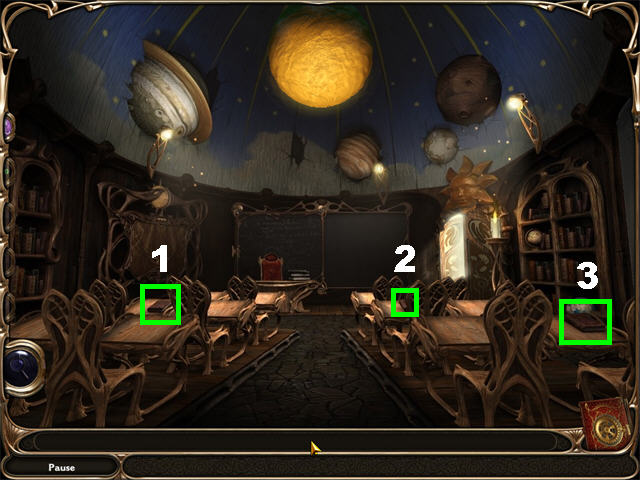
- There are 3 MAGICAL BOOKS marked in green (1, 2, 3); open each one to solve a puzzle.
- Click on the Decipher Dream Jewel to reveal the symbols or letters on the page.
- You must click on the symbols or letters in the lower left corner to fill in the spaces on the right side of the page.
- In Casual Mode the symbols will remain green when at least one of the symbols has been entered correctly.
- In Challenge Mode the symbols will remain green after all the symbols have been entered correctly.
- After the puzzle has been solved, a symbol will appear on the right page. You must place that symbol on the dials above the locked cabinet according to the directions on the left side of the page. You can enter the symbols one at a time or wait until you have all of them to place them.
- The symbols at the end of the puzzle are random; therefore you must look at the symbols in your game to solve the puzzle.
- The screenshots will show you the solutions for Challenge and Casual Mode.
Puzzle 1 Solution
- Pick up the 4 DREAM PIECES circled in blue.
- This Solution is for Book 1 in Casual Mode.
- Pick up the 4 DREAM PIECES circled in blue.
- This Solution is for Book 1 in Challenge Mode, click on “E-K-P”.
Puzzle 2 Solution
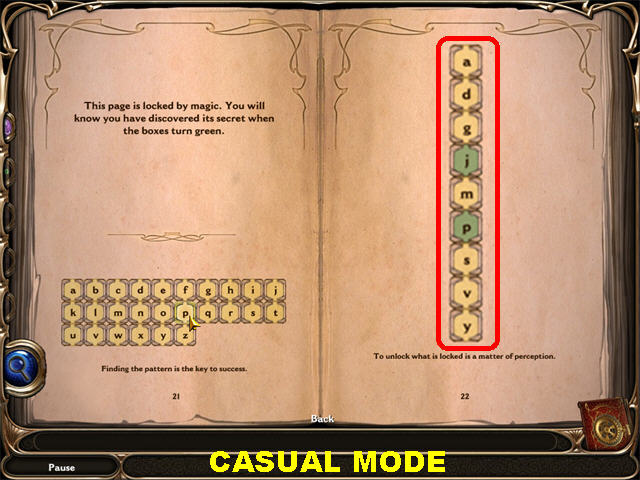
- This Solution is for Book 2 in Casual Mode, click on the letters “j” and “p”.
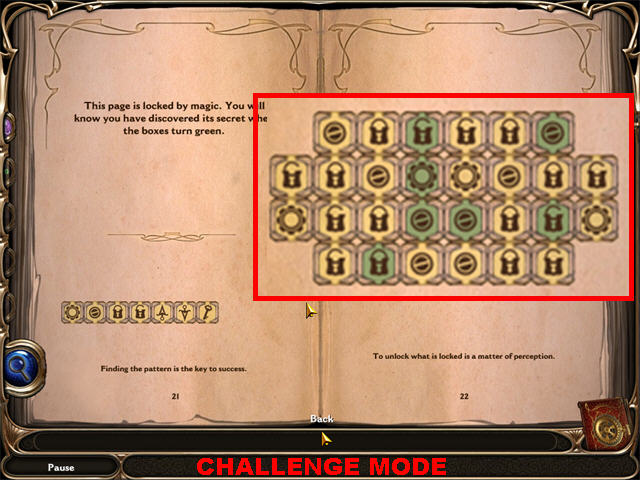
- This Solution is for Book 2 in Challenge Mode.
Puzzle 3 Solution
- This Solution is for Book 3 in Casual Mode.
- This Solution is for Book 3 on Challenge Mode.
- Zoom into the board on the left.
- Collect the 4 DREAM PIECES circled in yellow.
- Read Tangle’s Note on left.
- Enter the codes found in the books after each puzzle was solved. A map will appear and disappear right away.
- Exit the board.
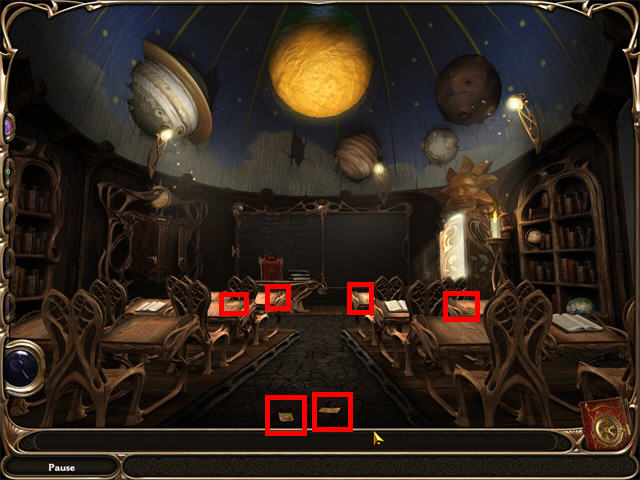
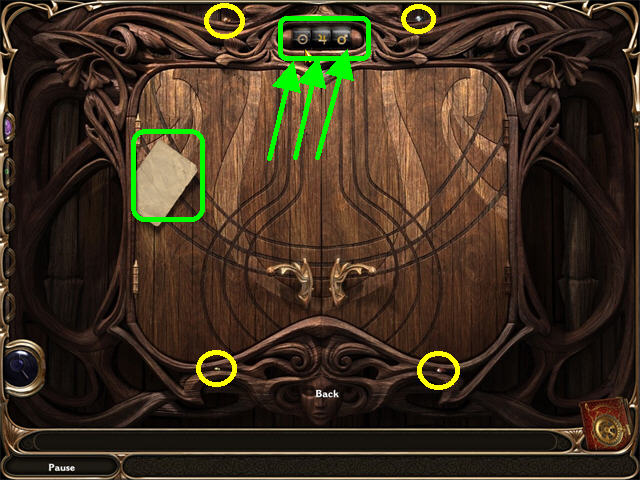
- Collect the 6 MAP PIECES marked in red in the classroom.
- Zoom onto the cabinet on left.
Map Puzzle
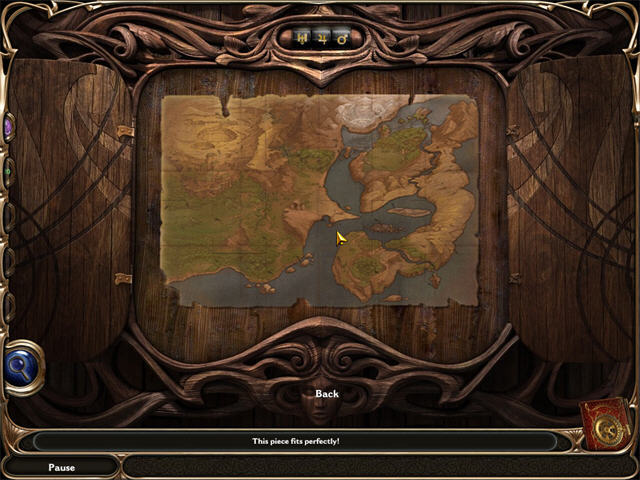
- Put the MAP on the cabinet; assemble the map as shown in the screenshot.
- The solution for Casual and Challenge Mode will be the same; the only difference is that in Challenge Mode the jigsaw pieces will be smaller.
- The Map will be added to inventory after the puzzle has been solved.
The Chalkboard
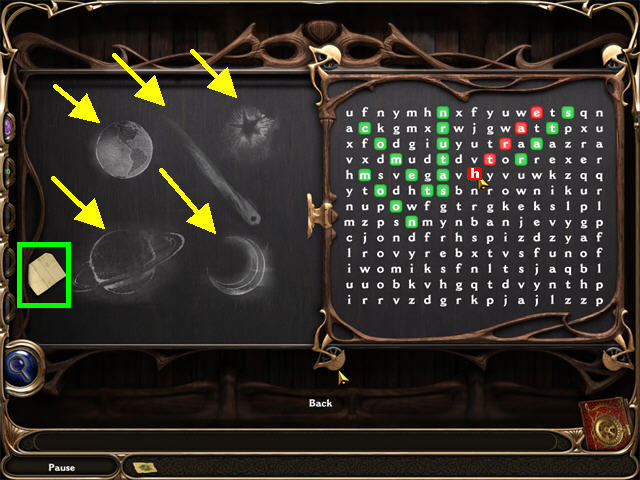
- Zoom into the chalkboard.
- Read Tangle’s Note in the lower left.
- Click on the Decipher Dream Jewel to decipher the words.
- Find the words of the symbols on the left in the word search on the right. Click on each letter to highlight and form the correct words.
- You can click on the symbols on the left to see what each symbol represents. The correct word will appear at the bottom of the screen.
- The positions of the words may be different for everyone but the words themselves are always the same.
- The solution for Casual Mode is as follows:Pentagon – Circle – Rectangle – Square – Triangle
- The solution for Challenge Mode is as follows:Moon – Comet – Saturn – Star – Earth
- Alternate Solution for Challenge Mode:Earth – Time – Water – Air - Fire
- Go through the portal on the right side of the board.
Airship
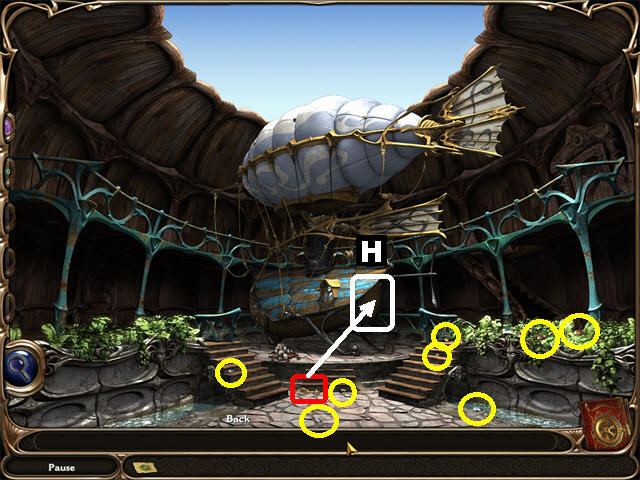
- Pick up the 8 DREAM PIECES circled in yellow.
- Pick up the KEY marked in red; use it to open up the DOOR (H) to the airship.
- Pick up the 6 DREAM PIECES circled in yellow.
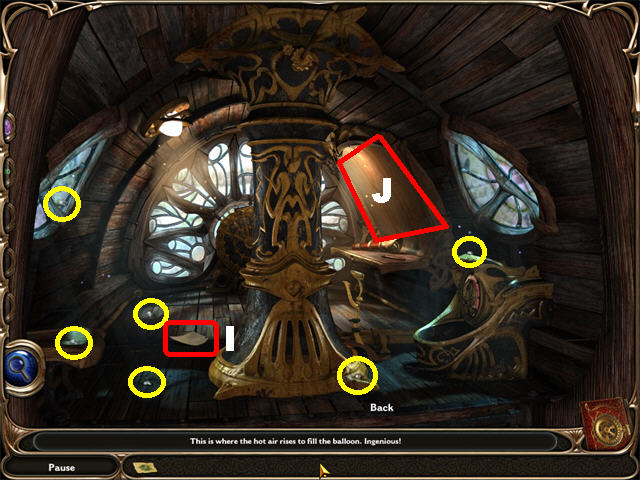
- Read the NOTE (I) in the lower left.
- Place the MAP on the right side of the wall (J).
- Go outside to the Courtyard.
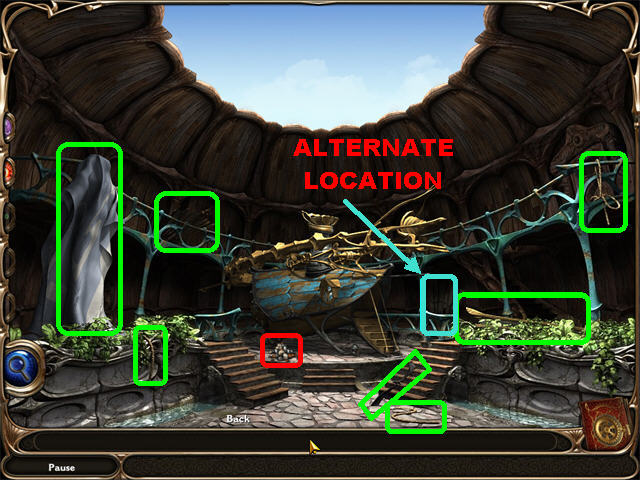
- Pick up the COLORED STONES marked in red on the ground.
- Pick up the PROPELLER, 2 FLAPS, 3 ROPE SEGEMENS and a DEFLATED BALLOON marked in green.
- Place the items back on the airship to repair it. You should place the Deflated Balloon on the airship last.
- Go back inside the airship.
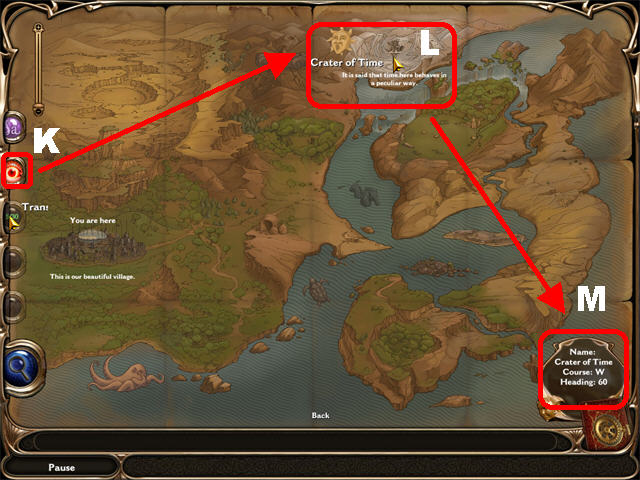
- Zoom into the map on right.
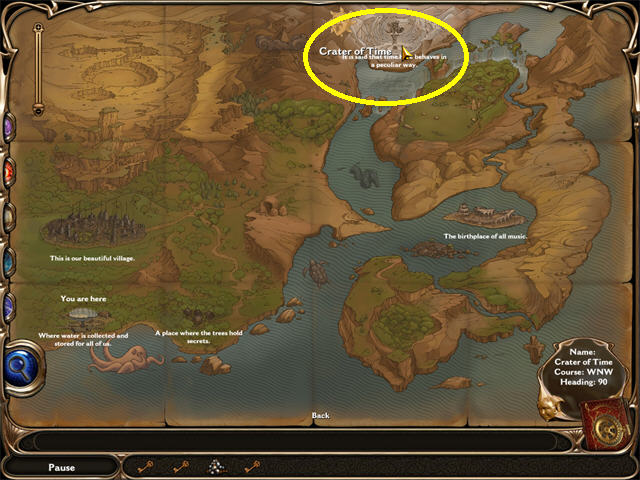
- Use the REVEAL DREAM JEWEL (K) to show you the next destination, Crater of Time (L).
- Pass your mouse over the area and the coordinates for the Crater of Time appear in the lower right corner (M).
- The random coordinates for this example are: “Course W, Heading 60”. The coordinates will be different for everyone, check your game for the solution.
- Exit the map.
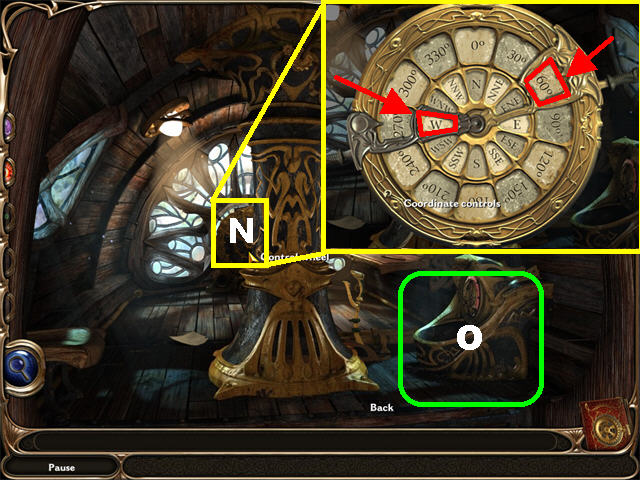
- Zoom into the Control Wheel (N).
- Place the Heading Bar (gold lever) on “60 degrees”.
- Place the Course Bar (silver lever) on “W.”
- Exit the Control Wheel; click on the Fuel Machine (O) on right.
- Pick up the 6 DREAM PIECES circled in yellow.
- Read the NOTE in the lower left.
- Place the COLORED STONES in the lower right slot.
- Click matching colored stones to eliminate them. You can click on one stone or multiple ones. The bigger the group you eliminate the faster the fuel will fill up.
- Once the lever is full of fuel, exit that scene.
- Pull the LEVER to lift the Airship.
Chapter 2: The Crater of Time
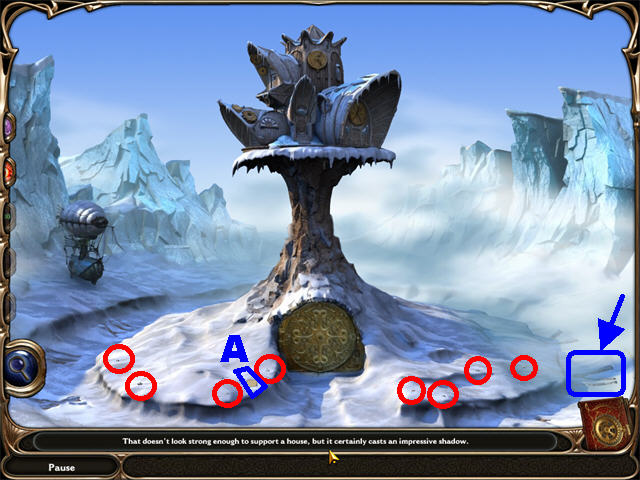
- Pick up the 8 DREAM PIECES circled in red.
- There are several numbers written in the snow. The sundial casts a shadow on the number VI.
- Read Tangle’s Note (A) on the lower left side of the ground.
- Zoom into the bottom door.
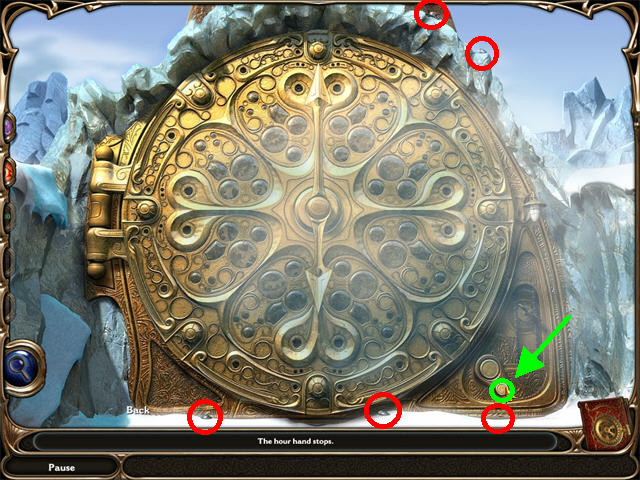
- Pick up the 5 DREAM PIECES circled in red.
- You must change the time to 6 o’clock. Click on the smallest button (marked in green) to make the hand move and click on it again when the hand reaches 6.
- Go through the door.
- Pick up the 7 DREAM PIECES circled in red.
- Read Tangle’s Note (B) in the lower center.
- Go through the door (C) in the lower left to reach the Clockmaker’s Communication Room.

- Click on the locked door.
- Go back outside and pick up the 2 GEARS marked in red.
- Go through left door.
- Read Tangle’s Note.
- Place the GEARS on the grid. All gears must be touching in order for them to turn.
- There are several ways to solve this puzzle; the screenshots shows you one way.
Casual Mode
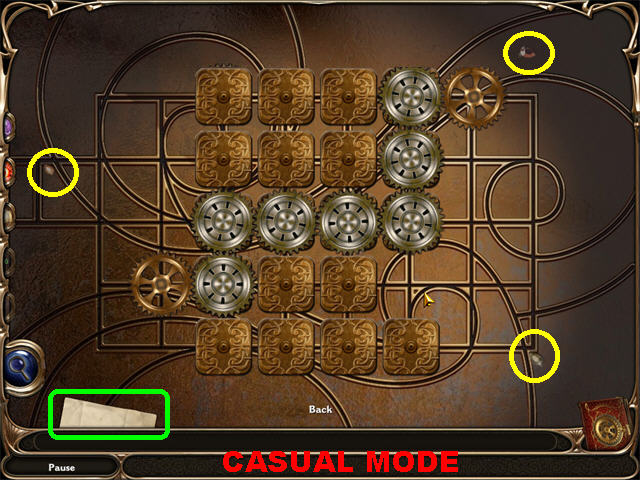
- Pick up the 3 DREAM PIECES circled in yellow.
- This solution is for Casual Mode.
Challenge Mode
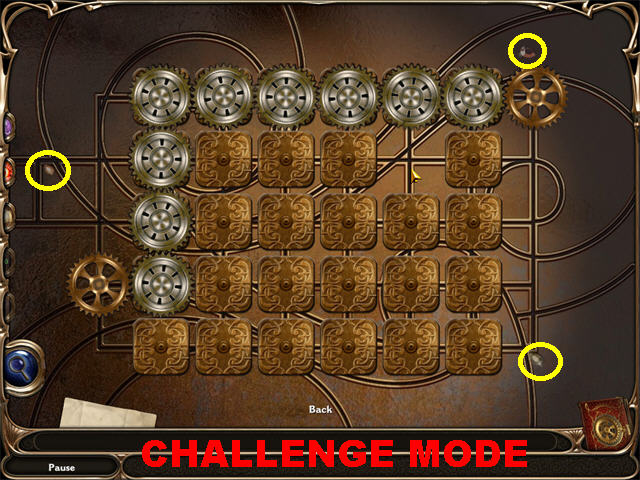
- Pick up the 3 DREAM PIECES circled in yellow.
- This solution is for Challenge Mode.
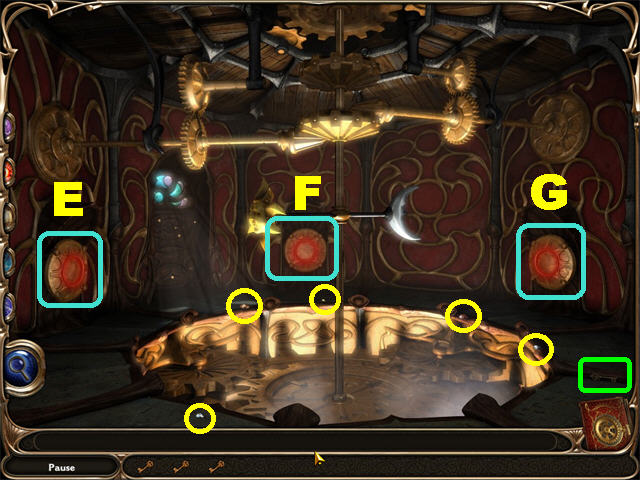
Clockmaker’s Communication Room

- Pick up the 12 DREAM PIECES circled in yellow.
- Read Tangle’s Note in the lower left marked in green.
- Pick up the METAL BELL and PIPE marked in blue.
- Use the PIPE and the METAL BELL to repair the bell as shown in the screenshot.
- Click on the GUEST BOOK marked in red on the right side of the counter.
Guest Book
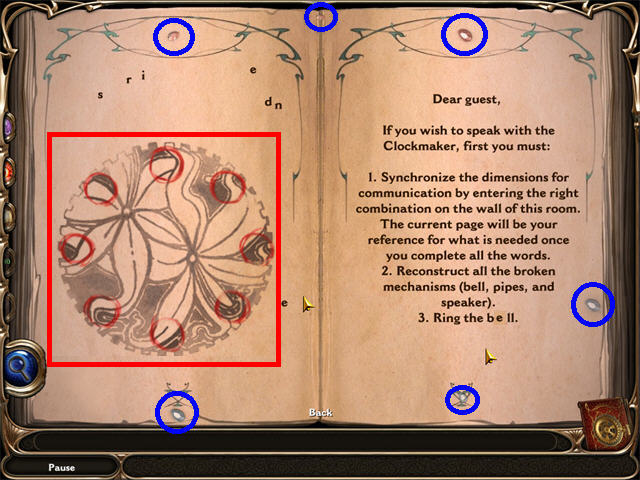
- Collect the 6 DREAM PIECES circled in blue.
- Click on the REVEAL DREAM JEWEL to make the text appear.
- To decipher the message, click on the letter you want to use and click on the line in which you want to place it.
- Letters placed correctly will turn green; incorrect ones will turn red, remove them by clicking on them.
- As you guess each word, it will fill a blank space on the right side of the page. Instructions will appear on the right after all the words have been deciphered.
- The Solution is:Dear guest, If you wish to speak with the Clockmaker, first you must: 1. Synchronize the dimensions for communication by entering the right combination on the wall of this room. The current page will be your reference for what is needed once you complete all the words. 2. Reconstruct all the broken mechanisms (bell, pipes, and speaker). 3. Ring the bell.”
- You will receive the image of a flower on the left page and a METAL TILE in inventory.
- Exit the puzzle.

- Zoom into the back wall.
- Collect the 5 DREAM PIECES circled in yellow.
- Read Tangle’s Note in the lower left.
- Put the METAL TILE on the wall to activate the puzzle.
- Turn the disks to match the position shown in the Guest Book.
- The gears will turn once the puzzle has been assembled correctly.
- Exit the puzzle.
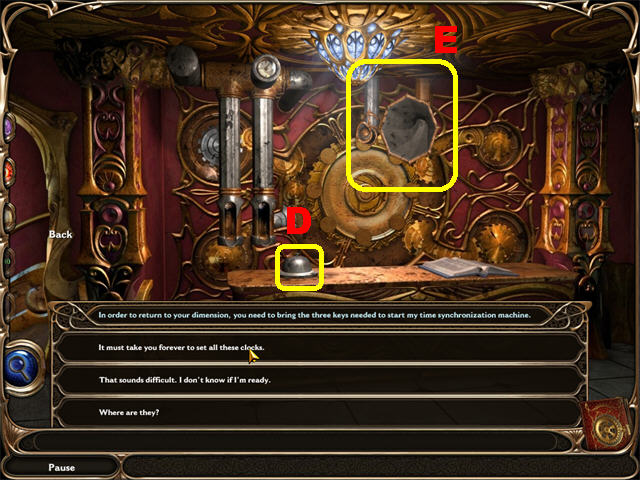
- Ring the bell (D) for a speaker and a periscope (E) to appear; click on them to begin speaking to the Clockmaker.
- Give the Clockmaker the correct answers to advance the storyline.
- The correct answers in order of appearance are:I’m trying to find my way home. I don’t belong here. Yes, I need to get back to my own dimension. Where are they? That sounds difficult but I will do my best. Very well. I shall return.
- Exit on left and enter door on right.
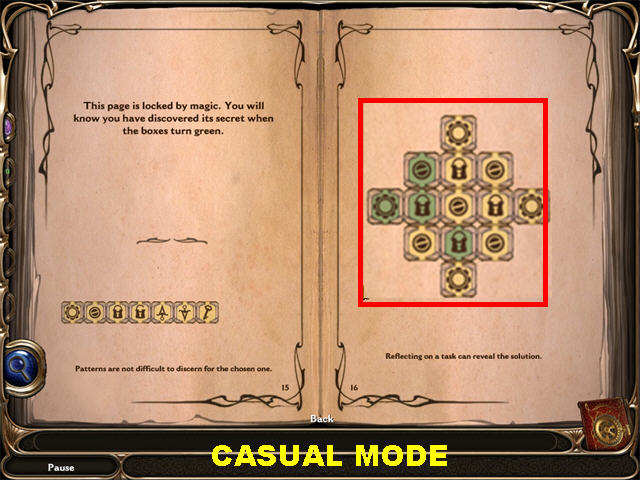
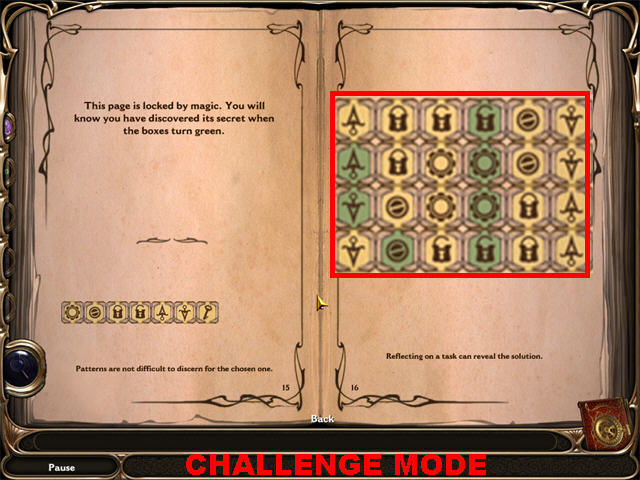
Clock Room Door Puzzle
- Pick up the 3 DREAM PIECES circled in yellow.
- Read Tangle’s Note in the lower left.
- Use the Reveal Power to make the pieces appear.
- Place the pieces on the board; correct pieces will lock in place.
- The solution for the Casual Mode and the Challenge Mode are shown in the screenshots below.
Casual Mode Solution
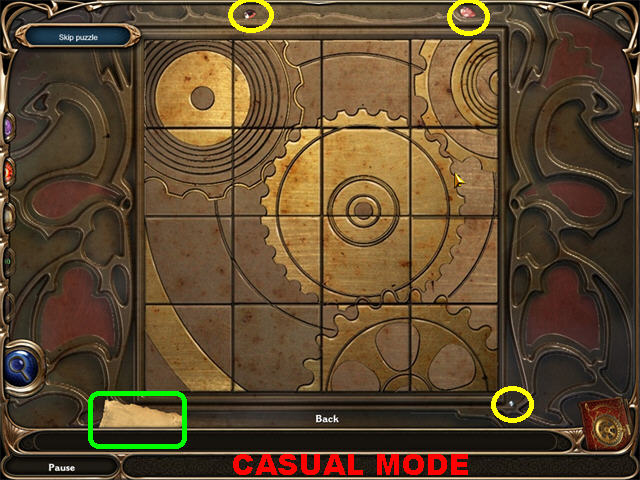
- Please look at the screenshot for the Casual Mode Solution.
Challenge Mode Solution
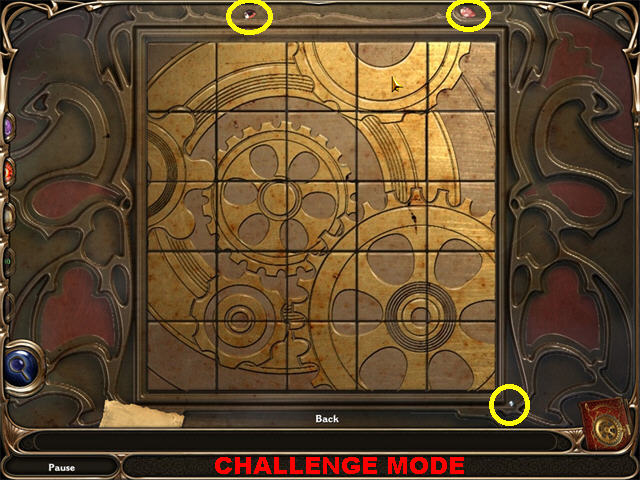
- Please look at the screenshot for the Casual Mode Solution.
Clock Room
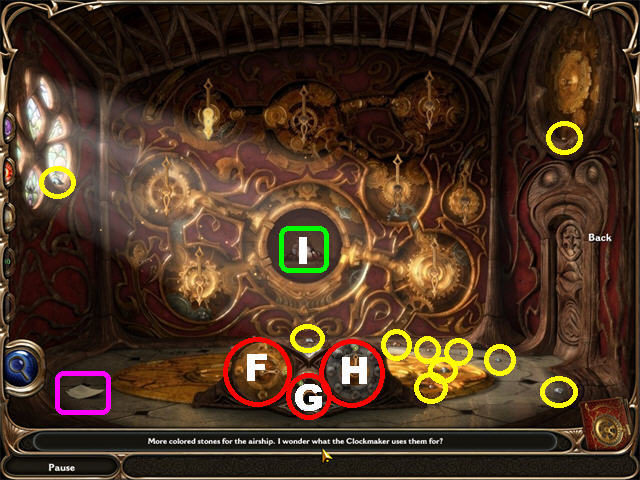
- The door to the Clock Room will open after the puzzle has been completed; go through it.
- Pick up the 10 DREAM PIECES circled in yellow.
- You must change the time on all the clocks so they are all synchronized to 6:00.
- Use the dials on the left (F) to turn the clock hands a certain amount of hours.The UP Button moves 1 Hour RIGHT button moves 2 Hours DOWN button moves 3 Hours LEFT Button moves 4 Hours
- The second dial (G) moves the hour hand in the increments chosen with the first dial (F).
- Use the third dial (H) to switch from clock to clock.
- Once all the clocks are at 6:00 the center clock will open; pick up the COLORED STONES (I).
- Go back to the Airship.
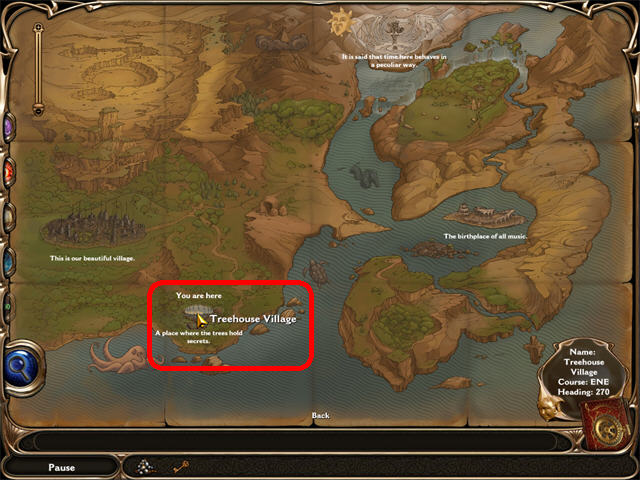
- Go to the map; use the Reveal Power to find the coordinates to your next destination – Treehouse Village.
- Zoom into the Control Wheel. Place the heading and course bars according to the coordinates shown in your game.
- Zoom into the Fuel Generator and fill up the tank.
- Pull the LEVER to reach your next destination.
Chapter 3: Tree House Village
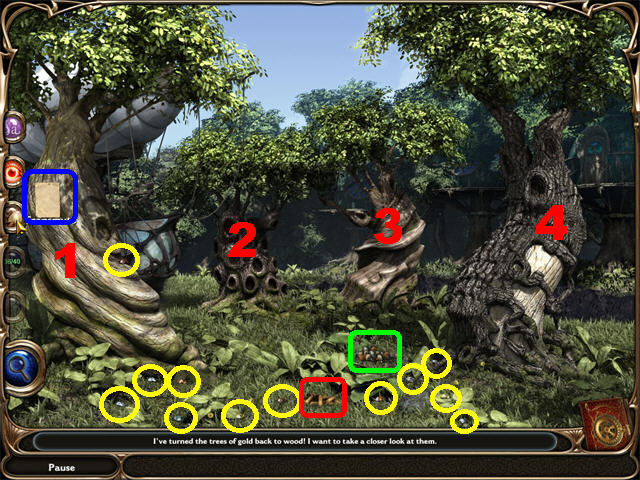
- Pick up the 12 DREAM PIECES circled in yellow.
- Read Tangle’s Note marked in blue.
- Click on the Transmute Power to turn the trees from gold to wood.
- Pick up the PILE OF STICKS marked in red.
- Pick up the COLORED STONES marked in green.
- You will have to take a closer look at each of the trees to solve a puzzle.
- Place the sticks in positions in which they will lead the walnut to fall into the hole.
- Click on a stick to remove it from the board.
- Press the small button on the wooden tube in the upper center to drop the walnut onto the board.
- Please look at the next set of screenshots for the solutions to all 4 puzzles. Please keep in mind that some of the sticks look very similar in shape and size. If the solution is not working for you try changing to a different stick with the same slant.
Tree Puzzle 1
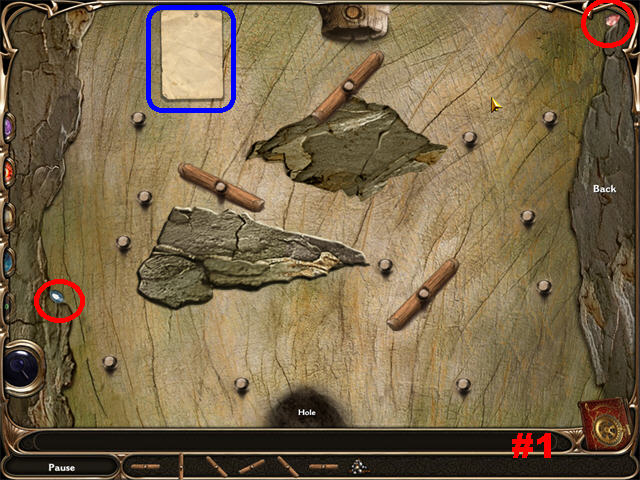
- Zoom into tree #1 on left.
- Pick up the 2 DREAM PIECES circled in red.
- Read Tangle’s Note marked in blue.
- Please look at the screenshot for the solution.
Tree Puzzle 2
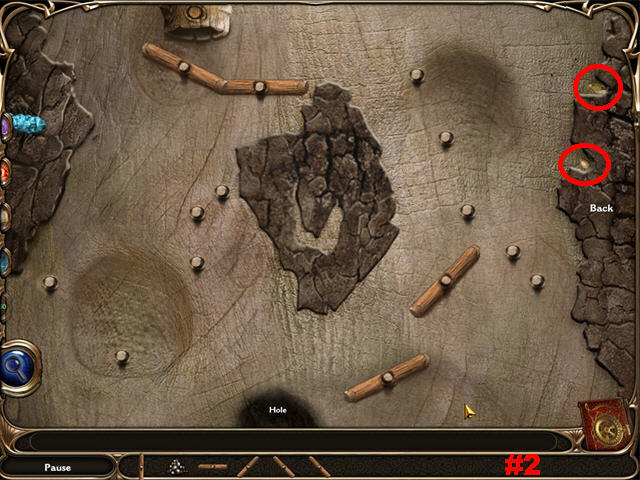
- Zoom into tree #2 on left.
- Pick up the 2 DREAM PIECES circled in red.
- Please look at the screenshot for the solution.
Tree Puzzle 3
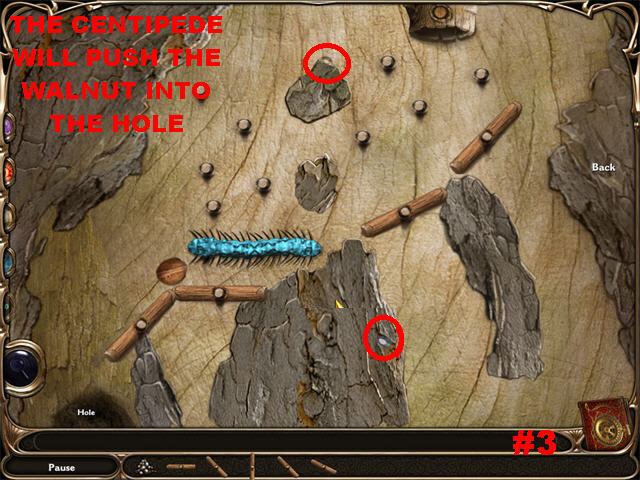
- Zoom into tree #3 on left.
- Pick up the 2 DREAM PIECES circled in red.
- Please look at the screenshot for the solution. In this solution the centipede will push the walnut into the hole as it passes through.
Tree Puzzle 4
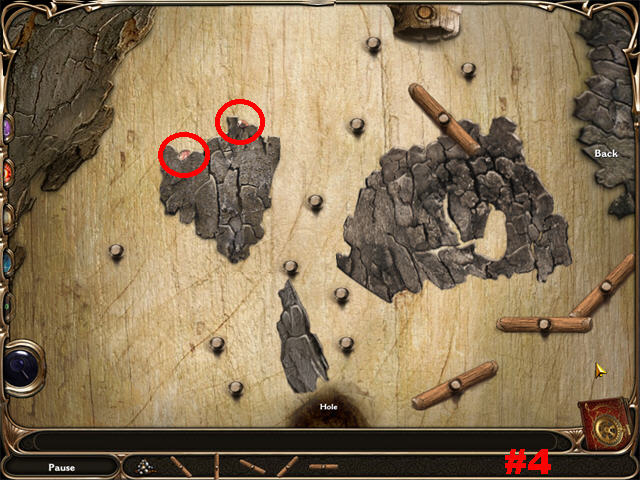
- Zoom into tree #4 on left.
- Pick up the 2 DREAM PIECES circled in red.
- Please look at the screenshot for the solution.
- Pick up the ORNATE KEY flashing on the ground after the puzzle has been solved.
- Go to the Airship.
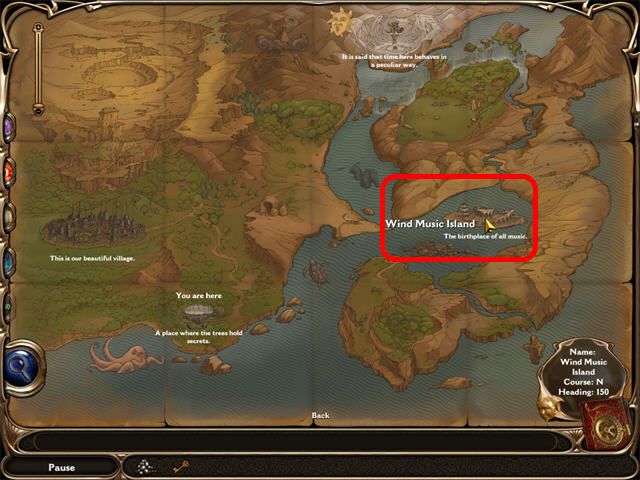
- Go to the map; use the Reveal Power to find the coordinates to your next destination – Wind Music Island.
- Zoom into the Control Wheel. Place the heading and course bars according to the coordinates shown in your game.
- Zoom into the Fuel Generator and fill up the tank.
- Pull the LEVER to reach your next destination.
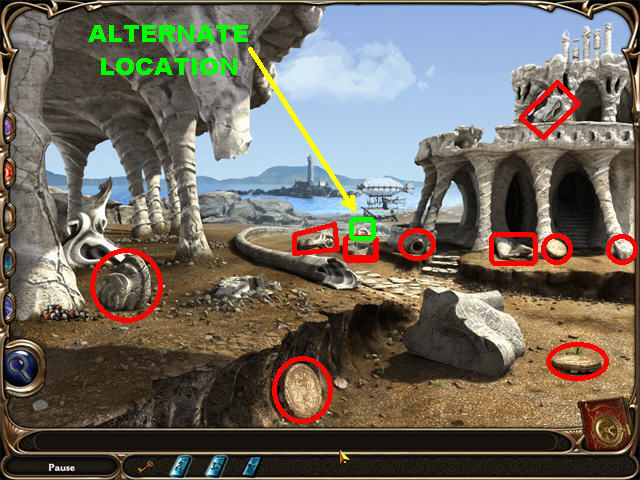
Chapter 4: Wind Music
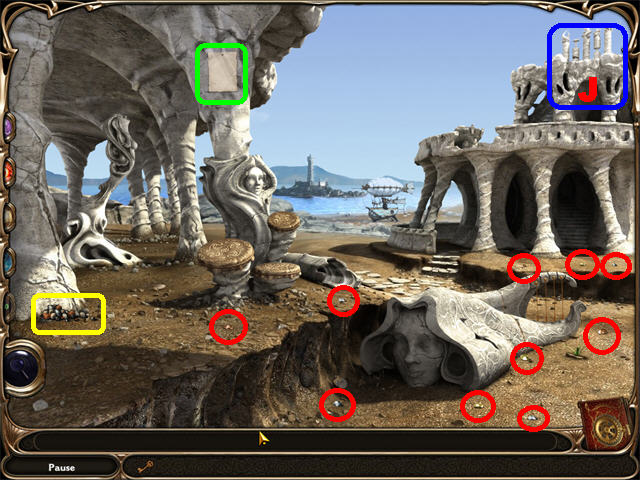
- Gather the 10 DREAM PIECES circled in red.
- Read Tangle’s Note in the upper left.
- Pick up the COLORED STONES marked in yellow in the lower left corner.
- Zoom into the columns (J) in the upper right.
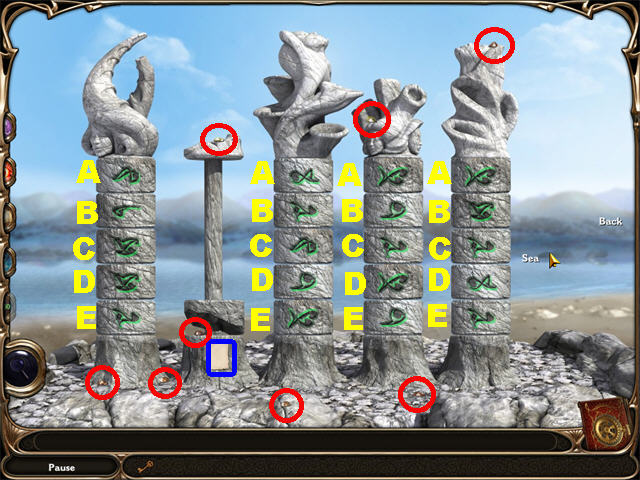
- Pick up the 8 DREAM PIECES circled in red.
- Read Tangle’s Note.
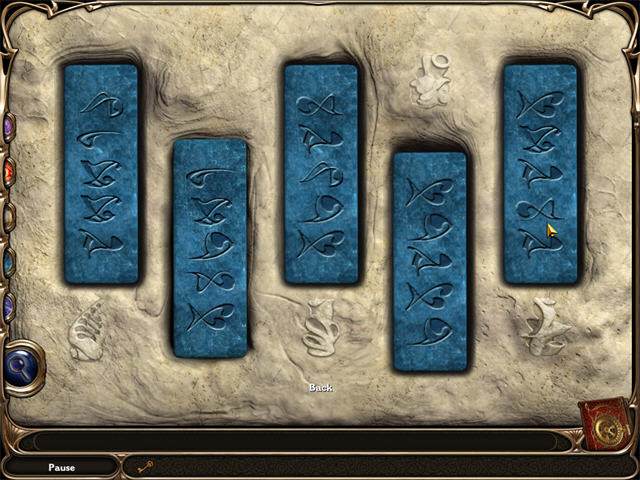
- Each totem represents a musical note. The symbols on them represent the score for that particular instrument.
- Turn the stone disks until they show the correct image. Correct symbols will turn green.
- To solve the puzzle please rotate the disks in the order shown below until the symbol in that section turns green.
- The solution for Casual Mode and Challenge Mode will be the same. The only difference is in the order in which you must turn the stones.
- Please check out our video solution for Casual Mode:Totem 1: E, D, C, B, A Totem 2: A, B, C, D, E Totem 3: C, B, A, D, E Totem 4: Any Order
- Please check out our video solution for Challenge Mode:
- When you get to the fourth column in this puzzle, don’t worry about some of your solutions resetting. Keep clicking on the disks until they turn green in the order shown.Totem1: E, D, C, B, A Totem 2: E, D, C, B, A Totem 3: B, E, D, C, A Totem 4: E, D, C, B, A, E, D
- Exit this scene and enter the Cave in the lower right.
Cave
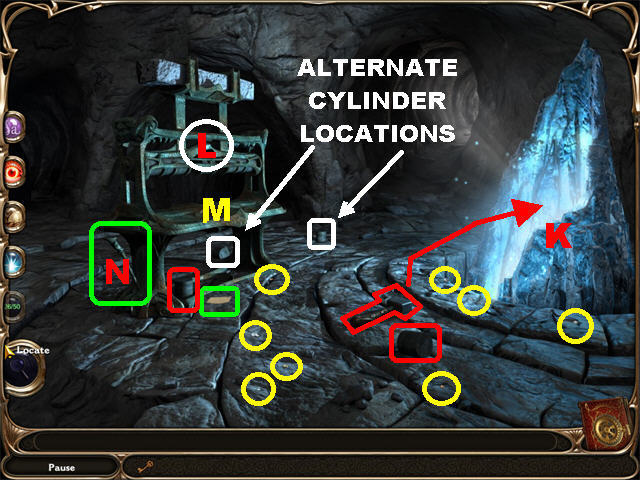
- Use the Brilliance Power to light up the cave.
- Pick up the 8 DREAM PIECES circled in yellow.
- Pick up the HAMMER and the 2 CYLINDERS marked in red. Alternate locations for cylinders are marked in white.
- Place the HAMMER a total of 4 times on the Crystal Mountain (K) on right to obtain 4 BLANK BLUE STONES.
- Place the 2 METALLIC CYLINDERS on the ancient press (L).
- Insert a BLANK BLUE STONE on the press in the spot shown on the screenshot (M).
- Click on the cylinders (L) after the stones have been inserted to bring up the symbol selection process.
- Pull the HANDLE (N) on the left side of the press to place the symbols on the stone. Repeat the same process until all the blue stones have been marked.
- Select the correct symbols on the tiles by clicking on them. You will hear a bell or a ding when the tile is in the correct spot; click on the handle at this point to imprint the stones.
- Please look at the screenshot for the solution. If you print the stones in the order shown, you can place them on the board in order of appearance.
- The solution will be the same for Casual and Challenge Mode.
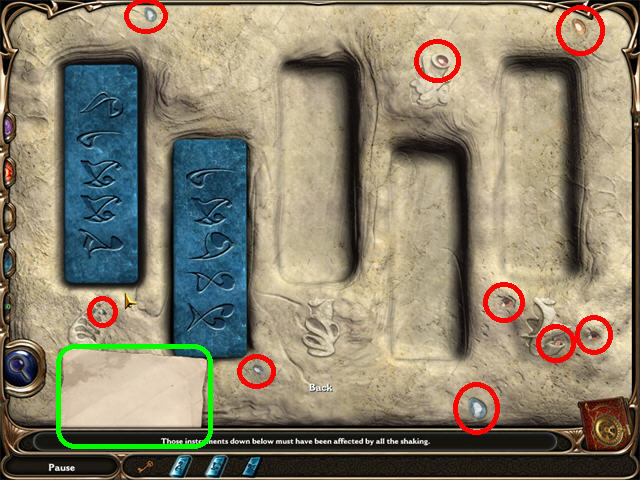
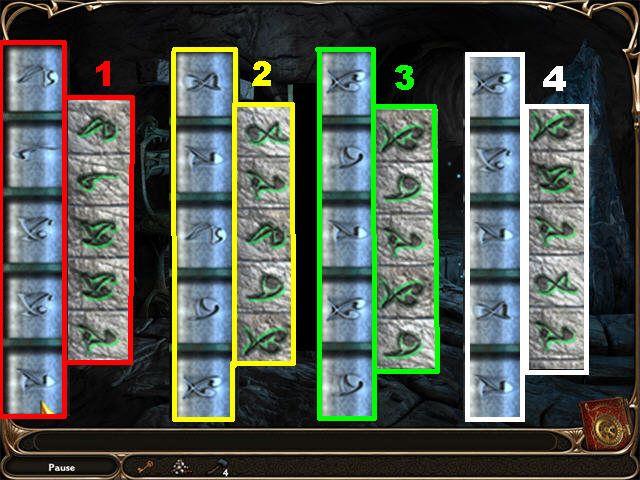
- Zoom into the spot in the upper center, just below the column area.
- Pick up the 9 DREAM PIECES circled in red.
- Read Tangle’s Note in the lower left.
- Place the first SCORED STONE on the board and the ground below will begin shaking. The stones will lock in place when placed in the correct spot.
- When you place a stone incorrectly it will revert to a blank stone. If this happens you must go back to the press machine to print some more stones.
- Go back down.
- Pick up the 10 pieces marked in red.
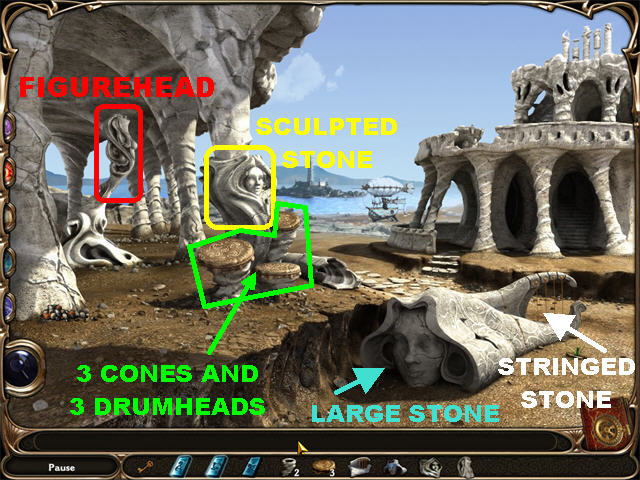
- Reconstruct the sculptures as shown in the screenshot.
- Place the FIGUREHEAD in the area marked in red.
- Place the3 STONE CONES and the 3 DRUMHEADS in the area marked in green.
- Put the LARGE STONE on the broken stone on the lower right.
- Place the STRINGED STONE in the back of the broken stone in the lower right.
- Go back to the stone slots and place the rest of the SCORED STONES in place.
- The ORNATE KEY will be added to inventory.
- Return to the Airship.
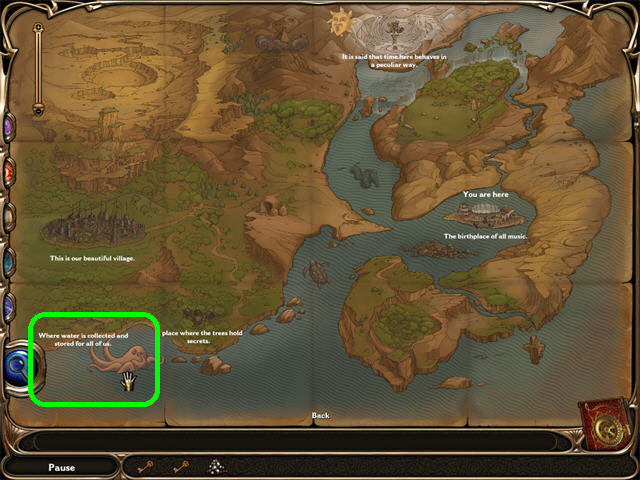
- Go to the map; use the Reveal Power to find the coordinates to your next destination – Water Collector.
- Zoom into the Control Wheel. Place the heading and course bars according to the coordinates shown in your game.
- Zoom into the Fuel Generator and fill up the tank.
- Pull the LEVER to reach your next destination.
Chapter 5: Water Collector
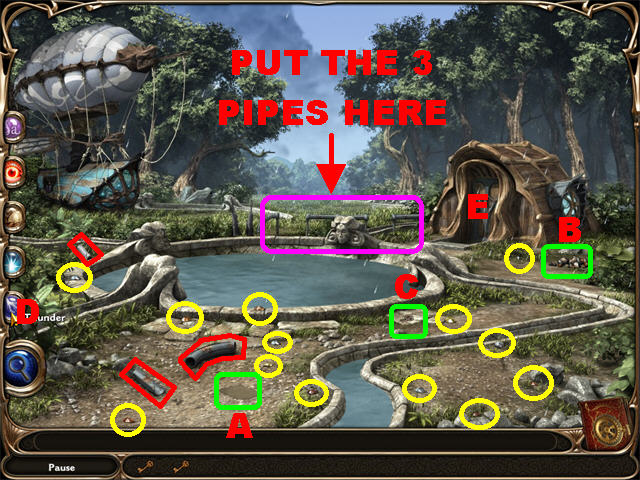
- Pick up the 13 DREAM PIECES circled in yellow.
- Read Tangle’s Note (A).
- Collect the COLORED STONES (B).
- Pick up the 3 PIPE pieces marked in red.
- Place the 3 PIPES in the area marked in purple to repair the pipes.
- Pick up the SMALL KEY (C) marked in green.
- Use the Thunder Spell (D) to make it rain.
- Use the SMALL KEY to unlock the hut (E) on right.
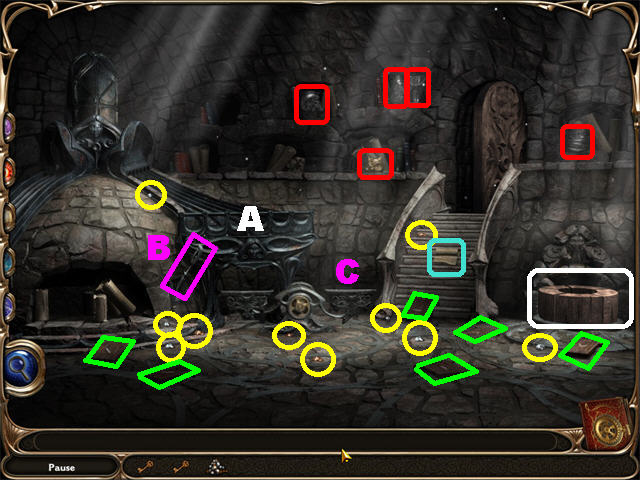
- Use the Brilliance Spell to light up the hut.
- Pick up the 10 DREAM PIECES circled in yellow.
- Read Tangle’s Note on the steps.
- Pick up the 6 CARVED PLANKS marked in green.
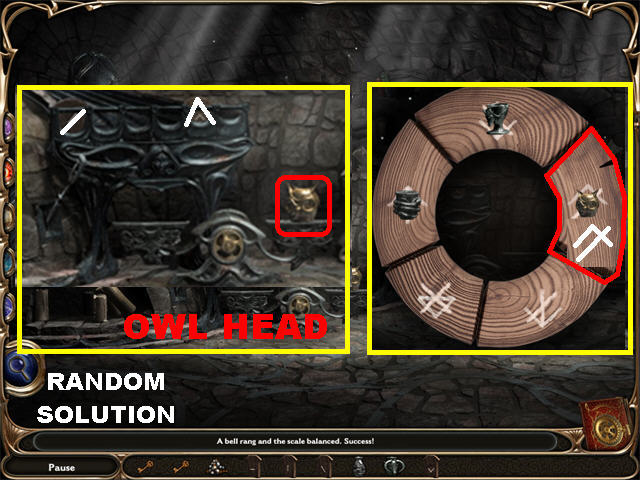
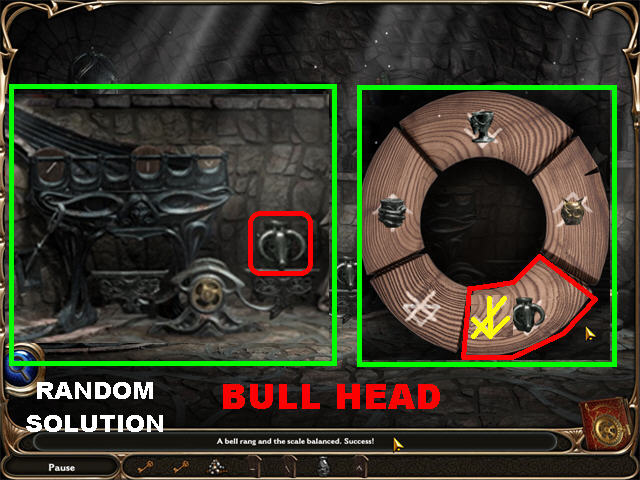
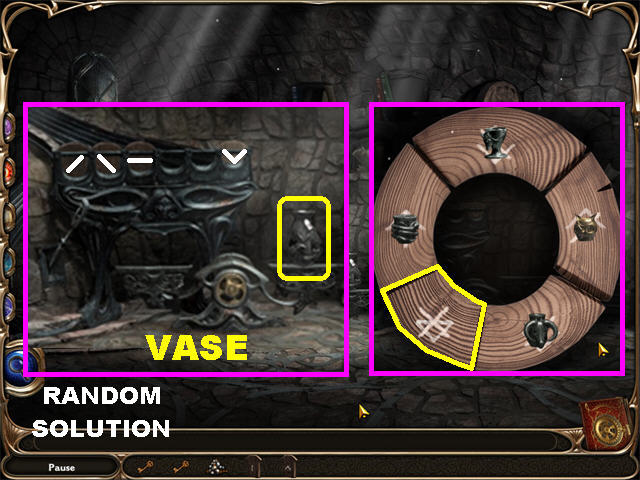
- Pick up the BULL HEAD, OWL HEAD, VASE, CHALICE, and CUP marked in red.
- Zoom into the wooden wheel marked in white; note the symbols around the wheel. Your goal is to place the wooden planks on the left slots (A) so they form the symbols shown on the wooden wheel.
- Put the planks into the slots (A) on left. Planks will automatically fall into the correct slots.
- Pull the lever (B) to release the water onto the left scale; then choose an item and place it on the right scale (C) to see if it balances.
- You will hear a bell once an item has been balanced correctly. Place that goblet onto the matching spot on the wooden wheel on right.
- Place the balanced item in the correct spot on the wooden wheel marked in white. When an item is placed correctly you will hear a bell and that item will lock in place.
- Repeat the same steps until you’ve balanced and placed all 5 items.
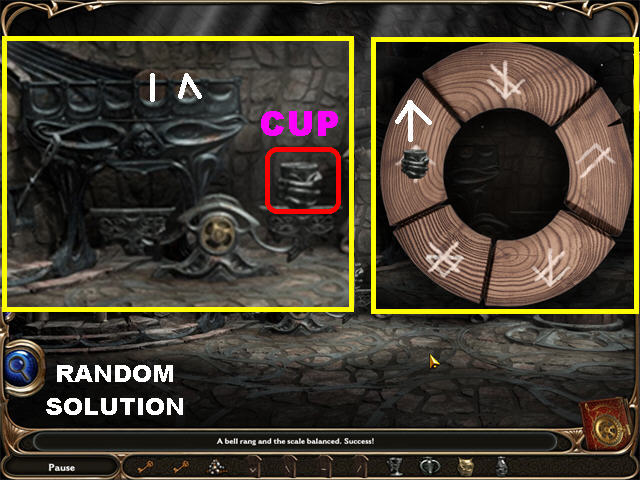
Cup Random Solution
- Please look at the screenshot for a sample solution.
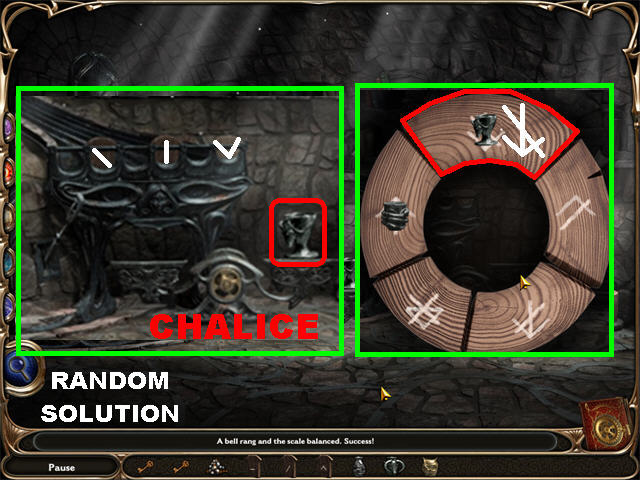
Chalice Random Solution
- Please look at the screenshot for a sample solution.
Owl Head Random Solution
- Please look at the screenshot for a sample solution.
Bull Head Random Solution
- Please look at the screenshot for a sample solution.
Vase Random Solution
- Please look at the screenshot for a sample solution.
- ORNATE KEY #3 will be added to inventory after the puzzle has been solved.
- Exit the hut and return to the Airship.
- Refuel the Ship.
- Go back to the map and find the coordinates for the Crater of Time.
- Go to the Control Wheel and enter the coordinates.
- Pull the lever to go to the Clockmaker.
The Final Door
- Go up the tower; click on the top left door (D).
- The clock numbers disappear.
- Go back outside.
- Pick up the 3 CLOCK NUMBERS marked in red on the snow.
- Go back to the door in the top left.
- Pick up the 3 DREAM PIECES marked in yellow.
- Place the CLOCK NUMBERS on the board and watch the sequence in which the clock hand moves.
- The solution is random. The numbers go by pretty quickly so you may want to write the sequence down.
- When you make a mistake the numbers will turn red and you will have to start the sequence over.
- You have to reproduce 6 sequences in Casual Mode and 9 for Challenge Mode.
- Go through the door after the puzzle has been solved.
Time Synchronization Machine
- Use your Brilliance Spell to light up the room.
- Pick up the 5 DREAM PIECES marked in yellow.
- Pick up the IRON KEY in the lower right.
- Place the ORNATE KEYS in each of the circles (E, F, G) to unlock them.
- Place the gears into the right spots. Click on a gear and then click in the spot you want to place it in.
- To remove a gear from its spot, click on it and then click on the Reset Button in the lower right.
- Once all gears are in place, click on the Button in the lower left to activate the gears. Slide the bar in the lower left corner towards the right to speed the rate in which the gears turn.
Left Door Solution
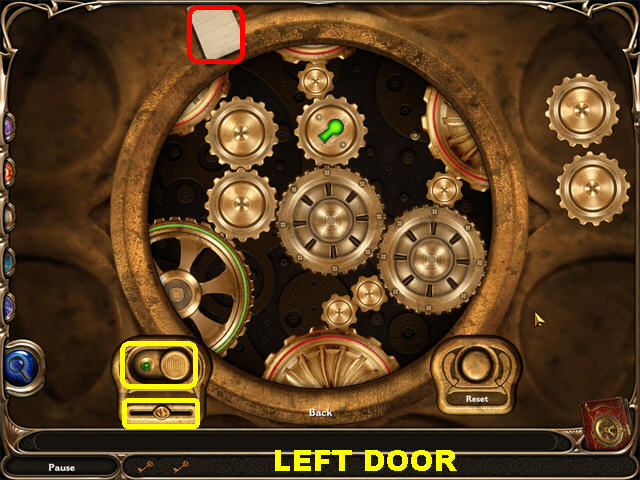
- Zoom into the left door.
- Read Tangle’s Note in the upper left.
- Place the IRON KEY in the lock.
- Please look at the screenshot for the solution.
Middle Door Solution
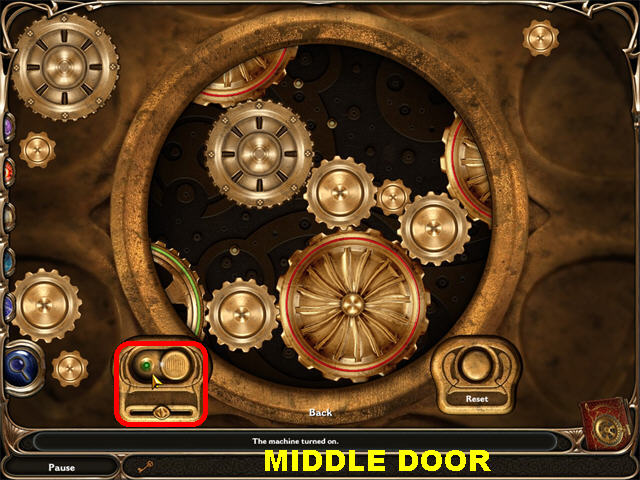
- Zoom into the middle door.
- Please look at the screenshot for the solution.
Right Door Solution
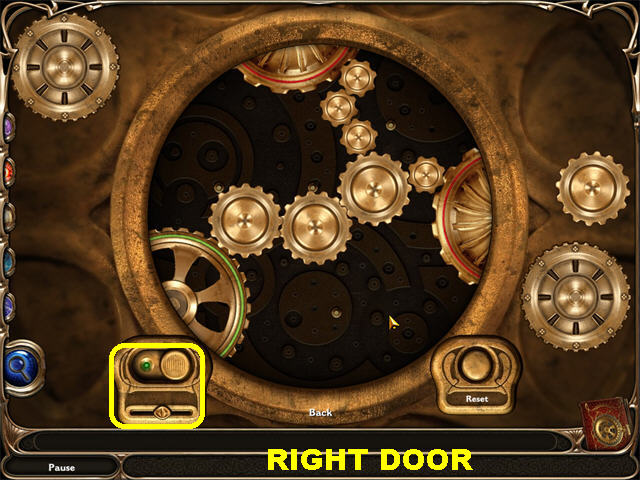
- Zoom into the right door.
- Please look at the screenshot for the solution.
- Exit the room.
- Go through right door to collect the COLORED ROCKS.
- Go to the Airship.
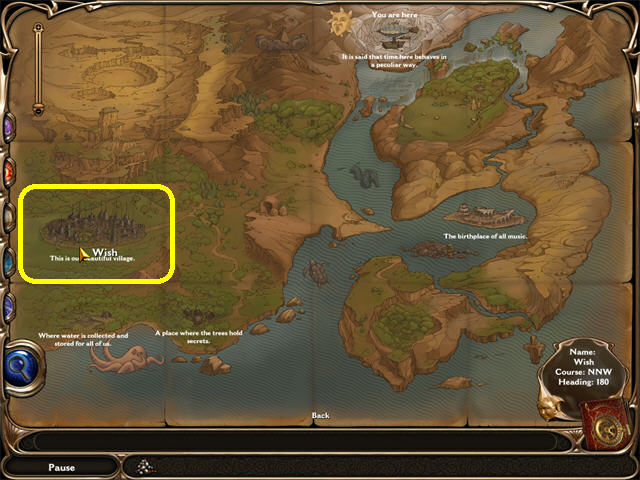
- Go to the map; look for the coordinates for Wish.
- Go to the Control Wheel and enter the coordinates.
- Pull the lever to go to your next destination.
- You now have access to the Bonus Chapter.
Bonus Chapter: Barge City
- Click on the Bonus Chapter in the Main Menu to access the extra content.
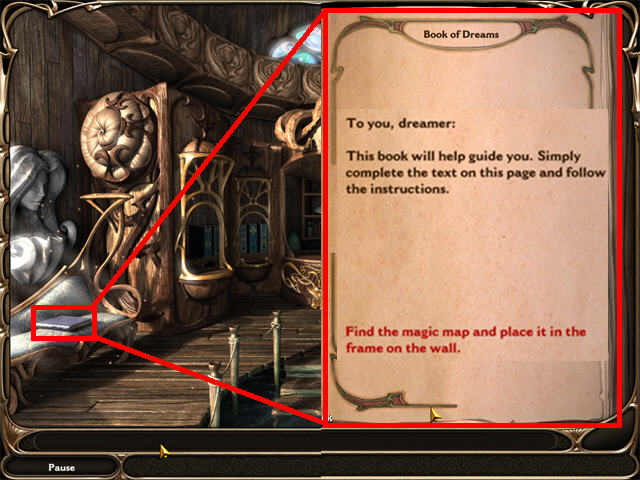
- Open the book on the lower left corner and decipher the message inside.“To you, dreamer: This book will help guide you. Simply complete the text on this page and follow the instructions.”
- The message at the bottom states:” Find the magic map and place it in the frame on the wall.”
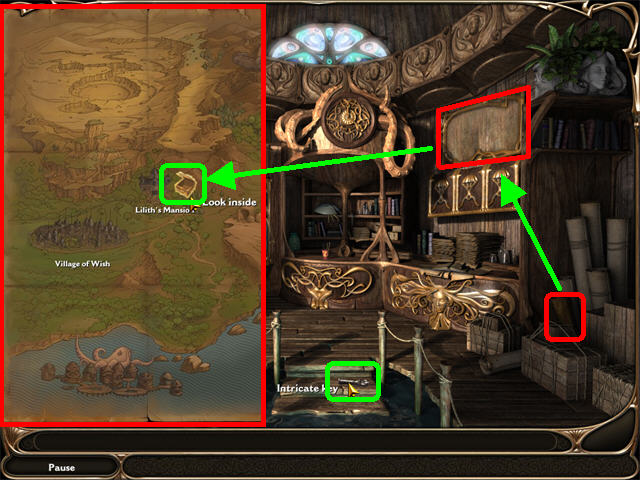
- Pick up the INTRICATE KEY in the lower center.
- Pick up the MAP marked in red in the lower right.
- Place the MAP on the upper right side of the wall and zoom into it.
- Place the INTRICATE KEY on the locked chest to access Lilith’s Mansion.
Airship Puzzle
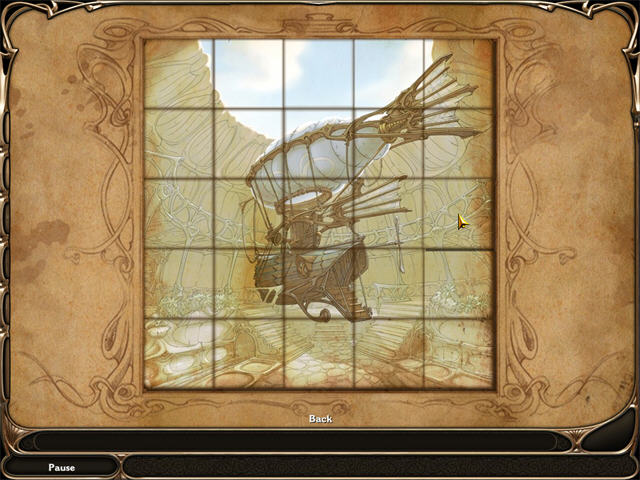
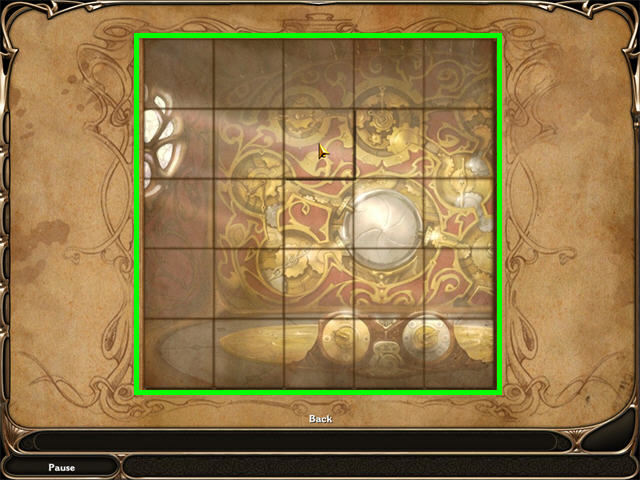
- Assemble the picture as shown in the screenshot.
- Wait for a few seconds for the concept art to appear.
- Return to the Sea Office.
Tower of Dreams
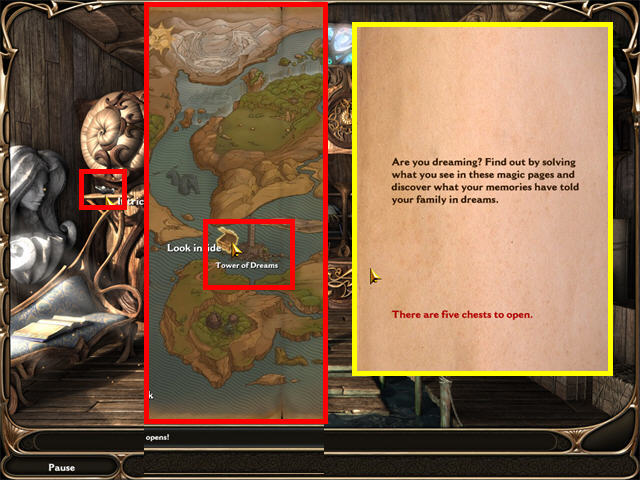
- Pick up the INTRICATE KEY in the upper left.
- Go to the MAP and place the INTRICATE KEY in the locked chest to access the Tower of Dreams.
- Decipher the words in the book.
- “Are you dreaming? Find out by solving what you see in these magic pages and discover what your memories have told your family in dreams.”
- The message states:” There are 5 chests left to open.” Watch the concept art.
- Return to the Sea Office.
The Observatory
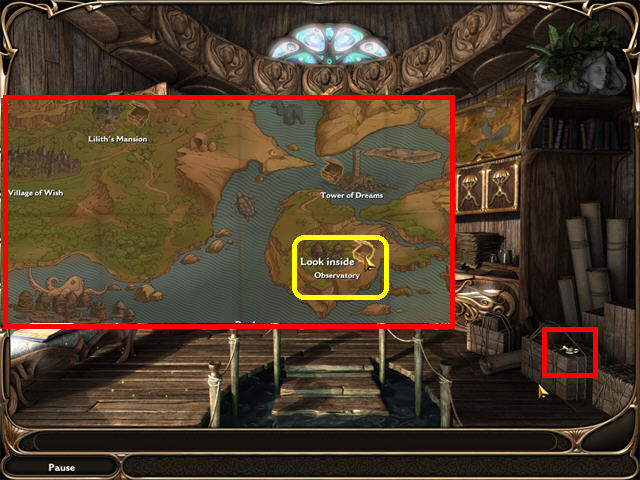
- Pick up the INTRICATE KEY in the lower right.
- Go to the MAP and place the INTRICATE KEY in the locked chest to access the Observatory.
- Solve the puzzle by placing the tiles in the same manner shown in the screenshot.
- Return to the Sea Office.
Barge City
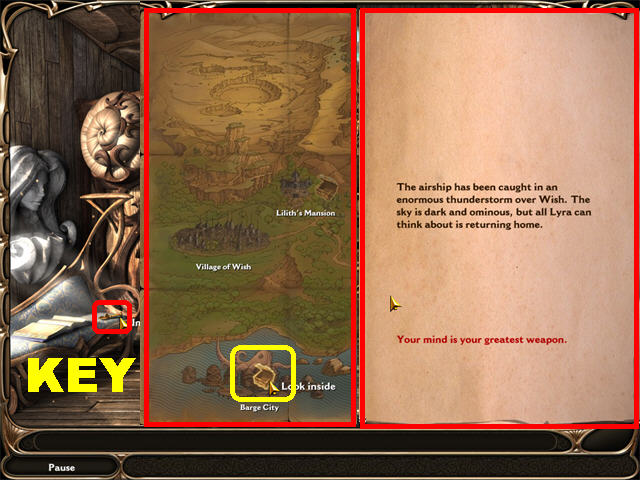
- Pick up the KEY in lower left.
- Decipher the words in the book:“The airship has been caught in an enormous thunderstorm over Wish. The sky is dark and ominous, but all Lyra can think about is returning home.”
- The message at the bottom states:” Your mind is your greatest weapon.”
- Return to the Sea Office.
Desert of the Lost
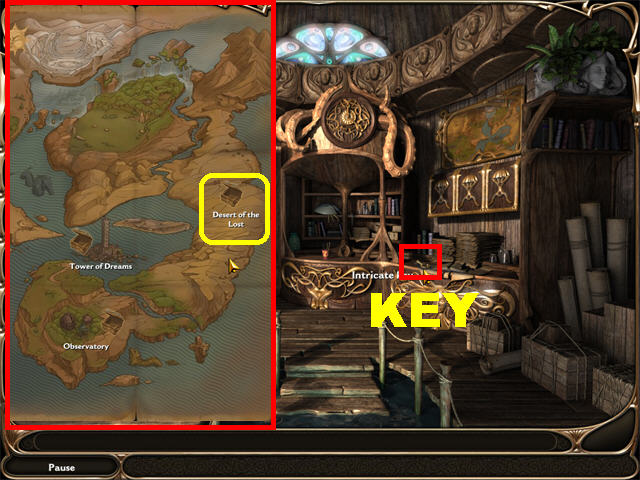
- Pick up the INTRICATE KEY on right.
- Go to the Map and open the locked chest to access the Desert of the Lost.
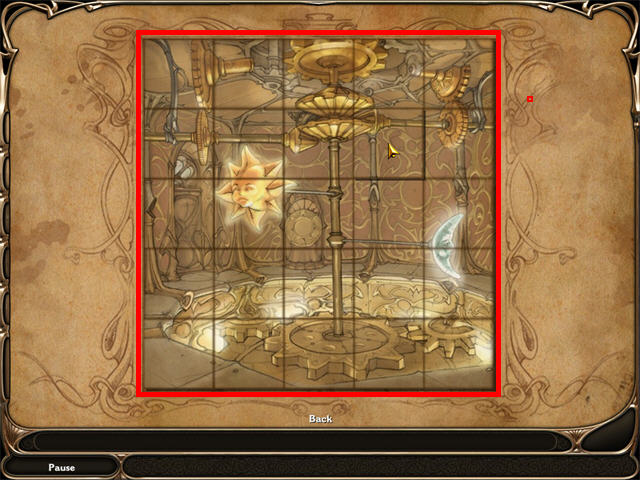
- Solve the puzzle by placing the tiles in the same manner shown in the screenshot.
- After the five chests have been opened, you will get a sneak peek at “Dream Chronicles: The Book of Water”.
- Congratulations! You have completed Dream Chronicles: The Book of Air.
Created at: 2010-06-24