

WALKTHROUGH MENU
- INTRODUCTION
- CHAPTER 1 - TREEHOUSE
- CHAPTER 2 - HERBALIST’S HOUSE
- CHAPTER 3 - FORGING AREA
- CHAPTER 4 - BRIDGE
- CHAPTER 5 - MY HOME
- CHAPTER 6 - RETREAT
- CHAPTER 7 - MAGIC TREE
INTRODUCTION
GENERAL TIPS
- There are seven chapters in the game. You do not have a timer to worry about, but your score depends on how quickly you complete the game.
- Your score will be affected by the amount of time it took to complete the game and the amount of Dream Pieces and Gold Nuggets you were able to collect. If you take too long to complete the game, you will get a score of zero, even if you find all the Dream Pieces and Nuggets. You may want to exit out of the game completely, if you plan to be away from the game for an extended period of time. The game seems to count your time even when it is paused.
- You can click on the scene freely without having to worry about any penalties. This will help you find hidden items within the scene.
- Click on the crystal ball that is in the lower left side of the scene if you need a clue as to what to do next.
- Whenever you see that an item from the inventory has a number next to it, it means that you will be able to use that item multiple times. For example, if the item has a number 4 next to it, then you can use it four times. If the item does not have a number next to it, then you can only use it once.
- The items in the game will always be in the same place the first time you play under a new name. The items will not always be in the same place when you play under the same name more than once.
- The only things that will always be in the same place are the locations of the Dream Pieces and the Gold Nuggets, regardless of how many times you play.
DREAM PIECES & GOLD NUGGETS
- There are a total of 90 Dream Pieces and 66 Gold Nuggets to be found in this game. The walkthrough will show you the location of all the Dream Pieces and all the Gold Nuggets in the game.
- Most of the time the Dream Pieces are circled in green, and the Gold Nuggets are highlighted in a yellow square.
- The Dream Pieces are necessary to find, since you need them to make the Dream Jewels. Without completed Dream Jewels, you will not be able to move to the next location.
NEXUS GATEWAY
- The Nexus Gateway is the area in which you will have access to different parts of the game. In order to open a gateway, you must find the right color combination of gems. Please read the section below for more information regarding this topic.
- The lever on the right side will take you backwards.
- The lever on the left side will take you to a new location, or it will move you forward.
DREAM JEWEL COLORS
- In this game you will be confronted with having to make the right color combination for the gems in the Dream Jewel. Once you know how to mix the colors you will be able to open any door in the Nexus.
- Just remember that the colors on each side of the triad will blend to make the combinations.
- The two gems on the top will combine to form the color for the gem that is on top of the Dream Jewel.
- The gems on the left will combine and form the color for the gem on the left side of the Dream Jewel.
- The gems on the right will combine to form the color on the right side of the Dream Jewel.
- If you can’t form a color - like the color red or yellow - because they are primary colors, use a clear crystal to help you achieve that color.
- Here is a list of the color combinations for this game.
- Yellow + Red = Orange
- Yellow + Blue = Green
- Red + Blue = Purple
- Clear Crystal + Any Color = Gem Color
- Yellow + Clear = Yellow
- Yellow + Yellow = Yellow
- Red + Red = Red
- Red + Clear = Red
CHAPTER 1 - TREEHOUSE
BRENNA’S BEDROOM
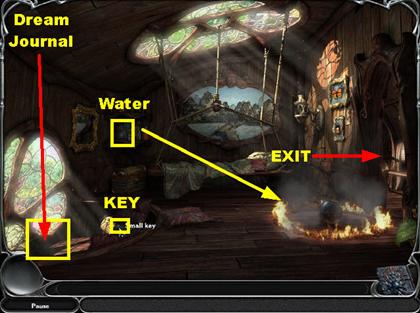
- The Dream Journal is in the lower left corner, in front of the window; click on it to pick it up.
- Once you click on the journal, a crystal ball will appear on the lower right side of the floor, and a fire will form around it.
- Grab the jar of water that is on the shelf, on the left side of the wall. The jar of water will give you two servings.
- Take the water from your inventory and place it on the fire twice; it will extinguish the fire.
- The crystal ball will automatically go in the lower left side of the scene.
- Pick up the small key that is on the lower left side, on the window seat. This key goes into the drawer of the sewing machine, which is in another room.
- Click on the right side of the scene to enter the next location.
BRENNA’S HOUSE ENTRANCE
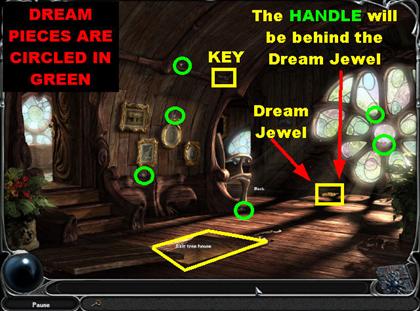
- Click on the trap door - which is the exit to the tree house - and the door will close shut, and a carpet will appear over the door.
- The carpet will disappear from the ground on its own. You will see the carpet appear inside the open door on the left side of the scene; the door will shut automatically.
- Click on the Dream Jewel that is on the right side of the ground, under the window.
- Grab the door handle that is on the ground, under the window. It is in the same place that you originally found the Dream Jewel.
- Click on the small key that is in the upper right side of the wall (please look at the screenshot). Place the key you just found in the door that closed on you earlier.
- Place the handle on the door, and then enter the sewing room.
SEWING ROOM
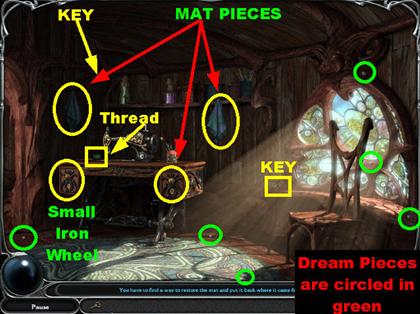
- When you enter the sewing room, the mat disappears and tears itself in four pieces that will scatter around the treehouse; find all four pieces.
- Use the key that is in the inventory; place it on the drawer on the right side of the sewing machine table, and the drawer will open. Click on the drawer again, and one piece of the mat will appear.
- The other two pieces are hanging above the sewing machine.
- There are two keys in this scene:
- Key #1 - Grab the key that is in the upper left side of the scene.
- Key #2 - Pick up the key that is on the right side, next to the window.
- Grab the key that you just picked up and place it on the drawer that is on the left side of the sewing machine table. In the drawer you will find a small iron wheel.
- In order for you to find the last mat piece you have to exit the room and go to the bedroom. Exit the sewing room by going through the door on the left.
- When you get to the hallway, you can access the bedroom by clicking on the right side of the scene.
BRENNA’S BEDROOM
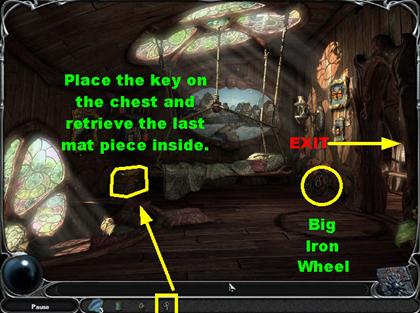
- Go back to the bedroom and grab the big iron wheel that is on the right side of the wall.
- Use the last key you found and place it on the chest on the left side of the room. The last piece of cloth will be inside.
BRENNA’S HOUSE ENTRANCE
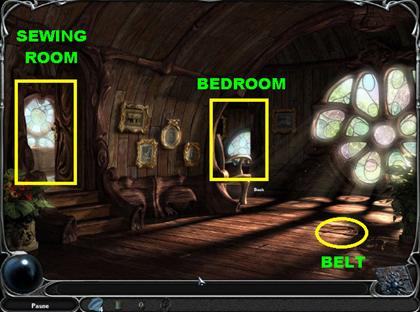
- When you exit the bedroom, pick up the belt that is on the right side of the floor.
- Go back to the sewing room by entering on the left side.
SEWING ROOM
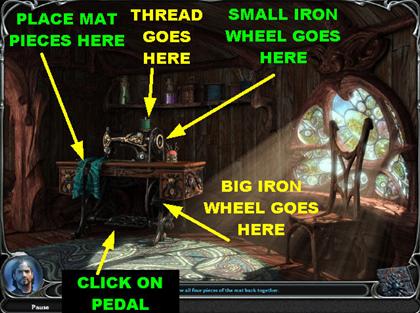
- Place the big iron wheel on the lower right side of the sewing machine table.
- Grab the spool of green thread and place it on top of the back side of the sewing machine.
- Place the small iron wheel on the back of the sewing machine.
- Place the belt on the back of the sewing machine. It will loop itself to the back of the machine and the large wheel that is underneath.
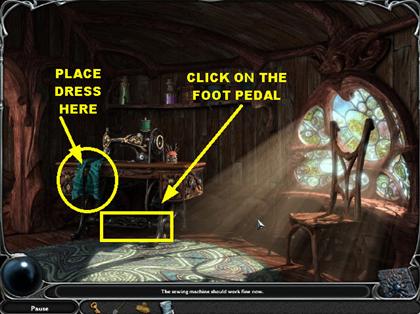
- Place two pieces of the mat on the sewing machine. Click on the foot pedal, and the machine will start sewing the mat back together.
- Once those two pieces have been sewn together, place another mat piece on the sewing machine and click on the pedal.
- Once that is done, place the last mat piece on the sewing machine and your mat will be finished.
- Once the mat is completed, it will go into inventory.
BRENNA’S HOUSE ENTRANCE
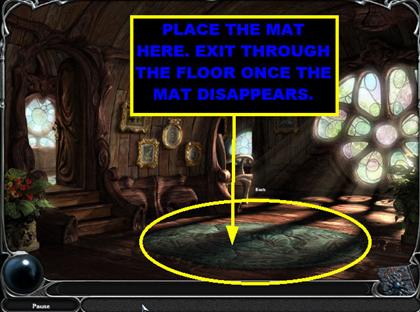
- Go back to the living room and place the mat on the floor where it was once before. The mat will disappear, and the door to the treehouse will appear again.
- Click on the door to exit the scene.
OUTSIDE BRENNA’S TREEHOUSE
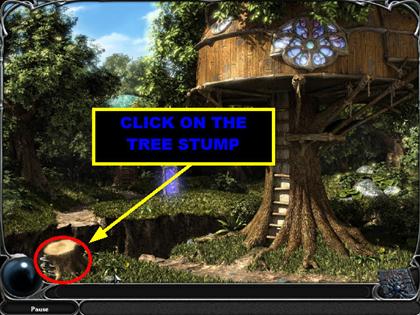
- As you enter the scene, you will see a gateway appear in the back of the scene. Colored stones will appear and disappear on the tree stump in the lower left side. A section of the ground will crumble.
- Click on the tree stump in the lower left side and you will get a closer view. The game tells you that you need to find eight stones. Exit out of the tree stump and look for the stones in the next scene.
FIND EIGHT STONES
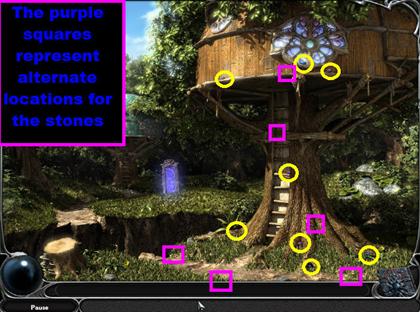
- Please look at the screenshot for the location of the eight stones. Please keep in mind that the red stone will appear in different places for different people.
- In the screenshot I’ve circled the location of all the stones for my game; they are circled in yellow.
- Alternate locations for the stones have been circled in purple, since the solution is random.
- Once you have all your stones, click on the tree stump again so you can solve the puzzle.
TREE STUMP PUZZLE
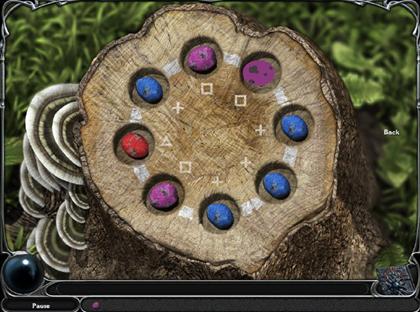
- The solution is always the same; the only thing that changes is the location of the stones.
- Place the red stone in the spot that has the triangle next to it. The red piece will always go in the spot that has only one symbol.
- Place the blue stones in the spots that have the "+" signs. The blue stones will always go in the spots that have four of the same symbols.
- Place the purple stones on the spots that have the squares next to them. The purple stones will always go in the spots that have three of the same symbols next to them.
- Once that has been completed, you will be taken back to the treehouse. Click on the gateway that is in the back of the scene.
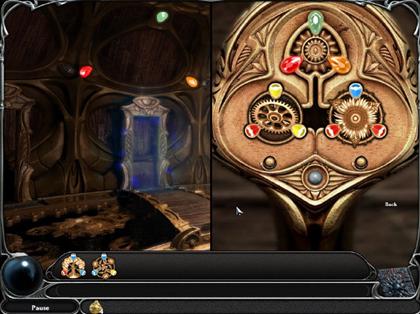
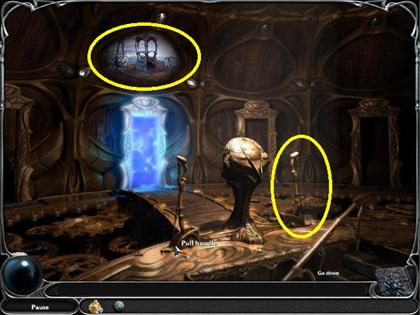
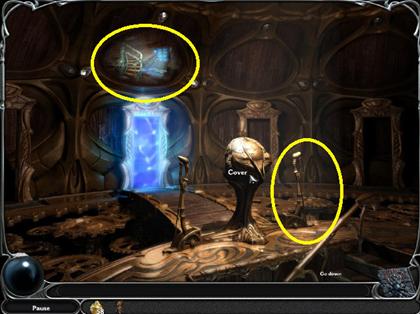
INSIDE THE NEXUS
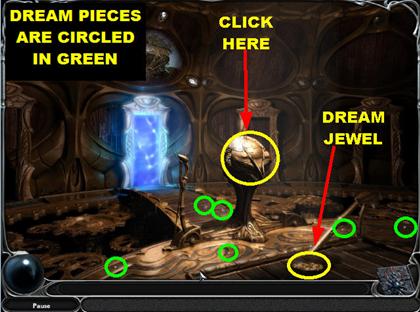
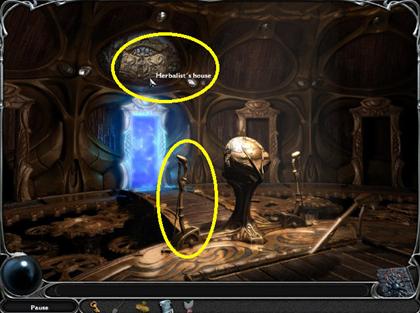
- As soon as you enter the nexus, you will be asked to pull the lever in order to unlock the entrance to the Herbalist’s house. You cannot do that until you pick up the Dream Pieces and the Dream Jewel that is in the mechanical room. (Please look at the screenshot for the location of all the pieces.)
- Once you’ve collected what you need, click on the cover of the device that is next to the lever and you will get a closer view.
UNLOCKING THE DOOR
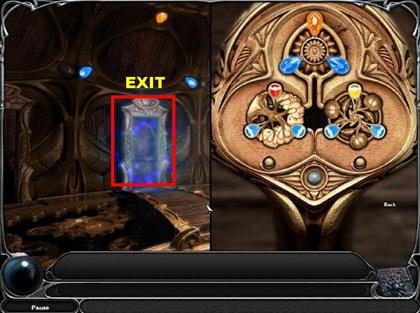
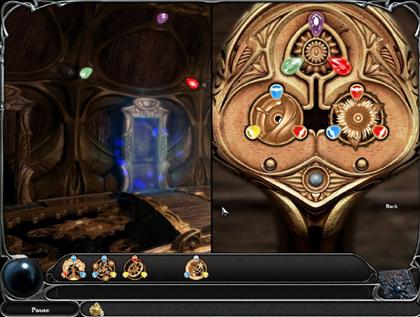
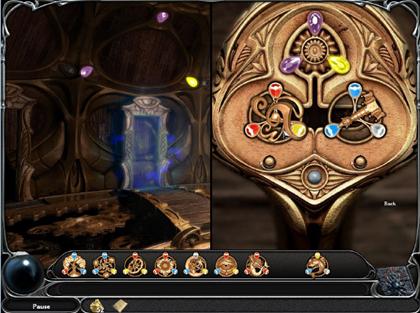
- Pull the lever that is in the room. The room will spin, and a new door will appear.
- Your goal is to match the colors of the trio of gems above the door using the Dream Jewels that you have at the bottom of the screen.
- Click on the cover of the device in the center for a closer view.
- Click on the two Dream Jewels at the bottom of the page and they will go on the cover of the device. You have to spin the Dream Jewels around until you reach the desired color combinations.
- Click in the center of the jewels if you want to spin them around. Each time they stop spinning, the color combinations you’ve created will reflect on the Dream Jewel that is on top.
- Mixing Colors: Red + Yellow = Orange; Blue + Blue = Blue.
- Make sure that the two gems on top of the device are red and yellow so you can get the orange color that you need.
- Go through the door once it’s available.
CHAPTER 2 - HERBALIST’S HOUSE
HERBALIST’S ENTRANCE
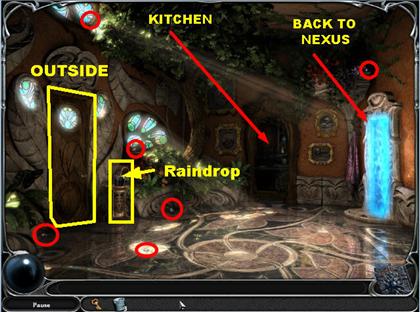
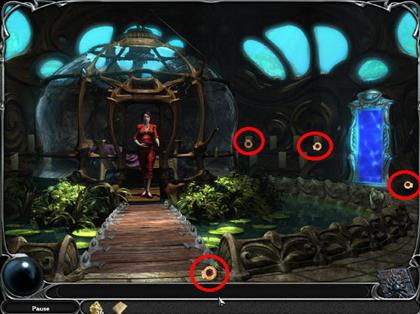
- Pick up the six Dream Pieces that are circled in red in the screenshot.
- Make a mental note of the umbrella that is next to the door; you will need it when the game asks you for a drop of rainwater.
- Click on the door and you will be taken to the front of the house.
HERBALIST’S HOUSE OUTSIDE
- When you get to the front yard, you will not be able to go through the door again until you can get enough supplies to clean off the door.
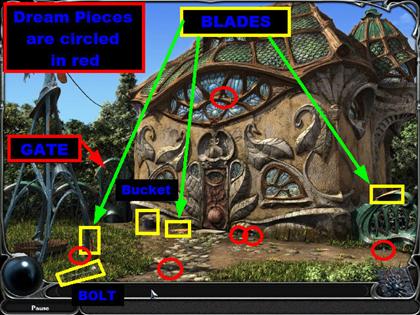
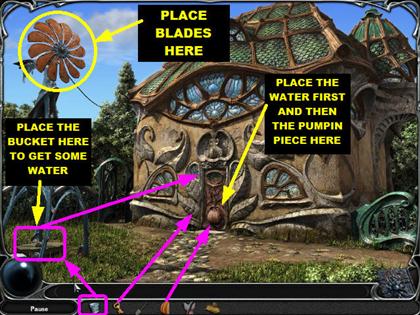
- Pick up the three windmill blades in the scene. Please look at the screenshot for the locations.
- Pick up the bucket that is on the lower left side, next to the door.
- Pick up the bolt that is in the lower left corner of the scene.
- Continue on to the garden by clicking on the gate that is on the left side of the house.
HERBALIST’S GARDEN
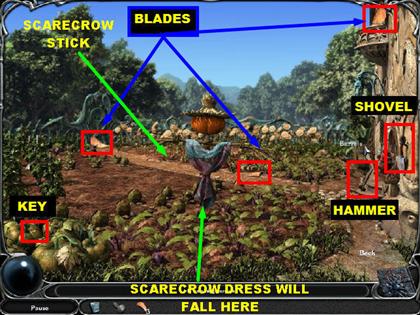
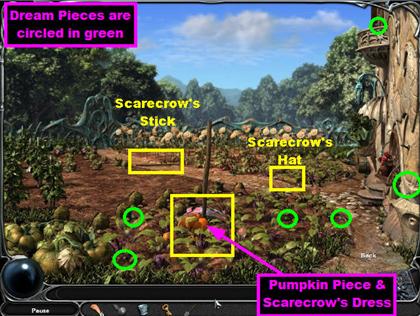
- Pick up the key in the lower left side of the scene; it is on top of the green pumpkins.
- Pick up the three blades as shown in the screenshot.
- One blade is in the top right side.
- The other blade is in the lower center of the scene, close to the sunflowers.
- The last blade is in the far left side of the scene, close to the gate.
- Pick up the hammer and the shovel that is on the side of the house.
- Place the hammer on the scarecrow’s head and it will break into pieces. Pick up the piece of pumpkin and the scarecrow’s dress after they fall to the ground.
- Pick up Scarecrow’s hat that is in the far right side of the scene, in front of the sunflowers.
- Pick up Scarecrow’s Stick that is in the far left side of the scene.
- Go back to the front yard by clicking in the lower right side of the scene.
HERBALIST’S HOUSE OUTSIDE
- You’ll need to assemble a windmill.
- Place the six windmill blades from the inventory on top of the windmill.
- Place the bolt from the inventory in the middle of the blades.
- Once all the blades and the bolt are in place, the windmill will turn on. You will see that the large bucket underneath will fill with water.
- Place the bucket from the inventory at the bottom of the windmill and your bucket will return to inventory with a number 4 next to it. That means that you can use the bucket a total of four times in the scene.
- Place the bucket of water on the lower part of the door, where the pumpkin is.
- Place the pumpkin piece from the inventory on the door. You have to place it over the partial pumpkin that is already on the door.
- The door will open; go through it.
TREEHOUSE/NEXUS
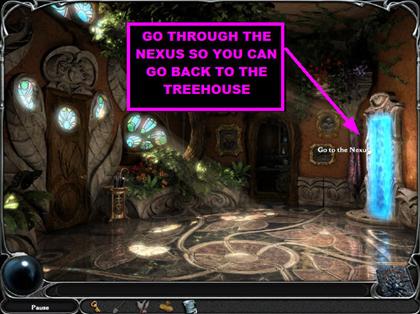
- As soon as you’re back in the house, go through the Nexus door in order to go back to the treehouse.
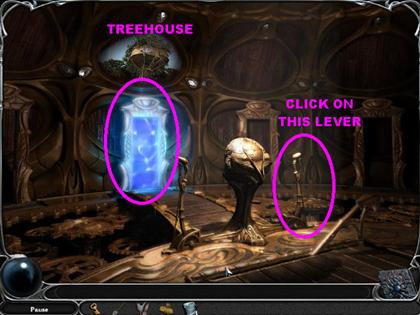
- When you go back through the nexus, there will be a new lever available. Pull the lever on the right and you will be taken back to the treehouse.
BRENNA’S TREEHOUSE OUTSIDE
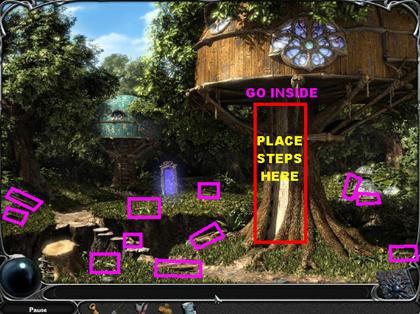
- When you first enter the scene, you will notice that the ladder leading up to the treehouse has disappeared. You must find 11 wooden sticks so you can rebuild the steps.
- Once you’ve found all the sticks, place them on the steps leading up to the treehouse. You have to place the sticks one by one and then enter through the top of the steps.
SEWING ROOM
- Enter the sewing room on the left side of the scene.
- Place the scarecrow’s dress on the sewing machine, and then click on the foot pedal.
- The dress will go back to the inventory once it’s all sewn up!
- Go back to the hallway by exiting the sewing room on the left. Exit the treehouse by clicking on the trap door in the middle of the floor.
- Once outside the treehouse, exit through the gateway in the back of the scene.
NEXUS
- Click on the lever that is on the left side of the device in order to go back to the Herbalist’s house.
- Go through the door and you will be back in the entrance of the house.
- Go to the kitchen that is located in the back of the scene.
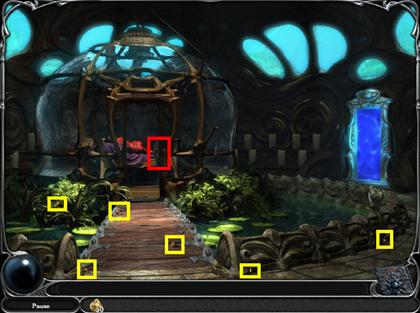
HERBALIST’S KITCHEN
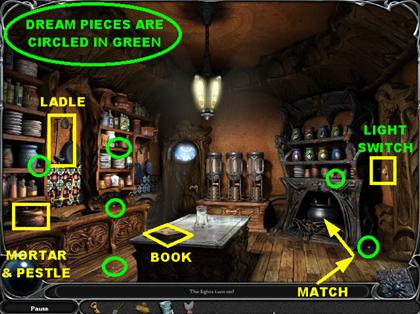
- Once you enter the kitchen, click on the light switch that is on the right side of the wall and the lights will come on.
- Pick up the six Dream Pieces that are highlighted in green in the screenshot.
- Grab the match that is on the lower right side of the floor, next to the cauldron.
- Place the match on the cauldron and it will start a fire.
- Place the key from the inventory on the back door in the kitchen, this will give you access to the garden.
SETTING UP THE KITCHEN

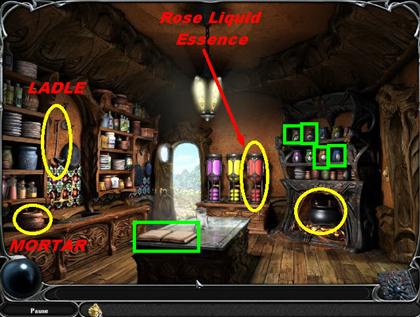
- Click on the book that is on the kitchen counter. It will give you instructions on what to do in order to set up the kitchen.
- Follow these steps in this exact order:
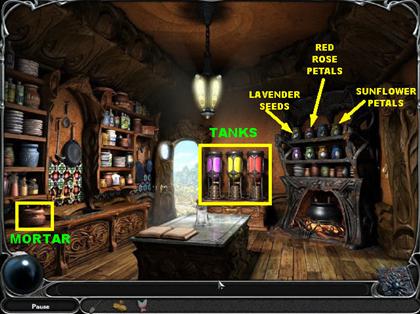
- Pick up the red rose petals from the jar marked with the same name. The rose petals will go in your inventory. Take them from the inventory and place them in the mortar and pestle that is in the lower left side of the kitchen.
- There are three tanks in the back of the kitchen, the one on the left, the one in the middle and the one on the right.
- Once the crushed red rose petals go back in the inventory, place them in the tank on the right. The crushed petals have to go in the glass container of the tank that is in the back of the room.
- Grab some sunflower petals from the shelf in the back of the kitchen and place them in the mortar and pestle on the left side of the room. Once the sunflower seeds are crushed, place them in the middle tank.
- Take the lavender seeds and place them in the mortar and pestle. Once the lavender is crushed place them in the tank on the left.
- Take the bucket of water from the inventory and place it on the three tanks that are in the back of the room. You will know that you’ve been successful when you see that all three tanks in the back have a different color.
- Click on the book again and you will be able to read what the right side of the page says.
- The next step is to click on the "Quick Ripen Potion."
THE QUICK RIPEN POTION
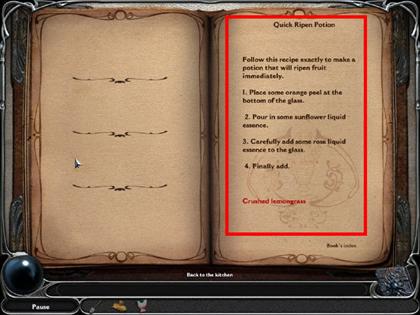
- Follow this recipe exactly as it is written in order to make a potion that will ripen fruit immediately.
- When you first open the book, some of the words will be scrambled on the left side of the page. In order to unscramble the words, you will have to click on the letters for each section.
- The letters will fall on the bars below them in the order in which you clicked them.
- If you make a mistake, click on the letter you want to remove and it will go back on top. Then, choose a new letter.
- Here is how the potion should read: "Follow this recipe exactly to make a potion that will ripen fruit immediately."
- Place some orange peel at the bottom of the glass.
- Pour in some sunflower liquid essence.
- Carefully add some rose liquid essence to the glass.
- Finally add crushed lemongrass.
MAKING THE QUICK RIPEN POTION
- When you follow the directions exactly as they are written, you will be able to make this potion easily.
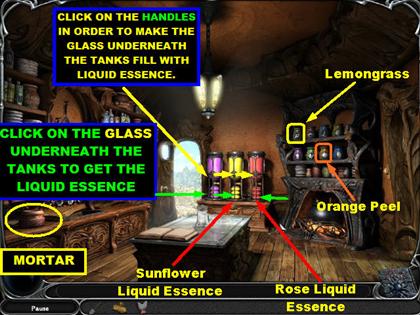
- Take some orange peel from the jar on the right side of the back wall.
- Place the orange peel in the glass container that is in the middle of the island.
- Click on the handles of each tank found in the back of the kitchen. When you do this, the glass underneath the liquid essence will fill up. From this moment on, all you will have to do is click on the glass at the bottom of the tank to get the liquid essence you need for your recipes.
- Click on the glass at the bottom of the sunflower liquid essence, and it will go into your inventory. Make sure that you are clicking the small glass instead of the large glass.
- Place the sunflower liquid essence from the inventory in the glass container that is on the island.
- For this next section you need to get the essence that is in the last tank. Click on the glass of the rose liquid essence, and it will go into your inventory. Take the liquid and place it in the glass container that is on the island.
- Take some lemongrass seeds from the jars in the back right side of the kitchen.
- Place the lemongrass seeds in the mortar that is in the lower left side of the scene. Once the lemongrass is crushed, place it in the glass container that is on the island.
- The quick ripen potion will then go into your inventory.
- Click on the book again and open up to the page called: "Guide to Practical Potions." Click on the heading called: "Instant Growth Potion."
INSTANT GROWTH POTION
- The words on the left side of the page are: "essence, petals, plant, and crush."
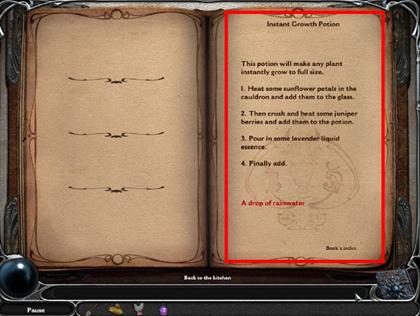
- The Instant Growth Potion Reads as Follows: "This potion will make any plant instantly grow to full size."
- Heat some sunflower petals in the cauldron and add them to the glass.
- Crush and heat some juniper berries and add them to the potion.
- Pour in some lavender liquid essence.
- Finally add a drop of rainwater.
MAKING THE INSTANT GROWTH POTION
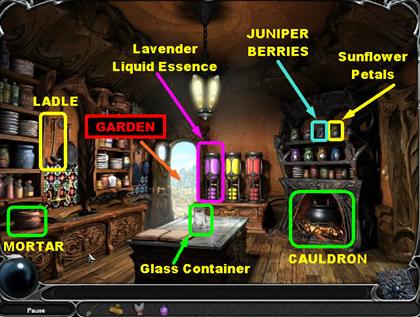

- Take some sunflower petals from the jars in the back of the kitchen. Place the sunflower petals in the cauldron (If your cauldron is not lit, make sure that you add the match from inventory underneath it).
- In order to remove the heated sunflower petals you will need to use a ladle. The ladle is hanging on the left side of the wall. The ladle will go back on the wall after each use, so make sure that you pick it up as often as needed.
- Place the ladle on the cauldron and the heated sunflower petals will go into inventory. Place the heated petals in the glass container that is in the middle of the island.
- Grab the juniper berries from the jars in the back of the kitchen and add them to the mortar in the lower left side of the kitchen. Once it goes back into inventory, place the crushed juniper berries in the cauldron.
- Grab the ladle and place it on the cauldron. Once the heated juniper berries go back into inventory, place the ladle on the glass container in the middle of the island.
- Pick up a glass of lavender liquid essence by clicking on the small glass of the first tank in the back of the kitchen.
- In order to obtain a drop of rainwater, you have to go back to the entrance. Click on the right side of the kitchen to access the entrance. Click on the umbrella that is close to the door and a drop of rainwater will go into your inventory. Go back to the kitchen.
- Place the drop of rainwater into the glass container on the island.
- The potion will go into your inventory.
- NOTE: IF YOU MAKE A MISTAKE AND MAKE THE WRONG POTION, JUST GO BACK TO THE GARDEN AND PICK UP ANOTHER GREY ROSE.
MEMORY RECOVERY POTION
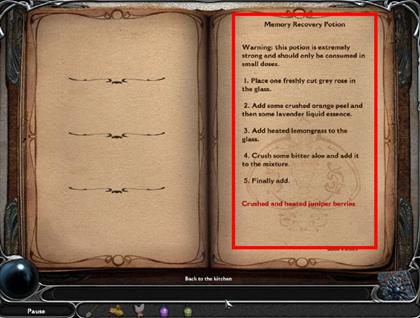
- Open the book on the counter; the unscrambled words are as follows: Lavender, Strong, Bitter, Heated.
- If you do not have the words in the same order, please look below for the completed text for this potion.
- Warning: this potion is extremely strong and should only be consumed in small doses.
- Place one freshly cut grey rose in the glass.
- Add some crushed orange peel and then some lavender liquid essence.
- Add heated lemongrass to the glass.
- Crush some bitter aloe and add it to the mixture.
- Finally, add crushed and heated juniper berries.
THE GREY ROSE & THE SCARECROW
- While in the kitchen, pick up some grey rose seeds from the jar in the back of the room.
- Go outside to the garden. If you found the key earlier, you will be able to go through the back of the kitchen. If you did not find it, you can go through the front door, and then through the gate on the side of the house.
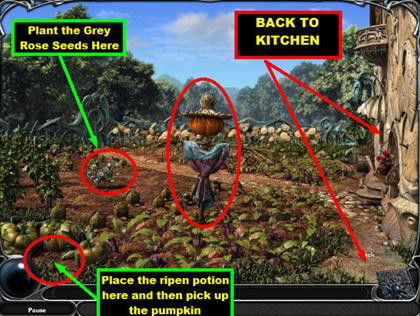
- Once you’re in the garden, place the quick ripen potion on the green pumpkins that are in the lower left side of the garden. Click on the orange pumpkin as soon as it ripens.
- Place the Scarecrow’s stick on the stick that is in the middle of the garden.
- Place the pumpkin, the hat, and the dress on the stick that is in the middle of the backyard. The Scarecrow is now complete.
- Your scarecrow has to be assembled before you can plant the grey rose seeds, otherwise a crow will come and take the seeds.
- Take your shovel and dig a hole on the left side of the ground.
- Place the grey rose seeds that you obtained in the kitchen into the hole you just dug.
- Take your instant growth potion and pour it over the area where you planted the grey rose seeds.
- Once the grey roses are fully grown, click on them and a freshly cut grey rose will go into the inventory.
- Go back to the kitchen.
THE MEMORY RECOVERY POTION
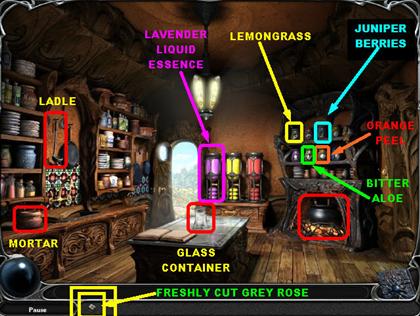
- Once you’re in the kitchen, place the freshly cut grey rose from inventory in the glass container on the island.
- Grab some orange peel from the jars in the back of the kitchen and crush them in the mortar on the lower left side of the room. Place the crushed orange peel in the glass container.
- Pick up some lavender liquid essence from the tank in the back. Place it in the glass container on the island.
- Grab some lemongrass from the jar in the back of the kitchen and place it in the cauldron. Grab the ladle in order to retrieve the heated lemongrass. Take the ladle with the heated lemongrass from the inventory and place it on the glass container in the middle of the island.
- Pick up some bitter aloe from the jars in the back of the kitchen and crush it in the mortar.
- Take the crushed bitter aloe and place it in the glass container in the middle of the island.
- Grab some juniper berries from the jars in the back of the kitchen and crush them in the mortar.
- Grab the crushed juniper berries and place them in the cauldron. Take the ladle from the left side of the wall and place it on the cauldron.
- Take the ladle of heated juniper berries from the inventory and place them on the glass container in the middle of the island.
- Once the memory recovery potion is completed, you will be shown an open drawer.
- Click on the drawer, and the strange symbol will go into the inventory.
THE STRANGE SYMBOL
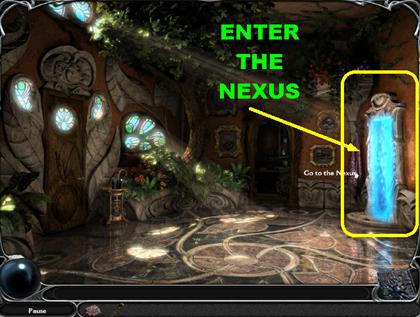
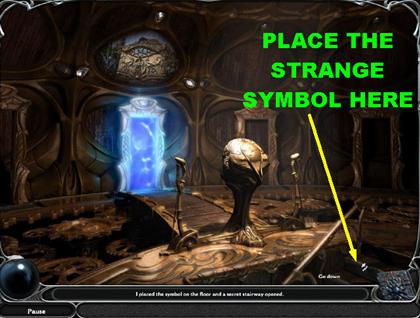
- Exit the kitchen on the right side; click on the blue nexus entrance on the right side of the scene.
- Place the strange symbol in the lower right side of the scene.
- Click on the steps that appear and you will be taken to a new area.
CHAPTER 3 - FORGING AREA
FORGING DEVICE
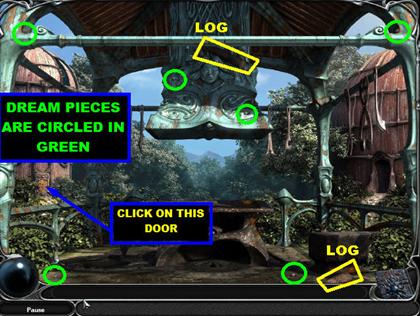
- Pick up the six Dream Pieces that are circled in green in the screenshot.
- Pick up the log that is in the lower right side of the scene.
- Pick up the other log that is in the top center of the scene.
- You will return to this area later. For now, click on the door that is on the far left side and you will get a closer view.
BULLSEYE PUZZLE
- Watch Video on Big Fish Games Tips YouTube Channel
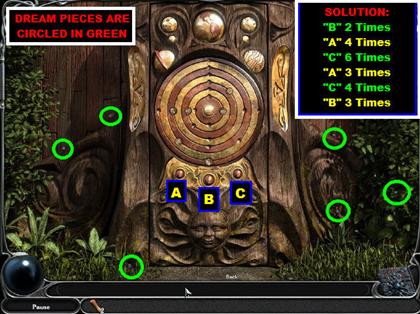
- Pick up the six Dream Pieces that are circled in green in the screenshot.
- When you first enter the scene, you will notice that all the planet symbols (brown buttons) will be aligned at the tip of the circle. In a matter of seconds, the planet symbols will be in different areas of the circle.
- In order to realign them you have to click on the three buttons below the circle.
- Labeling the buttons from left to right, A, B and C, press the buttons in the following order: "B" two times, "A" four times, "C" six times, "A" three times, "C" 4 times, and "B" three times.
- The door will open automatically; enter through it.
TELESCOPE ROOM
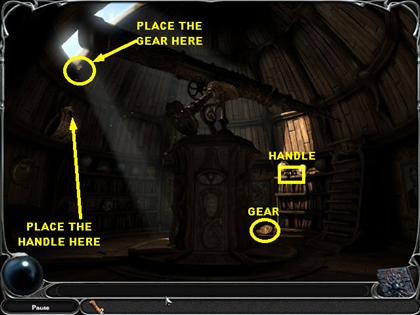
- Pick up the handle that is on the top right side of the bookcase.
- Pick up the gear that is at the bottom of the bookshelf on the right side of the room.
- Place the handle on the gold mechanism that is on the left side of the wall, and the handle will attach itself to the mechanism.
- The gear goes in the section that is on the top left side of the scene, at the very bottom of the window.
- Click on the handle, and the window will open some more.
TELESCOPE ROOM HIDDEN ITEMS
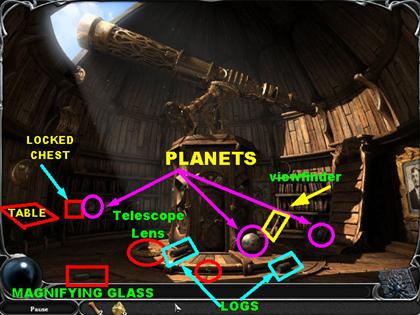
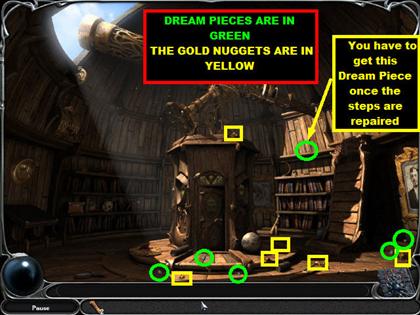
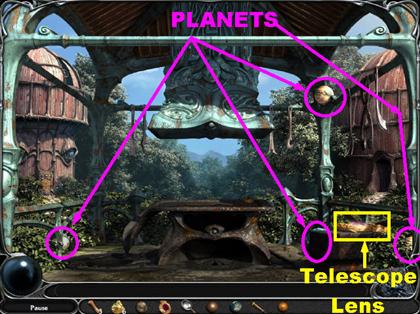
- In this section you have to find the planet models, six Dream Pieces, six Gold Nuggets, a telescope lens, a viewfinder, two logs, a magnifying glass, a key and a locked chest.
- There are two screenshots for this section. The second one shows you the location of all the Dream Pieces and Gold Nuggets. The first one shows you the location of everything else. The Dream Pieces are circled in Green. The Gold Nuggets are highlighted in yellow squares.
MAGIC BOOK
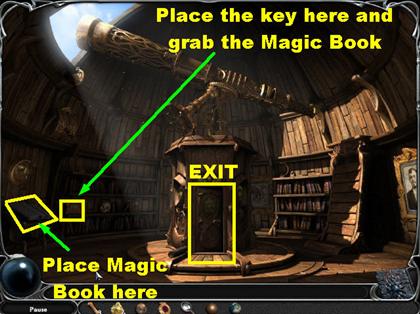
- Place the key from the inventory on the locked chest that is on the left side of the room, on the bookcase. Click on the chest again, and the magic book will go into the inventory.
- Grab the magic book and place it on the table in the lower left side of the scene.
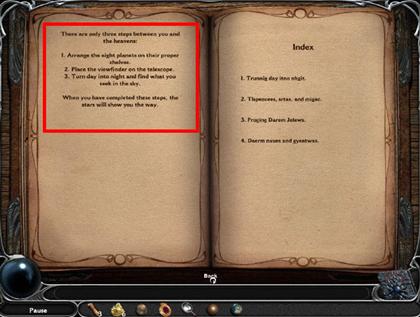
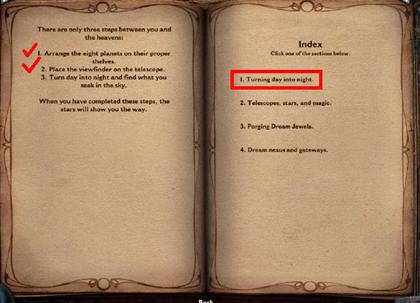
- Click on the book to get a closer view; you will find some instructions on the left side of it.
- For now, you will only follow the first step, which is to arrange the planets on their proper shelves.
- If you haven’t picked up the three planets that are in the room right now, please do so before you exit. You can look at the screenshots to aid you in your search.
- Exit through the door.
FINDING PLANETS

- There is a planet right outside of the observatory door.
- Click on the ground to go back to the forging area.
- In the forging area pick up the telescope lens that is on top of the anvil, on the lower right side.
- The planets in the forging area are in the following areas:
- There are two planets in the lower right side.
- There is one planet in the lower left side.
- There is one planet in the top right side of the scene.
- Go back to the telescope room.
THE TELESCOPE & THE PLANETS
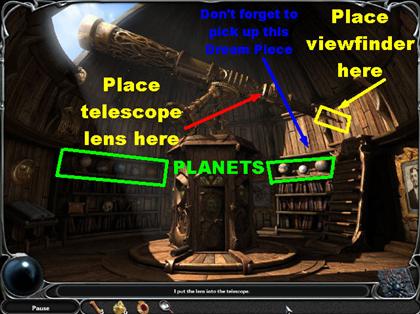
- Grab the planets from the inventory and place them on the shelves as they appear in the screenshot.
- Each planet can only be placed on either the left or right side of the bookcase. If a piece does not fit somewhere, place it somewhere else.
- Once all the planets are in place, the steps will restore themselves.
- Place the viewfinder on the right end of the telescope.
- Place one of the telescope lenses on the right side of the telescope. Please look at the screenshot for the exact location.
- Click on the magic book again; this time you will be able to read what is on the right side of the page.
- At this point you’ve completed steps one and two on the left side of the page. Now, you must complete step three, which is turning day into night. Click on the right side of the page so you can get instructions on how to do this.
TURNING DAY INTO NIGHT
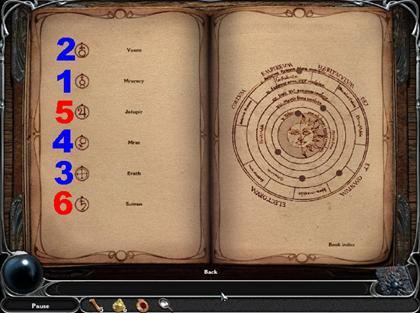
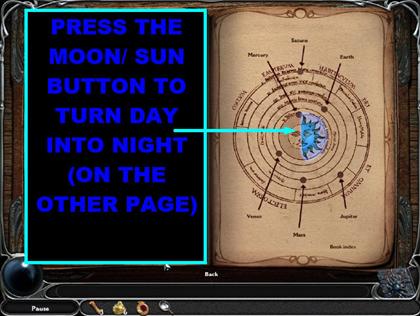
- To turn day into night you have to click on the planets on the left side of the page in the following order: Mercury, Venus, Earth, Mars, Jupiter, and Saturn.
- The names may be a bit scrambled, but you should still be able to understand them.
- Once it is correct, you will see the right side of the sun turn blue. You will be returned to the scene immediately and the room will be dark.
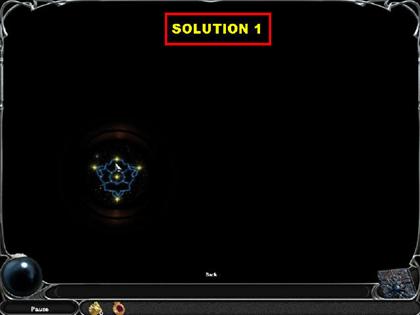
CONSTELLATIONS
- If you haven’t already done so, place a telescope lens on the top right side of the telescope. If you’re unsure where it goes, please refer back to the screenshot in "The Telescope & The Planets" section of this walkthrough.
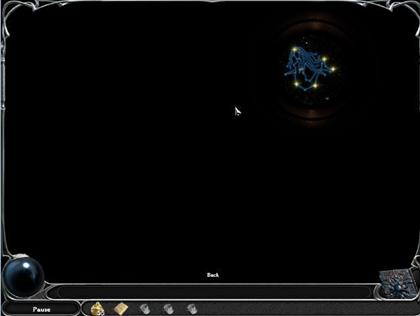
- Click on the viewfinder of the telescope and you will get a closer view of the stars.
- Make sure that it is actually night in the telescope room, or you will not be able to look at the constellations.
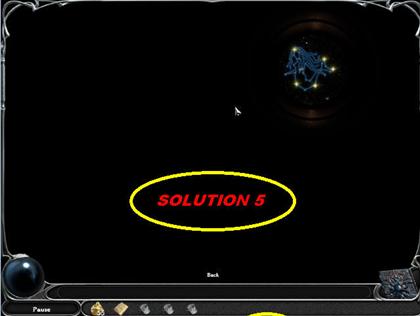
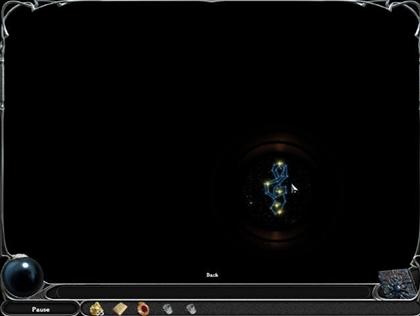
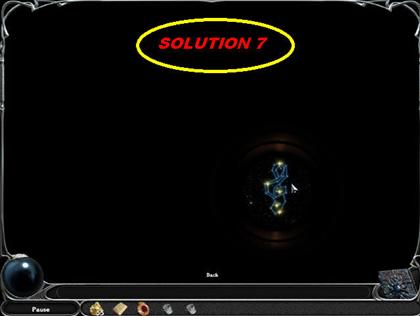
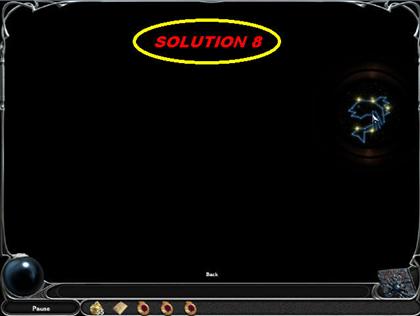
- Once you are looking through the telescope, move your cursor around until you can line up the dots on your cursor with the dots in the scene.
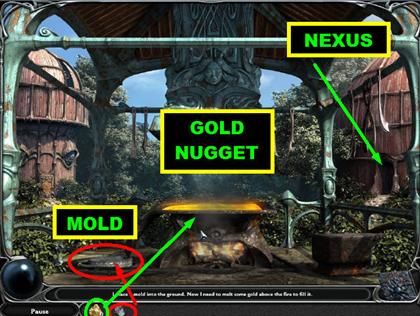
- Once the dots are lined up correctly, the constellation will light up and you will get a mold in your inventory.
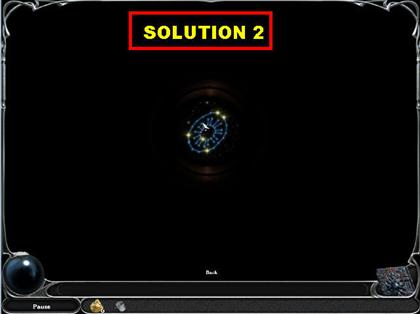
- Place the second telescope lens in the telescope slot and repeat the same process as above.
- Once the second mold has been placed into the inventory, leave the telescope room by exiting through the door in the center.
- Go back to the Forging Area.
A DREAM JEWEL
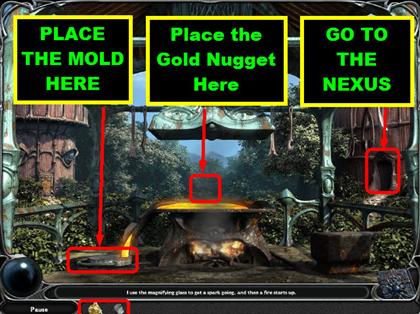
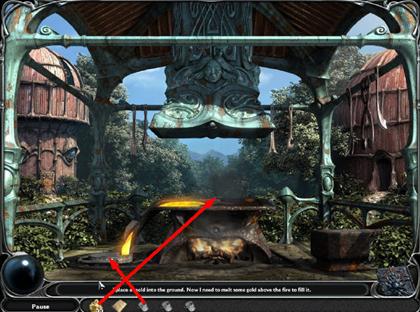
- Place the four logs in the fireplace.
- Place the magnifying glass in the fireplace, and the fire will start.
- In the lower left side of the forging device there is a hole in the ground. Place the mold from the inventory in the hole.
- Grab a Gold Nugget from the inventory and place it on top of the forging device. The gold nugget will melt, and the Dream Jewel will go into your diary.
- Place another mold in the lower left side of the forging device. Then place another gold nugget on top of the forging device. You will now have another Dream Jewel completed.
- Go to the nexus by exiting on the right side.
NEXUS
- Pull on the handle on the left side and you will see a trio of gems above the gateway.
- Click on the device and you will get a closer view.
- Click on the last 2 Dream Jewels at the bottom of the page.
- Mixing Colors: YELLOW + BLUE= GREEN, YELLOW + RED= ORANGE, RED + RED= RED.
- Please look at the screenshot to see the position of the Dream Pieces.
- Once the gate is open, go through it.
CHAPTER 4 - BRIDGE
OVERLOOK OF RETREAT
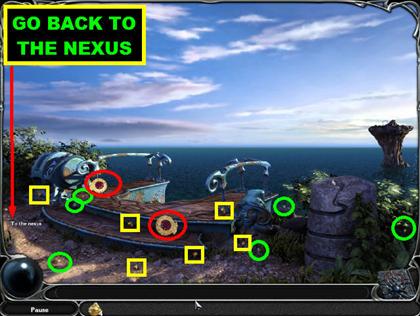
- Once you get to the overlook, all you can do is pick up the two Dream Pieces, the two Dream Jewels, and the two telescope lenses.
- The Dream Pieces are highlighted in green in the screenshot.
- The Gold Nuggets are highlighted in yellow in the screenshot.
- The telescope lenses are highlighted in red.
- Go back to the forging area.
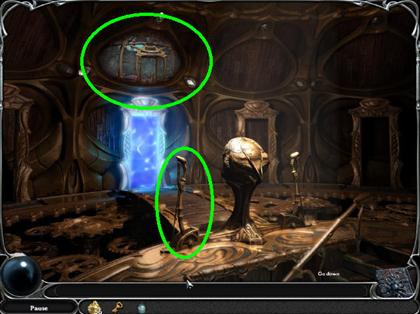
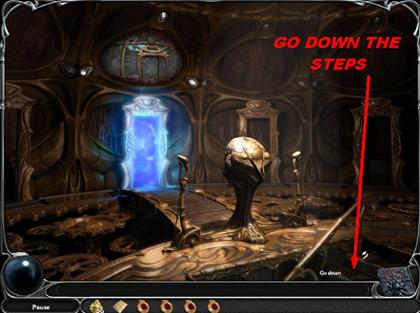
DREAM JEWEL MOLDS

- Once you get to the nexus, go down the steps in the lower right corner so you can access the forging area and the telescope room.
- Once you’re in the forging area, go back to the telescope room by clicking on the observatory door.
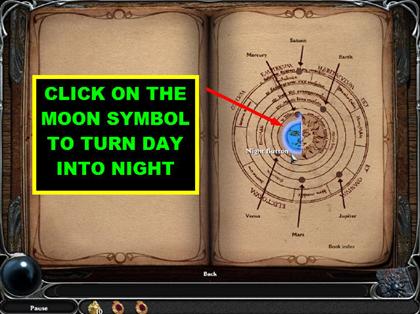
- When you enter the observatory room, click on the book in the far left side of the room.
- Click on the half moon sign that is on the left side of the page. This will turn day into night in the telescope room.
- Place a telescope lens in the telescope slot, and then click on the viewfinder.
- As soon as you get the mold, place the second telescope lens in the telescope slot.
- As soon as your second mold is done, go back to the forging area. Click on the door to go outside.
FORGING AREA
- You will just repeat the same steps as you did before. Place a mold in the hole on the lower left side of the ground. Then place a Gold Nugget on top of the forging device.
- Repeat the same steps for the second mold.
- Once both Dream Jewels have been completed, go back to the nexus.
NEXUS
- Once you’re in the nexus, pull the handle on the left.
- Click on the cover of the device.
- Mixing Colors: RED + BLUE = PURPLE, YELLOW + BLUE = GREEN, RED + RED = RED.
- Please look at the screenshot to see the position of the Dream Pieces.
- Once the gate is open, go through it.
CHAPTER 5 - MY HOME
FAYE’S HOUSE
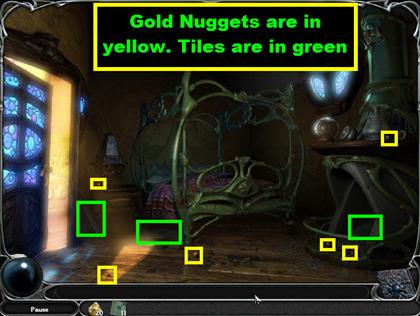
- When you enter the scene, you will see that a lot of the tiles on the floor have been removed. Your job is to find all the missing tiles and place them back on the floor where they belong.
- There are two tiles to pick up in this room; they are highlighted in blue in the screenshot.
- There are six Gold Nuggets on this floor; they are highlighted in yellow in the screenshot.
- Once you’ve picked up those pieces, go up the stairs.
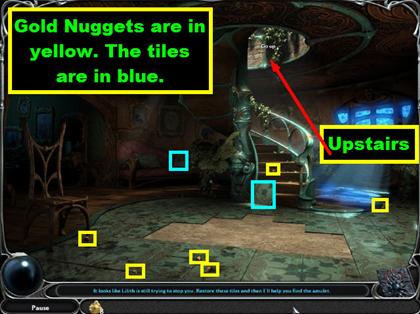
HALLWAY
- In the hallway, you have to pick up nine tile pieces and six Gold Nuggets.
- The tiles are highlighted in green squares in the screenshot.
- The Gold Nuggets are all highlighted in yellow squares.
- Once you’re done picking up all the tiles and nuggets, click on the door on the right side of the hallway.
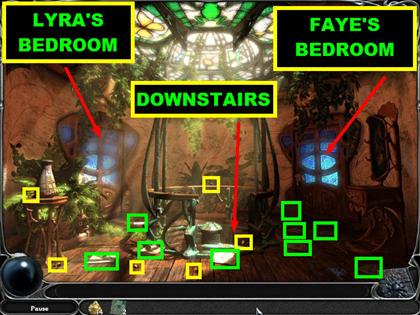
FAYE’S BEDROOM
- The bedroom contains a total of six Gold Nuggets and three tiles.
- The tiles are highlighted in green squares, and the Gold Nuggets are highlighted in yellow squares.
- Exit the room and go across the hallway to the door on the left.
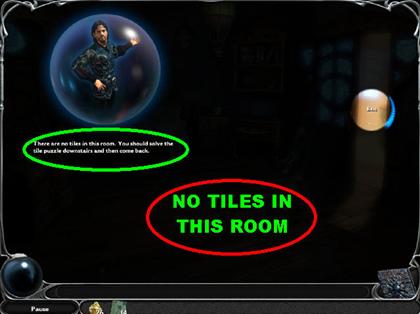
- When you enter Lyra’s room, you are told that there are no tiles on the room and that you need to go back downstairs to solve the tile puzzle.
TILE PUZZLE
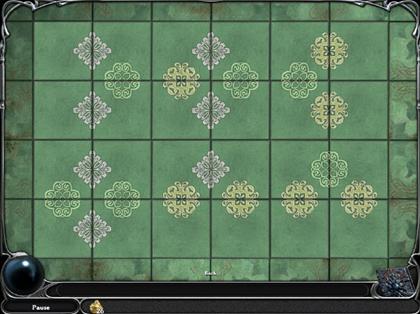
- Once you’ve gone back downstairs, place all 14 tiles on the floor.
- Place all the tiles one by one on the floor. It doesn’t matter where you click on them, as long as you click on an empty space.
- When all the pieces are back on the floor, click on the floor to get a closer view.
LYRA’S BEDROOM
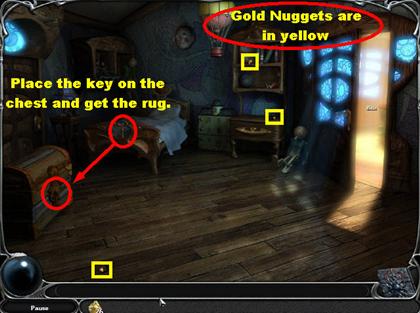
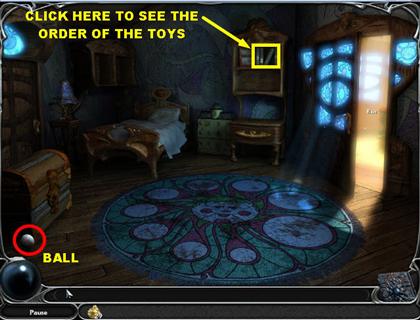
- Go upstairs to Lyra’s bedroom and retrieve the key that is at the end of the bed.
- Place the key on the chest that is on the left side of the room.
- Click on the chest once it is open and the rug will go into the inventory.
- Place the rug in the middle of the floor. Once the rug is on the floor, all the toys in the room will start to disappear.
- Pick up the ball that is in the lower left corner.
- Click on the paper that is on top of the bookshelf in the back of the room, on the right side.
- The paper will give you instructions on the order in which the toys need to be placed on the rug once you find them.
- Go back to the hallway for now.
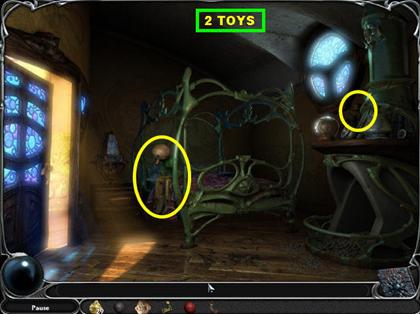
HALLWAY

- There are four toys in the hallway.
- Pick up the doll that is in the top left side of the scene.
- Grab the hot air balloon that is on the right side of the glass ceiling.
- Pick up the doll and the mask that are on the right side, on the dresser.
FAYE’S BEDROOM
- Pick up the doll that is on the bed.
- Pick up the doll that is on the top right side, on the fireplace.
FAYE’S HOUSE
- Pick up the ball that is in front of the couch.
- Grab the wooden doll that is on the steps.
- Go back to Lyra’s bedroom.
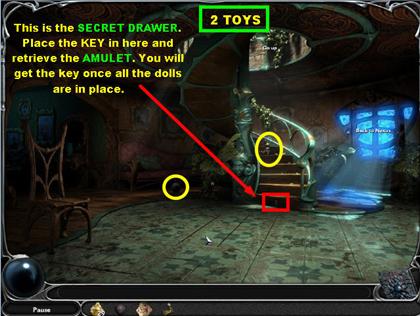
LYRA’S BEDROOM
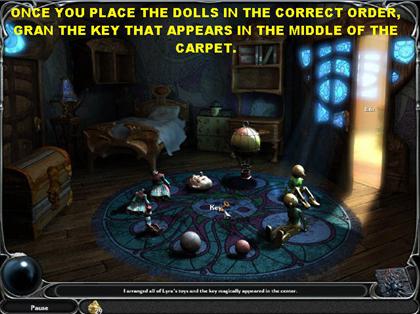
- Go downstairs and place the key in the keyhole at the end of the stairway.
- Grab the amulet that is in the drawer under the steps.
- Go to the nexus.
NEXUS
- When you enter the nexus, pull the lever on the right side one time. That will take you back to the fairy retreat.
FAIRY RETREAT
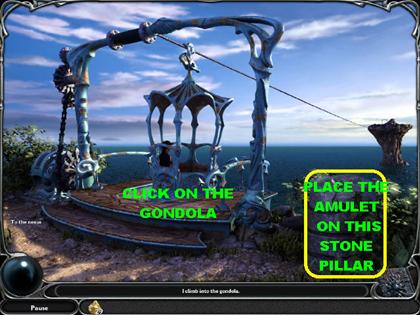
- Place the amulet from the inventory on the stone pillar that is on the right side.
- Once the gondola arrives, click on the door so it can take you to the Island.
UNDERWATER RETREAT ENTRANCE
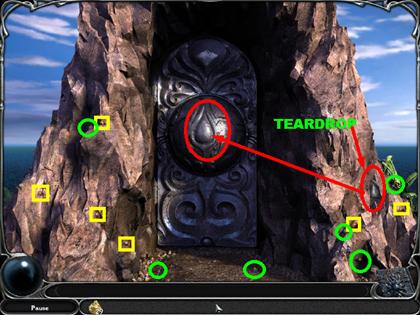
- Pick up the six Dream Pieces, the six Gold Nuggets, and the teardrop in this scene.
- The Dream Pieces are circled in green in the screenshot.
- The Gold Nuggets are highlighted in yellow squares.
- The teardrop is circled in red.
- Place the teardrop in the center of the door, and a puzzle will appear. Click on the puzzle and you will get a closer view.
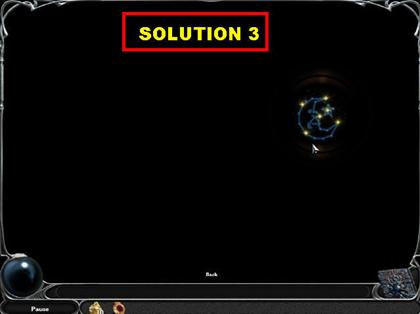
UNDERWATER DOOR PUZZLE
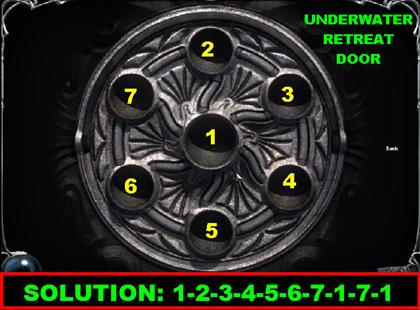
- The only thing you have to do in this puzzle is duplicate the sequence of lights.
- The screenshot will show you the correct sequence. The sequence will be the same for everyone.
- The ball in the center is labeled as number 1.
- Starting from the top and going clockwise, the numbers will be labeled from 2 to 7.
- Please click on the balls in the following order: 1, 2, 3, 4, 5, 6, 7, 1, 7, 1.
- As soon as the sequence is completed, you will enter the maze.
CHAPTER 6 - RETREAT
TEA ROOM MAZE
- Watch Video on Big Fish Games Tips YouTube Channel
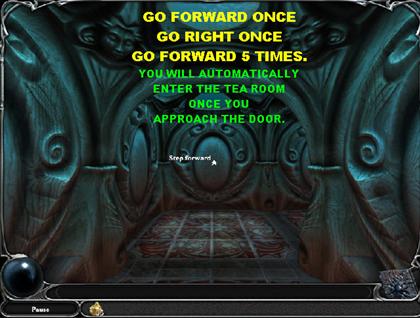
- As you enter the maze, follow these steps to get to the tea room: FORWARD, RIGHT, FORWARD 5x.
- You will be automatically taken to the tea room once you approach the door.
TEA ROOM
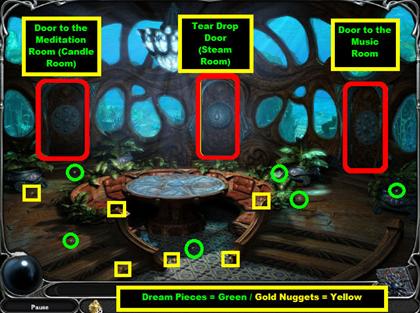
- Pick up the six Dream Pieces and the six Gold Nuggets that are in this room.
- The Dream Pieces are circled in green.
- The Gold Nuggets are in yellow squares.
- Once inside the tea room, you will notice that some items disappear off the table. You must visit other rooms in order to retrieve all the missing tea set pieces that belong on the table.
- You will notice three sets of doors in the back of the room. Each door will take you to a different place. The left door will take you to the Candle Room. The Middle Door will take you to the steam room (this will be the last door that you will enter). The Right Door will lead you to the Music Room.
- Once you’ve picked up all the nuggets and Dream Pieces, click on the door on the left and you will find another ball puzzle.
THE LEFT DOOR BALL PUZZLE
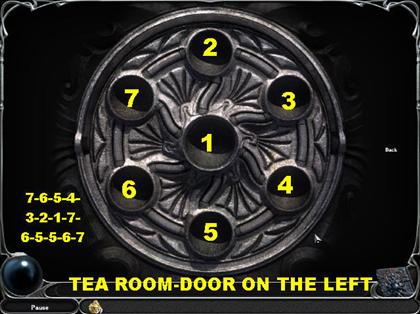
- Just like in the previous puzzle, all you have to do is duplicate the sequence of lights.
- The screenshot will show you the correct sequence. The sequence will be the same for everyone.
- The ball in the center is labeled number 1.
- Starting from the top and going clockwise, the numbers will be labeled from 2 to 7.
- Please click on the balls in the following order: 7, 6, 5, 4, 3, 2, 1, 7, 6, 5, 5, 6, 7.
- Once the sequence has been entered correctly, the door on the left will open and you will encounter another maze.
THE TEA ROOM/CANDLE ROOM MAZE

- Watch Video on Big Fish Games Tips YouTube Channel
- Please go through the maze by following these instructions:
- FORWARD 3x, RIGHT, FORWARD 3x, RIGHT, FORWARD 2x, RIGHT, FORWARD 1x, LEFT 1x, FORWARD.
MEDITATION ROOM/CANDLE ROOM
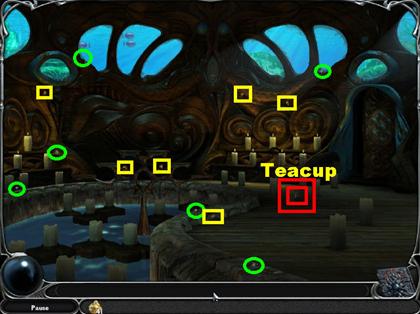
- When you first enter the meditation room, all the colorful candles will disappear from the candelabra.
- The six Dream Pieces are highlighted in green in the screenshot.
- The six Gold Nuggets are in yellow squares.
- The teacup is highlighted in a red square (this is all you will be able to find for now).
- You must click on the door and return to the tea room first, and then go to the music room.
THE CANDLE ROOM/TEA ROOM MAZE
- Watch Video on Big Fish Games Tips YouTube Channel
- To get back to the tea room, please follow these steps:
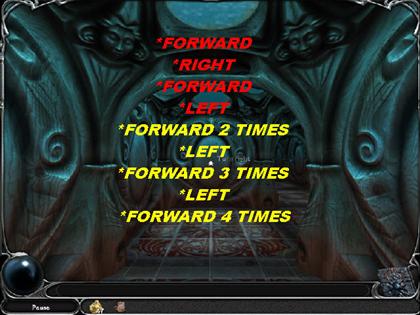
- FORWARD, RIGHT, FORWARD, LEFT, FORWARD 2x, LEFT, FORWARD 3x, LEFT, FORWARD 4x.
RIGHT DOOR BALL PUZZLE
- Once you get back to the tea room, all you have to do is click on the door on the right side. This will give you access to the next door puzzle and maze.
- Just like in the previous puzzle all you have to do is duplicate the sequence of lights.
- The screenshot will show you the correct sequence. The sequence will be the same for everyone.
- The ball in the center is labeled number 1.
- Starting from the top and going clockwise, the numbers will be labeled from 2 to 7.
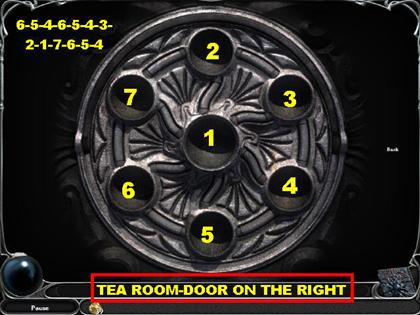
- Please click on the balls in the following order: 6, 5, 4, 6, 5, 4, 3, 2, 1, 7, 6, 5, 4.
- Exit through the door on the right.
THE TEA ROOM/MUSIC ROOM MAZE
- Watch Video on Big Fish Games Tips YouTube Channel
- Please go through the maze by following these instructions:
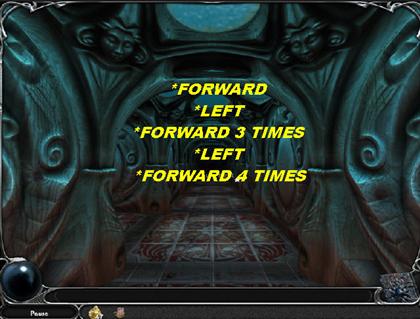
- FORWARD, LEFT, FORWARD 3x, LEFT, FORWARD 4x.
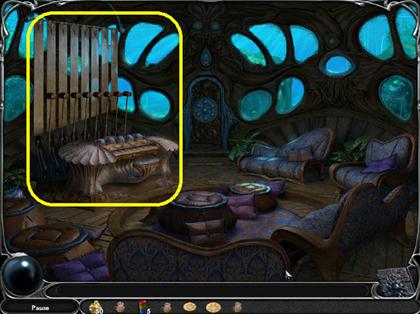
MUSIC ROOM
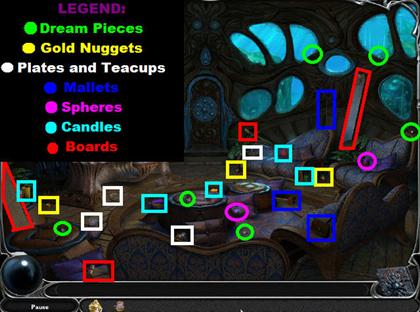
- When you enter, the pieces of the musical instrument will scatter all over the scene. Your goal is to find all the pieces and reassemble the instrument. You also have to find the remaining pieces of the tea set that are scattered throughout the scene.
- Since there are so many items to find in this scene, they have been color-coded by category:
- The six Dream Pieces are circled in green.
- The three Gold Nuggets are in yellow squares.
- The plates are highlighted in white in the screenshot.
- There is a plate on the ground, in front of the musical instrument.
- The other plate is on the couch closest to the door.
- The teacups are highlighted in white in the screenshot.
- There is a teacup in the lower left side of the room; it is on the floor, close to the musical instrument.
- The other teacup is in the lower center of the scene, next to the cushion on the floor.
- The mallets are highlighted in dark blue in the screenshot.
- One is in the lower right side, on the couch.
- The second one is on the right side of the floor.
- The last one is in the top right side, under one of the windows.
- The boards are highlighted in red in the screenshot.
- The first one is in the top right side, leaning against the wall.
- The second one is in the center, to the right of the door.
- The third one is on the left side, close to the couch.
- The last board is on the lower left side, leaning against the wall.
- The spheres are highlighted in lavender in the screenshot.
- It is on the lower center of the scene, in front of a cushion.
- The other one is on the right side, on the couch.
- The candles are highlighted in light blue in the screenshot.
- There are two of them in the lower right side of the scene. One is on the couch and the other one is on the floor, next to the couch.
- One is on the lower left side, close to the wall.
- The other one is in the lower left side, close to the instrument.
- NOTE: To obtain the three spoons, the candle, and the teapot, you must solve the sequence puzzle for the musical instrument.
MUSICAL INSTRUMENT ASSEMBLY
- Once you’ve collected all the pieces mentioned above, you must put together the musical instrument.
- Grab the four boards from the inventory and place them next to the other boards on the instrument.
- Place the three mallets on the instrument as well.
- Place the spheres on the instrument.
MUSICAL INSTRUMENT MINI-GAME
- Click on the instrument to get a closer view.
- Once you solve this puzzle correctly, you will obtain three spoons, one teapot, and a candle.
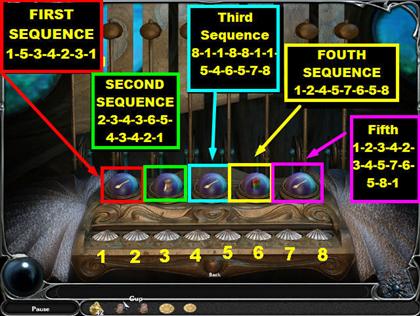
- Your goal here is to reproduce the musical sequences.
- Click on the spheres and you will hear and see the mallets hit the board. Using the shells at the bottom, reproduce the sequence.
- The shells are numbered 1 through 8, from left to right.
- SEQUENCE 1: 1, 5, 3, 4, 2, 3, 1. You will receive one spoon.
- SEQUENCE 2: 2, 3, 4, 3, 6, 5, 4, 3, 4, 2, 1. You will receive a teapot.
- SEQUENCE 3: 8, 1, 1, 8, 8, 1, 1, 5, 4, 6, 5, 7, 8. You will receive a second spoon.
- SEQUENCE 4: 1, 2, 4, 5, 7, 6, 5, 8. You will receive a candle.
- SEQUENCE 5: 1, 2, 3, 4, 2, 3, 4, 5, 7, 6, 5, 8, 1. You will receive the third spoon.
- Exit this room and go back to the tea room.
THE MUSIC ROOM/TEA ROOM MAZE
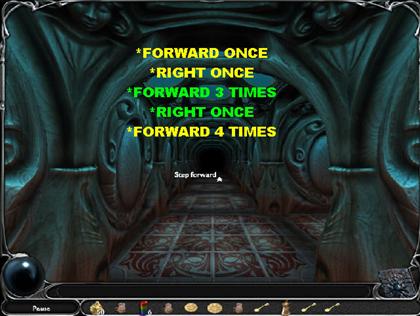
- Watch Video on Big Fish Games Tips YouTube Channel
- Click on the door and enter the maze. Follow these steps to get back to the tea room: FORWARD, RIGHT, FORWARD 3x, RIGHT, FORWARD 4x.
- Before you do the place settings on the table in the tea room, you must go back to the candle room and place the candles. You will receive the last plate once all the candles are in place.
THE TEA ROOM/CANDLE ROOM MAZE
- If you get lost, you can look at the videos that were posted a few sections before this one.
- Click on the door on the left and enter the maze. Follow these steps: FORWARD 3x, RIGHT, FORWARD 3x, RIGHT, FORWARD 2x, RIGHT, FORWARD, LEFT, FORWARD.
CANDLES IN THE CANDLE ROOM
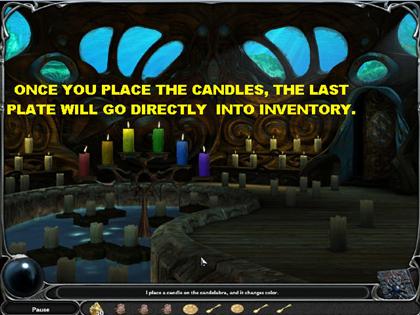
- Place the candles on the candelabra. Once the candles melt away, the last plate needed for the tea set will go into the inventory.
THE CANDLE ROOM/TEA ROOM MAZE
- To get back to the tea room, please follow these steps: FORWARD, RIGHT, FORWARD, LEFT, FORWARD 2x, LEFT, FORWARD 3x, LEFT, FORWARD 4x.
TABLE SETTING

- Click on the table in the tea room to get a closer view.
- Your goal in this task is to place the three teacups, the teapot, the three plates and the three teacups in the right order on the table.
- You have to pay attention to the markings on the spoons, plates and teacups. They each have a square, a circle or a triangle shape on them. Those items have to be placed facing that particular mark on the table.
- Once the table has been set correctly, a teardrop will go into the inventory.
- Place the teardrop on the door in the middle and solve the puzzle.
MIDDLE DOOR TEARDROP PUZZLE
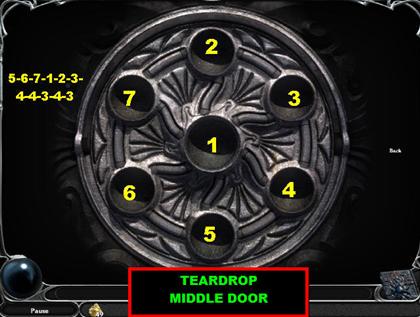
- Place the teardrop on the middle door, and a puzzle will appear.
- Just like in the previous puzzle, all you have to do is duplicate the sequence of lights.
- The screenshot will show you the correct sequence. The sequence will be the same for everyone.
- The ball in the center is labeled as number 1.
- Starting from the top and going clockwise, the numbers will be labeled from 2 to 7.
- Please click on the balls in the following order: 5, 6, 7, 1, 2, 3, 4, 4, 3, 4, 3.
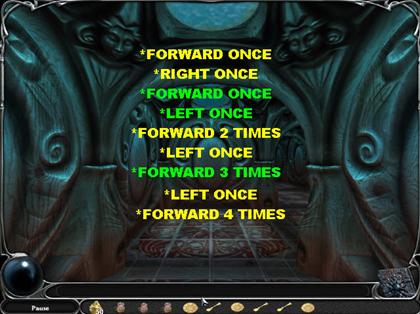
THE TEA ROOM/STEAM ROOM
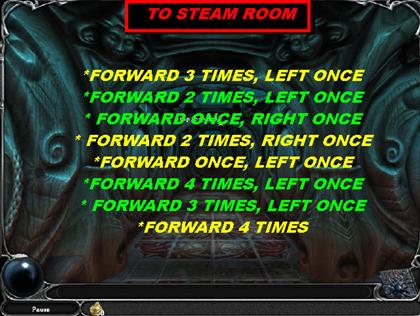
- Watch Video on Big Fish Games Tips YouTube Channel
- Please follow these steps: FORWARD 3x, LEFT, FORWARD 2x, LEFT, FORWARD, RIGHT, FORWARD 2x, RIGHT, FORWARD, LEFT, FORWARD 4x, LEFT, FORWARD 3x, LEFT, FORWARD 4x.
STEAM ROOM PUZZLE
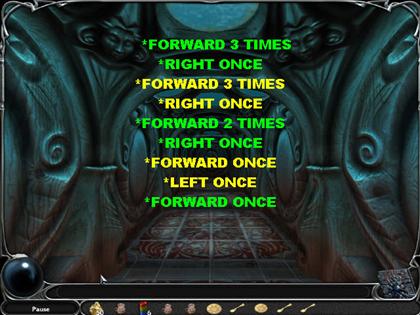
THE STEAM ROOM/LILITH’S ROOM
- Watch Video on Big Fish Games Tips YouTube Channel
- Please follow these steps: FORWARD, LEFT, FORWARD 2x, TURN RIGHT, FORWARD 2x, TURN LEFT, FORWARD 2x, TURN RIGHT, FORWARD 2x, TURN RIGHT, FORWARD, TURN LEFT, FORWARD 2x, TURN LEFT, FORWARD, TURN RIGHT, FORWARD 2x, TURN RIGHT, FORWARD 5x, TURN RIGHT, FORWARD, TURN LEFT, FORWARD 2x, TURN RIGHT, FORWARD 2x, TURN RIGHT, FORWARD 2x, TURN LEFT, FORWARD 3x, TURN LEFT, FORWARD, TURN RIGHT, FORWARD 2x, TURN LEFT, FORWARD, TURN RIGHT, FORWARD 4x.
LILITH’S ROOM
- Collect the six Gold Nuggets that are in this scene. They are highlighted in yellow squares in the screenshot.
- Click on the keyhole that is on the door. The key falls out of the lock and lands on a piece of paper.
- The key will automatically go into the inventory.
- Click on the screen when the dialogue is finished and the paper will automatically go into the inventory. The paper is actually the waking potion that you will need to wake Lilith from her slumber.
- Go through the nexus on the right side, in order to go back to the Herbalist’s house so you can make the potion.
THE HERBALIST’S HOUSE

- Click on the right lever three times, and you will be back at the Herbalist’s house.
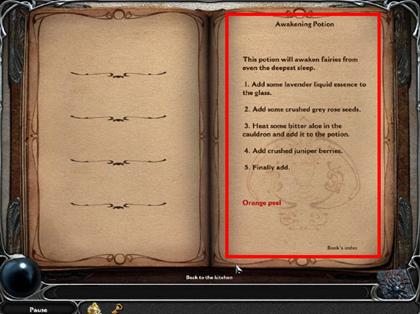
THE AWAKENING POTION RECIPE
- Go to the Herbalist’s kitchen.
- Click on the book on the counter.
- Place the page in the book on the counter.
- On the lower right side of the page you’re on, click where it says: "Book’s Index." Click on the 4th choice which is "Waking Potion."
- Unscramble the following words: Awaken, Sleep, Juniper, Seeds, and Cauldron.
- Since the words may be in a different order for everyone, here is the complete potion: "This potion will awaken fairies from even the deepest sleep."
- Add some lavender liquid essence to the glass.
- Add some crushed grey rose seeds.
- Heat some bitter aloe in the cauldron and add it to the potion.
- Add some crushed juniper berries.
- Finally, add orange peel.
- Exit out of the book.
THE AWAKENING POTION

- Place the lavender liquid essence in the glass container on the island.
- Grab some grey rose seeds from the jars in the back of the kitchen. Place them in the mortar on the left side of the kitchen. Add the crushed grey rose seeds to the glass container on the island.
- Pick up the jar of bitter aloe and place it in the cauldron. Grab the ladle from the left side of the kitchen and place it on the cauldron. Place the ladle from the inventory on the glass container on the island.
- Get the juniper berries from the jars in the back of the kitchen. Place them in the mortar on the lower left side of the kitchen. Once the juniper berries are crushed, place them in the glass container on the island.
- Grab some orange peels from the jars and place them in the glass container.
- The potion will automatically go into the inventory.
- Go to the nexus, and then go back to Lilith’s Room.
NEXUS
- Click on the left lever three times.
WAKE LILITH
- Place the glass room key on the keyhole.
- Give Lilith the Waking Potion; she will wake up and four telescope lenses will appear in the room; you will pick them up once the dialogue is complete.
- Lilith will also have put a potion into your inventory. Go back to the nexus.
NEXUS
- Go down the steps that are in the back of the nexus.
THE LAST FOUR DREAM JEWELS
- Go back to the telescope room.
- Click on the book. Then, click on the night button so you can turn day into night.
- Place the four telescope lenses one by one in the telescope slot. Click on the viewfinder and look for the constellations.
- Once you’ve received all four molds, you can go to the forging area.
FORGING AREA
- Place a mold in the area that is in the lower left side of the forging device. Then, place a Gold Nugget on top of the forging device.
- Repeat this step three more times until you’ve completed all four Dream Jewels.
- Go back to the nexus.
NEXUS

- Go back to the Herbalist’s house.
ROOT SHRIVELING POTION RECIPE
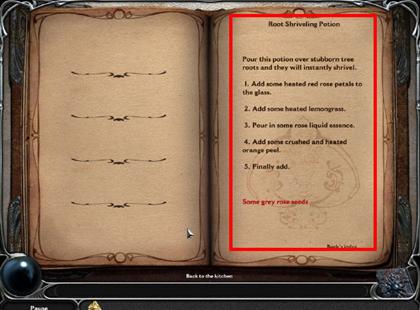
- Click on the book and add the potion recipe from the inventory on the book.
- The words you have to unscramble are: Crushed, Rose, Lemongrass, Shrivel, Roots.
- Since the words may be in a different order for everyone, here is the complete potion: "Pour this potion over stubborn tree roots and they will instantly shrivel."
- Add some heated red rose petals to the glass.
- Add some heated lemongrass.
- Pour in some rose liquid essence.
- Add some crushed and heated orange peel.
- Finally, add some grey rose seeds.
THE ROOT SHRIVELING POTION
- Grab a jar of red rose petals and heat them in the cauldron. Retrieve the red rose petals with the ladle and add them to the glass container on the island.
- Grab some lemongrass and place it in the cauldron. Retrieve the heated lemongrass with the ladle and place it in the glass container.
- Place some rose liquid essence into the glass container.
- Grab the orange peels and place them in the mortar. Place the crushed orange peel in the cauldron. Grab the ladle and retrieve the heated orange peel. Then, place it in the glass container.
- Grab the grey rose seeds from the jar and place them directly into the glass container.
- The root shriveling potion will go into your inventory.
- Go to the nexus.
NEXUS
- Pull on the right lever two times.
- You will notice a new set of gems over the door, and the cover for the device will open.
- Click on the cover of the device.
- Color Mixing: RED + BLUE = PURPLE, YELLOW + CLEAR = YELLOW.
- Please look at the screenshot for the solution.
- Go through the door.
CHAPTER 7 - MAGIC TREE
MAGIC TREE
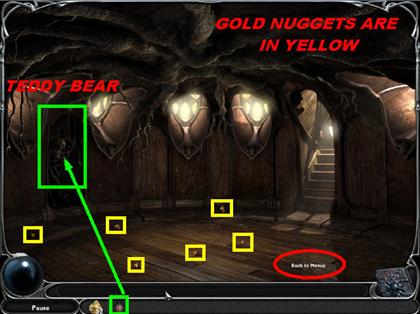
- Pick up the six Gold Nuggets in the room.
- Click on the door that is on the left side of the room and you will see the teddy bear being held by tree roots.
- Place the root shriveling potion on the teddy bear. The teddy bear will land on the floor. Click on him and he will go into the inventory.
NEXUS
- Click on the right lever two times and you will be at Faye’s House.
FAYE’S HOUSE
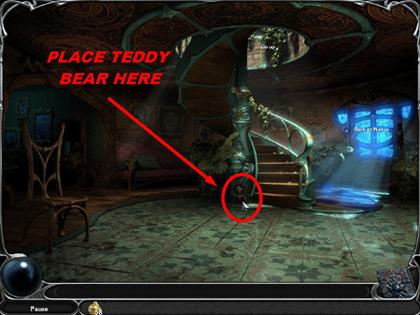
- Place Lyra’s teddy bear by the left side of the base of the steps, under the woman’s face.
- Watch the ending scene!
Created at: 2009-05-18