

Walkthrough Menu
- General Tips
- Chapter 1: the Tower of Thought
- Chapter 2: Brightforest Village
- Chapter 3: Sundrake City
- Chapter 4: Northwind Lighthouse
- Chapter 5: Skyleaf Palace
- Chapter 6: Dragonfang Palace
- Chapter 7: The Temple of Chains
General Tips
- This is the official guide for Dreampath: The Two Kingdoms.
- This guide will not show when you have to zoom into a location; the screenshots will show each zoom scene.
- Hidden-object puzzles are referred to as HOPs. This guide will not show screenshots of the HOPS, however, it will mention when an HOP is available and the inventory item you'll collect from it.
- Use the Map to travel to a location.
Chapter 1: The Tower of Thought
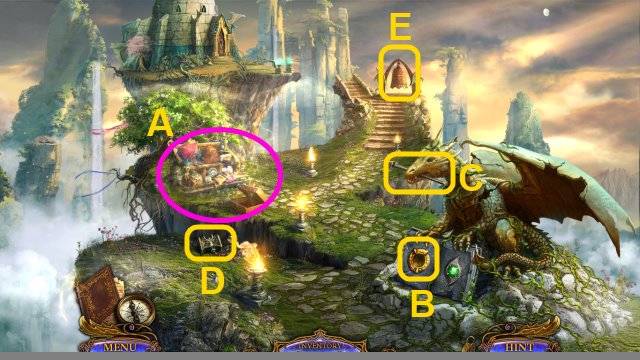
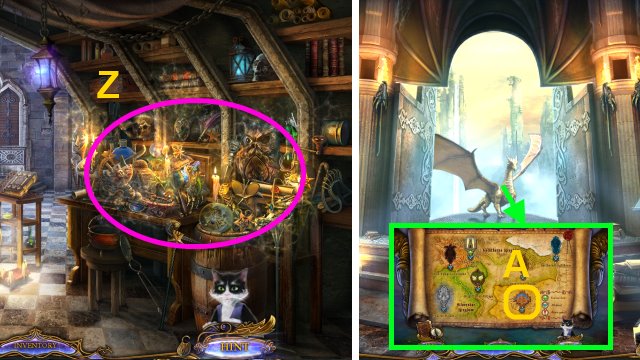
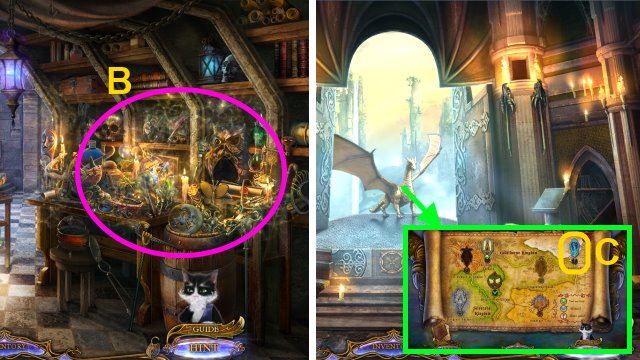
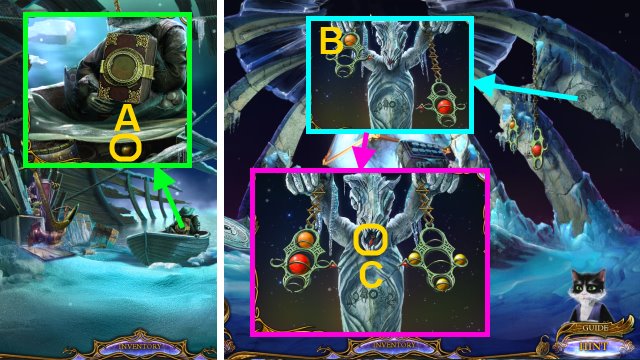
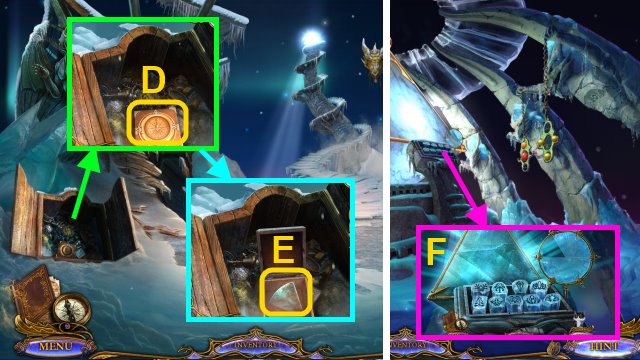
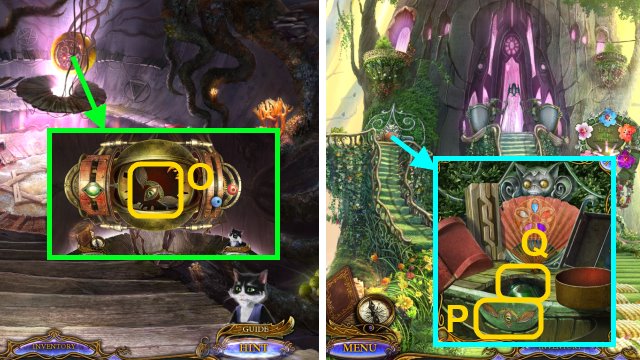
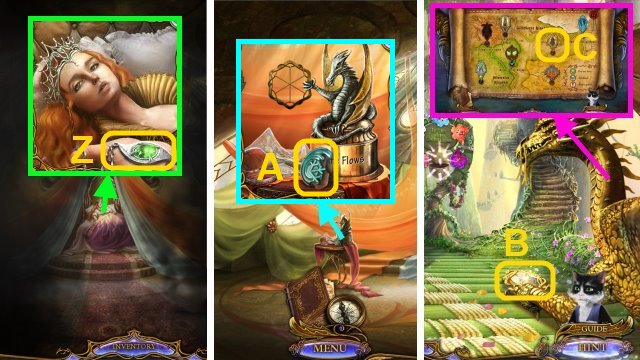
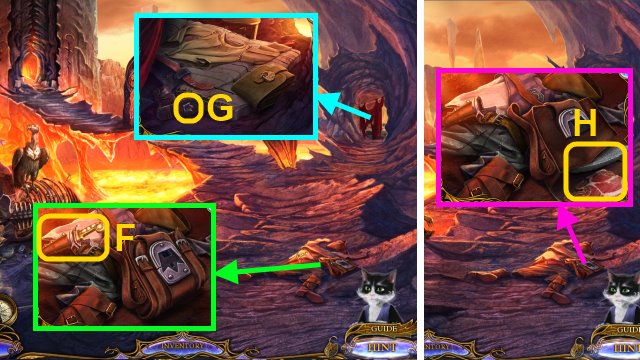
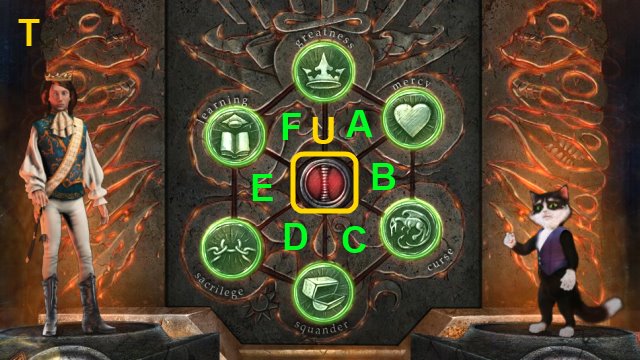
- Open the suitcase; play the HOP to receive the RUBY (A).
- Place the RUBY in the book (B); take the METAL HANDLE (C).
- Take the HAMMER HEAD (D).
- Combine the METAL HANDLE and HAMMER HEAD to make the HAMMER.
- Use the HAMMER on the bell (E).
- Walk forward.
- Move the shards; take the TABLET FRAGMENT (F).
- Walk left.
- Take the FLOWER MEDALLION 1/3 (G).
- Take the BRUSHWOOD (H).
- Walk down; go right.
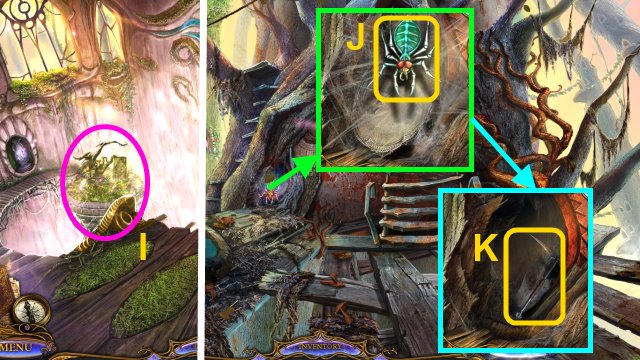
- Play the HOP to receive the CATERPILLARS (I).
- Talk to the cat (J); you receive the EARTH AMULET.
- Walk down.
- Place the CATERPILLARS on the plant (K); take the SILVER DRAGON.
- Walk left.
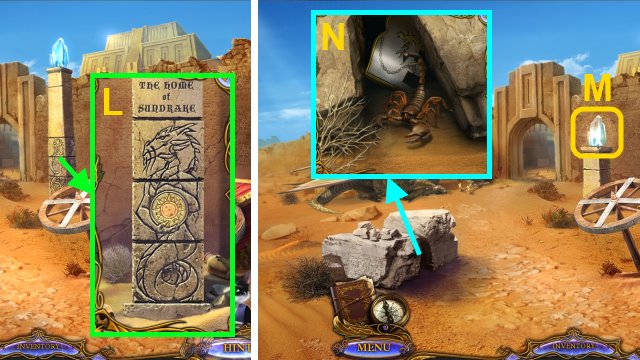
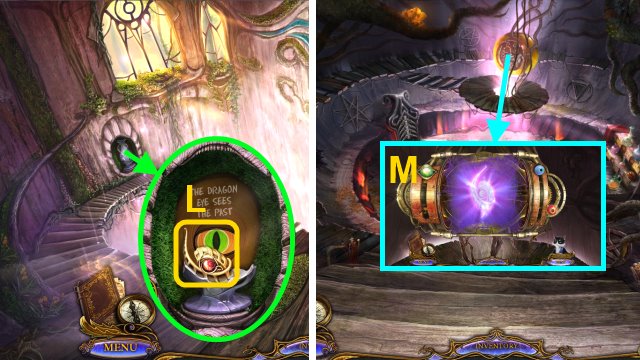
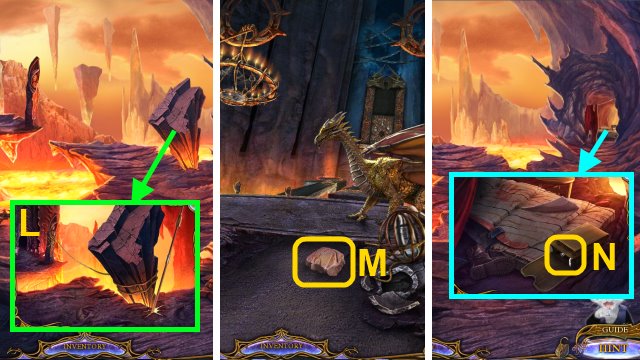
- Place the EARTH AMULET on the tree; rearrange them in the correct order (L).
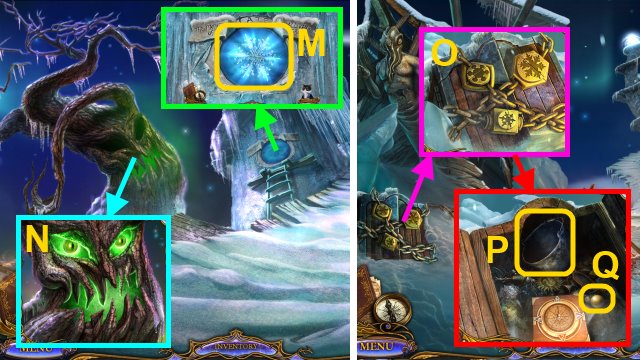
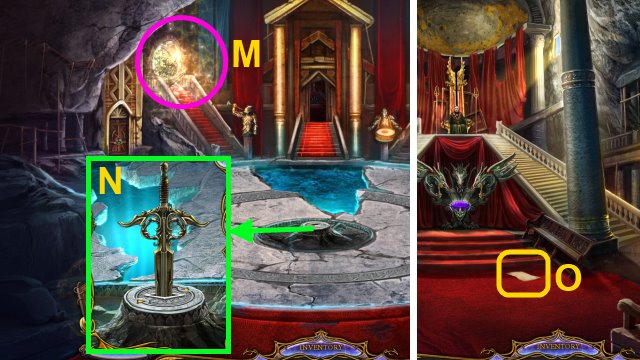
- Take the RETRIEVER POLE (M).
- Go to the Yard.
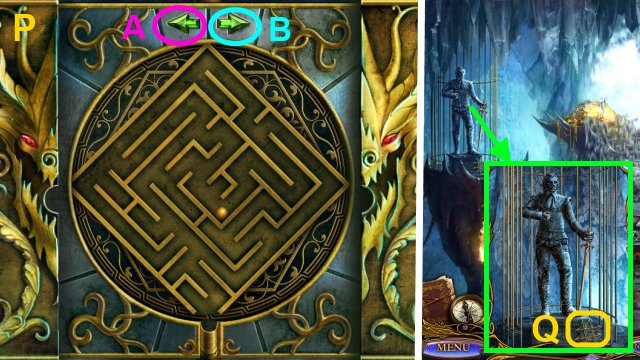
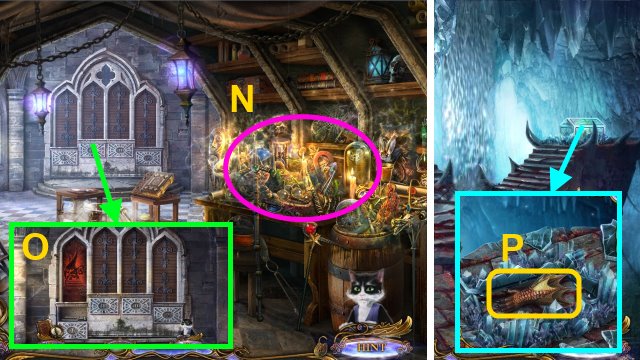
- Use the RETRIEVER POLE on the cage (N).
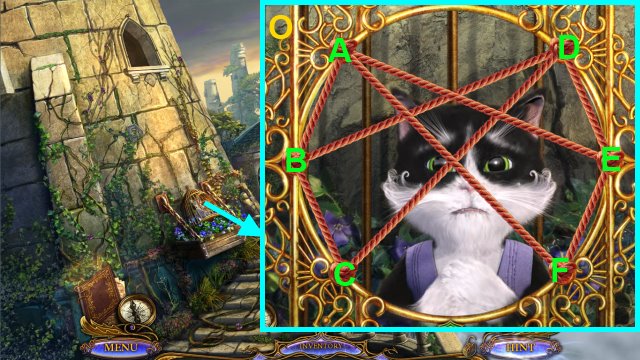
- Examine the cage for a mini-game.
- Solution (O): F-D, A-F, B-C, E-D.
- Walk down.
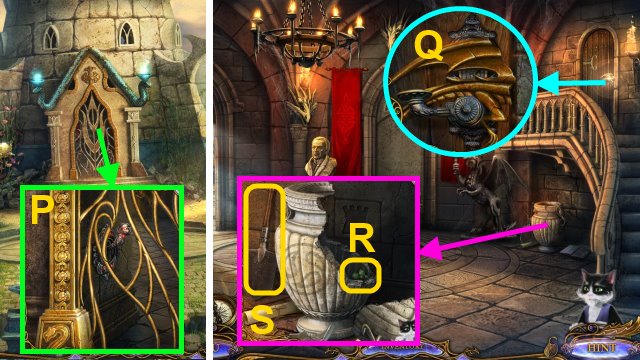
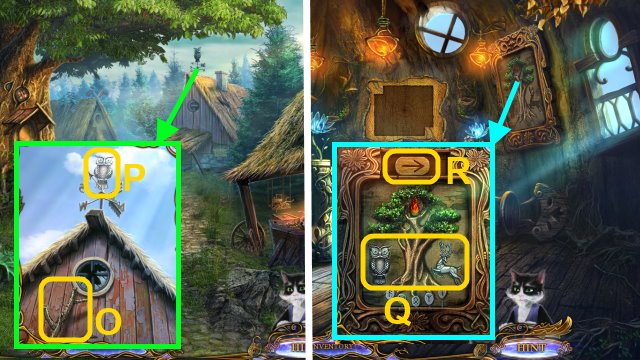
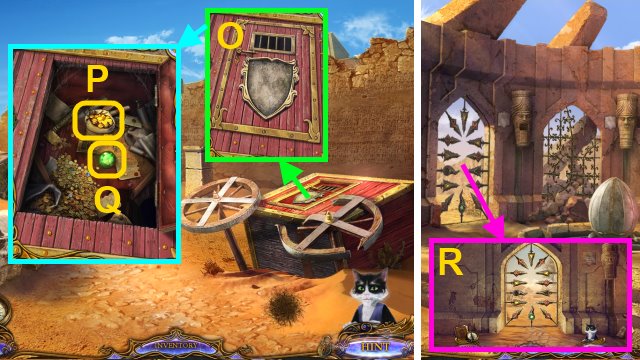
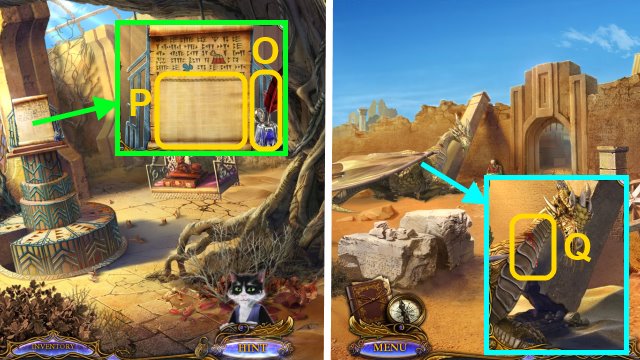
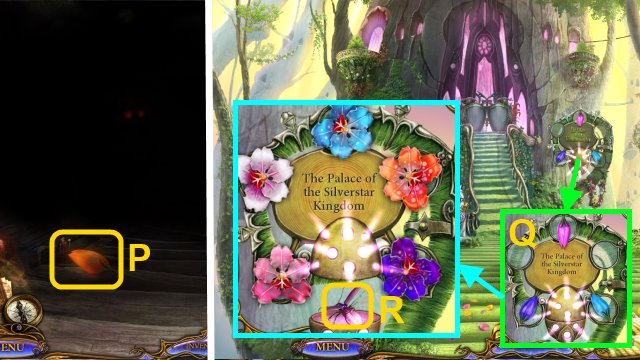
- Use Muir on the gate (P).
- Walk forward.
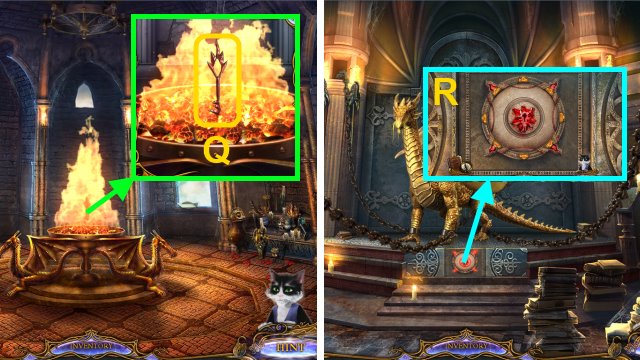
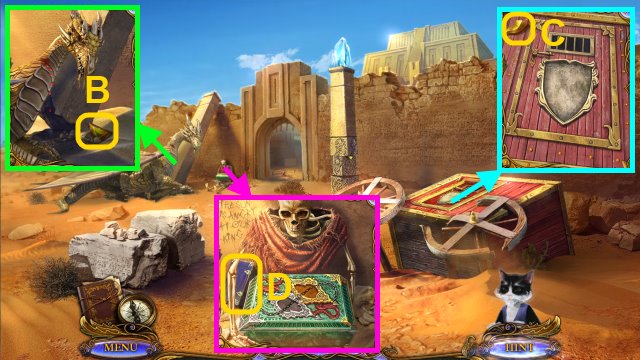
- Examine the keyhole (Q); you receive the DRAGON PART.
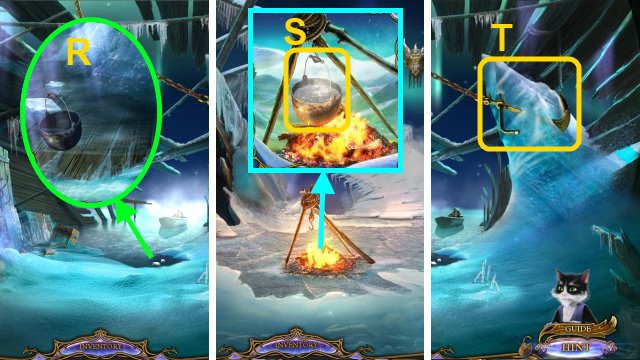
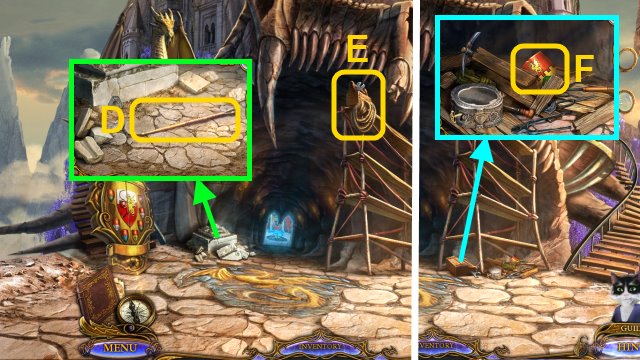
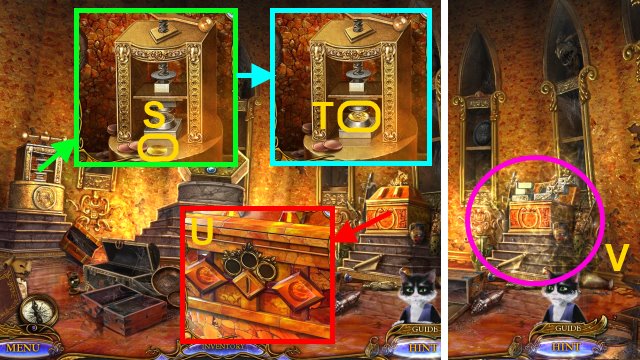
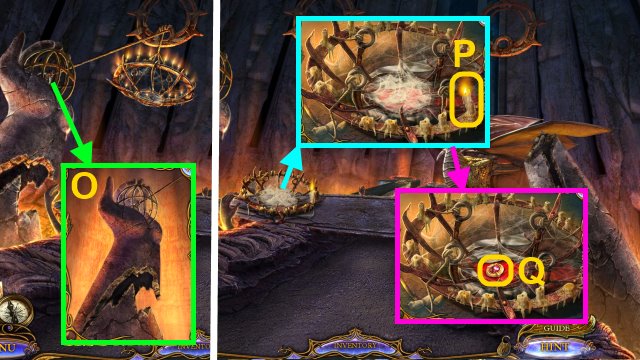
- Break the urn; take the FLOWER MEDALLION 2/3 (R) and SHOVEL (S).
- Walk left.
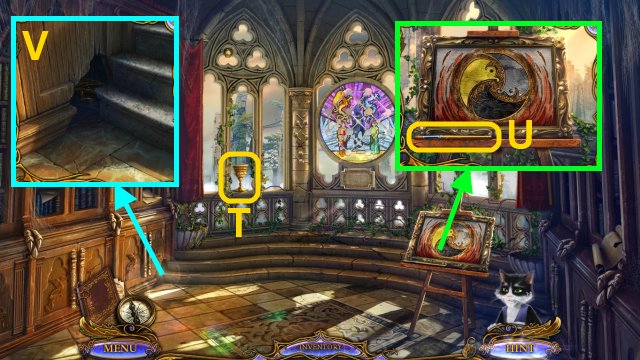
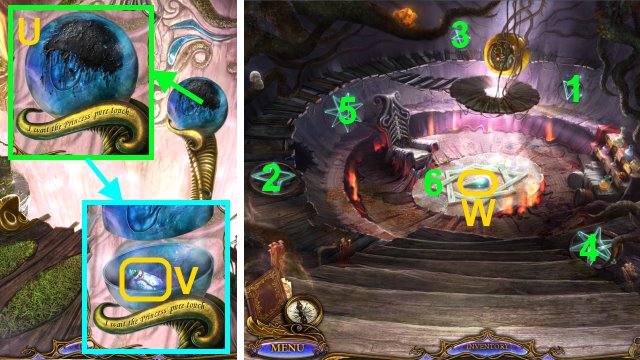
- Take the GOLDEN CUP (T).
- Take the BRUSH (U).
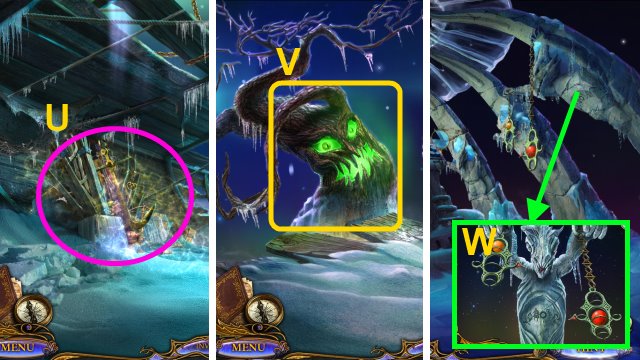
- Use Muir on the hole (V); you receive the DRAGON PART.
- Combine the 2 DRAGON PARTS to make the GOLDEN DRAGON.
- Go to the Rocky Descent.
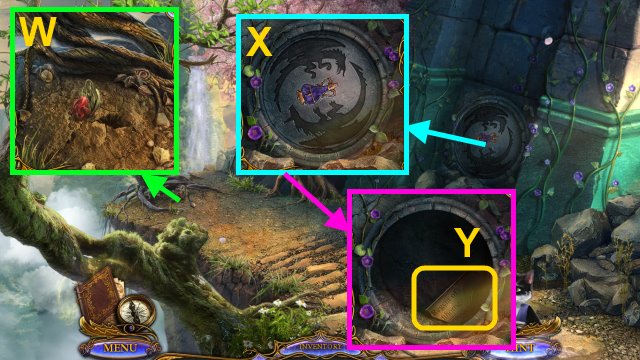
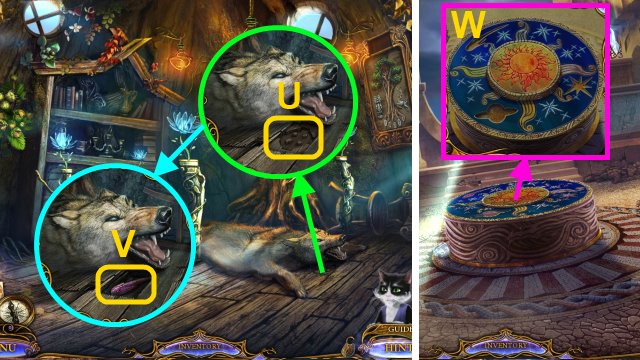
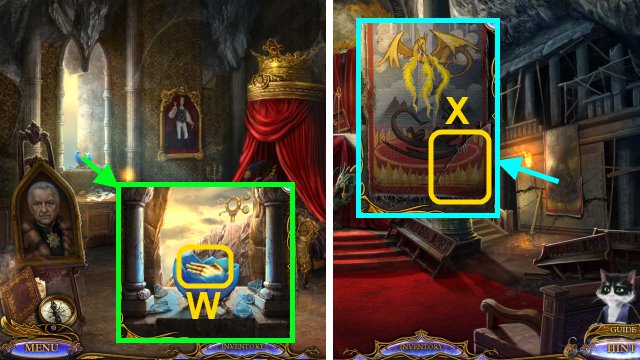
- Use the SHOVEL on the dirt (W); take the RED FLOWER.
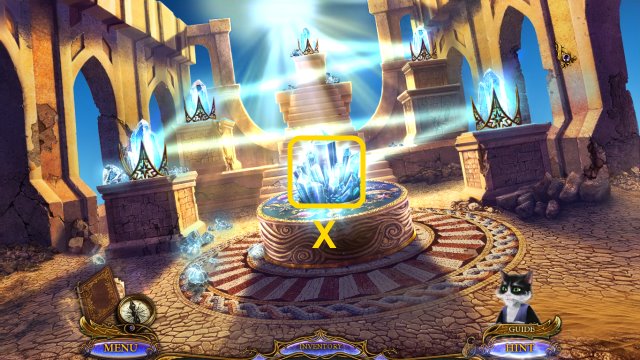
- Place the SILVER DRAGON and GOLDEN DRAGON in the slots (X).
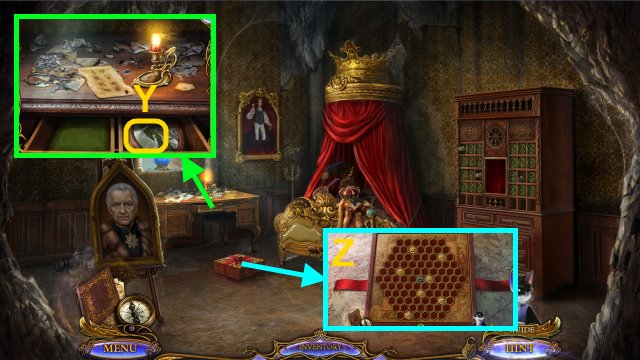
- Take the TABLET FRAGMENT (Y).
- Combine the 2 TABLET FRAGMENTS to make the TABLET.
- Go to the Front Hall.
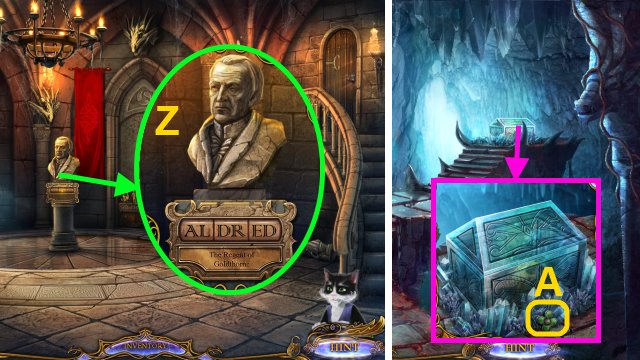
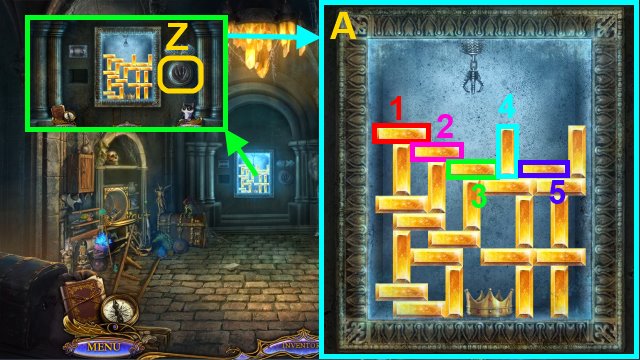
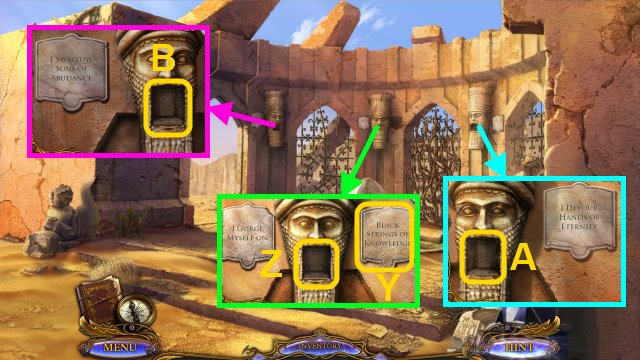
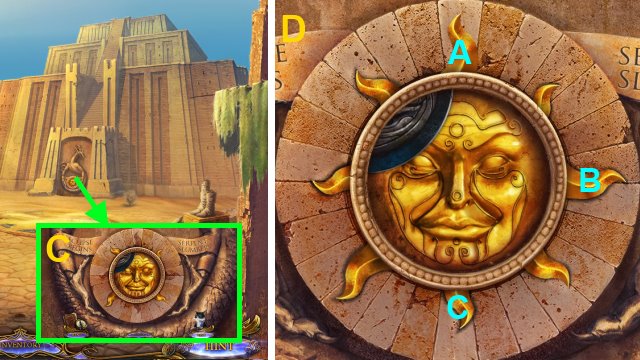
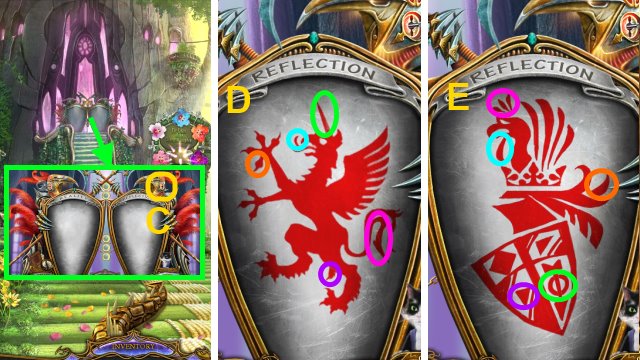
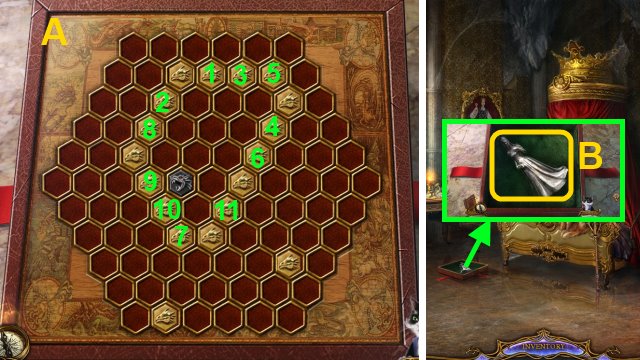
- Place the TABLET on the statue; turn the letters to the correct position (Z).
- Go downstairs.
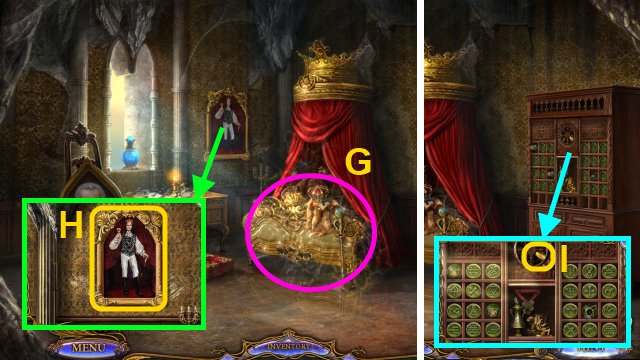
- Take the FLOWER MEDALLION 3/3 (A).
- Go to the Yard.
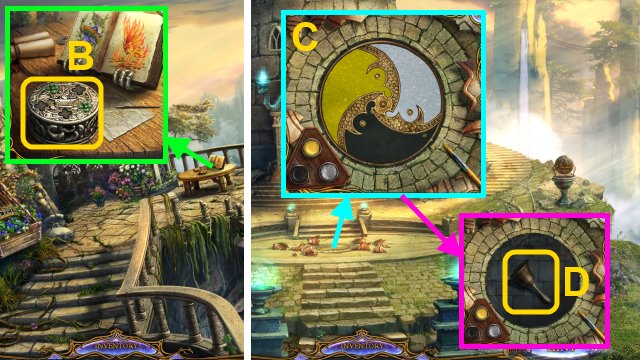
- Place the 3 FLOWER MEDALLIONS on the box (B); take the PAINTS.
- Combine the PAINTS and BRUSH to make the PAINTS AND BRUSH.
- Walk down.
- Use the PAINTS AND BRUSH to paint the hatch correctly (C).
- Take the BELL (D).
- Go to the Cave.
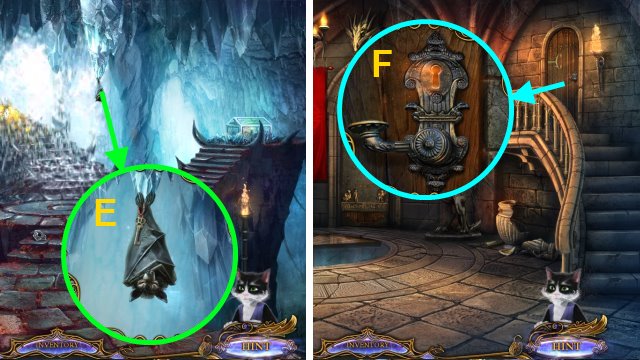
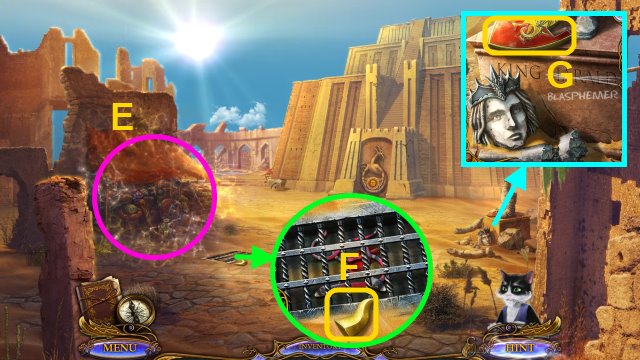
- Use the BELL on the bat to receive the BRASS KEY (E).
- Walk down.
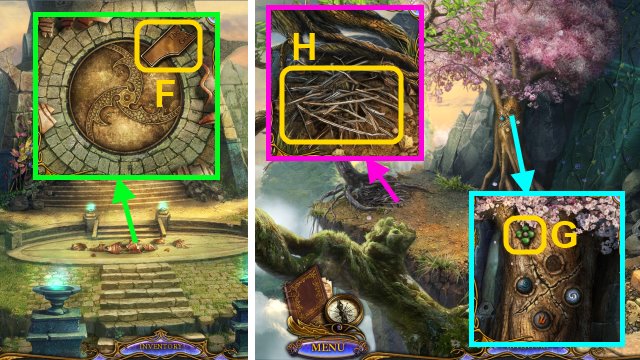
- Use the BRASS KEY on the door (F).
- Walk right.

- Play the HOP to receive the JAR (G).
- Take the CELL SIGN 1/3 (H).
- Take the BRASS PART (I).
- Go to the Yard.
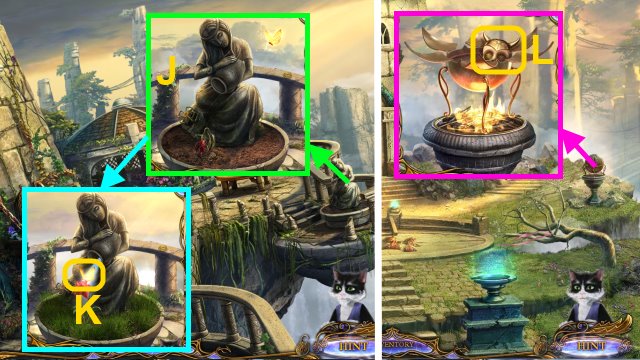
- Give the JAR to the statue; place the RED FLOWER in the dirt (J).
- Turn the tap; take the FLAME BUTTERFLY (K).
- Walk down.
- Place the BRUSHWOOD on the stand; use the FLAME BUTTERFLY.
- Take the SKULL MEDALLION (L).
- Walk left.

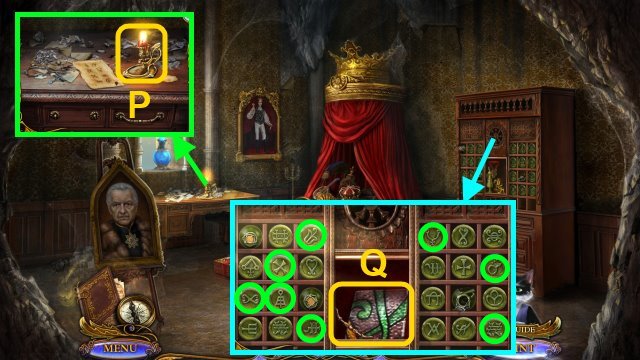
- Place the SKULL MEDALLION on the chest (M).
- Take the SHORT SWORD and GOLDEN BALL (N).
- Go to the cave.
- Place the GOLDEN BALL in the slot for a mini-game (O).
- Solution (P): Bx2, A, B, Ax3, Bx2, A.
- Take the CELL SIGN 2/3 (Q).
- Go to the Hall of Fire.
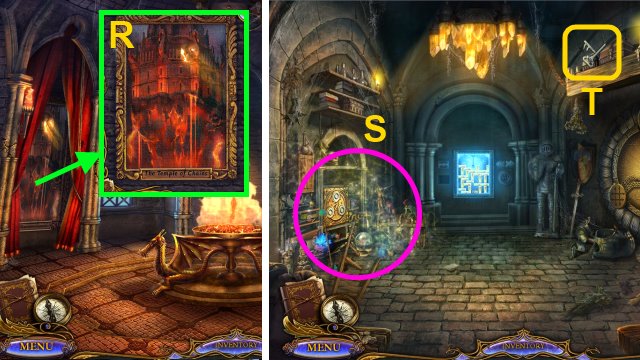
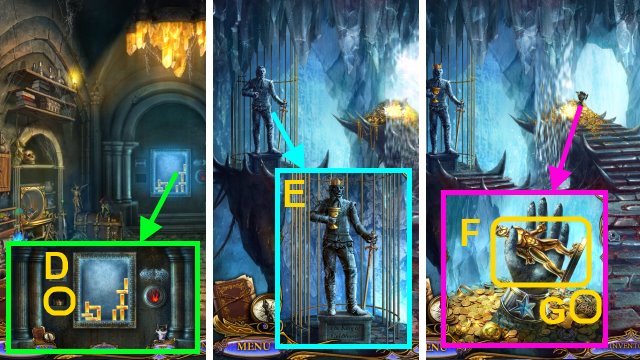
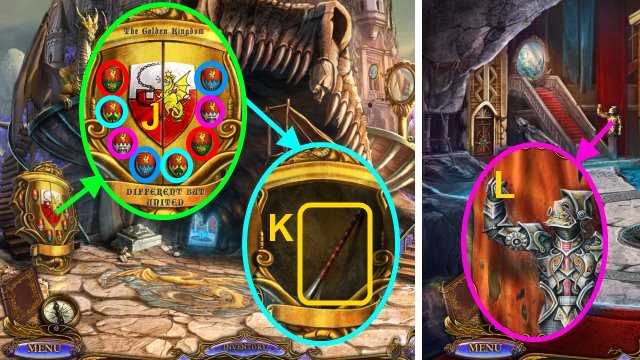
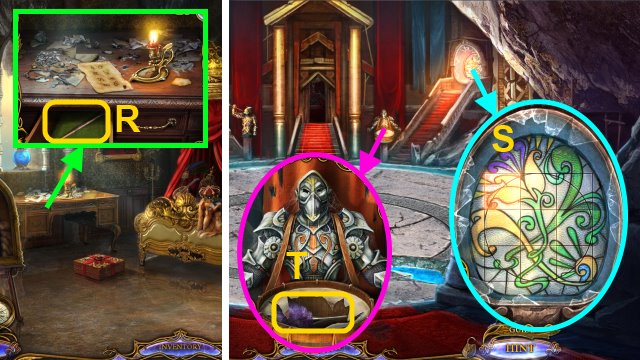
- Pull the cord; use the SHORT SWORD on the painting (R).
- Walk left.
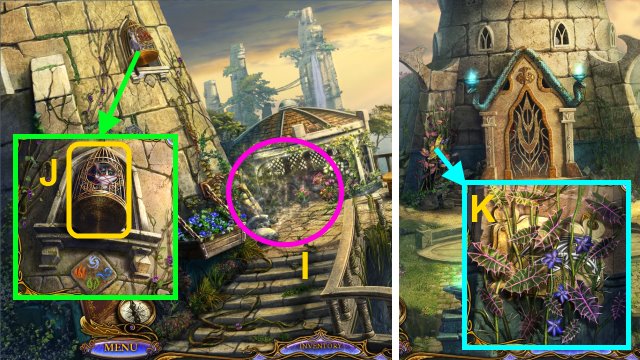
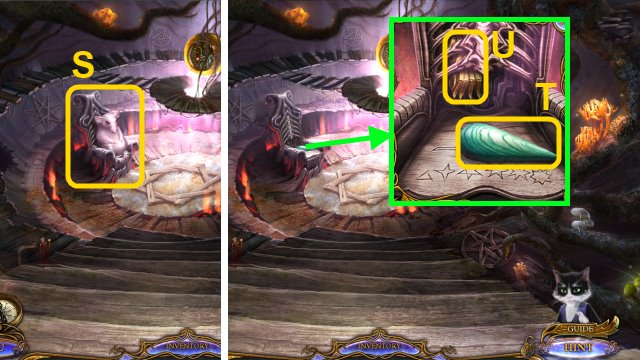
- Play the HOP to receive the TOWER (S).
- Use Muir to take the CROSSED KEYS (T).
- Go to the Front Hall.
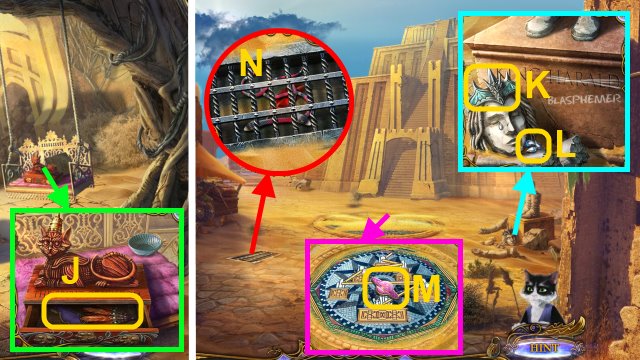
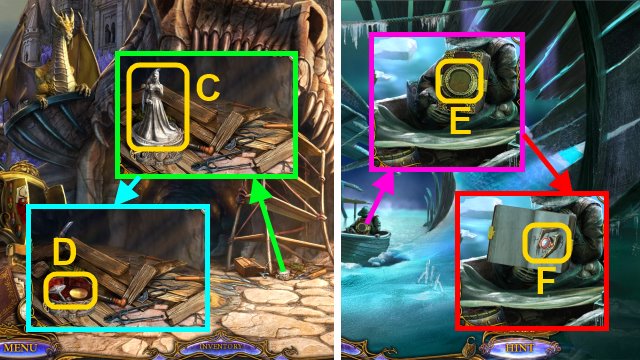
- Place the TOWER on the wall; take the DRAGON PAW (U).
- Walk right.
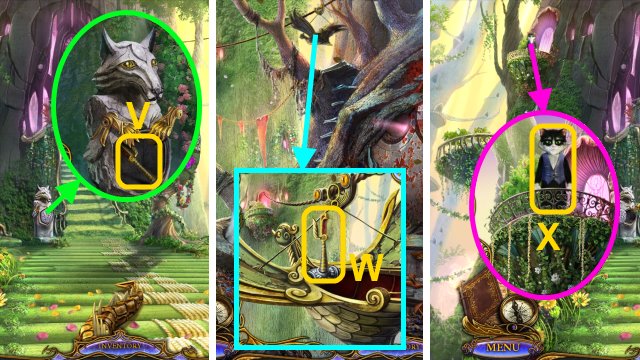
- Place the CROSSED KEYS on the seal; take the STENCIL (V).
- Go to the Terrace.
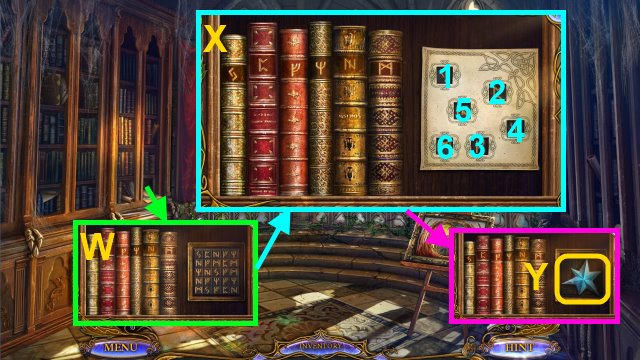
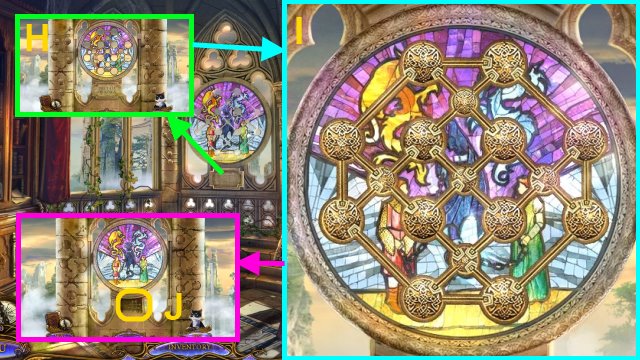
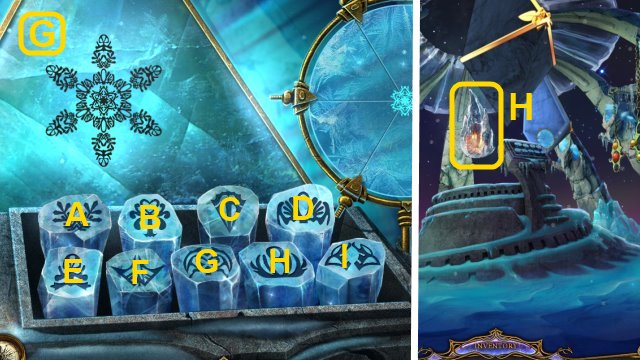
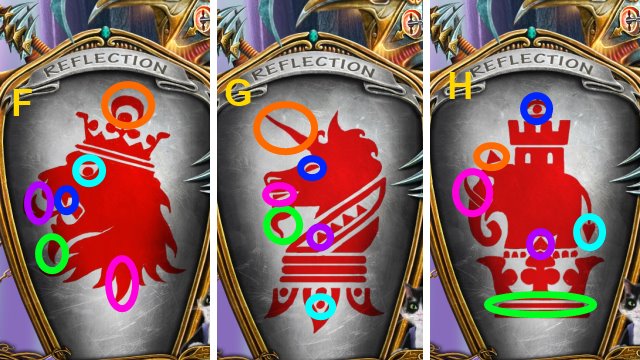
- Move the books; place the STENCIL on the symbols (W).
- Select the symbols in order (X): 1-6.
- Take the CRYSTAL STAR (Y).
- Go to the Treasury.

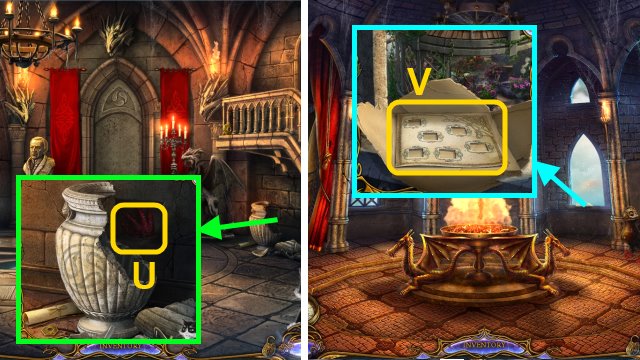
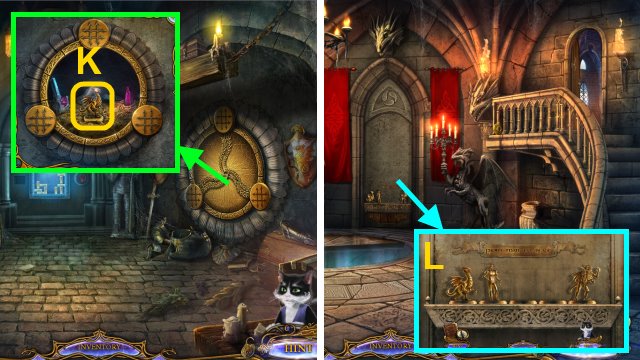
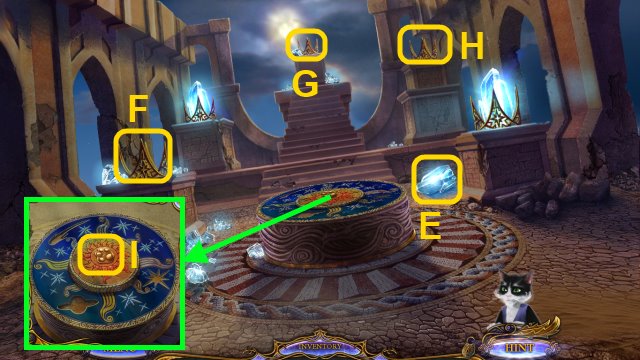
- Place the DRAGON PAW in the slot for a mini-game (Z).
- Solution (A-C): 1-15.
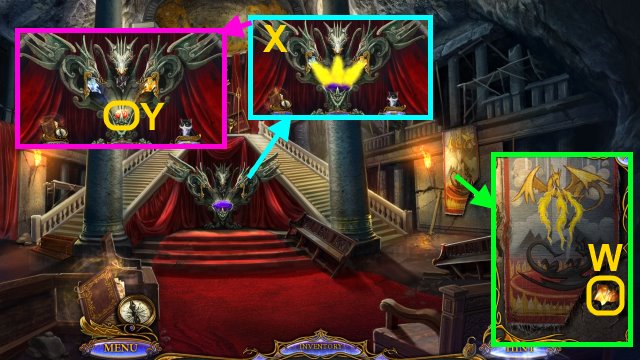
- Take the GOLDEN CROWN (D).
- Go to the Cave.
- Give the GOLDEN CUP and GOLDEN CROWN to the statue (E).
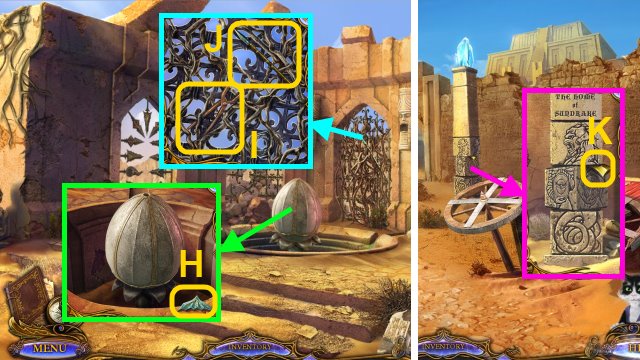
- Place the CRYSTAL STAR on the bracelet; take the HALF-DRAGON FIGURINE (F) and BRASS PART (G).
- Go to the Terrace.
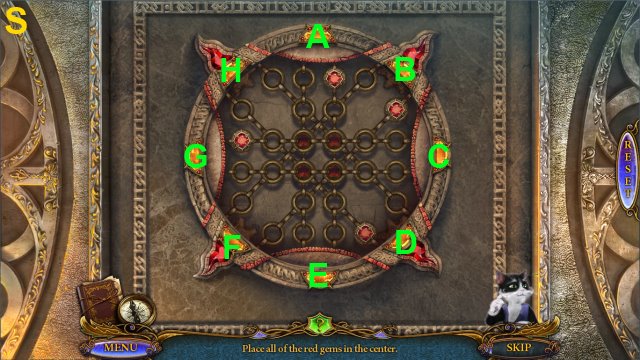
- Place the 2 BRASS PARTS in the slots for a mini-game (H).
- Solution (I).
- Take the CELL SIGN 3/3 (J).
- Go to the Treasury.
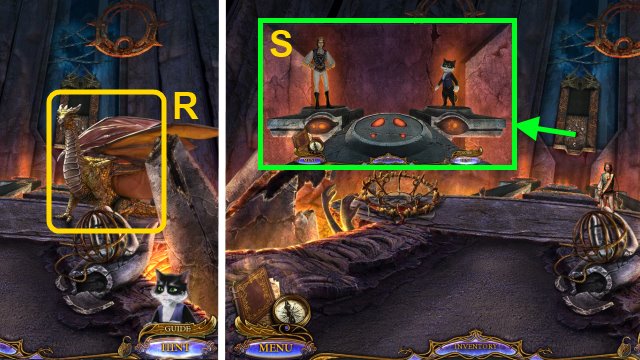
- Place the 3 CELL SIGNS in the slots; take the DRAGON FIGURINE (K).
- Go to the Front Hall.
- Place the HALF-DRAGON FIGURINE and DRAGON FIGURINE on the stand for a mini-game (L).
- Solution (M).
- Walk forward, then left.
- Play the HOP to receive the FIRST SIGN (N).
- Place the FIRST SIGN in the slot; take the TUNING FORK (O).
- Go to the Cave.
- Use the TUNING FORK on the chest; take the SALAMANDER GLOVE (P).
- Go to the Hall of Fire.
- Use the SALAMANDER GLOVE to take the RUBY KEY (Q).
- Go to the Dragon's Prison.
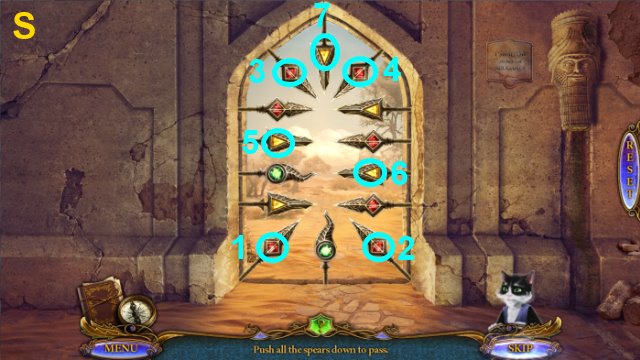
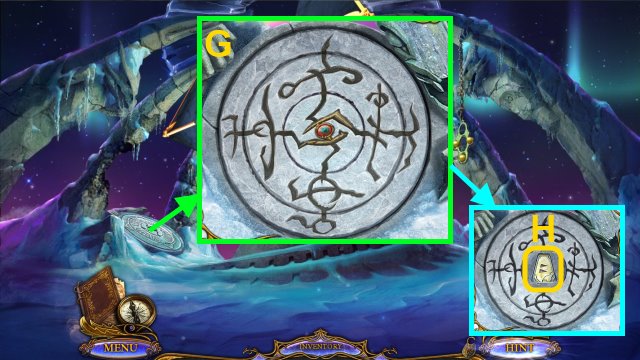
- Use the RUBY KEY on the lock for a mini-game (R).
- Solution (S): F, E, B, Cx2, Ex3, H, Ax2, Fx2.
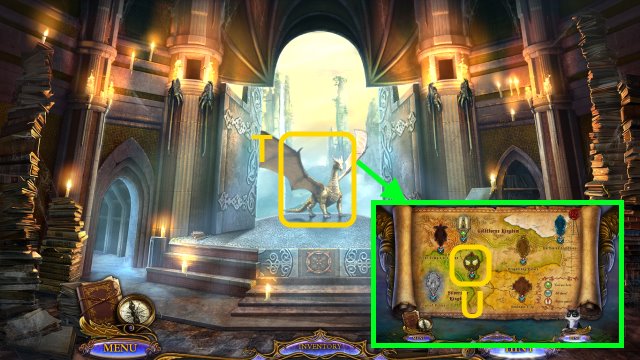
- Talk to Rald (T); you receive the MARKER: BRIGHTFOREST VILLAGE.
- Place the MARKER: BRIGHTFOREST VILLAGE on the map (U); select it.
Chapter 2: Brightforest Village
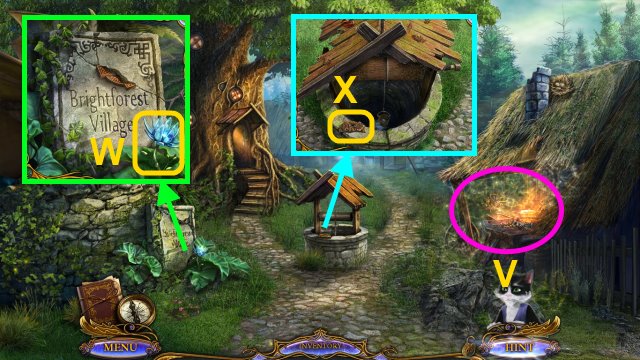
- Play the HOP to receive the SILVER DEER (V).
- Take the GLASS FLOWER 1/3 (W).
- Take the SEAL HALF (X).
- Walk forward.
- Take the GLASS FLOWER 2/3 (Y).
- Walk down, then left.
- Take the GLASS FLOWER 3/3 (Z).
- Move the rug; take the PLIERS HALF (A).
- Place the 3 GLASS FLOWERS on the stands.
- Take the RUNE (B).
- Examine the frame for a mini-game (C).
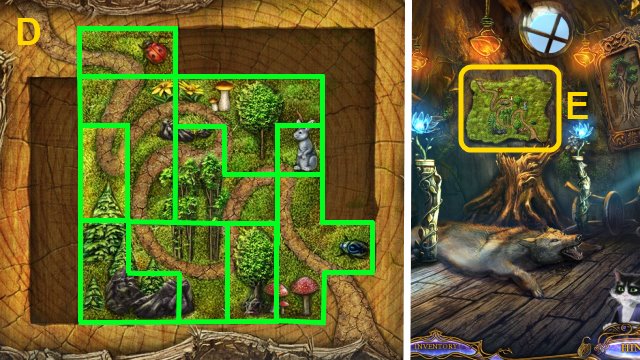
- Solution (D).
- Take the FOREST MAP (E).
- Go to the Forest Trail.
- Walk right twice, then left, then right twice.
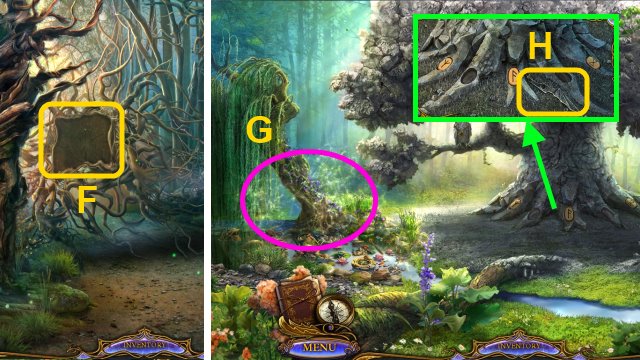
- Place the FOREST MAP in the frame (F).
- Walk forward.
- Play the HOP to receive the MALLET (G).
- Take the PLIERS HALF (H).
- Combine the 2 PLIERS HALVES to make the PLIERS.
- Go to the Tree House.
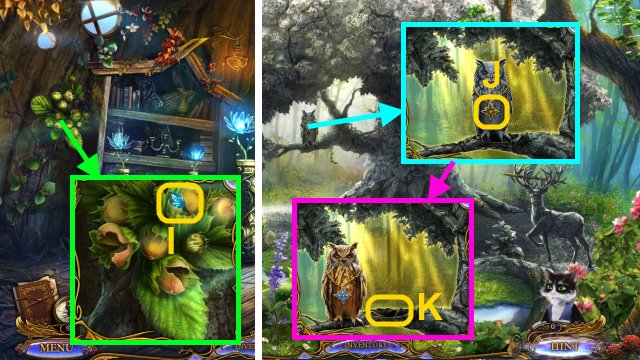
- Use the PLIERS on the nuts; take the TOPAZ (I).
- Go to the Mystic Glade.
- Place the TOPAZ on the medallion (J).
- Use Muir on the owl; take the CRANK (K).
- Walk down twice.
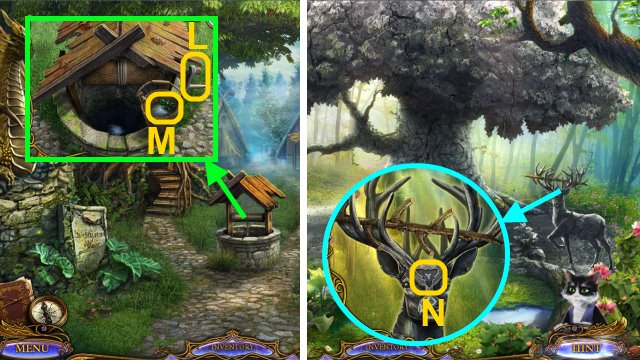
- Place the CRANK on the well; turn it (L).
- Take the EMERALD (M).
- Go to the Mystic Glade.
- Place the EMERALD on the statue (N); you receive the BRANCH LADDER.
- Walk down twice.
- Place the BRANCH LADDER under the window (O).
- Use Muir on the ladder; take the SILVER OWL (P).
- Walk left.
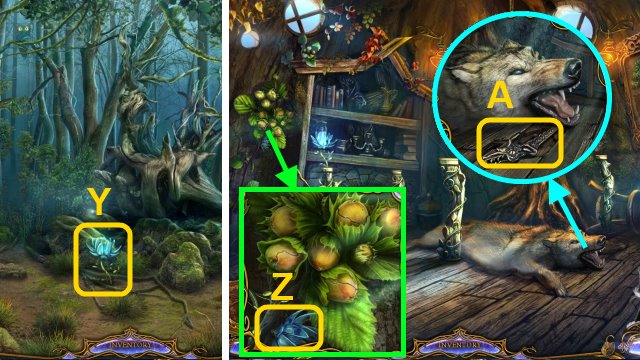
- Place the SILVER DEER and SILVER OWL in the slots (Q); take the RUNE (R).
- Go to the Mystic Glade.
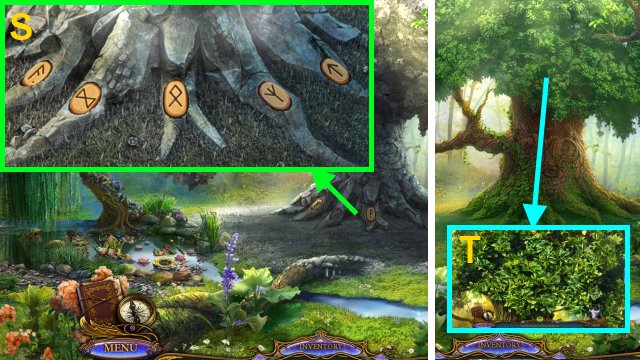
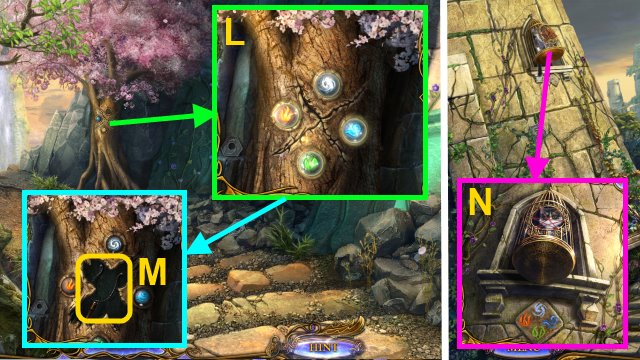
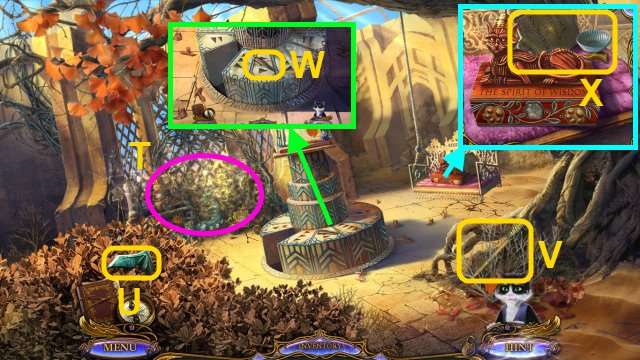
- Place the 2 RUNES on the roots; put them in order (S).
- Examine the tree for a mini-game (T).
- Solution (U).
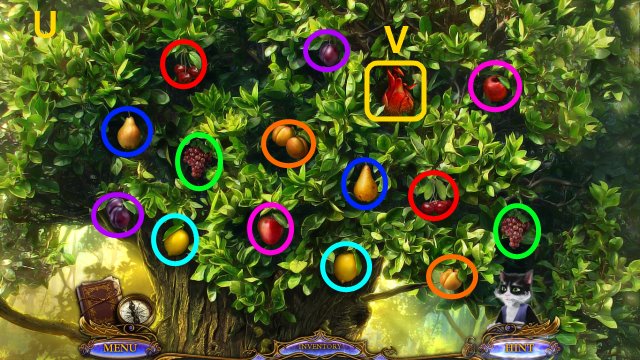
- Take the FRUIT OF LIFE (V).
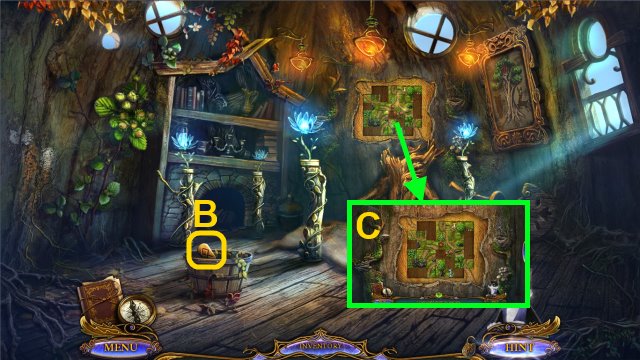
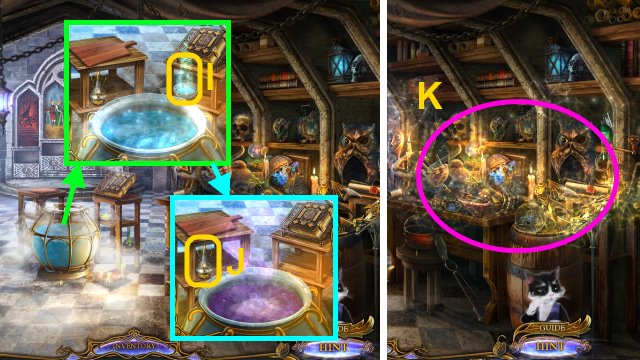
- Go to the Laboratory.
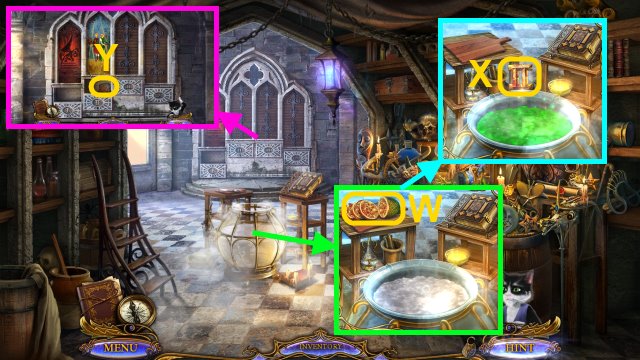
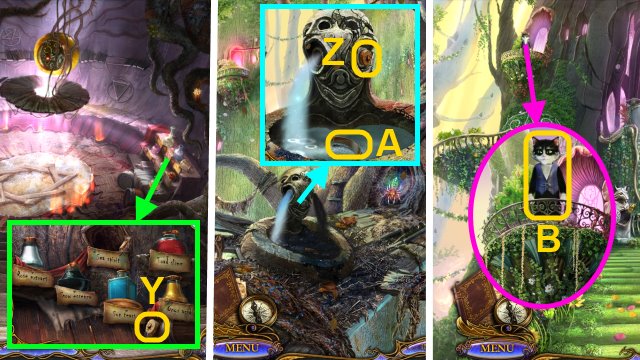
- Place the FRUIT OF LIFE on the table (W); put the fruit in the cauldron.
- Take the SECOND SIGN (X).
- Place the SECOND SIGN in the slot; take the MARKER: SUNDRAKE CITY (Y).
- Play the HOP to receive the STAR SYMBOL (Z).
- Walk down.
- Place the MARKER: SUNDRAKE CITY on the map (A); select it.
Chapter 3: Sundrake City
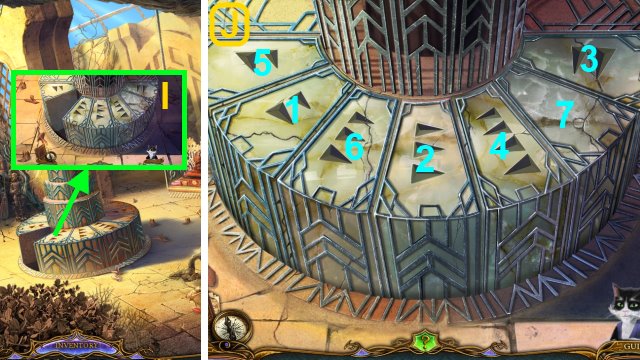
- Take the YELLOW CRYSTAL (B).
- Take the SUNBEAM 1/4 (C).
- Take the BOOK (D).
- Walk forward.
- Play the HOP to receive the MAGNIFYING GLASS (E).
- Take the SUNBEAM 2/4 (F).
- Take the COAT OF ARMS HALF (G).
- Walk left.
- Take the LEFT WING (H).
- Take the FORGING TONGS (I) and SPEAR (J).
- Go to the Town Walls.
- Use the FORGING TONGS to take the SUNBEAM 3/4 (K).
- Turn the stones (L).
- Take the CRYSTAL OF LIGHT 1/3 (M).
- Use the SPEAR on the scorpion; take the COAT OF ARMS HALF (N).
- Combine the 2 COAT OF ARMS PARTS to make the COAT OF ARMS.
- Place the COAT OF ARMS on the door (O).
- Take the BAG OF COINS (P) and GREEN CRYSTAL (Q).
- Go to the Dry Fountain.
- Place the YELLOW CRYSTAL and GREEN CRYSTAL on the gate for a mini-game (R).
- Solution (S): 1-7.
- Walk left.
- Play the HOP to receive the CLOCK (T).
- Move the leaves; take the RIGHT WING (U).
- Move the leaves; take the TORCH (V).
- Combine the MAGNIFYING GLASS and TORCH to make the BURNING TORCH.
- Take the WEDGE (W).
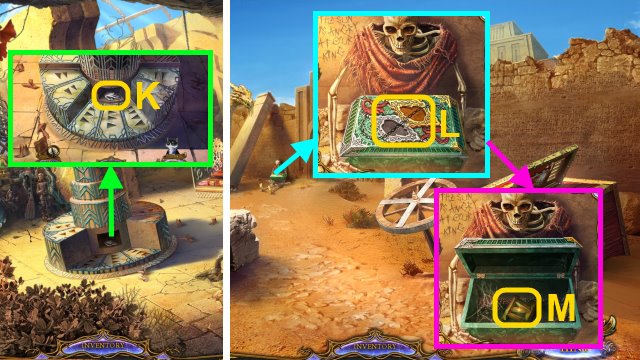
- Flip the cup; take the SUNBEAM 4/4 and PLAQUE (X).
- Walk down.
- Place the PLAQUE in the slot (Y); take the CRYSTAL OF LIGHT 2/3.
- Place the BOOK in the statue's mouth (Z).
- Place the CLOCK in the statue's mouth (A).
- Place the BAG OF COINS in the statue's mouth (B).
- Walk down.
- Place the 4 SUNBEAMS on the sun for a mini-game (C).
- Solution (D): A, B, Cx2.
- Walk forward.
- Take the CRYSTAL OF LIGHT 3/3 (E).
- Place the 3 CRYSTALS OF LIGHT on the stands (F-H).
- Take the CAT PAW PRINT (I).
- Go to the Dead Garden.
- Place the CAT PAW PRINT on the box; take the FAN OF THE STORM and CAT SILHOUETTE (J).
- Walk down twice.
- Place the LEFT WING and RIGHT WING on the crown (K); take the TEARS OF THE KING (L).
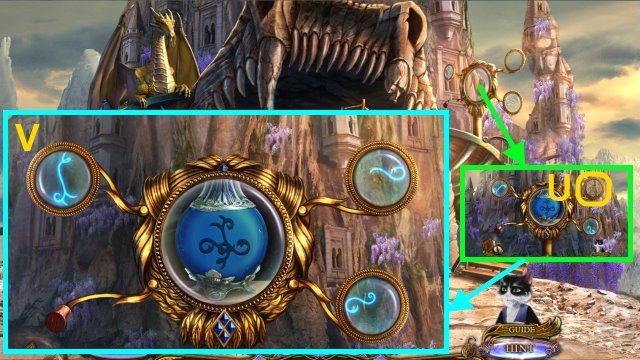
- Use the FAN OF THE STORM to clear the sand; take the PLANET SYMBOL (M).
- Use the BURNING TORCH on the snake (N); use Muir to take the FEATHER.
- Go to the Dead Garden.
- Open the vial; place the FEATHER in it (O).
- Use MUIR on the scroll to receive the VIAL (P).
- Go to the Town Walls.
- Use the VIAL on the dragon to receive the DRAGON'S BLOOD (Q).
- Go to the Dry Fountain.

- Pour the DRAGON'S BLOOD in the water; use the TEARS OF THE KING.
- Take the HEALING POTION (R).
- Walk down twice.
- Use the HEALING POTION on the dragon (S).
- Go to the Deserted Village.
- Use the WEDGE and MALLET to get the SEAL HALF (T); combine the 2 SEAL HALVES to make the SECRET SEAL.
- Walk left.
- Place the SECRET SEAL on the floorboard (U); take the COMET SYMBOL (V).
- Go to the Ziggurat of Light.
- Place the STAR SYMBOL, PLANET SYMBOL, and COMET SYMBOL in the slots (W).
- Turn the crystals to shine the light on the center crystal.
- Take the CAPTURED SUNLIGHT (X).
- Go to the Laboratory.
- Place the CAPTURED SUNLIGHT in the pestle (Y); pour it into the cauldron.
- Take the THIRD SIGN (Z).
- Place the THIRD SIGN in the slot; take the MARKER: NORTHWIND LIGHTHOUSE (A).
- Play the HOP to receive the MEDIUM SNOWFLAKE (B).
- Walk down.
- Place the MARKER: NORTHWIND LIGHTHOUSE on the map (C); select it.
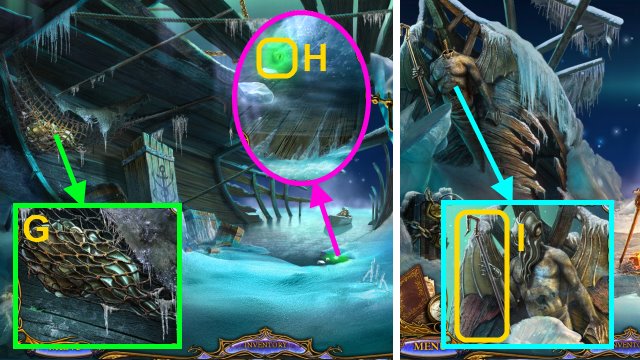
Chapter 4: Northwind Lighthouse
- Play the HOP to receive the ROPE (D).
- Take the SMALL SNOWFLAKE (E).
- Walk forward.
- Use Muir on the tree; take the CURVED KNIFE (F).
- Walk down, then left.
- Use the CURVED KNIFE to take the NETTING (G); take the TENTACLED HEAD.
- Use the NETTING to take the GREEN EYE 1/2 (H).
- Walk down.
- Place the TENTACLED HEAD on the statue; take the FISHING HOOK (I).
- Walk forward.
- Use the FISHING HOOK on the ladder (J); take the GREEN EYE 2/2 (K).
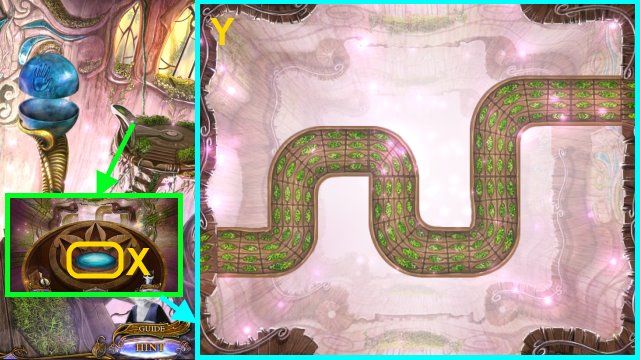
- Examine the window for a mini-game.
- Solution (L).
- Take the LARGE SNOWFLAKE (M).
- Give the 2 GREEN EYES to the tree (N).
- Walk down.
- Place the MEDIUM SNOWFLAKE, SMALL SNOWFLAKE, and LARGE SNOWFLAKE in the slot (O); take the EMPTY POT (P) and WEIGHT 1/3 (Q).
- Walk left.
- Use the EMPTY POT on the water to receive the POT OF WATER (R).
- Walk down.
- Put the POT OF WATER over the fire; take the BOILING WATER (S).
- Walk left.
- Pour the BOILING WATER on the ice (T).
- Play the HOP to receive the SPIKED CANONBALL (U).
- Go to the Snowy Trail.
- Use the SPIKED CANONBALL on the tree (V).
- Walk forward.
- Examine the statue (W).
- Walk down.

- Press the symbols in order (X).
- Take the HOOK and WEIGHT 2/3 (Y).
- Combine the HOOK and ROPE to make the ROPE WITH A HOOK.
- Go to the Shipwreck.
- Use the ROPE WITH A HOOK on the boat (Z).
- Move the canvas; take the WEIGHT 3/3 (A).
- Go to the Lighthouse.
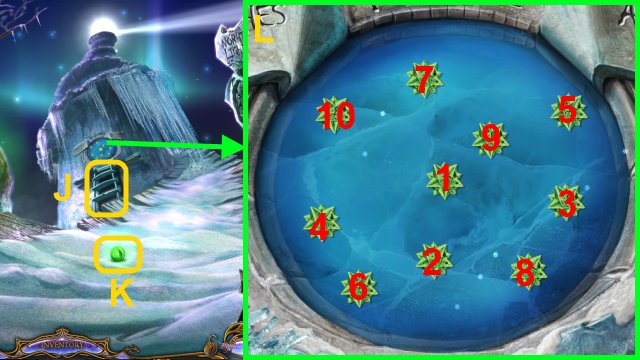
- Place the 3 WEIGHTS on the chain (B).
- Move the weights to the correct positions; use Muir to take the COMPASS NEEDLE (C).
- Walk down twice.
- Place the COMPASS NEEDLE on the compass (D); take the CRYSTAL TRIANGLE (E).
- Go to the Lighthouse.
- Place the CRYSTAL TRAINGLE on the stand for a mini-game (F).
- Solution (G): D, A, E, G, I, C, B, I, H, E, F, D.
- Take the FROZEN FIRE (H).
- Go to the Laboratory.
- Place the FROZEN FIRE in the bowl; pour it into the cauldron (I).
- Use the bottle on the cauldron to receive the ELIXIR OF LIFE (J).
- Play the HOP to receive the CROSSBOW (K).
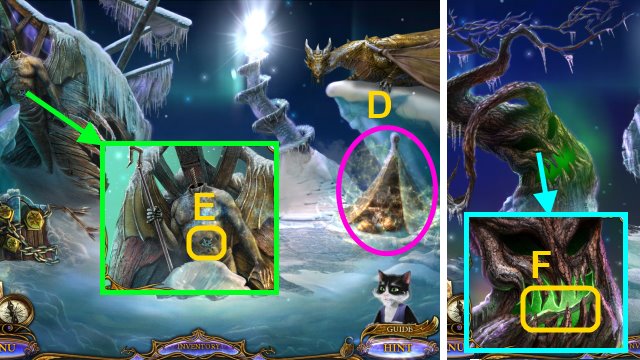
- Go to the Map; Select Skyleaf Palace.
Chapter 5: Skyleaf Palace
- Open the fan and boxes; take the BRACELET HALF (L) and WAND HANDLE (M).
- Take the GEMSTONE TEARDROP 1/3 (N).
- Walk right.
- Play the HOP to receive the BUD (O).
- Walk forward.
- Take the BUD (P).
- Walk down twice.
- Place the 2 BUDS on the sign (Q).
- Arrange the flowers in the correct order; take the MAGICAL FIREFLY (R).
- Go to the Dark Lair.
- Use the MAGICAL FIREFLY.
- Use Muir on the rat (S).
- Take the GEMSTONE TEARDROP 2/3 (T) and METAL PAW (U).
- Walk down twice.
- Place the METAL PAW on the statue; take the STARTER LEVER (V).
- Walk right.
- Put the STARTER LEVER on the bird (W); place Muir in it.
- Walk down.
- Talk to Muir (X); you receive the CORKSCREW.
- Go to the Dark Lair.
- Use the CORKSCREW to take the CORK (Y).
- Walk down.
- Place the CORK in the statue (Z); take the BRACELET HALF (A).
- Combine the 2 BRACELET HALVES to make the BRACELET.
- Walk down.
- Give the BRACELET to Muir (B); you receive the WINDING KEY.
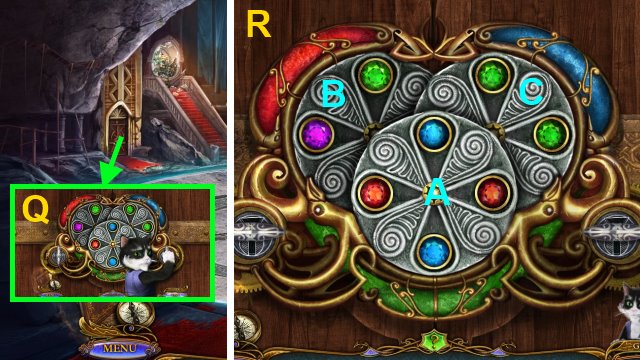
- Use the WINDING KEY on the lock for a mini-game (C).
- Solution (D – H).
- Walk forward.
- Play the HOP to receive the ENCHANTED ARROW (I).
- Combine the ENCHANTED ARROW and CROSSBOW to make the LOADED CROSSBOW.
- Go to the Corrupted Tree.
- Use the LOADED CROSSBOW on the spider (J).
- Move the armor pieces; take the WAR HAMMER (K).
- Go to the Hall of Bridges.
- Use the WAR HAMMER on the vase; take the ANCIENT SYMBOL (L).
- Go to the Dark Lair.
- Use the ANCIENT SYMBOL on the device for a mini-game (M).
- Solution (N).
- Take the SECRET SIGN (O).
- Walk down twice.
- Move the cloth; place the SECRET SIGN in the slot (P).
- Take the GREEN POTION (Q).
- Go to the Dark Lair.

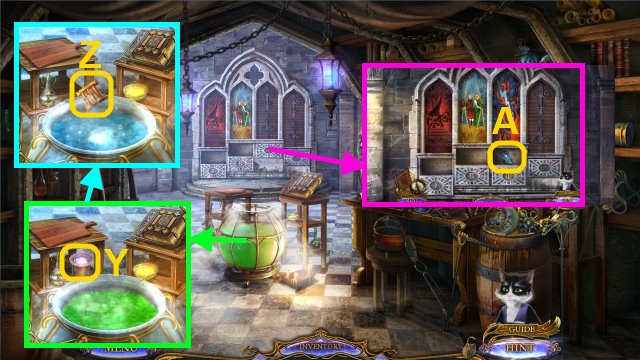
- Place the GREEN POTION on the shelf; place the potions in the correct positions (R).
- Take the DRY SPONGE (S).
- Walk down.
- Use the DRY SPONGE on the water to receive the WET SPONGE (T).
- Go to the Hall of Bridges.
- Use the WET SPONGE on the orb; press it (U).
- Take the MAGICAL CRYSTAL (V).
- Combine the WAND HANDLE and MAGICAL CRYSTAL to make the MAGIC WAND.
- Go to the Dark Lair.
- Use the MAGIC WAND on the symbols in the correct order (1-6); take the GEMSTONE TEARDROP 3/3 (W).
- Go to the Hall of Bridges.
- Place the 3 GEMSTONE TEARDROPS in the slots; press the stone for a mini-game (X).
- Solution (Y).
- Walk forward.
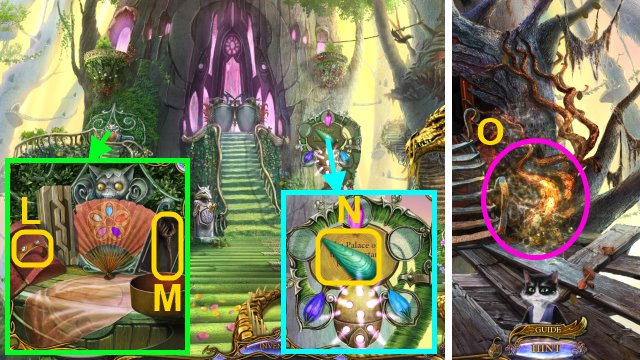
- Give the ELIXIR OF LIFE to the Queen; take the AMULET OF SILVERSTAR (Z).
- Take the ARC OF ICE (A).
- Go to the Palace Gates.
- Take the MARKER: DRAGONFANG PALACE (B).
- Place the MARKER: DRAGONFANG PALACE on the map; select it (C).
Chapter 6: Dragonfang Palace
- Move the stones; take the DRUMSTICK 1/2 (D).
- Use Muir on the toolbox (E).
- Take the CREST (F).
- Walk forward, then right.
- Play the HOP to receive the CREST (G).
- Move the portrait (H).
- Take the GOLDEN DISC 1/3 (I).
- Walk down twice.
- Place the 2 CRESTS in the slots; match them (J).
- Take the HORN (K).
- Walk forward.
- Give the HORN to the statue (L).
- Play the HOP to receive the SWORD (M).
- Place the SWORD in the slot; turn it (N).
- Walk forward.
- You receive the ARC OF FIRE.
- Combine the ARC OF FIRE and ARC OF ICE to make the ELEMENTAL AMULET.
- Use Muir to take the PIECE OF PAPER (O).
- Walk down, then right.
- Use the PIECE OF PAPER on the candle (P).
- Select the correct symbols; take the STAINED GLASS FRAGMENT and DRAWER HANDLE (Q).
- Place the DRAWER HANDLE on the drawer; open it.
- Take the DRUMSTICK 2/2 (R).
- Walk down.
- Place the STAINED GLASS FRAGMENT on the window; complete the image (S).
- Take the LENS.
- Give the 2 DRUMSTICKS to the statue; take the FEATHER DUSTER (T).
- Walk down.
- Place the LENS on the stand for a mini-game (U).
- Solution (V).
- Go to the Royal Apartments.
- Take the GOLDEN HAND (W).
- Go to the Throne Room.
- Use the FEATHER DUSTER on the rug; take the PIECE OF CLOTH (X).
- Go to the Royal Apartments.
- Open the drawer; use the PIECE OF CLOTH to take the IMPROVISED KNIFE (Y).
- Use the IMPROVISED KNIFE on the box for a mini-game (Z).
- Solution (A).
- Take the SILVER STATUETTE (B).
- Walk down twice.
- Place the SILVER STATUETTE on the box; turn the key 4 times (C).
- Take the GOLDEN DISC 2/3 and TREASURY KEY 1/2 (D).
- Go to the Shipwreck.
- Place the ELEMENTAL AMULET on the book (E); take the RUNE KEY (F).
- Go to the Lighthouse.
- Place the RUNE KEY in the slot; arrange the rings correctly (G).
- Take the CHISELED STONE (H).
- Go to the Dead Garden.
- Place the CHISELED STONE in the slot for a mini-game (I).
- Solution (J): 1-7.
- Take the SILVER HAND (K).
- Go to the Town Walls.
- Place the GOLDEN HAND and SILVER HAND on the box (L); take the FOURTH SIGN (M).
- Go to the Laboratory.

- Play the HOP to receive the KING SILHOUETTE (N).
- Place the FOURTH SIGN in the slot; take the SILVER CRYSTAL FLAME (O).
- Go to the Throne Room.
- You receive the TREASURY KEY 2/2 (P).
- Walk down.
- Place the 2 TREASURY KEYS in the lock.
- Use Muir on the lock; turn the key for a mini-game (Q).
- Solution (R): C, Ax2, C, B, A, Bx2, A.
- Walk left.
- Take the GOLDEN DISC 3/3 (S); place a GOLDEN DISC on the device; turn the handle.
- Take the GOLDEN COIN (T); repeat with the 2 GOLDEN DISCS.
- Place the 3 GOLDEN COINS on the chest (U).
- Play the HOP to receive the SILVER FORK (V).
- Go to the Throne Room.
- Use the SILVER FORK on the wall; take the CRYSTAL FLAME (W).
- Place the SILVER CRYSTAL FLAME and CRYSTAL FLAME on the statue.
- Change the flames to yellow (X); take the LEVER TIP (Y).
- Go to the Treasury.

- Place the LEVER TIP on the stand for a mini-game (Z).
- Solution (A): A-D, D-G, H-C, C-F, F-A, A-D, E-H, H-C, C-F, F-A, B-E, E-H, H-C, G-B, B-E, D-G.
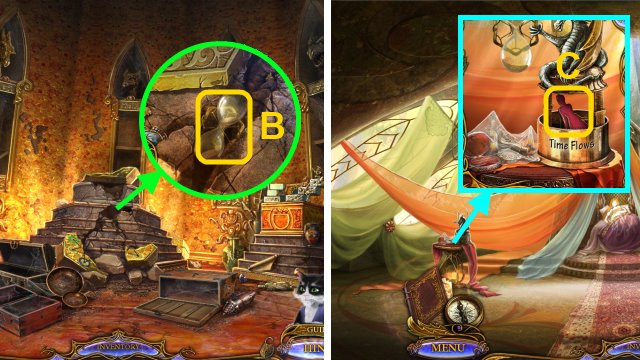
- Take the HOURGLASS (B).
- Go to the Queen's Bedroom.
- Place the HOURGLASS on the dragon; take the PRINCESS SILHOUETTE (C).
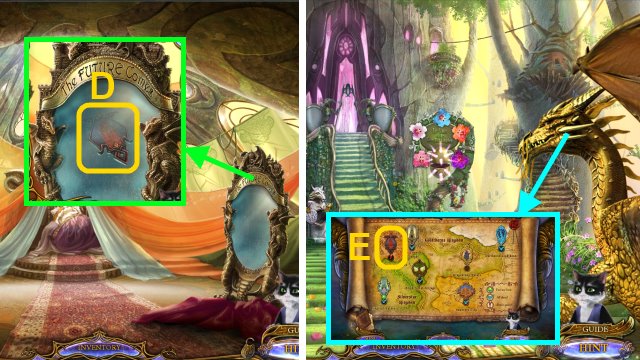
- Move the cloth; place the CAT SILHOUETTE, KING SILHOUETTE, and PRINCESS SILHOUETTE on the mirror.
- Take the MARKER: THE TEMPLE OF CHAINS (D).
- Walk down twice.
- Place the MARKER: THE TEMPLE OF CHAINS on the map (E); select it.
Chapter 7: The Temple of Chains
- Take the BLUNT KNIFE (F).
- Move the curtain.
- Move the boot; use the BLUNT KNIFE to take the STEEL CROWN (G).
- Place the STEEL CROWN on the bag; take the DRIED MEAT and WHETSTONE (H).
- Combine the BLUNT KNIFE and WHETSTONE to make the SHARP KNIFE.

- Move the shirt; use the SHARP KNIFE on the mattress.
- Take the STAFF (I).
- Give the DRIED MEAT to the vulture (J).
- Play the HOP to receive the LASSO (K).
- Use the LASSO and STAFF on the rocks (L).
- Walk left.
- Take the COBBLESTONE (M).
- Walk down.
- Use the COBBLESTONE on the lock; take the HALBERD BLADE (N).
- Combine the STAFF and HALBERD BLADE to make the HALBERD.
- Walk left.
- Use the HALBERD on the rope (O).
- Use the candle (P) on the web; take the AMULET OF GOLDTHORNE (Q).
- Give the AMULET OF GOLDTHORNE to Rald (R).
- Select the left stand; use Muir on the other stand.
- Select the middle stand for a mini-game (S).
- Solution (T): D, C, E, Bx2, F, E, Fx2.
- Press the button (U).
- Congratulations! You have completed Dreampath: The Two Kingdoms.
Created at: 2014-07-13