

Walkthrough Menu
- General Tips
- Chapter 1: The Queen's Virtue
- Chapter 2: The Knight's Virtue
- Chapter 3: The Artist's Virtue
- Chapter 4: The Scientist's Virtue
- Chapter 5: The Girl's Virtue
General Tips
- This is the official guide for Echoes of the Past: The Kingdom of Despair.
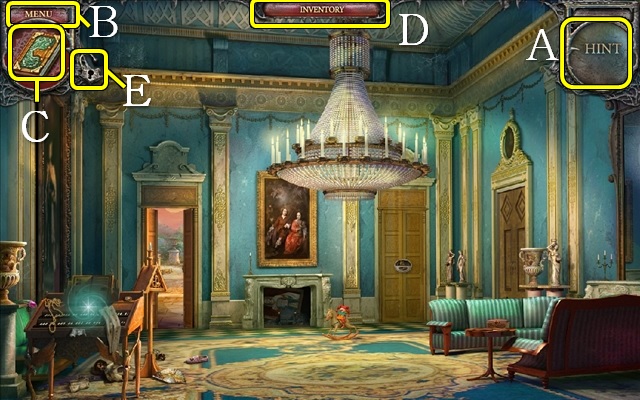
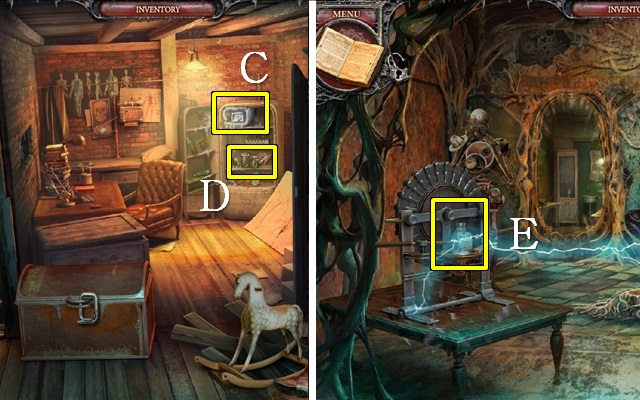
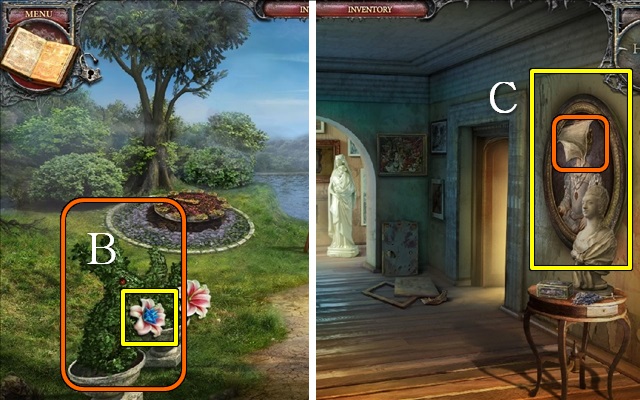
- Use the Hint button (A) in Regular and Advanced modes for help during the game or to find HOP items.
- Select Menu (B) to pause the game, review basic actions, change screen and sound options or return to the main menu.
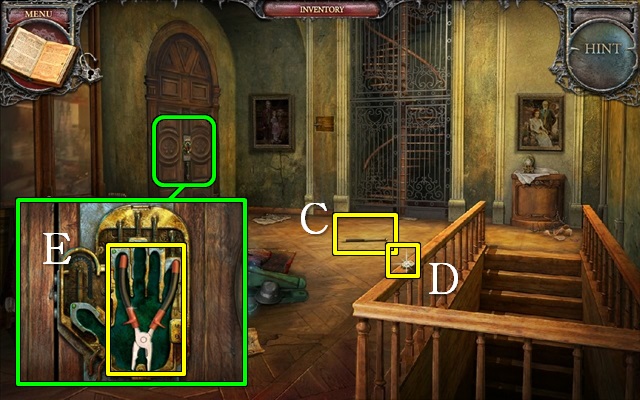
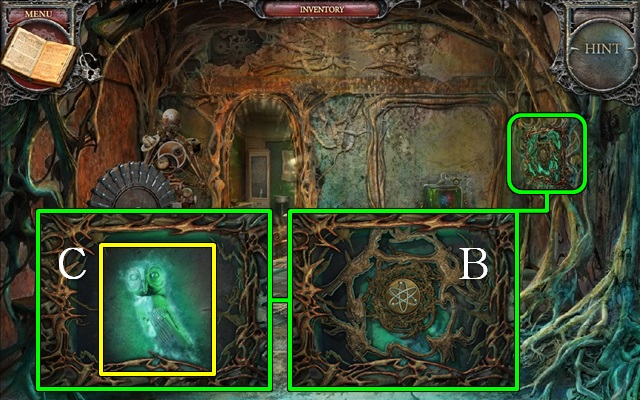
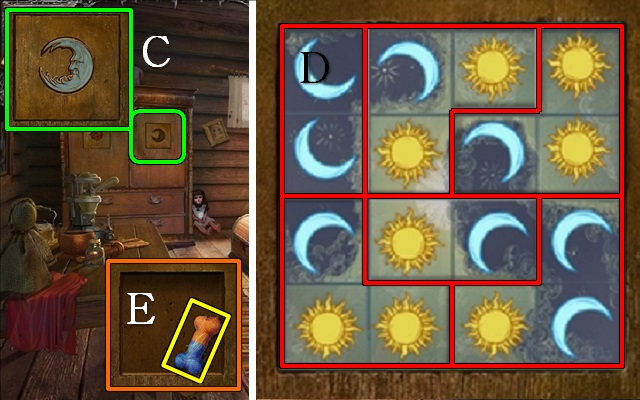
- Open the Journal (C) to review the storyline and review codes and clues.
- Move your cursor to the top of the screen to reveal the Inventory Bar (D); you may lock the inventory bar on the screen with the padlock (E).
- Hidden-object puzzles are referred to as HOPs in this guide. Items listed in red are hidden, or require additional actions to locate. Lists may be random; our lists may vary from yours. Interactive items in HOPs are color-coded.
- This game features several 'reverse HOPs' in which inventory items have to be placed in the scene.
- In mini-games, use the '?' button to get instructions and the Restart button to reset the game; in Regular and Advanced mode you can use the Skip button to skip mini-games.
Chapter 1: The Queen's Virtue
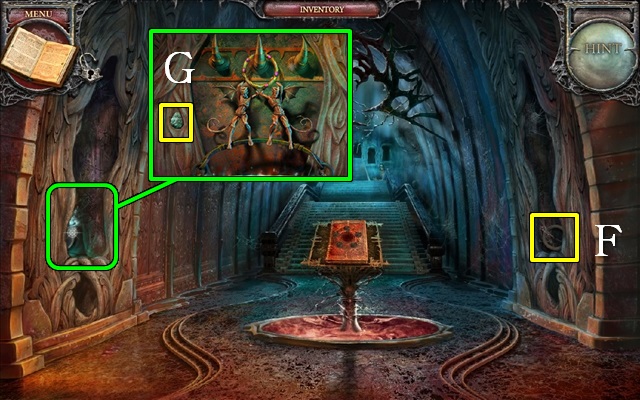
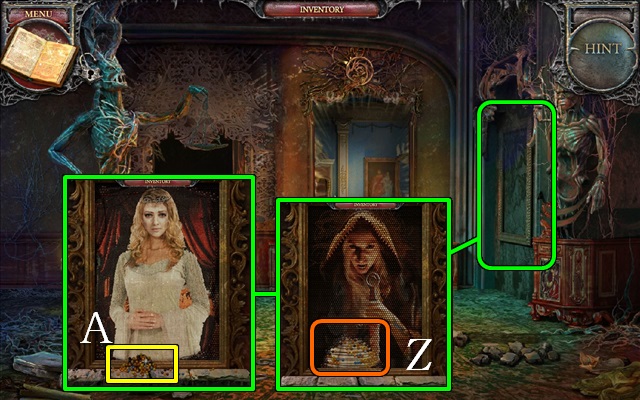
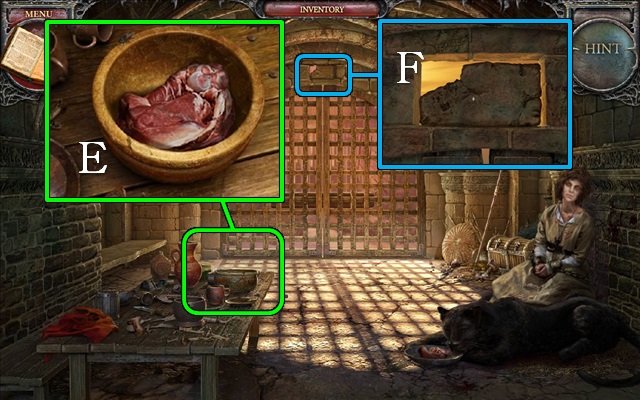
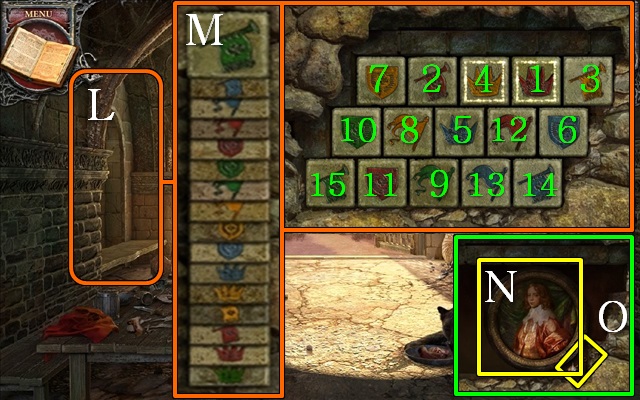
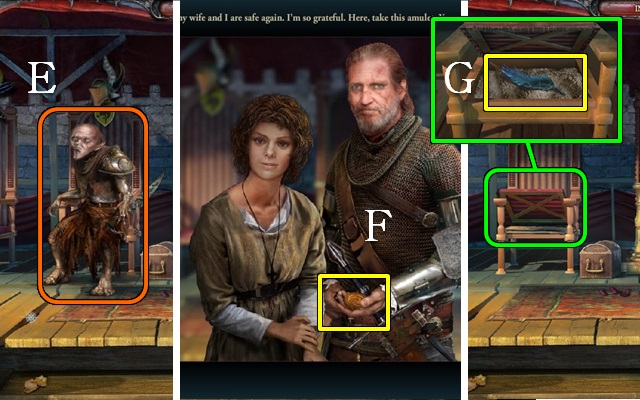
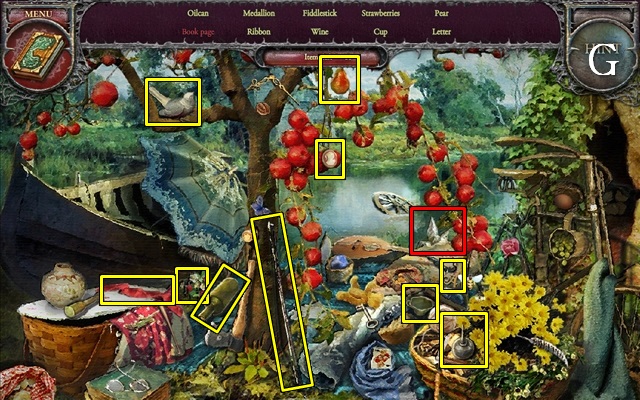
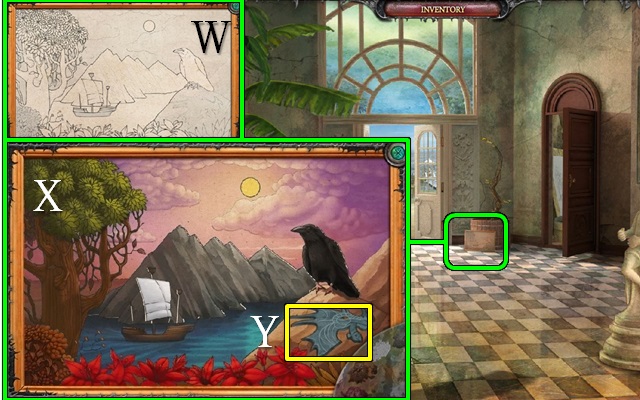
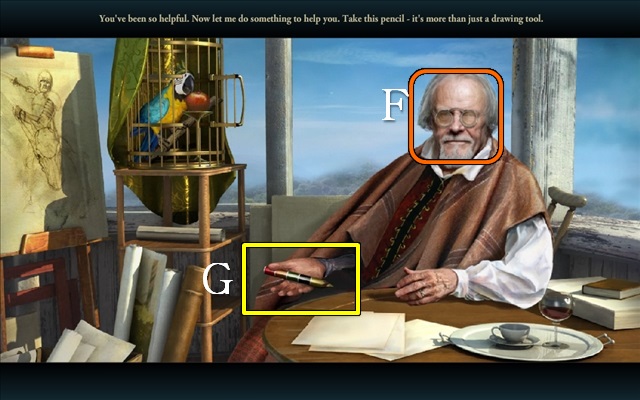
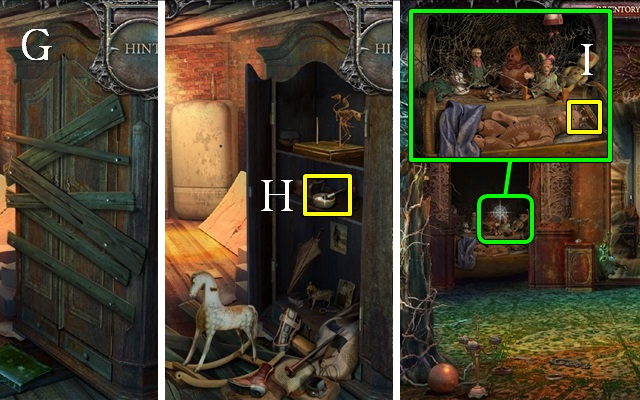
- Take the RING (F).
- Zoom into the alcove and take the HARD STONE (G).
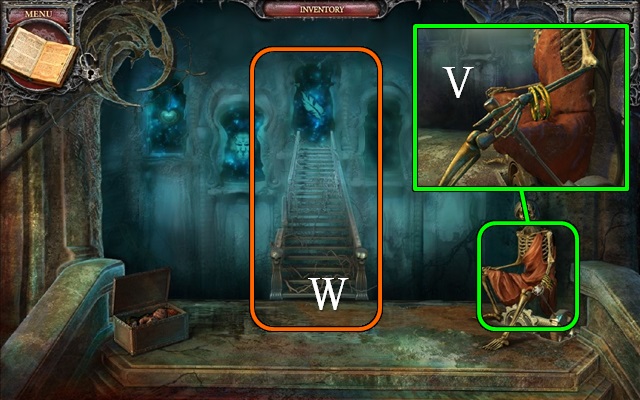
- Walk forward to the Stairs.
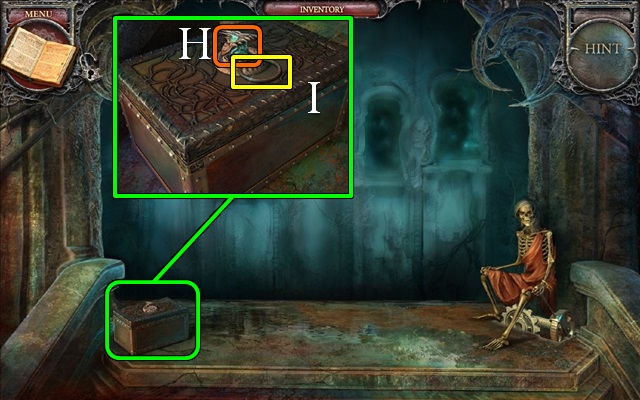
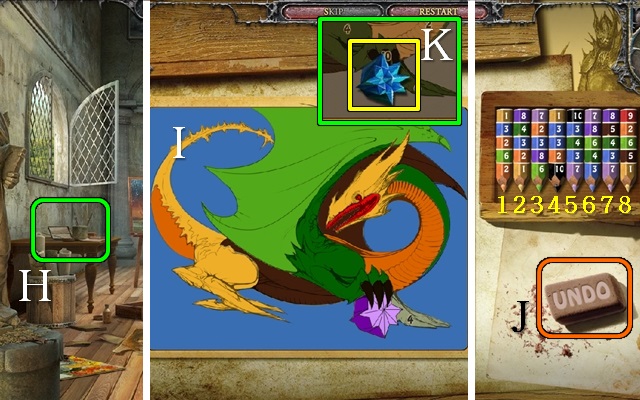
- Zoom into the chest; put the HARD STONE in the mouth (H) and take the second RING (I).
- Walk down.
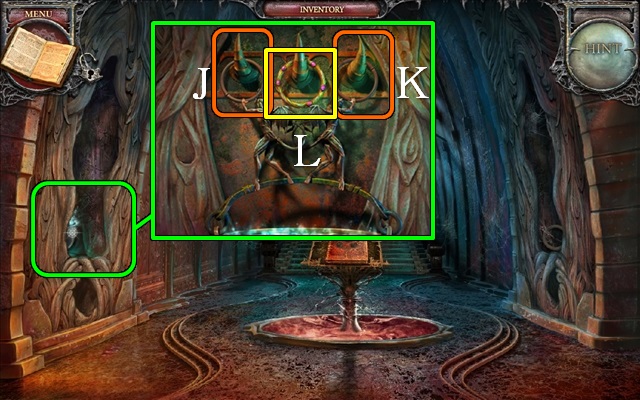
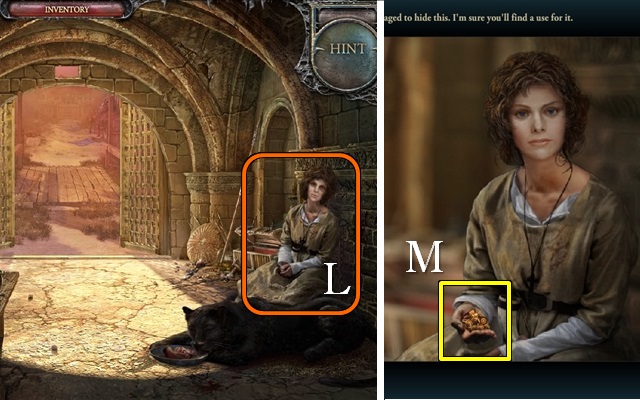
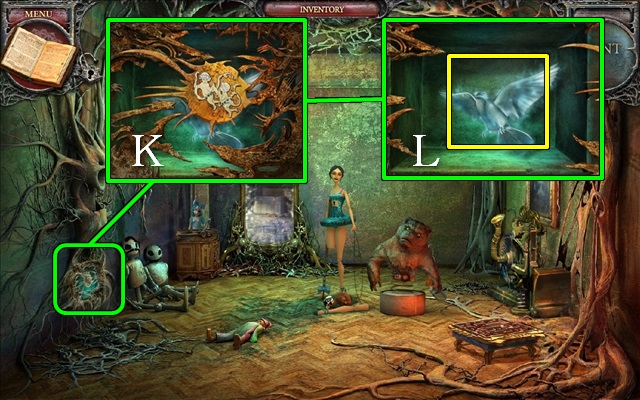
- Zoom into the alcove; put the RINGS on the hooks (J, K) and take the BRACELET (L).
- Walk forward.

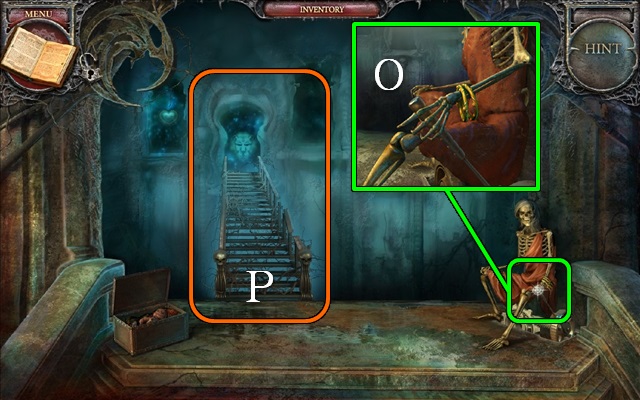
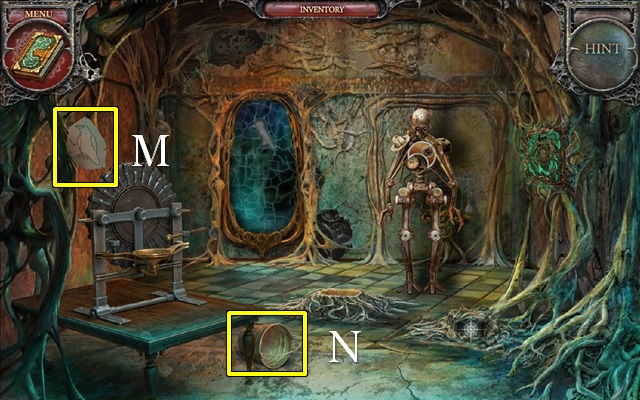
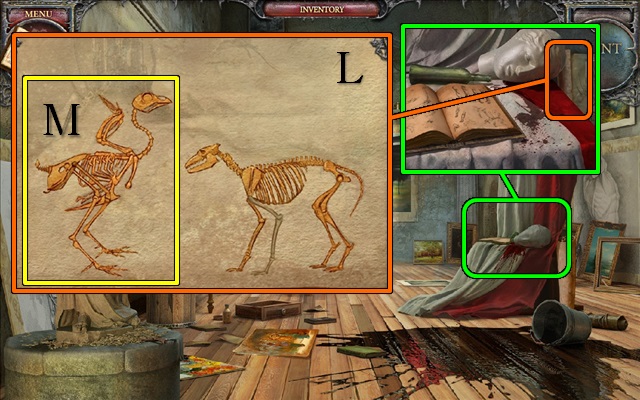
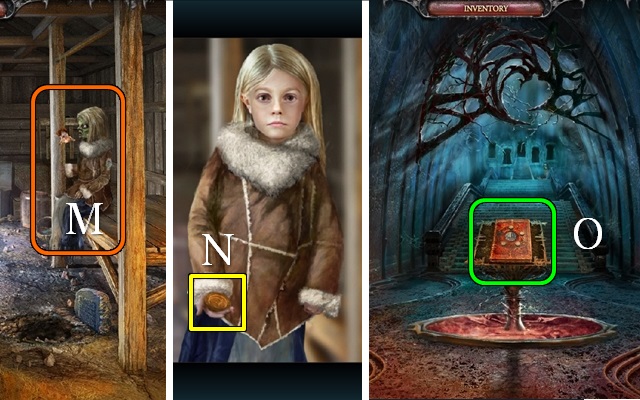
- Zoom into the skeleton and give him the BRACELET (M).
- Go up the stairs.
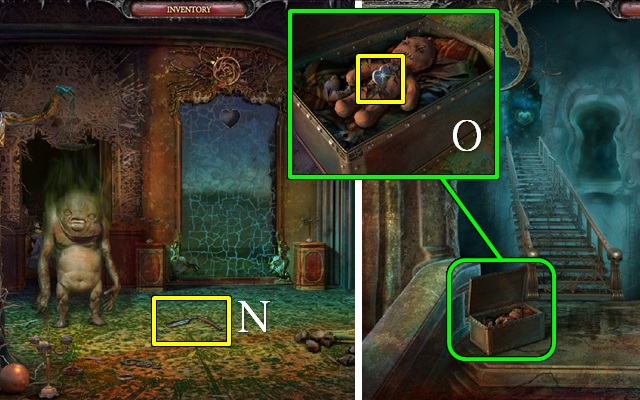
- Take the RAZOR (N).
- Walk down.
- Zoom into the chest; cut the doll with the RAZOR and take the MIRROR SHARD (O).
- Go up the stairs.
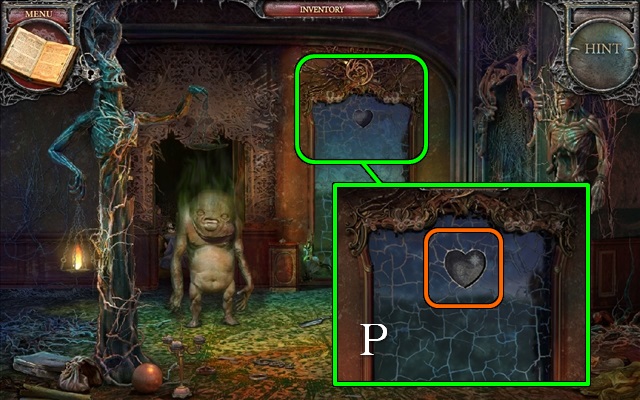
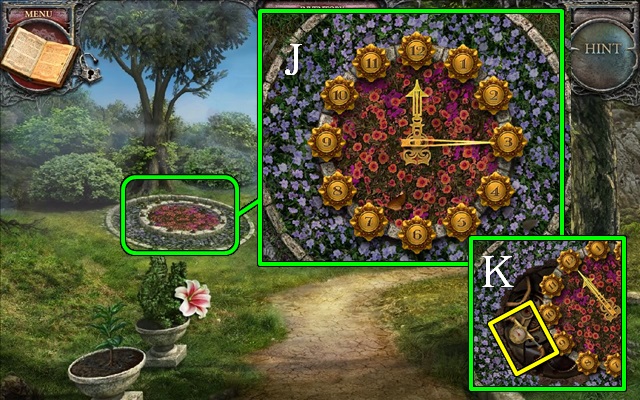
- Zoom into the mirror and put the MIRROR SHARD in the hole (P).
- Walk forward to the Drawing Room.
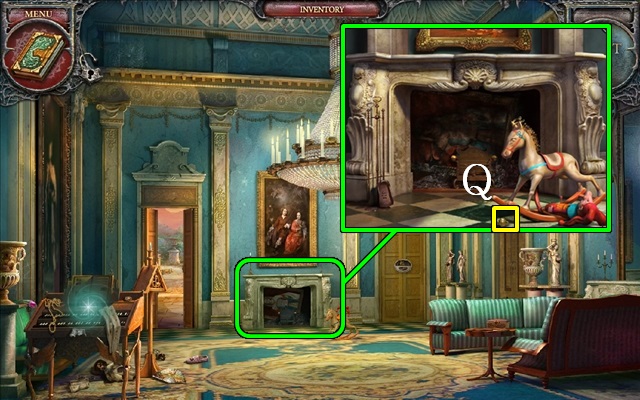
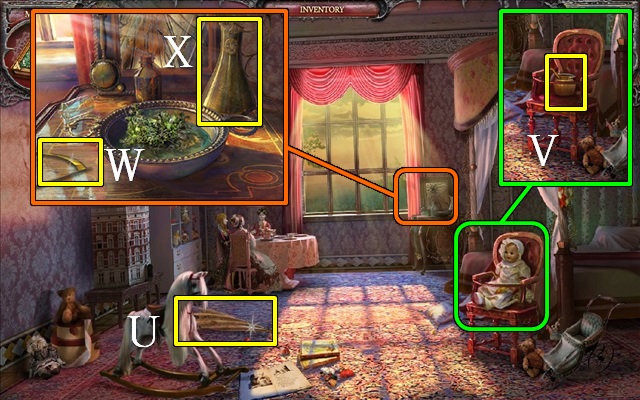
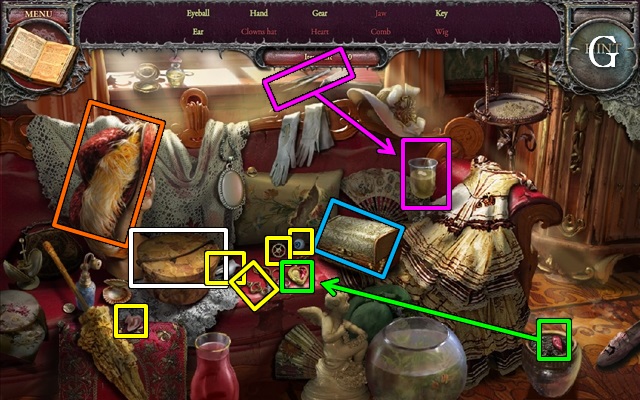
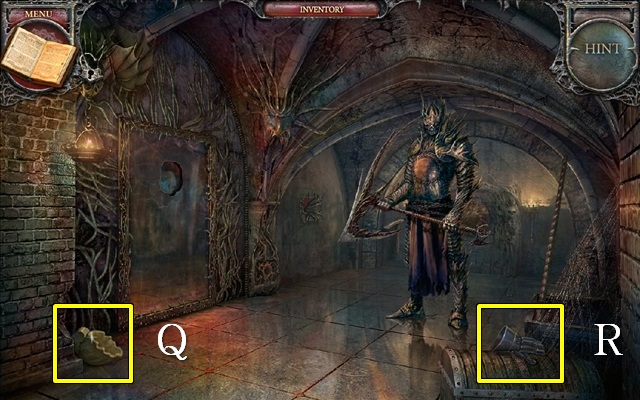
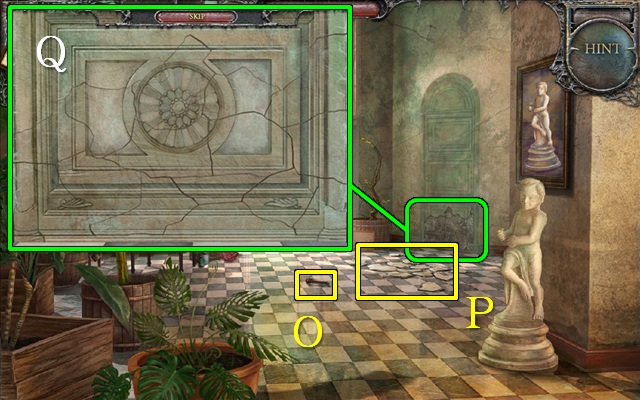
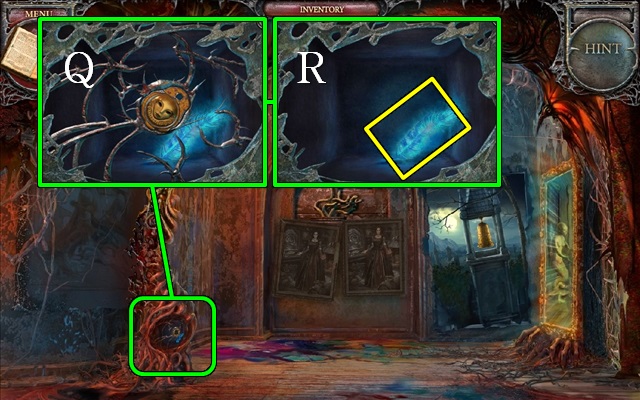
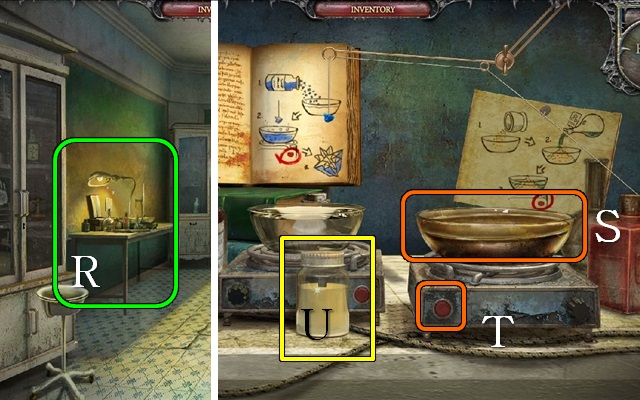
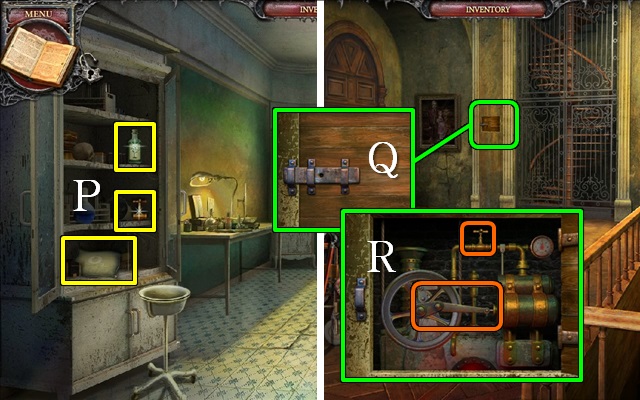
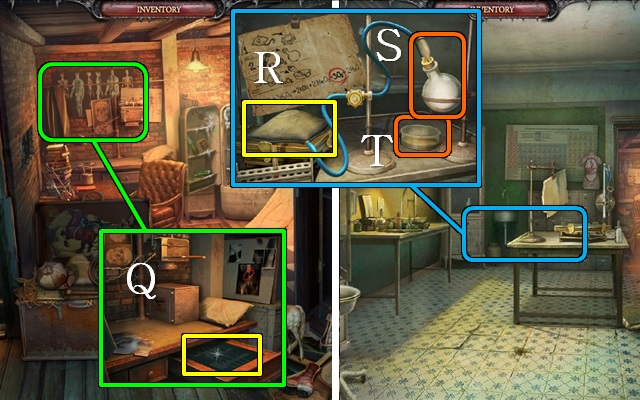
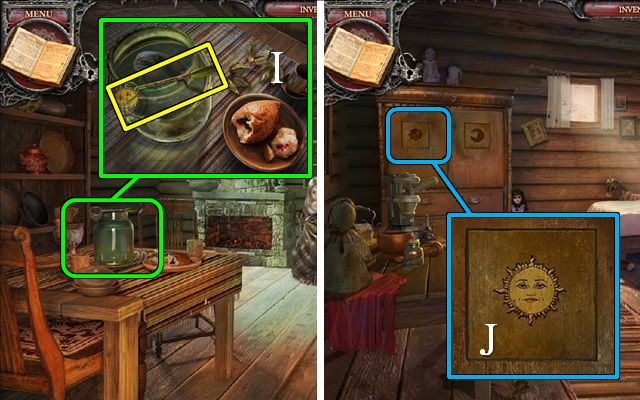
- Zoom into the fireplace; rock the rocking horse and take the RATTLE PART (Q).
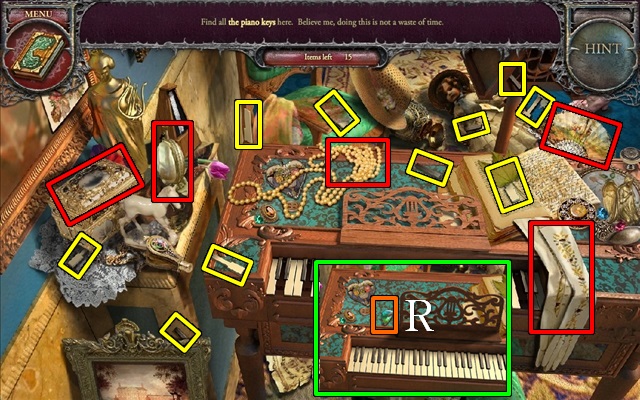
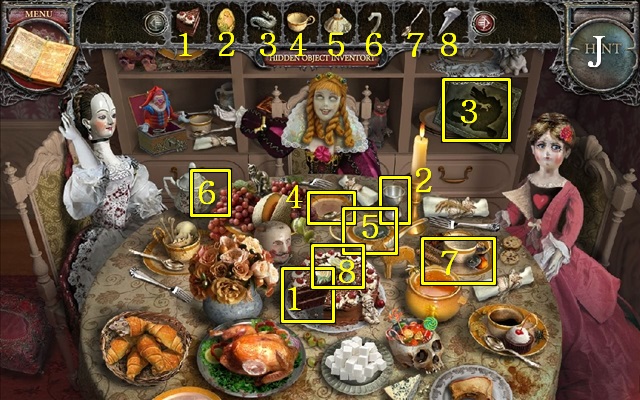
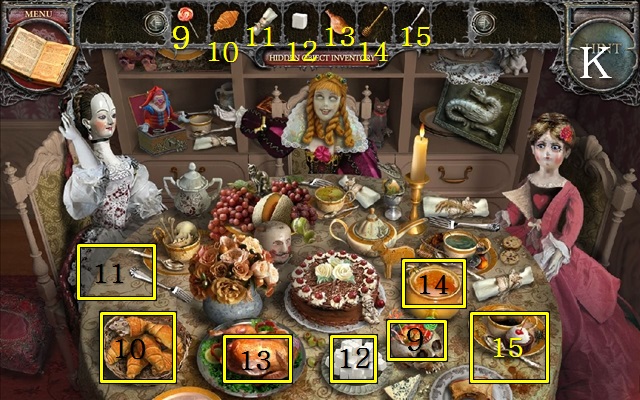
- Play the HOP.
- Take the LOCK PART (R).
- Walk forward to the Porch.
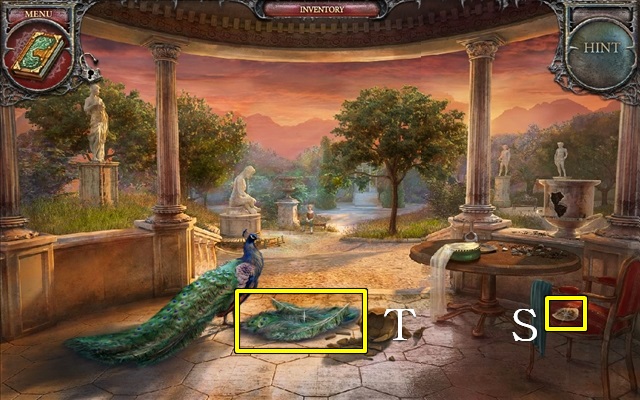
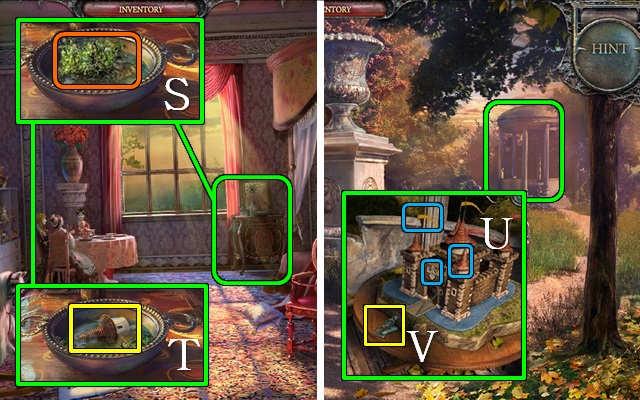
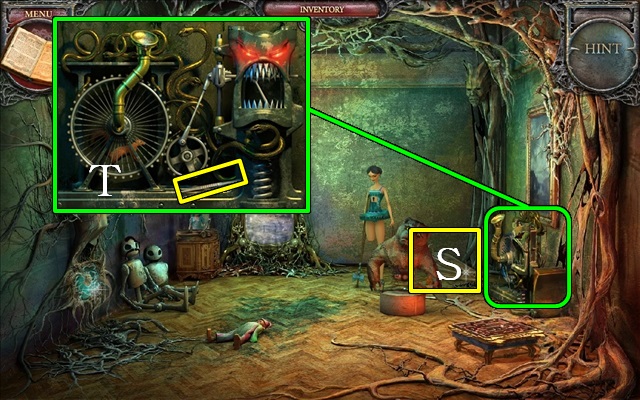
- Move the cloth and take the LANDSCAPE PART (S).
- Touch the peacock and take the FEATHERS (T).
- Walk forward to the Garden.
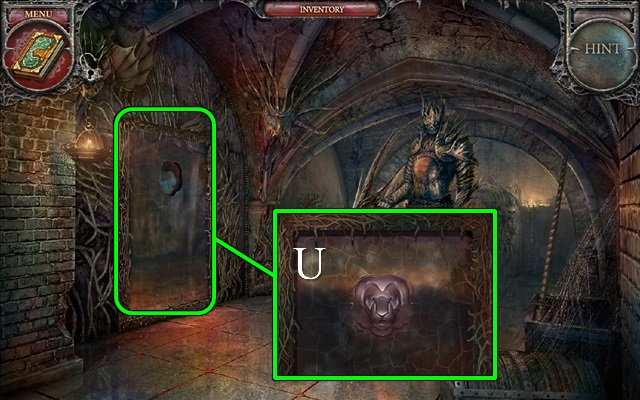
- Zoom into the gazebo; take the LOCK PART (U).
- Go to the Drawing Room.
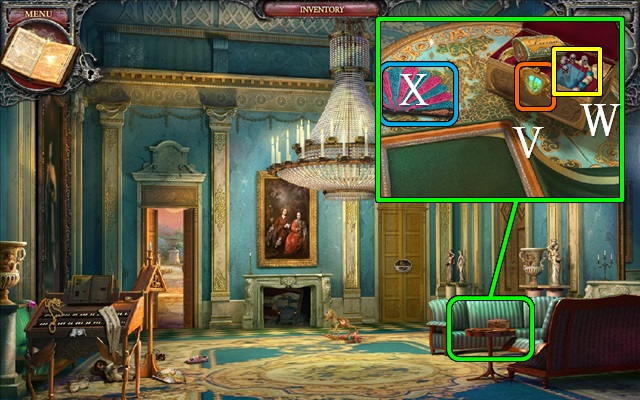
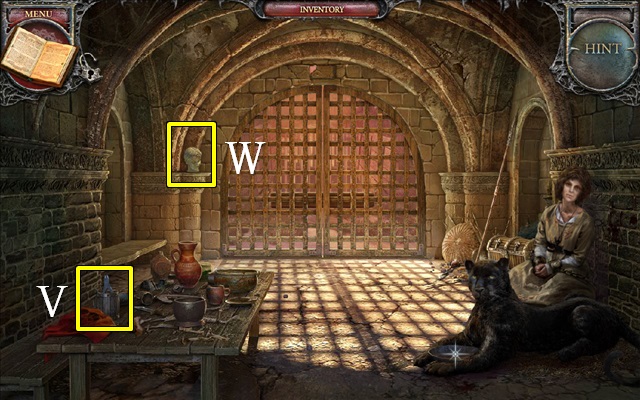
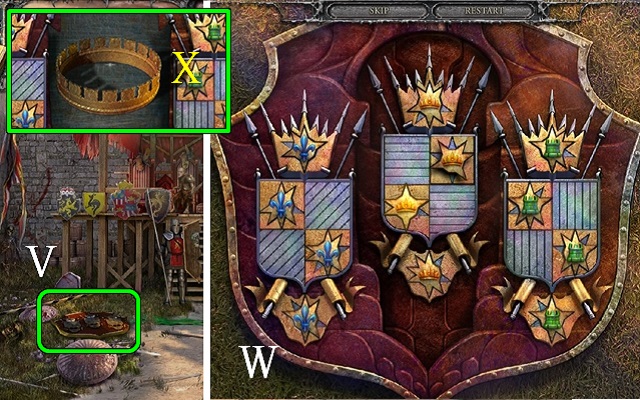
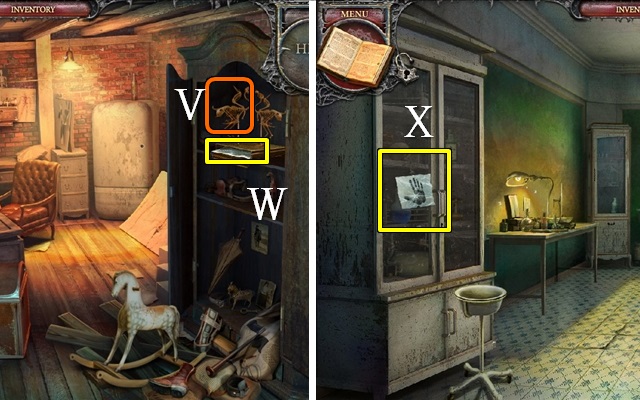
- Zoom into the table; put the two LOCK PARTS on the jeweled box (V) and take the PINS (W).
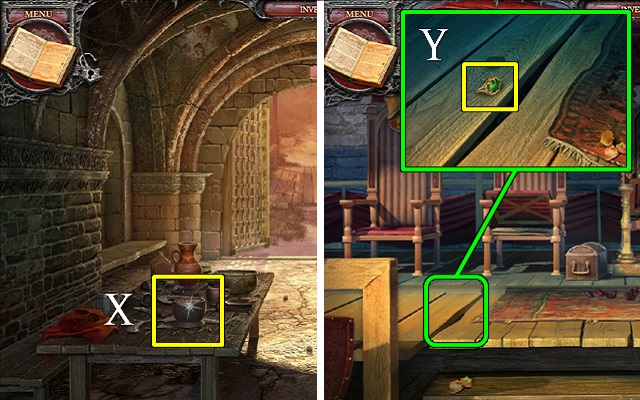
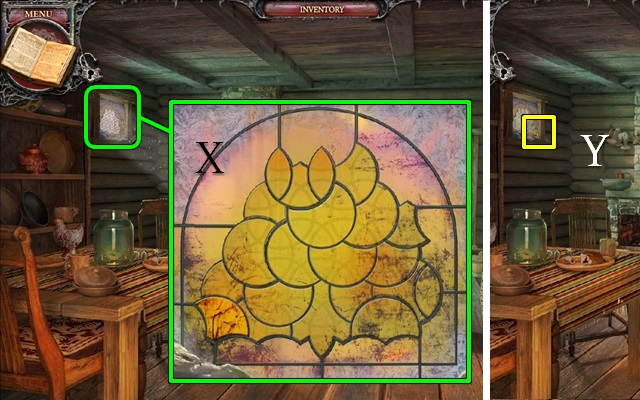
- Pick up the fan (X) for a mini-game.
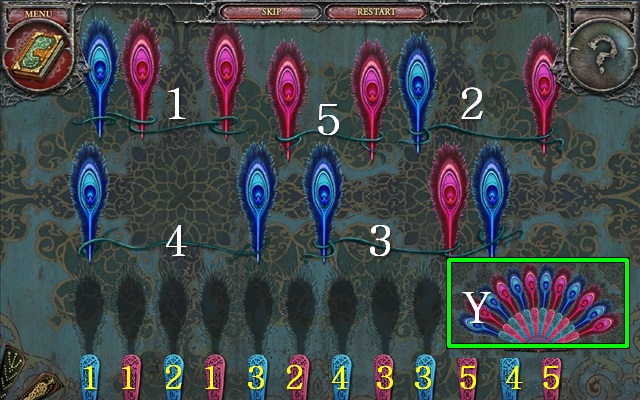
- Put the FEATHERS on the fan to activate the game.
- Select a group of feathers and move it to the bases at the bottom; place all groups of feathers so that each base contains a feather of matching color.
- Pick up the groups of feathers in numerical order and place them so that the leftmost feather fits into the leftmost available base.
- Pick up the FAN (Y).
- Walk down.
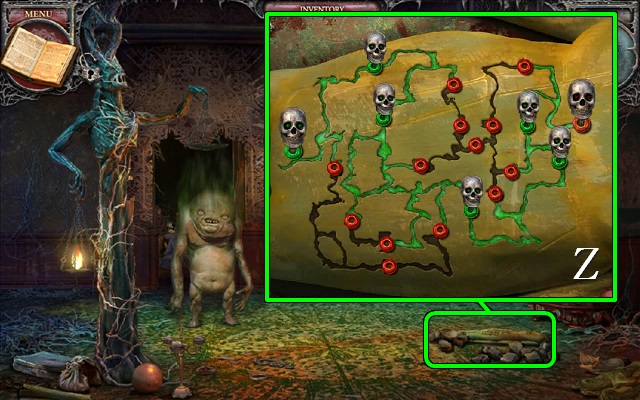
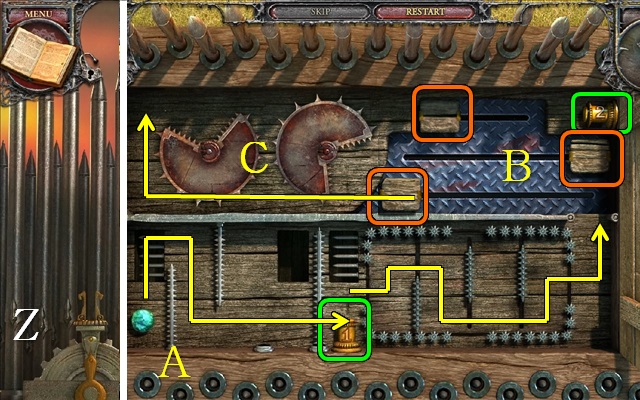
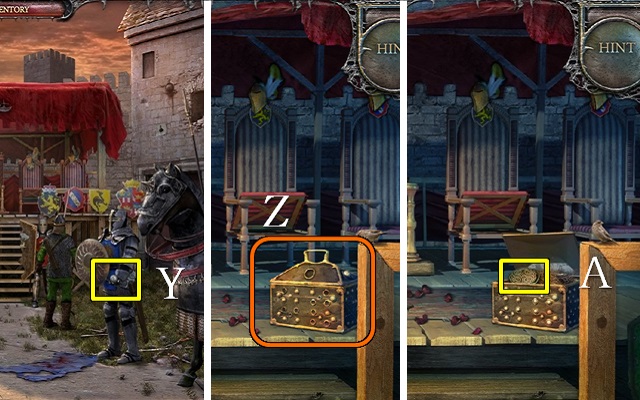
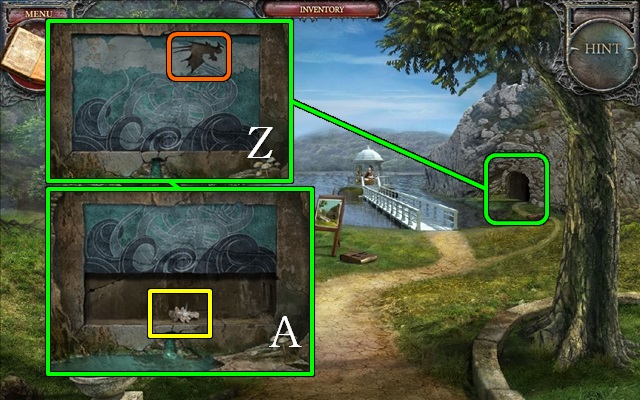
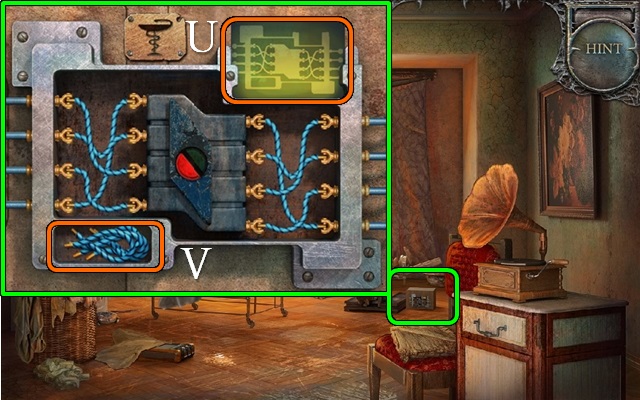
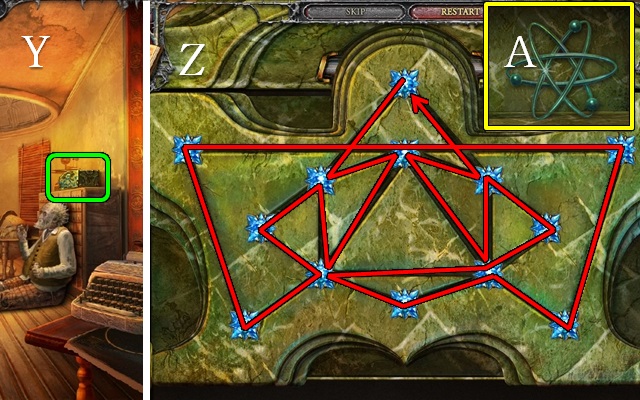
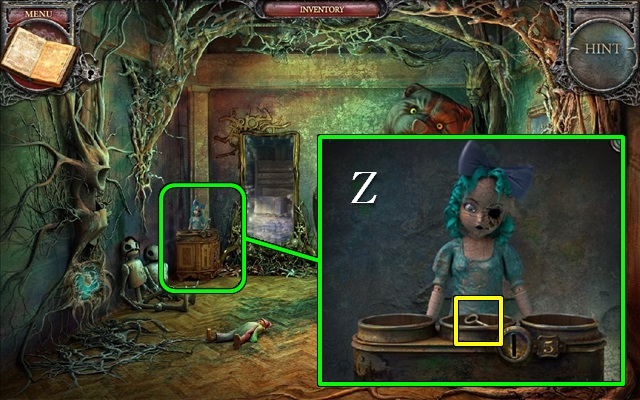
- Zoom into the voodoo doll and put the PINS in it to trigger a mini-game (Z).
- Put the pins in the holes to guide an energy line from left to right.

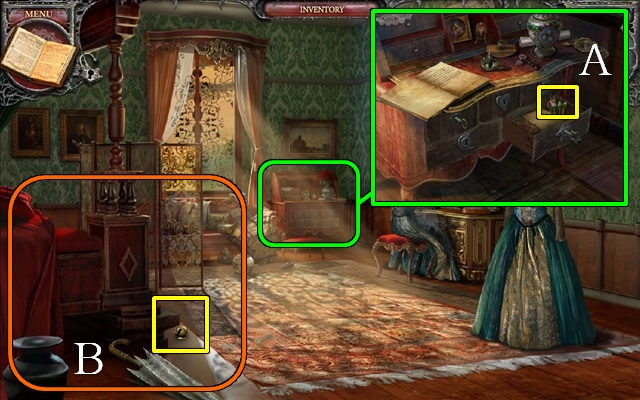
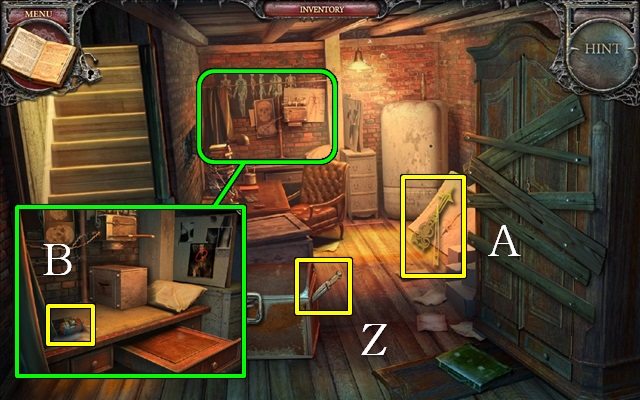
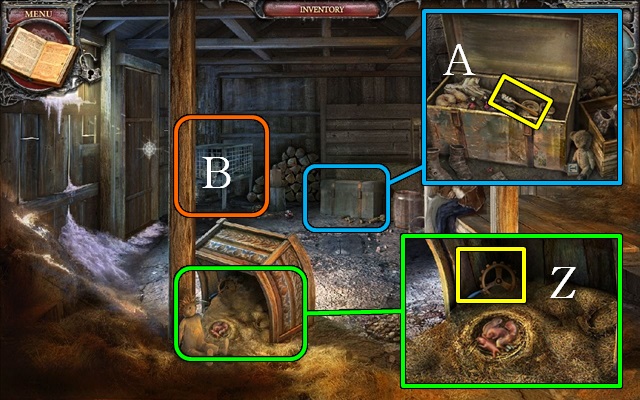
- Zoom into the bedroom; remove the blanket and take the CROWBAR (A).
- Go to the Garden.

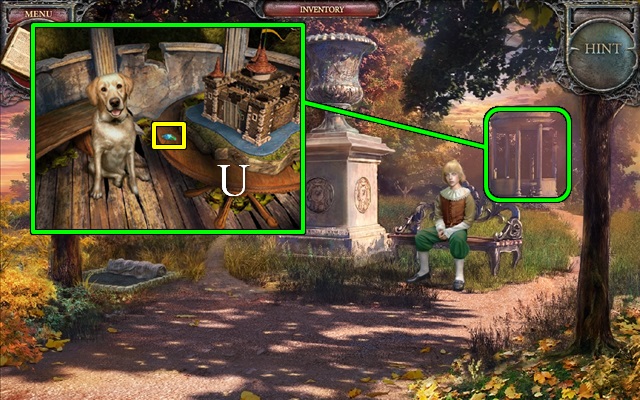
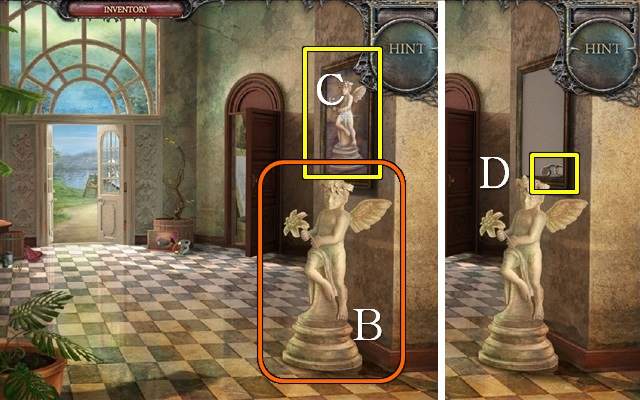
- Zoom into the gazebo; use the CROWBAR to release the dog's paw (B) and take the DOG (C).
- Give the DOG to the boy; take the BOUDOIR KEY (D).
- Go to the Drawing Room.
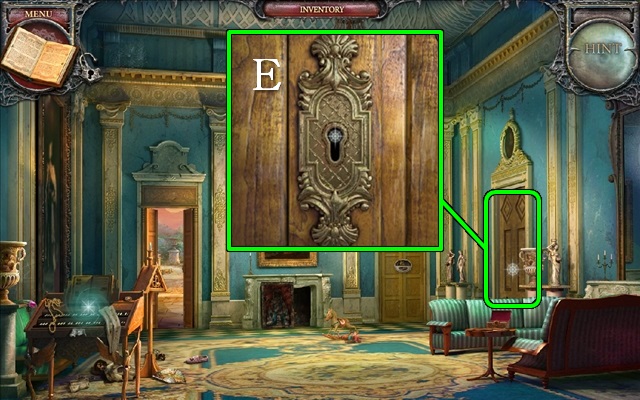
- Zoom into the door and open it with the BOUDOIR KEY (E).
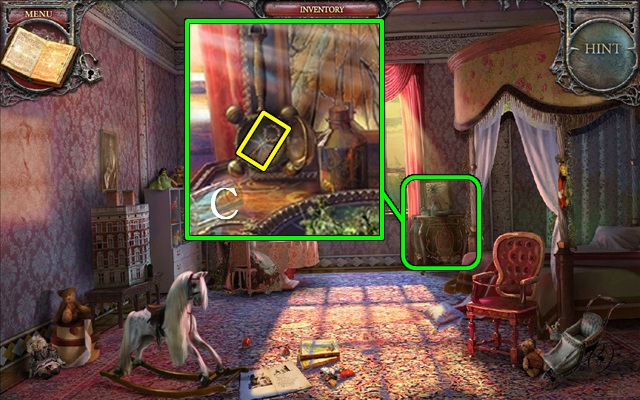
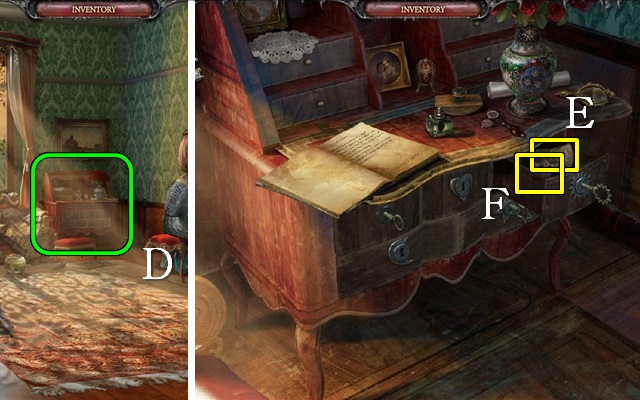
- Go right into the Boudoir.
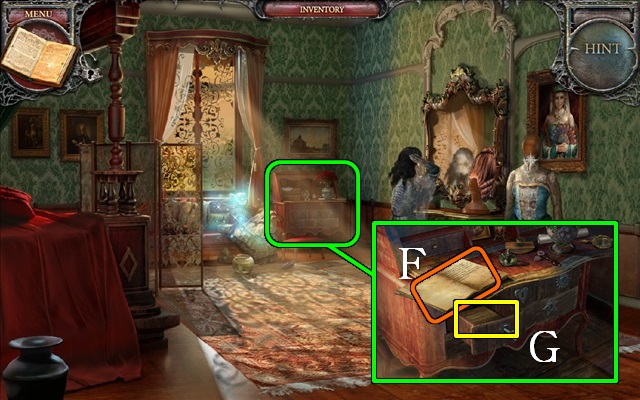
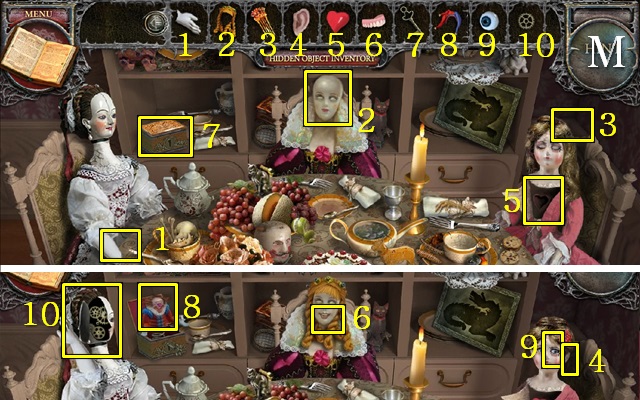
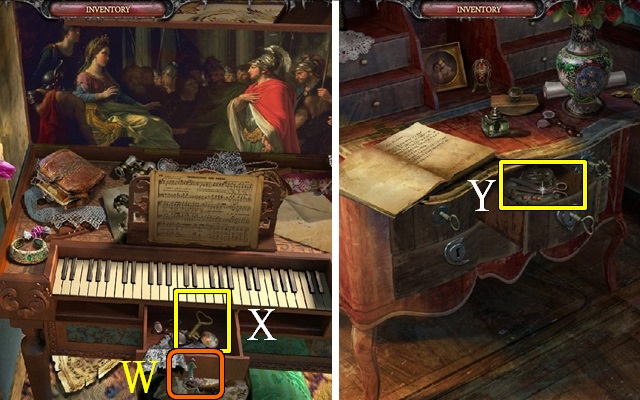
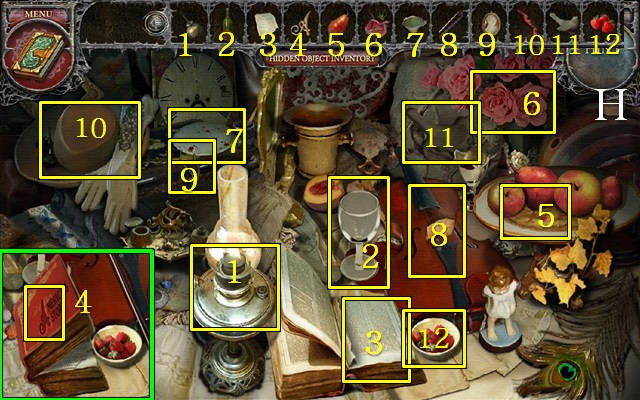
- Zoom into the desk, open the notebook and read the note (F); open the drawer, move the items and take the MUSIC SHEET (G).
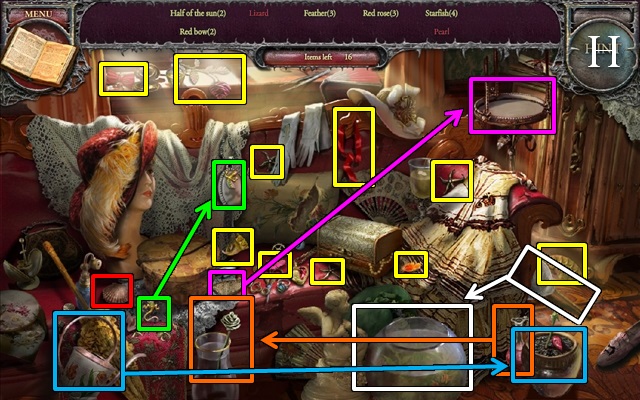
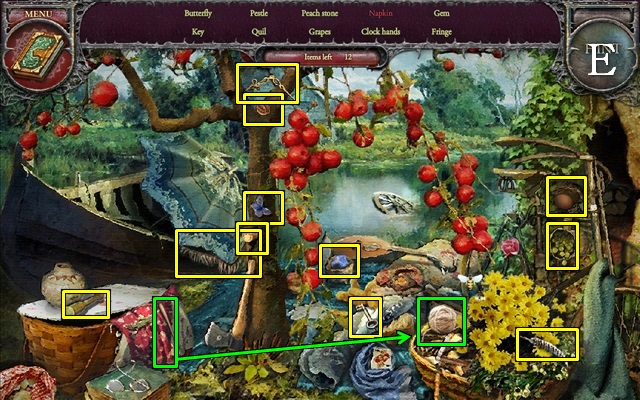
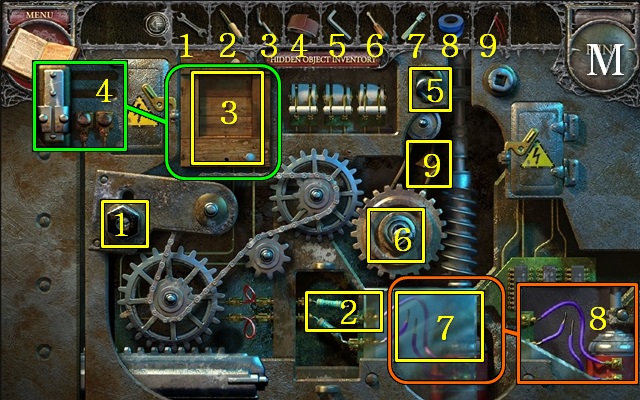
- Play the HOP (H).
- You will receive the HAT DECORATIONS.
- Walk down.
- Go to the piano.
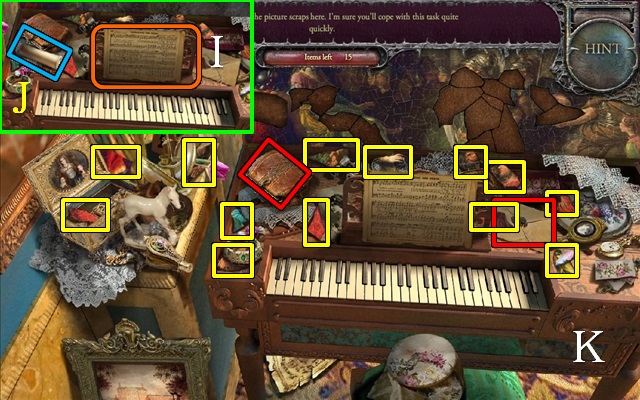
- Put the MUSIC SHEET (I) on the reader and pick up the CANDLE (J) to trigger a HOP.
- Play the HOP (K).
- Go to the Porch.
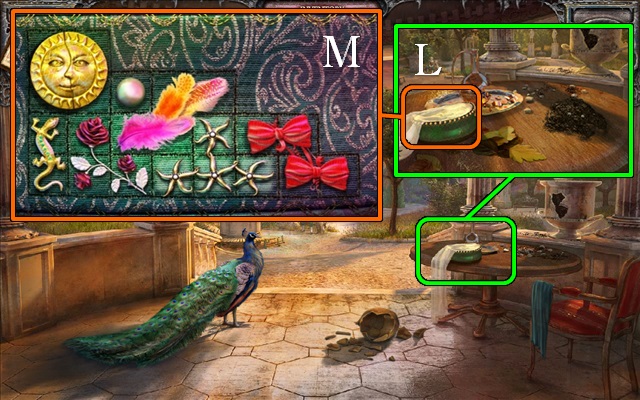
- Zoom into the table and then into the hat (L); put the HAT DECORATIONS on it to trigger a mini-game.
- Place all items on the grid so that none of the items overlap (M).
- Pick up the HAT (N) and another RATTLE PART (O).
- Go to the Mirror Room.
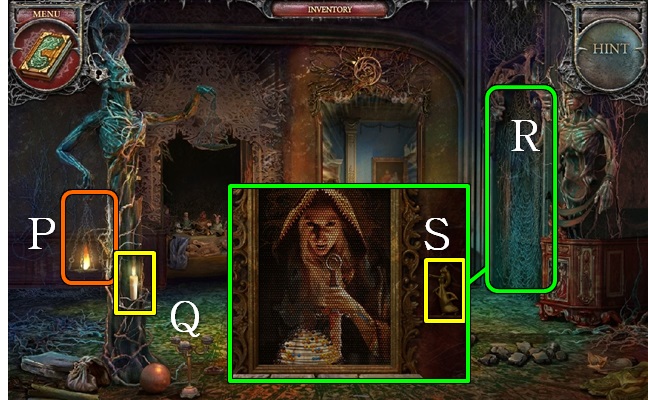
- Light the CANDLE in the lantern (P).
- Pick up the BURNING CANDLE (Q).
- Remove the cobwebs with the BURNING CANDLE (R).
- Zoom into the alcove and pick up the PRINCESS (S).
- Go to the Drawing Room.

- Zoom into the door; put the PRINCESS on the lock (T).
- Go through the door to the Nursery.
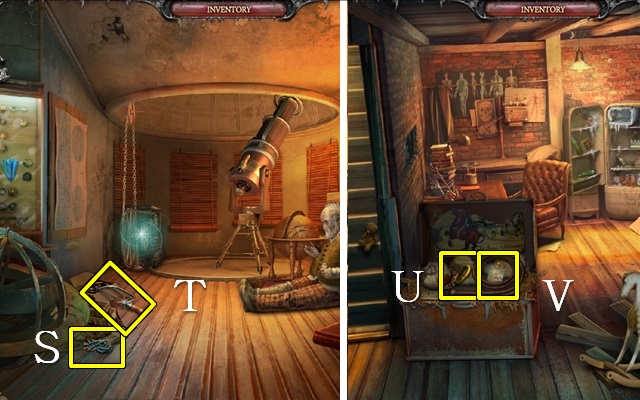
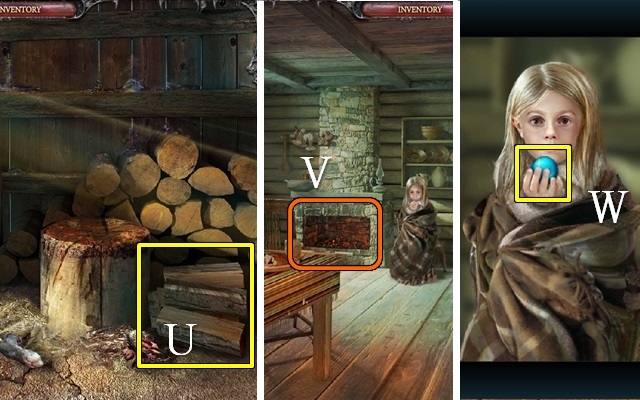
- Pick up the UMBRELLA (U).
- Move the doll and pick up the GLUE (V).
- Zoom into the side table; pick up the FLAG (W) and the JUG (X).
- Go to the Porch.

- Put the GLUE on the shards (Y).
- Take the STAR-SHAPED KEY (Z).
- Go to the Boudoir.
- Go to the desk and open the star-shaped drawer with the STAR-SHAPED KEY; read the note and take the SAPLINGS (A).
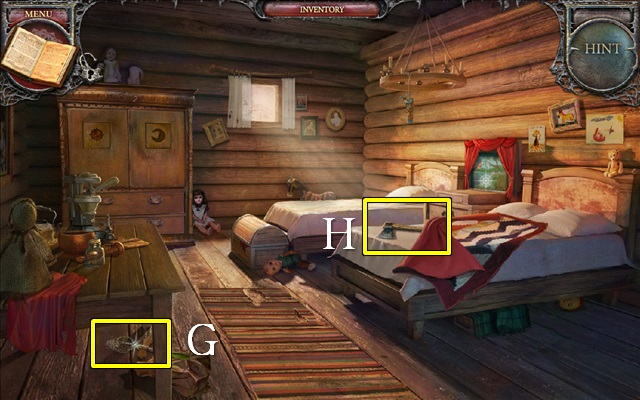
- Move the drape; use the UMBRELLA under the bed and take the RATTLE PART (B).
- Go to the Nursery.
- Zoom into the side table and put the three RATTLE PARTS on the rattle; take the SUN-SHAPED KEY (C).
- Go to the Boudoir.
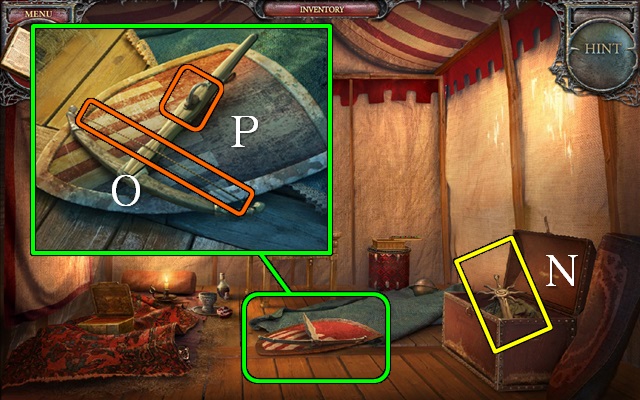
- Go to the desk (D) and open the sun-shaped drawer with the SUN-SHAPED KEY; take the SHIELD (E) and the BRUSH (F).
- Play the HOP (G).
- You will receive the TOY PARTS.
- Go to the Garden.
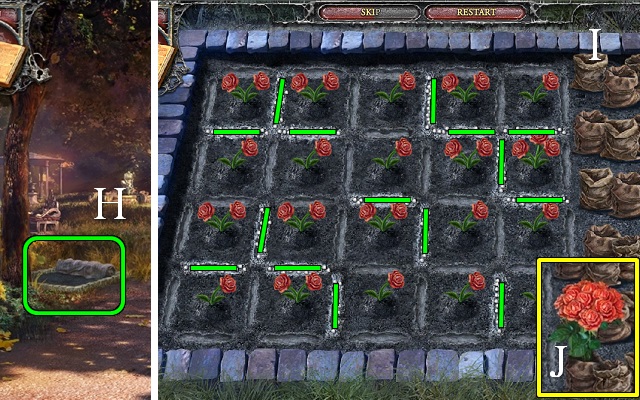
- Zoom into the flower bed (H) and plant the SAPLINGS to trigger a mini-game (I).
- Put fertilizer in the troughs between the saplings to make one flower bloom in each of the adjacent squares; make all flowers bloom.
- Pick up the BOUQUET (J).
- Go to the Drawing Room.

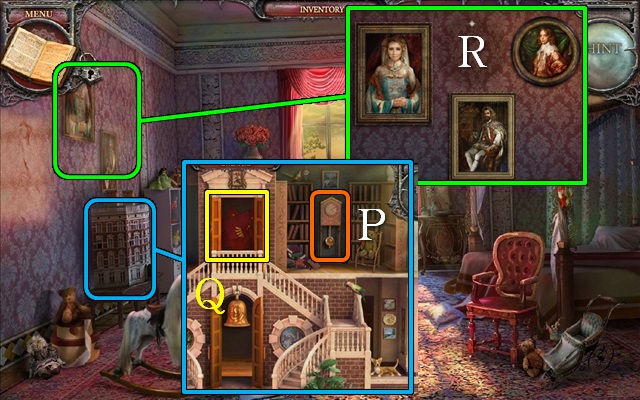
- Zoom into the fireplace and take out the painting; move the BRUSH over the painting until it is clean and pick up the QUEEN'S PORTRAIT (K).
- Go to the Nursery.
- Zoom into the vase and put the BOUQUET in it; take the BRACELET (L).
- Zoom into the table and put the TOY PARTS on it to trigger a reverse HOP.
- Play the reverse HOP (M).
- You will receive a CANE.
- Go to the Garden.
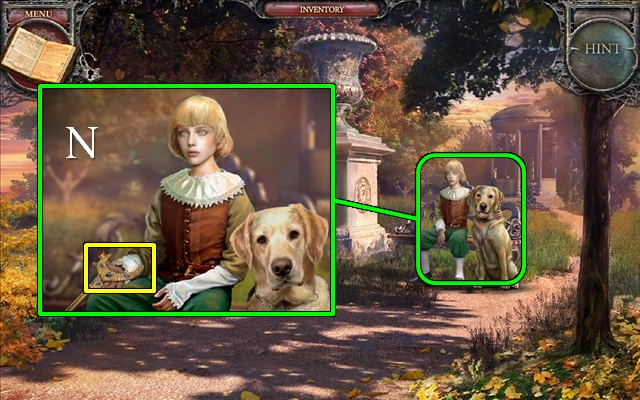
- Give the CANE to the boy.
- Take the MEDALLION (N).
- Go to the Stairs.
- Zoom into the skeleton and give him the BRACELET (O).
- Move the stairs to the Lion Door (P) and go through the door.
- Pick up the FOUNTAIN PART (Q) and the GLOVE (R).
- Go back through the Heart Door and go to the Nursery.
- Zoom into the side table and move the herbs with the glove (S); take the TOWER (T).
- Go to the Garden.
- Zoom into the gazebo, put the FLAG on the tower, the SHIELD above the drawbridge and replace the missing TOWER (U); take the PIANO KEY (V).
- Go to the Drawing Room.
- Walk to the piano.
- Open the drawer with the PIANO KEY (W).
- Take the HEART-SHAPED KEY (X).
- Go to the Boudoir.
- Go to the desk; open the heart-shaped drawer with the HEART-SHAPED KEY and take the SCISSORS (Y).
- Go to the Mirror Room.
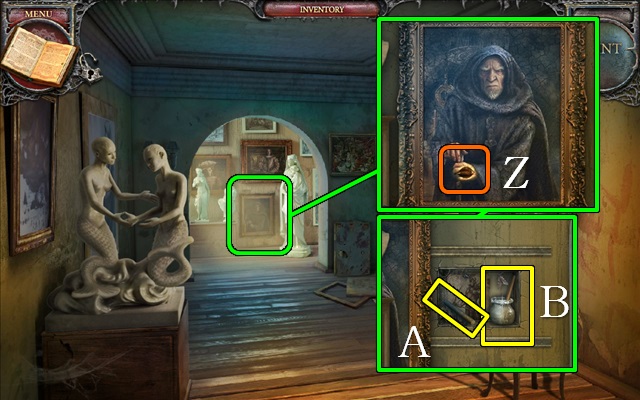
- Zoom into the portrait and cut it with the SCISSORS (Z); take the BEADS (A).
- Go to the Drawing Room.
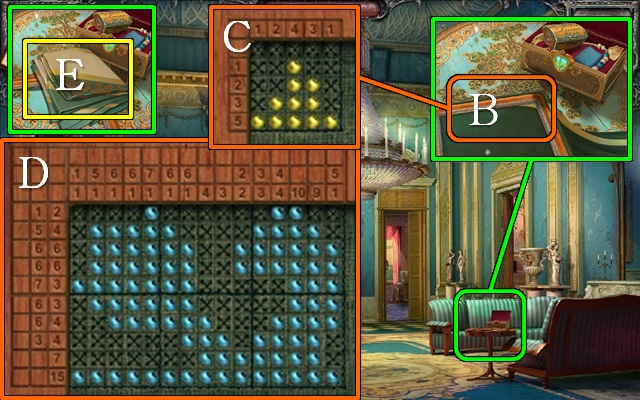
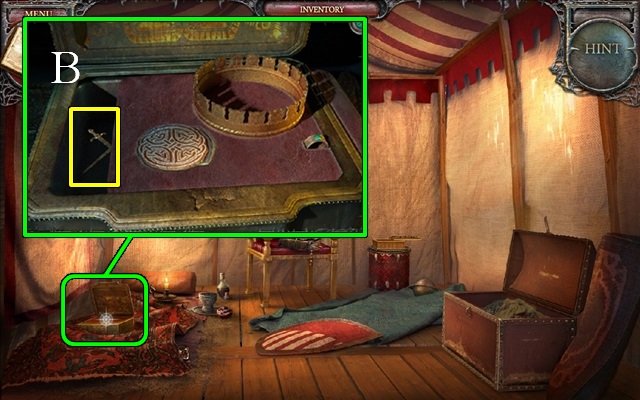
- Zoom into the table and then into the embroidery frame (B).
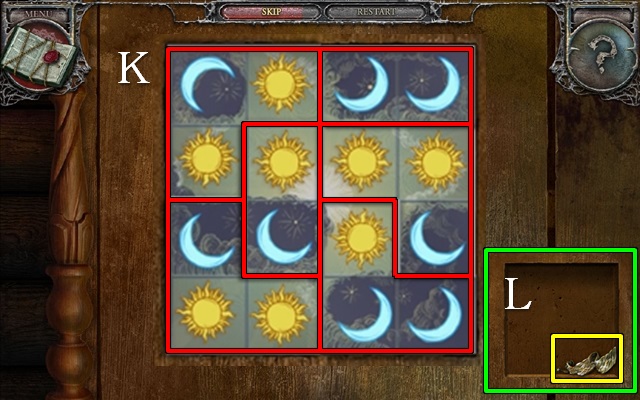
- Place the BEADS on the frame to trigger a nonogram-style mini-game (C, D).
- The numbers around the edges indicate the strings of bead beads you must place in each row or column.
- Strings need to be separated by at least one empty square; select a square twice to mark it as empty.
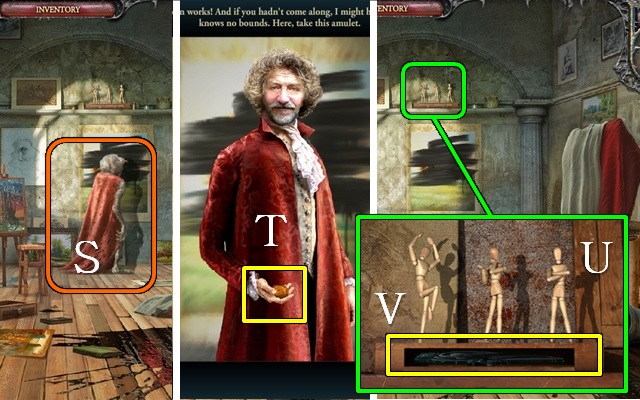
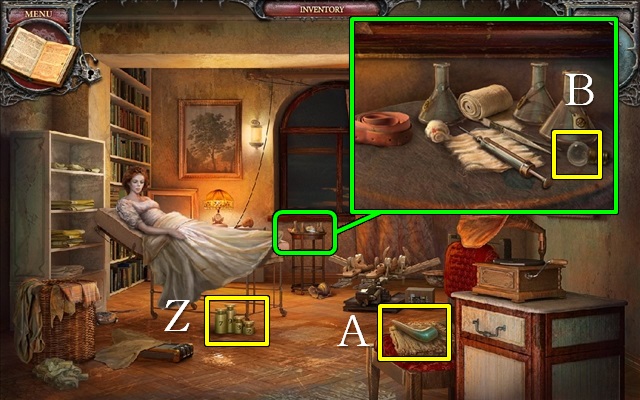
- Pick up the CLOAK (E).
- Go to the Boudoir.
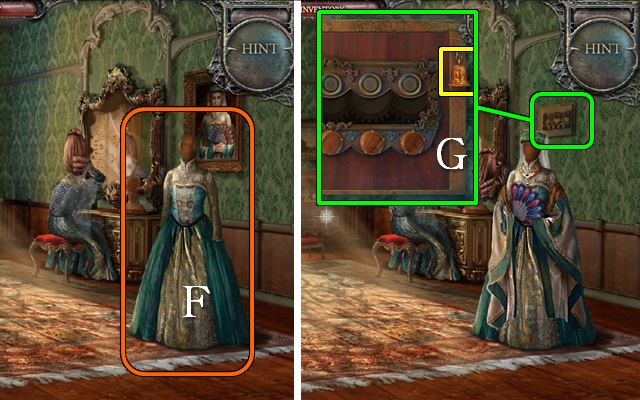
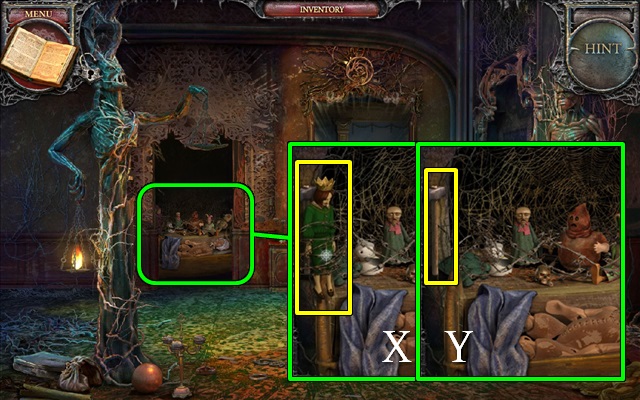
- Put the MEDALLION, HAT, FAN and CLOAK on the mannequin (F).
- Zoom into the safe and take the DOORBELL (G).
- Go to the Nursery.
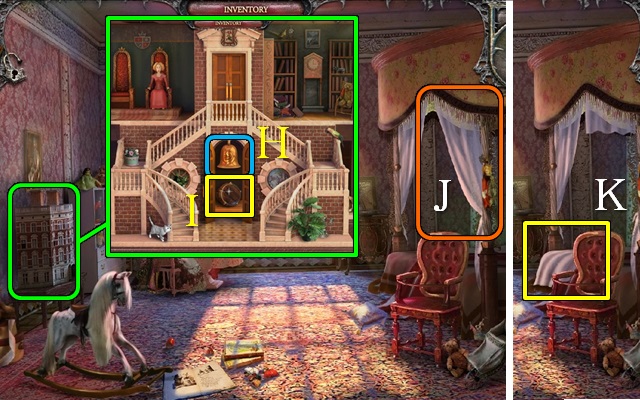
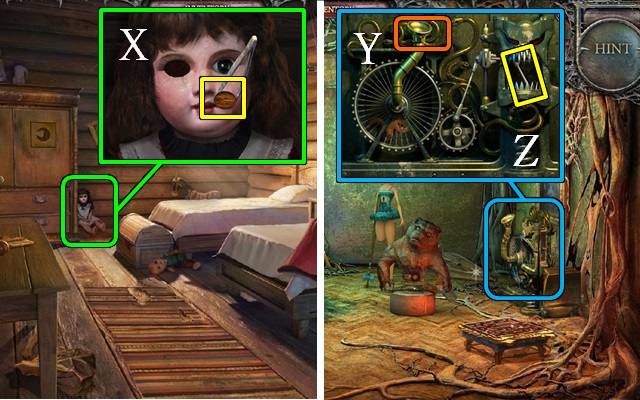
- Go to the doll's house and put the DOORBELL on the door (H); take the SAFE HANDLE (I).
- Cut the drapes with the SCISSORS (J); take the TULLE (K).
- Go to the Boudoir.
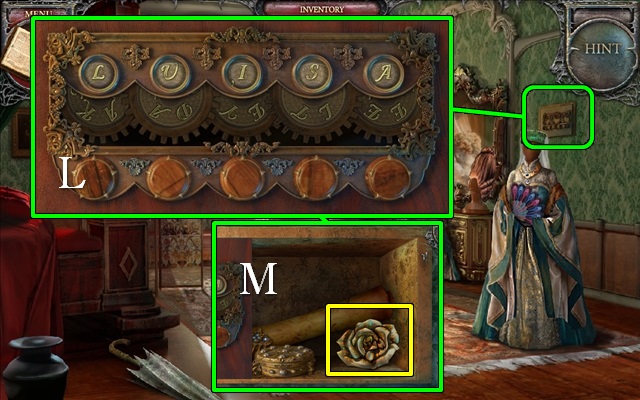
- Zoom into the safe; put the SAFE HANDLE on it to trigger a mini-game.
- Turn the knobs to spell Luisa (L).
- Take the METAL ROSE (M).
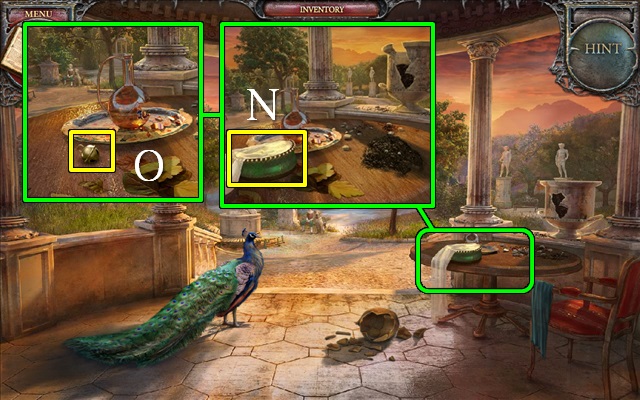
- Go to the Porch.
- Zoom into the table and sift the dirt with the TULLE; take the PEARLS (N).
- Go to the Mirror Room.
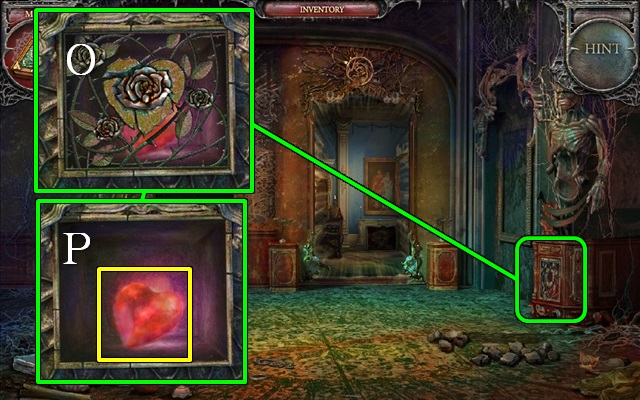
- Zoom into the statue base and put the METAL ROSE on the heart (O); take the QUEEN'S VIRTUE (P).
- Go to the Boudoir.

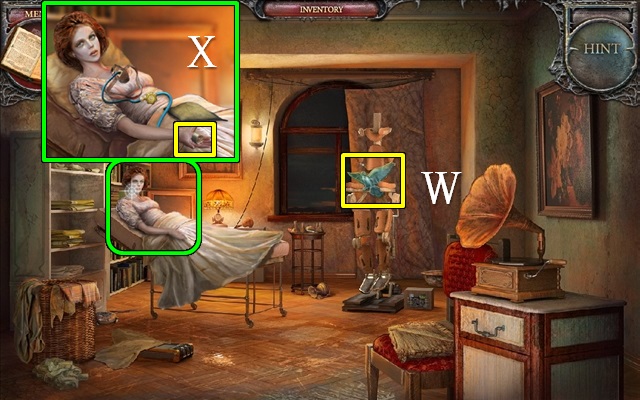
- Give the QUEEN'S VIRTUE to the Queen (Q).
- Take the BOOK AMULET (R).
- Take the MIRROR SHARD (S).
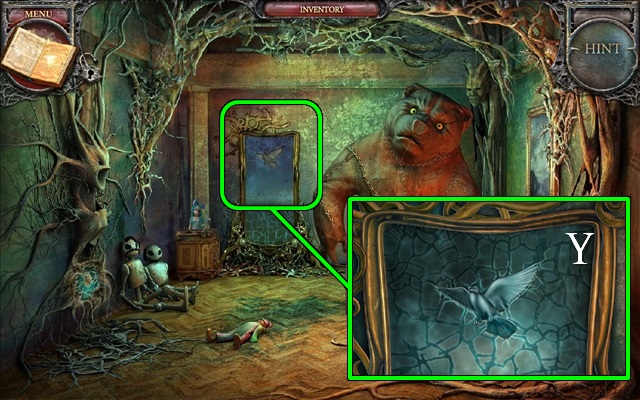
- Return to the Book of Spells.
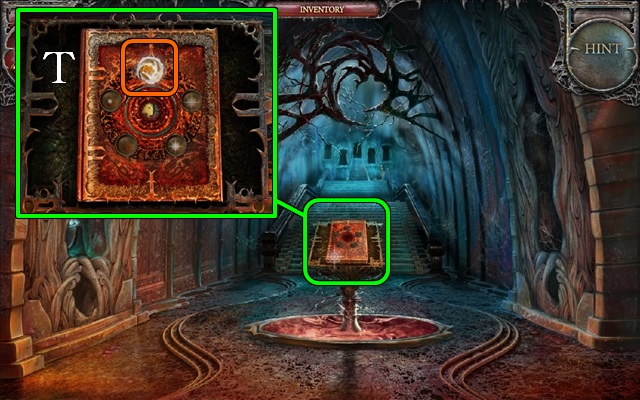
- Zoom into the book and put the BOOK AMULET on it (T).
- Go to the Stairs and through the Lion door.
Chapter 2: The Knight's Virtue
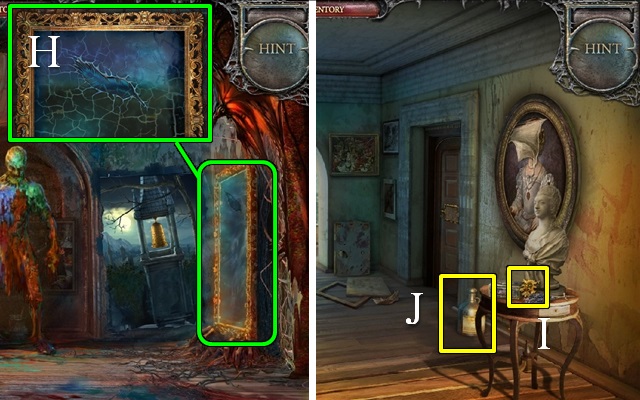
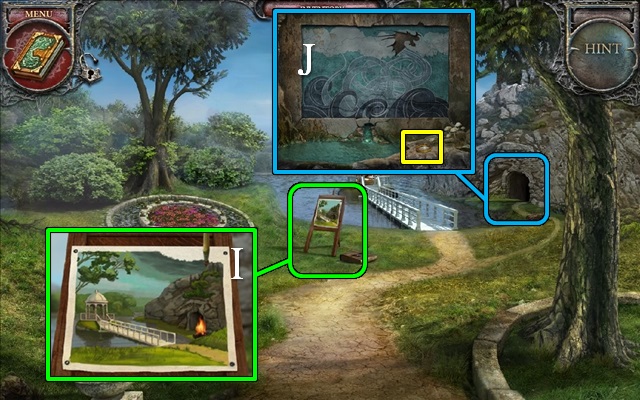
- Zoom into the mirror and put the MIRROR SHARD in the hole (U).
- Go through the mirror to the Cell.
- Pick up the WIRE-CUTTER (V) and the FOUNTAIN PIECE (W).
- Go to the Mirror Room behind the Heart Door.
- Zoom into the bedroom and cut the wire with the WIRE-CUTTER; take the TOY PRINCE (X) and the HAMMER (Y).
- Go to the Nursery.

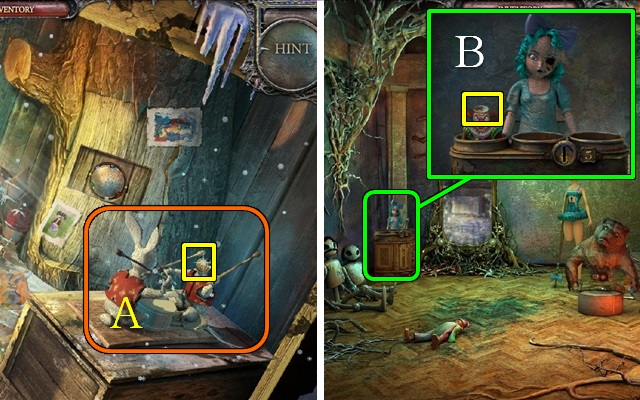
- Zoom into the doll's house (Z); put the TOY PRINCE (A) on the throne and take the SLEEPING PILLS (B).
- Go to the Garden.
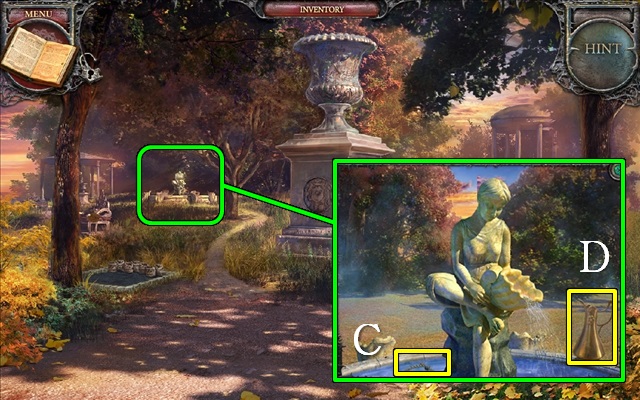
- Zoom into the fountain and replace the FOUNTAIN PART and the FOUNTAIN PIECE; take the BIG HOOK (C), fill the JUG with water and pick up the JUG WITH WATER (D).
- Go back to the Cell.
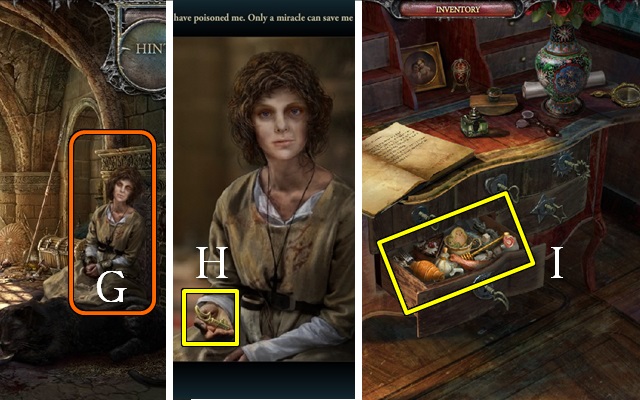
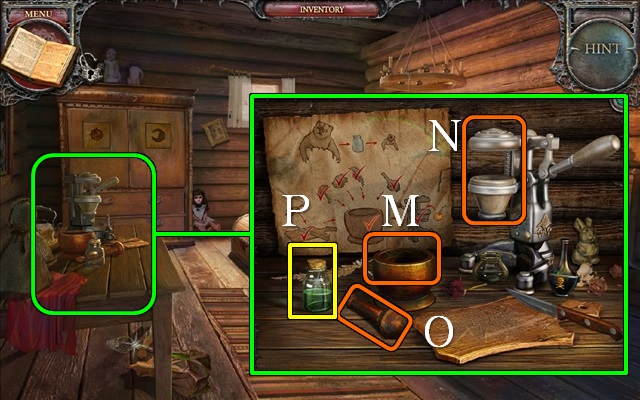
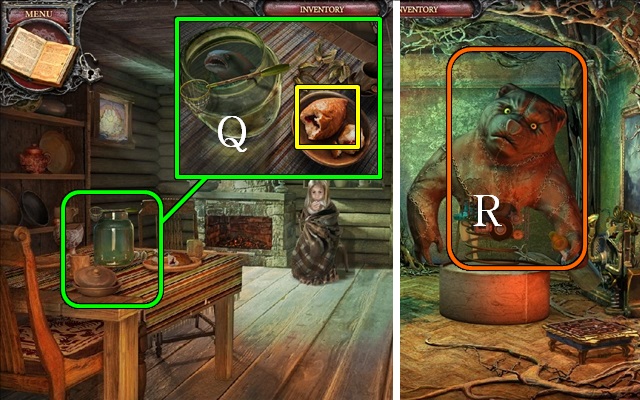
- Zoom into the table; put the SLEEPING PILLS on the meat and take the MEAT LACED WITH SLEEPING PILLS (E).
- Give the MEAT LACED WITH SLEEPING PILLS to the panther.
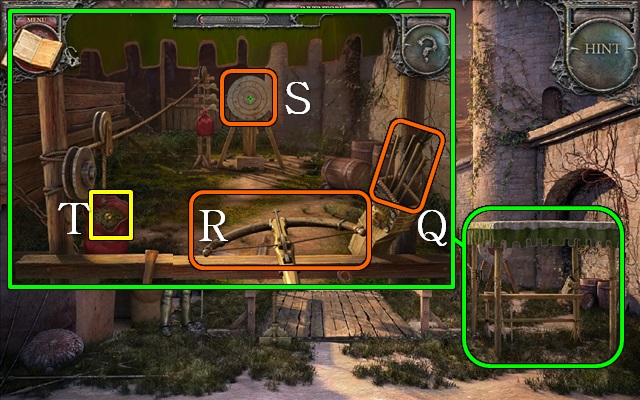
- Zoom into the stone above the door and remove it with the HAMMER (F).
- Put the BIG HOOK through the hole.
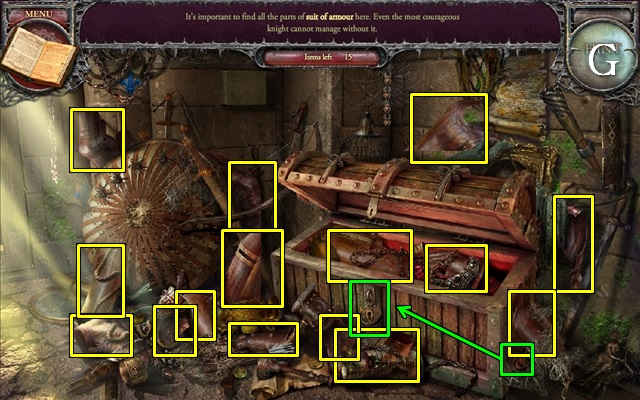
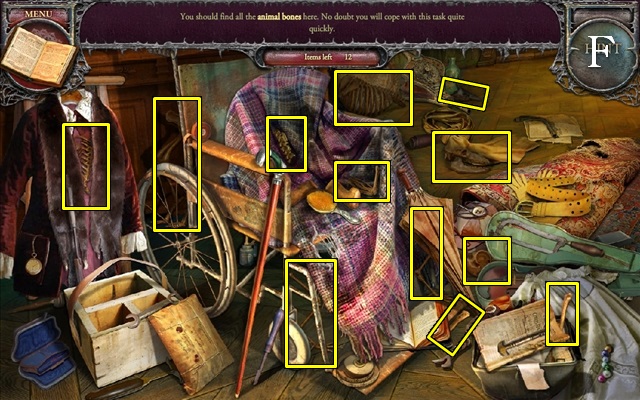
- Play the HOP (G).
- You will receive the ARMOR.
- Walk forward to the Camp.
- Take the RUST REMOVER (H) and read the scroll (I).
- Go to the Mirror Room.
- Put the RUST LIQUID on the knight (J).
- Take the PICK (K).
- Go to the Cell.
- Walk to the alcove (L).
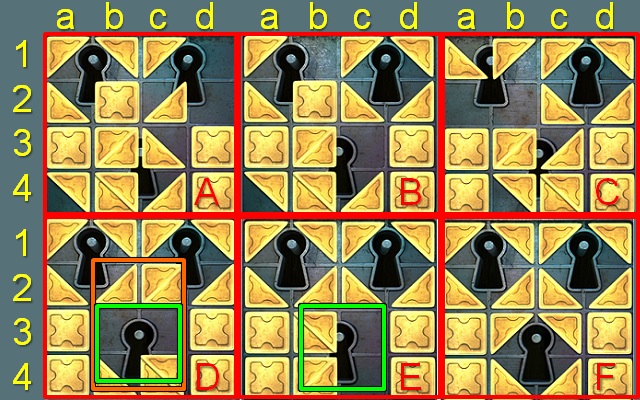
- Use the PICK on the wall to reveal a mini-game.
- Remove all stones and stack them on the tile with the green crown (M). Each stone must have either the same symbol or the same color as the previous stone. You can only remove stones that are fully exposed.
- Take the PRINCE'S PORTRAIT (N) and the PENDULUM (O).
- Go back to the Nursery.
- Zoom into the doll's house; put the PENDULUM in the clock (P) and take the FLAG PIECES (Q).
- Zoom into the wall; hang the PRINCE'S PORTRAIT and the QUEEN'S PORTRAIT (R).
- Go through the Lion Door.
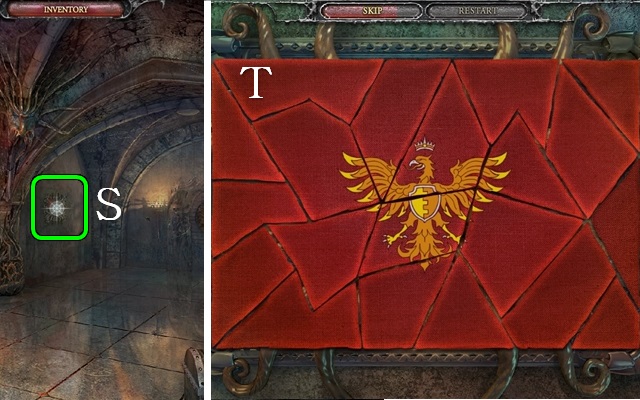
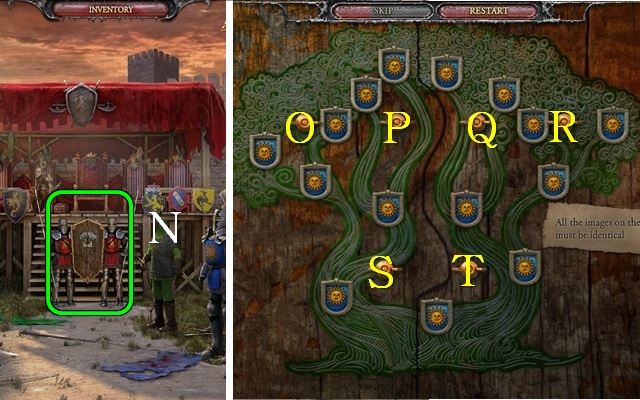
- Walk to the wall (S) and put the FLAG PIECES on it to trigger a mini-game (T).
- Recreate the flag by dragging and dropping the pieces into place.
- Take the FLAG.
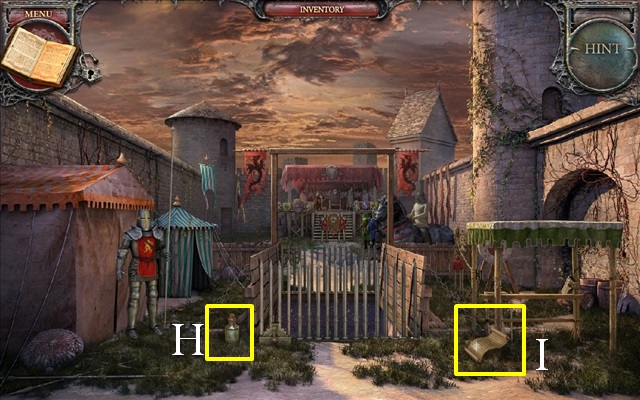
- Go to the Camp.
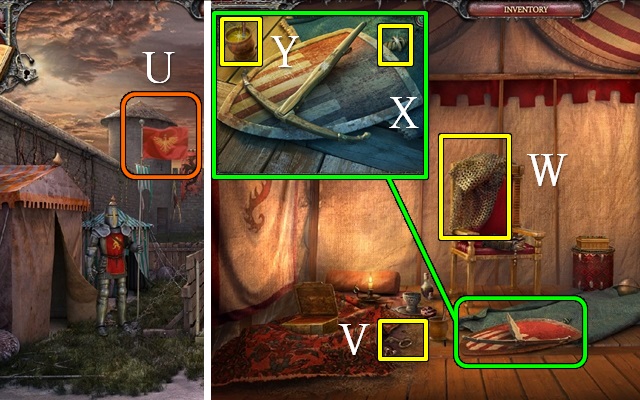
- Put the FLAG on the flagpole (U).
- Go into the Tent.
- Take the HANDCUFF KEY (V) and the CHAIN ARMOR (W).
- Zoom into the shield and take the LEVER (X); use the JUG WITH WATER on the jar and take the YELLOW PAINT (Y).
- Go to the Camp.
- Zoom into the fence and put the LEVER on the gear (Z) to trigger a mini-game.
- Pick up the ball and move it through the maze to the yellow pillars, carefully avoiding the obstacles (A).
- Move across the three sliding platforms (B) as they move past each other.
- Take the bottom platform back to the left and move around the bottom of the rotating circles (C) when the gaps in the circles are facing down.
- Walk forward to the Jousting Grounds.
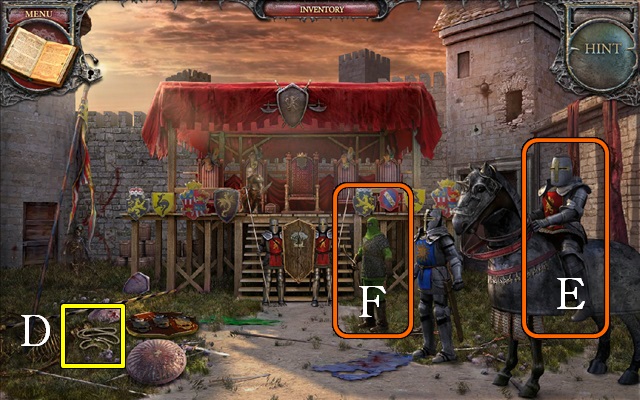
- Pick up the BOW STRING (D).
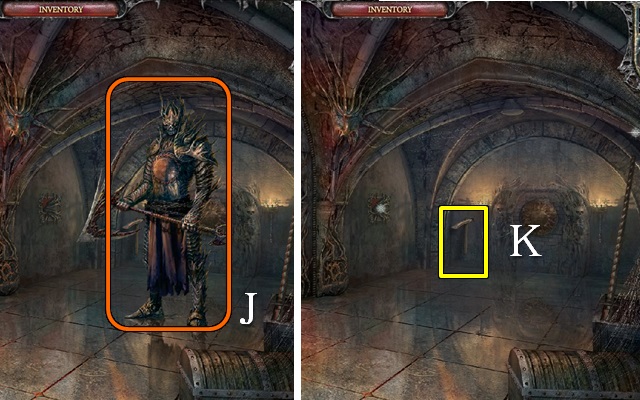
- Give the ARMOR to the horseman (E).
- Give the CHAIN ARMOR to the archer (F).
- Go to the Cell.
- Release the prisoner with the HANDCUFF KEY (G).
- Take the MOON-SHAPED KEY (H).
- Go back to the Boudoir.
- Zoom into the desk and open the moon-shaped drawer with the MOON-SHAPED KEY; take the note and the TOY TABLEWARE SET (I).
- Go to the Nursery.
- Walk to the table and put the TOY TABLEWARE SET on it to trigger a reverse HOP.
- Play the reverse HOP (J, K).
- You will receive the AQUA VITA.
- Go back to the Cell.
- Give the AQUA VITA to the prisoner (L).
- Take the HANDLES (M).
- Go to the Jousting Grounds.
- Zoom into the shield (N) and put the HANDLES on it to trigger a mini-game.
- Turn the handles until all shields show the same image.
- One solution is: Ox2, Px11, Rx9, Sx2, and Tx10.
- Walk forward to the Podium.
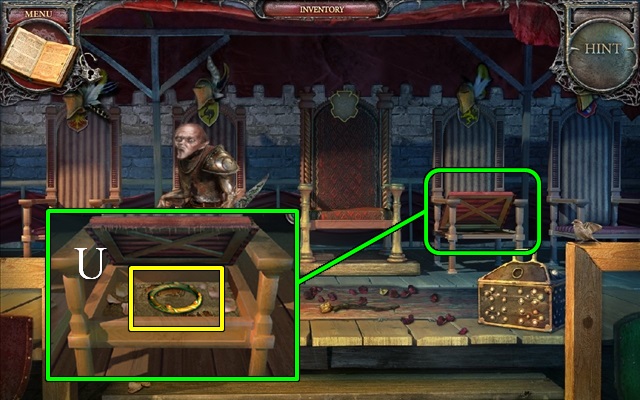
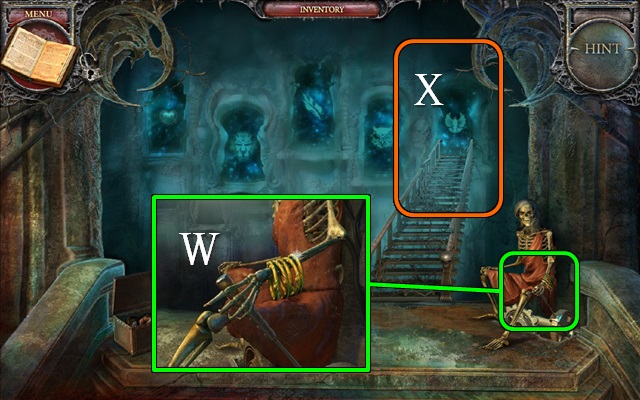
- Lift the seat of the right chair and zoom into it; take the BRACELET (U).
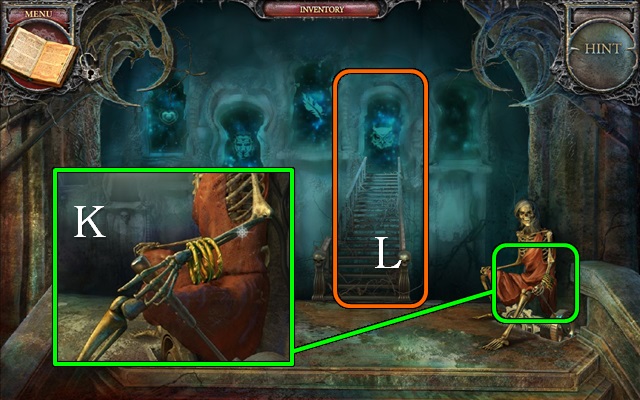
- Go to the Stairs.
- Zoom into the skeleton and give him the BRACELET (V).
- Go through the Feather Door (W).
- Take the SPEARPOINT (X) and the METAL BRUSH (Y).
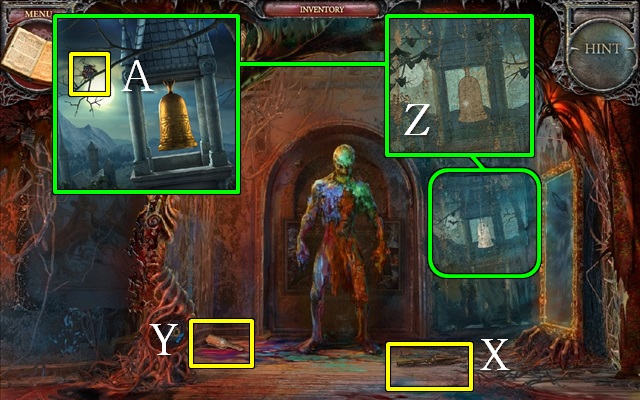
- Zoom into the mural (Z) and put the YELLOW PAINT on the bell; take the HERALDRY PART (A).
- Go to the Mirror Room behind the Lion Door.
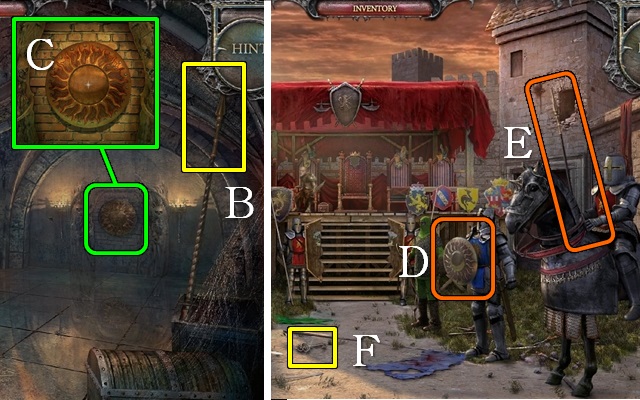
- Put the SPEARPOINT on the spear and take the SPEAR (B).
- Zoom into the shield and clean it with the METAL BRUSH; take the SHIELD (C).
- Go to the Jousting Grounds.
- Give the SHIELD to the blue knight (D).
- Give the SPEAR to the horseman (E).
- Pick up the CHEST KEY (F).
- Go to the Podium.
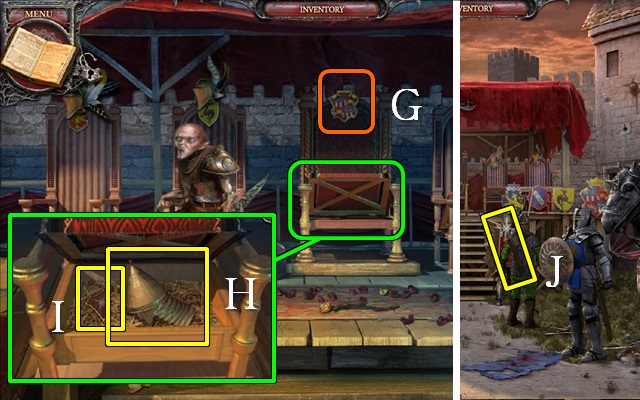
- Put the HERALDRY PART on the center chair (G) and zoom into it; take the HELMET (H) and the MAP PIECE (I).
- Walk down.
- Give the HELMET to the archer.
- Take his ARROWS (J).
- Go to the Tent.
- Zoom into the small box (K) and put the MAP PIECE on it for a mini-game (L).
- Capture the red tiles with your green tiles; you can only capture tiles with a lower number of shields.
- When a tile is captured, one shield will be moved from the green tile to the captured tile.
- Follow the yellow arrows, then the green, then the blue, the white, the pink and the orange.
- Take the CROSSBOW PART (M).
- Open the chest with the CHEST KEY.
- Take the SWORD (N).
- Zoom into the crossbow and put the BOW STRING (O) and CROSSBOW PART (P) on it; take the CROSSBOW.
- Walk down.
- Go to the Shooting Range.
- Put the ARROWS in the quiver (Q).
- Place the CROSSBOW on the barrier (R).
- Hit the bull's-eye three times (S).
- Take the GOLDEN RING (T).
- Walk down.
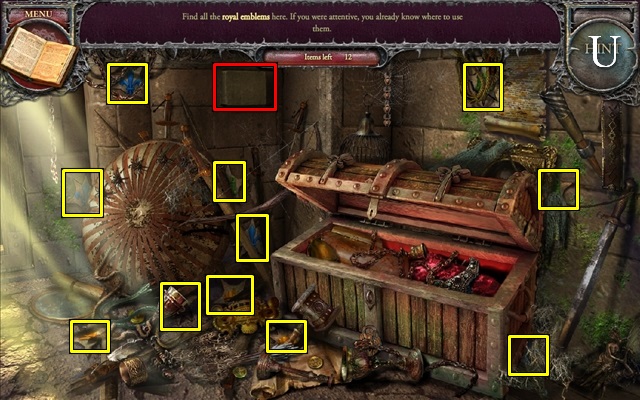
- Play the HOP (U).
- You will receive the ROYAL EMBLEMS.
- Go to the Jousting Grounds.
- Zoom into the shield (V) and put the ROYAL EMBLEMS on it for a mini-game.
- Fit all the emblems in a slot (W).
- Take the GOLDEN CROWN (X).
- Give the SWORD to the blue knight.
- Take the BIG PEARL (Y).
- Walk forward to the Podium.
- Put the PEARLS and the BIG PEARL on the chest (Z).
- Take the GOLDEN BUCKLE (A).
- Go to the Tent.
- Zoom into the chest and put the GOLDEN CROWN, GOLDEN BUCKLE and GOLDEN RING on it; take the METAL SWORDS (B).
- Go to the Mirror Room.
- Zoom into the niche and put the METAL SWORDS on the grate (C); take the KNIGHT'S VIRTUE (D).
- Go to the Podium.
- Give the KNIGHT'S VIRTUE to the creature (E).
- Take the BOOK AMULET (F).
- Lift the seat of the left chair and zoom into it; take the MIRROR SHARD (G).
- Return to the Book of Spells.
- Zoom into the book and put the BOOK AMULET on it.
- Go to the Stairs and go through the Feather Door.
Chapter 3: The Artist's Virtue
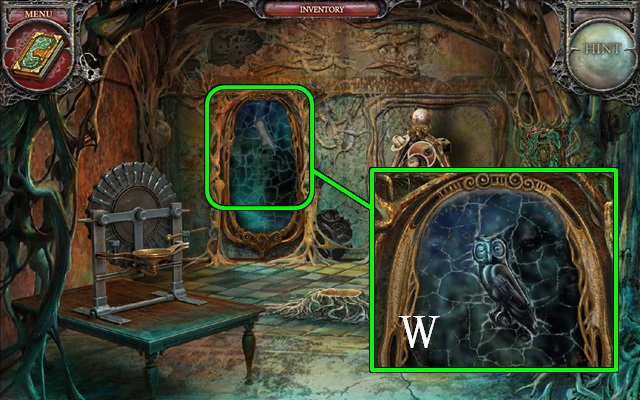
- Zoom into the mirror and put the MIRROR SHARD in the gap (H).
- Walk right to the Gallery.
- Pick the SPECIAL KEY (I) and the SOLVENT (J).
- Walk down.
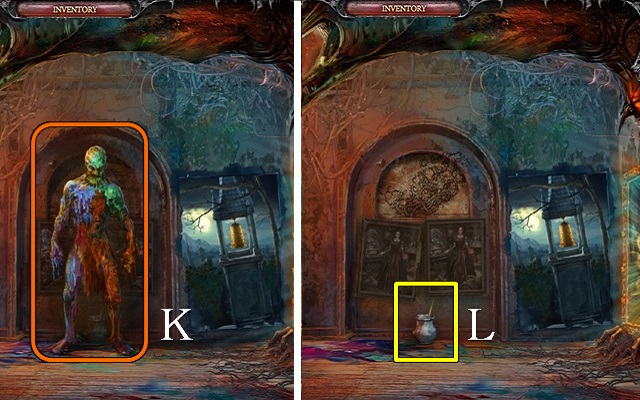
- Pour the SOLVENT on the zombie (K).
- Pick up the GREY PAINT (L).
- Go through the mirror.
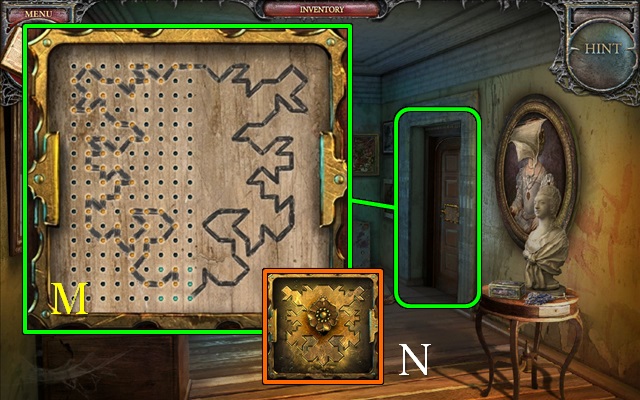
- Zoom into the door and put the GREY PAINT on it to trigger a mini-game (M).
- Using the holes in the board, draw the mirror image of the line on the right.
- Put the SPECIAL KEY in the lock (N).
- Go through the door to the Conservatory.
- Take the PESTLE (O) and the PICTURE SCRAPS (P).
- Zoom into the door and put the PICTURE SCRAPS on it for a mini-game (Q).
- Restore the door by picking up the pieces and placing them on the door.
- Play the HOP (R).
- Take the SMALL HOOK (S).
- Walk forward to the Lake.
- Open the flower bud and take the LANDSCAPE PART (T).
- Zoom into the easel and take the SMALL LEVER (U).
- Walk down and right to the Artist's Studio.
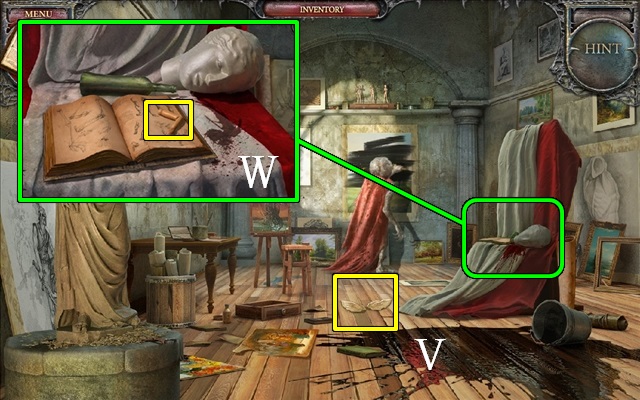
- Pick up the ALABASTER WING (V).
- Zoom into the drapes; tear the page off the book and pick up the STATUETTE PART (W).
- Go back to the Cell.
- Put the PESTLE in the mortar (X).
- Take the BONE POWDER.
- Go to the Podium.
- Zoom into the floorboards and use the SMALL HOOK on the gap; pick up the RING (Y).
- Go back to the Gallery.
- Zoom into the bottom painting and put the RING on it (Z); take the PENCIL (A) and the WHITE PAINT (B).
- Walk down.
- Zoom into the mural and put the PENCIL on it; color in the outline of the axe (C) and take the ALABASTER FLOWER (D).
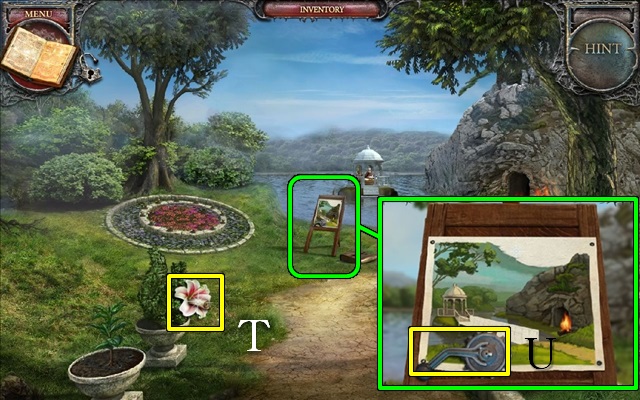
- Go to the Lake.
- Zoom into the easel and use the WHITE PAINT to paint the bridge (E).
- Cross the bridge to the Pergola.
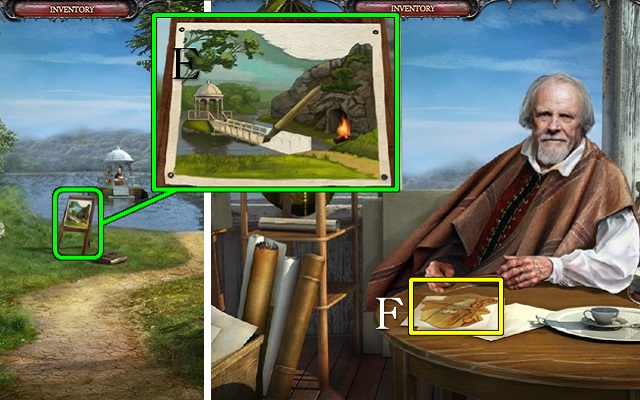
- Take the PICTURE OF AN OLD MAN (F).
- Play the HOP (G).
- You will receive the PICTURE SCRAPS.
- Go to the Gallery.
- Zoom into the painting by the door and put the PICTURE SCRAPS on it to trigger a reverse HOP.
- Play the reverse HOP (H).
- You will receive the BLACK PAINT.
- Go to the Lake.
- Zoom into the easel and paint the sky with the BLACK PAINT (I).
- Zoom into the cave and take the BRACELET (J).
- Go to the Stairs.
- Zoom into the skeleton and give him the BRACELET (K).
- Go through the Owl Door (L).
- Take the LANDSCAPE PART (M) and the BUCKET (N).
- Go back to the Lake.
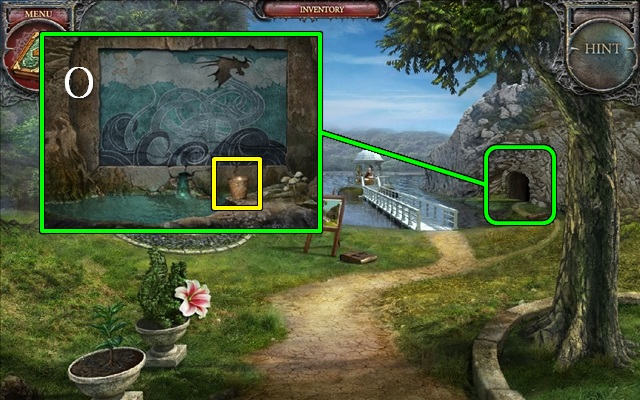
- Zoom into the cave; fill the BUCKET and take the BUCKET WITH WATER (O).
- Go to the Conservatory.
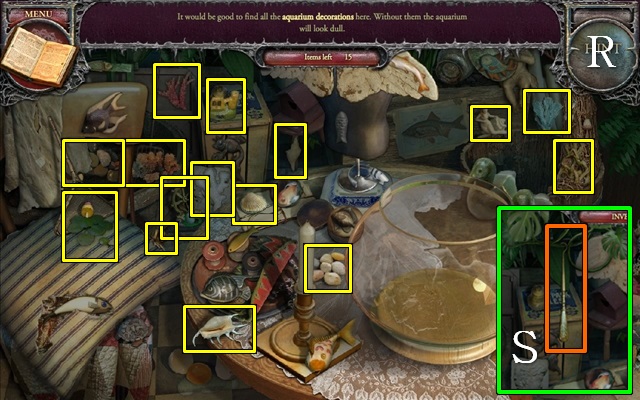
- Zoom into the table and fill the fish bowl with the BUCKET WITH WATER to trigger a HOP.
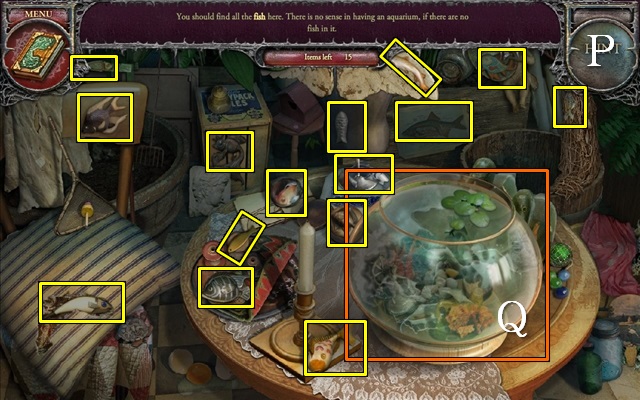
- Play the HOP (P).
- Take the AQUARIUM (Q).
- Go to the Gallery.

- Put the AQUARIUM on the statue (R).
- Take the OINTMENT (S).
- Go to the Pergola.
- Give the OINTMENT to the old man.
- Take the MEDAL (T).
- Go to the Gallery.
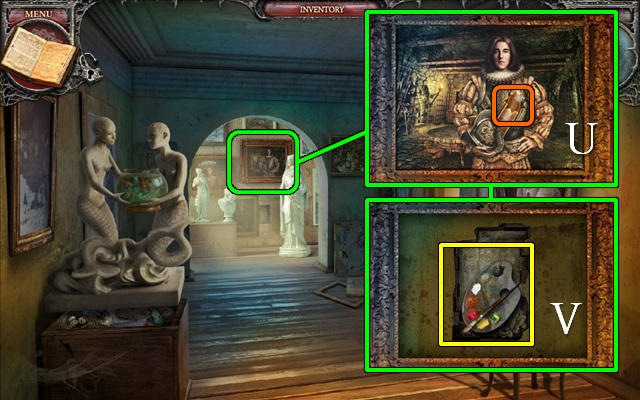
- Zoom into the top painting and put the MEDAL on it (U); take the PALETTE (V).
- Go to the Conservatory.
- Zoom into the drawing; put the three LANDSCAPE PARTS and the PALETTE on it for a mini-game (W).
- Color in the white parts of the painting (X); if you make a mistake you can use the brush to remove the paint.
- Take the MOSAIC PIECE (Y).
- Go to the Lake.
- Zoom into the cave; put the MOSAIC PIECE on the mosaic (Z) and take the ALABASTER WREATH (A).
- Go to the Conservatory.
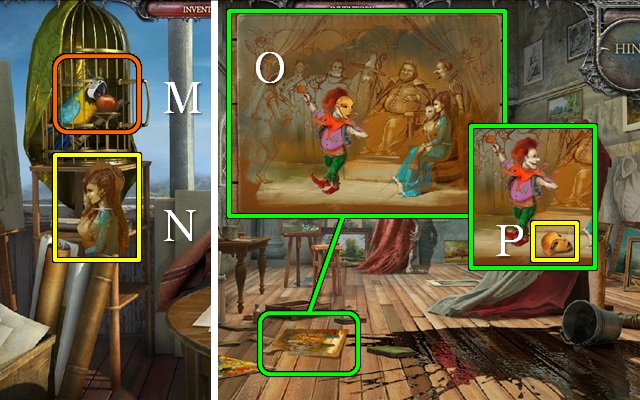
- Put the ALABASTER WINGS, the ALABASTER FLOWER and the ALABASTER WREATH on the angel statue (B).
- Take the ANGEL PICTURE (C) and the GLASSES (D).
- Go to the Pergola.
- Play the HOP (E).
- You will receive the PICTURE FRAGMENTS.
- Give the GLASSES to the old man (F).
- Take the MULTICOLORED PENCIL (G).
- Go to the Artist's Studio.
- Zoom into the table (H) and put the MULTICOLORED PENCIL with the others to trigger a mini-game.
- Color in the drawing according to the numbers (I); each time you use a color it is removed from the pencil.
- You can undo the last action with the eraser (J).
- One solution is: use up pencils 8, 2 and 7. Use the 10 on pencil 4. Use 3 and 4 on pencil 6. Use 7 and 3 on pencil 5.
- Take the CRYSTAL (K).
- Go to the Gallery.
- Zoom into the painting by the door and put the PICTURE FRAGMENTS on it to trigger a reverse HOP.
- Play the reverse HOP (L).
- You will receive an APPLE.
- Go to the Pergola.
- Give the APPLE to the parrot (M).
- Take the PICTURE OF A YOUNG WOMAN (N).
- Go to the Artist's Studio.
- Zoom into the painting on the floor and put the PICTURE OF AN OLD MAN, PICTURE OF A YOUNG WOMAN and ANGEL PICTURE on it (O).
- Take the METAL MASK (P).
- Go to the Mirror Room.
- Zoom into the niche and put the METAL MASK on the grate (Q); take the ARTIST'S VIRTUE (R).
- Go to the Artist's Studio.
- Give the ARTIST'S VIRTUE to the artist (S).
- Take the BOOK AMULET (T).
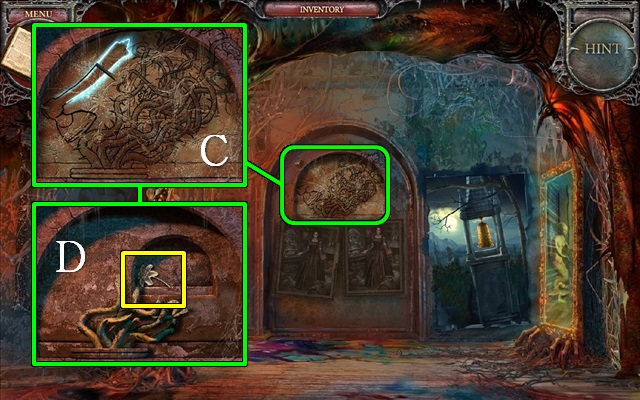
- Zoom into the models and put the STATUETTE PART on it for a mini-game. Move the models into the configuration shown in your Journal (U).
- Take the MIRROR SHARD (V).
- Return to the Book of Spells.
- Zoom into the book and put the BOOK AMULET on it.
- Go to the Stairs and go through the Owl Door.
Chapter 4: The Scientist's Virtue
- Zoom into the mirror and put the MIRROR SHARD in the gap (W).
- Walk forward to the Laboratory.
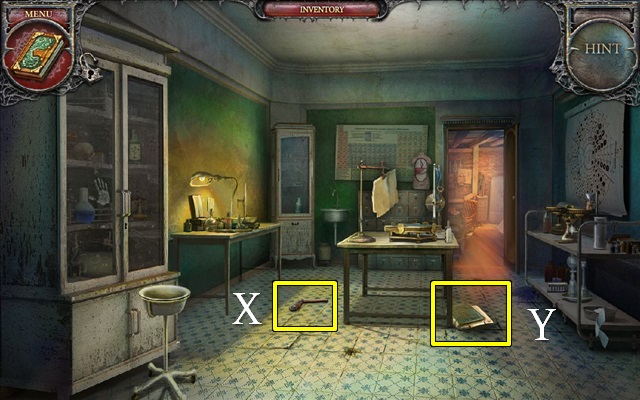
- Take the ELEVATOR PART (X).
- Read the note (Y).
- Walk forward to the Scientist's Office.
- Take the DAGGER (Z) and the CLOCK HANDS (A).
- Zoom into the back wall and take the STORAGE BATTERY (B).
- Go up the stairs to the Landing.
- Pick up the ELECTRODE (C) and TYPEWRITER KEY (D).
- Zoom into the door and take the PLIERS (E).
- Play the HOP (F).
- You will receive the BONES.
- Walk down.
- Remove the boards from the cupboard with the PLIERS (G).
- Take the POWDER (H).
- Go through the Heart Door.
- Zoom into the bedroom and remove the doll's bonnet; loosen a screw with the DAGGER and take the SCREW (I).
- Go back to the Lake.
- Zoom into the flower bed and place the CLOCK HANDS to trigger a mini-game.
- Select two flowers to open and swap them; keep swapping flowers until the numbers are all placed like on a clock (J).
- Take the MANOMETER (K).
- Go to the Artist's Studio.
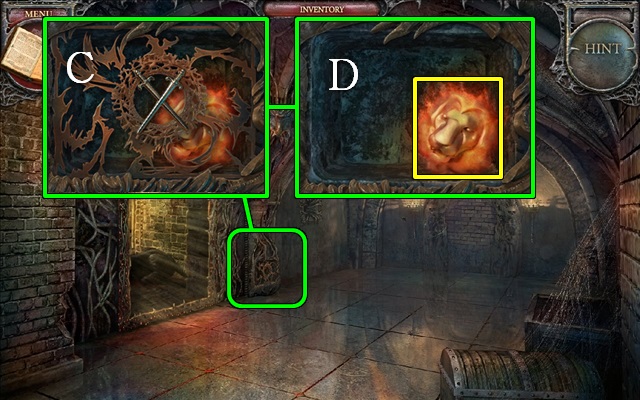
- Zoom into the drapes and then into the sketch; place the BONES on the sketch for a mini-game.
- Recreate the two skeletons (L).
- Pick up the BIRD SKELETON (M).
- Go to the Mirror Room behind the Owl Door.
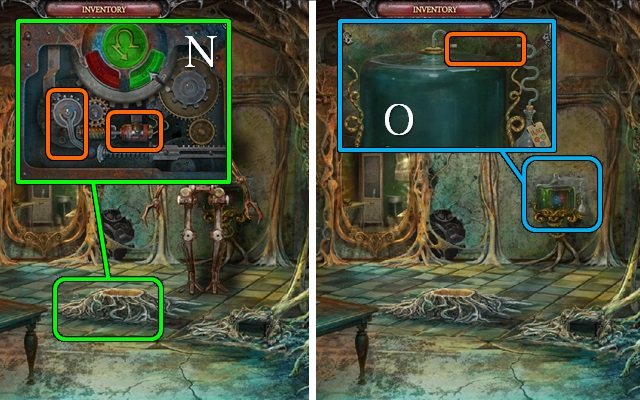
- Zoom into the center of the floor and put the SMALL LEVER and the STORAGE BATTERY on the mechanism (N).
- Go to the tank and put the MANOMATER in the gap for a mini-game (O).
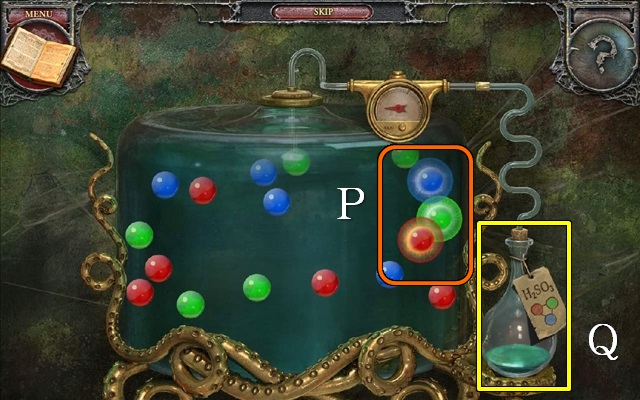
- Mouse over an atom to see its outer glow; select an atom when the outer glows of one green, one blue and one red atom overlap (P).
- Repeat this process until the flask is full.
- Take the SULFURIC ACID (Q).
- Go to the Laboratory.
- Go to the left table (R).
- Pour the BONE POWDER and SULFURIC ACID in the right bowl (S).
- Switch on the heating element (T).
- Take the BONE GLUE (U).
- Walk forward.
- Put the BIRD SKELETON in the cupboard (V).
- Take the FILM (W).
- Walk down.
- Use the POWDER on the glass cabinet and use the FILM on the handprint.
- Take the HANDPRINT (X).
- Go to the Landing.
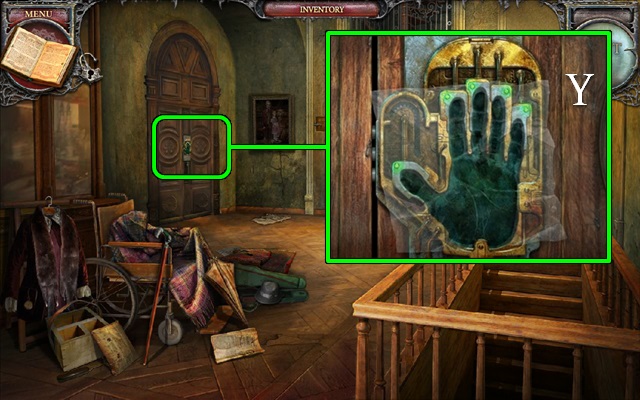
- Zoom into the door and put the HANDPRINT on the sensor (Y).
- Go through the door to the Hospital Room.
- Take the WEIGHTS (Z) and the REFRIGERATOR HANDLE (A).
- Zoom into the table and take the LAMP (B).
- Go to the Scientist's Office.
- Put the REFRIGERATOR HANDLE on the fridge.
- Take the ICE CUBE (C) and the BEAKERS (D).
- Go to the Mirror Room.
- Put the DIODE and the ICE CUBE on the generator (E).
- Take the SODIUM CHLORIDE.
- Go to the Laboratory.
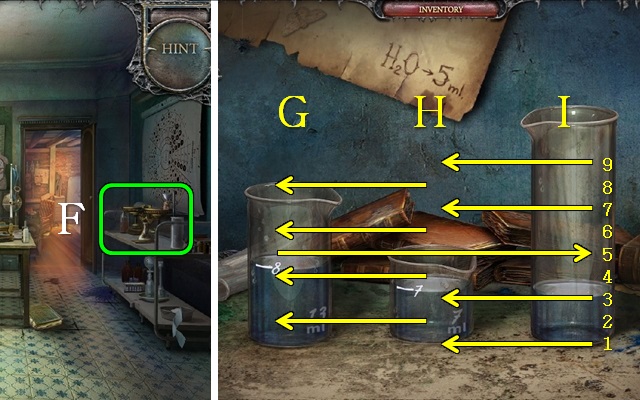
- Zoom into the trolley (F) and then into the beaker; put the BEAKERS down for a mini-game.
- Pour water from one beaker to another until you have exactly 5 ml in one of the beakers.
- Pour in this order: I-H, H-G, I-H, H-G, G-I, H -G, I-H, H-G, and I-H.
- Take the WATER.
- Zoom into the scales and put the WEIGHTS down for another mini-game.
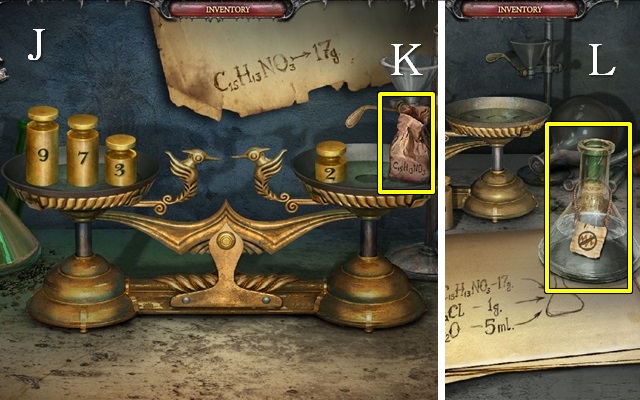
- Place the weights on the scales so that the scales will be balanced when 17 g of the medicine is added to the right scale (J).
- Take the KETOROLAC (K).
- Put the WATER, KETOROLAC and SODIUM CHLORIDE in the beaker.
- Take the PAINKILLER (L).
- Go to the Hospital Room.
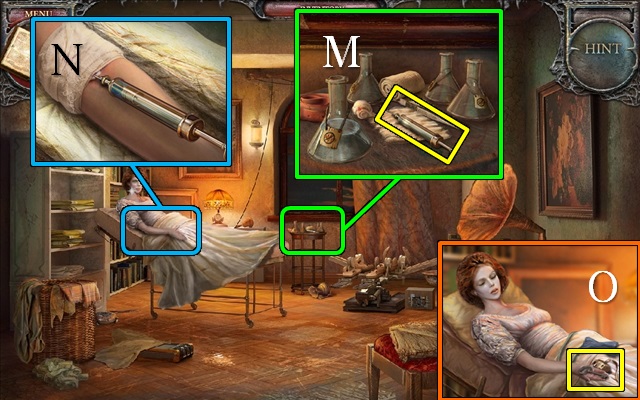
- Zoom into the table and put the PAINKILLER down; draw up some painkiller with the syringe and take the SYRINGE (M).
- Zoom into the woman's arm and put the SYRINGE on her drip (N).
- Take the CUPBOARD KEY (O).
- Go to the Laboratory.
- Open the cupboard with the CUPBOARD KEY.
- Take the EMPTY OXYGEN PILLOW, the ELEVATOR PART and the GROWTH ACCELERANT (P).
- Go to the Landing.
- Zoom into the elevator mechanism and put the SCREW on the latch (Q); put the two ELEVATOR PARTS on the mechanism (R).
- Go up the stairs to the Observatory.
- Take the WIRES (S) and the HACKSAW (T).
- Go to the Scientist's Office.
- Open the chest with the HACKSAW.
- Take the BRACELET (U) and the HYDROGEN PEROXIDE (V).
- Go to the Stairs.
- Zoom into the skeleton and give him the BRACELET (W).
- Go through the Dove Door (X).
- Pick up the GARDEN DECORATION (Y) and the MECHANISM PARTS (Z).
- Zoom into the mechanical toy and take the SCREWDRIVER (A).
- Go back to the Lake.
- Put the GARDEN DECORATION on the shrub and pour the GROWTH ACCELERANT on it.
- Open the flower and take the CRYSTAL (B).
- Go to the Gallery.
- Put the BONE GLUE on the torn painting.
- Take the PRINCESS'S PORTRAIT (C).
- Go back to the Nursery.
- Zoom into the wall and hang the PRINCESS'S PORTRAIT; take the EARRING (D).
- Go back to the Gallery.
- Zoom into the portrait and put the EARRING on it (E); take the FRAME PART (F).
- Walk down.
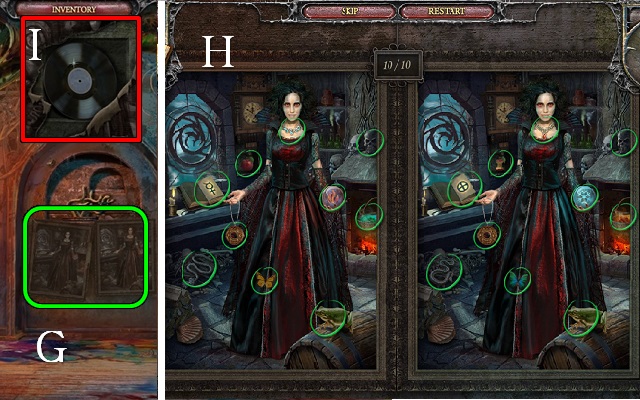
- Zoom into the portrait of the witch (G) and put the FRAME PART on it to trigger a mini-game.
- Find the 10 differences (H).
- Take the RECORD (I).
- Go to the Scientist's Office.
- Zoom into the wall and put the MECHANISM PARTS on it to trigger a reverse HOP.
- Play the reverse HOP (J).
- You will receive a TYPEWRITER KEY.
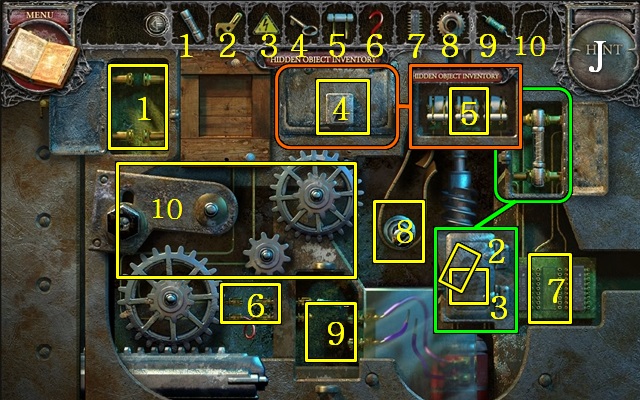
- Go to the Observatory.
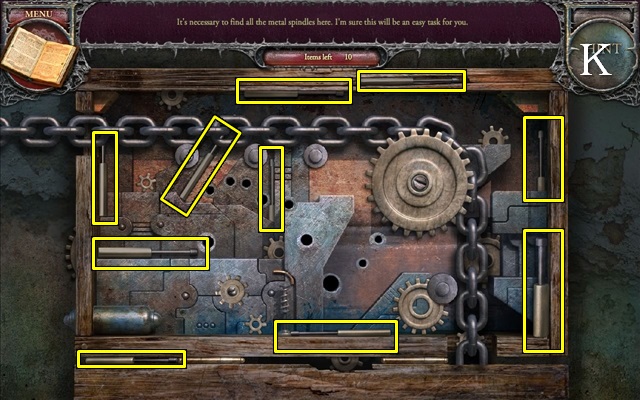
- Play the HOP (K).
- Fasten all the spindles with the SCREWDRIVER (green) (L).
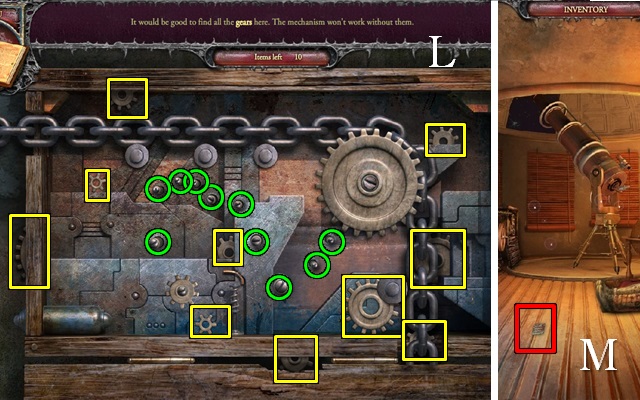
- Play the next HOP.
- Take the SAFE PART (M).
- Walk down.
- Zoom into the painting and remove it.
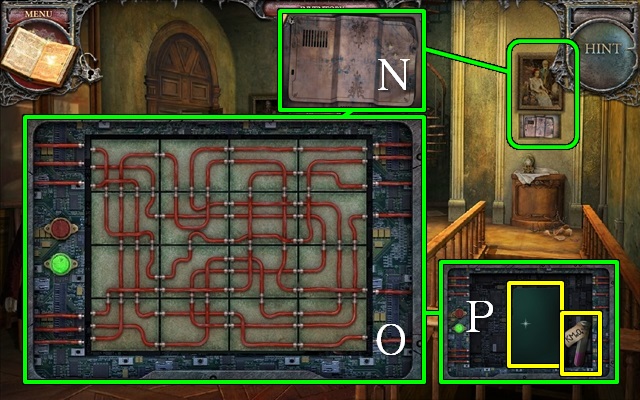
- Zoom into the safe and remove the panel (N); put the SAFE PART on it for a mini-game.
- Swap the tiles around until all wires are connected (O).
- Take the POTASSIUM PERMANGANATE and the X-RAY FILM (P).
- Walk down.
- Zoom into the back wall and put the X-RAY FILM in the drawer; take the X-RAY (Q).
- Walk down.
- Zoom into the center table, put the EMPTY OXYGEN PILLOW on the pad (R), the POTASSIUM PERMANGANATE in the flask (S) and the HYDROGEN PEROXIDE in the dish (T); take the FULL OXYGEN PILLOW.
- Go to the Hospital Room.
- Zoom into the power box; put the X-RAY on the lamp (U) and the WIRES in the slot (V) to trigger a mini-game.
- Take a wire and select two clamps to connect them according to the diagram on the X-ray.
- Take the MIRROR SHARD (W).
- Give the FULL OXYGEN PILLOW to the woman.
- Take the LENS (X).
- Go to the Stairs and go through the Dove Door.
- Zoom into the mirror and put the MIRROR SHARD on it (Y).
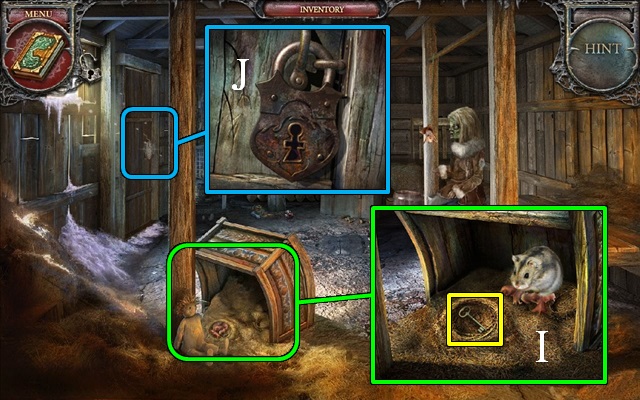
- Walk forward to the Barn.
- Zoom into the feeding trough; take the TELESCOPE PART (Z).
- Zoom into the chest and open it; take the GLASS-CUTTER (A).
- Go to the rabbit hutch (B).
- Take the COIN (C), the CHICKEN LEG (D) and the STEPS (E).
- Go to the Mirror Room.
- Zoom into the mechanical toy and put the COIN in the slot; take the TYPEWRITER KEY (F).
- Go back to the Observatory.
- Cut the display cabinet with the GLASS-CUTTER and take the CRYSTAL (G).
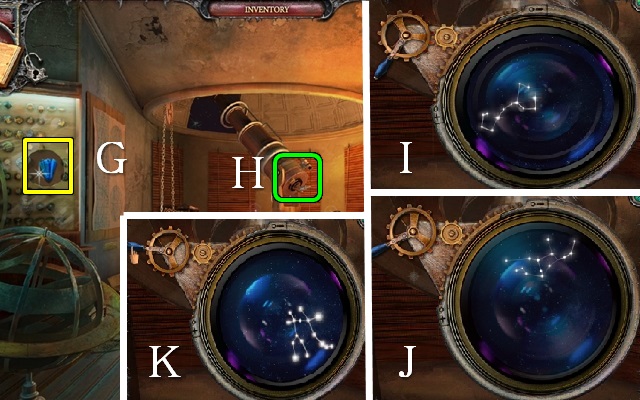
- Zoom into the telescope (H) and put the LENS and the TELESCOPE PART on it; turn the handle to find the constellations of Scorpio (I), Virgo (J) and Gemini (K).
- Go to the Landing.

- Play the HOP (L).
- You will receive the TOOLS.
- Go to the Scientist's Office.
- Zoom into the wall and put the TOOLS on it for a reverse HOP.
- Play the reverse HOP (M).
- You will receive a METAL PLANET.
- Go to the Hospital Room.

- Zoom into the device on the floor and put the METAL PLANET on it for a mini-game.
- Draw the constellations you saw through the telescope (N).
- Take the LAMP (O).
- Go to the Mirror Room.
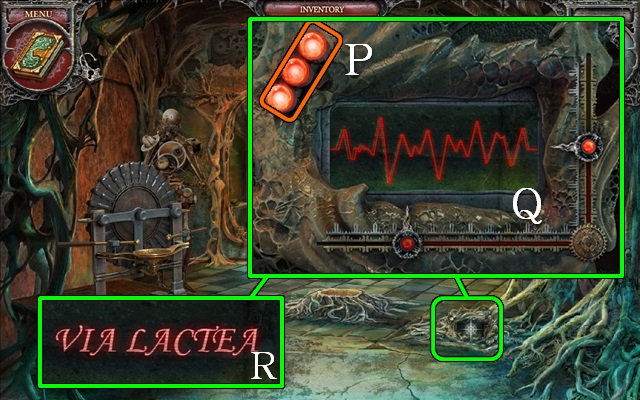
- Zoom into the device on the floor and put the two LAMPS on it for a mini-game (P).
- Move the sliders until the red waveform is identical to the drawn example (Q).
- Note the code (R).
- Go to the Observatory.
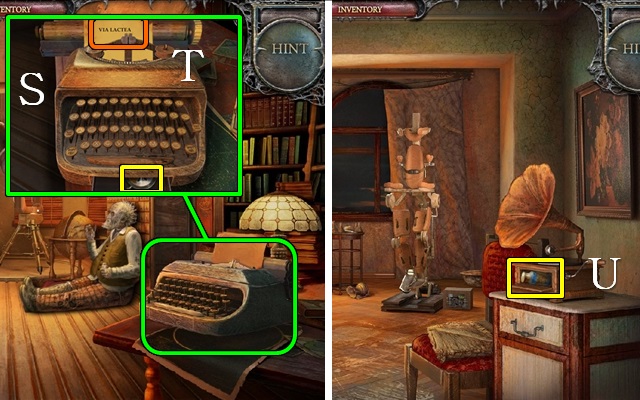
- Zoom into the typewriter, put the three TYPEWRITER KEYS on it and type Via Lactea (S); take the NEEDLE (T).
- Go to the Hospital Room.
- Put the NEEDLE and the RECORD on the gramophone.
- Take the BLUE VITRIOL (U).
- Go to the Laboratory.
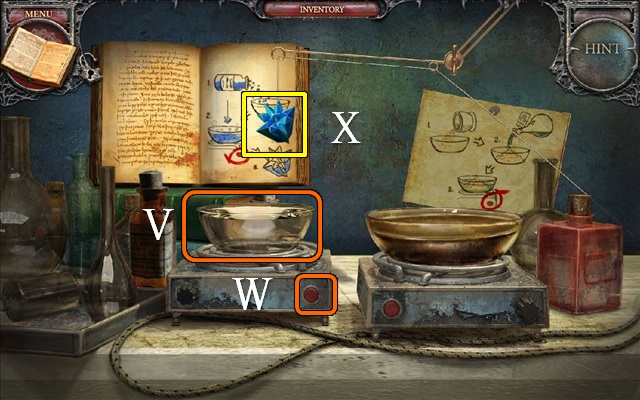
- Walk to the left table.
- Put the BLUE VITRIOL in the left dish (V).
- Turn on the heating element (W).
- Take the CRYSTAL (X).
- Go to the Observatory.
- Zoom into the box (Y); put the four CRYSTALS on it to trigger a mini-game.
- Draw one consecutive line connecting all the stars (Z); each line may only be used once.
- Take the METAL BALANCE (A).
- Go to the Mirror Room.
- Zoom into the alcove and open it with the METAL BALANCE (B); take the SCIENTIST'S VIRTUE (C).
- Go to the Observatory.
- Give the SCIENTIST'S VIRTUE to the scientist (D).
- Take the BOOK AMULET (E).
- Take the SEEDS (F).
- Return to the Book of Spells.
- Zoom into the book and put the BOOK AMULET on it.
- Go back through the Dove Door.
Chapter 5: The Girl's Virtue
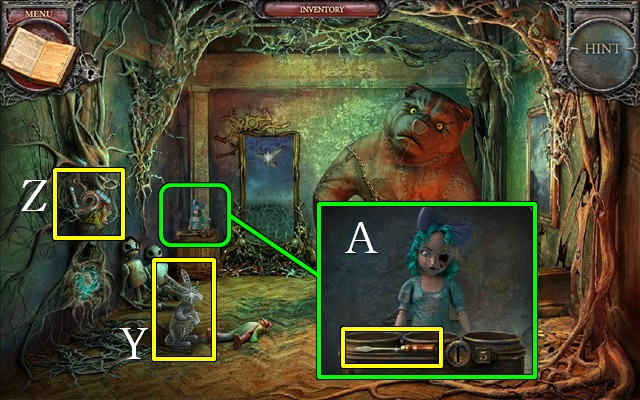
- Zoom into the maze and put the SEEDS on it to trigger a mini-game.
- Move the hamster through the maze by placing the seeds on the circles (G).
- Take the HAMSTER (H).
- Walk forward.
- Zoom into the feeding trough and put the HAMSTER on the nest; take the PADLOCK KEY (I).
- Zoom into the barn door and open it with the PADLOCK KEY (J).
- Go through the door to the Yard.
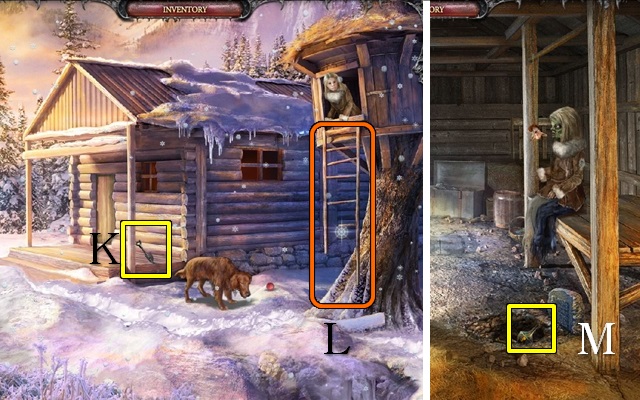
- Take the SPADE (K).
- Put the STEPS on the ladder (L).
- Walk down.
- Dig up the dirt with the SPADE and take the POISON (M).
- Go to the Yard and go into the Farmhouse.
- Take the SNOW SHOVEL (N) and the MUSHROOM (O).
- Zoom into the table and take the BEDROOM KEY (P); remove the husk from the berry and take the BERRY (Q).
- Go to the Yard.

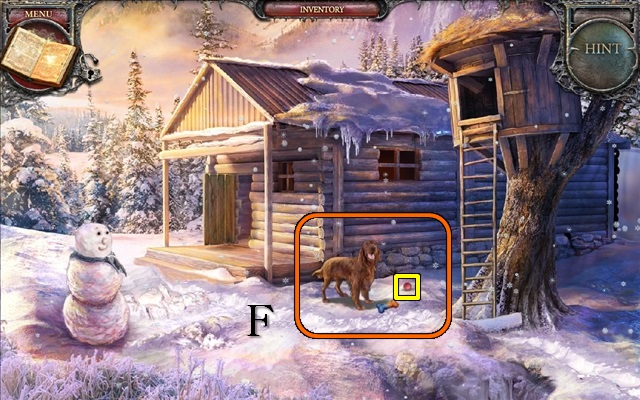
- Clear the path to the snowman with the SNOW SHOVEL (R).
- Turn the snowman's head and take the CARROT (S).
- Go to the Barn.
- Walk to the rabbit hutch.
- Give the CARROT to the rabbit (T).
- Take the FLOCK (U) and the BEDROOM KEY (V).
- Go to the Yard and go up the ladder to the Tree House.
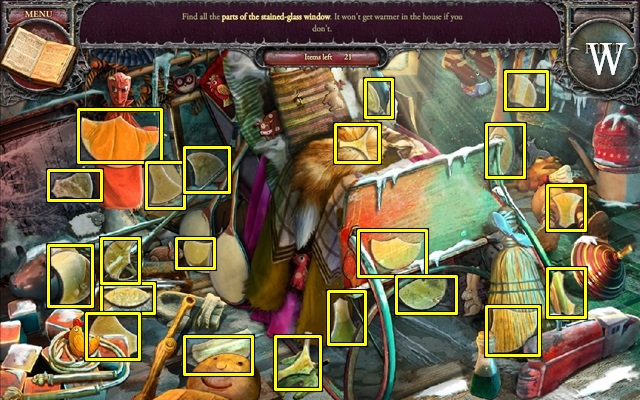
- Play the HOP (W).
- You will receive the PARTS OF STAINED-GLASS WINDOW.
- Go into the Farmhouse.
- Zoom into the window and put the PARTS OF STAINED-GLASS WINDOW on it for a mini-game.
- Put all the glass pieces into the frame to restore the window (X).
- Take the COIN (Y).
- Go to the Mirror Room.
- Zoom into the mechanical toy and put the COIN in the slot; take the BEDROOM KEY (Z).
- Go to the Farmhouse.
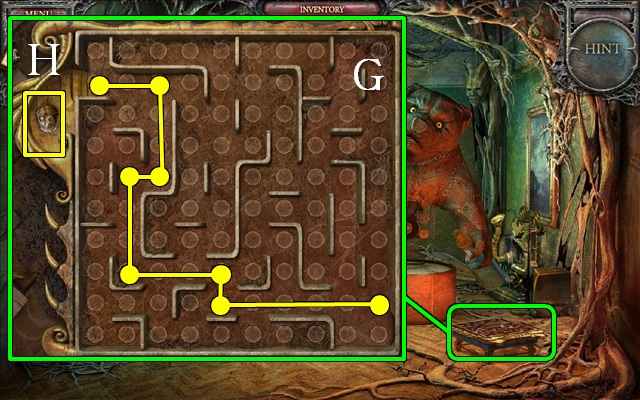
- Zoom into the bedroom door for a mini-game. Drag the tiles horizontally, vertically or diagonally to empty spaces on the lock until all three keyholes are completely exposed.
- A: c3-b3, c4-c3, d4-b4, c3-c4, d3-d4, c2-c3, d2-c2, and d1-d3.
- B: c1-d2, c1-c2, b1-d1, c2-c1, and c3-c2.
- C: c4-c3, b4-c4 x2, a4-b4, a3-a4, a1-b1, a2-a1, and b2-a3.
- D: a1-a2, b1-a1, move b2/c4 clockwise until you can move b3-b1; move b3/c4 counterclockwise until you can move b3-b2.
- E: c2-c3 x2, c3-b3 x2, move b3/c4 counterclockwise until you can move c4-c2.
- F: b4-c4 x2, b3-b4, b3-c3, and c4-b3.
- Put the three BEDROOM KEYS in the locks.
- Go into the Bedroom.
- Pick up the NET (G).
- Move the blanket and take the AXE (H).
- Walk down.
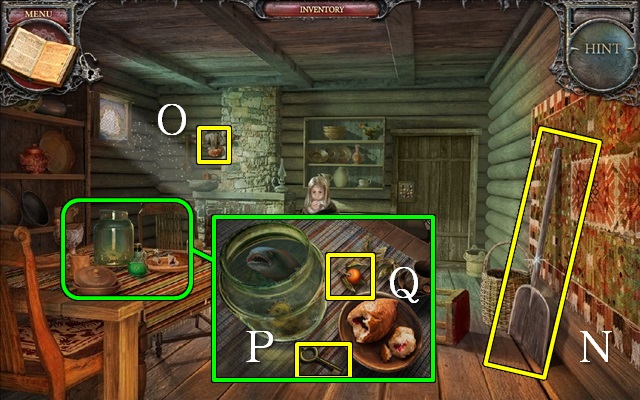
- Zoom into the table and put the NET in the jar; take the STAR (I).
- Go into the Bedroom.
- Zoom into the star panel on the cupboard and put the STAR on it for a mini-game (J).
- Drag and drop tiles onto the panel so that the symbols correspond with the background; select a tile to rotate it (K).
- Take the SCALES (L).
- Zoom into the table and put the CHICKEN LEG, MUSHROOM, FLOCK, SCALES and POISON into the mortar (M) and put the BERRY in the press (N); use the pestle (O) on the mortar, pour the contents into the jar and take the MAGIC LIQUID (P).
- Walk down.
- Zoom into the table and put the MAGIC LIQUID on the pastry; take the PASTRY (Q).
- Go to the Mirror Room.
- Give the PASTRY to the bear (R).
- Take the BELLOWS (S).
- Zoom into the squirrel mechanism and take the TWEEZERS (T).
- Go to the Barn.
- Walk to the rabbit hutch.
- Chop the wood with your AXE and pick up the FIREWOOD (U).
- Go to the Farmhouse.
- Put the FIREWOOD in the fire.
- Use the BELLOWS on the fire (V).
- Take the MARBLE (W).
- Go into the Bedroom.
- Zoom into the doll and remove the eye patch; use the TWEEZERS to take the NUT (X).
- Go to the Mirror Room.
- Zoom into the squirrel mechanism and give the NUT to the squirrel (Y); take the DRUMSTICK (Z).
- Go to the Tree House.
- Give the DRUMSTICK to the rabbits.
- Take the COIN (A).
- Go to the Mirror Room.
- Zoom into the mechanical toy and put the COIN in the slot; take the MOON (B).
- Go to the Bedroom.
- Zoom into the moon panel on the cupboard and put the MOON in the gap for a mini-game (C).
- Play as before (D).
- Take the BONE (E).
- Go to the Yard.
- Give the BONE to the dog.
- Take the MARBLE (F).
- Go into the Tree House.
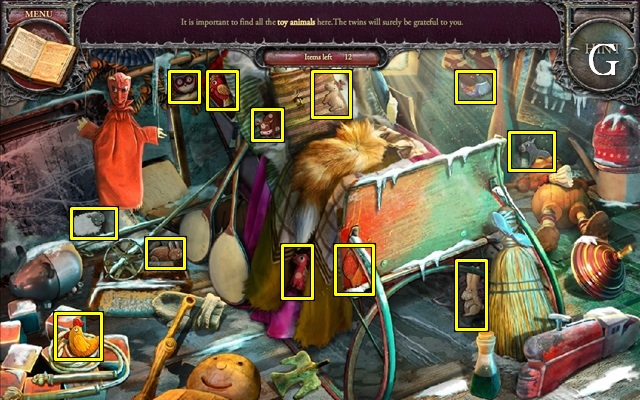
- Play the HOP (G).
- You will receive the TOY ANIMALS.
- Go to the Bedroom.
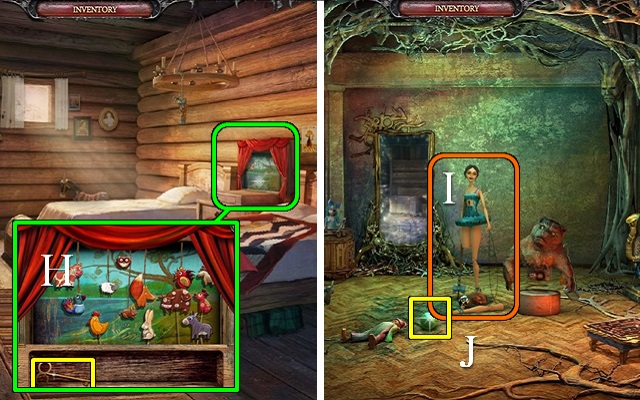
- Zoom into the bedside table and put the TOY ANIMALS on it; take the WINDING KEY (H).
- Go to the Mirror Room.
- Put the WINDING KEY on the ballerina (I).
- Take the MARBLE (J).
- Go to the Tree House.
- Zoom into the safe and put the three MARBLES in their respective slots for a mini-game.
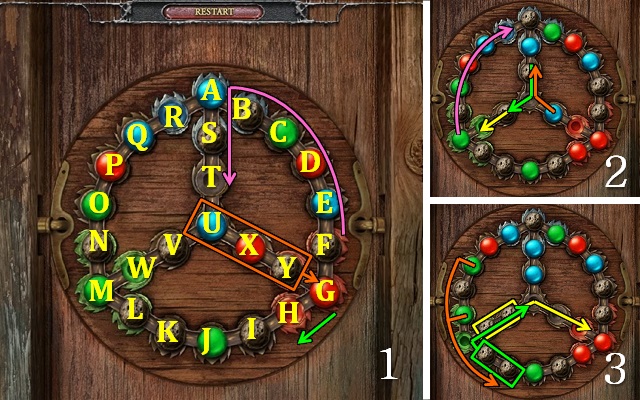
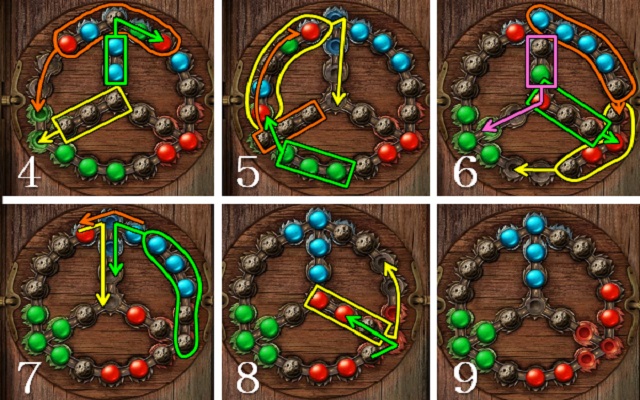
- Drag the marbles around until all marbles are in a hole of matching color.
- Section 1: Red marble in G to H; U, X and Y one right to G; S to T; A-G counterclockwise to S; red in Y to G. Section 2: V to W; T to V; blue X to T; M-Q clockwise to R.
- Section 3: V-W to X-Y; K-L to U-V; green N to K; O to W; green P to L. Section 4: U-W to M; Q-C to N; S-T to B-C.
- Section 5: N-R clockwise to U; M-V to Q; J-L to N. Section 6: F-I to L; U-Y to G; A-E to F; S-T to V-W.
- Section 7: Red R to U; blue B to R; C-G counter clockwise to T. Section 8: U-Y to D; H to X. Section 9: Move the red marbles to the red dots, the three gray marbles down and the blue marbles to the blue dots.
- Take the GEMINI.
- Go to the Mirror Room.
- Zoom into the alcove and put the GEMINI on the grid (K); take the GIRL'S VIRTUE (L).
- Go to the Barn.
- Give the GIRL'S VIRTUE to the girl (M).
- Take the BOOK AMULET (N).
- Return to the Book of Spells.
- Zoom into the book (O) and put the final BOOK AMULET on it.
- Congratulations, you have completed Echoes of the Past: The Kingdom of Despair.
Created at: 2013-09-11