

Walkthrough Menu
- General Tips
- Chapter 1: The Healers' Tower
- Chapter 2: The Market
- Chapter 3: The Forest
- Chapter 4: Outside the Gates
- Chapter 5: The Broken Bridge
- Chapter 6: Into the Castle
- Chapter 7: The Castle of the Dark
General Tips
- This is the official guide for Echoes of the Past: Wolf Healer.
- This guide will not show when you have to zoom into a location; the screenshots will show each zoom scene.
- Hidden-object puzzles are referred to as HOPs. This guide will not show screenshots of the HOPs, however, it will mention when an HOP is available and the inventory item you'll collect from it.
- Use the Map to travel to a location.
Chapter 1: The Healers' Tower
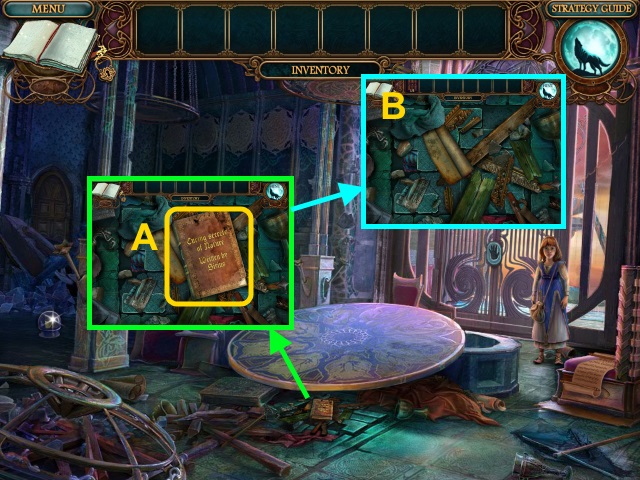
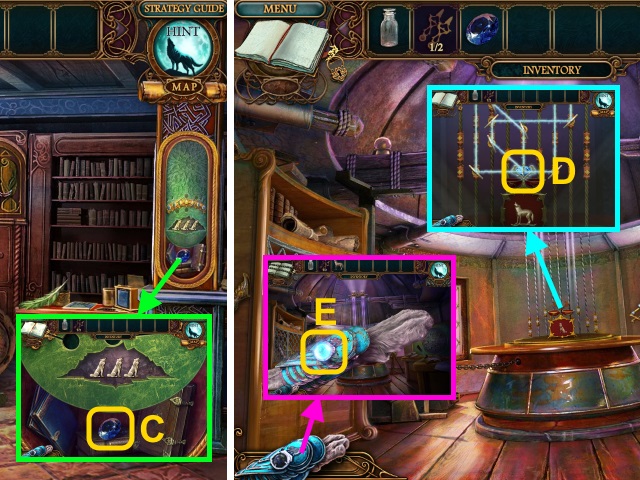
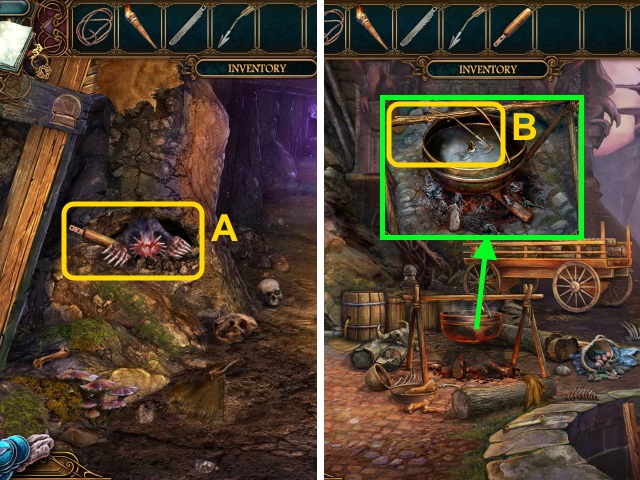
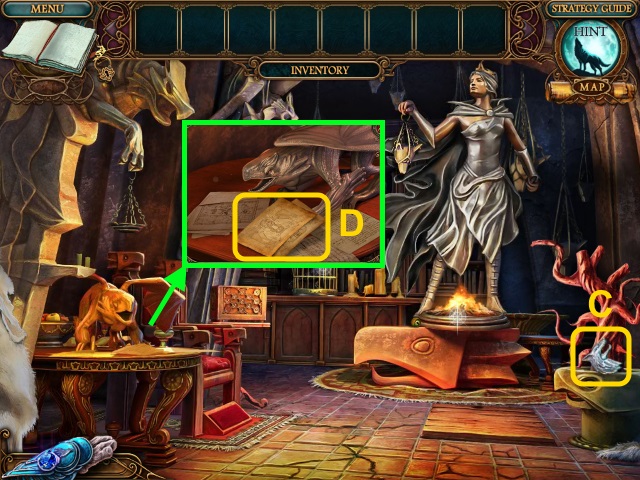
- Take the BOOK (1/3) (A).
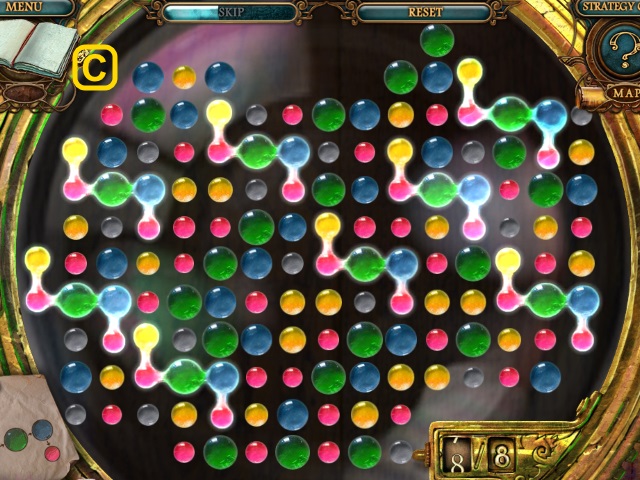
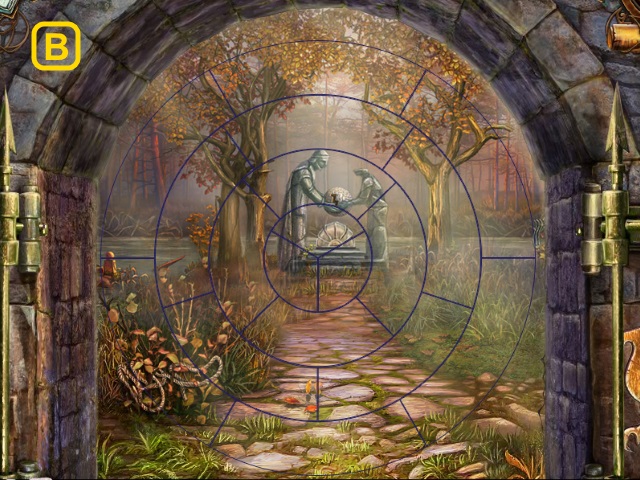
- Move the wreckage for a mini-game (B).
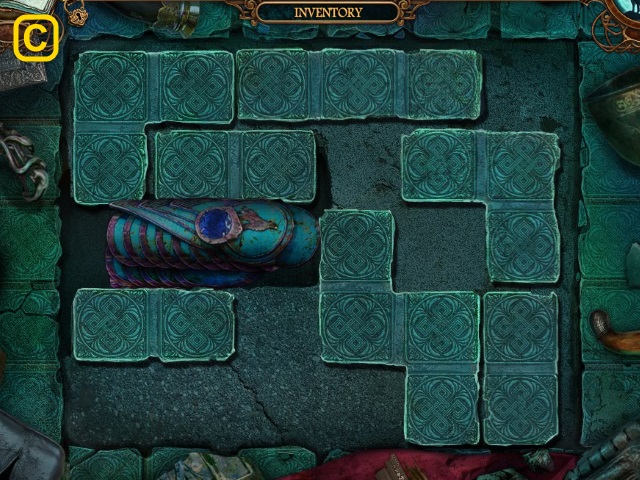
- Solution (C).
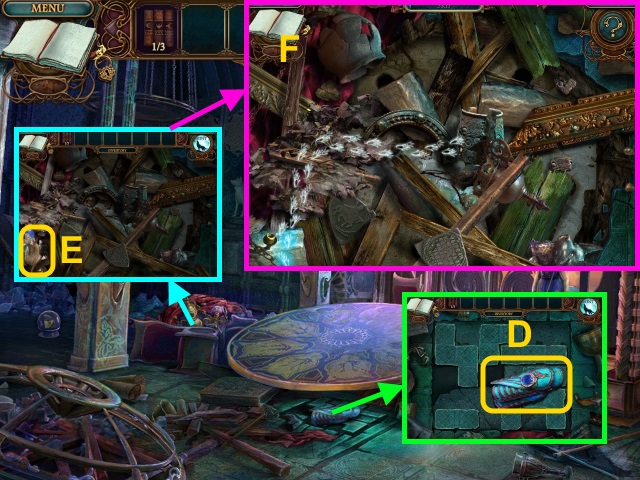
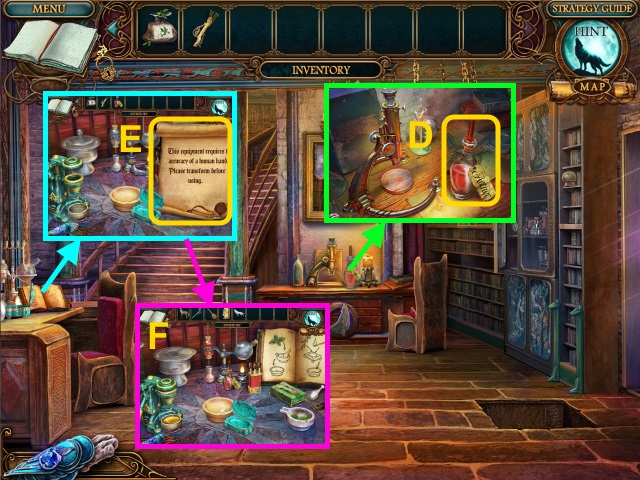
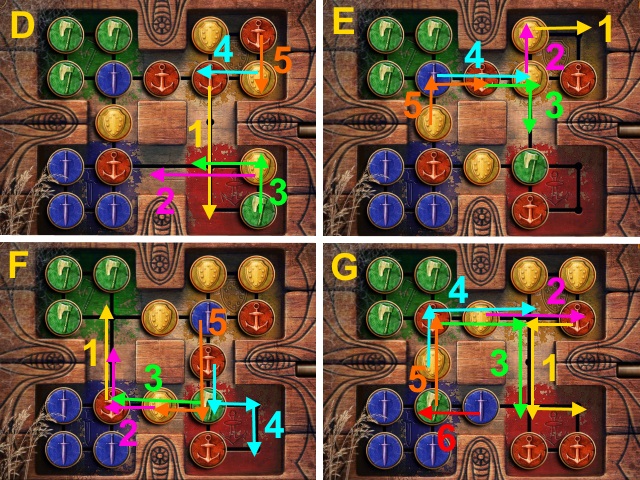
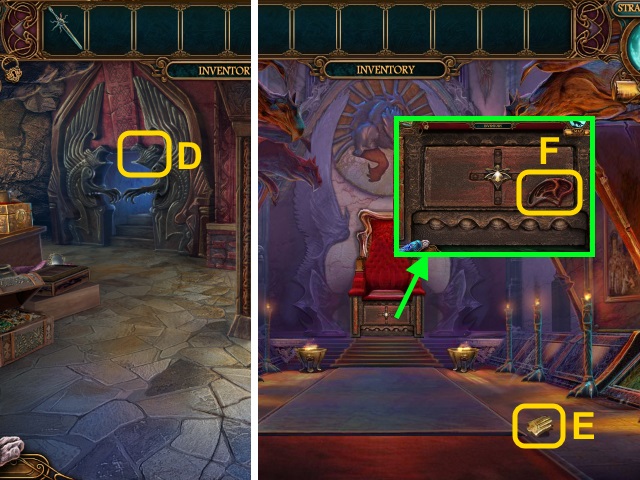
- Examine the bracelet (D).
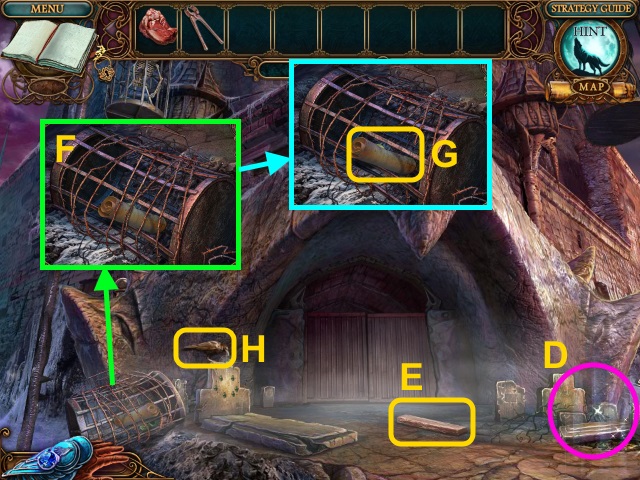
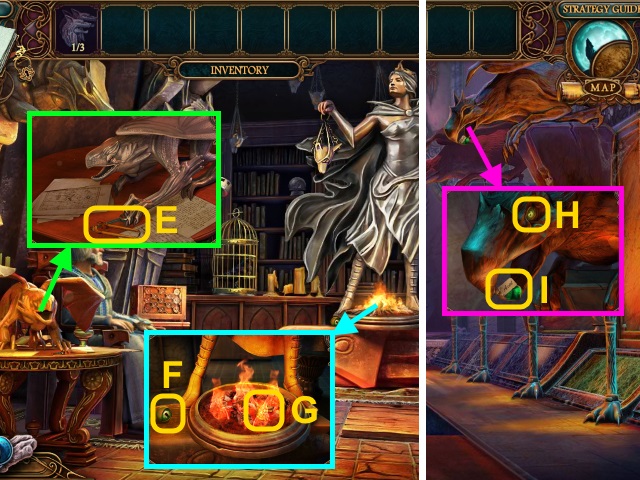
- Examine the mouse for a mini-game (E).
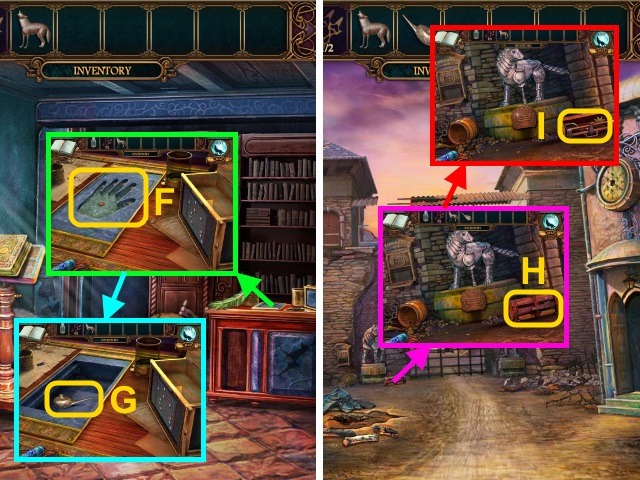
- Solution (F).
- Move the wreckage for a mini-game.
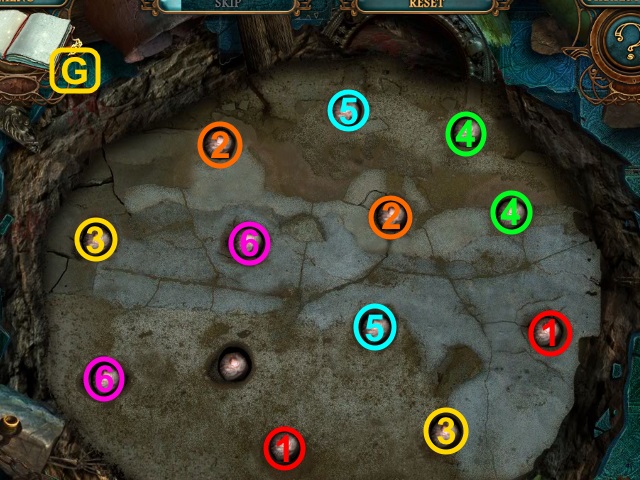
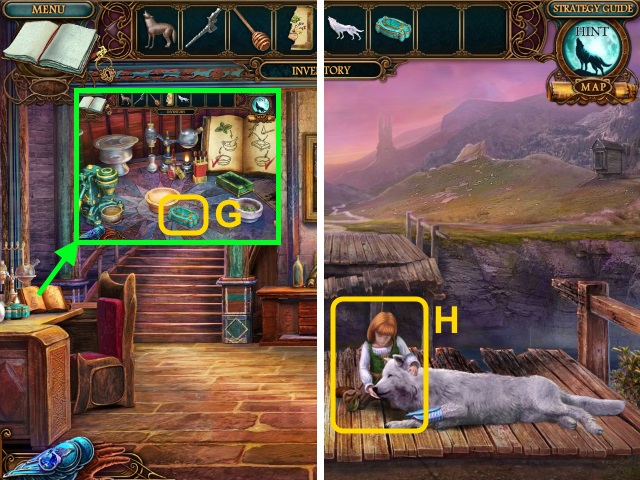
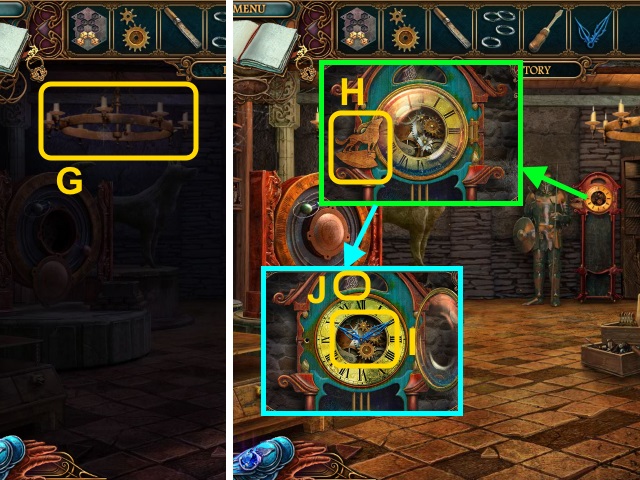
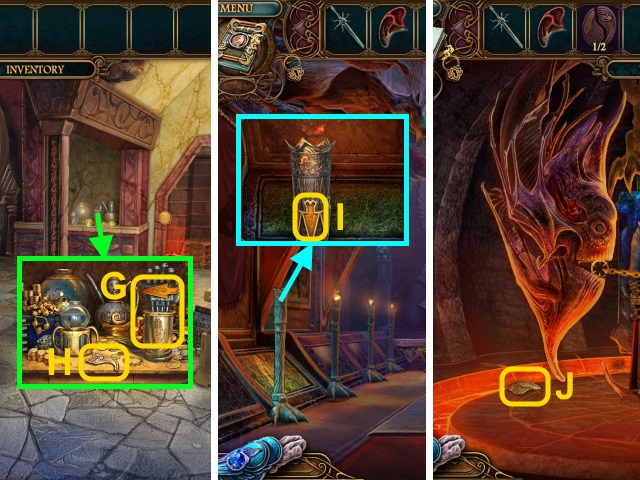
- Solution (G).
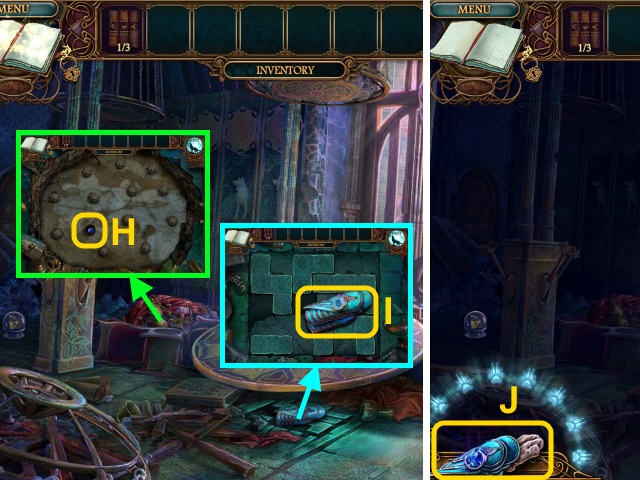
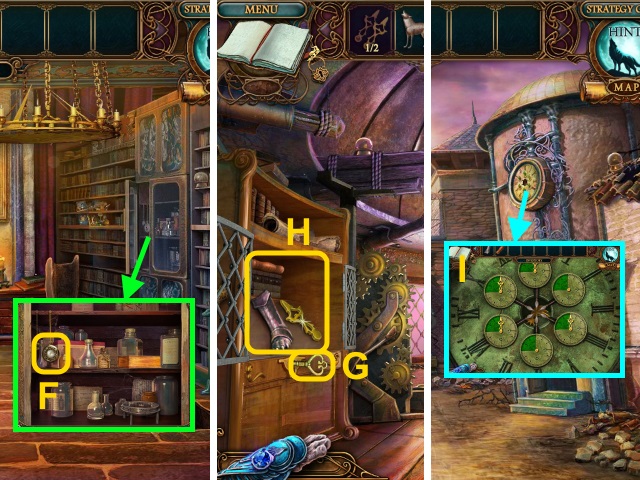
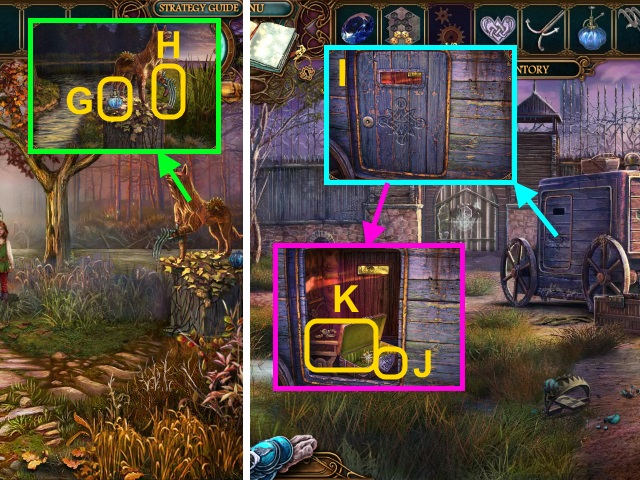
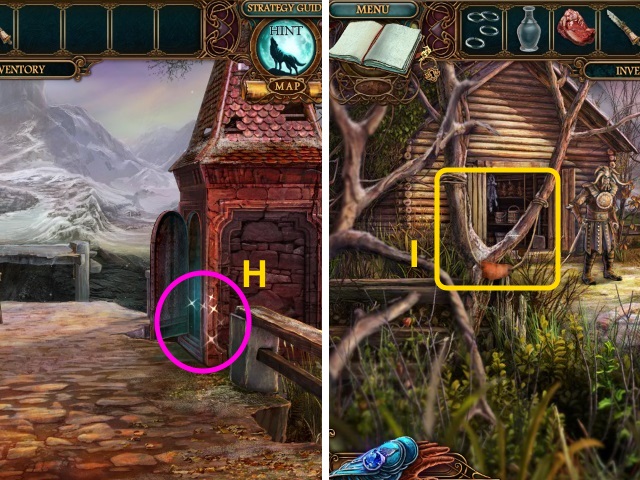
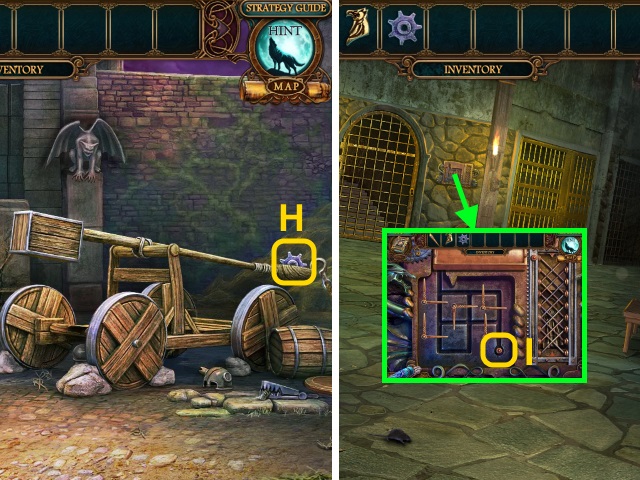
- Take the CHARGED CRYSTAL (H).
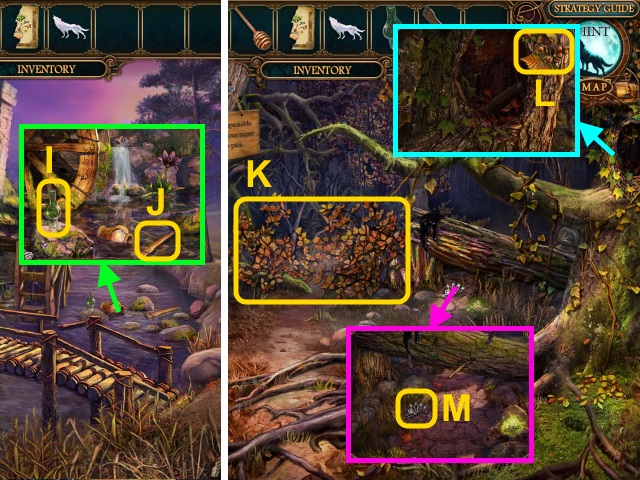
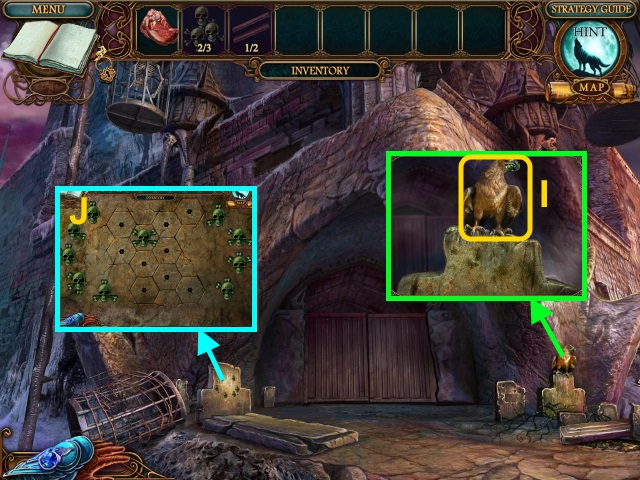
- Place the CHARGED CRYSTAL; take the Bracelet (I).
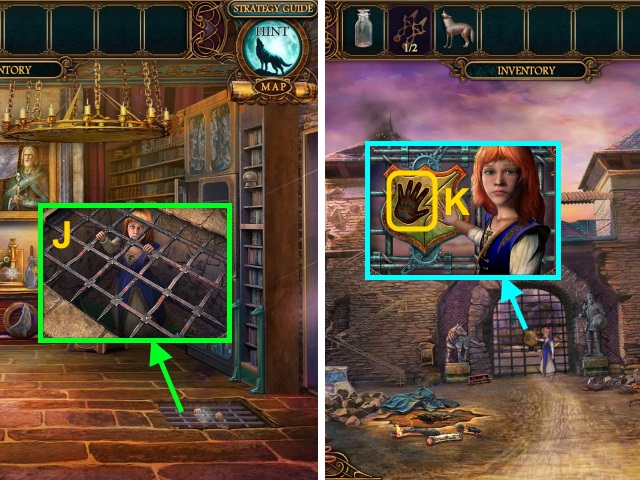
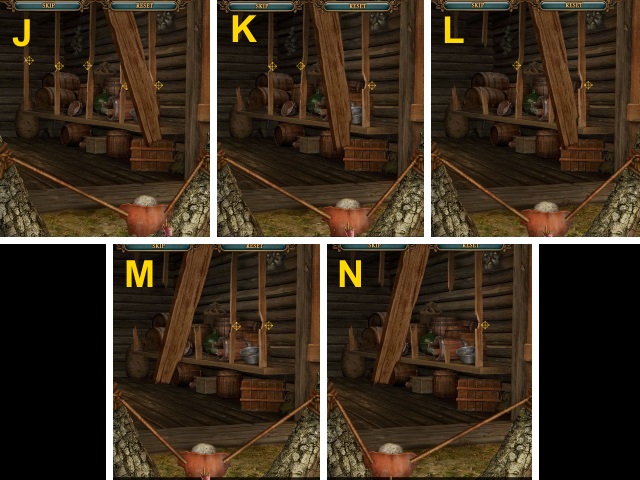
- Use the Bracelet (J).
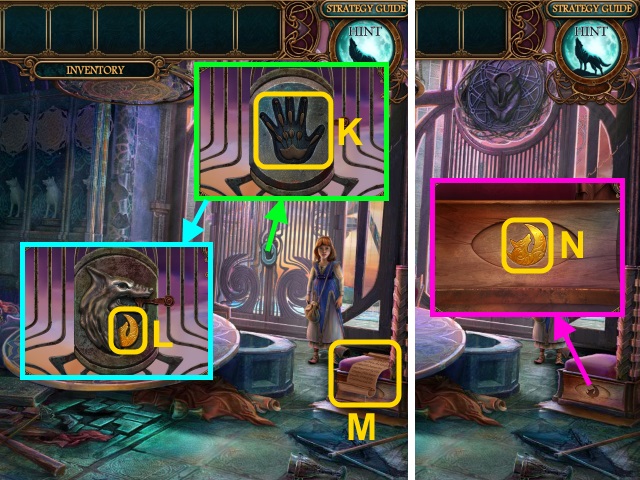
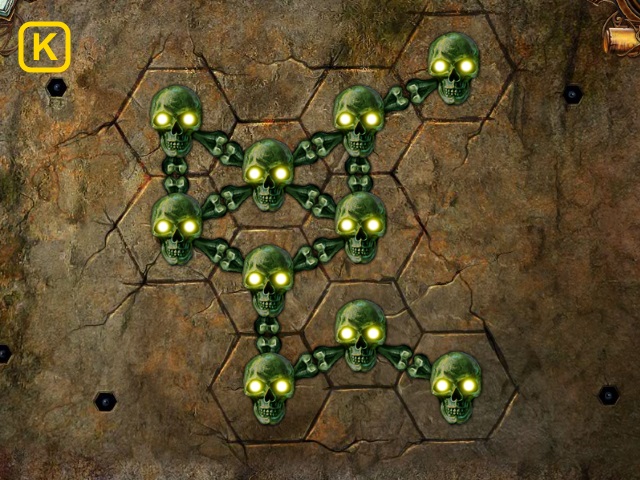
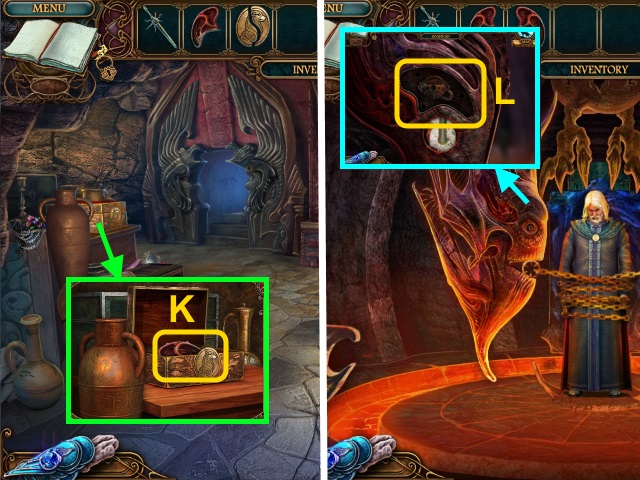
- Press the lock (K).
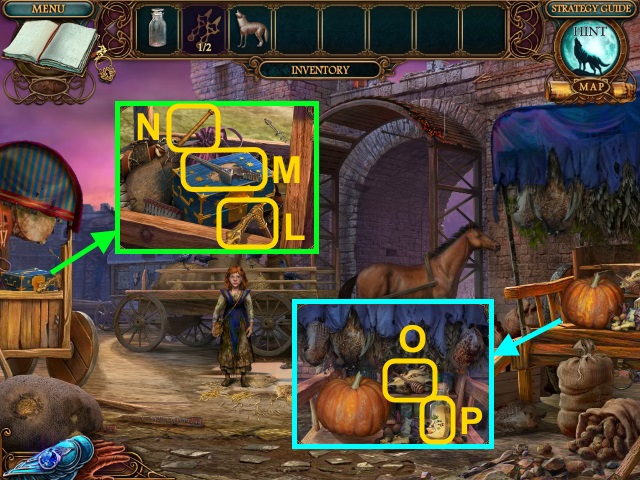
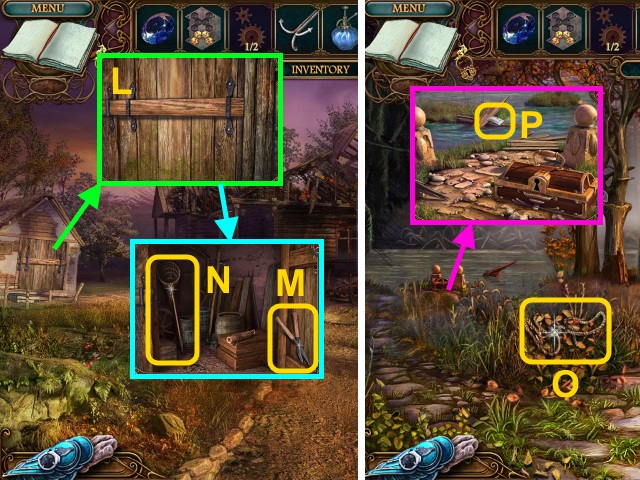
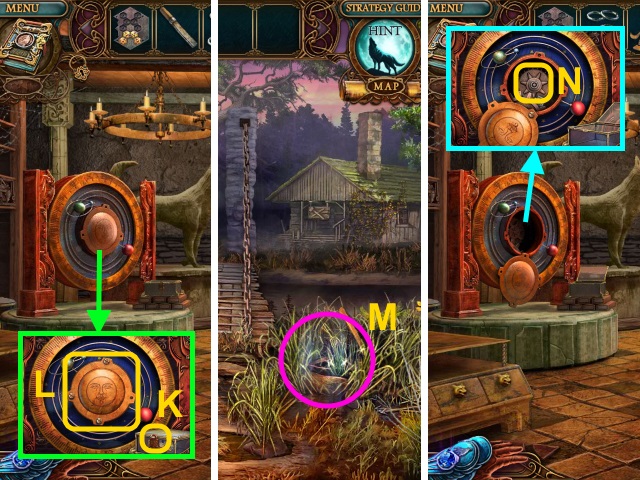
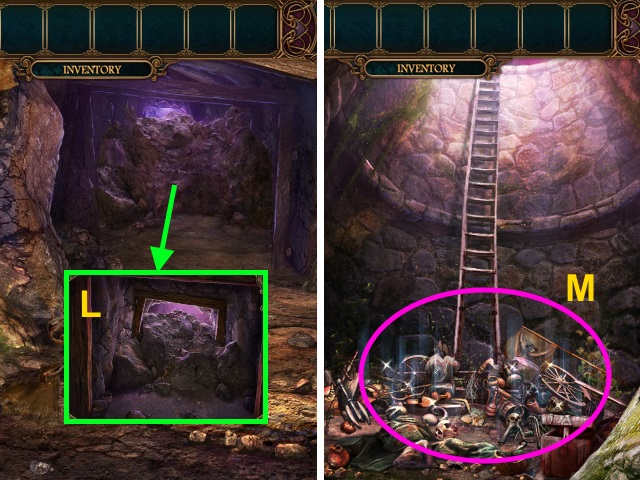
- Take the BAS-RELIEF (L).
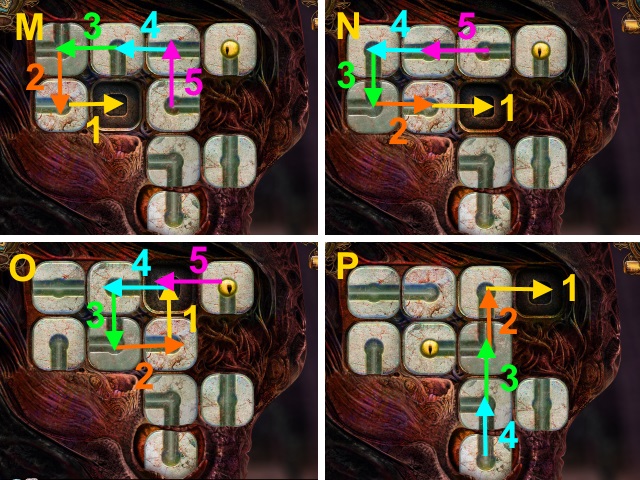
- Read the scroll (M).
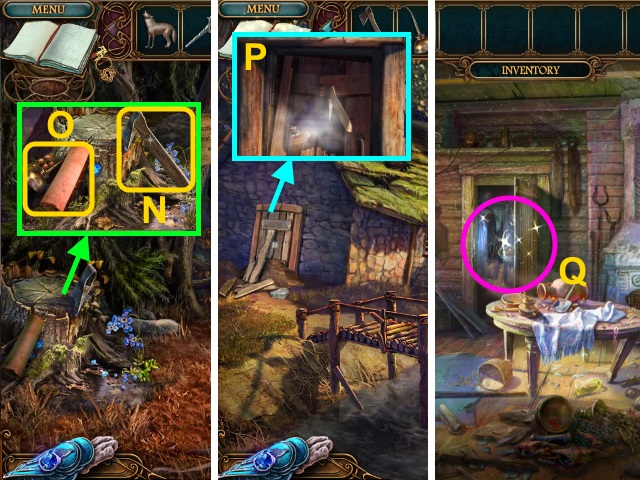
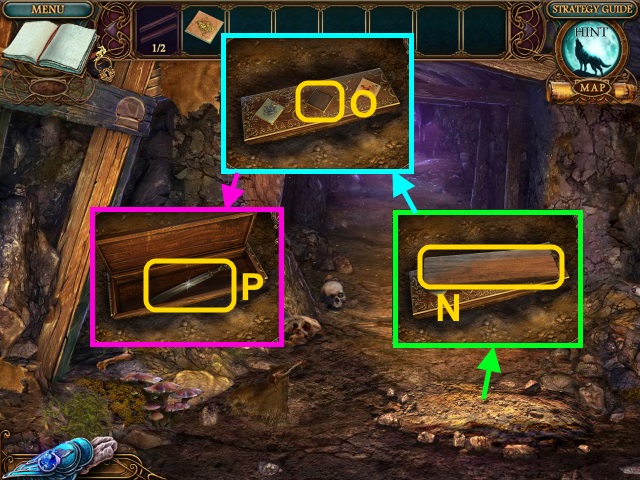
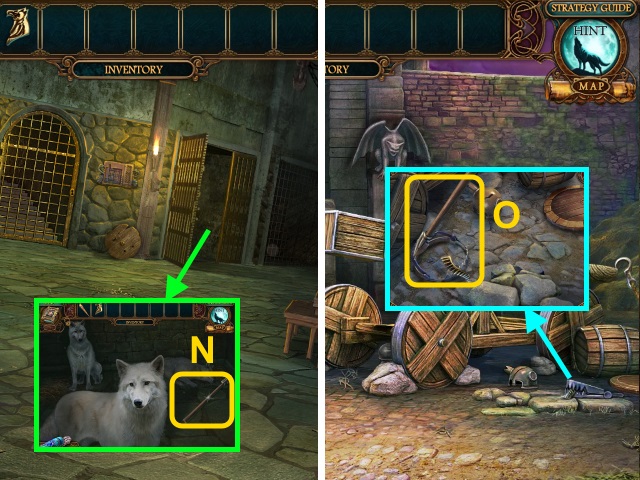
- Place the BAS-RELIEF (N).
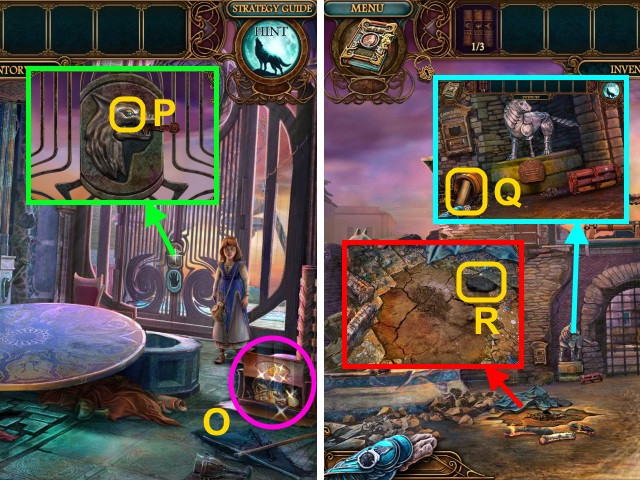
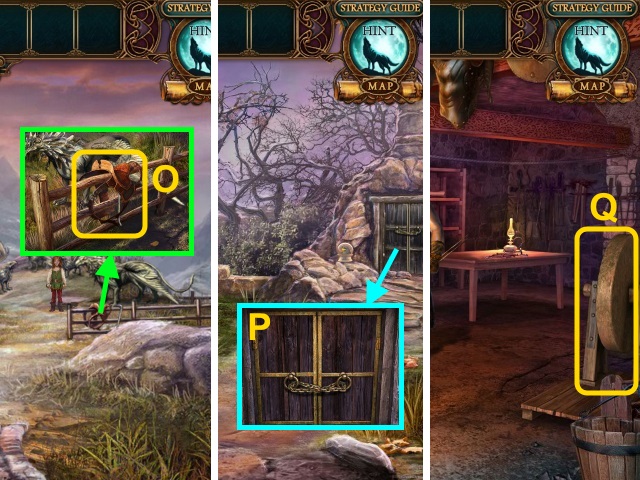
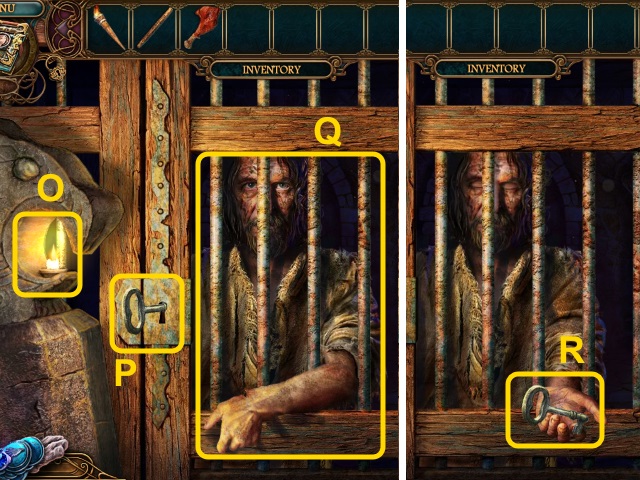
- Play the HOP to receive the WOLF EYE (O).
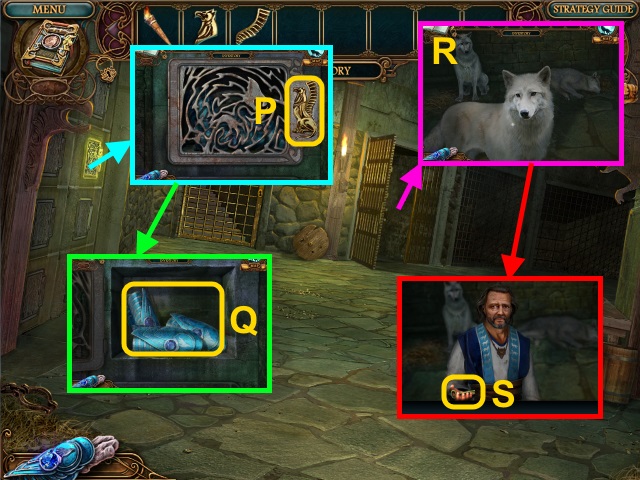
- Place the WOLF EYE (P).
- Walk forward.
- Use the Bracelet.
- Jump down.
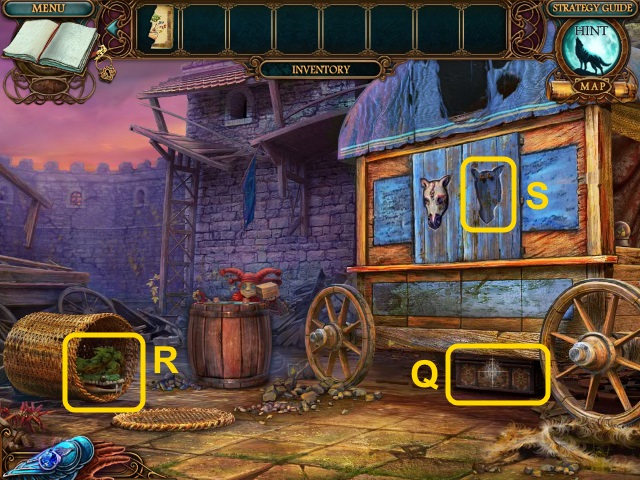
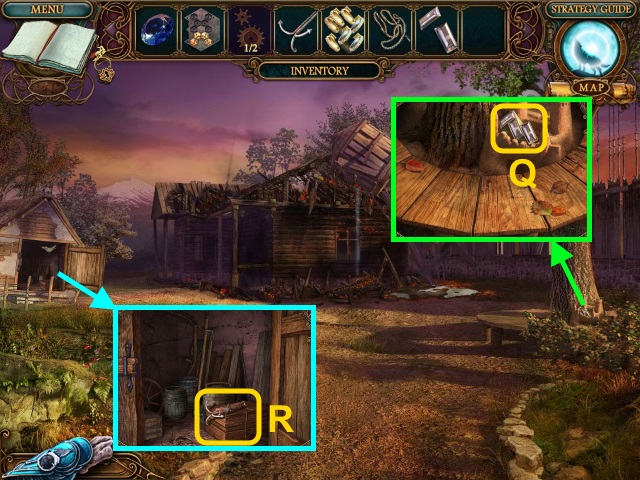
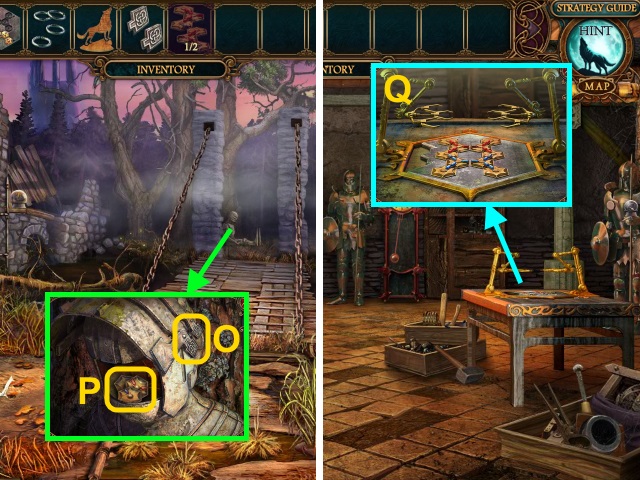
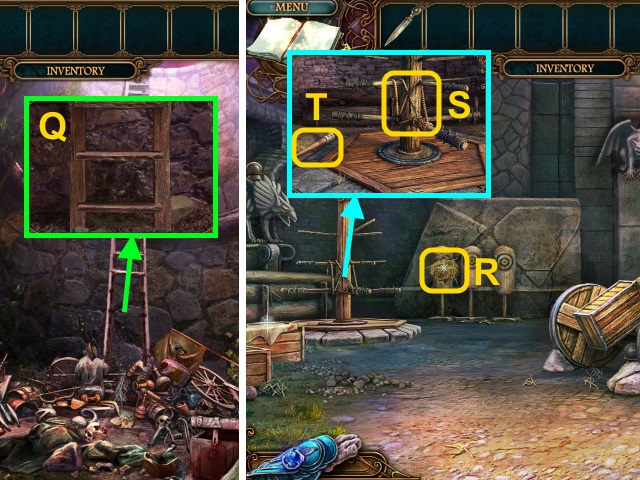
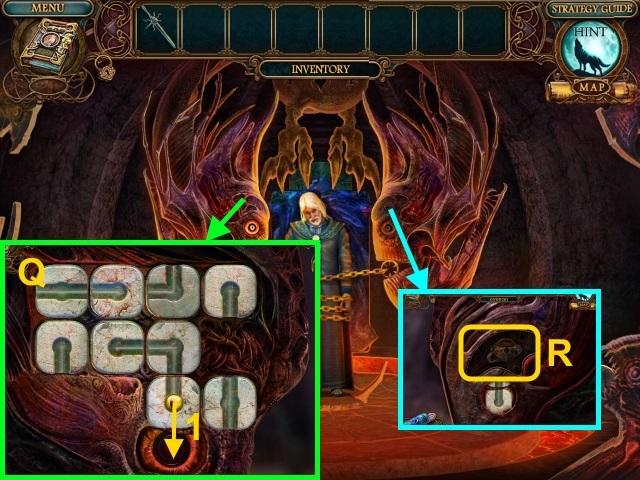
- Take the Map and BOOK (2/3) (Q).
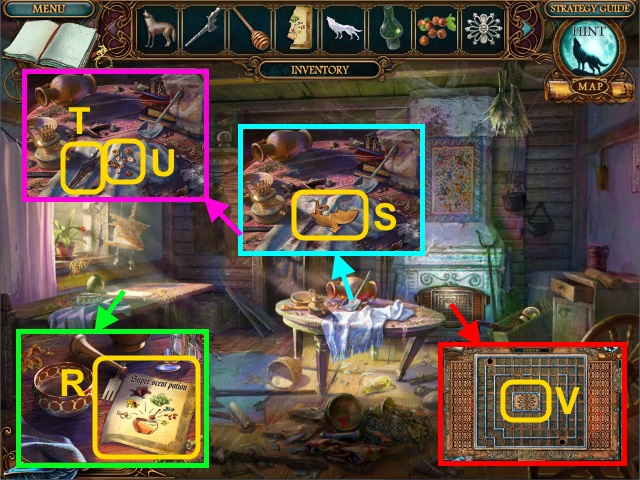
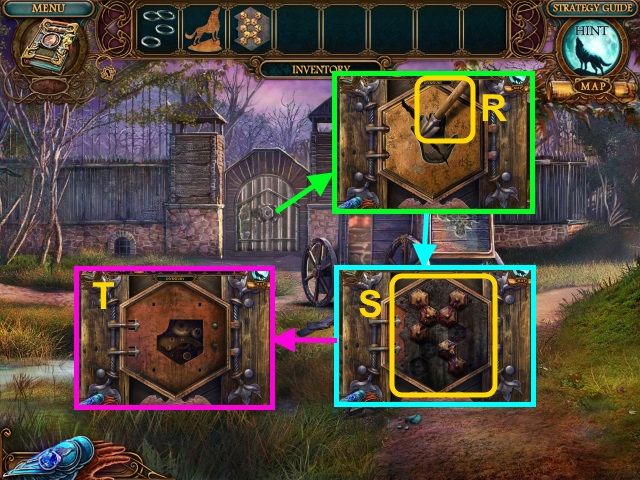
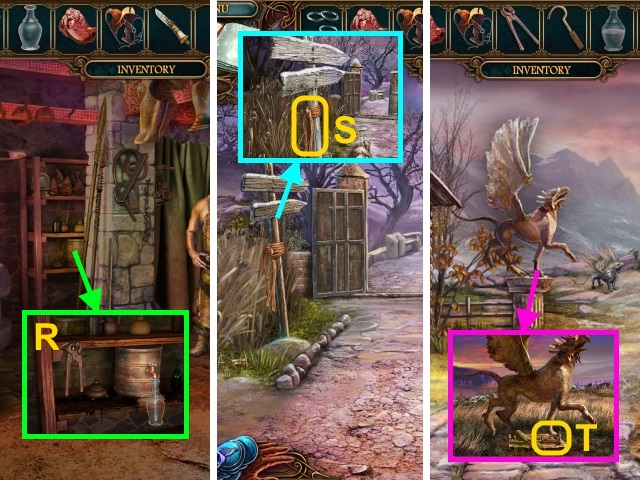
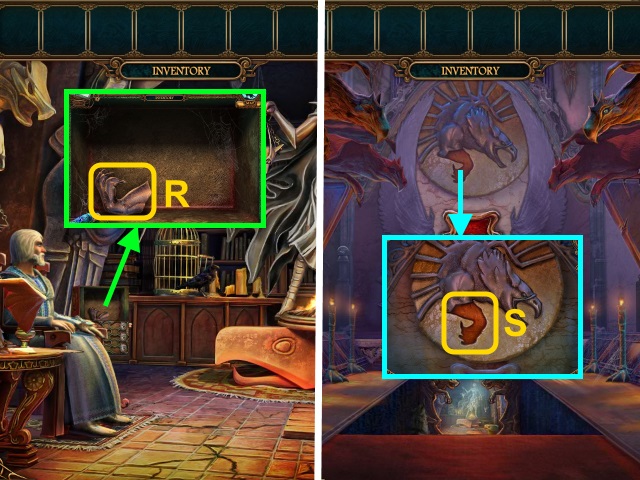
- Take the COAL (R).
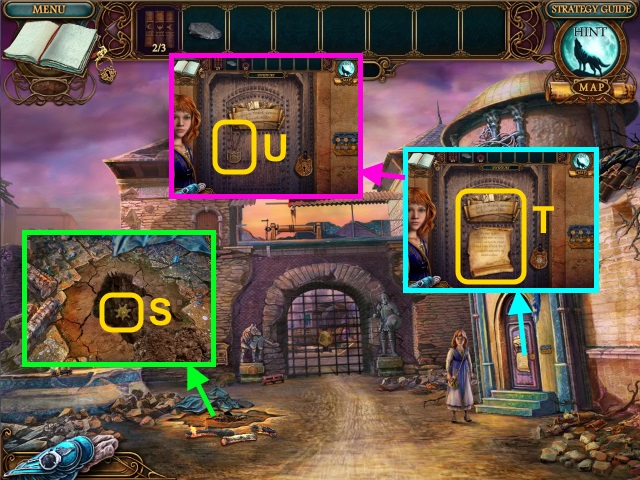
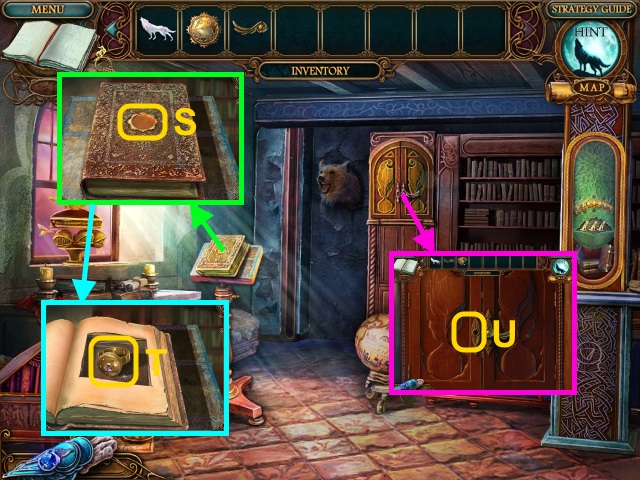
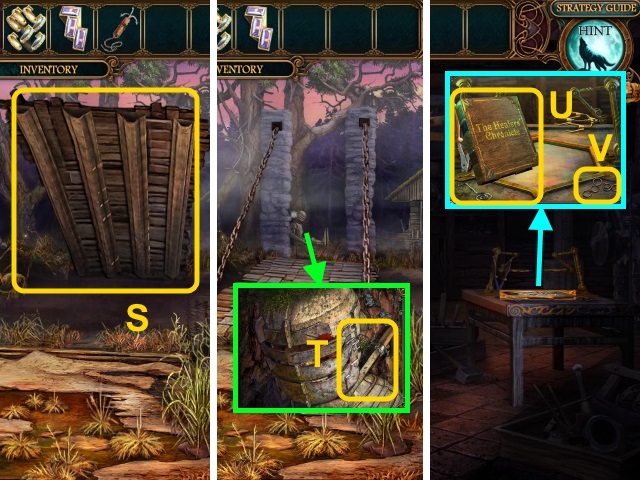
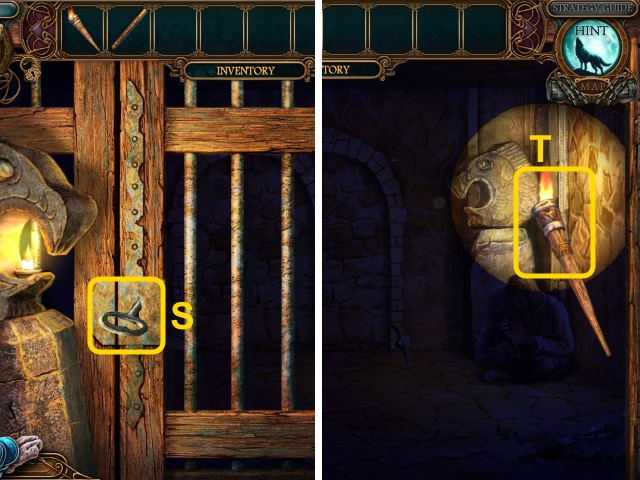
- Move the dirt; take the GEAR (1/2) (S).
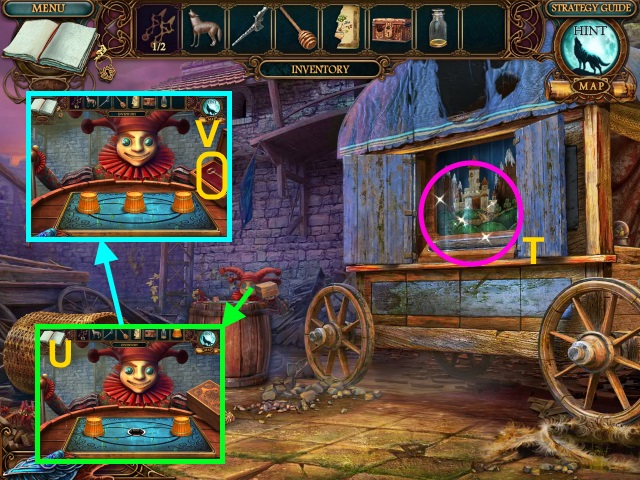
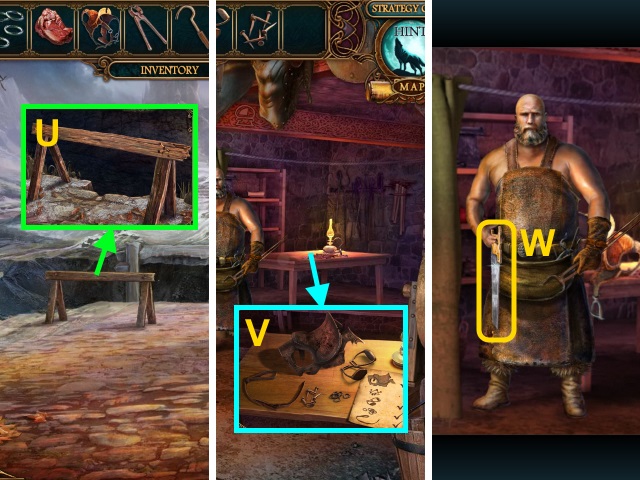
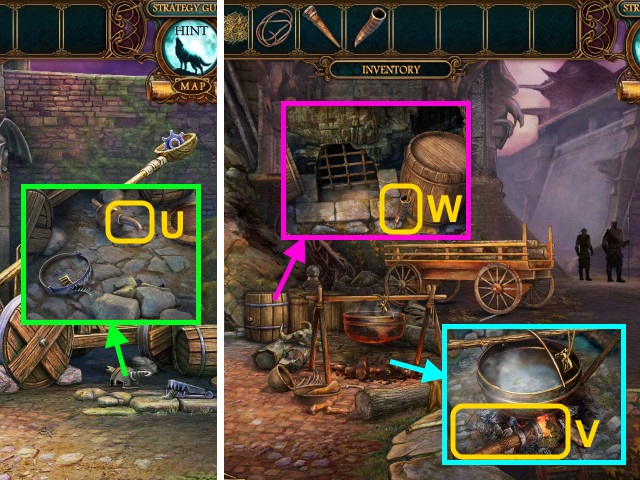
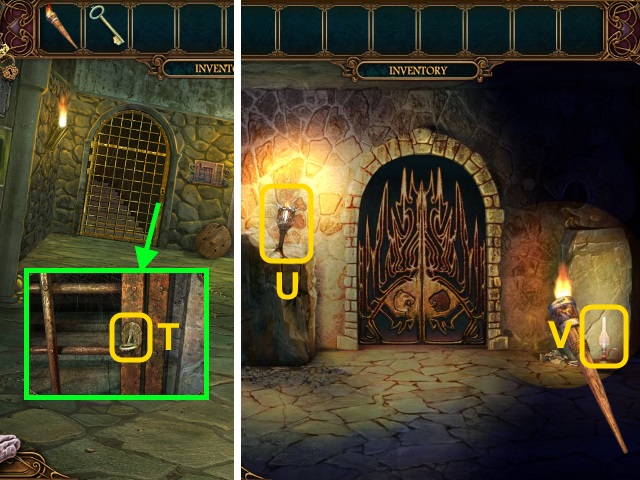
- Read the plaque and note (T); take the POSTBOX EMBLEM (U).
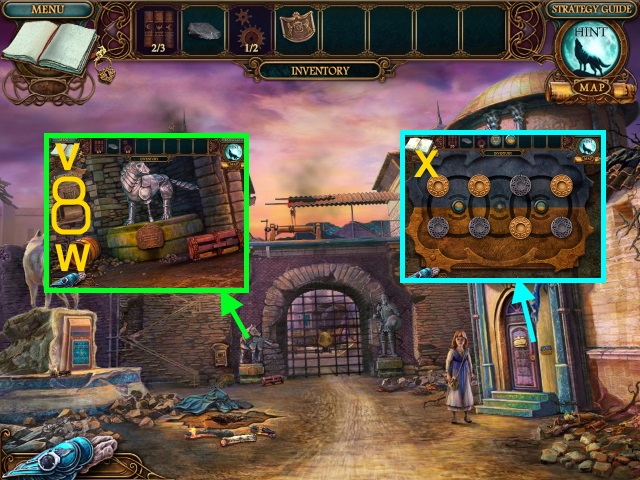
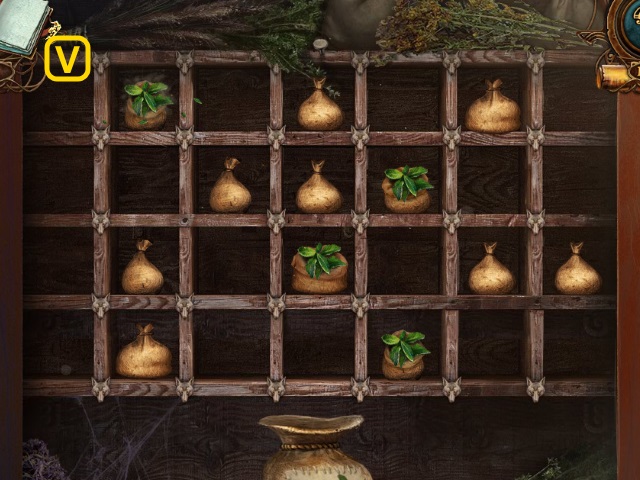
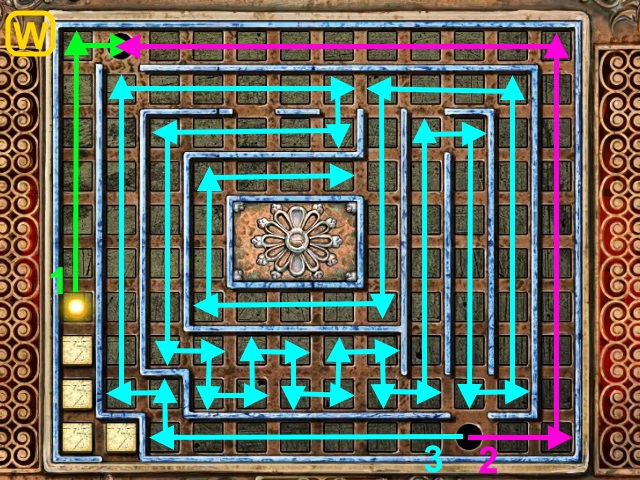
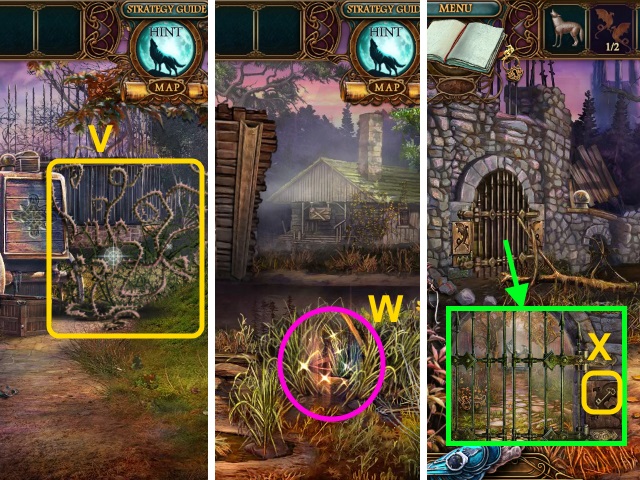
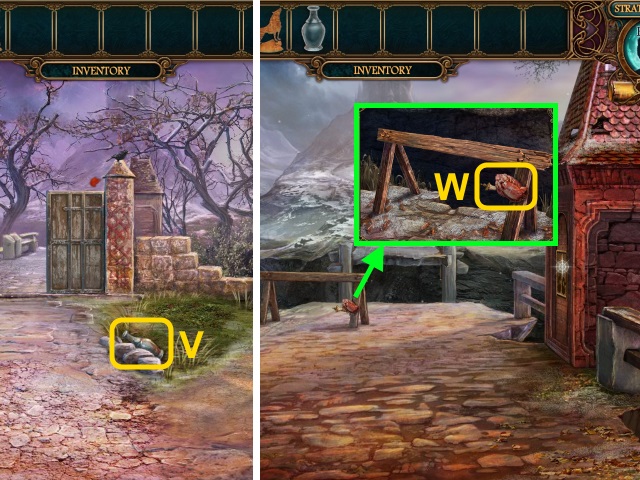
- Place the POSTBOX EMBLEM (V).
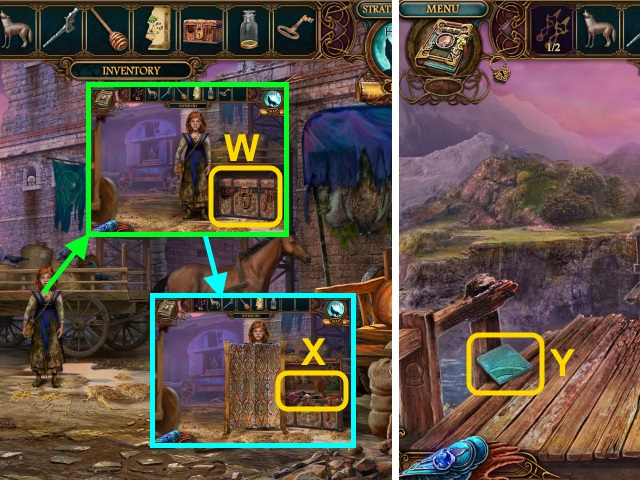
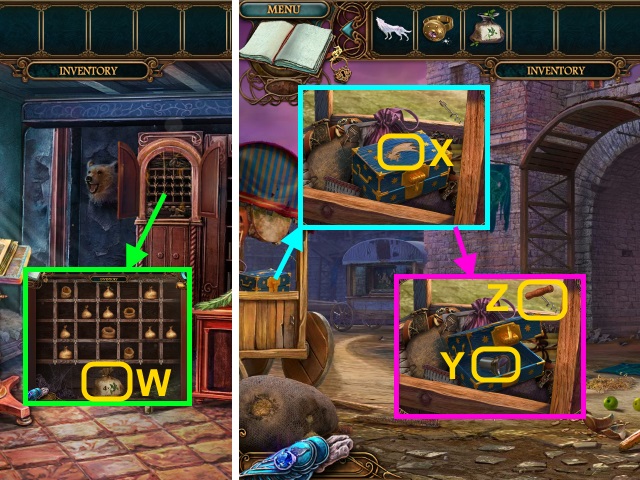
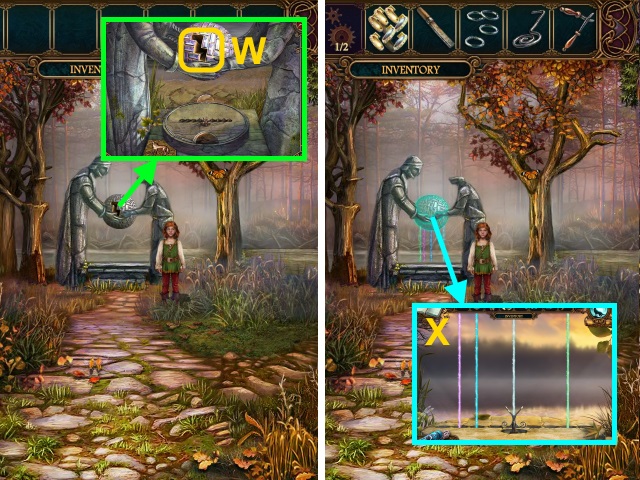
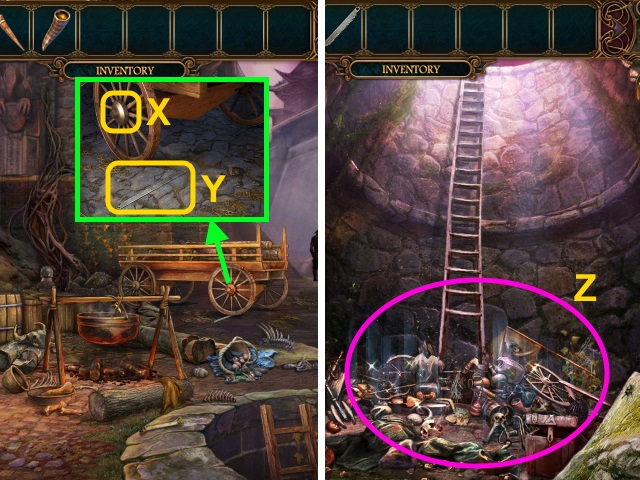
- Take the letters, AIR SIGN, and BUTTON (W).
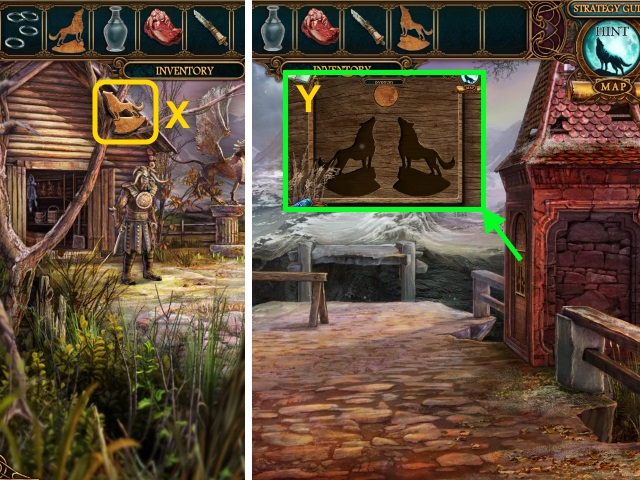
- Place the BUTTON for a mini-game (X).
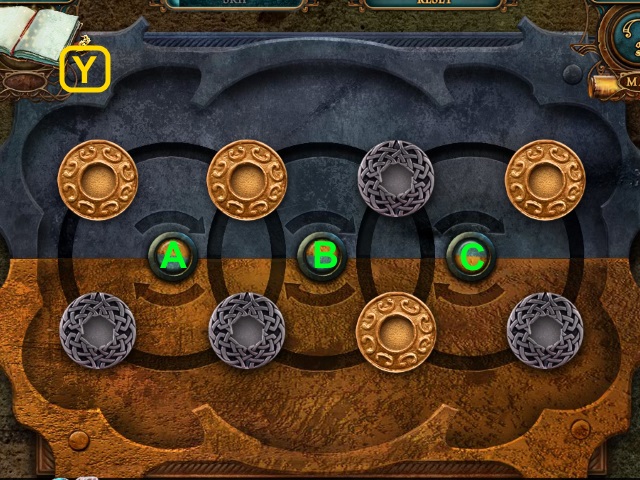
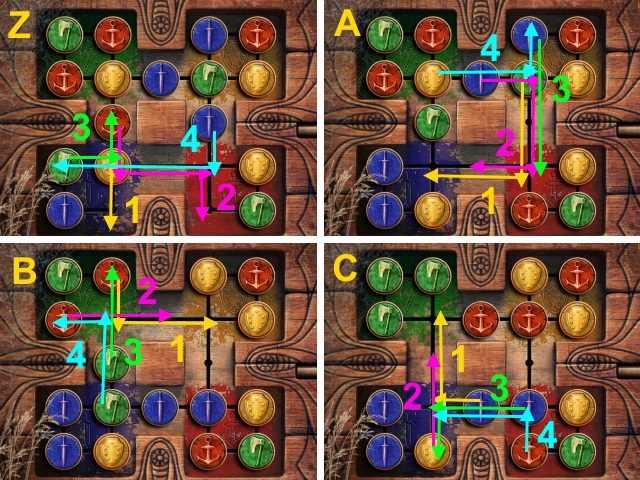
- Solution (Y): Ax2, B, C, Bx3.
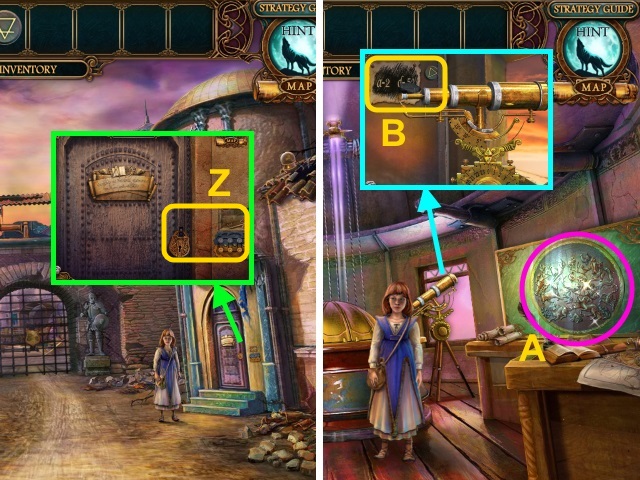
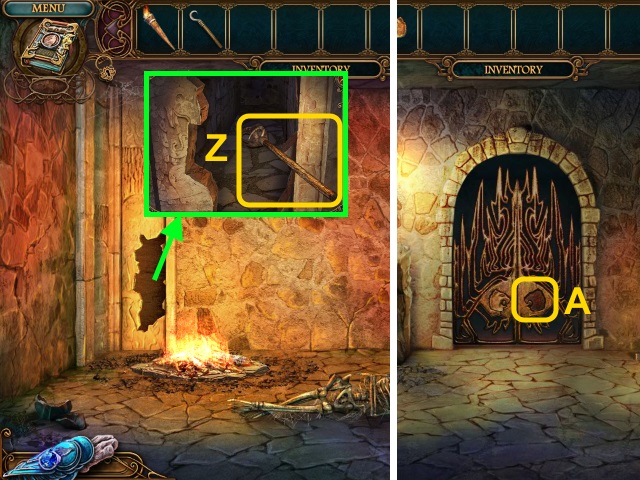
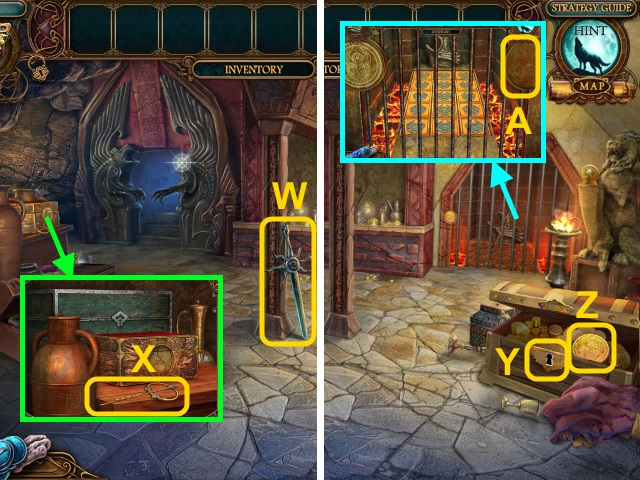
- Use the key (Z) on the lock.
- Walk right, then up.
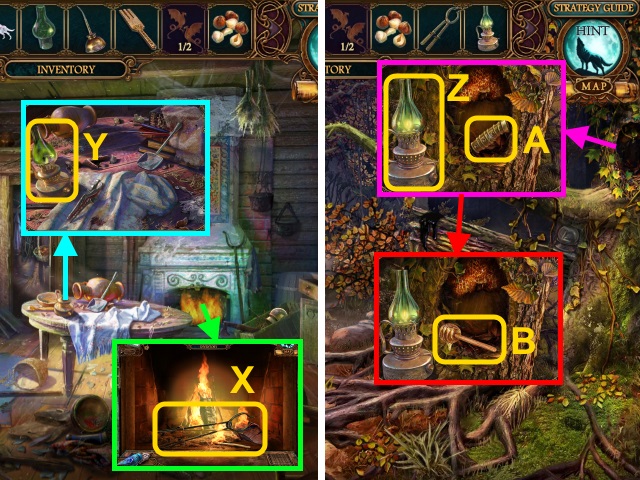
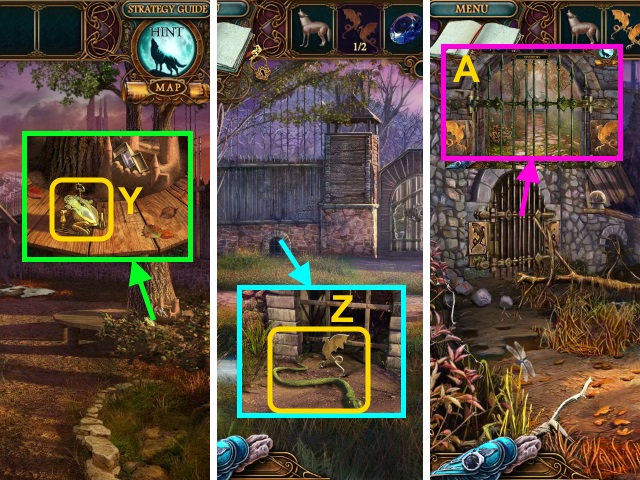
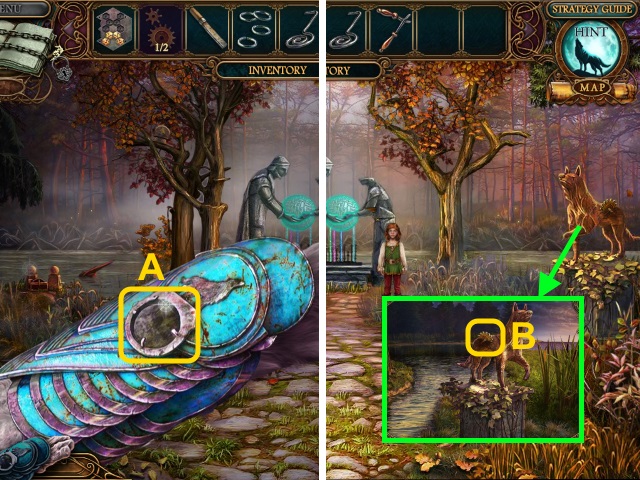
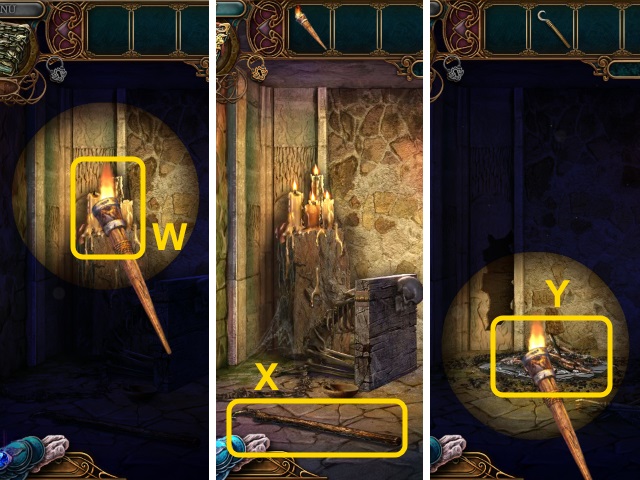
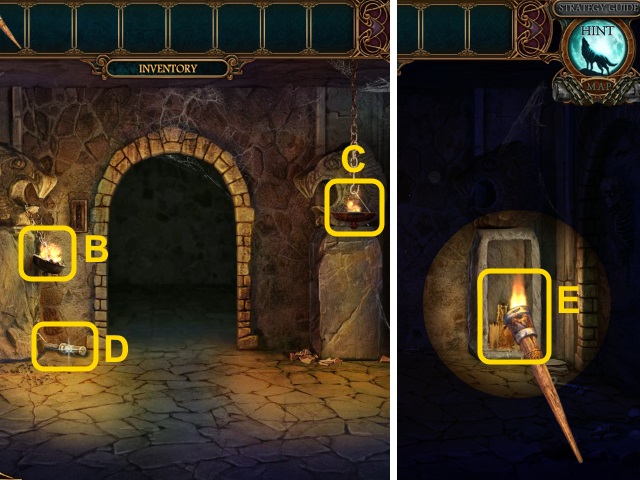
- Play the HOP to receive the FIRE SIGN (A).
- Take the WATER SIGN; use the COAL (B).
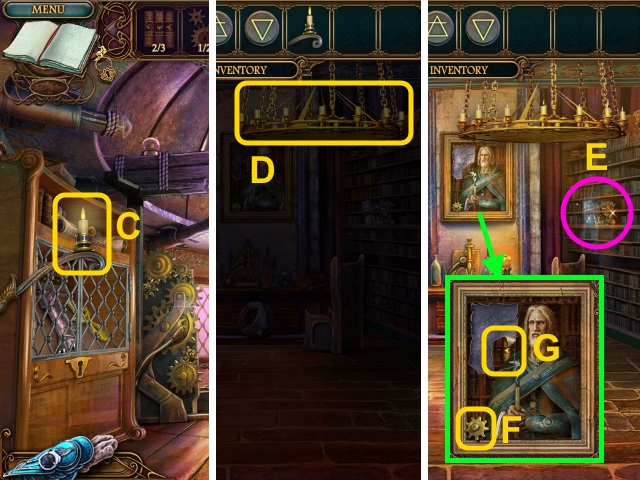
- Take the BURNING CANDLE (C).
- Walk down.
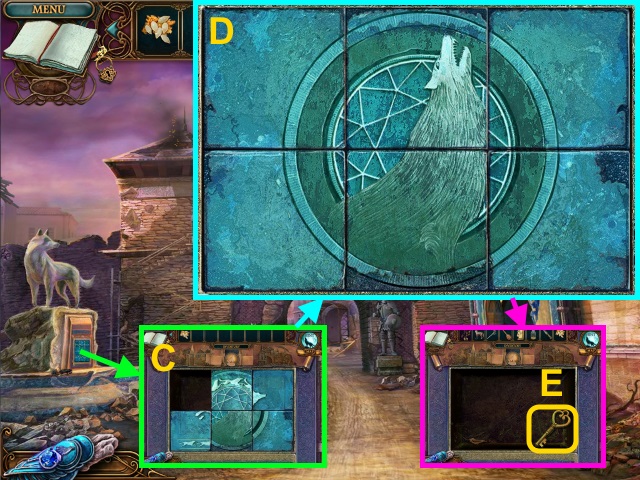
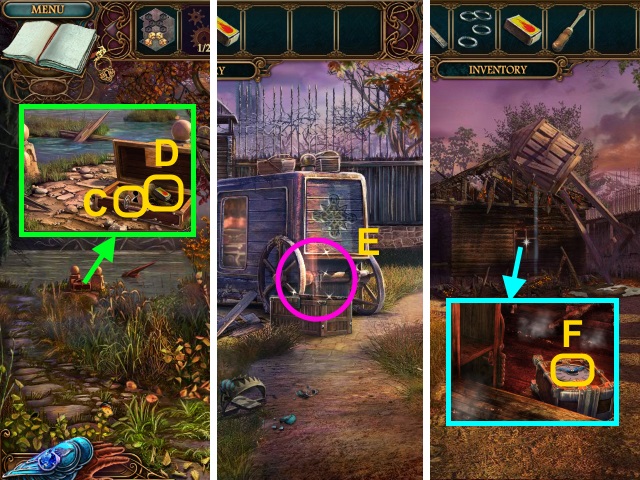
- Use the BURNING CANDLE (D).
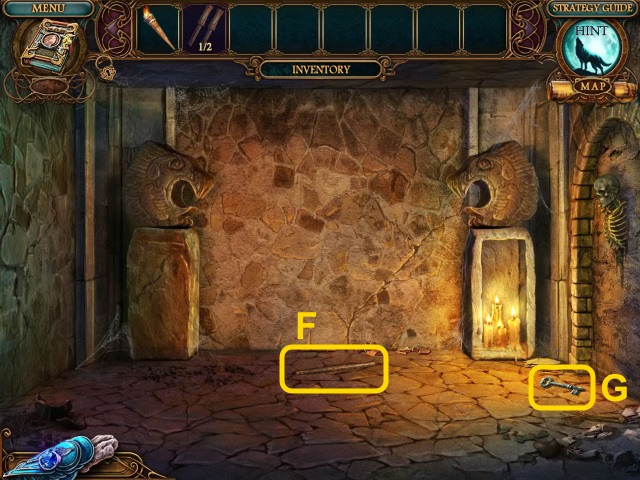
- Play the HOP to receive the TELESCOPE PART (E).
- Take the GEAR (2/2) (F) and PIECE OF CANVAS (1/2) (G).
- Go up.
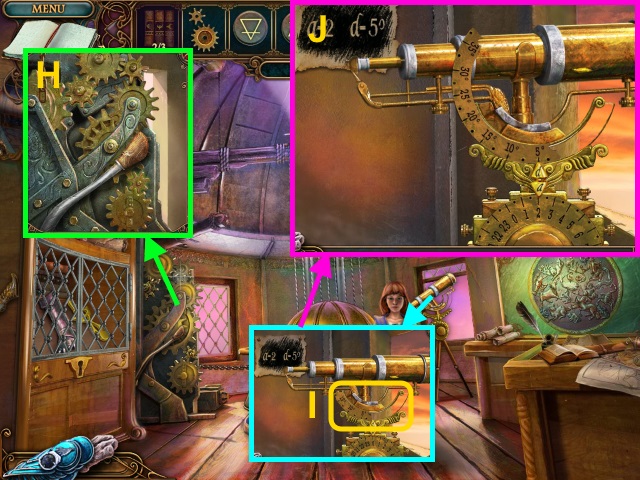
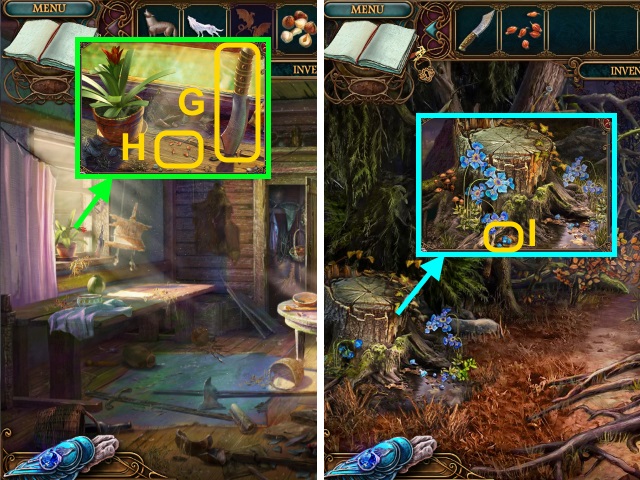
- Pull the lever; place the GEARS (H).
- Pull the lever.
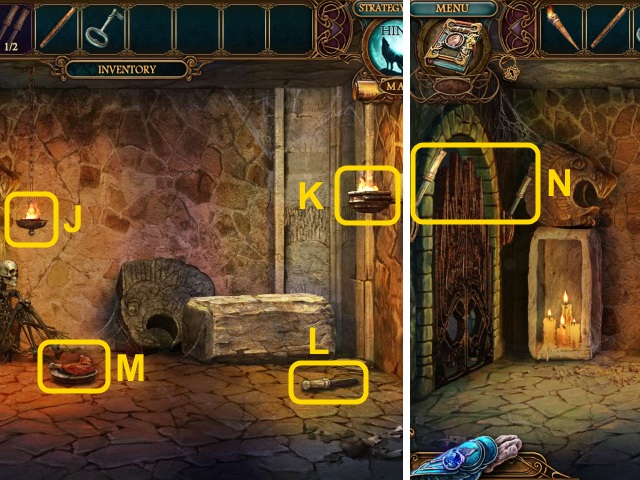
- Place the TELESCOPE PART (I); move the parts (J).
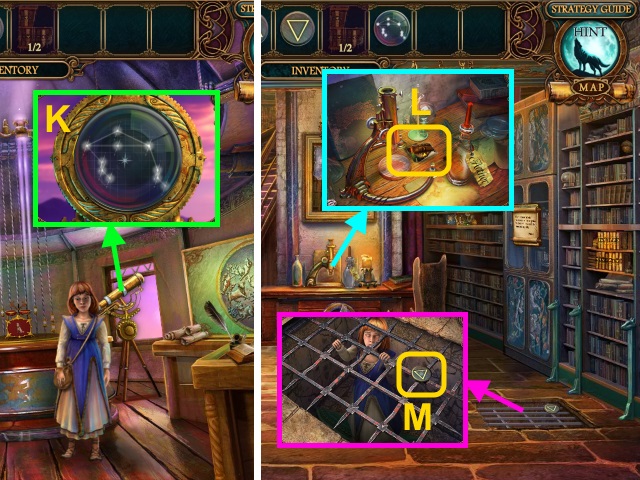
- Take the LENS (K).
- Go down.
- Take the PIECE OF CANVAS (2/2) (L).
- Take the EARTH SIGN (M).
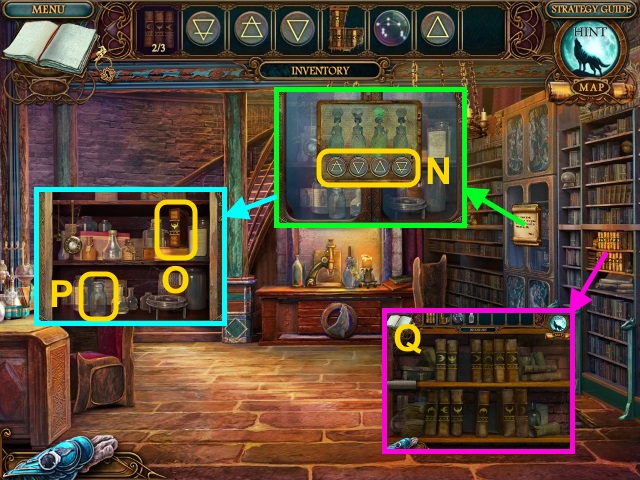
- Take the note; place the AIR SIGN, FIRE SIGN, WATER SIGN, and EARTH SIGN (N).
- Take the BOOK (3/3) (O) and JAR (P).
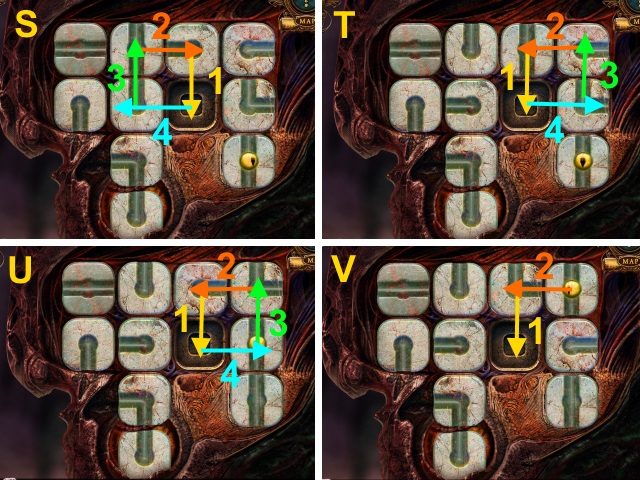
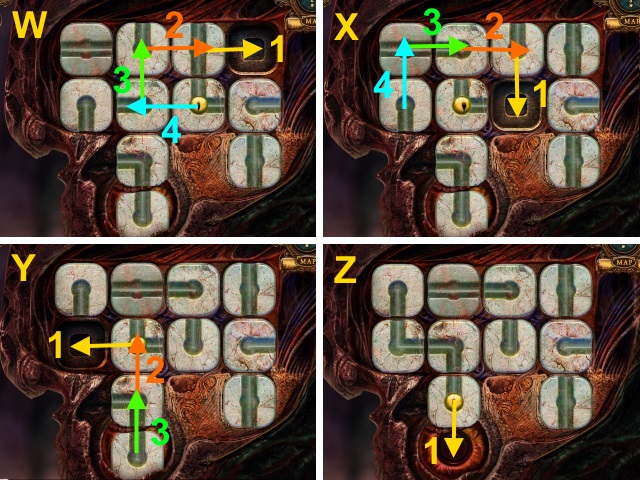
- Place the BOOKS and PIECE OF CANVAS for a mini-game (Q).
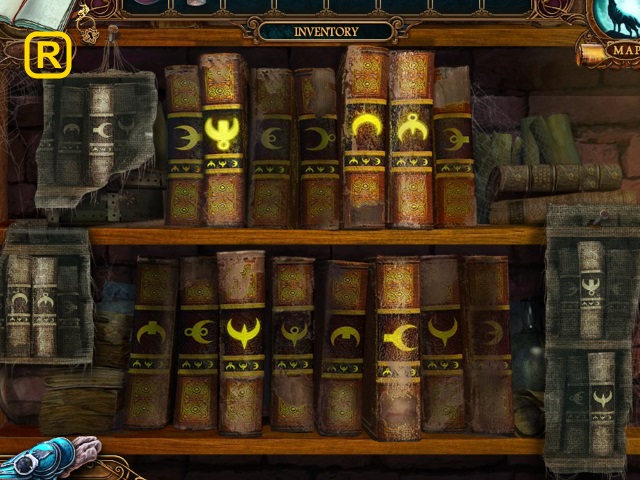
- Solution (R).
- Walk right.
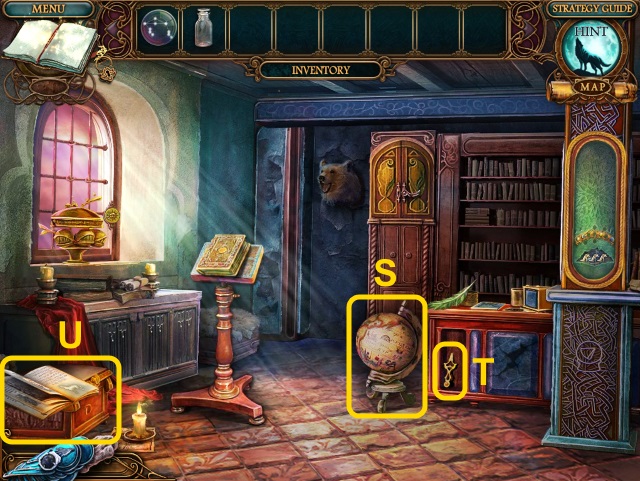
- Move the globe (S); take the CLOCK HAND (1/2) (T).
- Take the book; open the box (U).
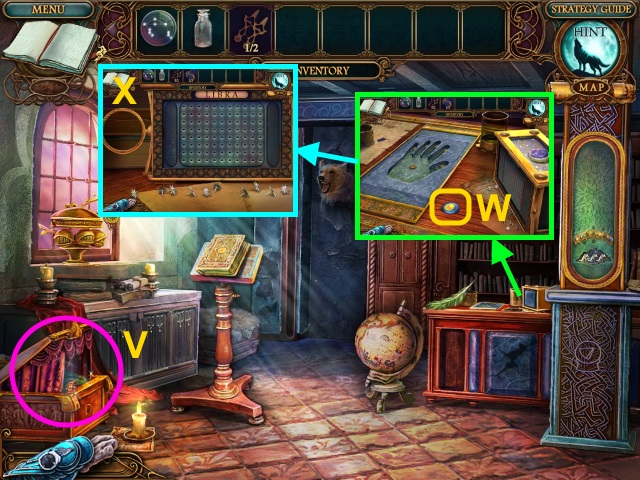
- Play the HOP to receive the MOON (1/3) (V).
- Take the MOON (2/3) (W).
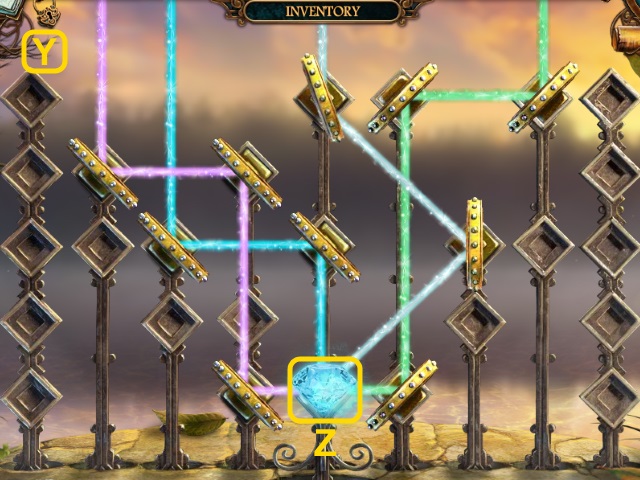
- Place the LENS for a mini-game (X).
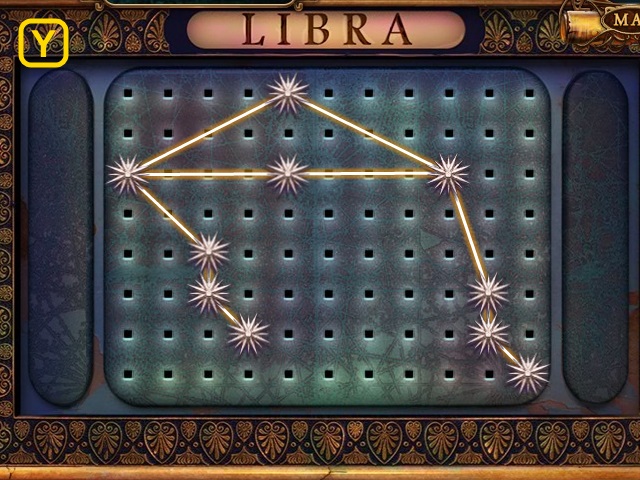
- Solution (Y).

- Take the MOON (3/3) (Z).
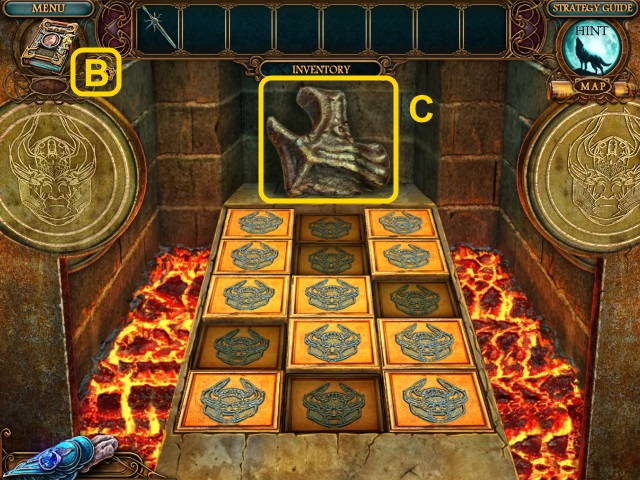
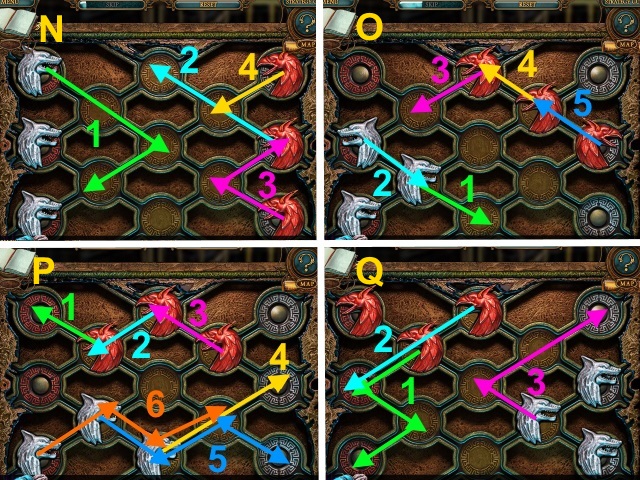
- Place the MOONS for a mini-game (A).
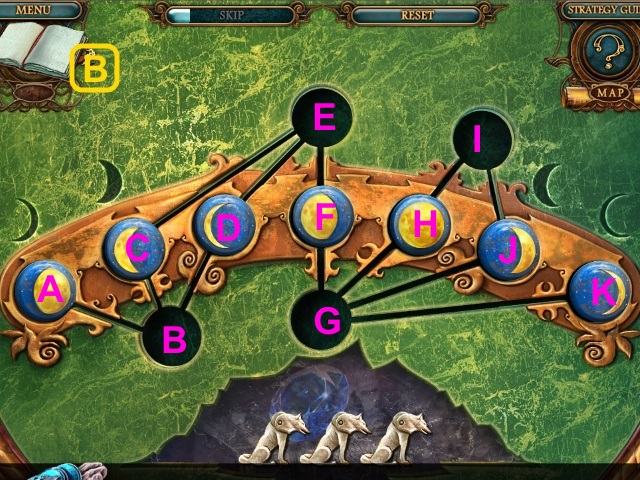
- Solution (B): H-I, F-H, D-B, K-D, C-K, B-C, D-B, J-D, C-J, B-C, D-G, A-D, C-A, G-C, H-G, I-H, J-I, G-J, H-E, K-F, I-K, J-H, F-J, E-F.
- Take the CRYSTAL (C).
- Walk down, then up.
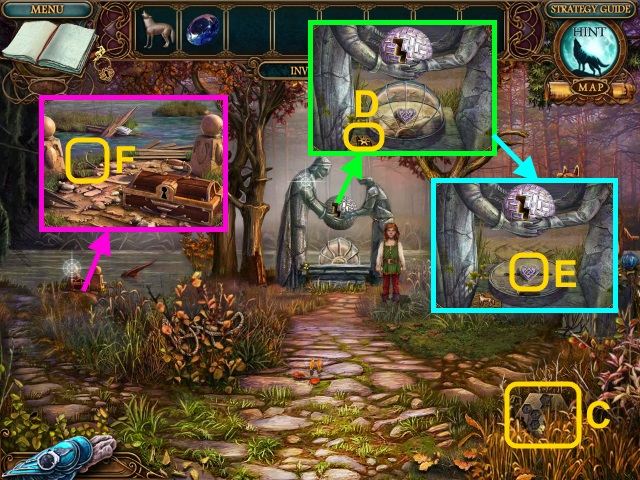
- Place the CRYSTAL (D); take the CHARGED CRYSTAL and MIRA'S AMULET.
- Place the CHARGED CRYSTAL (E).
- Walk down, then right.
- Press the tile (F); take the OIL (G).
- Walk down twice.
- Use the OIL (H).
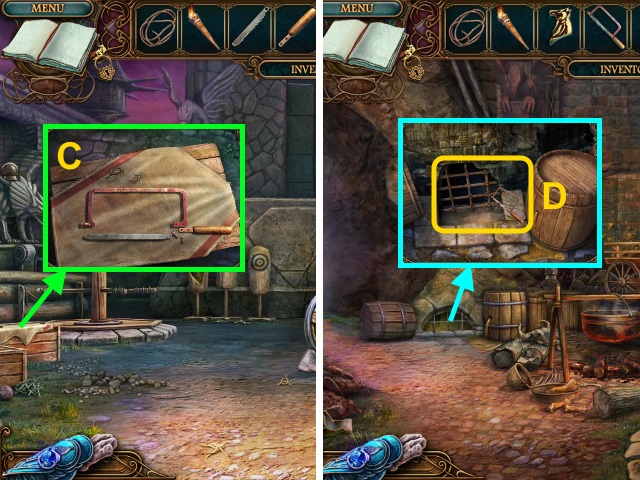
- Open the toolbox; take the HACKSAW (I).
- Walk right.
- Use the HACKSAW (J).
- Walk down.
- Press the lock (K).
- Walk forward.
Chapter 2: The Market
- Take the CANE (L), NUTCRACKER JAW (M), and FLUTE (N).
- Take the HONEY STICK, MASK (O), and PIECE OF INSTRUCTIONS (P).
- Walk left.
- Use the CANE (Q); take the CHEST WITH CLOTHES.
- Use the FLUTE and JAR to receive the SNAKE VENOM (R).
- Place the MASK (S).
- Play the HOP to receive the BARREL (T).
- Place the BARREL for a mini-game (U).
- Solution is random.
- Take the CHEST KEY (V).
- Walk down.
- Place the CHEST WITH CLOTHES (W); use the CHEST KEY.
- Place the clothes (X).
- Walk forward.
- Take the TILE (Y).

- Take the KNIFE (Z).
- Walk down.
- Use the KNIFE; take the PUMPKIN SEEDS (A).
- Walk down.
- Use the Bracelet; move the dirt (B).
- Place the TILE for a mini-game (C).
- Solution (D).
- Take the KEY (E).
- Walk right.
- Use the KNIFE (F); take the PEARL (1/2).
- Walk up.
- Use the KEY (G); take the PAW ARMOR, CLOCK HAND (2/2), and CORKSCREW HANDLE (H).
- Walk down twice.
- Place the CLOCK HANDS for a mini-game (I).
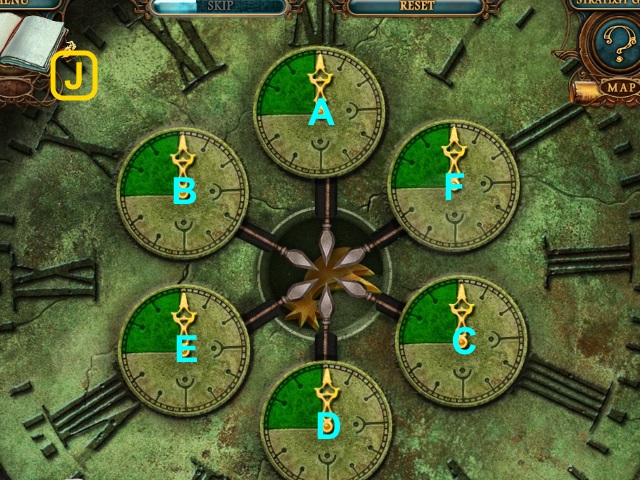
- Solution (J): select A. When A is at 20, select B, C, D. When A is at 25, select E. When A is at 35, select F.
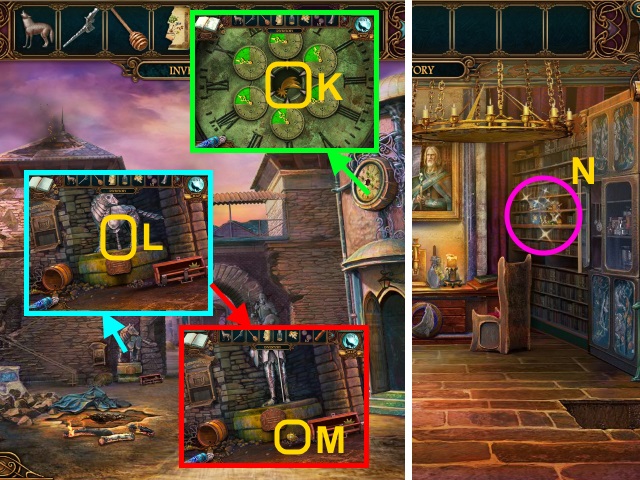
- Take the STAR (K).
- Place the PAW ARMOR (L); take the METAL SUN (M).
- Walk right.
- Play the HOP to receive the PEARL (2/2) (N).
- Walk right.
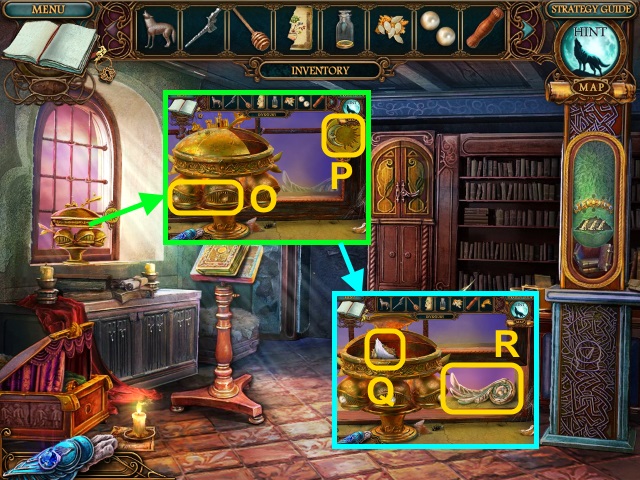
- Place the PEARLS (O) and METAL SUN (P).
- Take the WOLF EMBLEM, BOOK PART (Q), and HANDLE (R).
- Place the BOOK PART (S); take the MAGIC POWDER (T).
- Place the HANDLE for a mini-game (U).
- Solution (V).
- Take the MINT (W).
- Go to the Marketplace.
- Place the STAR (X); take the SCOPE (Y).
- Place the CORKSCREW HANDLE; take the CORKSCREW (Z).

- Use the CORKSCREW (A); take the ROOT.
- Walk down, then right.
- Place the SCOPE (B).
- Examine the microscope for a mini-game.
- Solution (C).
- Take the AETHER (D).
- Use the Bracelet.
- Take the note; place the PUMPKIN SEEDS, SNAKE VEMON, MINT, MAGIC POWDER, ROOT, and AETHER (E).
- Follow the directions (F).
- Take the POTION (G).
- Go to the Burnt Bridge.
- Give the POTION (H).
- Use the Bracelet.
- Go forward.
Chapter 3: The Forest
- Take the LAMP GLASS (I) and AXE HANDLE (J).
- Walk right.
- Move the branches (K).
- Take the NUTS (L).
- Take the METAL FLOWER (1/2) (M).
- Place the AXE HANDLE; take the AXE (N), Map, and OIL (O).
- Walk down.
- Use the AXE (P).
- Walk left.
- Open the door; play the HOP to receive the METAL FLOWER (2/2) (Q).
- Place the PIECE OF INSTRUCTIONS; take the SPATULA (R).
- Take the DRAGON (1/2) (S).
- Place the NUTCRACKER JAW and NUTS (T); take the CRACKED NUTS (U).
- Place the METAL FLOWER for a mini-game (V).
- Solution (W): 1-3.
- Place the match in the fire; take the LIT MATCH and TONGS (X).
- Use the OIL, LIT MATCH, and LAMP GLASS; take the LANTERN (Y).
- Walk down, then right.
- Place the LANTERN (Z); take the KNIFE HANDLE (A).
- Use the HONEY STICK; take the WILD HONEY (B).

- Use the SPATULA; take the TAR (C).
- Walk down.
- Use the TONGS (D); take the DARK LILY.
- Use the TAR; take the JAR WITH WATER (E).
- Walk left.
- Play the HOP to receive the YELLOW SEEDS (F).
- Place the KNIFE HANDLE; take the KNIFE (G).
- Pour the JAR WITH WATER; take the RED SEEDS (H).
- Walk down, then right.
- Pour the JAR WITH WATER; take the BLUE SEEDS (I).
- Use the KNIFE; take the GLOWING MOSS (J).
- Walk down, then left.
- Place the CRACKED NUTS, DARK LILY, WILD HONEY, BLUE SEEDS, YELLOW SEEDS, RED SEEDS, and GLOWING MOSS (K).
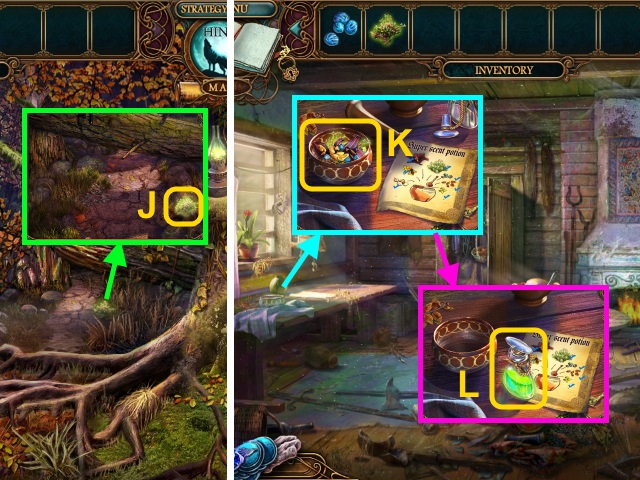
- Use the PESTLE; take the SUPER SCENT (L).
- Walk down, then right.
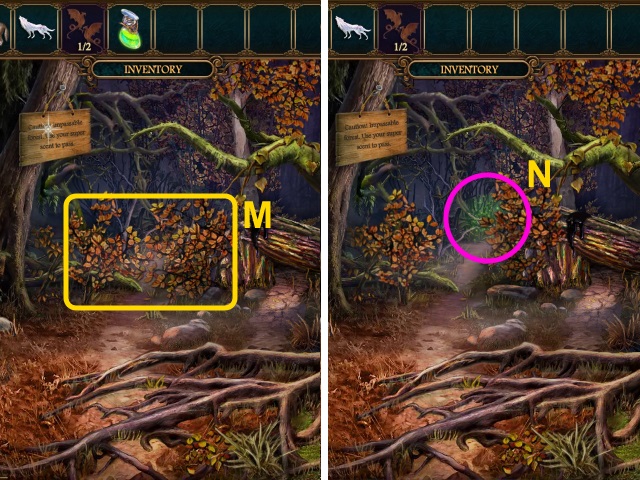
- Use the SUPER SCENT (M).
- Play the HOP to move forward (N).
- Walk left.
Chapter 4: Outside the Gates
- Take the CHEST PIECE (O).
- Walk down.
- Place the WOLF EMBLEM and CHEST PIECE (P).
- Play the HOP to receive the HIDE (Q).
- Walk left.
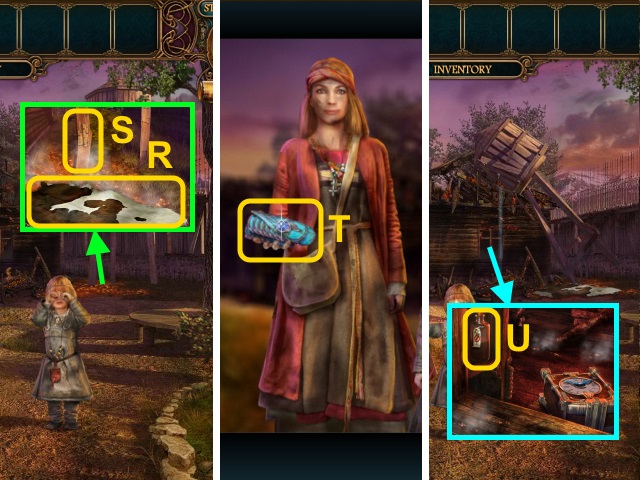
- Place the HIDE (R); break the pole (S).
- Take the Bracelet (T).
- Take the HERBICIDE (U).
- Walk down.
- Use the HERBICIDE (V).
- Walk right.
- Move the plants; play the HOP to receive the GLASS PIECE (W).
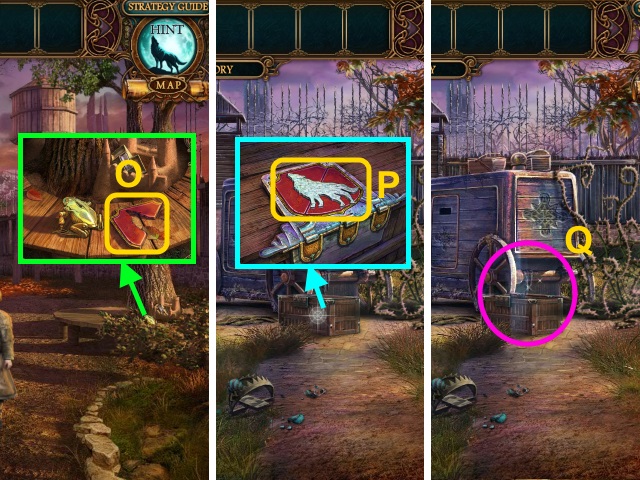
- Take the FROG KEY (X).
- Go to Nashira's Place.
- Use the FROG KEY; take the FROG (Y).
- Walk down.
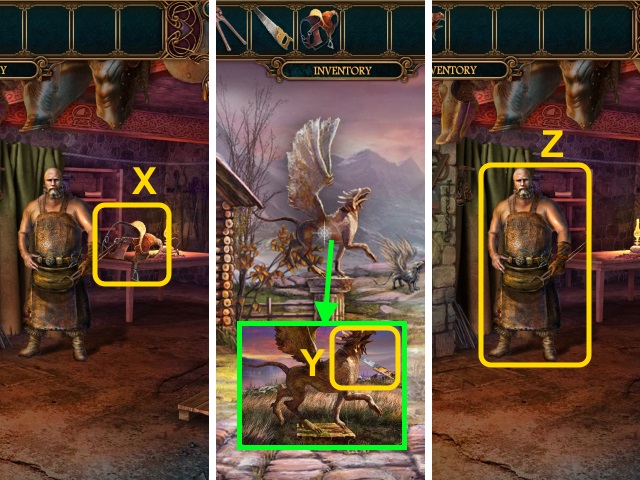
- Use the FROG; take the DRAGON (2/2) (Z).
- Walk right.
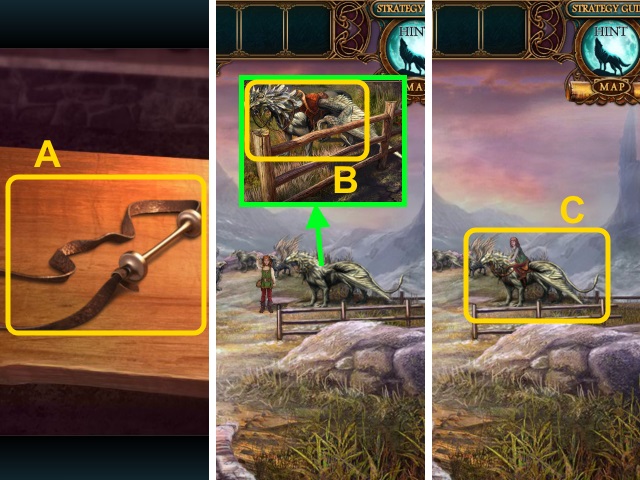
- Place the DRAGONS for a mini-game (A).
- Solution (B).
- Walk left.
- Take the GATE PART (C).
- Take the GEAR (D); place MIRA'S AMULET.
- Take the METAL HEART (E).
- Take the HOOK PART (F).
- Place the lid; take the ANTI-RUST SOLUTION (G) and STEEL CLAW (H).
- Walk down twice.
- Use the STEEL CLAW (I).
- Place the METAL HEART (J); take the LENS (1/2) and LENS (2/2) (K).
- Walk left.
- Use the STEEL CLAW (L).
- Use the ANTI-RUST SOLUTION (M); take the PRUNERS and NET (N).
- Go to the Pond.
- Use the PRUNERS; take the ROPE (O).
- Use the NET (P); take the GLASS PIECE (2/2).
- Go to Nashira's Place.
- Place the GLASS PIECES; take the PLANET PART (Q).
- Place the HOOK PART and ROPE; take the HOOK (R).
- Walk down, then right.
- Use the HOOK (S).
- Take the RASP (T).
- Walk right.
- Take the book, LOCKPICK, PLIERS(U), and RINGS (V).
- Walk down, then left.
- Place the PLANET PART (W).
- Place the CRYSTAL and LENSES for a mini-game (X).
- Solution (Y).
- Take the CHARGED CRYSTAL (Z).
- Place the CHARGED CRYSTAL (A).
- Use the PLIERS (B); take the GEAR (2/2).
- Use the LOCKPICK (C); take the MATCHES (D).
- Walk down twice.
- Play the HOP to receive the SCREWDRIVER (E).
- Walk left.
- Use the SCREWDRIVER (F); take the CLOCK HANDS.
- Go to the House.
- Use the MATCHES (G).
- Take the WOODEN WOLF (H).
- Use the SCREWDRIVER; place the GEARS and CLOCK HANDS (I).
- Take the METAL PLATE (1/2) (J).
- Use the RASP (K); take the GATE PLATE PIECE (1/2).
- Use the SCREWDRIVER (L).
- Walk down.
- Play the HOP to receive the SOCKET WRENCH (M).
- Walk right.
- Use the SOCKET WRENCH (N); take the METAL PLATE (2/2).
- Walk down.
- Place the METAL PLATES (O); open the grate.
- Take the GATE PLATE PIECE (2/2) (P).
- Walk right.
- Place the GATE PART and GATE PLATE PIECES; take the GATE PART (Q).
- Walk down twice.
- Move the spear (R); move the gate part (S).
- Place the GATE PART for a mini-game (T).
- Solution (U).
- Walk forward.
Chapter 5: The Broken Bridge
- Take the EMPTY VIAL (V).
- Walk forward.
- Take the MEAT and OLD KNIFE (W).
- Walk down.
- Take the WOODEN WOLF (X).
- Walk down, then forward.
- Place the 2 WOODEN WOLVES for a mini-game (Y).
- Solution (Z-G).
- Play the HOP to receive the SLINGSHOT PART (H).
- Walk down, then left.
- Place the SLINGSHOT PART (I); examine it for a mini-game.
- Solution (J-N).
- Take the BROKEN SADDLE and CROWBAR (O).
- Walk down.
- Use the CROWBAR (P).
- Walk right.
- Use the OLD KNIFE to make the SHARP KNIFE (Q).
- Take the NIPPERS and NAIL PULLER (R).
- Use the EMPTY VIAL; take the CLEANSER.
- Walk down.
- Use the SHARP KNIFE (S); take the LEATHER BELTS.
- Walk left.
- Use the CLEANSER (T); take the STIRRUPS.
- Walk down, then forward.
- Use the NAIL PULLER (U); take the NAILS.
- Walk down, then right.
- Place the BROKEN SADDLE, RINGS, LEATHER BELTS, STIRRUPS, and NAILS (V).
- Take the SAW (W).
- Take the SADDLE (X).
- Walk down, then left.
- Use the SAW (Y); take the GRIFFIN HEAD.
- Walk down, then right.
- Give the GRIFFIN HEAD (Z).
- Take the BRIDLE (A).
- Walk down, then left.
- Place the SADDLE and BRIDLE (B).
- Examine the griffin (C).
Chapter 6: Into the Castle
- Play the HOP to receive the SKULL (1/3) (D).
- Take the RUNG (1/2) (E).
- Use the NIPPERS (F); take the Map and SKULL (2/3) (G).
- Examine the bird (H).
- Give the MEAT (I); take the SKULL (3/3).
- Place the SKULLS for a mini-game (J).
- Solution (K).
- Go down.
- Use the Bracelet.
- Move the dirt (L).
- Walk forward.
- Play the HOP to receive the DECORATIVE TILE (M).
- Walk down.
- Move the dirt; take the RUNG (2/2) (N).
- Place the DECORATIVE TILE (O); take the ANCIENT KNIFE (P).
- Walk forward.
- Place the RUNGS (Q).
- Go up, then left.
- Use the ANCIENT KNIFE; take the HAY (R).
- Use the ANCIENT KNIFE; take the ROPE (S) and TORCH (T).
- Take the HORN (U).
- Walk down.
- Place the HAY; use the TORCH (V).
- Take the BURNING TORCH.
- Remove the cork; use the HORN (W).
- Take the HORN WITH OIL.
- Use the HORN WITH OIL (X); take the HACKSAW BLADE (Y).
- Go down.
- Play the HOP to receive the ARROW (Z).
- Walk down.
- Use the BURNING TORCH (A); take the HACKSAW HANDLE.
- Go forward twice.
- Move the pendant; use the arrow (B).
- Take the GRIFFIN HEAD.
- Walk left.
- Place the HACKSAW BLADE and HACKSAW HANDLE (C); take the HACKSAW.
- Walk down.
- Use the HACKSAW (D).
- Go through the tunnel for a mini-game.
- Solution (E): ABE, BEAF, FCDBEA.
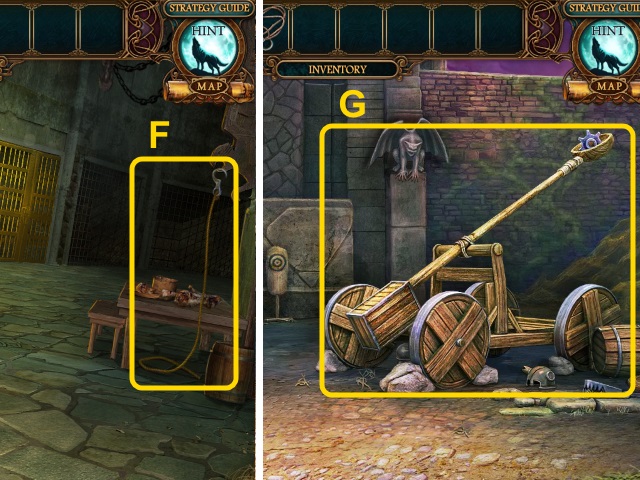
- Place the ROPE; take the ROPE (F).
- Walk down, then left.
- Use the ROPE (G).
- Take the GEAR (H).
- Go to the Dungeon.
- Place the GEAR for a mini-game (I).
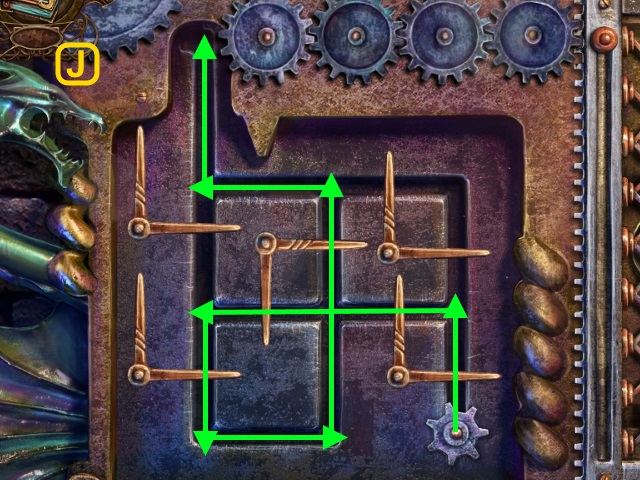
- Solution (J).
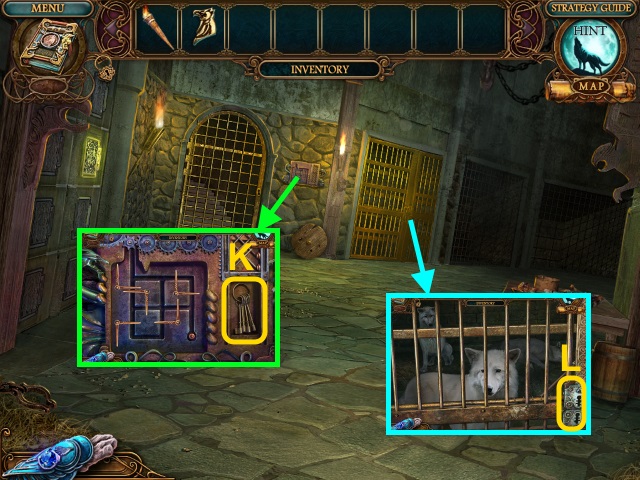
- Take the KEYS (K).
- Place the KEYS for a mini-game (L).
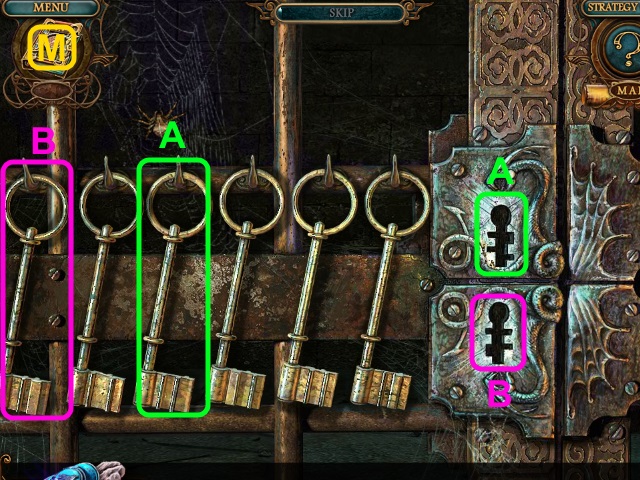
- Solution (M).
- Take the SPEAR (N).
- Go to the Training Ground.
- Use the SPEAR (O); take the GRIFFIN WING.
- Go to the Dungeon.
- Place the GRIFFIN HEAD and GRIFFIN WING (P).
- Take the HEALER BRACELETS (Q).
- Give the HEALER BRACELETS (R).
- Take the KEY (S).
- Use the KEY (T).
- Walk forward.
- Use the BURNING TORCH (U, V).
- Walk right.
- Use the BURNING TORCH (W).
- Take the HOOK (X).
- Walk down, then left.
- Use the BURNING TORCH (Y).
- Use the HOOK (Z); take the GRIFFIN HEAD.
- Walk down.
- Place the GRIFFIN HEAD (A).
- Walk forward.
- Use the BURNING TORCH (B, C).
- Take the LEVER (1/2) (D).
- Walk right.
- Use the BURNING TORCH (E).
- Take the PICK HANDLE (F) and GATE KEY (G).
- Walk down, then forward.

- Use the BURNING TORCH (H, I).
- Walk right.
- Use the BURNING TORCH (J, K).
- Take the LEVER (2/2) (L) and HAM (M).
- Walk down.
- Place the LEVERS (N).
- Walk left.
- Use the BURNING TORCH (O).
- Use the GATE KEY (P).
- Give the HAM (Q).
- Take the GATE KEY (R).
- Use the GATE KEY (S).
- Use the BURNING TORCH (T).

- Place the PICK HANDLE; take the PICK (U).
- Use the PICK (V).
- Walk forward.
Chapter 7: The Castle of the Dark
- Take the SWORD (W).
- Take the GOLDEN PIN (X).
- Use the GOLDEN PIN (Y); take the GOLDEN PLATE (Z).
- Place the GOLDEN PLATE for a mini-game (A).
- Solution (B).
- Take the STATUE HEAD (C).
- Place the STATUE HEAD (D).
- Walk forward.
- Take the HAND PART (E).
- Take the STATUE PART (F).
- Walk down.
- Place the HAND PART; Take the TORCH PART (G) and MEDALLION PIECE (1/2) (H).
- Walk forward.
- Place the TORCH PART (I).
- Walk left.
- Take the MEDALLION PIECE (2/2) (J).
- Walk down twice.
- Place the MEDALLION; take the STATUE PART (K).
- Walk forward, then left.
- Place the STATUE PART for a mini-game (L).
- Solution (M-Q).
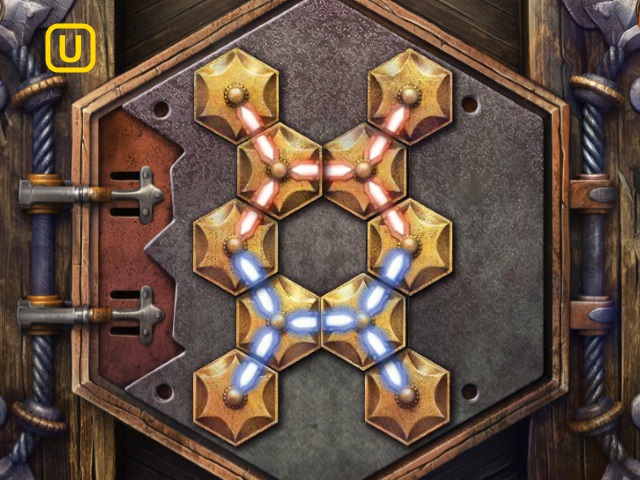
- Place the STATUE PART for a mini-game (R).
- Solution (S-Z).
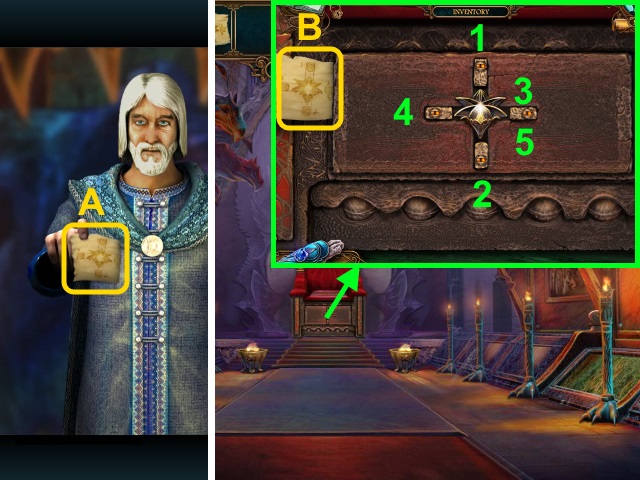
- Take the THRONE CODE (A).
- Walk down.
- Place the THRONE CODE (B).
- Press the eyes in order (1-5).
- Walk forward.
- Use the SWORD; take the WOLF HEAD (1/3) (C).
- Read the papers (D).
- Take the TONGS (E).
- Take the GRIFFIN'S EYE (F).
- Use the TONGS; take the WOLF HEAD (2/3) (G).
- Walk down.
- Place the GRIFFIN'S EYE (H); take the ACID (I).
- Walk forward.

- Use the ACID; take the GOLDEN KEY (J).
- Use the GOLDEN KEY (K); take the WOLF HEAD (3/3) (L).
- Place the WOLF HEADS for a mini-game (M).
- Solution (N-Q).
- Take the GRIFFIN CLAW (R).
- Walk down.
- Place the GRIFFIN CLAW (S).
- Walk forward.
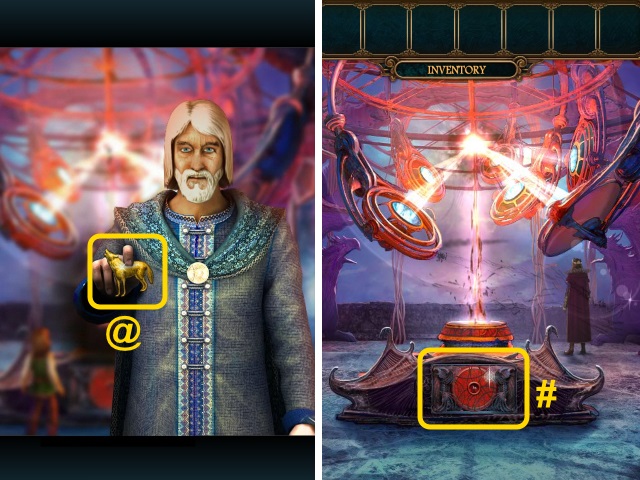
- Take SIRIUS'S AMULET (@).
- Examine the altar for a mini-game (#).
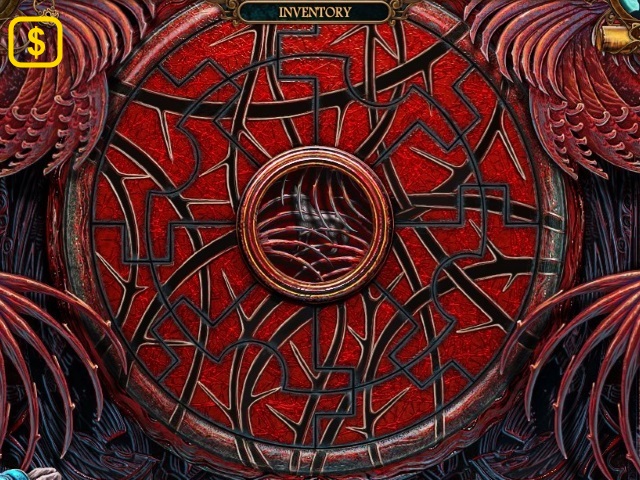
- Solution ($).
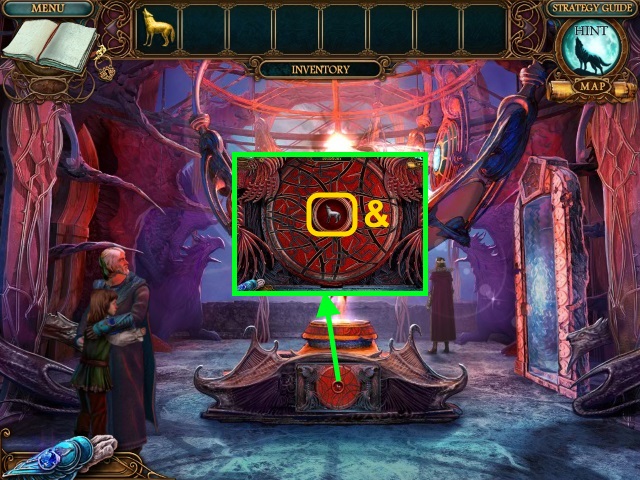
- Move the wolf (&); place SIRIUS'S AMULET.
- Congratulations! You have completed Echoes of the Past: Wolf Healer.
Created at: 2014-11-16