

Walkthrough Menu
General Tips & Information
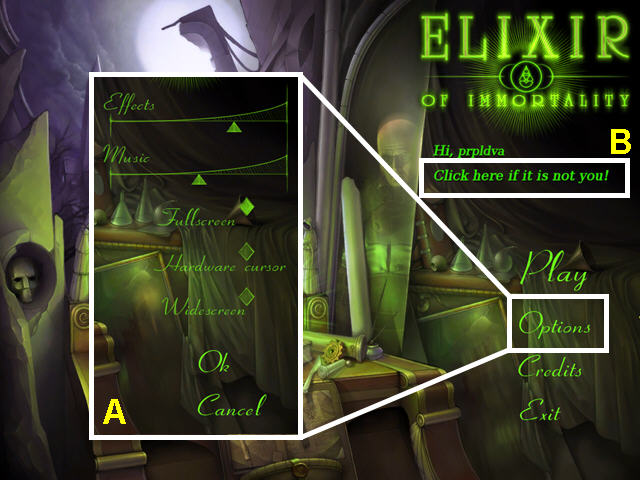
- The Options Menu allows for the adjustment of music and sound volumes (A).
- You may play this game in Windowed or Fullscreen Mode.
- The Hardware cursor may be disabled.
- From the main screen you may manage player profiles (B).
- You may skip mini-games once the skip meter is full.
- Hidden object scenes are random, so your solution may vary.
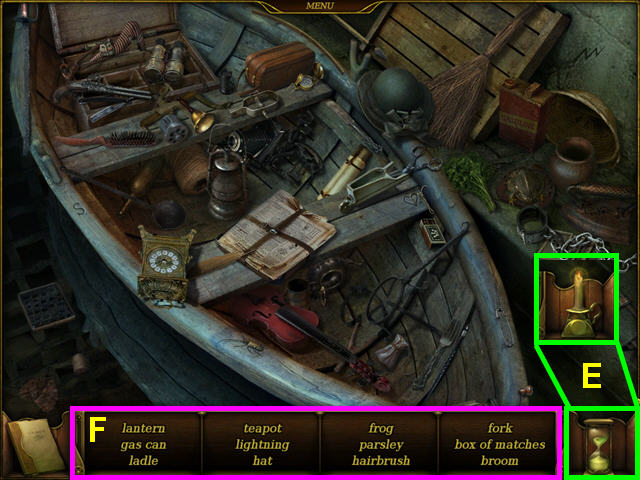
- In hidden object scenes, the hint is the candle in the lower right corner (E).
- It will change to an hour glass while recharging.
- You must locate all the items on the list to receive the inventory items (F).
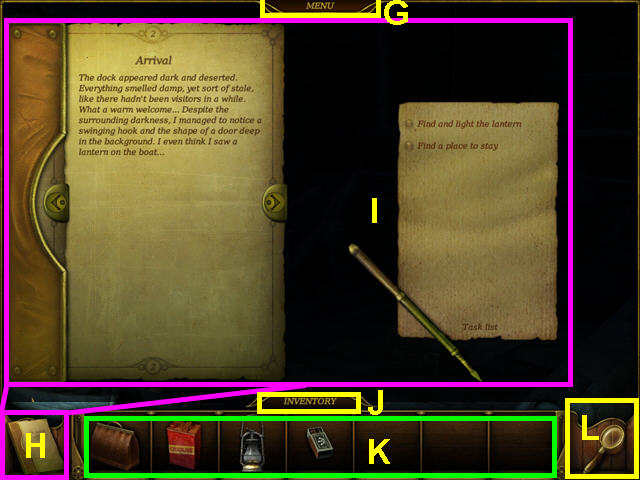
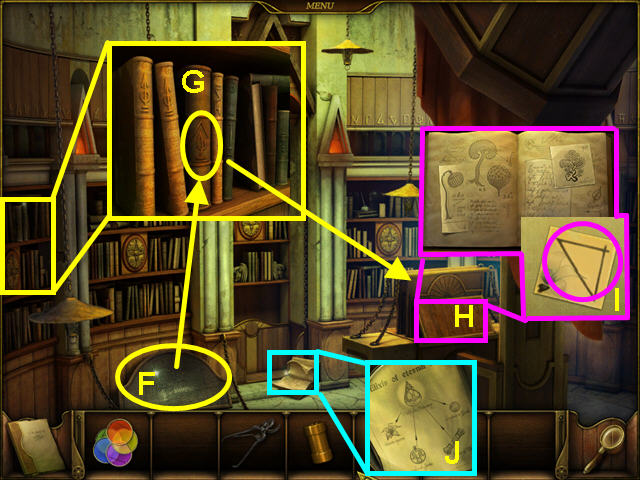
- The MENU button takes you to the menu (G).
- The lower left icon is the diary (H).
- Look at the diary to read notes on your accomplishments and tasks (I).
- You can also hover your cursor over the diary to see the current tasks.
- Click on INVENTORY to show/hide your inventory (J).
- Select an item in your inventory to use it, or combine it with another item (K).
- The magnifying glass in the lower right corner will show all the areas that you can interact with in a scene (L).
- Combine items by dropping one item onto another while inside your inventory.
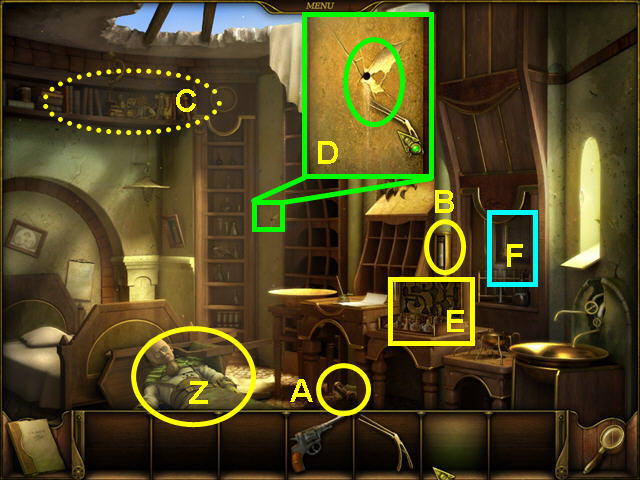
Chapter 1
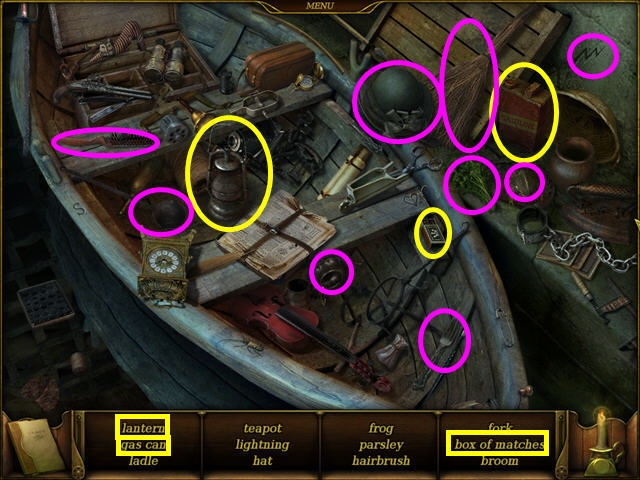
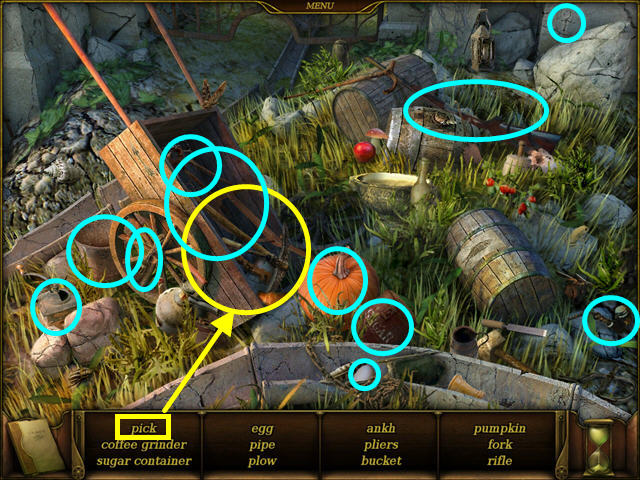
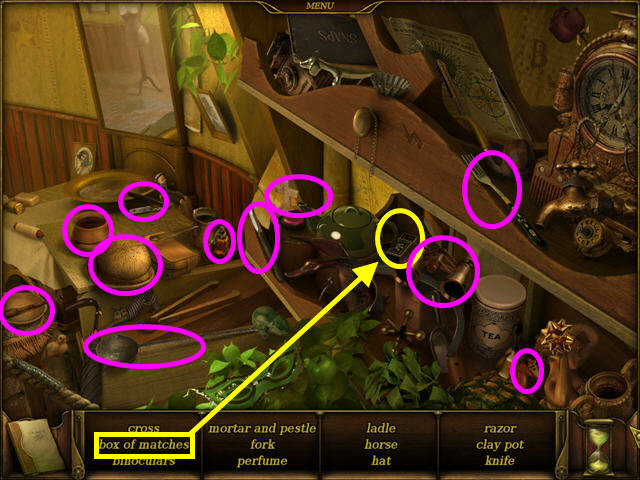
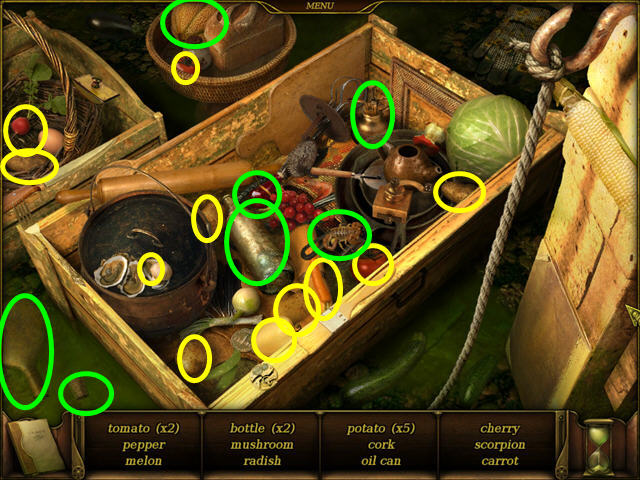
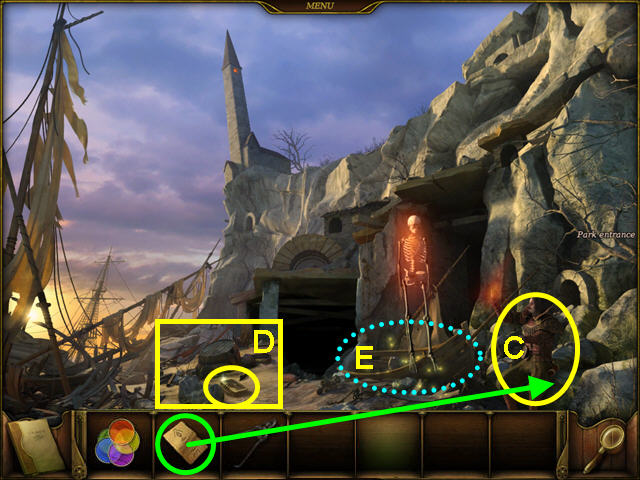
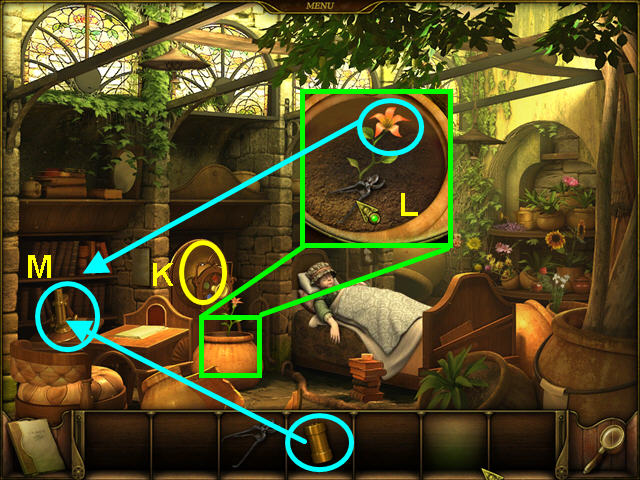
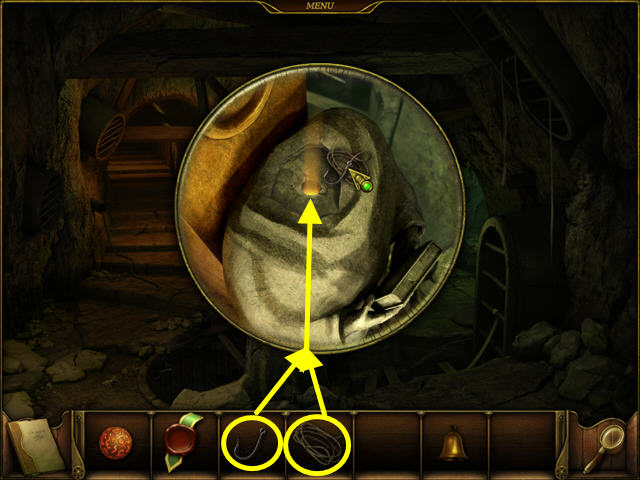
- Select the sparkling boat in the lower left for a hidden objects scene.
- Locate all the items on the list.
- The EMPTY LANTERN, BOX OF MATCHES, and GAS CAN will go into your inventory.
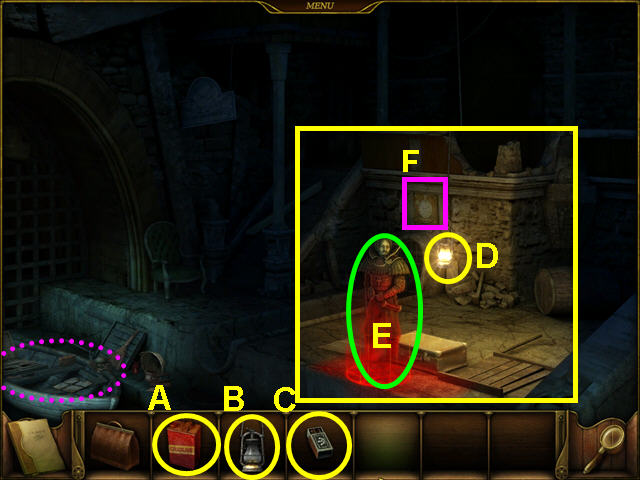
- Inside your inventory, combine the GAS CAN (A) and the EMPTY LANTERN (B) to get the LANTERN WITH OIL.
- Combine the BOX OF MATCHES (C) and the LANTERN WITH OIL to get the LIT LANTERN.
- Hang the LIT LANTERN on the hook (D).
- When the Occultist appears, click on him to talk and he will give you a clue to turn on the power (E).
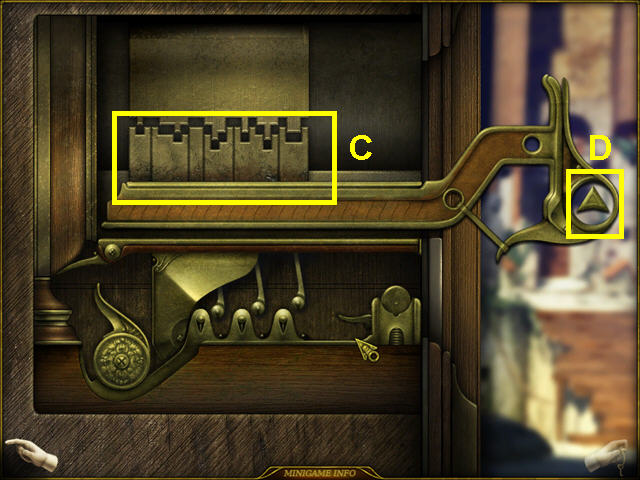
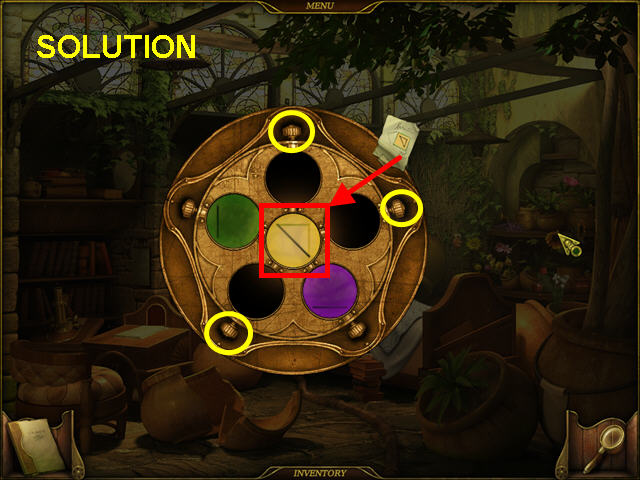
- Select the clock for a mini-game (F).
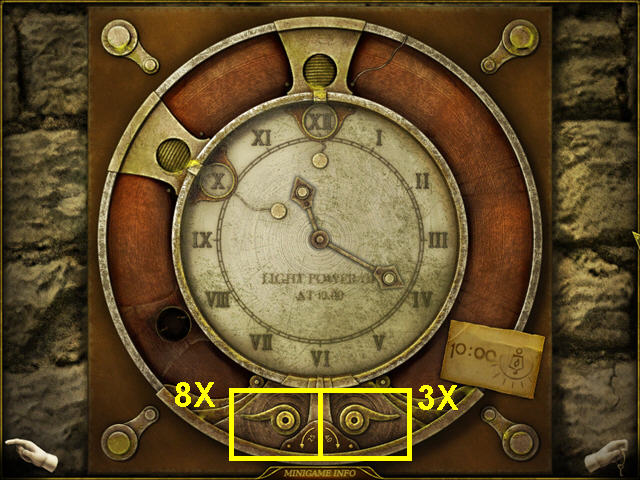
- The object of this mini-game is to set the clock to 10.
- The left lever moves the time back 25 minutes. The right lever moves the time ahead 45 minutes.
- Press the left lever 8 times (8X) and the right lever 3 times (3X) to solve.
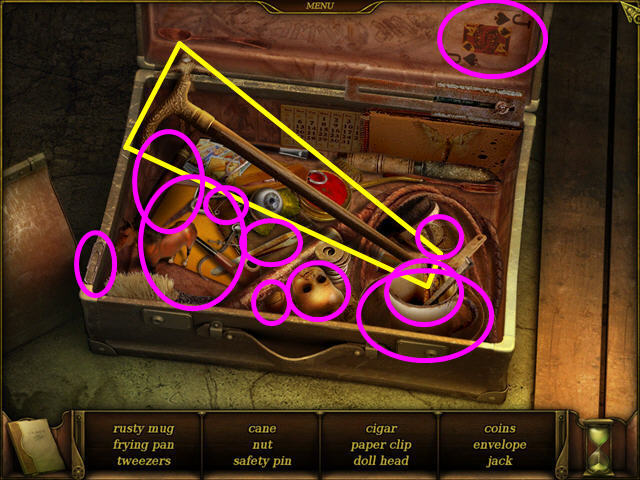
- Select the suitcase on the dock for a hidden object scene.
- Locate all the items on the list.
- The CANE will go into your inventory.
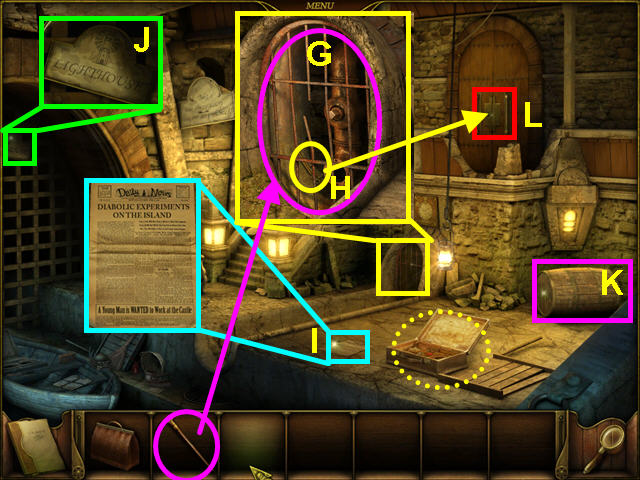
- Look at the close-up of the drain; use the CANE on the grate (G).
- Take the LOCK PICK (H).
- Read the newspaper (I).
- Note the lighthouse sign in the upper left (J).
- Note the wooden barrel (K).
- Use the LOCK PICK on the door for a mini-game (L).
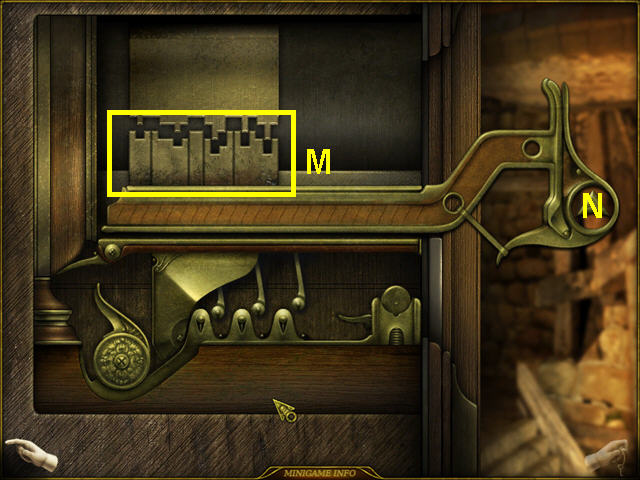
- The object of this mini-game is to swap the metal tumblers to match the lock pattern (M).
- Click on 2 pieces to swap positions.
- Click on the handle to raise the pick and better see what needs to be changed (N).
- The door will open when the pick is correctly set.
- Exit the dock through the door to enter the courtyard.
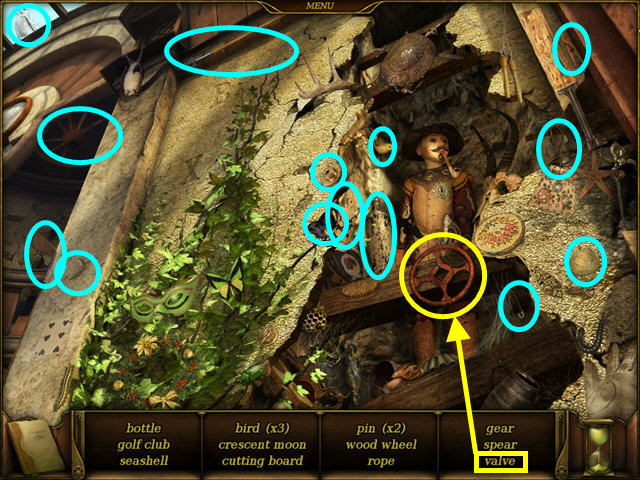
- Select the breach in the wall by the right gate for a hidden object scene.
- Locate all the items on the list.
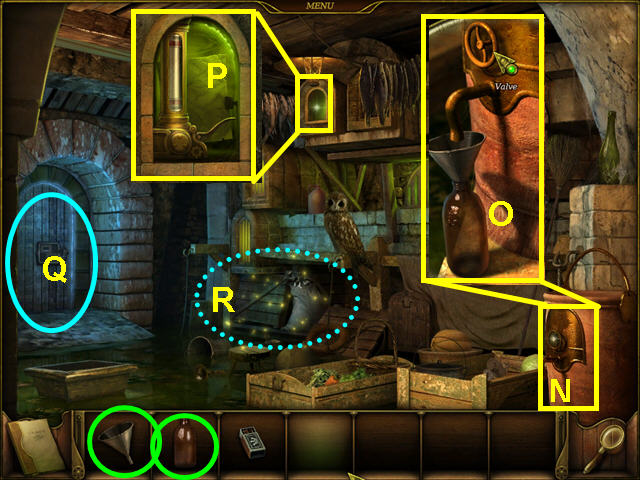
- The VALVE will go into your inventory.
- Walk down and return to the dock.
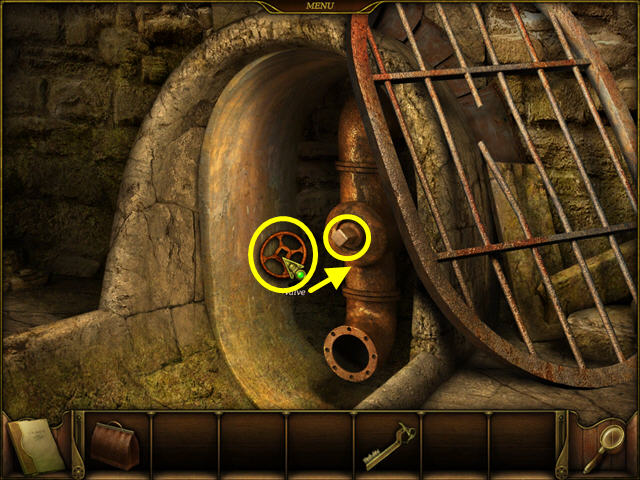
- Look at the close-up of the drain grate area.
- Place the VALVE on the drain.
- Click on the valve to open the drain.
- Exit the dock and return to the courtyard.
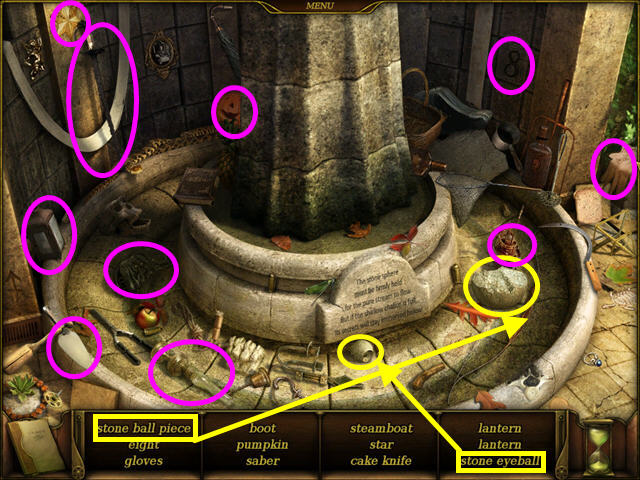
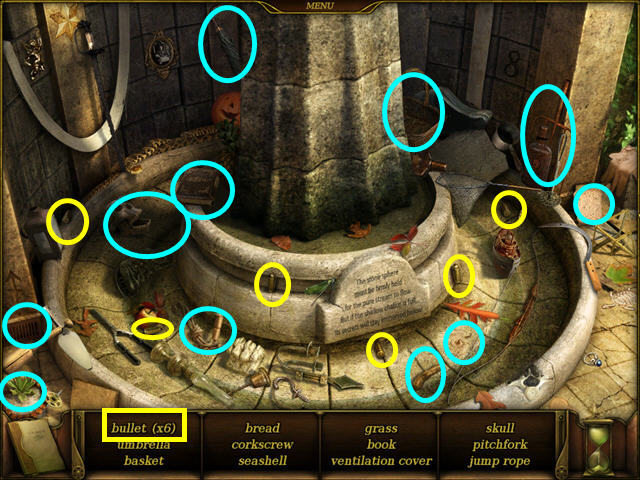
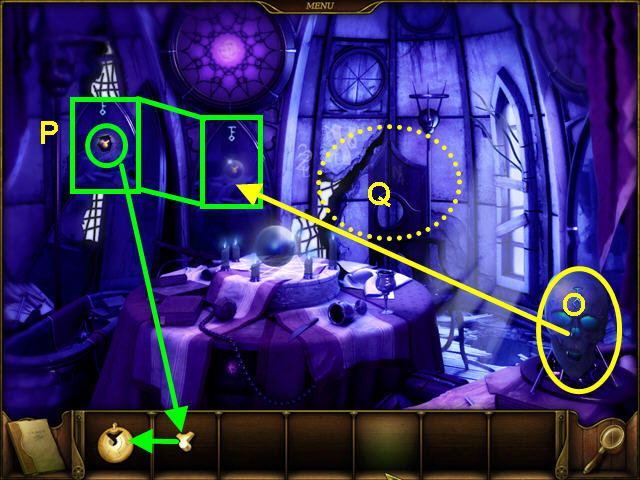
- Select the base of the fountain for a hidden object scene.
- Locate all the items on the list.
- The STONE EYE and STONE BALL PIECE will go into your inventory.

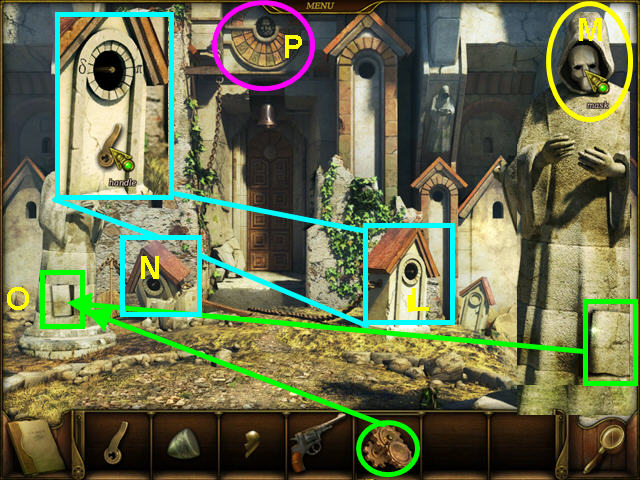
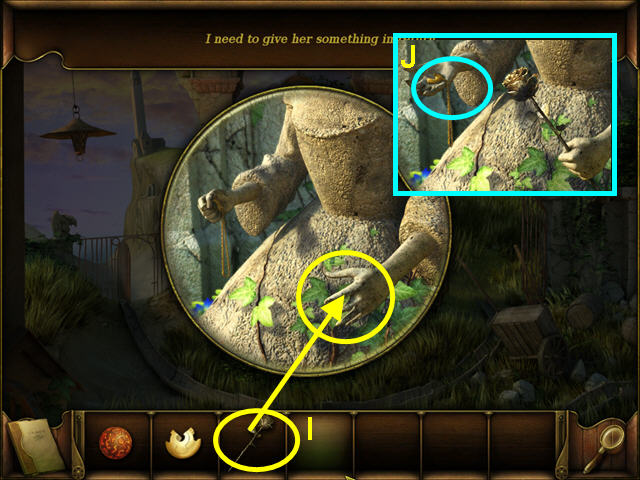
- Place the STONE EYE into the eye socket on the gargoyle statue (O).
- Take the STONE BALL PIECE from the mouth of the gargoyle (P).
- Note the back of the statue (Q).
- Walk left to the storage yard.
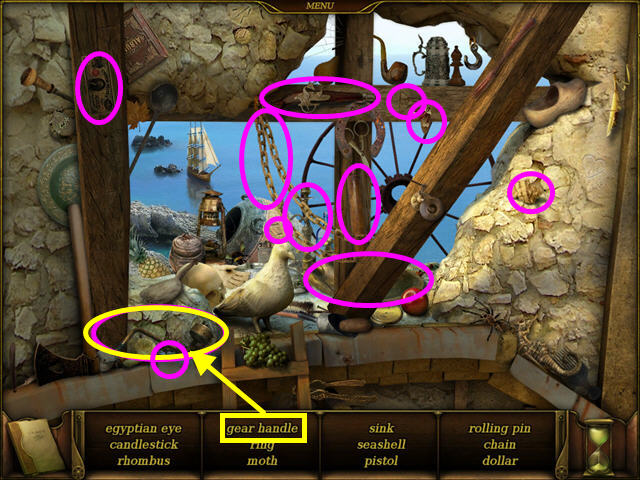
- Select the hole in the wall on the upper left for a hidden object area.
- Find all the objects on the list.
- The GEAR HANDLE will go into your inventory.
- Walk right and return to the courtyard.
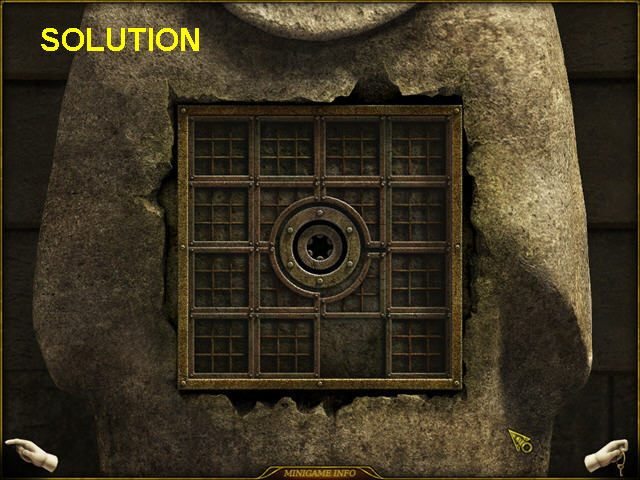
- Click on the back of the statue for a mini-game.
- The object is to move the pieces so that a circle is formed in the center.
- Click on a square adjacent to the empty spot to slide it.
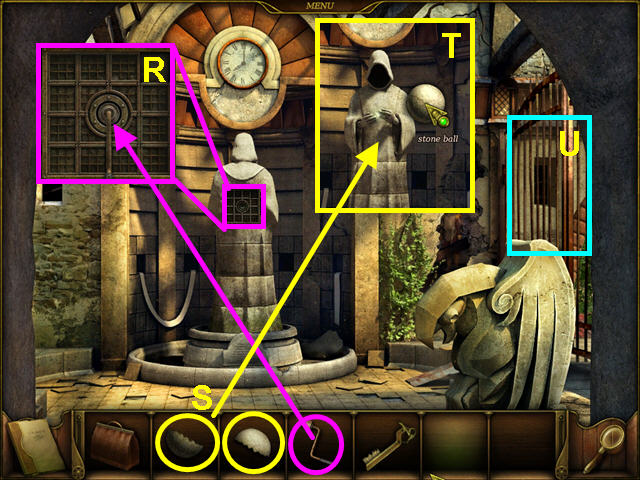
- Look at the close-up of the grate on the statue; place the GEAR HANDLE in the center (R).
- Click on the gear handle to turn it; the statue will then rotate.
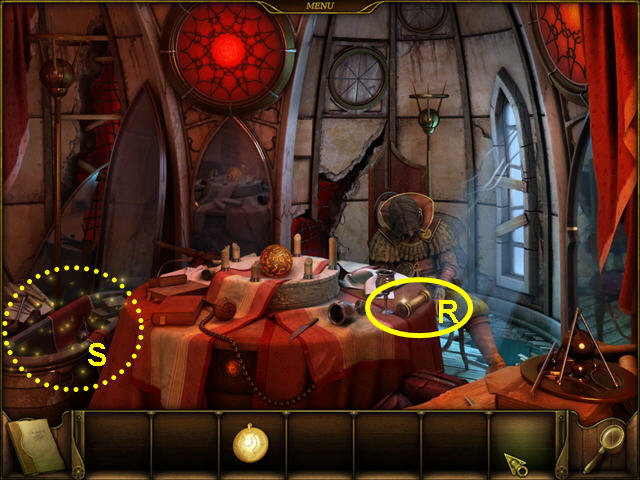
- Combine the two STONE BALL PIECES inside your inventory (S).
- Place the STONE BALL into the hands of the statue (T).
- This will unlock the right gate.
- Walk right through the gate to the inner courtyard.
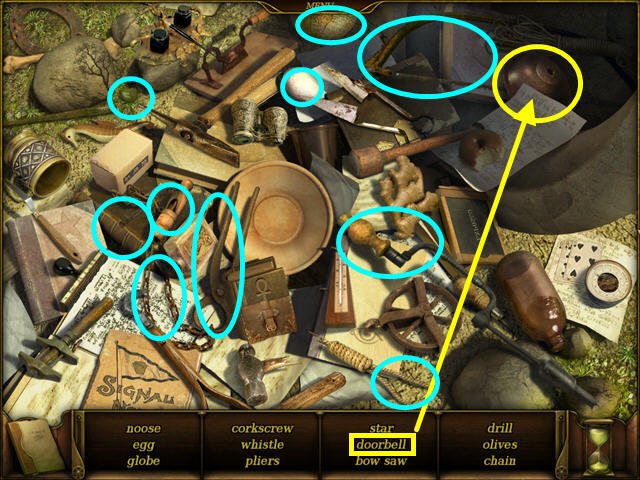
- Select the overturned urn in the center of the scene for a hidden object game.
- Locate all the objects on the list.
- The DOORBELL will go into your inventory.
- Walk right into the park entrance.
- Select the overturned cart on the right for a hidden object game.
- Locate all the objects on the list.
- The PICK will go into your inventory.
- Walk left 3 times to return to the storage yard.
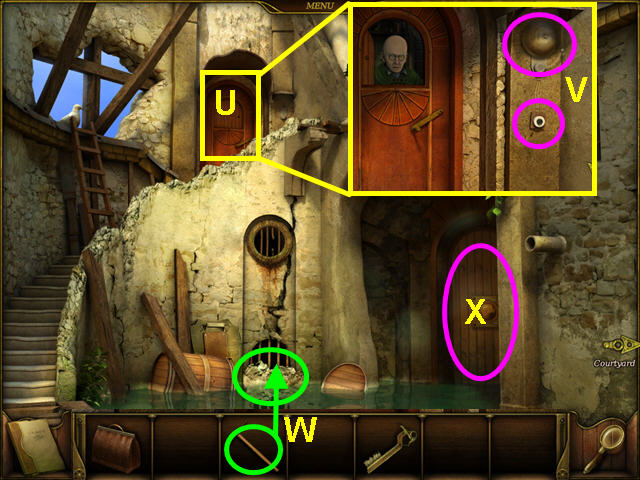
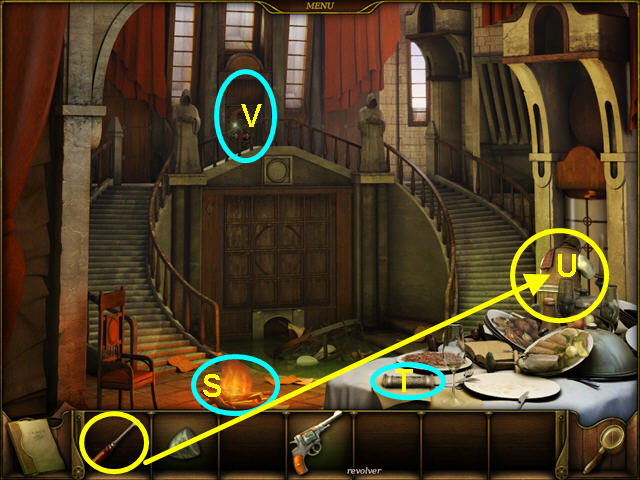
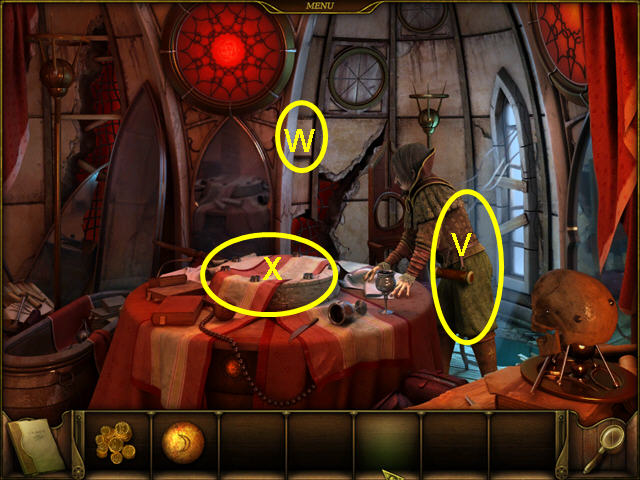
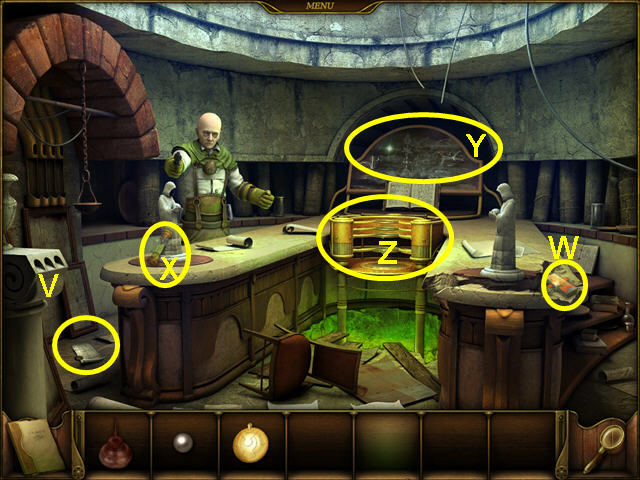
- Look at the close-up of the laboratory door (U).
- Replace the DOORBELL and press the button (V).
- The alchemist won't talk until the chemicals are gone.
- Use the PICK on the rock blocking the grate (W).
- Note the locked door (X).
- Press the doorbell button again and enter the laboratory.
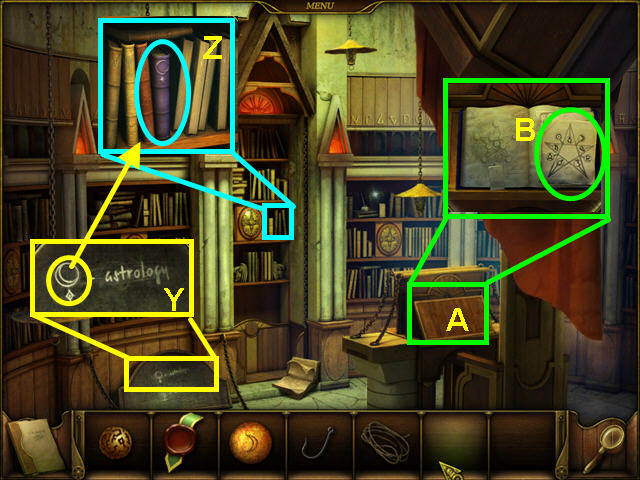
- Talk to the alchemist and he will give you the CROSS KEY (Y).
- Read the note on the wall (Z).
- Walk right 3 times to return to the inner courtyard.
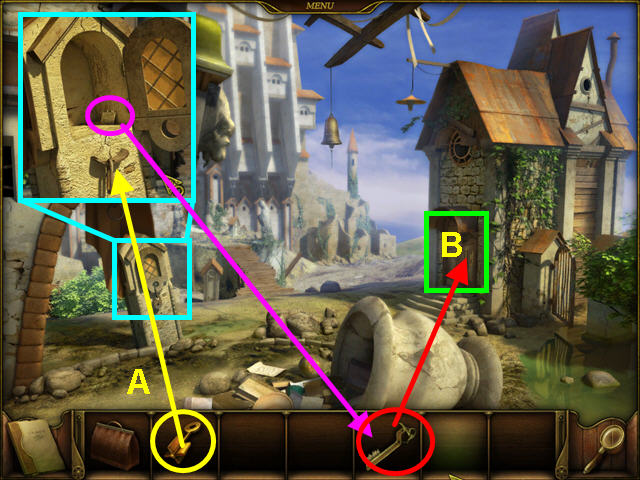
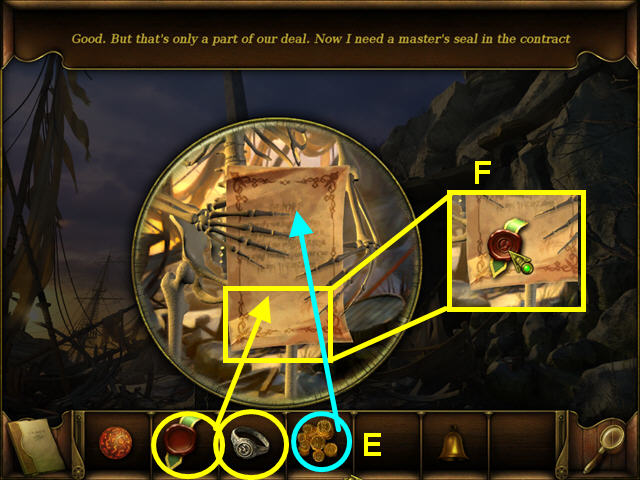
- Look at the close-up of the safe and use the CROSS KEY on the lock (A).
- Take the PRONG PIECE from the safe and combine it with the LOCK PICK inside your inventory.
- Look at the close-up of the door on the servant's house; use the LOCK PICK on the lock for a mini-game (B).
- The object of this mini-game is to swap the metal tumblers to match the lock pattern (C).
- Click on 2 pieces to swap positions.
- Click on the handle to raise the pick and better see what needs to be changed (D).
- The door will open when the pick is correctly set.
- Enter the servant's house.
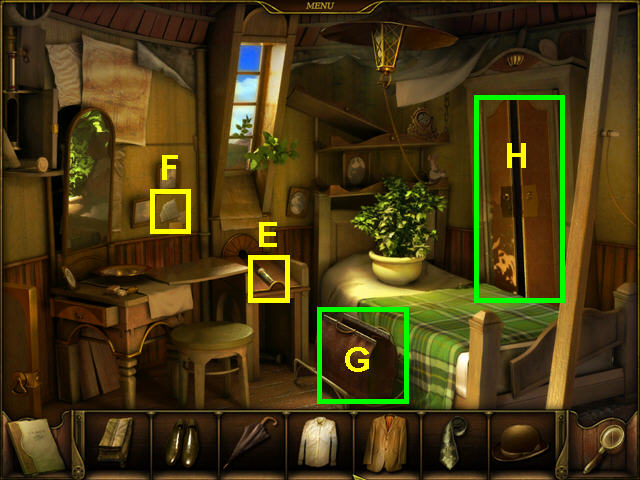
- Read the note in the mail tube (E) and the note on the wall (F).
- Place your suitcase on the rack (G).
- Click on the suitcase and all your clothing will go into your inventory.
- Open the closet and look inside for a mini-game (H).
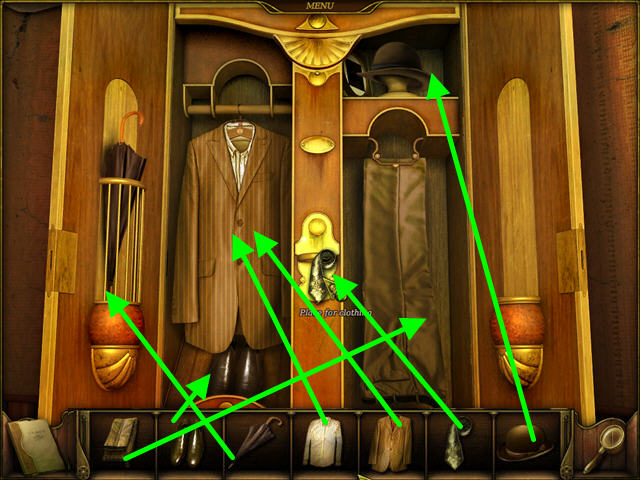
- Place the clothing in the appropriate places.
- Note that both the shirt and jacket go on the hangar.
- Once you exit the closet, read the note that arrives in the mail tube.
- Walk left 4 times to return to the laboratory.
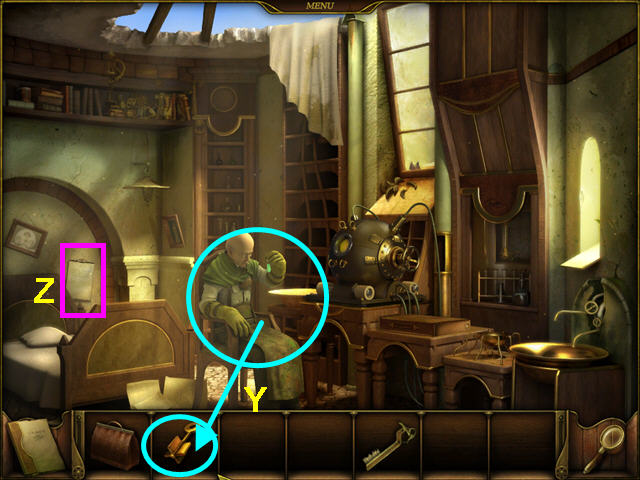
- Talk to the alchemist (I) then click on the device (J).
- Talk to the alchemist again.
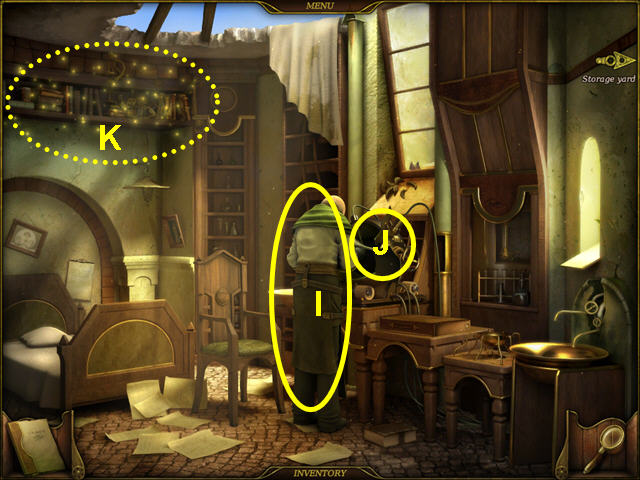
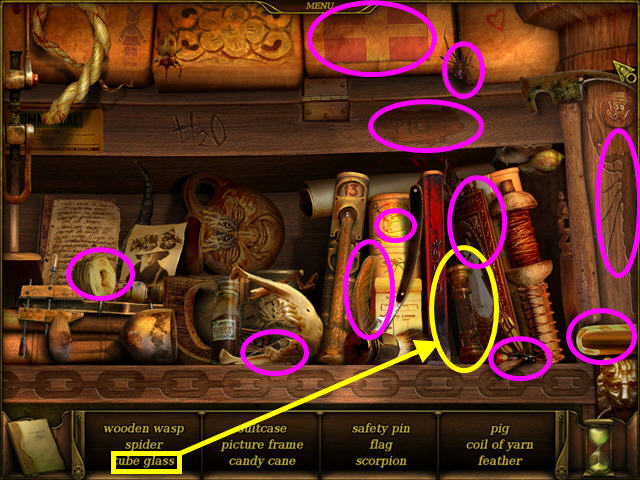
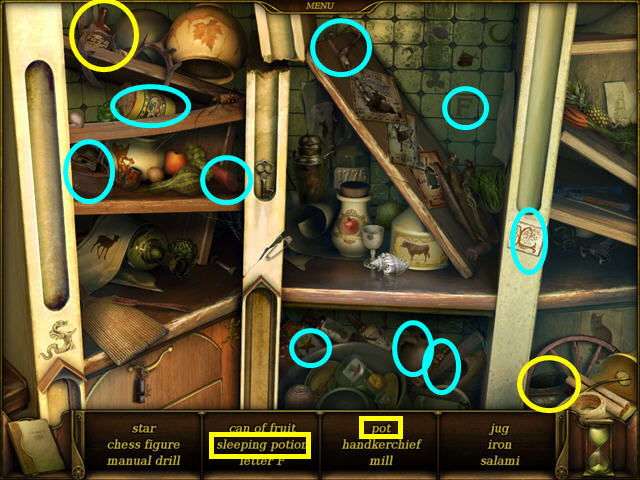
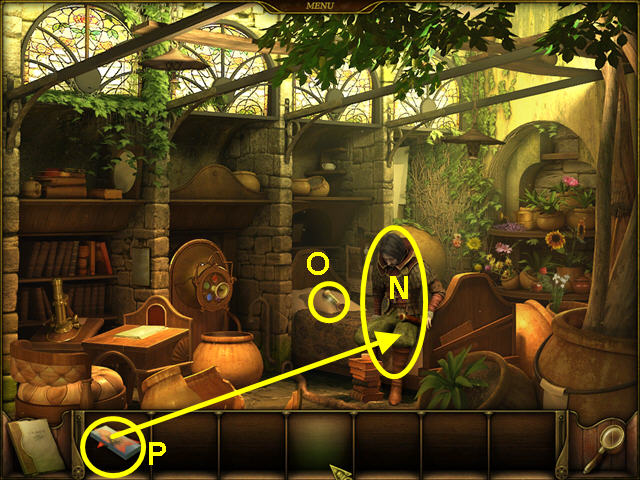
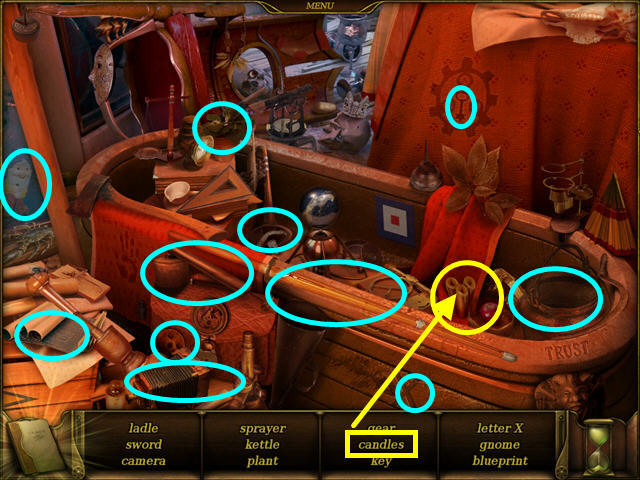
- Select the upper left shelf for a hidden object scene (K).
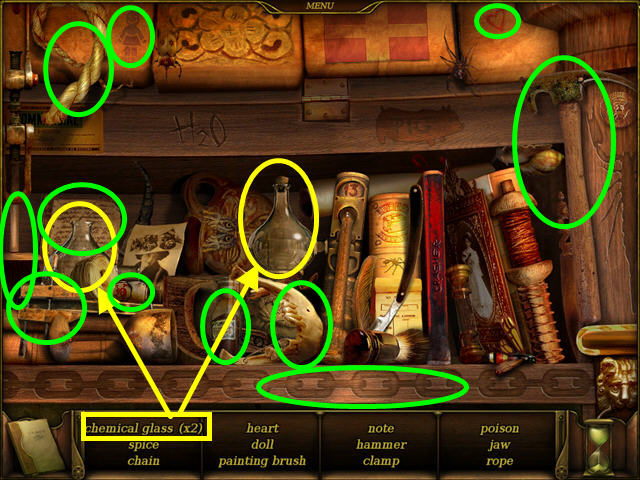
- Locate all the items on the list.
- The 2 CHEMICAL GLASSES will go into your inventory; give them to the alchemist.
- Exit right to the storage yard.
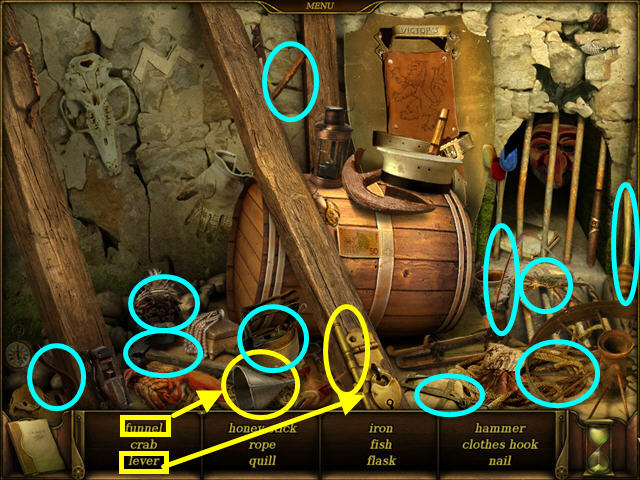
- Select the drain grate in the center for a hidden object scene.
- Locate all the items on the list.
- The FUNNEL and the LEVER will go into your inventory.
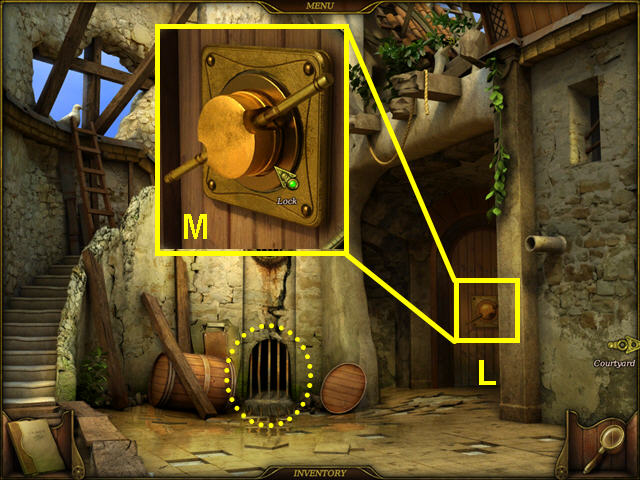
- Look at the close-up of the storage door (L).
- Use the LEVER on the lock (M).
- Click on the lever to unlock the door.
- Walk right 2 times and return to the inner courtyard.
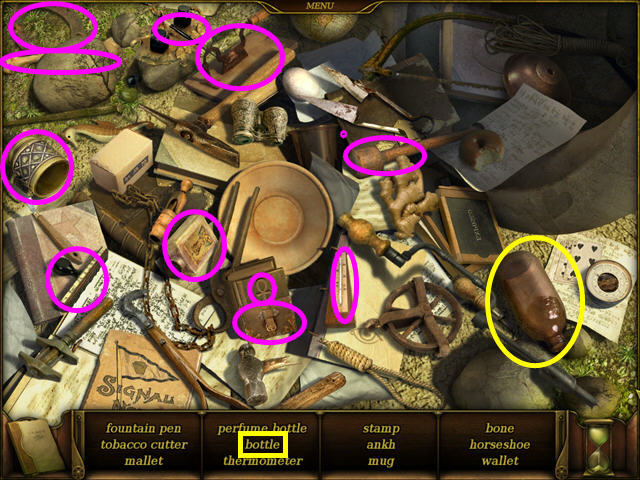
- Select the overturned urn for a hidden object area.
- Find all the objects on the list.
- The BOTTLE will go into your inventory.
- Enter the servant's house.
- Select the upper right shelf for a hidden object area.
- Find all the objects on the list.
- The BOTTLE will go into your inventory.
- Walk to the left 3 times and enter the storage area door.
- Combine the BOTTLE and the FUNNEL inside your inventory.
- Look at the close-up of the kerosene barrel (N).
- Place the BOTTLE WITH FUNNEL under the spigot and turn the valve (O).
- Take the BOTTLE OF KEROSENE.
- Look at the upper cubbyhole and see a stuck mail tube (P).
- Click on the tube to send it to the servant's quarters.
- Note the locked door (Q).
- Select the lower shelf area for a hidden object scene (R).
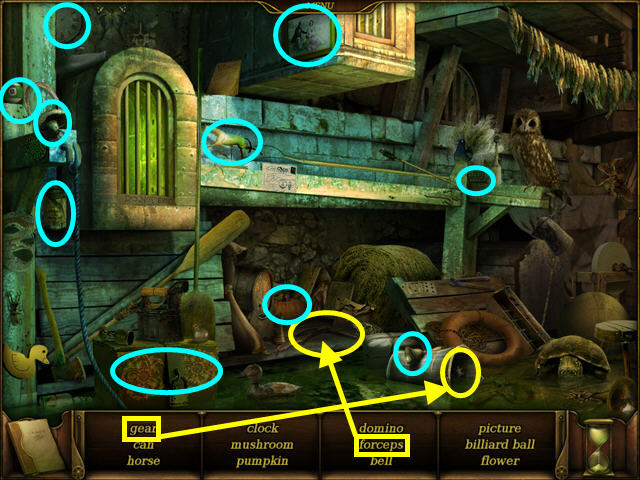
- Find all the objects on the list.
- The GEAR and the FORCEPS will go into your inventory.
- Use the GEAR on the locked door for a mini-game.
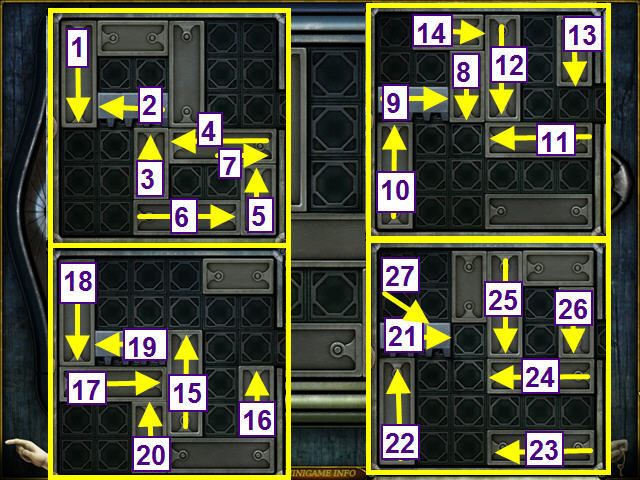
- The object of this slider puzzle is to move the silver piece out of the grid.
- Click on the bars to move them.
- Follow the numbered moves in the screenshot to solve the puzzle.
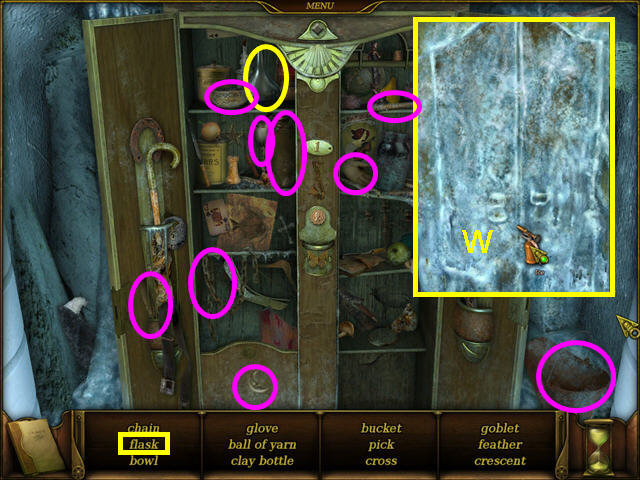
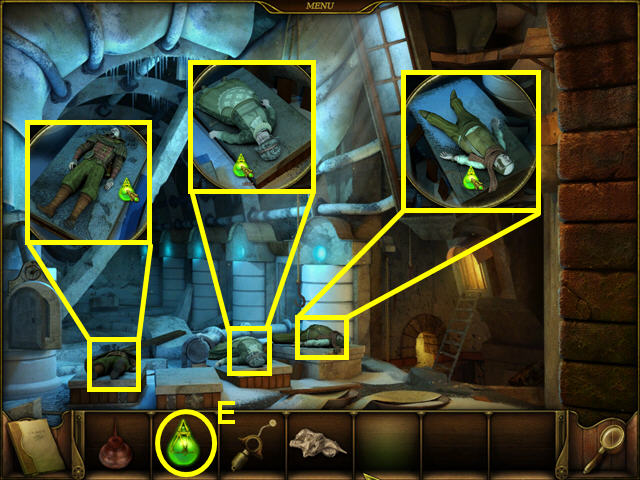
- Enter the freezing chamber.
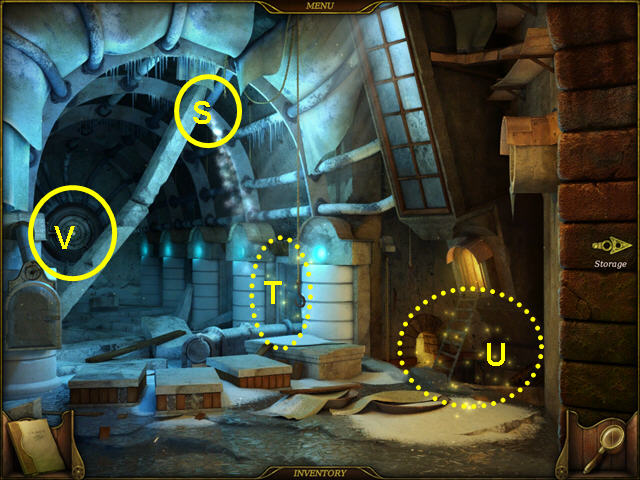
- Note the damaged pipe (S).
- Note the freezer (T), and ice hidden object areas (U).
- Select the control panel on the back wall for a mini-game (V).
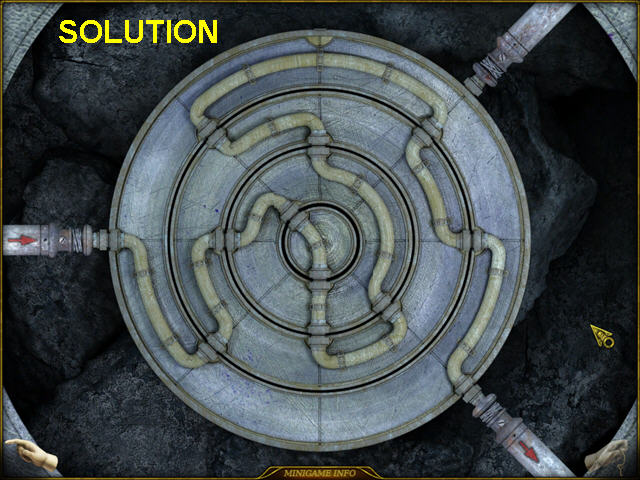
- The object is to connect the pipes to repair the Freon flow.
- Click on a ring to rotate it into position.
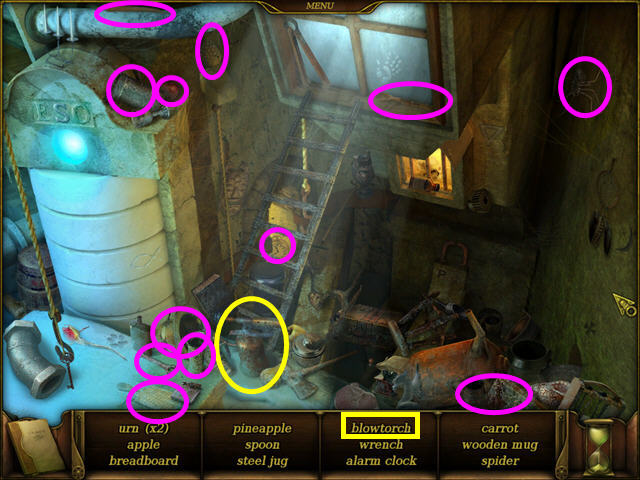
- Select the ice hidden object area on the right.
- Find all the objects on the list.
- The BLOWTORCH will go into your inventory.
- Select the freezer hidden object area.
- Use the BLOWTORCH 5 times on the cabinet to melt the ice (W).
- Click to open the cabinet.
- Locate all the items on the list.
- The FLASK will go into your inventory.
- Walk right 2 times and select the laboratory door.
- Give the alchemist the FLASK, MATCHES, and BOTTLE OF KEROSENE.
Chapter 2
- Walk right 2 times and select the statue base for a hidden object scene.
- Locate all the items on the list.
- The BULLETS will go into your inventory.
- Walk right 2 times to the park entrance; select the overturned cart for a hidden object game.
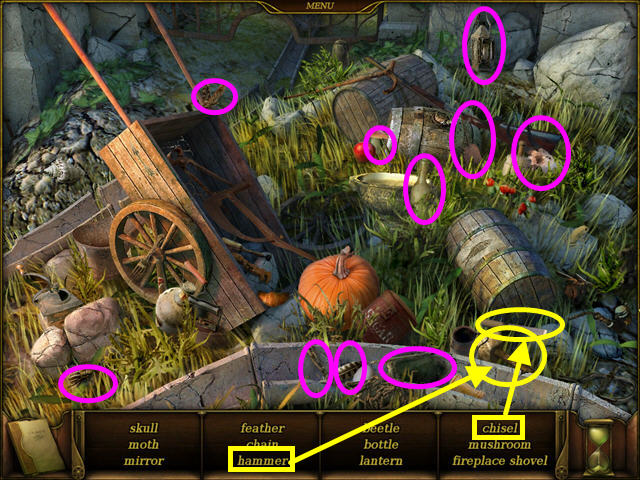
- Locate all the items on the list.
- The HAMMER WITH CHISEL will go into your inventory.
- Walk left to the inner courtyard and enter the servant's house.
- Read the message in the mail tube.
- Exit the house and walk left to the courtyard.
- Walk down to the dock.
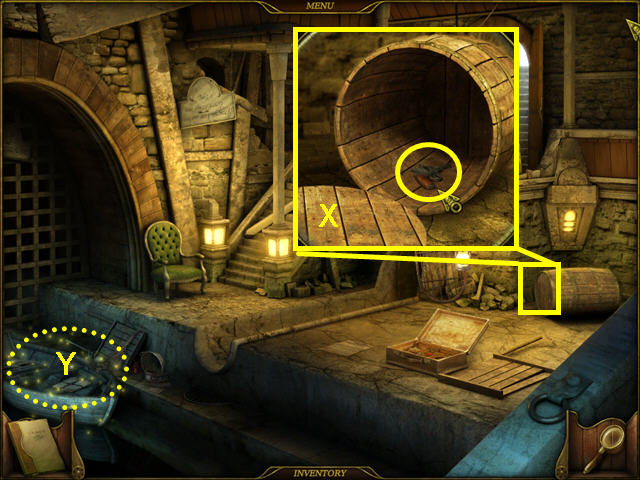
- Look at the close-up of the barrel.
- Use the HAMMER WITH CHISEL on the lid.
- Take the EMPTY REVOLVER (X).
- Select the boat in the lower left for a hidden object scene (Y).
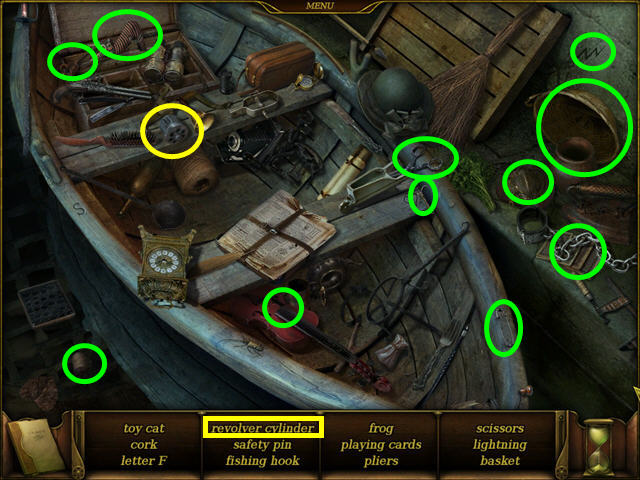
- Locate all the items on the list.
- The REVOLVER CYLINDER will go into your inventory.
- In your inventory combine the REVOLVER CYLINDER with the BULLETS.
- Combine the EMPTY REVOLVER with the CYLINDER.
- Exit the dock and walk left to the laboratory.
- Look at the alchemist, his body is cold (Z).
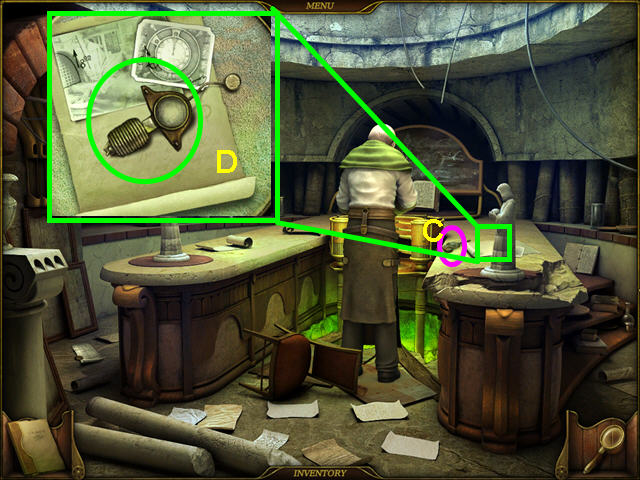
- Take the MAIL TUBE from the floor (A).
- Read the message from the castle (B).
- Note the shelf area (C).
- Look at the hole in the wall; use the FORCEPS to remove the SILVER BULLET (D).
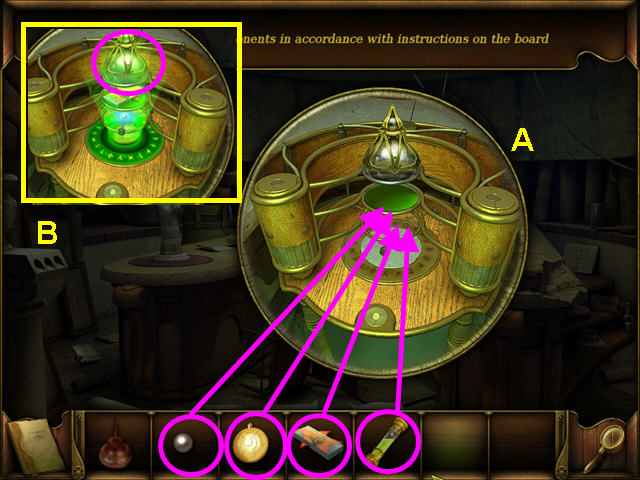
- Look at the box for a mini-game (E).
- Note the mail tube launcher (F).
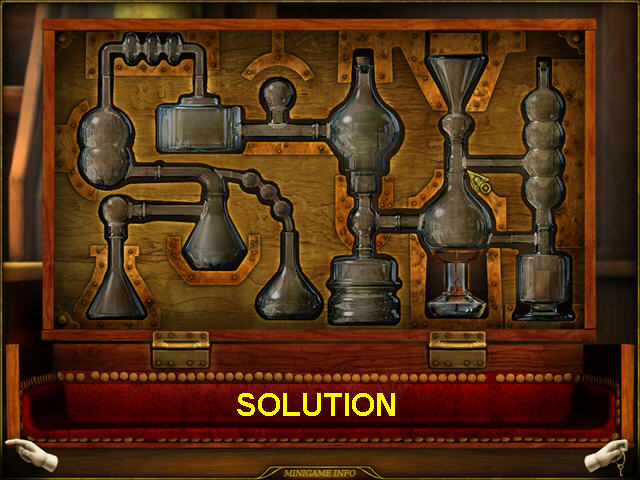
- Place all the glassware into the matching niches.
- The CHEMICAL LIQUID will go into your inventory.
- Select the shelf for a hidden object scene.
- Locate all the items on the list.
- The GLASS TUBE will go into your inventory.
- Inside your inventory combine the GLASS TUBE with the CHEMICAL LIQUID.
- Combine the FULL CONTAINER with the MAIL TUBE.
- Place the MAIL TUBE in the launcher and press the lever.
- Look at the new mail from the master and you will receive the HANDLE.
- Walk right 4 times then walk up to enter the park.
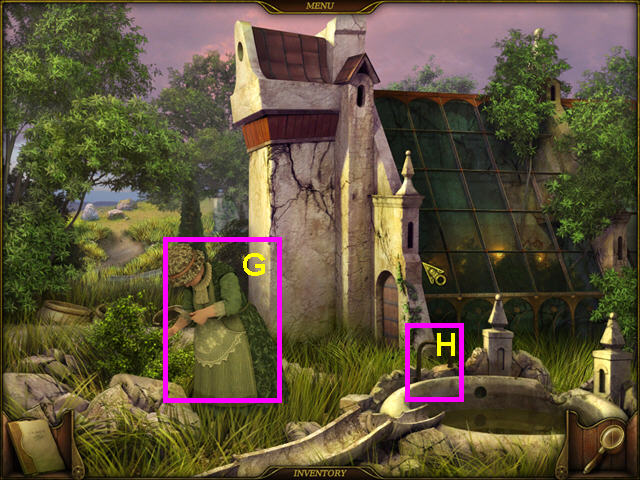
- Talk to the botanist and she will give you a JAR (G).
- Look at the water pump to learn that it is missing a handle (H).
- Walk down to the park entrance and click on the flowers at the base of the girl statue for a hidden object area.
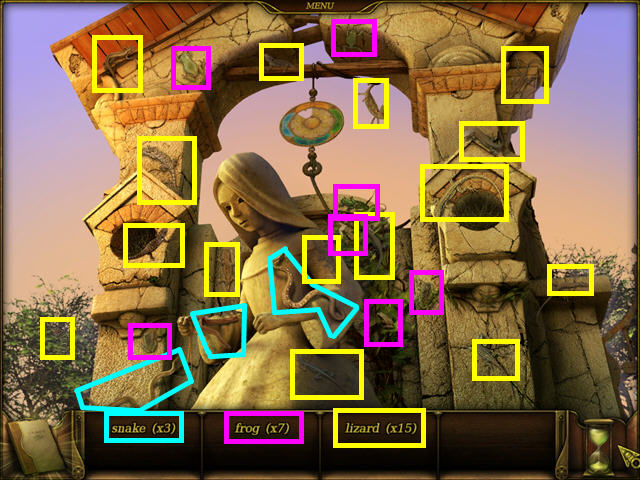
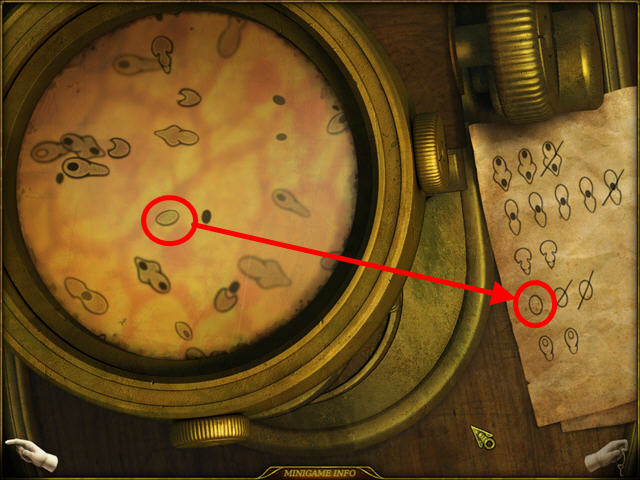
- Locate all the reptiles.
- The JAR WITH LIZARDS will go into your inventory.
- Walk left 3 times; enter the storage area then freezing room.
- Select the hidden object area on the right.
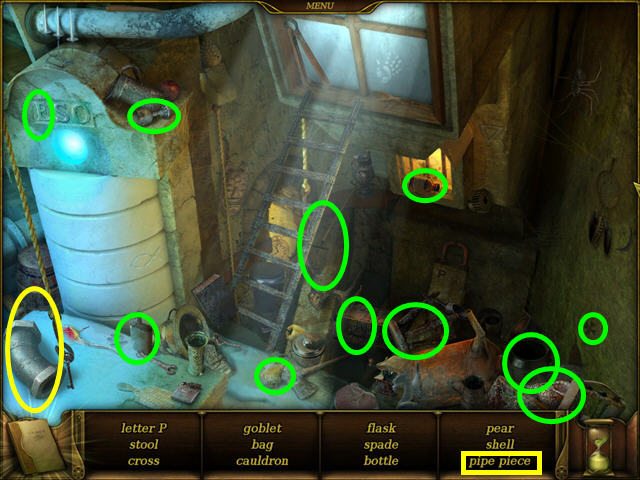
- Locate all the items on the list.
- The PIPE PIECE will go into your inventory.
- Use the PIPE PIECE on the leaky pipe (I).
- Look at the alchemist's body (J).
- Open the freezing chamber and place the JAR WITH LIZARDS inside (K).
- Click on the Freon control in the back for a mini-game.
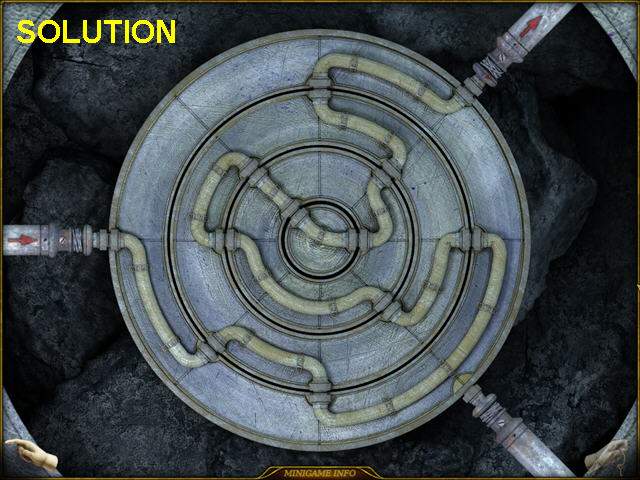
- Connect the pipes to repair the Freon flow.
- Click on a ring to rotate it into position.
- Look at the freezing chamber, close the door and turn the valve wheel.
- Open the door and take the FROZEN LIZARDS.
- Walk to the right 5 times and enter the park.
- Give the FROZEN LIZARDS to the botanist and she will give you a HALF HEART.
- Walk down 2 times and up once to the castle entrance.
- Look at the close-up of the right winding mechanism; use the HANDLE on it (L) .
- Click on the handle to operate.
- Note the symbols around the center.
- The right statue will turn around and another HANDLE will go into your inventory.
- Take the MASK from the face of the statue (M).
- Use the second handle on the left winding mechanism (N).
- Click on the handle; the gears need to be fixed.
- Look at the hidden compartment on the right statue and take the GEARS.
- Use the GEARS in the left statue's hidden compartment (O).
- Turn the handle on the left winding mechanism.
- Note the symbols around the center.
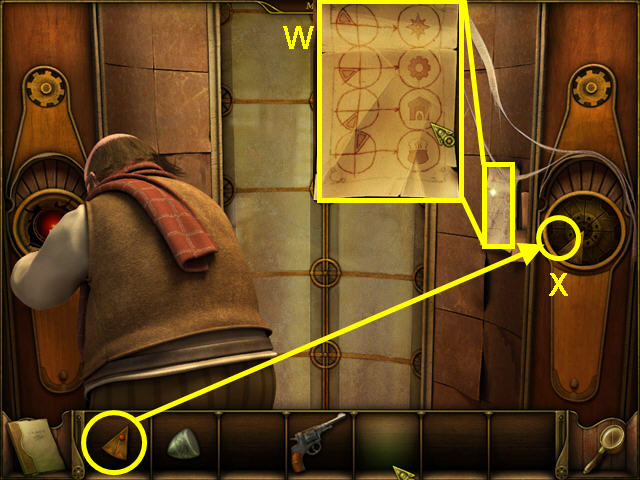
- Look at the stone face over the door for a mini-game (P).
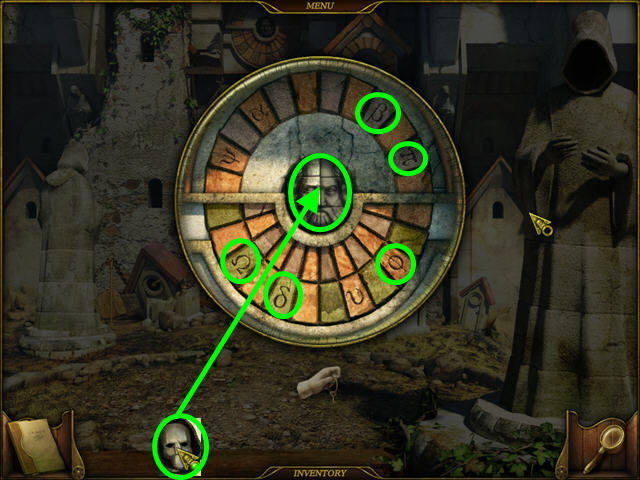
- Click on the symbols that were on the 2 winding mechanisms.
- Place the MASK on the stone face.
- Enter the castle.
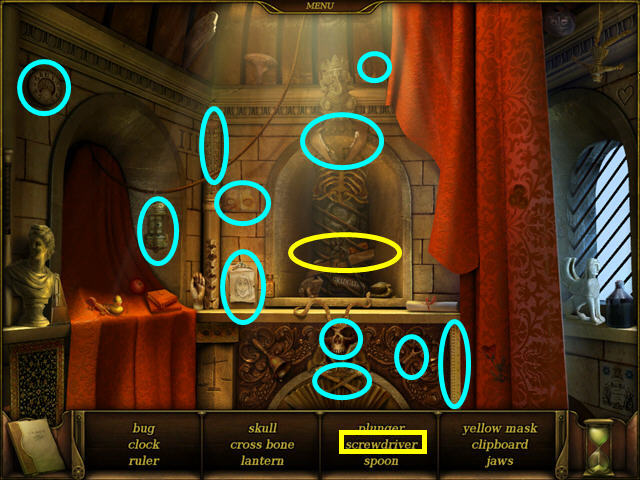
- Select the hole in the roof under the clock for a hidden object area.
- Locate all the objects on the list.
- The SCREWDRIVER will go into your inventory.
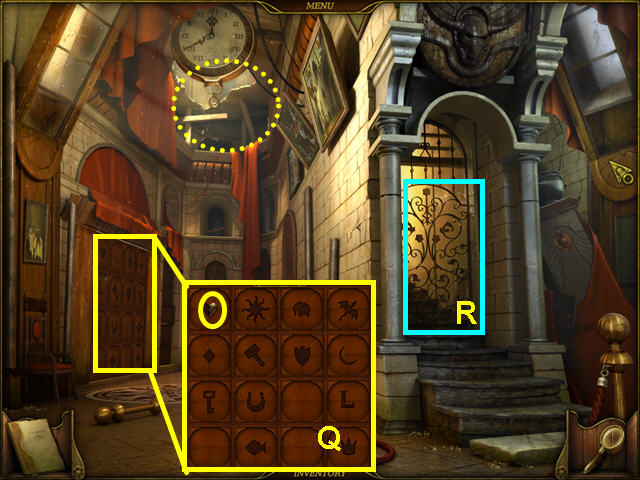
- Look at the lockers on the left wall.
- Place the HALF HEART in the matching niche (Q).
- Open the gate and enter the main hall (R).
- Make note of the fire (S).
- Look at the cryptex on the table (T).
- Talk to the physicist who is working on the lift and give him the screwdriver (U).
- Not the library door (V).
- Walk down 3 times, then walk left 2 times and enter the storage area door.
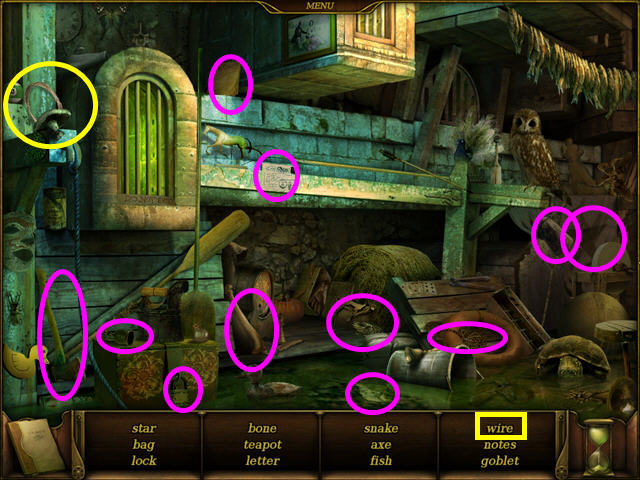
- Select the lower shelf for a hidden object area.
- Locate all the items in the list.
- The WIRE will go into your inventory.
- Return to the castle's main hall and give the WIRE to the physicist.
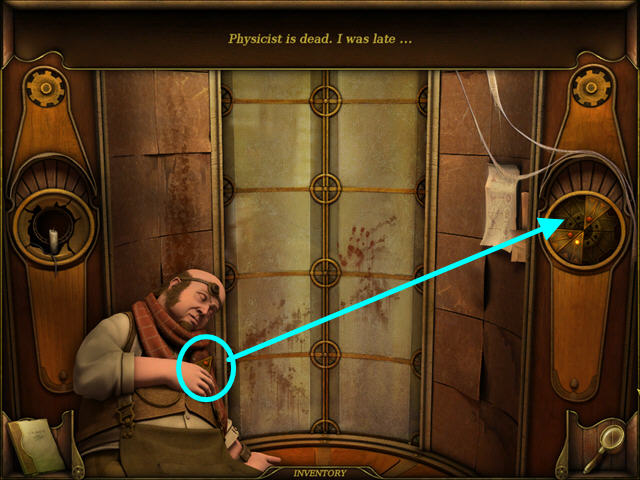
- Enter the lift.
- The physicist gives you his ROOM KEY.
- Look at the drawing on the wall (W).
- Place the ROOM KEY into the control and press the red button (X).

- Talk to the physicist (Y).
- Look at the diagram on the table (Z).
- Put the parts (1-6) onto the table stand (A).
- Put the REVOLVER, then the SILVER BULLET (7-8) into the clamp (B).
- Click on the gun to fire and test the experiment.
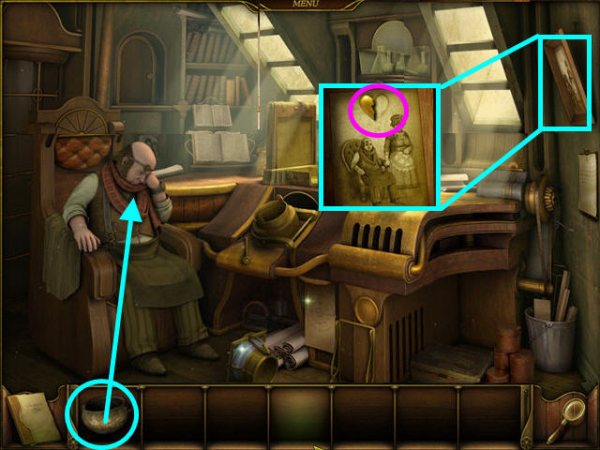
- Note the portrait with the other heart half (C).
- Read the note on the wall (D).
- Talk to the physicist again and he will give you the KITCHEN KEY.
- Click on the lift to exit (E).
- Put the KITCHEN KEY into the right control; push the button on the key for the main hall.
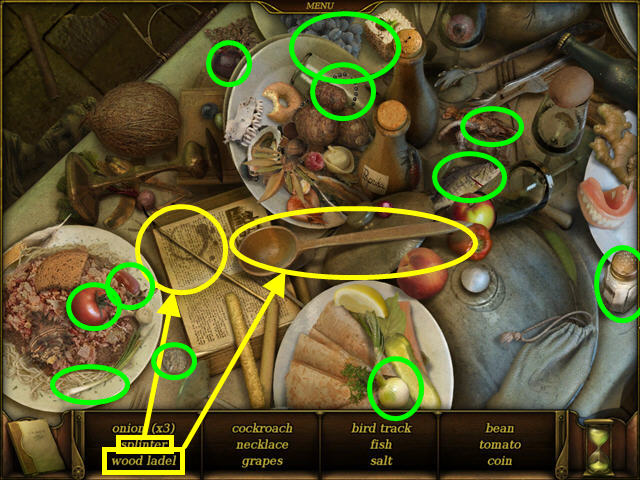
- Select the table for a hidden object area.
- Locate all the items on the list.
- The WOOD LADLE and the SPLINTER will go into your inventory.
- Use the SPLINTER on the fire to get FIRED SPLINTER.
- Exit the castle and return to the storage room.
- Select the box of vegetables for a hidden object area.
- Locate all the items on the list.
- The VEGETABLE BASKET will go into your inventory.
- Return to the castle and enter the lift in the main hall.
- Press the button for the kitchen.
- Select the back center area for a hidden object scene.
- Locate all the items on the list.
- The POT and the SLEEPING POTION will go into your inventory.
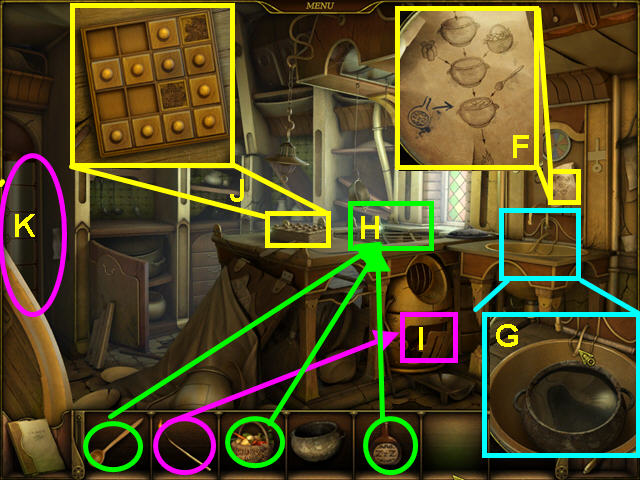
- Look at the recipe for soup on the wall (F).
- Use the POT on the sink (G).
- Press the lever to fill the POT with water then place the POT WITH WATER on the stove (H).
- Add the BASKET OF VEGETABLES to the pot.
- Use the LIT SPLINTER to light the stove (I).
- Look at the box of spice for a memory match game (J).
- Click on lids to find matching pairs of spices until all the lids are gone.
- SPICES will go into you inventory when matched.
- Put the SPICES, then the SLEEPING POTION, into the pot.
- Use the WOOD SPOON to stir the soup.
- Take the SOUP and enter the lift (K).
- Take the lift to the physicist's room and give him the SOUP.
- Look at the portrait and take the HALF HEART.
- Exit via the lift and return to the lockers in the hall.
Chapter 3
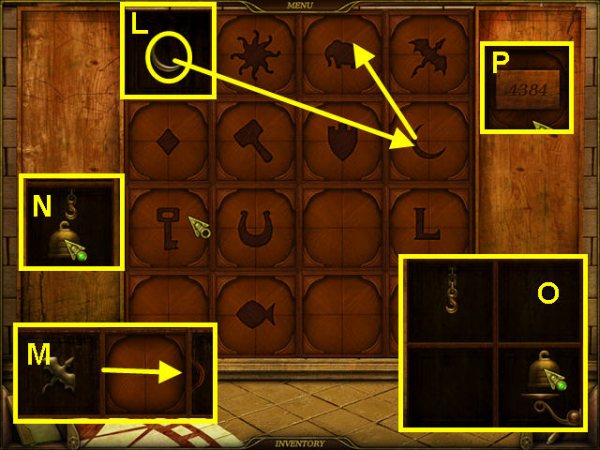
- Place the second HALF HEART into the top left locker to reveal a moon (L).
- Place the object you find in the matching niches.
- The first sequence is: 2 half hearts, moon, elephant, diamond, gear, L, hammer, shield.
- Slide the panel to reveal a dragon (M).
- The next sequence is: dragon, key, horseshoe.
- Hang the bell on the hook (N).
- The next sequence is: sun, moon, fish.
- Place the bell on the arm (O).
- Place the crown and find the code: 4384 (this code is random) (P).
- Exit the lockers and return to the main hall.
- Look at the cryptex; turn the dials to 4384 (this code is random).
- Inside is a SPROUT.
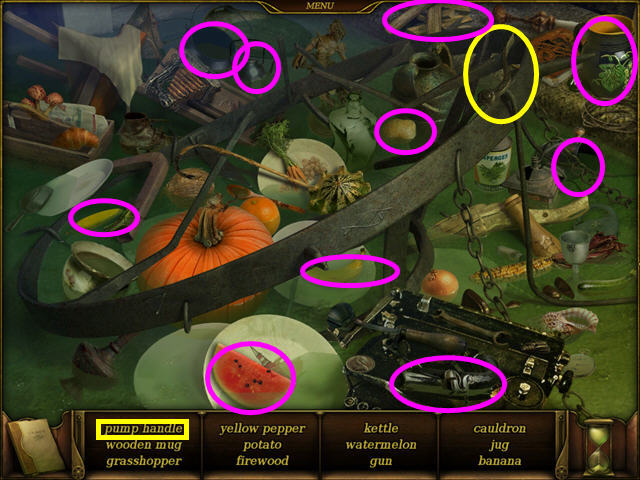
- Select the fallen chandelier for a hidden object scene.
- Locate all the items on the list.
- The PUMP HANDLE will go into your inventory.
- Enter the lift and return to the physicist's room.
- Talk to the physicist.
- Select the box on the table for a mini-game.
- The object is to move the ball from the bottom square to the top square.
- Make the following moves: U-L-D-R-U-L-D-L-D-R-U-R-D-R-U-L-D-L-U.
- Talk to the physicist again.
- Enter the lift and return to the hall.
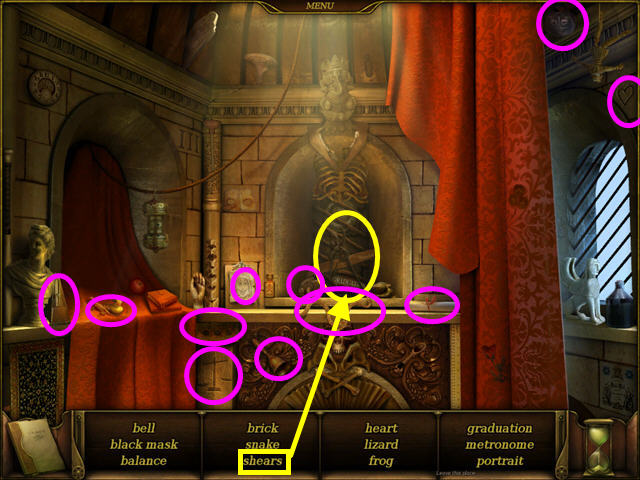
- Select the hole in the roof for a hidden object area.
- Locate all the items on the list.
- The SHEARS will go into your inventory.
- Exit the castle. Walk down, right and up to return to the park.
- Select the basin on the lower right for a hidden object area.
- Locate all the items on the list.
- The GLASS SHARD will go into your inventory.

- Look at the close-up of the pump and add the PUMP HANDLE (Q).
- Click on the handle to add water to the well.
- Enter the botanist's greenhouse (R).
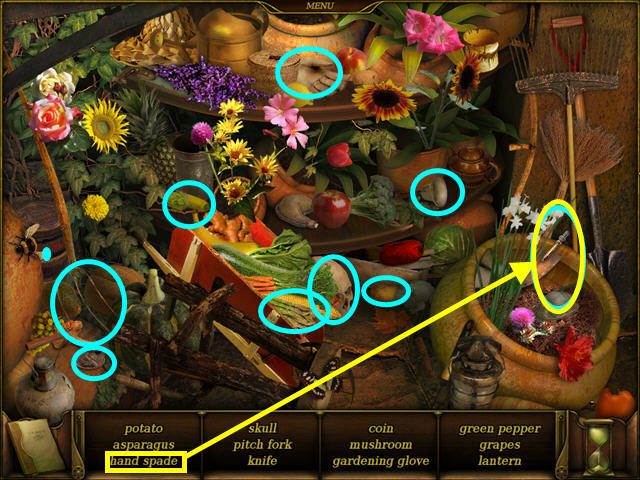
- Select the plants on the center right for a hidden object scene.
- Find all the items on the list.
- The HAND SPADE will go into your inventory.

- Talk to the botanist (S).
- Look at the notes on the table (T).
- Use the HAND SPADE to take some SOIL (U).
- Put the SOIL into the pot; then add the sprout (V).
- Turn on the tap to water the sprout.
- Look at the microscope to see the lens is missing (W).
- Look at the lighting system to see it is missing the glass discs (X).
- Read the wall note (Y).
- Exit the greenhouse and walk down to the park entrance.
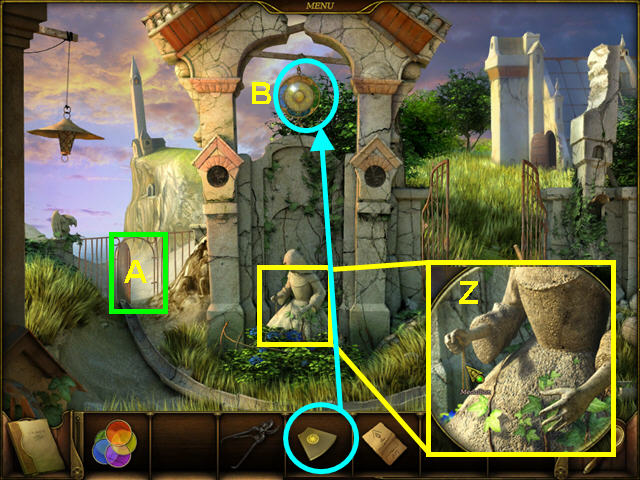
- Look at the close-up of the statue and note the medallion (Z).
- Note the gate to the shore (A).
- Use the GLASS SHARD on the hanging disc to trigger a mini-game (B).

- Match the inner items to the outer alchemical symbols.
- Click on 2 inner items to swap positions.
- The top symbol is fire and goes with the flame and the sun.
- The right symbol is earth and goes with a leaf and the foot of man.
- The bottom symbol is water and goes with the fish and anchor.
- The left symbol represents wind which goes with the bird's wing and the flag.
- Enter the gate to the shore.
- Give the NOTE to the occultist and he gives you the MAGIC SEALS (C).
- Make note of the chest on the beach (D).
- Select the broken boat for a hidden object game (E).
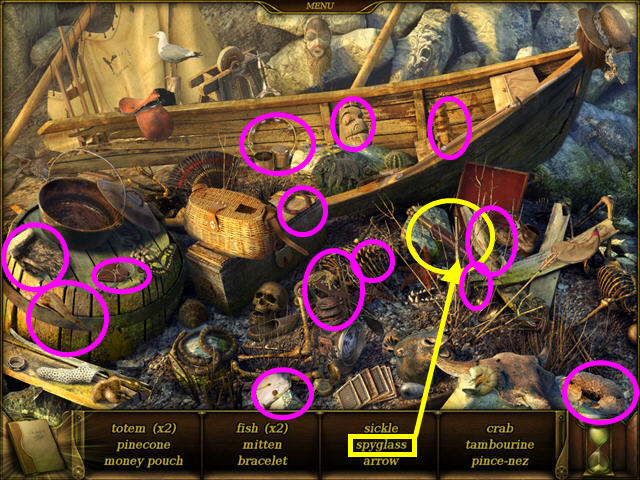
- Locate all the items on the list.
- The SPYGLASS will go into your inventory.
- Exit the shore and return to the castle.
- Enter the main hall and take the lift to the physicist's room.
- Give the physicist the SPYGLASS and he will give you the MICROSCOPIC EYEPIECE.
- Enter the lift and return to the main hall.
- Look at the close-up of the library door over the stairs.
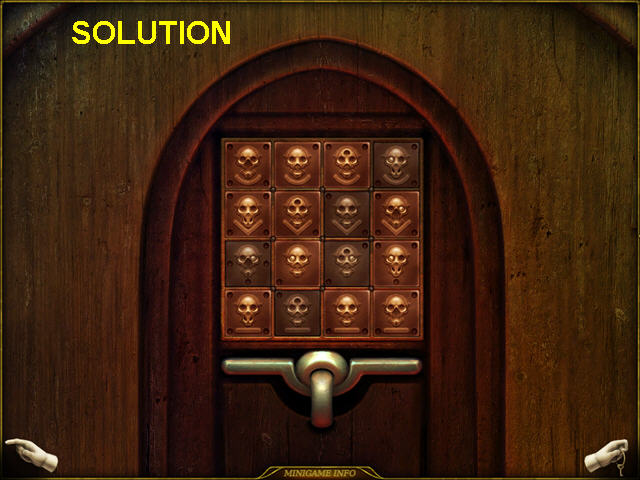
- Use the MAGIC SEALS on the grid to trigger a mini-game.
- Place the tiles so that each row has the same lower symbol and each column has the same number of dots around the border.
- Look at the chalkboard to see the symbol of the book you need (F).
- Look at the left bookshelf and take the brown book with the matching symbol (G).
- The book will go to the book stand (H).
- Look at the pages; take the lighting diagram (I).
- Look at the book on the floor to see the formula for the elixir of eternal life (J).
- Exit the castle and return to the botanist's greenhouse.
- Look at the lighting system; replace the GLASS DISCS.
- Click on the three knobs that will create the triangle required from the note.
- Once the lighting system (K) is correct, the flower will grow.
- Look at the close-up of the flower; use the SHEARS to cut the FLOWER (L).
- Use the MICROSCOPIC EYEPIECE on the microscope (M).
- Place the FLOWER on the microscope for a mini-game.
- Click on the floating pollen that matches the list on the right.
- They will be checked off as you find them.
- The FINISHED FLOWER will go into your inventory.
- The botanist has disappeared and the occultist is here.
- Talk to the occultist (N).
- Read the message in the mail tube (O).
- Give the FINISHED FLOWER to the occultist (P).
- Exit the greenhouse and return to the servant's house.
- Read the message in the mail tube.
- Exit the servant's house and return to the shore.
- Talk to the skeleton and learn you need the seal and payment to get the key to the chest (Q).
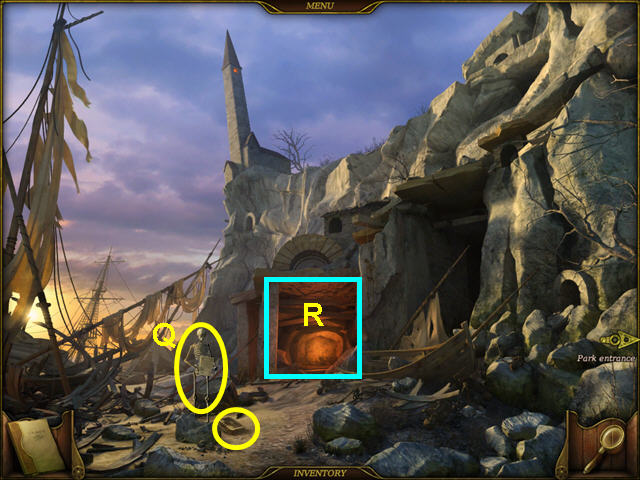
- Enter the grotto (R).
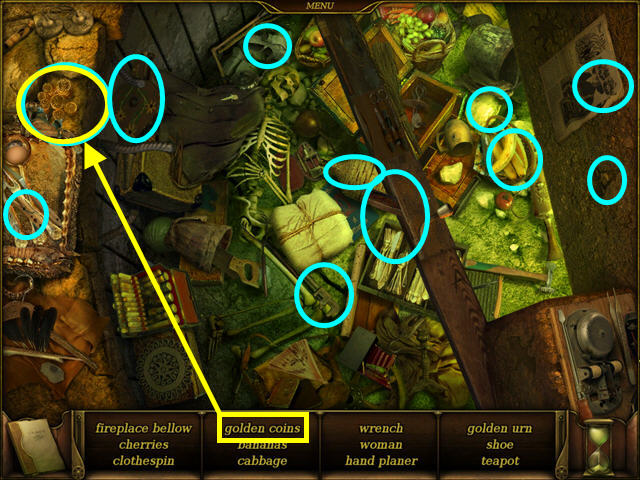
- Select the pit on the left of the statue for a hidden object scene.
- Locate all the items on the list.
- The GOLDEN COINS will go into your inventory.
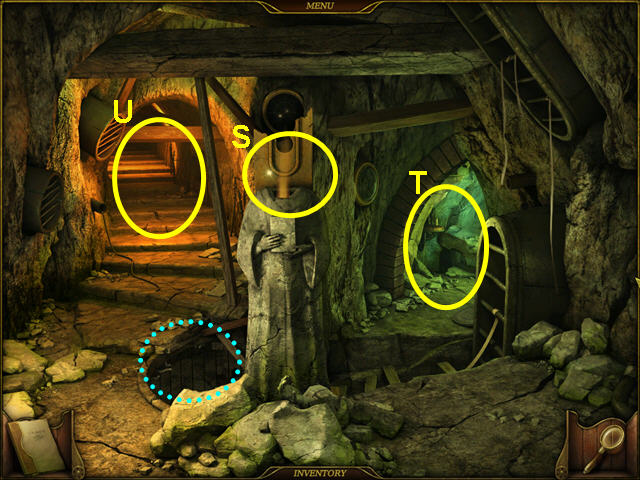
- Look at the headless statue to discover you need a tool (S).
- Note the right tunnel (T).
- Take the left tunnel to the occultist's tower entrance (U).
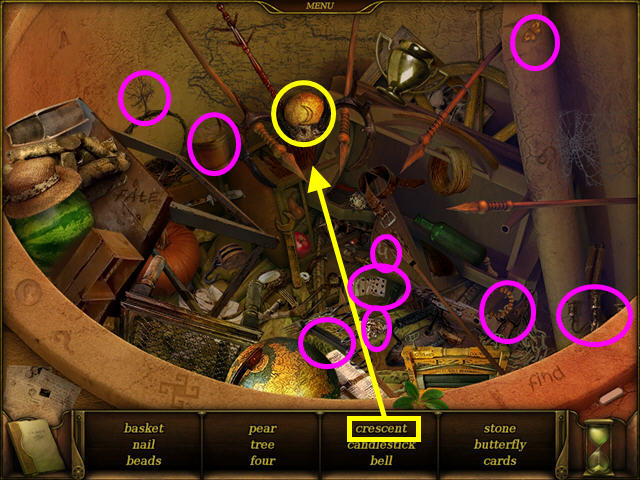
- Select the pit for a hidden object area.
- Locate all the items on the list.
- The STONE with the CRESCENT SYMBOL will go into your inventory.
- Enter the occultist's room in the upper left corner.
- Talk to the occultist and he will give you the SPHERE (V).
- Look at the note on the wall (W).
- Take note of the ritual area (X).
- Exit, return to the grotto and take the right tunnel.
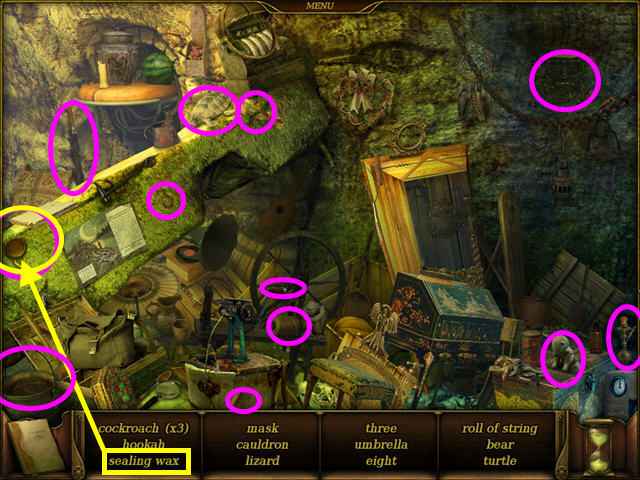
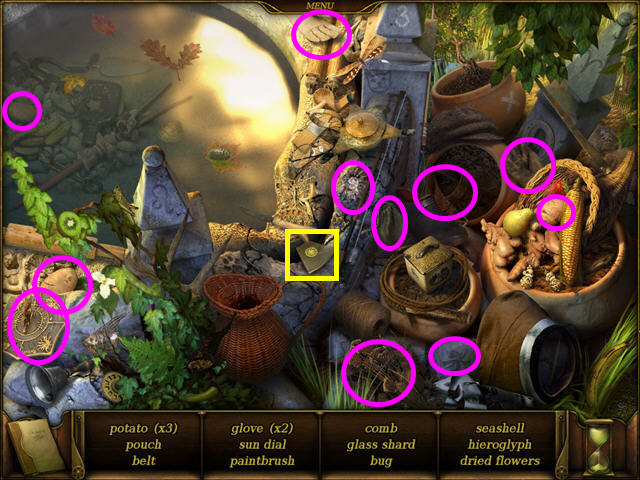
- Select the area under the fallen stone for a hidden object area.
- Locate all the items on the list.
- The SEALING WAX will go into your inventory.
- Exit the tunnel and return to the park outside the botanist's greenhouse.
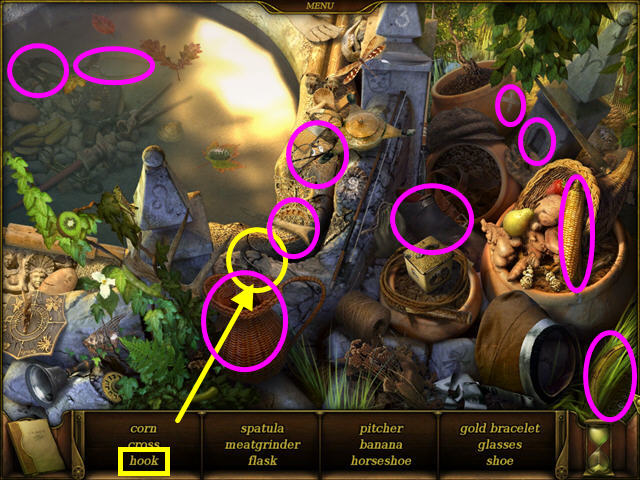
- Select the basin on the right for a hidden object area.
- Locate all the items on the list.
- The HOOK will go into your inventory automatically.
- Exit the park and return to the castle.
Chapter 4
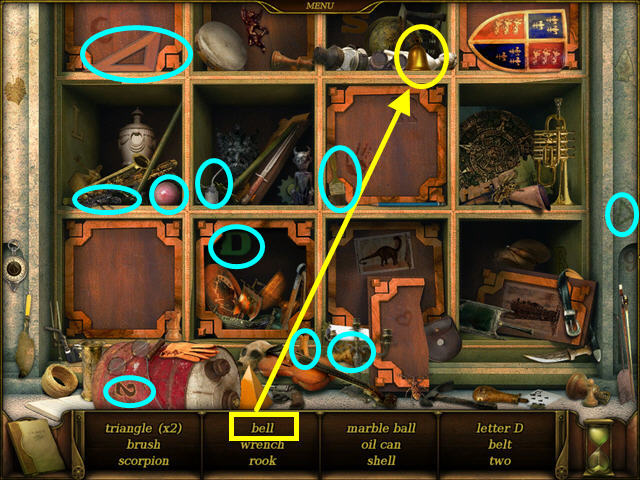
- Enter the main hall and select the fallen chandelier for a hidden object scene.
- Locate all the items on the list.
- The ROPE will go into your inventory.
- Go up the stairs and enter the library.
- Look at the chalkboard to see the symbol of the book you need (Y).
- Look at the narrow bookshelf; take the purple book with the matching symbol (Z).
- The book will go to the book stand (A).
- Look at the pages; take the planets diagram (B).
- Exit the library and enter the lift.
- Take the OBSERVATORY KEY from the dead physicist and place it in the elevator control.
- Press the button to go to the observatory.
- Select the boxes under the telescope for a hidden object scene.
- Locate all the items on the list.
- The BELL will go into your inventory.

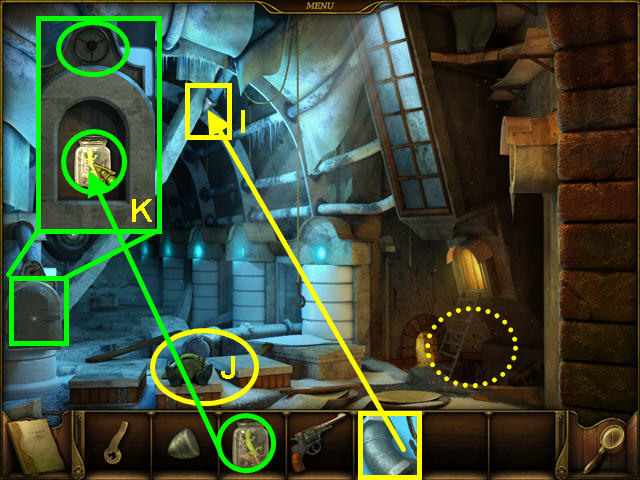
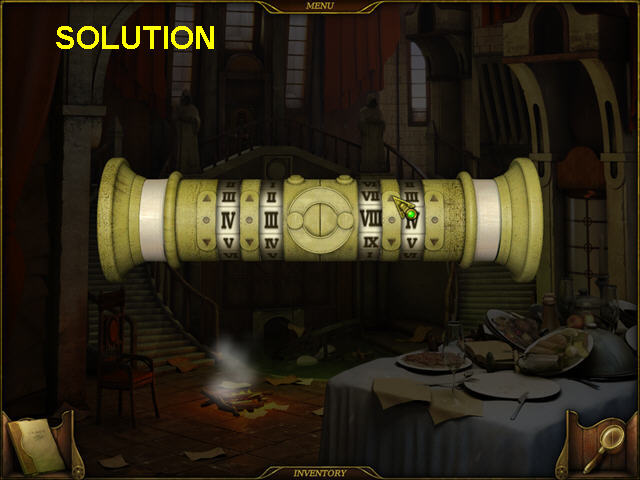
- Look at the close-up of the planets display; place the STONE with the CRESCENT SYMBOL onto the post to trigger a mini-game(C).
- After that mini-game is solved, use the SPHERE on the telescope for another mini-game (D).
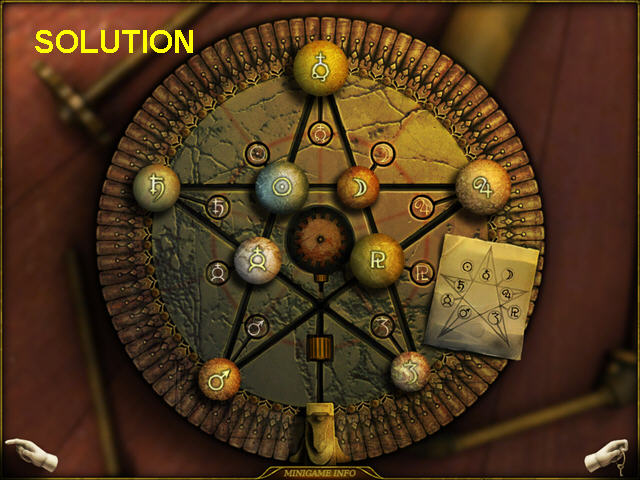
- The object of this mini-game is to place the stones in the same pattern at the paper.
- Click on a stone adjacent to the empty spot to move to that spot.
- The symbols are also marked on the board.
- Once you place the SPHERE on the telescope, a mini-game is triggered.
- Create the drawings from the papers using the stars.
- Click on the brightest star then click on the next ones in sequence.
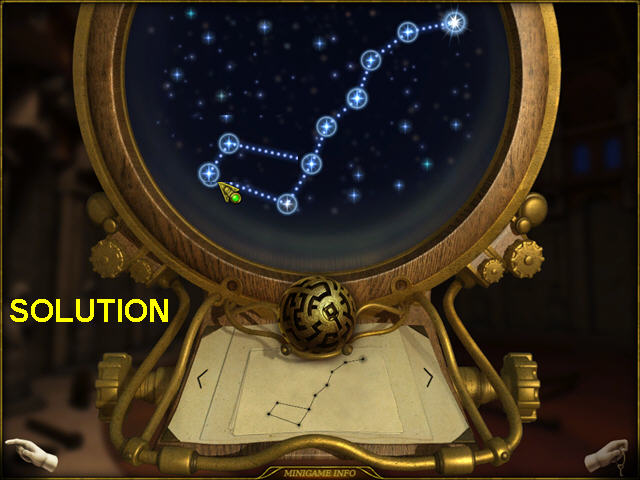
- This is the solution for the first drawing.
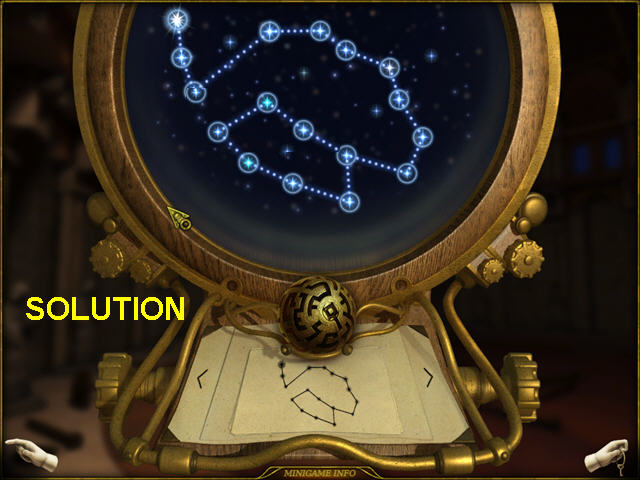
- This is the solution for the second drawing.
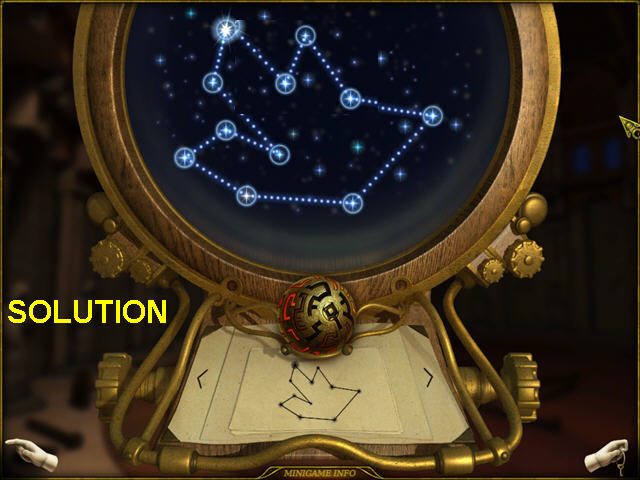
- This is the solution for the third drawing.
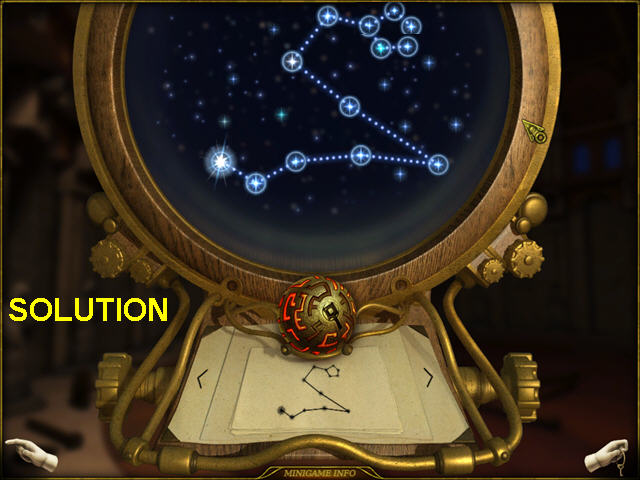
- This is the solution for the fourth drawing.
- The CHARGED SPHERE will go into your inventory.
- Use the elevator to exit and return to the grotto.
- Look at the close-up of the headless statue.
- Combine the HOOK and the ROPE inside your inventory to get the ROD.
- Use the ROD on the hole in the statue to retrieve the SEAL RING.
- Exit the grotto and look at the close-up of the skeleton.
- Give the GOLD COINS to the skeleton (E).
- Combine the SEAL RING and the SEALING WAX; use the result on the document (F).
- The skeleton will give you METAL PIECES.
- Look at the chest that was at the skeleton's feet.
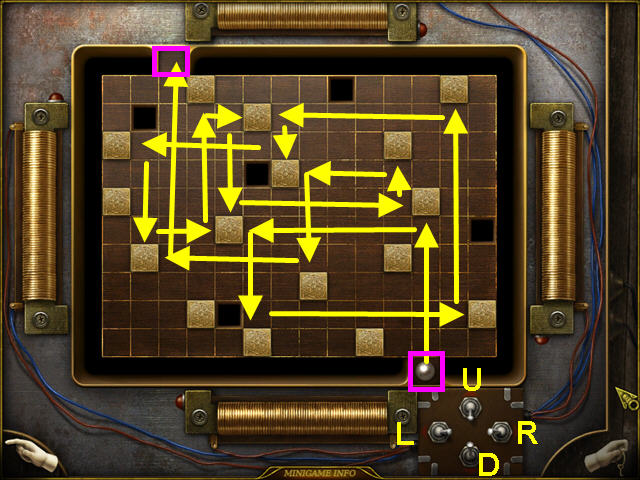
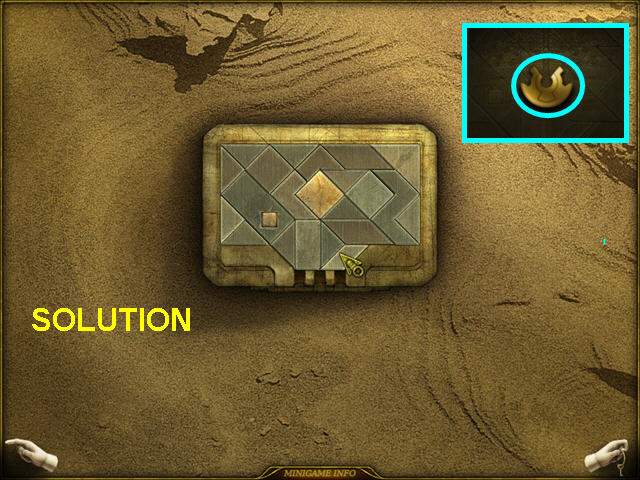
- Use the METAL pieces on the chest for a mini-game.
- Fit all the metal pieces into the inlay area.
- The MEDALLION PIECE will go into your inventory.
- Enter the grotto and enter the right tunnel.
- Look at the close-up of the delivery mechanism on the right wall.
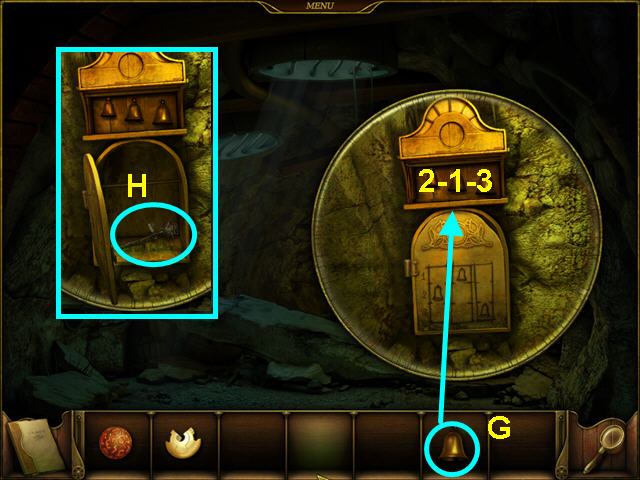
- Add the BELL to the other 2 bells (G).
- Click on the center bell, then the left bell, and finally the right bell to open the compartment (1-3).
- Take the ROSE from the compartment (H).
- Exit the tunnel and go to the park entrance.
- Look at the close-up of the statue.
- Place the ROSE in the open hand (I).
- Take the MEDALLION PIECE from the other hand (J).
- Combine the two MEDALLION PIECES in your inventory.
- Exit to the grotto and return to the occultist's room.
- Select the coffin on the left for a hidden object area.
- Collect all the items on the list.
- The CANDLES will go into your inventory.
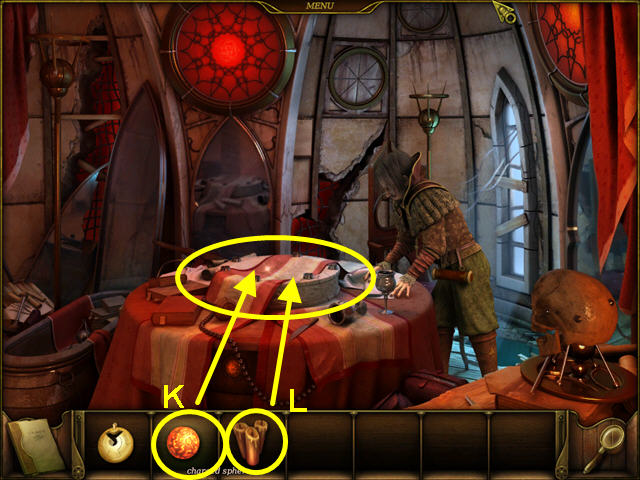
- Place the CHARGE SPHERE in the center of the ritual area (K).
- Place the CANDLES in the ritual area to trigger a mini-game (L).
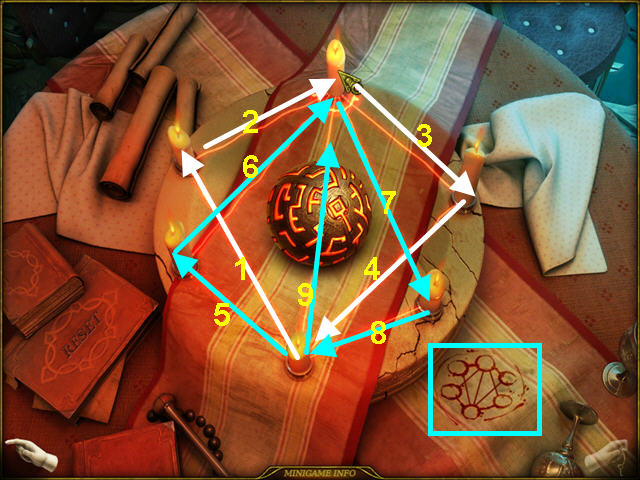
- The object is to duplicate the pattern shown without retracing any lines (M).
- Click on the lit candle at the bottom and follow the numerical steps (N).
- Use the MEDALLION on the portal in the ritual area.
- Take the SKULL and use it to break the mirror (O).
- Take the MEDALLION PIECE from the broken mirror (P).
- Combine the MEDALLION PIECES.
- Select the area to the right of the mirror for a hidden object area (Q).
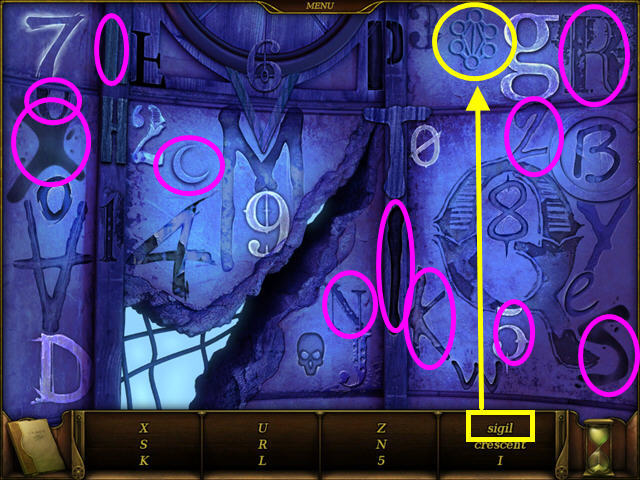
- Locate all the items on the list.
- The SIGIL will go into your inventory.
- Place the SIGIL on the sphere to open the portal.
- Click on the portal to return.
- Read the mail tube message near the occultist (R).
- Select the coffin for a hidden object area (S).
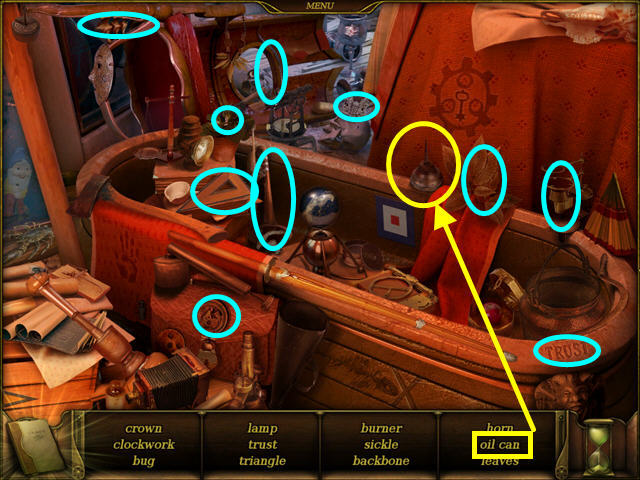
- Locate all the items on the list.
- The OIL CAN will go into your inventory.
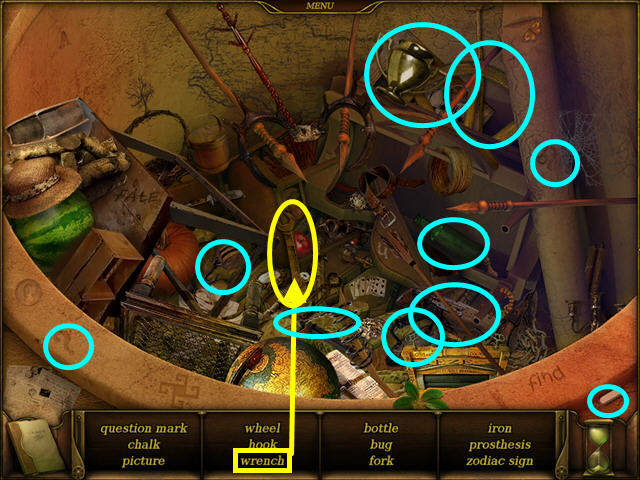
- Exit the occultist's room; select the pit for a hidden object scene.
- Locate all the items on the list.
- The WRENCH will go into your inventory.
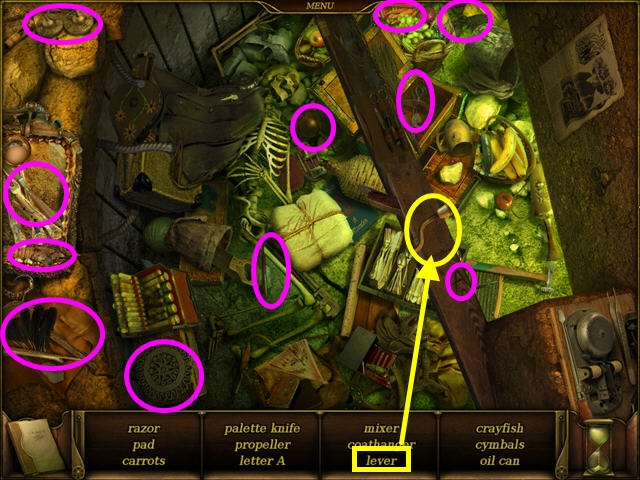
- Walk right to the grotto and select the pit for a hidden object scene.
- Locate all the items on the list.
- The LEVER will go into your inventory.
- Exit the grotto and return to the physicist's room in the castle.
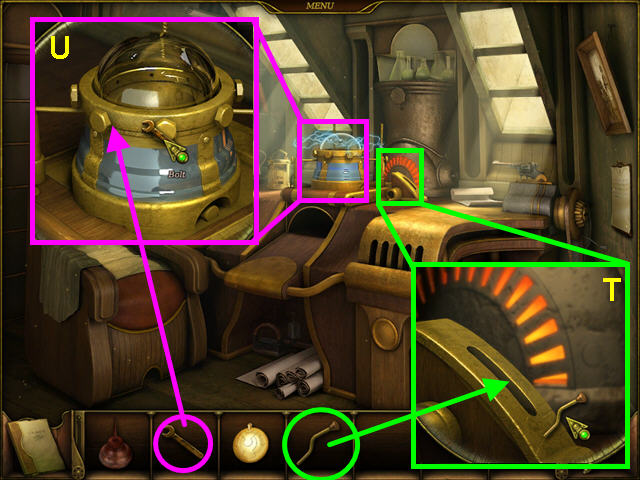
- Use the LEVER on the right side of the device to shut it down (T).
- Look at the close-up of the domed piece and use the WRENCH to remove the bolts (U).
- Look again for a mini-game.
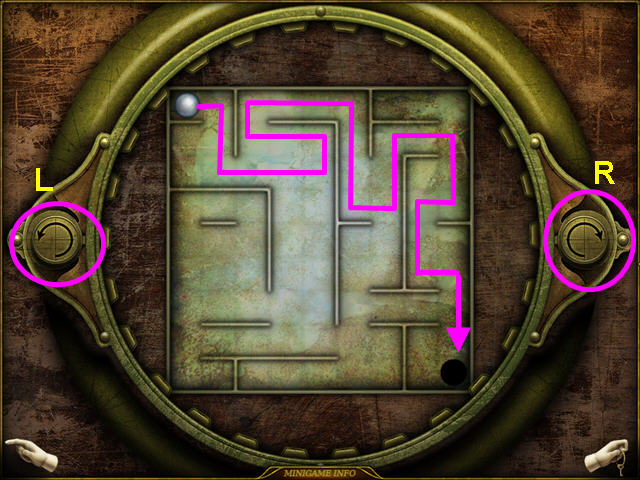
- The object of this mini-game is to move the ball to the hole using the right or left control.
- The solution is: R-L-R-R-R-L-L-L-R-R-L-L-L-R-R-L.
- Take the CHARGED BALL that rolls onto the table.
- Exit the castle and return to the grotto.
- Enter the right tunnel and click on the mansion master's room.
- The alchemist is alive and wants you to finish the elixir.
- Read the contract on the left floor (V).
- Take the FINISHED FLOWER (W).
- Take the FULL CONTAINER (X).
- Read the blackboard (Y).
- Look at the manufacturing machine (Z).
- Use the FINISHED FLOWER, FULL CONTAINER, CHARGED BALL, and MEDALLION on the machine (A).
- Take the finished ELIXIR (B).
- Take the GUN (C).
- Look at the papers; take the CLOCK ELEMENT (D).
- Exit the master's room; select the area under the beam for a hidden object area.

- Locate all the items on the list.
- The RAG will go into your inventory.
- Exit the tunnel and go to the freezing room.
- Use the ELIXIR on each of the bodies (E).
- Exit the freezing room and go to the docks.
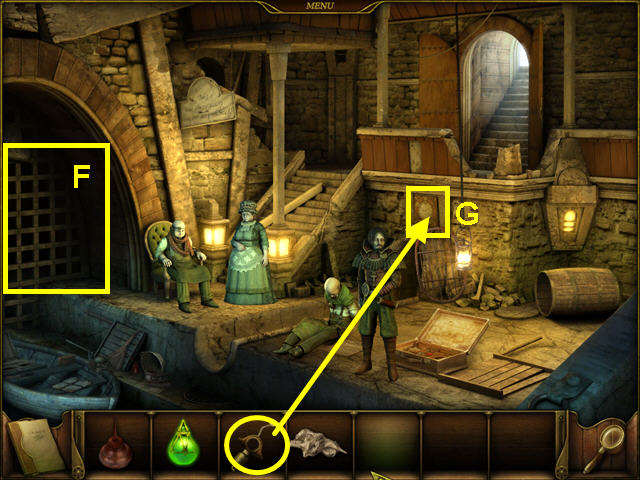
- Note the grate on the left (F).
- Use the CLOCK MECHANISM on the clock to trigger a mini-game (G).
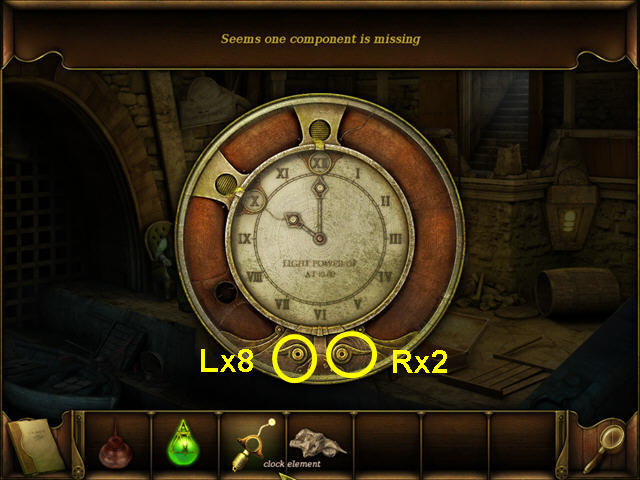
- The object of this mini-game is to set the clock to 8.
- The left lever moves the time back 25 minutes; the right lever moves the time ahead 45 minutes.
- Press the left lever 8 times (8X) and the right lever 2 times (2X) to solve.
- Walk left into the lighthouse canal.
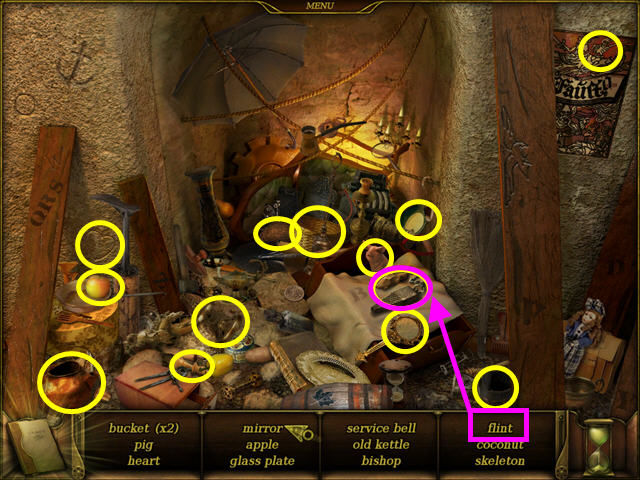
- Select the junk pile in the center for a hidden object scene.
- Locate all the items on the list.
- The FLINT will go into your inventory.

- Walk up the stairs and take the GEAR from the left pillar (H).
- Walk back down and open the faceplate of the rotating mechanism (I).
- Place the GEAR inside for a mini-game.
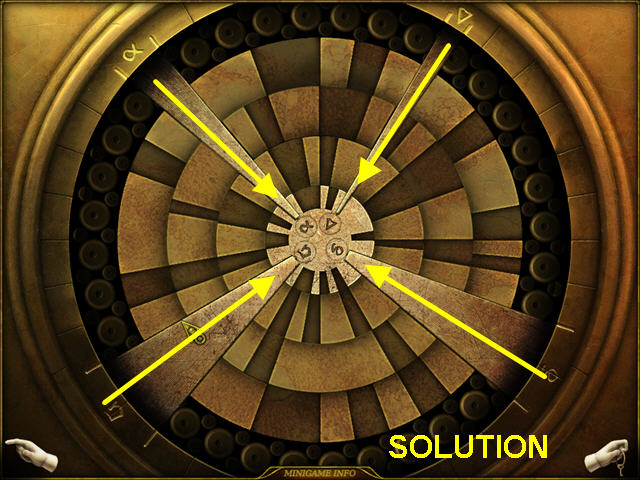
- Rotate all the rings so that the 4 pins can reach the center.
- This will rotate the lighthouse.

- Walk up the stairs to the lighthouse.
- Take the TORCH (J).
- Combine the TORCH with the RAG (K); add the OIL to the result (L).
- Use the FLINT (M) to light the TORCH.
- Open the round door and use the TORCH to light the lighthouse (N).
- Exit the lighthouse and return to the dock.
- Congratulations! You have completed Elixir of Immortality!
Created at: 2010-07-16