

Walkthrough Menu
- General Tips
- Chapter 1: At Home
- Chapter 2: The Elven Library
- Chapter 3: The Crash Site
- Chapter 4: Healing the Dragon
- Chapter 5: The Barracks
- Chapter 6: Across the Moat
- Chapter 7: The Lookout Point
General Tips
- This is the official guide for Emberwing: Lost Legacy.
- This guide will not mention each time you have to zoom into a location; the screenshots will show each zoom scene.
- We will use the acronym HOP for Hidden-object puzzles. Interactive items will be color-coded and some will be numbered; please follow the numbers in sequence.
- Use the map to travel to a location.
Chapter 1: At Home
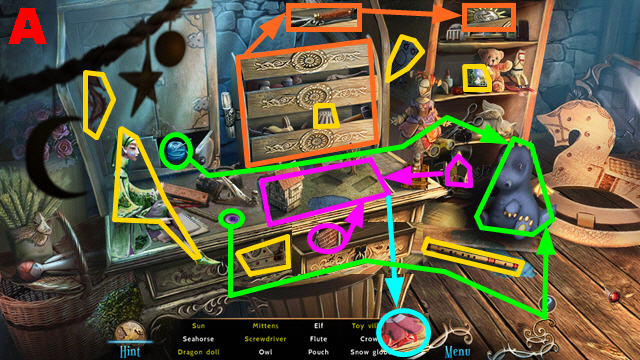
- Play the HOP.
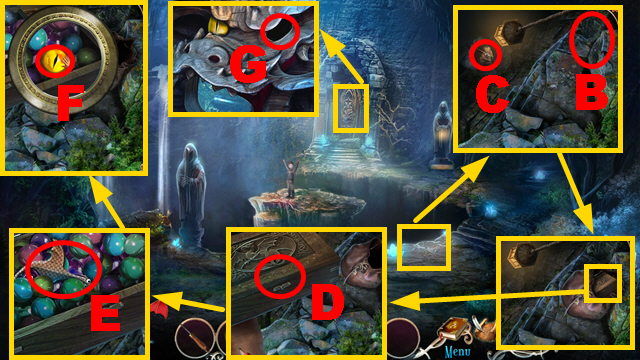
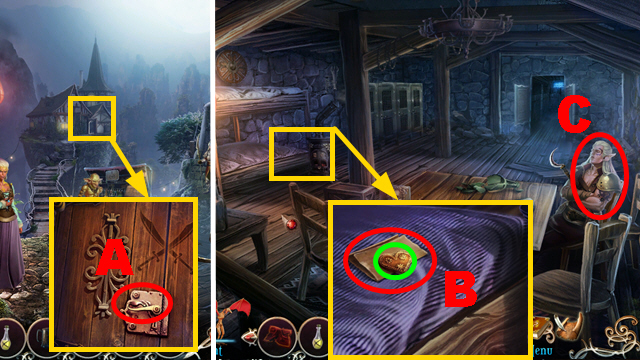
- You receive the SCREWDRIVER (A).

- Use the SCREWDRIVER (B).
- Take the SKETCH (C).
- Turn right.
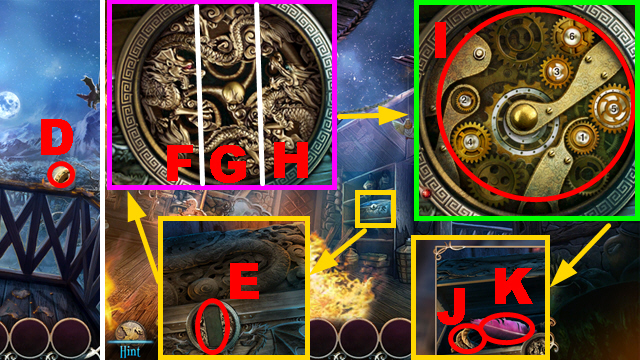
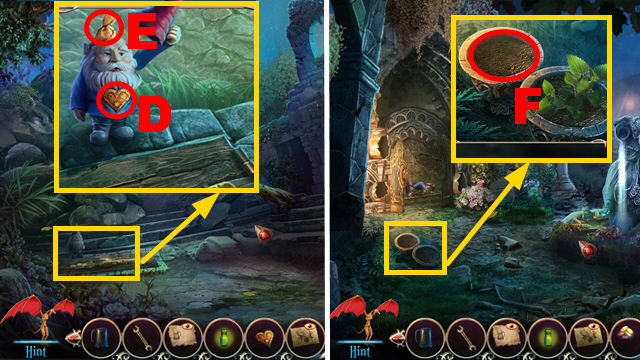
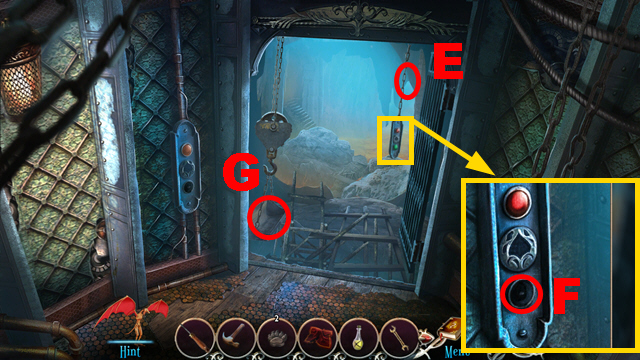
- Take the DIAL (D).
- Walk down.
- Place the DIAL (E).
- Play the mini-game.
- Solution (purple): Fx2, Gx4, Hx3.
- Solution (green): (I).
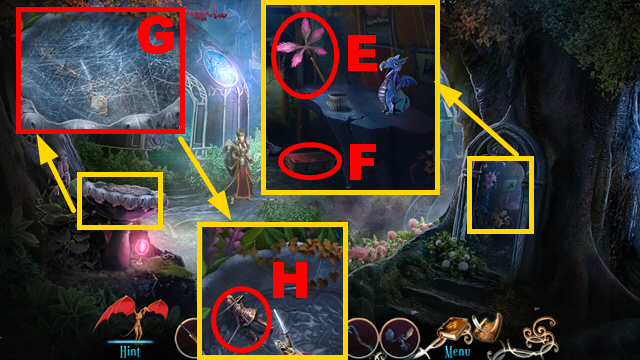
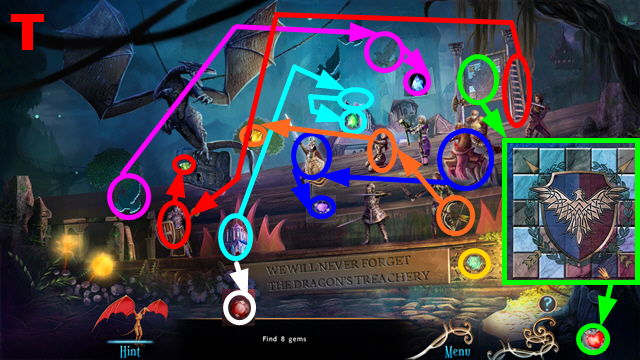
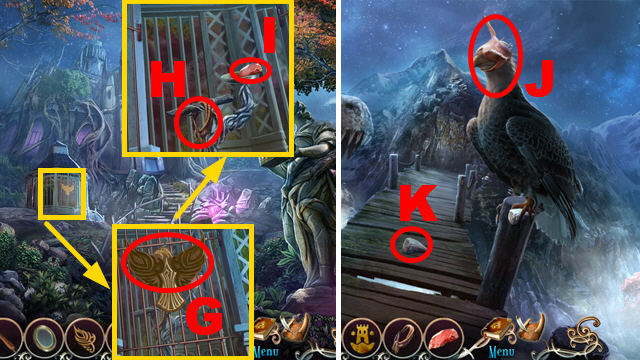
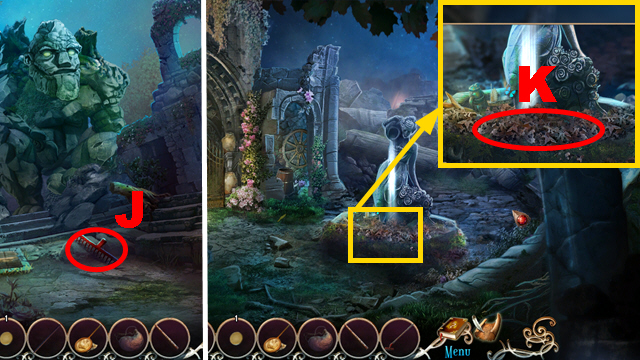
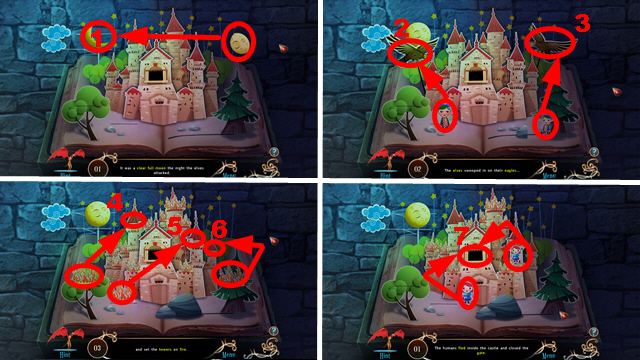
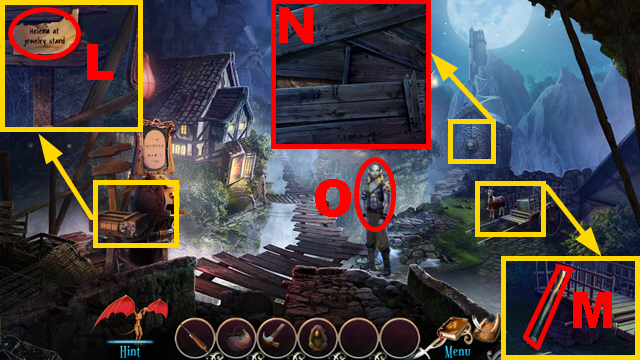
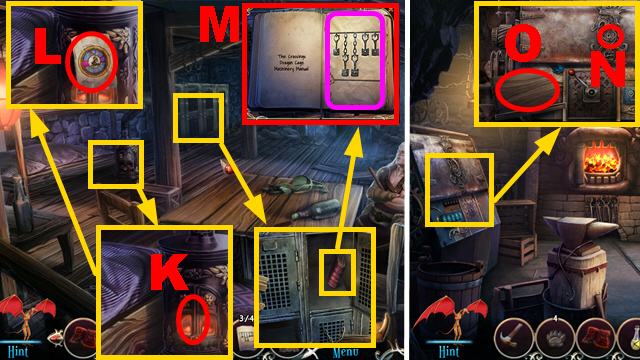
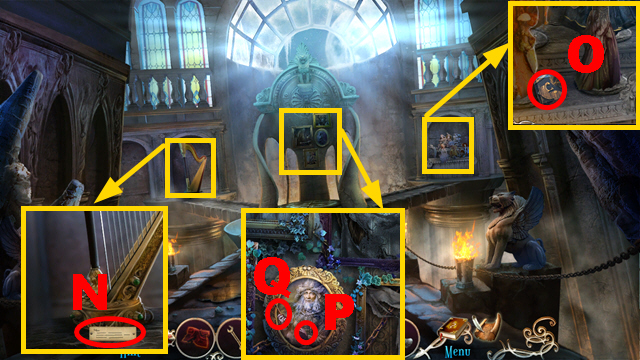
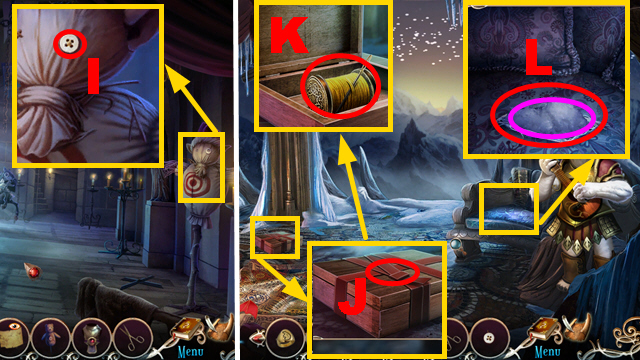
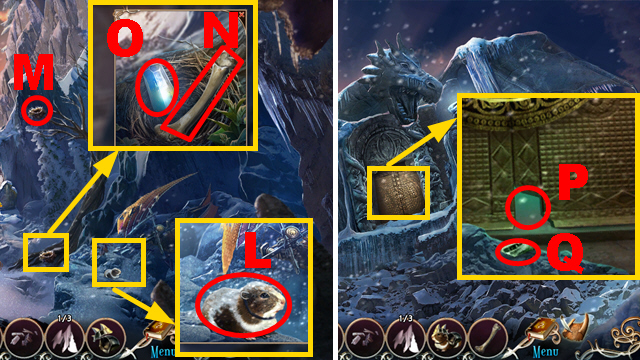
- Take the ROPE (J) and FEATHER 1/3 (K).
- Turn right.
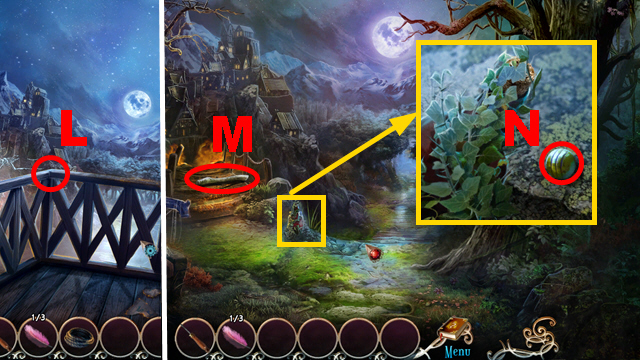
- Place the ROPE (L).
- Climb down.
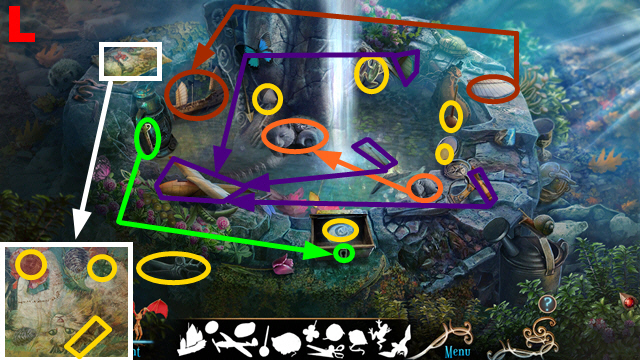
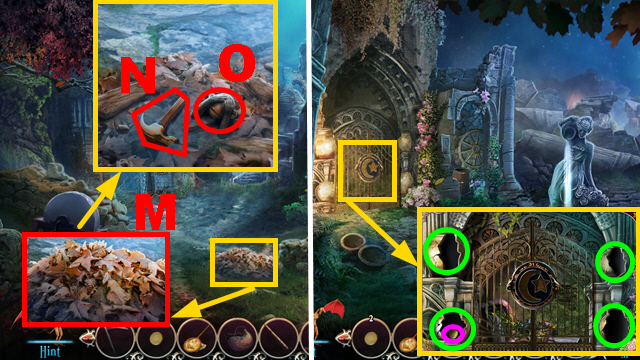
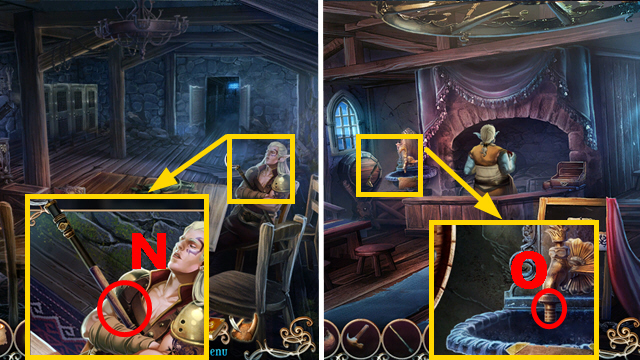
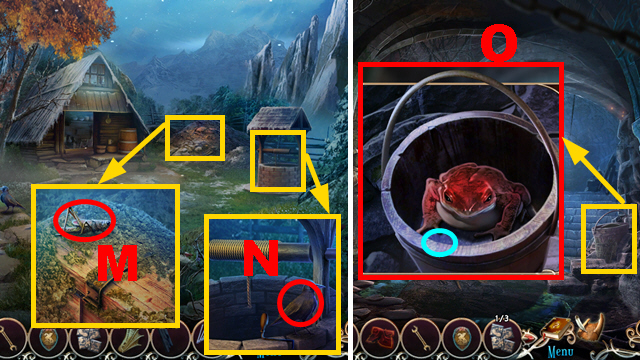
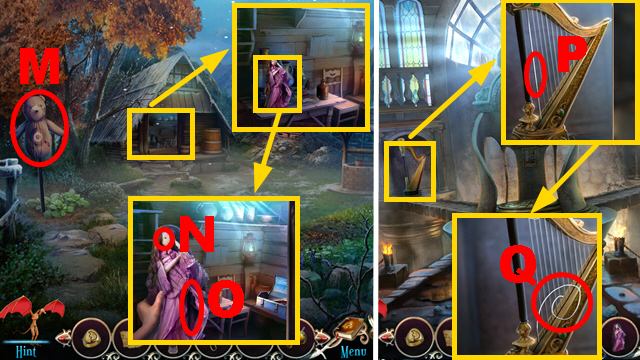
- Take the WOODEN STICK (M) and BEAD 1/5 (N).
- Move forward.
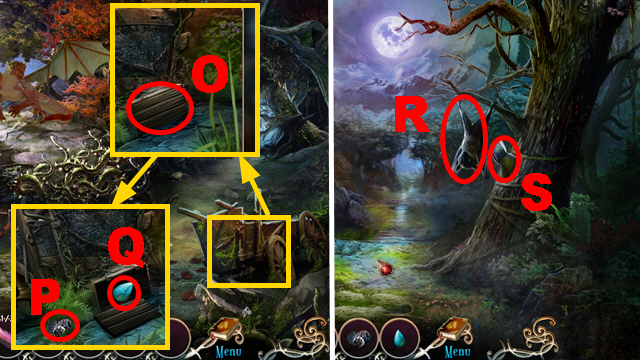
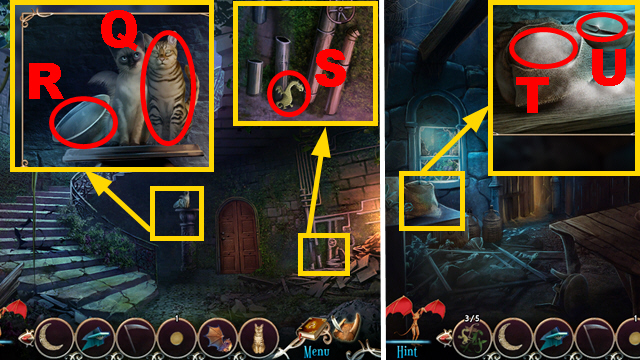
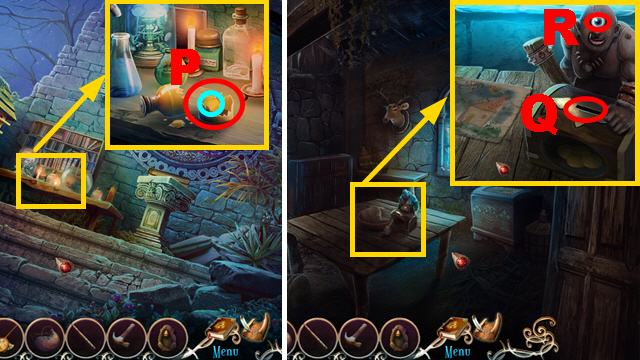
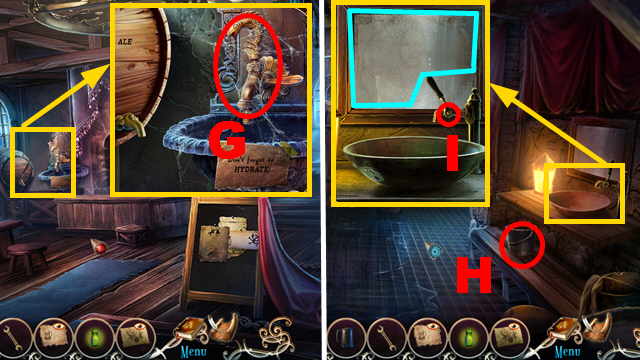
- Use the SCREWDRIVER (O); take the BERRIES (P) and CRYSTAL (Q).
- Walk down.
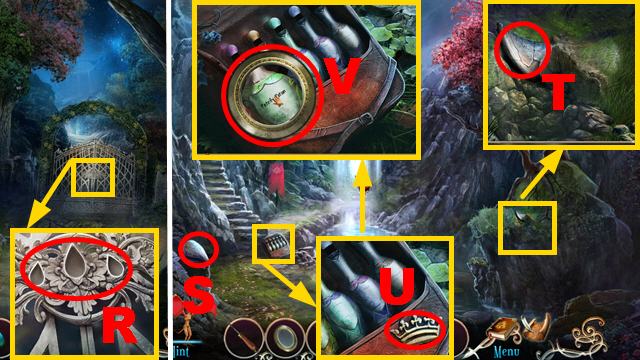
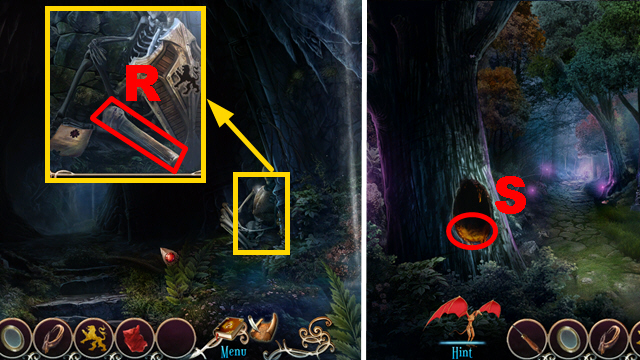
- Give the BERRIES to the bat (R).
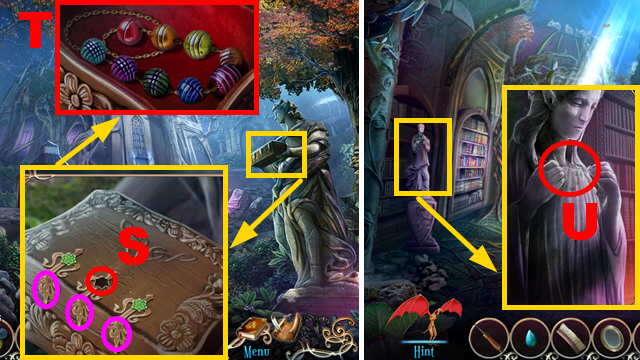
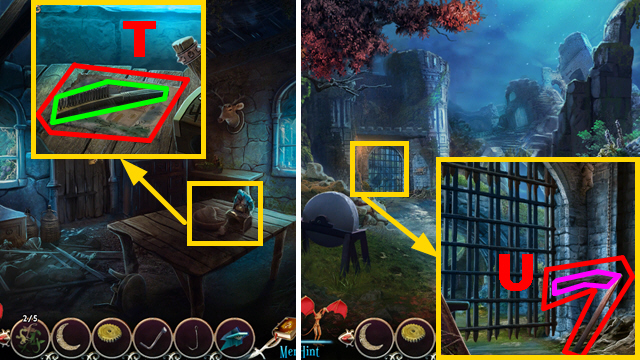
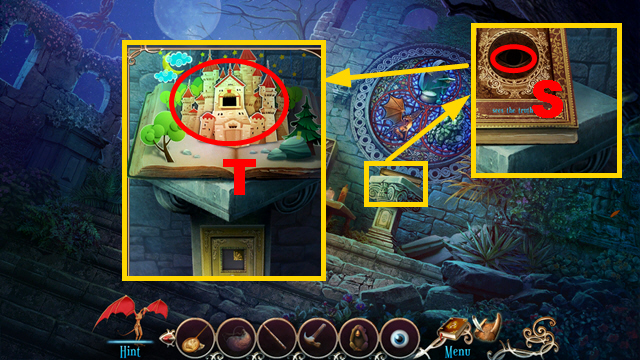
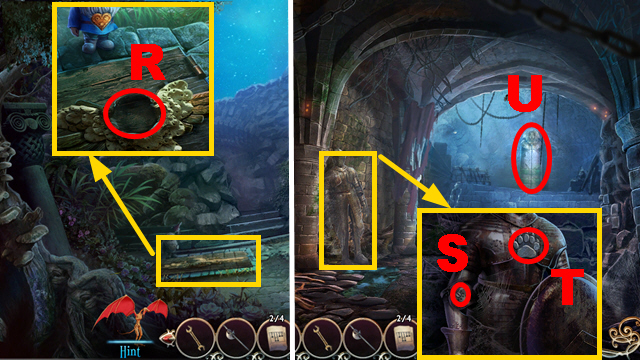
- Connect the WOODEN STICK to the blade (S); take the AXE.
- Move forward.
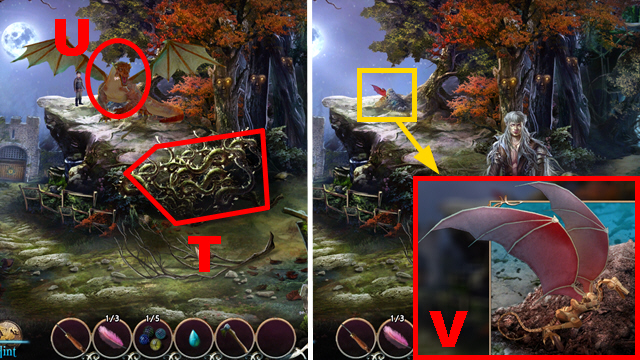
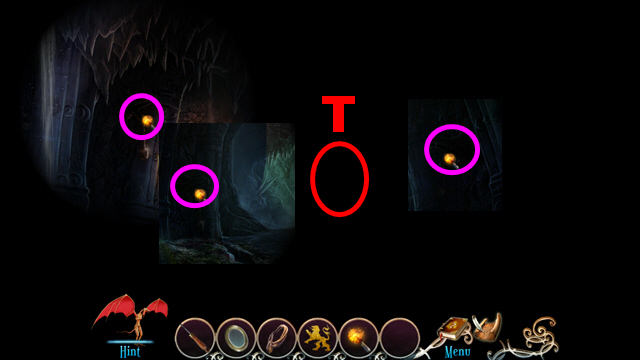
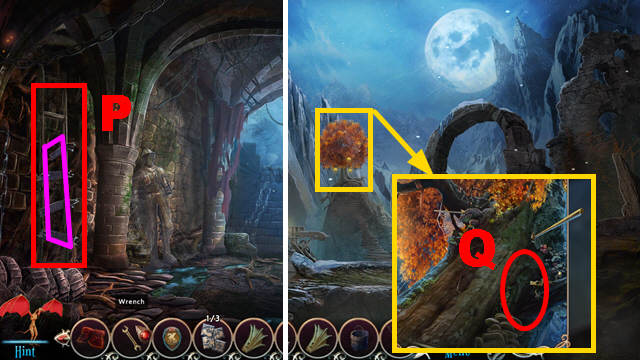
- Use the AXE four times (T).
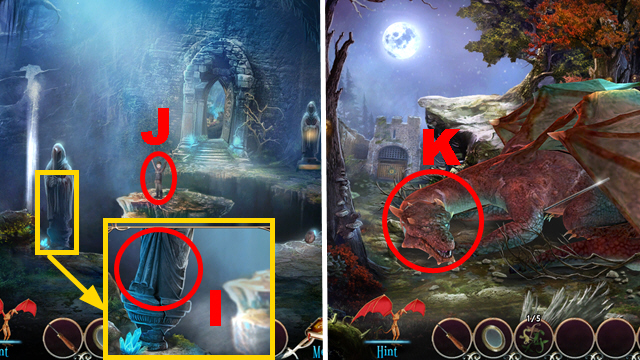
- Talk to the dragon (U).
- Take the clockwork dragon (V).
- Turn right.
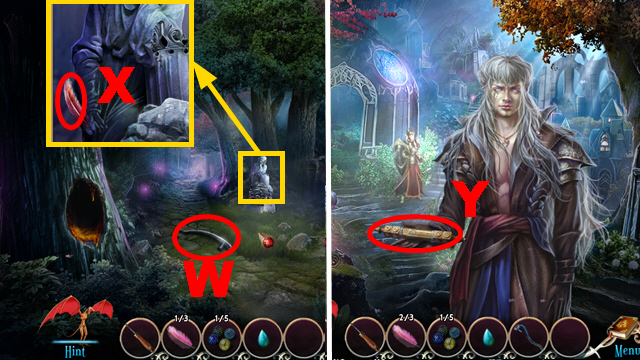
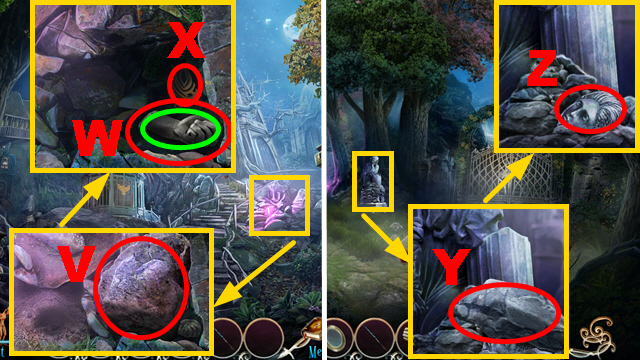
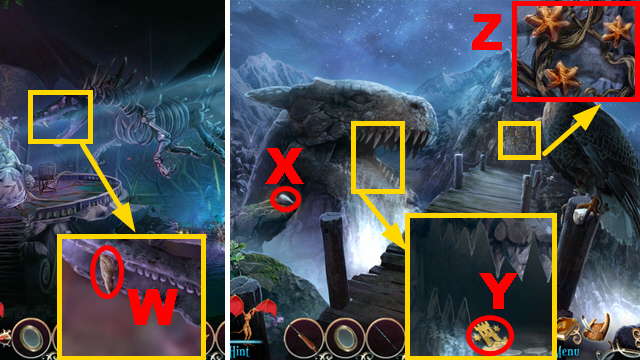
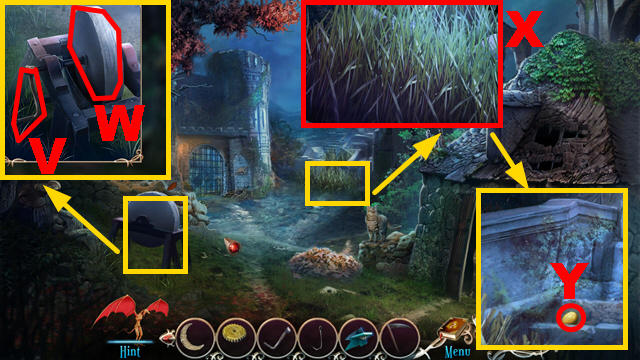
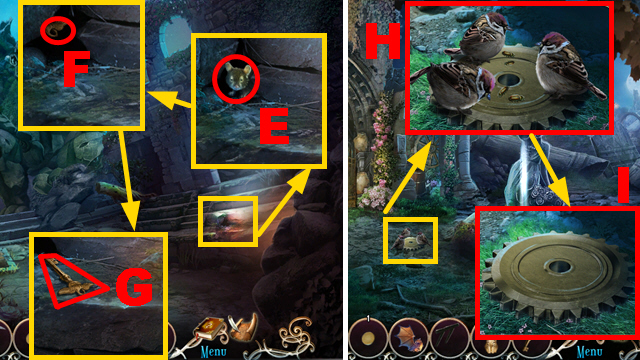
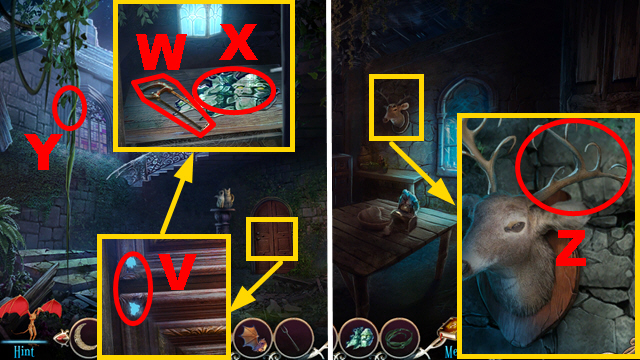
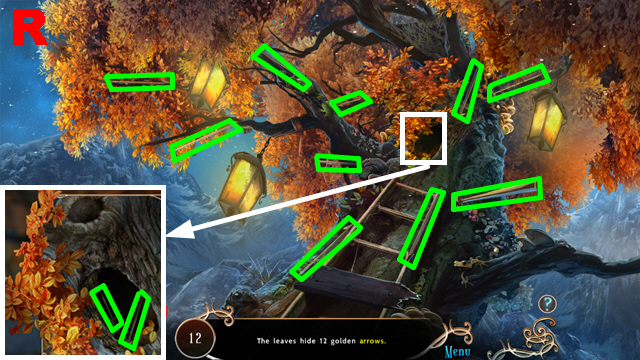
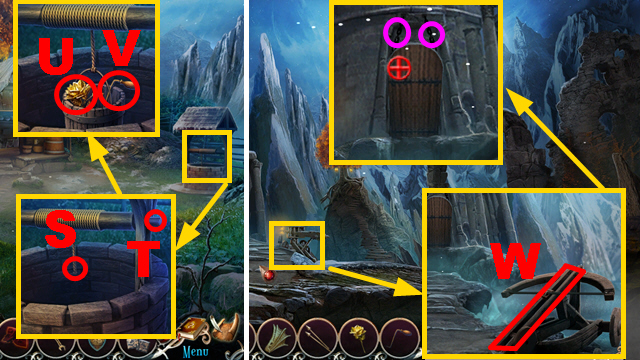
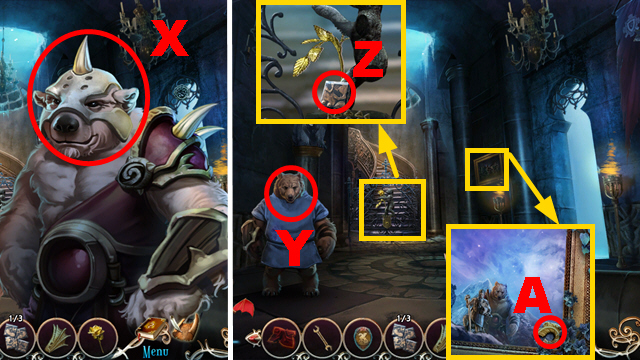
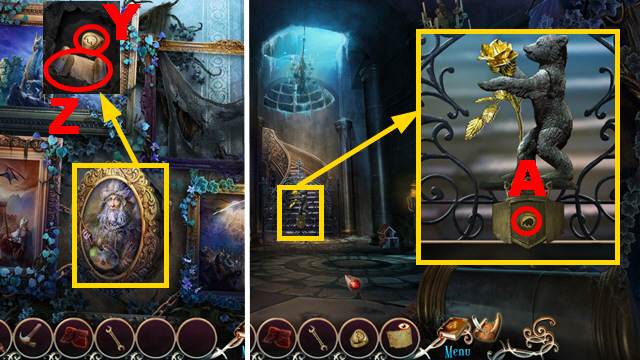
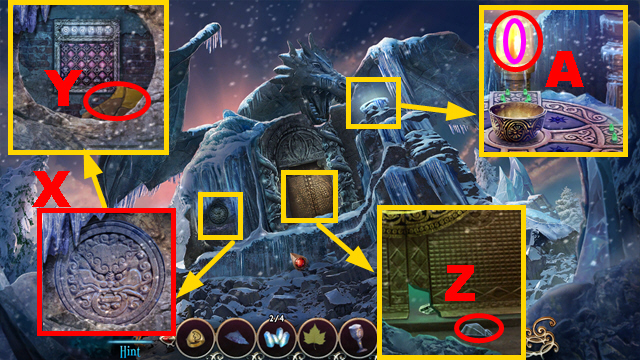
- Take the PUMP HANDLE (W) and FEATHER 2/3 (X).
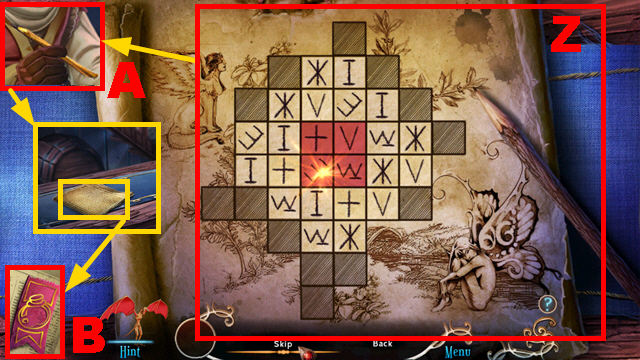
- Move forward.
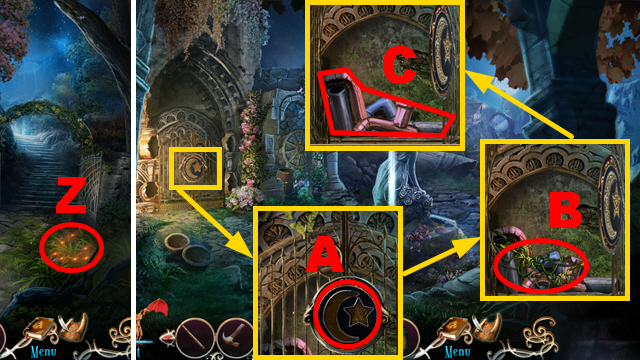
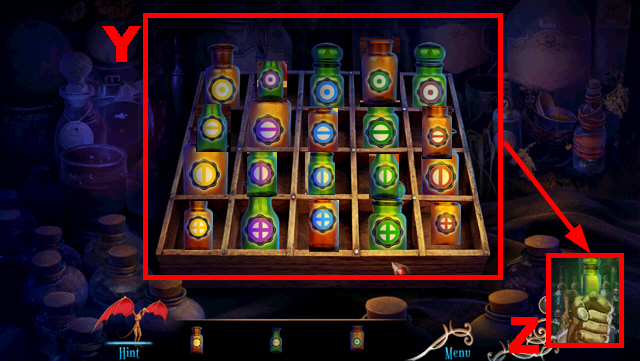
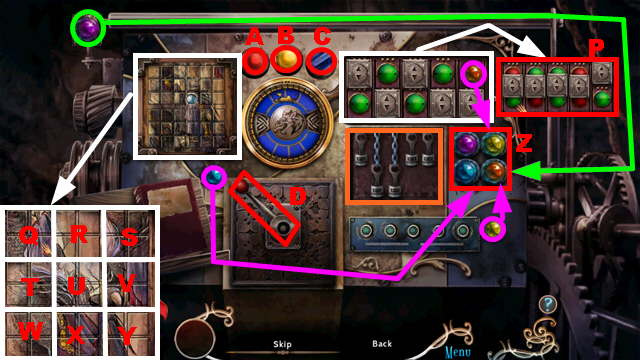
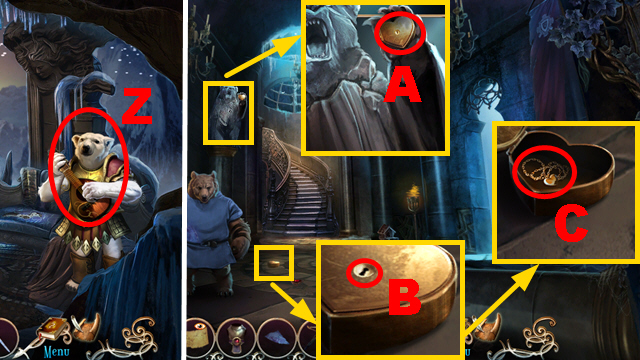
- Play the mini-game (Y).
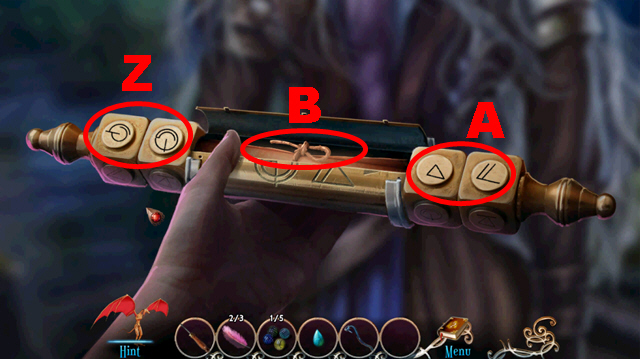
- Solution: (Z) and (A).
- Take the map (B).
- Take the DRAGON FIGURINE (C).
- Turn left.
- Take FEATHER 3/3 (D).
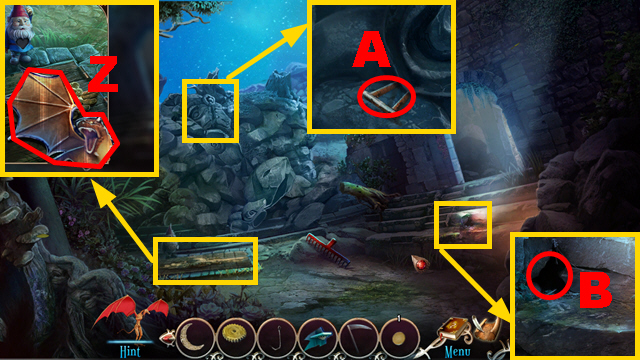
- Walk down.
- Place 3 FEATHERS (E).
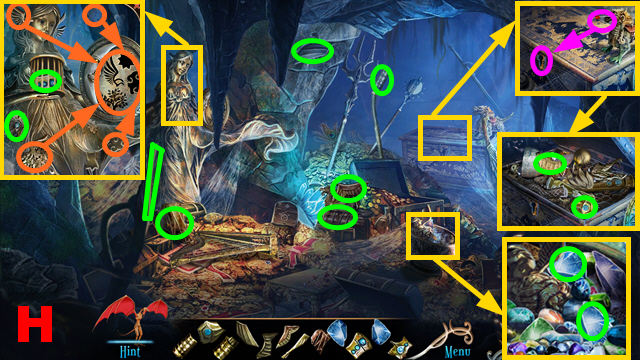
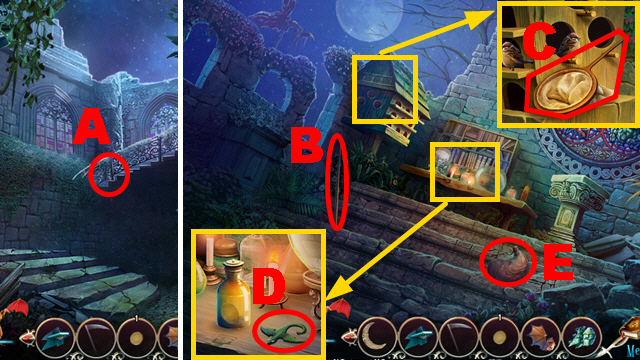
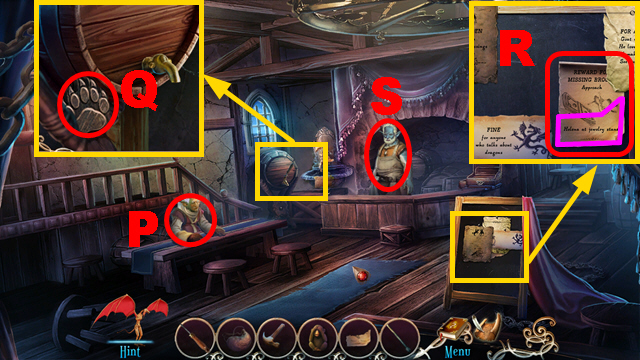
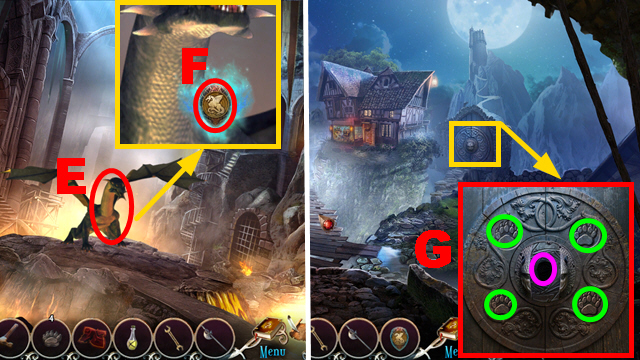
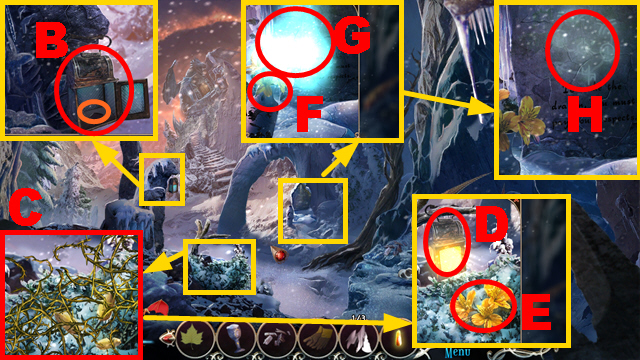
- Take the FEATHER DUSTER and VOL.3: THE GOLDEN AGE OF ELVES (F).
- Use the FEATHER DUSTER (G); take the SOLDIER FIGURINE (H).
- Move forward.
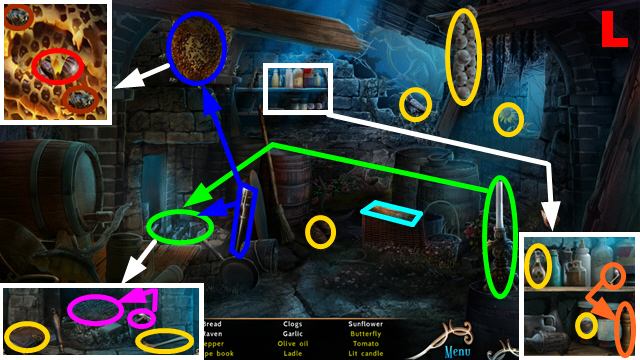
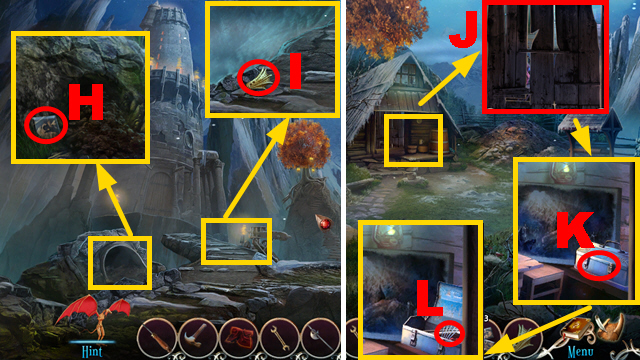
- Take BEAD 2/5 (I) and TROWEL (J).
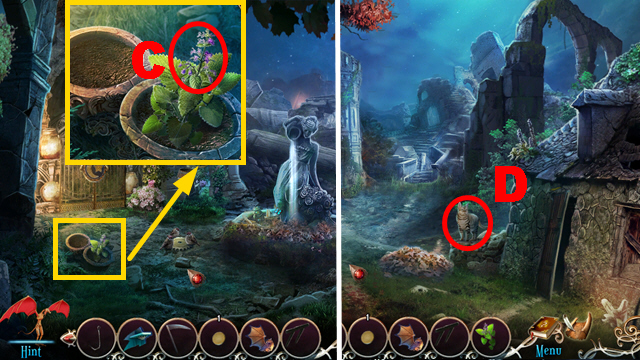
- Walk down three times.
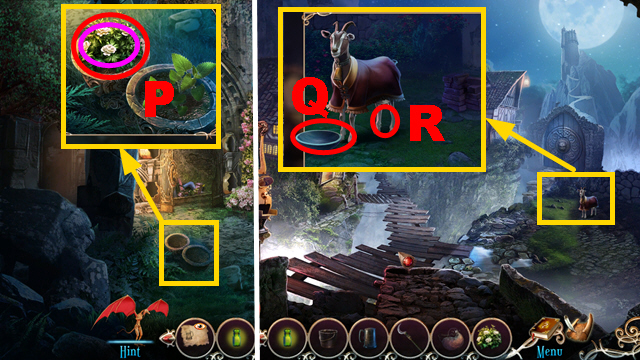
- Use the TROWEL (K); take the PRUNING SHEARS (purple).
- Walk down.
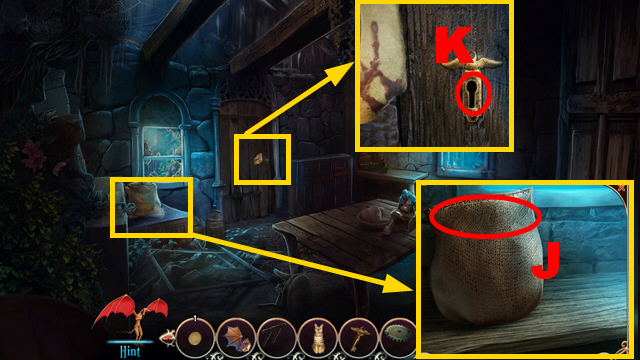
- Use the PRUNING SHEARS (L); take the CORK (M).
- Use the FEATHER DUSTER (N).
- Move forward.
- Place the CORK (green); take the EMPTY JAR (O).
- Walk down.

- Place the EMPTY JAR (P) and PUMP HANDLE (Q).
- Push the handle; take the JAR OF WATER.
- Go to the Village Entrance.
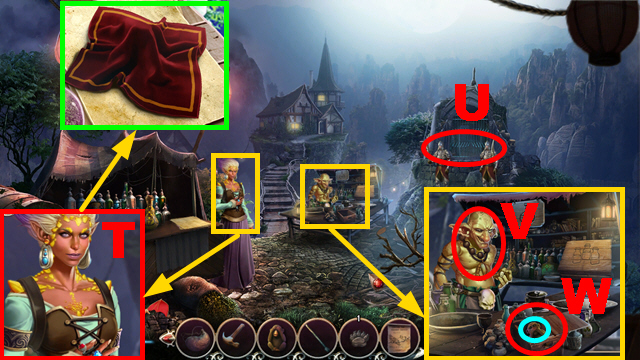
- Use the JAR OF WATER (R); take the KING FIGURINE (purple).
- Turn left.
- Place the SOLDIER FIGURINE, KING FIGURINE, and DRAGON FIGURINE (S).
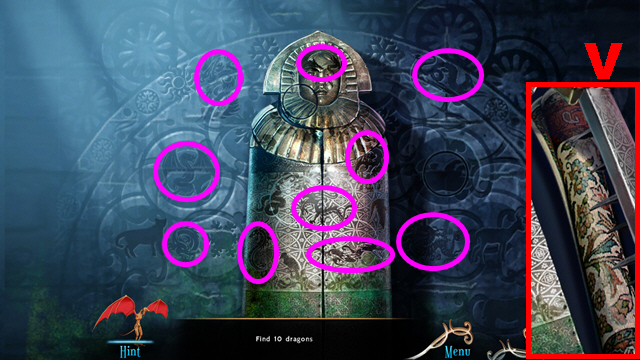
- Play the HOP.
- You receive the GEMS (T).
- Walk down twice.
- Place the GEMS (U); take the CROWN.
- Turn left twice.
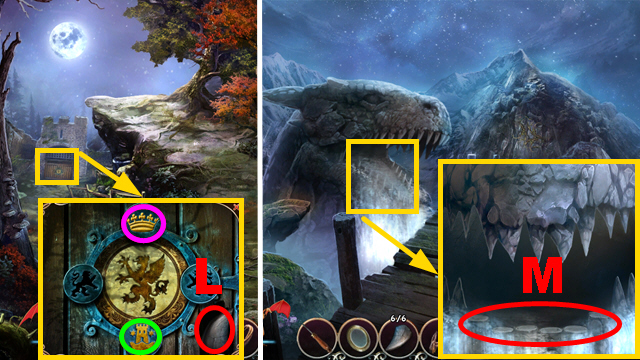
- Place the CROWN (V).
- Take BEAD 3/5 (W).
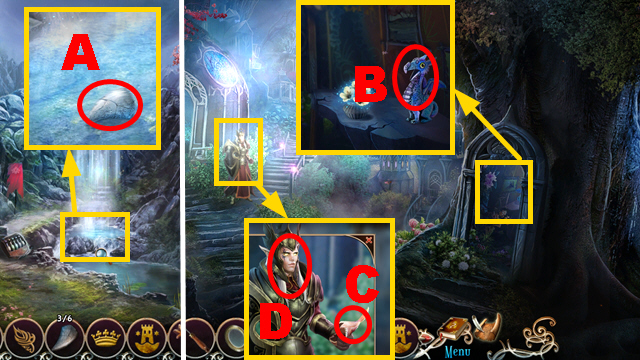
- Collect the MOONBELLS (X) with the PRUNING SHEARS.
- Walk down.
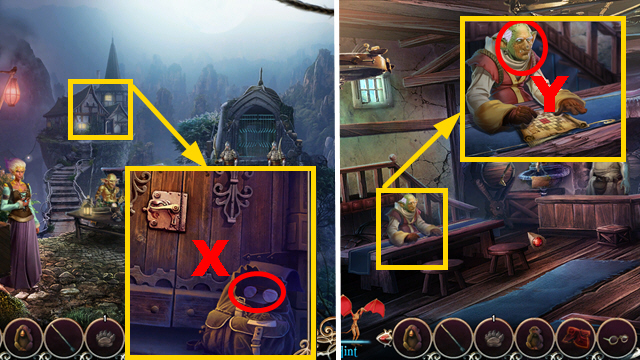
- Give the MOONBELLS to the elf (Y); take the BRUSH (Z).
- Turn left.
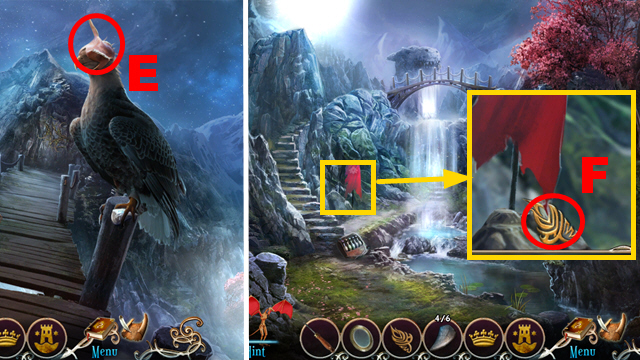
- Use the BRUSH three times (A).
- Play the mini-game.
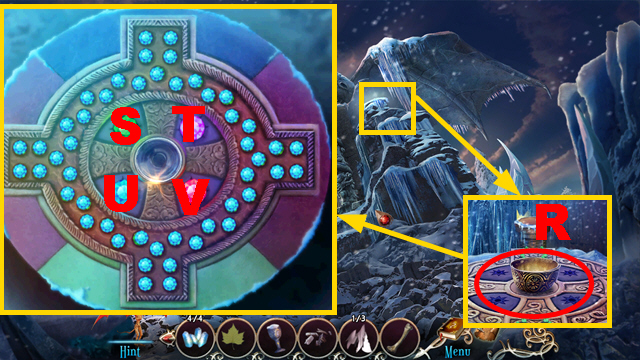
- Turn the knobs (B-E) to solve the puzzle.
- This puzzle is randomized.
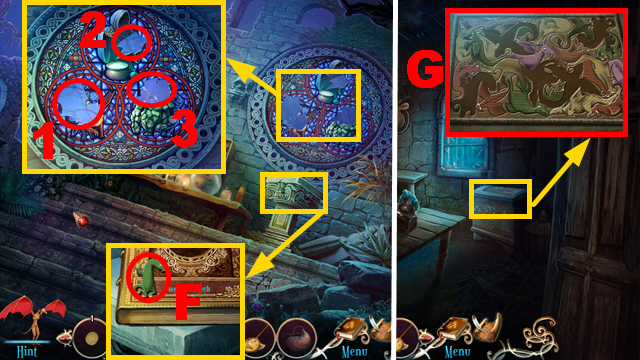
- Take the LENS (F).
- Walk down, move forward.
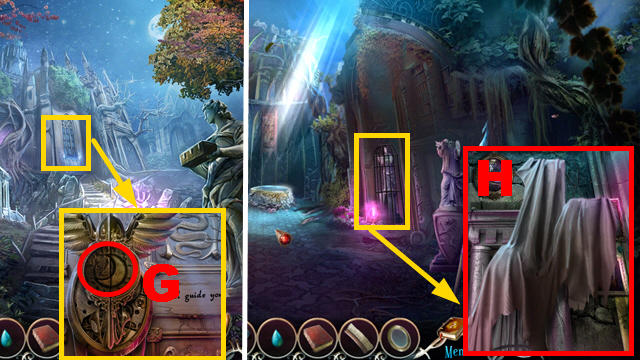
- Use the LENS (G).
- Move forward.
- Remove the blanket (H).
Chapter 2: The Elven Library
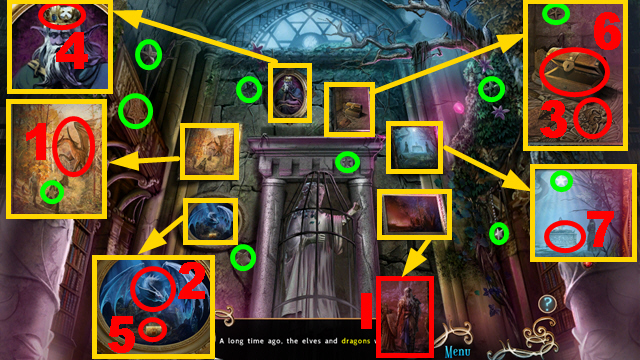
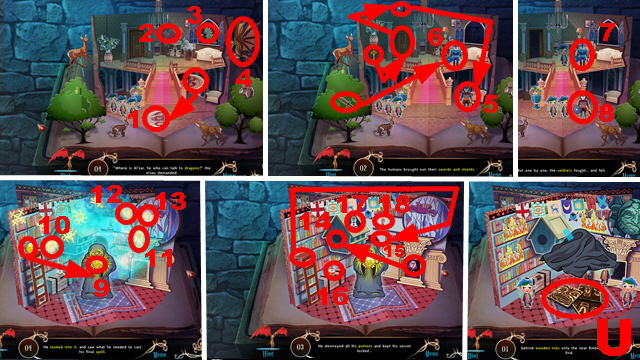
- Play the HOP.
- Collect items 1-7.
- Collect 10 stars (green).
- Collect Eridan (I).
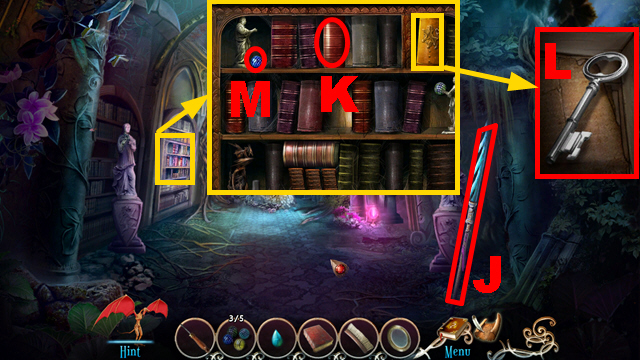
- Take the SPEAR (J).
- Place VOL. 3: THE GOLDEN AGE OF ELVES (K).
- Take the SILVER KEY (L) and BEAD 4/5 (M).
- Walk down twice.
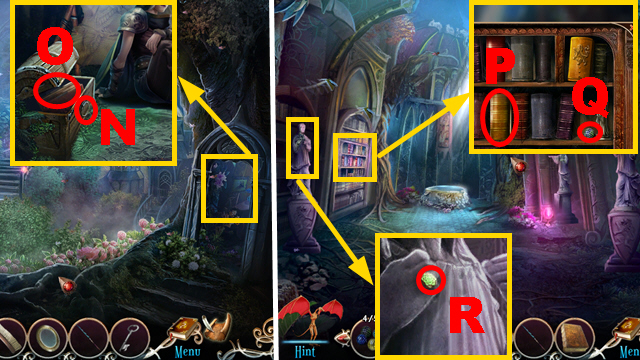
- Use the SILVER KEY (N); take VOL. 5: HUMAN GASTRONOMY (O).
- Move forward twice.
- Place VOL. 5: HUMAN GASTRONOMY (P); take BEAD 5/5 (Q).
- Take the FLOWER RING (R).
- Walk down.
- Place the FLOWER RING (S); open the box (purple).
- Place 5 BEADS correctly (T); take the NECKLACE.
- Move forward.
- Place the NECKLACE (U).
- Walk down.
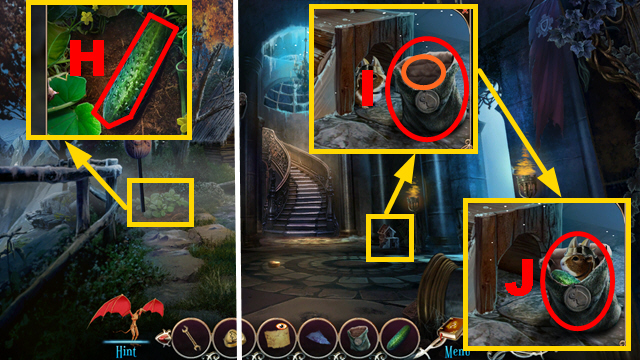
- Use the SPEAR (V) and BRUSH (W).
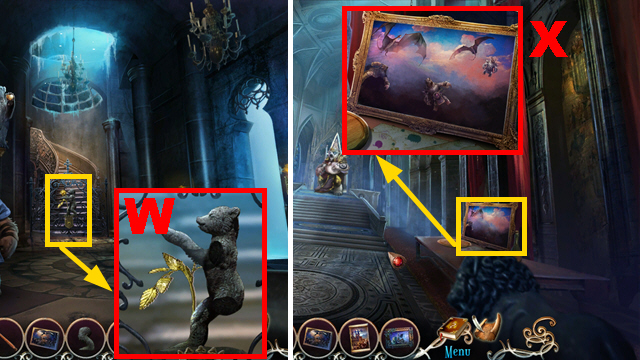
- Take the STONE ARM (green) and METAL WING (X).
- Walk down twice.
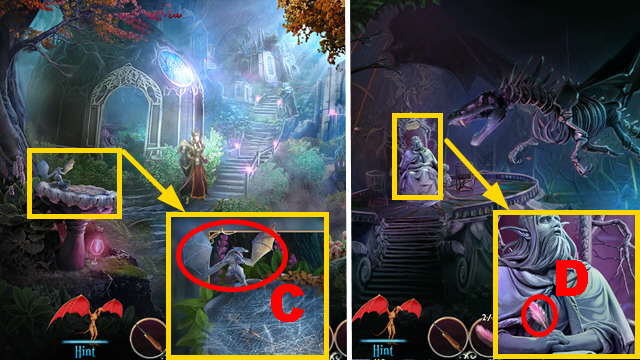
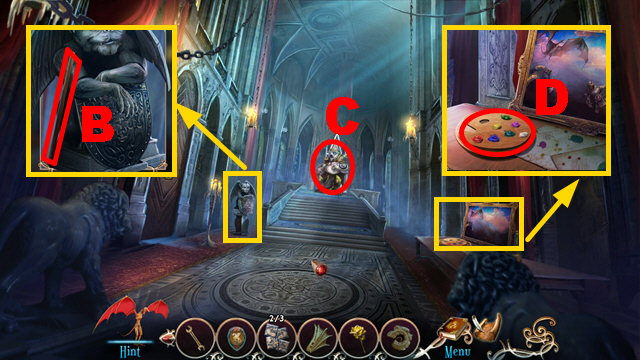
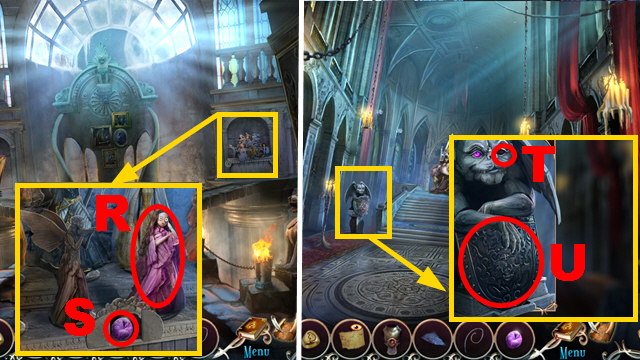
- Use the SPEAR (Y); take the STONE HEAD (Z).
- Go to the Elven Library.
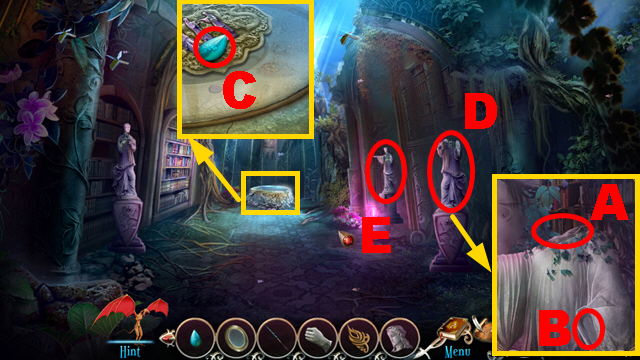
- Place the STONE HEAD (A) and STONE ARM (B).
- Take the CRYSTAL (C); you receive the SKETCH.
- Examine the SKETCH.
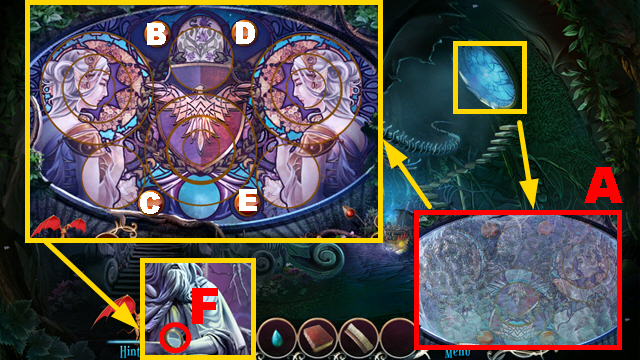
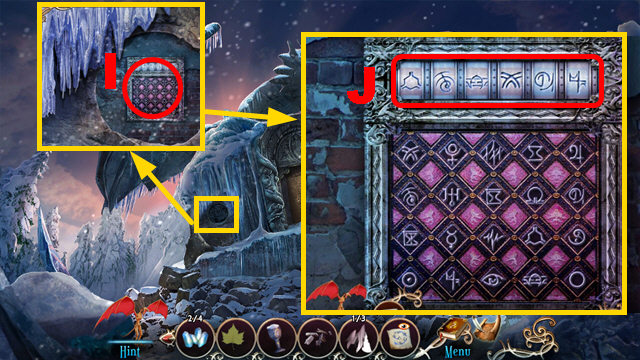
- Rotate statue (D) once and statue (E) twice.
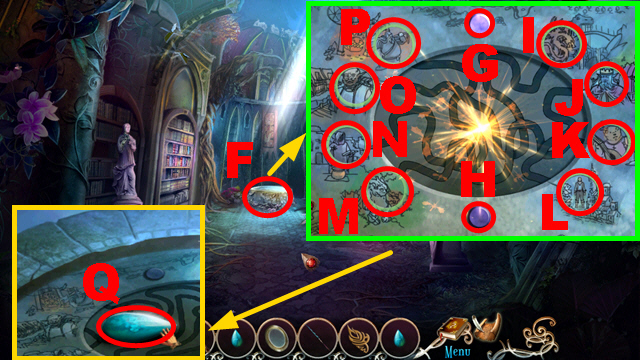
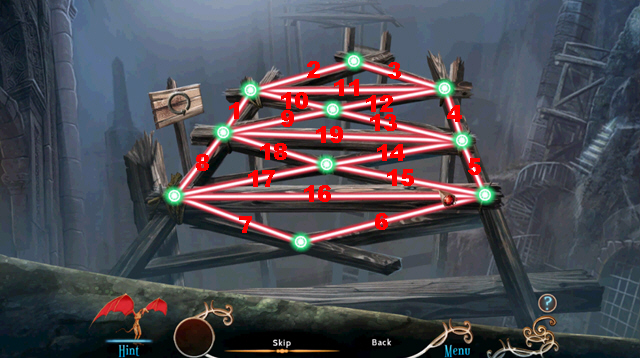
- Play the mini-game (F).
- Solution: (green).
- Activate buttons G-R to swap pathways and tokens.
- This puzzle is randomized.
- Take the CRYSTAL (Q).
- Walk down three times.
- Place 3 CRYSTALS (R).
- Turn right.
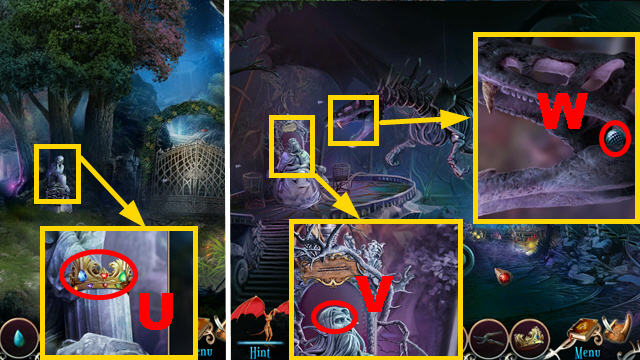
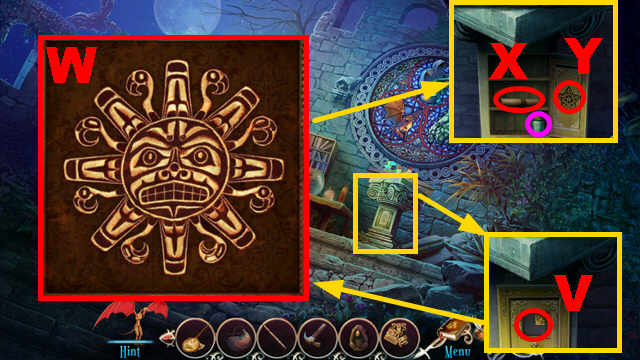
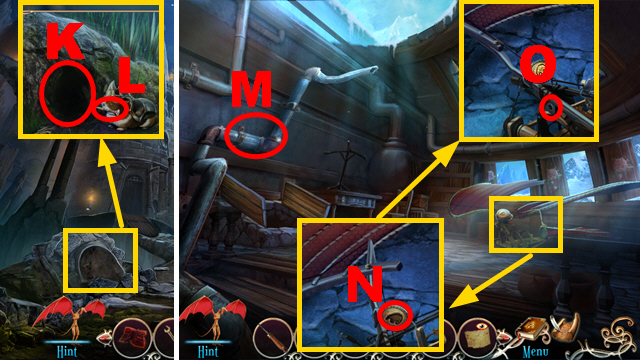
- Take STONE TOOTH 1/6 (S).
- Collect STONE TOOTH 2/6 with the SCREWDRIVER (T).
- Take the CROWN CREST (U).
- Use the LENS to collect the PETRIFY POTION (V).
- Go to the King's Pavilion.
- Use the PETRIFY POTION (W); take STONE TOOTH 3/6.
- Walk down twice, turn right, turn left.
- Use the SPEAR (X).
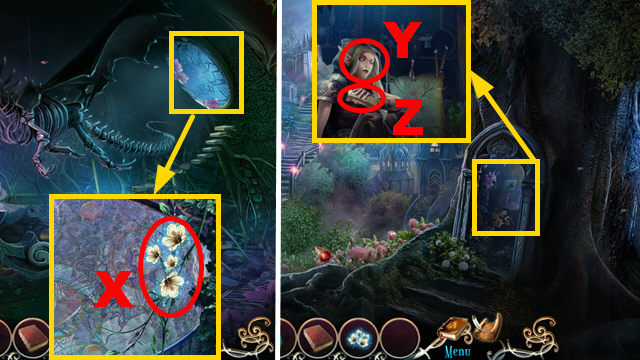
- Take the CASTLE CREST (Y) and STARNUTS (Z).
- Walk down.
- Take STONE TOOTH 4/6 (A).
- Walk down, turn left.
- Place the STARNUTS (B) to acquire the STARNUT SEEDS.
- Give the STARNUT SEEDS to the guard (C); take the EAGLE HOOD (D).
- Walk down, turn right, turn left.
- Place the EAGLE HOOD (E).
- Walk down.
- Take the METAL WING (F).
- Go to the Village Center.
- Place 2 METAL WINGS (G); take the ROPE (H) and MEAT (I).
- Go to the Top of Waterfall.
- Give the MEAT to the eagle (J).
- Take STONE TOOTH 5/6 (K).
- Walk down three times.
- Take STONE TOOTH 6/6 (L).
- Place the CROWN CREST (purple) and CASTLE CREST (green).
- Turn right twice, turn left.
- Place 6 STONE TEETH (M).
- Play the mini-game.
- Solution: (N).
- Walk down, move forward.
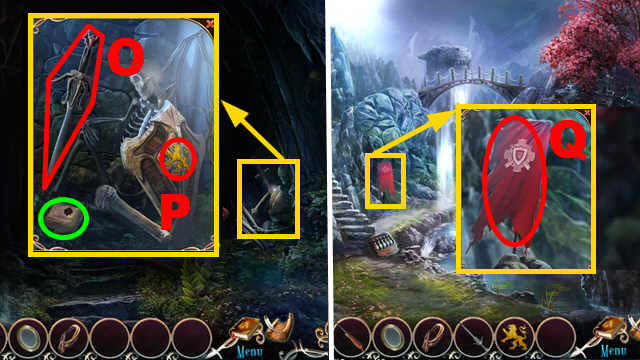
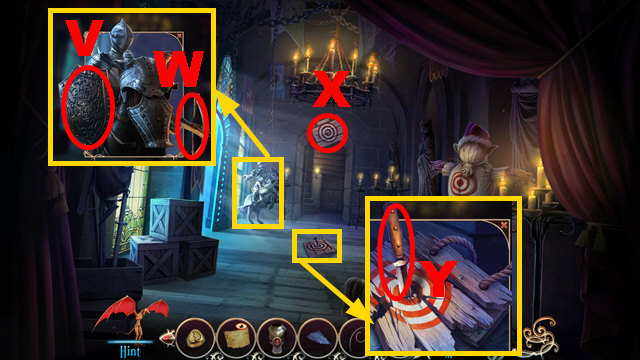
- Take the SWORD (O) and LION CREST (P); examine the note (green).
- Walk down.
- Collect the CLOTH with the SWORD (Q).
- Move forward.
- Place the CLOTH (R) to acquire the STICK WITH CLOTH.
- Walk down twice.
- Place the STICK WITH CLOTH (S) to acquire the UNLIT TORCH.
- Turn right, move forward.
- Place the UNLIT TORCH (T).
- Use the BURNING TORCH three times (purple).
- Move forward.
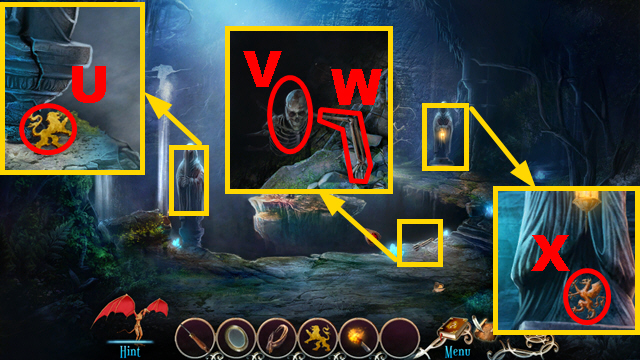
- Take the LION CREST (U).
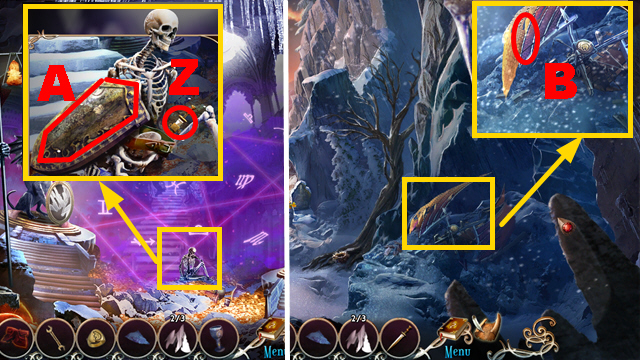
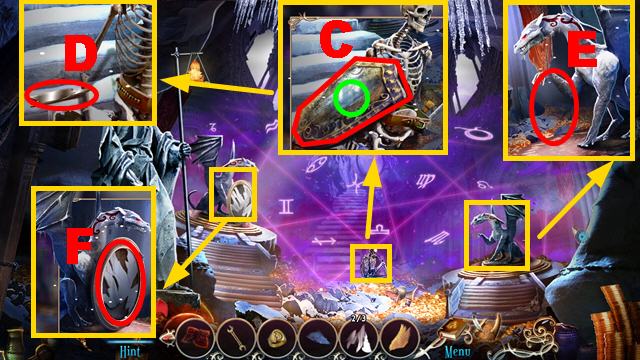
- Grab the skeleton (V); take the SKELETON ARM (W).
- Take the DRAGON CREST (X).
- Walk down four times.
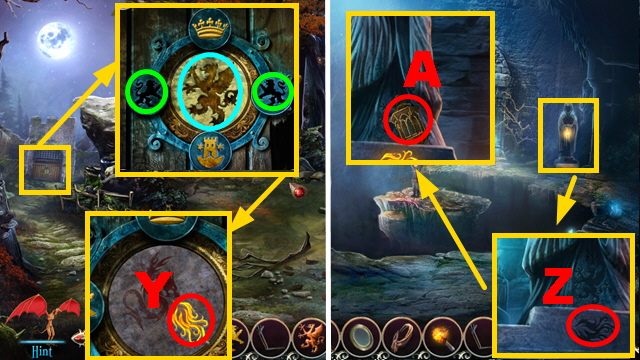
- Place 2 LION CRESTS (green) and DRAGON CREST (blue).
- Take the FLAME SYMBOL (Y).
- Go to the Dragon's Lair.
- Place the FLAME SYMBOL (Z).
- Use the BURNING TORCH and ROPE (A) to acquire the LANTERN WITH ROPE.
- Place the LANTERN WITH ROPE (B); push it.
- Collect the bag with the SKELETON ARM (C).
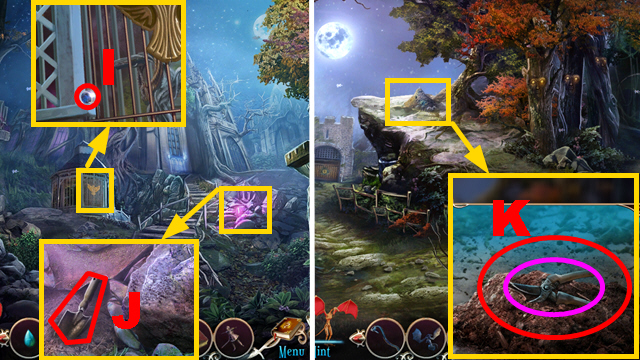
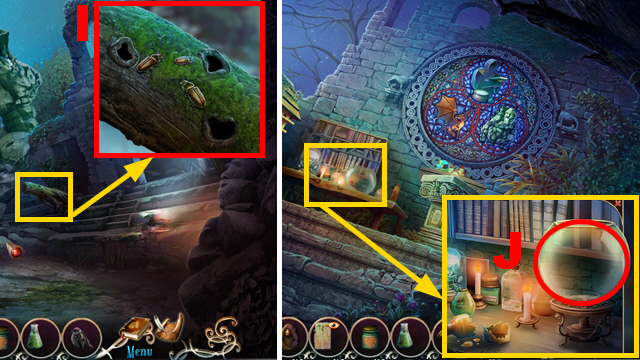
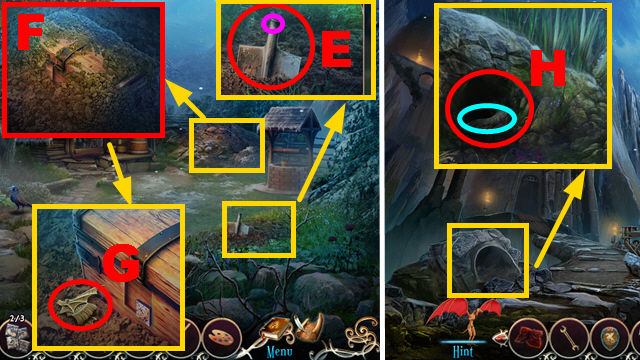
- Use the SCREWDRIVER (D); take JIGSAW PIECE 1/5 (E).
- Use the LENS to collect the DRAGON'S EYE (F).
- Place the DRAGON'S EYE (G).
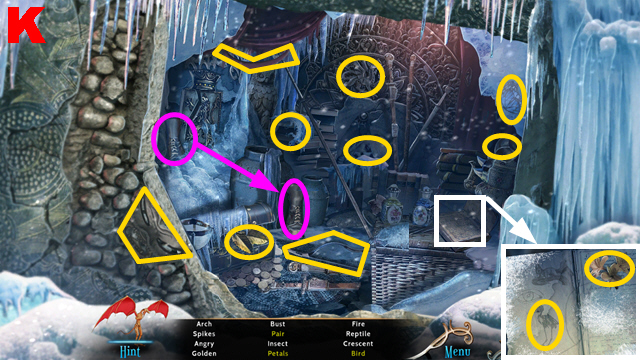
- Play the HOP.
- You receive the SLEDGEHAMMER (H).
- Use the SLEDGEHAMMER four times (I).
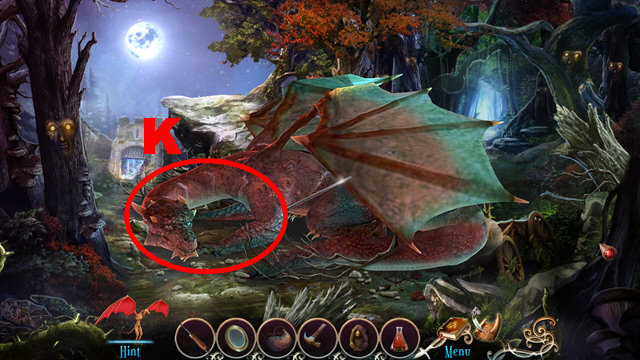
- Talk to the boy (J).
- Talk to the dragon (K).
- Turn left.
Chapter 3: The Crash Site

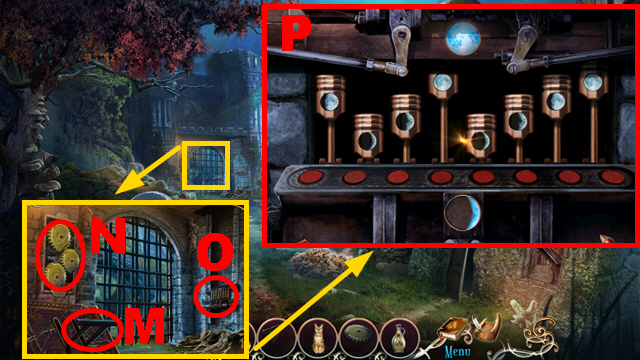
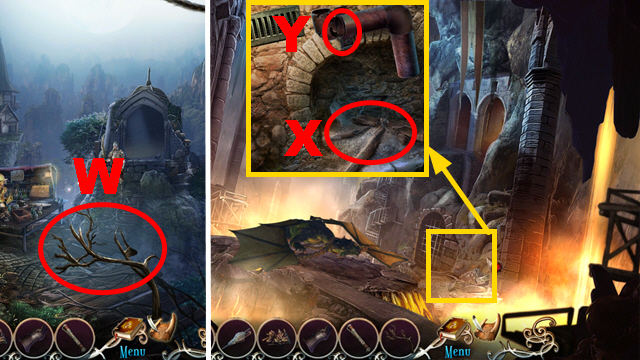
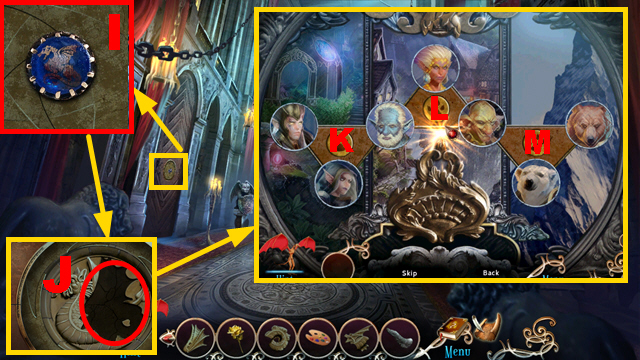
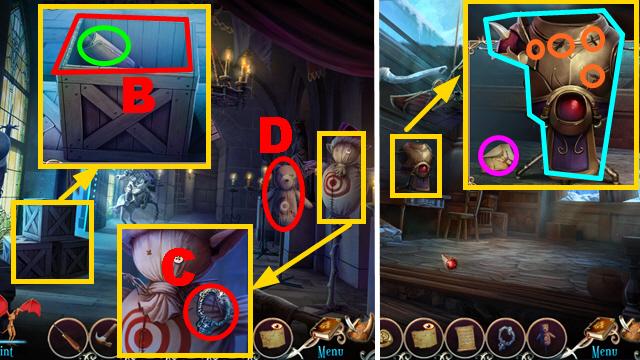
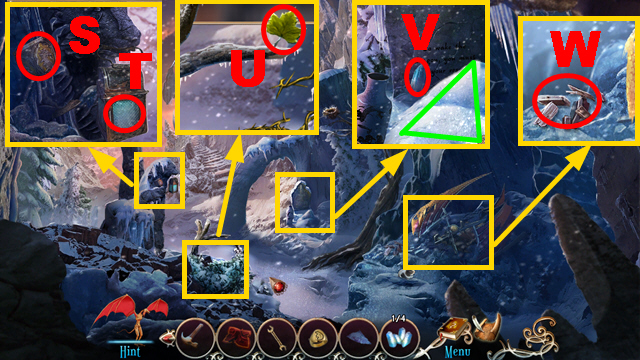
- Take the MOON-SHAPED CREST (L), BIG ROCK (M), and SMALL GEAR (N).
- Collect JIGSAW PIECE 2/5 with the SCREWDRIVER (O).
- Turn right.
- Use the BIG ROCK twice (purple).
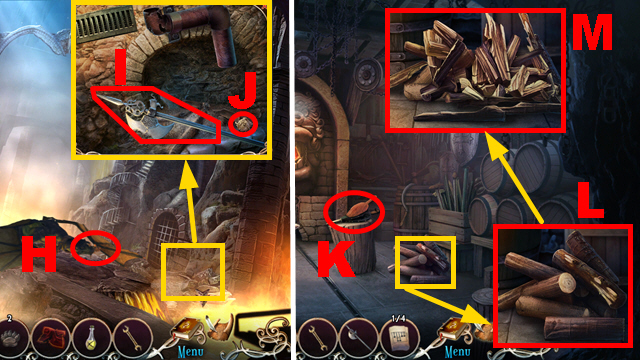
- Take the CRANK (P).
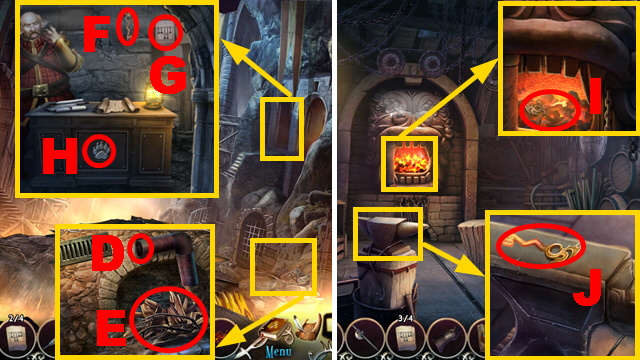
- Read the note (Q); use the SCREWDRIVER (R) to acquire the SMALL HOOK.
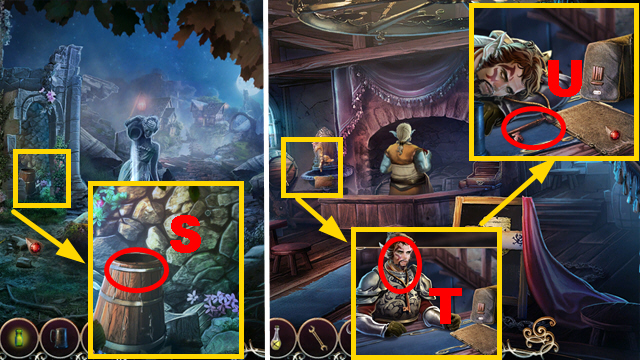
- Take the ALCHEMIST STAINED GLASS (S).
- Take the WIRE BRUSH (green); examine the sketch (T).
- Walk down.
- Use the WIRE BRUSH (purple); take the BLUNT BLADE (U).
- Place the CRANK (V); use the BLUNT BLADE (W) to acquire the SCYTHE.
- Use the SCYTHE three times (X); take the COIN (Y).
- Move forward.
- Take the DRAGON STAINED GLASS (Z).
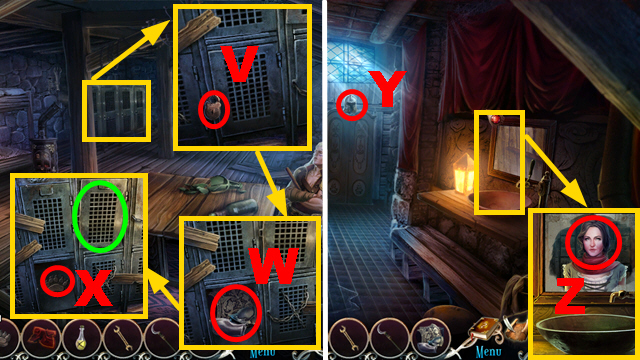
- Collect the LEVER with the SCREWDRIVER (A).
- Place the LENS (B); lure out the mouse.
- Turn right.
- Collect the CATNIP with the SCYTHE (C).
- Walk down twice.
- Collect the CAT with the CATNIP (D).
- Move forward.
- Use the CAT (E) and SMALL HOOK (F).
- Take the OLD KEY (G).
- Turn right.
- Use the CAT (H); take the GEAR (I).
- Go to the Cottage.
- Use the SCYTHE (J).
- Insert the OLD KEY into the lock (K).
- Play the HOP.
- You receive the OLIVE OIL (L).
- Walk down.
- Put down the LEVER (M); place the GEAR and SMALL GEAR (N).
- Pour the OLIVE OIL over the gears; pull the lever.
- Play the mini-game (O).
- Solution: (P).
- Examine the gate.
- Turn left.
- Try to go upstairs.
- Place the CAT (Q); take the SIFTER (R).
- Take JIGSAW PIECE 3/5 (S).
- Go to the Cottage.
- Use the SIFTER (T); take the FORK (U).
- Walk down, turn left.
- Place the FORK (V); take the SAW (W) and GOLEM STAINED GLASS (X).
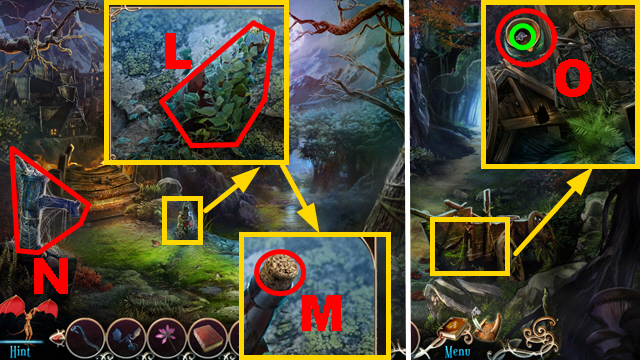
- Use the SCYTHE (Y) to acquire the VINE ROPE.
- Go to the Cottage.
- Use the SAW (Z).
- Connect the VINE ROPE to the antler to acquire the GRAPPLING HOOK.
- Walk down, turn left.
- Throw the GRAPPLING HOOK (A).
- Climb up.
- Take the RAKE HANDLE (B), NET (C), JIGSAW PIECE 4/5 (D), and EMPTY WATERSKIN (E).
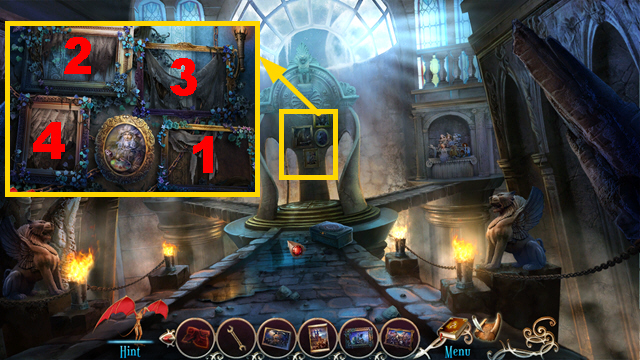
- Place the DRAGON STAINED GLASS (1), ALCHEMIST STAINED GLASS (2), and GOLEM STAINED GLASS (3).
- Take JIGSAW PIECE 5/5 (F).
- Go to the Cottage.
- Place 5 JIGSAW PIECES (G).

- Play the mini-game.
- Solution: (H).
- Take the FLUTE (I).
- Walk down, move forward.
- Place the RAKE HANDLE (J) to acquire the RAKE.
- Turn right.
- Use the RAKE three times (K).
- Play the HOP.
- You receive the COIN (L).
- Walk down twice.
- Use the RAKE (M); take the HAMMER (N) and SEE NO EVIL (O).
- Move forward, turn right.
- Use the HAMMER (green); take the COIN (purple).
- Go to the 2/F Tower.
- Use the HAMMER (P); take the COIN (blue).
- Go to the Cottage.
- Use 4 COINS (Q); take the EYE (R).
- Go to 2/F Tower.
- Place the EYE (S).
- Play the HOP (T).
- Solution: 1-7.
- Continue with the HOP.
- Solution: 1-18.
- Take the TILE PIECES (U).
- Place the TILE PIECES (V).
- Play the mini-game.
- Solution: (W).
- Take the ELIXIR RECIPE (X), EMPTY JAR (purple), and STAR-SHAPED CREST (Y).
- Go to the Forest Fork.
- Use the NET (Z) to acquire the FIREFLIES IN A JAR.
- Go to the Courtyard.
- Place the STAR-SHAPED CREST and MOON-SHAPED CREST (A).
- Use the SCYTHE four times (B); take the PIPES (C).
- Go to the G/F Tower.

- Arrange the PIPES correctly (D); rotate the valve (green).
- Move forward.
- Turn the faucet (E); take the POTION BASE (F).
- Use the FLUTE (G).
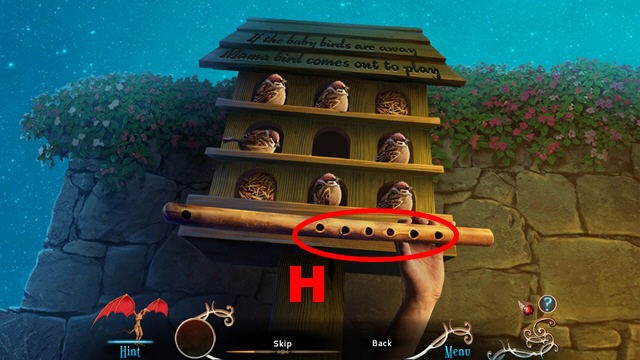
- Play the mini-game.
- Select the flute holes (H) in the correct sequence.
- The sequence is randomized.
- You acquire the BIRD.
- Go to the Golem Room.
- Place the BIRD (I) to acquire the BEETLE.
- Go to the 2/F Tower.
- Use the POTION BASE, FIREFLIES IN A JAR, and BEETLE (J).
- You acquire the DRAGON ELIXIR.
- Go to the Forest Clearing.
Chapter 4: Healing the Dragon
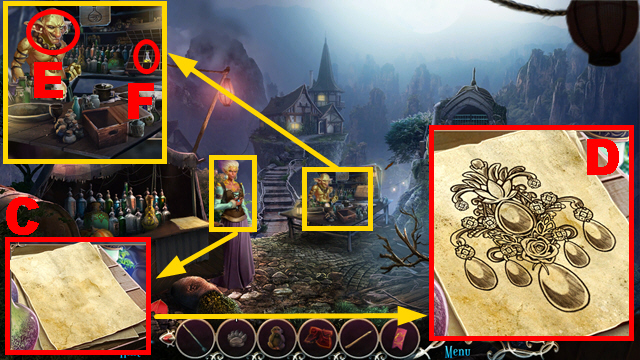
- Use the DRAGON ELIXIR (K).
- Turn right.
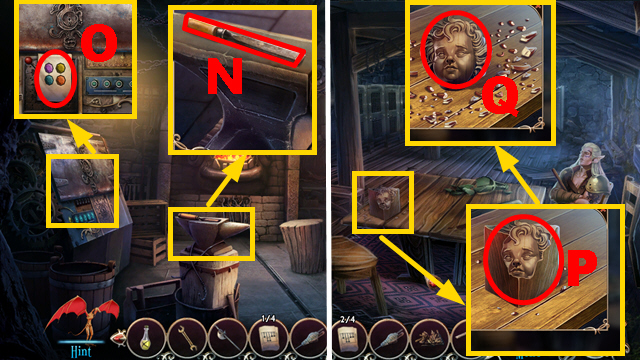
- Take the TORN NOTICE (L) and BUTTER CHURN PLUNGER (M).
- Use the HAMMER four times (N).
- Talk to the resident (O).
- Turn left.
- Talk to the old man (P).
- Take the PAW PRINT (Q).
- Place the TORN NOTICE (purple); take HELENA'S NOTICE (R).
- Talk to Tyrell (S).
- Walk down, move forward.
- Give HELENA'S NOTICE to the woman (T); take the HANDKERCHIEF (green).
- Talk to the guards (U) and potionsmaster (V).
- Use the SCREWDRIVER (W); take the SPEAK NO EVIL (blue).
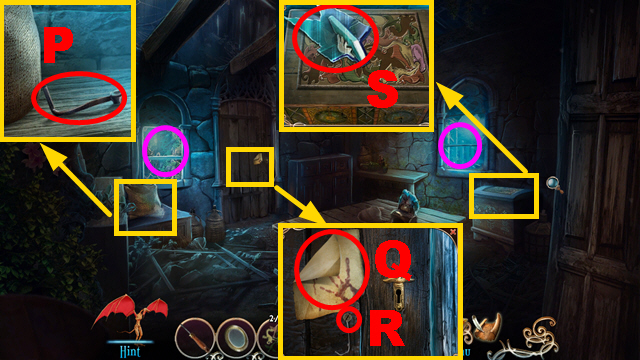
- Open the bag; take the READING GLASSES (X).
- Go to the Tavern.
- Give the READING GLASSES to the man (Y).
- Play the mini-game.
- Solution: (Z).
- Take the PENCIL (A) and POTION COUPON (B).
- Walk down, move forward.
- Use the PENCIL (C).
- Adjust the brooch sketch correctly (D).
- Take the BROOCH SKETCH.
- Use the POTION COUPON (E); take the RUST-BE-GONE POTION (F).
- Go to the Tavern.
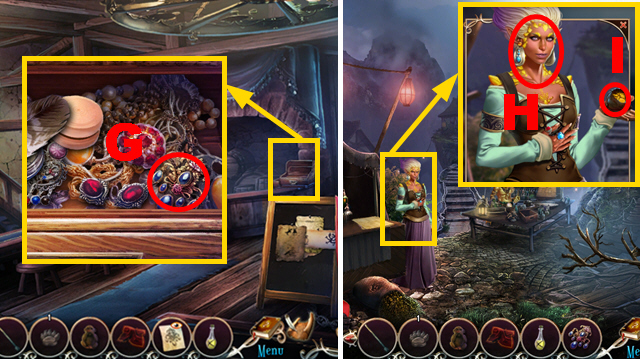
- Take the BROOCH (G).
- Walk down, move forward.
- Give the BROOCH to the woman (H); take the CROSSINGS CURRENCY (I).
- Go to the Tavern.
- Give the CROSSINGS CURRENCY to Tyrell (J); take the VIEWSCOPE KEY (K).
- Walk down.
- Place the VIEWSCOPE KEY (L); take the HEAR NO EVIL (M).
- Place SEE NO EVIL, HEAR NO EVIL, and SPEAK NO EVIL (N).
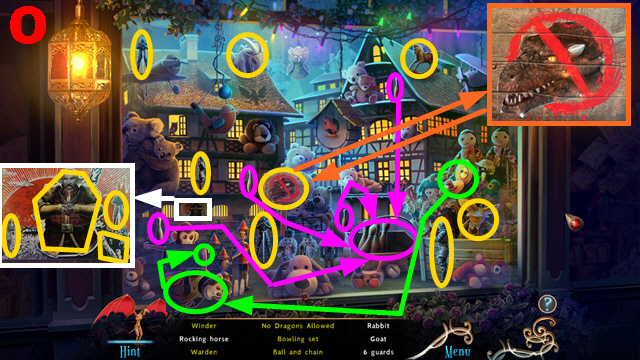
- Play the HOP.
- You receive the WINDER (O).
- Place the WINDER (P); take the GUARD'S BADGE (Q).
- Move forward.
- Give the GUARD'S BADGE to the guard (R).
- Go to the Tavern.
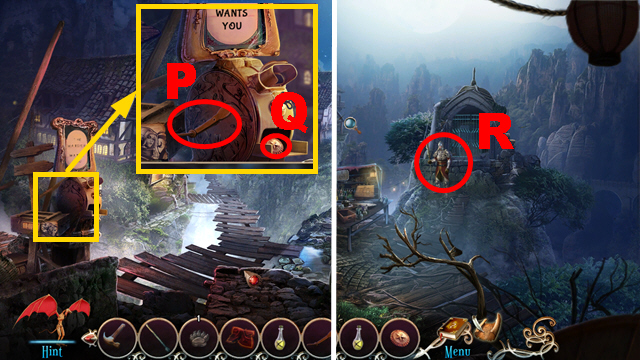
- Take the EMPTY ALE MUG (S) and WRENCH (T).
- Talk to the guard (green).
- Take the BUTTERED ALE RECIPE (U).
- Walk down twice.
- Use the WRENCH (purple); take the WHEEL (V).
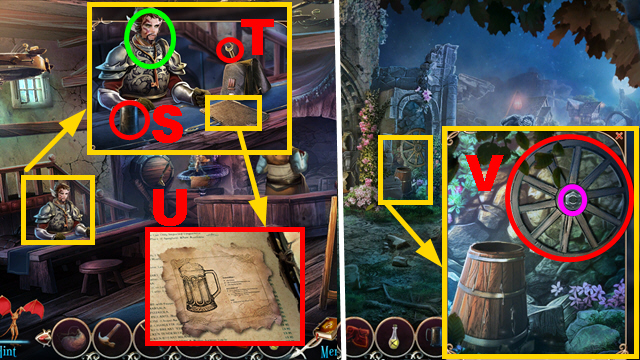
- Turn right.
- Place the WHEEL (blue); use the WRENCH (purple).
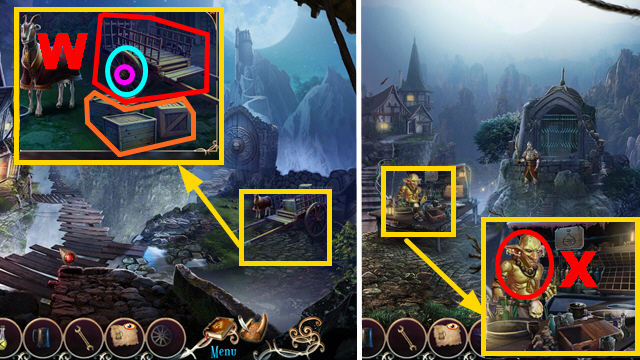
- Put 3 crates (orange) on the cart; take the POTIONS DELIVERY (W).
- Move forward.
- Give the POTIONS DELIVERY to the potionsmaster (X).
- Play the mini-game.
- Solution: (Y).
- Take the NIGHTY-NIGHT POTION (Z).
Chapter 5: The Barracks
- Use the WRENCH (A).
- Take the HEART (green); examine the note (B).
- Examine the guard (C); you receive the TATTOO DESIGN.
- Go to the Golem Room.
- Place the HEART (D); take the BITTERWEED SEEDS (E).
- Turn right.
- Place the BITTERWEED SEEDS (F).
- Go to the Tavern.
- Use the HANDKERCHIEF (G).
- Walk down, move forward three times.
- Take the EMPTY BUCKET (H).
- Collect the TAP with the WRENCH (I); use the HANDKERCHIEF (blue).
- Go to the Tavern.

- Place the TAP (J) and EMPTY ALE MUG (K) to acquire the AGED ALE.
- Walk down.
- Examine the TATTOO DESIGN; assemble the correct symbols (L).
- Take the BATON (M).
- Go to the Barracks.
- Place the BATON (N) to acquire the HOOKED SPEAR.
- Go to the Tavern.
- Use the EMPTY WATERSKIN (O) to acquire the WATER.
- Walk down twice.
- Use the WATER (P); take the BITTERWEED (purple).
- Turn right.
- Use the WATER and BITTERWEED (Q).
- Place the EMPTY BUCKET (R) to acquire the MILK.
- Walk down.
- Use the MILK and BUTTER CHURN PLUNGER (S) to acquire the SPIKED BUTTERED ALE.
- Go to the Tavern.
- Give the SPIKED BUTTERED ALE to the guard (T).
- Take the LOCKER KEY (U).
- Go to the Barracks.
- Use the LOCKER KEY (V).
- Take the GUARD UNIFORM (W) and PAW PRINT (X).
- Open the locker (green).
- Move forward.
- Use the HOOKED SPEAR to collect the HELMET (Y).
- Put on the HELMET and GUARD UNIFORM (Z).
- Walk down twice.

- Talk to the guard (A).
- Turn right.
- Collect the DOWN BUTTON with the SCREWDRIVER (B).
- Use the HAMMER (purple).
- Use the SCREWDRIVER (C) and (D); remove 2 metal plates.
- Open the door.
- Use the HOOKED SPEAR (E).
- Place the DOWN BUTTON (F); push it.
- Examine the cart (G).
- Play the mini-game.
- Solution: 1-19.
- Talk to the dragon (H).
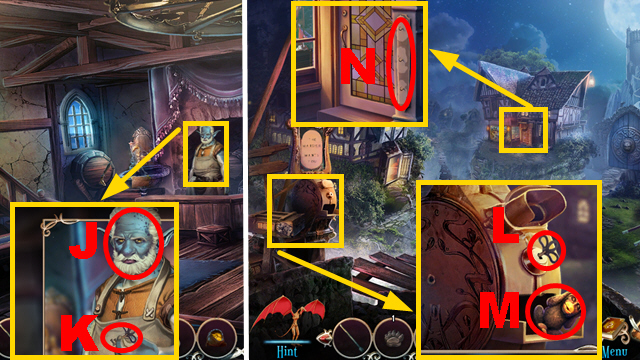
- Take the HALBERD (I) and MANUAL PAGE 1/4 (J).
- Turn left.
- Take the BELLOWS (K).
- Use the HALBERD twice (L); take the FIREWOOD (M).
- Take the CHISEL (N) and MANUAL PAGE 2/4 (O).
- Go to the Barracks.
- Use the CHISEL seven times (P); take the ANGEL HEAD (Q).
- Walk down four times.
- Place the ANGEL HEAD (R); open the trapdoor.
- Go downstairs.
- Use the SCREWDRIVER (S) to acquire the GAUNTLET.
- Take the PAW PRINT (T).
- Examine the coffin (U).
- Play the HOP.
- Take the TAPESTRY (V).
- Go to the Main Street.
- Collect the DRY KINDLING with the HALBERD (W).
- Turn right.
- Place the FIREWOOD and DRY KINDLING (X).
- Use the WRENCH (Y).
- Go to the Shower.

- Place the TAPESTRY (Z).
- Use the WRENCH (purple).
- Take the WET SHEET (A) and 2 PIPES (blue).
- Go to the Forge.
- Place the PIPE (B); collect the HOT COAL with the GAUNTLET (C).
- Walk down.
- Place the PIPE (D); use the HOT COAL and BELLOWS (E).
- Take the DEFORMED KEY (F), MANUAL PAGE 3/4 (G), and PAW PRINT (H).
- Turn left.
- Place the DEFORMED KEY (I); take the HOT KEY with the GAUNTLET.
- Place the HOT KEY (J); hit it with the HAMMER three times.
- Take the MACHINE KEY.
- Go to the Barracks.
- Place the WET SHEET (K); take MANUAL PAGE 4/4 (L).
- Place 4 MANUAL PAGES (purple); take the MACHINE MANUAL (M).
- Go to the Forge.
- Insert the MACHINE KEY into the lock (N); place the MACHINE MANUAL (O).
- Play the mini-game.
- Solution: purple, P.
- U, S, Y, X, R, S, X, Y, R, U, V, Y, Q, Y, U, Q, R, U, X, V, Q, R, U, Q, S.
- Green, Z, orange.
- Ax2, Bx4, D.
- Walk down.
- Talk to the dragon (E); take the DRAGON TOKEN (F).
- Go to the Crossings Landing.
- Use the RUST-BE-GONE POTION (G).
- Place 4 PAW PRINTS (green) and the DRAGON TOKEN (purple).
- Turn right.
Chapter 6: Across the Moat
- Take TILE 1/3 (H) and WOODEN CARVING (I).
- Turn right.
- Use the HALBERD (J) to acquire the WOODEN PLANK.
- Use the HAMMER (K); take the NAILS (L).
- Take the INSECT (M).
- Chase the bird (N).
- Go to the Dungeon.
- Place the INSECT (blue); take the PAIL (O).
- Place the WOODEN PLANK and NAILS (purple); fix them with the HAMMER.
- Take the LADDER (P).
- Walk down, turn right three times.
- Place the LADDER (Q).
- Play the HOP.
- You receive the ARROW (R).
- Turn right.
- Place the PAIL (S) and WRENCH (T); take the METAL FLOWER (U) and WINCH LEVER (V).
- Walk down.
- Place the ARROW and WINCH LEVER (W).
- Turn the handle; shoot 2 arrows (purple).
- Turn left.
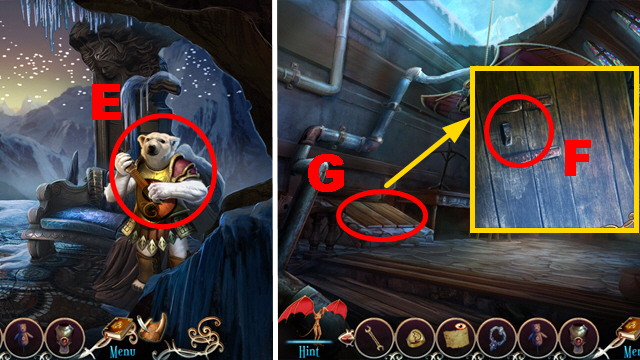
- Give the DRAGON TOKEN to the bear (X).
- Talk to the bear (Y).
- Take TILE 2/3 (Z) and WOODEN CARVING (A).
- Turn right.
- Take the WOODEN STICK (B).
- Talk to the king (C).
- Take the COLOR PALETTE (D).
- Walk down twice, turn right.
- Place the WOODEN STICK (purple); take the SHOVEL (E).
- Use the SHOVEL four times (F); take the WOODEN CARVING (G).
- Walk down.
- Use the SHOVEL (H); take the METAL PAW (blue).
- Turn left, turn right.
- Place the DRAGON TOKEN (I).
- Put down 3 WOODEN CARVINGS (J).
- Play the mini-game.
- Use the buttons K-M to solve this puzzle.
- The puzzle is randomized.
- Turn left.
- Take the note (N) and TILE 3/3 (O).
- Place the COLOR PALETTE (P); take the MAGICAL PAINTBRUSH (Q).
- Go to the Cabin Clearing.

- Use the MAGICAL PAINTBRUSH; take PAINTING 1 (R).
- Place 3 TILES (S); take the METAL LEG (T).
- Use the MAGICAL PAINTBRUSH; take PAINTING 4 (U).
- Walk down, turn left.
- Use the MAGICAL PAINTBRUSH; take PAINTING 2 (V).
- Place the METAL LEG, METAL PAW, and METAL FLOWER (W).
- Turn right.
- Use the MAGICAL PAINTBRUSH; take PAINTING 3 (X).
- Turn left.
- Place PAINTINGS 1 (1), PAINTING 2 (2), PAINTING 3 (3), and PAINTING 4 (4).
- Play the mini-game.
- Solution: 1-8.
- Collect the items (green) and (purple).
- Take the SIGNET RING (Y) and ANCIENT SCROLL (Z).
- Walk down twice.
- Place the SIGNET RING (A).
- Go upstairs.
- Use the HAMMER (B); take the MUSIC SHEET (green).
- Take the DOOR HANDLE (C) and SCAREBEAR (D).
- Move forward.
- Examine the note (purple); use the HAMMER (orange).
- Take the BREAST PLATE (blue).
- Walk down, turn left.
- Give the MUSIC SHEET to the bear (E).
- Walk down, move forward.
- Place the DOOR HANDLE (F); open the trapdoor.
- Examine the trapdoor (G).
- Play the HOP.
- You receive the SCISSORS (H).
- Walk down.
- Collect the CLOTHES BUTTON with the SCISSORS (I).
- Turn left.
- Use the SCISSORS (J); take the NEEDLE AND THREAD (K).
- Collect the TORN CLOTH with the SCISSORS (L); take the COTTON STUFFINGS (purple).
- Go to the Cabin Clearing.
- Place the SCAREBEAR (M).
- Use the CLOTHES BUTTON and NEEDLE AND THREAD (N).
- Use the COTTON STUFFINGS and NEEDLE AND THREAD (O).
- Take the CROSSINGS DOLL.
- Go to the Vault of History.
- Use the SCISSORS (P); take the INSTRUMENT STRING (Q).
- Place the CROSSINGS DOLL (R).
- Take the GEM (S).
- Walk down.
- Place the GEM (T).
- Take the SHIELD (U).
- Go to the Battleroom.
- Place the SHIELD (V); take the CROSSBOW (W).
- Shoot the CROSSBOW (X).
- Take the THROWING KNIFE (Y).
- Turn left.
- Give the INSTRUMENT STRING to the bear (Z); you receive the LUCKY PIN.
- Walk down twice.
- Use the CROSSBOW (A).
- Use the LUCKY PIN (B); take the BEAR HEART (C).
- Turn right, turn left.

- Place the BEAR HEART (D); take the BEAR HELMET (E).
- Walk down twice.
- Give the BEAR HELMET and BREAST PLATE to the bear (F).
- Take the FUR POUCH (G).
- Walk down, turn right.
- Collect the CUCUMBER PIECE with the THROWING KNIFE (H).
- Walk down, turn left.
- Place the FUR POUCH (I) and CUCUMBER PIECE (orange).
- Take the ARMORED GUINEA PIG (J).
- Walk down.
- Use the ARMORED GUINEA PIG (K); take the SCREW (L).
- Go to the Toy Workshop.
- Use the ARMORED GUINEA PIG (M).
- Place the SIGNET RING (N); use the SCREW and SCREWDRIVER (O).
- You receive the BIG KITE.
- Walk down, turn left.

- Place the BIG KITE (P).
- Take CRYSTAL 1/4 (Q).
- Use the kite (R).
Chapter 7: The Lookout Point
- Take the CHALICE (S); use the SCREWDRIVER (T).
- Take the GREEN LEAF (U) and CRYSTAL 2/4 (V).
- Use the CHALICE (green) to acquire the SNOW.
- Take the WOOD SCRAPS (W).
- Move forward.
- Use the SCREWDRIVER (X); take the THICK GLOVES (Y).
- Take MIRROR SHARD 1/3 (Z).
- Use the HAMMER (A); collect the SUN PRISM with the THICK GLOVES (purple).
- Walk down.
- Place the SUN PRISM (orange); take the SUN LANTERN (B).
- Use the THICK GLOVES twice (C); place the SUN LANTERN (D).
- Take the SUN LILIES (E).
- Place the SUN LILIES (F); talk to the wisp (G).
- Take the GLYPH NOTE (H).
- Move forward.
- Examine the GLYPH NOTE.
- Play the mini-game (I).
- Solution: (J).
- Play the HOP.
- You receive the TOY ARMOR (K).
- Walk down.
- Place the TOY ARMOR (L); take the ARMORED GUINEA PIG.
- Use the ARMORED GUINEA PIG (M).
- Take the BONE (N) and CRYSTAL 3/4 (O).
- Move forward.
- Use the ARMORED GUINEA PIG (P); take CRYSTAL 4/4 (Q).
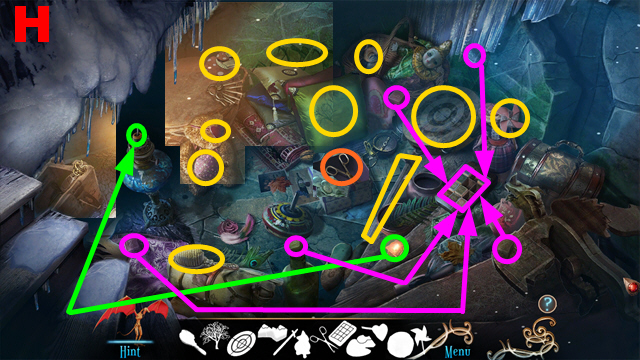
- Place 4 CRYSTALS (R).
- Play the mini-game.
- To solve this puzzle, activate buttons S-V until all gems are of the same color.
- This puzzle is randomized.

- Place the WOOD SCRAPS (W); take the ASH.
- Place the SNOW (X); take the WATER.
- Place the BONE (1), ASH (2), GREEN LEAF (3), and WATER (4).
- Move forward.
- Take MIRROR SHARD 2/3 (Y).
- Take the DAGGER (Z); use the WATER (A).
- Walk down twice.
- Use the DAGGER to acquire the CLOTH (B).
- Move forward twice.
- Use the CLOTH (green).
- Take the SHINY SHIELD (C) and MIRROR SHARD 3/3 (D).
- Place the SHINY SHIELD (E) and 3 MIRROR SHARDS (F).
- Play the mini-game.
- Solution: (G).
- Take the MAGIC SCROLL (H).
- Use the MAGIC SCROLL (I).
- Play the HOP.
- Solution: (J).
- Place the SIGNET RING (K); take the DRAGON EGG (L).
- Give the DRAGON EGG to Eridan (M).
- Talk to the dragon (N).
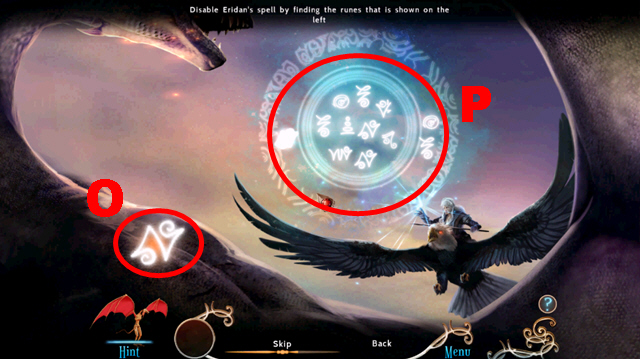
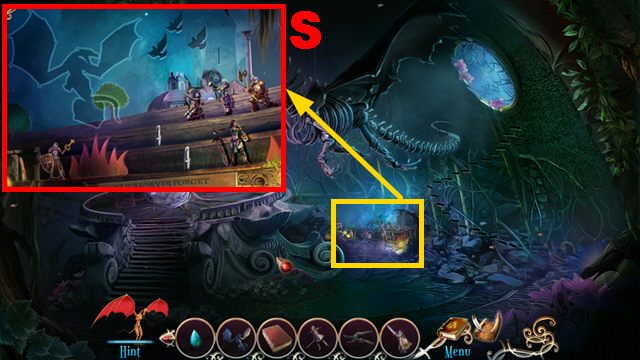
- Play the mini-game.
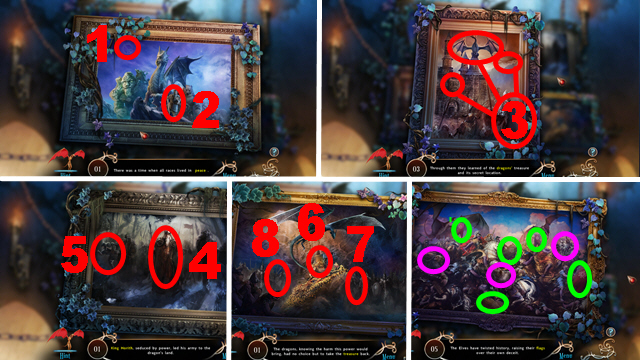
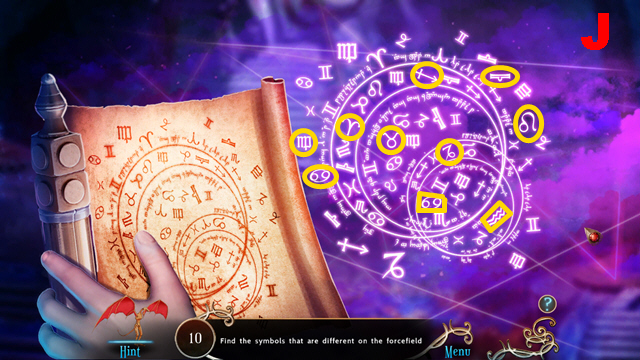
- Find the runes shown on the left (O) in the center (P) three times to defeat Eridan.
- The appearance of runes is randomized.
- Congratulations, you have completed Emberwing: Lost Legacy.
Created at: 2014-04-13