

Walkthrough Menu
- General Tips
- Chapter 1: Porch
- Chapter 2: Rooftop
- Chapter 3: Dragon Necropolis
- Chapter 4: Dragon Castle
- Chapter 5: Ice Layer
General Tips
- This is the official guide for Enchanted Kingdom: The Fiend of Darkness.
- This guide will not mention each time you have to zoom into a location; the screenshots will show each zoom scene.
- Hidden-object puzzles are referred to as HOPs. This guide will not show HOP solutions. It will identify the location of the HOP and the inventory item acquired.
- This guide will show solutions for non-random puzzles. Please read the in-game instructions for each puzzle.
- In this game, you will sometimes have to select the new scene to trigger dialog, cut-scenes, or tasks prior to interacting with the scene.
Chapter 1: Porch
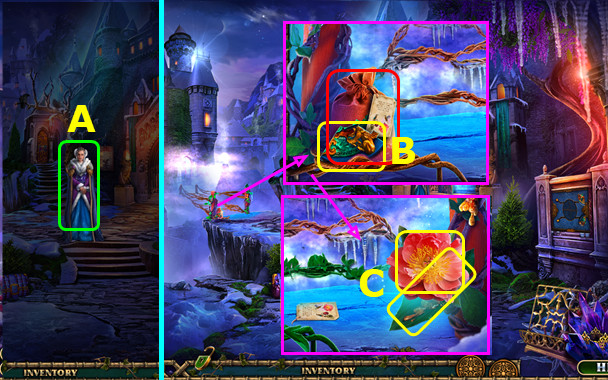
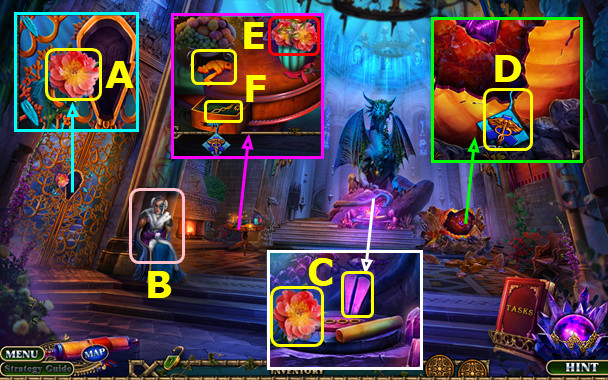
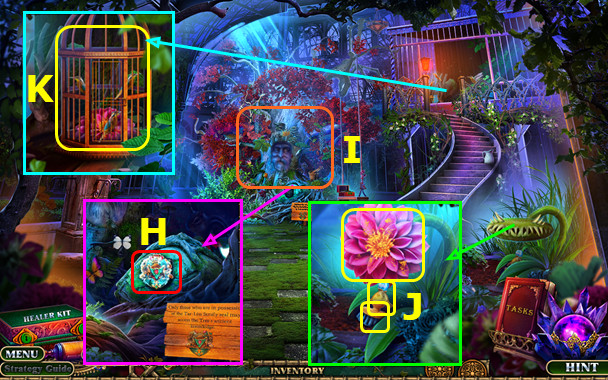
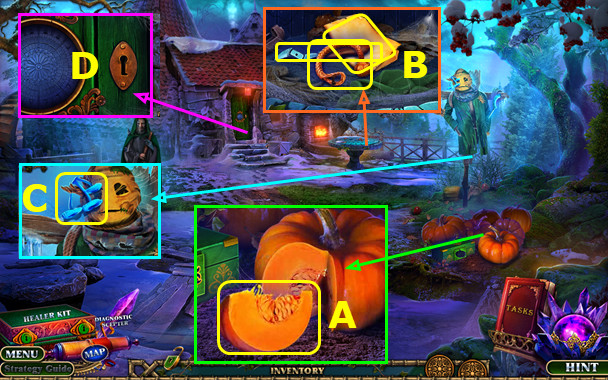
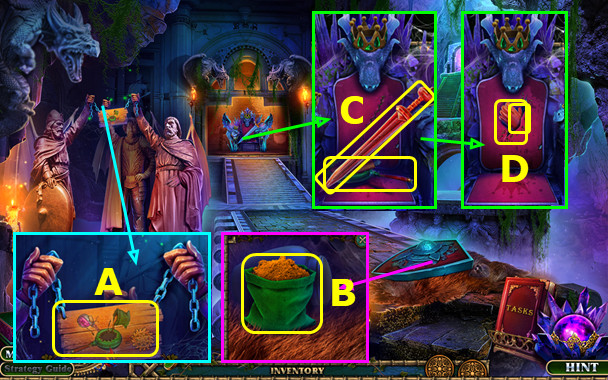
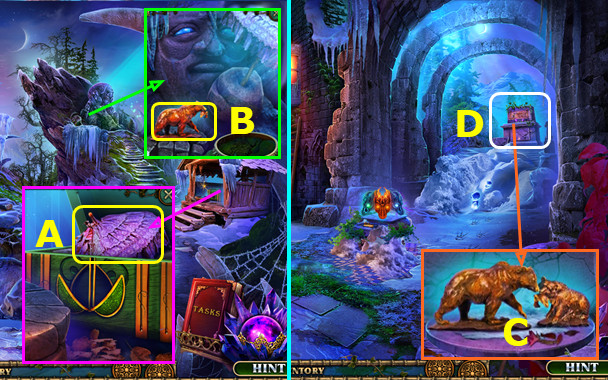
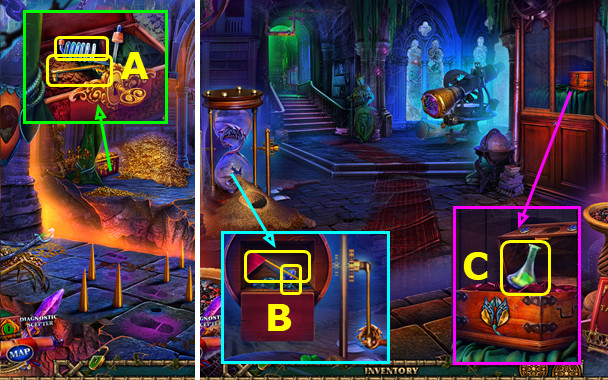
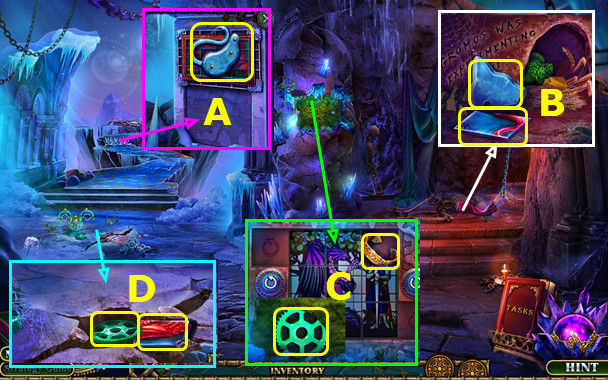
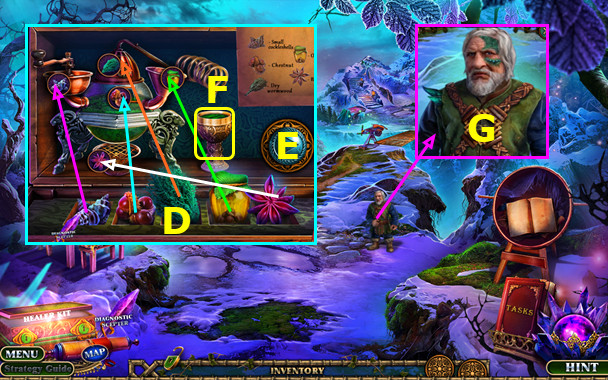
- Talk; earn MUFF (A).
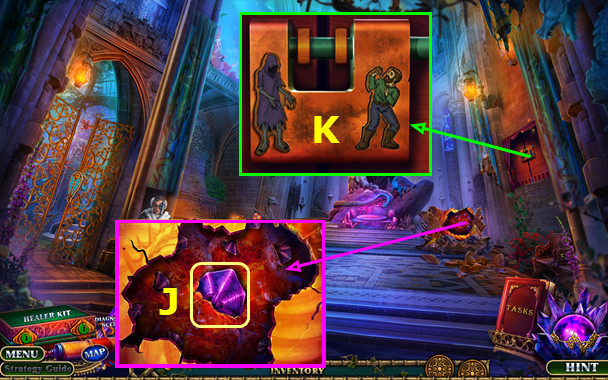
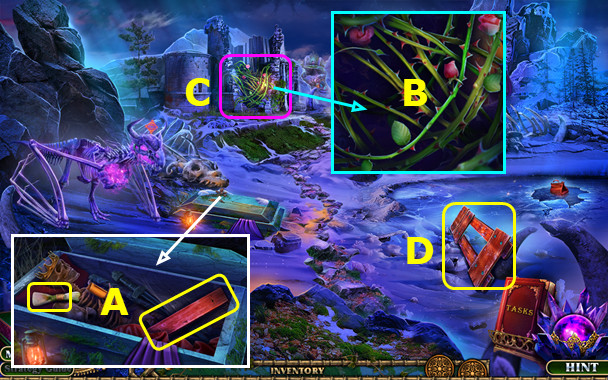
- Take 1/2 PUZZLE PIECE; select bag (B).
- Take 1/3 FLOWERS and RESIN ON LEAF (C).
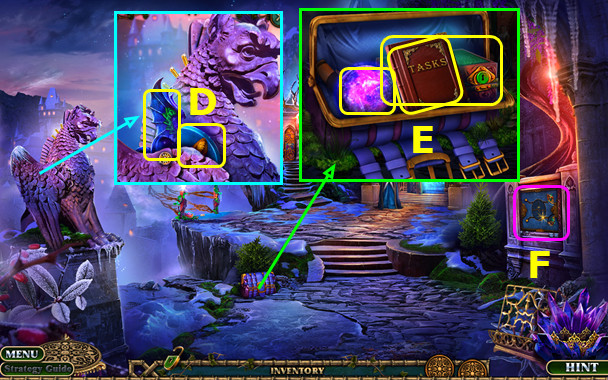
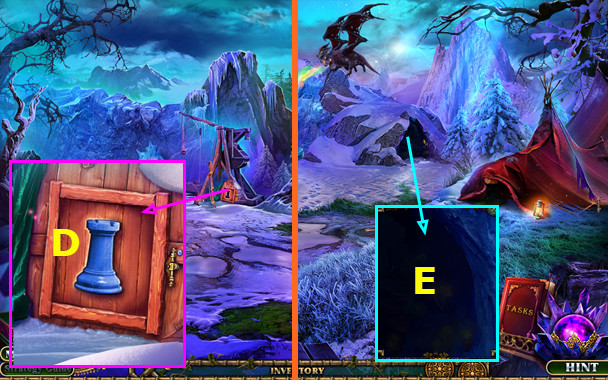
- Take 2/2 PUZZLE PIECE and BROKEN DRAGON FIGURINE (D).
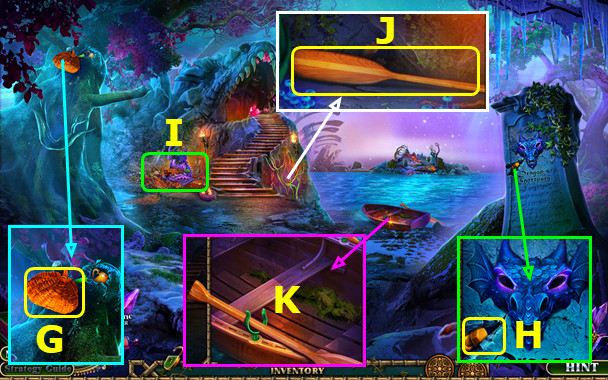
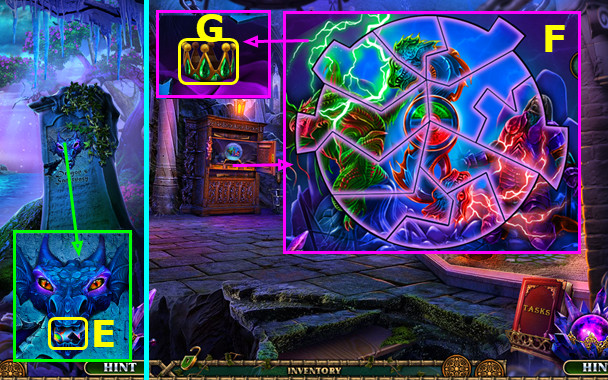
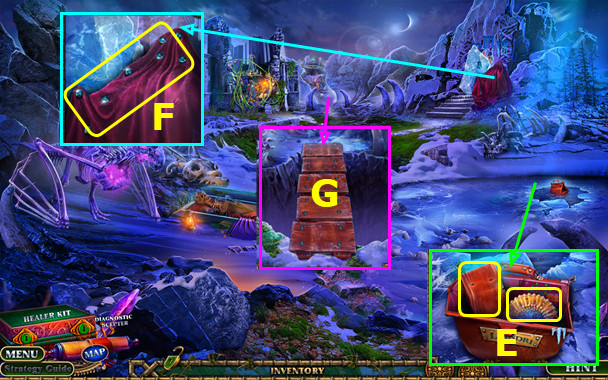
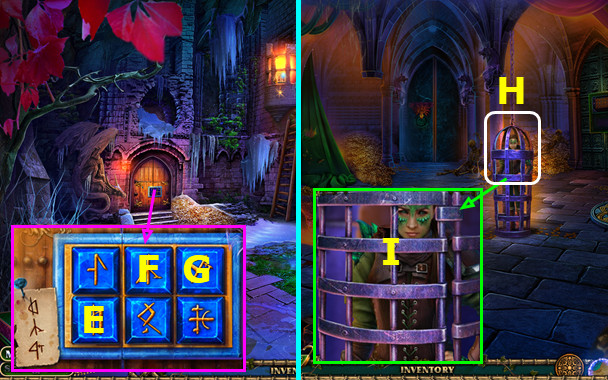
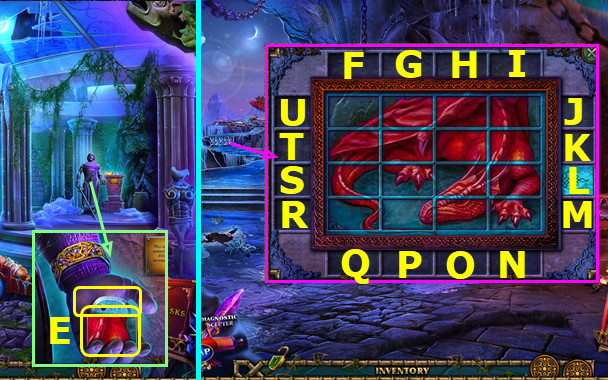
- Open buckles; take hint generator, task book, HEALER KIT, and BRUSH (E).
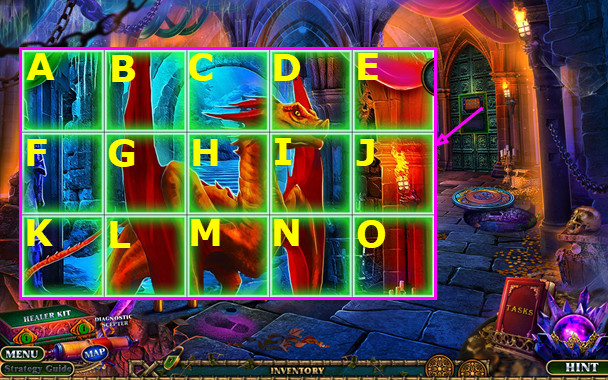
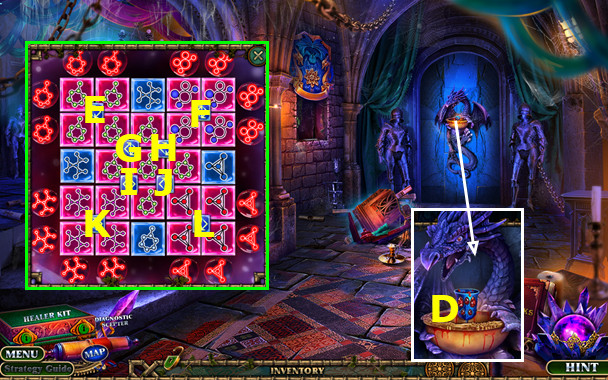
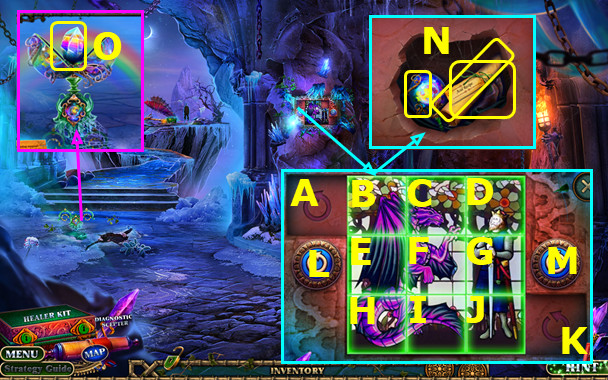
- Select (F).
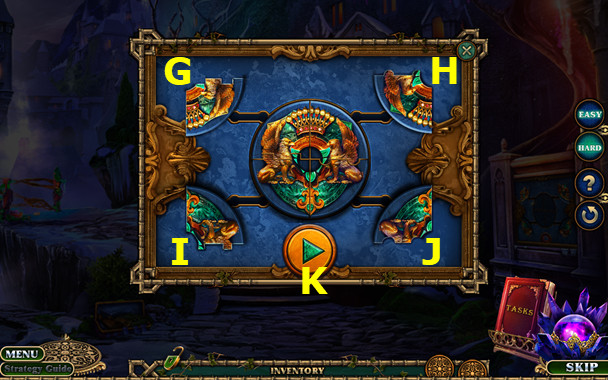
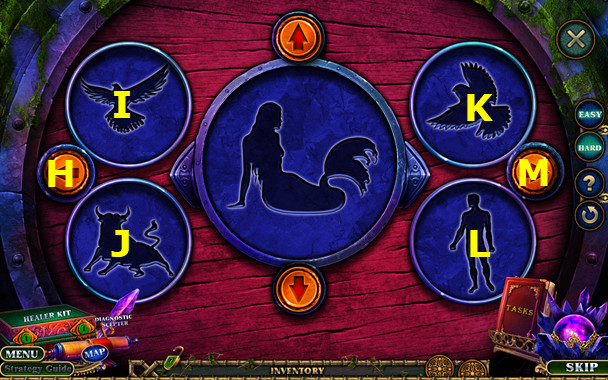
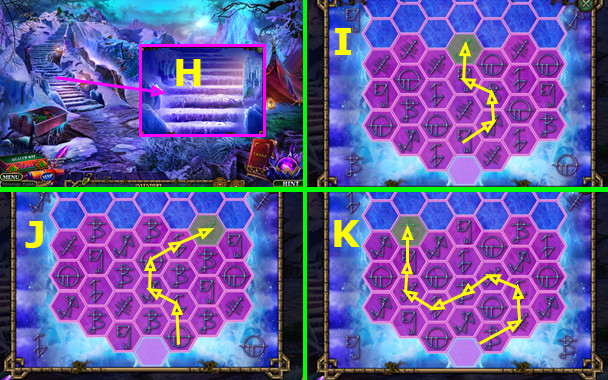
- Place 2 PUZZLE PIECES; easy solution Gx3-H-Jx2-K.
- Hard solution: Gx3-Jx2-Ix3-K.
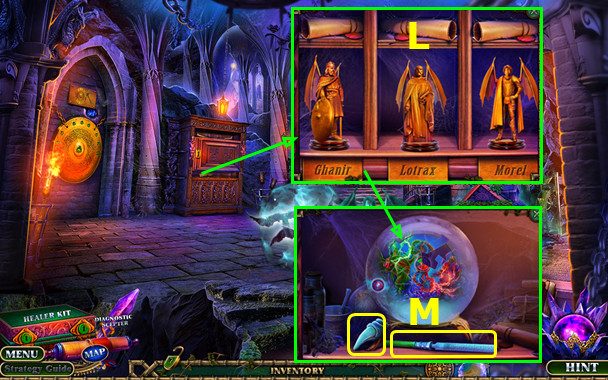
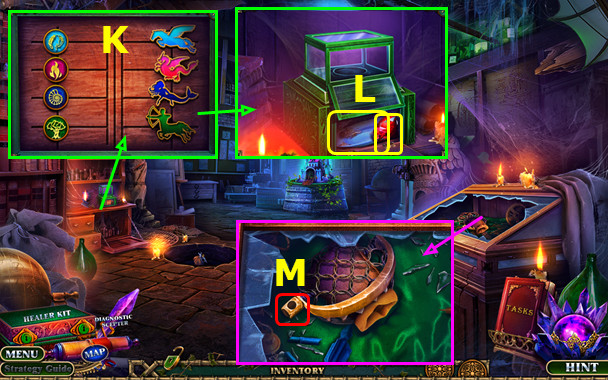
- Take CANE, map, and DRAGON FIGURINE PART.
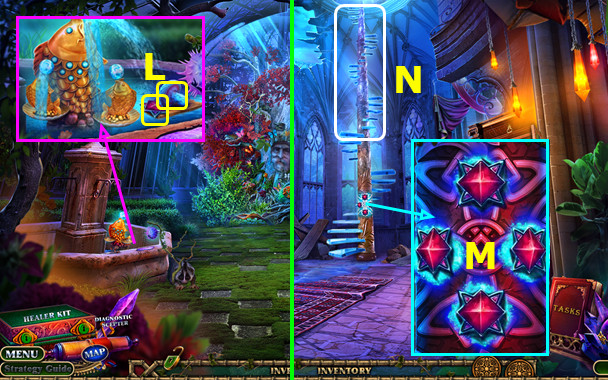
- RESIN ON LEAF, DRAGON FIGURINE PART, and BRUSH on BROKEN DRAGON FIGURINE; earn DRAGON FIGURINE.
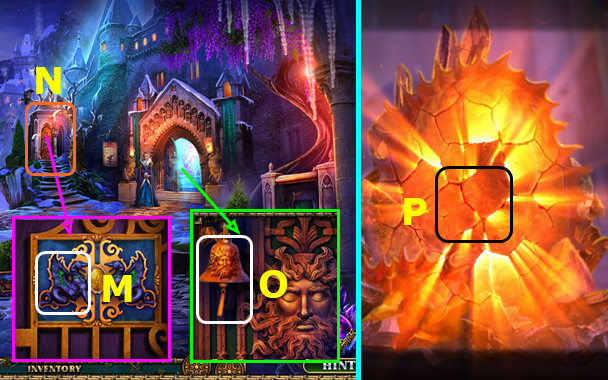
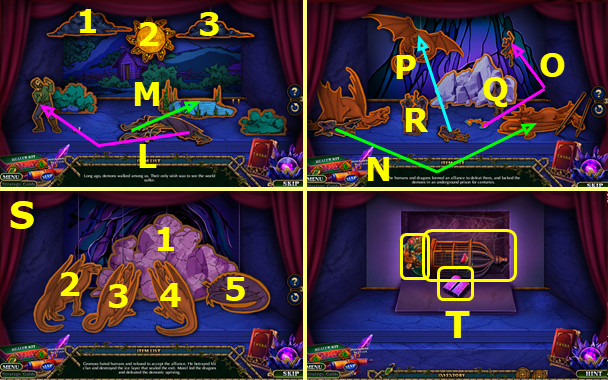
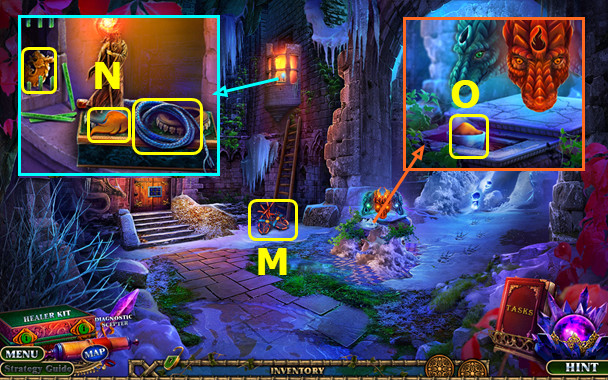
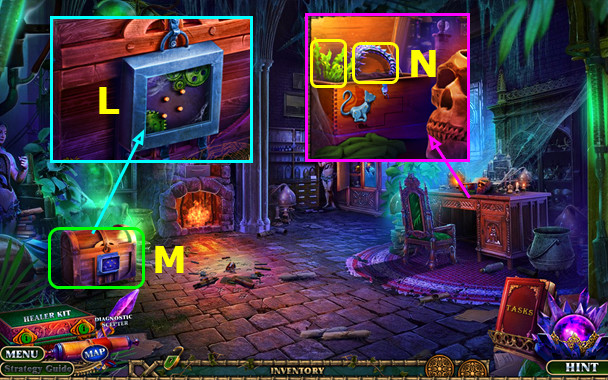
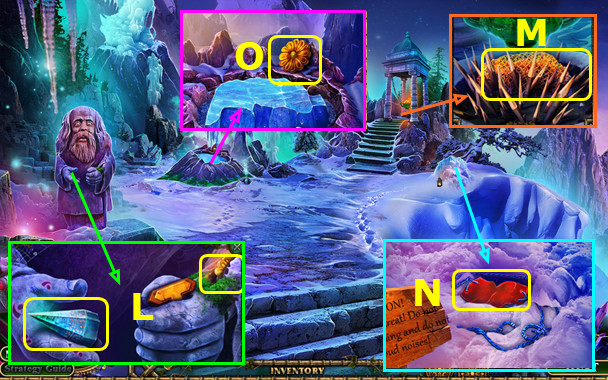
- Place DRAGON FIGURINE (M).
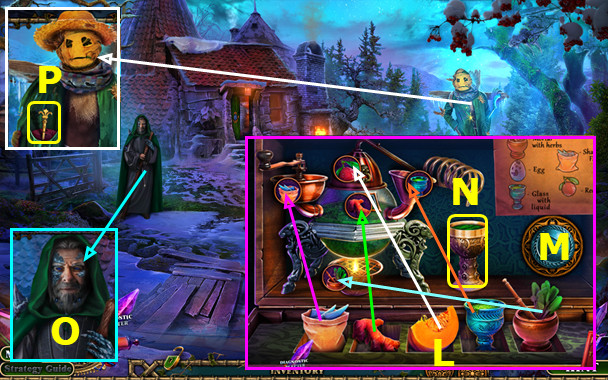
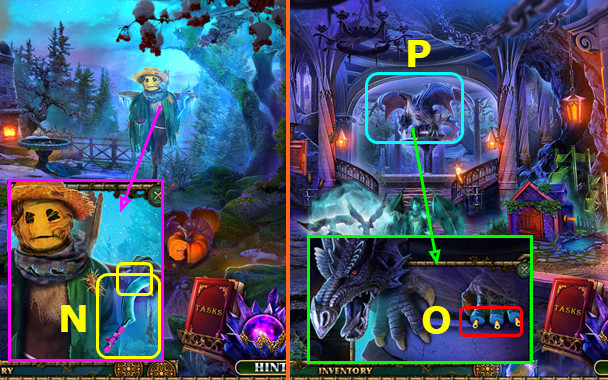
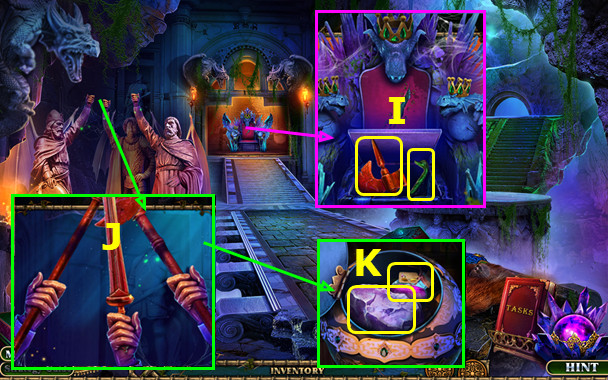
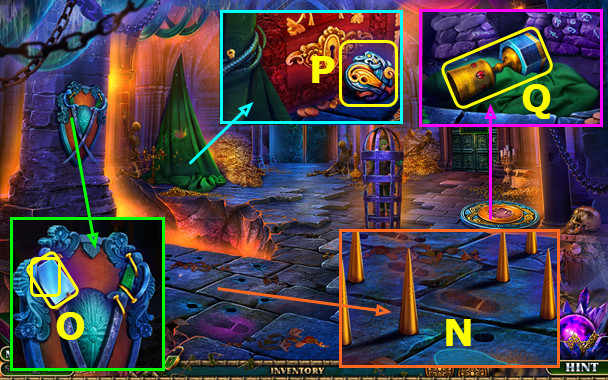
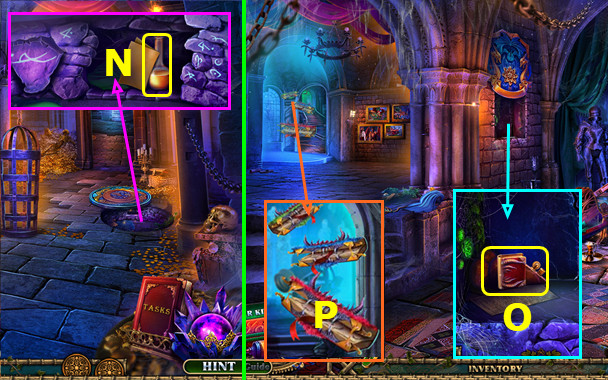
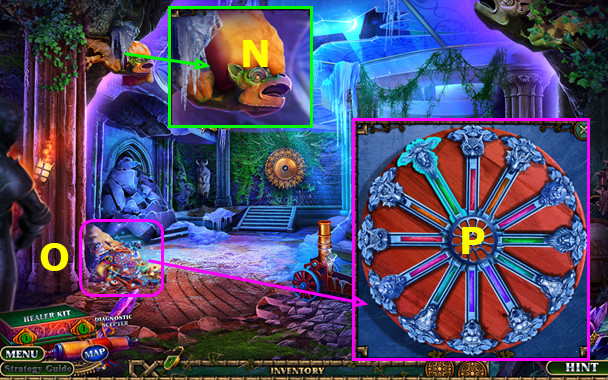
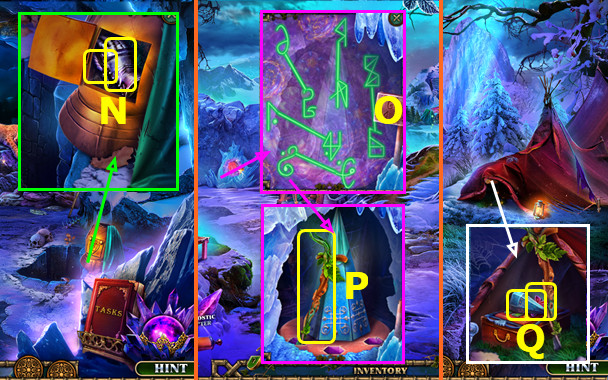
- Play HOP; earn DOOR BELL (N).
- Try to go right.
- Place DOOR BELL (O).
- Go right.
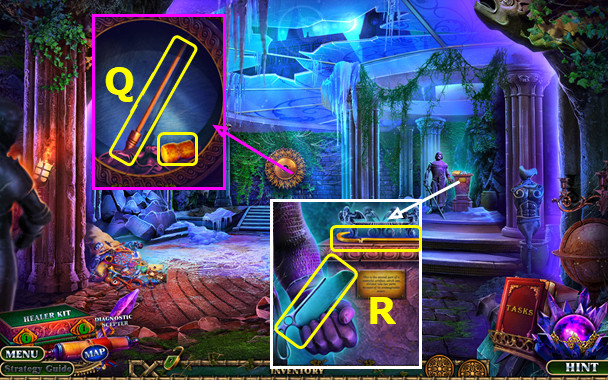
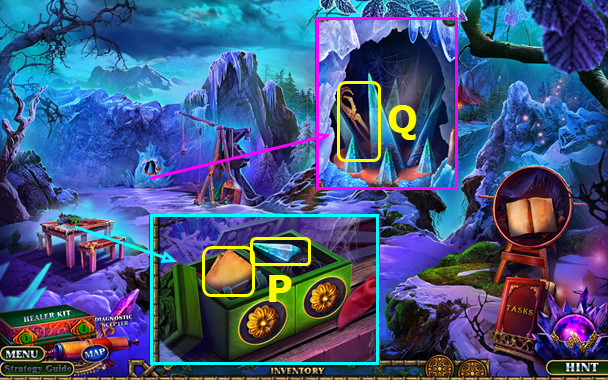
- Select (P).
- Take 2/3 FLOWERS (A).
- Talk (B).
- Take 3/3 FLOWERS, read note, and take 1/3 FEATHERS (C).
- Take HOOKED ORNAMENT (D).
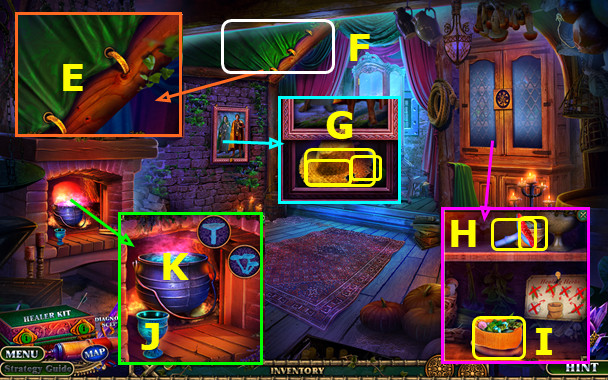
- Remove dead flower; place 3 FLOWERS (E).
- Take 1/2 WOODCUTTER EMBLEMS; use HOOKED ORNAMENT; take BARRETTE (F).
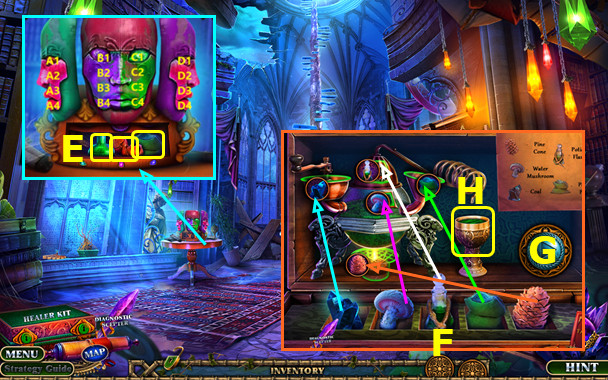
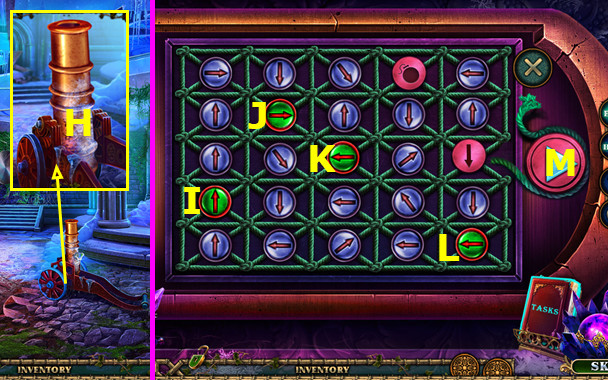
- BARRETTE on HEALER KIT; read note and select diagnostic scepter.
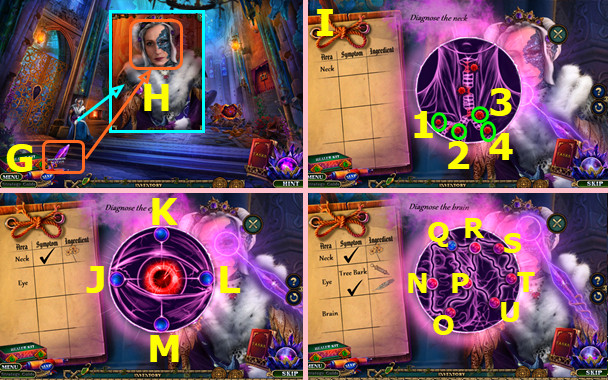
- Use DIAGNOSTIC SCEPTER (G-H).
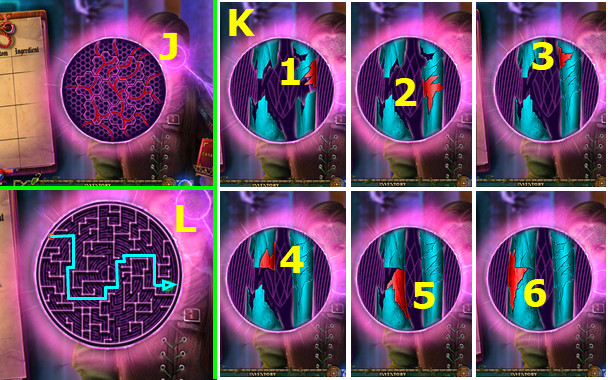
- Select 1-4 (I).
- Solution (J-L)-(L-J-M)-(J-M-L-K).
- Solution N-O-P-Q-R-S-T-U-P-R-T.
- Earn INGREDIENT LIST and KNIGHT FIGURINE.
- Walk down.

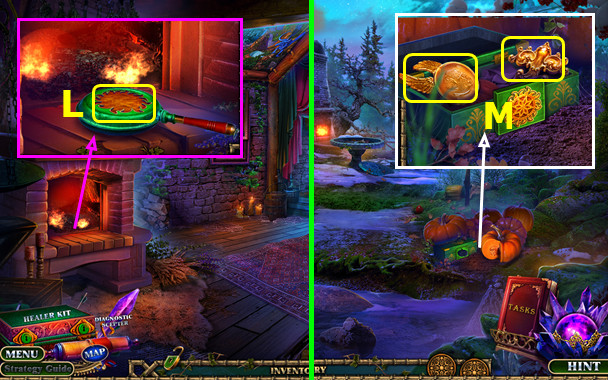
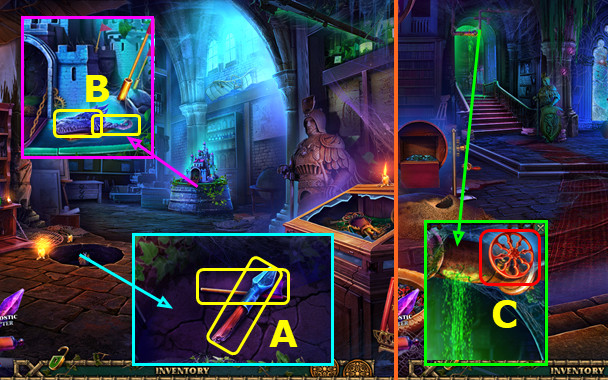
- Place KNIGHT FIGURINE; take GOLDEN BIRD (A).
- Go right.
- Place GOLDEN BIRD; play HOP (B).
- Walk left.
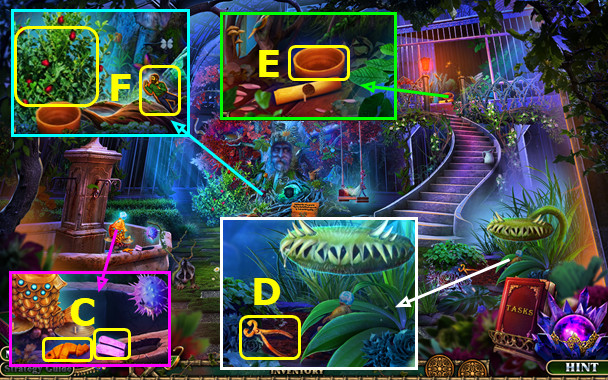
- Take 2/2 WOODCUTTER EMBLEMS and 2/3 FEATHERS (C).
- Use CANE; take PLIERS (D).
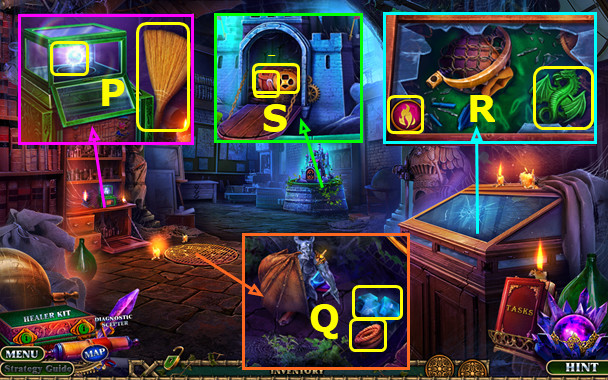
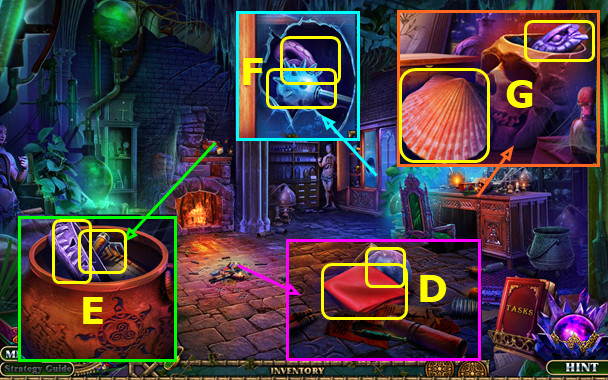
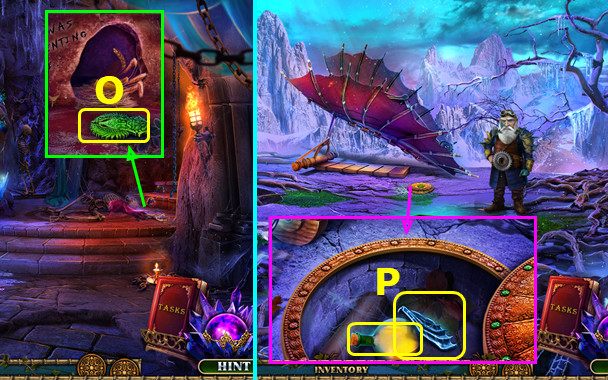
- Read note; take BOWL (E).
- Use BOWL; earn 1/5 POTION INGREDIENTS; take 1/2 LOCK FIGURINES (F).
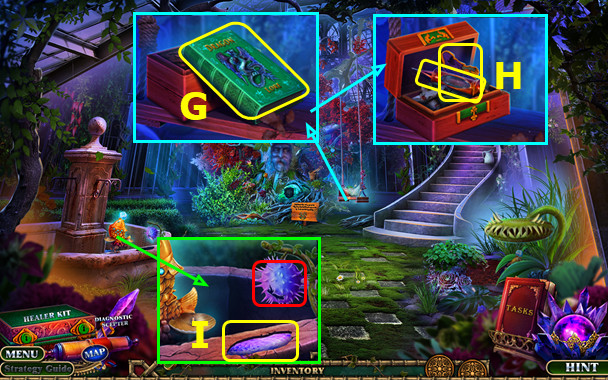
- Use MUFF; read book and take 2/5 POTION INGREDIENTS (G).
- Place 2 WOODCUTTER EMBLEMS; take GLASS SYRINGE and 2/2 LOCK FIGURINES (H).
- Select pod; use GLASS SYRINGE; earn 3/5 POTION INGREDIENTS (I).
- Walk down.
- Use PLIERS; earn 4/5 POTION INGREDIENTS (J).
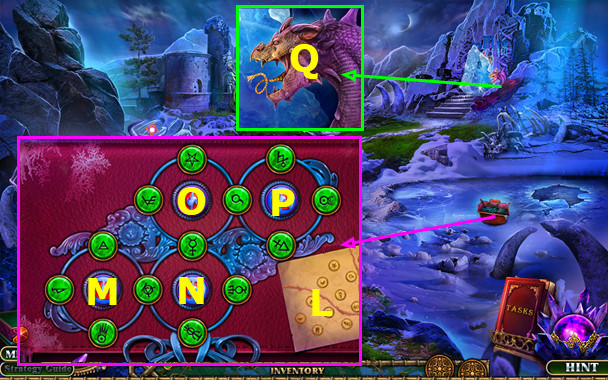
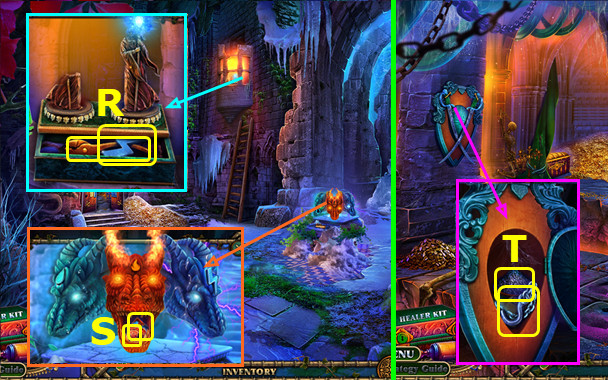
- Place 2 LOCK FIGURINES (K).
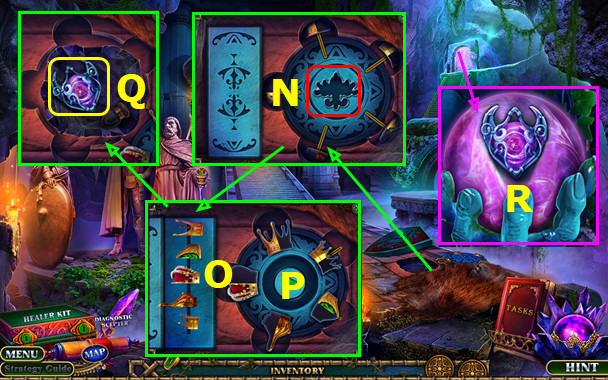
- Restore L-M; select 1-3.
- Restore N-O-P; select Qx3-R.
- Select 1-5 (S).
- Take 3/3 FEATHERS, CAGE, and BROKEN TREE TOKEN (T).
- Walk down.
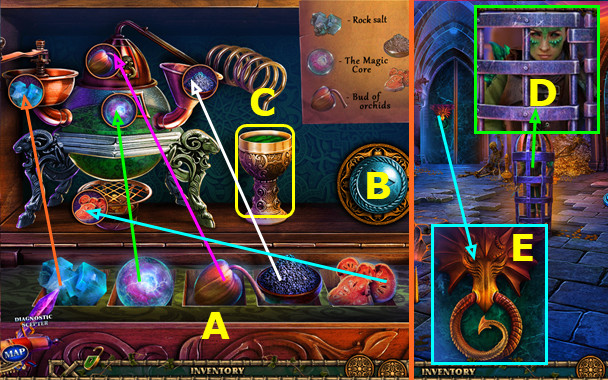
- Place 3 FEATHERS; take 1st TOKEN DETAIL and 5/5 POTION INGREDIENTS (A).
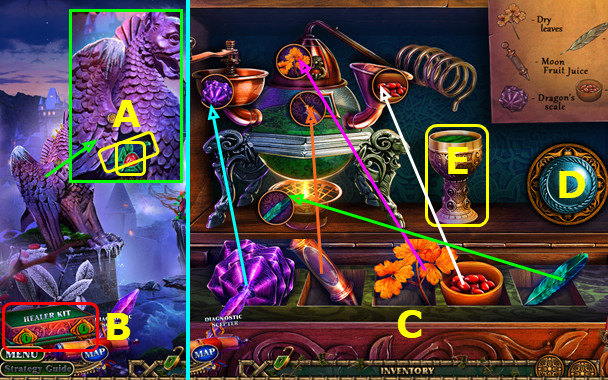
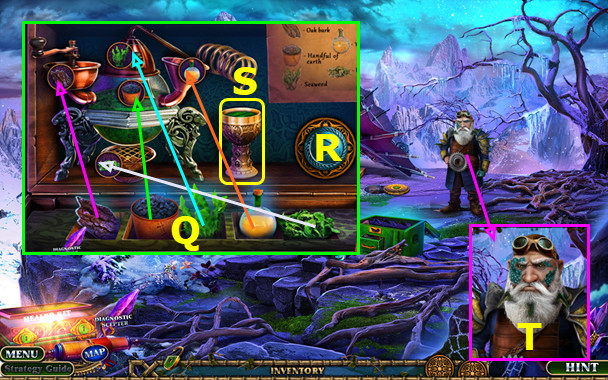
- Select HEALER KIT (B).
- Place POTION INGREDIENTS; use as shown (C).
- Select (D).
- Take HEALING POTION (E).
- Go right.
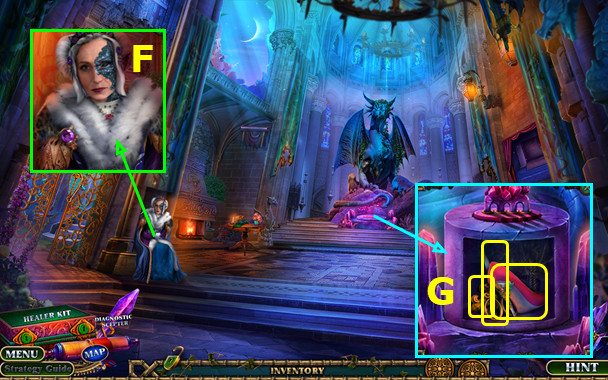
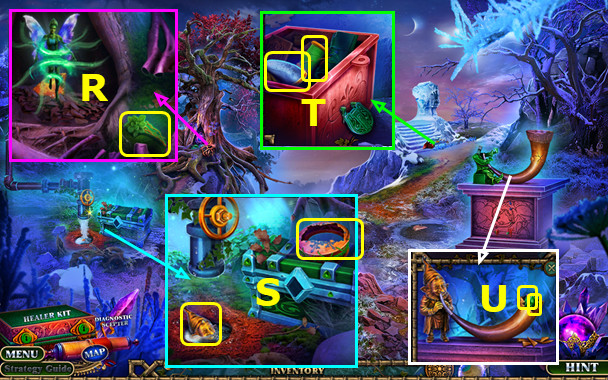
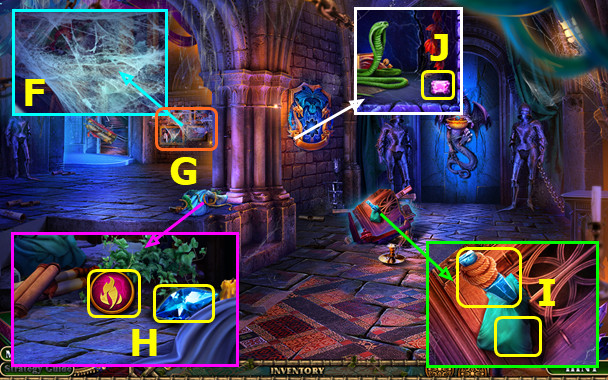
- Use HEALING POTION; earn HAIR PIN (F).
- Place HAIR PIN; take HEELED SHOE, SCISSORS, and 2nd TOKEN DETAIL (G).
- 2 TOKEN DETAILS on BROKEN TREE TOKEN; earn TREE TOKEN.
- Go left.
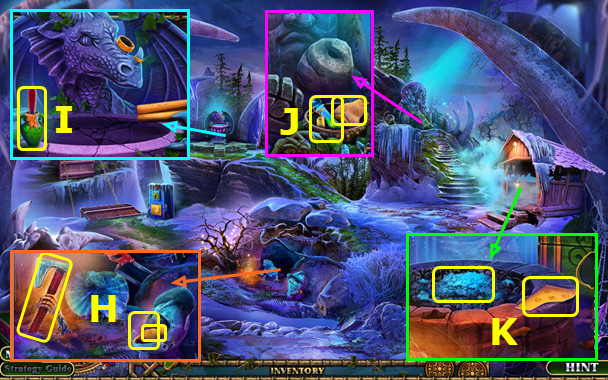
- Place TREE TOKEN (H).
- Play HOP; earn TRANSFORMATION POTION (I).
- Use TRANSFORMATION POTION; take BEAUTIFUL FLOWER, BRUSH, and 1/2 FISH FIGURINES (J).
- Use CAGE and BEAUTIFUL FLOWER; take BIRDCAGE (K).
- Walk down 2x.
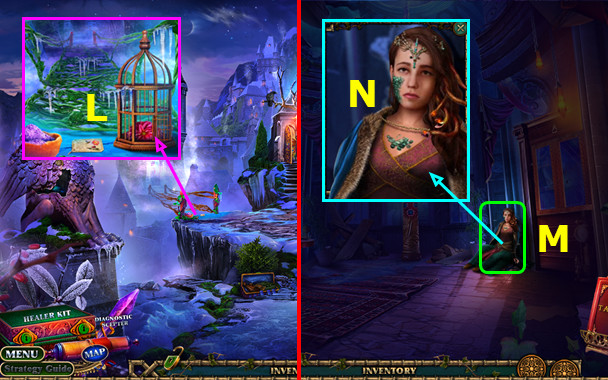
- Place BIRDCAGE (L).
- Go left.
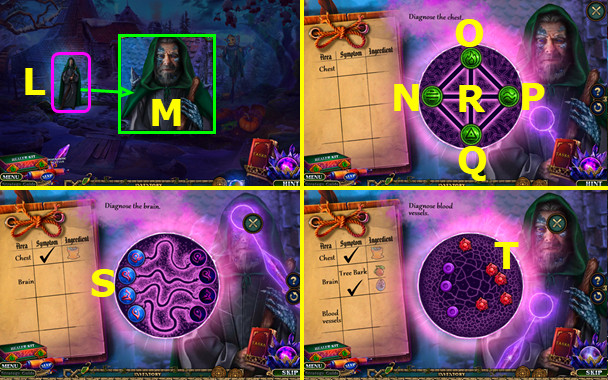
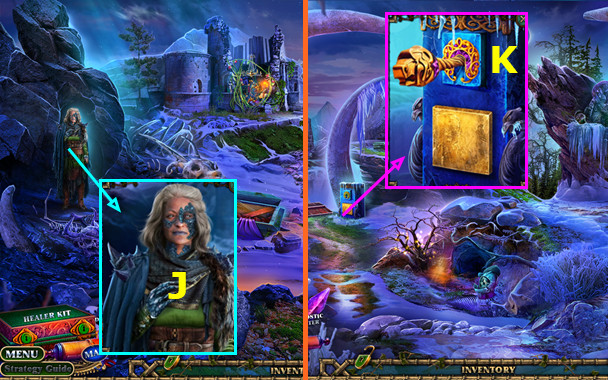
- Talk (M).
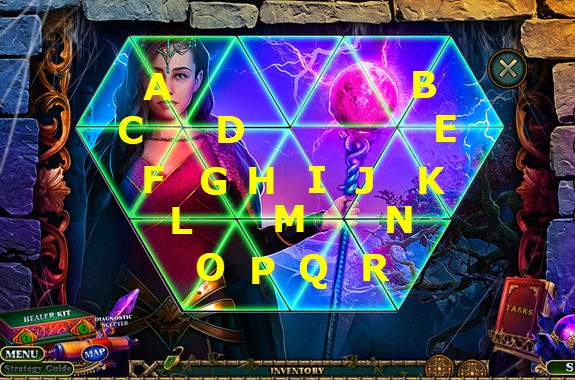
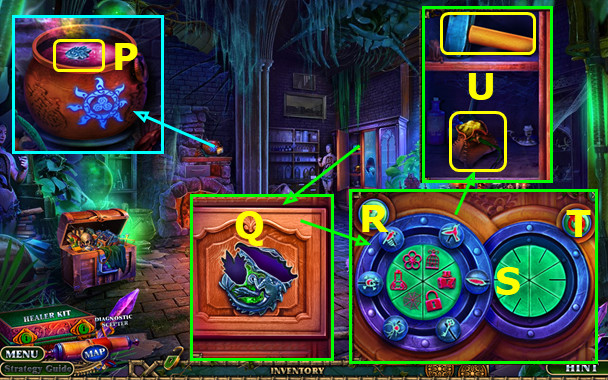
- Use DIAGNOSTIC SCEPTER (N).
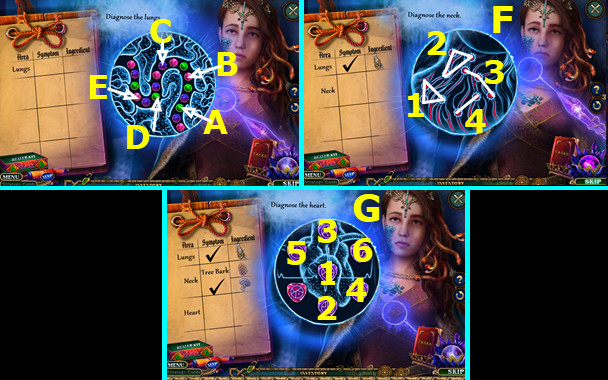
- Select D-C-B-Ex3-Ax2.
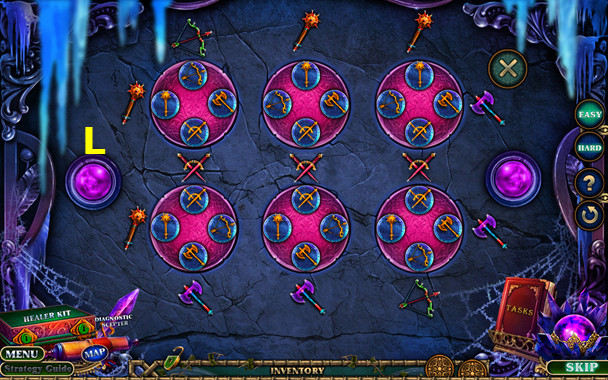
- Select 1-4 (F).
- Select 1-6 (G).
- Earn INGREDIENT LIST and LIGHTER.
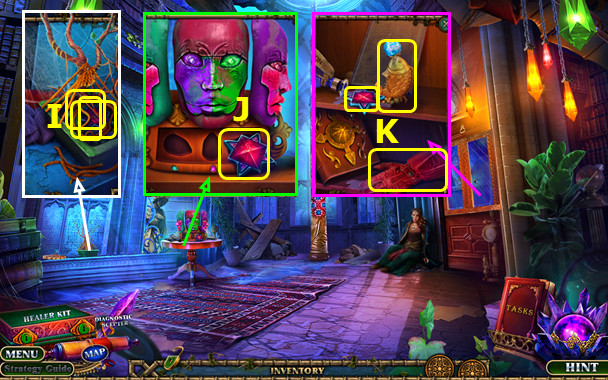
- Use SCISSORS; take BOWSTRING, 1/4 PILLAR AMULETS, and 1st GEMSTONE (I).
- Take 2/4 PILLAR AMULETS (J).
- Use HEELED SHOE and LIGHTER; take 3/4 PILLAR AMULETS, 2/2 FISH FIGURINES, and GLOVE (K).
- Walk down, right, and left.
- Place 2 FISH FIGURINES; take 1/5 POTION INGREDIENTS and 4/4 PILLAR AMULETS (L).
- Walk down 2x; go left.
- Place 4 PILLAR AMULETS (M).
- Go up (N).
Chapter 2: Rooftop
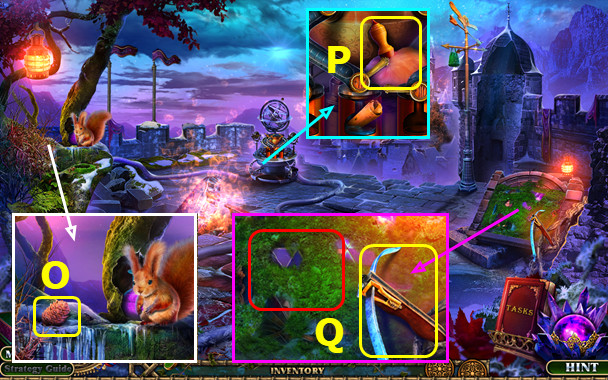
- Use GLOVE; take 2/5 POTION INGREDIENT (O).
- Take POWDER DUSTER; read note (P).
- Take INCOMPLETE CROSSBOW; use BRUSH (Q).
- Easy solution L-O-F-L-C-F-A-C-G-F-L-Q-P-O-G-L-G-D-G-K-J-E-K-R-N-Q-R-Q-P-O-L-P-O-P-Q-E-N-K-E.
- Hard solution L-O-F-L-C-F-A-C-Q-R-M-Q-H-M-K-E-K-J-L-O-G-F-L-I-H-G-H-J-I-N-R-Q-B-J-K-E-K.
- Take THUNDERCLOUD IN JAR and 2nd GEMSTONE.
- Use THUNDERCLOUD IN JAR; take ARROW and 3/5 POTION INGREDIENTS (S).
- BOWSTRING and ARROW on INCOMPLETE CROSSBOW; earn CROSSBOW.
- Use CROSSBOW; earn BAG (T).
- Open BAG; take DULL CLEAVER, 3rd GEMSTONE, and 4/5 POTION INGREDIENTS.
- Walk down.
- Place 3 GEMSTONES; easy solution (A1-C1)-(A2-C2)-(A3-C3)-(A4-C4)-(B1-D1)-(B2-D2)-(B3-D3)-(B4-D4).
- Hard solution (A1-C1)-(B1-D1)-(B2-D2)-(C3-D3)-(A3-B3)-(A4-D4)-(B4-D4).
- Take 1/3 RAIN MECHANISM PART, NUTS, and 5/5 POTION INGREDIENTS (E).
- Select HEALER KIT.
- Place 5 POTION INGREDIENTS; use as shown (F).
- Select (G).
- Take HEALING POTION (H).
- Use HEALING POTION; earn POWDER (I).
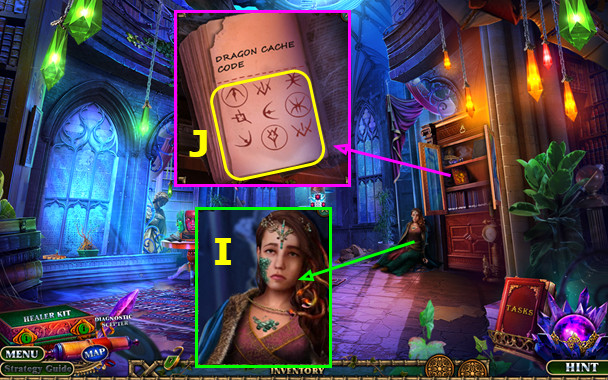
- Open book; use POWDER and POWDER DUSTER; take CODE (J).
- Walk down, right.
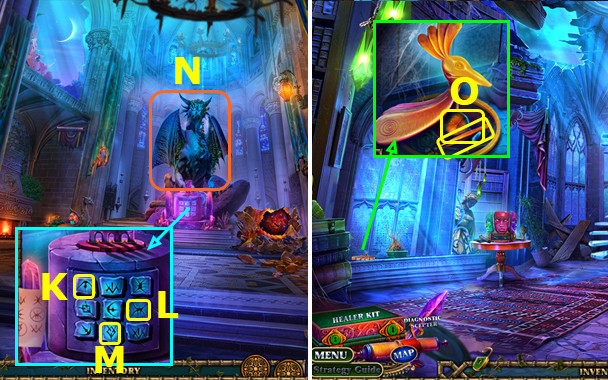
- Place CODE; select K-L-M.
- Play HOP; earn PEACOCK HEAD (N).
- Walk down, left.
- Place PEACOCK HEAD; take TWEEZERS and 2/3 RAIN MECHANISM PART (O).
- Go up.
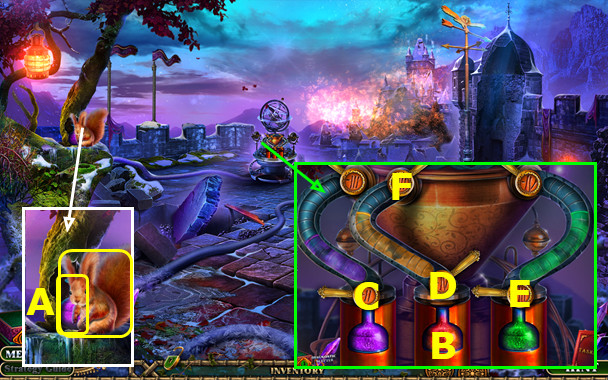
- Use NUTS; earn SQUIRREL; take 3/3 RAIN MECHANISM PART (A).
- Place 3 RAIN MECHANISM PARTS (B).
- Easy solution Cx3-Fx2-Dx2-E.
- Hard solution Cx3-Fx2-Dx2-Ex3.
- Go forward.
- Use SQUIRREL; take STAFF and GRINDSTONE (G).
- GRINDSTONE on DULL CLEAVER; earn SHARP CLEAVER.
- Use TWEEZERS; earn BOLT (H).
- Play HOP; take BROKEN CLIPPERS (I).
- Try to go forward.
- Use SHARP CLEAVER; take OAR (J).
- Place OAR (K).
- Go right.
- Talk (L).
- Use DIAGNOSTIC SCEPTER (M).
- Select P-Q-N-O-P-Q-N-R.
- Solution (S).
- Select all red (T).
- Earn INGREDIENT LIST and DOOR KEY.
- Use SHARP CLEAVER; take 1/5 POTION INGREDIENTS (A).
- Use STAFF; take ROPE, CLIPPERS HALF, and HEALING OINTMENT RECIPE (B).
- BOLT and CLIPPERS HALF on BROKEN CLIPPERS; earn CLIPPERS.
- Take MUSHROOMS (C).
- Use DOOR KEY (D).
- Go forward.
- Use CLIPPERS (E).
- Play HOP; earn CUPBOARD EMBLEM (F).
- Lift painting, take STRAW HAT, read note, take 2/5 POTION INGREDIENTS, and FLAT BONE (G).
- Place CUPBOARD EMBLEM; take TOADSTOOL and 3/5 POTION INGREDIENTS (H).
- Place HEALING OINTMENT RECIPE; play HOP; take 4/5 POTION INGREDIENTS (I).
- Read note: place TOADSTOOL and MUSHROOMS; use (J-K); earn 5/5 POTION INGREDIENTS.
- Walk down.
- Select HEALER KIT.
- Place 5 POTION INGREDIENTS; use as shown (L).
- Select (M).
- Take HEALING POTION (N).
- Use HEALING POTION; earn CRYSTALS (O).
- Place STRAW HAT; take LOCKPICK (P).
- Go forward.
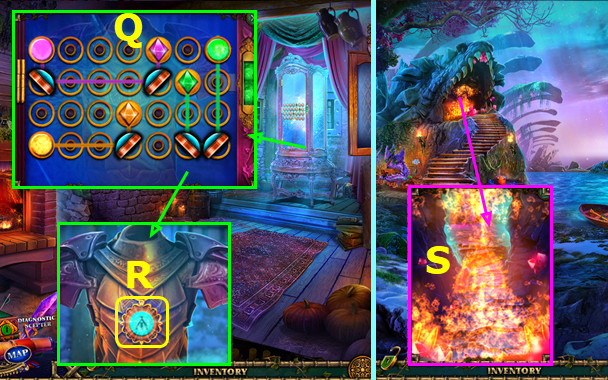
- Place CRYSTALS; solution (Q).
- Take DRAGON'S SCALE AMULET (R).
- Walk down 2x.
- Use DRAGON'S SCALE AMULET (S).
- Solution (A-1)-(B-2)-(C-3)-(D-4)-(E-5)-(F-6)-(G-7)-(H).
- Earn DAMAGED DRAGON SCEPTER.
- Take DRAGON SCEPTER ELEMENT (I).
- Take DRAGON SCEPTER TOP. BELT, and BONE (J).
- ROPE and BONE on FLAT BONE; earn BONE SHOVEL.
- Use BONE SHOVEL; take SCEPTER STONE, 1/3 DRAGON CLAWS, and STRONG HORN (K).
- Use LOCK PICK; solution (L).
- Take FILE and 2/3 DRAGON CLAWS (M).
- Walk down, right.
- Use BELT; take SICKLE and 3/3 DRAGON CLAWS (N).
- Walk down, forward.
- Place 3 DRAGON CLAWS (O).
- Play HOP; earn WATERMILL WHEEL (P).

- Place WATERMILL WHEEL; take 1/2 DRAGON EYES and SCEPTER WING (Q).
- DRAGON SCEPTER ELEMENT, DRAGON SCEPTER TOP, SCEPTER STONE, and SCEPTER WING on DAMAGED DRAGON SCEPTER; earn MAGIC SCEPTER.
- Use MAGIC SCEPTER; earn MAGICAL CENTERPIECE (R).
- Place MAGICAL CENTERPIECE (S).
- Walk left.
- Use FILE; earn CASTING INSTRUCTIONS (A).
- Take 1/3 WEAPONS; use STRONG HORN; take GOLD DUST (B).
- Take 2/3 WEAPONS; read note and take MOLDING FORM (C).
- Use SICKLE; take GLOVE and 2/2 DRAGON EYES (D).
- Walk down 2x.
- Place 2 DRAGON EYES; take GLASS CHIP (E).
- Go forward.
- Place GLASS CHIP; solution (F).
- Take CROWN (G).
- Go left.
- Place CROWN; take 3/3 WEAPONS and CANE (I).
- Place 3 WEAPONS (J).
- Open sphere; take HEAVY STONE and REAGENT (K).
- GOLD DUST, MOLDING FORM, and REAGENT on CASTING INSTRUCTIONS; earn FILLED MOLD.
- Walk down 2x; go right and forward.
- Place FILLED MOLD; take SUN INLAY (L).
- Walk down.
- Place SUN INLAY; take MEDAL and CACHE CENTER (M).
- Walk down, forward, and left.
- Place CACHE CENTER (N).
- Solution (O); select (P).
- Take PORTAL AMULET (Q).
- Place PORTAL AMULET (R).
- Go right.
Chapter 3: Dragon Necropolis
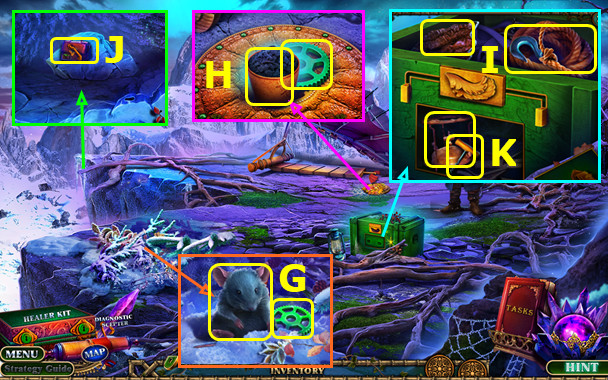
- Remove lid; take FLAT BONE, read note, and take 1/2 WOODEN BOARDS (A).
- Use GLOVE (B).
- Play HOP; earn PINCERS (C).
- Take BROKEN CROSSBAR (D).
- Use CANE; open bag; take FAN and 2/2 WOODEN BOARDS (E).
- Use PINCERS; earn NAILS (F).
- 2 WOODEN BOARDS, NAILS, and HEAVY STONE on BROKEN CROSSBAR; earn CROSSBAR.
- Place CROSSBAR (G).
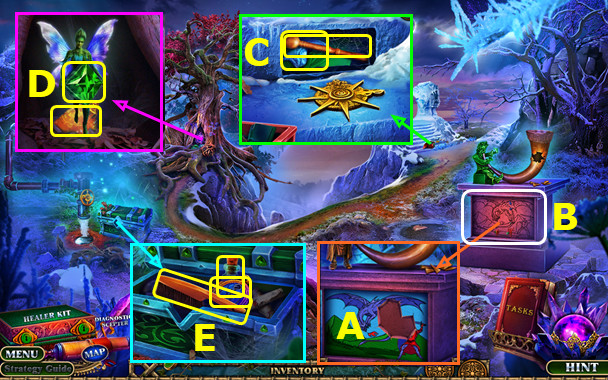
- Go forward.
- Take AXE; use MEDAL; take TORN COMBINATION and POUCH (H).
- Take MELTED AMBER and read note (I).
- Remove plant and use FLAT BONE; remove cover; take ACID, NUT, and 1st CODE PART (J).
- Use FAN; take 2nd CODE PART; use POUCH to earn 1st FOUNTAIN INGREDIENTS (K).
- MELTED AMBER and 2 CODE PARTS on TORN CODE; earn CODE.
- Walk down.
- Place CODE (L).
- Easy solution Nx2-Mx2-Px2-Ox2.
- Hard solution Nx2-Mx2-Ox2-Px2-Nx2-Ox2.
- Take MATCHES and 2nd FOUNTAIN INGREDIENTS.
- Use MATCHES (Q).
- Go right.
- Talk; use AXE; take 3rd FOUNTAIN INGREDIENTS (R).
- Place NUT; take HEAD; take TORN DRUM (S).
- Use ACID; take NEEDLE AND THREAD and DRAGON NOSE HORN (T).
- Place HEAD; take 4th FOUNTAIN INGREDIENTS and LEATHER PATCH (U).
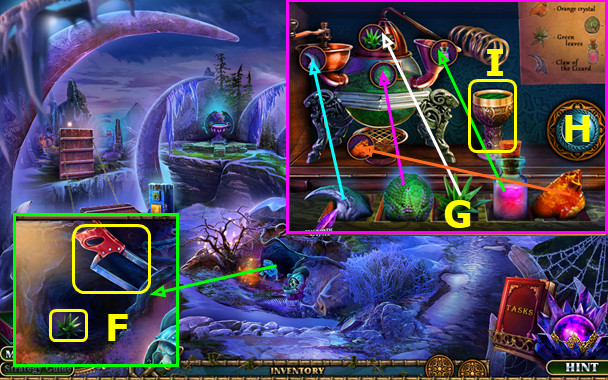
- Walk down and forward.
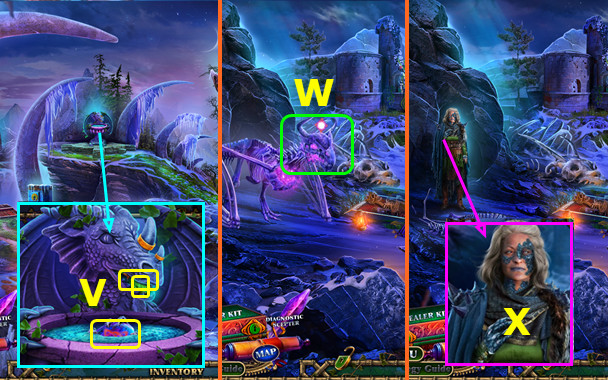
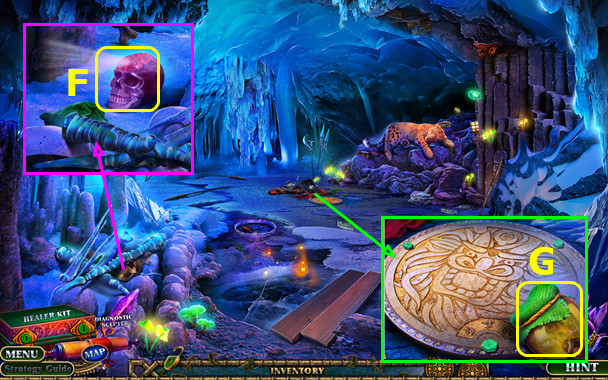
- Place 4 FOUNTAIN INGREDIENTS and DRAGON NOSE HORN; take 1/5 POTION INGREDIENTS, MAGIC WAND, and MAGICAL STONE (V).
- Walk down.
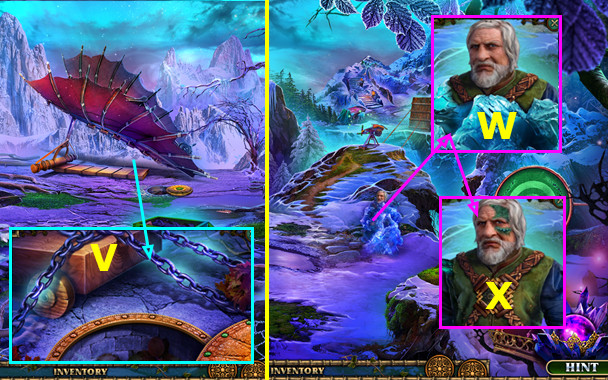
- Use MAGICAL STONE (W).
- Use DIAGNOSTIC SCEPTER (X).
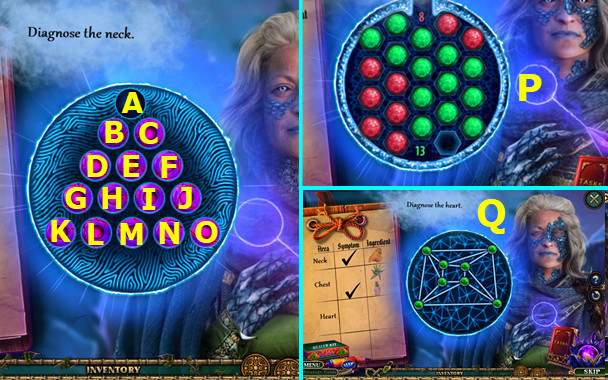
- Solution (D-A)-(M-D)-(K-M)-(N-L)-(F-M)-(O-F)-(G-B)-(A-D)-(C-J)-(D-F)-(F-O)-(L-N)-(O-M).
- This mini-game is random (P).
- Solution (Q).
- Earn INGREDIENT LIST and FRESCO FRAGMENT.
- Go right.
- Place FRESCO FRAGMENT (A).
- Play HOP; earn WIND ROSE (B).
- Place WIND ROSE; take DRUMSTICK and 2/5 POTION INGREDIENTS (C).
- NEEDLE AND THREAD, LEATHER PATCH, and DRUMSTICK on TORN DRUM; earn DRUM.
- Give MAGIC WAND; earn CHEST CRYSTAL; take 3/5 POTION INGREDIENTS (D).
- Place CHEST CRYSTAL; take BRUSH, LOCKET, and 4/5 POTION INGREDIENTS (E).
- Walk down and forward.
- Use DRUM; take 5/5 POTION INGREDIENTS and SAW (F).
- Select HEALER KIT.
- Place 5 POTION INGREDIENTS; place as shown (G).
- Select (H).
- Take HEALING POTION (I).
- Walk down.
- Use HEALING POTION; earn LEVER (J).
- Go forward.
- Use LEVER (K).
- Solution (L).
- Go left.
- Take SNOWSHOES (M).
- Use SAW; take LOCKET INLAY, WHIP, and 1/3 THREE ELEMENTS (N).
- Use BRUSH; take SAND (O).

- Use SNOWSHOES (P).
- Take LOCKET EMBLEM (Q).
- LOCKET INLAY and LOCKET EMBLEM; on LOCKET; solution (T-U)-(U-S)-(T-U).
- Take DRAGON EGG EMBLEM.
- Walk down.
- Place DRAGON EGG EMBLEM; take UMBRELLA (A).
- Place UMBRELLA; take BEAR FIGURINE (B).
- Go left.
- Place BEAR FIGURINE (C).
- Play HOP; earn CODE (D).
- Place CODE; solution E-F-G.
- Go left.
- Talk (H).
- Use DIAGNOSTIC SCEPTER (I).
- Solution (J).
- Restore pieces 1-6 (K).
- Solution (L).
- Earn INGREDIENT LIST and WATER MAGE FIGURINE.
- Use SAND (N).
- Take GLASS and 2/3 THREE ELEMENTS (O).
- Use WHIP; take CACHE CENTERPIECE (P).
- Place CACHE CENTERPIECE; take STONE IDOL (Q).
- Walk down.
- Place WATER MAGE FIGURINE; take 3/3 THREE ELEMENTS and PLIERS (R).
- Place 3 THREE ELEMENTS; take 1/5 POTION INGREDIENTS and COLORED TILE (S).
- Go left.
- Use PLIERS; take HOOK ON CHAIN and 2/5 POTION INGREDIENTS (T).
- Place COLORED TILE; easy solution (A-F)-(A-B)-(N-I)-(K-H)-(K-D)-(C-E)-(N-O).
- Hard solution (A-B)-(F-I)-(K-H)-(N-O)-(F-K)-(K-M)-(G-L)-(G-M)-(D-E)-(J-M)-(E-J).
- Walk right.
- Take BROOM; place GLASS; take 3/5 POTION INGREDIENTS (P).
- Use HOOK ON CHAIN; take 4/5 POTION INGREDIENTS and TWINE (Q).
- Take 1/2 TOKENS; use STONE IDOL; take DRAGON INLAY (R).
- Place DRAGON INLAY; take LOCKED TUBE and 5/5 POTION INGREDIENTS (S).
- Walk down.
- Select HEALER KIT.
- Place 5 POTION INGREDIENTS; move as shown (A).
- Select (B).
- Take HEALING POTION (C).
- Use HEALING POTION; earn DOOR RING (D).
- Use DOOR RING (E).
- Go forward.
Chapter 4: Dragon Castle
- Use BROOM (F).
- Play HOP; earn COAT OF ARMS ELEMENT (G).
- Move items and read note; take 2/2 TOKENS and SAPPHIRE (H).
- Use TWINE; take KNIFE and EMERALD (I).
- Place COAT OF ARMS ELEMENT; take TOPAZ (J).
- Walk down, right.
- Place 2 TOKENS; solution (K).
- Take RUBY and PLATE (L).
- EMERALD, SAPPHIRE, TOPAZ, and RUBY on LOCKED TUBE; take BRICK WITH SYMBOLS, MAGNET, and BROKEN IRON ARROW.
- Use BROKEN IRON ARROW; play HOP; earn FLUTE (M).
- Walk down.
- Place BRICK WITH SYMBOLS; read note; take STRENGTH POTION (N).
- Go forward.
- Use FLUTE; take LIGHTER (O).
- Use LIGHTER (P).
- Walk left.

- Take CANE; use PLATE; take CHEST KEY (Q).
- Take DUSTER; read note (R).
- Use MAGNET; take ALCHEMY CASE (S).
- Use KNIFE; play HOP; take DARK DRAGON'S WING (T).
- Walk down 2x.
- Use CHEST KEY; take SPIRAL TUBE and HOURGLASS CRANK (A).
- Go forward, left.
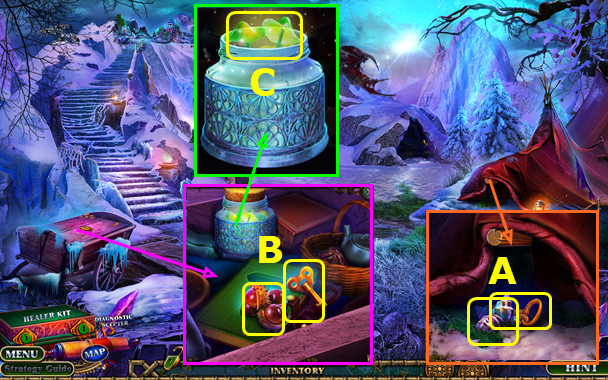
- Use HOURGLASS CRANK; take 1/2 FLAG and GEMSTONE (B).
- Place GEMSTONE; take ILLUSION POWDER (C).
- STRENGTH POTION, SPIRAL TUBE, and ILLUSION POWDER in ALCHEMY CASE; take DRAGON BLOOD.
- Walk down.
- Use DRAGON BLOOD (D).
- Easy solution H-F-G-E-G-H-I-G-J-E-H-G-F-G-E-H-F-K-J-I-K-I-L-J-K-L-I-J-L-H-Jx2-Gx2-Hx2-G.
- Hard solution Ix2-Kx2-J-L-H-F-Jx2-H-F-I-K-J-L-I-J-L-Ex3-G-Kx3-I-J-I-J-H-F-H-Jx2-Ex2-G-I-Kx3-G-E-G-I-G.
- Go right.
- Use CANE (N).
- Play HOP (O).
- Solution (P); take WHEEL.
- Use WHEEL; take POLE and CORK (Q).
- Take SURGICAL SAW and read note; use DUSTER; take HOOK (R).
- Walk down 2x; go right.
- Place DARK DRAGON'S WING; take ARROWHEAD and 2/2 FLAG (A).
- Place 2 FLAGS; take DRAGON HEAD TORCH and ROPE (B).
- ROPE and HOOK on POLE; earn HOOK ON POLE.
- Walk down; go forward and left.
- Use HOOK ON POLE (C).
- Go forward.
- Move items; take THICK CLOTH and CANNONBALL (D).
- Use CORK; take GUNPOWDER, RAKE, and read recipe (E).
- Use THICK CLOTH; take MACE and FLINT (F).
- Take SEA SHELL; use SURGICAL SAW; take STEEL (G).
- GUNPOWDER, FLINT, and STEEL on DRAGON HEAD TORCH; earn LIT DRAGON HEAD TORCH.
- Walk down 2x; go right.
- Use CANNONBALL and LIT DRAGONHEAD TORCH (H).
- Easy solution Lx5-Kx5-Ix7-J-M.
- Hard solution Kx5-Ix4-L-J-M.
- Walk left.
- Take BROKEN CAT TOY (A).
- Use ARROWHEAD; take 1/3 PAINTED TILES and TOY CAT'S HEAD (B).
- Take 1/4 GEARS; use SEASHELL; take BRACELET (C).
- Use MACE; take 2/4 GEARS and 2/3 PAINTED TILES (D).
- Walk down.
- Place BRACELET; take 3/3 PAINTED TILES and 1st TOY CAT'S LEG (E).
- Go left.
- Place 3 PAINTED TILES; easy solution G-G-P-M-R-Q-F-G-P-G-P-H-O-H-O-H-O-F-Q.
- -O-H-P-G-O-H-G-P-H-O-G-P-F-Q-G-P-Q-F-Q-F-G-P-F-Q-G-P-J-U-M-R-L-S-U-J-R-M-S.
- Hard solution G-F-Q-N-I-Q-F-G-P-M-R-Q-F-G-P-G-P-H-O-H-O-H-O-F-Q-O-H-P-G-O.
- -H-G-P-H-O-G-P-F-Q-G-P-Q-F-Q-F-G-P-F-Q-G-P-J-U-M-R-L-S-U-J-R-M-S.
- Walk left.

- Talk (A); use DIAGNOSTIC SCEPTER (B).
- Select 1-4 (C).
- Select 1-7 (D).
- Select Ex7-Fx5.
- Earn INGREDIENT LIST and CHEST INLAY.
- Move items; take MOUSE and 3/4 GEARS (G).
- Use RAKE; take 1/5 POTION INGREDIENTS and 4/4 GEARS (H).
- Place CHEST INLAY; take 2/5 POTION INGREDIENTS and ROPE (I).
- Use ROPE; take LOCKED BAG and DRAWER HANDLE (J).
- Take 3/5 POTION INGREDIENTS from LOCKED BAG.
- Place DRAWER HANDLE; take CORKSCREW and BURNER (K).
- Walk down 3x; go left and forward.
- Place 4 GEARS (L).
- Play HOP; earn 2nd TOY CAT'S LEG (M).
- TOY CAT'S HEAD, 1st TOY CAT'S LEG, and 2nd TOY CAT'S LEG on BROKEN CAT TOY; earn TOY CAT.
- Place CAT TOY; take 4/5 POTION INGREDIENTS and LIZARD'S TAIL (N).
- Walk down 2x; go right, and then left.
- Select, place MOUSE; take WARRIOR EMBLEM (O).
- Go left.
- Place WARRIOR EMBLEM; take 5/5 POTION INGREDIENTS and 1/2 CABINET INSERT (P).
- Select HEALER KIT.
- Place 5 POTION INGREDIENTS; use as shown (Q).
- Select (R).
- Take HEALING POTION (S).
- Give HEALING POTION; take FARELL'S STAMP (T).
- FARELL'S STAMP on LOCKED BAG; read note; take STONE CACHE FILE, NAIL PULLER, and MERMAID'S TEARS.
- Walk down.
- Place STONE CACHE TILE; easy solution J-G-D-C-B-C-E-H-I-F-C-B.
- -C-E-B-A-F-E-B-C-F-E-G-F-C-I-F-G-H-I-FJ-I-H-K-J-I-G-F-I-H-E-B-A.
- Hard solution B-Lx3-A-J-I-F-C-B-C-E-H-I-F-C-B-C-E-F-B.
- -Lx2-C-B-I-J-G-F-G-D-G-D-J-K-G-J-G-I-J-K-M-F-G-F-I-H.
- -J-I-J-H-E-B-C-G-J-G-K-J-I-G-D-C-B-A.
- Take ACID RECIPE, RAINBOW DECORATION, and BAT'S WINGS (N).
- Place RAINBOW DECORATION; take RAINBOW CRYSTAL (O).
- Walk down 2x; go left and forward.
- Place LIZARD'S TAIL, BAT'S WINGS, RAINBOW CRYSTAL, and MERMAID'S TEARS; take 2/2 CABINET INSERT. You earn WATER (P).
- Place 2 CABINET INSERTS (Q).
- Solution Tx3-2-R-T-S-R-Tx4-S-R-Tx5-S-R-Tx4-S-R-T-S-R.
- Take HAMMER and SULPHUR (U).
- BURNER, WATER, and SULPHUR on ACID RECIPE; earn ACID.
- Walk down 2x; go right, and then left 2x.
Chapter 5: Ice Layer
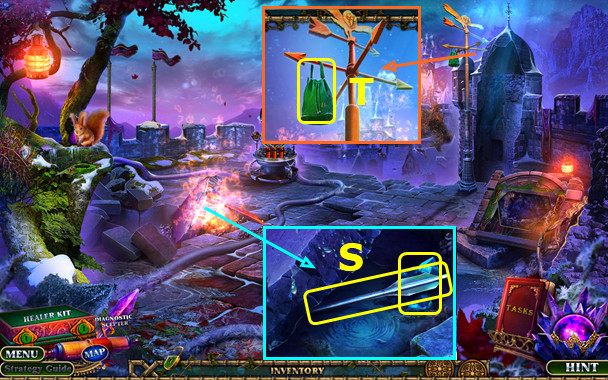
- Use ACID (V).
- Use HAMMER (W).
- Use DIAGNOSTIC SCEPTER (X).

- Select E-C-F-D-H-F-K-H-I-G-F-G-H-F-J-K-H-H-F-JG-H-K-F-H-D-F-G-A-B.
- Select 1-5 (L).
- Solution (M).
- Earn INGREDIENT LIST and DAGGER.
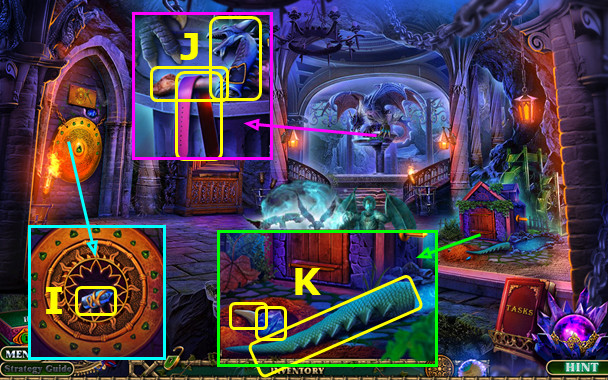
- Use NAIL PULLER; take WRENCH and LOCKED LANTERN (O).
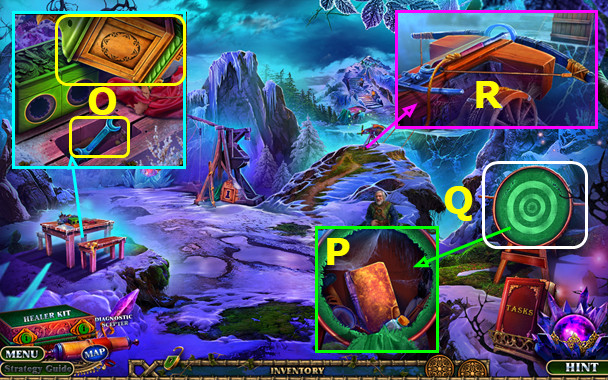
- Use DAGGER; select book (P).
- Play HOP; earn ARROW ON ROPE (Q).
- Use ARROW ON ROPE (R).
- Go forward.
- Take 1/5 POTION INGREDIENTS and CART KEY (A).
- Use CART KEY; take 2/5 POTION INGREDIENTS and LANTERN KEY (B).
- LANTERN KEY on LOCKED LANTERN; take TOWER INLAY and AWL.
- Use CORKSCREW; take GLOWING MUSHROOMS (C).
- Try to go left.
- Walk down.
- Place TOWER INLAY; play HOP; earn LEATHER BELT (D).
- LEATHER BELT on GLOWING MUSHROOMS; earn TORCH.
- Go forward.
- Use TORCH (E).
- Move items; take SKULL WITH SYMBOLS (F).
- Take 3/5 POTION INGREDIENTS; use WRENCH (G).
- Easy solution J-M-I-K-H-I-K-M-L-H-L-H-J-I-L-K-H-J.
- Hard solution M-J-M-I-K-M-I-K-L-J-M-M-L-K-H-J-I-H-H-L-H-I-H-K-L-M-M-J.
- Take LION HEAD.
- Place LION HEAD; take GAUNTLET and 4/5 POTION INGREDIENTS (N).
- Walk down 2x.
- Use SKULL WITH SYMBOLS; solution (O).
- Take THICK BRANCH (P).
- Go forward.
- Use THICK BRANCH; take 1/3 ICY PYRAMIDS and 5/5 POTION INGREDIENTS (Q).
- Walk down.
- Select HEALER KIT.
- Place 5 POTION INGREDIENTS; move as shown (D).
- Select (E).
- Take HEALING POTION (F).
- Use HEALING POTION; earn SPIKY BOOTS (G).
- Go forward.
- Use SPIKY BOOTS (H).
- Easy/hard stage 1 solution (I).
- Easy/hard stage 2 solution (J).
- Hard stage 3 solution (K).
- Take 2/3 ICY PYRAMIDS; use AWL; earn 1st FLOWER SHAPE (L).
- Use GAUNTLET; earn NET (M).
- Take SLING (N).
- Use SLING; take 2nd FLOWER SHAPE (O).
- Walk down 2x.
- Place 2 FLOWER SHAPES; take EXPLOSIVE INSTRUCTIONS and 3/3 ICY PYRAMID (P).
- Place 3 ICY PYRAMIDS; take SKELETON'S ARM (Q).
- Go forward, right.
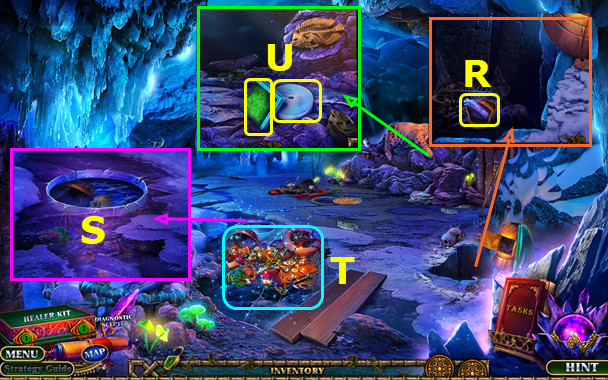
- Use SKELETON'S ARM; take SCROLL (R).
- Use NET (S).
- Play HOP; earn FISH (T).
- Give FISH; take GREEN TILE and DYNAMITE LID (U).
- Walk down.
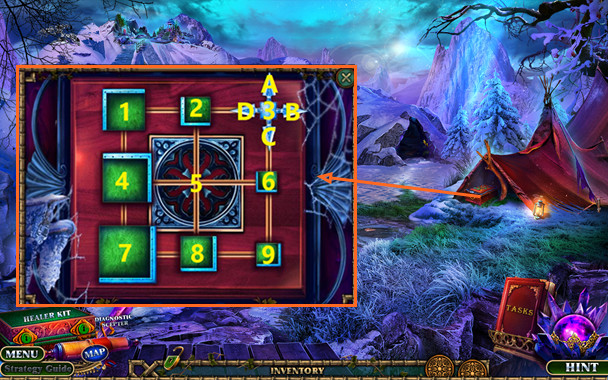
- Place GREEN TILE; easy solution 3-C-C-A-A-D, 8-A, 2-C, 1-C, 5-D-B.
- Hard solution 3-C-C-A-A-D-C-C, 4-B-B, 8-A-A-D-C-B-C-B-A-D-D-C-B-A.
- Take FILE and GUNPOWDER.
- Walk left.
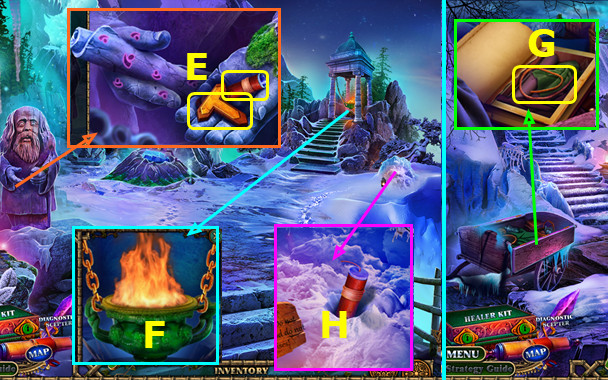
- Place SCROLL; take BOOK COVER INLAY and DYNAMITE TUBE (E).
- Use FILE; earn BOWL OF FIRE (F).
- Walk down.
- Place BOOK COVER INLAY; read note; take WICK (G).
- Go left.
- DYNAMITE LID, GUNPOWDER, DYNAMITE TUBE, and WICK on EXPLOSIVE INSTRUCTION; earn EXPLOSIVE.
- Use EXPLOSIVE and BOWL OF FIRE (H).
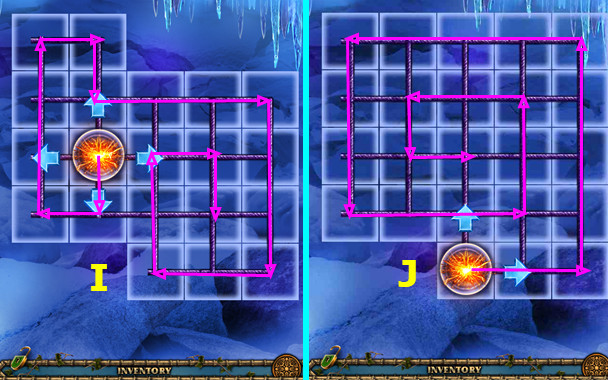
- Easy solution (I).
- Hard solution (J).
- Congratulations! You have completed Enchanted Kingdom: The Fiend of Darkness!
Created at: 2018-09-21