

Walkthrough Menu
- General Tips
- Chapter 1: The Town
- Chapter 2: The Mine
- Chapter 3: The Lost Isle
- Chapter 4: The Cursed Forest
- Chapter 5: Baldur's Tomb
General Tips
- This is the official guide for Endless Fables: Frozen Path.
- This guide will not show when you have to zoom into a location; the screenshots will show each zoom scene.
- Hidden-object puzzles are referred to as HOPs. This guide will not show screenshots of the HOPs, however, it will mention when an HOP is available and the inventory item you'll collect from it.
- Use the Map to fast travel to a location.
Chapter 1: The Town
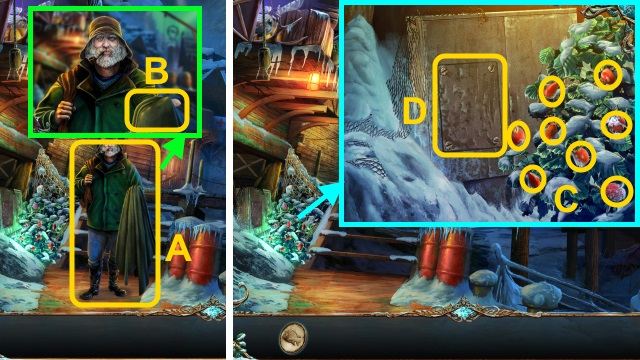
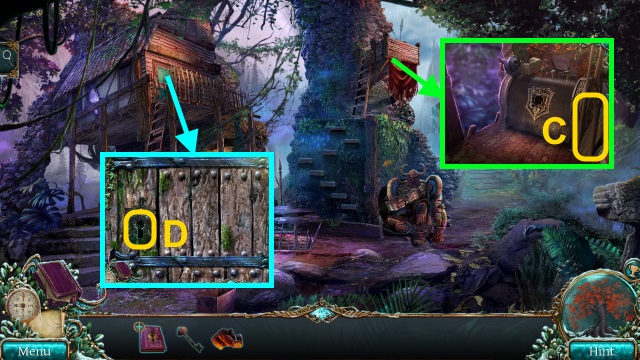
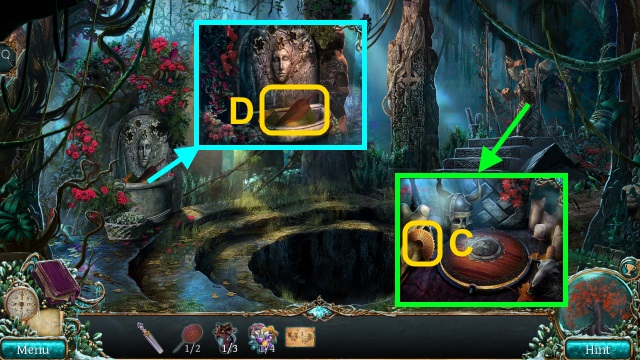
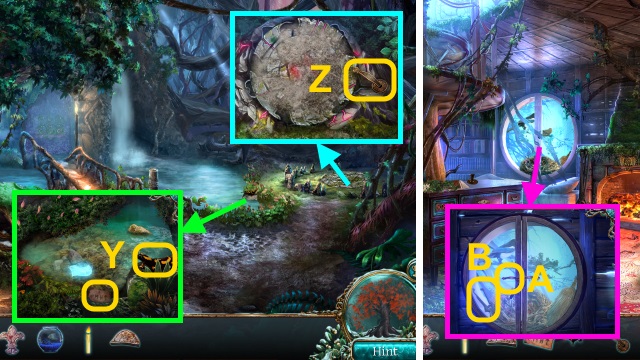
- Talk to the man (A); take the blanket (B). Select each option; take the BAG.
- Open the BAG; take the COIN.
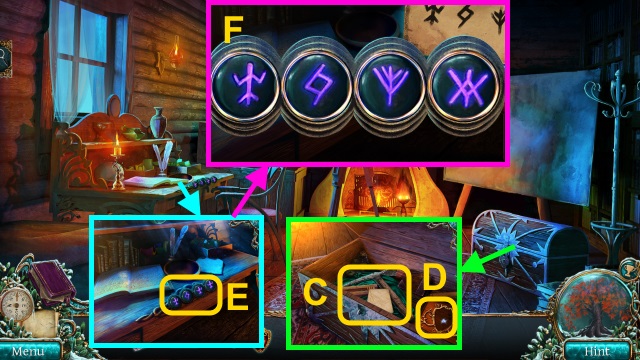
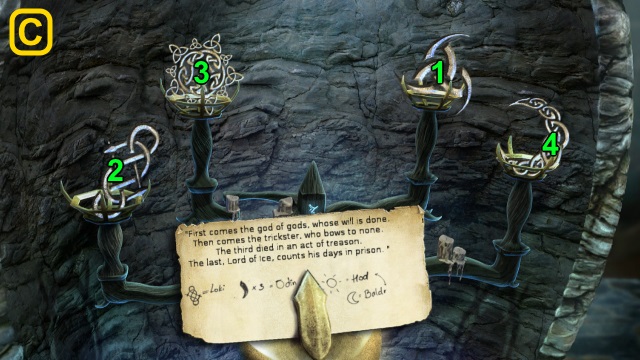
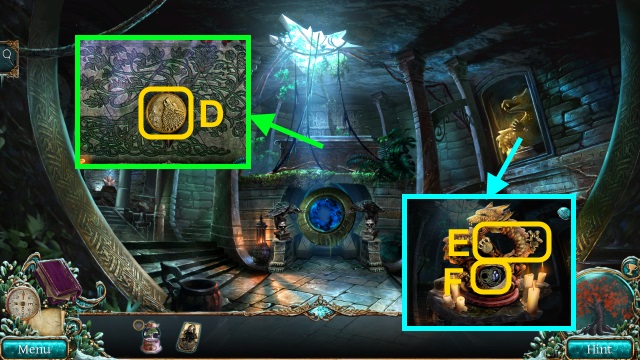
- Collect the ROSE BERRIES (1/8)-(8/8) (C). Use the COIN (D); remove the cover. Take the GEAR.
- Walk forward.

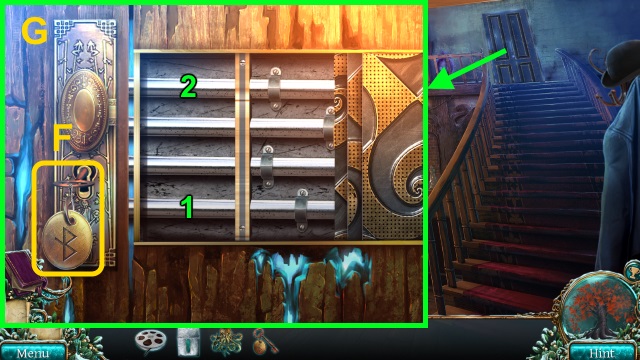
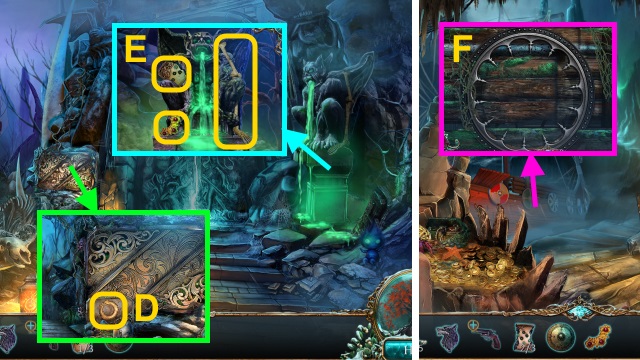
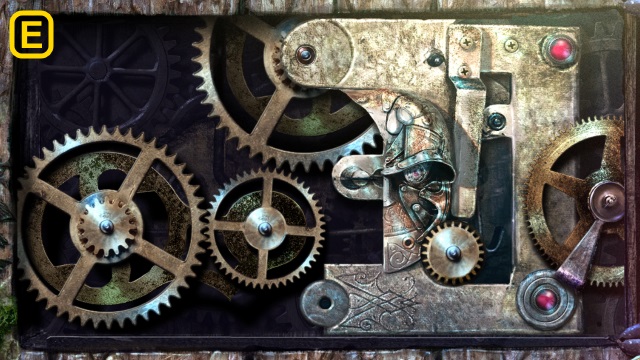
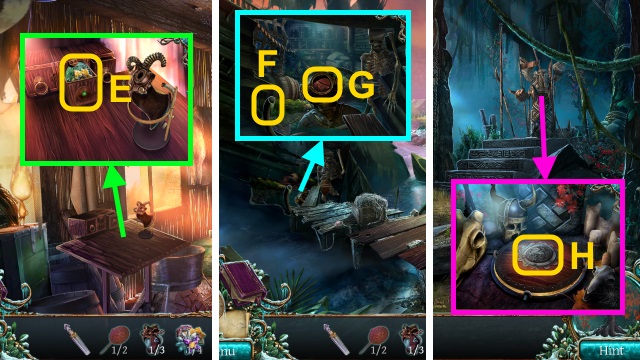
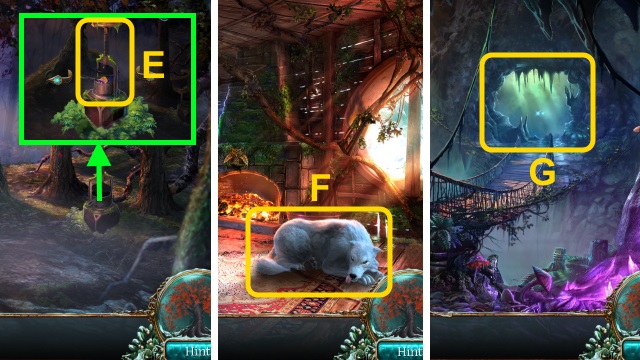
- Take the FILM REEL (E).
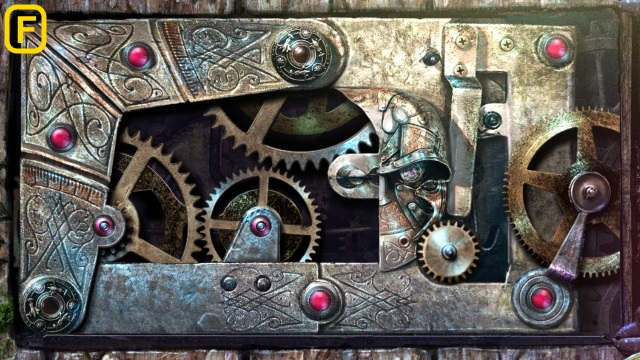
- Take the LADDER (F).
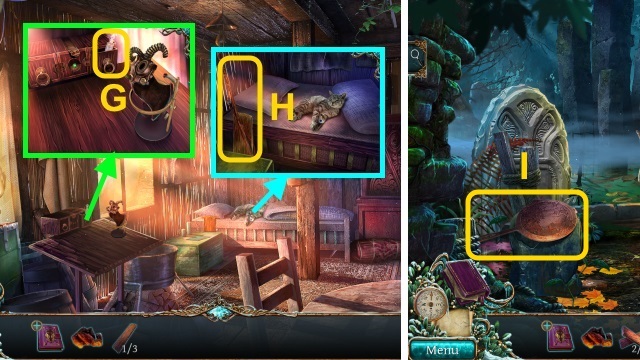
- Take the CABINET HANDLE (G).
- Walk down.

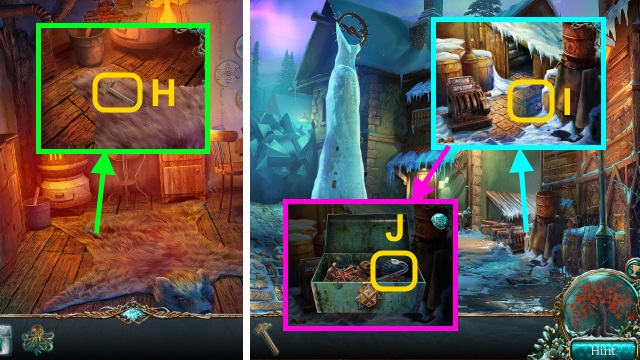
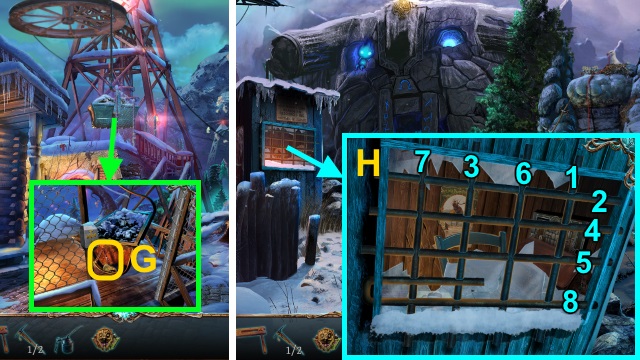
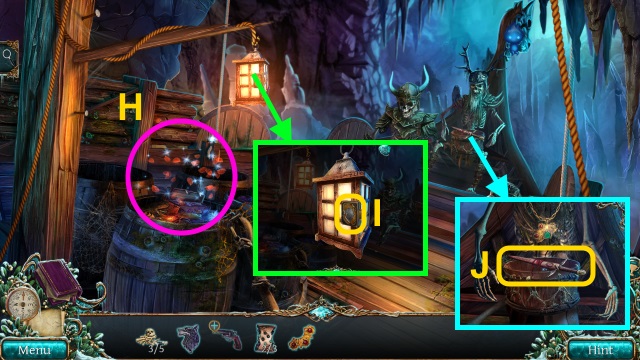
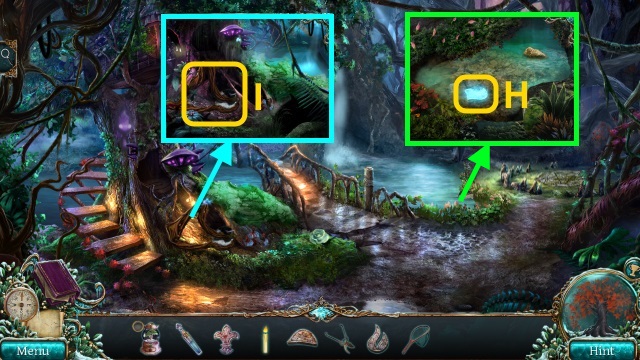
- Place the LADDER (H).
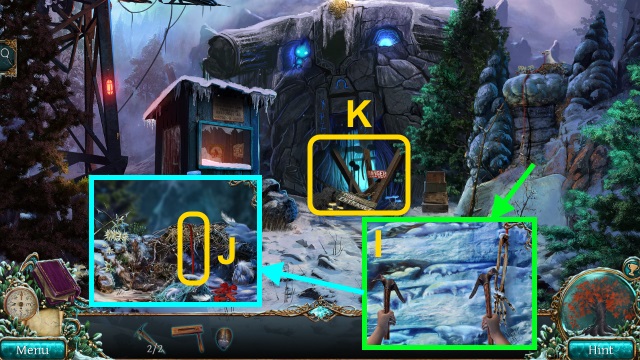
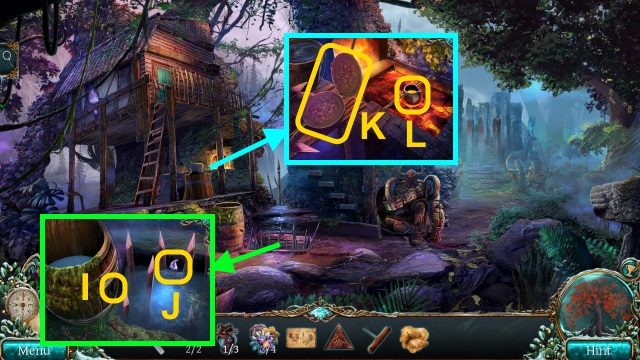
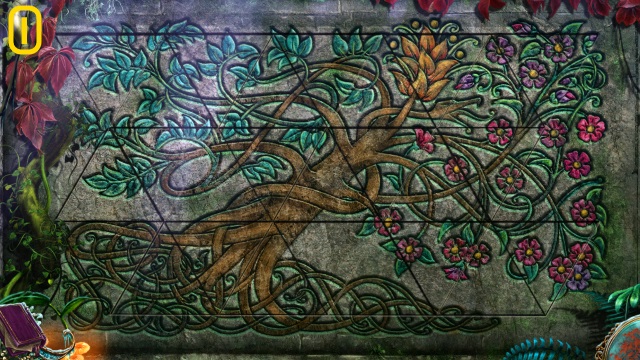
- Play the HOP; receive the ANCHOR SYMBOL (I).
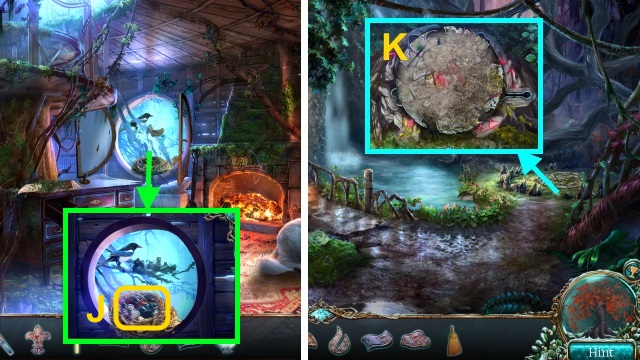
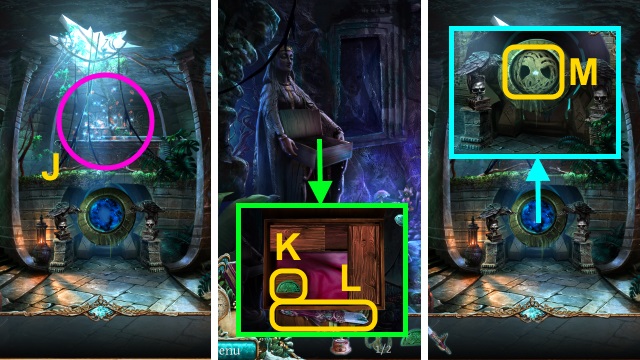
- Place the CABINET HANDLE (J); open the cabinet. Place the GEAR for a mini-game.
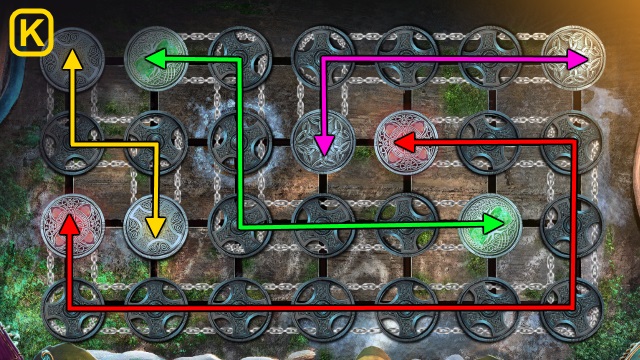
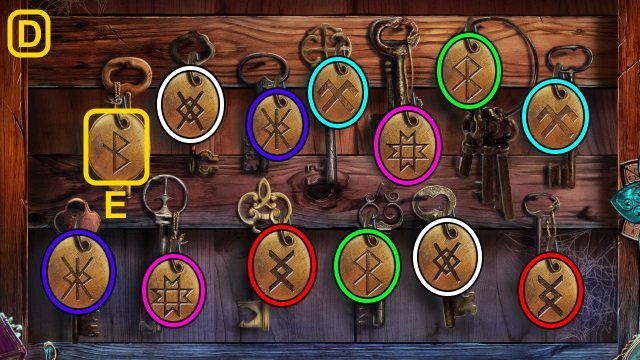
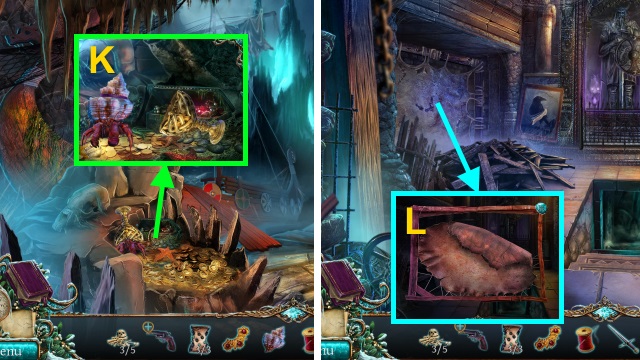
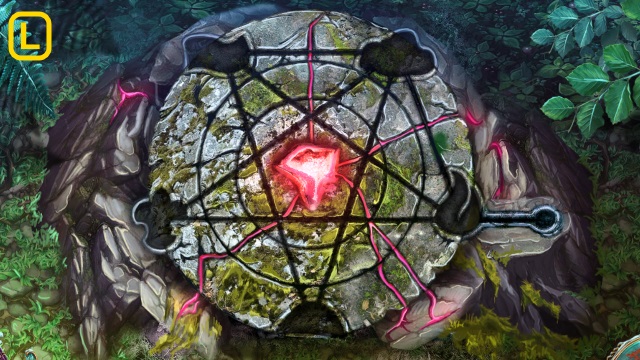
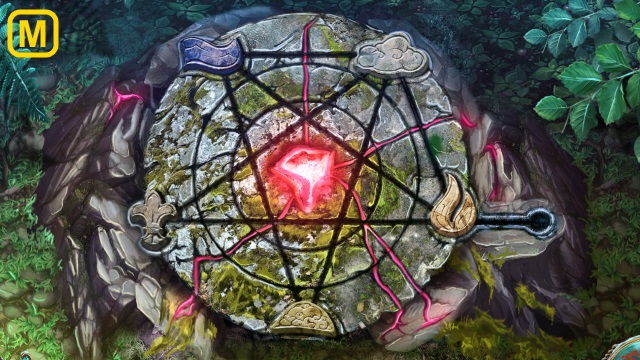
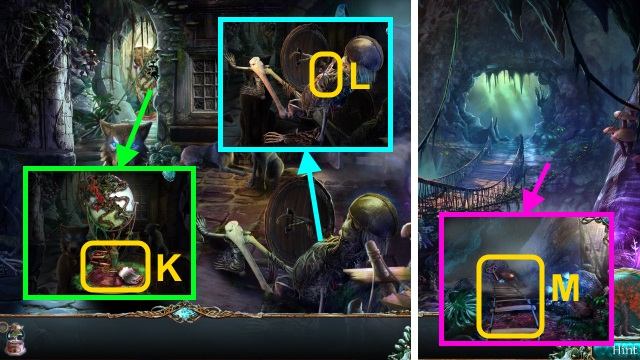
- Solution (K).
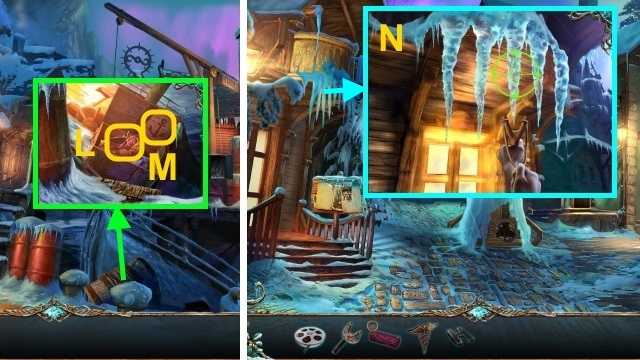
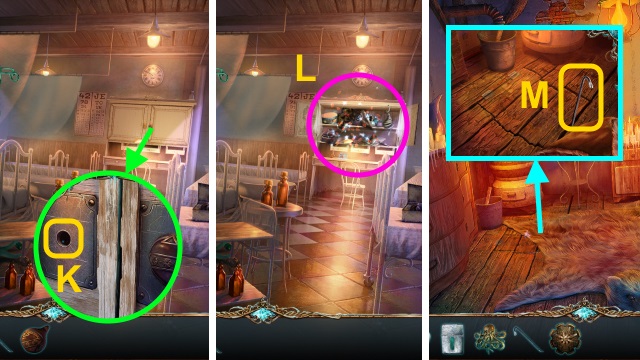
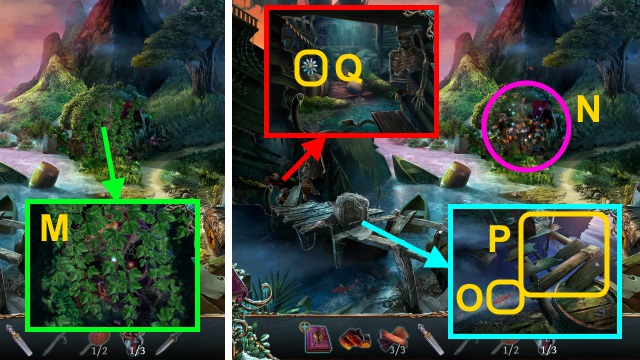
- Open the chest; take the SLINGSHOT and CLOSED PEN CASE (L). Place the ANCHOR SYMBOL (M); examine it. Take the CADUCEUS SYMBOL and FIRST AID SYMBOL.
- Examine the SLINGSHOT; use the ROSE BERRIES (8/8).
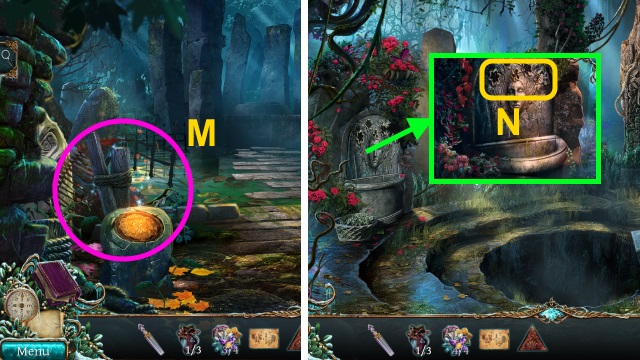
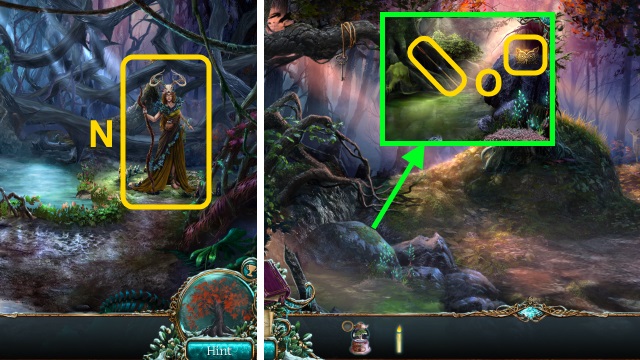
- Walk forward; try to walk left.
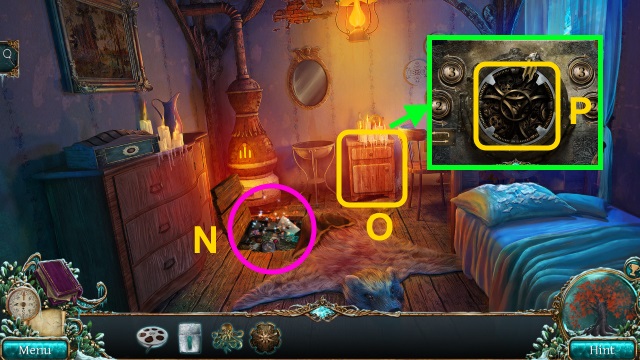
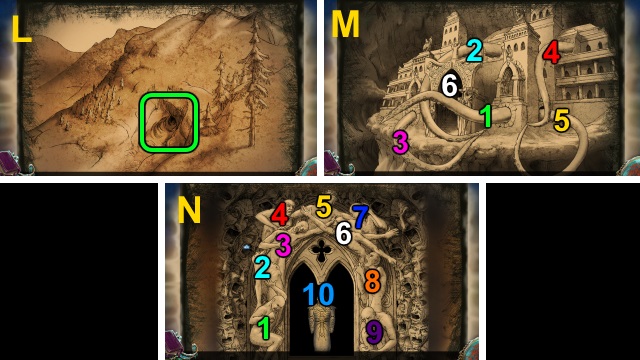
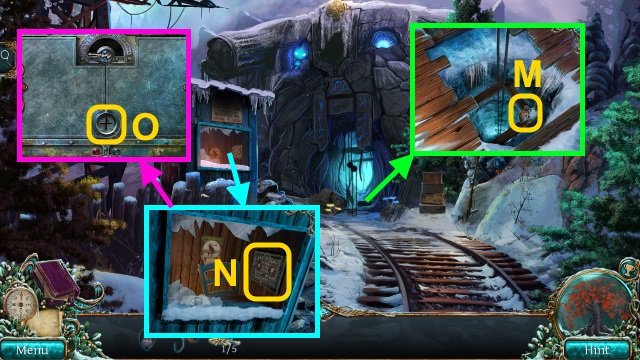
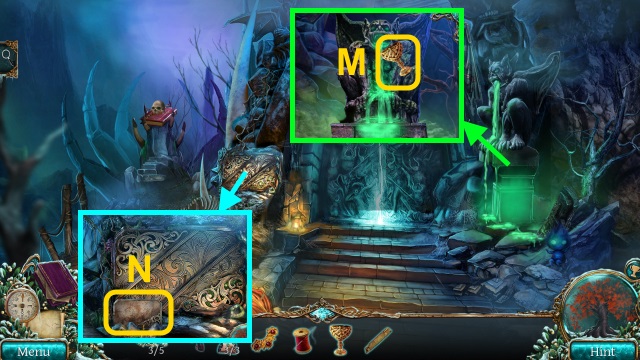
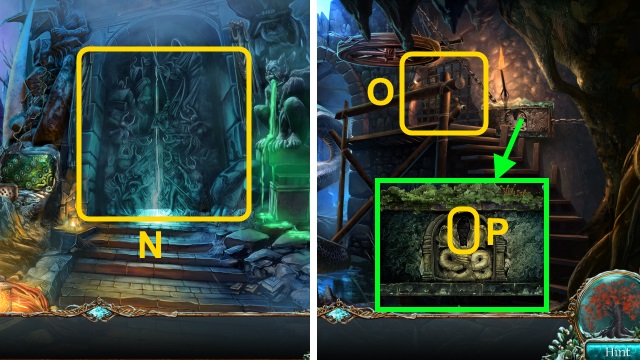
- Use the SLINGSHOT for a mini-game (N). Solution: shoot the icicles.
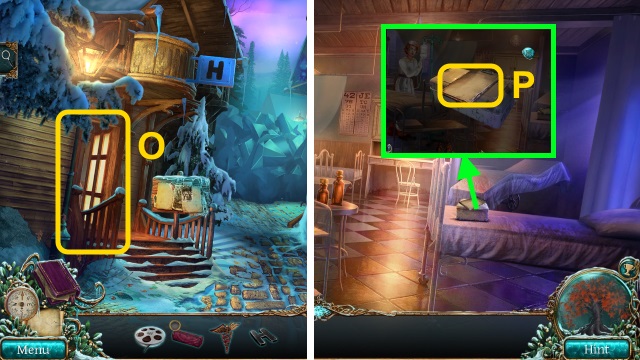
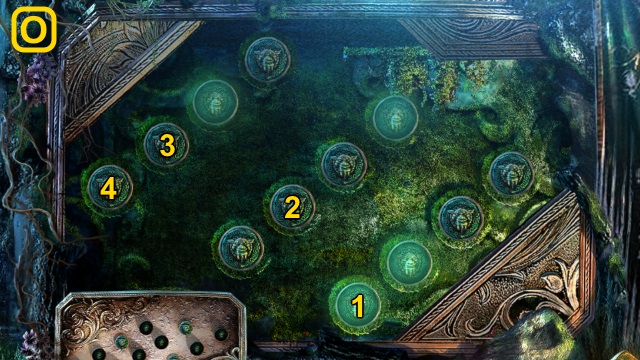
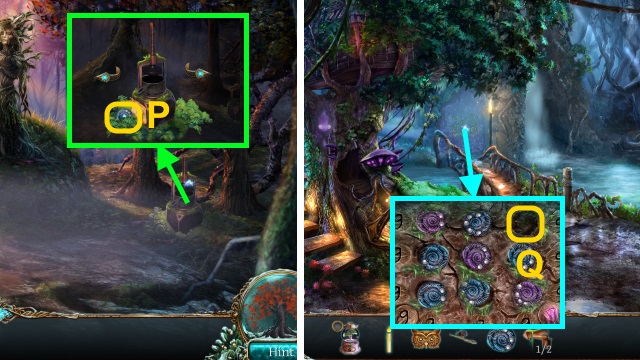
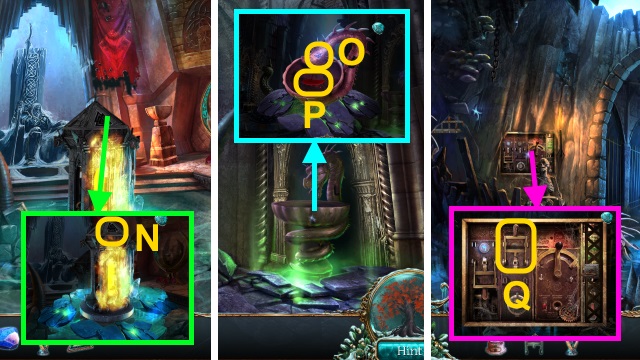
- Open the door (O).
- Walk left.
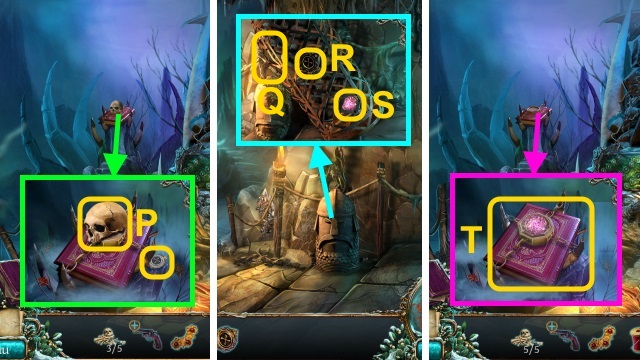
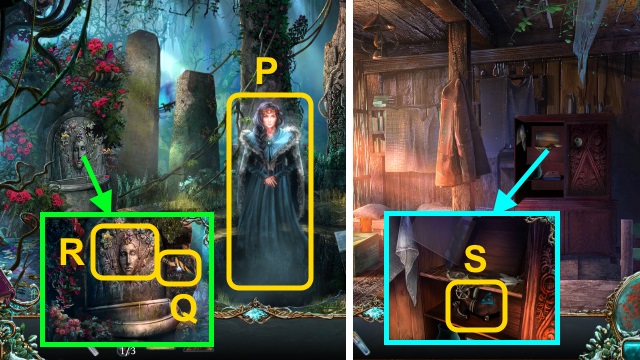
- Take the MEDICAL RECORDS (P); place the FIRST AID SYMBOL. Open the box; take the BUTTON (1/2) and SAFETY PIN.
- Combine the CLOSED PEN CASE and SAFETY PIN. Open the case; take the PENCIL.
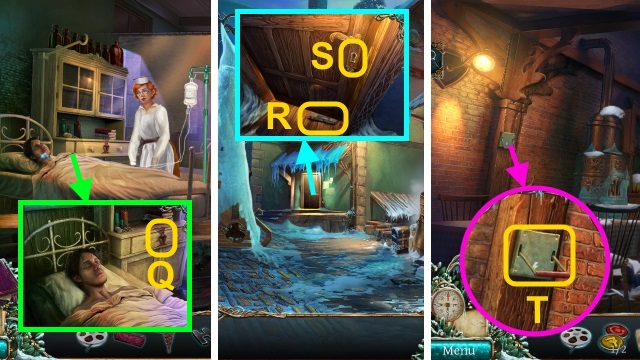
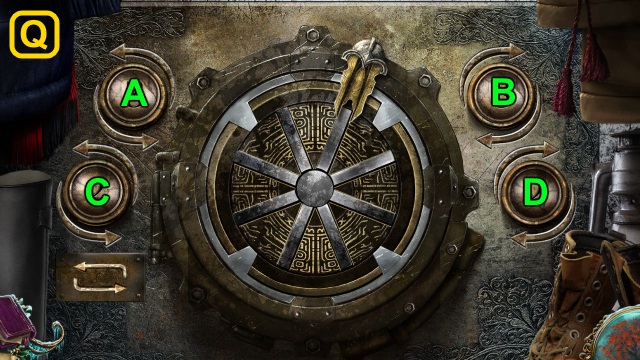
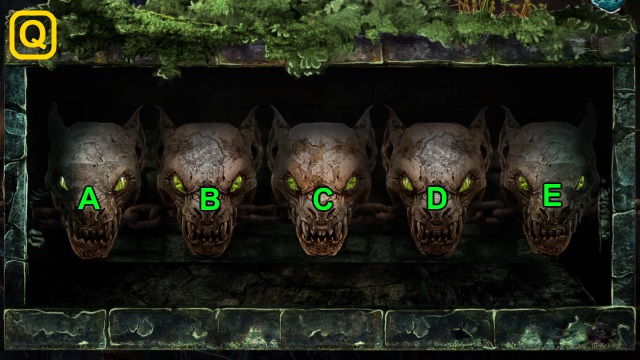
- Examine the drawer (Q); place the CADUCEUS SYMBOL. Open the drawer; take the CODE and DISINFECTING ALCOHOL.
- Walk down.
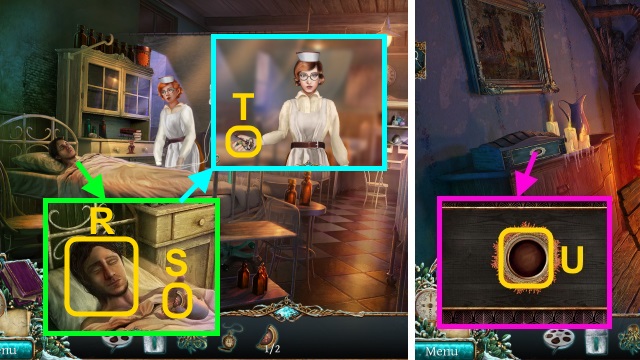
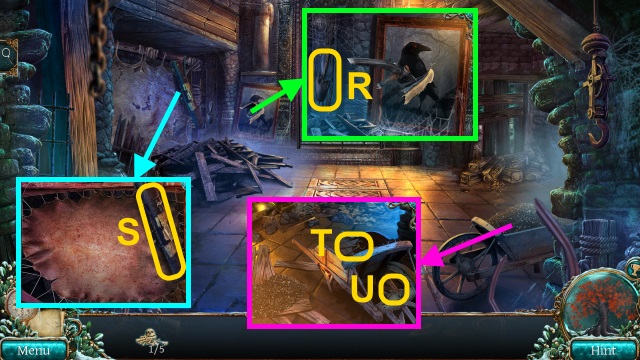
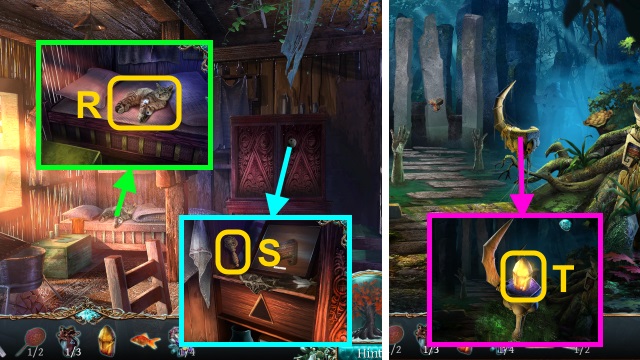
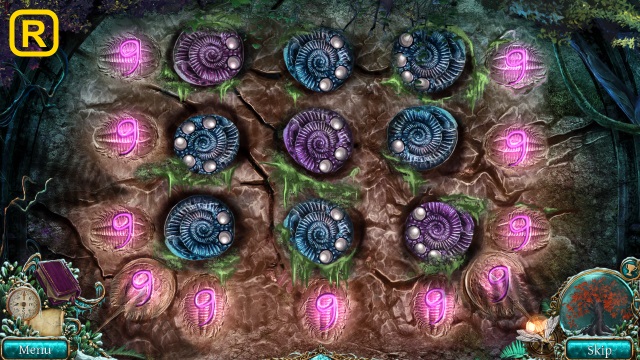
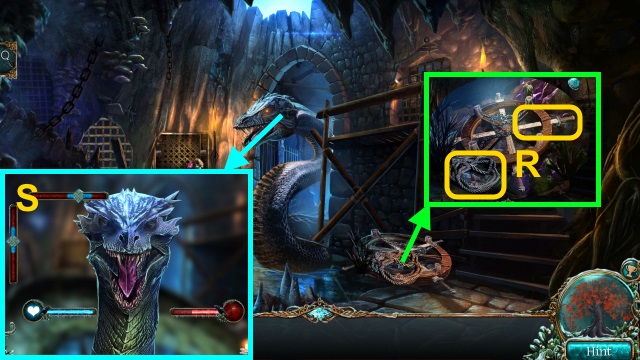
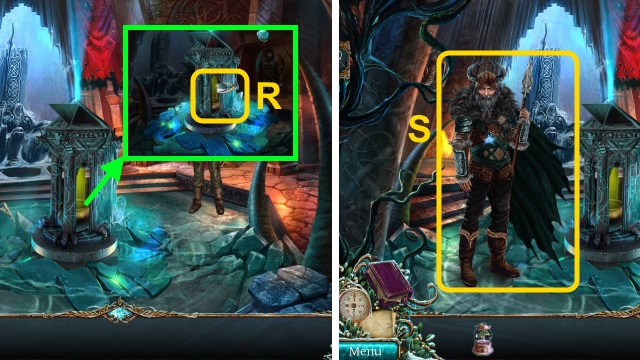
- Examine the door; place the MEDICAL RECORDS (R). Use the PENCIL (S); examine the records. Use the key; open the door.
- Walk right.
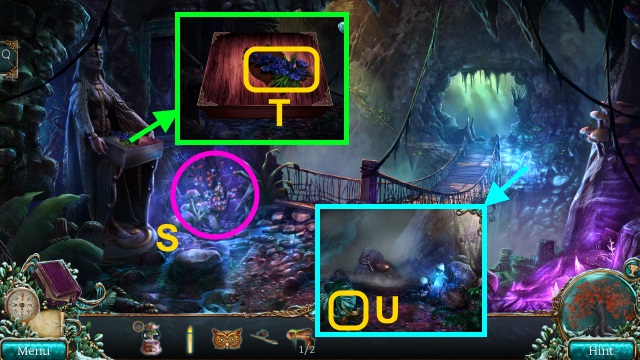
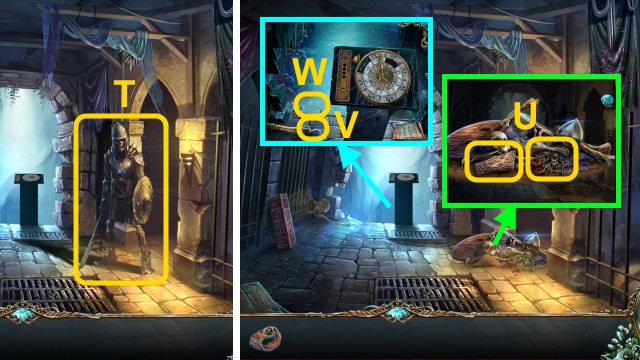
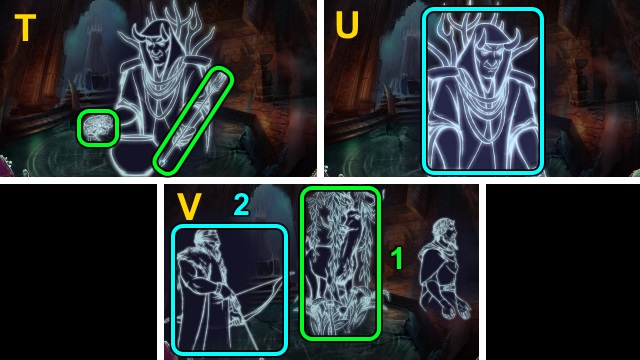
- Flip the switch (T).
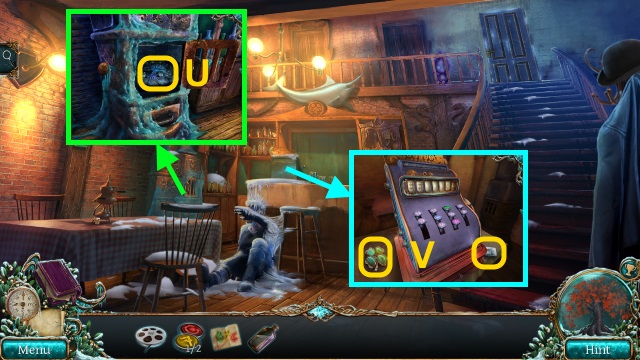
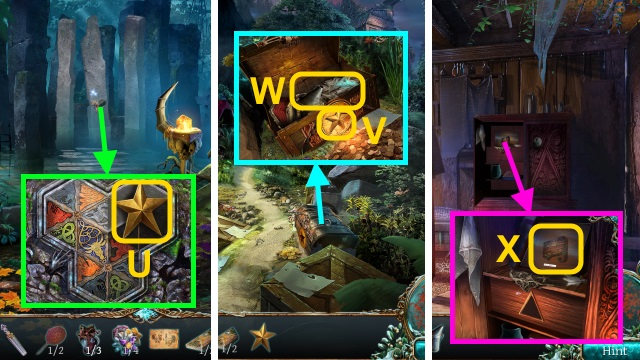
- Open the door; move the ashes. Take the TREE SYMBOL (U).
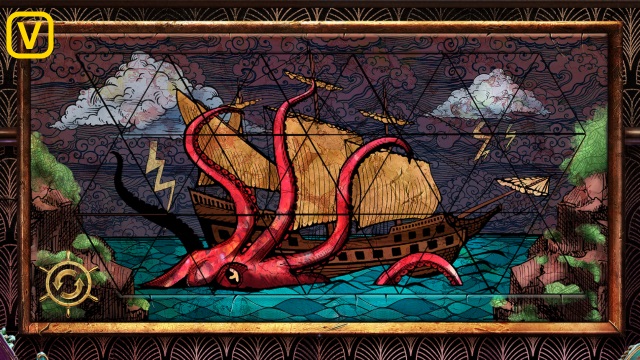
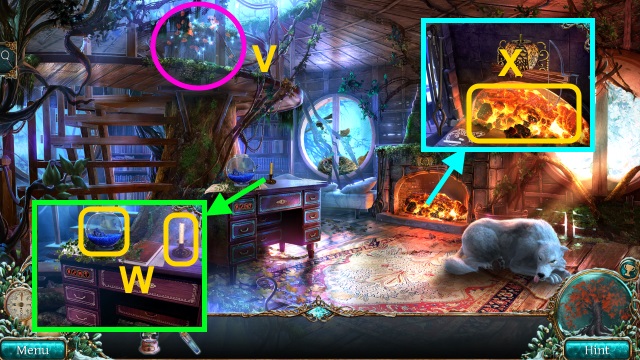
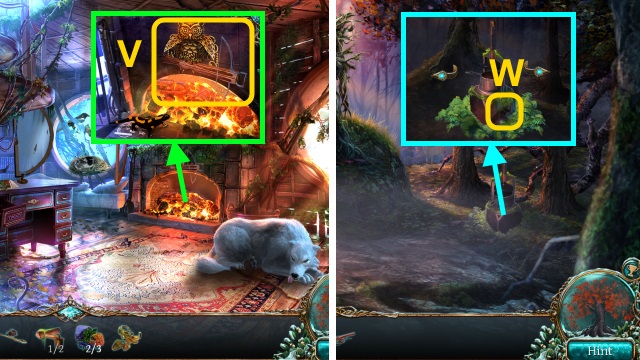
- Take the CLOVER SYMBOL and CLOSED EMPTY LIGHTER (V).
- Open the CLOSED EMPTY LIGHTER; pour the DISINFECTING ALCOHOL; take the LIGHTER.
- Walk down.
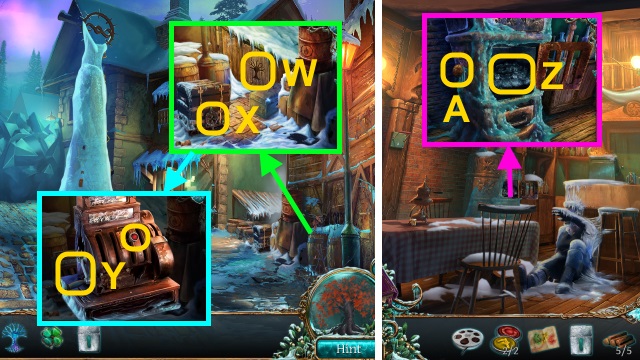
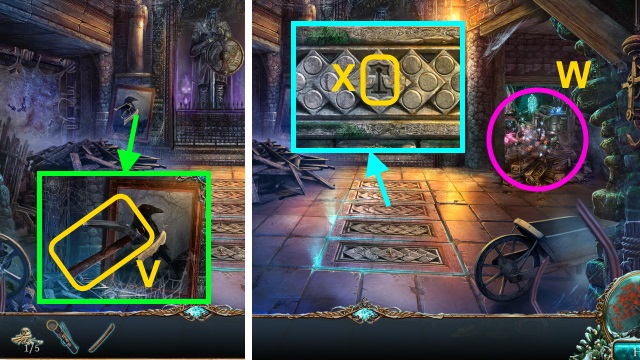
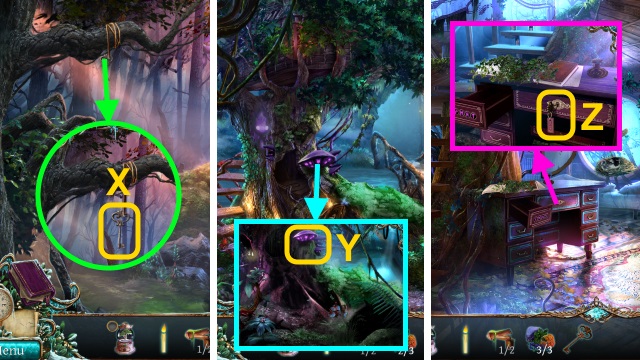
- Place the TREE SYMBOL (W); take the FIREWOOD (1/5)-(5/5).
- Examine the box; place the CLOVER SYMBOL (X). Take the BUTTON (2/2) and LEVER (Y).
- Walk right.
- Place the FIREWOOD (5/5) (Z); use the LIGHTER. Receive the DOOR SYMBOL.
- Take the KNOB (A).
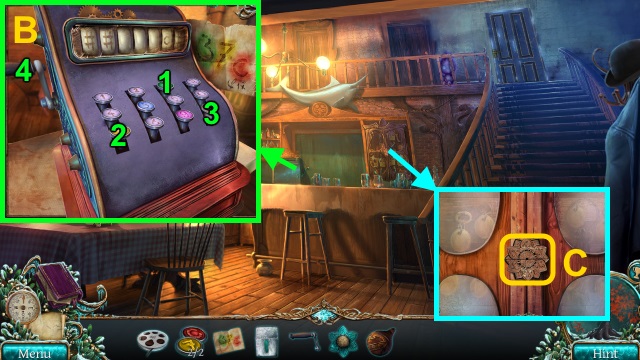
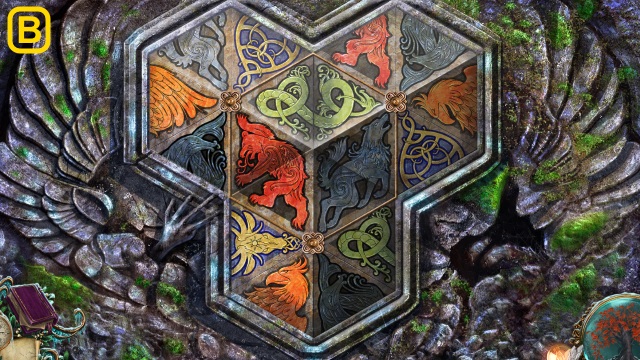
- Place the LEVER, BUTTON (2/2), and CODE for a mini-game; solution (B).
- Take the MEDALLION.
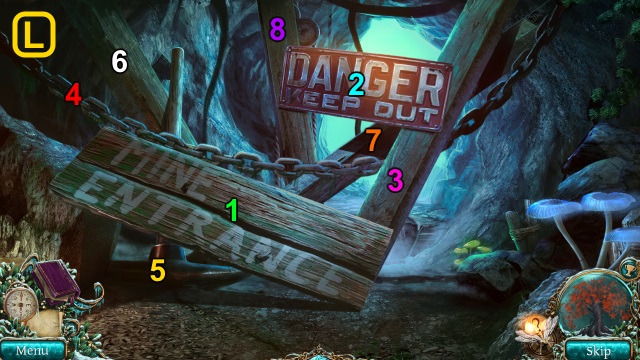
- Place the DOOR SYMBOL for a mini-game (C).
- Solution (D).
- Take the MINER'S SPARE KEY (E).
- Use the MINER'S SPARE KEY for a mini-game (F).
- Solution (G).
- Walk right.
- Take the HAMMER SYMBOL (H).
- Walk down twice.
- Examine the toolbox twice (I); place the HAMMER SYMBOL.
- Open the box. Move the items; take the CROWBAR (J).
- Walk left.
- Place the KNOB; open the cupboard (K).
- Play the HOP; receive the DIAL (L).
- Go to the Miner's Room.
- Move the rug 2x; use the CROWBAR (M).
- Play the HOP; receive the POCKET WATCH (N).
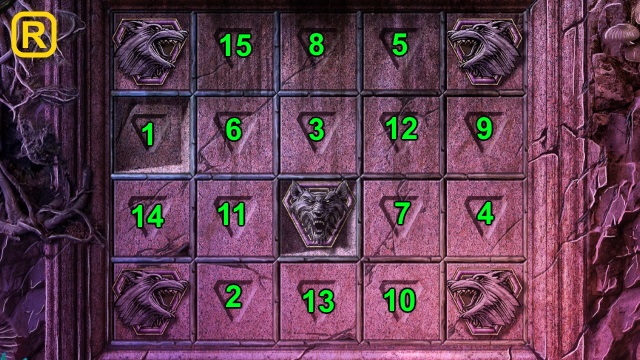
- Open the door (O); place the DIAL for a mini-game (P).
- Solution (Q): Bx8.
- Take the FIRE SYMBOL (1/2).
- Go to the Hospital.
- Use the POCKET WATCH (R).
- Take the FIRE SYMBOL (2/2) (S).
- Take the HOUSE KEY (T).
- Go to the Miner's Room.
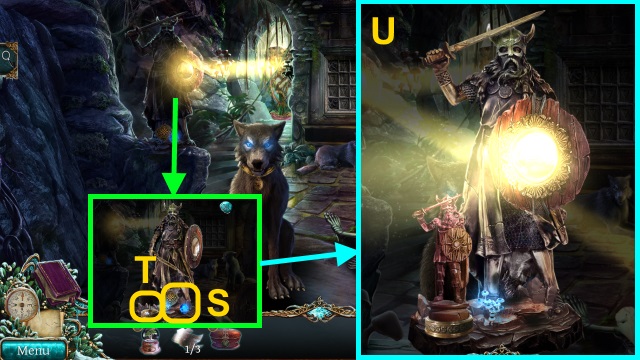
- Place the FIRE SYMBOL (2/2) for a mini-game (U).
- Solution (V).
- Take the MAGIC LIGHT.
- Walk down twice.

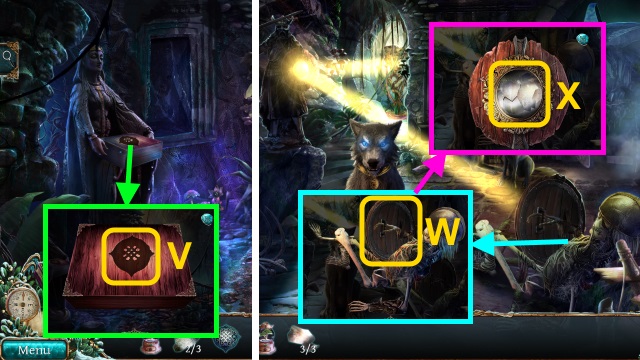
- Place the MEDALLION (W).
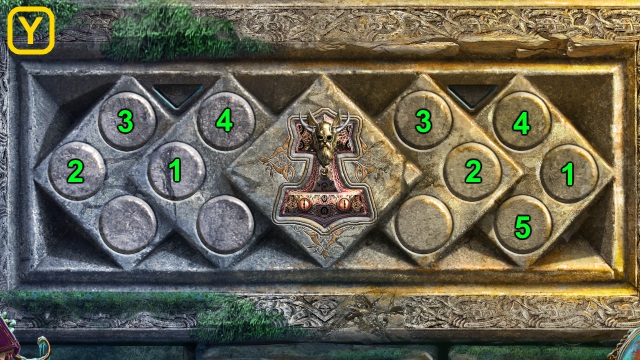
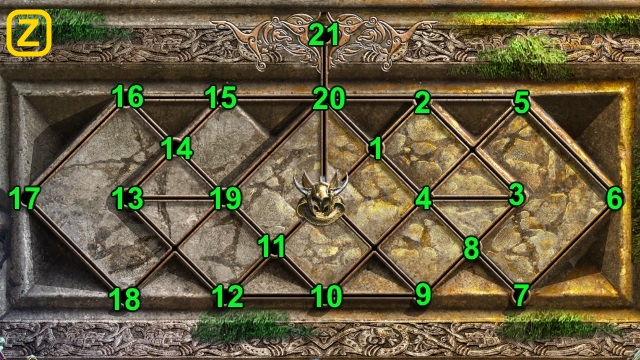
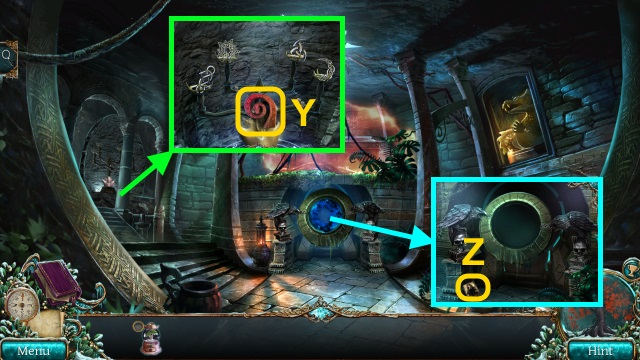
- Place the MAGIC LIGHT for a mini-game (X).
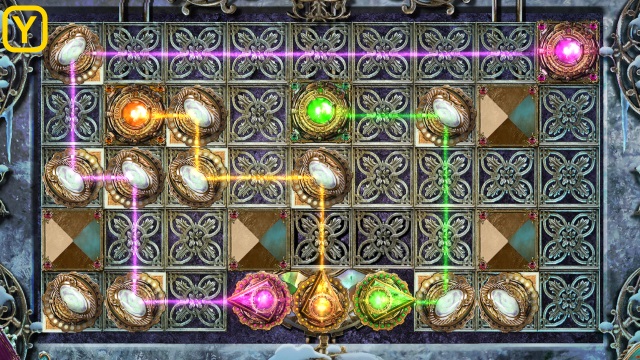
- Solution (Y).
- Walk forward.
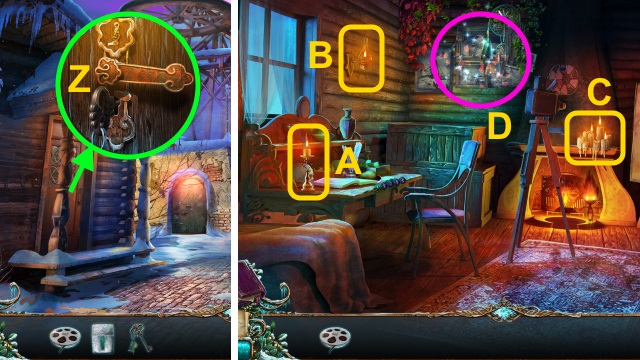
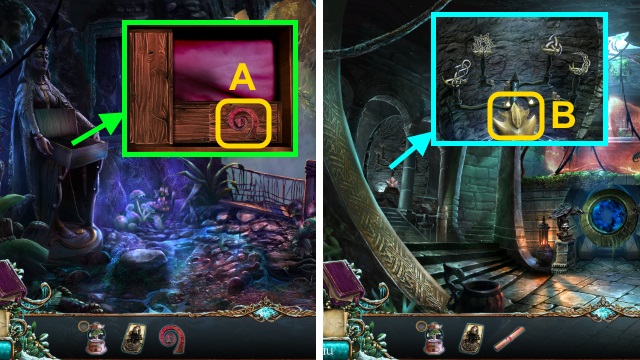
- Use the HOUSE KEY; open the door (Z).
- Walk left.
- Use the LIGHTER (A-C).
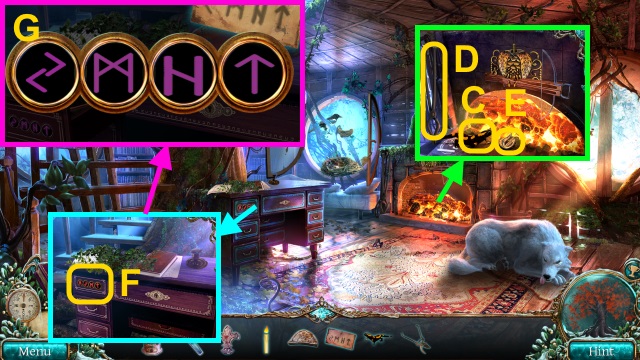
- Play the HOP; receive the MICROSCOPE (D).
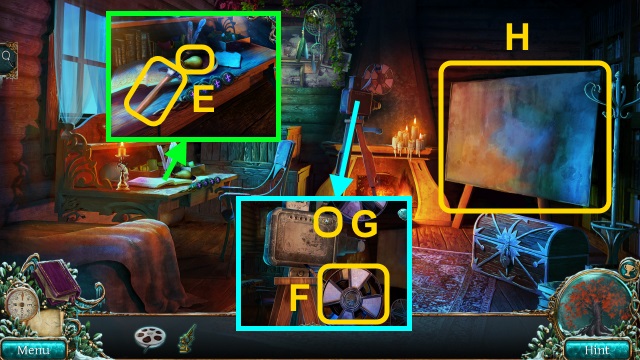
- Take the HAMMER and PEAR (E).
- Place the FILM REEL (F); flip the switch (G).
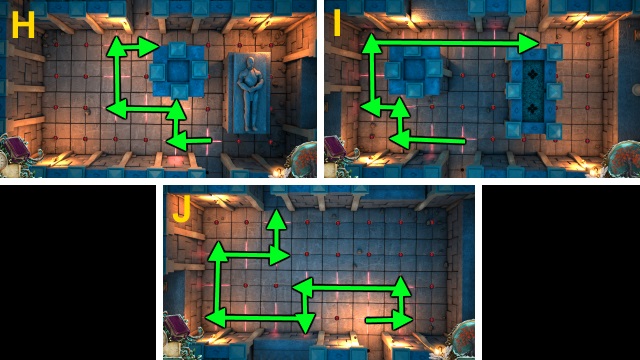
- Examine the screen for a mini-game (H).
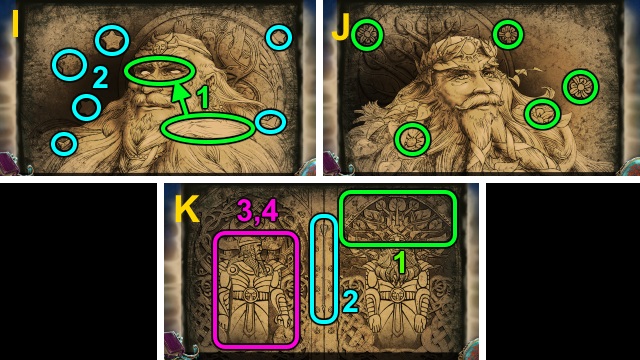
- Solution (I-N).
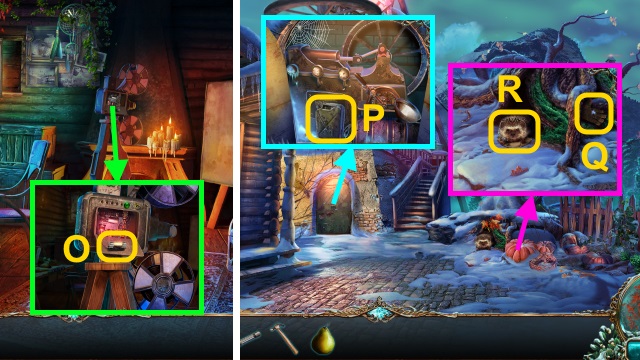
- Take the FUSE (O).
- Walk down.
- Use the HAMMER; open the door. Take the EMPTY FUEL CAN (P).
- Take the GLOVE (Q). Give the PEAR; take the CODE (R).
- Walk down.
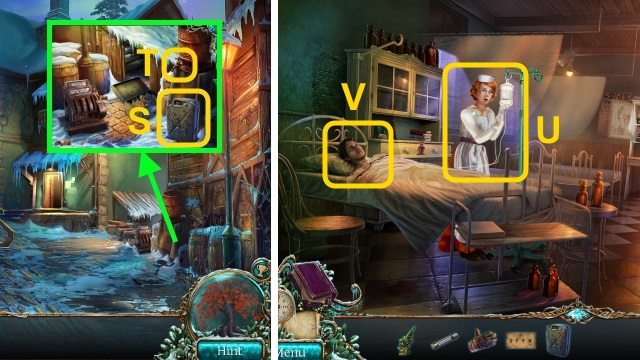
- Place the EMPTY FUEL CAN (S); turn the valve (T). Take the FILLED FUEL CAN.
- Walk left.
- Give the MICROSCOPE (U).
- Talk to Dan (V); receive the GATE KEY.
- Walk down, then forward.
Chapter 2: The Mine
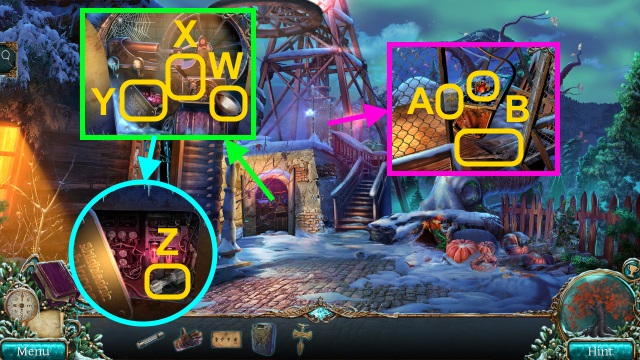
- Pour the FILLED FUEL CAN (W); pull the lever (X). Examine the wiring (Y).
- Replace the FUSE (Z); pull the lever (X).
- Place the GATE KEY (A); take the CLIPPERS and GOLDEN ORNAMENT (B).
- Walk left.
- Use the CLIPPERS; open the chest. Examine the note; take the CLIMBING PICK (1/2) and NOISEMAKER (C). Place the GOLDEN ORNAMENT (D); open the box. Take the OILCAN.
- Examine the symbols (E); use the CODE for a mini-game.
- Solution (F).
- Take PETER'S CLOSED DIARY.
- Read PETER'S CLOSED DIARY; take the BAG AMULET.
- Walk down.
- Use the OILCAN; pull the lever (G).
- Go forward.
- Examine the bars for a mini-game; solution (H). Use the GLOVE; take the BAG.
- Combine the BAG and BAG AMULET; open the bag. Take the ELVATOR KEY PART and CLIMBING PICK (2/2).
- Use the CLIMBING PICK (2/2) (I); examine the ice 4x.
- Use the NOISEMAKER; take the DEBRIS (J).
- Examine the DEBRIS; take the ROPE WITH HOOK and BONE (1/5).
- Examine the cave for a mini-game (K).
- Solution (L).
- Use the ROPE WITH HOOK: receive the KEYS (M).
- Combine the KEYS and ELEVATOR KEY PART.
- Examine the machinery (N); use the ELEVATOR KEY for a mini-game (O).
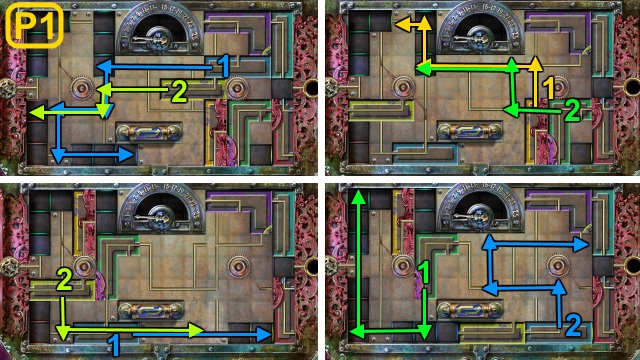

- Solution (P1-P2).
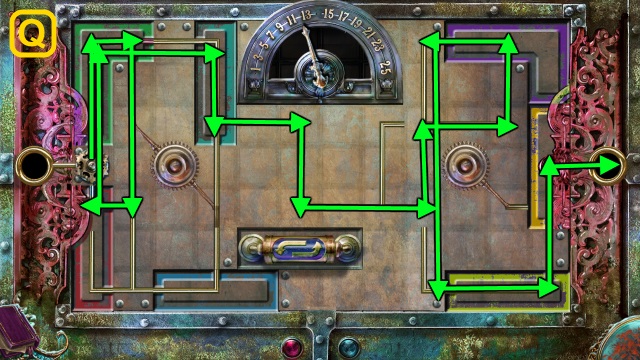
- Solution (Q).
- Walk forward.
- Take the TROWEL (R).
- Take the LOCKED MAP CASE (S).
- Use the TROWEL 3x; use the tongs (T) on the nail (U). Take the SPOKE.
- Remove the wood; place the SPOKE (V). Take the PICKAXE.
- Use the PICKAXE. Play the HOP; receive the HAMMER TOKEN (W).
- Place the HAMMER TOKEN for a mini-game (X).
- Solution (Y-Z).
- Walk forward.
- Take the BONE (2/5) (A).
- Take the WOLF SYMBOL (B).
- Walk forward.
- Receive the SIGNET RING.
- Combine the LOCKED MAP CASE and SIGNET RING; take the NOTE, GUN, and PIECE OF CODE (1/3).
- Take the SHIELD (C).
- Take the DAGGER LOCK (D).
- Take the CODE (2/3), BONE (3/5), and NECKLACE PIECE (E).
- Walk down.
- Place the SHIELD for a mini-game (F).
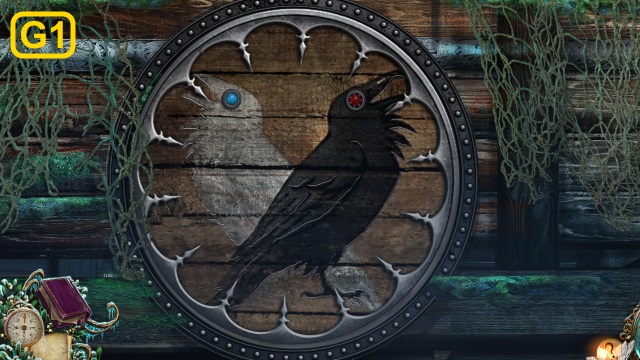
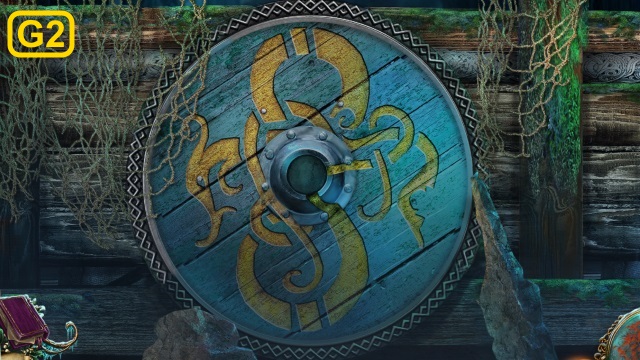
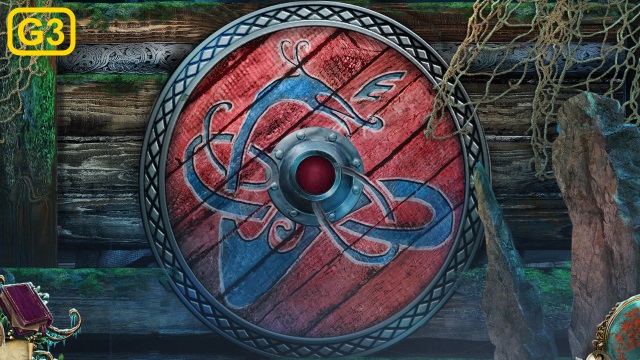
- Solution (G1-G3).
- Enter the Ship of the Dead.
- Remove the cloth. Play the HOP; receive the CONCH (H).
- Place the WOLF SYMBOL (I); take the CODE (3/3) and NEEDLE WITH THREAD.
- Take the LOCKED SCABBARD (J).
- Combine the LOCKED SCABBARD and DAGGER LOCK; take the DAGGER.
- Walk down.
- Give the CONCH; take the GOBLET (K).
- Walk down.
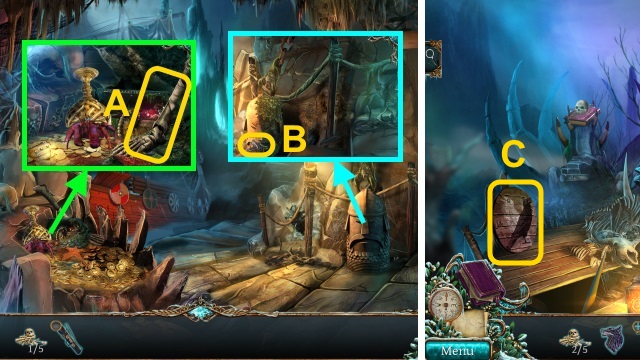
- Use the DAGGER; take the LEATHER PIECE (L).
- Go to the Gate.
- Use the GOBLET (M); receive the GOBLET FILLED WITH ACID.
- Place the CODE (3/3) for a mini-game (N).
- Solution (O).
- Take the BONE (4/5) and CAGE TOKEN (P).
- Walk down.
- Use the GOBLET FILLED WITH ACID (Q). Place the CAGE TOKEN (R); take the CLENCHED ARM BONE (S).
- Open the CLENCHED ARM BONE; take the DECORATED RUBY and BONE (5/5).
- Go to the Gate.
- Place the DECORATED RUBY (T); take the SEALED CODEX and DRUMSTICKS.
- Go to the Ship of the Dead.
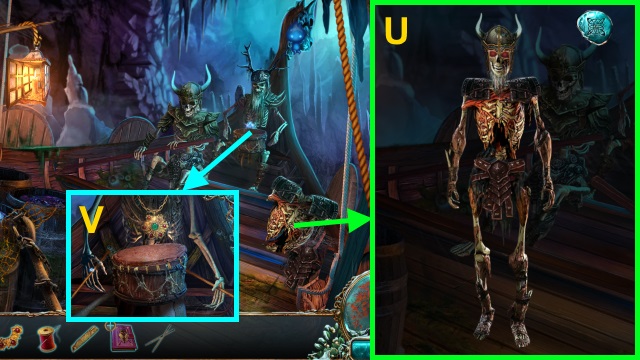
- Place the BONE (5/5) for a mini-game; solution (U).
- Use the NECKLACE PIECE, LEATHER PIECE, NEEDLE WITH THREAD, and DRUMSTICKS (V).
Chapter 3: The Lost Isle
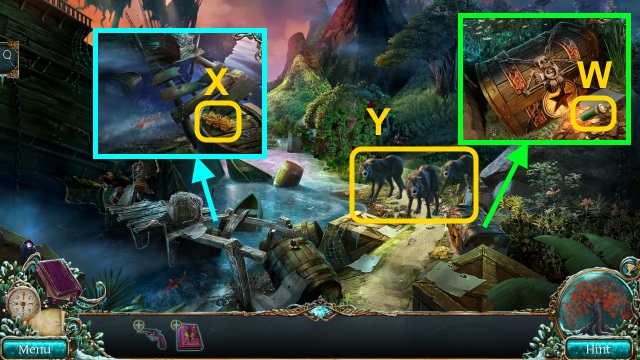
- Take the AMMUNITION (W).
- Open the GUN; use the AMMUNITION. Take the COMPLETE GUN.
- Take the STAIRS SYMBOL (X).
- Use the COMPLETE GUN (Y).
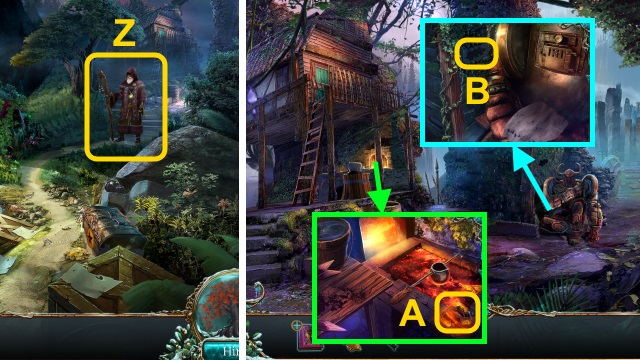
- Talk to the druid (Z); receive the DRUID'S KEY.
- Walk right.
- Take the GLOWING EMBERS (A).
- Place the STAIRS SYMBOL (B).
- Move the shield; take the PLANK (1/3) (C).
- Use the DRUID'S KEY for a mini-game (D).
- Solution (E-F).
- Go left.
- Take the PHIAL (G).
- Take the FISHING ROD and PLANK (2/3) (H).
- Walk down, then right.
- Take the MOLD (1/2) (I).

- Take the HEART PIECE (1/3) (J).
- Take the SKULL SYMBOL and PLANK (3/3) (K).
- Walk down.
- Place the SKULL SYMBOL; take the DAGGER (L).
- Walk down.
- Use the DAGGER (M).
- Play the HOP; receive the GLOWING CRYSTAL (N).
- Assemble the GLOWING CRYSTAL.
- Use the FISHING ROD (O); receive the FISH. Remove the planks (P); place the PLANK (3/3).
- Take the MAGIC FLOWER (1/4) (Q).
- Walk right, then left.
- Give the FISH (R); take the KNOB.
- Place the KNOB; open the door. Move the mask; take the SEAL (S).
- Examine the SEALED CODEX; read the note. Place the SEAL; take the GOLEM'S ASSEMBLY INSTRUCTIONS and RUNE PIECE (1/2).
- Walk down, then right.
- Place the GLOWING CRYSTAL (T).
- Take the STAR SYMBOL (U).
- Walk down twice.
- Place the STAR SYMBOL (V); open the chest. Take the HAIRPIN and EMPTY SMOKER (W).
- Combine the EMPTY SMOKER and GLOWING EMBER; take the SMOKER.
- Walk right, then left.
- Use the HAIRPIN (X); take the STATUE EYE.
- Walk down, then right.

- Use the SMOKER; place the STATUE EYE (Y). Take the RUNE PIECE (2/2) (Z).
- Place the RUNE PIECE (2/2) for a mini-game (A).
- Solution (B).
- Walk forward.
- Take the DRAWER SYMBOL (C).
- Take the BELLOWS (D).
- Go to the Druid's House.
- Place the DRAWER SYMBOL; take FRIGG'S SIGN and the MAGIC FLOWER (2/4).
- Walk down twice.
- Use the BELLOWS (F). Open the helmet; take the TRIANGLE and MOLD (2/2) (G).
- Go to Frigg's Shrine.
- Place FRIGG'S SIGN (H); take the GOLD NUGGET and CORKSCREW.
- Walk down twice.
- Use the CORKSCREW (I); take the MAGIC FLOWER (3/4) (J).
- Place the MOLD (2/2) (K); examine it. Use the GOLD NUGGET (L). Pour the gold into the mold; place the mold in the bucket. Open the mold; take the COIN.
- Walk right.
- Place the COIN. Play the HOP; receive the MAGIC FLOWER (4/4) (M).
- Walk forward.
- Examine the fountain; place the MAGIC FLOWER (4/4) for a mini-game (N).

- Solution (O).
- Talk to Frigg (P); receive the EVIDENCE COLLECTOR.
- Take the ARROWHEAD (Q); use the PHIAL (R). Receive the WATER OF LIFE.
- Examine the EVIDENCE COLLECTOR; read the note. Use the ARROWHEAD; take the HEART PIECE (2/3).
- Walk down twice, then left.
- Place the TRIANGLE; take the HEART PIECE (3/3) (S).

- Use the GOLEM'S ASSEMBLY INSTRUCTIONS, HEART PIECE (3/3), and WATER OF LIFE; take the GOLEM HEART (T).
- Walk down.
- Open the door; examine the machinery (U). Place the GOLEM HEART; examine it.
- Enter the Treehouse.
Chapter 4: The Cursed Forest
- Play the HOP; receive the STONE OF SOIL (V).
- Take the CANDLE and FILLED FISHBOWL (W).
- Use the CANDLE (X); receive the LIT CANDLE.
- Walk down.
- Receive the STONE OF SPIRIT.
- Use the FILLED FISHBOWL; take the CODE and SHIVERING SALAMANDER.
- Take the WINDOW LATCH.
- Walk left.
- Place the WINDOW LATCH; open the window. Take the CLIPPERS and HAND BROOM.
- Place the SHIVERING SLAMANDER (C); use the tongs (D) to take the STONE OF FIRE (E).
- Examine the symbols (F); use the CODE for a mini-game.
- Solution (G).
- Take the FISHING NET.
- Walk down.
- Use the FISHING NET (H); receive the STONE OF WATER.
- Use the CLIPPERS (I); take the CHICK.
- Walk left.
- Give the CHICK; take the STONE OF AIR (J).
- Walk down.
- Use the HAND BROOM for a mini-game (K).
- Solution (L).
- Place the STONE OF FIRE, STONE OF WATER, STONE OF SOIL, STONE OF SPIRIT, and STONE OF AIR for a mini-game.
- Solution (M).
- Talk to the woman; give the WATER OF LIFE (N).
- Walk right.
- Take the OWL HEAD and ARROW WITH ROPE (O).
- Take the FOSSIL TOKEN (P); scroll left. Take the PRESS PIECE (1/2).
- Walk down.
- Place the FOSSIL TOKEN for a mini-game (Q).
- Solution (R).
- Walk forward.
- Play the HOP; receive the POTION INGREDIENT (1/3) (S).
- Take the POTION INGREDIENT (2/3) (T).
- Take the ACORN (U).
- Walk down, then left.
- Place the OWL HEAD; take the CROSSBOW (V).
- Combine the CROSSBOW and ARROW WITH ROPE.
- Walk down, then right.
- Place the ACORN (W); take the CHISEL.
- Use the CROSSBOW; receive the DRAWER KEY (X).
- Walk down.
- Use the CHISEL (Y); take the POTION INGREDIENT (3/3).
- Walk left.
- Use the DRAWER KEY (Z); take the BOMB and HAMMER.
- Walk down, then forward.
- Use the HAMMER (A); receive the HEALING CRYSTAL.
- Walk down, then right.
- Use the BOMB and LIT CANDLE (B).
- Examine the dryad for a mini-game (C).
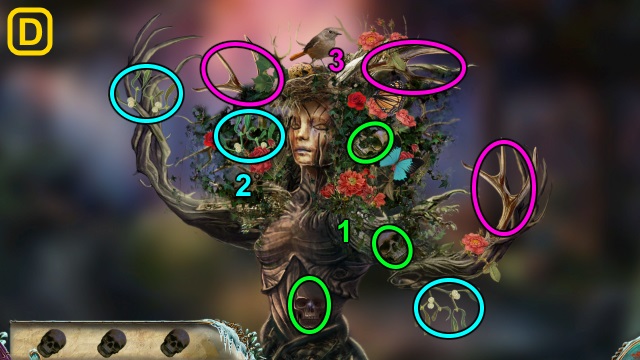
- Solution (D).
- Take the MISTLETOE.
- Combine the EVIDENCE COLLECTOR and MISTLETOE; take the PRESS PIECE (2/2).
- Place the PRESS PIECE (2/2), HEALING CRYSTAL, and POTION INGREDIENT (3/3) (E); use the press. Take the RESTORATIVE POTION.
- Walk down, then left.
- Give the RESTORATIVE POTION (F).
- Walk down, then forward.
- Examine the cave for a mini-game (G).
- Solution (H-J).
- Walk forward.
Chapter 5: Baldur's Tomb
- Take the GLASS SHARD (1/3) and ROPE LADDER (K).
- Take the DAGGER (L).
- Walk down.
- Use the ROPE LADDER; take the WINDING KEY and BOX (M).
- Walk forward.

- Use the DAGGER (N). Place the WINDING KEY (O); turn it. Take the WOLF TOKEN (P).
- Place the WOLF TOKEN for a mini-game (Q).
- Solution (R).
- Take the BLUE TOKEN and BLUE GEM (S).
- Combine the BOX and BLUE GEM; take the GLASS SHARD (2/3) and STATUETTE.
- Place the STATUETTE for a mini-game (T).
- Solution (U).
- Walk down.
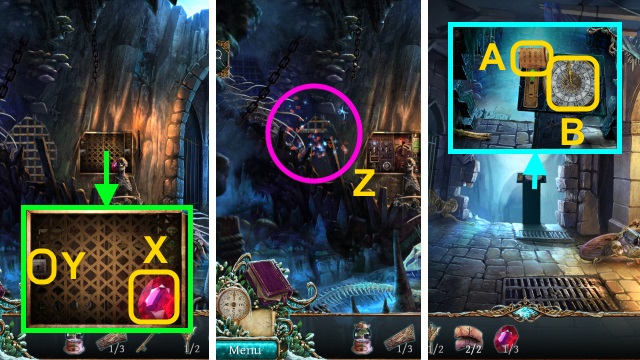
- Place the BLUE TOKEN (V); take the GLASS SHARD (3/3).
- Walk forward.
- Examine the shield (W).
- Place the GLASS SHARD (3/3) (X).
- Walk right.
- Take the RED TOKEN (Y).
- Take the SPHERE DEACTIVATOR (Z).
- Walk down twice.
- Move the board. Place the RED TOKEN (A); examine it. Take the RIDDLE.
- Walk forward, then right.
- Place the RIDDLE for a mini-game (B).
- Solution (C).
- Take the SPHERE DEACTIVATOR (D).
- Place the 2 SPHERE DEASTIVATORS (E); take the TREE OF LIFE (1/2) and WOLFSTONE (F).
- Walk down.

- Place the WOLFSTONE (G); receive the MEDALLION.
- Walk right.
- Place the MEDALLION for a mini-game (H).
- Solution (I).
- Play the HOP; receive the ANTLER PIECE (J).
- Combine the EVIDENCE COLLECTOR and ANTLER PIECE; take the GREEN TOKEN.
- Walk down twice.
- Move the boards; place the GREEN TOKEN (K). Read the note; take the TREE OF LIFE (2/2) and LIGHT OF BALDUR (L).
- Walk forward, then right.
- Place the TREE OF LIFE (2/2) (M).
- Use the LIGHT OF BALDUR (N).
- Walk forward.
- Examine the cell (O); receive the SNAKE HEAD.
- Place the SNAKE HEAD for a mini-game (P).
- Solution (Q): (A-C-E-D-B)-(D-C).
- Take the ROPE and SWORD (R).
- Use the SWORD for a mini-game. Solution (S): select the snake when the markers are inside the blue sections of the lines.
- Walk forward.
- Examine the skeleton (T).
- Take the KEY RING and MOSAIC PIECE (1/3) (U).
- Examine the KEY RING 4x; take the CAGE KEY and CRATE KEY (1/2).
- Take the HOOK (V).
- Combine the HOOK and ROPE; receive the HOOKED ROPE.
- Use the HOOKED ROPE (W); receive the STAIRS MECHANISM PIECE (1/2).
- Walk down.
- Take the GEM (1/2) (X); use the CAGE KEY (Y). Flip the lever.
- Play the HOP; receive the STAIRS MECHANISM PIECE (2/2) (Z).
- Walk forward.
- Place the paper (A) and STAIRS MECHANISM PIECE (2/2) (B).
- Walk forward.
- Take the MOSAIC PIECE (2/3) (C).
- Take the PICKAXE (D).
- Walk forward.
- Take the GEM (2/3) (E). Use the PICKAXE (F); take the WINTER SYMBOL.
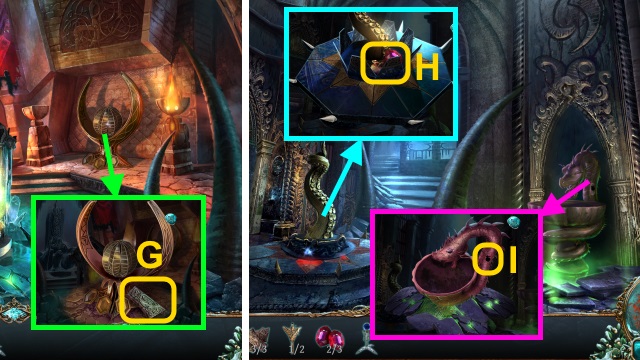
- Take the MOSAIC PIECE (3/3) (G).
- Walk down.
- Place the MOSAIC PIECE (3/3); take the APPLE PIECE and GEM (3/3) (H).
- Examine the dragon (I); place the APPLE PIECE. Take the CRATE KEY (2/2).
- Walk left.
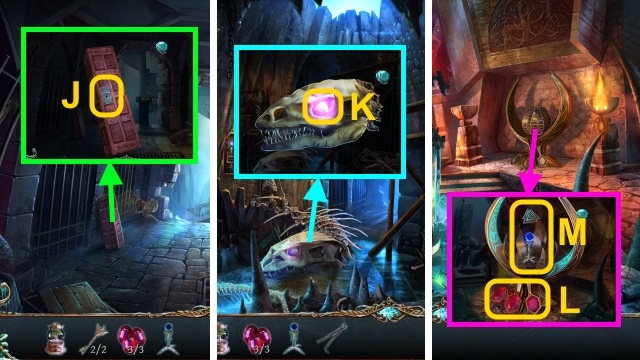
- Use the CRATE KEY (2/2) (J); take the PLIERS.
- Walk down.
- Use the PLIERS (K); take the DIAMOND EYE.
- Walk forward 3x.
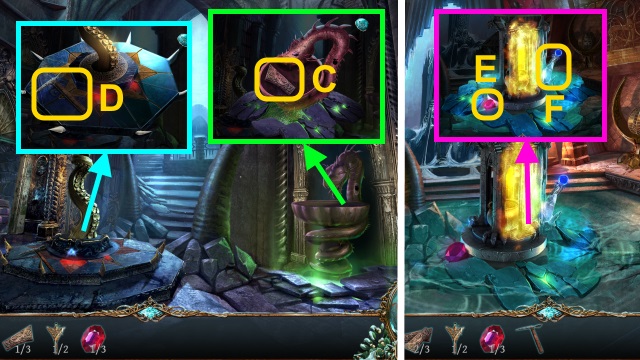
- Place the GEM (3/3) (L). Take the CHALICE; place the WINTER SYMBOL (M). Receive the ODIN SYMBOL.
- Place the ODIN SYMBOL; receive the MECHANICAL SWITCH (N).
- Walk down.
- Examine the dragon (O); place the DIAMOND EYE. Use the CHALICE (P); receive the CHALICE WITH BLOOD.
- Walk left, then down.
- Place the MECHANICAL SWITCH (Q); pull it.
- Walk forward 3x.
- Pour the CHALICE WITH BLOOD (R).
- Give the EVIDENCE COLLECTOR for a mini-game (S).
- Solution (T-V).
- Congratulations! You have completed Endless Fables: Frozen Path.
Created at: 2017-05-14