

Walkthrough Menu
- General Tips
- Chapter 1: The Museum Hall
- Chapter 2: The Temple
- Chapter 3: The Murky Shore
- Chapter 4: The Backyard
- Chapter 5: The Fire Tower
General Tips
- This is the official guide for Endless Fables: The Minotaur's Curse.
- This guide will not mention each time you have to zoom into a location; the screenshots will show each zoom scene.
- Hidden-object puzzles are referred to as HOPs. This guide will not show HOP solutions. It will identify the location of the HOP and the inventory item acquired.
- This guide will show solutions for non-random puzzles. Please read the in-game instructions for each puzzle.
- In this game, you will sometimes have to select the new scene to trigger dialog, cut-scenes, or tasks prior to interacting with the scene.
Chapter 1: The Museum Hall
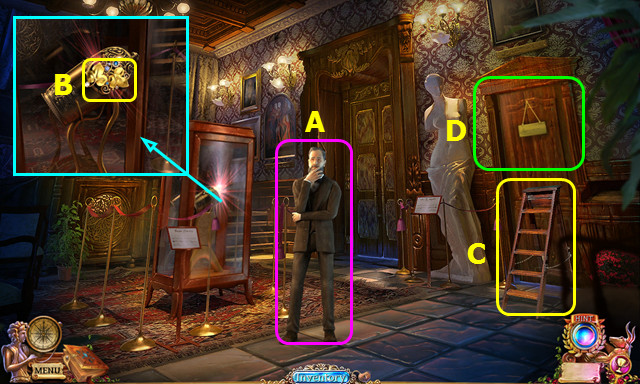
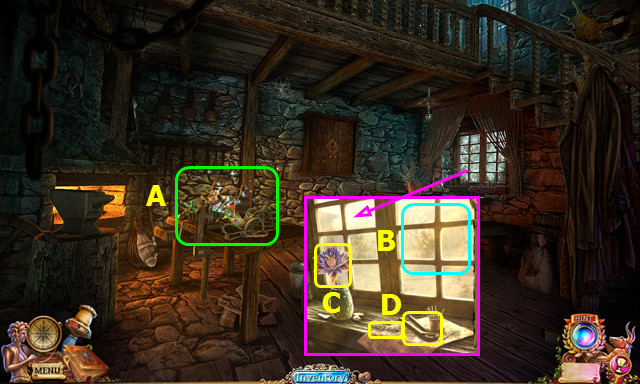
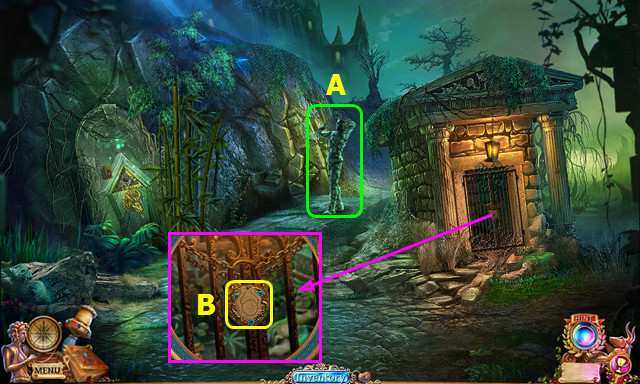
- Talk to Horace (A).
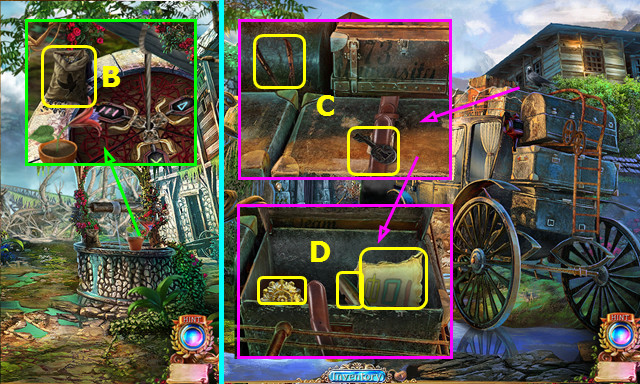
- Open the case; take the GOLDEN BROOCH (B).
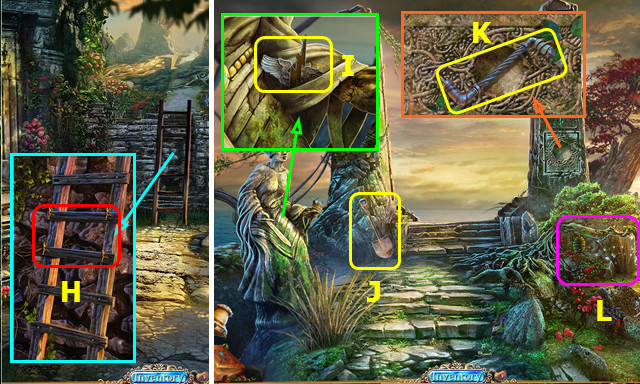
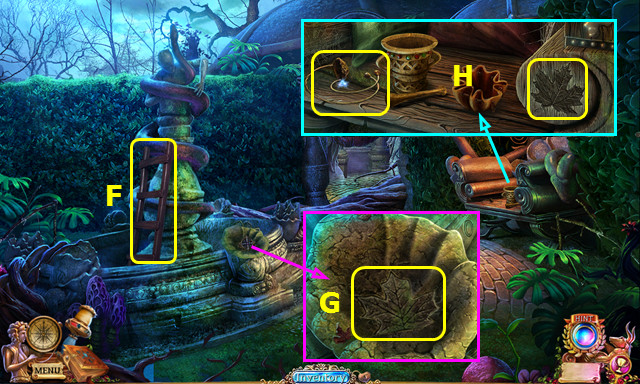
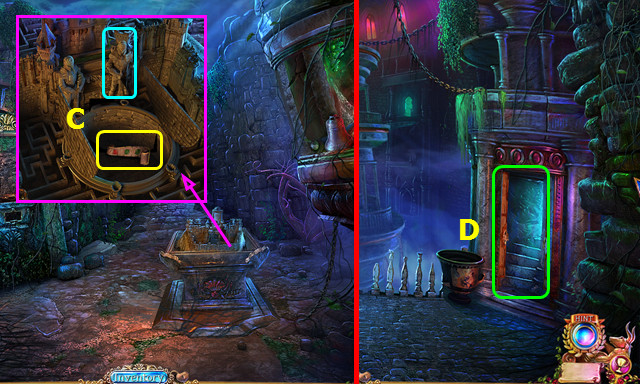
- Take the LADDER (C).
- Open the door; walk right (D).

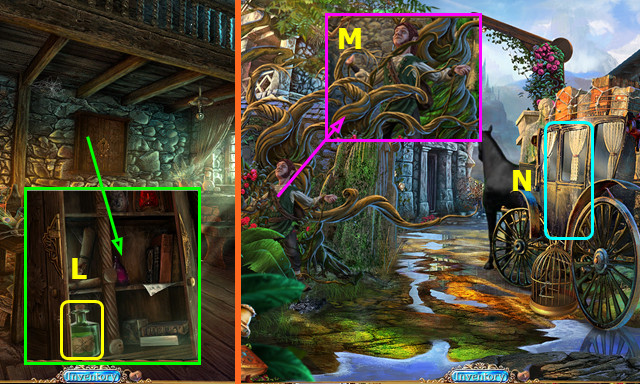
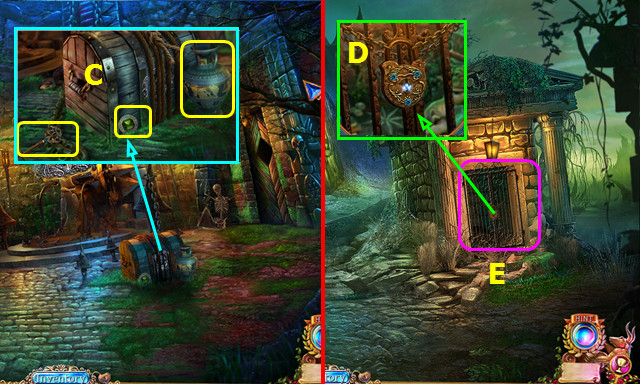
- Open the cabinet; play the HOP to earn the CLOSED POUCH (E).
- Open the CLOSED POUCH; take the GOLDEN AMULET (inventory).
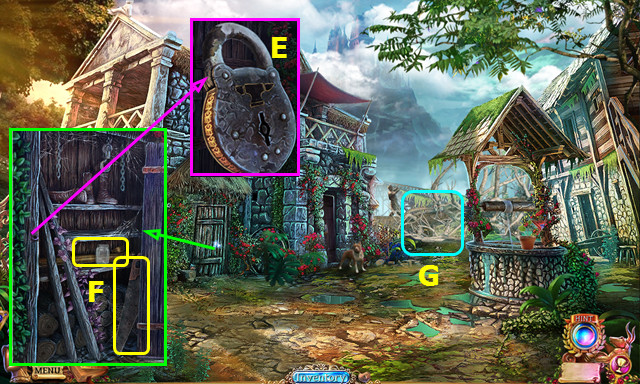
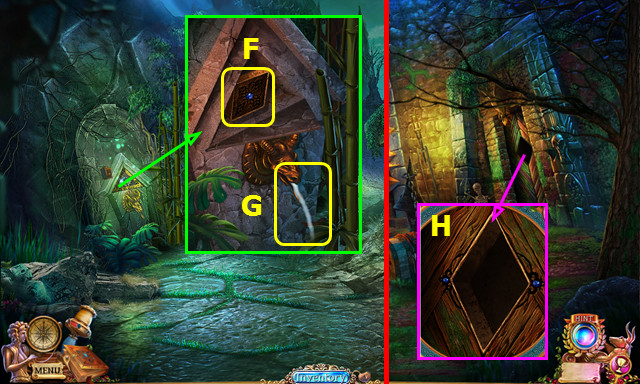
- Place the LADDER (F).
- Place the GOLDEN BROOCH (G).
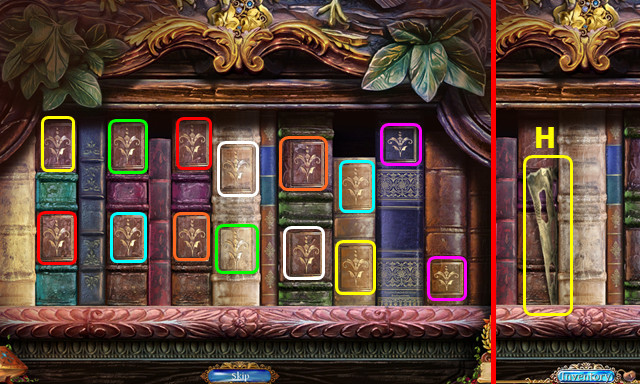
- Select the pairs (color-coded).
- Take the ANSWER KEY (H).
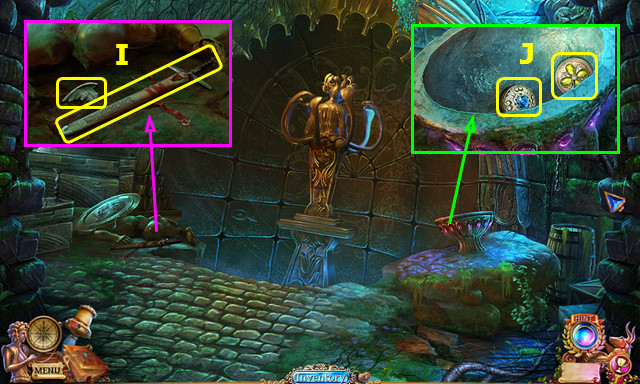
- Walk down.
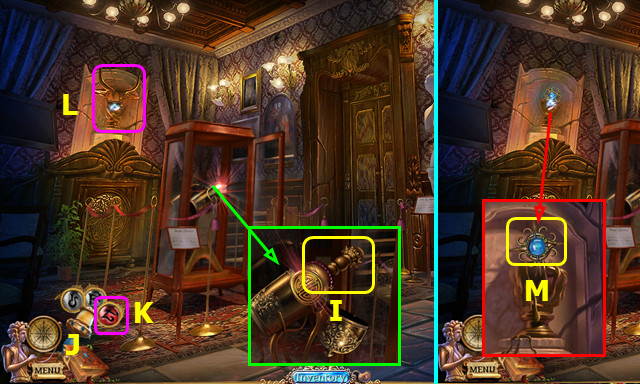
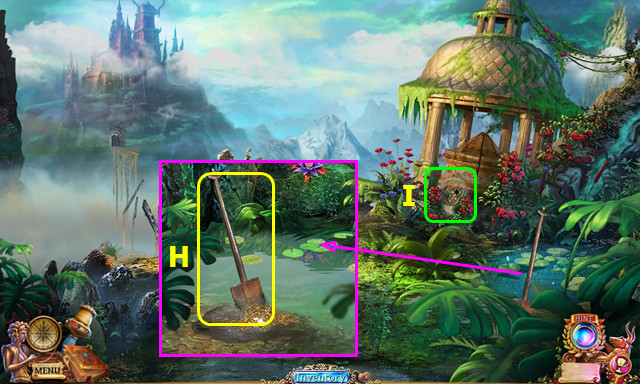
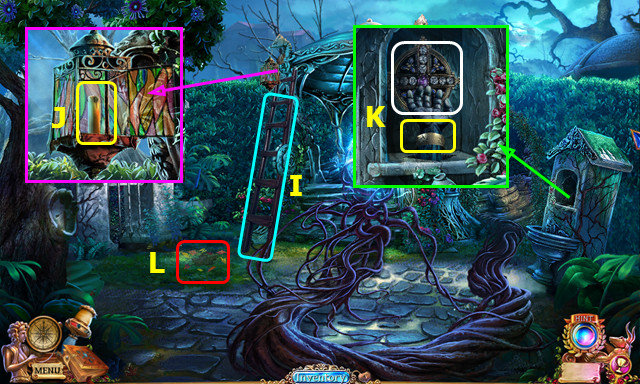
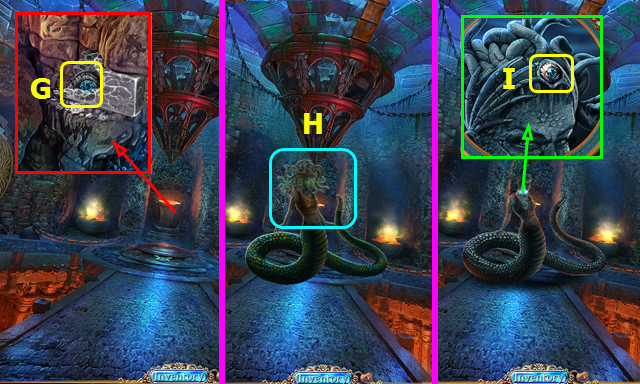
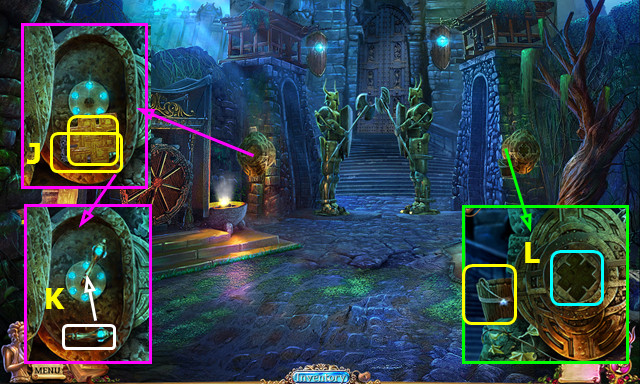
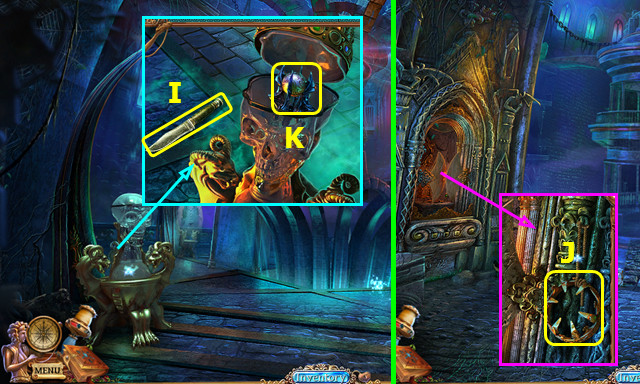
- Place the GOLDEN AMULET; take ARIADNE'S THREAD (I).
- ARIADNE'S THREAD will go to your menu bar (J).
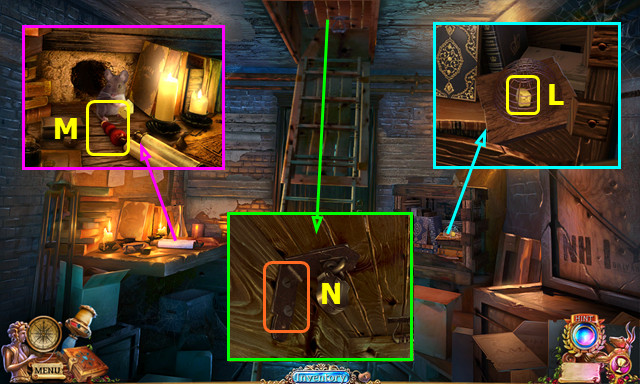
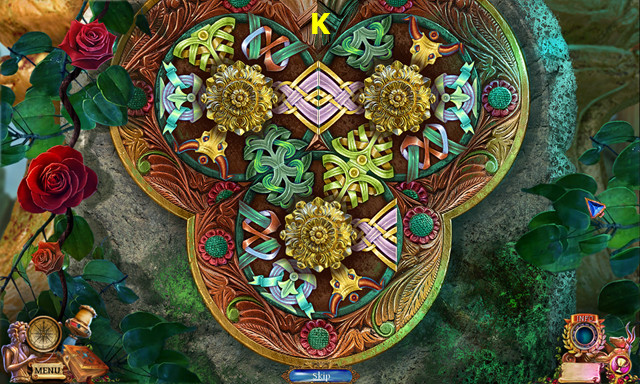
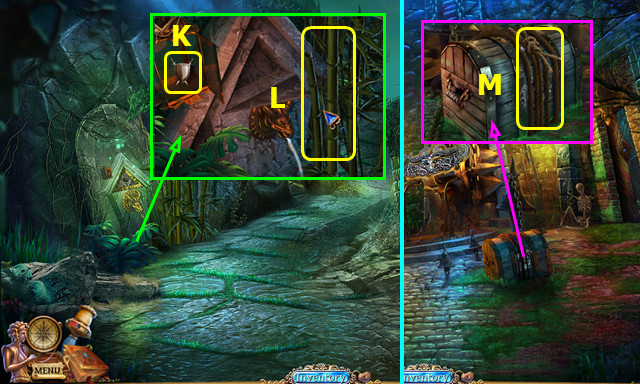
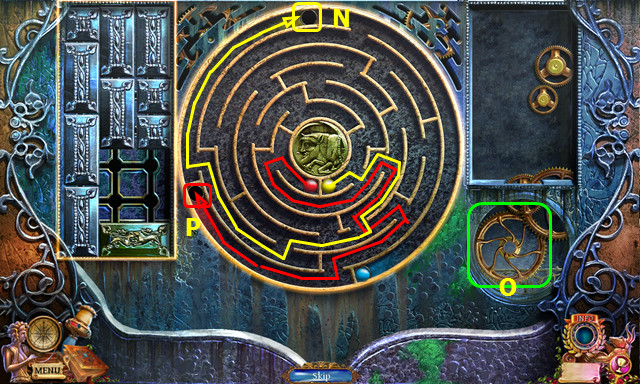
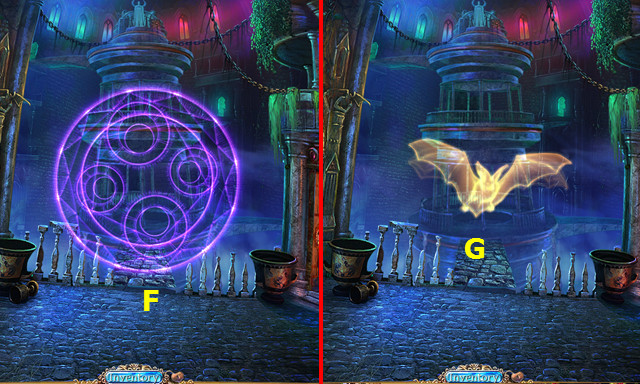
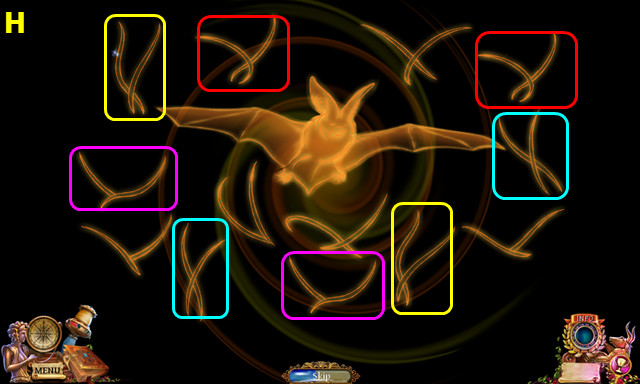
- Select the RED CRYSTAL (K), and then select (L).
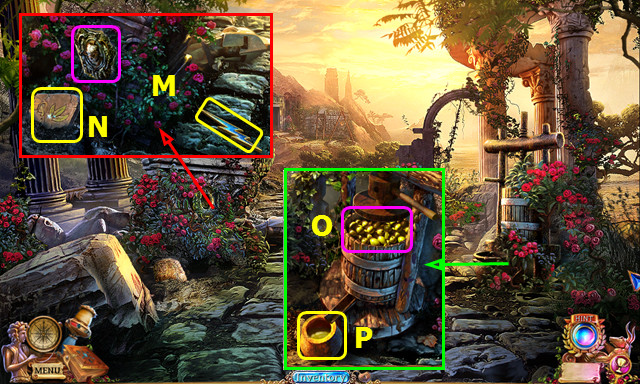
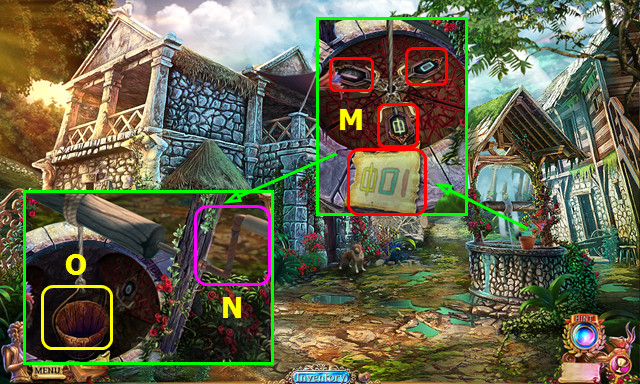
- Take the ANCIENT SEAL (M).
- Walk right.
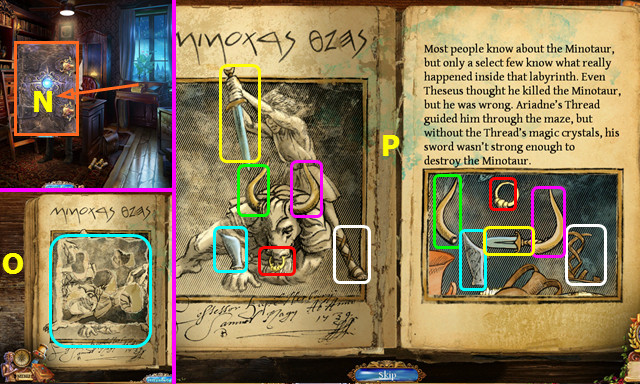
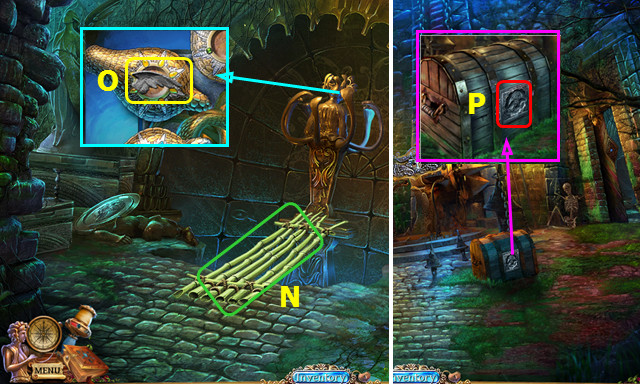
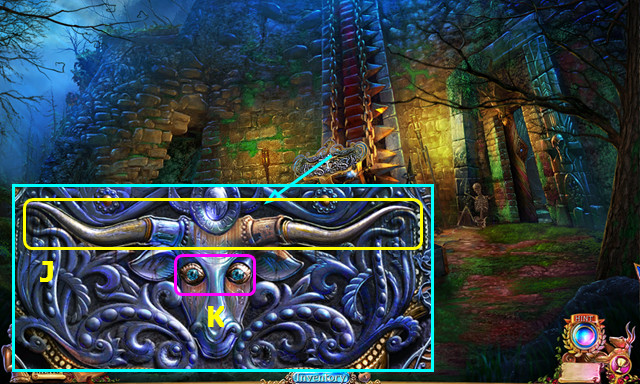
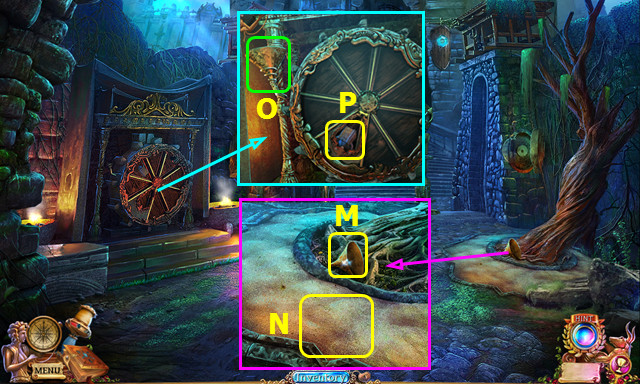
- Place the ANCIENT SEAL (N).
- Place and select the ANSWER KEY 2x (O).
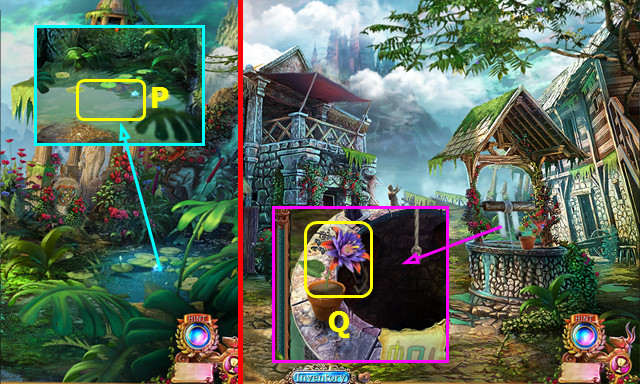
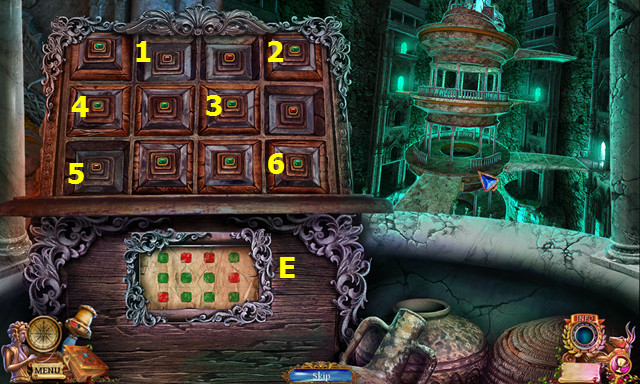
- Move the extra items; place the others into the scene (color-coded) (P).
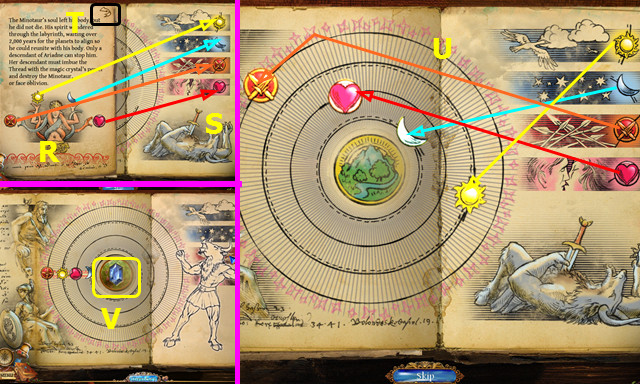
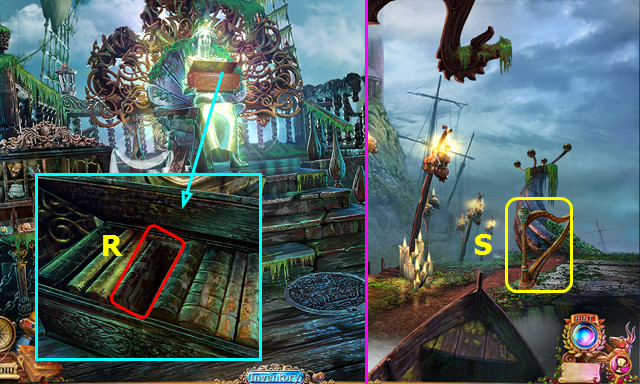
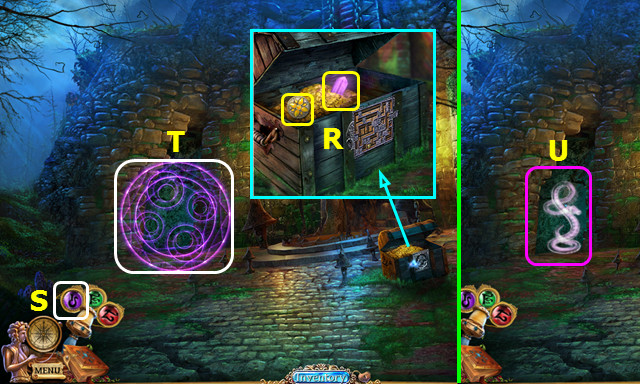
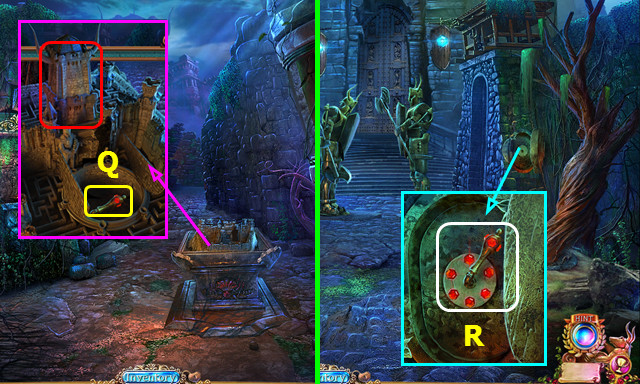
- Turn the page.
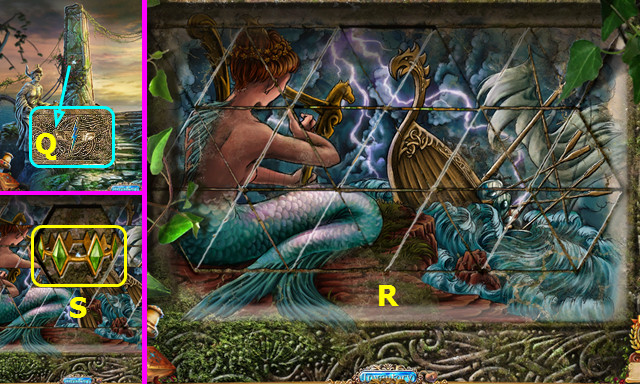
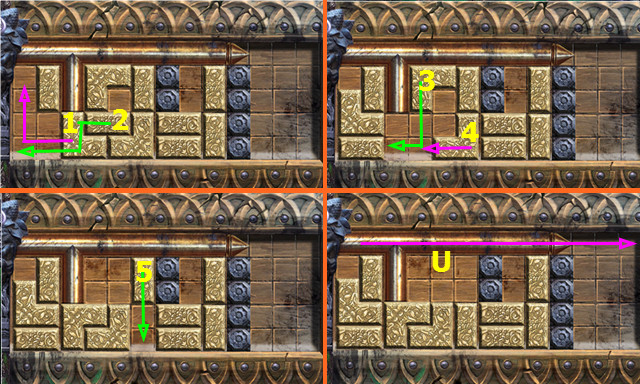
- Place the planets (R) in the slots as shown (S).
- Turn the page (T).
- Place the planets on the orbit lines (U).
- Take the 1/3 COINS (V).
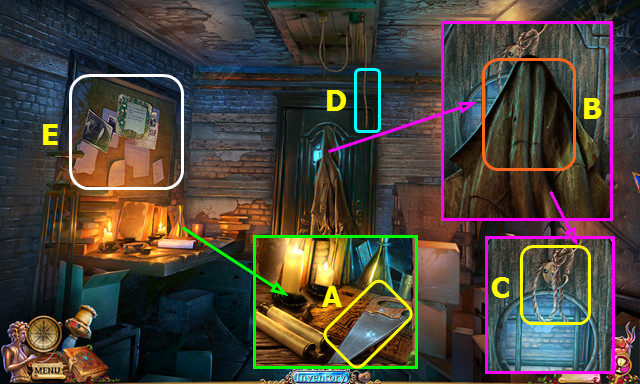
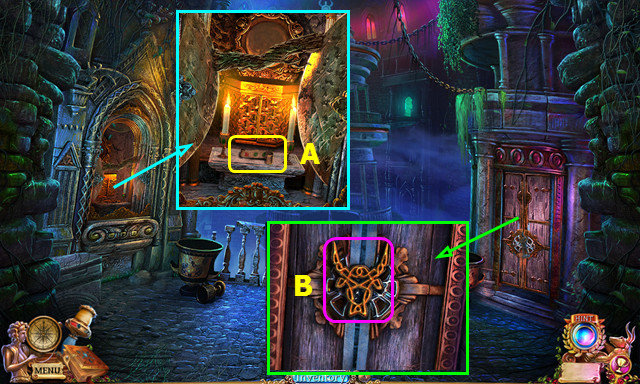
- Take the SAW (A).
- Remove the jacket (B).
- Take the HOOK (C).
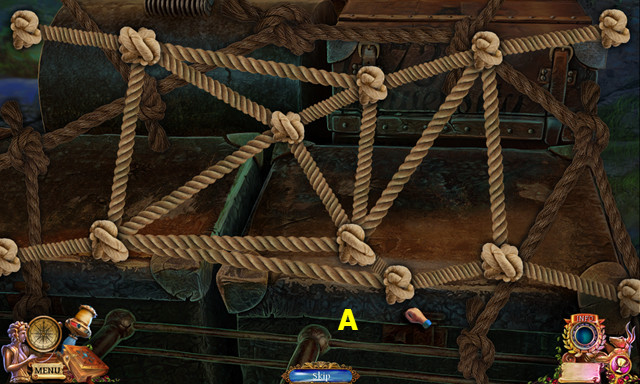
- Pull the rope (D).
- Select (E).
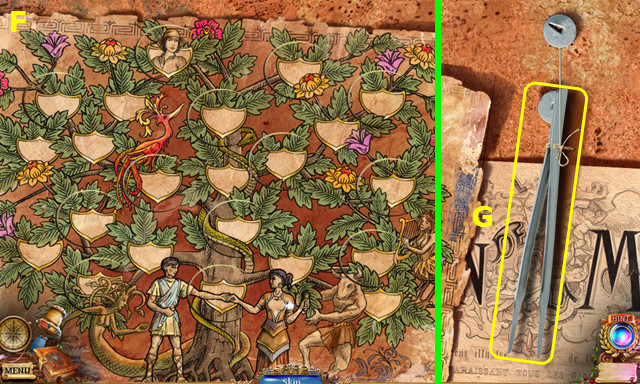
- Remove the tack and note.
- Restore the tree (F).
- Take the TWEEZERS (G).
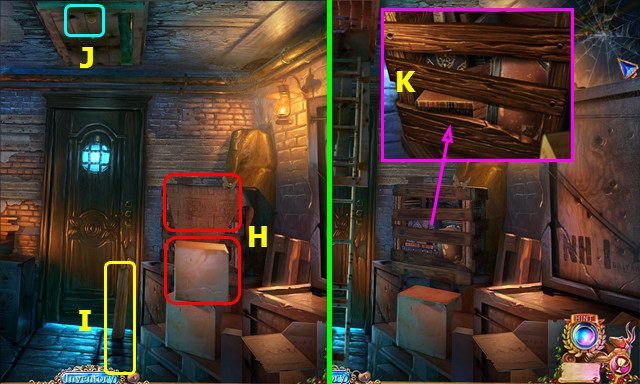
- Remove the cover and box (H).
- Take the BOARD (I).
- Combine the BOARD and HOOK to make the HOOKED ROD (inventory).
- Use the HOOKED ROD (J).
- Use the SAW 2x (K).
- Move the book; use the TWEEZERS to take the CHEESE (L).
- Place the CHEESE; take the SCREWDRIVER (M).
- Use the SCREWDRIVER 2x (N).
- Go forward.
- Select (O).
- Select (P).
- Go forward (Q).
- Talk to Robert (A).
- Take the TUBE (B).
- Take the CROWBAR (C).
- Use the CROWBAR 2x; play the HOP to earn the PUMP HANDLE (D).
- Open the cap and place the pump in the opening (E).
- Add the TUBE (F).
- Place and select the PUMP HANDLE (G).
- Select (H).
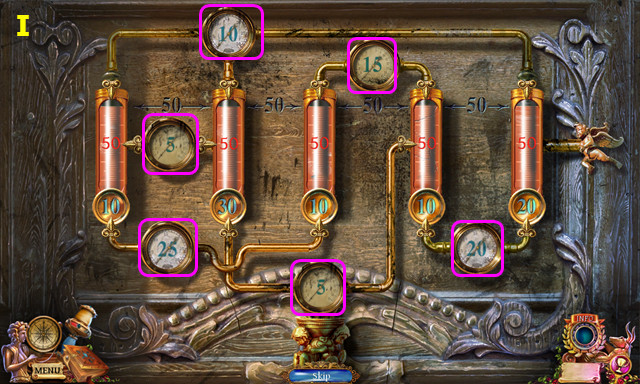
- Place the gauges as shown (I).
- Go forward.
- Talk to Robert; earn the 2/3 COINS (J).
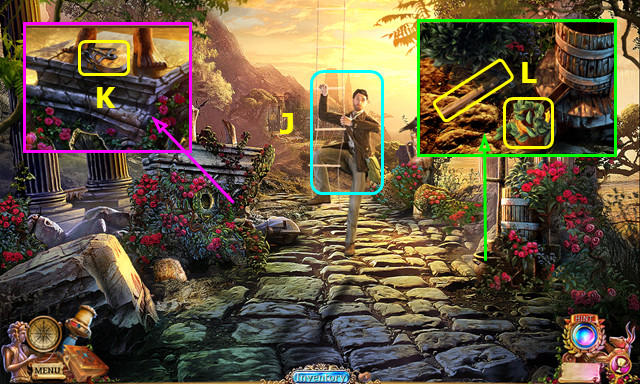
- Take the PULLEY (K).
- Take the HAMMER and LAUREL LEAVES (L).
- Walk forward.
- Take the UNLIT TORCH (M).
- Talk to the Man; take the WOODEN NOISEMAKER (N).
- Take the 1/2 RUNG (O).
- Use the UNLIT TORCH to make the LIT TORCH (P).
- Walk down.
- Use the WOODEN NOISEMAKER (Q).
- Play the HOP; earn the ROPE (R).
- Go forward.
- Place the PULLEY and ROPE; you earn the GOLDEN ORNAMENT (S).
- Select (T).
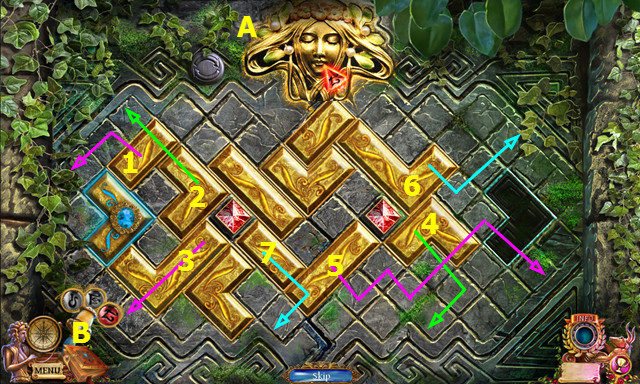
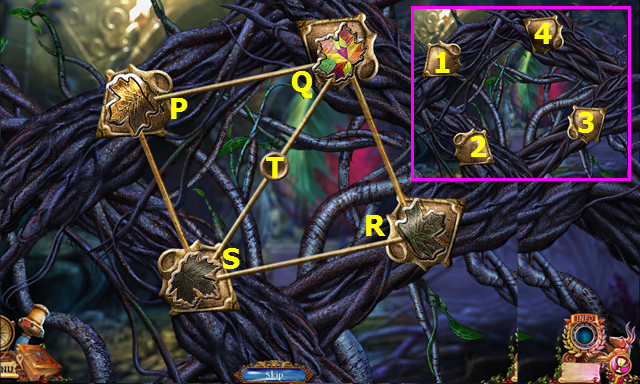
- Place the GOLDEN ORNAMENT (A).
- Select ARIADNE'S THREAD and the RED CRYSTAL (B); select (A).
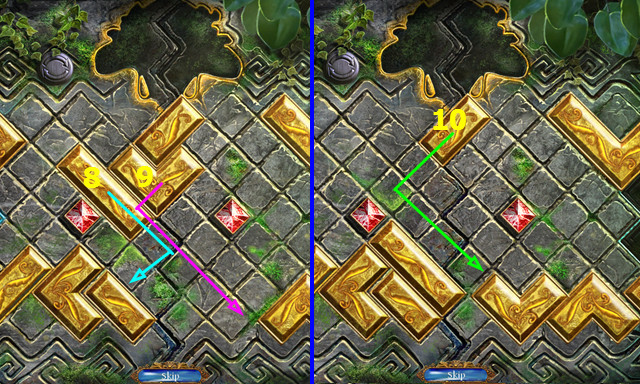
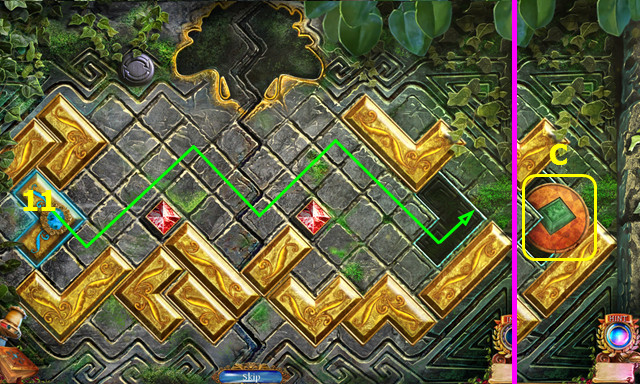
- Slide the tiles to the shown positions (1-11).
- Take the 3/3 COINS (C).
- Walk left.
Chapter 2: The Temple
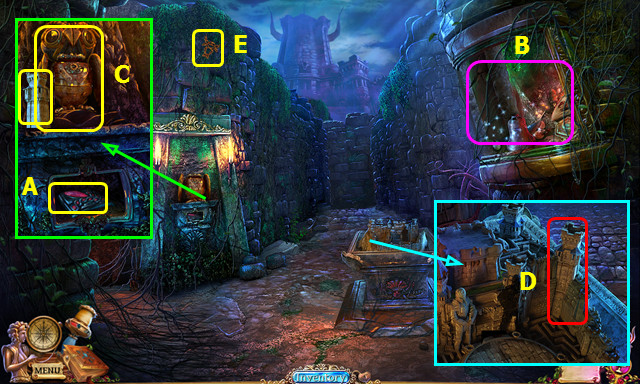
- Take the ZEUS ORNAMENT (D).
- Use the HAMMER 4x; take the 4 NAILS (E).
- Remove the lid; place and restore the 3 COINS (F).
- Take the 2/2 RUNG (G).
- Walk down.
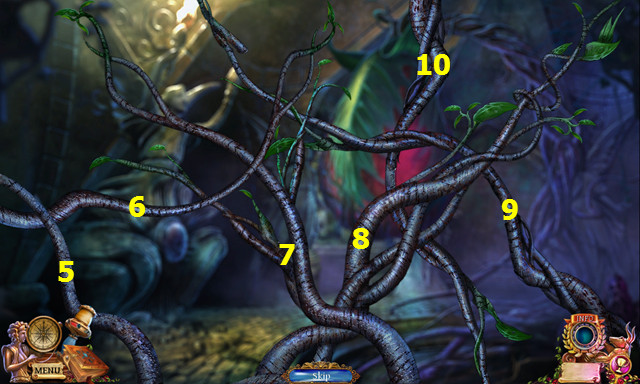
- Use the 2 RUNGS, 4 NAILS, and HAMMER (H).
- Go forward.
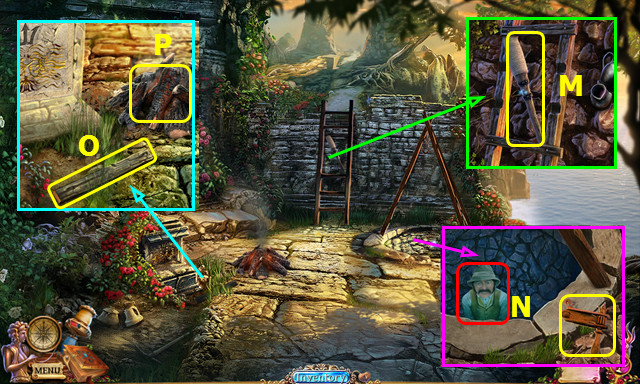
- Take the BROKEN THUNDER EMBLEM (I).
- Take the SHOVEL (J).
- Take the CRANK (K).
- Play the HOP; earn the OLIVES (L).
- Walk down 2x.
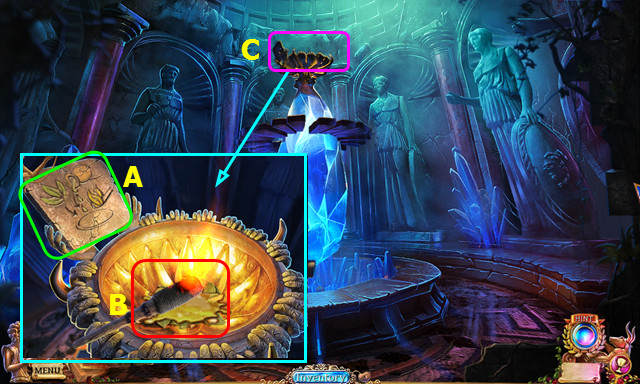
- Place the ZEUS ORNAMENT; take the THUNDERBOLT (M).
- Combine the BROKEN THUNDER EMBLEM and THUNDERBOLT to make the THUNDER EMBLEM (inventory).
- Use the SHOVEL; take the SLAB HALF (N).
- Place the OLIVES and turn the press (O).
- Take the OLIVE OIL (P).
- Go forward 2x.
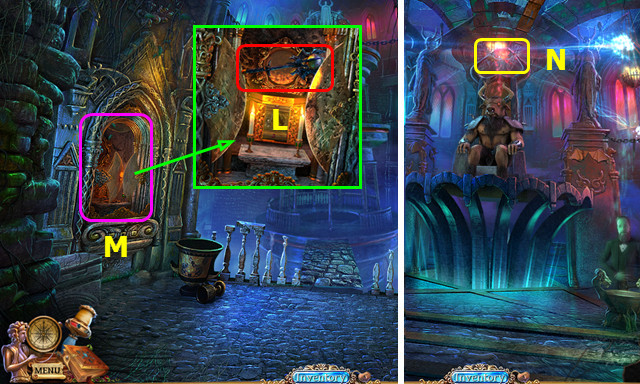
- Place the THUNDER EMBLEM (Q).
- Restore the picture (R).
- Take the CRYSTAL RING (S).
- Walk down and left.
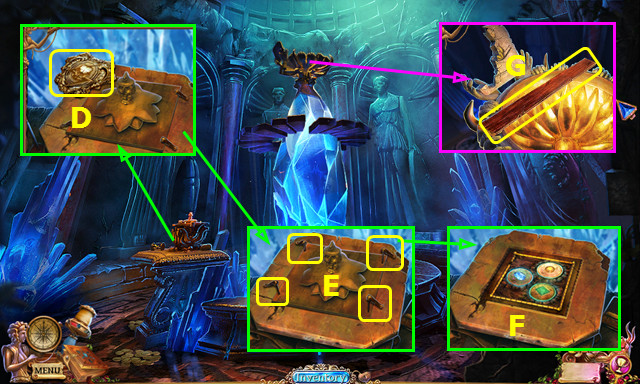
- Place the SLAB HALF (A).
- Place the LAUREL LEAVES, OLIVE OIL, and LIT TORCH (B).
- Select (C).
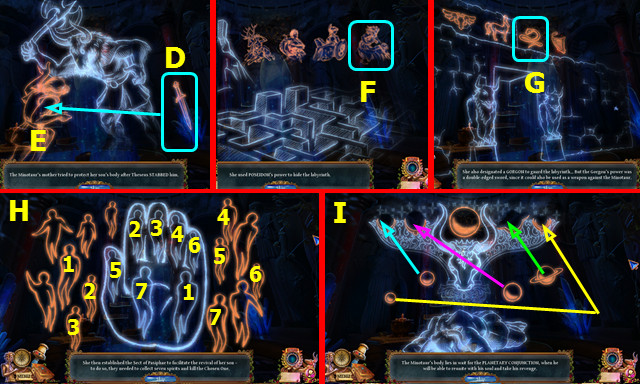
- Move (D) to (E).
- Select (F).
- Select (G).
- Move the 7 figures (H).
- Place the 4 planets (I).
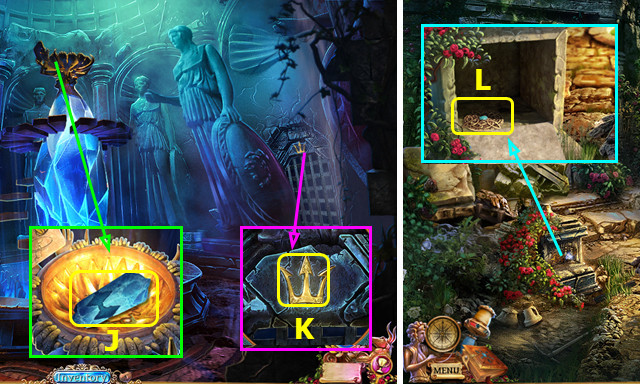
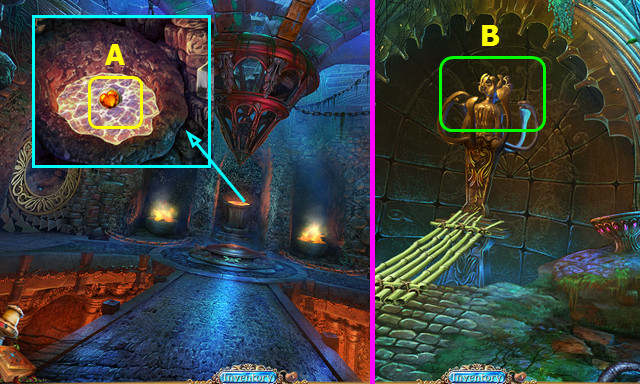
- Take the CRYSTAL (J).
- Combine the CRYSTAL and CRYSTAL RING to make the JAGGED CRYSTAL (inventory).
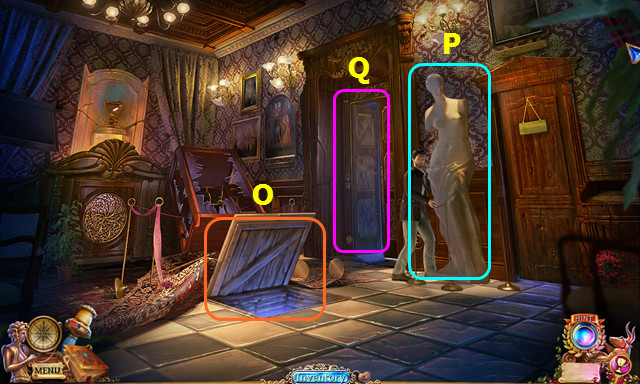
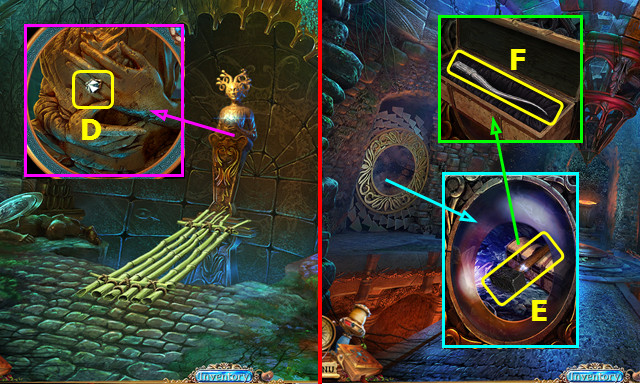
- Move the statue; take the POSEIDON SYMBOL (K).
- Walk right.
- Place the POSEIDON SYMBOL; take the STONE ORNAMENT (L).
- Go forward.
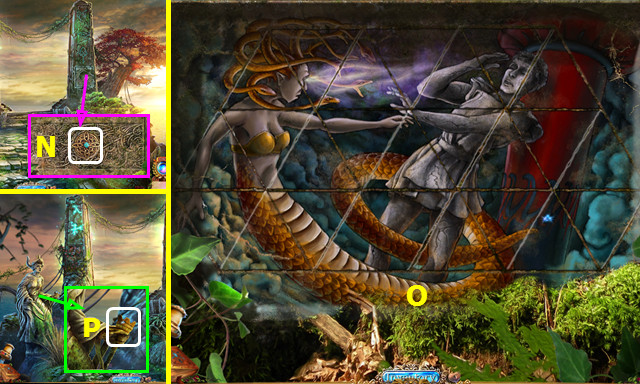
- Place the STONE ORNAMENT (N).
- Restore the picture (O).
- Place the JAGGED CRYSTAL (P).
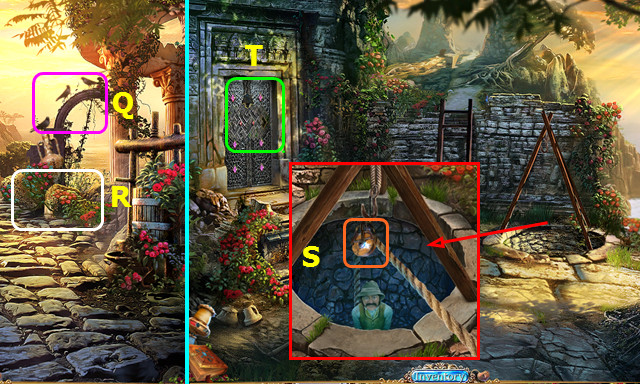
- Talk to the Dwarf (Q).
- Take the CLOTH (R).
- Place the CRANK (S).
- Select (T).
- Untangle the ropes (A).
- Walk forward.
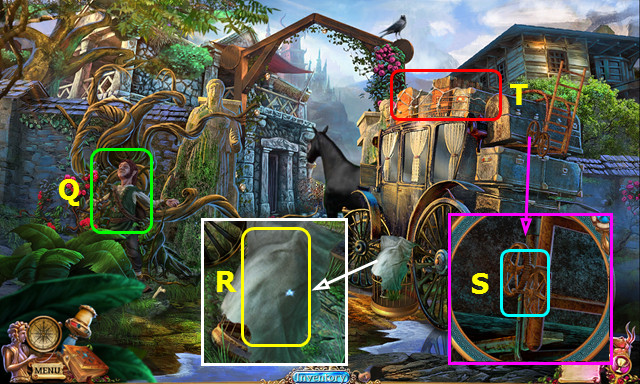
- Take the BIRDSEED (B).
- Walk down.
- Use the BIRDSEED; take the SHEARS and SHED KEY (C).
- Undo the strap and open the case; take the CODE, CORKSCREW HANDLE, and FLOWER ORNAMENT (D).
- Go forward.
- Use the SHED KEY (E).
- Take the HERBICIDE SPRAYER and SAW (F).
- Use the SAW (G).
- Go forward.
- Take the SHOVEL (H).
- Select (I).
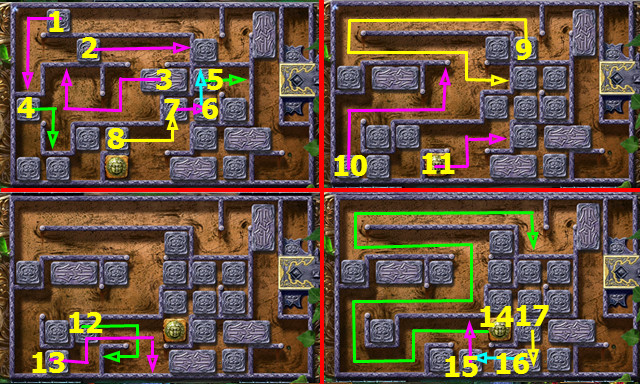
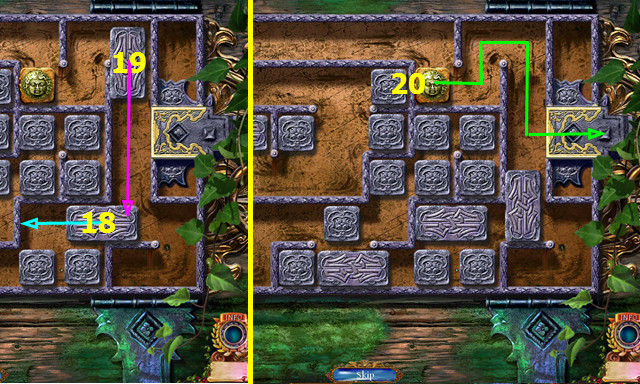
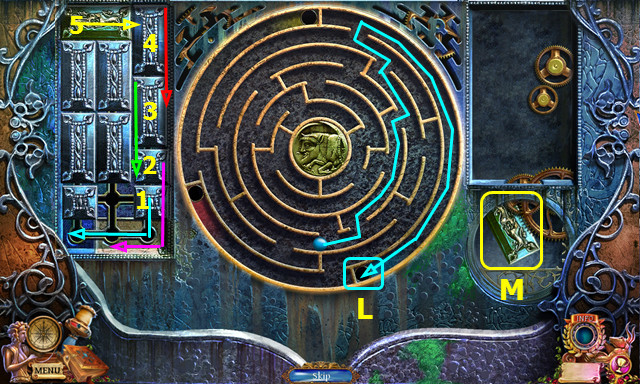
- Place the FLOWER ORNAMENT; rotate the wheels to the positions shown (K).
- Walk down.
- Place the CODE; change the symbols to match (M).
- Use the SHEARS; place and select the CRANK (N).
- Take the EMPTY BUCKET (O).
- Go forward.
- Use the EMPTY BUCKET to take the BUCKET OF WATER (P).
- Walk down.
- Use the BUCKET OF WATER; take the 1/4 FLOWERS (Q).
- Walk down.
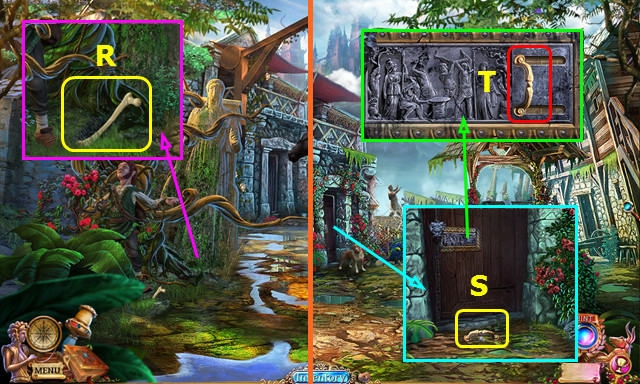
- Use the SHOVEL; take the BONE (R).
- Go forward.
- Use the BONE; take the DOOR HANDLE (S).
- Remove the broken handle; place and select the DOOR HANDLE (T).
- Slide the pieces (1-5).
- Slide the bar (U).
- Walk left.
- Play the HOP; earn the WALKING STICK (A).
- Use the CLOTH (B).
- Take the 2/4 FLOWERS (C).
- Take the CUTTING PLIERS and HELIX (D).
- Combine the CORKSCREW HANDLE and HELIX to make the CORKSCREW (inventory).
- Walk down 2x.
- Use the CUTTING PLIERS; take the 3/4 FLOWERS (F).
- Go forward 2x.
- Use the WALKING CANE to take the 4/4 FLOWERS (G).
- Place the 4 FLOWERS; take the GREEN CRYSTAL (H).
- Select the GREEN CRYSTAL (I).
- Select Hephaestus (J); you earn the CUPBOARD KEY.
- Walk down and left.
- Use the CUPBOARD KEY; take the HERBICIDE (L).
- Use the CORKSCREW on the HERBICIDE (inventory).
- Add the HERBICIDE to the HERBICIDE SPRAYER (inventory).
- Walk down 2x.
- Use the HERBICIDE SPRAYER (M).
- Enter the carriage (N).
- You earn the CONCH.
Chapter 3: The Murky Shore
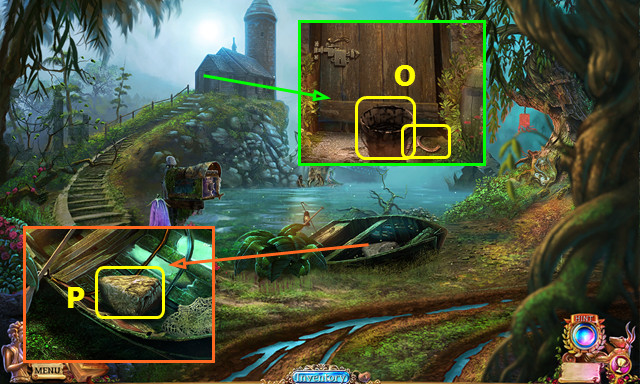
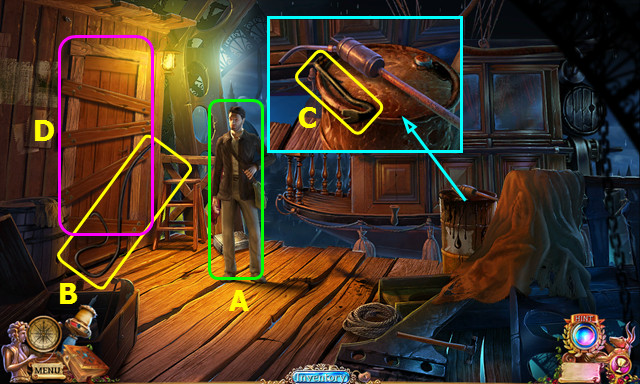
- Take the BUCKET OF TAR and OARLOCK (O).
- Take the STONE (P).
- Walk right.
- Take the 1/2 PLANKS and OAR (A).
- Place the STONE (B).
- Take the PAINTBRUSH and 2/2 PLANKS (C).
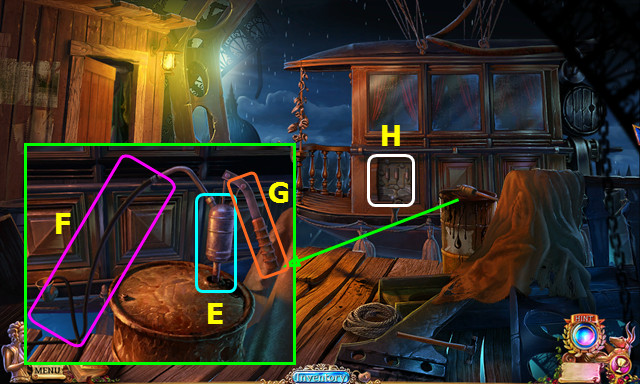
- Walk down.
- Place the 2 PLANKS (D).
- Place the BUCKET OF TAR and PAINTBRUSH (E); use the paintbrush on the planks (E).
- Place the OAR LOCK and OAR (F).
- Go forward.
- You earn the FAN LEAF.
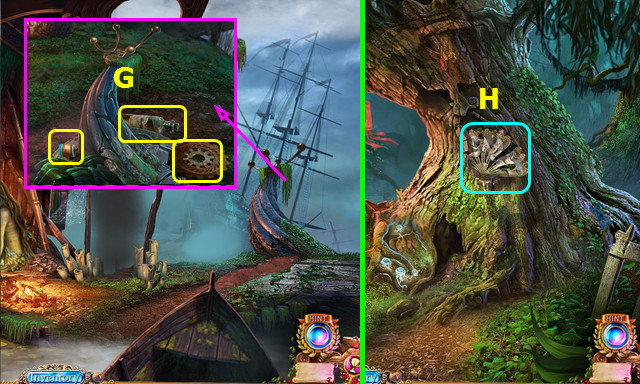
- Take the HARP FRAME PART, BOTTLE OF OIL, and GEAR (G).
- Walk down and right.
- Select (H).
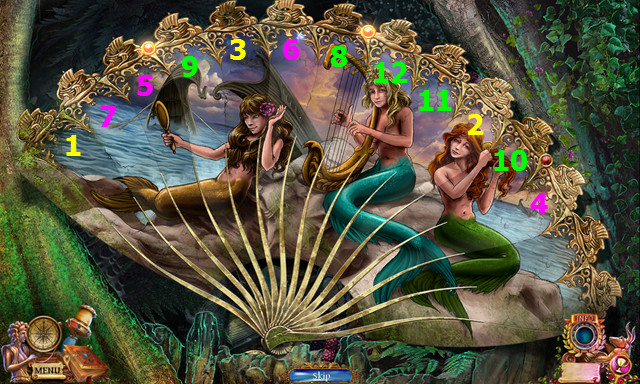
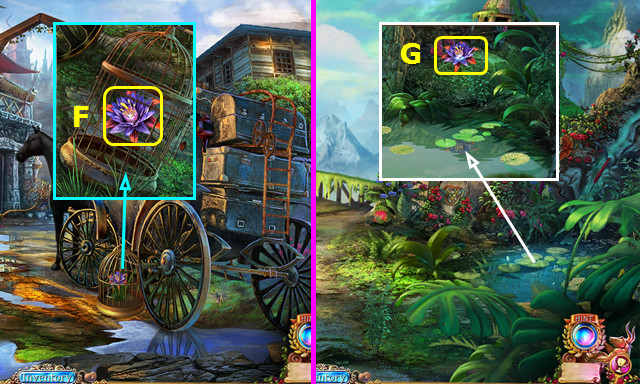
- Place the FAN LEAF.
- Repeat the sequences by pressing 1-3, 4-7, and 8-12.
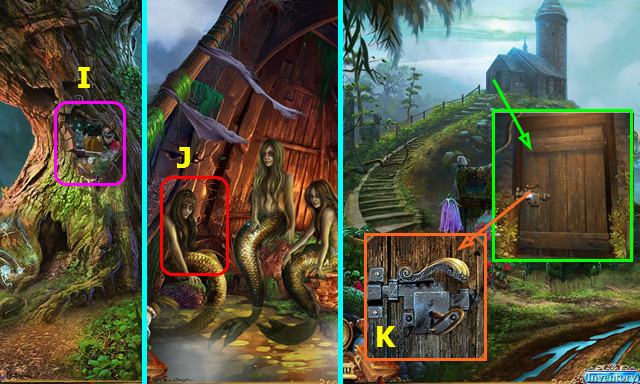
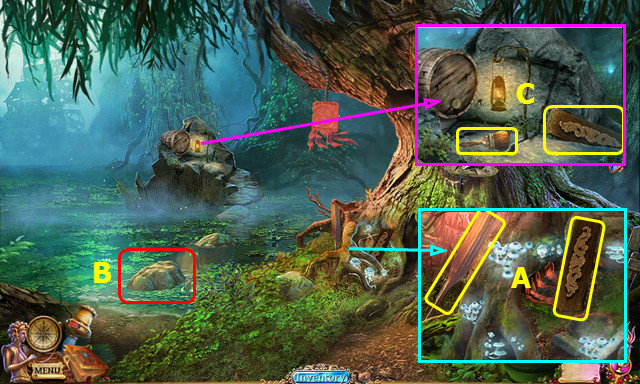
- Play the HOP; earn the SIREN'S COMB (I).
- Walk down and forward.
- Give the SIREN'S COMB; earn the LIGHTHOUSE KEY (J).
- Walk down.
- Use the LIGHTHOUSE KEY; turn the handle (K).
- Walk left.
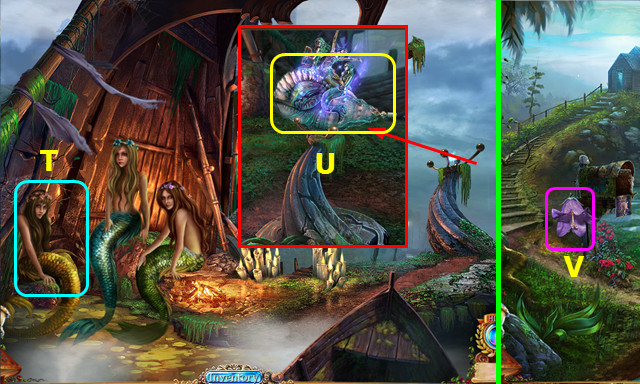
- Select (L).
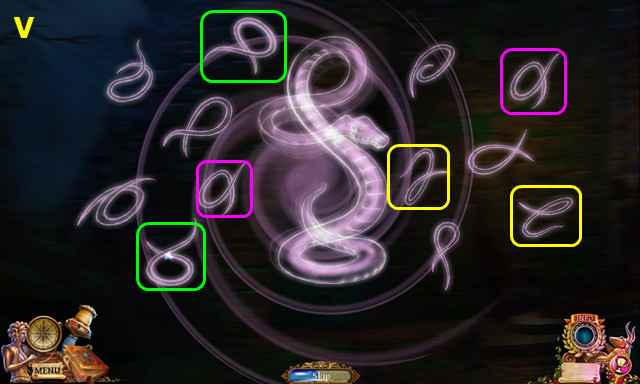
- Select ARIADNE'S THREAD and the GREEN CRYSTAL; select (M). Take the SQUIRREL.
- Place the SQUIRREL (N) and take the SHELL (O).
- Place the GEAR (P).
- Walk down.
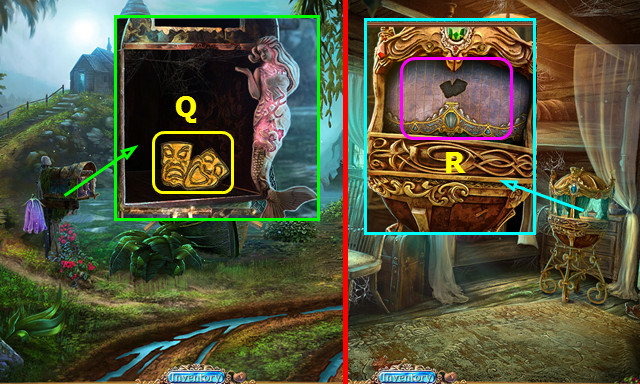
- Place the SHELL; take the DRAMA MASKS (Q).
- Walk left.
- Select (R).
- Place the DRAMA MASKS.
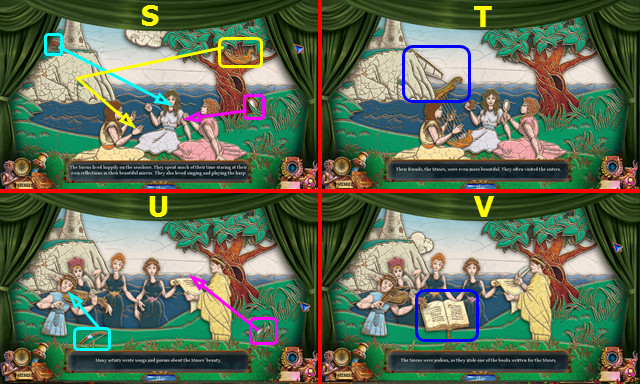
- Move the 3 items as marked (S); select the ship (T).
- Move the 2 items as marked (U); select the book (V).
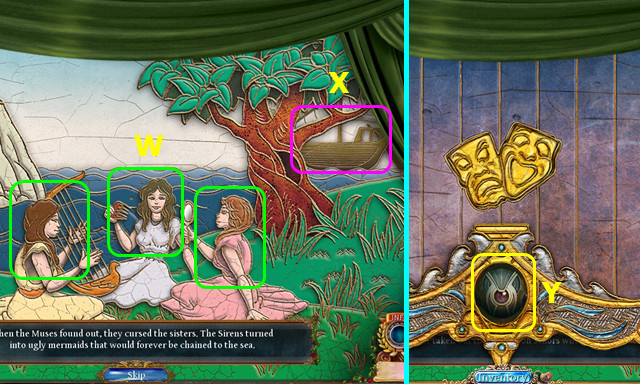
- Select each siren (W); select the ship (X).
- Take the FIREBALL (Y).
- Walk down and forward.
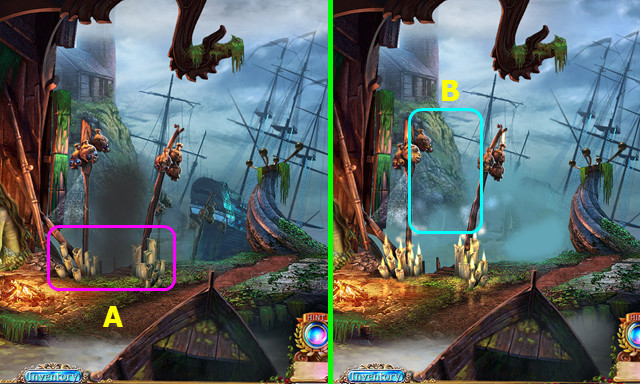
- Use the FIREBALL (A).
- Select (B).
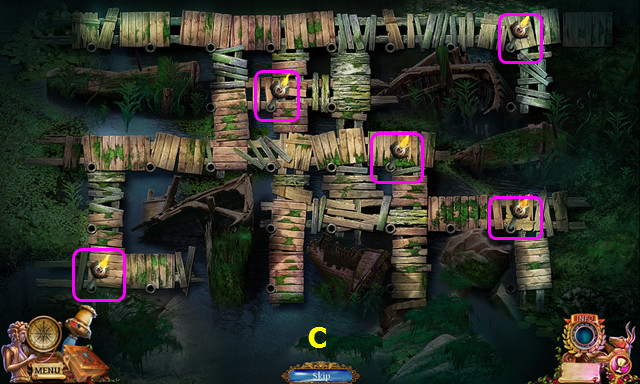
- Place the torches as shown (C).
- Walk forward.
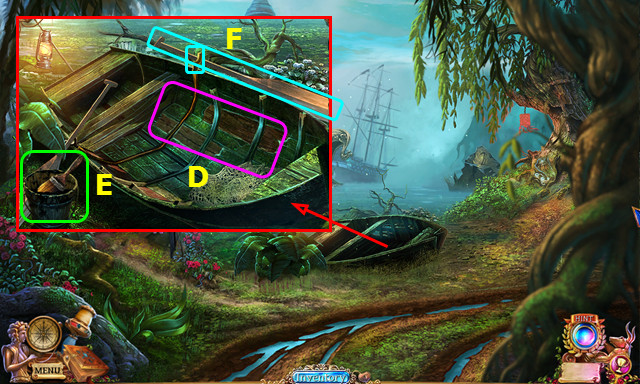
- Play the HOP; earn the MAP CASE (D).
- Open the MAP CASE; take the SIREN RAIDNE and PURPLE PEARL (inventory).
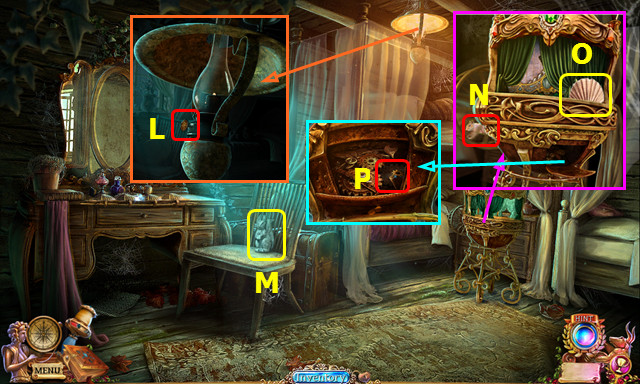
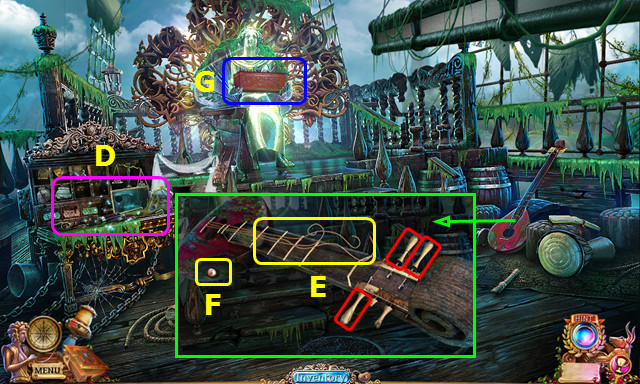
- Use the BOTTLE OF OIL; turn the 3 knobs and take the MUSIC STRINGS (E).
- Remove the piece and take the RED PEARL (F).
- Select (G).
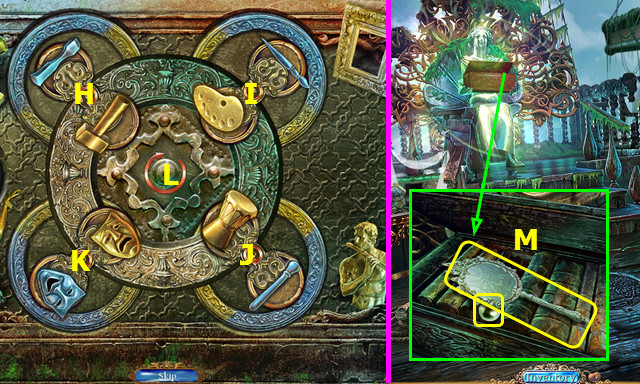
- Select L-J-L-I-Lx3-H-Lx2.
- Take the HAND MIRROR and GREEN PEARL (M).
- Walk down.
- Give the HAND MIRROR; earn the BLUE PEARL (N).
- Go down and left.
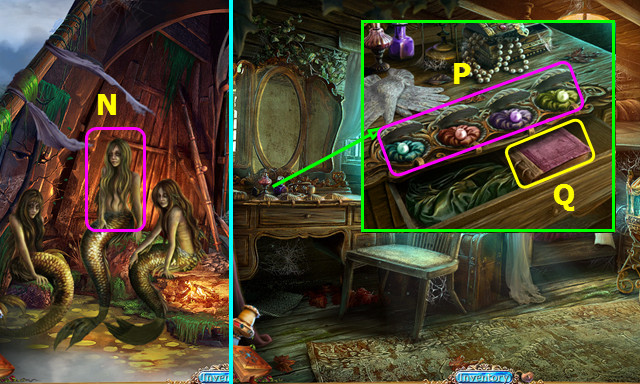
- Open the 4 shells; place the BLUE PEARL, RED PEARL, PURPLE PEARL and GREEN PEARL on the matching cushion(P).
- Take the STOLEN TOME (Q).
- Walk down; go forward 2x.
- Place the STOLEN TOME (R).
- Take the HARP (S).
- Remove the SIREN MOLPE from the HARP; add the MUSIC STRINGS and HARP FRAME PART (inventory).
- Add the SIREN MOLPE and SIREN RAIDNE to the CONCH (inventory).
- Give the HARP (T).
- Place the CONCH; take the SIRENS' MELODY (U).
- Walk down.
- Select (V).
Chapter 4: The Backyard
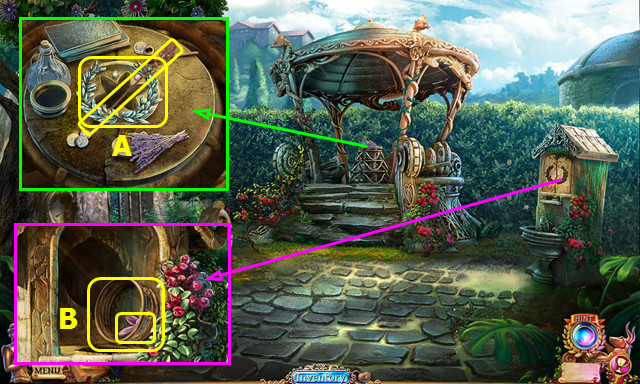
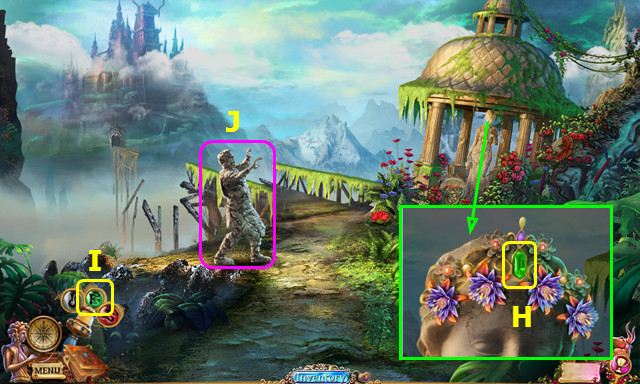
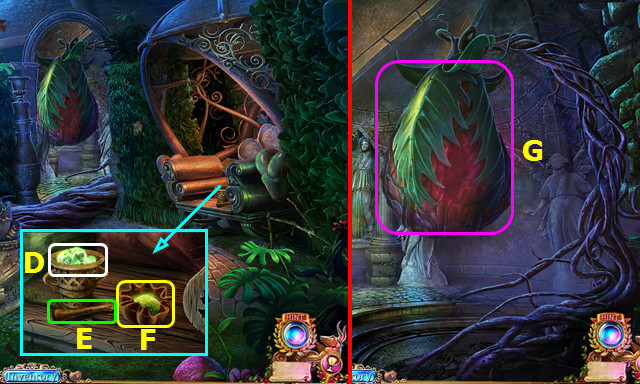
- Take the SHARP HAIRPIN and LAUREL WREATH (A).
- Place the LAUREL WREATH; take the SIEVE and FLORAL EMBLEM (B).
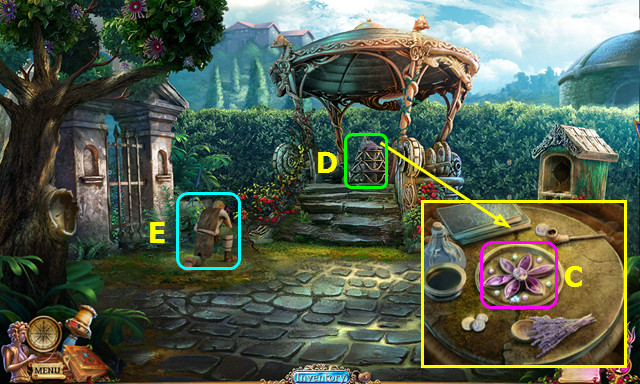
- Place the FLORAL EMBLEM (C).
- Play the HOP; earn the BLUE CRYSTAL FLOWER (D).
- Use the BLUE CRYSTAL FLOWER (E).
- Walk right.
- Take the LADDER (F).
- Take the JEWELED EMBLEM; use the SHARP HAIRPIN and take the STONE LEAF (G).
- Take the SLINGSHOT; use the SHARP HAIRPIN and take the WOODEN LEAF (H).
- Try to walk forward.
- Walk down.
- Place the LADDER (I).
- Open the lamp; take the CANDLE (J).
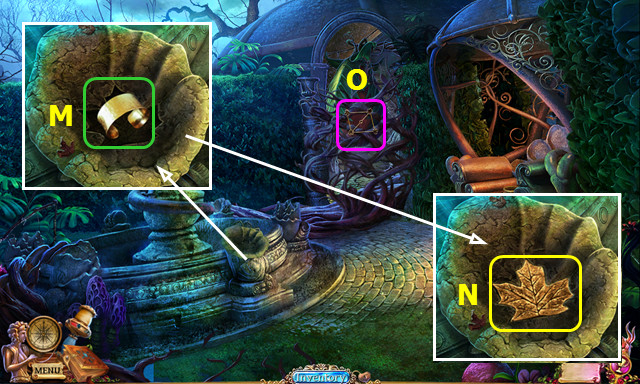
- Place the JEWELED EMBLEM; take the GOLDEN BRACELET (K).
- Select (L).
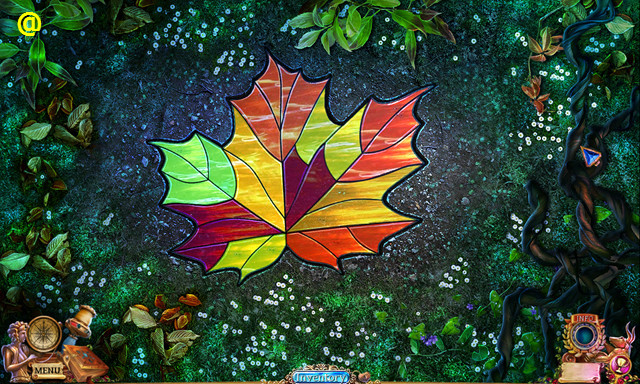
- Restore the leaf; click on the pieces to rotate orientation (@).
- Take the GLASS LEAF.
- Walk forward.
- Place the GOLDEN BRACELET (M).
- Select ARIADNE'S THREAD and the RED CRYSTAL; select the golden bracelet.
- Take the GOLDEN LEAF (N).
- Select (O).
- Place the STONE LEAF, GLASS LEAF, WOODEN LEAF, and GOLDEN LEAF.
- Select Q-P-S-R-Q-T.
- Select 1-4.
- Select 5-10.
- Walk forward.

- Open the cover; take the SUN SYMBOL (A).
- Use the CANDLE; close the cover (B).
- Play the HOP; earn the CASKET (C).
- Combine the CASKET and SUN SYMBOL; read the instructions and take the GLOWING NUGGET (inventory).
- Walk down.
- Place the GLOWING NUGGET (D).
- Use (E) on (D).
- Close the pouch; take the GLOWING POWDER (F).
- Walk forward.
- Use the GLOWING POWDER (G).
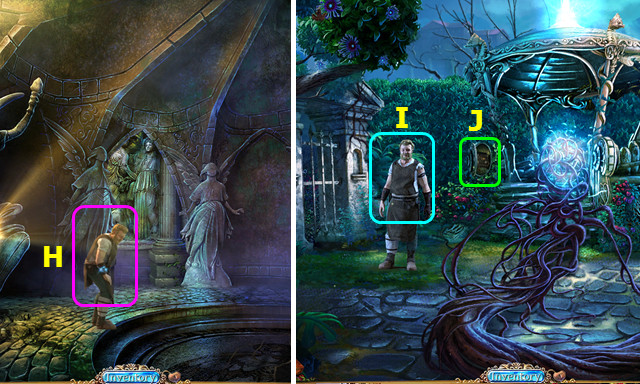
- Talk to Hephaestus (H).
- Walk down 2x.
- Give the SLINGSHOT (I).
- Select (J).
- Connect the gears as shown (K).
- Connect the gears as shown (L).
- Walk left.
- Play the HOP; earn the SIEVE NET (M).
- Add the SIEVE NET to the SIEVE (inventory).
- Go forward.
- Use the SIEVE to take the GOLDEN FLAKES (N).
- Walk down and left.
- Place the GOLDEN FLAKES; earn the SHIELD OF REFLECTION (O).
- Walk down and forward.
- Place the SIRENS' MELODY (P).
- Go forward.
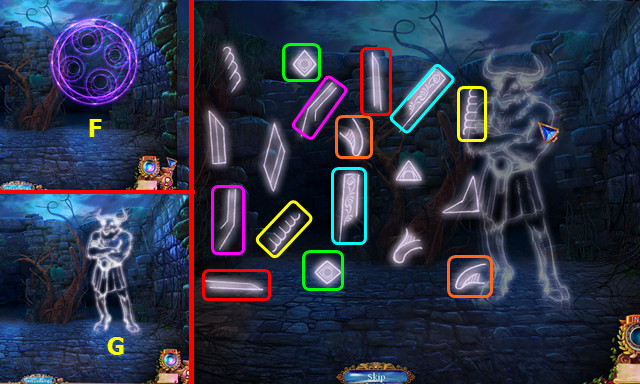
- Select ARIADNE'S THREAD and the GREEN CRYSTAL; select (A).
- You earn the 1/2 BULL HORNS.
- Take the TAURUS EMBLEM (B).
- Go forward.
- Take the CRYPT KEY, 1/4 COBRA STONES, and VASE (C).
- Walk down.
- Use the CRYPT KEY (D).
- Play the HOP; earn the STONE ROSE (E).
- Place the STONE ROSE; take the WOODEN CARVING (F).
- Use the VASE to take COLD WATER (G).
- Go forward.
- Place the WOODEN CARVING (H).
- Walk right.
- Take the 1/2 WINGS; move the hand and take the SWORD SHEATH (I).
- Take the JEWELED HANDLE and 2/4 COBRA STONES (J).
- Walk down 2x.
- Use the JEWELED HANDLE; take the SWORD SYMBOL (K).
- Combine the SWORD SHEATH and SWORD SYMBOL; take the SWORD (inventory).
- Use the SWORD to take the BAMBOO STICKS (L).
- Walk forward.
- Use the SWORD to take the ROPE (M).
- Combine the BAMBOO STICKS and ROPE to make the BAMBOO BRIDGE (inventory).
- Walk right.
- Place the BAMBOO BRIDGE (N).
- Take the 2/2 WINGS (O).
- Walk down.
- Select (P).
- Place the 2 WINGS.
- Slide the stones to the marked positions (1-20).
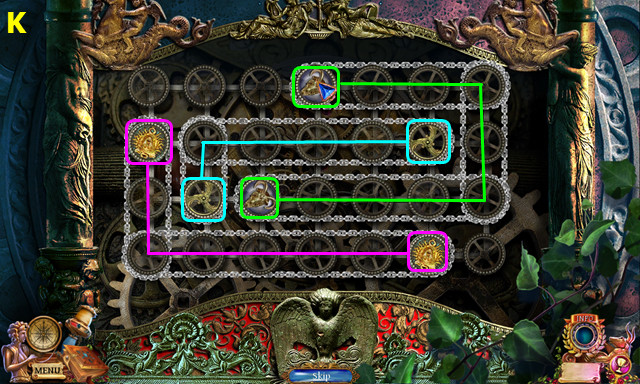
- Take the 3/4 COBRA STONES and PURPLE CRYSTAL (R).
- Select the PURPLE CRYSTAL (S); select (T).
- Select (U).
- Select the 3 pairs (color-coded) (V).
- Walk left.
Chapter 5: The Fire Tower
- Use the COLD WATER; take the 4/4 COBRA STONES (A).
- Walk down and right.
- Select (B).

- Place the 4 COBRA STONES.
- Restore the stones (C).
- Take the DIAMOND RING (D).
- Walk down and left.
- Use the DIAMOND RING; take the HAMMER (E).
- Place the TAURUS EMBLEM; take the 2/2 BULL HORNS (F).
- Use the HAMMER; take the 1/2 BULL EYES (G).
- Use the SHIELD OF REFLECTION (H); you earn MEDUSA'S POWER.
- Take the 2/2 BULL EYES (I).
- Walk down.
- Place the 2 BULL HORNS (J).
- Place the 2 BULL EYES (K).
- Guide the blue stone to (L).
- Select (M).
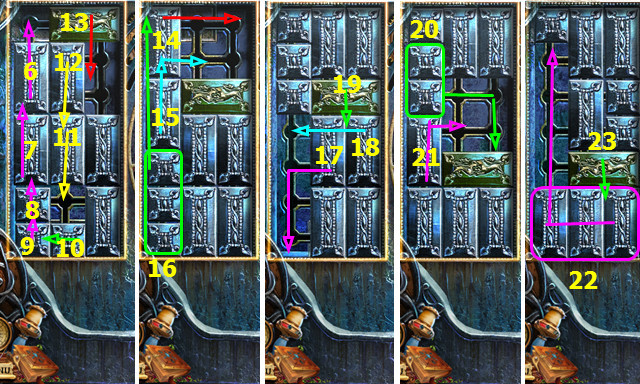
- Slide the pieces as shown (1-23).
- Guide the yellow stone to (N).
- Select (O).
- Guide the red stone to (P).
- Select (O).
- Go forward.
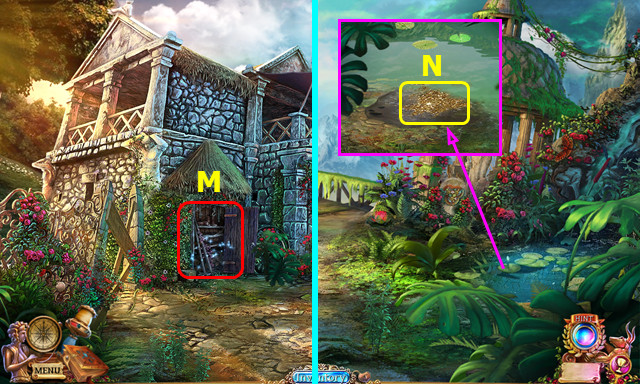
- Take the BRICK (A).
- Place the BRICK; play the HOP and earn the MECHANICAL OWL HEAD (B).
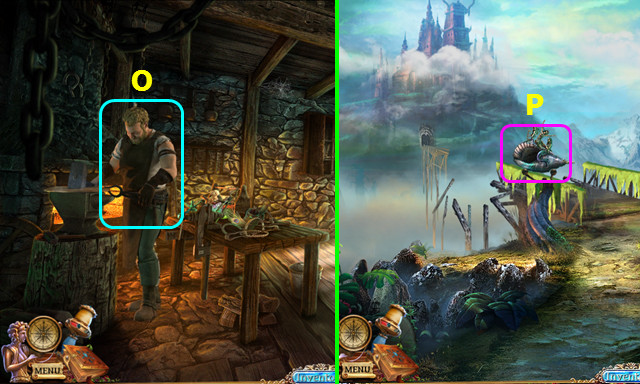
- Place the MECHANICAL OWL HEAD; take the MECHANICAL OWL and GUARD TOWER (C).
- Place the GUARD TOWER (D).
- Use the MECHANICAL OWL to take the BULL SYMBOL (E).
- The DEPLETED OWL will return to your inventory.
- Go forward.
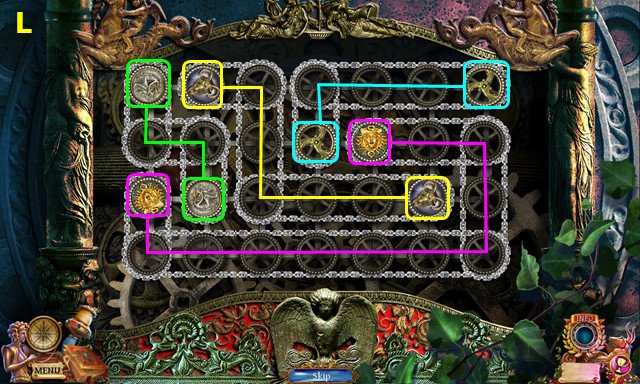
- Select ARIADNE'S THREAD and the PURPLE CRYSTAL; select (F).
- Select (G).
- Select 5 pairs (color-coded).
- Walk right.
- Select ARIADNE'S THREAD and the GREEN CRYSTAL; select (H).
- Walk right.
- Select ARIADNE'S THREAD and the RED CRYSTAL; select (I).
- Walk left.
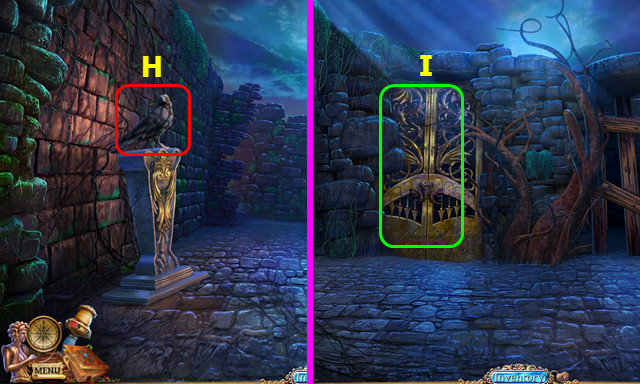
- Select the symbol to open; take the MINOTAUR SYMBOL and FRAMED CODE (J).
- Place and select the lever (K).
- Take the BUCKET; place the MINOTAUR SYMBOL (L).
- Take the FUNNEL (M).
- Use the BUCKET; take the BUCKET OF SAND (N).
- Use the FUNNEL and BUCKET OF SAND (O).
- Take the BLACK TOWER (P).
- Walk down.
- Place the BLACK TOWER; take the RED LEVER (Q).
- Go forward.
- Place and turn the RED LEVER (R).
- Go forward.
- Take the 1/2 CODE PIECES (A).
- Take the GUARD STATUETTE; place the BULL SYMBOL (B).
- Walk down 2x.
- Place the GUARD STATUETTE; take the 2/2 CODE PIECES (C).
- Combine the FRAMED CODE and 2 CODE PIECES (inventory).
- Go forward 2x.
- Select (D).
- Place the FRAMED CODE (E).
- Press (1-6).
- Try to go forward.
- Select ARIADNE'S THREAD and the PURPLE CRYSTAL; select (F).
- Select (G).
- Select the 4 pairs (color-coded) (H).
- Walk forward.
- Take the KNIFE (I).
- Walk down.
- Use the KNIFE to take the CROWN (J).
- Go forward.
- Place the CROWN; take the SCEPTER (K).
- Walk down.
- Use the SCEPTER (L).
- Play the HOP; earn the WINDING KEY (M).
- Combine the DEPLETED OWL and WINDING KEY to make the MECHANICAL OWL (inventory).
- Go forward.
- Use the MECHANICAL OWL to take the LOCKED LAMP (N).
- Look at the LOCKED LAMP. Select ARIADNE'S THREAD and the RED CRYSTAL; use on the lock. Open the lamp and insert MEDUSA'S POWER to make MEDUSA'S LAMP (inventory).
- Combine the MECHANICAL OWL and MEDUSA'S LAMP to make the MECHANICAL OWL WITH LAMP (inventory).
- Use the MECHANICAL OWL WITH LAMP (N).
- Congratulations! You have completed Endless Fables: The Minotaur's Curse!
Created at: 2016-04-10