

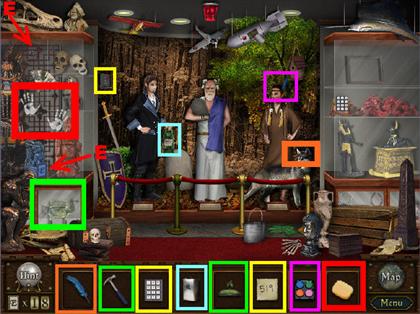
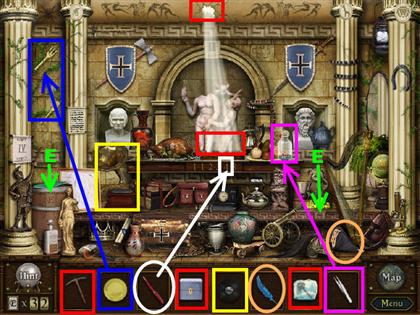
WALKTHROUGH MENU
GAMEPLAY
Game Overview
- The game is divided into an introductory level, three main chapters, and an ending.
- There are 13 Hidden Object scenes, which you will visit a total of three times each. There are several puzzles and mini-games to solve in the game.
- There is no timer in the game. You can play the game at your own pace.
General Tips
- Click on the map icon in the lower right side of the scene and you will be able to temporarily exit out of a scene. This will allow you to go back and forth to other locations if you get stuck in a particular scene.
- If you click randomly in the scene, your cursor will freeze up momentarily. It will unfreeze by itself after a few seconds.
- Whenever your mouse turns into a magnifying glass, click on it; it may be on an area that you need to investigate.
- Sometimes the magnifying glass lets you read information about an object. In some cases, when you click on the magnifying glass, the game will show you an item that you need to interact with.
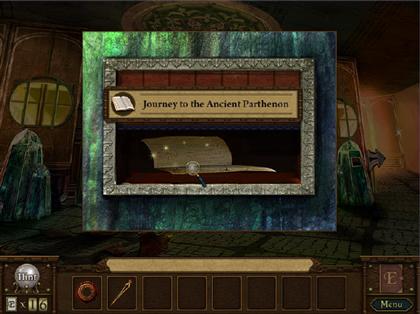
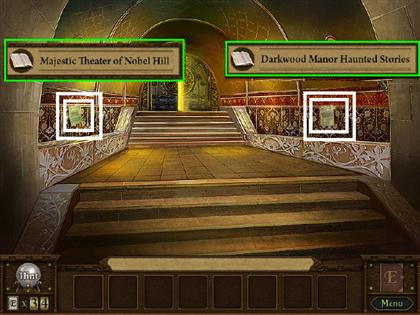
Enlightenus Book
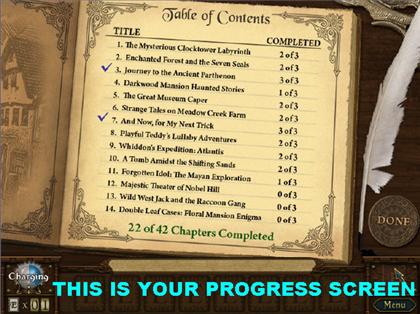
- When you open your Enlightenus book, you will see the name of all the Hidden Object scenes in the game.
- Each time you complete one of the scenes, the counter will show you that one of these scenes has been completed. You will only visit each location a total of three times.
- Once you’ve completed the three visits to a location, a green check mark will appear next to the name of a scene.
- You cannot access the book when you are in a Hidden Object scene. If you want to access the book, click on the map icon in the lower right side of the scene. Then, click on the book icon that appears in the lower right side.
Finding Objects
- This game has a bit of a different twist on the Hidden Object genre. Instead of looking for items on a list, you have to match the picture in your inventory with an item in the scene.
- You have to find some kind of relationship between the picture in your inventory and one item in the scene.
- Keep an open mind when looking for related items because things may not always be as they seem.
- Grab an item from your inventory and drag it around the scene. As the item goes around the scene, you will see the titles of the assorted items.
- The name of the items will not be visible unless you have an item attached to your cursor.
Hint Orb
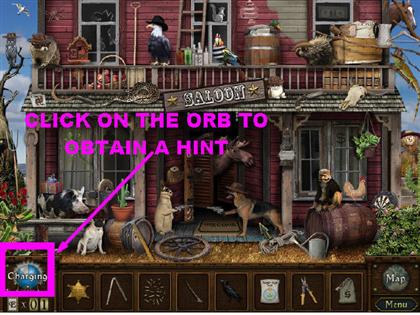
- You can use the Hint Orb that is located in the lower left corner to obtain a hint.
- The hints are unlimited, but you have to wait for them to recharge before you can use them again.
- If you want to make the hints recharge faster, use an Enlightenus Card. The Orb will recharge in a matter of seconds, instead of minutes, when the Enlightenus Card is used.
- To use a hint, click on the word from the list that you would like to find, and then click on the Orb. The Orb will show you the location of the item you’re looking for.
Enlightenus Cards
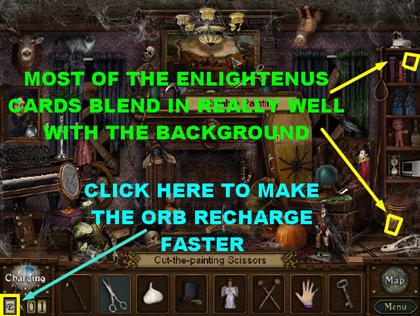
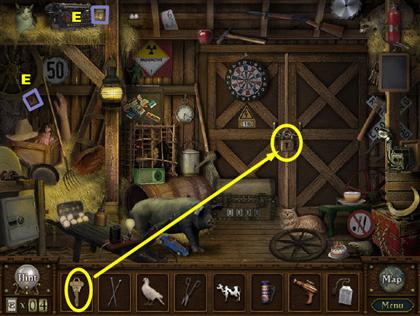
- Find the Enlightenus Cards and you will be able to make the Hint Orb recharge faster.
- To use the Enlightenus Card, click on the card with the “E” that is located below the Orb. The Orb will recharge in a matter of seconds, use it as soon as it’s ready.
- There are two Enlightenus Cards in every scene. When you revisit the same scene, you will find two new Enlightenus Cards, but they will be in different locations.
- Cards can be of different colors and sizes. Some of them blend in really well with a background, so make sure that you look in every corner.
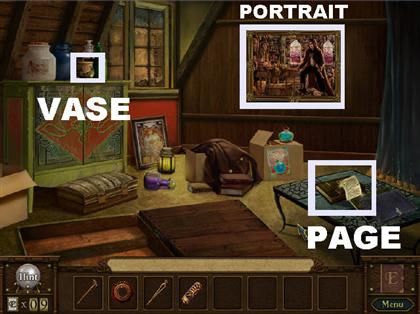
Portrait Puzzles & Engraved Buttons
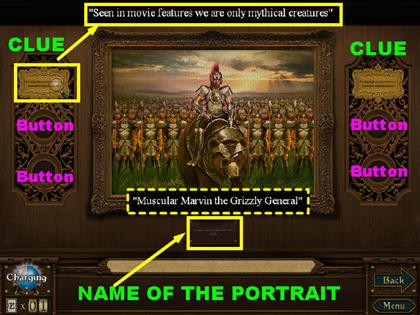
- You will receive an Engraved Button at the end of each Hidden Object level.
- Click on the plaques that are on the top left and top right side of each portrait.
- Read the clue given by each card and place the appropriate buttons in the correct places.
- If you don’t have enough buttons, or you don’t have the right buttons, you need to keep exploring other scenes until you collect all the necessary buttons.
- Some clues will be easier to decipher than others. In some of the cases, you will have to look for the answers in other scenes of the game.
- For example, in one of the clues they ask you to name the fruits that Jack likes to eat. The clue is actually given when you click on some statues that are in a totally different area.
- You can click on a portrait to get a closer view if you want to.
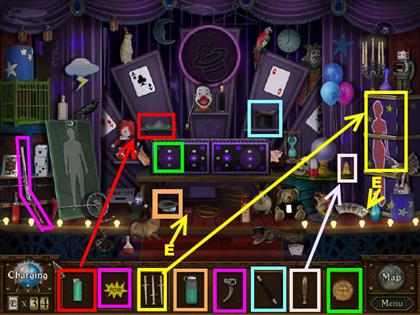
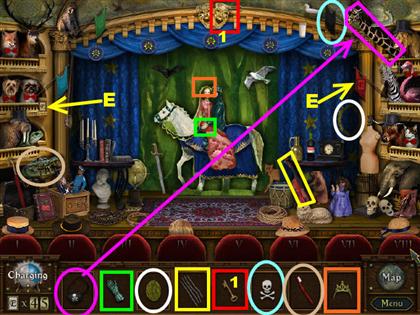
Walkthrough
- The following section contains the solutions for all the puzzles and Hidden Object levels in the game.
- There are many paths to get through this game; the walkthrough shows you one of them.
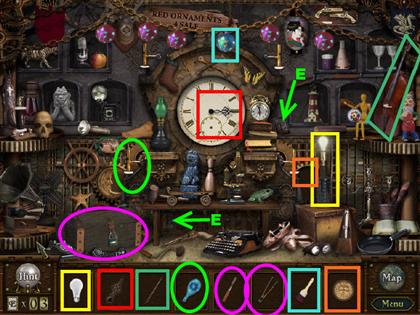
- The guide will show you the location of all the items in each Hidden Object scene. The walkthrough will name the items as they appear in the game.
- To use the screenshots in the game, just match the color of the inventory items with the color of the items highlighted in the scene.
- When you see more than one item with the same color in the screenshot, it means that several items will be used in the same spots. Keep in mind that when this happens, items must be used in a particular order or some of the items will not work.
INTRODUCTION
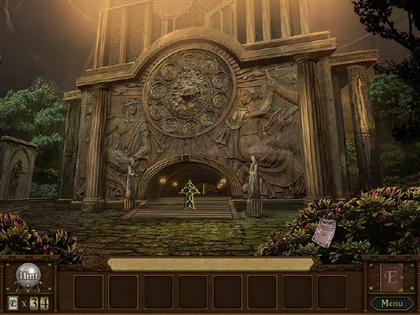
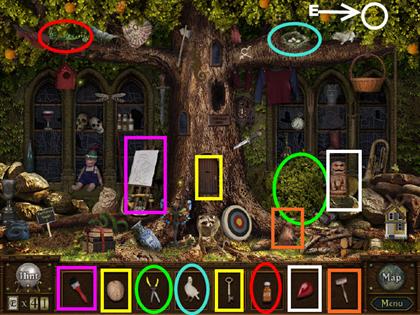
Outside Mansion
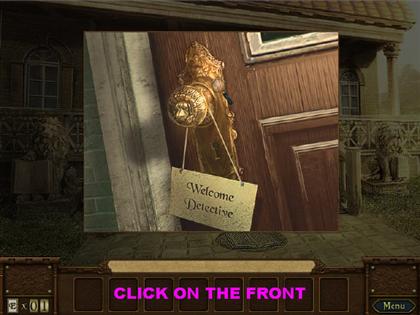
- Click on the door for a closer view and you will enter your first location.
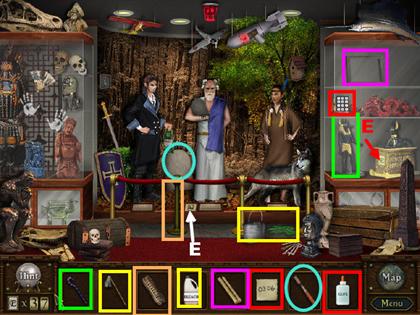
Entrance
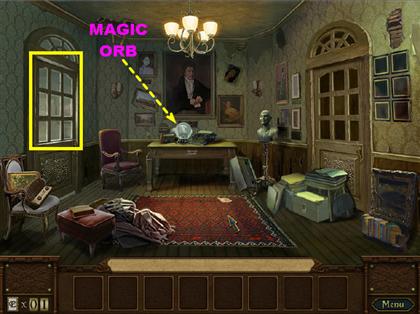
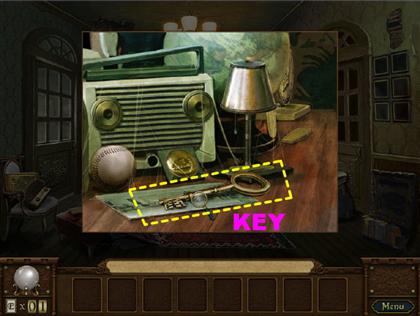
- When you enter the scene, click on the Orb that is on the desk. The crystal Orb will go into the lower left side of the page.
- Click in the same area that the Orb was located, on the desk, and you will get a closer view. You will find a key was hidden under the Orb; pick up the key.
- The pop-up window will close by itself, since you don’t need any other items from this spot.
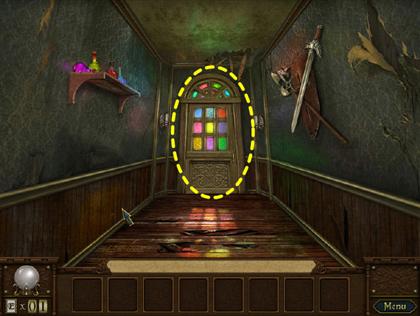
- Place the key on the door located on the left side of the scene. Once the door is open, go through it.
Hallway & Library
- Once you enter the hallway, there is nothing for you to do there for now. Go through the door in the back.
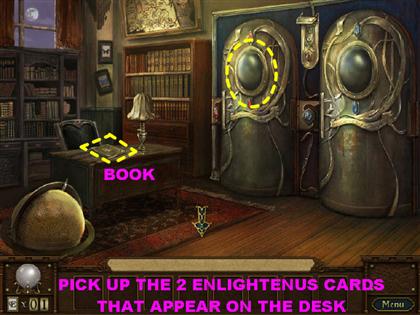
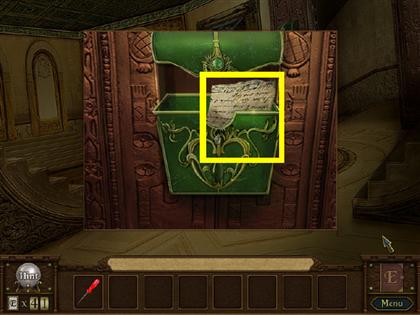
- Once you enter the Library, pick up the book that is on the desk.
- When the man stops talking, click on the machine’s panel to transport to the Enlightenus world.
- Once the smoke clears, the Hint Orb will be available to you. The Hint Orb gives you unlimited hints, but it needs time to recharge between uses. You can use the Enlightenus Cards that you find in each scene to speed up the recharging process.
- You will notice that the crystals on both doors are cracked at this time. Click on the “E” card that is in the lower left side of the scene.
- Pick up the two cards that are on the desk. Those two cards are Enlightenus Cards and they will be automatically added to the card that was already there.
- Click on the sparkly note that is on the door on the right side of the scene and you will be taken to a new scene.
The Mysterious Clockwork Labyrinth
- The game will take you through a quick tutorial.
- Some objects have to be placed in a particular order for it to work.
- Grab the Large Bulb from inventory and place it on the Lamp that is on the right side of the page.
- Grab the Bolt Cutter and place it on the Locked Chest that is in the lower left side of the scene.
- Pick up the Chisel and place it on the Generic Stone that appears once the chest is open.
- The Minute Hand goes on the One-Hand Clock in the center of the scene.
- The Red Paintbrush goes on the Blue Ornament that is hanging from the ceiling.
- The Sun Emblem goes in the Empty Slot that is in the lower right side of the scene.
- The Bow goes on the Antique Cello in the upper right side.
- The Deflated Balloon goes on the Helium Gas.
- At the end of this scene, you will receive an Eagle button.
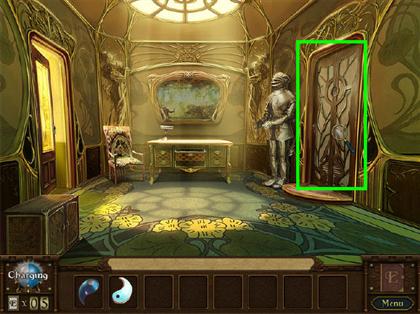
New Hallway
- You will be taken back to the Library.
- Place your cursor at the bottom of the scene, until you see an arrow appear.
- Click on the arrow to go to the Hallway. You will notice that the Hallway looks differently than it did earlier.
- You can explore the scene by clicking on the portrait, the shield, and the green mailbox.
- You cannot do anything in this scene for now; you can revisit it later.
- Place your cursor at the bottom of the scene to go back to the Entrance.
Mansion Entrance
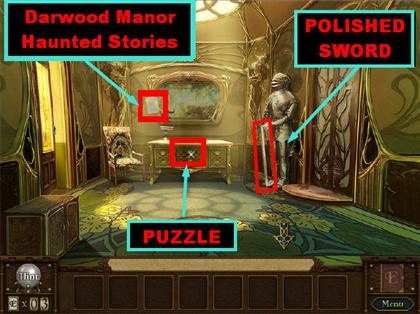
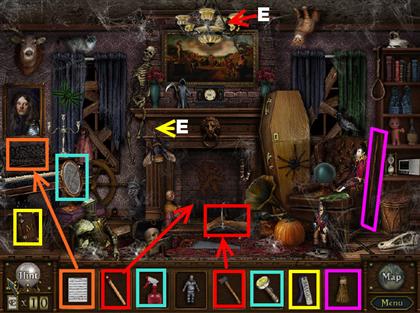
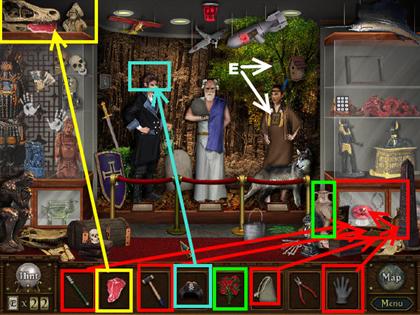
- Click on the Polished Sword that the knight is holding, and it will go into inventory.
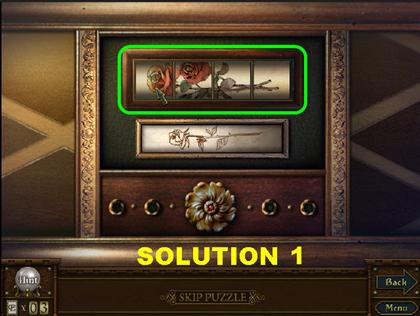
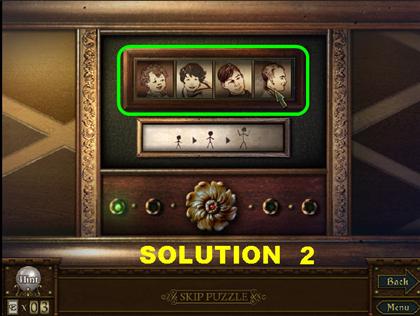
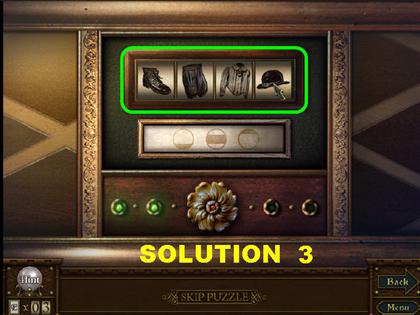
- Click on the drawer, and a puzzle will appear.
- The solutions to this puzzle will be shown in the next section.
- After the puzzle is solved, click on the sparkly note that is on the left side of the wall.
Drawer Puzzle 1 – Rose
Drawer Puzzle 2 – Chronology
Drawer Puzzle 3 – Clothes
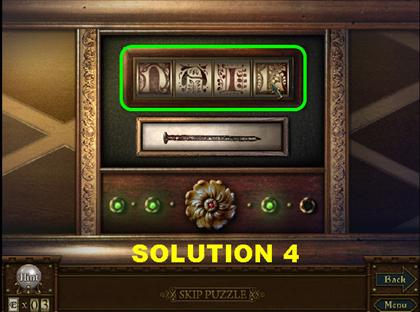
Drawer Puzzle 4 – Nail
Sturdy Hammer
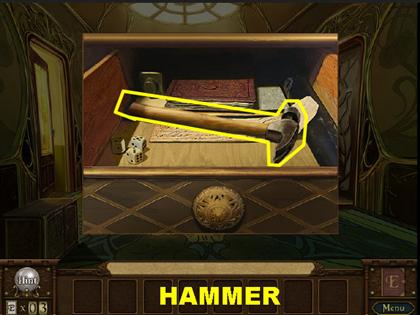
- Once you’ve solved the four puzzles, the drawer will open.
- Pick up the Sturdy Hammer that is in the drawer.
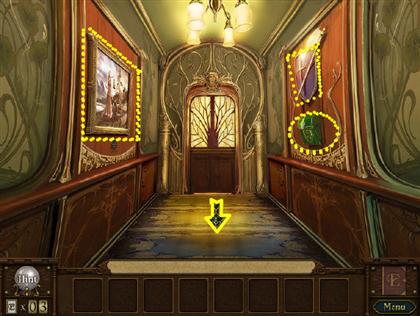
- After you return to the Entrance scene, click on the sparkly note that is on the left side of the painting and you will find a new scene.
Darkwood Manor Haunted Stories
- Place the Pumpkin Scooper on the Pumpkin with Seeds that is in the lower right side of the scene.
- Put the Carving Knife on the Pumpkin without Seeds in the lower right side.
- Place the Jack O’ Lantern Candle in the Jack O’ Lantern in the right corner.
- Place the Toy Train on the Railroad Track in the lower right side.
- The Piece of Cheese goes on the Mouse Trap that is in the far left side of the scene. Once the cheese is on the trap, the mouse will come out to eat it.
- The “Portrait Mood” Spray Bottle goes on the Sad Portrait on the left side of the scene.
- The Antlers go on the Deer Head in the upper left corner.
- Place the Diaper on the Baby Doll.
- At the end of this level you will receive a Bird Button.
- Once you get back to the Entrance, place your cursor at the bottom of the page to go to the Main Entrance.
Obtain the Yang Gem
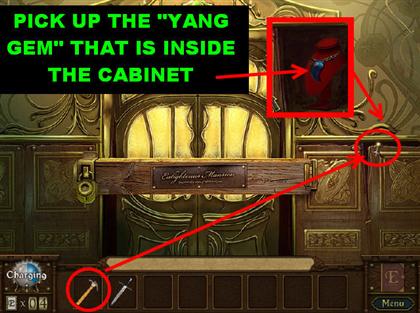
- Place the Sturdy Hammer from inventory on the nail that is on the right side of the door.
- When the door opens, grab the Yang Gem that is inside.
- Go back to the Hallway. Place your cursor at the bottom to get back to the Main Entrance.
- To get back to the Hallway from the Mansion Entrance, click on the door on the left side of the scene.
New Hallway
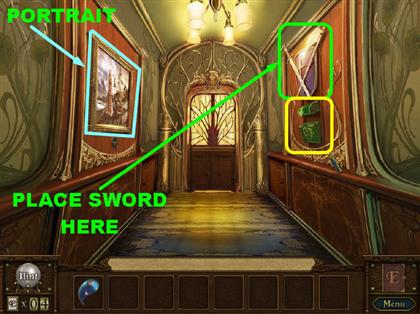

- Place the Polished Sword from inventory on the purple shield that is on the right side of the wall. This action will unlock the mailbox.
- Click on the green mailbox and you will get a closer view.
- Click on the page that is inside the open mailbox.
- After you complete the Hidden Object level, click on the portrait that is on the left side of the wall.
Strange Tales on Meadow Creek Farm
- Place the Rusty Key on the Rusty Lock and the barn door will open.
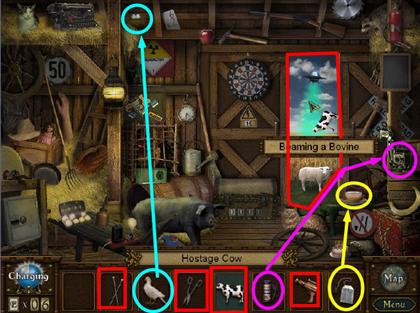
- Put the Hostage Cow on the “Beaming a Bovine” that is outside of the door. The Hostage Cow will hang on the beam.
- The UFO Escape Beam goes on the UFO. The UFO will then carry the cow away.
- The Shears go on the Sheep that is outside the door. The Shears will cut the wool from the sheep and fall to the ground.
- The Knitting Needles go on the Pile of Wool that is next to the Sheep. A Wool Sweater will fall on the ground next to the Sheep.
- The Tea Bag goes in the Tea Cup that is on the right side of the open door.
- The Film goes in the Camera.
- The Mother Bird goes on the Nest with Eggs, on the top left side of the barn.
- You will receive a Swan Button at the end of this level.
Obtain the Yin Gem
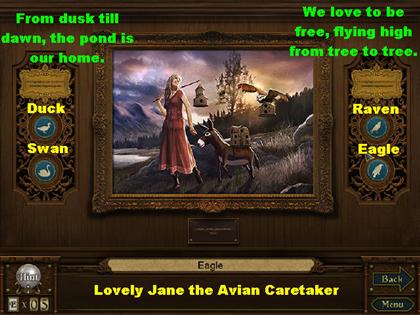
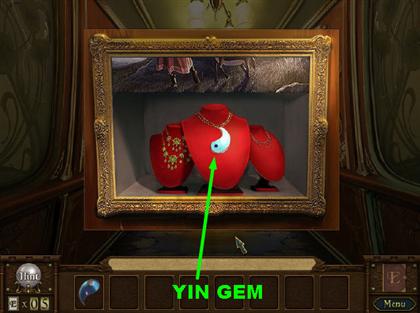
- You can access the portrait puzzle (Lovely Jane the Avian Caretaker) by clicking on the portrait that is hanging on the left side of the wall in the Hallway.
- The Duck Button will already be on the side of the portrait. There will also be three Buttons in your inventory.
- Your goal is to place the right Buttons in the slots that are on each side of the portrait.
- Click on the golden plaques that are on each side of the portrait. You will be able to read a clue for placing the Buttons.
- The solution is as follows:Left Side Clue: “From dusk till dawn, the pond is our home.” Solution: Duck and Swan. Right Side Clue: “We love to be free, flying high from tree to tree.” Solution: Raven and Eagle.
- Once the portrait is solved, it will lift up.
- Click on the red necklace holder that appears behind the portrait and you will get a closer view.
- Pick up the Yin Gem once you’re in the close-up.
- Go back to the Main Entrance by placing your arrow at the bottom of the page.
CHAPTER ONE
Yin & Yang Symbol Placement

- Click on the door on the right and you will get a closer view.
- Place the Yin and the Yang symbol from inventory on the close-up.
- The door will open; go through the door. Once you pass this section, you will not be able to go through the previous rooms.
Store Front
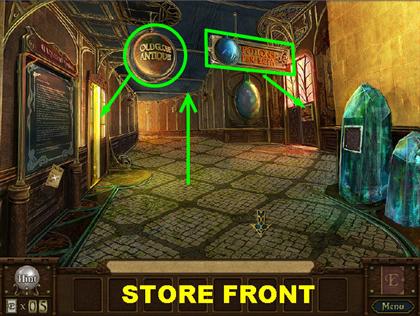
- On the left side of the scene, you have the Old Globe Antique shop.
- On the right side of the scene, you have the Potions Perfecta shop.
- You can place your arrow on top of the scene to go all the way in the back.
- For now, let’s go into the Old Globe Antique shop.
Old Globe Antique Shop
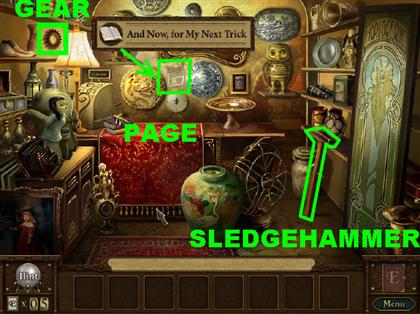
- Pick up the Gear that is on the top left side of the wall.
- Pick up the Sledgehammer that is in the far right side of the shop.
- If you click on the owl, you will notice that it is missing a red gem. Remember the location of the owl for a later time in the game.
- Click on the sparkly page that is on the back wall.
And Now, for My Next Trick
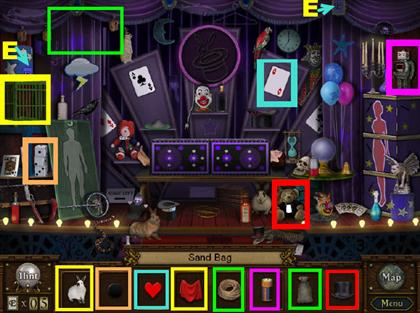
- Place the Caged Rabbit in the Performing Cage.
- The Rabbit’s Red Cloth goes on the “Hide the Rabbit” cage that the rabbit is now in.
- The Ropes for Pulley go on the Pulleys that are in the top left side of the scene. Make sure that the Ropes on Pulleys go in above the cloud.
- Place the Sand Bag on the Hook on Rope. It is at the end of the Rope with Pulleys.
- The Sand Bag will make the red cloth lift from the Rabbit’s Cage revealing a rooster instead of a rabbit.
- The Battery goes in the Powerless Robot.
- The “Ace of Hearts?” goes in the Heartless Ace.
- Place the Top Hat on the Magician Bear.
- Place the Black Dot on the Die with One Dot.
- Once you complete this level, you will receive a Saw Button.
- Exit the Antique Shop by placing your arrow at the bottom of the scene. You will be taken back out to the Store Front.
Potions Perfecta Puzzle
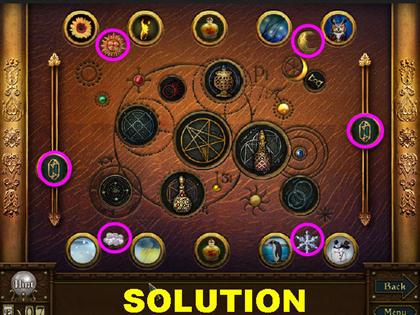
- Go through the door of the Potions Perfecta store and you will encounter a puzzle.
- The first thing you have to do is move the sliding symbols that are on each end of the puzzle. Then you have to place the buttons in the right places.
- Slide the symbols on each side of the puzzle until they match. Please look at the screenshot so you can look at the shape you need for both of them.
- Once the right symbols are placed, they will automatically lock into place and the rest of the buttons will be revealed.
- Now, you want to move the symbols around to match the four symbols in each corner: the Sun, the Moon, the Cloud, and the Snowflake.
- Place items that are related to each item.
- The solution is as follows:
- Top left side, next to the Sun – Place the Sunflower and the Flame.
- Top right side, next to the Moon – Place the Night Sky and the Owl.
- Lower left side, next to the Cloud – Place the Stars and the Lightning.
- Lower right side, next to the Snowflake – Place the Penguin and the Snowman.
- Place a bottle in the top center of the puzzle.
- Place the other bottle in the lower center of the puzzle.
- Once you complete this puzzle, the doors to the Potions Perfecta store will open.
Potions Perfecta
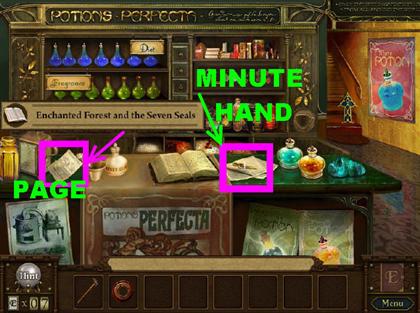
- Pick up the Minute Hand that is on top of the table, and it will go into inventory.
- Click on the sparkly page that is on the left side of the table and you will be taken to another scene.
Enchanted Forest and the Seven Seals
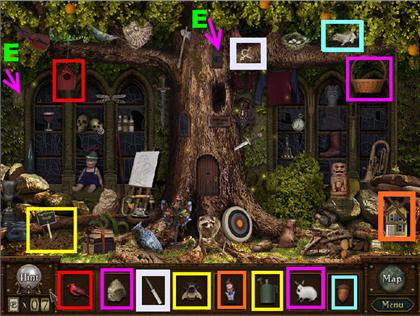
- Place the Watering Can on the Fast-Growth Seed in the lower left side of the scene. A Sunflower will grow.
- Place the Bee on the Sunflower.
- The Heavy Stone goes in the basket that is in the top right side of the scene.
- The basket will be weighed down by the stone, and a carrot will appear on the other end of the rope.
- Place the Hungry Bunny on the Food on Rope, where the carrot is.
- The Red Bird goes in the Empty Red Birdhouse.
- Give the Acorn to the Hungry Squirrel on the top right side of the scene.
- The Small Gnome goes in the Gnome House that is in the lower right side of the scene.
- The Carving Knife goes on the Unfinished Carving that is in the top center of the scene. It is on the tree branch.
- At the end of this scene, you will receive a Hook Button.
Attic
- Once you’re back at Potions Perfecta, place your arrow in the top right side of the page so you can go to the Attic.
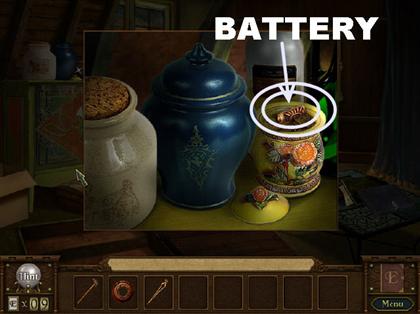
- In the attic, click on the sparkly vase that is on top of the cabinet and you will get a closer view.
- Pick up the Battery that is inside of the yellow open jar. The battery will go into inventory.
- You can click on the Portrait that is on the right side of the wall, but you do not have enough buttons to solve the puzzle at this time. You will come back to this puzzle later.
- Click on the books that are on the small blue table and a sparkly page will be revealed. Click on the page to visit the next scene.
The Mysterious Clocktower Labyrinth
- The Microscope Lens goes on the Lens-less Microscope.
- The Microscopic Slide goes on the Functional Microscope.
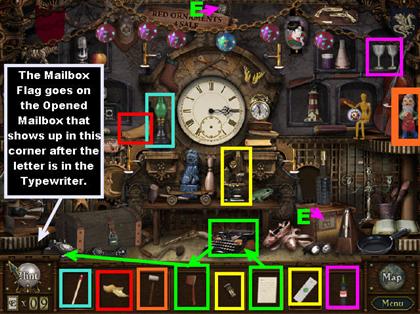
- The Untyped Paper goes on the Typewriter. Once you place the paper, a mailbox will slide out of the lower left corner.
- Place the Mailbox Flag on the Opened Mailbox.
- The Silver Stone Hammer goes on the Silver Stone Gnome.
- The Match goes on the Oil Lamp.
- Place the Winged Wooden Shoe on the Wooden Foot that is on the left side of the large clock.
- The Wine for Two goes on the Wine Glass Pair that is on the top right side of the scene.
- You will receive the Bullet Button at the end of this round.
Elevator
- To get out of the attic, point your cursor downwards and you will go down the steps.
- From the Potions Perfecta store, point your cursor down to go back outside, to the Store Front.
- Once you get outside, place your cursor upwards so you can go to the back of the scene.
- At this point you will be in front of the Aquatic Museum.
- Point your cursor on the right side of the page and go to the back of the scene.
- You will now be in front of the Elevator.
- Click on the sparkly note that is on the green stone, on the left side of the scene.
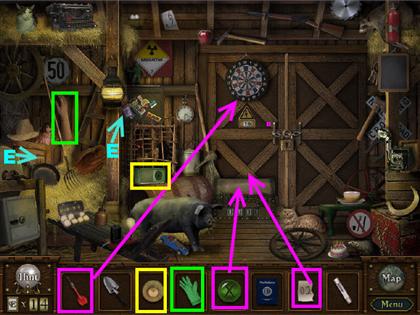
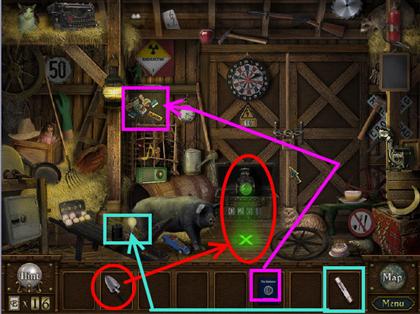
Darkwood Manor Haunted Stories
- Place the Axe on the Whole Logs in the lower center of the room. The chopped logs will go into the fireplace.
- Place the Match on the Filled Fireplace Rack and it will start a fire.
- Place the Mirror Cleanser on the Dirty Mirror; the reflection of a ghost will appear.
- The Warding Flashlight goes on the Mirror Spirit.
- The Magic Bookmark goes on the Magic Book that is on the lower left side of the scene.
- The Sheet Music goes on the Piano Music Stand that is on the left side of the room.
- The Tied Straws go on the Broom Handle that is on the right side of the room.
- Place the Prisoner Doll on the Noose that is hanging on the top right corner.
- At the end of this level, you will receive a Chisel Button.
Elevator
- As soon as you’re done with the Hidden Object scene, you will be taken back to the Elevator.
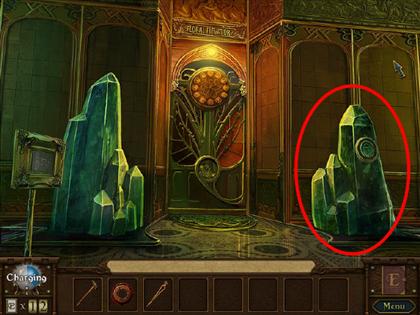
- Click on the large green stone that is on the right side of the scene and you will get a closer view.
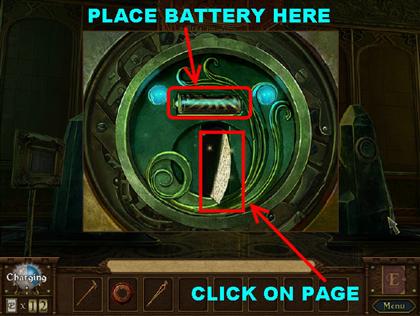
- Place the Battery in the empty slot that is on top, and a sparkly page will appear in the round slot.
- Click on the sparkly page to go to the next scene.
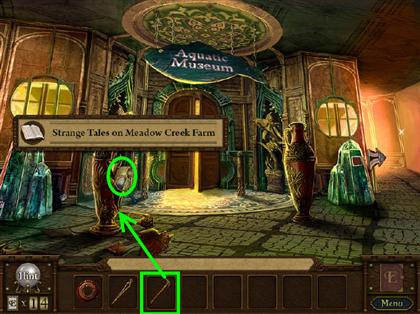
Strange Tales on Meadow Creek Farm
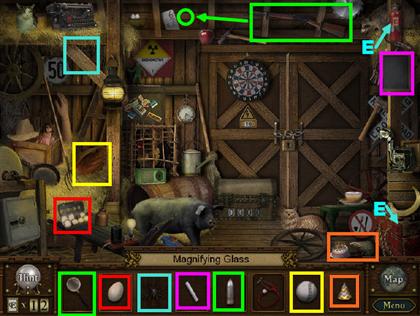
- The Long Bullet goes on the Shotgun and it will put a hole in the ceiling.
- Place the Magnifying Glass on the Beam of Light that is coming out of the hole in the ceiling.
- Place the Spider on the Spider Web located in the top left side.
- The Egg goes in the Egg Carton that is located in the lower left side of the scene.
- The Chalk goes on the Blackboard.
- The Tiny Party Hat goes on the Birthday Rat that is in the lower right side of the scene.
- The Baseball goes on the Baseball Glove that is on the lower far right side.
- The Thief’s Stethoscope goes on the Safe that is in the lower left corner.
- You will receive a Deer Horn Button at the end of this level.
Aquatic Museum
- After you finish the Hidden Object Game, click on the lower part of the scene and you will be back outside the Aquatic Museum.
- Place the Sledgehammer on the Metallic Vase that is on the left side of the Museum’s entrance.
- Once the Vase is cracked open, click on the page that is inside.
Strange Tales on Meadow Creek Farm
- Place the Dart on the Dart Board, and a piece of paper will fall to the ground below.
- Place the Paper with Code (02) on the other Paper with Code (61) that fell below the Dart Board.
- The chest will open, revealing a lantern.
- Place the Lantern lens on the Empty Lantern that is inside the chest. A green “X” will appear on the ground.
- Place the Shovel on the Lighted Floor, and Buried Coins will appear.
- Place the Radio Dial on the Ham Radio.
- The Green Glove goes on the Mannequin Hand that is on the left side of the scene.
- The Fuse goes in the Empty Bulb Box on the lower left side of the scene.
- The Passport goes on the Traveler’s Luggage that is close to the left side of the door.
- You will receive a Wood Button at the end of this level.
Matching Mini-Game
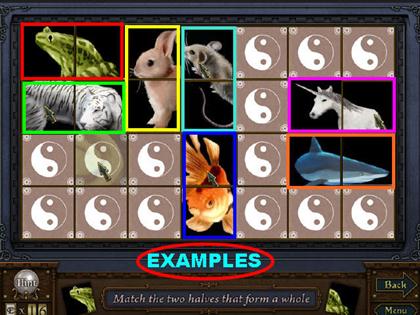
- Click on the green stone that is on the right side of the Museum’s Entrance and you will find a mini-game.
- The objective of this mini-game is to match the two halves that make a whole.
- You can click on a Hint Orb and it will show you up to three card pairs for free.
- Each time you use the Hint Orb, a green check mark will appear.
- Click on the picture and you will only see part of that picture.
- Find the matching pair, and both pieces will be eliminated.
- Keep in mind that the two halves may not always be facing the same direction. The screenshot shows you some sample solutions.
- Once this game is done, a page will appear on the screen. Click on the page to enter the next scene.
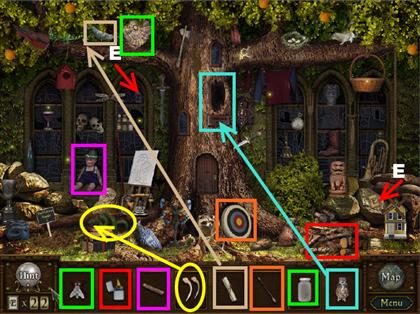
Journey to the Ancient Parthenon
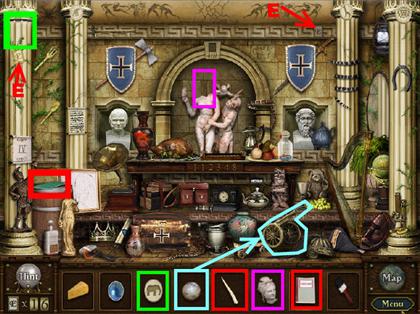
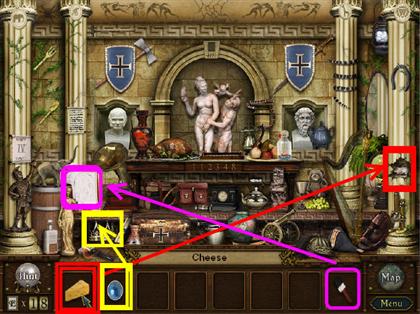
- The Origami Instruction goes on the Green Paper that’s on top of the barrel on the left side of the scene.
- The Elephant Emblem goes on the Emblem Slot located on top of the left column. A yellow beam of light will change the Elephant Origami into a regular elephant.
- Place the Ivory Tusk on the Elephant that is on top of the barrel.
- The Small Cannonball goes in the Cannon on the right side of the scene. The Cannon will put a hole in the column on the right. A mouse will be inside of the hole in the column.
- Give the Cheese to the Hungry Mouse that’s inside of the column on the right.
- Place the Royal Blue Gem on the Half-finished Crown.
- The Statue Head goes on the Statue in the back of the room.
- Place the Artist’s Brush on the Sketched Painting on the left side of the scene. The brush will reveal a picture on the frame.
- You will receive a Binocular Button at the end of this level.
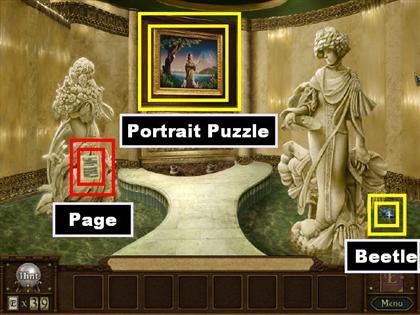
Fish Display
- Go inside the Aquatic Museum; look around.
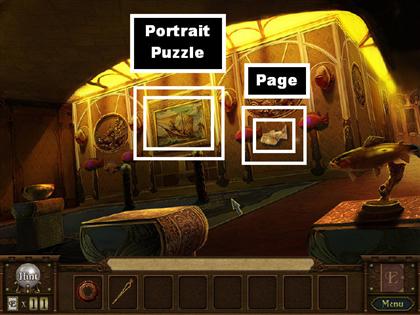
- There is a Portrait Puzzle on the wall.
- There is a sparkly page shaped like a fish; click on it and you will enter a new scene.
The Great Museum Caper
- The Hammer goes on the Thick Breakable Glass that’s in the lower left side of the scene. The glass will break, revealing a Clay Camel Pot.
- Place the Clay Camel Lid on the Clay Camel Pot that is inside the broken glass case on the right.
- The Alarm Panel goes on the Panel Slot on the left side of the back wall.
- Place the Alarm Disable Code on the Alarm Panel on the left side of the back wall.
- The Sponge for Dirty Glass Panel goes on the Dirty Handprints located on the glass case on the left side of the scene.
- The Blue Feather goes on the Headband located on the wolf that’s in the back of the room.
- The War Paint goes on the Warrior’s Face (the woman on the right).
- The Can of Oil goes on the Oil-less Lamp that the man in the back is holding.
- At the end of this level you will receive a Bait Button.
Obtain the Tea Cup Emblem
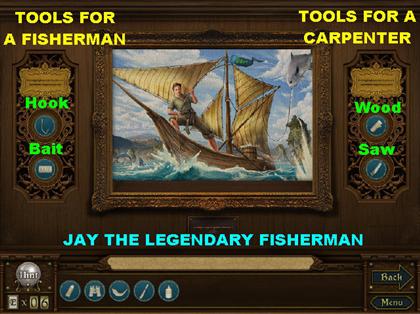
- Click on the Portrait on the wall to access the Jay the Legendary Fisherman puzzle.
- Click on the golden plaques that are on each side of the portrait. You will be able to read a clue for placing the Buttons.
- The solution is as follows:Left Side Clue: “Tools for a Fisherman.” Solution: Fishing Hook and Bait Right Side Clue: “Tools for a Carpenter.” Solution: Wood and Saw
- Once the portrait is solved, the portrait will lift up.
- Click on the Tea Cup Emblem that appears behind the portrait, and it will go into inventory.
Teacup Emblem Placement
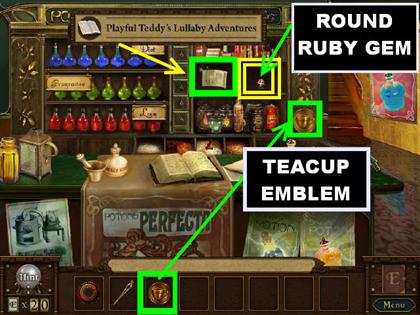
- From the Fish Display, go back to the Main Entrance by placing your arrow at the bottom of the page.
- From the Aquatic Museum Entrance, place your cursor at the bottom of the page.
- From the Store Front, go to the Potions Perfecta shop on the right side.
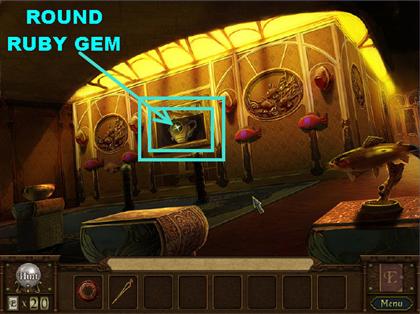
- Place the Teacup Emblem on the Slot with a Teacup Engraving. It is on the lower right side of the back wall.
- Once the Teacup Emblem is in place, a page and a Round Ruby Gem will be revealed on top of the cabinet.
- Pick up the Round Ruby Gem.
- Click on the sparkly page, and a new scene will open.
Playful Teddy’s Lullaby Adventures
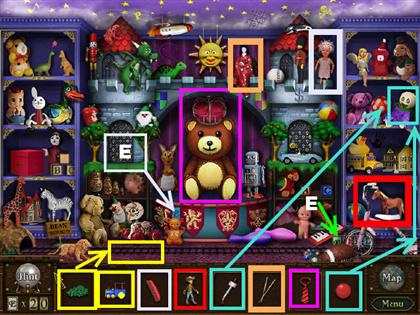
- Place the Bean Train on the Train Tracks.
- Place the Magic Beans on the Toy Cargo Train. The train will travel towards the tunnel in the lower left side.
- The Oversized Tie goes on the Big Bear.
- The Asian Styling Chopsticks go on the Geisha Doll in the top center of the scene.
- Place the Insta-Hair on the Bald Doll in the upper right side. That turns the doll into a Clown Doll.
- The Clown Nose goes on the Clown Doll.
- The Small Comb goes on the Doll with Messy Hair in the upper right side of the scene.
- Place the Rodeo Doll on the Toy Horse.
- You will receive a Hammer Button at the end of this level.
Obtain the Fish Emblem
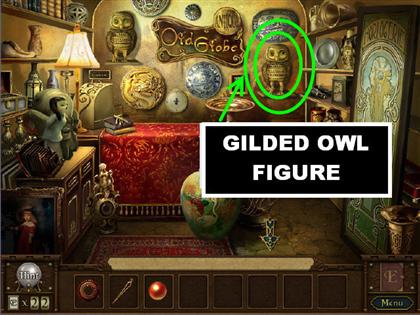
- Place your cursor at the bottom of the screen and go outside.
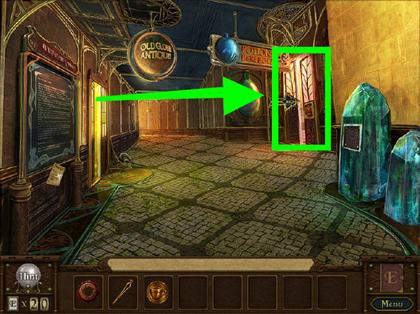
- Once outside, go to the Old Globe Antique shop on the left.
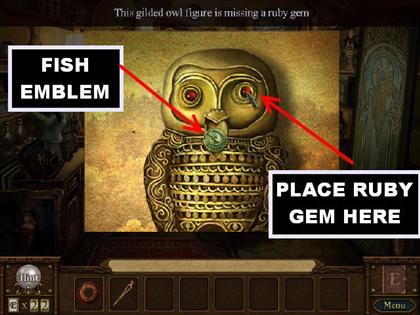
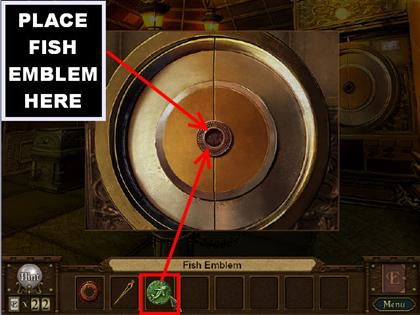
- Click on the Gilded Owl Figure and you will get a closer view.
- Place the Gilded Owl’s Ruby Gem on the right eye, and a Fish Emblem will appear on its beak.
- Click on the Fish Emblem, and it will go into inventory.
Unlock the Elevator
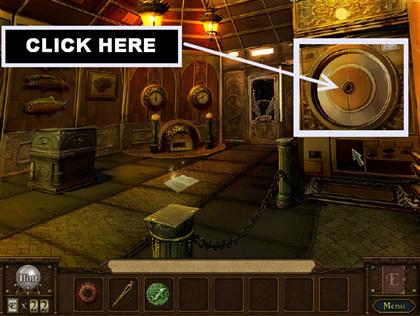

- From the Old Globe Antique shop, place your cursor at the bottom of the page and you will be back outside.
- Place your cursor on top of the scene to go back to the Aquatic Museum.
- Go into the Aquatic Museum and place your cursor on the right side of the page to go in the back of the Museum.
- Click the panel on the right side of the room and you will get a closer view.
- Place the Fish Emblem in the center of the Antique Machinery and the panel will be removed.
- Grab the Gear from inventory and place it on the Antique Machinery.
- Click on the Antique Machinery and you will learn that the Elevator is now unlocked.
Enchanted Forest and the Seven Seals
- Click on the sparkly page that is on the floor of the Control Room.
- Place the Fly on the Spider’s Web in the upper left side, and a Spider will appear.
- Place the Bug Jar on the Spider and you will capture the Spider.
- The Wooden Nose goes on the Noseless Doll that is on the far left side of the scene.
- The Owl goes in the Nocturnal Rest located in the hole of the tree. For the Owl to go in the hole, click on the plaque that is below the hole.
- Place the Campfire Lighter on the Logs in the lower right side, and it will make a fire.
- The Arrow goes on the Target that is on the lower center of the scene.
- The Fangs go on the Toothless Snake in the lower left side.
- Place the Small Letter on the Carrier Pigeon in the upper left corner.
- You will receive a Glue Button at the end of this chapter.
Obtain the Hour Hand
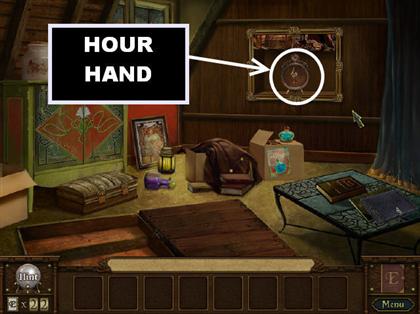
- At this point you need to go back to the Attic in the Potions Perfecta location.
- From the Control Room, click the bottom of the page to go back to the Fish Display room.
- From the Fish Display Room, click at the bottom of the page and you will be outside of the Aquatic Museum.
- From the outside of the Aquatic Museum, click the bottom of the page to reach the Storefront.
- From the Storefront, go into the Potions Perfecta store on the right.
- Once inside, click on the steps on the right side to go to the Attic.
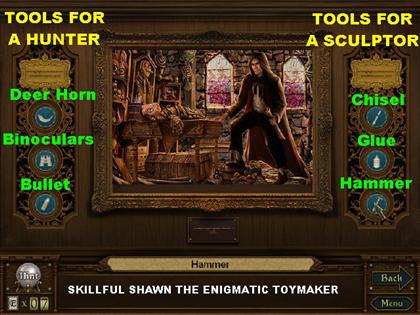
- Click on the Portrait that is in the back of the room for the Skillful Shawn the Enigmatic Toymaker puzzle.
- Click on the golden plaques that are on each side of the portrait. You will be able to read a clue for placing the Buttons.
- The solution is as follows:Left Side Clue: “Tools for a Hunter.” Solution: Deer Horn, Binoculars and Bullet. Right Side Clue: “Tools for a sculptor.” Solution: Glue, Chisel and a Hammer.
- Once the portrait is solved, the portrait will lift up. Click on the Hour Hand that appears behind the Portrait and it will go into inventory.
Unlock the Elevator
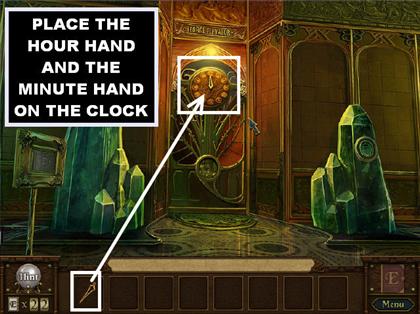
- At this point you need to go back to the Elevator.
- From the Attic, place your cursor on the steps in the lower left side.
- From the Potions Perfecta shop, place your cursor at the bottom of the page to go back outside.
- From the Store Front, place your cursor in the back of the scene to go back to the Museum.
- From the front of the Museum, place your cursor on the right side to reach the Elevator.
- Place the Minute Hand and the Hour Hand on the clock that is on the Elevator. Click on the clock, and the Elevator will start moving.
- The Elevator will be unlocked and you will be taken to the Underground Garden.
CHAPTER TWO
Great Tree Matching Mini-Game
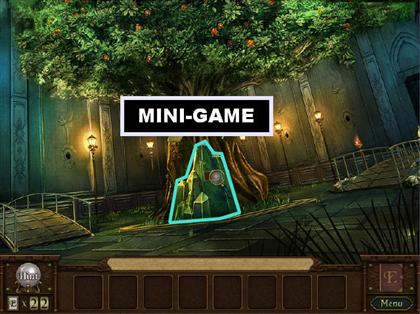
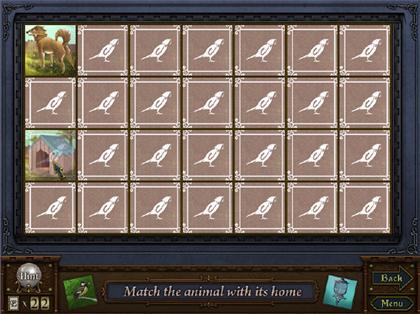
- When you get off the elevator you will be in front of the Great Tree.
- Click on the green stone and you will find a mini-game.
- The goal in this game is to match the animal with its home.
- This version of the game has a new twist to it. You will be able to see what’s behind the cards before you click on them.
- Just hover your mouse over any card and you will be able to see the image briefly.
- Match the image of the animal with its home and you will eliminate a pair of cards. Match all cards to win the game.
- Match the following items:Bat & Cave Bee & Beehive Bird & Birdcage Bird & Birdhouse Bird & Nest Dog & Dog House Goldfish & Bowl Horse & Stable Mouse & Mouse Hole Mouse & Mousetrap Penguin & Ice Spider & Web Worm and Earth
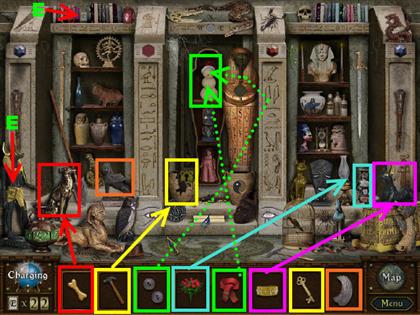
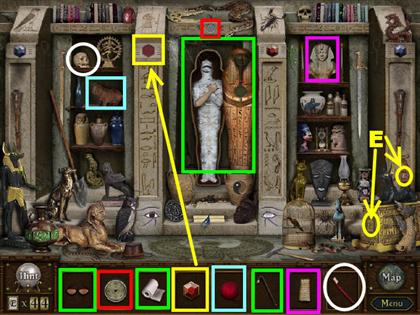
A Tomb Amidst the Shifting Sands
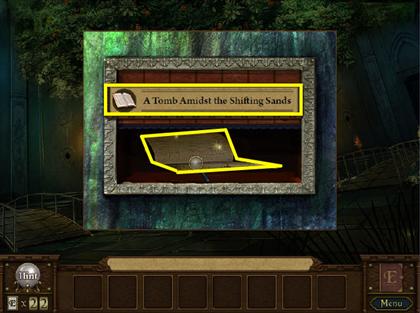
- Once you’re done with the mini-game, the compartment on the stone will open. Click on the sparkly page to enter a new scene.
- Place the Hammer on the Cracked Pot, and a Coffin Lock will be revealed.
- Place the Tomb Key in the Coffin Lock, and the Coffin Lid will open.
- The Snowman Scarf goes on the Snowman that is inside of the Coffin.
- Place the Black Buttons on the Blind Snowman.
- Give the Golden Bone to the Golden Dog Statue in the lower left side of the scene.
- The Egyptian Dog Collar goes on the Dog Ark Statue in the lower right side.
- Place the Stone Wing on the Wing-less Sphinx on the left side.
- The Flowers go in the Vase in the lower right side.
- You will receive a Strawberry Button at the end of this level.
Elevator
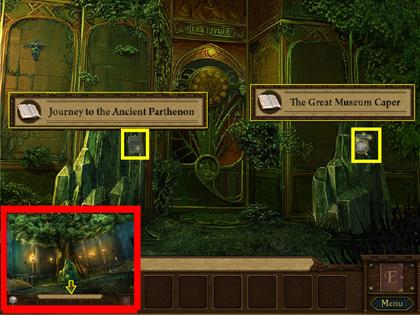
- You will automatically be taken back to the Great Tree location.
- Click at the bottom of the page to go back to the Elevator.
- There are two sparkly pages in this scene.
- The stone on the left opens up the “Journey to the Ancient Parthenon” location.
- The stone on the right opens up the “The Great Museum Caper” location.
Journey to the Ancient Parthenon
- The Crusader Axe goes on the Crusader Shield in the upper left corner.
- The Crusader Sword goes on the Crusader Shield in the upper right corner.
- Once the two shields are complete, the Treasure Chest at the bottom of the scene will open up. Inside the Chest you will see a head with a blonde wig on it.
- The Styling Scissors go on the Golden Hair in the lower center of the scene.
- The Glasses go on the Squinting Statue on the left side of the scene.
- The Slab with etched Five goes over the Etched Slab on top of the scene.
- The “Time reverse” Bandages go on the Over-Cooked Turkey in the center of the scene.
- The Wet Sponge goes on the Dirty Statue in the lower right side of the scene.
- The Red Bow Tie goes on the Bow-less Bear.
- At the end of this level you will receive a Green Grape Button.
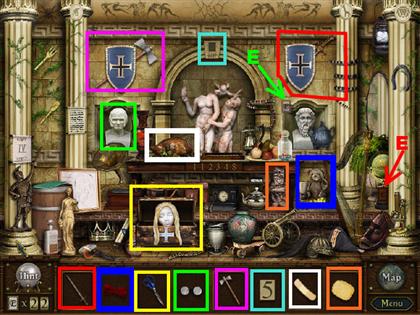
The Great Museum Caper
- The next four steps have to be performed in the correct order.
- The Sledgehammer goes on the Smashable Crate in the lower right side of the scene. Once the crate has been smashed, the Thin Glass will be visible.
- Place the Glass Cutter on the Thin Glass in the lower right side. The Precious Ruby will be exposed at this time.
- The Thief Glove goes on the Precious Ruby. Once the Precious Ruby is removed, there will be a space for a weight.
- Place the Sand Bag in the Missing Weight spot in the lower right side of the glass case.
- The Prehistoric Meat goes on the Dino Head in the upper left corner.
- The Flowers go in the Vase in the lower right side of the scene.
- The Pirate Hat goes on the Pirate Head in the back of the scene.
- Place the Wire Cutters on the Bomb on Wires that is in the upper right side.
- You will receive a Coconut Button at the end of this level.
Pond
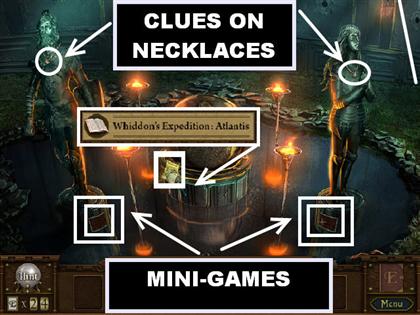
- From the Elevator scene, point your cursor downwards to go back to the Great Tree location.
- From the Great Tree, point your cursor to the right to enter the Pond.
- If you click on the bottom of each statue, you will open two matching mini-games.
- If you click on the sparkly paper, you will be taken to a new scene.
- If you click on the necklaces of both statues, you will receive a special clue which will help you in the Portrait Puzzles.
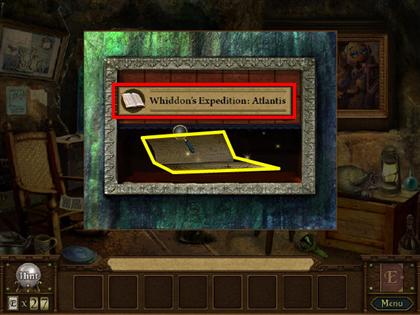
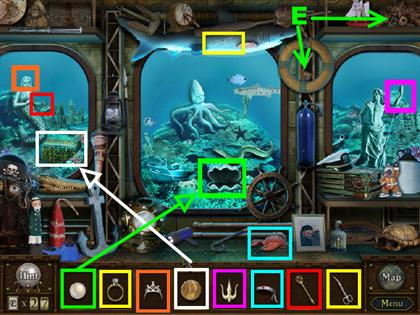
Whiddon’s Expedition: Atlantis
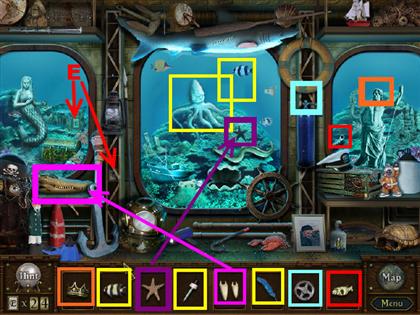
- Place the Feather on the Ticklish Squid that is in the center of the scene. Once you give him the Feather, some Messy Ink appears in the water.
- Place the Pipette on the Messy Ink, and a Zebra Fish will appear.
- Place the Twin Zebra Fish on the Zebra Fish and both will be in the water.
- The Valve goes in the Inoperable Tank on the right side of the screen.
- The Deflated Blowfish goes in the Tank Hose located on the right side of the window.
- Place the Teeth in the Skull with Missing Teeth on the left side of the scene.
- The Starfish goes on the Fish Engraving that is close to the Squid.
- The Poseidon Crown goes on the Poseidon Statue’s Head that is on the right side of the scene.
- You will receive a Watermelon Button at the end of this round.
Obtain the Machete
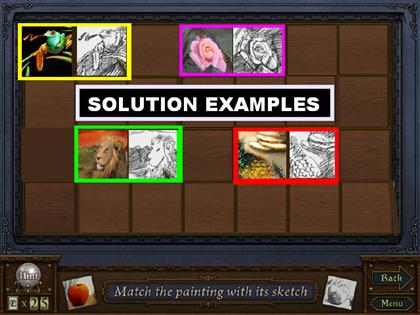

- Click on the plaque located at the bottom of the Male Statue and you will open a mini-game.
- The goal in this game is to match the painting with its sketch.
- Pick up the Machete that appears inside.
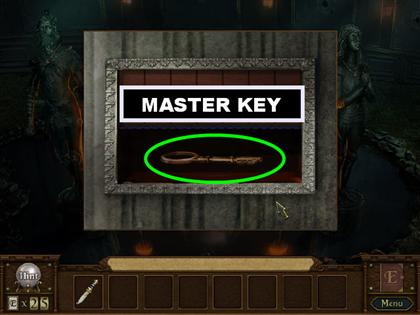
Obtain the Master Key
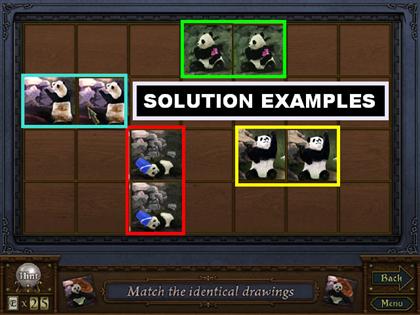
- Click on the plaque located at the bottom of the Female Statue and you will open a mini-game.
- The goal in this game is to match identical drawings.
- Since this mini-game only has pandas to choose from, which all look similar, it is best to start matching the ones that have something that’s easy to recognize.
- Pick up the Master Key that appears inside, once the game is completed.
Female Necklace Inscription
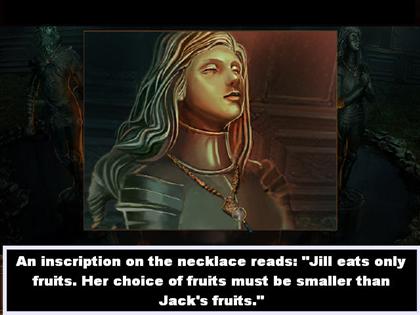
- Click on the necklace of the Female Statue and you will be able to read what her necklace says.
- You will need to remember this clue when you are solving one of the Portrait Puzzles.
- An inscription on the necklace reads: “Jill eats only fruits. Her choice of fruits must be smaller than Jack’s fruits.”
Male Necklace Inscription
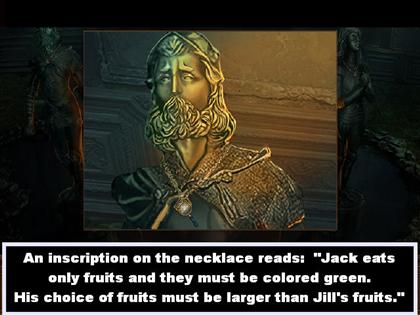
- Click on the necklace of the Male Statue and you will be able to read what his necklace says.
- You will need to remember this clue when you are solving one of the Portrait Puzzles.
- An inscription on the necklace reads: “Jack eats only fruits and they must be colored green. His choice of fruits must be larger than Jill’s fruits.”
Entrance
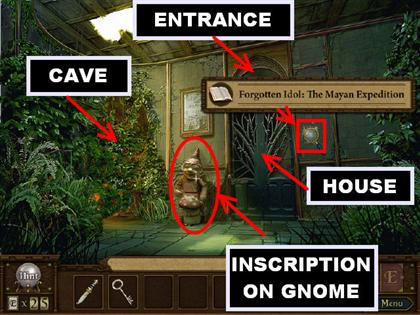
- Point your arrow at the bottom of the scene to get back to the Great Tree.
- From the Great Tree, point your arrow to the left side of the screen. You will now be at the Entrance.
- In this scene, you will find several items.
- Click on the Gnome and you will receive a clue.
- Click on the sparkly paper and you will enter a new scene.
- The entrance to the House is through the door.
- The entrance to the Cave is through the bushes on the left.
Gnome Inscription

- Click on the Gnome and you will get a closer view.
- An inscription on the necklace reads: “In the aquatic Elven home, West is what governs earth and East is what governs heaven.”
- This clue will be helpful when you are trying to place the Buttons on one of the Portrait Puzzles.
Forgotten Idol: The Mayan Expedition
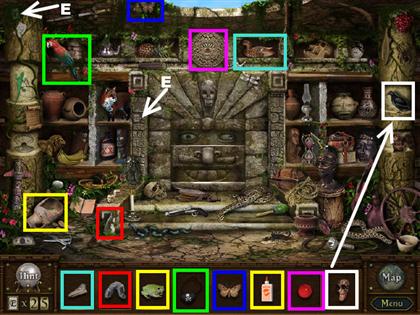
- Click on the sparkly note that is on the right side of the door and you will enter a new scene.
- The Pottery Glue goes on the Broken Pot that is in the lower left side. Once the Glue is on the Pot, a Lily Pad appears on top of the fixed Pot.
- Place the Frog on the Lily Pad Pot in the lower left side of the scene.
- The Shaman Mask goes on the Shaman Crow in the upper right side of the scene.
- The Ruby Pupil goes on the Stone Eye Disc, on top of the scene.
- The Twin Moth goes on the Brown Moth that is in the upper left side of the scene.
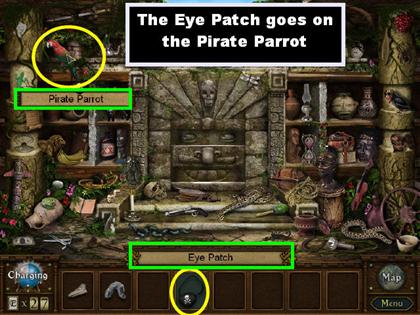
- The Eye Patch goes on the Pirate Parrot in the top left side of the scene.
- The Tail goes on the Unbalanced Squirrel in the lower left side of the scene.
- The Beak goes on the Beakless Duck in the upper right side.
- You will receive a Green Apple Button at the end of this level.
Unlock the House
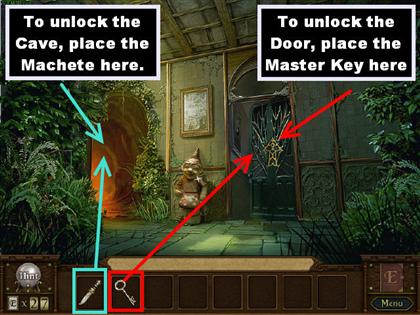
- From the Entrance, place the Machete on the bushes that are on the left side of the scene.
- The Machete will cut away all the bushes from the entrance.
- From the Entrance, place the Master Key on the door and the door will open.
- You can go into any entrance you prefer but for the purposes of this guide, we will go into the Cave first.
Cave
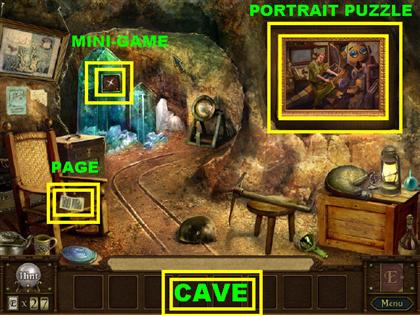
- On the top left side of the Cave, we have a Portrait Puzzle. You cannot solve it now because you do not have enough buttons.
- In the back of the Cave, click on the plaque that is on the green stone and a mini-game will appear.
- On the rocking chair you will find a sparkly page. Click on the page to enter a new scene.
Matching Mini-Game
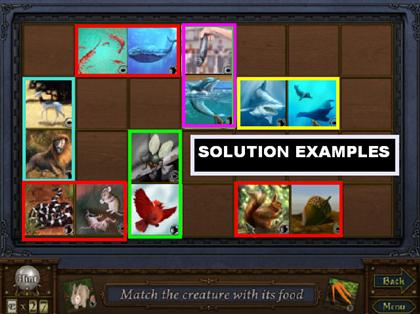
- Your goal in this mini-game is to match the creature with its food.
- Some of the solutions are listed below. The rest of the solutions are shown in the screenshot.Bird & Fly Bunny & Carrots Dog & Dog Food Dolphin & Fish Fish & Worm Frog & Fly Giraffe & Tree Monkey & Bananas Mouse & Cheese Snake & Mouse Squirrel & Acorn
- Click on the sparkly paper that appears at the end of this game to enter the next scene.
Whiddon’s Expedition: Atlantis
- Place the Surgical Scissors on the Loose Stitches on the Shark in the ceiling. Once the Stitches are cut, a Plastic Hand will pop out.
- Place the Diamond Ring on the Plastic Hand that is sticking out of the Shark.
- The Martial Arts Bandana goes on the Kung Fu Lobster in the lower right side of the scene.
- The Royal Scepter goes on the Mermaid’s Hand.
- The Tiara goes on the Mermaid Statue’s Head.
- The Sharp Prong goes on Poseidon’s Hand.
- The Gold Coin goes on the Gold Chest.
- The Pearl Goes in the Large Clam.
- You will receive a Large Banana Button at the end of this level.
And Now, for My Next Trick
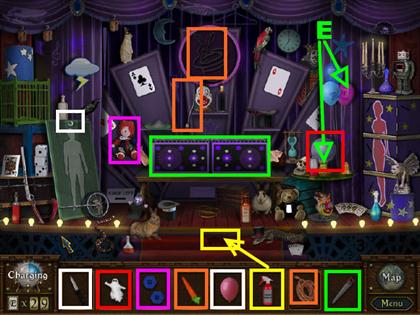
- Click on the sparkly paper that is on the rocking chair to enter the next scene.
- The Balloon goes on the Balloon Hook that is on the left side of the scene. It is on the board with the chalk outline of a male body.
- The Throwing Dagger goes on the Pop the Balloon on the left side of the scene.
- The Extension Cord goes on the Short Cord that is above the Wooden Box. The neon sign will light up.
- Place the Glowing Carrot on the Neon Rabbit.
- The Ghost Projection goes on the Crystal Ball on the right side of the scene.
- The Saw goes on the Wooden Box that is in the center of the scene.
- The Carpet Cleaner goes on the Carpet Stain that is in the lower center of the scene.
- The Button for Eyes goes on the Eyeless Clown Doll that is on the left side of the Wooden Box.
- You will receive a Lettuce Button at the end of this level.
Obtain the Blue Sapphire

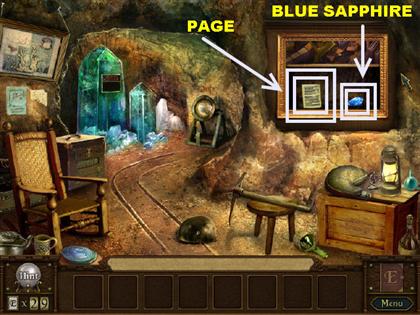
- Click on the Portrait to access the Colin the Whiz-kid Inventor puzzle.
- Click on the golden plaques that are on each side of the portrait. You will be able to read a clue for placing the Buttons.
- The solution is as follows:Left Side Clue: “Food that Jack likes to eat.” Solution: Green Apple & Watermelon. Right Side Clue: “Food that grows on trees.” Solution: Coconut & Big Banana.
- Once this Puzzle is solved, pick up the Page and the Blue Sapphire that appears underneath the Portrait.
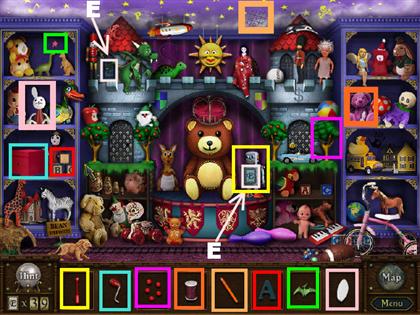
Playful Teddy’s Lullaby Adventures

- The White Ink Spray Can goes on the “Striped Horse?” Once you place the ink, a Unicorn will be revealed.
- Place the Horn on the “Hornless Unicorn?” It will become a Unicorn at that point.
- The Gold Knob goes on the Knobless Door on the left side of the scene.
- The Green Worm goes on the Bitten Apple that is on the left side of the scene.
- The Piano Key goes on the Missing Key of the red keyboard on the right side of the scene.
- The B Block goes on the A and C Blocks on the right side of the scene.
- The Yellow Halo goes on the Halo-less Angel Doll.
- The Knight Doll goes on the Knight-hungry Dragon in the upper left side of the scene.
- You will receive a Cloud Button at the end of this level.
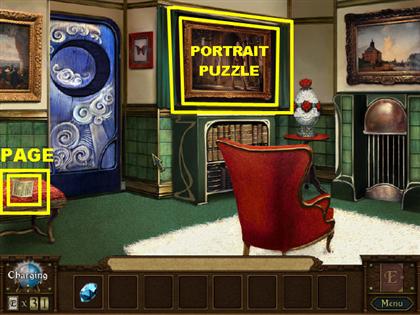
Living Room
- From the Cave, place your cursor at the bottom of the scene to go back outside.
- Enter the door on the right.
- There is a Puzzle Portrait on the right side of the scene.
- You can click on the sparkly page in the lower left side and you will enter a new scene.
The Mysterious Clockwork Labyrinth
- The Thinking Cap goes on the Thinking Gargoyle.
- The Unfried Egg goes in the Frying Pan that is in the lower right side.
- The Plastic Eye goes on the Plastic Skull on the left side of the scene.
- Place the Red Dragon Stitching on the Blank Red Flag in the upper left corner.
- The Envelope for Stocking goes on the Stocking that is next to the big clock.
- Place the Taste for Poison (teeth) on the Poisonous Apple in the upper left side of the scene.
- The Candles go on the Shiny Candelabra that is in the lower right side of the scene.
- The Doll Spirit goes on the Wooden Doll that is on the right side of the scene.
- You will receive a Potato Button at the end of this level.
Obtain the Ring
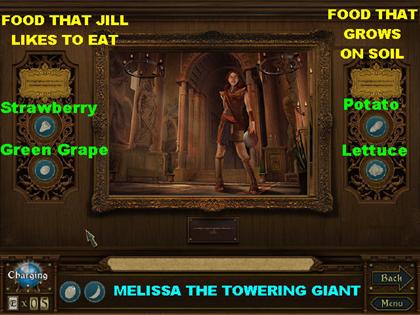

- Click on the portrait to access the Melissa the Towering Giant puzzle.
- Click on the golden plaques that are on each side of the portrait. You will be able to read a clue for placing the Buttons.
- The solution is as follows:Left Side Clue: “Food that Jill likes to eat.” Solution: Strawberry & Green Grape. Right Side Clue: “Food that grows on soil.” Solution: Potato & Lettuce.
- Once the portrait lifts up, pick up the Ring and the Page that is inside.
Journey to the Ancient Parthenon
- The Pickaxe goes on the Cracked Ceiling. A beam of light will come out as soon as the ceiling is cracked.
- The Key in Ice goes on the Warm Light at the end of the light beam. The light melts the ice, and the key appears.
- Place the Locked Box on the Key on Tray that is below the light beam. The Box will open, and gold coins will be inside.
- The Record goes on the Phonograph located on the left side of the scene.
- The Gilded Plate goes on the Gilded Silverware that is on the top left side of the wall.
- The Correction Pen goes on Fibonacci 4, located on the set of numbers that are on the piece of wood in the back of the scene.
- The Blue Feather goes on the Featherless Hat in the lower right side.
- The Tweezers belong in the Incomplete Ship in a bottle that is on the right side of the scene.
- You will receive a Dirt Button at the end of this level.
Ring & Blue Sapphire Placement
- Once you leave the Living Room, click at the bottom of the scene to go back outside.
- Once you’re outside, place your cursor at the bottom of the page.
- Once you’re in the Great Tree, click on the right side of the screen so you can go back to the pond.
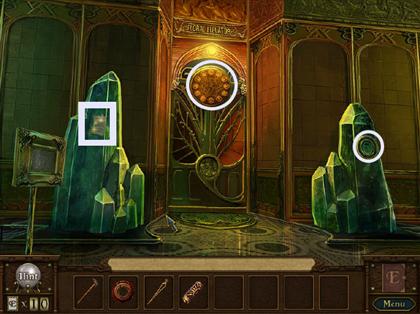
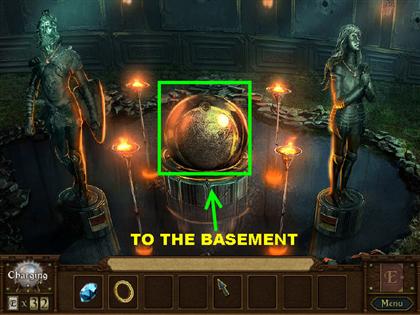
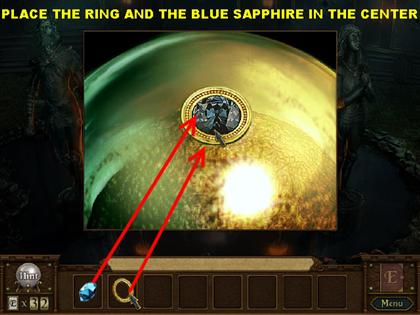
- Click on the large gold sphere and you will get a closer view.
- Place the Ring in the center of the sphere.
- Now, place the Blue Sapphire in the center of the sphere.
- The pop-up window will disappear.
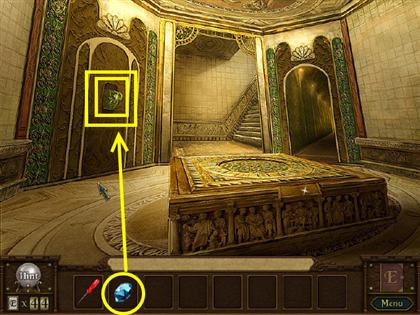
- Click on the sphere again and you will enter a new location: the Basement.
Basement
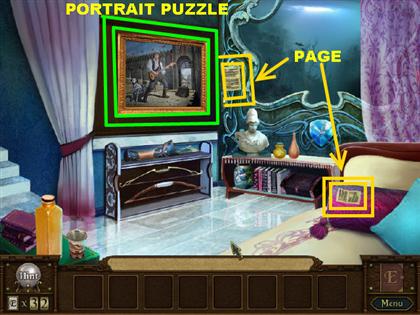
- There is a Portrait Puzzle on the wall.
- There is a sparkly page on the pillow that is on the right side of the scene.
- There is another sparkly page that is located on the right side of the Portrait Puzzle.
- Click on one of the pages to enter a new scene.
A Tomb Amidst the Shifting Sands

- The Red Sun Emblem goes on the Sun-engraved Coffin Lid. Once the Sun Emblem is on, the Coffin will open up.
- Place the Skeleton Arm on the Skeleton that is inside the Coffin.
- The Can of Oil goes on the Dry Torch on the left edge of the scene. This will oil the torch.
- The Match goes on the Oiled Torch.
- The Black Orb goes on the eye Engraving that is at the bottom of the third column.
- The Anubis Spear goes on the Anubis Statue on the left side of the scene.
- The Yang Gem goes on the Yin Pot that is in the center of the scene.
- The Black Paint goes on the “Black Cat?” on the right. The cat is actually painted in gold before the paint is applied to it.
- You will receive the Moon Button at the end of this round.
And Now, for my Next Trick
- The Metal Trigger goes on the Incomplete Rifle on the left hand side. Once the trigger is attached, a flag will pop out of the rifle.
- Place the POW Patch on the Rifle with Flag.
- The Sun Emblem goes on the Celestial Slot that is located on the left side of the Wooden Box.
- The Bell Handle goes on the Bell that is on the small round table on the right.
- The Three Swords go on the Cabinet with Slots on the right side of the scene.
- The Water Bottle goes on the Sun and Water Hat located in the lower center. Flowers will pop out of the hat after the water is added.
- The Magic Wand goes on the Magic Hat that is in the center of the stage.
- The Lighter goes on the Plate of Gunpowder that is in the center of the stage.
- You will receive the Wave Button at the end of this level.
Obtain the Moon Emblem
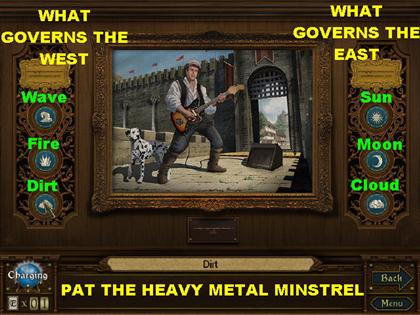
- Click on the Portrait that is in the Basement to go to the Pat the Heavy Metal Minstrel puzzle.
- The Fire Button and the Sun Button will already be on the Portrait.
- Click on the golden plaques that are on each side of the portrait. You will be able to read a clue for placing the Buttons.
- The solution is as follows:Left Side Clue: “What governs the West?” Solution: Wave, Fire & Dirt. Right Side Clue: “What governs the East?” Solution: Sun, Moon & Cloud.
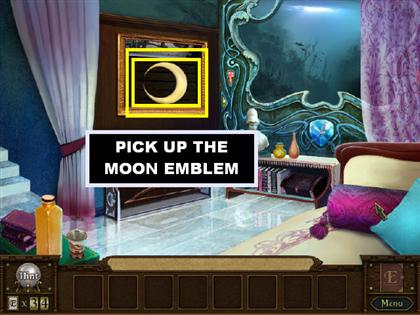
- Once the portrait lifts up, pick up the Moon Emblem that is inside.
Placing the Moon Emblem
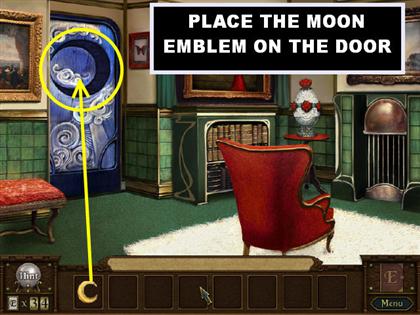
- From the Basement, go left to exit out of that scene.
- From the Pond, exit at the bottom of the scene.
- From the Great Tree, exit on the left side.
- From the Entrance, go through the Door to get back to the Living Room.
- In the Living Room, place the Moon Emblem on the blue door. The door will open; go through the door.
CHAPTER THREE
Garden & Entrance
- You can read the page in the lower right side of the scene if you want.
- Go through the steps to enter the Mansion.
- There are two sparkly pages in the Hallway: one on the left side of the wall, and one on the right side of the wall.
- You can click on either page to start looking for items within the scenes.
Majestic Theater of Nobel Hill
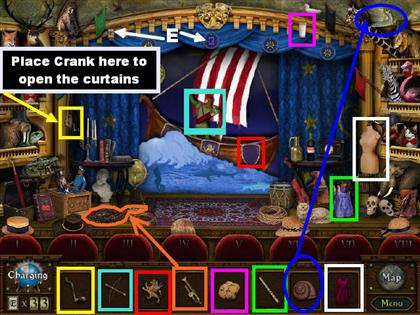
- The Handle goes on the Crank that is in the upper left side of the scene. Once the Crank goes on the Handle, the curtains will open.
- The Bow and Arrow go on the Archer that is on the boat.
- The Lion Emblem goes on the purple Shield that is on the side of the boat.
- The Flute goes on the Flutist Doll in the lower right side of the scene.
- Place the Shell on the Shell-less Slug in the upper right corner.
- The Dress goes on the Bare Mannequin on the right side of the stage.
- The Bedtime Cookie goes with the Warm Milk that is in the top right side of the scene.
- The Trumpet goes with the Horn-blowing Snake that is on the lower left side of the stage.
- You will receive a Dragon Button at the end of this level.
Darkwood Manor Haunted Stories
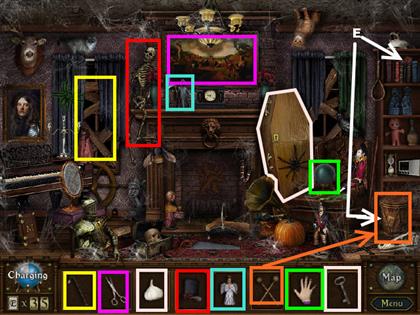
- The Key goes in the Coffin Lid. Once the key has been inserted, the Coffin Lid will open up and a Vampire will appear.
- Give the Garlic to the Vampire, and it will disappear from the Coffin.
- Place the Cut-the-painting Scissors on the Rippable Painting in the top center of the scene. You will find a treasure chest behind the ripped painting.
- The Hand of Forecasting goes on the Crystal Ball on the right side of the room.
- The Crowbar goes on the Window Boards that are on the left side of the scene.
- The Top Hat for Bonehead goes on the Skeleton Gentleman on the top left side.
- Place the Angel Figurine on the Death Figurine that is on top of the mantle. The Angel Figurine will then go on the opposite side of the mantle.
- The Drum Mallets go on the Rain Drum that is in the lower right corner. It will begin raining after it has been placed.
- You will receive a Cowboy Hat Button at the end of this level.
Ground Floor

- Once you’re done with the scenes, place your cursor on top of the steps to reach the Ground Floor.
- In the Ground Floor, you have a green mailbox on the left side of the wall and a sparkly paper on the side of the table.
- There’s also a missing plaque in front of the table. Remember that spot for later.
- If you click on the green mailbox, you will notice that it has a gem missing. Once you find the gem, return to this spot.
- There are two exits in this room:
- The one on the right will lead you to the Fountain Room.
- The one in the middle will lead you to the First Floor.
The Great Museum Caper
- The Bleach goes in the Empty Bucket that is in the lower right corner. The Bucket will fill with Bleach.
- The Mop goes on the green Stain next to the Bucket.
- The Panel Code goes on the Case Panel that is on the right side of the scene. The previous action opens up the glass case.
- The Rolled Up Painting goes in the Empty Frame inside the glass case on the right.
- The Egyptian Scepter goes in the Anubis Statue that is inside the glass case on the right.
- Place the Fix-All Glue on the Shattered Pieces that are inside of the glass case. Second shelf from the top, next to the red dragon figure.
- The Polishing Brush goes on the Tarnished Pole located in the lower center of the scene.
- The Chisel goes on the Smooth Tombstone located behind the people on the stage.
- You will receive a Helmet Button at the end of this round.
Fountain Room
- From the Ground Floor, go to the arch on the right so you can enter the Fountain Room.
- In this room you will have a Portrait Puzzle, a sparkly page, and a blue Beetle.
- Pick up the blue Beetle that is in the lower right side of the room, and it will go into inventory.
- Do not click on the Portrait Puzzle right now if you don’t have enough buttons to solve it.
Playful Teddy’s Lullaby Adventures
- The Antenna goes on the Short Reception Robot that is in the center of the scene.
- Place the Crank on the Jack in the box that is on the left side of the scene.
- The Five Red Marbles go on the Tree on the right; it will become an Apple Tree.
- The Letter A goes on the Block Stack that is on the left side of the scene.
- The Piece of White Plastic goes on the Rabbit missing an Ear on the left side of the room.
- The Needle and Thread go on the purple Torn Bear in the upper right side of the scene.
- The Paper Pterodactyl goes on the Chewed Gum above the Paper Brachiosaurus in the upper left side of the scene.
- Place the Pencil on the Tic Tac Toe game that is scribbled on the ceiling.
- You will receive a Cat Button at the end of this level.
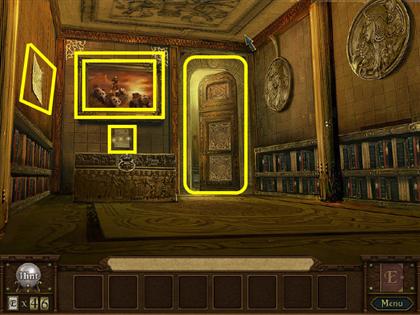
First Floor
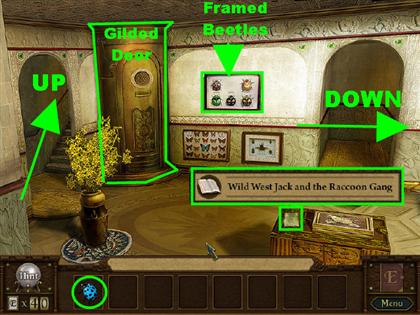
- Place your arrow in the down position to go back to the Ground Floor.
- From the Ground Floor, place your arrow in the top center of the scene (on the stairs) to go upstairs.
- There is a picture frame in the back of the room that contains beetles.
- There is a sparkly page on the desk.
- You can go upstairs by placing your cursor in the upper left side.
- You can go downstairs by placing your cursor on the right side of the page.
- There is floral engraving on the gilded door that is next to the framed pictures. You will need to remember that for later.
- Click on the sparkly page to enter a new scene.
Wild West Jack and the Raccoon Gang
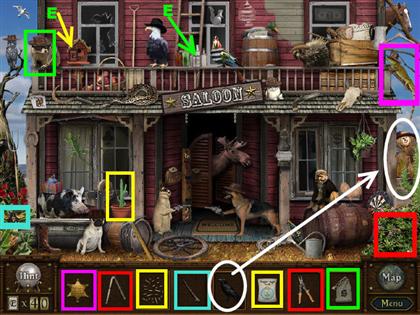
- The Super-Age Soil goes on the Baby Cactus in the lower left side. The Baby Cactus will turn into a fully grown Smooth Cactus.
- The Plant Needles go on the Smooth Cactus that just grew.
- The Shears go on the Overgrown Hedge in the lower right side. A Large Walnut will appear after the hedges have been cut.
- Place the Nutcracker on the Large Walnut in the lower right side.
- Give the Bag of Cash to the Raccoon Robber in the upper left side.
- Place the Insect Stinger on the Harmless Bee in the lower left side of the scene. The bee is on the cactus in the corner.
- The Sheriff Badge goes on the Sheriff Lizard in the upper right side.
- The Crow goes on the Friendly Scarecrow on the right.
- You will receive a Tiger Button at the end of this level.
Place the Beetle
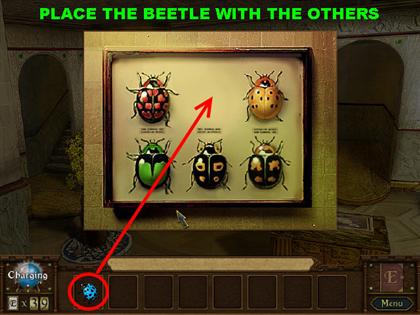
- Click on the Beetle Frame that is on the back wall and you will get a closer view.
- Place the Beetle from inventory in the Frame.
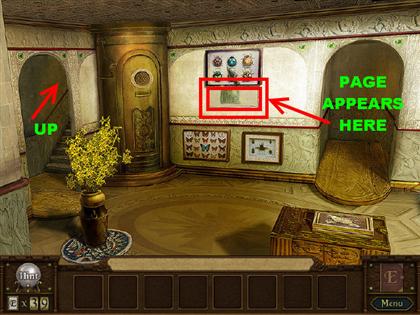
- The pop-up window will close and a sparkly page will appear at the bottom of the Beetle picture.
- Click on the sparkly page.
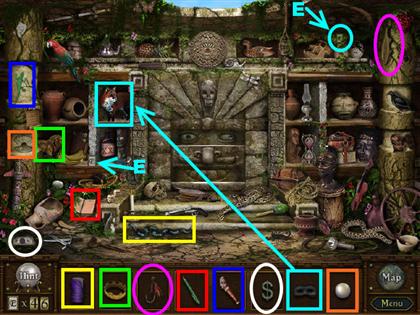
Forgotten Idol: The Mayan Expedition

- The Shovel goes on the “X Marks the Spot” in the lower center of the scene. There will be some Loose Dirt in the spot in which the “X” was located.
- Place the Seeds for Planting on the Loose Dirt in the lower center of the scene. A Carrot below Dirt will peek from the ground.
- Place the Hungry Rabbit on the Carrot below Dirt in the lower center of the scene.
- Place the Tiny Hammer on the “Crack This Egg” located in the lower left side of the scene. A Baby Chick will appear after the egg is cracked.
- The Brush with White Paint goes on the squirrel that says “Skunk?” It is located on the column on the right side of the scene.
- The Stone Star goes on the Star Slot on the left side of the scene.
- The Explorer’s Pith Helmet goes on the Explorer’s Skull. It is on the lower left side of the fireplace.
- The Battery goes on the Empty Flashlight in the lower right side of the scene.
- You will get a Shield Button at the end of the level.
Second Floor
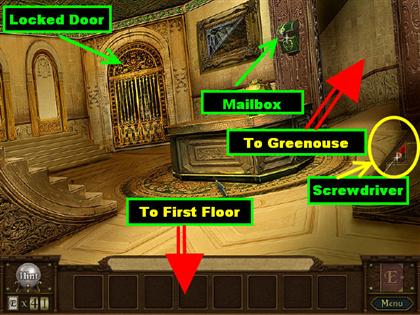
- From the First Floor, place your cursor in the top left side to access the Second Floor.
- Pick up the Screwdriver that’s in the lower right side of the scene.
- The door on the left is locked; you can access it later.
- To go to the Greenhouse, place your cursor in the top right side of the scene.
- To go back to the First Floor, point your cursor downwards.
- Click on the green mailbox and you will have access to a sparkly page. Click on the sparkly page to access a new scene.
Enchanted Forest and the Seven Seals
- Place the Key on the Locked Door that is in the middle of the tree, and a Nutcracker will appear.
- Give the Hard Walnut to the Nutcracker in the middle of the tree.
- The Clippers go on the Untrimmed Bush located on the right side of the tree. The Clippers will cut the bushes into the shape of a horse.
- The Mother Bird goes on the Nest with Eggs in the upper right corner.
- The Brown Dye goes on the Visible Chameleon in the upper left side.
- Place the Red Gem on the Missing Eye Statue on the right side of the scene.
- The Toy Mallet goes with the Toy Gopher in the lower right side of the scene.
- The Paintbrush goes on the Drafted Canvas located in the lower left side of the tree.
- You will obtain a Chain Mail Button at the end of this level.
Obtain the Blue Sapphire

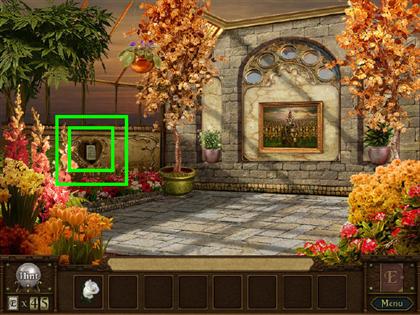
- To exit the Second Floor and reach the Greenhouse, place your cursor on the top right side of the room.
- Enter the Greenhouse and find a sparkly page in the far left side, inside of the pot.
- On the left side of the wall, there is an empty slot for a Stone Heart.
- In the back of the room there is a Portrait Puzzle.
- In the lower right side, you will find a Blue Sapphire. Click on the Blue Sapphire and it will go into inventory.
Wild West Jack and the Raccoon Gang

- The Antique Rifle goes on the Sharpshooter Kitten in the upper right side. The Kitten will punch a hole in the Wine Barrel that is in the lower right side of the scene.
- Place the Sober Rat on the Wine Leak located in the Wine Barrel.
- The Half Loaf of Bread goes on the other Half Loaf of bread that is in the upper right side of the scene.
- Place the Paintbrush on the Unpainted Wood in the upper right side of the Saloon.
- The Gunslinger’s Hat goes on the Gunslinger Rabbit.
- The Bullet Belts go on the Bullet-less Barker (the dog at the bottom of the scene).
- Place the Boxing Glove on the Punch-hungry Pug in the lower left side.
- The Mystery Mask goes on the Mysterious Moose that’s in the middle of the scene.
- You will receive a Unicorn Button at the end of this round.
Blue Sapphire Placement

- From the Greenhouse, point your arrow downwards to go back to the Second Floor.
- From the Second Floor, point your arrow downwards to access the First floor.
- From the First Floor, point your arrow on the right side of the page to access the Ground Floor.
- Click on the green mailbox on the left side of the wall once you reach the Ground Floor.
- After you get a closer view of the mailbox, place the Blue Sapphire in the empty slot above the mailbox.
- The mailbox will open and a page will be inside. Click on the page to enter a new scene.
A Tomb Amidst the Shifting Sands
- Place the Crowbar on the Coffin Lid, and a Mummy will appear inside of the coffin.
- Give the Mummy the white Bandage from inventory, and it will wrap its arm with the Bandage.
- Give the Sunglasses to the Bright-Eyed Mummy.
- The Ruby Gem goes in the Slot located in the upper left side of the scene.
- Give the Toothbrush to the Skull with Dirty Teeth in the upper left side of the scene.
- The Compass goes on the Engraving in the upper center of the scene. It is above the coffin.
- The Stone Beard goes on the Stone Pharaoh Bust in the upper left side of the scene.
- The Ball of Yarn goes with the Playful Cat in the upper left side of the scene.
- At the end of this level you will receive a Lion Button.
Obtain the Golden Plaque

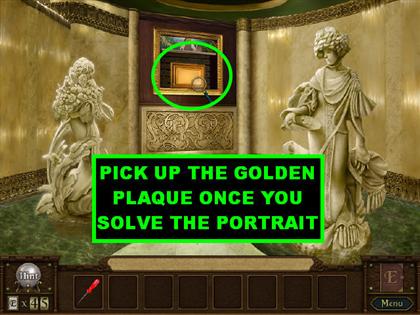
- From the Ground Floor, point your arrow on the archway located on the right side of the scene and you will be in the Fountain Room.
- Click on the Portrait in the back of the room and you will access the Jenny the Life Artist puzzle.
- Click on the golden plaques that are on each side of the portrait. You will be able to read a clue for placing the Buttons.
- The solution is as follows:Left Side Clue: "Adorn me and you need not evade from the enemy's blade" Solution: Helmet, Shield & Chain Mail. Right Side Clue: "We’re all family at our core, yet our voices range from a purr to a roar." Solution: Lion, Cat & Tiger.
- Once the portrait lifts up, pick up the Golden Plaque that is inside.
Obtain the Triangle Gem
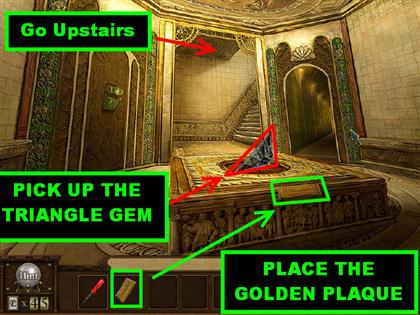
- To return to the Ground Floor, click on the lower part of the scene in the Fountain Room.
- Place the Golden Plaque in the empty slot in front of the table.
- Pick up the Triangle Gem that pops up above the table.
- To place the Triangle Gem go back upstairs.
Triangle Gem Placement
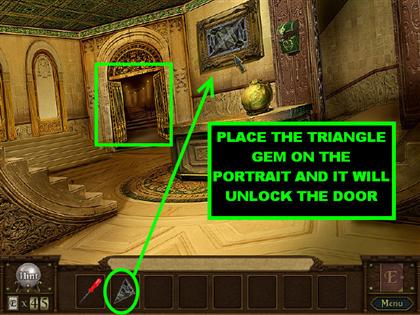
- To get back to the First Floor, place your cursor on the steps.
- To get to the Second Floor from the First Floor, place your cursor on the steps on the left side of the scene.
- Place the Triangle Gem on the portrait on the back wall, and the door will open.
- The door will give you access to the Balcony.
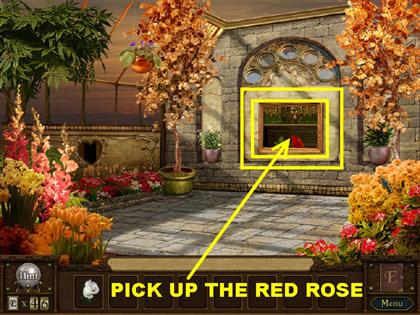
Obtain the White Rose
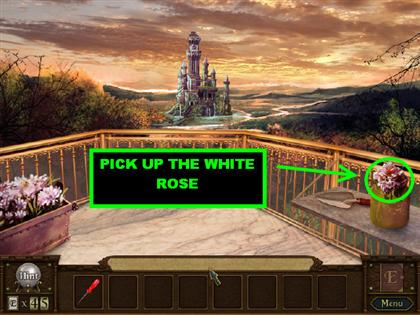
- Go through the door on the Second Floor, once the Triangular Gem has been placed, and you will have access to the Balcony.
- Pick up the White Rose that is in the lower right side of the scene.
Pick up the Stone Heart
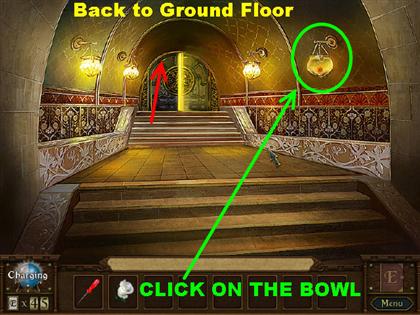
- Point your cursor at the bottom of the screen to exit the Balcony.
- Point your arrow at the bottom of the scene in order to go back to the First Floor.
- Point your arrow on the right side of the scene in order to go back to the Ground Floor.
- Point your arrow at the bottom of the scene in order to go back to the Entrance.
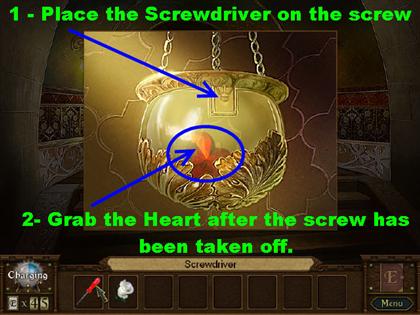
- Click on the bowl that is hanging on the right side of the scene and you will get a closer view.
- Place the Screwdriver from inventory on the screw that is on top of the bowl.
- Click on the red heart that is inside of the bowl. The Heart Stone will go into your inventory.
Heart Stone Placement
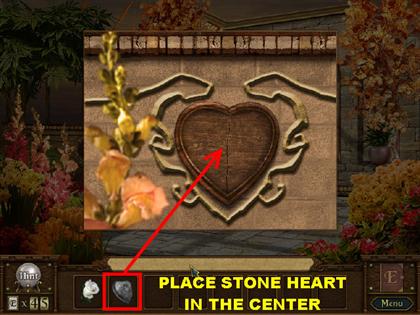
- Your goal now is to place the Heart Stone in the Greenhouse.
- To go back to the Ground Floor from the Entrance, place your cursor at the top of the steps.
- To go back to the First Floor, place your cursor on the steps.
- To go back to the Second Floor, place your cursor on the steps on the left side of the room.
- To go back to the Greenhouse, place your cursor on the top right side of the room.
- Click on the Heart Slot located on the left side of the wall and you will get a closer view.
- Place the Heart Stone in the empty slot.
- The pop-up page will disappear and a sparkly page will appear. Click on the sparkly page to enter a new scene.
Majestic Theater of Nobel Hill
- Place the Key with “Tragedy” engraved on the Keyholed Tragedy Mask in the upper center of the scene. The curtains will open at this point.
- Place the Tiara on the Princess that is on the horse.
- The Gauntlet goes on the Knight’s Hand.
- Place the Crossbones on the Pirate Flag in the upper right side.
- The Strings go on the Incomplete Violin in the lower right side of the scene.
- Give the Toothbrush to the Dirty-teeth Alligator in the lower left side of the scene.
- The Moon-piece goes on the Half Moon that is on the right side of the curtains.
- Place the Pirate Patch on the Pirate Giraffe located in the upper right side of the scene.
- You will receive a Beret Button at the end of this level.
Obtain the Red Rose
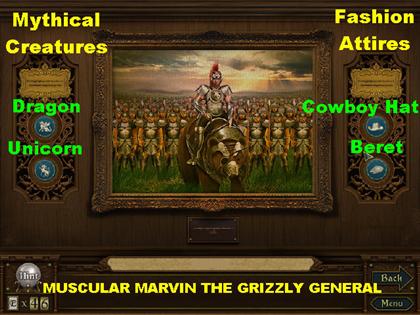
- Click on the Portrait in the back of the room to access the Muscular Marvin the Grizzly General puzzle.
- Click on the golden plaques that are on each side of the portrait. You will be able to read a clue for placing the Buttons.
- The solution is as follows:Left Side Clue: “Seen only in movie features, we are mythical creatures.” Solution: Dragon & Unicorn. Right Side Clue: “Many fashion trends have we led by resting comfortably on the human head.” Solution: Cowboy Hat & Beret.
- Once the portrait lifts up, pick up the Red Rose that is inside.
Obtain the Stone Rose
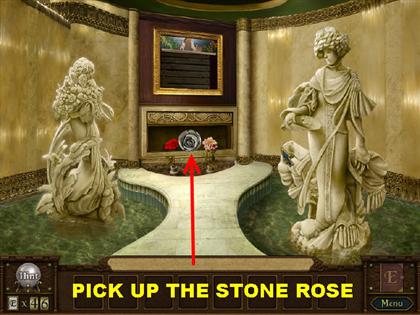
- To get out of the Greenhouse, place your cursor at the bottom of the page.
- From the Second Floor, place your arrow at the bottom of the page and you will be back on the First Floor.
- From the First Floor, place your cursor on the top right side of the page and it will take you back to the Ground Floor.
- From the Ground Floor, place your cursor on the arch located on the right side of the scene to access the Fountain Room.
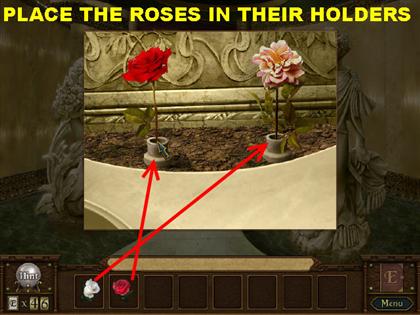
- Click on the section located below the Portrait and you will get a closer view.
- Place the White Rose and Red Rose in the holders.
- Once the pop-up window disappears, click on the Stone Rose located behind the flowers.
The Gilded Door

- To get out of the Fountain Room, place your cursor at the bottom of the scene.
- From The Ground Floor, place your cursor on the steps in the back of the scene.
- Place the Stone Rose on the Gilded Door on the left side of the room.
- The Gilded door will open once the Rose is placed; go through the door.
ENDING
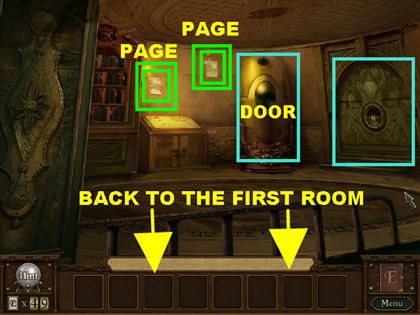
First Room
- There are two sparkly pages on the wall.
- There is a Portrait Puzzle on the back wall.
- The door leads to a second room.
Forgotten Idol: The Mayan Expedition
- The Tiny Pegleg goes on the Three-legged Lizard in the upper left side of the scene.
- Place the Signing Pen on the Autograph Book located in the lower left side of the scene.
- The Animal Crown goes on the Lion on the left side of the scene.
- Give the Warm Sleeping Bag to the Cold Snake in the lower left side of the scene.
- The White Pearl goes on the Clam Engraving on the left side of the scene.
- Give the Burglar Mask to the Bandit Fox in the upper left side of the scene.
- Place the Dollar Sign on the Dollar Bill in the lower left corner of the scene.
- The Hook goes on the Hanging Fish in the upper right side of the scene.
- You will get a III Button at the end of this level.
Whiddon’s Expedition: Atlantis
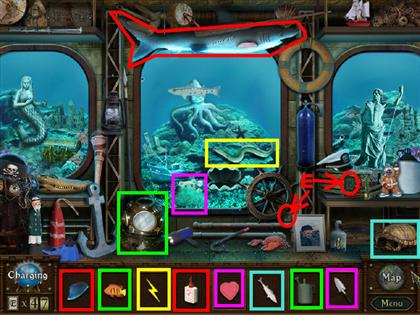
- Place the Watering Can on the Bowl-like Helmet in the lower left side of the scene. It will fill with water.
- Place the Goldfish in the Water-filled Helmet.
- Place the Small Shovel on the Buried Teddy Bear located in the lower center of the scene.
- Give the “Teddy Bear needs Love” bear the Heart from inventory. It now becomes the Loving Teddy Bear.
- Place the Glue on the Smooth Finless Shark in the upper center of the scene.
- Place the Fin on the Sticky Finless Shark in the top center of the scene.
- The Lightning Bolt goes on the Eel that is inside the middle panel.
- The Sardine for the Hermit goes to the Hiding Turtle in the lower right side of the scene.
- You will get a II Button at the end of this level.
Second Room
- Go through the door in the First Room and you will be in the Second Room.
- There are two sparkly pages in this room.
- There is a Gilded Door on the right side of the scene that has something missing in its slot.
- There is another door on the right side that also has something missing in its slot.
- Click on the sparkly pages to solve them.
Majestic Theater of Nobel Hill
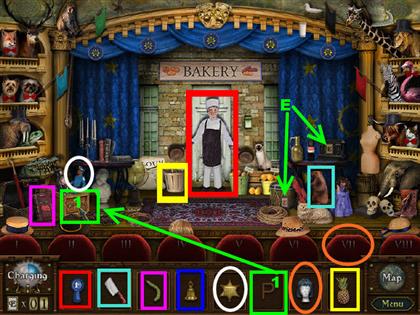
- Place the Letter P on the Crate in the lower left side. Once the letter is placed, it will form the word “OPEN” on the crate and the curtains will open.
- The Culinary Award goes on the Star Chef.
- Give the Kitty Bell to the Siamese Cat that is next to the Star Chef.
- The Pineapple goes on the Pineapple Basket that is next to the Star Chef.
- The Cleaver goes on the beaver marked “Rhymes with Beaver” in the lower right side of the scene.
- The “Book” Worm goes in the Apple Book located in the lower left side of the scene.
- The 7th Visitor goes on Chair VII in the lower right corner.
- The Sheriff Star goes on the Policeman Doll that is in the crate.
- You will receive the IV Button at the end of this level.
Wild West Jack and the Raccoon Gang
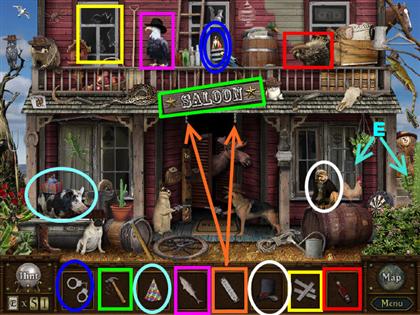
- The Boards go on the Broken Window in the upper left side of the scene.
- Place the Hammer and Nails on the Crooked (Saloon) Sign.
- Place the Top Hat on the Well-dressed Monkey in the lower right side of the scene.
- The Vacancy Sign goes on the Chains that are under the “Saloon” sign in the center of the scene.
- Give the Whiskey to the Parched Porcupine in the upper right side of the scene.
- Give the Party Hat to the Partying Porker in the lower left side of the scene.
- Give the Fish to the Hungry Eagle in the upper part of the scene.
- Place the Handcuffs on the Prisoner Parrot on top of the saloon.
- You will receive a V Button at the end of this level.
Obtain the Golden Leaf
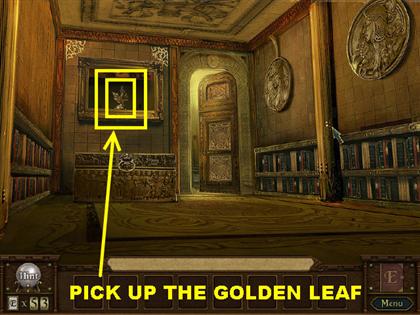
- To go back to the First Room, place your cursor at the bottom of the page while you’re in the Second Room.
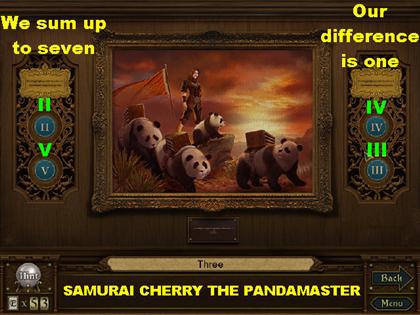
- Click on the portrait in the back of the room to access the Samurai Cherry the Pandamaster puzzle.
- Click on the golden plaques that are on each side of the portrait. You will be able to read a clue for placing the Buttons.
- The solution is as follows:Left Side Clue: “We sum up to seven.” Solution: II & V. Right Side Clue: “Our difference is one.” Solution: IV & III.
- Once the portrait lifts up, pick up the Golden Leaf that is inside.
Enlighten Key Usage
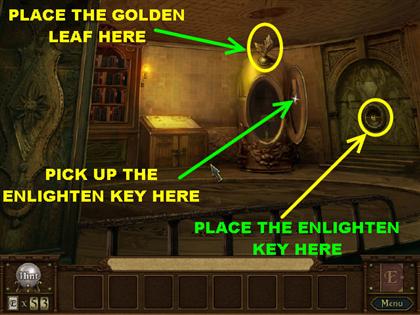

- Go back to the Second Room and place the Golden Leaf on the top part of the Gilded Door.
- The Professor will show up to tell you that he has been observing your progress and that he was able to write his best novel yet , “Inspector Double Leaf: Floral Mansion Enigma,” which chronicles your adventures there.
- Once the professor leaves, the Gilded door will be open.
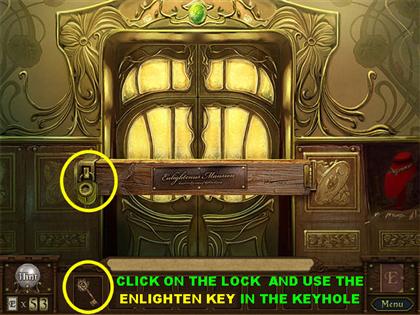
- Click on the sparkly item on the lid and you will receive the Enlighten Key in your inventory. The Enlighten key can be used more than once.
- Click on the large door on the right and you will get a close view of the Keyhole.
- Place the Enlighten Key in the Keyhole and you will be able to enter the room where you first started.*SPOILER ALERT* There is a Secret Room in the game. If you wish to find it on your own, please stop reading now.
Enlighten Key Usage II
- Please follow the next few steps in the walkthrough to access the Secret Room.
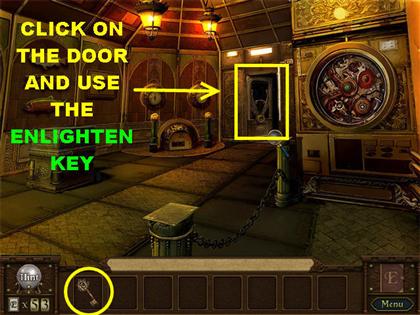
- From the Library, point your cursor at the bottom of the page.
- From the Hallway, point your cursor at the bottom of the page.
- From the Entrance, go through the door on the left side of the scene, next to the Knight.
- You will now be in the Store Front area. Place your cursor on top of the page so you can go back to Aquatic Museum.
- Enter the Aquatic Museum once you get in front of it.
- You will now be in front of the Fish Display. Place your cursor on the top right side of the scene to go to the Control Room.
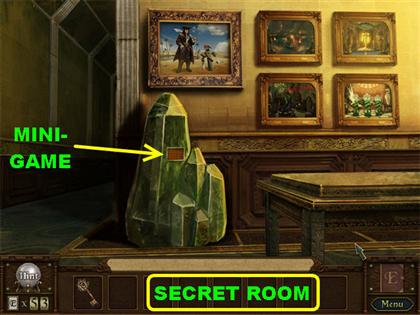
- Click on the back door of the Control Room and you will enter a Secret Room.
- You can explore the Secret Room by clicking on the different portraits that are on the wall.
- Click on the golden plaque that is on the green stone and you will play a mini-game.
Matching Mini-Game
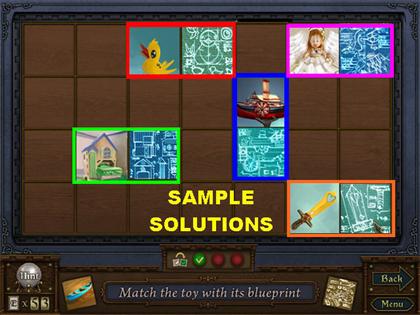
- In this mini-game you have to match the toy with its blueprint.
- Please look at the screenshot to see some sample solutions.
- Once this mini-game is over, the green rock will break into pieces. Click on the golden plaque that appears in the rubble and read the inscription.
Enlighten Key Usage III
- You are almost at the end of the game; you must use the Enlighten key one more time.
- To exit the Secret Room, place your cursor on the top left side of the page.
- From the Control Room, place your cursor at the bottom of the page and you will be back at the Fish Display.
- From the Fish Display, place your cursor at the bottom of the page to go outside of the museum.
- Once outside, place your cursor at the bottom of the page and you will be back at the Store Front.
- From the Store Front, place your cursor at the bottom of the page and you will be back in the Entrance.
- From the Entrance, place your cursor at the bottom of the page and you will encounter the door.
- Once you get to the door, click on the lock that is on the left side of the door and you will get a closer view.
- From the close-up, place the Enlighten Key in the keyhole to unlock the door.
- Click on the door to enter. Enjoy the final scene!
Created at: 2009-06-25