

Walkthrough Menu
- General Tips
- Chapter 1: The Vacation
- Chapter 2: Laura and Henry
- Chapter 2: Emily
- Chapter 2: Francis
- Chapter 3: The Kids
- Chapter 4: Reunited
- Chapter 5: The Great Escape
General Tips
- Escape the Lost Kingdom has 5 chapters; however, chapter 2 is divided into 3 parts. Each part in chapter 2 is played by a different character.
- You can choose to play the characters in any order. The order you choose does not affect the outcome of the game.
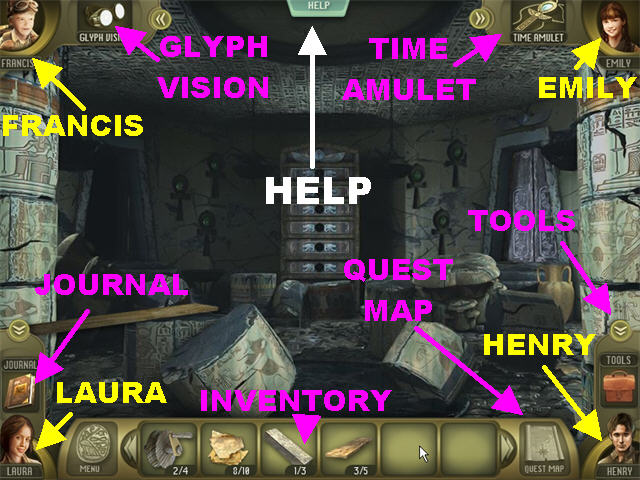
- Henry, the father, finds the Tools in the early part of the game. The Tools are located in the lower right corner of each scene. Use the Tools to help you advance in the game.
- While playing as Emily you will be able you use the Time Amulet in the upper right which allows you to see solutions for some of the puzzles.
- When you play as Francis, you will be able to activate the Glyph Vision in the upper left corner. It lets you see parts of the scene you can interact with; these interactive areas will glow blue when it is activated.
- Laura takes note in her Journal located in the lower left corner. Consult the Journal when you need extra help in the game.
- Some scenes in this game can be viewed using Red/ Cyan 3D glasses. The game will give you a choice to disable or enable this function at the beginning of the game.
- When you see the puzzle piece icon it means that something is missing in that section, use an inventory items in those spots.
- The items written in the green box on the find list in Hidden Object Scenes are items that will enter your inventory.
- Click on the HELP tab above the screen to help you solve puzzles. To disable this feature click on the “NO” button.
- Click on “Quest Map” on the lower right corner to check the map.
Chapter 1: The Vacation
Museum of Ancients
- Follow the quick tutorial given at the beginning of the game.
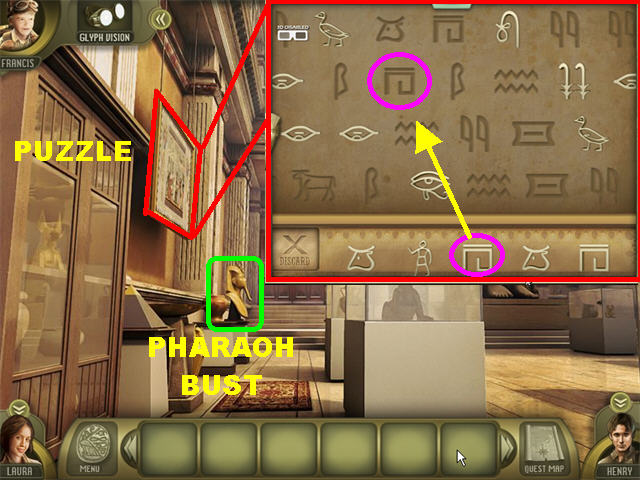
- Zoom into the hieroglyph in the upper left; click on it again to begin a mini-game.
- Pick up the shapes at the bottom of the screen and place them in their appropriate slots on the board.
- Zoom into the PHARAOH BUST on the far left.
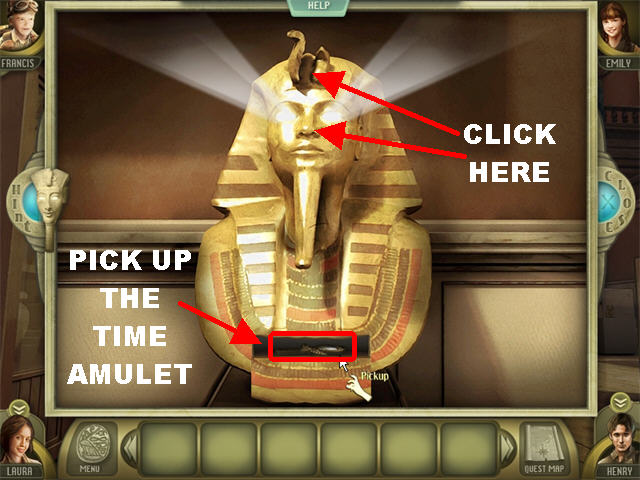
- Click on the Pharaoh’s Eyes to light them up.
- Click on his HEADDRESS to open the bottom compartment; take the TIME AMULET.
- Click on the Time Amulet in the upper right, it reveals how things looked in the past. It can also help you see solutions for assorted puzzles.
- Exit through the door in the far left.
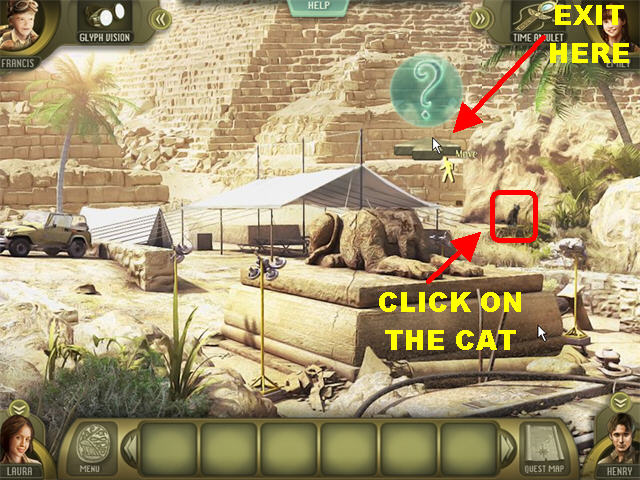
- Click on the CAT on the far right, then click on the ARROW on the upper right to reach the Valley of the Kings.
Valley of the Kings
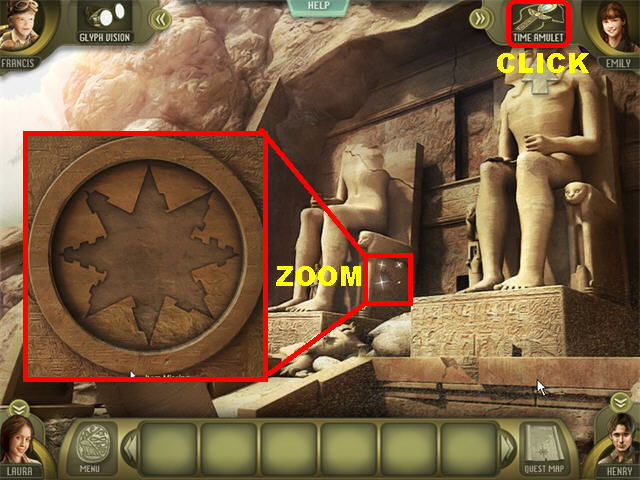
- Click on the Time Amulet in the upper right to see a short scene on how to access the inside.
- Click on the Time Amulet again to exit out of that view.
- Zoom into the bottom of the left statue; you need a key, close out that view for now.
- Return to the West Grounds by clicking downwards.

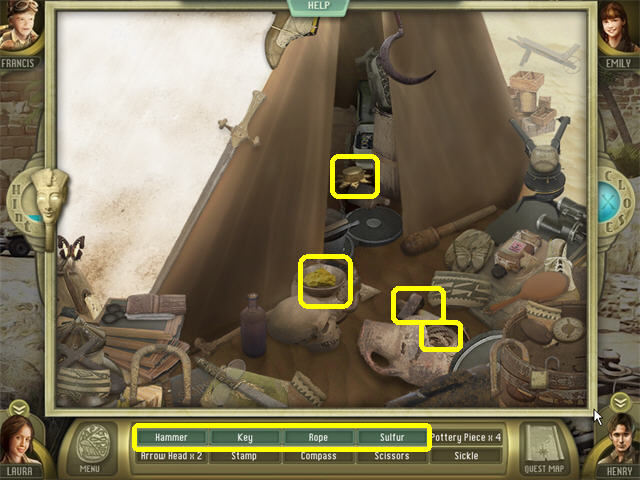
- Click on the tent on the left to trigger a Hidden Object Scene.
- The ROPE, KEY & SULFUR will be added to your inventory at the end of your search.
- The HAMMER will be added to your tools.
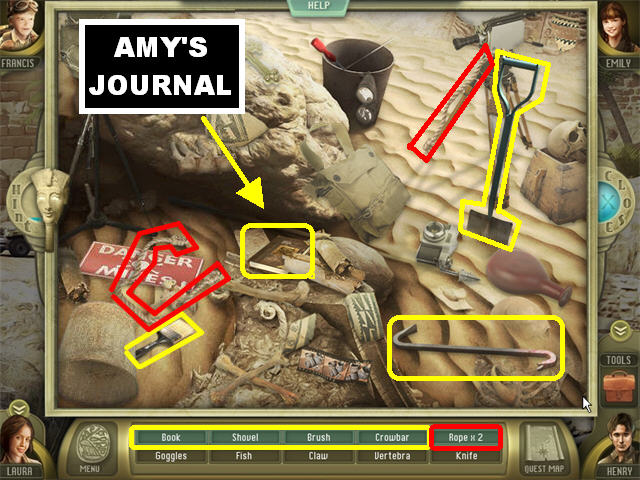
- Click on the broken sphinx on the right to trigger a Hidden Object Scene.
- The 2 ROPES and the BRUSH will be added to inventory.
- Amy’s Journal has been added to the lower left corner of the scene. It is filled with information that can give you extra help when needed.
- The CROWBAR and SHOVEL have been added to the Tools Bag in the lower right.
- Return to the Valley of the Kings in the upper right.
Valley of the Kings
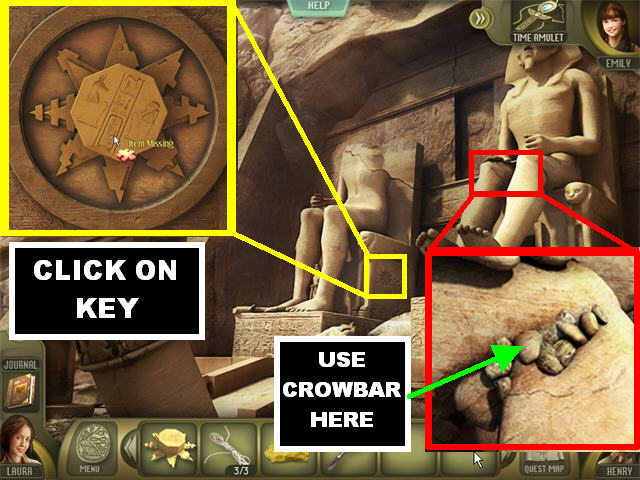
- Zoom into the base of the first statue.
- Place the KEY on the empty slot.
- Click on the KEY to lift the feet of the statue on the right.
- Take a closer look at the right statue’s leg, use the CROWBAR to chip away the stones and lift the statue’s leg all the way up.
- Enter the Tunnel.
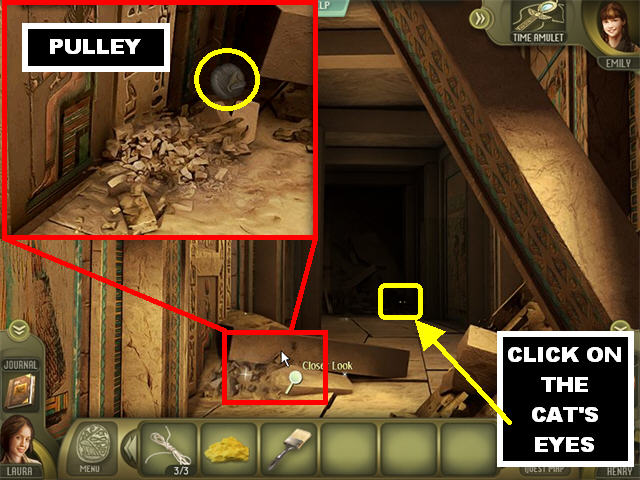
- Take a closer look at the rubble on the ground.
- Use the SHOVEL 3 times on the ground to eliminate the debris.
- Pick up PULLEY #1 on the far right.
- Click on the CAT’S EYES in the lower right side of the doorway.
- Chapter Complete!
Chapter 2: Laura and Henry
Choose Characters
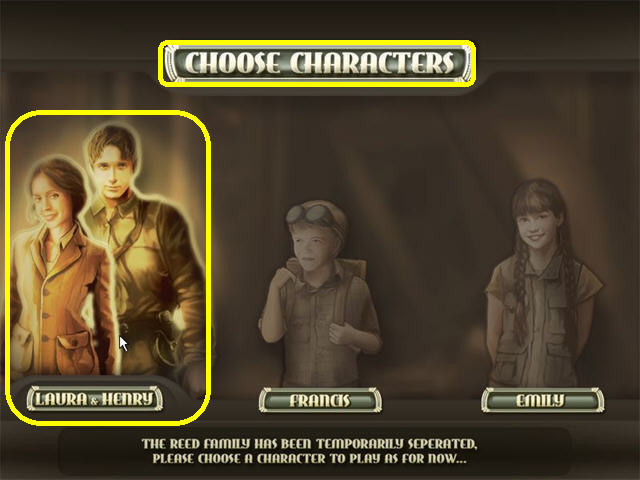
- You can choose any of the characters at this time; your choice will not affect the outcome of this game.
- For the purposes of this guide we will start with Laura and Henry.
Temple of Light
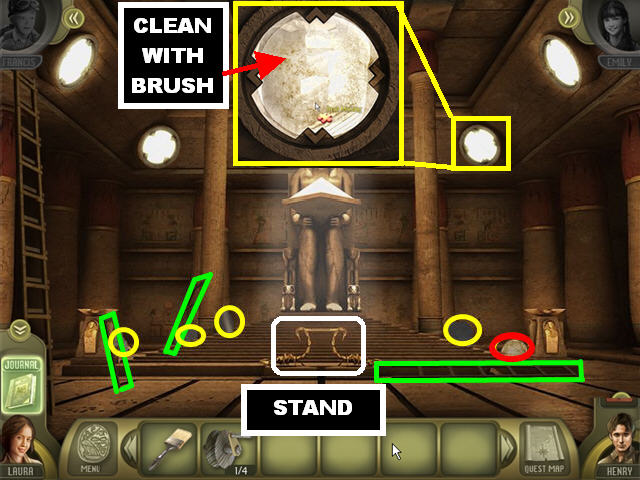
- Pick up the 3 LADDER fragments marked in green.
- The CRYSTAL BALL is marked in red.
- Pick up the 4 MIRRORS circled in yellow.
- Place the LADDER below one of the rounded frames in the ceiling.
- Zoom into the frames and place the correct MIRROR in the frame.
- Clean the MIRROR with the BRUSH.
- Repeat the same process until you’ve used the other 3 MIRRORS and cleaned them with the BRUSH.
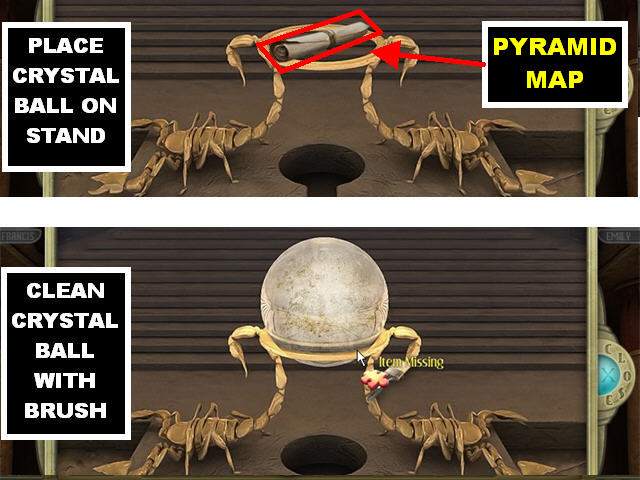
- Take a closer look at the gold stand in the lower center.
- Pick up the PYRAMID MAP above the stand. Click on “Quest Map” in the lower right whenever you wish to take a look at the map.
- Place the CRYSTAL BALL on the stand.
- Clean the CRYSTAL BALL with the BRUSH to light up all the mirrors and the room.
- Click in the lower center to reach the Courtyard.
Courtyard
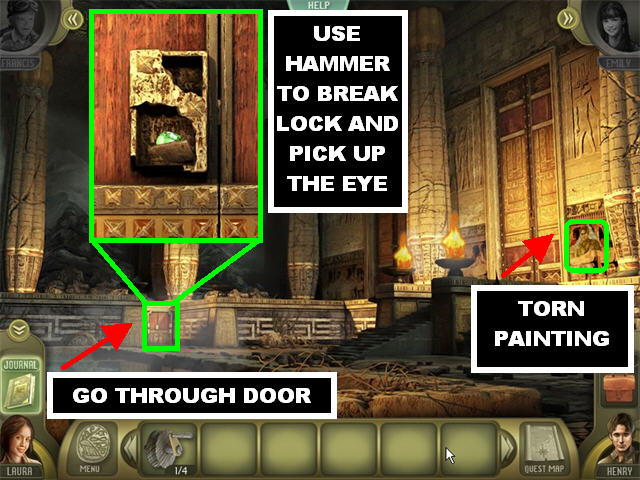
- Pick up TORN PAINTING #1 marked in green on the right.
- Zoom into the SMALL DOOR in the lower left and use the HAMMER to break the lock.
- Pick up EYE #1 inside the lock.
- Go through the door to reach the Toy Maker’s Chamber.
Toy Maker’s Chamber
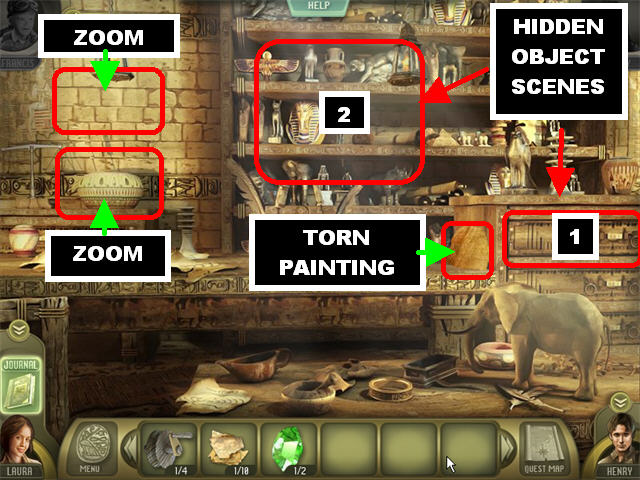
- Pick up TORN PAINTING #2 on the right.
- There are 2 Hidden Object Scenes; click on the shelves and the drawer to open them.
- There are 2 Zoom-in scenes on the upper left.
- Click on the DRAWER on the right to begin the Hidden Object Scene.
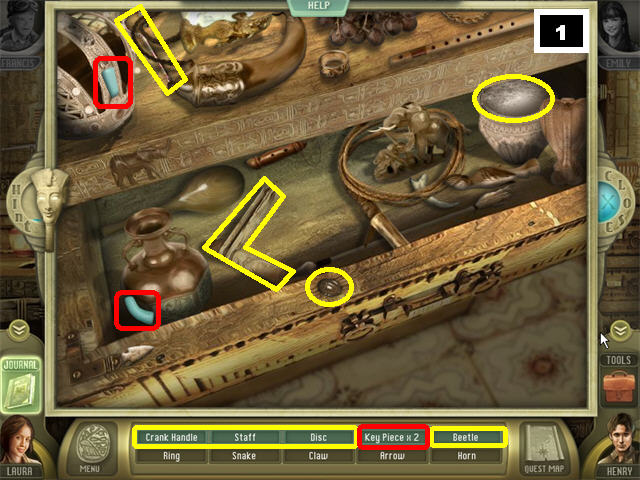
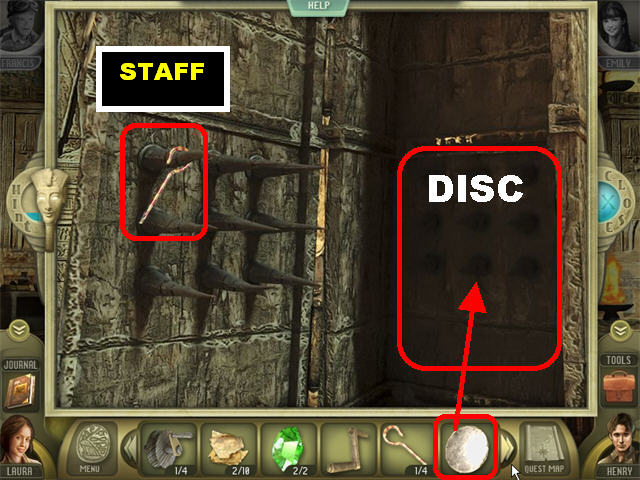
- KEY PIECE #1 and #2, CRANK HANDLE, STAFF #1, BEETLE and DISC will be added to inventory.
- Click on the SHELF to trigger another Hidden Object Scene.
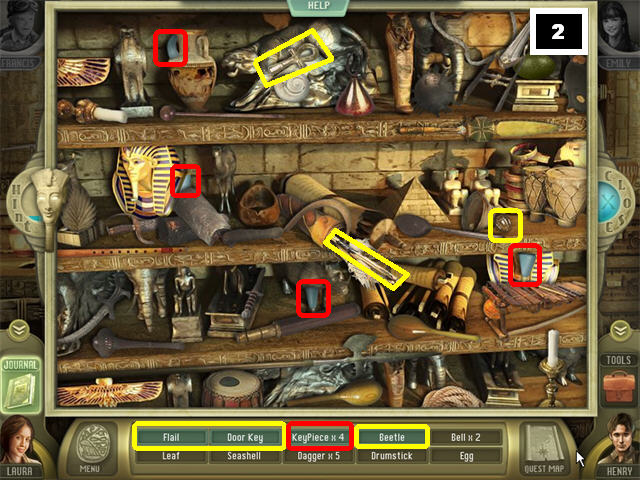
- FLAIL #1, DOOR KEY, KEY PIECES #3 through #6 and BEETLE #2 will be added to inventory.
- Zoom into the VASE on the left.
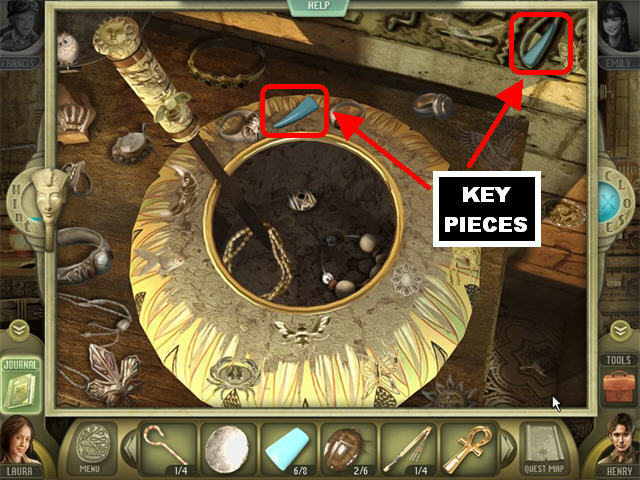
- Pick up the last 2 KEY PIECES marked in red.
- The TORTURE KEY will be created automatically at this point.
- Zoom into the left side of the wall.
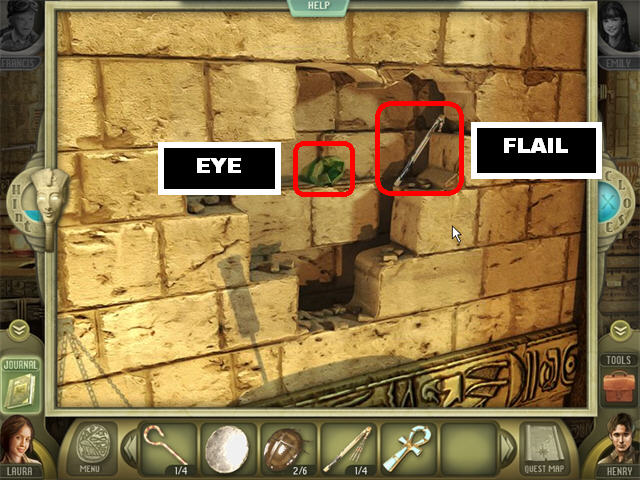
- Break the wall with the HAMMER a total of 3 times; pick up FLAIL #2 and EYE #2.
- This location has been cleared, return to the Courtyard.
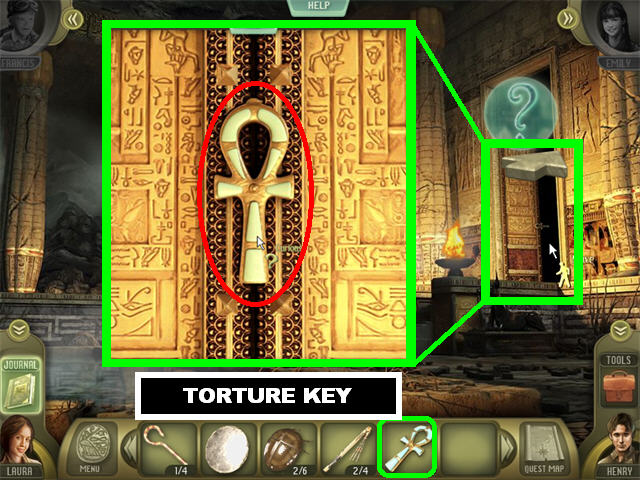
- Zoom into the door on the right.
- Place the TORTURE KEY in the center of the door.
- Turn the TORTURE KEY to unlock the door; go through it.
Torture Chamber
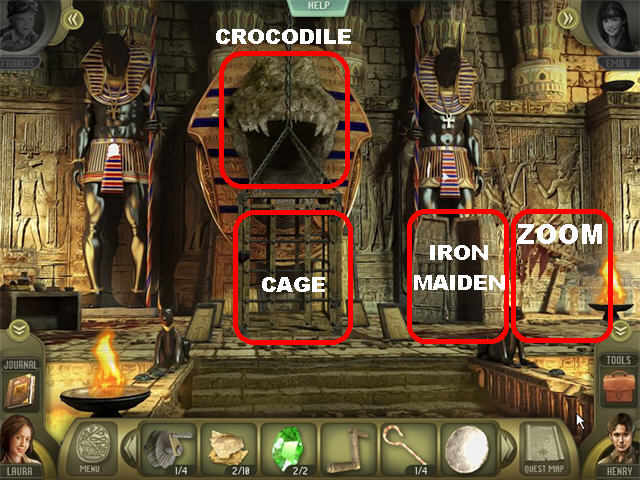
- There are several interactive areas in this scene, please look at the screenshot to familiarize yourself with them.
- Zoom into the IRON MAIDEN on the right and pick up STAFF # 2.
- Place the DISC on the right and click that area several times until the GEAR goes into inventory.
- Zoom into the lower right side of the wall.
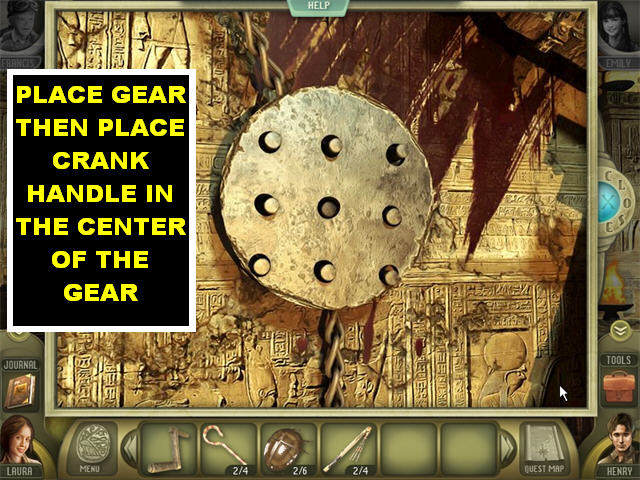
- Place the GEAR on the PEGS.
- Place the CRANK HANDLE in the center of the gear.
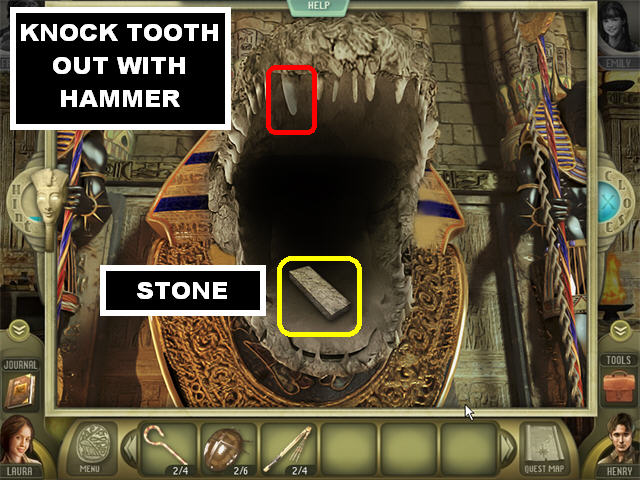
- Zoom into the CROCODILE in the upper left; pick up the STONE in its mouth.
- Knock out the TOOTH marked in red using the HAMMER from your tools.
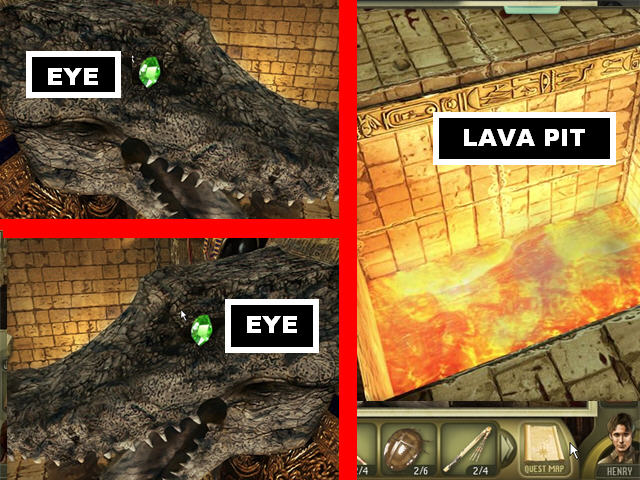
- Click on the crocodile’s left eye for a closer look and place the EYE in the socket.
- Click on the crocodile’s right eye for a closer look and place the EYE in the socket. This action unlocks a pit of lava below the cage.
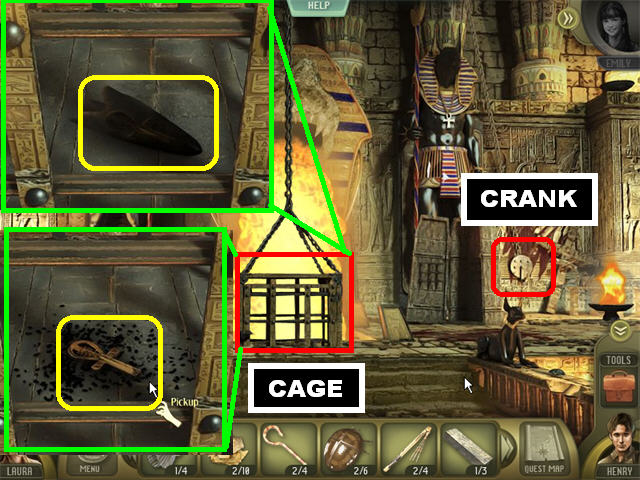
- Click on the CRANK on the right to lower the cage.
- Zoom into the CAGE and place the TOOTH in the cage.
- Click on the CRANK again to bring the cage back up.
- Click on the CAGE for a closer look, place the HAMMER on the Tooth and pick up the PRIEST’S KEY on the ground.
- This location is cleared, go back to the Courtyard.
Courtyard
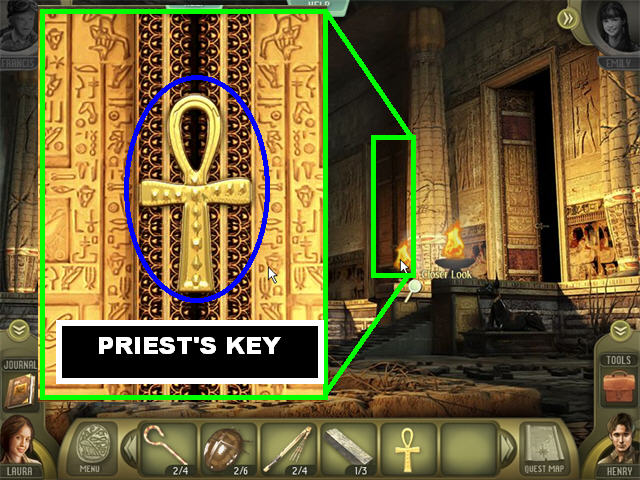
- Zoom into the left door.
- Place the PRIEST’S KEY on the lock; twist the key to unlock the door.
- This location is cleared. Go through the door.
Priest’s Chamber
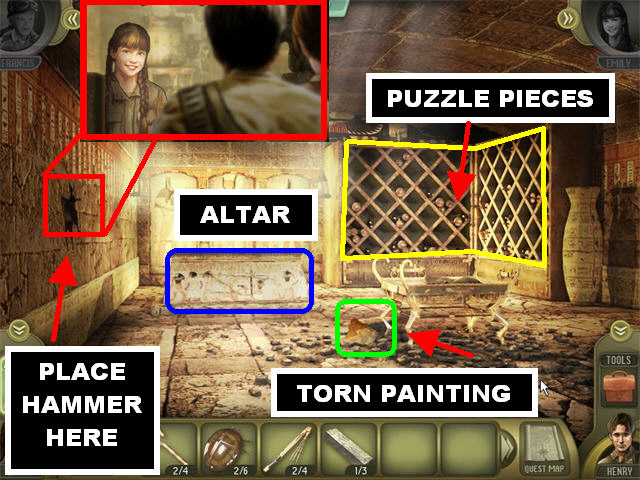
- Pick up TORN PAINTING #3 in the lower center.
- Smash the dark spot on the left side of the wall with the HAMMER and take a closer look.
- Zoom into the SCROLL RACK on the right.
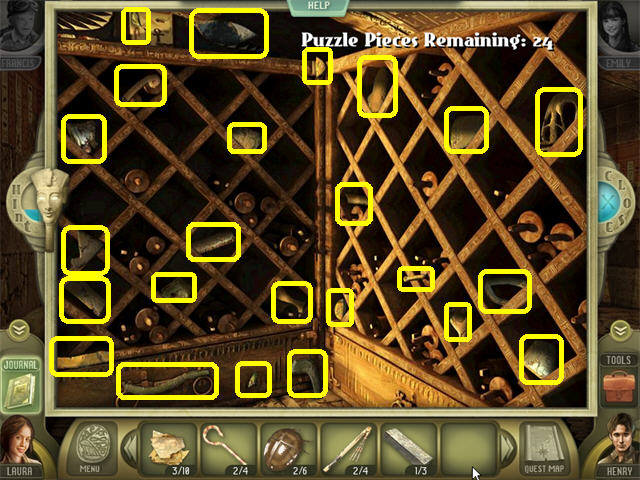
- Pick up the 24 PUZZLE PIECES marked in yellow.
- Zoom into the ALTAR in the back of the scene to trigger a puzzle.
- Place the 24 ALTAR PIECES on the board to begin.
- Drag the pieces into the right spots until it looks like the image on the screenshot.
- Correct pieces will lock in place.
- Some of the smaller pieces can get lost on the board; make sure the pieces are in the right spots.
- This location is now cleared. Click on the steps in the lower left.
- Chapter Complete!
Chapter 2: Emily
Choose Characters
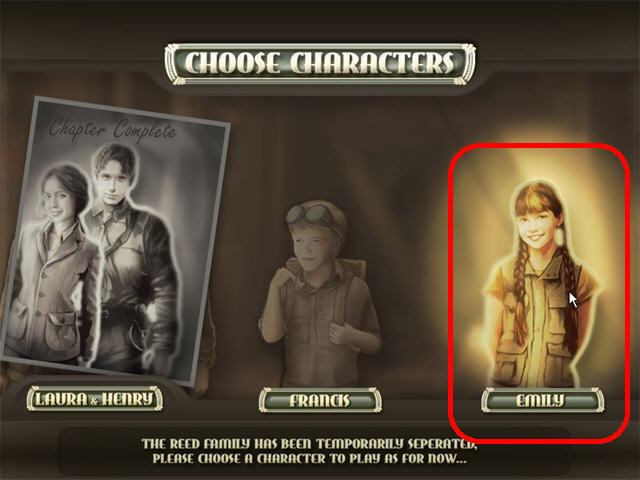
- You can choose either Emily or Francis in this section. For the purposes of the guide we’ve chosen Emily.
Library
- There are 3 entrances to choose from in the Hallway.
- Enter the Library through the left door.
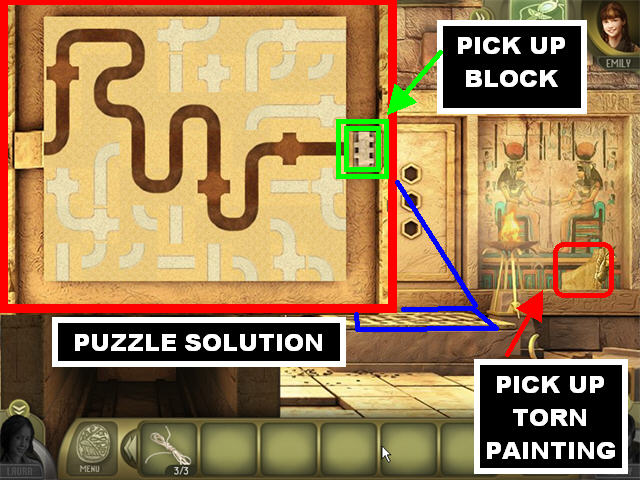
- Pick up TORN PAINTING #1 in the lower right.
- Click on the stand to trigger a puzzle.
- Click on the blocks to rotate them so you can connect one end of the maze with the other.
- Please look at the screenshot for the solution.
- Pick up the BLOCK on the right after the puzzle has been solved.
- Go back to the Hallway and enter the right door.
Princess’ Chambers
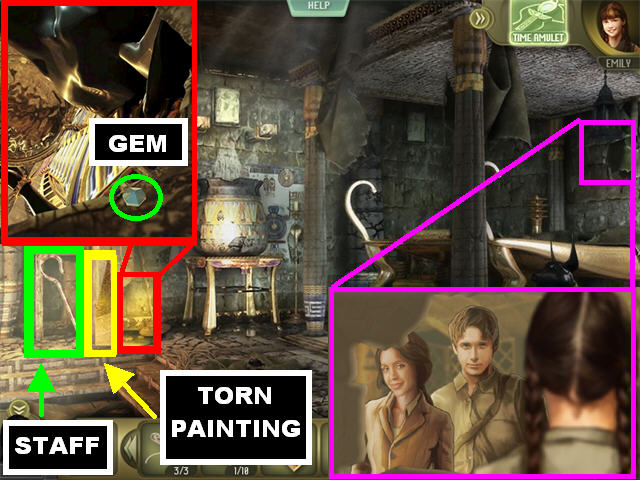
- Click on the upper right side of the back wall to see Henry and Laura.
- Pick up STAFF #1in the lower left.
- Zoom into the area marked in red; pick up GEM #1.
- Pick up TORN PAINTING #2 in the lower left.
- Place the 3 ROPES on the cauldron in the back of the scene and click on it to tip it over.
- This location has been cleared.
- Return to the Hallway and enter the middle door.
Burial Chamber
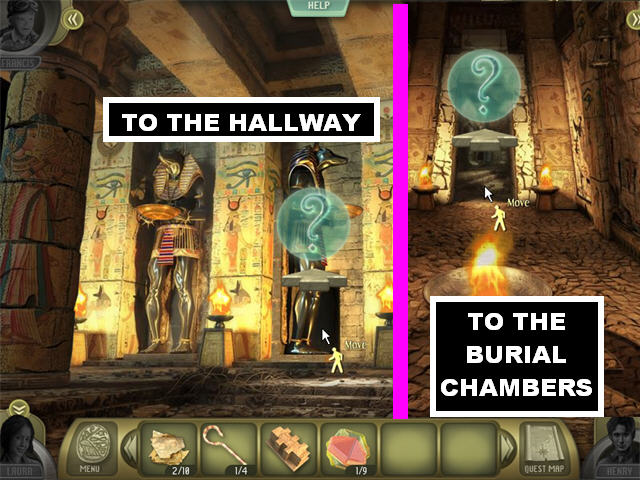
- The large middle statue will turn sideways. Go to the next Hallway. Go straight ahead to reach the Burial Chamber.
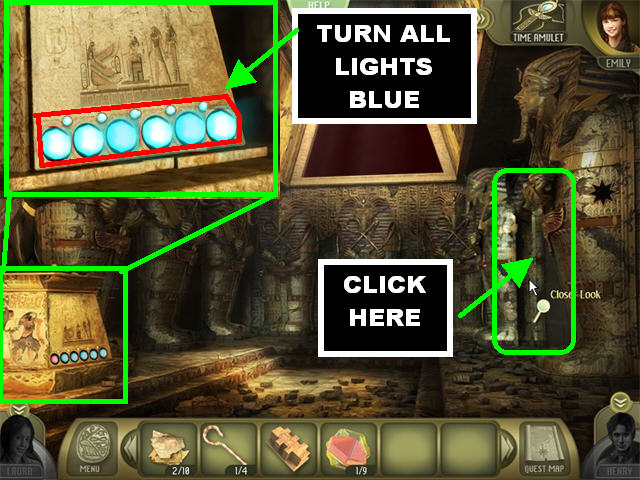
- Zoom into the lights in the lower left.
- You must turn all the lights blue by clicking on the correct buttons.
- The solution for this puzzle is random.
- Click on the open sarcophagus on the right.
- Chapter Complete!
Chapter 2: Francis
Choose Characters
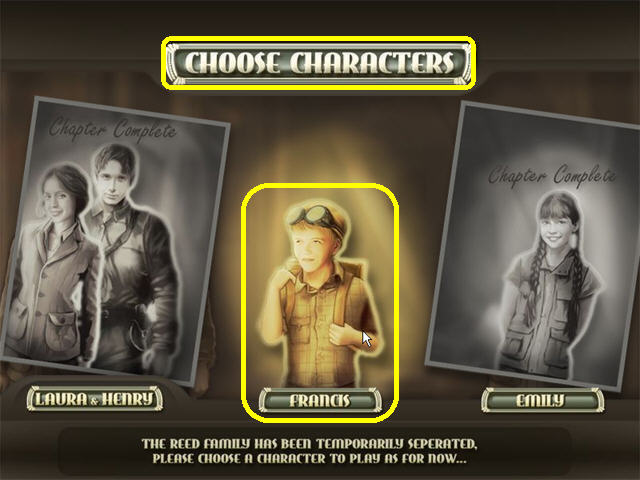
- For the purposes of this guide, we’ve chosen Francis as the last character.
Hieroglyph Chamber
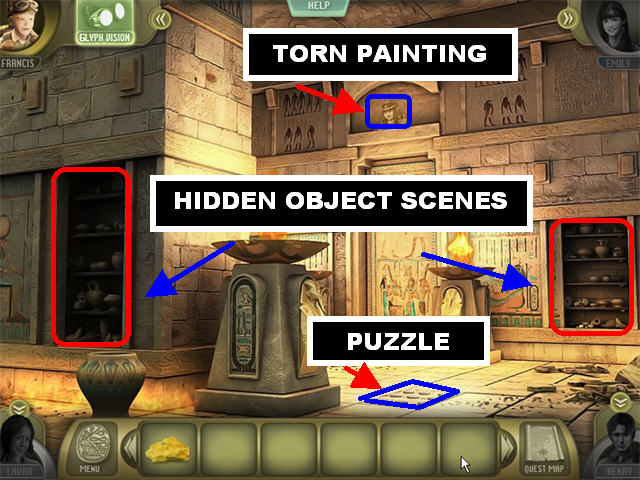
- There are 2 Hidden Object Scenes in this room; they have both been marked in red in the screenshot.
- Pick up the TORN PAINTING #1 in the upper center.
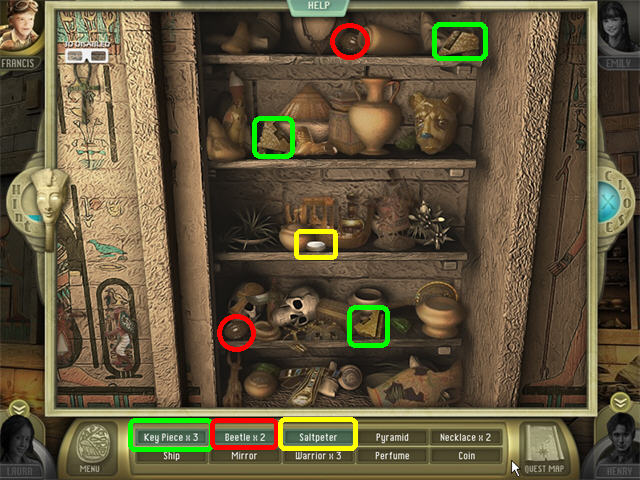
- Click on the Hidden Object Scene on the left.
- Look for all the items on the list.
- The KEY PIECES #1 through #3, BEETLES #1 & #2 and the SALTPETER will be added to inventory.
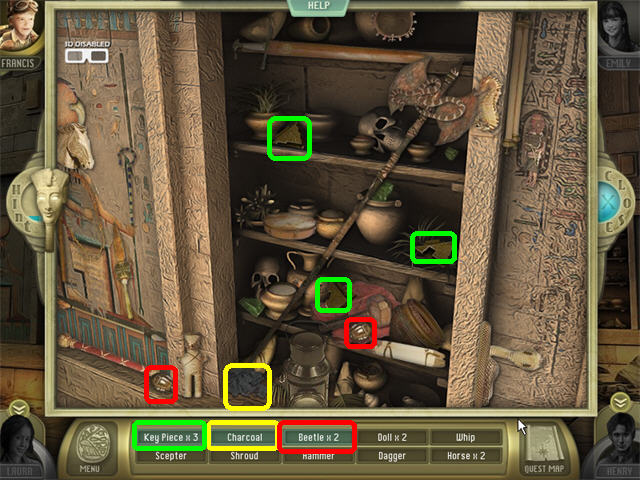
- Click on the Hidden Object Scene on the right.
- Look for all the items on the list.
- The KEY PIECES #4 to #6, BEETLES #3 and #4 and the CHARCOAL will be added to inventory.
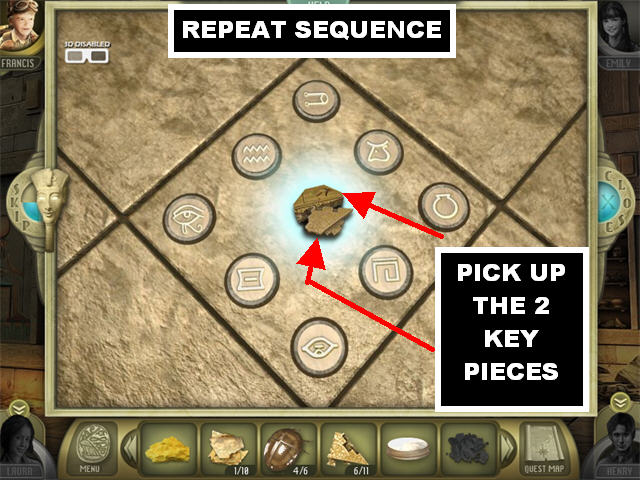
- Click on the right side of the ground to trigger a puzzle.
- You must repeat the sequence shown on the screen.
- If you make a mistake you must start the sequence over.
- Complete 6 sequences to beat the game.
- Pick up KEY PIECE #7and #8 in the center of the puzzle.
- This area is now clear, go through the entrance in the center.
Alchemy Chamber
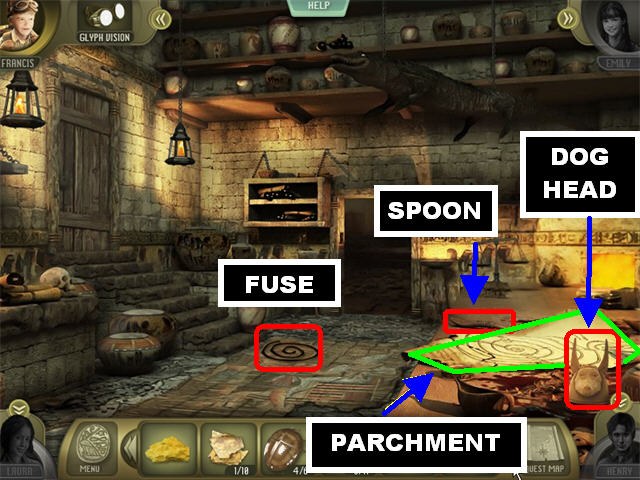
- Pick up the FUSE on the ground.
- Pick up the SPOON in the lower right.
- Pick up the DOG HEAD in the lower right corner.
- Zoom into the PARCHMENT in the lower right.
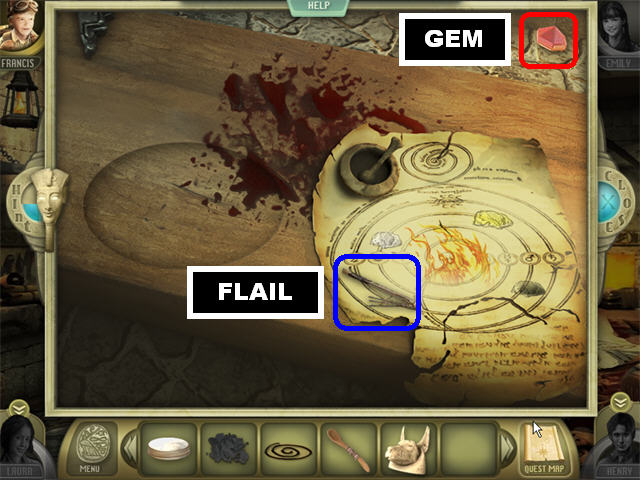
- Pick up GEM #1 in the upper right.
- Pick up FLAIL #1.
- Close the pop-up window.
- Go through the back door.
Embalmer’s Chamber
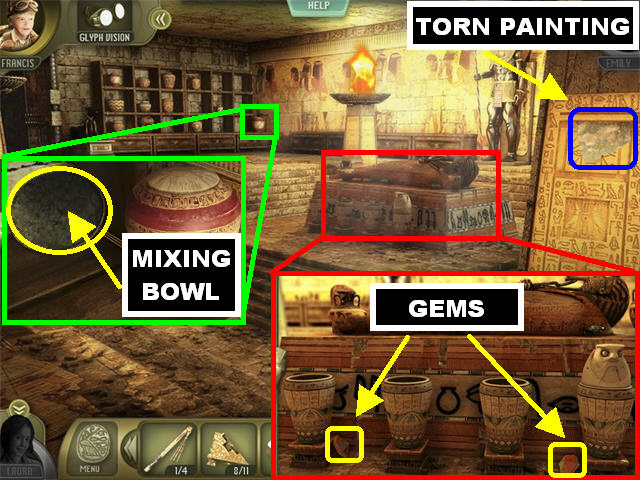
- Zoom into the SARCOPHAGUS in the center and pick up GEM #2 and #3. Close the pop-up window.
- Pick up the TORN PAINTING in the upper right.
- Zoom into the sparkly VASE marked in green; pick up the MIXING BOWL circled in yellow. Exit out of that view.
- Go down to return to the Alchemy Chamber.
Alchemy Chamber
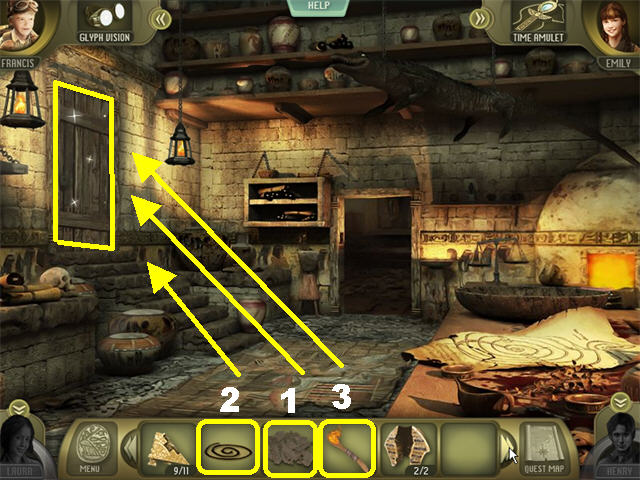
- Zoom into the PARCHMENT in the lower right.
- Place the MIXING BOWL on the table and add the following ingredients:SALTPETER CHARCOAL SULFUR
- Use the SPOON to mix all the ingredients and the SPOON and PASTE will be added to inventory.
- Click on the mixture and the FLAMMABLE PASTE will be added to inventory.
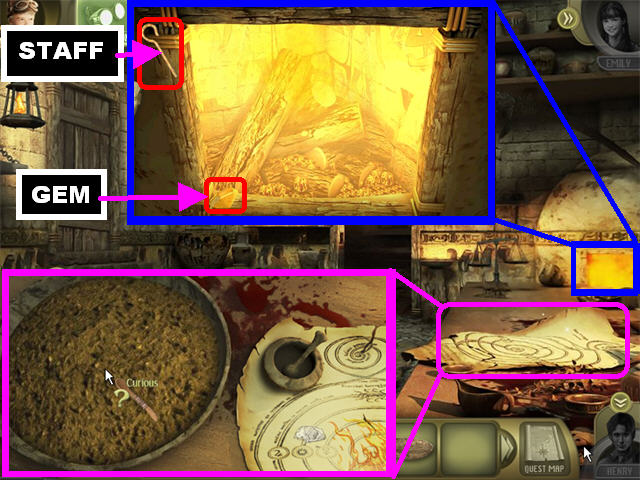
- Zoom into the fireplace.
- Pick up STAFF #1 in the upper left.
- Pick up GEM #4 in the lower left.
- Put the SPOON and PASTE into the fireplace to obtain the LIT SPOON.
- Go straight, turn left and straight again to reach the Burial Chamber.
Burial Chamber
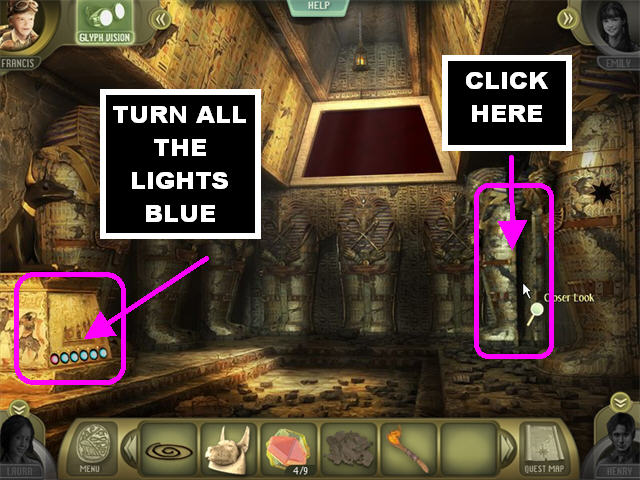
- Zoom into the base of the statue on the left to trigger a puzzle.
- Click on the buttons until they all turn blue.
- The solution for this puzzle is random. You can choose to skip the puzzle once the Skip button is fully charged.
- Click on the open sarcophagus.
- Chapter Complete!
Chapter 3: The Kids
Ceremonial Halls
- This scene opens in the Burial Chamber. Go down to reach the Hallway. There are 2 paths to take, take the lower right path to access the Ceremonial Halls.
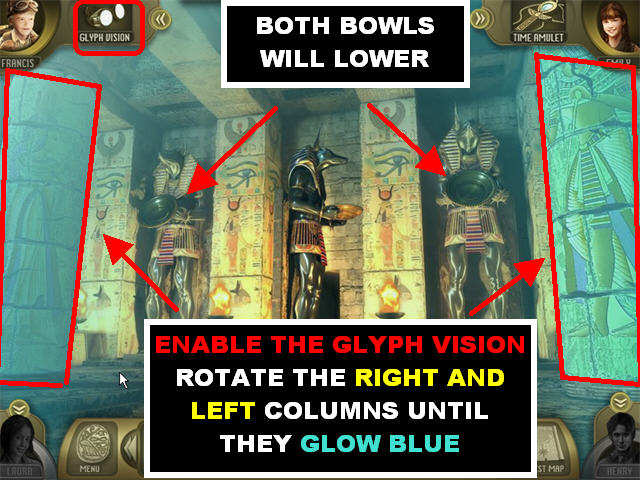
- You receive a message to put on the Glyph Vision. When you put them on you notice that something is wrong with the column on the right and the one on the left.
- Drag the columns on the right until they turn blue like the image in the screenshot.
- Drag the columns on the left until they glow blue like the image in the screenshot.
- The Anubis on the right and left will lower their bowls.
- Disable the Glyph Vision.
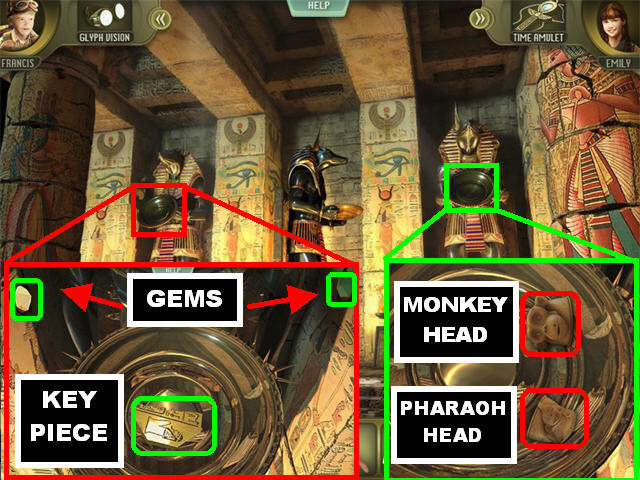
- Zoom into the bowl of the right statue; pick up the MONKEY HEAD and the PHARAOH HEAD.
- Zoom into the bowl of the left statue and pick up KEY PIECE #9 and GEMS #6 & #7.
- This location is cleared. Go behind the middle statue. In the Hallway, take the lower left path to reach the Embalmer’s Chamber.
Embalmer’s Chamber
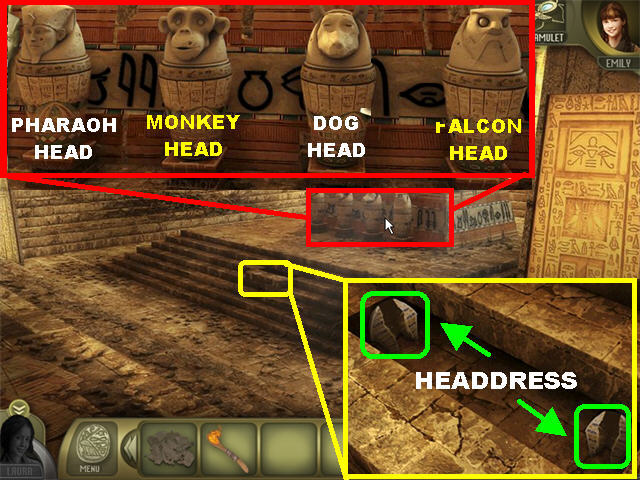
- Zoom into the sarcophagus.
- You have to place the HEADS on the CANOPIC JARS. The Falcon Head is already in place.
- From left to right the heads need to be positioned in this manner:PHARAOH HEAD MONKEY HEAD DOG HEAD FALCON HEAD
- Zoom into the BRICK sticking out of the steps; pick up the 2 HEADDRESS pieces.
- This location is cleared. Go down to reach the Alchemy Chamber.
Alchemy Chamber
- Place the FLAMMABLE PASTE on the left door to put a hole in it.
- Place the FUSE on the left door.
- Light the FUSE with the LIT SPOON to blow a hole through the door.
- This location is now clear, go through the left door.
Library #2
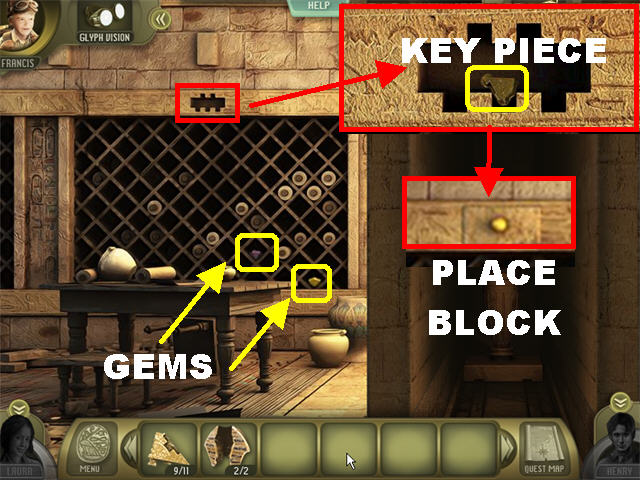
- Zoom into the hole in the upper center and pick up KEY PIECE #10.
- Place the BLOCK into the space in which the Key Piece was located.
- Pick up GEM #8 and #9 at the bottom of the shelves in the wall.
- Follow these steps to go back to the other library. Go down, forward, left, lower right path, down, left chamber in Hallway.
Library #1
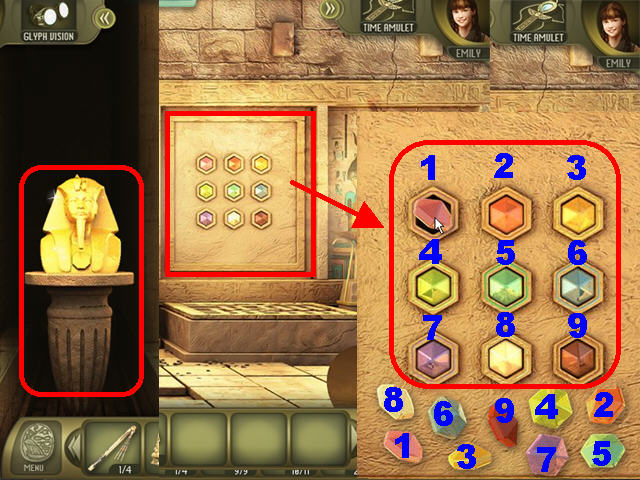
- Zoom into the puzzle on the back wall.
- Place the GEMS on the board.
- Notice the color around the edges of the slots. Place the GEMS into their matching slots.
- Correct Gems will lock into place.
- Please look at the screenshot for the solution.
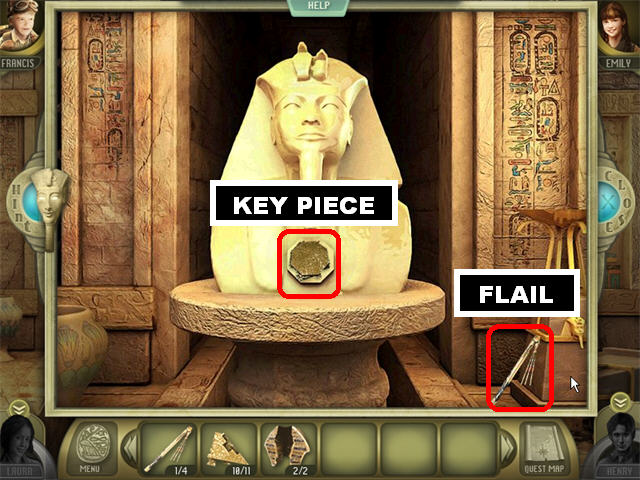
- The GOLD PHARAOH on the left will slide forward; click on it for a closer look.
- Pick up KEY PIECE #11. The KEY is now complete.
- Pick up FLAIL #2 in the lower right.
- This location is cleared. Return to the Burial Chamber by exiting this scene, take the middle chamber and go forward 2 times.
Burial Chamber
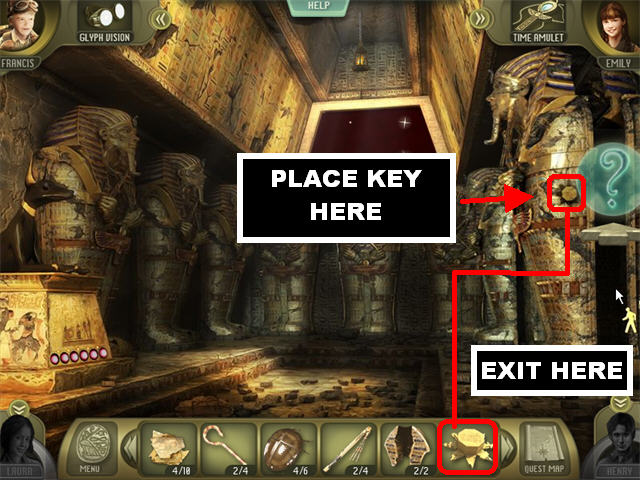
- Put the KEY on the side of the last sarcophagus on the right.
- Go through the opening behind the last sarcophagus to enter the air shaft.
Air Shaft Maze
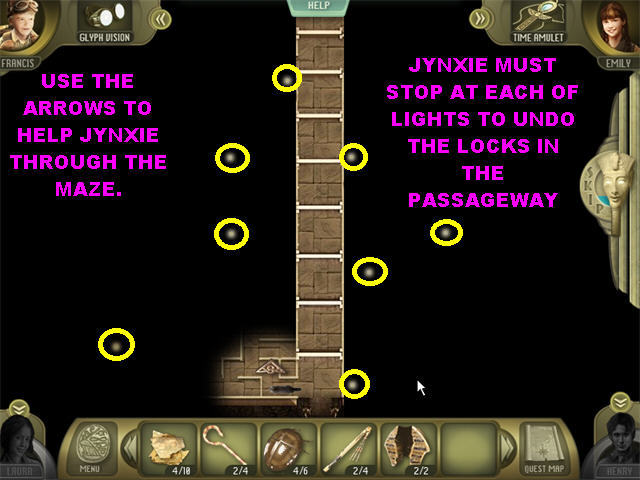
- Click on the arrows to lead Jynxie through the maze and help her undo all the locks to the passageway.
- If you do not want to follow the exact directions below, simply follow the path to all the 8 flashing lights in the scene.
- First Lock:Up, Left 2 times, Down Left, Up, Left, Down, Left Down, Left, Up, Left, Up
- Second Lock:Down, Right 2 Times, Up Right, Up, Left, Up, Right Up, Left, Up, Right, Right Down, Right, Up, Left, Up Left, up, Right 2 times, Up
- Third Lock:Up, Right 2 times, Up 2 times, Left, Down
- Fourth Lock:Up, Right 2 times, Up, Left, Up Right, Up, Right
- Fifth Lock:Left, Up, Right 2 times Down 2 times, Left, Down 2 times
- Sixth Lock:Up, Right, Down, Left, Down, Right Down, Right, Down, Right, Down
- Seventh Lock:Up, Left, Up, Left, Down Left, Up, Left, Down, Right Down, Left, Down, Right
- Eighth Lock:Left, Up, Right, Up, Right Down 2 times, Left, Up, Left Down, Right, Up, Right 2 times Down 2 times, Left, Up, Left, Down Right, Down, Left, Up, Left, Down
- Chapter Complete!
Chapter 4: Reunited
Throne Room

- All locations are available since the family has been reunited. All the inventory items have also been combined since the family is reunited.
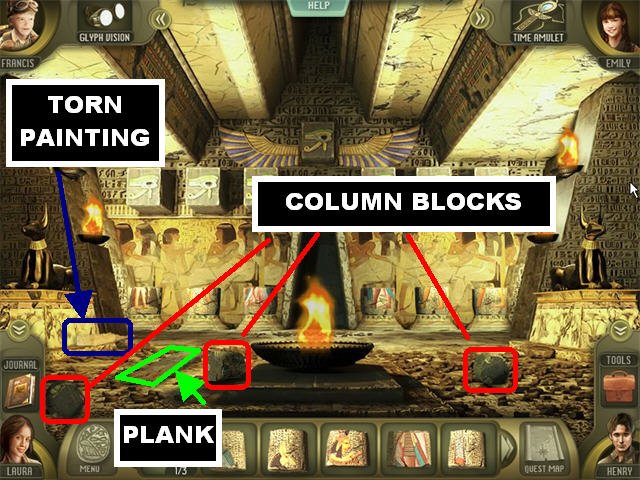
- Pick up the 7 COLUMN BLOCKS marked in red.
- Pick up PLANK #1 in the lower left marked in green.
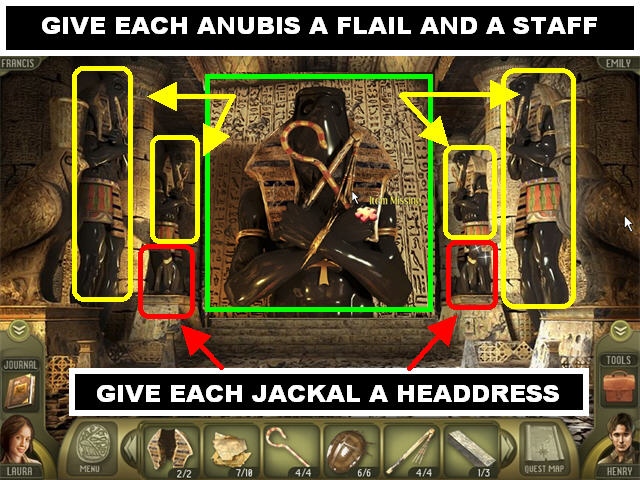
- The 4 Anubis statues are marked in yellow. Click on each of them and give them a FLAIL and a STAFF.
- The 2 JACKALS are marked in red. Place a HEADRESS on each of them.
- This location is cleared. Go through the door in the back.
Hall of Gods
- Click on the Time Amulet and you will see that the columns need to be rebuilt but you are missing several pieces.
- Pick up TORN PAINTING # 8 in the lower marked in blue.
- Pick up the 3 COLUMN BLOCKS marked in red.
- Pick up PLANK #2 in the lower left marked in green.
- Go through the door in the back.
Temple Gates
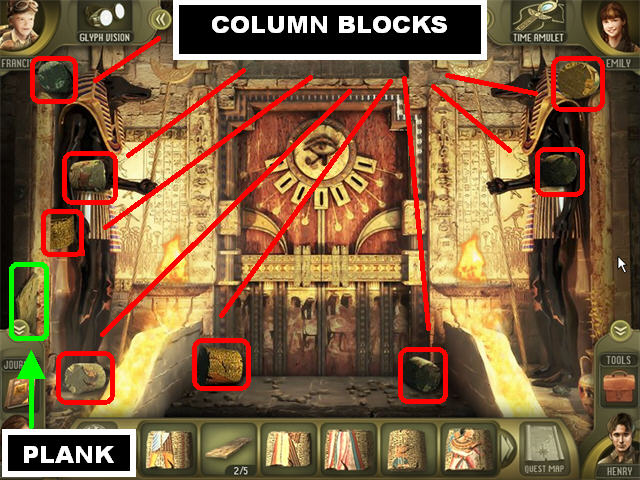
- Pick up the 8 COLUMN BLOCKS marked in red.
- Pick up PLANK #3 in the lower left marked in green.
- Go back to the Hall of Gods.
Hall of Gods
- You should have 18 COLUMN BLOCKS in your inventory, 3 for each column.
- You have to place the COLUMN BLOCKS on the correct columns.
- Click on the Time Amulet to view the correct positions of all the blocks. Scroll through your inventory while the Time Amulet is open so you can keep your inventory with the right pieces in view whenever possible.
- Have your blocks in place as much as you can when you disable the Time Amulet so pieces can be easily positioned.
- Each time 3 pieces are placed correctly on a column, it will lift up the block above it.
- Please look at the screenshot for the solution.
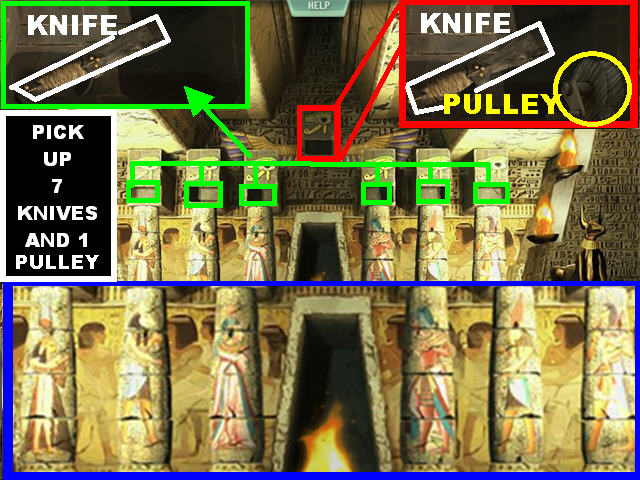
- After the puzzle has been solved, zoom into each of the 6 boxes above the columns to pick up KNIVES # 1 through #6.
- Click on the seventh box that appears in the upper center to retrieve KNIFE #7 and PULLEY #2.
- This location is cleared. Go back to the Temple Gates.
Temple Gates

- Zoom into the back door and place the 7 KNIVES into the slots to clear this location.
- Go through the door.
Interior Temple
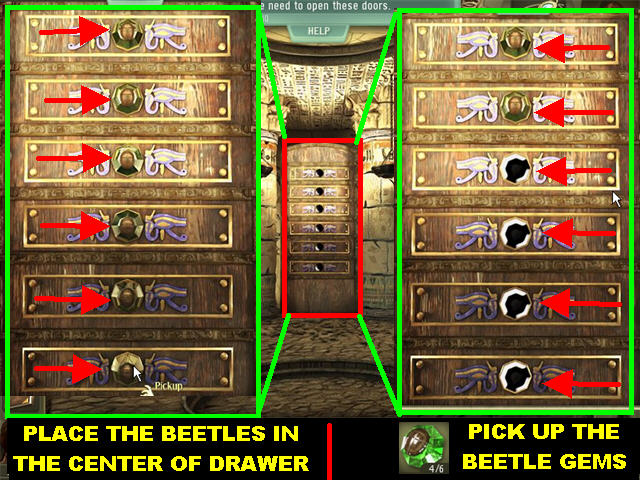
- Zoom into the drawers in the back and place the 6 BEETLES in the center of each drawer.
- Pick up the 6 BEETLE GEMS in the center of the drawer.
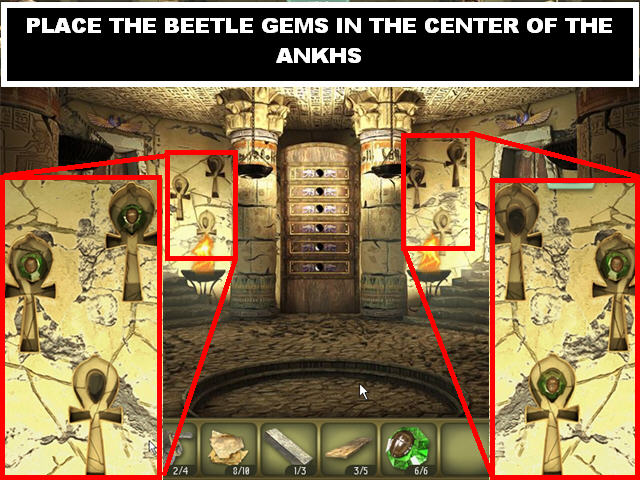
- Zoom into the ANKHS on the left side of the wall and place the 3 BEETLE GEMS in the center of the ANKHS.
- Zoom into the ANKHS on the right side of the wall and place the 3 BEETLE GEMS in the center of the ANKHS.
- Chapter Complete!
Chapter 5: The Great Escape
Interior Temple
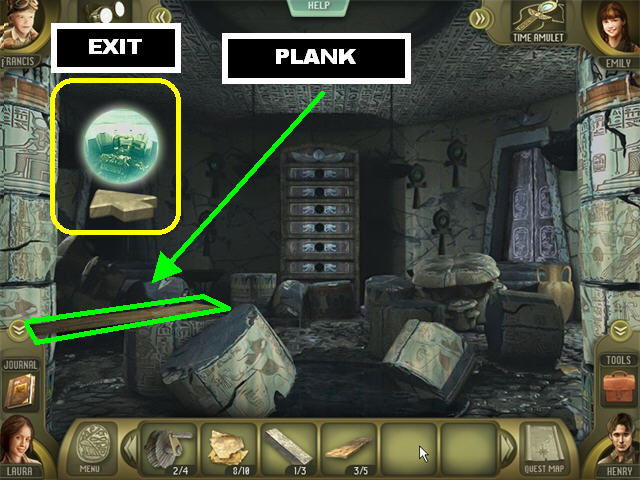
- Pick up PLANK # 4 marked in green.
- This location is cleared. Exit in the upper left.
Underground Tomb
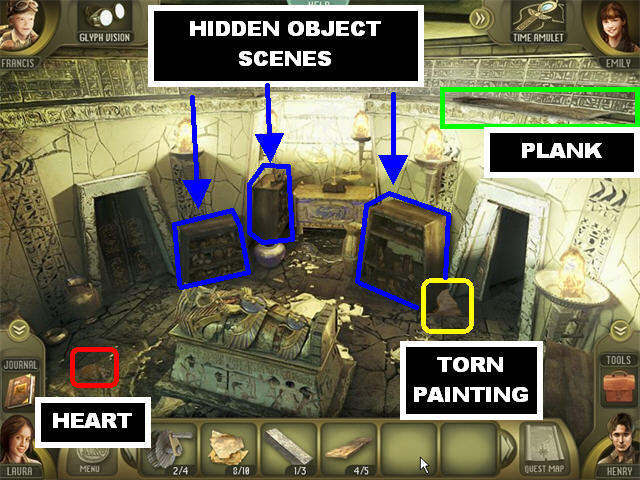
- Pick up PLANK # 5 marked in green in the upper right.
- Pick up TORN PAINTING # 9 marked in yellow in the lower right.
- Pick up the HEART marked in red in the lower left.
- The 3 Hidden Object Scenes are marked in blue.
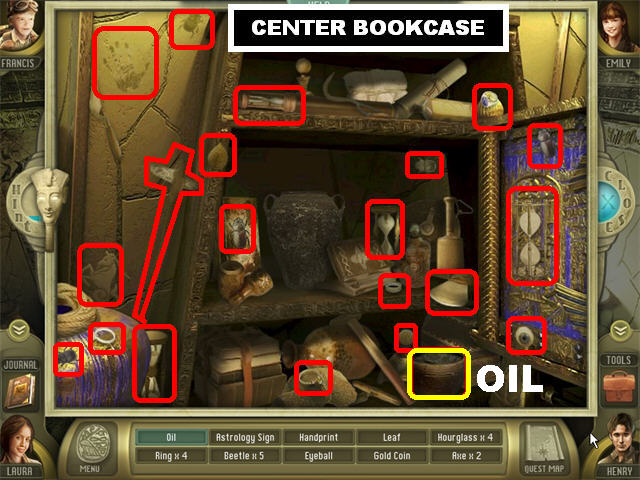
- Click on the center bookcase to trigger a Hidden Object Scene.
- The OIL will be added to inventory at the end of your search.
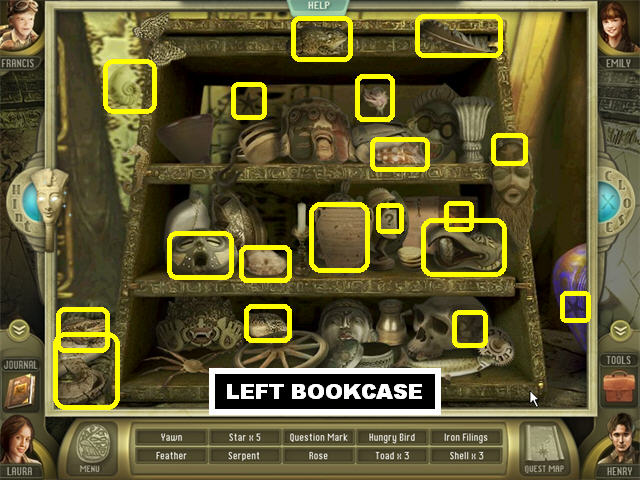
- Click on the left bookcase to trigger a Hidden Object Scene.
- Look for all the items on the list. You will not receive any inventory items at the conclusion of this search.
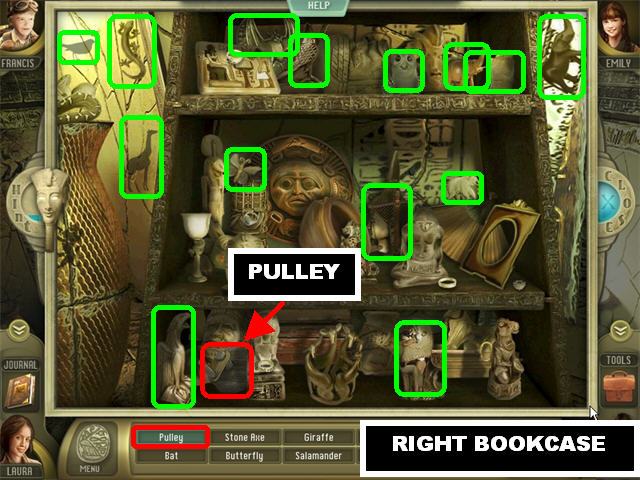
- Click on the right bookcase to trigger a Hidden Object Scene.
- PULLEY #3 will be added to inventory at the end of your search.
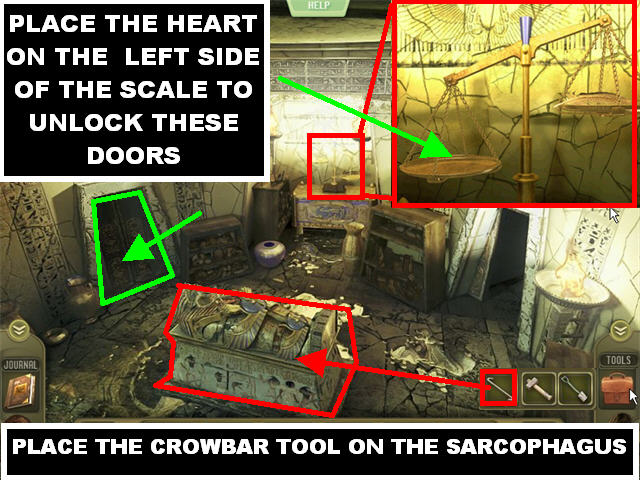
- Zoom into the SCALE in the upper center.
- Place the HEART on the left side of the scale and it will unlock the left chamber entrance.
- Place the CROWBAR TOOL (look in your Tools Bag in the lower right) on the large sarcophagus in the center of the room to trigger a Hidden Object Scene.
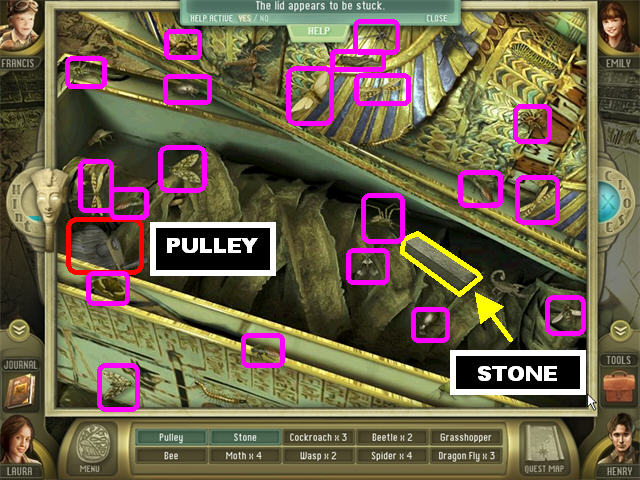
- Look for all the items on the list.
- You will obtain PULLEY # 4 and STONE #2 at the end of your search.
- This location is cleared. Go through the entrance on the left.
Boat Room
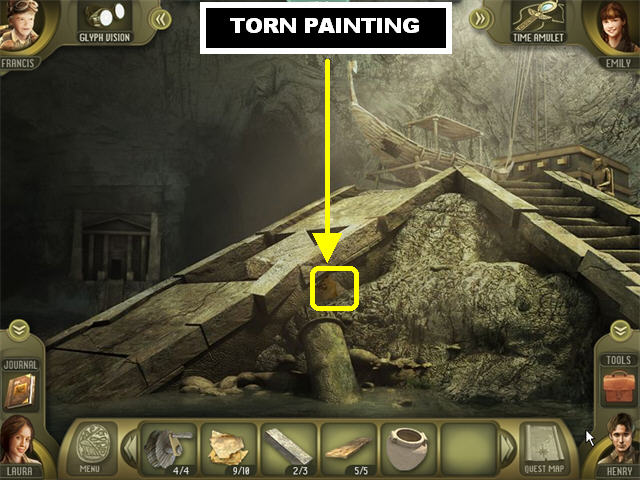
- Pick up TORN PAINTING # 10 in the lower center.
- Let’s go back to the Burial Chamber. Go down, right, down 4 times, lower left path in the Hallway.
Burial Chamber
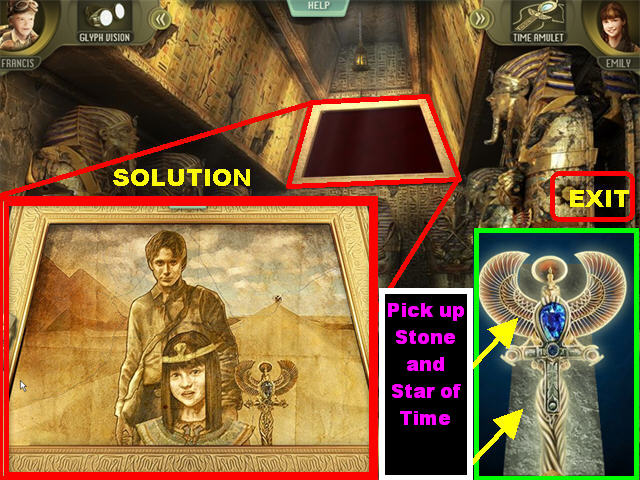
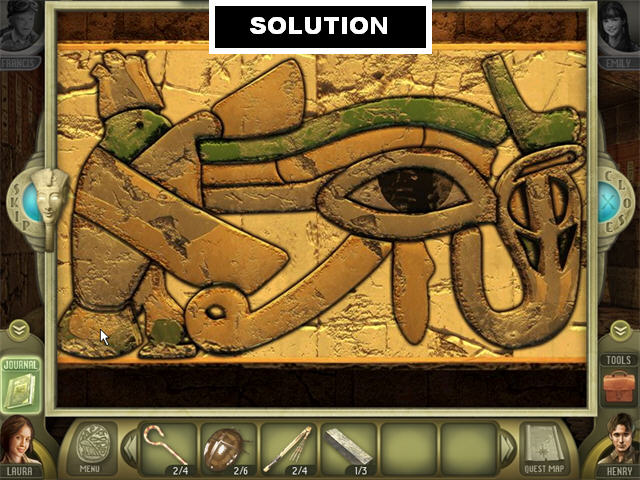
- Zoom into the sparkly red board in the upper center and place the 10 TORN PAINTING fragments on the board.
- Drag the pieces into the right spots on the board.
- Correct pieces will lock in place.
- Please look at the screenshot for the solution.
- Pick up the STAR OF TIME and STONE #3 in the center of the puzzle.
- This location is cleared. Go back to the Boat by following these steps: go through sarcophagus on the right, forward 4 times, and left 2 times.
The Boat
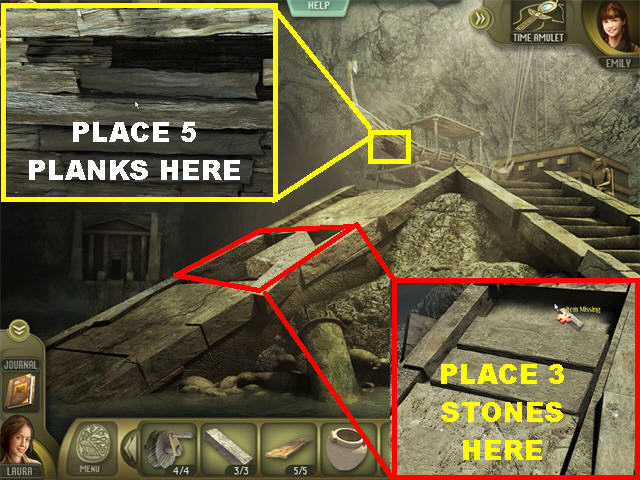
- Zoom into the broken ramp and place the 3 STONES on the path to patch it up.
- Zoom into the hole in the boat and place the 5 PLANKS in the hole to patch it up.
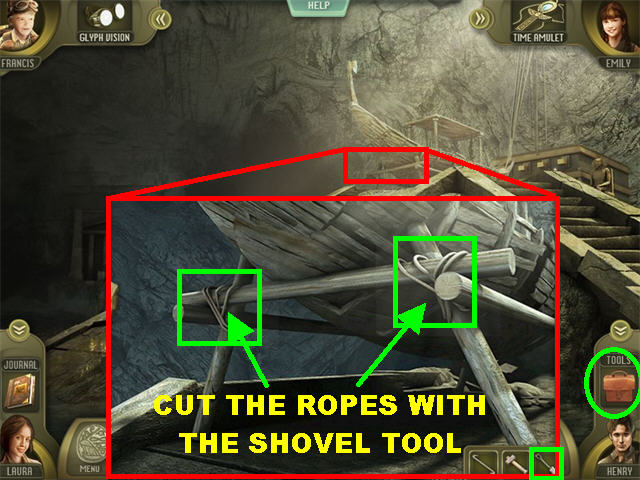
- Click below the boat, open your Tools and place the SHOVEL on the ROPES on the left and right sides of the support to cut them.
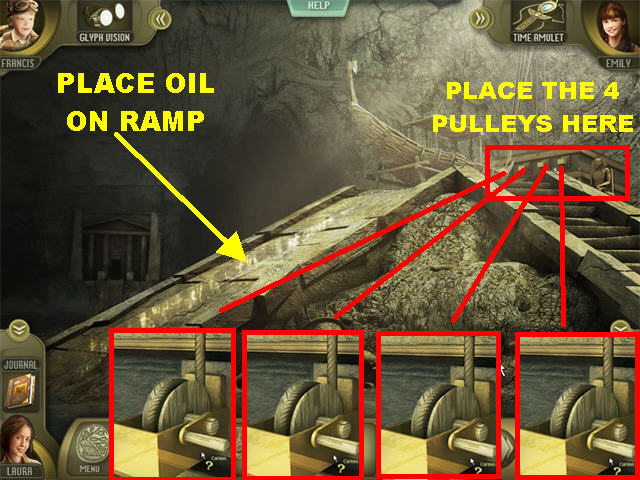
- Place the OIL on the stone ramp.
- There are 4 slots in the upper right, click on them for a closer view.
- Place a PULLEY in each of those 4 slots and click on the PULLEY to pull the rope.
- The End!
Created at: 2010-05-06