

Walkthrough Menu
- General Tips
- Chapter 1: The Mystery
- Chapter 2: The Pantheon Area
- Chapter 3: Saint Angelo
- Chapter 4: Secrets
General Tips
- This is the official guide for European Mystery: The Face of Envy.
- This guide will not mention each time you have to zoom into a location; the screenshots will identify each location.
- Hidden-object puzzles are referred to as HOPs in this guide. Items listed in red are hidden or they require additional actions to locate. Interactive items in HOPs are color-coded.
- Mini-games and HOPs are sometimes randomized; your solution may vary.
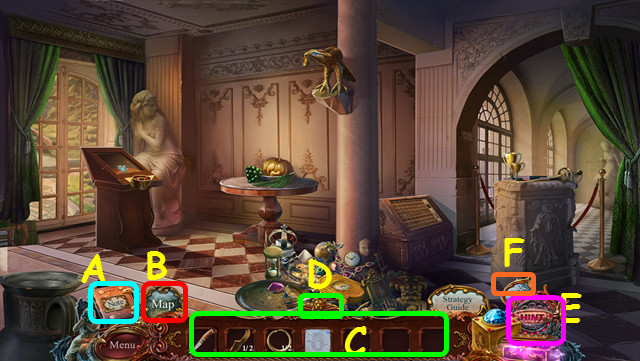
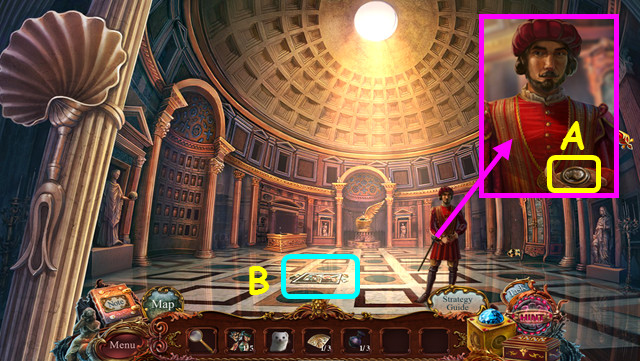
- Select the notes to read clues and notes (A).
- Use the map to travel quickly and see where you have tasks to complete (B).
- Move your mouse down to open the inventory panel; hover over an item in your inventory to see its name (C).
- Select the lion to keep the inventory panel open (D).
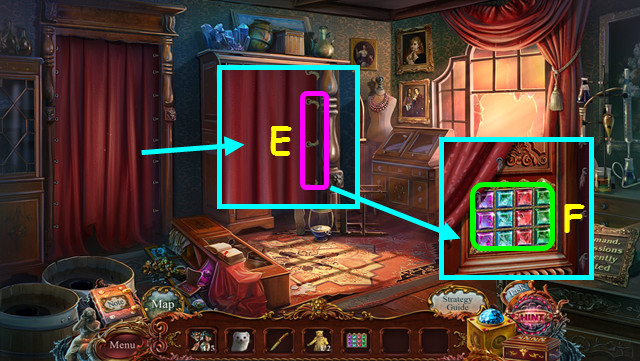
- Select the hint button for a hint (E).
- The task button will give the next task you must complete (F).
Chapter 1: The Mystery
- You have the option of an interactive tutorial.
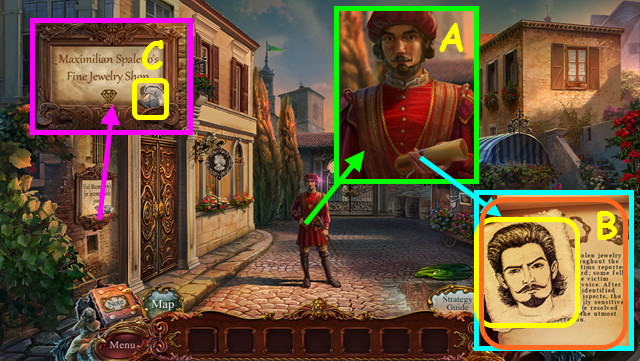
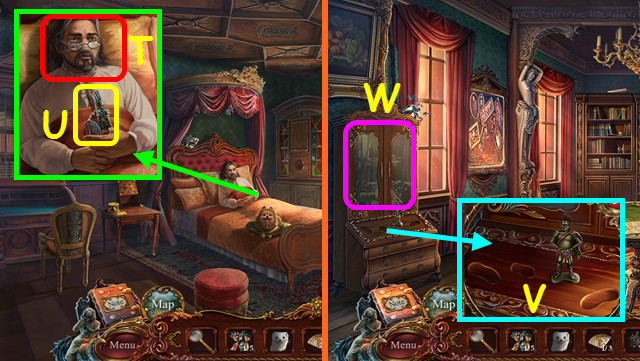
- Talk to Lorenzo (A).
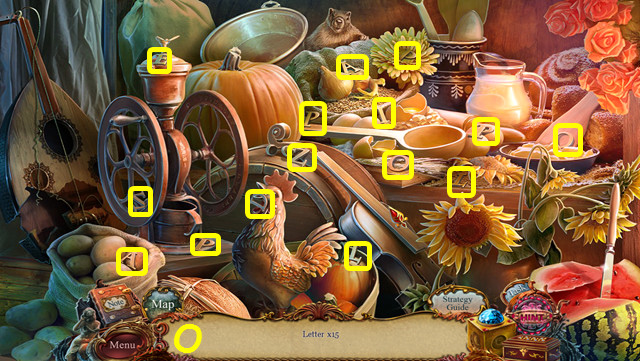
- Take the SKETCH OF SUBJECT and read the note (B).
- Take the 1/3 CHEF'S HAT (C).
- Take the JEWEL and read the note (D).
- Use the JEWEL in the lock (E).
- Walk left into the Jewelry Workshop.
- Take the SILVER ROSE (F).
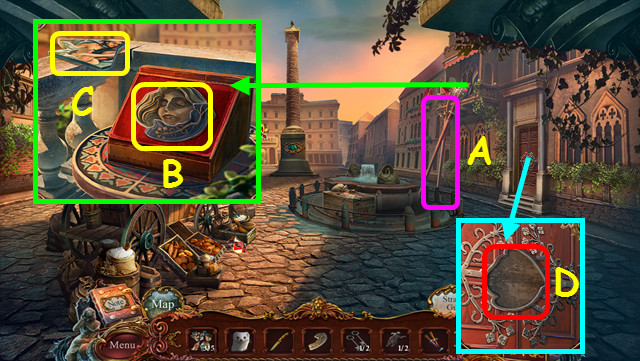
- Take the APPLE; read the letter and the instructions (G).
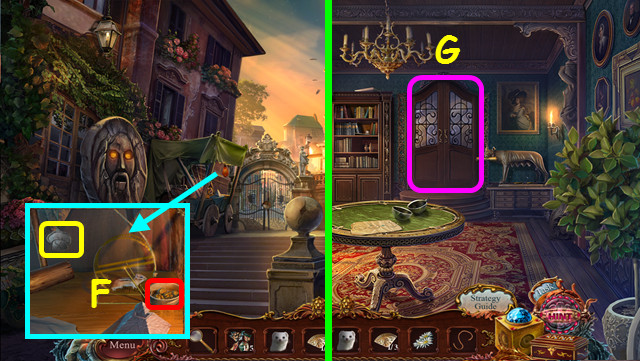
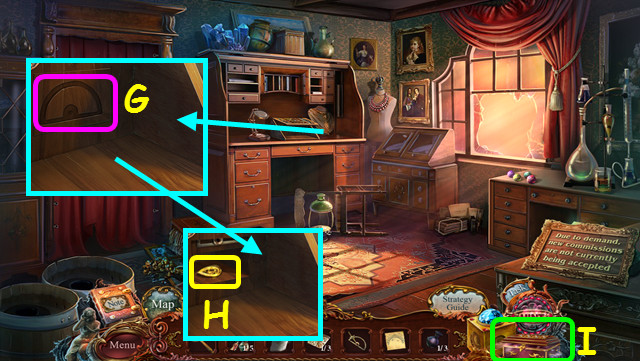
- Select the fallen case (H).
- Play the HOP to earn the FILE (I).
- Walk down to Victoria Street.
- Use the FILE on the chain, read the poster, and open the doors (J).
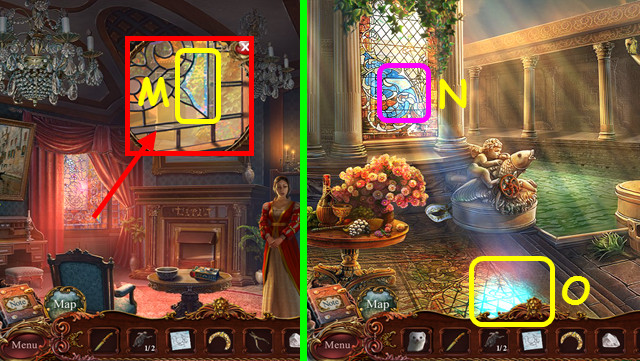
- Take the MAGNIFYING LENS and the GOLD ROSE; read the note (K).
- Walk left.
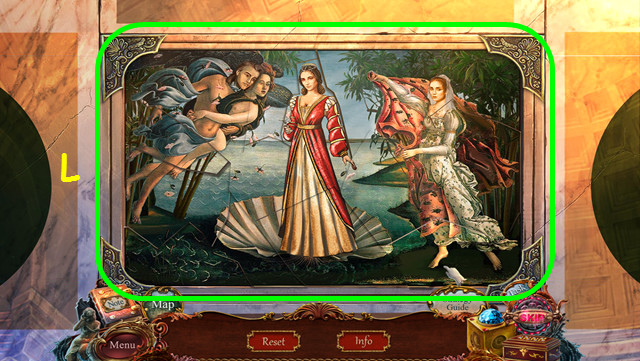
- Note the painting (L).
- Place the SILVER ROSE and the GOLD ROSE in the frame (M).
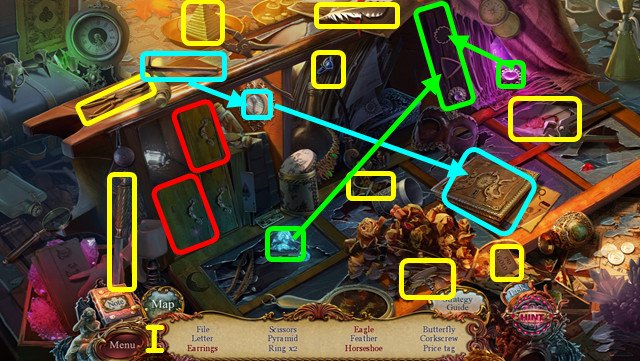
- Create a path from each colored gem to the same color vase (N).
- Select a gem, and then choose the squares to make a path.
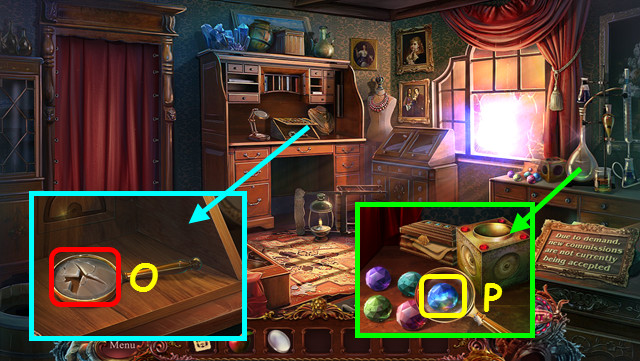
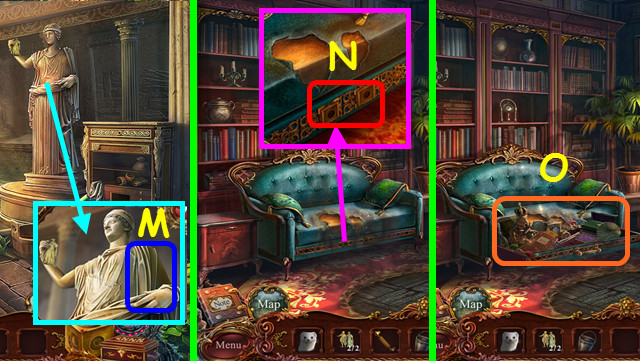
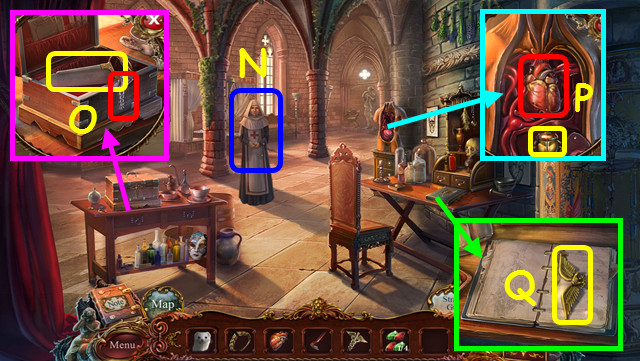
- Remove the broken glass, place the MAGNIFYING LENS in the frame, and then take the MAGNIFYING GLASS (O).
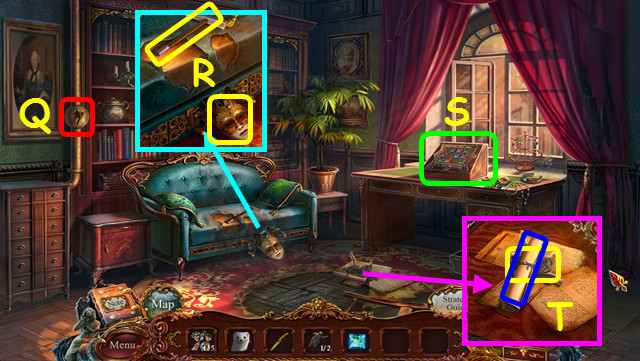
- Use the MAGNIFYING GLASS on the gems; take the SPECIAL CRYSTAL (P).
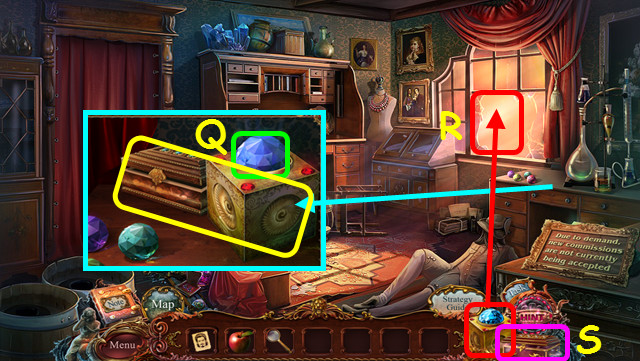
- Place the SPECIAL CRYSTAL on the cube; take the CRYSTAL CUBE and the JEWELER'S BOX (Q).
- The CRYSTAL CUBE and the JEWELER'S BOX are now in your menu bar.
- Use the CRYSTAL CUBE on the window to earn the CHARGED CRYSTAL (BLUE) (R).
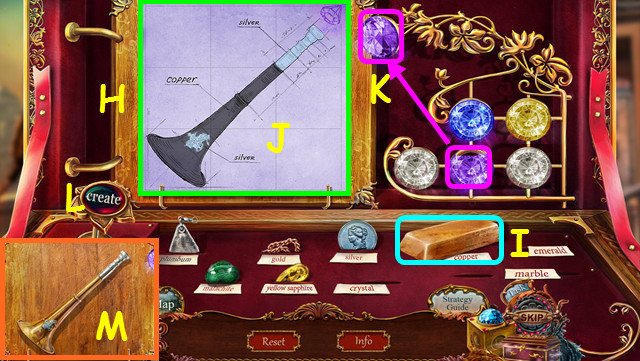
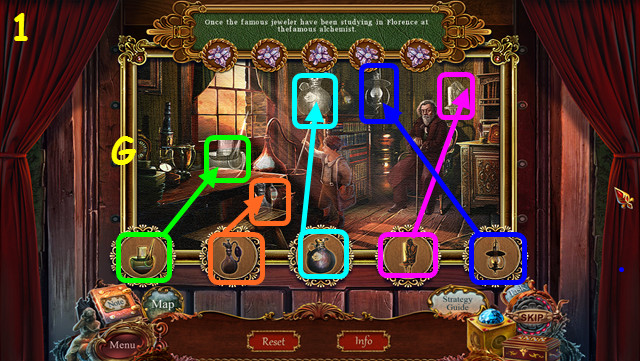
- Select the JEWELER'S BOX (S).
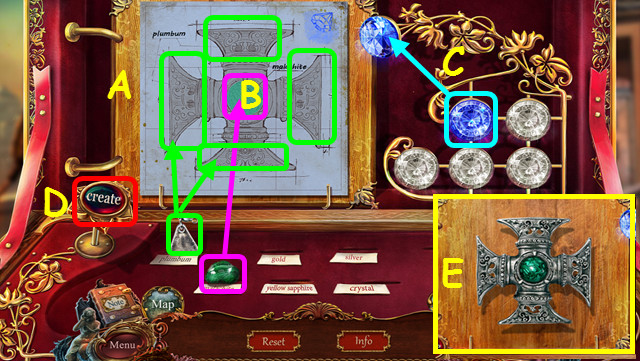
- Drag the correct materials over the blueprint (A).
- Drag the MALACHITE to the center (B).
- Drag the PLUMBUM to the 4 arms (green).
- Select the BLUE CRYSTAL (C), and push the 'Create' button (D).
- Take the MALTESE CROSS (E).
- Walk down.
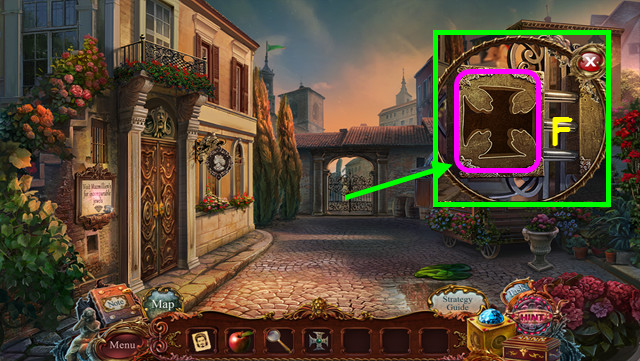
- Use the MALTESE CROSS in the lock (F).
- Walk forward to the Main Square.

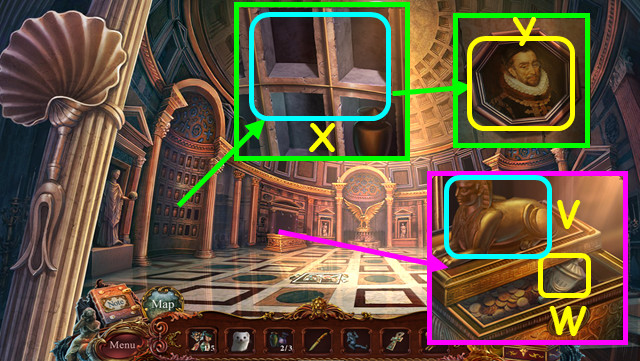
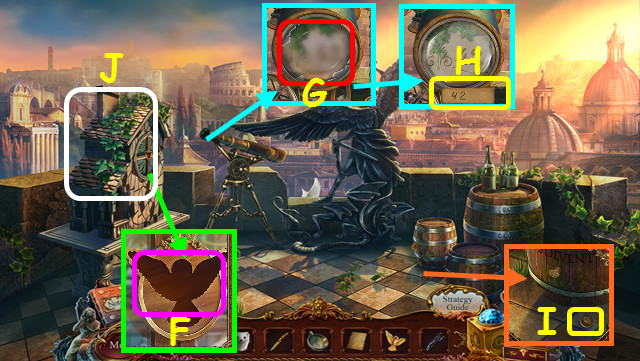
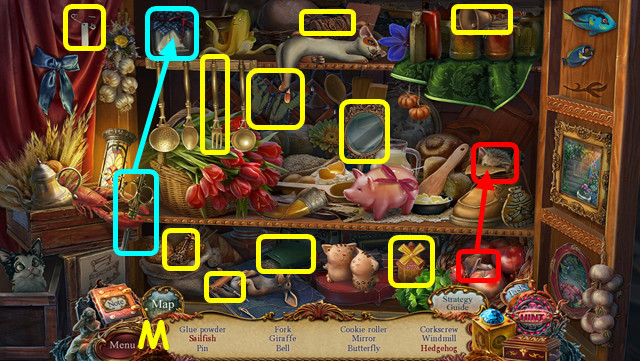
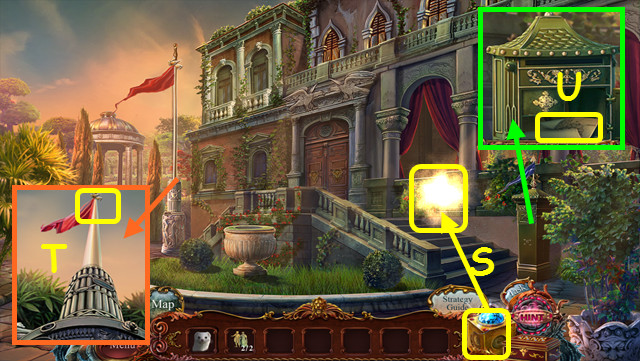
- Take the 1st SIGN, read the invite, and take the 1/2 AMBER EYE (G).
- Try to walk to the right (H).
- Enter the Circus (I).
- Give the APPLE to the hedgehog (J).
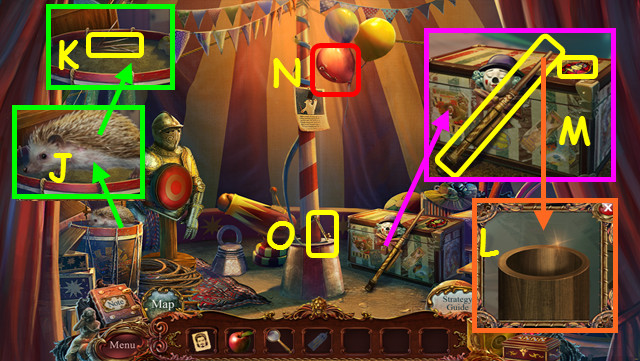
- Take the NEEDLES (K).
- Place the NEEDLES in the barrel (L).
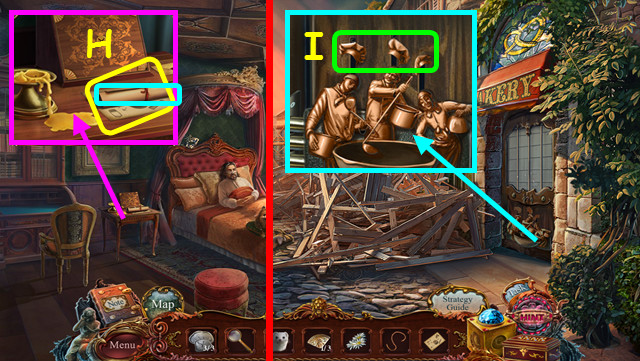
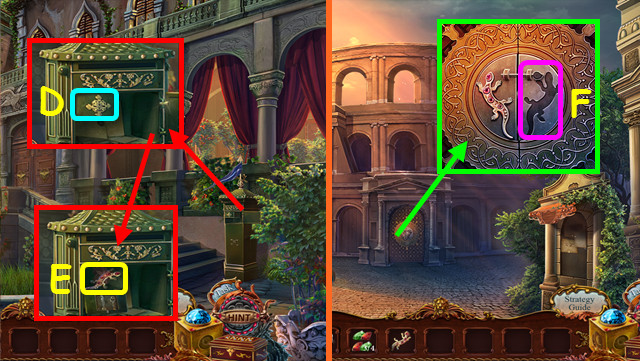
- Take the 1/5 MOSAIC PART and the BLOWGUN (M).
- Use the BLOWGUN on the balloon (N).
- Take the CAGE KEY (O).
- Walk down.

- Take the WEDGE; use the CAGE KEY on the lock (P).
- Take the ERMINE (Q).
- Name your ermine (R).
- Take the 1/3 PLATE PART (S).
- Use the ERMINE on the statue to get the CLOWN NOSE (T).
- Walk left.
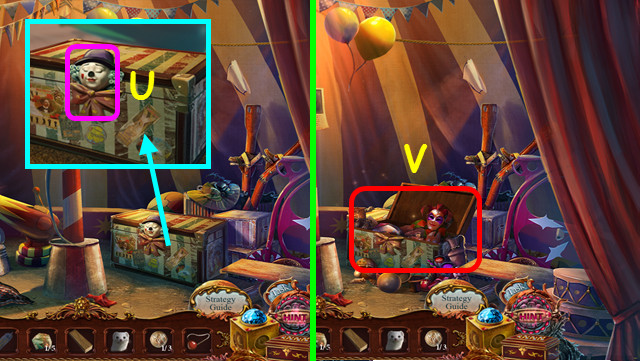
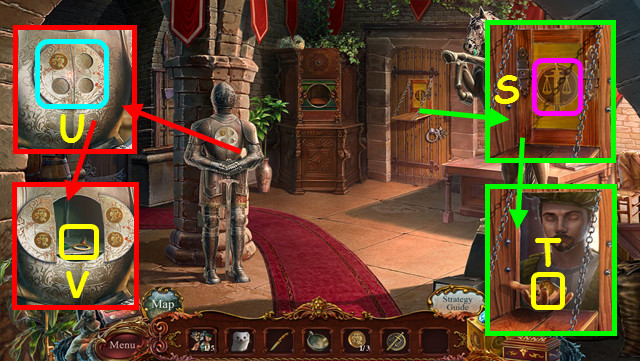
- Place the CLOWN NOSE on the clown (U).
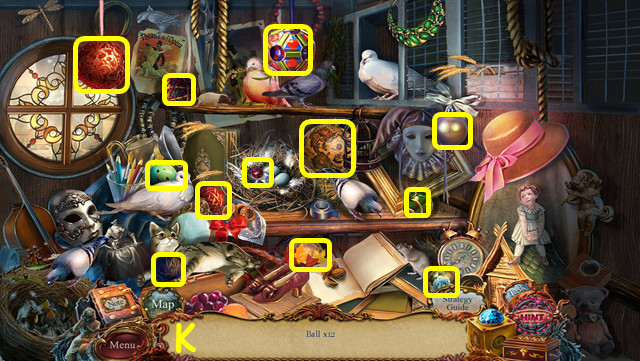
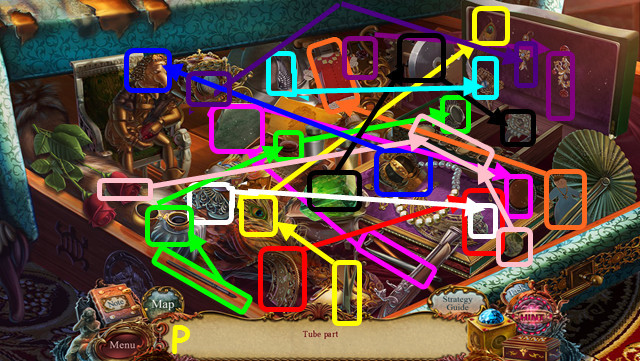
- Select the open chest (V).
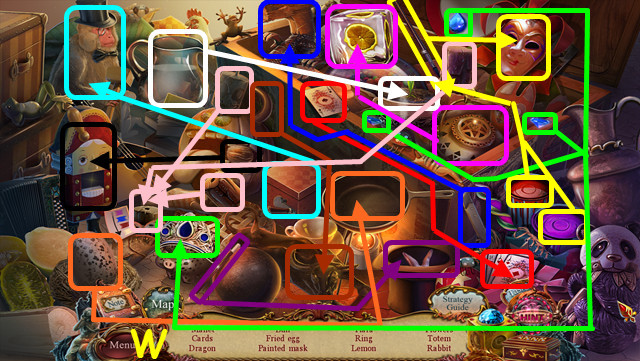
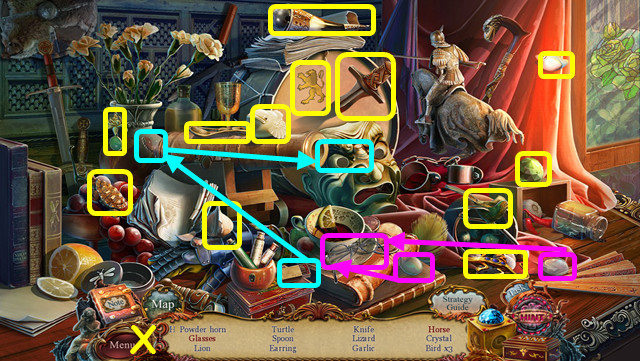
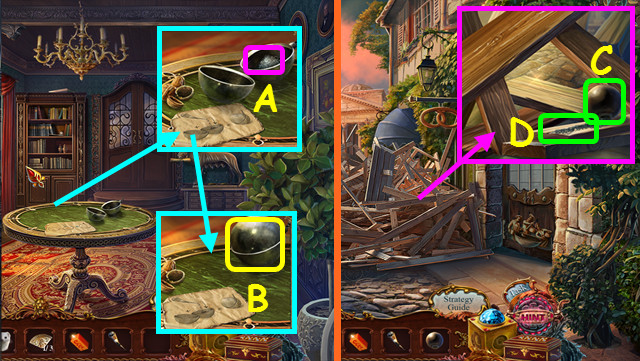
- Play the HOP to earn the MALLET (W).
- Walk down.
- Place the WEDGE on the barrel; use the MALLET on the wedge (A).
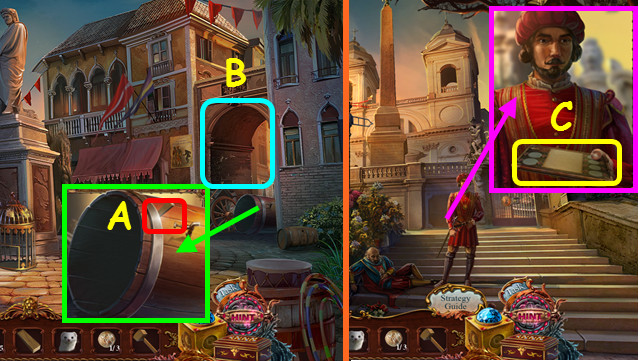
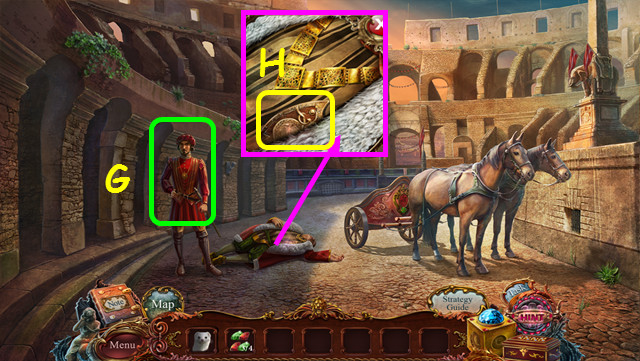
- Walk right to the Spanish Steps (B).
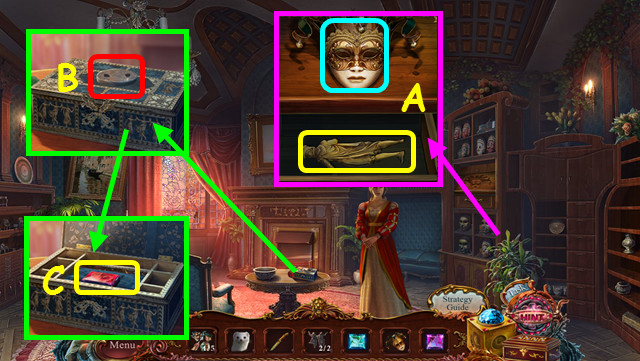
- Talk to Lorenzo and take the face kit (C).
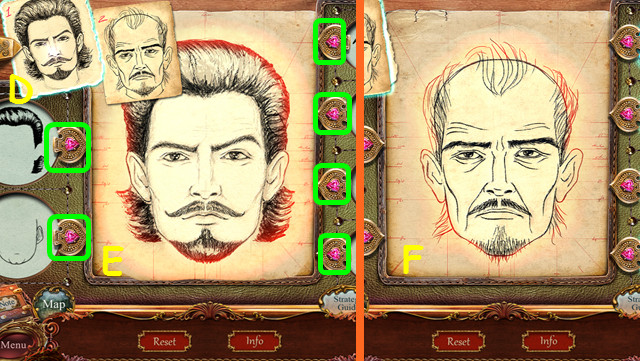
- Place the SKETCH OF SUSPECT in the top left (D).
- Change the facial features (green) until the sketch in the center matches the one in the upper left (E).
- Do the same for the second sketch (F).
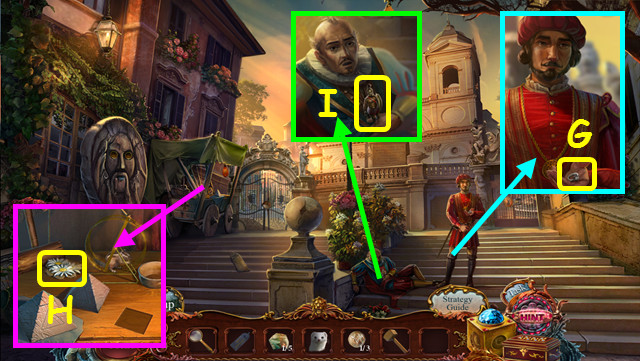
- Take the TRIANGLE RING from Lorenzo (G).
- Take the CHAMOMILE (H).
- Talk to Antonio; take the 1/3 LEGIONNAIRE FIGURINE (I).
- Return to the Jewelry Workshop.
- Use the TRIANGLE RING on the lock; take the GEAR (J).
- Walk to the Circus.
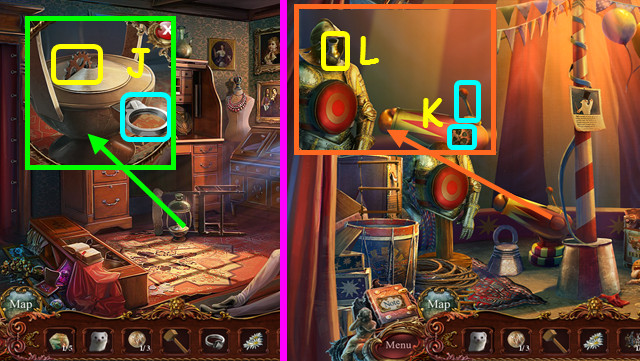
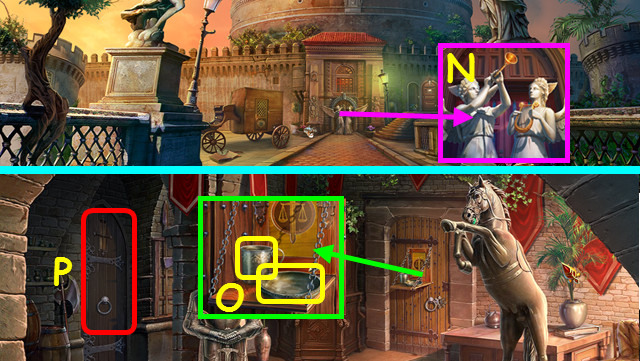
- Pull the lever, remove the broken gear, place the GEAR inside, and pull the lever twice (K).
- Take the GOLD WEIGHT (L).
- Walk down.
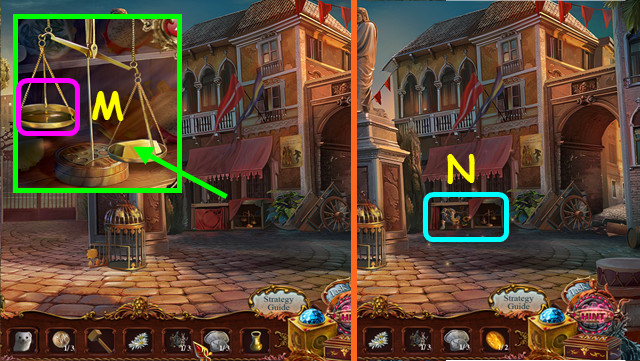
- Place the GOLD WEIGHT on the scale (M).
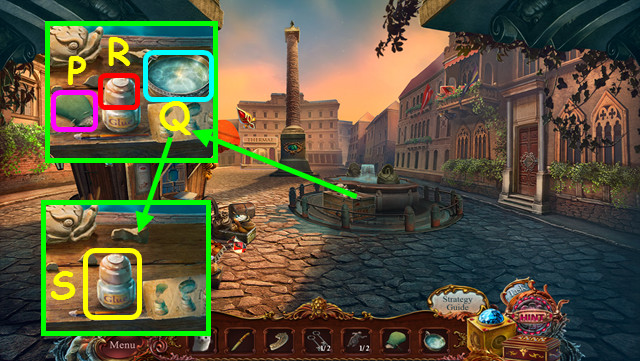
- Select the shop (N).
- Play the HOP to earn the SIGN LETTERS (O).
- Walk right.
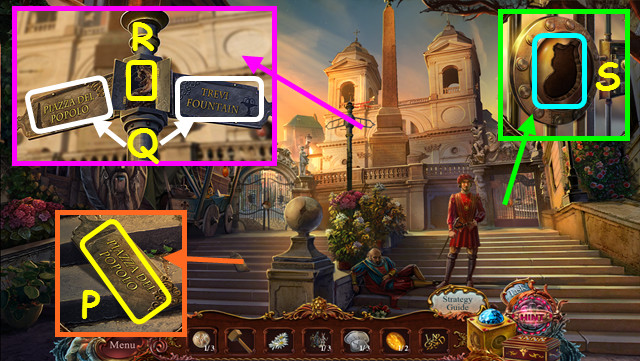
- Place the SIGN LETTERS on the sign; take the 2nd SIGN (P).
- Place the 1st SIGN and the 2nd SIGN on the post (Q).
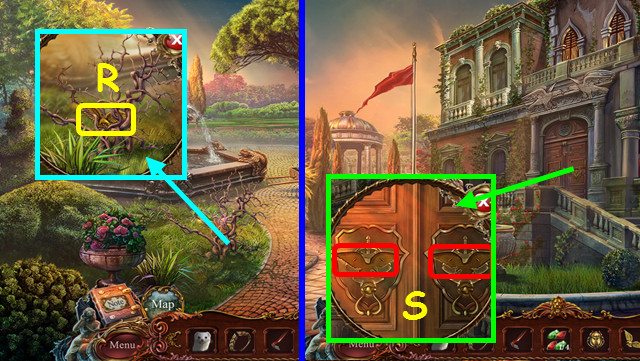
- Take the NEPTUNE FIGURINE (R).
- Use the NEPTUNE FIGURINE on the lock (S).
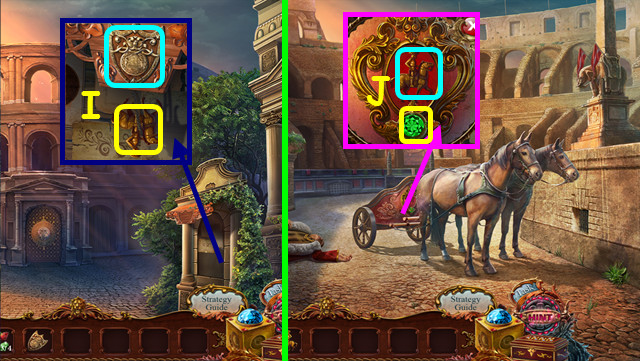
- Enter the right gate to the Trevi Fountain.
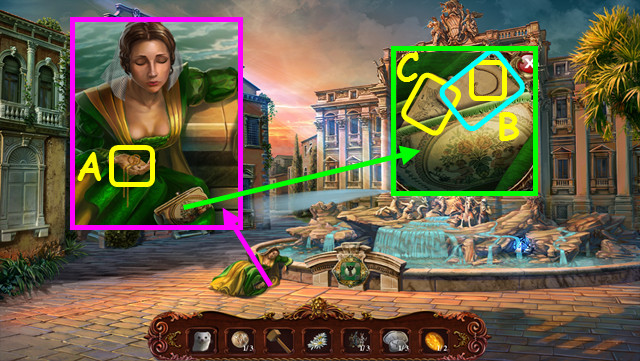
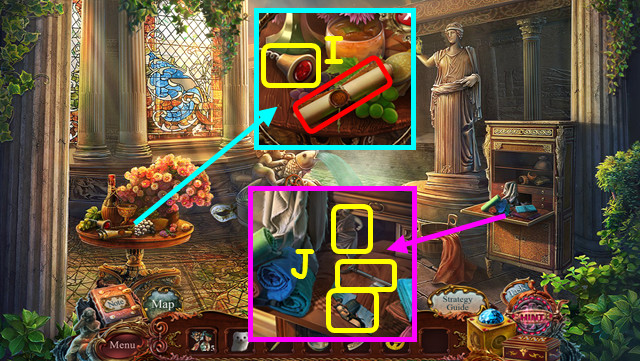
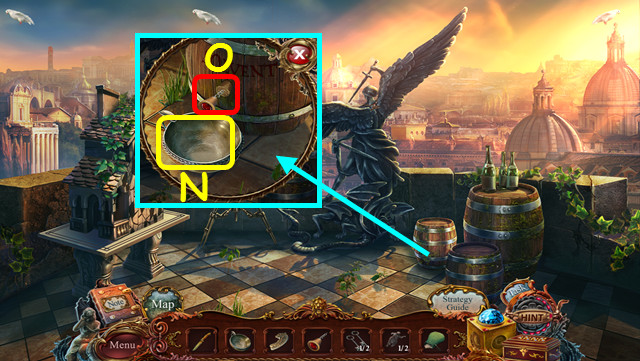
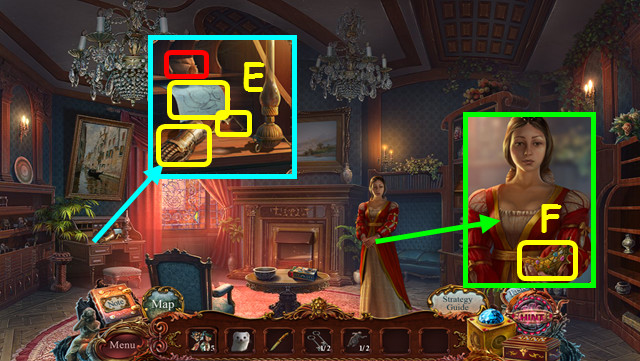
- Talk to Antonio's wife; take the GOLD CHAIN (A).
- Open the case, take the THREAD, and read the note (B).
- Take the ANGEL-STATUE BLUEPRINT (C).

- Use the ERMINE to take the PYRAMID (D).
- Use the CRYSTAL CUBE on the light to get the CHARGED CRYSTAL (YELLOW) (E).
- Walk down.
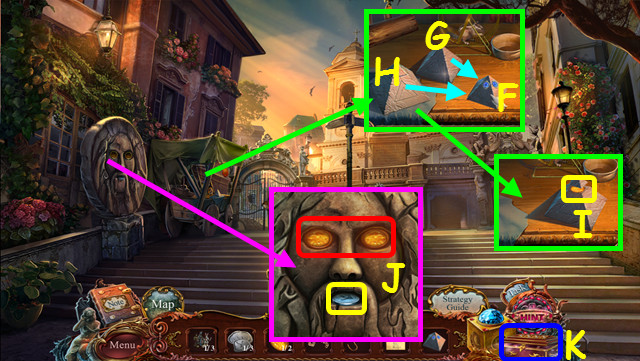
- Place the PYRAMID on the table (F).
- Move the middle pyramid (G) onto the right, and then move the left pyramid (H) onto the right pyramid.
- Open the pyramid and take the 2/2 AMBER EYE (I).
- Place the 2 AMBER EYES on the face; take the SILVER COIN (J).
- Select the JEWELER'S BOX (K).
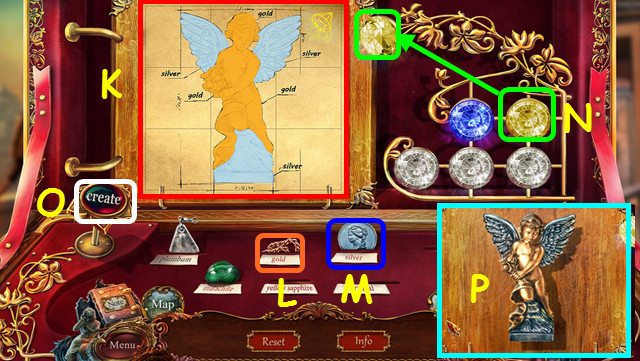
- Place the ANGEL-STATUE BLUEPRINT on the board (K).
- Place the GOLD CHAIN on the gold sign (L), and place the SILVER COIN on the silver sign (M).
- Use the gold and silver items on the blueprint as shown.
- Select the yellow gem (N), and press the 'Create' button (O).
- Take the ANGEL STATUE (P).
- Walk to the Trevi Fountain.
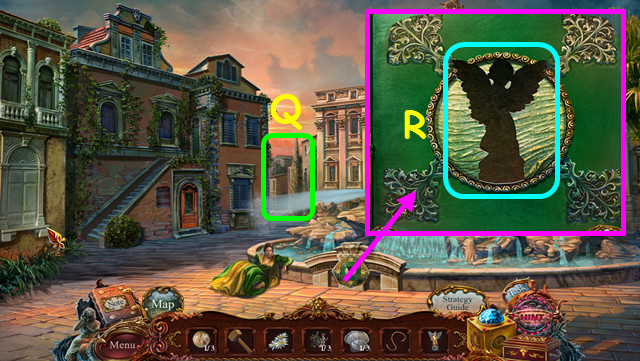
- Note the blocked street (Q).
- Place the ANGEL STATUE in the indentation (R).

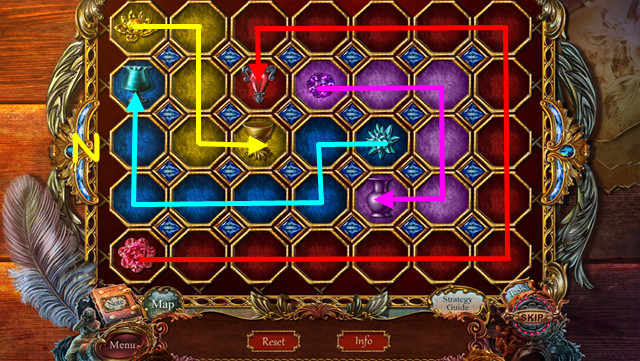
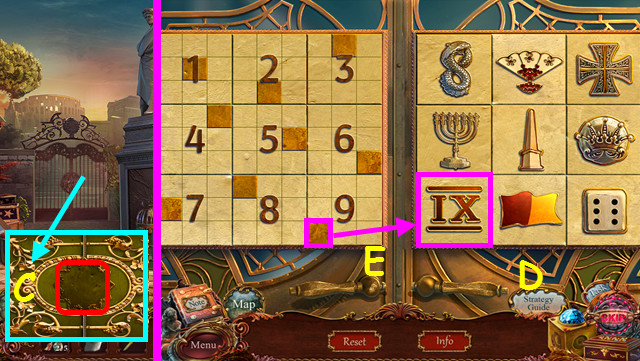
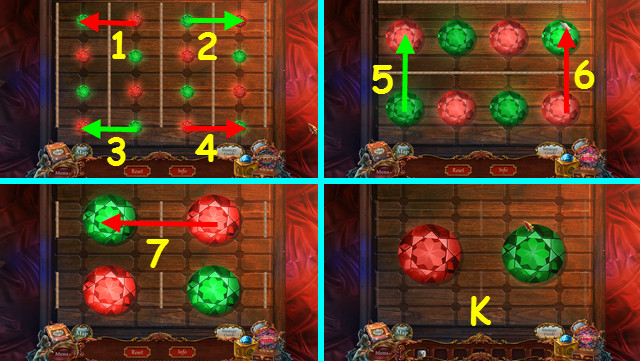
- Select a number and move it the number of spaces indicated by the number.
- Move all the numbers so they all read zero.
- Move the numbers T5-S6, T6-S5, U5-T6, U6-T5, U4-V6, W5-U5, W6-V5, W3-W6, X6-W3, X4-X6, X2-X5, V4-W5, X1-X3, W2-X1, V3-W4, V1-W2, U3-V4, T1-W1, T3-V2, T2-U1, and T4-U3.
- Walk left to Corsa Street.
Chapter 2: The Pantheon Area
- Try to walk forward.
- Read the note and take the HOUSE KEY (A).
- Walk down.
- Use the HOUSE KEY on the lock (B).
- Enter Bruno's House.
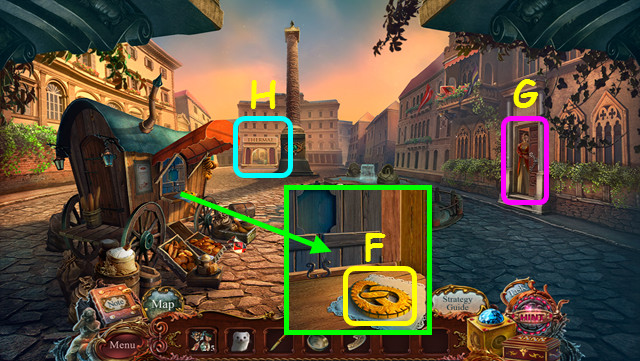
- Use the ERMINE to take the 2/3 CHEF'S HAT (C).
- Use the MALLET on the shells; take the NUT (D).
- Read the instructions (E).
- Walk down twice to the Spanish Steps.
- Place the NUT in the bowl; take the 3/3 CHEF'S HAT (F).
- Return to Bruno's House.
- Walk forward to Bruno's Bedroom (G).
- Read the scroll and take the MEDICINE RECIPE (H).
- Return to Corsa Street.
- Place the 3 CHEF'S HATS on the bakers (I).
- Walk right to the Bakery.
- Read the note, take the CAKE KNIFE, the 2/3 LEGIONNAIRE FIGURINE, and CROSS-SHAPED KEY (J).
- Return to Bruno's Bedroom.
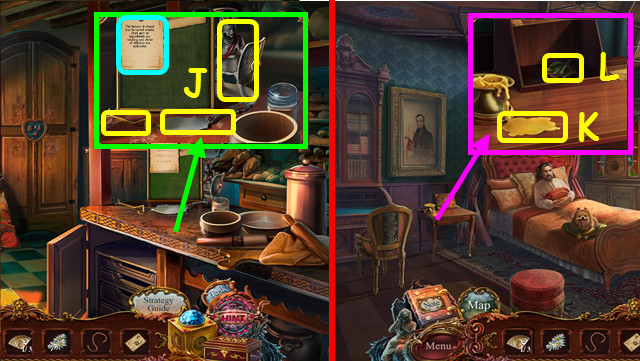
- Use the CAKE KNIFE to take the WAX (K).
- Use CROSS-SHAPED KEY on the box; take the GINSENG (L).
- Travel to the Bakery.
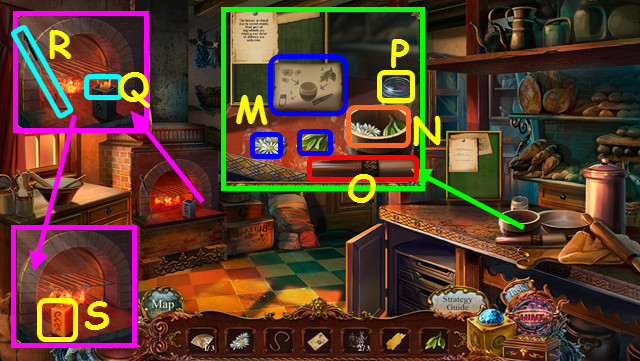
- Place the MEDICINE RECIPE, the GINSENG, and the CHAMOMILE on the table (M).
- Place the ginseng and the chamomile in the mortar (N); use the pestle (O).
- Take the MEDICINE (P).
- Place the THREAD in the mold, followed by the WAX (Q).
- Select the poker and use it to push the mold in the fire; use the poker again to pull it out of the fire (R).
- Take the CANDLE and use it on the flames to get the BURNING CANDLE (S).
- Return to Bruno's Bedroom.
- Use the MEDICINE on Bruno (T).
- Take the 3/3 LEGIONNAIRE FIGURINE (U).
- Walk down.
- Place the 3 LEGIONNAIRE FIGURINES in the case (V).
- Select the case (W).
- Play the HOP (X).
- You will earn the POWDER HORN.
- Use the POWDER HORN on the ball (A).
- Close the ball and take the BOMB (B).
- Return to Corsa Street.
- Place the BOMB on the boards, and then use the POWDER HORN to make a trail (C).
- Use the BURNING CANDLE on the trail (D).
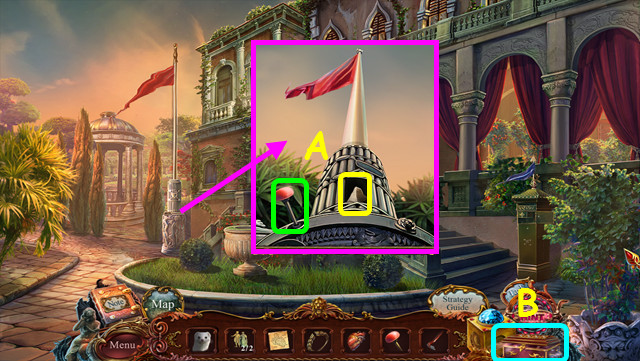
- Walk forward to the Pantheon Exterior.
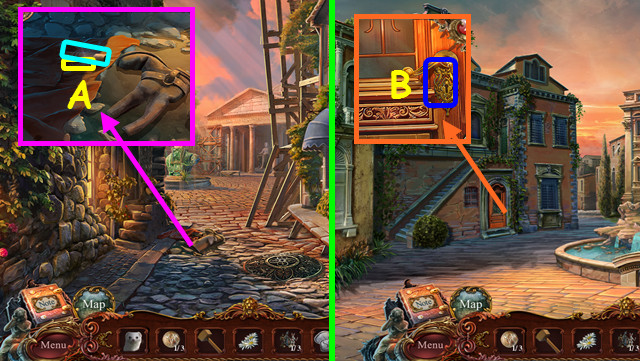
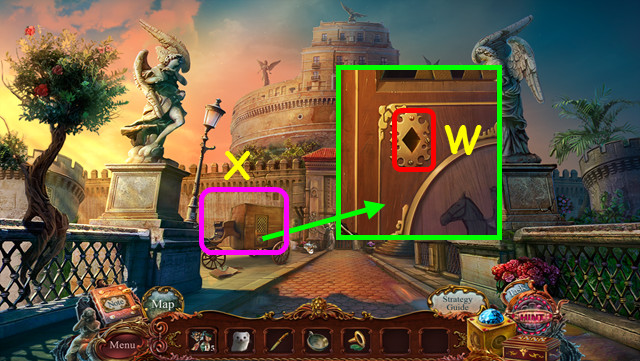
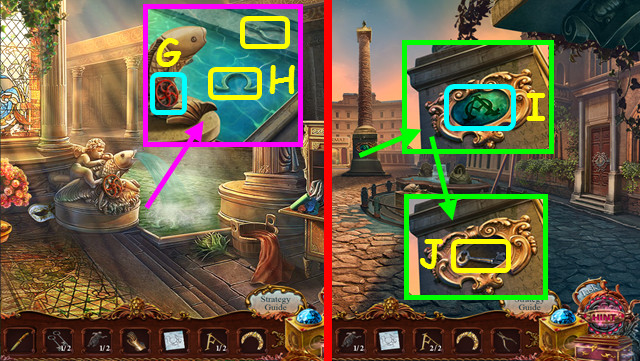
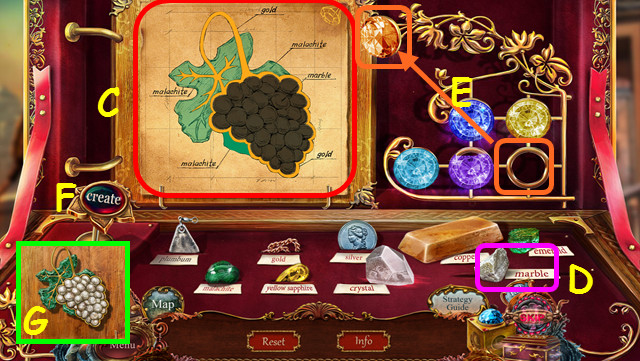
- Take the PROTRACTOR, the CROWN BLUEPRINT, and read the notes (E).
- Take the 1/3 URN (F).
- Travel to the Jewelry Workshop.
- Place the PROTRACTOR in the indentation (G).
- Take the YELLOW SAPPHIRE (H).
- Select the JEWELER'S BOX (I).
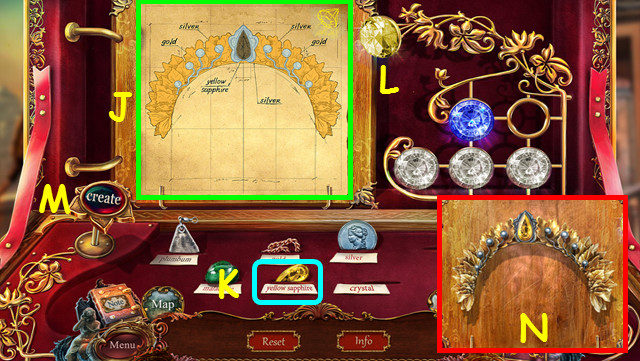
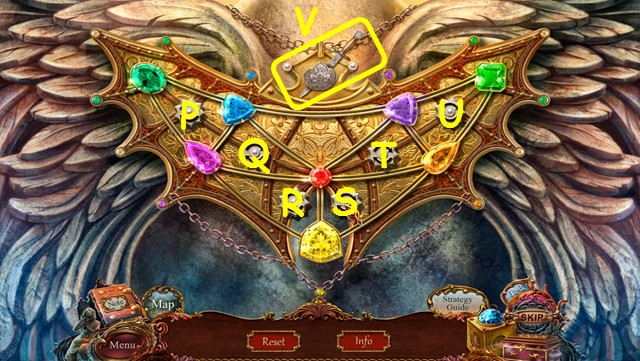
- Place the CROWN BLUEPRINT on the board (J).
- Place the YELLOW SAPPHIRE on the yellow sapphire sign (K).
- Use the gold, silver, and yellow sapphire on the blueprint as shown.
- Make sure the yellow crystal is in place (L), and select the 'create' button (M).
- Take the JUPITER'S CROWN (N).
- Return to the Pantheon Exterior.
- Place the JUPITER'S CROWN on the statue (O).
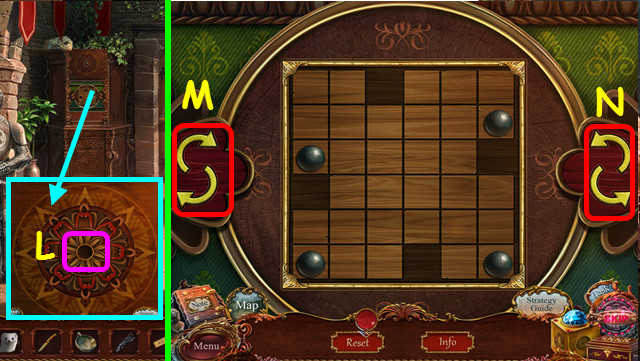
- Select the mini-game (P).
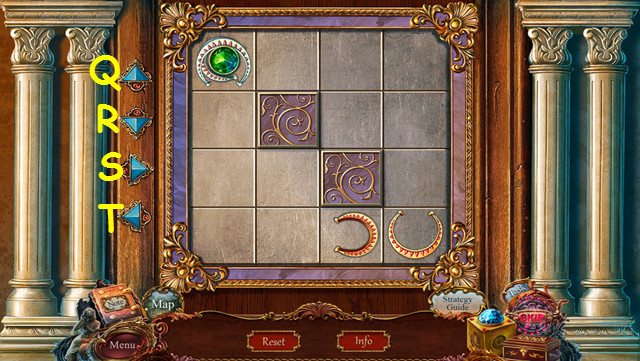
- Use the gem to move 2 of the same-colored crescents together.
- Press Tx2, Rx3, Sx3, Qx2, T, Q, Tx2, Rx2, S, R, S, T, Q, T, R, S, Q, T, Qx2, Sx2, R, S, Q, Tx3, Rx2, S, R, T, and Qx3.
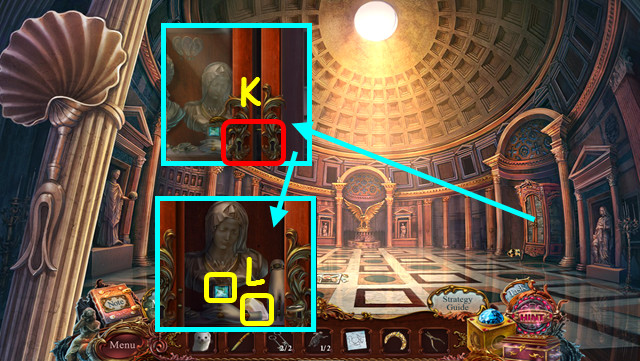
- Walk forward into the Pantheon.
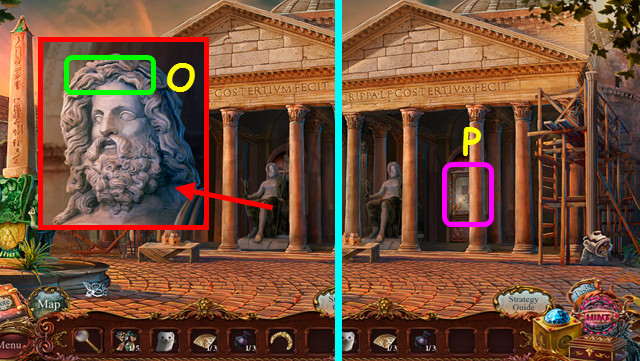
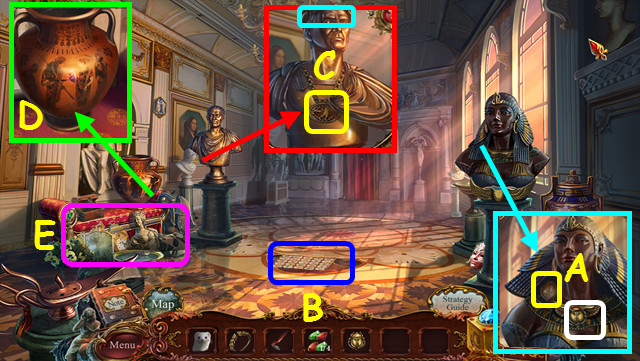
- Talk to Lorenzo and take BRUNO'S FAMILY SEAL (A).
- Note the mosaic mini-game on the floor (B).
- Travel to Bruno's Bedroom.

- Place BRUNO'S FAMILY SEAL on the cabinet (C).
- Take the KNIFE, the HATCH KEY, read the note, and take the SILVER LAUREL WREATH (D).
- Return to the Pantheon.
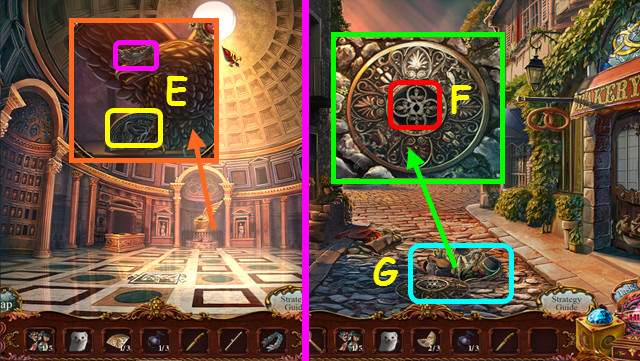
- Place the SILVER LAUREL WREATH on the eagle; take the 2/3 PLATE PART (E).
- Travel to Corsa Street.
- Use the HATCH KEY to open the hatch (F).
- Select the open hatch (G).
- Play the HOP to earn the 1/2 TUSK (H).
- Enter the Bakery.
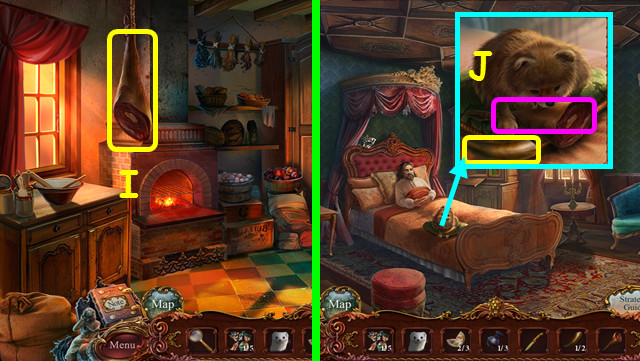
- Use the KNIFE to take the PORK LEG (I).
- Walk to Bruno's Bedroom.
- Give the PORK LEG to the dog; take the 2/2 TUSK (J).
- Walk to the Pantheon Exterior.
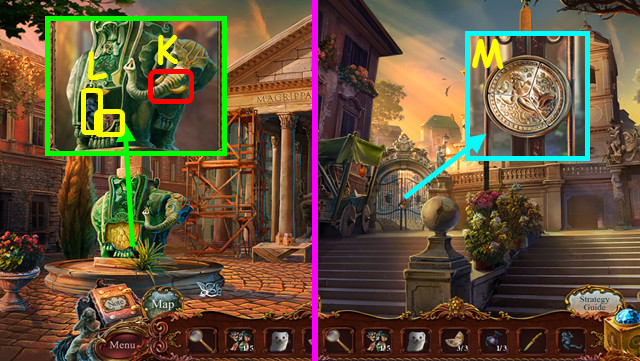
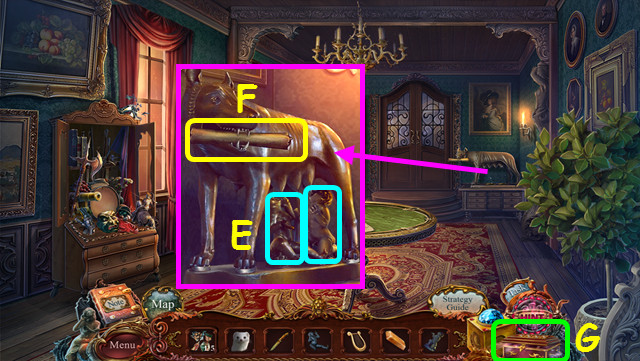
- Place the 2 TUSKS on the elephant (K).
- Take ROMULUS and the 3/3 PLATE PART (L).
- Travel to the Spanish Steps.
- Use the 3 PLATE PARTS to open the gate (M).
- Walk left to the Public Square.
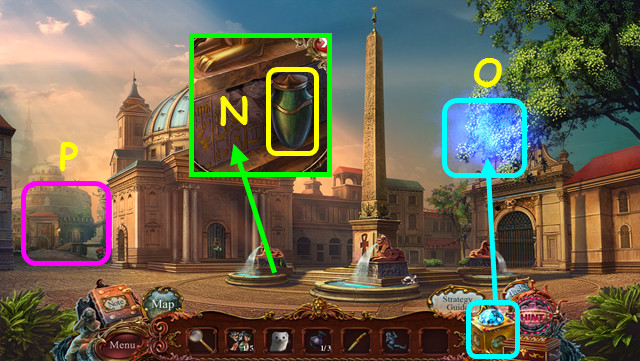
- Take the 2/3 URN (N).
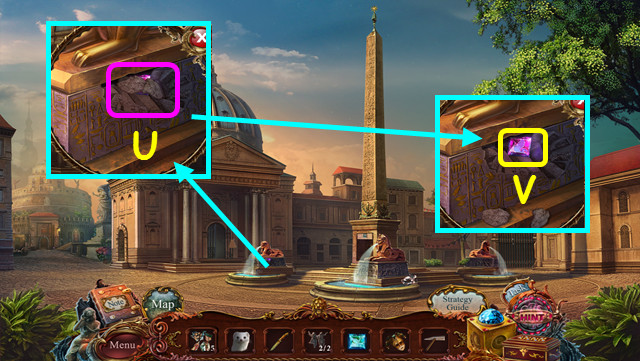
- Use the CRYSTAL CUBE on the light to earn the CHARGED CRYSTAL (VIOLET) (O).
- Walk left to the Saint Angelo Exterior (P).
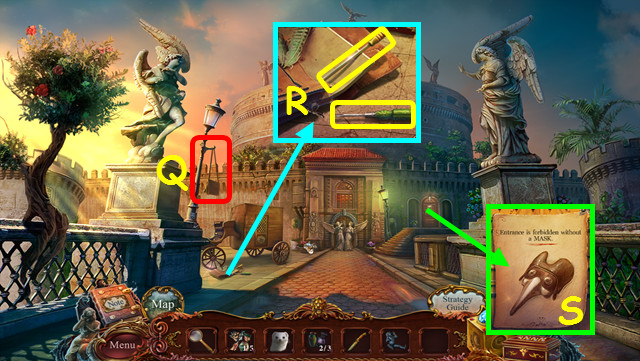
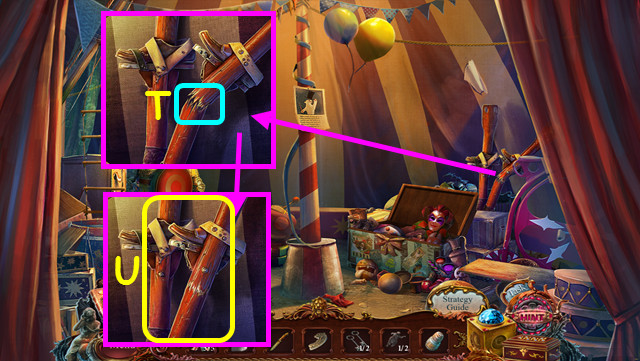
- Use the ERMINE to knock down the bag (Q).
- Take the RAMROD and the SCREWDRIVER (R).
- Read the poster (S).
- Return to the Pantheon Exterior.
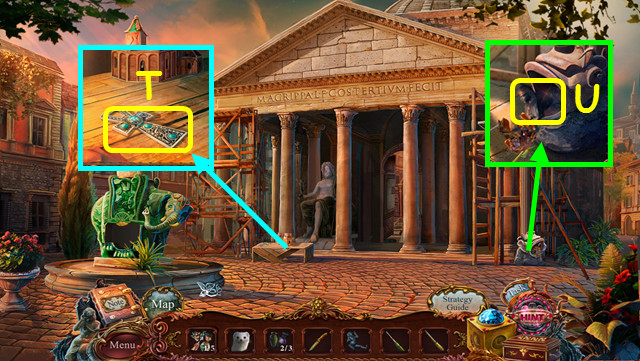
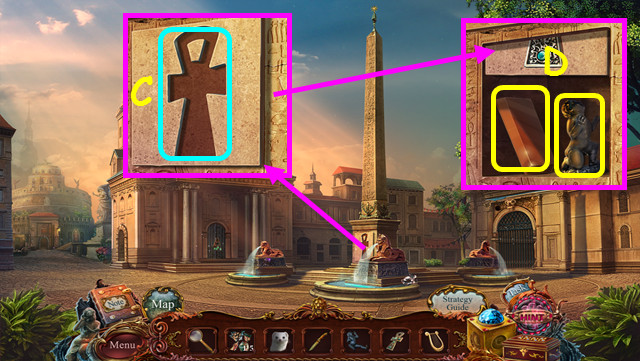
- Use the SCREWDRIVER to take the ANKH (T).
- Use the RAMROD to clear the drain; take the SPHINX STATUE (U).
- Walk forward.
- Place the SPHINX STATUE on the platform (V).
- Take the 3/3 URN (W).
- Place the 3 URNS on the shelves (X).
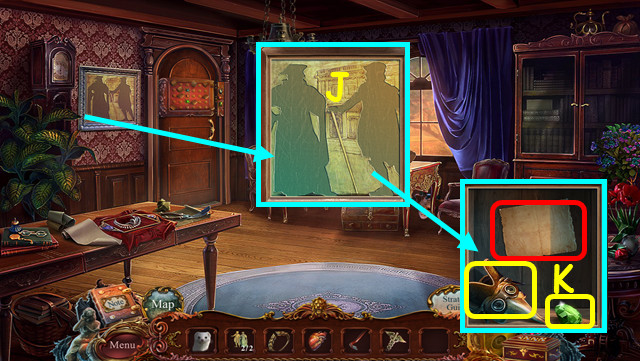
- Take the PORTRAIT (Y).
- Return to Bruno's house and select the portraits on the left wall.
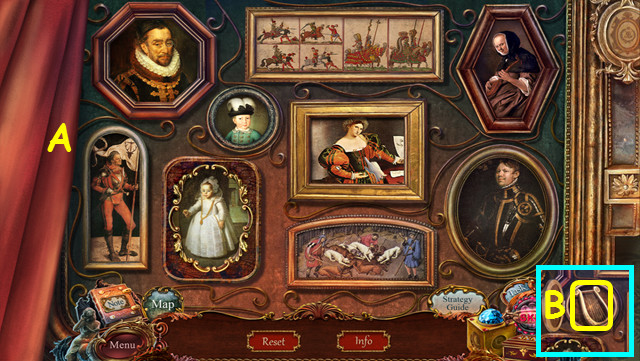
- Place the PORTRAIT on the wall.
- Move the portraits to the correct position (A).
- Take the LYRE (B).
- Travel to the Public Square.
- Place the ANKH on the panel (C).
- Take the COPPER and the REMUS (D).
- Walk to Bruno's House.
- Place ROMULUS and REMUS under the statue (E).
- Take the TRUMPET BLUEPRINT (F).
- Select the JEWELER'S BOX (G).
- Place the TRUMPET BLUEPRINT on the board (H).
- Place the COPPER on the copper sign (I).
- Use the copper and silver to color the blueprint as shown (J).
- Select the violet crystal (K) and press the 'create' button (L).
- Take the TRUMPET (M).
- Travel to the Saint Angelo Exterior.
- Place the TRUMPET and the LYRE in the angel's arms (N).
- Walk forward to the Saint Angelo Interior.
- Take the CUP and the BOWL (O).
- Walk left to Guards' Room (P).
Chapter 3: Saint Angelo
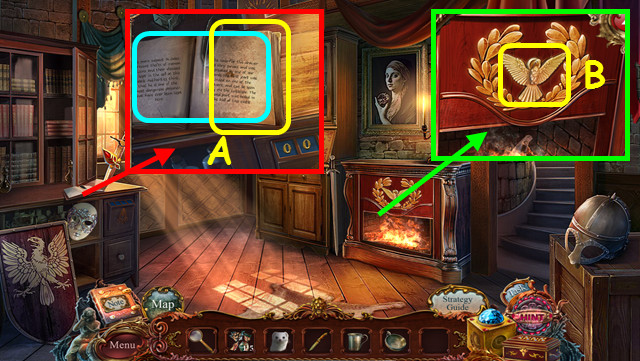
- Read the book; take the PAPER SHEET (A).
- Use the KNIFE to take the DOVE SYMBOL (B).
- Travel to the Trevi Fountain.
- Use the CUP on the water to get the CUP OF WATER (C).
- Return to the Guards' Room.
- Use the CUP OF WATER on the fire; take the COAL (D).
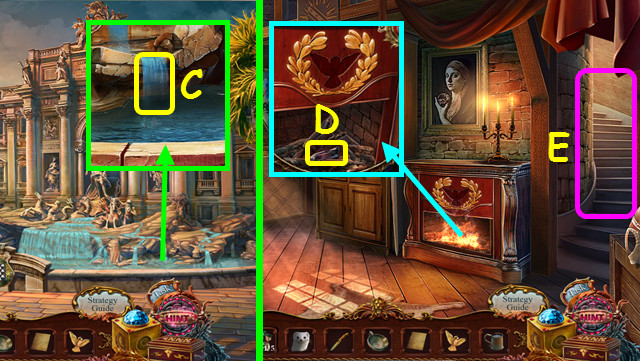
- Go up the stairs to the Castle Roof (E).
- Place the DOVE SYMBOL in the indentation (F).
- Use the MAGNIFYING GLASS on the lens (G).
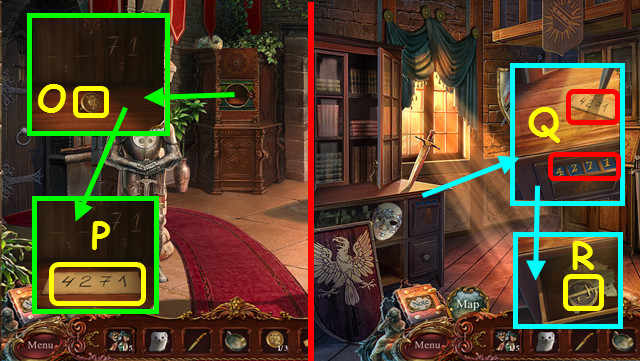
- Use the PAPER SHEET and the COAL on the number to get the CODE HALF (H).
- Take the 1/2 GOLD BUTTON (I).
- Select the dovecote (J).
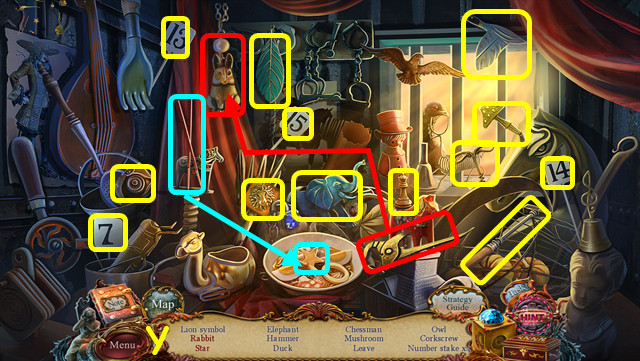
- Play the HOP to earn the MARBLE (K).
- Walk down twice.
- Place the MARBLE in the opening (L).
- Press the buttons to rotate the board and move the balls together.
- Press M x 2, N x 3, M x 2, and N.
- Take the 2/3 GOLD BUTTON (O).
- Use the CODE HALF and the COAL on the number to get the CODE (P).
- Walk left.
- Place the CODE on the desk; enter the code on the numbers (Q).
- Take the WINDOW KEY (R).
- Walk down.
- Use the WINDOW KEY on the panel (S).
- Talk to Valentino and take the 3/3 GOLD BUTTON (T).
- Place the 3 GOLD BUTTONS on the armor (U).
- Take the RHOMBIC KEY (V).
- Walk down.
- Use the RHOMBIC KEY on the lock (W).
- Select the Carriage (X).
- Play the HOP to earn the LION SYMBOL (Y).
- Return to the Guards' Room.
- Place the LION SYMBOL on the panel (A).
- Take the 2/5 MOSAIC PART, the PENDANT HALF, and the PIAZZA COLONNA KEY (B).
- Travel to the Main Square.
- Use the PIAZZA COLONNA KEY to open the gate (C).
- Look at the numbers on the left and note the positions of the dark square near each number (D).
- Change the symbols to correspond with the numbers and positions (E).
- Walk forward to Colonna Square.
- Take the PRETZEL (F).
- Talk to Lucretia (G).
- Walk forward (H).
- Read the note and take the CORKSCREW (I).
- Move the towels 3 times; take the 1/2 ROMAN DANCER, the 1/2 SHOWCASE KEY, and the 3/5 MOSAIC PART (J).
- Return to the Bakery.
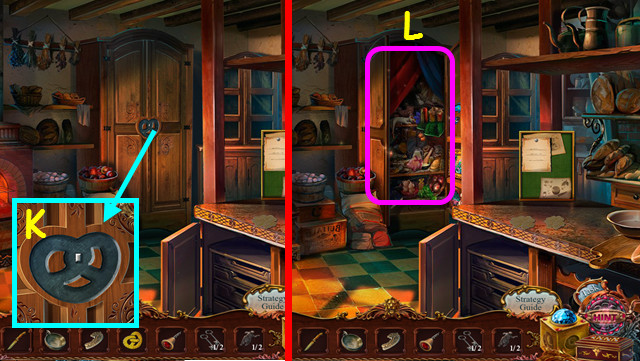
- Use the PRETZEL in the lock (K).
- Select the open cabinet (L).
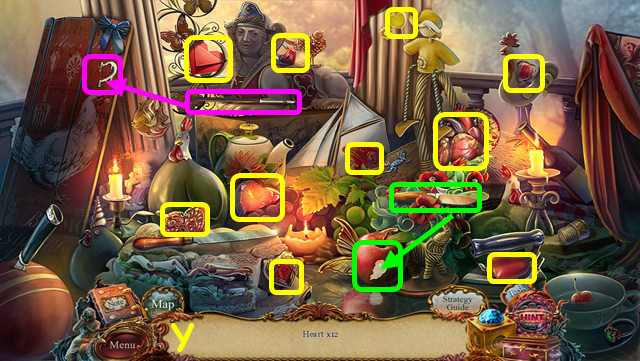
- Play the HOP to earn the GLUE POWDER (M).
- Travel to the Castle Roof.
- Place the BOWL on the floor (N).
- Use the CORKSCREW to remove the cork (O).
- Take the BOWL OF SOLVENT.
- Travel to Colonna Square.
- Place the GLUE POWDER (P) and the BOWL OF SOLVENT on the chest (Q).
- Remove the lid (R); select the glue powder, and then the solvent.
- Select the lid, and then take the GLUE (S).
- Return to the Circus.
- Use the GLUE on the crack (T).
- Move the broken stilt; take the STILTS (U).
- Travel back to Colonna Square.
- Use the STILTS on the balcony (A).
- Place the PENDANT HALF on the box; take LUCRETIA'S PENDANT (B).
- Take the 4/5 MOSAIC PART (C).
- Place LUCRETIA'S PENDANT on the door (D).
- Walk right to Lucretia's House.
- Read the note; take the SQUIRREL BLUEPRINT, the GLOVE, and the 1/2 ALPHA AND OMEGA (E).
- Talk to Lucretia and take the TIARA (F).
- Walk to the Thermae.
- Use the GLOVE on the valve (G).
- Take the 2/2 ALPHA AND OMEGA and the PLIERS (H).
- Walk down.
- Place the ALPHA AND OMEGA in the plaque (I).
- Take the 2/2 SHOWCASE KEY (J).
- Travel to the Pantheon.
- Use the 2 SHOWCASE KEYS in the locks; open the door (K).
- Take the CRYSTAL and the BLUE GEM (L).
- Return to Lucretia's House.
- Use the PLIERS to take the STAINED-GLASS PIECE (M).
- Walk to the Thermae.
- Place the STAINED-GLASS PIECE in the window (N).
- Use the CRYSTAL CUBE on the light to get the light blue CHARGED CRYSTAL (O).
- Return to the Castle Roof and select the statue.
- Place the TIARA on the wings.
- Move the gems to the correct position.
- Select the buttons P, Q, T, U, T, Q, P, T, Q, T, Q, T, T, and S.
- Take the SWORD (V).
- Walk down.
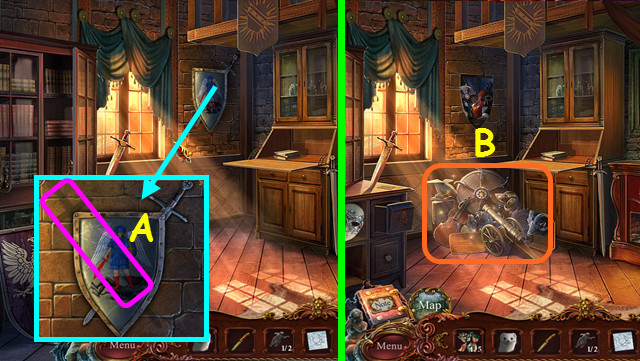
- Place the SWORD on the shield (A).
- Select the debris (B).
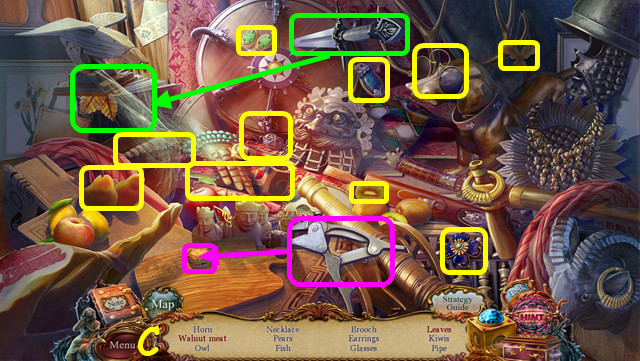
- Play the HOP to earn the HORN (C).
- Walk down.
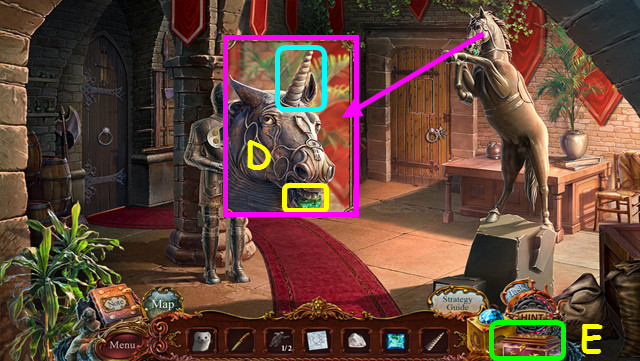
- Place the HORN on the unicorn and take the EMERALD (D).
- Select the JEWELER'S BOX (E).
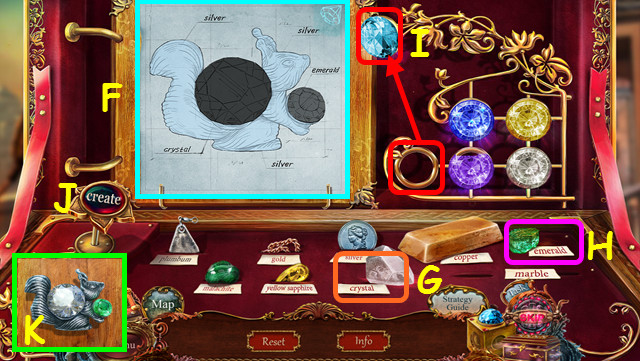
- Place the SQUIRREL BLUEPRINT on the board (F).
- Place the CRYSTAL on the crystal sign (G) and the EMERALD on the emerald sign (H).
- Color the blueprint as shown, using the silver, crystal, and emerald.
- Select the light blue crystal (I), and then select the 'create' button (J).
- Take the SQUIRREL PENDANT (K).
- Walk down twice.
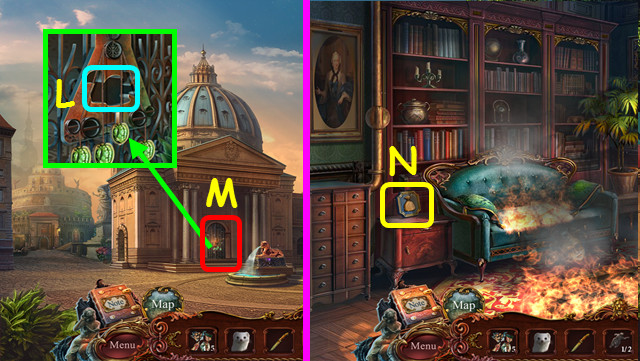
- Place the SQUIRREL PENDANT in the lock (L).
- Enter the Jeweler's House (M).
- Take the TRADE SYMBOL (N).
- Return to Colonna Square.
- Place the TRADE SYMBOL on the doors (O).
- Take the AXE (P).
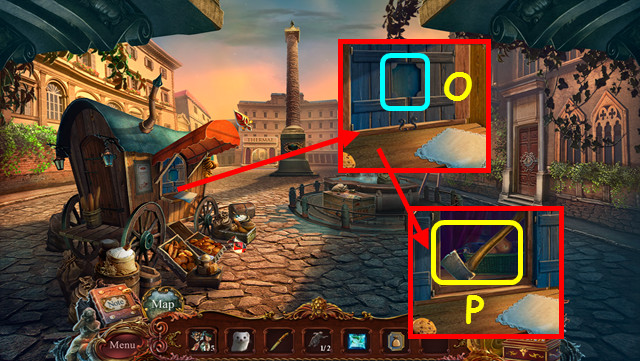
- Return to the Jeweler's House.
- Use the AXE on the pipe (Q).
- Take the CARNIVAL MASK and the PICK (R).
- Note the gem mini-game on the desk (S).
- Read the note and take the 2/2 ROMAN DANCER (T).
- Walk down.
- Use the PICK on the crack (U).
- Take the PINK GEM (V).
- Travel to Lucretia's House.
- Place the CARNIVAL MASK on the shelf; take the 1/2 BAS-RELIEF (A).
- Place the 2 ROMAN DANCERS on the box (B).
- Take the RED GEM (C).
- Return to the Jeweler's House and select the gem mini-game on the desk.
- Place the BLUE GEM, the PINK GEM, and the RED GEM on the board.
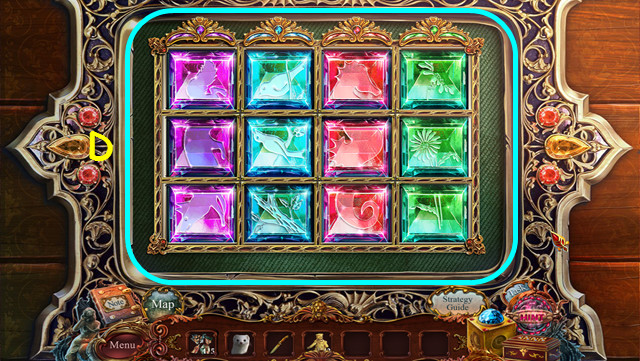
- Move the gems into the correct color column and arrange to complete each picture (D).
- Select 2 gems to swap positions.
- Take the completed GEM TABLET.
- Travel to the Jewelry Workshop.
- Use the KNIFE to cut the ropes (E).
- Place the GEM TABLET on the panel (F).
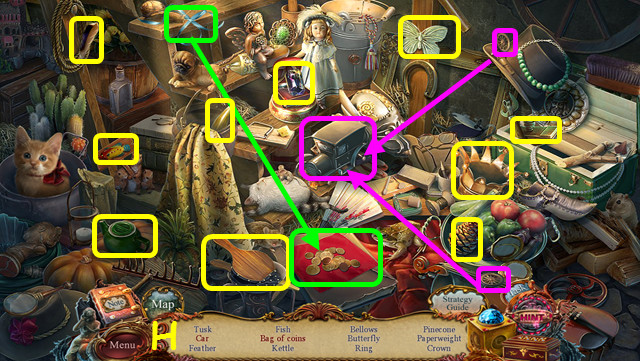
- In each scene, return the 5 items to their proper places (G).
- There are 5 scenes to complete (1-5).
- Walk left to the Secret Room.
Chapter 4: Secrets
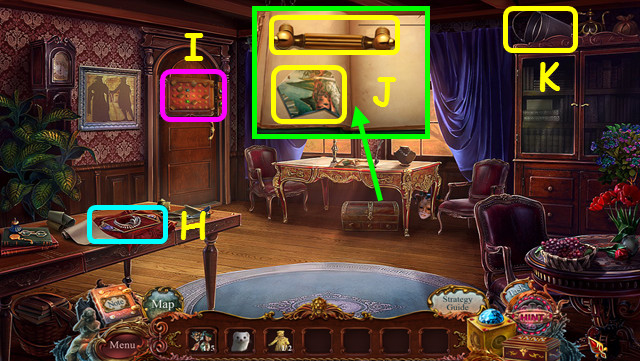
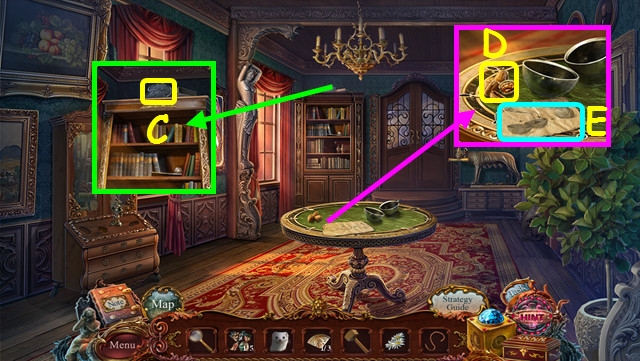
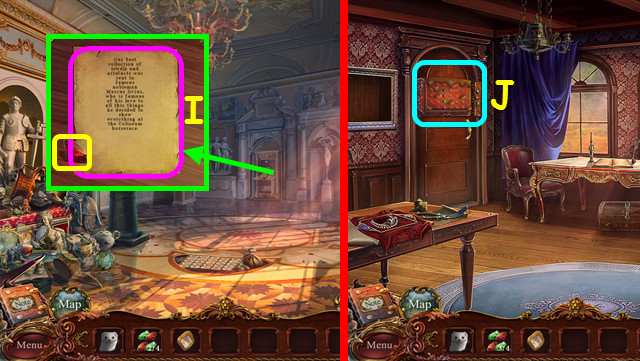
- Read the letter and note the necklace on the table (H).
- Note the mirror mini-game on the door (I).
- Take the 5/5 MOSAIC PART and the SOFA HANDLE (J).
- Use the ERMINE to take the BUCKET (K).
- Return to the Pantheon and select the floor mosaic.
- Place the 5 MOSAIC PARTS with the other pieces.
- Restore the mosaic (L).
- Take the CORNUCOPIA.
- Travel to the Thermae.
- Place the CORNUCOPIA on the statue to receive the 2/2 BAS-RELIEF (M).
- Return to the Jeweler's House.
- Place the SOFA HANDLE on the sofa (N).
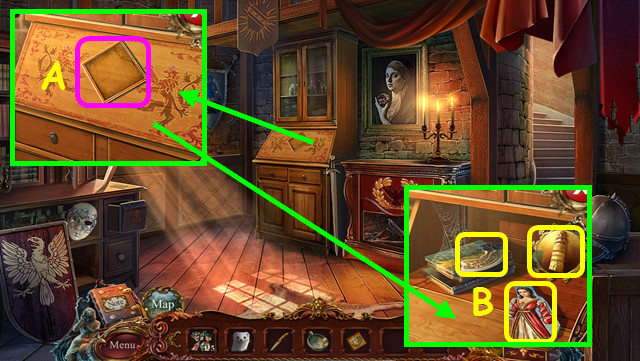
- Select the open drawer (O).
- Play the HOP to earn the PIPE PIECE (P).
- Travel to the Public Square.
- Hang the BUCKET on the hook and place the PIPE PIECE in the bracket (Q).
- Walk right to the Villa Borghese (R).
- Use the CRYSTAL CUBE on the light to get the CHARGED CRYSTAL (ORANGE) (S).
- Use the ERMINE on the flagpole to get the DOVE SYMBOL (T).
- Open the mailbox and take the GRAPES BLUEPRINT (U).
- Walk forward to the Borghese Gardens.
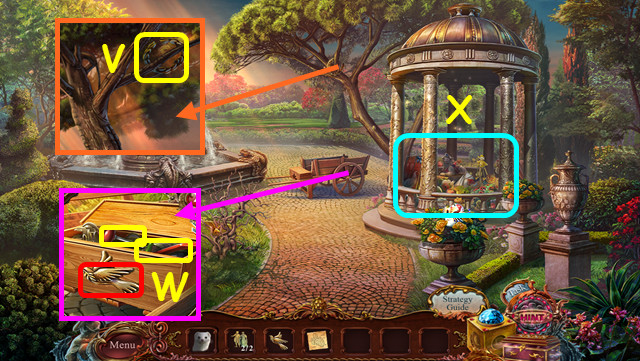
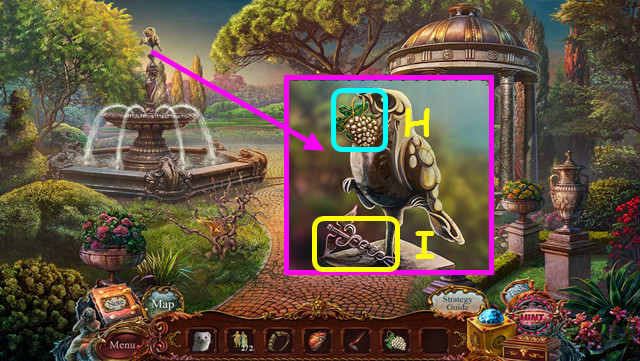
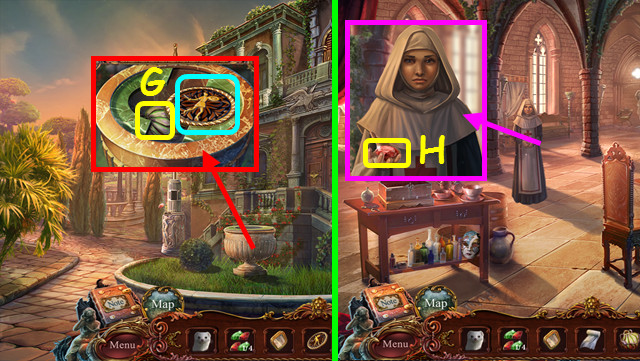
- Use the ERMINE to take the LAUREL WREATH (V).
- Place the DOVE SYMBOL on the crate; take the FLAGPOLE HANDLE and the CROWBAR (W).
- Select the gazebo (X).
- Play the HOP to earn the DUMMY HEART (Y).
- Walk down.
- Place the FLAGPOLE HANDLE on the base; take the MARBLE PIECE (A).
- Select the JEWELER'S BOX (B).
- Place the GRAPES BLUEPRINT on the board (C).
- Place the MARBLE PIECE on the marble sign (D).
- Color the drawing using the gold, malachite, and the marble.
- Select the orange crystal (E), and then the 'create' button (F).
- Take the GRAPES SYMBOL (G).
- Walk forward.
- Place the GRAPES SYMBOL in the frame (H).
- Take the MEDICAL SYMBOL (I).
- Return to the Secret Room.
- Place the BAS-RELIEF in the frame (J).
- Read the note; take the CHOLERA MASK and the 1/4 NECKLACE GEM (K).
- Return to the Saint Angelo Exterior.
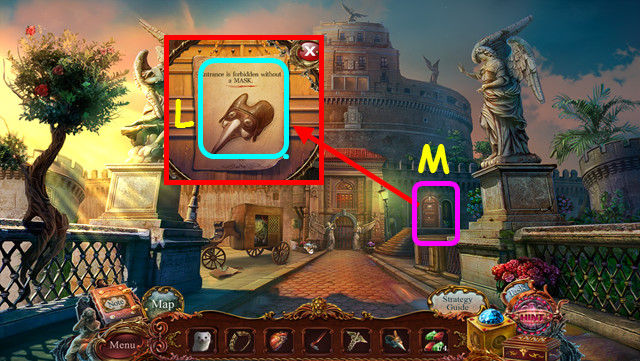
- Use the CHOLERA MASK on the sign (L).
- Enter the Infirmary (M).
- Talk to Sister Mary (N).
- Use the MEDICAL SYMBOL on the box, open the lid, and take the MEDICAL SAW (O).
- Place the DUMMY HEART in the cavity and take the SCARAB (P).
- Open the book and take the 1st EAGLE (Q).
- Travel to the Borghese Gardens.
- Use the MEDICAL SAW to take the 2nd EAGLE (R).
- Walk down.
- Place the 2 EAGLES on the doors (S).
- Walk right into the Villa Borghese Gallery.
- Place the SCARAB in the neckpiece and take the MIRROR (A).
- Note the mini-game on the floor (B).
- Place the LAUREL WREATH on the bust and take the LEGIONARY SIGN (C).
- Use the CROWBAR on the urn (D).
- Select the chaise (E).

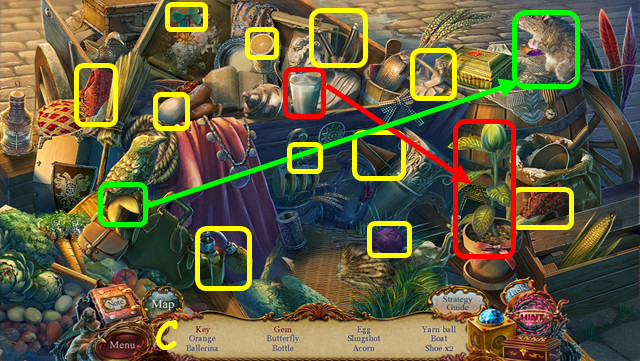
- Play the HOP to earn the BANDAGE (F).
- Walk down.
- Place the LEGIONARY SIGN on the urn and take the BAG OF STONES (G).
- Travel to the Infirmary.
- Give the BANDAGE to Sister Mary and take the 2/4 NECKLACE GEM (H).
- Return to the Villa Borghese Gallery and select the floor mini-game.
- Place the BAG OF STONES on the right.
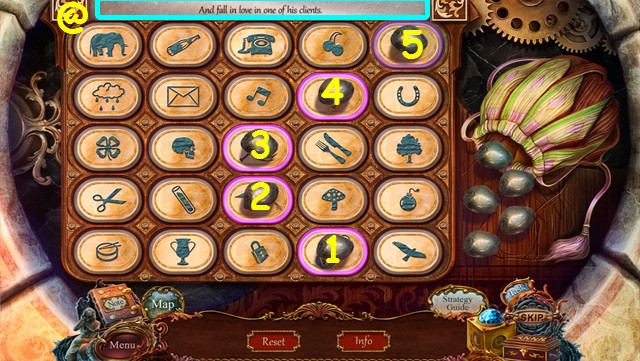
- Read the riddle at the top (@), and place a stone on the answer.
- Place the stones (1-5).
- Open the curtains, read the note, and take the 3/4 NECKLACE GEM (I).
- Return to the Secret Room.
- Select the door (J).

- Place the MIRROR on the board.
- Slide the mirrors to place them so the lasers hit the same color gem (K).
- Walk forward to Coliseum Exterior.
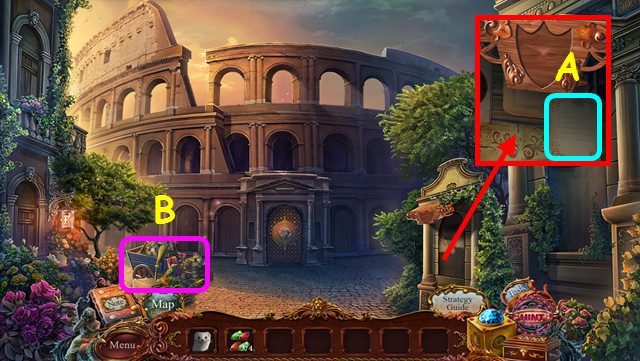
- Read the note (A).
- Select the cart (B).
- Play the HOP to earn the SECRET-BOX KEY (C).
- Travel to the Villa Borghese.
- Use the SECRET-BOX KEY on the lock (D).
- Take the SALAMANDER SYMBOL (E).
- Return to the Coliseum Exterior.
- Use the SALAMANDER SYMBOL on the lock (F).
- Walk forward.
- Talk to Lorenzo (G).
- Take the NOBLE EMBLEM (H).
- Walk down.
- Place the NOBLE EMBLEM in the indentation; take the HORSEMAN SYMBOL (I).
- Walk forward.
- Place the HORSEMAN SYMBOL in the indentation; take the 4/4 NECKLACE GEM (J).
- Walk down twice and select the necklace on the table.
- Place the 4 NECKLACE GEMS on the design.
- Combine the crystals until there are only 2 (K).
- You may only swap opposite colors; make the swaps shown (1-7).
- Take the DUNGEON KEY and the VILLAIN'S NECKLACE.
- Return to the Saint Angelo Interior.

- Use the DUNGEON KEY on the lock (L).
- Walk right to the Dungeon.
- Use the VILLIAN'S NECKLACE on the 2 Maximillians (M).
- Congratulations! You have completed European Mystery: The Face of Envy!
Created at: 2014-03-16