

Walkthrough Menu
- General Tips
- Chapter 1: Summoned To Hamelin
- Chapter 2: The Piper's Partner
- Chapter 3: The Underground City
- Chapter 4: The Viceroy
- Chapter 5: The Double-Cross
- Chapter 6: The Skeleton Key and The Pied Piper's Flute
- Fabled Objects
General Tips
- Hidden Object Scenes and mini-games are often randomized - your solution may vary.
- Hidden Object Scenes will be referred to as HOS in this walkthrough.
- Items in orange require additional steps.
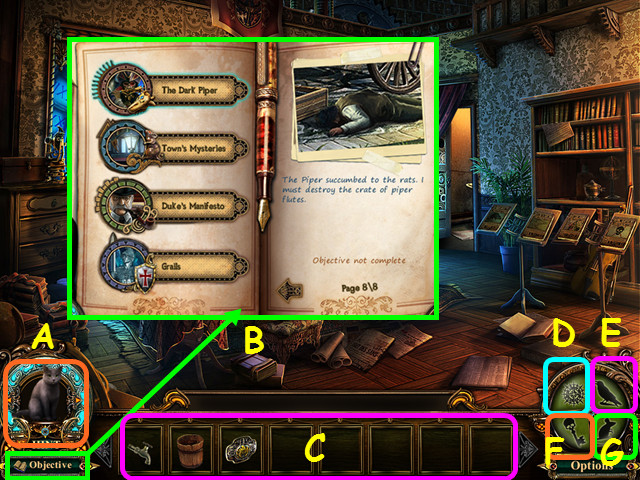
- Hints are unlimited, but you must wait for the meter to refill (A).
- Select the Objectives button to see what tasks you need to complete (B).
- Your inventory is in the bottom panel - select an item to choose it for use (C).
- Select the Compass icon to view the map (D).
- Select the Raven icon to use the Ravenlore Whistle (E).
- Select the key icon to use the Skeleton Key (F).
- Select the rat icon to use the Pied Piper's Flute (G).
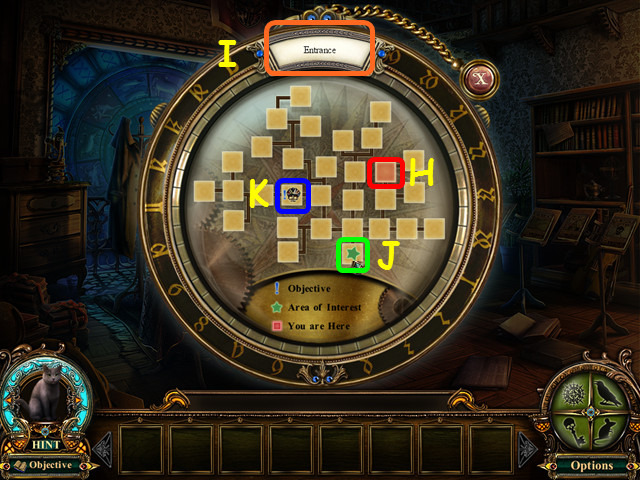
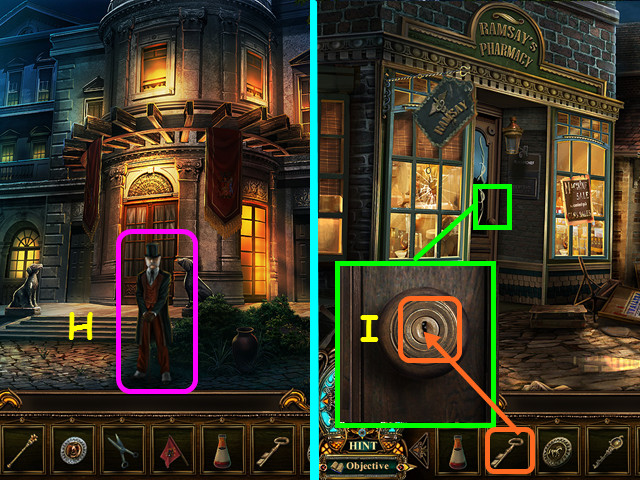
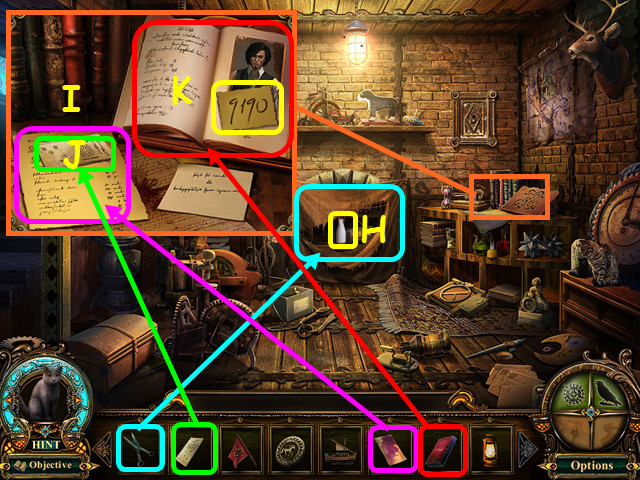
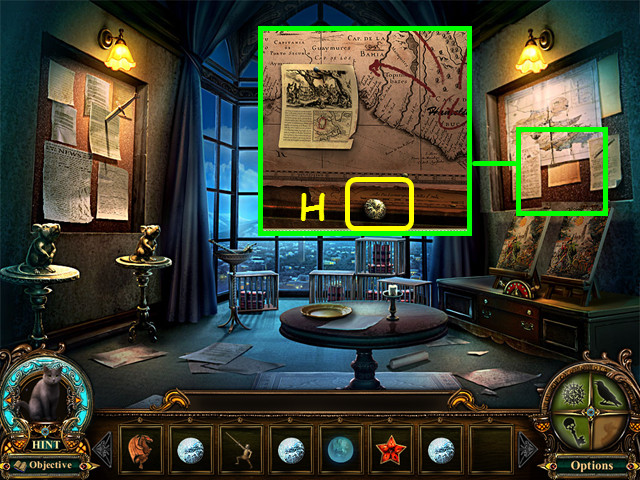
- Use the map to determine your current location; you are the flashing red square (H).
- Hover your mouse over a square to view the location name in the upper display (I).
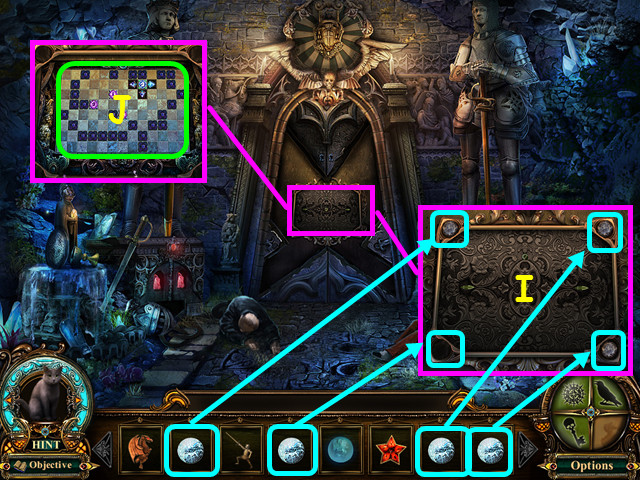
- Green stars indicate a HOS (J).
- Blue exclamation marks indicate the location of an objective (K).
Chapter 1: Summoned To Hamelin
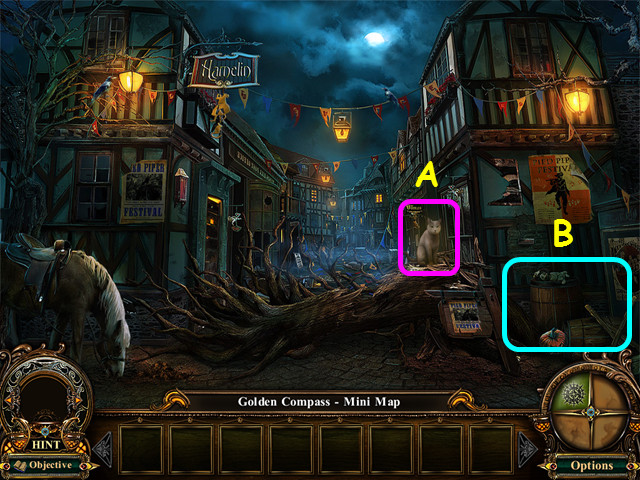
- Select the cat to enable your hint meter (A).
- You will have the option of some interactive help.
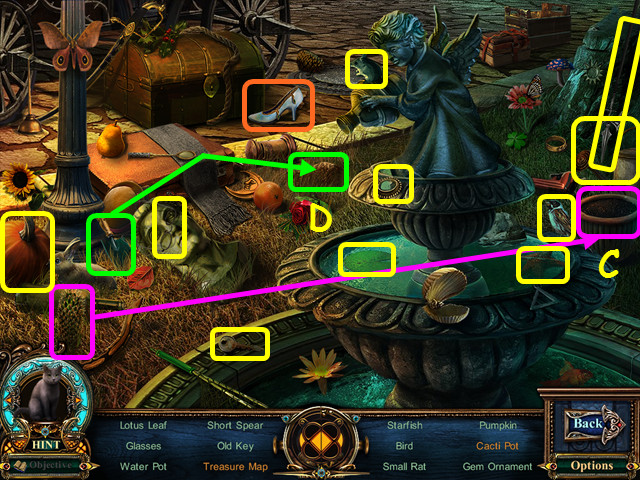
- Select the barrels on the right for a HOS (B).
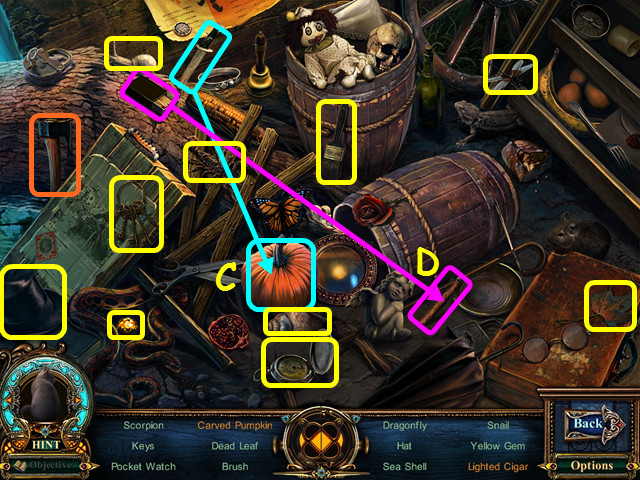
- Locate all the items on the list.
- Use the knife on the pumpkin to make the carved pumpkin (C).
- Use the matches on the cigar to make the lighted cigar (D).
- You will earn the WOODEN AX.
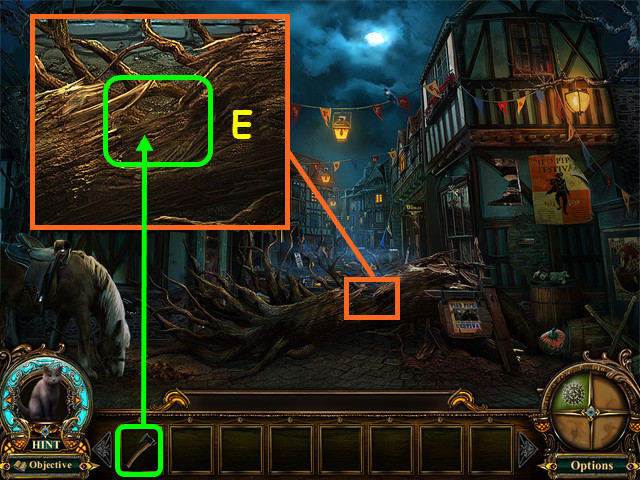
- Look at the fallen tree and use the WOODEN AX to cut a path (E).
- Walk forward.
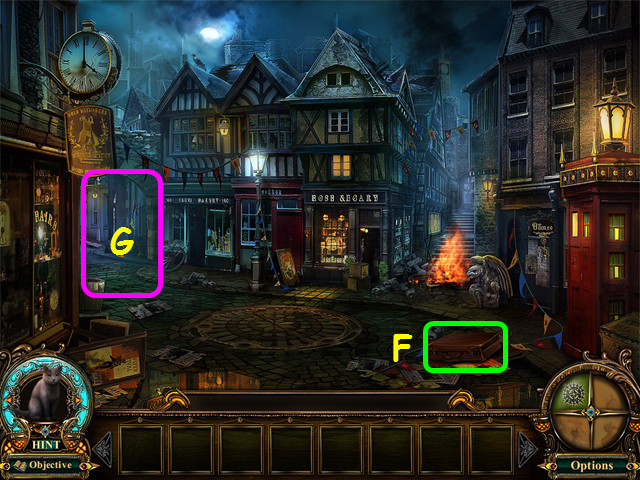
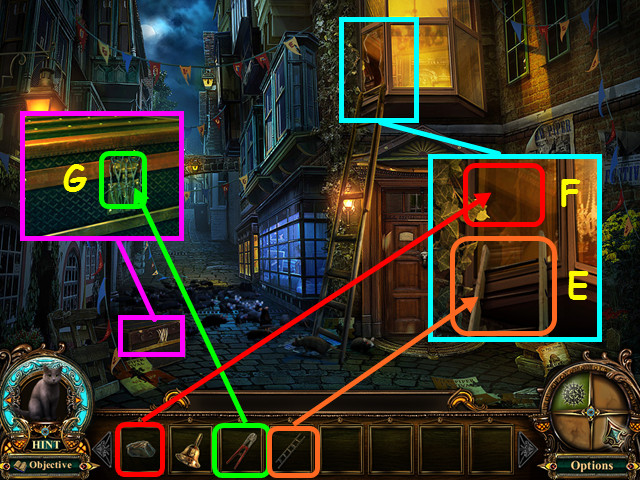
- Open the case and take the ROCK (F).
- Walk to the left (G).
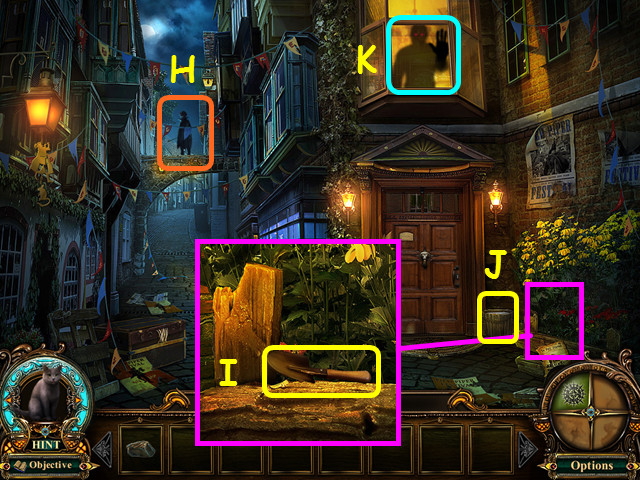
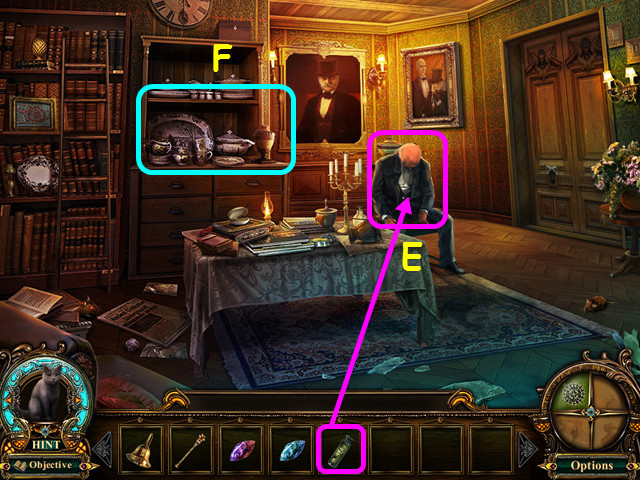
- Look at the Piper (H).
- Look at the flowers and take the HAND SHOVEL (I).
- Take the BUCKET OF WATER (J).
- Note the figure in the window (K).
- Walk down once.
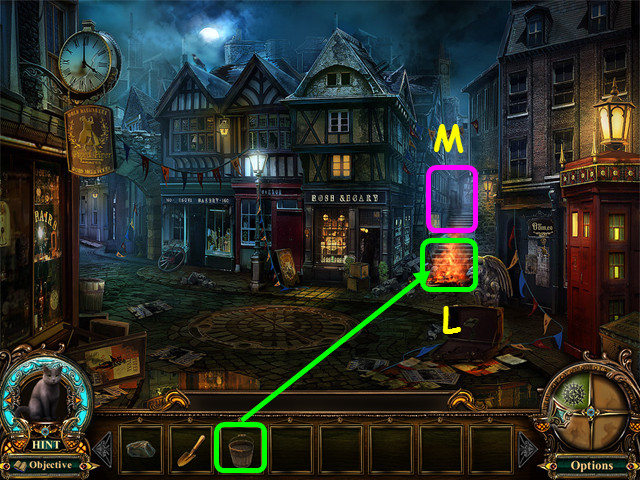
- Use the BUCKET OF WATER on the flames (L).
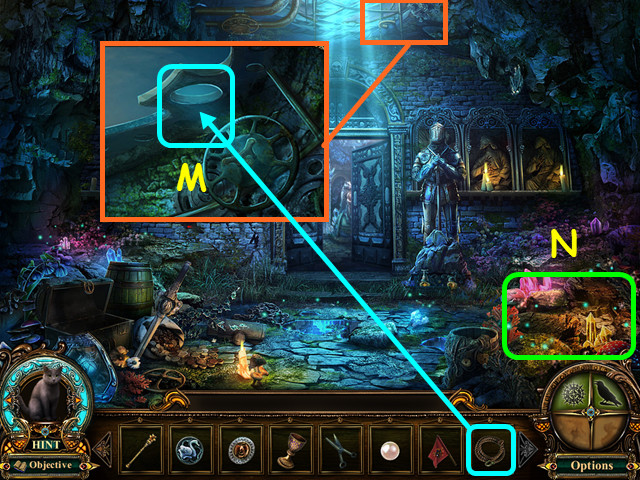
- Walk forward (M).
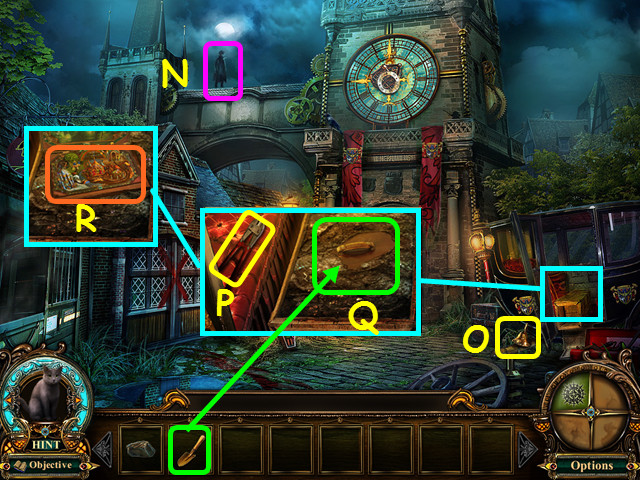
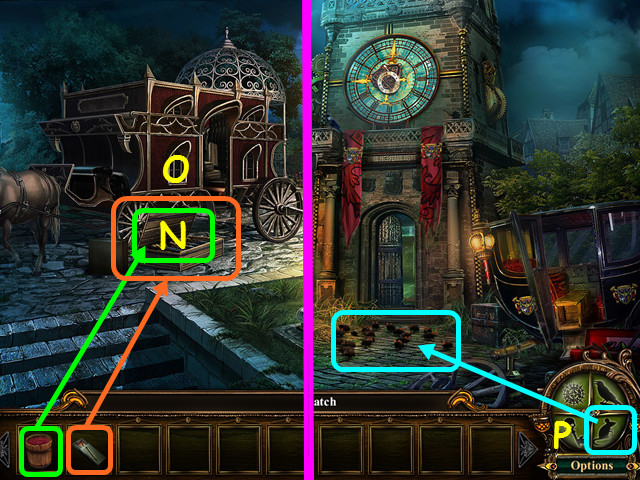
- Look at the Piper (N).
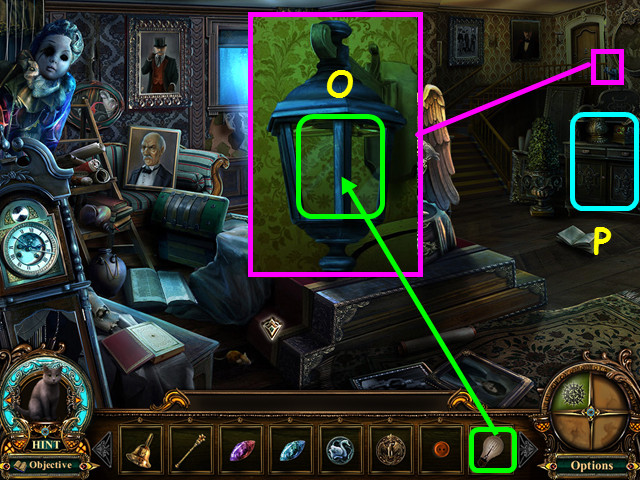
- Take the GOLD BELL (O).
- Look inside the coach and take the BOLT CUTTER (P).
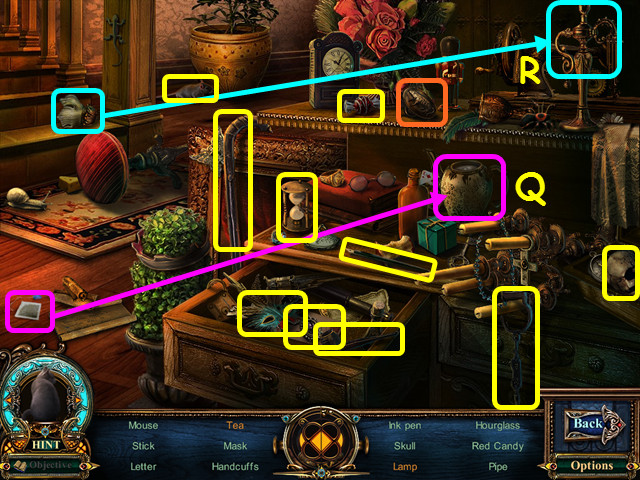
- Use the HAND SHOVEL on the crate to uncover a box (Q).
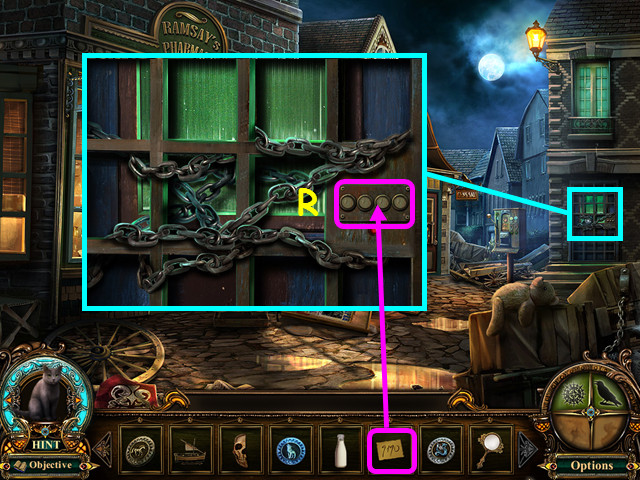
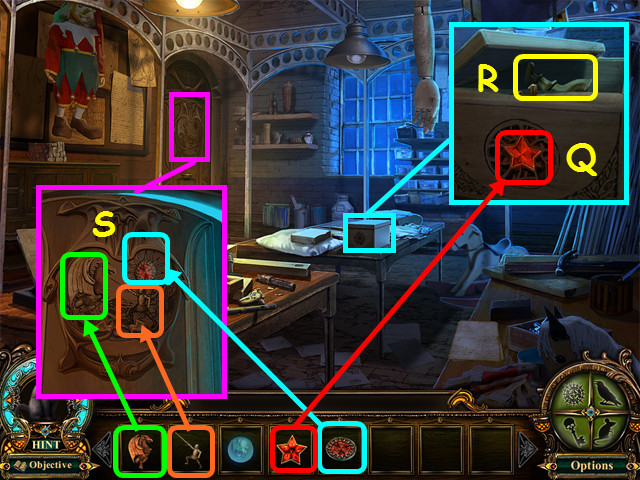
- Select the box for a mini-game (R).
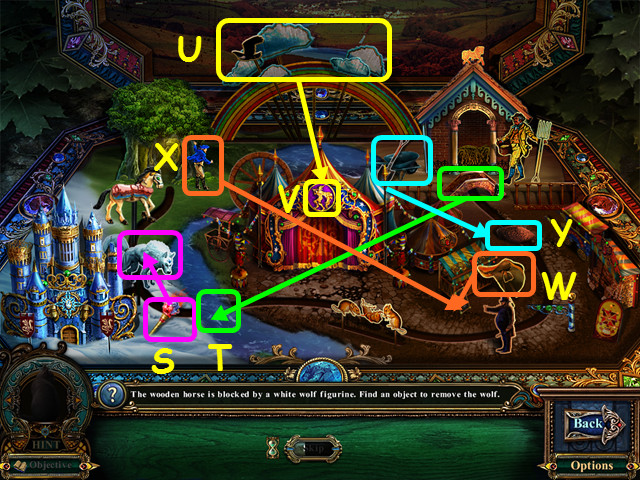
- Use items in the scene to help the horse move along the track.
- Take the torch and use it on the wolf (S).
- Place the bridge over the stream (T).
- Select the clouds to change it to night (U), then select the Piper symbol on the tent (V).
- Place the saddle (W) and the rider (X) on the horse.
- Use the wheelbarrow and shovel (Y) on the dirt.
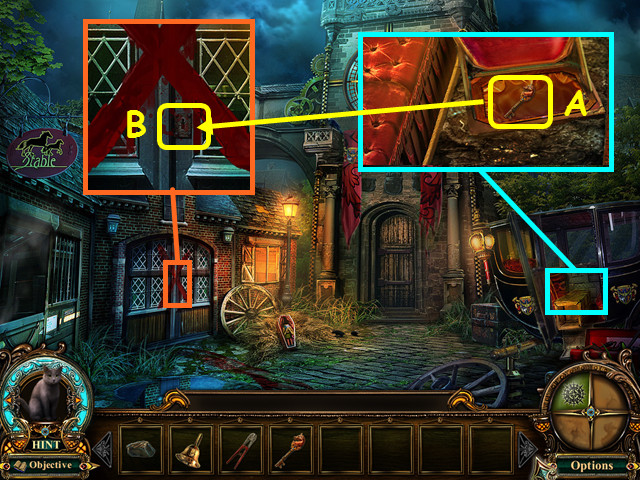
- Take the STABLE KEY (A).
- Look at the stables for a new objective.
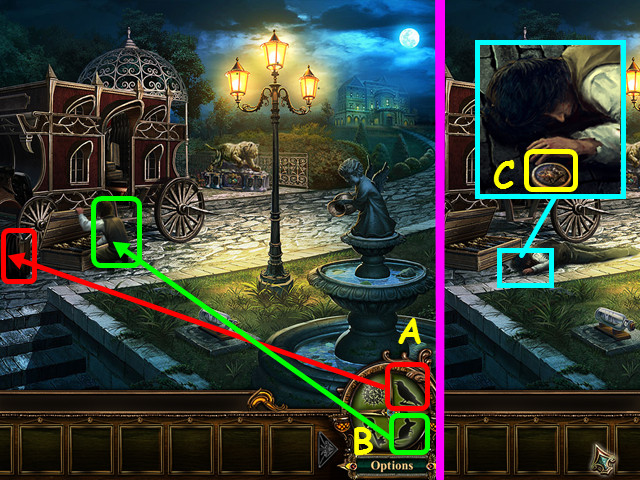
- Look at the stable door again and use the STABLE KEY on the lock (B).
- Enter the stables.
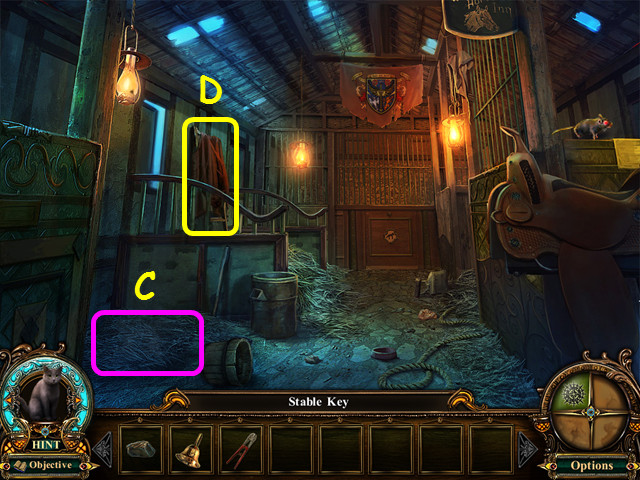
- Note the smoke coming from under the hay (C).
- Remove the cloth and take the LADDER (D).
- Walk down twice, then go to the left.
- Look at the window and place the LADDER beneath it (E).
- Use the ROCK to break the window (F).
- Look at the chest and use the BOLT CUTTER on the wires (G).
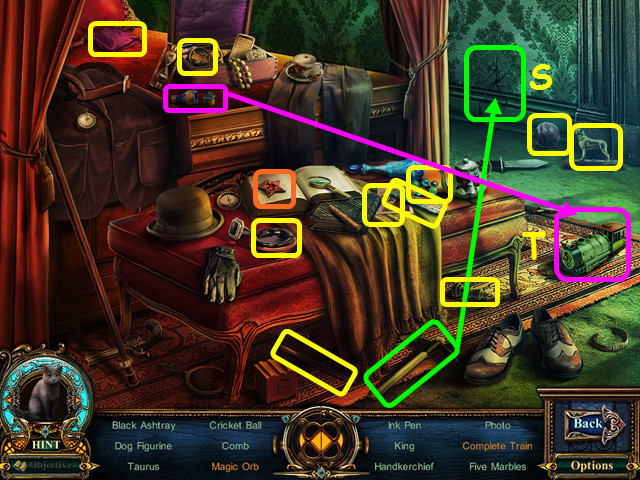
- Select the chest for a HOS.
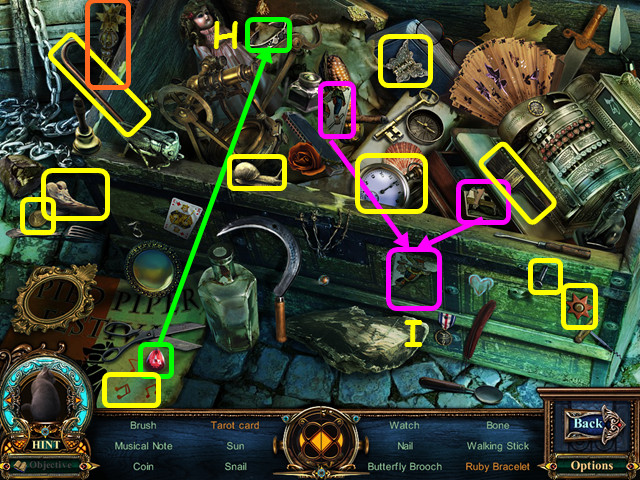
- Locate all the items on the list.
- Place the ruby in the cuff to make the ruby bracelet (H).
- Place the 2 card pieces with the 3rd to make the tarot card (I).
- You will earn the BRONZE SCEPTER.
- Enter the window.
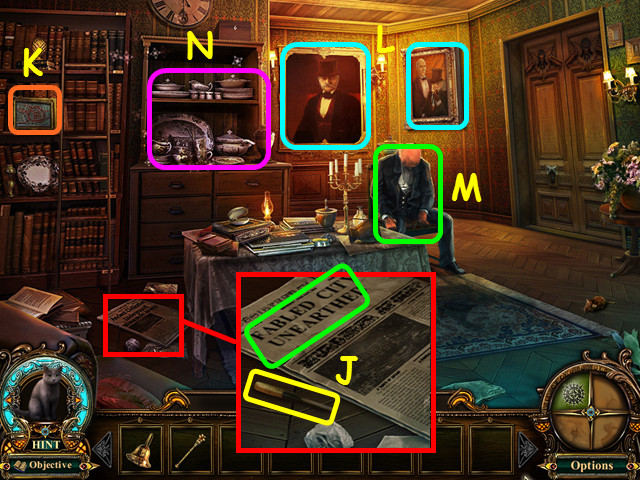
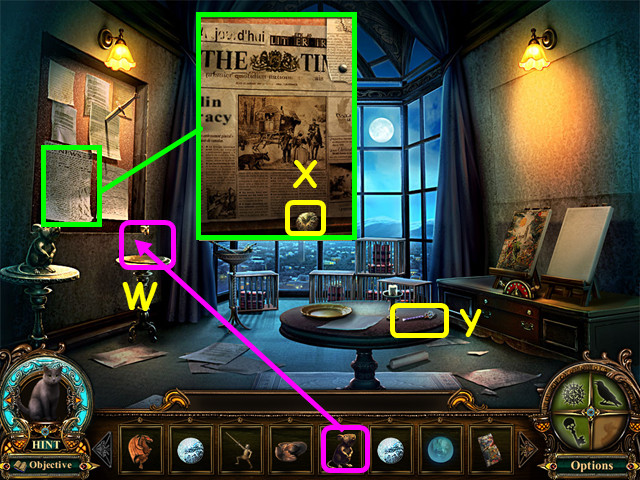
- Look at the newspaper; read the headline and take the CHISEL (J).
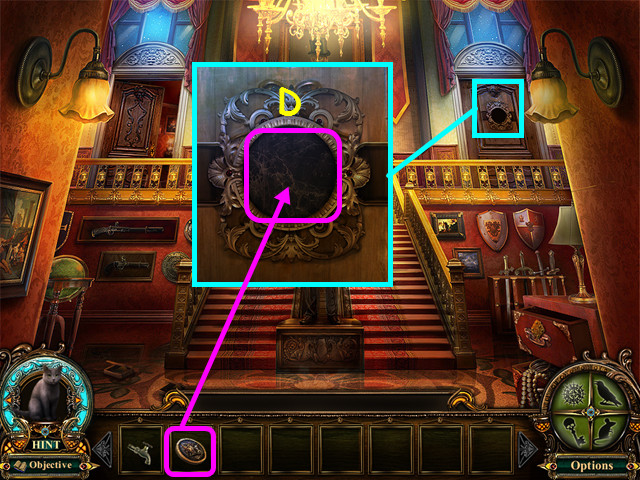
- Look at the map (K).
- Look at the 2 portraits (L).
- Look at the butler (M).
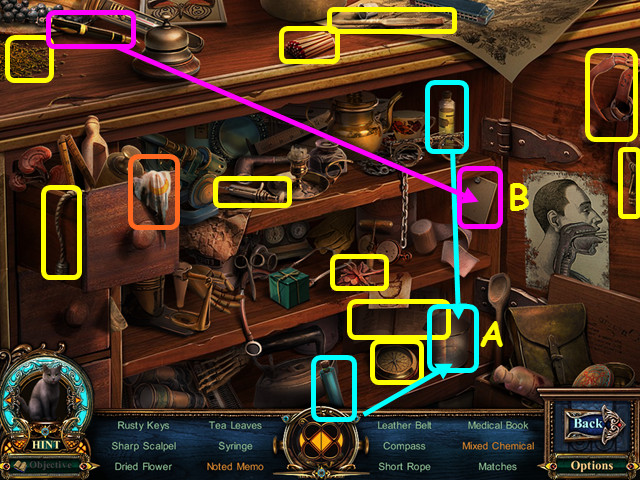
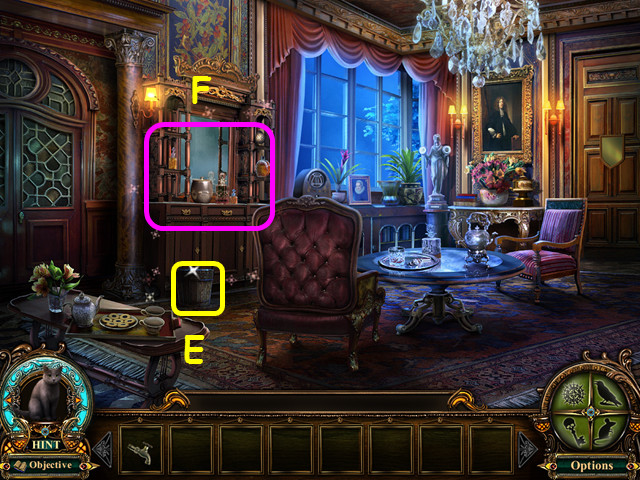
- Select the china cabinet for a HOS (N).
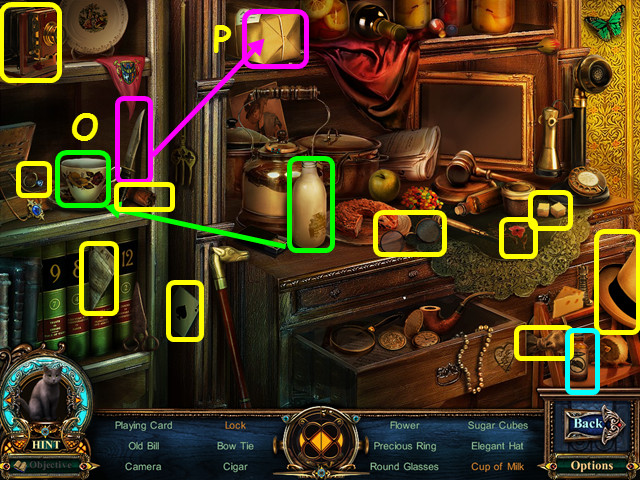
- Locate all the items on the list.
- Use the milk on the cup for the cup of milk (O).
- Use the knife to cut open the box to find the lock (P).
- You will earn the VERMIN REPELLENT.
- Walk down once.

- Use the VERMIN REPELLENT on the rats (Q).
- Walk forward.
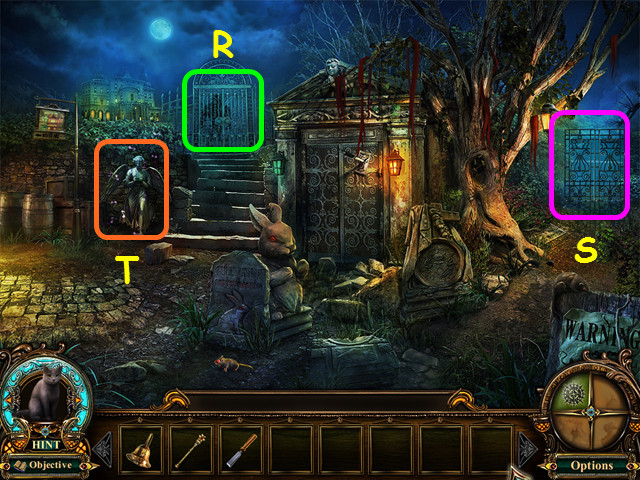
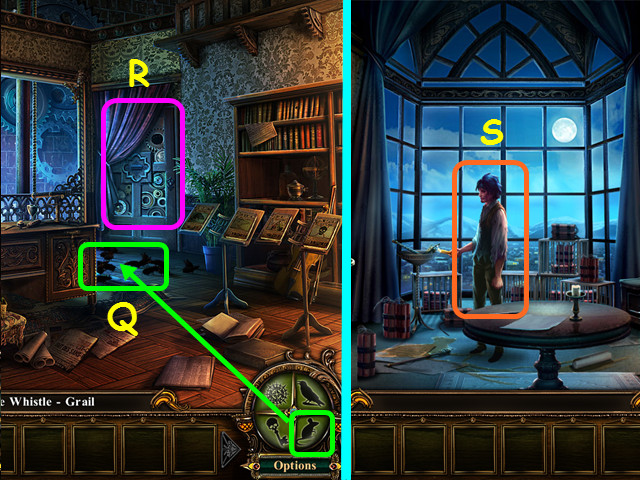
- Look at the figure behind the gate (R).
- Note the gate to the lake (S).
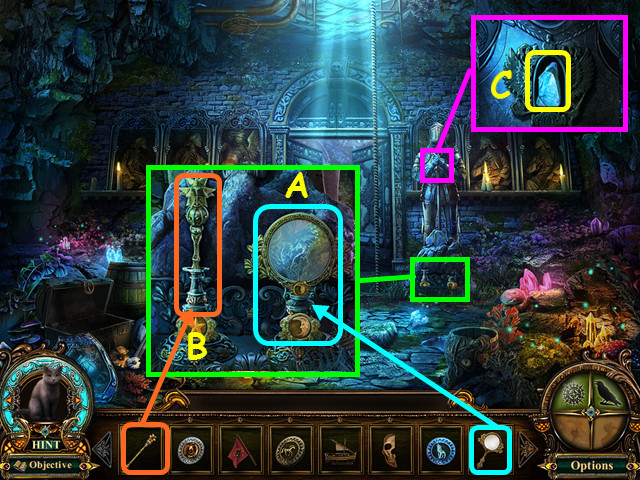
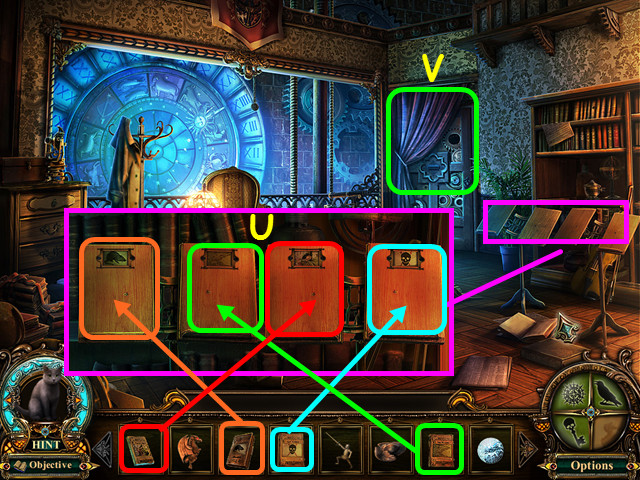
- Select the statue for a mini-game (T).
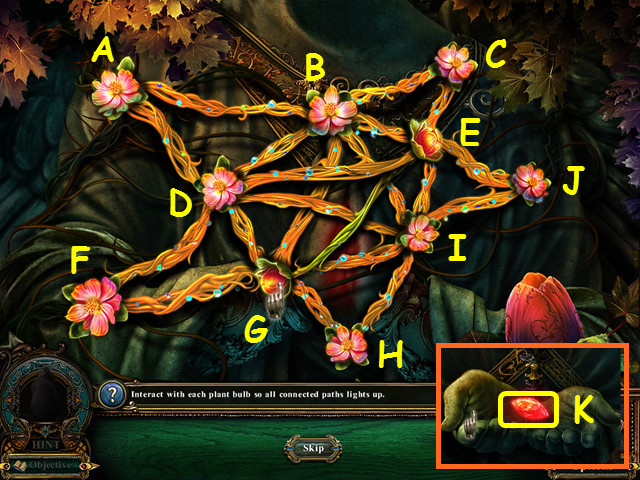
- Move from bud to bud so that all connecting vines are lit.
- Our solution is: D-G-F-D-A-B-D-E-B-C-E-J-I-B-G-H-I-G-E-I-D.
- Take the RUBY EYE (K).
- Walk to the left.
- Look at the door and take the WOODEN DOLL HEAD (L).
- Take the HAY FORK (M).
- Walk down, then enter the gate to the lake.
Chapter 2: The Piper's Partner
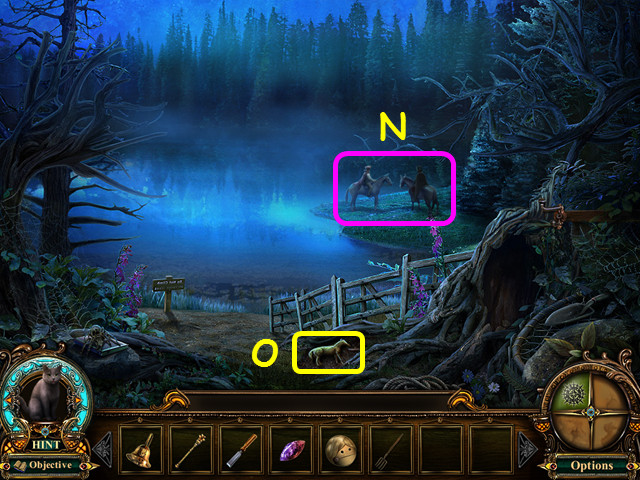
- Look at the figures on horseback (N).
- Take the HORSE FIGURINE (O).
- Walk down 3 times.
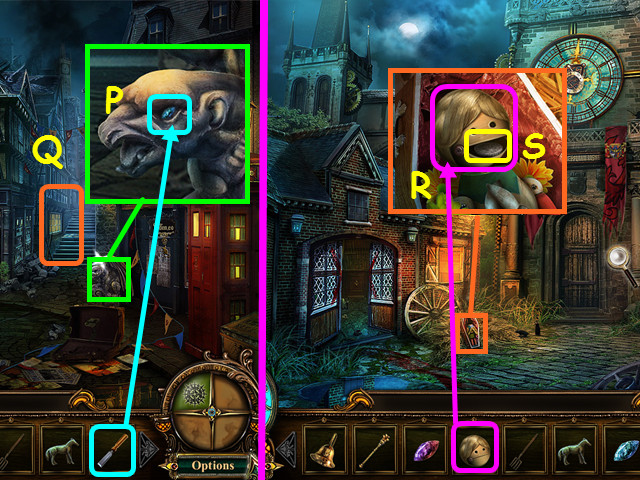
- Look at the gargoyle and use the CHISEL to take the SAPPHIRE EYE (P).
- Walk forward (Q).
- Look at the doll and place the WOODEN DOLL HEAD on top (R).
- Take the SILVER COIN from the doll's mouth (S).
- Enter the stables.
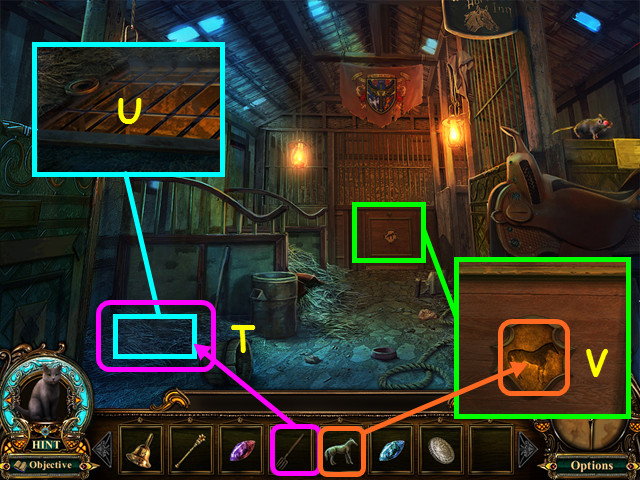
- Use the HAY FORK to remove the hay over the trap door (T).
- Note the trapdoor needs a handle (U).
- Look at the stall door and place the HORSE FIGURINE in the indentation (V).
- Select the stall for a HOS.
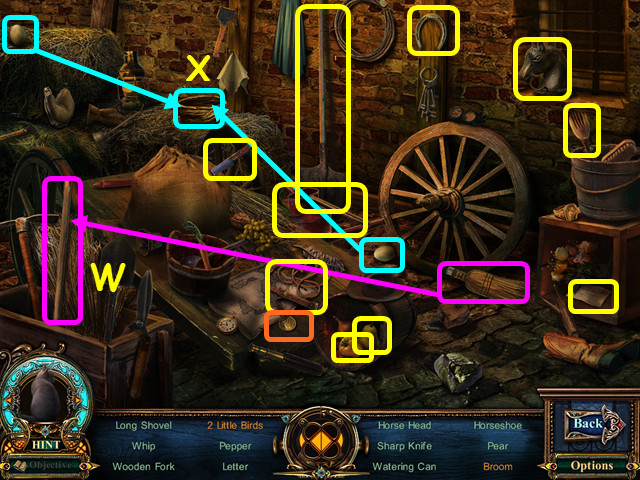
- Locate all the items on the list.
- Place the broom head on the stick to make the broom (W).
- Place the 2 eggs in the nest to find the 2 little birds (X).
- You will earn the GOLD COIN.
- Walk down twice, go left, forward, and left again to the street area.
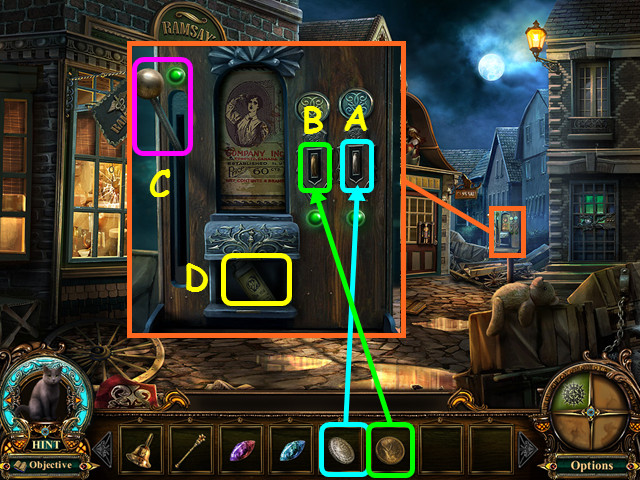
- Look at the vending machine; place the SILVER COIN in the silver slot (A), and place the GOLD COIN in the gold slot (B).
- Pull the lever on the left (C).
- Take the TONIC WATER (D).
- Walk down twice and enter the window.
- Give the TONIC WATER to the butler (E).
- The butler will give you the WHITE SWAN EMBLEM.
- Select the china cabinet for a HOS (F).
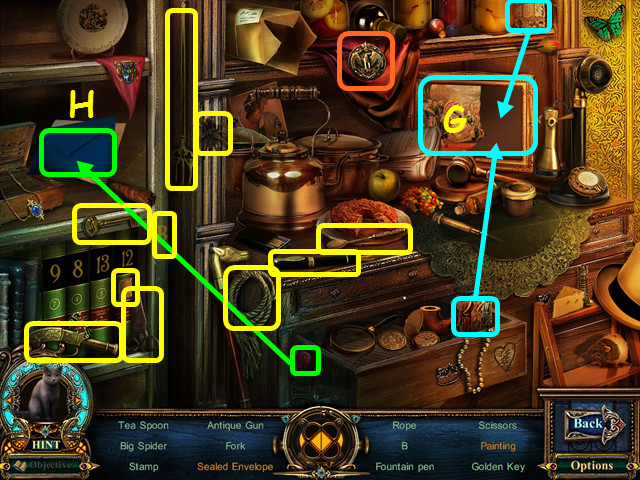
- Locate all the items on the list.
- Place the 2 painting scraps in the frame to complete the painting (G).
- Place the wax seal on the envelope for the sealed envelope (H).
- You will earn the RAVEN DISK.
- Walk down, then enter the newly-opened door below the window.
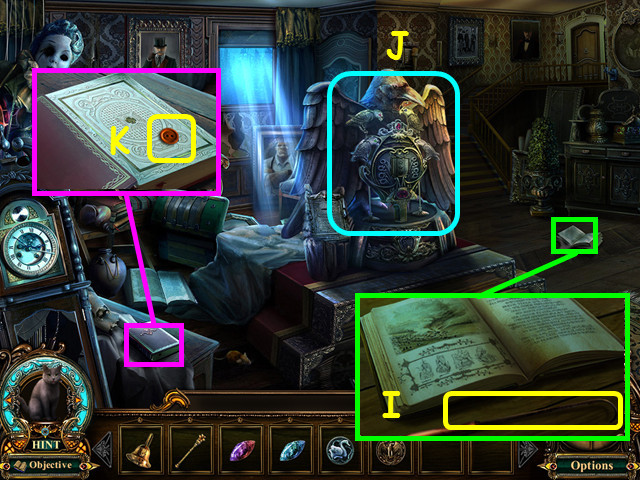
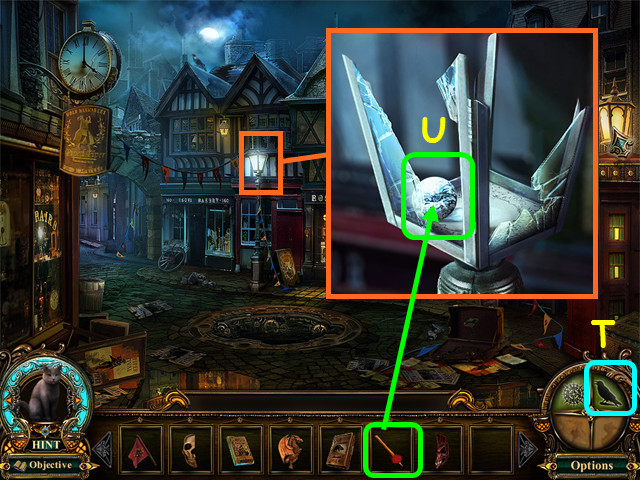
- Look at the book and take the LONG HOOK (I).
- Note the raven statue (J).
- Open the book and take the SHINY BUTTON (K).
- Walk down, then go forward to the Gravesite.
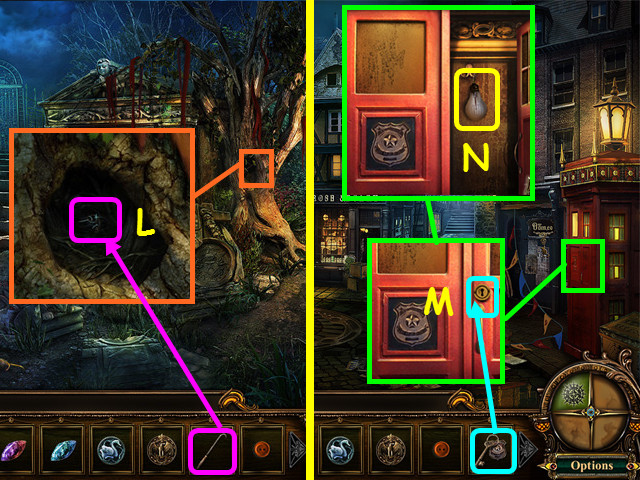
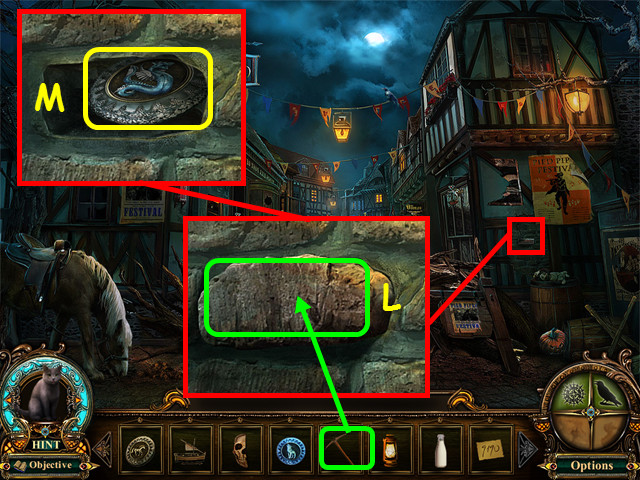
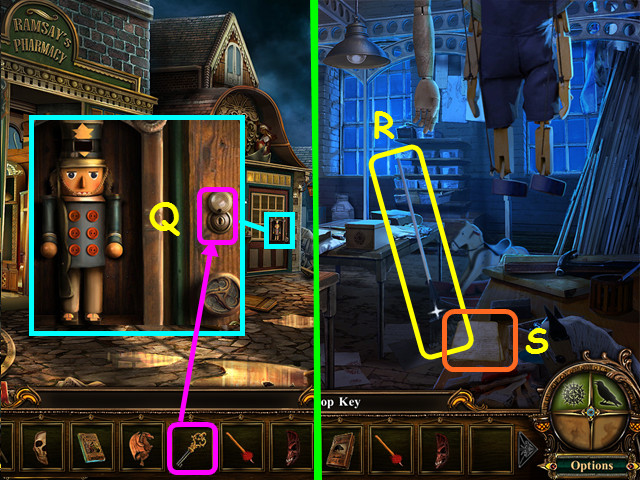
- Look at the tree hollow and use the LONG HOOK to get the POLICE KEY (L).
- Walk down twice.
- Look at the police booth and use the POLICE KEY on the lock (M).
- Take the BULB (N).
- Walk to the left and enter the door under the window.
- Look at the fixture and place the BULB inside (O).
- Select the cabinet for a HOS (P).
- Locate all the items on the list.
- Place the teabag in the kettle for the tea (Q).
- Hang the fixture on the stand to make the lamp (R).
- You will earn the RAT KNOB.
- Walk down twice, go forward, then enter the stables.
- Look at the trapdoor and use the RAT KNOB to open the door (S).
- Enter the trapdoor to the sewer.
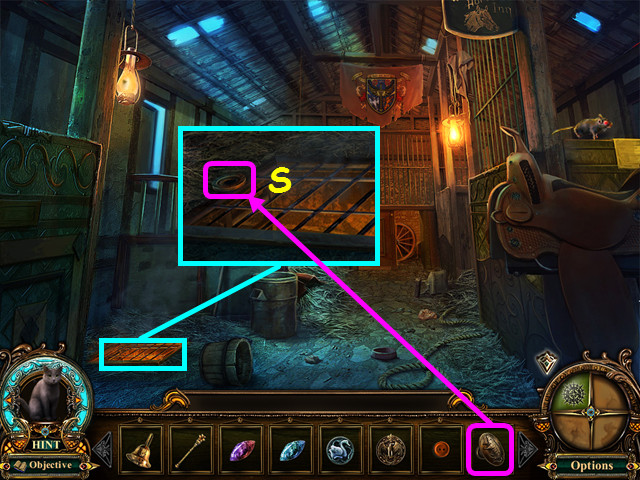
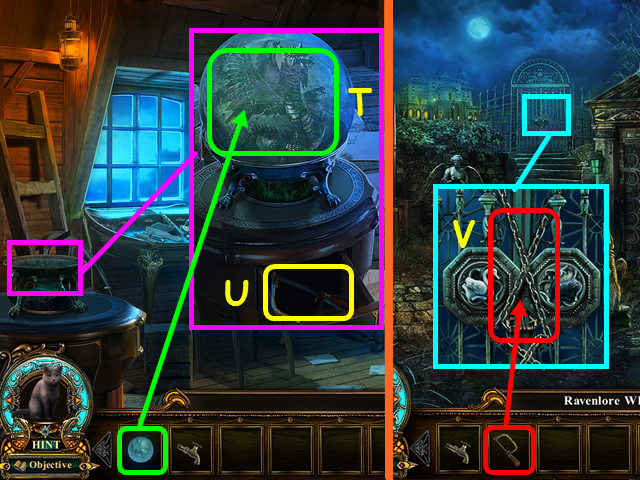
- Move the cloth and take the PHOENIX PLATE (T).
- Note the exit out of the sewer (U).
- Select the table on the left for a mini-game (V).
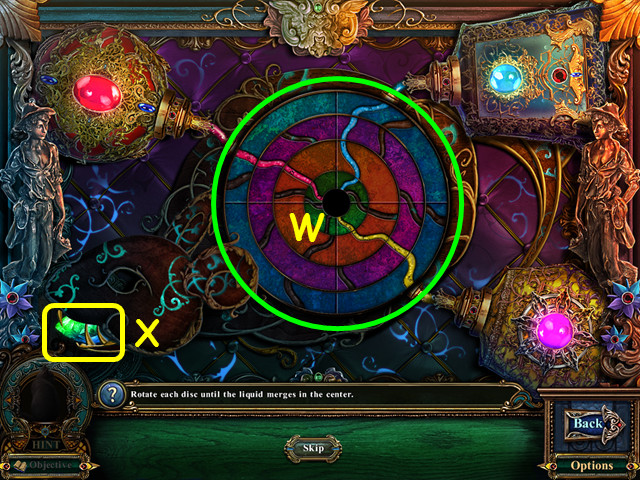
- Rotate the rings so the 3 colors can all flow to the center (W).
- Take the JADE EYE (X).
- Exit the sewer and walk down 3 times.
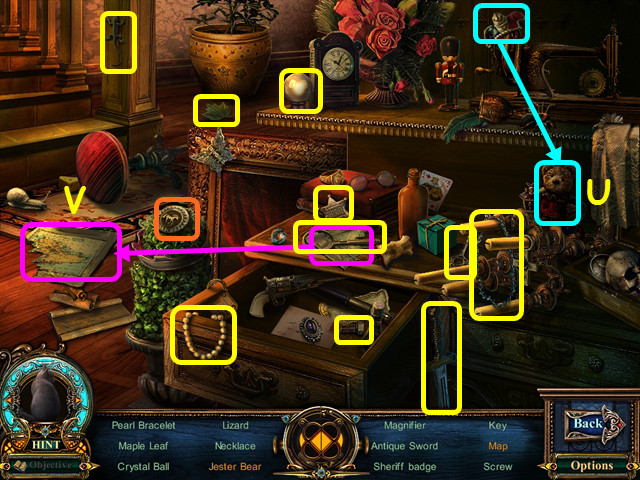
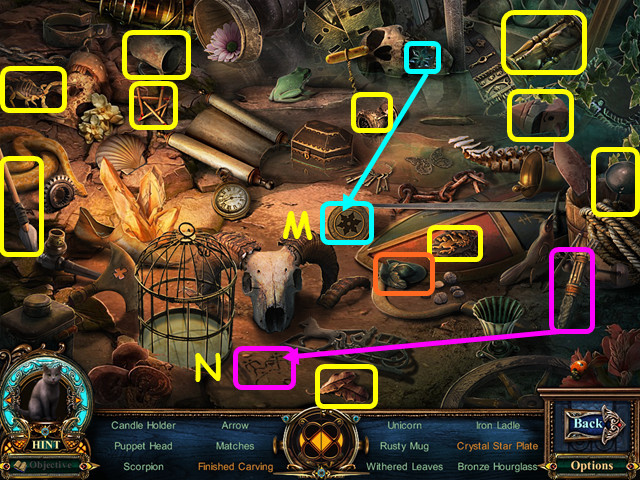
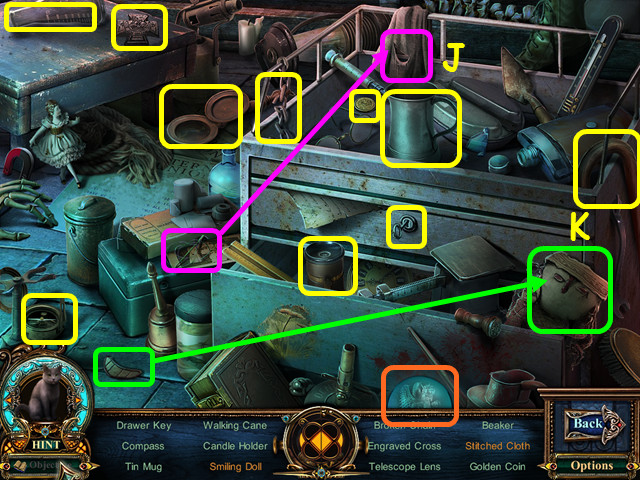
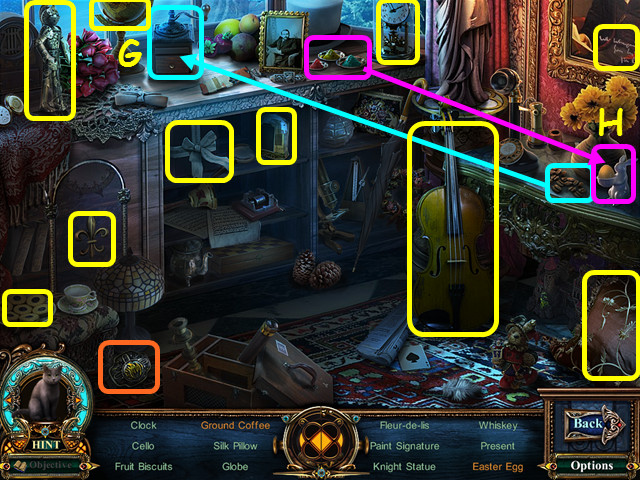
- Select the barrels on the right for a HOS.
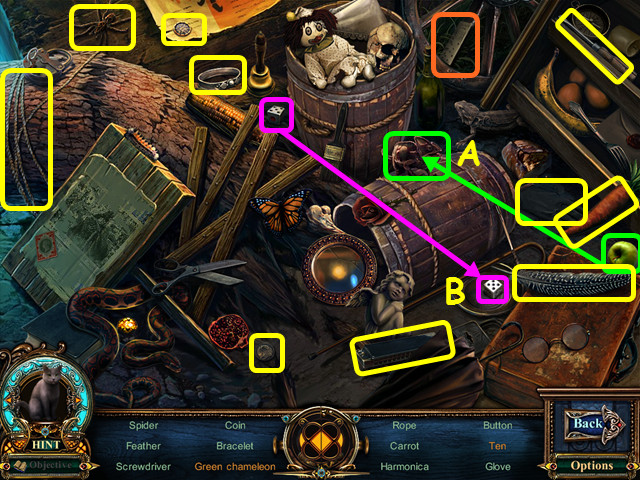
- Locate all the items on the list.
- Use the apple on the chameleon to make the green chameleon (A).
- Place the die with the other die to make ten (B).
- You will earn the DECODER.
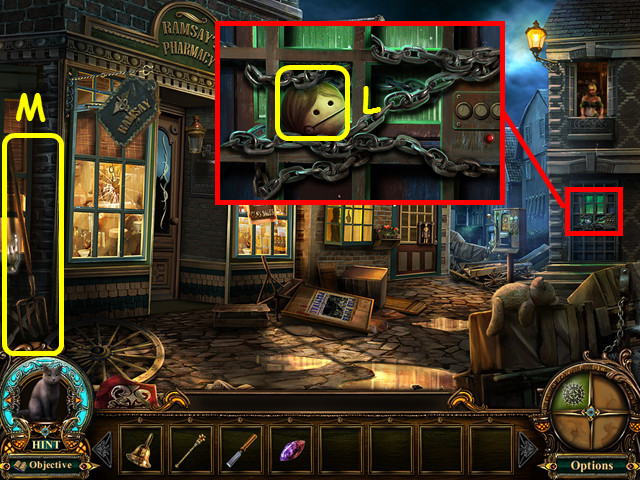
- Walk forward, left, forward, and left again to the street.
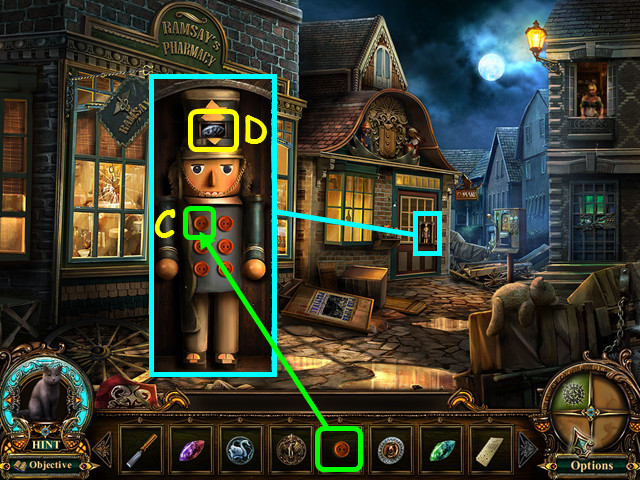
- Look at the toy shop door and place the SHINY BUTTON on the soldier (C).
- Take the CRYSTAL EYE (D).
- Walk down twice and enter the door under the window.
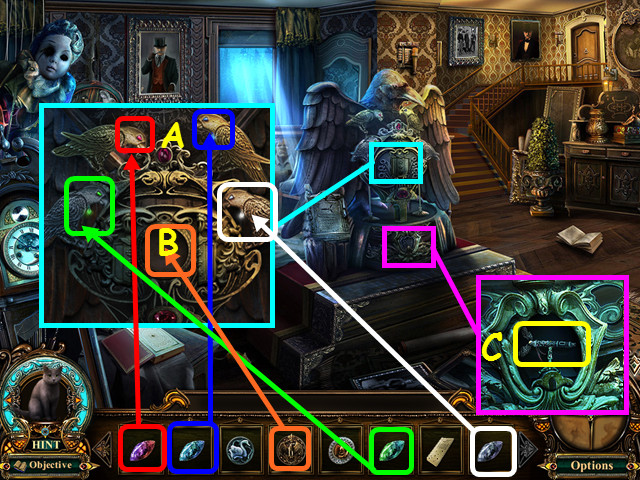
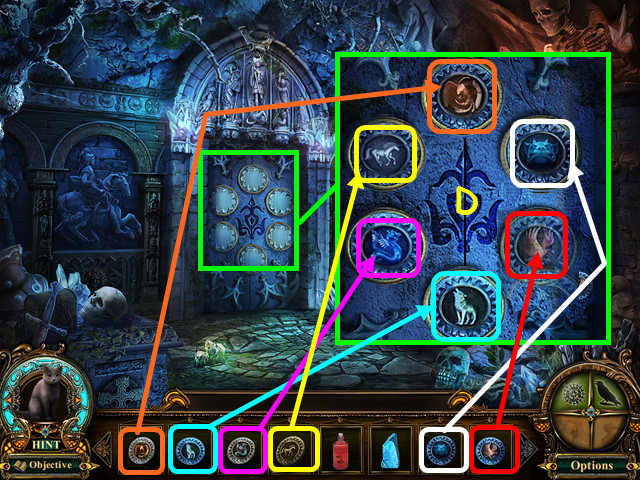
- Look at the raven statue and place the CRYSTAL EYE, JADE EYE, RUBY EYE, and SAPPHIRE EYE into the eyes of the 4 birds with the same color stone on their neck (A).
- Place the RAVEN DISC in the center of the birds (B).
- Take the Ravenlore whistle (C).
- Walk down, then go forward to the Gravesite and enter the right gate to the lake.
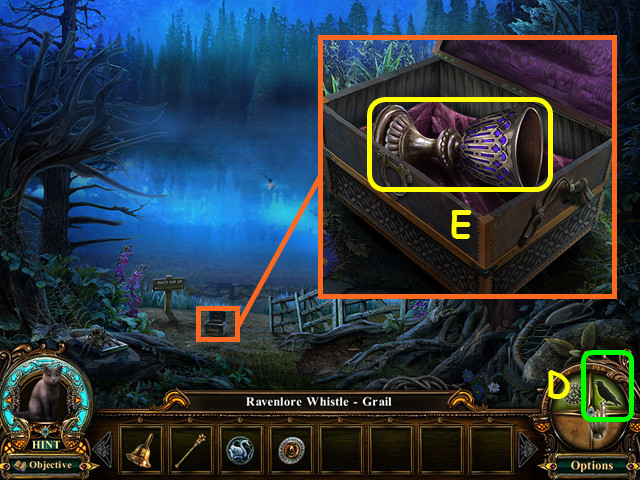
- Select the Ravenlore Whistle (D) and the raven will deposit the chest on the shore.
- Look at the chest; open the lid and take the GOLD CHALICE (E).
- Walk down 3 times.
Chapter 3: The Underground City
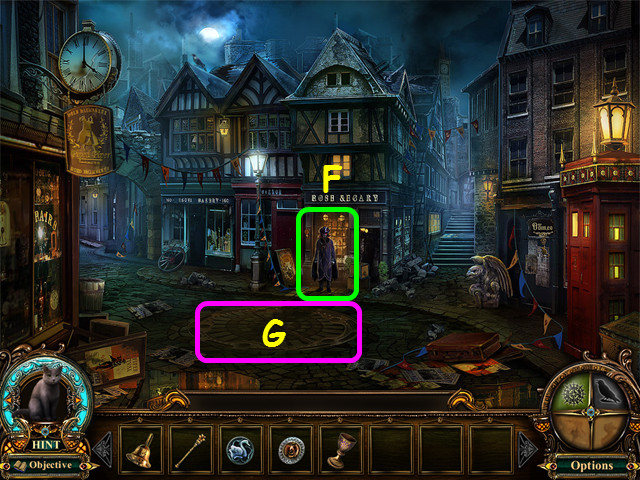
- Talk to the Dark Piper (F).
- You will fall below the street (G).
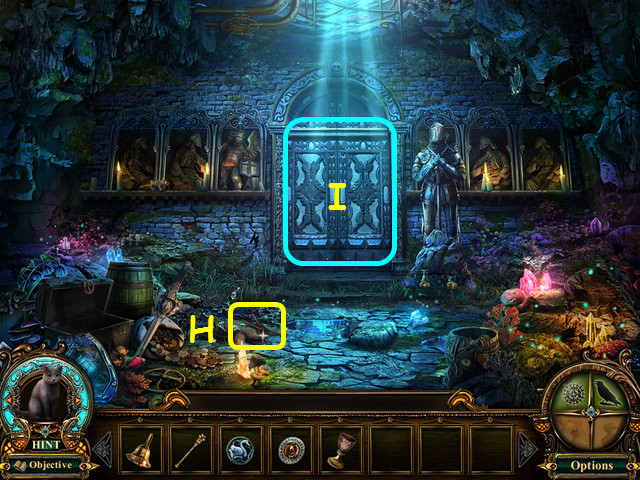
- Take the SCISSORS (H).
- Open the doors and walk forward (I).
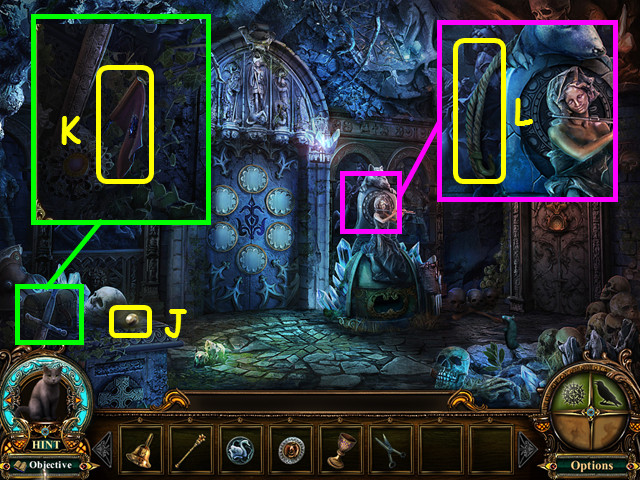
- Take the PEARL (J).
- Look on the left and take the FLAG (K).
- Look at the statue and take the ROPE WITH HOOK (L).
- Walk down once.
- Look at the opening and use the ROPE WITH HOOK on the hole (M).
- Select the area on the right for a HOS (N).
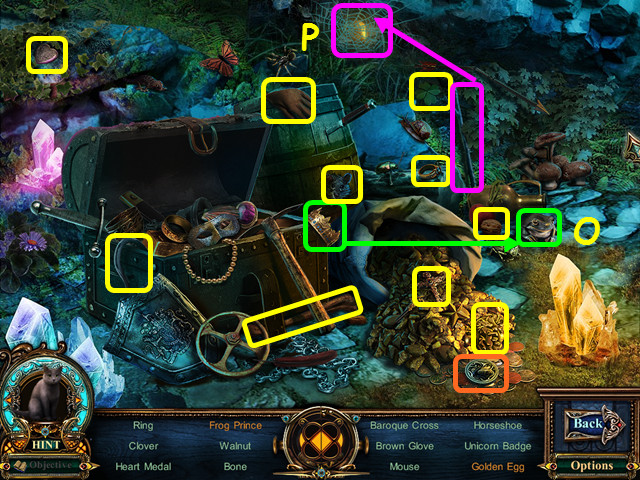
- Locate all the items on the list.
- Place the crown on the frog for the frog prince (O).
- Use the stick on the spiderweb to find the golden egg (P).
- You will earn the BLACK SWAN EMBLEM.
- Climb up the rope, walk forward and enter the stables.
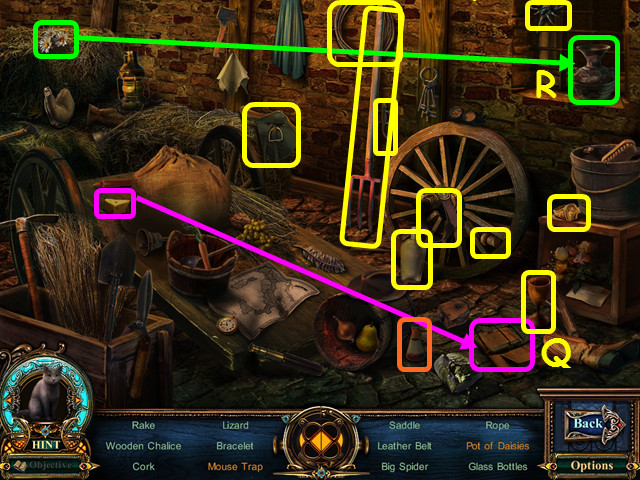
- Select the back stall for a HOS.
- Locate all the items on the list.
- Place the cheese on the trap for the mouse trap (Q).
- Place the flowers in the pot for the pot of daisies (R).
- You will earn the RUST REMOVER.
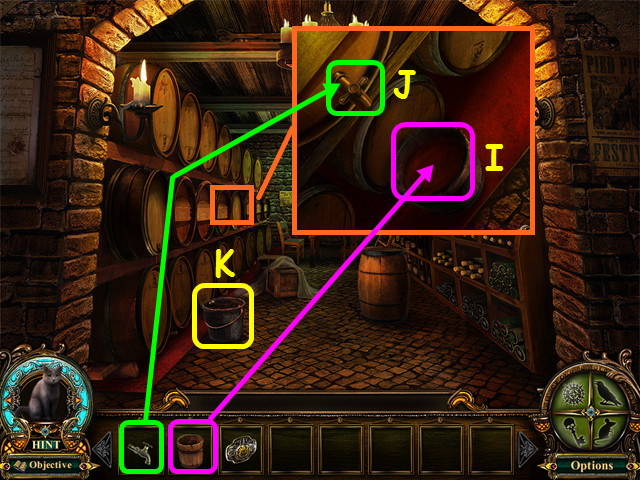
- Enter the trapdoor to the sewer.
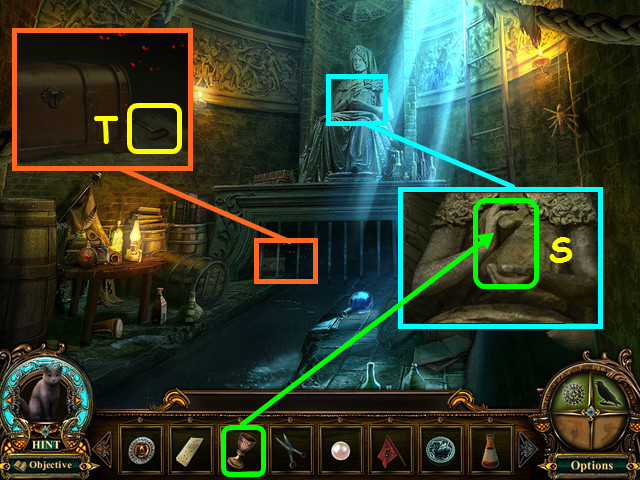
- Look at the statue and place the GOLD CHALICE in her hands (S).
- Look in the opening and take the PHARMACY KEY (T).
- Exit the sewer and walk down twice, go to the left and enter the door under the window.
- Select the cabinet on the right for a HOS.
- Locate all the items on the list.
- Place the hat on the bear to make the jester bear (U).
- Place the scrap with the large piece to make the map (V).
- You will earn the UNICORN PLATE.
- Walk down once, then go up the ladder.

- Look at the table and place the PEARL into the shell (W).
- Take the CLOCK TOWER KEY from the drawer (X).
- Exit the room, then walk forward to the Gravesite.
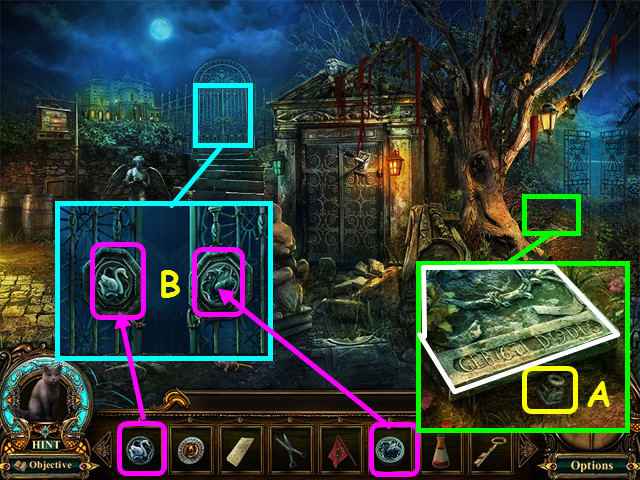
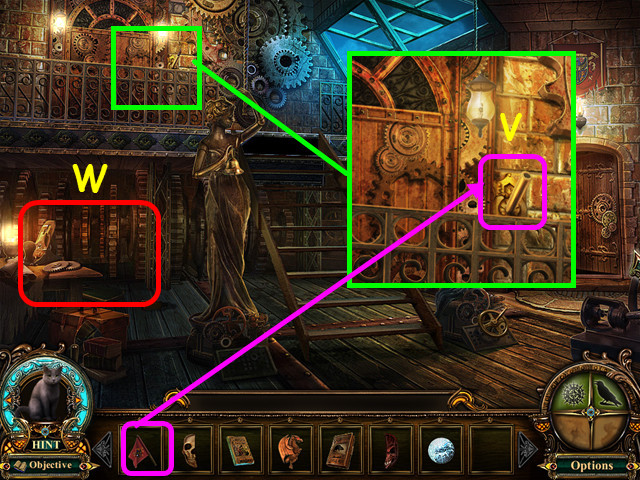
- Look at the tombstone, push it back and take the INVISIBLE INK (A).
- Look at the left gate; place the WHITE SWAN EMBLEM and the BLACK SWAN EMBLEM into the circles (B).
- Walk forward through the gate.
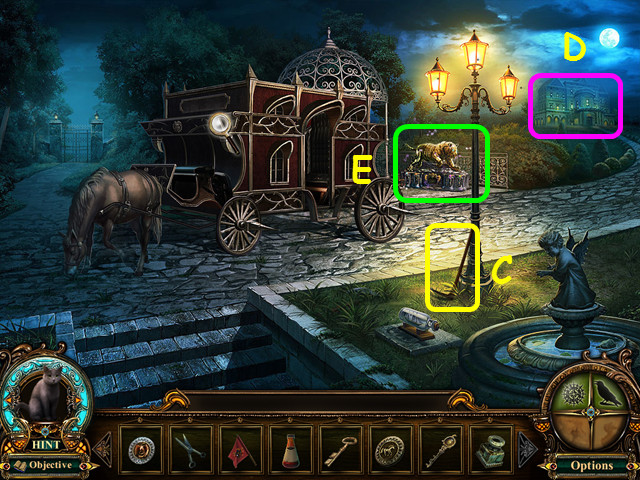
- Take the RUSTY PICKAX (C).
- Note the Duke's mansion (D).
- Look at the tiger for a mini-game (E).
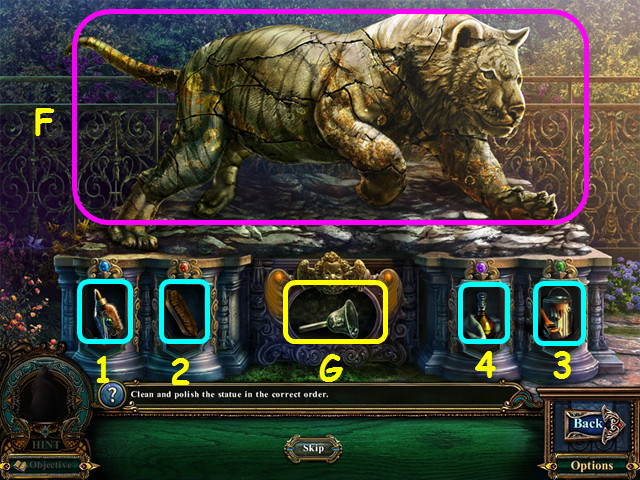
- Place the pieces to restore the tiger statue (F).
- Use the cleaning supplies in numerical order on the tiger statue (1-4).
- Take the SILVER BELL (G).
- Walk to the mansion.
- Talk to the Duke and you will receive the WOLF PLATE (H).
- Walk down twice, then go to the left.
- Look at the pharmacy door and use the PHARMACY KEY on the lock (I).
- Enter the pharmacy.
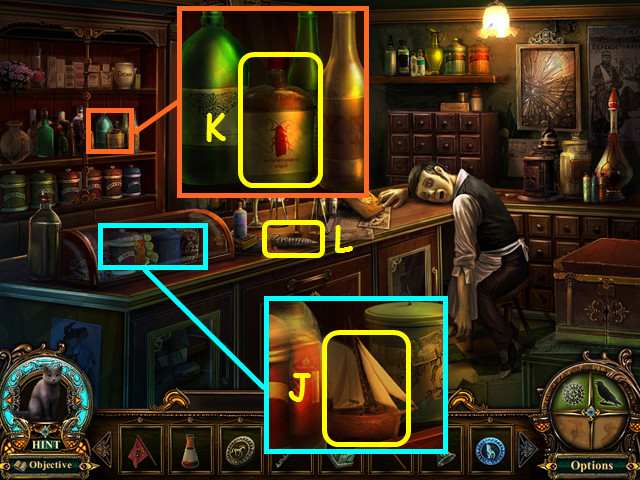
- Look at the glass case and take the SMALL SHIP (J).
- Look at the shelf and take the INSECTICIDE (K).
- Take the STONE CARROT (L).
- Walk down twice to the Gravesite.
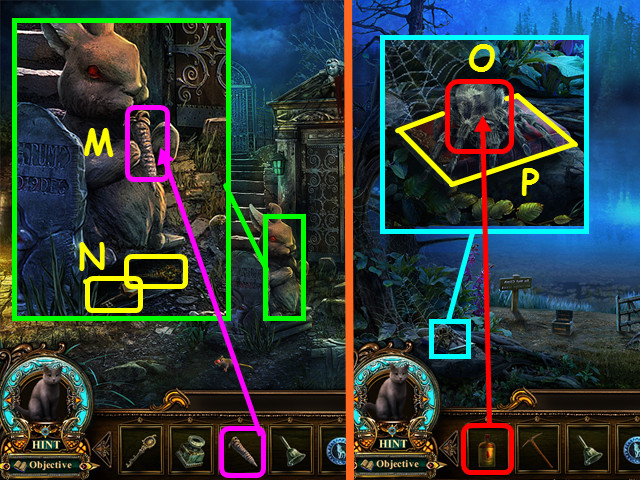
- Look at the rabbit statue and place the STONE CARROT in its paws (M).
- Take the DIARY KEY and the CABINET KEY (N).
- Walk through the right gate to the lake.
- Look at the spider and use the INSECTICIDE on the spider (O).
- Take the ADDRESS BOOK (P).
- Walk down, left, then enter the pharmacy.
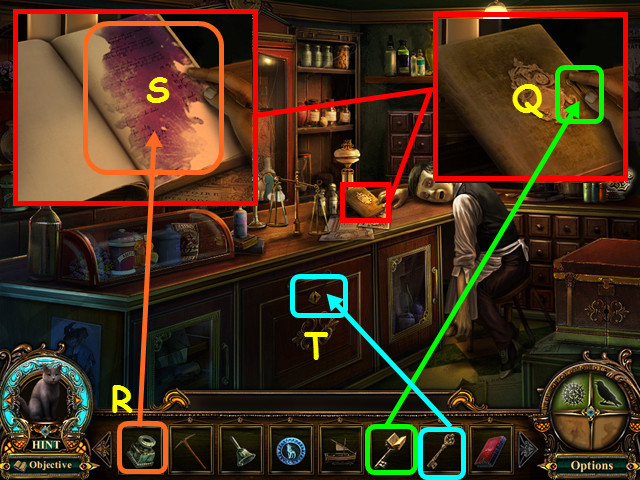
- Look at the diary and use the DIARY KEY on the lock (Q).
- Use the INVISIBLE INK on the pages (R).
- Take the ENCRYPTED RECEIPT (S).
- Use the CABINET KEY to unlock the cabinet (T).
- Select the cabinet for a HOS.
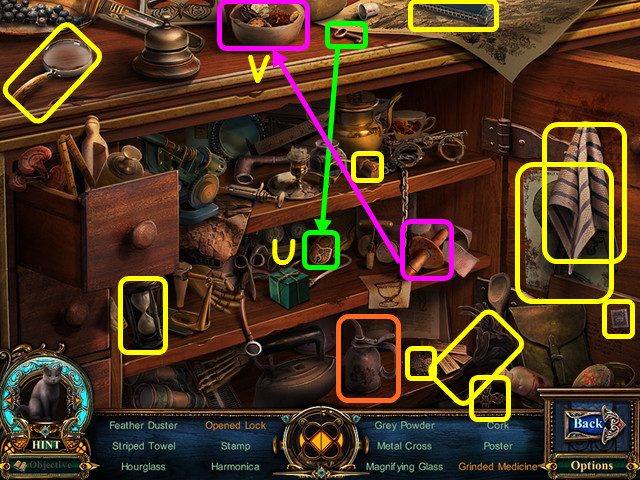
- Locate all the items on the list.
- Use the key in the lock to get the opened lock (U).
- Use the pestle in the mortar to get the ground medicine (V).
- You will earn the OIL.
- Walk down 4 times, then walk forward.
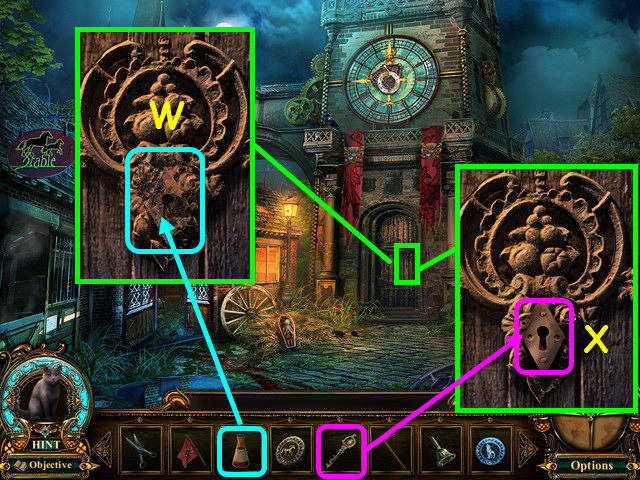
- Look at the clock tower door and use the RUST REMOVER on the lock (W).
- Use the CLOCK TOWER KEY on the keyhole (X).
- Enter the tower.
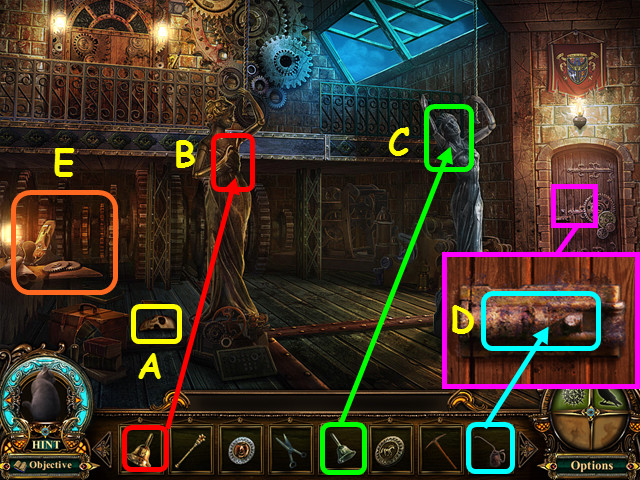
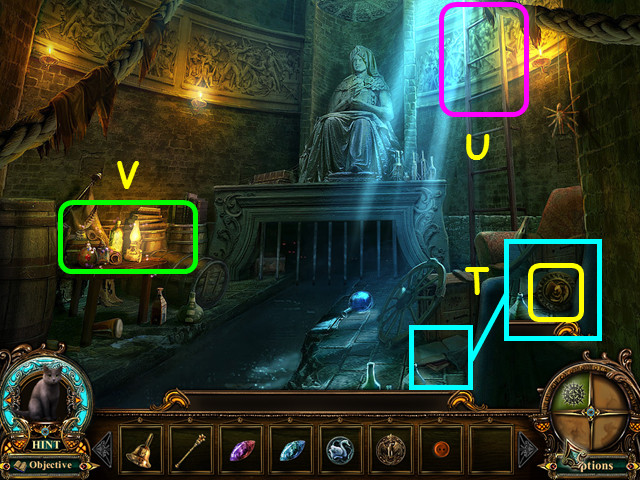
- Take the SKELETAL HALF MASK (A).
- Place the GOLD BELL on the gold statue (B), and place the SILVER BELL on the silver statue (C).
- Look at the door on the right and use the OIL on the lock (D).
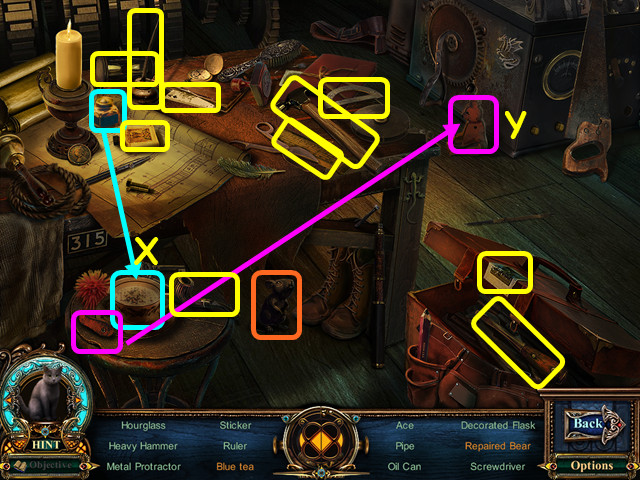
- Select the table on the left for a HOS (E).
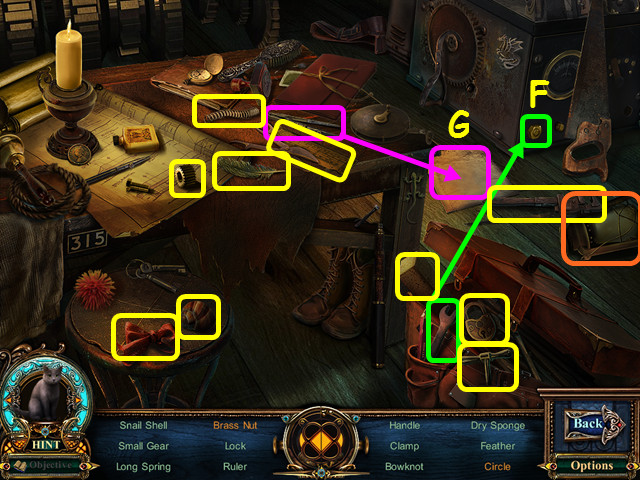
- Locate all the items on the list.
- Use the wrench to remove the brass nut (F).
- Use the compass on the paper to make the circle (G).
- You will earn the LAMP.
- Enter the door on the right.
Chapter 4: The Viceroy
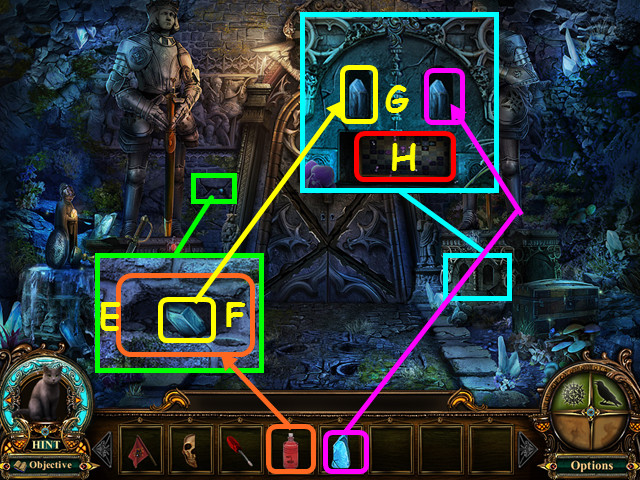
- Use the SCISSORS to cut the hanging cloth, then take the BOTTLE OF SOUR MILK (H).
- Look at the corner table and place the ENCRYPTED RECEIPT on the surface (I).
- Place the DECODER on the receipt (J).
- Place the ADDRESS BOOK on the stand; open it and take the MORGUE CODE (K).
- Walk down 4 times to the entrance.
- Look at the wall and use the RUSTY PICKAX on the loose brick (L).
- Take the SEA SERPENT PLATE (M).
- Walk forward, left, forward, then enter the right gate to the lake.
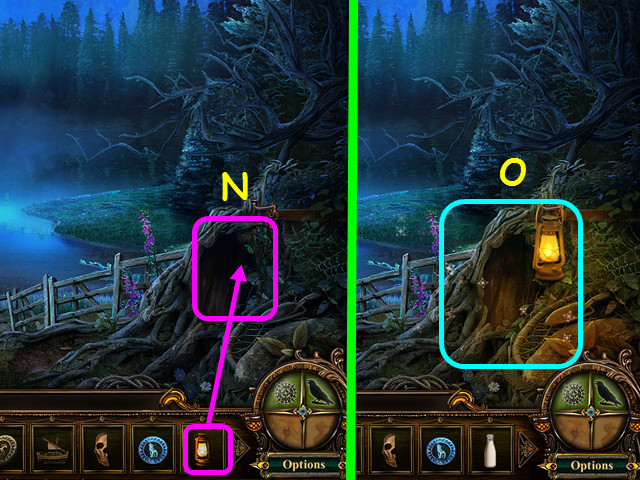
- Use the LAMP on the hollow (N).
- Select the hollow for a HOS (O).
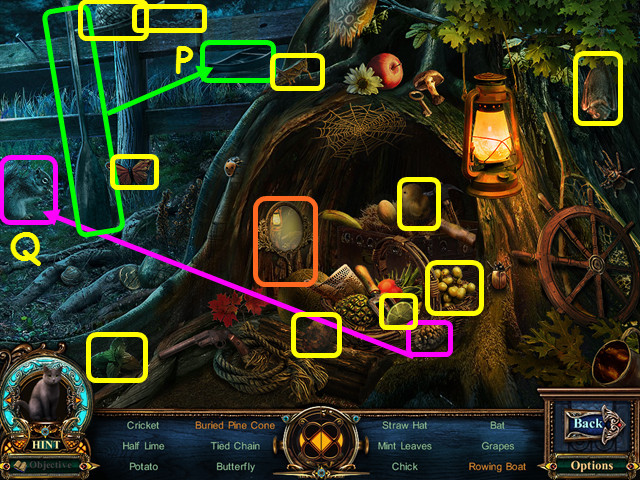
- Locate all the items on the list.
- Place the oar in the boat to make the rowing boat (P).
- Give the pine cone to the squirrel to make the buried pine cone (Q).
- You will earn the HAND MIRROR WITH MOON ENGRAVING.
- Walk down, then go left to the street.
- Look at the morgue door and use the MORGUE CODE on the lock (R).
- Enter the morgue.
- Take the SCREWDRIVER (S).
- Select the cabinet on the right for a HOS (T).
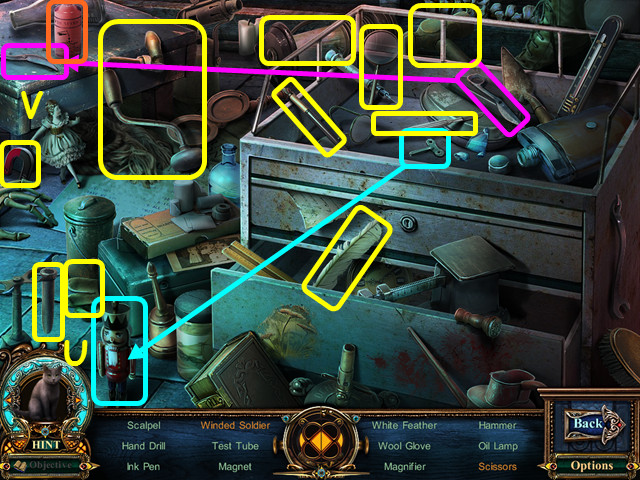
- Locate all the items on the list.
- Use the key on the nutcracker to get the wound soldier (U).
- Combine the 2 scissor halves to make the scissors (V).
- You will earn the EMBALMING ACID.
- Walk down twice and enter the left gate.
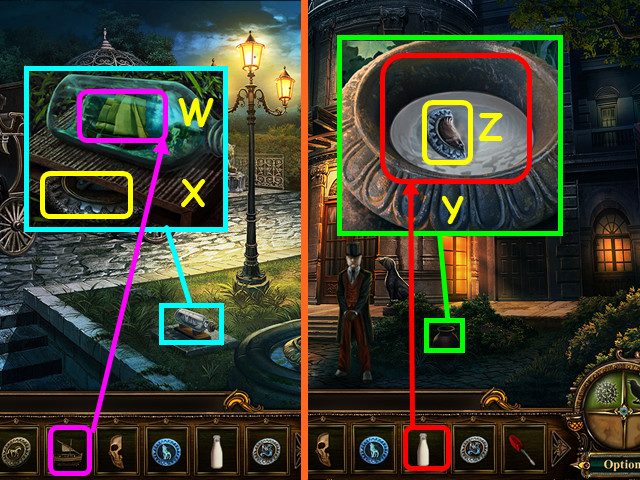
- Look at the bottle and place the SMALL SHIP inside (W).
- Take the GOLEM PLATE (X).
- Walk forward to the mansion.
- Look at the pot and pour the BOTTLE OF SOUR MILK inside (Y).
- Take the EAGLE PLATE (Z).
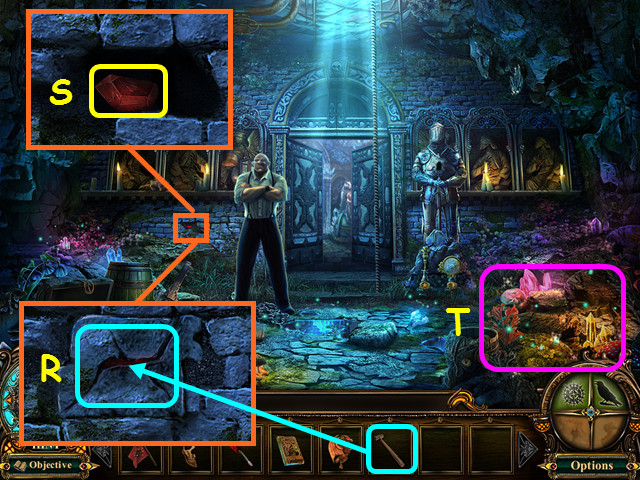
- Walk down 4 times and enter the hole in the street.
- Look at the base of the knight; place the HAND MIRROR WITH MOON ENGRAVING on the right (A) and place the BRONZE SCEPTER on the left (B).
- Take the BLUE CRYSTAL #1 (C).
- Walk forward.
- Look at the left door and place the EAGLE PLATE, SEA SERPENT PLATE, GOLEM PLATE, WOLF PLATE, UNICORN PLATE, and the PHOENIX PLATE into the matching circles (D).
- Walk forward through the door to the vault entrance.
- Look at the wall and use the EMBALMING ACID on the mortar (E).
- Take the BLUE CRYSTAL #2 (F).
- Look at the base of the right knight and place the 2 BLUE CRYSTALS into the niches (G).
- Select the area that opens for a mini-game (H).

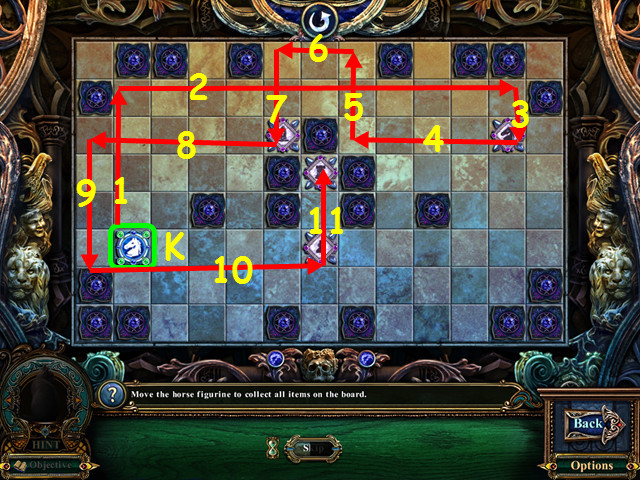
- Move the blue horse figurine (I) so that it collects all the items on the board.
- Select the horse and it will indicate the possible directions it can move; the horse will move until something stops it.
- Move along the path in numerical order (1-14).
- Take the VAULT KEY #1.
- Walk down twice, climb up through the hole in the street, walk left, forward, then go through the left gate and continue to the mansion.
- After the cut-scene, you will be returned to the vault entrance; select the debris on the left for a HOS.
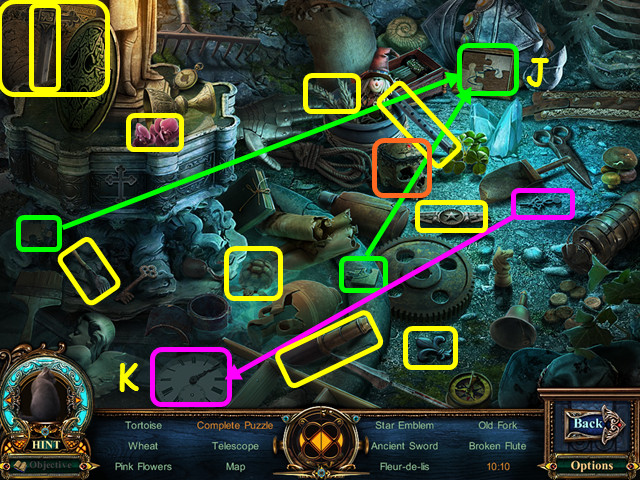
- Locate all the items on the list.
- Place the 2 pieces into the frame for the complete puzzle (J).
- Place the clock hand on the face and it will have the time of 10:10 (K).
- You will earn the SKULL.
- Walk down once.
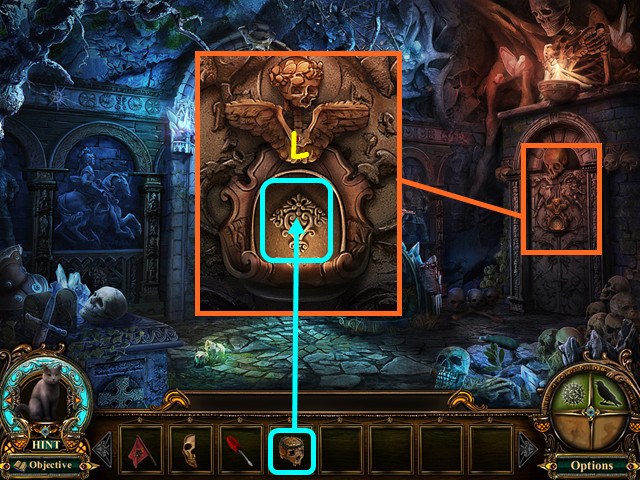
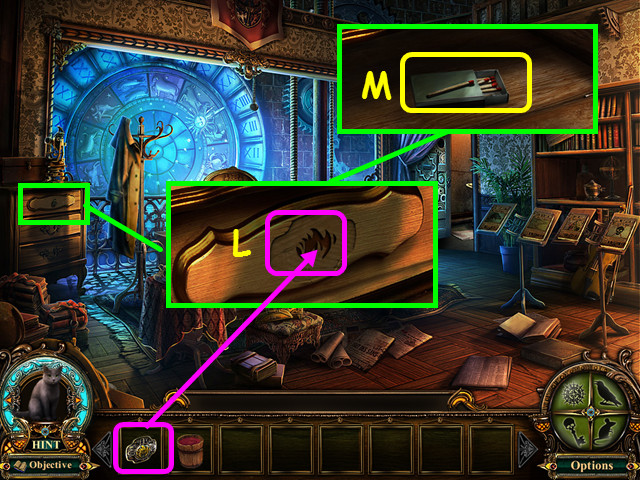
- Look at the door on the right and place the SKULL into the basin (L).
- Enter the door.
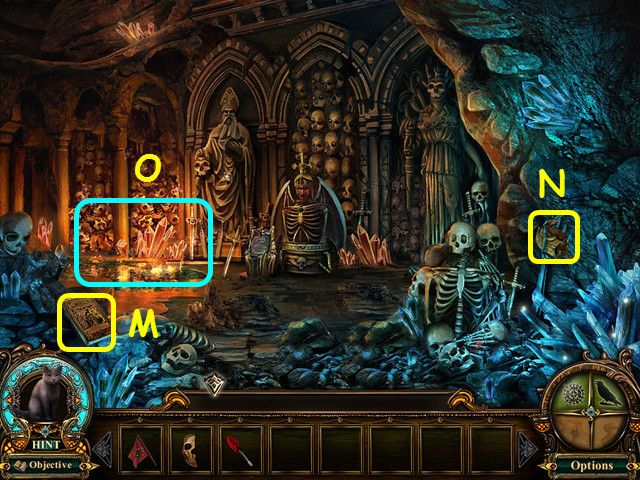
- Take the BOOK OF PIED PIPER (M).
- Take the WOODEN DRAGON (N).
- Select the area on the left for a HOS (O).
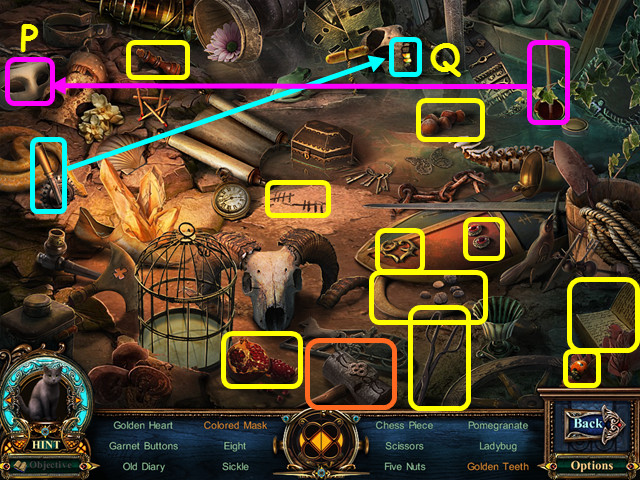
- Locate all the items on the list.
- Use the paint on the mask for the colored mask (P).
- Use the chisel on the skull to get the golden teeth (Q).
- You will earn the SLEDGEHAMMER.
- Walk down twice.
- Look at the wall and use the SLEDGEHAMMER on the brick (R).
- Take the RED CRYSTAL #1 (S).
- Select the area on the right for a HOS (T).

- Locate all the items on the list.
- Place the bee on the honeycomb to get the honey (U).
- Place the flute piece with the other pieces to make the flute (V).
- You will earn the COMPASS.
- Walk forward twice to the vault entrance.
- Look at the chest and place the COMPASS in the lock (W).
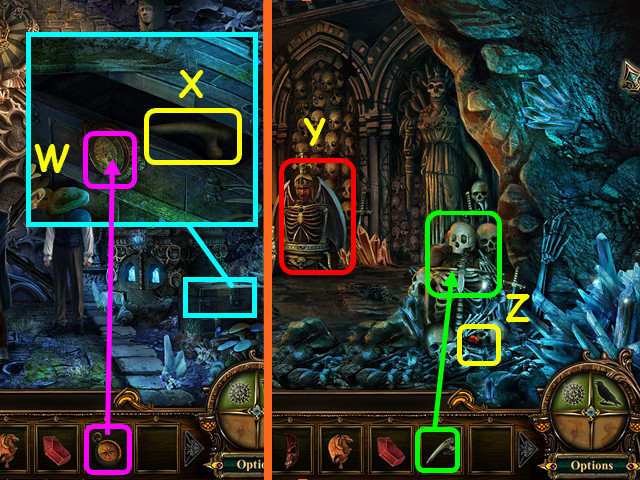
- Take the BONES from the chest (X).
- Walk down and enter the door on the right.
- Look at the statue for a new objective (Y).
- Use the BONES on the skeleton and take the RED CRYSTAL #2 (Z).
- Walk down, then go forward through the door on the left.
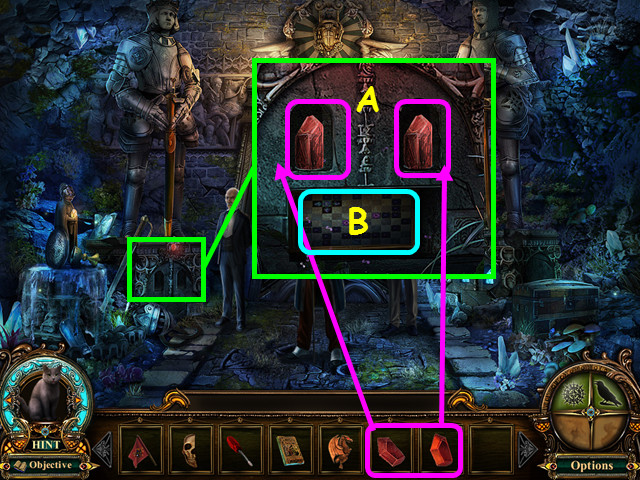
- Look at the base of the left statue and place the 2 RED CRYSTALS into the niches (A).
- Select the area that opens for a mini-game (B).
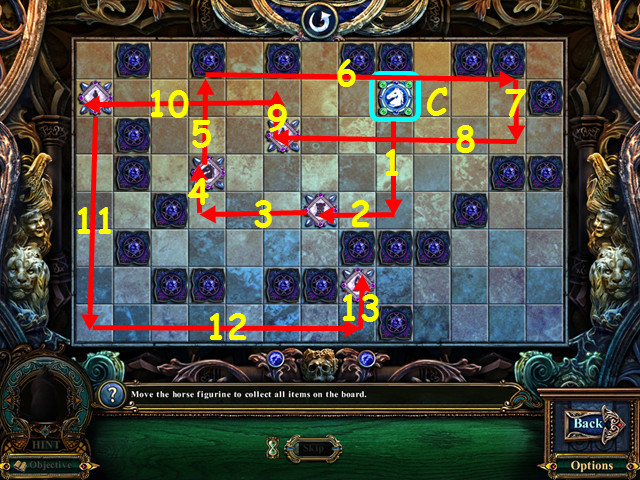
- Move the blue horse figurine (C) so that it collects all the items on the board.
- Select the horse and it will indicate the possible directions it can move; the horse will move until something stops it.
- Move along the path in numerical order (1-13).
- Take the VAULT KEY #2.
Chapter 5: The Double-Cross
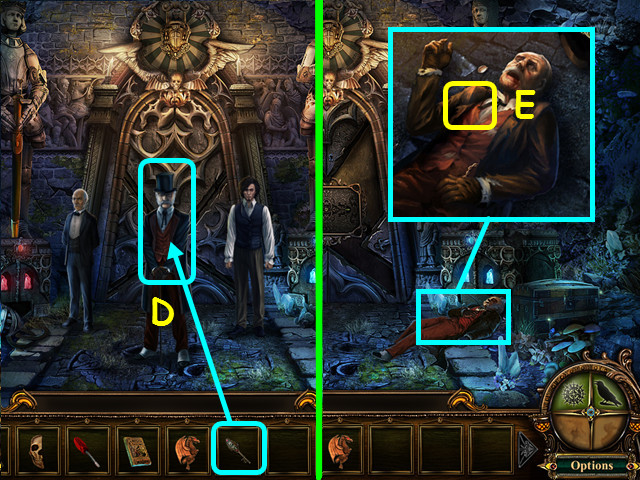
- Give the VAULT KEY #2 to the Duke (D).
- After the cut-scene, look at the Duke's body and take the MANSION KEY (E).
- Walk down twice and climb up the rope; walk left and forward, then enter the right gate to the lake.
- Select the hollow for a HOS.
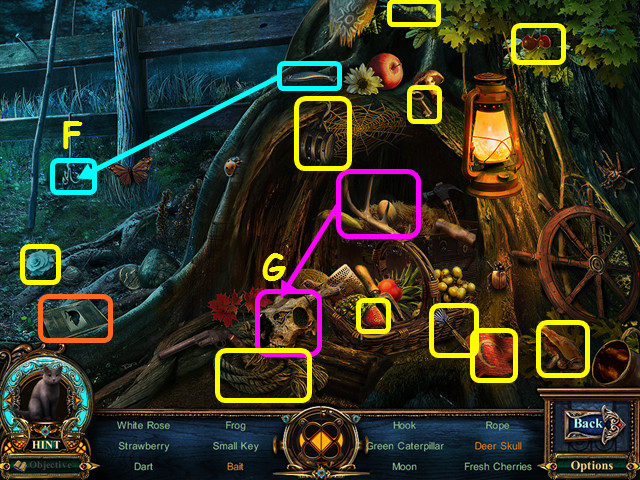
- Locate all the items on the list.
- Place the fish on the hook for the bait (F).
- Place the antler on the skull to make the deer skull (G).
- You will earn the BOOK OF RATS.
- Walk down, enter the left gate and walk forward to the mansion.
- Use the MANSION KEY on the front door, then go inside.
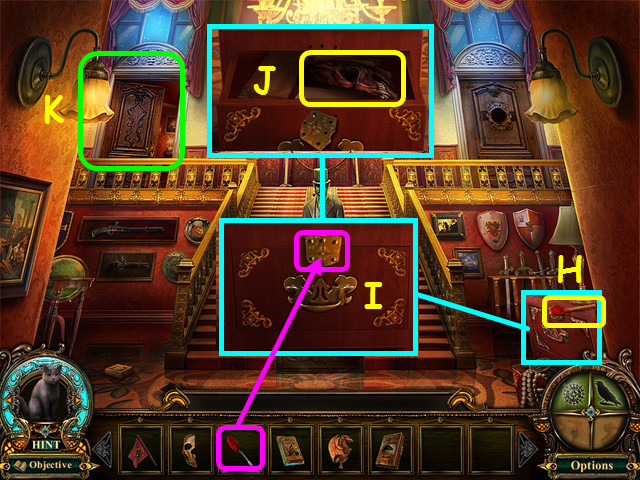
- Take the BLOW DART (H).
- Look at the drawers and use the SCREWDRIVER to remove the plate (I).
- Take the BURNT HALF MASK (J).
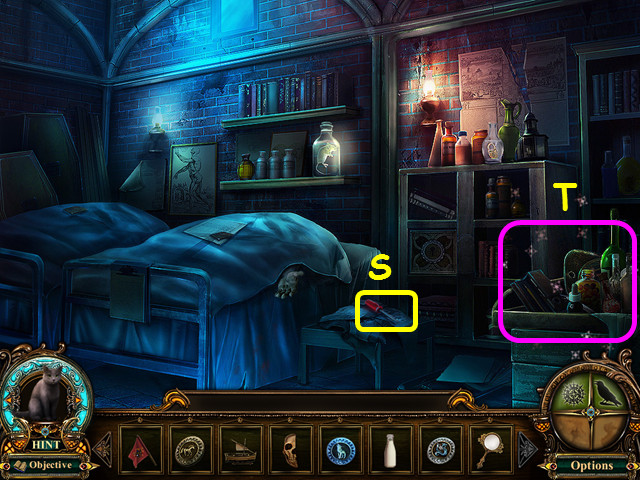
- Enter the left door (K).
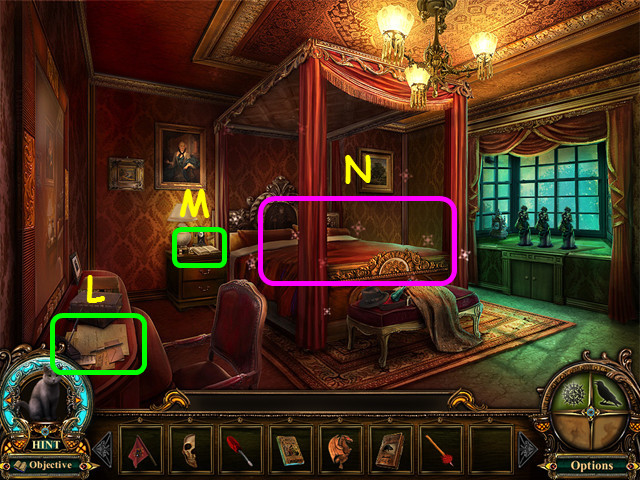
- Zoom in and read the correspondence (L), and the diary (M).
- Select the bed for a HOS (N).
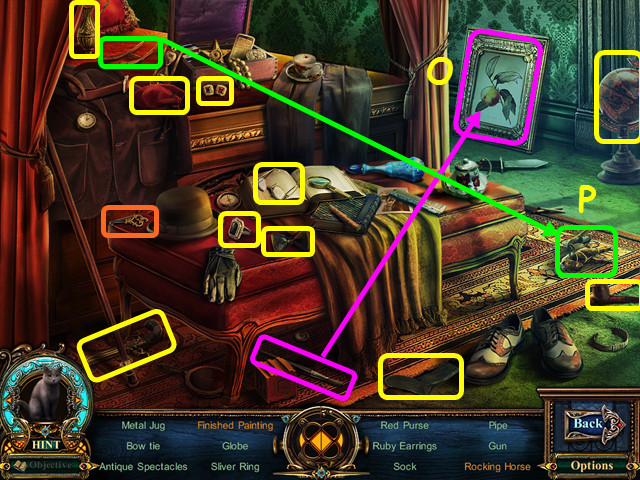
- Locate all the items on the list.
- Use the paint brush on the canvas to make the finished painting (O).
- Place the rails on the horse to make the rocking horse (P).
- You will earn the WORKSHOP KEY.
- Walk down 4 times then walk to the left.
- Look at the workshop door and use the WORKSHOP KEY in the lock (Q).
- Enter the workshop.
- Take the RAKE (R).
- Read the order (S).
- Walk down 4 times.
- Use the Ravenlore Whistle (T).
- Look at the lamp and use the BLOW DART to get the WHITE CRYSTAL #1 (U).
- Walk forward and enter the clock tower.
- Look at the left door and place the FLAG into the holder (V).
- Select the area on the left for a HOS (W).
- Locate all the items on the list.
- Place the ink in the tea to make blue tea (X).
- Place the leg on the bear to get the repaired bear (Y).
- You will earn the RAT CARVING.
- Enter the door on the top left.

- Look at and open the small chest; take the WOODEN KNIGHT (A).
- Take the BLUEPRINT from the wall (B).
- Take the METAL VASE from the desk (C).
- Walk down 3 times, walk left, forward, then through the left gate.
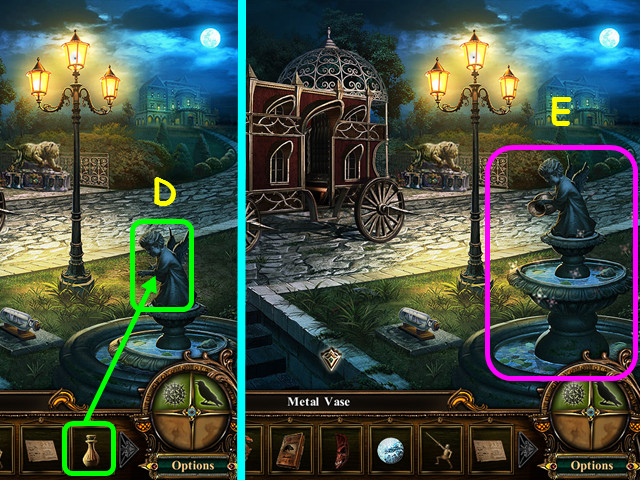
- Place the METAL VASE on the angel (D).
- Select the fountain for a HOS (E).
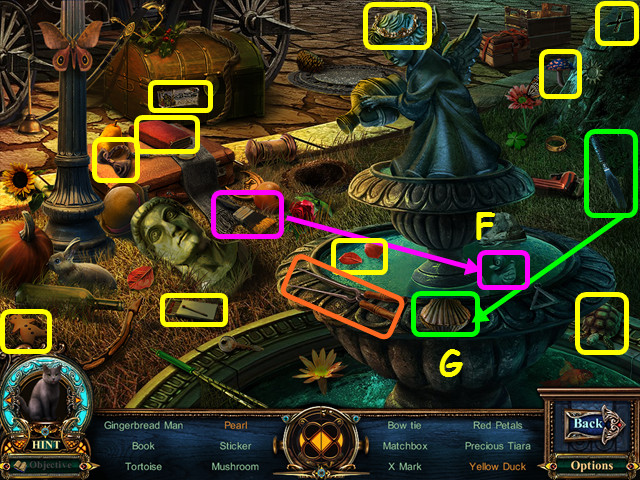
- Locate all the items on the list.
- Use the paintbrush on the duck for the yellow duck (F).
- Use the knife on the shell to find the pearl (G).
- You will earn the TONGS.
- Walk down, go left, then enter the morgue.
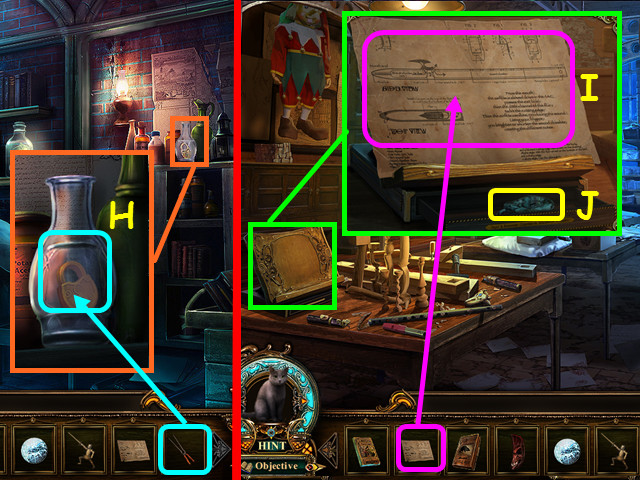
- Look at the bottle and use the TONGS to get the GOLD LOCK (H).
- Walk down, then enter the workshop.
- Look at the table and place the BLUEPRINT on the stand (I).
- Take the DIAMOND LOCK (J).
- Walk down 3 times.
- Select the chest on the left for a HOS.
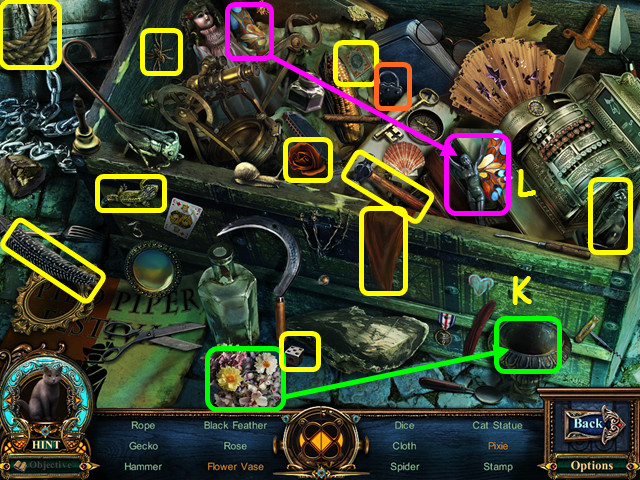
- Locate all the items on the list.
- Place the flowers in the vase for the flower vase (K).
- Place the wing on the figure to make the pixie (L).
- You will earn the SILVER LOCK.
- Walk down, enter the hole in the street, go forward and enter the right door.
- Select the area on the left for a HOS.
- Locate all the items on the list.
- Place the star in the plate for the crystal star plate (M).
- Use the chisel on the carving to make the finished carving (N).
- You will earn the MINIATURE HAT.
Chapter 6: The Skeleton Key and the Pied Piper's Flute
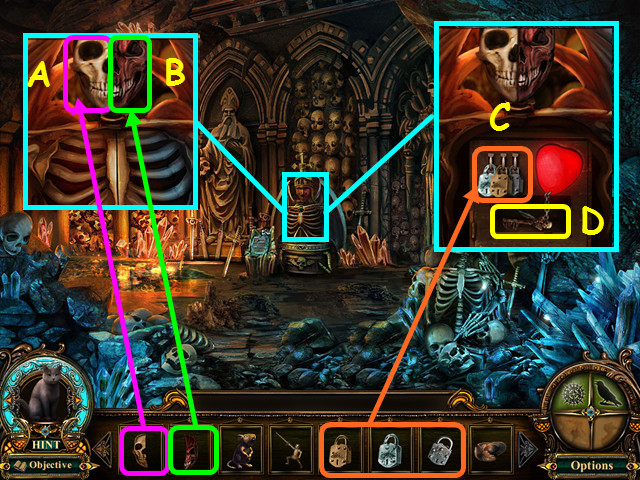
- Look at the skeleton statue and place the SKELETAL HALF MASK on the left (A), and the BURNT HALF MASK on the right (B).
- Place the GOLD LOCK, the SILVER LOCK, and the DIAMOND LOCK on the rings (C).
- Take the Skeleton Key (D).
- Walk down twice, climb up the rope, walk forward, enter the stables, and go down to the sewer.
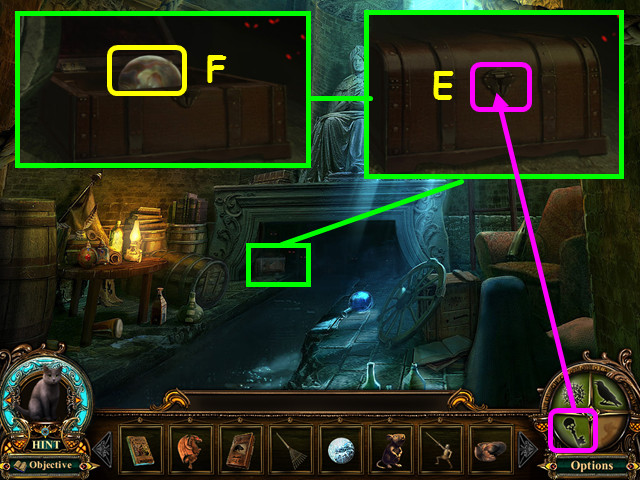
- Look under the statue and use the Skeleton Key on the chest (E).
- Take the WHITE CRYSTAL #2 (F).
- Exit the sewer, walk down twice, go left, forward left, then enter the morgue.
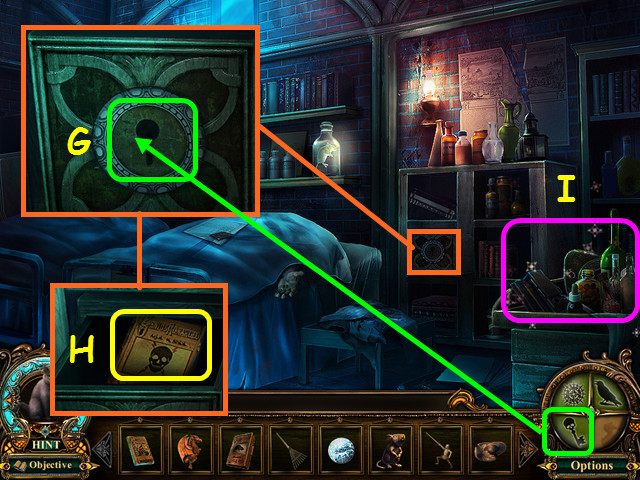
- Look at the box and use the Skeleton Key on the lock (G).
- Take the BOOK OF POISON (H).
- Select the cabinet for a HOS (I).
- Locate all the items on the list.
- Use the needle and thread on the cloth to create the stitched cloth (J).
- Place the mouth on the doll to create the smiling doll (K).
- You will earn the GLOWING ORB.
- Walk down twice, go through the left gate, and forward to the mansion.
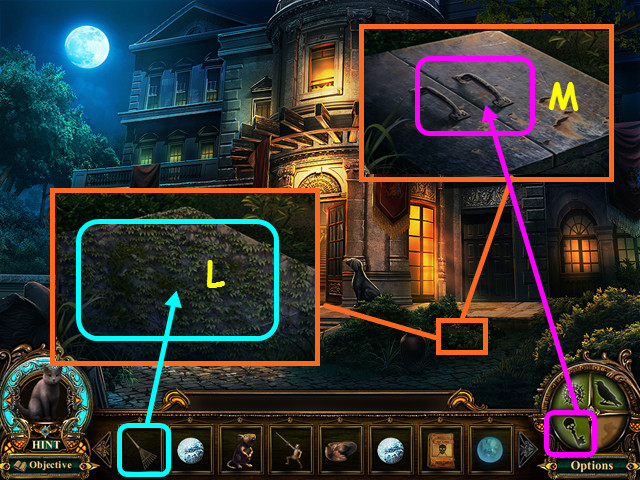
- Look in the shrubs and use the RAKE to remove the growth (L).
- Use the Skeleton Key to unlock the cellar door (M).
- Enter the cellar.
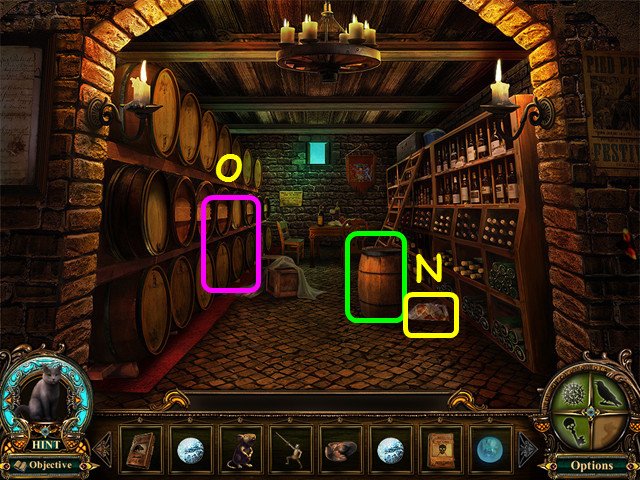
- Move the barrel and take the PAINTING PIECE 2 (N).
- Note that you need something for the keg (O).
- Exit the cellar and enter the mansion.
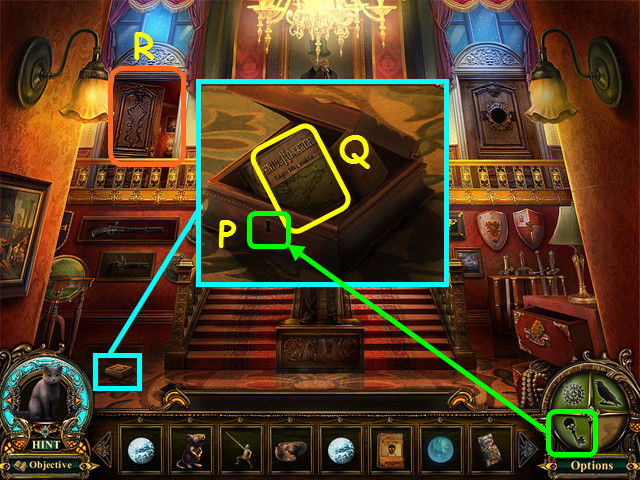
- Look at the box and use the Skeleton Key on the lock (P).
- Take the BOOK OF MAPS (Q).
- Enter the door on the left (R) and select the bed for a HOS.
- Locate all the items on the list.
- Use the pick on the wall to find the magic orb (S).
- Place the smokestacks on the train to make the complete train (T).
- You will earn the STAR EMBLEM.
- Walk down 6 times; go forward, enter the clock tower, then enter the door on the left.
- Look at the stands; place the books from left to right – BOOK OF RATS, BOOK OF MAPS, BOOK OF PIED PIPER, and the BOOK OF POISON (U).
- Enter the newly-opened door (V).
- Place the RAT CARVING on the pedestal (W).
- Look at the newspaper clipping and take the WHITE CRYSTAL #3 (X).
- Take the MINIATURE WAND (Y).
- Walk down 4 times, walk left, forward, left, and enter the pharmacy.
- Select the cabinet for a HOS.
- Locate all the items on the list.
- Pour the 2 small bottles into the beaker for the mixed chemicals (A).
- Use the pen on the paper to make the noted memo (B).
- You will earn the PAINTING PIECE 1.
- Walk down twice and enter the left gate.
- Select the angel fountain for a HOS.
- Locate all the items on the list.
- Place the cactus into the pot for the cacti pot (C).
- Use the shovel on the dirt to find the treasure map (D).
- You will earn the MINIATURE HEELS.
- Walk forward to the mansion, walk inside, then enter the left door.
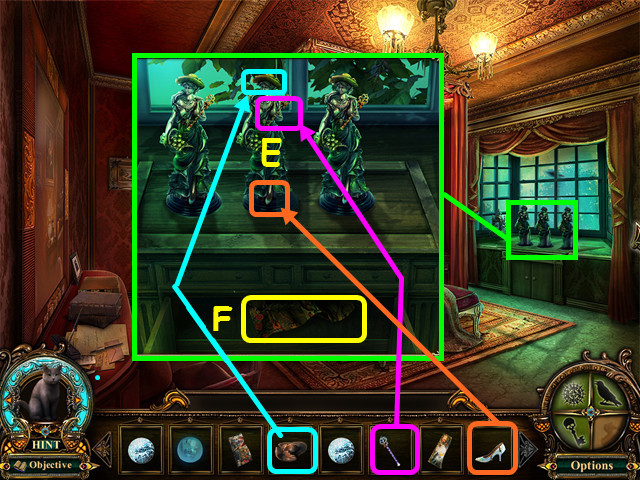
- Look at the figurines; place the MINIATURE HEELS, MINIATURE HAT, and the MINIATURE WAND on the center figurine (E).
- Take the PAINTING PIECE 3 (F).
- Walk down 6 times, walk forward, enter the clock tower, enter the left door, then walk forward again.
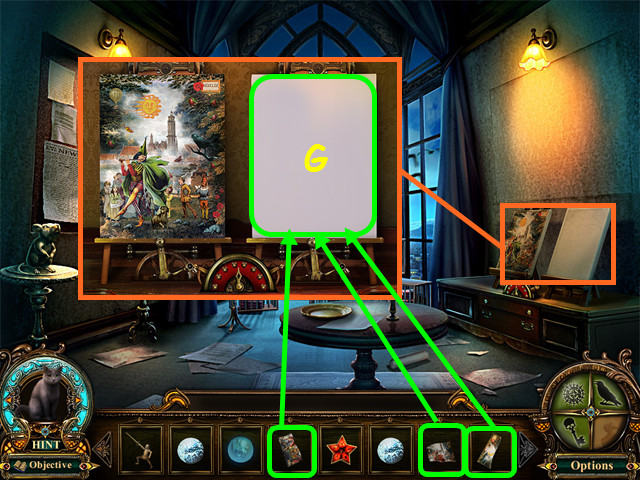
- Look at the canvases on the right and place the 3 PAINTING PIECES onto the blank canvas (G).
- Select the canvases for a mini-game.
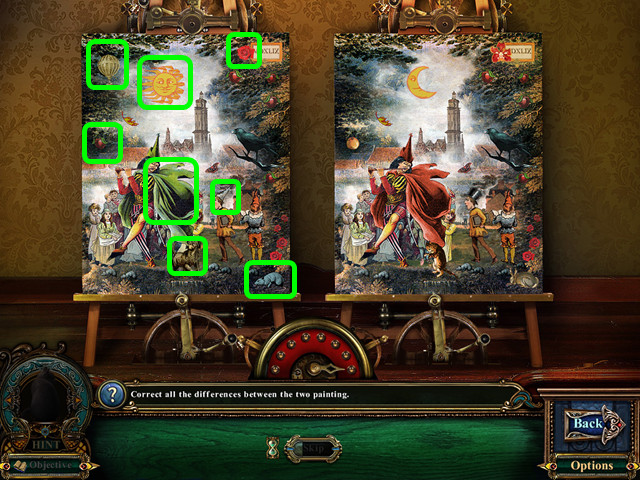
- Find the 8 differences between the 2 paintings (green).
- Select a difference to correct it on the canvas.
- Look at the bulletin board and take the WHITE CRYSTAL #4 (H).
- Walk down 4 times, enter the hole in the street, then walk forward twice.
- Look at the vault door and place the 4 WHITE CRYSTALS into the 4 corners (I).
- Select the center for a mini-game (J).
- Move the blue horse figurine (K) so that it collects all the items on the board.
- Select the horse and it will indicate the possible directions it can move; the horse will move until something stops it.
- Move along the path in numerical order (1-11).
- Press the glowing button then walk forward.
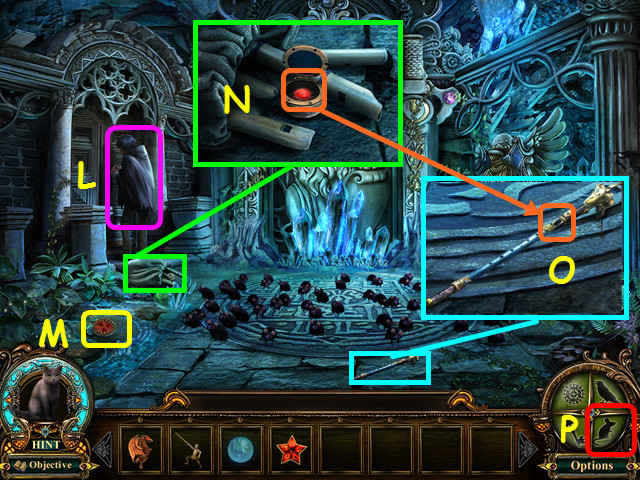
- Look at the Dark Piper (L).
- Take the WOODEN SUN (M).
- Look at the sack; open the box and take the FLUTE GEM (N).
- Look at the flute, place the FLUTE GEM in the niche; take the Pied Piper's Flute (O).
- Use the Pied Piper's Flute to get rid of the rats (P).
- Walk down 3 times, climb up the rope, walk left and then forward.
- Use the Pied Piper's Flute to get rid of the rats.
- Walk to the left and enter the workshop.
- Look at the box and place the STAR EMBLEM on the front (Q); take the FAUCET TAP (R).
- Look at the door; place the WOODEN DRAGON, the WOODEN SUN, and the WOODEN KNIGHT into the carving (S).
- Walk through the door.
- Look at the pedestal and place the GLOWING ORB in the base (T).
- Take the HANDSAW (U).
- Walk down 3 times.
- Look at the left gate and use the HANDSAW on the chains (V).
- Walk through the left gate.
- Use the Ravenlore Whistle to steal the vanishing cloak (A).
- Use the Pied Piper's Flute to call the rats on the Dark Piper (B).
- Look at the Dark Piper and take the DUKE'S EMBLEM (C).
- Walk to the mansion and go inside.
- Look at the right door and place the DUKE'S EMBLEM in the circle (D).
- Enter the right door.
- Take the BUCKET (E).
- Select the cabinet for a HOS (F).
- Locate all the items on the list.
- Place the beans in the grinder for ground coffee (G).
- Use the dyes on the egg to make the Easter egg (H).
- You will earn the FIRE EMBLEM.
- Walk down twice and enter the cellar.
- Look at the keg and place the BUCKET underneath (I).
- Place the FAUCET TAP on the keg (J).
- Take the BUCKET WITH ALCOHOL (K).
- Walk down 5 times, go forward, enter the clock tower, then the left door.
- Look at the drawers and place the FIRE EMBLEM into the indentation (L).
- Take the MATCHES (M).
- Walk down 3 times, go left, forward, then through the left gate.
- Use the BUCKET OF ALCOHOL on the crate (N).
- Use the MATCHES on the crate (O).
- Walk down 3 times then go forward.
- Use the Pied Piper's Flute to get rid of the rats (P).
- Enter the clock tower and go through the left door.
- Use the Pied Piper's Flute again (Q).
- Open the door and walk forward (R).
- Talk to the Dark Piper (S).
Fabled Objects
- There are 20 morphing Fabled Objects throughout the game.
- Not all objects will morph the first time you see them; you may have to come back to an area later in the game to obtain them all.
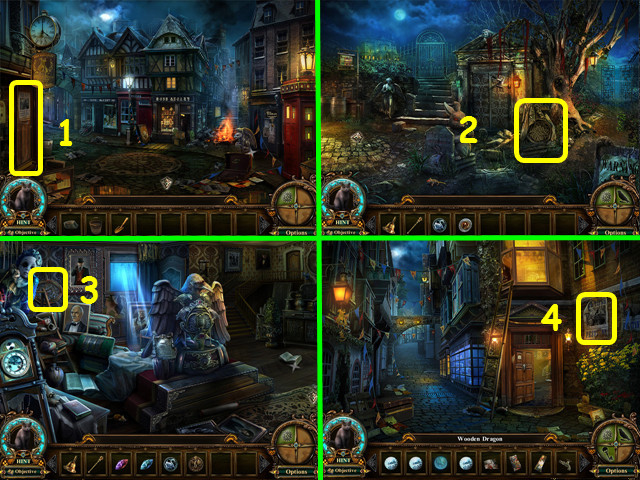
- Window under the clock in the Town Square (1).
- The tombstone at the Gravesite (2).
- The painting in the House Bottom (3).
- The poster in the Alley (4).
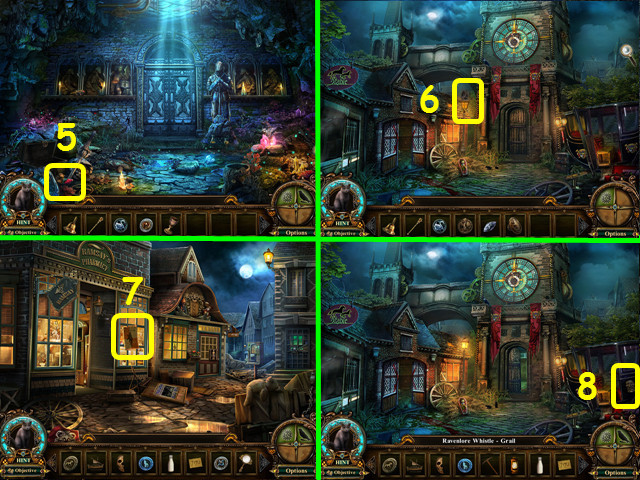
- Mushroom in the Underground Cave (5).
- The lamp in the Courtyard (6).
- The poster on the pharmacy window on the Street (7).
- The carriage emblem in the Courtyard (8).
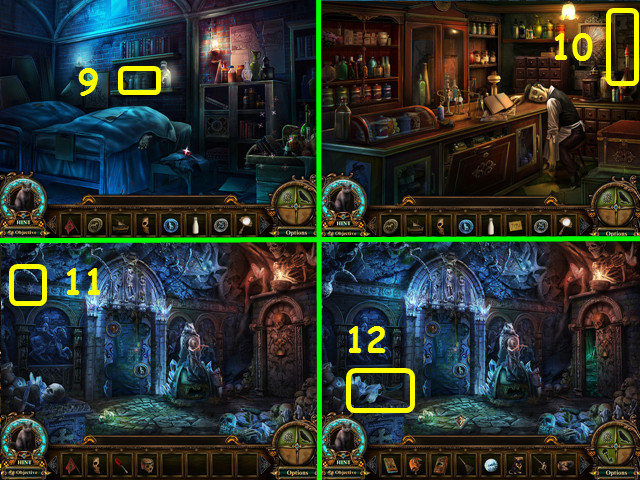
- The bottles inside the Morgue (9).
- The poster in the Pharmacy (10).
- The wall carving in the Piper Lair (11).
- The skull in the Piper Lair (12).
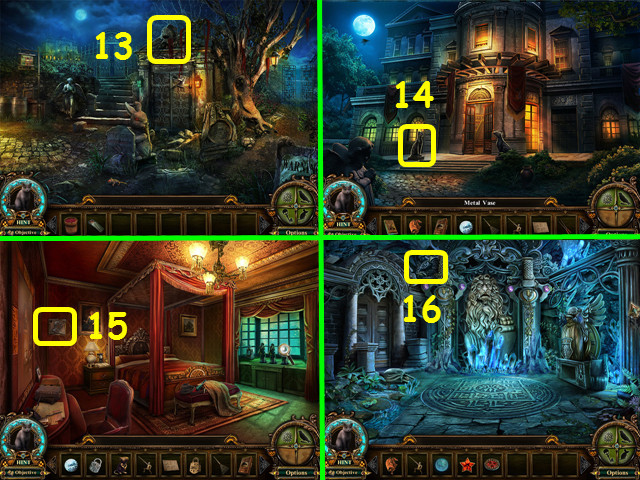
- The angel on the crypt at the Gravesite (13).
- The left dog statue at the Mansion Entrance (14).
- The painting in the Mansion Left (15).
- The flower carving in the Vault (16).
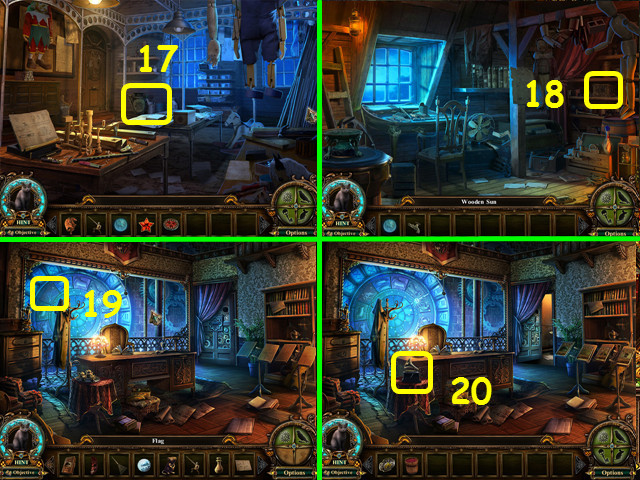
- The paint can in the Workshop Bottom (17).
- The box in the Workshop Top (18).
- The Zodiac sign in the Clock Tower Top (19).
- The tea set in the Clock Tower Top (20).
- Congratulations! You have completed Fabled Legends: The Dark Piper Standard Edition!
Created at: 2012-06-08