

Walkthrough Menu
- General Tips
- Chapter 1: Arrest
- Chapter 2: Campus
- Chapter 3: Cinderella's House
- Chapter 4: The King
- Chapter 5: The Party
- Chapter 6: The Ball
General Tips
- This is the official guide for Fairy Godmother Stories: Cinderella.
- This guide won't tell you when to zoom into a location; the screenshots show each zoom scene.
- Hidden-object puzzles are referred to as HOPs. Only the locations of the HOPs will be shown.
- Use the Map to fast travel to a location.
Chapter 1: Arrest
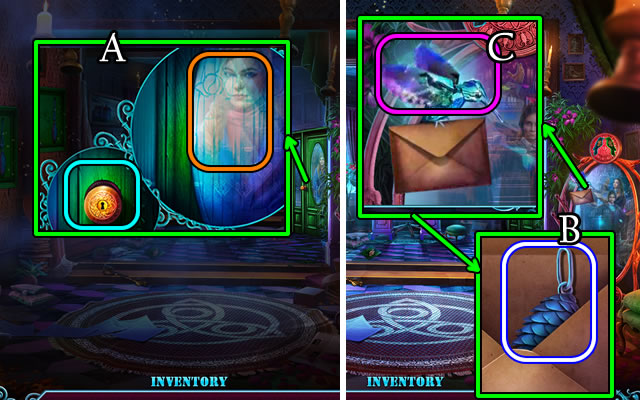
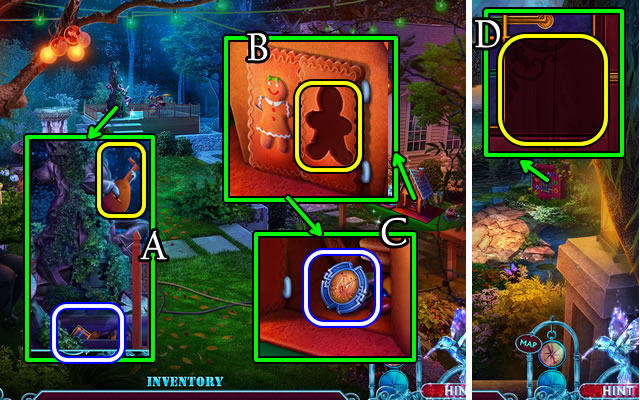
- Speak to character; select door knob (A).
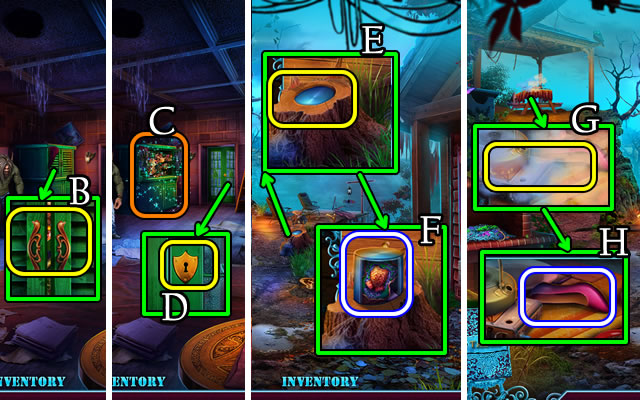
- Open envelope; take note, WEIGHT (B); take hummingbird Hint (C).
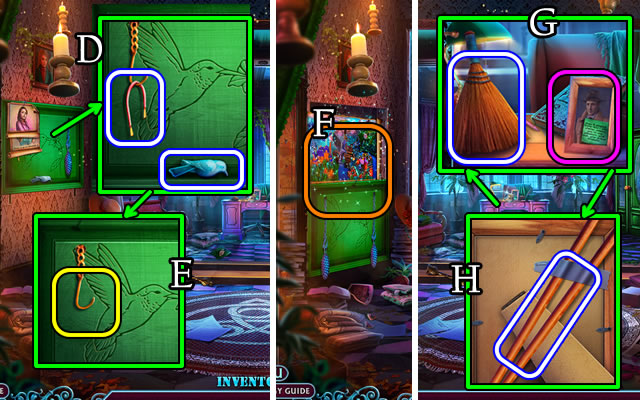
- Take BIRD AMULET, posters, WIRE (D).
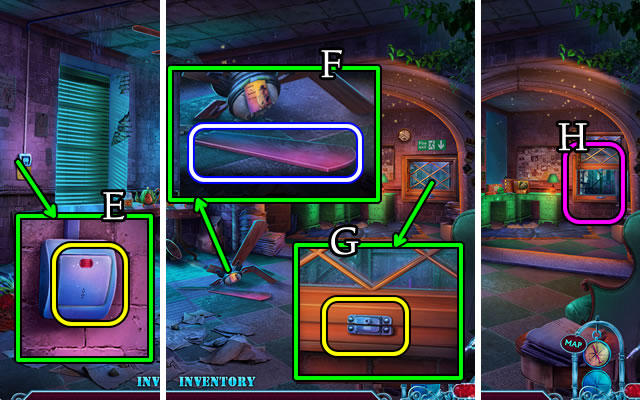
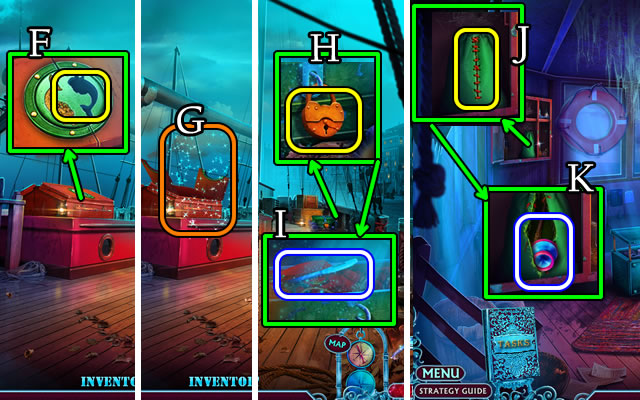
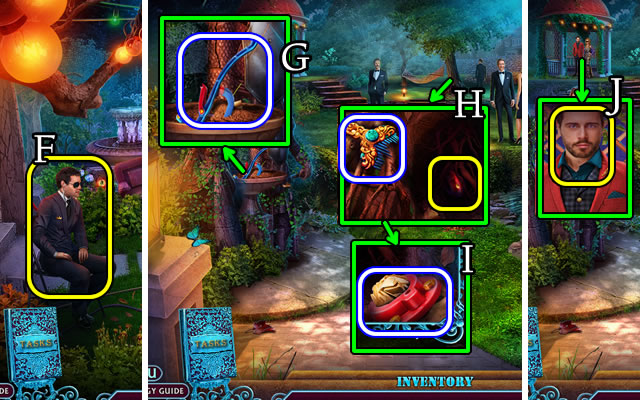
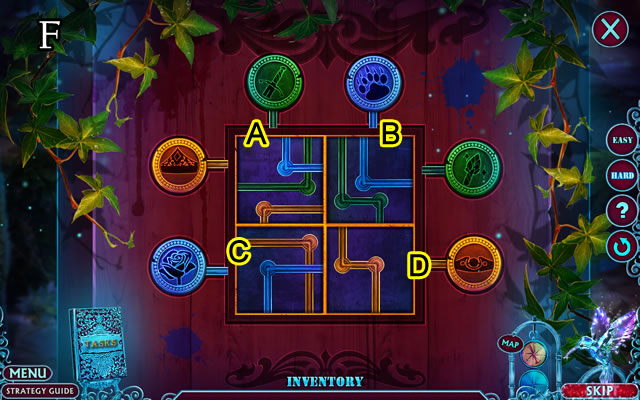
- Place WEIGHT (E) for HOP (F); receive FAIRY GODMOTHER FIGURINE.
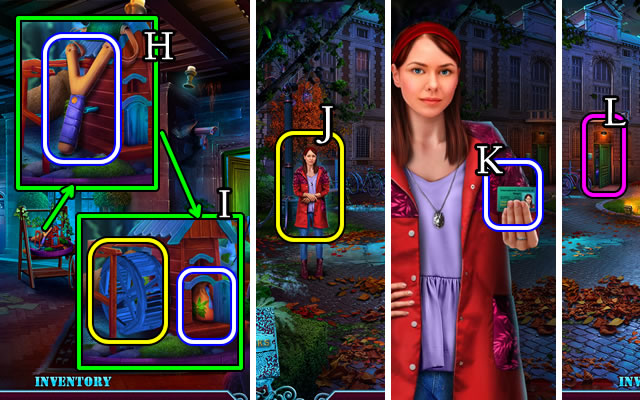
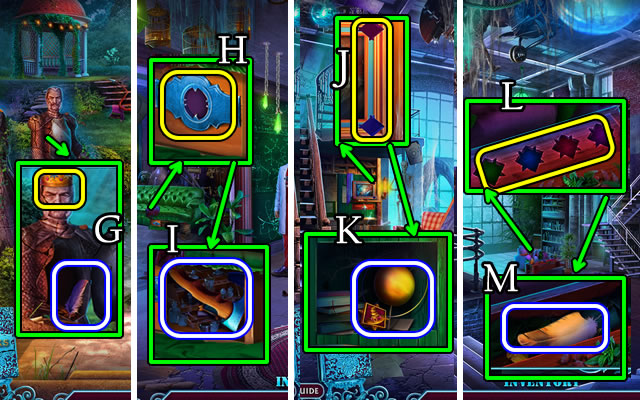
- Take BROOM, article, picture (G), CHOPSTICKS (H).
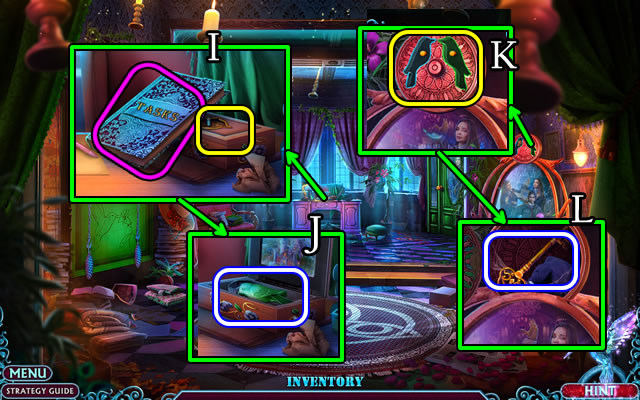
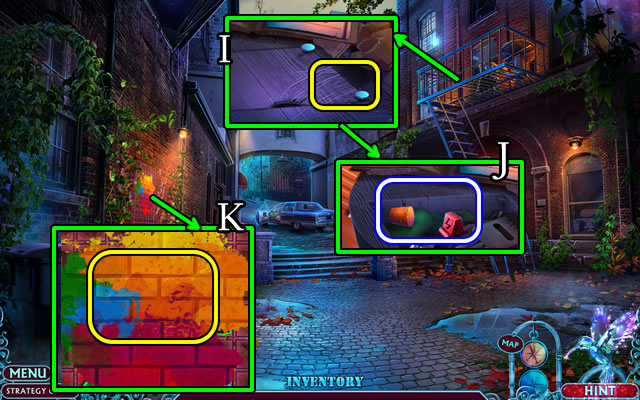
- Take Tasks; place FAIRY GODMOTHER FIGURINE (I); take BIRD AMULET (J).
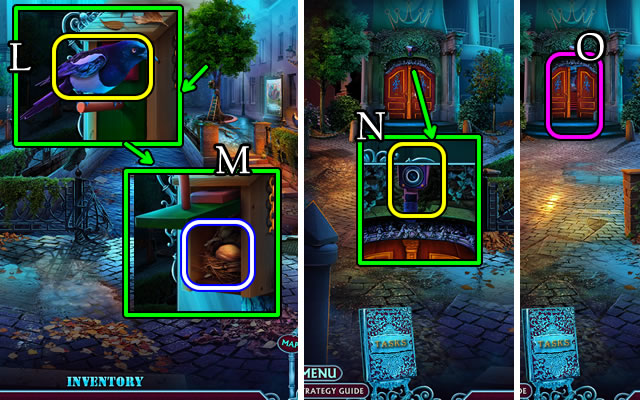
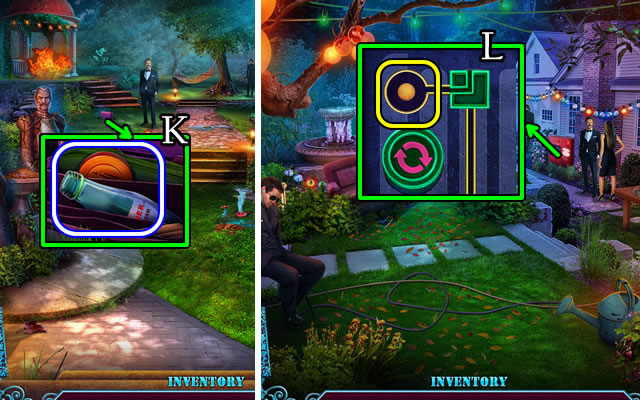
- Place 2 BIRD AMULETS (K); take DOOR KEY (L).

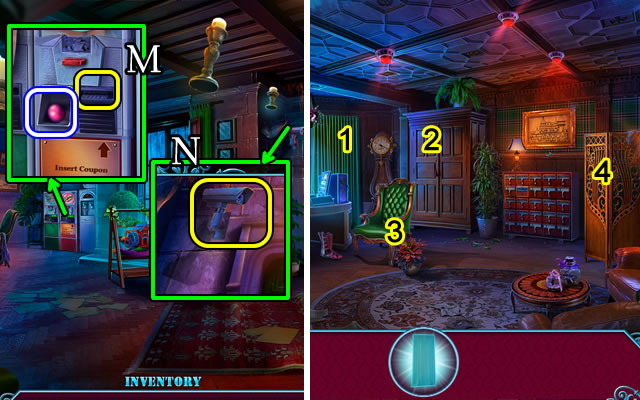
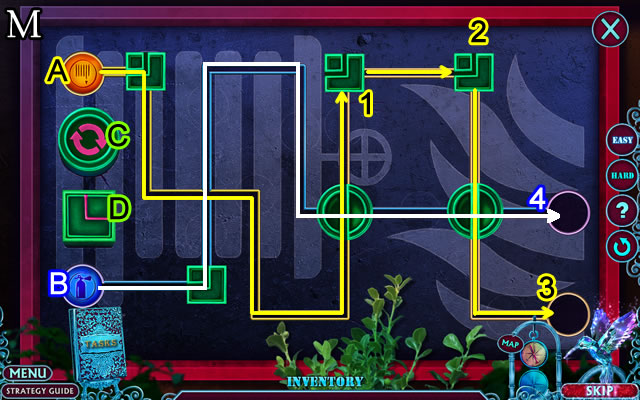
- Use DOOR KEY (M).
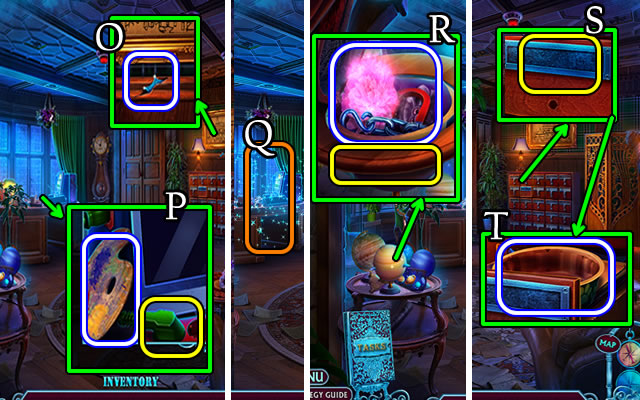
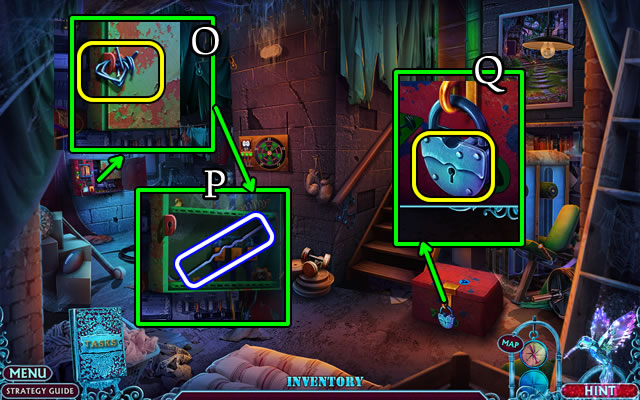
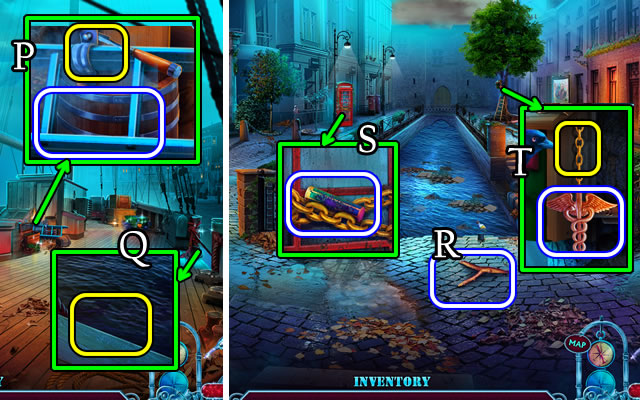
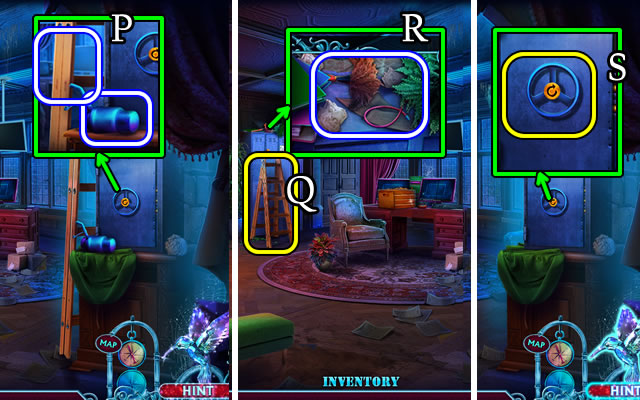
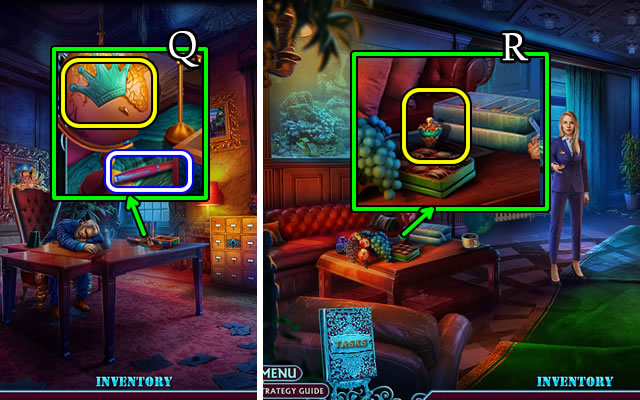
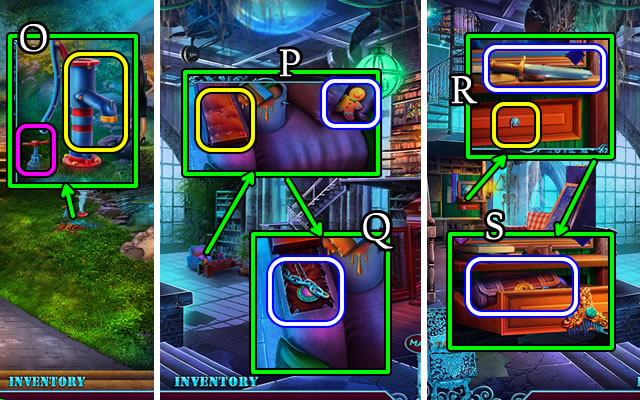
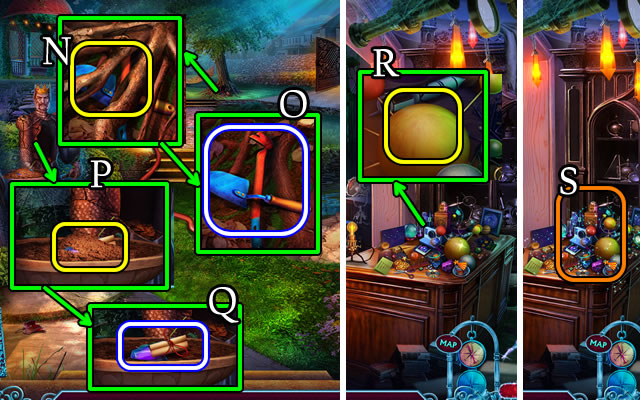
- Take, use umbrella (N) for METAL COMB (O); take, select phone (P).
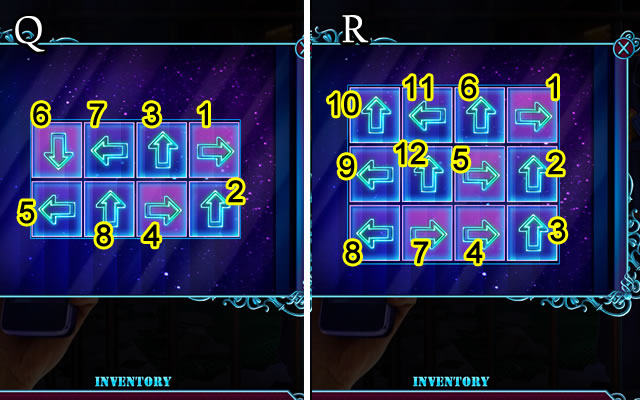
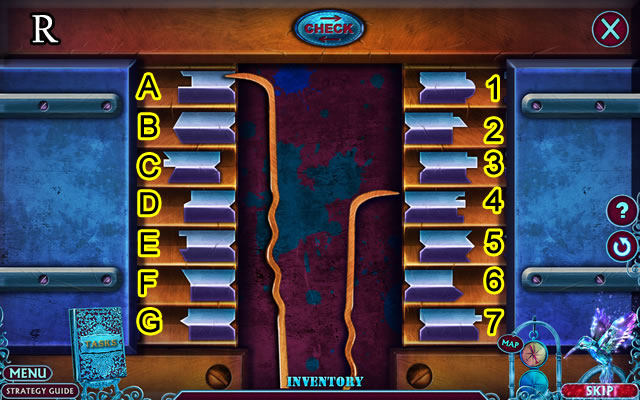
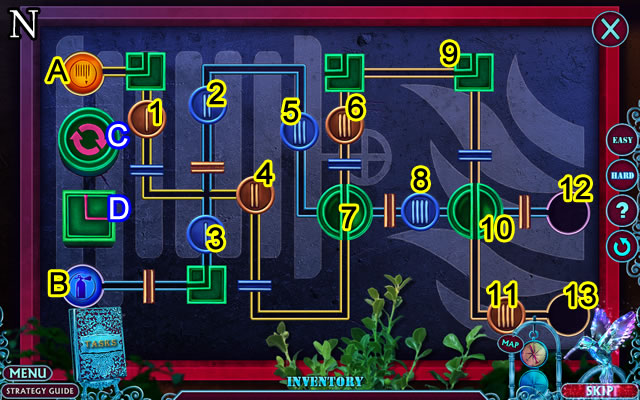
- Easy solution (Q). 1-8.
- Hard solution (R). 1-12.
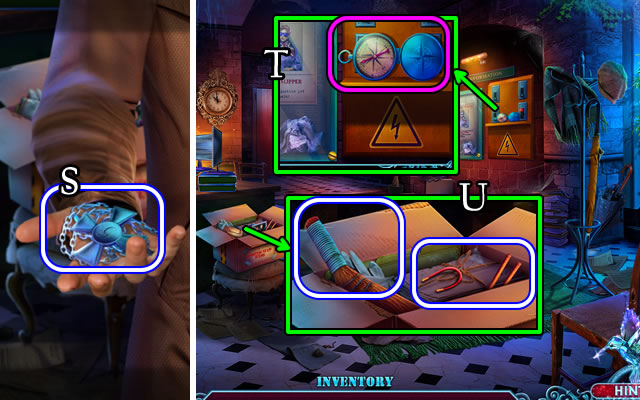
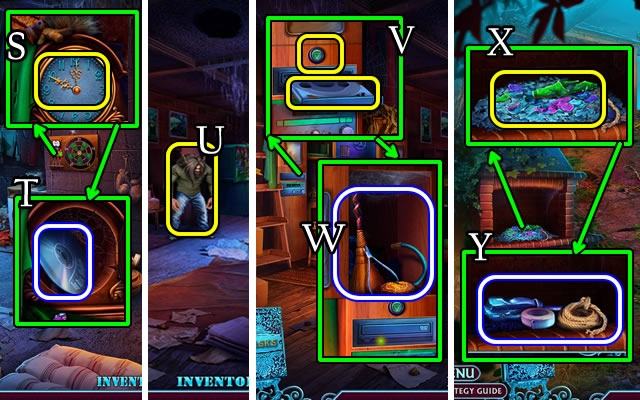
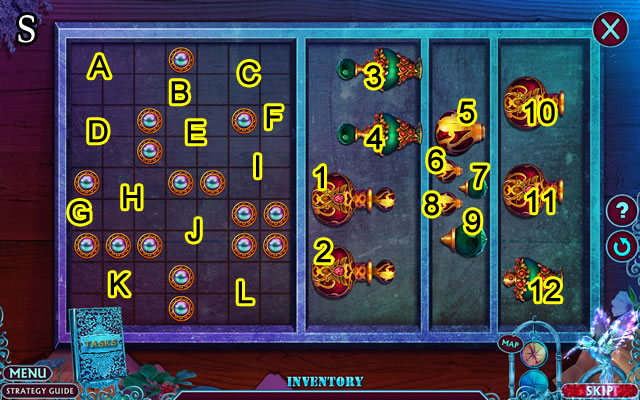
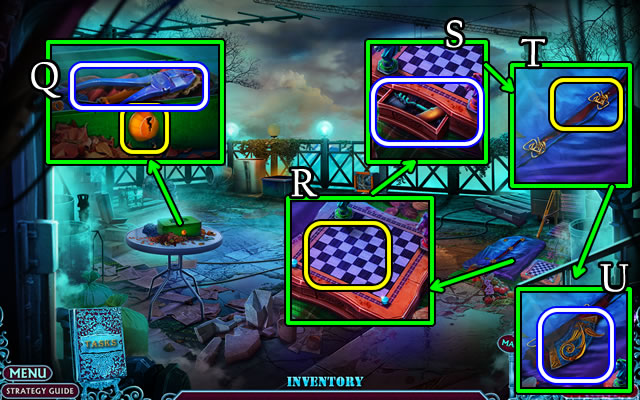
- Take GOODWIN'S MEDAL (S).
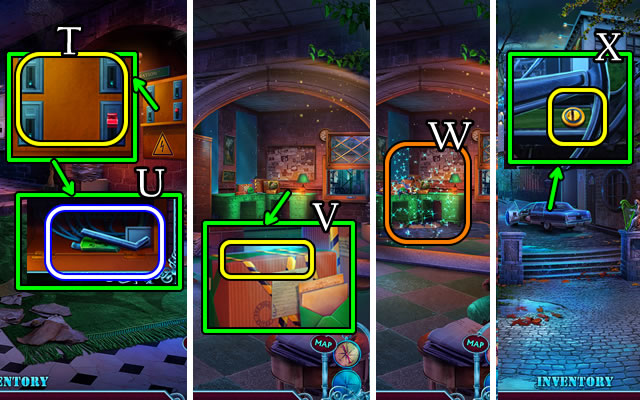
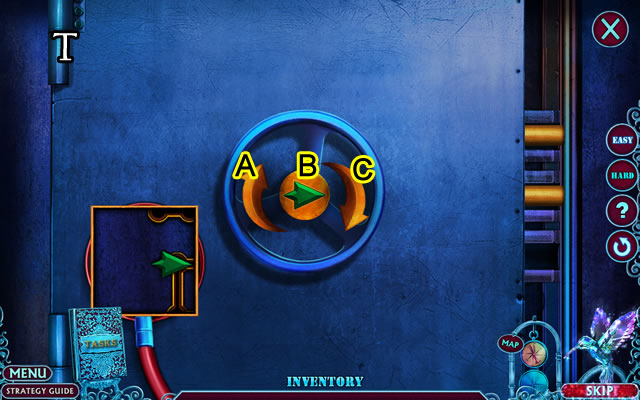
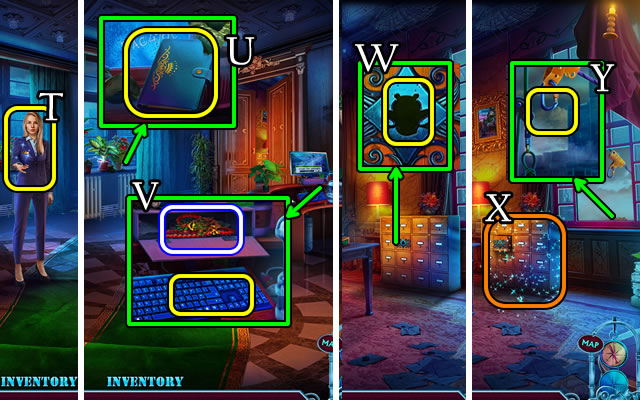
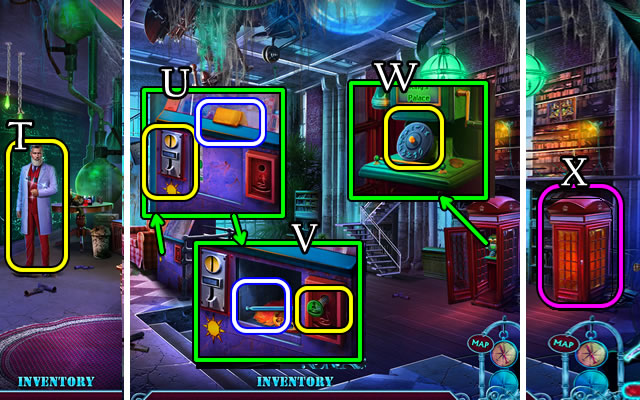
- Take compass Map (T).
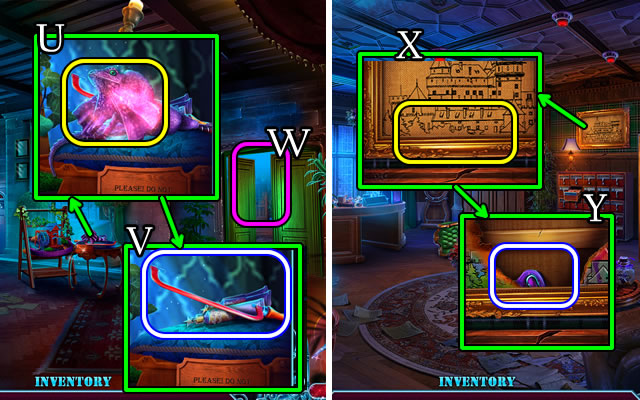
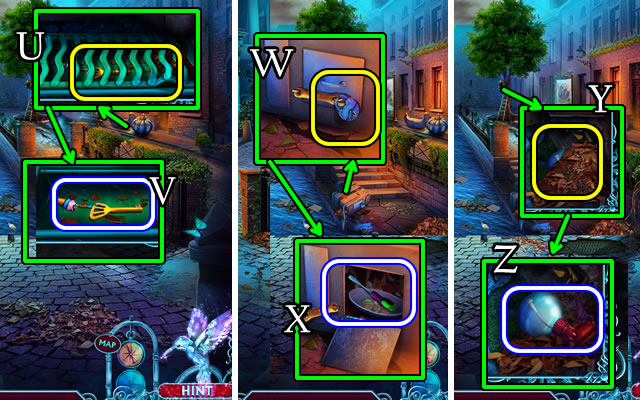
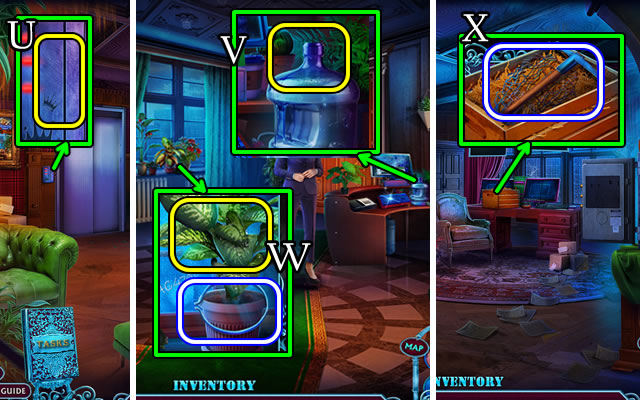
- Take note, photo, BROOM, WIRE, CHOPSTICKS (U).
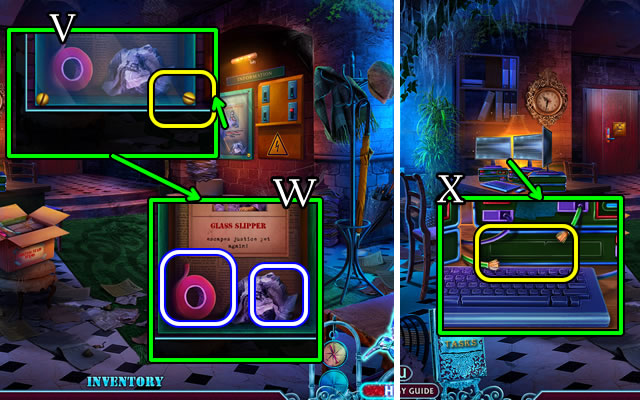
- Use GOODWIN'S MEDAL (V); take ELECTRICAL TAPE, NEWSPAPER and poster (W).
- Place WIRE; use ELECTRICAL TAPE (X).
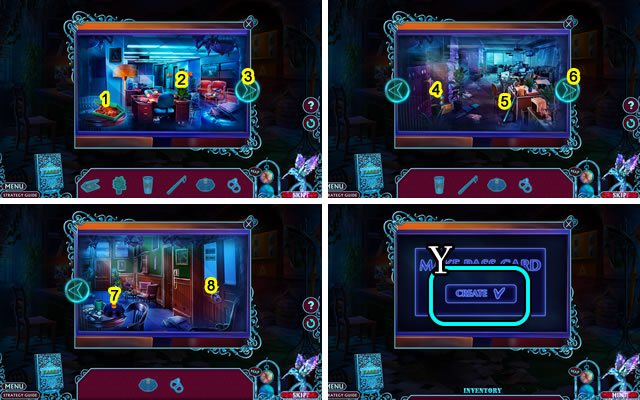
- Solution. 1-8.
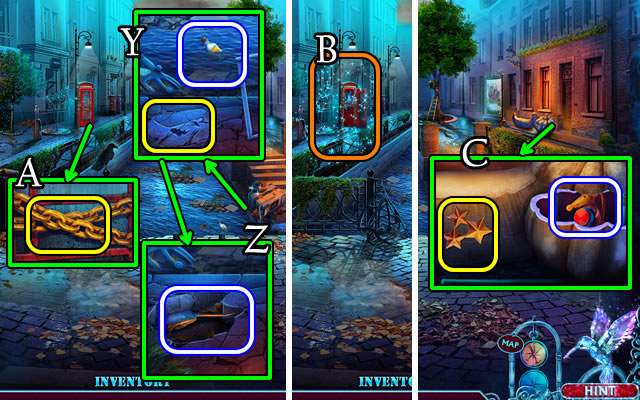
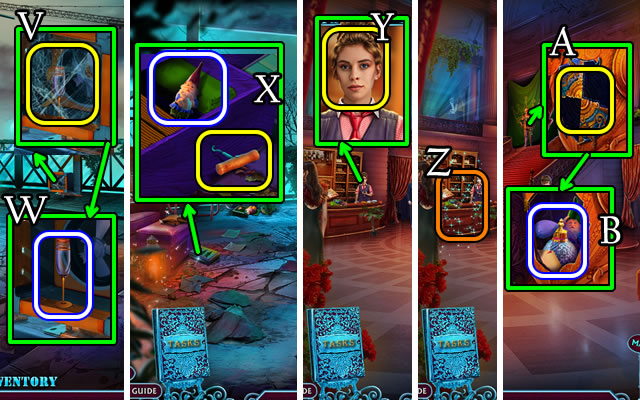
- Select (Y).
- Take ACCESS CARD.

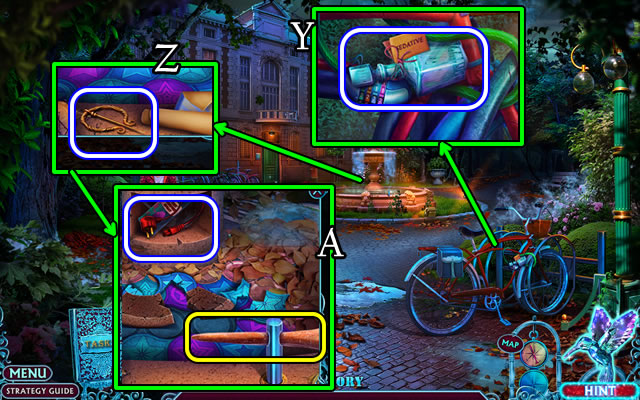
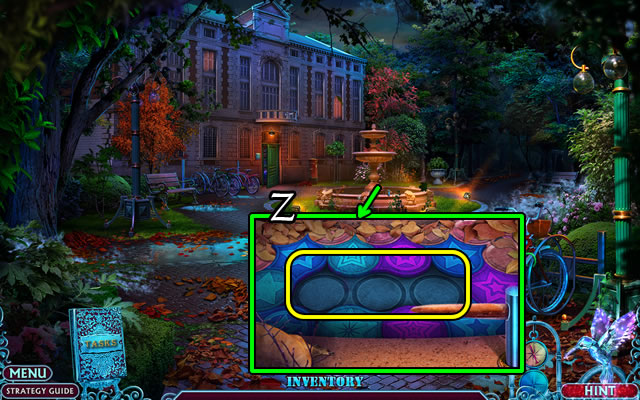
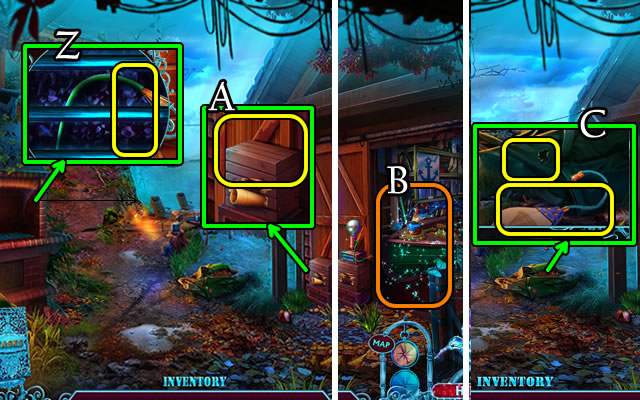
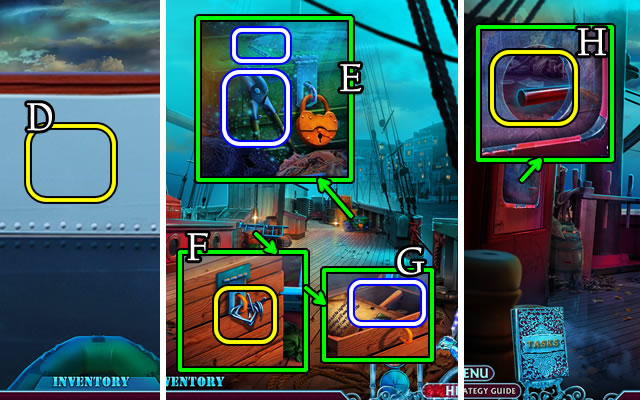
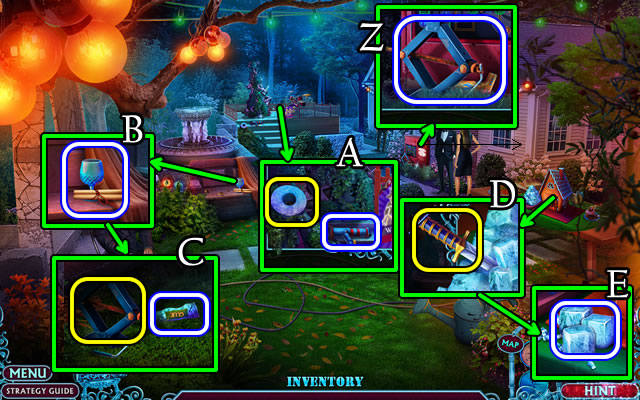
- Use ACCESS CARD (Z).
- Solution. When guards are in position (A), select 3.
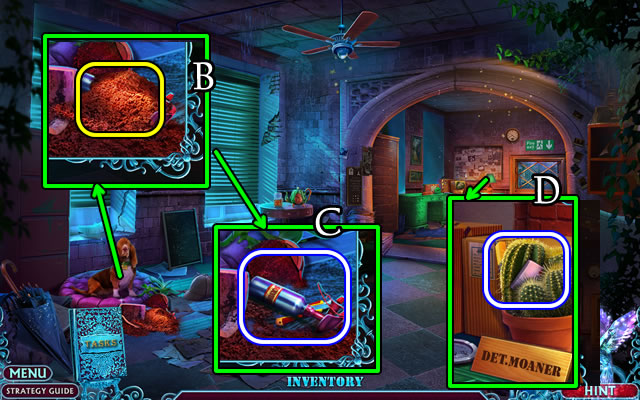
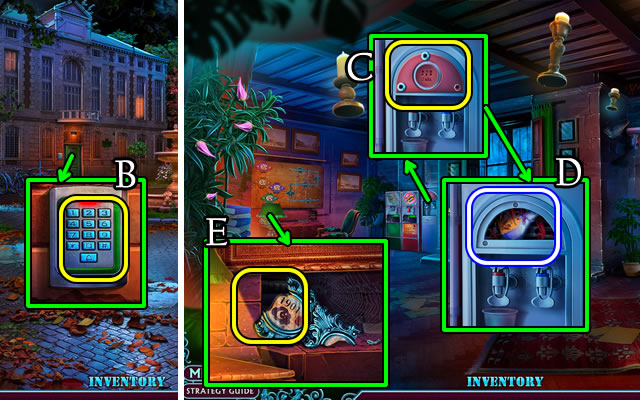
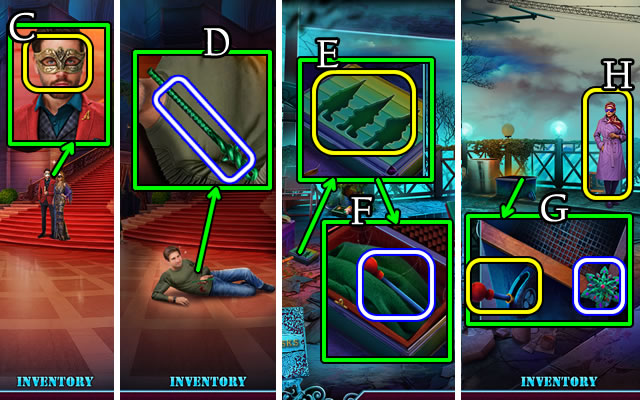
- Use BROOM (B); take SOLVENT, BROKEN KNIFE (C).
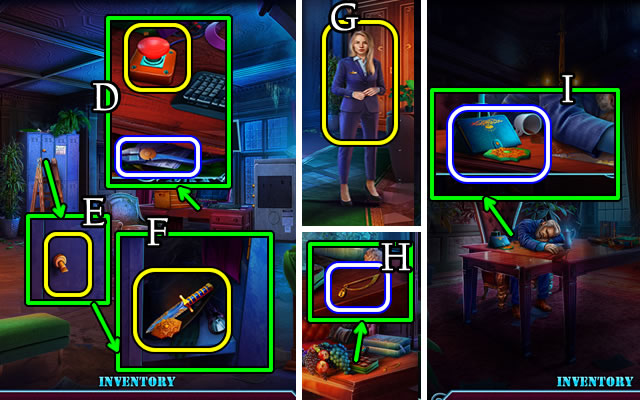
- Use CHOPSTICKS for SWITCH BUTTON (D).
- Take note; place, select SWITCH BUTTON (E).
- Take note, FAN BLADE (F).
- Use FAN BLADE (G).
- Go (H).
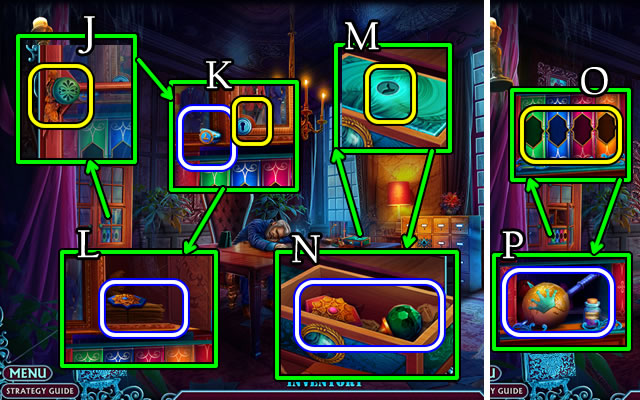
- Take note; use METAL COMB (I); take 1/3 SWITCHES, CORK (J).
- Use SOLVENT and NEWSPAPER (K).
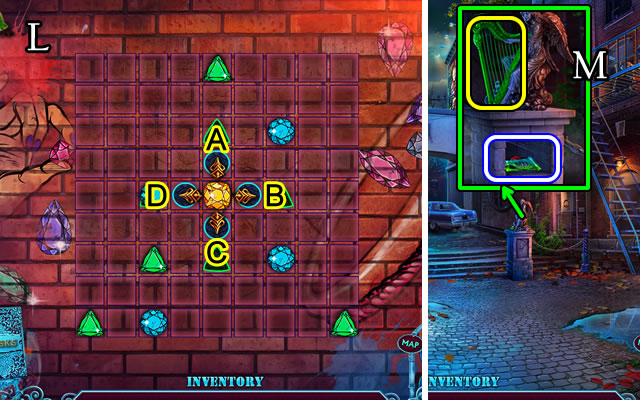
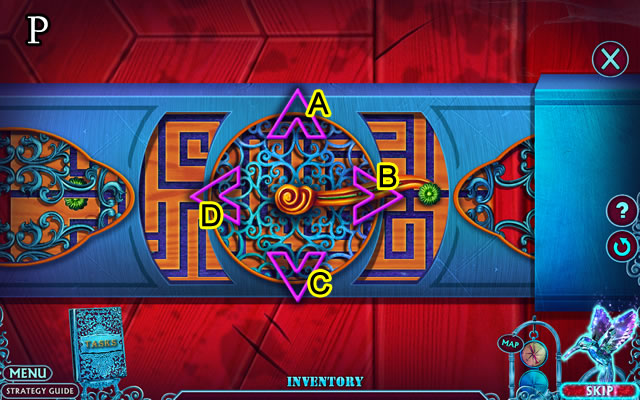
- Solution (L). B-Cx4-B-Dx4-Bx4-Ax6-Dx4-Cx2-Bx2.
- Take HARP.
- Place HARP; take GLUE, 2/3 SWITCHES (M).
- Go down 2x.
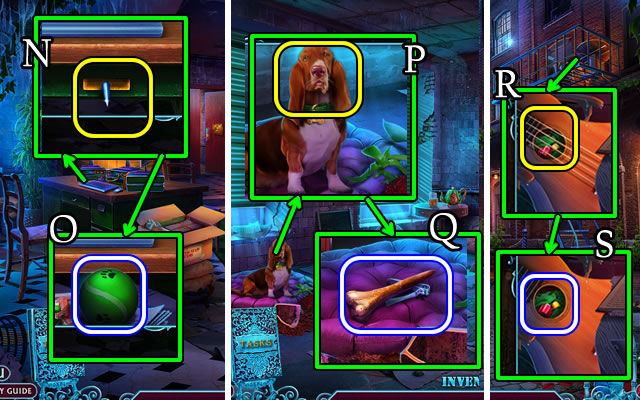
- Use CORK (N); take BALL (O).
- Go forward.
- Give BALL (P); take BONE, NAIL CLIPPERS (Q).
- Go forward.
- Use NAIL CLIPPERS (R); take 3/3 SWITCHES, SCREW (S).
- Go down 2x.
- Place 3/3 SWITCHES (T); take HEX KEY, KNIFE PART (U).
- Go forward.
- SCREW and KNIFE PART on BROKEN KNIFE for BOX CUTTER.
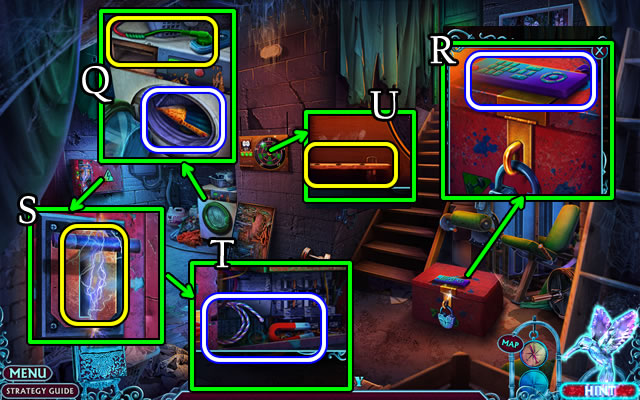
- Use BOX CUTTER (V) for HOP (W); receive CAR KEY.
- Go forward.
- Take note; use CAR KEY (X).
Chapter 2: Campus
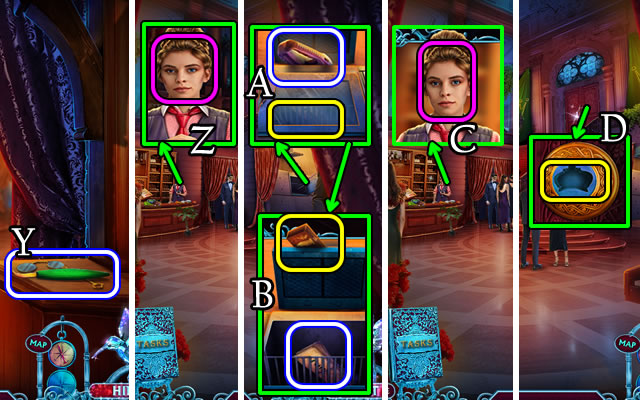
- Take VIAL WITH RECIPE (Y).
- Take note and FIBULA (Z); place BONE; take POWER CABLE, LATENT FINGERPRINT SPRAY (A).
- Use LATENT FINGERPRINT SPRAY (B).
- Go forward.
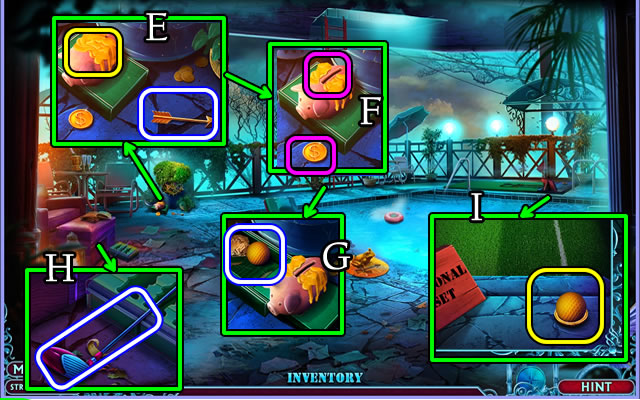
- Use HEX KEY (C); take LAVENDER OIL (D).
- Use GLUE (E).
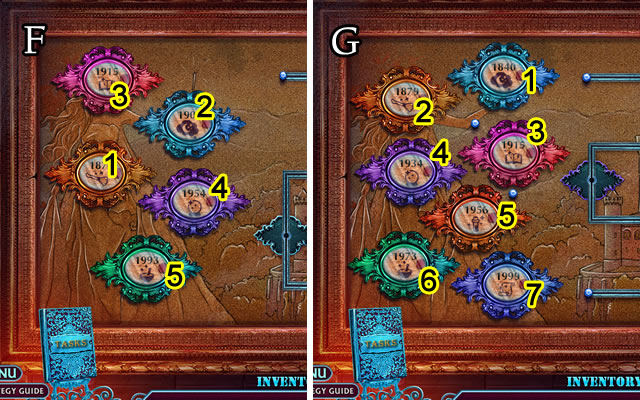
- Easy solution (F). 1-5.
- Hard solution (G). 1-7.
- Take MILL WHEEL.
- Take UNLOADED SLINGSHOT (H); place MILL WHEEL; take DRIED MINT, BRUSH (I).
- Go down.
- LAVENDER OIL and DRIED MINT on VIAL WITH RECIPE for SEDATIVE.
- Give SEDATIVE (J); speak to character; take COUPON FOR GUM (K).
- Go (L).
- Use COUPON FOR GUM take GUM (M).
- GUM on UNLOADED SLINGSHOT for SLINGSHOT WITH GUM.
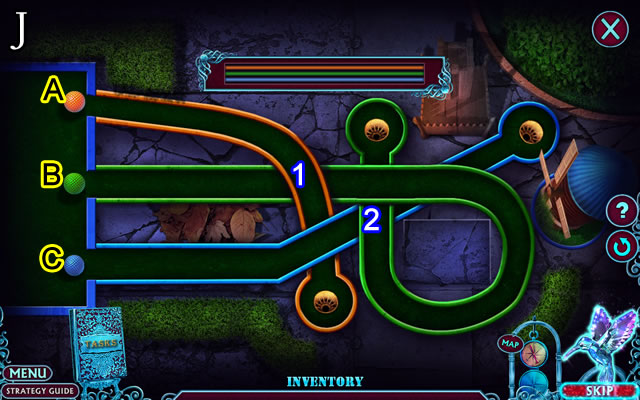
- Use SLINGSHOT WITH GUM (N).
- Go forward.
- Select 1-4.
- Use FIBULA (O) for 1/3 MOSAIC TILES.
- Take note, INCOMPLETE PALETTE; replace POWER CABLE (P) for HOP (Q); receive SATURN'S RING.
- Place SATURN'S RING; take CHAIN, FLOWER and MAGNET (R).
- Use MAGNET (S); take 2/3 MOSAIC TILES, CAT BOWL (T).
- Go down.
- Give FLOWER (U); take BROKEN HACKSAW, MAGIC PAINTS (V).
- Go (W).
- BRUSH and MAGIC PAINTS on INCOMPLETE PALETTE for MAGIC PALETTE.
- Place MAGIC PALETTE (X); take 3/3 MOSAIC TILES, CARABINER (Y).
- Go down 2x.
- Uncover, place 3/3 MOSAIC TILES (Z).
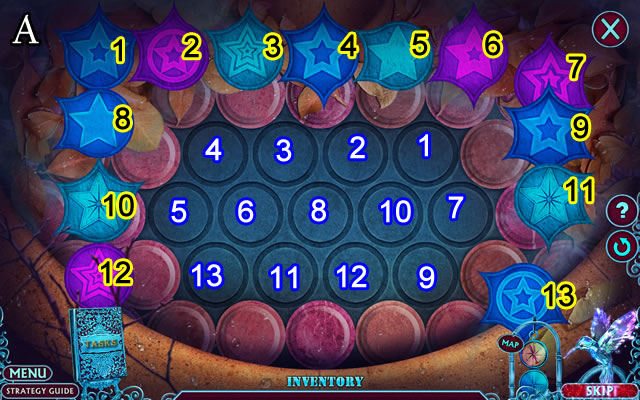
- Solution (A). 1-13.
- Take MAGNIFIER.
- Go forward 2x.

- Select, open folder; use MAGNIFIER (B); take BICYCLE CODE (C).
- Go down 2x.
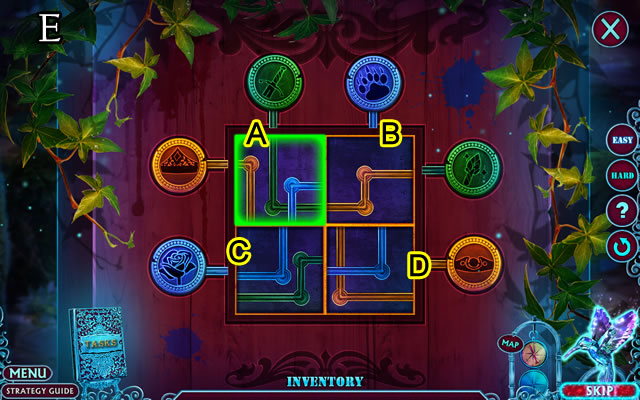
- Place BICYCLE CODE (D).
- Solution (E): Ax2-Bx5-Dx2.
Chapter 3: Cinderella's House
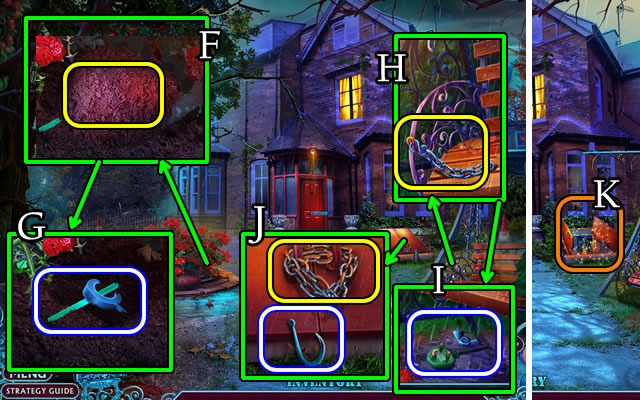
- Use CAT BOWL (F); take ELECTRICAL TAPE, HACKSAW BLADE (G).
- Use CHAIN and CARABINER (H); take PLUG, WINGNUT (I).
- HACKSAW BLADE and WINGNUT on BROKEN HACKSAW for HACKSAW.
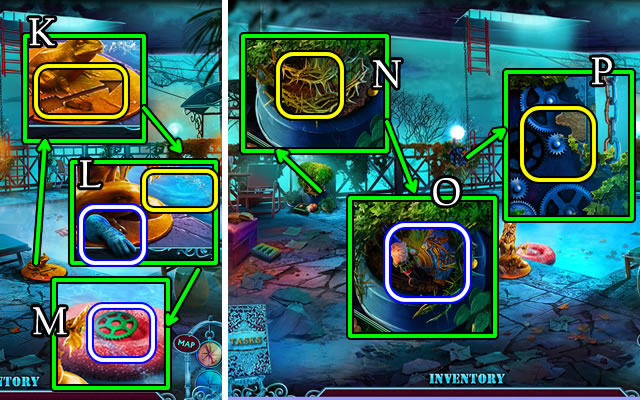
- Take HOOK; use HACKSAW (J) for HOP (K); receive BOOMERANG.
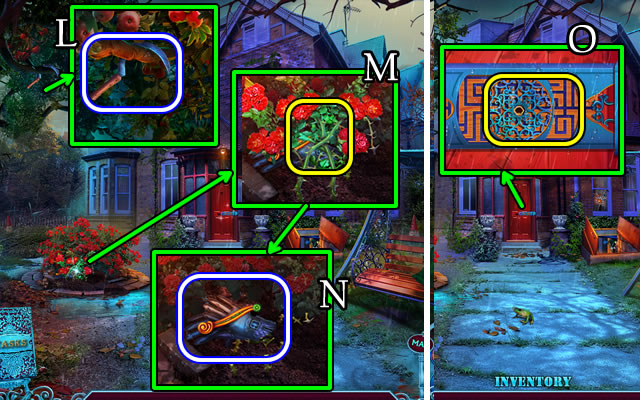
- Use BOOMERANG (L); receive SICKLE.
- Use SICKLE (M); take DOOR HANDLE, RUBBER GLOVE (N).
- Place DOOR HANDLE (O).
- Solution (P). D-Ax2-D-Cx3-D-C-D-A-B-A-D.
- Go forward.
- Use PLUG, ELECTRICAL TAPE; take FAN, MIRROR (Q).
- Take REMOTE CONTROL, DARTS (R).
- Use RUBBER GLOVE (S); take MAGNET, WIRE (T).
- Place DARTS (U).
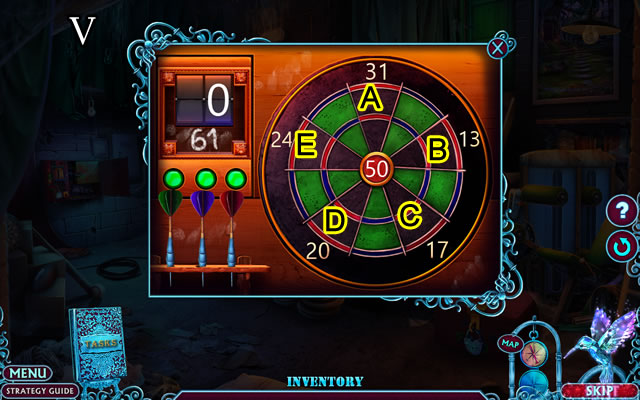
- Solution (V). A-B-C.
- Take YOYO, 1/2 BATTERIES.
- HOOK on WIRE for HOOK AND WIRE.
- Place MIRROR; use HOOK ON WIRE (W).
- Go forward.
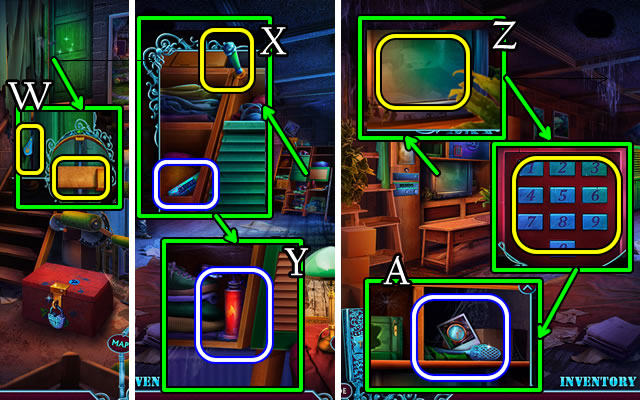
- Take note, 2/2 BATTERIES; use YOYO (X); take BLOWTORCH (Y).
- 2/2 BATTERIES on REMOTE CONTROL.
- Use REMOTE CONTROL (Z); select 2-5-8-4-3; take SPATULA, CLOCK PHOTO (A).
- Use SPATULA (B) for HOP (C); receive DOOR KEY.
- Use DOOR KEY (D).
- Go forward.
- Use MAGNET (E); take BOX AMULET (F).
- Use FAN (G); take PINK SHOE (H).
- Go down.

- Place BOX AMULET (I); take FISHING ROD, UNLIT LAMP (J).
- Place PINK SHOE; take BELLOWS, SHOEHORN (K).
- Go forward.
- Use FISHING ROD; take FISH (L).
- Give FISH (M); take 1/2 LOCKPICKS (N).
- Go down 2x.
- Use BLOWTORCH (O); take 2/2 LOCKPICKS (P).
- Use 2/2 LOCKPICKS (Q).
- Solution (R). (A-2)-(B-2)-(A-2)-(D-2)-(E-2)-(G-6)-(F-6)-(D-4)-(D-6)-(D-2)-(G-2).
- Take ANTIDOTE, BULB.
- Place CLOCK PHOTO (S); take DISK (T).
- Go forward.
- Use ANTIDOTE (U); speak to character; receive DVD BUTTON.
- Place DVD BUTTON, DISK (V); take NAIL CLIPPERS, HOSE, POWDER and BROOM (W).
- Go forward.
- Use BROOM (X); take TAPE, ANCHOR ON ROPE (Y).
- Use SHOEHORN (Z); receive WIRES.
- WIRES and BULB on UNLIT LAMP for LIT LAMP.
- Take note; place LIT LAMP (A) for HOP (B); receive REPAIR KIT.
- HOSE on BELLOWS for IMPROVISED PUMP.
- Place IMPROVISED PUMP and REPAIR KIT (C).
- Go forward.
Chapter 4: The King
- Use ANCHOR ON ROPE (D).
- Take TIN SNIPS, NUT (E).
- Use NAIL CLIPPERS (F); take note, GLASS CUTTER (G).
- Use GLASS CUTTER; select handle (H).
- Go left.

- Take CHISEL (I).
- Take CROWBAR (J); use POWDER, TAPE (K); take SHIP'S WHEEL (L).
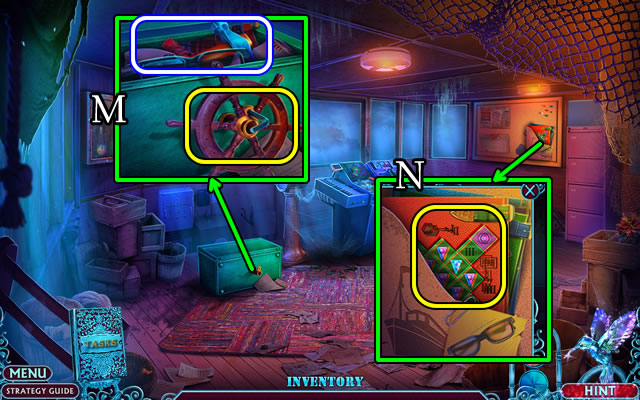
- Use NUT, SHIP'S WHEEL; take 3-D GLASSES, HAMMER (M).
- Use 3-D GLASSES (N).
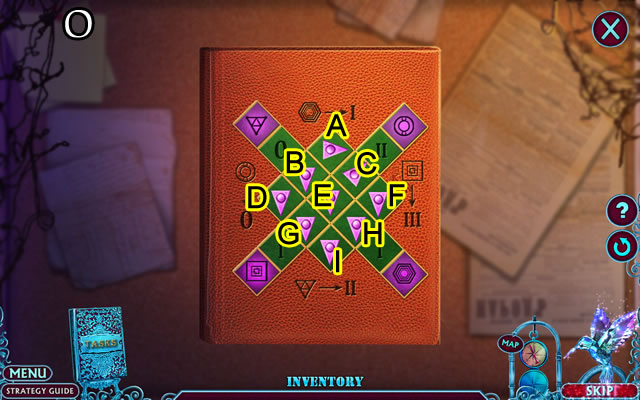
- Solution (O). Ax7-Bx6-Cx5-Ex7-Fx2-G-Hx3-Ix2.
- Take photo; receive HANDKERCHIEF.
- Use CHISEL, HAMMER; take LADDER (P).
- Place LADDER (Q).
- Go to Pier.
- Take SLINGSHOT FRAME (R).
- Take note, DIRTY CRYPTEX (S).
- Use TIN SNIPS for MEDICAL SYMBOL (T).
- Use CROWBAR (U); take SAFE KEY (V).
- Use SAFE KEY (W); take SCREWDRIVER, BOWL (X).
- Use BOWL (Y); take EMPTY ATOMIZER (Z).
- Return to Wheelhouse.
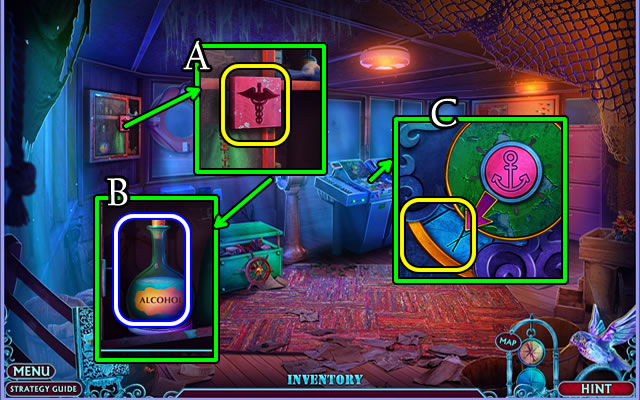
- Place MEDICAL SYMBOL (A); take ALCOHOL, TOURNIQUET (B).
- HANDKERCHIEF and ALCOHOL on DIRTY CRYPTEX for CRYPTEX.
- Use CRYPTEX (C).
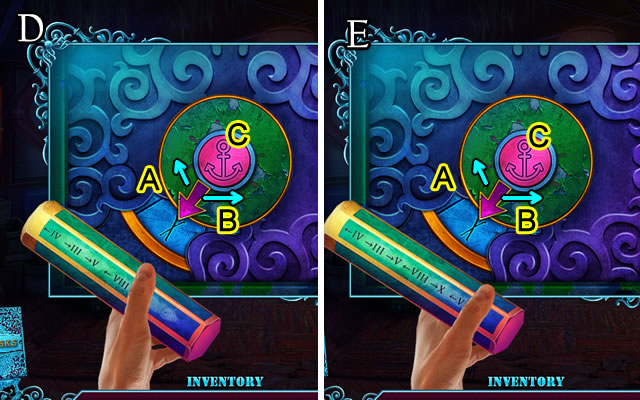
- Easy solution (D). (A to IV)-(C)-(B to III)-(C)-(B to V)-(C)-(A to VIII).
- Hard solution (E). (A to IV)-(C)-(B to III)-(C)-(B to V)-(C)-(A to VIII)-(C)-(B to X)-(C)-(A to V).
- Take MERMAID, NOISEMAKER.
- Go down.
- Place MERMAID (F) for HOP (G); receive SET OF LOCKPICKS.
- Use SET OF LOCKPICKS (H); take KNIFE (I).
- Return to Wheelhouse.
- Use KNIFE (J); take STETHOSCOPE PART (K).
- Return to Pier.
- Use NOISEMAKER (L); take NUT (M).
- TOURNIQUET and NUT on SLINGSHOT FRAME for SLINGSHOT.
- Use SLINGSHOT (N).
- Go (O).
- Take PUMP, STEPLADDER (P).
- Place STEPLADDER (Q); take DUSTER, BROKEN STETHOSCOPE (R).
- STETHOSCOPE PART on BROKEN STETHOSCOPE for STETHOSCOPE.
- Use STETHOSCOPE (S).
- Easy solution (T). C-B-A-B-A-B-C-Bx2-A-Bx2-C-B-C-Bx2-C-Bx2-C-B-C-B-A-B.
- Hard Solution (T). C-B-A-B-A-B-C-B-C-B-A-B-A-B-C-B-C-B-A-B-C-B.
- C-B-C-B-A-Bx2-C-B-A-Bx2-C-Bx2-C-B-C-B-A-B.
- Take ACCESS CARD.
- Use ACCESS CARD (U).
- Go forward.
- Place PUMP, EMPTY ATOMIZER (V); receive WATER.
- Use WATER; take METAL RIM (W).
- Go down.
- Use SCREWDRIVER; take PICKAXE, NET (X).
- Go down.
- METAL RIM and NET on DUSTER for SCOOP NET.
- Use SCOOP NET for ACID; use PICKAXE (Y); take OILCAN (Z).
- Use ACID (A) for HOP (B); receive STARS.
- Place STARS; take RED BUTTON (C).
- Go forward.
- Place RED BUTTON; take PLIERS, BUSINESS CARD (D).
- Use PLIERS (E); take RUSTY DAGGER, 1/4 COVER AMULETS (F).
- Go forward.
- Give BUSINESS CARD (G); speak to character.
- Take SAFETY PIN (H).
- Go forward.
- Take 2/4 COVER AMULETS, NOTEBOOK, invitation (I).
- Use OILCAN (J); take KING'S RING; use SAFETY PIN (K); take 3/4 COVER AMULETS (L).
- Use KING'S RING (M); take 4/4 COVER AMULETS, POISON VIAL LID (N).
- Place 4/4 COVER AMULETS (O); take GLOBE, BATON and SEDATIVE (P).
- Place GLOBE; take PEN (Q).
- Go down.
- Place POISON VIAL LID (R).
- Solution (S). (1-A)-(2-K)-(3-C)-(4-L)-(5-I)-(6-F)-(7-B)-(8-G)-(9-J)-(10-E)-(11-H)-(12-D).
- Take EMPTY VIAL.
- Give EMPTY VIAL (T); speak to character.
- Place NOTEBOOK, PEN (U); receive PASSWORD.
- Place PASSWORD; take DECORATED FROG, BEADS (V).
- Go forward.
- Place DECORATED FROG (W) for HOP (X); receive ROPE SWING.
- Place ROPE SWING (Y).
- Go forward.
Chapter 5: The Party
- Take JACKSCREW, BURNER (Z).
- Take poster, BROKEN HYDRANT; place RUSTY DAGGER on grindstone (A) for SHARP DAGGER.
- Take EMPTY GLASS (B); use JACKSCREW; take GLUE (C).
- Use SHARP DAGGER, BATON (D); take ICE CUBES (E).
- SEDATIVE, BURNER and ICE CUBES on EMPTY GLASS for SLEEPING POTION.
- Give SLEEPING POTION (F).
- Go left.
- Speak to character.
- Take HYDRANT LEVER, MAGNET (G).
- MAGNET on BEADS for STRUNG MAGNET.
- Take DECORATED COMB; use STRUNG MAGNET (H); take CINDERELLA'S CRIMINAL PHOTO, HYDRANT BASE (I).
- Give CINDERELLA'S CRIMINAL PHOTO (J).
- Open purse; take THINNER, TOKEN (K).
- Go down.
- Place TOKEN (L).
- Easy solution (M). (Dx3)-(A-1)-(Dx3)-(A-2)-(D)-(A-3)-(D)-(C)-(B-4).
- Hard solution (N). (Dx3)-(A-1)-(D)-(B-3)-(A-4)-(B-2)-(A-7)-(B-5)-(A-6)-(C)-(B-8).
- (Dx2)-(A-9)-(D)-(C)-(A-11)-(C)-(B-12)-(A-13).
- Take HOSE, CLOTH.
- Go left.
- HYDRANT BASE, HYDRANT LEVER on BROKEN HYDRANT for HYDRANT.
- Select handle; place HYDRANT, HOSE (O).
- Go forward.
- Take GINGERBREAD MAN, use THINNER, CLOTH (P); take CHAIN, HAIRPIN (Q).
- Take SWORD, use GLUE, DECORATED COMB (R); take CLOSED TUBE, LUTE and MAGIC INKWELL (S).
- HAIRPIN on CLOSED TUBE for BRUSH.
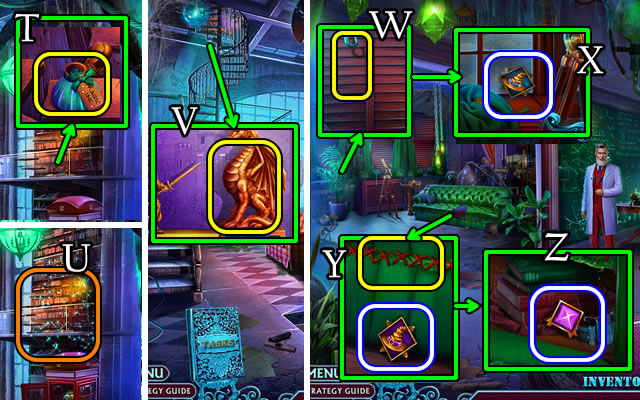
- Take book; place MAGIC INKWELL, BRUSH (T) for HOP (U); receive GOLD DRAGON.
- Place GOLD DRAGON (V).
- Climb stairs.
- Speak to character.
- Use CHAIN (W); take 1/4 WITCH'S TOKENS (X).
- Take 2/4 WITCH'S TOKENS; use SWORD (Y); take 1/2 COLORFUL DECORATIONS (Z).
- Return to Party.
- Replace LUTE; take BLUE TILE (A).
- Place GINGERBREAD MAN (B); take MONOGRAM (C).
- Go left.
- Place BLUE TILE (D).
- Easy solution (E). (C-D)-(B-D).
- Hard solution (F). Dx3-Cx2-A.
- Take CROWN.
- Place CROWN; take 1/3 COLORED FEATHERS, 3/4 WITCH'S TOKENS (G).
- Return to Observatory.
- Place MONOGRAM (H); take HATCHET, 2/2 COLORFUL DECORATIONS (I).
- Go down.
- Place 2/2 COLORFUL DECORATIONS (J); take 4/4 WITCH'S TOKENS, JUPITER (K).
- Place 4/4 WITCH'S TOKENS (L); take 2/3 COLORED FEATHERS, SPRING (M).
- Go down.
- Use HATCHET (N); take TROWEL, CROWBAR (O).
- Use TROWEL (P); take GLUE, SATURN (Q).
- Return to Observatory.
- Place SATURN, JUPITER (R) for HOP (S); receive CLAIRVOYANT SPHERE.
- Give CLAIRVOYANT SPHERE (T); speak to character; tale COIN.
- Go down.
- Use COIN; take LIGHTER (U); place SPRING; take ANTENNA, PHONE PART and 3/3 COLORED FEATHERS (V).
- Place PHONE PART (W).
- Enter (X).
Chapter 6: The Ball
- Take BENT KNIFE, PINCE-NEZ (Y).
- 3/3 COLORED FEATHERS and PINCE-NEZ on GLUE.
- Speak to character (Z).
- Take HAND VACUUM; use CROWBAR (A); take MONEY; use ANTENNA to take CHESS PIECES (B).
- Give MONEY (C); receive CROWN INLAY.
- Place CROWN INLAY (D).
- Go forward.
- Take GOLDEN ARROW; use LIGHTER (E); select, place coin (F); take GOLF BALL (G).
- Take GOLF CLUB (H).
- Place GOLF BALL, GOLF CLUB (I).
- Solution (J). B; C when B is at 1; A when C is at 2.
- Take WINDUP DUCK.
- Place GOLDEN ARROW (K); take GAUNTLET; place WINDUP DUCK (L); take GEAR (M).
- Use GAUNTLET (N); take 1/3 GNOMES, EMBLEM PART (O).
- Place GEAR (P).
- Climb ladder.
- Use BENT KNIFE; take PLIERS (Q).
- Place CHESS PIECES (R); take CORKSCREW (S); use PLIERS (T); take EMBLEM PART (U).
- Use HAND VACUUM (V); take CHAMPAGNE GLASS (W).
- Go down.
- Use CORKSCREW; take note, 2/3 GNOMES (X).
- Go down.
- Give CHAMPAGNE GLASS (Y) for HOP (Z); receive CHANGE-OF-HEART POTION.
- Place 2 EMBLEM PARTS (A); take MAGIC PERFUME, 3/3 GNOMES (B).
- Give CHANGE-OF-HEART POTION (C).
- Speak to character; take BROKEN WAND (D).
- Go forward.
- Place 3/3 GNOMES (E); take VENT LEVER (F).
- Go forward.
- Place, select VENT LEVER; take WAND TOP (G).
- MAGIC PERFUME and WAND TOP on BROKEN WAND for WAND.
- Use WAND (H).
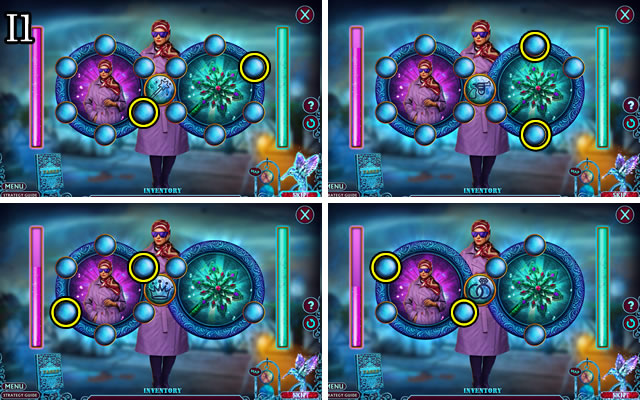
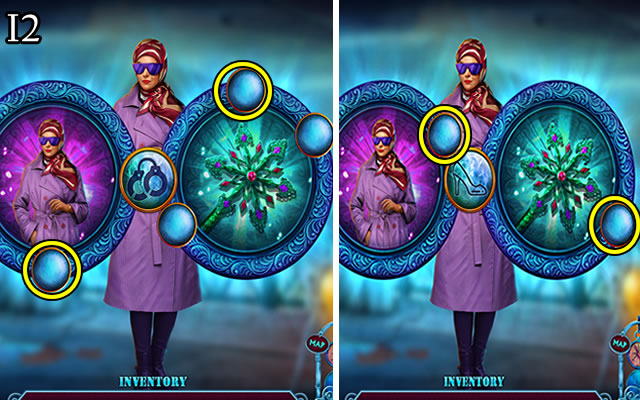
- Solution (I1-I2).
- Congratulations, you have completed playing Fairy Godmother Stories: Cinderella.
Created at: 2020-01-03