

Walkthrough Menu
- General Tips
- Chapter 1: Town
- Chapter 2: Beanstalk
- Chapter 3: Moon Walk
- Chapter 4: Return to the Beanstalk
- Chapter 5: Water World
- Chapter 6: Desert World
- Chapter 7: Cloud World
General Tips
- There is a brief tutorial at the start of the game.
- The Menu button allows you to adjust in-game options and exit to the title screen.
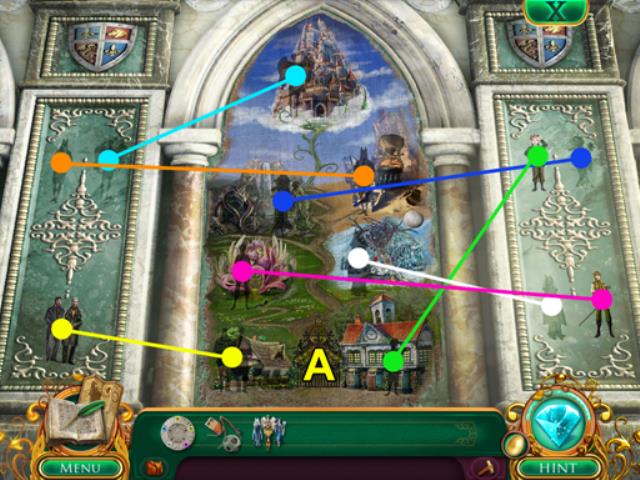
- The Map button displays pertinent Fairmill locations as well as outstanding Tasks.
- The Inventory button displays current items at your disposal.
- The Task button displays a list of the necessary components to create a special item.
- The Hint button will highlight the next objective in a scene.
- The Blue Arc above the Hint Diamond needs to be full before another hint can be used.
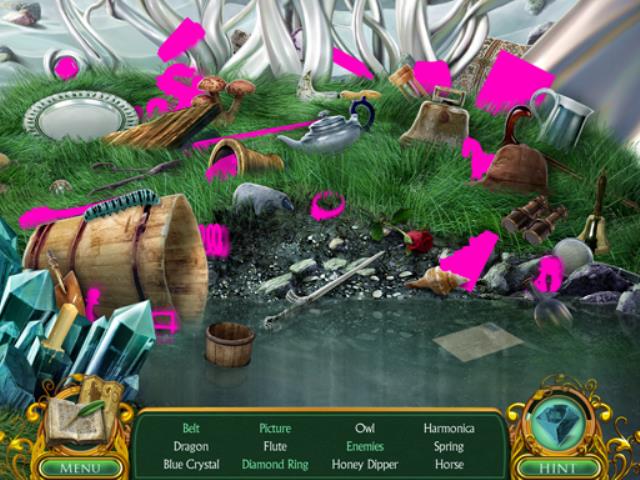
- We will use the acronym HOP for Hidden-object puzzles.
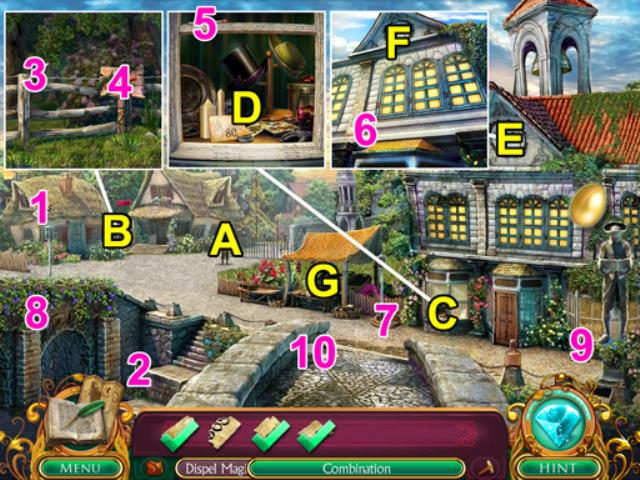
Chapter 1: Town

- Speak with the Brothers Grimm to get more information (A).
- Examine the Bridge to start the Bricks Task (B).
- Find the BRIDGE BRICKS hidden around the scene to complete the Task (1, 2, 3).
- Use the BRIDGE BRICKS on the Bridge to repair it (B).
- Examine the Magic Barrier to start the Anti-Magic Spell Task (C).
- Items that cannot be collected yet are displayed with a Lock over them.
- Collect the MENDING STONE from the ground (4).
- Examine the Water to start the Magic Bowl Task (D).
- Collect the BOWL, INK, and BRUSH to create the MAGIC BOWL (5, 6, 7).
- The MAGIC BOWL is added to the Inventory (E).
- Use the MAGIC BOWL on the Water to collect HOLY WATER (D).
- Examine the Flowers behind the Brothers Grimm to start the Ritual Knife Task (F).
- Collect the HILT, BLADE, and POMMEL (8, 9, 10).
- The RITUAL KNIFE is added to the Inventory (E).
- Use the RITUAL KNIFE to collect ENCHANTED FLOWERS (F).
- The ANTI-MAGIC SPELL is added to the Inventory (E).
- Use the ANTI-MAGIC SPELL on the Magic Barrier (C).
- The Dispel Magic Task is activated once the Barrier disappears.
- Examine the Chest under the Cart to start the Combination Task (G).
- Collect 3 CODE PIECES hidden around the scene (11, 12, 13).
- Cross the Bridge and enter the Town Center (C).
- Collect the last CODE PIECE and the LOCKBOX COMBINATION is added to your Inventory (1).
- Speak with Jack to start the Fake Key Task (A).
- Collect the WIRE near the stairs (2).
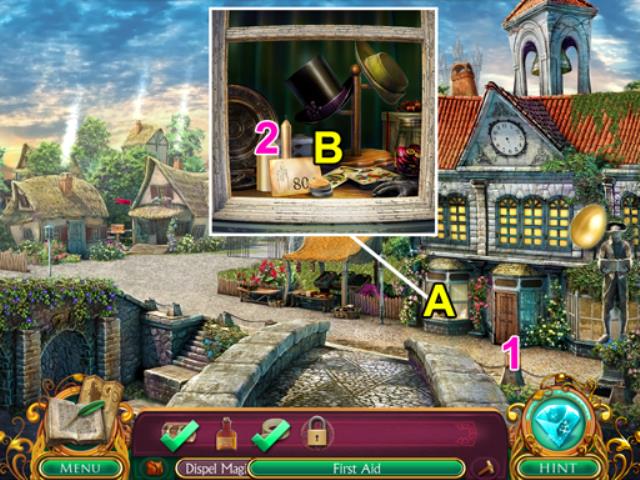
- Examine the Signpost (B) to collect a FORK and an X (3, 4).
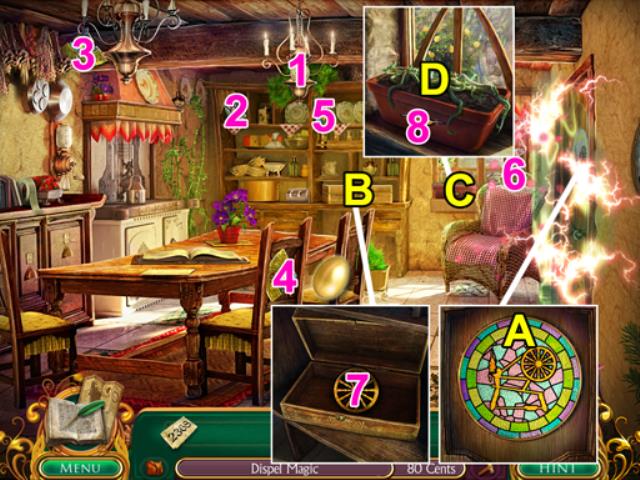
- Examine the Window (C) to collect a MATCH (5) and start the 80 Cents Task (D).
- Examine the Clock (E) to get a 50 CENT PIECE (6)and start the Slingshot Task (F).
- Collect the ROPE, RUBBER, Y, and STONE hidden around the scene (7, 8, 9, 10).
- The SLINGSHOT is added to your Inventory.
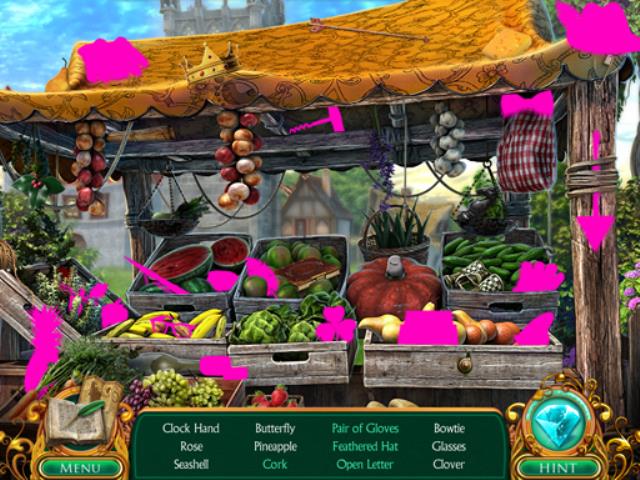
- Use the SLINGSHOT on the Clock (F) to start a HOP (G).
- Items listed in green need to be assembled by combining other items hidden in the scene.
- The CLOCK HAND is awarded and the FAKE KEY is added to your Inventory once all items are located.
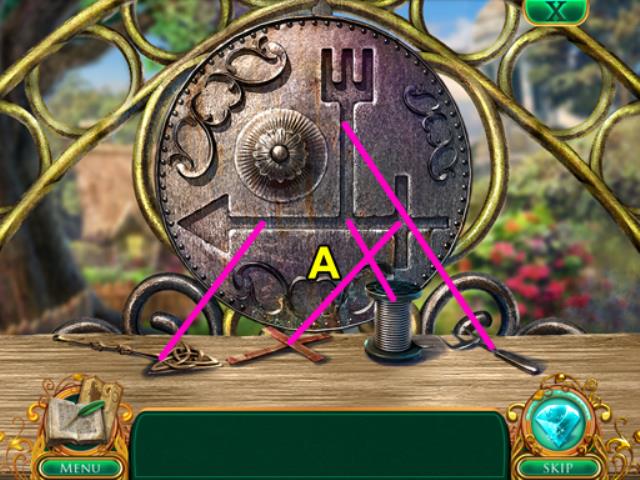
- Use the FAKE KEY on the Gate to start a mini-game (A).
- Drag the pieces of the FAKE KEY into their corresponding spaces in the Lock.
- Use the WIRE to fasten them and complete the puzzle.
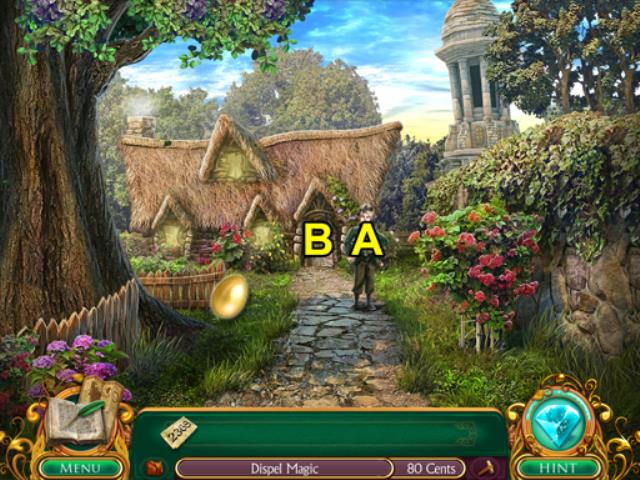
- Proceed through the open Gate into Jack's Yard.
- Speak to Jack to gain access to his house (A).
- Follow Jack into his home (B).
- Collect a NICKEL from the Chandelier (1).
- Examine the Magic Barrier on the Door to start the Spinning Wheel Task (A).
- Collect the STAINED GLASS from the Shelf (2).
- Examine the Box on the Shelf to start the Compass Task (B).
- Collect the 4 COMPASS PIECES from around the room (3, 4, 5, 6).
- The COMPASS is added to your Inventory.
- Use the COMPASS on the Box from the Shelf (B) to get the GLASS WHEEL (7).
- Examine the Planter on the Windowsill (C) to get the GLASS SPINDLE (8) and start the Fertilizer Task (D).
- The SPINNING WHEEL is added to your Inventory.
- Use the SPINNING WHEEL on the Magic Barrier blocking the Door (A).
- Exit through the Door into the Garden.
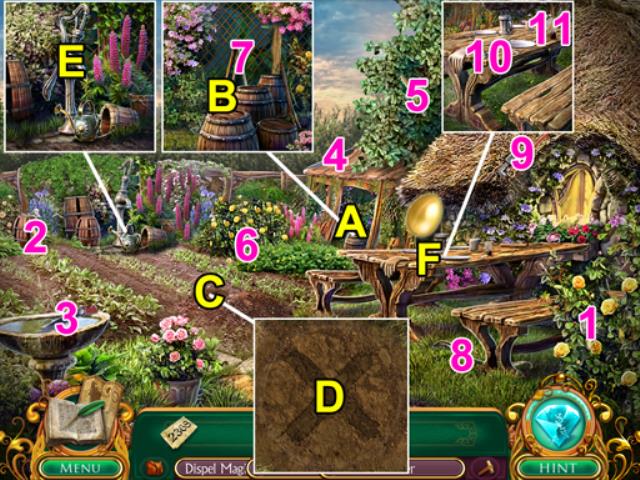
- Collect the QUARTER and 80 CENTS will be added to your Inventory (1).
- Examine the Barrels (A) to start the Garden Supplies Task (B).
- Collect the two SHEAR BLADES and two SHEAR HANDLES from the scene (2, 3, 4, 5).
- GARDEN SHEARS are added to your Inventory.
- Examine the Barrels (A) and use the GARDEN SHEARS to remove the Vines (B).
- Examine the X on the ground to start the Garden Shovel Task (C).
- Collect the SHOVEL HEAD (6).
- Find the SHOVEL HANDLE behind the Barrels (7).
- GARDEN SHOVEL is added to your Inventory.
- Use the GARDEN SHOVEL on the X on the ground to start the Barrel mini-game (D).
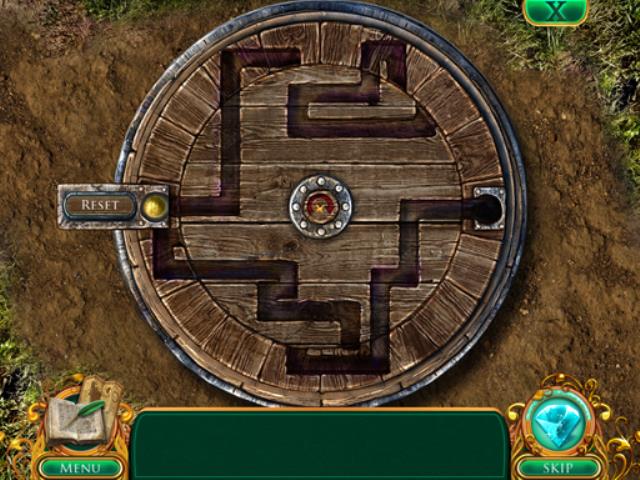
- Use the button in the center to rotate the disc while the Ball is rolling to get it to the other side.
- Solution is: rotate twice, launch ball, rotate twice, launch ball.
- Collect MIRACLE POWDER.
- Examine the Water Pump to start the Spout Repairs Task (E).
- Collect the PUMP HANDLE and ADJUSTABLE WRENCH from the scene (8, 9).
- Examine the Table (F) to collect the BOLT and TEABAG (10, 11).
- SPOUT REPAIRS are added to your Inventory.
- Use the SPOUT REPAIRS on the Water Pump to collect FRESH WATER (E).
- FERTILIZER is added to your Inventory.
- Return to Jack's House.
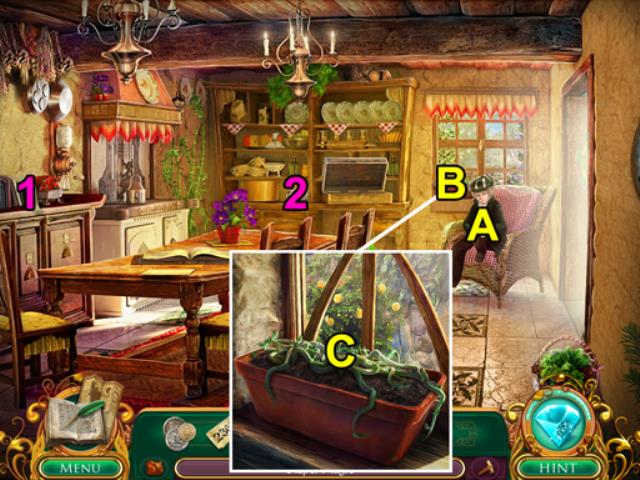
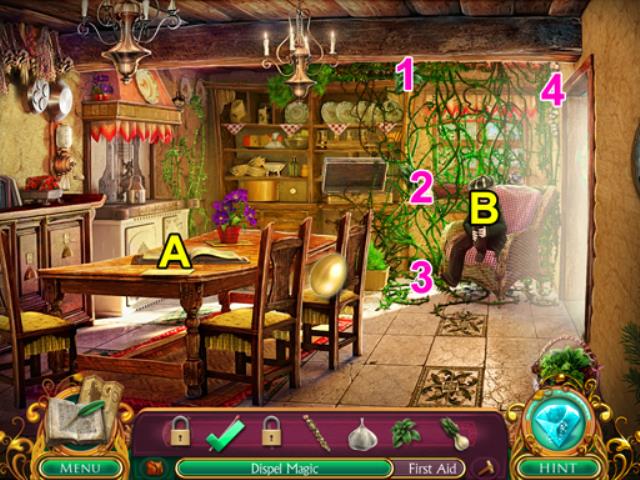
- Speak with Jack to start the First Aid Task (A).
- Collect the TAPE and BANDAGE from the room (1, 2).
- Examine the Planter (B) on the Windowsill and use the Fertilizer on the vines (C).
- Collect the BASIL, FENNEL, GARLIC, and PEPPER from the vines (1, 2, 3, 4).
- Leave the House and return to the Town Center.
- Collect the ANTISEPTIC (1).
- Examine the Shop Window (A) and use 80 CENTS (B) to purchase a CANDLE (2).
- Return to the Country Path.
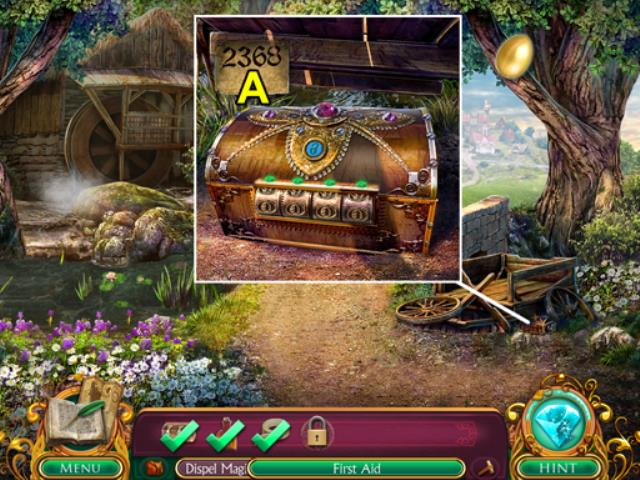

- Use the LOCKBOX COMBINATION on the Box to start a mini-game (A).
- Click on one of the digits to move the wheel until the light above the number turns green when the lock button is pressed.
- The solution is: 3259.
- Collect the BANISHING AMULET from the lockbox and DISPEL MAGIC is added to your Inventory.
- Return to Jack's House.
- Examine the Table to start (A).
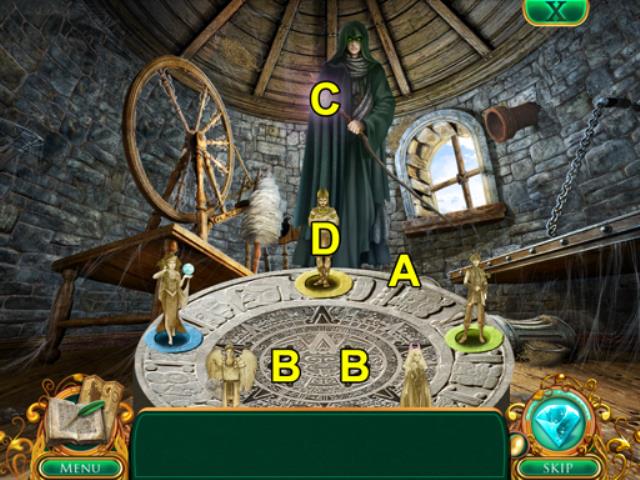
- Use DISPEL MAGIC on the Table to start a mini-game (A).
- The components need to be placed on the central Glyph in the correct order.
- The solution is:
- Amulet (1). Candle (2). Beans (3). Basil (4). Garlic (5). Fennel (6). Pepper (7). Match (8).
- Collect the HEALING AMULET once the mini-game is completed.
- FIRST AID is added to your Inventory.
- Use the FIRST AID on Jack (B).
Chapter 2: Beanstalk
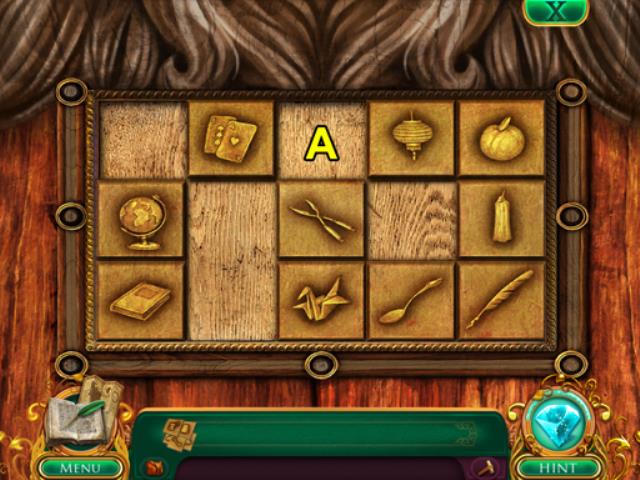
- Speak to D'ouhr to start the Puzzle Tiles Task (A).
- Collect the THIMBLE, THREAD, KEY, and SHOE TILES from the scene (1, 2, 3, 4).
- Examine the Vine to start the Fan Task (B).
- Collect the NEWS PRINT, BROWN BAG, FLYER, and PAPERCLIP from the scene (5, 6, 7, 8).
- The FAN is added to your Inventory.
- Use the FAN on the Vine (B) to get the FAN TILE (9).
- PUZZLE TILES are added to your Inventory.
- Examine D'ouhr again to start a mini-game (A).
- Use the PUZZLE TILES to fill the empty spaces in the puzzle (A).
- Answer three riddles by selecting the correct Tile.
- The solution will change based on the riddles presented.
- D'ouhr disappears and you are free to proceed Inside The Stalk.
- Examine the Door to get the Create Ice Task (A).
- Collect the FREEZE WAND (1).
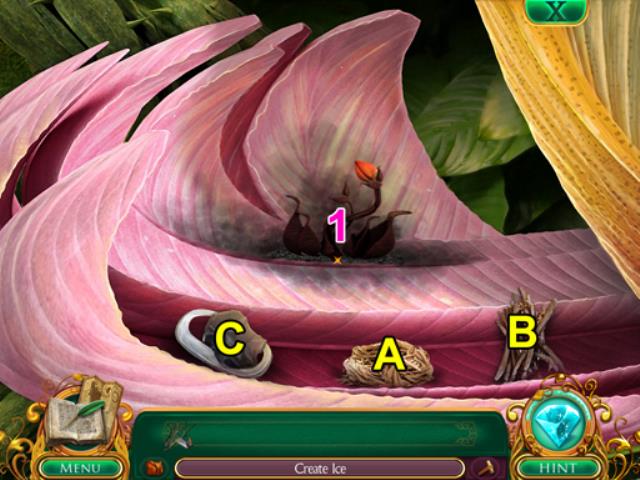
- Examine the Wilted Fire Flower to begin the Fire Starter Task (B).
- Collect the BRANCHES, STEEL, FLINT, and TINDER from the scene (2, 3, 4, 5).
- The FIRE STARTER is added to your Inventory.
- Use the FIRE STARTER on the Wilted Fire Flower to start a mini-game (B).
- The FIRE STARTER components need to be used in the correct order to successfully complete the mini-game.
- The solution is:
- Tinder (A).
- Branches (B).
- Flint and Steel (C).
- Collect WARM COALS (1).

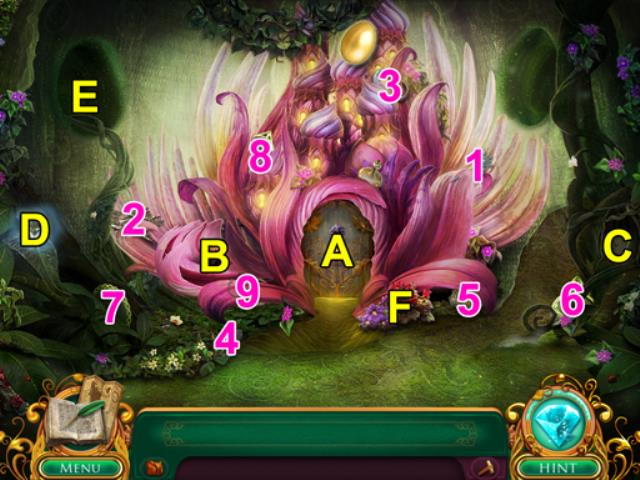
- Examine the Wilted Earth Flower to start the Mirrors Task (A).
- Collect the DIAMOND, CIRCULAR, and RECTANGLE MIRRORS from the scene (6, 7, 8).
- MIRRORS are added to your Inventory.
- Use the MIRRORS on the Wilted Earth Flower to start a mini-game (C).
- The MIRRORS need to be positioned to shine a beam of light onto the Flower.
- The light starts in the top left.
- Solution:
- Move the Rectangle Mirror (A) to the right twice, the Diamond Mirror (B) down twice, and the Circular Mirror (C) down once.
- Collect DEWY LEAVES for the Ice Flower (1).
- CREATE ICE is added to your Inventory.
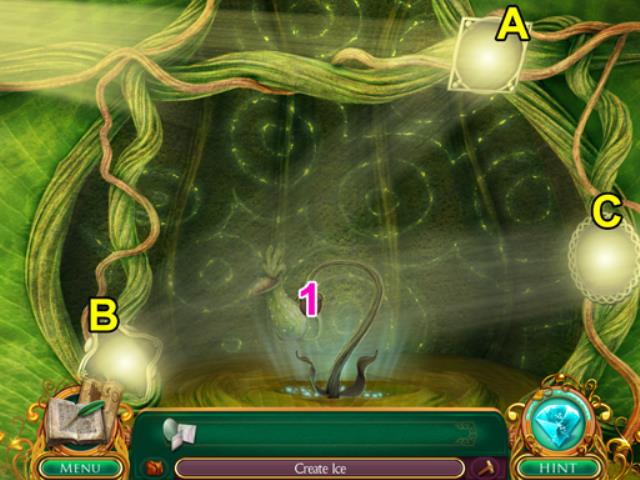
- Use CREATE ICE on the Wilted Ice Flower to start a mini-game (D).
- The CREATE ICE components need to be assembled in the correct order to cast the spell.
- The solution is:
- Warm Coals (A). Dewy Leaves (B). Freeze Wand (C).
- The Palace door is now ready to unlock.
- Examine the Door and unlock it using the button with the lock icon on it. (A).
- Exit to the Moon Passage (E).
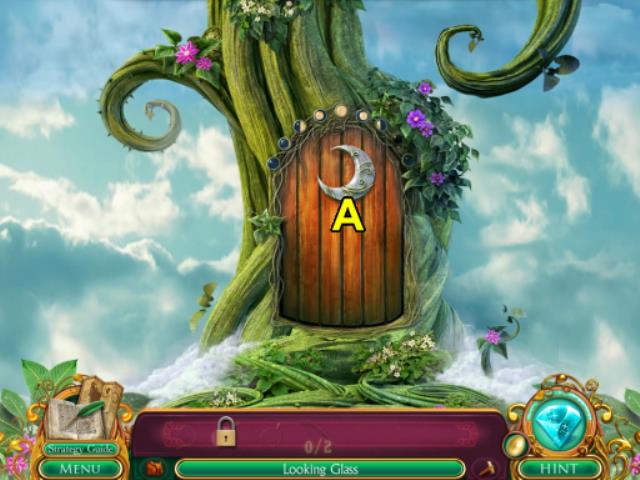
- Examine the Door to start the Looking Glass Task (A).
- Return to Inside The Stalk.
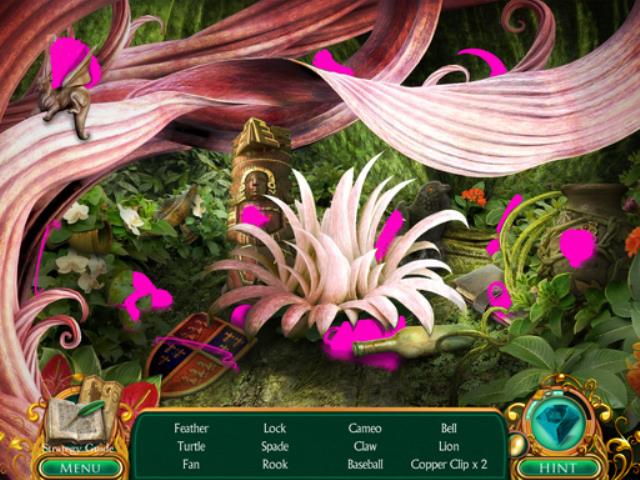
- Examine the Flower Shrub to start a HOP (F).
- Two COPPER CLIPS are collected once all objects have been located.
- Collect the CHAIN (9).
- Exit to the Flower Palace (A).
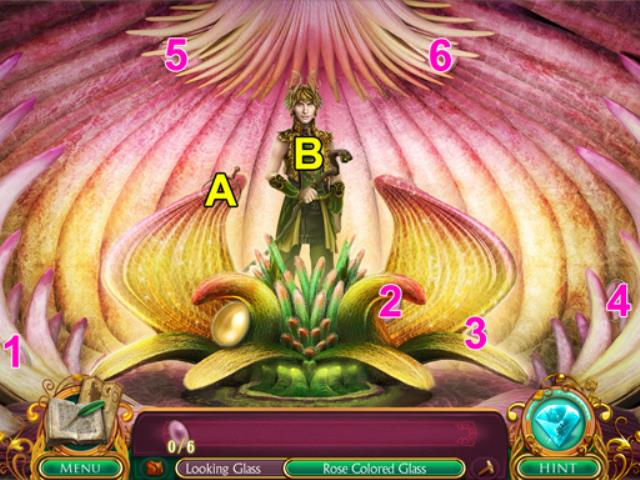
- The Guardian speaks to you and starts the Rose Colored Glass Task as you enter.
- Collect the six PINK LENSES around the scene (1, 2, 3, 4, 5, 6).
- ROSE COLORED GLASS is added to your Inventory.
- Collect the METAL RING (A).
- Give the ROSE COLORED GLASS to the Guardian (B).
- The LOOKING GLASS is added to your Inventory.
- Exit the Flower Palace and return to the Moon Passage.
- Use the LOOKING GLASS on the Door to reveal a Handle (A).
- Exit through the Door to the Moon Landscape.
Chapter 3: Moon World
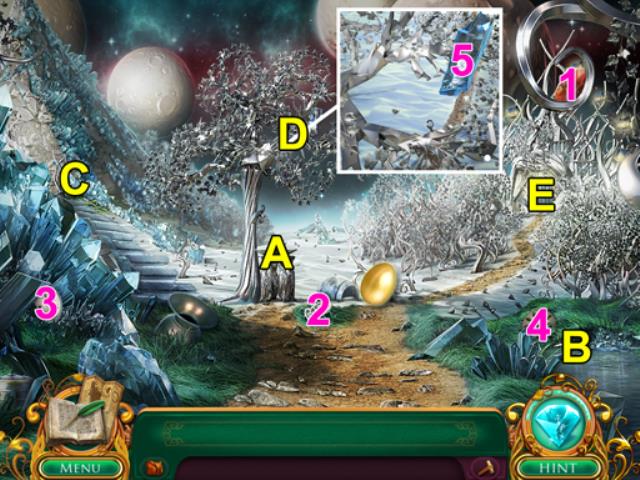
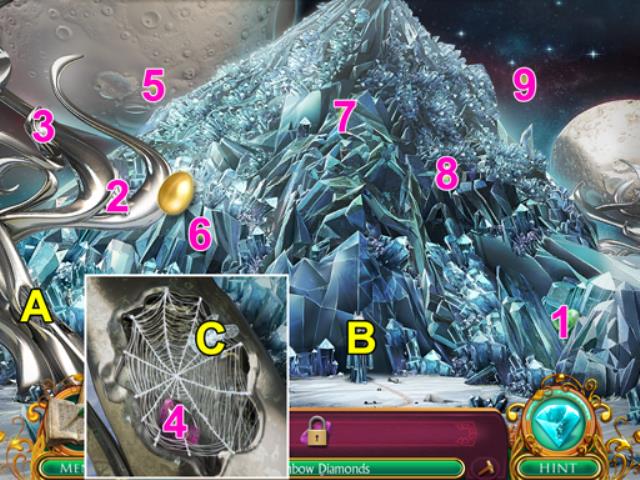
- Examine the Fountain to start the Rainbow Diamonds Task (A).
- Collect the ORANGE DIAMOND (1).
- Examine the Crystals to start a HOP (B).
- A BLUE DIAMOND is awarded once all objects have been located.
- Exit to Crystal Wall (C).
- Collect the GREEN DIAMOND (1).
- Examine the Spider Web to start the Crystal Insect Task (A).
- Collect the INSECT WINGS (2).
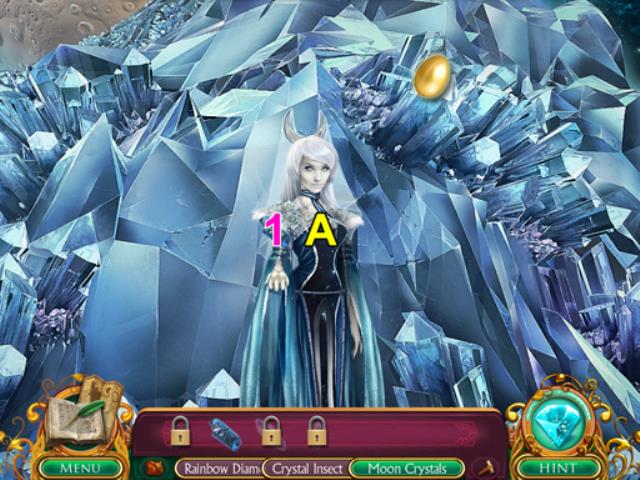
- Advance to the Guardian Wall (B).
- The Guardian starts the Moon Crystals Task as you enter the scene.
- Collect the first MOON CRYSTAL (1).
- Leave the Guardian and return to the Moon Landscape.
- Collect the INSECT BODY and the CRYSTAL INSECT will be added to your Inventory (2).
- Examine the Treetop to start the Mixed Nuts Task (D).
- Exit to the Crystal Wall (C).
- Collect the ACORN (3).
- Use the CRYSTAL INSCECT (C) on the Spiderweb to get the PURPLE DIAMOND (4).
- RAINBOW DIAMONDS are added to your Inventory.
- Exit to the Moon Landscape.
- Use the RAINBOW DIAMONDS on the Fountain to open the way (A).
- Exit to the Moon City (E).
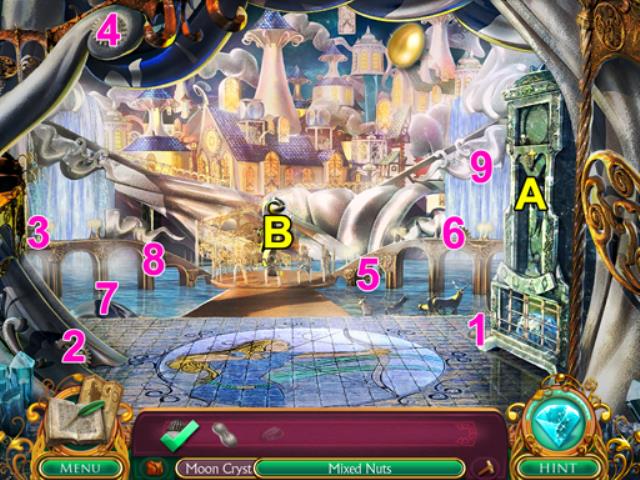
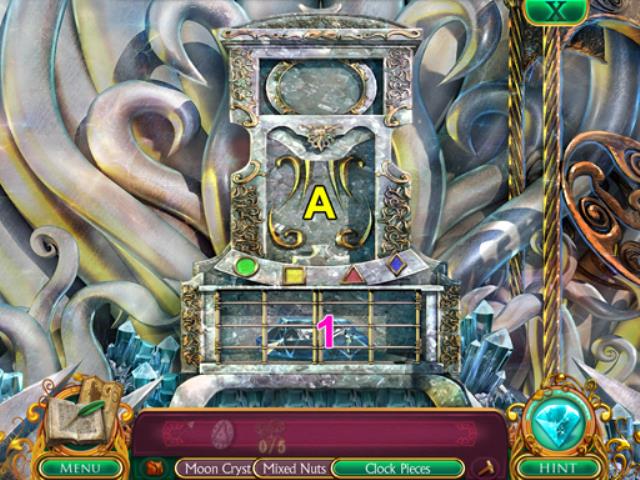
- Examine the Clock (A).
- Examine the Centerpiece to start the Clock Pieces Task (A).
- Return to the Moon City.
- Collect the PEANUT (1).
- Collect the five GEARS hidden around the scene (2, 3, 4, 5, 6).
- Exit to the Moon Landscape.
- Collect the CLOCK FACE (3).
- Return to Moon City (E).
- Advance to the Glade (B).
- Collect the SUNFLOWER SEED (1).
- MIXED NUTS are added to your Inventory.
- Collect the PENDULUM (2).
- CLOCK PIECES are added to your Inventory.
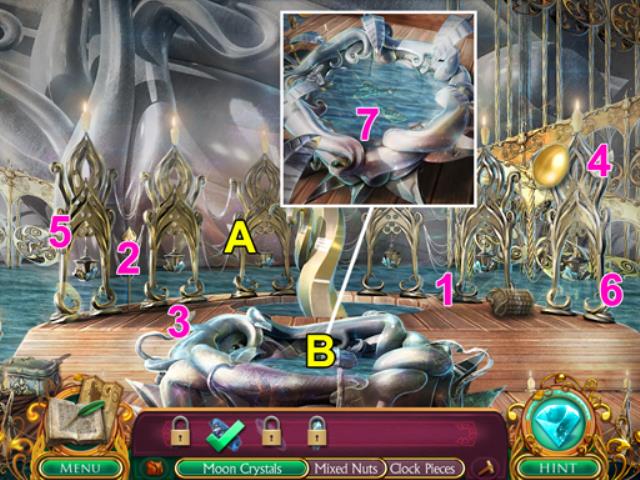
- Examine the Lanterns to start the Fireflies Task (A).
- Examine the Pond to start the Fishing Equipment Task (B).
- Collect the two BROAD LEAVES, LINE, and HOOK from the scene (3, 4, 5, 6).
- Return to the Moon City.
- Collect the POLE and two SILVER LEAVES from the scene (7, 8, 9).
- Examine the Clock (A).
- Use the CLOCK PIECES to start a mini-game.
- The objective is to click on the Clock when the Pendulum is pointing to a matching shape.
- Collect the second MOON CRYSTAL after completing the mini-game (1).
- Return to the Moon Landscape.
- Collect the REEL (4).
- FISHING EQUIPMENT is added to your Inventory.
- Use the MIXED NUTS on the Treetop (D) to get the third MOON CRYSTAL (5).
- Exit to the Moon City and return to the Glade (E).
- Use the FISHING EQUIPMENT on the Pond (B) to get the final MOON CRYSTAL (7).
- MOON CRYSTALS are added to your Inventory.
- Back out to the Moon Landscape and return to the Guardian Wall.
- Give the MOON CRYSTALS to the Guardian to start the Charge Crystal and Save Jack Tasks (A).
- Collect the EMPTY MOONSTONE from the Guardian (1).
- Exit to the Moon Landscape.
- Collect five FIREFLIES from around the scene (5, 6, 7, 8, 9).
- Exit to Moon Landscape.
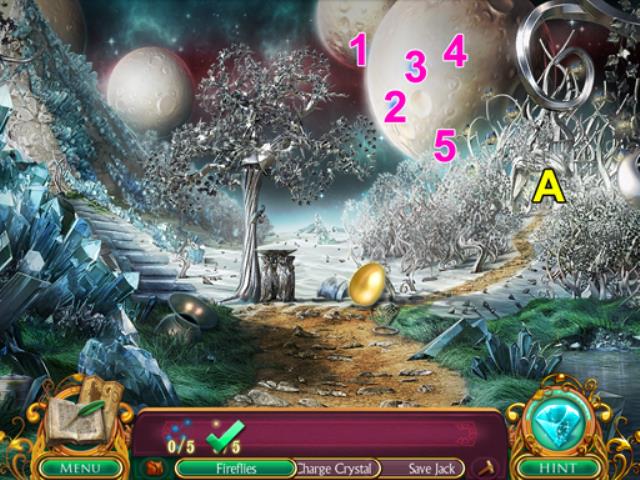
- Collect five more FIREFLIES from around the scene (1, 2, 3, 4, 5).
- FIREFLIES are added to your Inventory.
- Exit to the Moon City and return to the Glade (A).
- Use the FIREFLIES on the Lanterns to open the way forward (A).
- Climb the Beanstalk to enter the Crystal Temple (B).
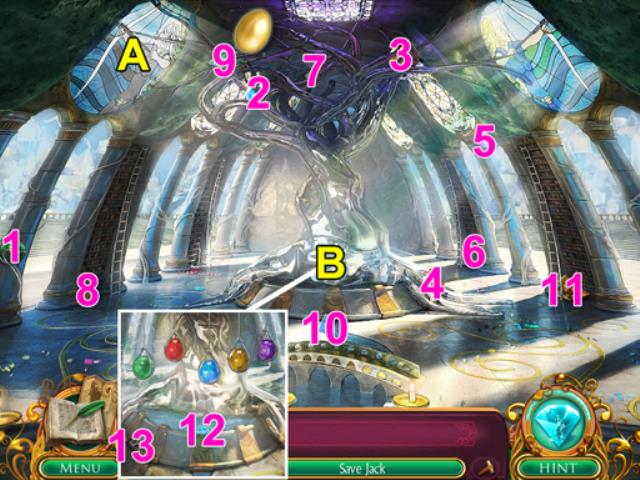
- Collect the five GLASS MOONS hidden around the scene (1, 2, 3, 4, 5).
- The CHARGE CRYSTAL is added to your Inventory.
- Collect the JAR and CORK (6, 7).
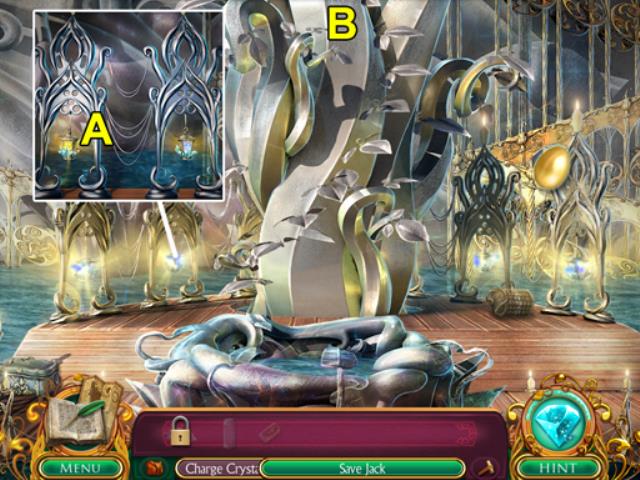
- Examine the Window to start the Stained Glass Task (A).
- Collect the four pieces of STAINED GLASS hidden around the scene (8, 9, 10, 11).
- STAINED GLASS is added to your Inventory.
- Examine the Window again (A).
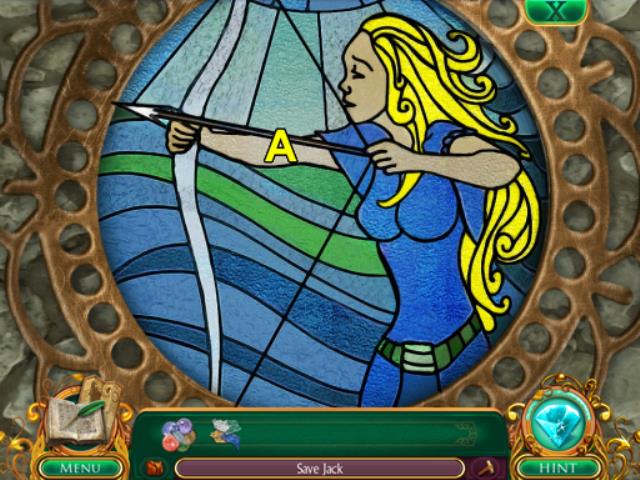
- Use the STAINED GLASS to start a mini-game (A).
- The pieces of STAINED GLASS need to be dragged over the gray areas.
- The solution is: Blue robe, Yellow hair, Orange face, and Green belt.
- Use the CHARGE CRYSTALS on Crystal Tree (B) to get the CHARGED MOONSTONE (12).
- Collect Mini Jack (13).
- SAVE JACK is added to your Inventory.
- Return to the Guardian Wall.
- Use SAVE JACK on the Guardian (A).
Chapter 4: Return to the Beanstalk
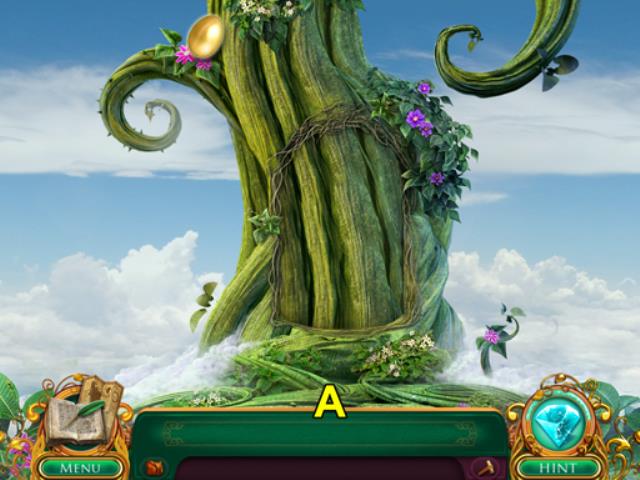

- Exit to Inside The Stalk (A).
- Examine the new Stalk to start the Gold Goblet Task (A).
- Collect the GOLD GOBLET BASE (1).
- Exit through the Crevice (B).
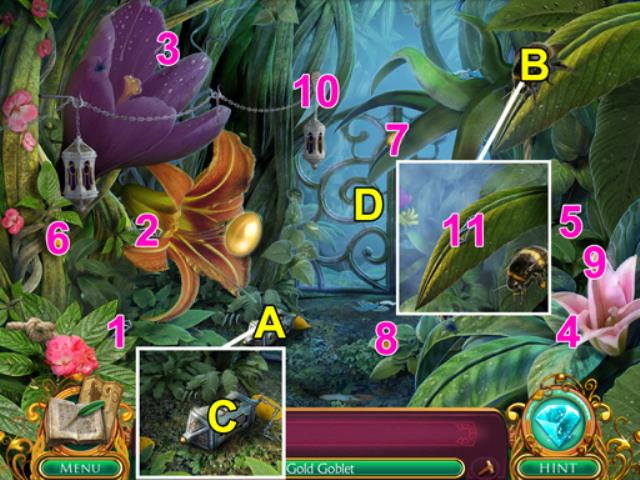
- Examine the Lantern to start the Fix Lantern Task (A).
- Locate the five of the CHAIN LINKS hidden around the scene (1, 2, 3, 4, 5).
- Examine the Bee to start the Distract Bee Task (B).
- Find four pieces of HONEY hidden around the scene (6, 7, 8, 9).
- Collect the HONEY DIPPER (10) and the BEE FOOD is added to your Inventory.
- Use the BEE FOOD on the Bee (B).
- Collect the last CHAIN LINK (11) and the CHAIN LINKS are added to your Inventory.
- Use the CHAIN LINKS on the Lantern to clear the way forward (C).
- Exit to Rose Valley (D).
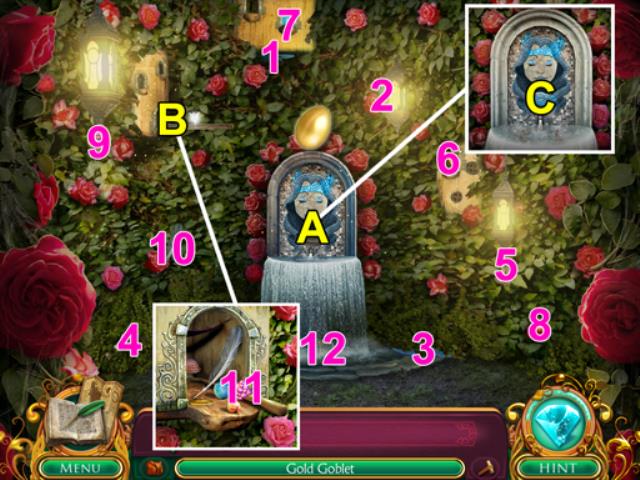
- Examine the Fountain to start the Finish Mosaic Task (A).
- Collect three MOSAIC PIECES scattered around the scene (1, 2, 3).
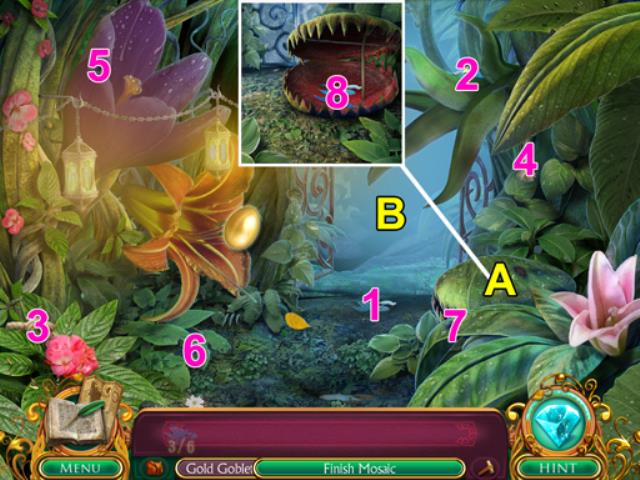
- Exit back to the Crevice.
- Collect two more MOSAIC PIECES hidden in the scene (1, 2).
- Examine the Strange Plant to start the Open Fly Trap Task (A).
- Find two pieces of FLY TRAP ROPE in the area (3, 4).
- Catch three FLIES hiding in the leaves (5, 6, 7).
- Return to the Rose Valley (B).
- Collect two pieces of FLY TRAP ROPE (4, 5).
- Examine the Birdhouse to start the Get The Cane Task (B).
- Collect the SHINY COIN, MARBLE, CANDY, CHARM, and FEATHER (6, 7, 8, 9, 10).
- FAIRY OFFERING is added to your Inventory.
- Use the FAIRY OFFERING on the Birdhouse (B) to get the CANE (11).
- FLYTRAP OPENER is added to your Inventory.
- Exit to the Crevice.
- Use the FLYTRAP OPENER on the Strange Plant (A) to get the last MOSAIC PIECE (8).
- The BLUE ROSE is added to your Inventory.
- Return to the Rose Valley (B).
- Use the BLUE ROSE on the Mosaic (C) to get stop the fountain water.
- Collect GOLD GOBLET BOWL (12).
- The GOLD GOBLET is added to your Inventory.
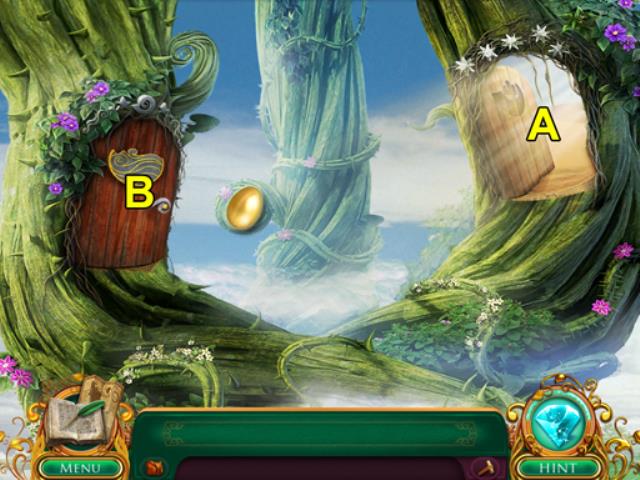
- Return to Inside The Stalk.
- Use the GOLD GOBLET on the Beanstalk to make it grow (A).
- Exit to the Crossroad (C).
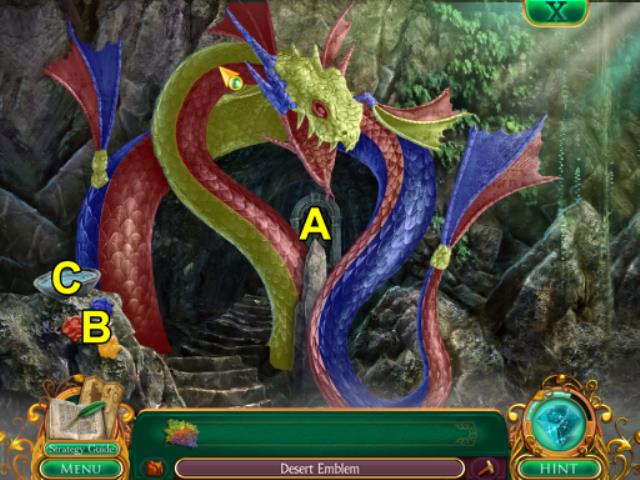
- Try to move through the open door to start the Desert Emblem Task (A).
- Move through the other door to the Lagoon (B).
Chapter 5: Water World
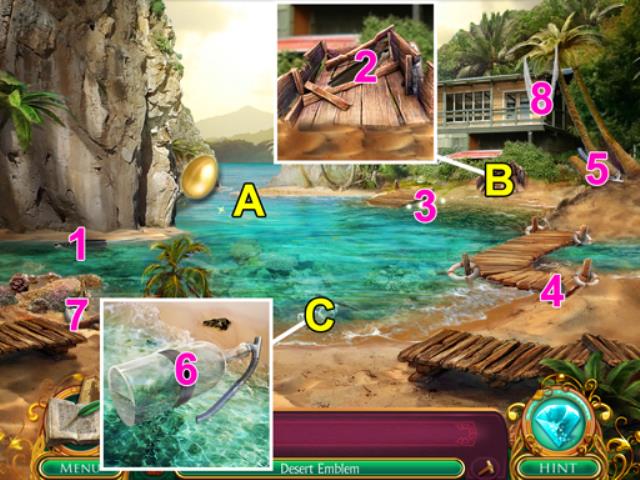
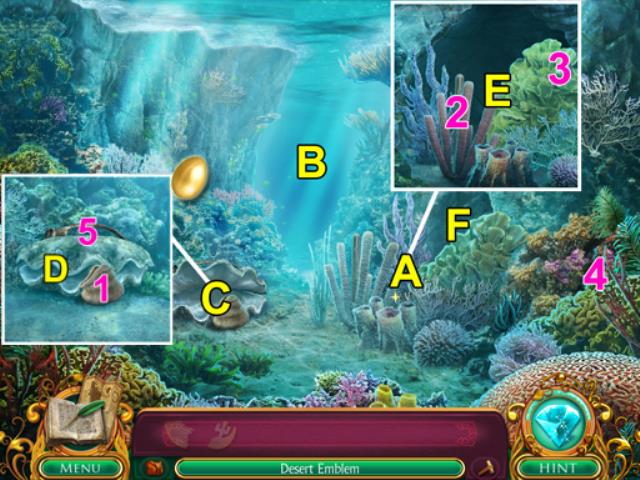
- Examine the Water to start the Breathing Equipment Task (A).
- Collect the FLIPPER (1).
- Look in the Cart (B) to find the other FLIPPER (2).
- Examine the Broken Bottle to start the Fix Bottle Task (C).
- Collect the AIR WISPS, ELECTRICAL TAPE, and SNORKEL from the area (3, 4, 5).
- FIX BOTTLE SUPPLIES are added to your Inventory.
- Use the FIX BOTTLE SUPPLIES on the Broken Bottle (C) to get a MAGIC BOTTLE (6).
- DIVING EQUIPMENT is added to your Inventory.
- Use the DIVING EQUIPMENT on the Water and exit to the Coral Reef (A).
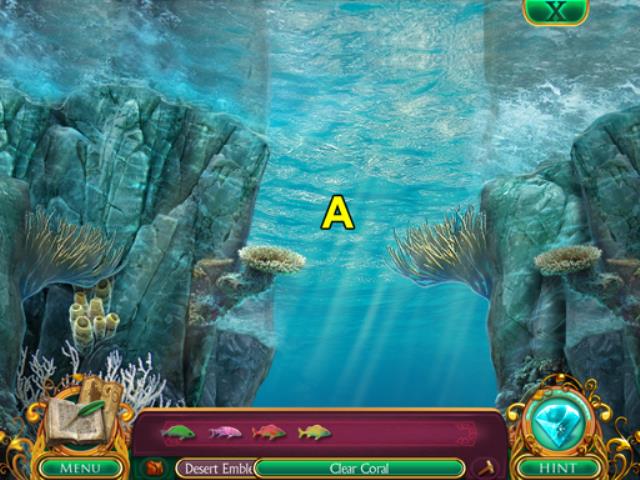
- Examine the Coral to start the Clear Coral Task (A).
- Swim ahead to the Fishing Hole (B).
- Examine the surface of the Water to start the Catch Fish Task (A).
- Return to the Coral Reef.
- Examine the Large Clam (C) to find the FISH FOOD (1) and start the Close Clam Task (D).
- Search the Coral (A) to find the SHAFT and a PEARL PIECE (2, 3).
- Find the PEARL PIECE hidden in the coral (4).
- Return to the Lagoon.
- Collect the PEARL PIECE and the FULL PEARL is added to your Inventory (7).
- Get the FISH NET hanging from the trees (8).
- Return to the Coral Reef (A).
- Use the FULL PEARL on the Large Clam (D) and get the HOOP (5).
- The FISHING GEAR is added to your Inventory.
- Swim ahead to the Fishing Hole (B).
- Use the FISHING GEAR on the surface of the Water to start a mini-game (A).
- A sequence of five colored fish will appear at the top of the screen.
- Catch fish of the matching color in the order presented.
- Once you catch three sequences COLORED FISH will be added to your Inventory.
- You automatically return to the Coral Reef.
- Use the COLORED FISH on the Coral (E).
- Proceed into the Cenote (F).
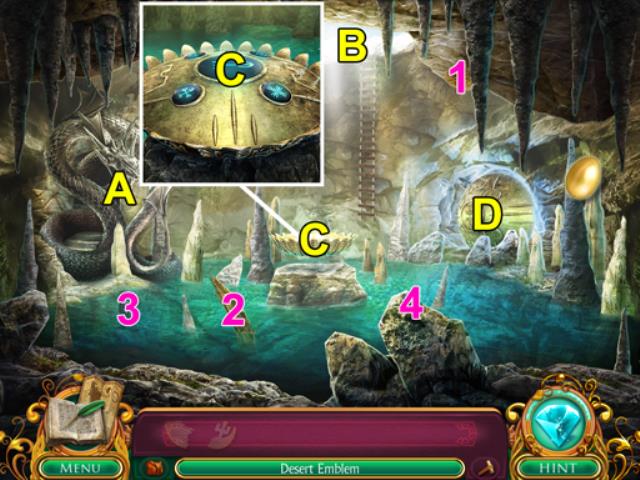
- Examine the Dragon to start the Paint Supplies Task (A).
- Collect the SPONGE (1).
- Exit to the Mineral Spring (B).
- Examine the pool (A) to find BLUE ALGAE (1).
- Examine the Vent (B) to find RED ALGAE (2) and start the Block Vent Task (C).
- Collect two HEAVY STONES from around the area (3, 4).
- Return to the Cenote.
- Collect the final HEAVY STONE (2) and HEAVY ROCKS are added to your Inventory.
- Return to the Mineral Spring (B).
- Use the HEAVY ROCKS on the Vent to expose another Pool (C).
- Examine the new Pool (D) to find YELLOW ALGAE (5).
- PAINT SUPPLIES are added to your Inventory.
- Return to the Dragon in the Cenote.
- Use the PAINT SUPPLIES on the Dragon to start a mini-game (A).
- Use the Paint Splotches on the left to select a color (B).
- Use the Water to clear away existing paint (C).
- The objective is to paint the entire Dragon without using the same color on connecting pieces.
- Examine the Floating Platform to start the Break Barrier Task (C).
- Collect two ANCIENT RUNES from the area (3, 4).
- Return to the Mineral Spring (B).
- Collect three ANCIENT RUNES from the area (6, 7, 8).
- BARRIER RUNES are added to your Inventory.
- Return to the Cenote.
- Use the BARRIER RUNES on the Floating Platform to open the way forward (C).
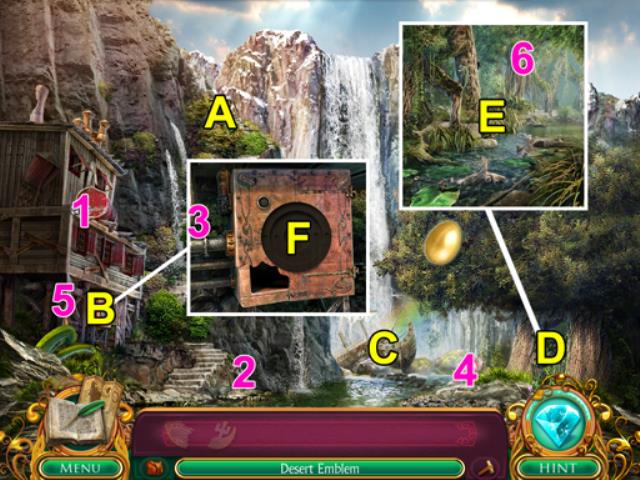
- Proceed to the Waterfall (D).
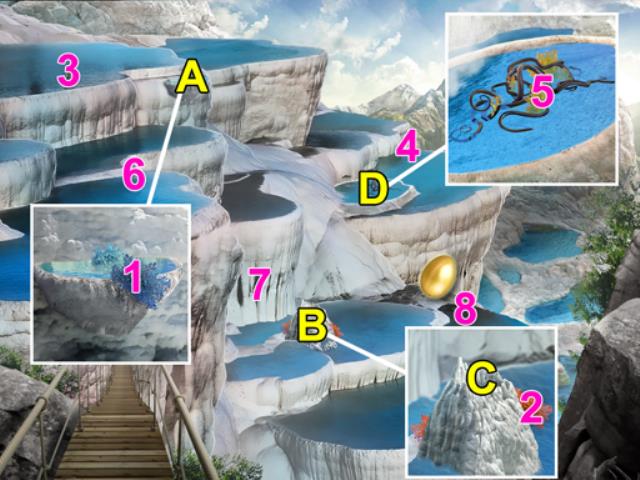
- Proceed up the Stairs to the Bayou (A).
- Examine the Pillar to start Raise Bridge Task (A).
- Collect a BULB, FUSE and the BRIDGE SWITCH from the area (1, 2, 3).
- Return to the Waterfall.
- Collect two BULBS from the area (1, 2).
- Examine the Panel (B) to find a FUSE (3).
- Proceed into the Basin (C).
- Examine the Emblem (A) to find a FUSE (1) and start the Break Water Cage Task (B).
- BAYOU BRIDGE PARTS are added to your Inventory.
- Return to the Bayou.
- Collect the WATER CAGE PENCIL and PAPER (4, 5).
- The WATER CAGE SPELL is added to your Inventory.
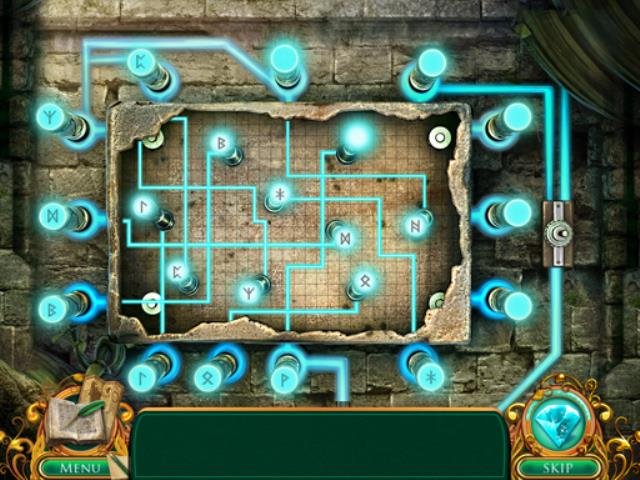
- Use the BAYOU BRIDGE PARTS on the Pillar to start a mini-game (A).
- The objective is to light up all the fuses in the center panel.
- Mouse over the inactive fuses to reveal their special rune.
- Activate matching pairs until all fuses are lit.
- Collect the DESERT EMBLEM RIGHT from the Bridge (6).
- Return to the Basin.
- Use the WATER CAGE SPELL on the Emblem to start a mini-game (A).
- Fold the Paper until it matches the mold in the Emblem to release the Guardian (B).
- Speak to the Guardian to start the Gather The Plants Task (C).
- Return to the Waterfall.
- Collect the FLOWER (4).
- Examine the Panel to start the Crack Safe Task (B).
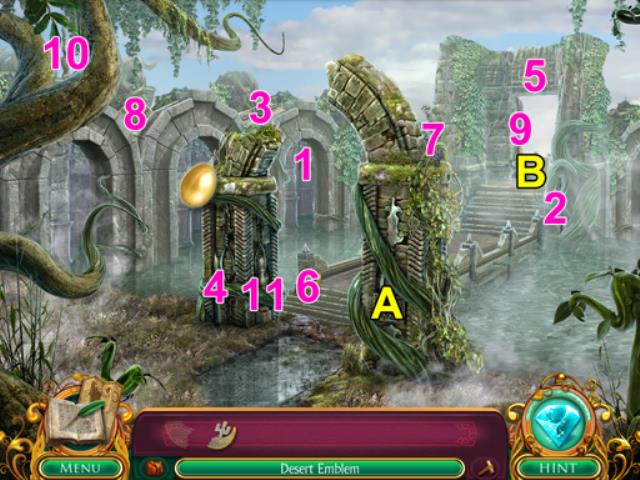
- Continue up to the Bayou (A).
- Collect the LAVENDER (7).
- Collect the INNER RING (8).
- Return to the Waterfall.
- Explore the Overgrowth to start the Trim The Vines Task (D).
- Collect a TRIMMER BLADE (5).
- Take the Stairs to the Bayou (A).
- Collect the TRIMMER BLADE (9).
- TRIMMERS will be added to your Inventory.
- Return to the Waterfall.
- Use the TRIMMERS on the Overgrowth (E) to get OUTER RING (6).
- Proceed to the Basin (C).
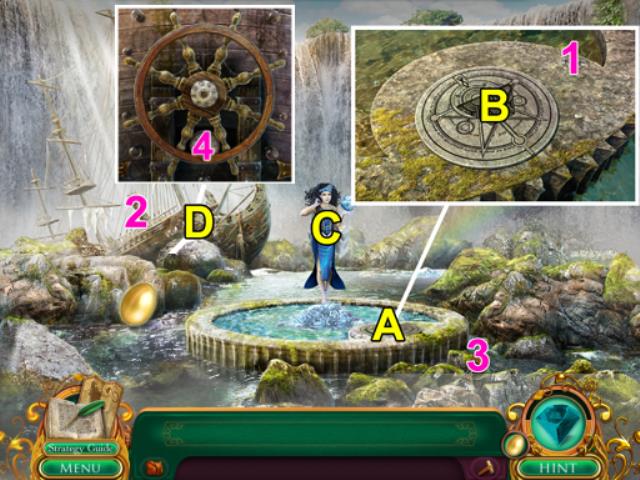
- Examine the Shipwreck to start the Fix Ship Wheel Task (D).
- Collect two SHIP WHEEL PIECES from the area (2, 3).
- Return to the Bayou.

- Collect two SHIP WHEEL PIECES from the area (10, 11).
- The SHIP WHEEL is added to your Inventory.
- Return to the Basin.
- Use the SHIP WHEEL on the Shipwreck (D) to get the PANEL DIAL (4).
- PANEL PIECES will be added to your Inventory.
- Return to the Waterfall.
- Examine the Panel (B) and use the PANEL PIECES on the center disc to start a mini-game (F).
- The objective of the mini-game is to rotate each disc to the correct digit.
- The solution is: 5, 8, 7 as hinted by the dates written on panel.
- Collect the ROSEMARY after completing the mini-game (1).
- GATHERED PLANTS will be added to your Inventory.
- Return to the Bayou.
- Examine the Cauldron (B).
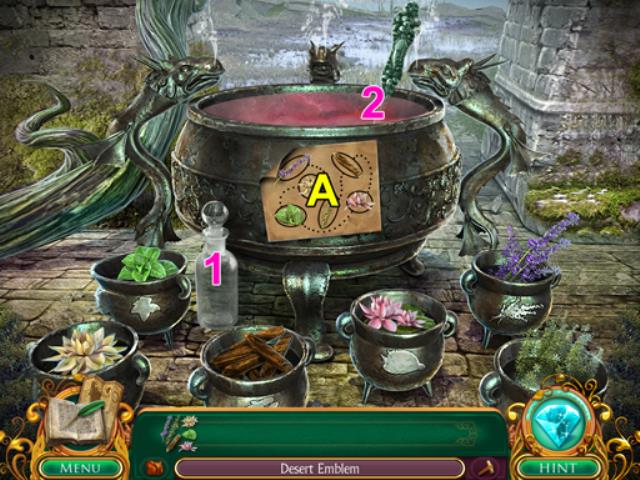
- Use the GATHERED PLANTS on the Cauldron to start a mini-game (A).
- The objective of the mini-game is to select the ingredients in the correct order.
- Follow the recipe outlined in the image on the front of the Cauldron to start the Repower The Orb Task.
- Take the POTION BOTTLE and MAGICAL ESSENCE (1, 2).
- The ORB POTION is added to your Inventory.
- Return to the Basin.
- Use the ORB POTION on the Guardian (C).
- Examine the Chamber that appears to find the DESERT EMBLEM LEFT (A).
- DESERT EMBLEM is added to your Inventory.
- Return to the Crossroad.
Chapter 6: Desert World
- Use the DESERT EMBLEM on the Closed Door (A).
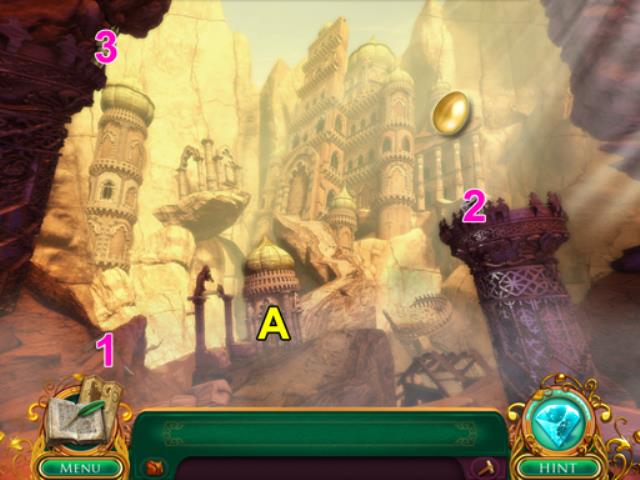
- Proceed through to the Ruin Entrance (A).
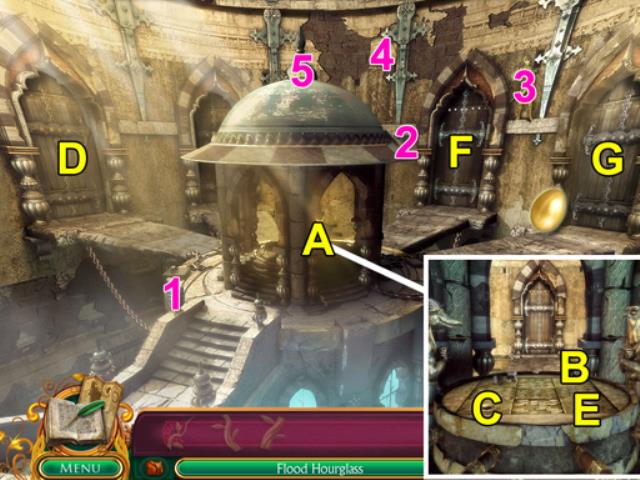
- Continue through the Ruins to the Hourglass Room (A).
- Examine the Mural to start the Flood Hourglass Task (A).
- Proceed to the Chain Room (B).
- Examine the Dome (A) to open the Tomb door (B) and start the Open Chain Room Doors Task (C).
- Collect the MOON EMBLEM RIGHT HALF (1).
- Proceed to the Tomb (D).
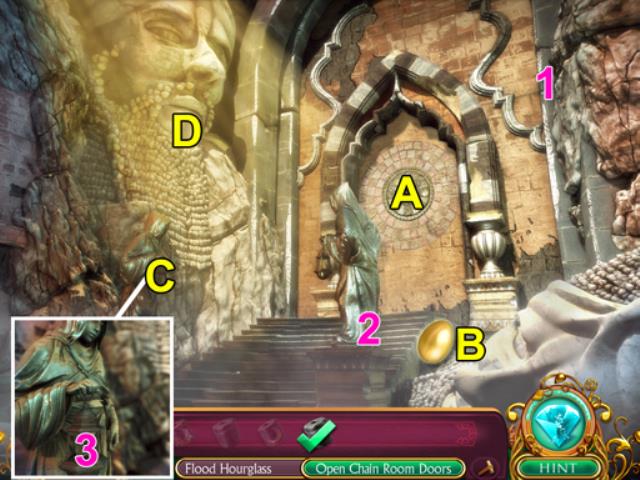
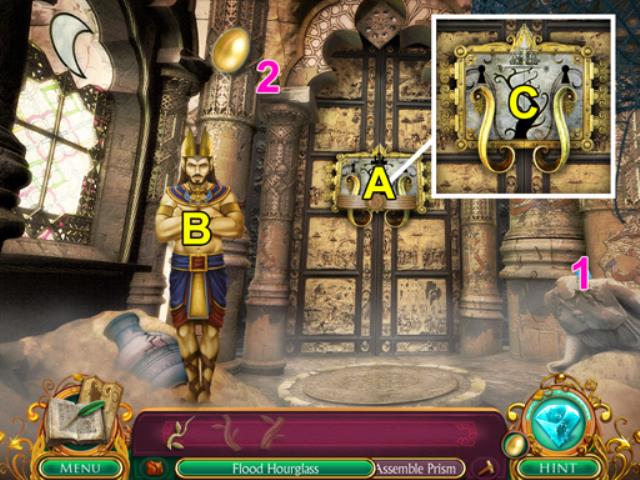
- Examine the Wall Mural to start the Assemble Prism Task (A).
- Collect TURTLE EMBLEM RIGHT HALF (1).
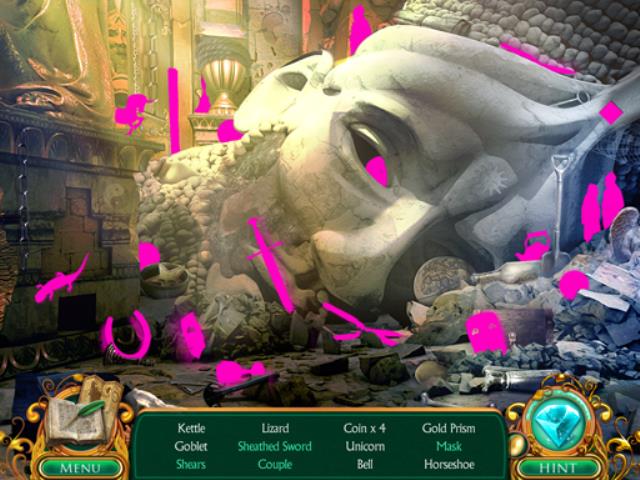
- A HOP becomes available (B).
- Locate all the listed items to collect the PRISM HALF.
- Return to the Hourglass Room after completing the HOP.
- Examine the Clay Pot to start the Dig Out The Pot Task (C).
- Return to the Chain Room (B).
- Collect the SHOVEL SPADE (2).
- Return to Ruin Entrance.
- Collect the SHOVEL HANDLE and the SHOVEL is added to your Inventory (1).
- Collect the MOON EMBLEM LEFT HALF (2).
- Return to Hourglass Room (A).
- Use the SHOVEL on the Clay Pot (D) to get the TURTLE EMBLEM LEFT HALF (1).
- CHAIN DOOR KEYS are added to your Inventory.
- Exit to Chain Room.
- Use the CHAIN DOOR KEYS inside the Domes empty slots (C).
- Select each Key to unlock the Chain Room Doors (C, E).
- Exit to Arch Gate (G).
- Collect the PRISM HALF and the SUN MOON PRISM is added to your Inventory (1).
- Examine the Emblem on the Door to start the Ornate Keys Task (A).
- Speak to the Desert Guardian that appears to start the Gather The Statues Task (B).
- Return to the Chain Room.
- Collect the first STATUE (3).
- Exit to the Hourglass Room.
- Collect the next STATUE (2).
- Exit to the Ruin Entrance.
- Collect the next STATUE (3).
- Return to the Tomb (A).
- Collect another STATUE (2).
- Examine the Large Statue (C) to get a SILVER KEY (3).
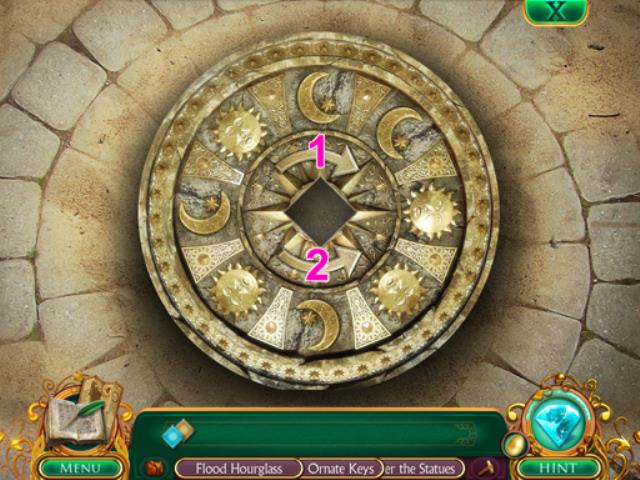
- Use the SUN MOON PRISM on the Wall Mural to start a mini-game (A).
- After completing the mini-game, collect the BEANSTALK EMBLEM BASE (D).
- The objective of the mini-game is to light each symbol by spinning the Prism.
- Sun symbols need to be highlighted in Yellow while Moon symbols need Blue light.
- Press 1x3, 2x1, 1x6, 2x1, 1x2 to complete the mini-game.
- Completing the mini-game reveals the BEANSTALK EMBLEM BASE in the main scene.
- Return to the Chain Room and enter the Turtle Room to the right of the dome.
- Collect the final STATUE and the GUARDIAN STATUES are added to your Inventory (1).
- Collect the SILVER KEY (2).
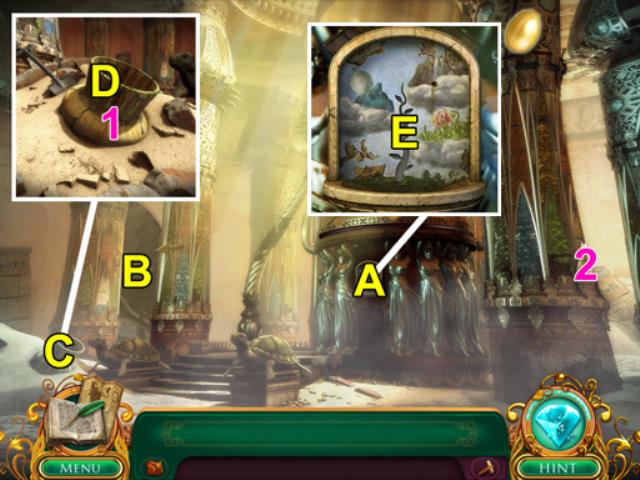
- Examine the Turtle Shell in the center to start the Pillar Turtle Task (A).
- Collect the PILLAR SHELL PIECE on top of the Altar (3).
- Collect CLOUD AMULET (4).
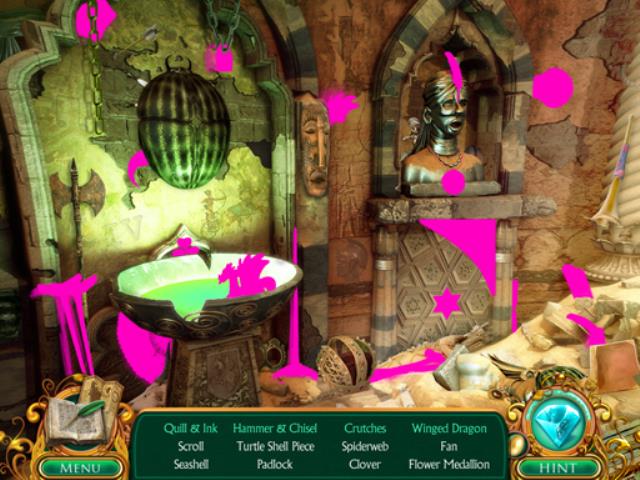
- Examine the Bowl to start a HOP (B).
- Locate all the listed items.
- Another PILLAR SHELL PIECE is collected after all items have been located.
- Return to the Chain Room after completing the HOP.
- Collect two PILLAR SHELL PIECES hidden in the room (4, 5).
- Exit to the Arch Gate (G).
- Collect the final PILLAR SHELL PIECE and the PILLAR TURTLE SHELL is added to your Inventory (2).
- Use the GUARDIAN STATUES on the Desert Guardian (B).
- The Desert Guardian gives you the VINE AMULET and the ORNATE SILVER KEYS are added to your Inventory.
- Use the ORNATE SILVER KEYS to unlock the panel on the Door (C).
- Examine the hieroglyphs that appear to start a mini-game (A).
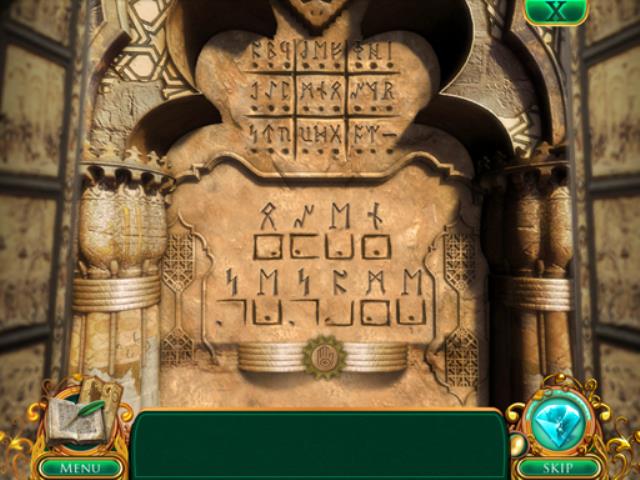
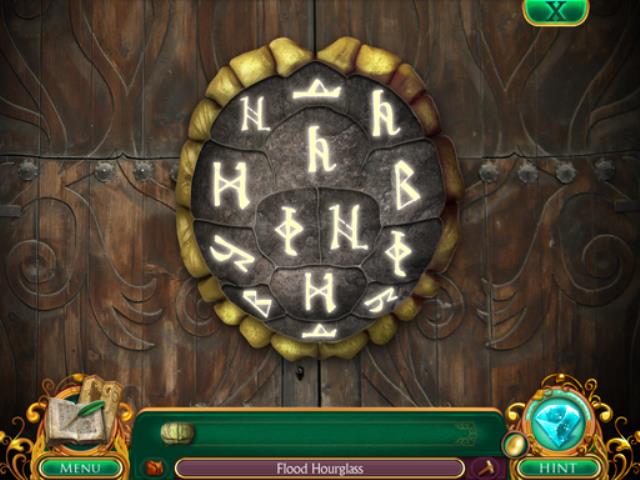
- The objective of the mini-game is to select the Runes at the top based on the Glyphs that appear in the center.
- Note the shape of the boxes and the location of dot in the Glyphs to find the matching Rune within the grid.
- Select a Rune within the top grid then click any matching Glyph to highlight it.
- Check your progress by clicking on the Hand Icon at the bottom of the puzzle.
- Collect the BEANSTALK EMBLEM TIP after completing the mini-game.
- Return to the Turtle Room.
- Use the PILLAR TURTLE SHELL on the Pillar to start a mini-game (A).
- The objective of this mini-game is to match the Symbols hidden under the segments of the Turtle Shell.
- Match pairs until all the pieces of the Shell have been used.
- Collect the BEANSTALK EMBLEM CENTER after completing the mini-game.
- The BEANSTALK EMBLEM is added to your Inventory.
- Return to the Hourglass Room.
- Use the BEANSTALK EMBLEM on the Mural (E).
- Exit to Ruin Entrance.
- Speak to the Desert Guardian to get the GUARDIAN RELIC (A).
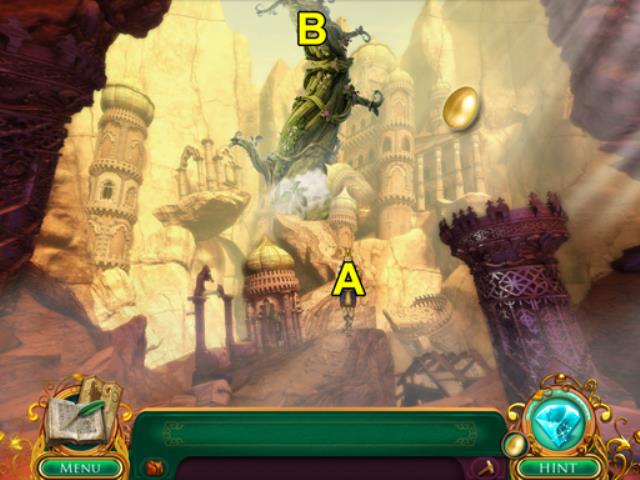
- Climb the Beanstalk to move to In The Clouds (B).
Chapter 7: Cloud World
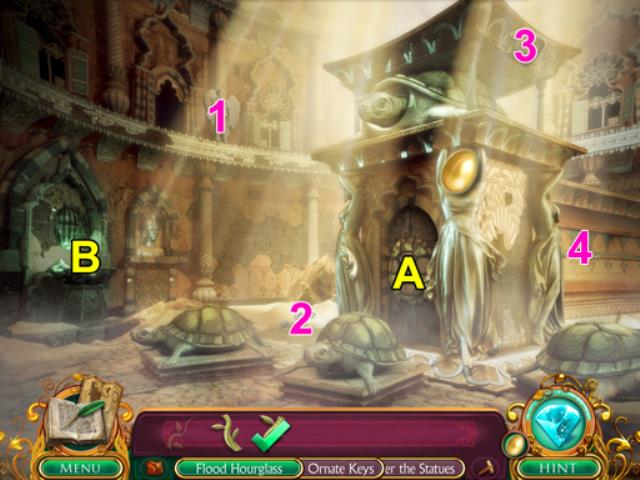
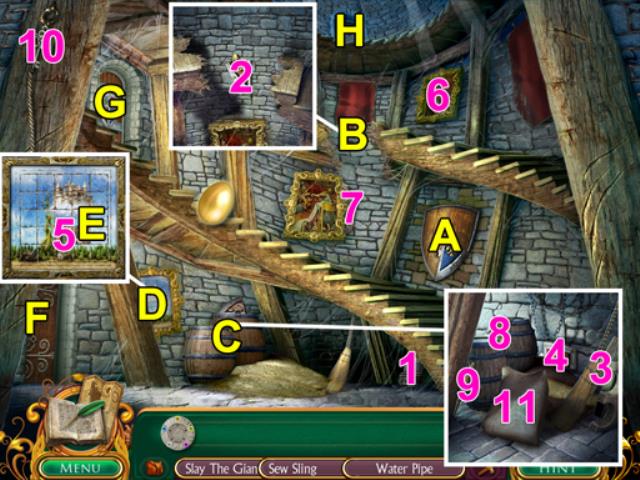
- The Slay The Giant Task activates as soon as you enter this area.
- Advance into the Courtyard (A).
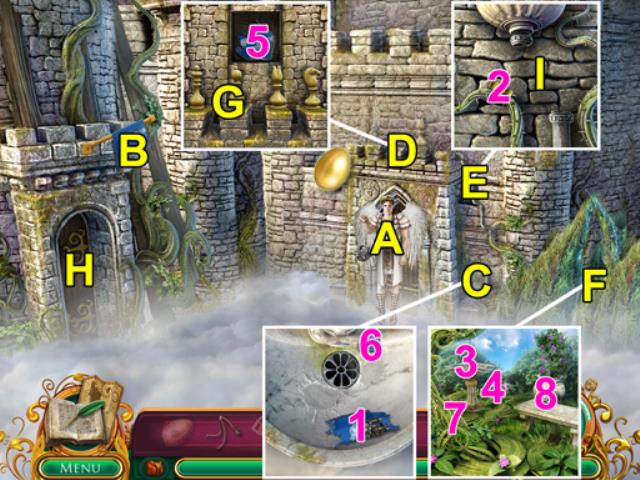
- Speak to the Cloud Guardian to start the Sew Sling Task (A).
- Examine the Torn Flag to start the Mend Blue Flag Task (B).
- Look in the Fountain (C) to find a BLUE FLAG STRIP (1).
- Examine the Wall above the Cloud Guardian to start the Unlock Chess Panel Task (D).
- Examine the Pipes (E) to find the BISHOP (2) and start the Water Pipe Task.
- Look into the Shrubs (F) to find the PAWN, and a PIPE PIECE (3, 4).
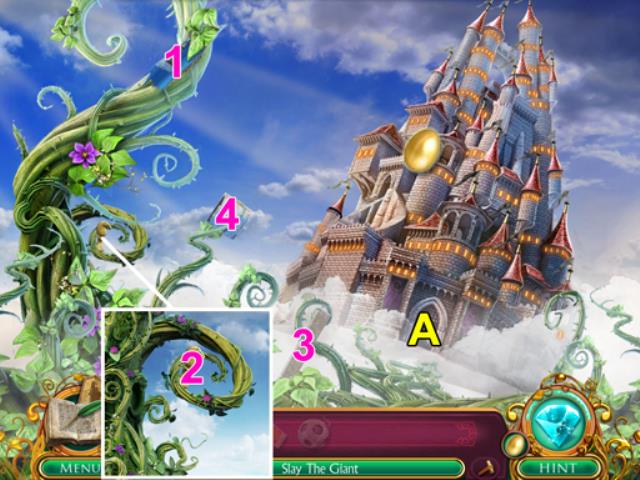
- Return to In The Clouds.
- Collect the BLUE FLAG STRIP and KNIGHT from the Beanstalk (1, 2).
- CHESS PIECES are added to your Inventory.
- Return to the Courtyard (A).
- Use the CHESS PIECES on the Wall (G) to get the last BLUE FLAG STRIP (5).
- BLUE FLAG is added to your Inventory.
- Use the BLUE FLAG to repair the Torn Flag (B).
- Proceed into the Inner Tower (H).
- Collect the PIPE PIECE (1).
- Examine the Shield Frame to start the Complete Shield Task (A).
- Examine the Gap (B) to start the Repair Stairs Task and collect a SHIELD PIECE (2).
- Search the Barrels (C) to find a STRONG BOARD and a SHIELD PIECE (3, 4).
- Examine the Picture Frame (D) to start the Stone Puzzle Task and collect a PIPE PIECE (5).
- FOUNTAIN PIPES are added to your Inventory.
- Return to the Courtyard.
- Use the FOUNTAIN PIPES on the Pipes (I).
- Search the Fountain to find a STONE TILE (6).
- Examine the Shrubs to find a STRONG BOARD and a SHIELD PIECE (7, 8).
- Return to In The Clouds.
- Collect a STRONG BOARD and a STONE TILE from the Vines (3, 4).
- PUZZLE TILES are added to your Inventory.
- Return to the Inner Tower.
- Use the PUZZLE TILES on the Painting to unlock the Door (E).
- Proceed into the Alchemy Lab (F).
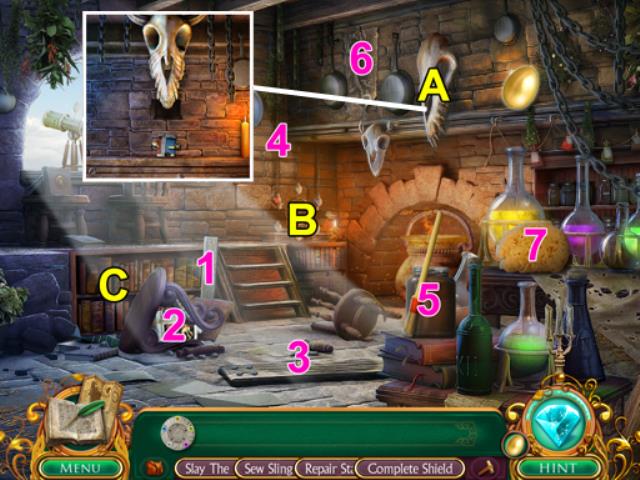
- Collect the STRONG BOARD, SHIELD PIECE, and NAILS from the room (1, 2, 3).
- Examine the Skull to start the Bull Horns Task (A).
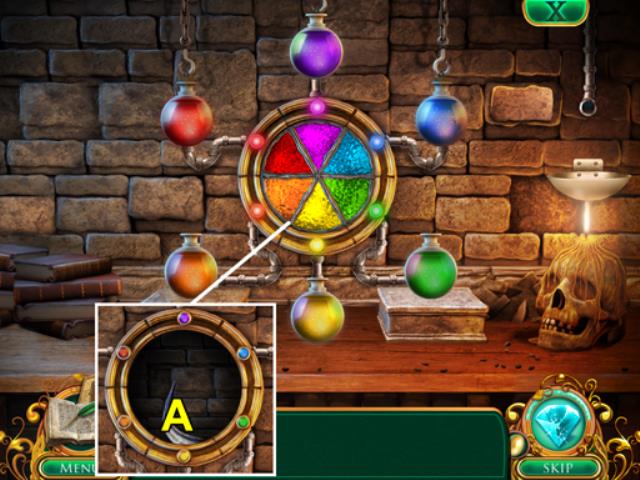
- Examine the Potion Machine to start a mini-game (B).
- The Empty Bottles need to be filled with the color that matches their light in the Machine.
- Select an Empty Bottle then combine the colors from the Machine to create a match.
- Solution:
- Green = Blue and Yellow.
- Orange = Yellow and Red.
- Purple = Red and Blue.
- Collect the RIGHT HORN that appears after completing the puzzle (A).
- Return to the Inner Tower.
- Collect the LEFT HORN from the Painting (6).
- The BULL HORNS are added to your Inventory.
- Return to the Alchemy Lab (F).
- Examine the Large Skull (A) and use the BULL HORNS on the skull to get the final SHIELD PIECE.
- The SHIELD PIECES are added to your Inventory.
- Examine the Bookshelf to start a mini-game (C).
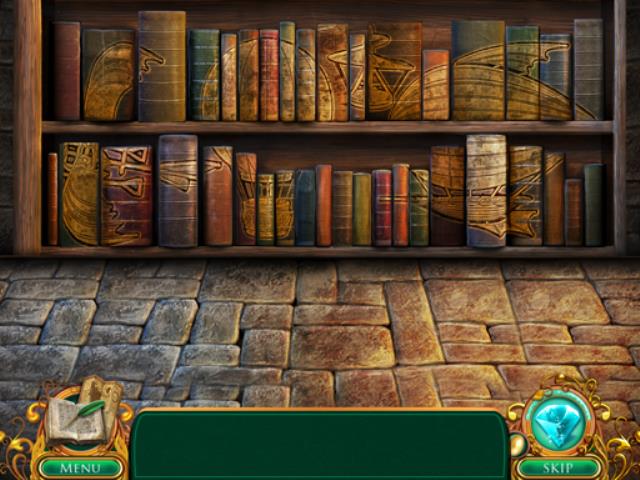
- Place all the Books in their correct location.
- Use the image on the Book Edges as a guide.
- A BOOK is awarded after completing the puzzle.
- Exit to the Inner Tower.
- Use the SHIELD PIECES on the Shield Frame (A).
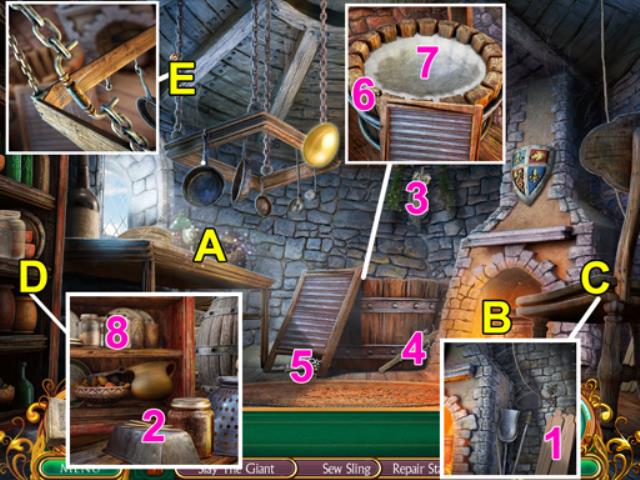
- Advance into the Kitchen (G).
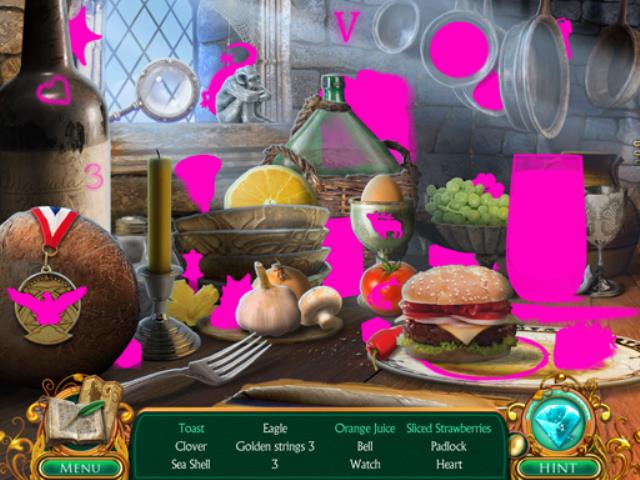
- Examine the Table to start a HOP (A).
- Locate all the listed items.
- MATCHES are collected after all items have been located.
- Examine the Cauldron to start a mini-game (B).
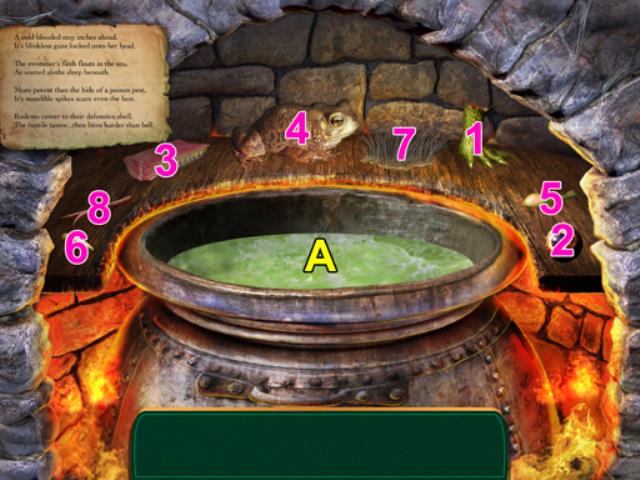
- The Ingredients need to be added in the correct order.
- The Riddle offers hints to the order.
- The solution is: 1. Foot. 2. Eyeball. 3. Fish. 4. Toad. 5. Stinger. 6. Tooth. 7 Quills. 8. Tongue.
- Collect the REPAIR ESSENCE from the Cauldron (A).
- The STAIR REPAIRS are added to your Inventory.
- Return to the Inner Tower.
- Use the STAIR REPAIRS on the Gap (B).
- Proceed up to the Falling Bridge (H).
- Examine the Broken Bridge to start the Marshmallow Bridge Task (A).
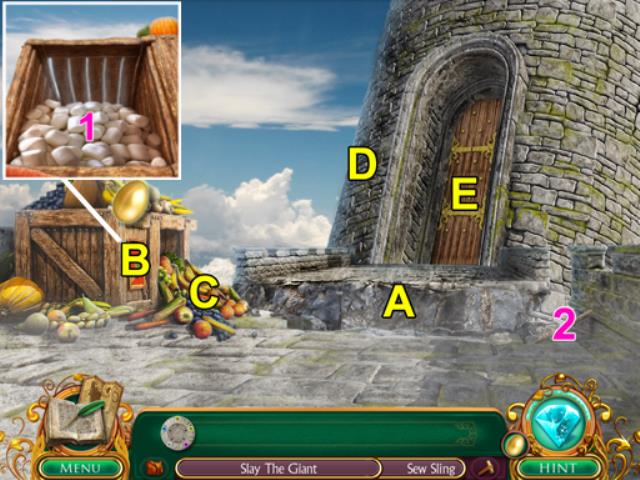
- Examine the Crate to start the Golden Apple Task (B).
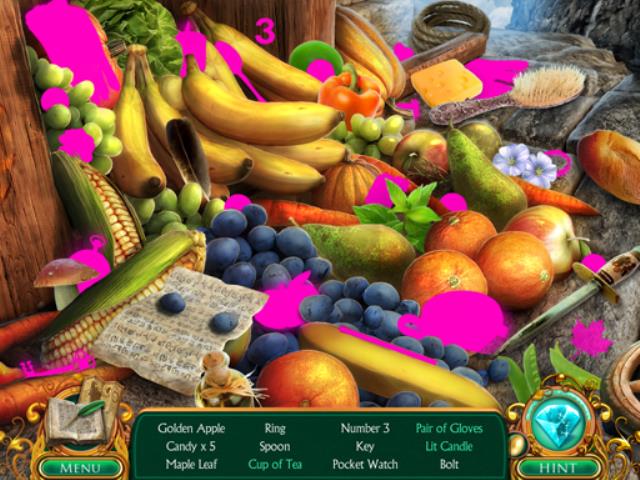
- Search the Fruits for a HOP (C).
- Locate all the listed items.
- The GOLDEN APPLE is collected after all items have been located.
- Return to the Alchemy Lab.
- Collect the GLUE (5) and the GOLDEN APPLE will be added to your Inventory.
- Return to the Kitchen.
- Examine the Fireplace (C) to get POPSICLE STICKS (1).
- Search the Shelf to find TOOTHPICKS (2).
- Return to the Falling Bridge.
- Use the GOLDEN APPLE on the Crate (B) to get MARSHMALLOWS (1).
- MARSHMALLOW BRIDGE ITEMS are added to your Inventory.
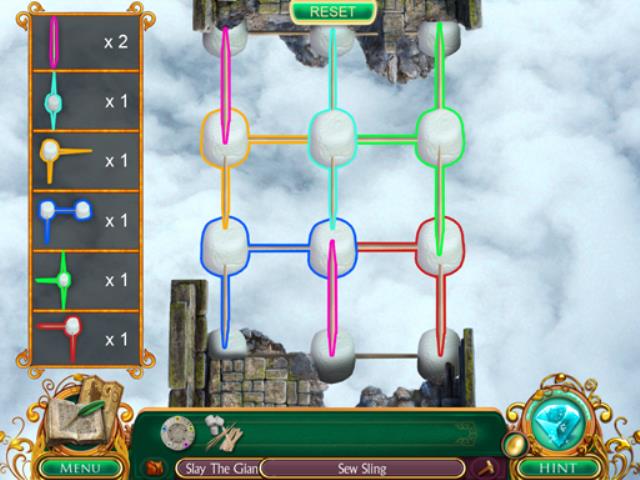
- Examine the Broken Bridge (A).
- Use the MARSHMALLOW BRIDGE ITEMS in the empty space to start a mini-game.
- A list of the available Repair Items appear on the left.
- Use all the available Repair Items to create a grid to the other side of the Bridge.
- Examine the Tower to start the Mend Tower Flag Task (D).
- Return to the Inner Tower.
- Collect the OGRE FLAG PIECE near the Painting (7).
- Examine the Barrels (C) to find another OGRE FLAG PIECE (8).
- Return to the Alchemy Lab (F).
- Collect the OGRE FLAG PIECE from the Wall (6).
- Return to the Kitchen.
- Collect the final OGRE FLAG PIECE (3).
- The ATTIC FLAG is added to your Inventory.
- Return to the Falling Bridge.
- Use the ATTIC FLAG on the Tower to open the Door (D).
- Proceed into the Attic (E).
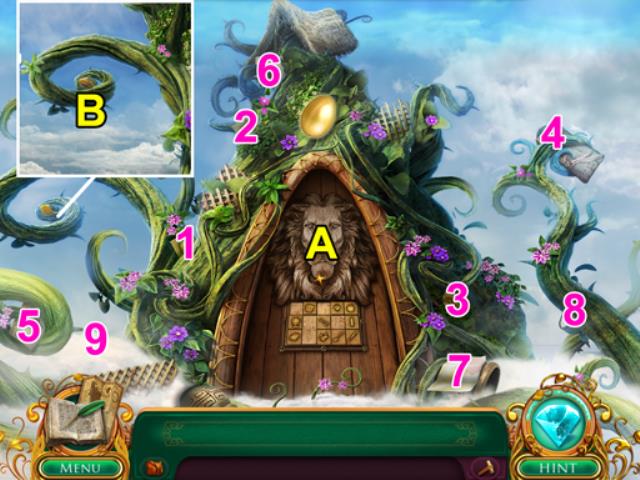
- Use the GUARDIAN RELIC anywhere in the scene to begin a mini-game (A).
- Use the Arrows (B) to cycle the Statues to find the color that matches the Flower Guardians Staff (C).
- The Guardian Statue at the top of the Wheel can be used against the Flower Guardian (D).
- The MAGIC PATTERN is awarded after defeating the Flower Guardian.
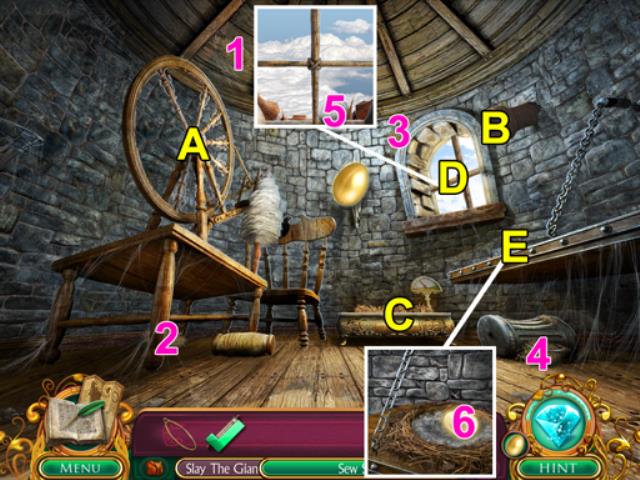
- Examine the Spinning Wheel to start the Spinning Wheel Task (A).
- Examine the Pipe to start the Unclog The Drain Task (B).
- Examine the Scale to start the Gather Straw Task (C).
- Collect four pieces of STRAW from the room (1, 2, 3, 4).
- LOOSE STRAW is added to your Inventory.
- Use the LOOSE STRAW on the Scale (C) to get a NEEDLE.
- Examine the Window (D) to get WOOL (5).
- Exit to Falling Bridge.
- Collect the WHEEL SPOKE (2).
- Exit to the Inner Tower.
- Examine the Barrels (C) to get a WHEEL SPOKE (9).
- Continue to the Alchemy Lab (F).
- Collect the SPONGE (7).
- Exit to the Kitchen.
- Collect the WHEEL SPOKE (4).
- Examine the Broken Chain to start the Replace The Chain Task (E).
- Collect a KEY (5).
- Examine the Washtub (F) to find a HANDLE and SOAP BUBBLES (6, 7).
- Search the Shelf (D) for a JAR (8).
- The DRAIN CLEANER is added to your Inventory.
- Exit to the Inner Tower.
- Collect the KEY (10) and the REPLACEMENT CHAIN is added to your Inventory.
- Return to the Kitchen (G).
- Use the REPLACEMENT CHAIN on the Broken Chain (E).
- SPINNING WHEEL SPOKES are added to your Inventory.
- Return to the Attic.
- Use the SPINNING WHEEL SPOKES on the Spinning Wheel (A).
- MAGIC SLING PARTS are added to your Inventory.
- Use the DRAIN CLEANER on the Pipe (B) to cause an golden egg to fall out.
- Examine the Bench (E) and collect the GOLDEN EGG (6).
- Exit to the Courtyard.
- Use the MAGIC SLING PARTS on the Cloud Guardian to get the MAGIC SLING (A).
- Proceed into the Hallway (A).
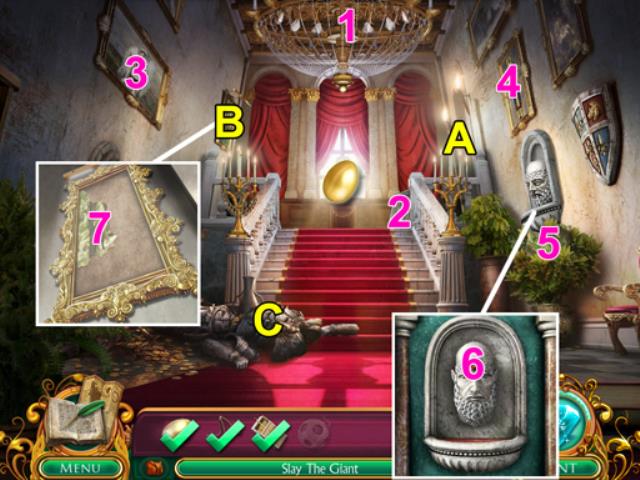
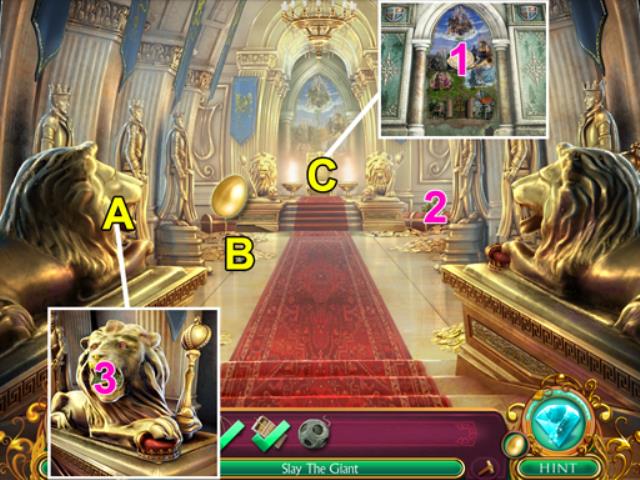
- Advance into the Throne Room (A).
- Examine the Lion Statue to start the Adorn Lion Task (A).
- Examine the Bombshells to start the Pack The Bombs Task (B).
- Examine the Mural (C) to collect the PACKING LEATHER (1) and start the Tapestry Cutouts Task.
- Return to the Hallway.
- Collect a LION EYE GEM and METAL PAN from the room (1, 2).
- Collect the CLOUD and DESERT GUARDIAN CUTOUTS from the Paintings (3, 4).
- Examine the Green Painting to start the Repair Painting Task (B).
- Collect a PAINTING PIECE in the Shrub (5).
- Examine the Fountain to get a LION EYE GEM (6).
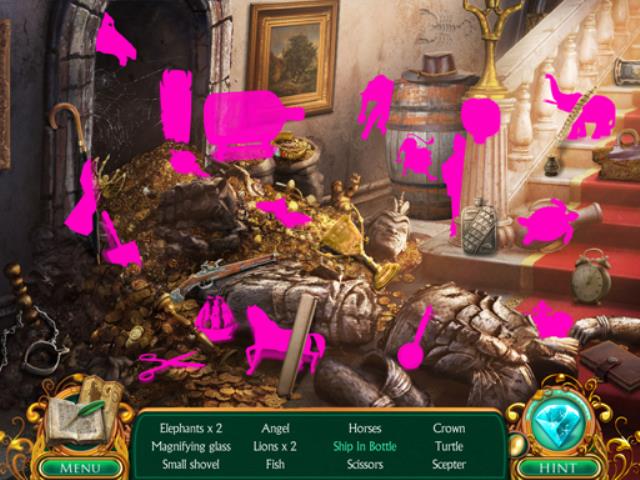
- Examine the Toppled Statue to start a HOP (C).
- Locate all the listed items.
- The CROWN AND SCEPTER are collected after all items have been located.
- LION ADORNMENTS are added to your Inventory.
- Return to the Throne Room.
- Collect a PAINTING PIECE (2).
- Examine the Lion Statue (A) and use the LION ADORNMENTS to get another PAINTING PIECE (3).
- The FULL PAINTING is added to your Inventory.
- Return to the Hallway.
- Use the FULL PAINTING on the Green Painting (B) to get the PLANT GUARDIAN CUTOUT (7).
- Return to the Inner Tower.
- Examine the Barrels (C) to find the PACKING SAND (11).
- BOMB PACKING is added to your Inventory.
- Exit to the Throne Room.
- Place the BOMB PACKING in the Box to start a mini-game (B).
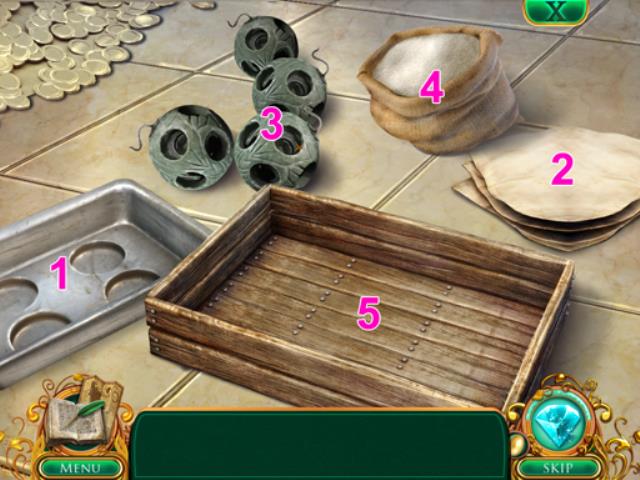
- The ingredients need to be placed in the Box in the correct order.
- The solution is: 1. Pan. 2. Leather. 3. Shells. 4. Sand.
- Collect the EXPLOSIVES and the WATER GUARDIAN CUTOUT (5).
- GIANT SLAYING SUPPLIES and GUARDIAN CUTOUTS are added to your Inventory.
- Use the GUARDIAN CUTOUTS on the Mural to start a mini-game (C).
- Place all the Characters from the side sections into the main Tapestry.
- Look for matching outlines.
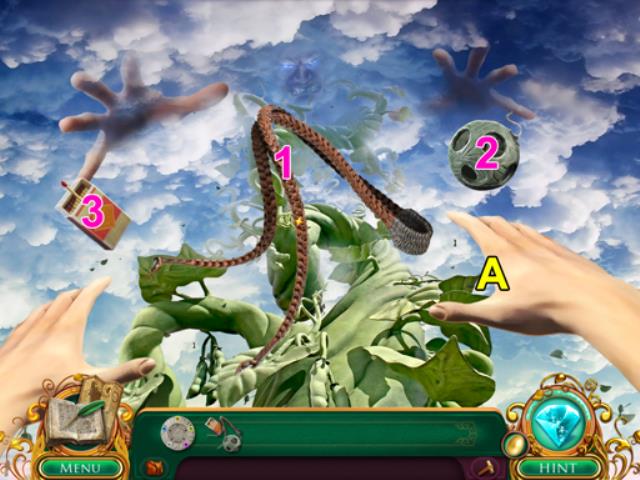
- Collect JACK and prepare to confront the Giant (A).
- Use the Sling (1) and then the Bomb (2) on the hand (A).
- Use the MATCH (3) on the armed sling (A) to ignite the bomb and watch the ending cinematic.
- Congratulations! You've completed Fairy Tale Mysteries: The Beanstalk!
Created at: 2013-11-17