

Walkthrough Menu
- General Tips
- Chapter 1: Eastwood
- Chapter 2: Evelyn's House
- Chapter 3: The Crypt
- Chapter 4: The School
- Chapter 5: The Forest
- Chapter 6: The Sanatorium
General Tips
- This is the official guide for Fear for Sale: City of the Past.
- This guide will not mention each time you have to zoom into a location; the screenshots will show each zoom scene.
- Hidden-object puzzles are referred to as HOPs. This guide will not show screenshots of the HOPs, but it will mention when a HOP is available and the inventory item you'll collect from it.
- This guide will give step-by-step solutions for all puzzles that are not random. Please read the instructions in the game for each puzzle.
Chapter 1: Eastwood
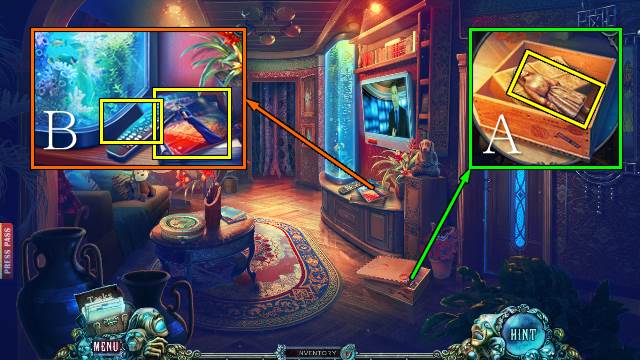
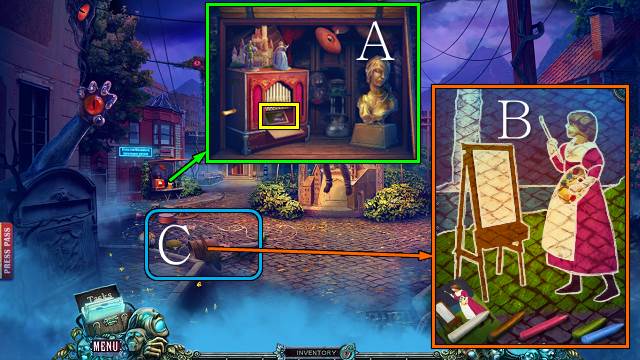
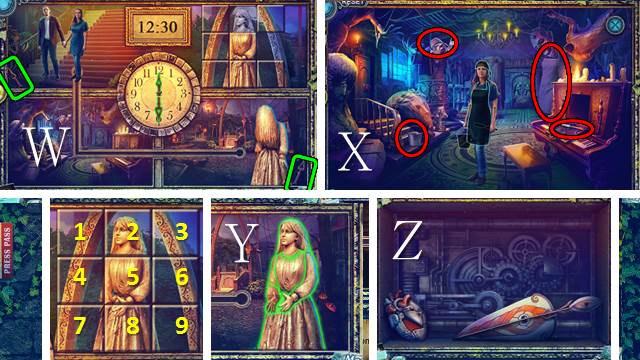
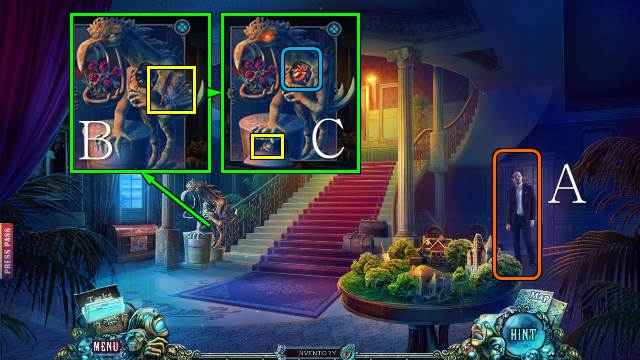
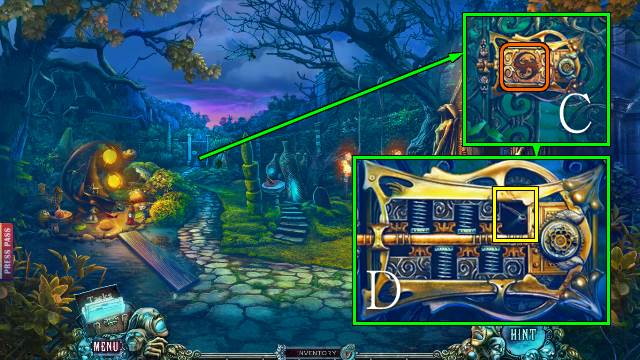
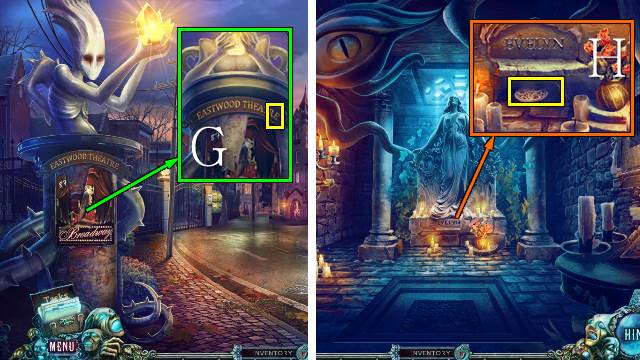
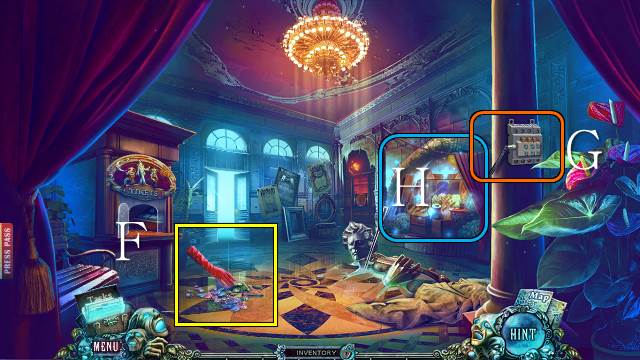
- Open the crate and take the STATUETTE (A).
- Take the REMOTE; move the magazine and take the PRINTER PAPER (B).
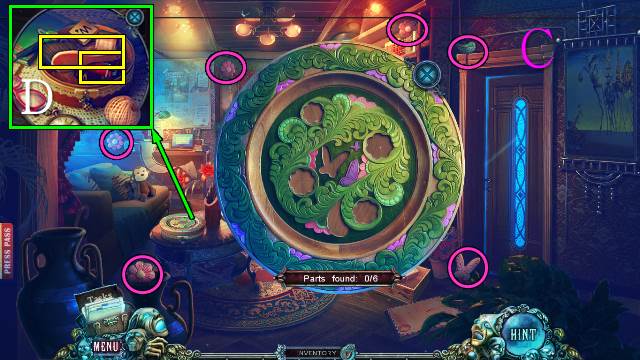
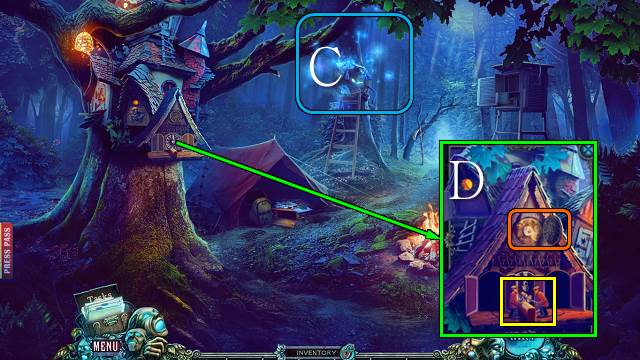
- Select the box and find the parts (C); open the box, move the items and take the BRUSH and LIGHTER (D).

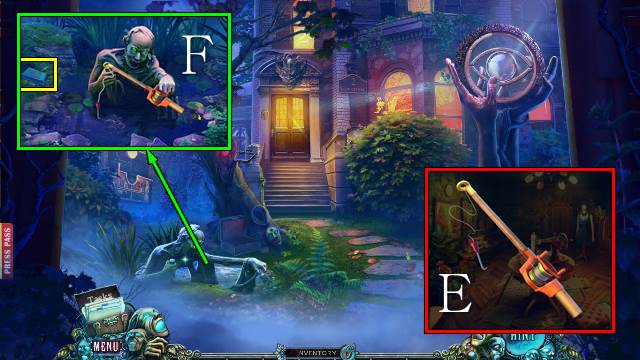
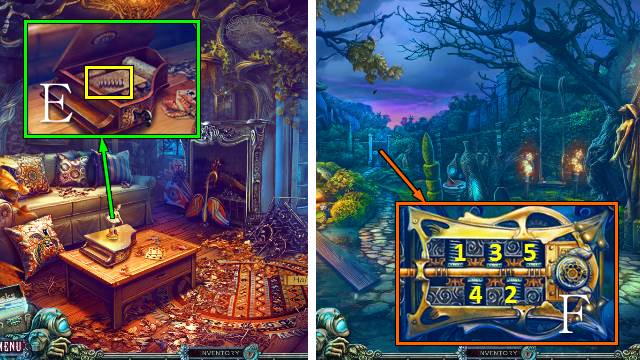
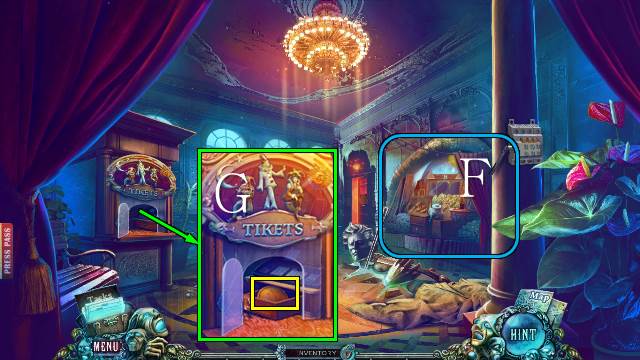
- Use the LIGHTER and inspect the picture (E); take the DAMAGED MAP (F).
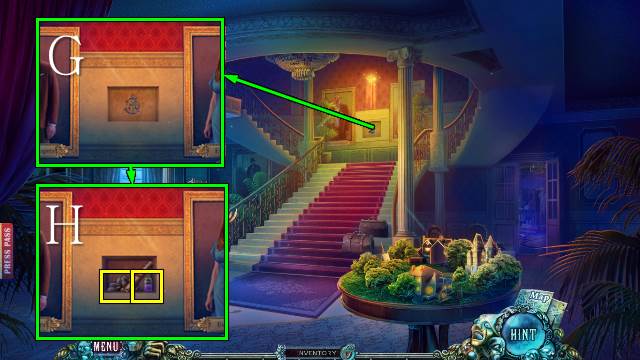
- Open the scanner and place the DAMAGED MAP; place the PRINTER PAPER (G).
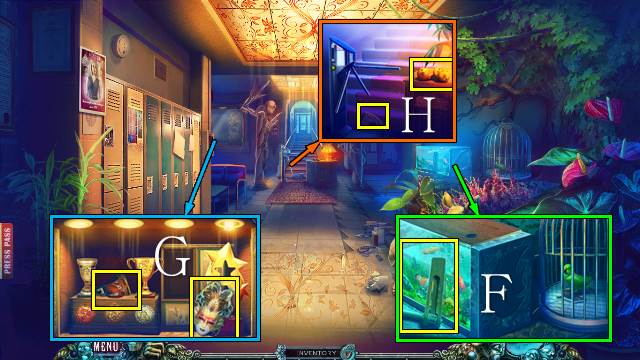
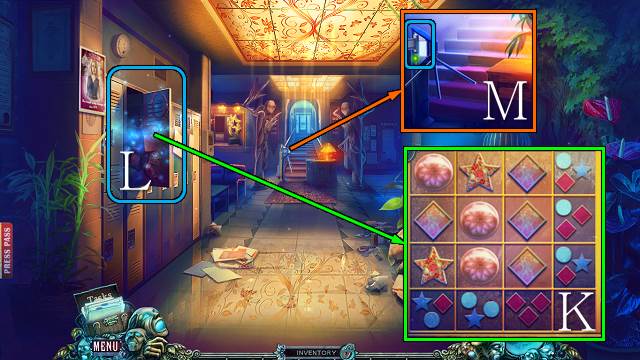
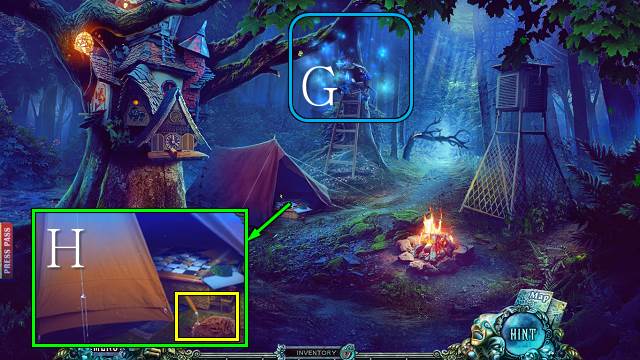
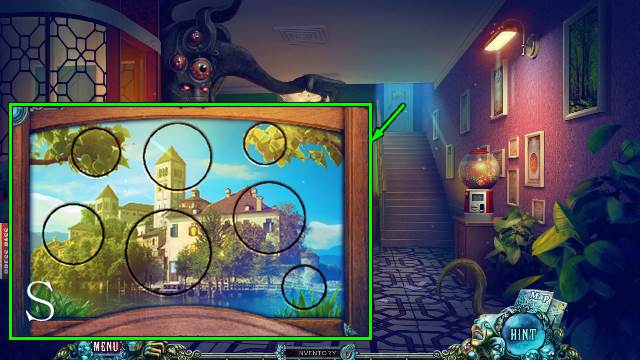
- Play the HOP (H).
- You receive the PASSWORD.

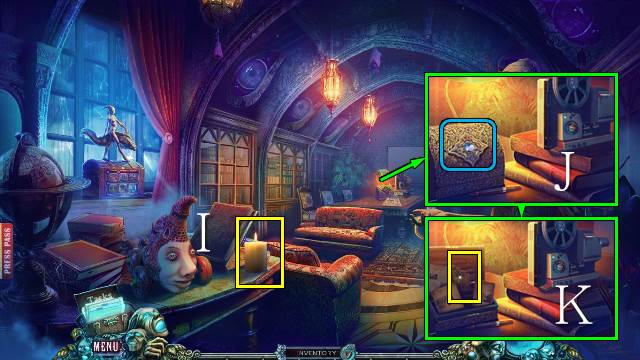
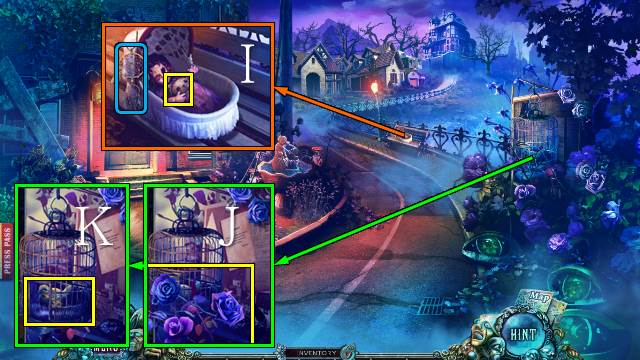
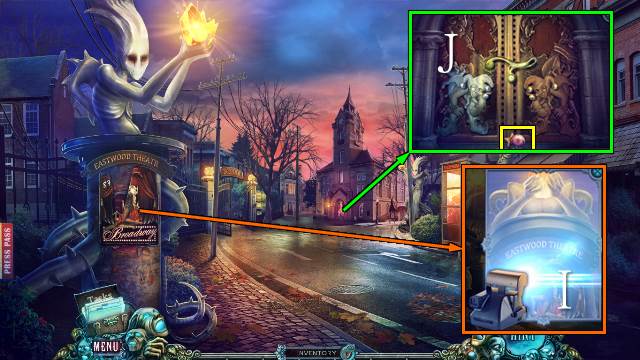
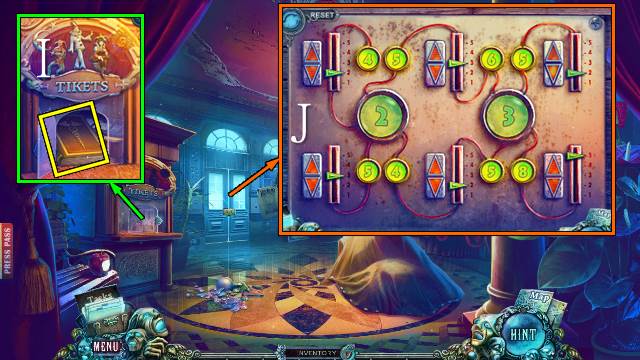
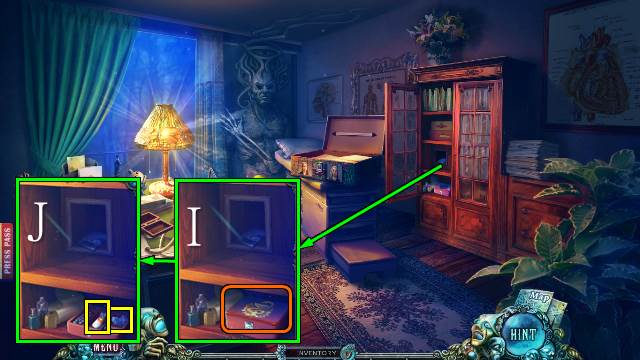
- Access the laptop (I), place the PASSWORD, enter 789065 and hit the green button (J); clean the map (K).
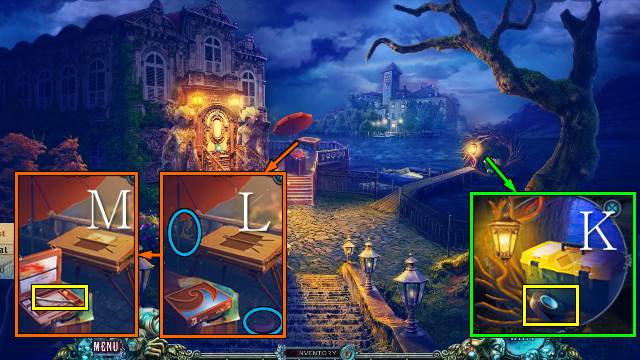
- Take the BROKEN FLASHLIGHT (L).
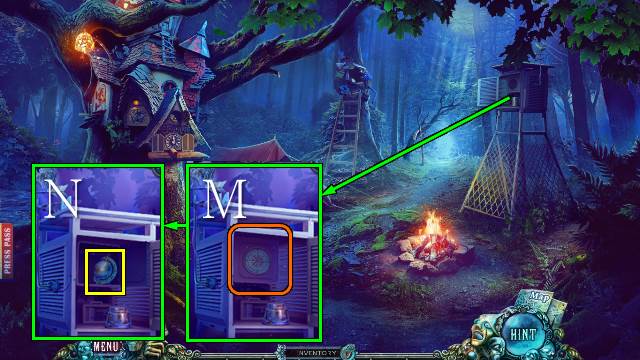
- Take the PLAQUE HALF (M).
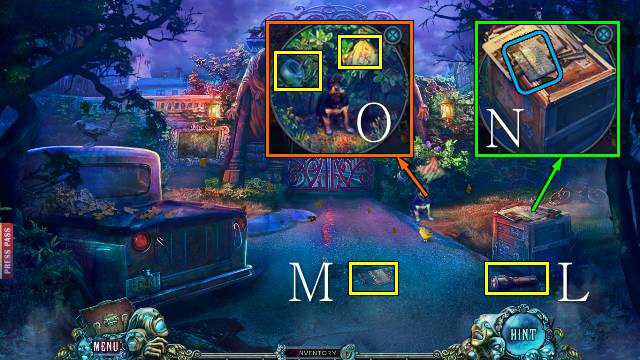
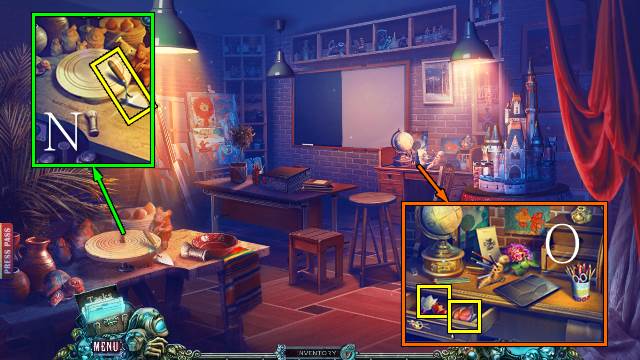
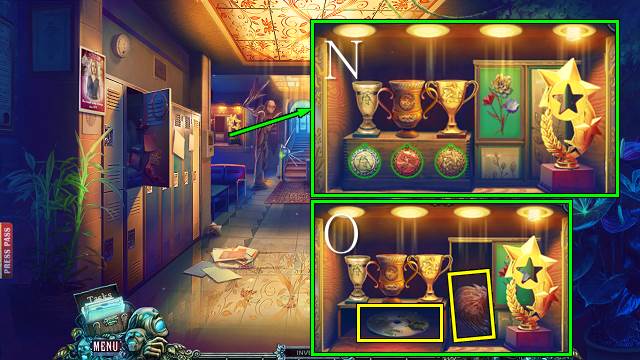
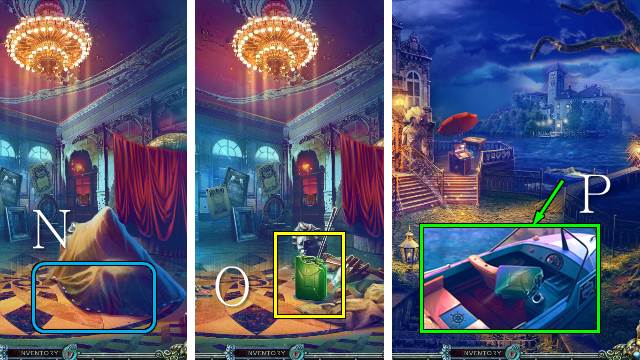
- Take your Map and move the papers (N).
- Take the TAPE and FLAG (O).
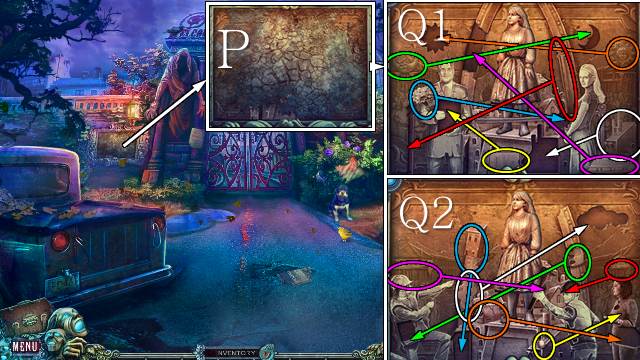
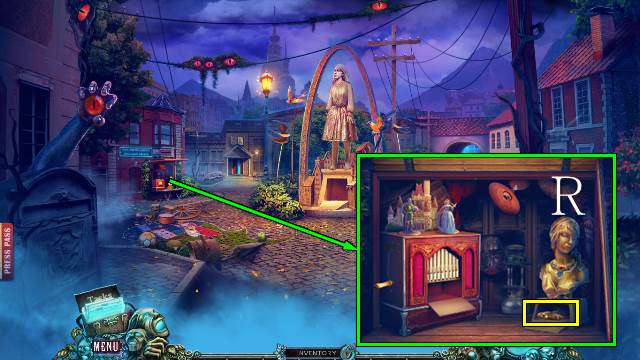
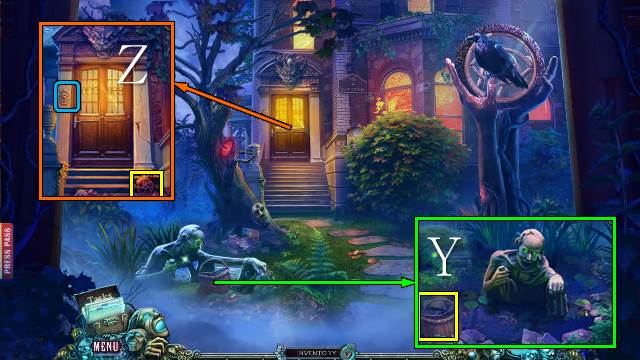
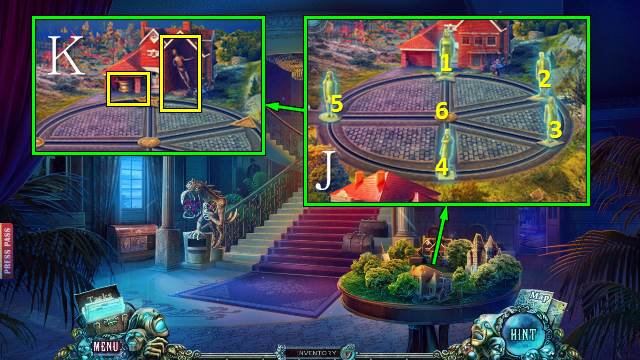
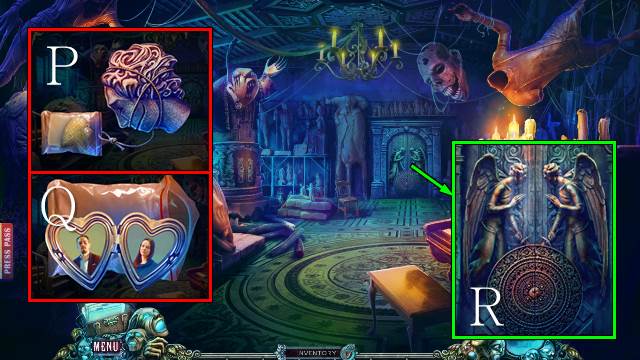
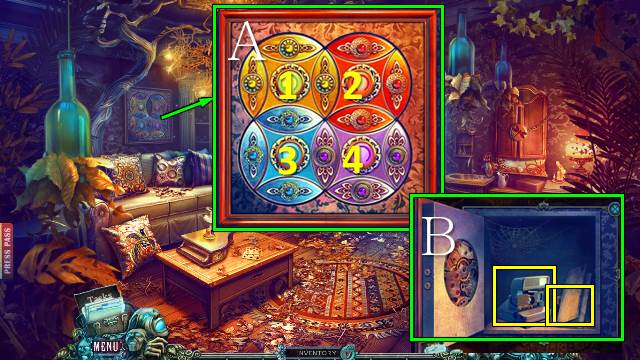
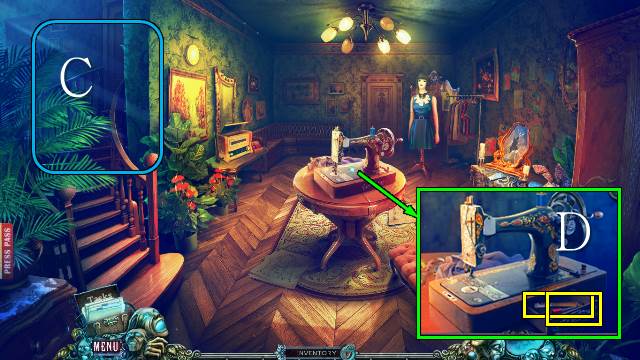
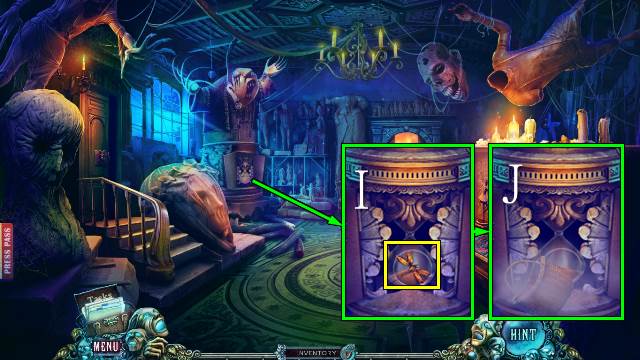
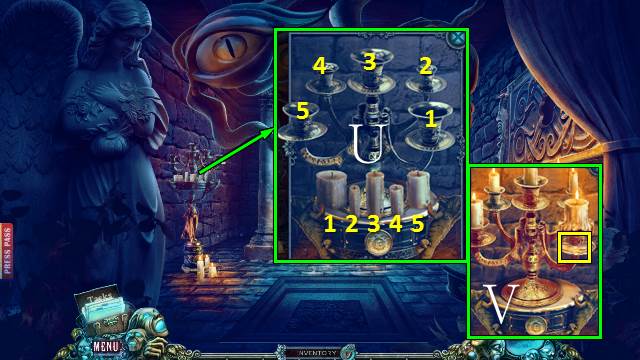
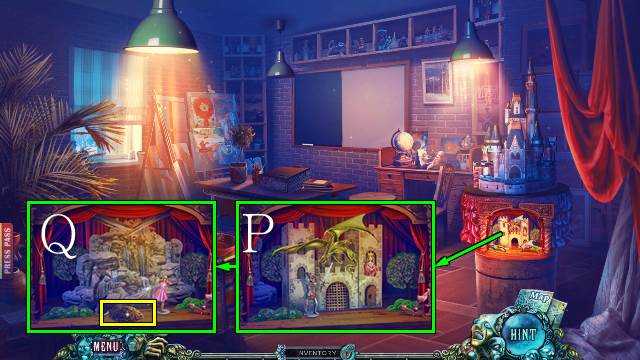
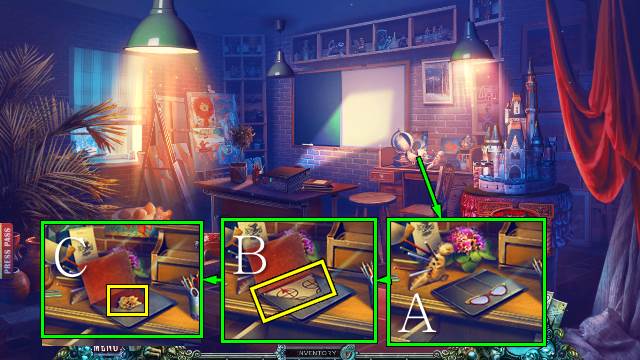
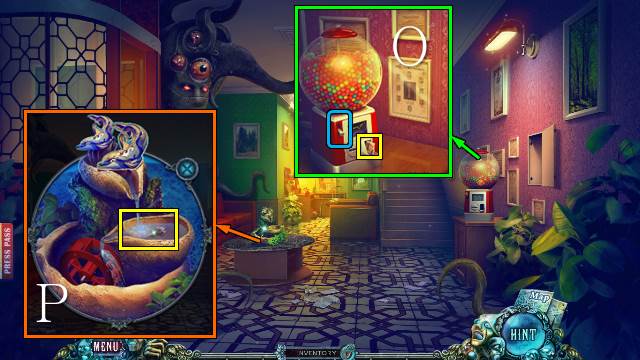
- Use the BRUSH (P) and place the STATUETTE for a mini-game (Q1, Q2).
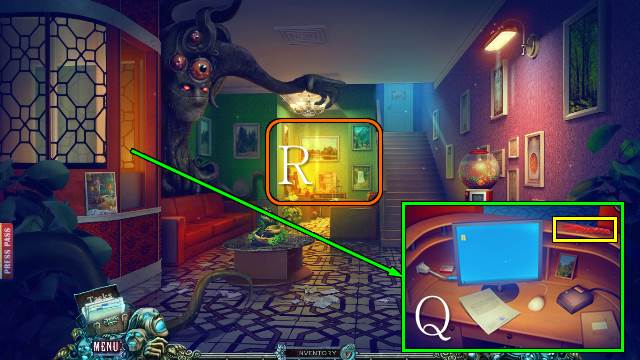
- Walk forward.
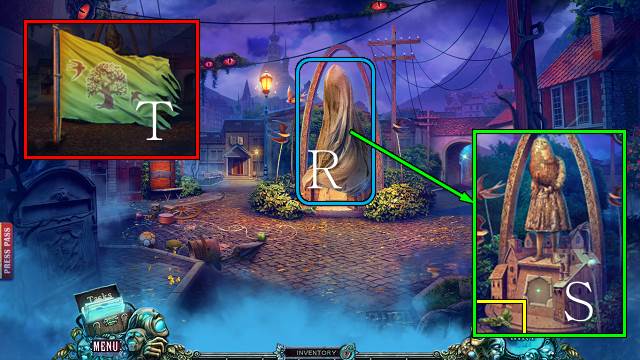
- Remove the sheet (R).
- Take the BUTTERFLY (S).
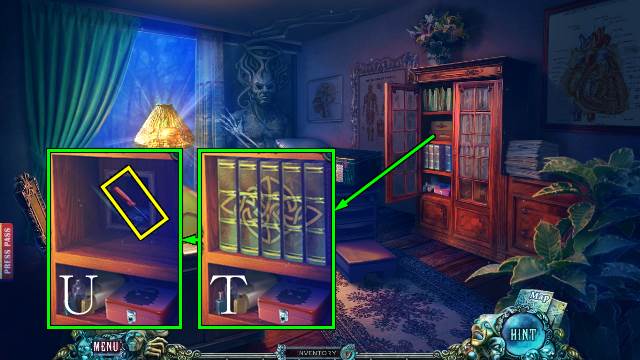
- Access the FLAG and take the STAFF (T).
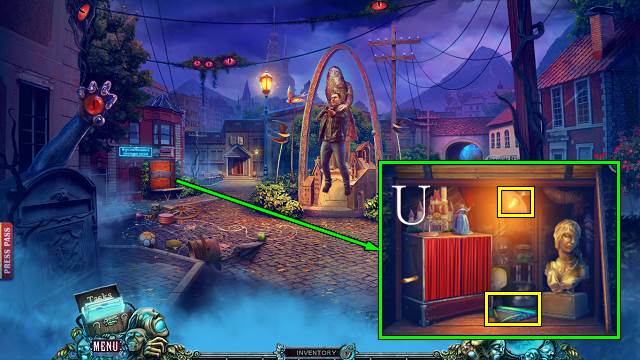
- Use the STAFF; take the SILK and LIGHT BULB (U).
- Walk down.
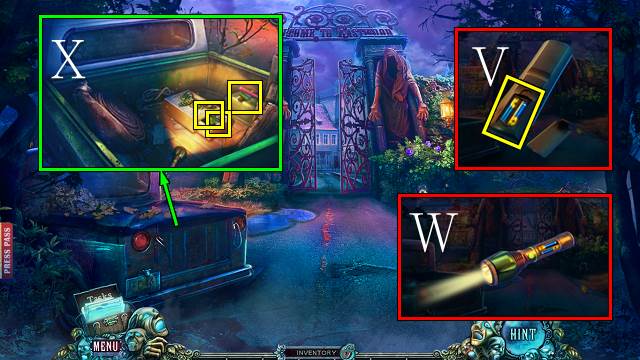
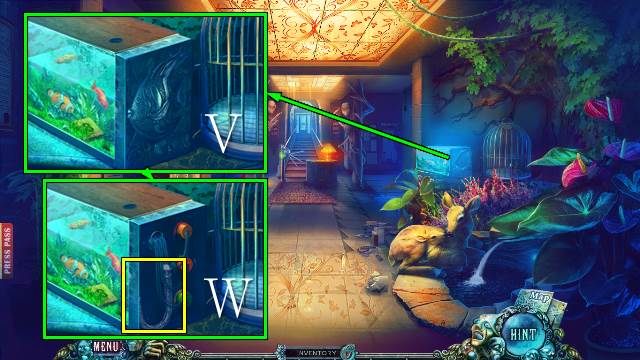
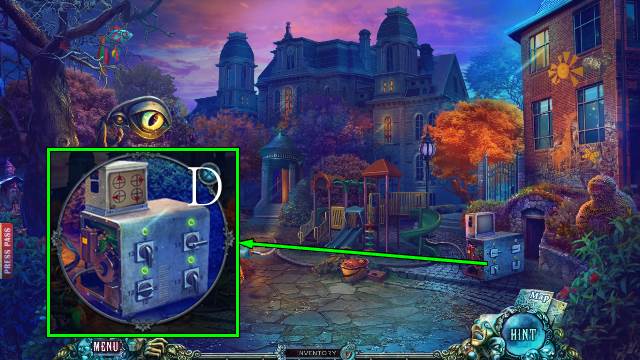
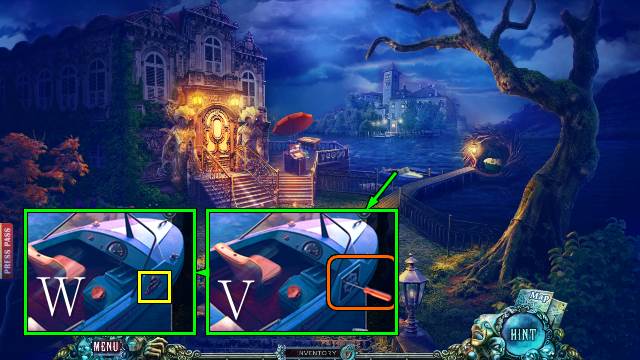
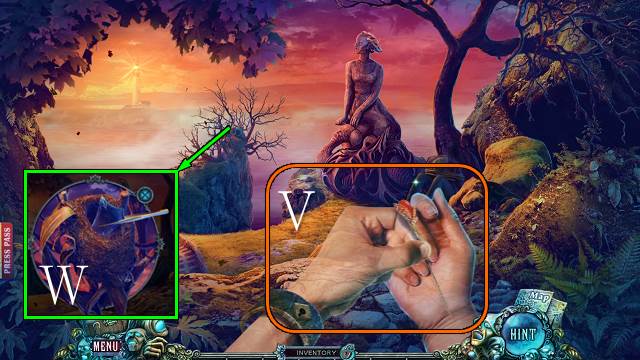
- Access the REMOTE, open it and take the BATTERIES (V).
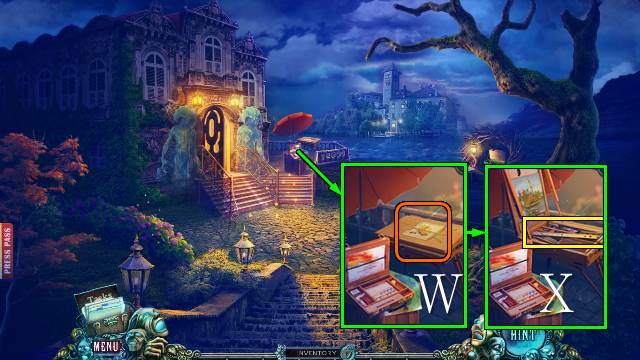
- Access the BROKEN FLASHLIGHT, open it and place the BATTERIES and LIGHT BULB; you receive a FLASHLIGHT (W).
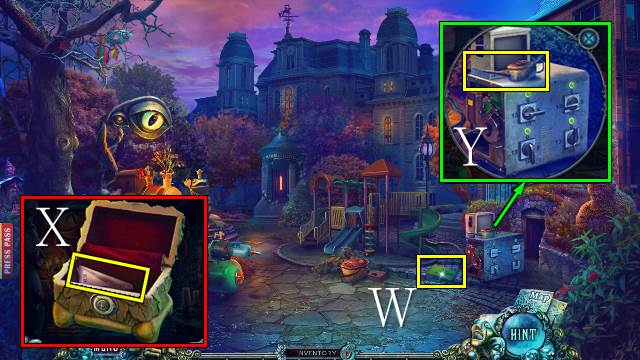
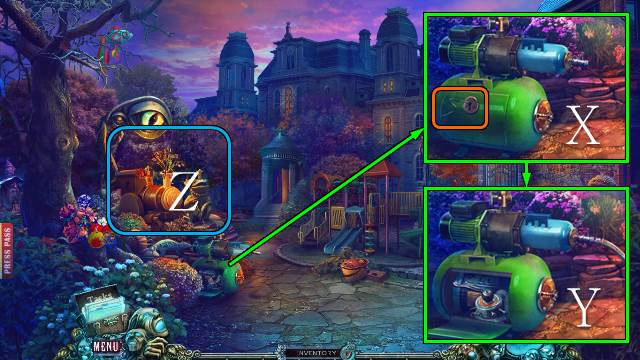
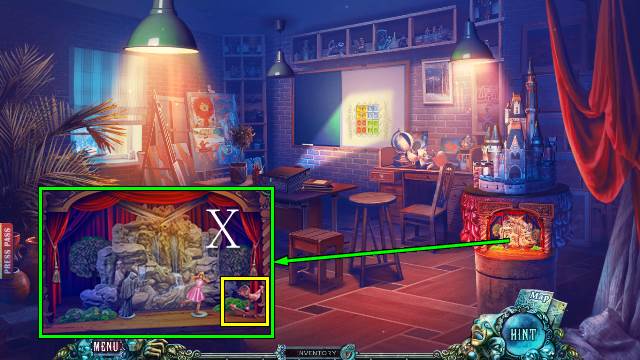
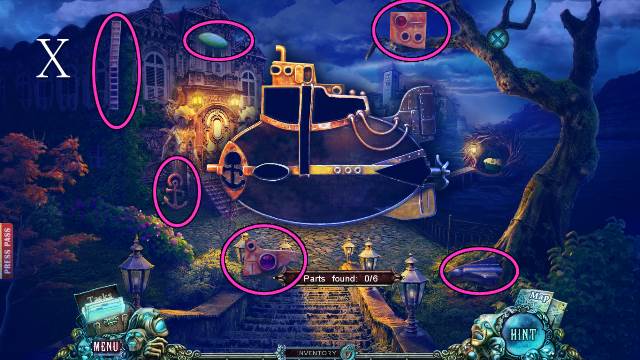
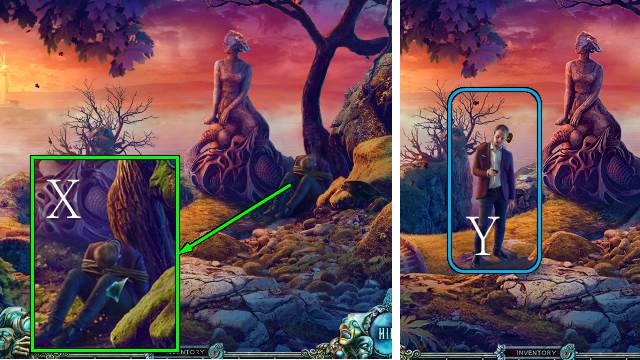
- Remove the tarp, place the FLASHLIGHT and BUTTERFLY and take the PRINCE FIGURINE, STONE EYE and CRAYONS (X).
- Walk forward.
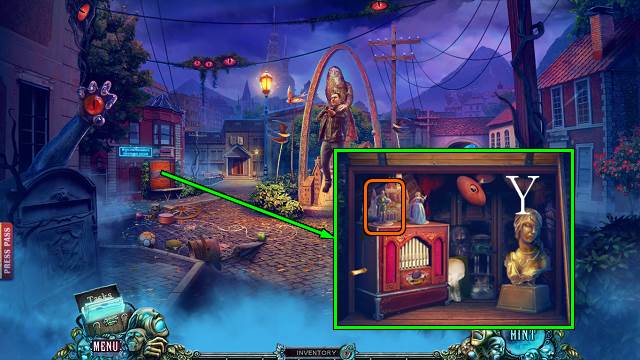
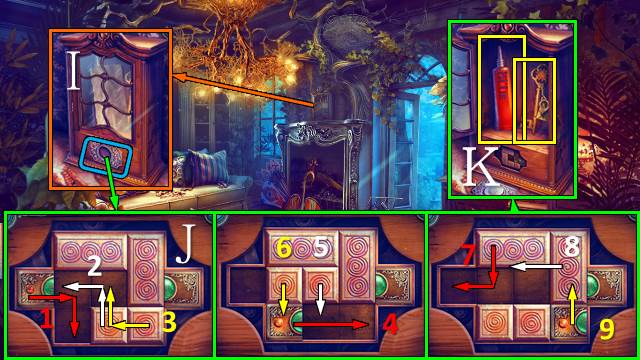
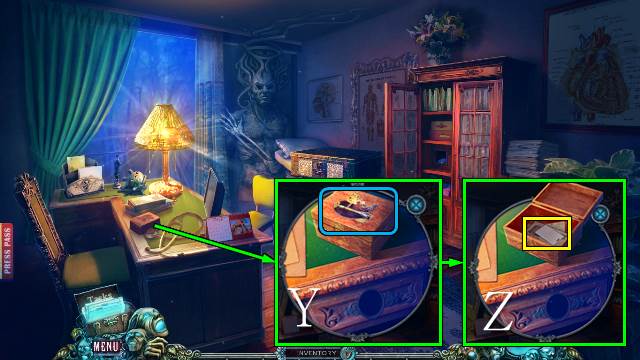
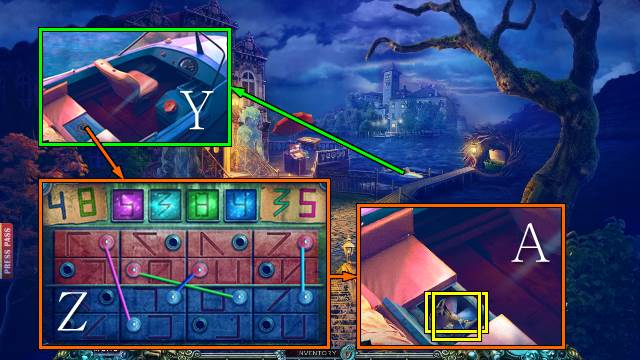
- Place the PRINCE FIGURINE and zoom in for a mini-game (Y).

- Solution: swap 2-3, 1-5, 4-6, push Z2, swap 7-9, 7-10, 8-11 push Z1, swap 12-13.
- Take the REFERENCE IMAGE (A).
- Place the REFERENCE IMAGE and CRAYONS for a mini-game (B).
- Play the HOP (C).
- You receive a CROWBAR.
- Walk down.
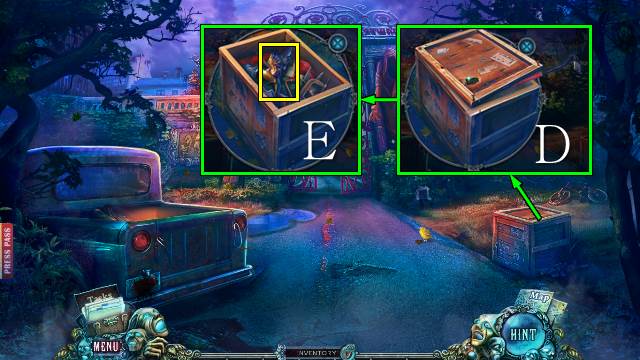
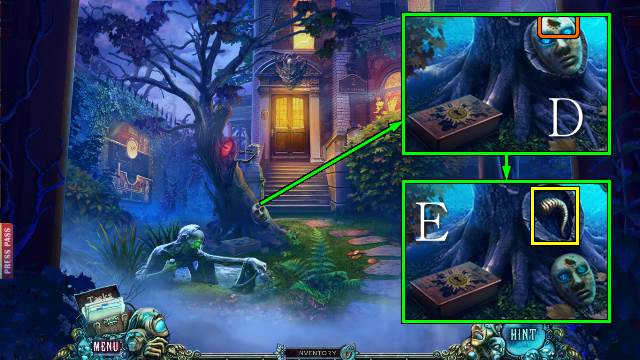
- Use the CROWBAR (D) and take the SWALLOW (E).
- Walk forward.
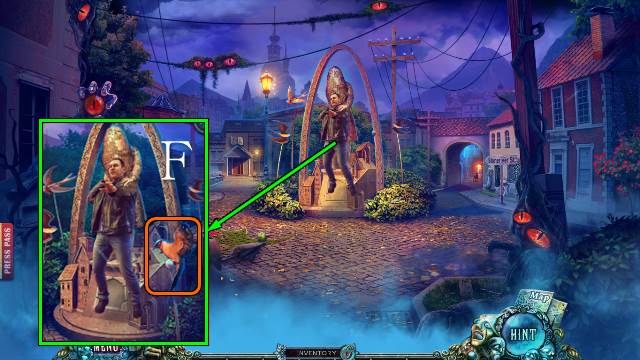
- Place the SWALLOW (F).
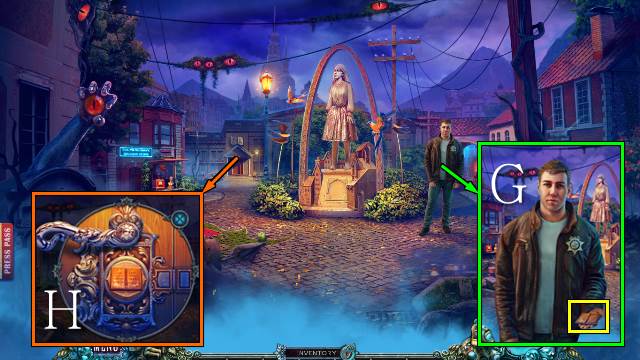
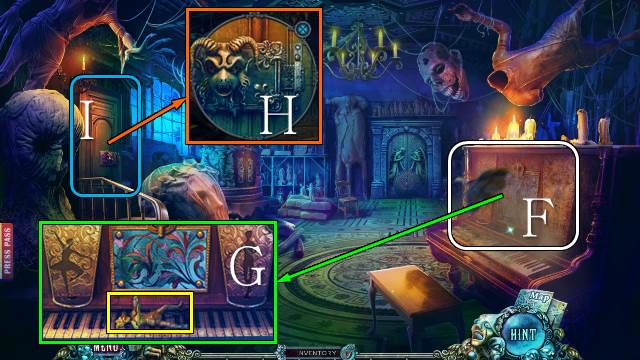
- Talk to the Sheriff; take the BOOK (G).
- Take the ORNAMENTAL KEY, place the BOOK and open the door (H).
- Go left.
- Take the CANDLE (I).
- Place the ORNAMENTAL KEY (J); read the newspaper clippings and take the PLAQUE HALF (K).
- Walk down.
- Place the two PLAQUE HALVES (L); take the EMPTY LAMP and FILM REEL (M).
- Go left.
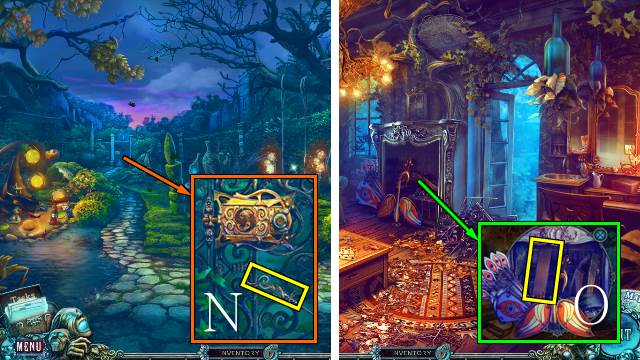
- Place the FILM REEL; take the KNOB (N).
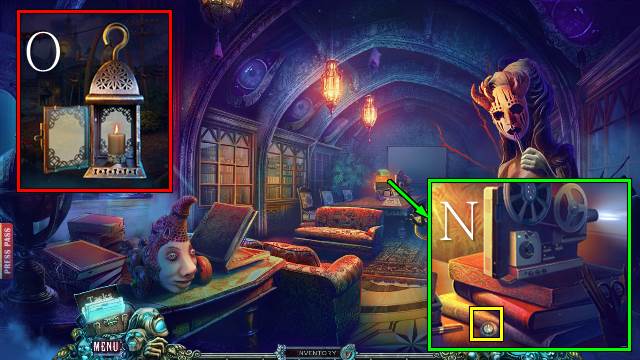
- Access the EMPTY LAMP and place the CANDLE; you receive a LAMP (O).
- Place the LAMP and take the VALVE (P); place the STONE EYE and take the STONE NECKLACE (Q).
- Walk down.
- Place the STONE NECKLACE and take the EVELYN FIGURINE (R).
- Go left.
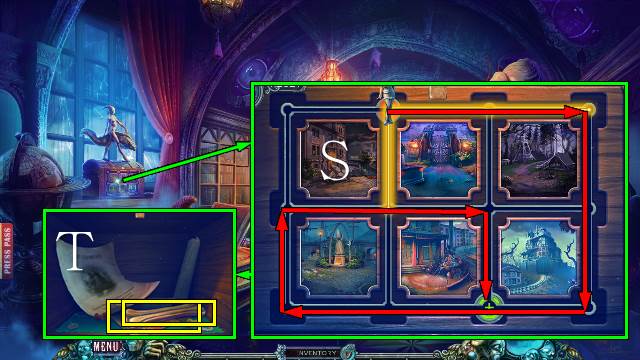
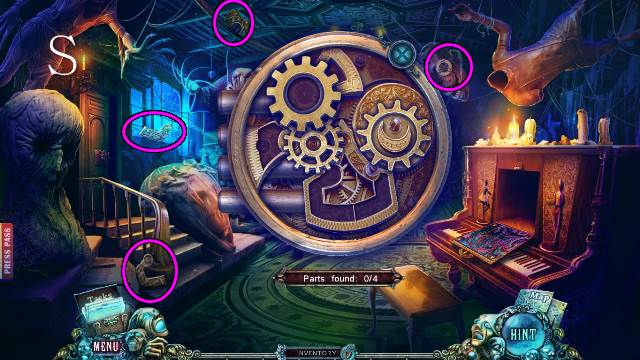
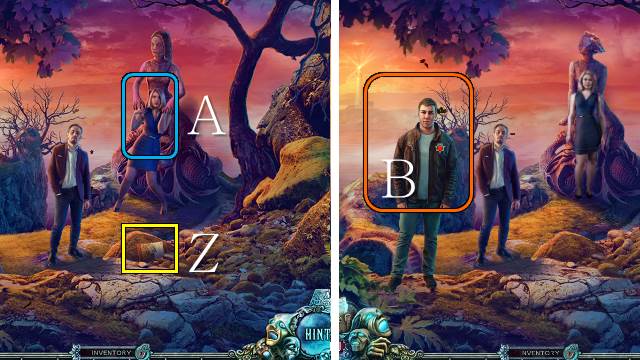
- Place the EVELYN FIGURINE for a mini-game (S).
- Take the DOG BISCUIT and PICTURE PART (T).
- Walk down twice.
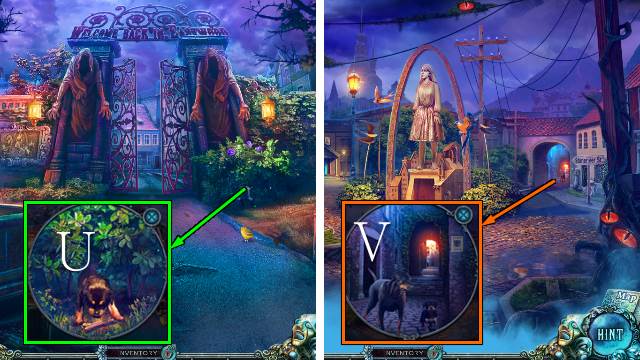
- Touch the dog and place the DOG BISCUIT; take the PUPPY (U).
- Go forward.
- Release the PUPPY (V).
- Go right.
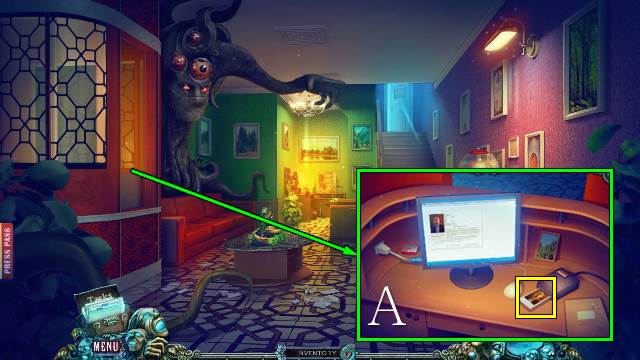
Chapter 2: Evelyn's House
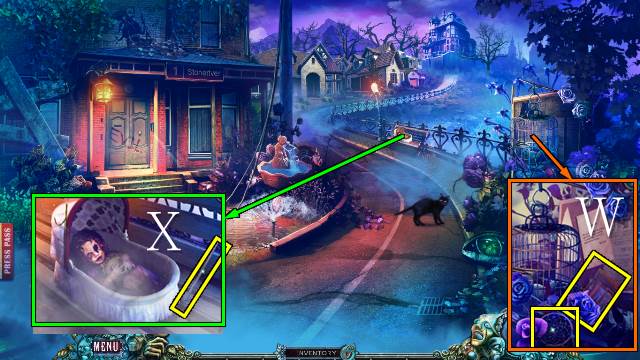
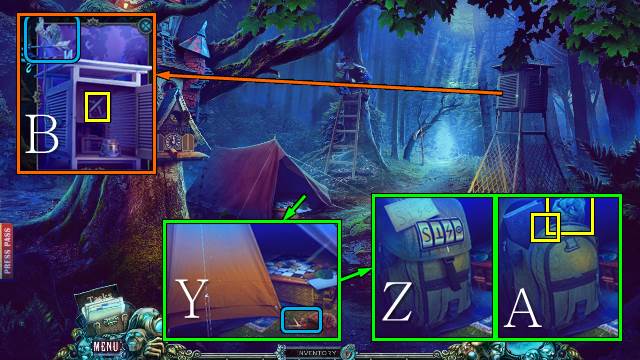
- Take the PICTURE PART and DREAM-CATCHER BOTTOM (W).
- Take the ANTENNA (X).
- Go forward.
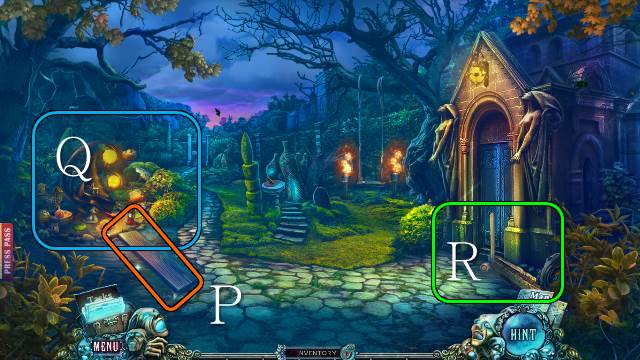
- Take the BASKET (Y).
- Ring the bell; take the VALVE (Z).
- Walk down.
- Place the two VALVES; take the SEALED BAGGIE (A).
- Go left.
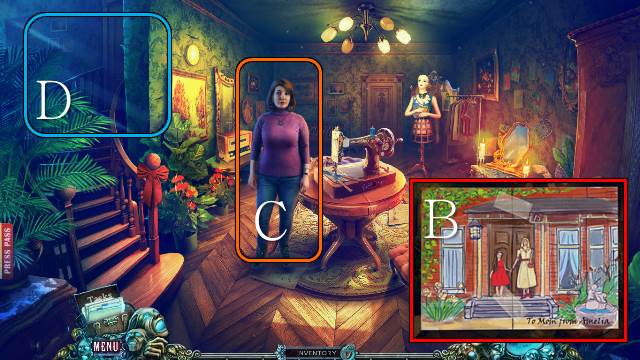
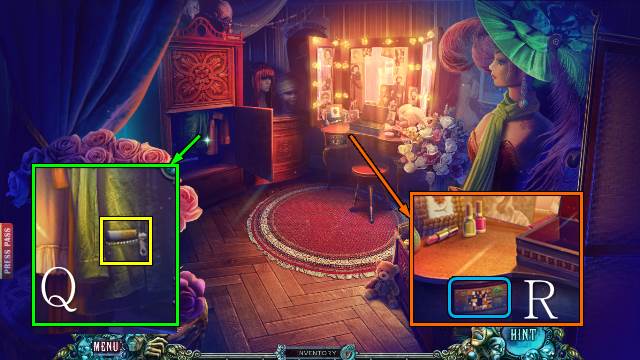
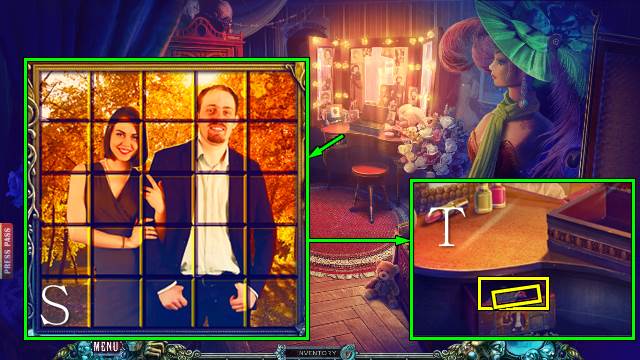
- Access the PICTURE PART, place the second PICTURE PART and TAPE; you receive AMELIA'S PICTURE (B).
- Give AMELIA'S PICTURE to Sophia (C).
- Play the HOP (D).
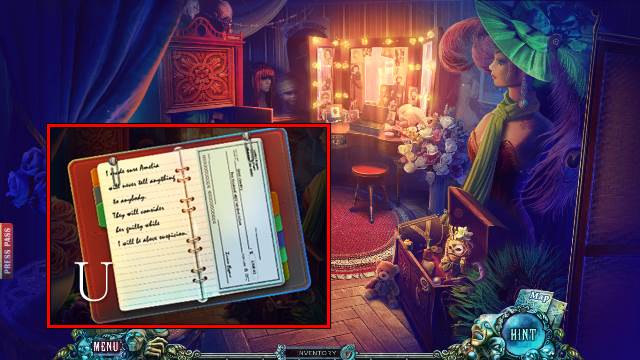
- You receive a NOTEBOOK.

- Place the DREAM-CATCHER BOTTOM (E) and find the missing parts (F); you receive a DREAM CATCHER.
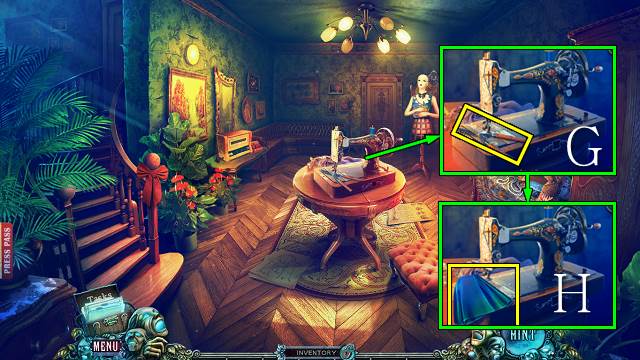
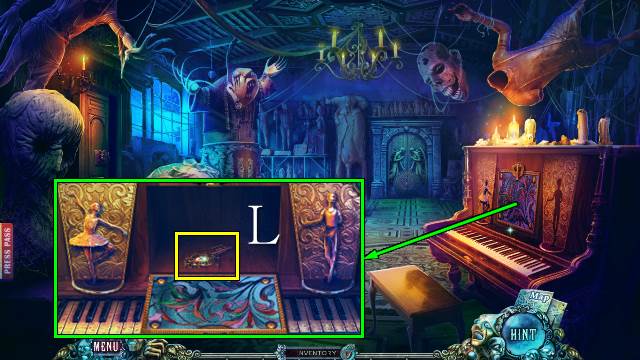
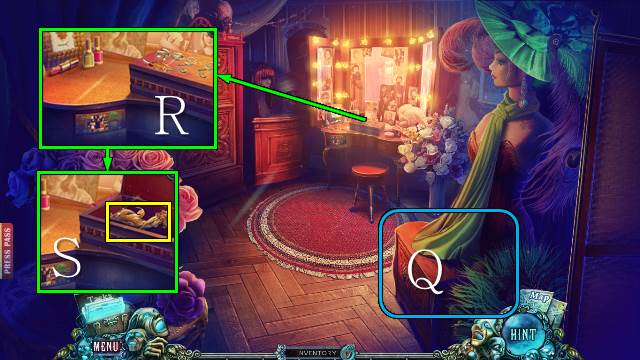
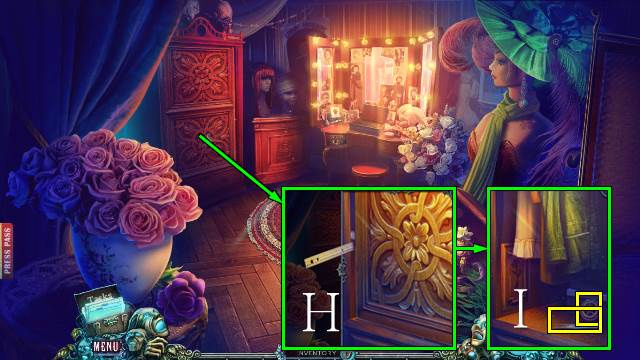
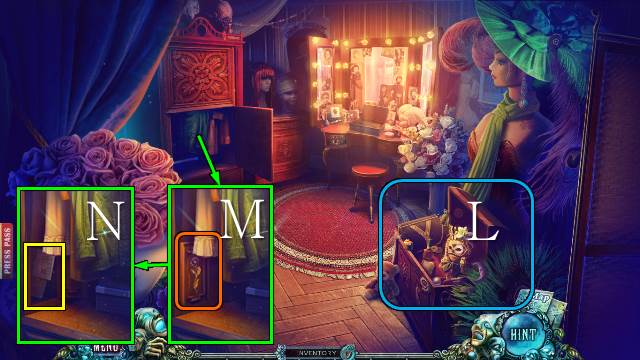
- Take the CLIPPERS (G); place the SILK and take the SKIRT (H).
- Walk down.
- Place the DREAM CATCHER and take the RABBIT FACE (I).
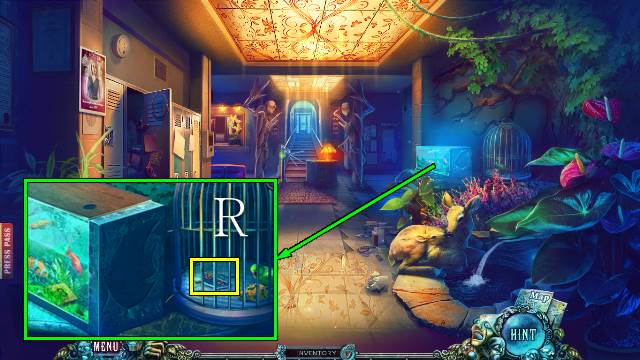
- Take the BLACK ROSES with the CLIPPERS (J); open the cage and take the WIG (K).
- Go left.

- Place the SKIRT and WIG and take the HANDBAG (L).
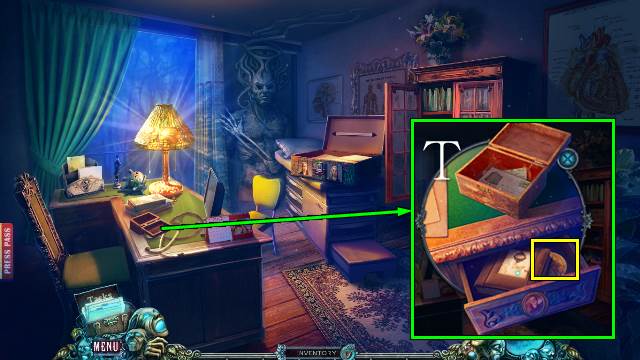
- Place the RABBIT FACE and take the PENCIL (M).
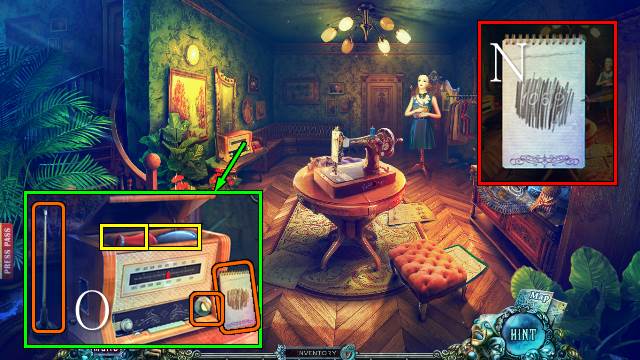
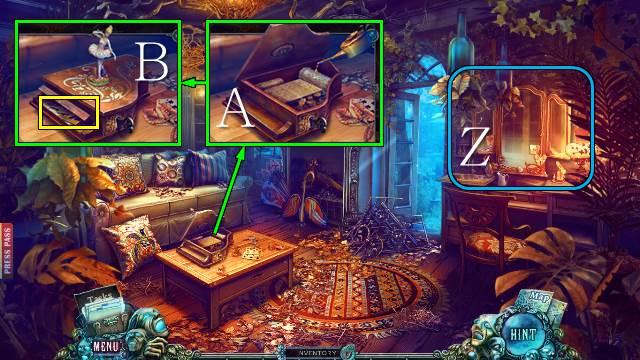
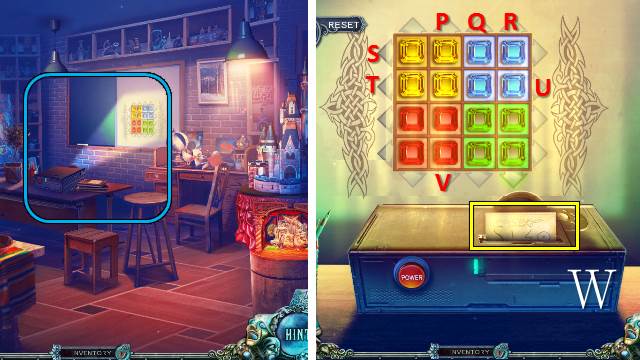
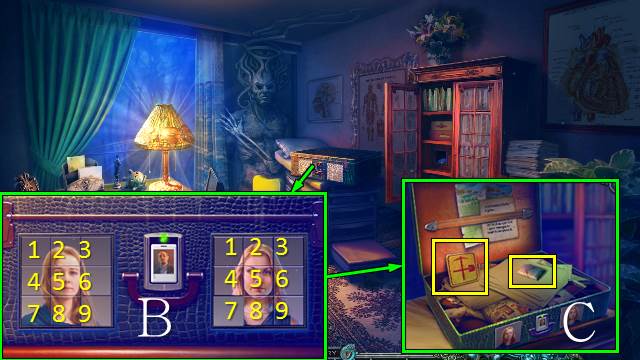
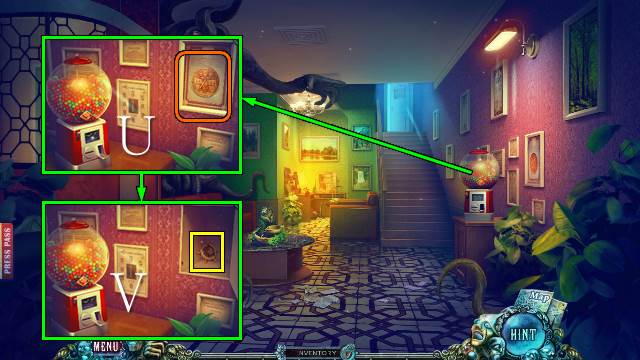
- Access the NOTEBOOK and use the PENCIL; you receive a RADIO CHANNEL (N).
- Place the KNOB, ANTENNA and RADIO CHANNEL; take the RUBBER BULB and LENS (O).
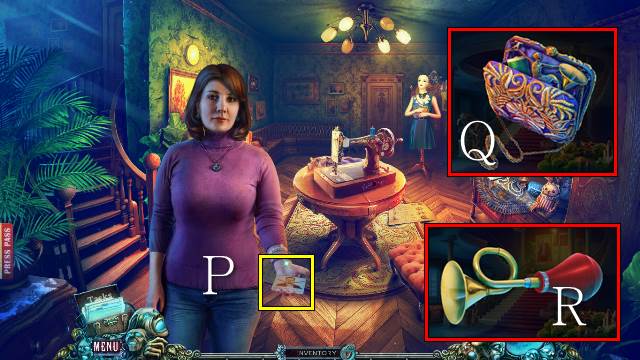
- Take FRANK'S PICTURE (P).
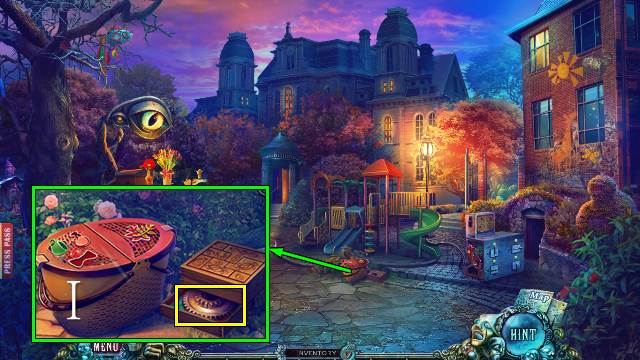
- Access the HANDBAG and open it; take the HORN and DANCER FIGURINE (Q).
- Access the HORN and place the RUBBER BULB; you receive a BULB HORN (R).
- Walk down and forward.
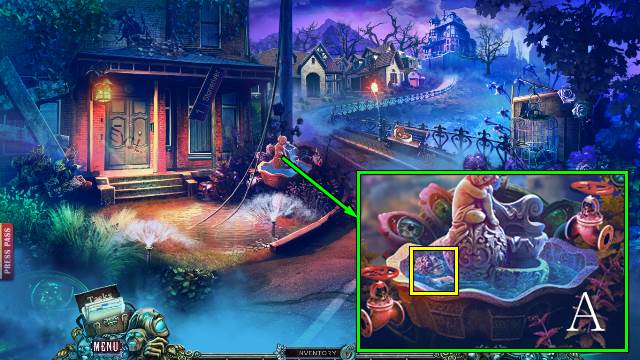
- Use the BULB HORN (S).
- Take the PUZZLE PLATE (T).
- Place the LENS (U).
- Zoom in for a mini-game (V).
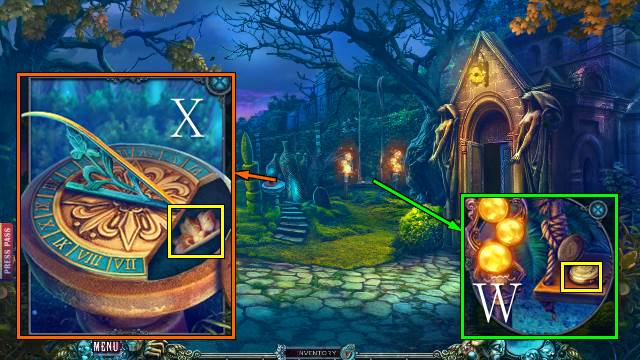
- Find the hands and set the clock (W).
- Find the missing objects (X).
- Move 6-3-2-5-8-9-6-5-4-7-8-5-4-7-8-9-6-5-4-7-8-9.
- Move head and arms (Y).
- Take the PEACOCK FEATHER and MECHANICAL HEART (Z).
- Go forward.
- Show Frank FRANK'S PICTURE (A).
- Remove the plant, place the BLACK ROSES and take the FAN (B); place the MECHANICAL HEART and take the SUN RING (C).
- Walk down.
- Remove the leaves and place the SUN RING (D); take the HORN (E).
- Go forward twice.
- Use the FAN (F).
- Take the KNIGHT FIGURINE (G).
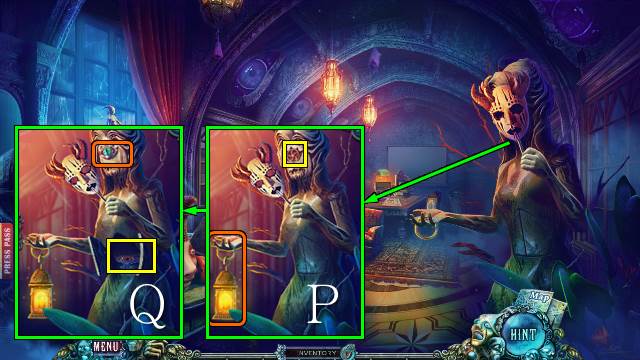
- Place the HORN (H).
- Play the HOP (I).
- You receive an AMELIA FIGURINE.
- Walk down.
- Place the AMELIA FIGURINE for a mini-game (J).
- Solution: 4-5-6-3-2-1-5-6.
- Take the DANCER FIGURINE and FISHING LINE (K).
- Go forward.
- Place the two DANCER FIGURINES; take the KEY (L).
- Walk down twice.
- Use the KEY (M); take the PUZZLE PLATE (N).
- Go forward.
- Place the two PUZZLE PLATES; take the ANGEL WING (O).
- Go forward.
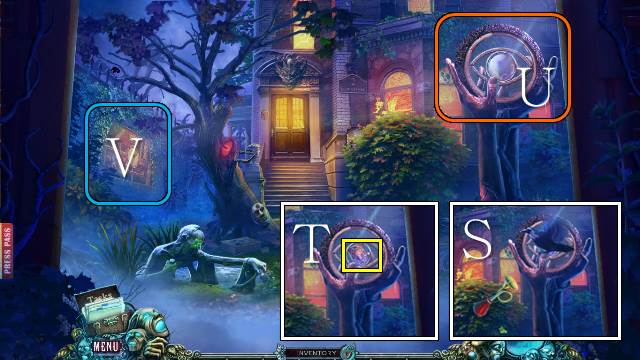
- Access the SEALED BAGGIE and take the ANGEL'S HEAD (P); open the bag and take the note and LOCKET WITH PHOTOS (Q).
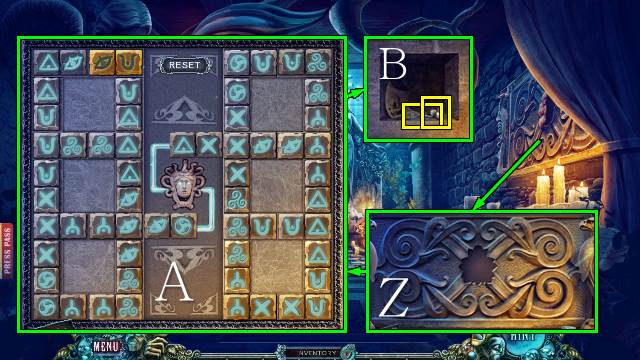
- Place the ANGEL'S HEAD and ANGEL WING; zoom into the lock (R).
- Find the missing pieces (S).
Chapter 3: The Crypt
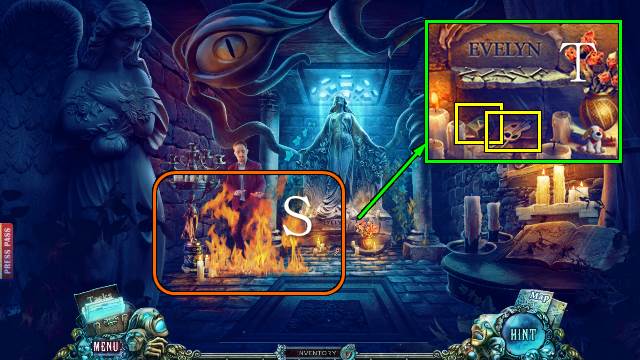
- Give Evelyn the LOCKET WITH PHOTOS (T).
- Play the HOP (U).
- You receive a MOSAIC PIECE.
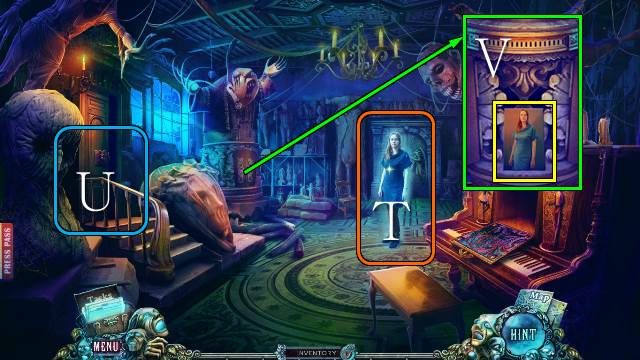
- Take EVELYN'S PORTRAIT (V).
- Walk down.
- Place EVELYN'S PORTRAIT and take the clue and THREAD TOKEN (W).
- Go forward twice.

- Place the PEACOCK FEATHER (X); take the clue and SCRAPER (Y).
- Take the FILE (Z).
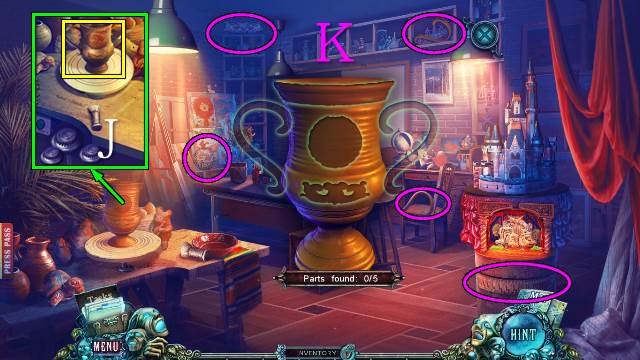
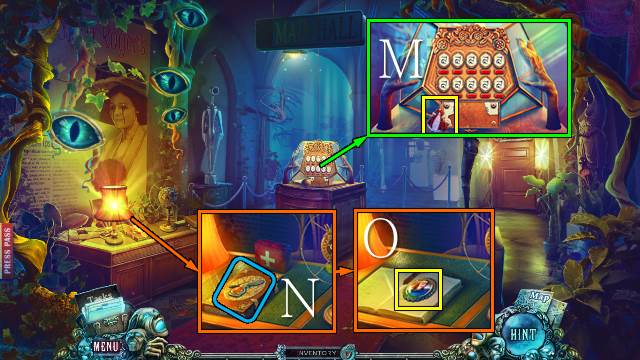
- Place the MOSAIC PIECE for a mini-game(A).
- Solution: 2-1-3-4-4-4-2-2-2-1-4-3-3-3-1-4-4.
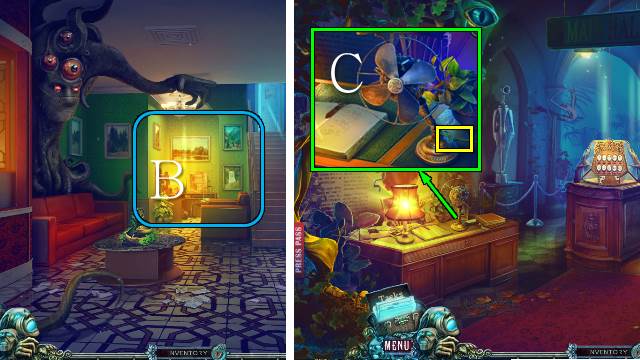
- Take the clue, CAMERA and CANDELABRA PART (B).
- Go to Sophia's House.
- Play the HOP (C).
- You receive a BROKEN POLE.
- Place the THREAD TOKEN; take the HOOK and GLASS CUTTER (D).
- Walk down and forward.
- Access the BROKEN POLE and place the FISHING LINE and HOOK; you receive a FISHING POLE (E).
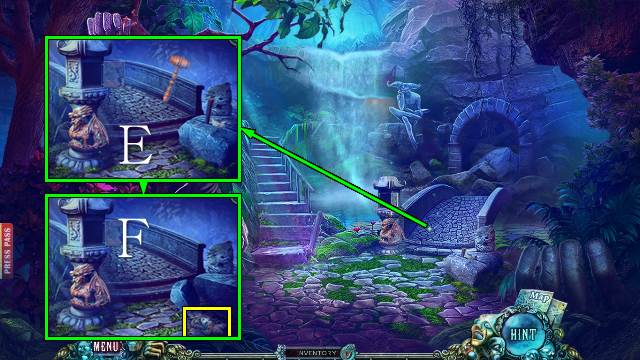
- Take the SYMBOL with the FISHING POLE; use the SCRAPER and take the SUNDIAL PART (F).
- Walk forward.
- Place the SYMBOL (G); take the clue, BAS-RELIEF and ACID (H).
- Go forward.
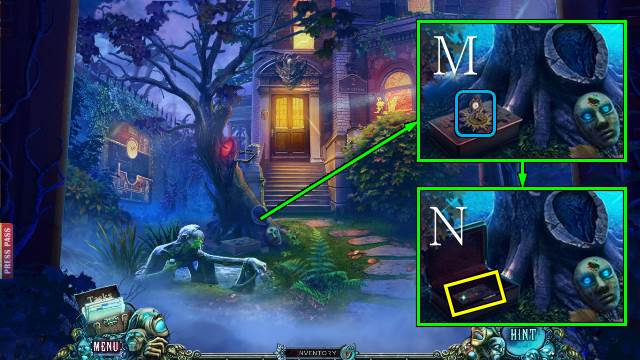
- Use the GLASS CUTTER and take the DRAGONFLY (I); use the BASKET to get a BASKET WITH SAND (J).
- Walk forward.

- Place the DRAGONFLY (K).
- Play the HOP (L).
- You receive EVELYN'S BOX.
- Use the ACID (M).
- Open the door and go forward.
- Take the POKER with the FILE (N).
- Walk down.
- Use the POKER; take the BOARD (O).
- Walk forward.
- Place the BOARD (P).
- Play the HOP (Q).
- You receive a LEVER.
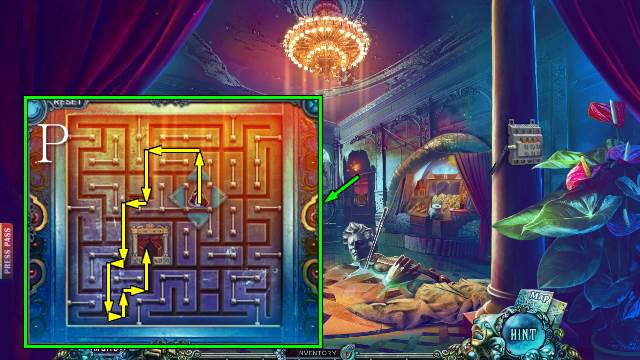
- Use the LEVER (R).
- Go right.
- Use the BASKET WITH SAND (S).
- Take the SUNDIAL PART and PALETTE PLATE (T).
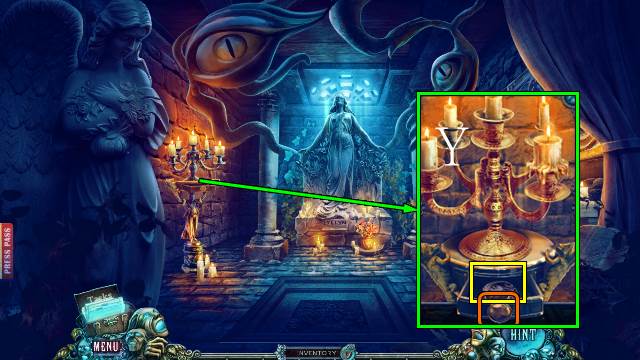
- Place the CANDELABRA PART and move the candles (U); take the WAX (V).
- Walk down.
- Use the WAX and take the SEAL (W).
- Place the TWO SUNDIAL PARTS; move the numbers to the correct spots and take the BAS-RELIEF (X).
- Go right.
- Place the SEAL and take the PHOENIX (Y).
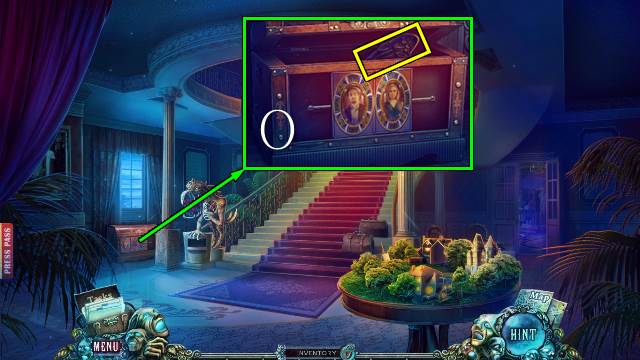
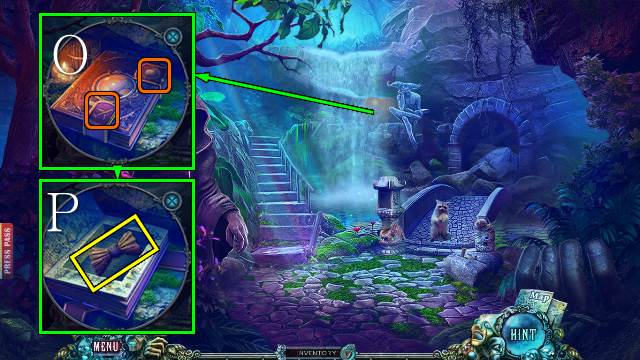
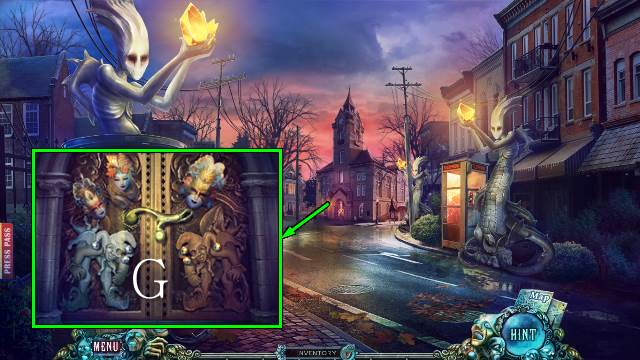
- Place the two pieces of BAS-RELIEF (Z) for a mini-game (A).
- Take the clue, WIND-UP KEY and SILVER BELLS (B).
- Walk down.
- Place the PHOENIX (C); take the HANDLE (D).
- Walk down.
- Place and turn the WIND-UP KEY; take the SPRING (E).
- Walk forward.
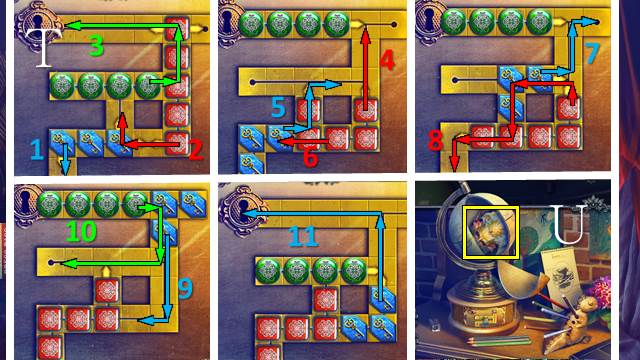
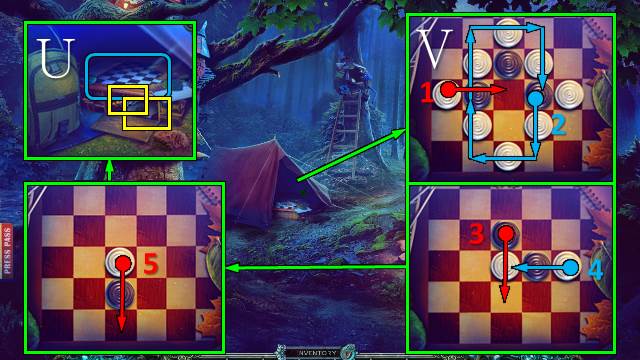
- Place the SPRING and select the springs in order (F).
- Go forward.
Chapter 4: The School
- Take the LETTER E (G).
- Go down and right.
- Place the letters and the LETTER E; take the CABINET MEDALLION (H).
- Walk down twice.
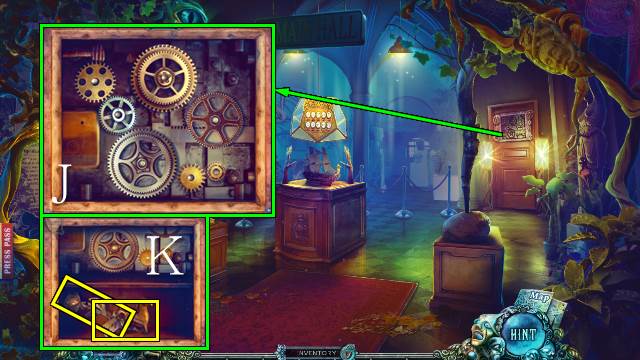
- Place the CABINET MEDALLION (I) and zoom in for a mini-game (J).
- Take the clue, MAILBOX KEY and GLUE (K).
- Go forward twice.
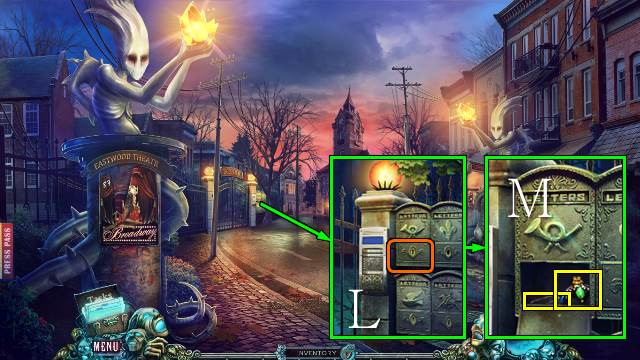
- Use the MAILBOX KEY (L); take the clue, FIREFLY and WIRE (M).
- Walk down.
- Play the HOP (N).
- You receive a CRACKED JUG.
- Access the CRACKED JUG, use the GLUE and restore the JUG (O).
- Use the JUG to get a JUG WITH WATER (P).
- Place the FIREFLY (Q); take the CLAMPS (R).
- Go right.
- Use the JUG WITH WATER (S); take EVELYN'S RING (T).
- Walk down and forward.

- Zoom in (U) and place the CLAMPS for a mini-game (V).
- Go left.
- Take the HORTICULTURE CARD (W).
- Access EVELYN'S BOX and place EVELYN'S RING; remove the items in pairs, take the clue and the HANDKERCHIEF (X).
- Take the OILER with the HANDKERCHIEF (Y).
- Go to Evelyn's Room.
- Play the HOP (Z).
- You receive the FLOWER PERFUME.
- Use the OILER (A), turn the key and take the LIGHTNING (B).
- Walk forward twice.
- Place the LIGHTNING (C); take the LIGHT BULB (D).
- Go left.
- Use the FLOWER PERFUME (E).
- Go forward.
- Take the RATTLE (F).
- Place the LIGHT BULB; take the MASK and POSTER PART (G).
- Take the DRAGON WING and GOLD BELLS (H).
- Walk down twice.
- Place the POSTER PART and use the CAMERA; you receive a PHOTO WITH NUMBER (I).
- Place the SILVER BELLS and GOLD BELLS; take the LOCKER TOKENS (J).
- Go left and forward.
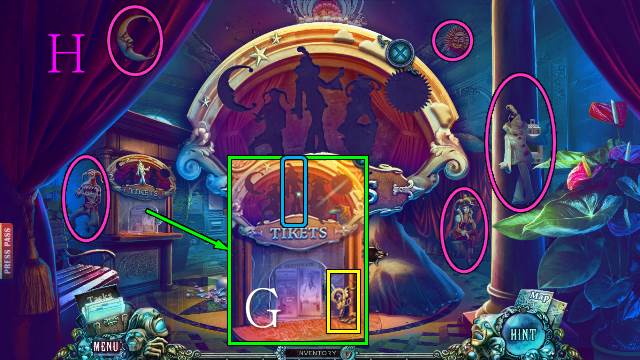
- Place the LOCKER TOKENS for a mini-game (K).
- Play the HOP (L).
- You receive AMELIA'S STUDENT ID.
- Use AMELIA'S STUDENT ID and go forward (M).
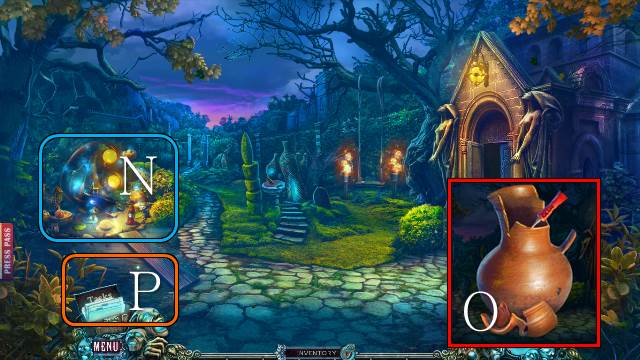
- Take the TROWEL (N).
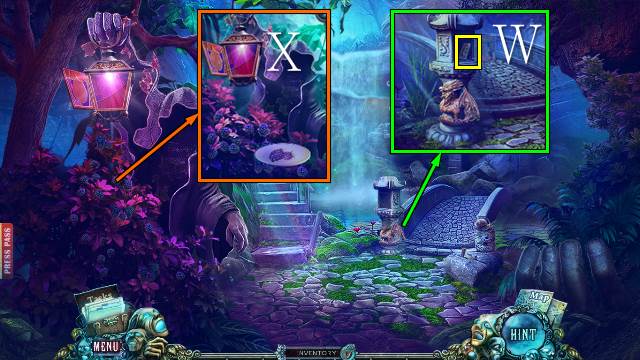
- Place the PALETTE PLATE; take the FIRE PLATE and PAPER FLOWERS (O).
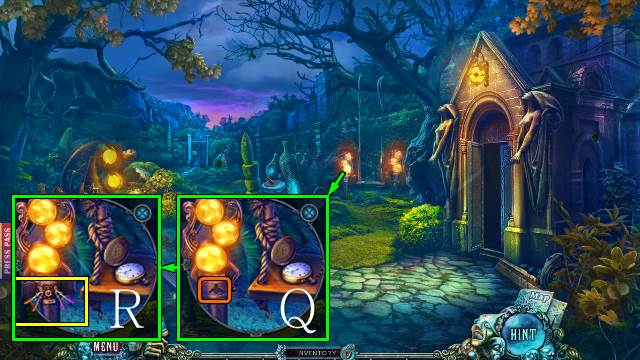
- Place the KNIGHT FIGURINE and complete the scene (P); take the BIRD FEED (Q).
- Walk down.
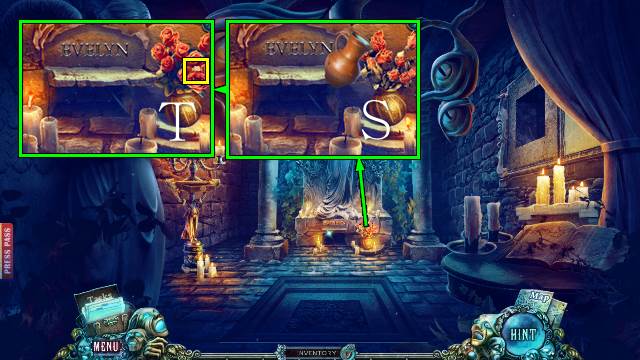
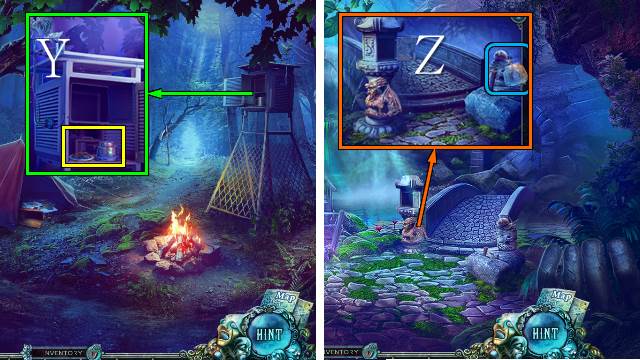
- Place the BIRD FEED; take the PUZZLE LINK (R).
- Go forward.

- Place the PUZZLE LINK for a mini-game (S).
- Solution (T).
- Take the clue, MASK and FISH (U).
- Walk down.
- Place the FISH (V); take the HOSE (W).
- Walk down.
- Use the WIRE (X), remove the rubber and place the HANDLE and HOSE (Y).
- Play the HOP (Z).
- You receive the GLASSES PLATE.
- Go forward twice.
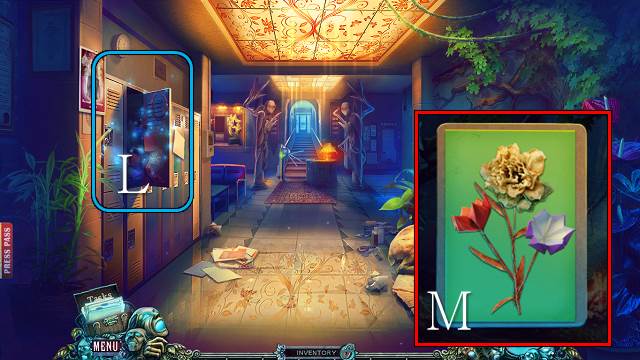
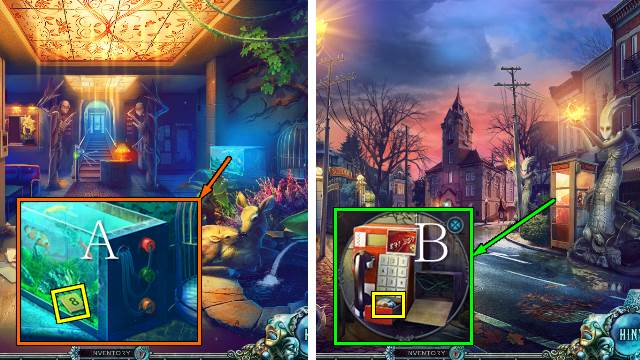
- Place the GLASSES PLATE (A), read the notes and take the ELECTRICAL DIAGRAM (B) and CHRYSANTHEMUM (C).
- Walk down twice.
- Place the ELECTRICAL DIAGRAM and turn the knobs as indicated (D).
- Go right.
Chapter 5: The Forest
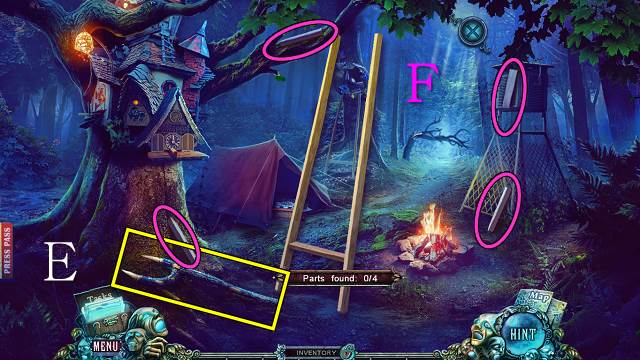
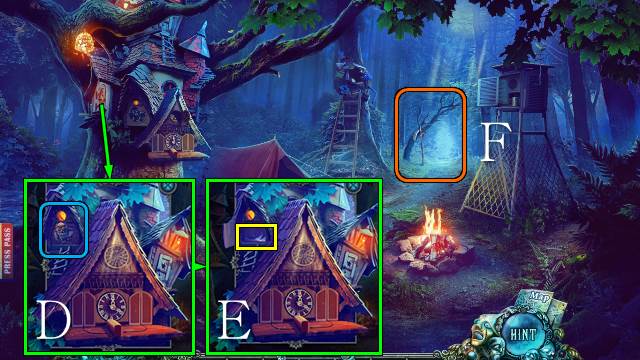
- Take the SUPPORT (E).
- Pick up the ladder and find the missing parts (F).
- Play the HOP (G).
- You receive a PUZZLE PIECE.
- Take some CLAY with the TROWEL (H).
- Walk down.
- Place the PUZZLE PIECE and put it in the box; take the GEAR (I).
- Go forward twice.
- Place the CLAY and GEAR; turn the wheel (J).
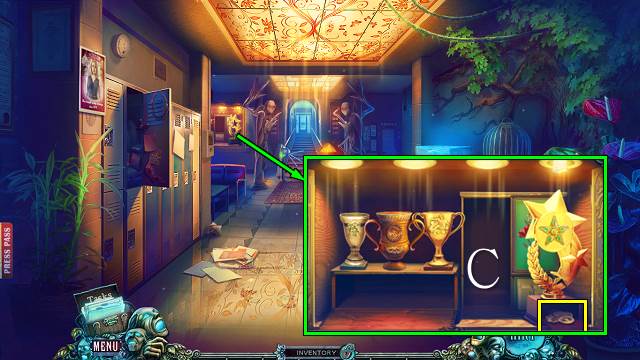
- Take the trophy and find the pieces (K).
- Take the TROPHY (J).
- Walk down.
- Play the HOP (L).
- You receive some SCISSORS.
- Access the HORTICULTURE CARD and place the PAPER FLOWERS and CHRYSANTHEMUM; you receive the HORTICULTURE CARD (M).
- Place the TROPHY and HORTICULTURE CARD and swap the medals (N); take the CD and WEATHER-VANE TAIL (O).
- Go forward.
- Push the Power button and place the CD for a mini-game.
- Solution: V-T-P-U-V-Q-R2-S2-Q2-R2.
- Take the COMBINATION (W).
- Place the WEATHER-VANE TAIL and take the WEATHER VANE (X).
- Go to the Forest Edge.
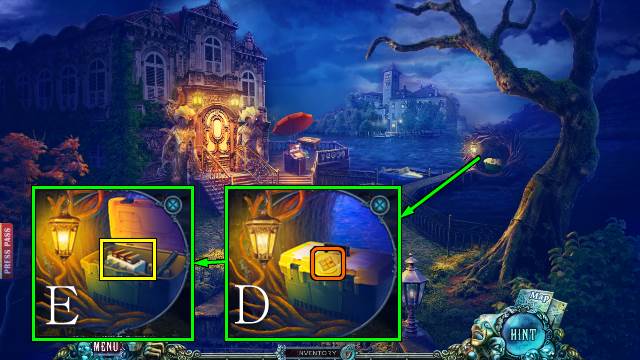
- Use the SCISSORS to get the PEG (Y); place the COMBINATION, enter the code (Z) and take the TARP, clue and STAR (A).
- Place the WEATHER VANE and take the PLANE (B).
- Go to the School.
- Place the STAR and take the OWL (C).
- Go to the Forest Edge.
- Place the OWL (D); take the MOSAIC PIECE (E).
- Place the SUPPORT (F).
- Go forward.
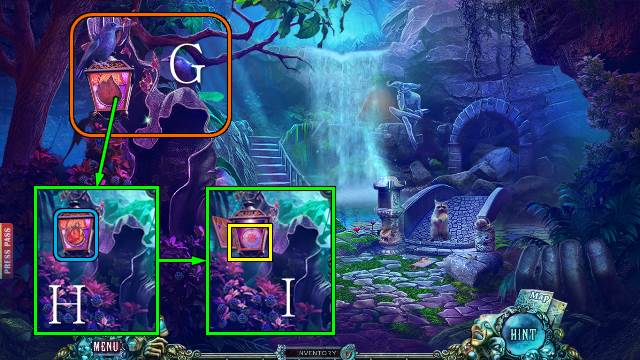
- Use the RATTLE (G).
- Place the FIRE PLATE (H); take the WIND ROSE (I).
- Place the TARP (J).
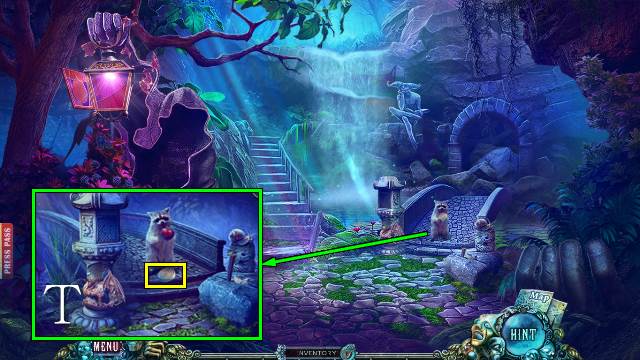
- Take the INKWELL (K).
- Take the EASEL HALF (L).
- Walk down.
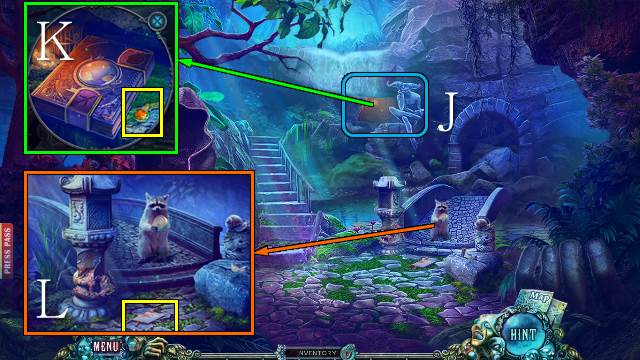
- Place the WIND ROSE (M); take the GLOBE FIGURE (N).
- Walk forward.
- Place the GLOBE FIGURE and PLANE (O); take the clues and BOW (P).
- Walk down twice.
- Play the HOP (Q).
- You receive a CHECKER.
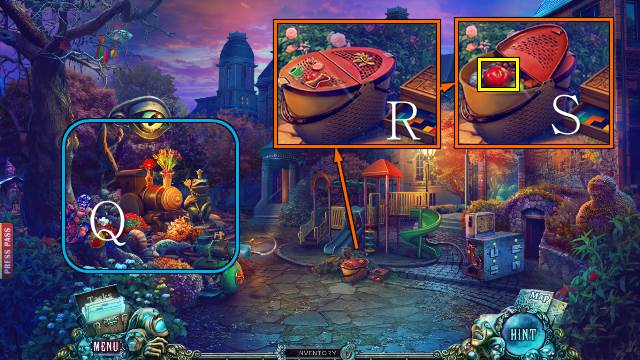
- Place the BOW and turn the pieces into place (R); take the APPLE (S).
- Go right and forward.
- Throw the APPLE and take the CHECKER (T).
- Walk down.
- Place the two CHECKERS (U) and zoom in for a mini-game (V).
- Take the DRAGON HEAD, PLATE and clue (U).
- Go forward.
- Place the DRAGON WING and DRAGON HEAD; take the PUZZLE SWITCH (W).
- Place the PLATE to receive BERRIES (X).
- Walk down.
- Place the BERRIES, take the JAR (Y).
- Go forward.
- Get the SNAIL with the JAR (Z).
- Go to the School.
- Move the cables and release the SNAIL; take the BUTTON (A).
- Go to the City Street.
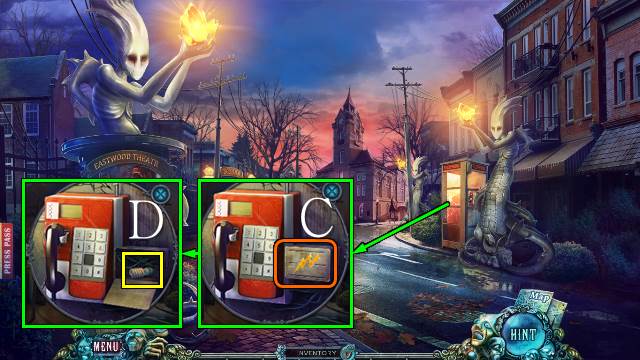
- Place the BUTTON and PHOTO WITH NUMBER; dial 871-359 and take the CLOCK PART (B).
- Go to the Forest Edge.
- Play the HOP (C).
- You receive a PIERROT.
- Open the compartment and place the CLOCK PART; take the HAMMER (D).
- Go forward.
- Place the PEG and HAMMER (E); take the MASK (F).
- Go to the City Street.
- Place the three MASKS (G).
- Go forward.
Chapter 6: The Sanatorium
- Take the EARRING (G).
- Place the PIERROT and find the missing parts (H).
- Take the clues and BOOK (I).
- Place the PUZZLE SWITCH for a mini-game (J).
- Go forward.
- Take the INSULATING TAPE (K).
- Place the MOSAIC PIECE and find the other two pieces (L); take the clue and CLAY TOOL (M).
- Walk down.
- Use the CLAY TOOL (N); take the GAS CAN (O).
- Walk forward.
- Remove the cap and use the GAS CAN (P).
- Go forward.
- Use the INSULATING TAPE and plug in the computer; go through the folders and take the GLOVE (Q).
- Play the HOP (R).
- You receive a SANATORIUM-PICTURE PART.
- Place the SANATORIUM-PICTURE PART for a mini-game (S).
- Go forward.
- Open the cabinet, place the BOOK and restore the image (T); take the SCREWDRIVER (U).
- Walk down twice.
- Use the SCREWDRIVER (V); take the submarine (W).
- Find the missing parts to receive the SUBMARINE (X).
- Go forward twice.
- Place the SUBMARINE (Y); take the INACTIVE KEY CARD (Z).
- Walk down.
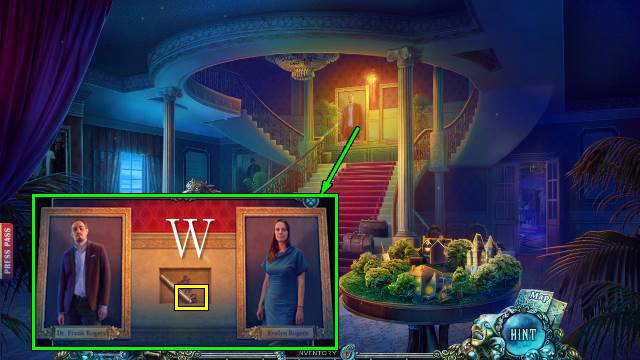
- Place the INACTIVE KEY CARD, touch the screen and take FRANK'S KEY CARD (A).
- Go forward.
- Place FRANK'S KEY CARD for a mini-game (B).
- Solution left: 6-3-2-5-8-9-6-5-4-7-8-5-4-7-8-9-6-5-4-7-8-9.
- Solution right: 8-9-6-5-2-3-6-5-4-1-2-3-6-9-8-5-6-9-8-7-4-5-8-9-6-5-8-7.
- Take the BATTERY, TOOLBOX TOKEN and clues (C).
- Walk down twice.
- Place the TOOLBOX TOKEN (D); take the SWITCH (E).
- Walk down.
- Take the ATOMIZER with the GLOVE (F).
- Place the SWITCH and pull it (G).
- Play the HOP (H).
- You receive a MEDICAL SYMBOL.
- Go to Frank's Office.
- Place the MEDICAL SYMBOL (I); take the SMELLING SALTS and DRY ICE (J).
- Walk down twice.
- Access the ATOMIZER and place the DRY ICE; you receive the FREEZING LIQUID (K).
- Interact with the statues and use the FREEZING LIQUID (L).
- Go left.
- Take the LOUISE FIGURINE (M).
- Place the INKWELL (N); read the cards and take the CAMEO (O).
- Walk down twice.
- Place the LOUISE FIGURINE for a mini-game (P).
- Go right.
- Open the chest and play the HOP (Q).
- You receive the EASEL HALF.
- Place the items and the EARRING (R); take the clue and MERMAID (S).
- Go to Frank's Office.
- Place the CAMEO, take the clue and MEDAL (T).
- Walk down.
- Place the MEDAL (U); take the SHIP'S WHEEL (V).
- Walk down.
- Place the two EASEL HALVES (W); take the RULER (X).
- Place the SHIP'S WHEEL (Y) for a mini-game (Z).
- Take the FAN BLADES and DOLPHIN (A).
- Go forward.
- Play the HOP (B).
- You receive a COMBINATION.
- Walk down and left.
- Place the FAN BLADES and take the WIRES (C).
- Place the COMBINATION and enter the code (D); place the MERMAID and take the LYRE (E).
- Walk down twice.
- Play the HOP (F).
- You receive a DECORATIVE WHEEL.
- Place the LYRE; take the COIN (G).
- Go right.
- Use the RULER (H); take the note, TWEEZERS and GEAR (I).
- Go to the Gallery.
- Place the GEAR for a mini-game (J).
- Take the clue, AMELIA'S GIFT and the ROSE (K).
- Go to the Dressing Room.
- Play the HOP (L).
- You receive LOUISE'S DIARY.
- Place the ROSE (M); take the CRIME PLAN (N).
- Go to the Sanatorium.
- Place the WIRES and COIN and flick the switch; take the PUZZLE PIECE (O).
- Place the DOLPHIN and DECORATIVE WHEEL and take the ZIPPER SLIDER (P).
- Go to the Dressing Room.
- Place the ZIPPER SLIDER and take the PUZZLE PIECE (Q).
- Place the two PUZZLE PIECES for a mini-game (R).
- Solution (S).
- Take the HAIRPIN and CHECK (T).
- Access LOUISE'S DIARY and place the CRIME PLAN and CHECK (U).
- Use the HAIRPIN (V).
- Take the SHARD with the TWEEZERS (W).
- Use the SHARD and SMELLING SALTS (X).
- Give Frank the BATTERY (Y).
- Take the EVIDENCE (Z).
- Show Evelyn AMELIA'S GIFT (A).
- Give the EVIDENCE to the Sheriff (B).
- Congratulations, you have completed Fear for Sale: City of the Past.
Created at: 2015-11-27