

Walkthrough Menu
- General Tips
- Chapter 1: At Linda's Apartment
- Chapter 2: The Coast
- Chapter 3: The Backyard
- Chapter 4: The Secret Corridor
- Chapter 5: The Lighthouse
- Chapter 6: Near the Falls
General Tips
- This is the official guide for Fear for Sale: Hidden in the Darkness.
- This guide will not mention each time you have to zoom into a location; the screenshots will show each zoom scene.
- Hidden-object puzzles are referred to as HOPs. This guide will not show HOP solutions. It will identify the location of the HOP and the inventory item acquired.
- This guide will show solutions for non-random puzzles. Please read the in-game instructions for each puzzle.
- In this game, you will sometimes have to select the new scene to trigger dialog, cut-scenes, or tasks prior to interacting with the scene.
Chapter 1: At Linda's Apartment
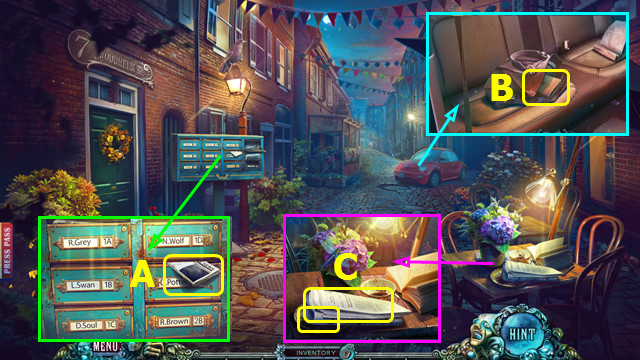
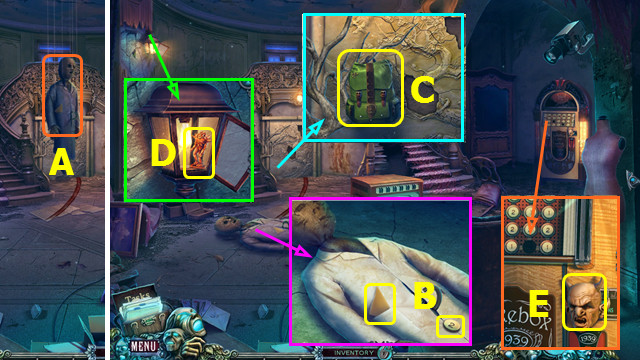
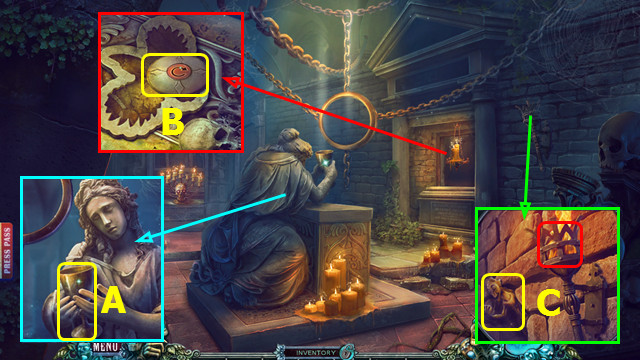
- Take the 1/3 NEWSPAPER (A).
- Take the 2/3 NEWSPAPER. Open the case and examine the photo; take the NOTEBOOK (B).
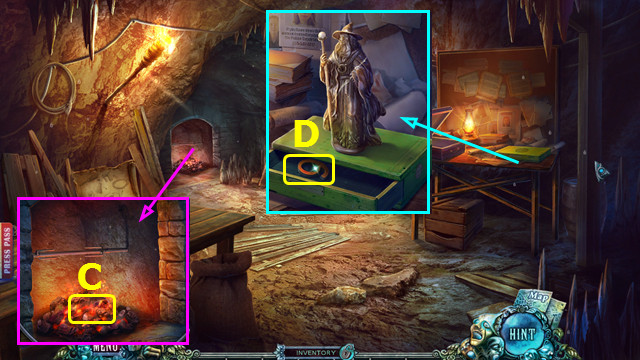
- Take the 3/3 NEWSPAPER and SPONGE CAKE (C).
- Take the CAN OF PAINT; place the 3 NEWSPAPERS (D).
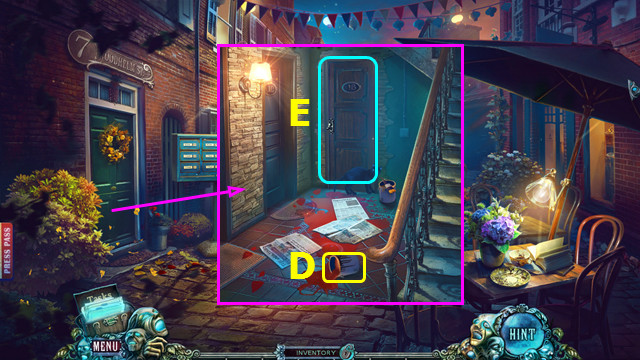
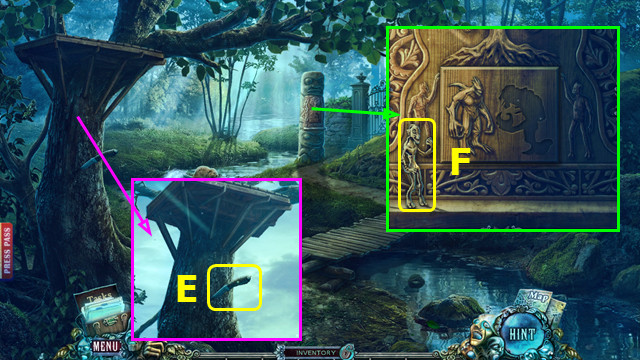
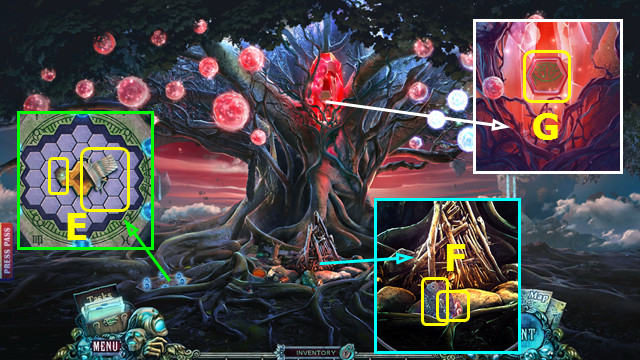
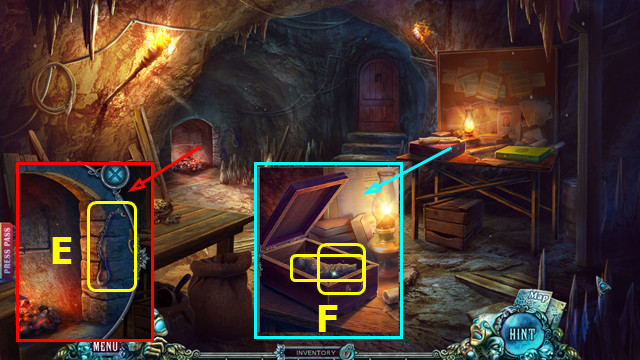
- Open the door and go forward (E).
- Play the HOP.
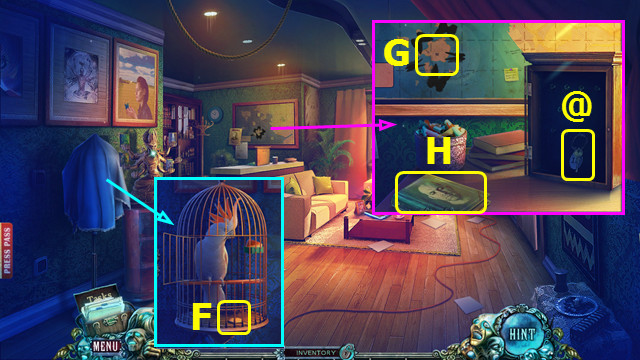
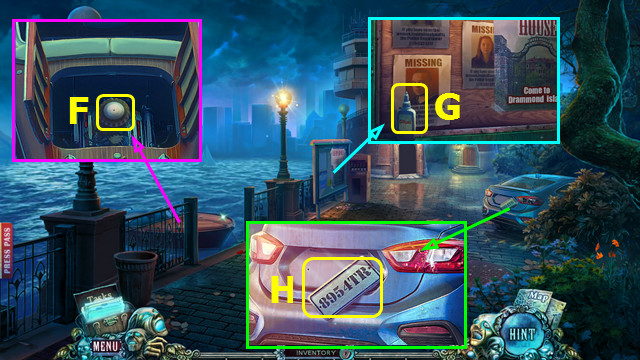
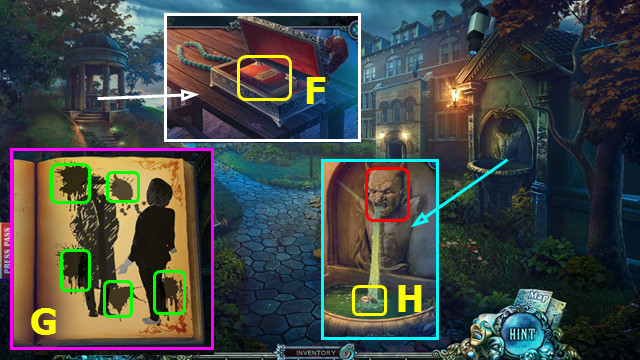
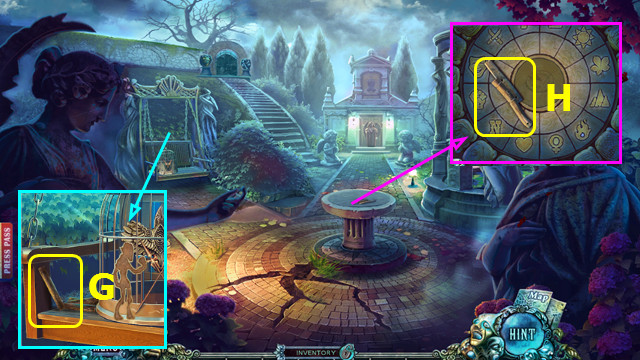
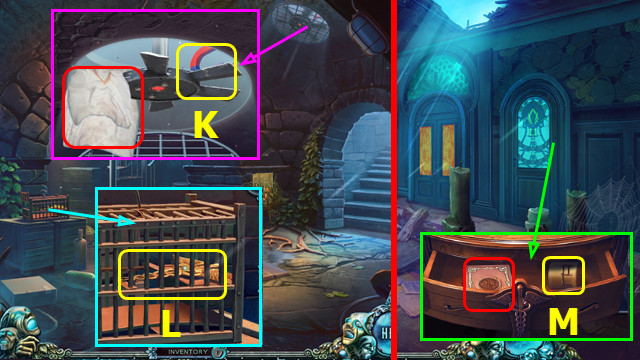
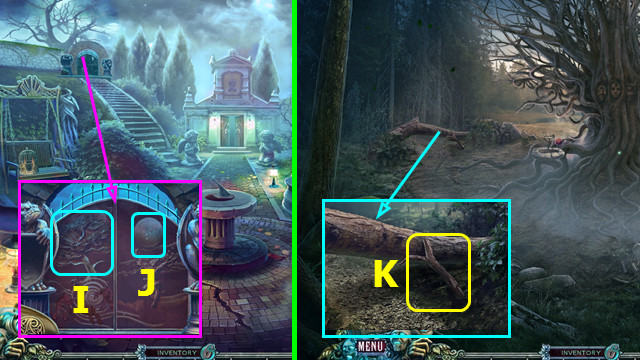
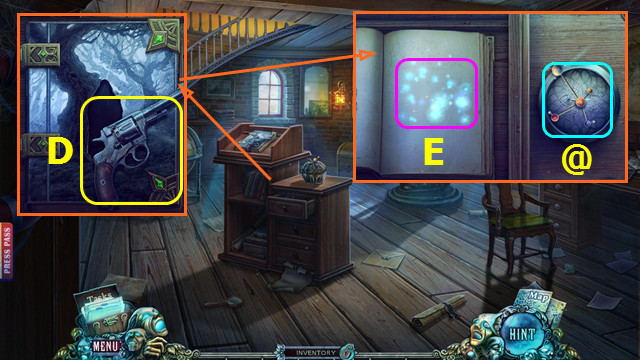
- Take the LACE CLOTH. Open the cage and give the SPONGE CAKE; take the PATTERN PIECE (F).
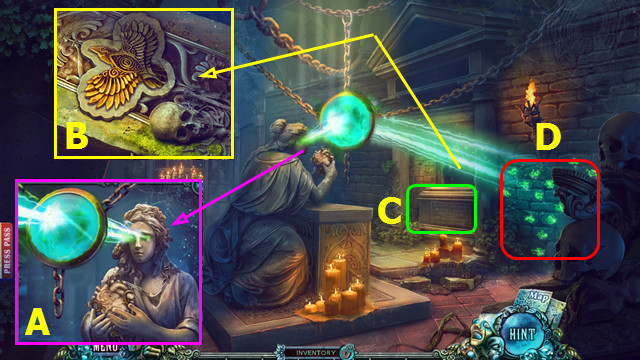
- Use the NOTEBOOK to take the COORDINATES (G).
- Take the 1st BOOK (H).
- Place the PATTERN PIECE and take the MAILBOX KEY (@).
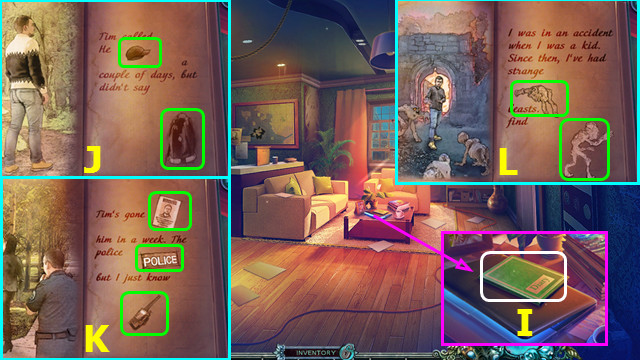
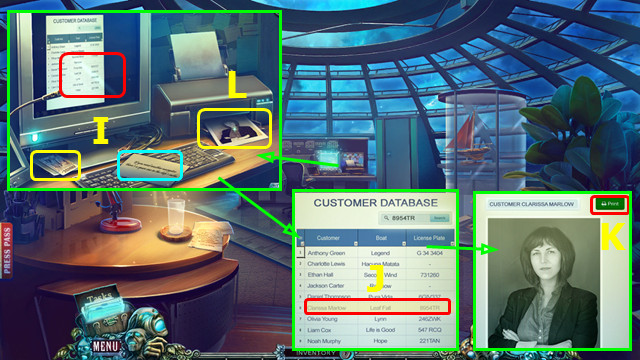
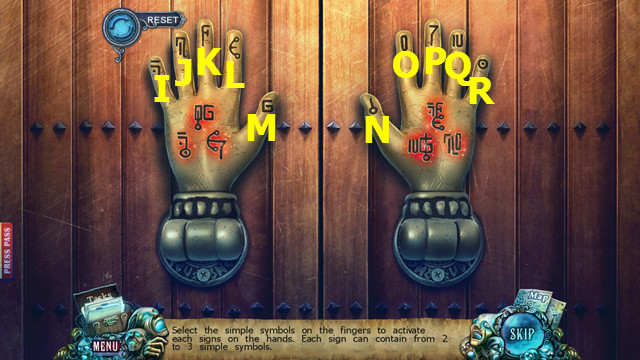
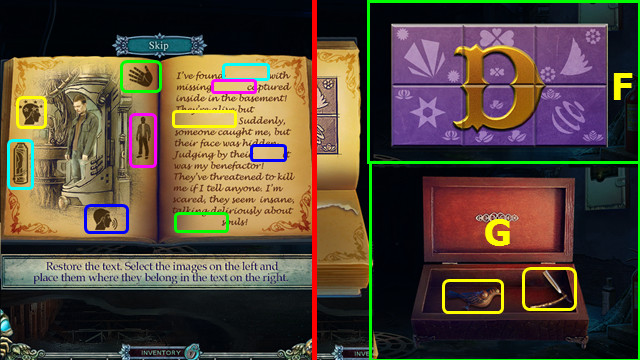
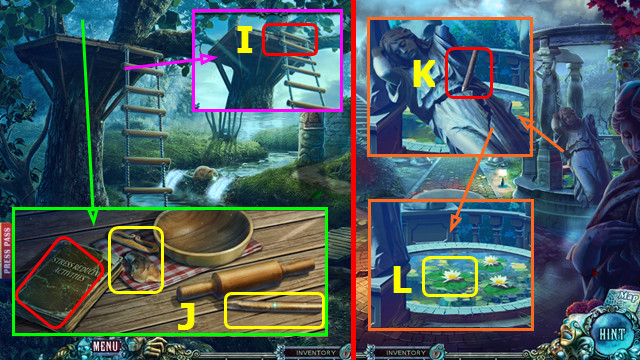
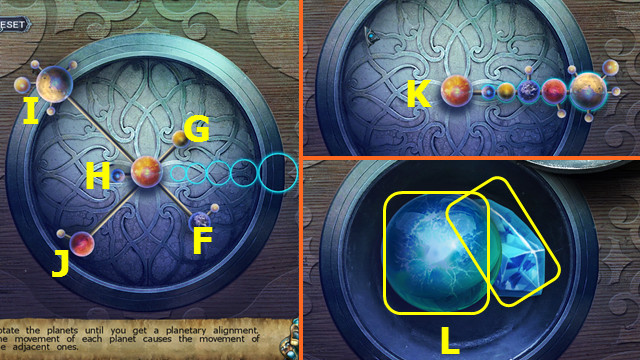
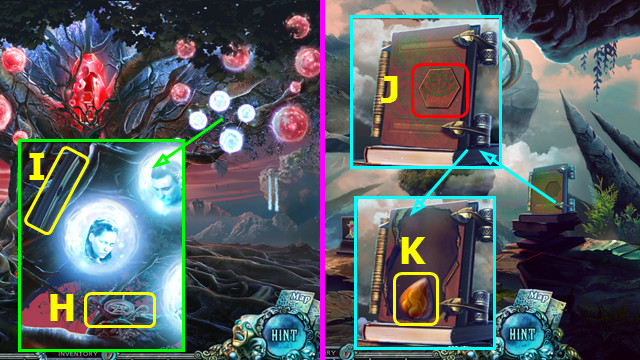
- Read the magazine and select the diary (I).
- Select the items (green) to restore the text; turn the page to move to the next set (J-K-L).
- Walk down.
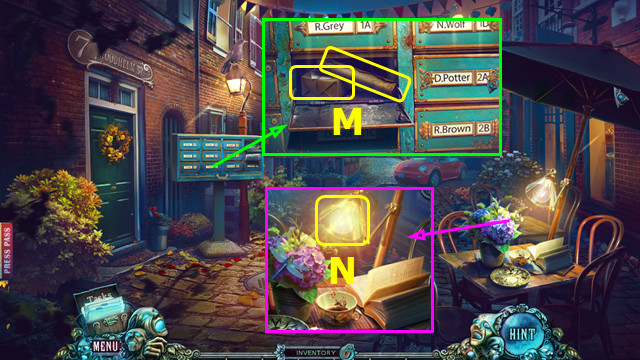
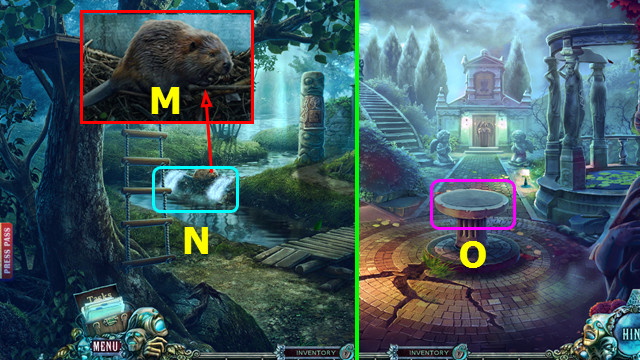
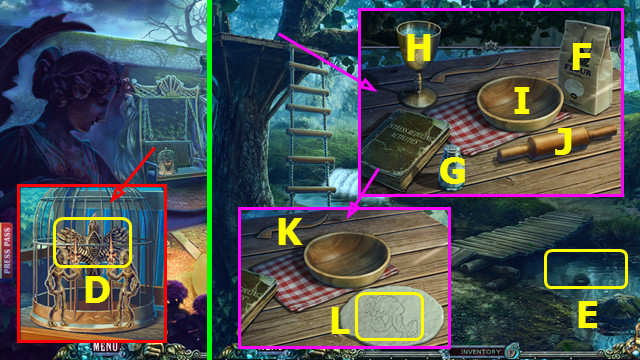
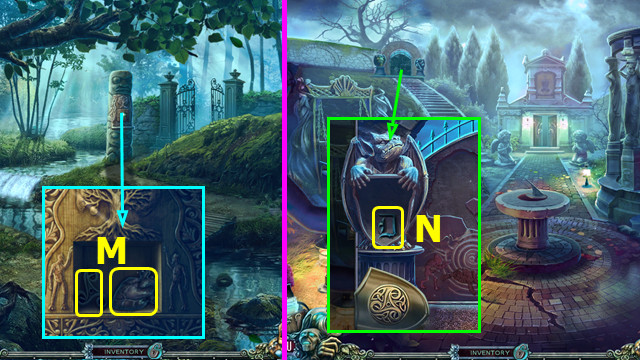
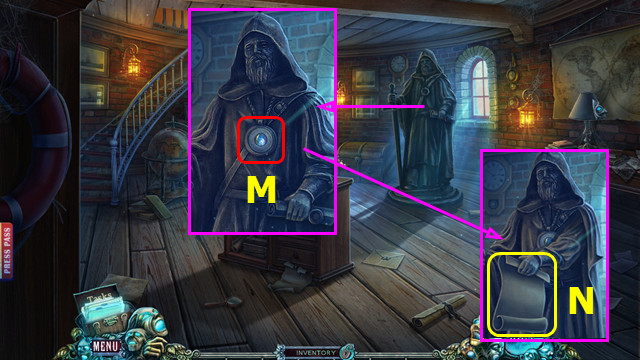
- Use the MAILBOX KEY; take the MAP, open the package and take the 2nd BOOK (M).
- Use the LACE CLOTH to take the BULB (N).
- Combine the BULB and CAN OF PAINT to make the RED BULB.
- Walk left.
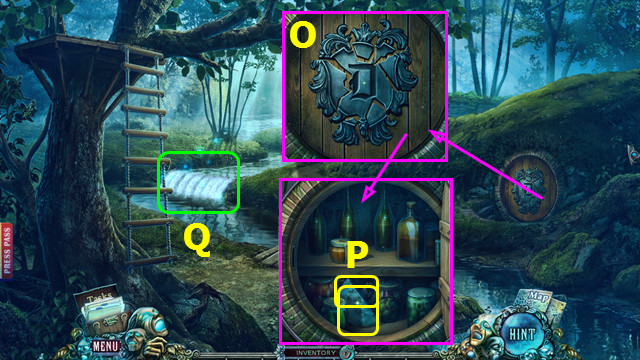
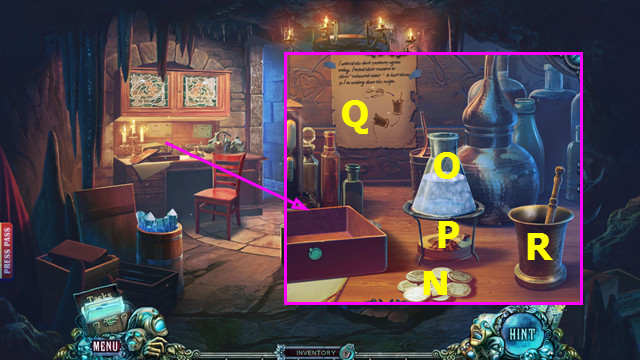
- Place the 2 BOOKS; take the FILM (O).
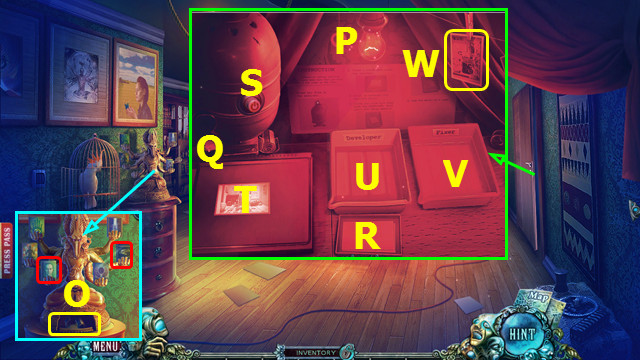
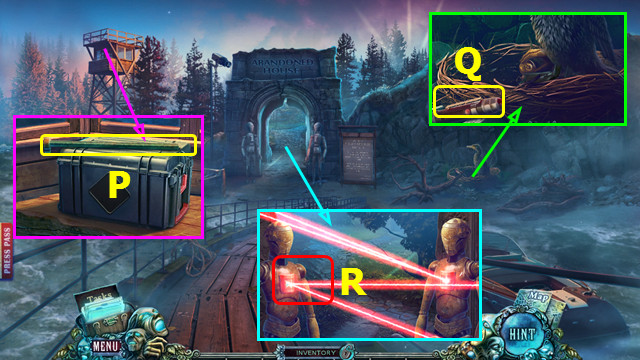
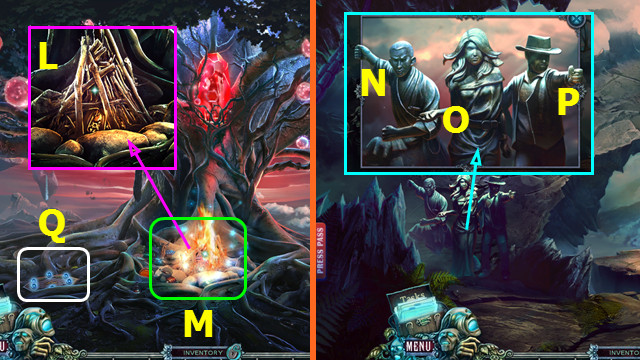
- Place the RED BULB (P).
- Place the FILM (Q).
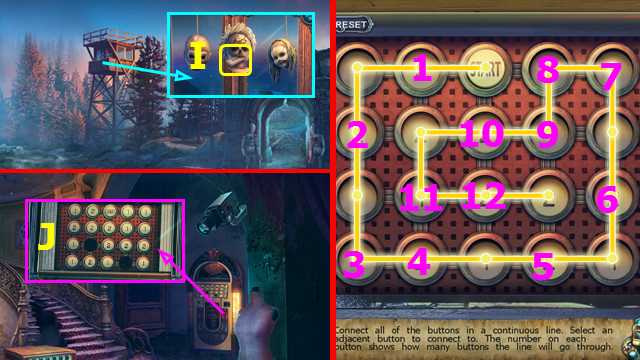
- Open and select (R).
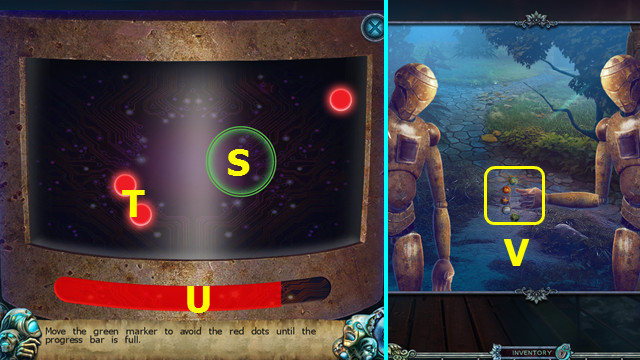
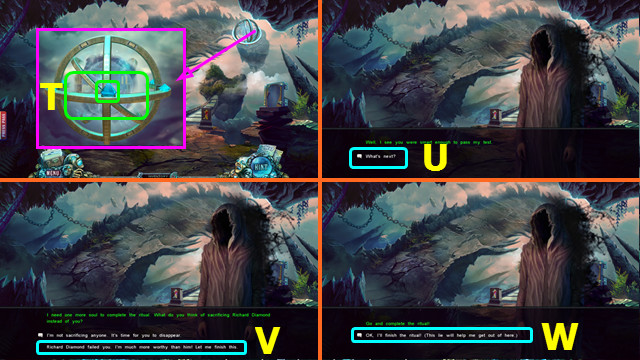
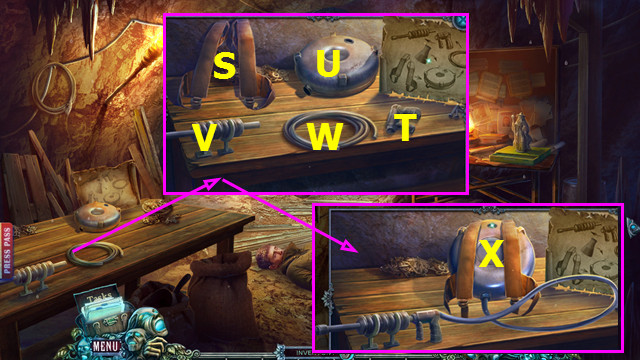
- Push the button (S).
- Move (T) to (U), and then to (V).
- Move (V) to (W); take the CHILDREN'S PHOTO.
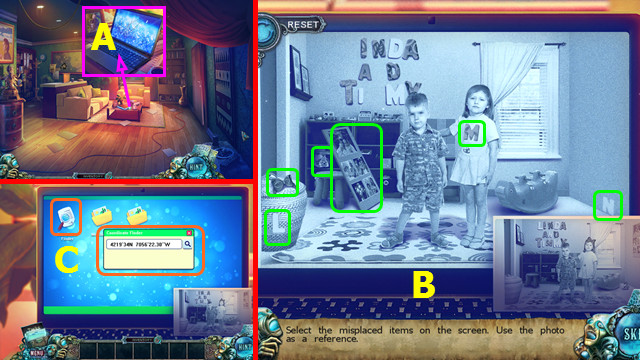
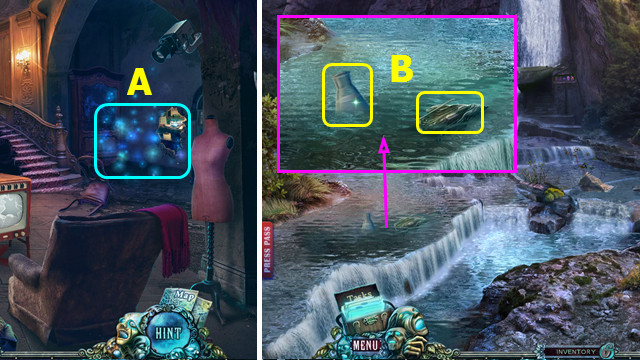
- Open and select the laptop (A).
- Use the CHILDREN'S PHOTO on the laptop.
- Select the differences (B).
- Select the coordinate finder; use the COORDINATES (C).
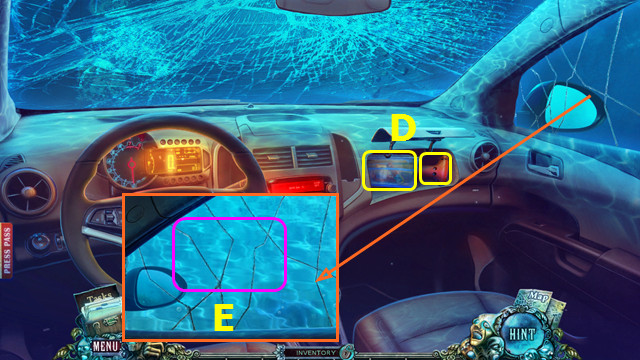
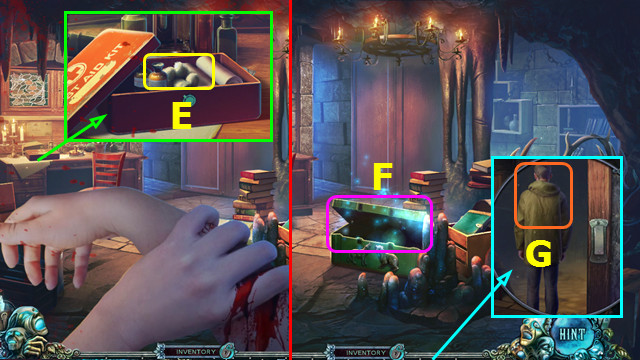
- Open the glove compartment; take the WATERPROOF CASE and EMERGENCY HAMMER (D).
- Open the WATERPROOF CASE; take the BATTERY and JOURNALIST ID.
- Use the EMERGENCY HAMMER (E).
- Take the WHEEL (F).
- Take the GLUE (G).
- Take the LICENSE PLATE (H).
- Go forward.
- Take the TICKET and read the note; use the LICENSE PLATE (I).
- Select (J).
- Select (K).
- Take CLARISSA'S PHOTO (L).
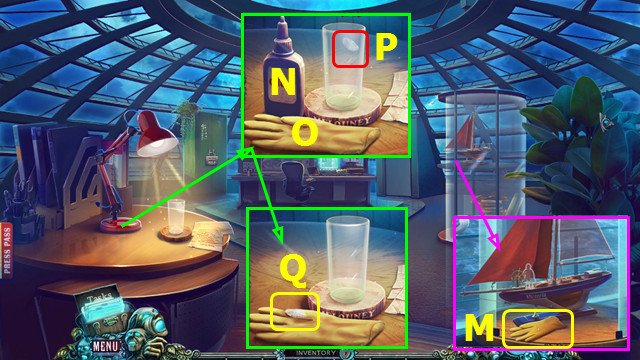
- Take the GLOVE (M).
- Place the GLUE (N) and GLOVE (O); use (N) on (O), use (O) on (P).
- Take the FAKE FINGERPRINT (Q).
- Walk down.
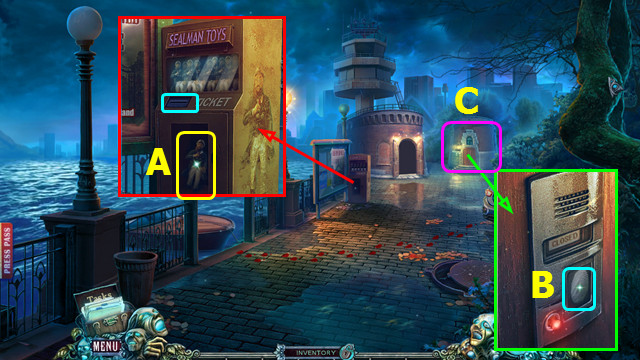
- Use the TICKET; take the CAPTAIN FIGURINE (A).
- Use the FAKE FINGERPRINT (B).
- Play the HOP; earn the PLUGGED GAS CAN (C).
- Remove the POSTER from the PLUGGED GAS CAN to find the GAS CAN.
- Go forward.
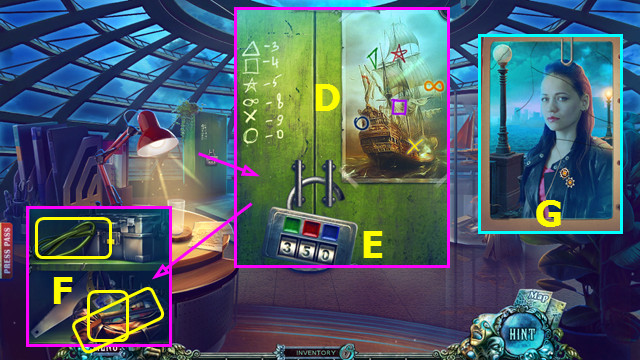
- Place the POSTER (D).
- Set the lock to 3-5-0 (E).
- Take the HOSE and HARPOON GUN HANDLE; look at the badge and take the SECURITY JOURNAL (F).
- Open the SECURITY JOURNAL and place CLARISSA'S PHOTO; restore the photo (G).
- Turn the page 2x and take the SAIL and EVIDENCE.
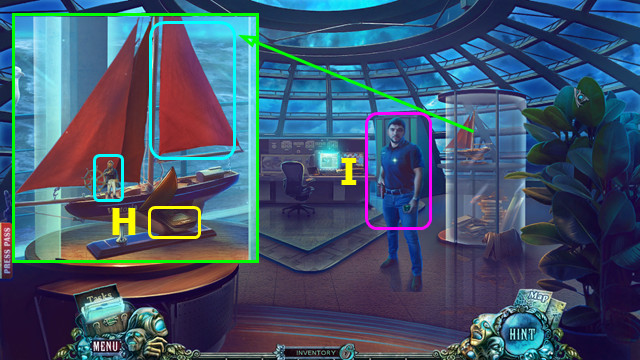
- Place the SAIL and CAPTAIN FIGURINE; take the GPS NAVIGATOR (H).
- Give the JOURNALIST ID and give the EVIDENCE; take the GPS NAVIGATOR (I).
- Walk down.
- Place the GAS CAN and the HOSE: take the GAS CAN (J).
- Use the GASOLINE CANISTER (K).
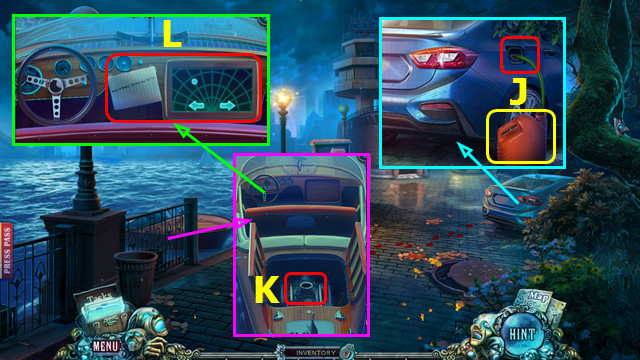
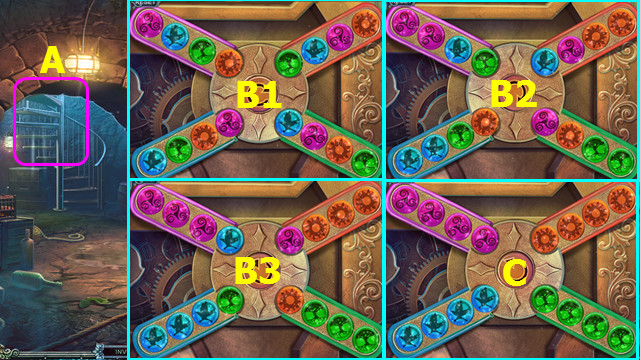
- Place the GPS NAVIGATOR and COORDINATES (L).
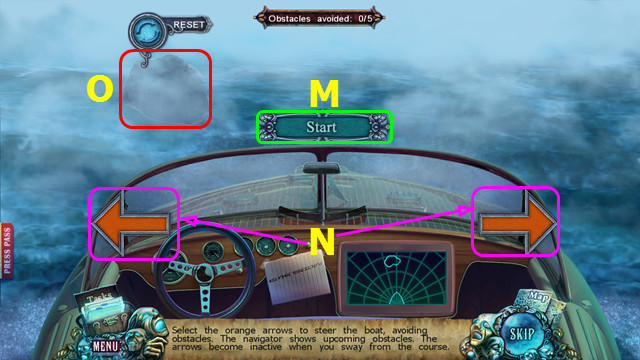
- Select (M) to begin.
- Press the arrows (N) to avoid 5 obstacles (O).
- This mini-game is randomly generated.
Chapter 2: The Coast
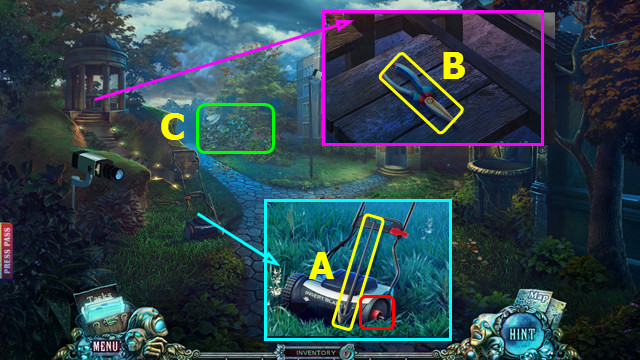
- Take the HARPOON GUN BARREL (P).
- Take the UNCHARGED LASER POINTER (Q).
- Combine the UNCHARGED LASER POINTER and BATTERY to make the LASER POINTER.
- Use the LASER POINTER (R).
- Select start. Drag the green circle (S) around, avoiding the red circles (T), until the bar is full (U).
- Repeat the process a second time.
- Select and take LINDA'S NECKLACE (V).
- Go forward.
- Take the HARPOON and place the WHEEL (A).
- Combine the HARPOON GUN HANDLE, HARPOON GUN BARREL, and HARPOON to make the HARPOON GUN.
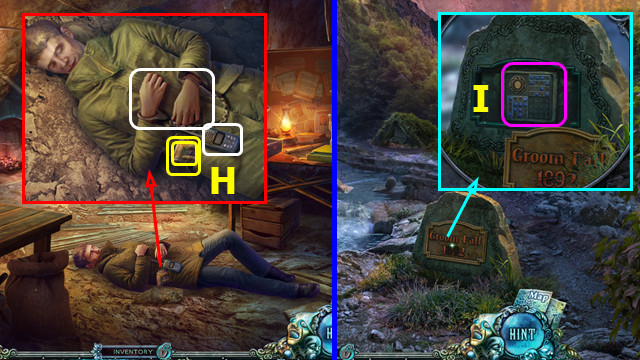
- Remove the blanket and select the camera; read the letter and take the NIPPERS (B).
- Select 3x to play the HOP; earn the LEFT HAND (C).
- Walk down.
- Use the HARPOON GUN (D).
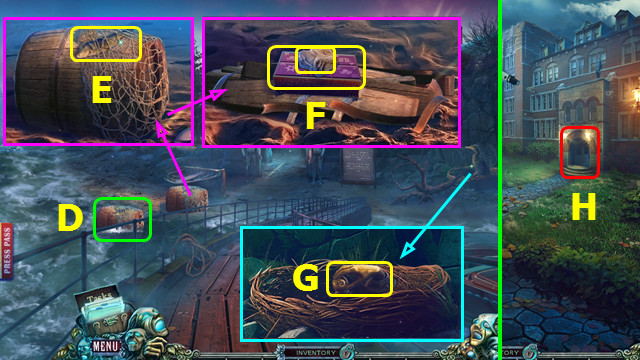
- Remove the net; take the FISH (E).
- Remove the net and use the NIPPERS; take the 1st IMAGE PIECE and BOX (F).
- Give the FISH; take the RIGHT HAND (G).
- Go forward.
- Select (H).
- Place the RIGHT HAND and LEFT HAND on the doors.
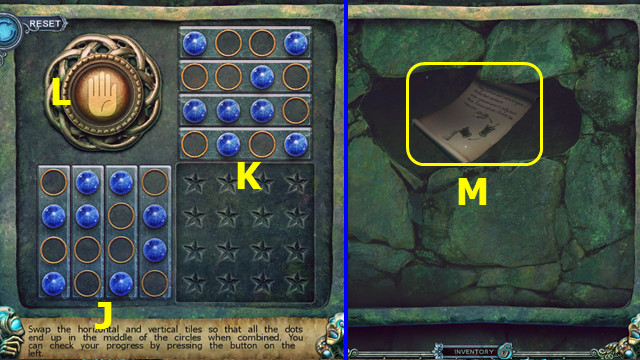
- Select I-R-M-N-O-L-P-M-N-Q-I-K-L-J-O.
- Go forward.
- Select (A).
- Take the DIARY PAGE 1 and 1/2 BUTTONS (B).
- Take LINDA'S BACKPACK (C).
- Use LINDA'S NECKLACE on LINDA'S BACKPACK; change the backpack buttons to match the necklace. Look at the license; take the LIGHTER and FIGURINE.
- Open the lamp and take the HUMANOID FIGURINE (D).
- Take the DEMON HEAD (E).
- Walk down.
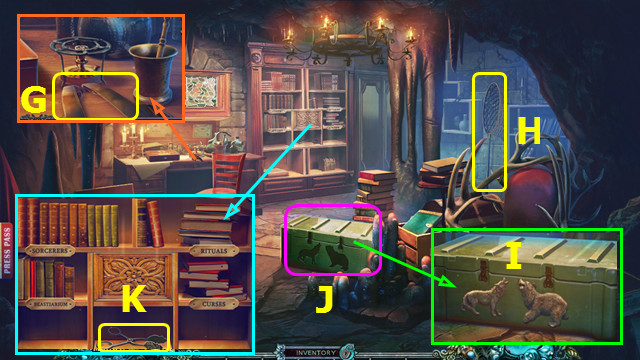
- Read the brochure and place the HUMANOID FIGURINE; take CLARISSA'S DIARY (F).
- Open CLARISSA'S DIARY and take the 2/2 BUTTONS. Turn the page and place the DIARY PAGE 1.
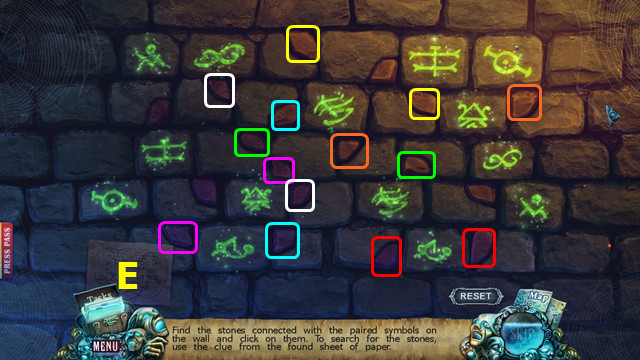
- Select the 5 inkblots (G). Turn the page.
- Place the DEMON HEAD; take the DOLL'S HEAD (H).
- Walk down.
- Place the DOLL'S HEAD; take the JUKEBOX LABEL (I).
- Go forward 2x.
- Place the 2 BUTTONS (J).
- Select 1-12.
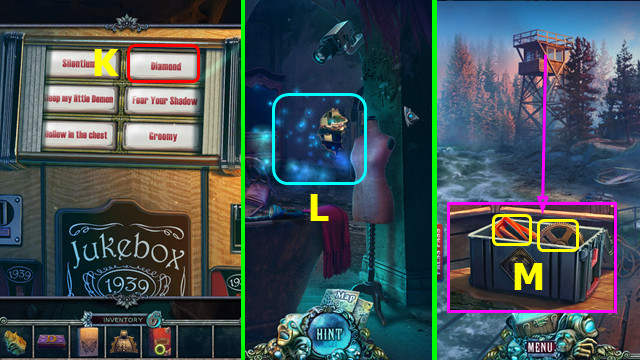
- Place and select the JUKEBOX LABEL (K).
- Play the HOP; earn the TECHNICIAN'S BADGE (L).
- Walk down 2x.
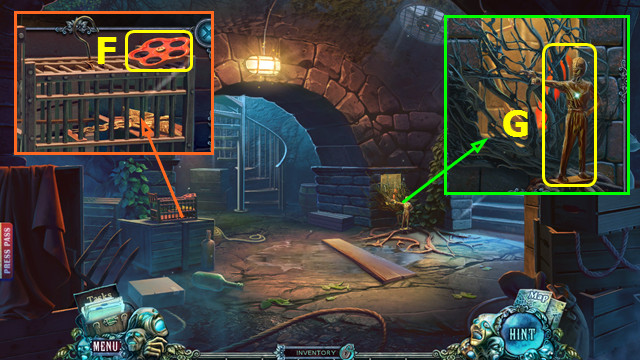
- Place the TECHNICIAN'S BADGE; take the 1st GEAR and MOWER BLADE (M).
- Go forward.
- Place the MOWER BLADE (A).
- Take the 2nd IMAGE PIECE (B).
- Walk forward.
- Place the 2 IMAGE PIECES (C).
- Go forward.
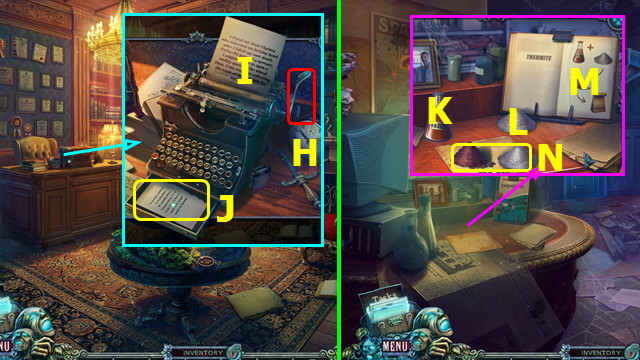
- Read the cell phone texts; take the DIARY PAGE 2 (D).
- Take the MALLET (E).
- Walk down.
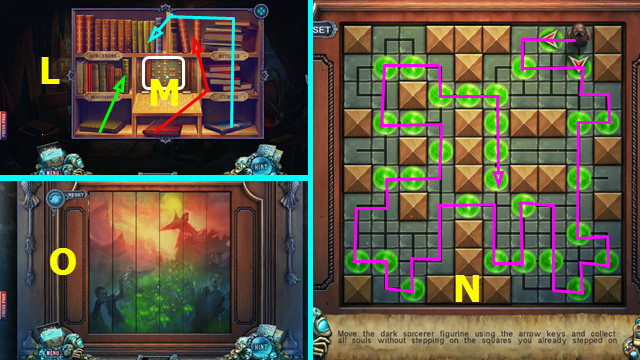
- Open CLARISSA'S DIARY and place the DIARY PAGE 2. Move the images (color-coded).
- Turn the page and use the BOX on CLARISSA'S DIARY; change the images to match the sketch (F).
- Look at the photo and note; take the 1st MECHANICAL BIRD and RAZOR (G).

- Use the RAZOR; take the RING HANDLE (H).
- Use the MALLET; take the 2nd GEAR (I).
- Walk down.
- Play the HOP; earn the SWITCH (J).
- Use the RING HANDLE and remove the debris 5x; take the SIGNET RING (K).
- Go forward 2x.
- Place the 2 GEARS and take the WRENCH; place the SWITCH (L).
- Select (M).
- Place the FIGURINE (N) and SIGNET RING (O).
- Set the discs as shown (P).
- Select (Q).
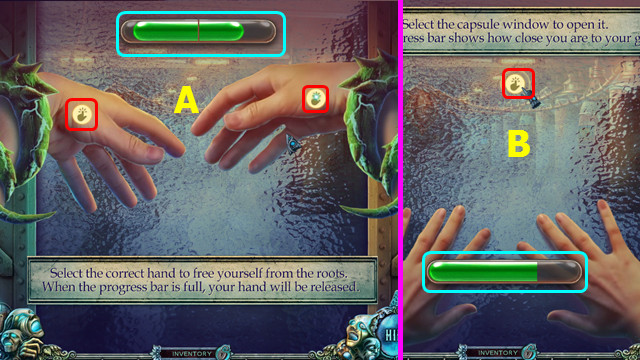
- Select alternating hands to fill the green bar on both sides (A).
- Select rapidly until the green bar fills (B).
- Take the TOURNIQUET and use the WRENCH (C).
- Use the LIGHTER (D).
- Move from the start (E) to finish (F).
- Select 1-12.
Chapter 3: The Backyard
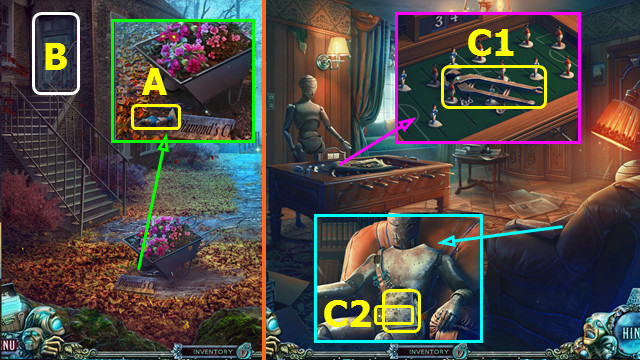
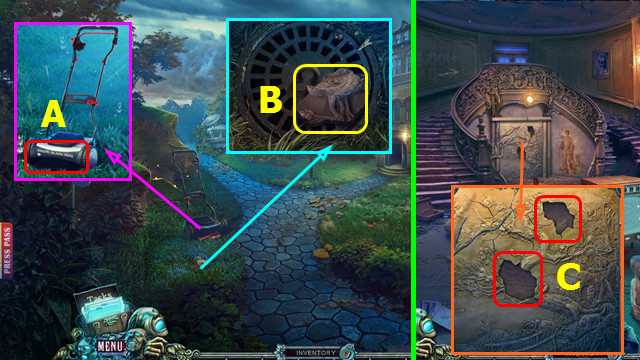
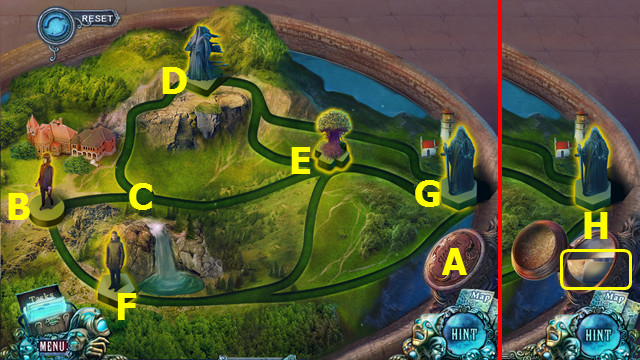
- Move the sign; take the FOOTBALLER 1 (A).
- Walk left (B).
- Read the newspaper and take the CUPBOARD HANDLE (C1).
- Take the DIARY PAGE 3 and 2nd MECHANICAL BIRD (C2).
- Walk down.
- Place the 2 MECHANICAL BIRDS (D).
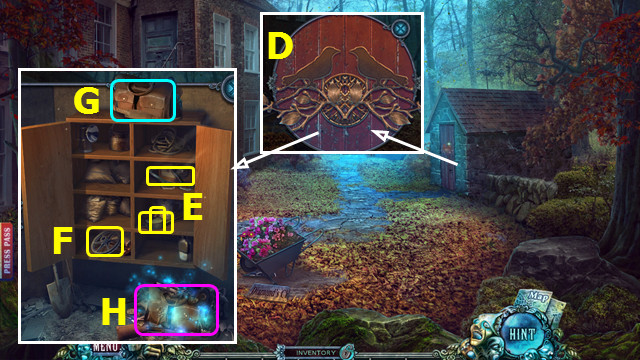
- Place the CUPBOARD HANDLE; take the OILER, SALT, and HOOKS (E).
- Open the door and take the PULLEY (F).
- Select (G).
- Play the HOP; earn the DOCTOR'S PHOTO (H).
- Walk left.
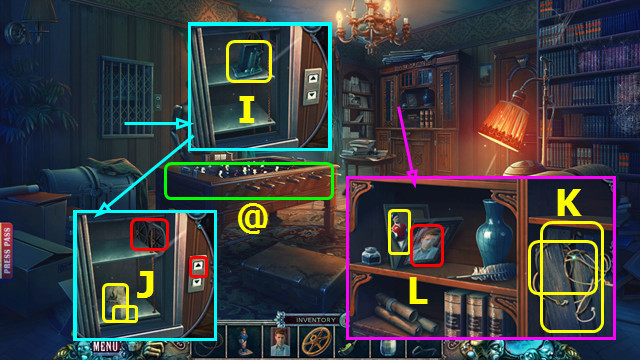
- Use the OILER; take the BROKEN JACK (I).
- Place the PULLEY and TOURNIQUET, press the up button, and take the FLOUR and CABINET KEY (J).
- Use the CABINET KEY; take the ROPE LADDER and BOARDS (K).
- Place the DOCTOR'S PHOTO; take the FOOTBALLER 2 (L).
- Select (@).

- Place the FOOTBALLER 1 and FOOTBALLER 2 on the board.
- Adjust the 3 figures (green) as shown; select (M).
- Adjust the figure (green) as shown; select (N).
- Take the BUCKLE JEWEL and SPRING (O).
- Combine the BROKEN JACK and SPRING to make the SCREW JACK.

- Place the BUCKLE JEWEL; take the TOOL BELT (P).
- Walk down.
- Use the SCREW JACK; take DEATH FIGURE 1 (Q).
- Select (R).
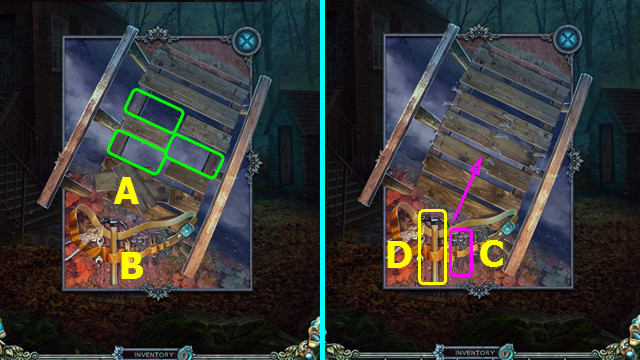
- Place the BOARDS (A) and TOOL BELT (B).
- Move the 3 board pieces to the empty spaces (green).
- Use the nails (C) and hammer (D) on the boards.
- You earn the HAMMER.
- Walk forward.
- Take the KNIFE (E).
- Take the SPEARMAN 1 (F).
- Go forward.
- Take the WOOD PIECES (G).
- Add the HOOKS and WOOD PIECES to the ROPE LADDER.
- Take the EMERY STONE (H).
- Walk down.
- Place the ROPE LADDER (I).
- Read the book; take the FLINT AND STEEL and the SPIKE (J).
- Go forward.
- Use the SPIKE and HAMMER (K).
- Use the KNIFE to take the WATER LILY (L).
- Walk down.
- Use the WATER LILY (M).
- Play the HOP; earn the SUNDIAL PART (N).
- Go forward.
- Select (O).

- Place the SUNDIAL PART (P).
- Arrange the inner track of symbols as shown (Q).
- Take the DEATH FIGURE 2 (R).
- Place DEATH FIGURE 1 and DEATH FIGURE 2 (S).
- Go forward.
- Take the CUP (A).
- Take the METAL PLATE (B).
- Use the FLINT AND STEEL; use the KNIFE to take the SPEARMAN 2 (C).
- Walk down.
- Place the SPEARMAN 1 and SPEARMAN 2; take the RAVEN INLAY (D).
- Walk down.
- Use the CUP to take the CUP OF WATER (E).
- Place the FLOUR (F), SALT (G), and CUP OF WATER (H).
- Use (F) and (H) on (I); use (G) on (I).
- Use (J) on (I).
- Use (K) on (L); take the SERVANT FIGURINE.
- Place the SERVANT FIGURINE; take the STONE HEART and GLYPH (M).
- Go forward.
- Place the GLYPH; take the LETTER D (N).
- Walk down.
- Place the LETTER D (O).
- Play the HOP.
- Take the HALF MOON 1 and THORNY VINE (P).
- Combine the STONE HEART and THORNY VINE to make the HEART WITH THORNS.
- Play the HOP; earn the LENS (Q).
- Go forward 2x.
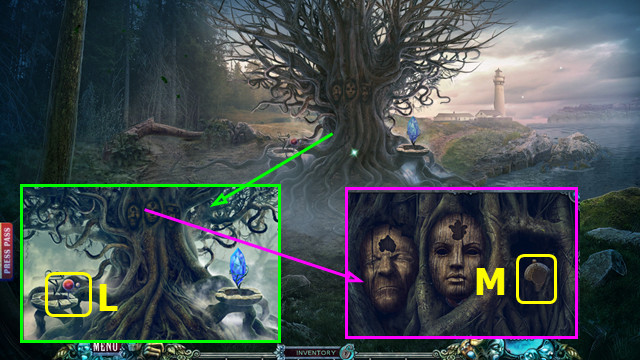
- Place the HEART WITH THORNS and LENS (A).
- Place the RAVEN INLAY (B).
- Play the HOP; earn the HANDBAG (C).
- Open the HANDBAG; take the HYDROGEN PEROXIDE.
- Open CLARISSA'S DIARY and add the DIARY PAGE 3 and HYDROGEN PEROXIDE. Turn the page and take the HINT.
- Select (D).
- Place the HINT (E).
- Select the pairs (color-coded).
- Walk right.
Chapter 4: The Secret Corridor
- Take the VALVE HANDLE (F).
- Take the TROPHY 1 (G).
- Walk right.
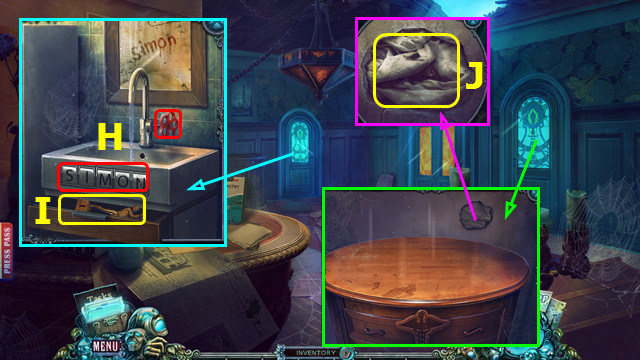
- Place the VALVE HANDLE (H), set the letters to S-I-M-O-N, and take the TROPHY 2 (I).
- Select 2x to take the SHEET (J).
- Walk down.
- Open the cover and use the SHEET; take the MAGNET (K).
- Use the MAGNET; take the CADUCEUS (L).
- Walk right.
- Place the CADUCEUS; take the CANDLE and select the book (M).
- Walk down 2x.

- Place the CANDLE and swap to match the candles with the symbols; take the FRAME PIECE (O).
- Play the HOP; earn the BOOK EMBLEM (N).
- Go right 2x.
- Use the BOOK EMBLEM; turn the page and take the SKETCH (P).
- Combine the METAL PLATE, SKETCH, and EMERY STONE; take the MECHANISM KEY and ALUMINUM DUST.
- Walk down.
- Select (A).
- Place the MECHANISM KEY (B1); swap the discs on the arms as shown and select (B1).
- Swap the discs on the arms as shown and select (B2x2).
- Swap the discs on the arms as shown and select (B3x3).
- Final solution (C).
- Go forward.

- Take the KEY CARD (D).
- Take the KATANA; place the TROPHY 1 and TROPHY 2. Take the LOCKPICKS and STONE INLAY (E).
- Walk down.

- Use the KATANA; take the FLARE and CARRIAGE RETURN (F).
- Walk right.
- Use the KEY CARD; take the CLEANER and IRON OXIDE (G).
- Walk down and forward.
- Place the CARRIAGE RETURN (H) and select the paper (I); take the INSTRUCTIONS (J).
- Walk down and right.
- Place the IRON OXIDE (K), ALUMINUM DUST (L); open the book and place the INSTRUCTIONS (M).
- Select K-L-N; take the THERMITE.
- Walk down and forward.

- Place the FRAME PIECE (O).
- Use the THERMITE and FLARE; take the MYSTERIOUS SYMBOL 1 and select the book (P).
- Play the HOP; earn the NAME PLATE (Q).
- Select (R).
- Place the NAME PLATE (A).
- Select E-F-B-C-D-G-F-B-C.
- Read the note and take the HALF MOON 2 (H).
- Walk down 3x.
- Place the STONE INLAY (I).
- Place the HALF MOON 1 and HALF MOON 2 (J).
- Go forward.
- Take the THICK BRANCH (K).
- Take the PLANET 1 (L).
- Place the MYSTERIOUS SYMBOL 1; take the 1/2 KEEPER'S MEDALLION (M).
- Walk right.
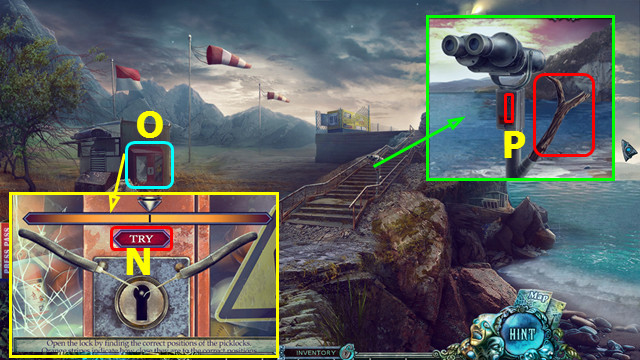
- Place the LOCKPICKS and arrange as shown so the bars fill; select (N).
- Play the HOP; earn the BINOCULARS TICKET (O).
- Place the THICK BRANCH and BINOCULARS TICKET (P).
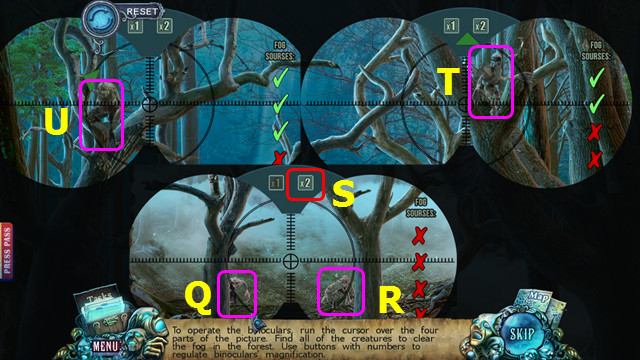
- Select (Q) and (R).
- Select (S).
- Select (T) and (U).

- Take the PLANET 2 (A).
- Select the hull 3x; take the DIRTY SYMBOL (B).
- Combine the DIRTY SYMBOL and CLEANER to make the MYSTERIOUS SYMBOL 2.
- Walk down.
- Place the MYSTERIOUS SYMBOL 2; take the 2/2 KEEPER'S MEDALLION and KEEPER FIGURINE (C).
- Walk right and forward.
Chapter 5: The Lighthouse
- Take the OLD GUN and place the KEEPER FIGURINE (D).
- Play the HOP; earn the SCROLL SEAL (E).
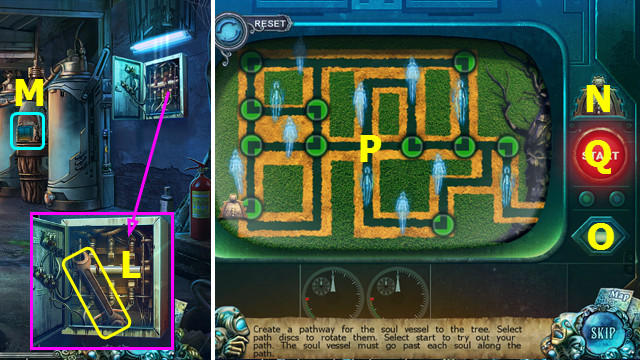
- Place the PLANET 1 and PLANET 2; select (@).
- Select: F-Gx2-Hx6-Ix5-J.
- Final positions (K).
- Take the 1/2 CRYSTAL BALL and the CRYSTAL (L).
- Place the 2 KEEPER'S MEDALLION (M).
- Play the HOP; earn the STAFF BASE.
- Place the SCROLL SEAL; take the SPELL (N).
- Walk down 2x.

- Place the CRYSTAL and SPELL (O).
- Select (P).
- Select 1-14.
- Enter the portal.
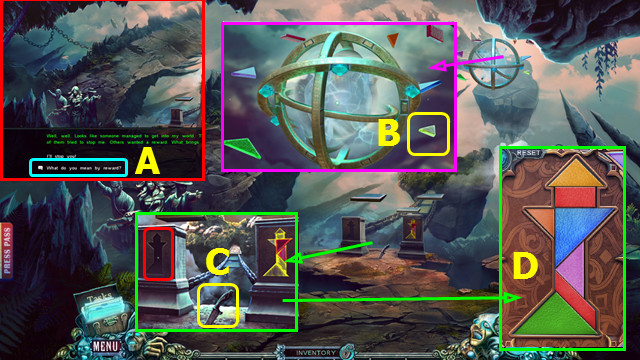
- Select (A).
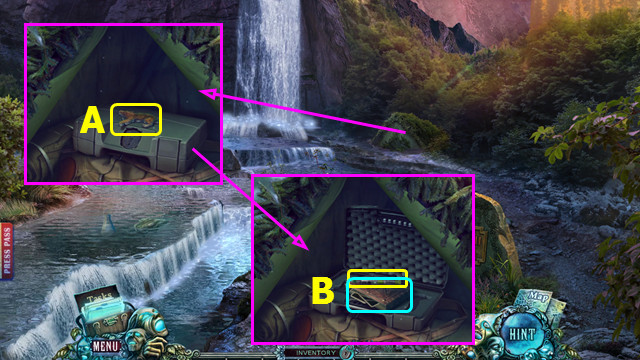
- Take the PRECIOUS FRAGMENTS (B).
- Take the RITUAL KNIFE; place the PRECIOUS FRAGMENTS (C).
- Solution (D).
- Go forward.
- Take the EMBLEM and SCARAB WING 1 (E).
- Take the HUNTER'S BADGE and MYSTERIOUS SYMBOL 3 (F).
- Use the RITUAL KNIFE to take the HEXAGON (G).
- Use the RITUAL KNIFE; take the 2/2 CRYSTAL BALL (H).
- Take the RING SEGMENT (I).
- Walk down.
- Place the HEXAGON (J); play the HOP.
- Take the FIRE SYMBOL (K).
- Go forward.
- Use the FIRE SYMBOL (L).
- Play the HOP; earn the STAFF HEAD (M).
- Combine the STAFF BASE and STAFF HEAD to make the PILGRIM'S STAFF.
- Walk down.
- Place the PILGRIM'S STAFF (N), the 2 CRYSTAL BALL pieces (O), and the OLD GUN (P).
- You earn the UNCHARGED CRYSTAL.
- Go forward.
- Select (Q).
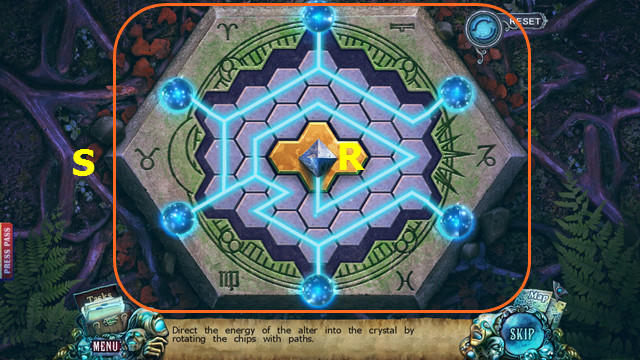
- Place the UNCHARGED CRYSTAL (R).
- Arrange the chips as shown (S).
- Take the CHARGED CRYSTAL (R).
- Walk down.
- Place the RING SEGMENT and the CHARGED CRYSTAL (T).
- Select (U-V-W).
- Place the MYSTERIOUS SYMBOL 3; take the NUMBER EIGHT and the TOGGLE SWITCH (A).
- Walk right.
- Play the HOP; earn the DEAD CAR BATTERY (B).
- Place the DEAD CAR BATTERY (C) and TOGGLE SWITCH (@).
- Take the CAR BATTERY (C).
- Go forward.
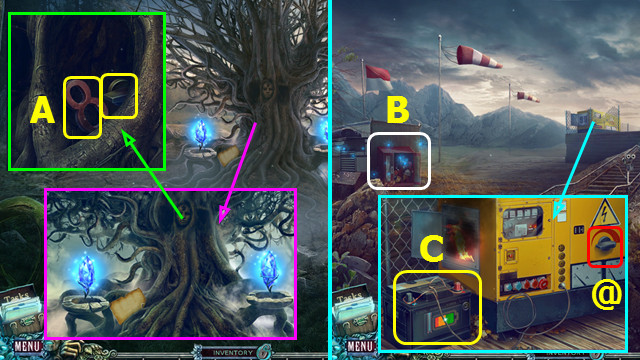
- Take the SCARAB WING 2 and CHAINSAW (D).
- Walk down.
- Place the SCARAB WING 1 and SCARAB WING 2; take the ISLAND MAP and TARP (E).
- Walk down.
- Place the CHAINSAW (F) and CAR BATTERY (G); select (F) to charge, then use it on (H).
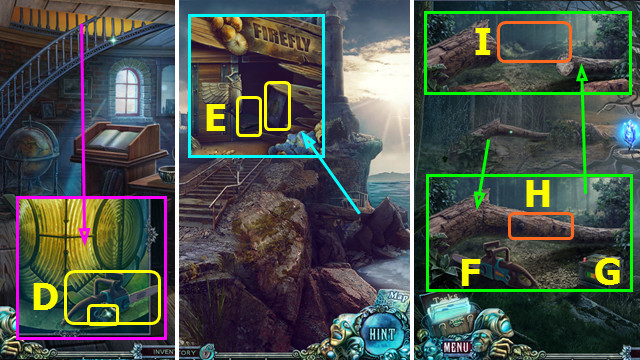
- Use the ISLAND MAP on (I).
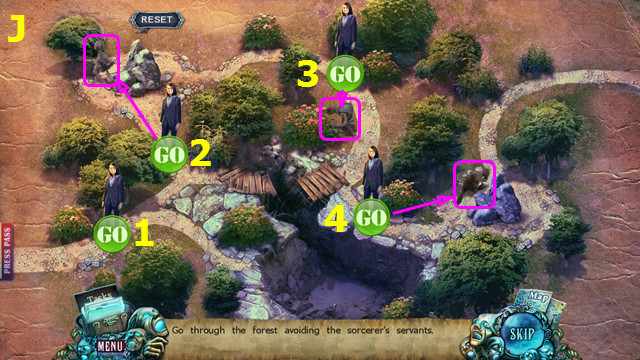
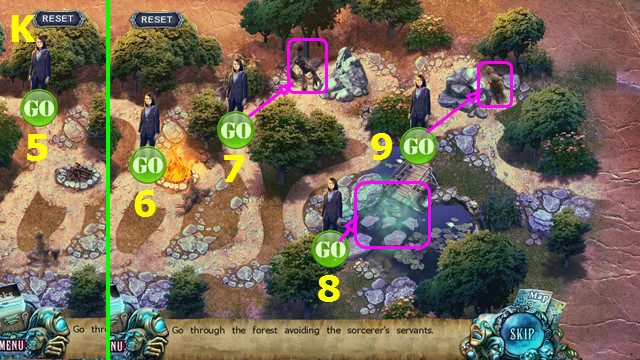
- Part 1 (J)- select the 'GO' buttons (1-4) when the servants are in the marked position.
- Part 2 (K)- select the 'GO' buttons (5-9) when the servants or obstacles are in the marked position.
Chapter 6: Near the Falls
- Move the branches 3x, open the tent and take the BEAR SHAPE (A).
- Place the HUNTER'S BADGE; take the TRANQUILIZER DART and select the book (B).
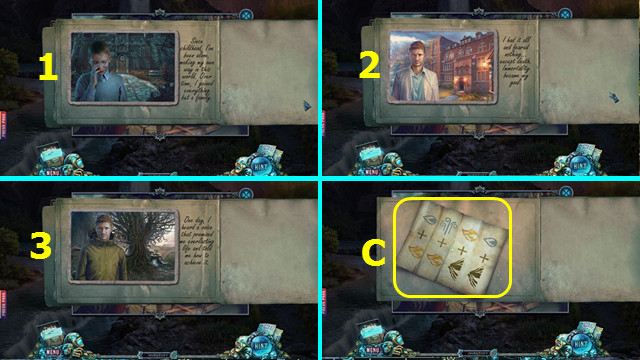
- Restore the photos (1-3).
- Take the CAVE CODE (C).
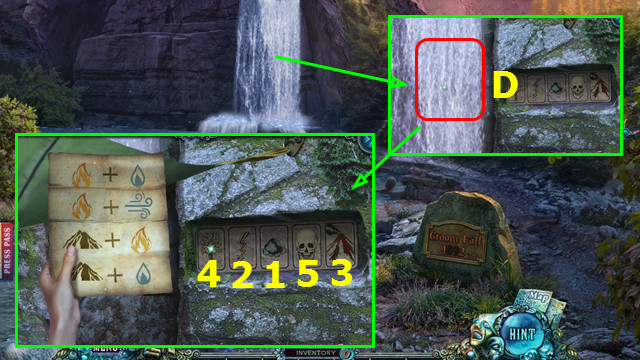
- Use the TARP and CAVE CODE (D).
- Select 1-5.
- Go forward.
- Take the HANDCUFFS (E).
- Read the note and place the EMBLEM; read the note. Take the WOLF SHAPE and SILVER COINS (F).
- Go forward.
- Take the STRAP (G).
- Take the NET (H).
- Place the WOLF SHAPE and BEAR SHAPE (I).
- Play the HOP; earn the SORCERY BOOKS (J).
- Take the TONGS and place the SORCERY BOOKS (K).
- Move the books as shown (L).
- Select (M).
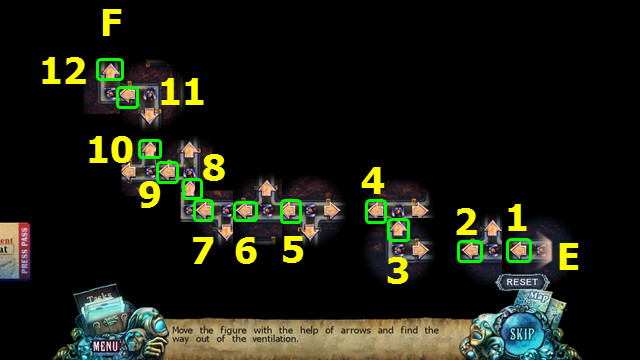
- Move on the indicated path (N).
- Solution (O).
- Go forward.
- Play the HOP; earn the STATUETTE HALF 1 (A).
- Walk down 3x.
- Use the NET to take the FLASK OF WATER and STATUETTE HALF 2 (B).
- Walk forward.
- Use the TONGS to take a SMOLDERING COAL (C).
- Place the STATUETTE HALF 2 and STATUETTE HALF 1; take the NUMBER 9 (D).
- Open and select (E).
- Play the HOP; earn the TRANQUILIZER GUN (F).
- Combine the TRANQUILIZER GUN and TRANQUILIZER DART to make the TRANQUILIZER.
- Open the latch and use the TRANQUILIZER (G).
- Walk down.
- Use the HANDCUFFS and select the radio; take the WATER CANNON NOZZLE and VESSEL PART (H).
- Walk down.
- Place the NUMBER 8 and NUMBER 9; select (I).
- Arrange the pieces as shown (J-K); select (L).
- Take the SILVERWATER RECIPE (M).
- Go forward 2x.
- Place the SILVER COINS (N), FLASK OF WATER (O), SMOLDERING COAL (P), and SILVERWATER RECIPE (Q).
- Use (N) on (R); pour (R) into (O).
- Take the SILVERWATER (O).
- Walk down.
- Place the STRAP (S), and WATER CANNON NOZZLE (T).
- Use (S) on (U); use (T) on (V).
- Select (W).
- Use the SILVERWATER on (X); you earn the WATER CANNON.
- Go forward 2x.
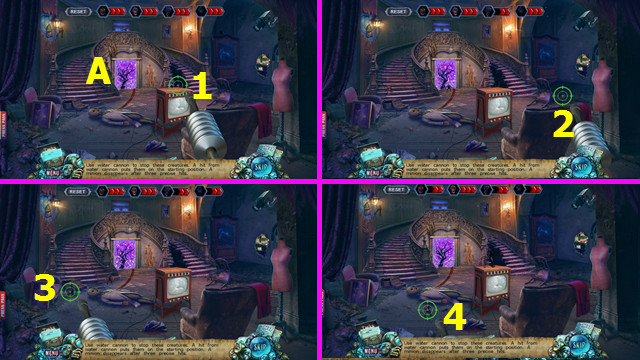

- Use the WATER CANNON (A).
- Select 1-8.
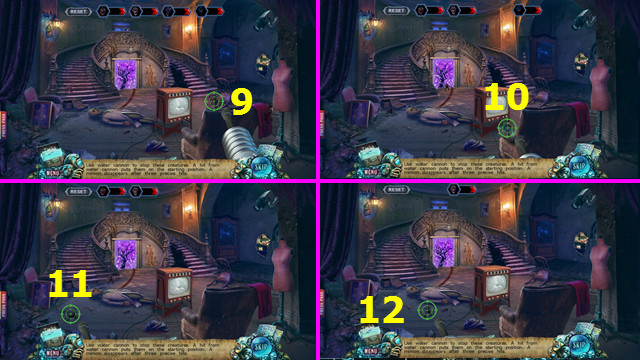
- Continue shooting the creatures (9-12).
- Go forward.
- Place the VESSEL PART at the top.
- Select the pairs (color-coded).
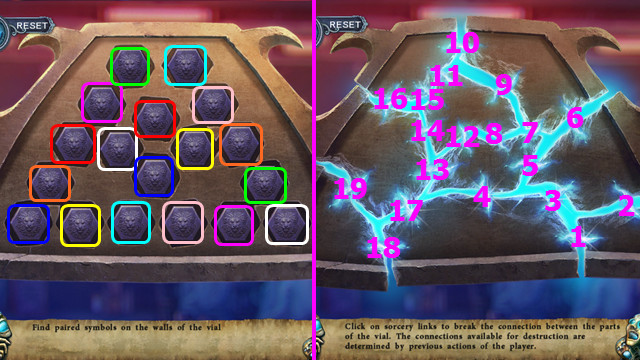
- Select 1-19.
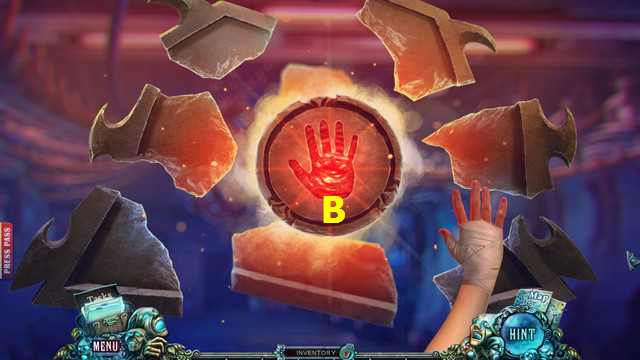
- Select (B).
- Congratulations! You have completed Fear for Sale: Hidden in the Darkness!
Created at: 2017-05-19