

Walkthrough Menu
- General Tips
- Chapter 1: The Front Yard
- Chapter 2: The Office
- Chapter 3: The Break Room
- Chapter 4: The Air Shaft
- Chapter 5: The Power Plant
- Chapter 6: The Jail Cell
- Chapter 7: The Revealing Place
General Tips
- This is the official guide for Fear for Sale: Phantom Tide.
- This guide will not mention each time you have to zoom into a location; the screenshots will show each zoom scene.
- We will use the acronym HOP for Hidden-object puzzles. Interactive items will be color-coded.
- Use the map to travel to a location.
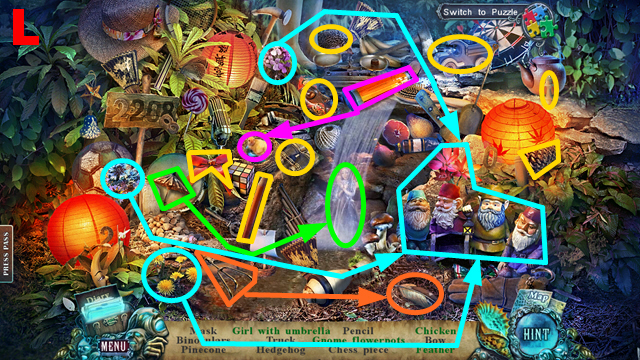
Chapter 1: The Front Yard

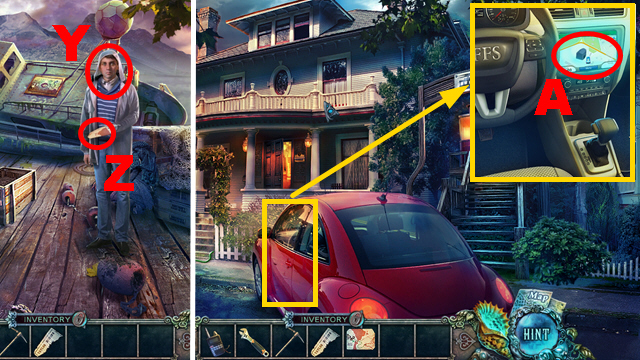
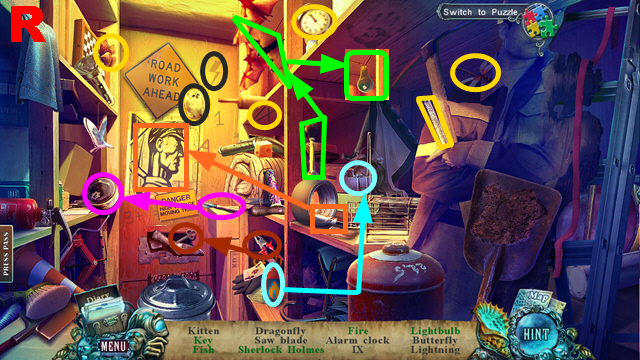
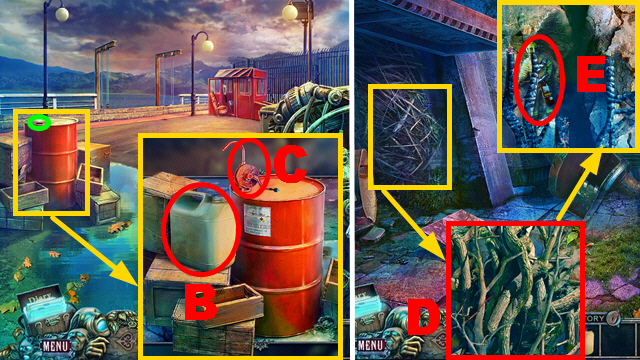
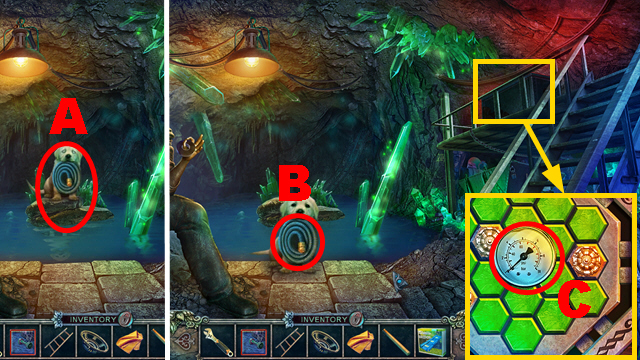
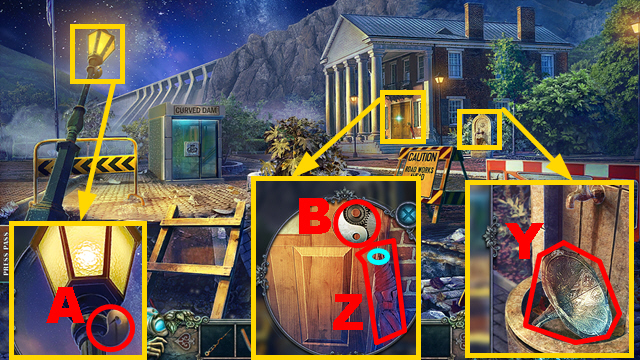
- Take the BATTERY (A).
- Move the lid; arrange the device correctly (B).
- Ring the bell (C).
- Enter the house.
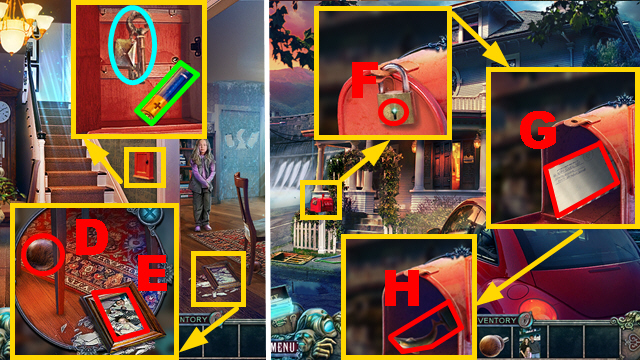
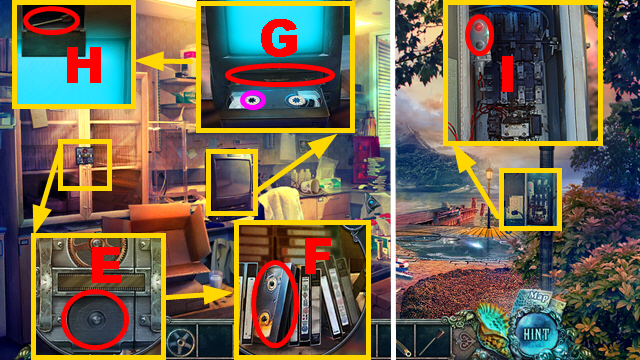
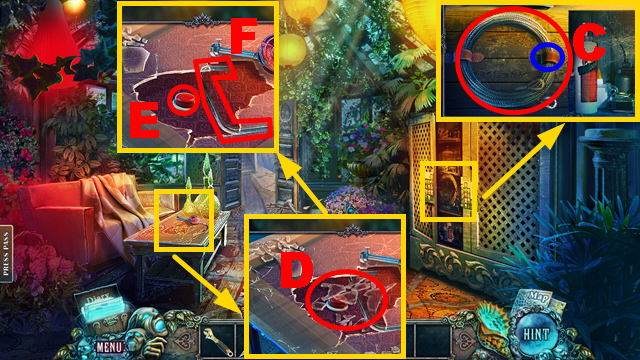
- Take the KEY (blue) and BATTERY (green).
- Take the KNOB (D) and FAMILY PHOTO (E).
- Walk down.
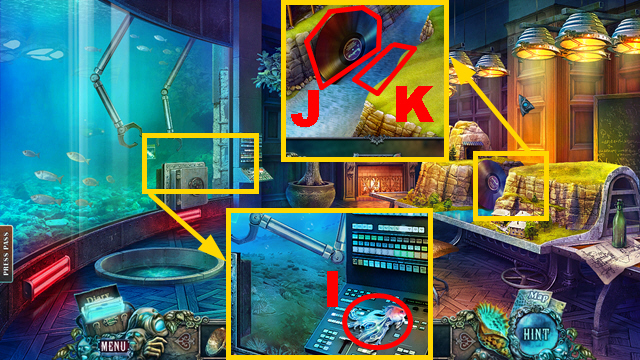
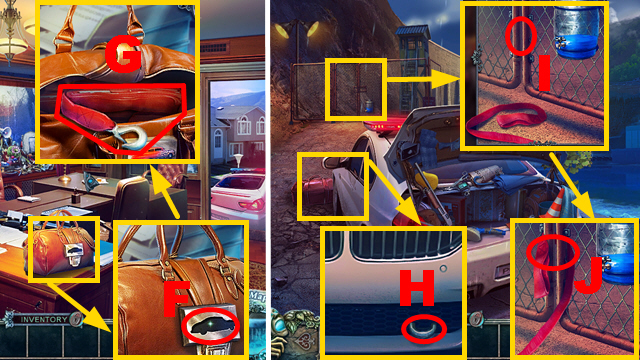
- Use the KEY (F); take the letter (G) and DOLPHIN (H).
- Open the bag; place 2 BATTERIES (purple).
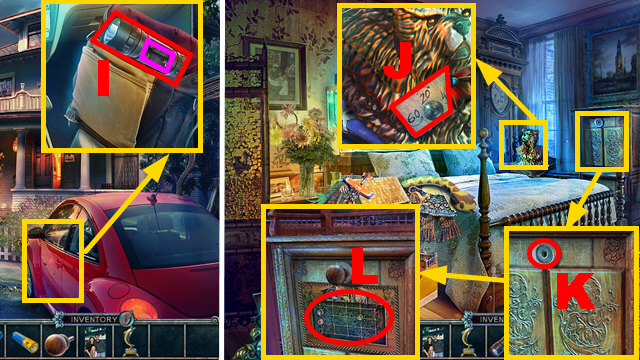
- Take the FLASHLIGHT (I).
- Turn left twice.
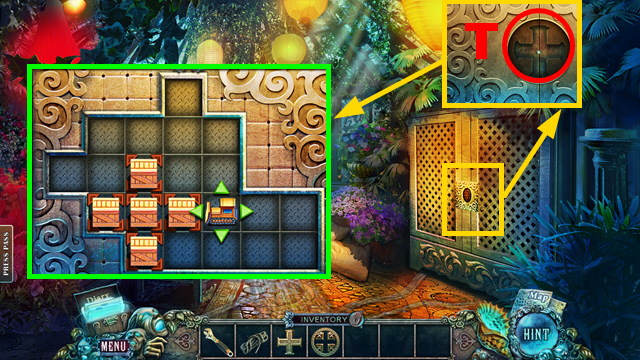
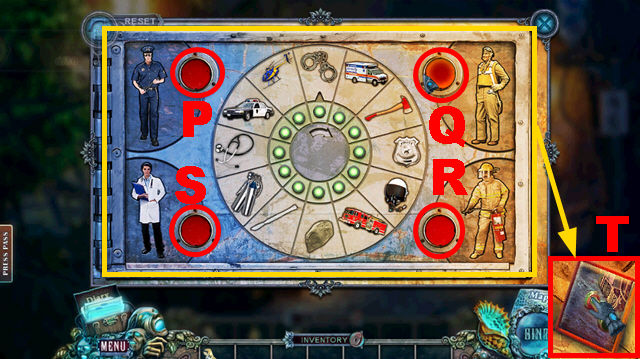
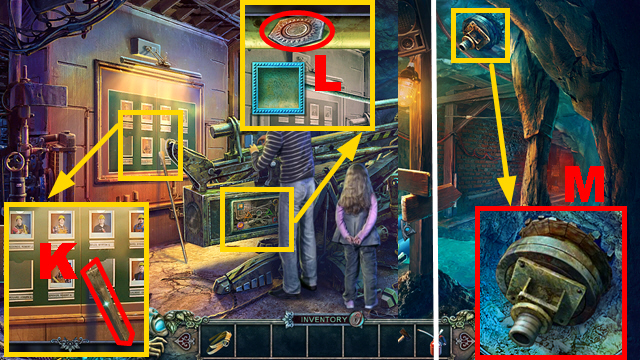
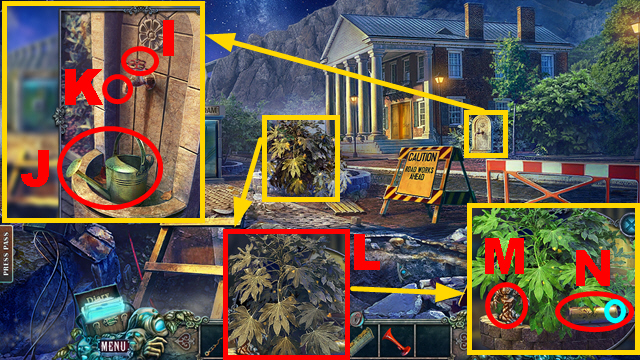
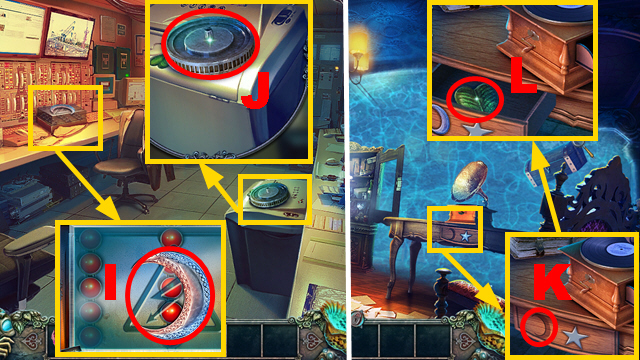
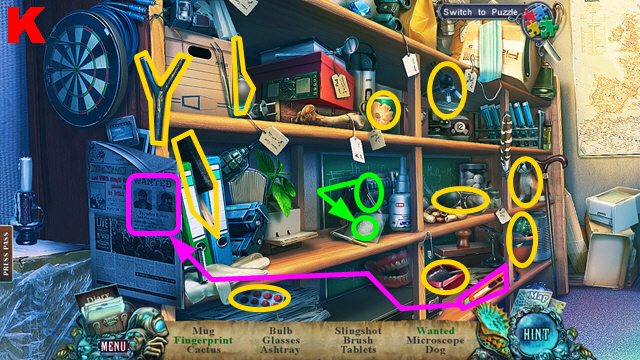
- Take the CODE (J).
- Place the KNOB (K); examine the compartment (L).
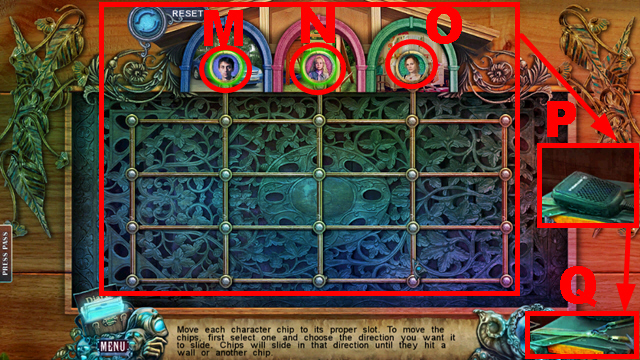
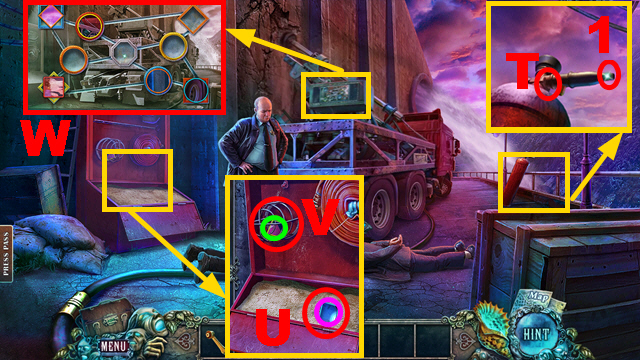
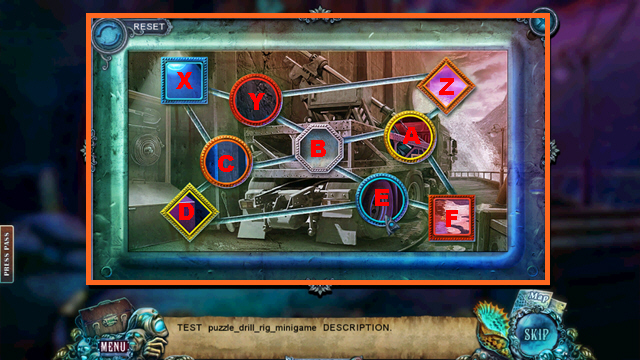
- Play the mini-game.
- Solution: M-right, N-up, M-left, M-up, O-down, N-down, N-right, N-up, O-up.
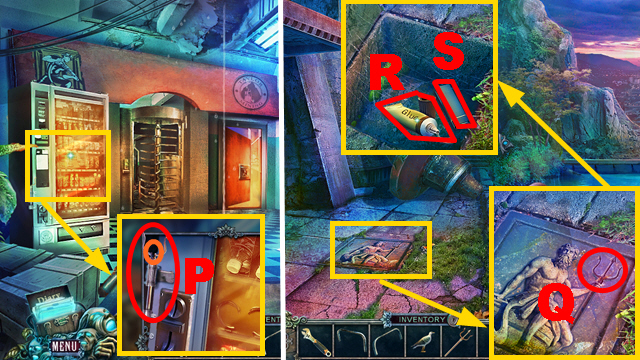
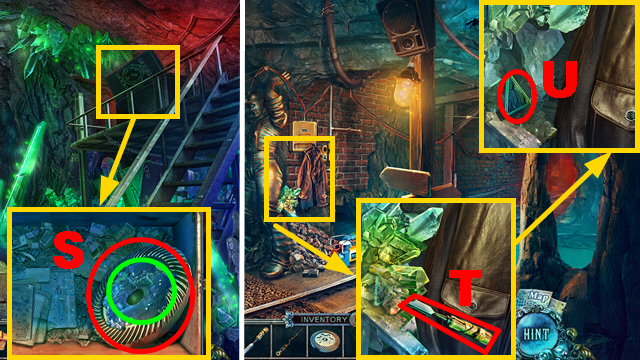
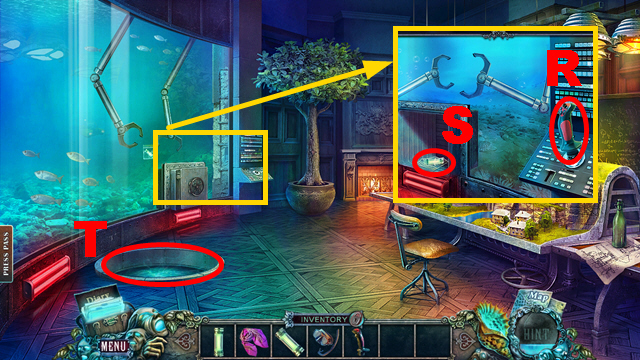
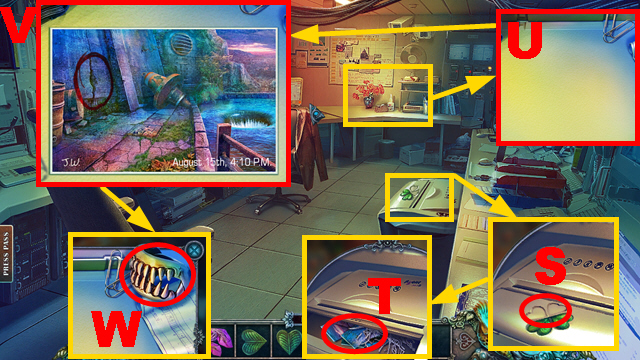
- Use the radio (P); take the PRUNERS (Q).
- Walk down twice.
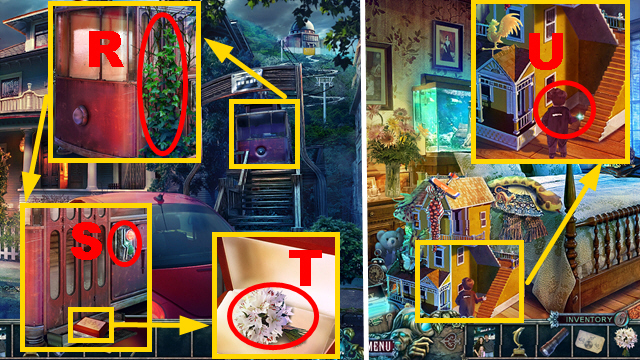
- Use the PRUNERS (R); touch the panel (S).
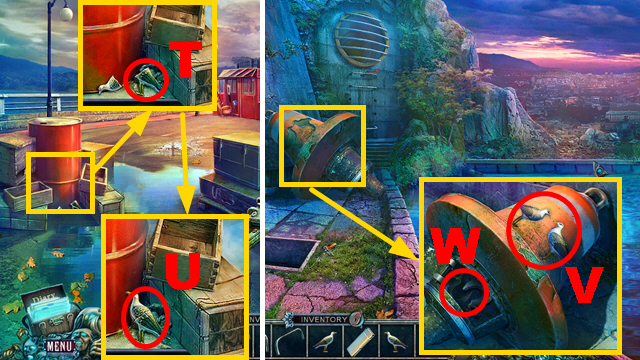
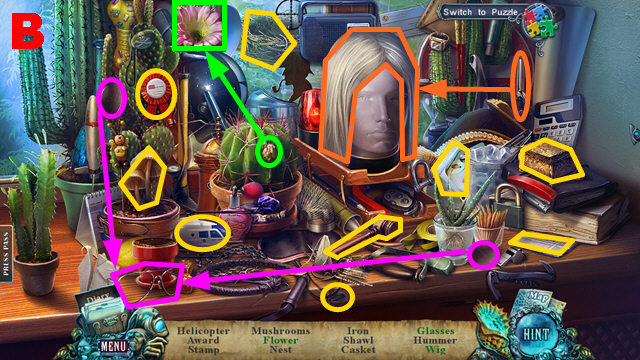
- Open the box; take the BOUQUET (T).
- Turn left twice.
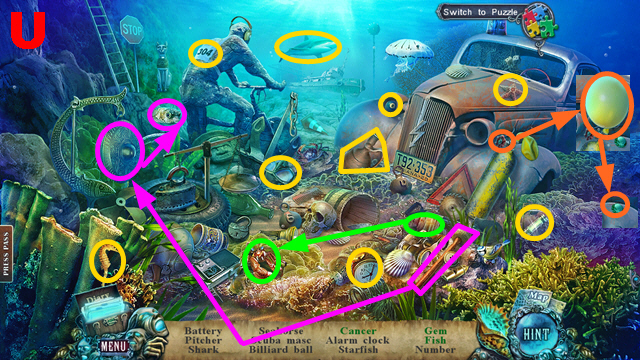
- Place the BOUQUET (U).
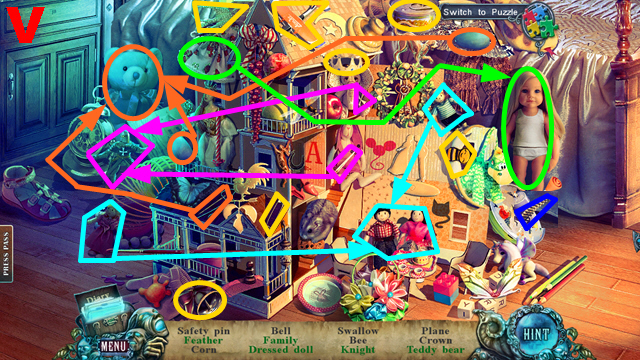
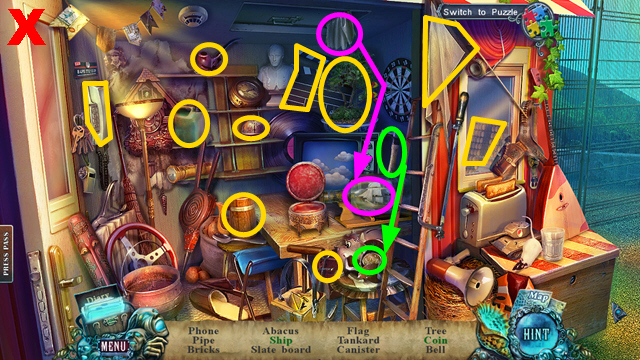
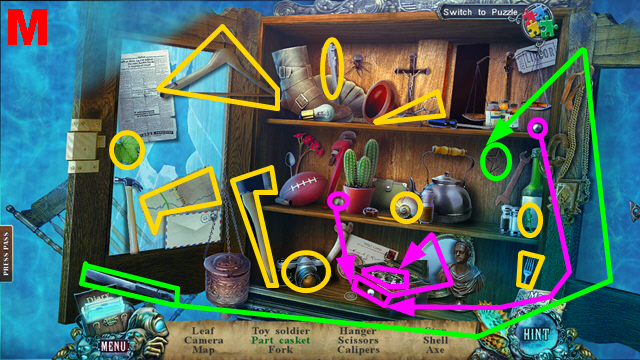
- Play the HOP.
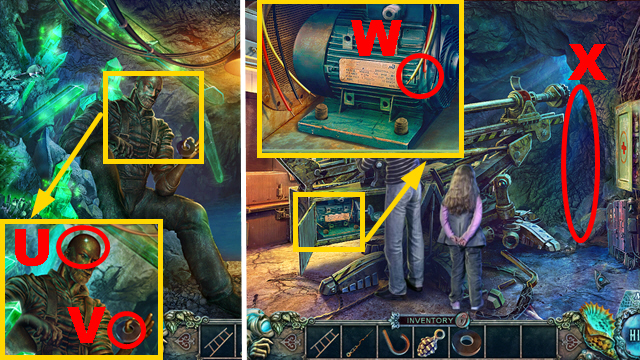
- You receive the CORN (V).
- Use the CORN (W); take the MINIATURE DAM MODEL (X).
- Walk down.
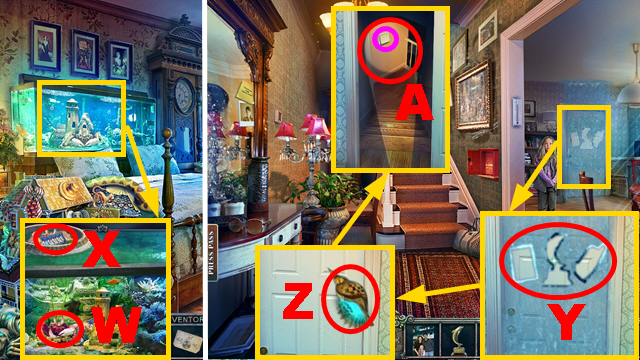
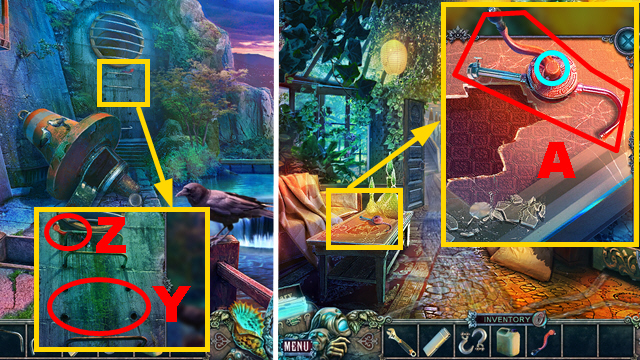
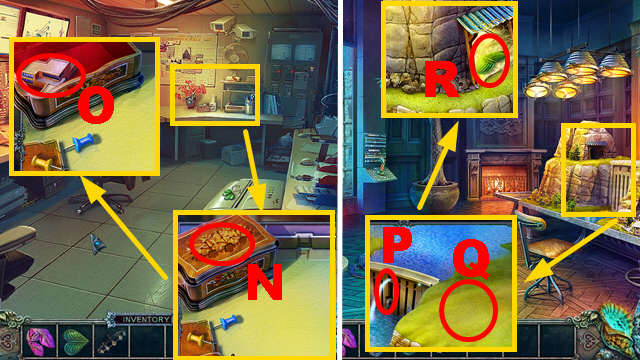
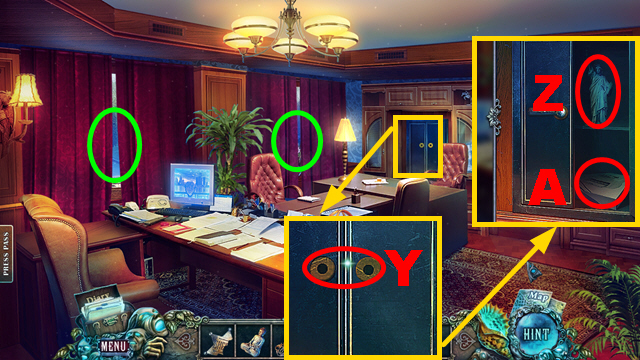
- Place the FAMILY PHOTO, DOLPHIN, and MINIATURE DAM MODEL (Y).
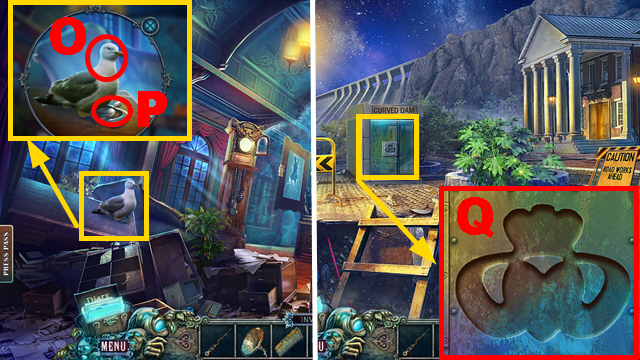
- Take the shell (Z).
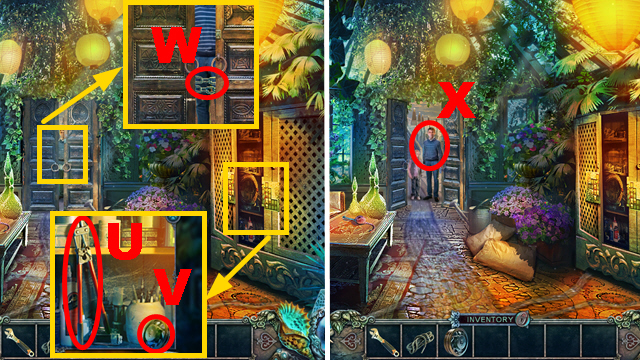
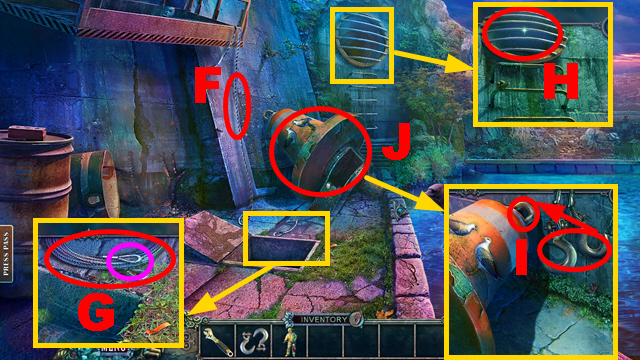
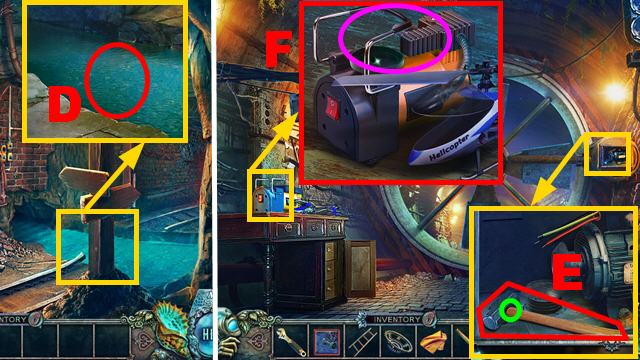
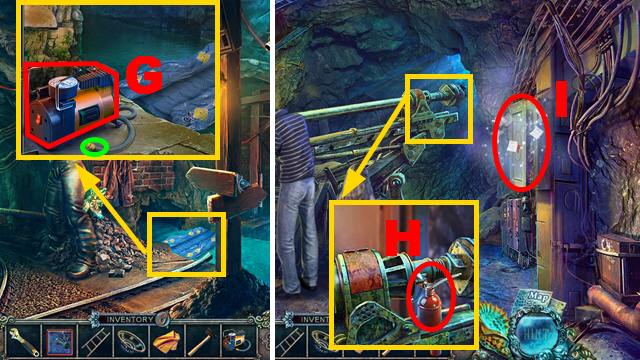
- Open the door; use the FLASHLIGHT (A).
- Turn the switch (purple).
- Go downstairs.
- Use the shell (B).
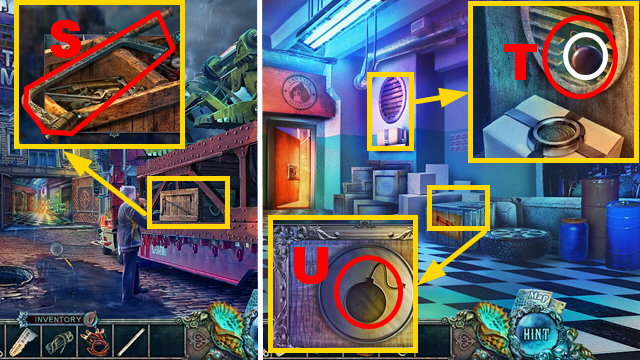
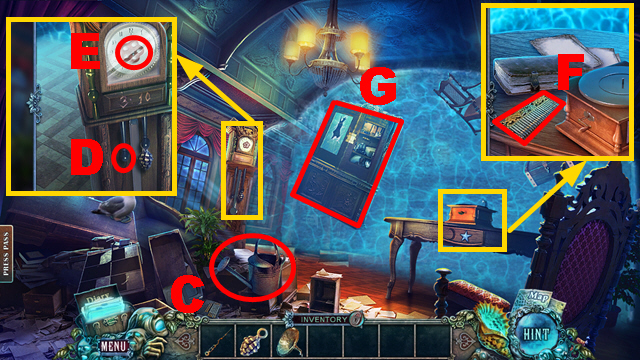
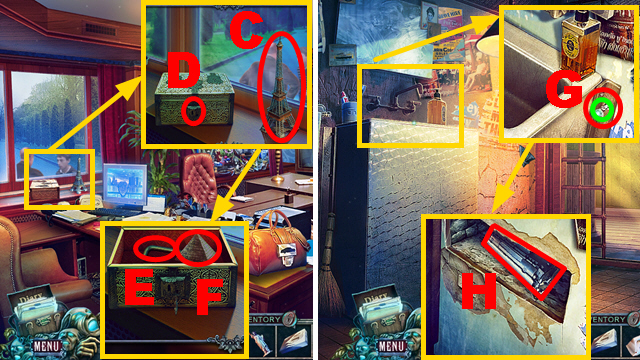
- Take the TAPE (C).
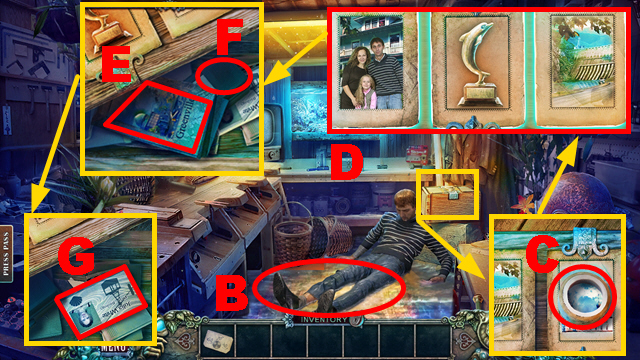
- Arrange the photos correctly (D).
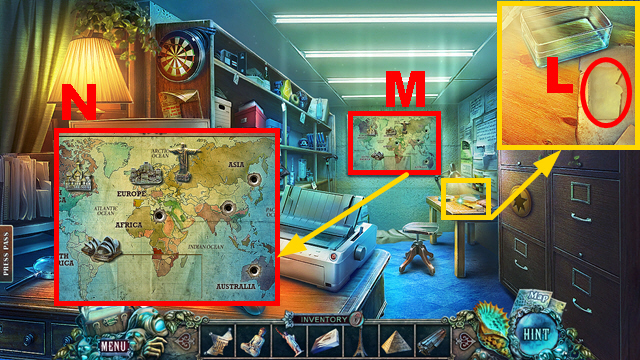
- Take the map (E); activate the cassette player (F).
- Take the KEY CARD (G).
- Walk down twice.
- Use the shell (H) and KEY CARD (I).
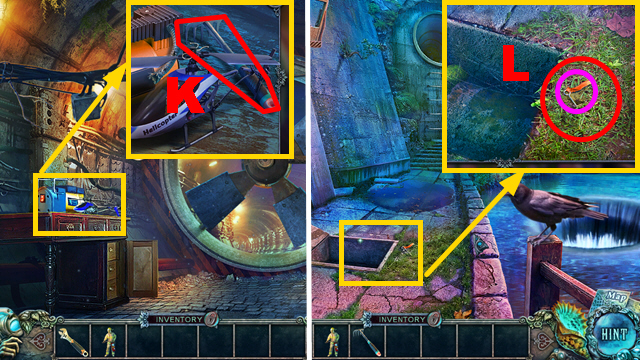
- Enter the streetcar.
- Talk to the man (J).
- Take the DIVER (K).
- Play the HOP.
- You receive the PENCIL (L).

- Examine the plate (M); take the TORN LABEL (N).
- Go to the Basement.
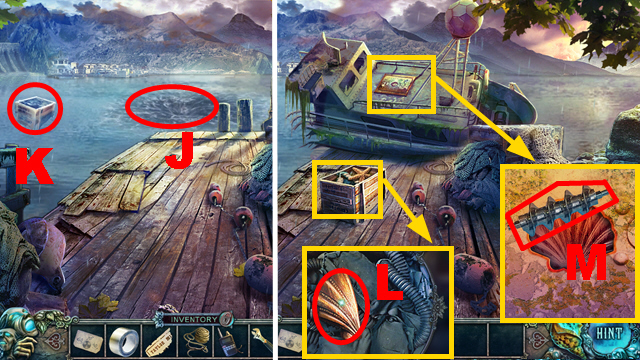
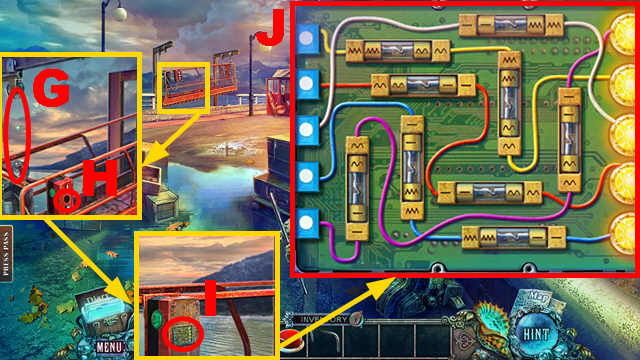
- Place the DIVER (O); take the BOAT (P).
- Place the BOAT (Q).
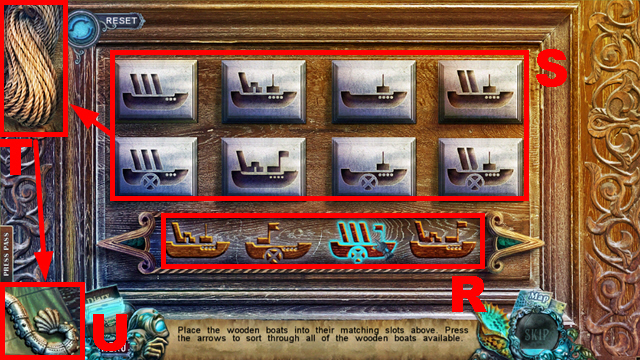
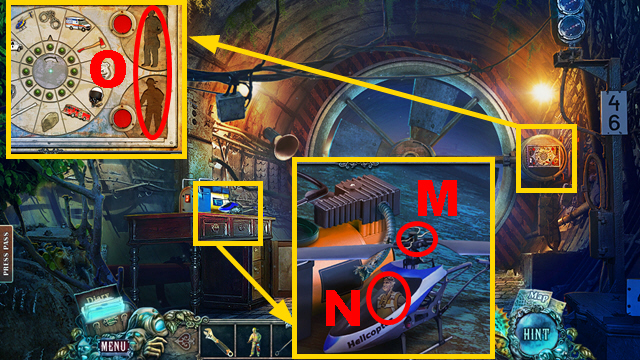
- Play the mini-game.
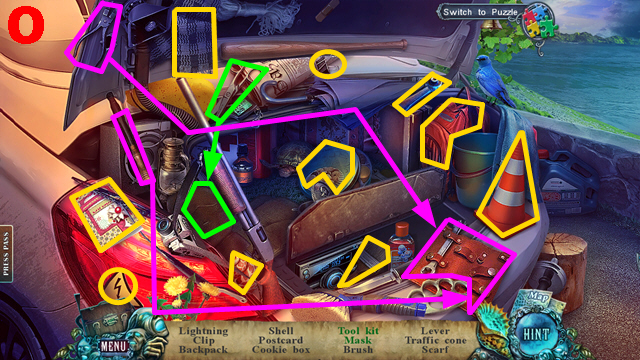
- Select 8 boats from the bottom (R) that match the boats at the top (S).
- This puzzle is randomized.
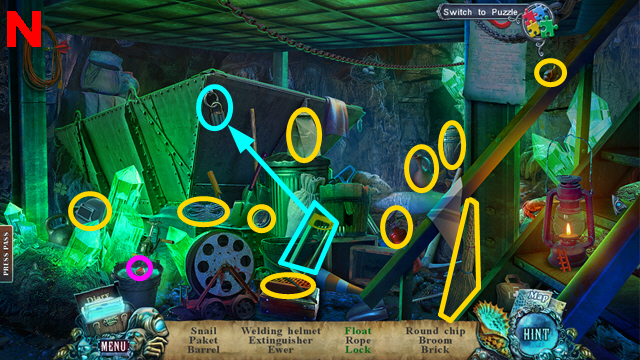
- Take the ROPE (T) and TENTACLE (U).
- Walk down twice, turn right.
- Place the TENTACLE (V).
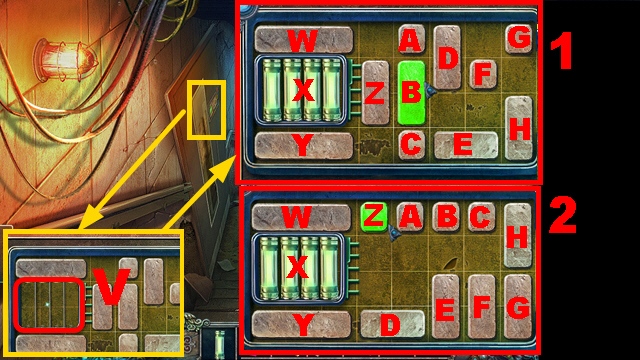
- Play the mini-game.
- Solution: Y, X, Yx3, X, Wx2, X, Wx2, X, Yx3, X, Yx2, X, W, X, Y, X, Wx5, X, Yx4, X, Yx2, X, Wx3, X, Yx4, X, Wx5, X, Yx6, X, Wx7, X.
- Yx6, X, Y, X, Wx3, X, Y, X, Wx2, X, Y, X, Wx5, X, Yx4, X, Y, X, W, X, Wx4, X, Yx3, X, Wx2, X, Yx3, X, Wx2, X, Yx2, X, W, X, Y, X, W, X.
- Turn left.
Chapter 2: The Office
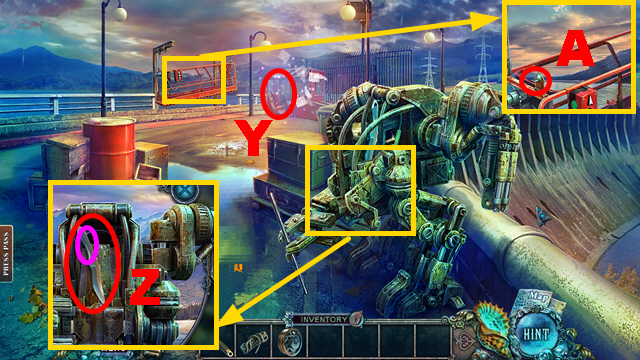
- Open the crate; place the ROPE (purple).
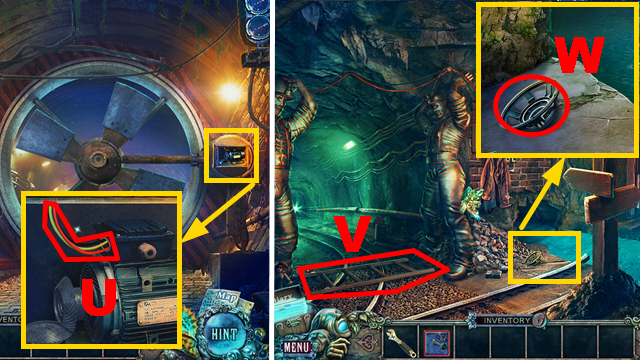
- Take the GRAPPLING HOOK (Z).
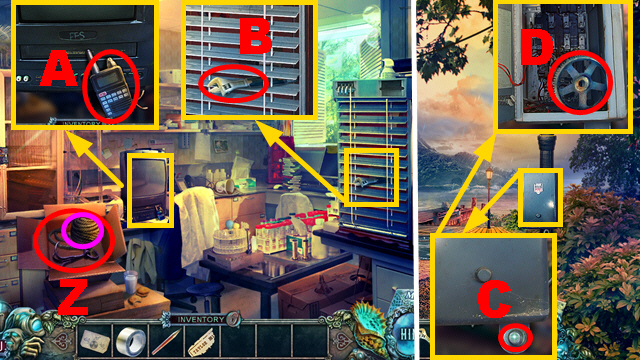
- Take the BROKEN RADIO (A) and ADJUSTABLE WRENCH (B).
- Walk down.
- Use the ADJUSTABLE WRENCH (C); open the box.
- Take the GEAR (D).
- Turn left.
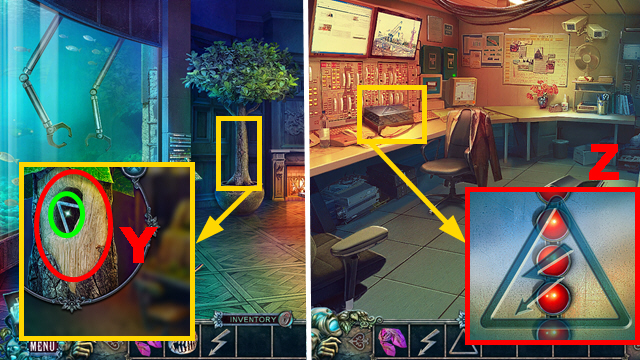
- Place the GEAR (E); take the VIDEO CASSETTE (F).
- Place the VIDEO CASSETTE (G); use the PENCIL (purple).
- Push the video cassette.
- Take the LEVER (H).
- Walk down.
- Place the LEVER (I); pull it.
- Turn right.
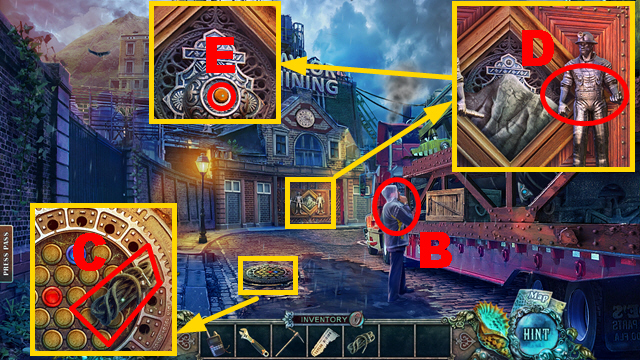
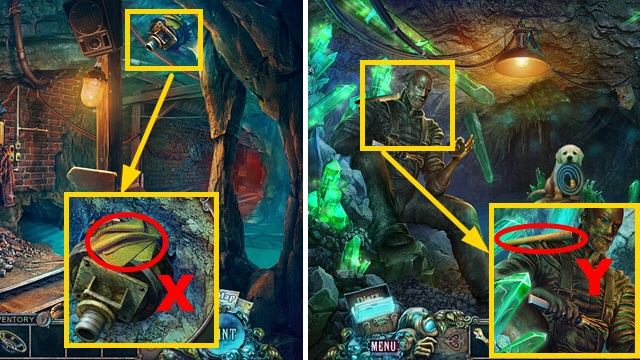
- Use the shell (J) and GRAPPLING HOOK (K).
- Remove the debris; take the SHELL FRAGMENT (L).
- Take the MECHANISM (M).
- Walk down, turn left.
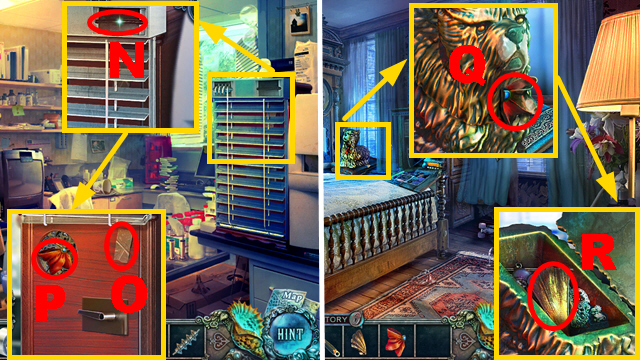
- Place the MECHANISM (N) and CODE (O).
- Take the HALF OF A BOW (P).
- Go to the Bedroom.
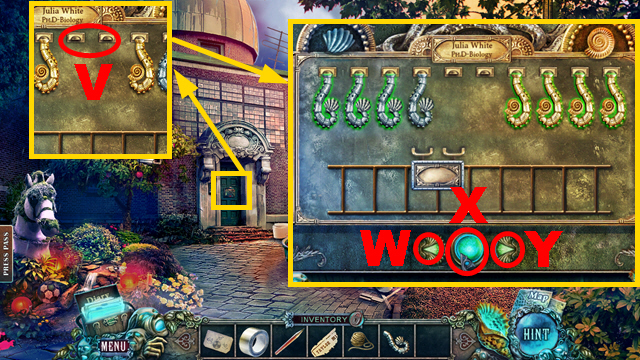
- Place the HALF OF A BOW (Q); take the SHELL FRAGMENT (R).
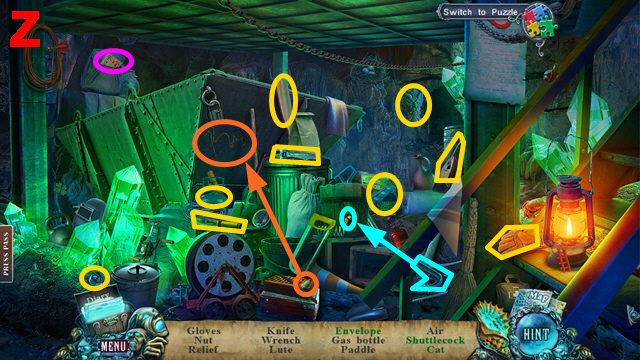
- Play the HOP.
- You receive the Safe Dial (S).
- Go to the Office.

- Place the SAFE DIAL (T); turn the dial.
- Take the SHELL FRAGMENT (U).
- Walk down, turn right.
- Place 3 SHELL FRAGMENTS (V); take the PICKAXE (W).
- Place the TORN LABEL (X) and TAPE (purple); take the TORN LABEL.
- Give the TORN LABEL to the man (Y); take the DIRECTIONS (Z).
- Walk down twice.
- Place the DIRECTIONS (A).
- Move forward.
- Talk to the man (B).
- Take the SHOELACE (C).
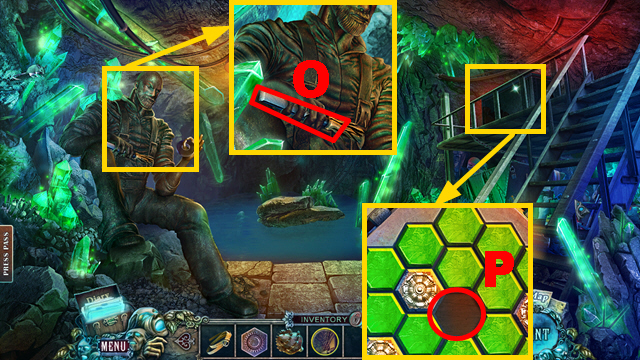
- Place the PICKAXE (D); push the button (E).
- Move forward.
- Take the JUMPER CABLES (F), GREEN BUTTON (purple), and CODE (G).
- Walk down.
- Place the GREEN BUTTON (H) and CODE (I).

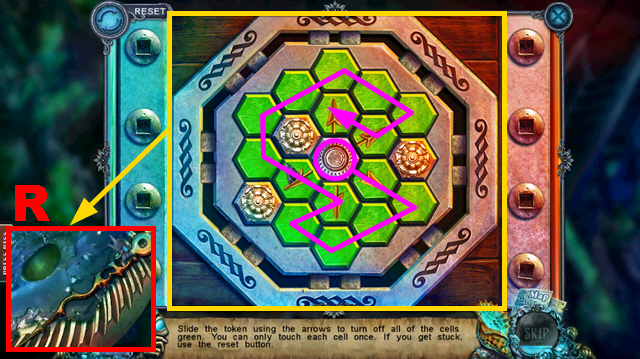
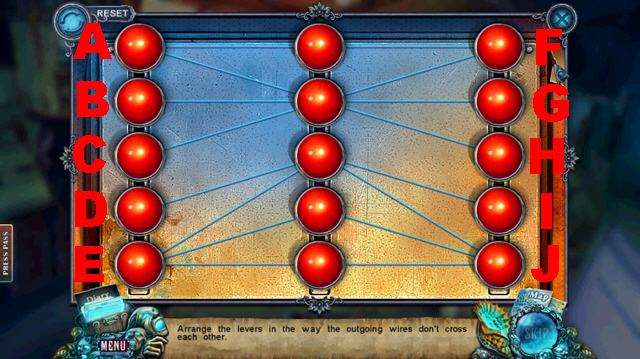
- Play the mini-game.
- Solution: Jx2, K, Lx4, M, N, Jx3, Nx5.
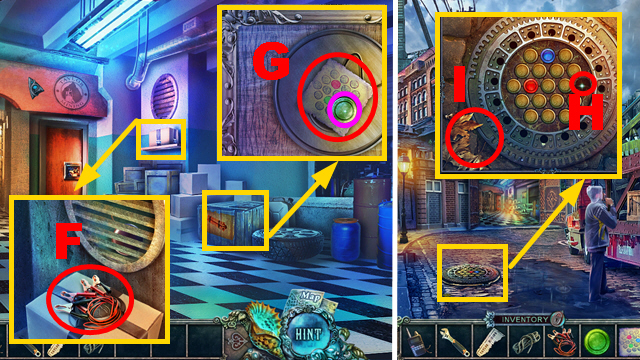
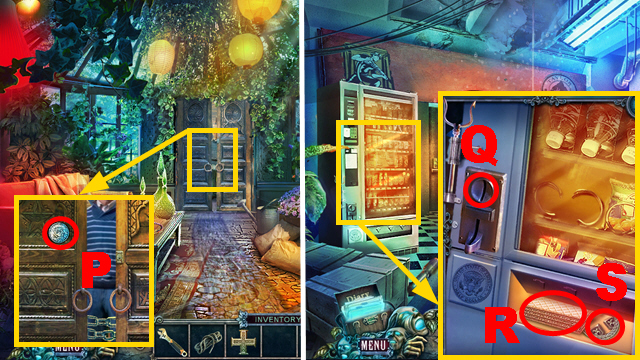
- Use the shell (O); take the IMAGE PANEL (green).
- Move forward.
- Place the IMAGE PANEL (P).
- Play the mini-game.
- Solution: (Q).
- Play the HOP.
- You receive the SAW BLADE (R).
- Walk down.
- Place the SAW BLADE; take the HACKSAW (S).
- Move forward.
- Use the HACKSAW (T); take the BOMB EMBLEM (white).
- Place the BOMB EMBLEM (U).
- Play the mini-game.
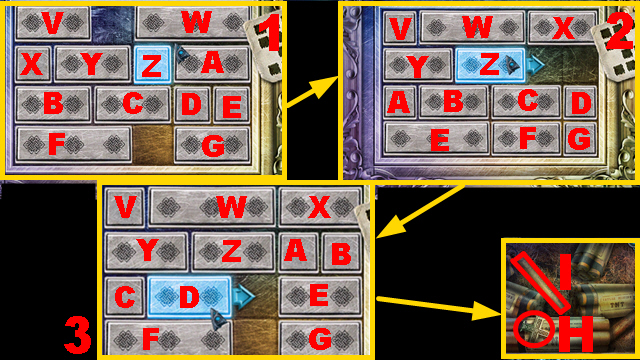
- Solution part (1): G-left, E-down, D-right, C-right, B-right, X-down, Y-left, Z-left, Z-up, Y-right x2, V-down, Z-left x2, W-left x2, A-up, Y-right x2, V-right x2.
- Solution part (2): V-down, W-left, Y-left, Z-left, D-up, C-right, W-right, V-up, A-up, B-right, A-down, Y-left, Z-left, D-left, B-left, C-left, G-up x2, F-right, C-right.
- Solution part (3): F-right, C-down, D-left, E-left x2, G-up, F-right x2, C-right x2, D-down, Y-down, Z-left x2, A-left x2, B-left x2, G-up, E-right x2, D-right, B-down, A-right, Z-right, V-down x2, Z-left, A-left, G-left, W-left.
- Take the CROSS EMBLEM (H); place the TORN LABEL (I).
- Try to walk down.

- Place the BROKEN RADIO (J) and JUMPER CABLES (K).
- Talk through the radio.
- Use the shell (L); take the EMBLEM (green).
- Place the EMBLEM (M); take the ACCESS CARD (N).
- Use the ACCESS CARD (O).
- Move forward.
Chapter 3: The Break Room
- Take the HALF-DOLLAR (P).
- Walk down.
- Use the HALF-DOLLAR (Q); eat the snack (R).
- Take the CROSS EMBLEM (S).
- Move forward.
- Place 2 CROSS EMBLEMS (T).
- Play the mini-game.
- Solution (green): Left, up, left x2, up x2, left, down, right, down, right x2, down, left, up, left, up x2, right x2, down, left, down x2, right, up, down, right x2, up, left x3, up x2, right, down, left, down x2, right x2, up, left.
- Take the CLIPPERS (U) and PULLEY (V).
- Use the CLIPPERS (W).
- Talk to the man (X).
- Open the door (Y).
- Use the SHOELACE (purple); take the KNIFE (Z).
- Place the PULLEY (A).
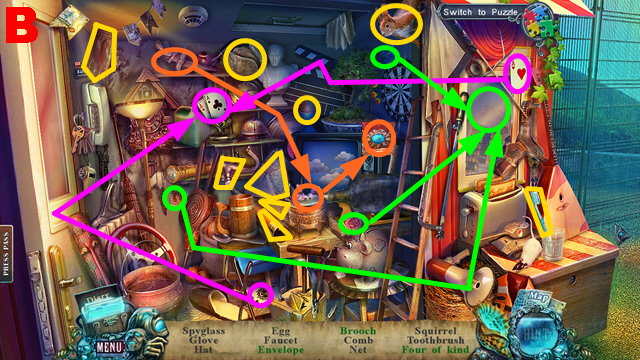
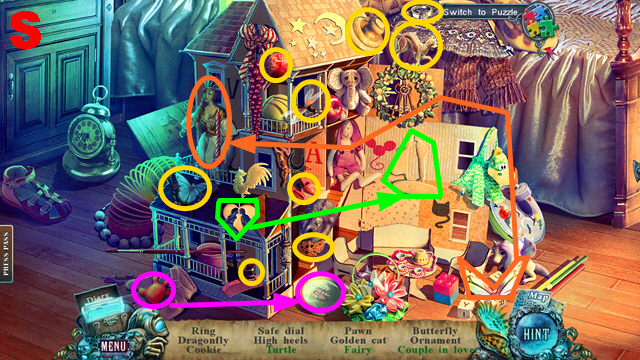
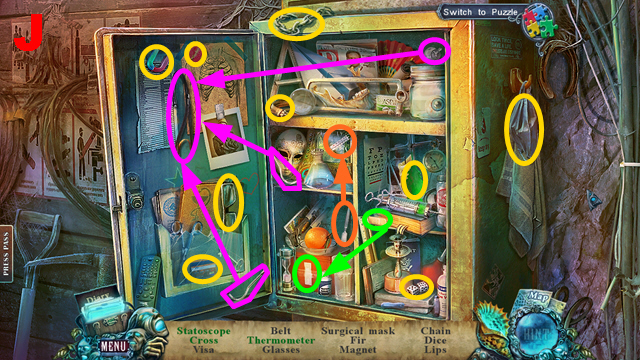
- Play the HOP.
- You receive the GLOVE (B).
- Walk down.
- Use the KNIFE (blue); take the STEEL CABLE (C).
- Remove the shards with the GLOVE (D).
- Take the BUTTON (E) and METAL STAIR (F).
- Move forward.
- Place the STEEL CABLE (G) and BUTTON (H); push the button.
- Play the mini-game (I).
- Solution: (J).
- Push the button.
- Take the SPIKE (K) and ROBOT HAND (L).
- Walk down.
- Place the ROBOT HAND (M); take the METAL STAIR (N).
- Walk down twice.
- Play the HOP.
- You receive the GULL (O).
- Place the SPIKE (orange); take the TRIDENT (P).
- Move forward three times.
- Place the TRIDENT (Q); take the GLUE (R) and LIGHTER (S).
- Walk down.
- Apply the GLUE (T); repair the broken gull.
- Take the GULL (U).
- Move forward.
- Place 2 GULLS (V); take the HOOKS (W).
- Walk down.
- Play the HOP.
- You receive the EMPTY CANISTER (X).
- Move forward.
- Place 2 METAL STAIRS (Y); take the PUMP HANDLE (Z).
- Walk down twice.
- Place the PUMP HANDLE (blue); take the PUMP (A).
- Move forward.
- Open the barrel (green); place the EMPTY CANISTER (B) and PUMP (C).
- Activate the pump; take the CANISTER WITH FUEL.
- Move forward.
- Use the CANISTER WITH FUEL and LIGHTER (D).
- Take the FIREMAN (E).
- Try to walk down.
- Pull the cable (F).
- Place the HOOKS (purple); take the CABLE WITH HOOKS (G).
- Place the CABLE WITH HOOKS (H).
- Connect the hooks to the structure (I).
- Use the shell (J).
- Move forward.
Chapter 4: The Air Shaft
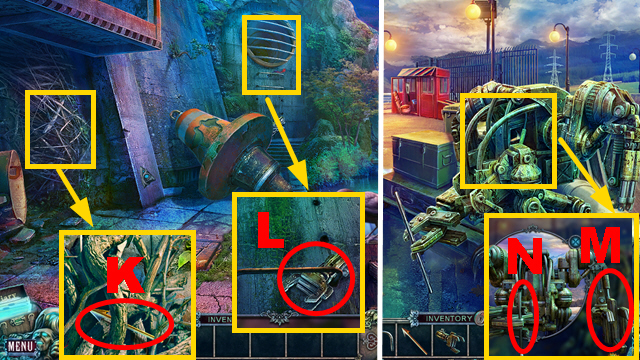
- Take the SMALL RAKE (K).
- Walk down.
- Use the SMALL RAKE (L); take the CROCHET HOOK (purple).
- Move forward.
- Use the CROCHET HOOK (M); take the PILOT (N).
- Place the PILOT and FIREMAN (O).
- Play the mini-game.
- Solution: P, S, R, P, Q, R, Q, S, R, S, P, Q.
- Take the LOCK PART (T).
- Disconnect the wires (U).
- Move forward.
- Take the LADDER (V) and SPEAKER FRAME (W).
- Take the SHAMMY (X).
- Turn left.
- Take the SHAFT (Y).
- Play the HOP.
- You receive the AIR BRIDGE (Z).
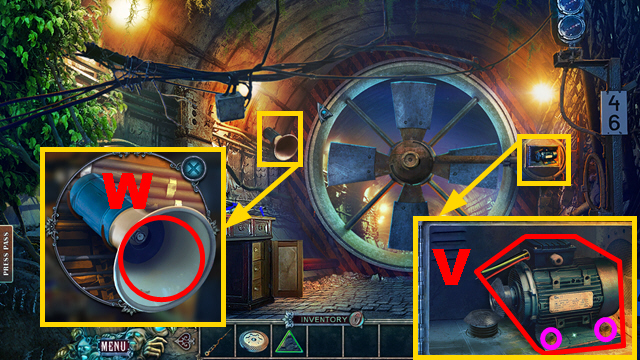
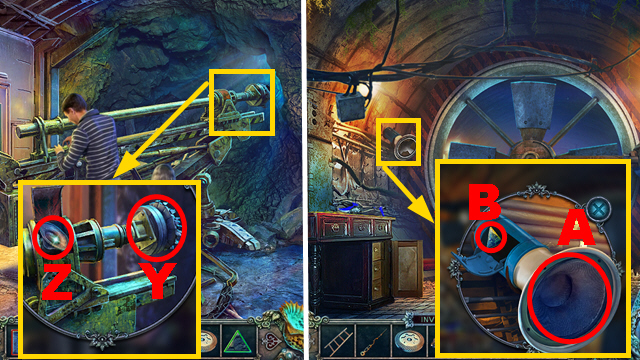
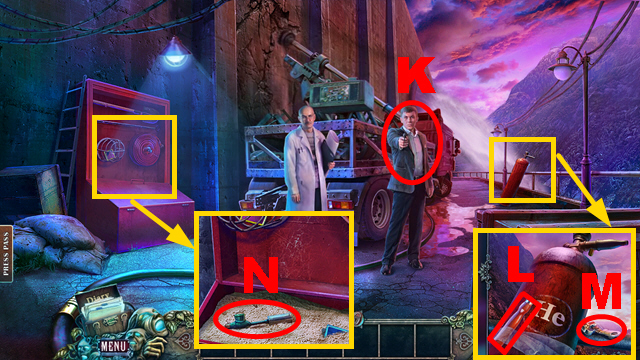
- Use the shell (A).
- Take the HOSE (B) and MANOMETER (C).
- Walk down.
- Place the AIR BRIDGE (D).
- Walk down.
- Place the SHAFT (green); take the HAMMER (E).
- Place the HOSE and MANOMETER (purple); take the COMPRESSOR (F).
- Move forward.
- Place the COMPRESSOR (G); connect the hose to the air bridge (green).
- Activate the compressor.
- Turn right.
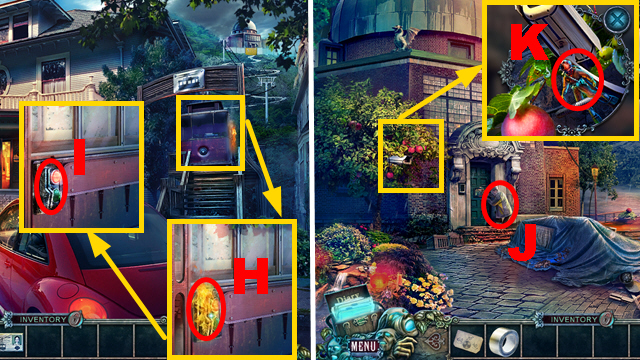
- Take the OILCAN (H).
- Open the medicine cabinet (I).
- Play the HOP.
- You receive the BELT (J).
- Take the CROWBAR (K) and EMBLEM (L).
- Walk down.
- Collect the DRILL BIT with the CROWBAR (M).
- Turn left.
- Play the HOP.
- You receive the LOCK PART (N).
- Place the BELT; take the CHISEL (O).
- Place the EMBLEM (P).
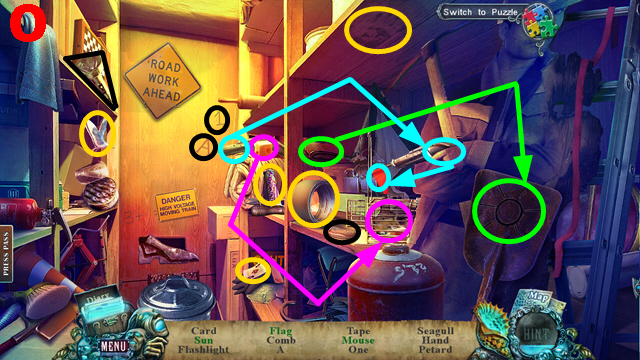
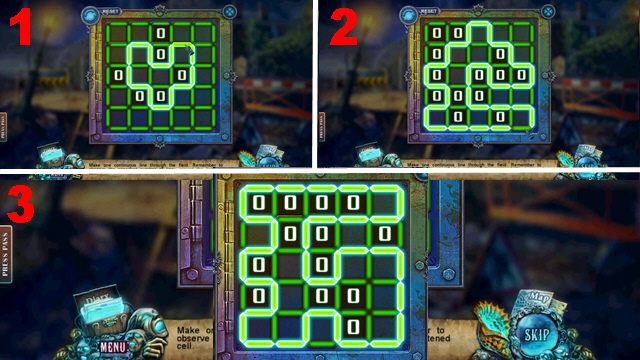
- Play the mini-game.
- Follow the line (purple) to complete this puzzle.
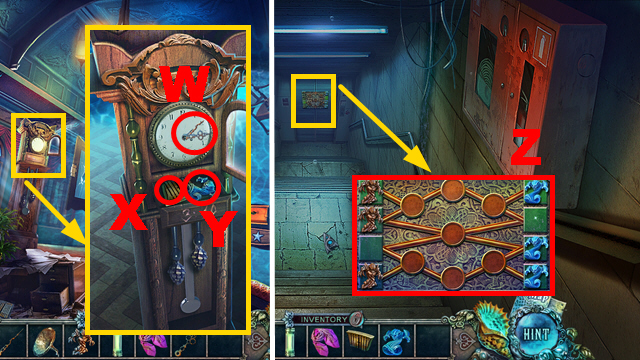
- Take the CLOCK HAND (R).
- Use the SHAMMY (green); take the GEAR (S).
- Walk down.
- Place the CHISEL (T); hit it with the HAMMER.
- Take the LOCK PART (U).
- Walk down.
- Use the OILCAN and ADJUSTABLE WRENCH (purple).
- Take the ENGINE (V).
- Place the SPEAKER FRAME (W).
- Move forward, turn right.
- Play the HOP.
- You receive the PHOTO (X).
- Replace the broken drill bit with the DRILL BIT (Y); take the SPEAKER (Z).
- Walk down twice.
- Place the SPEAKER (A); take the LOCK PART (B).
- Move forward, turn right.

- Place 4 LOCK PARTS (C).
- Play the mini-game.
- Solution: D-E, H-D, G-H, I-G, J-I, G-J, F-G.
- Take the RIVET (K) and UMBRELLA HANDLE (L).
- Place the ENGINE (M) and GEAR (N).
- Walk down.

- Place the RIVET (O); open the pocket.
- Take the PHOTO (P).
- Turn right.
- Place 2 PHOTOS (Q).
- Take the note (R), BRONZE PINECONE (S), and HELMET (T).
- Walk down, turn left.
- Place the HELMET (U); take the ELECTRICAL TAPE (V).
- Walk down, turn right.
- Use the ELECTRICAL TAPE (W).
- Place the LADDER (X).
- Move forward.
Chapter 5: The Power Plant
- Take the MEGAPHONE (Y).
- Place the UMBRELLA HANDLE (blue); take the UMBRELLA (Z).
- Collect the YIN with the UMBRELLA (A).
- Place the YIN (B).
- Move forward to the Power Plant Entrance.
- Take the EMPTY CAN (C).
- Place the BRONZE PINECONE (D); take the VALVE (E).
- Take the COMB (F).
- Examine the cabinet (G).
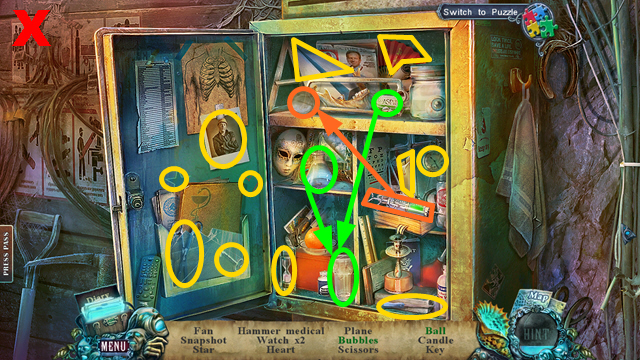
- Play the HOP.
- You receive the MECHANICAL HORN (H).
- Walk down.
- Place the VALVE (I) and EMPTY CAN (J); turn the valve.
- Use the shell (K); take the WATERING CAN.
- Use the WATERING CAN (L); place the MECHANICAL HORN (blue).
- Take the LOCK PART (M) and AIR HORN (N).
- Move forward.
- Use the AIR HORN (O); take the HEART (P).
- Walk down.
- Place the HEART (Q).
- Play the mini-game.
- Solution: 1-3.
- Turn left.

- Talk to the man (R).
- Take the BATTERY (S) and SCARF (T).
- Use the COMB (U); take the CLOCK HAND (V).
- Walk down, turn right.
- Place 2 CLOCK HANDS (W).
- Take the DAM (X) and LOCK PART (Y).
- Walk down, turn left.
- Place 2 LOCK PARTS (Z).
- Play the mini-game.
- Solution: Solution: 1-2, 13-12, 2-3, 6-2, 2-1, 9-10, 8-7, 3-2, 7-8, 8-4, 12-13, 13-7, 7-8, 15-12, 12-13, 13-7, 10-11, 11-12, 12-15, 14-10, 10-11, 11-12, 7-9, 2-6, 12-13, 6-2, 13-12, 9-10, 10-14, 8-7.
- 7-9, 4-8, 8-7, 12-11, 5-4, 4-8, 2-3, 7-13, 8-7, 3-4, 4-5, 1-2, 2-3, 3-4, 7-6, 4-8, 8-4, 13-7, 6-2, 2-1, 7-6, 4-8, 11-12, 12-13.
- Move forward.
- Take the FISH (I) and RECORD (J).
- Place the DAM (K).
- Walk down twice, turn right.

- Place the MEGAPHONE (L) and RECORD (M).
- Take the BATTERY (N).
- Walk down, turn left.
- Place the FISH (O); take the MASK (P) and LEVER (Q).
- Move forward.
- Place the LEVER (R); pull it.
- Open the bag; take the BATTERY (S).
- Place the MASK (T).
- Play the HOP.
- You receive the BATTERY (U).
- Walk down.
- Place 4 BATTERIES (V).
- Play the mini-game.
- Solution part (1): F-up, D-down, D-right, B-right, A-down x2, Z-up, A-left, A-down, Z-down, Z-right, F-left, A-up x3, C-left, A-right, C-up x3, G-left, E-left x2, H-up x2, D-down, D-right, B-right, B-down, Z-right, Z-down.
- Solution part (2): Z-down x2, A-down x2, B-left x2, C-left x2, F-up x2, E-right, A-right, A-down, Z-right x2, Z-up x2, X-right x3, Y-up, W-down, D-left x3, A-left x3, B-left x3, C-left x3, Z-left x3, X-down, F-left x3, H-left x3, E-up x2, E-left, G-up x2, G-left, X-right x2, F-down x2, H-down x2, E-left x2, G-left x2, X-up, X-right.
- Turn left.
- Take the HALF MOON (I) and BLADE WHEEL (J).
- Walk down twice, turn right.
- Place the HALF MOON (K); take the LEAF (L).
- Play the HOP.
- You receive the CASKET PART (M).
- Go to the Control Room.
- Place the CASKET PART (N); take the POWER PLANT (O).
- Go to the Underwater Room.
- Place the BLADE WHEEL (P) and POWER PLANT (Q); take the LEAF (R).
- Walk down, turn left.
- Place 2 LEAVES (S); take the PICTURE PIECES (T).
- Put down the PICTURE PIECES (U).
- Play the mini-game.
- Solution: (V).
- Take the JAW (W).
- Go to the Underwater Room.
- Play the HOP.
- You receive the LIGHTNING (X).
- Use the JAW (Y); take the TRIANGLE (green).
- Walk down, turn left.
- Place the TRIANGLE and LIGHTNING (Z).
- Play the mini-game.
- Solution: A-E, C-A, G-J, G-F.
Chapter 6: The Jail Cell
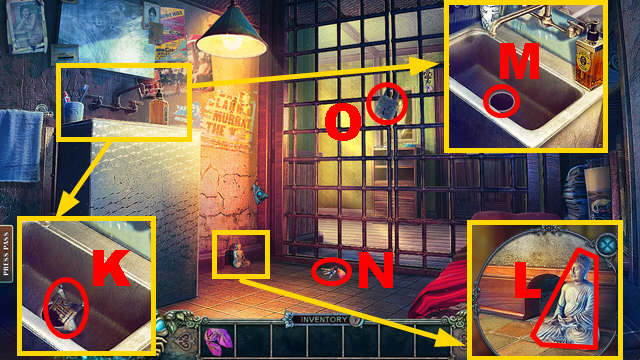
- Take the SHERIFF BADGE (K) and BUDDHA (L).
- Use the NECKCLOTH and shell (M).
- Take the KEY (N).
- Use the KEY (O).
- Open the door (P).
- Move forward.
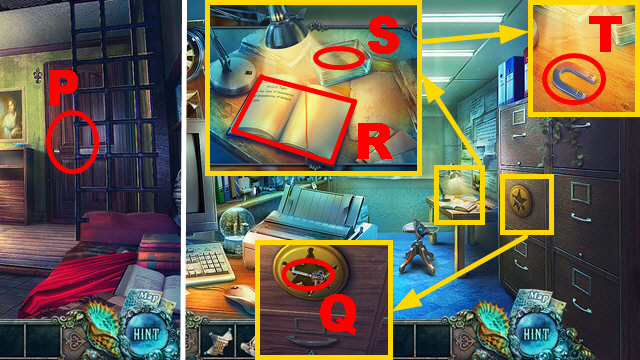
- Take the KEY (Q), book (R), sheet (S), and MAGNET (T).
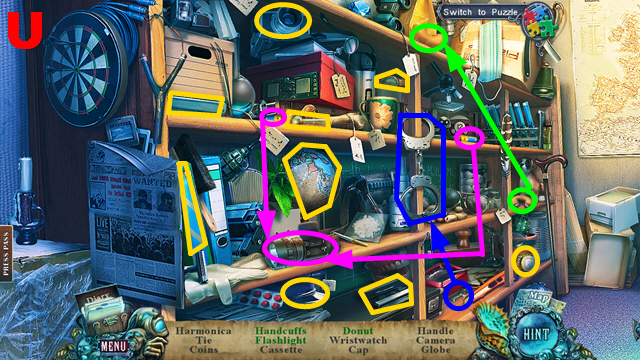
- Play the HOP.
- You receive the HANDLE (U).
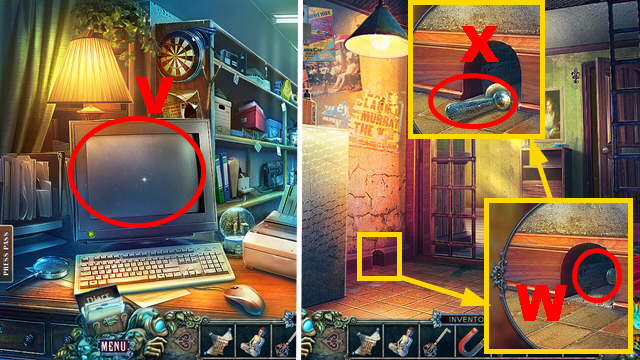
- Activate the computer (V).
- Walk down.
- Place the MAGNET (W); take the HANDLE (X).
- Turn left.
- Open the curtains (green).
- Place 2 HANDLES (Y); open the cabinet.
- Take the STATUE OF LIBERTY (Z) and PRINTER PAPER (A).
- Play the HOP.
- You receive the IRON PART (B).
- Take the EIFFEL TOWER (C); use the KEY (D).
- Turn the key; take the HEX KEY (E) and PYRAMID (F).
- Walk down.
- Use the HEX KEY (G); pull the nail (green).
- Take the PRINTING CARTRIDGE (H).
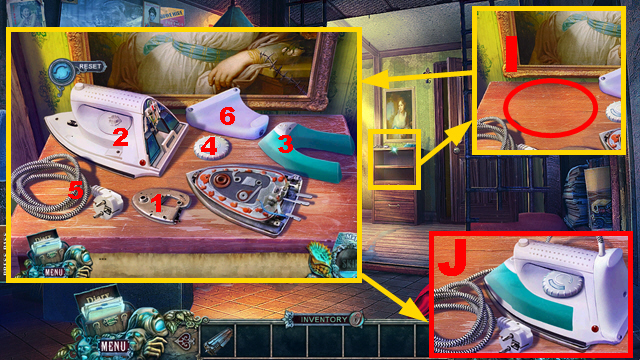
- Place the IRON PART (I).
- Play the mini-game.
- Assemble the iron: 1-6.
- Take the IRON (J).
- Turn right.
- Play the HOP.
- You receive the BOX CUTTER (K).
- Use the IRON (L).
- Remove the blanket (M).
- Place the BUDDHA, STATUE OF LIBERTY, EIFFEL TOWER, and PYRAMID (N).

- Play the mini-game.
- Solution: (O).
- Take the LOGIN (purple).
- Walk down.
- Use the BOX CUTTER (P); take the SHERIFF BADGE (green).
- Turn right.
- Place 2 SHERIFF BADGES (Q); remove 2 folders.
- Take the PASSWORD PIECE (R).
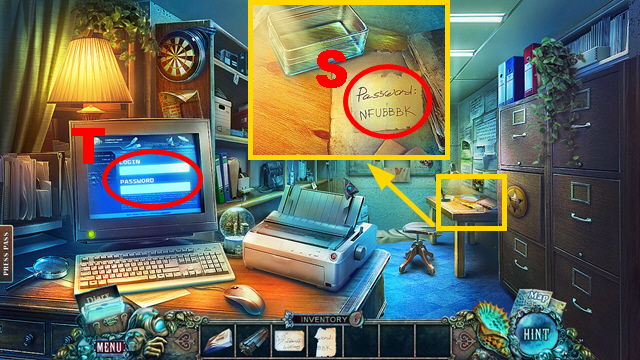
- Place the PASSWORD PIECE; take the PASSWORD (S).
- Use the LOGIN and PASSWORD (T).

- Play the mini-game.
- Solution: 1-2.
- Place the PRINTING CARTRIDGE and PRINTER PAPER (U).
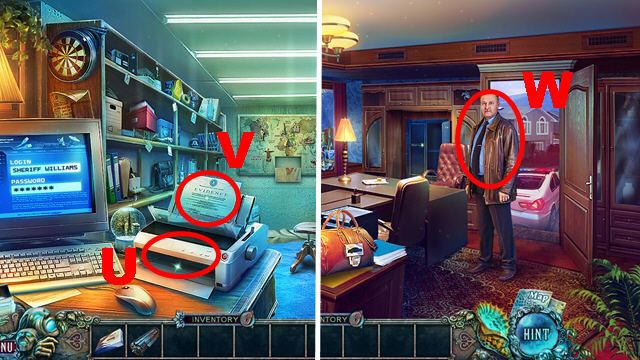
- Take the EVIDENCE (V).
- Walk down, turn left.
- Give the EVIDENCE to the man (W).
Chapter 7: The Revealing Place
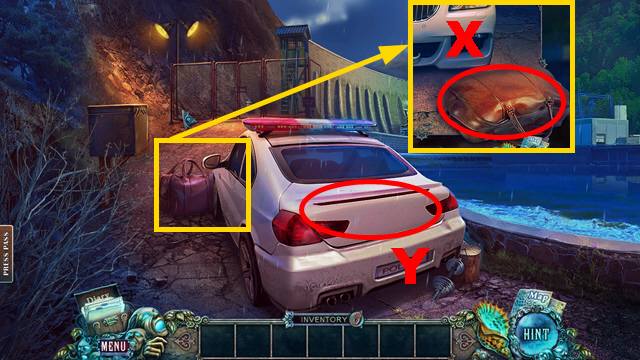
- Move the bag (X).
- Open the trunk (Y).

- Play the HOP.
- You receive the EMPTY FLASK (Z).
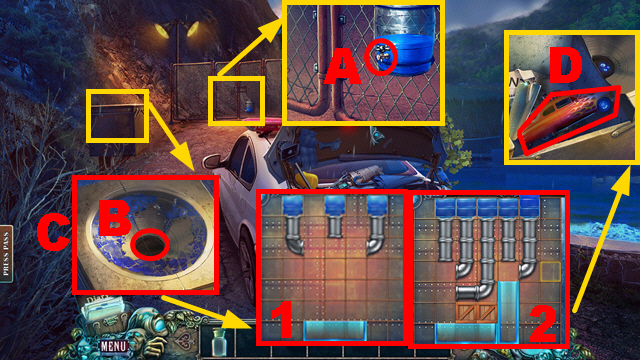
- Place the EMPTY FLASK (A) to acquire the BLUE FLUID.
- Use the BLUE FLUID (B).
- Play the mini-game (C).
- Solution: 1-2.
- Take the CAR (D).
- Walk down.
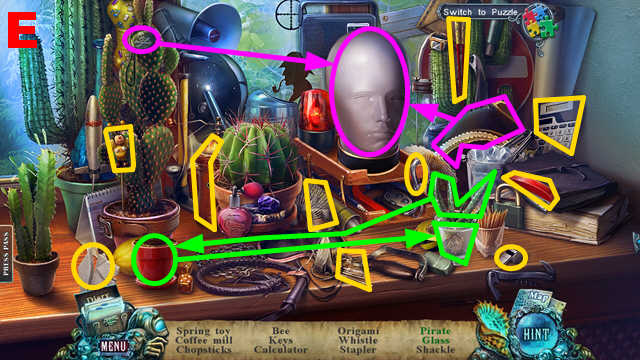
- Play the HOP.
- You receive the SHACKLE (E).
- Place the CAR (F); take the TOWING ROPE (G).
- Move forward.
- Place the TOWING ROPE (H).
- Place the towing rope (I); connect the SHACKLE to it (J).
- Move forward.
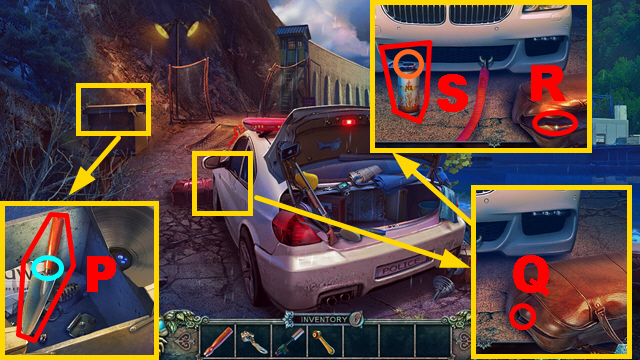
- Use the shell (K).
- Take the HANDLE (L) and ZIPPER PULL (M).
- Open the compartment; take the BURNER CAP (N).
- Walk down.
- Play the HOP.
- You receive the LEVER (O).
- Place the HANDLE (blue); take the SCOOP (P).
- Place the ZIPPER PULL (Q); pull it.
- Take the BALLOON (R).
- Place the BURNER CAP (orange); take the BURNER (S).
- Move forward.
- Place the BALLOON (1) and LEVER (T); turn the lever.
- Release the balloon to acquire the LOCK PART.
- Use the SCOOP (U); take the LOCK PART (purple).
- Use the BURNER (V); take the LOCK PART (green).
- Place 3 LOCK PARTS (W).
- Play the mini-game.
- Solution (orange): Y-B, X-Y, C-X, D-C, E-D, F-E, A-F, Z-A, Y-Z, B-Y, A-B, F-A, E-F, B-E, A-B, Z-A, Y-Z, B-Y, C-B.
- D-C, E-D, B-E, A-B, F-A, E-F, D-E, C-D, X-C, Y-X, B-Y, A-B, Z-A, Y-Z, X-Y, C-X, D-C, E-D, B-E.
- Congratulations, you have completed Fear for Sale: Phantom Tide.
Created at: 2014-05-02