

Walkthrough Menu
- General Tips
- Chapter 1: Checking In
- Chapter 2: The Nightmare
- Chapter 3: Room 16
- Chapter 4: Jack's Past
- Chapter 5: The Park
- Chapter 6: Blue and Yellow Keys
- Chapter 7: Green and Red Keys
- Chapter 8: The Summoning
General Tips
- This is the official guide for Fear for Sale: The 13 Keys.
- This guide does not mention each time you have to zoom into a location; the screenshots show each zoom scene.
- Hidden-object puzzles are referred to as HOPs. This guide does not show screenshots of the HOPs, however, it is mentioned when a HOP is available and the inventory item collected.
- This guide will give step-by-step solutions for all puzzles that are not random. Please read the instructions in the game for each puzzle.
- Use the map to travel quickly to a location.
Chapter 1: Checking In
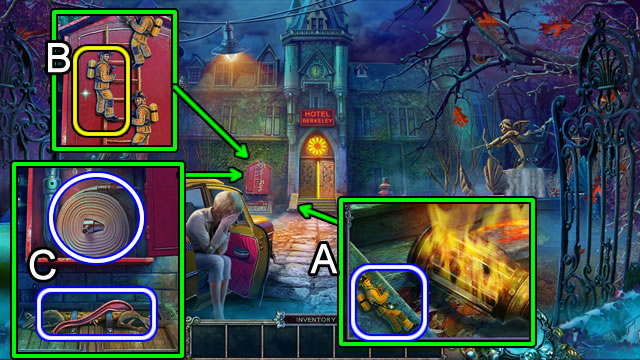
- Speak to the woman; approach the entrance; read the newspaper; take the FIREMAN (A).
- Place the FIREMAN (B).
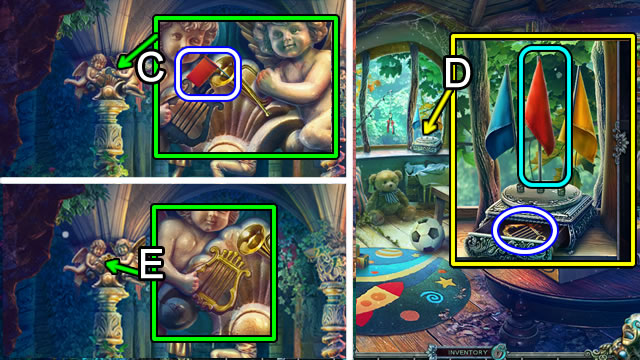
- Take the FIRE HOSE and LEVER (C).
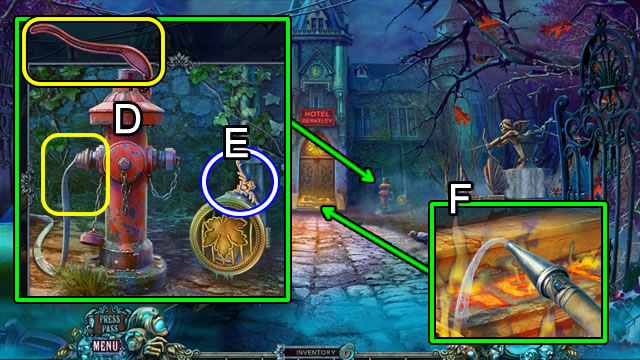
- Attach the LEVER and FIRE HOSE (D). Pick up the SCALE HANGER (E).
- Douse the flames (F) with the hose; open the door and enter the hotel.
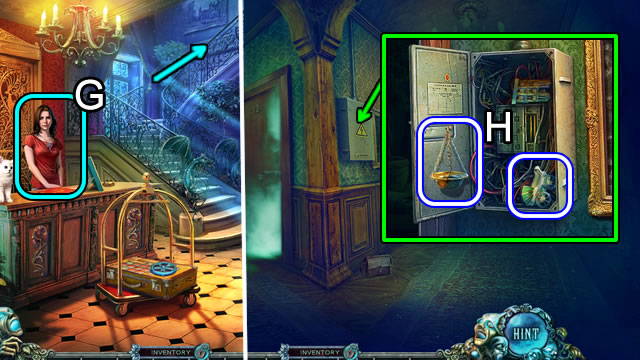
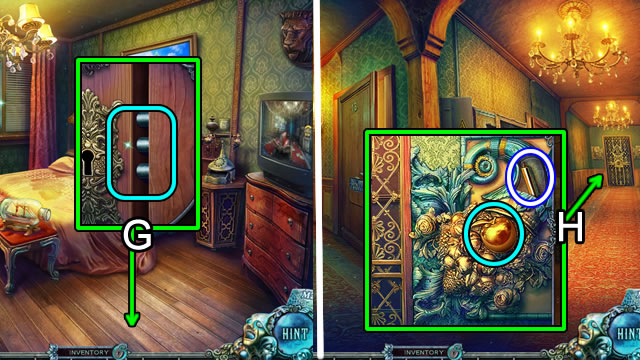
- Speak to the woman (G); follow her up the stairs.
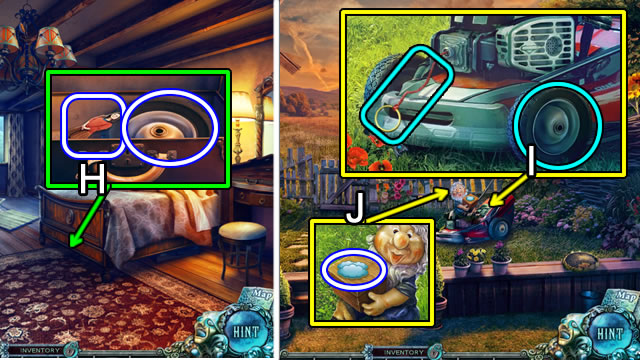
- Open the fuse box; take the LEFT SCALE and BABY CARRIAGE (H).
- Walk down.
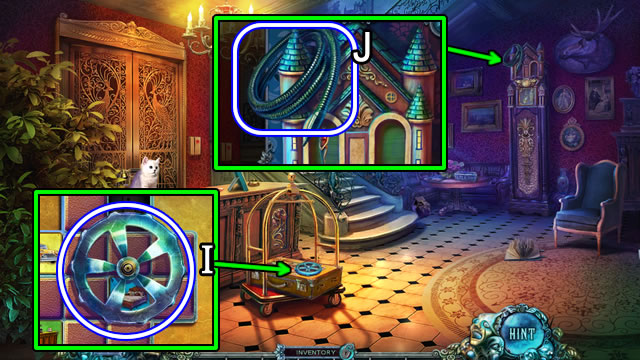
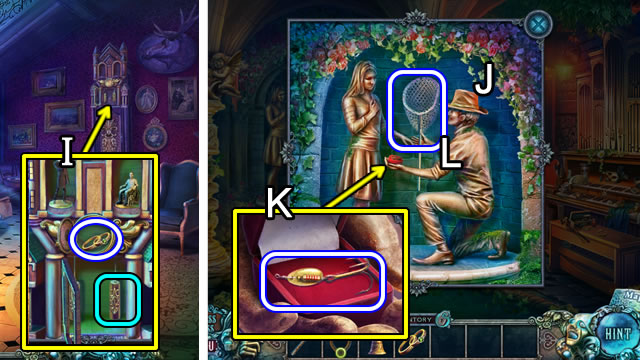
- Pick up the VALVE (I) and grab the HOSE (J).
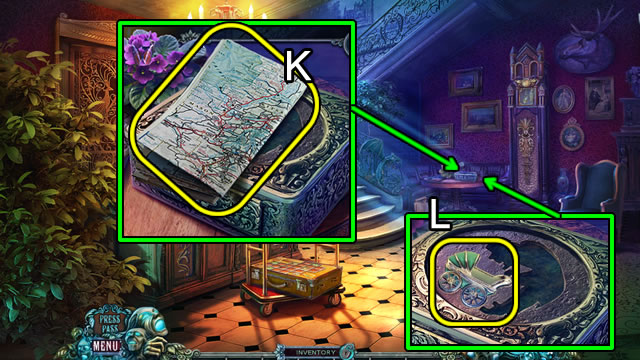
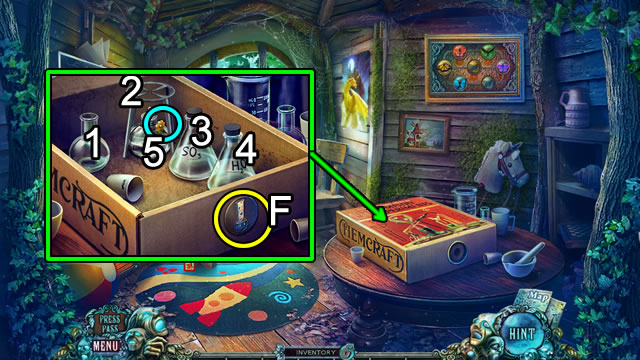
- Take the map (K).
- Insert the BABY CARRIAGE (L) to trigger a fragment HOP; Collect the pieces to complete the box lid.

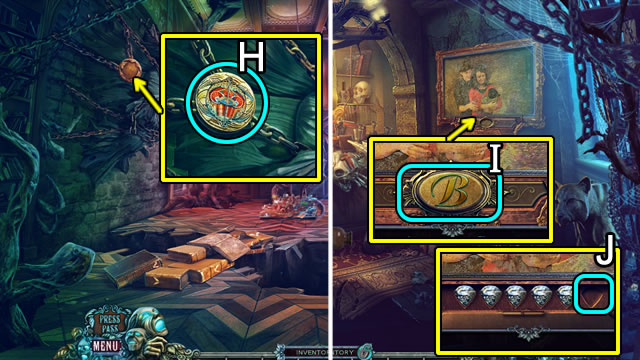
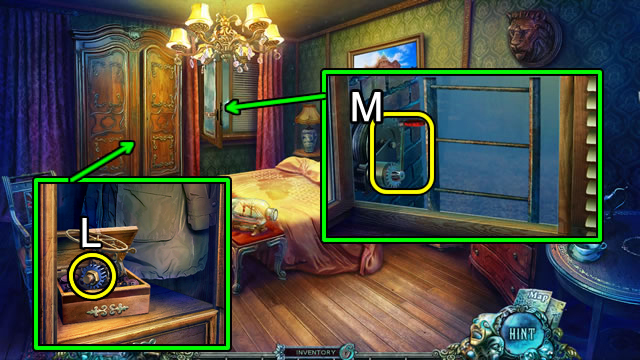
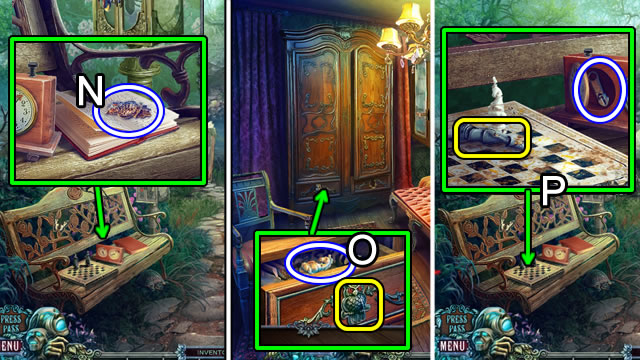
- Take the ELASTIC HEADBAND and LEAF EMBLEM (N).
- Walk down.
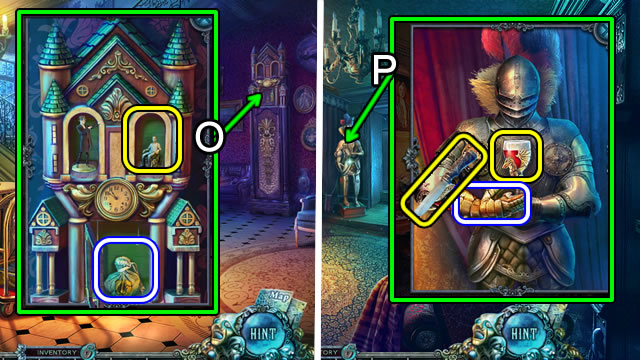
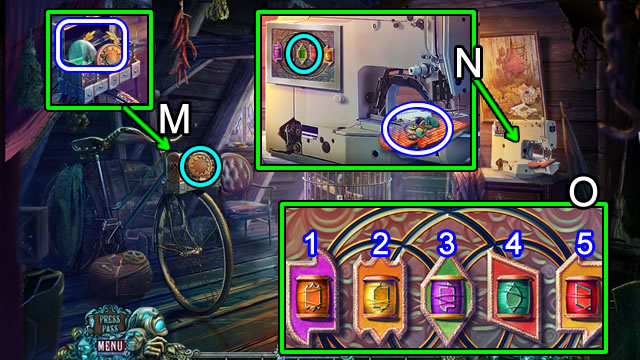
- Attach the VALVE (O); turn to activate a HOP (P).
- Play the HOP; get a MECHANICAL WOODPECKER.
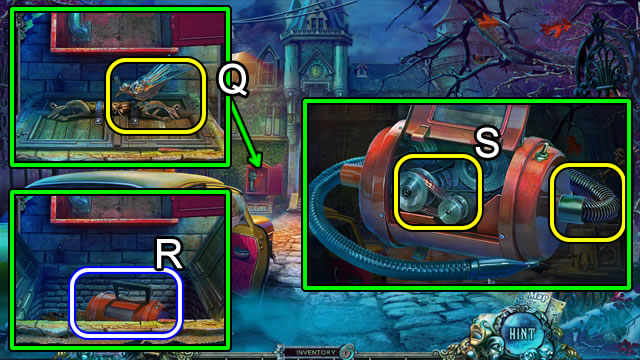
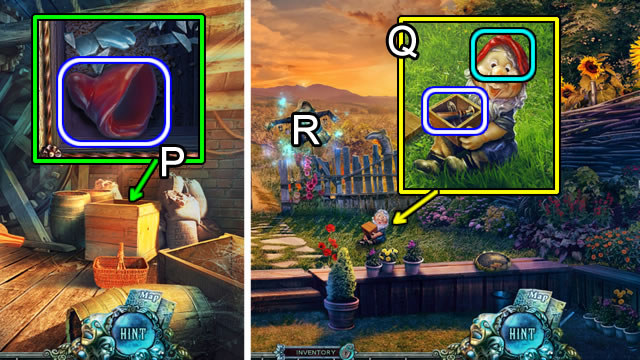
- Use the MECHANICAL WOODPECKER (Q); take the BROKEN LEAF BLOWER (R).
- Select and open the BROKEN LEAF BLOWER to add the ELASTIC HEADBAND and HOSE (S) for a LEAF BLOWER (Inventory).
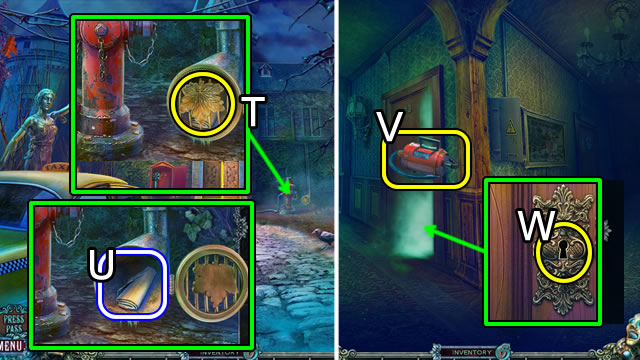
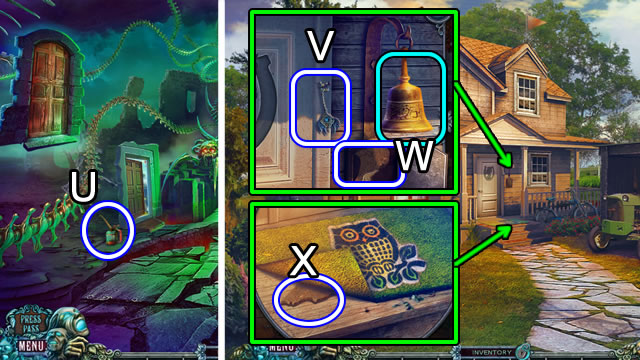
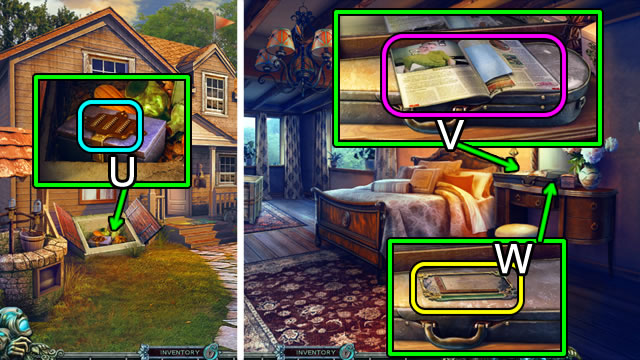
- Use the LEAF EMBLEM (T); take the BUNDLE (U).
- Open the BUNDLE (Inventory); take the LOCKPICK.
- Return to the Hallway.
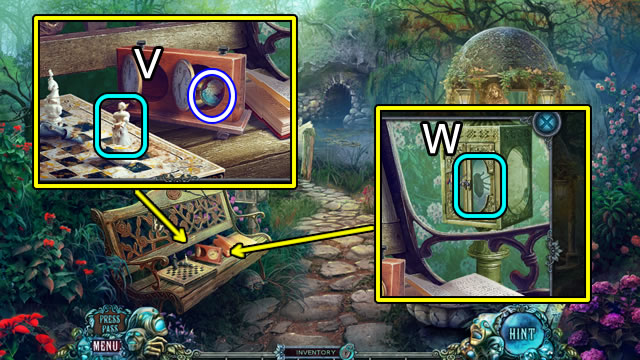
- Use the LEAF BLOWER (V).
- Insert the LOCKPICK (W) to open a puzzle.
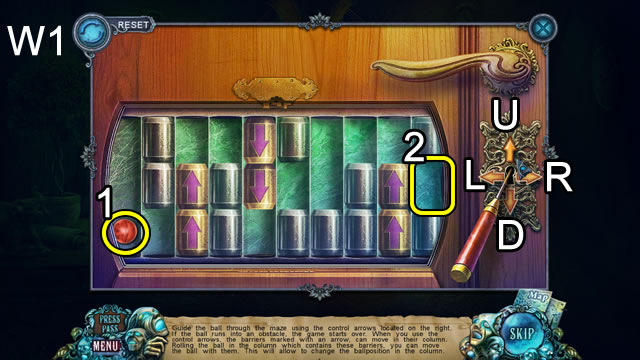
- Use the arrows to guide the ball (1) through the maze to the exit (2).
- Solution: U-D-Rx2-Ux2-Rx2-D-Rx2-U-D-U-D-U-Rx2-Ux2-R.
- Enter the room.
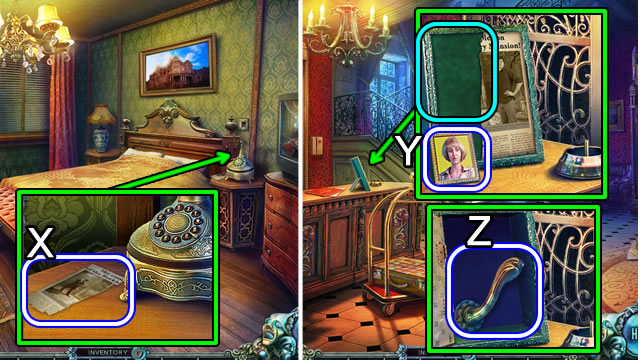
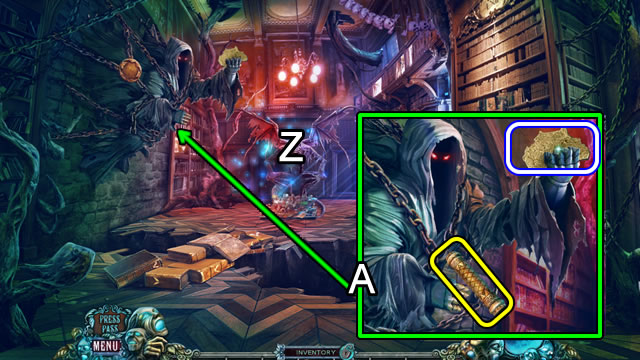
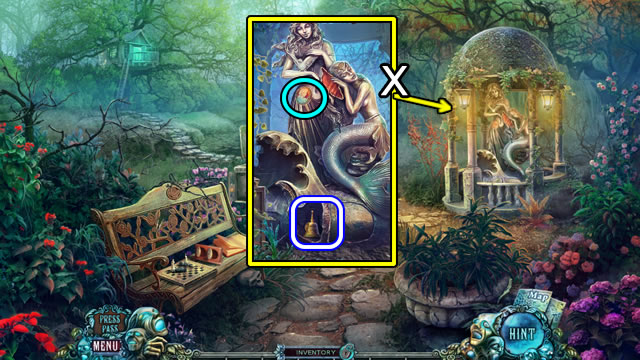
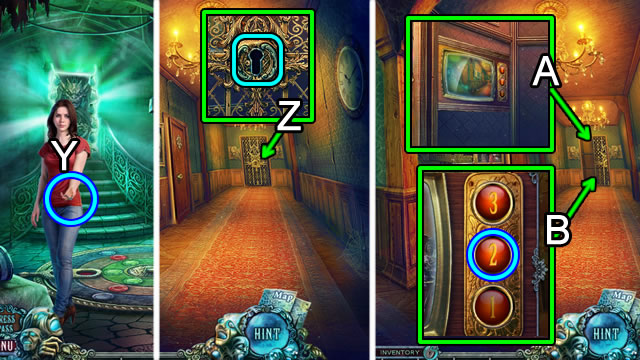
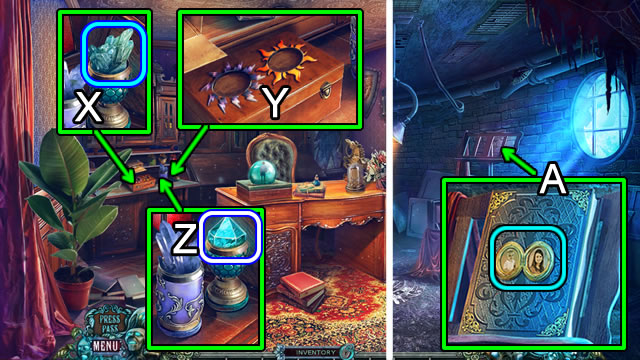
- Pick up the PHOTO HALF (X).
- Walk down twice.
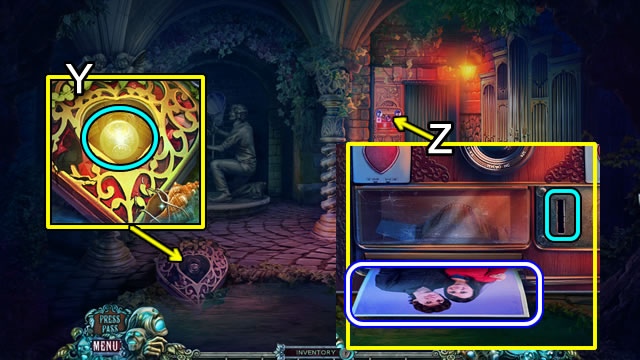
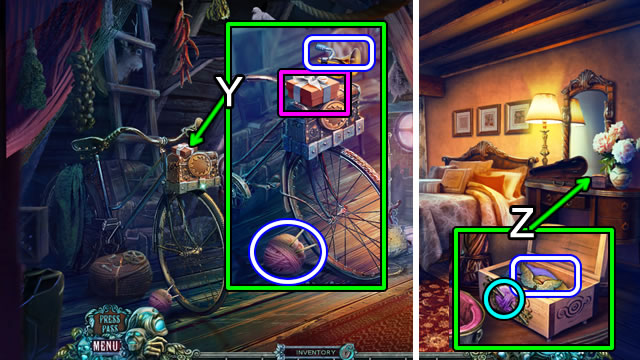
- Take the TILE (Y) and add the PHOTO HALF ; select the picture; take the WINDOW HANDLE (Z).
- Return to Room 13.

- Open the blinds (A); attach the WINDOW HANDLE (B); take the LIGHT SWITCH (C).
- Use LIGHT SWITCH (D).
Chapter 2: The Nightmare
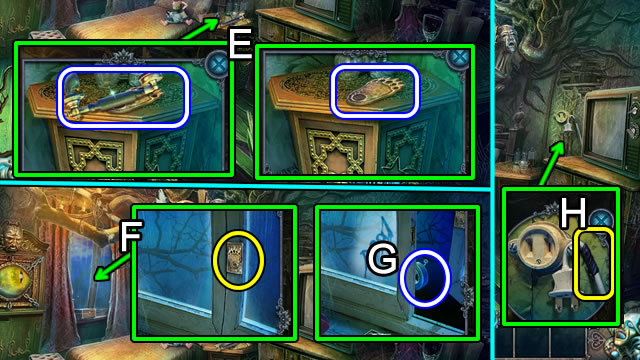
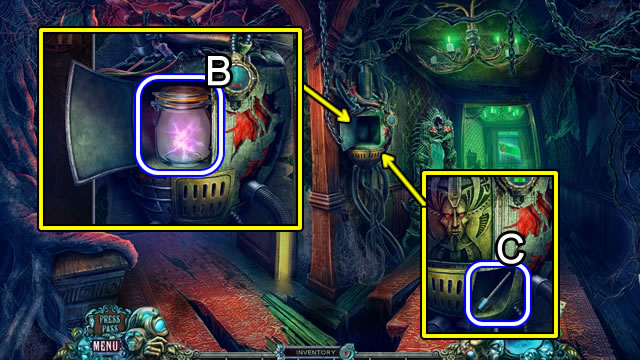
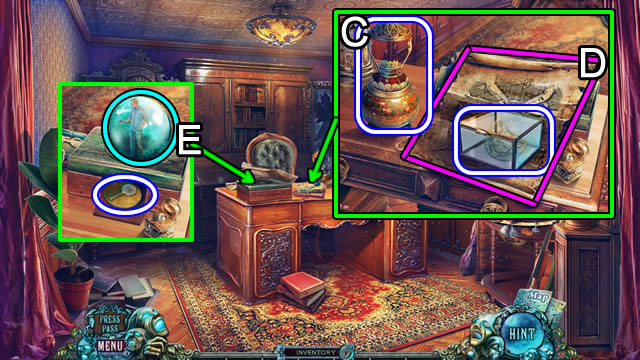
- Pick up the RECEIVER and PAW (E).
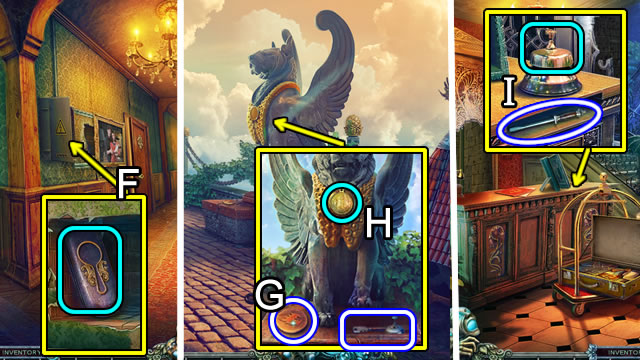
- Use the PAW (F). Take the TAPE (G).
- Use the TAPE (H); put the plug in the socket to trigger a HOP.
- Play the HOP to receive a SILVER FEATHER.
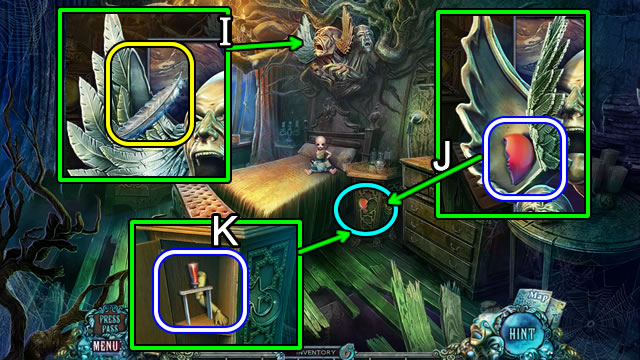
- Use the SILVER FEATHER (I).
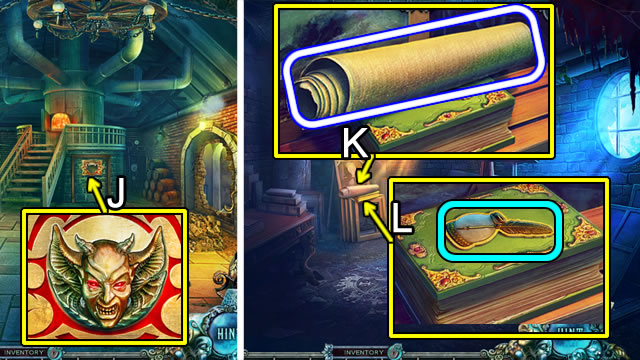
- Take and place the HEART HALF (J).
- Grab the BREAKER SWITCH and DOLL'S ARM (K).
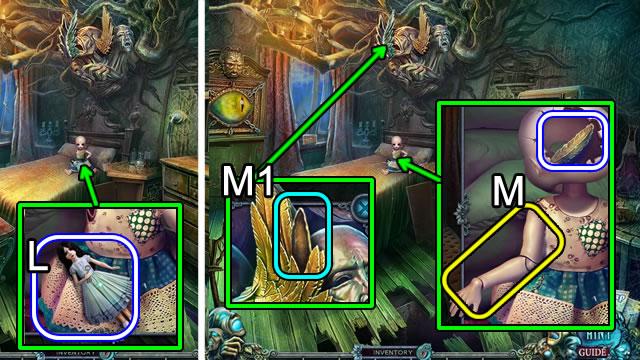
- Take the DOLL (L).
- Attach the mechanical DOLL'S ARM; take the GOLD FEATHER (M).
- Use the GOLD FEATHER (M1); take a FLASHLIGHT.
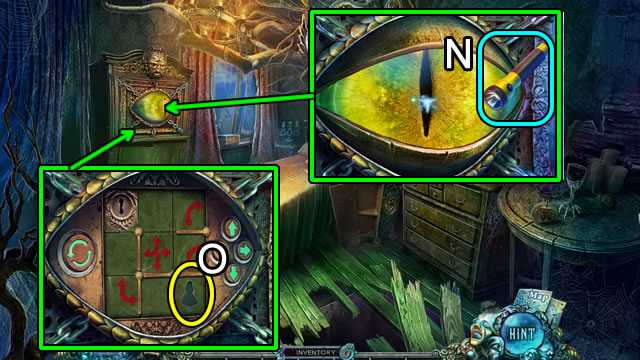
- Select the eye; use the FLASHLIGHT after the reaction (N).
- Place the DOLL (O) to open a puzzle (O1).
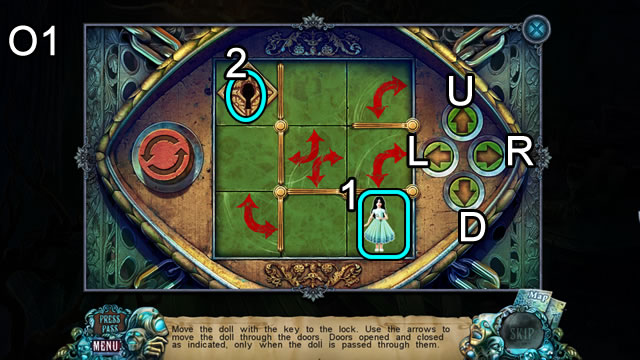
- Move the DOLL (1) through the gates to the keyhole (2) using the arrows.
- Solution (O1): Ux2-L-D-U-R-D-Lx2-U.
Chapter 3: Room 16
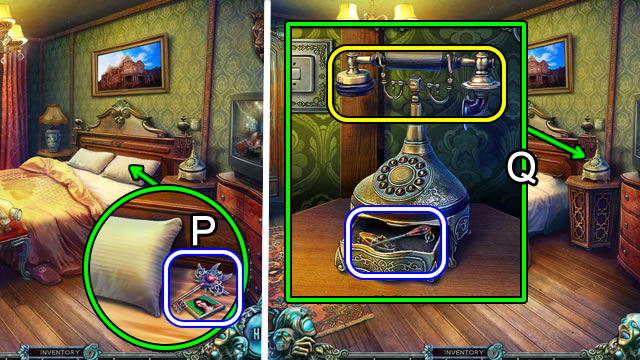
- Move the pillow (P) for a STRANGE KEY and TILE.
- Place the RECEIVER; answer the phone; take the STICKPIN and RIGHT SCALE (Q).
- Walk down.
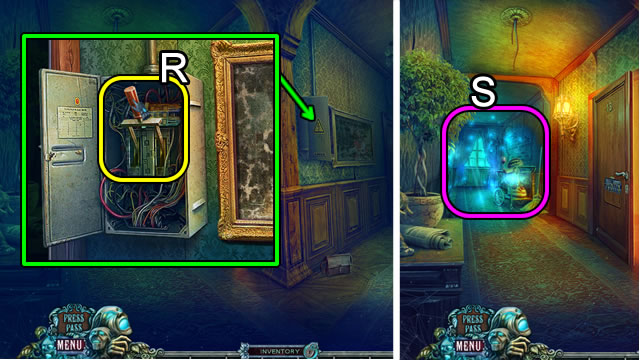
- Place and flip the BREAKER SWITCH (R) to trigger a HOP (S).
- Play the HOP to receive a TILE (Inventory).
- Walk down.

- Take the scrap (T).
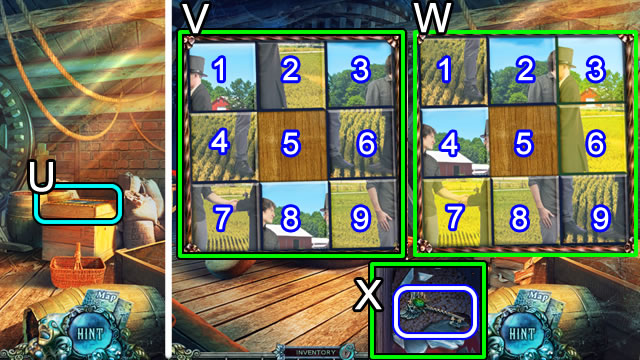
- Add the three TILES (U) to open a puzzle.
- Slide the tiles so the tile background colors match the image background colors.
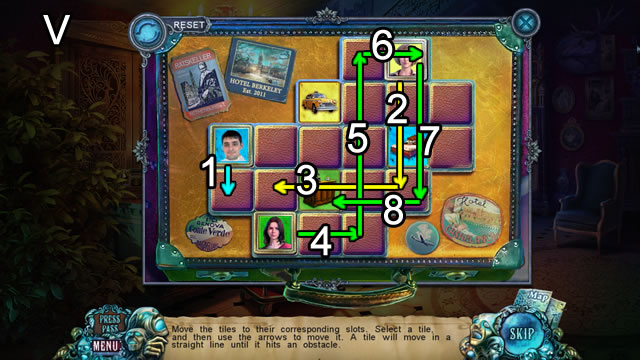
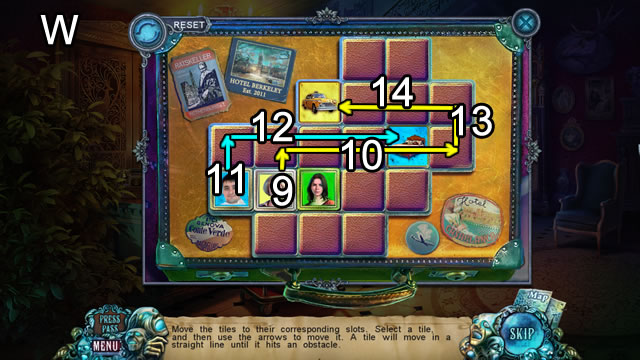
- Solution (V-W).
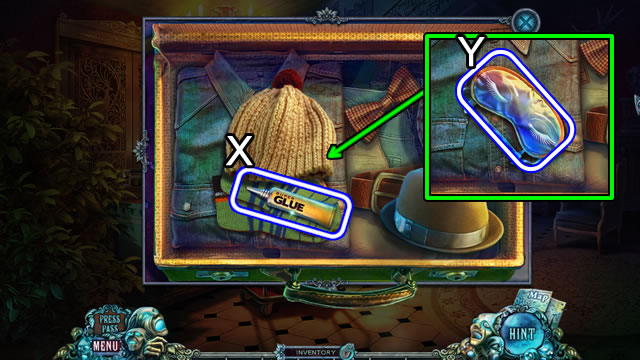
- Take the GLUE (X).
- Move items to find the EYE MASK (Y).
- Walk down.
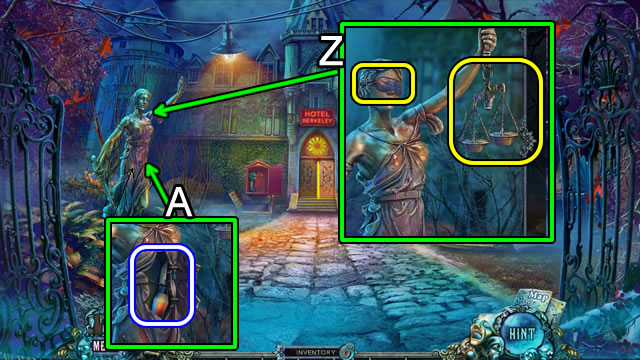
- Add the LEFT SCALE and RIGHT SCALE to the SCALE HANGER for SCALES.
- Use the SCALES and EYE MASK (Z).
- Take the PAINT RESTORER and KNIFE (A).
- Return to the Hallway.
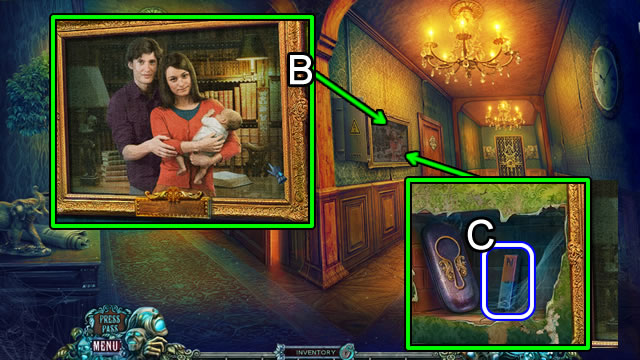
- Use the PAINT RESTORER (B).
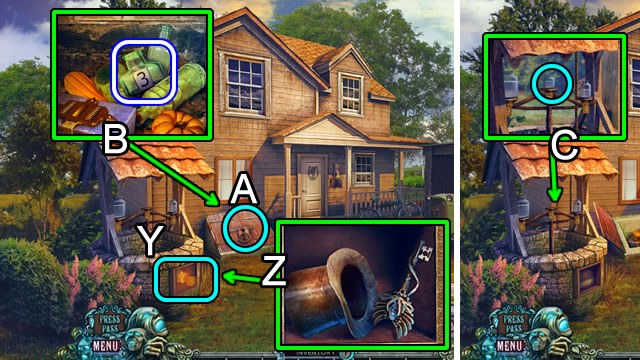
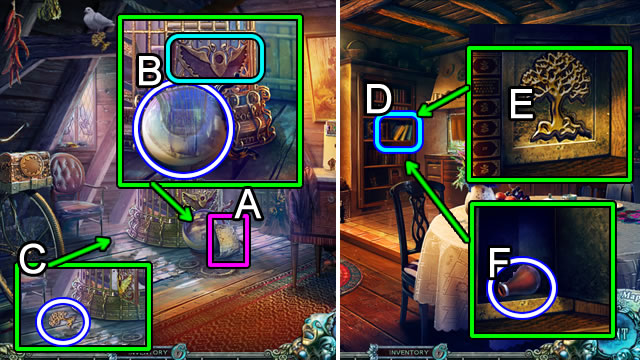
- Select the painting and take the MAGNET (C).
- Enter Room 13.
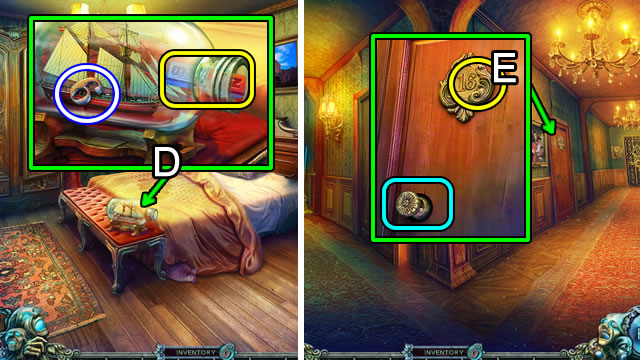
- Use the MAGNET to attract NUMBER 6 (D).
- Walk down.
- Insert NUMBER 6 (E) to pop out the doorknob.
- Enter Room 16.

- Speak to the man (F) to receive a CLOSED LOCKET (F).
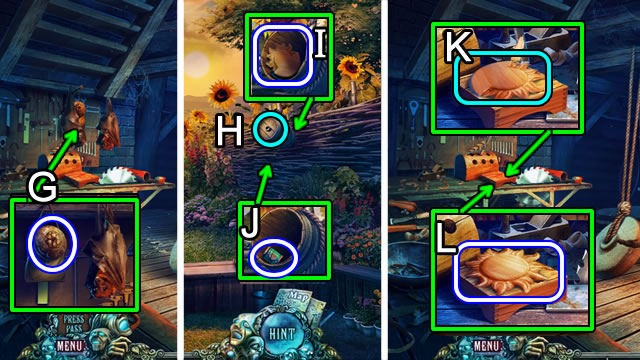
- Take the GRAPE TILE (G) to open a puzzle.

- Solution (H).
- Take the MAN FIGURINE (I).
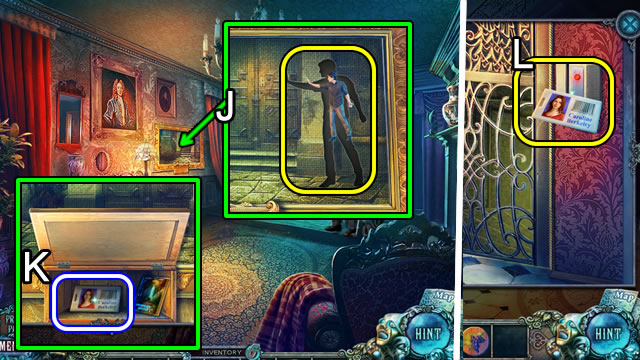
- Use the MAN FIGURINE (J) to trigger a fragment HOP.
- Play the HOP to take a KEY CARD (K).
- Return to the Lobby.
- Use the KEY CARD (L).
- Enter the shaft.
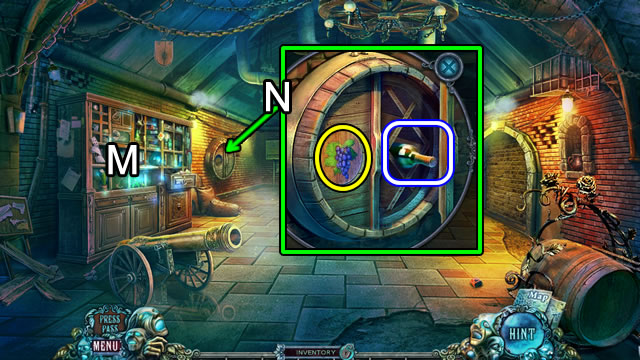
- Play the HOP (M); receive the SAM FIGURINE.
- Use the GRAPE TILE and take WINE (N).
- Walk down.
- Place the SAM FIGURINE (O); take the GUNPOWDER.
- Return to Room 16.
- Pour the WINE; use the KNIFE; get the ARMORED GLOVE (P).
- Go to the Boiler Room.
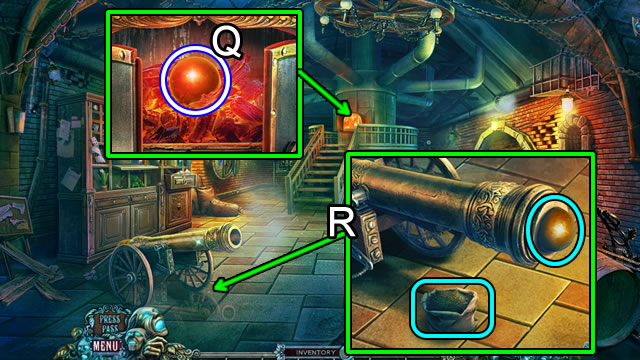
- Use the ARMORED GLOVE to retrieve the CANNONBALL (Q).
- Place the GUNPOWDER; place, then load the CANNONBALL (R) to trigger a puzzle.
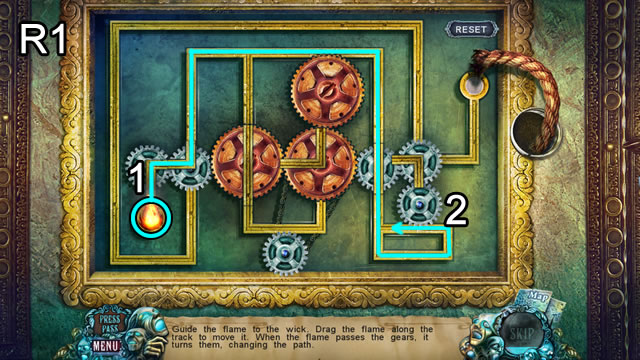
- Solution (R1): Drag the flame (1) along the path; drag down, right, up and left at (2). Repeat (2) moves.
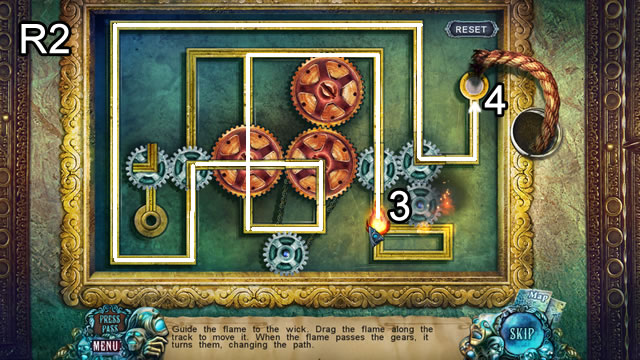
- Complete the path (3) to the wick (4).
- Walk right; speak to the woman.
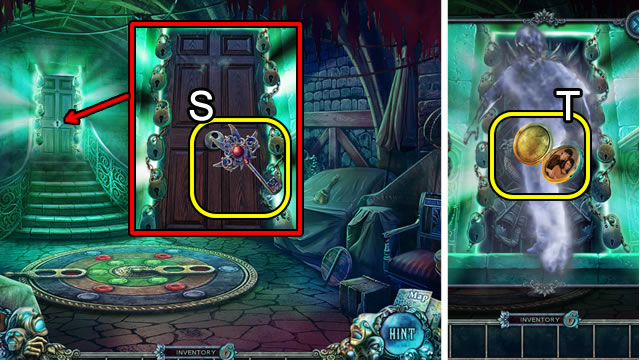
- Attempt to use the STRANGE KEY (S).
- Combine the CLOSED LOCKET and STICKPIN for a LOCKET.
- Give the LOCKET (T).
- Play the HOP; receive a LIBRARY CARD.
Chapter 4: Jack's Past
- Grab the EYE (U).
- Walk down; speak to Jack.
- Open the door (V) and take the EMBLEM HALF 1.
- Attempt to take the wig (W); play the fragment HOP.
- Use the GLUE; take the WIG (X).
- Trigger a puzzle with the LIBRARY CARD (Y).
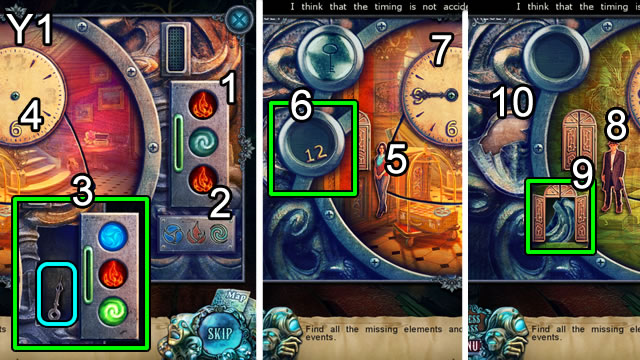
- Solution (Y1): scroll through the buttons (1) to match the pattern (2). Place the clock hand (3) on the face (4). Press the clock rivet (4).
- Touch the woman (5). Put the number (6) on the clock face (7). Press the rivet.
- Touch the man (8). Get the missing piece (9); use it (10) to get the number 3. Repeat the process with the last figure.
- Walk up the stairs.
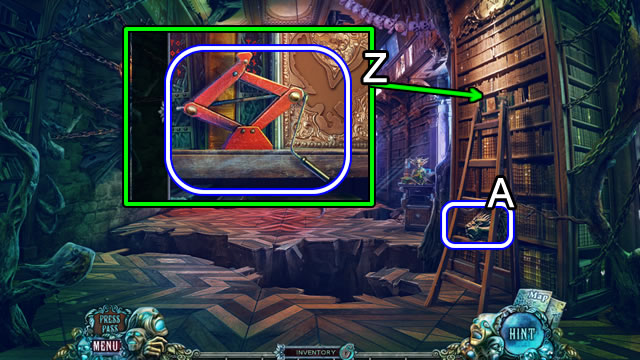
- Get the SCISSOR JACK (Z); grab LION 1 (A).
- Walk down.
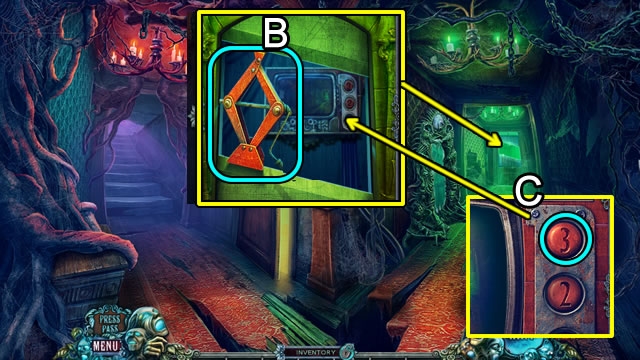
- Use the SCISSOR JACK (B); press button 3 (C).
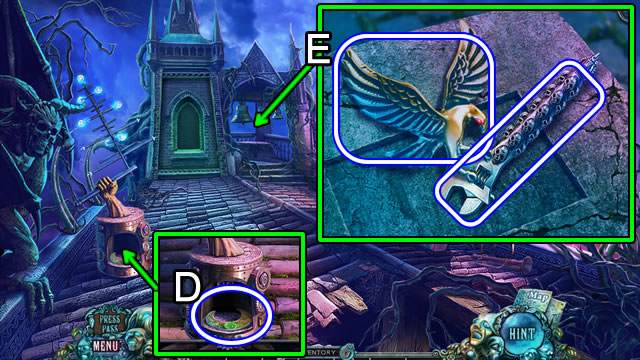
- Grab the HALF-MOON (D).
- Zoom in on the pedestal; take the EAGLE and WRENCH (E).
- Walk down; press button 2.
- Enter Emma's Nightmare room.
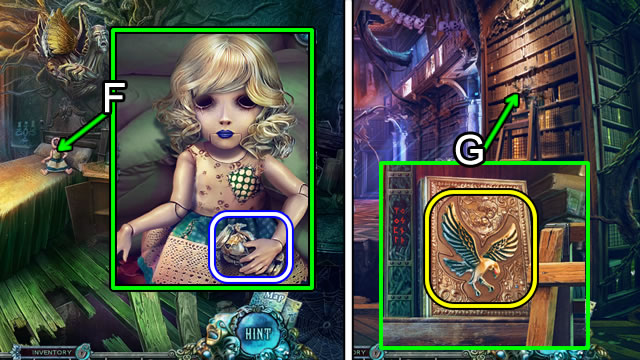
- Use the WIG; take the HOURGLASS (F).
- Exit the room; go up the stairs.
- Place the EAGLE (G).
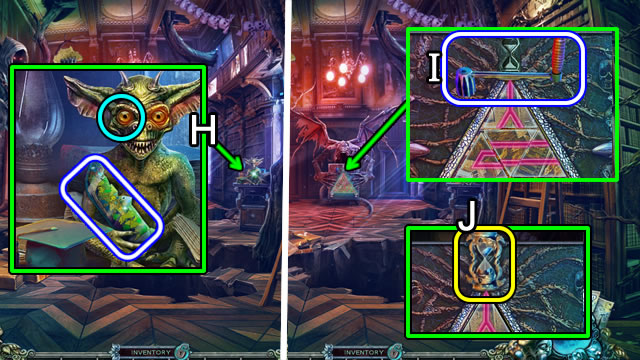
- Insert the EYE; get STAINED GLASS 2 (H).
- Take the HANDLE (I); add the HOURGLASS (J) to trigger a puzzle.
- Flip the triangles to find the pattern.

- Solution (K).
- Play the HOP; receive STAINED GLASS 1.
- Return to the Nightmare Roof.
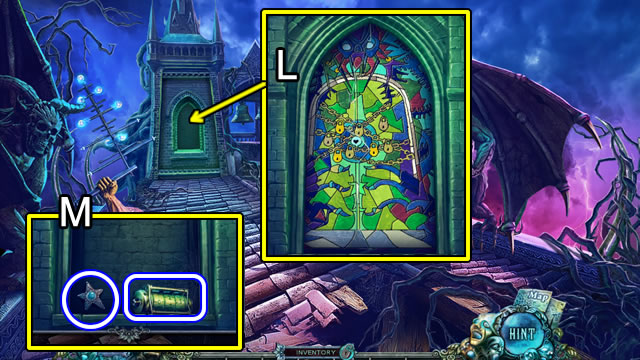
- Add STAINED GLASS 1 and STAINED GLASS 2 (L).
- Grab the STAR and CODED CYLINDER (M).
- Return to Emma's Nightmare room.
- Add the STAR and HALF MOON (N).
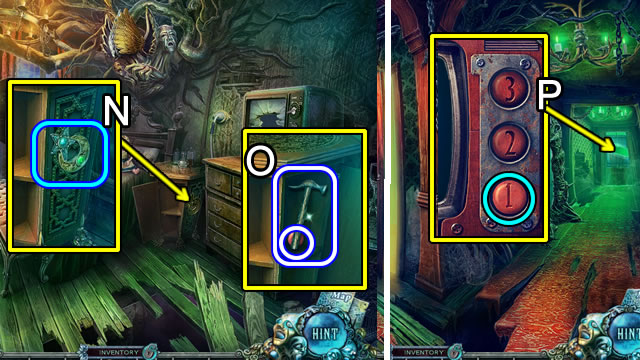
- Get the HAMMER and BUTTON 1 (O).
- Walk down.
- Insert and press BUTTON 1 (P).
- Speak to the man; play the HOP; receive a HORN.
- Take the CHALK and DRAGON WING (Q).
- Grab LION 2 (R).
- Return to Emma's Nightmare Room.
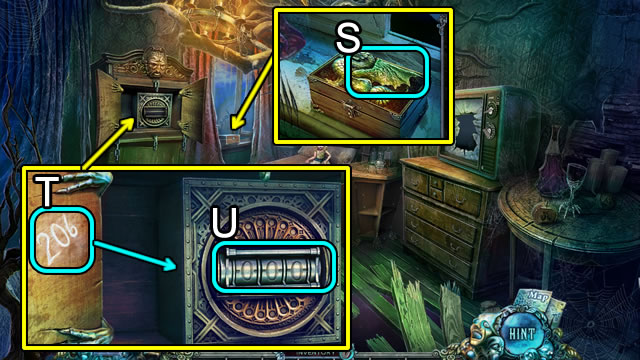
- Put the DRAGON WING (S); take the CRYSTAL SKULL.
- Use the CHALK (T).
- Insert the CODED CYLINDER (U); set tumblers to 2-0-6; take the JAR WITH ELECTRODE.
- Walk down.
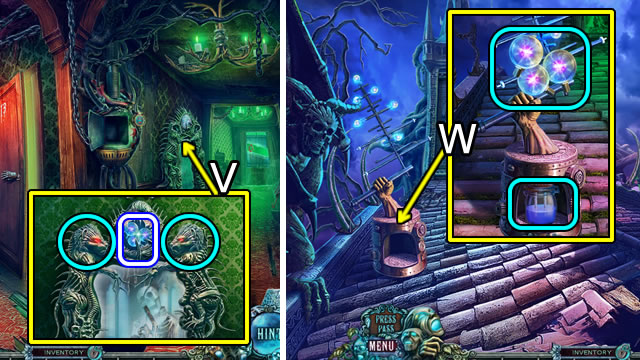
- Add LION 1 and LION 2; take PARTS OF THE ANTENNA (V).
- Go to the Nightmare Roof.
- Use the PARTS OF ANTENNA and JAR WITH ELECTRODE (W); take JAR WITH LIGHTNING.
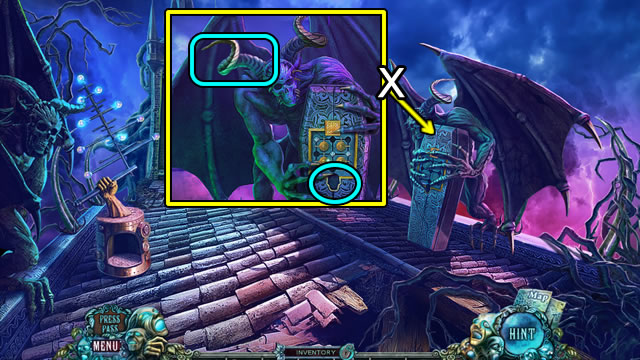
- Attach the HORN (X); insert the CRYSTAL SKULL to trigger a puzzle.
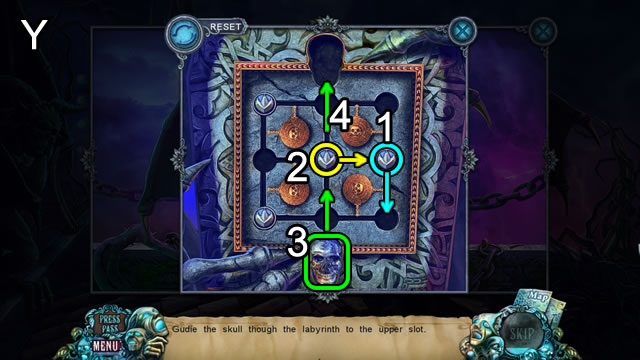
- Solution (Y).
- Grab the SCROLL.
- Go to the Nightmare Library.
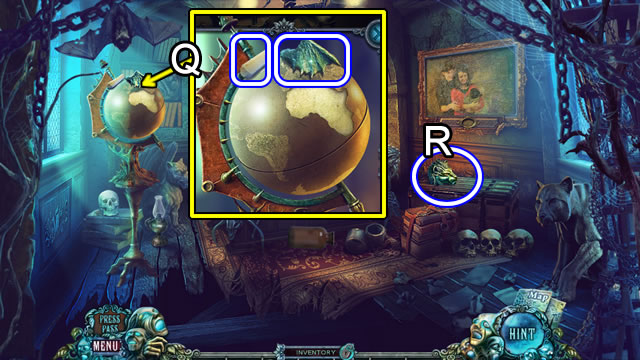
- Play the HOP (Z); receive a BOX WITH EARS.
- Give the SCROLL; get AFRICA (A).
- Walk down.
- Put JAR WITH LIGHTNING (B); take CLAPPER (C).
- Return to Nightmare Roof.
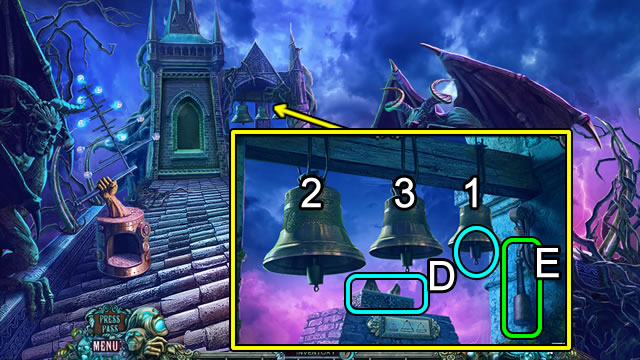
- Add the CLAPPER (1); place the BOX WITH EARS (D).
- Use the mallet (E) to strike the bells (1, 2, 3); take the HOT AIR BALLOON.
- Go to the Nightmare Office.
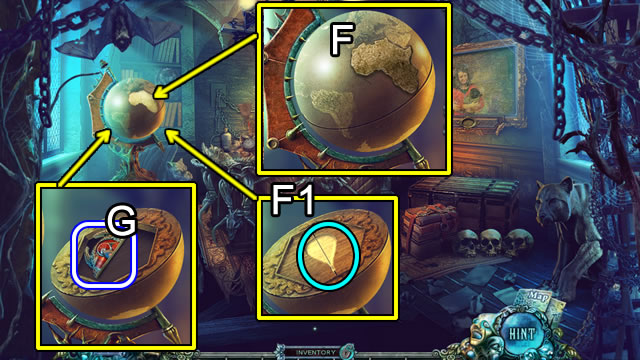
- Place AFRICA (F); insert the HOT AIR BALLOON (F1); take EMBLEM HALF 2 (G).
- Return to the Nightmare Library.
- Insert EMBLEM HALF 1 and EMBLEM HALF 2 (H); take the MONOGRAM.
- Go to the Nightmare Office.
- Play the HOP; receive a RAINBOW CRYSTAL.
- Put the MONOGRAM (I); place the RAINBOW CRYSTAL (J) to trigger a puzzle.
- Solution (K).
- Use the WRENCH to remove the COGWHEEL (L).
- Combine the HANDLE and COGWHEEL to create a GEAR (Inventory).
- Use the GEAR (M) to raise the ladder.
- Climb down the ladder.
Chapter 5: The Park
- Open the book; read the note; take the OWL (N).
- Walk down.
- Place the OWL; take the KNIGHT (O).
- Climb down the ladder.
- Place the KNIGHT; take the ZIPPER PULL (P).
- Walk down.
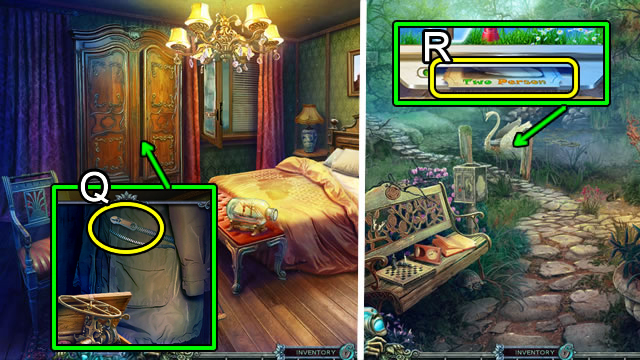
- Fasten the ZIPPER PULL (Q); take the TICKET.
- Climb down the ladder.
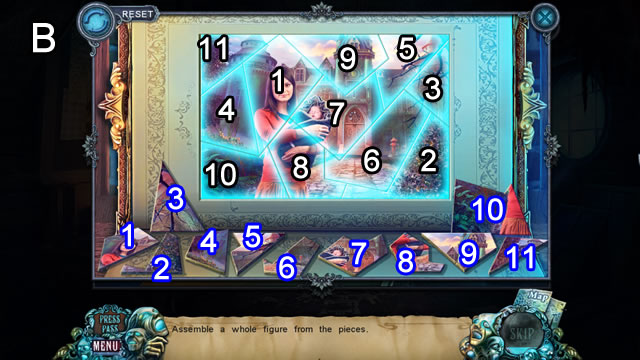
- Insert the TICKET (R) to open a puzzle.
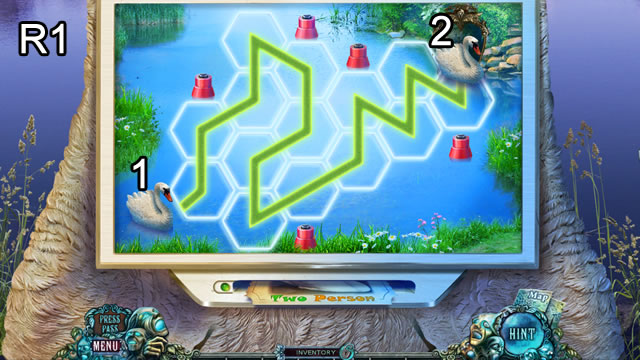
- Solution (R1).
- Play the HOP; receive a CHESS QUEEN.
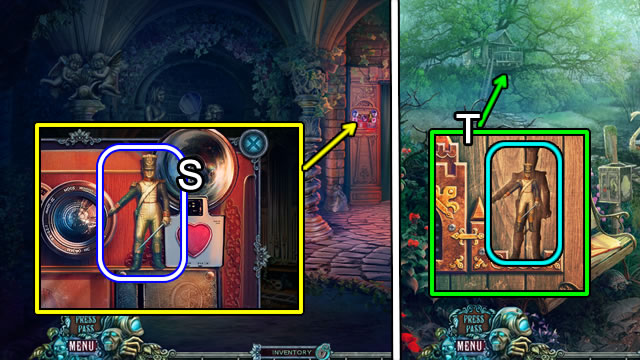
- Take the TOY SOLDIER (S).
- Walk down; walk to the Treehouse; insert the TOY SOLDIER (T) to enter the Treehouse.
- Grab the HORSESHOE and FIREFLY (U).
- Walk down.
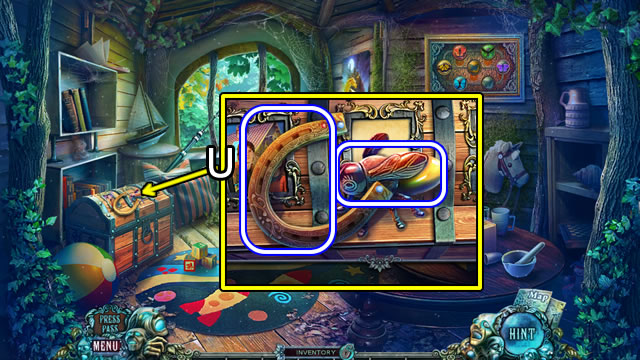
- Place the CHESS QUEEN); take the BROOCH and APPLE (V).
- Place the FIREFLY (W); take the LIGHT BULB.
- Add the BROOCH; take the BELL and COIN (X).
- Walk to the tunnel.
- Use the LIGHT BULB (Y).
- Insert the COIN; take the PHOTO (Z).
- Return to the Treehouse.
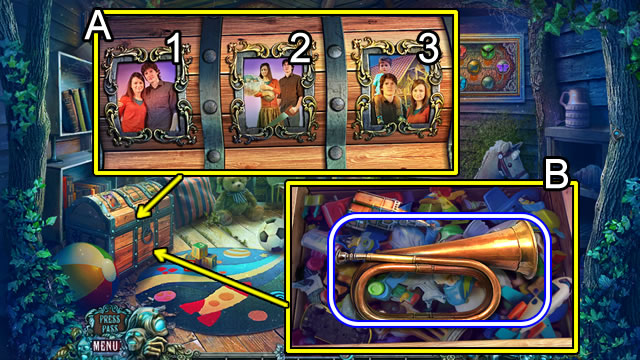
- Add the PHOTO (A); order (1-2-3).
- Take the BUGLE (B).
- Return to the Grotto.
- Place the BUGLE; take the PENNANT (C).
- Return to the Treehouse.
- Add the PENNANT; take the HARP (D).
- Return to the Grotto.
- Place the HARP (E); receive a FLASK BADGE.
- Return to the Treehouse.
- Read the note; place the FLASK BADGE (F).
- Place flask (1) on (2). Add flasks (3-4). Turn knob (5). Take ACID.
- Walk down three times.
- Use the ACID (G) to open the door.
- Walk down.
- Play the HOP; receive a HAT.
- Add the APPLE (H); take the CLOCK PENDULUM.
- Walk down.
- Place the CLOCK PENDULUM (I); take the RINGS.
- Return to the Grotto.
- Place the HAT (J).
- Place the RINGS; take the HOOK (K); grab the BUTTERFLY NET (L).
- Walk down.
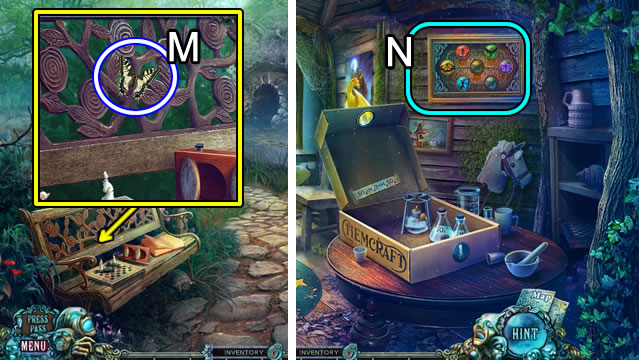
- Use the BUTTERFLY NET; get the BUTTERFLY (M).
- Go to the Treehouse.
- Add the BUTTERFLY (N) to trigger a puzzle.
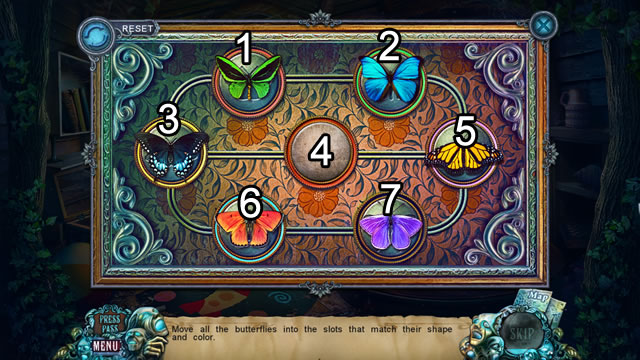
- Solution: 5-7-6-3-4-5-7-6-3-1-2-5-4-3-1-2-5-7-6-3-4-5-7-6-3-4-5-7-6-3-4-5-2-1-3-4-5-7-6-3-1-2-5-4.
- Take a REEL.
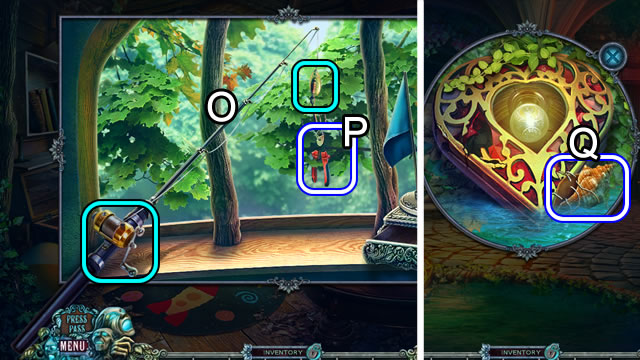
- Place the REEL and HOOK (O); select the reel and take the WIRE CUTTERS (P).
- Return to the Grotto.
- Use the WIRE CUTTERS to get the SHELL (Q).
- Play the HOP; receive a GEM.
- Combine the SHELL and GEM (Inventory); get a BEJEWELED SHELL.
- Walk down.
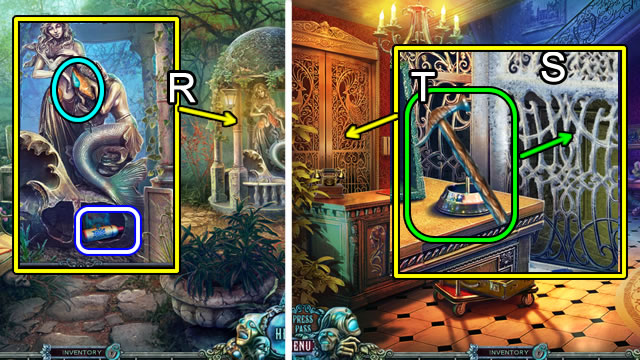
- Place the BEJEWELED SHELL; take the LIQUID NITROGEN (R).
- Return to the Lobby.
- Use the LIQUID NITROGEN (S); apply the HAMMER (T).
- Go down to the Boiler Room then right.
Chapter 6: Blue and Yellow Keys
- Pick up the OIL CAN; go through the door (U).
- Play the HOP; receive a KEY.
- Take the KEY (V); place the BELL; take the ANAGLYPHY (W).
- Move the mat, and pick up the second ANAGLYPHY (X).
- Place the two ANAGLYPHY pieces (Y); take the TOP HAT and KEY (Z).
- Insert the TOP HAT (A); open the cellar doors; grab the BOTTLE (B).
- Place the BOTTLE. Examine the bottles to trigger a puzzle (C).
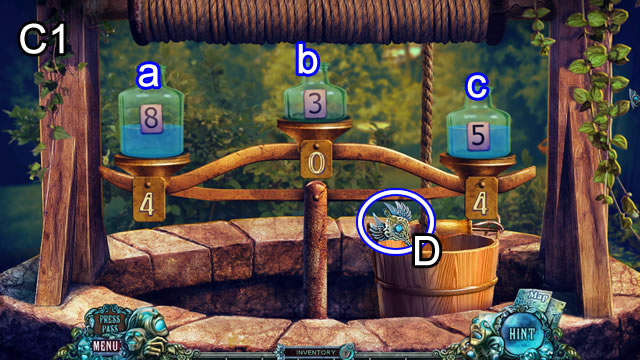
- Solution (C1): b-c, a-b, b-c, c-a, b-c, a-b, b-c.
- Take the KEY (D).
- Walk down.
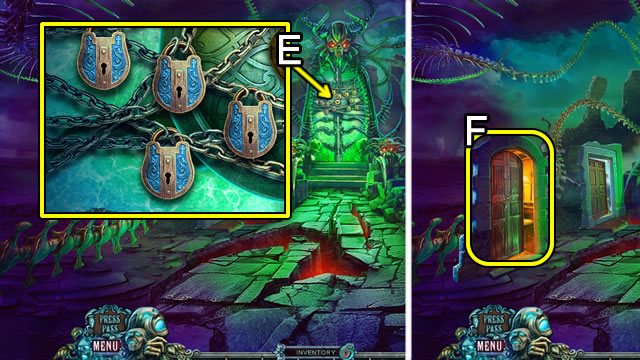
- Use the four KEYS in the blue locks (E).
- Go through the door (F).
- Play the HOP; receive PRUNING SHEARS.
- Take the HORSE (G).
- Pick up the DOLLAR NOTE and JACK'S PHOTO (H).
- Return to Near the House.

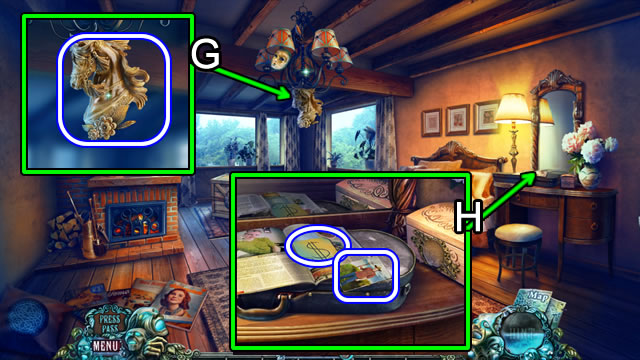
- Use the PRUNING SHEARS (I); get a BOUQUET OF FLOWERS.
- Combine the HORSESHOE and HORSE (Inventory) for an EQUESTRIAN ORNAMENT.
- Affix the EQUESTRIAN ORNAMENT (J) and enter the house.
- Place the DOLLAR NOTE on the cabinet door (K). Match the note and day color (L); take the HANDLE (M).
- Return to the Bedroom.
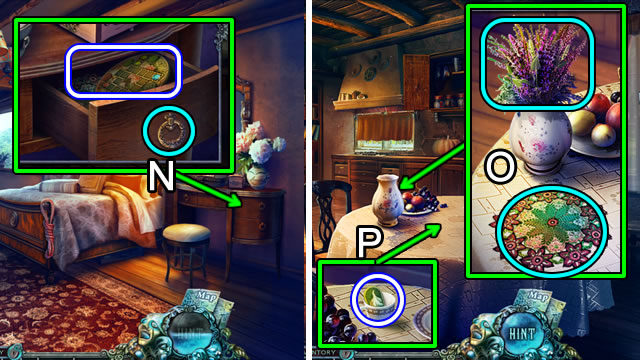
- Attach the HANDLE (N); take the CHIP and PLACEMAT.
- Return to the Dining Room.
- Place the BOUQUET OF FLOWERS and PLACEMAT (O) to trigger a fragment HOP.
- Play the HOP; take the LABEL (P). Take the KEY from Jack.
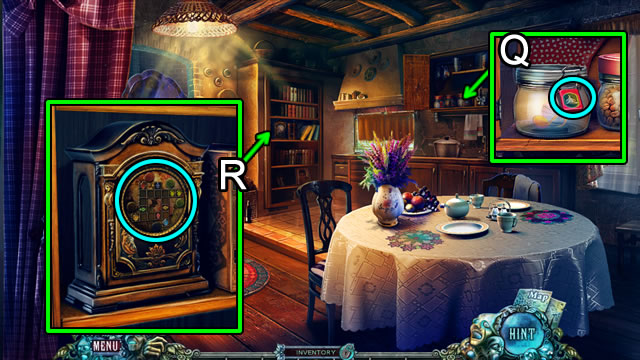
- Add the LABEL (Q); get a MUSICAL NOTE.
- Insert the CHIP (R); select the clock to open a puzzle.
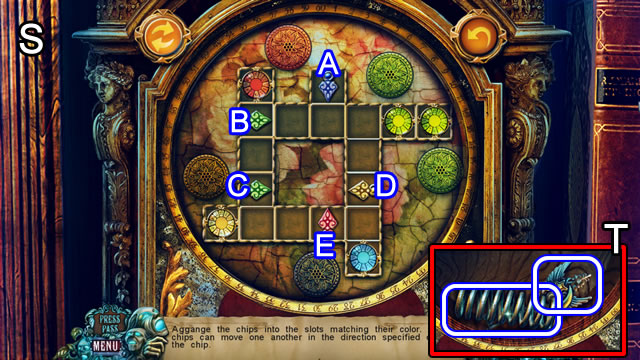
- Solution (S): A-Bx2-Ax2-Dx2-Ex2-Cx4-Ax2-Dx2-Ex2.
- Take the SPRING and KEY (T).
- Walk down.
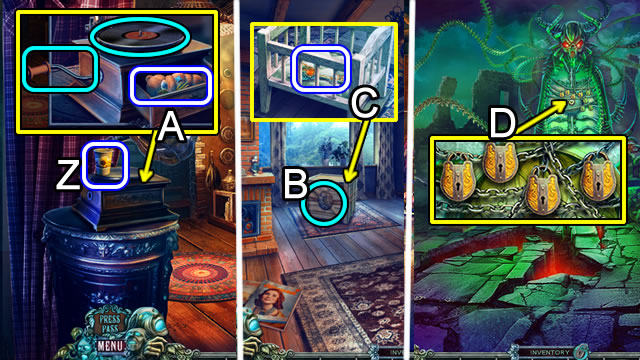
- Play the HOP; receive a PHONOGRAPH RECORD.
- Place the SPRING (U); take the HANDLE.
- Return to the Bedroom.
- Move the magazine (V); add the MUSICAL NOTE (W) to open a puzzle.
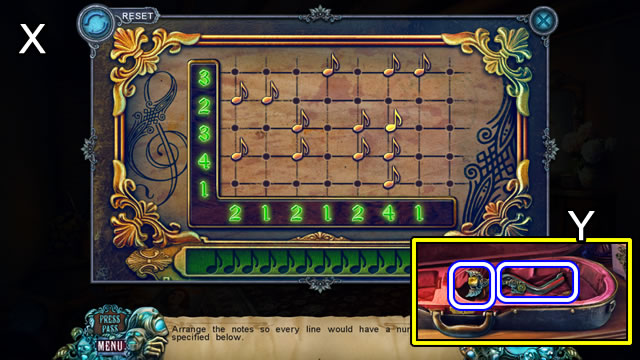
- Solution (X).
- Get the HAND CRANK and KEY (Y).
- Return to the Dining Room.
- Pick up the CUP (Z).
- Put the PHONOGRAPH RECORD and HAND CRANK; use the crank and take the BEAR (A).
- Return to the Bedroom.
- Place the BEAR (B). Take a KEY (C).
- Walk down.
- Insert the KEYS in the yellow locks (D); enter the new door and speak with Jack.
Chapter 7: Green and Red Keys
- Get the SEALED TUBE (E).
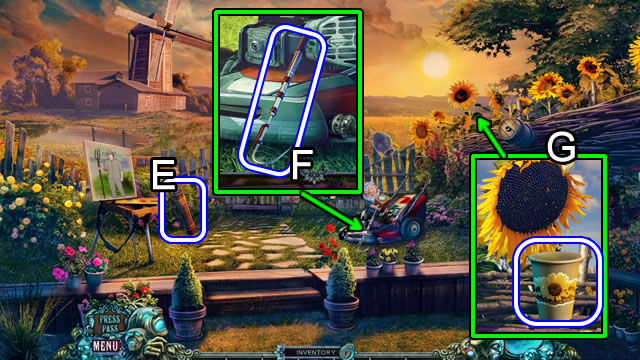
- Pick up the GAFF HOOK (F).
- Put the CUP (G); receive SUNFLOWER SEEDS.
- Return to the Bedroom.
- Use the GAFF HOOK to retrieve the suitcase; take MARTHA and the WHEEL (H).
- Return to the Backyard.
- Attach the HANDLE and WHEEL (I); pull the handle.
- Take the CLOUD (J).
- Play the HOP; receive a WEIGHT.
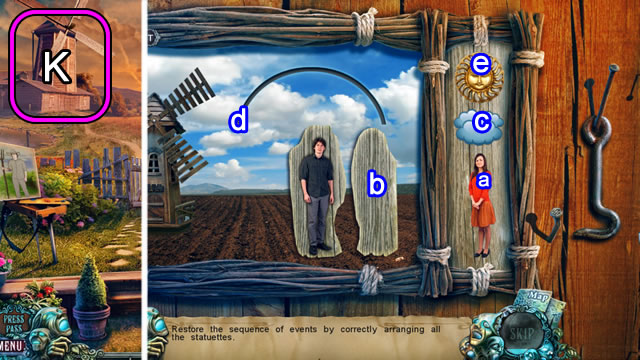
- Select the Mill (K) for a puzzle.
- Place MARTHA and the CLOUD on the side panel.
- Solution: a-b, e-d, c-d.
- Take a KEY.
- Enter the Mill.
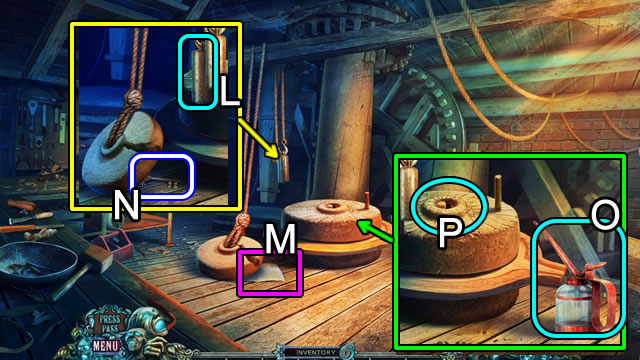
- Attach the WEIGHT (L); read the note (M); take the KEY (N).
- Put the OIL CAN (O); pour the SUNFLOWER SEEDS (P); take the OIL.
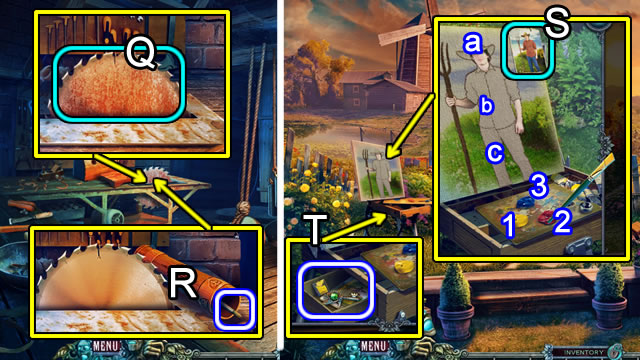
- Use the OIL (Q).
- Open the SEALED TUBE (R); take the BRUSH.
- Walk down.
- Attach JACK'S PHOTO (S) and place the BRUSH.
- Complete the painting: 1-a, 2-b, 3-c.
- Read the note; take the SECTION OF PICTURE and KEY (T).
- Walk up.
- Add the SECTION OF PICTURE (V) to open a puzzle.
- Solution part 1 (V): 8-9-6-3-2-1-4-5-6-3-2-5.
- Solution part 2 (W): 4-1-2-5-8-7-4-5-8-9.
- Take the KEY(X).
- Walk down twice.
- Use the four green KEYS in the green locks.
- Go through the new door.
- Open the box and read the note.
- Take the BICYCLE HORN WITHOUT BULB; pick up the KNITTING (Y).
- Return to the Bedroom.
- Play the HOP; receive a DOVE.
- Place the KNITTING; take the WINGS (Z).
- Return to the Attic.
- Read the note (A).
- Take the CRYSTAL BALL; place the WINGS (B).
- Pick up the TREE (C).
- Return to the Dining Room.
- Move the books (D); insert the TREE (E); take the BULB (F).
- Return to the Mill.
- Combine the BICYCLE HORN WITHOUT BULB and BULB (Inventory); get a BICYCLE HORN.
- Use the BICYCLE HORN (G); take the BARREL KNOB.
- Walk down.
- Use the BARREL KNOB (H) to open the barrel; take the WOODWORKING PIECE (I) and THREAD (J).
- Walk up.
- Place the WOODWORKING PIECE (K); take the SUN (L).
- Return to the Attic.
- Place the SUN; take the CHIP and LAUREL WREATH (M).
- Pick up the THUMBTACKS and add the THREAD (N) to open a puzzle (O).
- Solution: 1-3, 3-5, 1-3, 1-4, 1-3, 2-5.
- Take the POTHOLDER.
- Return to the Mill.
- Use the POTHOLDER to retrieve the CAP (P).
- Walk down.
- Place the CAP (Q); take the SIGNET and CARABINER.
- Play the HOP (R); receive SOLVENT.
- Return to the Attic.
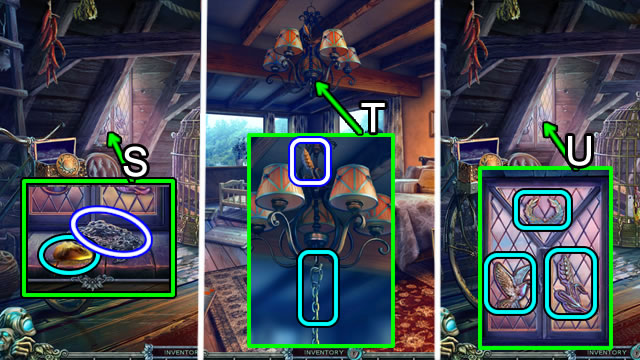
- Use the SOLVENT; attach the CARABINER; take the CHAIN (S).
- Return to the Bedroom.
- Hook the CHAIN to the chandelier and pull; take the SPRIG ORNAMENT (T).
- Return to the Attic.
- Insert the LAUREL WREATH, DOVE and SPRIG ORNAMENT (U); speak to Jack; take the red KEY.
- Walk down.
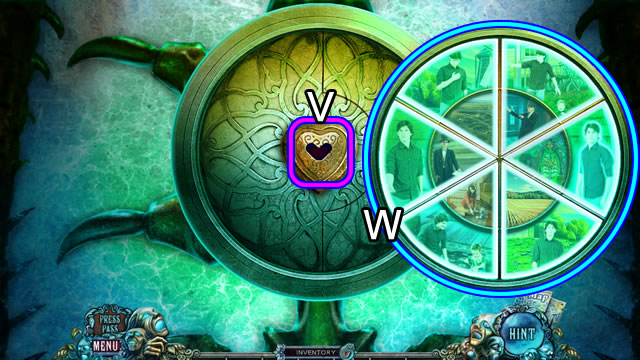
- Use the red KEY (V) to trigger a puzzle.
- Solution (W).
- Speak to Jack; take the PICTURE LOCKET.
Chapter 8: The Summoning
- Speak to the woman; take the KEY (Y).
- Go to the Hallway.
- Use the KEY (Z).
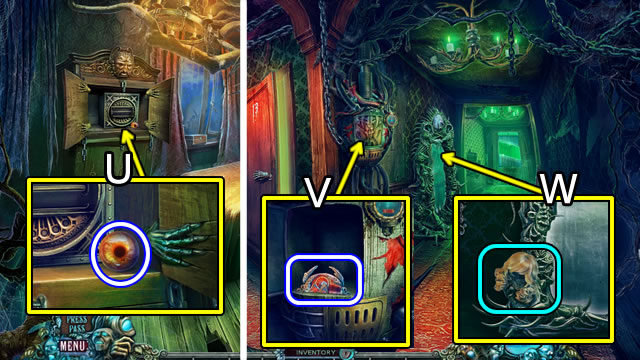
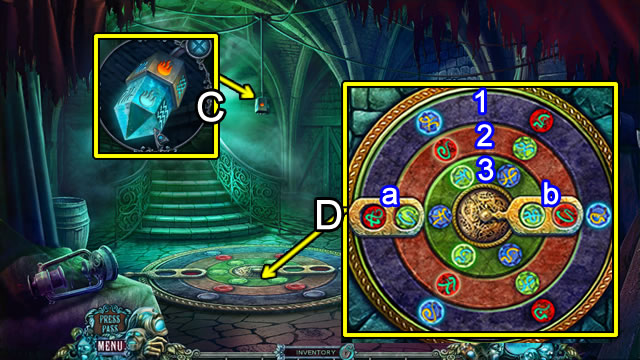
- Select the panel (A); press 2 (B).
- Speak to the apparition; play the HOP; receive a MEDAL.
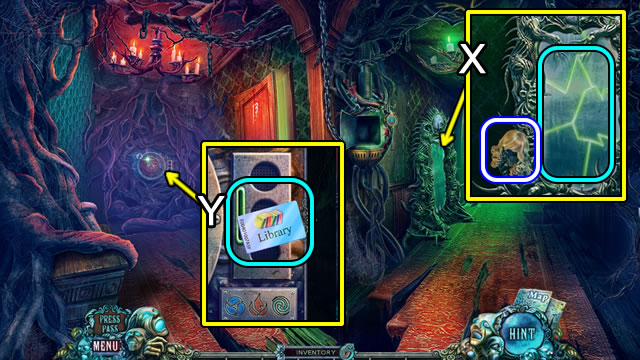
- Pick up the LAMP and GLASS BOX (C); move the blueprint (D); speak to the woman.
- Place the CRYSTAL BALL; take the MAGNIFIER (E).
- Walk down; press button 1.
- Place the MAGNIFIER (F); take the INKWELL.
- Go to the Roof.
- Pick up the FIRE disc (G); add the MEDAL; take the GLASS-CUTTER and RECEPTION BELL (H).
- Combine the GLASS BOX and GLASS-CUTTER (Inventory); remove the DEMON BADGE.
- Return to the Lobby.
- Use the RECEPTION BELL to get a CHISEL (I).
- Return to the Boiler Room.
- Play the HOP; receive WAX.
- Insert the DEMON BADGE (J).
- Enter the Secret Room; speak to the woman.
- Pick up the CANVAS (K).
- Use the INKWELL to get the SUNDIAL GNOMON (L).
- Select the dark desk (M).
- Put down the LAMP (N).
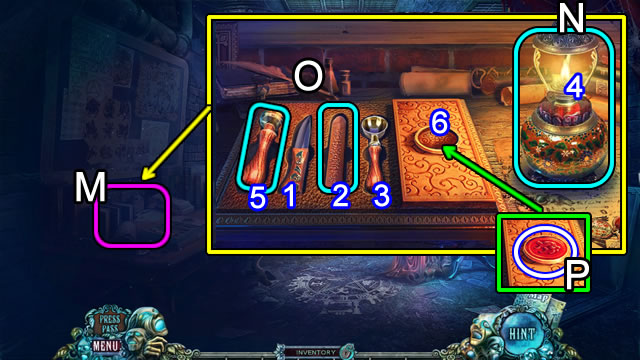
- Add the SIGNET and WAX to the tray (O).
- Use the knife (1) to cut the wax (2). Put the cut wax in the spoon (3) and hold next to the lamp (4).
- Put the signet (5) in the melted wax (6) to create SEALING WAX (P).
- Return to Jack's Office.
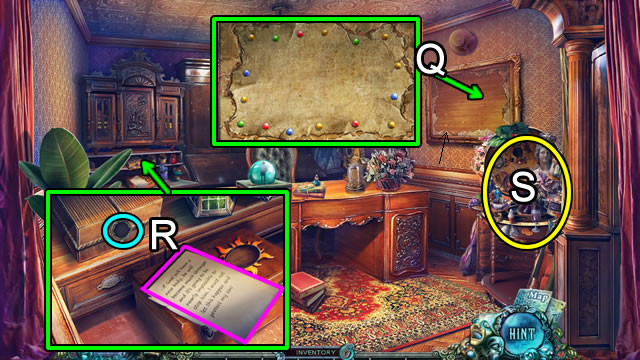
- Put up the CANVAS and THUMBTACKS (Q); take the DIARY.
- Read the note and use the SEALING WAX (R); take the SAM PHOTO.
- Play the HOP(S); receive a SUNDIAL PART.
- Return to the Roof.
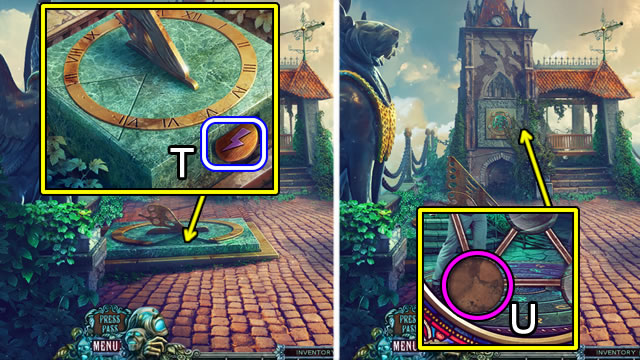
- Place the SUNDIAL GNOMON and SUNDIAL PART; take the LIGHTNING disc (T).
- Add the CHIP to the wall (U) to trigger a puzzle.

- Solution (V): 3x2-4-3x2-4-3-2.
- Take the MINERAL (W).
- Return to the office.
- Place the MINERAL (X) to trigger a fragment HOP for additional minerals.
- Insert the FIRE and LIGHTNING discs (Y); add the CHISEL.
- Select the hammer and chisel to create a FACETED CRYSTAL (Z).
- Return to the Secret Room.
- Combine the PICTURE LOCKET and SAM PHOTO (Inventory); get a PICTURE LOCKET WITH PHOTO.
- Place the DIARY; insert the PICTURE LOCKET WITH PHOTO (A) to open a puzzle.
- Solution (B).
- Place the FACETED CRYSTAL; take a SUMMONER CRYSTAL.
- Walk down and right.
- Insert the SUMMONER CRYSTAL (C).
- Select the floor pattern to open a puzzle (D).
- Solution: 3-2-b-3x2-2x2-b-3x2-2-a-2-b-2-1x2-a-2x2-1x2-a.
- Congratulations. You have completed Fear For Sale: The 13 Keys.
Created at: 2014-11-21