

Walkthrough Menu
- General Tips
- Chapter 1: Outside Helen's House
- Chapter 2: The Carmer Gates
- Chapter 3: The Labyrinth Entrance
- Chapter 4: The Labyrinth
- Chapter 5: Ben's Room
- Chapter 6: The Fifties Yard
General Tips
- This is the official guide for Fear For Sale: The Dusk Wanderer.
- Hidden-object puzzles are referred to as HOPs. This guide will not show screenshots of the HOPs, however, it will mention when an HOP is available and the inventory item you'll collect from it.
- This guide will not mention each time you have to zoom into a location; the screenshots will show each zoom scene.
Chapter 1: Outside Helen's House
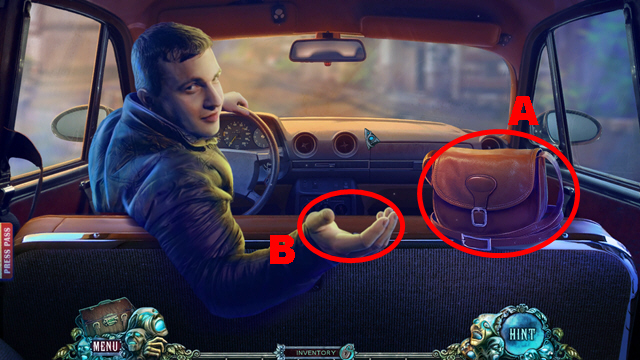
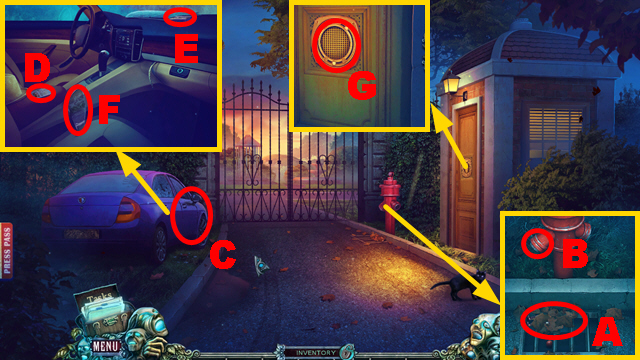
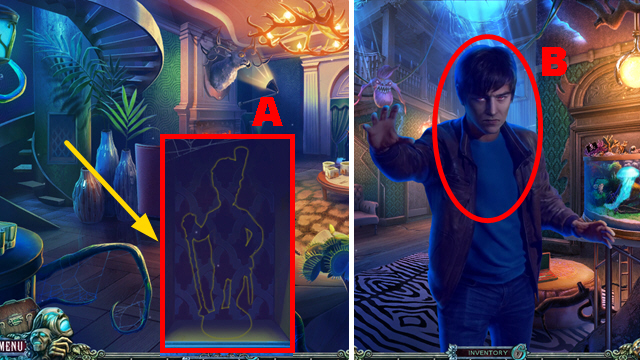
- Take EMMA'S PURSE (A).
- Open EMMA'S PURSE and take the DISCHARGED PHONE, magazine, and WALLET from it.
- Use the WALLET (B).
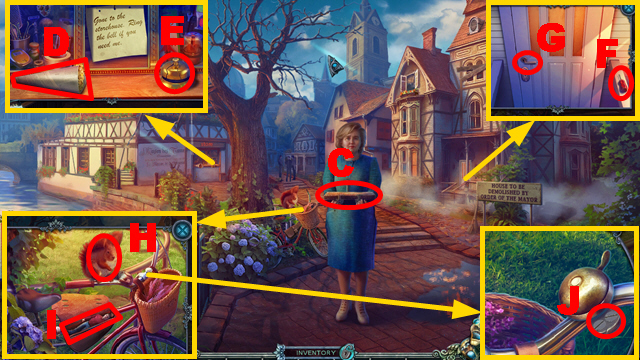
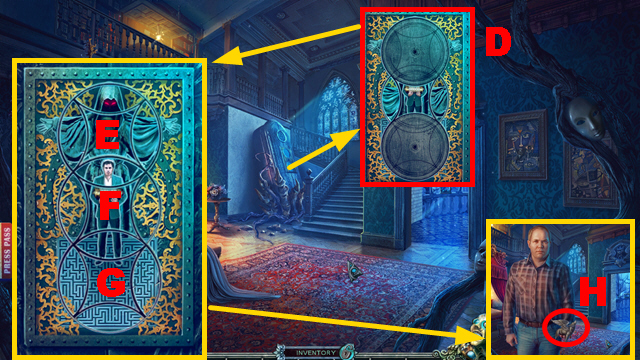
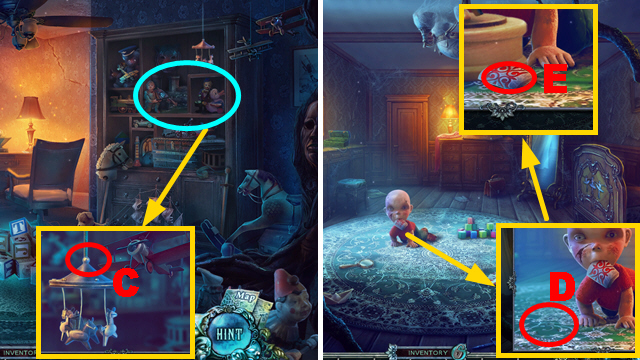
- Take EDGAR'S BELONGINGS (C) and the CONE WITH NUTS (D).
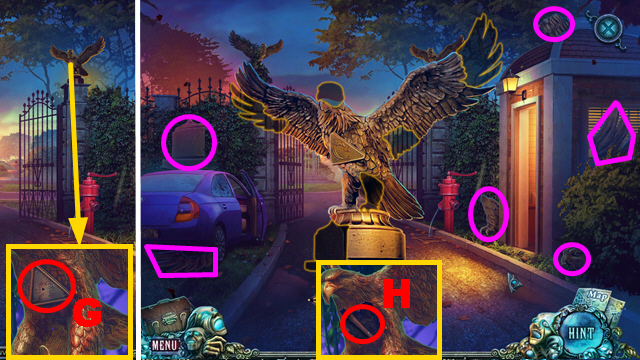
- Ring and remove the bell (E).
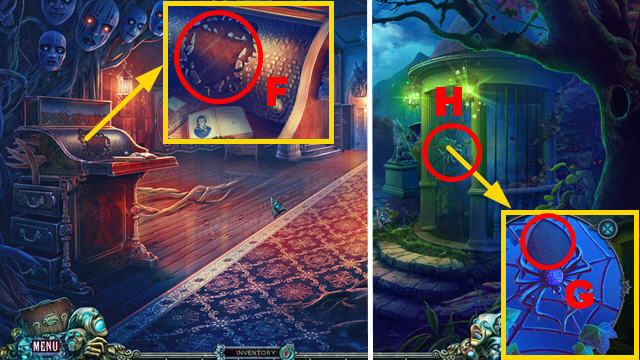
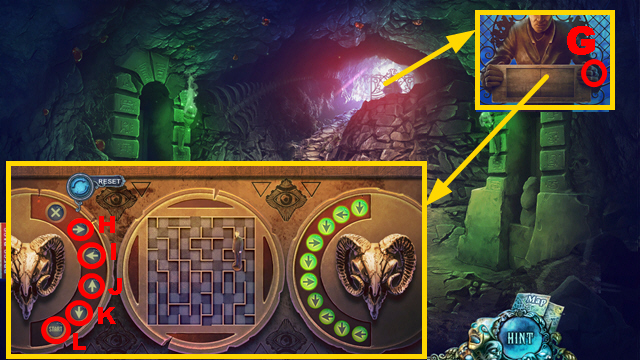
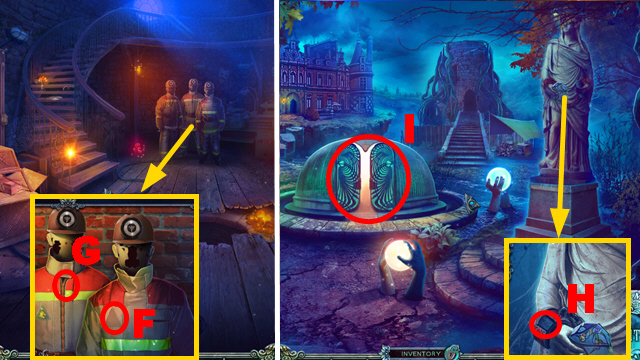
- Take the SCREWDRIVER (F); open the door (G).
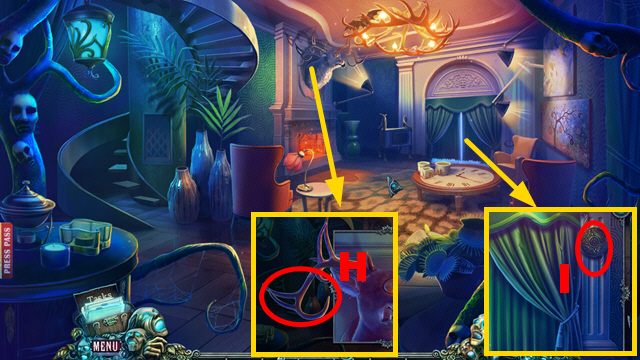
- Take the NUTS from the CONE WITH NUTS.
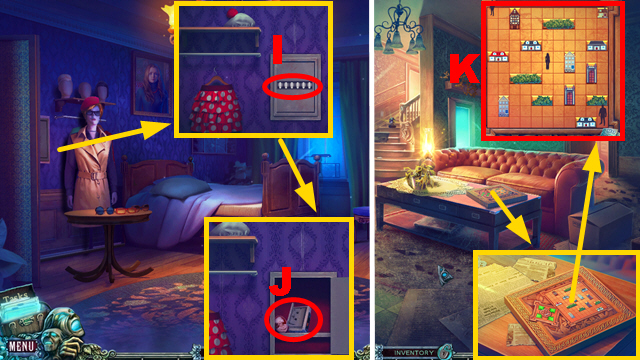
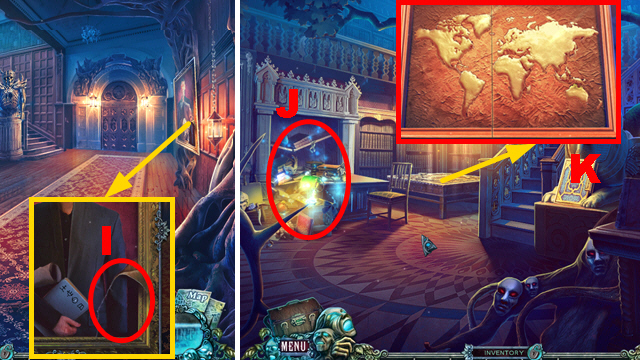
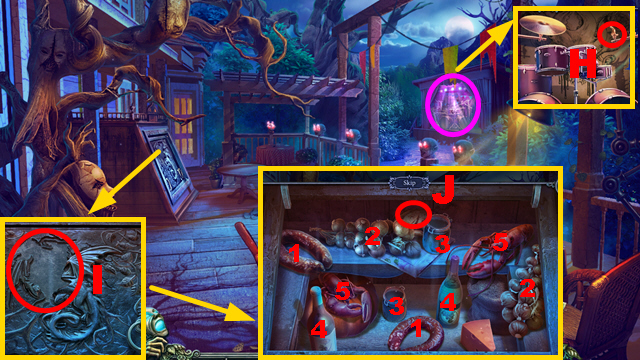
- Use the NUTS (H); open the pocket and take the MAN'S FIGURINE (I).
- Use the SCREWDRIVER to acquire the BICYCLE BELL (J).
- Open EDGAR'S BELONGINGS 1-4; take the photo, note, and BRACELET FOR HELEN.
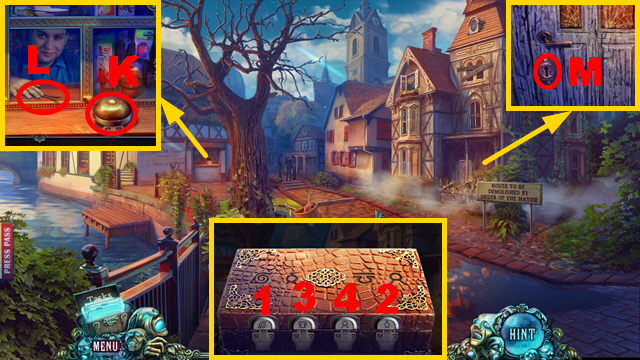
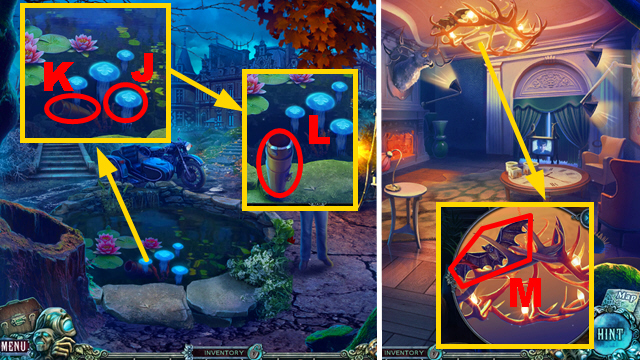
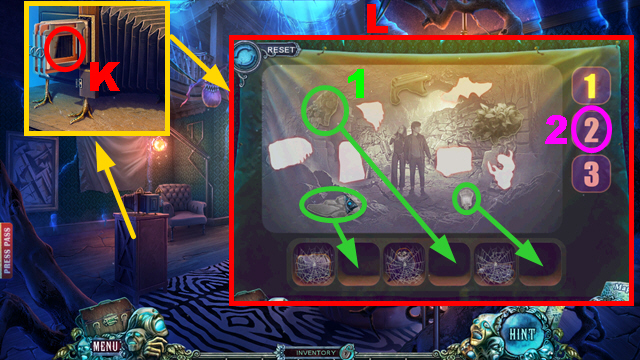
- Place the BICYCLE BELL and select it (K); use the WALLET and take the HAIRPIN (L).
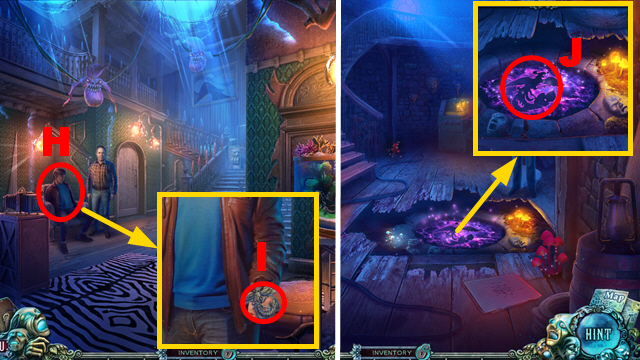
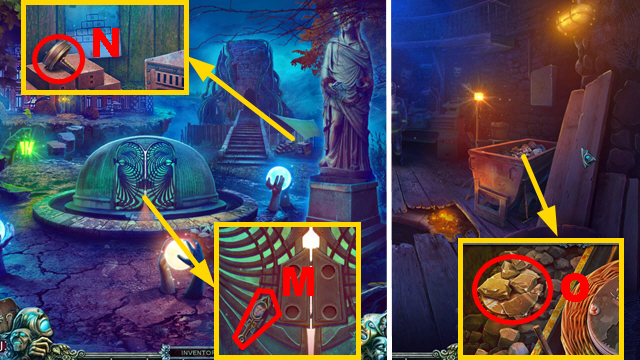
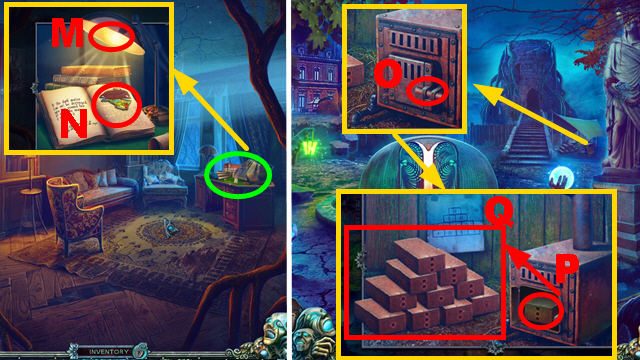
- Use the HAIRPIN (M).
- Turn right.
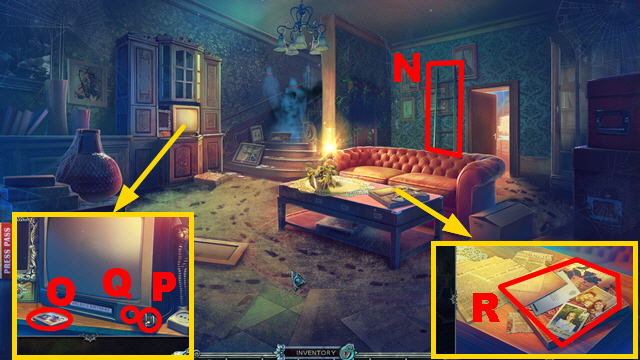
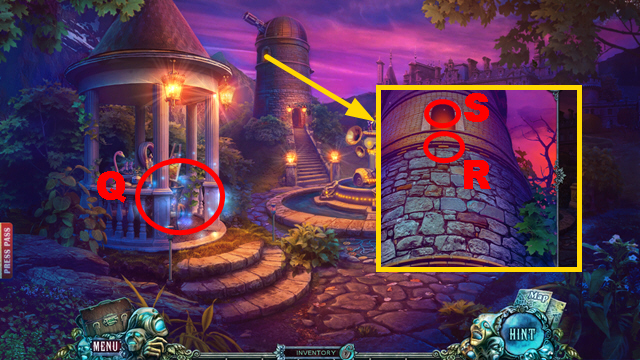
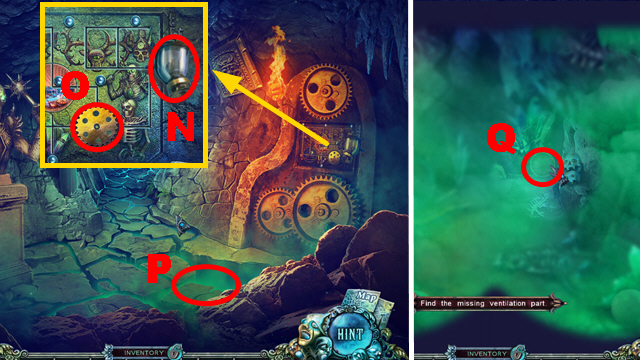
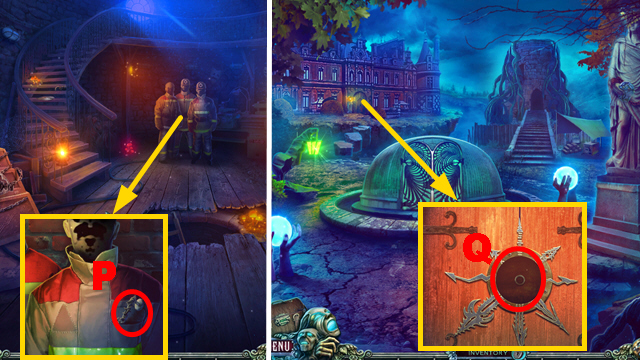
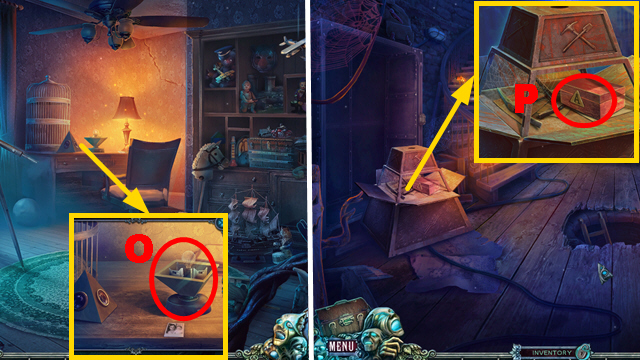
- Take the LADDER (N) and CHEST ORNAMENT (O); select the plug (P) and push the button (Q).
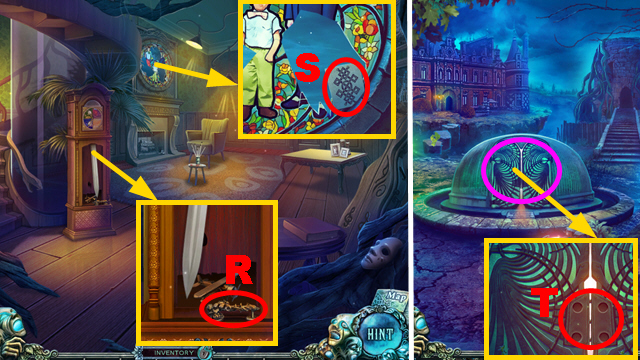
- Remove 2 letters, the photo, and take the map and FAMILY PHOTO PIECE (R).
- Walk down.
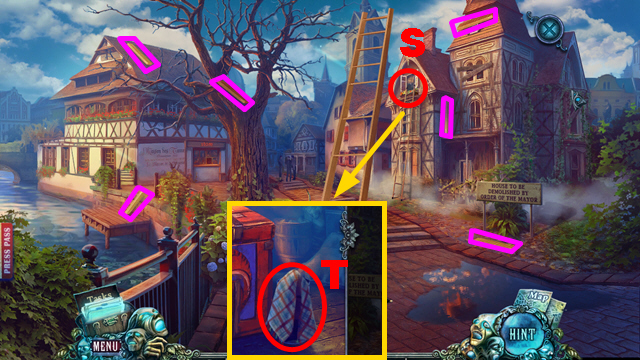
- Place the LADDER (S).
- Collect 6 steps (purple).
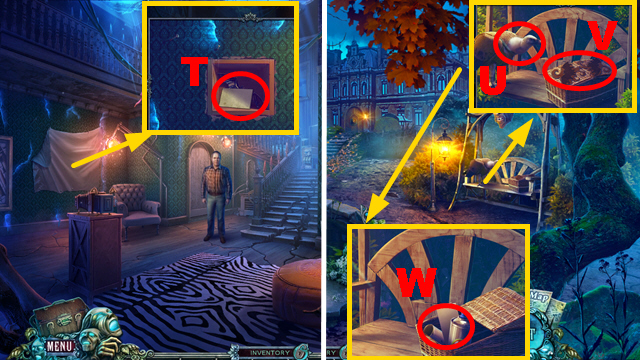
- Take the HANDKERCHIEF and WEED KILLER (T).
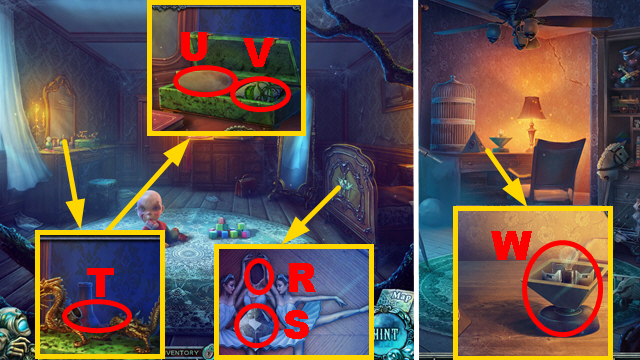
- Turn right.
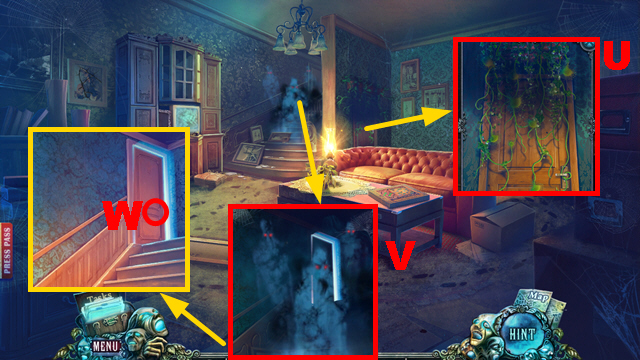
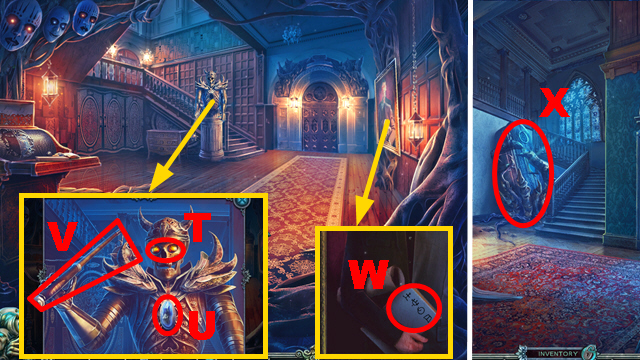
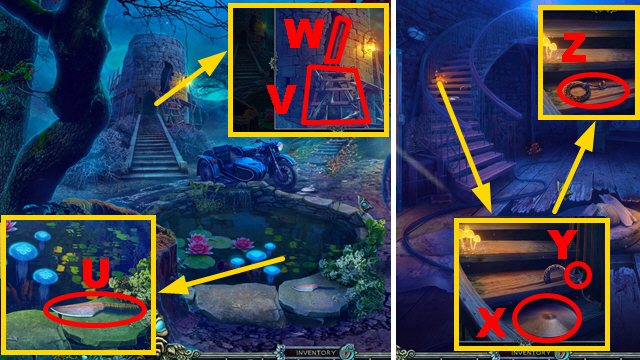
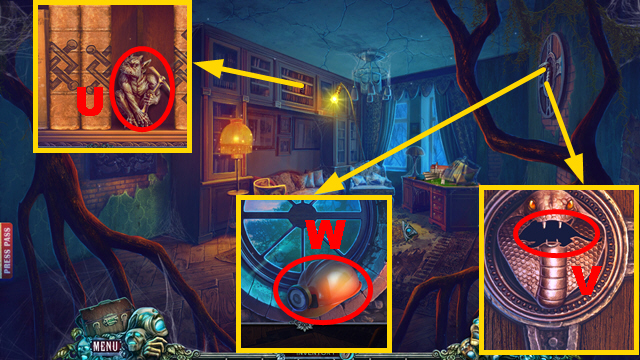
- Use the WEED KILLER, remove weed, and open the door (U) to play the HOP; receive the CHILD'S LAMP.
- Use the CHILD'S LAMP (V); open the door (W).
- Go upstairs.
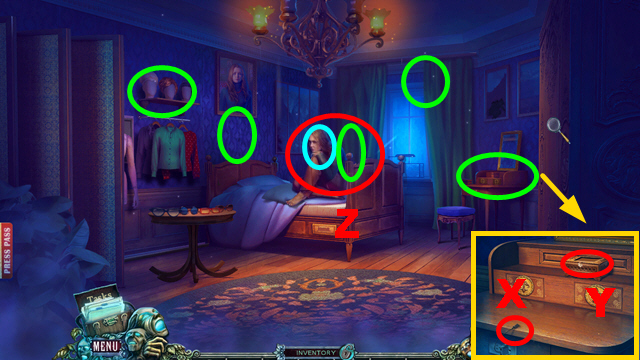
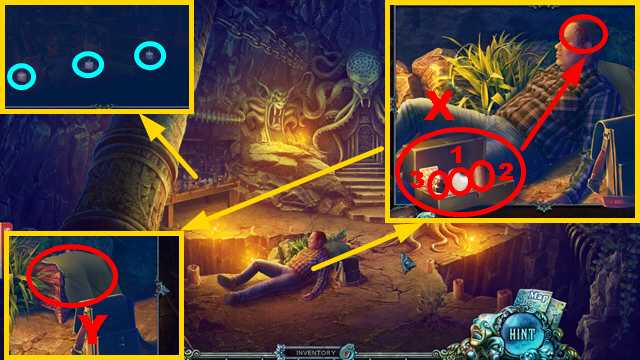
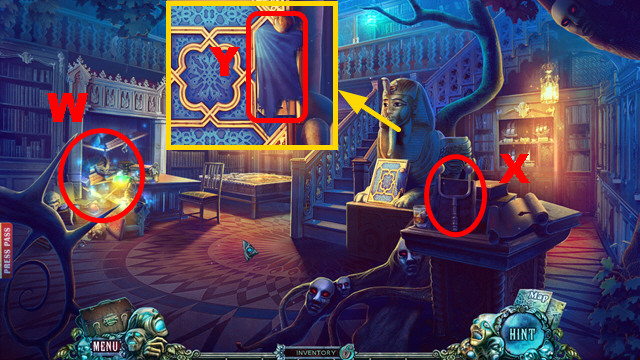
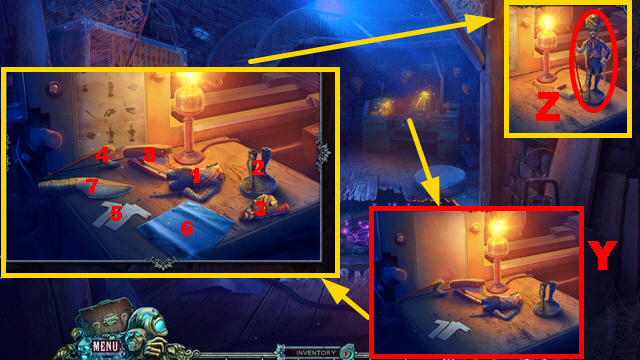
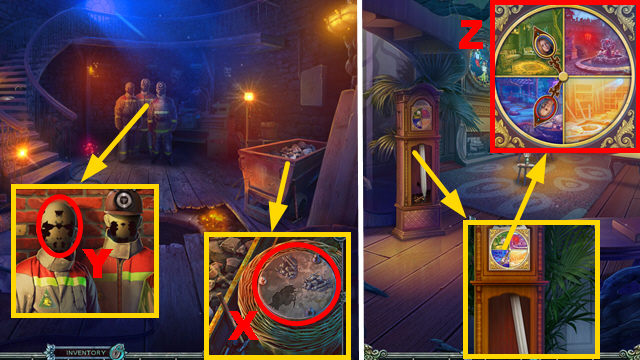
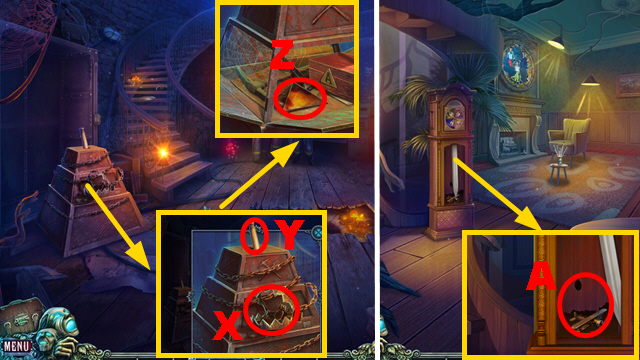
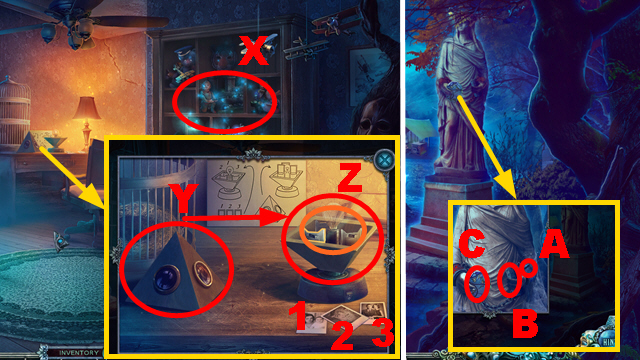
- Plug in the DISCHARGED PHONE and take the CAMERA PHONE (X); place the CHEST ORNAMENT and take HELEN'S FIGURINE (Y).
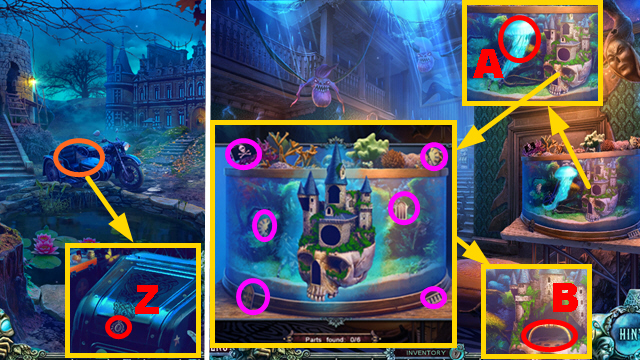
- Use the CAMERA PHONE (Z) and collect 5 ghosts (green).
- Talk to Helen and give her the BRACELET FOR HELEN (blue).
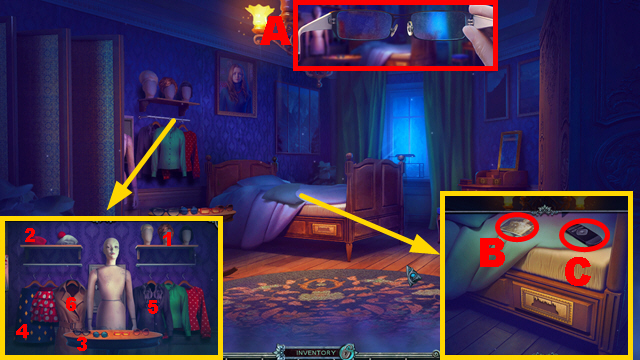
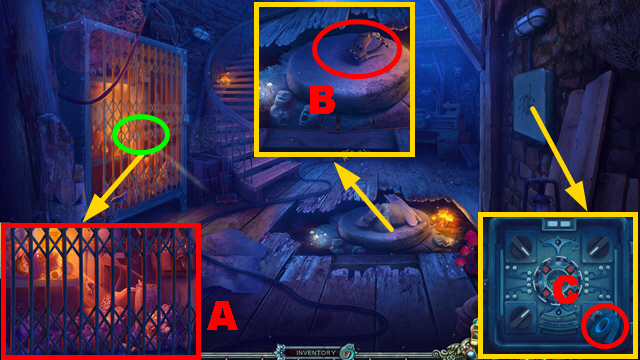
- Use the HANDKERCHIEF (A).
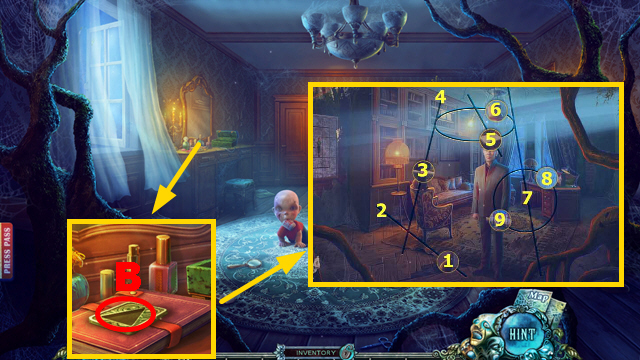
- Move the pillow; take the FAMILY PHOTO PIECE (B) and REMOTE CONTROL (C).
- Dress the mannequin 1-6.
- Walk down.

- Use the REMOTE CONTROL (D); take the LABEL (E).
- Place 2 FAMILY PHOTO PIECES (F); take the FLEUR-DE-LIS (G).
- Go upstairs.
- Place the FLEUR-DE-LIS and take the PENCIL WITH ERASER and EDGAR'S FIGURINE (H).
- Place the LABEL and enter the code (I); take the NON-FUNCTIONAL VOICE RECORDER and HELEN'S CAMEO (J).
- Walk down.
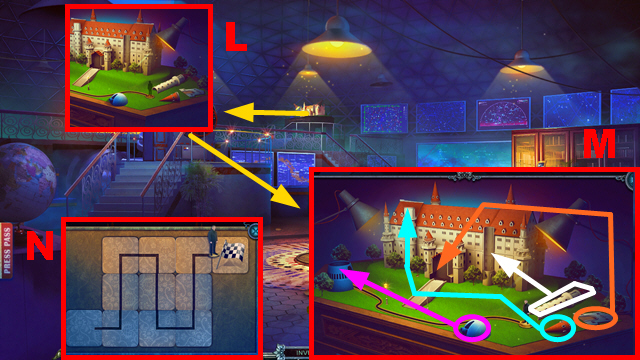
- Place HELEN'S FIGURINE, EDGAR'S FIGURINE, and the MAN'S FIGURINE (K).
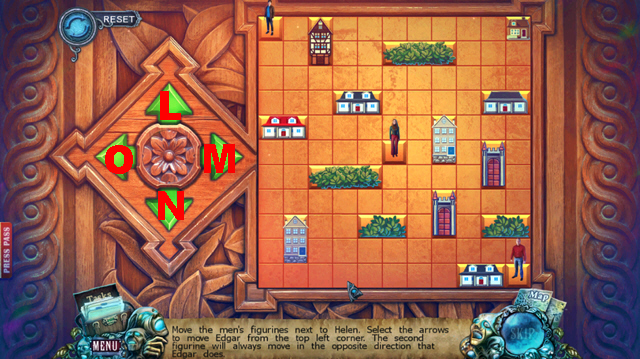
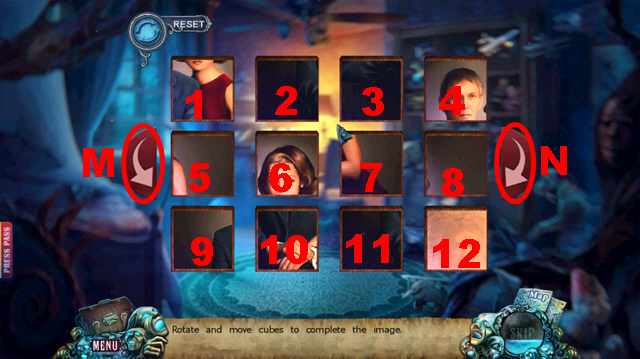
- Play the mini-game.
- Solution: M-Nx3-Mx4-Nx4-Mx2.
- Take the note and CARMER ESTATE PLATE.
- Go upstairs.
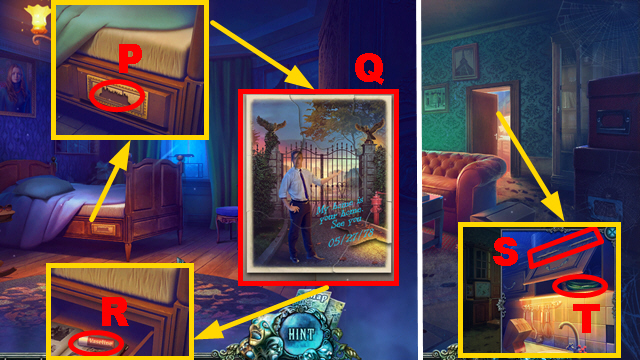
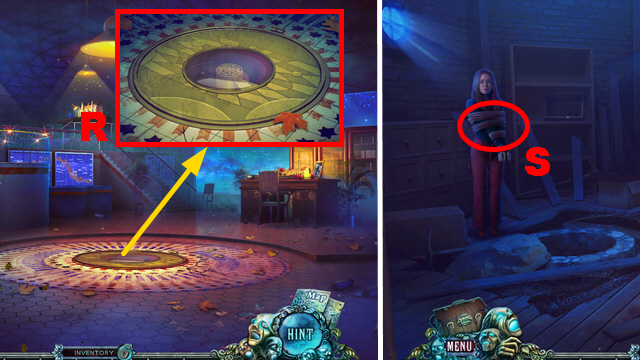
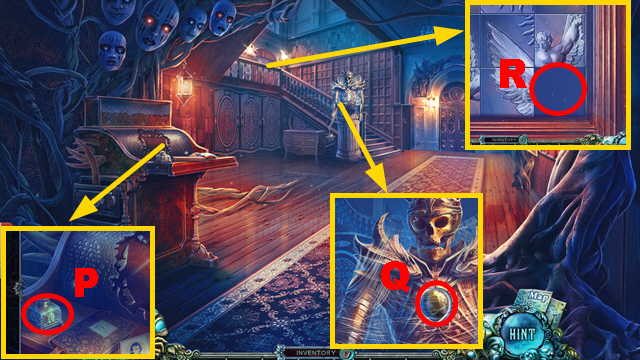
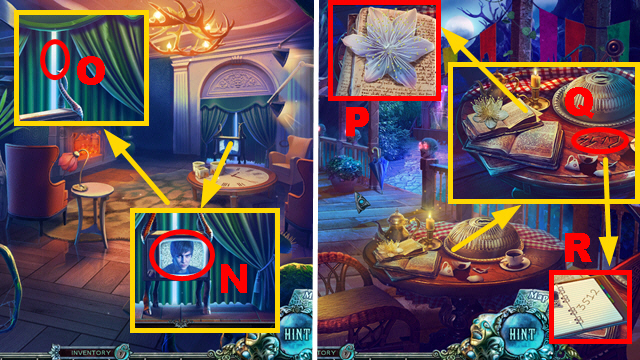
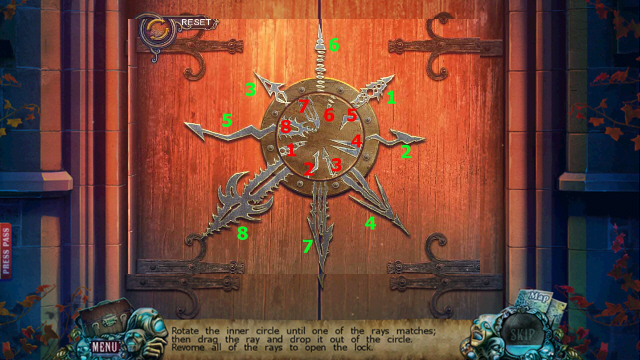
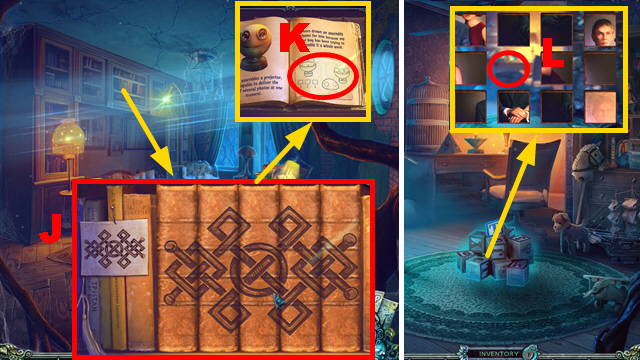
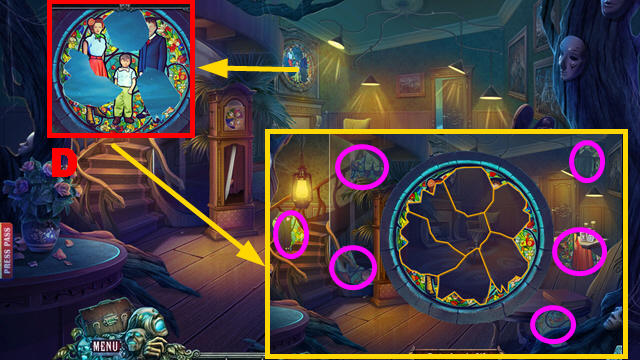
- Place the CARMER ESTATE PLATE (P); pull the book.
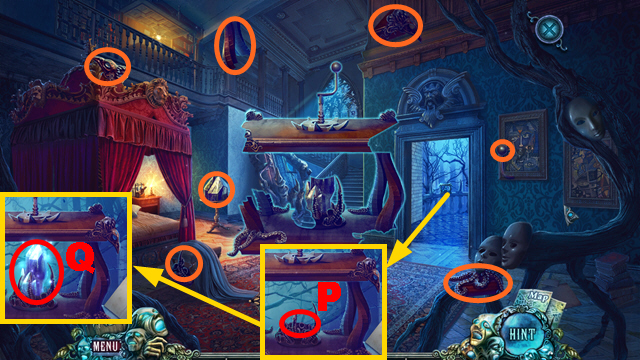
- Recreate the photo (Q); take the PETROLEUM JELLY (R).
- Walk down.
- Use the PETROLEUM JELLY (S); open the cupboard and take the HOSE and DRIED VEGETABLES (T).
- Go upstairs.
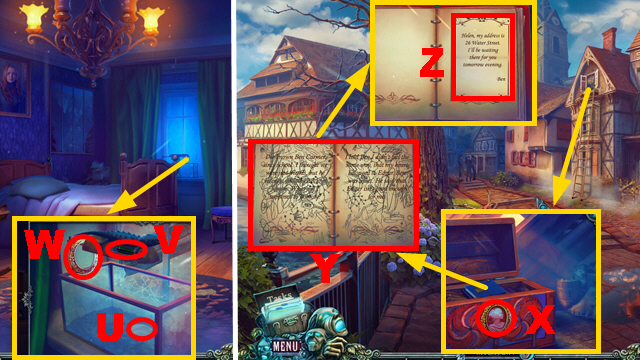
- Place the DRIED VEGETABLES (U); take the BATTERY (V) and CAMEO FRAME (W).
- Walk down twice.
- Place HELEN'S CAMEO and the CAMEO FRAME (X).
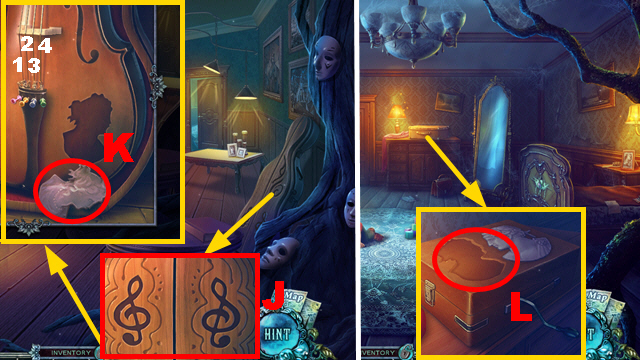
- Use the PENCIL WITH ERASER 5 times, turn a page, use the PENCIL WITH ERASER 6 times, and turn a page (Y); take the note (Z).
Chapter 2: The Carmer Gates
- Remove leaves 3 times and take the SAXOPHONIST FIGURINE (A); place the HOSE (B).
- Open the door (C).
- Move the hat and newspaper; take the license (D) and CASSETTE TAPE (E).
- Use the HANDKERCHIEF to collect the GLASS KNIFE (F).
- Place the BATTERY and CASSETTE TAPE on the NON-FUNCTIONAL VOICE RECORDER and close it twice; receive the VOICE RECORDER WITH RECORDING.
- Use the VOICE RECORDER WITH RECORDING (G).
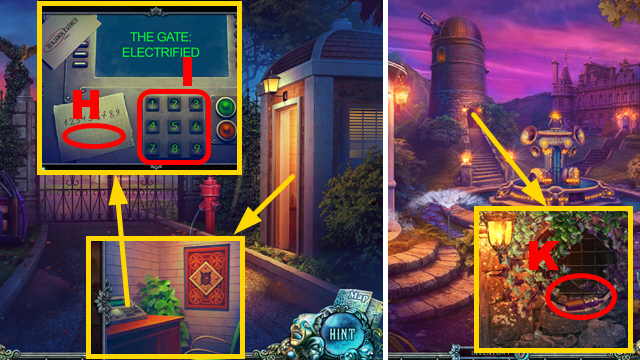
- Use the PENCIL WITH ERASER (H); enter the code '16895438' (I).
- Go forward.
- Use the GLASS KNIFE and take the LOCKPICK (K).
- Take the IMAGE PART (L).
- Read the newspaper and take the GUARDIAN EMBLEM (M).
- Walk down.
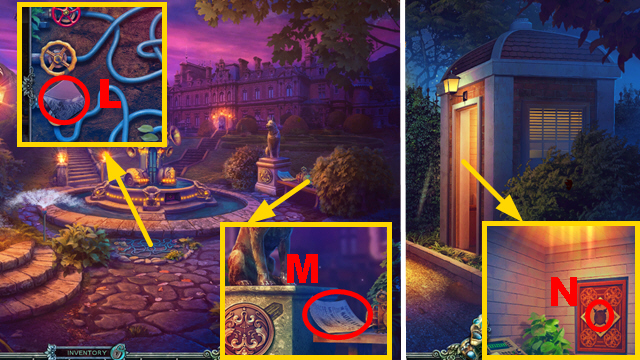
- Place the GUARDIAN EMBLEM and take the VALVE (N).
- Use the LOCKPICK and take the ROPE (O).
- Go forward.
- Place the VALVE (P).
- Play the mini-game.
- Solution: 1-4.
- Play the HOP (Q); receive the GARDEN HOOK.
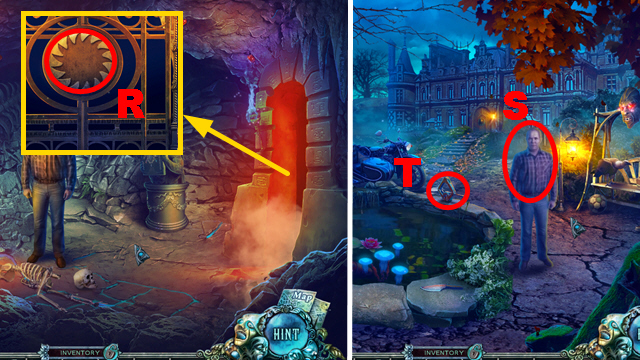
- Place the GARDEN HOOK on the ROPE; receive the ROPE WITH HOOK.
- Throw the ROPE WITH HOOK (R); inspect the area (S).
- Play the mini-game.
- Solution: 1-3.
- Match pairs 1-5; take the HYDRANT HANDLE (T).
- Take the BRUSH (U) and photo (V).
- Walk down twice.
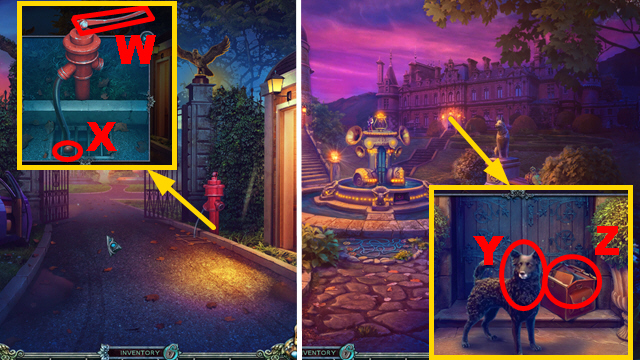
- Place the HYDRANT HANDLE and push it (W); take the RUBBER BALL (X).
- Go forward.
- Throw the RUBBER BALL (Y); open the bag and take BEN CARMER'S DIARY, the note, and TELESCOPE LENS (Z).

- Use the BRUSH and take the PUMP (A).
- Place the SAXOPHONIST FIGURINE (B) and PUMP (C).
- Enter the Tower.
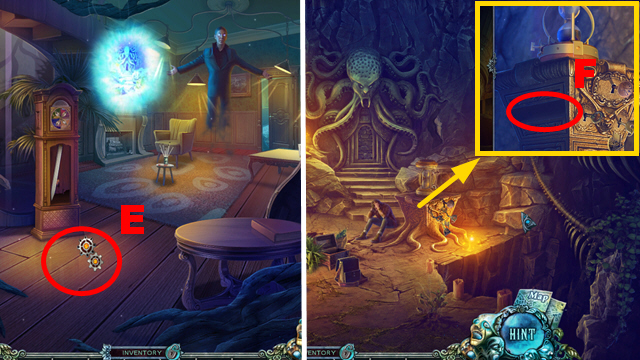
- Place the TELESCOPE LENS and select the telescope (D).
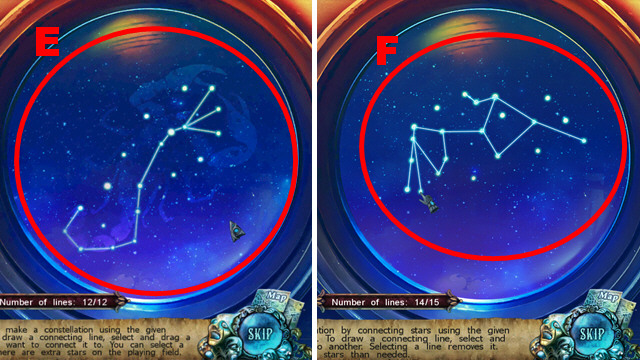
- Play the mini-game.
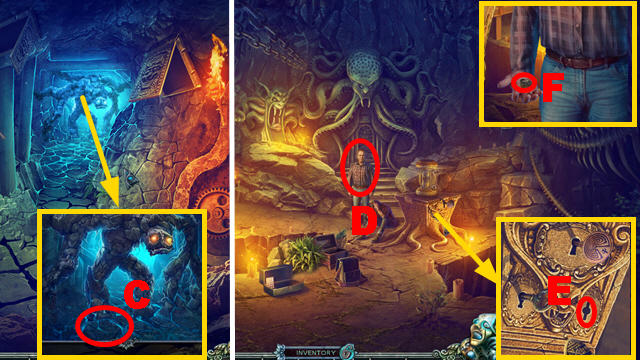
- Solution: E-F.
- Take the COMPASS WITHOUT NEEDLE and EAGLE BREASTPLATE.
- Walk down twice.
- Place the EAGLE BREASTPLATE (G).
- Collect 6 parts (purple).
- Take the STONE BONE (H).
- Go forward.
- Place the STONE BONE (I); take the MODEL PART and FILM (J).
- Enter the Tower.
- Place the FILM (K).
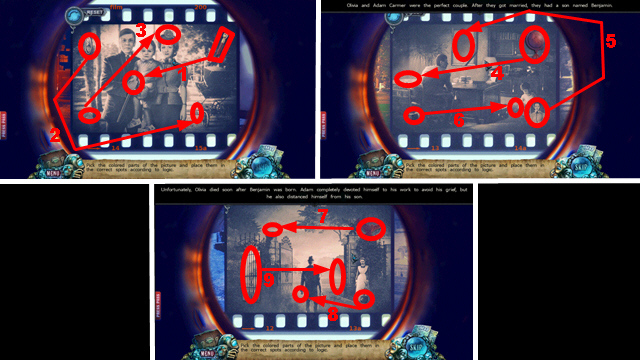
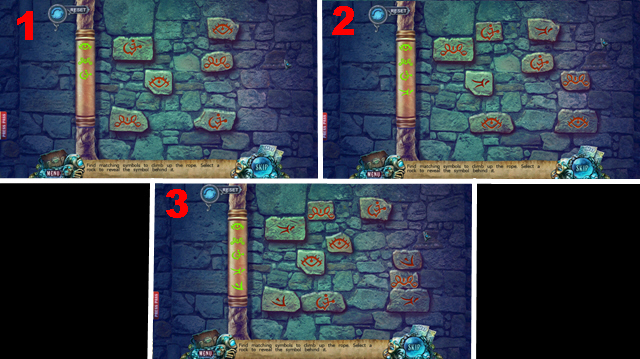
- Play the mini-game.
- Solution: 1-9.
- Take the note and ADAM'S FIGURINE.
- Place the MODEL PART and ADAM'S FIGURINE (L).
- Assemble the model (M); play the HOP.
- Mini-game solution: (N); receive the GUITARIST FIGURINE.
- Walk down.

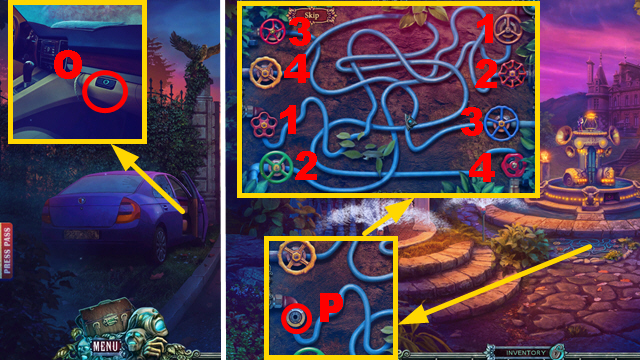
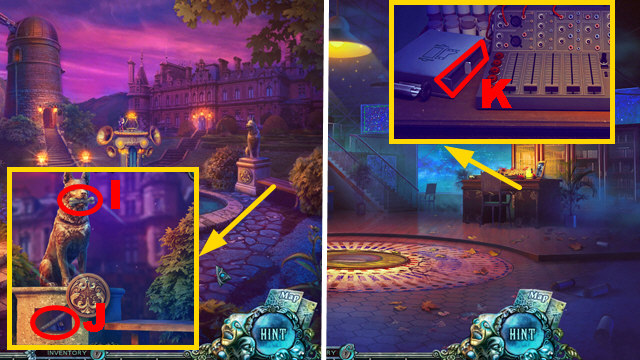
- Place the GUITARIST FIGURINE (O); use the CAMERA PHONE (P) to acquire the PHONE WITH SEQUENCE.
- Enter the Tower.
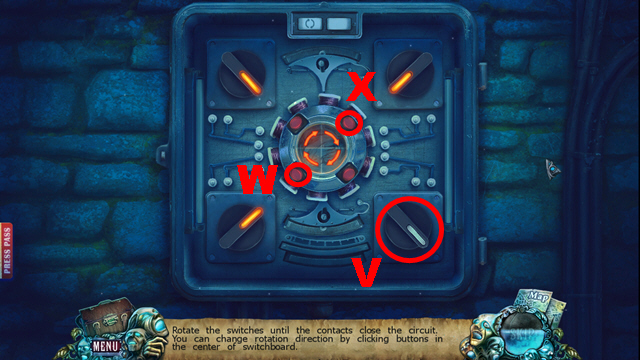
- Use the PHONE WITH SEQUENCE, adjust the switches correctly (Q), and push the button (green).
- Open the cover (R).
- Go downstairs.
- Use the GLASS KNIFE (S).
Chapter 3: The Labyrinth Entrance
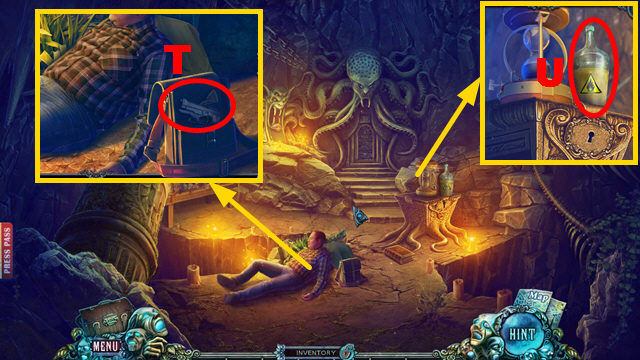
- Open the bag, take BEN'S GUN and the ETCHED PLATE (T).
- Take the KEROSENE BOTTLE (U).
- Place the ETCHED PLATE on BEN CARMER'S DIARY.
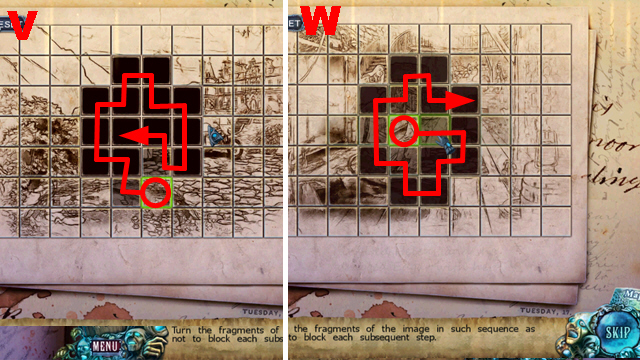
- Play the mini-game.
- Solution: V-W.
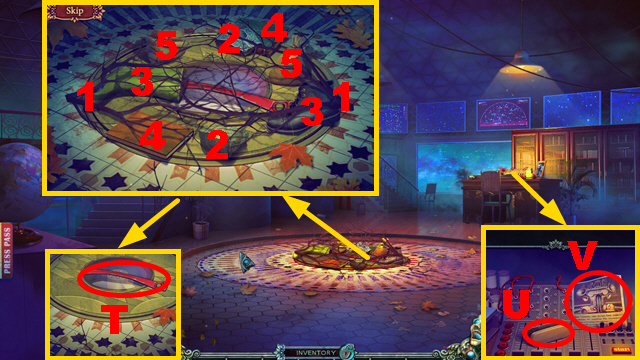
- Take the PEARL and LIGHTER.
- Use the LIGHTER 3 times (blue) to play the HOP; receive the MEDICAL KIT.
- Place the MEDICAL KIT (X); use items 1-3.
- Take the RAG, open the chest, and take the note and LABYRINTH KEY (Y).
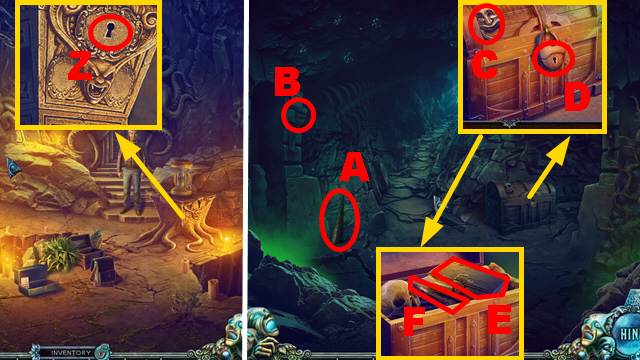
- Insert the LABYRINTH KEY (Z).
- Turn right.
- Take the PIECE OF WOOD (A).
- Use the RAG, KEROSENE BOTTLE, and LIGHTER on the PIECE OF WOOD to acquire the TORCH.
- Use the TORCH (B).
- Take the FIRST FOUNTAIN MASK (C); use BEN'S GUN (D).
- Take the book (E) and COMPASS NEEDLE (F).
- Place the COMPASS NEEDLE on the COMPASS WITHOUT NEEDLE to acquire the COMPASS.

- Use the COMPASS (G).
- Play the mini-game.
- Solution: 1-12.
- Use the TORCH twice (green).
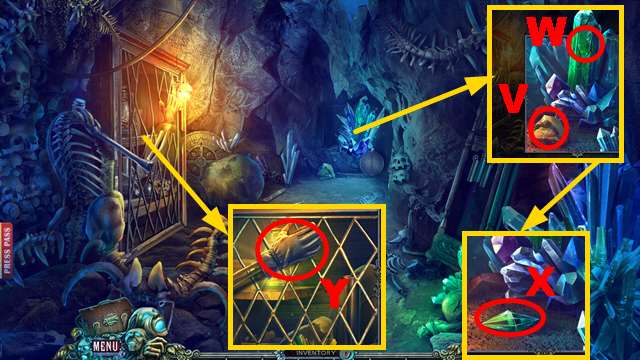
- Take ASIA (H) and the FEATHER (I).
- Take the LEFT WING and place the PEARL (J).
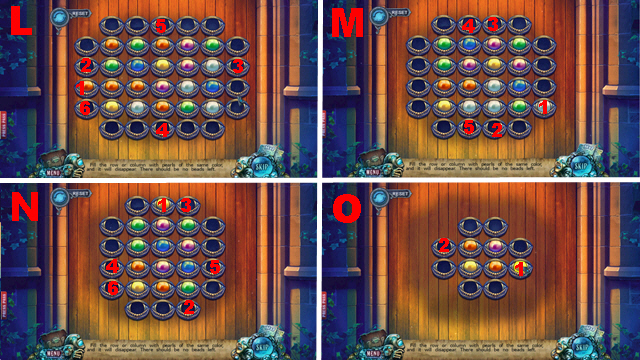
- Play the mini-game.
- Solution (K): (1-2)-(3-4)-(5-2).
- Solution (L): (1-2)-(3-4)-(5-6).
- Solution (M): (1-2)-(3-4)-(5-2).
- Solution (N): (1-2)-(3-4)-(5-6).
- Solution (O): 1-2.
- Turn left.
- Take the EMPTY INKWELL (P) and SPIDER STONE (Q).
- Place the IMAGE PART (R).

- Play the mini-game.
- Solution: S-Tx3-S-Ux2-Vx3-T.
- Move forward.
- Play the HOP (W); receive the WINE.
- Take the ARRESTER (X).
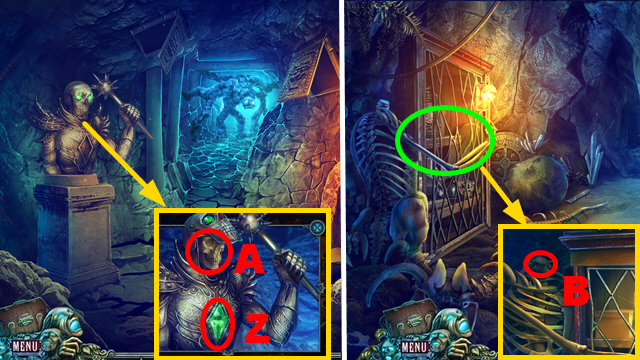
- Take the LEFT SKULL EYE and remove the cloth (Y).
- Walk down, turn left.

- Take the TWEEZERS (Z), place the ARRESTER (A), and read the note (B).
- Place the WINE (C); take the card and SOUTH AMERICA (D).
- Take the CARMER CREST PART (E).
- Walk down.
- Place the CARMER CREST PART (F).
- Walk down.
- Place the SPIDER STONE (G) and play the HOP (H); receive the SICKLE.
- Turn left.
- Use the SICKLE to acquire the CANVAS PIECE (I).
- Move forward.
- Play the HOP (J); receive the FRIGATE INSTRUCTIONS.
- Place SOUTH AMERICA and ASIA, assemble the world map, and take the GRIFFIN and NOTEBOOK (K).

- Use the TWEEZERS to collect the WOODEN SPILL and take the SECOND FOUNTAIN MASK (L).
- Walk down twice.
- Place the FIRST FOUNTAIN MASK and SECOND FOUNTAIN MASK and adjust the masks (M).
- Take the DARK CRYSTAL (N); place the EMPTY INKWELL (O) to acquire the FULL INKWELL.
- Turn left twice.
- Place the DARK CRYSTAL (P).
- Collect 7 parts (orange).
- Take the SHINING CRYSTAL (Q).
- Use the SICKLE and take the RIGHT SKULL EYE (R).
- Place the FULL INKWELL and FEATHER on the NOTEBOOK to acquire the WRITING UTENSILS.
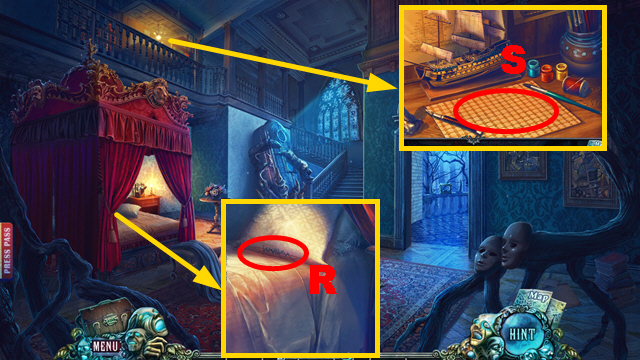
- Place the WOODEN SPILL, CANVAS PIECE, and FRIGATE INSTRUCTIONS (S).
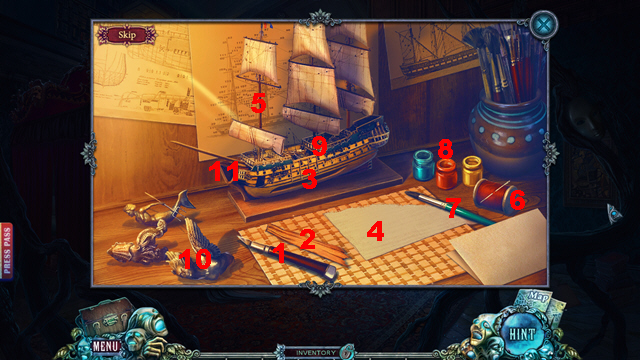
- Play the mini-game.
- Solution: (1-2)-(2-3)-(1-4)-(4-5)-(6-9)-(7-8-9)-(10-11).
- Take the FRIGATE MODEL.
- Walk down.
- Place the RIGHT SKULL EYE, LEFT SKULL EYE (T), and SHINING CRYSTAL (U); take the MACE (V).
- Use the WRITING UTENSILS (W) to acquire the SYMBOLS SEQUENCE.
- Turn left.
- Use the MACE (X).
- Walk down, move forward.
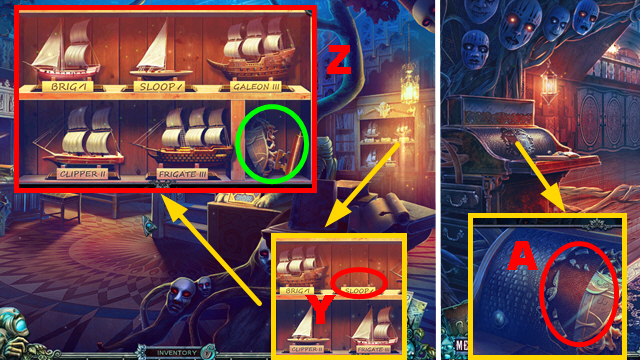
- Place the FRIGATE MODEL (Y).
- Arrange the ships correctly (Z); take the KEY PART and CARMER CREST PART (green).
- Walk down.
- Place the CARMER CREST PART (A).
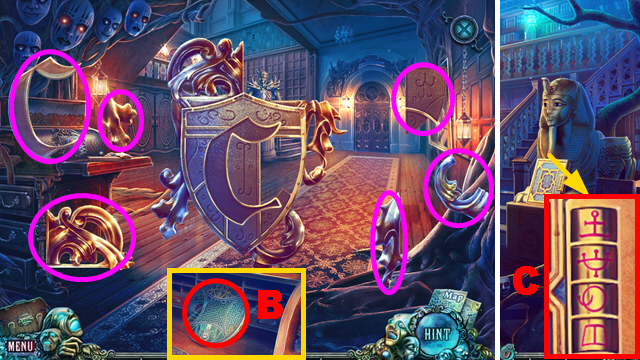
- Collect 6 parts (purple).
- Take the SARCOPHAGUS DISC (B).
- Move forward.
- Place the SYMBOLS SEQUENCE and enter the correct symbols (C).
- Play the mini-game.
- Solution: 1-5.
- Take the SARCOPHAGUS DISC.
- Walk down, turn left.
- Place 2 SARCOPHAGUS DISCS (D).
- Play the mini-game.
- Solution: F-E-Fx2-E-G-F-G-F-G-F-Ex2-Fx3-Ex3-F-Ex3-Gx3.
- Take the WINGED WOLF (H).
- Walk down twice.

- Place the GRIFFIN and WINGED WOLF (I).
- Play the HOP (J); receive the KEY PART.
- Combine 2 KEY PARTS; receive the SECOND LABYRINTH KEY.
- Insert the SECOND LABYRINTH KEY (blue).
- Go forward.
Chapter 4: The Labyrinth
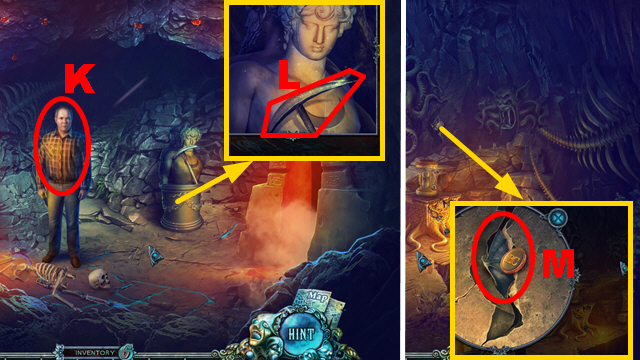
- Talk to Ben (K).
- Take the PICK (L).
- Walk down.
- Use the PICK and take the LATCH and RIGHT WING (M).
- Go forward.
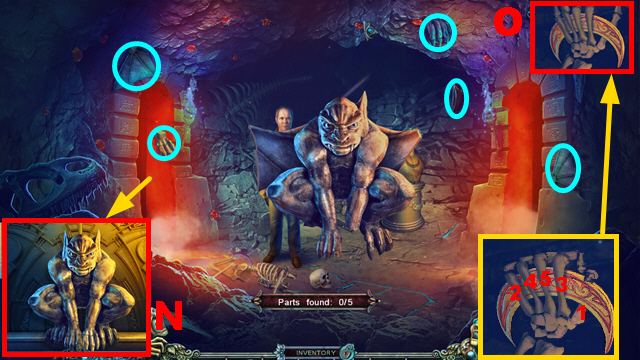
- Place the LEFT WING and RIGHT WING (N).
- Collect 5 parts (blue).
- Select fingers 1-5; take the GOLDEN MOON (O).
- Place the GOLDEN MOON (P).
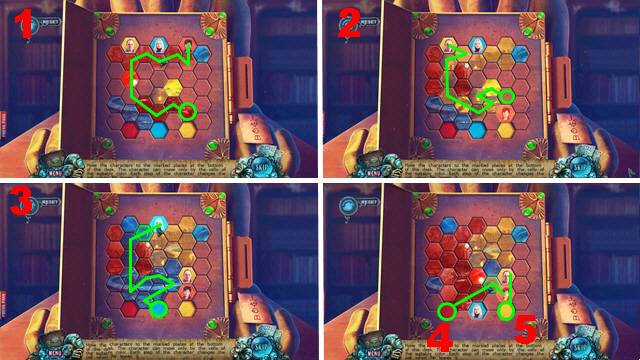
- Inspect the board (Q).
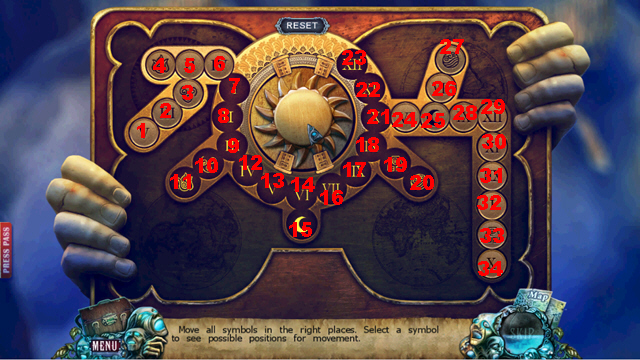
- Play the mini-game.
- Solution: (6-15)-(5-19)-(4-11)-(3-10)-(2-21)-(1-4)-(19-1)-(21-2)-(15-3)-(24-12)-(25-15)-(26-13)-(27-20)-(28-27)-(29-23)-(30-22)-(31-17)-(32-26)-(33-19)-(17-33)-(13-32)-(12-31)-(4-30)-(26-4)-(3-12)-(2-9)-(1-8)-(4-7)-(30-13)-(31-14)-(32-16)-(33-17)-(27-18)-(34-21).
- Take the GOLDEN SUN.
- Place the GOLDEN SUN (R).
- Talk to Ben (S).
- Take the JACK (T).
- Take the DAGGER (U).
- Use the PICK 3 times (V); take the POLE (W).
- Enter the Tower.
- Take the LEFT CYMBAL (X) and use the DAGGER (Y); take the RING PULL (Z).
- Use the JACK (A) to play the HOP (green); receive the LADLE.
- Remove 5 items and take the MUZZLE (B).
- Open the cover; take the INSULATING TAPE (C).
- Walk down.

- Use the MUZZLE (D).
- Enter the Seventies Hall.
- Take the THIRD LABYRINTH KEY (E) and PIECE OF FABRIC (F).
- Use the DAGGER to acquire the ANTLER (H)
- Place the RING PULL (I).
- Walk down.
- Place the ANTLER and INSULATING TAPE on the POLE to acquire the HARPOON.
- Hold the LADLE (J) to acquire the LADLE WITH WATER; use the HARPOON (K).
- Take the TELESCOPE CASE (L).
- Place the LATCH on the TELESCOPE CASE; take the SOLDIER INSTRUCTIONS and LENS.
- Enter the Seventies Hall.
- Use the HARPOON to collect the LEFT BAT (M).
- Use the LADLE WITH WATER (N) to acquire the KNOB.
- Open the curtain (O).
- Go forward.
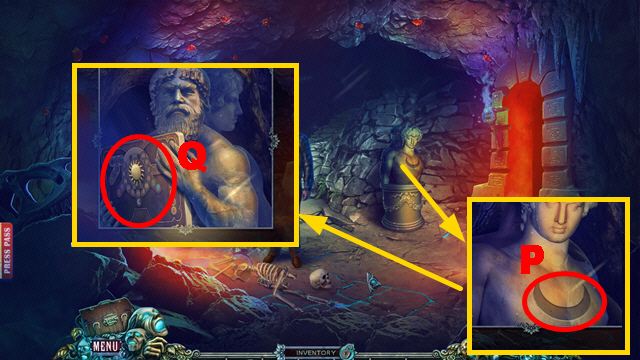
- Take the WHITE MYRTLE (P); use the WRITING UTENSILS (Q).
- Take the CODE (R).
- Take the SILVER CHAIN and HEAD (S); place the LEFT CYMBAL (T).
- Go to the Tower.
- Place the KNOB (U).
- Play the mini-game.
- Solution: V-W-X-V.
- Place the SOLDIER INSTRUCTIONS, DAGGER, PIECE OF FABRIC, and HEAD (Y).
- Assemble the doll: (1-2)-(3-2)-(4-2)-(5-6)-(7-6)-(6-2)-(8-2).
- Take the TOY SOLDIER (Z).
- Go to the Seventies Hall.
Chapter 5: Ben's Room
- Place the TOY SOLDIER (A).
- Go upstairs.
- Use the SILVER CHAIN (B).
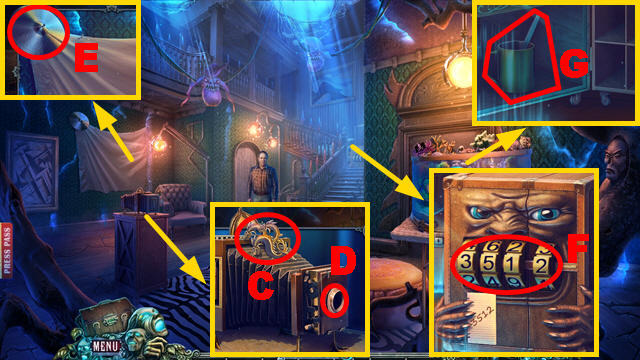
- Take the HYDRA (C); place the LENS (D).
- Take the RIGHT CYMBAL (E).
- Place the CODE and enter the code '3512' (F); take the FILE and METAL MUG (G).
- Go to the Seventies Banquet Hall.
- Place the RIGHT CYMBAL (H) and play the HOP (purple); receive the MISSING SLIDE.
- Place the HYDRA (I).
- Collect pairs 1-5; take the PARTRIDGE (J).
- Walk down, go upstairs.
- Insert the MISSING SLIDE (K).
- Play the mini-game.
- Solution (L): 1-2.
- Solution (M): 1-3.
- Solution (N): 1-3.
- Solution (O): 1-3.
- Solution (P): 1-2.
- Solution (Q): 1-2.
- Solution: (R): 1-3.
- Solution: (S): 1.
- Pull the blanket and take the note and RIGHT BAT (T).
- Walk down twice.
- Use the PARTRIDGE (U); place the LEFT BAT and RIGHT BAT (V).
- Take the INSECT REPELLENT, note, and POTION RECIPE (W).
- Enter the Seventies Hall.

- Place the POTION RECIPE, METAL MUG, WHITE MYRTLE, and LADLE WITH WATER (X).
- Go forward.
- Use the INSECT REPELLENT, unfold the blanket, and take the KEYS (Y).
- Walk down twice.
- Use the KEYS (Z) and play the HOP (orange); receive the NET.
- Go to Ben's Room.
- Use the NET to catch the JELLYFISH (A).
- Select the tank, collect 6 pieces (purple).
- Take the NOSE RING.
- Walk down.
- Place the NOSE RING (B); take the DOME HANDLE (C).
- Go forward.
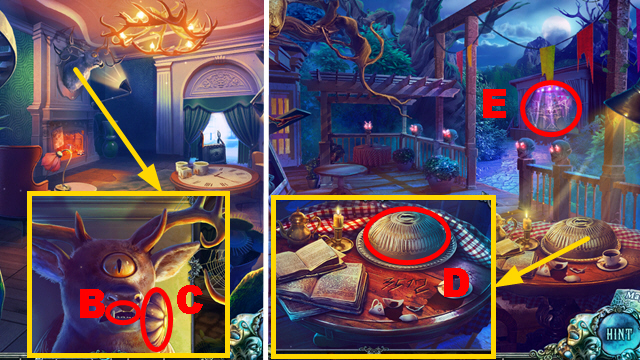
- Place the DOME HANDLE, remove the cover, and take the TUNING FORK (D).
- Play the HOP (E) to acquire the BLACK MUSHROOM.
- Walk down twice.

- Use the JELLYFISH and take the RED ALGAE (F).
- Go to the Seventies Hall.
- Place the BLACK MUSHROOM and RED ALGAE (G); prepare the potion 1-4 and take the CLARIFYING POTION (blue).
- Go upstairs.
- Use the CLARIFYING POTION (H); take the PHOENIX (I).
- Go to the Tower.
- Insert the PHOENIX (J).

- Use the FILE to collect the PENDULUM (K).
- Use the PENDULUM (L).
- Go forward.
- Take the WICK (M).
- Take the OXYGEN MASK (N) and COGWHEEL (O).
- Use the OXYGEN MASK (P).
- Take the STONE CIRCLE (Q).
- Go forward.

- Place the STONE CIRCLE (R).
- Play the mini-game.
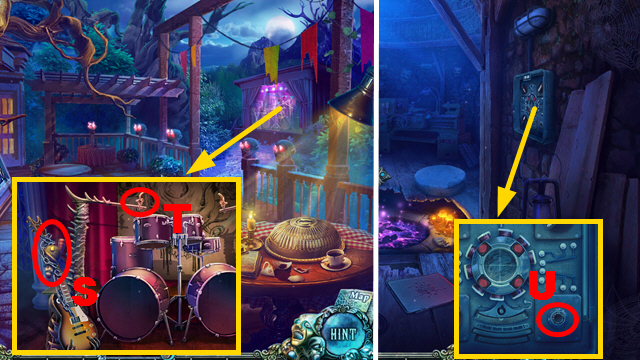
- Solution: S-(U-down-left-up-right-down-right)-T-(U-down-left-down-up-right-up)-Tx3-(U-down-right-up-left-up-right).
- Enter the Trap.
- Take the SILICON STONES (V) and use the TUNING FORK (W); take the GREEN CRYSTAL (X).
- Take the MINER'S GLOVE (Y).
- Go forward.
- Place the GREEN CRYSTAL (Z); take the KNIGHT'S SKULL (A).
- Go downstairs.
- Place the KNIGHT'S SKULL (B) and play the HOP (green); receive the DYNAMITE STICK.
- Place the WICK on the DYNAMITE STICK to acquire the DYNAMITE.
- Go forward.
- Use the DYNAMITE and SILICON STONES (C).
- Go forward.
- Talk to Ben (D).
- Insert the THIRD LABYRINTH KEY (E).
- Take the DARK RING (F).
- Turn left.
- Place the DARK RING (G).
- Play the mini-game.
- Solution: K-I-K-H-K-H-K-I-K-I-L.
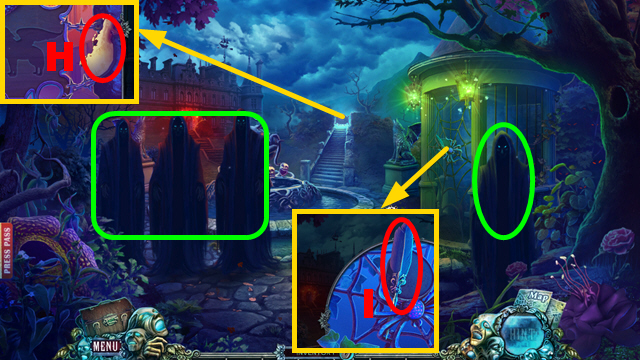
Chapter 6: The Fifties Yard
- Take the ADAM CLOCK HAND (M) and CAROUSEL PART (N).
- Go forward.
- Use the MINER'S GLOVE, remove 4 stones, and take the INNER CIRCLE (O).
- Take the LEFT METAL VINE (P).
- Walk down.
- Place the INNER CIRCLE (Q).
- Play the mini-game.
- Solution: 1-8.
- Enter the Fifties Hall.
- Take the RIGHT METAL VINE (R) and PATTERN SKETCH (S).
- Walk down.
- Place RIGHT METAL VINE and LEFT METAL VINE (T) and play the HOP (purple); receive the METAL MOUSE.
- Turn left, go upstairs.
- Take the GARGOYLE (U).
- Place the METAL MOUSE (V); take the MINER'S HELMET (W).
- Go to the Fifties Tower.
- Place the GARGOYLE and take the EDGAR CLOCK HAND (X).
- Place the MINER'S HELMET (Y).
- Go to the Fifties Hall.
- Place the ADAM CLOCK HAND and EDGAR CLOCK HAND (Z).

- Play the mini-game.
- Solution: Ax6-Bx4-Cx2-Dx4.
- Enter Olivia's Room.

- Take the RIGHT TREBLE CLEF (E) and FIRST BOOK (F).
- Go forward.
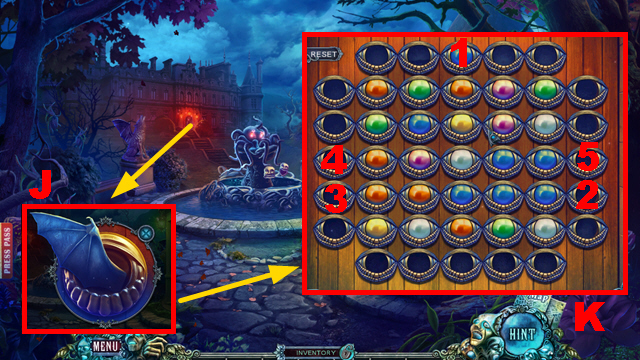
- Take the SOLVENT (G) and PLIERS (H); place the COGWHEEL and take the LEFT TREBLE CLEF (I).
- Walk down twice.
- Place the RIGHT TREBLE CLEF and LEFT TREBLE CLEF (J); select strings 4-2-3-4-1 and take the WOMAN'S PROFILE (K).
- Go forward.
- Place the WOMAN'S PROFILE and take the ZIPPER PULL (L).
- Walk down, go upstairs.
- Use the SOLVENT (M).
- Open the book, take the WINDOW SHARD (N), and turn one page to play the HOP (green); receive the DRAGON PART.
- Walk down twice.
- Use the PLIERS (O) and move the brick (P); arrange the bricks correctly and take the BALLERINA'S HEAD (Q).
- Go to Olivia's Room.
- Place the BALLERINA'S HEAD (R); take the DIAMOND (S).
- Place the DRAGON PART (T); take the PHOTO FOR A PROJECTOR (U) and WINDOW SHARD (V).
- Go forward.
- Place the PHOTO FOR A PROJECTOR (W).
- Go to the Tower.
- Use the DIAMOND (X); take the STAKE (Y) and TRIANGULAR PLATE (Z).
- Walk down, turn left.
- Place the STAKE and take the TOY PLANE (A).
- Turn right.
- Place the TRIANGULAR PLATE (B).
- Play the mini-game.
- Solution: (1-2)-(3-4)-(5-1)-(2-3)-(6-5)-(4-7)-(8-6)-(9-8)-(7-9).
- Rip the page and take the SCISSORS.
- Go forward.
- Use the SCISSORS and place the TOY PLANE (C); receive the CAROUSEL PART.
- Play the HOP (blue); receive the PATCH.
- Combine 2 CAROUSEL PARTS; receive the MUSICAL CAROUSEL.
- Walk down.
- Place the MUSICAL CAROUSEL (D); take the SHACKLES PART (E).
- Go to the Tower.
- Place the PATCH (F); use the ZIPPER PULL and take the SECOND BOOK (G).
- Walk down.
- Place the SHACKLES PART (H).
- Play the HOP (I); receive the CHILDREN'S CUBE.
- Go to Adam's Office.
- Place the FIRST BOOK and SECOND BOOK, PATTERN SKETCH, and assemble the books (J); take the SCHEMATICS and ADAM'S RING (K).
- Go to Ben's Room.
- Place the CHILDREN'S CUBE (L).
- Play the mini-game.
- Solution: (1-Mx2-1)-(2-Mx2-2)-(3-N-3)-(8-N-8)-(12-Mx2-12)-(1-3)-(2-4)-(3-6)-(5-9)-(6-8)-(7-12)-(8-9)-(9-11).
- You acquire the PHOTO FOR A PROJECTOR.
- Place the SCHEMATICS and PHOTO FOR A PROJECTOR (O).
- Go to the Tower.
- Use ADAM'S RING and take the PICTURE PART (P).
- Go to Adam's Office.

- Place the PICTURE PART (Q).
- Play the mini-game.
- Solution: Rx3-S-T-U-V-U-Wx3.
- Take the PHOTO FOR A PROJECTOR.
- Go to Ben's Room.
- Play the HOP (X); receive the SHACKLES PART.
- Place the PHOTO FOR A PROJECTOR (orange), select photos 2-1-3, and move the top (Y); take BEN'S PROJECTOR (Z).
- Walk down three times.
- Place the SHACKLES PART (A); take the LABYRINTH SCROLL (B) and WINDOW SHARD (C).
- Enter the Fifties Hall.
- Place 3 WINDOW SHARDS (D).
- Collect 6 parts (purple).
- Place BEN'S PROJECTOR (E).
- Place the LABYRINTH SCROLL (F).
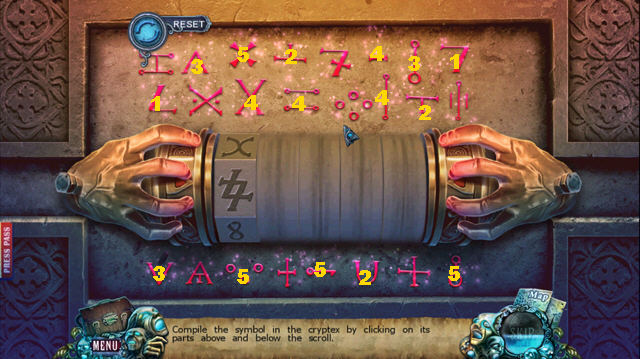
- Play the mini-game.
- Solution: 1-5.
- Congratulations! You have completed Fear For Sale: The Dusk Wanderer.
Created at: 2016-10-30