

Walkthrough Menu
- General Tips
- Chapter 1: The Ranch House
- Chapter 2: The Barn
- Chapter 3: House Secrets
- Chapter 4: Helping Alex
- Chapter 5: Freeing Sonia
- Chapter 6: The Ritual
General Tips
- This is the official guide for Fear for Sale: The House on Black River.
- This guide does not mention each time you have to zoom into a location; the screenshots show each zoom scene.
- Hidden-object puzzles are referred to as HOPs. This guide does not show screenshots of the HOPs, however, it is mentioned when a HOP is available and the inventory item collected.
- Use the Map to travel quickly to a location.
Chapter 1: The Ranch House

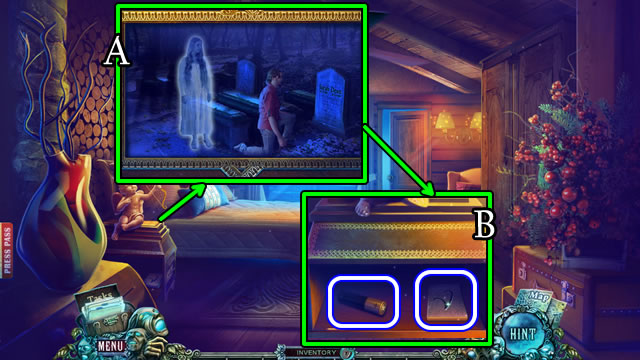
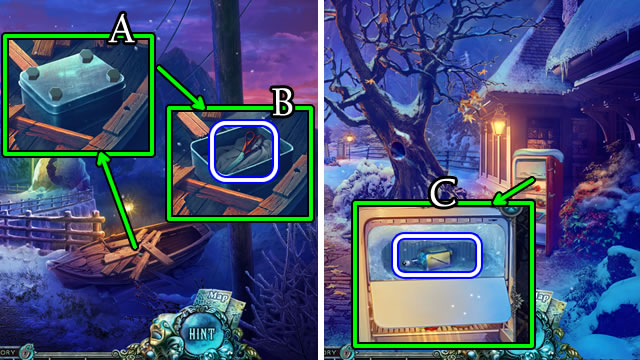
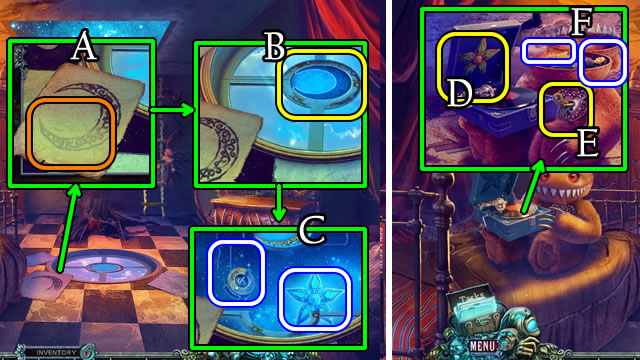
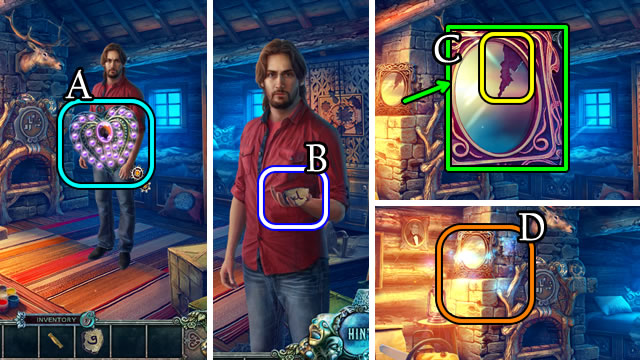
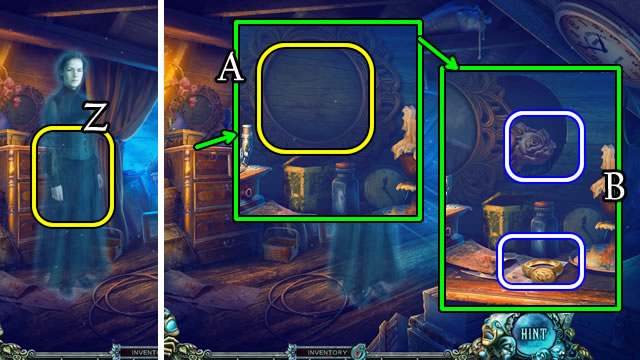
- Take the Map (A).
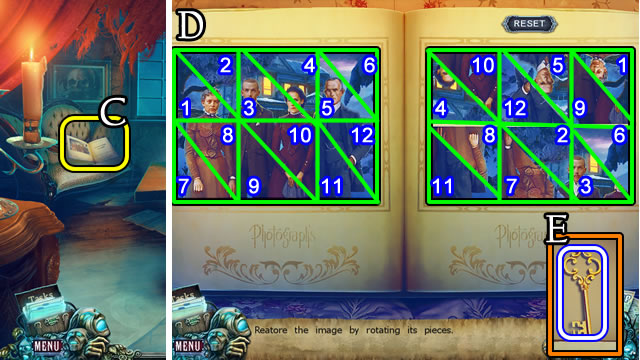
- Open the crate, read the paper, uncover and take the COOKIE and CAT COLLAR (B).
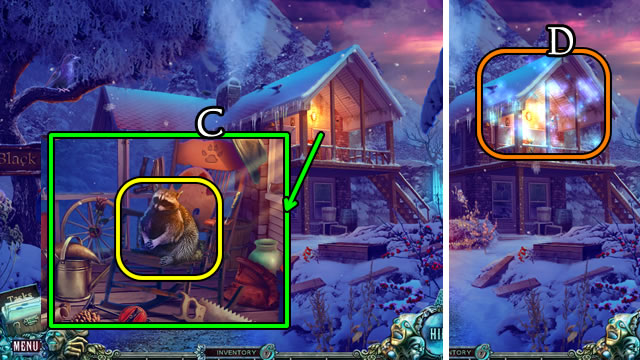
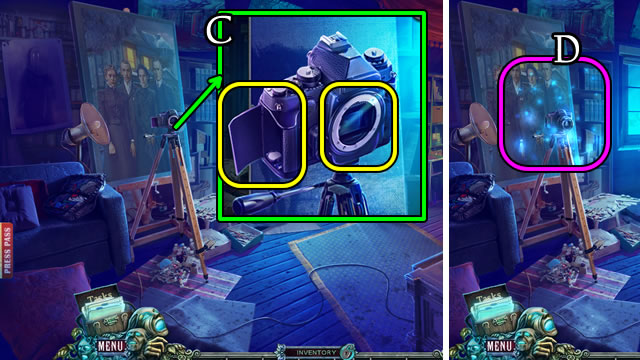
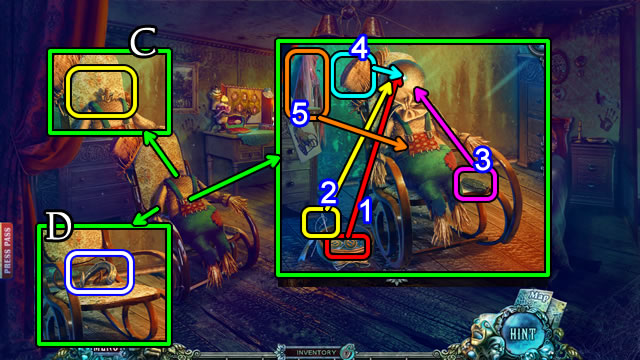
- Give the COOKIE (C).
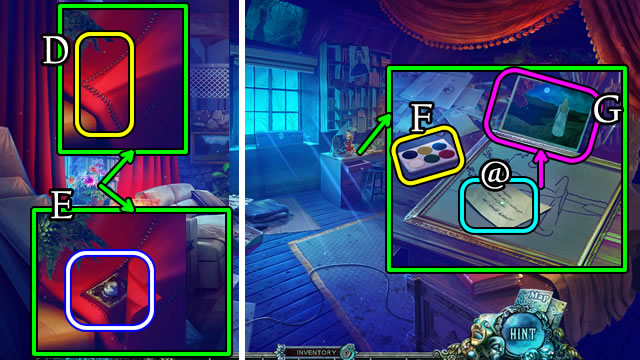
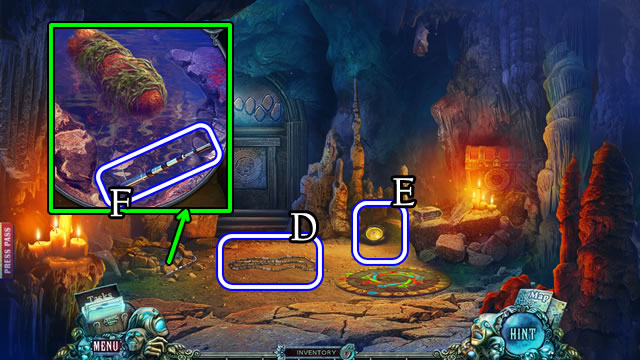
- Play the HOP (D); receive WIRE.
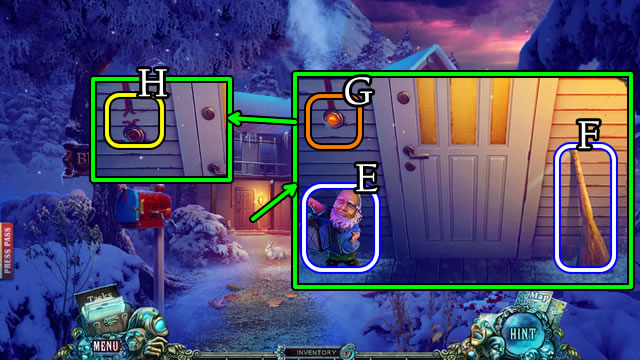
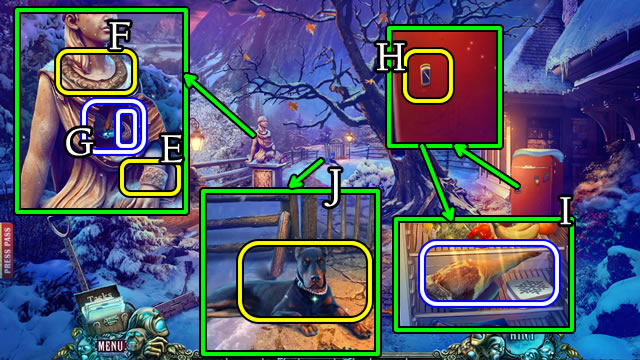
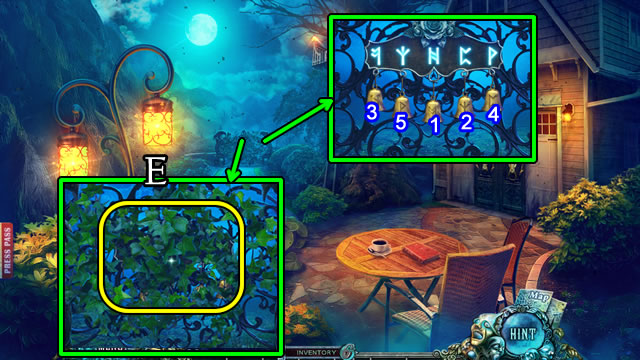
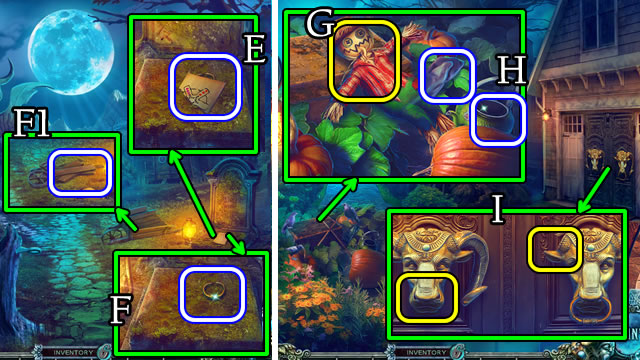
- Take the GARDEN GNOME (E) and BROOM (F).
- Touch the doorbell (G). Use the WIRE (H). Touch the doorbell.
- Walk forward.
- Speak to the woman and the man.
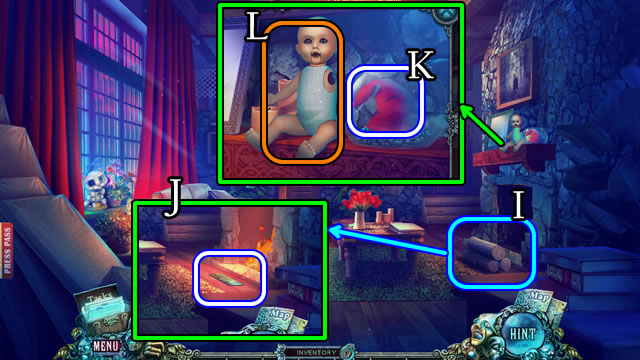
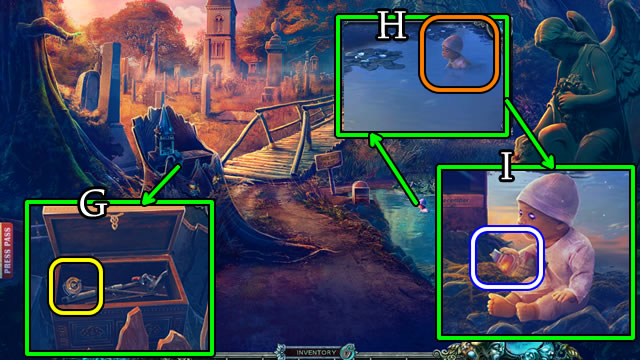
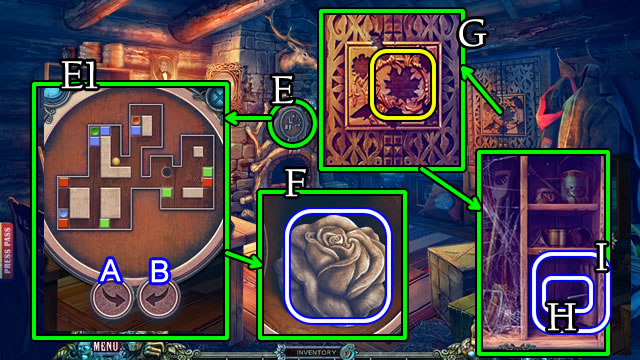
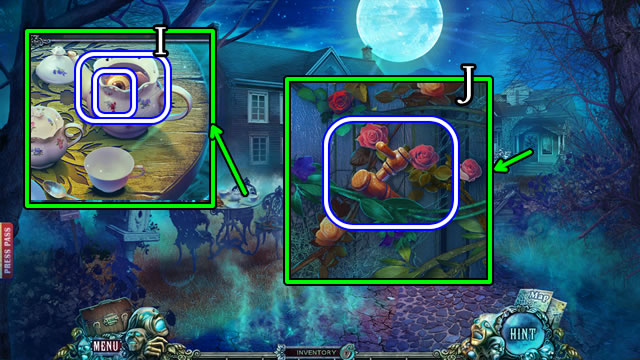
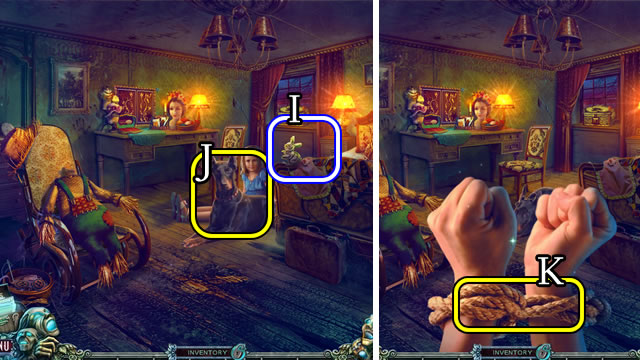
- Touch the wood 3x (I). Take the PANEL PART (J).
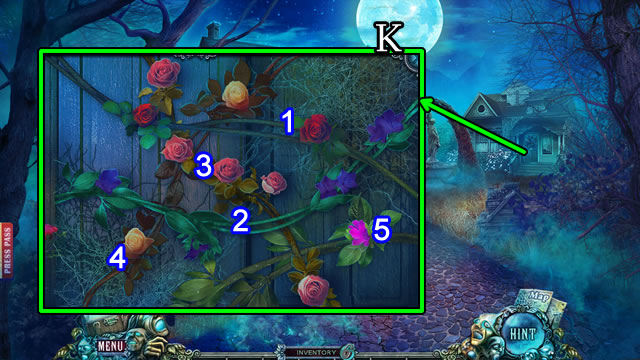
- Take the GNOME CAP (K).
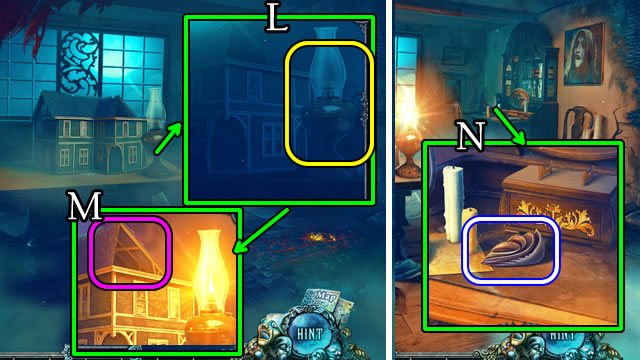
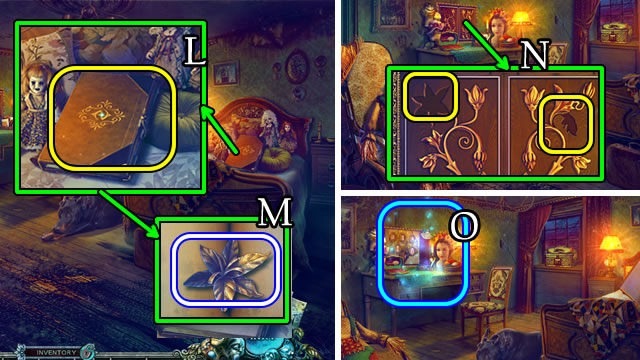
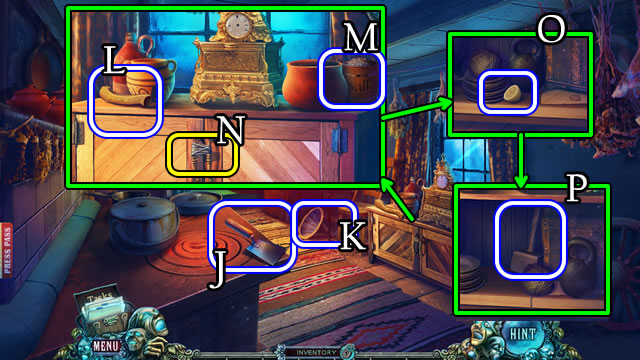
- Select the doll (L). Play the MINI-HOP to get SONIA'S DOLL.
- Walk forward.
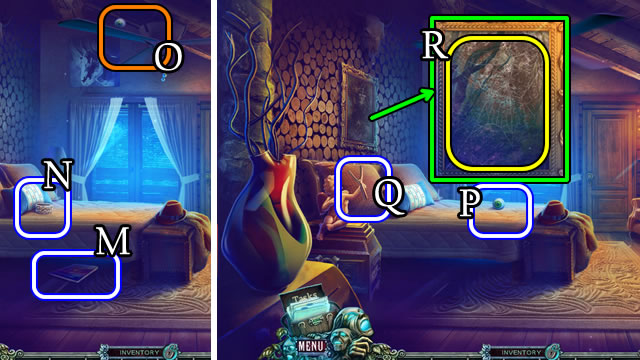
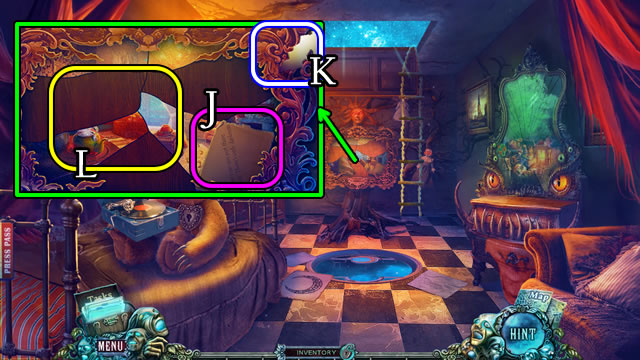
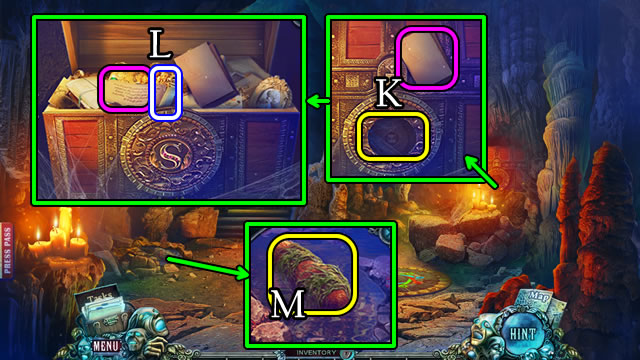
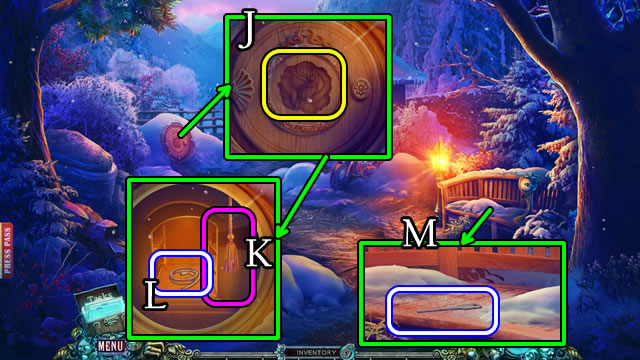
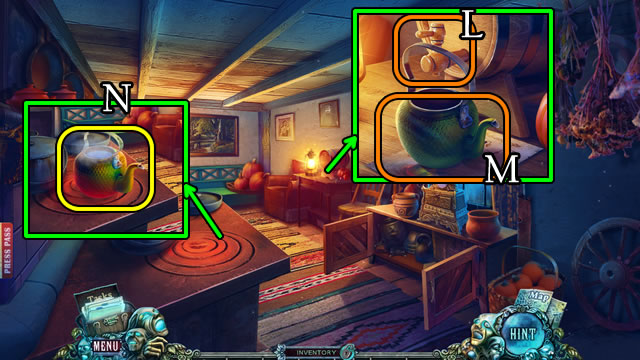
- Take the MAGAZINE (M).
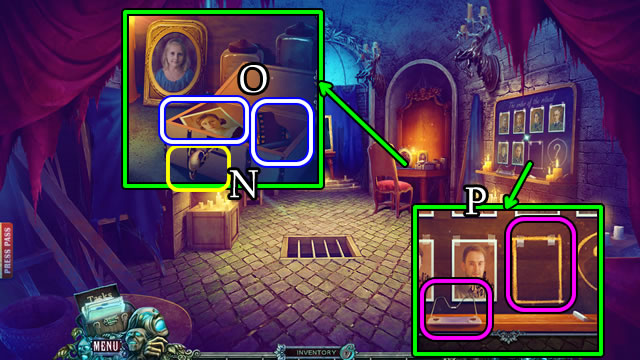
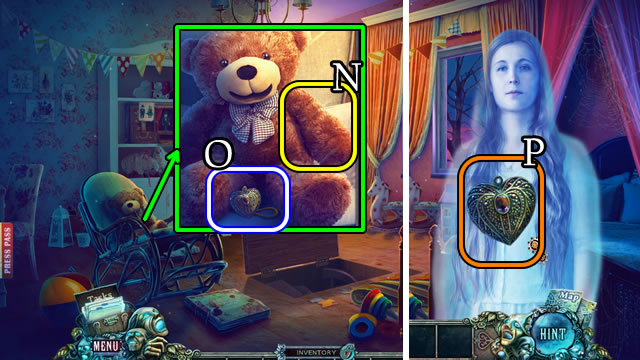
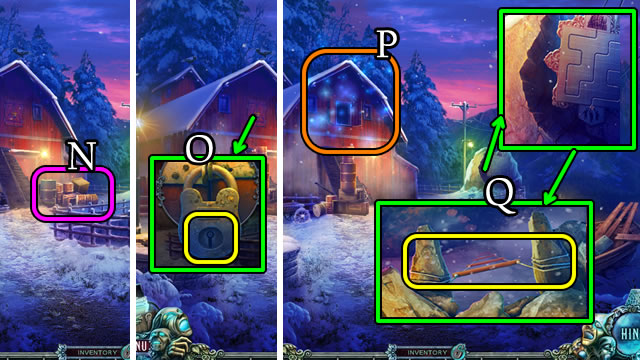
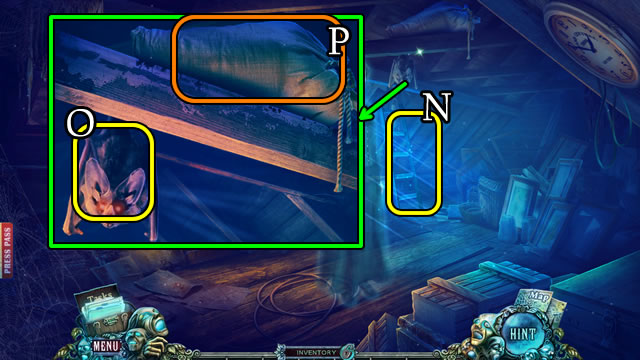
- Take the BRACELET (N).
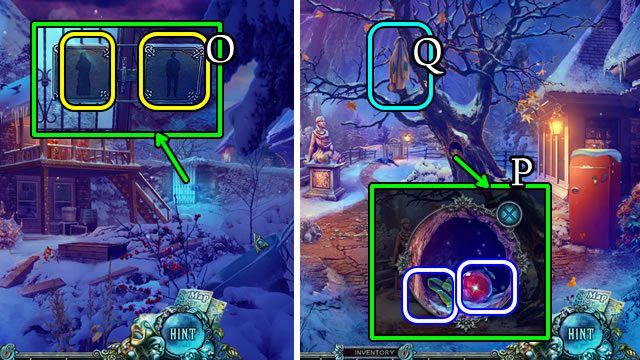
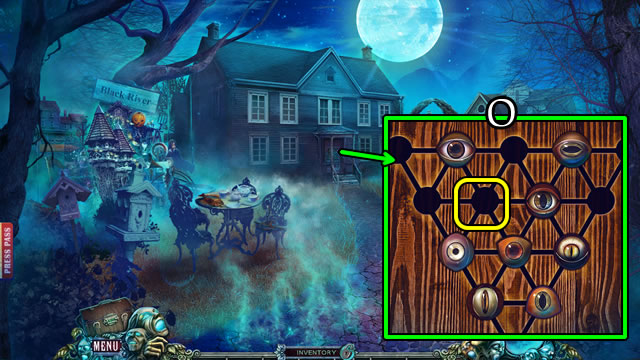
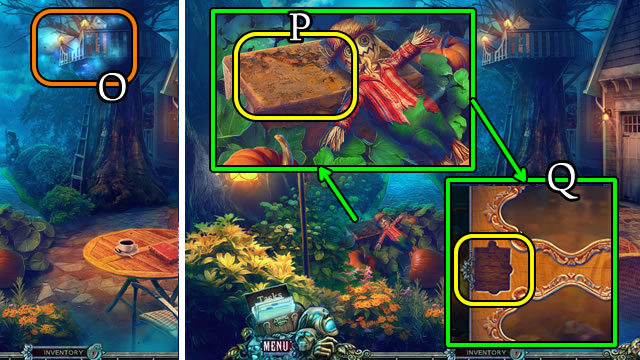
- Touch the fan (O).
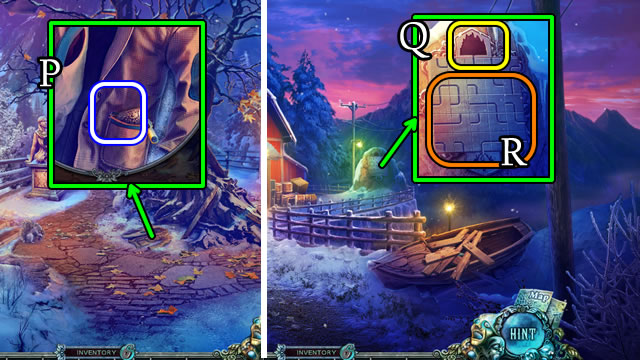
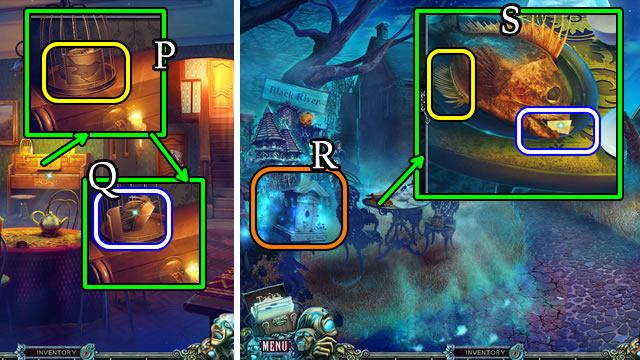
- Take the EYE (P).
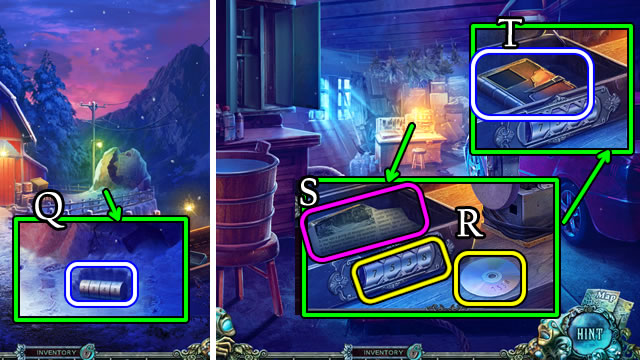
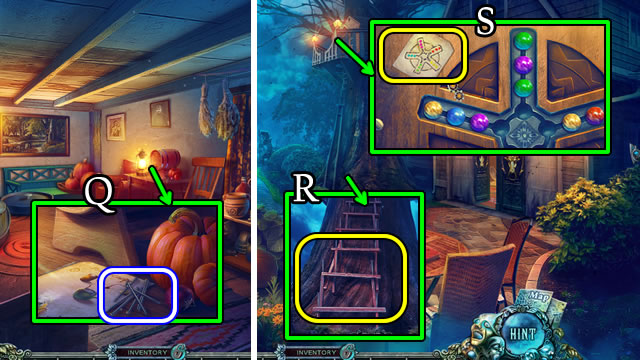
- Take the SLINGSHOT BASE (Q).
- Use the BROOM (R). Touch the painting.
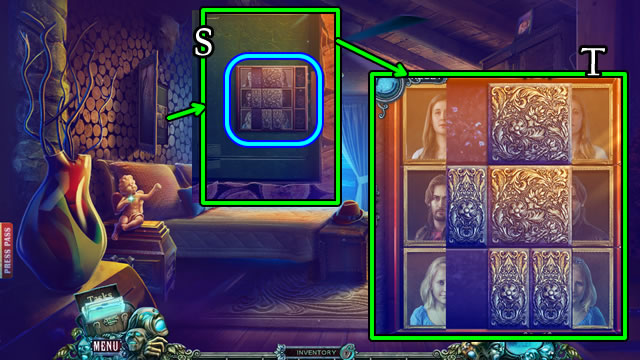
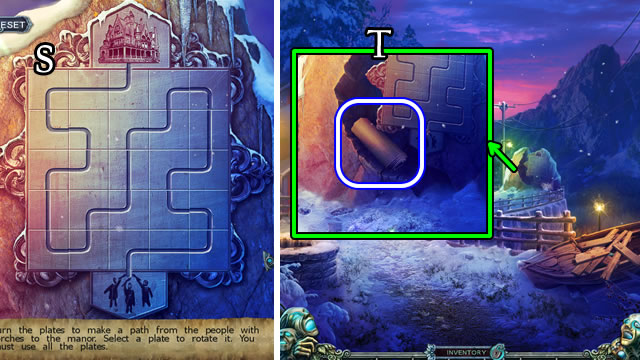
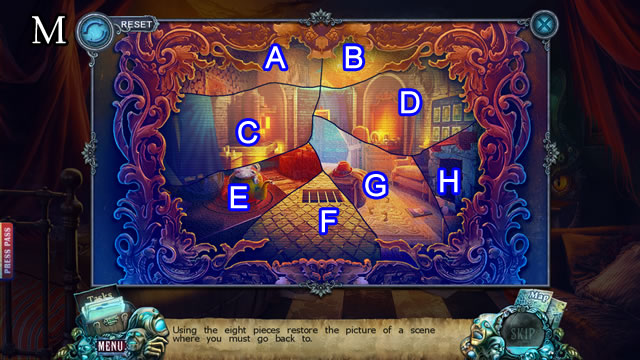
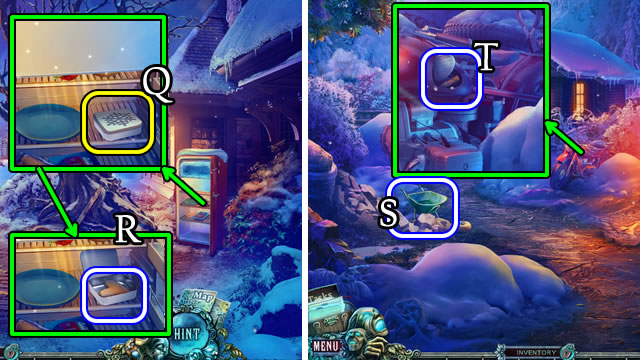
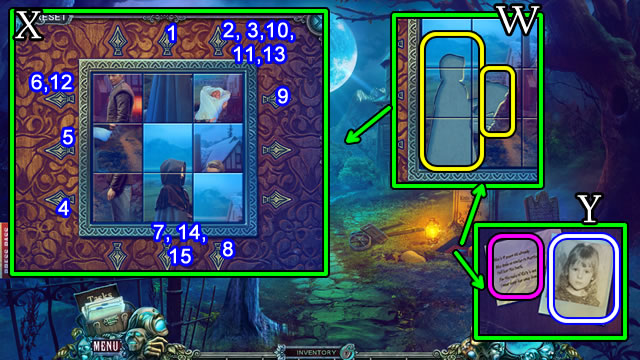
- Select (S) for a puzzle (T).
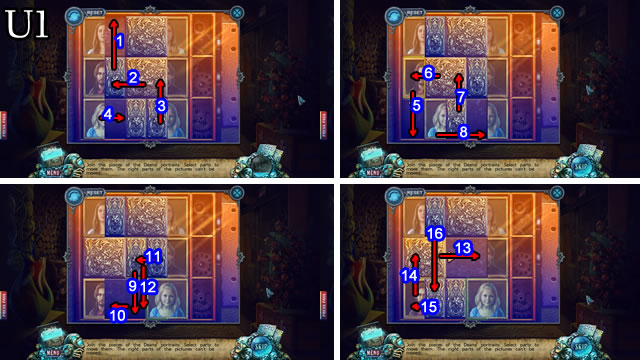
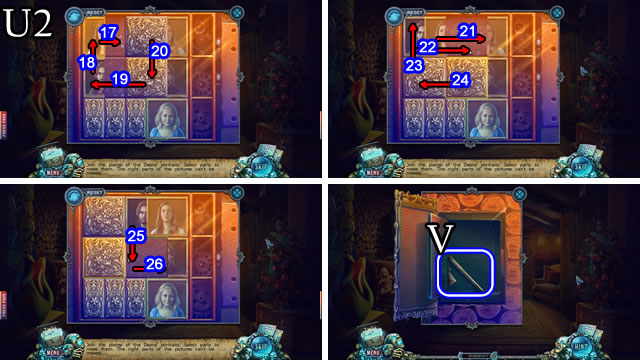
- Solution (U1-U2). 1-26.
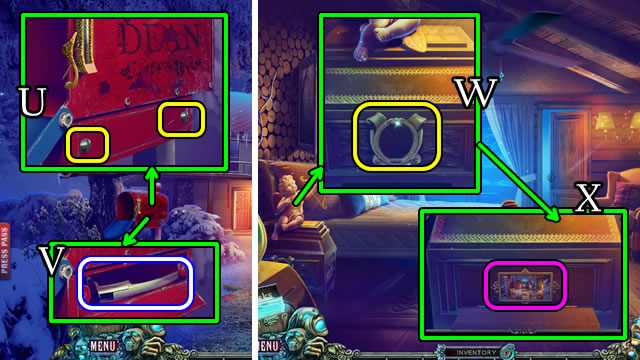
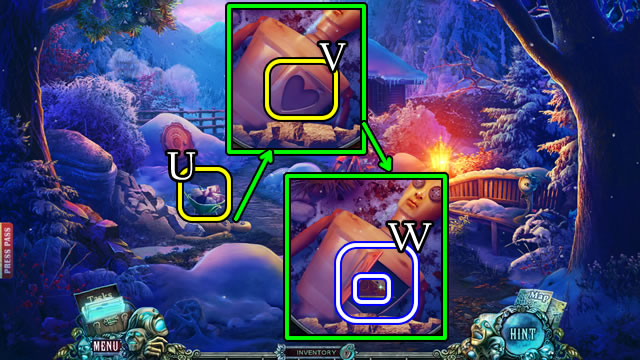
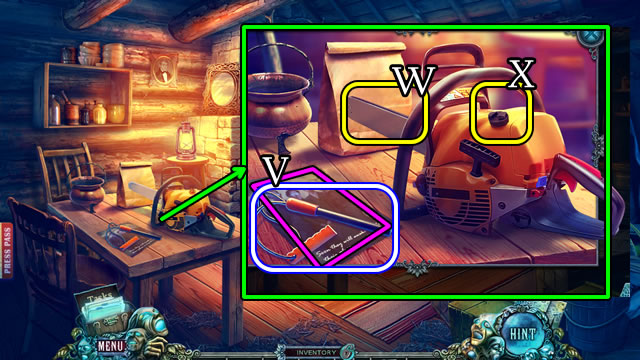
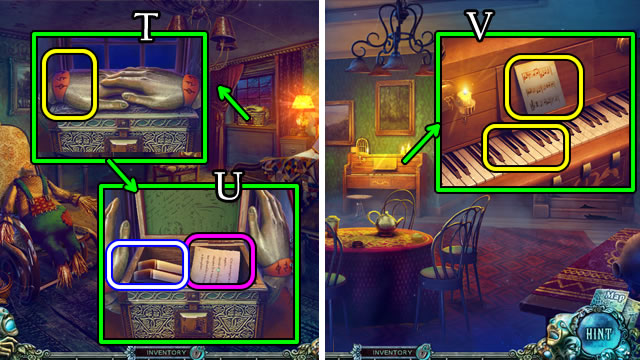
- Take the note and MAILBOX KEY (V).
- Walk down 2x.
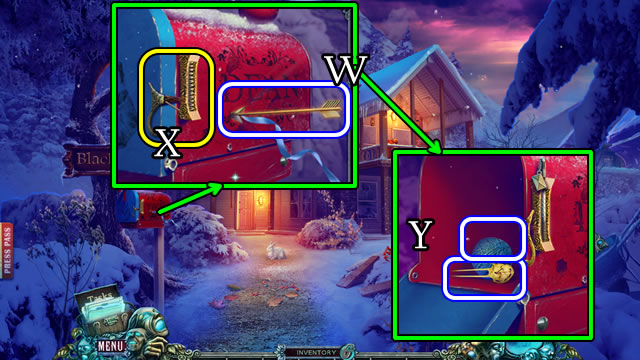
- Take CUPID'S ARROW (W).
- Use the MAILBOX KEY (X).
- Open and take the letter, HAIRPIN and BALL OF YARN (Y).
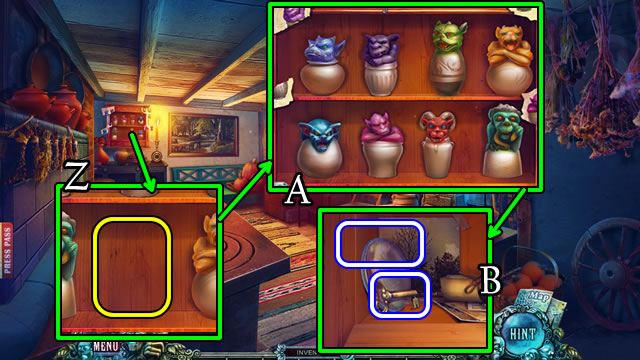
- Walk forward.
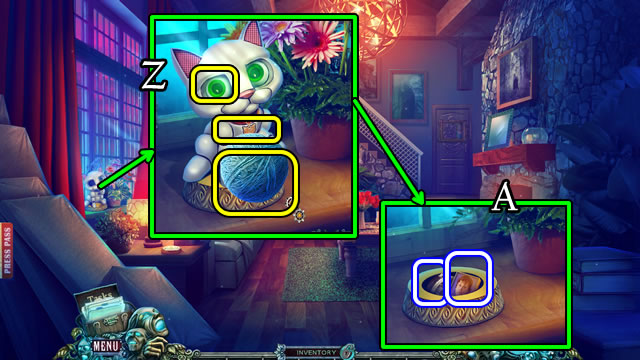
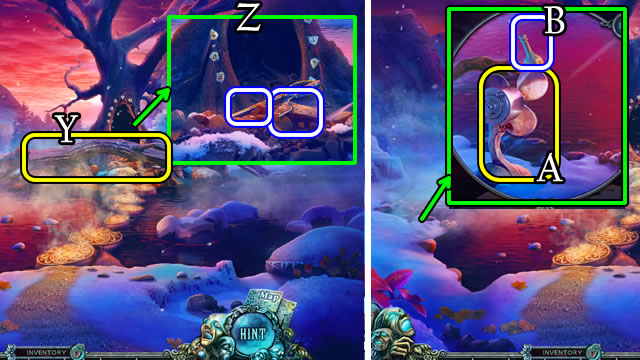
- Place the CAT COLLAR, EYE and BALL OF YARN (Z).
- Take HARRY'S PORTRAIT and the LENS (A).
- Walk forward.
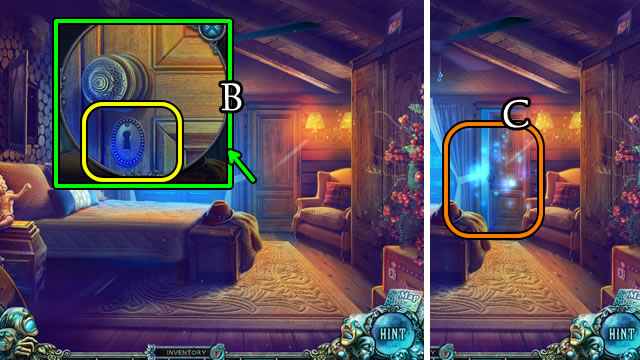
- Use the HAIRPIN (B).
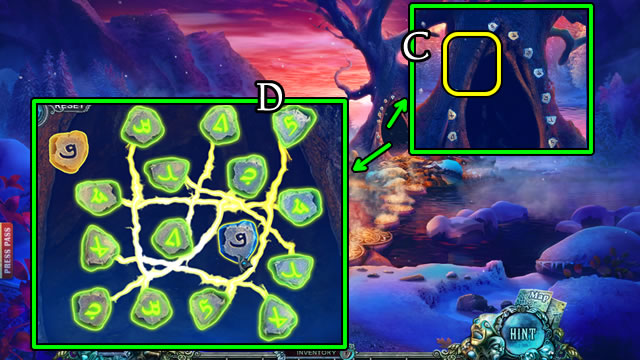
- Play the HOP (C) for a BOW.
- Combine the BOW and CUPID'S ARROW for CUPID'S BOW (Inventory).
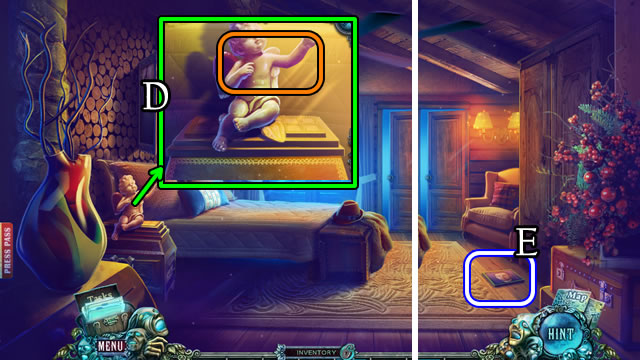
- Place CUPID'S BOW (D).
- Take MARTIN'S PORTRAIT (E).
- Walk down.
- Combine the GARDEN GNOME and GNOME CAP to take LISA'S PORTRAIT (Inventory).
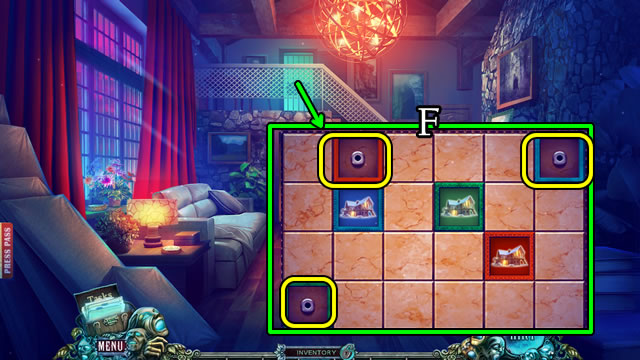
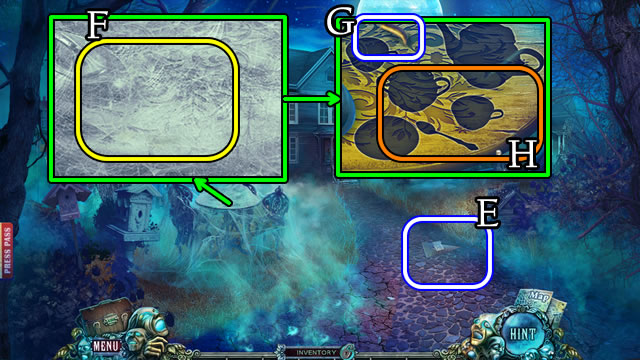
- Place LISA'S, HARRY'S and MARTIN'S PORTRAIT (F).
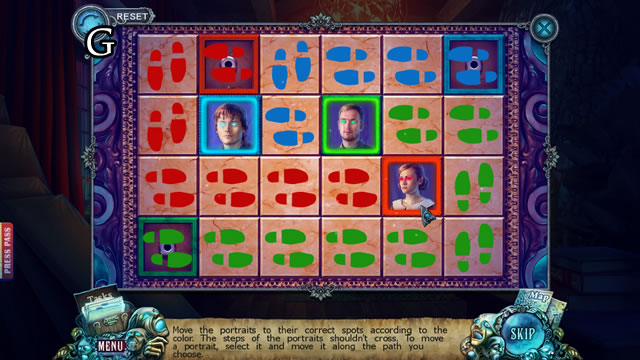
- Solution (G).
- Enter Alex's Studio.
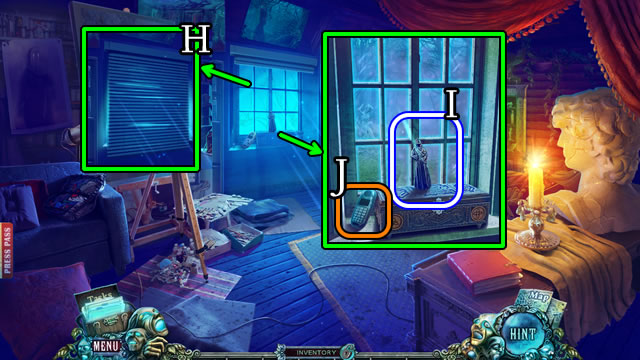
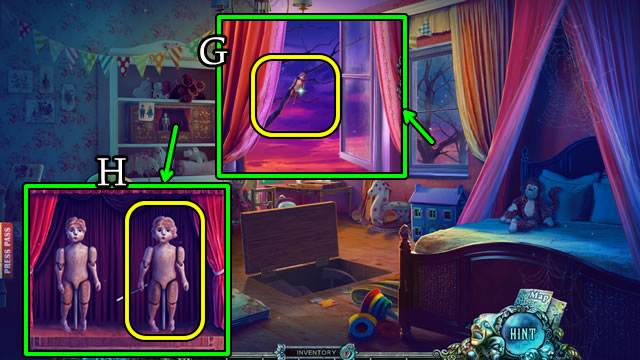
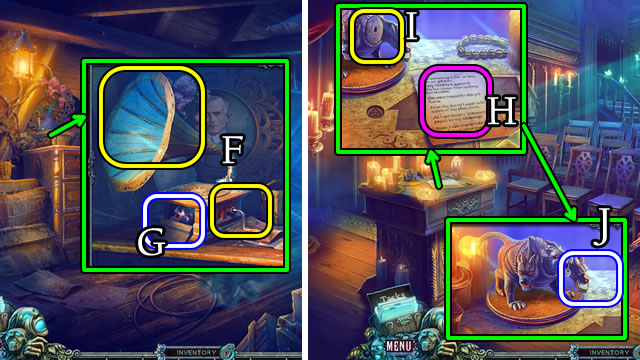
- Lift the blinds (H).
- Take the HOODED FIGURE (I).
- Select the phone (J) for a MINI-HOP; receive JACK'S BROKEN PHONE.
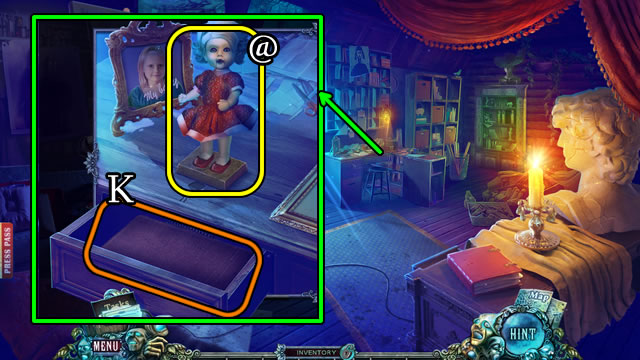
- Place SONIA'S DOLL (@).
- Take the album (K).
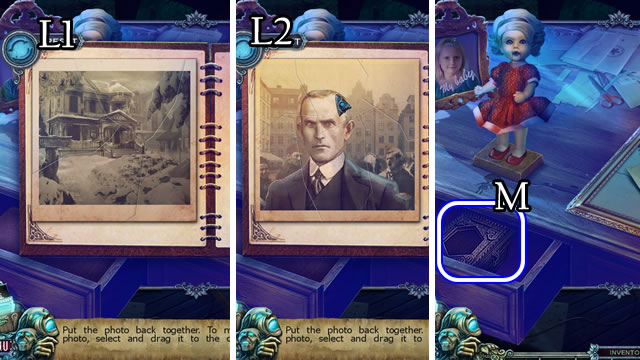
- Solution (L1-L2).
- Take the BOX (M).
- Walk down 2x.
- Open the MAGAZINE (Inventory) take the note and MALE FIGURE.
- Place the MALE and HOODED FIGURES (O).
- Select and walk right.
- Uncover and take the RED GLASS BALL and SUSPENDERS (P).
- Combine the SLINGSHOT BASE and SUSPENDERS for a SLINGSHOT (Inventory).
- Place the SLINGSHOT for a MINI-HOP (Q).
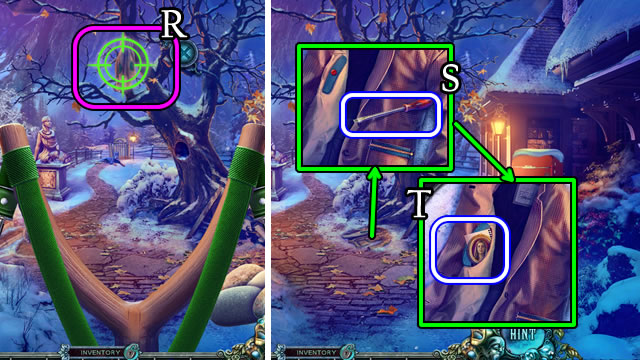
- Aim and shoot the SLINGSHOT (R).
- Take the SCREWDRIVER (S).
- Open and take the SARAH'S PICTURE and SYMBOLS (T).
- Walk down.
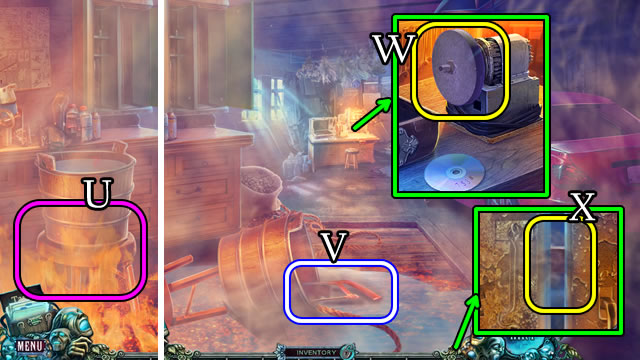
- Use the SCREWDRIVER (U); take the REFRIGERATOR HANDLE (V).
- Return to the Guest Room.
- Place the SARAH'S PICTURE (W) and select (X).
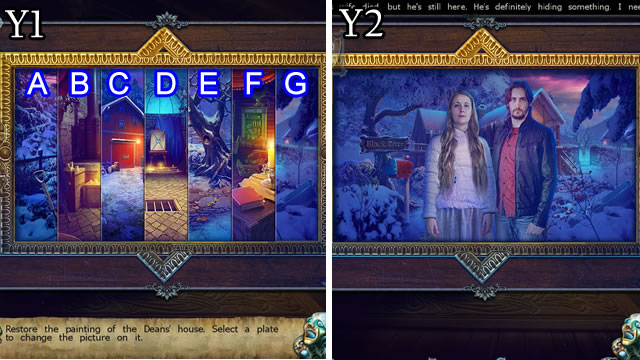
- Solution (Y1-Y2). Ax2-B-Cx4-Dx2-Ex3-F.
- Select (A). Take a BATTERY and RUNE (B).
- Return to Alex's Studio.
- Place the LENS and BATTERY (C) to trigger a HOP (D). Receive a NECKLACE.
- Walk down 2x, then right.
- Place the BRACELET (E) and NECKLACE (F). Take the HAMMER and COIL OF ROPE (G).
- Place and select the REFRIGERATOR HANDLE (H).
- Take the HAM (I).
- Give the HAM (J).
- Open the gate; walk forward.
Chapter 2: The Barn
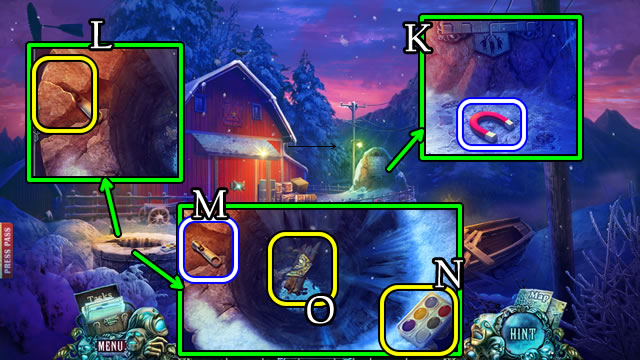
- Take the MAGNET (K).
- Use the HAMMER (L).
- Take the ZIPPER PULL (M).
- Take the BOX OF PAINTS (N).
- Combine the MAGNET and COIL OF ROPE for a MAGNET ON A ROPE (Inventory).
- Use the MAGNET ON A ROPE to get the ORNAMENT HALF (O).
- Walk down.
- Use the ZIPPER PULL to open the pocket. Take the ORNAMENT HALF(P).
- Walk forward.
- Combine the 2 ORNAMENT HALVES for a HEXAGONAL DECORATION (Inventory).
- Combine the BOX and HEXAGONAL DECORATION for a MINIATURE MANSION (Inventory).
- Place the MINIATURE MANSION (Q); select for a puzzle (R).
- Solution (S).
- Take the FABRIC BUNDLE (T).
- Select the FABRIC BUNDLE (Inventory). Take the RUNE and RAG.
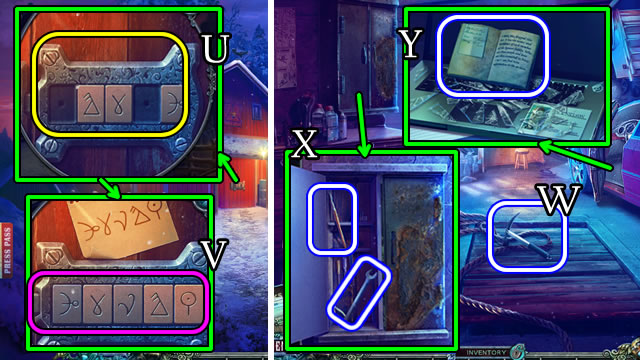
- Place 2 RUNES and the SYMBOLS (U).
- Solution (V).
- Walk forward.
- Take the ICE AXE (W).
- Open, take the WRENCH and BRUSH (X).
- Select and take the NOTEBOOK (Y).
- Walk down.
- Uncover to use the WRENCH (A). Take the SCISSORS (B).
- Walk down.
- Open. Use the ICE AXE. Take the RUST REMOVER (C).
- Walk down, then forward.
- Use the SCISSORS (D).
- Take the BOOK EMBLEM (E).
- Walk to Alex's Studio.
- Read the note (@); place the BOX OF PAINTS (F). Use the BRUSH to recreate the drawing (G).
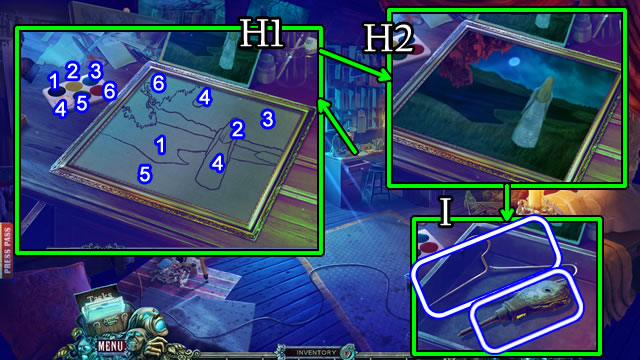
- Solution (H1-H2).
- Take the BELLOWS and HANGER (I).
- Return to the Barn.
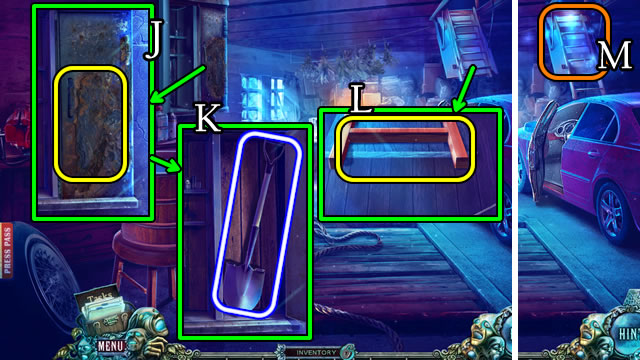
- Use the RUST REMOVER (J).
- Open, take the SHOVEL (K).
- Select the HANGER 3x (Inventory) for a HOOK.
- Use the HOOK (L) to trigger a HOP (M). Play the HOP for a CABLE.
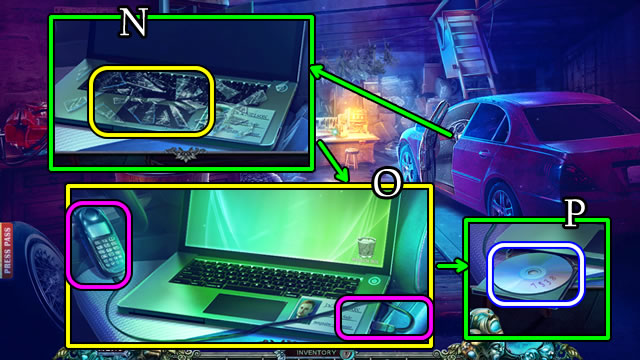
- Use the RAG (N).
- Touch the computer. Place the JACK'S BROKEN PHONE and CABLE (O).
- Take the CODE (P).
- Walk down.
- Use the SHOVEL. Take the CODE BARREL (Q).
- Walk forward.
- Place the CODE BARREL and CODE. Set to 7-5-3-8 (R).
- Take the paper (S) for a MINI-HOP.
- Take the LOCKED BOOK (T).
- Use the HAMMER (U).
- Take the DULL HACKSAW (V).
- Place the DULL HACKSAW for a SHARPENED HACKSAW (W).
- Use the SHARPENED HACKSAW (X).
- Return to Alex's Studio.
- Combine the LOCKED BOOK and BOOK EMBLEM. Take the MIRROR, DEAN FAMILY PHOTO and BOOK (Inventory).
Chapter 3: House Secrets
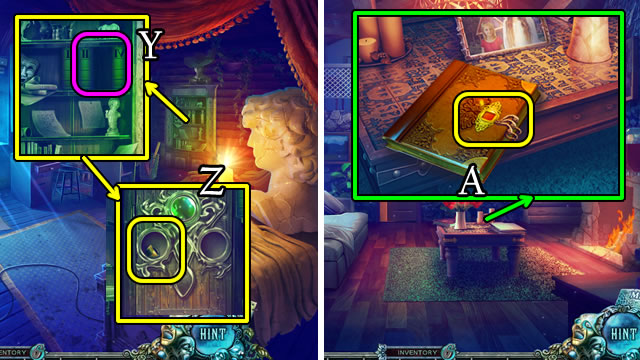
- Place the BOOK (Y).
- Take the SIGNET (Z).
- Walk down.
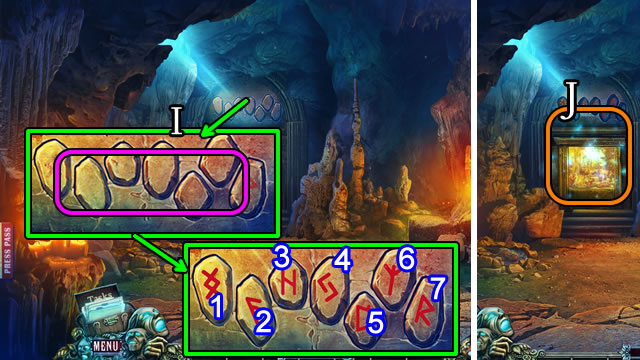
- Place the SIGNET and select for a puzzle (A).
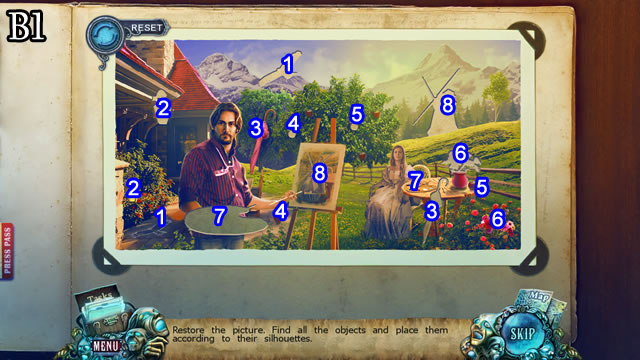
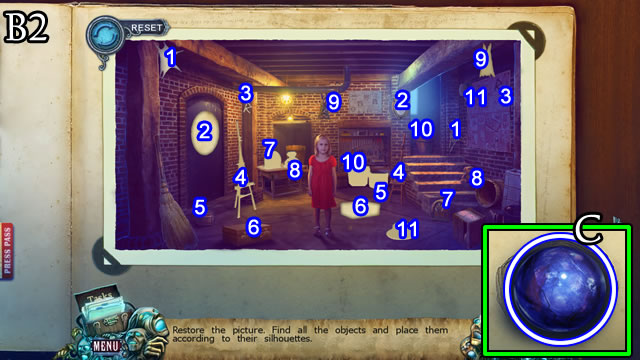
- Solution (B1). 1-8.
- Solution (B2). 1-11.
- Take the BLUE GLASS BALL (C).
- Walk to Alex's Studio.
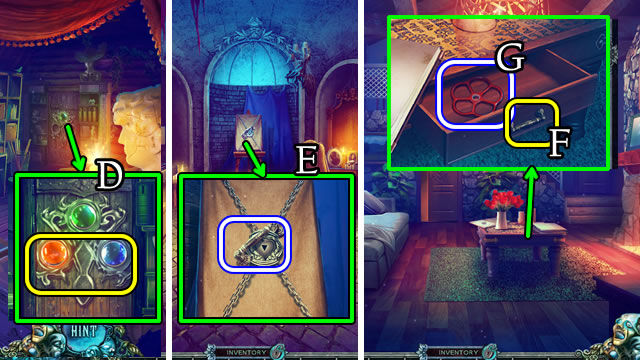
- Place the RED and BLUE GLASS BALLS (D).
- Walk forward.
- Take the DRAWER HANDLE (E).
- Walk down 2x.
- Place the DRAWER HANDLE (F). Take the VALVE (G).
- Return to the Secret Room.
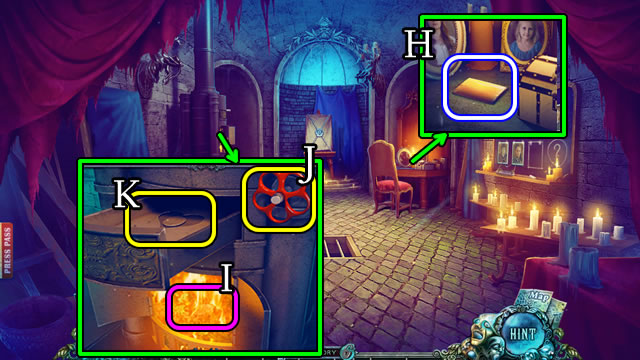
- Take the CHUNK OF AMBER (H).
- Use the BELLOWS (I). Place the VALVE (J).
- Place the CHUNK OF AMBER (K) to receive an AMBER PENDANT.
- Combine the AMBER PENDANT and DEAN FAMILY PHOTO for DEAN FAMILY PENDANT (Inventory).
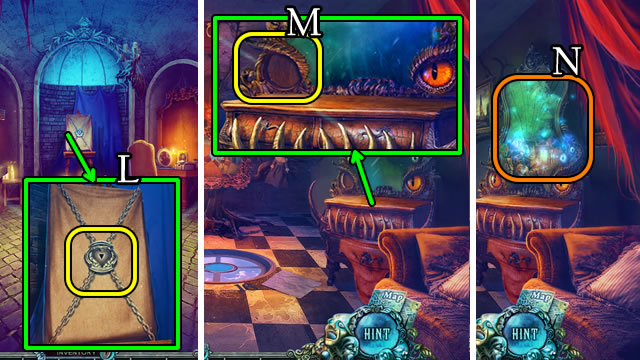
- Place the DEAN FAMILY PENDANT (L).
- Walk forward.
- Place the MIRROR (M) to trigger a HOP (N). Receive a PORTRAIT FRAGMENT.
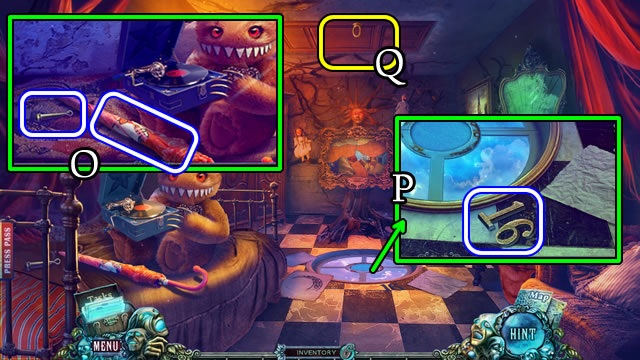
- Take the BELL-CLAPPER and UMBRELLA (O).
- Take THE NUMBER 16 (P).
- Use the UMBRELLA (Q).
- Walk forward.
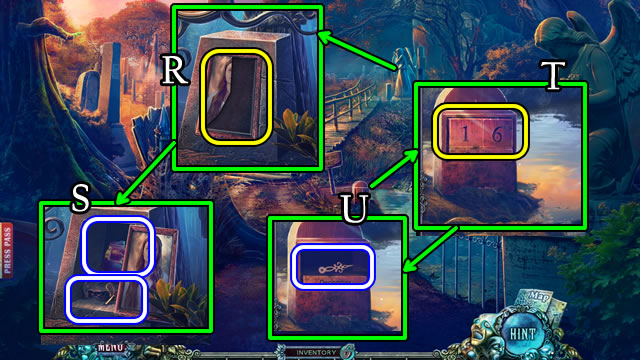
- Place the PORTRAIT FRAGMENT (R).
- Take the BEAR KEY and PICTURE PART (S).
- Place the NUMBER 16 (T).
- Take the BIG CLOCK HAND (U).
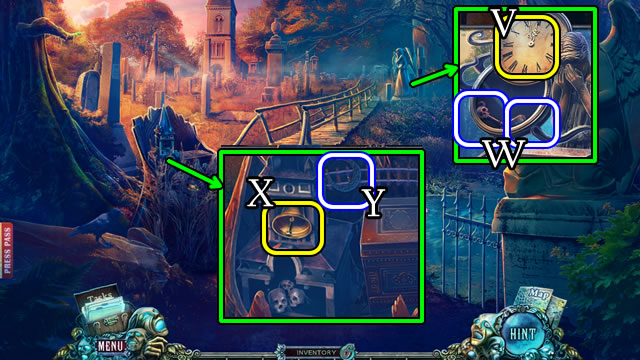
- Place the BIG CLOCK HAND (V). Take the SKULL KEY and CHARCOAL (W).
- Uncover, then place the BELL-CLAPPER (X). Take the CRESCENT (Y).
- Walk down.
- Use the CHARCOAL (A).
- Place the CRESCENT (B).
- Take the STAR and FISHING REEL (C).
- Place the STAR (D) and BEAR KEY (E).
- Take MARTHA'S FIGURINE and PICTURE PART (F).
- Walk forward.
- Open and place the FISHING REEL (G).
- Play the MINI-HOP. Receive a FISHING ROD.
- Place the FISHING ROD (H). Select the doll 3x.
- Take the PICTURE PART (I).
- Walk down.
- Take the note (J) and MIRROR FRAGMENT (K).
- Place the 3 PICTURE PARTS (L).
- Solution (M). Ax2-Bx3-E-Gx2-Hx3.
- Walk forward.
- Use the SKULL KEY (N). Take the PHOTO OF CAROLINE and FILM (O).
- Place the NOTEBOOK and PHOTO OF CAROLINE (P).
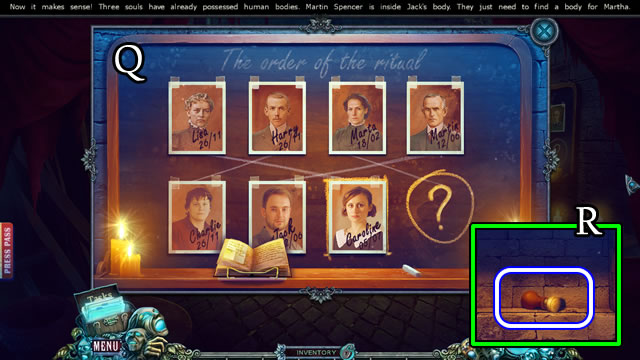
- Solution (Q).
- Take FANCY SEAL (R).
- Walk down.
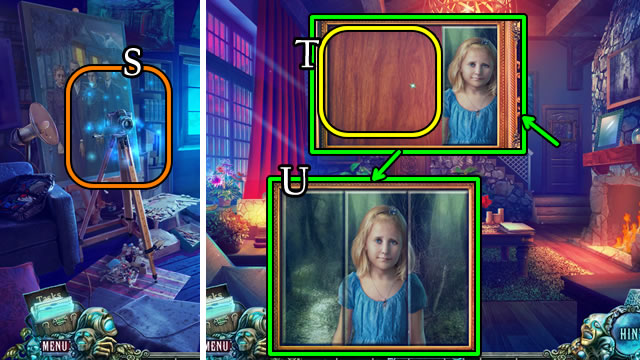
- Play the HOP (S); receive a PANEL PART.
- Walk down.
- Place (T) and arrange (U) the 2 PANEL PARTS.
- Enter Sonia's Room.

- Place the FILM on the device (V), press the right arrow 3x (W). Take the DECORATIVE SEAL (X).
- Take the UNIQUE SNOWFLAKE (Y).
- Walk down; enter Alex's Studio.
- Place the DECORATIVE and FANCY SEALS (Z).
- Take the note; take the STENCIL PLATE and SQUARE TILE (A).
- Return to Sonia's Room.
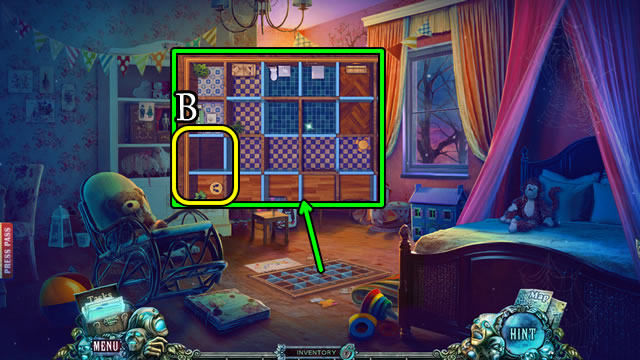
- Lift the rug; place MARTHA'S FIGURINE and SQUARE TILE (B).
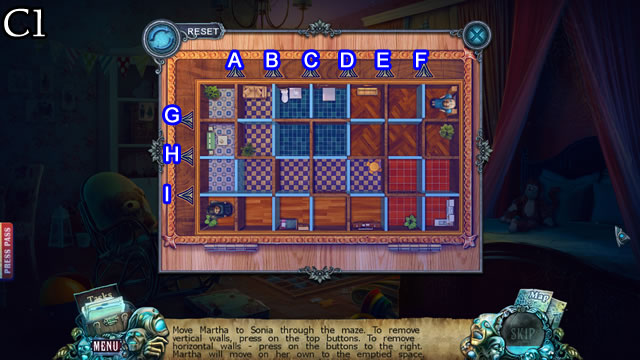
- Solution (C1). I-A-I-B-I-H-B-G-B-C-D-G-D-H-D-I-E-F-I-F-H-G-F.
- Enter the Basement.
- Grab the CHAINSAW CHAIN (D).
- Take the WHEEL (E).
- Take the GAFF (F).
- Walk down.
- Open the window; use the GAFF to reach the MAGICIAN PUPPET (G).
- Place the MAGICIAN PUPPET (H).
- Play the MINI-HOP for SPRAY PAINT.
- Enter the Basement.
- Place the STENCIL PLATE and SPRAY PAINT (I).
- Touch 1-3-5-7-2-4-6.
- Play the HOP (J) to receive the SPENCER FAMILY EMBLEM.
- Take the note; place the SPENCER FAMILY EMBLEM (K).
- Take the note and SMALL KNIFE (L).
- Use the SMALL KNIFE; take the BEAR'S PAW (M).
- Walk down.
- Place the BEAR'S PAW (N). Take SARAH'S MEDALLION (O).
- Give SARAH'S MEDALLION (P); receive a CHARGED MEDALLION.
- Return to the Backyard.
- Place the UNIQUE SNOWFLAKE (Q). Take the WOODEN HEART (R).
- Walk left.
- Grab the BROKEN WHEELBARROW (S).
- Open, remove the CORKSCREW HANDLE (T).
- Combine the BROKEN WHEELBARROW and the WHEEL for a WHEELBARROW (Inventory).
- Place the WHEELBARROW and load the rocks (U).
- Place the WOODEN HEART (V). Take the PLATE WITH SYMBOLS and RUNE (W).
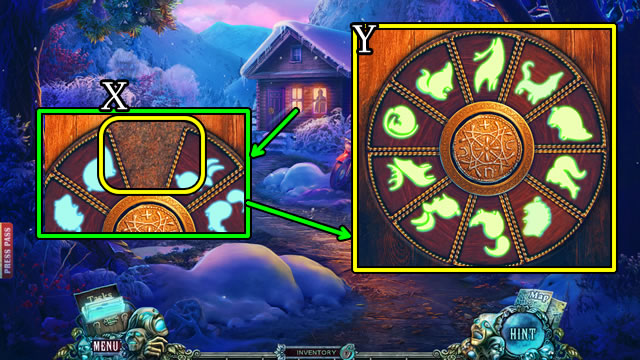
- Place the PLATE WITH SYMBOLS (X).
- Solution methods vary (Y).
- Walk forward.
Chapter 4: Helping Alex
- Give the CHARGED MEDALLION (A); speak to Alex; take RUNE (B).
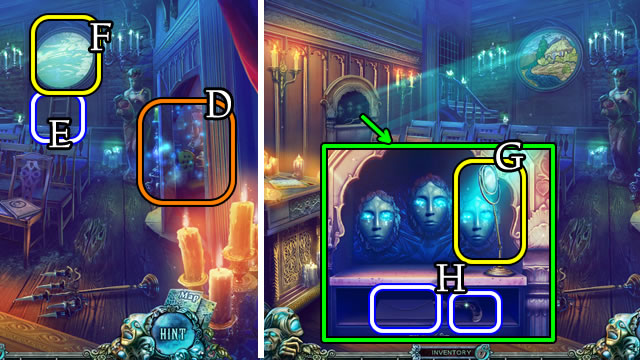
- Place the MIRROR FRAGMENT (C).
- Play the HOP (D) to receive a MAPLE LEAF.
- Select (E).
- Solution (E1). Bx2-A-Bx3-Ax5-B-A-Bx3-Ax2-B-A-B-Ax3.
- Take the STONE ROSE (F).
- Place and select the MAPLE LEAF to play the MINI-HOP (G).
- Open. Place the CORKSCREW HANDLE for a CORKSCREW (H).
- Take the LEATHER GLOVE (I).
- Walk down.
- Place the STONE ROSE (J).
- Select (K); take the HOSE (L).
- Use the LEATHER GLOVE to take the LOCKPICK (M).
- Walk down and forward.
- Touch the boxes (N).
- Use the LOCKPICK (O); remove the lock to trigger a HOP (P). Receive a ROPE LADDER.
- Place the ROPE LADDER (Q) and climb down.

- Take the EMPTY JERRYCAN (R).
- Take the BROKEN FAN BLADES (S).
- Return to the Abandoned Garden.
- Place and select the BROKEN FAN BLADES (T) for a MINI-HOP; receive a SMALL FAN.
- Place the EMPTY JERRYCAN and HOSE for a FULL JERRYCAN (U).
- Walk forward.
- Take the FLINT IGNITER and read the paper (V); place the CHAINSAW CHAIN (W); remove the cap and place the FULL JERRYCAN (X). Take the CHAINSAW.
- Return to the Riverbank.
- Use the CHAINSAW (Y) and remove the logs.
- Take the MUSIC BOX CRANK and SCOOP NET (Z).
- Use the SMALL FAN (A) and SCOOP NET. Take the SEALED BOTTLE (B).
- Select the SEALED BOTTLE (Inventory) and take RUNE. Use the CORKSCREW to take the SHEET MUSIC.
- Place the 3 RUNES(C).
- Select for a puzzle.
- Solution (D).
- Grab the DOLLHOUSE ROOF (E).
- Use the FLINT IGNITER repeatedly to clear the cobwebs (F).
- Take the WOLF'S FANG (G).
- Select for a MINI-HOP (H).
- Open, take the EYE and CUP SHARD (I).
- Take the TAP (J).
- Solution (K). 1-5.
- Walk forward.
- Use the FLINT IGNITER (L).
- Place the DOLLHOUSE ROOF for a MINI-HOP (M).
- Take the WOLF'S EAR (N).
- Walk down.
- Place the EYE (O).

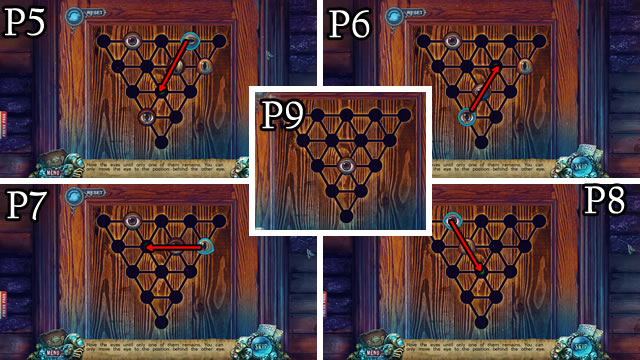
- Solution (P1-P4).
- Solution (P5-P9).
- Walk forward left.
- Take the SHIP (Q).
- Place the WOLF'S FANG and WOLF'S EAR (R).
- Take the TORN PHOTO, METAL BAR and DRY BRANCHES (S).
- Take the note and BAG (T).
- Walk down.
- Use the METAL BAR (U). Take the FIGURINE OF MARTIN (V).
- Combine the DRY BRANCHES and FLINT IGNITER for SMOLDERING BRANCHES (Inventory).
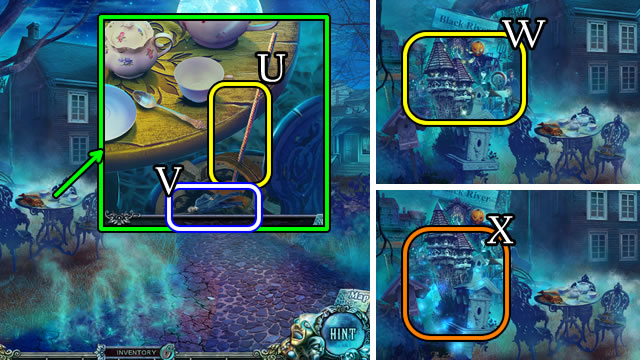
- Use the SMOLDERING BRANCHES (W) to trigger a HOP. Play the HOP (X) to receive a BROKEN MOUSE.
- Walk forward right.
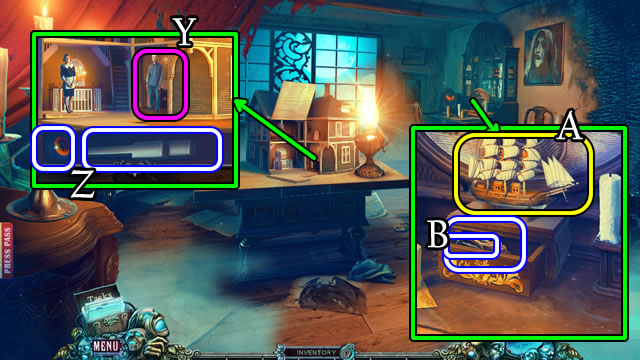
- Place FIGURINE OF MARTIN (Y). Take the TINY WHEEL and WHITE KEYS (Z).
- Place the SHIP (A). Take the METALLIC LEAF and SKELETON'S HAND (B).
- Place the TORN PHOTO for a puzzle (C).
- Solution (D).
- Take the KEY (E).
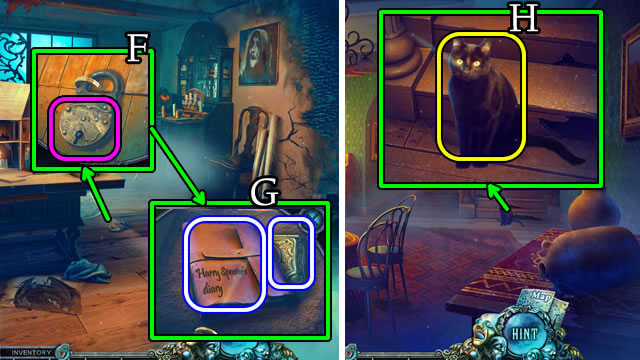
- Use the KEY (F).
- Take HARRY SPENCER'S DIARY and BROKEN MUSIC BOX (G).
- Walk down. Walk forward left.
- Combine the BROKEN MOUSE and TINY WHEEL for a TOY MOUSE (Inventory).
- Use the TOY MOUSE (H).
- Walk forward.
- Take the RABBIT FIGURINE (I).
- Combine the BROKEN MUSIC BOX, MUSIC BOX CRANK and RABBIT FIGURINE for a MUSIC BOX (Inventory).
- Use the MUSIC BOX (J).
- Use the CUP SHARD (K).
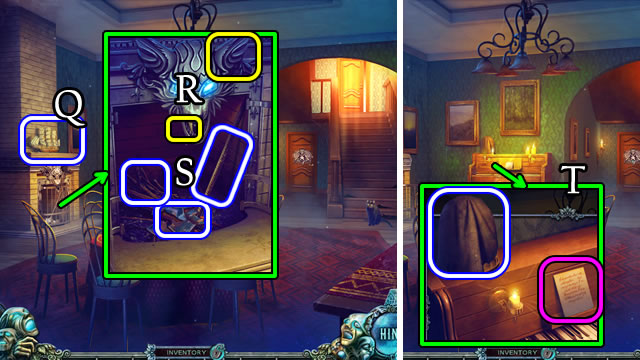
Chapter 5: Freeing Sonia
- Select and open the book (L), turn the page and take the METAL FLOWER (M).
- Place the METALLIC LEAF and METAL FLOWER (N) to trigger a HOP (O). Receive a BIRD FIGURINE.
- Walk down.
- Place the BIRD FIGURINE (P). Take the BONY FIN (Q).
- Walk down.
- Play the HOP (R). Receive a PRUNER.
- Uncover and place the BONY FIN. Take the DIARY PAGE (S).
- Walk forward left, then forward.
- Combine HARRY SPENCER'S DIARY and the DIARY PAGE. Place the items. Take the BRACELET and HARRY SPENCER'S DIARY (Inventory).
- Place the BRACELET (T). Take the note and BLACK KEYS (U).
- Walk down.
- Place the SHEET MUSIC and BLACK and WHITE KEYS (V).
- Select the piano for a puzzle.
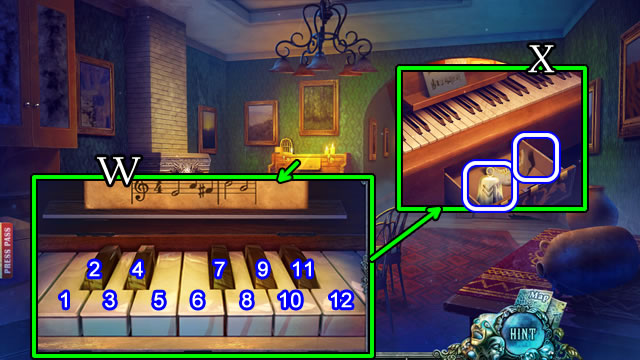
- Solutions (W). Round 1: 5-10-7-12-8. Round 2: 7-5-2-3-11-12. Round 3: 7-11-8-10-2-5-3.
- Take the RUNE BELL and a JAW (X).
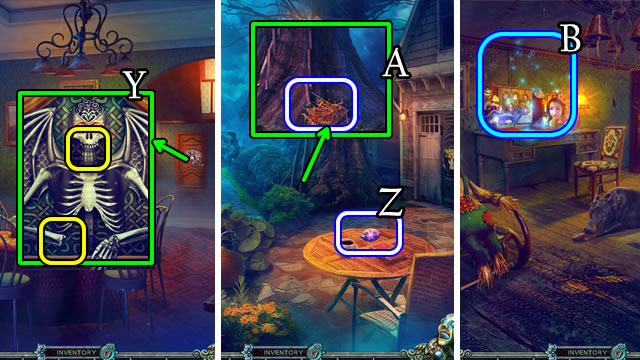
- Place the SKELETON'S HAND and JAW for a MINI-HOP (Y).
- Walk forward left.
- Take the STAR SAPPHIRE (Z).
- Take the STRAW (A).
- Walk down, then forward right.
- Play the HOP (B) to receive a RUNE BELL.
- Combine the BAG and STRAW for a SCARECROW'S HEAD (Inventory).
- Place the SCARECROW'S HEAD (C).
- Complete (1-5), then take the SCARECROW.
- Take the BRONZE HORN (D).
- Walk down then forward left.
- Use the PRUNER (E).
- Place 2 RUNE BELLS. Select 1-5.
- Walk forward.
- Take the DIARY PAGE (E) and BRONZE RING (F).
- Select the wheelbarrow; take the BOARDS (F1).
- Walk down.
- Place the SCARECROW (G).
- Take the OVEN MITT and EMPTY KETTLE (H).
- Place BRONZE HORN and RING (I).
- Walk right.
- Grab the SPATULA (J) and PHONOGRAPH TRUMPET (K).
- Take the AXE HANDLE (L) and SALT (M). Use the PRUNER (N).
- Take the LEMON (O); uncover and take the MALLET (P).
- Take the NAILS (Q).
- Walk down.
- Place the BOARDS and NAILS. Use the MALLET (R).
- Combine HARRY SPENCER'S DIARY and DIARY PAGE for a DIAGRAM (Inventory).
- Place the DIAGRAM for a puzzle (S).
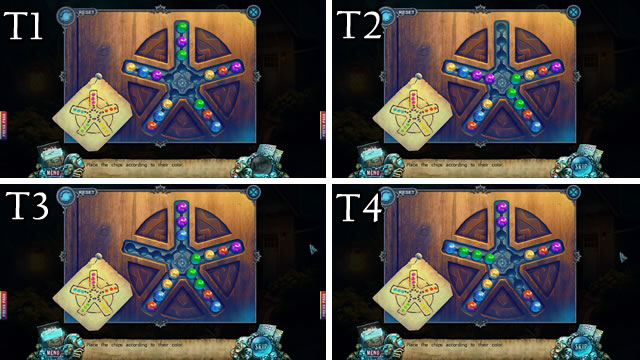
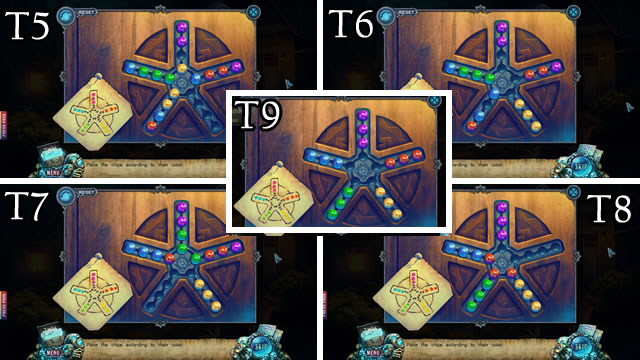
- Solution (T1-T4).
- Solution (T5-T9).
- Play the HOP to receive an ANGEL (U).
- Walk forward.
- Place the AXE HANDLE. Take the AXE (V).
- Use the SPATULA on the grave (W).
- Place the ANGEL (X).
- Take the STATUETTE (Y).
- Walk down, then right.
- Place the STATUETTE for a puzzle (Z).
- Solution (A).
- Take the CHAPEL KEY and LENS (B).
- Walk down and forward.
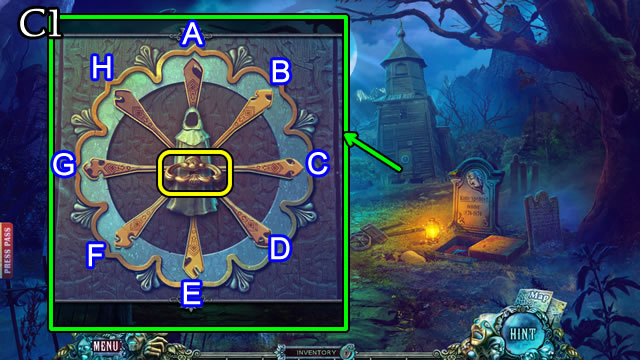
- Place the CHAPEL KEY (yellow) for a puzzle.
- Solution (C1). (F-G)-(B-C)-(A-C)-(H-E)-(C-D).
- Walk right.
- Play the HOP (D) to receive a STAINED GLASS FRAGMENT.
- Take the LADDER (E).
- Place the STAINED GLASS FRAGMENT for a MINI-HOP (F).
- Place, then select the LENS 3x (G).
- Take the LETTER FROM MARTHA and LEVER (H).
- Use the LEVER (I).
- Use the AXE on the floorboards. Take the SPIDER (J) and PANEL (K).
- Walk down 2x, then right.
- Place the TAP (L).
- Place the EMPTY KETTLE (M); touch the tap.
- Place the SALT and LEMON. Take the KETTLE WITH RUST REMOVER.
- Place the KETTLE WITH RUST REMOVER (N). Use the OVEN MITT. Take the HEATED RUST REMOVER.
- Walk down.
- Select the LETTER FROM MARTHA (Inventory). Open and take the note and MARTHA'S MEDALLION.
- Play the HOP (O); receive a CLOAKED WOMAN.
- Use the HEATED RUST REMOVER (P).
- Place MARTHA'S MEDALLION for a puzzle (Q).
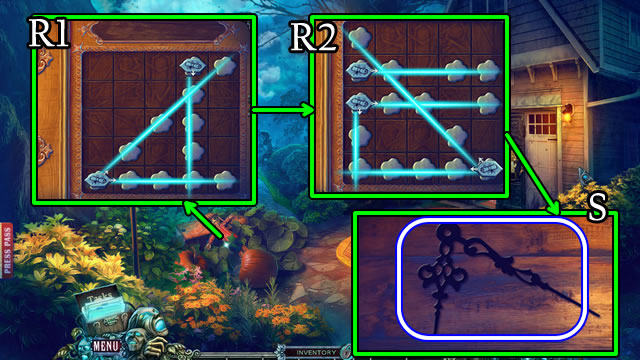
- Solution (R1-R2).
- Take the note and CLOCK HANDS (S).
- Walk right.
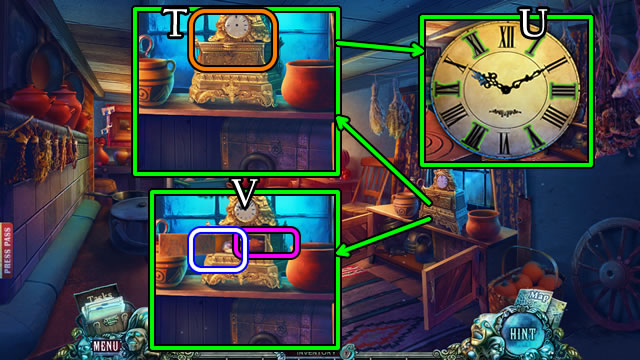
- Place the CLOCK HANDS for a MINI-HOP (T).
- Set the clock to 10:10 (U).
- Take the note and the CHILD FIGURINE (V).
- Walk down and forward.
- Place the CLOAKED WOMAN and CHILD FIGURINE for a puzzle (W).
- Solution (X). 1-15.
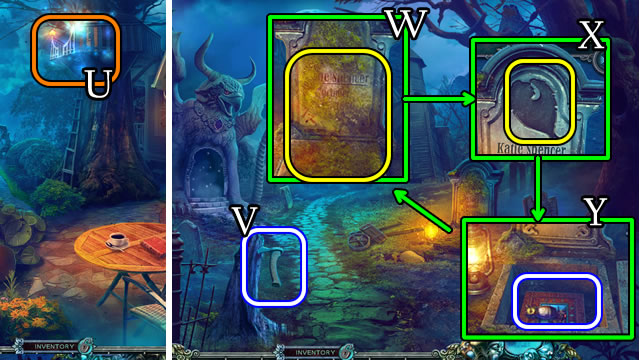
- Take the note and KATIE'S PHOTO (Y).
- Walk right, then forward.
- Give KATIE'S PHOTO (Z).
- Place the PANEL (A).
- Take the STONE FLOWERS and ORNATE SIGNET RING (B).
- Walk down.

- Play the HOP to receive a TAMBOURINE (C).
- Place the STONE FLOWERS (D) for a MINI-HOP.
- Take the SCROLL and the PHONOGRAPH HANDLE (E).
- Walk forward.
Chapter 6: The Ritual
- Place the PHONOGRAPH HANDLE and PHONOGRAPH TRUMPET (F). Take the HELLHOUND'S HEAD (G).
- Walk down.
- Take the note (H); place the HELLHOUND'S HEAD (I).
- Take ELABORATE SIGNET RING (J).

- Place ELABORATE and ORNATE SIGNET RINGS for a puzzle (K).
- Solution (L).
- Take the note and SPIDER (M).
- Walk forward.
- Place the LADDER (N).
- Use the TAMBOURINE (O). Select the sack (P).
- Select the books for a puzzle.
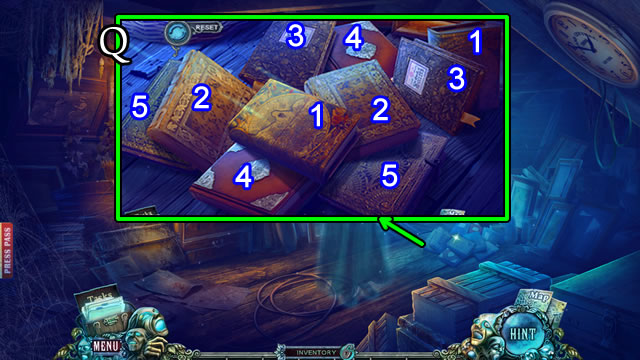
- Solution (Q).
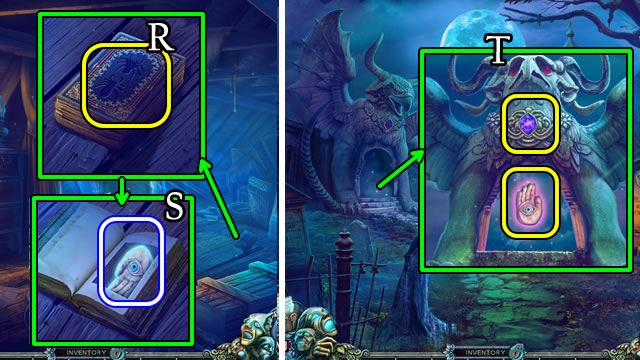
- Place both SPIDERS (R).
- Take the HAND SYMBOL (S).
- Walk down 2x.
- Place the STAR SAPPHIRE and HAND SYMBOL (T).
- Walk left.
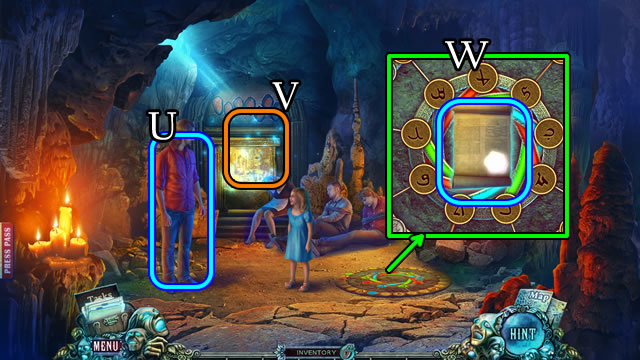
- Speak to Alex (U); play the HOP to receive the SCROLL SEAL (V).
- Combine the SCROLL and SCROLL SEAL for a SEALED SCROLL (Inventory).
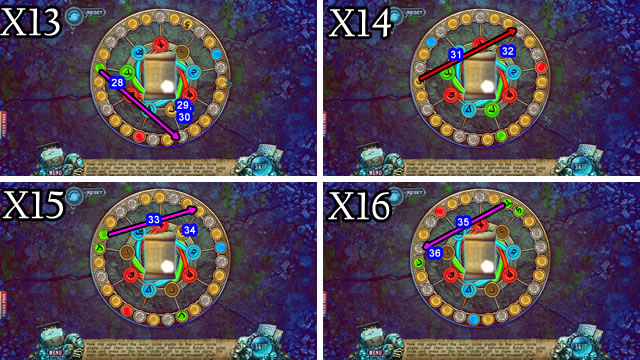
- Place the SEALED SCROLL for a puzzle (W).
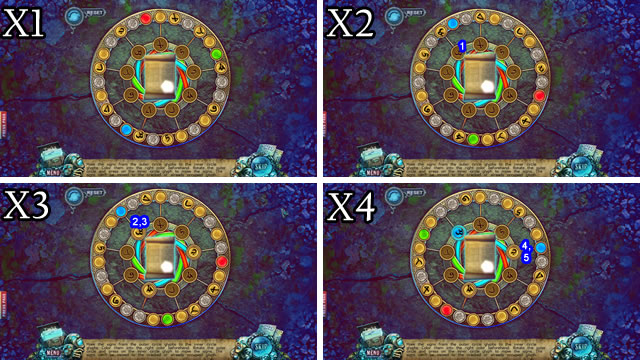
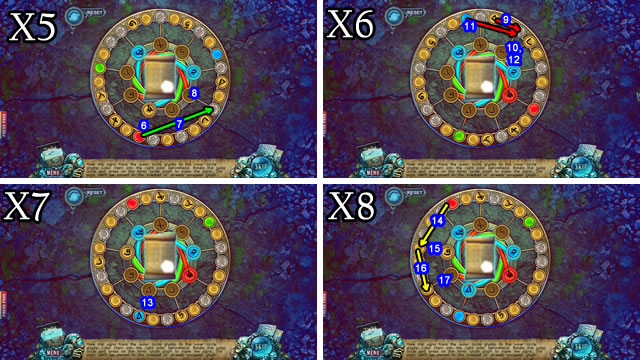
- Solution (X1-X4).
- Solution (X5-X8).
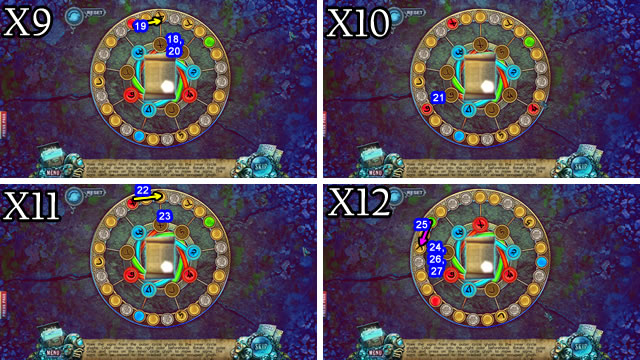
- Solution (X9-X12).
- Solution (X13-X16).
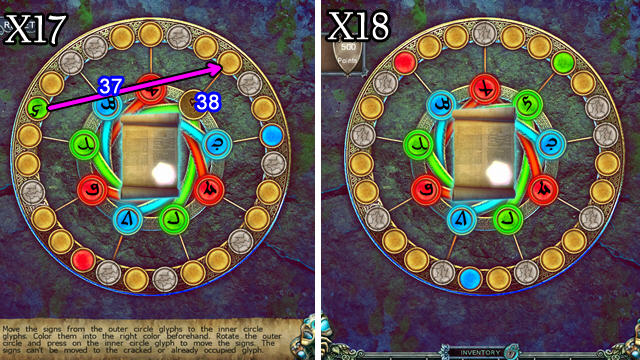
- Solution (X17-X18).
- Congratulations. You have completed Fear for Sale: The House on Black River.
Created at: 2016-04-15