

Walkthrough Menu
- General Tips
- Chapter 1: The Inn
- Chapter 2: Storage Yard
- Chapter 3: The Forest
- Chapter 4: The Spring of Tears
- Chapter 5: The Cloud Path
- Chapter 6: The Chocolate Castle
General Tips
- This is the official guide for Fearful Tales: Hansel and Gretel.
- This guide will not mention each time you have to zoom into a location; the screenshots will show each zoom scene.
- Please look at the puzzle instructions in the game by selecting the question mark in the upper right. This guide will provide instructions only when the ones in the game are not enough. However, full solutions will be given for any puzzle which is not random.
- We will use the acronym HOP for Hidden-object puzzles. Interactive items will be color-coded and some will be numbered; please follow the numbers in sequence when appropriate.
- The HOP lists and the interactive items are random; our lists may vary from yours.
- Use the map to fast travel to a location.
Chapter 1: The Inn
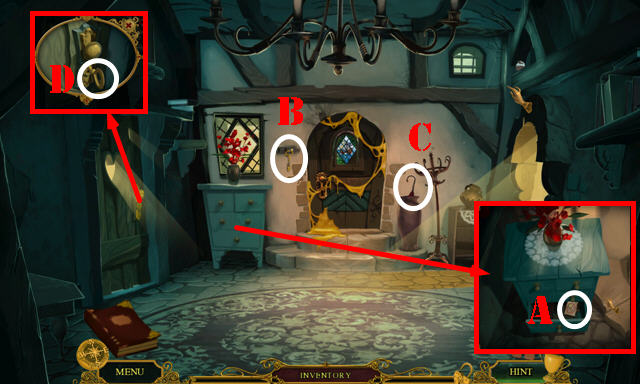
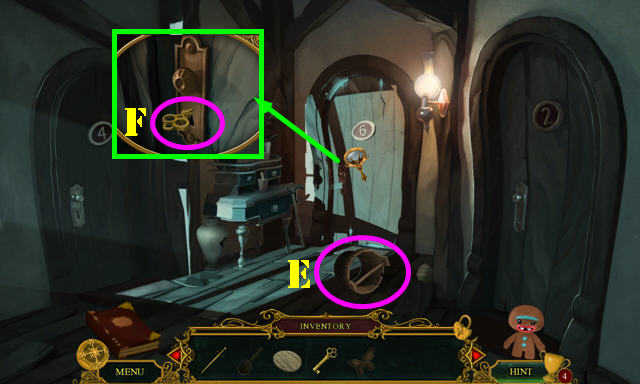
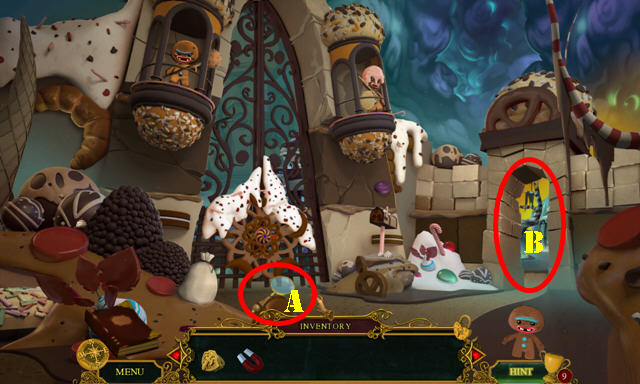
- Open the drawer; take the clue and the MATCHES (A).
- Take the CHILDREN'S ROOM KEY (B) and the UMBRELLA (C).
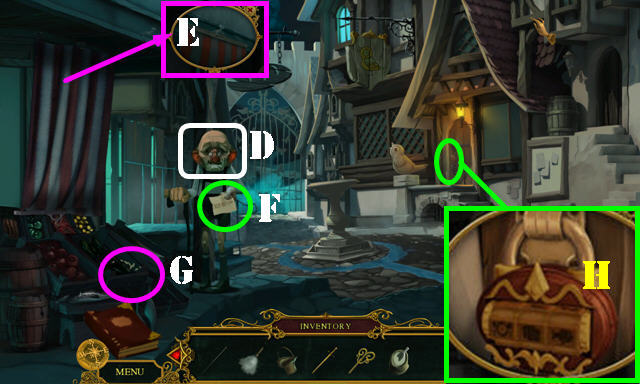
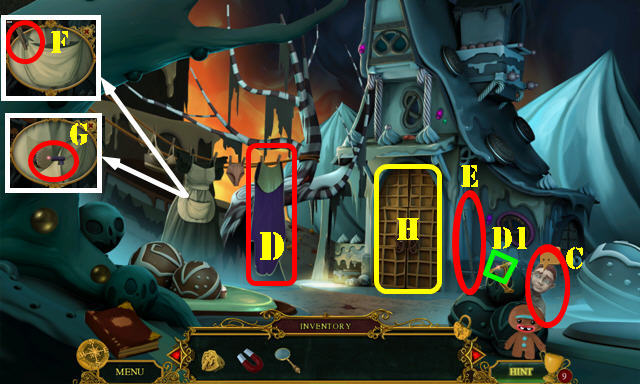
- Use the CHILDREN'S ROOM KEY in the lock (D); turn the key and go into the Children's Room.
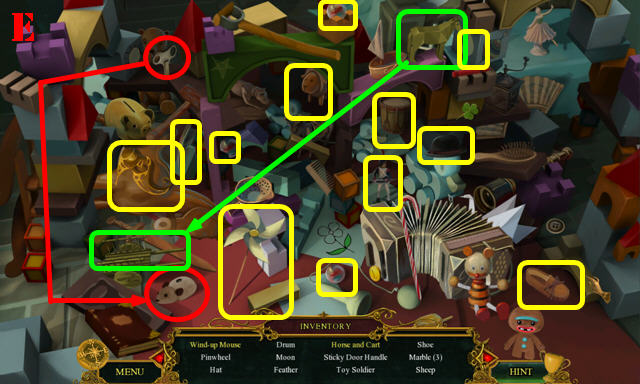
- Play the HOP.
- You receive the STICKY HANDLE (E).
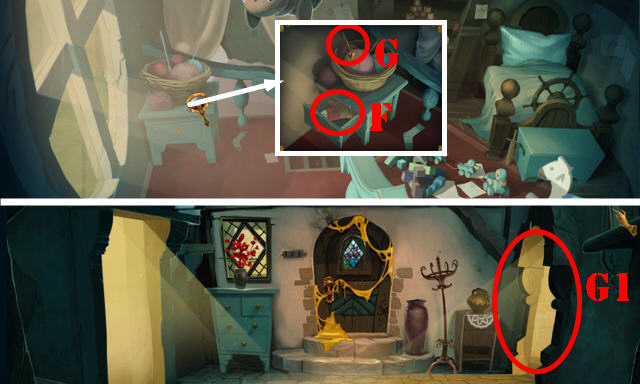
- Open the drawer and take the OVEN MITT (F).
- Take the KNITTING NEEDLE (G).
- Walk down and go into the Kitchen (G1).
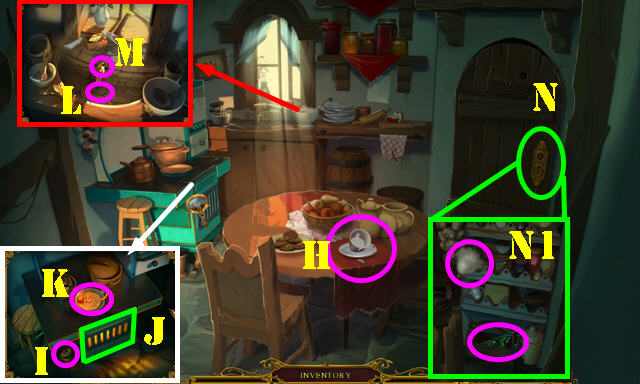
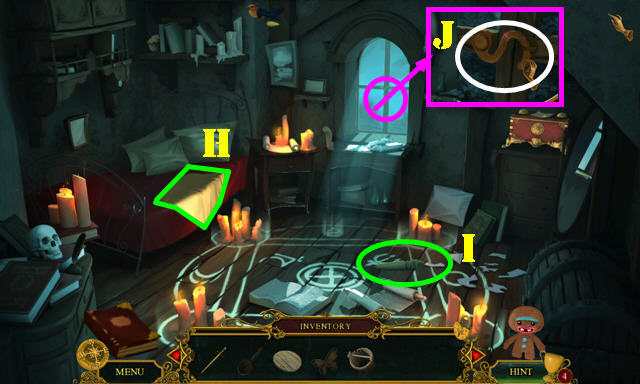
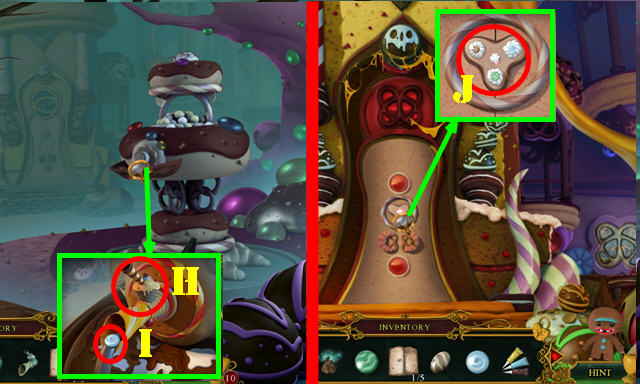
- Take the BROKEN TEACUP (H) and the SINK STOPPER (I).
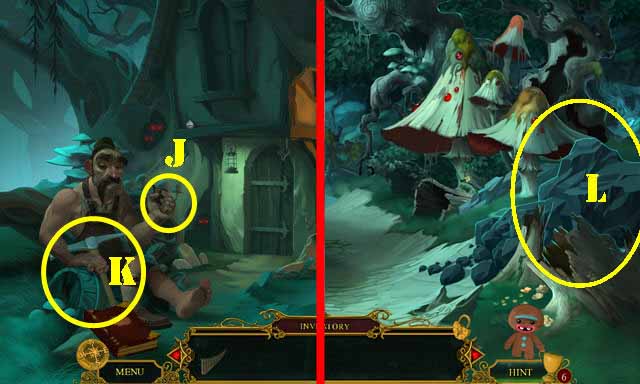
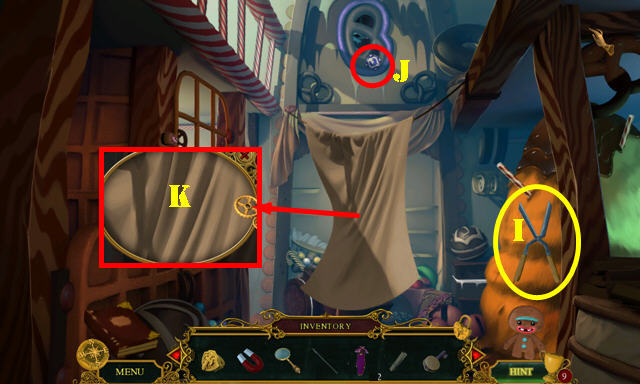
- Open the stove door and use the MATCHES in it (J).
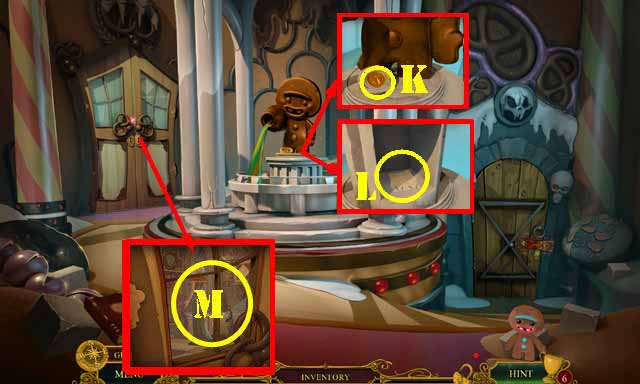
- Put the STICKY HANDLE in the pot (K) and then take the HOT HANDLE with the OVEN MITT.
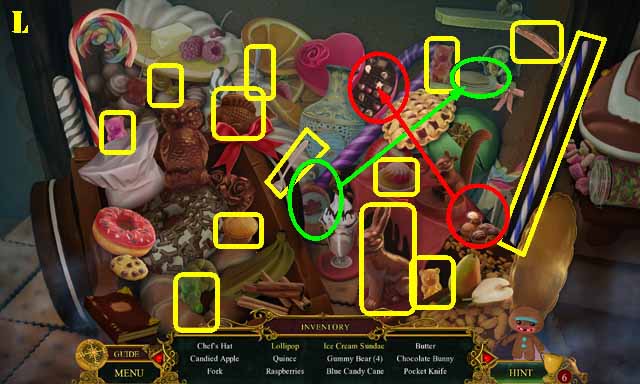
- Place the SINK STOPPER in the hole (L), then turn on the faucet (M). Put the HOT HANDLE in the water; touch the water for a cut scene, and take the PANTRY HANDLE.
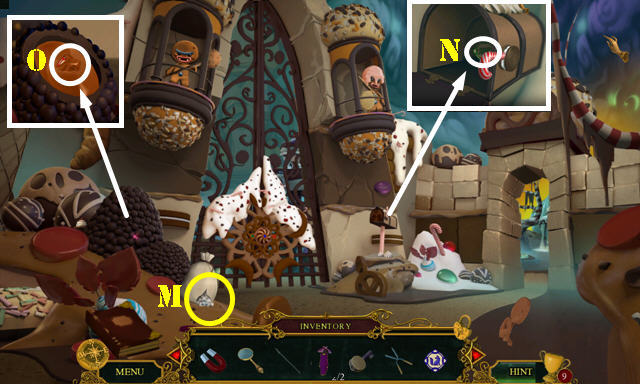
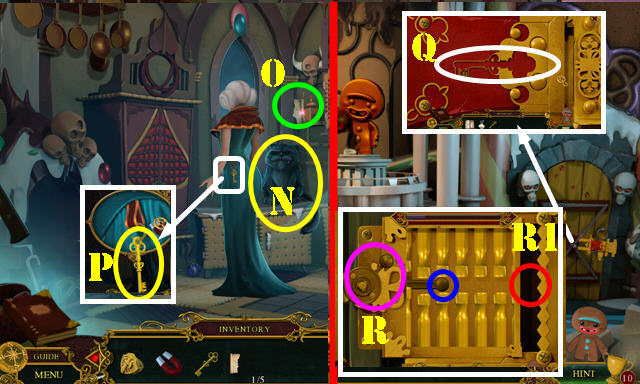
- Put the PANTRY HANDLE on the door (N); take the FEATHER and the WINDOW PIECE (N1).
- Walk down.
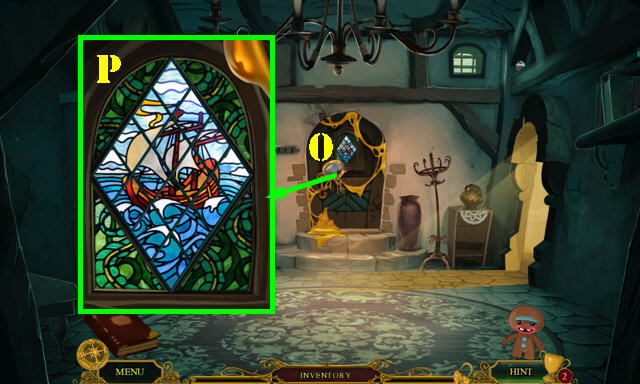
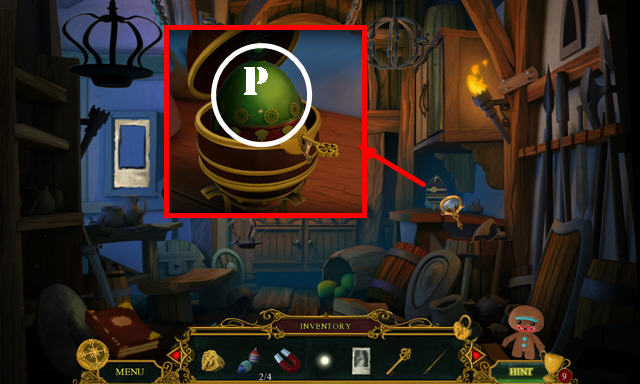
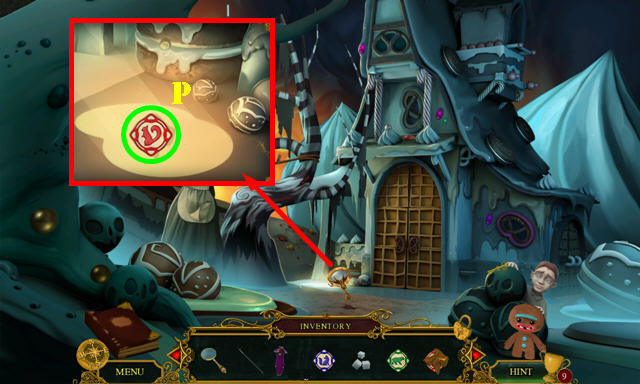
- Put the WINDOW PIECE on the door window (O) to activate a puzzle.
- Swap the pieces to form the image in the screenshot (P).
- Go through the door.
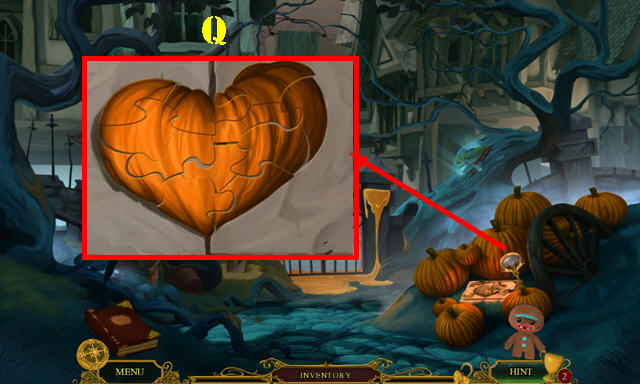
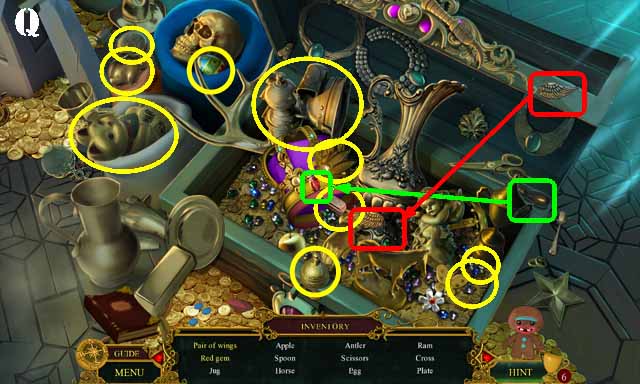
- Zoom into the pumpkin patch to activate a puzzle.
- Assemble the puzzle as shown (Q).
- Take the PUMPKIN HEART and the SCRAPER.
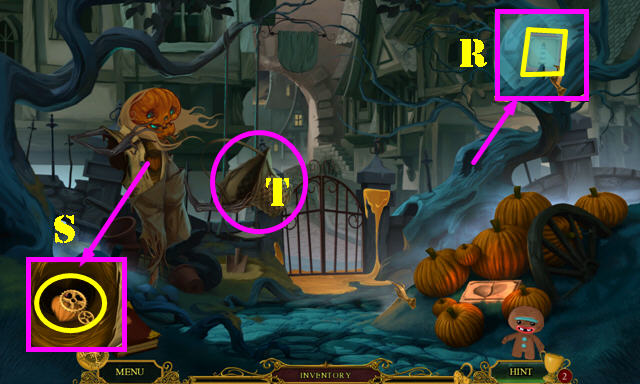
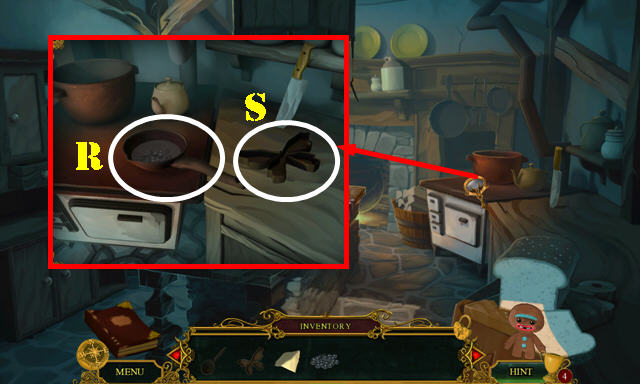
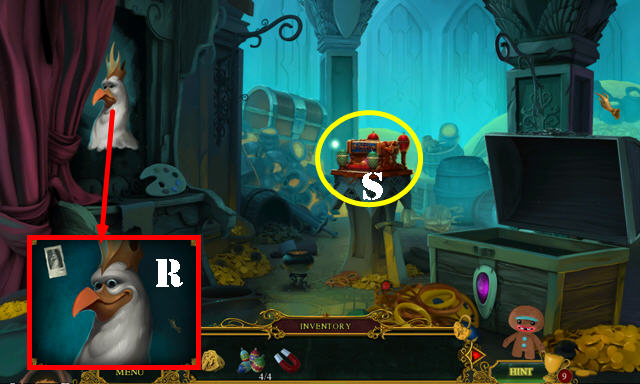
- Use the SCRAPER on the tree and then take the TOY BLOCK (R).
- Put the PUMPKIN HEART in the scarecrow (S).
- Take the WICKER BASKET (T).
- Return to the Children's Room.
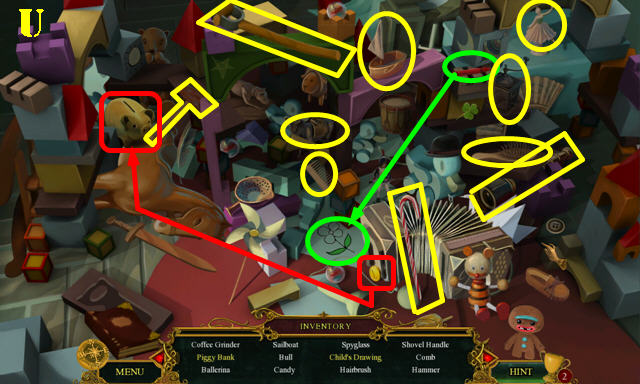
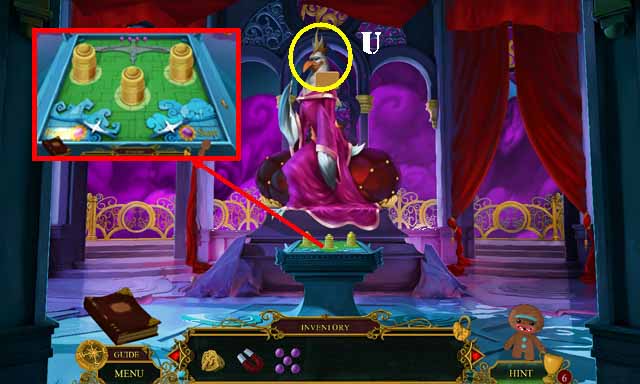
- Play the HOP.
- You receive the SHOVEL HANDLE (U).
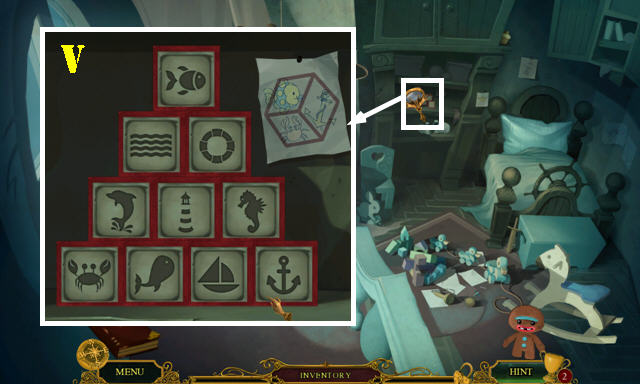
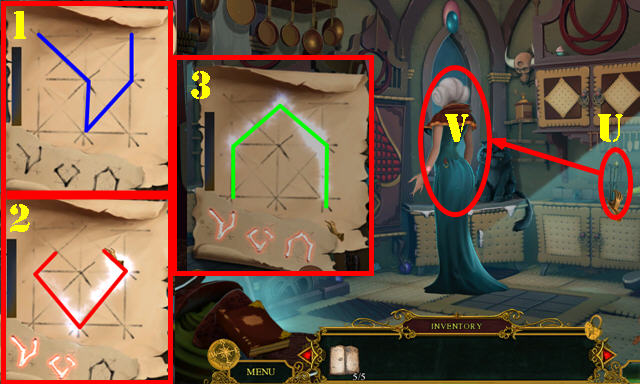
- Look closer at the blocks and place the TOY BLOCK in the slot to activate a puzzle.
- Flip the blocks a shown in the screenshot (V).
- Take the LITTLE SWORD.
- Return to the Front Yard.
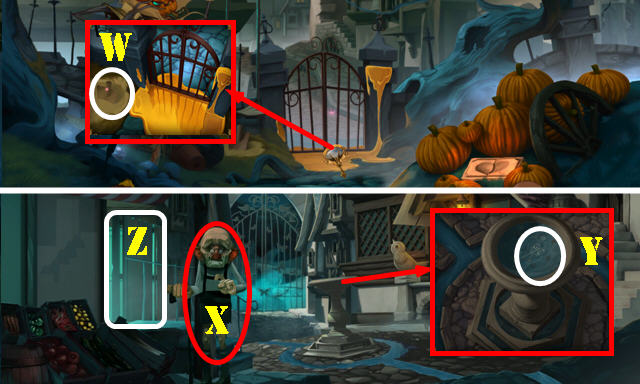
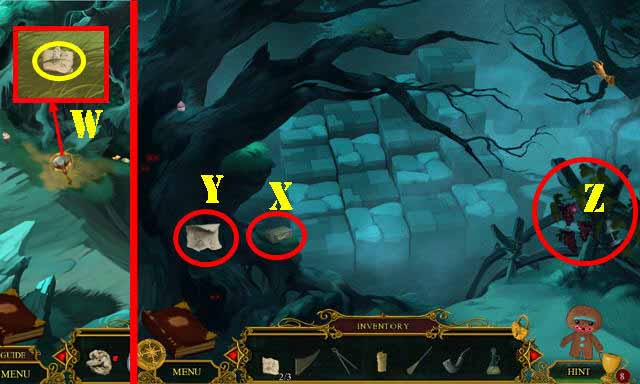
- Place the SHOVEL HANDLE on the shovel head (W).
- Go through the gate to access the Village Street.
- Talk to Mr. Gideon (X).
- Touch the water in the fountain twice for a cut scene, and then take the LAMP KEY (Y).
- Enter the Storage Yard (Z).
Chapter 2: Storage Yard
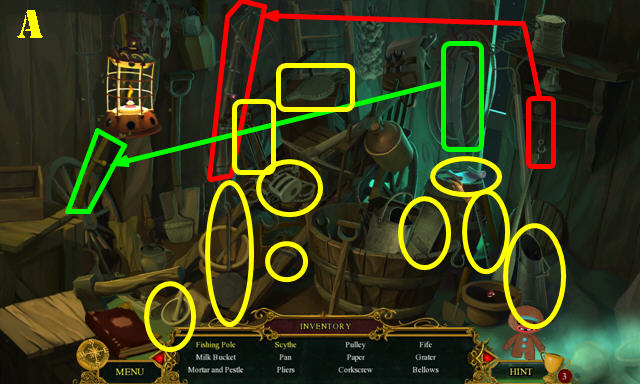
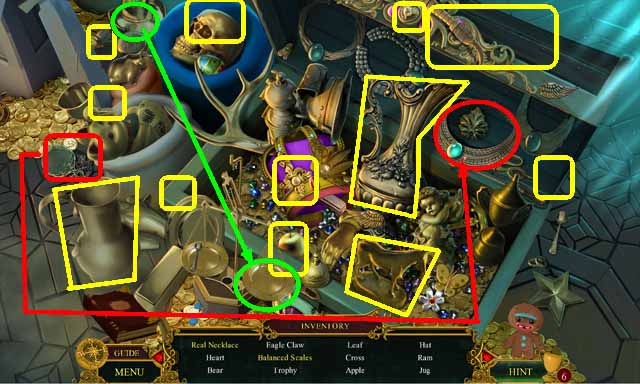
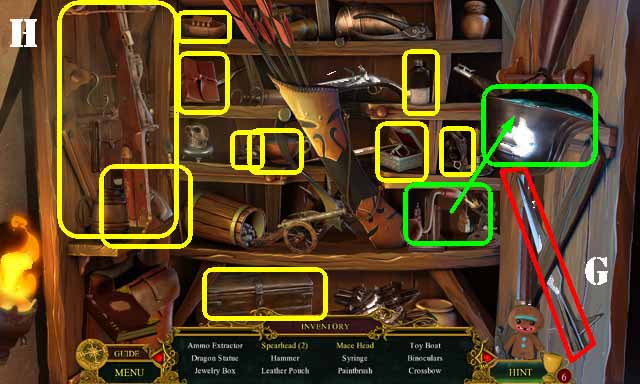
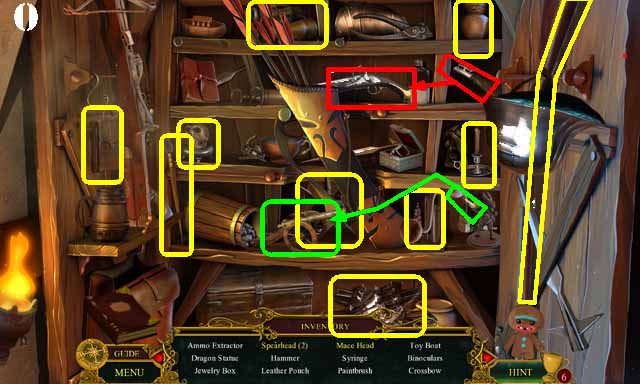
- Play the HOP.
- You receive the PLIERS (A).
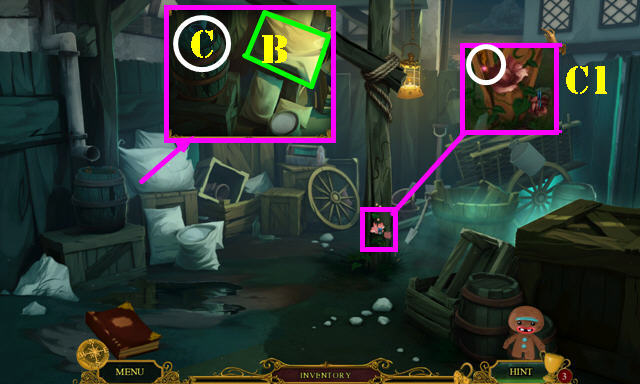
- Take the SACK OF FLOUR (B).
- Use the PLIERS on the nails (C) and take the HEARING HORN.
- Use the BROKEN TEACUP on the sticky stuff to get the CUP OF STICKY STUFF (C1).
- Walk down.
- Give the HEARING HORN to Mr. Gideon (D).
- Use the UMBRELLA on the awning (E), then take the code (F) and the APPLE SEEDS (G).
- Enter that combination on the lock (H).
- Enter Nachtigall Inn.
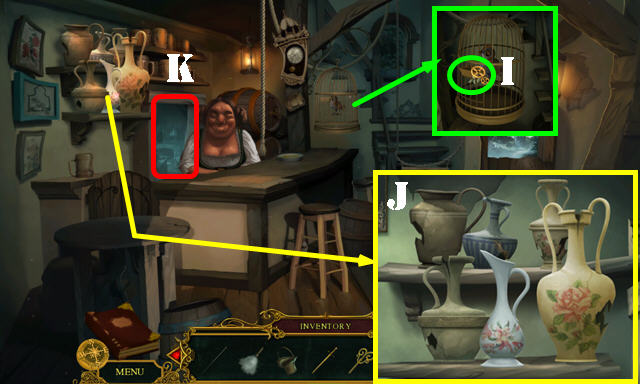
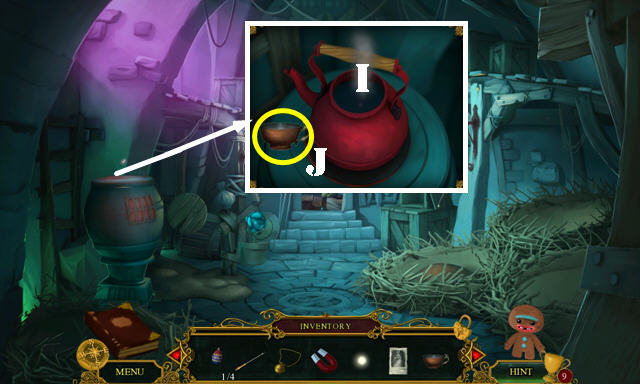
- Place the APPLE SEEDS in the birdcage tray (I).
- Play the jugs mini-game. Swap the jugs and rotate them into place.
- Solution (J). You receive the JUG.
- Go to the Inn's Kitchen (K).
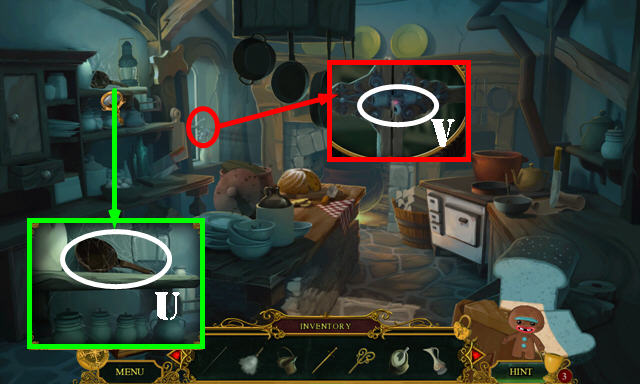
- Remove the spider web with the FEATHER DUSTER and take the LADLE (U).
- Pull the latch and then use the KNITTING NEEDLE on it (V) to activate a HOP.
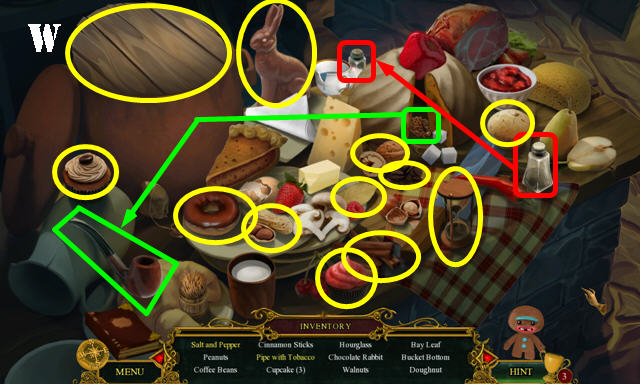
- Play the HOP.
- You receive the BUCKET BOTTOM (W).
- Walk down and go through the right door to the Orchard.
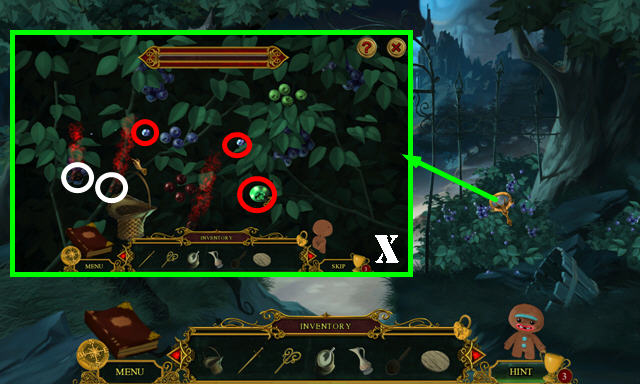
- Use the WICKER BASKET on the blueberries to activate a mini-game (X).
- Use the basket to collect the fresh berries (red); avoid the spoiled ones (white).
- You receive the BLUEBERRIES.
- Walk down twice.
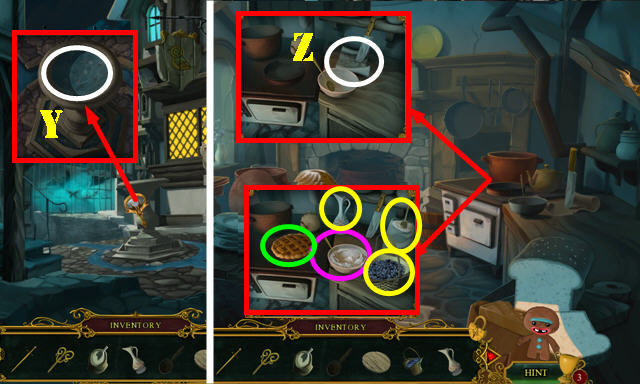
- Use the JUG in the fountain to receive the JUG OF WATER (Y).
- Return to the Inn's Kitchen.
- Take the recipe (Z).
- Put down the SACK OF FLOUR, BLUEBERRIES, and JUG OF WATER (yellow).
- Touch the flour and then the jug of water. Touch the spoon (purple) and then the mix.
- Touch the blueberries and then touch the pie twice. Take the PIE (green).
- Walk down.
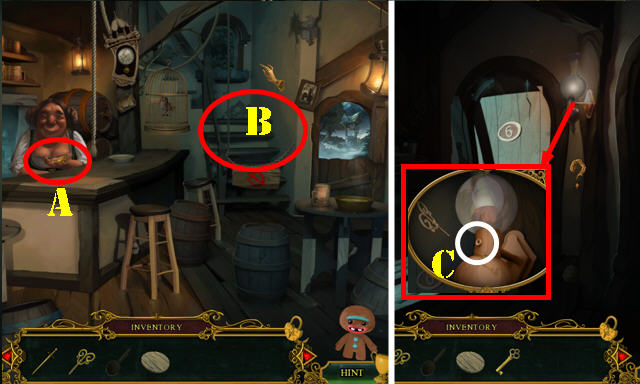
- Give the PIE to the cook and take the LADY'S ROOM KEY (A).
- Go to the Inn's Second Floor (B).
- Use the LAMP KEY on the lamp (C) to activate a HOP.
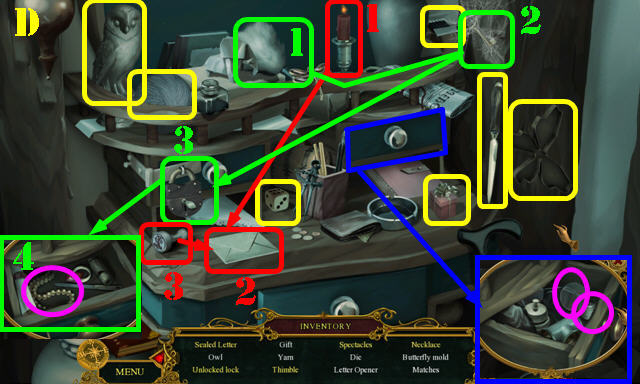
- Play the HOP.
- You receive the BUTTERFLY MOLD (D).
- Take the BROKEN BUCKET (E).
- Use the LADY'S ROOM KEY in the lock (F); turn the key and enter the Strange Lady's Room.
- Touch anywhere on the scene.
- Take the RAG (H) and the STOOL LEG (I).
- Open the latch (J).
- Return to the Orchard.
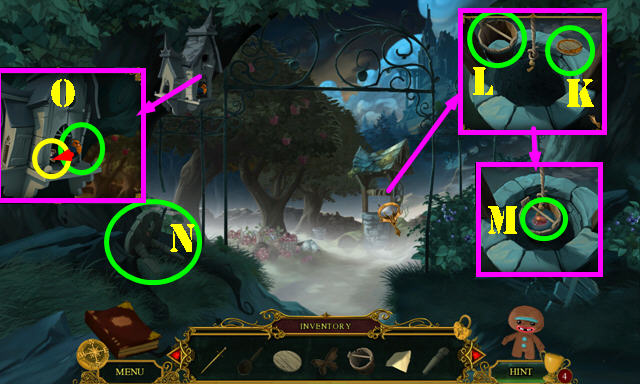
- Place the BUCKET BOTTOM (K) and the BROKEN BUCKET (L) on the well.
- Use the CUP OF STICKY STUFF on the bucket bottom and then touch it.
- Take the WORM (M).
- Place the STOOL LEG on the stool (N).
- Give the WORM to the bird and take the TOY SHIELD (O).
- Return to the Strange Lady's Room.
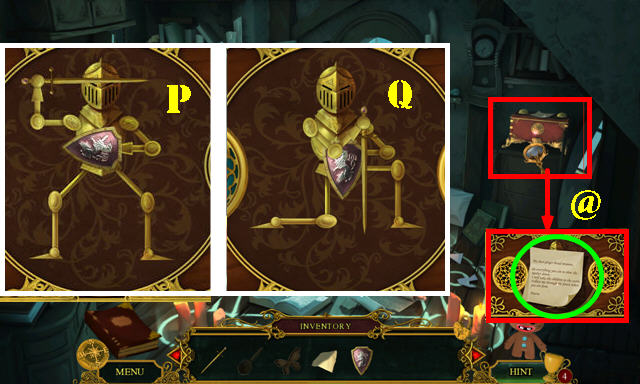
- Take the note (@); place the LITTLE SWORD and the TOY SHIELD on the knight to activate a mini-game.
- Select the joints to position the knight as shown (P and Q).
- Take the LEAD AMMUNITION.
- Return to the Inn's Kitchen.
- Put down the LADLE (R) and the BUTTERFLY MOLD (S).
- Place the LEAD AMMUNITION in the ladle.
- Touch the ladle and take the BUTTERFLY KEY.
- Return to the Village Street.
- Put the BUTTERFLY KEY in the lock (A).
- Go through the gate to the Forest Entrance.
Chapter 3: The Forest
- Take the WORK GLOVES 1/2 (B).
- Take the EMPTY JAR (C).
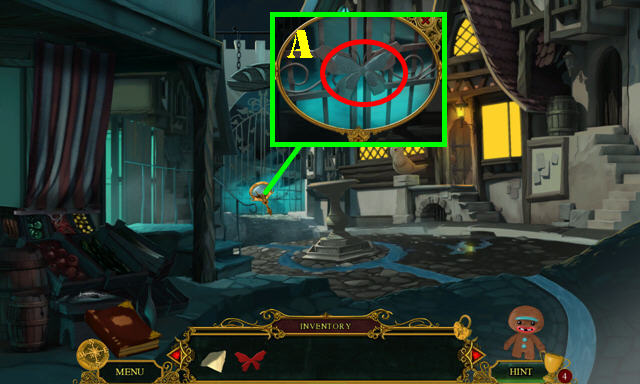
- Try to go forward to the Crossroads, and then touch the vines for a mini-game (D).
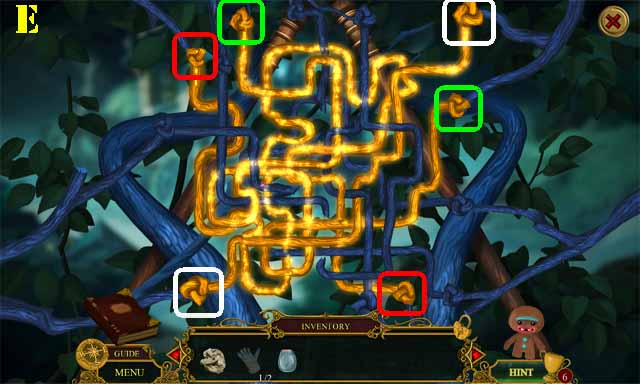
- Select both ends of the same rope. The solution is color-coded (E).
- Take the BRANCH.
- Go forward to the Crossroads.

- Take the SHARP NUTSHELL (F).
- Go left to the Battlefield Remains (G).
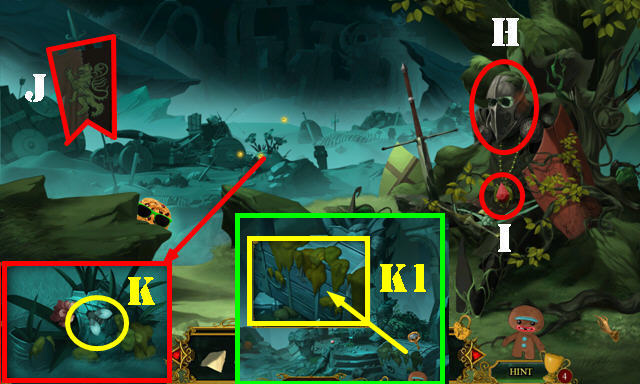
- Talk to the knight (H).
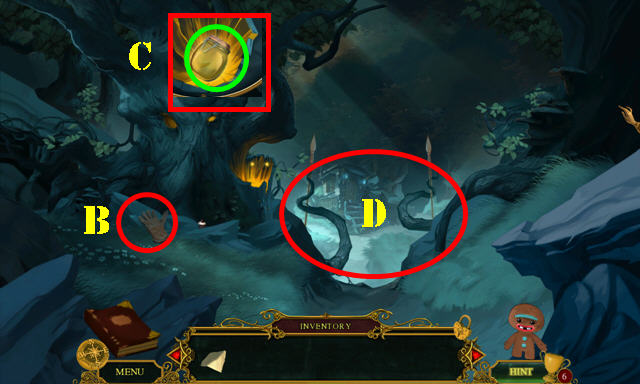
- Take the AMULET PIECE 1/3 (I).
- Move the flag (J) and take the GUNPOWDER SACK.
- Use the EMPTY JAR to get the MOSS-EATING MOTH (K).
- Go forward to Castle Ruins.
- Zoom into the chest and use the MOSS-EATING MOTH on it to activate a HOP (K1).
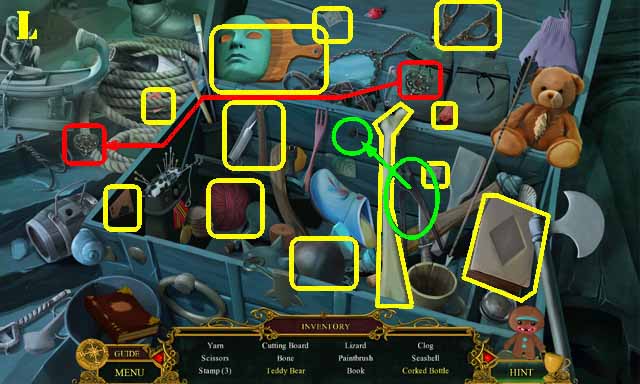
- Play the HOP.
- You receive the AMULET PIECE 2/3 (L).
- Walk down twice.
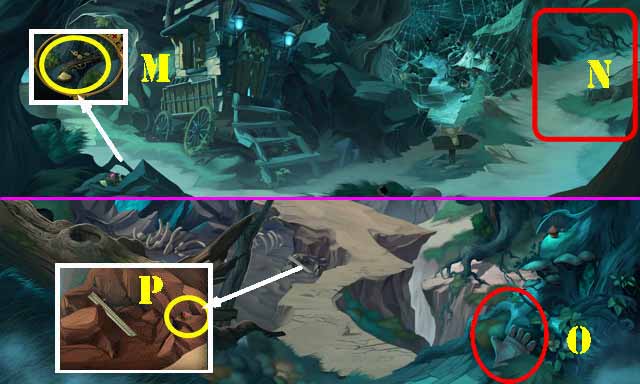
- Use the GUNPOWDER SACK on the lighter; take the FLINTLOCK LIGHTER (M).
- Head right to the Lynx Den (N).
- Take the 2/2 WORK GLOVES (O).
- Take the 3/3 AMULET PIECE (P).
- Walk down.
- Use the 2 WORK GLOVES on the trap and then use the SHARP NUTSHELL on the boot. Use the BRANCH in the slit to get the TROWEL (Q).
- Return to the Castle Ruins.
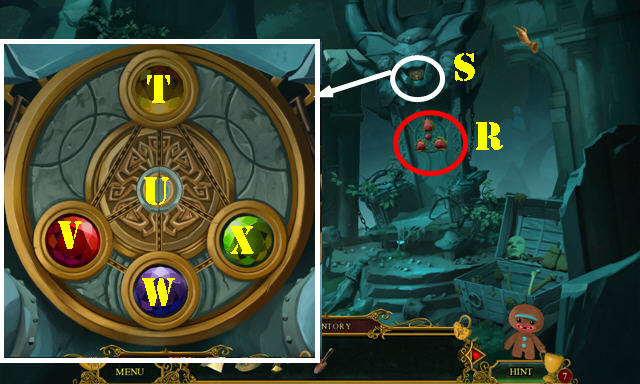
- Place the 3 AMULET PIECES in the slots (R) and then zoom into the puzzle (S).
- Solution: V, W, X, U, T, V, W, and U.
- Dip the RAG in the oil to get the OILY RAG (S).
- Walk down.
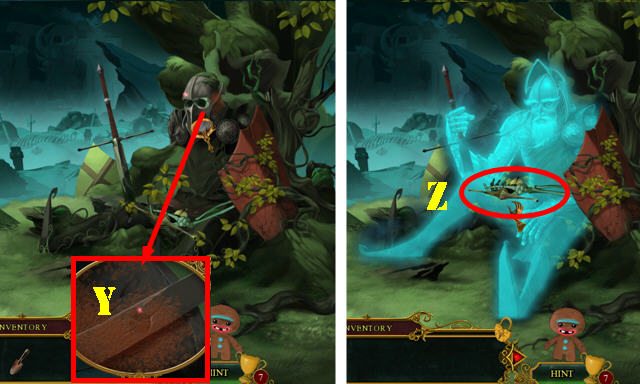
- Use the OILY RAG on the helmet and then touch it (Y).
- Talk to the knight spirit and then take the SWORD HANDLE (Z).
- Return to the Lynx Den.
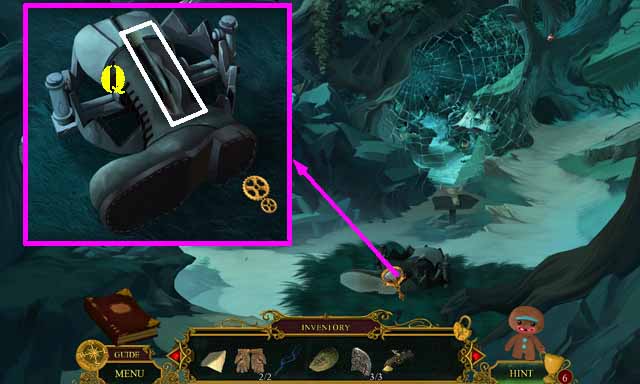
- Use the TROWEL in the dirt; use the SHARP NUTSHELL on the bag and take WAGON LOCK PIECE (A).
- Walk down.
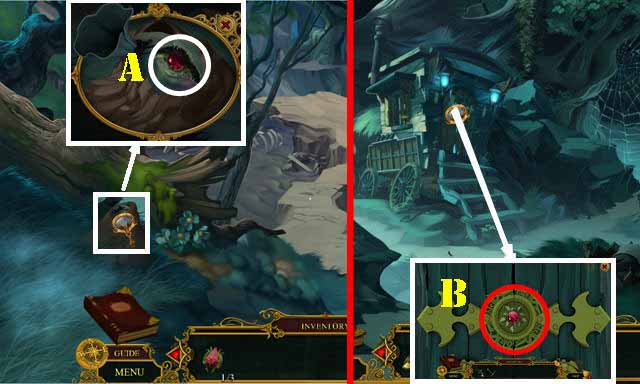
- Place the WAGON LOCK PIECE in the slot (B) to activate a puzzle.
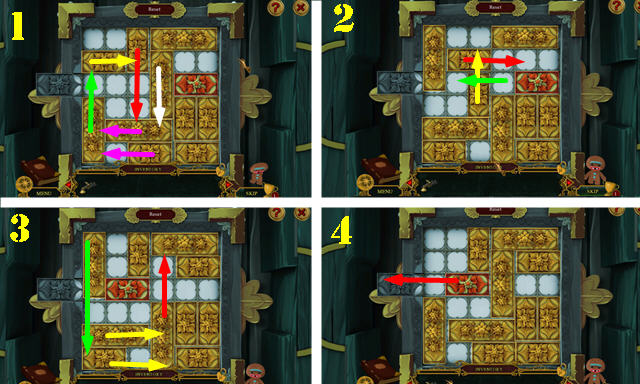
- Slide the red lock to the exit.
- Move the blocks in the direction of the arrows in this order: Red, Yellow, Green, Purple, and White (1-4).

- Play the HOP.
- You receive the FERTILIZER SACK (C).
- Return to the Castle Ruins.
- Use the FERTILIZER SACK on the carrots (B) and then take the LASSO (C).
- Return to the Lynx Den.
- Place the SWORD HANDLE on the blade and then use the LASSO to get the SWORD (D).
- Walk down.
- Play the HOP.
- You receive the INSECT REPELLENT (E).
- Use the INSECT REPELLENT and then the SWORD on the spider web (F). Go forward to the Clearing.
- Touch anywhere on the scene.
- Take the PITCHER (G).
- Go to the Spring of Tears (H).
Chapter 4: The Spring of Tears
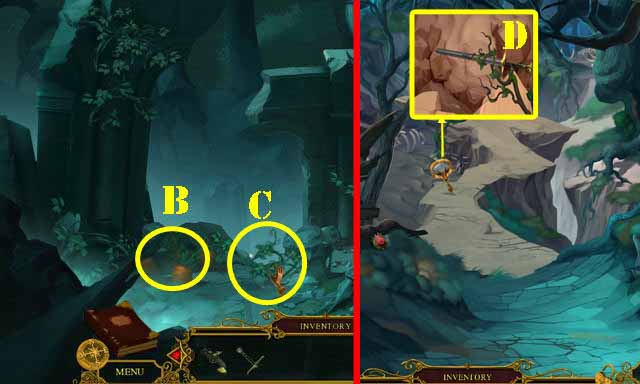
- Use the PITCHER on the tears to collect the PITCHER WITH SALT WATER (I).
- Go to Outside the Goblin's Hut (J).
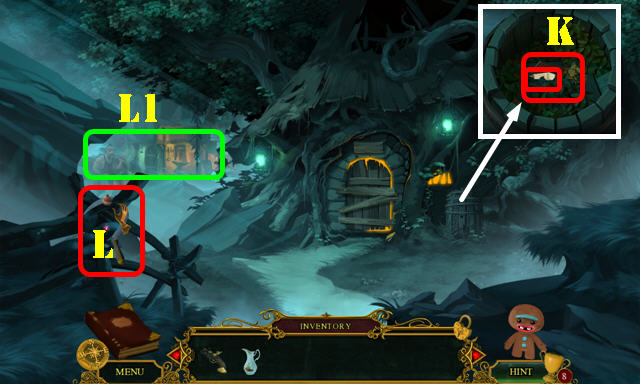
- Remove the leaves; take the MAGIC FLUTE and the RECIPE PIECE 1/3 (K).
- Take the SICKLE (L).
- Go to the Smithy (L1).
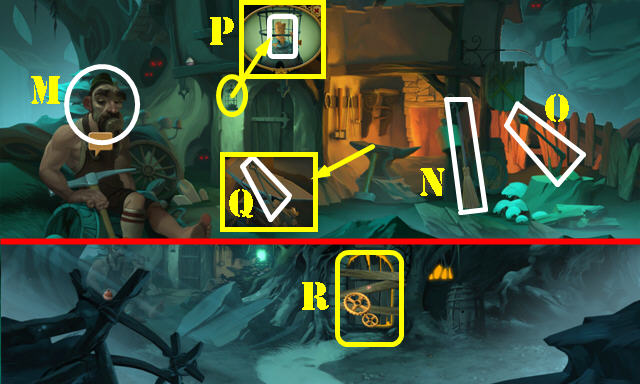
- Talk to the smithy (M).
- Take the BROOM (N), AXE (O), CANDLE (P), and TONGS (Q).
- Walk down.
- Use the AXE on the boards (R).
- Enter the Goblin's Hut.
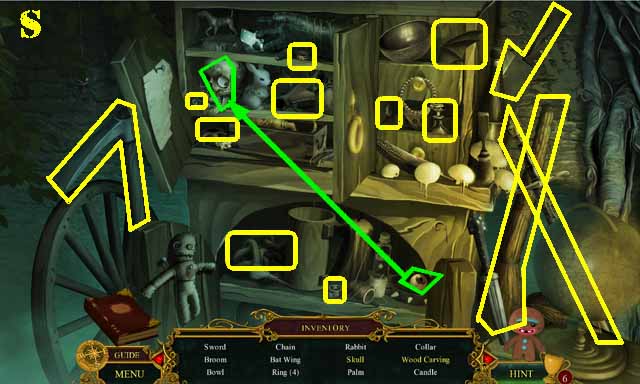
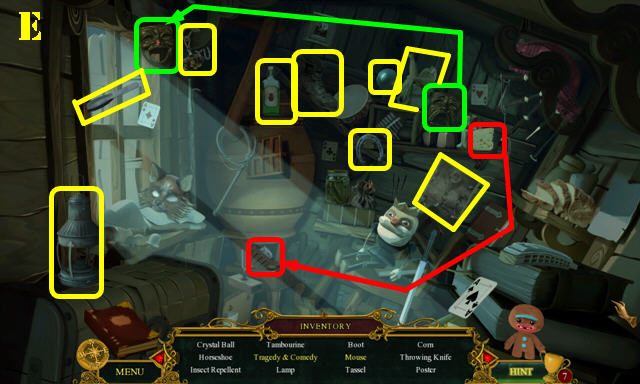
- Play the HOP.
- Open both doors.
- You receive the BOWL (S).
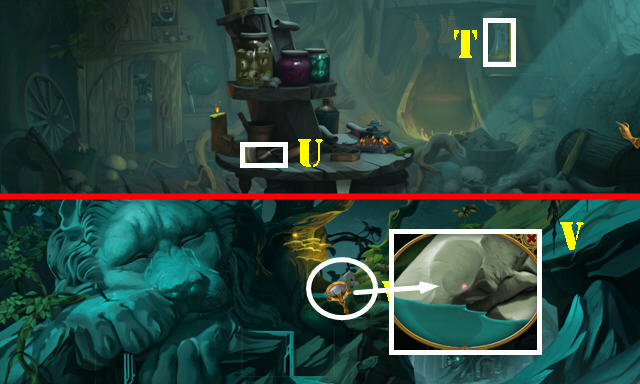
- Take the OLIVE OIL (T) and TOBACCO PIPE (U).
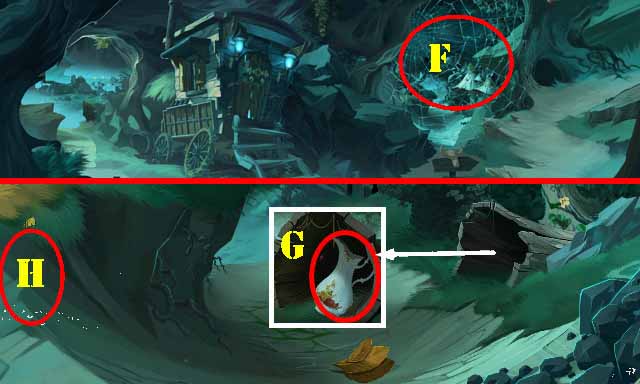
- Return to the Spring of Tears.
- Use the BOWL to get the CLAY (V).
- Walk down.
- Use the SICKLE on the grass. Take the RECIPE PIECE 2/3 (W).
- Go forward to Chessboard Field.
- Take the TOBACCO CONTAINER (X) and the RECIPE PIECE 3/3 (Y).
- Play the bug mini-game (Z).
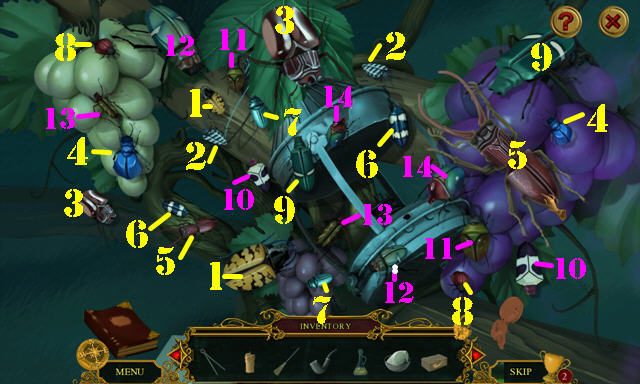
- Match up bug pairs.
- Solution (1-14).
- Take the LAMP.
- Walk down.

- Use the TOBACCO CONTAINER to get the TOBACCO LEAVES (A).
- Hang the LAMP; put the CANDLE in it and light it with the FLINTLOCK LIGHTER (B).
- Take the ALCHEMY VIAL (C).
- Return to the Goblin's Hut.
- Place the 3 RECIPE PIECES on the table (D); place the ALCHEMY VIAL in the slot (E).
- Place the PITCHER WITH SALT WATER, OLIVE OIL, and CLAY in the vial.
- Use the FLINTLOCK LIGHTER on the burner (F). Take the LION'S PAW FILLER.
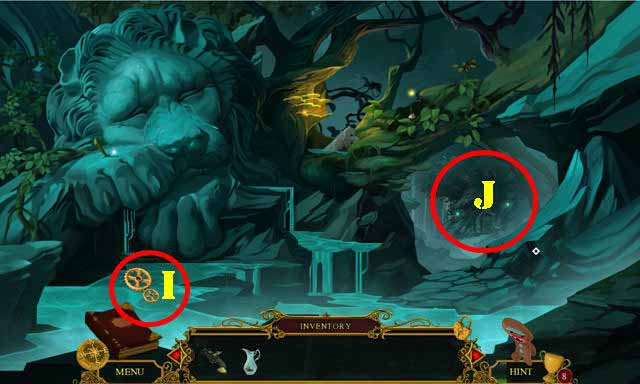
- Return to the Spring of Tears.
- Remove the thorn (G) with the TONGS. Use the LION'S PAW FILLER on the wound.
- Take the CHESS PIECES (H).
- Return to Chessboard Field.
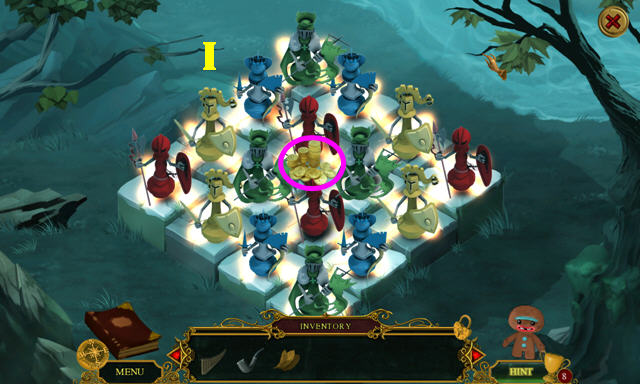
- Zoom into the chessboard and use the BROOM on it, then put the CHESS PIECES on it.
- Place the chess pieces in the right spots.
- Solution (I).
- Take the GOLD COINS (purple).
- Return to the Smithy.
- Give the TOBACCO PIPE, and then the TOBACCO LEAVES, to the smithy (J).
- Give the GOLD COINS to the smithy and take the PICKAXE (K).
- Return to the Clearing.
- Use the PICKAX 3 times on the boulders (L). Go right to the Lake.
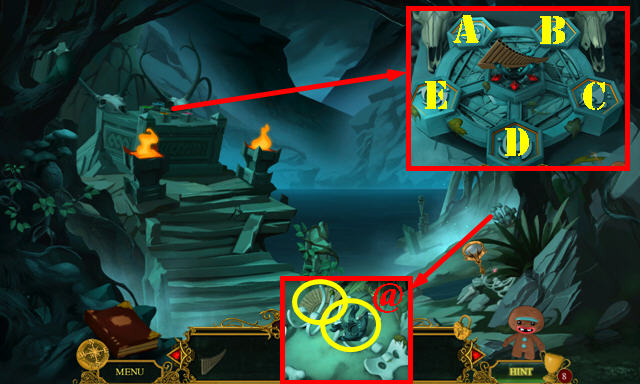
- Take the FAN and the ALTAR ITEM (@).
- Place the ALTAR ITEM and the MAGIC FLUTE on the altar to activate a puzzle. Repeat the sequence of lights.
- Round 1: D, C, B.
- Round 2: D, E, B, C.
- Round 3: A, E, D, B, C.
- Round 4: E, A, D, B, C, B.
- Round 5: E, A, B, D, C, B.
- Talk to the Lake Faerie and take the RING. Take the portal to the Cloud Path.
Chapter 5: The Cloud Path
- Take the BELL CLAPPER (F).
- Take the SKY KINGDOM FLAG (G).
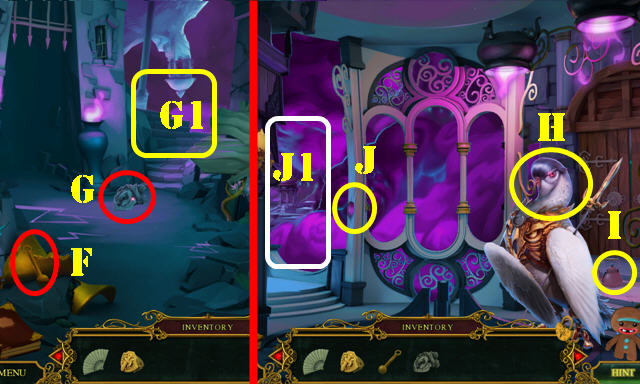
- Go to the Upside-down Watchtower (G1).
- Talk to the Pigeon Guard (H).
- Take the KETTLE (I) and PURPLE GEM (J).
- Go to the Birdbaths (J1).

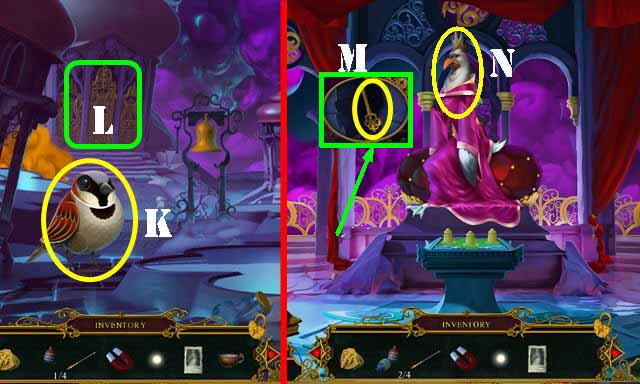
- Talk to the sparrow (K).
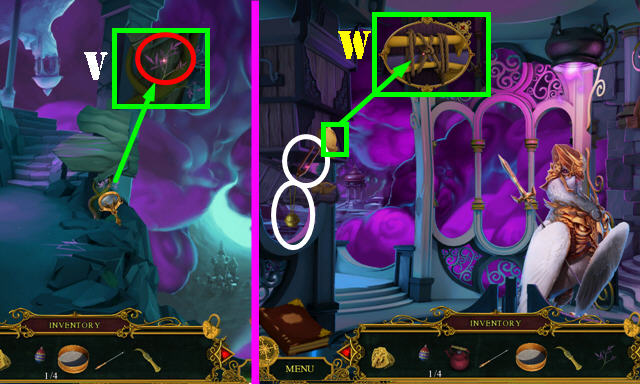
- Place the BELL CLAPPER on the bell (L) and take the EGG 1/4 (M).
- Use the KETTLE in the water to get the FILLED KETTLE (N).
- Place the SKY KINGDOM FLAG on the helmet and take the SHINY HELMET (O).
- Walk down.
- Place the SHINY HELMET on the Pigeon Guard (P) to unlock the door to the Albatross Barracks (P1).
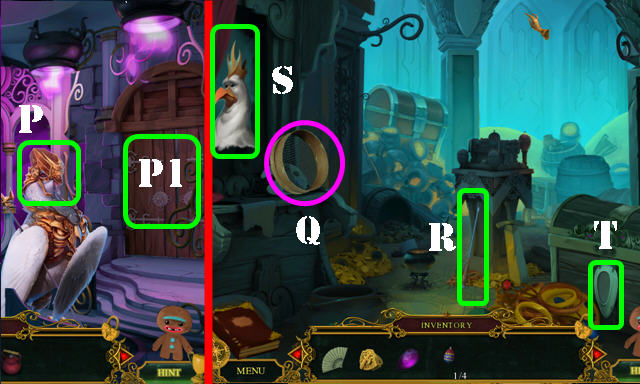
- Walk down and go into the Treasury on the left.
- Take the SIEVE (Q) and FONDUE FORK (R).
- Move the curtain and look at the picture (S).
- Place the PURPLE GEM in the slot to activate a HOP (T).
- Play the HOP.
- You receive the EAGLE'S CLAW (U).
- Walk down.
- Use the EAGLE'S CLAW to get the PINK HERBS (V).
- Return to the Upside-down Watchtower.
- Cut the rope with the EAGLE'S CLAW (W); take the TUNING FORK and the TEA INFUSER (white).
- Return to the Birdbaths.
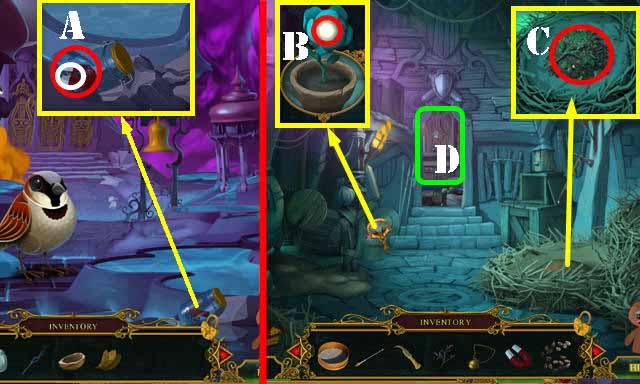
- Use the TUNING FORK on the jar. Take the MAGNET and the MAGIC SEEDS (A).
- Go to the Albatross Barracks.
- Use the MAGIC SEEDS in the soil. Take the SHINY FLOWER (B).
- Use the SIEVE in the ground to get the GLITTERING PIECES (C).
- Go to the Arsenal (D).
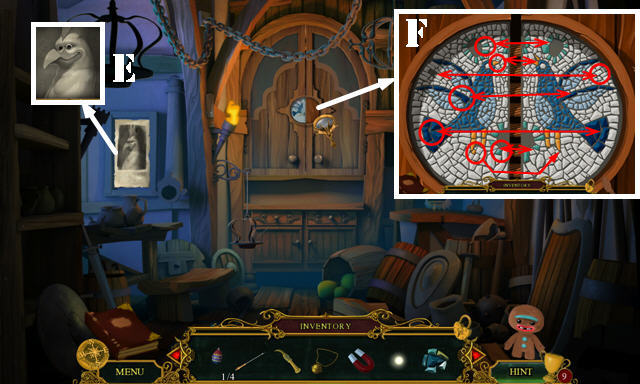
- Use the EAGLE'S CLAW on the picture to get the PORTRAIT OF THE SMILING KING (E).
- Place the GLITTERING PIECES in the slot to activate a puzzle. Find the 7 differences in both images (F).
- Play the HOP. Cut the rope around the shield (not pictured) with the sword (G).
- You receive the COPPER CUP (H).
- Walk down.
- Place the FILLED KETTLE on the stove. Put the PINK HERBS and the TEA INFUSER in the kettle (I).
- Put down the COPPER CUP (J) and use the FAN on the kettle to get the TEA.
- Return to the Birdbaths.
- Give the TEA to the swallow to receive the EGG 2/4 (K).
- Go to the Throne Room (L).
- Use the FONDUE FORK to get the CHEST KEY (M).
- Touch the King (N).
- Return to the Arsenal.
- Play the HOP.
- You receive PAINTBRUSH (O).
- Use the CHEST KEY in the lock; turn the key and take the EGG 3/4 (P).
- Return to the Treasury.
- Play the HOP.
- You receive the EGG 4/4 (Q).
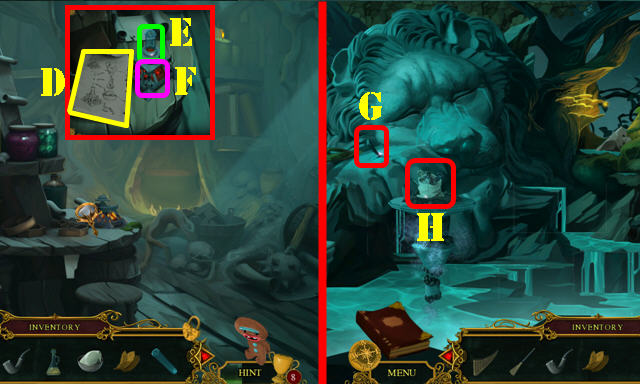
- Place the PORTRAIT OF THE SMILING KING on the picture. Use the PAINTBRUSH on the face (R).
- Use the SHINY FLOWER on the case (S); put down the 4 EGGS to activate a puzzle.
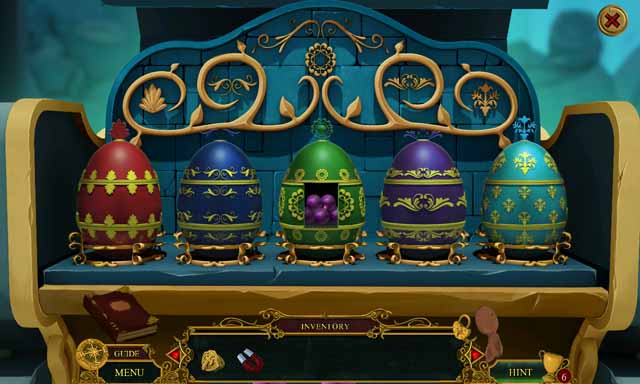
- Swap the egg parts until they form this image (T).
- Take the GAME PIECES.
- Return to the Throne Room.
- Talk to the Albatross King (U).
- Put the GAME PIECES on the board and then zoom into it.
- Guess which cup the ball is under. Solution: 1, 3, 2, 3, and 1.
- You are automatically taken to the Castle Gate.
Chapter 6: The Chocolate Castle
- Take the MAGNIFYING GLASS (A).
- Go to the Castle Backyard (B).
- Talk to the boy (C).
- Take the INVISIBILITY CLOAK (D), CELLAR KEYS (D1), GAFF (E), CLOTHESPIN (F), and MAILBOX KEY (G).
- Go into the Stall (H).
- Use the MAGNET on the haystack. Take the GARDEN SHEARS (I).
- Use the GAFF to get the FOX TOKEN (J).
- Use the CLOTHESPIN on the sheet to activate a HOP (K).
- Play the HOP.
- You receive the POCKET KNIFE (L).
- Return to the Castle Gate.
- Cut the sack with the POCKET KNIFE. Take the MANE BRUSH (M).
- Use the MAILBOX KEY in the lock and take the BEAR TOKEN (N).
- Use the GARDEN SHEARS on the chocolate and take the CHOCOLATE PIECE (O).
- Go to the Castle Backyard.
- Put down the CHOCOLATE PIECE and use the MAGNIFYING GLASS on it (P). Take the SQUIRREL TOKEN.
- Go into the Stall.

- Play the HOP.
- You receive the POUCH (Q).
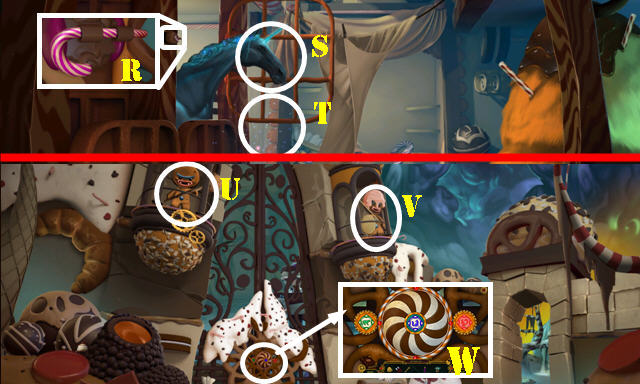
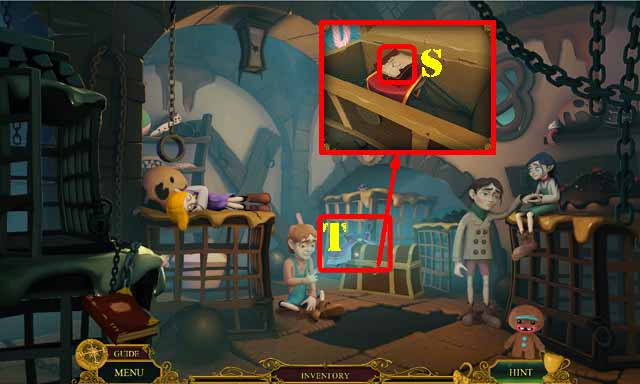
- Pull the candy cane (R). Use the MANE BRUSH on the unicorn (S).
- Use the POUCH to get the SLEEPING DUST (T).
- Return to the Castle Gate.
- Use the SLEEPING DUST on both guards (U and V).
- Place the BEAR TOKEN, FOX TOKEN, and SQUIRREL TOKEN in the slots to activate a puzzle (W).
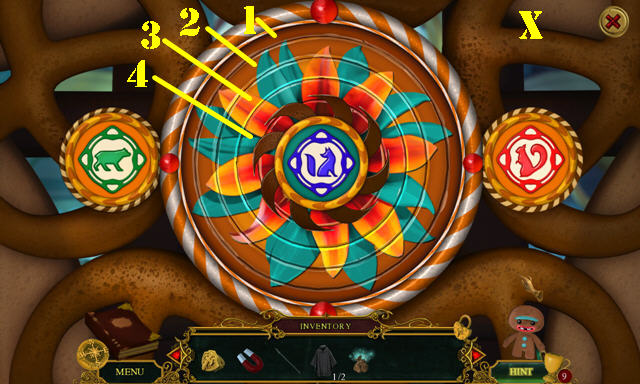
- Arrange the image as shown on the screenshot (X). Rotating one ring (1-4) affects the other.
- Go through the gate.
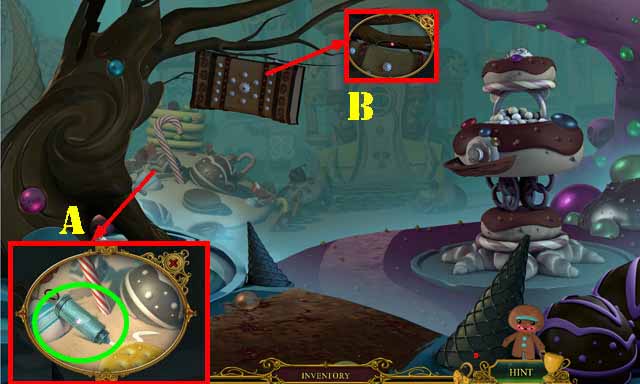
- Take the DECORATING FROSTING (A).
- Use the GAFF on the suitcase to activate a HOP (B).
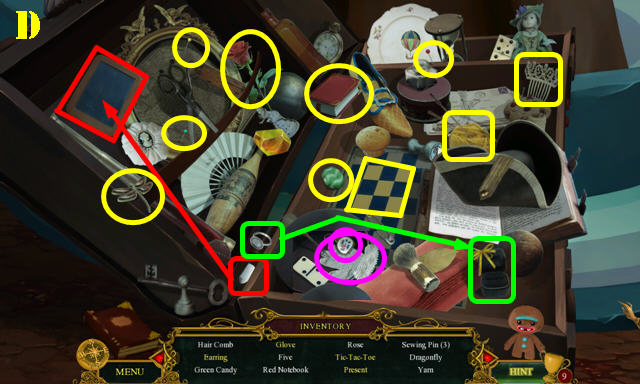
- Play the HOP.
- You receive the GREEN CANDY (D).
- Go forward.
- Talk to the kid (E) and take the TAP (F).
- Take the BROWN CANDY and the SPELL 1/4 (G).
- Walk down.
- Place the TAP on the device (H) and take the BLUE CANDY (I).
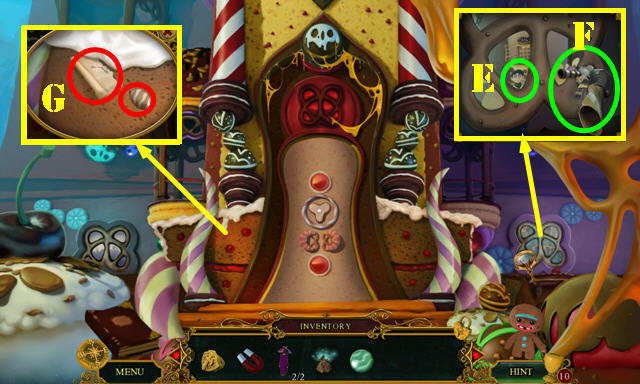
- Go forward.
- Use the DECORATING FROSTING on the door. Place the GREEN CANDY, BROWN CANDY, and BLUE CANDY on the door (J).
- Enter the Castle Lobby.
- Place the RING in the slot (K); turn it and take the SPELL 2/4 (L).
- Use the INVISIBILITY CLOAK on the door (M).
- Enter Maeva's Kitchen.
- Use the SLEEPING DUST on the cat (N) and take the SPELL 3/4 (O).
- Use the MAGNET to get MAEVA'S KEY (P).
- Walk down.
- Use the CELLAR KEYS on the door to activate a puzzle (Q).
- Move the lever (R) up and down so the ball tip (blue) never reaches the end of the line (R1) by making the ball go back towards the lever. You will win the puzzle once the meter on the top fills up.
- Take the INVISIBILITY CLOAK 2/2 (T).
- Use MAEVA'S KEY on the lock and take the SPELL 4/4 (S).
- Return to Maeva's Kitchen.
- Take the MAGIC WAND (U).
- Use the MAGIC WAND on Maeva (V).
- Trace the spells on the paper (1-3).
- Congratulations, you have completed Fearful Tales: Hansel and Gretel!
Created at: 2013-09-23