

Walkthrough Menu
- General Tips
- Chapter 1: The Barn
- Chapter 2: Forest
- Chapter 3: Snowville
- Chapter 4: Ancient Pantheon Ruins
- Chapter 5: Forest Reserve
General Tips
- This is the official guide for Fierce Tales: Feline Sight!
- This guide will not mention each time you have to zoom into a location; the screenshots will show each zoom scene.
- Hidden-object puzzles are referred to as HOPs. This guide will not show screenshots of the HOPs, however, it will mention when an HOP is available and the inventory item you'll collect from it.
- This guide will give step-by-step solutions for all puzzles which are not random. Please read the instructions in the game for each puzzle.
Chapter 1: The Barn
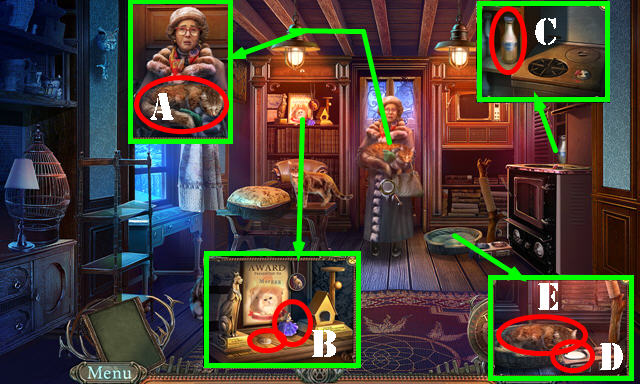
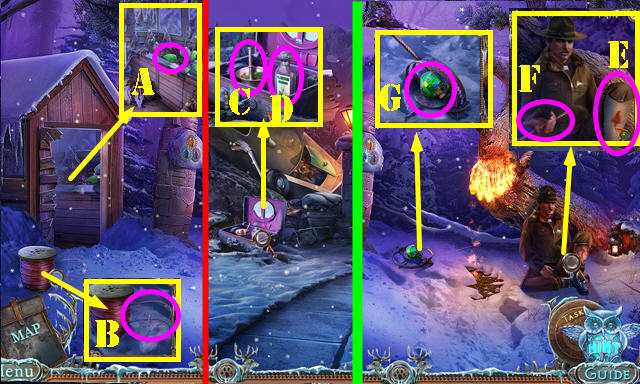
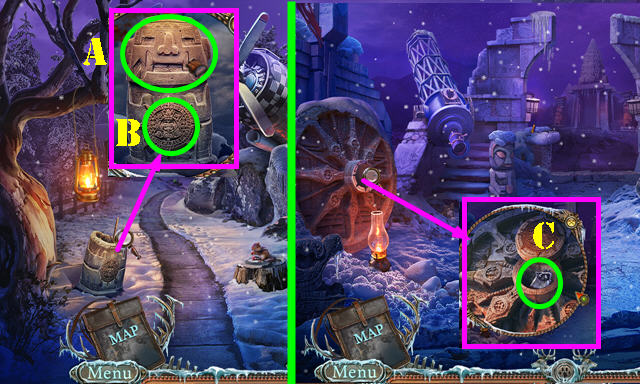
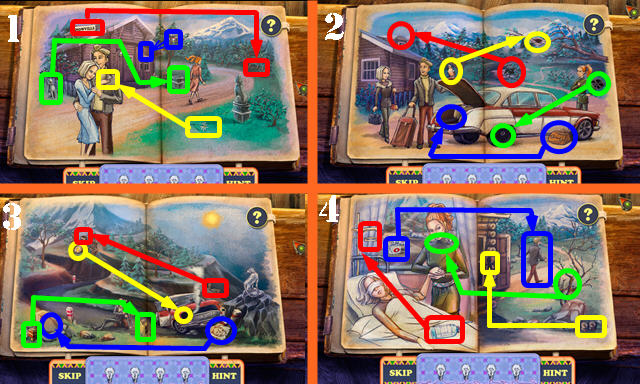
- Talk to the lady; take the CAT (A).
- Take the DANCER FIGURINE 1/2 and CAT MEDICINE (B).
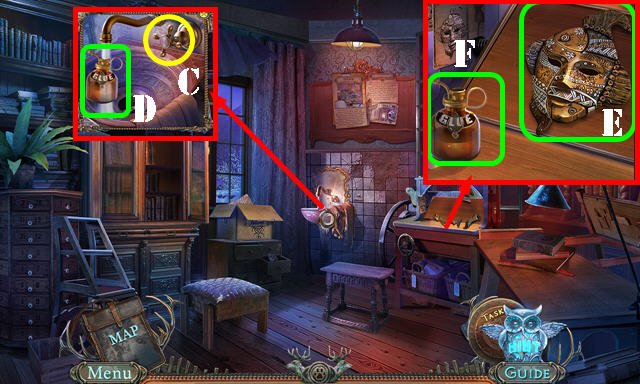
- Open the door; take the MILK BOTTLE (C) and remove its cap (inventory).
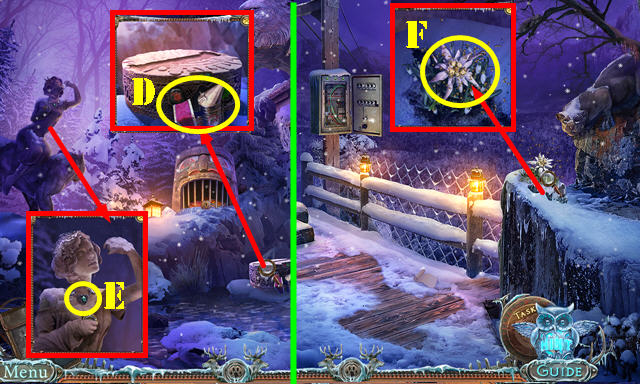
- Place the MILK BOTTLE and CAT MEDICINE (D). Put down the CAT (E).
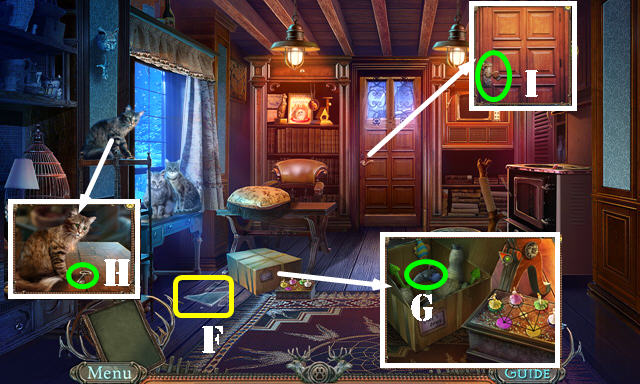
- Take the GLASS SHARD (F); use it on the box. Move the items and take the MOUSE (G).
- Place the MOUSE on the cat. Take the DOOR KEY (H).
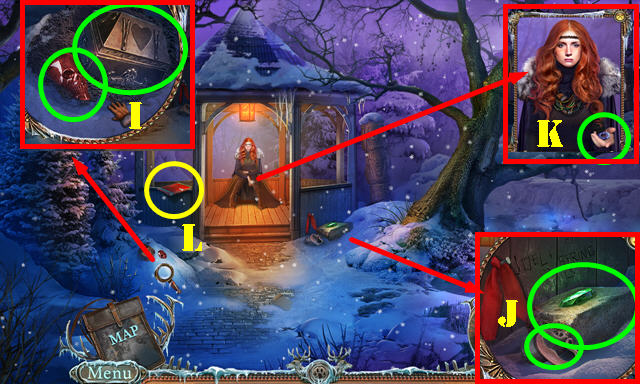
- Use the DOOR KEY (I); exit.
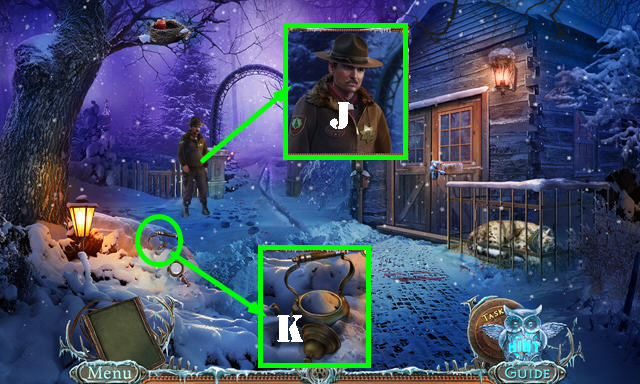
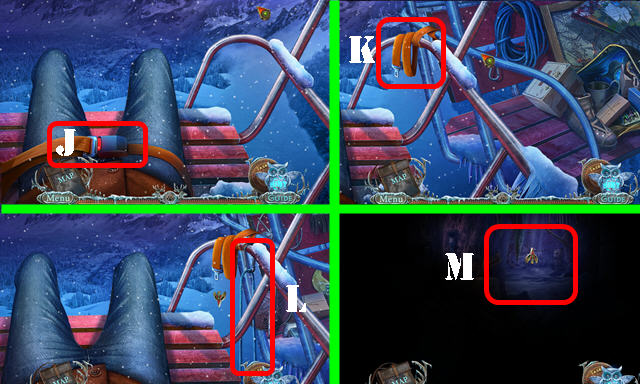
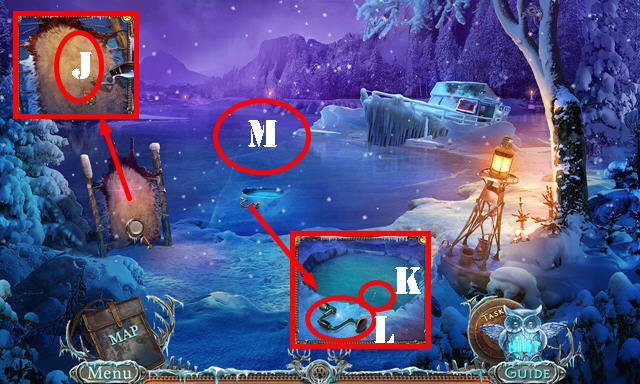
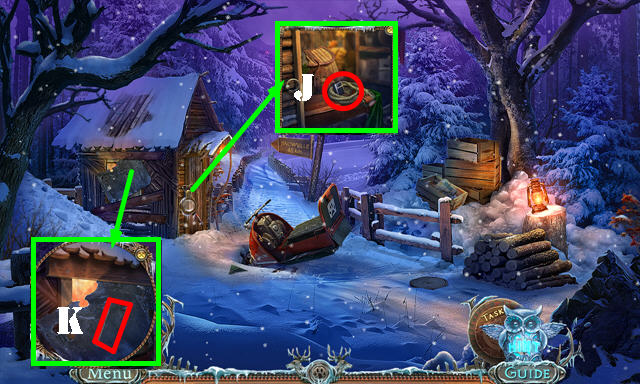
- Talk to the forest ranger (J).
- Remove the snow; take off the lid, touch the snow and take the TEAPOT WITH SNOW (K).
- Walk down.
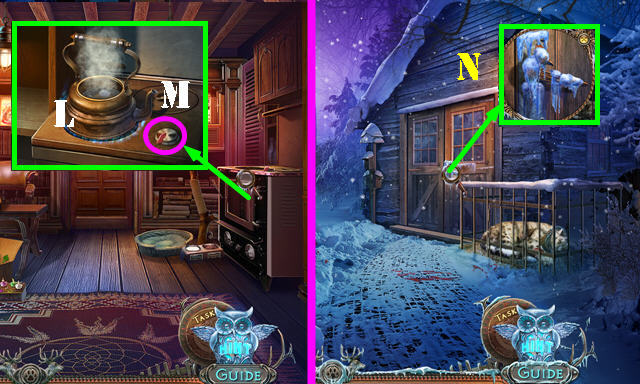
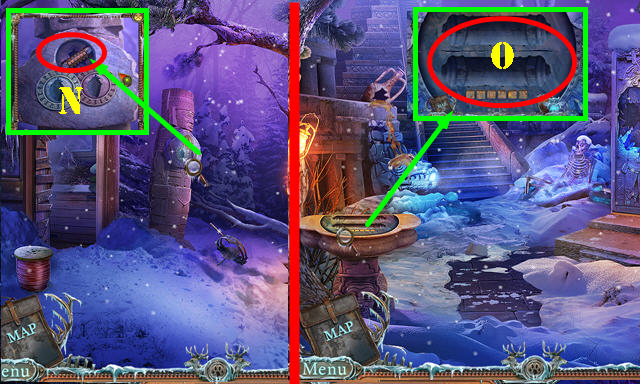
- Place the TEAPOT WITH SNOW (L); turn the knob (M). Take the HOT WATER.
- Go out the door.
- Pour the HOT WATER (N); turn the handle. Enter the Barn.

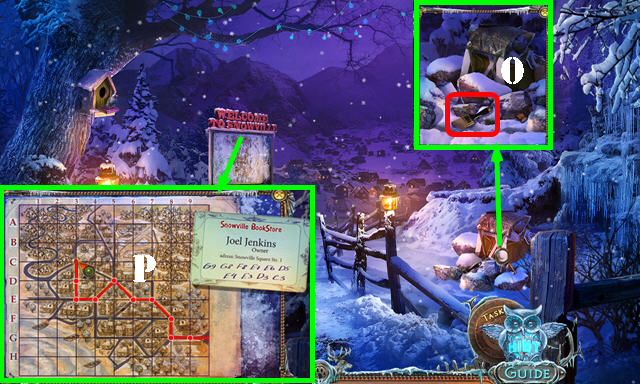
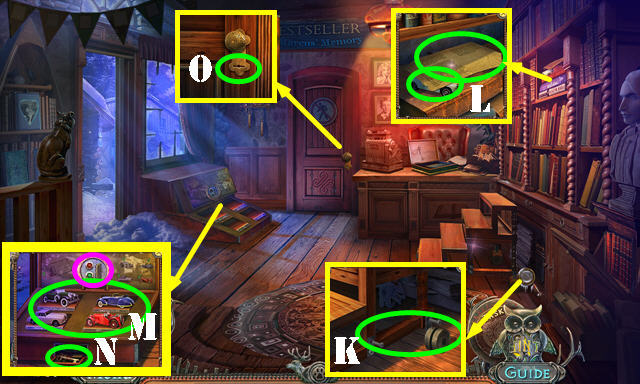
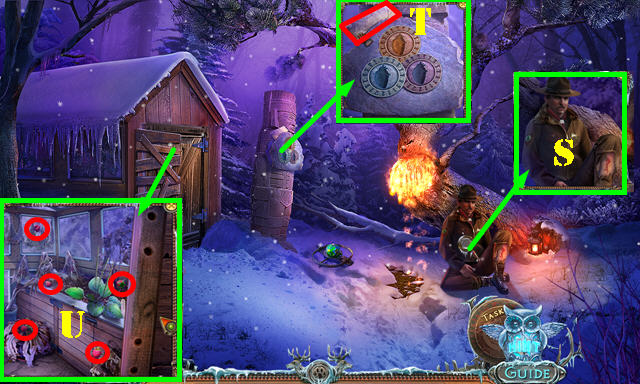
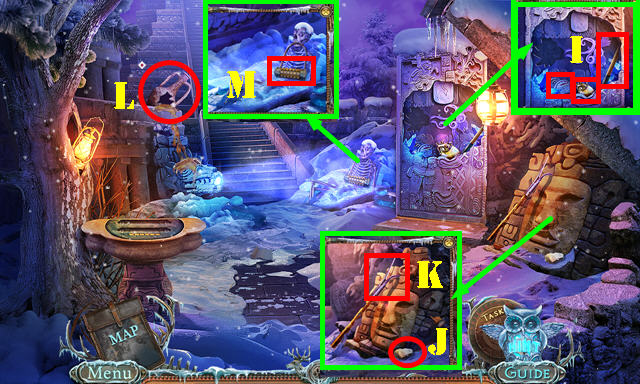
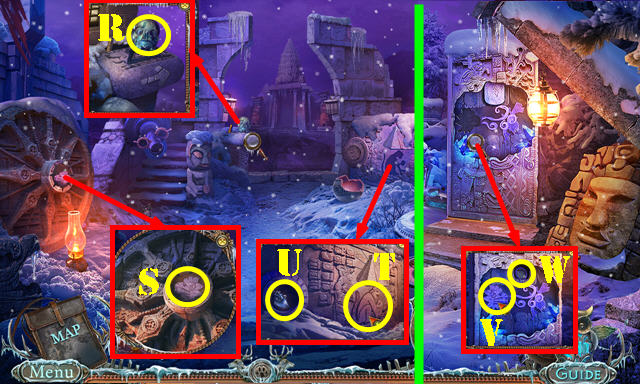
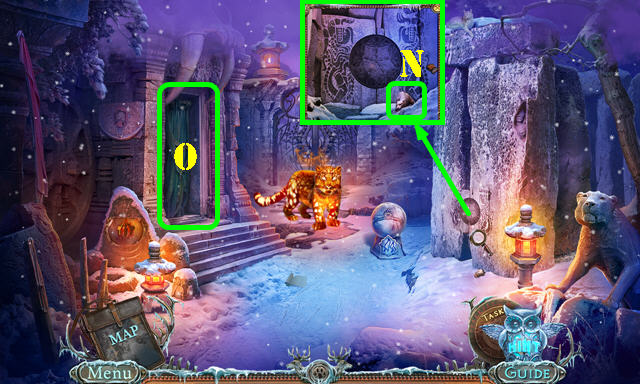
- Open the lid; take the HAMMER and SLINGSHOT (O).
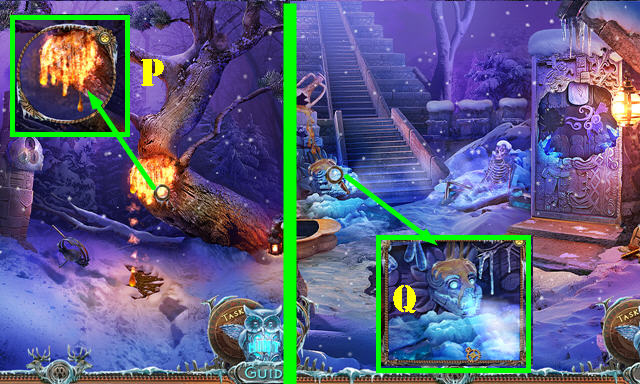
- Move the basket and box. Touch the cabinet for a HOP (P); play it to get the VETERINARY KIT.
- Walk down.
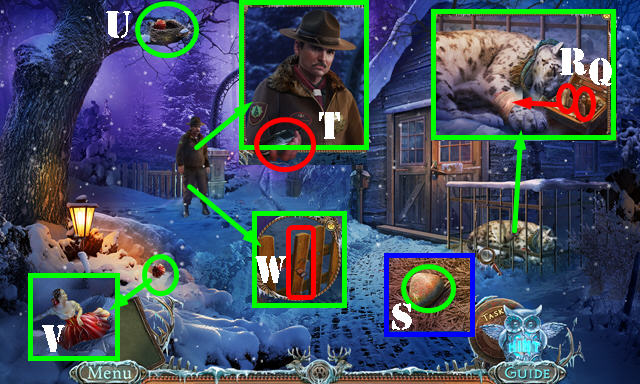
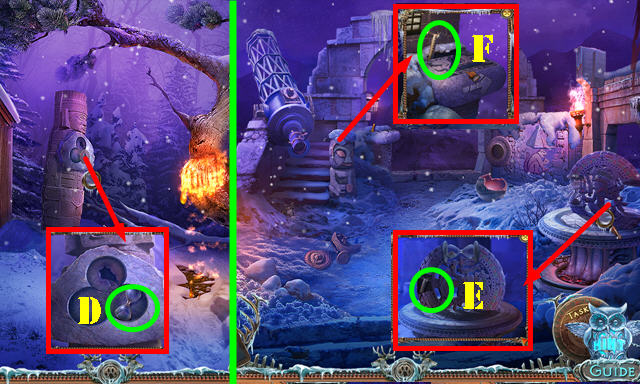
- Put down the VETERINARY KIT. Use the bottle (Q) and then the bandage (R). Take the PROJECTILE (S).
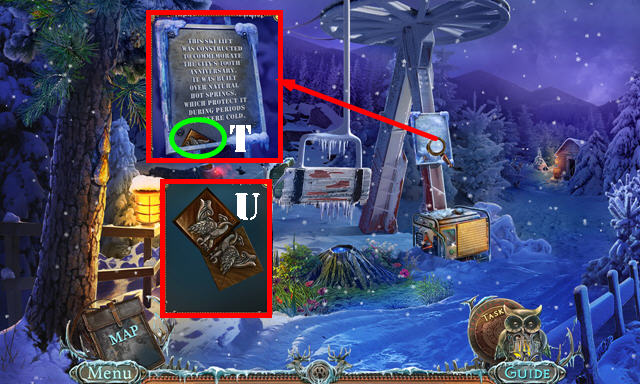
- Talk to the forest ranger; take the WALKIE-TALKIE (T).
- Place the PROJECTILE on the SLINGSHOT to get the LOADED SLINGSHOT (inventory).
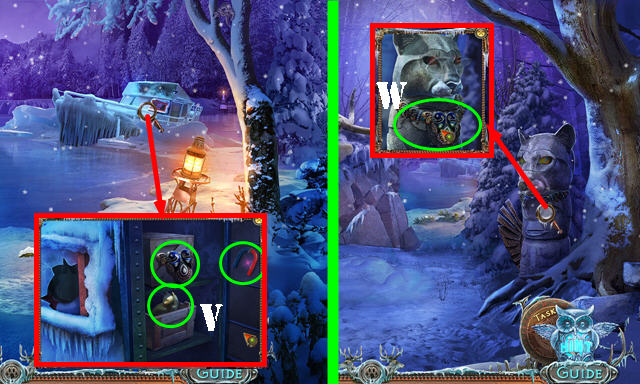
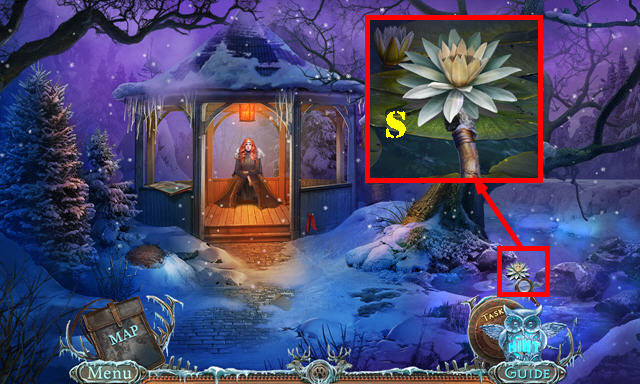
- Use the LOADED SLINGSHOT (U); take the DANCER FIGURINE 2/2 (V).
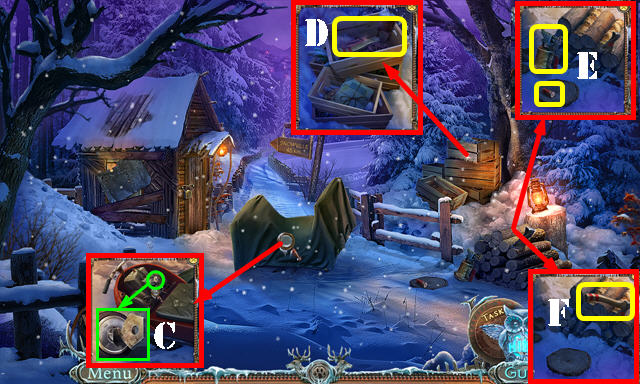
- Take the PLANK (W).
- Enter the Barn.
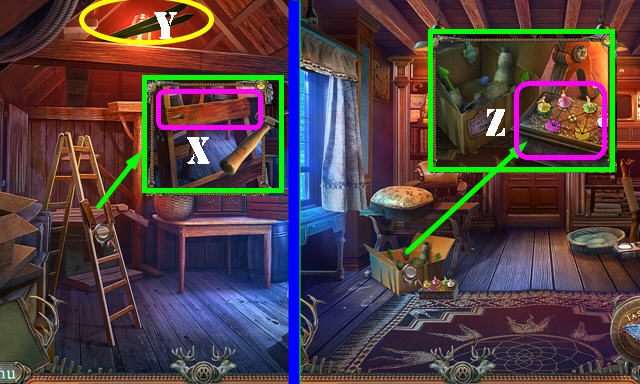
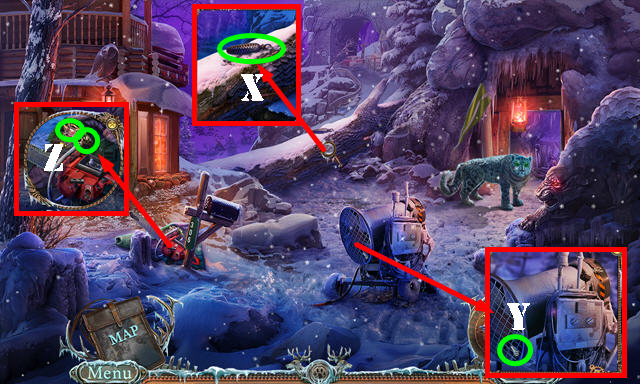
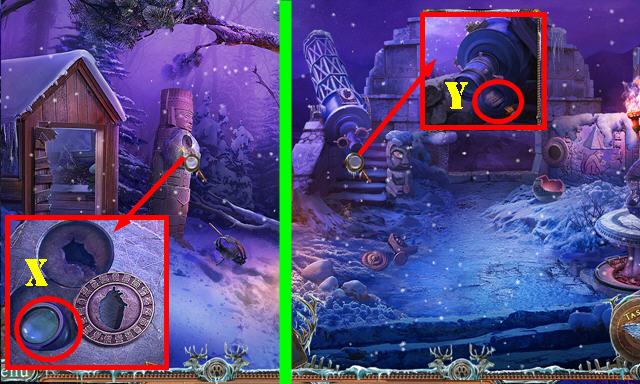
- Remove the broken plank; place the PLANK; use the HAMMER (X). Take the SKIS (Y).
- Walk down twice.
- Place the 2 DANCER FIGURINES and examine the box for a puzzle (Z).
- Solution: E-D-C-B-A-F-E-D-C-B-G-F-A-B-F-G. Take the Map.
- Go out the door.
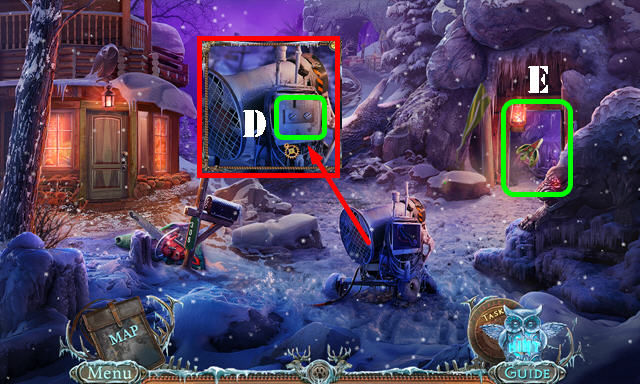
- Place the SKIS (H).
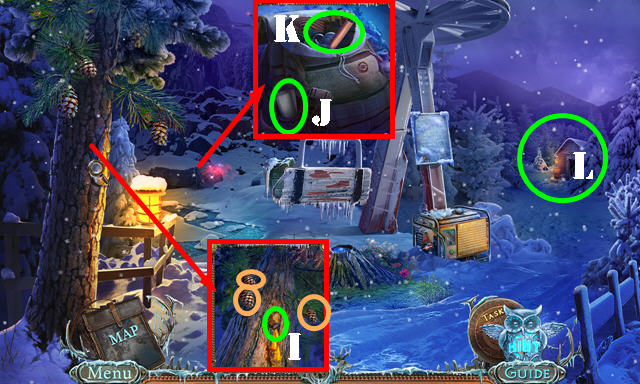
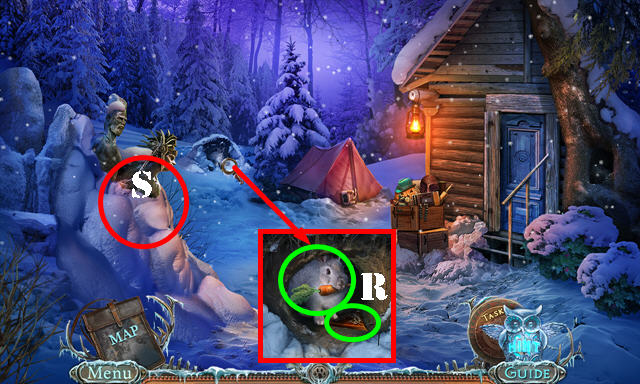
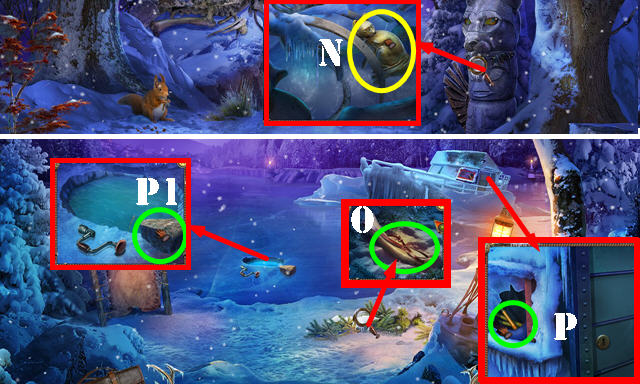
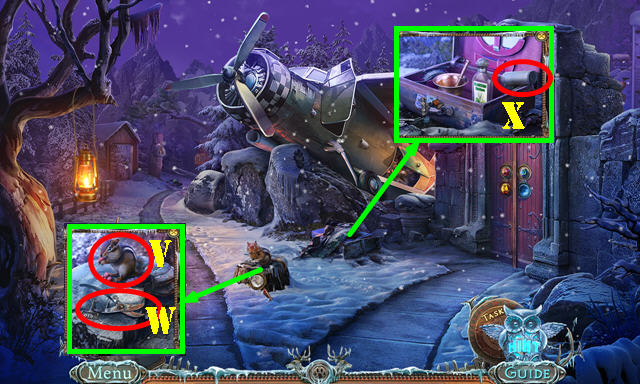
- Take the RESIN (I) and 3 PINECONES (orange).
- Look at the note (J). Open the backpack; take the FLARE GUN (K).
- Head right (L).
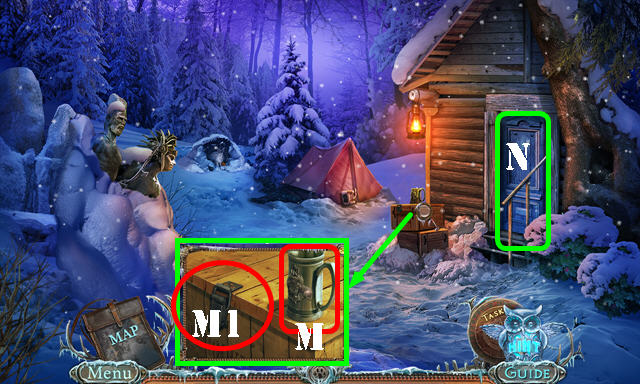
- Take the METAL MUG (M); open the lid (M1) to activate a HOP; play it to get the FLARE.
- Place the FLARE in the FLARE GUN to create the LOADED FLARE GUN (inventory).
- Enter the Cabin (N).
- Use the LOADED FLARE GUN on the leopard.
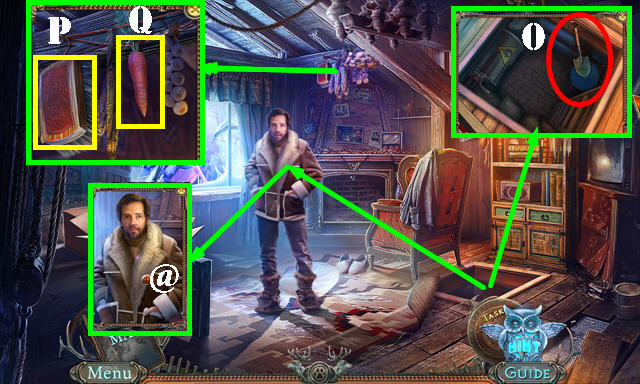
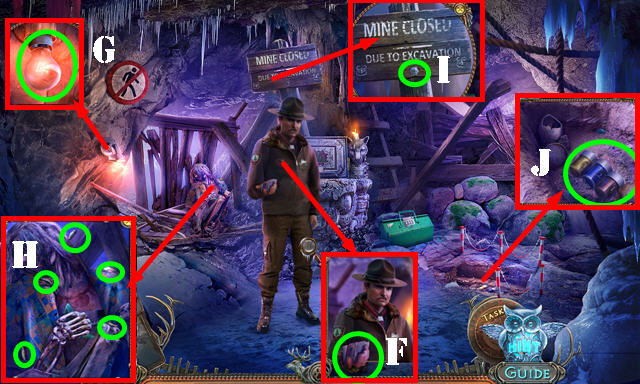
- Open the hatch; talk to the inspector (@). Take the SHOVEL (O).
- Take the BRUSH (P). Move the items; take the CARROT (Q).
- Walk down.
- Give the CARROT; take the MEDALLION 1/2 (R).
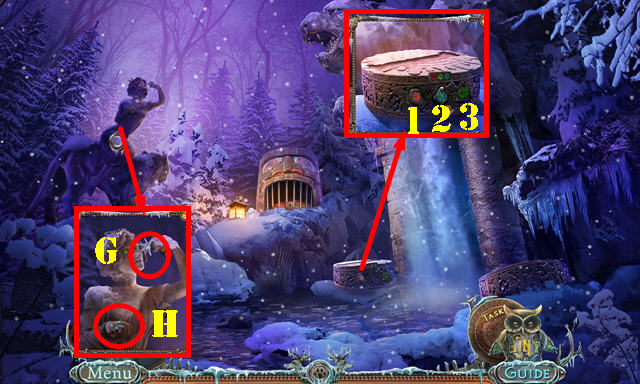
- Use the SHOVEL; play the puzzle (S).
- Solution (1-3). Take the COVER.
- Walk down.
- Use the BRUSH; take the MEDALLION 2/2 (T).
- Touch the 2 MEDALLIONS 3x (inventory) (U).
- Go to the Meadow.
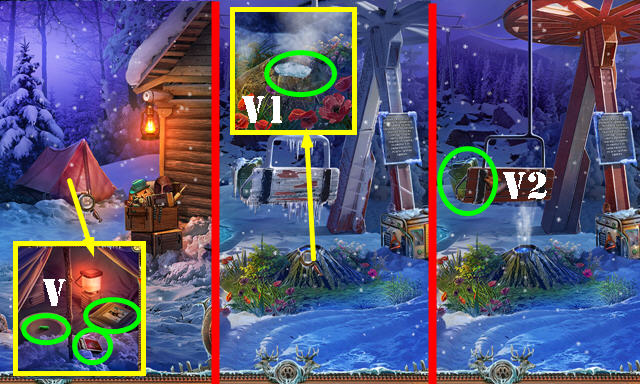
- Place the MEDALLION and pull the zipper. Take the MATCHES and ALPINIST PILL. Open and look at the book (V).
- Walk down.
- Place the ALPINIST PILL and then the COVER (V1).
- Take the EMPTY GAS CAN (V2).
- Return to the Cabin.
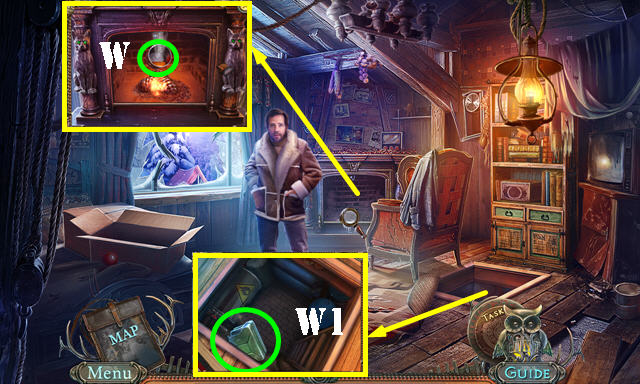
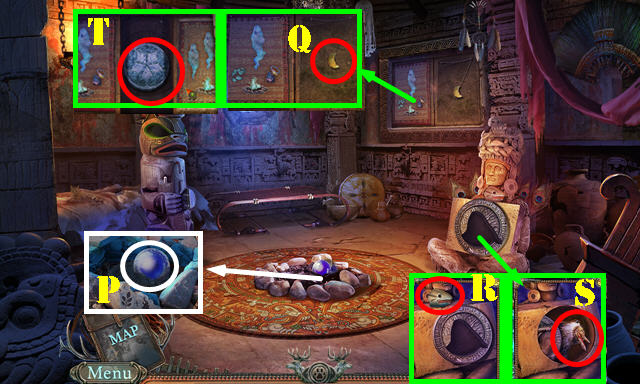
- Place the 3 PINECONES and METAL MUG; put the RESIN in the mug. Use the MATCHES and take the MELTED RESIN (W).
- Place the EMPTY GAS CAN to get the FULL GAS CAN (W1).
- Return to the Crossroad.
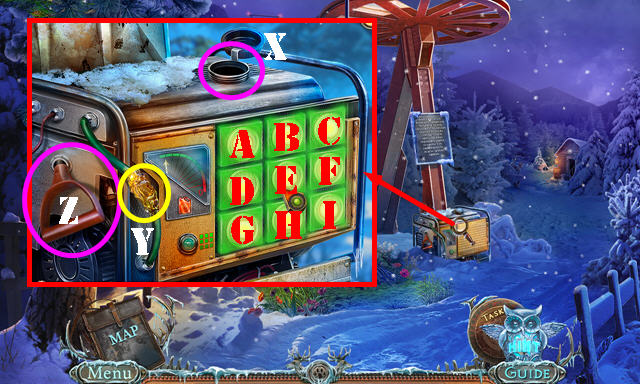
- Open the cover; place the FULL GAS CAN (X). Place the MELTED RESIN (Y) and pull the handle (Z) for a puzzle.
- Solution: B-H-D-F-I-A-C-G-E. Pull the handle.
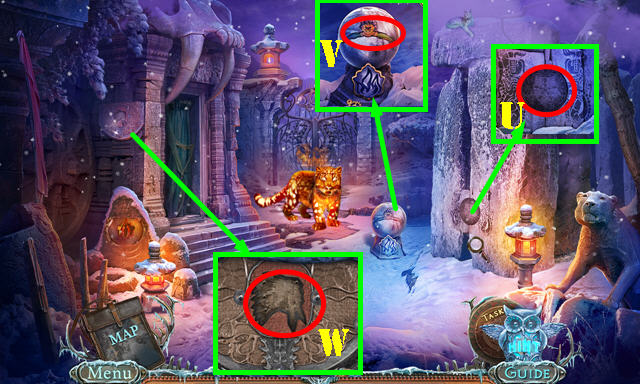
- Take the BELT (J).
- Scroll right.
- Hook the BELT (K) and pull it.
- Touch the lift to activate a HOP; play it to get the CABLE.
- Use the CABLE (L), go down and then forward (M).
- Take the CAT FIGURINE 1/2 (N).
- Go forward.
- Move the plants; take the SKATE 1/2 (O).
- Take the CHEMICAL LANTERN (P) and touch each one (inventory).
- Take the STONE (P1).
- Walk down.
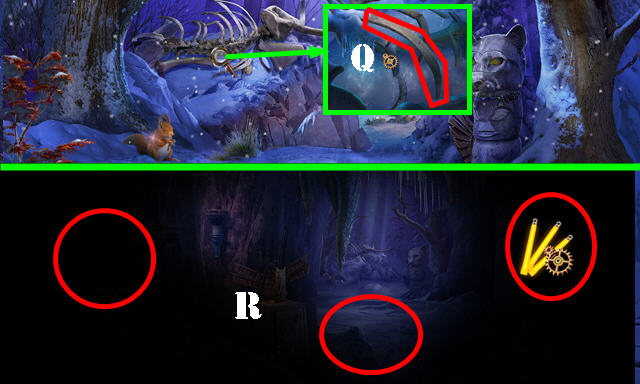
- Use the STONE; take the BONE (Q).
- Walk down.
- Use the CHEMICAL LANTERN on the dark scene 3x (R).
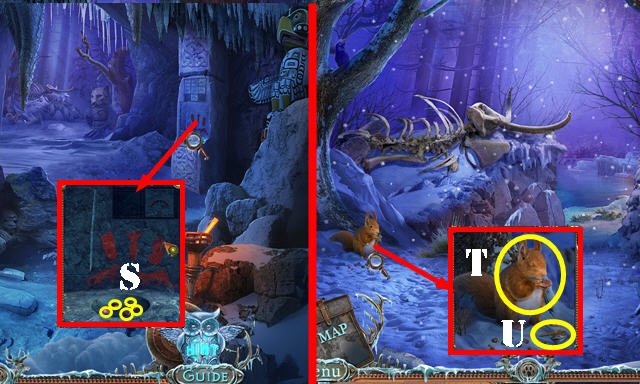
- Take the 5 PINE NUTS (S).
- Return to the Forest.
- Give the 5 PINE NUTS (T); take the BOAT KEY (U).
- Go forward.
- Use the BOAT KEY and turn it; take the MAGNET, LEOPARD COLLAR and CAT FIGURINE 2/2 (V).
- Walk down.
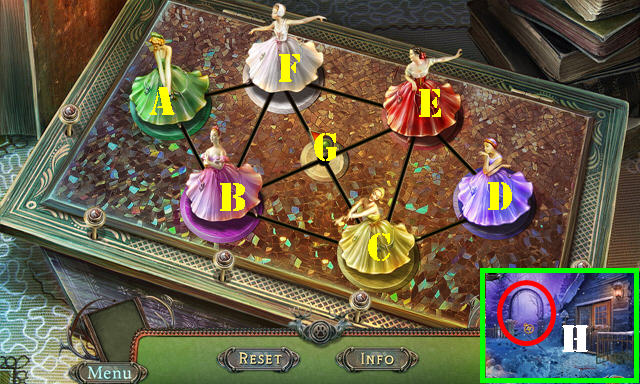
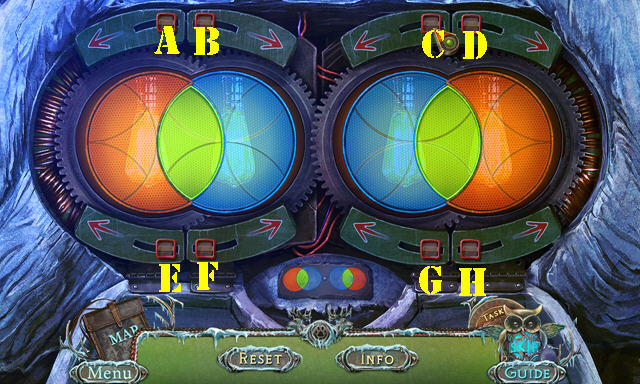
- Place the LEOPARD COLLAR (W) to activate a mini-game.
- Solution: E-Fx2-A-F-H-Cx2-D-C.
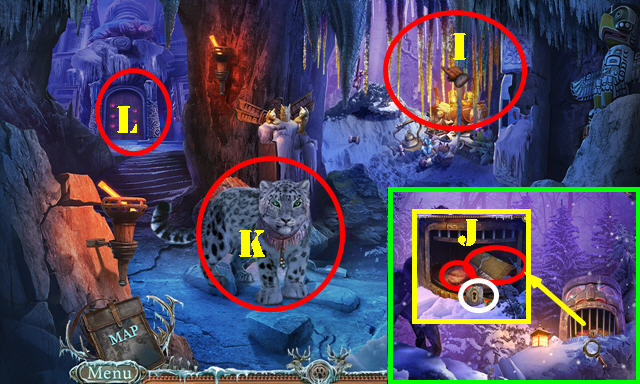
- Use the SHOVEL twice; open the napkin; take the LEOPARD PAW (I).
- Walk down.
- Place the 2 CAT FIGURINES to activate a HOP (J); play it to get the ROD.
- Place the MAGNET on the ROD to get the ROD WITH MAGNET (inventory).
- Place the LEOPARD PAW (K) for a mini-game.
- Solution: H-E-F-C-B-A-D-E-F-C-B-A-D-G.
- Take the RITUAL KNIFE (I).
- Return to the Lakeshore.
- Use the RITUAL KNIFE (J) to get the STRAP.
- Use the ROD WITH MAGNET to get the drill bit (K). Place the drill bit on the HAND DRILL (L) and take it.
- Use the HAND DRILL on the BONE; place the STRAP on it to get SKATE 2/2 (inventory).
- Use the 2 SKATES (M).
Chapter 2: Forest

- Talk to the forest ranger; take the hot tea. Talk to him again; take the BOOKSTORE ADDRESS (not pictured).
- Take the 5 DRIED CLOTHES (white).
- Take the BUCKSHOT AMMO 1/2 and MINI-BOOK 1/4 (red).
- Open the book; take the TWEEZERS (A).
- Open the door and exit (B).
- Use the RITUAL KNIFE on the cloth; turn the key (C). Use the TWEEZERS to get the BROKEN KEY.
- Remove the items; take the AXE HANDLE (D).
- Grab the BUCKSHOT AMMO 2/2 and BURNER (E).
- Place the AXE HANDLE (F); take a log and chop it. Take the PLANKS.
- Walk Down.

- Put down the BURNER (G) and turn the valve (H); take the FILLED BURNER.
- Place the 2 BUCKSHOT AMMOS; take the RIFLE (I).
- Return to the Ranger hut exterior.
- Use the RIFLE on the lock. Move all items; take the LIGHTER (J).
- Turn on the FILLED BURNER. Use the LIGHTER on the FILLED BURNER to get the LIT BURNER (inventory).
- Use the LIT BURNER; take the METAL (K).
- Walk down.
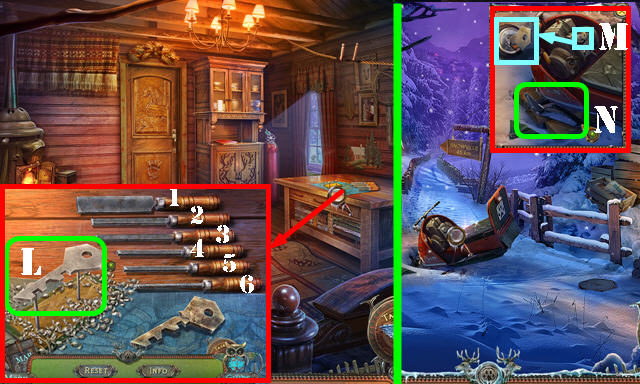
- Put down the BROKEN KEY and METAL for a puzzle.
- Solution: 1-3-5-5-6. Take the SNOWMOBILE KEY (L).
- Exit scene.
- Place the SNOWMOBILE KEY and turn it (M).
- Place the PLANKS (N).
Chapter 3: Snowville
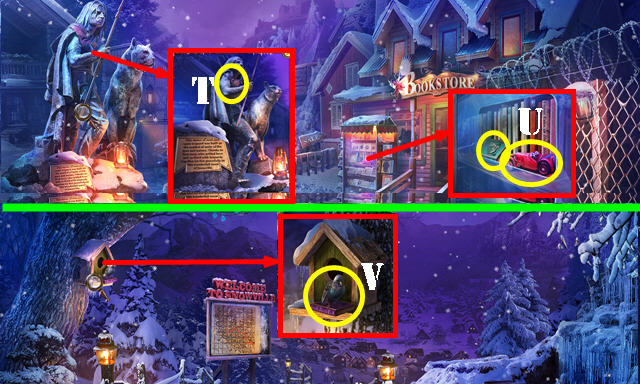
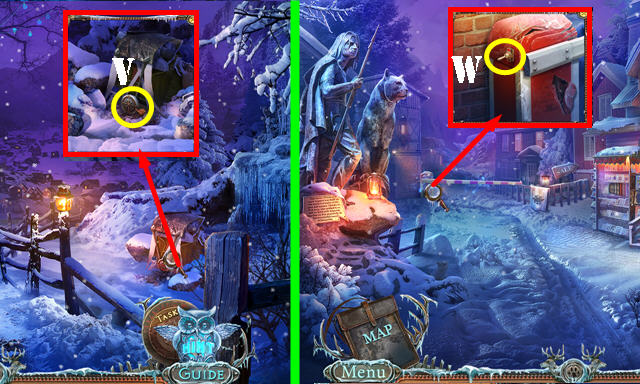
- Remove the stones; take the BRUSH (O).
- Use the BRUSH and then place the BOOKSTORE ADDRESS for a puzzle. Solution (P).
- Go forward.
- Knock on the door; pull the handle and enter (not pictured).
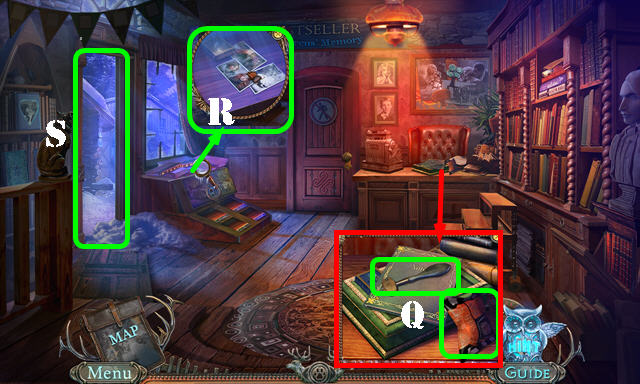
- Touch the pieces 3x to take the GLASS CUTTER and SEED BAG (Q). Look at and open the notebook.
- Open the SEED BAG; take the SUNFLOWER SEEDS (inventory).
- Move the books; take the PHOTO SET and MINI-BOOK 2/4 (R).
- Exit (S).
- Remove the scarf; take the NECKLACE (T).
- Use the GLASS CUTTER; take the MINI-BOOK 3/4 and CAR 1/4 (U).
- Walk down.
- Give the SUNFLOWER SEEDS; take the MINI-BOOK 4/4 (V).
- Return to the Bookstore.

- Place the 4 MINI-BOOKS for a puzzle.
- Solution: 1-2-3-4-5-6. Take the FRESCO PART and COMPASS ROSE.
- Return to the City entrance.
- Move all the rocks. Place the COMPASS ROSE (V) and touch it for a HOP; play it to get the RUBBER GLOVE.
- Go forward.
- Use the RUBBER GLOVE (W). Go through the gate.
- Take the CLOCK WEIGHT (X).
- Use the TWEEZERS to get the BOLT 1/2 (Y).
- Take the TOOLBOX SYMBOL and CAR 2/4 (Z).
- Walk down.
- Place the TOOLBOX SYMBOL. Open the door, move the items; take the SCREWDRIVER (A).
- Go to the Bookstore.
- Place the CLOCK WEIGHT (B); take the CAR 3/4 (C).
- Return to the Slope.
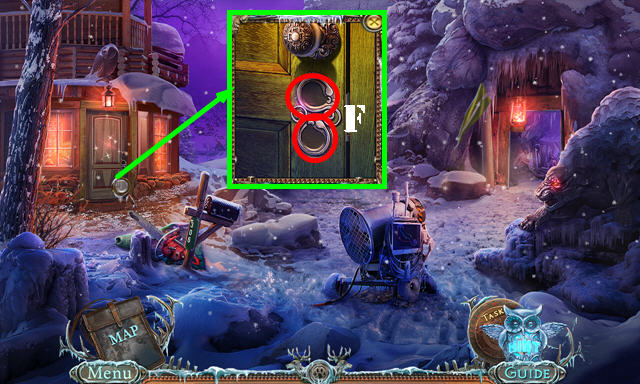
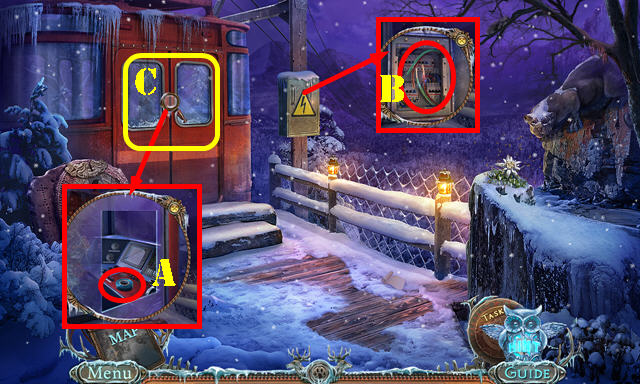
- Use the SCREWDRIVER (D); remove the plate and touch the 3 wires.
- Enter the Mine (E).
- Talk to the forest ranger; take JOEL'S WALLET (F). Open it; read the note and take the DRIVER'S LICENSE and AIRPLANE TICKET (inventory).
- Use the RUBBER GLOVE to get the LIGHT BULB (G).
- Take the 5 NECKLACE PARTS (H).
- Use the SCREWDRIVER (I); take the BOLT 2/2.
- Use the BRUSH; take the PAINT CANS (J).
- Return to the Bookstore.
- Place the 2 BOLTS; use the SCREWDRIVER on them (K). Read the note; take the CAR 4/4 and LITTLE BOX (L).
- Place the DRIVER'S LICENSE (purple) and 4 CARS (M). Take the STOREROOM KEY (N).
- Use the STOREROOM KEY (O); turn it twice and go through the door.

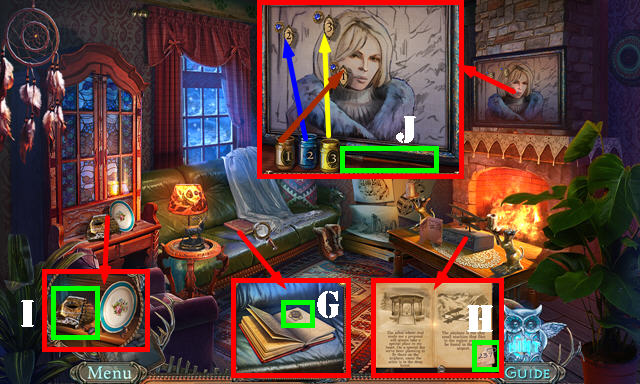
- Open the box and then the album; place the PHOTO SET; take the SPRING PENDANT (P).
- Use the TWEEZERS to get the GLOVE COMPARTMENT BUTTON (Q).
- Take the NECKLACE CRYSTAL (R).
- Place the 5 NECKLACE PARTS on the NECKLACE and touch each one. Place the NECKLACE CRYSTAL on it to get the ANCIENT NECKLACE (inventory).
- Return to the Mine.
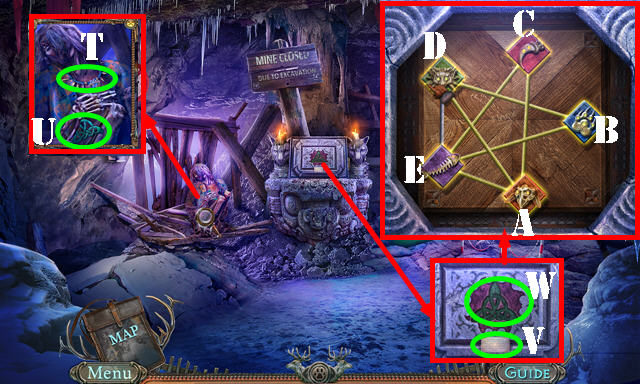
- Place the ANCIENT NECKLACE (T); take the ANCIENT SYMBOL (U).
- Read the note (V); place the ANCIENT SYMBOL (W) for a puzzle.
- Solution: A-C-E-B-D-A-E-D. You receive the AUTUMN PENDANT.
- Walk down.
- Place the AUTUMN PENDANT and SPRING PENDANT (F).
- Enter the House.
- Open the book; take the ROSE PATTERN (G).
- Place the ROSE PATTERN on the LITTLE BOX. Press the lock and read the note. Take the TRUNK KEY (inventory).
- Read the note; take the CODE (H).
- Take the BROKEN MASK (I).
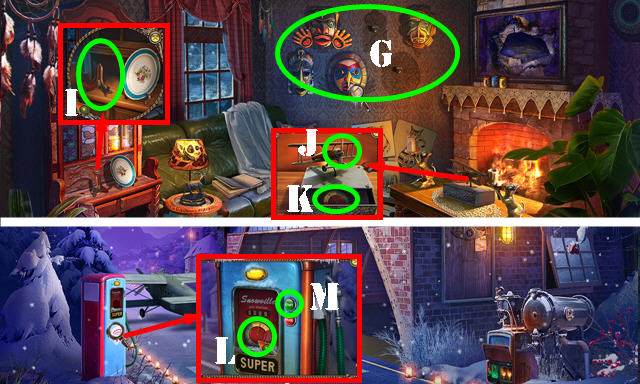
- Place the PAINT CANS for a mini-game. Dip the brush (J) in the paint cans and paint as shown. Take the WARDROBE HANDLE.
- Return to the Mine.
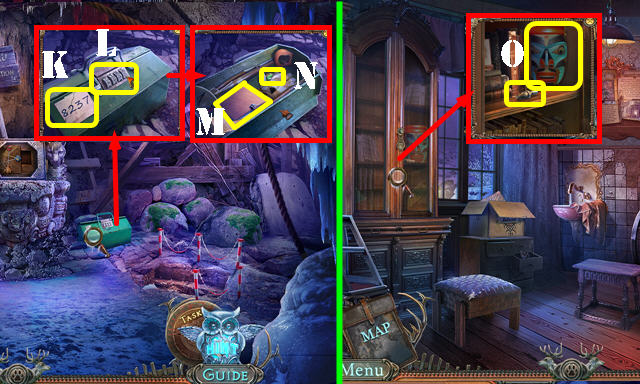
- Place the CODE (K). Change the tumblers to 8237 (L). Read the book (M). Move the gloves; take the CHAINSAW BUTTON (N).
- Return to the Storeroom.
- Place the WARDROBE HANDLE and open the wardrobe; take the CHAINSAW SPARK PLUG and MASK 1/2 (O).
- Return to the Slope.
- Place the CHAINSAW BUTTON (P) and CHAINSAW SPARK PLUG (Q). Close the lid and take the CHAINSAW.
- Use the CHAINSAW (R). Move forward.
- Use the TRUNK KEY (S); turn it twice and take the CROWBAR (T).
- Use the CROWBAR on the door; place the GLOVE COMPARTMENT BUTTON. Open it; read the book (U) and take the CLIPPERS (V).
- Walk down.
- Use the CLIPPERS (W). Go through the fence.

- Talk to the pilot; give him the AIRPLANE TICKET (X).
- Take the DRIED GLUE (Y).
- Open the lid; place the LIGHT BULB and flip the switch (Z).
- Take the PIN (Z1).
- Return to the Slope.
- Use the PIN; open the pocket and take the ACID (A).
- Return to the Airport.
- Use the ACID (B).
- Return to the Storeroom.
- Turn on the faucet (C); place the DRIED GLUE on the water to get the GLUE (D).
- Put down the BROKEN MASK and GLUE. Arrange the mask as shown (E) and put GLUE on it (F). Take the MASK 2/2.
- Return to the House.
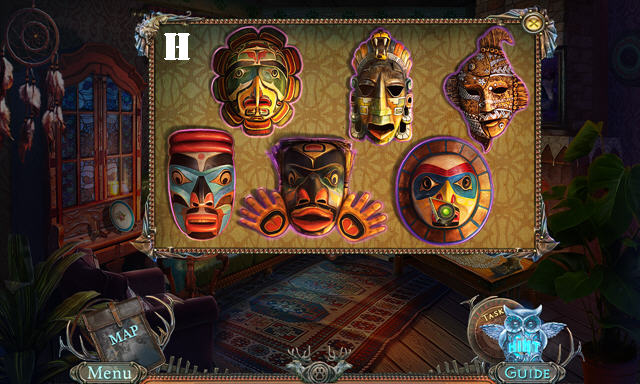
- Place the 2 MASKS for a puzzle (G).
- Solution (H). Take the SERVICE PLATE.
- Place the SERVICE PLATE (I) for a HOP; play it to get the MODEL PROPELLER.
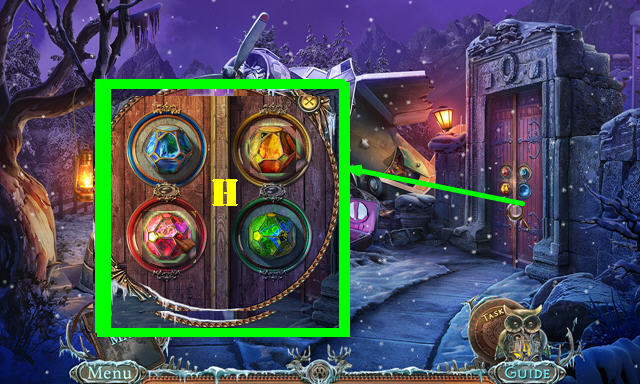
- Place the MODEL PROPELLER (J); take the MANOMETER (K).
- Return to the Airport.
- Place the MANOMETER (L); push start (M).
Chapter 4: Ancient Pantheon Ruins
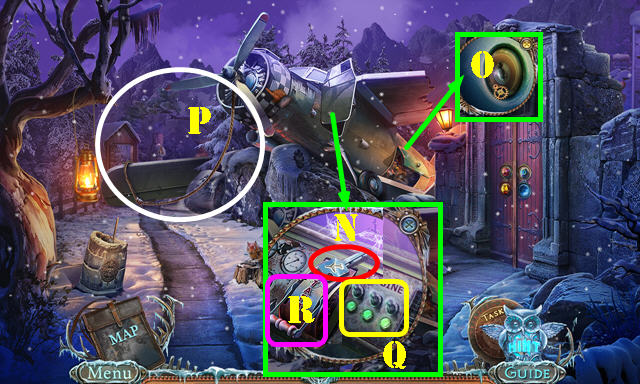
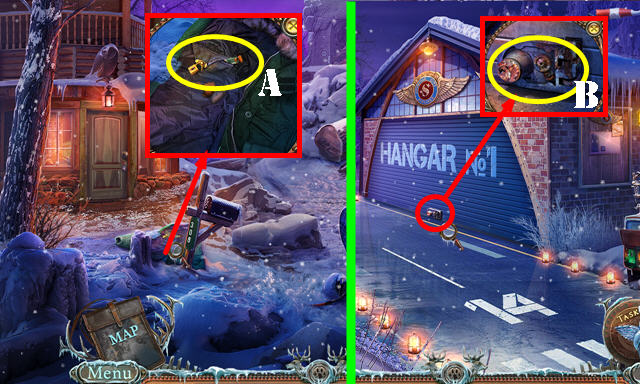
- Open the door; take the AIRPLANE TRUNK KEY (N).
- Use the AIRPLANE TRUNK KEY (O). Turn it for a HOP; play it to get the COILED ROPE.
- Place the COILED ROPE on the propeller (P) and touch it.
- Flip the three switches (Q) and then the lever (R).
- Go forward.
- Talk to the forest ranger (S).
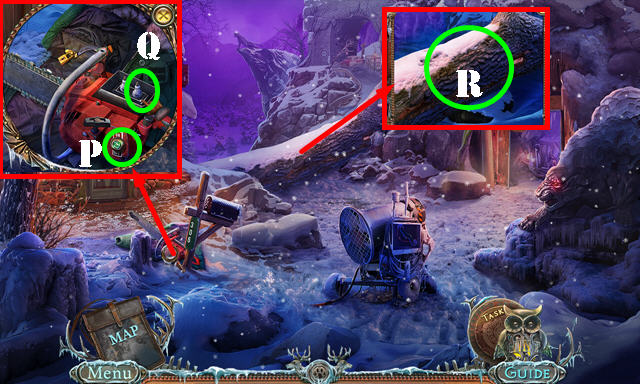
- Take the GRINDSTONE (T).
- Use the SCREWDRIVER; take the 5 RASPBERRIES (U).
- Walk down.
- Give the 5 RASPBERRIES (V); take the MED-KIT KEY and RUSTY CLIPPERS (W).
- Use the GRINDSTONE on the RUSTY CLIPPERS (inventory).
- Move the items; use the MED-KIT KEY in the lock; take the BANDAGE (X).
- Go forward.
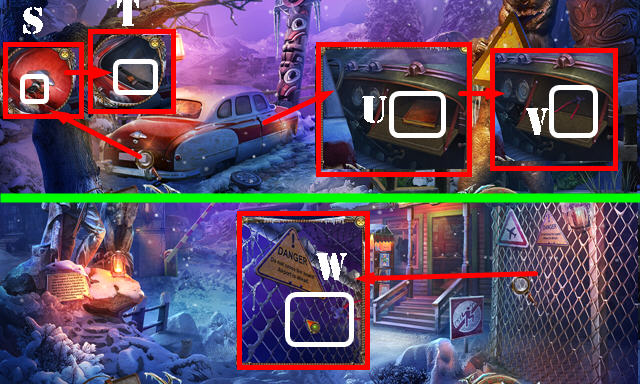
- Use the CLIPPERS to get the LEAF (A) and WIRE (B).
- Walk down.
- Place the LEAF (C); touch the pestle and then the bottle (D). Take the TINCTURE.
- Go forward.
- Place the TINCTURE and then the BANDAGE (E). Take the ROD (F).
- Use the ROD; take the SPHERE (G).
- Walk down.
- Place the SPHERE; swap as shown (H).
- Go through the door.
- Take the GOLD HEART, STONE CYLINDER, and GAFF HANDLE (I).
- Take the STONE (J). Touch the handle and take the GAFF TOP (K).
- Place the GAFF HANDLE and then the WIRE on the GAFF TOP. Tighten the wire twice and take the GAFF (inventory).
- Throw the STONE (L).
- Use the GAFF to take the CRYPTEX 1/2 (M).
- Return to the Pinery.
- Place the GOLD HEART; take the CRYPTEX 2/2 (N).
- Return to the Ancient pantheon ruins.
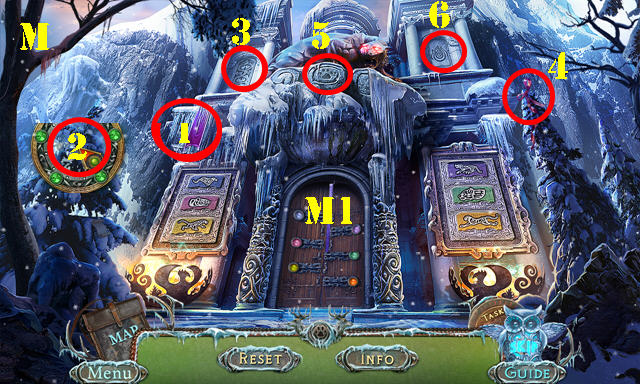
- Place the 2 CRYPTEX in the slots for a puzzle.
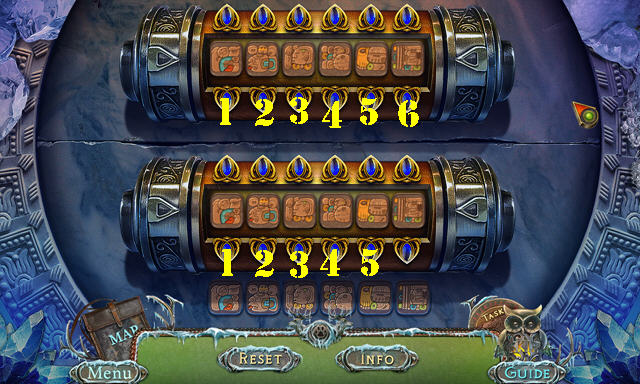
- Solution: 1x6-2x5-3x4-4x1-x5-5x4-1x2-3x4-6x3-4x3-2x3-5x3-1x3-3x3.
- Take the TORCH.
- Return to the Pinery.
- Place the TORCH (P) to get the TORCH WITH RESIN.
- Return to the Ancient pantheon ruins.
- Use the TORCH WITH RESIN (Q).
- Go up the steps.
- Take the SKULL 1/3 (R) and STONE (S).
- Place the FRESCO PART (T); take the IRON HEART (U).
- Walk down.
- Place the STONE (V); take the LENS 1/2 (W).
- Return to the Pinery.
- Place the IRON HEART; take the LENS 2/2 (X).
- Return to the Pyramid top.
- Place the 2 LENSES; take the PILLAR TOP (Y).
- Return to the Landing Zone.
- Place the PILLAR TOP; spin it 4x (A). Take the SOLAR CIRCLE (B).
- Return to the Pyramid top.
- Place the SOLAR CIRCLE; take the STONE HEART (C).
- Return to the Pinery.
- Place the STONE HEART; take the HOURGLASS (D).
- Return to the Pyramid top.
- Place the HOURGLASS; take the JOYSTICK (E).
- Place the JOYSTICK (F) and touch it 3X.
- Go forward.

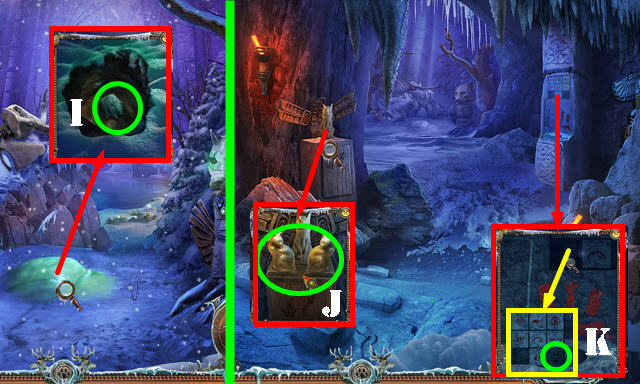
- Place the STONE CYLINDER (G) for a HOP; play it to get the SCOOP.
- Head right (H).
- Use the SCOOP; take the SKULL 2/3 and OLD BOX (I).
- Take the FLINT and STONE SQUARE (J).
- Talk to Autumn; take the STONE DISK (K).
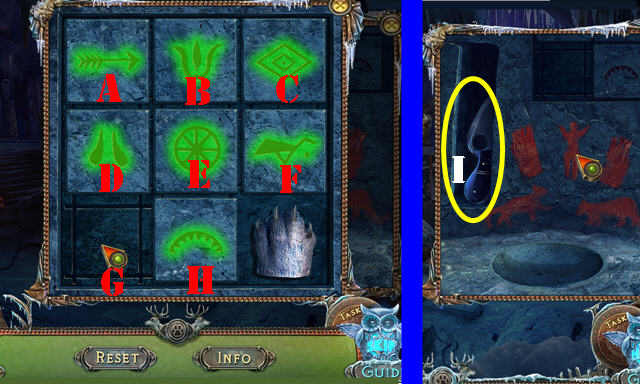
- Touch the book and open it for a puzzle (L).
- Solution (1-4).
- Take the MOON 1/2 and THREADED NEEDLE.
- Walk down.
- Place the STONE DISK on the door; go through the door (M).
- Flip the basket; take the SKULL 3/3 and TORN BAG (N).
- Use the THREADED NEEDLE on the TORN BAG; take the SEWN BAG (inventory).
- Place the STONE SQUARE for a HOP (O); play it to get the CHARGED CATCHER.
- Return to the Arbor.
- Place the SEWN BAG; touch it and take the BAG WITH SOIL (P).
- Return to the Plateau.
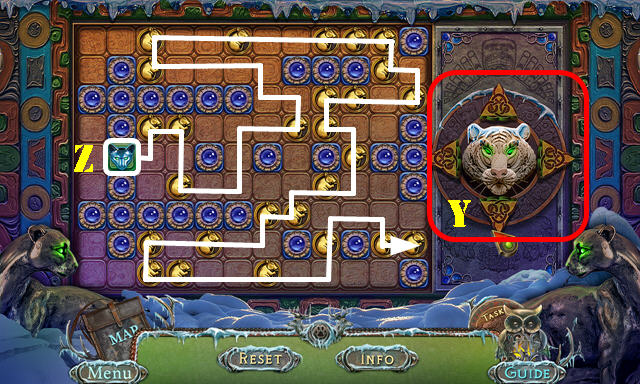
- Place the 3 SKULLS for a puzzle (Q).
- The solution is random. Make matches of 3 or more (R). Take the OBSIDIAN KNIFE.
- Return to the Arbor.
- Use the OBSIDIAN KNIFE to get the LILY WITH WATER (S).
- Return to the Stone fields.
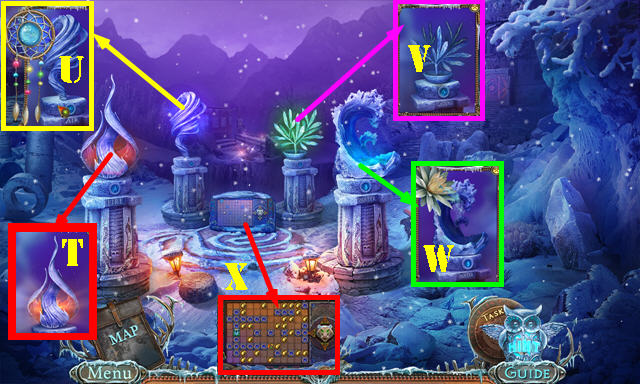
- Place the FLINT (T), CHARGED CATCHER (U), BAG WITH SOIL (V) and LILY WITH WATER (W).
- Play the puzzle (X).
- Use the arrows (Y) to move in the pattern shown (Z).
- Go forward.
- Use the GLASS CUTTER; take the INSULATING TAPE (A).
- Open the door; place the INSULATING TAPE (B).
- Enter the lift (C).
Chapter 5: Forest Reserve
- Take the SMOKER (D) and HEART LOCKET (E).
- Place the HEART LOCKET on the OLD BOX; read the note and take the TOTEM PART 1/4 (inventory).
- Walk down.
- Use the SMOKER; cut the flower with the OBSIDIAN KNIFE. Take the EDELWEISS FLOWER (F).
- Return to the Forest reserve.
- Place the EDELWEISS FLOWER (G); take the TRUTH AMULET and RUNE OF POWER (H).
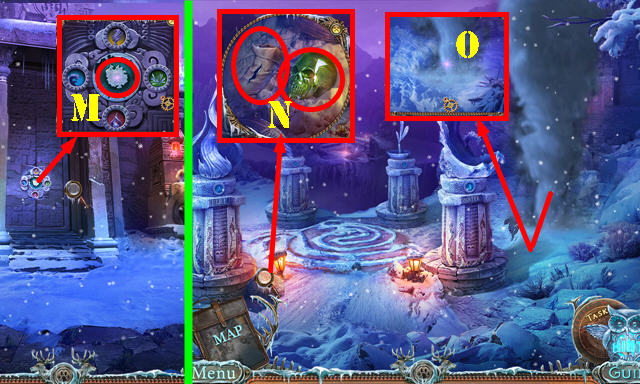
- Place the RUNE OF POWER and press the stones: 1-3-2.
- Enter the Leopard cave.
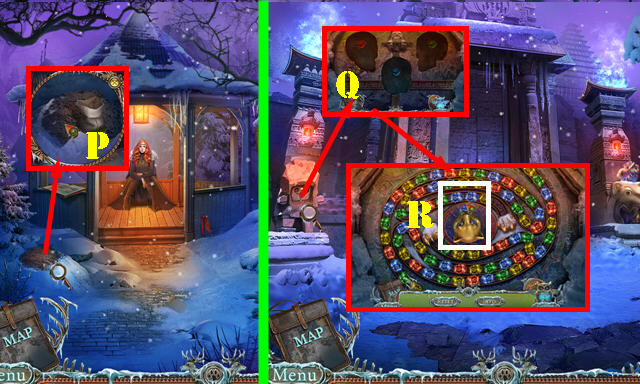
- Touch the icicles (I) for a HOP. Play it to get the FEEDER KEY.
- Walk down.
- Place the FEEDER KEY and turn it twice (white); take the CARPET WITH PATTERN and MEAT (J).
- Return to the Leopard cave.
- Give the MEAT (K).
- Approach the door (L).
- Place the TRUTH AMULET on the scene for a puzzle.
- Solution (M).
- Go through the door (M1).
- Take the CEREMONIAL SCULPTURE (N).
- Enter the Spirit hall (O).
- Take the CRYSTAL SPHERE (P), MOON 2/2 (Q), and TOTEM PART 2/4 (R).
- Place the CEREMONIAL SCULPTURE; take the ELDER IMAGE (S).
- Place the CARPET WITH PATTERN; take the HOPE SYMBOL (T).
- Walk down.
- Place the HOPE SYMBOL (U) for a HOP. Play it to get the MARBLE CUTTER.
- Use the MARBLE CUTTER to get the AMULET PIECE (V).
- Place the ELDER IMAGE for a puzzle (W).
- Solution (1-3).
- Take the MAGIC LEAVES.
- Go to the Spirit hall.
- Place the MAGIC LEAVES and use the FLINT (X).
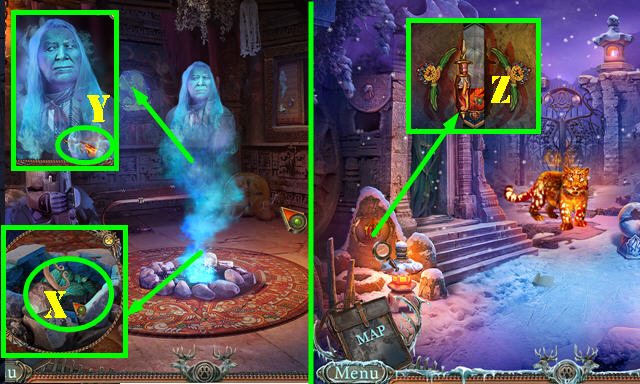
- Talk to the spirit; take the VIAL OF FIRE (Y).
- Go to the Ancient city center.
- Place the AMULET PIECE and VIAL OF FIRE for a puzzle (Z).
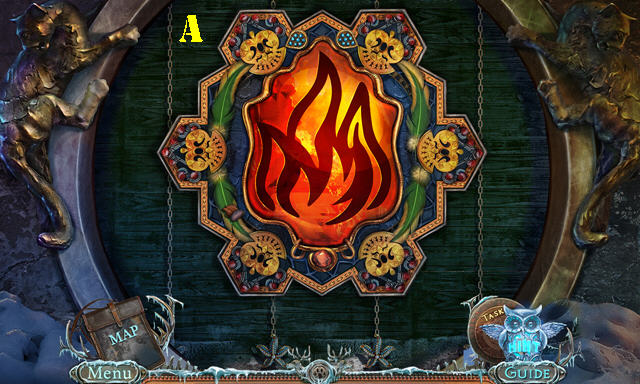
- Solution (A). Take the FIRE AMULET.
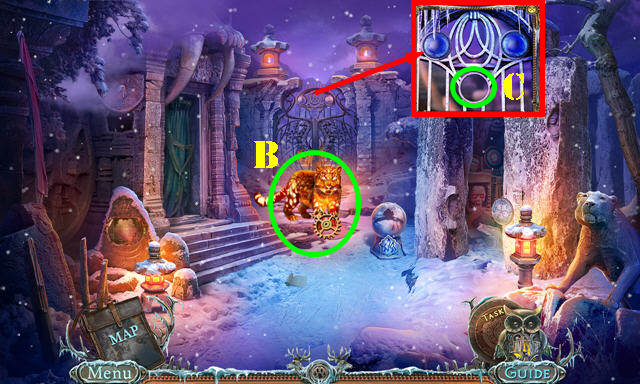
- Place the FIRE AMULET (B) and then the CRYSTAL SPHERE (C).
- Go forward.
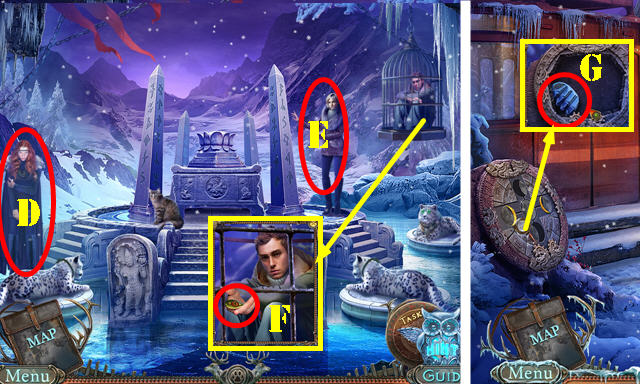
- Talk to the 2 ladies (D-E).
- Talk to Joel; take the TOTEM PART 3/4 (F).
- Return to the Cliff.
- Place the 2 MOONS; take the TOTEM PART 4/4 (G).
- Return to the Spirit hall.
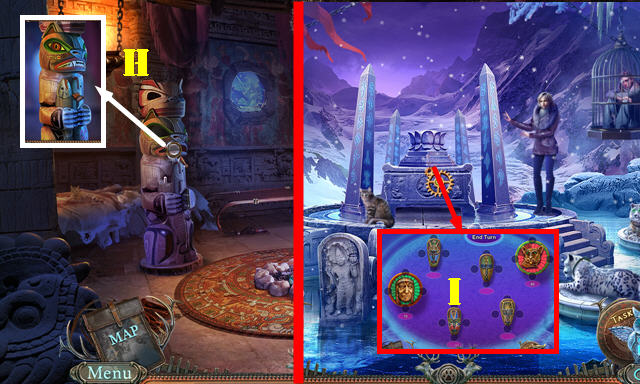
- Place the 4 TOTEM PARTS; take the LEOPARD TOTEM (H).
- Return to the Ceremonial glade.
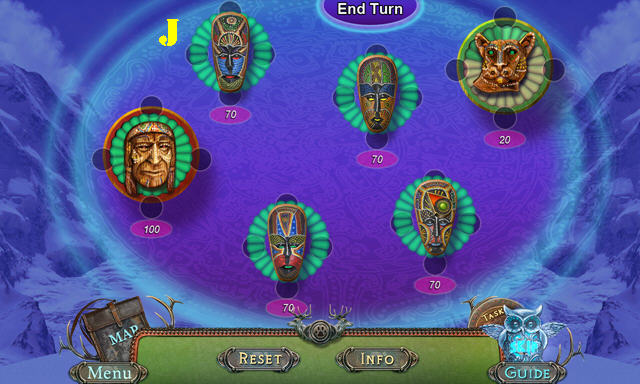
- Place the LEOPARD TOTEM for a puzzle (I).
- Solution (J).
- Congratulations, you've completed Fierce Tales: Feline Sight.
Created at: 2014-10-03