

Walkthrough Menu
- General Tips
- Chapter 1: The Garage
- Chapter 2: The Detective's House
- Chapter 3: Jenny's Room
- Chapter 4: The Lighthouse
- Chapter 5: The Dean's House
- Chapter 6: Ashton's Room
General Tips
- This is the official guide for Fierce Tales: The Dog's Heart Standard Edition.
- The 'Options' button in the main menu allows you to adjust the screen, music, sound, cursor, and difficulty level.
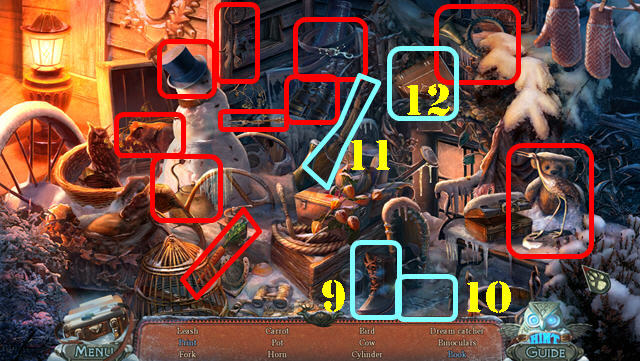
- This guide will refer to Hidden Object Scenes as 'HOS'. Items listed in blue in a HOS require an extra step of interaction to find.
- Certain scenes will not activate until some of the notes/clues have been discovered. Make sure you click on the notes so they can register in your journal.
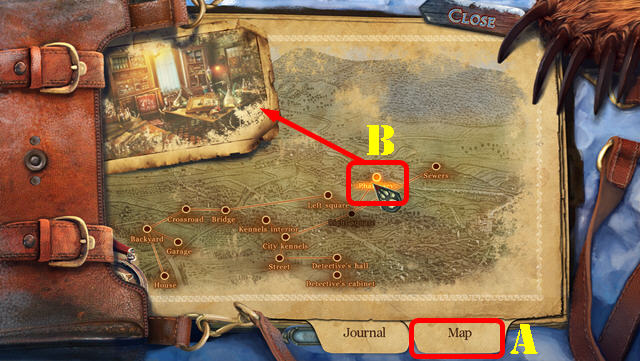
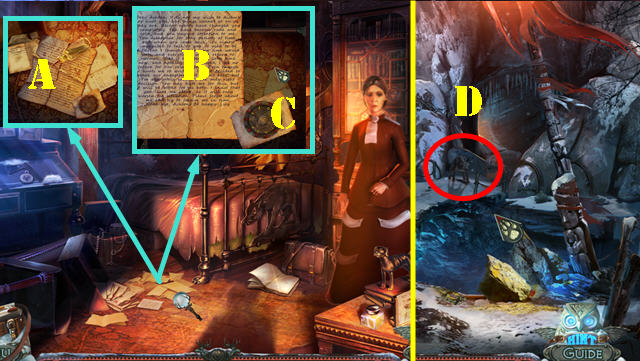
- Open your journal and select the 'Map' tab (A) to view all the available locations. Just press on a location to travel directly there (B).
- This guide will use the names of the locations as they are written on the map.
- All puzzles may be skipped and some have a reset button; use the reset button to follow our step-by-step solutions.
Chapter 1: The Garage
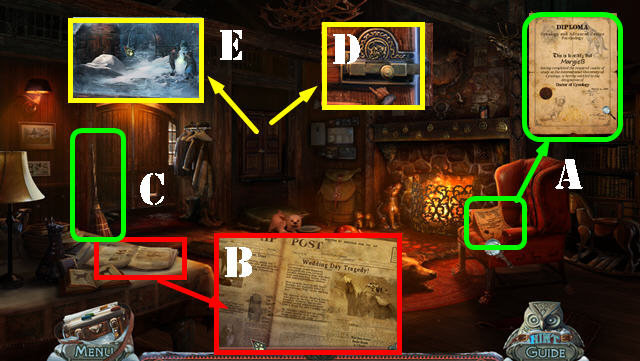
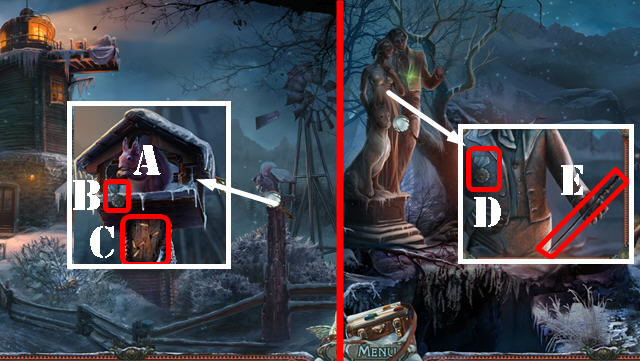
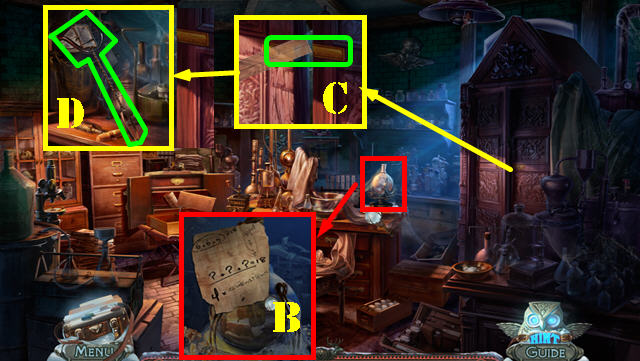
- Look at the note on the chair (A).
- Look at the article on the table (B).
- Take the broom (C).
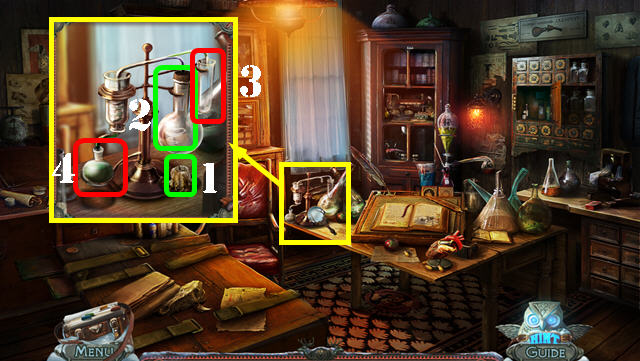
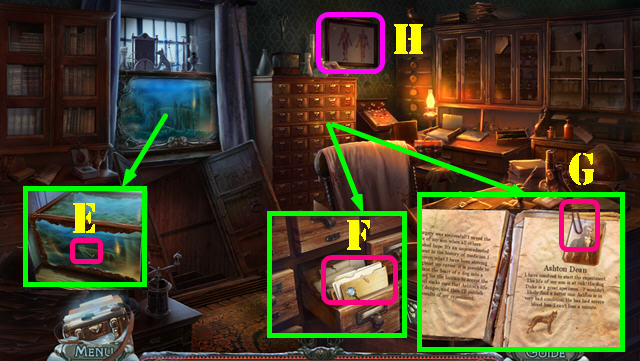
- Zoom into the window; slide the latch (D) and look out the window (E). This action triggers a HOS.

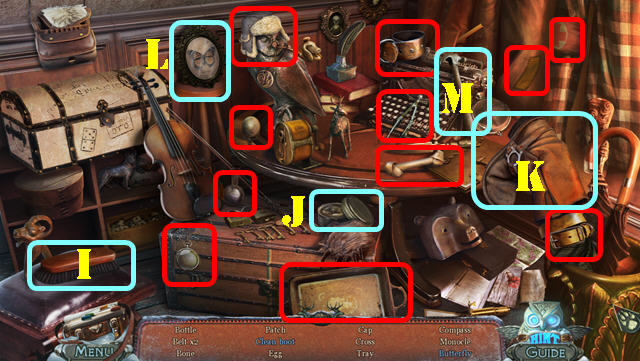
- Play the HOS.
- Open the bag; take the knife (F); cut the cloth with the knife and take the coin (G).
- Wipe the wood with the rag (H) and take the train (I).
- The CAN OPENER will be added to inventory.
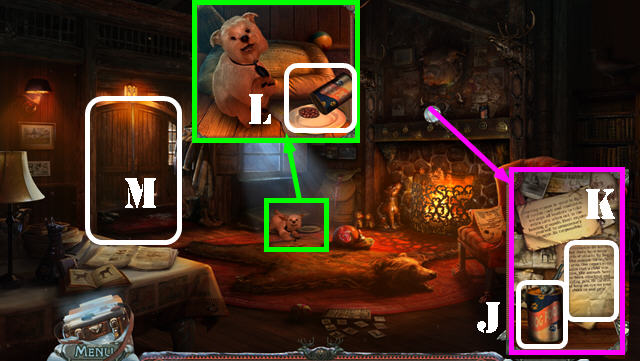
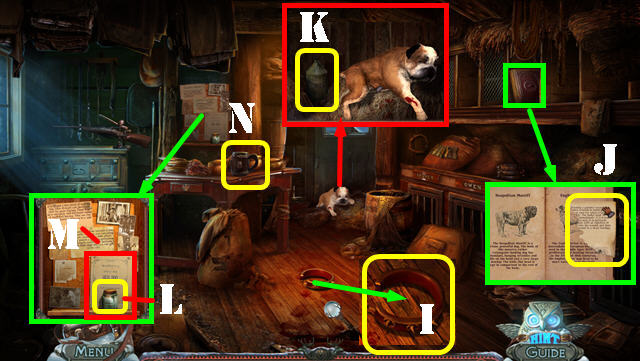
- Examine the mantle; open the can with the CAN OPENER and take the DOG FOOD (J).
- Look at the letter (K).
- Examine the dog; put the DOG FOOD on the plate (L).
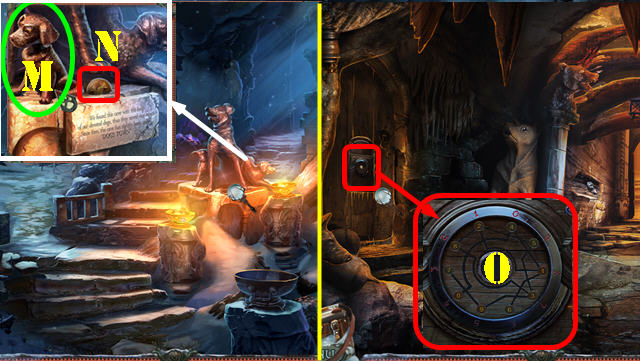
- Go out the door after the dog goes through it (M).
- Talk to the kids.
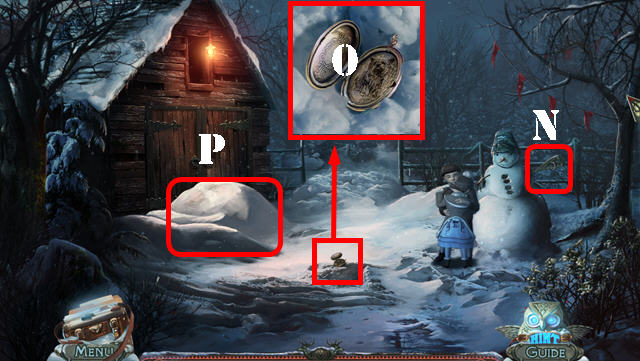
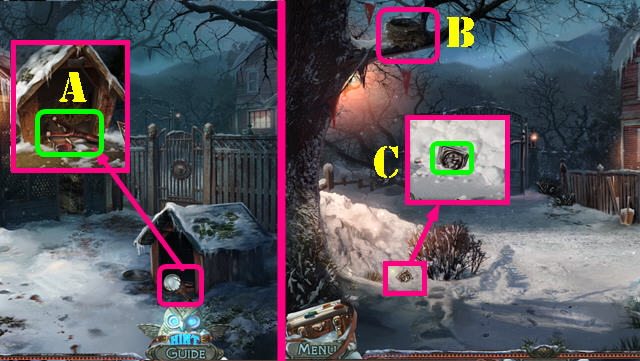
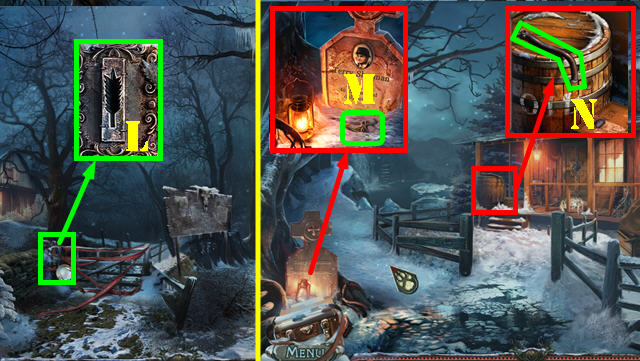
- Take the 1/2 SNOWSHOE (N).
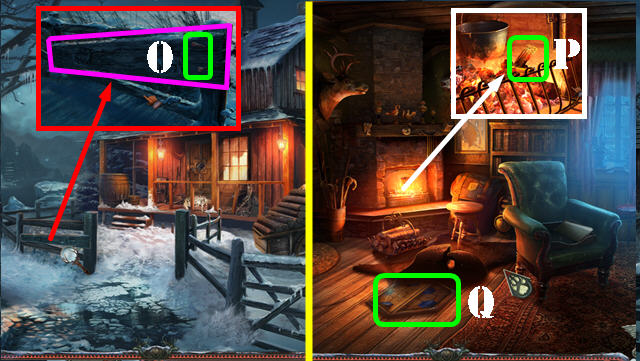
- Look at the ground; touch the locket (O).
- Clear the snow with the BROOM (P).
- Open the door and go through it.
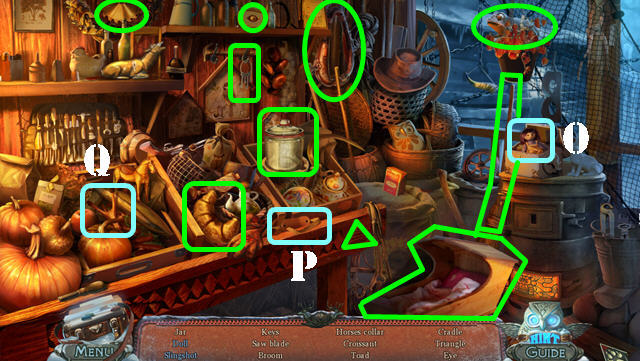
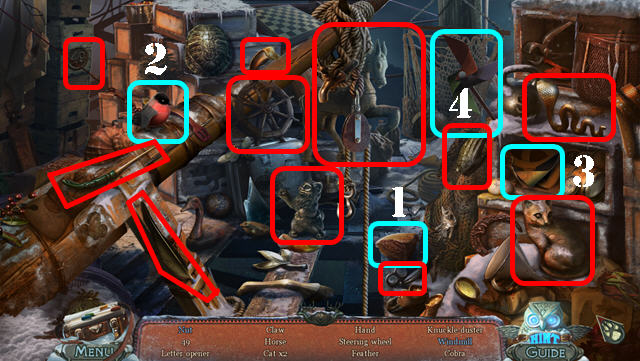
- Play the HOS.
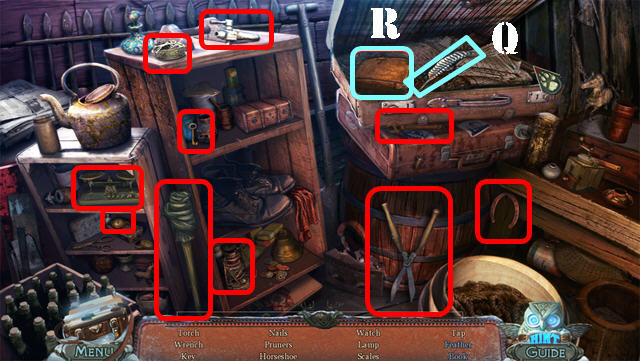
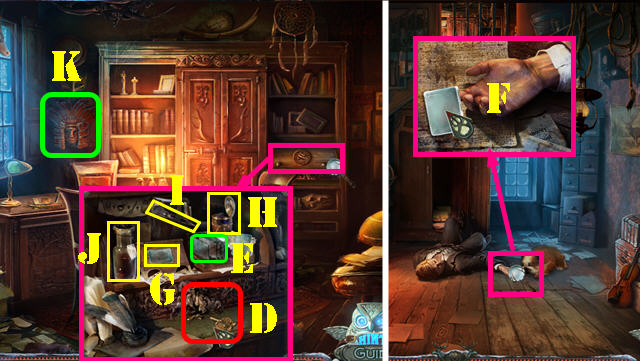
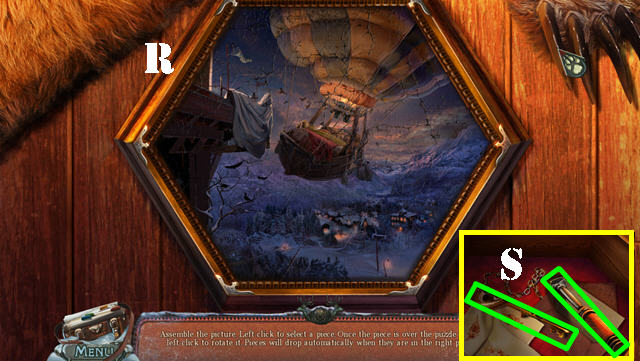
- Open the two latches on the suitcase and then open the suitcase; take the feather (Q) and the book (R).
- The TORCH will be added to inventory.
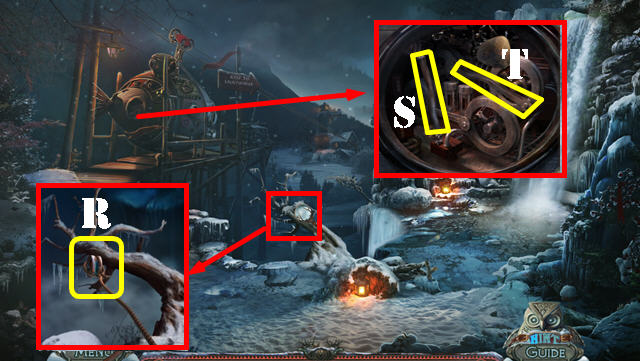
- Examine the net to activate a puzzle.
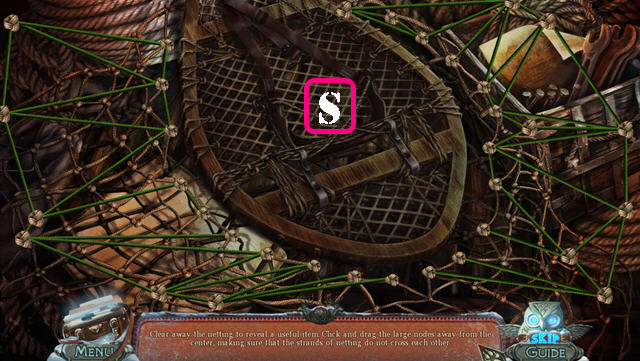
- Untangle the ropes by dragging the nodes apart. Red Ropes represent tangled lines and green ones represent untangled ones.
- You can only move the larger nodes, the smaller ones are static.
- Please look at the screenshot for the solution (S).
- You will get the 2/2 SNOWSHOE.
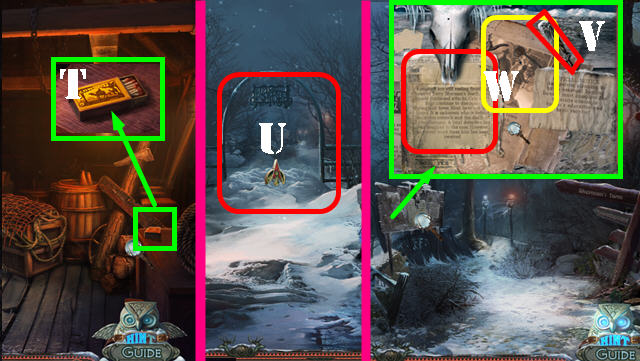
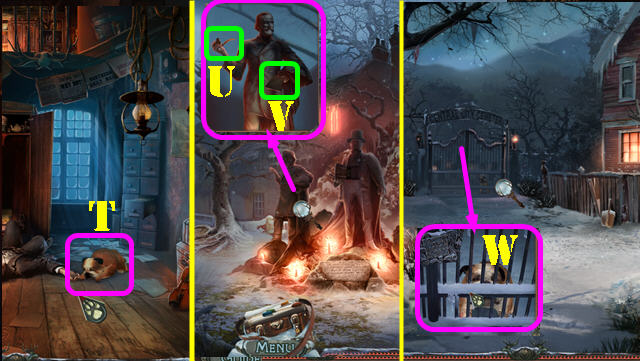
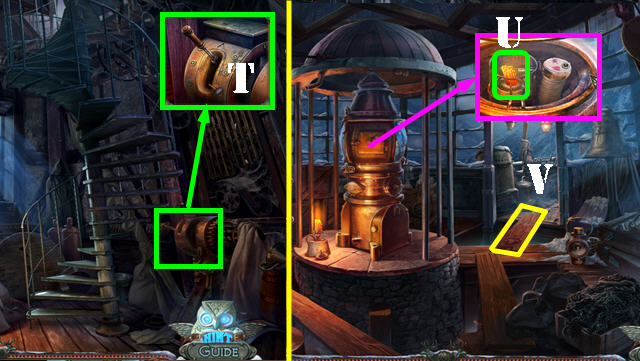
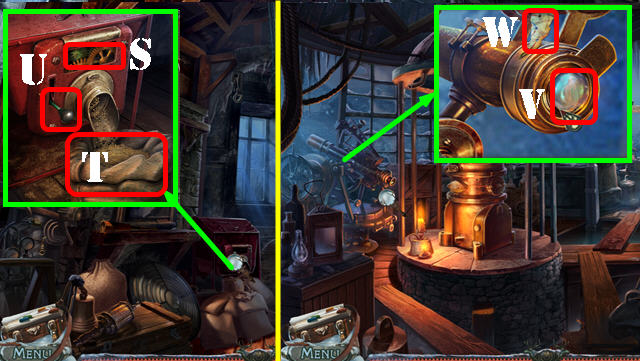
- Zoom into the table; take the MATCHES (T).
- Walk down.
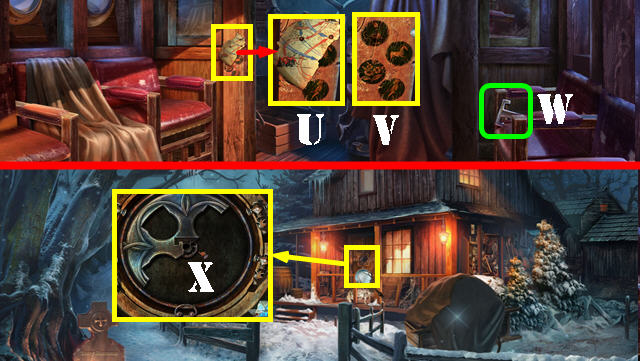
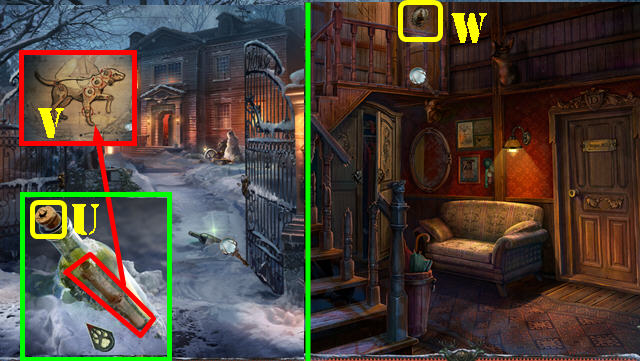
- Put the 2 SNOWSHOES on the snow below the arch to go forward (U).
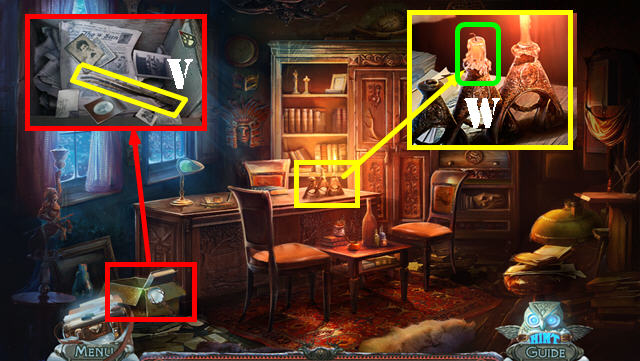
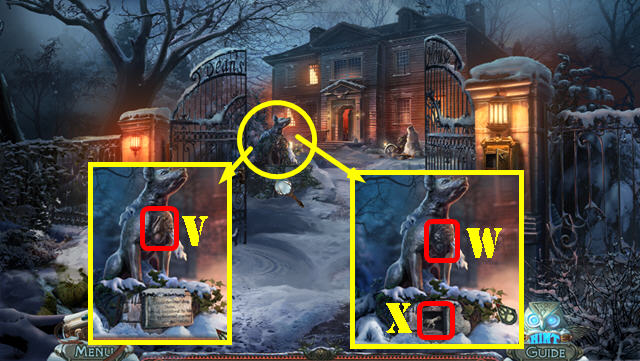
- Examine the board; take the ICE PICK (V) and read the 2 notes (W).
- Go right.
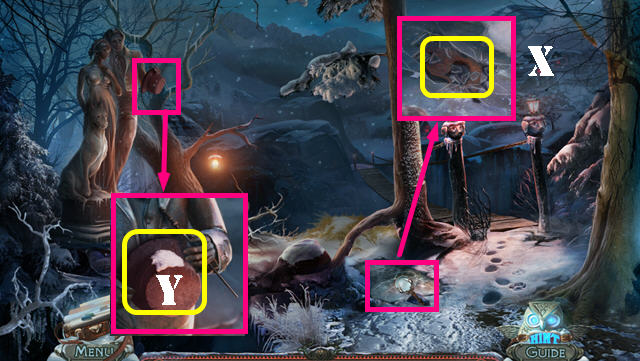
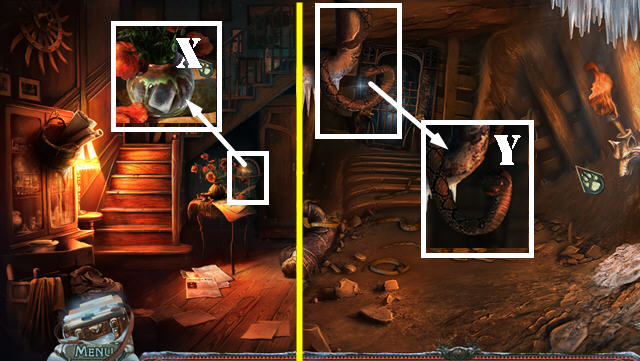
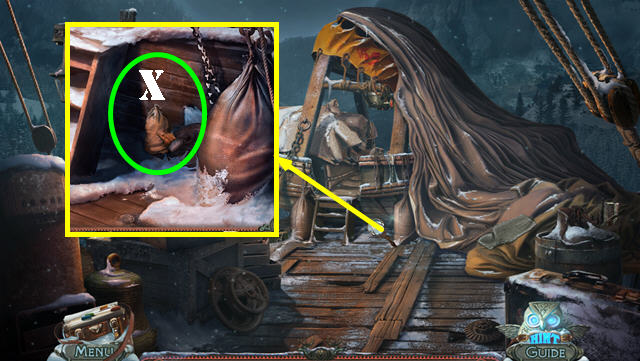
- Zoom into the ice; use the ICE PICK on the ice and take the SAW HANDLE (X).
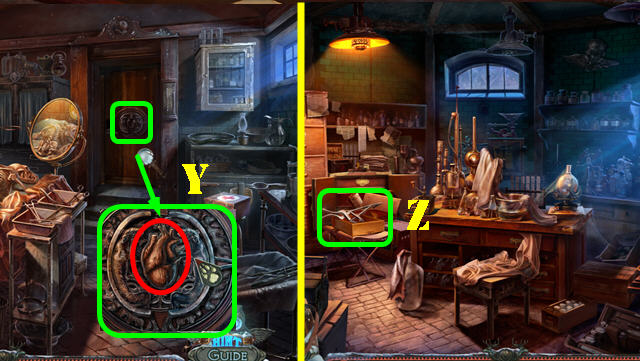
- Examine the statue; take the HAT (Y).
- Go back to the garage.
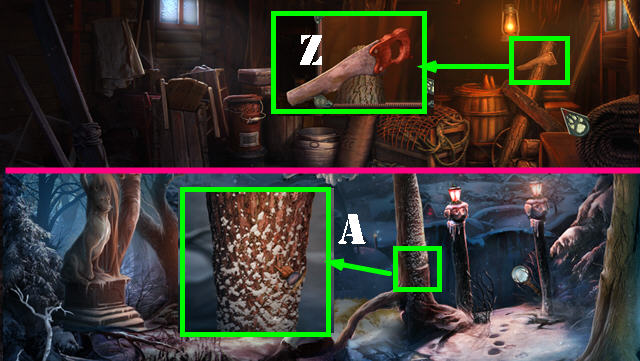
- Examine the saw blade; put the SAW HANDLE on the blade to get the SAW (Z).
- Go back to bridge.
- Click on the bridge for a cut scene.
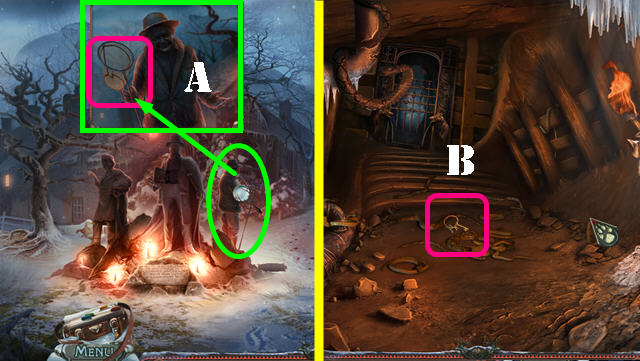
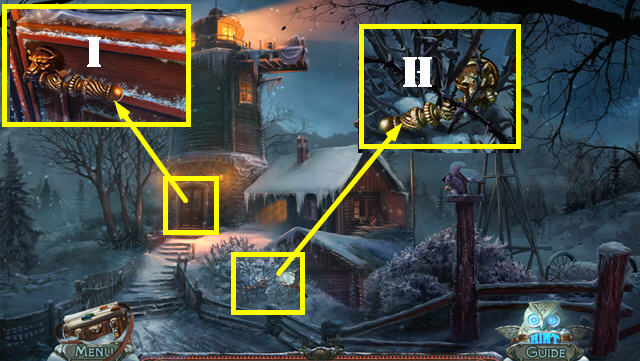
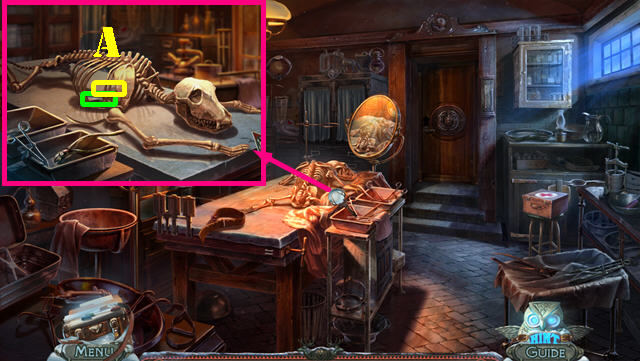
- Zoom into the tree; cut the tree with the SAW (A); go forward and then go right.
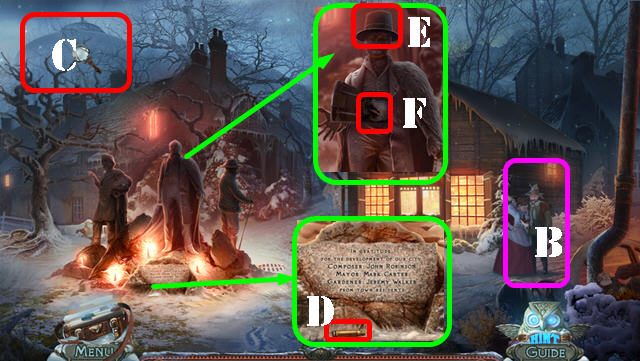
- Talk to the officer (B).
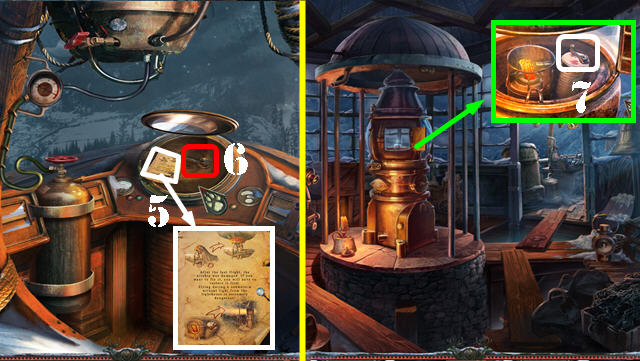
- Touch the dome (C).
- Examine the plaque; take the SHELL (D).
- Look at the center statue; put the HAT (E) on it and take the DOG HEAD (F).
- Go forward.
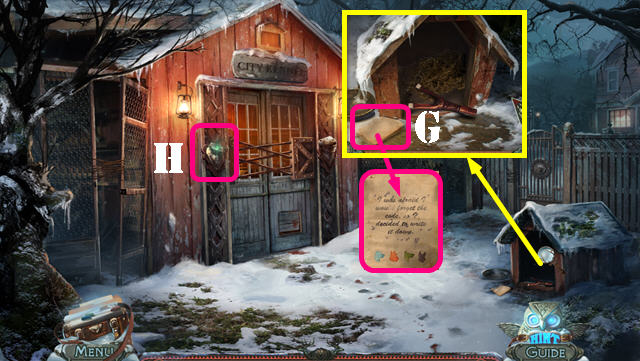
- Examine the dog house; take the note (G).
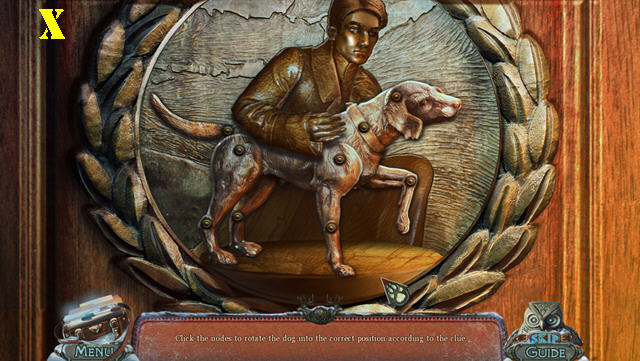
- Put the DOG HEAD on the statue to activate a puzzle (H).
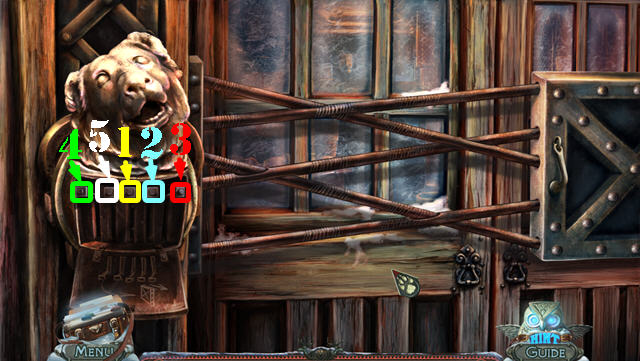
- Push on the buttons in the right order to remove the bars around the door.
- To solve the puzzle, press on the buttons in the order shown in the screenshot (1-5).
- Go into the kennel.
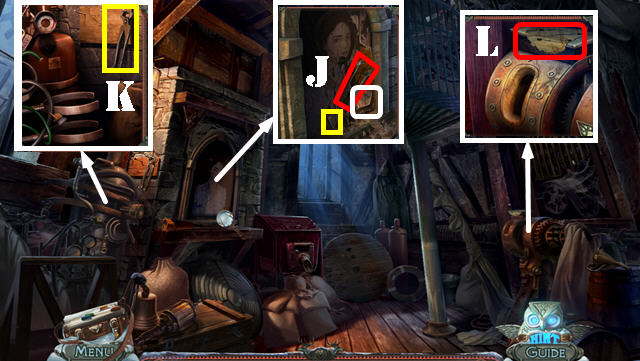
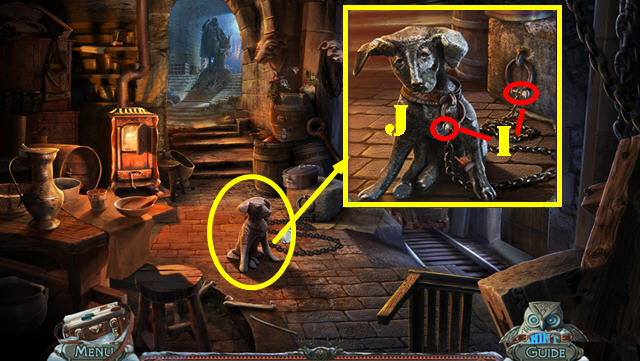
- Examine and take the STRANGE COLLAR (I).
- Examine and open the book; flip the pages twice and take the INSTRUCTIONS PIECE (J).
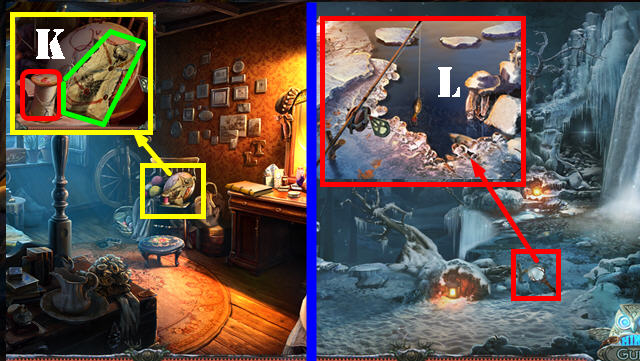
- Take a closer look at the dog and take the KEROSENE (K).
- Examine the bulletin board; take the BOTTLE (L) and the note (M).
- Take the EMPTY CUP (N).
- Walk down 3 times to reach the left square.
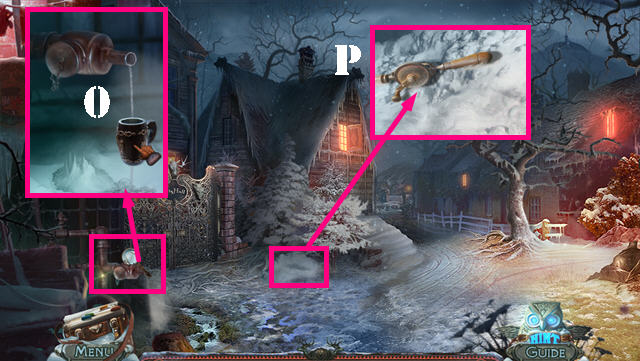
- Zoom into the tap; put the EMPTY CUP below it to acquire the CUP OF WARM WATER (O).
- Zoom into the snowdrift; pour the CUP OF WARM WATER on the snow; take the DRILL (P).
- Go back to the city kennel.
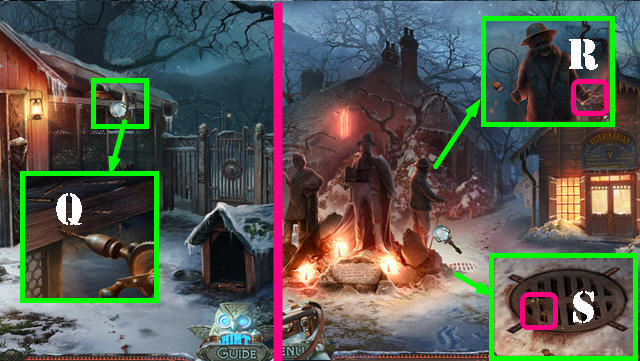
- Zoom into the beam; put the DRILL on it to get the DRILL WITH BIT (Q).
- Walk down.
- Look at the landscaper statue; touch the key (R). Zoom into the drain; touch the key and it will fall into the hole (S).
- Use the DRILL WITH BIT on the manhole cover. Go down the manhole cover to reach the sewers.
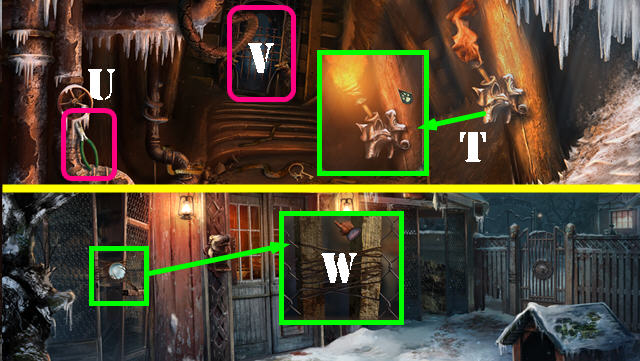
- Examine the holder and put the TORCH in it. Add the KEROSENE to the torch and then light the torch with the MATCHES (T).
- Take the NIPPERS (U).
- Touch the gate (V).
- Go back to the city kennel.
- Zoom into the left gate; cut the wire with the NIPPERS to activate a HOS (W).
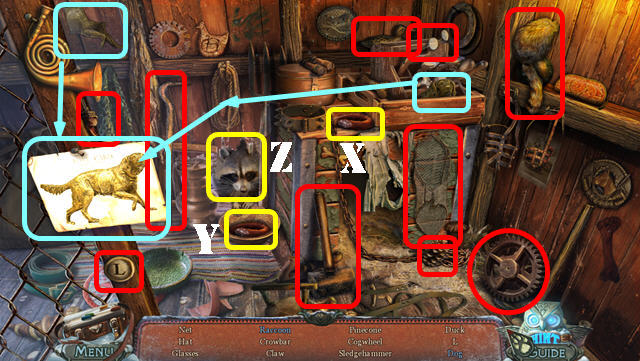
- Play the HOS.
- Put the sausage (X) in the bowl (Y); take the raccoon (Z).
- Drag the 2 picture fragments (blue) to the postcard; take the dog.
- The NET will be added to inventory.
- Walk down.
- Examine the landscaper statue; put the NET on the hoop; take the NET (A).
- Go back down to the sewers.
- Use the NET to retrieve the VETERINARIAN'S KEY (B).
- Walk down.
- Examine the door; use the VETERINARIAN'S KEY on the lock, turn the key twice and go through the door.
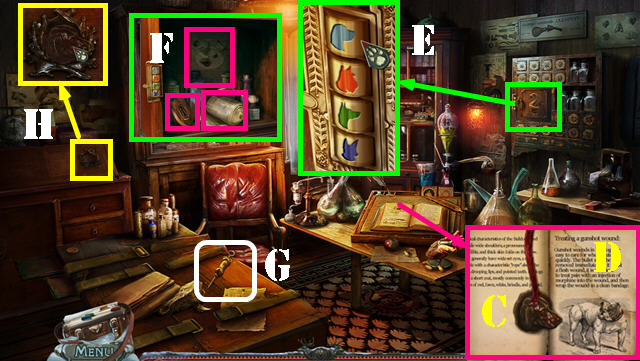
- Look at the book; flip the page and take the DOG MEDALLION (C).
- Put the INSTRUCTIONS PIECE on the torn page (D) to learn how to treat a wound.
- Examine the shelf and then zoom into the lock; turn the dog faces to the key shown in the screenshot: blue, orange, green, and purple (E).
- Look at the note; take the BANDAGE and SYMBOL 1 (F).
- Take the SYRINGE (G).
- Inspect the desk and put the DOG MEDALLION in the slot to activate a HOS (H).
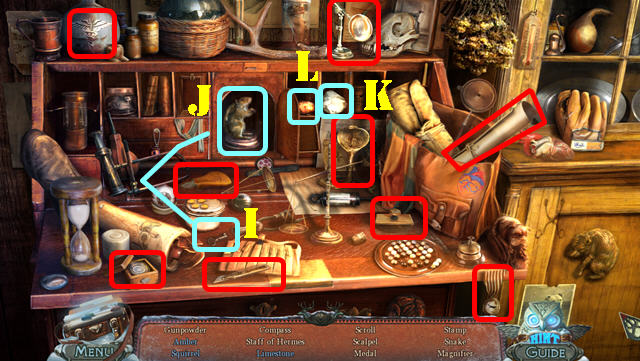
- Play the HOS.
- Put the key (I) in the lock and take the squirrel (J).
- Move the paper and take the limestone (K).
- Open the door and take the amber (L).
- The GUNPOWDER will be added to inventory.
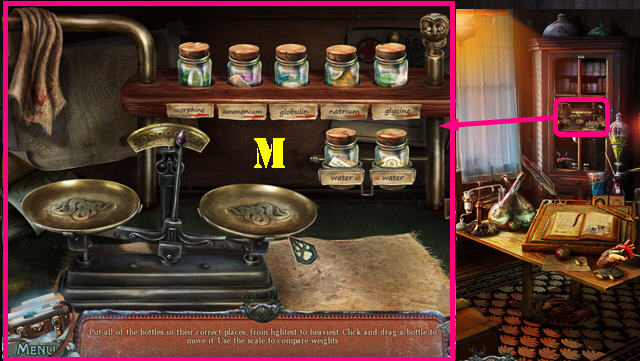
- Zoom into the shelf; put the BOTTLE down to activate a puzzle.
- Put the bottles in their proper places (lightest to heaviest) by weighing them on the scale.
- Please look at the screenshot for the solution (M).
- The MORPHINE will be added to inventory.
- Go to the kennels interior.
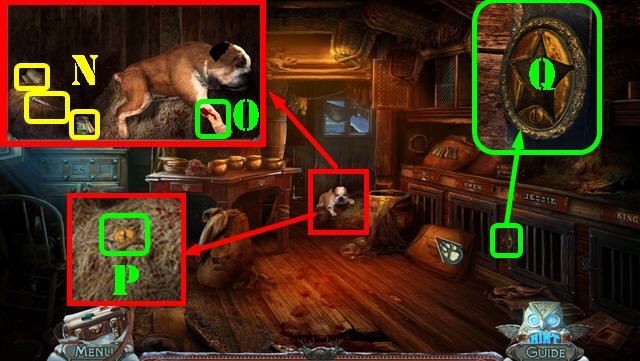
- Zoom into the dog; put the SYRINGE, BANDAGE, and MORPHINE down (N).
- Dip the SYRINGE into the MORPHINE bottle. Put the syringe on the wound and then put the BANDAGE over the wound (O).
- Look back in the spot the dog was in and take the STAR KEY (P).
- Inspect the lock; put the STAR KEY in the lock to activate a HOS (Q).

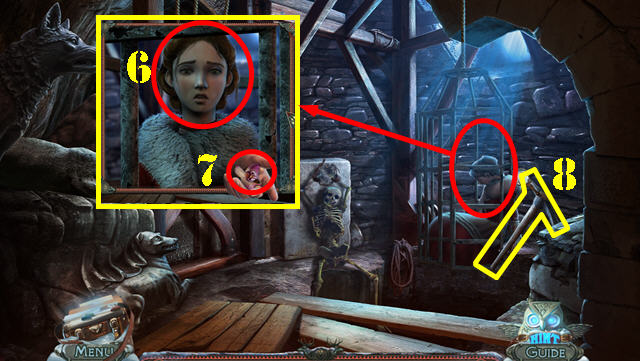
- Play the HOS.
- Drag the milk bottle (R) to the cup (S); take the cup of milk.
- Open the cage and take the mouse (T).
- Open the bag; take the ear of wheat (U).
- The BUCKSHOT will be added to inventory.
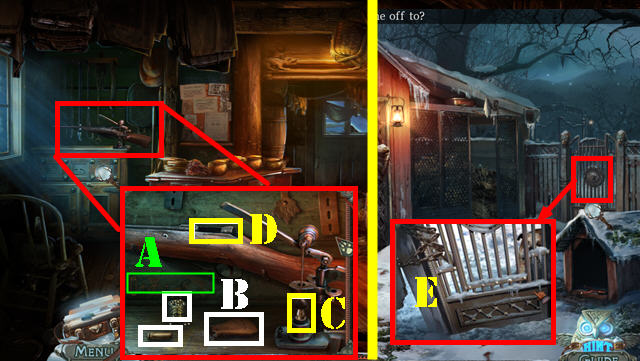
- Zoom into the rifle; look at the etchings (A).
- Put the SHELL, GUNPOWDER, and the BUCKSHOT on the table (B).
- Put the SHELL in the hole and then add the GUNPOWDER to it, followed by the BUCKSHOT. Press on the handle and take the BULLET (C).
- Put the BULLET into the RIFLE (D).
- Walk down.
- The dog goes through the gate. Use the RIFLE on the gate's close-up and then go through it (E).
Chapter 2: The Detective's House
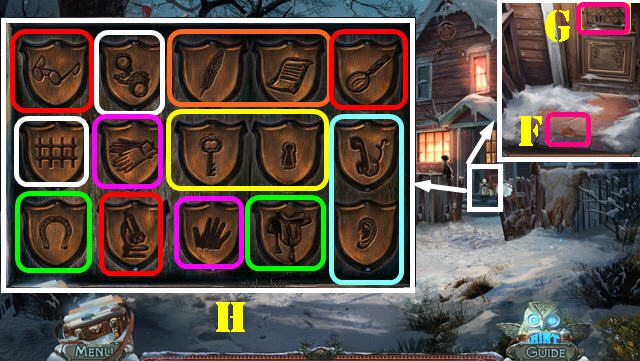
- Inspect the door; take the SYMBOL 2 (F).
- Touch the top of the door (G); put SYMBOL 1 and SYMBOL 2 in the empty slots to activate a puzzle.
- Select 2 or 3 matching items to eliminate them from the board.
- Please look at the screenshot for the solution, the matches are marked in the same color (H).
- Enter the detective's house.
- Play the HOS.
- Dip the brush (I) into the shoe polish (J); clean the boot with the brush and take the clean boot (K).
- Break the mirror (L) with the hammer (M); take the butterfly.
- The PURPLE SOLUTION will be added to inventory.
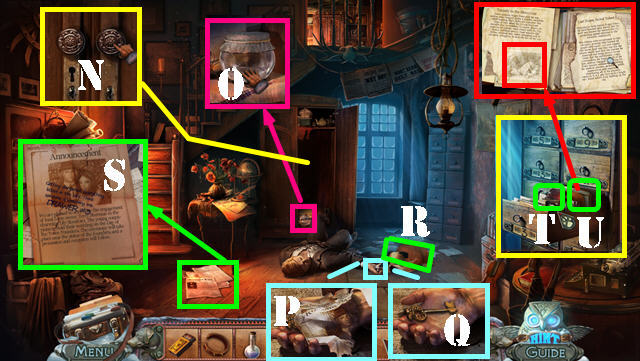
- Zoom into the closet and pull on the knob (N).
- Look inside the closet and take the JAR (O).
- Inspect the hand; take the NEWSPAPER PIECE (P) and then take the KEY (Q).
- Touch the dog (R).
- Look at the papers on the floor; push the papers aside and put the NEWSPAPER PIECE on the torn paper (S). Click on the paper and look at the code in your journal.
- Look at the file cabinet and open drawer 3; take the SLINGSHOT BAND (T) and open the file (U).
- Go upstairs.
- Inspect the cardboard box; move the items aside and take the TWEEZERS (V).
- Take a closer look at the table; take the CANDLE (W).
- Walk down.
- Zoom into the bowl; use the TWEEZERS to retrieve the 1/2 FINGERPRINT (X).
- Go back to the sewers.
- Zoom into the snake; put the JAR over the snake to get the JAR WITH POISON (Y).
- Go back to the pharmacy.
- Zoom into the table; put the CANDLE (1) and the PURPLE SOLUTION down (2).
- Pour the JAR WITH POISON into the test tube (3).
- Light the candle with the MATCHES.
- Take the ACID (4). This action triggers a HOS.

- Play the HOS.
- Open the door and take the tobacco (5).
- Put the scale piece (6) on the scale (7); take the scales.
- The BOX OF TOBACCO will be added to inventory.
- Go to the city kennel.
- Zoom into the dog house; put the SLINGSHOT BAND on the incomplete slingshot. Take the SLINGSHOT (A).
- Go through the gate.
- Use the SLINGSHOT on the nest (B).
- Inspect the ground and take the SYMBOL OF MATURITY (C).
- Go to the detective's cabinet.
- Examine the box; use the KEY in the lock, touch it and it will break (D).
- Use the ACID on the lock.
- Take the SLIDE (E).
- Walk down.
- Zoom into the hand; put the SLIDE on the finger to get the INVISIBLE FINGERPRINT (F).
- Go back to the detective's cabinet.
- Put the INVISIBLE FINGERPRINT on the stand (G).
- Put the powder (H) on the slide and then dust it off with the brush (I).
- Put the bottle (J) on the slide to get FINGERPRINT 2/2.
- Touch the mask and zoom into the area behind the mask (K).
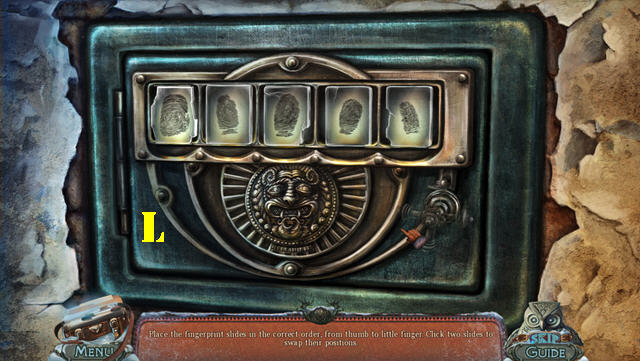
- Put the 2 FINGERPRINTS on the door to activate a puzzle.
- Put the slides in the right order from the thumb to the little finger.
- Select any 2 fingerprints to swap their positions.
- Please look at the screenshot for the solution (L).
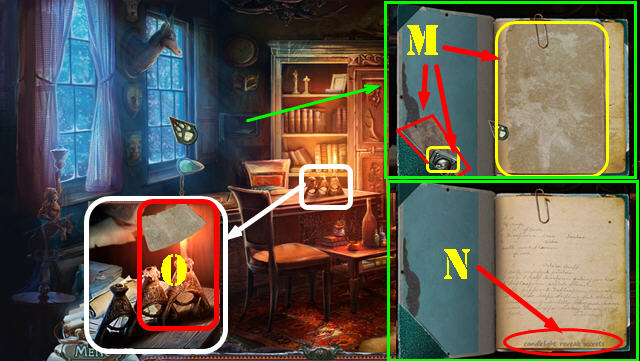
- Look in the safe and take the SYMBOL OF BIRTH, SCRAP OF CLOTHING, and the STRANGE PAPER (M).
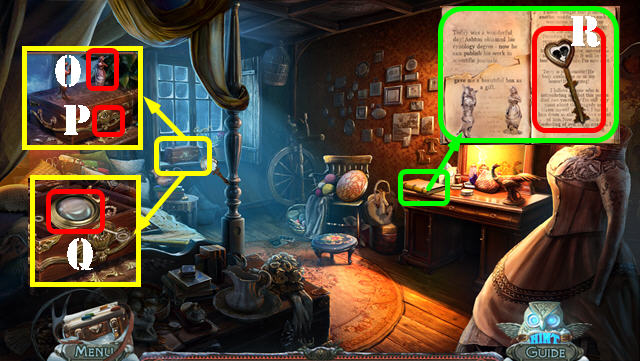
- Click on the note that says: 'candlelight reveals secrets' (N).
- Zoom into the candleholder; put the STRANGE PAPER on the candle and take the note (O).
- Walk down.
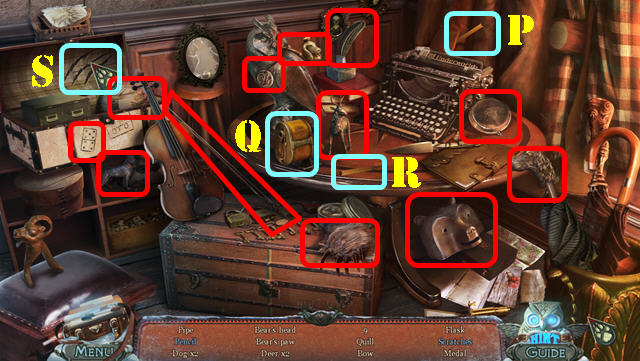
- Play the HOS.
- Put the pencil (P) in the pencil sharpener (Q); take the pencil (R).
- Open the chest and take the scratches (S).
- The PIPE will be added to inventory.
- Give the SCRAP OF CLOTHING to the dog (T).
- Go back to the right square.
- Zoom into the composer statue; put the PIPE in its hand (U).
- Put the BOX OF TOBACCO in the pipe and light the pipe with the MATCHES.
- Take the MUSIC SHEET (V).
- Go back to the street.
- Inspect the gate; and zoom into the lock (W).
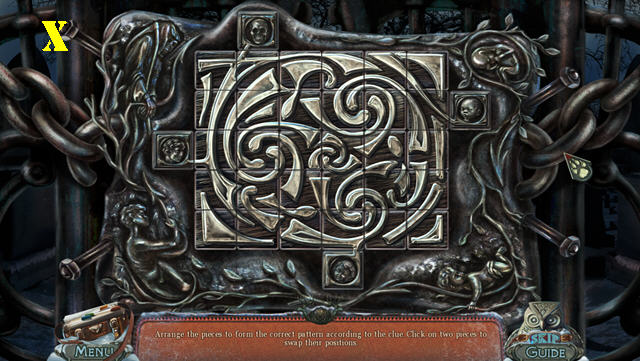
- Put the SYMBOL OF MATURITY and the SYMBOL OF BIRTH on the lock to activate a puzzle.
- Arrange the image correctly. Select any two pieces to swap their positions.
- Tiles that have been placed correctly will lock in place.
- Please look at the screenshot for the solution (X).
- Go through the gate to access the graveyard.
Chapter 3: Jenny's Room
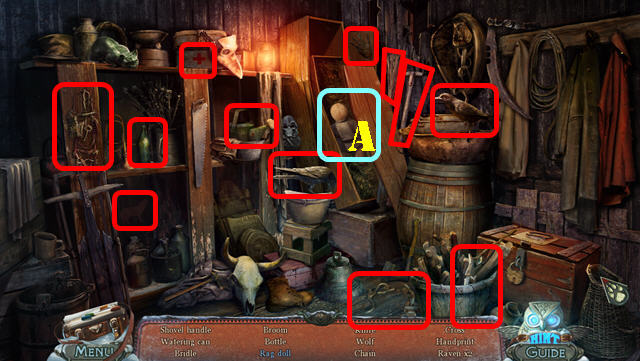
- Play the HOS.
- Open the casket; take the rag doll (A).
- The SHOVEL HANDLE will be added to inventory.
- Take the BAG OF SAND (B).
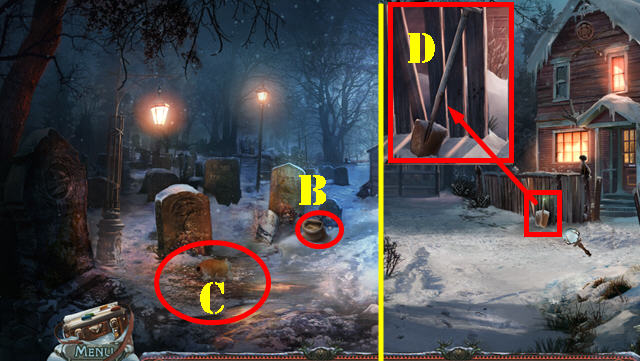
- Note the grave (C).
- Walk down.
- Zoom into the shovel head; put the SHOVEL HANDLE on it and take the SHOVEL (D).
- Go back to the graveyard.
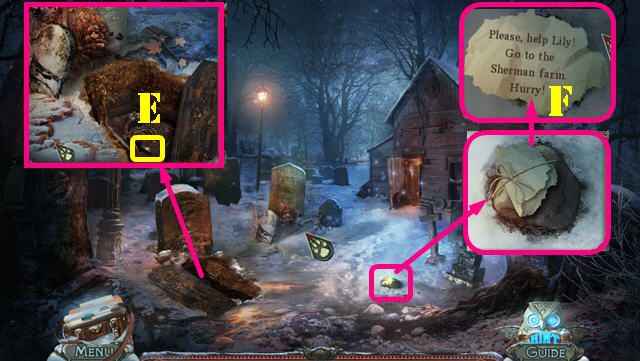
- Zoom into the grave; use the SHOVEL in the ground for a cut scene and to activate a HOS.
- Zoom back into the grave and take the PIANO KEY (E).
- Look at the stone; take the note (F) and then the STONE.
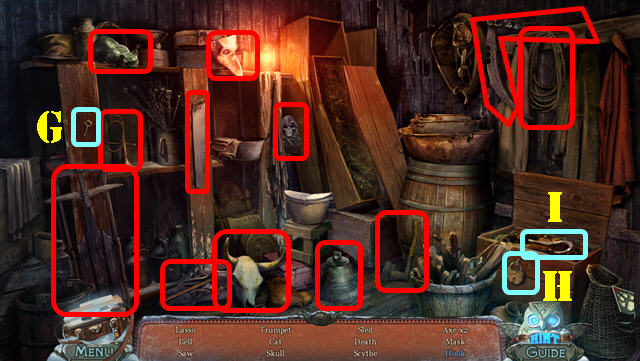
- Play the HOS.
- Put the key (G) in the lock (H) and turn the key twice; take the hook (I).
- The LASSO will be added to inventory.
- Return to the left square.

- Zoom into the ice on the road; put the BAG OF SAND on it and then go forward (I).
- Inspect the pianist statue; put the MUSIC SHEET on the stand. Put the PIANO KEY on the keyboard (J).
- Examine the ground by the conductor; take the FARM KEY (K).
- Walk down 3 times to go to the crossroad.
- Inspect the lock; put the FARM KEY in it and go through the open gate (L).
- Look at the grave; take the LOCK PART 1 (M).
- Look at the barrel; take the SHORT HOSE (N).
- Play the HOS.
- Open the box and take the doll (O).
- Put the slingshot band (P) on the slingshot (Q); take the slingshot.
- The CANDY JAR will be added to inventory.
- Go forward through the left path to reach the cliff.
- Play the HOS.
- Throw the stone (1) at the bird (2) and take the nut.
- Put the blade (3) on the pinwheel (4); take the windmill (5).
- The NUT will be added to inventory.
- Examine the tree; use the LASSO to retrieve the FISHING REEL (R).
- Inspect the zeppelin; remove the old hose and replace it with the SHORT HOSE (S).
- Use the STONE on the metal bar (T).
- Go into the vehicle.
- Look at and take the 1/5 MAP PIECE (U). Note the etchings behind it (V).
- Take the LOCK PART 2 (W).
- Walk down twice.
- Inspect the door; put the LOCK PART 1 and the LOCK PART 2 on the lock to activate a puzzle (X).

- You must rotate the symbols into the right positions.
- Lever A; rotates itself and D. Lever B; rotates itself. Lever C; rotates itself and B. Lever D; rotates only itself.
- To solve the puzzle, set the 2 images on the left side first and the 2 on the right side last.
- Enter the farm house.
- Examine the picture frame; break the glass with the STONE and take the FISHING LURE (1).
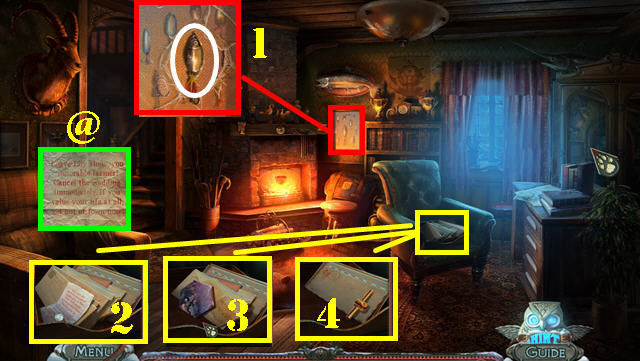
- Examine the box on the chair; open the note and read it (2). Press on the next letter and take the 1/ 2 MOSAIC PIECE (3).
- Look at the next note (@).
- Press on the next letter and take the SMALL VALVE (4).
- Go up the steps.

- Play the HOS.
- Put the lemon slice (E) in the cup (F); Pour the tea in the kettle (G) into the cup and take the tea with lemon.
- Use the scissors (H) on the strap (I); take the pole (J).
- The POLE will be added to inventory.
- Look at the chair; take the 2/5 MAP PIECE and the NEEDLE AND THREAD (K).
- Go back to the cliff.
- Zoom into the right side of the ground; put down the POLE, FISHING REEL, and FISHING LURE to create the fishing rod.
- Press on the reel to automatically catch the FRESH FISH (L).
- Go into the vehicle.
- Remove the sheet and zoom into the controls.
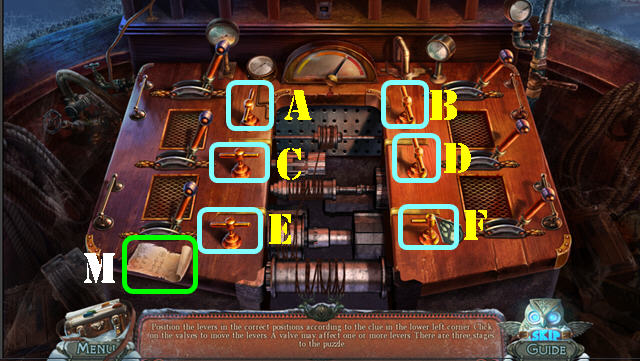
- Put the SMALL VALVE on the lever to activate a puzzle.
- Flip the switches to the correct positions. Look at the note (M) to see the right solution. Move all the levers to the left first, then all to the middle, and lastly, all to the right.
- To solve the puzzle, press on the levers in this order: E, F, A, E, F, D, E, F, B, and F.
- Once you solve the puzzle, you will be taken to the lighthouse.
Chapter 4: The Lighthouse
- Inspect the squirrel (A); give him the NUT and take the MEDAL (B).
- Put the CANDY JAR on the termites to get the JAR WITH TERMITES (C).
- Walk down 3 times and then take the right path to the bridge.
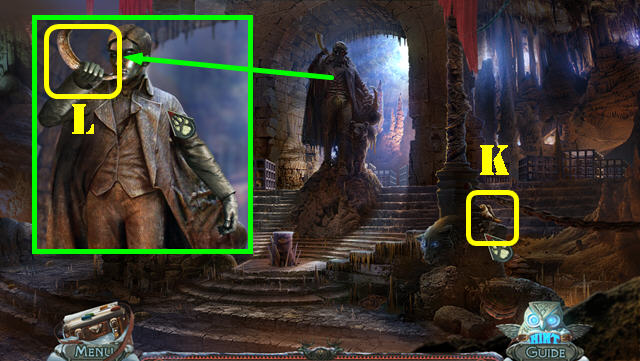
- Examine the statue; put the MEDAL on the jacket (D) and take the CANE (E).

- Go back to the farm.
- Inspect the covered cart; use the CANE on the wheel and take the TARPAULIN (F).
- Take the GLOVE (G) as well.
- Go back to the lighthouse.
- Zoom into the bush; grab the DOOR HANDLE with the GLOVE (H).
- Zoom into the door; put the DOOR HANDLE on it (I). Turn the handle and go inside the lighthouse.
- Examine the fresco; put the JAR OF TERMITES on the it; take the TONGS, SMALL KEY, and the 2/2 MOSAIC PIECE (J).
- Examine the device on the left; take the NAIL PULLER (K).
- Inspect the device on the right; take the 3/5 MAP PIECE (L).
- Walk down 3 times.
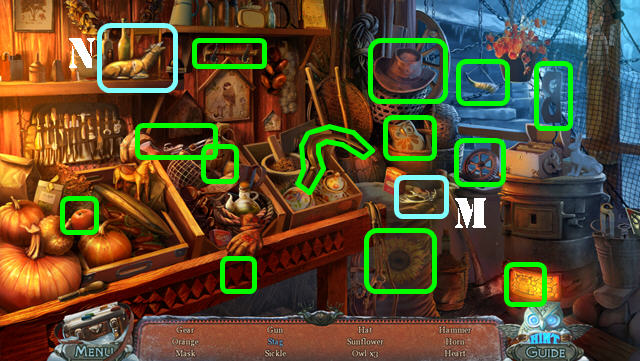
- Play the HOS.
- Put the antlers (M) on the deer (N) and take the stag.
- The GEAR will be added to inventory.
- Inspect the fence; pull out the nails with the NAIL PULLER and take the BOARD (O).
- Go into the farm house.
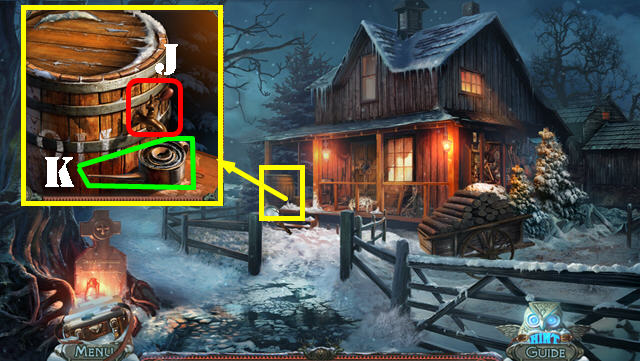
- Look at the fireplace; take the BURNING COAL with the TONGS (P).
- Move the bear rug and zoom into the ground (Q).
- Put the 2 MOSAIC PIECES on the ground to activate a puzzle.
- Grab the piece and then press on it several times to rotate it. Put it in an empty space; if the piece has been rotated correctly, it will lock in place. If the piece has not placed correctly it will continue rotating.
- Arrange the pieces as shown in the screenshot (R).
- Examine the niche; take the PART OF KEY and the BIG LEVER (S).
- Return to the lighthouse floor 1.
- Examine the mechanism on the right; put the BIG LEVER on it and pull the lever (T) to lower the stairs.
- Go up the stairs.
- Open the lighthouse lantern; put the BURNING COAL in it and close the lid (U).
- Put the board down (V) and go forward.
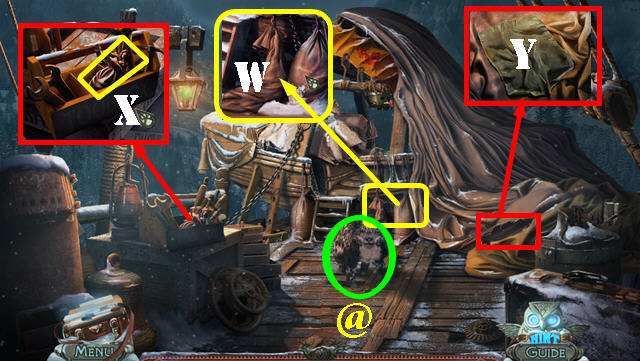
- Give the FRESH FISH to the wildcat (@).
- Examine and take the EMPTY SACK (W).
- Inspect the toolbox; take the GIRL FIGURINE (X).
- Zoom into the cover; put the TARPAULIN over the hole. Use the NEEDLE AND THREAD on the tarp (Y).
- Go forward.
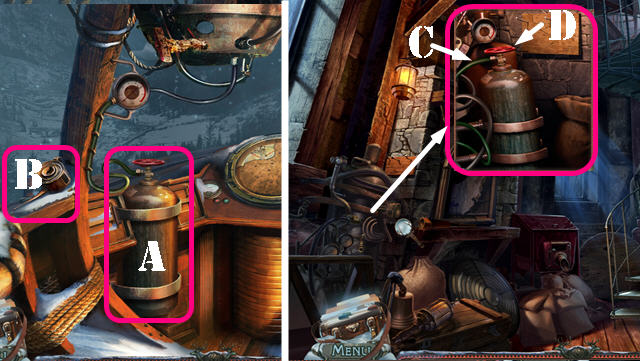
- Take the EMPTY GAS TANK (A).
- Take the EMPTY OILER (B).
- Walk down 3 times.
- Examine the mechanism; put the EMPTY GAS TANK in the holder; attach the hose (C) and turn the valve (D).
- Take the FULL GAS TANK.
- Walk down 2 times.

- Play the HOS.
- Use the shard (E) on the net and take the fish skeleton (F).
- Put the weight (G) on the hook (H) and take the diving helmet (I).
- The TAP will be added to inventory.
- Walk down.
- Examine the barrel; put the TAP on it (J).
- Put the EMPTY OILER below the tap; turn the tap and take the FULL OILER (K).
- Go to Lily's room.
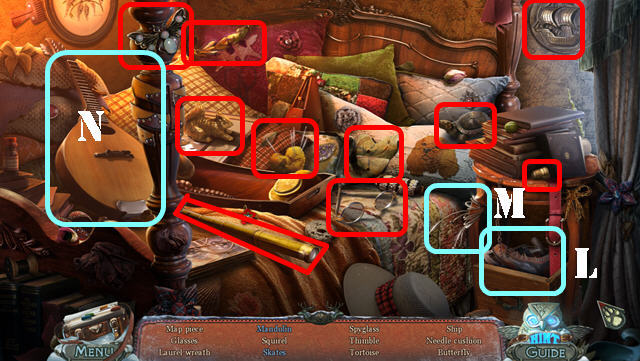
- Play the HOS.
- Move the sheet; take the skates (L).
- Put the strings (M) on the mandolin (N); take the mandolin.
- The 4/5 MAP PIECE will be added to inventory.
- Inspect the window sill; put the GIRL FIGURINE on the box (O). Insert the SMALL KEY in the keyhole (P); turn the key and take the LENS (Q).
- Open the book; put the PART OF KEY next to the other (R). Take the ZEPPELIN KEY.
- Go back to the lighthouse floor 1.
- Inspect the red mechanism; put the GEAR (S) and the EMPTY SACK (T) in place.
- Use the FULL OILER on the gears. Turn the lever (U) and take the SACK WITH SAND.
- Go to the lighthouse floor 2.
- Inspect the telescope; remove the lens cap and put the LENS in it (V). Zoom into the lens to view a cut scene.
- Take the 5/5 MAP PIECE (W).
- Go to the landing zone.
- Zoom into the sack; put the SACK WITH SAND next to it (X).
- Go to the zeppelin.
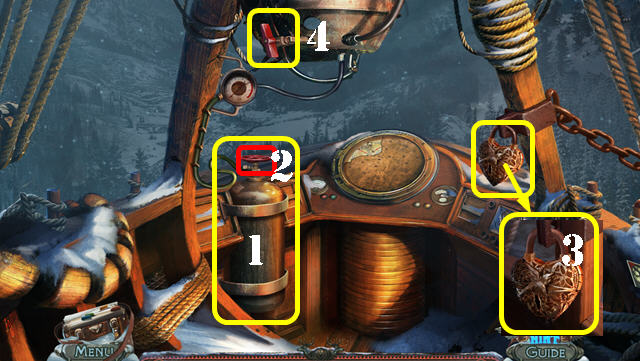
- Put the FULL GAS TANK in the holder (1); turn the valve (2).
- Zoom into the heart lock; put the ZEPPELIN KEY in the keyhole; turn the key to unlock the lock (3).
- Put the FULL OILER on the lever; turn the lever (4).
- Zoom into the center; put the 5 MAP PIECES on the controls to activate a puzzle.
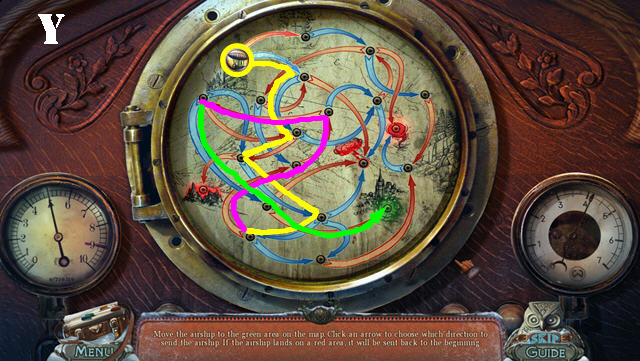
- Move the zeppelin to the green point.
- Please look at the screenshot for the solution and follow the marked path in this order: yellow, purple, and green (Y).
- Look at the note on the controls (5) and take the GAS VALVE (6).
- Walk down twice.
- Examine the lantern; open the cover and put the GAS VALVE in the compartment (7).
- Turn the valve. Close the lid and turn the handle on the cover.
- Go into the zeppelin to get to the other side of the town.
Chapter 5: The Dean's House
- Take the HOSE (A).
- Walk down.
- Inspect the pipe on the left; attach the HOSE to it (B).
- Go right.
- Touch the scene with your cursor for the hose to appear and extinguish the fire.
- Play the HOS.
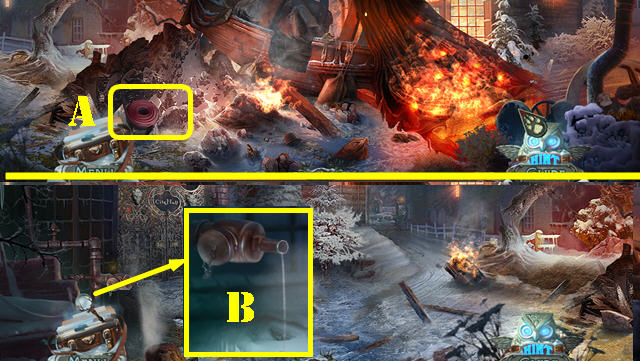
- Drag the heart fragment (C) to the other fragment (D); take the full heart.
- Pour the bottle (E) over the notes (F); take the notes.
- The BATON will be added to inventory.
- Go right.
- Take the SAXOPHONE KEY (G).
- Walk down twice and go forward.
- Inspect the saxophonist; put the SAXOPHONE KEY on the sax (H).
- Examine the conductor and give him the BATON (I).
- Examine the device to activate a puzzle (J).
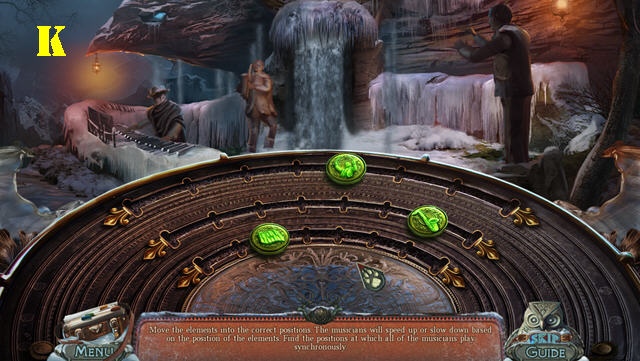
- Move the buttons to the right slots so all the musicians play in sync.
- Please look at the screenshot for the solution (K).
- Go forward.
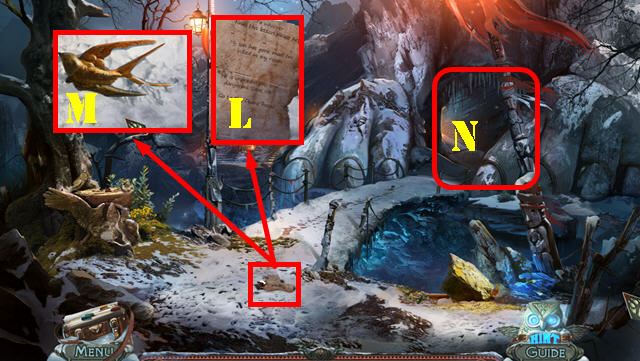
- Look at and take the note (L), also take the SWALLOW below it (M).
- Try to go into the cave and the dogs will appear (N).
- Go back to the Dean's house.

- Zoom into the mailbox; put the SWALLOW in the slot (O).
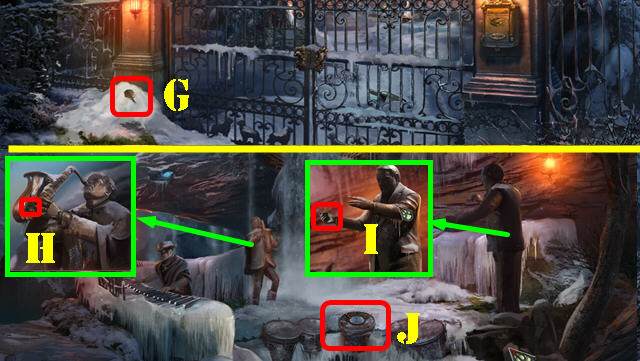
- Take the DEAN'S KEY (P).
- Inspect the gate; insert the DEAN'S KEY in the lock and turn the key (Q).
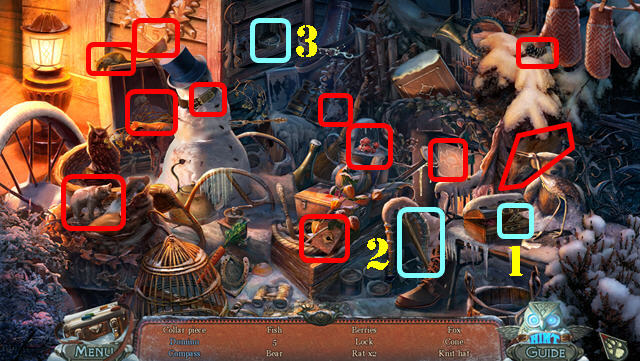
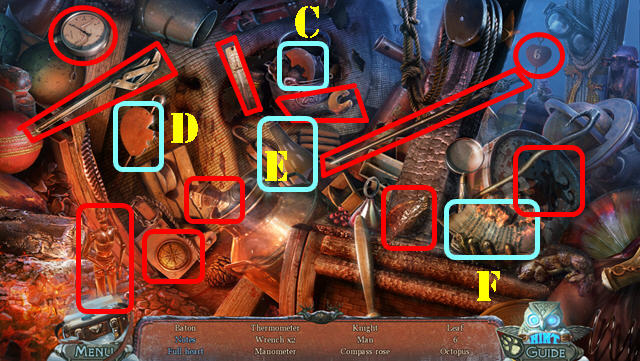
- Play the HOS.
- Open the box; take the domino (1).
- Put the hammer (2) on the wood and take the compass (3).
- The COLLAR PIECE will be added to inventory.
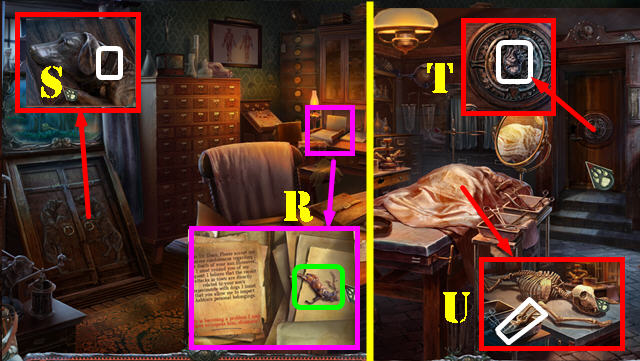
- Go into the dean's house and then go through the lower right door.
- Zoom into the book; move the papers aside and take the DEER FIGURINE (R).
- Inspect the cellar door; put the COLLAR PIECE on it and go down to the cellar (S).
- Examine the back door; take the STONE HEART (T).
- Remove the sheet and look at the skeleton; take the PRUNER (U).
- Walk down 3 times.
- Examine the statue; cut the branches around the statue with the PRUNER. Take the WOODEN HEART (V).
- Put the STONE HEART on the dog (W) and take the DOG PUPPET (X).
- Go down to the cellar.
- Zoom into the back door; put the WOODEN HEART on the door (Y); turn the handle and go through the door.
- Take the RETRACTOR (Z).
- Walk down.
- Zoom into the skeleton; use the RETRACTOR on the skeleton; take the WEB CUTTER and the RULER (A).
- Go through the door.
- Zoom into the bottle; use the WEB CUTTER to remove the cobwebs and take the note (B).
- Examine the cupboard; use the RULER on the latch (C) and take the SMALL HOOP NET (D).
- Walk down twice.
- Zoom into the fish tank; use the SMALL HOOP NET to retrieve the CARD FILE KEY (E).
- Examine the file cabinet; use the CARD FILE KEY in the lock and turn the key.
- Look at the folder (F); touch the note and take the CLIP (G).
- Touch the picture (H) and zoom into the safe to activate a puzzle.
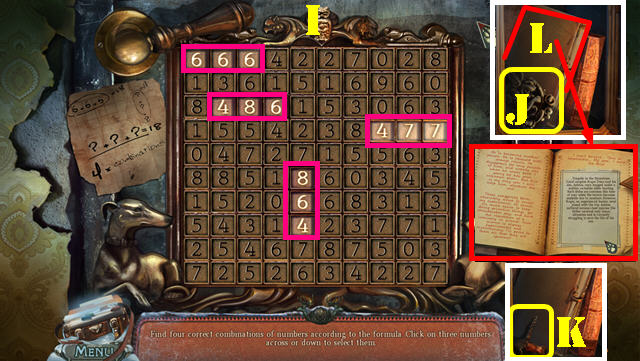
- You have to find 4 correct combinations whose sums of 3 numbers add up to 18 according to the formula on the clue.
- Please look at the screenshot for the solution (I).
- Look in the safe; take the PATTERN (J) and the CORKSCREW (K).
- Look in the folder and take the note (L).
- Go into the cellar.
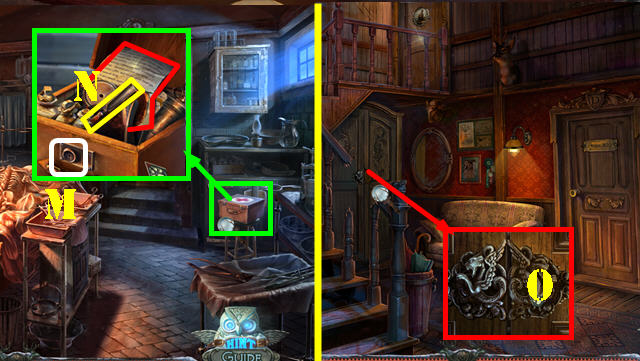
- Examine the first aid kit; use the CLIP in the lock (M).
- Take the FILE and read the note (N).
- Walk down twice.
- Examine the wardrobe; put the PATTERN on the lock to activate a HOS (O).
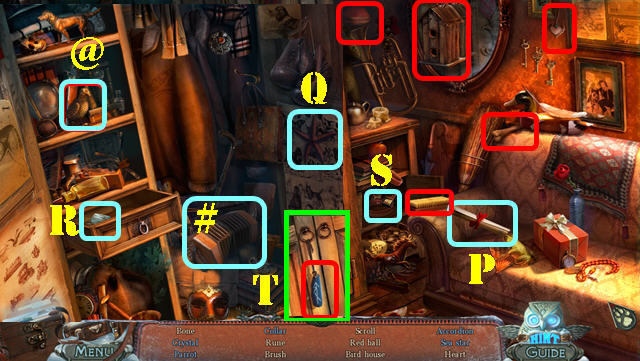
- Play the HOS.
- Move the pillow; take the scroll (P).
- Open the cabinet door; take the sea star (Q),the parrot (@), and the accordion (#). Open the drawer; take the crystal (R).
- Open the small door; take the collar (S).
- The rune is hanging from the cabinet door handle (T).
- The BONE will be added to inventory.
- Walk down.
- Inspect the bottle; remove the cork (U) with the CORKSCREW and take the note (V).
- Go back into the Dean's house.
- Inspect the top door; put the DOG PUPPET on the door to activate a puzzle (W).
- Rotate the joints according to the clue in your journal.
- Please look at the screenshot for the solution (X).
- Go through the top door to access Ashton's room.
Chapter 6: Ashton's Room
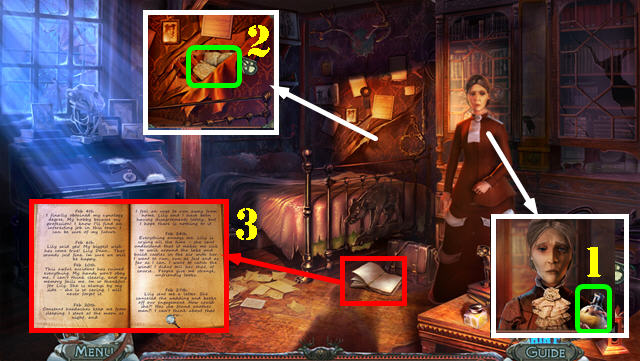
- Talk to the lady and take the DOG SCENT (1).
- Tear the wallpaper; zoom into it and take the PIECES OF LETTER (2).
- Look at the book and read the note (3).
- Walk down.
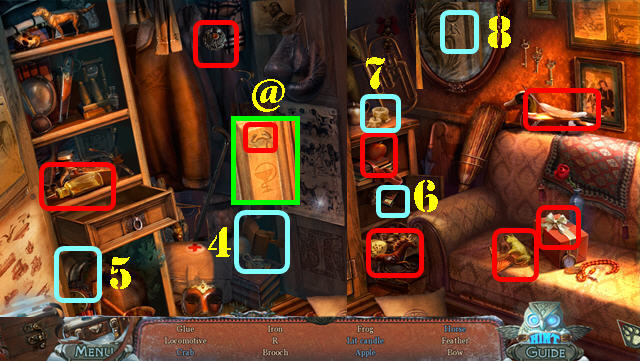
- Play the HOS.
- Open the cabinet door; take the locomotive (4) and the iron (5).
- Use the matches (6) on the candle (7); take the lit candle.
- Open the cabinet door and then take the 'R' on the mirror (8).
- Take the crab (@) on the door.
- The GLUE will be added to inventory.
- Walk down.
- Play the HOS.
- Touch the boot (9) and then take the print (10).
- Use the broom (11) on the book (12); take the book.
- The LEASH will be added to inventory.
- Go back into the Ashton's room.
- Look at the papers on the ground; put the PIECES OF LETTER on it (A).
- Put the GLUE on the paper; look at the note (B) and the clue (C).
- Go back to the canyon.
- Put the DOG SCENT on the dogs guarding the cave (D).
- Enter the cave.

- Play the HOS.
- Use the crowbar (E) on the barrel; take the screwdriver and one gnome (F).
- Use the stick (G) on the drum (H) and take the eagle spirit.
- The SCREWDRIVER will be added to inventory.
- Go through the cave on the right and then forward to reach the dining room.
- Examine the dog statue; use the SCREWDRIVER on one of the two screws to remove them (I).
- Take the PUPPY STATUE (J).
- Go up the steps.
- Take the BIRD SKULL (K).
- Examine the statue; take the MAMMOTH TUSK (L).
- Walk down 3 times.
- Examine the dog statue; put the PUPPY STATUE down (M) and take ASHTON'S MEDAL (N).
- Go through the right cave.
- Zoom into the left door; put ASHTON'S MEDAL on the door to activate a puzzle (O).
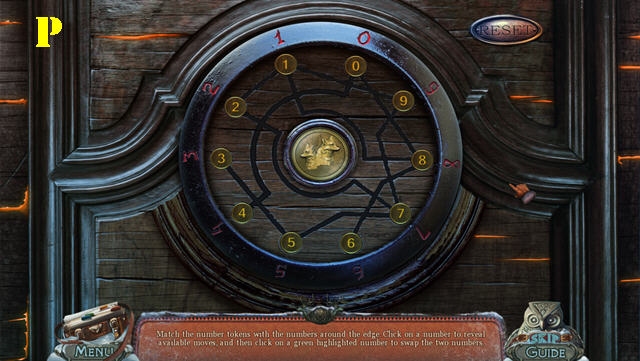
- Rotate the elements correctly using the clue in the journal by placing the same numbers below each other.
- Click on a number and the numbers you can swap it out with will light up, choose the best path for that number.
- To solve the puzzle, swap out the numbers in the following order: (3-9), (5-9), (4-0), (2-1), (7-3), (7-5), (8-1), (8-2), and (2-1) (P).
- Go through the door.
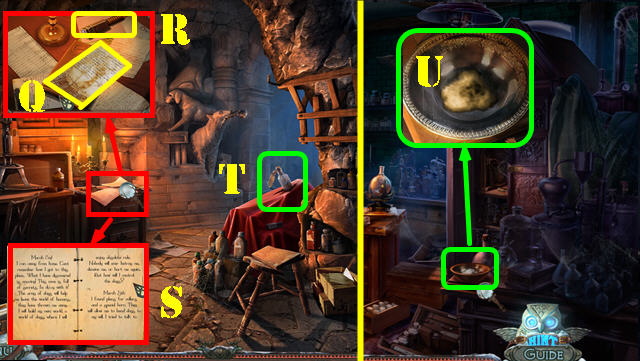
- Examine the papers; take the note (Q) and the TRIANGLE (R).
- Open the book and flip through the pages (S).
- Take the SMELLING SALTS (T).
- Go to the laboratory.
- Zoom into the bowl; put the SMELLING SALTS in it and take the SMELLING SALTS COTTON (U).
- Go back to dogs town.
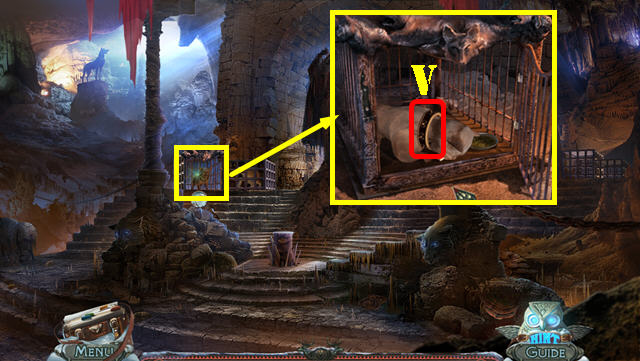
- Inspect the left dog cage; open the latch.
- Give the BONE to Pippa and zoom into her collar (V).
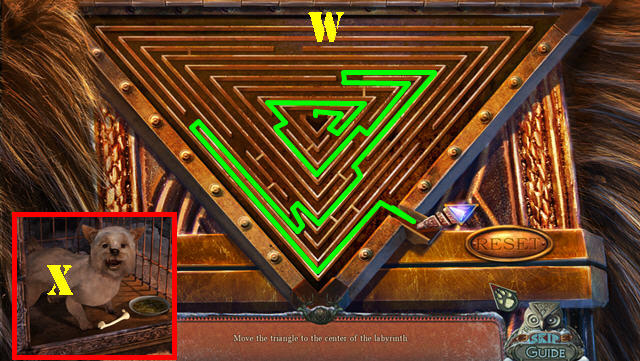
- Put the TRIANGLE on the puzzle to activate a puzzle.
- Move the triangle to the center of the labyrinth as shown in the screenshot (W).
- Take PIPPA (X).
- Walk down to reach the dining room.
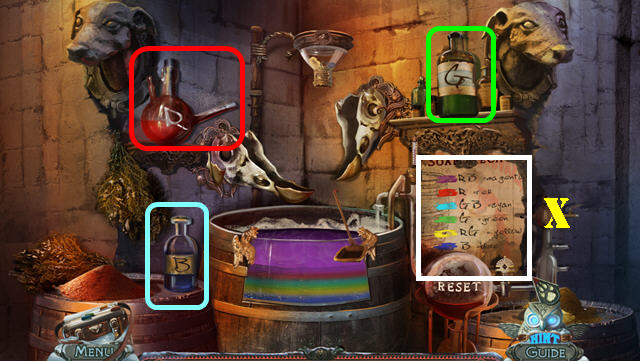
- Examine the barrels; put the BIRD SKULL on the scene to activate a puzzle.
- Make the colored soaps in the order shown on the chart (X).
- To solve the puzzle, mix the colors in this order: (Blue), (Green plus Red), (Green twice), (Blue), (Red twice), and (Red plus Blue).
- You will earn the SOAP.
- Walk down.
- Zoom into the concrete; put the SOAP down (1) and touch the base of the statue.
- Look at the statue on the right and take the PEARLS (2).
- Examine the hole and take the LEVER (3).
- Go forward.
- Look at the cell; use the LEASH on the bars (4).
- Zoom into the cart; put the LEVER on the cart and pull on it (5).
- Go through the right door.
- Inspect Lily; put the SMELLING SALTS COTTON on her face (6).
- Take the LIFE FLOWER (7).
- Take the PICKAXE (8).
- Walk down 2 times.
- Zoom into the left side of the wall; use the PICKAXE to get the DIAMOND (9).
- Look in the hole in the wall; put the DIAMOND in the hole (10).
- Put PIPPA in the hole on the left (11).
- Take the OWL SYMBOL (12).
- Go back to the canyon.
- Examine the tree stump; put the FILE, MAMMOTH TUSK, LIFE FLOWER, and PEARLS down to activate a puzzle (13).
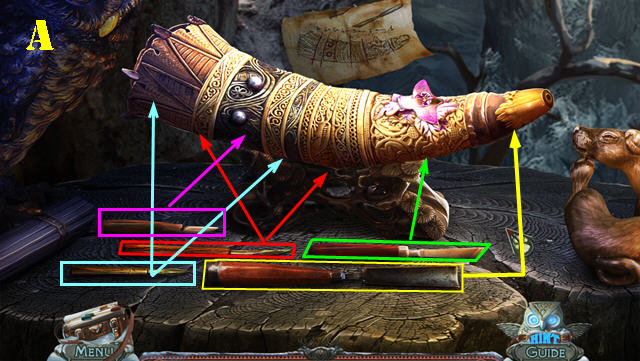
- Carve out the horn according to the clue using the instruments at the bottom.
- Please use the instruments on the sections the arrows are pointing to. Then add the flower and the pearls at the end.
- Please look at the screenshot for the solution (A).
- Take the HORN COPY.
- Go to Roger's laboratory.
- Zoom into the dog; put the HORN COPY on the horn to get the HORN (B).
- Go back to the cages.
- Examine the mechanism on the left; put the DEER FIGURINE and the OWL SYMBOL into the slots to activate a puzzle (C).
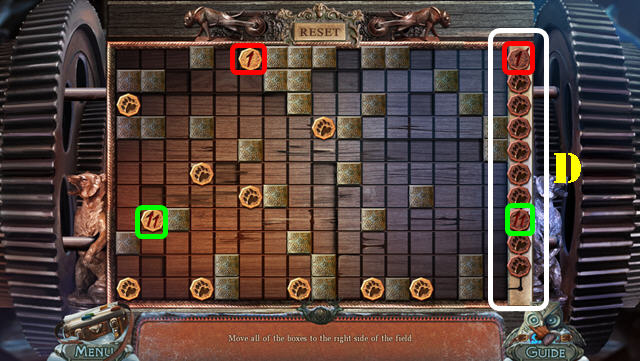
- Move all the boxes to the right side of the field. Note that the number 1 and the number 11 need to be placed on the right in a specific slot.
- Try to move as many pieces on the upper right as much as possible and then bring them down once they are on the right side of the field. Place the number 1 last so it does not block the way.
- Please look at the screenshot for the final image (D).
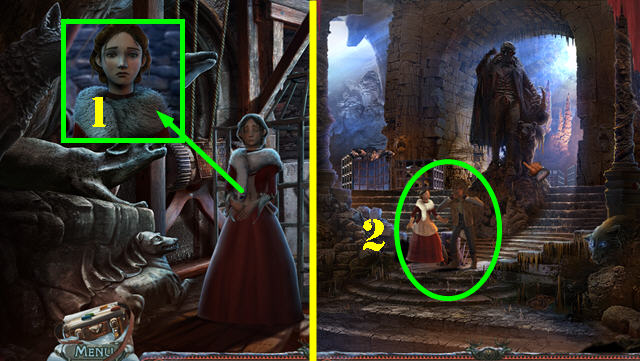
- Give the STRANGE COLLAR to Lily (1).
- Go to dogs town.
- Use the HORN on the man (2).
- Congratulations, you have completed Fierce Tales: The Dog's Heart Standard Edition!
Created at: 2012-07-27