

Walkthrough Menu
- General Tips
- Chapter 1 – Father's Mansion
- Chapter 2 – The Gardener
- Chapter 3 – Studio
- Chapter 4 – Museum
- Chapter 5 - Egyptian Studio
- Chapter 6 – The Maid
- Chapter 7 - Antidote
- Hidden Estate Photo Achievement
- Father's Secret Card Achievement
- Lighting Lamps Achievement
- Mystery Achievement
General Tips
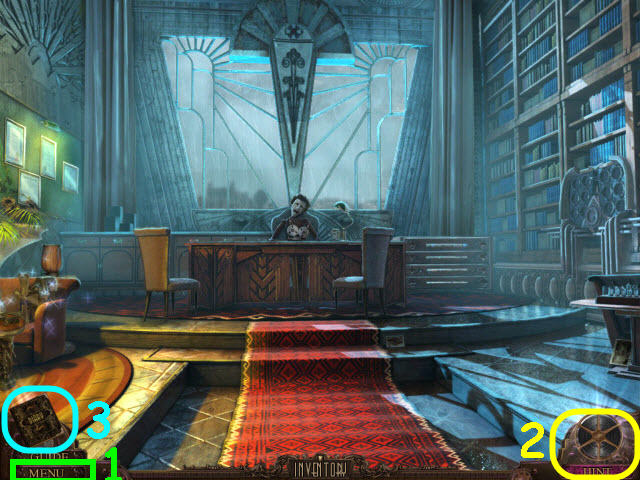
- Select Menu (1) to adjust the Music, SFX, Voice Volume, Full Screen and Custom Cursor.
- You can choose between Regular and Expert Mode.
- Throughout the guide, we will use the acronym 'HOS' for Hidden Object Scenes.
- Items written in orange in HOS require an extra step before they can be obtained. The items in HOS are random except for the items in orange.
- There is a short penalty for random clicking.
- In order to complete some of the puzzles you will need to collect the clues in your diary first. Puzzles may be skipped.
- Select the Question Mark on the top right of the puzzle screen to get directions for the puzzles.
- Select the movie reel (2) to get a hint in either the HOS or regular gameplay.
- Select the diary (3) to access the journal, map and objectives.
- This game is not linear and you may do things in a different order as the guide. If you cannot do an action when stated in the guide, please check the previous entries to see if you missed something.
Chapter 1 – Father's Mansion
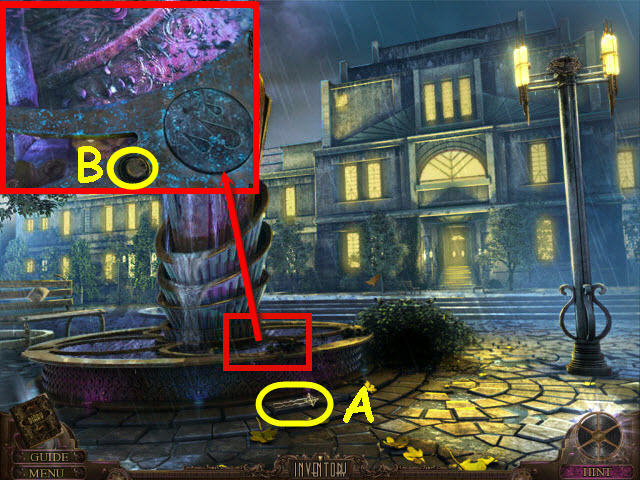
- Take the HAIRPIN (A).
- Examine the fountain; use the HAIRPIN to get the BUTTON (B).
- Examine the fountain to access a HOS.
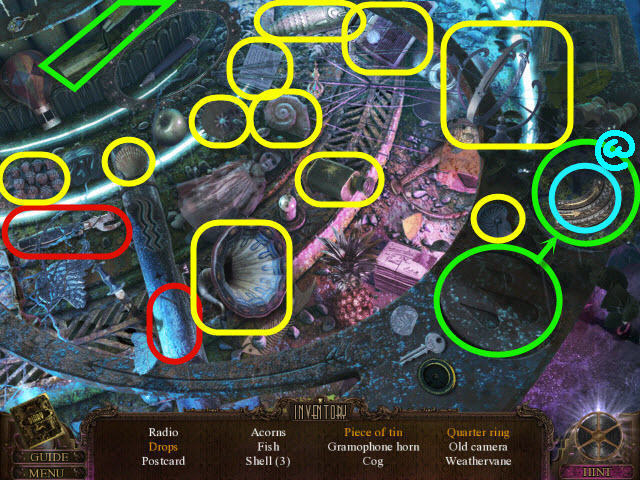
- Find the items listed.
- Marked in red: use the can opener on the pipe to get a piece of tin.
- Marked in green: use the trowel on the cover to get the drops and QUARTER RING (@).
- Go forward to the mansion.
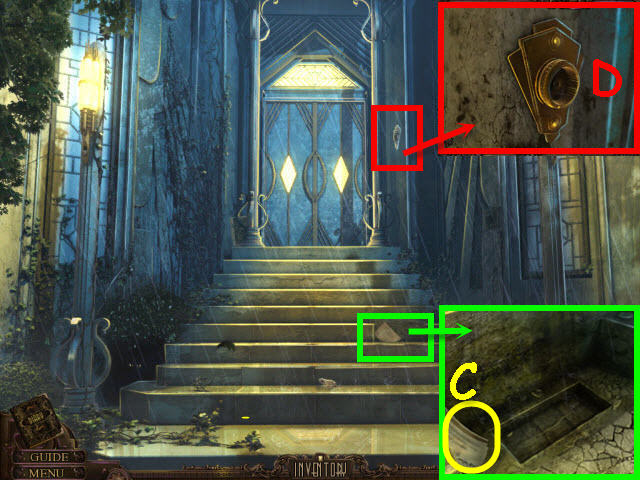
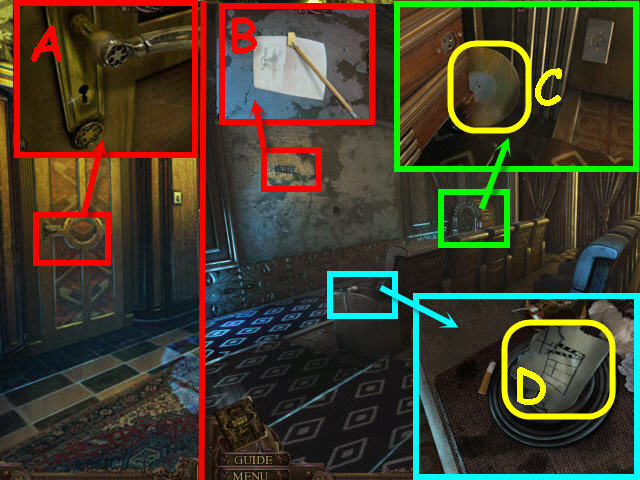
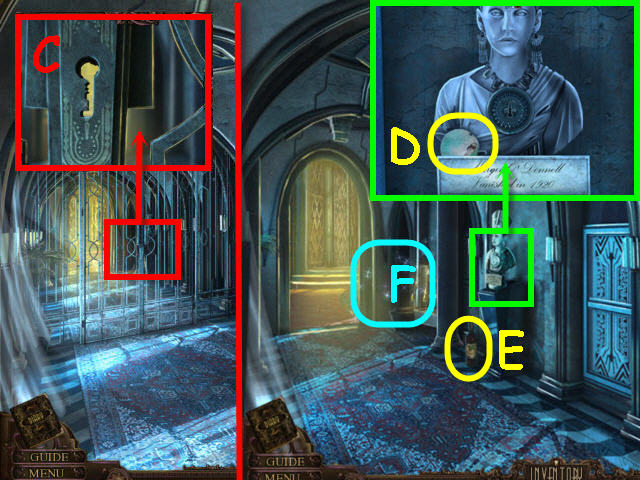
- Examine the steps; take the note (C).
- Examine and place the BUTTON on the doorbell (D); ring the doorbell.
- Enter into the foyer.
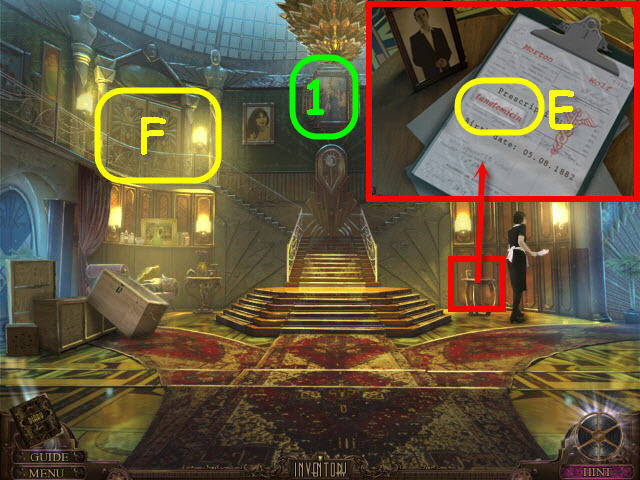
- Examine and select the poster (1) to get a clue.
- Examine the table; take the prescription name (E).
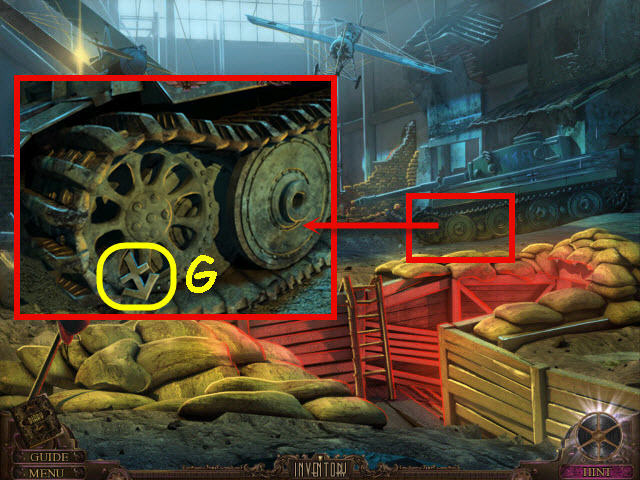
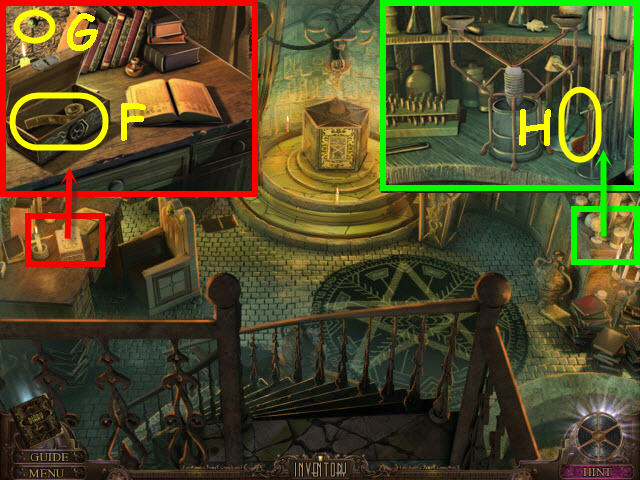
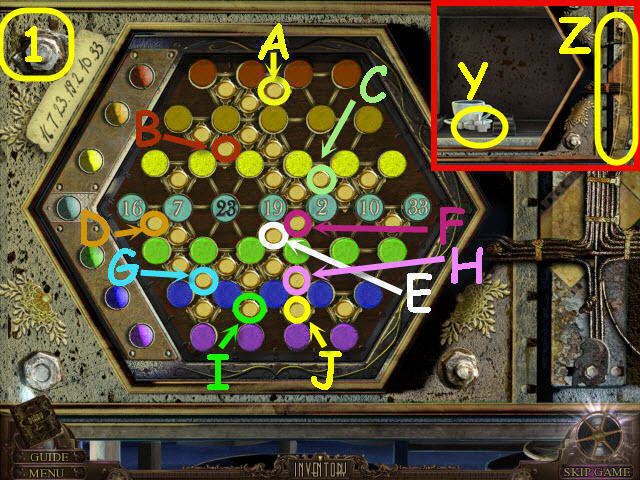
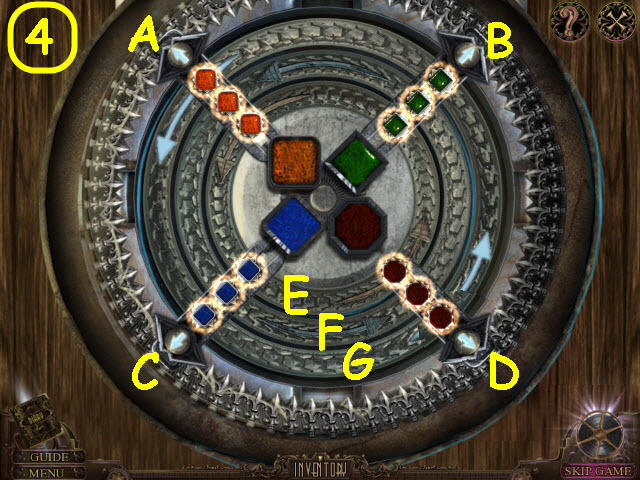
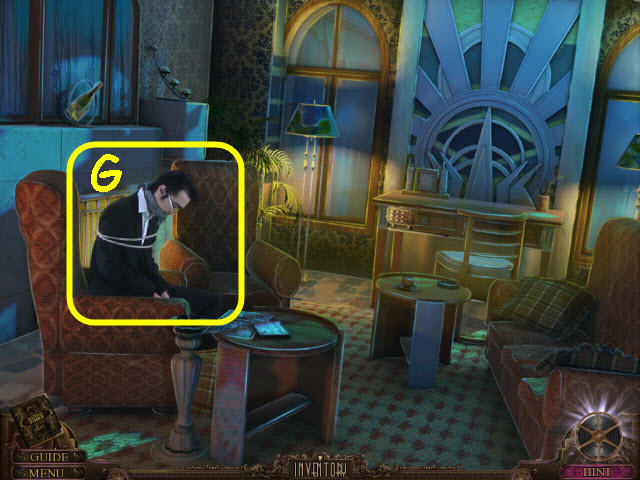
- Examine and place the QUARTER RING on the upper left door (F) to trigger a puzzle.
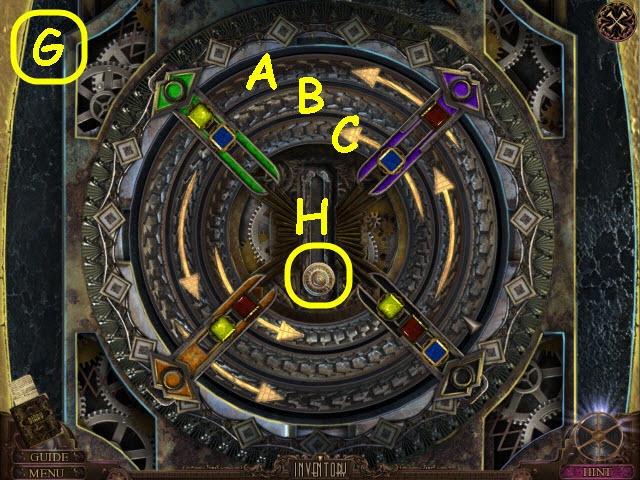
- Turn the rings to combine the colors so that the jewel holders match the inner colors.
- Solution: turn Ax2, B, and Cx3 (G).
- Slide the lever (H) to unlock the door.
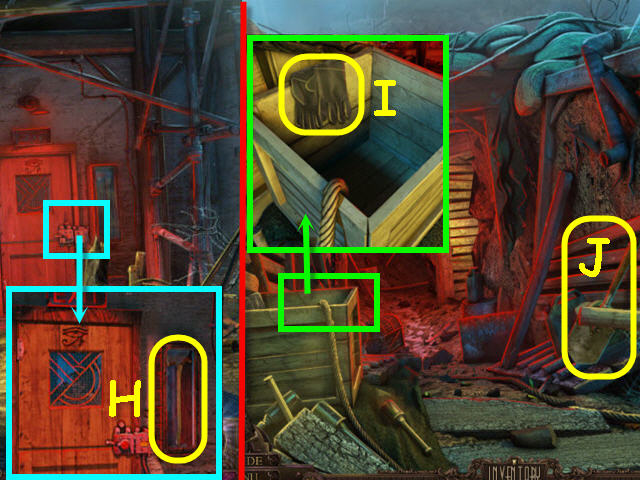
- Enter father's study.

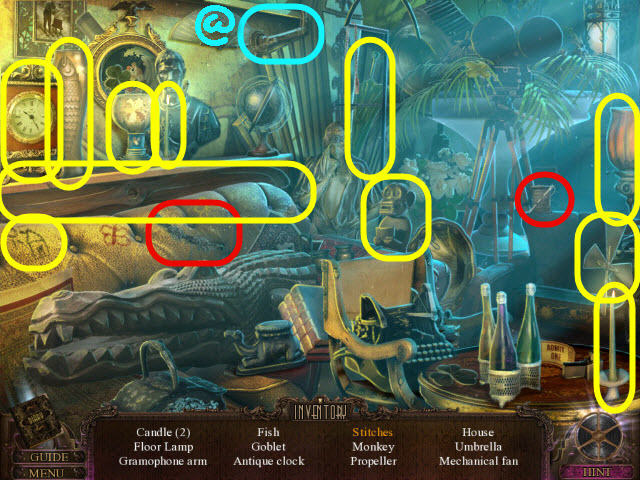
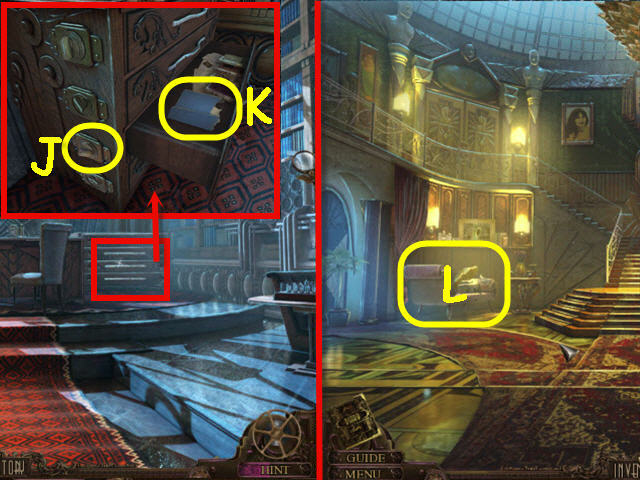
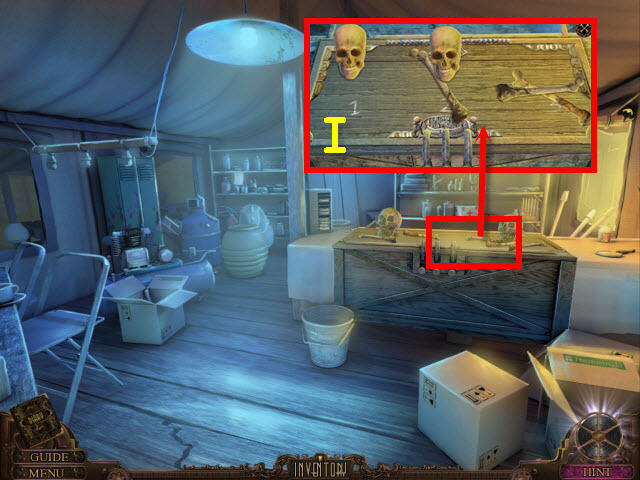
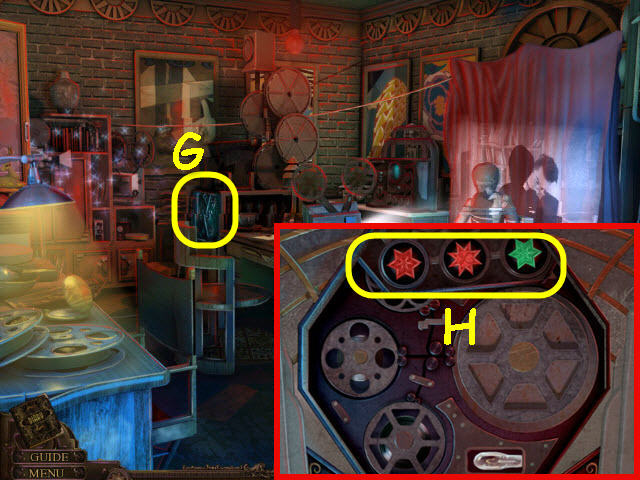
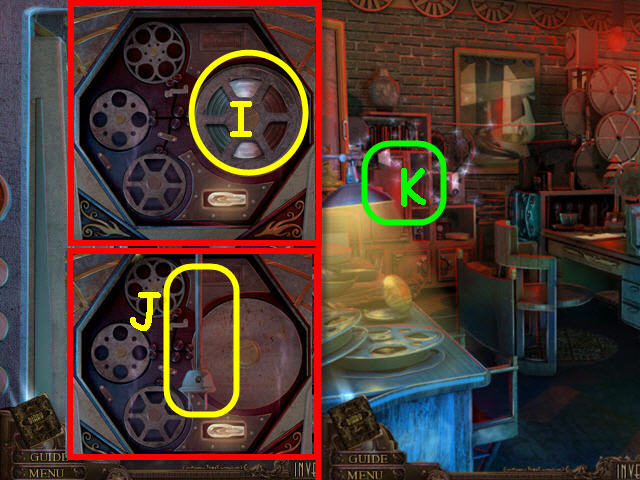
- Examine the desk; remove the cloth and select the audio tapes (I).
- Examine the desk; take the PAPER (J).
- Examine the frames; take the LETTER T (K).
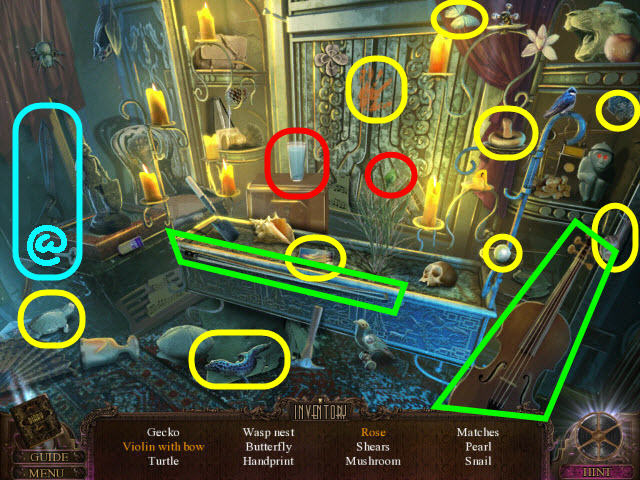
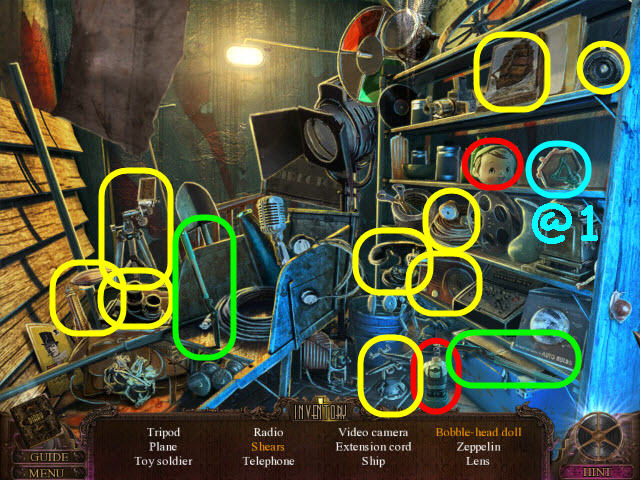
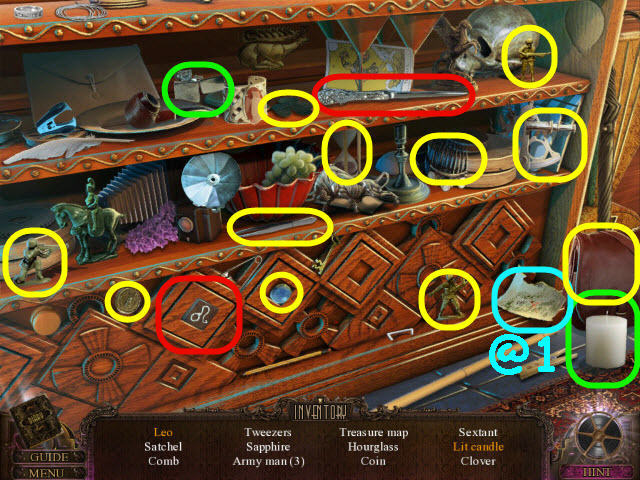
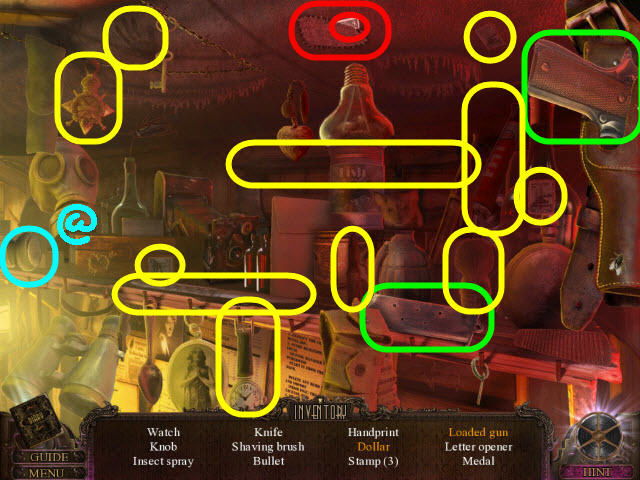
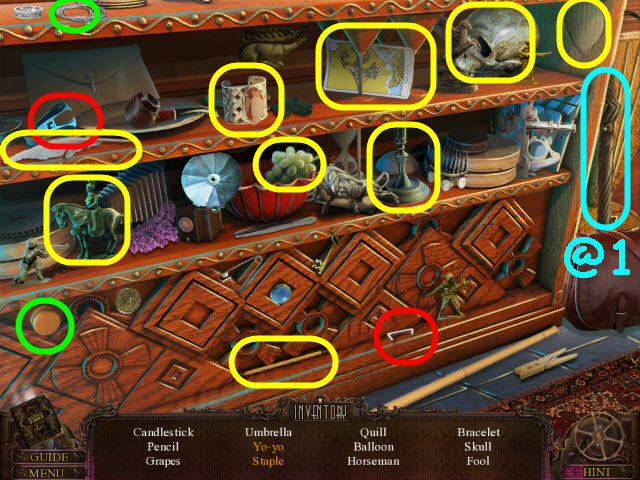
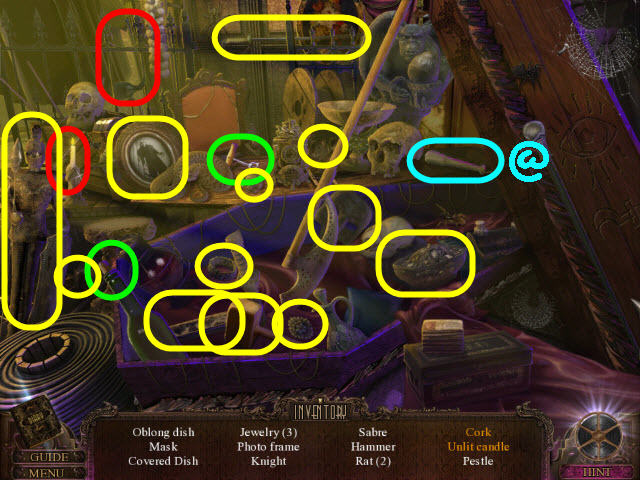
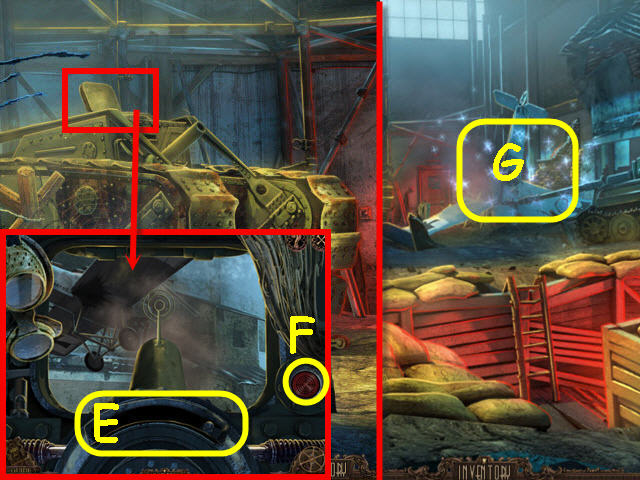
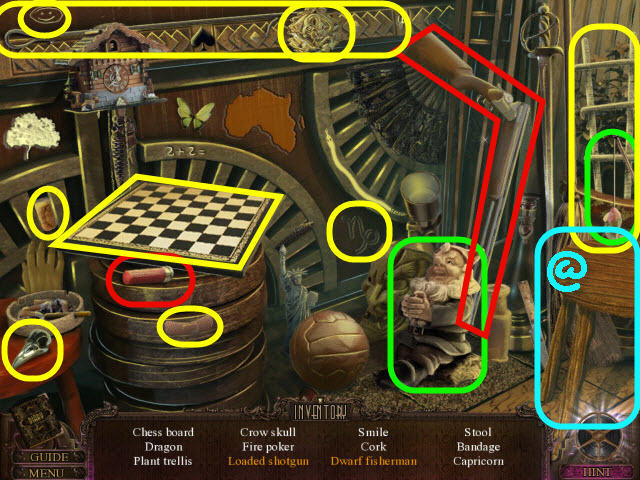
- Examine the sofa (L) to access a HOS.
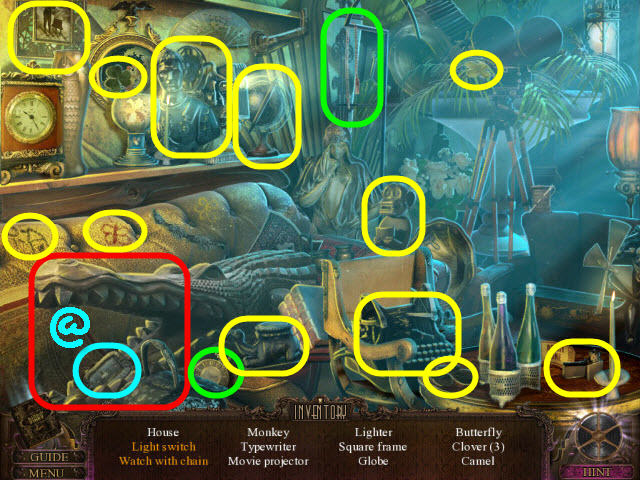
- Find the items listed.
- Marked in red: open the crocodile jaws to get the light switch.
- Marked in green: place the chain on the watch to get a watch with chain.
- You will earn a SWITCH (@).
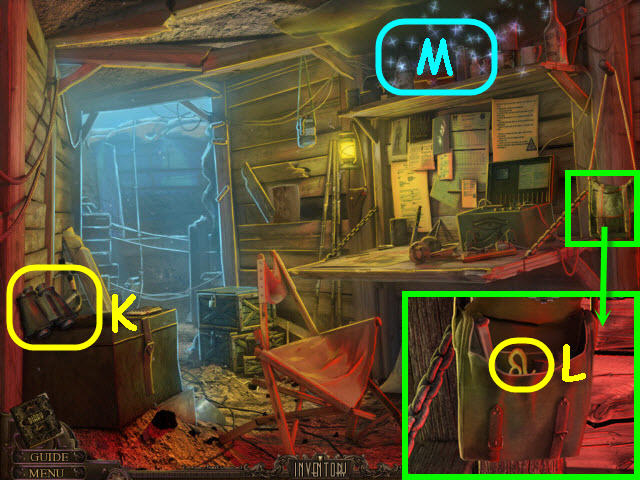
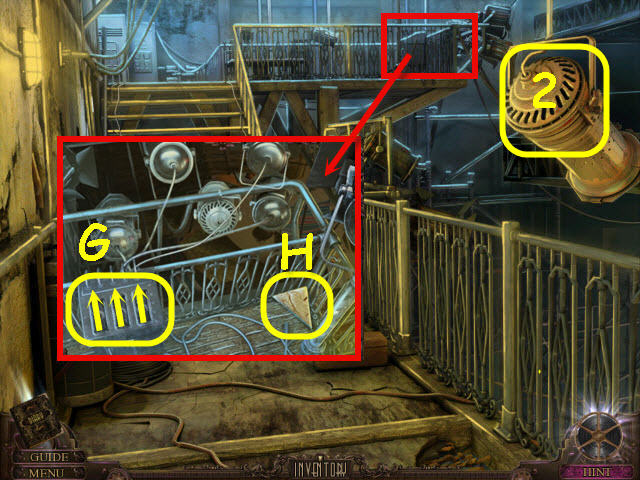
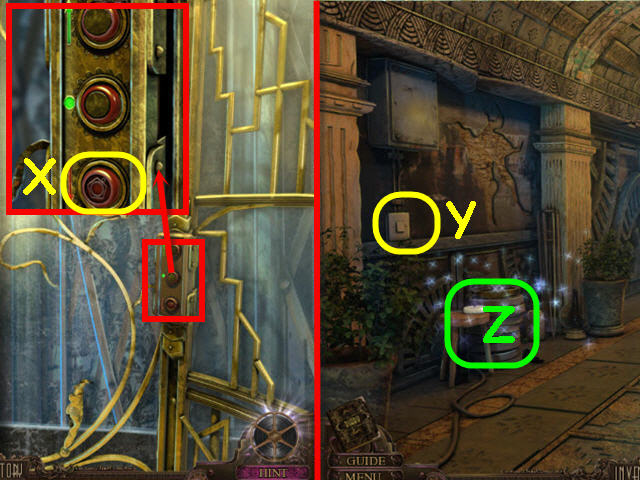
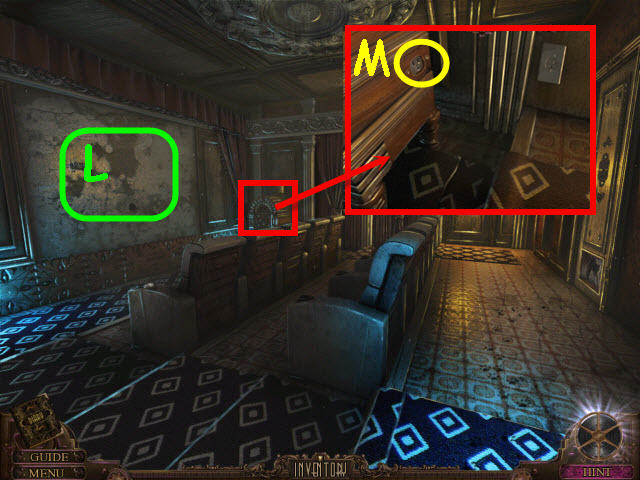
- Back out and go right to the east hall.
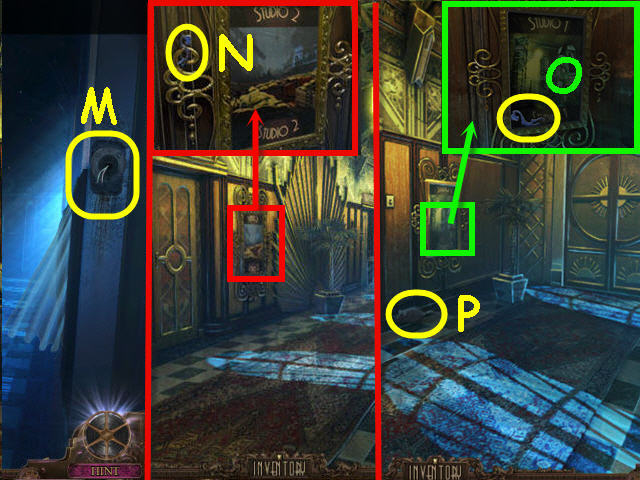
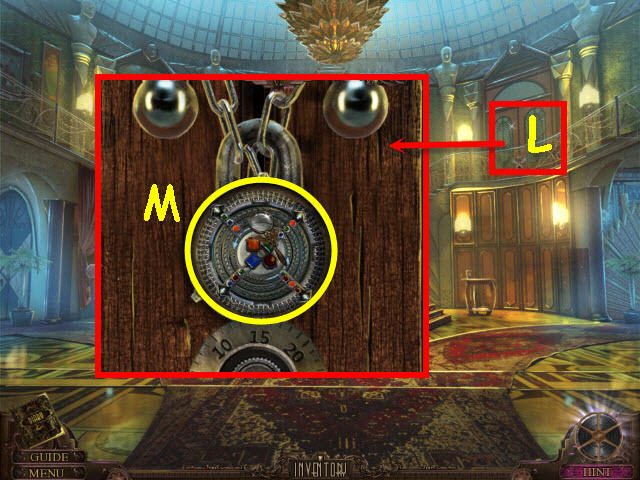
- Place the SWITCH on the wires (M); flip the SWITCH.
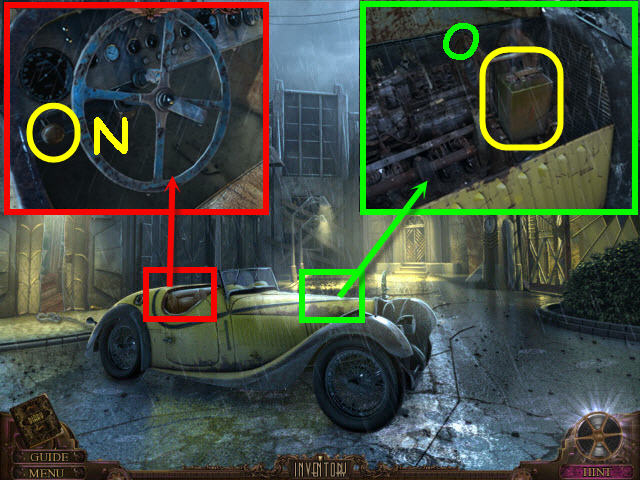
- Examine the poster; take the SMALL GARDEN LOCK 1/3 (N).
- Go forward to the east hall end.
- Examine the poster; take the SMALL GARDEN LOCK 2/3 (O).
- Take the MOUSE TOY (P).
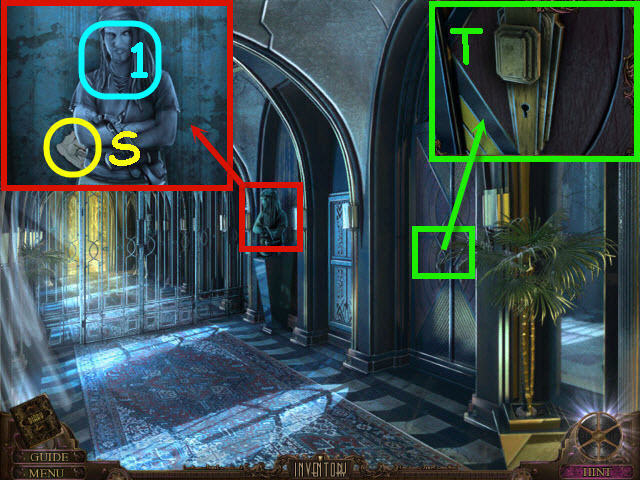
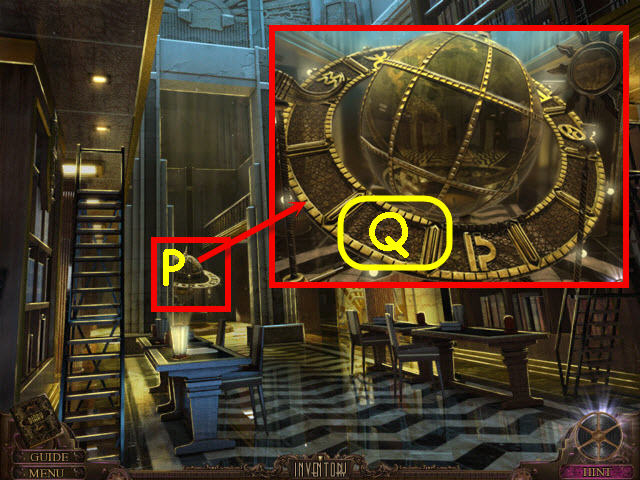
- Back out and go left into the library.
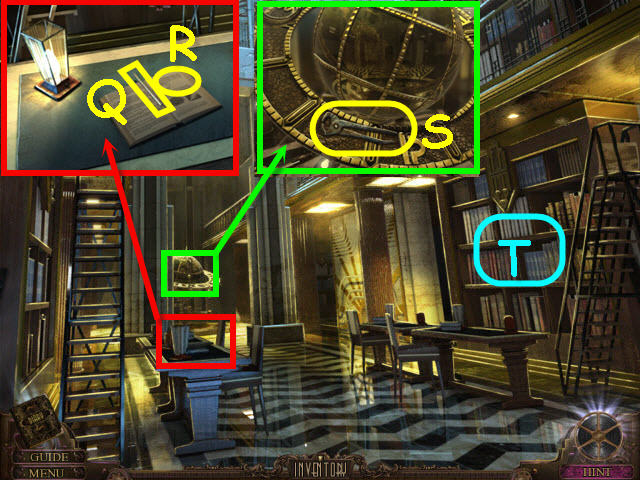
- Examine the table and open the book; take the BLUNT PENCIL (Q) and recipe (R).
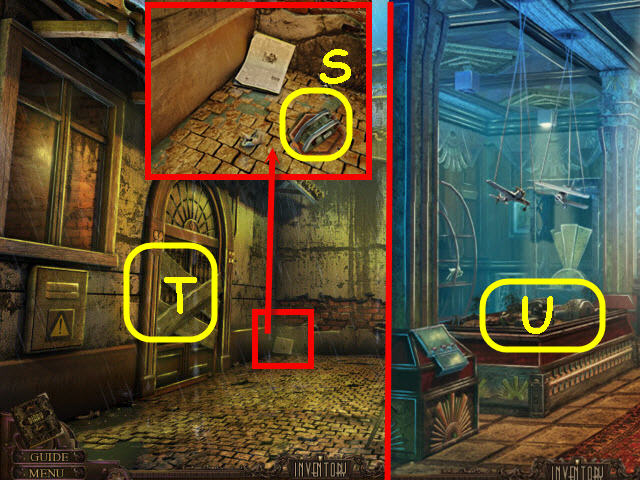
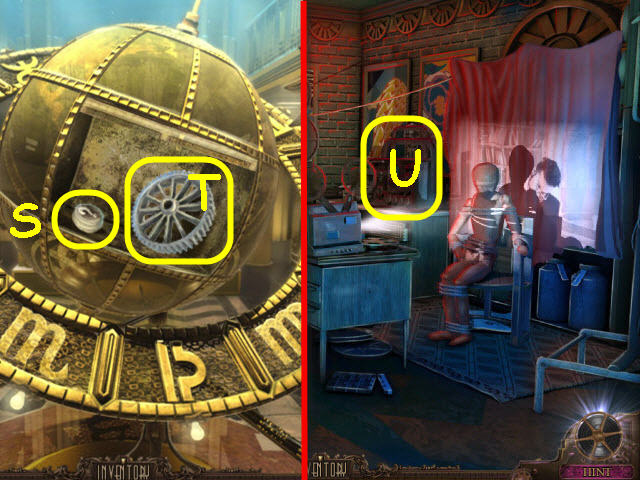
- Examine the globe; take the PINCERS (S).
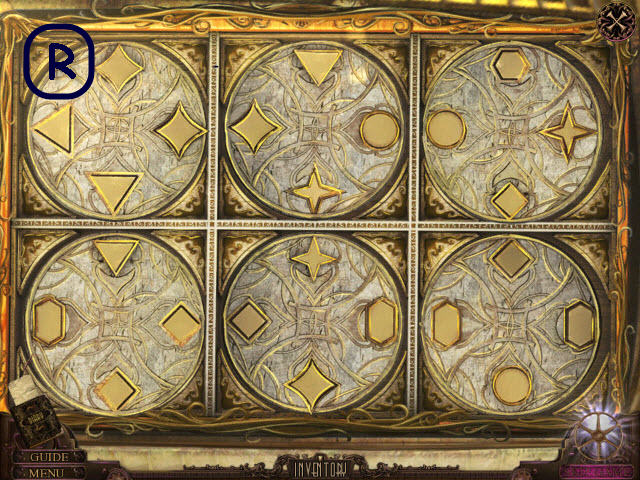
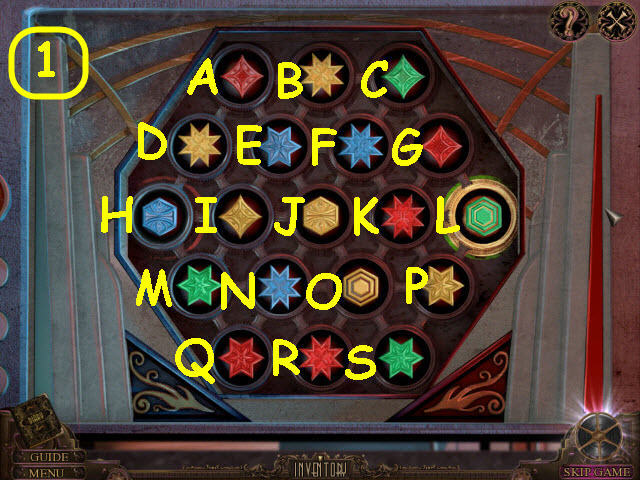
- Examine the bookcase (T); place the LETTER T on the top of the center book to trigger a puzzle.
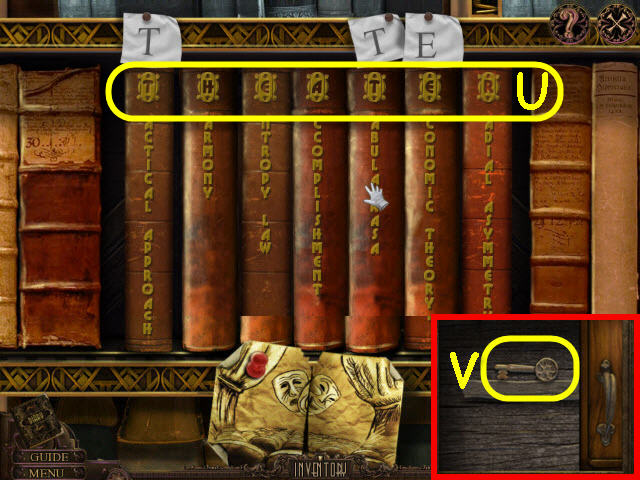
- Rearrange the books to spell a word with the top letters.
- Solution: T-H-E-A-T-E-R (U).
- Open the compartment; take the THEATER KEY (V).
- Back out.
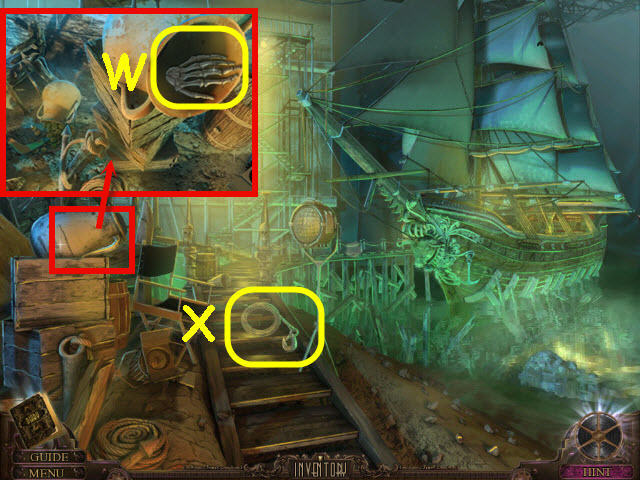
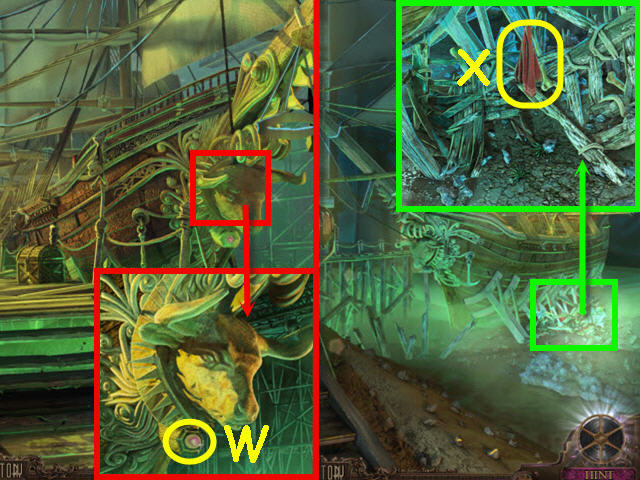
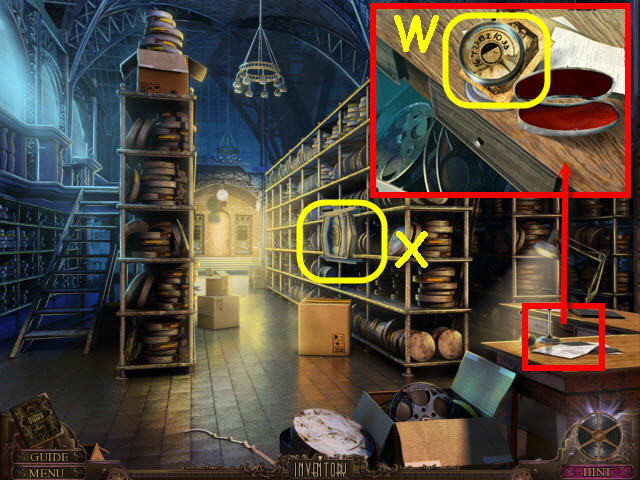
- Examine the sculpture; use the PINCERS to get the SPADE (W).
- Go to the father's study.
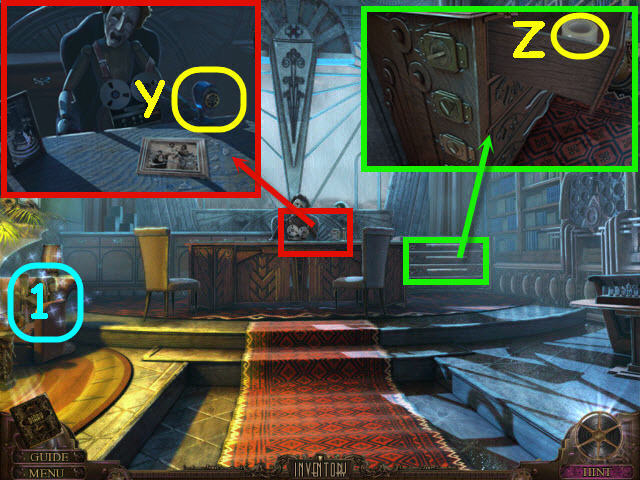
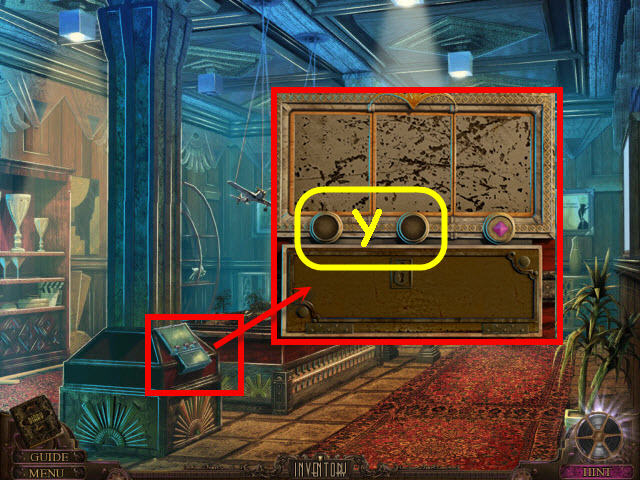
- Examine the desk; use the BLUNT PENCIL on the sharpener (Y); get a SHARP PENCIL.
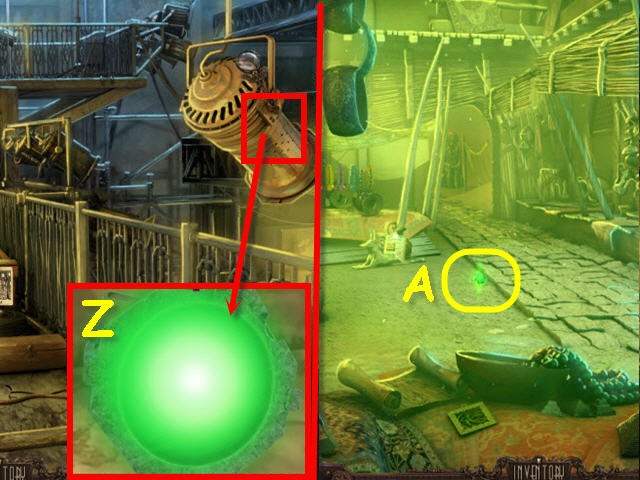
- Examine and place the SPADE on the top cabinet lock; take the note and STICKY TAPE (Z).
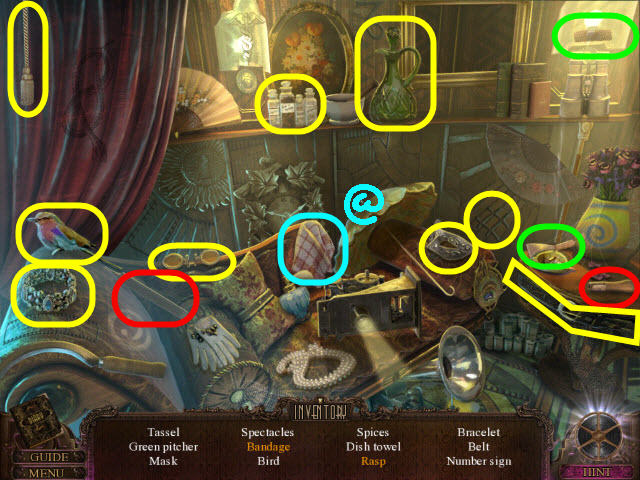
- Examine the sofa (1) to access a HOS.
- Find the items listed.
- Marked in red: use the thread on the rip to get stitches.
- You will earn a GRAMOPHONE ARM (@).
- Go to the east hall end.
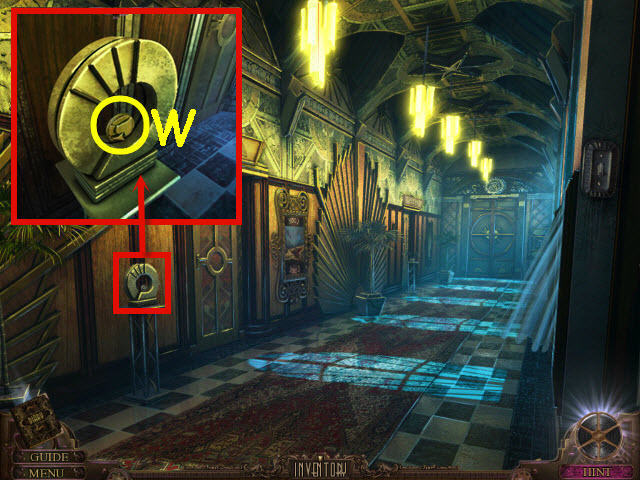
- Examine and use the THEATER KEY on the left door lock (A); turn the key.
- Enter the theater.
- Examine and use the PAPER and SHARP PENCIL on the wall scribbles; get a pass code (B) in your diary.
- Examine the jukebox; take the GOLD RECORD (C).
- Examine the arm rest; move the garbage and take the MAP PIECE 1/5 (D).
- Back out.
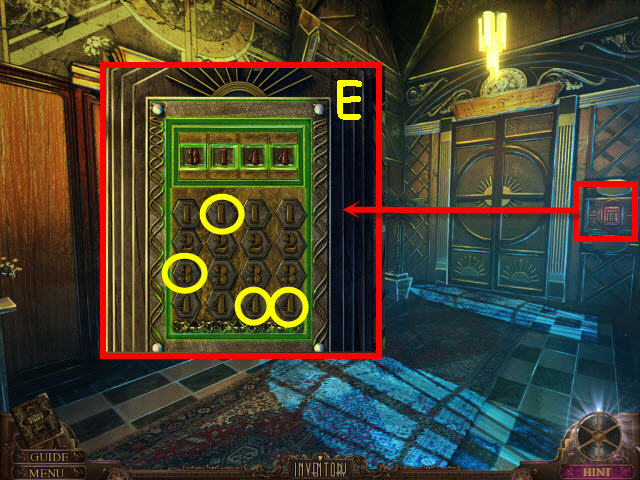
- Examine and enter the code from the ashtray in the panel.
- Solution: 3144 (E).
- Enter the music room.
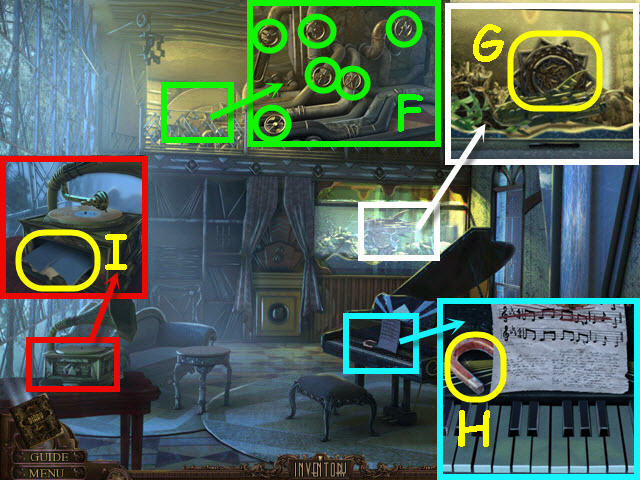
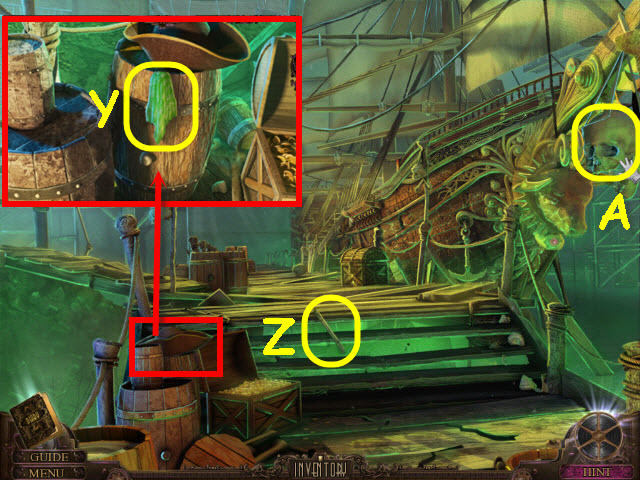
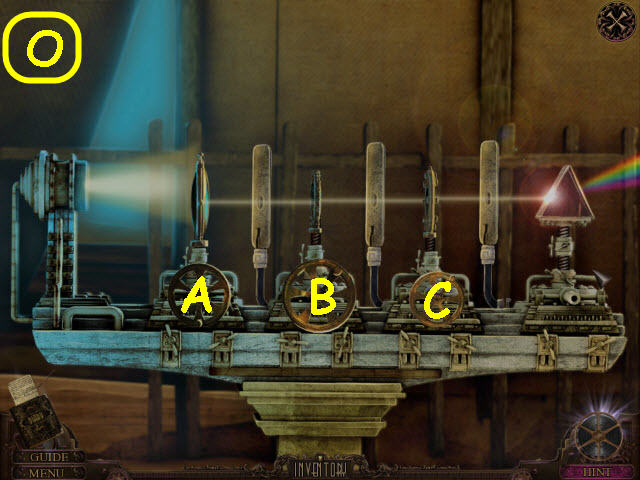
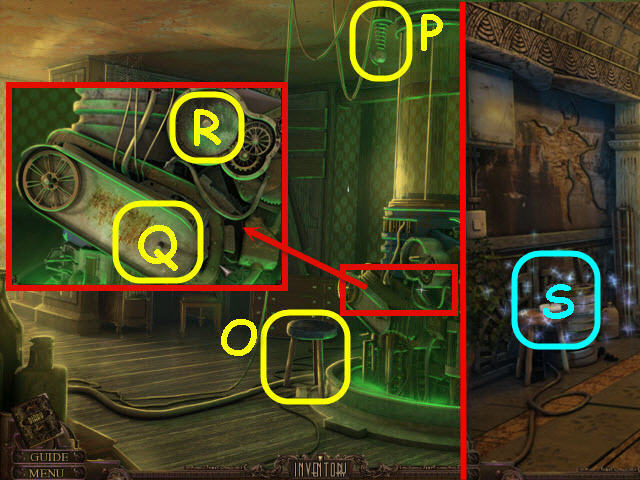
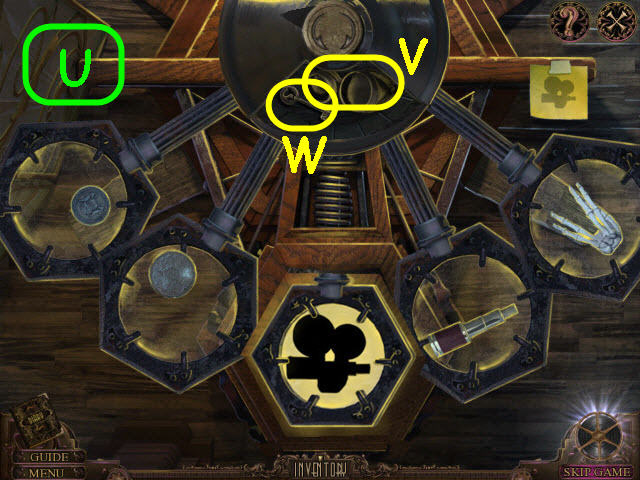
- Examine the upper balcony; turn all the valves (F).
- Examine the aquarium; open the glass and take the LARGE GARDEN LOCK (G).
- Examine the piano; take the MAGNET (H).
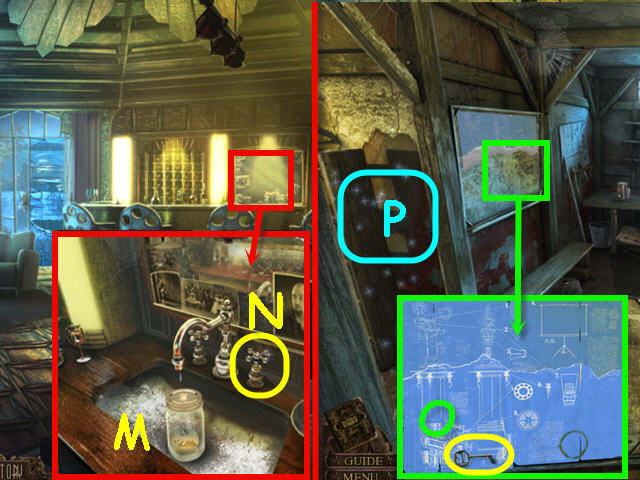
- Examine and place the GOLD RECORD and GRAMOPHONE ARM on the gramophone; take the note and PROJECTOR BLUEPRINT HALF (I).
- Go to the mansion entrance.
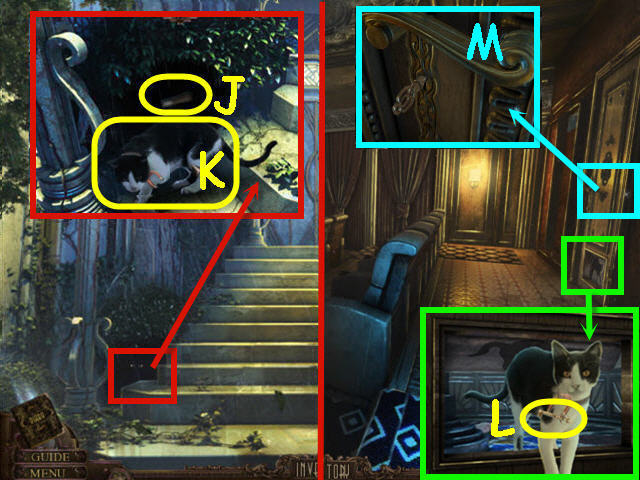
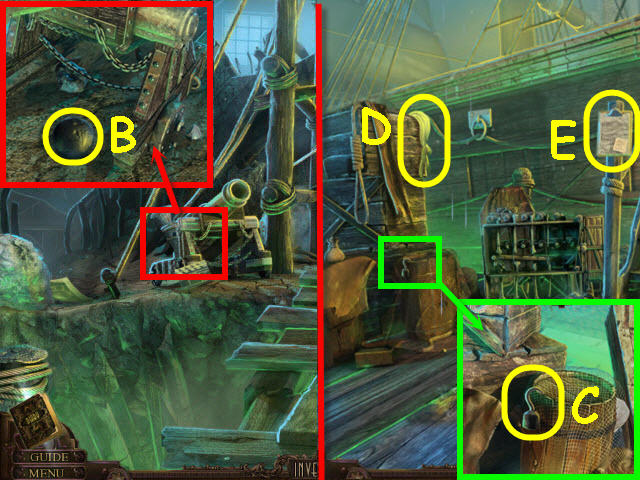
- Examine the left bushes; give the MOUSE TOY to the cat; take the WOODEN HANDLE (J).
- Use the MAGNET and the STICKY TAPE on the cat's collar; take the CAT WITH MAGNET (K).
- Go to the theater.
- Examine and open the cat door; place the CAT WITH MAGNET in the door; take the PROJECTOR ROOM KEY (L).
- Examine and use the PROJECTOR ROOM KEY on the door lock (M); turn the key.
- Enter the projector room.
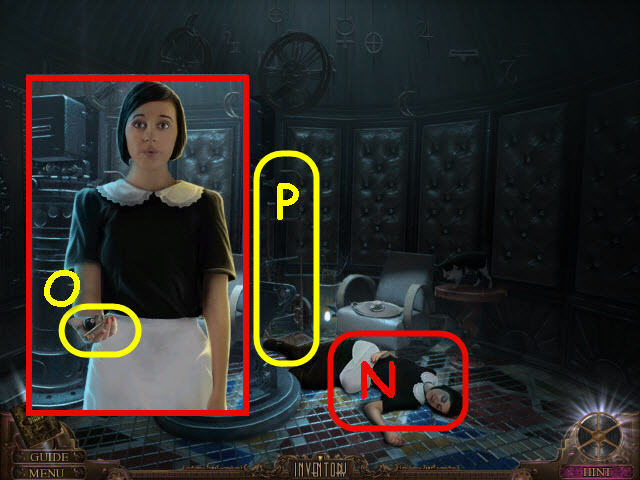
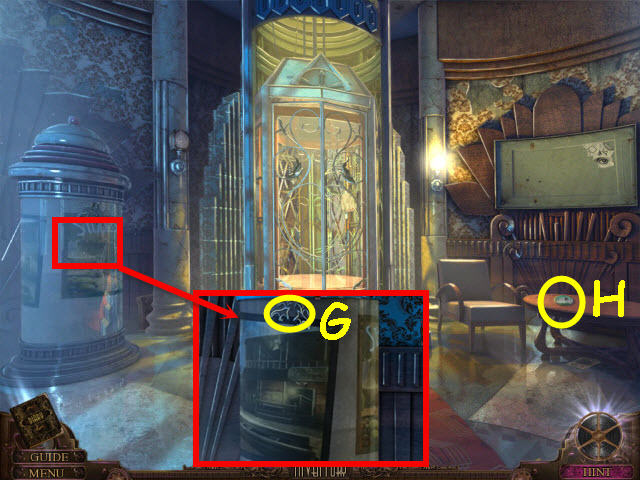
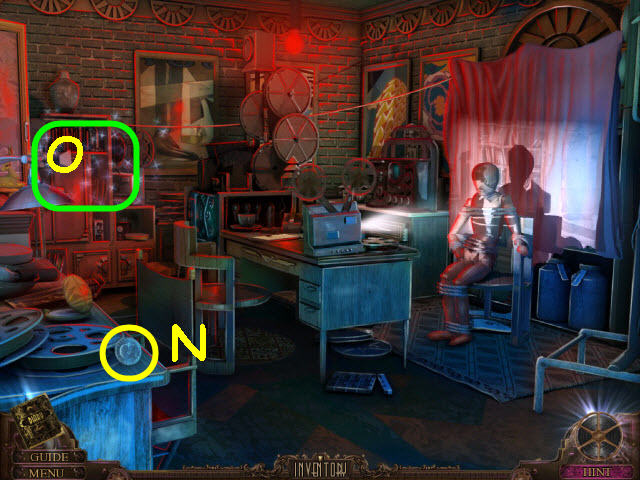
- Select the maid (N) to wake her.
- Take the REC ROOM KEY (O).
- Take the HAND CART (P).
- Go to the foyer.
Chapter 2 – The Gardener
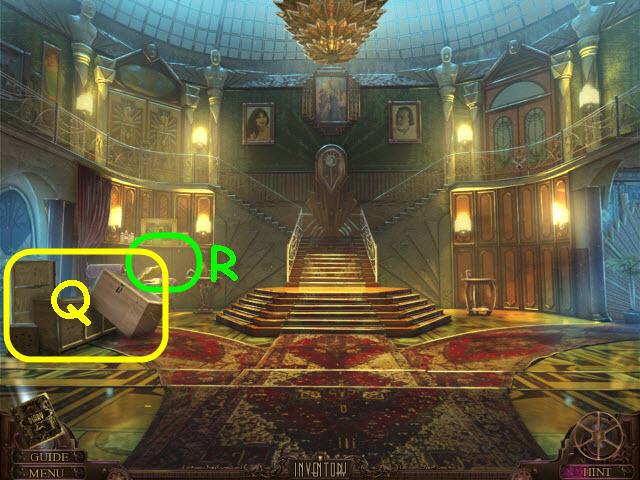
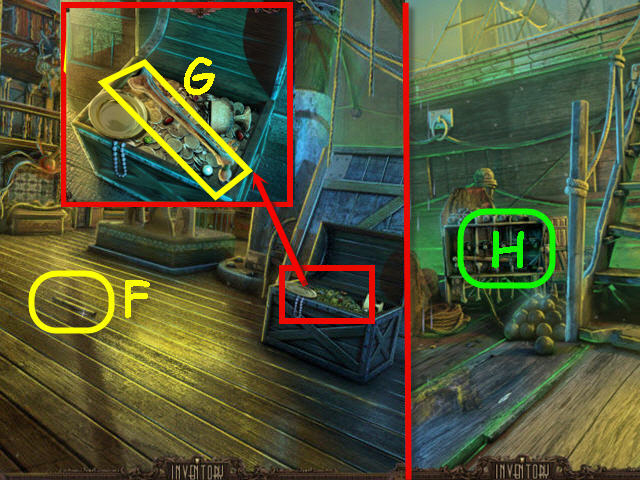
- Use the HAND CART on each of the four crates (Q).
- Examine the settee (R) to access a HOS.
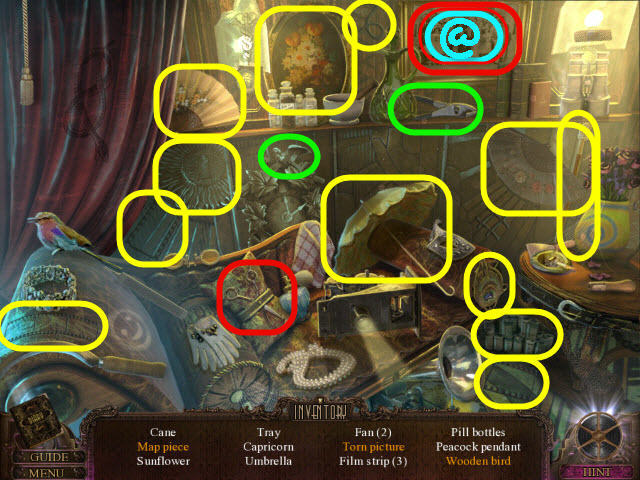
- Find the items listed.
- Marked in red: use the scissors on the picture to get a torn picture and a map piece.
- Marked in green: use the wrench on the bird to get a wooden bird.
- You will earn a MAP PIECE 2/5 (@).
- Go left into the west hall.
- Examine the bust; select the pirate (1) to get a clue and take the MAP PIECE 3/5 (S).
- Examine and use the REC ROOM KEY on the door lock (T); turn to open.
- Enter the rec room and go forward to the garden.
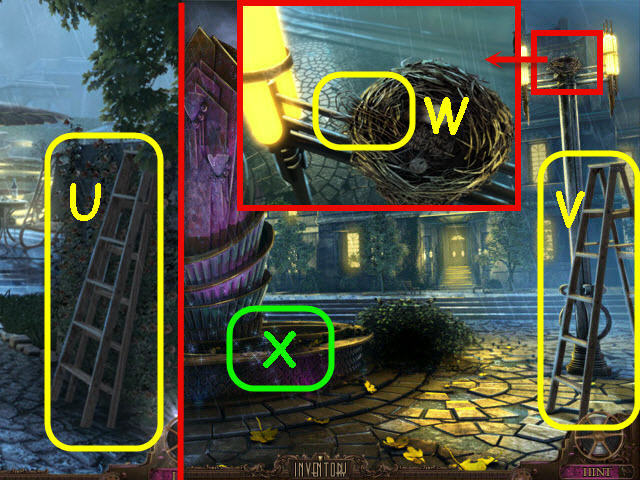
- Take the LADDER (U).
- Back out to the fountain.
- Place the LADDER by the pole (V).
- Examine the bird's nest; take the WIRE (W).
- Examine the fountain (X) to access a HOS.
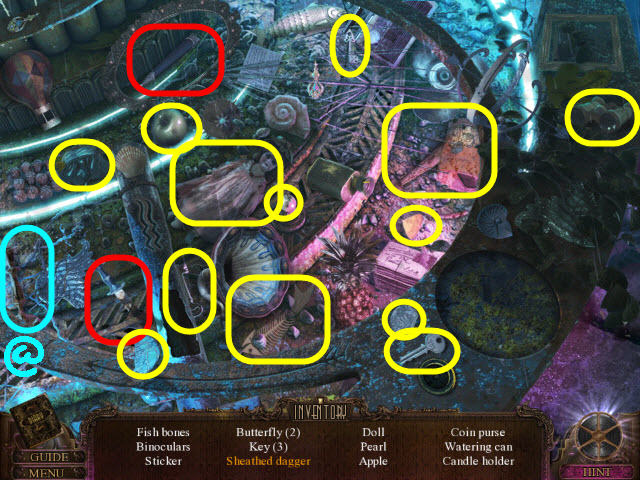
- Find the items listed.
- Marked in red: place the dagger in the sheath to get a sheathed dagger.
- You will earn a CANDLE HOLDER (@).
- Go to the rec room.

- Examine the sink; take the THAUMATROPE 1/5 (Y).
- Examine and open the globe; take the BOTTLE 1/3 (Z).
- Examine the table; take the note (A) and TRANSPARENT MAP (B).
- Back out.
- Examine and use the WIRE on the gate lock (C).
- Go through the gates to the west hall end.
- Examine the bust; take the THAUMATROPE 2/5 (D).
- Take the BOTTLE 2/3 (E).
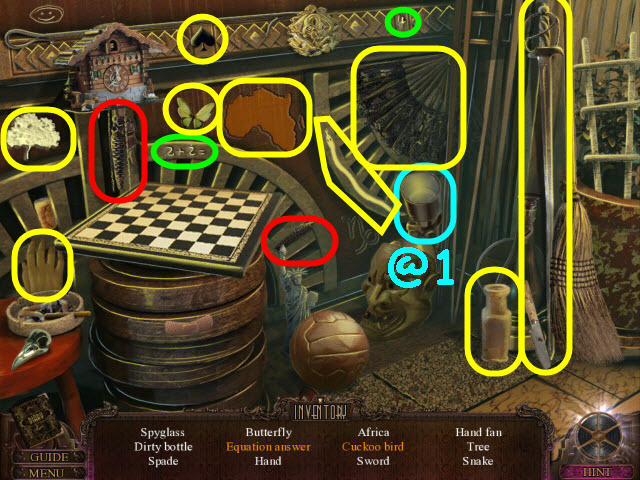
- Examine the corner (F) to access a HOS.
- Find the items listed.
- Marked in red: use the glass of water on the rosebud to get a rose.
- Marked in green: use the bow on the violin to get a violin with bow.
- You will earn SHEARS (@).
- Go forward into the elevator room.
- Examine the glass case; take the SMALL GARDEN LOCK 3/3 (G).
- Take the THAUMATROPE 3/5 (H).
- Go to the garden.
- Use the SHEARS on the tall grasses (I).
- Go left into the basement.
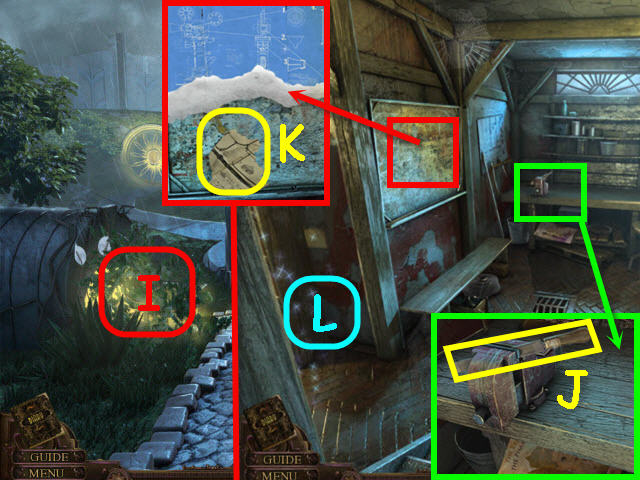
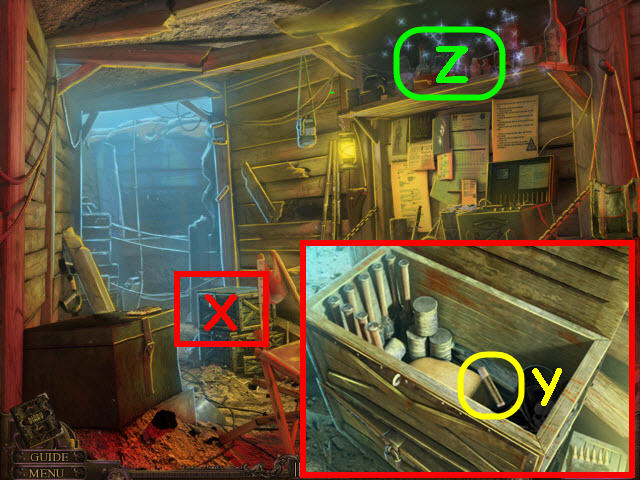
- Examine the workbench; place the WOODEN HANDLE on the file and take the FILE (J).
- Examine and place the PROJECTOR BLUEPRINT HALF on the board; unfold the print and take the MAP PIECE 4/5 (K).
- Examine the storeroom (L) to access a HOS.

- Find the items listed.
- Marked in red: remove the spotlight cover to get the bulb.
- Marked in green: place the wooden stick on the blade to get a tomahawk.
- You will earn a CROWBAR (@1).
- Back out.
- Examine and place the LARGE GARDEN LOCK on the round gate (M).
- Use the FILE on the rust; place the SMALL GARDEN LOCKS 3/3 on the lock (N) to trigger a puzzle.
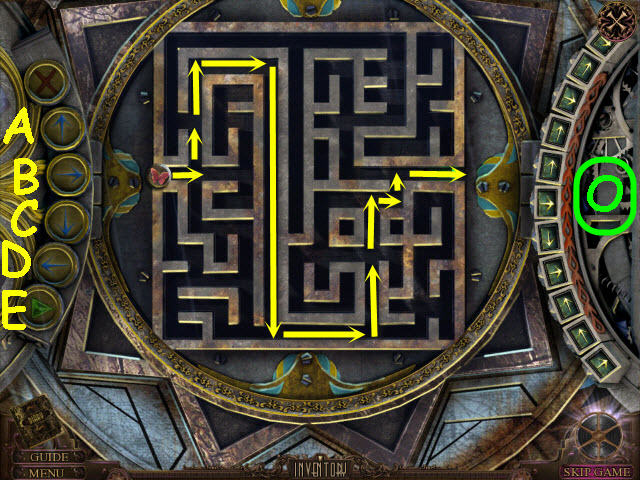
- Guide the butterfly through the maze in eleven moves using the buttons on the left.
- To solve the puzzle, select the following buttons: B, Ax2, B, C, B, Ax2, B, A, B, and E (O).
- Go through the gate to the studio entrance.
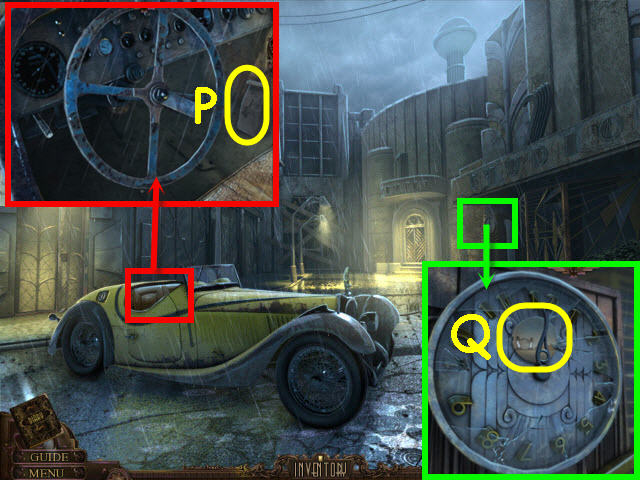
- Examine the roadster interior; take the BIRD FOOD (P).
- Examine and use the CANDLE HOLDER on the clock; take the THAUMATROPE 4/5 (Q).
- Back out.
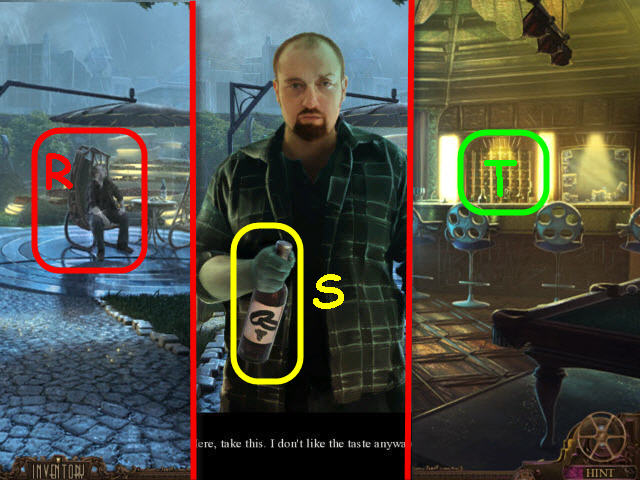
- Give the BIRD FOOD to the gardener (R).
- Take the BOTTLE 3/3 (S).
- Back out.
- Examine the bar (T); place the BOTTLE 3/3 on the wine rack to trigger a puzzle.
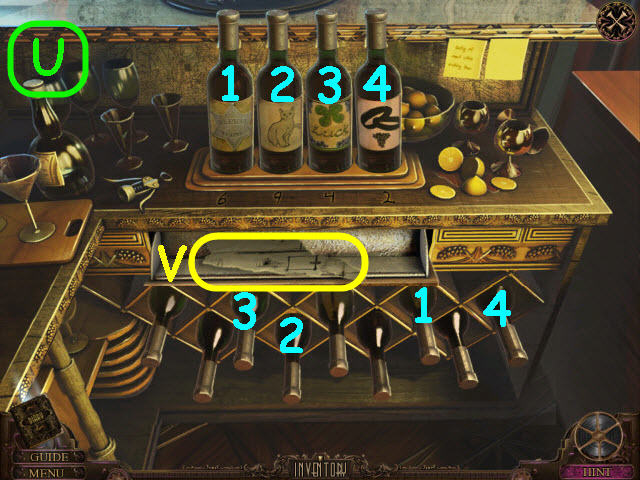
- Place the bottles with the labels matching the numbers on the holders.
- Solution: 6 = Deputy Badge/6 points on the star (1), 9= cat with 9 lives (2), 4= four leaf clover (3), and 2=wedding bands (4) (U).
- Take the MAP PIECE 5/5 (V).
- Go to the elevator room.
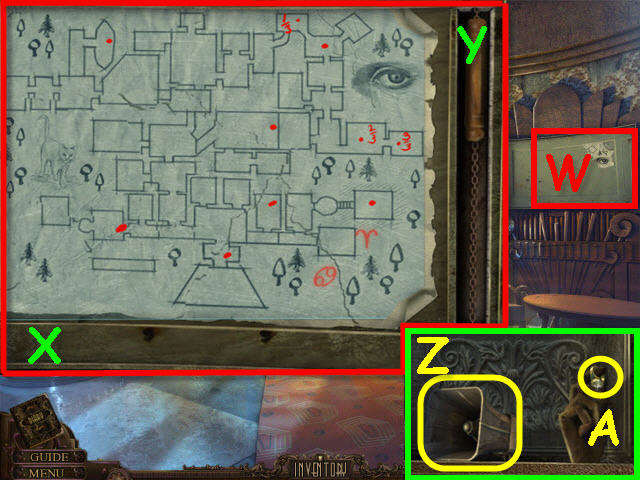
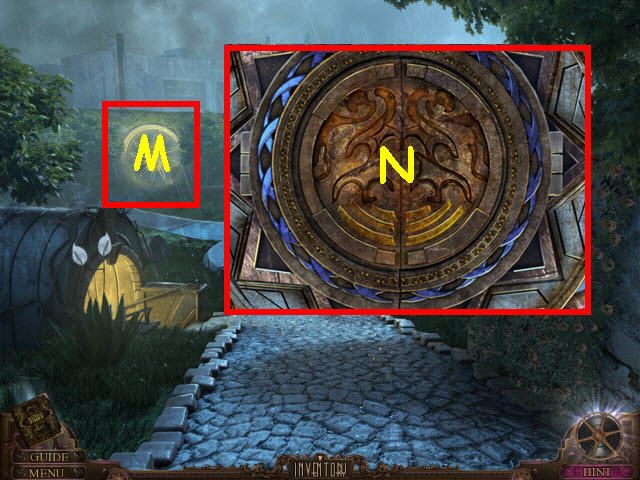
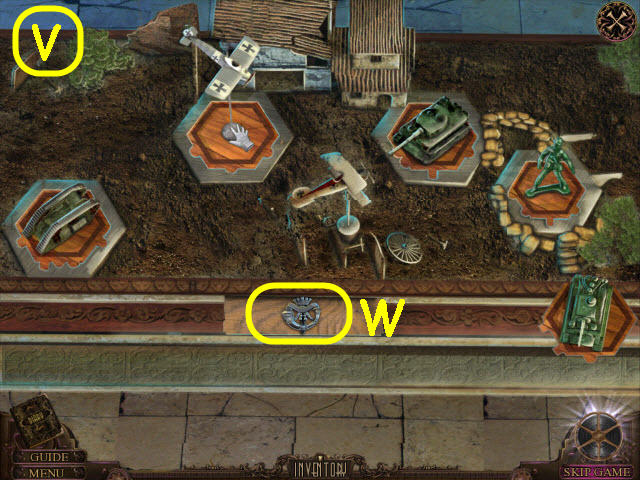
- Examine and place the MAP PIECE 5/5 in the frame (W) to trigger a puzzle. Then place the TRANSPARENT MAP (X) over the completed map.
- Pull the chain (Y); take the PROJECTOR SPEAKER (Z) and FATHER'S RING (A).
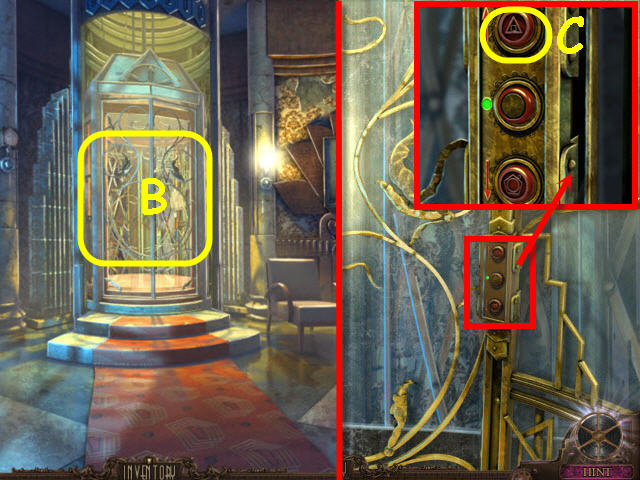
- Use the CROWBAR on the elevator doors (B).
- Enter the elevator.
- Read the note; examine and use FATHER'S RING on the top button and press the button (C).
Chapter 3 – Studio

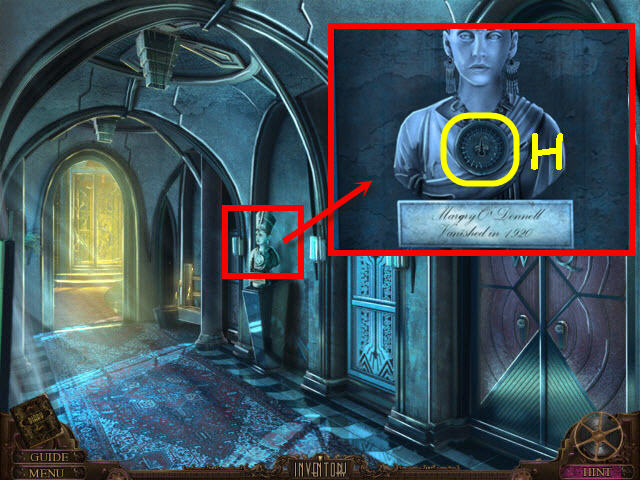
- Take the note (D) and EGYPTIAN SYMBOL (E).
- Examine the pictures; select the left picture (1) to get a clue.
- Open and take the right picture; take the DIAMOND (F).
- Go to the west hall end.
- Examine the corner (G) to access a HOS.
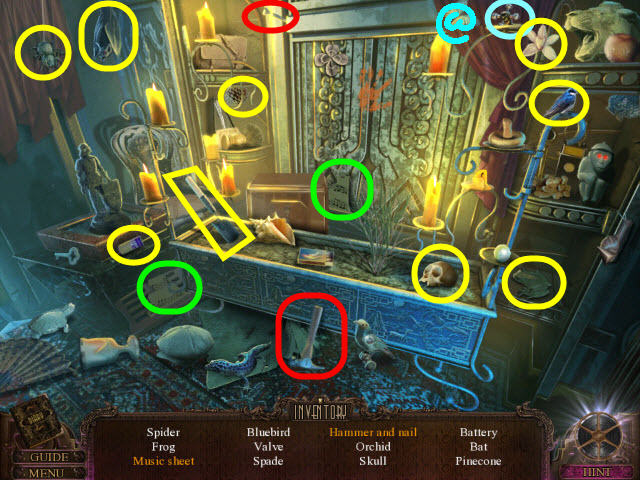
- Find the items listed.
- Marked in red: use the hammer on the nail to get a hammer and nail.
- Marked in green: combine the two halves of the music sheets together to get a music sheet.
- You will earn a VALVE (@).
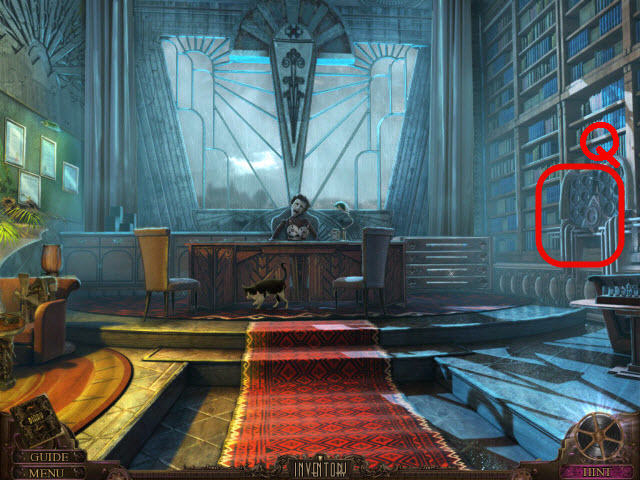
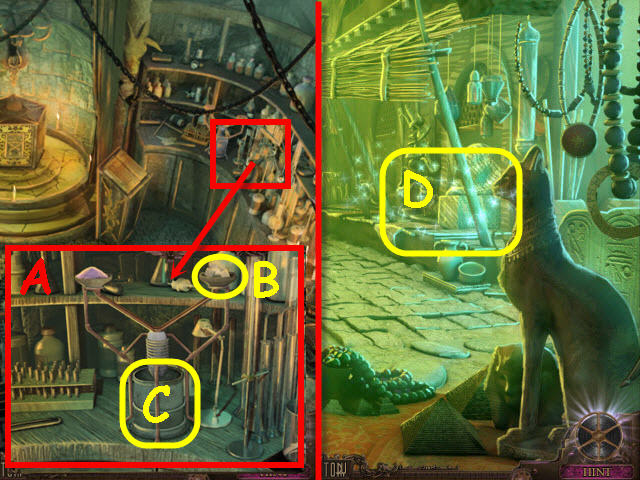
- Examine the bust.
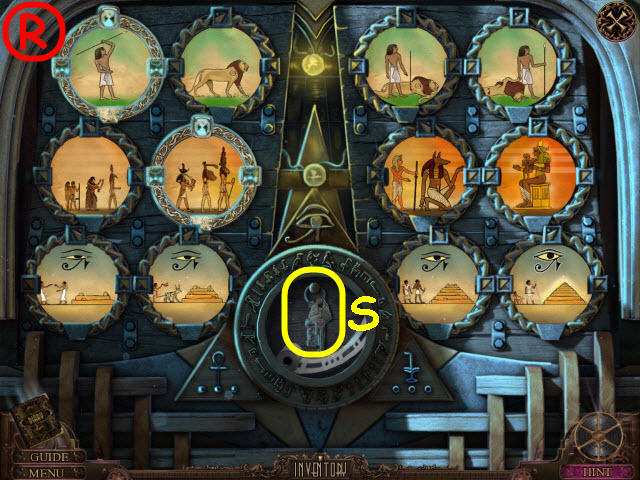
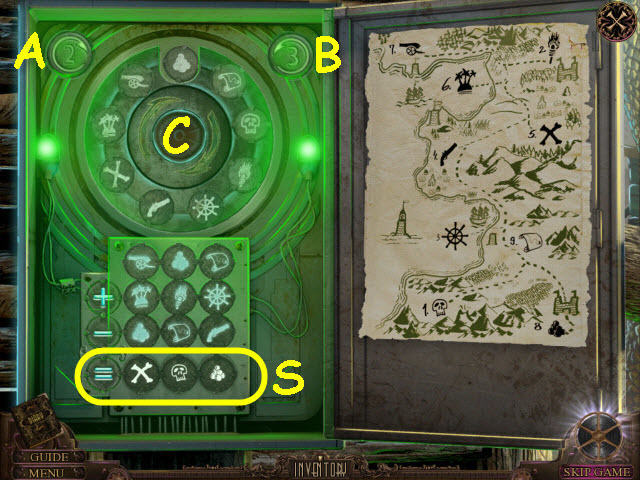
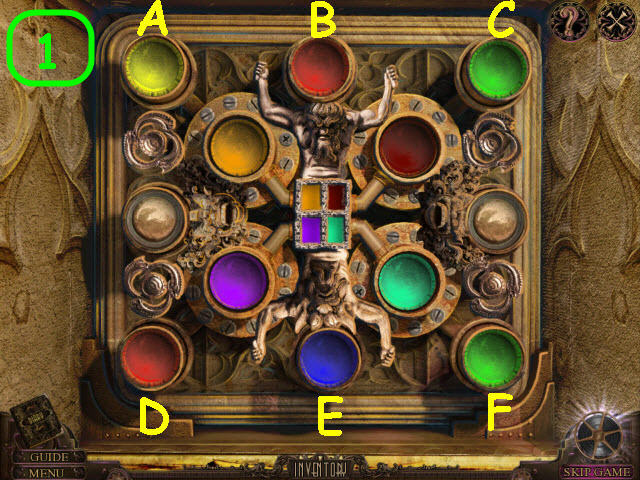
- Place the EGYPTIAN SYMBOL on the pendant (H) and select to trigger a puzzle.
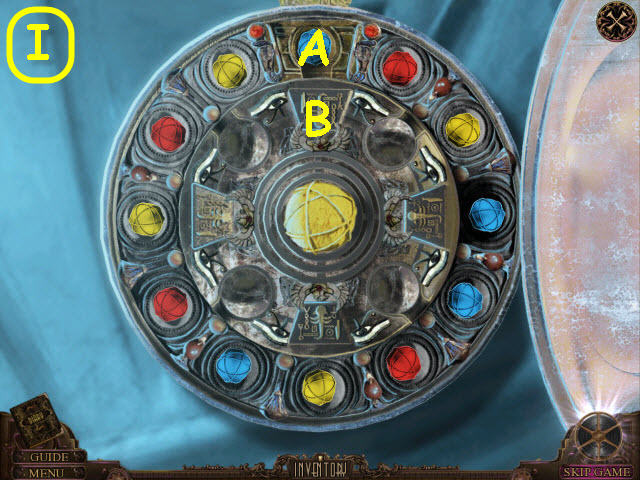
- Place all the same colored balls in the middle ring to match the color in the center ring till all rings are gone.
- To solve the puzzle rotate the rings in the following order: Ax3, Bx2, Ax3, Bx2, Ax4, Bx2, Ax4, Bx2, Ax2, Bx2, Ax3, Bx2, Ax2, Bx2, Ax3, Bx2, Ax5, and Bx2 (I).
- Take the JAR WITH THAUMATROPE.
- Return to the father's study.
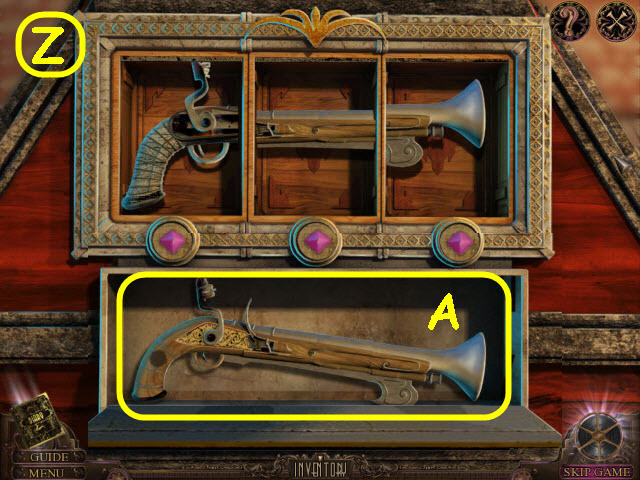
- Examine and place the DIAMOND into the third cabinet lock (J); take the note and the BLUEPRINT SECOND HALF (K).
- Return to the foyer.
- Examine the settee (L) to access a HOS.
- Find the items listed.
- Marked in red: place the file on the handle to get a rasp.
- Marked in green: use the paint scraper on the bandage to get a bandage.
- You will earn a DISH TOWEL (@).
- Return to the rec room.
- Examine and place the JAR WITH THAUMATROPE in the sink (M).
- Place the VALVE on the tap (N) and turn; unscrew the lid of the jar to get a THAUMATROPE 5/5.
- Go to the basement.
- Examine and place the BLUEPRINT SECOND HALF on the board; open the print; take the STUDIO KEY (O).
- Examine the storeroom (P) to access a HOS.
- Find the items listed.
- Marked in red: place the head on the body to get a bobble-head doll.
- Marked in green: combine the two shear halves to get shears.
- You will earn a TOY SOLDIER (@1).
- Go to father's study.
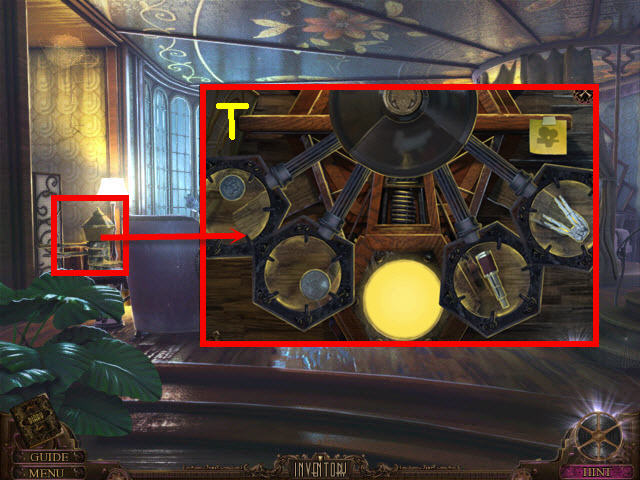
- Examine the thaumatrope player (Q).
- Place the THAUMATROPE 5/5 on an empty slot on the player to trigger a puzzle.
- Arrange the tiles to complete the scenes.
- See screenshot (R) for solution.
- Take the film and CAR KEY (S).
- Go to the studio entrance.
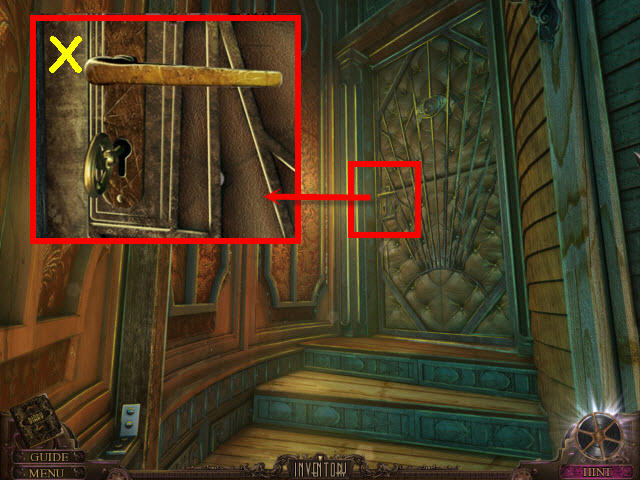
- Examine and use the STUDIO KEY on the studio door lock (T); turn to open.
- Enter the ticket hall.
- Take the WOOD PIECE 1/3 (U).
- Examine and pull the switch (V).
- Go to the pirate's entrance.
- Examine and take the SKELETON HAND (W) from the pot.
- Take the CABLE (X).
- Go forward to the pirate's gangway.
- Examine the pirate hat; take the BANDANA 1/3 (Y).
- Take the WOOD PIECE 2/3 (Z).
- Take the SKULL (A).
- Go left to the pirate's tower base.
- Examine the cannon; take the CANNONBALL (B).
- Back out and go forward to the pirate's ship side.
- Examine the barrel; take the HOOK (C).
- Take the BANDANA 2/3 (D).
- Examine and take the clipboard (E).
- Go up to the pirate's ship deck.
- Take the WOOD PIECE 3/3 (F).
- Examine the chest; take the BONE (G).
- Back out.
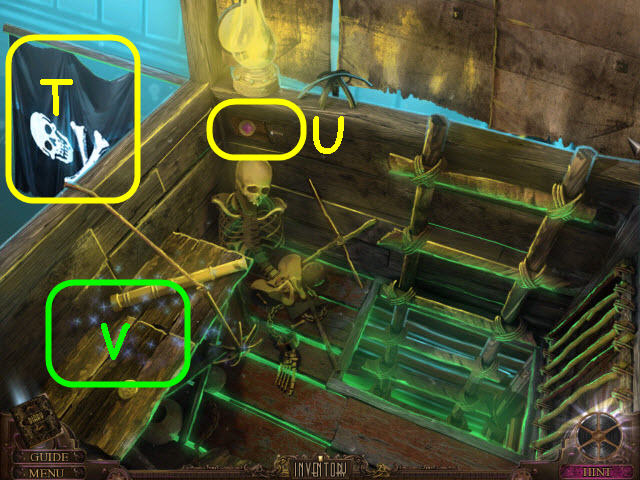
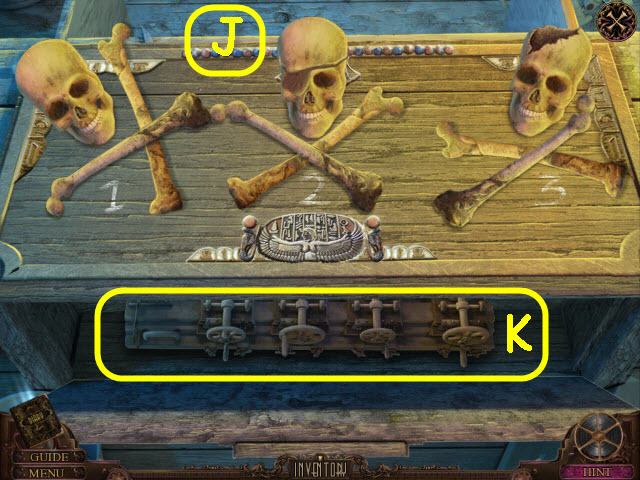
- Examine and place the BONE on the rack (H) to trigger a puzzle.
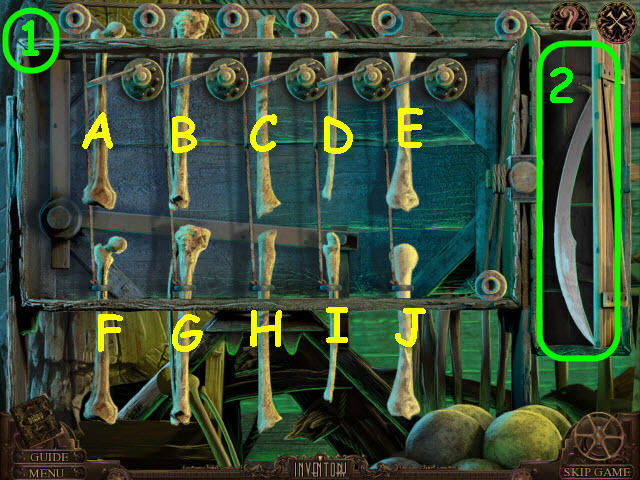
- Select the bones in the correct order to open the cage on the right.
- To solve the puzzle, select the bones in the following order: A, C, B, E, D, H, G, J, F, and I (1).
- Take the SWORD (2).
- Go to the pirate's tower base.
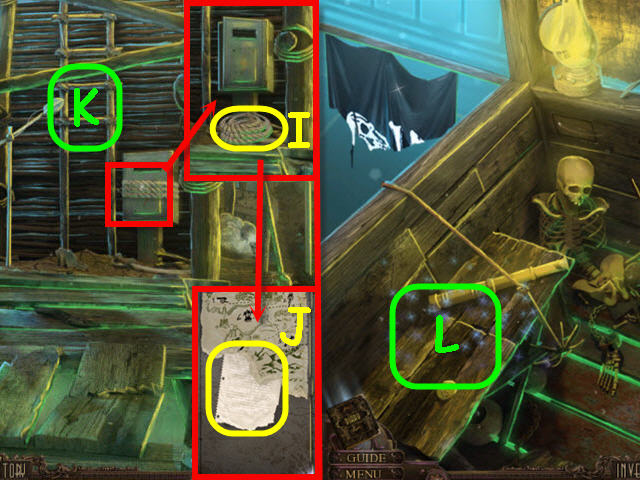
- Use the SWORD on the rope; take the PIECE OF ROPE (I).
- Examine and open the box; take the note (J).
- Use the WOOD PIECE 3/3 and PIECE OF ROPE on the broken ladder (K).
- Go up the ladder to the pirate's tower.
- Examine the bench (L) to access a HOS.
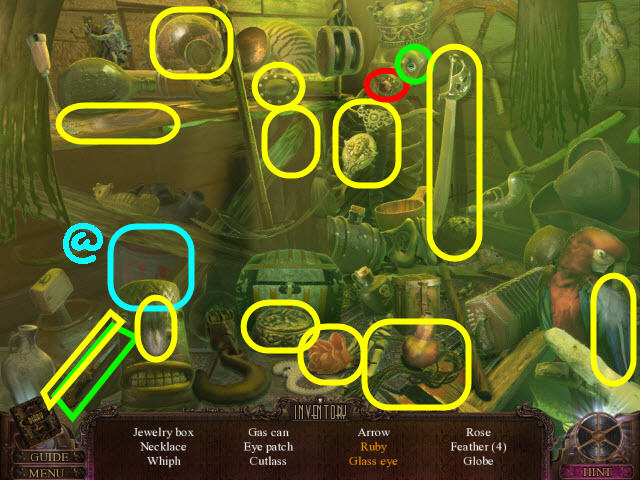
- Find the items listed.
- Marked in red: open the jaw to get the ruby.
- Marked in green: use the knife to pry out the glass eye.
- You will earn a GAS CAN (@).
- Go to the studio entrance.
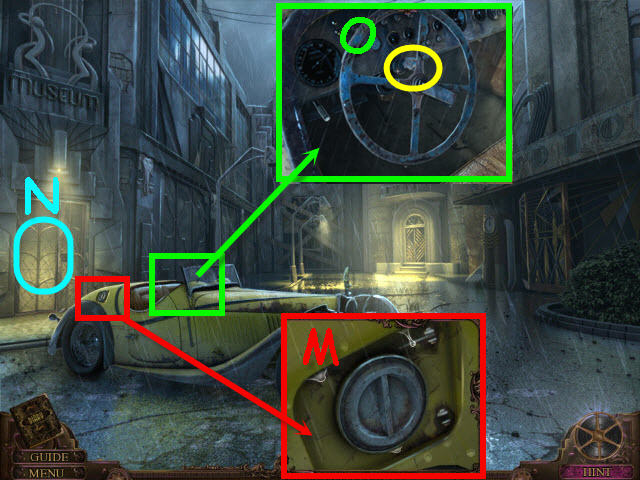
- Examine the roadster gas tank; use the DISH TOWEL on the gas cap (M).
- Fill the tank with the GAS CAN.
- Place the CABLE on the museum door (N).
- Examine the car interior; use the CAR KEY on the ignition; turn the key (O).
- Enter the museum.
Chapter 4 – Museum

- Take the TORN JOLLY ROGER (P).
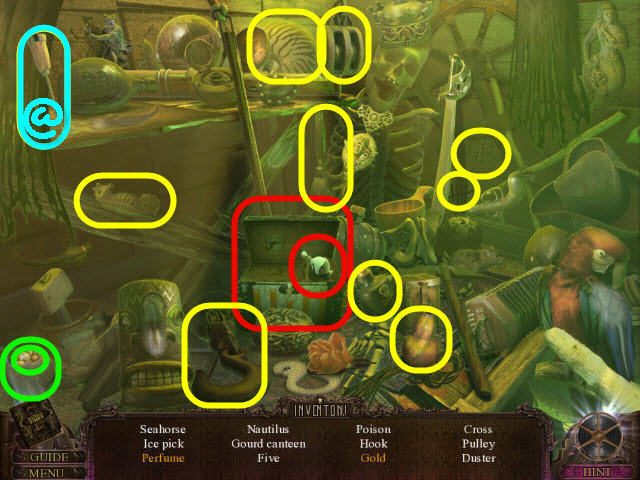
- Examine the left shelves (Q) to access a HOS.
- Find the items listed.
- Marked in red: use the letter opener to get the Leo.
- Marked in green: use the lighter on the candle to get a lit candle.
- You will earn a PIRATE MAP (@1).
- Go to pirate's tower base.

- Examine the control box.
- Place the PIRATE MAP in the box (R) to trigger a puzzle.
- Use the map as your guide to decipher the symbol values and solve the equation.
- To solve the puzzle, select the following buttons: B, A, B, C, A, A, C, A, and C (S).
- Go up the ladder to the pirate's tower.
- Place the TORN JOLLY ROGER on the flag (T).
- Take the PINK CRYSTAL 1/2 (U).
- Examine the bench (V) to access a HOS.
- Find the items listed.
- Marked in red: open the box to get the perfume.
- Marked in green: break the vase to get the gold.
- You will earn an ICE PICK (@).
- Go to pirate's gangway.
- Examine the figurehead; use the ICE PICK to get the PINK CRYSTAL 2/2 (W).
- Back out.
- Examine the ship's bottom; take the BANDANA 3/3 (X).
- Go to the museum.
- Examine the pedestal of the pillar.
- Place the PINK CRYSTAL 2/2 in the slots (Y) to trigger a puzzle.
- Press the three buttons to complete the flintlock.
- The clue can be found in your diary from when you searched the pirate bust in the west end.
- See screenshot (Z) for solution.
- Take the FLINTLOCK (A).
- Go to the pirate's ship deck.
- Examine the pirates.
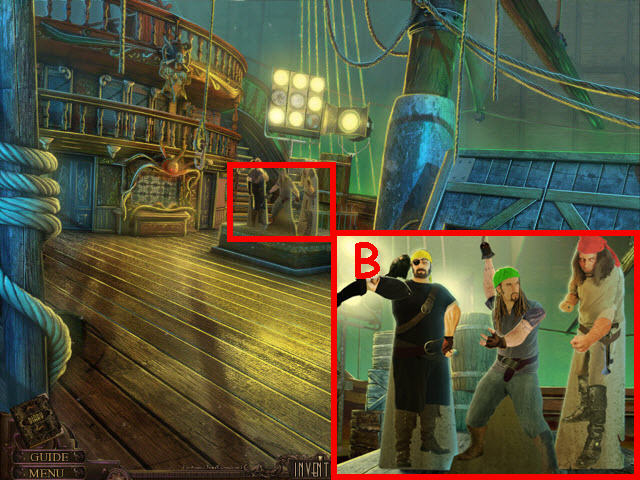
- Place the HOOK, BANDANA 3/3, and FLINTLOCK on the pirates (B) to trigger a puzzle.

- Rearrange the positions of the arms, bandanas and accessories to match the movie poster in the foyer.
- See screenshot (C) for solution.

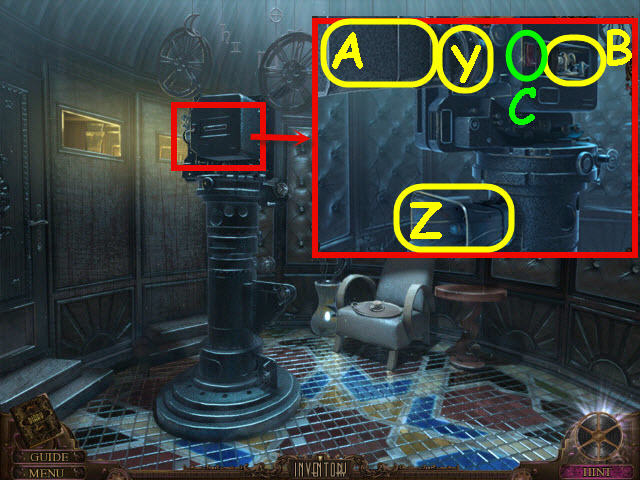
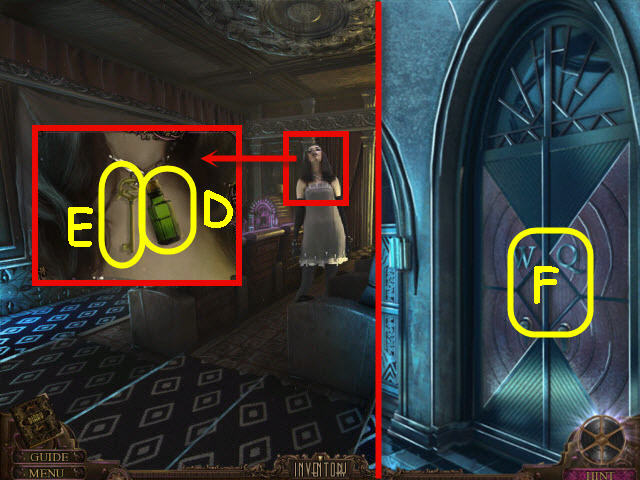
- Examine the compartment; read the note and take the CLOCK HAND (D) and PROJECTOR LAMP (E).
- Go to the studio entrance.
- Examine and place the CLOCK HAND on the clock; set the time to the opening time found in picture on father's bedroom wall.
- Solution: 9:00 (F).
- Enter right into the WWI entrance.
- Examine the tank tracks; take the ZODIAC 1/5 (G).
- Go forward to the WWI Exit.
- Examine the door; use the CANNONBALL on the side glass and take the AXE (H).
- Back out and go into the WWI trench.
- Examine the crate; take the LEATHER GLOVES (I).
- Take the SHOVEL (J).
- Go forward to the WWI trench end.
- Take the BINOCULARS (K).
- Examine and open the satchel; read the note and take the ZODIAC 2/5 (L).
- Examine the shelf (M) to access a HOS.
- Find the items listed.
- Marked in red: rip the patch to get the dollar.
- Marked in green: place the clip in the gun to get a loaded gun.
- You will earn a TRUNK LEVER (@).
- Go to the studio entrance.
- Examine the roadster interior; place the TRUNK LEVER on the stem (N) and pull.
- Examine and open the hood; use the LEATHER GLOVES to get the BATTERY (O).
- Go to the WWI trench end.

- Examine and place the BATTERY on the telegraph machine (P); tap the straight key (Q).
- Go to the WWI exit and go through the door (R) to the alley.
Chapter 5 – Egyptian Studio
- Examine the corner; take the TOY TANK (S).
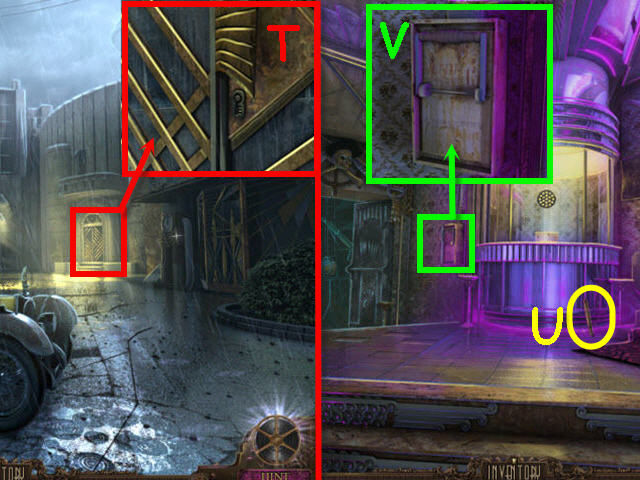
- Examine and use the AXE on the door (T).
- Go to the museum.
- Examine and place the TOY SOLDIER and TOY TANK on the center display (U) to trigger a puzzle.
- Arrange the toys on the correct bases based on the patterns on the base of the toys.
- See screenshot (V) for solution.
- Take the BUCKLE (W).
- Go to the WWI trench end.
- Examine the chest (X); place the BUCKLE on the lock and open.
- Move the Jolly Roger flag and take the FUSE (Y).
- Examine the shelf (Z) to access a HOS.
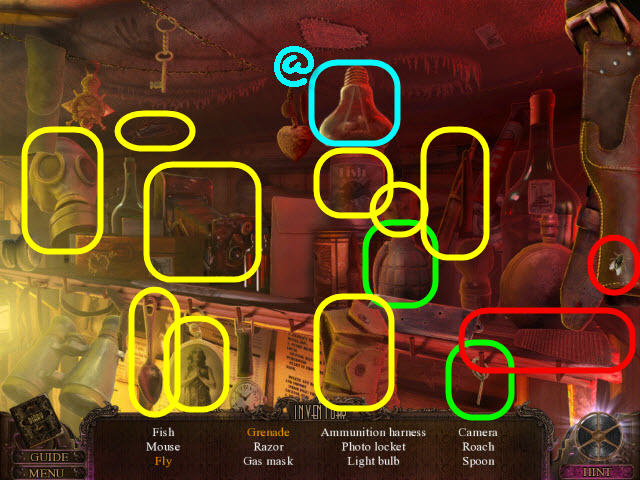
- Find the items listed.
- Marked in red: use the flyswatter to get the fly.
- Marked in green: place the pin in the grenade to get the grenade.
- You will earn a LIGHT BULB (@).
- Go to the alley.
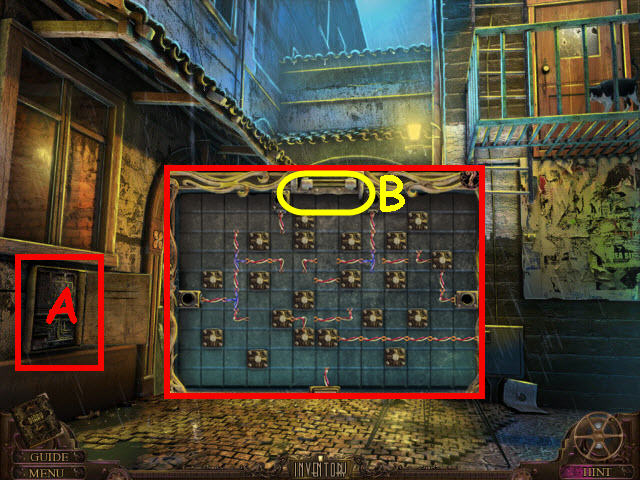
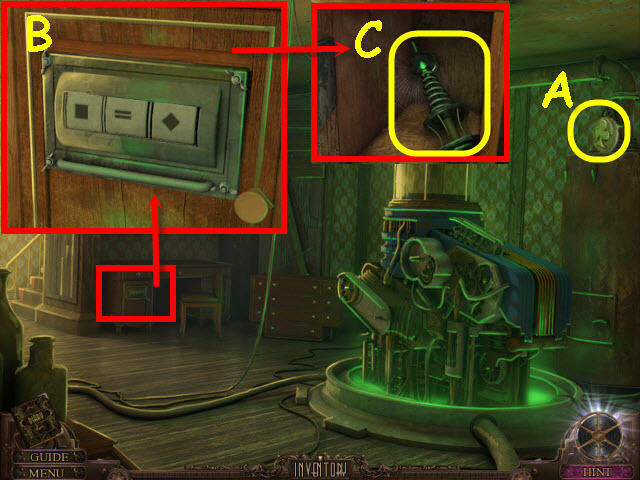
- Open and examine the fuse box (A).
- Place the FUSE on the top slot (B) to trigger a puzzle.
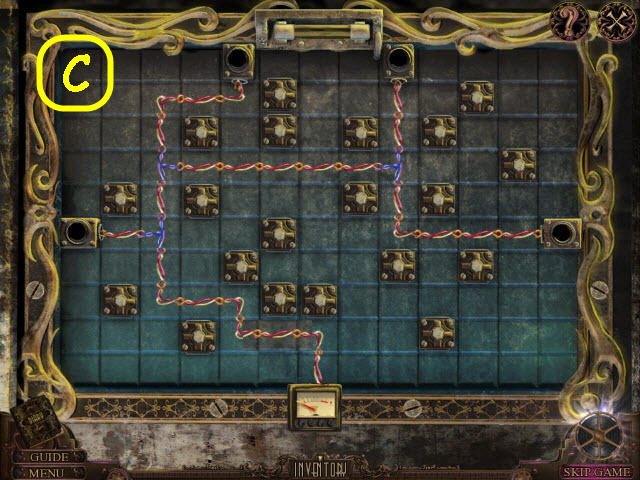
- Place the connectors on the grid to complete the circuit.
- See screenshot (C) for solution.
- Go left through the door to enter backstage down.
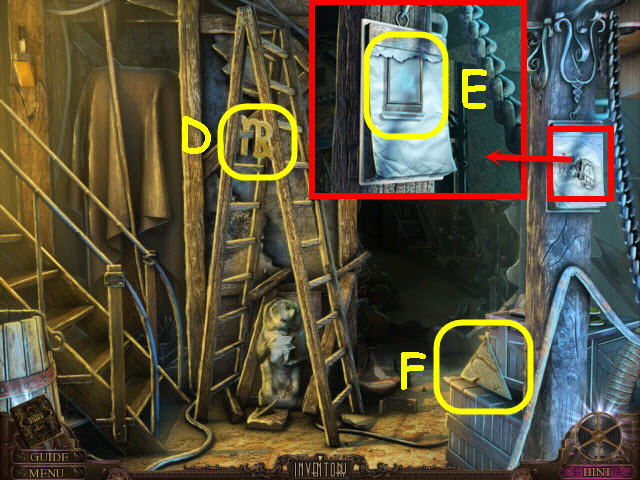
- Take the ZODIAC 3/5 (D).
- Examine the clipboard; take the sketch and LANTERNA MAGICA SLIDE (E).
- Take the SARCOPHAGUS PART (F).
- Go left to backstage up.
- Examine and place the LIGHT BULB in the lamp (2).
- Examine the control panel; push all switches up (G) and take the SARCOPHAGUS PART 2/3 (H).
- Back out and go forward to bazaar.
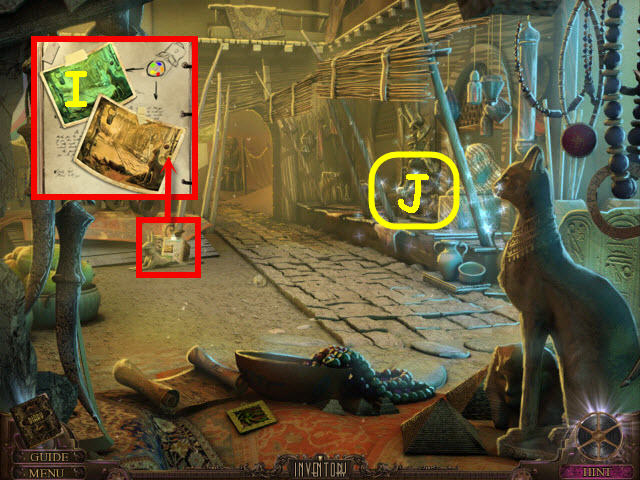
- Examine the clipboard (I) and select it to get a clue.
- Examine the market stall (J) to access a HOS.
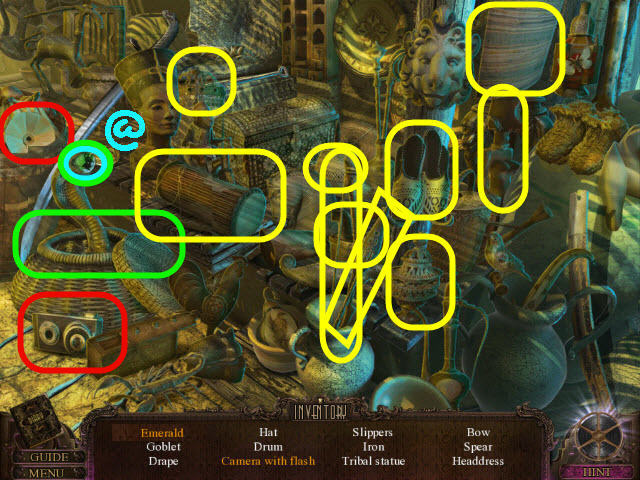
- Find the items listed.
- Marked in red: place the flash on the camera to get a camera with flash.
- Marked in green: remove the basket cover to get the color crystal.
- You will earn an EMERALD 1/4 (@).
- Go forward to the tent ext.

- Take the ZODIAC 4/5 (K).
- Go into the tent interior.
- Examine the left shelves; take the notes and the SALTPETER (L).
- Examine the box; hold and drag the air compressor nozzle (M) on the dust and take the BONES (N).
- Go to the museum.
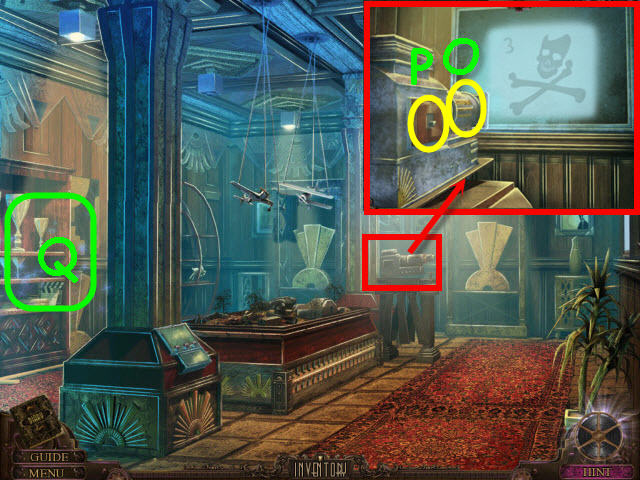
- Examine and place the LANTERNA MAGICA SLIDE on the projector (O).
- Flip the switch (P).
- Examine the shelves (Q) to access a HOS.
- Find the items listed.
- Marked in red: use the staple remover to get the staple.
- Marked in green: use the string on the yo-yo to get a yo-yo.
- You will earn an UMBRELLA (@1).
- Go to the alley.
- Use the UMBRELLA on the fire escape ladder (R).
- Go up to the film archives.
- Take the EMPTY FILM ROLL (S).
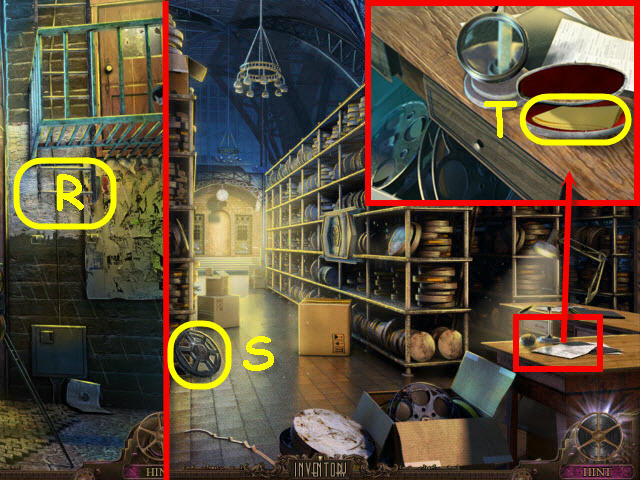
- Examine the desk; open the case and take the SOFT CLOTH (T).
- Go straight to the props archive.
- Examine the top of the pedestal; take the SARCOPHAGUS PART 3/3 (U).
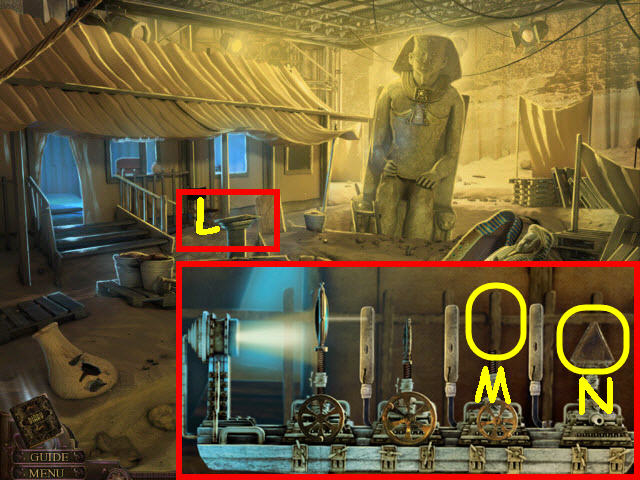
- Examine and place the BINOCULARS on the table (V).
- Open the toolbox and use the three screwdrivers (W) on the BINOCULARS; take it apart twice and take the LENS (X).
- Examine the coffin (Y) to trigger a HOS.
- Find the items listed.
- Marked in red: use the key on the lock to get a book.
- Marked in green: use the knife on the apple to get a slice of apple.
- You will earn a LIGHT FILTER (@).
- Go to the backstage up.
- Examine and place the LIGHT FILTER on the lamp (Z).
- Go to the bazaar.
- Take the EMERALD 2/4 (A).
- Go forward.
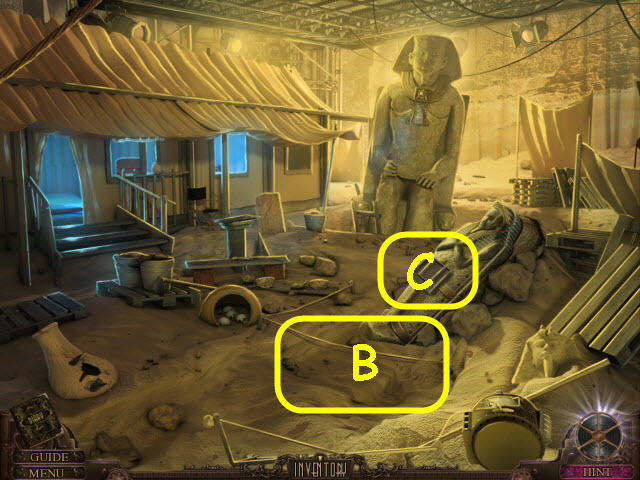
- Use the SHOVEL on the sand mound (B) twice.
- Examine and place the SARCOPHAGUS PART 3/3 on the sarcophagus (C) to trigger a puzzle.
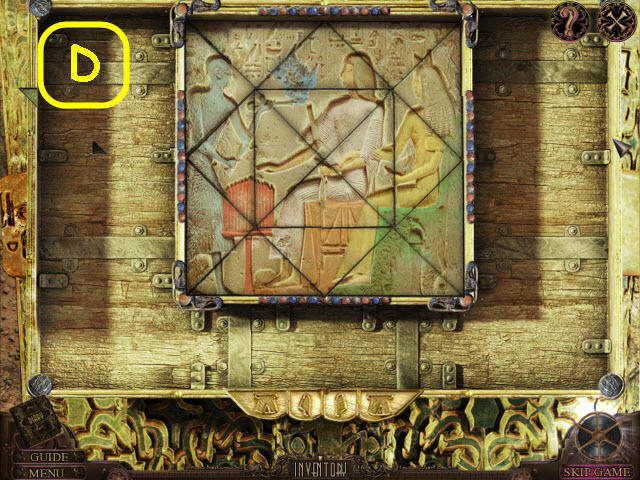
- Place the tiles in the frame and complete the picture.
- See screenshot (D) for solution.
- Enter the sarcophagus to go into the maid's lair.
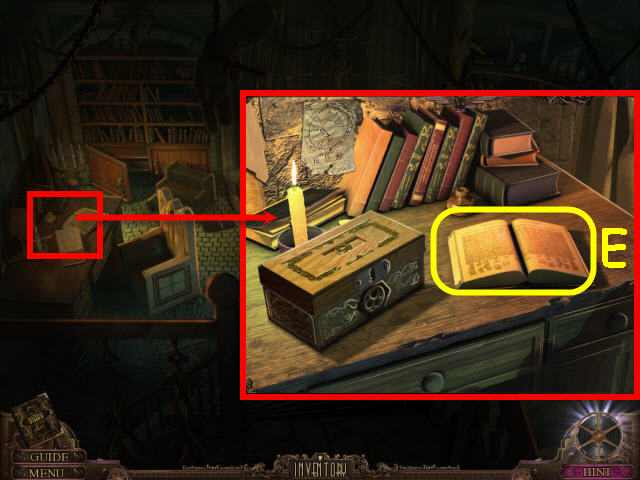
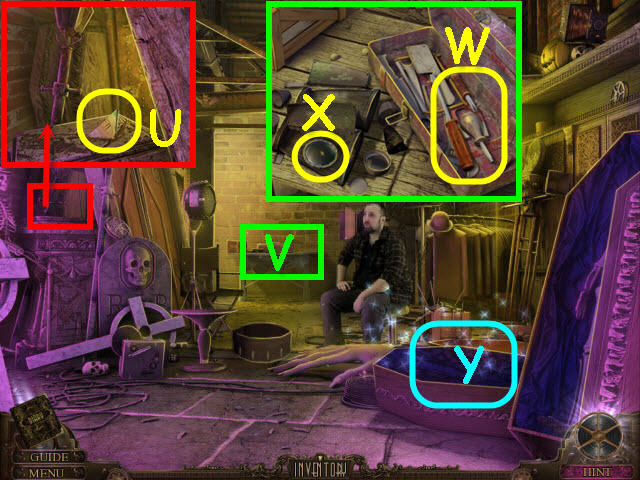
- Examine the desk.
- Select the book (E) to trigger a cutscene.
Chapter 6 – The Maid
- Examine the desk; open the box and take the TAPE PART 1/3 (F).
- Read the note and take the EMERALD 3/4 (G).
- Examine the lab area; take the EYE PATCH (H).
- Go to the tent interior.
- Examine the chest.
- Place the EYE PATCH, BONES, and SKULL on the chest (I) to trigger a puzzle.
- Rotate the skulls, bones and patch to match the three Jolly Roger's you have found.
- The clue can be found in your diary.
- See screenshot (J) for solution.
- Take the OPTICAL DEVICE (K).
- Back out.
- Place the OPTICAL DEVICE on the pedestal (L).
- Examine and place the LENS on the empty spindle (M) of the OPTICAL BENCH.
- Use the SOFT CLOTH on the prism (N) to trigger a puzzle.
- Adjust the lenses so the ray of light travels through.
- To solve the puzzle, turn the following valves: Ax3, Bx5, and Cx4 (O).

- Examine the statue; take the EMERALD 4/4 (P).
- Take the note and the PROJECTOR LENS (Q).
- Go into the maid's lair.
- Open the curtain, examine, and place the EMERALD 4/4 on the upper slots on the device (R) to trigger a puzzle.

- Select the outer colors so that they combine to change the inner the colors to match the adjoining rectangular one. You must complete 3 rounds of this puzzle.
- To solve the first round, select the following buttons: Ax2, Bx2, C, D, Ex3, and F (1).
- To solve the second round, select the following buttons: Ax2, Bx2, C, Dx3, and F (2).
- To solve the third round, select the following buttons: B, Dx2, Ex3, and C (3).
- Take the PROJECTOR IRIS and ZOETROPE BOTTOM.
- Go to the props archive.

- Examine and place the ZOETROPE BOTTOM on the zoetrope (S).
- Select the zoetrope top to assemble and select again to spin.
- Take the TAPE PART 2/3 (T).
- Take the FATHERS PHOTO (U).
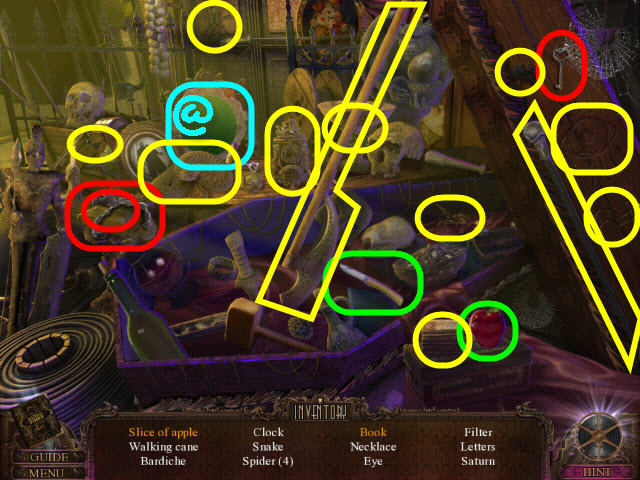
- Select the coffin (V) to access a HOS.
- Find the items listed.
- Marked in red: use the snuffer on the candle to get an unlit candle.
- Marked in green: use the corkscrew on the wine bottle to get a cork.
- You will earn a PESTLE (@).
- Back out.
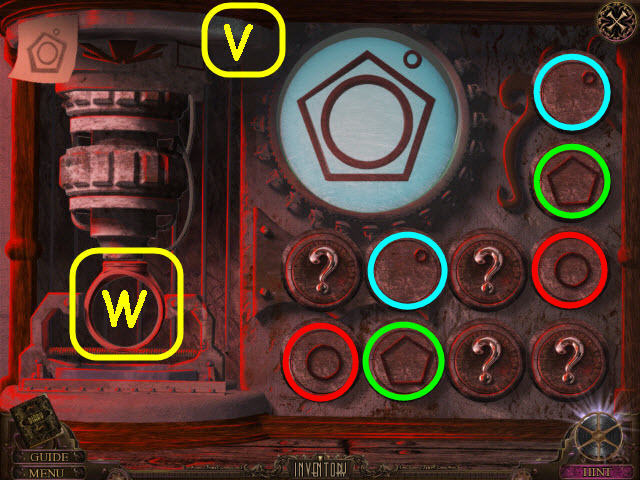
- Examine the desk; place the FATHERS PHOTO on the magnifying glass and select the code (W) to get a diary entry.
- Examine and open the panel (X) to trigger a puzzle.
- Use the buttons to align the colored buttons to match the colors on the left and arrange the numbers to match the code in the upper left.
- To solve the puzzle, select the following buttons: A, Bx2, C, D, Ex2, F, G, Hx2, I, and J (1).
- Take the SUGAR (Y) and TAPE PART 3/3 (Z).
- Go to the maid's lair.
- Examine the lab area; place the SUGAR and SALTPETER on the device (A).
- Use the PESTLE on the SUGAR (B); take the SMOKE POWDER (C).
- Go to the bazaar.
- Examine the stall (D) to access a HOS.
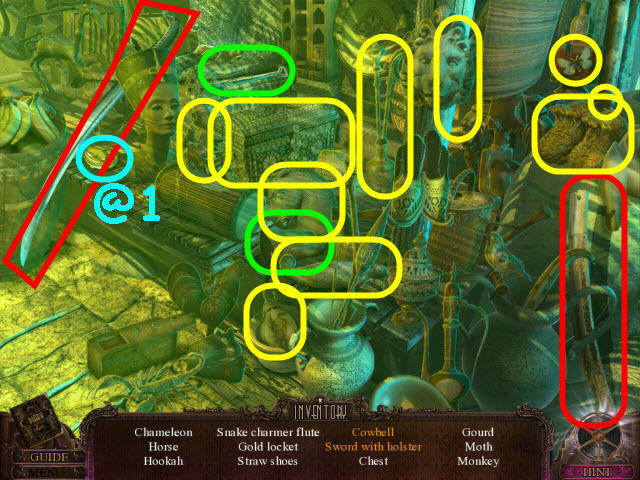
- Find the items listed.
- Marked in red: place the sword in the holster to get a sword with holster.
- Marked in green: put the clapper on the bell to get a cowbell.
- You will earn a HEART (@1).
- Go to the WW1 exit.
- Open and examine the tank turret hatch; open and place the SMOKE POWDER in the compartment (E) to trigger a puzzle.
- Wait for the plane to get in the crosshairs and push the button (F) to shoot. You will need to shoot the plane twice to down it.
- Back out.
- Examine the downed plane (G) to access a HOS.
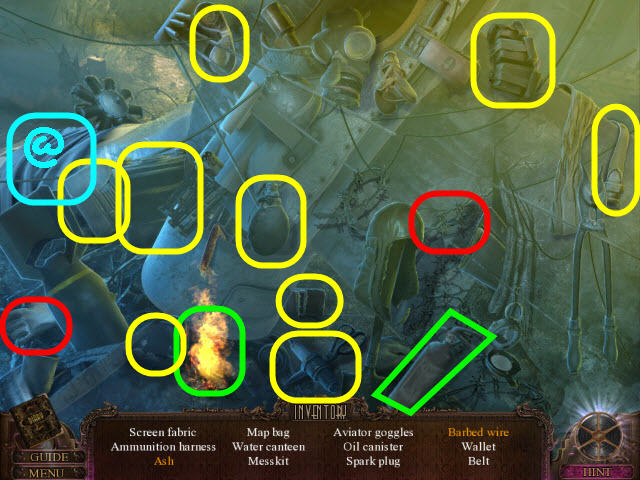
- Find the items listed.
- Marked in red: use the glove to get the barbed wire.
- Marked in green: use the fire extinguisher on the fire to get ash.
- You will earn a SCREEN FABRIC (@).
- Go to father's study.
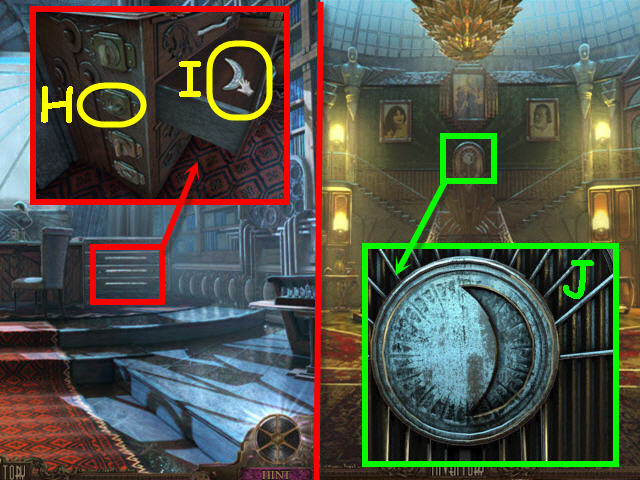
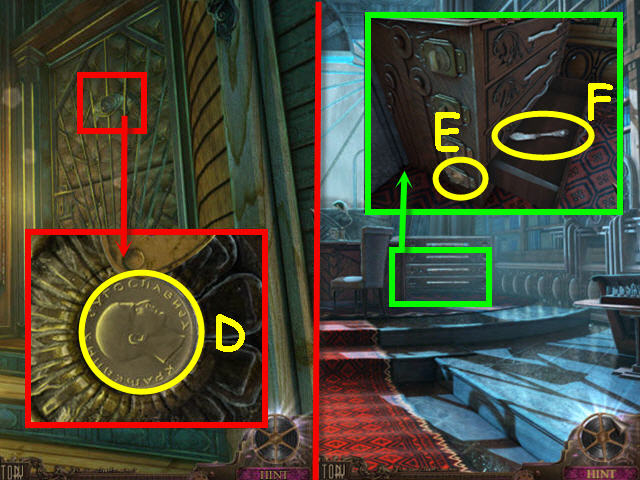
- Examine the cabinet; place the HEART on the second drawer lock (H); read the note and take the MOON SHAPE (I).
- Back out.
- Examine and place the MOON SHAPE on the zodiac clock (J) to trigger a puzzle.
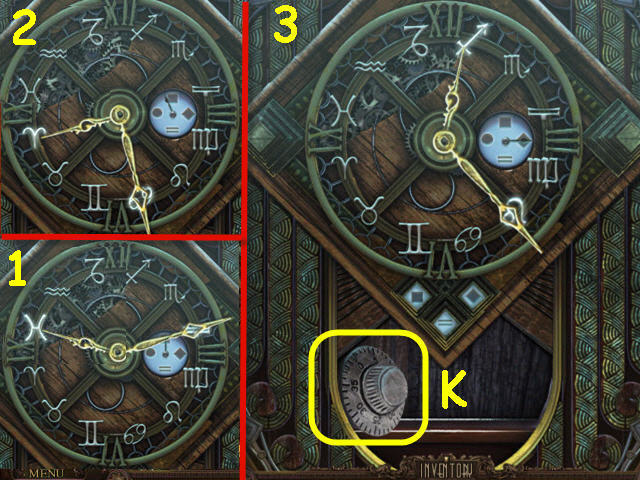
- Position the clock hands duplicating the three pairs of zodiac signs on the left.
- See screenshot (1-3) for solution.
- Take the PADLOCK DIAL (K).
- Examine the editing room door (L); place the PADLOCK DIAL on the lock.
- Turn the dial to open and examine the center (M) to trigger a puzzle.
- Align the gems by using the arrows and rotating the dials.
- To solve the puzzle, select the following arrows and rings: A, D, Ex2, A, D, B, F, C, D, F, B, C, D, C, D, G, A, Gx2, A, C, and D (4).
- Enter the newly-opened door to the editing room.
Chapter 7 – Antidote
- Take the COIN 1/2 (N).
- Examine the shelves (O) to access a HOS.
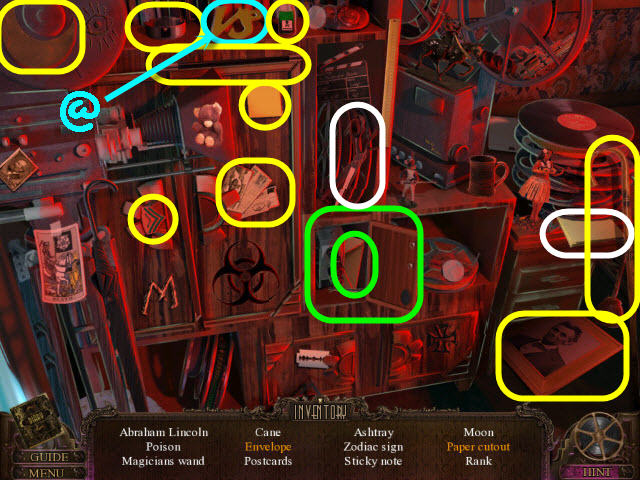
- Find the items listed.
- Marked in green: open the compartment to get the envelope.
- Marked in white: use the scissors on the paper to get a paper cutout.
- You will earn a ZODIAC 5/5 (@).
- Go to the library.
- Examine the globe (P).
- Place the ZODIAC 5/5 on the ring (Q) around the globe to trigger a puzzle.
- Rotate the disks so that matching symbols are adjacent.
- See screenshot for solution (R).
- Take the COLOR SHAPE (S) and PROJECTOR SPROCKET (T).
- Go to the editing room.
- Examine and place the COLOR SHAPE in the slot and RING WITHOUT SYMBOL on the left of the engraving machine (U) to trigger a puzzle.
- Find the matching pairs of the three designs needed to match the template in the upper left.
- See screenshot for solution (V).
- Automatically get FATHER'S RING 2 (W).
- Go to the elevator.
- Examine and use FATHER'S RING 2 on the bottom button of the panel; press the down button (X).
- Examine and press the switch (Y).
- Examine the stool (Z) to access a HOS.
- Find the items listed.
- Marked in red: place the shotgun shell in the shotgun to get a loaded shotgun.
- Marked in green: place the fishing pole on the dwarf to get a dwarf fisherman.
- You will earn a STOOL (@).
- Go forward to the lower projector.
- Take the CLUB (A).
- Examine the locked desk; enter the code (B) in your diary from the zodiac clock.
- Take the PROJECTOR COIL (C).
- Go to the connecting door on the left.
- Examine and open the peephole; take the COIN 2/2 (D).
- Go to father's study.
- Examine the cabinet; place the CLUB on the bottom drawer lock (E); read the note and take the BUTTER KNIFE (F).
- Go to the editing room.
- Examine and place the TAPE PART 3/3 and the EMPTY FILM ROLL on the editing machine (G).
- Use the BUTTER KNIFE on the upper panel (H) to trigger a puzzle.
- Connect the symbols by color or shape to end up on the right green tile.
- To solve the puzzle, select the tiles in the following order: J, I, D, F, K, G, C, and L (1).
- Take the PROJECTOR TAPE (I).
- Take the ELECTRIC CABLE (J).
- Examine the shelves (K) to access a HOS.
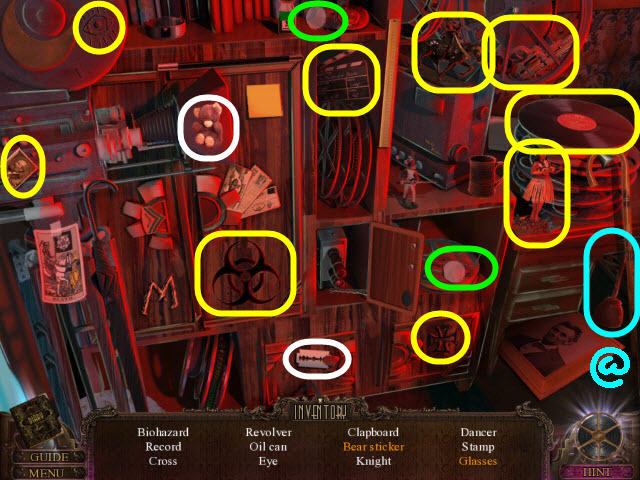
- Find the items listed.
- Marked in white: use the razor on the sticker to get a bear sticker.
- Marked in green: place the half of glasses with the half of glasses to get glasses.
- You will earn OIL (@).
- Go to the theater.
- Place the SCREEN FABRIC on the wall (L).
- Examine and place the ELECTRIC CABLE on the jukebox (M).
- Examine the jukebox to trigger a puzzle.

- Align the numbers so no duplicate are in any row, column or sequence.
- Select the button you want the number on and then the number on the right you wish to duplicate.
- See screenshot for solution (N).
- Go to the lower projector.
- Place the STOOL on the floor (O).
- Place the PROJECTOR COIL by the ceiling (P).
- Examine and place the PROJECTOR TAPE (Q) and PROJECTOR SPROCKET (R) on the machine.
- Back out.
- Examine the stool (S) to access a HOS.
- Find the items listed.
- Marked in red: hang the weight on the clock to get a cuckoo.
- Marked in green: place the 4 on the equation to get an equation answer.
- You will earn a SPYGLASS (@1).
- Go to father's bedroom.
- Examine and place the COIN 2/2, SPYGLASS, and SKELETON HAND on the machine (T).
- Use the OIL on the center coil to trigger a puzzle.
- Turn the pieces so that the shadows combine to form a projector.
- Press the top arrows when pieces are set.
- See screenshot for position of the pieces (U).
- Take the GOGGLES (V) and SECRET KEY (W).
- Go to the connecting door.
- Examine and use the SECRET KEY on the lock; turn the key and pull the handle (X).
- Go through the door to the projector room.
- Examine the place the PROJECTOR IRIS (Y), PROJECTOR SPEAKER (Z) and PROJECTOR LENS (A) on the projector.
- Open and place the PROJECTOR LAMP (B) in the side compartment.
- Flip the switch (C).
- Go left to the theater.
- Examine the maid; take the ANTIDOTE (D) and WORKER'S QUARTERS KEY (E).
- Go to west hall end.
- Examine and use the WORKER'S QUARTERS KEY on the door (F); turn the key.
- Go right into the workers quarters.
- Give the ANTIDOTE to the brother (G).
- Congratulations! You have successfully completed Final Cut: Death on the Silver Screen Standard Edition.
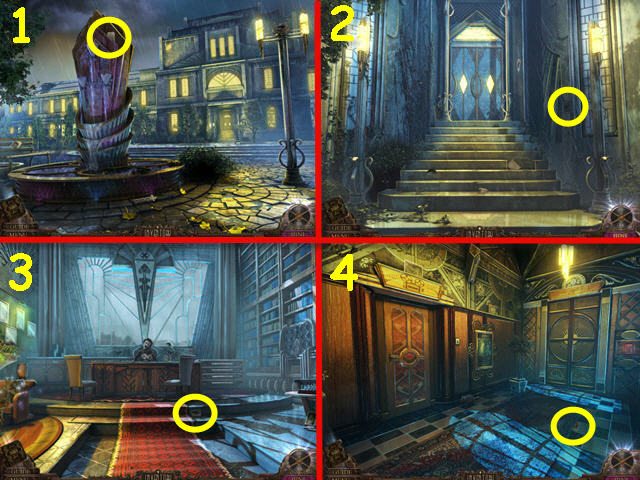
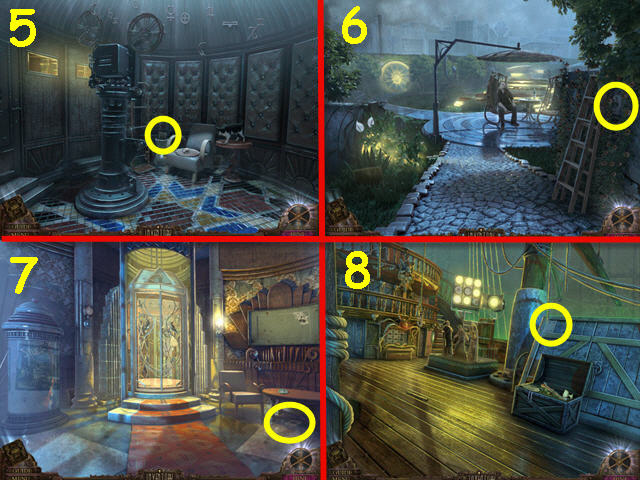
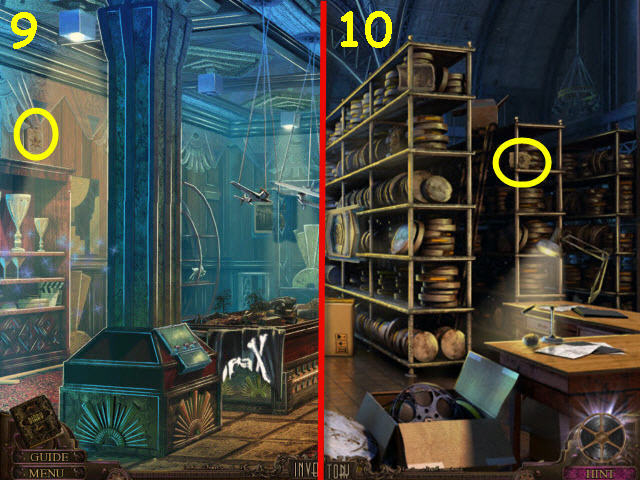
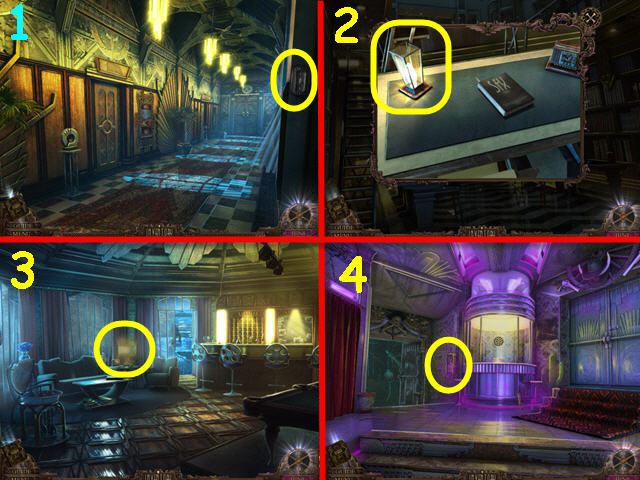
Hidden Estate Photo Achievement
- There are 20 hidden estate photos throughout the game. They are all listed below.
- Bench by the fountain (1).
- Left of the front door to the mansion (2).
- Upper right in the foyer (3).
- Under the chessboard table on the right side of the father’s study (4).
- Top of the left door in the east hall end (5).
- On top of the right rolling ladder in the library (6).
- Above the right water wall in the music room (7).
- Behind the chair in the projector room (8).

- Left of the path in the garden (9).
- Under the table in the rec room (10).
- Behind the pillar in the elevator room (11).
- On the left by the rock on the pirate's tower base (12).
- Under the stairs at the pirate's ship side (13).
- On the bottom of the mast on the pirate's ship deck (14).
- On the back wall of the museum (15).
- On the right wall of the WWI trench (16).

- On the wall in the WW1 trench end (17).
- On the side of the crate in backstage up (18).
- On the left wall in the tent interior (19).
- On the top rack of the 3rd from right film rack in the film archives (20).
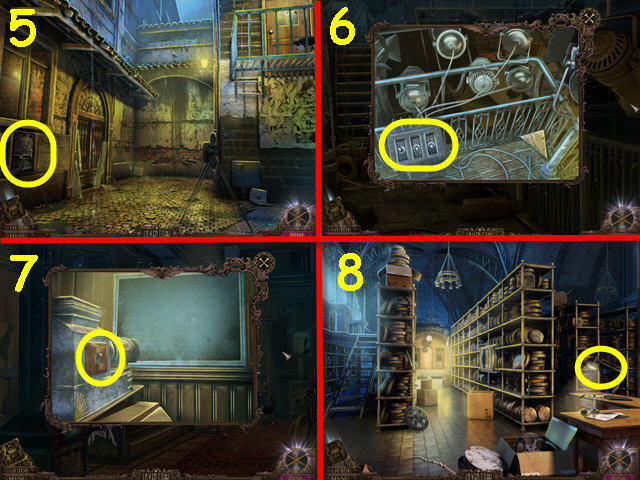
Father's Secret Card Achievement
- There are 10 father's secrets cards hidden throughout the game.
- Top of fountain (1).
- Right wall of mansion entrance (2).
- To the right of the stair runner in father's study (3).
- Tucked on the right of the carpet in the east hall end (4).
- In the vase in the projector room (5).
- Right of the ladder in the garden (6).
- Under the table in the elevator room (7).
- Above the chest in the pirate's ship deck (8).
- Above the left shelves in the museum (9).
- On the top shelf of the middle film rack in the film archive (10).
Lighting Lamps Achievement
- There are ten lamps to be lit throughout the game.
- The switch in the east hall (1).
- In the zoom in on the table in the library (2).
- On the table in the rec room (3).
- Pull the switch in the ticket hall (4).
- Automatic when completing the puzzle in the alley (5).
- Turn on the lights while zoomed in on backstage up (6).
- Turn on Lanterna Magica in the museum (7).
- On the desk in the film archives (8).
- Above the desk in the editing room (9).
- The wall switch in the secret passage (10).
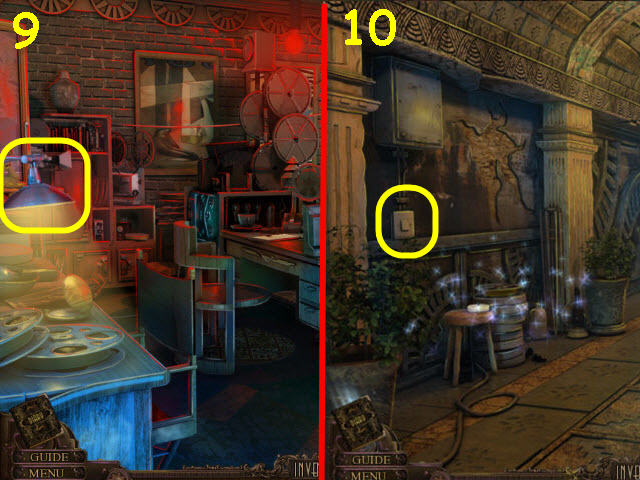
Mystery Achievement
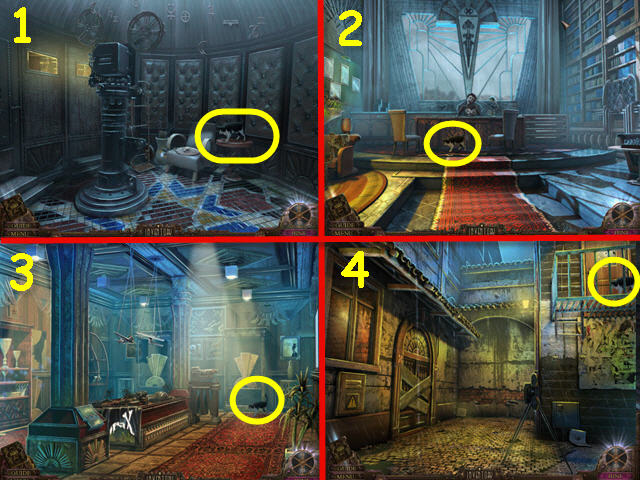
- There are 6 cats appearing in the game. They are listed here in order of appearance.
- Projector Room (1), Father's Study (2), Museum (3), and Alley (4).
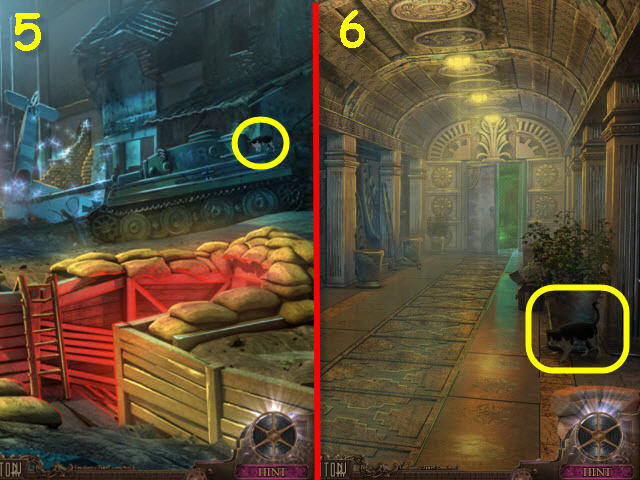
- WW1 Entrance (5) and Secret Passage (6).
Created at: 2012-06-22