

Walkthrough Menu
- General Tips
- Chapter 1: Hill Overlook
- Chapter 2: Wolf Studios
- Chapter 3: The Bar
- Chapter 4: Private Car
- Chapter 5: Trailer Park
- Chapter 6: Horizon Restaurant
- Chapter 7: Wolf Studios Office
General Tips
- This is the official guide for Final Cut: Fade to Black.
- This guide will not tell you when you have to zoom into a location; the screenshots will show each zoom scene.
- Hidden-object puzzles are referred to as HOPs. This guide will not show screenshots of the HOPs, however, it will mention when an HOP is available and the inventory item you'll collect from it.
- Use the Map to fast travel to a location.
Chapter 1: Hill Overlook
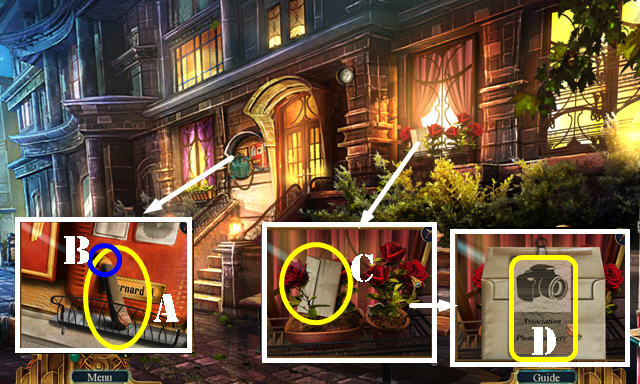
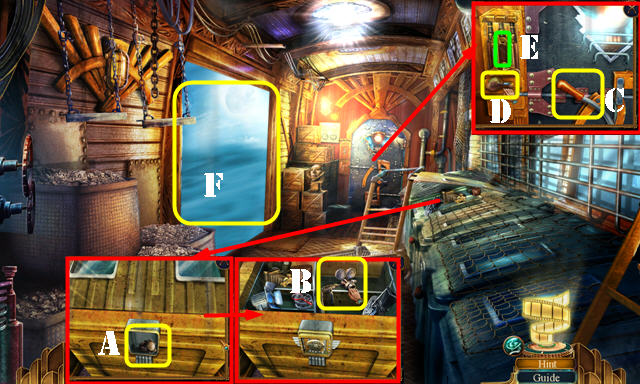
- Select the card on the screen.
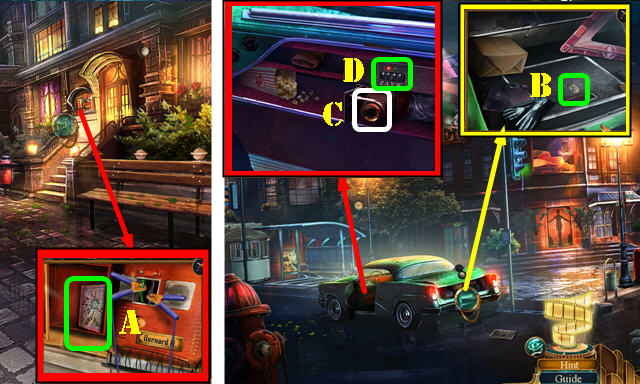
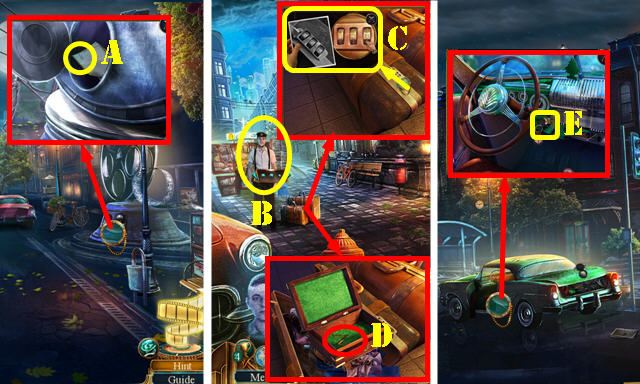
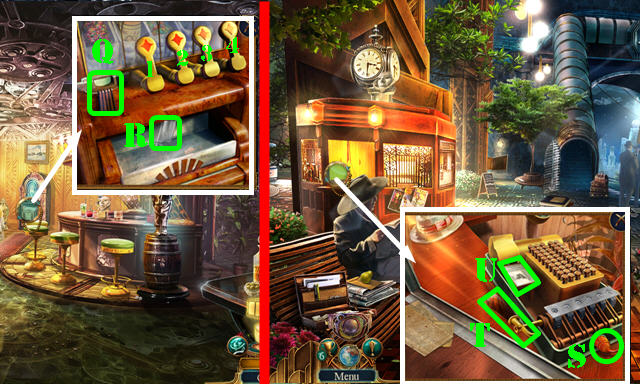
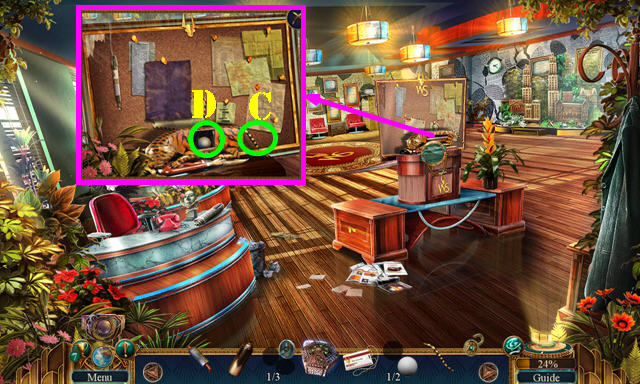
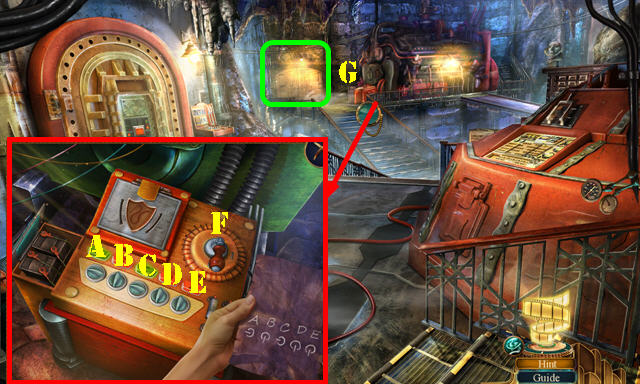
- Take the GRAPHITE (A); push the button (B).
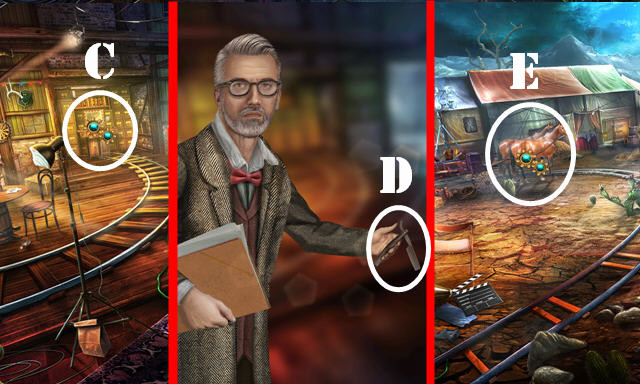
- Open the letter (C) use the GRAPHITE. Take BERNARD'S BADGE (D).
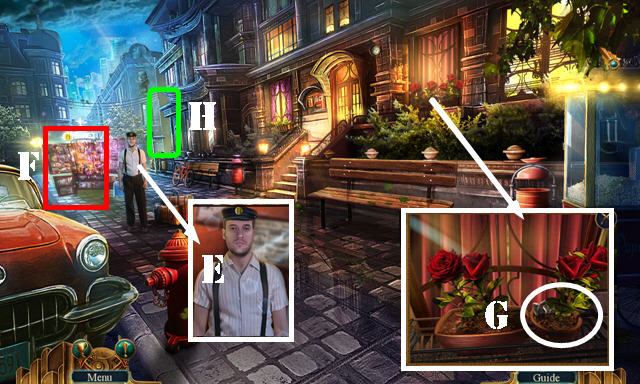
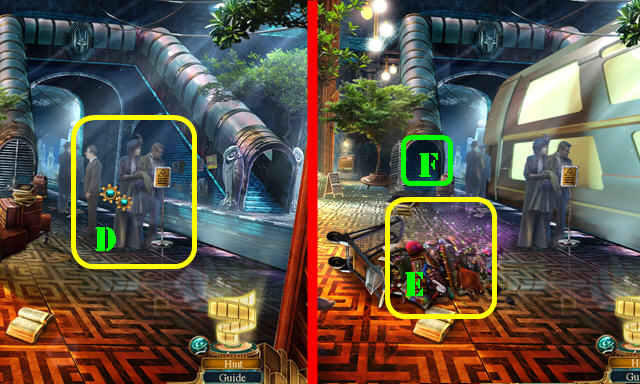
- Talk to the man; give him BERNARD'S BADGE (E).
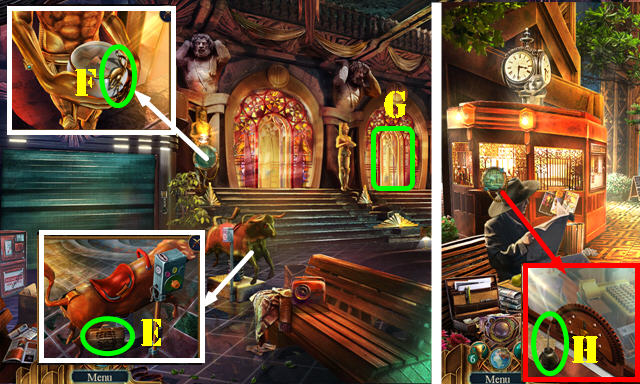
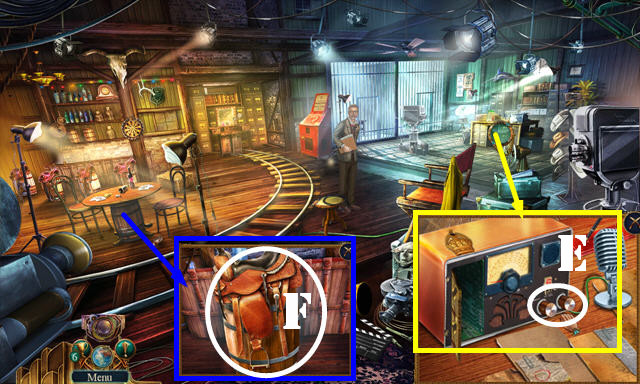
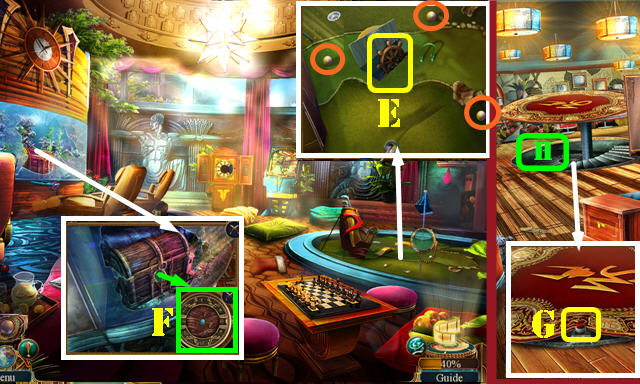
- Open the stand (F) for an HOP; play it to get the UMBRELLA.
- Open the UMBRELLA; take the NAME LIST and UMBRELLA (inventory).
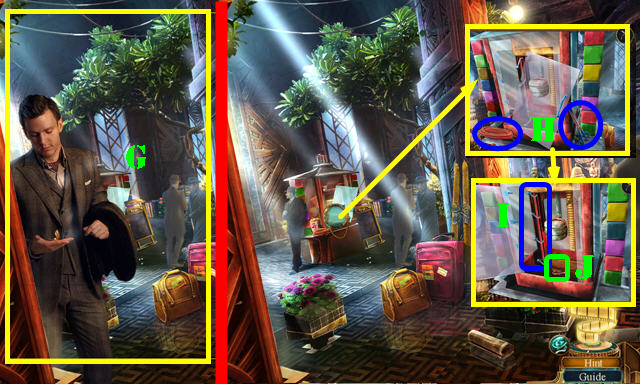
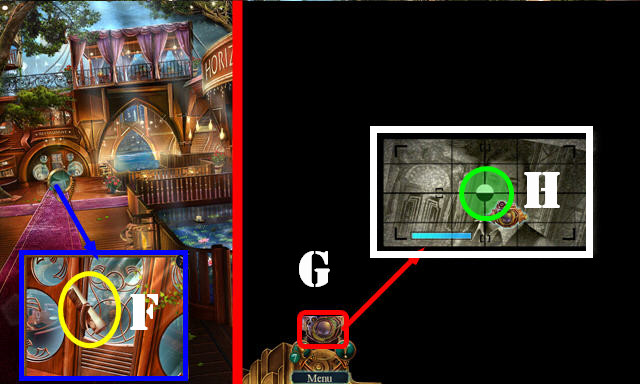
- Use the UMBRELLA; take the CAR EMBLEM (G).
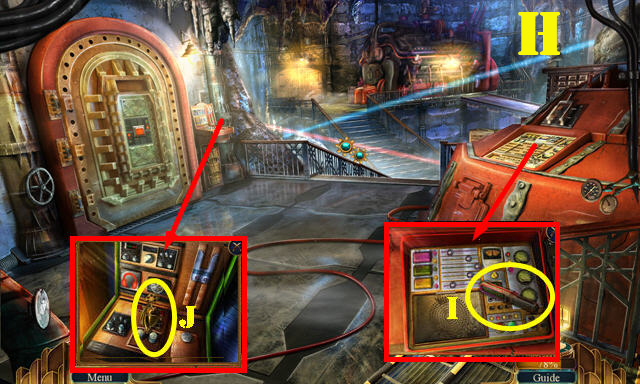
- Go to the Hill Overlook (H).
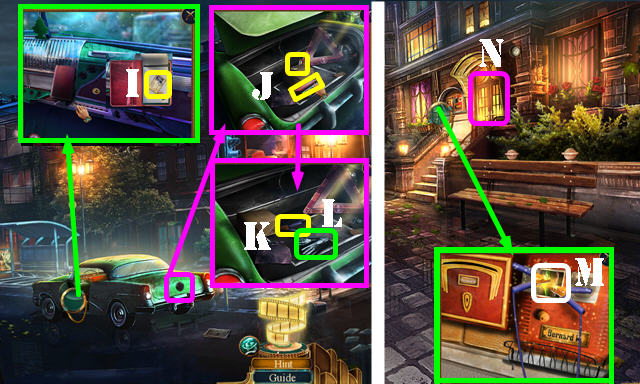
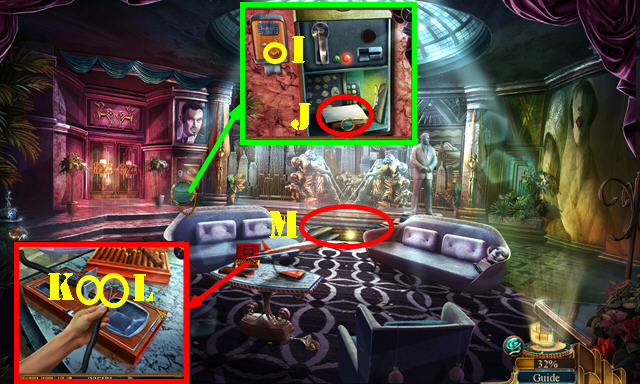
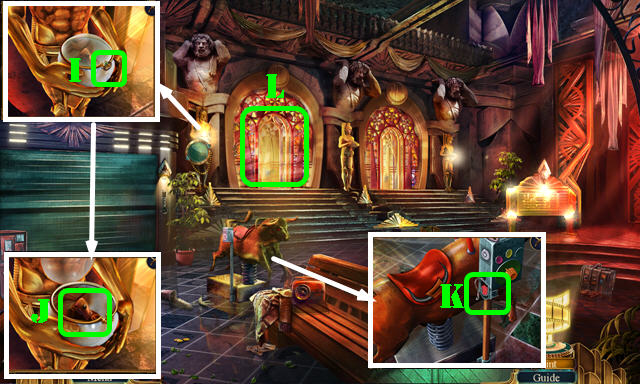
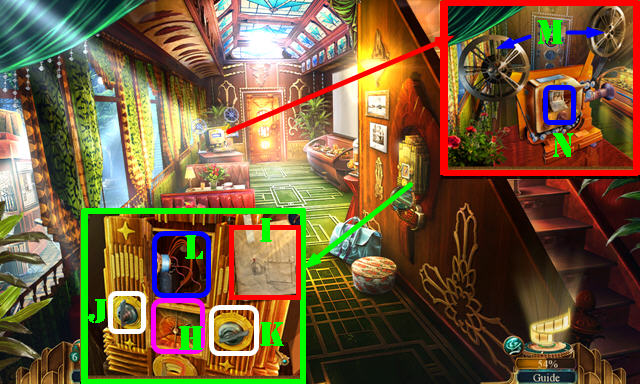
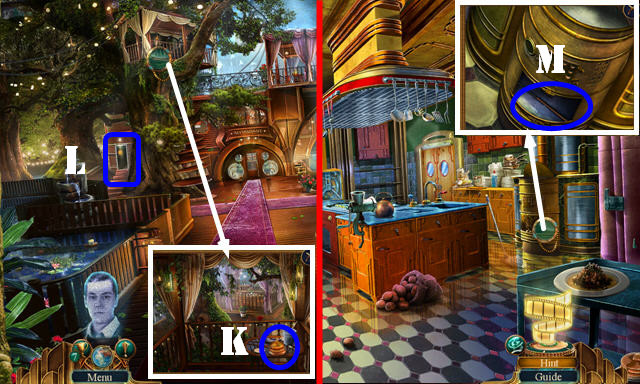
- Open the door; open the notepad, select the card (I) and take the NOTEPAD.
- Place the CAR EMBLEM; press the cap; take the RED LIGHT and MIRROR (J). Move the box; take the JUMPER CABLES (K). Move the gloves (L).
- Walk down.
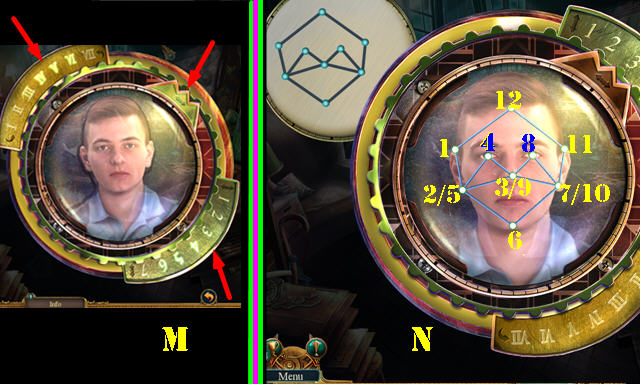
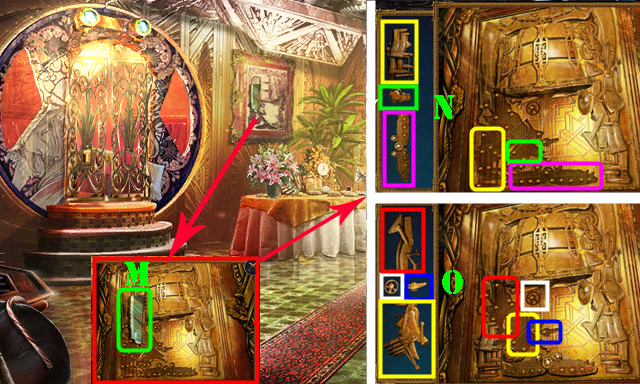
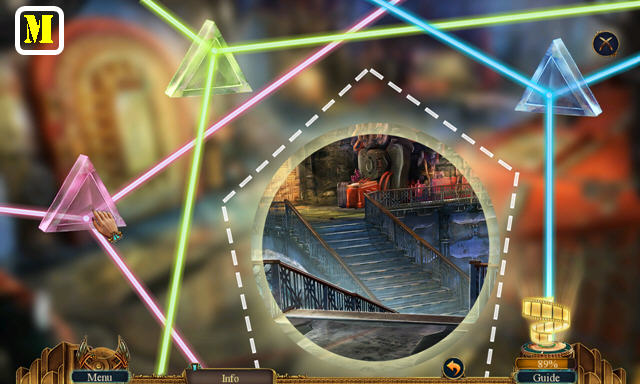
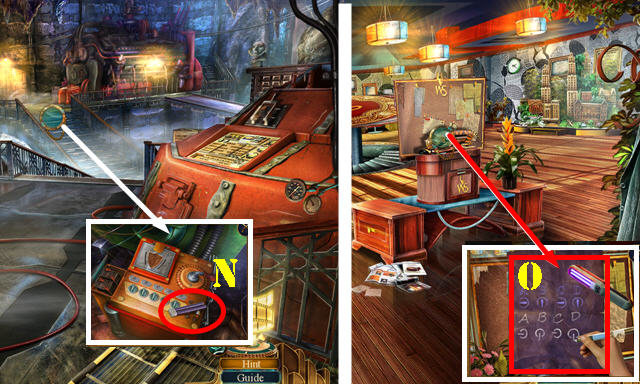
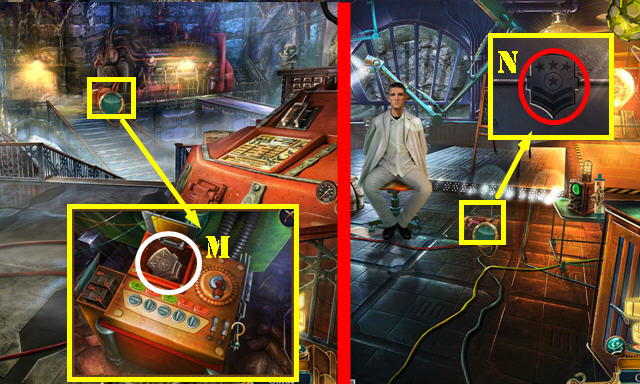
- Use the JUMPER CABLES (M).
- Enter the Apartment (N).
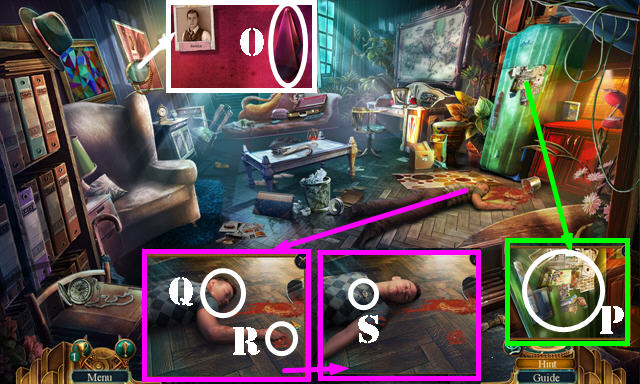
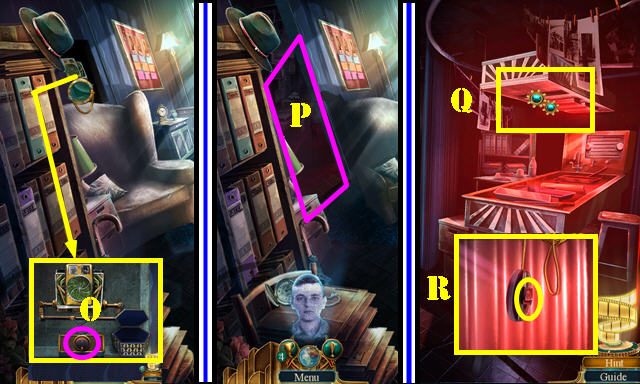
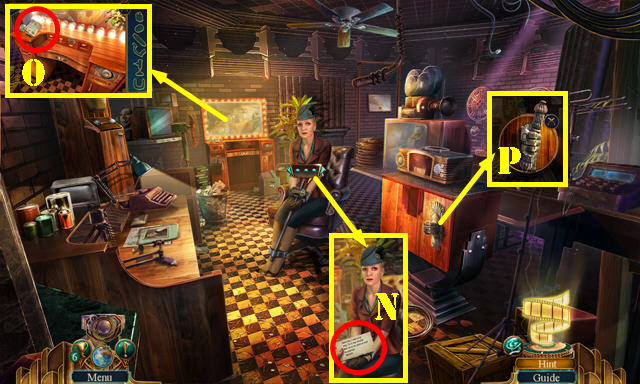
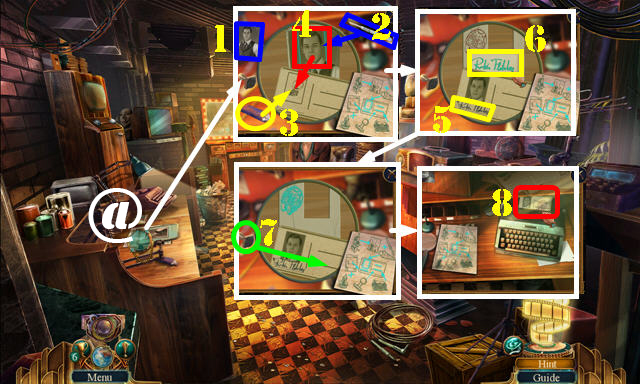
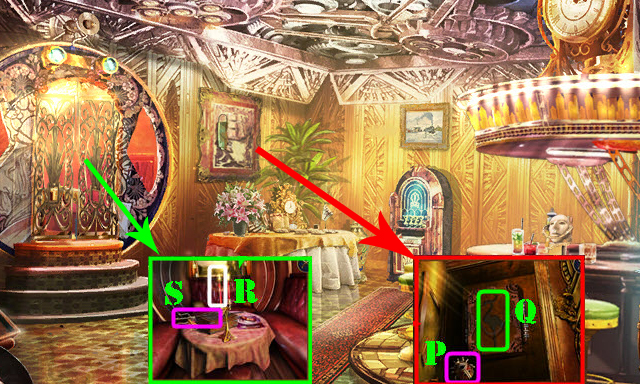
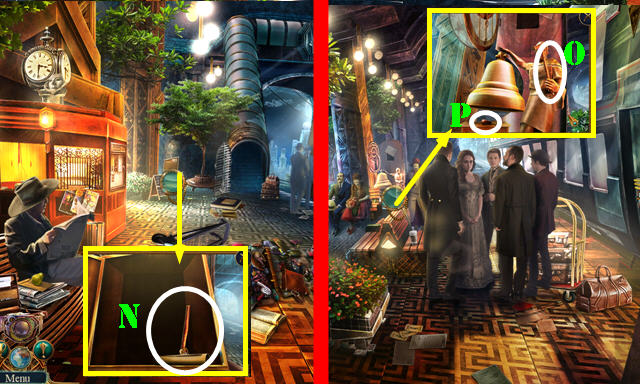
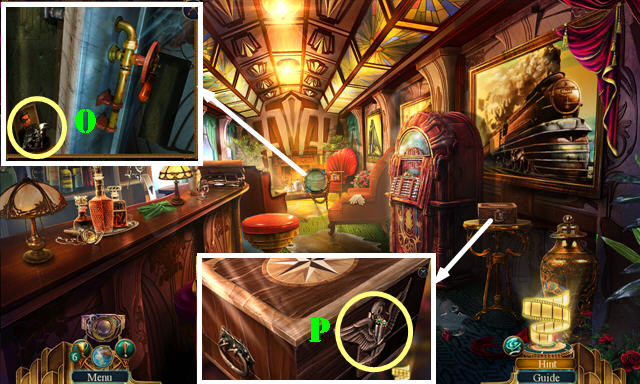
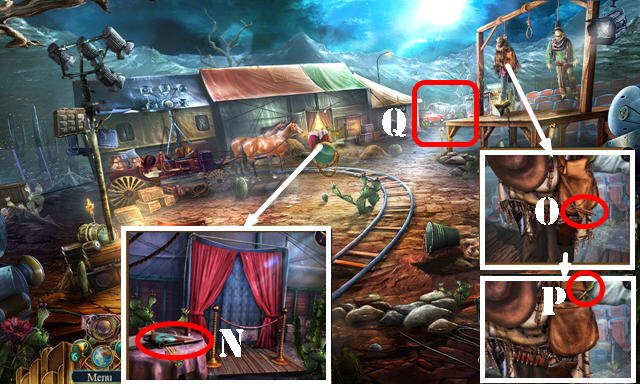
- Take the NAPKIN (O).
- Open the fridge (P).
- Use the MIRROR (Q) and NAPKIN (R). Use the NOTEPAD (R) to get the MYSTERIOUS SYMBOL. Take the MAILBOX KEY (S).
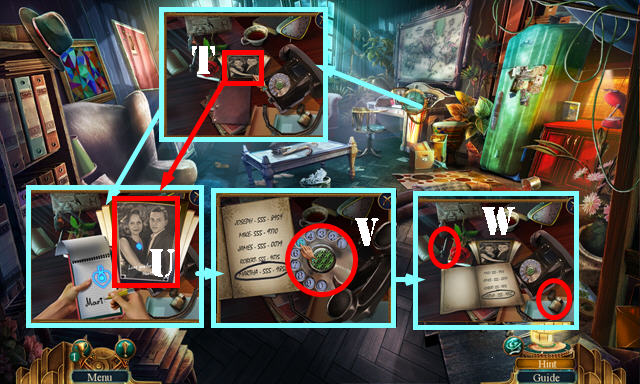
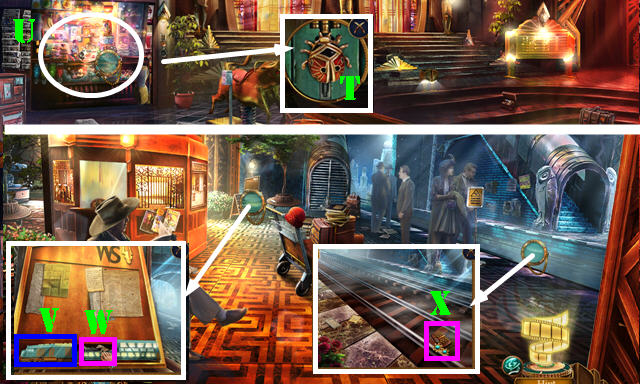
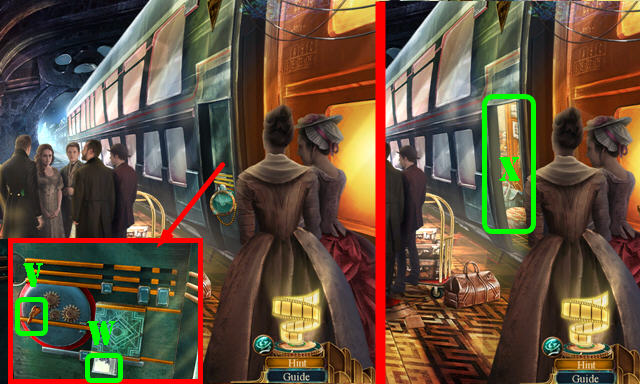
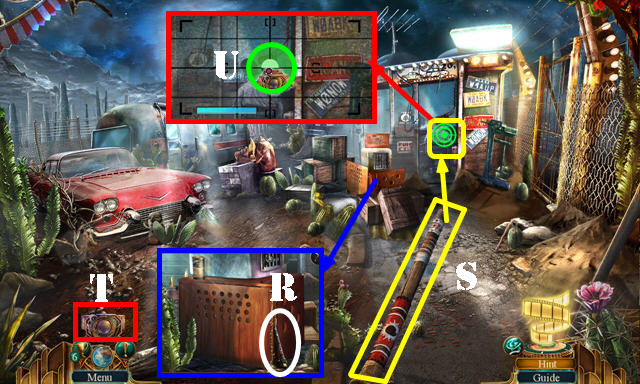
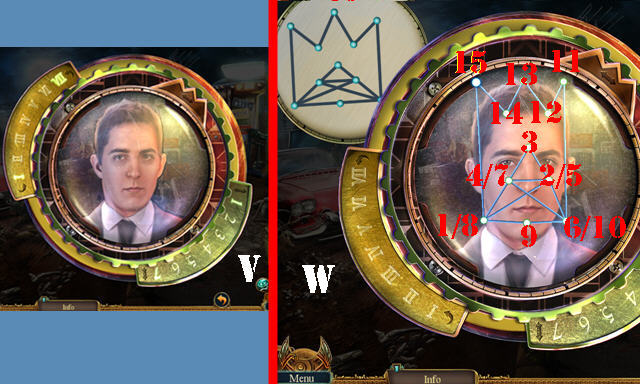
- Look At the photo (T); use the MYSTERIOUS SYMBOL (U). Flip the pages twice; dial 5559850 (V) to receive the CAR CODE.
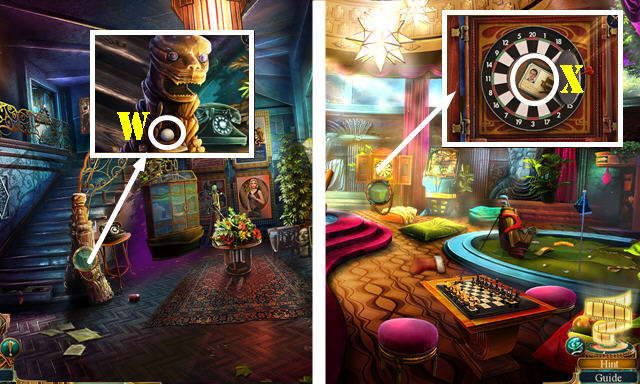
- Take the EYEDROPPER and EMPTY LIGHTER (W).
- Walk down.
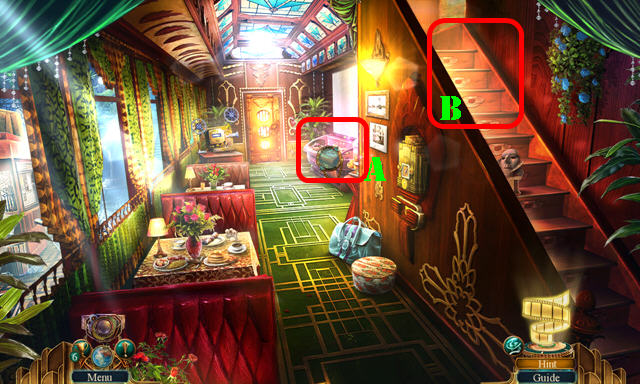
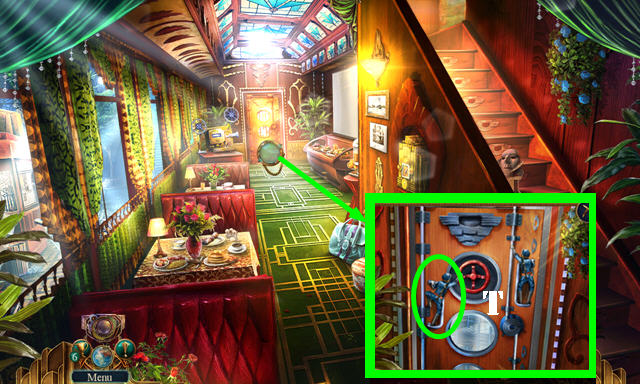
- Use the MAILBOX KEY; turn it. Take the Map and SIGNET RING (A).
- Go to the Hill Overlook.
- Use the SIGNET RING (B) for an HOP; play it to get the CAR HANDLE.
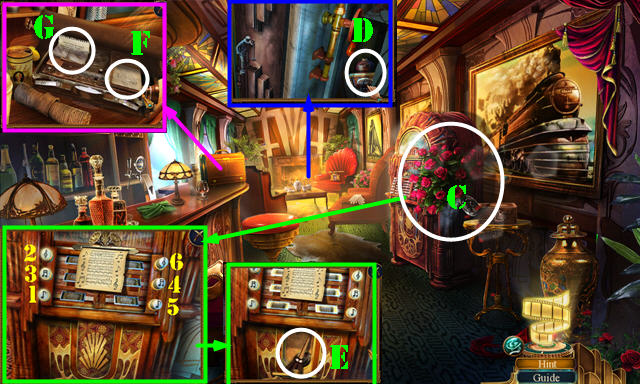
- Place the CAR HANDLE; take the CAMERA and GOLDEN ARCH 1/2 (C).
- Place the CAR CODE; select the buttons (D). Look at the letter and take the FOLDER.
- Return to the Apartment.
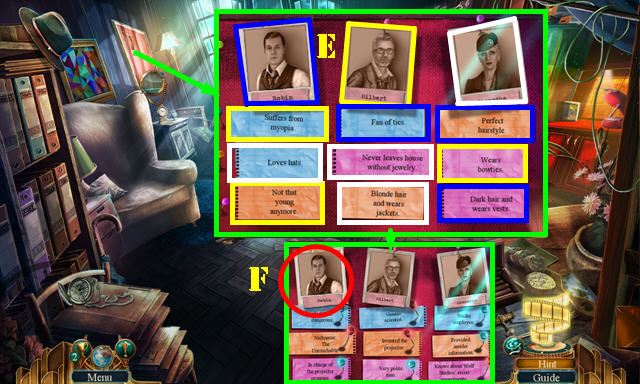
- Place the NAME LIST and FOLDER for a puzzle. Color-coded solution (E).
- Take the PHOTOGRAPH (F).
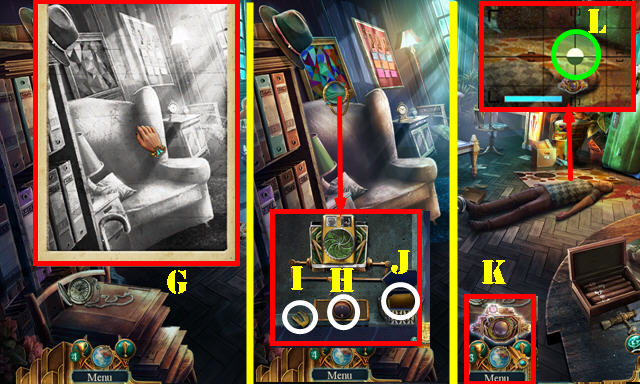
- Place the PHOTOGRAPH as shown (G).
- Remove the painting. Push the button (H); take the GOLDEN ARCH 2/2 (I). Place the 2 GOLDEN ARCHES; take the Projector necklace (J).
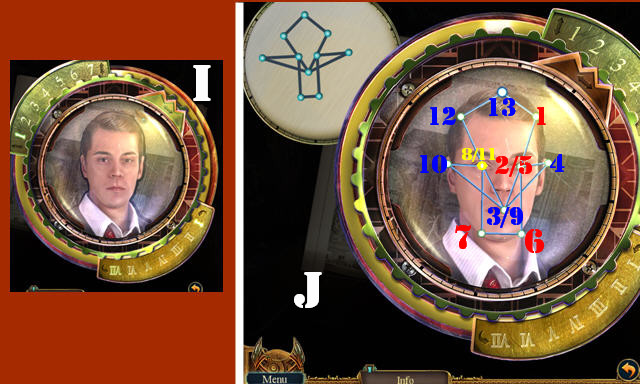
- Select the Projector necklace (K); place it on the man until the light turns green (L).
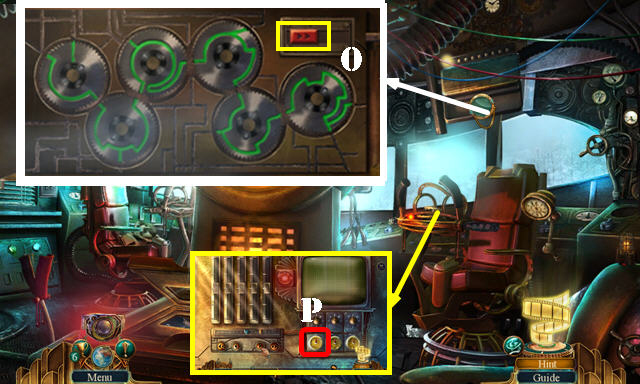
- Solution one: Move the dials until you get the image shown (M).
- Solution two (N).
- Push the button (O).
- Move the chair; enter the Secret Room (P).
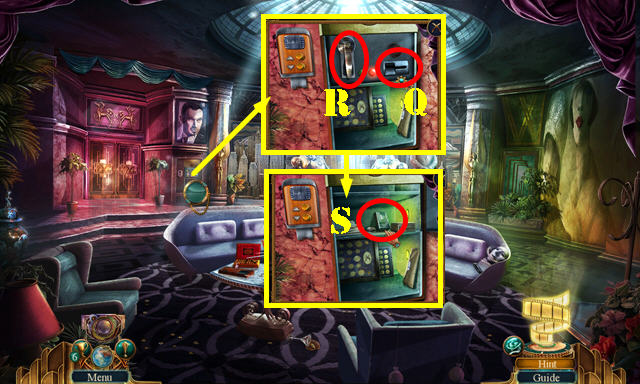
- Use the RED LIGHT (Q) for a HOP; play it to get the COMBINATION.
- Push the switch (R).
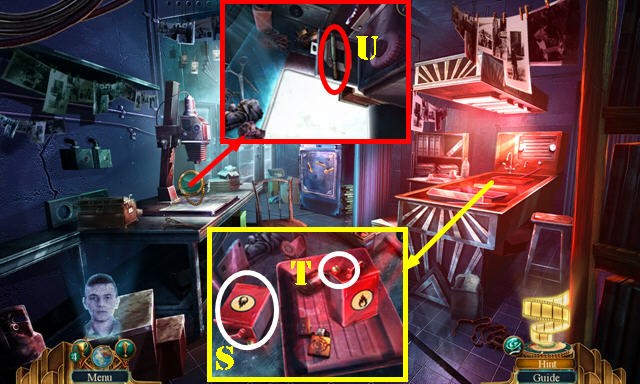
- Select the canister (S); put down the EMPTY LIGHTER. Use the EYEDROPPER (T) to get the LIGHTER.
- Open the tray; take the FILE (U).
- Walk down.
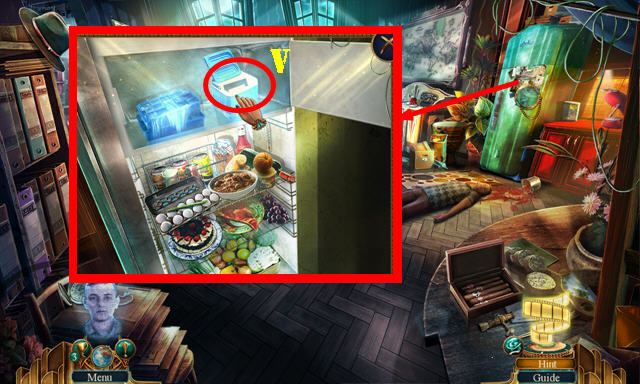
- Use the LIGHTER; open the freezer and the box; take the MICROFILM (V).
- Return to the Secret Room.
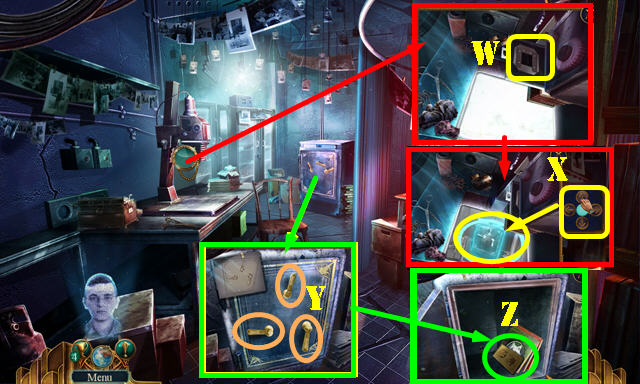
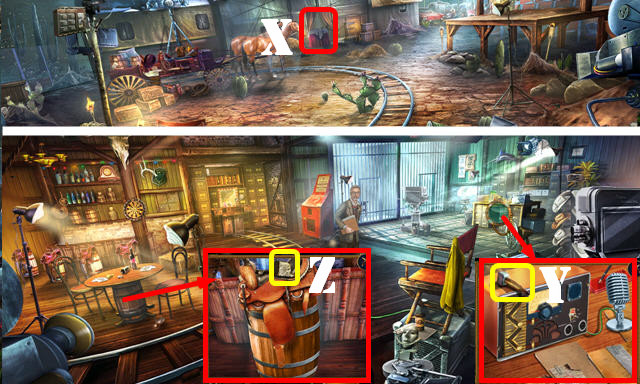
- Place the MICROFILM (W). Use the arrows to find the safe and then push the blue light (X). Take the HANDLES CLUE.
- Place the HANDLES CLUE; arrange the handles as shown (Y).Look at the folder and note; take the EMPLOYEE ID and WOLF STUDIOS INSIGNIA (Z).
- Return to the Hill Overlook and slide right.
- Place the WOLF STUDIOS INSIGNIA; look at the newspaper; take the PAPER CLIP (A).
- Walk down.
- Talk to the man (B).
- Place the COMBINATION; enter 842 (C). Move the sweater; select the suitcase and use the PAPER CLIP; take the BRASS M (D). Move the belt; open the wallet; take the CAR KEYS.
- Go to the Hill Overlook and slide left.
- Use the CAR KEYS (E).
Chapter 2: Wolf Studios
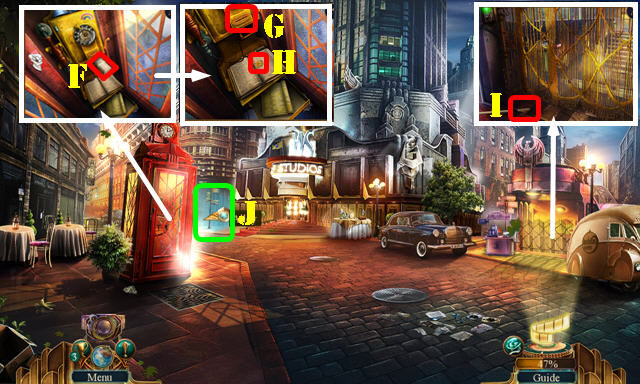
- Open the phone booth. Look at the newspaper (F). Use the PAPER CLIP (G); take the COIN (H).
- Select the gate; take the SPRING (I).
- Go to the Alley (J).
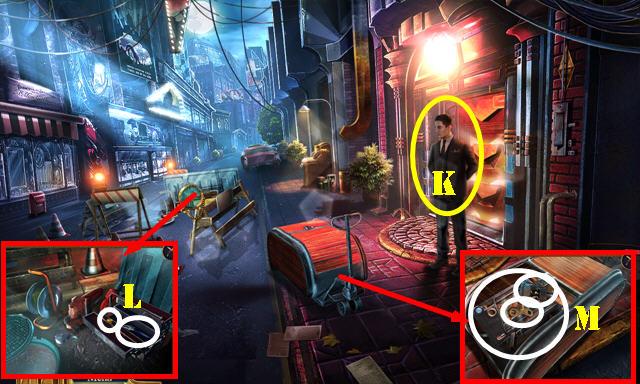
- Talk to the guard (K).
- Use the FILE; take the PLIERS and ELEVATOR BUTTON (L).
- Use the PLIERS; take the INK, WIND-UP KEY and PINBALL MACHINE (M).
- Walk down.

- Insert the EMPLOYEE ID (N) and WIND-UP KEY (O); take the HARP MEDALLION (P).
- Place the HARP MEDALLION (Q); enter Wolf Studios Lobby.
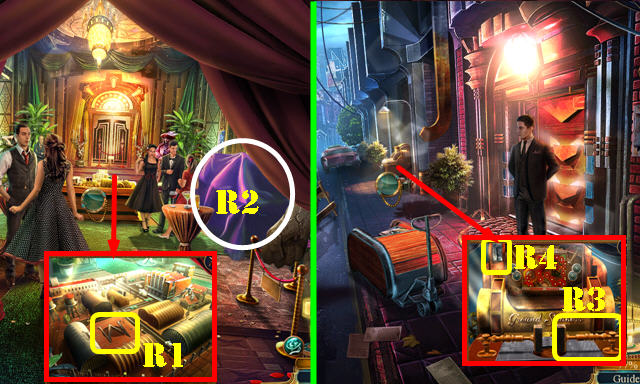
- Take the BRASS W (R1).
- Remove the sheet (R2) for a HOP; play it to get the MARBLE.
- Return to the Alley.
- Place the SPRING and MARBLE in the PINBALL MACHINE; press the button; take the GROUND SHAKER PART (inventory).
- Place the GROUND SHAKER PART (R3) and COIN (R4) for a puzzle.
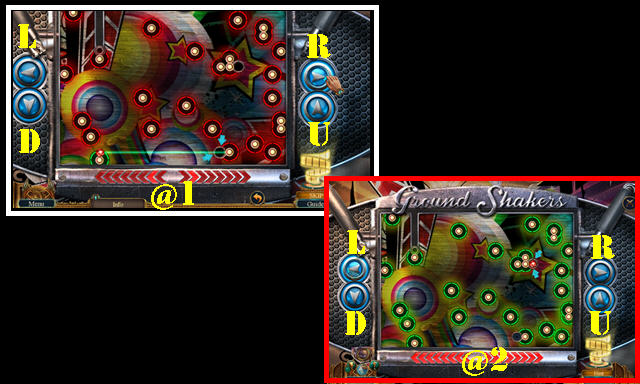
- Solution one: R-D-L-U-R-D-L-D-R (@1).
- Solution two: U-R-L-U-R-D-L-R-D-L (@2).
- Take the TOWER FIGURINE.
- Return to Wolf Studios Lobby.
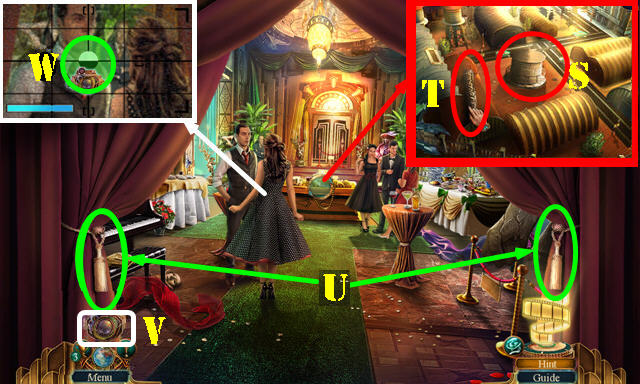
- Place the TOWER FIGURINE (S); take the HANDLE and KNIFE (T).
- Use the KNIFE (U).
- Select the Projector necklace (V); place it on the couple until the light turns green (W).
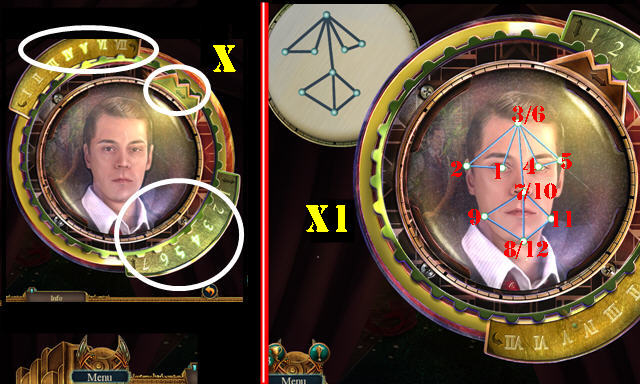
- Solution one (X).
- Solution two (X1).
- Return to the Alley.
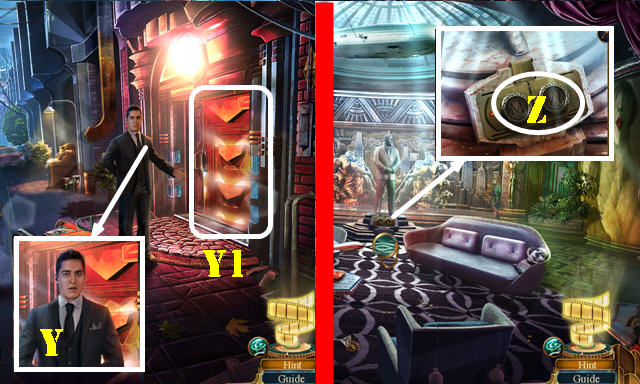
- Talk to the guard (Y).
- Enter the Restricted Area (Y1).
- Place the BRASS M and BRASS W (Z) for a puzzle.
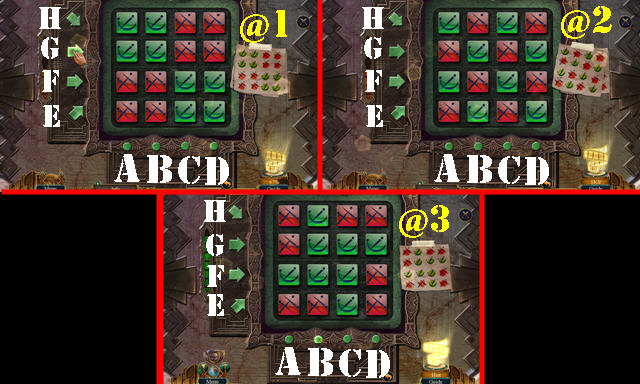
- Solution one: A-B-F-G (@1).
- Solution two: E-B-H-D-A-C (@2).
- Solution three: C-H-B (@3).
- Place the ELEVATOR BUTTON (I) and press it. Look at the letter; take the FIRST AID BOX and CABLE (J).
- Place the CABLE (K); select it and take the WIRE (L).
- Go to the Prep Room (M).
- Talk to the lady; select the card (N).
- Take the SOLUTION (O); play the HOP to get the MICROSCOPE.
- Place the HANDLE (P) for a HOP; play it to get the BELT.
- Use the WIRE on the BELT'S zipper to get the BLANK KEYCARD (inventory).
- Place the MICROSCOPE and SOLUTION. Touch the microscope; place the BLANK KEYCARD.
- Select the photo (1), use the scalpel (2), use the glue (3) and place the photo (4).
- Flip the leftover photo, use the INK (5), remove the card (6), and use the stamp (7). Take the FORGED ID (8).
- Walk down.
- Use the FORGED ID (Q). Pull the handle (R); take the TICKET STAMP and HANDCUFFS KEYS (S).
- Return to the Prep Room.
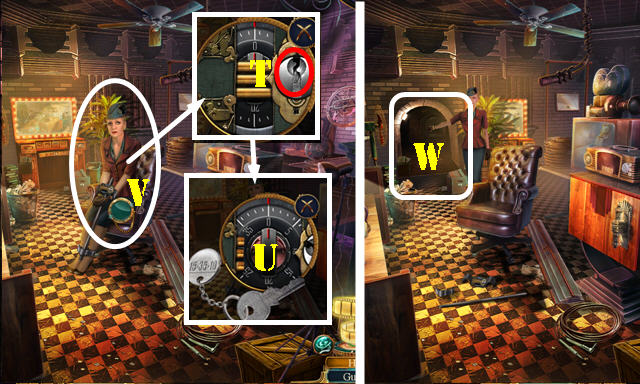
- Use the HANDCUFFS KEYS (T). Select the dial 3x (U).
- Talk to Samantha (V).
- Go Downtown (W).
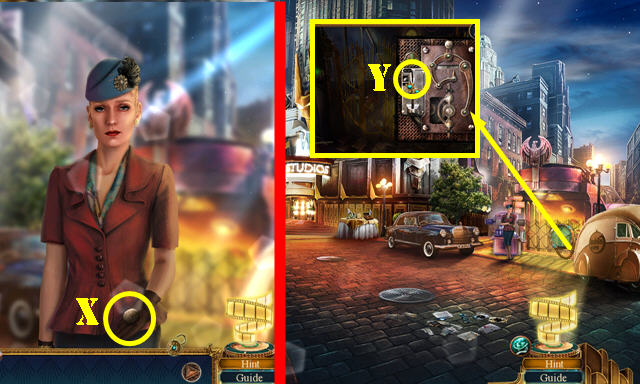
- Take the RAILWAY TOKEN (X).
- Insert the RAILWAY TOKEN (Y); open the gate and go forward.
Chapter 3: The Bar

- Put down the FIRST AID BOX and open it.
- Use the scissors (A). Use the suture scissors on the cotton (B). Use alcohol (C) on the cotton. Place the bandage (D).
- Take the MECHANICAL PARTS BOX (E) and HERON FIGURE (F).
- Go to the East Platform (G).
- Take the MACHINE OIL (H).
- Walk down.
- Use the MACHINE OIL; take the METAL HOLDER (I) and ELECTRIC LIGHTER (J).
- Select the ELECTRIC LIGHTER 2x; take the LIGHTER IGNITION (inventory).
- Use the LIGHTER IGNITION; take the TOKEN (K).
- Go to the Bar (L).
- Take the MODEL TRAIN CAR (M). Place the MECHANICAL PARTS BOX for a puzzle. Solution (N-O).
- Take the LADYBUG (P). Place the HERON FIGURE (Q); take the DEPARTURE ANNOUNCEMENT.
- Use the METAL HOLDER; take the CANDLE (R). Move the candleholder; take the TRIDENT (S).
- Walk down.
- Place the LADYBUG (T) for an HOP; play it (U) to get the TAPE.
- Go to the East Platform.
- Place the MODEL TRAIN CAR (V); take the SCREW ANCHORS 1/3 and DACHSHUND FIGURINE (W).
- Use the TRIDENT; take the PURSE (X).
- Open the PURSE; take the CLEANING CLOTH and BATTERY (inventory).
- Return to the Bar.
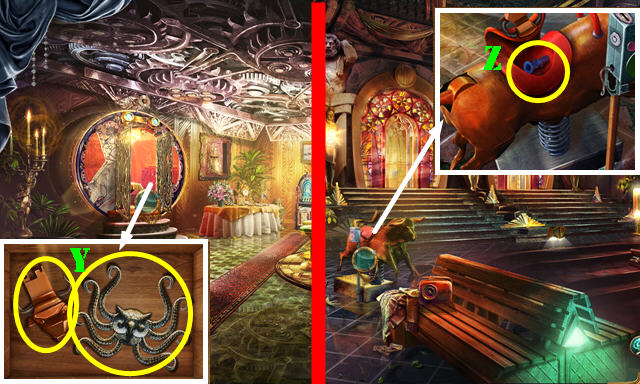
- Select the box; place the DACHSHUND FIGURINE; take the OWL-OCTOPUS KEY and SADDLE KEY (Y).
- Walk down.
- Use the SADDLE KEY; take the SCREW ANCHORS 2/3 (Z).
- Return to the East Platform.
- Use the OWL-OCTOPUS KEY; take the CLOCK NUMBER and HAT (A).
- Return to the Bar.
- Place the HAT (B) for a puzzle.
- Solution (C).
- Look at the note; take the JUKEBOX BUTTON and LENS.
- Return to the East Platform.
- Place the LENS and BATTERY on the CAMERA to get the CAMERA WITH SPECIAL LENS (inventory).
- Use the CAMERA WITH SPECIAL LENS (D).
- Play the HOP (E) to get the SCREW ANCHORS 3/3.
- Go to the West Platform (F).
- Use the CAMERA WITH SPECIAL LENS on the scene (G).
- Slide left.
- Take the POWER CABLE and SCISSORS (H).
- Place the 3 SCREW ANCHORS; open the door and select each nail (I); take the TICKET READER KEY (J).
- Slide right.
- Look at the note. Place the CLOCK NUMBER and DEPARTURE ANNOUNCEMENT. Change the time to 9:30 (K). Open the compartment; take the FIREPLACE HANDLE and SONG LABEL (L).
- Take the WOLF STUDIOS SIGN (M).
- Walk down.
- Place the WOLF STUDIOS SIGN; look at the letter; take the FUSE and BELL HAMMER (N).
- Go to the West Platform.
- Place the BELL HAMMER (O); take the TICKET MACHINE LEVER (P).
- Return to the Bar.
- Use the TOKEN (Q). Select the levers: 2-1-4-3. Use the SCISSORS to get the PIECE OF PLASTIC (R).
- Use the CANDLE, TAPE and PIECE OF PLASTIC on the TICKET STAMP; take the NON-VALIDATED TRAIN TICKET (inventory).
- Return to the East Platform.
- Place the POWER CABLE (S), TICKET MACHINE LEVER (T) and NON-VALIDATED TRAIN TICKET (U); select the lever and take the VALIDATED TICKET.
- Go to the West Platform.
- Use the TICKET READER KEY (V) and select it. Use the VALIDATED TICKET (W). Select the key.
- Enter the Dining Car (X).
Chapter 4: Private Car
- Play the HOP (A) to get the POCKET KNIFE.
- Go to the Private Car (B).
- Drop the flowers (C).
- Place the FIREPLACE HANDLE; take the BUCKLE and GAS CANISTER (D).
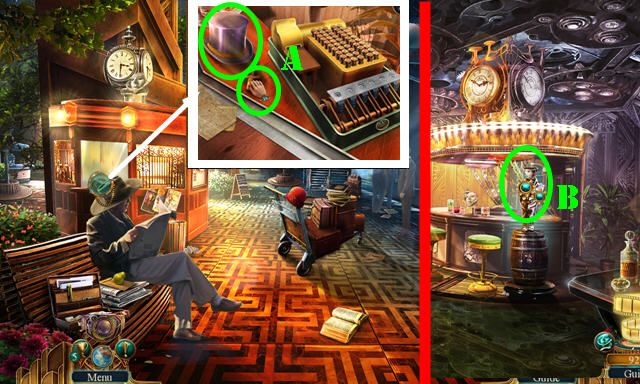
- Place the SONG LABEL and JUKEBOX BUTTON. Press the buttons in order (1-6); take the ARCHEOLOGY BRUSH and TUNING KNOB (E).
- Use the POCKET KNIFE; take the RADIO SKETCH (F). Look at the note (G); take the FILM.
- Walk down.
- Use the CLEANING CLOTH (H). Place the RADIO SKETCH (I) and TUNING KNOB. Adjust the knobs as shown (J-K). Take the SADDLE STRAPS and CHIMNEY (L).
- Place the FILM (M). Look at the note (N); take the EAGLE'S WING.
- Return to the Private Car.
- Place the CHIMNEY; look at the photo and take the EAGLE'S HEAD KEY (O).
- Place the EAGLE'S' HEAD KEY and EAGLE'S WING for a puzzle (P).
- Solution one (Q).
- Solution two (R).
- Solution three (S).
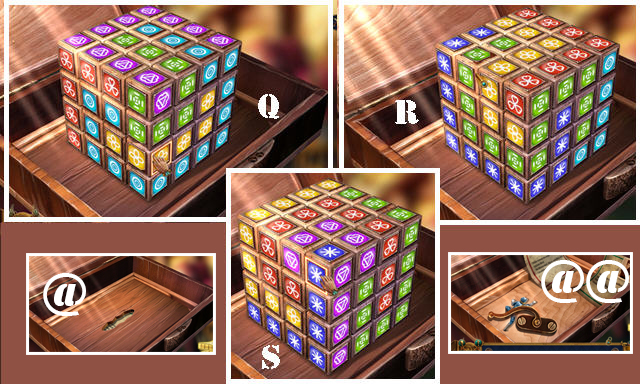
- Remove the base (@); look at the two notes; take the LATCH and CLEANING BOY FIGURINE (@@).
- Walk down.
- Place the CLEANING BOY FIGURINE (T). Open the door; go forward to the Freight Car.
- Take the KNOB (A). Place the BUCKLE; select it twice and open the case; take the PRESSURE REGULATOR (B).
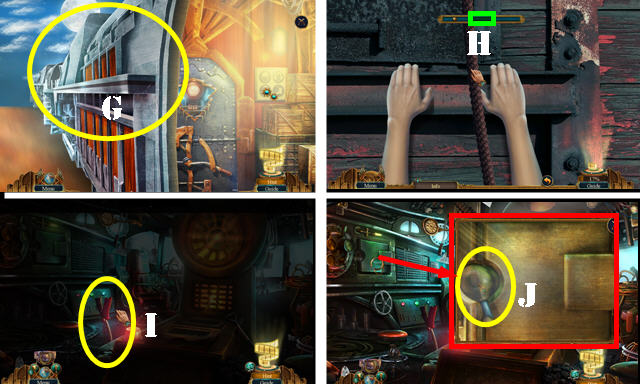
- Pull the lever (C); take the HANDLE (D). Place the FUSE (E); take the GRAPPLING HOOK.
- Place the PRESSURE REGULATOR, KNOB and GRAPPLING HOOK on the GAS CANISTER to get the GRAPPLING HOOK LAUNCHER (inventory).
- Look outside (F). Use the GRAPPLING HOOK LAUNCHER (G). Stop the ball in the green area 5x (H).
- Pull the lever (I).
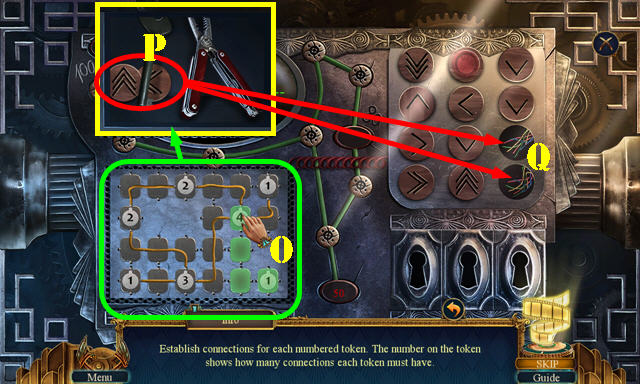
- Place the HANDLE (J) for a puzzle.
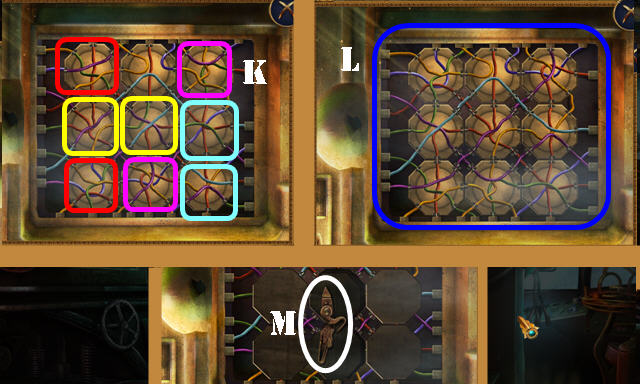
- Swap the wires marked in the same color (K). Solved puzzle (L).
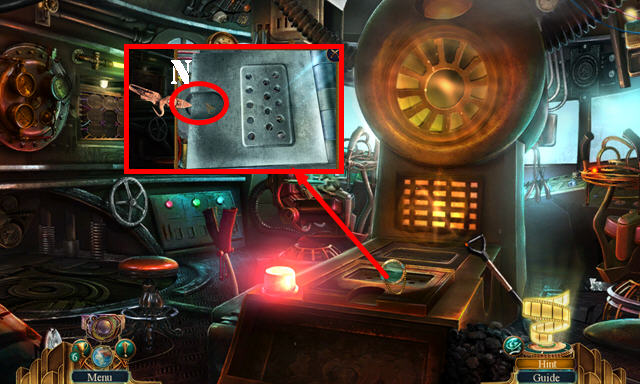
- Take the CONTAINER PIECE (M).
- Use the CONTAINER PIECE (N) for a HOP; play it to get the GEAR.
- Remove the cover; place the GEAR for a puzzle. Solution (O).
- Take the GAUGE.
- Place the GAUGE for a puzzle (P).
- Solution one: D-C-Bx2-C-B-C-B.
- Solution two: D-A-C-B-D-B-C.
- Solution three: D-B-C.
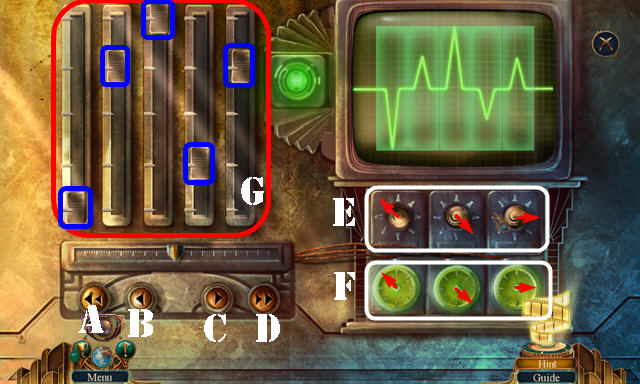
- Position the knobs (E) to match the meters (F).
- Position the sliders as shown (G).
- Pull the handle (H).
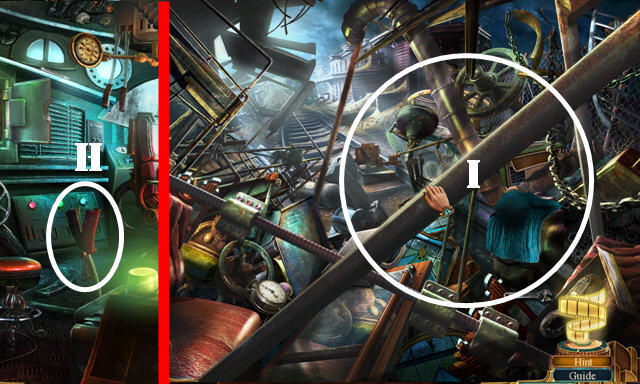
- Move all the items out of the way (I); go forward.
- Take the COWBOY BOX (J).
- Use the ARCHEOLOGY BRUSH; open the box; take the SEAM RIPPER and RADIO BUTTON 1/2 (K).
- Take the ELECTROMAGNETIC SCHEMATIC (L).
- Go to the Movie Set (M).
Chapter 5: Trailer Park
- Take the CLEANING ROD and FIRE EXTINGUISHER (N).
- Take the SCREW WITH COIL (O).
- Use the SEAM RIPPER; take the SLEEPING DART (P).
- Go to the Trailer Park (Q).
- Take the EMPTY BLOWGUN (R).
- Use the CLEANING ROD, then insert the SLEEPING DART in the EMPTY BLOWGUN to get the BLOWGUN (inventory).
- Place the BLOWGUN; aim and shoot (S).
- Use the Projector necklace (T); select the area once the light turns green (U).
- Solution (V).
- Solution (W).
- Walk down.
- Go to the Production Tent (X).
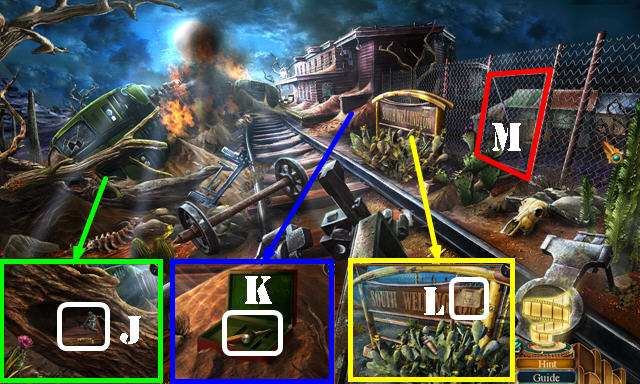
- Take the BULLET QUEEN (Y) and GALLIUM (Z).
- Return to Dead Valley.
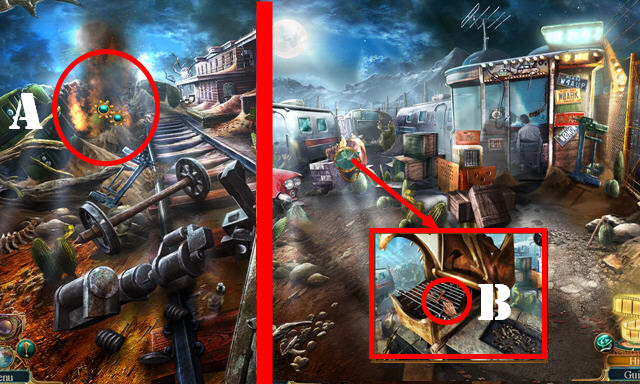
- Use the FIRE EXTINGUISHER (A) for a HOP; play it to get the BULL FIGURINE.
- Place the BULL FIGURINE on the COWBOY BOX; take the EYE-SHAPED GEM (inventory).
- Go to the Trailer Park.
- Place the EYE-SHAPED GEM; take the POWER SWITCH (B).
- Walk down.

- Place the POWER SWITCH and pull it (C). Flip up the three switches (D); take the TELESCOPING ANTENNA (E).
- Walk down.
- Use the TELESCOPING ANTENNA; take the ACETONE (F).
- Return to the Trailer Park.
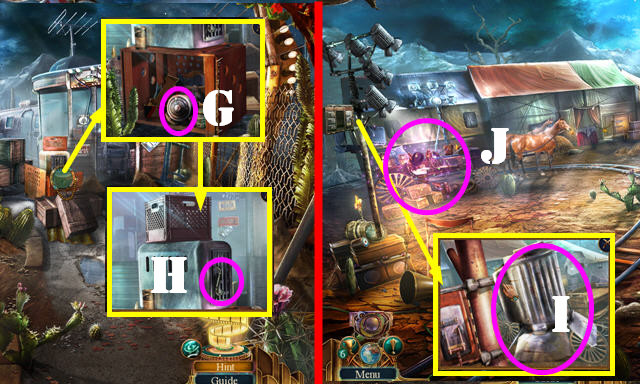
- Use the ACETONE; take the REFLECTOR LIGHT (G). Take the DECORATIVE HOOK 1/2 (H).
- Walk down.
- Place the REFLECTOR LIGHT (I); select it.
- Play the HOP (J) to get the HAND DYNAMO.
- Place the ELECTROMAGNETIC SCHEMATIC and SCREW WITH COIL on the HAND DYNAMO; select both wires to get the ELECTROMAGNET (inventory).
- Go to the Trailer Park.
- Use the ELECTROMAGNET (K) to get the DECORATIVE CROWN.
- Return to the Production Tent.
- Place the DECORATIVE CROWN (L); take the ICE PICK (M).
- Go to the Trailer Park.

- Use the ICE PICK; take the BULLET KING (N).
- Place the BULLET QUEEN and BULLET KING (O) for a puzzle.
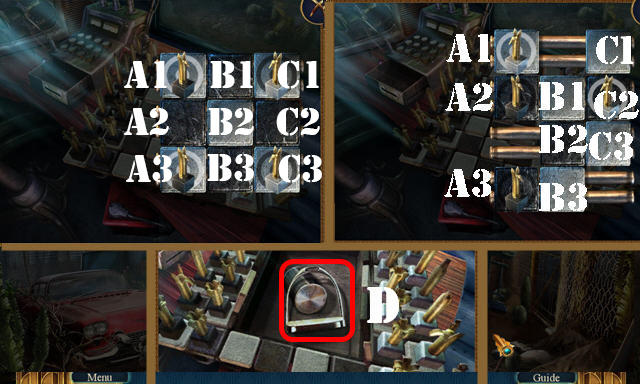
- Solution one (A1-B3)-(C1-A2)-(B3-C1)-(C3-B1)-(A3-C2)-(B1-A3)-(A2-C3)-(C2-A1)-(A3-C2).
- (C3-B1)-(C1-A2)-(A2-C3)-(A1-B3)-(C2-A1)-(B1-A3)-(B3-C1).
- Solution two (A3-C3)-(A2-B3)-(C3-A2)-(A2-C1)-(B3-A2)-(C2-B3)-(A1-C2)-(C1-B2)-(B2-A1).
- (A2-C3)-(B3-A2)-(A2-C1)-(C3-A2)-(C1-B2)-(A2-C1)-(C2-B3)-(B3-A2)-(A2-C3).
- (C1-A2)-(A2-B3)-(B2-C1)-(C3-A3)-(B3-C2)-(C1-A2).
- Take the RADIO BUTTON 2/2 and STIRRUP (D).
- Go to the Production Tent.
- Place the 2 RADIO BUTTONS (E) and press them; take the FUSE and TONGS.
- Place the SADDLE STRAPS and STIRRUP; take the SADDLE (F).
- Go to Dead Valley.

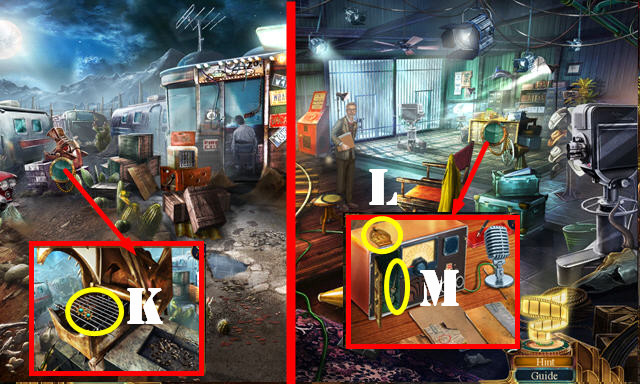
- Use the TONGS (G); take the MECHANICAL SCORPION.
- Go to the Movie Set.
- Place the MECHANICAL SCORPION (H); take the STRANGE REMOTE (I).
- Open the STRANGE REMOTE for a puzzle (inventory).

- Solution (A-A1)-(B-B1)-(A1-A2)-(A2-A1)-(B1-B)-(A1-A3)-(B-B2)-(A3-A4)-(B2-B3)-(B3-B2)-(A4-A3).
- (B2-B)-(A3-A5)-(B-B4)-(A5-A6)-(B4-B5)-(A6-A7)-(B5-B6) (@1).
- You receive the WORKING REMOTE.
- Go to the Production Tent.
- Use the WORKING REMOTE for a HOP (C); play it to get the EVIDENCE.
- Take the RAZOR BLADE (D).
- Walk down.
- Place the SADDLE (E) and use the RAZOR BLADE to go directly to the restaurant.
Chapter 6: Horizon Restaurant
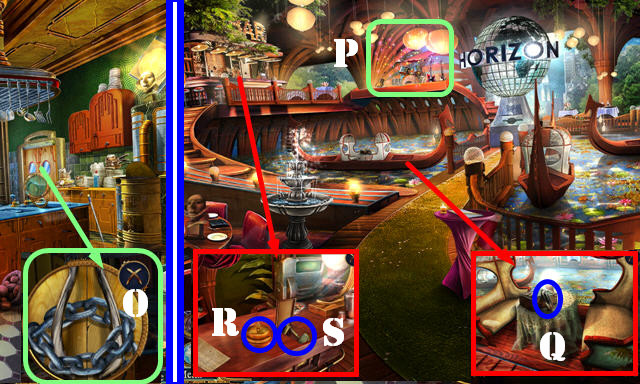
- Look at the newspaper (F) to get the BURNER DECORATION.
- Use the Projector necklace (G); select the area once the light turns green (H).
- Solution (I).
- Solution (J).
- Take the BELL (K).
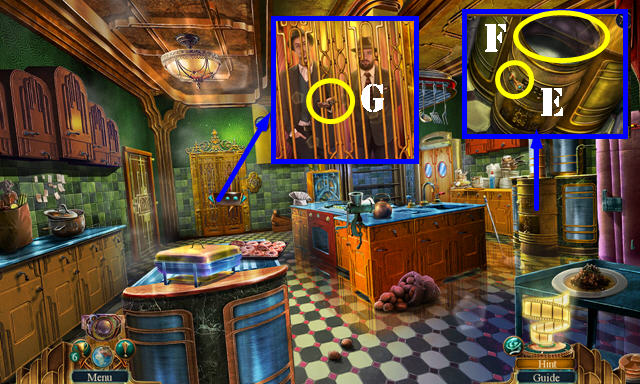
- Go to the Horizon Restaurant Kitchen (L).
- Place the BURNER DECORATION; take the BOTTLE MUSIC HAMMER (M).
- Walk down.

- Use the BOTTLE MUSIC HAMMER for a puzzle. Solution (N); select the box (N1).
- Take the ACID.
- Go to the Horizon Restaurant Kitchen.
- Use the ACID (O). Enter the Horizon Restaurant Dining Room.
- Play the HOP (P) to get the AQUARIUM NET.
- Take the AEROSOL SPRAY (Q).
- Put down the BELL (R); take the MANUAL STOVE PEDAL (S).
- Walk down twice.
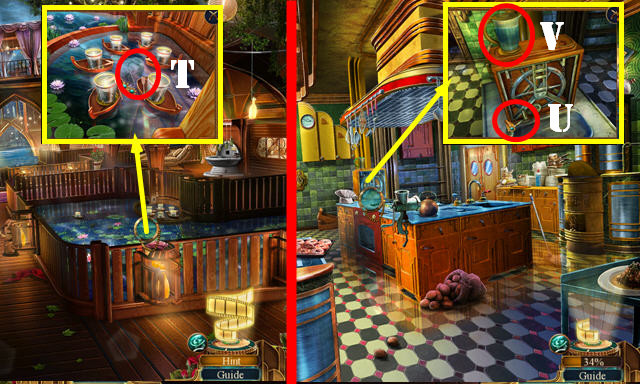
- Use the AQUARIUM NET to get the DECORATIVE HOOK 2/2 and GLASS MOLD (T).
- Go to the Horizon Restaurant Kitchen.
- Place the MANUAL STOVE PEDAL (U). Place the GALLIUM and GLASS MOLD (V). Press the pedal to get the MELTED GALLIUM.
- Go to the Horizon Restaurant Dining Room.
- Use the 2 DECORATIVE HOOKS; open the gate; take the BASS CLEF INSIGNIA (W).
- Place the MELTED GALLIUM and LATCH (X); take the SHEARS.
- Walk down twice.
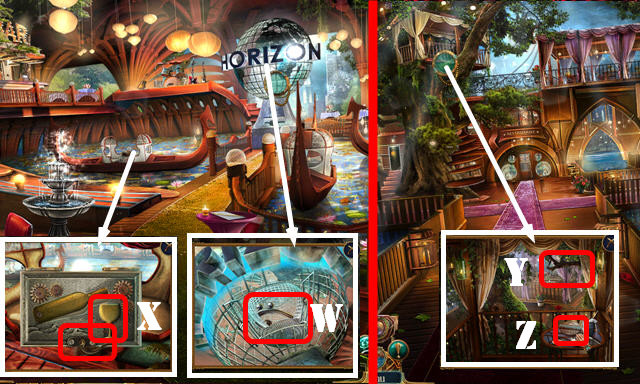
- Use the SHEARS (Y); take the BRANCH and HORIZON INSIGNIA (Z).
- Go to the Horizon Restaurant Dining Room.
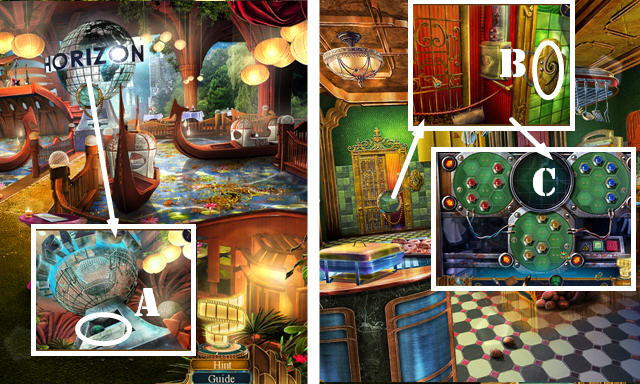
- Place the HORIZON INSIGNIA; take the WIRING SCHEMATIC (A).
- Walk down.
- Place the BASS CLEF INSIGNIA (B).
- Place the WIRING SCHEMATIC for a puzzle (C).
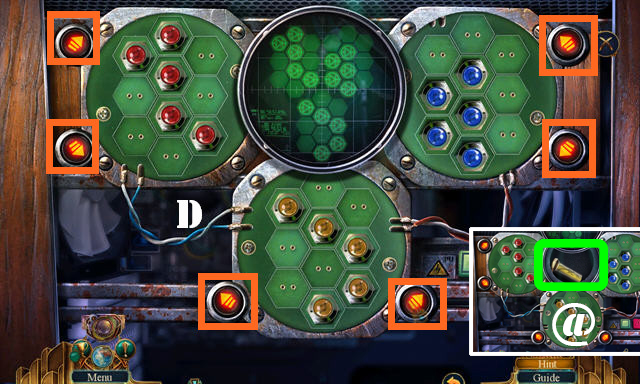
- Solution (D). Swap the pieces in place, then use the buttons marked in orange to rotate the board. Place all the pieces in the right spots and then rotate them in place, red, blue and yellow (in that order).
- Take the BURNER PLUG.
- Use the BURNER PLUG (E) and BRANCH (F).
- Talk to the detectives; give them the EVIDENCE and take the KEY (G).
Chapter 7: Wolf Studios Office
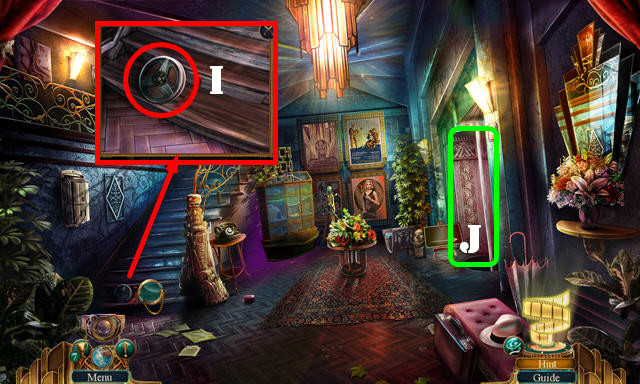
- Take the FILM REEL 1/3 (I).
- Go to the Wolf Studios Lounge (J).

- Open the doors; take the GLASS EYE (K).
- Walk down.
- Place the GLASS EYE (L); take the GOLF EMBLEM (M).
- Go to Wolf Studios Lounge.
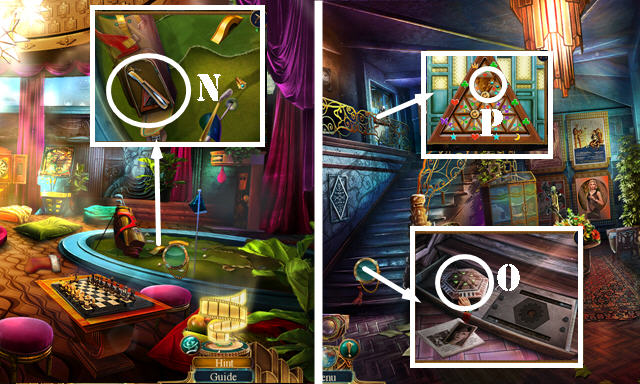
- Use the GOLF EMBLEM; take the SHOE HORN and WOODEN TRIANGLE (N).
- Walk down.
- Use the SHOE HORN; look at the photo and take the PRISMS BOX (O).
- Place the WOODEN TRIANGLE for a puzzle (P).
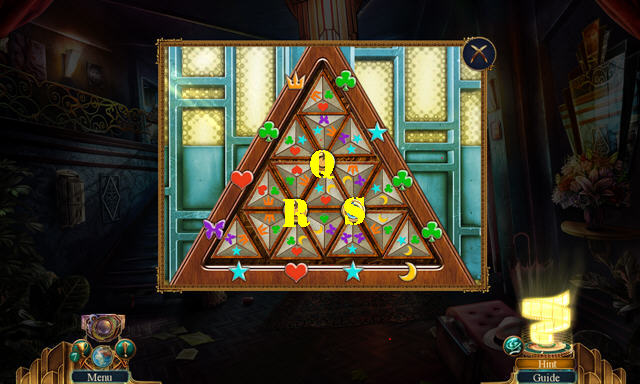
- Solution: Rx4-Qx5-Sx5-Qx5-Sx5.
- Enter the Wolf Studios Office.
- Play the HOP (T) to get the DART.
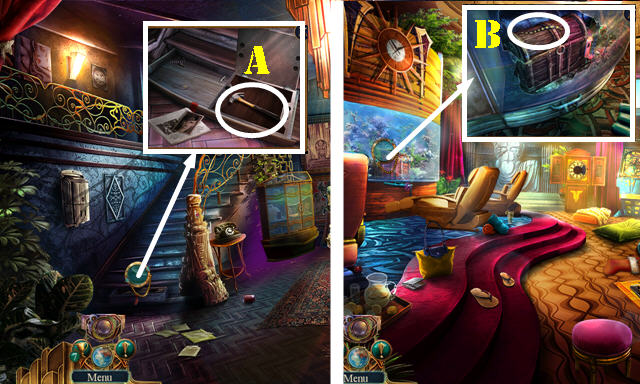
- Take the SECURITY CARD (U) and RUBY (V).
- Walk down.
- Place the RUBY; take the GOLF BALL 1/2 (W).
- Go to Wolf Studios Lounge.
- Throw the DART; take the EMPLOYEE PHOTO (X).
- Go to Wolf Studios Office.
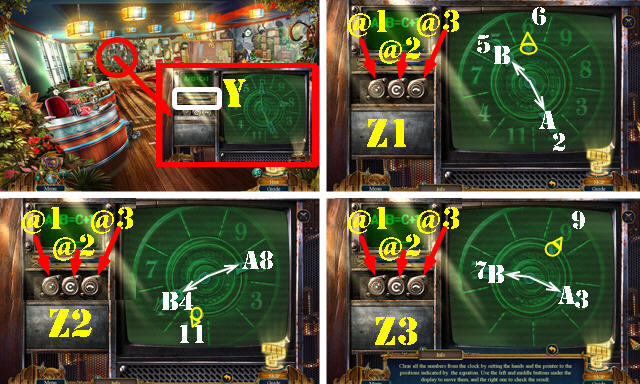
- Insert the EMPLOYEE PHOTO for a puzzle (Y).
- Solution one (Z1): @1x7-@2x4-@3.
- Solution two (Z2): @1x5-@2x7-@3.
- Solution three (Z3): @1x5-@2x1-@3.
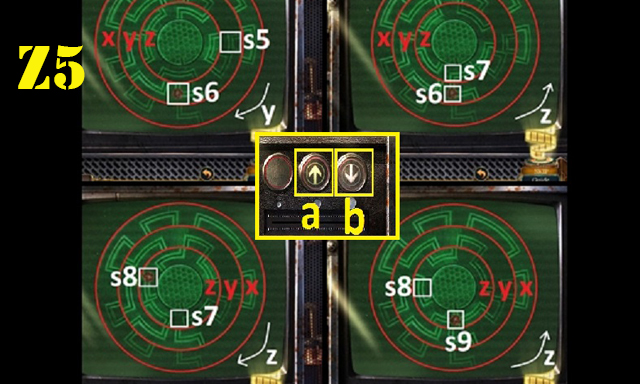
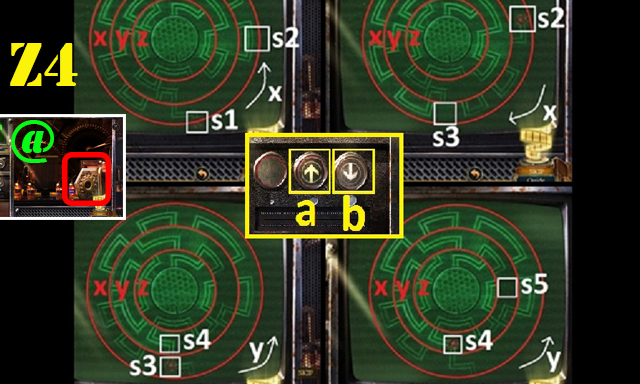
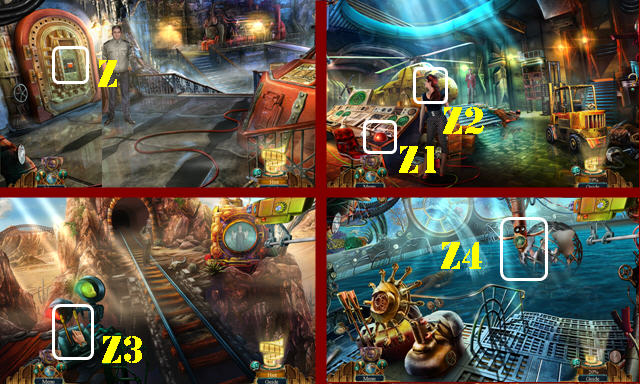
- Select the screen several times and zoom back in. Solution four (Z4).
- a-rotate x-s1–s2-b-rotate x-s2–s3-rotate y-s3–s4-a-rotate y-s4–s5-b-(Z5) rotate y-s5–s6-rotate z-s6–s7-a-rotate z-s7–s8-b-rotate z-s8–s9-a.
- Take the WRENCH EMBLEM.
- Walk down.
- Place the WRENCH EMBLEM; take the HAMMER (A).
- Go to Wolf Studios Lounge.
- Use the HAMMER; take the TIGER TAIL (B).
- Go to Wolf Studios Office.
- Place the TIGER TAIL (C); take the GOLF BALL 2/2 (D).
- Go to Wolf Studios Lounge.
- Place the 2 GOLF BALLS; select the three balls (orange); take the SHIP'S WHEEL (E).
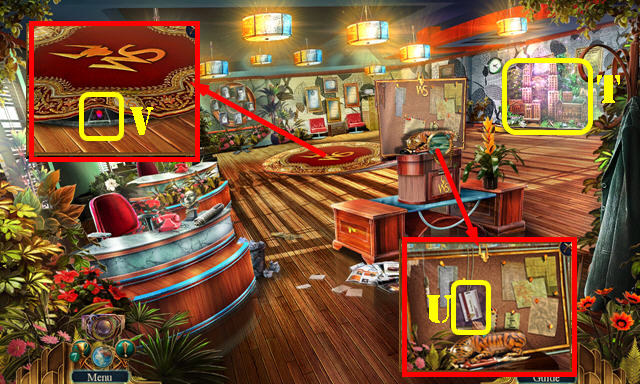
- Place the SHIP'S WHEEL (F); take the ELEVATOR SWITCH and FOLDER.
- Open the FOLDER; look at all the notes; take the GENERAL'S PHOTO AND FILM REEL 2/3 (inventory.).
- Go to Wolf Studios Office.
- Place the ELEVATOR SWITCH (G) and press it; go down to the Secret Base (H).
- Take the INCOMPLETE UV LAMP (I).
- Take the TROPHY FIGURINE (J).
- Go to Wolf Studios Hallway.

- Place the TROPHY FIGURINE (K) for a HOP; play it to get the STAR.
- Go to the Secret Base.
- Place the STAR on the PRISMS BOX; take the PRISMS (inventory).
- Use the AEROSOL SPRAY and the PRISMS on the scene for a puzzle.
- Solution (M).
- Take the UV BULB (N).
- Walk down.
- Place the UV BULB in the INCOMPLETE UV LAMP to get the UV LAMP (inventory).
- Use the UV LAMP to get the GENERATOR SOLUTION (O).
- Go to the Secret Base.
- Place the FUSE and GENERATOR SOLUTION for a puzzle.
- Solution: F-C-E-D-B-A-D.
- Go to the Research Room (G).

- Take the PROJECTOR REMOTE (H).
- Use the SECURITY CARD (I); take the FILM REEL 3/3 (J).
- Open the glass. Place the 3 FILM REELS; select the last two reels (K). Use the PROJECTOR REMOTE (L) for a HOP; play it to get the EEL CREST.
- Walk down.
- Place the EEL CREST; take the ARMY EMBLEM (M).
- Return to the Research Room.
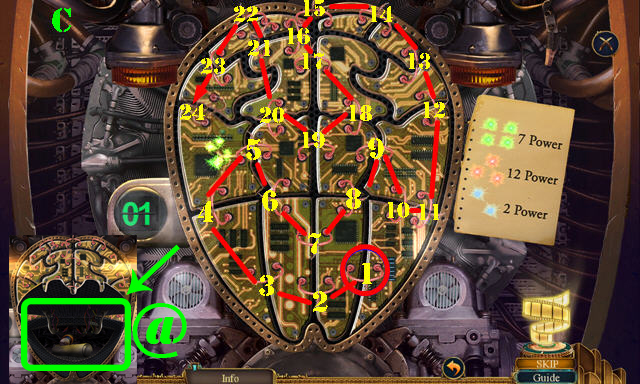
- Place the ARMY EMBLEM for a puzzle (N).
- Select a number and then drag a wire to the next number. Solution (O).
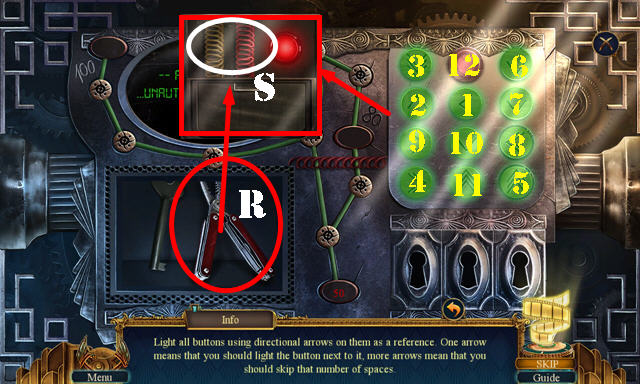
- Place the buttons (P) on the panel (Q); select the buttons 1-12.
- Use the wire cutter (R) on the wires (S).
- Change the symbols as shown (orange).
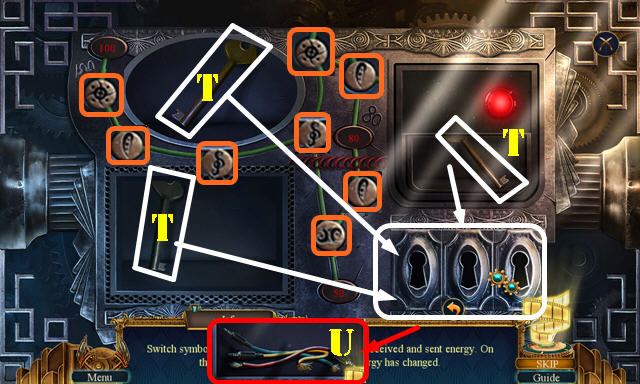
- Place the three keys in the locks (T).
- Take the WIRES (U).
- Walk down.

- Place the WIRES (V): select the 3 buttons (V1). Take the HEADPHONES (V2).
- Place the HEADPHONES (W). Select the knob 3x (W1).
- Place the GENERAL'S PHOTO on the scene. Use the Projector necklace; select the area once the light turns green (X).
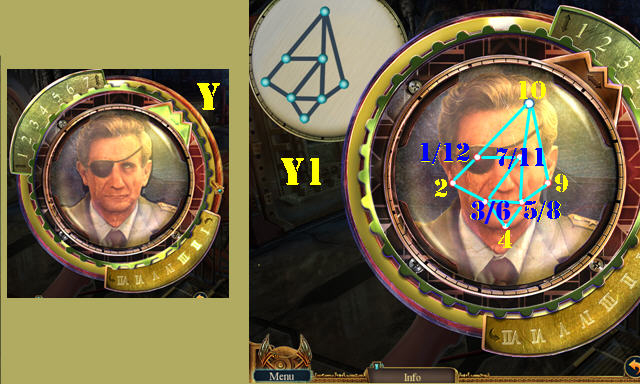
- Solution one (Y).
- Solution two (Y1).
- Push the button on the door (Z); go through it.
- Press the button (Z1).
- Use the AEROSOL SPRAY (Z2).
- Pull the lever (Z3).
- Select the periscope for a puzzle (Z4).
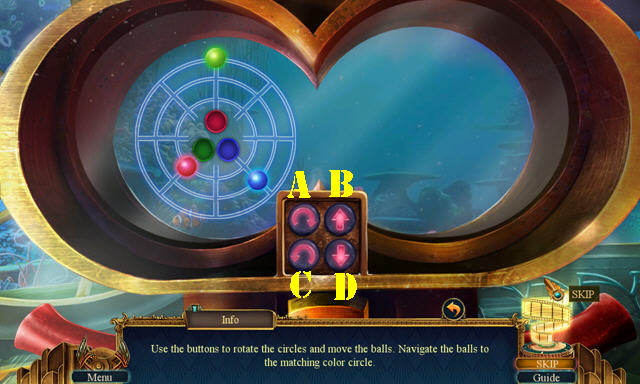
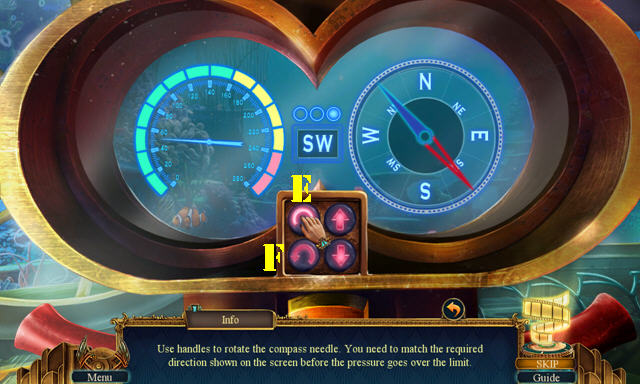
- Solution: Cx3-Dx3-Ax5-D.
- Solution two: Ex5-Fx4-Ex4.
- Congratulations, you've completed Final Cut: Fade to Black!
Created at: 2016-01-03