

Walkthrough Menu
- General Tips
- Chapter 1: Silverwood
- Chapter 2: Marvin's Villa
- Chapter 3: Langdale Street
- Chapter 4: The Abandoned Neighborhood
- Chapter 5: Wolf Studios
General Tips
- This is the official guide for Final Cut: The True Escapade.
- This guide will not show when you have to zoom into a location; the screenshots will show each zoom scene.
- Hidden-object puzzles are referred to as HOPs. This guide will not show screenshots of the HOPs, however, it will mention when an HOP is available and the inventory item you'll collect from it.
- Use the Map to fast travel to a location.
Chapter 1: Silverwood
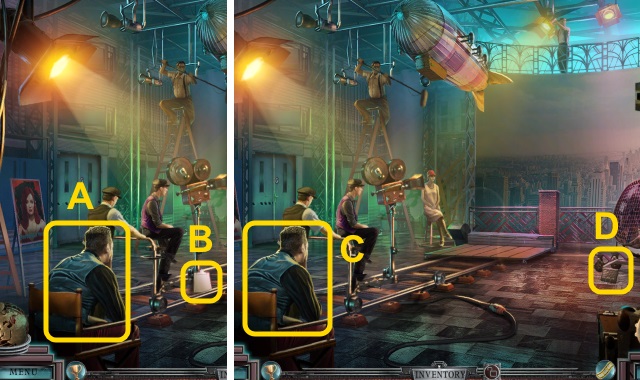
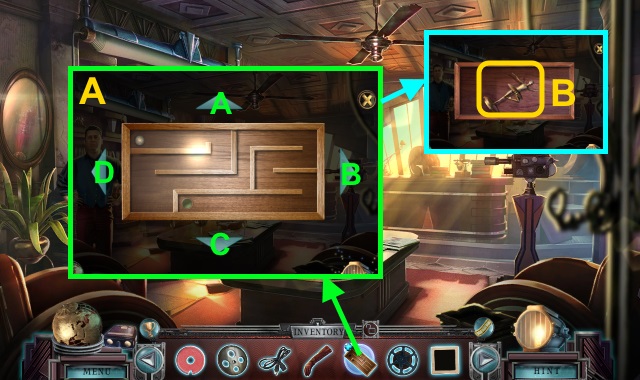
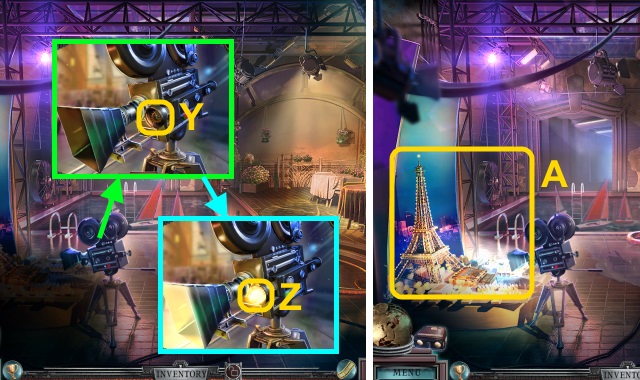
- Talk to Francis (A).
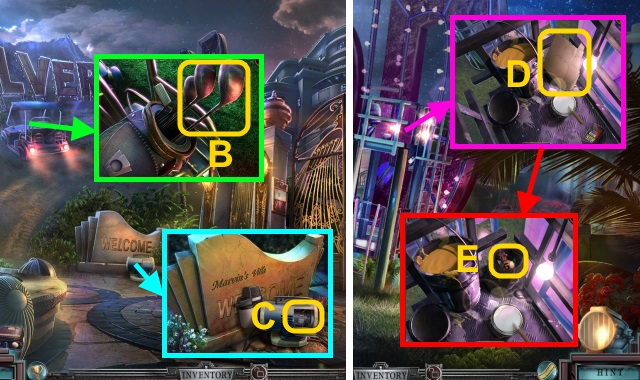
- Take the SHOOTING SCHEDULE (B).
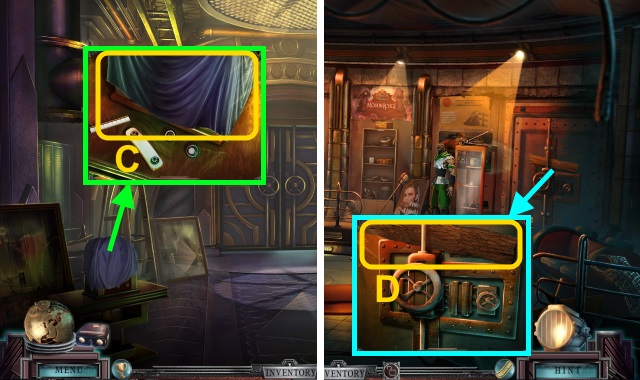
- Give the SHOOTING SCHEDULE (C).
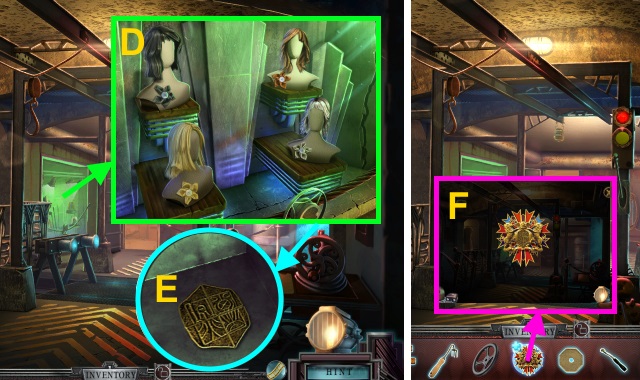
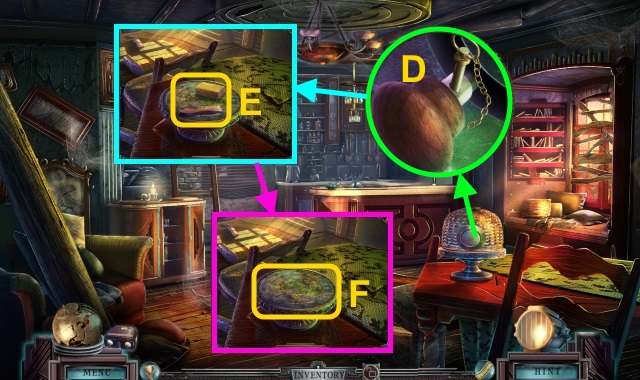
- Use the clapperboard (D).
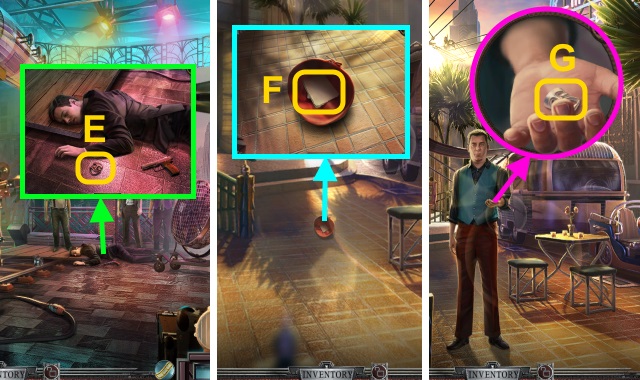
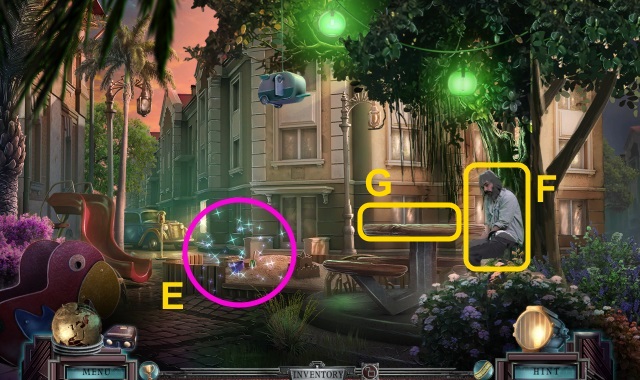
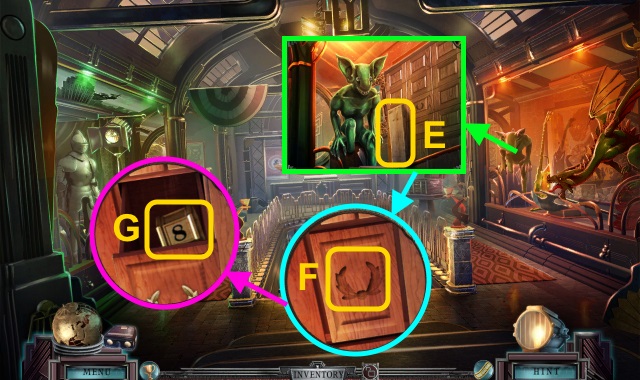
- Take the MASK EMBLEMS (1/3) (E).
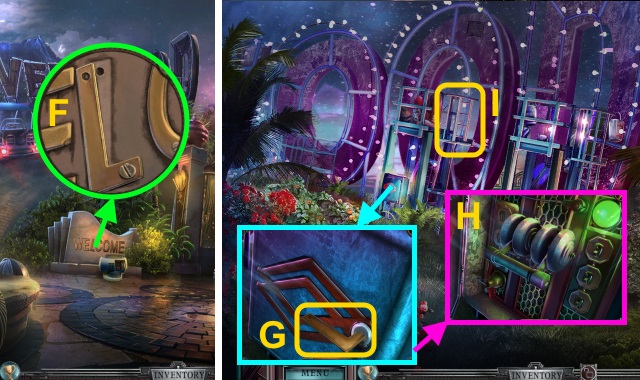
- Walk left.
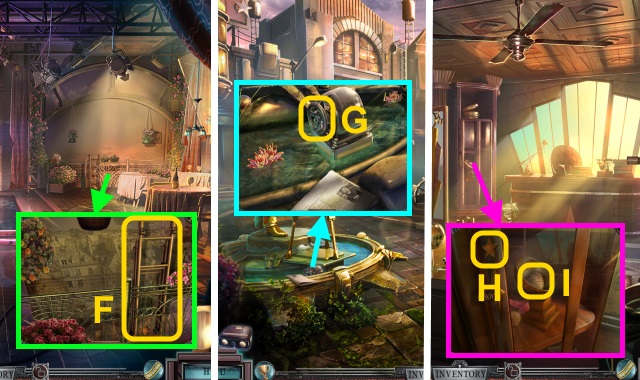
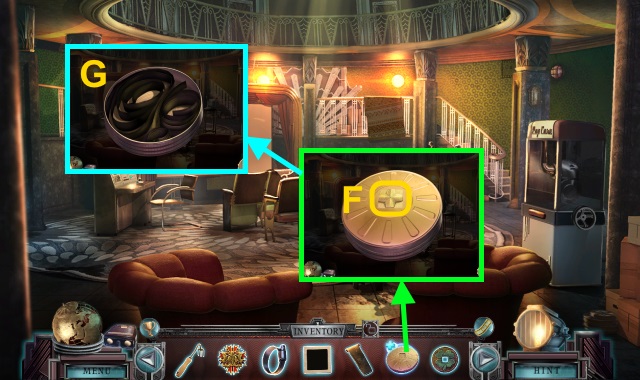
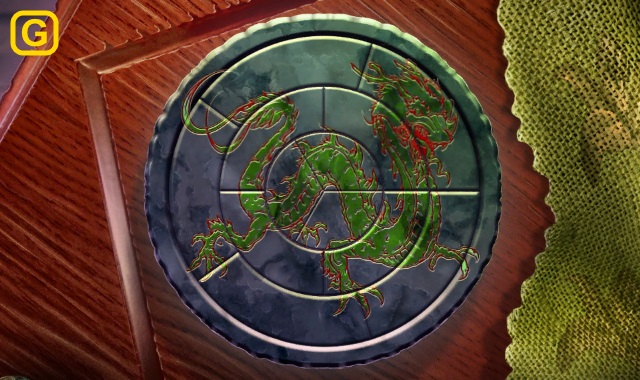
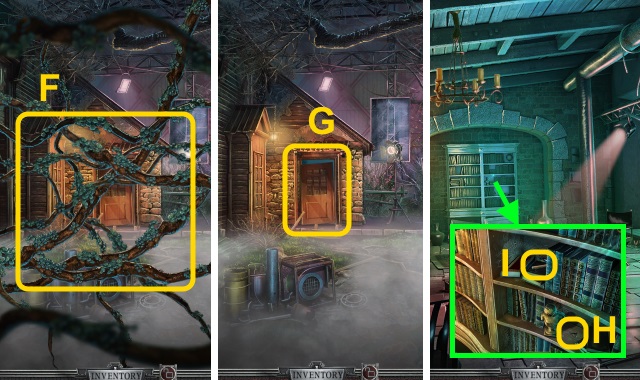
- Read the note; take the PROP ROOM SLIDE and ring (F).
- Take the MASK EMBLEMS (2/3) (G).
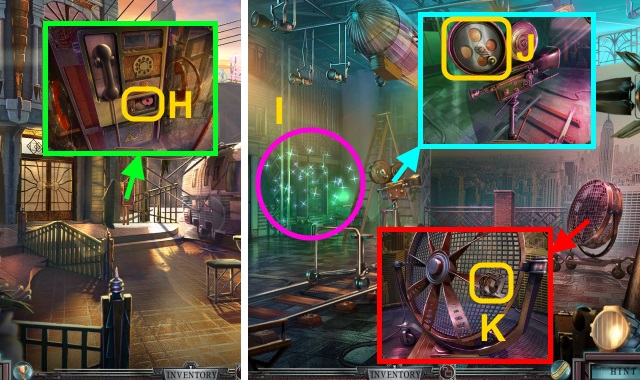
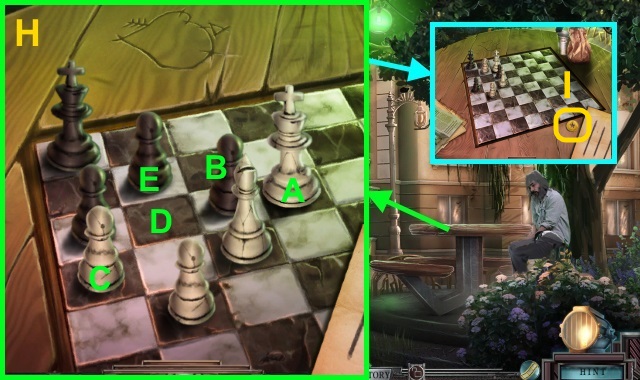
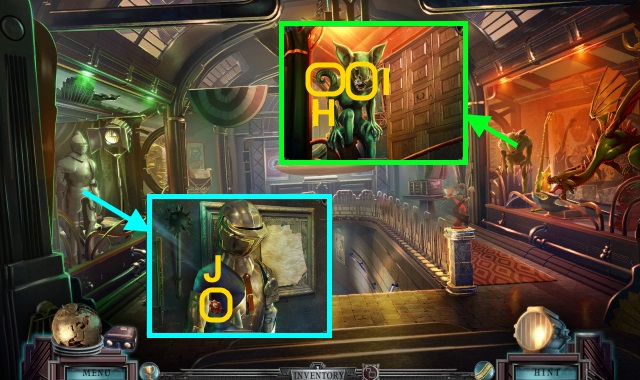
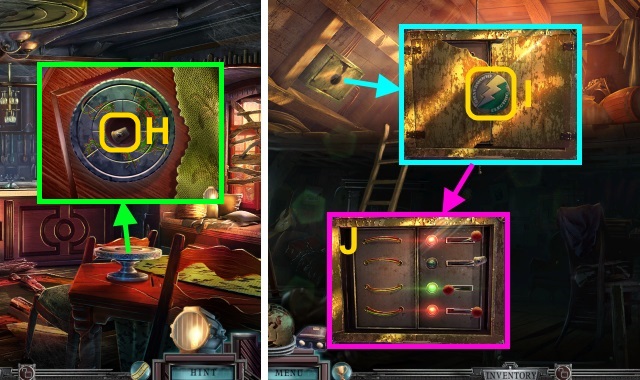
- Open the slot; take the CIRCLE TOKEN and COIN (H).
- Walk down.
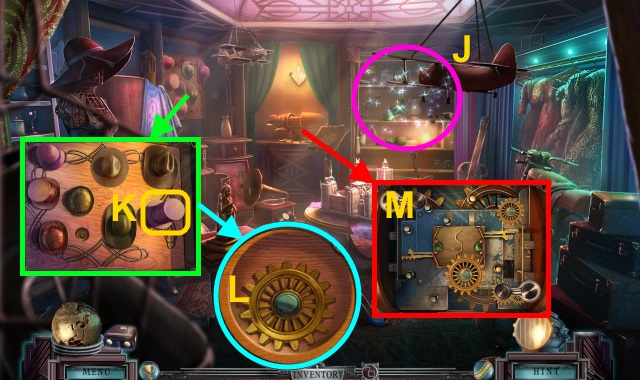
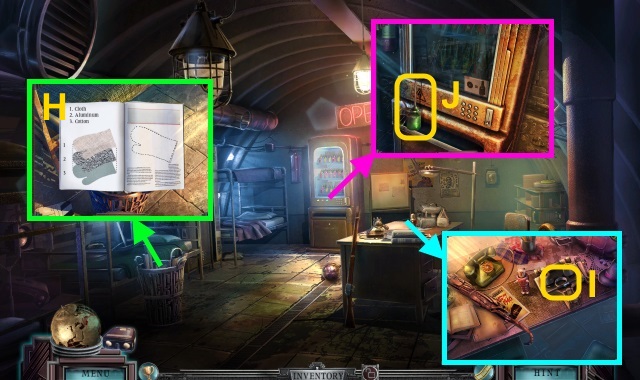
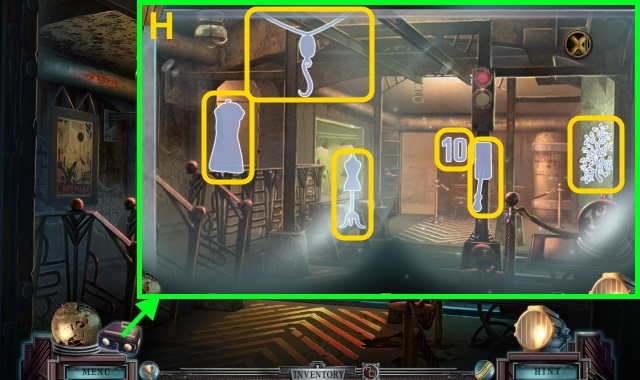
- Move the ladder; play the HOP to receive the SLIDE VIEWER CASE (I).
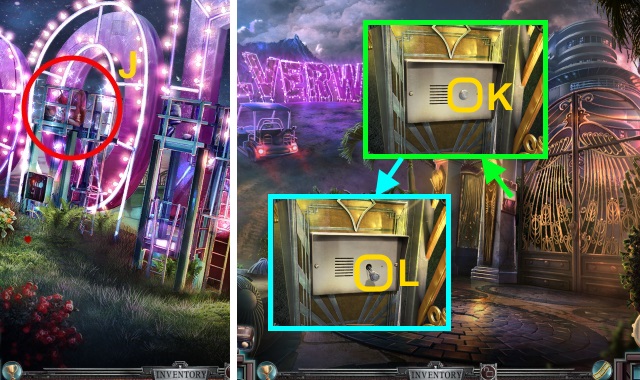
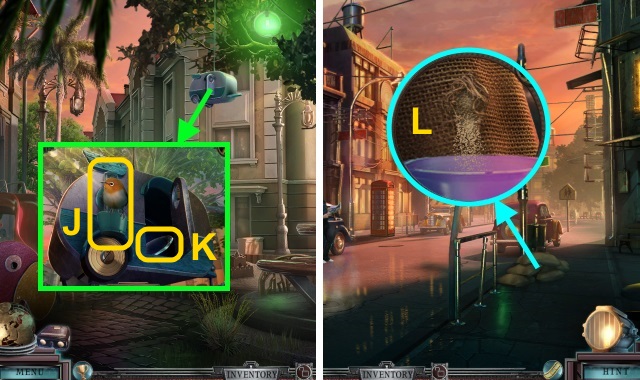
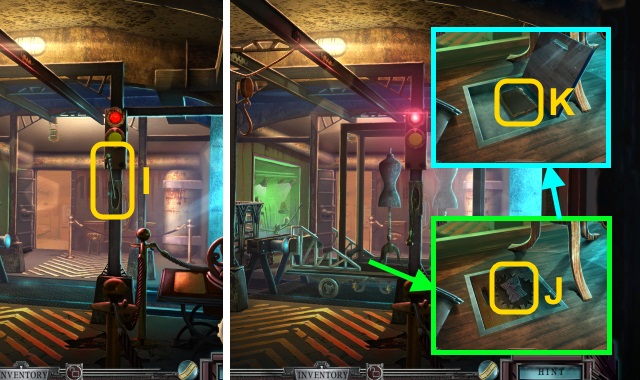
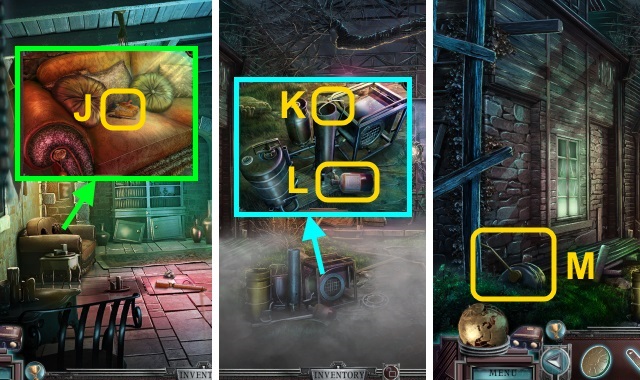
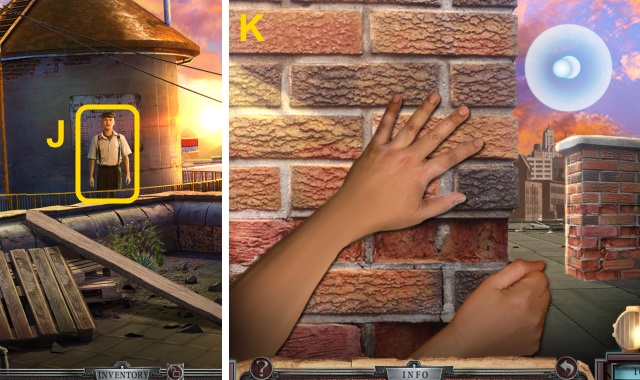
- Use the COIN; take the EMPTY FILM REEL (J).
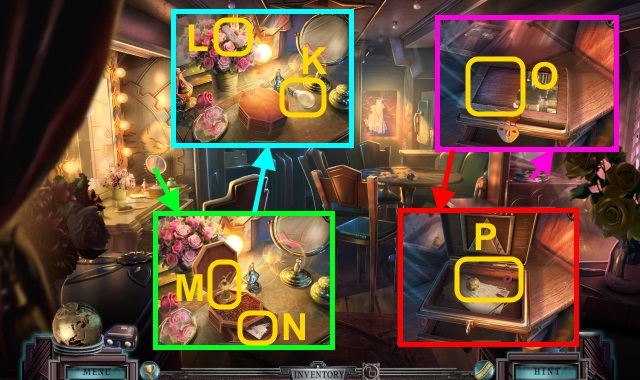
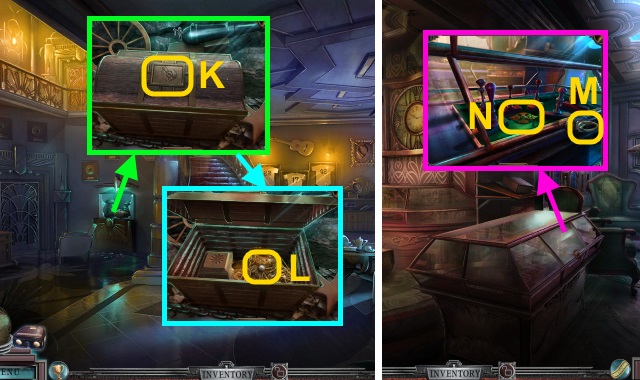
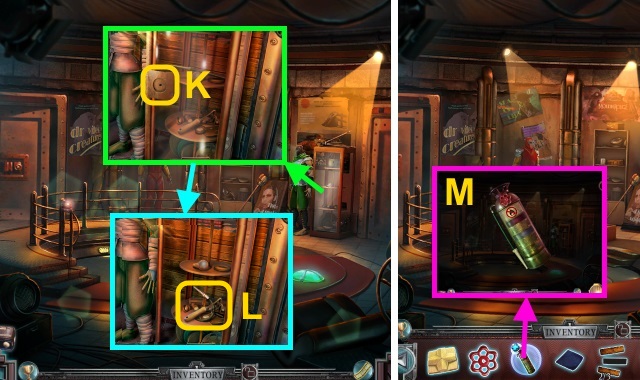
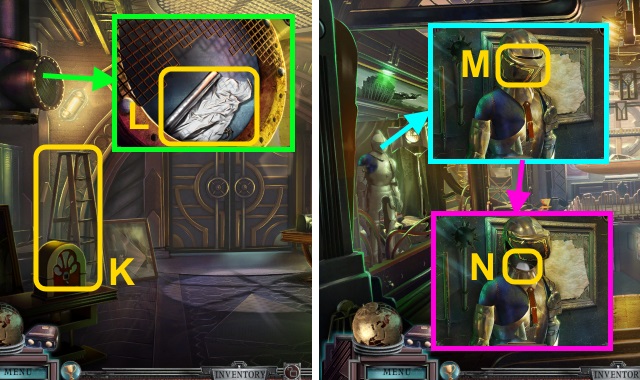
- Remove the fan cover; take the POWER CABLE and WOLF STUDIOS LOGO (K).
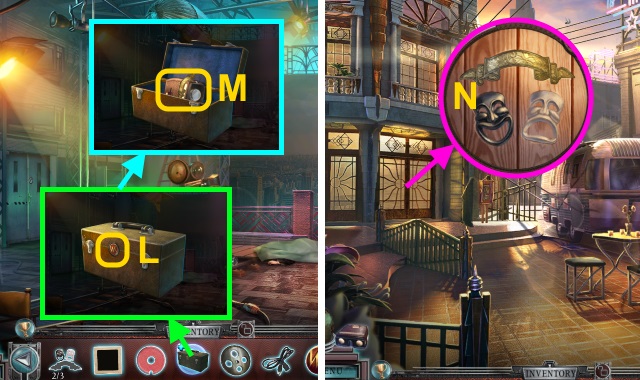
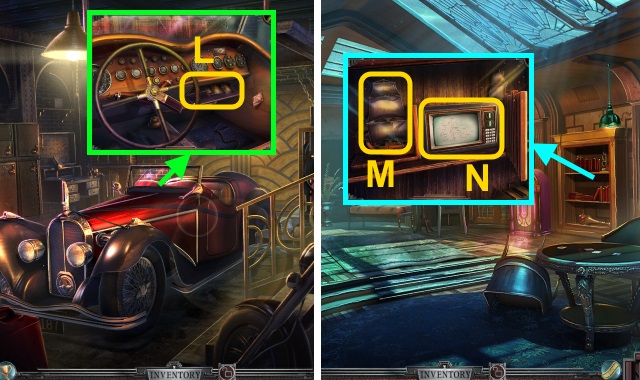
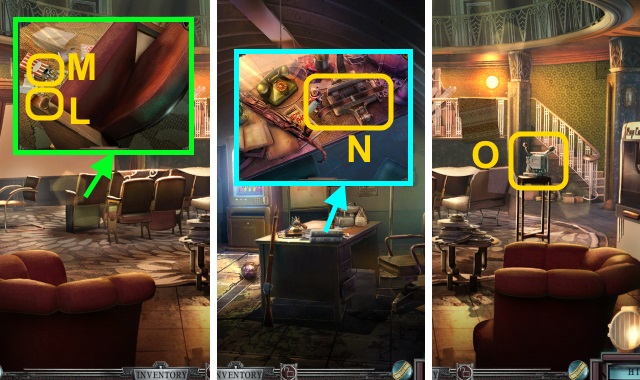
- Place the WOLF STUDIOS LOGO on the SLIDE VIEWER CASE (L).
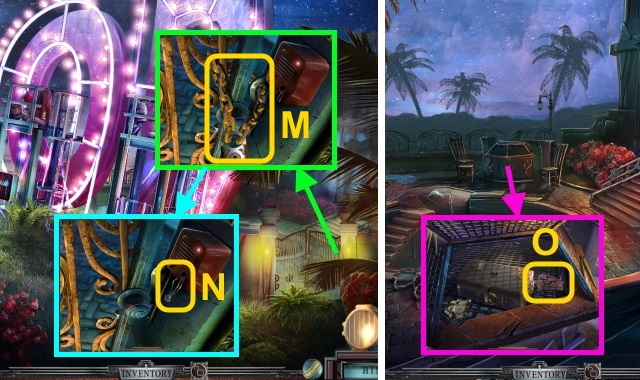
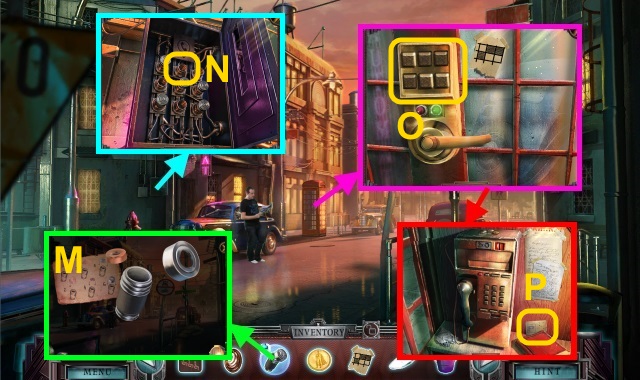
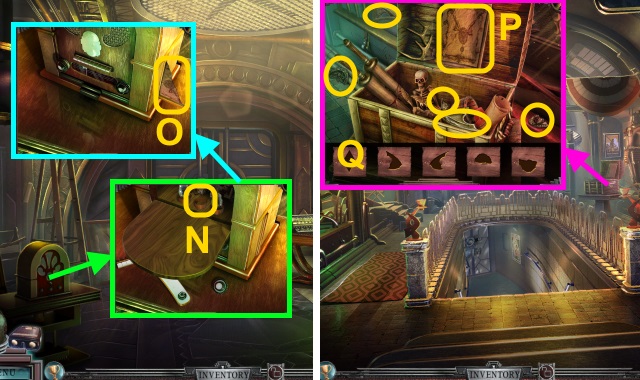
- Read the instructions; take the Film Viewer and MASK EMBLEMS (3/3) (M).
- Walk left.
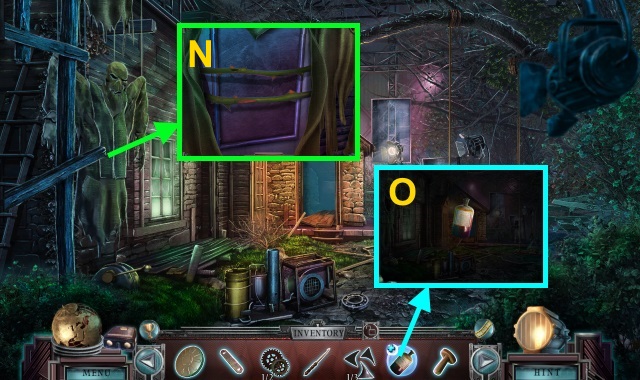
- Place the MASK EMBLEMS (3/3) (N).
- Walk left.
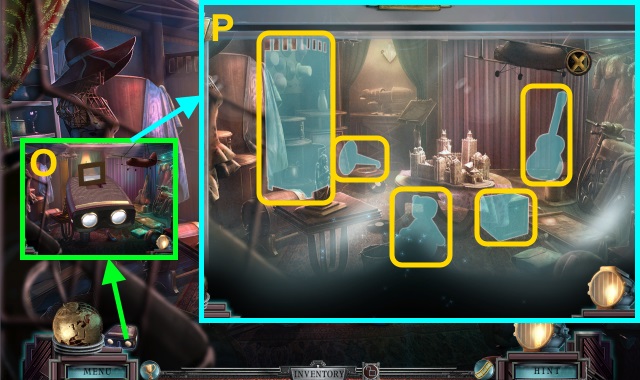
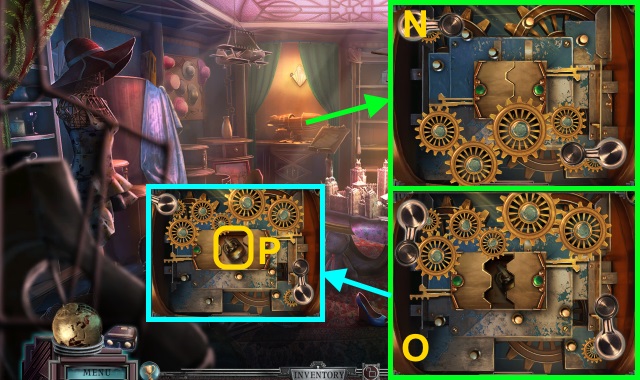
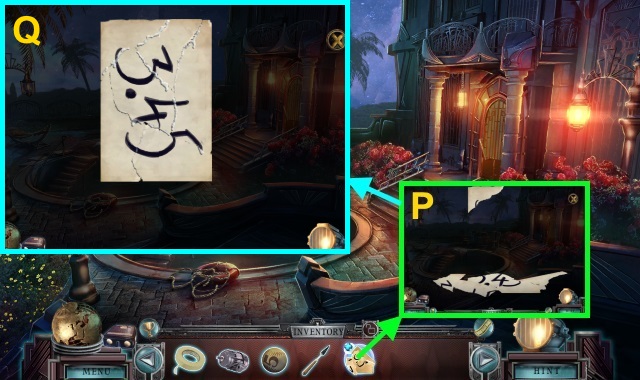
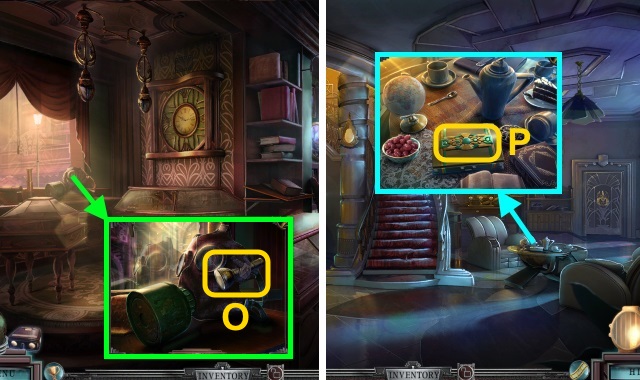
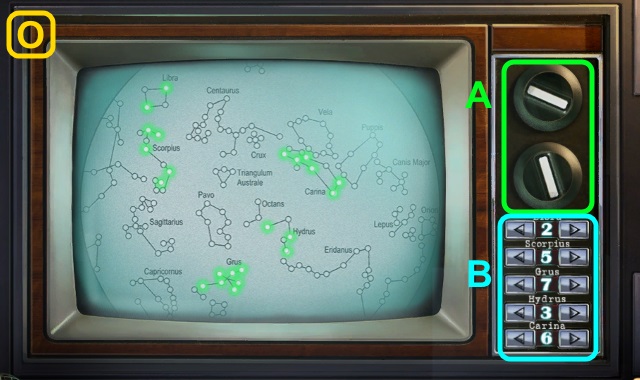
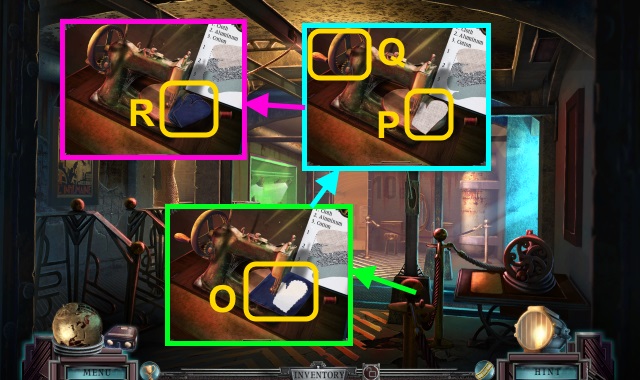
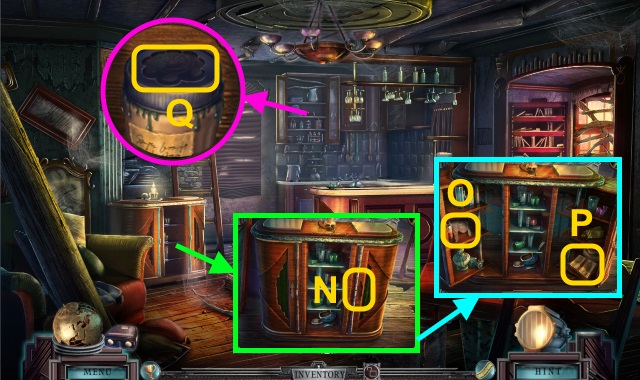
- Examine the Film Viewer; place the PROP ROOM SLIDE for a mini-game (O).
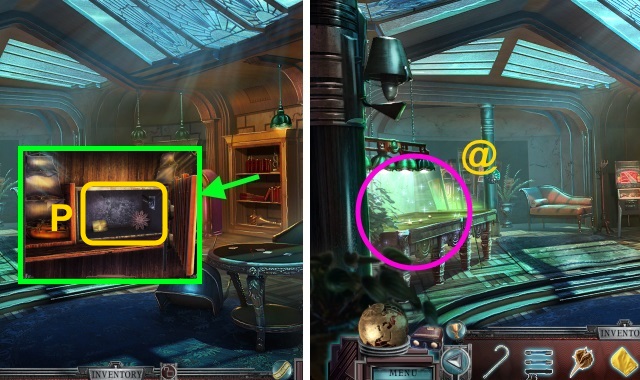
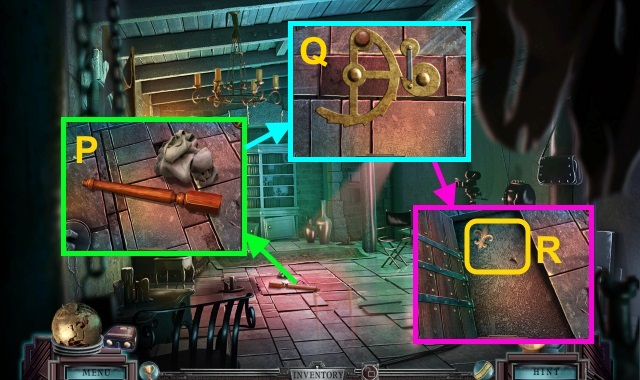
- Solution (P).
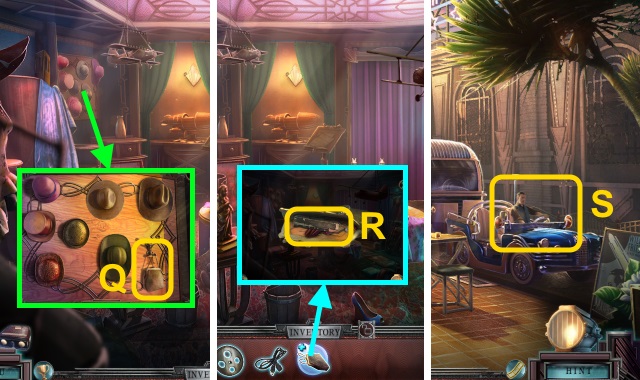
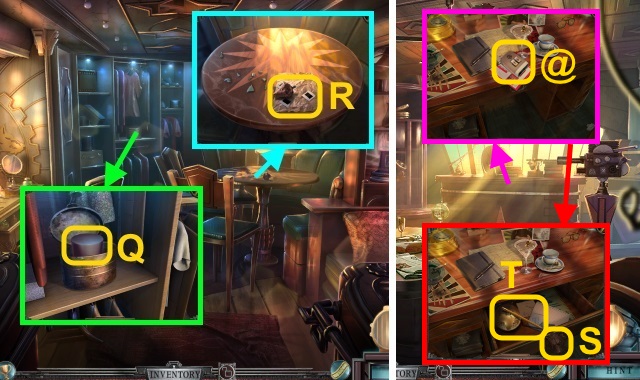
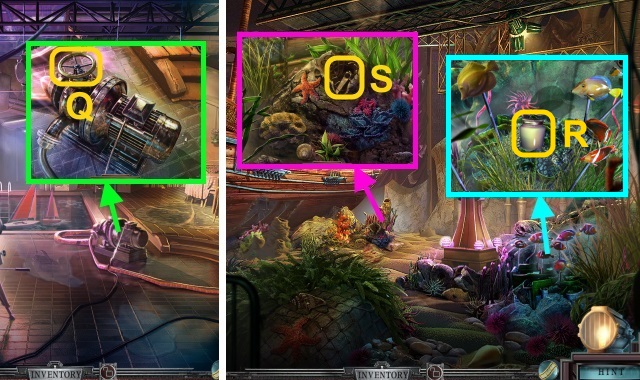
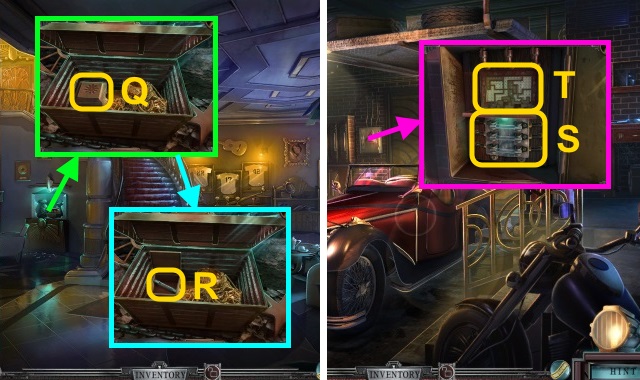
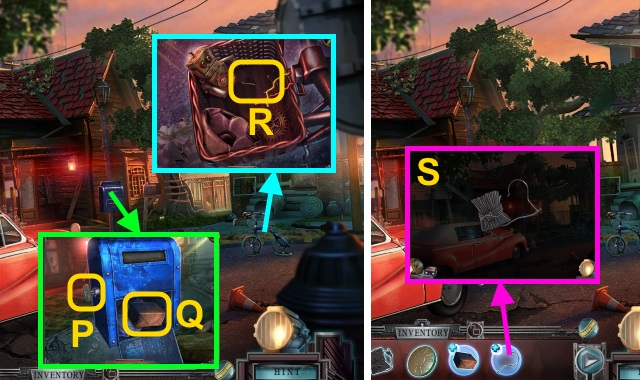
- Move the screen; take MELANIE'S PURSE (Q).
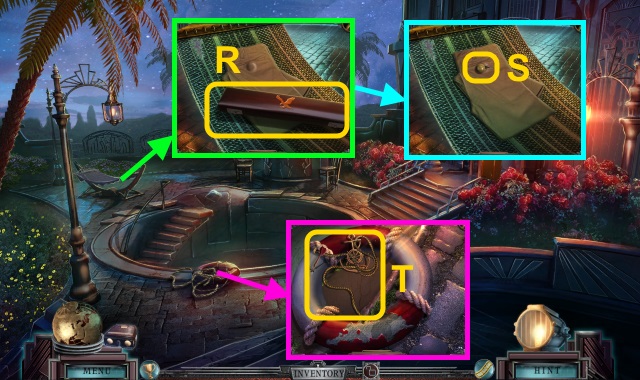
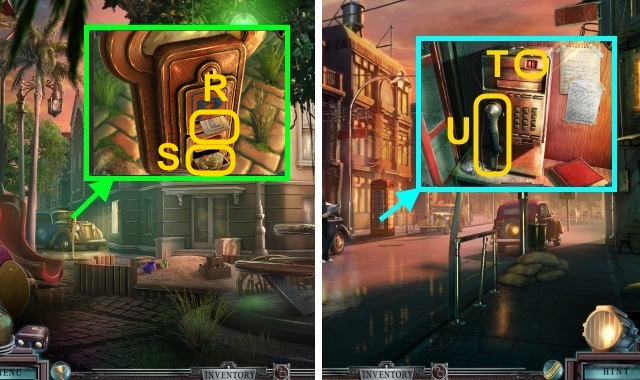
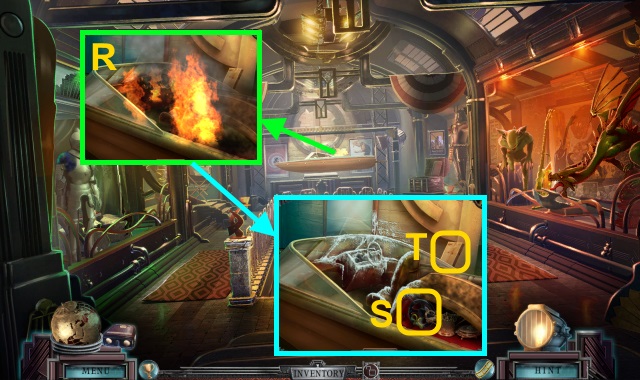
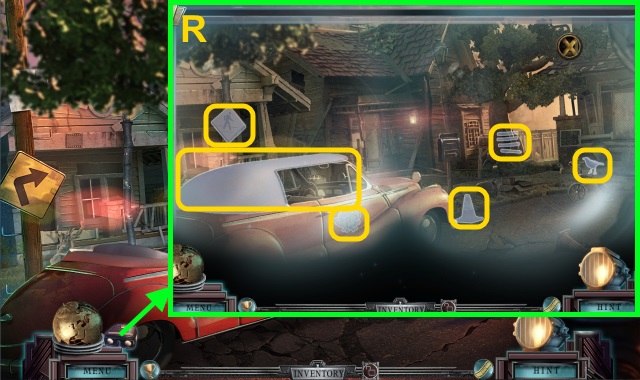
- Open MELANIE'S PURSE; take the book, LEATHER GLOVE, and CAR KEY (R).
- Walk down.
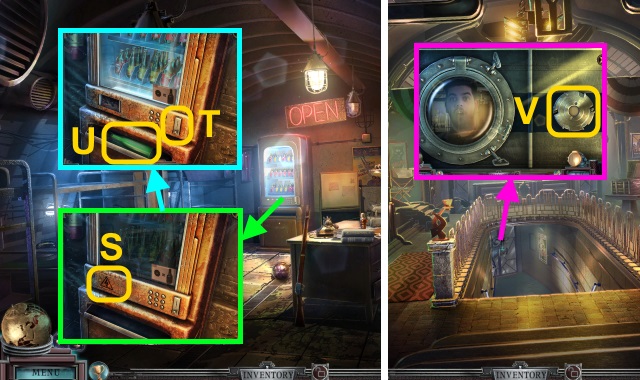
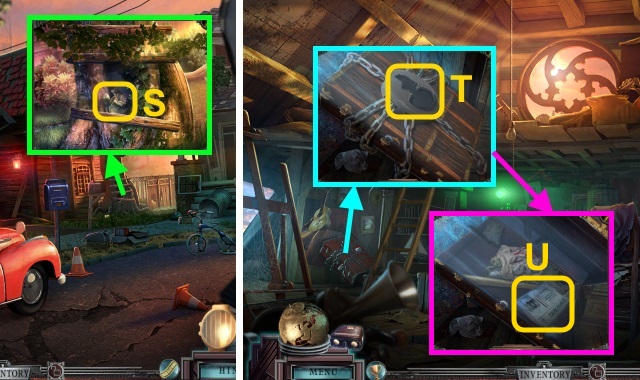
- Give the CAR KEY (S).
- Walk forward.
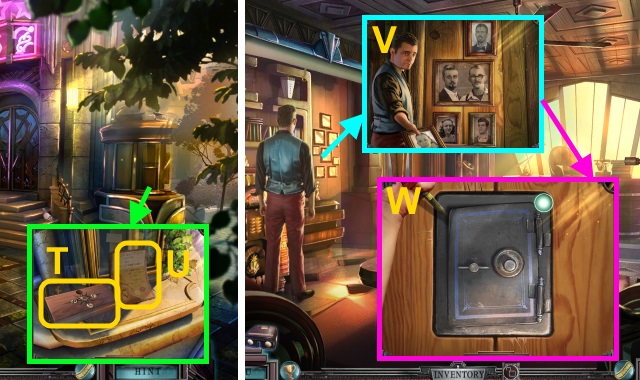
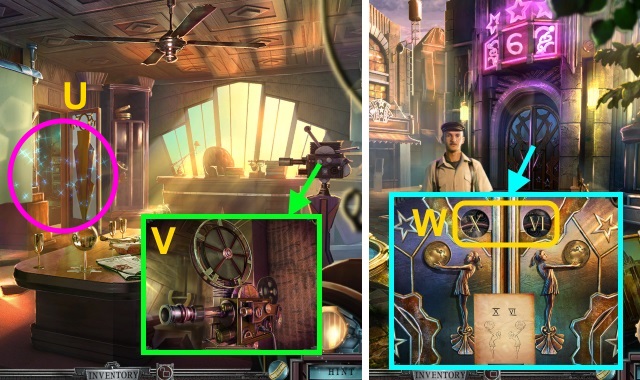
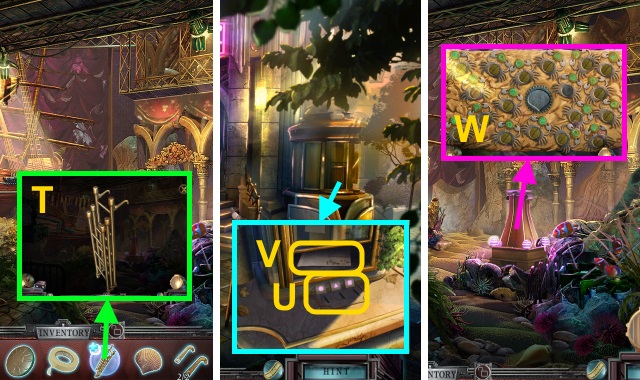
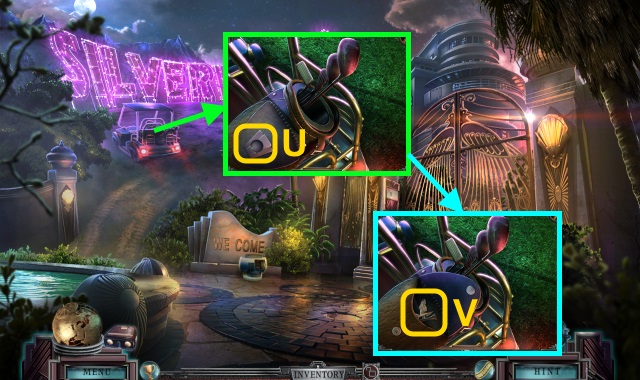
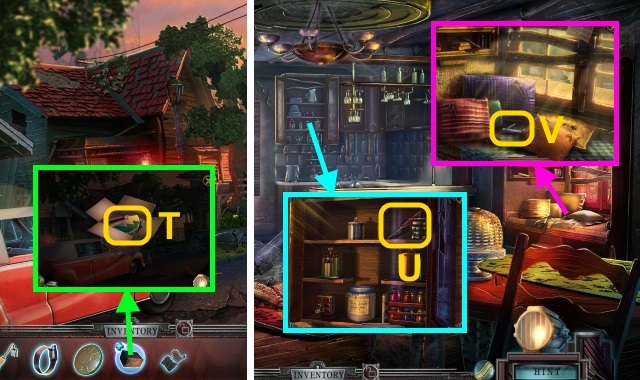
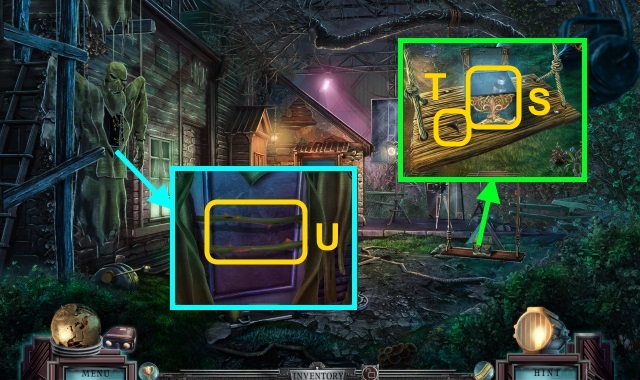
- Take the PROP BOX (T); move the poster (U).
- Walk left.
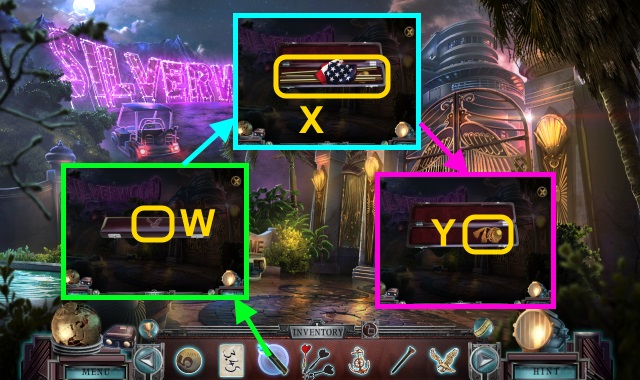
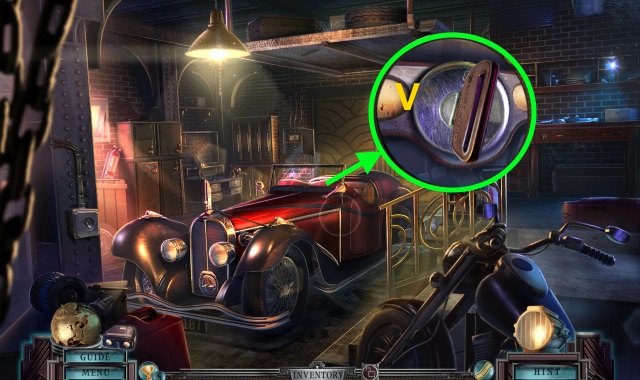
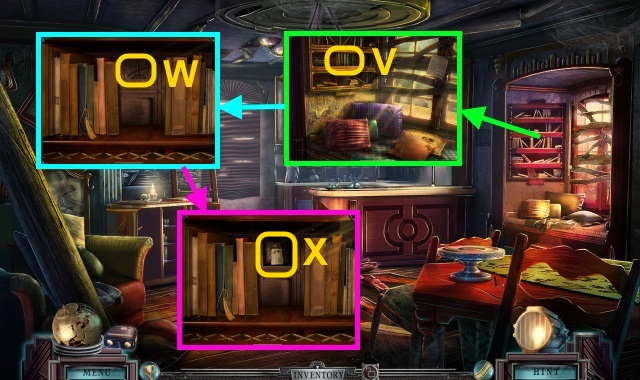
- Take the pictures for a mini-game (V).
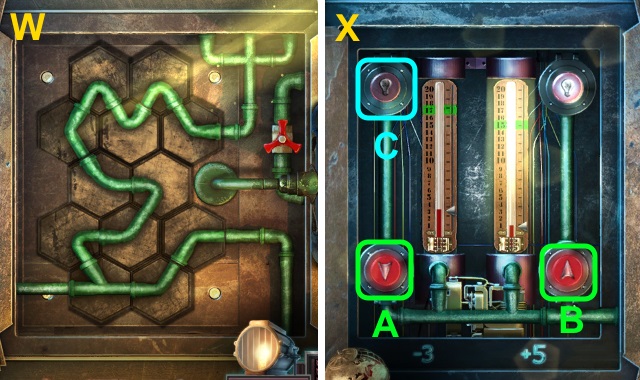
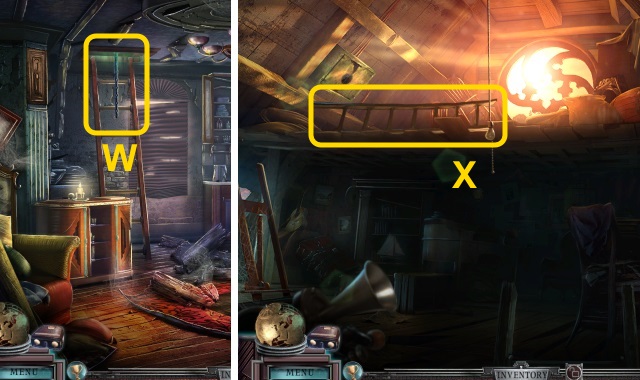
- Solution (W): Press the circles when they turn green.
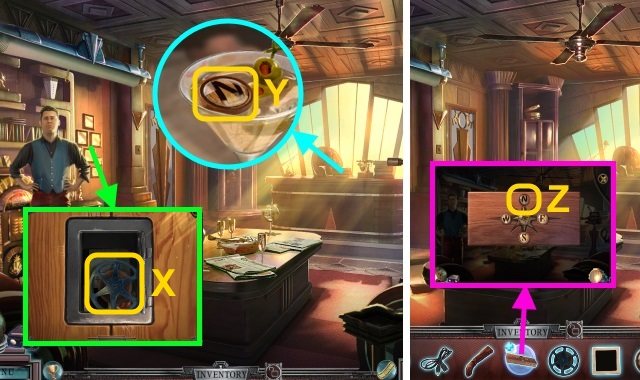
- Take the ORIGINAL NEGATIVES, BASEBALLS (1/2), and CITYSCAPE SET SLIDE (X).
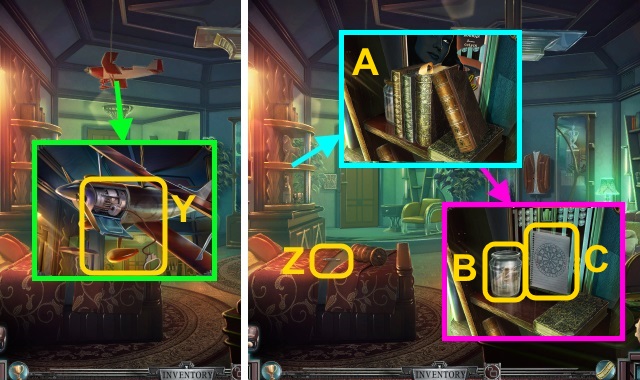
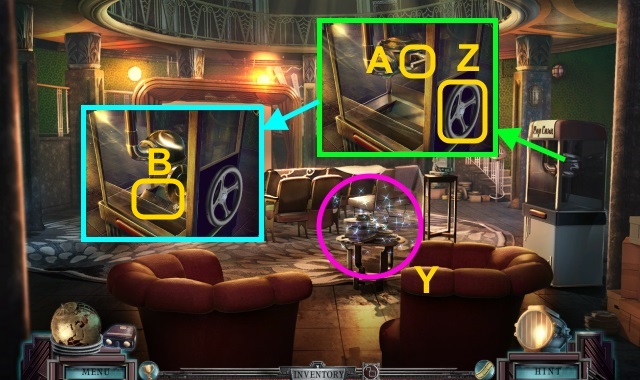
- Take the LETTER N (Y).
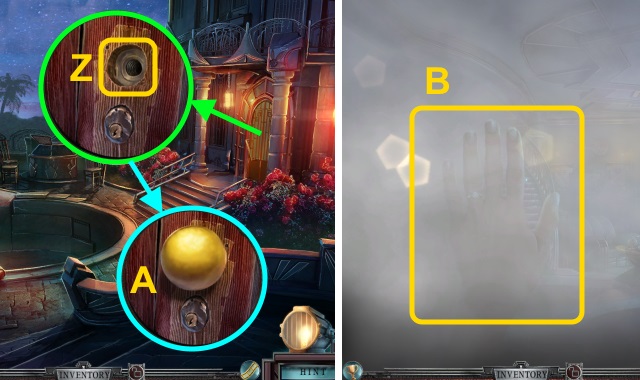
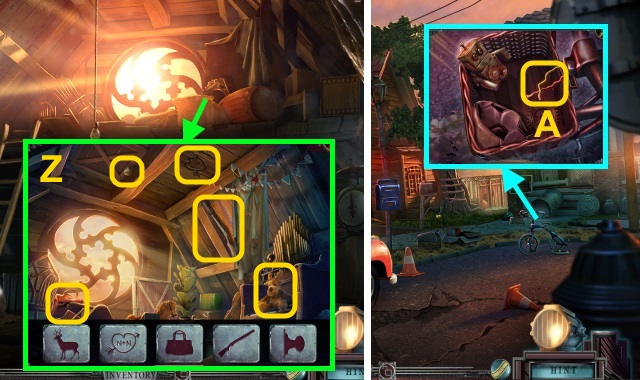
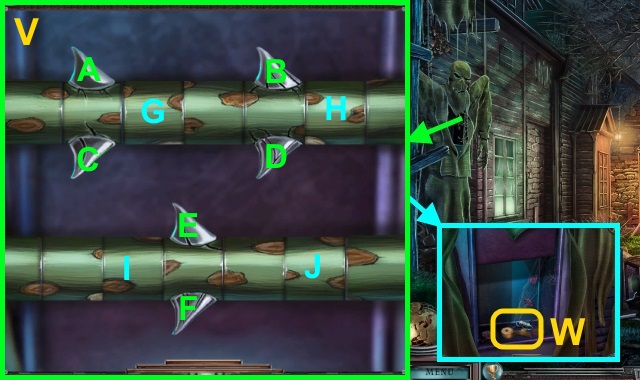
- Place the LETTER N on the PROP BOX for a mini-game (Z).
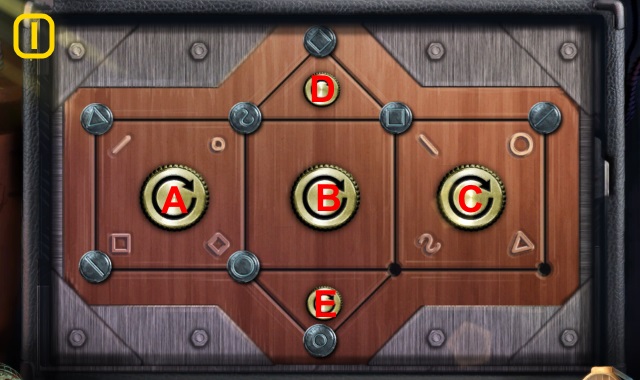
- Solution (A): B, A, B, C, D, C, B, A, B, A, B, C, D, C, B, C, D.
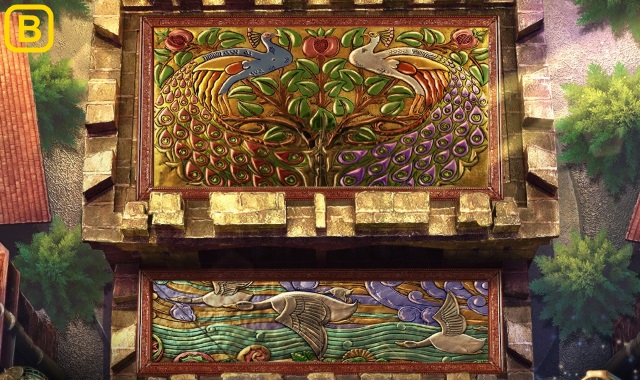
- Take the BALLET FIGURINE (B).
- Go to the Cityscape Set.
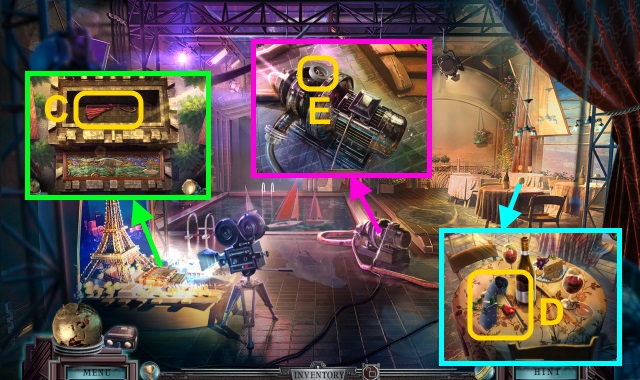
- Place the CITYSCAPE SET SLIDE in the Film Viewer for a mini-game.
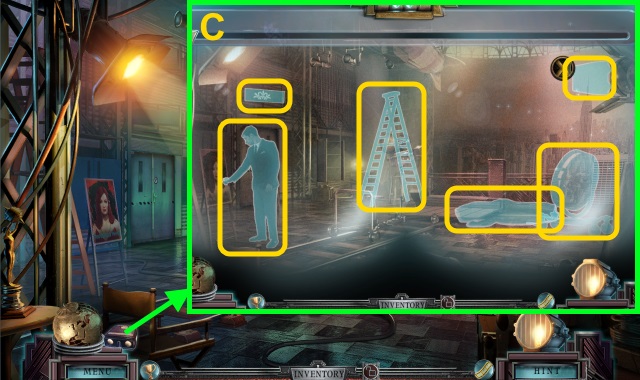
- Solution (C).
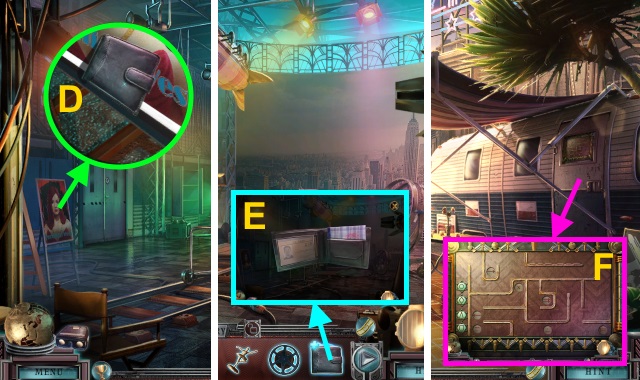
- Take BRIAN'S WALLET (D); open it.
- Move the handerkerchief and take the DOOR CODE (E).
- Walk left.
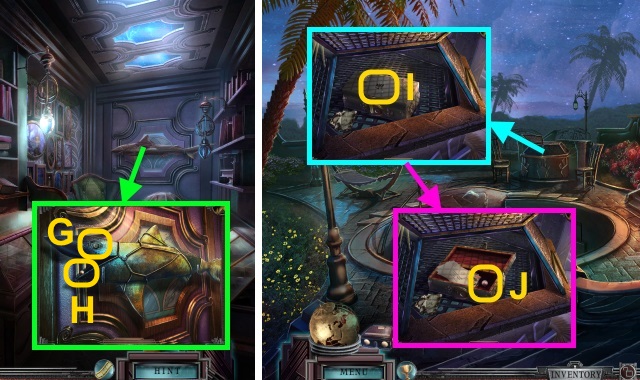
- Place the DOOR CODE for a mini-game (F).
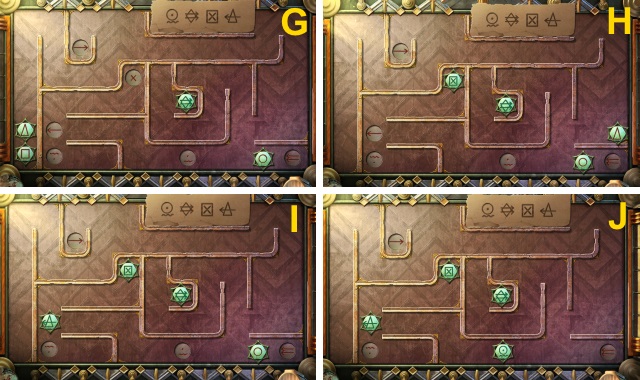
- Solution (G-J).
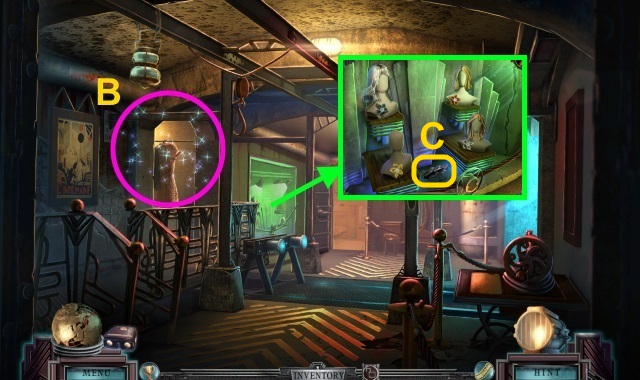
- Walk right.
- Take the LIGHT BULB (K) and note (L).
- Open the music box; place the BALLET FIGURINE (M).
- Take the TORN PHOTO (N).
- Place the TORN PHOTO (O); take the STUDIO GLOBES (1/2) and SQUARE TOKEN (P).
- Open the box; take the TOP HAT (Q).
- Open the paper; take the WOLF KNOB, BUNCH OF SLIDES, and note (R).
- Go to Francis' Office.
- Take the remote (@) and instructions.
- Place the WOLF KNOB (S); open the drawer.
- Take the PENCIL and STUDIO GLOBES (2/2) (T); press the button.
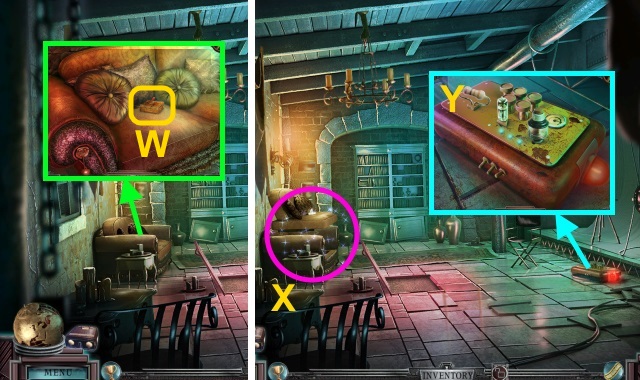
- Play the HOP to receive the DEVELOPED FILM REEL (U).
- Place the EMPTY FILM REEL, POWER CABLE, and DEVELOPED FILM REEL (V); you receive the CODE and DEVELOPED FILM REEL.
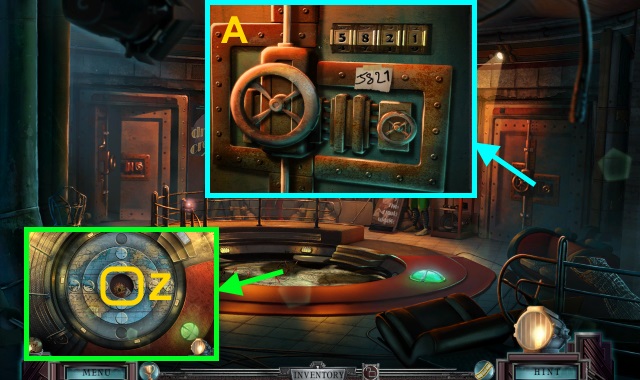
- Walk down.
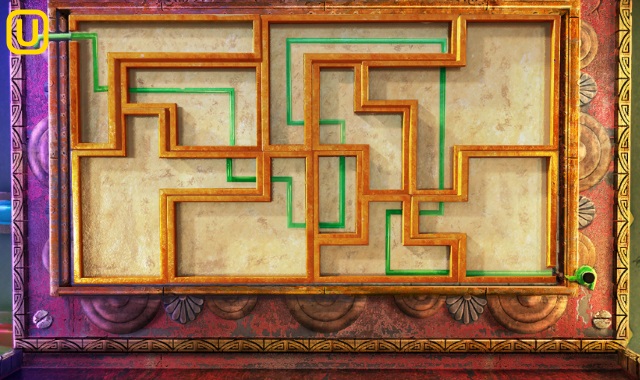
- Place the STUDIO GLOBES (2/2) and CODE; move the numbers (W).
- Walk forward.
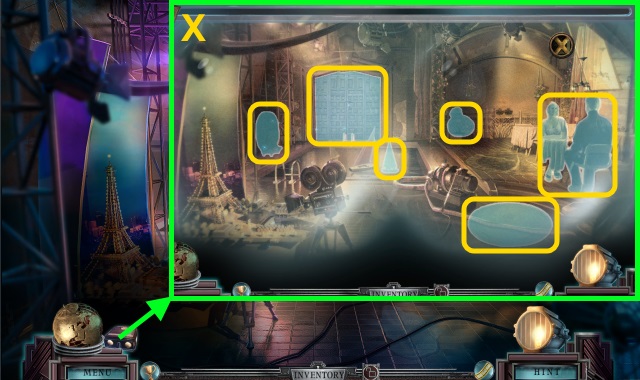
- Place the BUNCH OF SLIDES in the Film Viewer; flip through the slides for a mini-game.
- Solution (X).
- Take the COGS (1/2) (Y); place the LIGHT BULB (Z).
- Examine the set for a mini-game (A).
- Solution (B).
- Take the TASSEL (C).
- Move the rose and the tie; take the SOCKET WRENCH (D).
- Take the ADHESIVE TAPE (E).
- Take the BROKEN FOLDING LADDER and GOLDEN STAR AWARD (F).
- Walk down.
- Use the SOCKET WRENCH; take the PUMP PARTS (1/2) (G).
- Walk left.
- Place the GOLDEN STAR AWARD (H).
- Take the FAKE SHELL (I).
- Go to the Prop Room.
- Place the TASSEL; play the HOP to receive the SMALL HOOKS (1/2) (J).
- Place the TOP HAT (K).
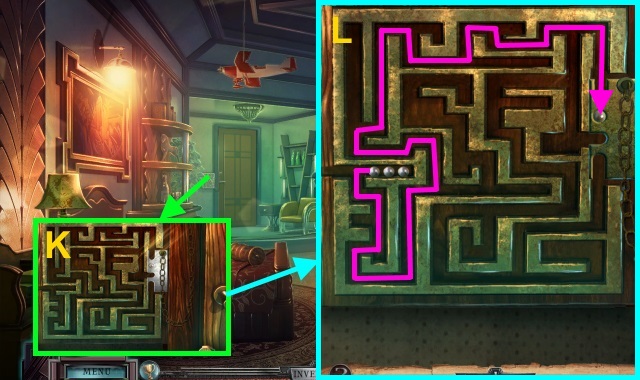
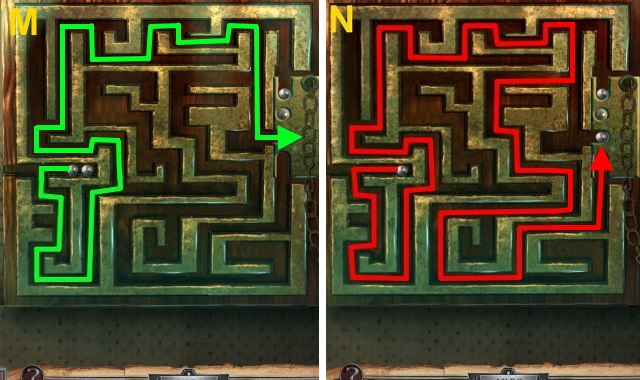
- Take the COGS (2/2) (L).
- Place the COGS (2/2) for a mini-game (M).
- Solution (N, O).
- Take the PUMP PARTS (2/2) (P).
- Go to the Paris Set.
- Place the PUMP PARTS (2/2) (Q).
- Walk forward.
- Move the fish; take the PAPER GLUE and TRIANGLE TOKEN (R).
- Use the LEATHER GLOVE to take the SMALL HOOKS (2/2) (S).
- Place the SMALL HOOKS (2/2) on the BROKEN FOLDING LADDER to receive the FOLDING LADDER (T).
- Walk down twice.
- Place the CIRCLE TOKEN, SQUARE TOKEN, and TRIANGLE TOKEN (U).
- Read the newspaper (V); take the SHELL COIN.
- Go to the Shipwreck Set.
- Place the FAKE SHELL and SHELL COIN for a mini-game (W).
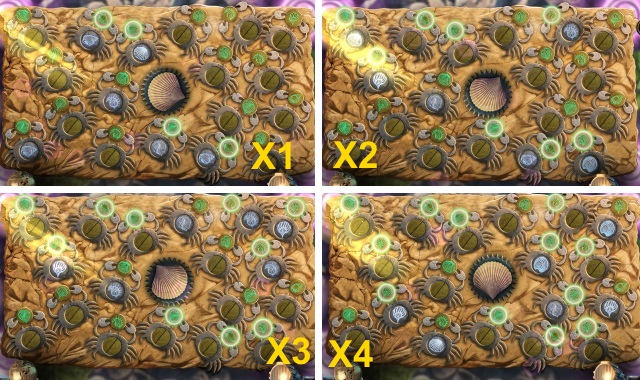
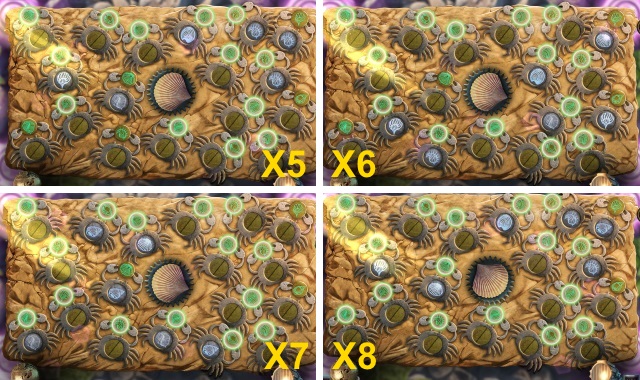
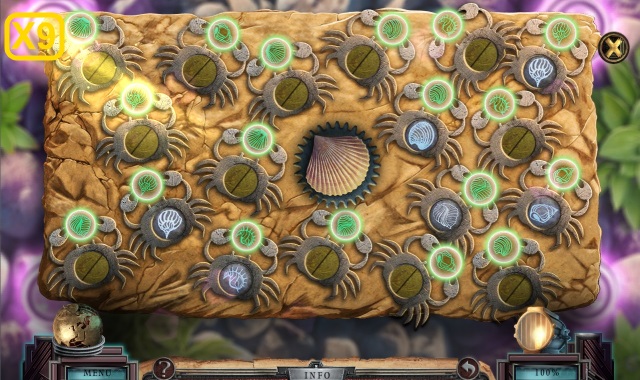
- Solution (X1-X9).
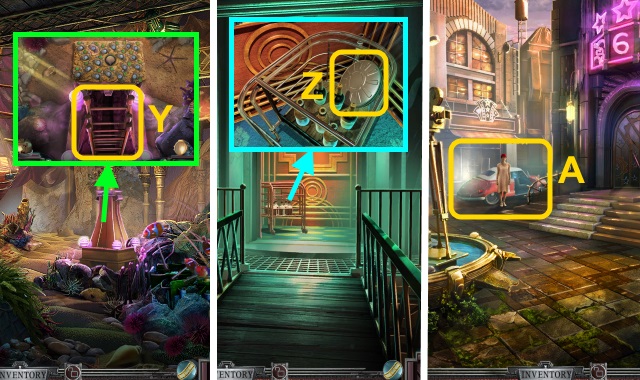
- Place the FOLDING LADDER (Y).
- Go up.
- Open the gate; place the DEVELOPED FILM REEL (Z).
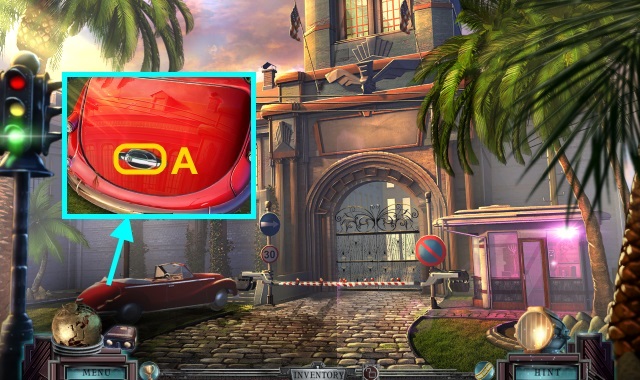
- Get in the car (A).
Chapter 2: Marvin's Villa
- Take the GOLF CLUB (B).
- Use the PENCIL to open the case; take the ENGINE (C).
- Walk forward.
- Move the cardboard (D); open the bag.
- Take the BASEBALLS (2/2) (E).
- Walk down.
- Take the LETTER L (F).
- Walk forward.
- Place the LETTER L (G); turn it.
- Flip the switches (H).
- Use the GOLF CLUB (I).
- Play the HOP to receive the PALLETE KNIFE (J).
- Walk down.
- Move the switch (K); use the PALLETE KNIFE to take the INTERCOM SWITCH (L).
- Walk forward.
- Move the lock (M).
- Place the INTERCOM SWITCH and ADHESIVE TAPE (N); press the switch.
- Walk forward.
- Open the grate; take the PAPER PIECES (O).
- Use the PAPER GLUE on the PAPER PIECES for a mini-game (P).
- Solution (Q).
- Take the KNOB COMBINATION.
- Take the FLAGPOLE KIT (R).
- Use the PALLETE KNIFE; take the BRASS GOLF BALL (S).
- Move the rope; take the DART (1/3) and ANCHOR (T).
- Walk down twice.
- Place the BRASS GOLF BALL (U); take the GOLF TEE and ARMY BADGE (V).
- Place the ARMY BADGE on the FLAGPOLE KIT (W).
- Move the flag and poles (X); take the FINIAL (Y).
- Go to the Backyard.
- Place the FINIAL and KNOB COMBINATION for a mini-game (Z).
- Solution (A): Up, right, down, left, up, down.
- Walk right.
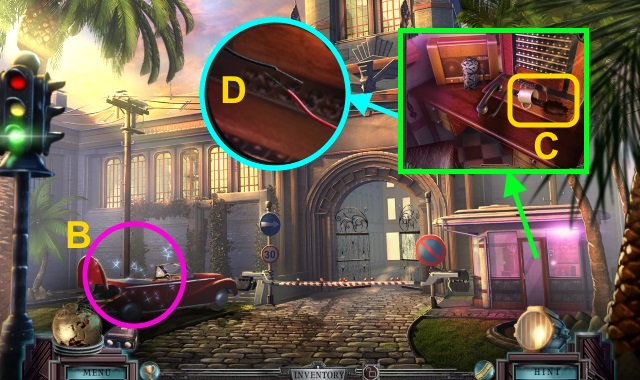
- Clear the smoke (B).
- Walk left.
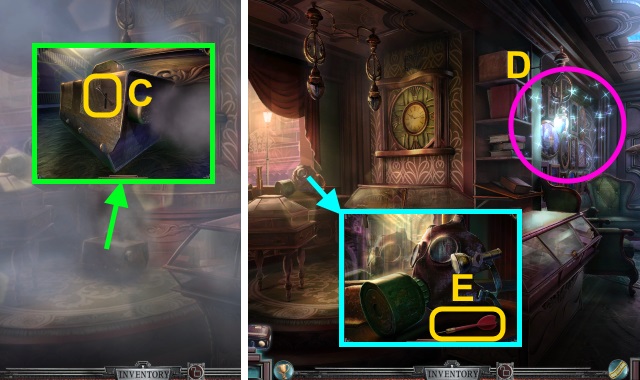
- Use the GOLF TEE (C).
- Play the HOP to receive the PULL STARTER (D).
- Take the DART (2/3) (E).
- Walk down.
- Take the GLASSES TEMPLES (F).
- Take the MASK TOKEN (G).
- Place the BASEBALLS (2/2); arrange the baseballs (I).
- Take the FRATERNITY RING (J).
- Place the ANCHOR (K); take the PEARLS (1/3) (L).
- Walk left.
- Use the FRATERNITY RING (M); take the CIGAR LOGO (N).
- Place the MASK TOKEN; take the FLASHLIGHT (O).
- Walk down.
- Place the CIGAR LOGO (P); open the box for a mini-game.
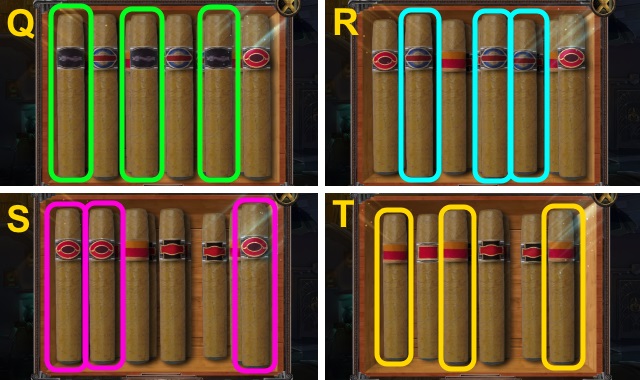
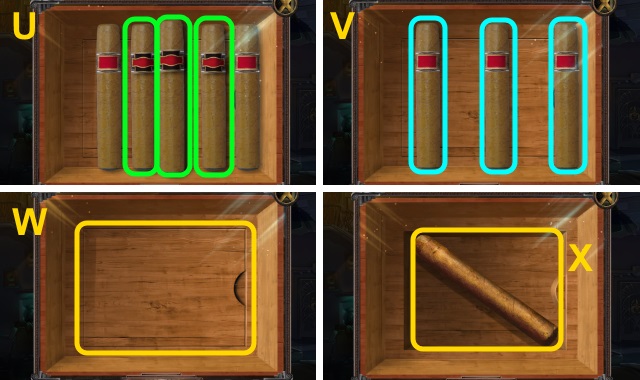
- Solution (Q-V).
- Move the false bottom (W); take the CIGAR (X).
- Go up.
- Open the plane; place the ENGINE and PULL STARTER (Y).
- Take the GATE CONTROLS (1/3) (Z).
- Move the books and poster; open the jar (A).
- Take the DESERT ROSE CRYSTAL, SHARK EYE EMBLEM (B), move the poster and take the DARTS DIAGRAM (C).

- Take the CIGAR CUTTER (D).
- Use the CIGAR CUTTER on the CIGAR (E); dump the CIGAR to receive the EAGLY INLAY.
- Take the DART (3/3) (F).
- Go to the Curiosity Room.
- Place the SHARK EYE EMBLEM (G); take the PEARLS (2/3) (H).
- Walk down twice.
- Place the EAGLE INLAY (I).
- Take the PEARLS (3/3) (J).
- Go to the Master Suite.
- Place the PEARLS (3/3) for a mini-game (K).
- Solution (L-N).
- Walk forward.
- Examine the KNOB COMBINATION (P); flip it to receive the CLOCK NOTE.
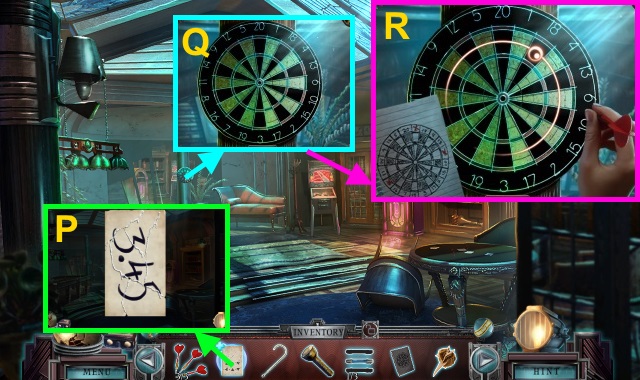
- Place the DARTS DIAGRAM and DART (3/3) for a mini-game (Q).
- Solution (R): Throw the dart when the red circles line up.
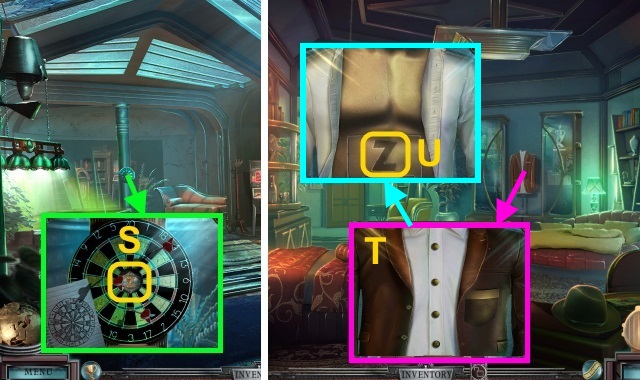
- Take the Z BUCKLE (S).
- Walk down.
- Remove the jacket and shirt (T); place the Z BUCKLE (U).
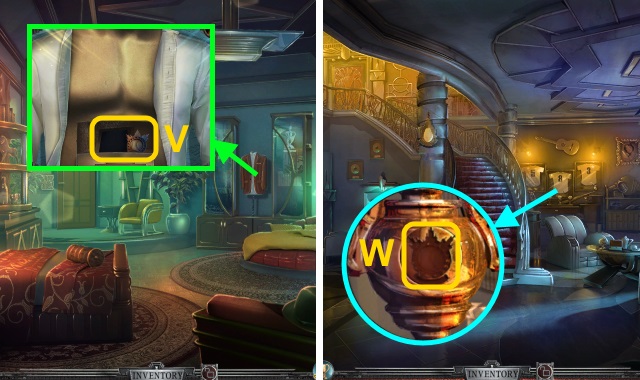
- Take the TROPHY INSIGNIA and CURIOSITY ROOM SLIDE (V).
- Walk down.
- Place the TROPHY INSIGNIA (W); take the GATE CONTROLS (2/3).
- Walk left.
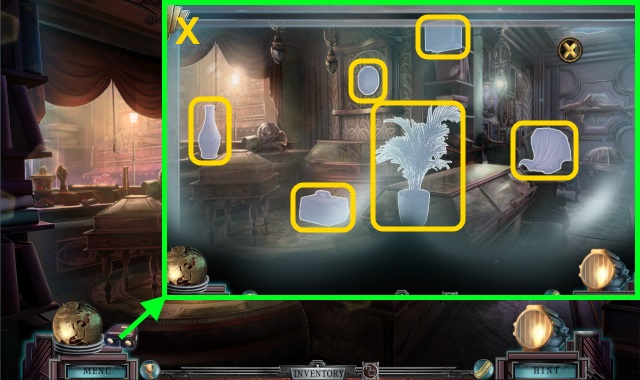
- Place the CURIOSITY ROOM SLIDE in the Film Viewer for a mini-game.
- Solution (X).
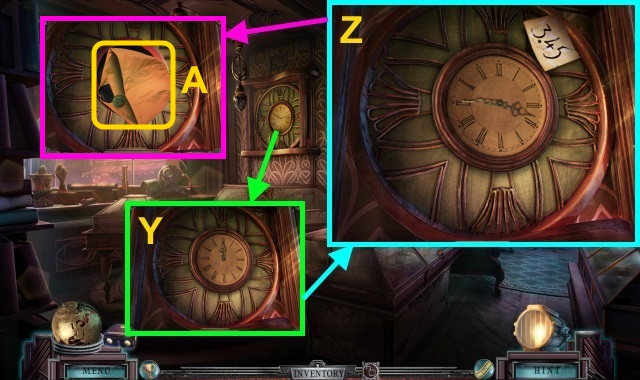
- Place the CLOCK NOTE for a mini-game (Y).
- Solution (Z).
- Take the PINBALL BUTTON and RUBBER SHEET (A).
- Go to the Game Center.
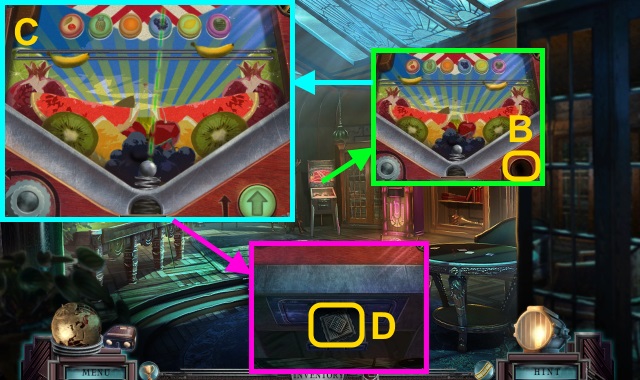
- Place the PINBALL BUTTON for a mini-game (B).
- Solution (C): shoot the pinball at the bumpers without hitting the bananas.
- Take the LOCK PLATE for a mini-game (D).
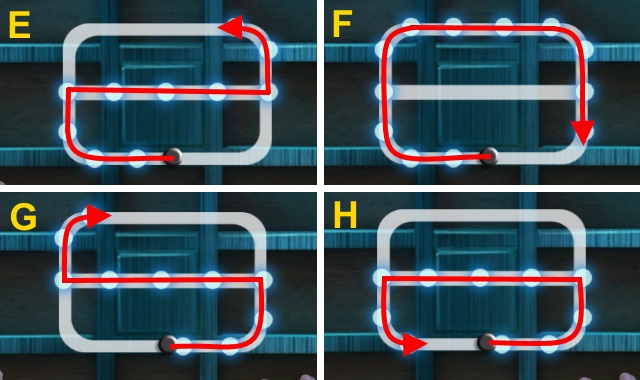
- Solution (E-H).
- Walk down.
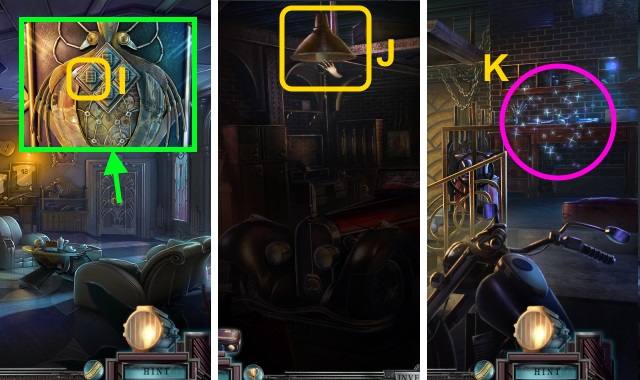
- Place the LOCK PLATE (I).
- Walk right.
- Use the FLASHLIGHT; turn on the light (J).
- Play the HOP to receive the SHIP'S MAST (K).
- Open the compartment; take the SHIP'S SAIL (L).
- Go to the Game Center.
- Place the SHIP'S MAST and SHIP'S SAIL (M).
- Examine the safe for a mini-game (N).
- Solution (O): A, B.
- Open the safe.
- Take the LOCK PIECE and SNOWFLAKE LOCK (P); flip the switch.
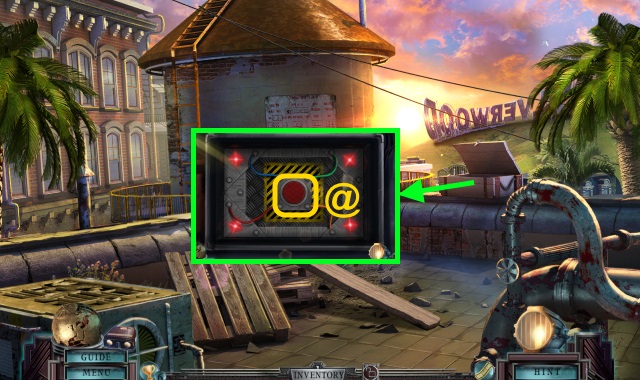
- Play the HOP to receive the CAR KEY (@).
- Walk down twice.
- Place the SNOWFLAKE LOCK (Q); take the GATE CONTROLS (3/3) (R).
- Walk right.
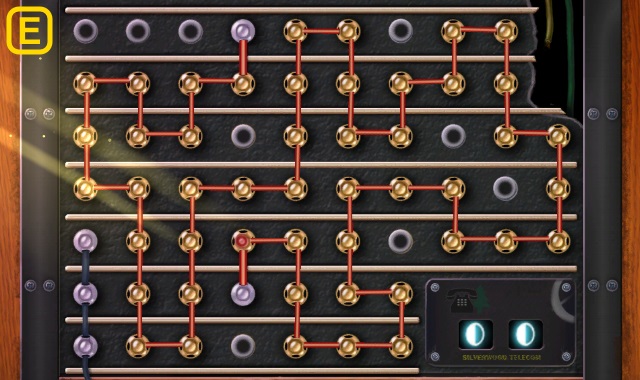
- Open the circuit box; place the GATE CONTROLS (3/3) (S).
- Examine the circuit box for a mini-game (T).
- Solution (U).
- Use the CAR KEY (V).
Chapter 3: Langdale Street
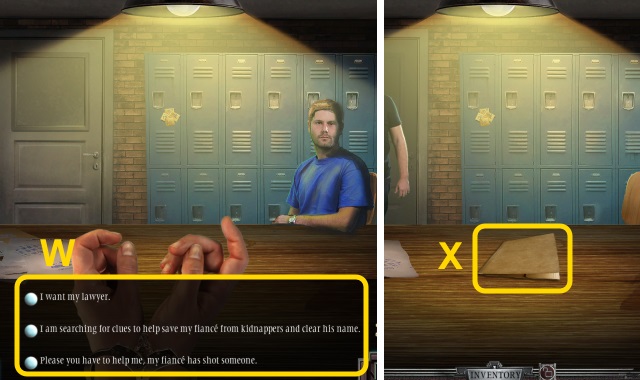
- Select two dialogue options (W).
- Read the file (X).
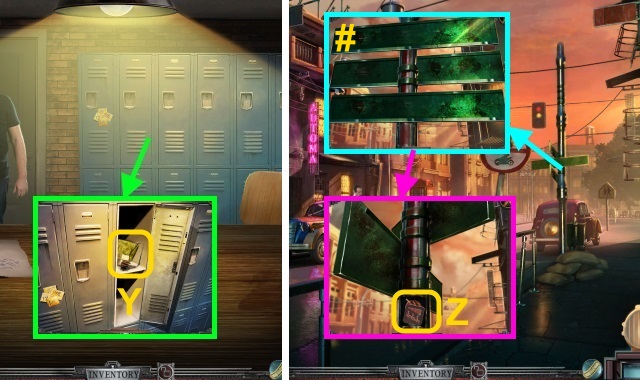
- Open the locker; take the DESERT ROSE CRYSTAL, RUBBER SHEET, LOCK PIECE, and GLASSES TEMPLE (Y).
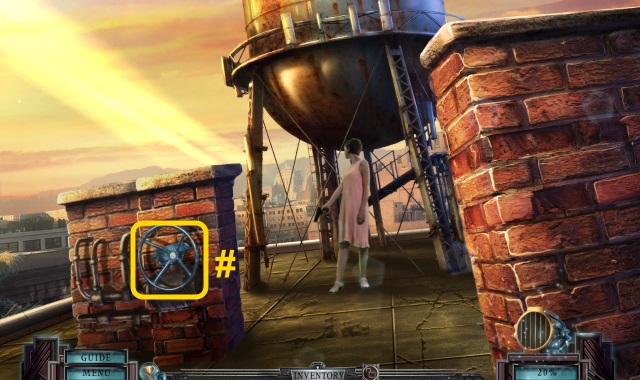
- Turn each sign twice (#); take the CINEMA PLAQUE and PIECE OF WIRE (Z).

- Move the leaves; take the FEED DISH (A) and PARCEL (B).
- Use the RUBBER SHEET to take the BROKEN FUSE (C).
- Take the FUSE MANUAL (@) and PHONE BOOTH COMBINATION.
- Open the PARCEL; take the VALVE and BIRD SEED (D).
- Walk forward.
- Play the HOP to receive the TOY BUCKET (E).
- Talk to the man (F).
- Examine the board for a mini-game (G).
- Solution (H): A-B, C-D, D-E.
- Take the STAR COINS (1/2) (I).
- Place the FEED DISH and BIRD SEED (J); take the PIECE OF GLASS (K).
- Walk down.
- Use the DESERT ROSE CRYSTAL and TOY BUCKET to receive the BUCKET WITH SAND (L).
- Use the FUSE MANUAL, PIECE OF WIRE, BUCKET WITH SAND, and PIECE OF GLASS on the BROKEN FUSE to receive the WORKING FUSE (M).
- Place the WORKING FUSE (N).
- Place the PHONE BOOTH COMBINATION; press the buttons (O).
- Take the PUNCH CARD (P).
- Walk forward.
- Insert the PUNCH CARD; press the button (R).
- Move the coins; take the STAR COINS (2/2) (S).
- Walk down.
- Insert the STAR COINS (2/2) (T).
- Examine the phone for a mini-game (U).
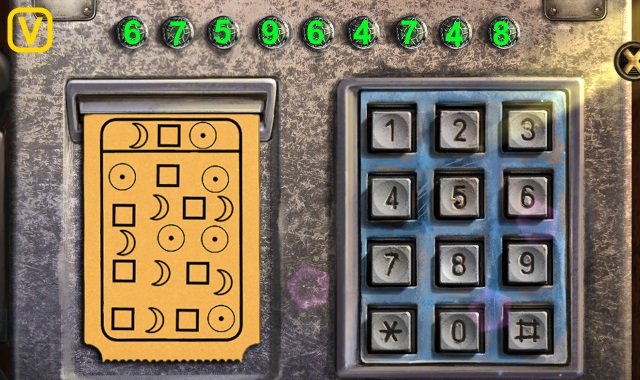
- Solution (V).
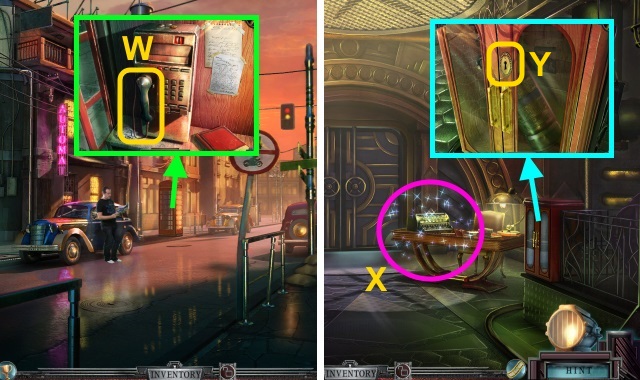
- Use the phone (W).
- Examine the typewriter; play the HOP to receive the MINIATURE LAUREL WREATH (X).
- Use the GLASSES TEMPLE (Y); open the cabinet.
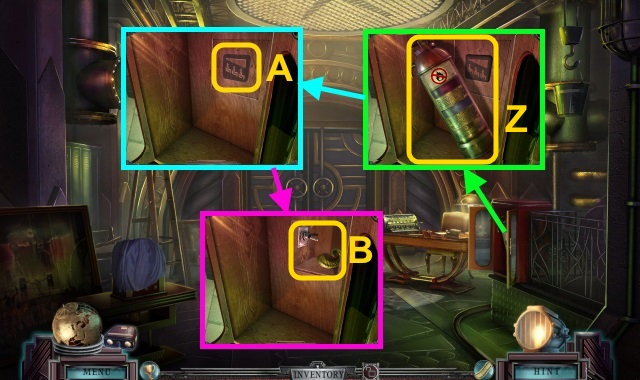
- Take the EXTINGUISHER CANNISTER (Z).
- Place the CINEMA PLAQUE (A); press it.
- Take the MONSTER HORN; flip the switch (B).
- Take the CLOTH (C).
- Walk forward.
- Take the WOODEN PLANKS (1/3) (D).
- Walk left.
- Take the WOODEN PLANKS (2/3) (E).
- Place the MINIATURE LAUREL WREATH (F); take the COMBINATION TUMBLER (G).
- Place the MONSTER HORN (H); take the VACUUM TUBE (I).
- Move the armor; take the KNOB (J).
- Walk down.
- Place the KNOB (K); take the HAND RAKE and EXTINGUISHER HOSE (L).
- Place the EXTINGUISHER HOSE and VALVE on the EXTINGUISHER CANNISTER to make the FIRE EXTINGUISHER (M).
- Walk down.
- Open the radio; place the VACUUM TUBE (N) and radio parts.
- Take the DRAWING (O).
- Go to the Action-Adventure Room.
- Place the DRAWING (P).
- Find the pieces to receive the VAMPIRE SYMBOL (Q).
- Use the FIRE EXTINGUISHER (R).
- Open the case; take the HAND WHEEL, ANKH SYMBOL (S), and WOODEN PLANKS (3/3) (T).
- Walk down.

- Place the VAMPIRE SYMBOL and ANKH SYMBOL (U); press the button (V).
- Take the CODE (1/2) (W).
- Examine the floor for a mini-game (X).

- Solution (Y).
- Take the CIVIC MEDALLION and CODE (2/2) (Z).
- Place the COMBINATION TUMBLER and CODE (2/2); enter the combination (A).
- Walk right.
- Play the HOP to receive the HEXAGONAL COIN (B).
- Take the TRACING WHEEL and wig for a mini-game (C).
- Solution (D).
- Take the CIVIC CREST (E).
- Place the CIVIC CREST on the CIVIC MEDALLION to make the CIVIC REGALIA (F).
- Walk forward.
- Use the TRACING WHEEL to take the PAPER PATTERN (H).
- Take the PIPE CLAMP (I).
- Take the LUBRICANT (J).
- Go to the Bunker Airlock.
- Place the WOODEN PLANKS (3/3) (K).
- Open the grate; take the ALUMINUM FOIL and SURVIVAL SAW (L).
- Go to the Action-Adventure Room.
- Use the LUBRICANT (M); take the COTTON (N).
- Go to the Dressing Room.
- Place the CLOTH and PAPER PATTERN (O); use the TRACING WHEEL.
- Use the ALUMINUM FOIL and COTTON (P).
- Turn the handle (Q); take the INSULATING GLOVES (R).
- Walk forward.
- Use the SURVIVAL SAW (S); connect the wires.
- Use the HEXAGONAL COIN (T); Take the BOTTLE OF WATER (U).
- Go to the Action-Adventure Room.
- Use the INSULATING GLOVES and BOTTLE OF WATER for a mini-game (V).
- Solution (W, X): A, Bx3, Ax2, B, C, Bx3, Ax2, B, Ax2, B.
- Walk forward.
- Play the HOP to receive the DRESSING ROOM SLIDE (Y).
- Place the HANDLE WHEEL; turn it (Z).
- Pull the lever (A); take the PLASTIC HANDLE (B).
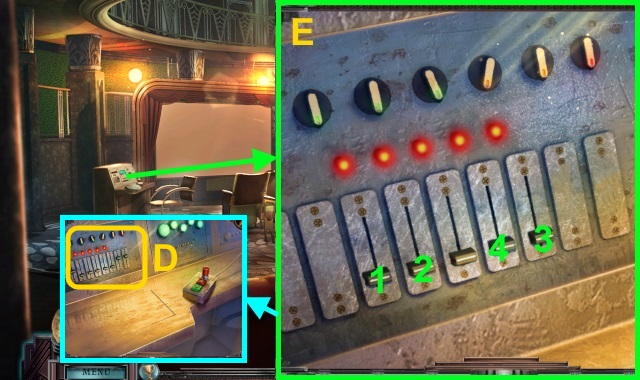
- Examine the dial for a mini-game (D).
- Solution (E).
- Take the GOOD LUCK CHARM and FILM BOX.
- Place the LOCK PIECE on the FILM BOX (F); take the FILM PIECES (G).
- Go to the Dressing Room.
- Place the DRESSING ROOM SLIDE in the Film Viewer for a mini-game.
- Solution (H).
- Flip the switch (I); open the case.
- Move the mannequin; take the TWINE (J).
- Place the CIVIC REGALIA.
- Take the case files and SEAT LIFTER KEY (K).
- Go to the Screening Room.
- Place the SEAT LIFTER KEY (L).
- Move the popcorn; take the GLUE (M).
- Go to the Dormitory.
- Place the PLASTIC HANDLE, FILM PIECES, and GLUE (N); take the FILM.
- Go to the Screening Room.
- Place the FILM (O).
- You receive the ORIGINAL FILM REEL.
Chapter 4: The Abandoned Neighborhood
- Place the GOOD LUCK CHARM (P); take the OLD PARCEL (Q).
- Take the COAT HANGER (R).
- Place the TWINE on the COAT HANGER to make the GRAPPLING HOOK (S).
- Open the OLD PARCEL; take the REEL SYMBOL (T).
- Walk forward.
- Take the SKIMMER HANDLE (U).
- Move the pillow; take the NAIL CLIPPER (V).
- Pull the string (W).
- Go up.
- Use the GRAPPLING HOOK (X).
- Find the objects to receive the BRASS KNOB (Z).
- Walk down twice.
- Use the NAIL CLIPPERS to take the WIRING (A).

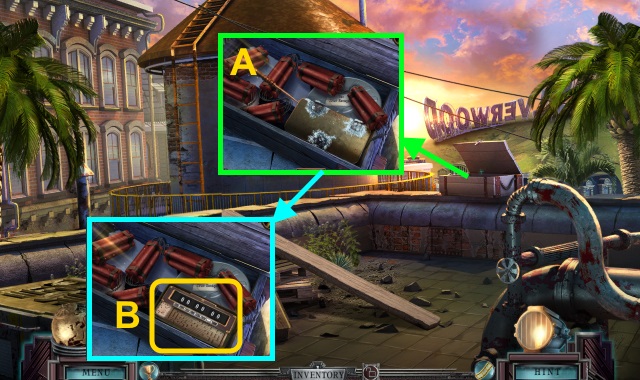
- Place the SKIMMER HANDLE and PIPE CLAMP (B).
- Play the HOP to receive the LINCHPIN (C).
- Walk forward.
- Place the BRASS KNOB and LINCHPIN (D); remove the case.
- Take the KITCHEN SPONGE and TYPEWRITER BRUSH (E).
- Examine the stand for a mini-game (F).
- Solution (G).
- Take the PORCELAIN THIMBLE (H).
- Go up.
- Place the REEL SYMBOL (I).
- Place the WIRING, and PORCELAIN THIMBLE (J); flip the switches.

- Play the HOP to receive the CABINET ORNAMENT (K).
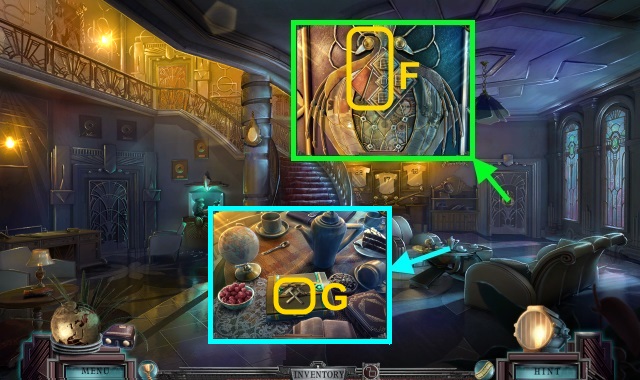
- Take the script (@); use the TYPEWRITER BRUSH.
- Read the paper; take the FLOWER TOKEN (L).
- Take the UMBRELLA WIRE (M).
- Walk down.
- Place the CABINET ORNAMENT (N).
- Move the bottle; take the MARS THE AVENGER (1/3) (O).
- Read the book (P); take the ABANDONED NEIGHBORHOOD SLIDE.
- Place the FLOWER TOKEN (Q); take the MARS THE AVENGER (2/3).
- Walk down.
- Place the ABANDONED NEIGHBORHOOD SLIDE in the Film Viewer for a mini-game.
- Solution (R).
- Use the HAND RAKE; take the MARS THE AVENGER (3/3) (S).
- Go to the Attic.
- Place the MARS THE AVENGER (3/3) (T); open the case.
- Take the SPRING (U); newspaper, and BOOK SYMBOL.
- Walk down.
- Move the books (V); place the BOOK SYMBOL (W).
- Take the frame and card (X).
- Walk down.
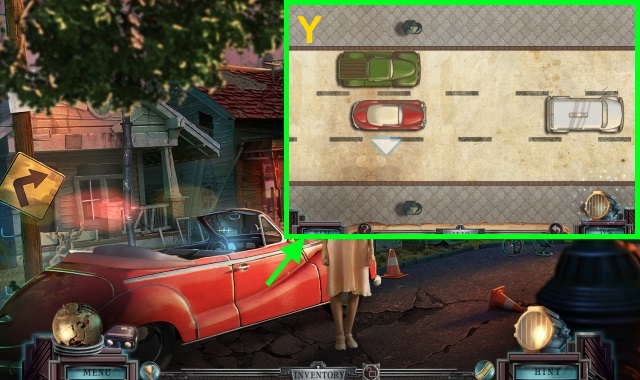
- Examine the car for a mini-game (Y).
- Solution: Use the arrows to avoid other cars.
Chapter 5: Wolf Studios
- Use the UMBRELLA WIRE (A).
- Play the HOP to receive the BANDAGES (B).
- Use the KITCHEN SPONGE (C).
- Use the BANDAGES for a mini-game (D).
- Solution (E).
- You receive the INITIALS (1/2).
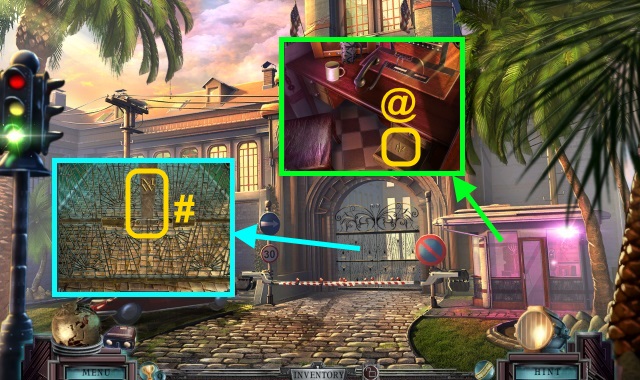
- Take the INITIALS (@).
- Place the INITIALS; take the METAL BRACKET (#).
- Walk forward.
- Move the branches (F).
- Open the door (G).
- Walk forward.
- Move the statues and books; take the METAL THORNS (1/3) (H) and OLD RAZOR (I).
- Move the pillow and sheet; take the CROCHET HOOK (J).
- Walk down.
- Use the OLD RAZOR (K); take the CLOSED BOTTLE OF COOLANT and SWITCH (L).
- Flip the switch (M).
- Open the scarecrow (N).
- Use the METAL BRACKET on the CLOSED BOTTLE OF COOLANT to receive the BOTTLE OF COOLANT (O).
- Walk forward.
- Move the debris (P); place the SPRING (Q).
- Take the BOX ORNAMENT and METAL THORNS (2/3) (R).
- Walk down.
- Place the BOX ORNAMENT; take the COPPER COIL (S) and METAL THORNS (3/3) (T).
- Place the METAL THORNS (3/3) for a mini-game (U).
- Solution (V): A-F, C-E, D-B, I-H, G-J.
- Take the BANDAGE and REGULATOR (W).
- Walk forward.
- Close the box; place the BANDAGE (X).
- Flip the switch.
- Play the HOP to receive the CAPACITOR (Y).
- Place the SWITCH, COPPER COIL, CAPACITOR, and REGULATOR; flip the switch (Z).
- Go up.
- Use the BOTTLE OF COOLANT and CROCHET NEEDLE (A).
- Open the case; examine it for the mini-game (B).
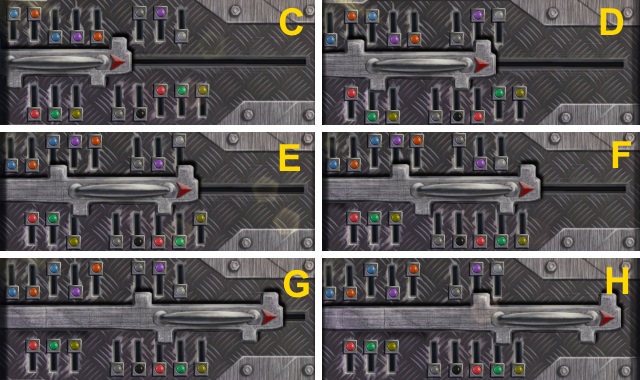
- Solution (C-H).
- Solution (I): Bx2, Ax2, Dx2, C, E, C, Ax2, C, D, C, A, E, A, Dx2, A, Ex2, A, D, A.
- Press the button (@).
- Give the ORIGINAL FILM REEL for a mini-game (J).
- Solution (K): Move when the white circles line up.
- Turn the wheel (#).
- Congratulations! You have completed Final Cut: The True Escapade.
Created at: 2014-12-22