
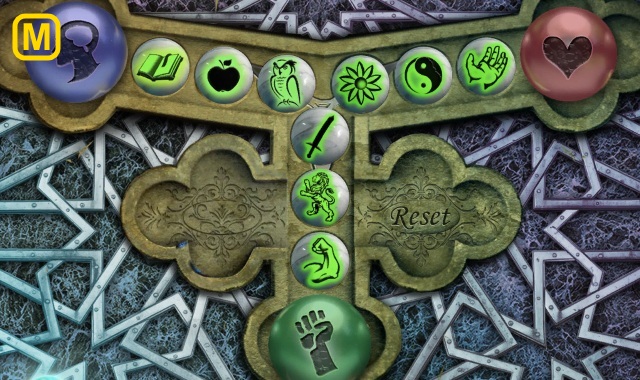
Walkthrough Menu
- General Tips
- Chapter 1: The Forest
- Chapter 2: The Wasteland
- Chapter 3: Reunited
- Chapter 4: The Shadow
General Tips
- This is the official guide for Forgotten Kingdoms: The Ruby Ring.
- This guide will not show when you have to zoom into a location; the screenshots will show each zoom scene.
- Hidden-object puzzles are referred to as HOPs. This guide will not show screenshots of the HOPs, however, it will mention when an HOP is available and the inventory item you'll collect from it.
- Use the Map to fast travel to a location.
Chapter 1: The Forest

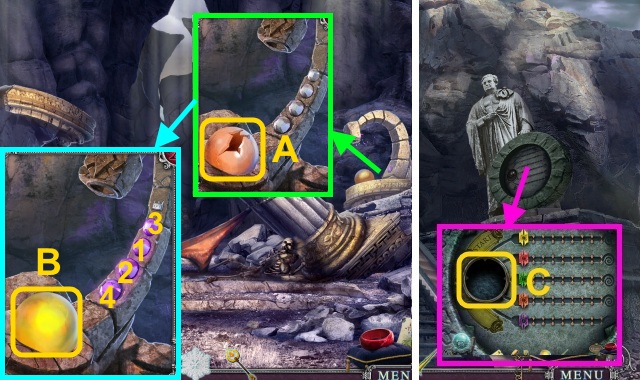
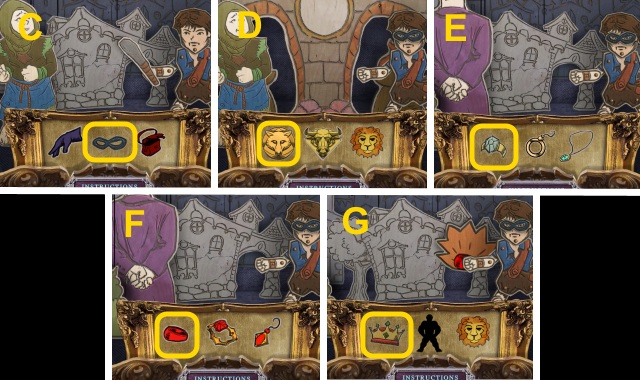
- Talk to Naya (A).
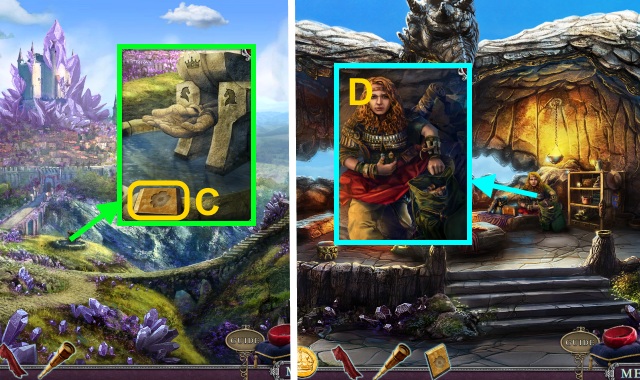
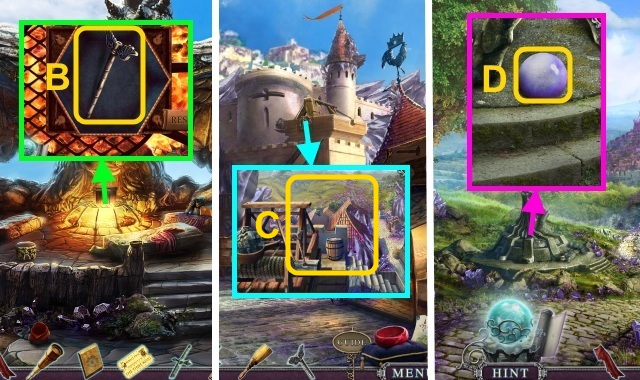
- Take the SCISSORS (B).
- Use the SCISSORS (C).
- Walk right.
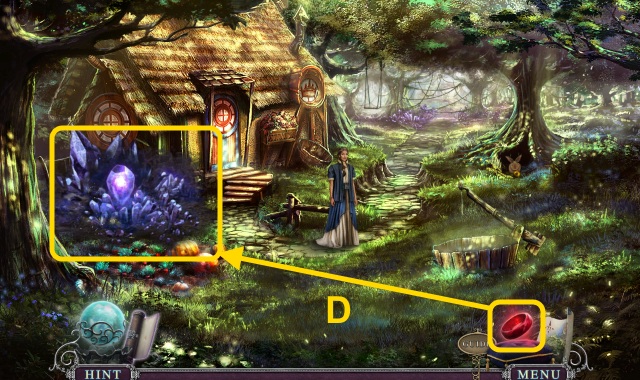
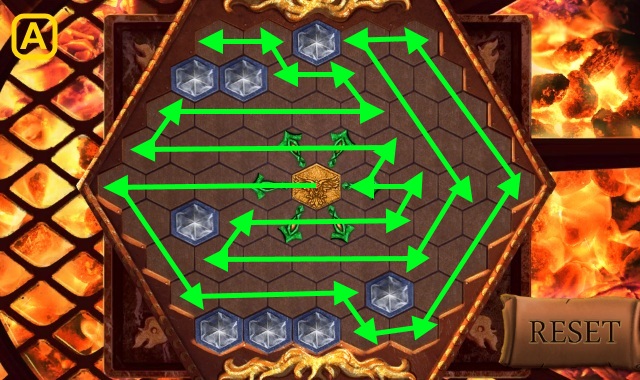
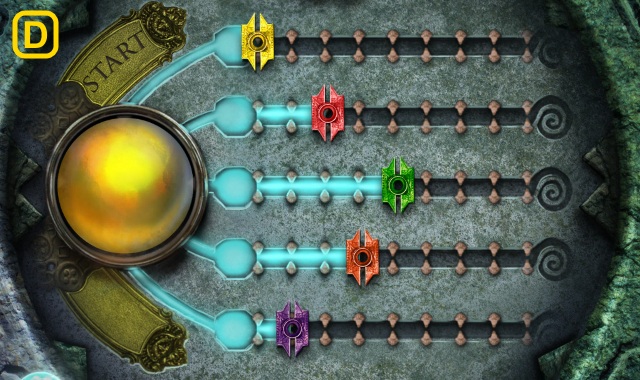
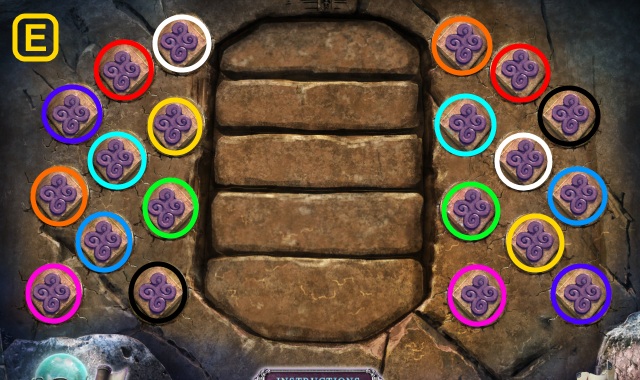
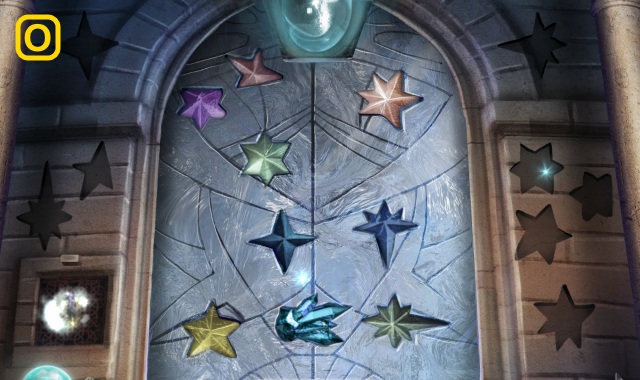
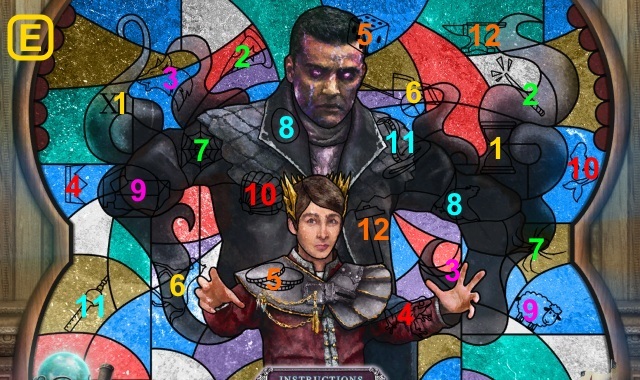
- Use the Ruby Ring for a mini-game (D).
- Solution (E).
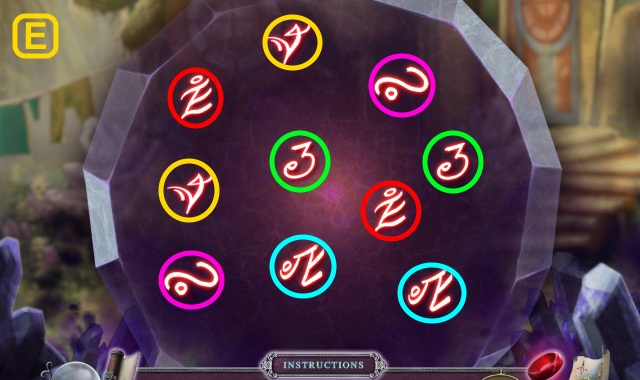
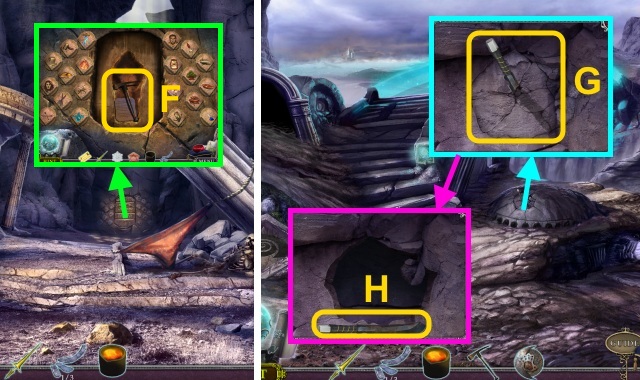
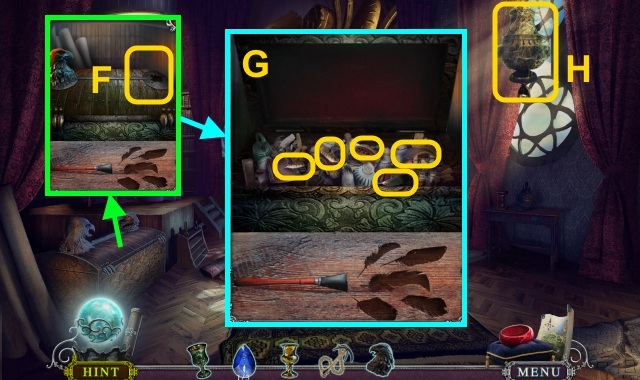
- Play the HOP to receive GROWING PLANTS WITH MAGIC (F).
- Walk left.
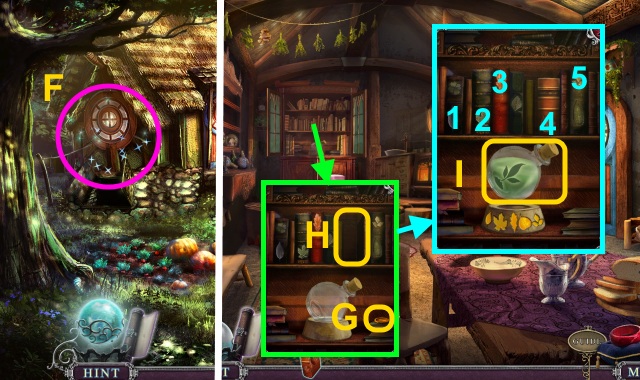
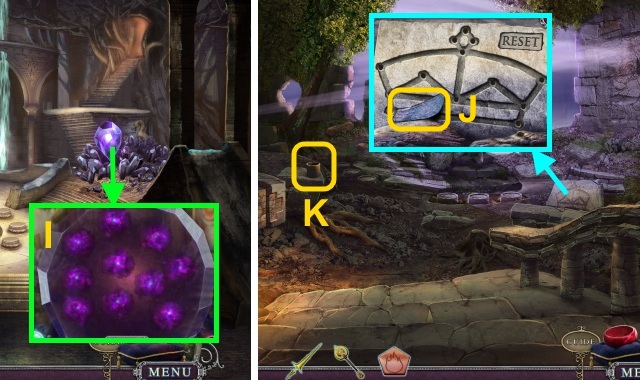
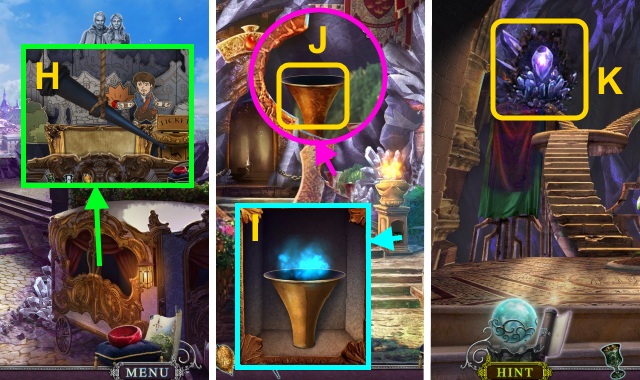
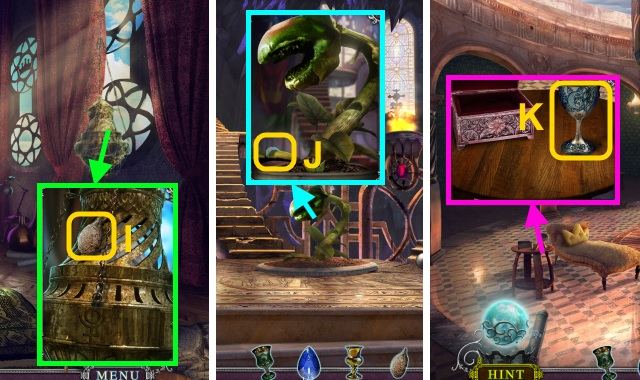
- Take the CROWN COIN (G); place GROWING PLANTS WITH MAGIC (H).
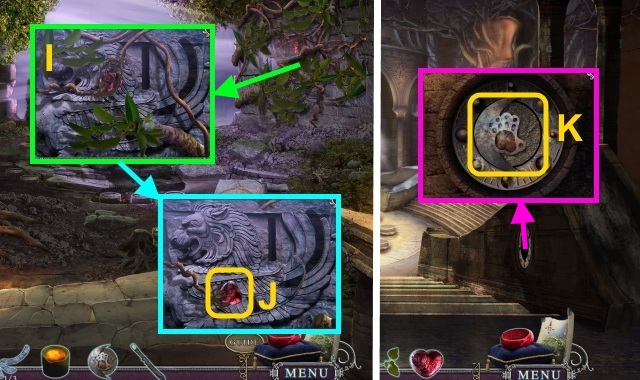
- Match the leaves; take the MAGIC GROW (I).
- Walk right.
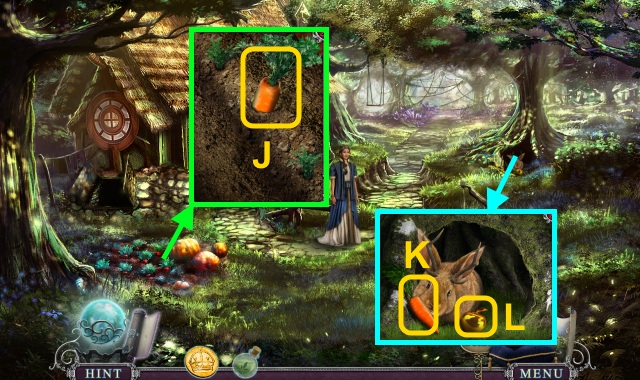
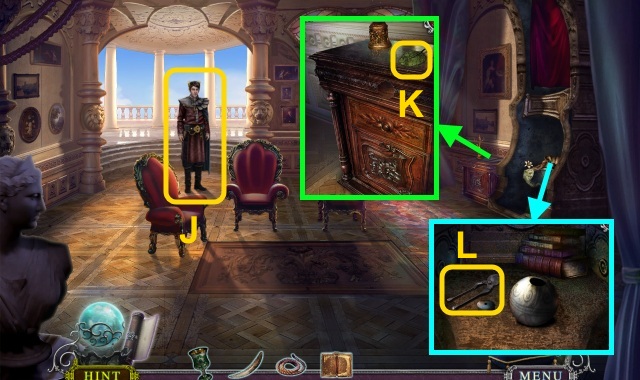
- Use the MAGIC GROW; take the CARROT (J).
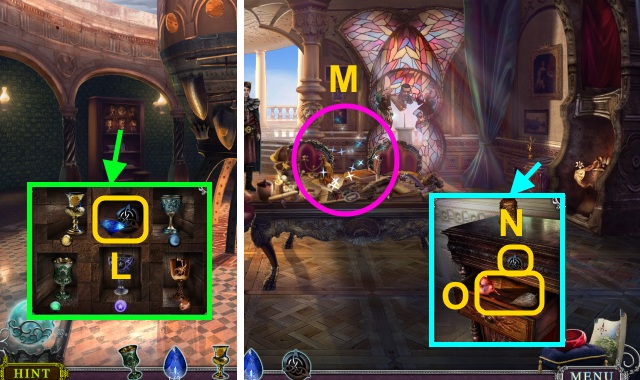
- Give the CARROT (K); take the ORNAMENTAL APPLE (L).
- Walk left.
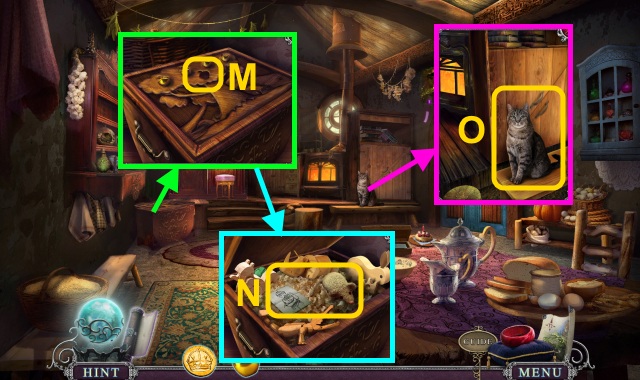
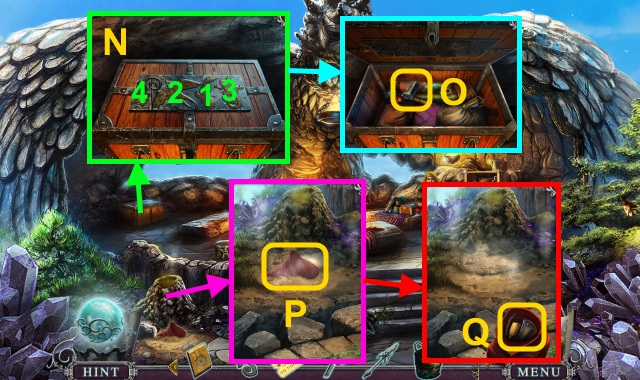
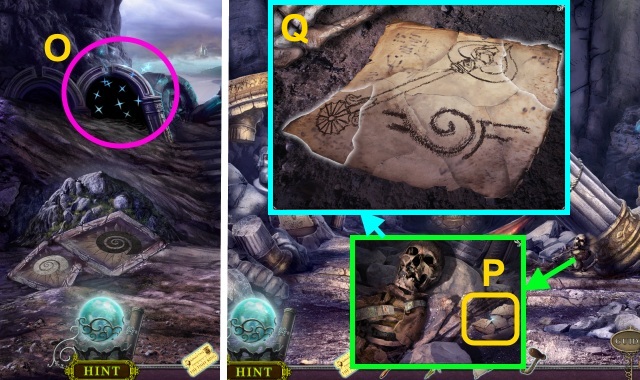
- Place the ORNAMENTAL APPLE (M); take the drawing and TOY MOUSE (N).
- Give the TOY MOUSE (O); open the cupboard.
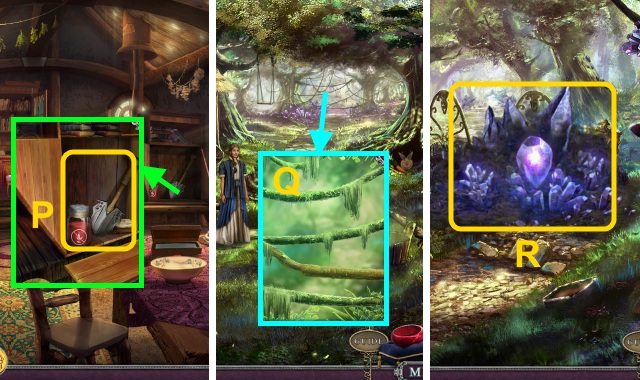
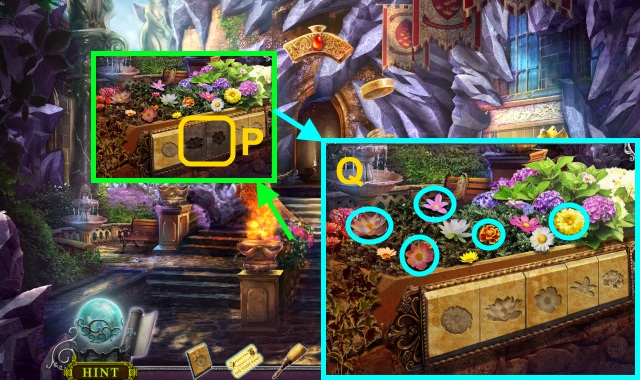
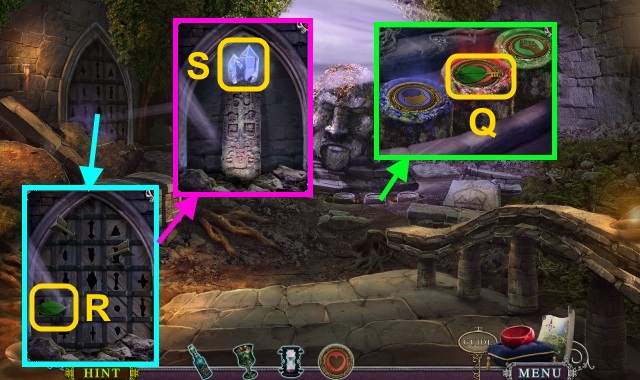
- Take the VINES-B-GONE, SPADE, and note (P).
- Walk right.
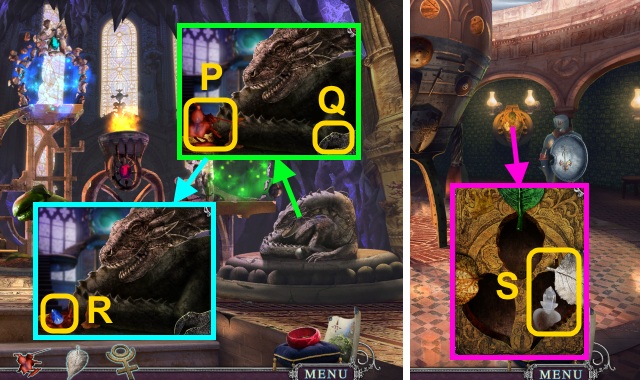
- Use the VINES-B-GONE (Q).
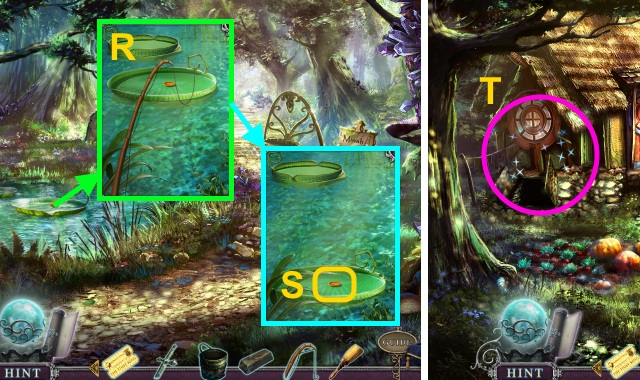
- Walk forward.
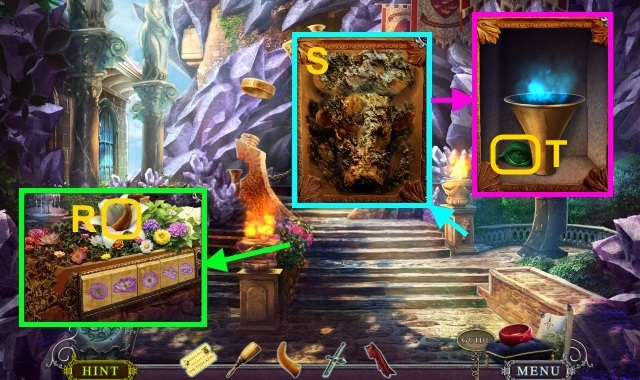
- Use the Ruby Ring for a mini-game (R).
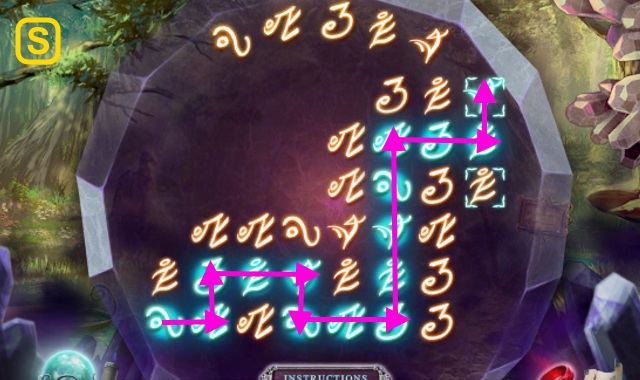
- Solution (S).
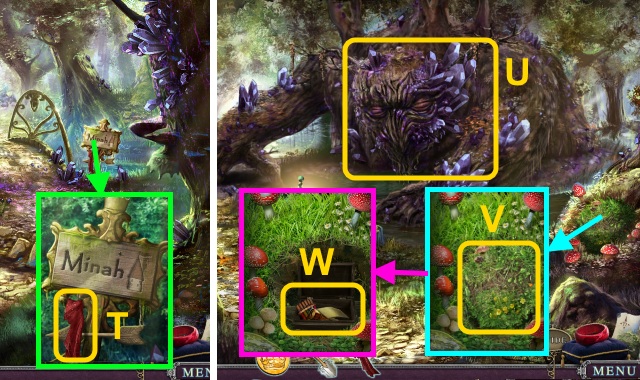
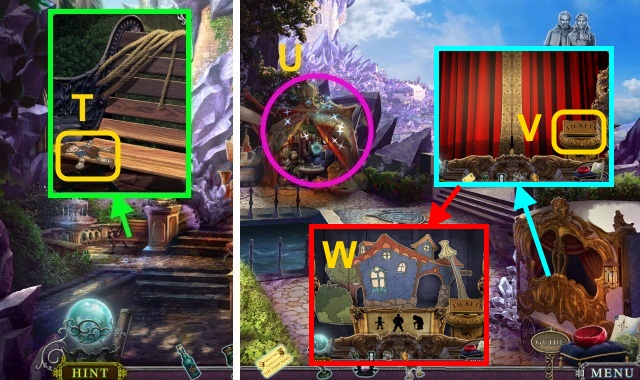
- Take the FABRIC (T).
- Walk forward.
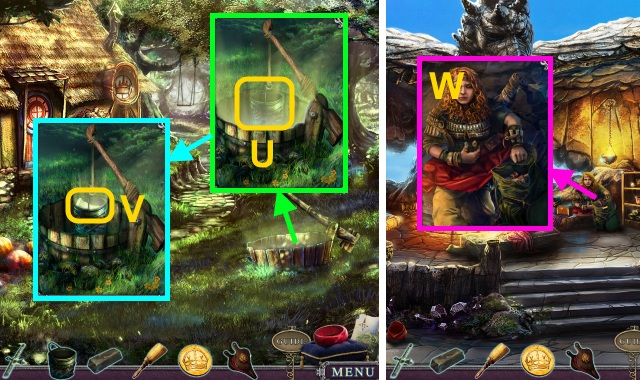
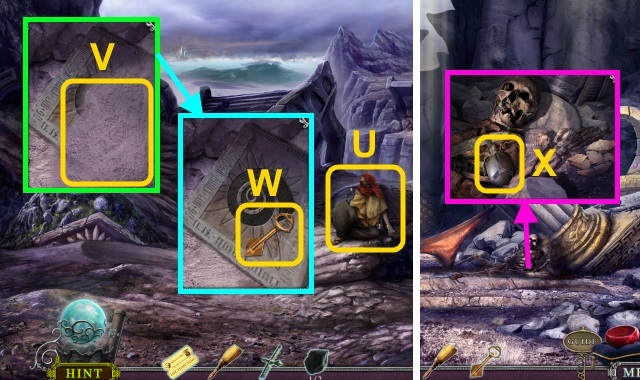
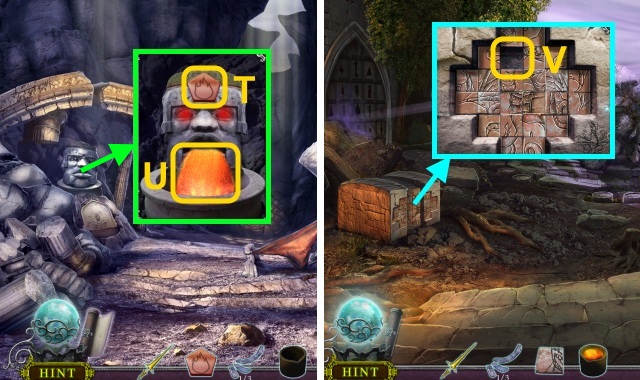
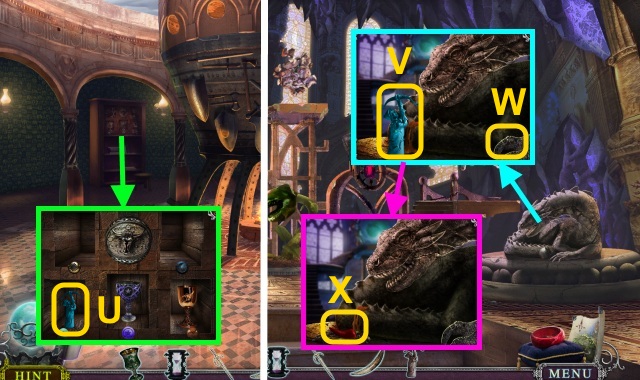
- Talk to the Spirit (U).
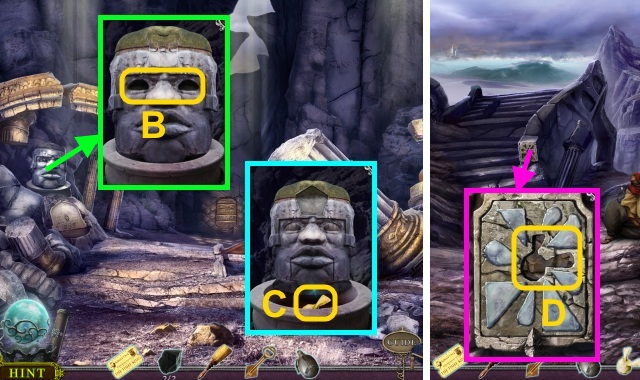
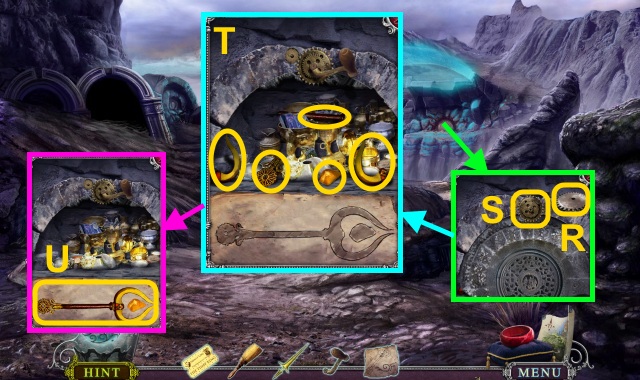
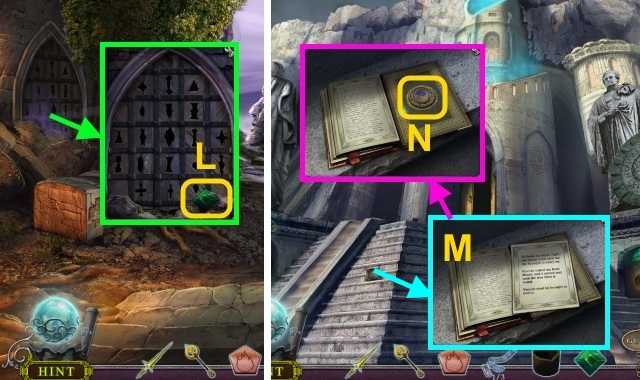
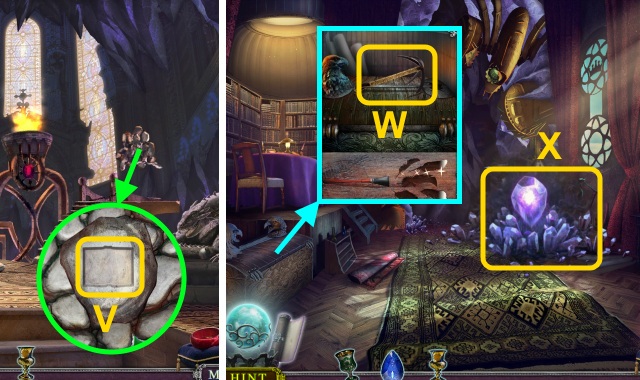
- Use the SPADE (V); open the box.
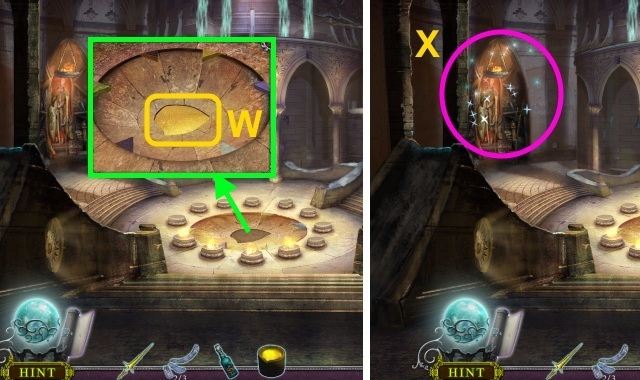
- Take the drawing, SPYGLASS, and PAN FLUTE (W).
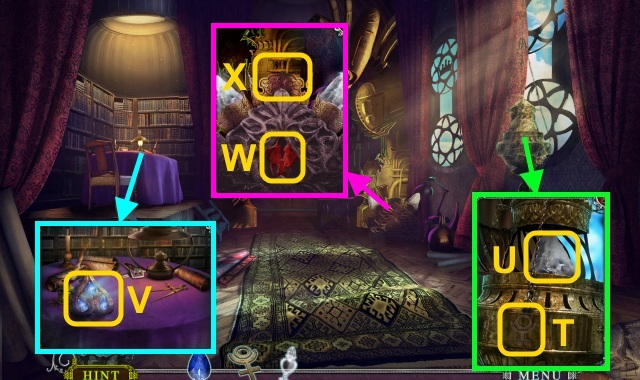
- Walk down.
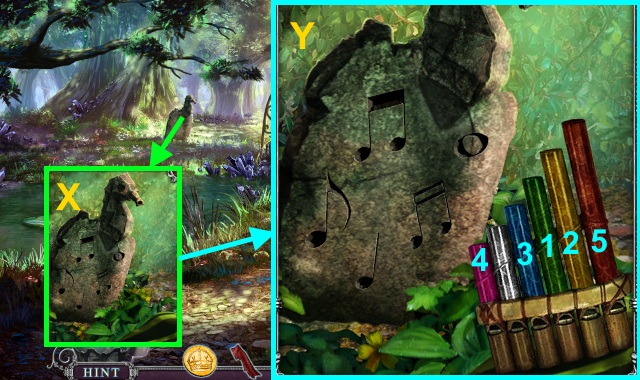
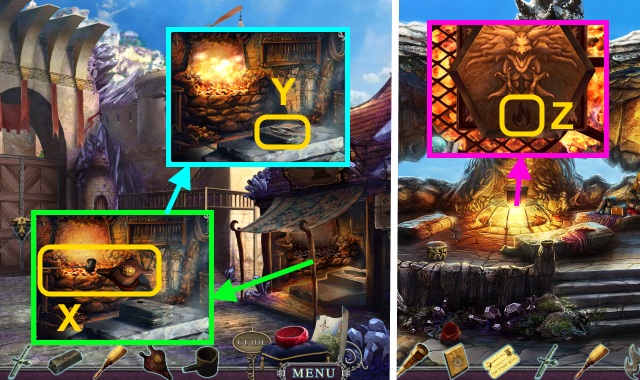
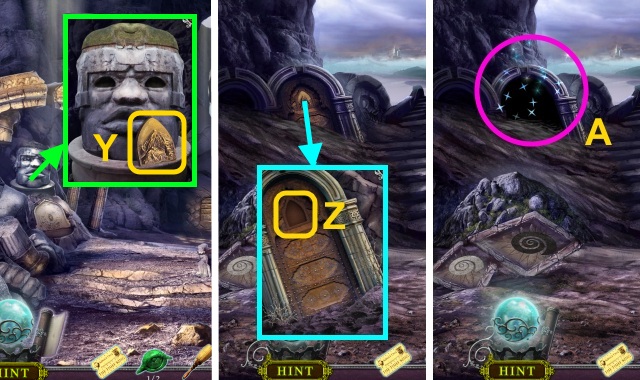
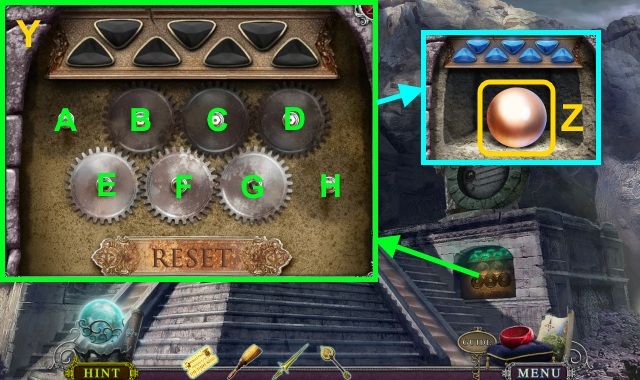
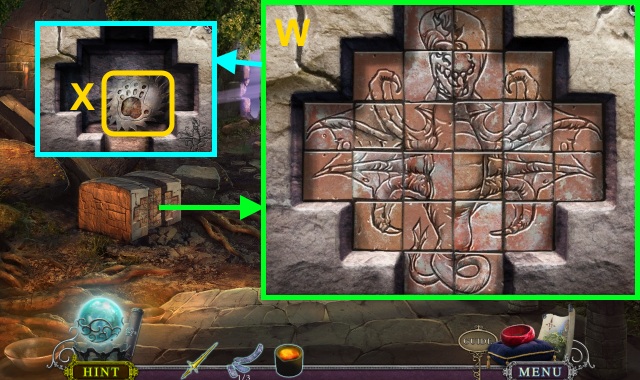
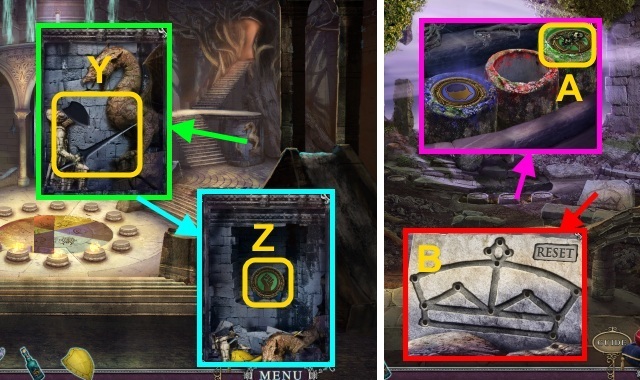
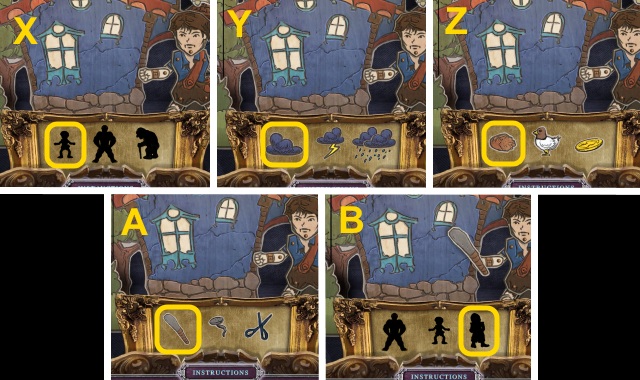
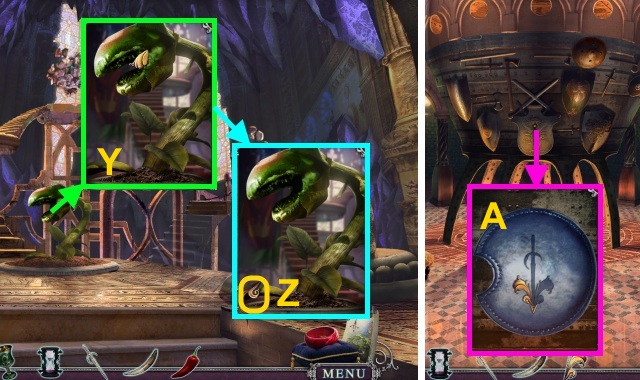
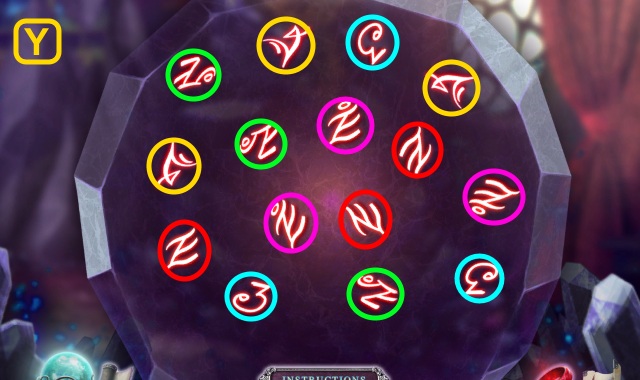
- Use the PAN FLUTE for a mini-game (X).
- Solution (Y).
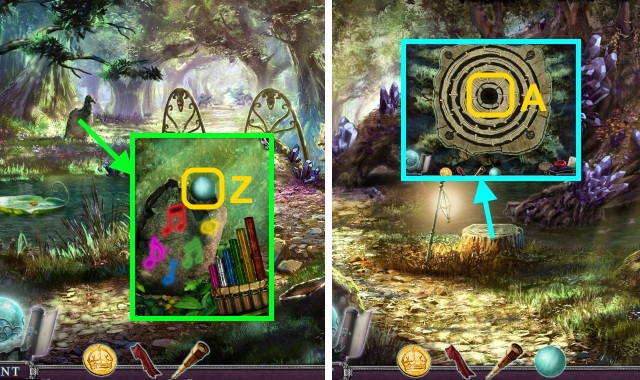
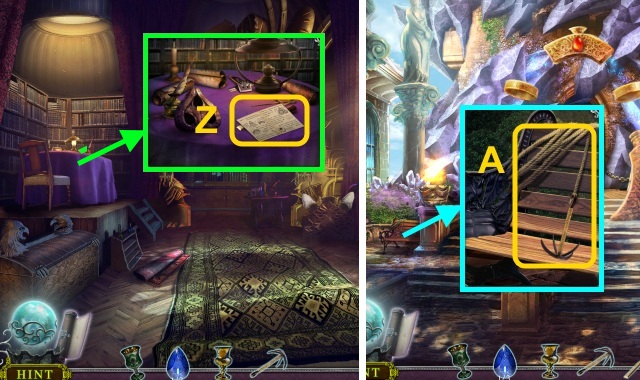
- Take the PURIFYING STONE (Z).
- Walk forward.
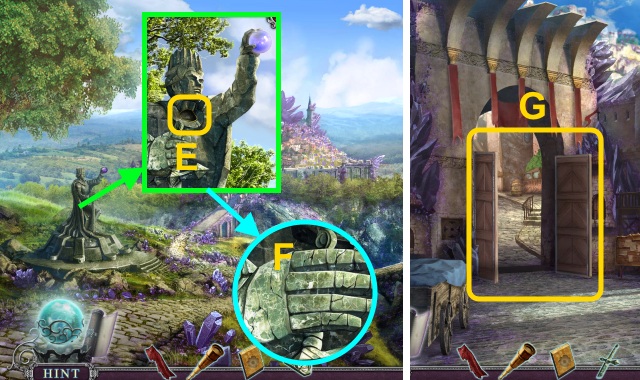
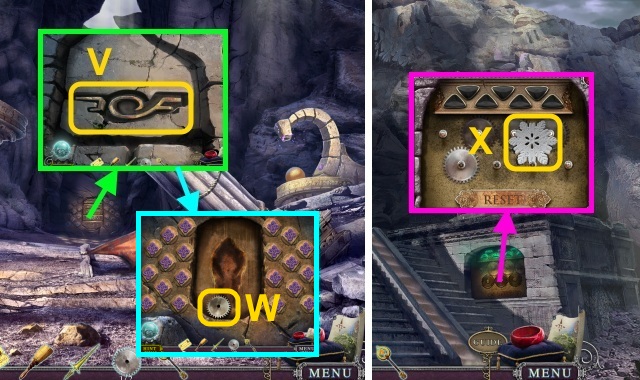
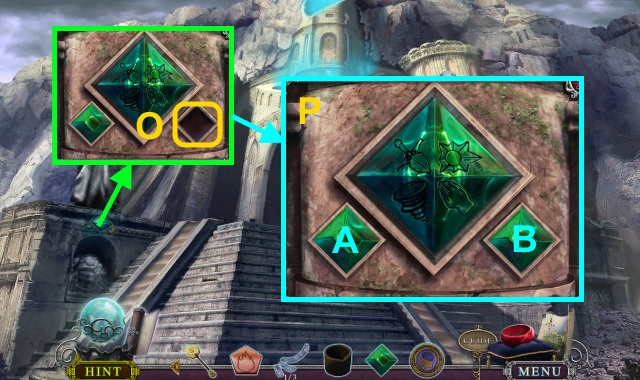
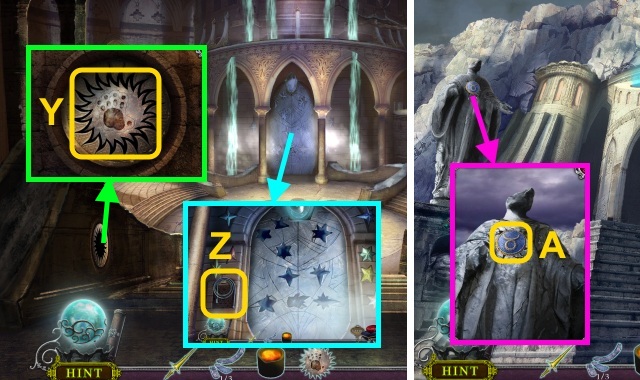
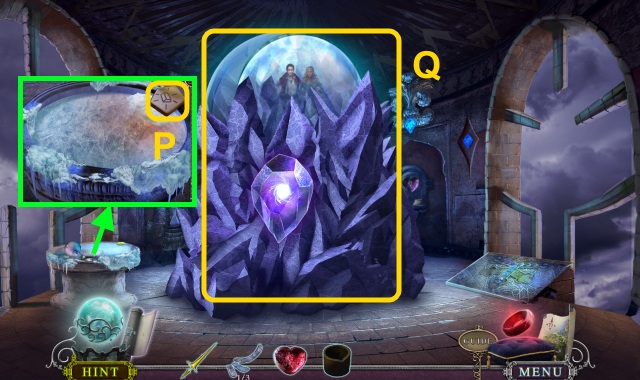
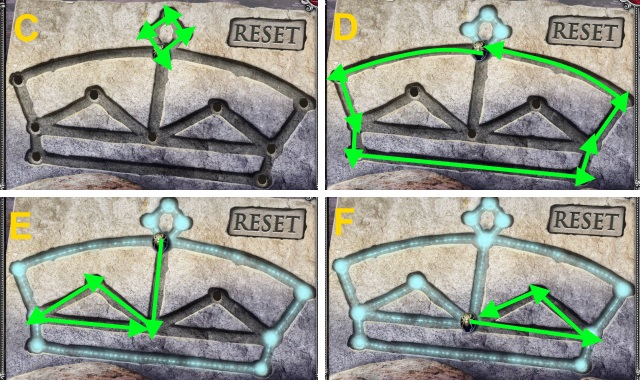
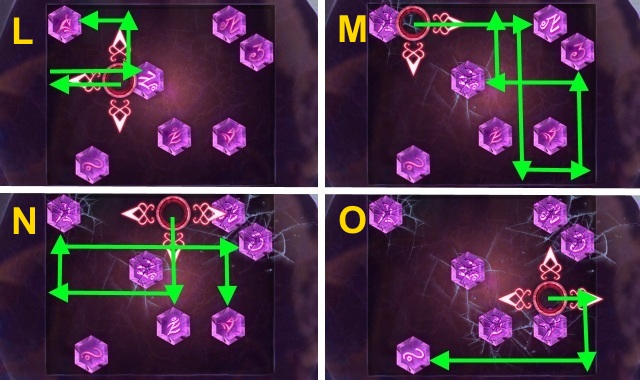
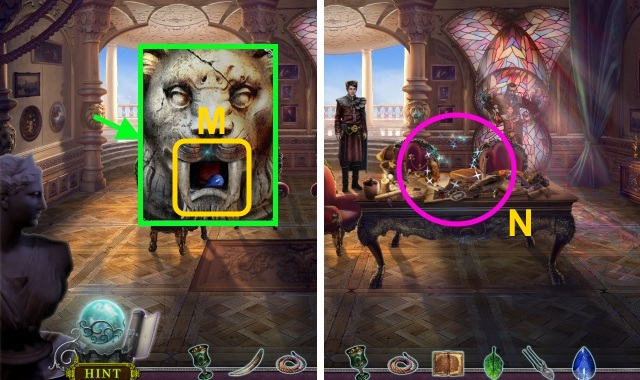
- Place the PURIFYING STONE for a mini-game (A).
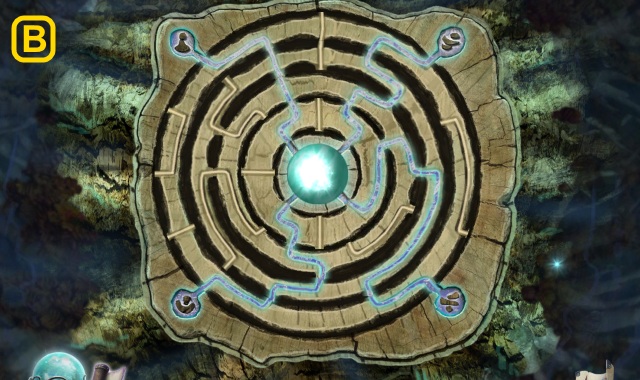
- Solution (B).
- Walk left.
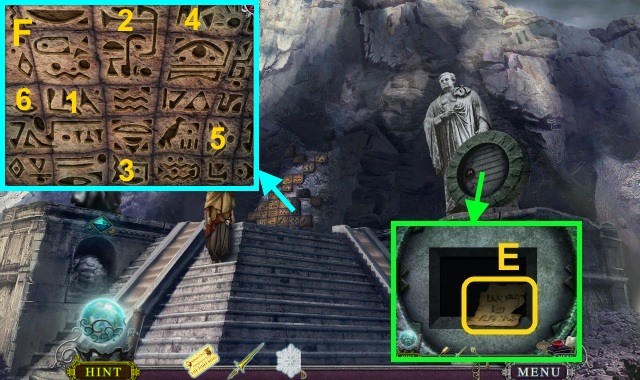
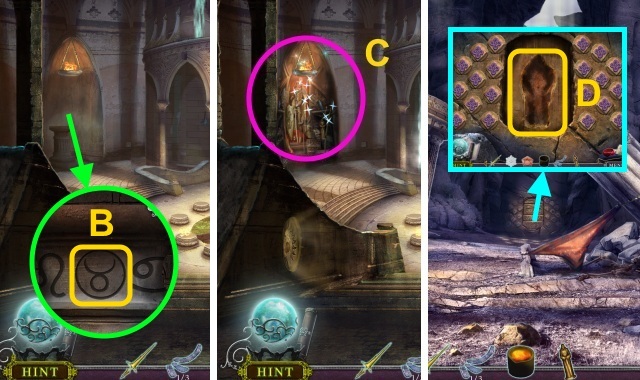
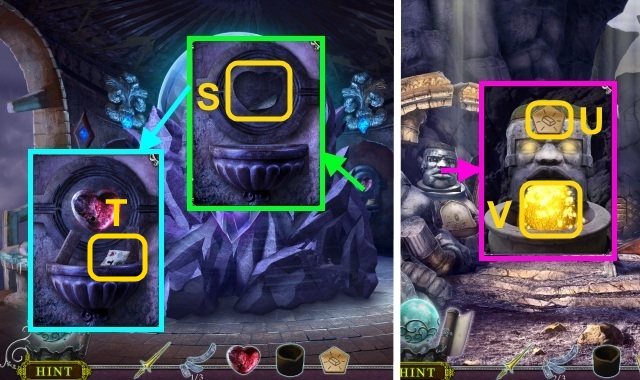
- Take the FLOWER ETCHING (C).
- Walk right.
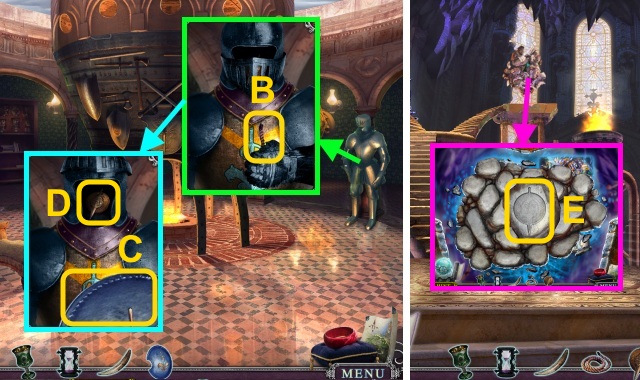
- Talk to the woman (D); give the CROWN COIN to receive the STONE MEDALLION.
- Walk down.
- Place the STONE MEDALLION (E).
- Open the hand (F); take the SHORT SWORD.
- Walk forward.
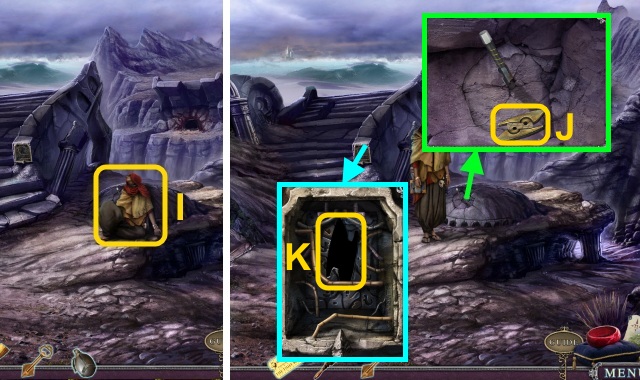
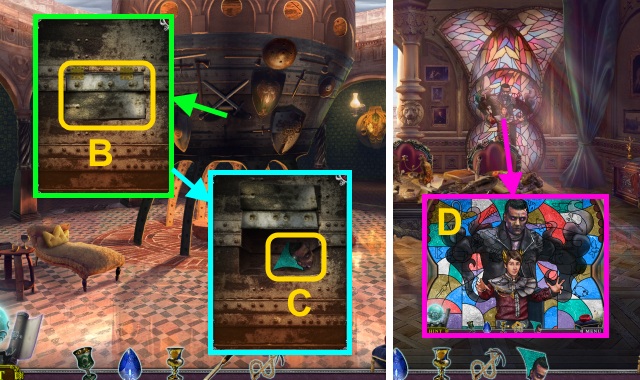
- Try to walk forward (G).
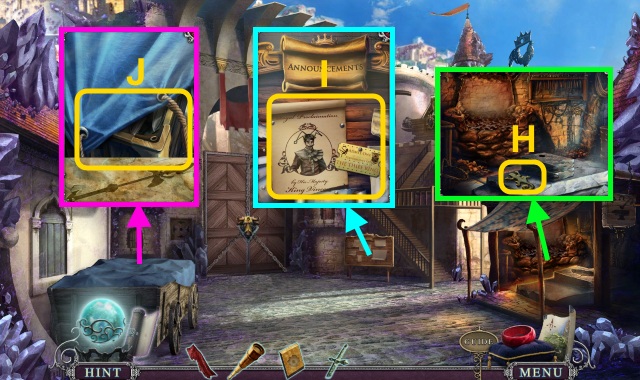
- Take the BRASS LIZARD (H).
- Take the SHOW TICKET and poster (I).
- Use the short sword (J).
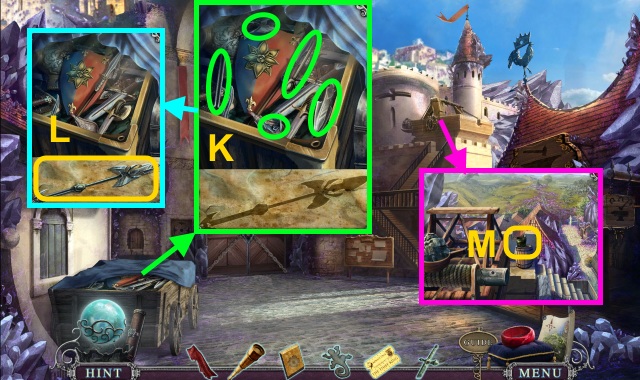
- Assemble the pieces (K); take the SILVER PIKE (L).
- Take the EMPTY BUCKET (M).
- Walk down, then right.
- Place the BRASS LIZARD; press the animals in order (N).
- Open the chest; take the IRON INGOT (O).
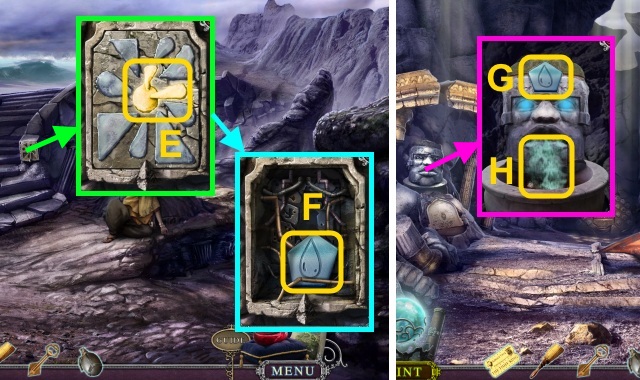
- Use the SILVER PIKE (P); take the letter, FISHING ROD, and BRUSH (Q).
- Walk down three times.
- Use the FISHING ROD (R); take the CROWN COIN (S).
- Walk down.
- Play the HOP to receive the BELLOWS (T).
- Place the EMPTY BUCKET (U); lower it.
- Retrieve the BUCKET; take the BOTTLED SUNLIGHT (V).
- Go to the Phoenix Trading Post.
- Talk to the woman; give the CROWN COIN to receive the CRUCIBLE (W).
- Walk down, then forward.
- Use the CRUCIBLE, IRON INGOT, and BELLOWS (X); pour the metal.
- Take the FIRE EMBLEM (Y).
- Walk down, then right.
- Place the FIRE EMBLEM for a mini-game (Z).
- Solution (A).
- Take the METAL LEVER (B).
- Walk down, then forward.
- Place the METAL LEVER (C); use the SPYGLASS.
- Walk down.
- Move the stones; take the MAGIC ORB (D).
- Walk forward.

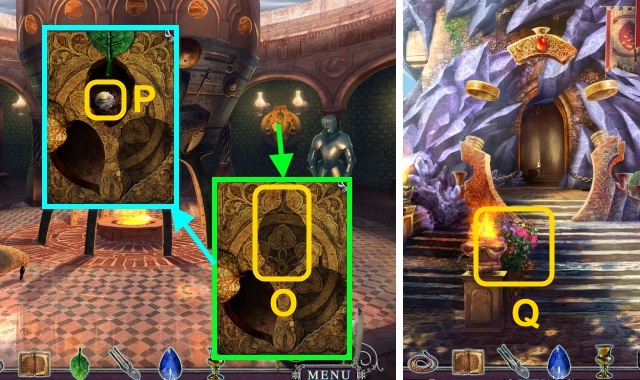
- Place the MAGIC ORB (E).
- Walk forward.
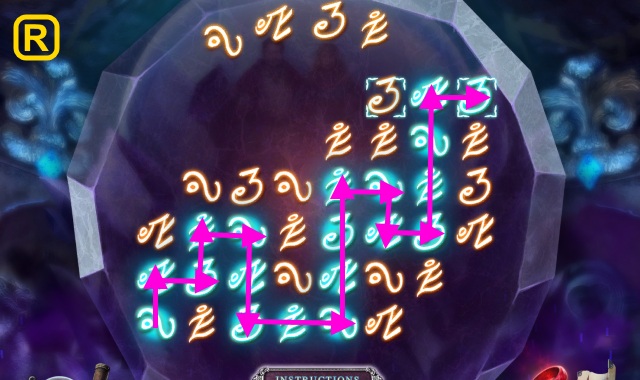
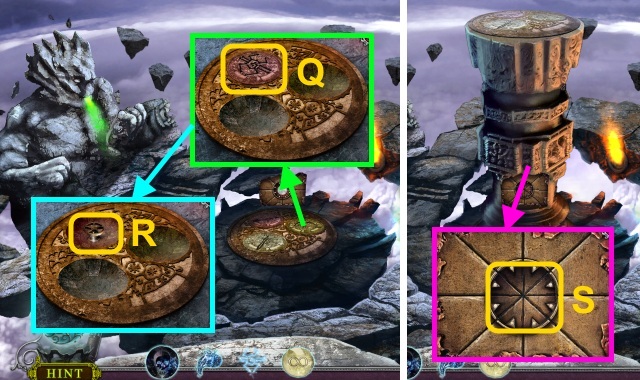
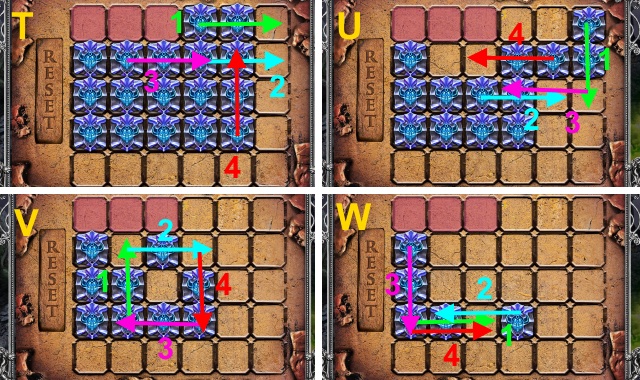
- Use the Ruby Ring for a mini-game (F).
- Solution (G, H).
- Use the BOTTLED SUNLIGHT (I).
- Play the HOP to receive the HORN (J).
- Use the SHORT SWORD; take the CROWN COIN (K).
- Walk down twice, then right.

- Talk to the woman (L); give the CROWN COIN to receive the TRAVELER'S TOKEN.
- Walk down.
- Place the TRAVELER'S TOKEN; take the GOLDEN LION (M).
- Walk forward twice.
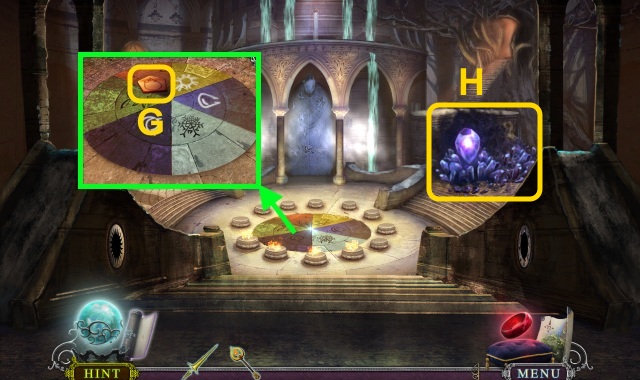
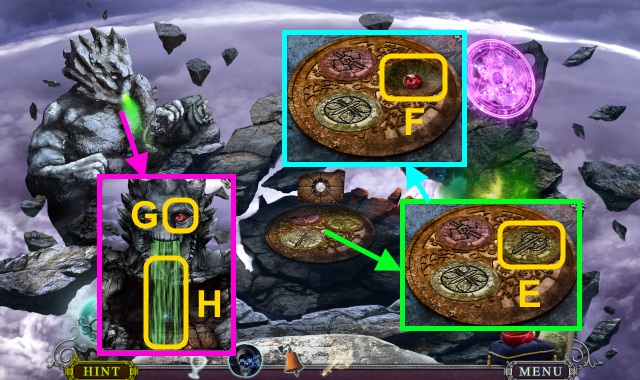
- Place the GOLDEN LION (N); take the FLOWER ETCHING (O).
- Walk left.
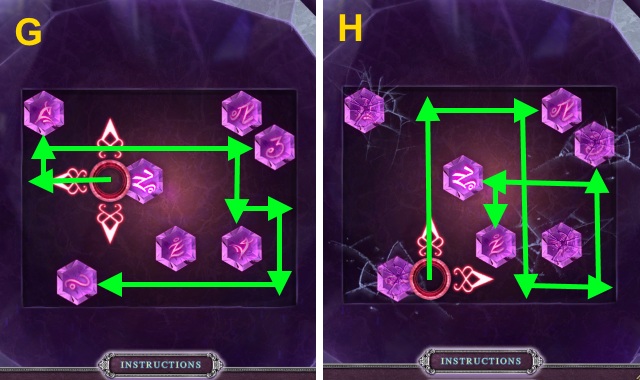
- Place the FLOWER ETCHINGS for a mini-game (P).
- Solution (Q).
- Take the HORN (R).
- Use the FABRIC (S); place the HORNS.
- Take the JADE EYE (1/2) (T).
Chapter 2: The Wasteland
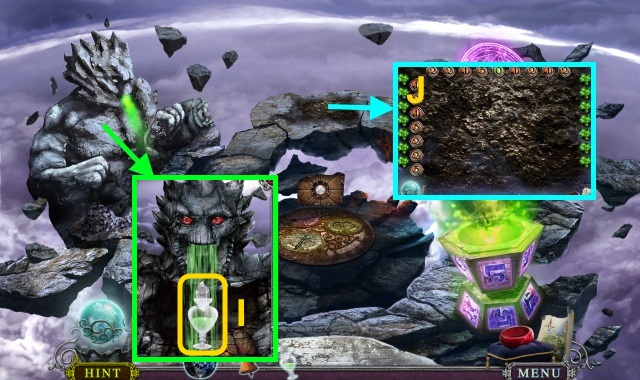
- Talk to the woman (U).
- Use the BRUSH (V); take the DIAMOND KEY (W).
- Walk right.
- Use the SHORT SWORD (X); take the EMPTY CANTEEN.
- Take the SATURN INSIGNIA (Y).
- Walk down.
- Place the SATURN INSIGNIA (Z).
- Play the HOP to receive the JADE EYE (2/2) (A).
- Walk right.
- Place the JADE EYE (2/2) (B); take the SUN FRAGMENT (C).
- Walk down.
- Place the SUN FRAGMENT for a mini-game (D).
- Solution is random (E).
- Take the WATER TOKEN (F).
- Walk right.
- Place the WATER TOKEN (G); use the EMPTY CANTEEN to receive the WATER (H).
- Walk down.
- Give the WATER (I).
- Take the LIGHTNING CONDUCTOR (J).
- Place the LIGHTNING CONDUCTOR (K).
- Cross the bridge.
- Use the DIAMOND KEY (L); take the GOLDEN LANCE (M).
- Take the TORN PARCHMENT (N).
- Walk down.
- Play the HOP to receive the CRANK HANDLE (O).
- Walk right.
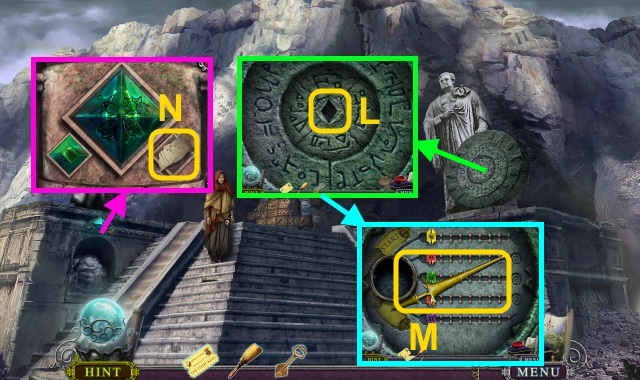
- Place the TORN PARCHMENT for a mini-game (P).
- Solution (Q).
- You receive the SCEPTER SCHEMATIC.
- Walk down.
- Take the GEAR (1/2) (R); place the CRANK HANDLE (S).
- Place the SCEPTER SCHEMATIC; gather the parts (T).
- Take the SCEPTER OF SAND (U).
- Walk right.
- Use the SCEPTER OF SAND (V); take the GEAR (2/2) (W).
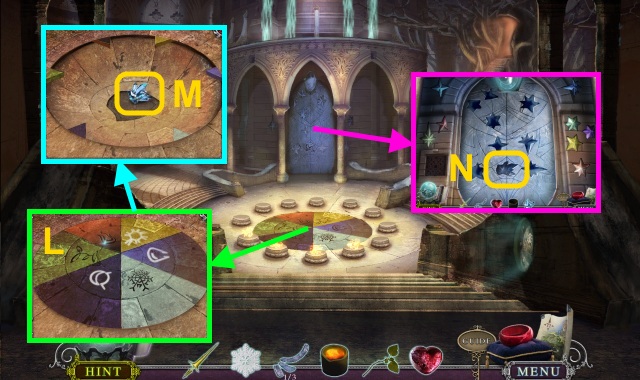
- Go to the Temple of Kings.
- Take the SNOWFLAKE; place the GEAR (2/2) for a mini-game (X).
- Solution (Y): E-A, B-E, F-B, C-F, G-C, D-G, A-D.
- Take the EMPTY ORB (Z).
- Walk down, then right.
- Move the orb (A); place the EMPTY ORB.
- Press the crystals in order; take the CHARGED ORB (B).
- Go to the Temple of Kings.
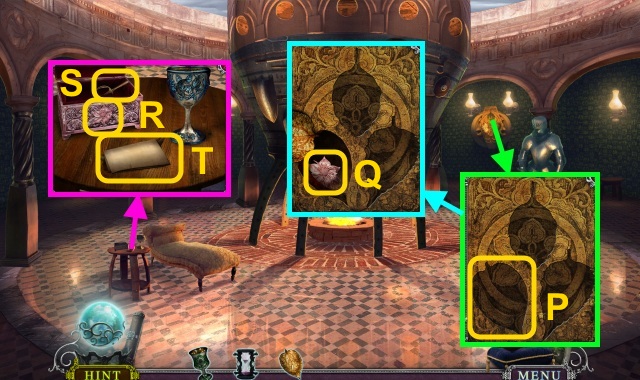
- Place the CHARGED ORB for a mini-game (C).
- Solution (D).
- Take the note (E).
- Use the BRUSH (F); press the glyphs in order.
- Walk forward.
- Take the LAVA TOKEN (G).
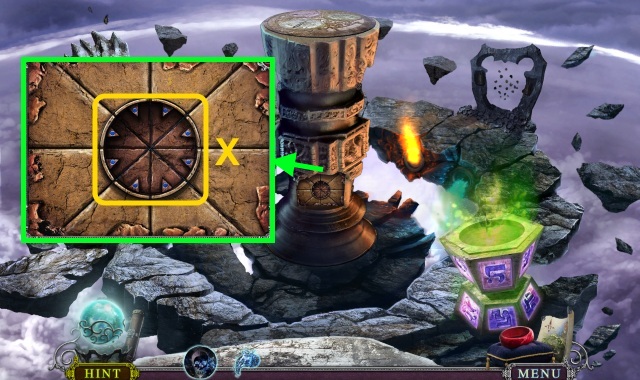
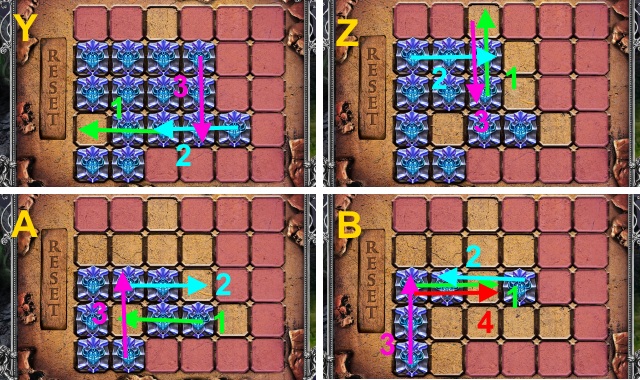
- Use the Ruby Ring for a mini-game (H).
- Solution is random (I).
- Walk right.
- Take the STONE FEATHER (1/3) (J).
- Take the CRUCIBLE (K).
- Move the rocks; take the GREEN JEWEL (L).
- Walk down twice.
- Open the book; read the note (M).
- Take the KNOWLEDGE EMBLEM (N).
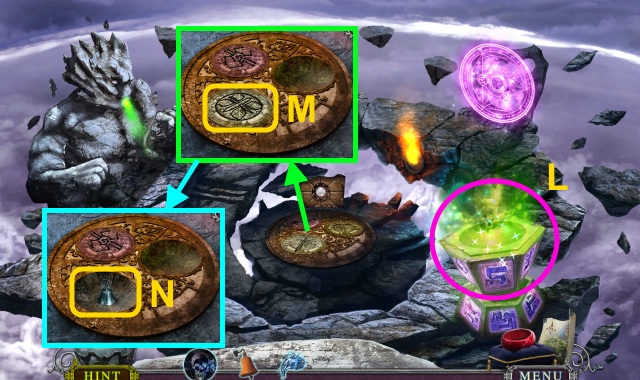
- Place the GREEN JEWEL for a mini-game (O).
- Solution (P): Ax3, Bx3.
- Walk forward, then right.
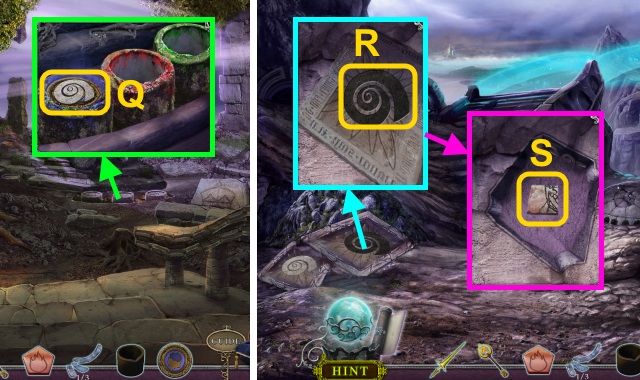
- Place the KNOWLEDGE EMBLEM; take the SPIRAL STONE (Q).
- Walk down three times.
- Place the SPIRAL STONE (R).
- Use the SCEPTER OF SAND; take the SNAKE TILE (S).
- Walk right.
- Place the LAVA TOKEN (T); use the CRUCIBLE to take the MOLTEN LAVA (U).
- Go to the Chamber of Knowledge.
- Place the SNAKE TILE for a mini-game (V).
- Solution (W).
- Take the SUN COG (X).
- Walk down.
- Place the SUN COG (Y); turn it.
- Take the BULLWHIP (Z).
- Walk down.
- Use the BULLWHIP to take the TAURUS TOKEN (A).
- Walk forward.
- Place the TAURUS TOKEN (B).
- Play the HOP to receive the MONK STATUETTE (C).
- Go to the Cliffs.
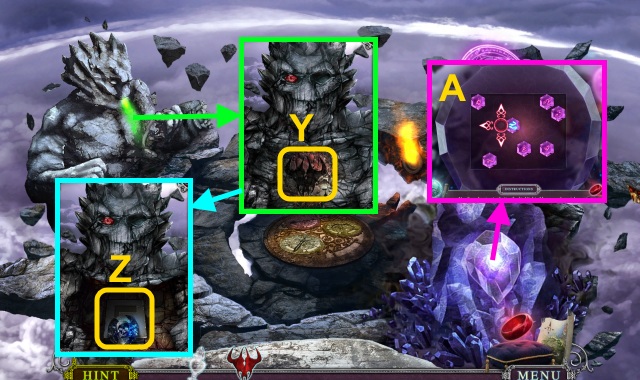
- Place the MONK STATUETTE for a mini-game (D).
- Solution (E).
- Take the PICKAXE, note, and MOON COG (F).
- Walk down.
- Use the PICKAXE (G); take the MACHETE (H).
- Go to the Chamber of Knowledge.
- Use the MACHETE to receive the BRANCH (I); take the RUBY HEART (J).
- Walk down.
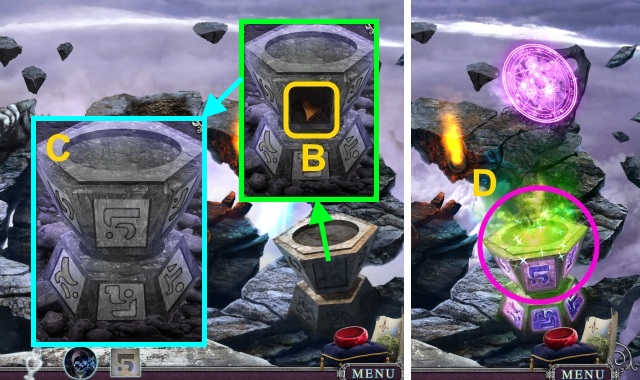
- Place the MOON COG (K); turn it.
- Place the MOLTEN LAVA, SNOWFLAKE, and BRANCH (L); take the CELESTIAL JEWEL (M).
- Place the CELESTIAL JEWEL for a mini-game (N).
- Solution (O).
- Walk forward.
Chapter 3: Reunited
- Take the GOLD TOKEN (P).
- Use the Ruby Ring for a mini-game (Q).
- Solution (R).
- Take the STONE FEATHER (2/3) (S); place the RUBY HEART.
- Take the note (T); take the VISIBILITY POTION.
- Go to the Cliffs.
- Place the GOLD TOKEN (U); use the CRUCIBLE to take the LIQUID GOLD (V).
- Go to the Chamber of Bravery.
- Pour the LIQUID GOLD (W); take the GOLDEN SHIELD.
- Play the HOP to receive the STONE FEATHER (3/3) (X).
- Place the GOLDEN SHIELD and GOLDEN LANCE (Y); take the BRAVERY EMBLEM (Z).
- Walk right.
- Place the BRAVERY EMBLEM; take the ONYX SPIDER (A).
- Place the ONYX SPIDER for a mini-game (B).
- Solution (C-F).

- Take the THAWING POTION (G).
- Place the STONE FEATHER (3/3) (H); take the THREE-POINTED STAR (I).
- Walk down, the forward.
- Use the THAWING POTION (J); take the PLANET CHALICE (K).
- Place the THREE-POINTED STAR for a mini-game (L).
- Solution (M).

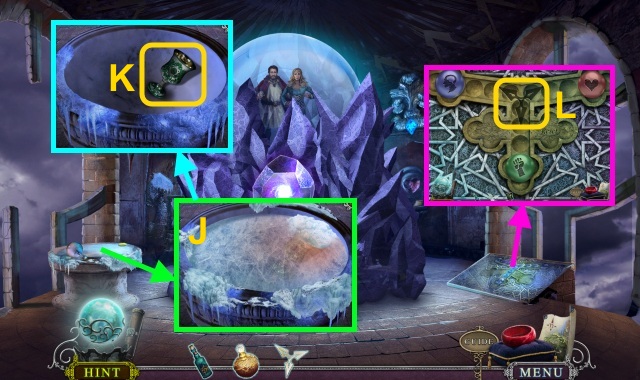
- Take the FREEZING POTION (N).
- Use the FREEZING POTION (O); take the HOURGLASS OF TIME, note, and COMPASSION EMBLEM (P).
- Walk down, then right.
- Place the COMPASSION EMBLEM; take the LEAF KEY (Q).
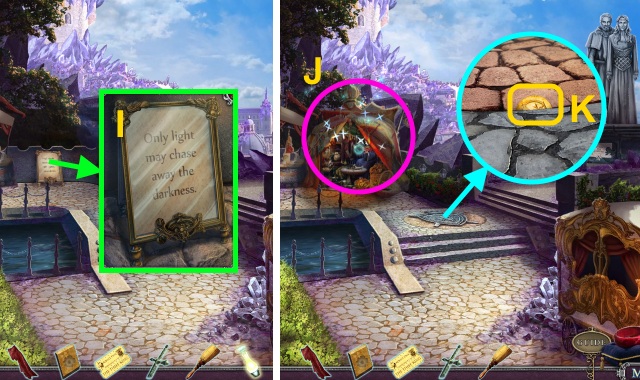
- Examine the door; use the LEAF KEY (R).
- Examine the crystal (S).
- Use the VISIBILITY POTION; take the MARIONETTE (T).
- Walk down.
- Play the HOP to receive the GOLD LEAF (U).
- Use the SHOW TICKET (V); place the MARIONETTE for a mini-game (W).
- Solution (X-G).
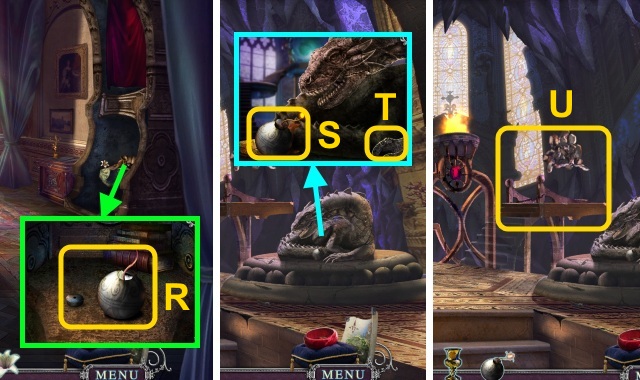
- Take the TORCH (H).
- Walk forward.
- Use the TORCH to receive the LIT TORCH (I).
- Use the LIT TORCH (J).
- Walk forward.
- Use the Ruby Ring for a mini-game (K).
- Solution (L-O).
- Walk left.
- Place the GOLD LEAF (P); take the ROSE GOLD FLOWER (Q).
- Place the ROSE GOLD FLOWER (R); take the TIDA SWORD (S), note (T), and FANG.
- Take the WAX ARCHER (U).
- Walk down.
- Place the WAX ARCHER (V); move the claw (W).
- Take the HOT PEPPER (X).
- Give the HOT PEPPER (Y); take the TIDA WAVE (Z).
- Walk left.
- Place the TIDA SWORD and TIDA WAVE (A); take the TIDA SHIELD.
- Take the WICK (B); give the TIDA SHIELD (C).
- Take the SWORD CAMEO (D).
- Walk down.
- Place the SWORD CAMEO for a mini-game (E).
- Solution (F-I).
- Walk forward.
Chapter 4: The Shadow
- Use the HOURGLASS OF TIME (J); you receive the BOOK CAMEO.
- Take the EMERALD LEAF (K).
- Take the PRUNERS (L).
- Place the FANG; take the SAPPHIRE (1/3) (M).
- Examine the lion.
- Play the HOP to receive the SUNBURST CHALICE (N).
- Walk down, then left.
- Place the EMERALD LEAF (O); take the NATRON (P).
- Walk down twice.
- Use the PRUNERS to receive the SWEET FLOWER (Q).
- Walk forward twice.
- Place the WICK, NATRON, and SWEET FLOWER; (R) move the cap.
- Take the SMOKE BOMB.
- Walk down.
- Place the SMOKE BOMB (S); press the claw (T).
- Take the LIT SMOKE BOMB.
- Use the LIT SMOKE BOMB (U).
- Use the BOOK CAMEO (V).
- Walk right.
- Take the HOOK (W).
- Use the Ruby Ring for a mini-game (X).
- Solution (Y).
- Take the note and CHISEL (Z).
- Walk down twice.
- Place the HOOK on the rope (A); take the GRAPPLING HOOK.
- Walk forward, then left.
- Use the CHISEL (B); take the STAINED GLASS (C).
- Walk down, then forward.
- Place the STAINED GLASS for a mini-game (D).
- Solution (E).
- Take the EAGLE HEAD.
- Walk down, then right.
- Place the EAGLE HEAD (F).
- Gather the feathers (G); take the FEATHER DUSTER.
- Use the GRAPPLING HOOK (H).
- Use the FEATHER DUSTER; take the HARD SHELL (I).
- Walk down.
- Give the HARD SHELL; take the GLASS MOON (J).
- Walk left.
- Place the GLASS MOON; take the MOON CHALICE (K).
- Place the PLANET CHALICE, SUNBURTS CHALICE, and MOON CHALICE; take the SAPPHIRE (2/3) and DRAWER HANDLE (L).
- Walk down, then forward.
- Play the HOP to receive the PLUTO EMBLEM (M).
- Place the DRAWER HANDLE (N); take the SILVER LEAF and WAX LANCER (O).
- Walk down.
- Place the WAX LANCER (P); press the claw (Q).
- Take the SAPPHIRE (3/3) (R).
- Walk left.
- Place the SILVER LEAF; take the EMPTY JAR (S).
- Walk down, then right.
- Place the PLUTO EMBLEM (T); take the CRYSTAL (U).
- Place the SAPPHIRE (3/3); take the ENERGY SOURCE (V).
- Take the EARTH STONE (W); place the ENERGY SOURCE.
- Place the CRYSTAL (X).
- Walk forward.
- Place the EARTH STONE (Y); take the DEATH CRYSTAL and STRANGE GLYPH (Z).
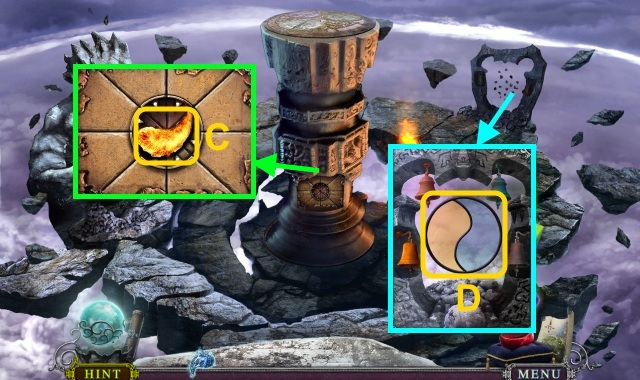
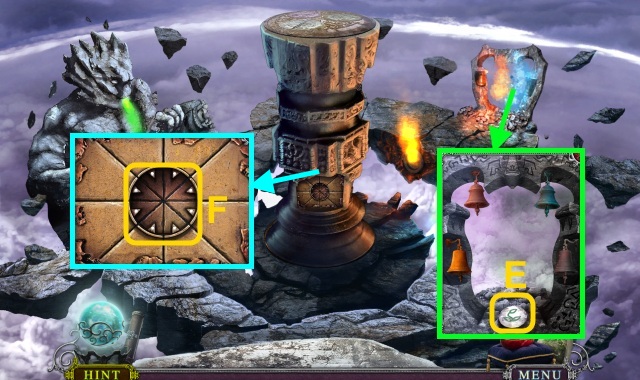
- Use the Ruby Ring for a mini-game (A).
- Solution is random.
- Take the GOLDEN BELL (B).
- Place the STRANGE GLYPH (C); press the glyphs.
- Play the HOP to receive the AXE CONSTELLATION (D).
- Place the AXE CONSTELLATION (E); take the GIANT'S EYE (F).
- Place the GIANT'S EYE (G); use the EMPTY JAR (H).
- Take the DEMON BILE (I).
- Use the DEMON BILE for a mini-game (J).

- Solution (K).
- Take the ESSENCE OF WATER.
- Play the HOP to receive the SHIELD CONSTELLATION (L).
- Place the SHIELD CONSTELLATION (M); take the TURQUOISE BELL (N).
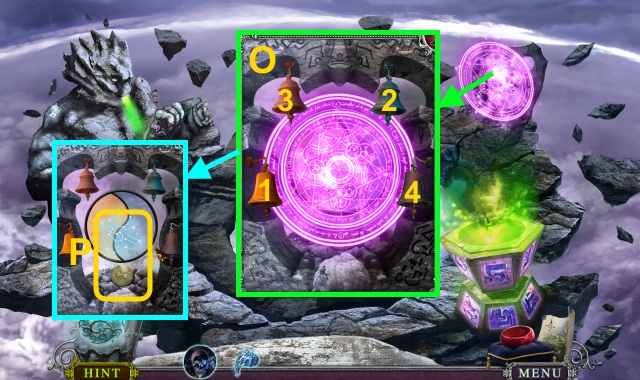
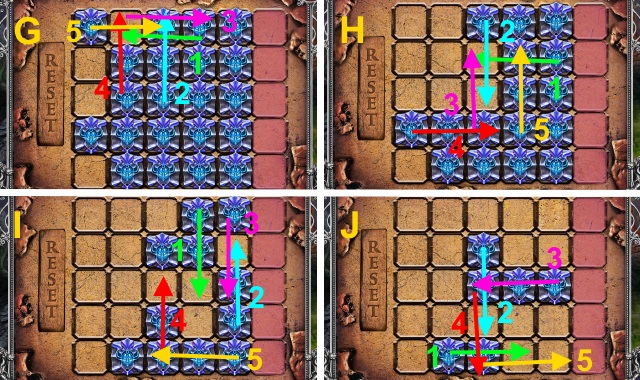
- Place the GOLDEN BELL and TURQUOISE BELL; ring the bells in order (O).
- Take the UNIVERSE CONSTELLATION and ETERNITY CRYSTAL (P).
- Place the UNIVERSE CONSTELLATION (Q); turn the valve (R).
- Place the ETERNITY CRYSTAL for a mini-game (S).
- Solution (T-W).
- Place the DEATH CRYSTAL for a mini-game (X).
- Solution (Y-B).
- Take the ESSENCE OF FIRE (C).
- Place the ESSENCE OF WATER and ESSENCE OF FIRE (D).
- Take the LIFE CRYSTAL (E).
- Place the LIFE CRYSTAL for a mini-game (F).
- Solution (G-J).
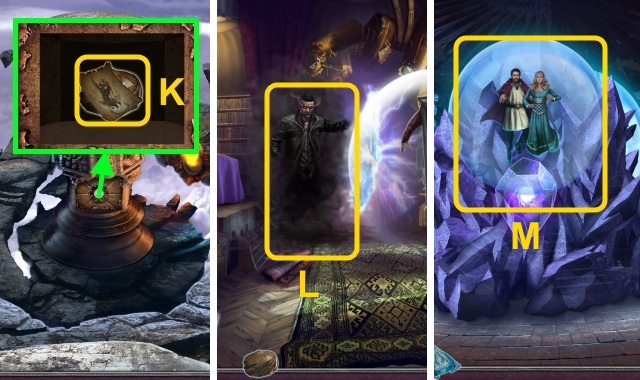
- Take the note and ANCIENT VESSEL (K).
- Walk down.
- Use the ANCIENT VESSEL (L).
- Go to the Chamber of Compassion.
- Use the TRIGON (M).
- Congratulations! You have completed Forgotten Kingdoms: The Ruby Ring.
Created at: 2015-07-19