

Walkthrough Menu
General Tips
- This is the official guide for Fright Chasers: Dark Exposure.
- This guide won't tell you when to zoom into a location; the screenshots show each zoom scene.
- Hidden-object puzzles are referred to as HOPs. Only the locations of the HOPs will be shown.
- Use the Map to fast travel to a location.
Chapter 1: The Observatory
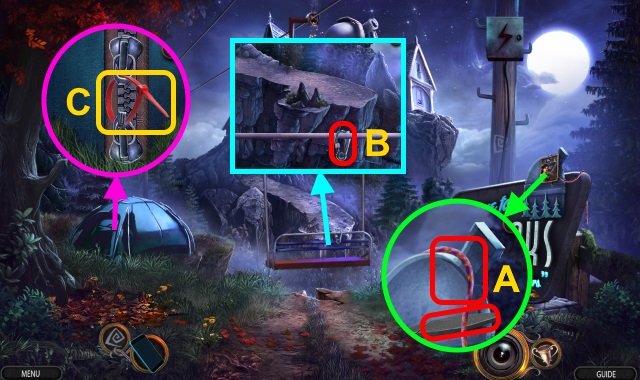
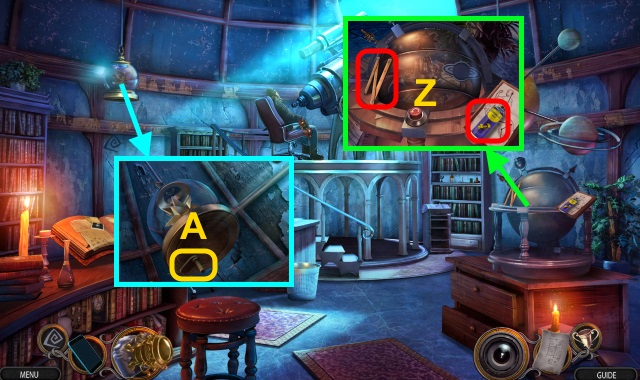
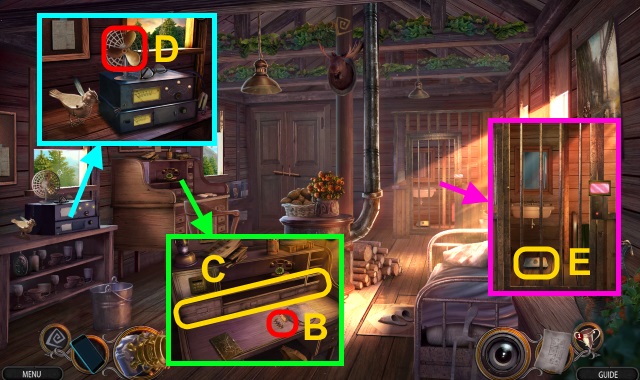
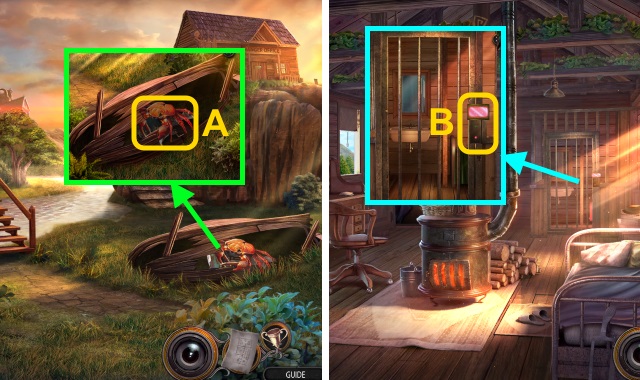
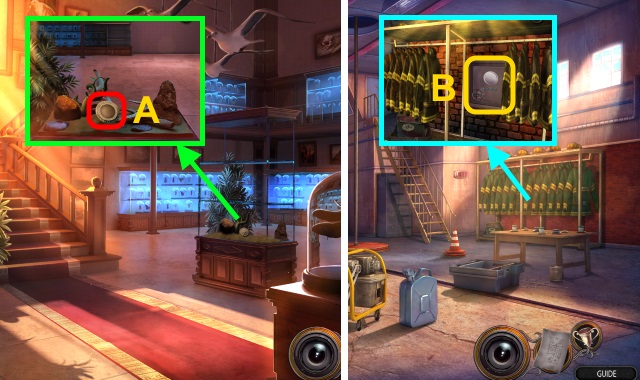
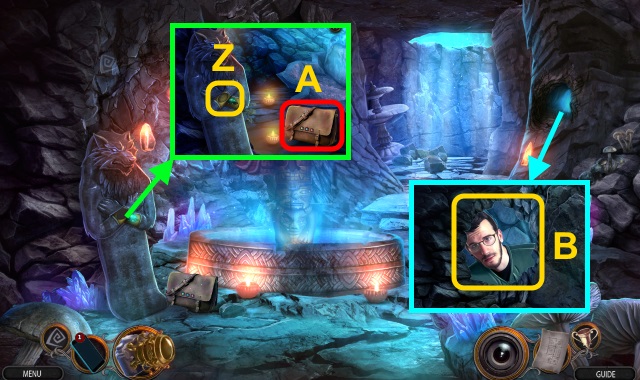
- Examine photo; take ROPE and WHETSTONE (A).
- Take CARABINER (B).
- Examine CARABINER; use WHETSTONE. Receive POCKETKNIFE.
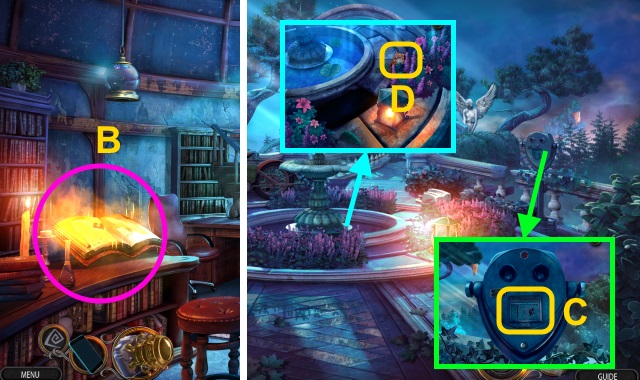
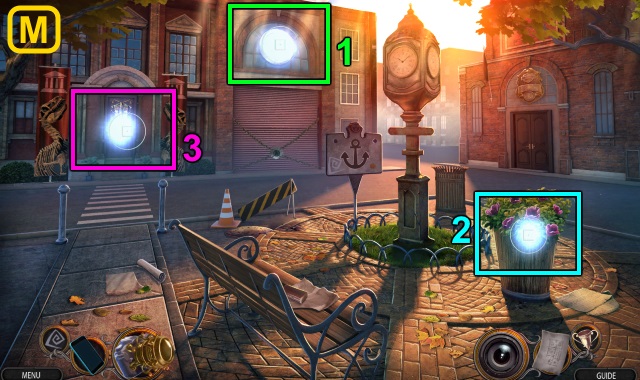
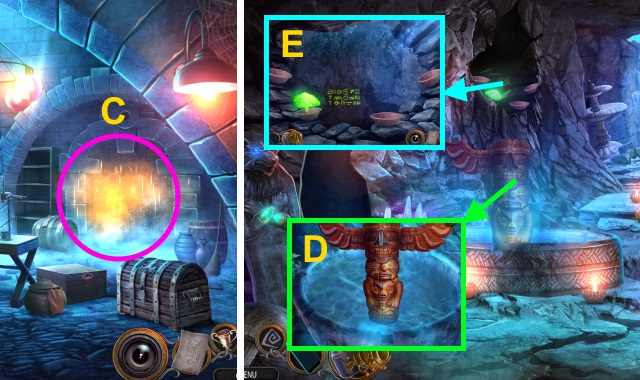
- Use POCKETKNIFE (C).
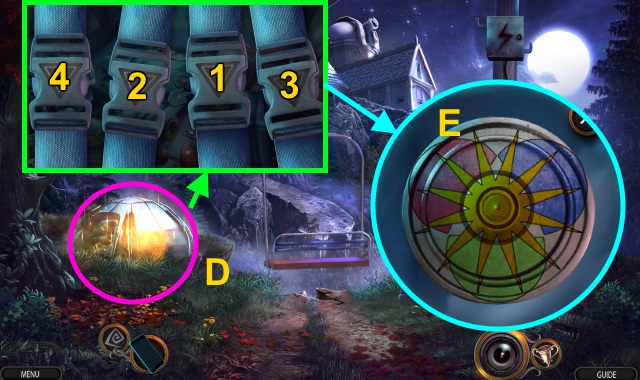
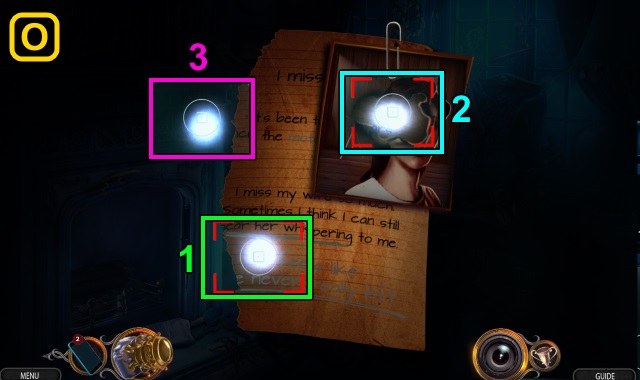
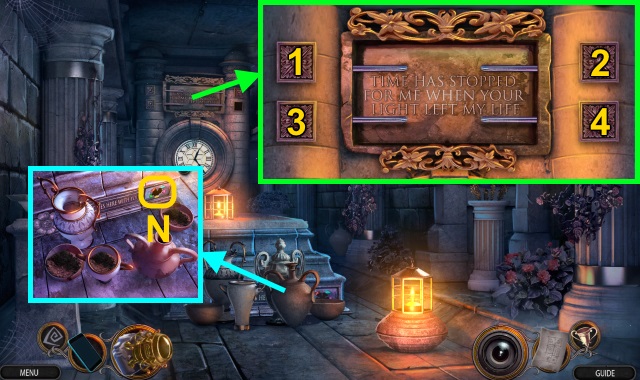
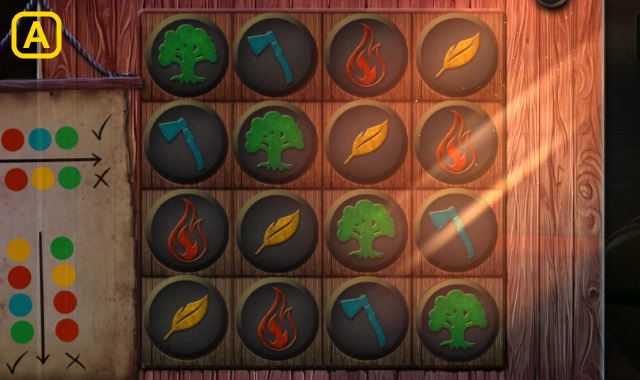
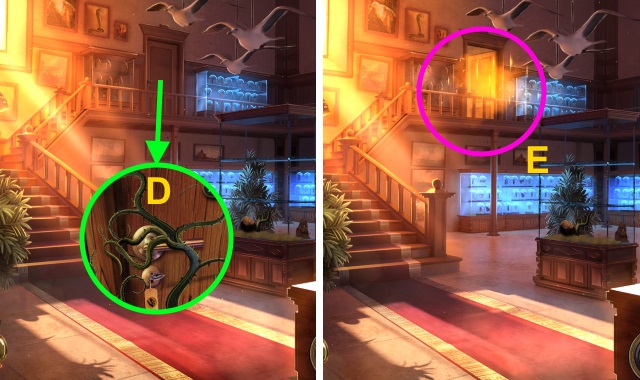
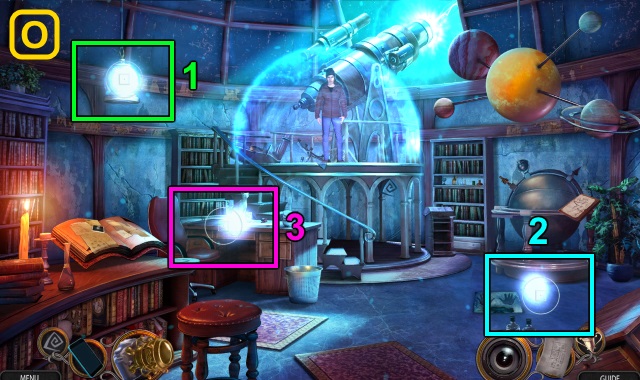
- Play HOP; receive DRONE (D).
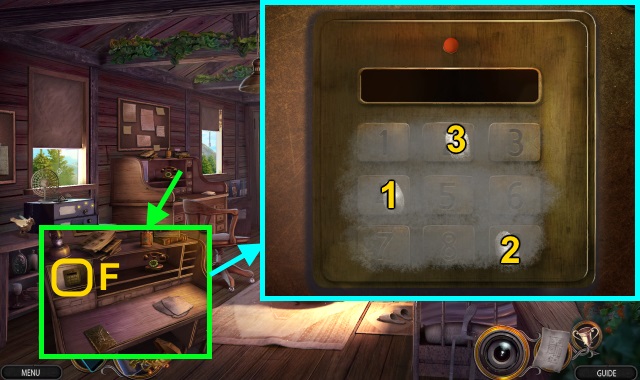
- HOP solution (1-4).
- HOP solution (E).
- CARABINER on ROPE; receive CLIMBING ROPE.
- CLIMBING ROPE on DRONE; receive DRONE WITH ROPE.
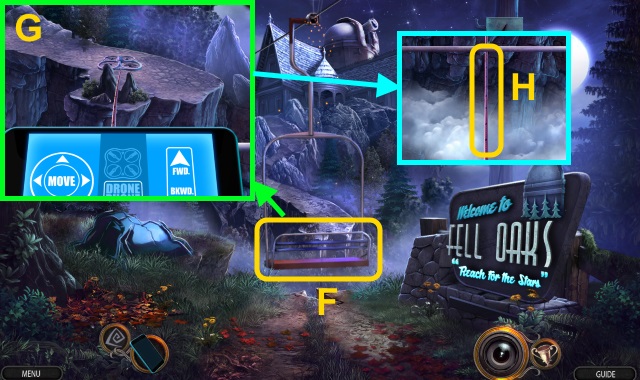
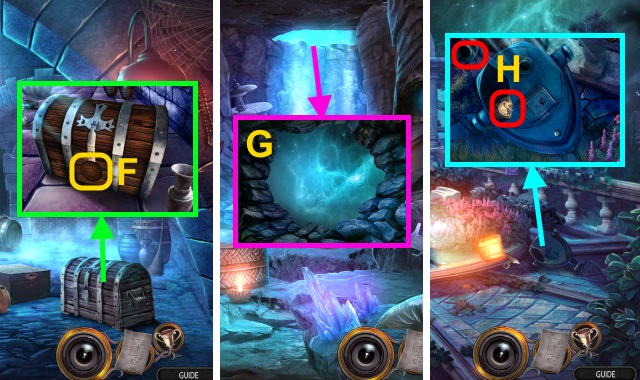
- Examine (F).
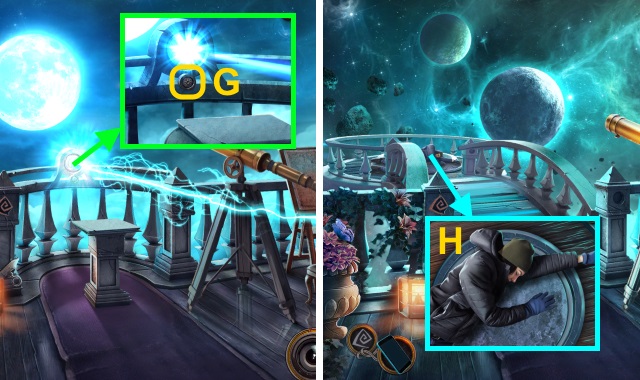
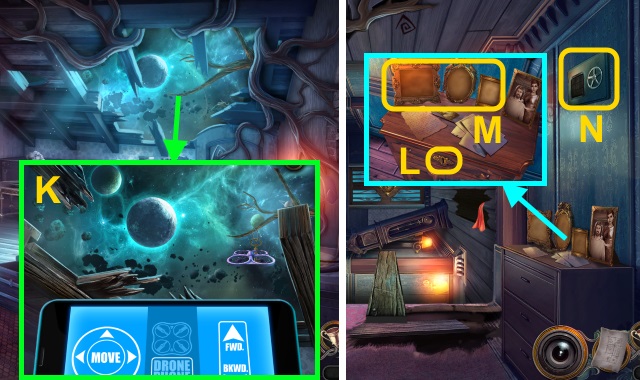
- Use DRONE WITH ROPE. Solution (G): move drone into position.
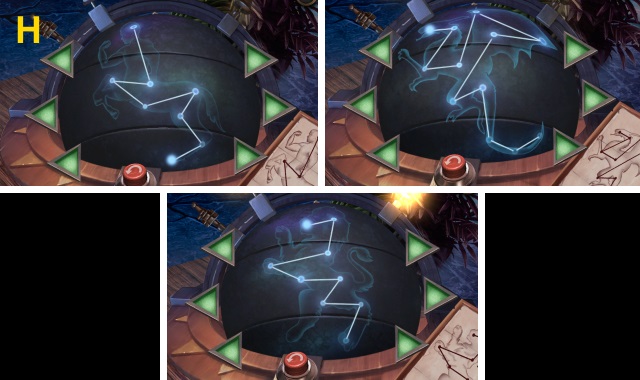
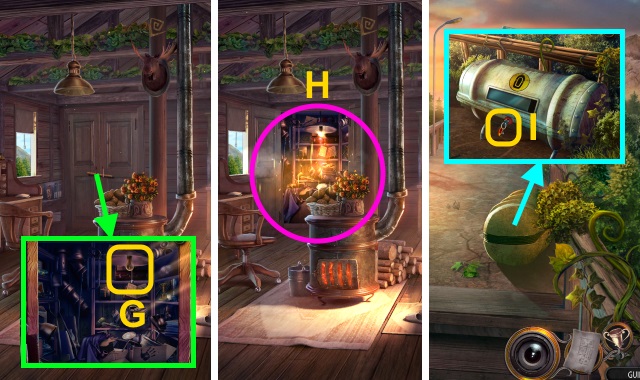
- Examine rope 3x (H).
- Go forward 2x, then try to walk left.
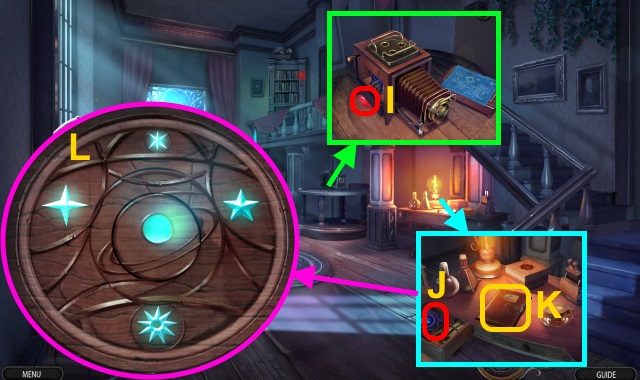
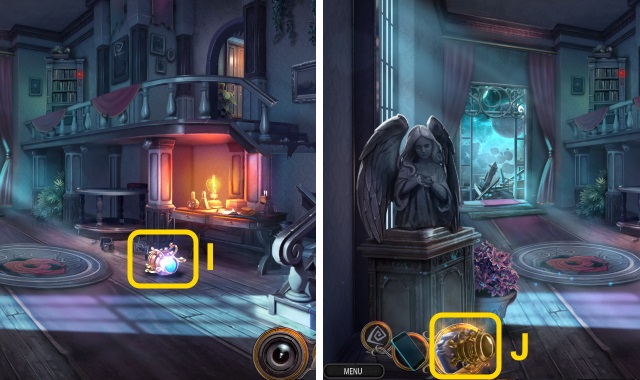
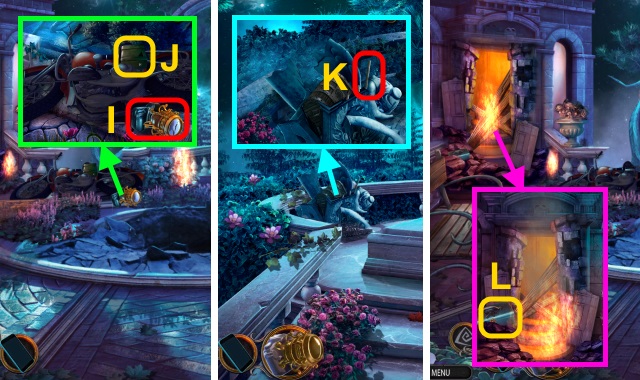
- Take SMALL GEM (1/2) (I).
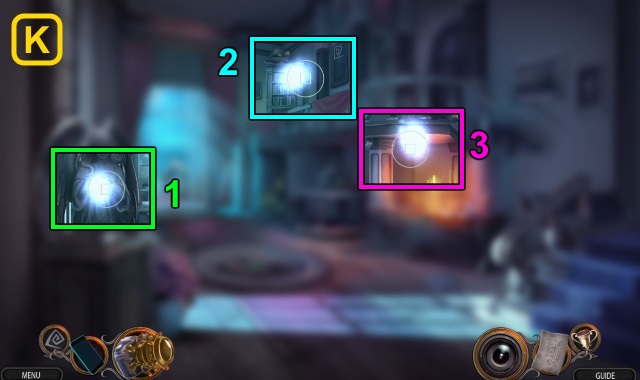
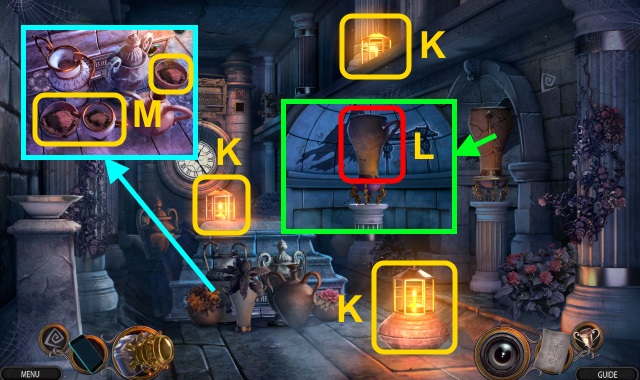
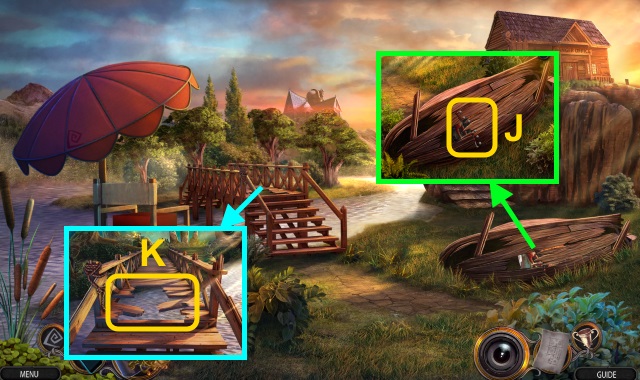
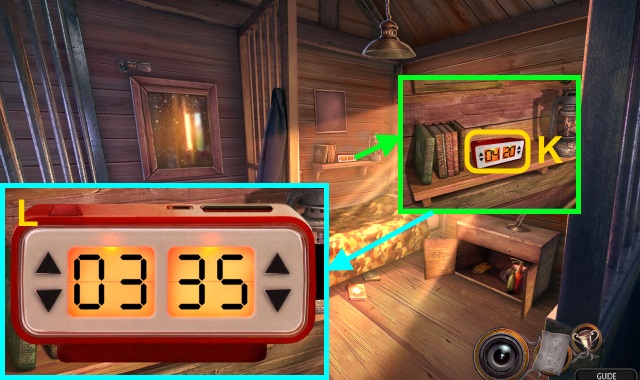
- Open; take CAMERA FILM PLATE (1/2) and STONE PETAL (1/4) (J). Take RYAN KILBOURN'S JOURNAL (K); examine.
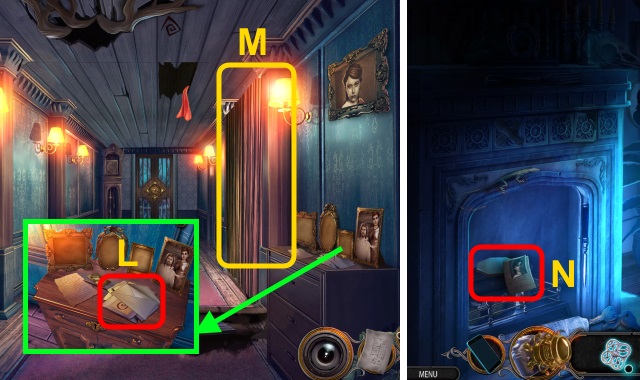
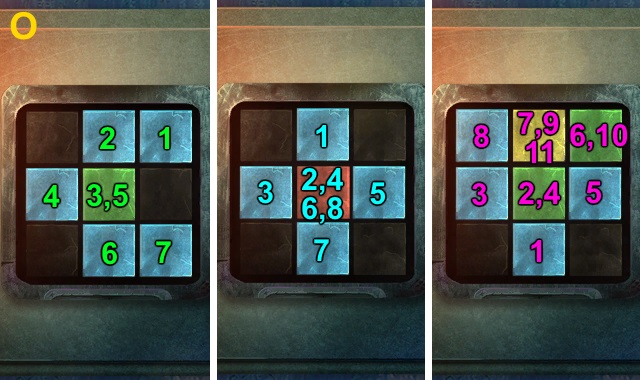
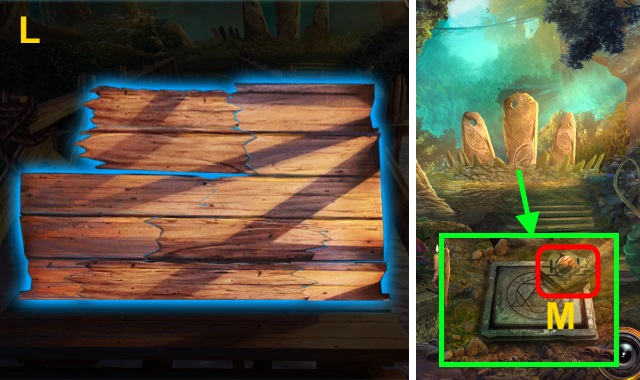
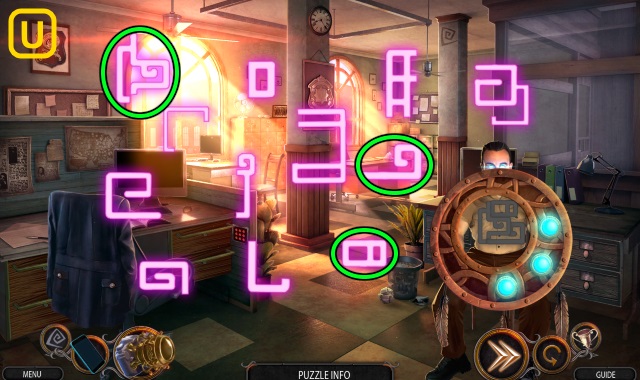
- Solution (L).
- Open; take SMALL GEMS (2/2).
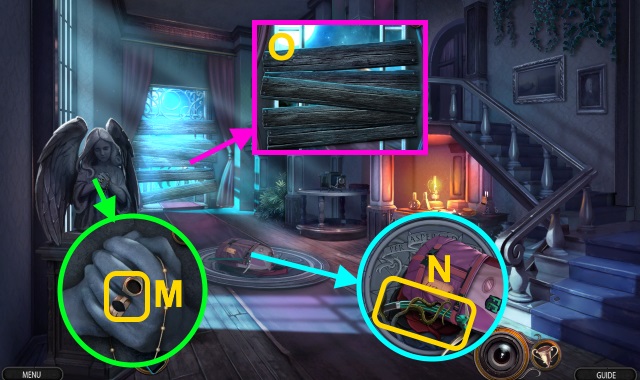
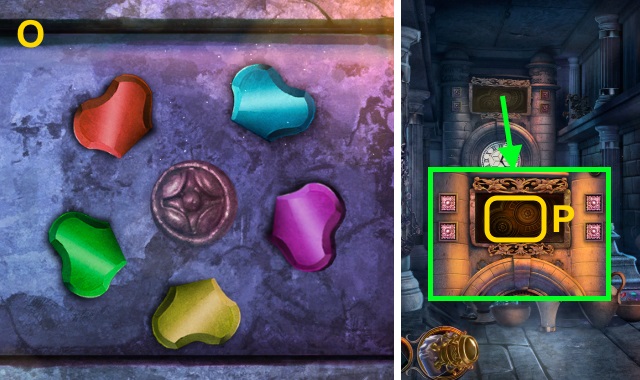
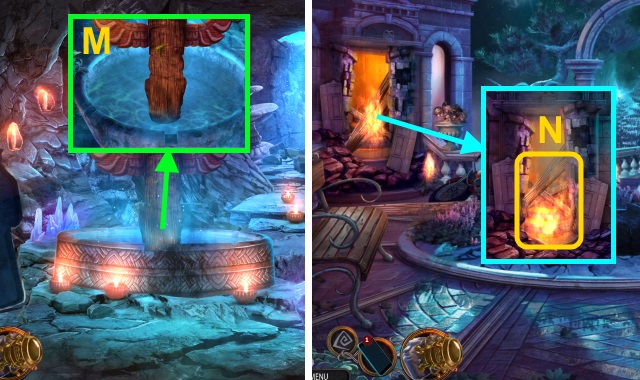
- Place SMALL GEMS (2/2) (M); take SHARP CRYSTAL.
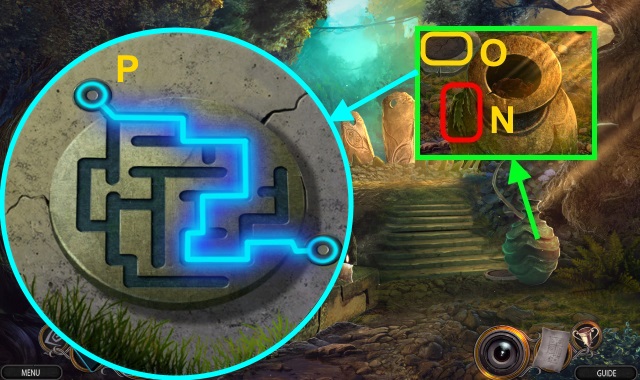
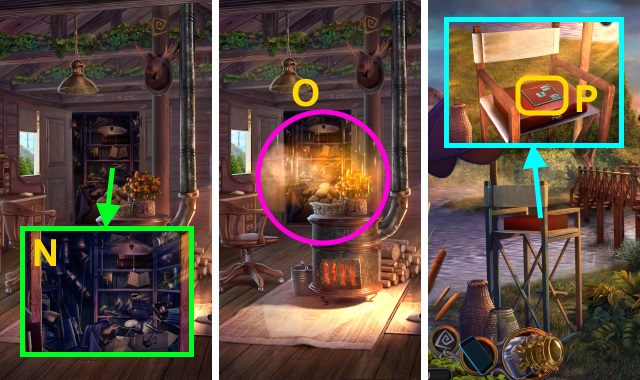
- Examine; use SHARP CRYSTAL (N). Take CLIMBING PICK.
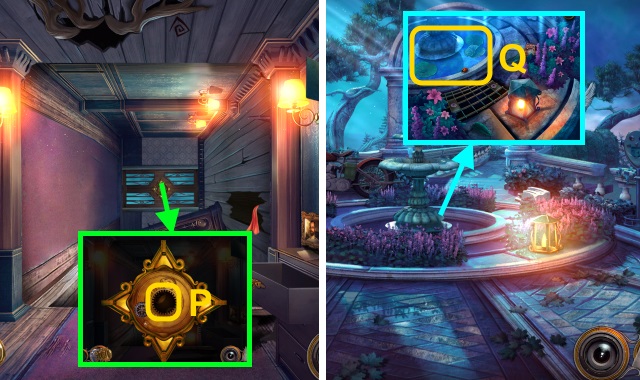
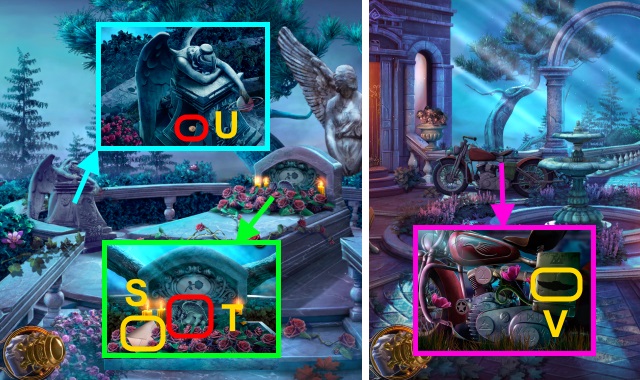
- Use CLIMBING PICK (O).
- Walk left.
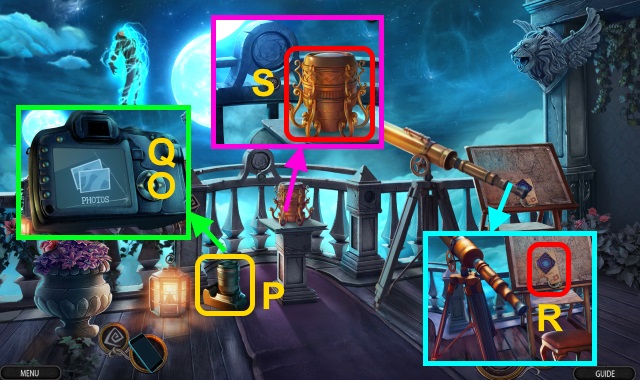
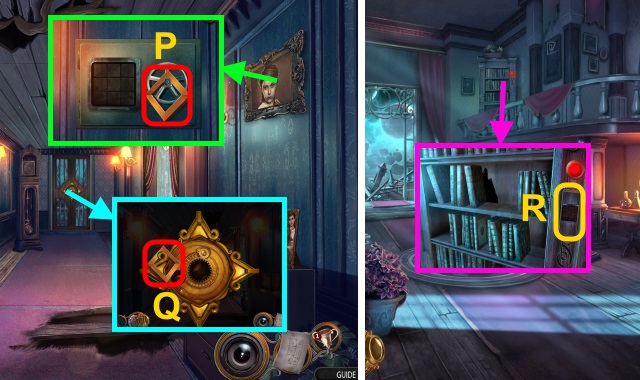
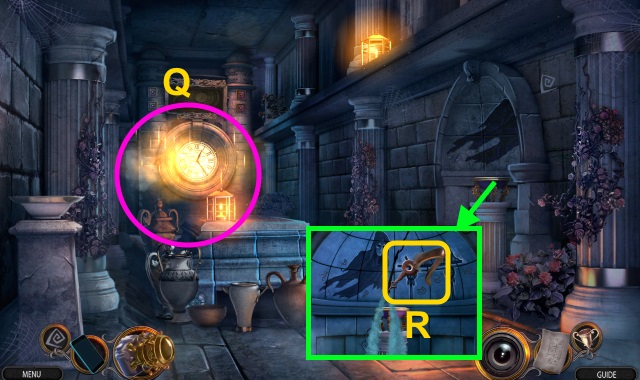
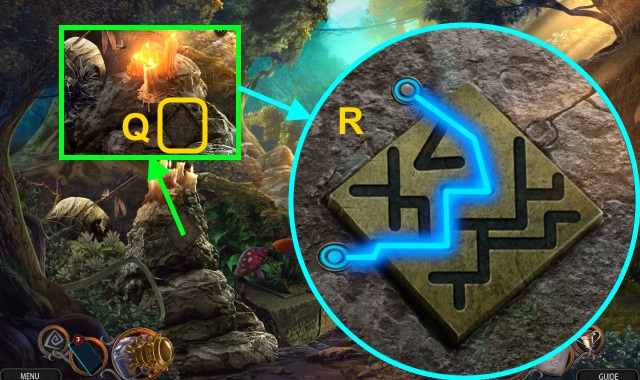
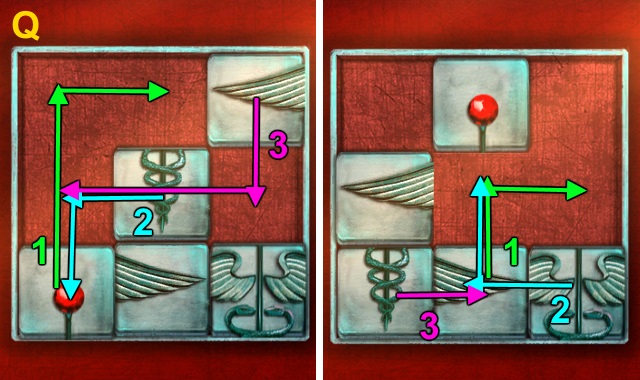
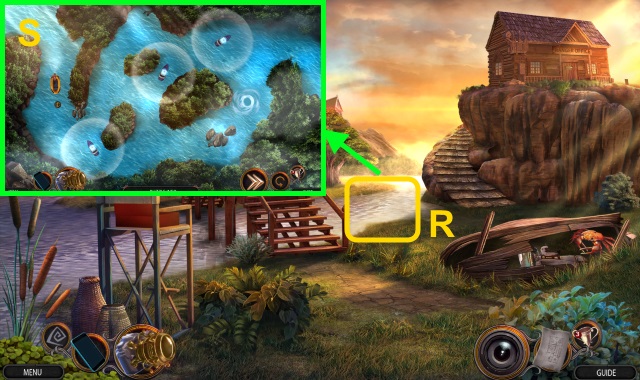
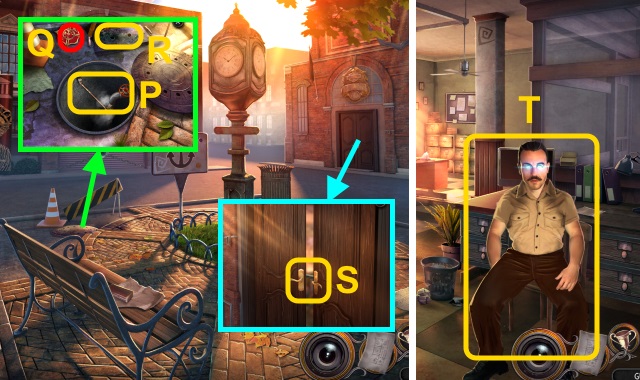
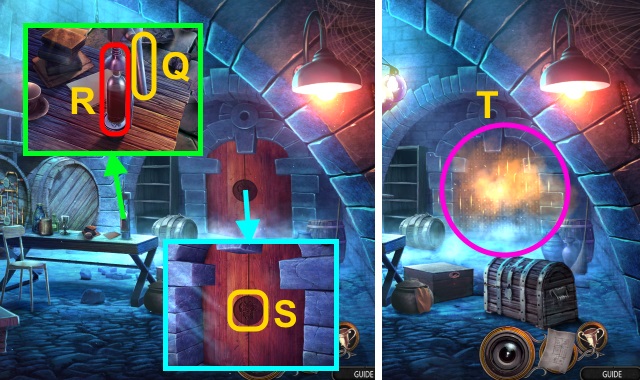
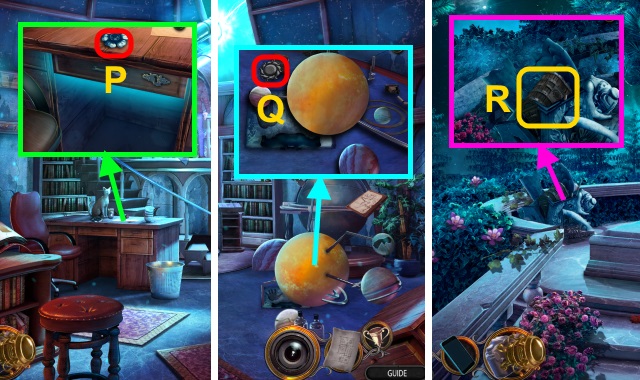
- Take CAMERA (P); examine 3x (Q).
- Take JOURNAL PAGE and DRAWER HANDLE (R).
- Open RYAN KILBOURN'S JOURNAL; place JOURNAL PAGE. Take CAMERA FILM PLATE (2/2).
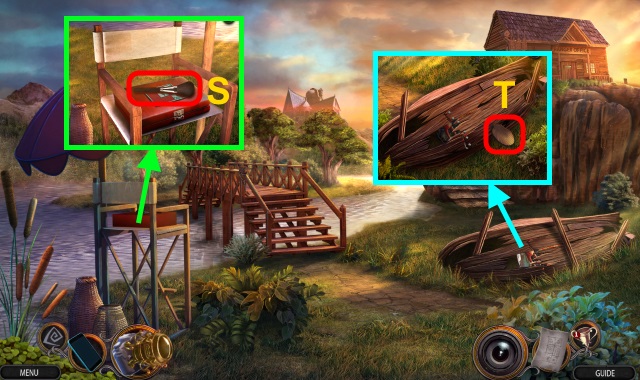
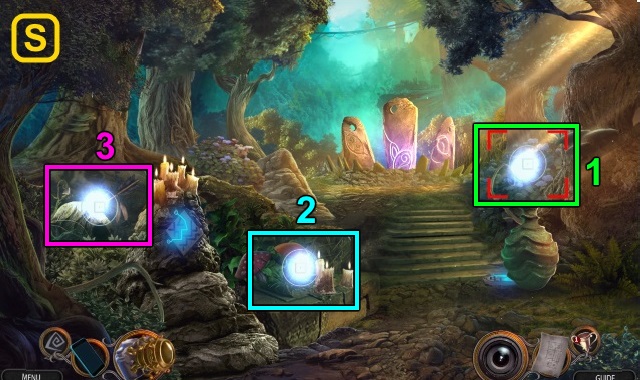
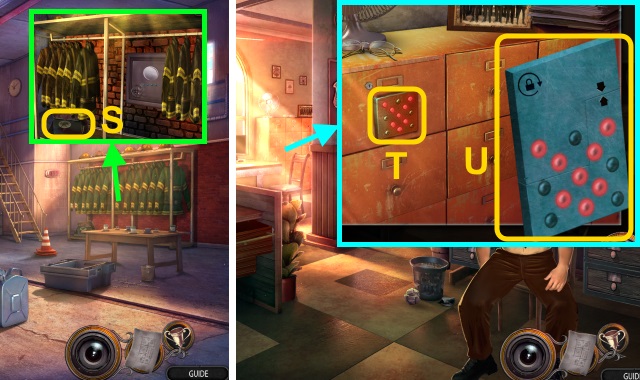
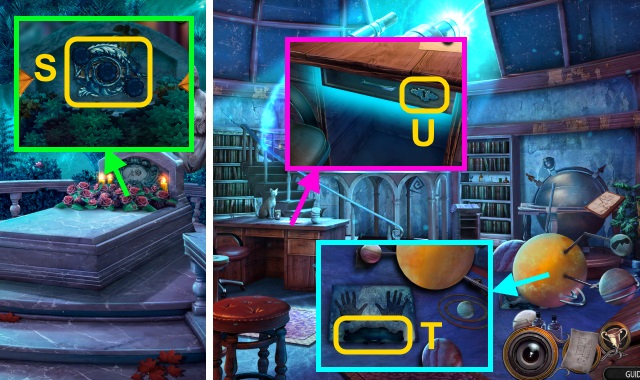
- Take ORNAMENTED CAMERA LENS (S).
- Walk down.
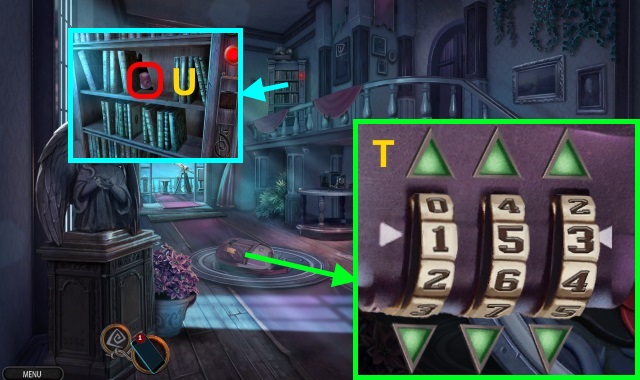
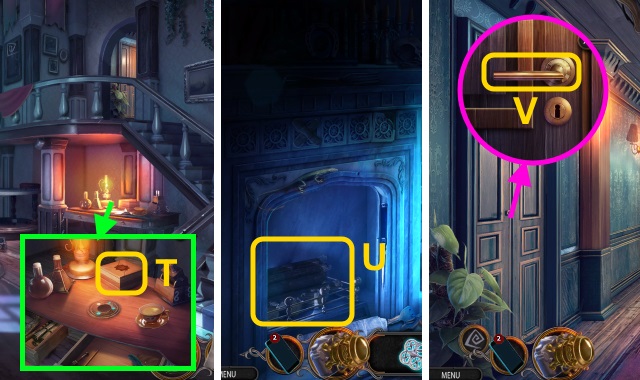
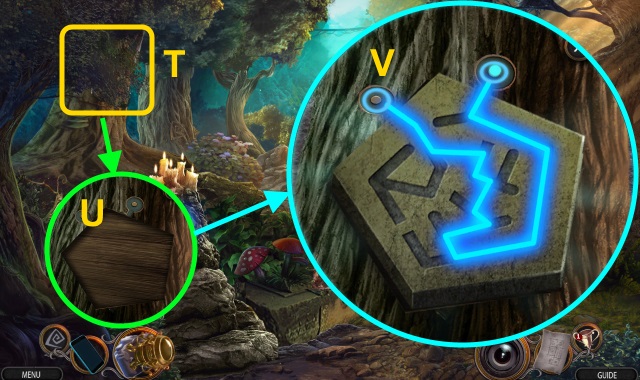
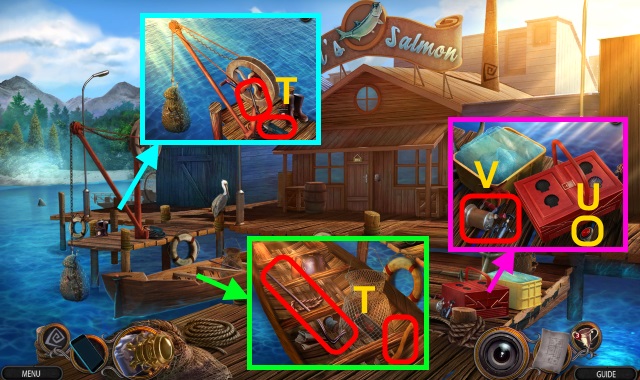
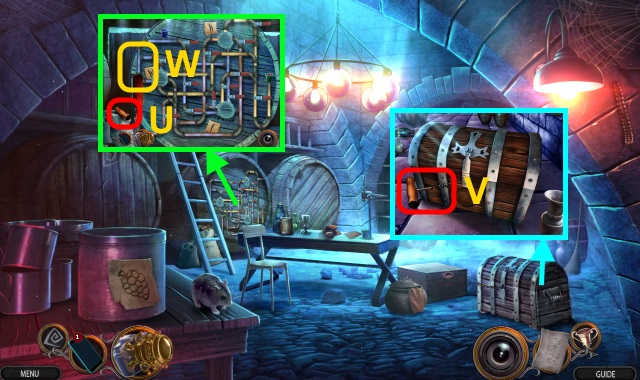
- Examine; solution (T).
- Take MAP. Move item; take FIRST AID KIT.
- Open FIRST AID KIT. Move items; take TWEEZERS.
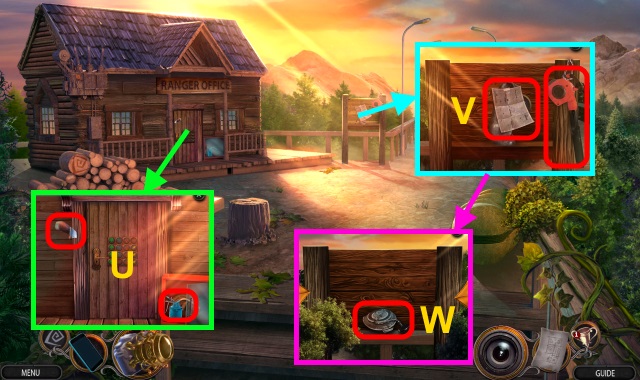
- Move; take STATUE GLOBE (1/4) (U).
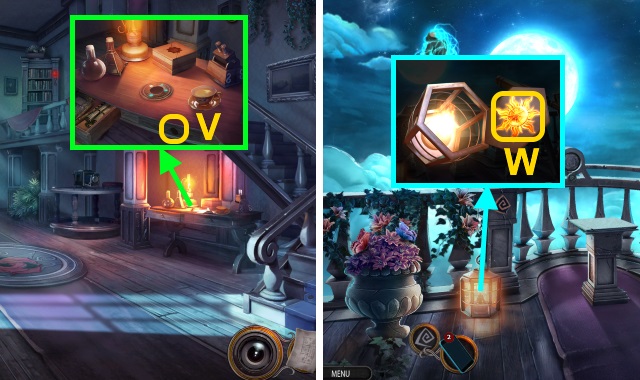
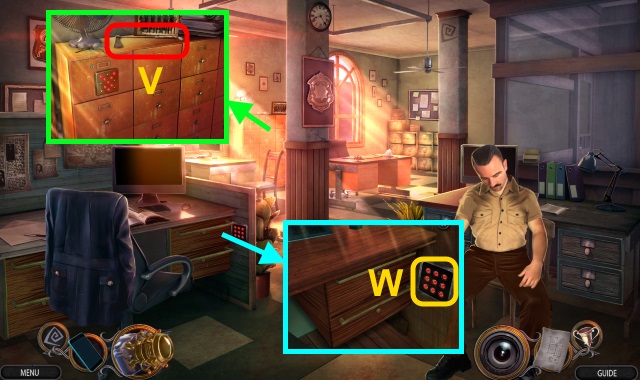
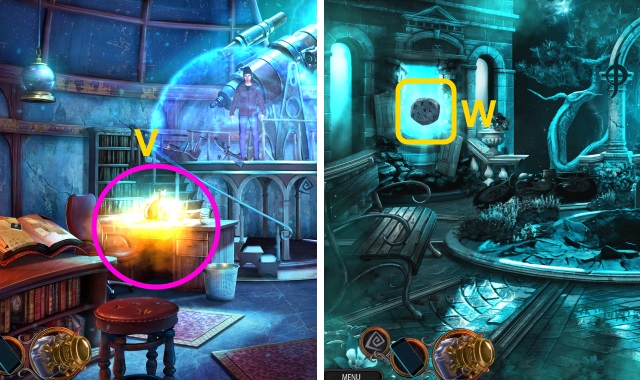
- Place DRAWER HANDLE (V); open. Move items; take newspaper and LETTER OPENER.
- Walk left.
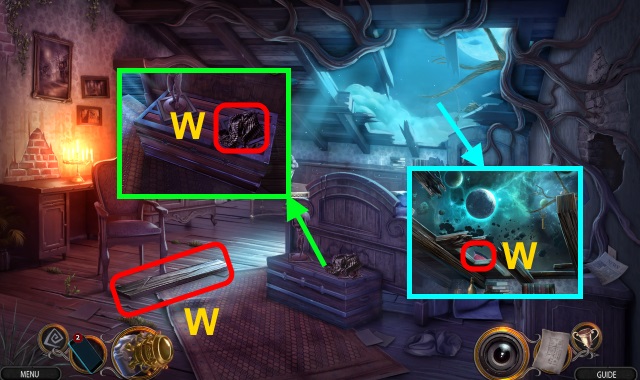
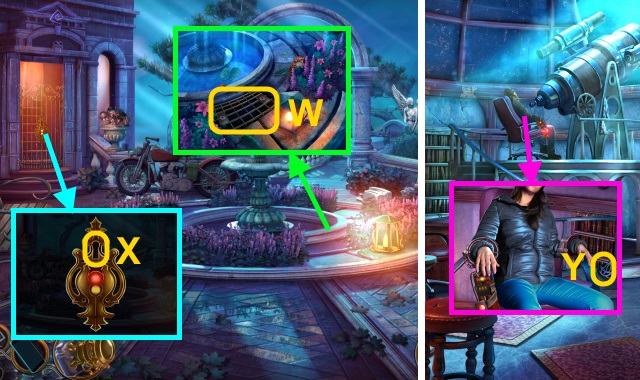
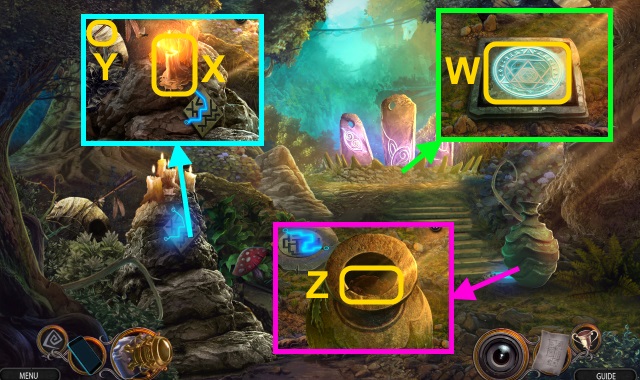
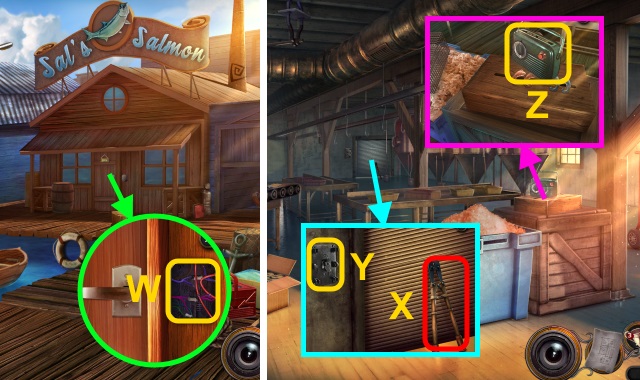
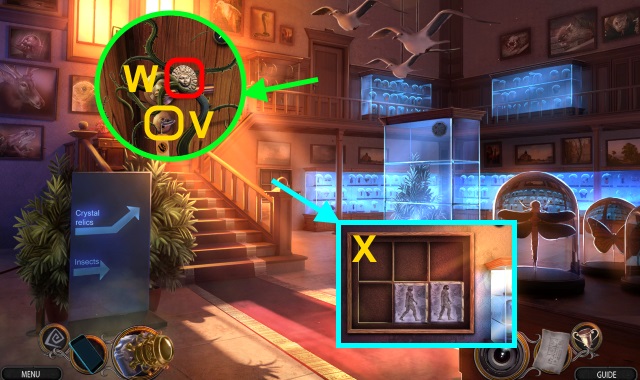
- Examine. Use TWEEZERS (W); receive SUN EMBLEM.
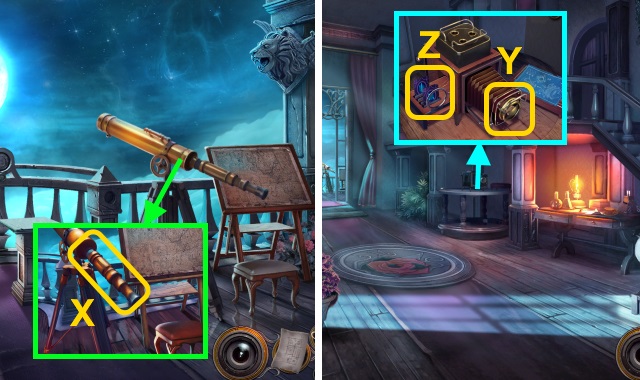
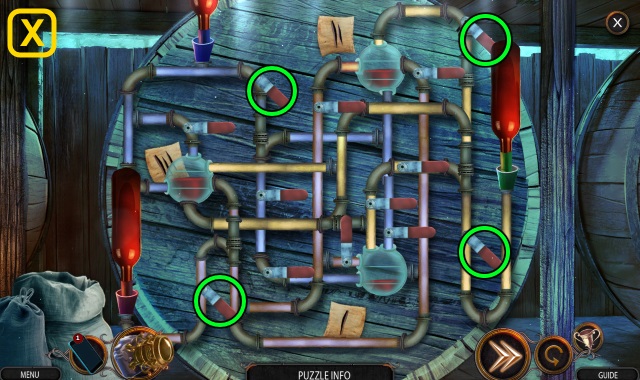
- Examine (X); use LETTER OPENER. Take MOON EMBLEM.
- Walk down.
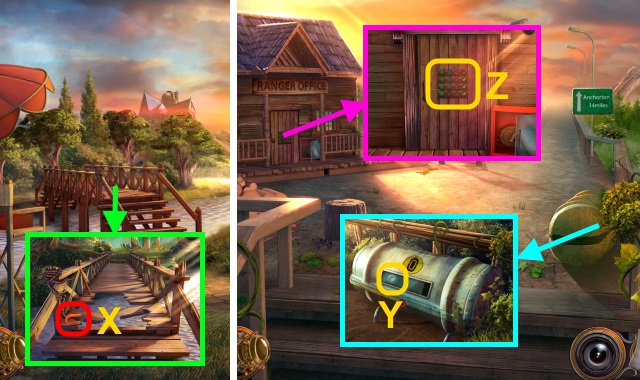
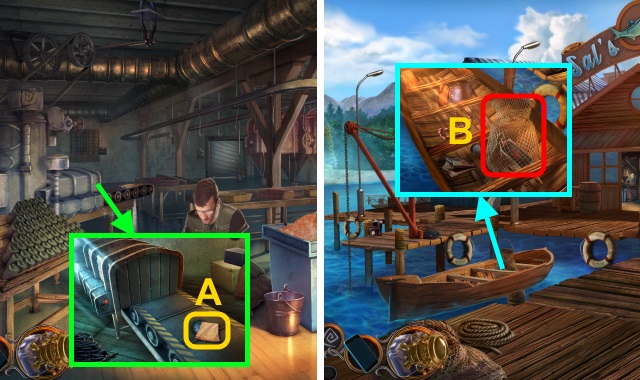
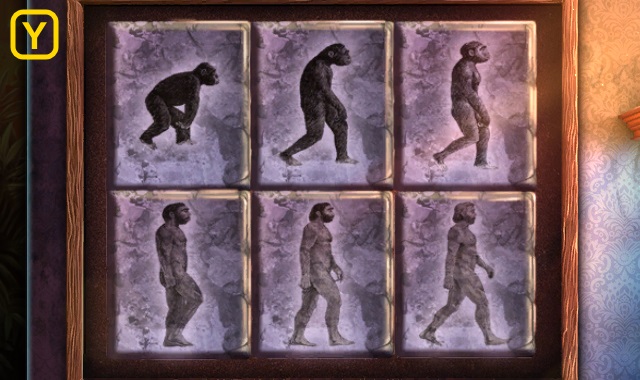
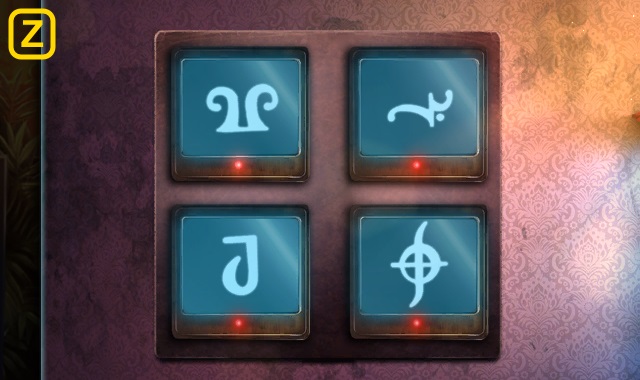
- Examine; place ORNAMENTED CAMERA LENS (Y). Examine; place CAMERA FILM PLATE (2/2) (Z). Examine.
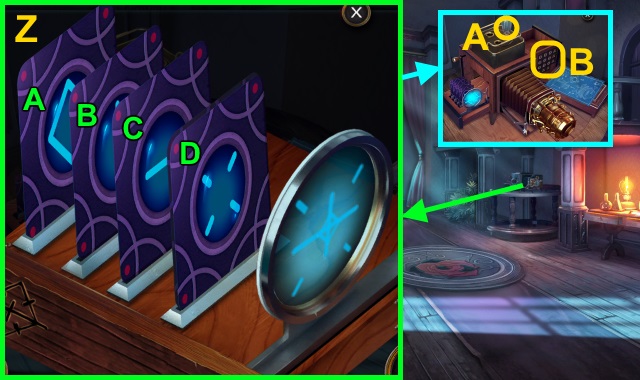
- Solution (Z): (A-C)-(A-D)-(A-B).
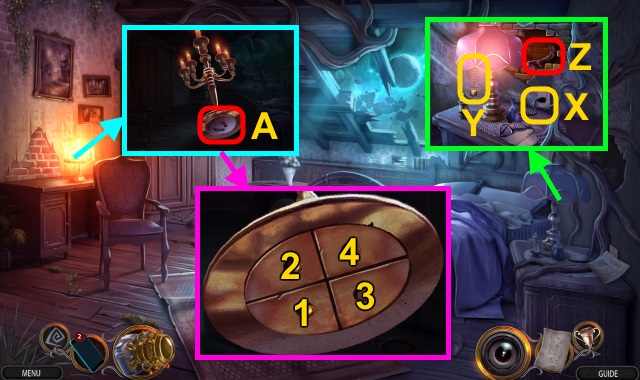
- Place bulb (A); examine (B).
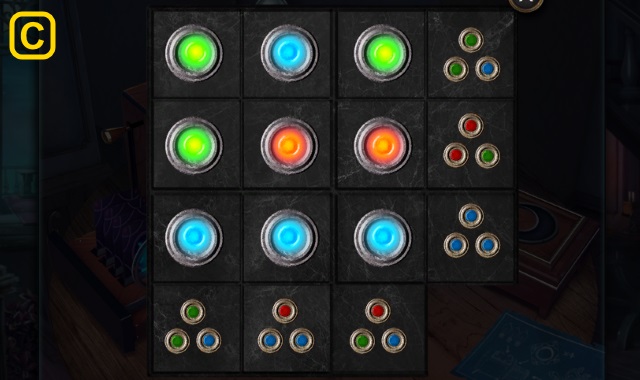
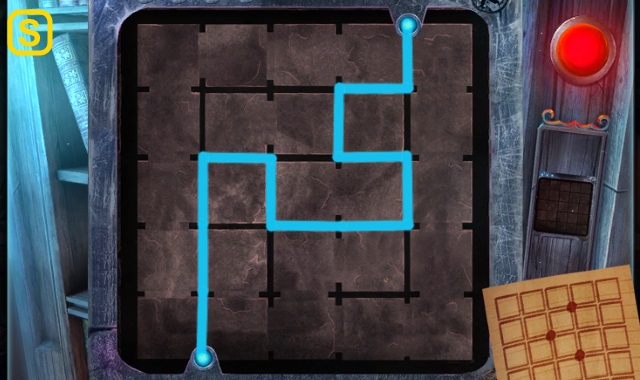
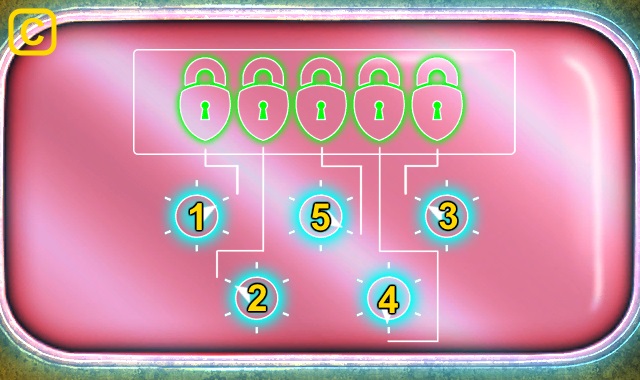
- Solution (C).
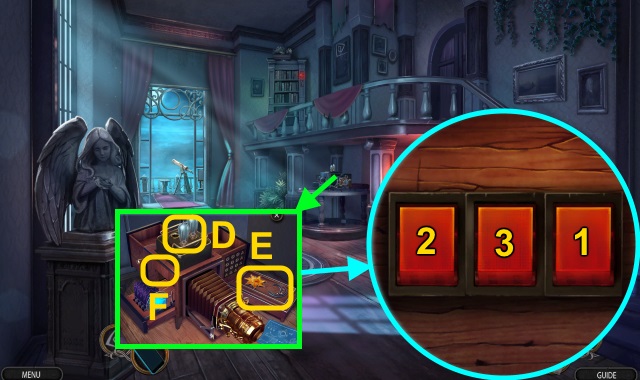
- Place bulb (D).
- Examine; place SUN EMBLEM and MOON EMBLEM (E). Place bulb.
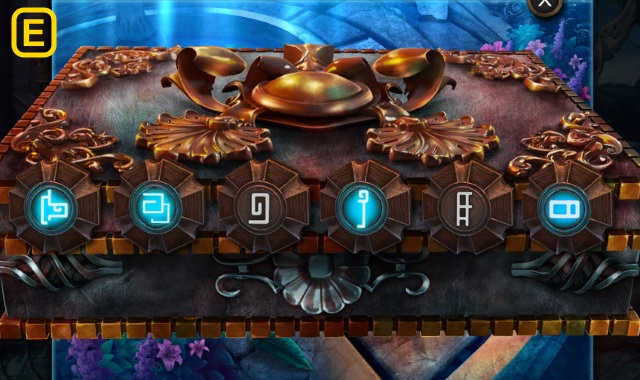
- Examine (F).
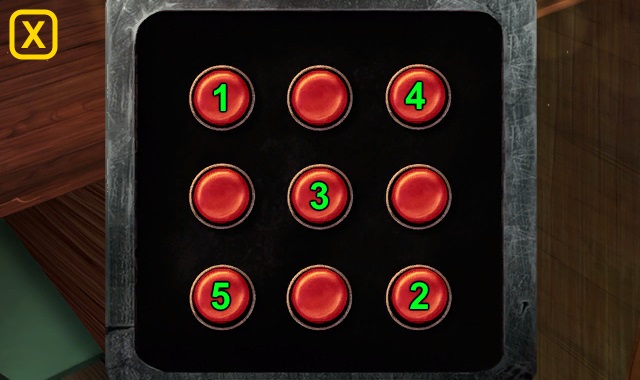
- Solution (1-3).
- Walk left.
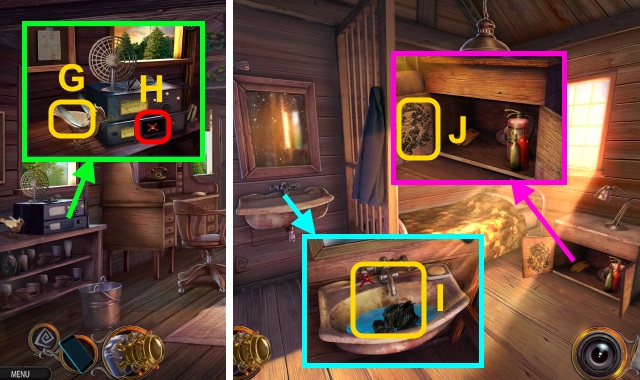
- Press (G).
- Examine (H).
Chapter 2: Anne
- Try to go right.
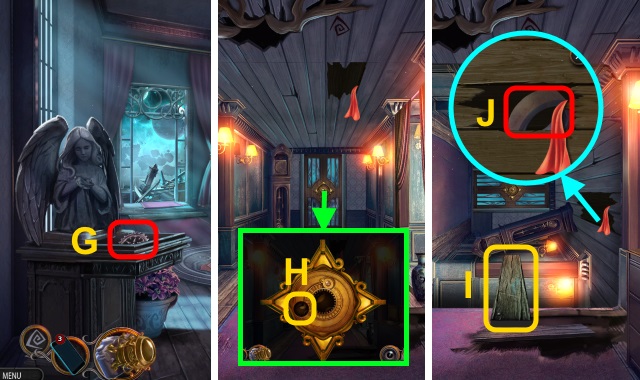
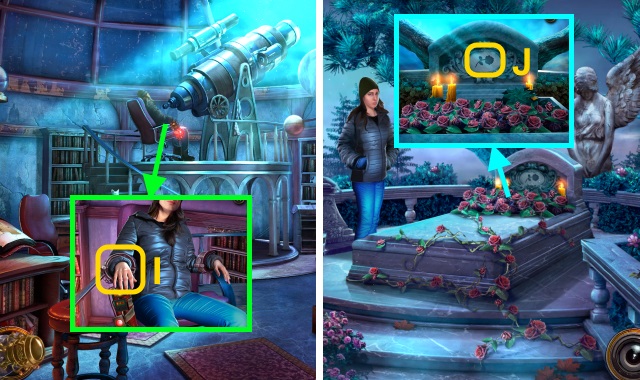
- Take Spirit Camera (I).
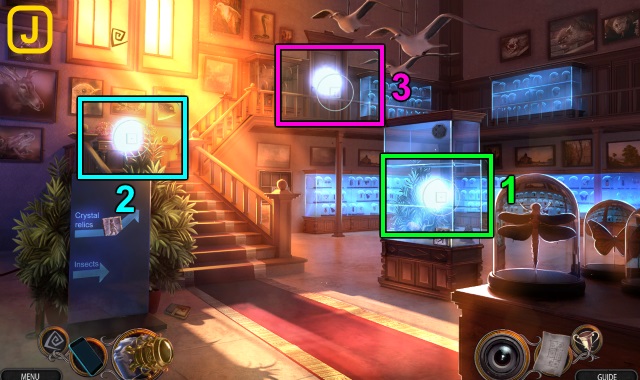
- Use Spirit Camera (J).
- Solution (K).
- Walk right.
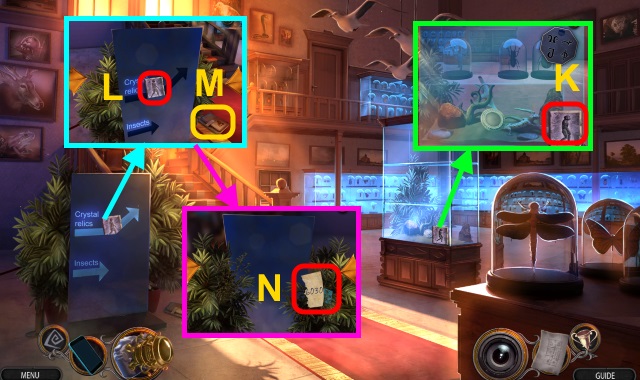
- Take letter and JOURNAL PAGE (L).
- Place JOURNAL PAGE on RYAN KILBOURN'S JOURNAL; take note.
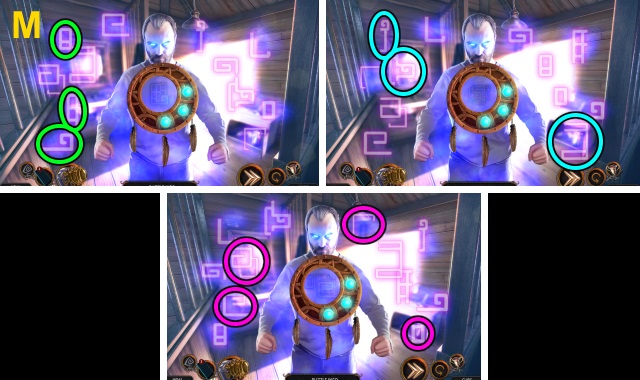
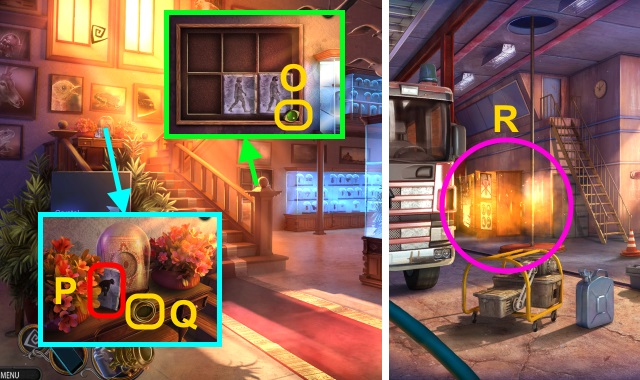
- Examine (M).
- Walk right.
- Take BURNT PHOTO and WOODEN PLATE (1/3) (N).
- Examine BURNT PHOTO; use Spirit Camera.
- Solution (O).
- Take JOURNAL PAGE.
- Place JOURNAL PAGE on RYAN KILBOURN'S JOURNAL; take PHOTOGRAPH (1/2).
- Walk down.
- Examine; take WOODEN PLATES (2/3) (P).
- Take WOODEN PLATES (3/3) (Q).
- Walk down.
- Examine (R).
- Solution (S).
- Take STONE PETAL (2/4).
- Examine (T); place WOODEN PLATES (3/3). Take STONE PETAL (3/4) and LIGHTER.
- Walk right twice.
- Use LIGHTER (U). Play HOP; receive DOOR HANDLE.
- Place DOOR HANDLE (V); open.
- Walk left.
- Take WOODEN PLANK, SCARF, and STONE PETAL (4/4) (W).
- Read newspaper; place plug (X). Pull cord (Y); take STATUE PARTS (2/4) (Z).
- Examine; take STATUE PARTS (3/4) (A).
- Solution (1-4).
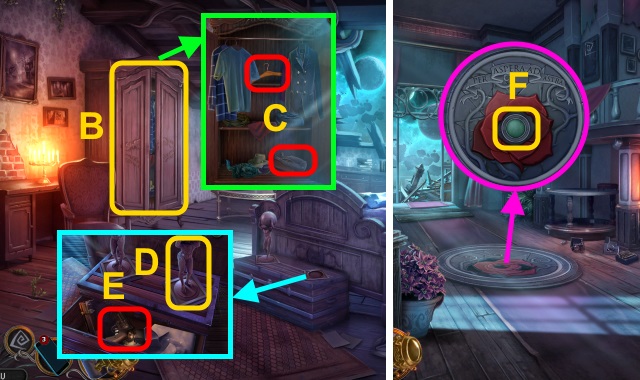
- Open (B). Move clothes; take HANGER and STATUE PARTS (4/4) (C).
- Examine HANGER; take HOOK.
- Examine STATUE; arrange pieces. Receive ATLAS STATUE.
- Place ATLAS STATUE (D); take EMPTY PISTOL and PHOTOGRAPHS (2/2) (E).
- Walk down twice.
- Place STONE PETAL (4/4); press (F).
- Take ORNAMENTAL GEAR (G).
- Walk right.
- Place ORNAMENTAL GEAR (H).
- Place WOODEN PLANK (I).
- Take TAPE (J).
- HOOK and TAPE on DRONE; receive DRONE WITH HOOK.
- Walk left.
- Use DRONE WITH HOOK. Solution (K): move drone to key.
- Receive DRAWER KEY.
- Walk down.
- Use DRAWER KEY (L); examine photo. Place PHOTOGRAPHS (2/2) (M); examine.
- Examine (N).
- Solution (O).
- Open; take ORNAMENTAL GEAR.
- Place ORNAMENTAL GEAR (P).
- Walk forward.
- Examine each lily (Q); take COIN (1/3).
- Walk forward.
- Use Spirit Camera.
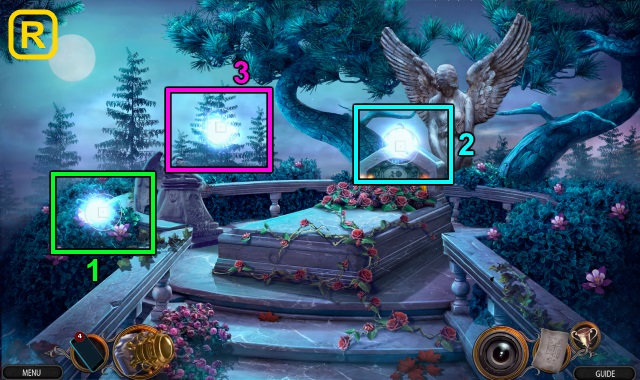
- Solution (R).
- Read (S); take JOURNAL PAGE. Take ANGEL STATUE (T).
- JOURNAL PAGE on RYAN KILBOURN'S JOURNAL; take MOTORBIKE EMBLEM.
- Move stone; take COIN (2/3) (U).
- Walk down.
- Place MOTORBIKE EMBLEM (V); open. Play HOP; Receive T WRENCH.
- Examine (W); use T WRENCH and ANGEL STATUE. Remove grate; take ORNATE KEY.
- Use ORNATE KEY (X).
- Walk left.
- Examine scene.
- Examine (Y); take COIN (3/3).
- Take ANTI-RUST SPRAY and FOLDING RULER (Z).
- Open FOLDING RULER.
- Use FOLDING RULER (A).
- Play HOP; receive STAR (1/3) (B).
- Walk down.
- Place COIN (3/3) (C); examine 2x.
- Examine 2x (D).
- Solution (E).
- Open; take NEPTUNE AND STAR (2/3).
- Walk right.

- Use ANTI-RUST SPRAY; take ASTRONOMICAL TOKENS (3/3) (F).
- Walk down, then left.
- Open; place ASTRONOMICAL TOKENS (G).
- Solution (H).
- Take AMMO.
- AMMO on EMPTY PISTOL; receive LOADED PISTOL.
- Use LOADED PISTOL (I); receive STONE ROSE.
- Walk down, then right.
- Place STONE ROSE (J).
Chapter 3: The Crypt
- Use LIGHTER 3x (K).
- Take URN (L).
- Open URN; move items. Take CLOCK KEY (1/2) and IRON HANDLE.
- Remove each plant; examine dirt (M). Take STONE ORNAMENT.
- Place STONE ORNAMENT; solution (1-4).
- Take FLOWER ORNAMENT.
- Move urn; place FLOWER ORNAMENT (N).
- Solution (O).
- Move urn; take CLOCK KEY (2/2).
- Place CLOCK KEY (2/2) (P).
- Play HOP; receive CLOCK HAND (Q).
- Use CLOCK HAND and IRON HANDLE 3x (R).
- Examine scene.
- Remove net; take BRUSH (S).
- Move board; take SEASHELL (T).
- Walk right.
- Open; take OILCAN and HUNTING KNIFE (U).
- Take LEAF BLOWER and Map (V). Use OILCAN; take TOKEN (1/2).
- Rotate. Examine 2x; take MOTOR STARTER (W).
- Walk down.
- Examine bridge. Use HUNTING KNIFE; take MAGNET (X).
- Walk right.
- Use MAGNET (Y); take TOKENS (2/2).
- Place TOKENS (2/2) (Z); examine.
- Solution (A).
- Walk left.
- Read note; take COLORFUL KEYS (B). Open each drawer (C); take TAPE MEASURE.
- Open; take PROPELLER (D).
- Use TAPE MEASURE (E); receive FINGERPRINT KIT.
- Open FINGERPRINT KIT; place BRUSH.
- Examine; use FINGERPRINT KIT (F).
- Solution (1-3).
- Take LIGHTBULB.
- Take WOODEN HANDLE; open. Place LIGHTBULB; pull cord (G).
- Play HOP; receive BOAT STORAGE KEY (H).
- Walk down.
- Use BOAT STORAGE KEY; open (I). Take HAMMERHEAD, papers, and TORN BOAT.
- WOODEN HANDLE on HAMMERHEAD; take HAMMER.
- Walk down.
- Use HAMMER (J); receive WOODEN PLANKS.
- Place WOODEN PLANKS (K).
- Solution (L).
- Walk left.
- Take note and STONE TILE (3/3) (M).
- Take SEAWEED (N). Place STONE TILE (3/3) (O); examine.
- Solution (P).
- Place STONE TILE (2/2) (Q); examine.
- Solution (R).
- Use Spirit Camera.
- Solution (S).
- Move branch (T).
- Place STONE TILE (U).
- Solution (V).
- Examine (W); take paper, AMULET OF PROTECTION, and DRY BRANCH.
- Use DRY BRANCH (X); take ARROW HOOK (Y). Use SEASHELL (X); receive MELTED WAX.
- Use ARROW HOOK (Z); receive UTILITY BELT.
- Open UTILITY BELT; take KEY CARD.
- Walk down.
- Give SEAWEED (A); take BROKEN MOTOR.
- MOTOR STARTER and PROPELLER on BROKEN MOTOR; receive BOAT MOTOR.
- Walk right, then left.
- Use KEY CARD (B); examine.
- Solution (C).
- Open.
- Walk right.

- Move; take SILVER WING (D). Examine book (E); take METAL TILE (1/2).
- Use COLORFUL KEYS; select key (F). Open; move items. Take BROKEN FLASHLIGHT.
- Walk down.
- Place SILVER WING (G); take TAP HANDLE (H).
- Walk right.
- Place SCARF and TAP HANDLE (I); take WET SCARF.
- Use WET SCARF (J).
- Examine (K).
- Solution (L).
- Take BATTERY.
- Use AMULET OF PROTECTION on scene.
- Solution (M): Symbol positions are randomized.
- Examine note; play HOP.
- BATTERY on BROKEN FLASHLIGHT; receive FLASHLIGHT.
- Use FLASHLIGHT (N).
- Play HOP; receive METAL TILES (2/2) (O).
- Walk down twice.
- Place METAL TILES (2/2) (P); examine.
- Solution (Q).
- Take RUBBER PATCH.
- MELTED WAX, RUBBER PATCH, LEAF BLOWER, and BOAT MOTOR on TORN BOAT; receive INFLATABLE BOAT.
- Use INFLATABLE BOAT (R).
- Solution (S): dodge obstacles.
Chapter 4: The Docks
- Take CROWBAR, AXE HANDLE, BROKEN STUN GUN, and WRENCH (T).
- Use CROWBAR (U); receive ON/OFF BUTTON. Take BROKEN BLOWTORCH (V).
- ON/OFF BUTTON on BROKEN STUN GUN; receive STUN GUN.
- Examine; use STUN GUN (W).
- Walk forward.
- Take BOLT CUTTER (X). Use WRENCH (Y); take SEASHELL (1/3).
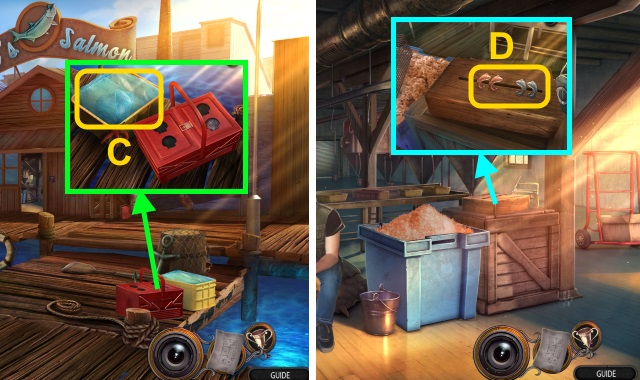
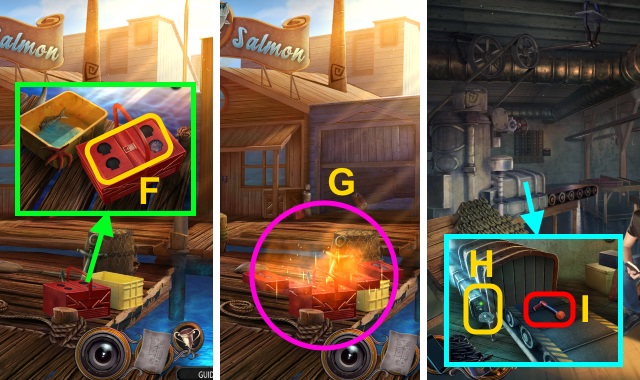
- Press button; move radio (Z). Talk; take FISH FIGURINE.
- Move paper; take SEASHELL (2/3) (A).
- Walk down.
- Use BOLT CUTTER; take LIGHTER FLUID (B).
- Examine BROKEN BLOWTORCH; use LIGHTER FLUID; receive BLOWTORCH.
- Use BLOWTORCH (C); take FISH FIGURINE (2/2).
- Walk forward.
- Place FISH FIGURINE (2/2) (D); examine.
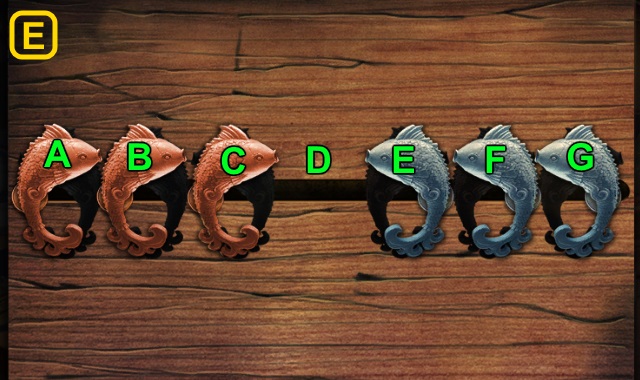
- Solution (E): E-C-B-D-F-G-E.
- C-A-B-D-F-E-C-D.
- Move items; take SEASHELL (3/3).
- Walk down.
- Place SEASHELL (3/3) (F).
- Play HOP; receive ELECTRONIC KEY (G).
- Walk forward.
- Use ELECTRONIC KEY (H); take CRANK HANDLE (I).
- Walk down.
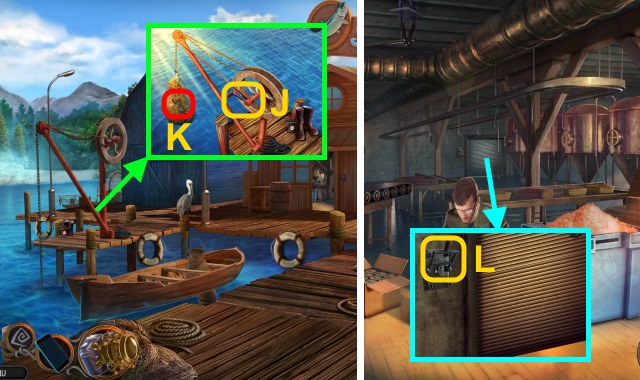
- Use CRANK HANDLE (J); take SWITCH HANDLE (K).
- Walk forward.
- Place SWITCH HANDLE; pull (L).
- Walk forward.
- Use Spirit Camera.
- Solution (M).

- Remove flowers and dirt; take VALVE HANDLE (N).
- Take note, METAL HANDLE, and SAW HANDLE (O).
- Use CROWBAR; remove cover. Use VALVE HANDLE; take DECORATIVE HATCHET (1/4) (P). Move cone; take FIRE STATION SYMBOL (Q). Place METAL HANDLE (R); open. Place SAW HANDLE; take SAW.
- Open; use SAW (S).
- Walk right.
- Use AMULET OF PROTECTION (T).
- Solution (U): symbol positions are randomized.
- Take DECORATIVE HATCHET (2/4).
- Move photo; take DECORATIVE HATCHET (3/4) (V).
- Examine (W).
- Solution (X).
- Open drawer; take FLOWER CODE.
- Walk down.
- Use FLOWER CODE; solution (Y).
- Take DECORATIVE HATCHET (4/4).
- Place DECORATIVE HATCHET (4/4) (Z); open. Use AMULET OF PROTECTION.
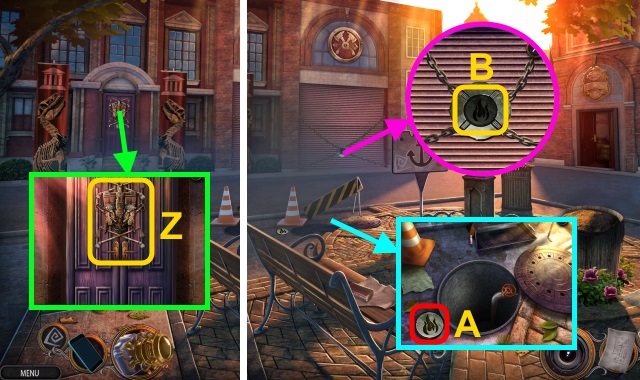
- Take FIRE EMBLEM (A).
- Place FIRE EMBLEM (B).
- Walk forward.
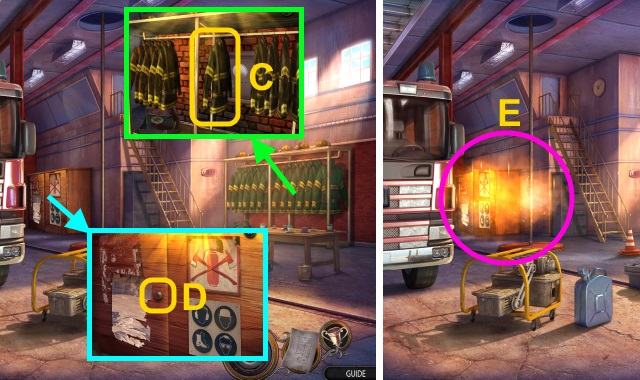
- Move; examine jacket (C). Open each zipper; take SMALL KEY.
- Use SMALL KEY (D).
- Play HOP; receive FIRE HOSE (E).
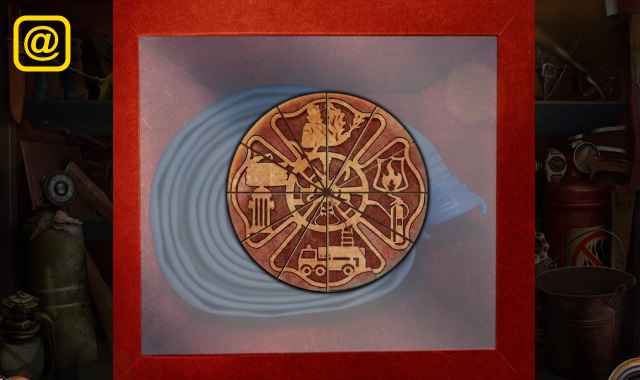
- HOP solution (@).

- Place FIRE STATION SYMBOL (F); take FIREFIGHTER'S EMBLEM (1/2). Place FIREHOSE (G); turn (H). Receive OPERATIONAL FIREHOSE.
- Walk down.
- Use OPERATIONAL FIRE HOSE (I).
- Walk left.
- Use Spirit Camera.
- Solution (J).
- Take EVOLUTION TILE (1/4) (K).
- Take EVOLUTION TILE (2/4) (L). Open wallet (M); take FIREFIGHTER'S EMBLEM (2/2).
- Rotate; take COMBINATION (1/2) and ID CARD PART (1/2) (N).
- Take JEWELED EYE EMBLEM (O).
- Take EVOLUTION TILE (3/4) (P). Place JEWELED EYE EMBLEM (Q); open. Take ANTIQUE BOOK.
- Walk down, then forward.
- Play HOP; receive SAFE DIAL (R).
- Examine (S); place FIREFIGHTER'S EMBLEM (2/2). Open; take EVOLUTION TILE (4/4) and BROKEN ID CARD.
- Examine BROKEN ID CARD; receive POLICE ID CARD.
- Walk down, then right.
- Use POLICE ID CARD (T); solution (U).
- Open; examine letter. Take MUSEUM MASTER KEY.
- Walk down, then left.
- Use MUSEUM MASTER KEY (V); take STONE MEDALLION (1/2) (W).
- Place EVOLUTION TILE (4/4) (X).
- Solution (Y); examine.
- Solution (Z).
- Take STONE MEDALLION (2/2) (A).
- STONE MEDALLION (2/2) on ANTIQUE BOOK. Read; take COMBINATION (2/2).
- Walk down, then forward.
- Examine (B); place SAFE DIAL and COMBINATION (2/2).
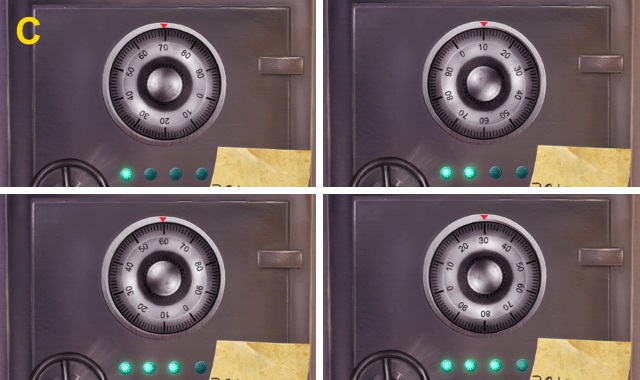
- Solution (C).
- Take AXE HEAD and TACTICAL KNIFE.
- AXE HANDLE on AXE HEAD; use TACTICAL KNIFE. Receive MAGICAL AXE.
- Walk down, then left.
- Use MAGICAL AXE (D).
- Play HOP (E).
- Walk down.
Chapter 5: Lisa
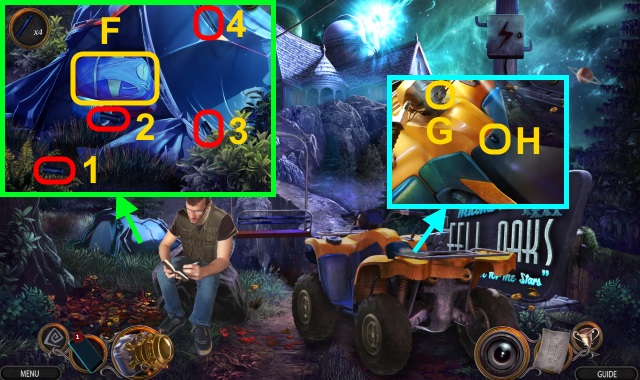
- Open tent; collect pegs (1-4). Take TENT PEGS. Move items (F); take ADHESIVE BANDAGE.
- Use key (G) on lock (H). Use ADHESIVE BANDAGE; take JUMPER CABLES.
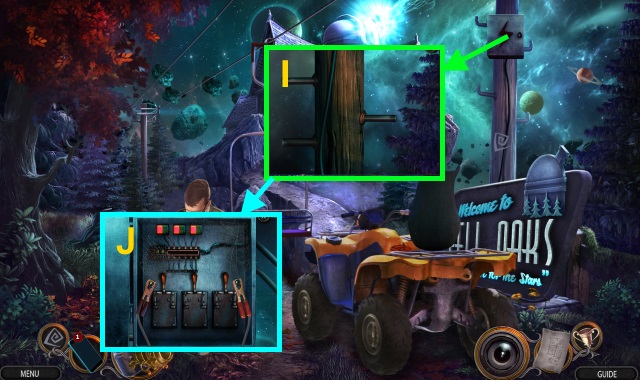
- Use TENT PEGS (I); scroll up.
- Open; place JUMPER CABLES. Pull levers (J).
- Go forward.
- Try to walk right.
- Examine scene 3x.
- Go forward.
- Use Spirit Camera.
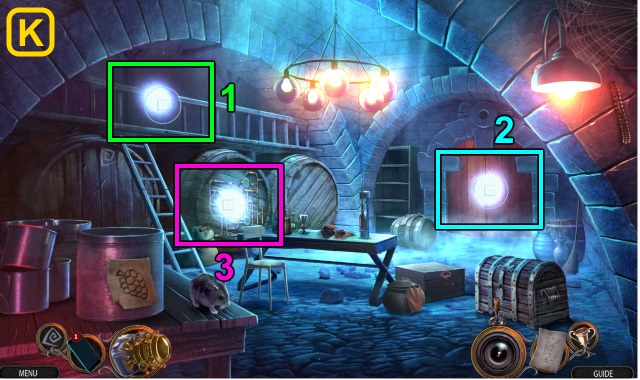
- Solution (K).
- Move items; take MATCHES (L).
- Take CANDLE (M).
- Place ladder (N).
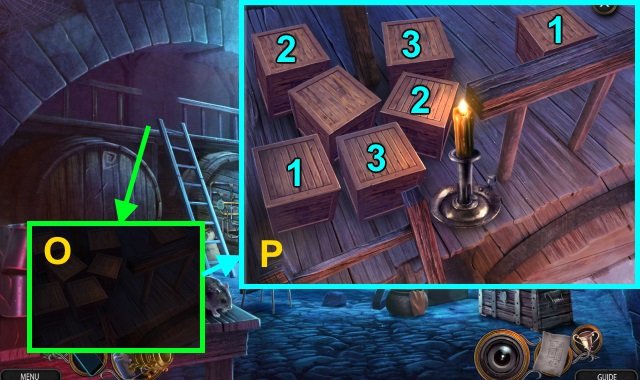
- Use CANDLE and MATCHES (O).
- Solution (P).
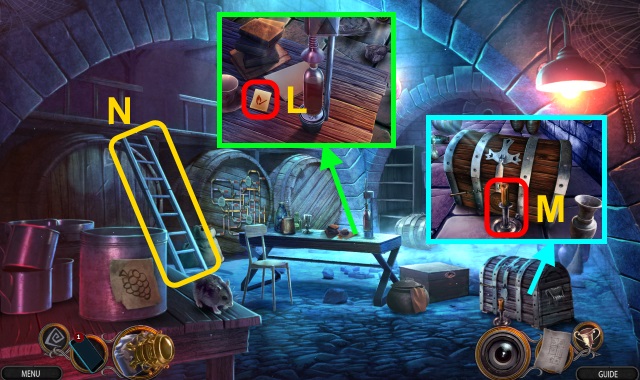
- Open; move cloth. Take STEEL HANDLE.
- Use STEEL HANDLE (Q); take WINE BOTTLE (1/2) and GRAPE EMBLEM (R).
- Place GRAPE EMBLEM (S).
- Play HOP; receive CLOSED WINE BOTTLE (T).
- Take CORKSCREW HANDLE (U).
- Place CORKSCREW HANDLE; take CORKSCREW (V).
- CORKSCREW on CLOSED WINE BOTTLE; receive WINE BOTTLE (2/2).
- Use WINE BOTTLE (2/2) (W).
- Solution (X).
- Walk left.
- Take GLOWING MUSHROOM (1/3), GREEN GEM, TOTEM POLE WING (1/2), and TOOLBOX EMBLEM (Y).
- Place GREEN GEM (Z); open. Take GLOWING MUSHROOMS (2/3) and LEATHER BAG (A).
- Examine; talk (B). Receive STRONG ROPE.
- Walk down.
- Play HOP; receive TOTEM POLE PARTS (2/2) (C).
- Walk left.
- Place TOTEM POLE PARTS (2/2) (D); take GLOWING MUSHROOMS (3/3).
- Place GLOWING MUSHROOMS (3/3) (E). Play HOP; receive IRON CIRCLE.
- Walk down.
- Place IRON CIRCLE (F); take GRAPPLING HOOK and JEWELED PIN.
- JEWELED PIN on LEATHER BAG; take UNLOADED GRAPPLING GUN.
- GRAPPLING HOOK and STRONG ROPE on UNLOADED GRAPPLING GUN; receive LOADED GRAPPLING GUN.
- Walk left.
- Use LOADED GRAPPLING GUN (G).
- Go right.
- Try to walk left.
- Take COIN and DIRTY LENS (H).
- Take Spirit Camera (I). Use COIN (J); receive TORN METAL CONTAINER.
- Walk forward.
- Take METAL BAR (K).
- Walk down.
- Use METAL BAR (L); receive TOOLBOX.
- TOOLBOX EMBLEM on TOOLBOX; take STONE DAISY (1/3) and SEALANT.
- SEALANT on TORN METAL CONTAINER; receive METAL CONTAINER.
- Walk down.
- Use METAL CONTAINER (M); receive CONTAINER OF WATER. Use DIRTY LENS; receive CLEAN LENS.
- Examine Spirit Camera; place CLEAN LENS.
- Go right.
- Use CONTAINER OF WATER (N); move boards.
- Walk left.
- Use Spirit Camera.
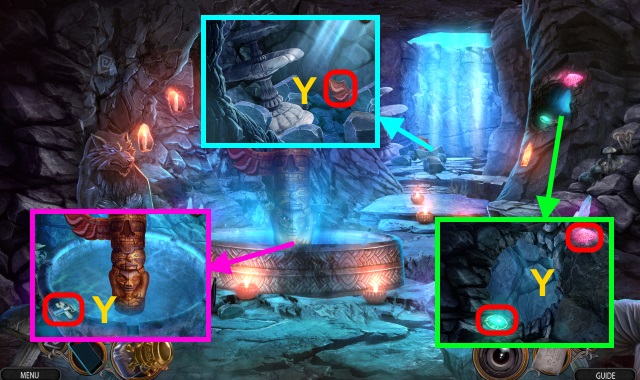
- Solution (O).
- Take STONE DAISY (2/3) (P).
- Take SUNSHINE EMBLEM (Q).
- Walk down, then forward.
- Place SUNSHINE EMBLEM (R); take STONE DAISY (3/3).
- Rotate; place STONE DAISY (3/3) (S). Take DATE PLATE.
- Walk down, then left.
- Move; place DATE PLATE (T). Take DESK KEY.
- Use DESK KEY (U).
- Play HOP (V).
- Examine stone (W).
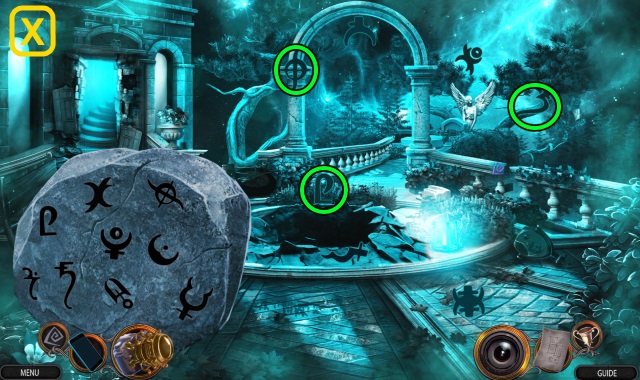
- Collect symbols (X).
- Walk forward.
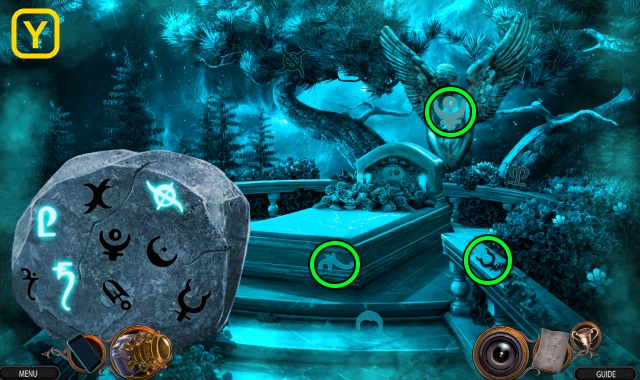
- Collect symbols (Y).
- Walk down twice.
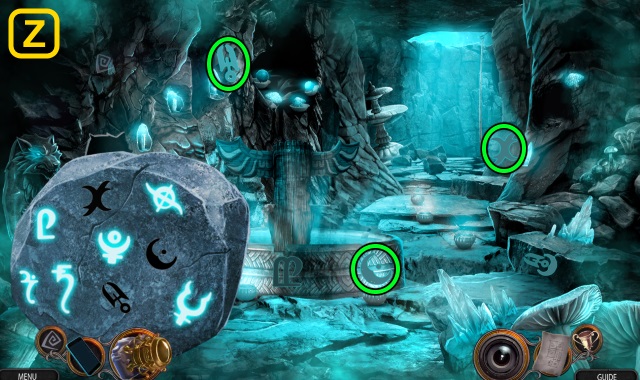
- Collect symbols (Z).
- Go right, then left.

- Solution (A).
- Solution (B).
- Select 'Publish.'
- Congratulations! You have completed Fright Chasers: Dark Exposure.
Created at: 2017-11-19