

Walkthrough Menu
- General Tips
- Chapter 1: Odeon Theater
- Chapter 2: Dread at Castle Windswept
- Chapter 3: Land of Gold
- Chapter 4: One Night at the Crossroads Teahouse
- Chapter 5: Anabelle, My Love
General Tips
- This is the official guide for Fright Chasers: Director's Cut.
- This guide won't tell you when to zoom into a location; the screenshots show each zoom scene.
- Hidden-object puzzles are referred to as HOPs. Only the locations of the HOPs will be shown.
- Use the Map to fast travel to a location.
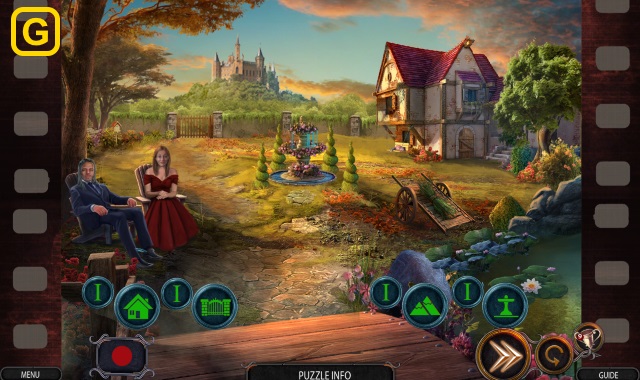
Chapter 1: Odeon Theater
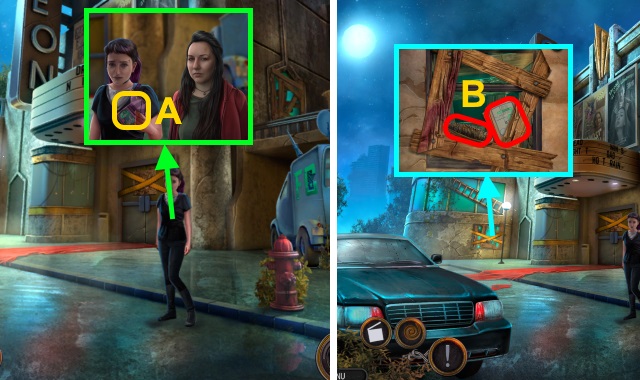
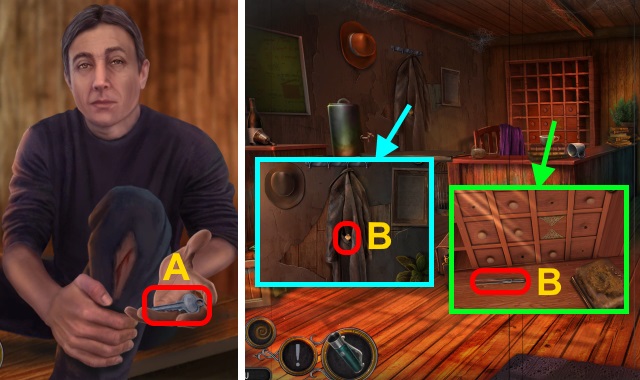
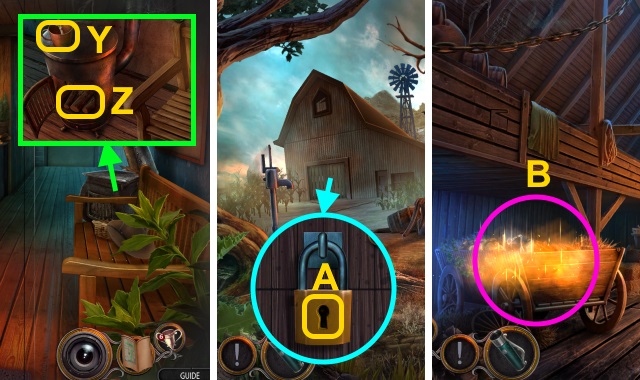
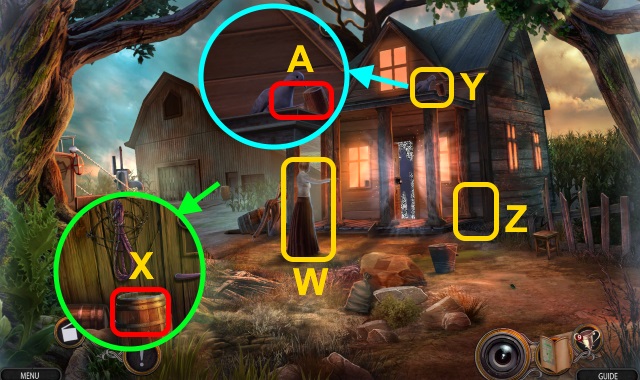
- Talk; examine photo (A).
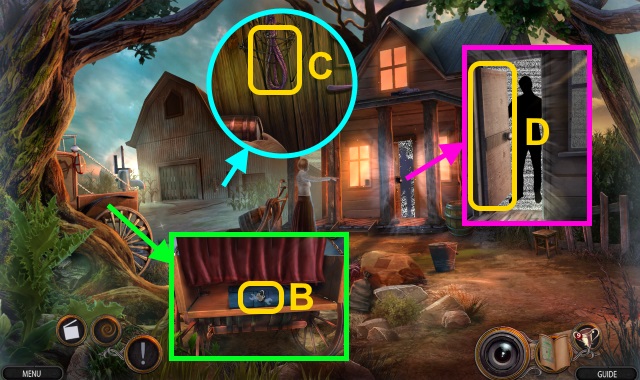
- Remove tape; take WIRE BRUSH and Map (B). Examine boards.
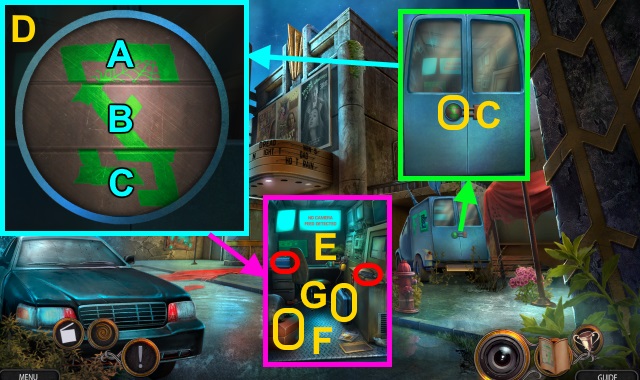
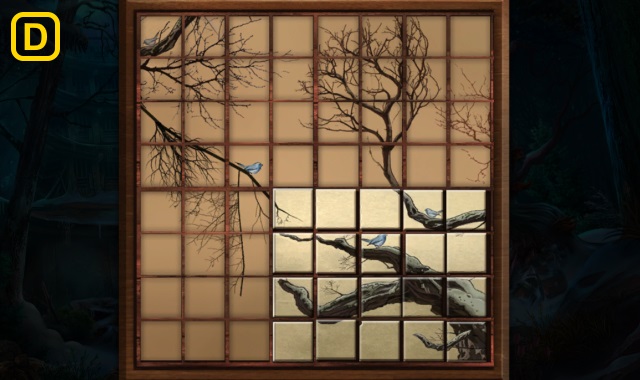
- Examine (C).
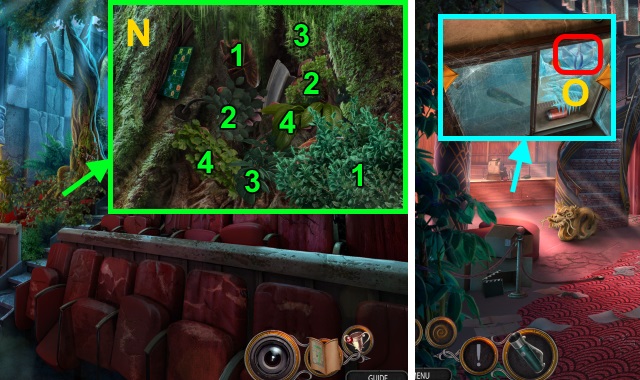
- Solution (D): Ax4-Bx2-C.
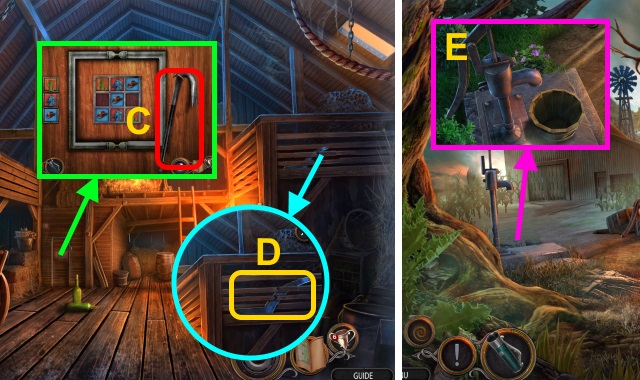
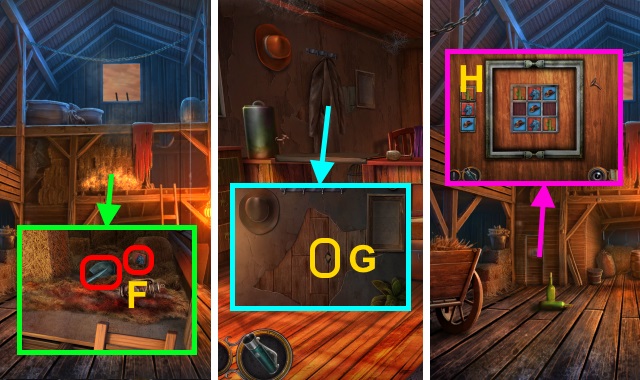
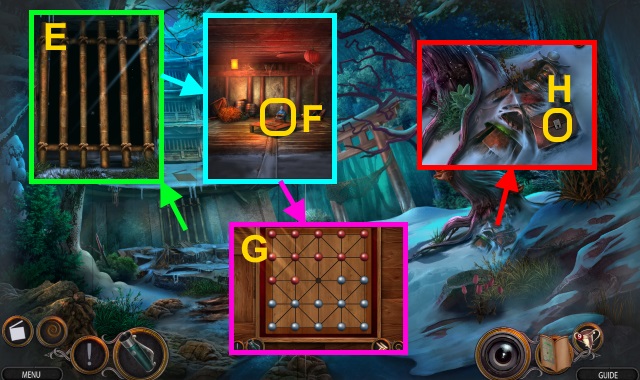
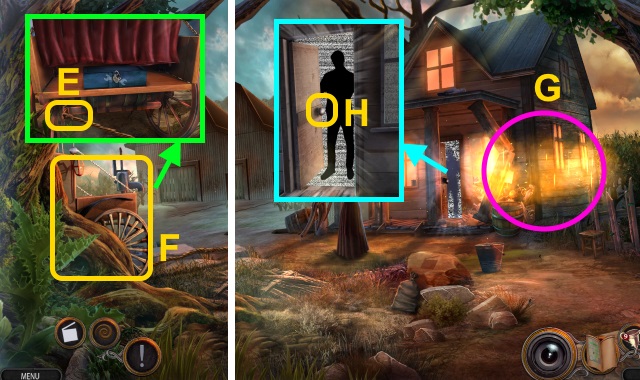
- Take MINI CAMERA and LUNCH BOX (E). Open (F); take GLASS CUTTER. Examine (G); open. Move items; take Flashlight.
- Examine LUNCH BOX; rotate. Take STICKY NOTE.
- Examine STICKY NOTE.
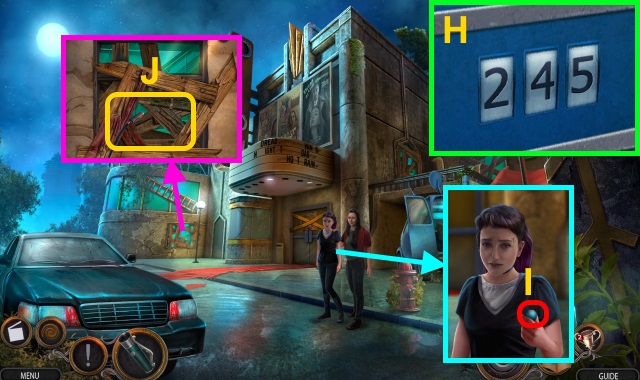
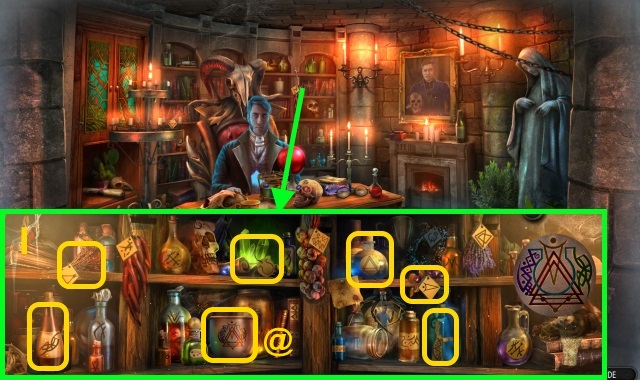
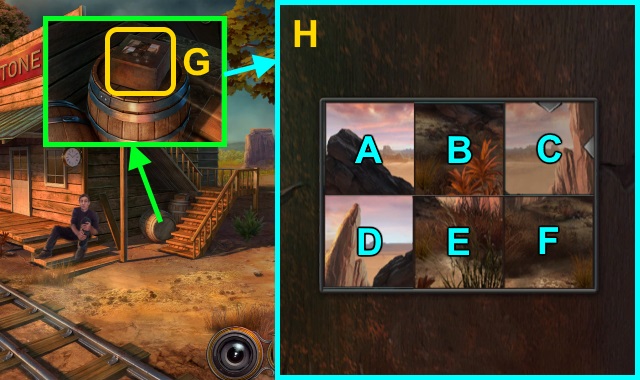
- STICKY NOTE on LUNCH BOX; enter 245 (H). Take COFFEE THERMOS and LEMONADE.
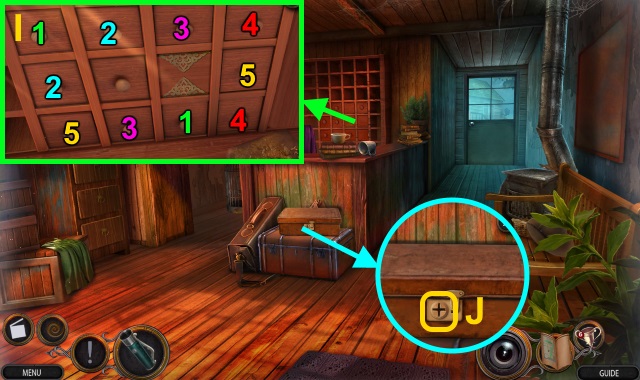
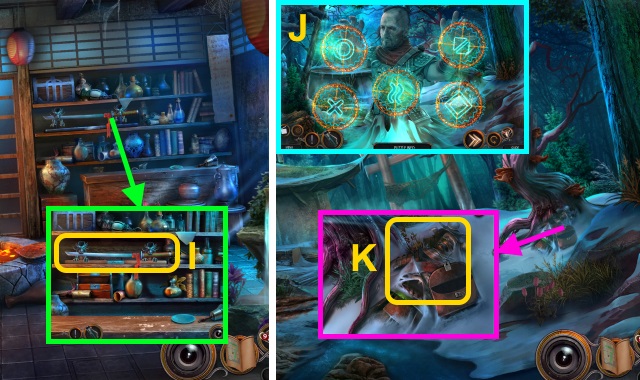
- Give COFFEE THERMOS; take LOCK BALL (1/3) (I).
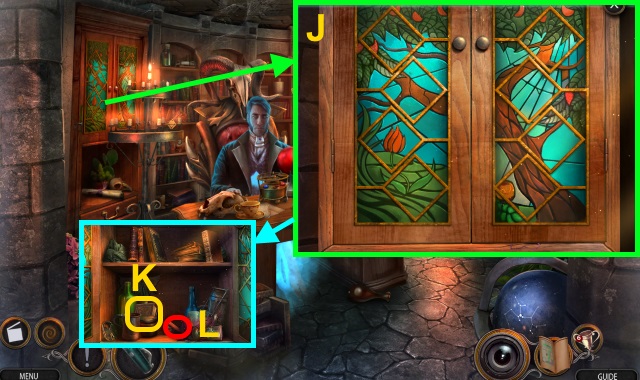
- Use MINI CAMERA (J).
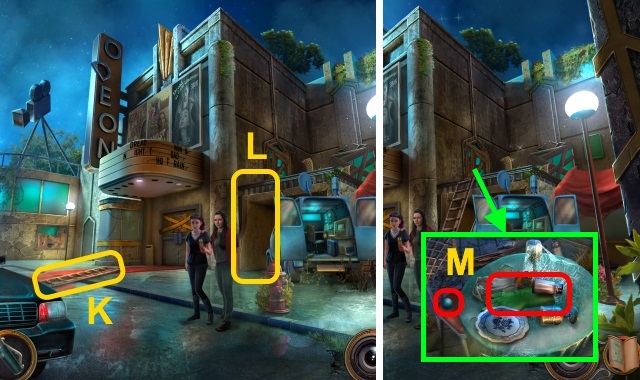
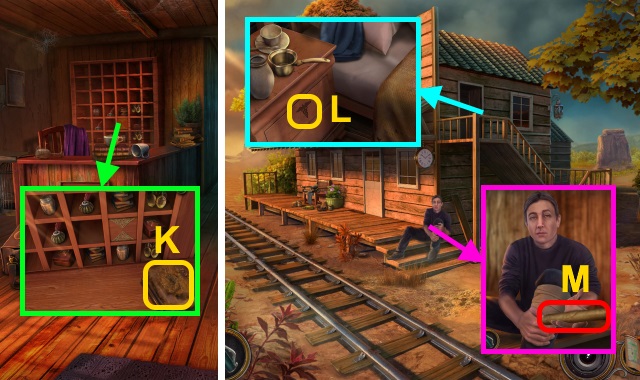
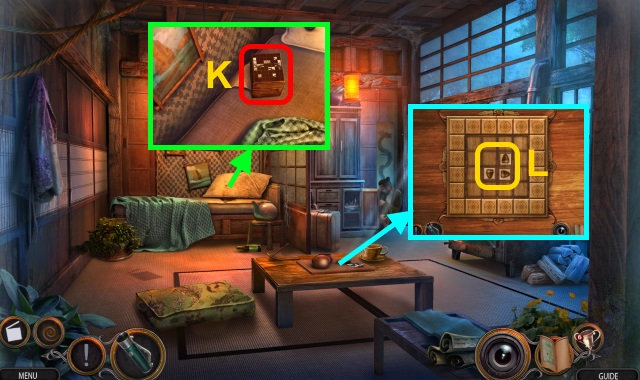
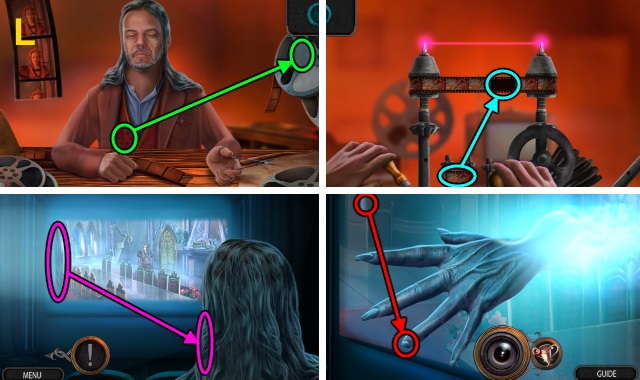
- Place ladder (K) on (L).
- Move items; take SALT, RUBBER GLOVE, and LOCK BALL (2/3) (M).
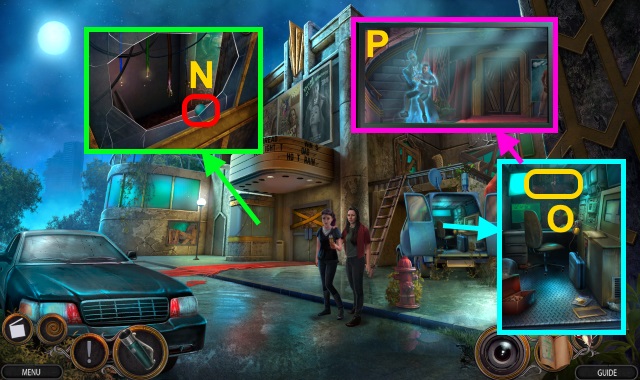
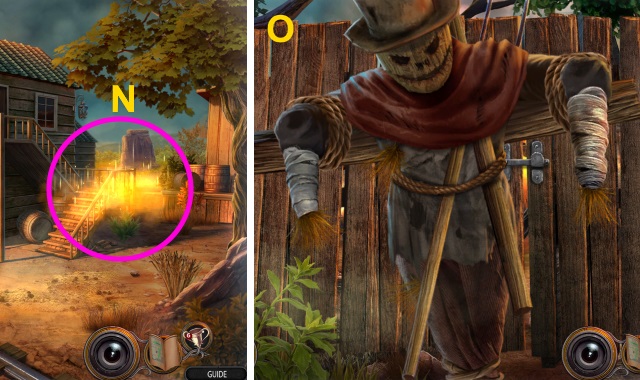
- Use GLASS CUTTER; take LOCK BALL (3/3) (N). Use MINI CAMERA.
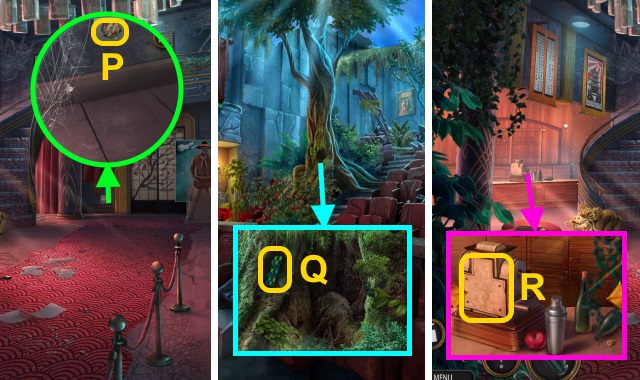
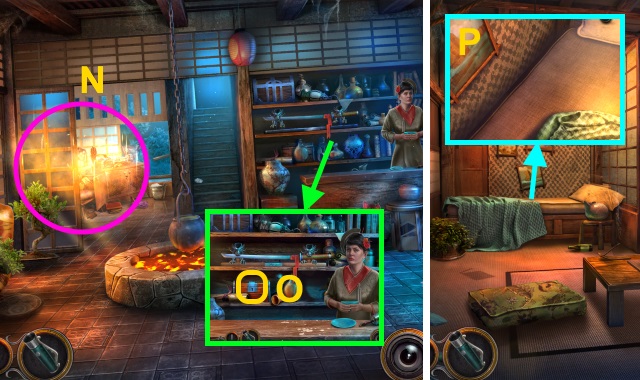
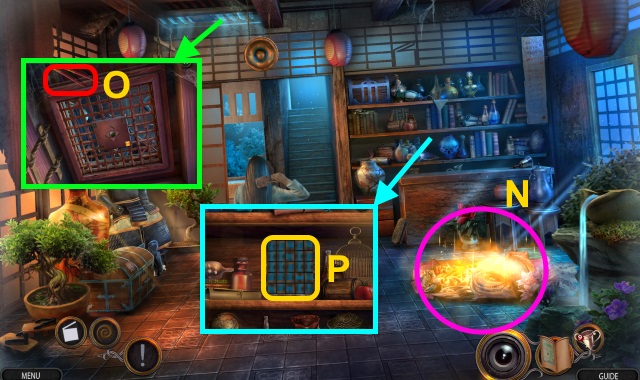
- Examine (O).
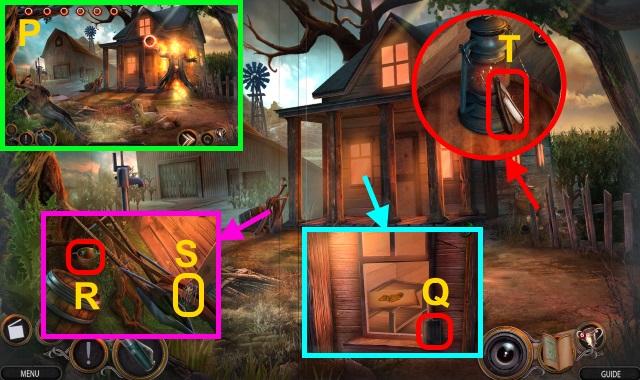
- Scroll left (P).
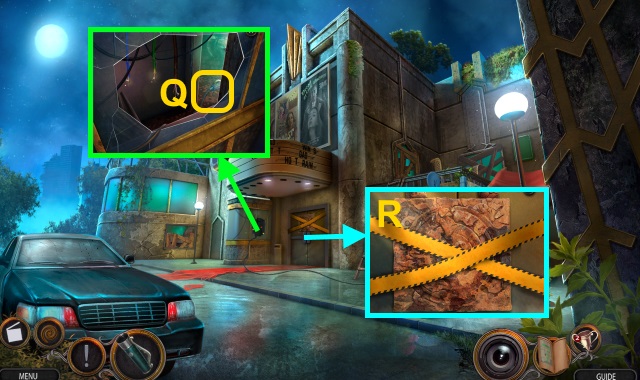
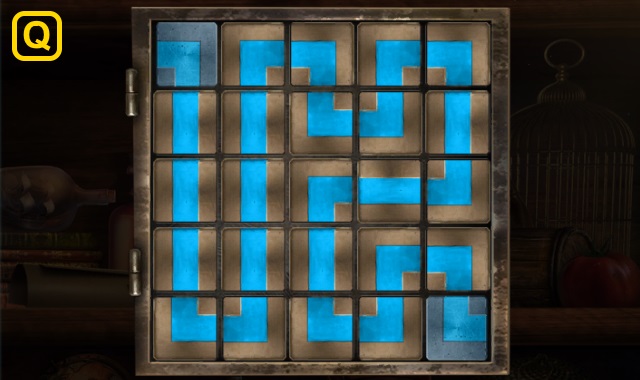
- Examine camera (Q); take LOCK PART.
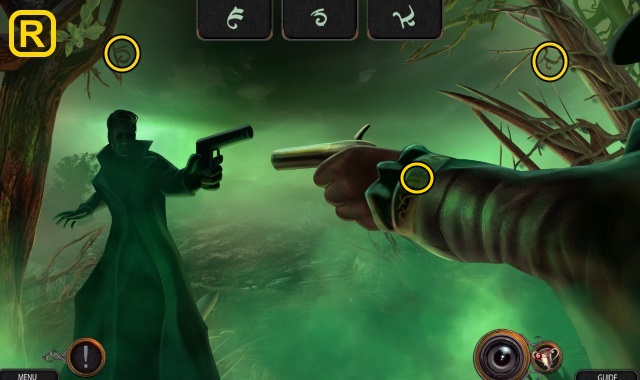
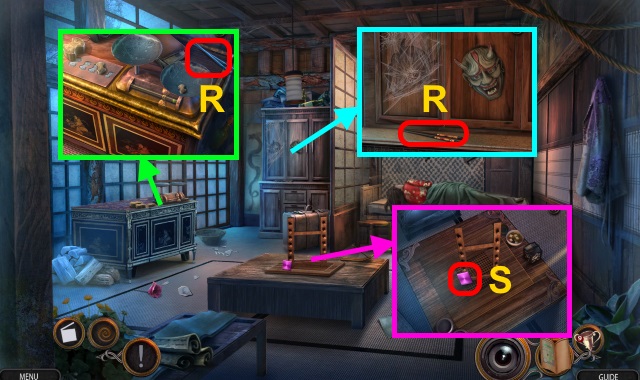
- Remove tape (R); use LEMONADE, SALT, WIRE BRUSH, LOCK BALL (3/3), and LOCK PART.
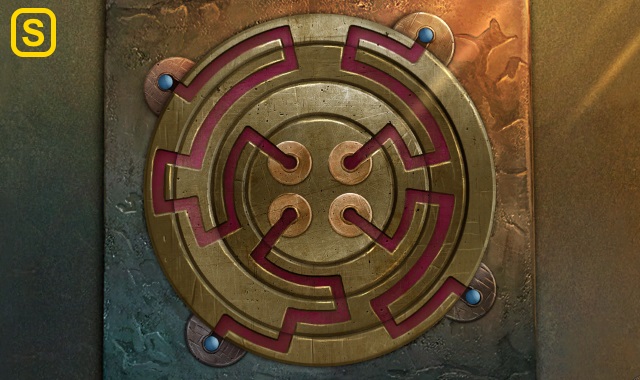
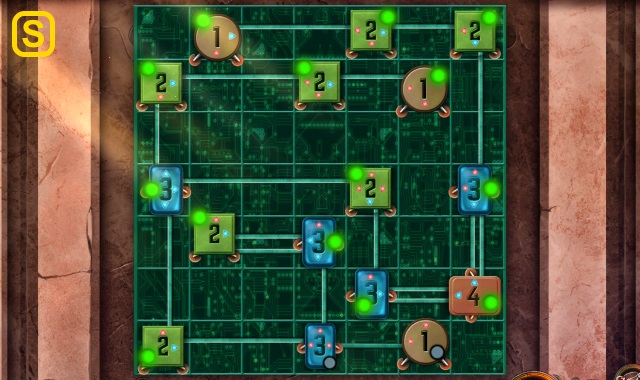
- Solution (S).
- Walk forward.
- Examine scene.
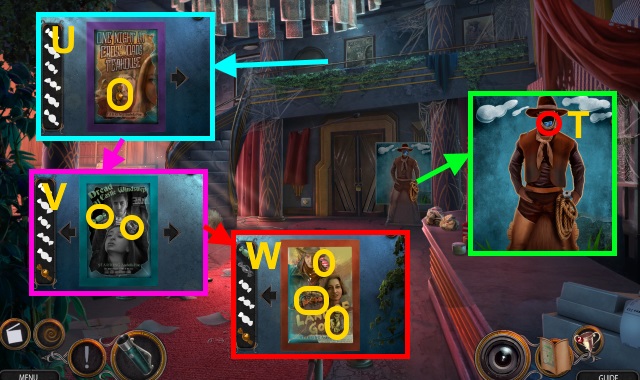
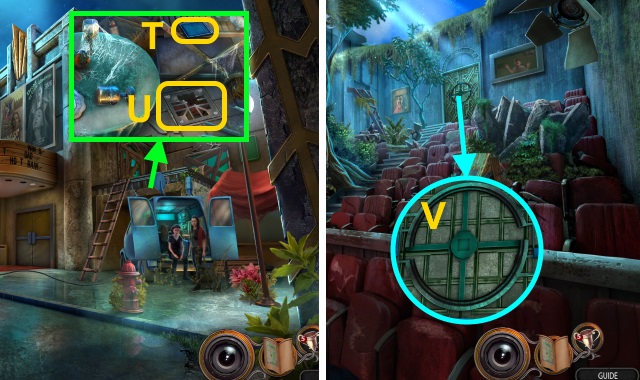
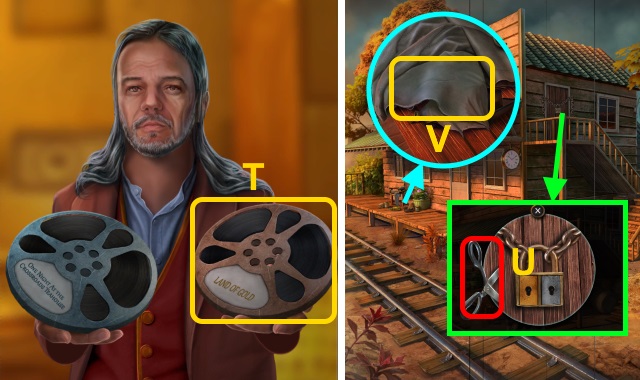
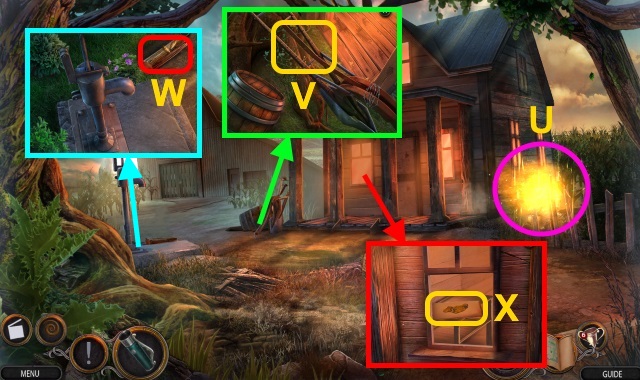
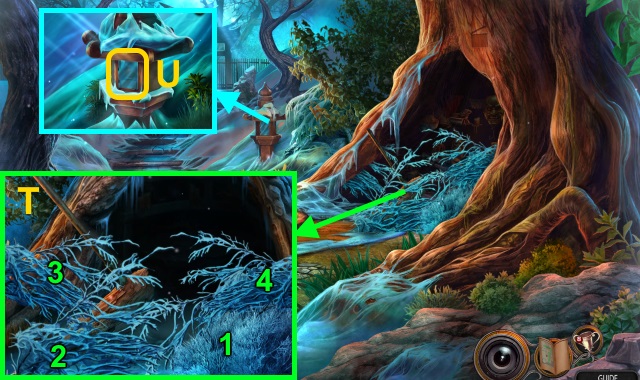
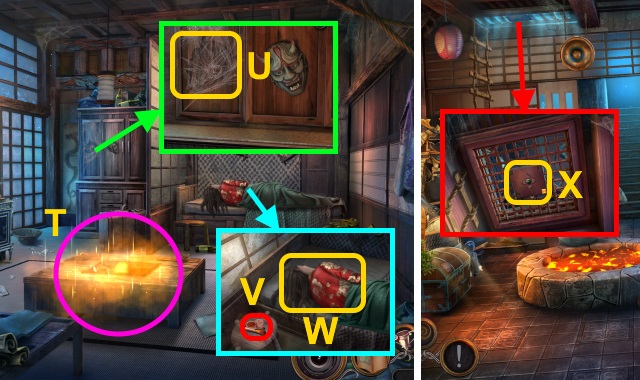
- Take LIGHTER (T).
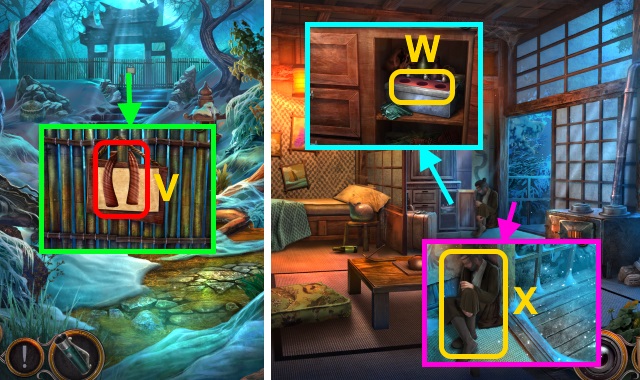
- Take candy (U). Scroll right; collect candies (V). Scroll right. Use RUBBER GLOVE; collect candies (W). Take CANDY.
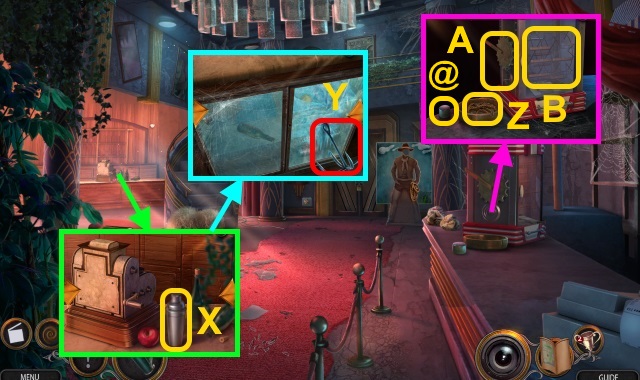
- Examine (X); open. Take TANGLED GEAR.
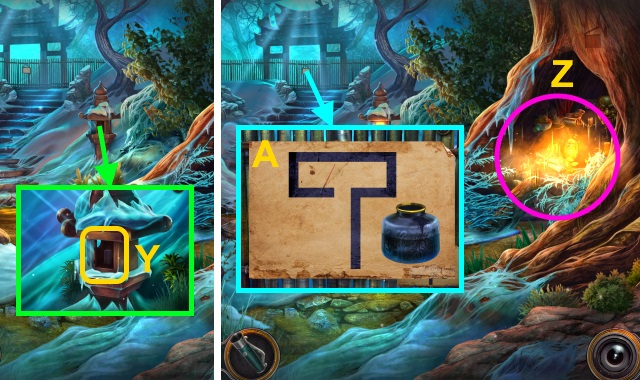
- Rotate; take HOOK (Y).
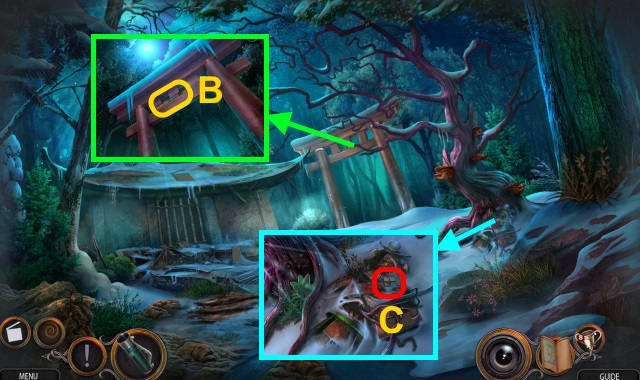
- Examine (@). Place TANGLED GEAR (Z); use LIGHTER. Place gear; pull handle (A). Open (B); take HEX KEY.
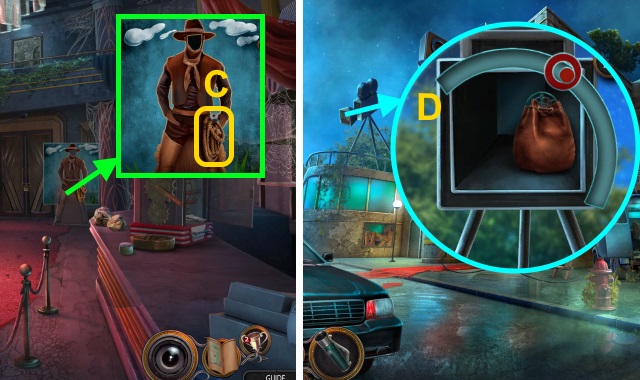
- Use HEX KEY (C); take LASSO.
- HOOK on LASSO; take GRAPPLING HOOK.
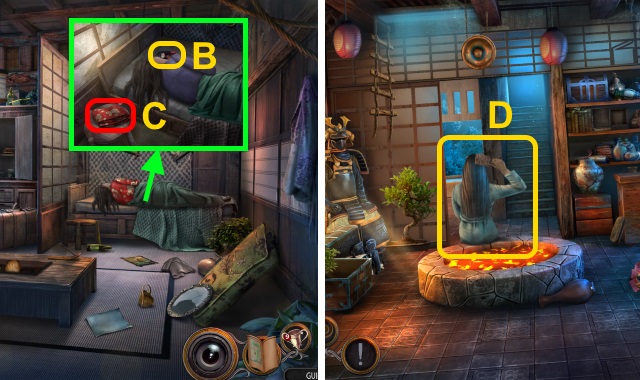
- Walk down.
- Use GRAPPLING HOOK. Solution (D): select when the red circle and dot align.
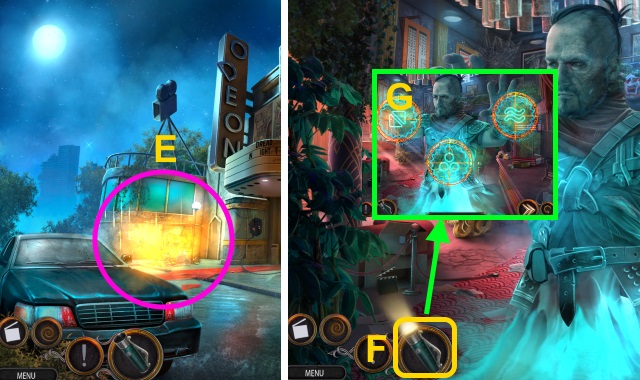
- Play HOP; receive BAG (E).
- Open BAG; take LOCK PART and PROJECTOR KEY.
- Walk forward.
- Examine scene.
- Use FLASHLIGHT (F).
- Solution is random (G).
- Walk forward.
- Examine (H).
- Examine (I).
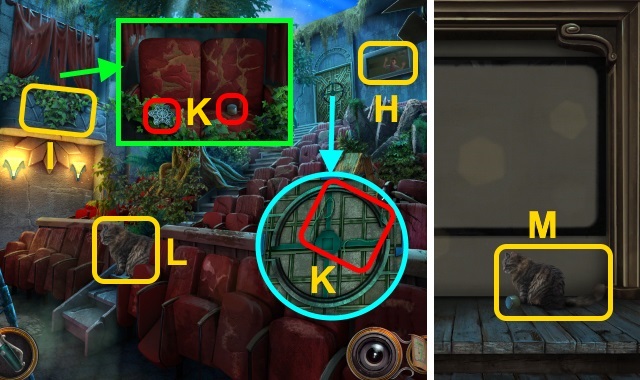
- Take KNOB (1/2), FRIDGE HANDLE, and STRING (K).
- Open each CANDY; use STRING. Take CAT TOY.
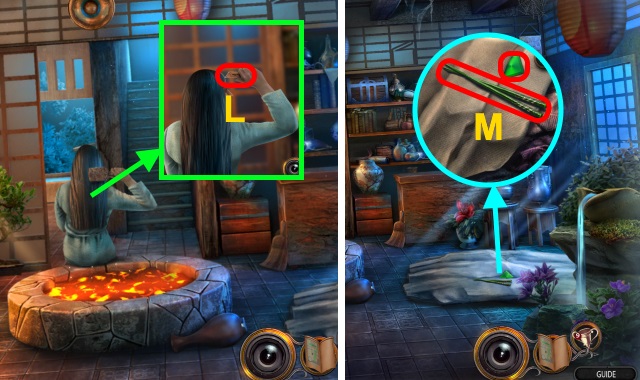
- Examine cat (L).
- Give CAT TOY (M); take KNOB (2/2).
- Scroll right.
- Solution (N); take IRON.
- Walk down.
- Place FRIDGE HANDLE; take ICE BLOCK (O).
- Examine paper (P). Use IRON and ICE BLOCK; take PLIERS.
- Walk forward.
- Use PLIERS (Q); receive CIRCUIT.
- Walk down.
- Rotate; open (R). Place CIRCUIT.
- Solution (S).
- Take SCREWDRIVER.
- Walk down.
- Examine (T); use SCREWDRIVER (U). Take LOCK PART.
- Walk forward twice.
- Place 2 LOCK PARTS (V).
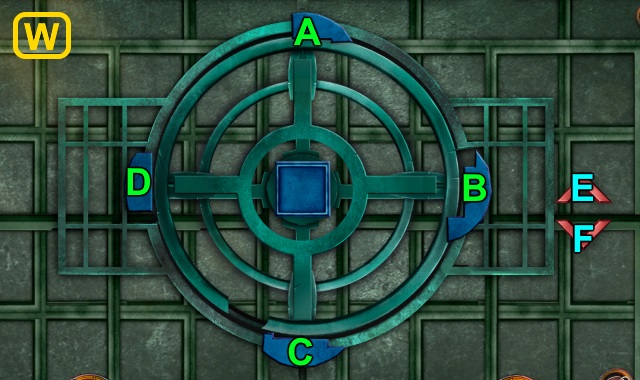
- Solution (W): C-A-Ex2-B-D.
- Walk forward.
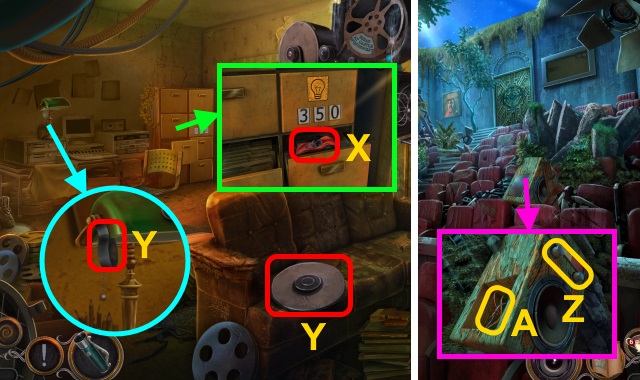
- Open; take WINDUP TOY (X).
- Take INSULATION TAPE and PROJECTOR COVER (Y).
- Walk down; scroll right.
- Move boards; read note. Place KNOB (2/2) (Z). Use INSULATION TAPE (A); take WINDING KEY.
- Walk forward.
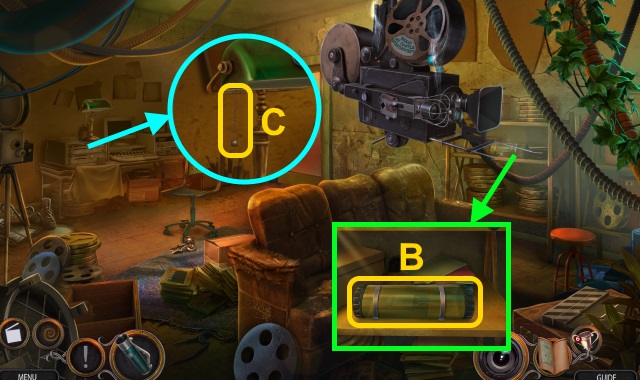
- Open; use WINDUP TOY and WINDING KEY (B). Take VIDEOTAPE.
- Pull cord (C); use VIDEOTAPE.
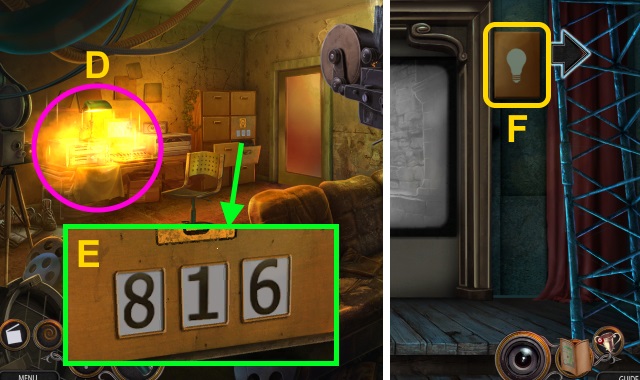
- Play HOP (D).
- Enter 816 (E); take TELESCOPIC BATON.
- Walk down; scroll left.
- Use TELESCOPIC BATON (F); receive PROJECTOR LIGHT BULB.
- Scroll right; walk forward.

- Examine film (G); place PROJECTOR COVER. Use PROJECTOR KEY (H); replace PROJECTOR LIGHT BULB (I).
- Take ROOM KEY (J).
Chapter 2: Dread at Castle Windswept
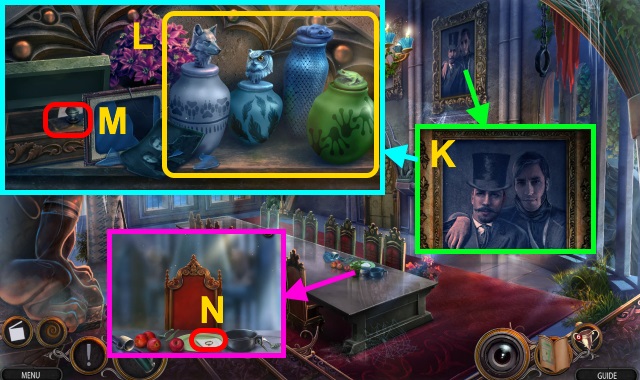
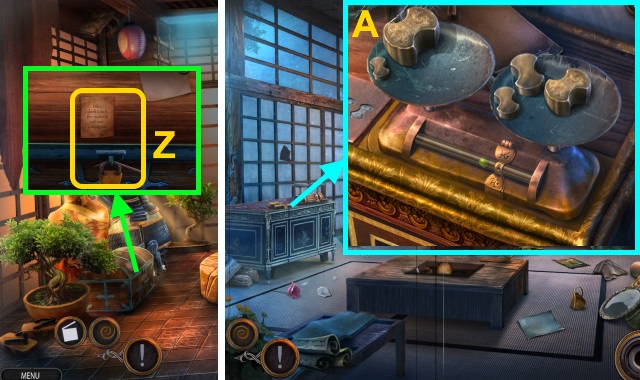
- Examine picture (K).
- Arrange lids (L); take PAPERWEIGHT and GROUNDS MAP (M).
- Move items; take DIAMOND RING and NAPKIN (N).
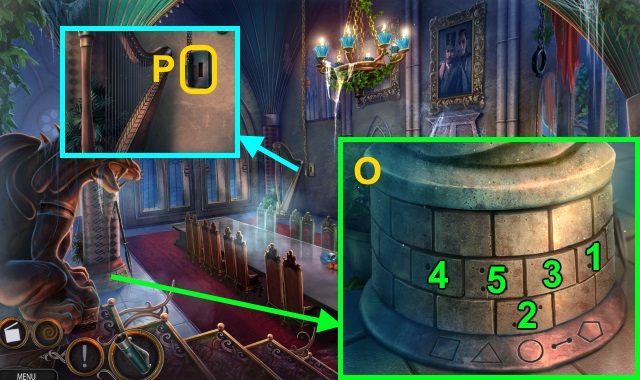
- Use NAPKIN; solution (O).
- Take LEVER.
- Place LEVER (P); pull.
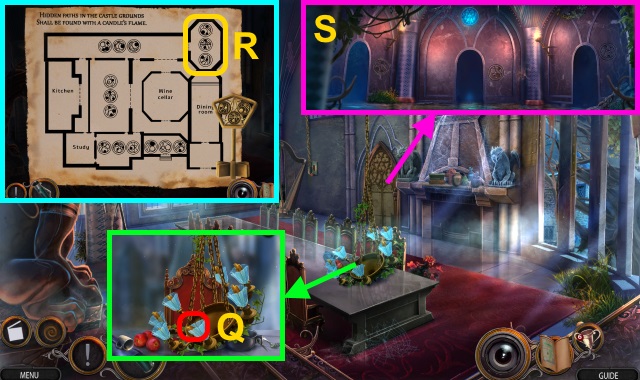
- Take CANDLE (Q).
- CANDLE and LIGHTER on GROUNDS MAP; examine map. Use ROOM KEY; match key (R).
- Examine; use GROUNDS MAP (S). Go left, right, then center.
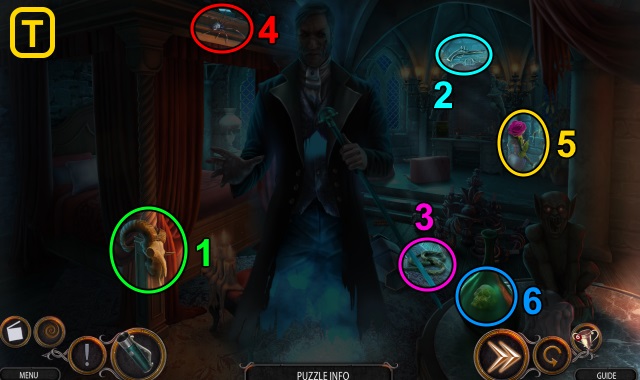
- Use Flashlight; solution (T).
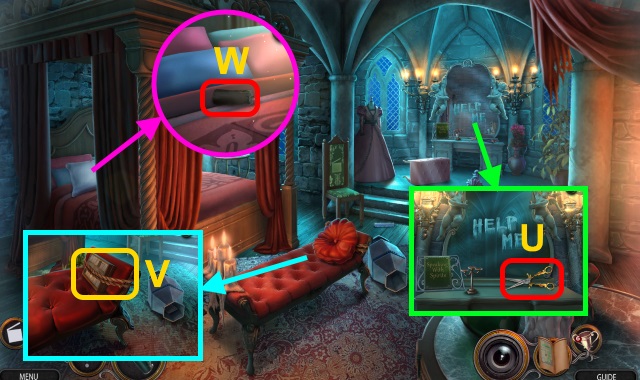
- Take SCISSORS (U).
- Move cushion; use SCISSORS (V). Take PUZZLE BOX.
- Move pillow; take BLACK CANDLE (1/3) (W).
- Take WIRE HOOK and BOX TILE (1/2) (X).
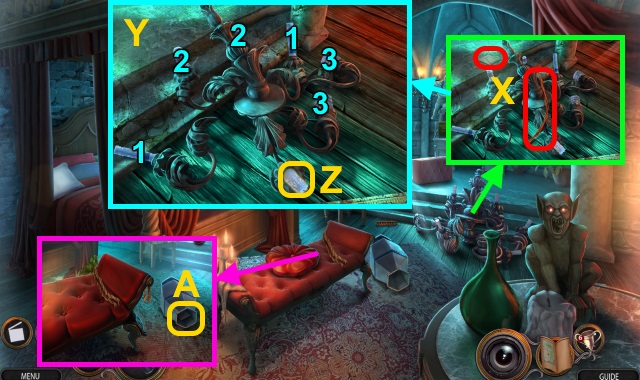
- Match candles (Y); examine candle (Z). Take BLACK CANDLE (2/3).
- Use WIRE HOOK (A); receive BOX TILE (2/2).
- BOX TILE (2/2) on PUZZLE BOX.
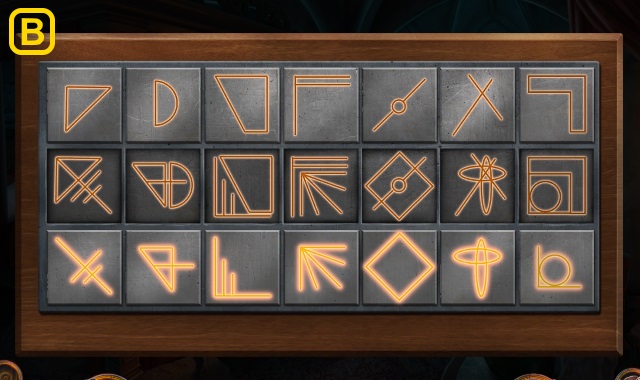
- Solution (B).
- Take BLACK CANDLE (3/3).
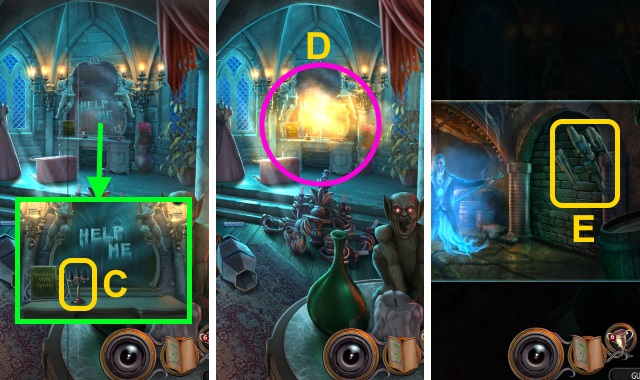
- Place BLACK CANDLE (3/3) (C); use LIGHTER.
- Play HOP (D).
- Go right, then left twice.
- Examine (E); go right.

- Take BLUE CHALK (F).
- Examine (G); take PORCELAIN JAR.
- Take HANDLE (H); use PORCELAIN JAR.
- Solution (I).
- Use PAPERWEIGHT (@); take MYSTICAL POWDER.
- Solution (J).
- Examine book (K); take KNIFE. Move items; take RED CHALK (L).

- Use KNIFE; receive SKULL CLUE. Use HANDLE (M); open. Take BURNER FUEL.
- Use RED CHALK, BLUE CHALK, MYSTICAL POWDER, SKULL CLUE, and BURNER FUEL. Pour fuel (N); examine skull (O).

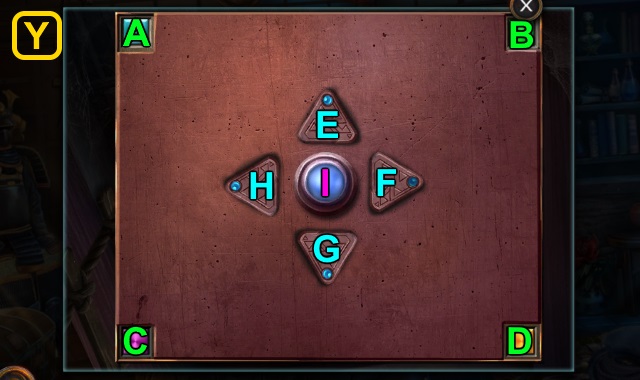
- Solution (P): (A-I-C)-(B-D)-(A-I)-(B-E)-(A-F-G-I)-(B-H-G).
- Examine powder (Q).

- Solution (R-S).
- Play HOP; take gun.
Chapter 3: Land of Gold
- Examine scene.
- Select 'Land of Gold' (T).
- Take SCISSORS (U).
- Use SCISSORS (V); take BLANKET.
- Play HOP; receive HAND SAW HANDLE (W).
- Take LOG (1/2) (X). Place HAND SAW HANDLE (Y); take HANDSAW.
- Use HANDSAW (Z).
- Take SILVER APARTMENT KEY (A).
- Walk forward.
- Take TWEEZERS and GOLD APARTMENT KEY (B).

- Move hat; take NIPPER and PICTURE TILE (1/2) (C).
- Walk down.
- Use SILVER APARTMENT KEY and GOLD APARTMENT KEY (D).
- Use TWEEZERS (E); take PICTURE TILE (2/2). Move items; collect handles (F). Take DRAWER KNOB (5/5).
- Examine (G); place PICTURE TILE (2/2).
- Solution (H): B-E-F-C-B-A-D-E-F-C.
- Read paper; take SEAL HANDLE.
- Walk forward.
- Place DRAWER KNOB (5/5); solution (I).
- Take PACKAGE.
- Open PACKAGE; read folder. Take TORN CLUE; take EMPTY GUN, HANDCUFFS, and LUCKY COIN.
- Use LUCKY COIN (J); take CLEANING SPRAY.
- Use CLEANING SPRAY and SEAL HANDLE (K); take MEDICAL SYMBOL TILE.
- Walk down.
- Place MEDICAL SYMBOL TILE (L); move paper. Take MEDICAL SUPPLIES.
- Use MEDICAL SUPPLIES; take Map (M).
- Play HOP (N).
- Move corn; take SCARECROW (O). Open gate.
- Use Flashlight.
- Solution (P): select circles before they get too close.
- Take WHISKEY FLASK (Q).
- Take COPPER CUP (R). Use NIPPER (S); take BULLET (1/3) and MATCHES.
- Take DULL RAZOR (T); pour WHISKEY FLASK.
- Play HOP; receive MAGNET (U).
- Use DULL RAZOR (V); take SHARP RAZOR.
- Take BULLET (2/3)-(3/3) and LOG (2/2) (W).
- Examine EMPTY GUN; use BULLET (3/3). Take LOADED GUN.
- SHARP RAZOR on SCARECROW; receive ROPE. Take PITCHFORK and TOOL POLE.
- MAGNET and ROPE on TOOL POLE; take MAGNET ON A POLE.
- Use MAGNET ON A POLE (X); take WAXED BARN KEY. Open envelope; take BILL OF OWNERSHIP.
- Walk down, then forward.
- Place COPPER CUP and WAXED BARN KEY (Y). Open; use LOG (2/2) and MATCHES (Z). Take BARN KEY.
- Walk down, then right.
- Use BARN KEY (A).
- Go left.
- Use PITCHFORK. Play HOP; receive BUCKET (B).
- Take CROWBAR (C).
- Use CROWBAR (D); take PUMP HANDLE.
- Walk down.
- Place PUMP HANDLE and BUCKET (E); use pump. Take FULL BUCKET.
- Walk left.
- Use FULL BUCKET; take DECORATED TILE (1/2) and SHOVEL BLADE (F).
- SHOVEL BLADE on TOOL POLE; take SHOVEL.
- Go to Waiting Room.
- Move coat; use CROWBAR (G). Read letter; take GOLDEN MEDALLION, PAPER PIECE, and DECORATED TILE (2/2).
- PAPER PIECE on TORN CLUE.
- Go to Barn Interior.
- Use DECORATED TILE (2/2) (H).

- Solution (I): Lx2-Fx2-A-L-H.

- Use SHOVEL; read book (J). Scroll right; use BILL OF OWNERSHIP. Use GOLDEN MEDALLION.
- Walk down.
- Use LOADED GUN and HANDCUFFS on scene.
- Take film (K).
Chapter 4: One Night at the Crossroads Teahouse
- Move bushes x2.
- Take MALLET (L).
- Take KOKESHI DOLL (1/3) (M); knock.
- Use MALLET (N); take AROMATIC OIL.
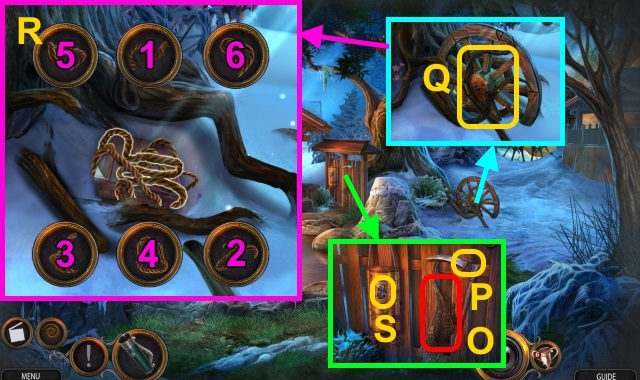
- Take NET (O); use AROMATIC OIL (P). Take SICKLE.
- Use SICKLE (Q); remove wheel.
- Solution (R); take BOX KEY.
- Use BOX KEY (S); take ROAD PASS.
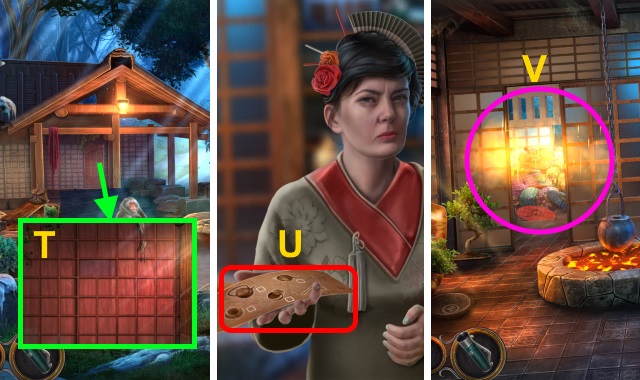
- Give ROAD PASS (T).
- Take TEA INSTRUCTIONS (U).
- Open. Play HOP; receive WHISK (V).
- Take FOLDING PAPER and TEAPOT (W).
- Examine FOLDING PAPER; examine each corner. Take CODE.
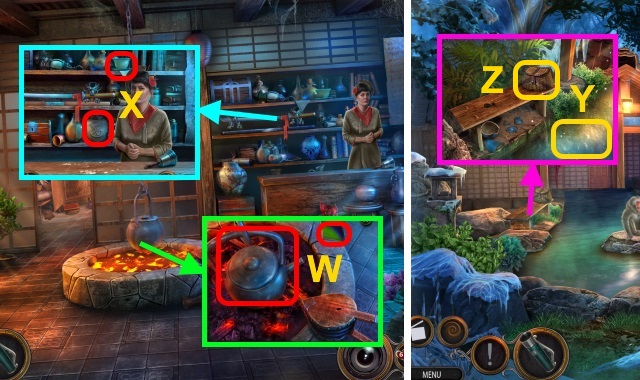
- Move items; take TEA POWDER and TEA BOWL (X).
- Walk down.
- Use TEAPOT (Y); receive FULL TEAPOT. Examine (Z); place CODE.
- Solution (A).
- Take TEA STRAINER.
- WHISK, TEA POWDER, TEA BOWL, FULL TEAPOT, and TEA STRAINER on TEA INSTRUCTIONS; take TEA SET.
- Walk forward.
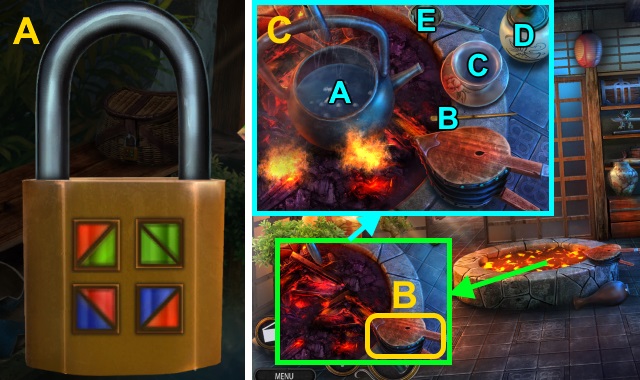
- Examine 3x (B); place TEA SET.
- Select (C): B-D-A-E-A. Take GREEN TEA.
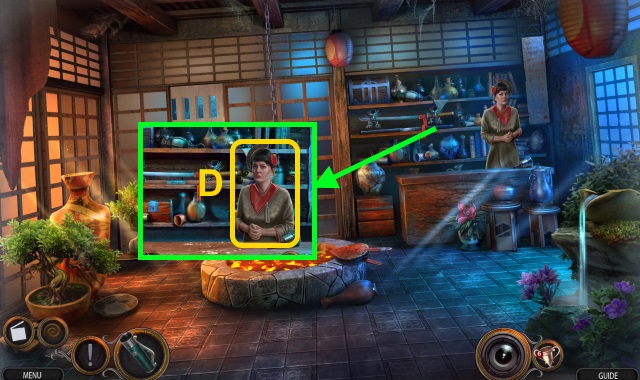
- Give GREEN TEA (D).
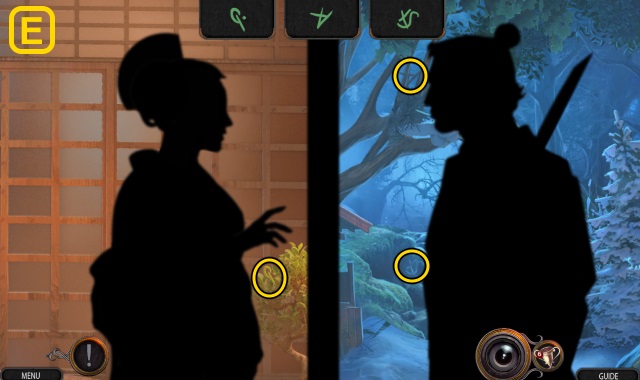
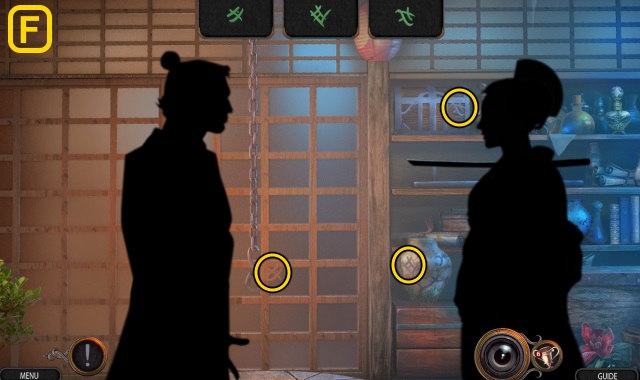
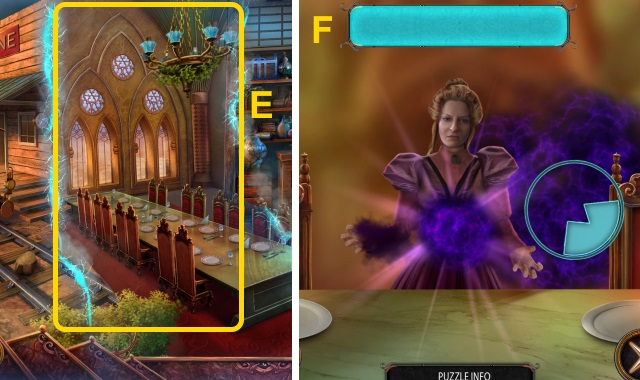
- Solution (E-F).
- Walk forward.
- Use Flashlight.
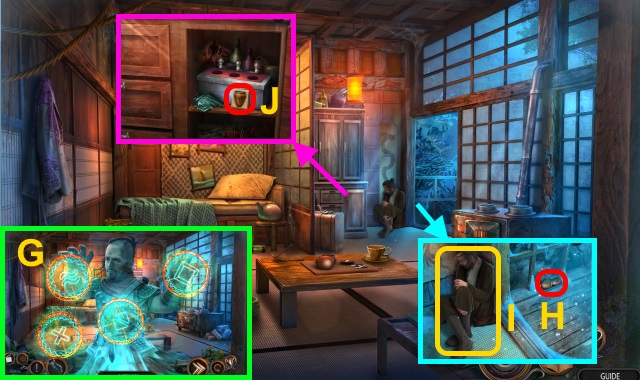
- Solution is random (G).
- Take KOKESHI DOLL (2/3) (H). Talk (I); take WARRIOR'S BAG.
- Open WARRIOR'S BAG; take HAIRPIN, FOREST MAP PIECE, and picture.
- Open; take GAME PIECE (J).
- Move pillow; take PUZZLE BOX (K).
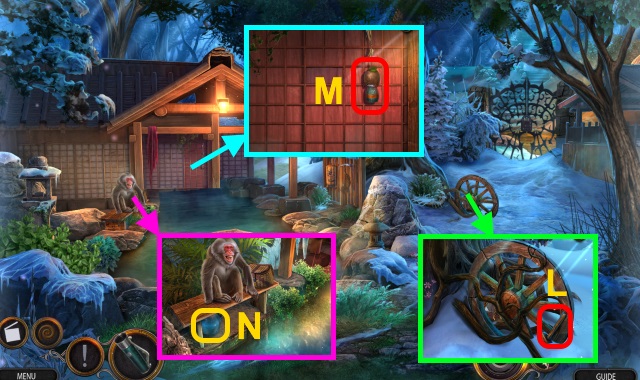
- Place GAME PIECE (L).
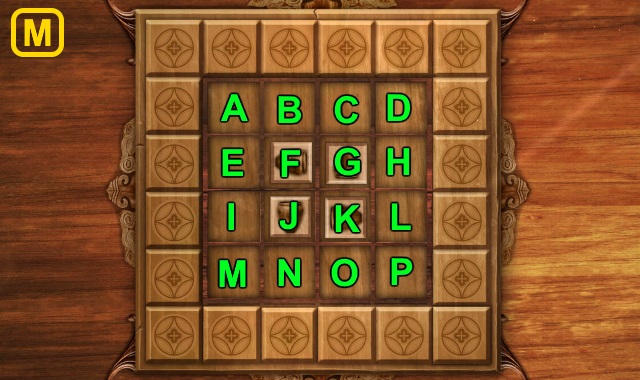
- Solution (M): F-K-F-K-Ix2-Hx2-Ax2-Px2.
- Take SMALL CHEST KEY.
- Walk down.
- Play HOP; receive FLINT (N).
- Use SMALL CHEST KEY (O); take FISHING REEL.
- Walk forward.
- Use FISHING REEL (P); take FOREST MAP.
- FOREST MAP PIECE on FOREST MAP; take PADLOCK PART and FOREST MAP.
- Walk down twice.

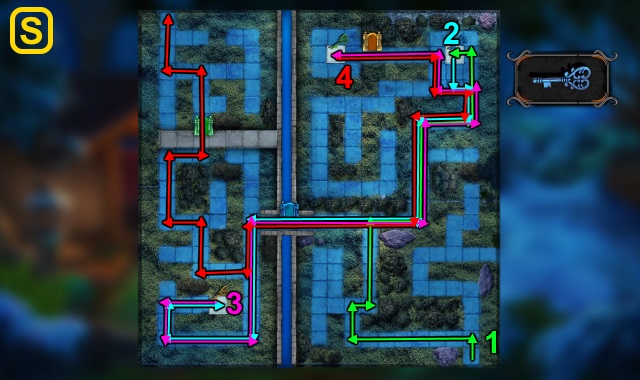
- Place PADLOCK PART; solution (Q): C-F-I-H-G-D-E-B-C.
- F-I-H-E-B-C-F-I-H-E-F-C-B-E.
- Use FOREST MAP; (R) examine.
- Solution (S).
- Select branches in order (T). Rock on spear; receive RUSTY SPEAR.
- Open (U); take CRYPTIC LETTER and KOKESHI DOLL (3/3).
- Take SCARF (V).
- Go to Guest Room.
- Place KOKESHI DOLL (3/3) (W); take STEEL STRIKER.
- FLINT on STEEL STRIKER; take FLINT AND STEEL.
- Give CRYPTIC LETTER (X); take GATE SYMBOL.
- Go to Forest Shrine.
- Use FLINT AND STEEL (Y).
- Play HOP; receive INKWELL (Z).
- Use GATE SYMBOL and INKWELL. Solution (A): draw line.
- Go left.
- Use NET and RUSTY SPEAR (B); take MYSTERIOUS CONTAINER.
- DIAMOND RING on MYSTERIOUS CONTAINER; take DRAGON CROWN (1/2).
- Take PUZZLE BOX KEY (C).
- PUZZLE BOX KEY on PUZZLE BOX.
- Solution (D).
- Take TOKEN.
- Use SCARF and RUSTY SPEAR (E).
- Examine (F); place TOKEN.
- Solution is random (G); take BAG KEY.
- Remove branches; use BAG KEY (H). Take DRAGON CROWN (2/2).
- Go to Receiving Room.
- Place DRAGON CROWN (2/2) (I); take SWORD.
- Go to Ruined Temple.
- Use Flashlight; solution is random (J).
- Use SWORD (K).
- Solution (L).
- Take ANABELLE'S BOX and film.
Chapter 5: Ananelle, My Love
- Enter Train Station.
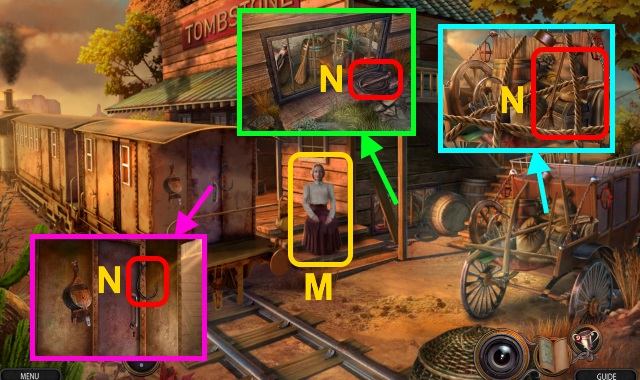
- Talk (M).
- Take SPIKE, WIRE, BAGPIPES, BROOM, and HOOK (N).
- WIRE and HOOK on BROOM; take LONG HOOK.
- Use LONG HOOK (O); receive ARROW.
- Use ARROW (P); take BELLOWS.
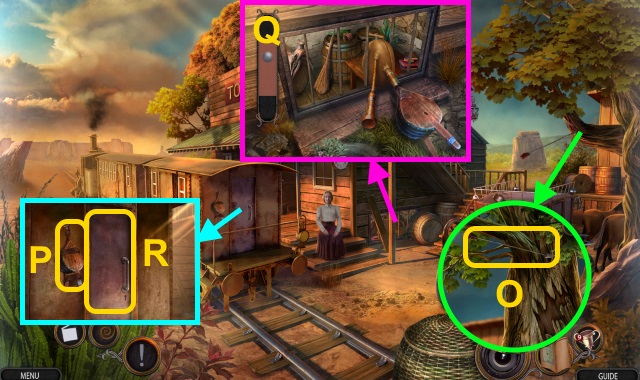
- Use BAGPIPES and BELLOWS. Solution (Q): select bellows when ball stops in red section.
- Use LONG HOOK; receive DYNAMITE.
- Use DYNAMITE (R).
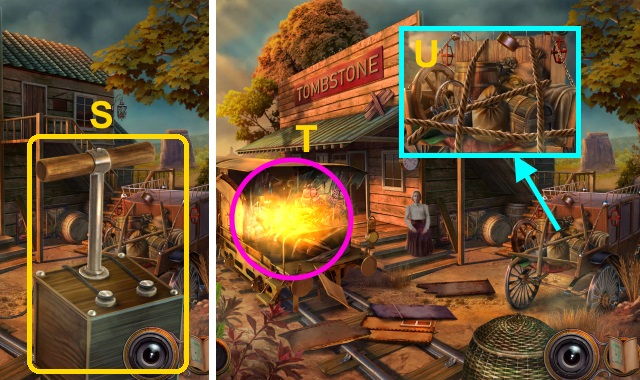
- Examine (S).
- Play HOP; receive LUGGAGE (T).
- Place LUGGAGE (U).
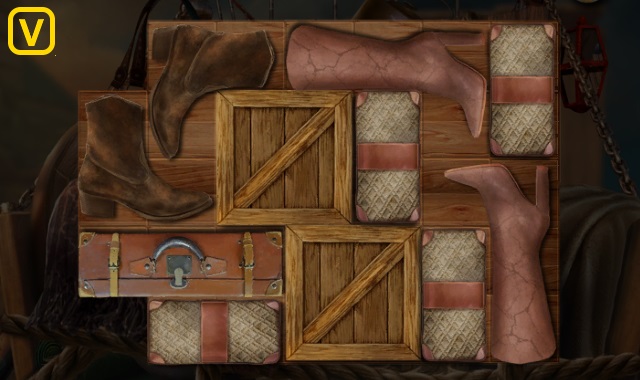
- Solution (V).
- Examine (W).
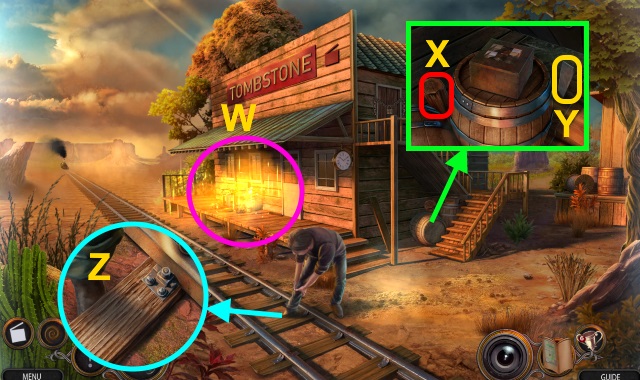
- Take BARREL (X).
- Examine (Y).
- Place BARREL (Z).
- Take MALLET (A).
- Use SPIKE and MALLET (B); examine. Take PLIERS.
- Use PLIERS (C); take OLD ROPE.
- Examine door (D); use OLD ROPE.
- Place rope (E).
- Examine cart (F).
- Play HOP; receive CHAIN (G).
- Use CHAIN (H).

- Place chain (I).
- Examine cart (J).
- Give ANABELLE'S BOX (K).
- Walk right.
- Talk; take OUTFIT PARTS (L).
- Take CHOPSTICKS (1/4) and LOCK TILE (1/3) (M); move blanket.
- Play HOP; receive DRESS BOW (N).
- Take CHOPSTICKS (2/4) (O).
- Move items; examine (P).
- Solution (Q).
- Take WOODEN SANDALS and LOCK TILE (2/3).
- Go forward.
- Take CHOPSTICKS (3/4)-(4/4) (R).
- Take LOCK TILE (3/3) (S); place CHOPSTICKS (4/4).
- Play HOP; receive MASK (T).
- Use BLANKET (U); place MASK. Take WEIGHT (1/2).
- Take MAKEUP KIT (V); talk (W).
- Walk down.
- Place LOCK TILE (3/3) (X).
- Solution (Y): (A-G-F-E-F-G-I)-(B-H-G-F-E-F-G-F-E-I).
- (C-E-F-E-F-I)-(D-E-H-G-F-G-H-I).
- Move items; take SICKLE.
- Examine lock and note (Z). Use SICKLE; take FAN and WEIGHT (2/2).
- Walk forward.
- Place WEIGHT (2/2); solution (A).
- Take TAKI.
- Give TAKI (B); take KIMONO (C).
- HAIRPIN, DRESS BOW, WOODEN SANDALS, MAKEUP KIT, FAN, and KIMONO on OUTFIT PARTS; take COMPLETE OUTFIT.
- Walk down.
- Give COMPLETE OUTFIT (D).
- ANABELLE'S BOX on scene.
- Examine (E).
- Solution (F): select circle when blue fragments are inside.
- Use ANABELLE'S BOX on scene.
- Solution (G).
- Congratulations! You have completed Fright Chasers: Director's Cut.
Created at: 2019-03-17